anz transactive – global getting started user … · anz transactive – global getting started...
TRANSCRIPT

ANZ TRANSACTIVE – GLOBAL GETTING STARTED USER GUIDE
November 2016
Public
CONTENTS
Overview 3 About this guide ......................................................................................................................................... 3 Recommended system requirements.................................................................................................. 3 Session timeouts ........................................................................................................................................ 3 Logging out.................................................................................................................................................. 3 Further assistance ...................................................................................................................................... 4
Accessing the System 4 Logging in..................................................................................................................................................... 4 Password criteria ........................................................................................................................................ 5 Change your password ............................................................................................................................. 5 Forgot Password ......................................................................................................................................... 6
Navigating the system 8 Workspace .................................................................................................................................................... 8 Application Banner .................................................................................................................................... 8 Menu .............................................................................................................................................................. 9 Settings & Preferences ........................................................................................................................... 10 Download Centre .................................................................................................................................... 12 Contact ....................................................................................................................................................... 12 Help ............................................................................................................................................................. 12
Workspaces 13 Manage Workspaces .............................................................................................................................. 13 Create a Workspace ................................................................................................................................ 13 Types of content ...................................................................................................................................... 14 Adding content to Workspaces .......................................................................................................... 14 Removing content from Workspaces ................................................................................................ 15 Favourite Accounts ................................................................................................................................. 15 Net Position ............................................................................................................................................... 17 Historical Balances .................................................................................................................................. 18 Deposits...................................................................................................................................................... 19
3
Public
OVERVIEW
About this guide This user guide contains information and procedures for getting started using ANZ Transactive – Global.
This user guide will be updated when there is new and/or updated information. Please ensure you regularly check the available version for the most up-to-date copy. We recommend that you read this guide in conjunction with the applicable product terms and conditions.
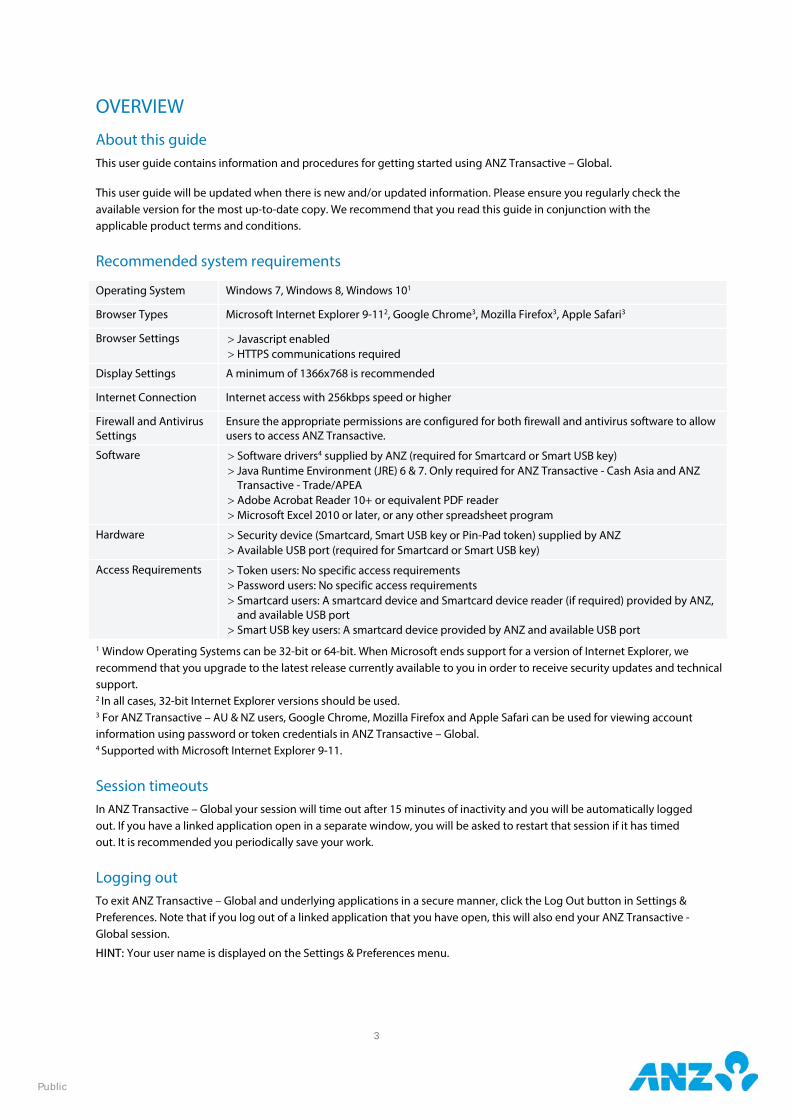
Recommended system requirements
Operating System Windows 7, Windows 8, Windows 101
Browser Types Microsoft Internet Explorer 9-112, Google Chrome3, Mozilla Firefox3, Apple Safari3
Browser Settings > Javascript enabled > HTTPS communications required
Display Settings A minimum of 1366x768 is recommended
Internet Connection Internet access with 256kbps speed or higher
Firewall and Antivirus Settings
Ensure the appropriate permissions are configured for both firewall and antivirus software to allow users to access ANZ Transactive.
Software > Software drivers4 supplied by ANZ (required for Smartcard or Smart USB key) > Java Runtime Environment (JRE) 6 & 7. Only required for ANZ Transactive - Cash Asia and ANZ
Transactive - Trade/APEA > Adobe Acrobat Reader 10+ or equivalent PDF reader > Microsoft Excel 2010 or later, or any other spreadsheet program
Hardware > Security device (Smartcard, Smart USB key or Pin-Pad token) supplied by ANZ > Available USB port (required for Smartcard or Smart USB key)
Access Requirements > Token users: No specific access requirements > Password users: No specific access requirements > Smartcard users: A smartcard device and Smartcard device reader (if required) provided by ANZ,
and available USB port > Smart USB key users: A smartcard device provided by ANZ and available USB port
1 Window Operating Systems can be 32-bit or 64-bit. When Microsoft ends support for a version of Internet Explorer, we recommend that you upgrade to the latest release currently available to you in order to receive security updates and technical support. 2 In all cases, 32-bit Internet Explorer versions should be used. 3 For ANZ Transactive – AU & NZ users, Google Chrome, Mozilla Firefox and Apple Safari can be used for viewing account information using password or token credentials in ANZ Transactive – Global. 4 Supported with Microsoft Internet Explorer 9-11.
Session timeouts In ANZ Transactive – Global your session will time out after 15 minutes of inactivity and you will be automatically logged out. If you have a linked application open in a separate window, you will be asked to restart that session if it has timed out. It is recommended you periodically save your work.
Logging out To exit ANZ Transactive – Global and underlying applications in a secure manner, click the Log Out button in Settings & Preferences. Note that if you log out of a linked application that you have open, this will also end your ANZ Transactive - Global session.
HINT: Your user name is displayed on the Settings & Preferences menu.
4
Public
Further assistance If you require further assistance, please contact your local Customer Service Centre. Details can be found at anz.com/servicecentres.
ACCESSING THE SYSTEM
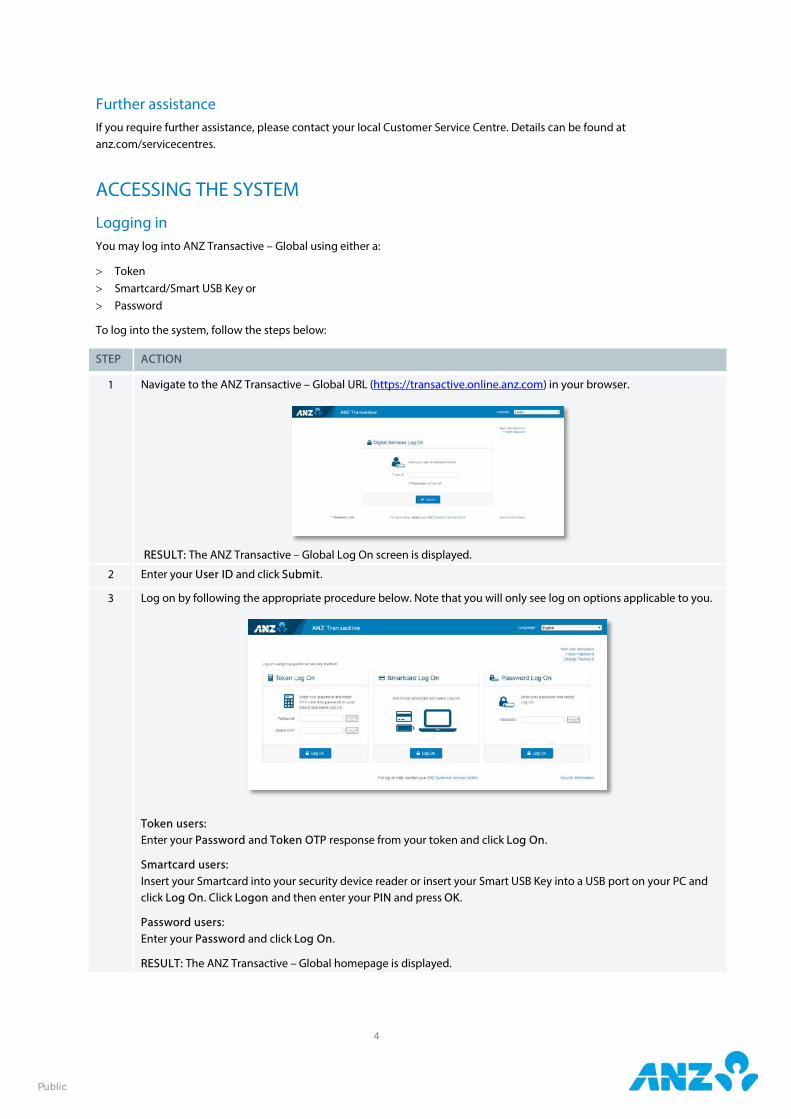
Logging in You may log into ANZ Transactive – Global using either a:
> Token > Smartcard/Smart USB Key or > Password
To log into the system, follow the steps below:
STEP ACTION
1 Navigate to the ANZ Transactive – Global URL (https://transactive.online.anz.com) in your browser.
RESULT: The ANZ Transactive – Global Log On screen is displayed.
2 Enter your User ID and click Submit.
3 Log on by following the appropriate procedure below. Note that you will only see log on options applicable to you.
Token users: Enter your Password and Token OTP response from your token and click Log On.
Smartcard users: Insert your Smartcard into your security device reader or insert your Smart USB Key into a USB port on your PC and click Log On. Click Logon and then enter your PIN and press OK.
Password users: Enter your Password and click Log On.
RESULT: The ANZ Transactive – Global homepage is displayed.
5
Public
Password criteria
> Contain a minimum of 8 characters > Include a minimum of 2 alphabetical characters, one upper case, one lower case > Include a minimum of 2 numerical characters > Must not have been used in the last 13 passwords
NOTE: Your password does not expire but you can change it by clicking on Change Password on the Log On screen.
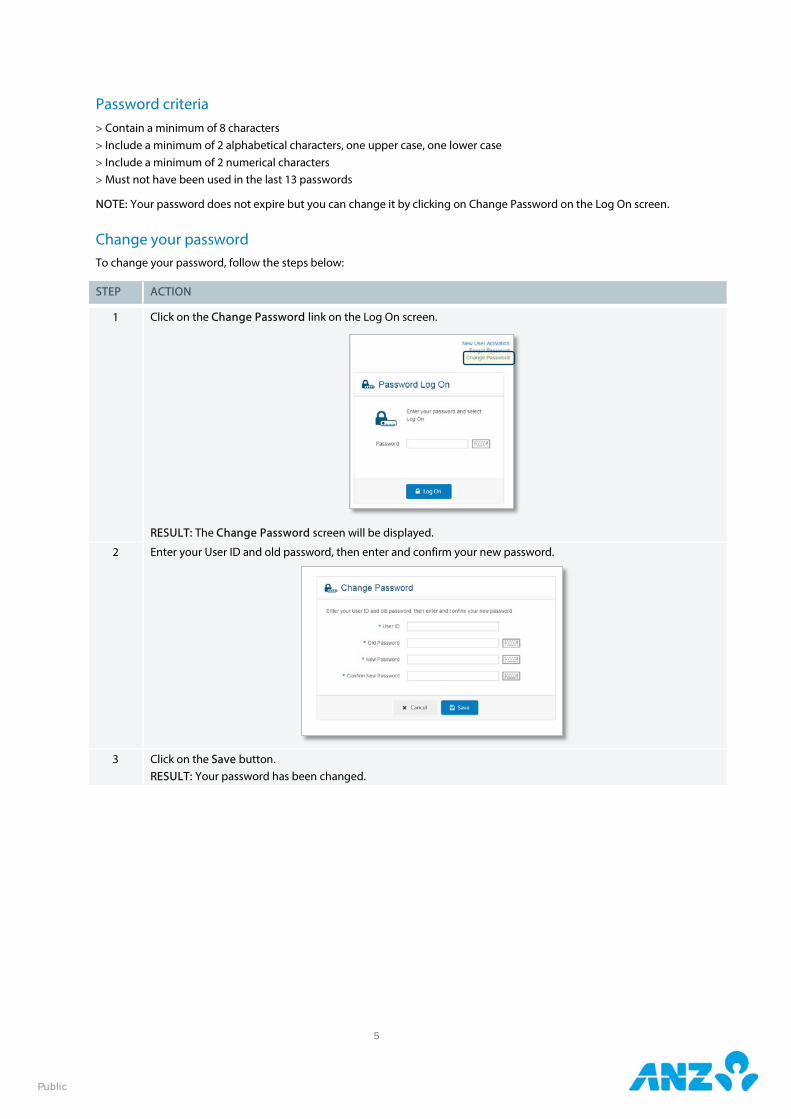
Change your password To change your password, follow the steps below:
STEP ACTION
1 Click on the Change Password link on the Log On screen.
RESULT: The Change Password screen will be displayed.
2 Enter your User ID and old password, then enter and confirm your new password.
3 Click on the Save button.
RESULT: Your password has been changed.
6
Public
Forgot Password If you have forgotten your password or your password has been locked, you can follow the steps below to have a new password sent to you.
NOTE: You must have an email address, mobile phone number and security questions lodged with ANZ to use this service.
STEP ACTION
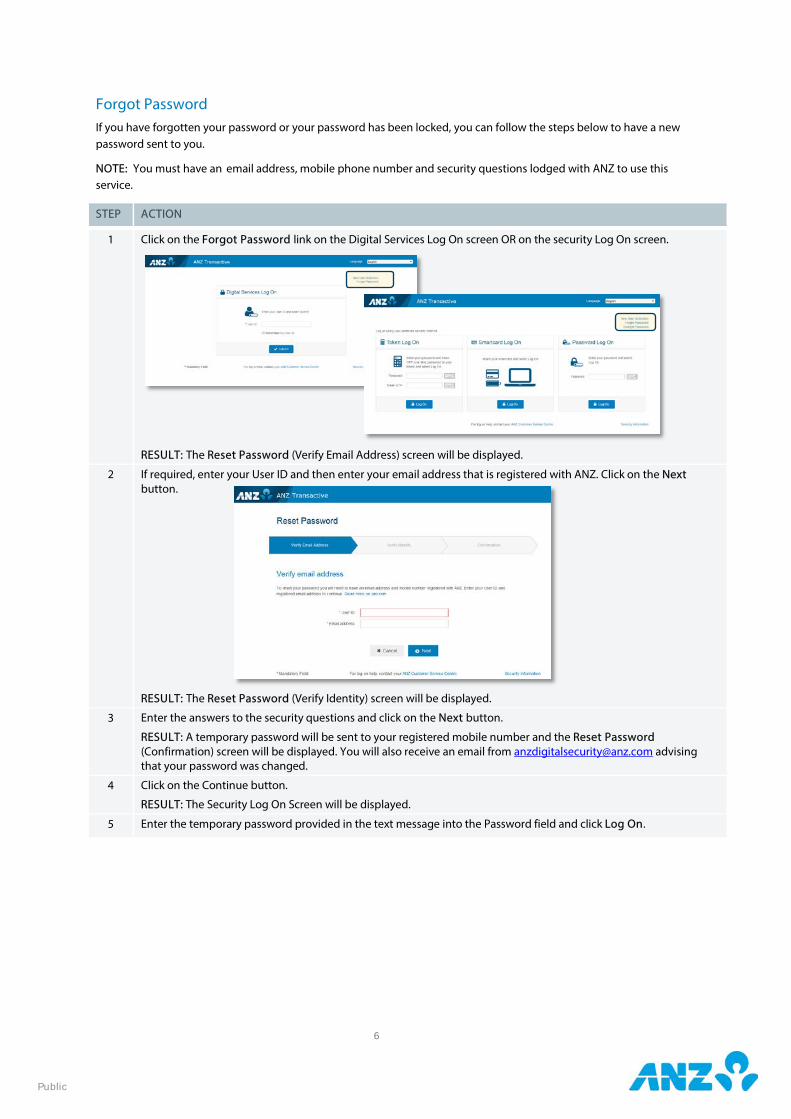
1 Click on the Forgot Password link on the Digital Services Log On screen OR on the security Log On screen.
RESULT: The Reset Password (Verify Email Address) screen will be displayed.
2 If required, enter your User ID and then enter your email address that is registered with ANZ. Click on the Next button.
RESULT: The Reset Password (Verify Identity) screen will be displayed.
3 Enter the answers to the security questions and click on the Next button.
RESULT: A temporary password will be sent to your registered mobile number and the Reset Password (Confirmation) screen will be displayed. You will also receive an email from [email protected] advising that your password was changed.
4 Click on the Continue button.
RESULT: The Security Log On Screen will be displayed.
5 Enter the temporary password provided in the text message into the Password field and click Log On.
7
Public
STEP ACTION
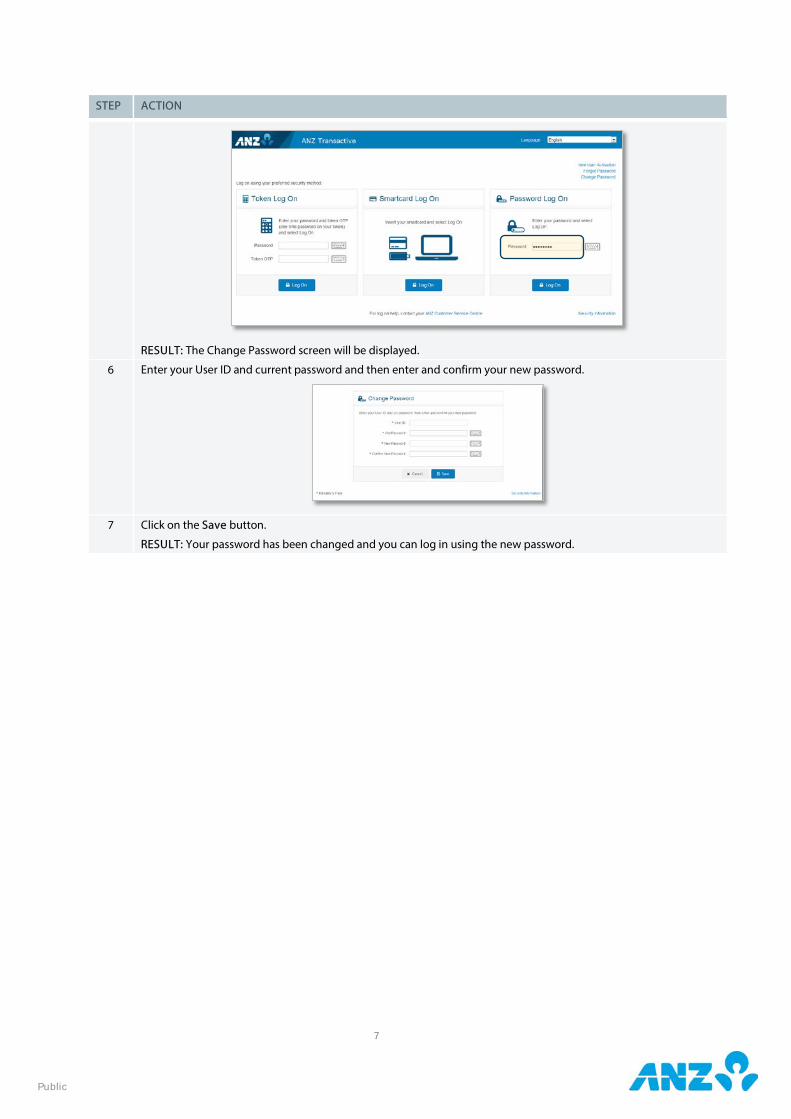
RESULT: The Change Password screen will be displayed.
6 Enter your User ID and current password and then enter and confirm your new password.
7 Click on the Save button.
RESULT: Your password has been changed and you can log in using the new password.
8
Public
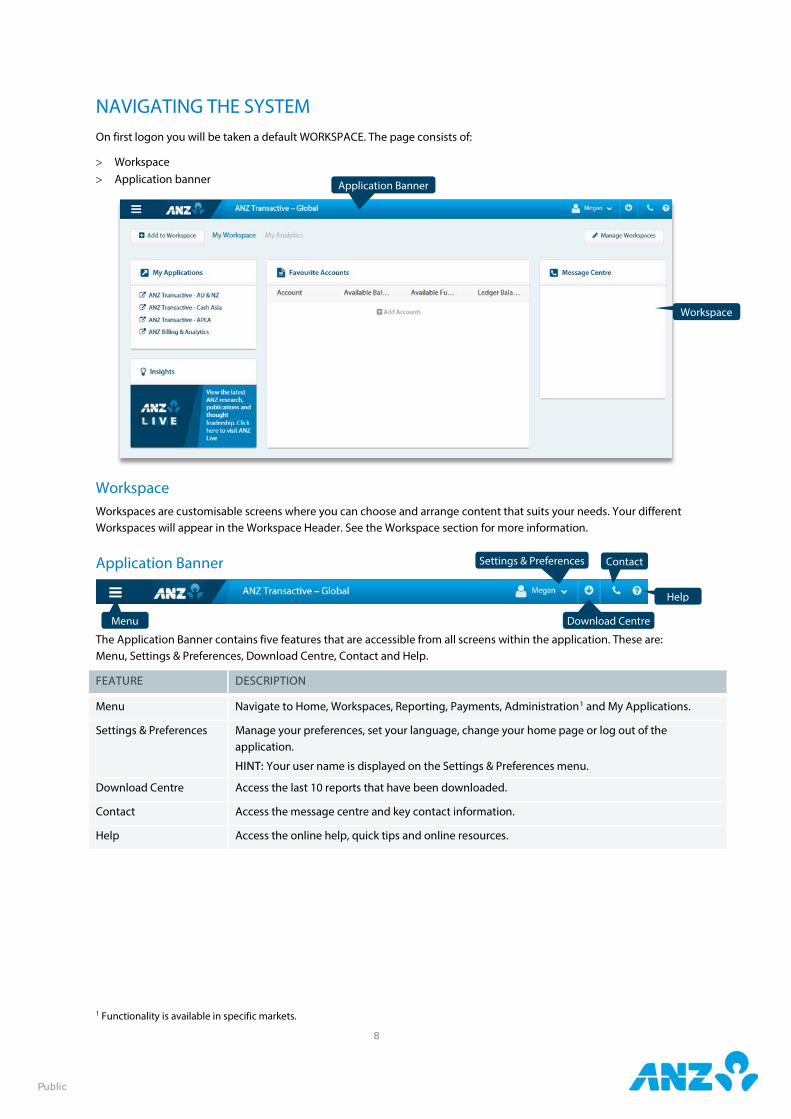
NAVIGATING THE SYSTEM On first logon you will be taken a default WORKSPACE. The page consists of:
> Workspace > Application banner
Workspace Workspaces are customisable screens where you can choose and arrange content that suits your needs. Your different Workspaces will appear in the Workspace Header. See the Workspace section for more information.
Application Banner
The Application Banner contains five features that are accessible from all screens within the application. These are: Menu, Settings & Preferences, Download Centre, Contact and Help.
FEATURE DESCRIPTION
Menu Navigate to Home, Workspaces, Reporting, Payments, Administration1 and My Applications.
Settings & Preferences Manage your preferences, set your language, change your home page or log out of the application.
HINT: Your user name is displayed on the Settings & Preferences menu.
Download Centre Access the last 10 reports that have been downloaded.
Contact Access the message centre and key contact information.
Help Access the online help, quick tips and online resources.
1 Functionality is available in specific markets.
Workspace
Application Banner
Menu Download Centre
Settings & Preferences Contact
Help
9
Public
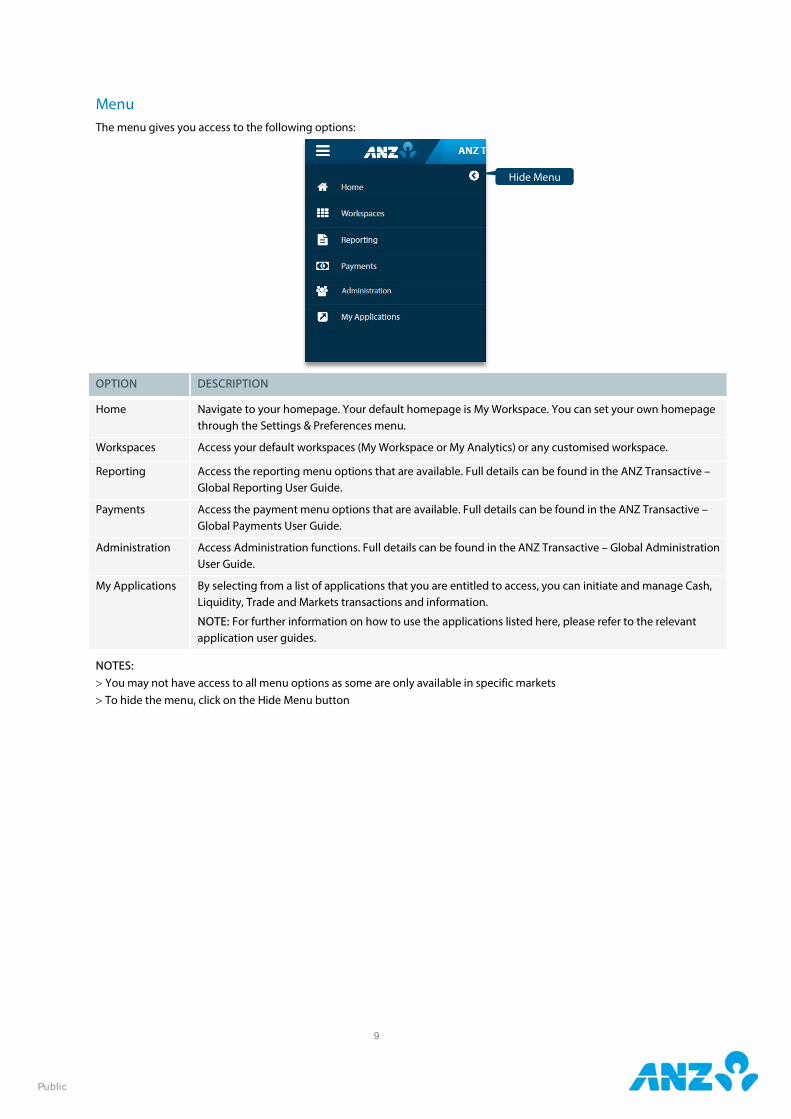
Menu The menu gives you access to the following options:
OPTION DESCRIPTION
Home Navigate to your homepage. Your default homepage is My Workspace. You can set your own homepage through the Settings & Preferences menu.
Workspaces Access your default workspaces (My Workspace or My Analytics) or any customised workspace.
Reporting Access the reporting menu options that are available. Full details can be found in the ANZ Transactive – Global Reporting User Guide.
Payments Access the payment menu options that are available. Full details can be found in the ANZ Transactive – Global Payments User Guide.
Administration Access Administration functions. Full details can be found in the ANZ Transactive – Global Administration User Guide.
My Applications By selecting from a list of applications that you are entitled to access, you can initiate and manage Cash, Liquidity, Trade and Markets transactions and information.
NOTE: For further information on how to use the applications listed here, please refer to the relevant application user guides.
NOTES: > You may not have access to all menu options as some are only available in specific markets > To hide the menu, click on the Hide Menu button
Hide Menu
10
Public
Settings & Preferences The Settings & Preferences menu allows you to manage your application preferences, including specifying your language, defining your home page and logging off the system. The following options are available:
OPTION DESCRIPTION
Manage my preferences
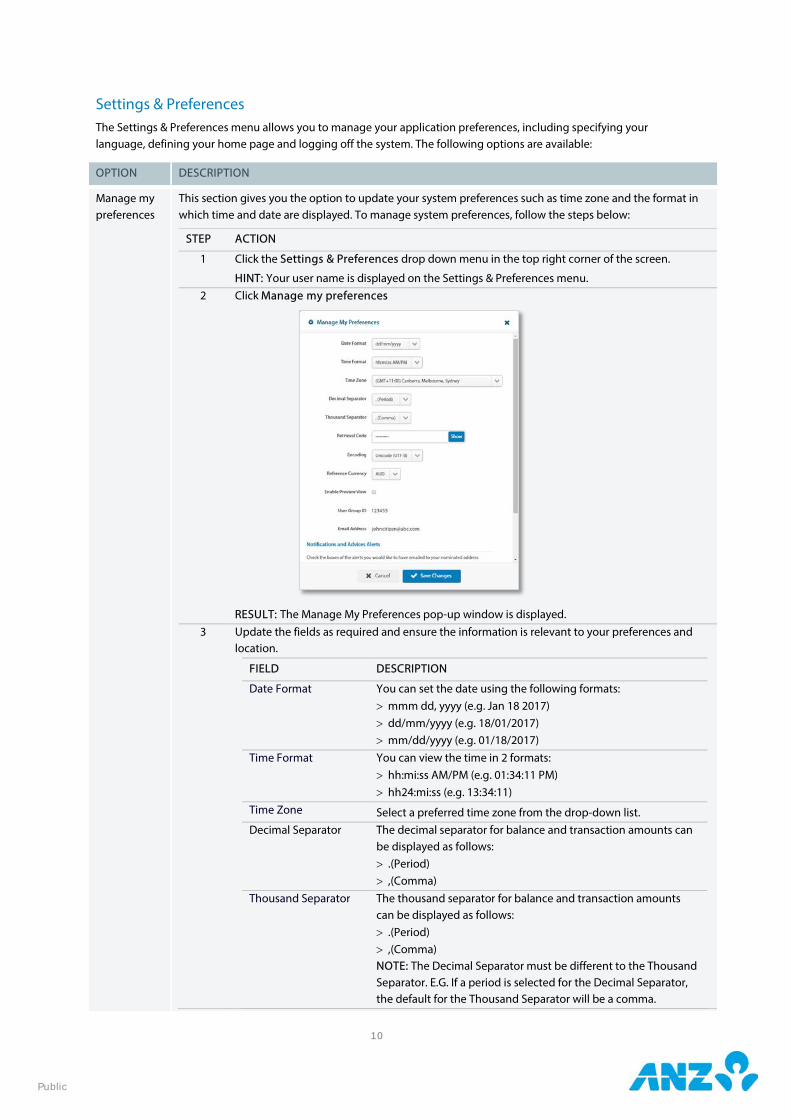
This section gives you the option to update your system preferences such as time zone and the format in which time and date are displayed. To manage system preferences, follow the steps below:
STEP ACTION
1 Click the Settings & Preferences drop down menu in the top right corner of the screen.
HINT: Your user name is displayed on the Settings & Preferences menu. 2 Click Manage my preferences
RESULT: The Manage My Preferences pop-up window is displayed.
3 Update the fields as required and ensure the information is relevant to your preferences and location.
FIELD DESCRIPTION
Date Format You can set the date using the following formats: > mmm dd, yyyy (e.g. Jan 18 2017) > dd/mm/yyyy (e.g. 18/01/2017) > mm/dd/yyyy (e.g. 01/18/2017)
Time Format You can view the time in 2 formats: > hh:mi:ss AM/PM (e.g. 01:34:11 PM) > hh24:mi:ss (e.g. 13:34:11)
Time Zone Select a preferred time zone from the drop-down list. Decimal Separator The decimal separator for balance and transaction amounts can
be displayed as follows: > .(Period) > ,(Comma)
Thousand Separator The thousand separator for balance and transaction amounts can be displayed as follows: > .(Period) > ,(Comma) NOTE: The Decimal Separator must be different to the Thousand Separator. E.G. If a period is selected for the Decimal Separator, the default for the Thousand Separator will be a comma.
11
Public
OPTION DESCRIPTION
Report Retrieval Code This will act as a password to access encrypted scheduled reports that are sent to you by email. To show the code, press the Show button.
NOTE: If this option is not available, you will need to register your email address with ANZ. If you are ANZ managed, contact the Customer Service Centre who will be able to assist you further. All other users please contact your ANZ Transactive – Global Administrator (ANZ Transactive – AU & NZ users only).
Encoding Only applicable for some report formats. The Encoding options available are based on your language selection. For English, UTF-8 is available as the default pre-selection. Choose from: > English: UTF-8, US-ASCII > Traditional Chinese: Big5, UTF-8 > Japanese: Shift-JIS, 1byte Kana, UTF-8 > Vietnamese: Windows, UTF-8 > Khmer: UTF-8 > Simplified Chinese: GB2312, UTF-8
Reference Currency You can set a reference currency from the drop-down list to convert the balances to be displayed on reports.
Enable Preview View Select this to enable a Preview View mode in Operating Accounts, Nostro Accounts, Deposits, Report Profiles and Scheduled Reports screens.
User Group ID Your User Group ID is displayed. NOTE: This is only visible for ANZ Transactive – AU & NZ users.
Email Address The email address that you have registered with ANZ is displayed.
Notifications and Advices Alerts
Select the types of alerts you would like to have emailed to you. NOTE: This will only be visible to users with Payments functionality.
4 Click on the Save Changes button.
Set My Language
Click here to set your display language preferences. To change the language displayed, follow the steps below:
STEP ACTION
1 Click the Settings & Preferences drop down menu in the top right corner of the screen. 2 Click Set my language.
RESULT: The available languages list is displayed. Choose from English, Traditional Chinese, Japanese, Vietnamese, Khmer or Simplified Chinese.
3 Select your language preference.
RESULT: The page will auto-refresh and display the selected language. Note that the names of the workspaces that you have created will not be displayed in the new language.
4 Click on the OK button.
Set this page as my home page
Click here to set a screen within the ANZ Transactive – Global application as your home page.
Log Out Click here to log out of the application and any underlying applications.
12
Public
Download Centre The Download Centre displays the last 10 report downloads that you have requested. There are three report download status types as indicated by the colour of the dot next to the file name:
• Green - Report ready for download • Grey - Download pending • Red - Not available for download
To open the report, click on the file name. The reports are also available from Menu > Download Reports.
Contact Contact opens the Message Centre and Contact Us link. To view full message details click on the message heading. Click on the Contact Us link at the bottom of the screen to display details of bank contacts.
Help Help gives you access to online help, quick tips and online resources. Quick tips are page relevant and provide you with easy access to frequently asked questions. Click on the Online Resources link at the bottom of the screen to display a list of quick reference guides, user guides and any other useful information.
13
Public
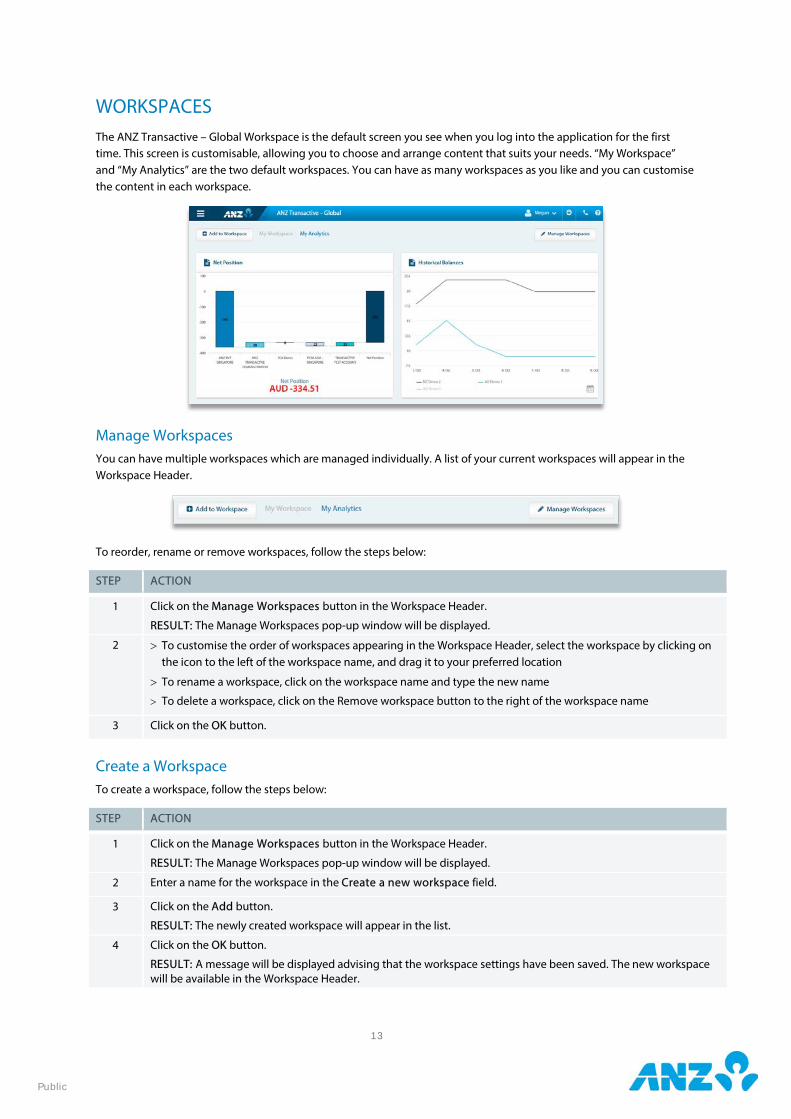
WORKSPACES The ANZ Transactive – Global Workspace is the default screen you see when you log into the application for the first time. This screen is customisable, allowing you to choose and arrange content that suits your needs. “My Workspace” and “My Analytics” are the two default workspaces. You can have as many workspaces as you like and you can customise the content in each workspace.
Manage Workspaces
You can have multiple workspaces which are managed individually. A list of your current workspaces will appear in the Workspace Header.
To reorder, rename or remove workspaces, follow the steps below:
STEP ACTION
1 Click on the Manage Workspaces button in the Workspace Header.
RESULT: The Manage Workspaces pop-up window will be displayed.
2 > To customise the order of workspaces appearing in the Workspace Header, select the workspace by clicking on the icon to the left of the workspace name, and drag it to your preferred location
> To rename a workspace, click on the workspace name and type the new name
> To delete a workspace, click on the Remove workspace button to the right of the workspace name
3 Click on the OK button.
Create a Workspace To create a workspace, follow the steps below:
STEP ACTION
1 Click on the Manage Workspaces button in the Workspace Header.
RESULT: The Manage Workspaces pop-up window will be displayed.
2 Enter a name for the workspace in the Create a new workspace field.
3 Click on the Add button.
RESULT: The newly created workspace will appear in the list.
4 Click on the OK button.
RESULT: A message will be displayed advising that the workspace settings have been saved. The new workspace will be available in the Workspace Header.
14
Public
Types of content You can add the following content to your workspaces.
NOTE: The content options shown are based on your permissions.
CONTENT DESCRIPTION
My Applications Provides access to your Cash, Liquidity, Trade and Markets services. The applications you see in this list are based on your access permissions.
Favourite Accounts Provides a snapshot of the account details and balances most relevant to you. See the Favourite Accounts section for more information.
Message Centre Keeps you up to date with important information from ANZ, including: > News, announcements and service notifications > New and enhanced ANZ applications > Training events and materials for using ANZ applications
Net Position Displays the net position in a graphical view. > Choose a waterfall, bar or doughnut chart view > Group your accounts by currency, country, company or account type See the Net Position section for more information.
Historical Balances Provides a graphical view of your balance history. > Add up to seven accounts > View up to 12 months balance history > Easily switch and zoom to different periods of time See the Historical Balances section for more information.
Deposits Provides a snapshot of your Asia domiciled term deposit information.
NOTE: This is available in specific markets for customers who subscribe to term deposit services. See the Deposits section for more information.
Insights Provides access to ANZ Live, where you can view the latest ANZ research, publications and thought leadership.
NOTE: You can apply for membership to this service when you first visit the ANZ Live page.
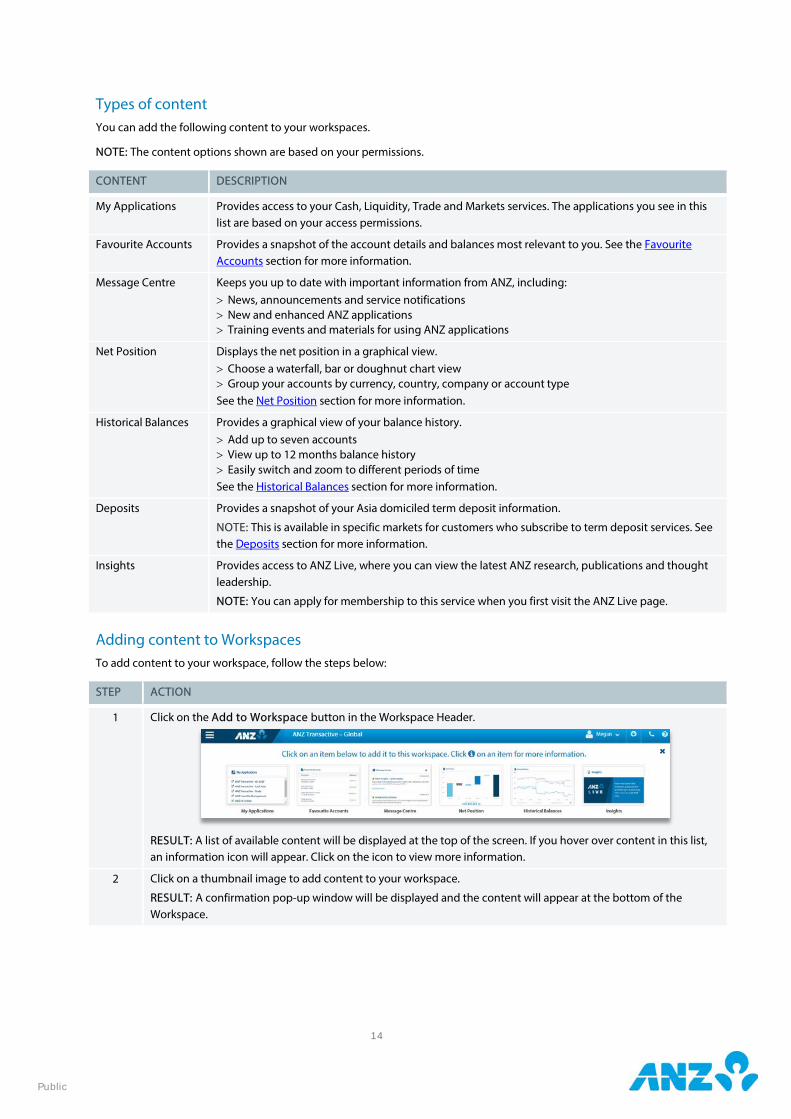
Adding content to Workspaces To add content to your workspace, follow the steps below:
STEP ACTION
1 Click on the Add to Workspace button in the Workspace Header.
RESULT: A list of available content will be displayed at the top of the screen. If you hover over content in this list, an information icon will appear. Click on the icon to view more information.
2 Click on a thumbnail image to add content to your workspace.
RESULT: A confirmation pop-up window will be displayed and the content will appear at the bottom of the Workspace.
15
Public
To customise content, you can do the following:
> Drag and drop the content to your preferred location on the page > Resize the content window by dragging the resize icon on the bottom of the content window > Refresh the details in the content by clicking on the refresh button on the right hand side of the content window > Remove content from your workspace by clicking on the X on the top right of the content window. > Apply additional settings such as viewing different types of account balances, downloading the various account
reports or adding accounts through the settings menu on the top right of the content window NOTE: The above features vary for each content window.
Removing content from Workspaces To remove content from your workspace, follow the steps below:
STEP ACTION
1 Hover your mouse over the content window.
RESULT: The available actions are displayed in the top right of the content window.
2 Click on the remove button.
RESULT: A confirmation pop-up window will be displayed.
3 Click on the Yes button.
RESULT: The content is removed from your workspace.
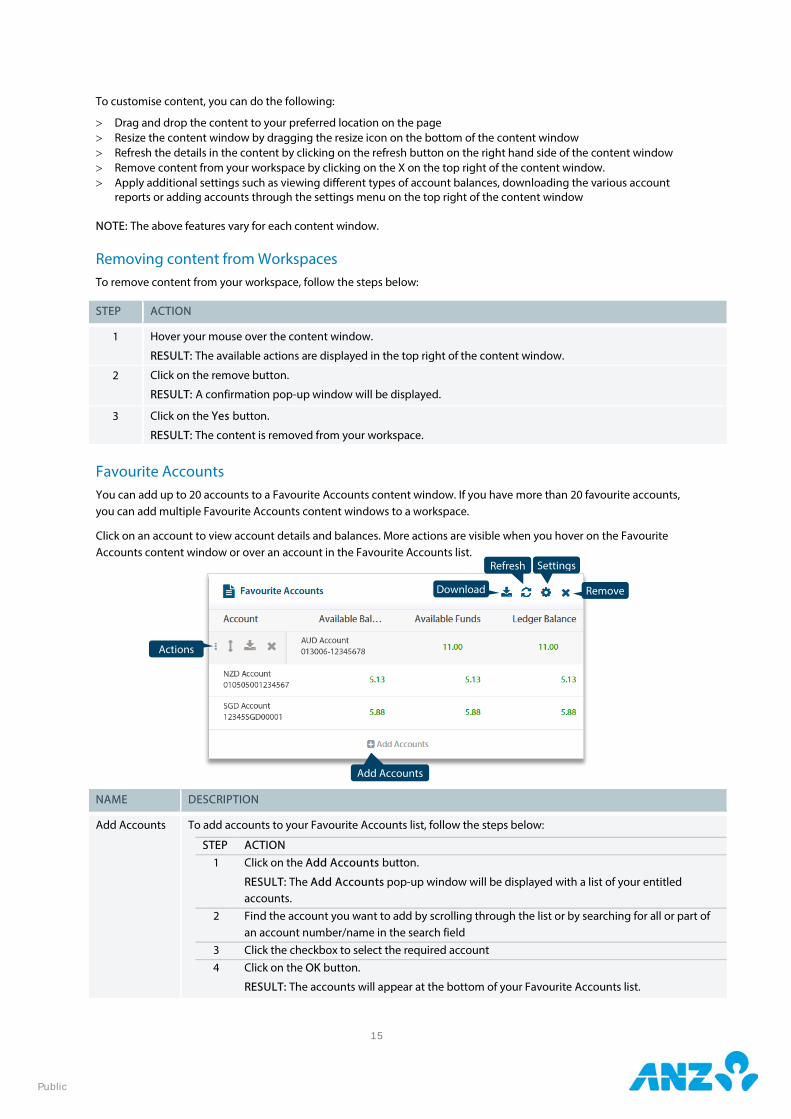
Favourite Accounts
You can add up to 20 accounts to a Favourite Accounts content window. If you have more than 20 favourite accounts, you can add multiple Favourite Accounts content windows to a workspace.
Click on an account to view account details and balances. More actions are visible when you hover on the Favourite Accounts content window or over an account in the Favourite Accounts list.
NAME DESCRIPTION
Add Accounts To add accounts to your Favourite Accounts list, follow the steps below:
STEP ACTION 1 Click on the Add Accounts button.
RESULT: The Add Accounts pop-up window will be displayed with a list of your entitled accounts.
2 Find the account you want to add by scrolling through the list or by searching for all or part of an account number/name in the search field
3 Click the checkbox to select the required account 4 Click on the OK button.
RESULT: The accounts will appear at the bottom of your Favourite Accounts list.
Actions
Settings
Add Accounts
Refresh
Download Remove
16
Public
NAME DESCRIPTION
Actions Click on the Actions button to perform the following on an account: > Reorder this Account - select the arrow to move the account to your preferred position within the list > Download a Report for this Account - click to download a report for a selected account.
NOTE: The report will be downloaded according to the Download Settings if you have previously selected Remember This. If you need to change the settings, go to Settings and unselect the Remember This option. See Download Settings for more information.
> Remove this Account - remove an account from the Favourite Accounts list.
Download Click to download a report for your favourite accounts. See Download Settings for more information.
RESULT: The report will be available at the bottom of your screen, in the Download Centre or in Reporting > Download Reports.
Refresh Click to refresh the account information on your screen.
Settings Click to specify the following settings for your Favourite Accounts:
FIELD DESCRIPTION VIEW SETTINGS Show Available Balance Select to display the available balance for your Favourite Accounts. Show Available Funds Select to display the available funds for your Favourite Accounts. DOWNLOAD SETTINGS Report Type Choose from Account Statement Report, Account Summary Report or
Balance Summary Report. Report Format Choose from CSV, XLSX, PDF, MT940, BAI2, Multicash, Statement Files or
NZ Statement Files.
NOTE: Formats available are dependent on the Report Type selected. Report Language Choose from English, Traditional Chinese, Japanese, Vietnamese, Khmer or
Simplified Chinese. Report Encoding Only applicable for some report formats. The Encoding options available
are based on your language selection. For English, UTF-8 is available as the default pre-selection. Choose from:
> English: UTF-8, US-ASCII > Traditional Chinese: Big5, UTF-8 > Japanese: Shift-JIS, 1byte Kana, UTF-8 > Vietnamese: Windows, UTF-8 > Khmer: UTF-8 > Simplified Chinese: GB2312, UTF-8
Date Specify the date range from the following options:
> Yesterday > Week to Yesterday (current week, beginning Monday, to yesterday, e.g. if Wednesday, data will include Mon, Tues of current week) > Previous Week (Mon-Sun of previous week) > Month to Yesterday (current month to yesterday, e.g. if Wednesday 3 Dec, will include Dec 1, 2) > Previous Month > Last Business Day
Multilingual Narrative Available if you select Account Statement Report in MT940, BAI2 or MultiCash format. Select this checkbox if you wish to enable multilingual narratives (where non-Latin characters are allowed) for your Account Statement Report.
Remember This Select this if you want the chosen report settings to be saved for future downloads.
ACCOUNTS Add Accounts Click to add accounts to the Favourite Accounts list. See Add Accounts
section for more details.
17
Public
NAME DESCRIPTION
Click on the OK button to save any changes.
Remove Accounts To remove accounts from the Favourite Accounts list, follow the steps below:
STEP ACTION 1 Click on the Remove Accounts button.
RESULT: The Remove Accounts pop-up window will be displayed with a list of all your entitled Accounts.
2 Find the account you want to remove by scrolling through the list or by searching for all or part of an account number/name in the search field
3 Click the checkbox to select the required account 4 Click on the Remove button.
RESULT: The account will be removed from your Favourite Accounts list.
Remove Click to remove the Favourite Accounts content from your workspace.
Net Position Add a Net Position graph to your workspace to view aggregated balances across different accounts you are entitled to view. Choose the type of graph to display and how you want the accounts to be grouped. Hover over the graph to obtain more information about the net position such as account balances.
The following options are visible when you hover on the Net Position content window:
NAME DESCRIPTION
Refresh Click to refresh the net position information on your screen. Settings
Click to specify the following settings for your Net Position graph:
FIELD DESCRIPTION Chart Type Select Doughnut, Bar or Waterfall. Group By Select Company, Country, Currency or Account Type. Reference Currency Choose a reference currency from the drop-down list to convert the
balances displayed into the currency selected. Note that the exchange rate used to convert balances is indicative only.
Click on the OK button to save any changes.
Remove Click to remove the Net Position content from your workspace.
Refresh
Settings
Remove
18
Public
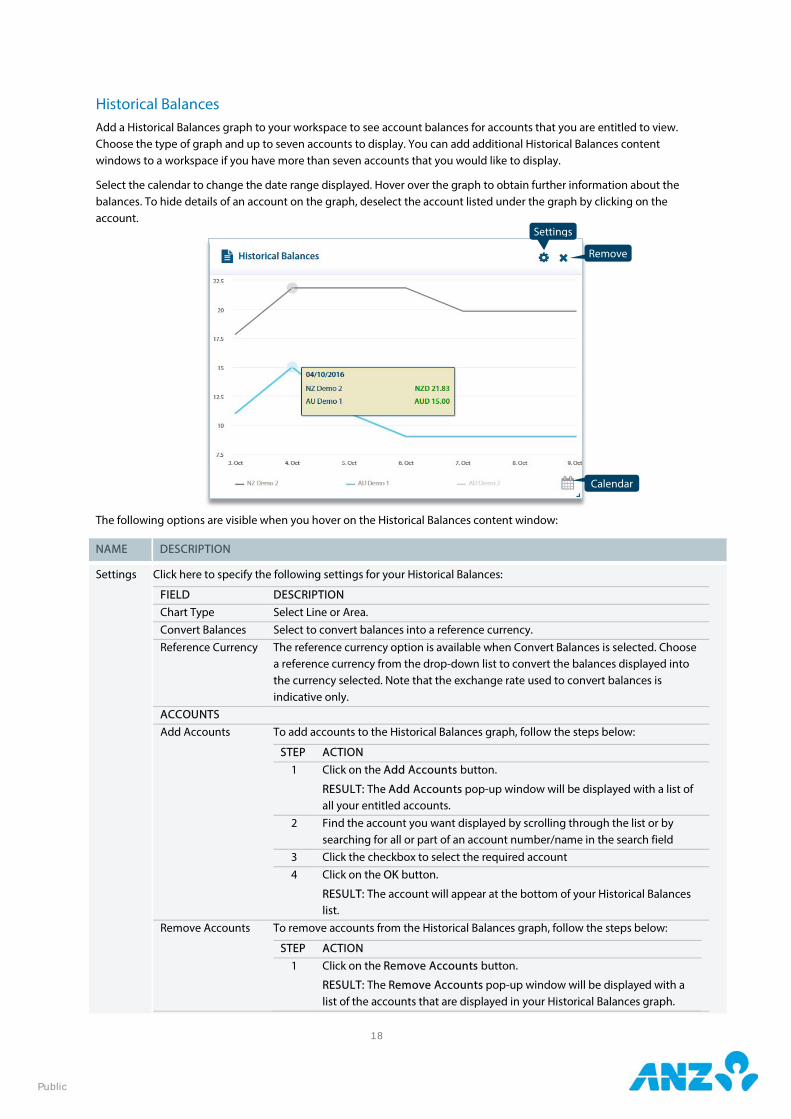
Historical Balances
Add a Historical Balances graph to your workspace to see account balances for accounts that you are entitled to view. Choose the type of graph and up to seven accounts to display. You can add additional Historical Balances content windows to a workspace if you have more than seven accounts that you would like to display.
Select the calendar to change the date range displayed. Hover over the graph to obtain further information about the balances. To hide details of an account on the graph, deselect the account listed under the graph by clicking on the account.
The following options are visible when you hover on the Historical Balances content window:
NAME DESCRIPTION
Settings Click here to specify the following settings for your Historical Balances:
FIELD DESCRIPTION Chart Type Select Line or Area. Convert Balances Select to convert balances into a reference currency. Reference Currency The reference currency option is available when Convert Balances is selected. Choose
a reference currency from the drop-down list to convert the balances displayed into the currency selected. Note that the exchange rate used to convert balances is indicative only.
ACCOUNTS Add Accounts To add accounts to the Historical Balances graph, follow the steps below:
STEP ACTION 1 Click on the Add Accounts button.
RESULT: The Add Accounts pop-up window will be displayed with a list of all your entitled accounts.
2 Find the account you want displayed by scrolling through the list or by searching for all or part of an account number/name in the search field
3 Click the checkbox to select the required account 4 Click on the OK button.
RESULT: The account will appear at the bottom of your Historical Balances list.
Remove Accounts To remove accounts from the Historical Balances graph, follow the steps below:
STEP ACTION 1 Click on the Remove Accounts button.
RESULT: The Remove Accounts pop-up window will be displayed with a list of the accounts that are displayed in your Historical Balances graph.
Calendar
Settings
Remove
19
Public
NAME DESCRIPTION
2 Find the account you want to remove by scrolling through the list or by searching for all or part of an account number/name in the search field
3 Click the checkbox to select the required account 4 Click on the Remove button.
RESULT: The account will be removed from your Historical Balances list.
Click on the OK button to save any changes.
Remove Click to remove the Historical Balances content from your Workspace.
Calendar Click to change the date range displayed. You can choose a date period ranging from Last Week, 3 Months, 6 Months or 12 Months.
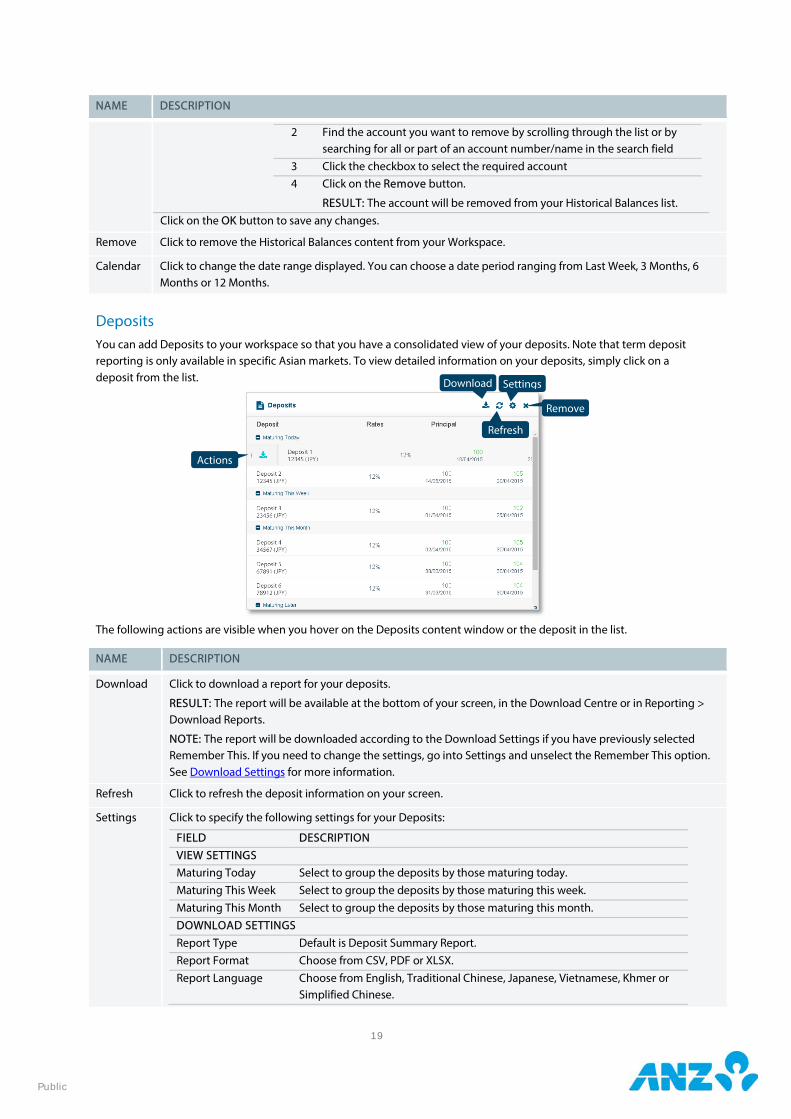
Deposits
You can add Deposits to your workspace so that you have a consolidated view of your deposits. Note that term deposit reporting is only available in specific Asian markets. To view detailed information on your deposits, simply click on a deposit from the list.
The following actions are visible when you hover on the Deposits content window or the deposit in the list.
NAME DESCRIPTION
Download Click to download a report for your deposits.
RESULT: The report will be available at the bottom of your screen, in the Download Centre or in Reporting > Download Reports.
NOTE: The report will be downloaded according to the Download Settings if you have previously selected Remember This. If you need to change the settings, go into Settings and unselect the Remember This option. See Download Settings for more information.
Refresh Click to refresh the deposit information on your screen.
Settings Click to specify the following settings for your Deposits:
FIELD DESCRIPTION VIEW SETTINGS Maturing Today Select to group the deposits by those maturing today. Maturing This Week Select to group the deposits by those maturing this week. Maturing This Month Select to group the deposits by those maturing this month. DOWNLOAD SETTINGS Report Type Default is Deposit Summary Report. Report Format Choose from CSV, PDF or XLSX. Report Language Choose from English, Traditional Chinese, Japanese, Vietnamese, Khmer or
Simplified Chinese.
Remove
Settings
Refresh
Download
Actions
20
Public
NAME DESCRIPTION
Report Encoding Only applicable for some report formats. The Encoding options available are based on your language selection. For English, UTF-8 is available as the default pre-selection. Choose from: > English: UTF-8, US-ASCII > Traditional Chinese: Big5, UTF-8 > Japanese: Shift-JIS, 1byte Kana, UTF-8 > Vietnamese: Windows, UTF-8 > Khmer: UTF-8 > Simplified Chinese: GB2312, UTF-8
Date Choose a date period ranging from Yesterday, Week to Yesterday, Previous Week, Month to Yesterday or Previous Month.
Remember This Select this if you want the report settings you have chosen to be saved for future downloads.
Click on the OK button to save any changes.
Remove Click to remove the Deposits content from your workspace.
Actions Click on the Actions button to perform the following on a deposit: > Download A Report For This Deposit - click to download a report for the selected deposit.
NOTE: The report will be downloaded according to the Download Settings if you have previously selected Remember This. If you need to change the settings, go into Settings and unselect the Remember This option. See Download Settings for more information.

Australia and N
ew Zealand Banking G
roup Limited (A
NZ) 2015 A
BN 11 005 357 522.
anz.com