anyrail 5 manual english · 4 anyrail 5 manual english © 2014w drail modelspoor software 1 getting...
TRANSCRIPT

© 2014 DRail Modelspoor Software
AnyRail 5 Manual English
AnyRail 5 Manual English2
© 2014 DRail Modelspoor Software
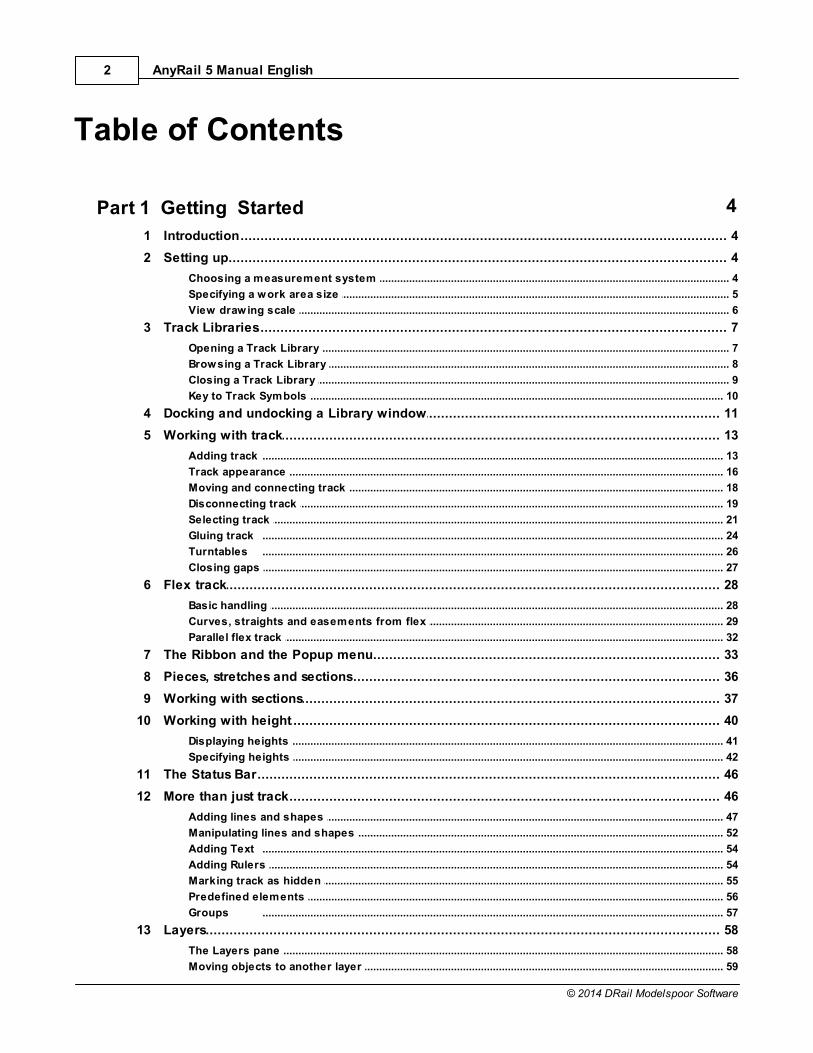
Table of Contents
Part 1 Getting Started 4
................................................................................................................................... 41 Introduction
................................................................................................................................... 42 Setting up
.......................................................................................................................................................... 4Choosing a measurement system
.......................................................................................................................................................... 5Specifying a work area size
.......................................................................................................................................................... 6View drawing scale
................................................................................................................................... 73 Track Libraries
.......................................................................................................................................................... 7Opening a Track Library
.......................................................................................................................................................... 8Browsing a Track Library
.......................................................................................................................................................... 9Closing a Track Library
.......................................................................................................................................................... 10Key to Track Symbols
................................................................................................................................... 114 Docking and undocking a Library window
................................................................................................................................... 135 Working with track
.......................................................................................................................................................... 13Adding track
.......................................................................................................................................................... 16Track appearance
.......................................................................................................................................................... 18Moving and connecting track
.......................................................................................................................................................... 19Disconnecting track
.......................................................................................................................................................... 21Selecting track
.......................................................................................................................................................... 24Gluing track
.......................................................................................................................................................... 26Turntables
.......................................................................................................................................................... 27Closing gaps
................................................................................................................................... 286 Flex track
.......................................................................................................................................................... 28Basic handling
.......................................................................................................................................................... 29Curves, straights and easements from flex
.......................................................................................................................................................... 32Parallel flex track
................................................................................................................................... 337 The Ribbon and the Popup menu
................................................................................................................................... 368 Pieces, stretches and sections
................................................................................................................................... 379 Working with sections
................................................................................................................................... 4010 Working with height
.......................................................................................................................................................... 41Displaying heights
.......................................................................................................................................................... 42Specifying heights
................................................................................................................................... 4611 The Status Bar
................................................................................................................................... 4612 More than just track
.......................................................................................................................................................... 47Adding lines and shapes
.......................................................................................................................................................... 52Manipulating lines and shapes
.......................................................................................................................................................... 54Adding Text
.......................................................................................................................................................... 54Adding Rulers
.......................................................................................................................................................... 55Marking track as hidden
.......................................................................................................................................................... 56Predefined elements
.......................................................................................................................................................... 57Groups
................................................................................................................................... 5813 Layers
.......................................................................................................................................................... 58The Layers pane
.......................................................................................................................................................... 59Moving objects to another layer

3Contents
3
© 2014 DRail Modelspoor Software
................................................................................................................................... 6014 User objects
.......................................................................................................................................................... 60Creating a user object
.......................................................................................................................................................... 63Managing user objects
................................................................................................................................... 6615 Finishing up
.......................................................................................................................................................... 66Saving your work
.......................................................................................................................................................... 67Print preview
.......................................................................................................................................................... 67Printing your design
.......................................................................................................................................................... 67Generating pictures
.......................................................................................................................................................... 68Generating a 3D file
.......................................................................................................................................................... 69Generating a TrainPlayer file
.......................................................................................................................................................... 69Generating a list of materials
.......................................................................................................................................................... 70Generating a list of Sections
................................................................................................................................... 7116 Licensing
.......................................................................................................................................................... 72Updates and upgrades
Part 2 Reference Guide 74
................................................................................................................................... 741 Features
.......................................................................................................................................................... 75Glue
.......................................................................................................................................................... 75Rotate
.......................................................................................................................................................... 76Flip
................................................................................................................................... 772 The Quick Access Toolbar
................................................................................................................................... 783 The Ribbon
................................................................................................................................... 804 Ribbon Tab Reference
.......................................................................................................................................................... 80File tab
.......................................................................................................................................................... 88Home tab
.......................................................................................................................................................... 90Insert tab
.......................................................................................................................................................... 91Track libraries tab
.......................................................................................................................................................... 91Object libraries tab
.......................................................................................................................................................... 91User objects
.......................................................................................................................................................... 92Settings tab
................................................................................................................................... 945 Context sensitive tabs and popup menus
.......................................................................................................................................................... 94Track tab and menu
.......................................................................................................................................................... 96Endpoint tab and menu
.......................................................................................................................................................... 97Connection tab and menu
.......................................................................................................................................................... 98Lines and surfaces tab and menu
.......................................................................................................................................................... 101Texts tab and menu
.......................................................................................................................................................... 102Rulers tab and menu
Index 105

AnyRail 5 Manual English4
© 2014 DRail Modelspoor Software
1 Getting Started
Getting Started
with
1.1 Introduction
We've designed AnyRail™ to be as straightforward as possible. You can
start experimenting with layouts as soon as you've installed the
software. However, it’s probably a good idea to read through this
Getting Started guide.
1.2 Setting up
The Settings tab enables you to set up AnyRail to suit your way of
working. There’s a full description starting here . Most of the default
settings should be OK for now. However, you probably want to chose a
measurement system and specify a work area right away.
1.2.1 Choosing a measurement system
By default, all measurements are metric. However, you can change this.
To specify a measurement system
1.Click the Settings tab:
74

Getting Started 5
© 2014 DRail Modelspoor Software
2.Click Measurement system:
If you select "English fractional units", AnyRail shows all
measurements using fractions, e.g. 20 ¾.
If you select decimal units, the same value appears as 20.75.
AnyRail accepts measurements in both formats, and rounds fractions
to the nearest 1/64 of an inch.
1.2.2 Specifying a work area size
In AnyRail, you can set the outer limits of your work area.
To specify a work area size
1.Click the Settings tab.
2.Find the Work Area group:

AnyRail 5 Manual English6
© 2014 DRail Modelspoor Software
3.Enter a Width and Depth.
TIP: To draw the table for your layout, draw a surface .
1.2.3 View drawing scale
To zoom in or zoom out
1.Locate the View Scale slider in the lower right corner:
2.Move the Slider to change the view scale.
Or:
1.Click the Home tab.
47

Getting Started 7
© 2014 DRail Modelspoor Software
2.Select a View Scale.
TIP: For fast zoom, press CTRL and use the mouse wheel.
TIP: To zoom using the keyboard, press CTRL + or CTRL -.
NOTE: This setting has nothing to do with the train scale i.e.: TT, O, H0, etc. The train scaledepends on which track library you use.
1.3 Track Libraries
The first thing you need is some track!
AnyRail keeps track in libraries, and has one for all the well-known
manufacturers, including Atlas, Märklin, Roco, Peco, and many others.
Each piece of track matches the original as closely as possible - some of
them were even created using the manufacturer’s original CAD files.
1.3.1 Opening a Track Library
To open a Track Library
1.Click the Track libraries tab:
You'll see a group for each scale.
2.Click the name of the manufacturer to open the list of track libraries.
3.Select a track library:

AnyRail 5 Manual English8
© 2014 DRail Modelspoor Software
You can have as many libraries open as you want. Don't worry, AnyRail
won't link incompatible track pieces – unless you tell it to (see The
AnyRail Settings Tab ).
1.3.2 Browsing a Track Library
The status bar at the bottom of the screen shows detailed informationabout the track.
92

Getting Started 9
© 2014 DRail Modelspoor Software
1.3.3 Closing a Track Library
To close a Track Library
Click the little cross in the right upper corner of the track window:

AnyRail 5 Manual English10
© 2014 DRail Modelspoor Software
NOTE: You can also close a library the same way you opened it.
1.3.4 Key to Track Symbols
Here are the most common track symbols:
Straight Feeder: Wire the
tracks here.
Curve Separator: Isolated
tracks
7

Getting Started 11
© 2014 DRail Modelspoor Software
Regular Turnout Curved turnout.
Catch: Turnout to
make engines derail
from one direction
(as a safety
precaution).
Rerailer: Puts the
wheels back on track.
Y-Turnout Circuit: (only for model
railways) Generates a
pulse when passed,
generally direction
sensitive.
Three-way Turnout Buffer: End of the line.
Crossing Uncoupler: uncouples
rolling stock.
Double Slipswitch Turntable
Single Slipswitch
Flex Track: Easily cut and bent as
required.
*Other common words for turnout are “switch”, “point” and “junction”.
1.4 Docking and undocking a Library window
Drag the Library window around like any other window. You can also
"dock" it. This means that it will stop floating and stick to the edge of
the main window.
To dock a Library window

AnyRail 5 Manual English12
© 2014 DRail Modelspoor Software
TIP: To avoid docking, hold down CTRL while you move the library
Nesting libraries

Getting Started 13
© 2014 DRail Modelspoor Software
TIP: To un-nest a library, drag it away by its tab
1.5 Working with track
AnyRail is designed to make working with track quick and easy.
1.5.1 Adding track
To add a track Piece
There are three methods for adding new track:
Method 1: Click

AnyRail 5 Manual English14
© 2014 DRail Modelspoor Software
Method 2: Drag and drop

Getting Started 15
© 2014 DRail Modelspoor Software
Method 3: Shift-click to connect to the most recently addedcomponent

AnyRail 5 Manual English16
© 2014 DRail Modelspoor Software
TIP: To undo the most recent action, click the Undo button, or press Ctrl Z.
1.5.2 Track appearance
A few general settings control how track appears on your screen. You
can find these in the Ribbon Home tab:

Getting Started 17
© 2014 DRail Modelspoor Software
Example 1: Centerline
Example 2: Track
Example 3: Sleepers

AnyRail 5 Manual English18
© 2014 DRail Modelspoor Software
NOTE: AnyRail displays sleepers for aesthetic reasons, only. The position shown is notintended to be exact, though the width is correct.
Example 4: Centerline with roadbed
NOTE: To avoid disappointment, use this option to check that the roadbed fits on your traintable and that the tracks are not too close to each other.
1.5.3 Moving and connecting track
Use the mouse to move and connect your track pieces. By default, only
track from the same track system can be connected. However, you can
override this (see The AnyRail Settings Tab ). 92

Getting Started 19
© 2014 DRail Modelspoor Software
To connect track
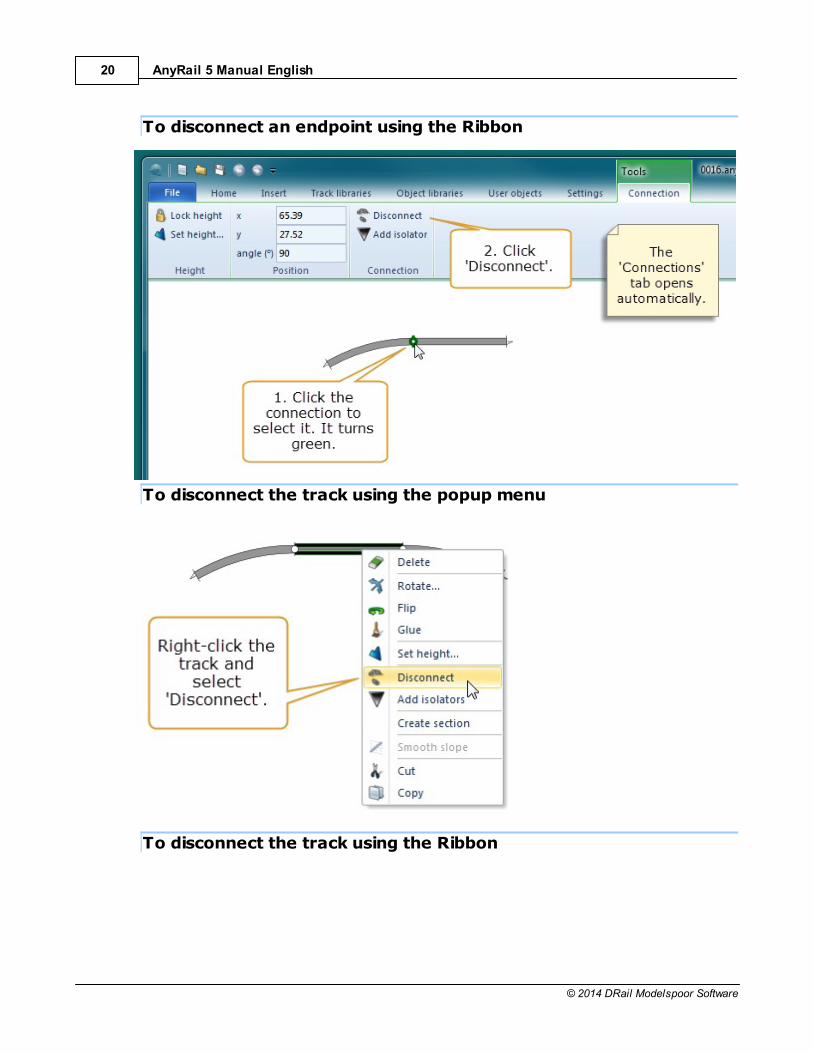
1.5.4 Disconnecting track
You can disconnect track using the popup menu or the Ribbon.
To disconnect an endpoint using the popup menu
AnyRail 5 Manual English20
© 2014 DRail Modelspoor Software
To disconnect an endpoint using the Ribbon
To disconnect the track using the popup menu
To disconnect the track using the Ribbon

Getting Started 21
© 2014 DRail Modelspoor Software
1.5.5 Selecting track
Obviously, you can select one section of track by simply clicking it.
However, you can also use the mouse to select several pieces of track,
and then move or alter them as one.
To select track

AnyRail 5 Manual English22
© 2014 DRail Modelspoor Software
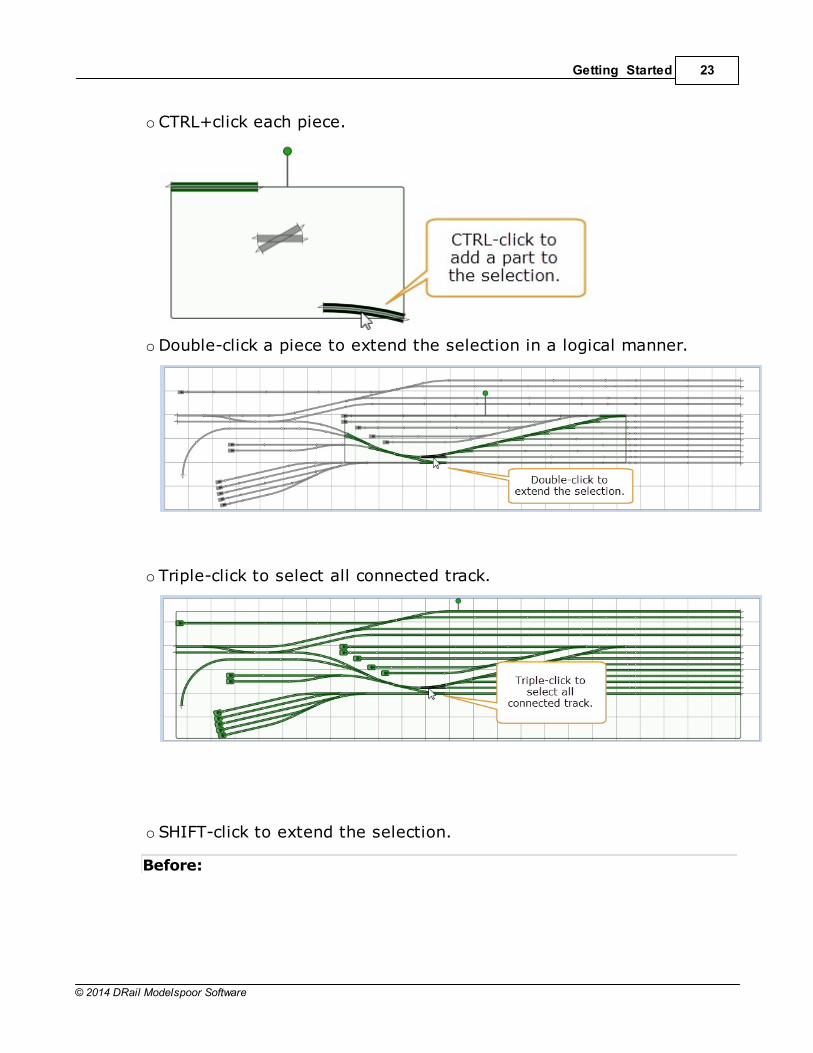
Other ways to select pieces
Do either of the following:
Getting Started 23
© 2014 DRail Modelspoor Software
o CTRL+click each piece.
oDouble-click a piece to extend the selection in a logical manner.
o Triple-click to select all connected track.
o SHIFT-click to extend the selection.
Before:

AnyRail 5 Manual English24
© 2014 DRail Modelspoor Software
After:
AnyRail bolds the selected pieces.
To deselect a single piece
CTRL-click the piece.
To deselect all the pieces
Press ESC.
To move a selection
Drag any of the pieces.
AnyRail moves the entire selection as one.
You can also copy, paste and delete track in the standard Windows way.
TIP: If you open AnyRail twice, you can copy and paste elements from one layout to theother.
1.5.6 Gluing track
If you want to make sure that you don't accidentally move track, you can
glue it down!
To glue track

Getting Started 25
© 2014 DRail Modelspoor Software
Method 1:
Method 2:
If you want to know whether track is glued, hover over it, and look in
the Status Bar:

AnyRail 5 Manual English26
© 2014 DRail Modelspoor Software
TIP: To move glued track, hold the SHIFT key down when dragging. The track will be ungluedautomatically.
1.5.7 Turntables
Many turntables require a special adapter or transition track from the
same library in order to connect them to the regular tracks at the
required angles.

Getting Started 27
© 2014 DRail Modelspoor Software
1.5.8 Closing gaps
If you use sectional track, you'll often find that it's difficult to make a
perfect fit when your design becomes more complex.
Some manufacturers provide all sorts of filler track just for this purpose.
Sometimes you can make the track fit by using the play (wiggle room) in
the track. While this can be considered cheating, sometimes you don't
even notice that you're doing just that when laying real track.
In AnyRail, you can cheat a little bit as well.
In general, to close a small gap, you can often disconnect a stretch of
track and rotate it one or two degrees to make your plan fit.
To close a gap
1.Switch off Autoconnect in the Settings tab. When you do that, track
will no longer jump into position, but will be left just where you

AnyRail 5 Manual English28
© 2014 DRail Modelspoor Software
dropped it. If there is another piece of track within the tolerances
(defined in the Settings tab) a connection will be made to it.
2.Disconnect a stretch of track and rotate it one or two degrees so it
will fit.
3.Put the track back in place and make sure to connect the outer ends.
4.Turn Autoconnect back on.
NOTE: Only resort to this technique after you've tried to make your track plan fit properly.
1.6 Flex track
Many sectional track manufacturers also provide "flex track". Flex track
can be used to fill gaps. Its looser curves also give your layout a more
natural look.
1.6.1 Basic handling
Some libraries contain “flex track”, designed to be bent, stretched and
trimmed. You can do this to AnyRail flex track by using the control
points. These are the little crosses that appear at either end of a piece,
and on either side of it. Dragging the control point changes the track.
AnyRail checks the track as you shape it and paints it red if:
You over-stretch it
You bend it into overly tight curves (likely to derail a train)
Of course, these features can be switched off (The AnyRail Settings tab
).
To connect flex track
Connect flex track in the usual way by dragging it near another part.
92

Getting Started 29
© 2014 DRail Modelspoor Software
Or
Drag one of the outer control points onto another endpoint.
AnyRail smoothes out the curves of the resulting track.
TIP: Pressing SHIFT while dragging a control point keeps it in a straight line.
1.6.2 Curves, straights and easements from flex
AnyRail can create (near) perfect arcs, easements and straights fromflex track.
To create a straight, curve or easement

AnyRail 5 Manual English30
© 2014 DRail Modelspoor Software
Alternatively, click the flex, and select from the Ribbon:
A straight

Getting Started 31
© 2014 DRail Modelspoor Software
A curve
Creating a precise curve (circular arc) is similar to straightening a piece
of track.
An easement
An easement provides a smooth transition between a straight and a
curve. Real railways always use them to avoid wear and tear, and to
permit higher speeds. They also increase passenger comfort.

AnyRail 5 Manual English32
© 2014 DRail Modelspoor Software
1.6.3 Parallel flex track
AnyRail can create parallel flex track.
To create parallel track

Getting Started 33
© 2014 DRail Modelspoor Software
1.7 The Ribbon and the Popup menu
The Ribbon
When you select something, the Ribbon shows you what you can do with
it and grays out any options that don't apply.
Example 1: Select a flex

AnyRail 5 Manual English34
© 2014 DRail Modelspoor Software
Example 2: Select a flex, a surface, and some text
The Popup menu
A handy feature of AnyRail is the menu that “pops up” with relevant
options whenever you right-click something.

Getting Started 35
© 2014 DRail Modelspoor Software
Example 1: Right-click a stretch of track
Example 2: Right-click a connection
There’s a description of each option in the Reference Guide . The next
couple of chapters cover the more commonly used ones.
74

AnyRail 5 Manual English36
© 2014 DRail Modelspoor Software
1.8 Pieces, stretches and sections
AnyRail thinks of your track as being made up of pieces, stretches and
sections.
A piece of track is just that – any one of the components you select
from the Track Libraries. A stretch of track is a piece and all pieces
connected to it. Many AnyRail options apply to stretches rather than
pieces. A section of track is something that you create, and requires
more explanation.
Sections
A section is a stretch of track with a specific function or purpose, as
defined by you. You can turn any stretch – that is a connected group of
pieces - into a section, as long as both ends have an isolator.
Sections are useful in both conventional and digital operation:
In conventional (analog) operation, you need to feed stretches of
track individually to control trains independently of each other.
This enables you, e.g., to switch off a section's power to stop a
train for a red signal.
In digital operation, especially with a PC, it is often handy to know

Getting Started 37
© 2014 DRail Modelspoor Software
where trains are so that the software can control them. Usually,
the layout is divided into sections of track, each with its own
occupancy detector. The shorter the sections, the more accurate
the positional information.
NOTE: Once you’ve created a section, you can change its properties such as color, nameand usage. You can also see a list of sections. This is helpful when calculating how manyoccupancy detectors you need. See Generating a list of Sections .
1.9 Working with sections
Here are the two methods for creating a section.
Method 1: Creating a section from selected track
70

AnyRail 5 Manual English38
© 2014 DRail Modelspoor Software
Method 2: Creating a section from isolated track

Getting Started 39
© 2014 DRail Modelspoor Software
TIP: Of course, you can also use the Ribbon to create the section. Left-click one piece oftrack within the isolated tracks to select it, and click Create Section in the Ribbon
To change a section’s properties
1.Left-click a piece of track in the section.
The Ribbon opens the Track tab with a Section group:
2.Select a Usage and enter a Name.
The name appears on the layout:

AnyRail 5 Manual English40
© 2014 DRail Modelspoor Software
To change a section’s color
1.In the Ribbon Track tab, Section group, select Color.
A color selection box appears:
2.Select a color.
The section changes color.
1.10 Working with height
Few model railway layouts are entirely on the same level. Fortunately,
AnyRail can handle track at varying heights.
If you want to make sure that the height of a certain point is not
changed accidentally, right-click it, and select Lock height.
The point turns blue to indicate that its height is locked:

Getting Started 41
© 2014 DRail Modelspoor Software
1.10.1 Displaying heights
Before working with heights, it helps to switch on their display.
To display heights
In the Ribbon Home tab, find the Show group:
Heights now appear on the track:

AnyRail 5 Manual English42
© 2014 DRail Modelspoor Software
1.10.2 Specifying heights
There are various ways to create a slope, or set the height of track.
As it can be on a slope, a piece of track doesn't necessarily have a
single height. AnyRail works out the height based on the track's
endpoints and connections.
You can specify a certain height for a stretch of track, and then ease the
connected track into sensible gradients.
AnyRail will show a warning if slopes are too steep.
If your tracks cross, make sure you leave enough headroom for the lower train, and anypossible overhead lines! Bear in mind the thickness of the tracks, the sleepers, and the actualbridge.
To set selected track to a certain height

Getting Started 43
© 2014 DRail Modelspoor Software

AnyRail 5 Manual English44
© 2014 DRail Modelspoor Software
To specify a height for a point
This function is useful when you want to set the height of an individual
point.
1.Right-click the point (this is an endpoint or a connection), and select
Set Height....
Alternatively, select the point by left-clicking it, and in the Ribbon
Track tab, select Set Height...
2.Set the height.
3.Click OK.
To create a smooth slope
Sometimes, it's useful to create a slope between two points, where
AnyRail calculates a linear descent percentage. This is called a smooth
slope.
There are a few restrictions when creating a slope from point A to point
B.
All the track on the slope should be connected.
There should be only one 'path' from A to B.
The path may go through turnouts and crossings, but the path may not
split to a third point.
Point A and point B must be on a regular straight or curve, not a
turnout or a crossing.

Getting Started 45
© 2014 DRail Modelspoor Software
NOTE: This feature works best when A and B have a different height!
Example:
To set the maximum percentage for slopes
1.Open the Ribbon Settings, and locate Slopes.

AnyRail 5 Manual English46
© 2014 DRail Modelspoor Software
2.Set the Maximum percentage.
1.11 The Status Bar
There’s a lot to keep track of if you use all of AnyRail’s features. The
good news is that the Status bar is a mine of information:
1.12 More than just track
Being enthusiasts ourselves, we suspect that your layout will contain
more than just track!
For this reason, AnyRail enables you to draw shapes onto your layout
to represent scenery, such as stations or landscape features.
Of course, you can draw your train table or your garden.
You can also mark track as hidden, and add text labels and position
them as required.
47
54

Getting Started 47
© 2014 DRail Modelspoor Software
Additionally there are plenty of predefined elements .
1.12.1 Adding lines and shapes
To add a line or a shape
56

AnyRail 5 Manual English48
© 2014 DRail Modelspoor Software
TIP: Turn a line into a shape by clicking on the starting point.
TIP: You can also right-click on the work area, and select Add line/surface from the popupmenu.
To change the line into a surface
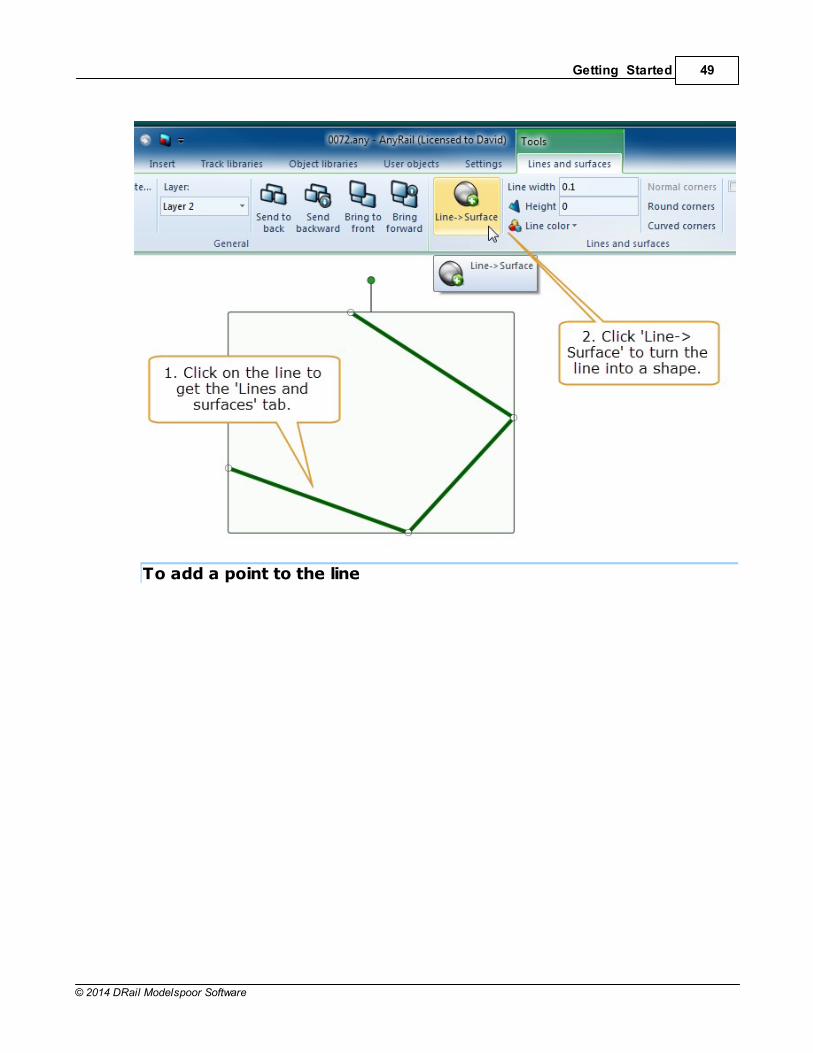
Getting Started 49
© 2014 DRail Modelspoor Software
To add a point to the line

AnyRail 5 Manual English50
© 2014 DRail Modelspoor Software
TIP: You can add a point by hovering over the line and pressing 'p'.
To delete a point
TIP: To quickly delete a point, click it and press 'Delete'
To move a point

Getting Started 51
© 2014 DRail Modelspoor Software
Simply drag the point to move it.
Sometimes you need to precisely position a point, e.g. if you're drawing
your train table.
To position a point
You can create round or curved corners for points that have neighboring
points. The points at the end of the line cannot be set to round or
curved.
A round corner is a perfect arc. A part of a circle.
A curved corner is a curve halfway to each neighboring point.

AnyRail 5 Manual English52
© 2014 DRail Modelspoor Software
For an overview of all available functions, please see the Reference
Guide .
1.12.2 Manipulating lines and shapes
This topic covers a few special functions for surfaces.
To move a line
74

Getting Started 53
© 2014 DRail Modelspoor Software
To resize the shape

AnyRail 5 Manual English54
© 2014 DRail Modelspoor Software
1.12.3 Adding Text
You can place text anywhere on your layout plan, for example to label
features or make notes to yourself.
To add text
1.Find the Ribbon Insert tab, and click Add Text.
2.Click in the work area.
3.Enter your text and press Enter.
NOTE: Depending on the scale of your drawing, the initial text may be very small. To changethe size, left-click the text, and set the size in the Ribbon.
NOTE: To create a new line, use Shift-Enter.
Change the appearance
Left-click on the text and select one of the options from the Ribbon
Text tab.
To edit existing text
Double-click the text.
To move the text
Place the cursor on the text, left-click and hold to drag the text.
You can also add names to sections of track. See Working with Sections .
1.12.4 Adding Rulers
To add a ruler
1.Find the Ribbon Insert tab, and click Add Ruler.
2.Click in the work area.
3.Size the ruler by dragging its end points.
37

Getting Started 55
© 2014 DRail Modelspoor Software
Change the appearance
Left-click on the ruler and select one of the options from the Ribbon
Rulers tab.
To move the ruler
Place the cursor on the ruler, left-click and hold to drag the ruler.
1.12.5 Marking track as hidden
Some of your track may not be visible, for example in tunnels or fiddle
yards, or underneath features such as station canopies. For this reason,
AnyRail can show hidden track as a dotted line.
To mark track as hidden
1.Select the track that is supposed to be hidden.
2. In the Ribbon Track tab, check Hidden.
To show hidden track

AnyRail 5 Manual English56
© 2014 DRail Modelspoor Software
1.12.6 Predefined elements
AnyRail has a number of predefined elements that you can find in the
Objects tab.
These include:
Scenery elements
Signals

Getting Started 57
© 2014 DRail Modelspoor Software
Structures
1.12.7 Groups
You can combine lines, surfaces and text into a Group.

AnyRail 5 Manual English58
© 2014 DRail Modelspoor Software
To create a group
1.Select all the elements that should form the group.
2.Click Group on the Ribbon.
1.13 Layers
AnyRail layers let you show or hide different parts of your layout plan
while you're working on it, e.g. to hide scenery while working on track.
It's up to you how to arrange them. A layer can contain all sorts of
elements, on all heights. (Really, a layer is just an arbitrary group of
elements.)
There is always one current layer. This layer is always visible. New
elements are always added to the current layer.
1.13.1 The Layers pane
Maintain your layers using the Layers pane.
From this pane, you can add, delete, and rename layers. You can also
pick which layers are visible.
To add a layer

Getting Started 59
© 2014 DRail Modelspoor Software
To remove a layer
Click the little red cross to delete a layer.
CAUTION: Deleting a layer deletes all the elements it contains! If you press Delete layer byaccident, you can always use Undo (Ctrl-Z).
To rename a layer
Double click the layer name so you can edit it.
NOTE: AnyRail makes sure that each layer has a unique name.
To make a layer visible or invisible
Click the check box in front of the layer name.
NOTE: You cannot make the current layer invisible.
NOTE: The current layer is bold.
TIP:Click a layer name to make it the current layer.
1.13.2 Moving objects to another layer
Of course, it might happen that you decide to move something to
another layer. That's easy.
To move objects to another layer
1.Select the objects.
2. In the Ribbon, select the target layer.
Example

AnyRail 5 Manual English60
© 2014 DRail Modelspoor Software
1.14 User objects
You can save your creation as a "user object" for later reuse. You
can even share user objects with other AnyRail users.
1.14.1 Creating a user object
You can create a user object out of a single line or surface, or from any
group which can contain lines, surfaces and text.
To create a user object
57

Getting Started 61
© 2014 DRail Modelspoor Software
A dialog appears.
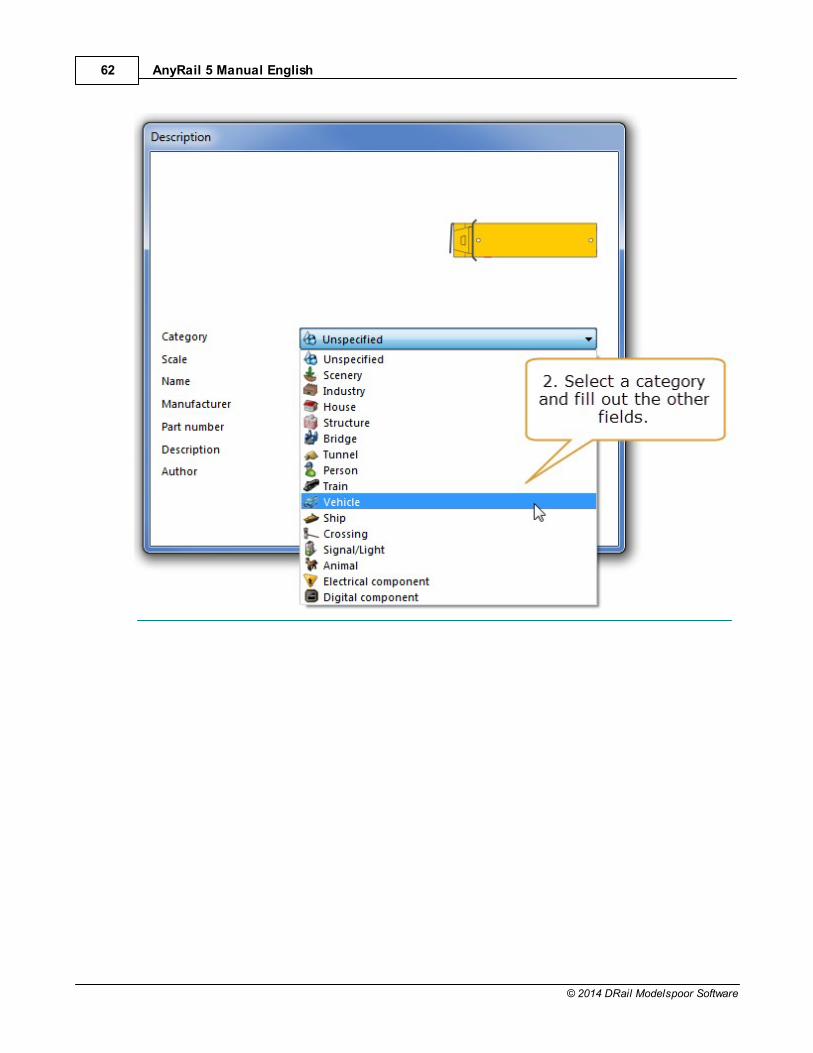
AnyRail 5 Manual English62
© 2014 DRail Modelspoor Software

Getting Started 63
© 2014 DRail Modelspoor Software
The user object is added to the correct library in the User objects tab.
1.14.2 Managing user objects
To take a look at your user objects, open the User objects tab.
To update your user objects
1.Make sure you have a working internet connection.
2. In the User objects tab, click Download new items.
To open a library of user objects

AnyRail 5 Manual English64
© 2014 DRail Modelspoor Software
Check the library's check box.
The user objects are displayed just like the regular track items.
If you've created an object you want to share, you can upload it to the
AnyRail servers.
To share a user object

Getting Started 65
© 2014 DRail Modelspoor Software
NOTE: Other people won't see your objects right away - we have to approve them first.

AnyRail 5 Manual English66
© 2014 DRail Modelspoor Software
1.15 Finishing up
Once you’ve completed the design, you’ll need to get it in some sort of
usable form. It's simplest just to print the layout. However, you can also
save parts of it as pictures – useful for emailing your friends or to
publish your track plan on a forum.
In addition, you can view lists of materials and sections.
1.15.1 Saving your work
You can save AnyRail design files just as you would with any other
Windows software. You might also find Save as useful for recording
different stages of your design.
To save your file
From the File tab, select Save.
To save your file with a new name and location
From the File tab, select Save As.
A standard file window opens, allowing you to save a copy of your file.
The old one is untouched.
Auto-save
AnyRail auto-saves your work every 10 minutes in a separate folder. If
AnyRail closes in a normal way, these auto-saved files are deleted to
preserve disk space.
However, if your computer crashes, or if AnyRail terminates in an
unexpected way, you can find a recent copy in the Autosave folder.
To find an auto saved file

Getting Started 67
© 2014 DRail Modelspoor Software
1.Open the File tab.
2.Select Help.
3.Click the button tagged Autosave Folder.
NOTE: The most recent file you find is probably your best choice.
1.15.2 Print preview
Color ink is expensive! Also, it can be annoying to wait while a design
prints out, only to discover that the settings were not quite right. For
this reason, AnyRail enables you to see what your printout is going to
look like.
To preview your printout
From the File tab, click Print.
AnyRail displays a preview of your printout.
1.15.3 Printing your design
To print your design
1.From the File tab, select Print.
2.Review your settings and click the Print button.
The design prints at the specified scale, using several pages if required.
NOTE: Printing a large layout in a large scale takes a lot of processing power and resources.Each page is a picture, so it might take a while depending on your computer.
TIP: To print your layout to real size, set the view scale to 1:1. However, before clicking OK,check the number of pages it will take!
1.15.4 Generating pictures
You can either create a picture of whatever is in view, or of the complete
plan.
The resolution of the resulting picture depends on the view scale that
you have set.
If pictures get too large, choose another view scale.

AnyRail 5 Manual English68
© 2014 DRail Modelspoor Software
To generate pictures (.gif, .bmp, .jpg or .png)
1.If required change the view scale. The scale slider is in the lower
right corner of the status bar.
2.Use the scroll bars to get the exact picture you want if you need to
crop the layout.
3.From the Ribbon File tab, select Export As, then in the right pane,
click Picture.
A window appears:
4.Click OK.
A standard File window opens.
5.Save the file in the required graphics format.
THIS IS NOT THE SAME AS SAVING YOUR TRACK PLAN! These pictures cannot bereloaded into AnyRail.
1.15.5 Generating a 3D file
You can generate a Collada file that can be imported into most 3D
drawing programs such as Google SketchUp.
Please note that the 3D export only draws a very rough version of the
track. It can be used to check the elevations.

Getting Started 69
© 2014 DRail Modelspoor Software
To create a Collada 3D file
1.Open the File tab.
2.Select Export as.
3.Select Collada 3D file.
4.Type or select a file name, and press Save.
1.15.6 Generating a TrainPlayer file
You can generate an intermediate file that can be imported by
TrainPlayer, a program that simulates running trains on a layout. For
more information, please go here.
To create a TrainPlayer file
1.Open the File tab.
2.Select Export as.
3.Select TrainPlayer export file.
4.Type or select a file name, and press Save.
1.15.7 Generating a list of materials
The list of materials contains all the track you’ve placed on the layout.
It also shows the total track length, and the track length per track
element.
To generate a list of materials
1.From the Ribbon File tab, select Info.
2.Here, select List of materials.
The list of materials opens:

AnyRail 5 Manual English70
© 2014 DRail Modelspoor Software
TIP: Copy and paste the list into a spreadsheet for further processing.
1.15.8 Generating a list of Sections
The list of sections is very useful when assigning occupancy detectors.
To generate a list of sections
From the Ribbon File tab, select Info.
Here, select List of sections.
The List of sections opens:

Getting Started 71
© 2014 DRail Modelspoor Software
TIP: Copy and paste the list into your spreadsheet program for further processing.
1.16 Licensing
With the trial version, you can freely use AnyRail for small layouts of up
to 50 elements.
If you want to go beyond that, you need to buy a license key that
unlocks the software and lifts this restriction.
To register, first buy a license on our website.
You will get an email stating your registered user name and license key.
To register AnyRail
1.Open the File tab, and select Help.

AnyRail 5 Manual English72
© 2014 DRail Modelspoor Software
2.Copy and paste the necessary information from your registration
email.
3.Click OK.
NOTE:You may use your license on multiple computers, as long as you are the one using thesoftware.
1.16.1 Updates and upgrades
Whether or not you have a license for AnyRail, you can always update
your installation for free. Updates can be recognized by a difference in
the minor version number, e.g. 5.15.0 to 5.19.0, or in the patch number
5.15.0 to 5.15.1.

Getting Started 73
© 2014 DRail Modelspoor Software
Upgrades can be recognized by a difference in the major version number,
e.g. 4.27.0 to 5.1.0. Whether upgrades are free depends on your current
license.
To check the current license
Open the File tab, and select Help.
AnyRail indicates for which major versions your license is valid.
Of course, AnyRail will never overwrite an existing licensed version. If you install a newerversion for which you do not have a license, the new version will be installed next to the oldversion.
To check for updates and upgrades
Open the File tab, and select Help.

AnyRail 5 Manual English74
© 2014 DRail Modelspoor Software
AnyRail automatically contacts us to see if a newer version is
available. If so, it will ask you whether you want to update.
Update options
Depending on your settings, AnyRail regularly checks for updates
automatically
To view or change the update options
1.Open the File tab, and select Help.
2.Click Update options.
2 Reference Guide
This part of the user manual lists each AnyRail feature and function.
TIP: If you're new to AnyRail, please read the Getting Started first.
2.1 Features
This chapter lists those AnyRail features that need some extra
explanation.
4

Reference Guide 75
© 2014 DRail Modelspoor Software
2.1.1 Glue
You can "glue" certain elements, such as track and predefined elements,
so that you can't accidentally move them.
To glue track
Right-click the element, and select Glue.
2.1.2 Rotate
Any element or selection of elements can be rotated.
Method 1
1.Select the elements. A selection box with a handle appears.
2.Use the handle to rotate the selection.
NOTE: If the handle is red, the selection cannot be rotated. Usually this is caused by glueditems.
Method 2
1.Select the elements. Depending on what you select, various extra

AnyRail 5 Manual English76
© 2014 DRail Modelspoor Software
tabs appear on the Ribbon:
2.Click Rotate
A new window appears:
3.Enter an angle or use the slider. Your selection rotates as you change
the angle.
You can also use the buttons to rotate a certain number of degrees.
The 0 button resets the rotation to the start position.
4.Click OK.
Using the slider will change the angle in full degrees. However, the angle may be changed anarbitrary amount by entering a value in the edit box, i.e. 23.7.
2.1.3 Flip
Some elements can be "flipped" (i.e. turned into a mirror image of
themselves). You can use this feature to invert your complete layout if
you wish. AnyRail will automatically replace each element with its
mirrored counterpart. AnyRail shows a list of elements that cannot be
mirrored.

Reference Guide 77
© 2014 DRail Modelspoor Software
To flip an element or a selection of elements
1.Select the elements to flip. For track, all connected track is flipped
automatically when a subselection of it is flipped.
2. In the Ribbon, select Flip.
The elements are mirrored. If the action cannot be completed, a list of
problem elements is displayed. These elements don't have a mirrored
counterpart.
2.2 The Quick Access Toolbar
The Quick Access Toolbar is the list with small icons at the top left of
the window.

AnyRail 5 Manual English78
© 2014 DRail Modelspoor Software
Don't worry if you can't remember the small icons! If you hover over
them you'll see a tooltip.
To change to Quick Access Toolbar
1.Right-click the function you want to add to the Quick Access Toolbar.
2.Select Add to Quick Access Toolbar.
Example
TIP: To reset AnyRail to its original settings, shut it down and start it again while holdingSHIFT down.
2.3 The Ribbon
All functions available in AnyRail can be accessed through the Ribbon.

Reference Guide 79
© 2014 DRail Modelspoor Software
The Ribbon is the part at the top of the window where the functions are
displayed.
The Ribbon is organized into tabs. A tab is organized into groups.
When you resize the AnyRail window, the Ribbon resizes as well. Groups
might collapse.
To open a collapsed group, simply click the little arrow on it.
Sometimes, the Ribbon takes too much space. To fold it, double-click
one of its tabs (not the File tab).
Double-click a tab again to unfold it.

AnyRail 5 Manual English80
© 2014 DRail Modelspoor Software
Tabs
Not all tabs are visible at all times. The tabs to work on track, lines,
rulers, etc. only appear when you have selected these elements and are
highlighted in green.
2.4 Ribbon Tab Reference
In the following, each function on each tab is listed and explained.
2.4.1 File tab
This in fact is not a real tab. It is the backstage button.
Click it to open.

Reference Guide 81
© 2014 DRail Modelspoor Software
New Start a new layout.
Save Save the layout.
Save As Save the layout by a new name.
Open Open an existing layout from disk.
Info Info on your current design.
Recent designs The files you have opened most recently.
Print Print the layout or change print settings.
Export as Export the layout in various formats.
Help Help, updates, and registration.
Options Program options.
Exit Quit the program.
Info

AnyRail 5 Manual English82
© 2014 DRail Modelspoor Software
Click Info to find these options.
List of materials The list of all elements used in your track plan.
List of sections The list of sections you defined for your track plan.
Recent designs
Click Recent designs to see the files you recently used.
Click Print to find these options.

Reference Guide 83
© 2014 DRail Modelspoor Software
Print Print the plan at the current scale.
Copies The number of copies to print.
Portrait/Landscape The paper orientation.
Suppress empty
pages
Do not print pages with nothing on it.
Selection Print only what is selected in the plan.
Print scale Set the print scale in various ways.
Print alignment
markers
Print markers on the page corners to make it easier
to align them.
Print date/time and
name
Print this info on each page.
Print Setup Setup printer, paper size, etc.

AnyRail 5 Manual English84
© 2014 DRail Modelspoor Software
Export as
Click the arrow on the Export As button to find these options.
Picture Create a picture of your plan.
Collada 3D File Create a basic 3D file that can be viewed in Google
SketchUp and most other 3D viewers.
Trainplayer export
file
Create a file that can be interpreted by Trainplayer.
Trainplayer is a program to simulate running trains
that can be found here: TrainPlayer.
Help

Reference Guide 85
© 2014 DRail Modelspoor Software
Help Open this documentation.
AnyRail Website Go to the AnyRail website.
Options Open the options dialog.
Autosave folder Open the folder with the automatically saved files. Use
this function in case AnyRail stopped or was stopped in
an unexpected way, and you want to recover the layout
you were working on.
Check for
updates
Contact the AnyRail server and see if there are any
updates.
Update options Set the automatic update function.
Register Register the software with a license key.
Options

AnyRail 5 Manual English86
© 2014 DRail Modelspoor Software
This button opens a new window where you can set additional options.
General options
Small track icons Check to make the track libraries smaller. This is
useful for preserving screen estate.
Center work area Uncheck to draw the work area in the left upper corner
of the screen. Check to center the work area.
Libraries

Reference Guide 87
© 2014 DRail Modelspoor Software
Select the scales for which you want to use the track and object
libraries.
User objects

AnyRail 5 Manual English88
© 2014 DRail Modelspoor Software
Move... Move your user objects to another folder.
Change... Set a new folder for your user objects.
2.4.2 Home tab
The home tab contains functions you probably use most often
They mainly control what's currently displayed.
Cut Remove whatever's selected, and keep it in the Paste
buffer. Shortcut is Ctrl-X.
Copy Keep a copy of whatever's selected in the Paste
buffer. Shortcut is Ctrl-C.
Paste Paste whatever's in the Paste buffer. Shortcut is Ctrl-

Reference Guide 89
© 2014 DRail Modelspoor Software
V.
Layers Open the layers pane.
Centerline Show only a single line for the track.
Track Show the track. The outer lines of what's drawn are
the actual rails.
Sleepers Draw Track with sleepers. The sleepers have the
actual width, but not the actual position and distance
from each other.
Roadbed Show the roadbed of the track. The actual width of the
sectional elements is used here.
Hidden track Show all track labeled Hidden. This is dotted track in
tunnels, hidden staging yards, etc.
Visible track Show all track not labeled Hidden. This is all track in
plain sight.
Part number Show a part number on each track element. The
software tries to scale the font down on smaller parts.
If this is not possible, the track number won't show.
Section name Show the name of the section. This only shows when
there's enough room. The software determines a
position and orientation for the text.
Section usage Show the usage of the section. This shows only when
there's enough room.
Slope percentage This shows the percentage of the gradient (if any).
1% means one unit of descent/ascent per 100 units of
distance, e.g. 1 cm per meter. When the slope is too
steep, this percentage will be shown in red. See
Settings to set the maximum slope.
Height on slopes Show the height, but only on slopes.
Height on plains Show the height, but only on plains. The height is
only shown here and there.
Lines and
surfaces
Show lines and surfaces.
92

AnyRail 5 Manual English90
© 2014 DRail Modelspoor Software
Texts Show texts.
Rulers Show rulers.
Glue Show glue indicators.
Pages Show the pages as the layout would be printed in the
current view scale.
Guides Show circle center point for curved flex track.
Lower limit Only show all elements with a height of at least this
value. Together with the Upper limit, his allows you to
define a horizontal slice of your layout.
Upper limit Only show all elements with a height below this
value.
View scale Set the display scale.
Fit to window Find the largest scale such that the work area fits the
window.
2.4.3 Insert tab
On the insert tab are elements that can be added to the layout.
Add line/
surface
Add a line or a surface. This function can be used to draw
shapes, the train table, or even your garden.
Add rectangleAdd a rectangle with the given measurements.
Width Width of the rectangle to add.
Height Height of the rectangle to add.
Add circle Add a circle with the given radius.
Radius Radius of the circle to add.
Add ruler Add a ruler. The length and style can be set afterwards.
Add text Add text. The font and size can be set afterwards.

Reference Guide 91
© 2014 DRail Modelspoor Software
2.4.4 Track libraries tab
On this tab you can find all supported track libraries.
Note that the libraries are sorted by scale or gauge.
Click on the little down arrow to open a folded group (e.g. H0 in the
picture).
Click a manufacturer's name to get a list of the track systems we
support.
TIP: Most people only use one gauge. To hide all gauges you are not going to use, go to theOptions .
2.4.5 Object libraries tab
On this tab you can find all the predefined objects, such as signals,
trees, and structures.
The icon indicates the sort of objects that you'll find.
Click the small arrow to open the list of supported libraries.
TIP: Most people only use one gauge. To hide all gauges you are not going to use, go to theOptions .
2.4.6 User objects
On this tab you can manage your user objects.
85
85

AnyRail 5 Manual English92
© 2014 DRail Modelspoor Software
Click Download new items to download items that others have shared.
The items are ordered per scale, per manufacturer.
2.4.7 Settings tab
Use this tab to change the overall settings of the software.
AnyRail remembers settings between sessions, but also saves them with
each layout.
Measurement
system
Choose from cm, mm, inches with fractions or
decimals.
Width The width of the work area on screen. Make it
somewhat larger than your train table.
Depth The depth of the work area on screen. Make it
somewhat larger than your train table.
Grid Show a grid.
Size Size of a square of the grid.
Endpoint The drawing size of an endpoint. An endpoint is the
outer end of a piece of track.
Connection The drawing size of a connection. The connection is the
circle denoting that two pieces of track are connected.
Control point The drawing size of the control points. These are the
points to manipulate flex track and lines.

Reference Guide 93
© 2014 DRail Modelspoor Software
Alert on flex too
long
When checked, overstretched flex appears red.
Alert on too
sharp curves
When checked, too-tightly curved flex appears red.
Minimum radius Radius used for determining when Alert in too sharp
curves triggers.
Distance The maximum distance allowed allowed between
connecting endpoints.
Angle The maximum angle allowed between connecting
endpoints.
Maximum
percentage
The maximum percentage allowed on slopes.
Autoconnect Automatically connect track when endpoints are close
enough.
Allow mixed rails When checked, any track with the same gauge will
connect. Uncheck to make sure you use the correct
transition track.
Snap to grid Makes lines and surfaces snap to an underlying grid.
The left upper point of the line or surface is aligned
with the grid.
Size The underlying grid size for Snap to grid. If the size is
very small, the grid will work but not be displayed
fully.

AnyRail 5 Manual English94
© 2014 DRail Modelspoor Software
2.5 Context sensitive tabs and popup menus
Some tabs only display in specific cases, depending on what you've
currently selected on screen.
These tabs have a green glow.
When you right-click an object, a popup menu comes up, giving you fast
access to the most frequently used features.
2.5.1 Track tab and menu
The Track tab appears when track is selected.
The track popup menu appears when you right-click the track.
Delete Delete the selected track.
Glue Glue the selected track to prevent accidentally moving

Reference Guide 95
© 2014 DRail Modelspoor Software
it.
Rotate Rotate the selected track and all connected track with
it.
Flip Mirror all selected track with all connected track.
Layer Move selected track to another layer.
Hidden Draw selected track dashed to indicate it's not visible
on the real layout.
Extend selection Enlarge the selection in a logical way. Double click on
the track has the same result.
Select section Only when sections are used: select the complete
section.
Select stretch Select all connected track.
Disconnect Disconnect the selected track.
Add isolators Insert isolators at the outer ends of the current
selection.
Change direction For straight track only:add an arrow to indicate one way
track.
Set height Set the height of the selected track. See here for
more details.
Smooth slope Create a slope for the selected track. See here for
more details.
Create section Turn the selection, or isolated track, into a section.
See here for more details.
Remove Section Remove a section. The track itself remains unaffected,
but is no longer part of a section. See here for more
details.
Cut Cut the selected track.
Copy Copy the selected track.
Section functions
42
44
36
36

AnyRail 5 Manual English96
© 2014 DRail Modelspoor Software
Whenever a section is defined for the selected track, the tab has a
few additional functions.
Remove sectionsRemove the section definitions. The track itself is not
removed.
Name Enter a name for the section here.
Usage Select a usage type here.
Color Select a color for the section.
Font Select a font for the section label.
Size Set a font size for the section label.
2.5.2 Endpoint tab and menu
Clicking on an endpoint (the small line and triangle at the end of the
track) reveals the Endpoint tab.
The Endpoint popup menu appears when you right-click an endpoint.
Lock height Lock the height so it cannot be changed by accident. Be
careful using this function and make sure that you check
the heights surrounding it to confirm the slopes are all OK.
36

Reference Guide 97
© 2014 DRail Modelspoor Software
Set height... Set the height of this point. For an explanation go here .
x The x coordinate of this point (left to right).
y The y coordinate of this point (top to bottom).
angle The direction of the endpoint.
Connect Connect this endpoint to a nearby other endpoint.
2.5.3 Connection tab and menu
Clicking on a connection (the small circle between two pieces of track)
reveals the Connection tab.
The Connection popup menu appears when you right-click a connection.
Lock height Lock the height so it cannot be changed by accident. Be
careful using this function and make sure that you check
the heights surrounding it to confirm the slopes are all
OK.
Set height... Set the height of this point. For an explanation go here
.
x The x coordinate of this point (left to right).
y The y coordinate of this point (top to bottom).
angle The direction of the endpoint.
Disconnect Remove the connection and disconnect the track.
Add/Remove
isolator
Adds or removes the isolator between the two pieces of
track. Use this to create sections .
44
44
37

AnyRail 5 Manual English98
© 2014 DRail Modelspoor Software
2.5.4 Lines and surfaces tab and menu
This tab is only available when a line or surface, or one of its points is
selected. A general explanation is here .
The popup menu is available when you right-click a point or a line.
Point functions
Tab:
Right-click menu:
x The x coordinate of this point (left to right).
y The y coordinate of this point (top to bottom).
Move point Move only this point.
Move
surface
Move the whole surface.
Normal
corner
The corner defined by the neighboring points.
Round
corner
A perfect arc.
Curved
corner
An elliptic corner.
Delete pointDelete the current point.
Add point Add a point close to the current point.
Load image Load an image to fill the surface.
Remove
image
Remove the image that fills the surface.
Width, Set the size of the image (in your measurement units), and
47

Reference Guide 99
© 2014 DRail Modelspoor Software
Height,
Angle
the orientation.
Maintain
aspect ratio
Keep the aspect ratio of the original image.
Adjust
outline
Recalculates the surface outline so it fits the picture
exactly.
Line and surface functions
Tab:
Right-click menu:
Delete Delete the shape.
Glue Glue the shape to avoid moving it by accident.
Rotate... Rotate the shape.

AnyRail 5 Manual English100
© 2014 DRail Modelspoor Software
Flip Mirror the shape.
Layer Select to move the shape to another layer.
Send to back Send this shape to the back of all shapes with the
same height.
Send backward Send this shape one step back relative to all shapes
with the same height.
Bring to front Bring this shape on top of all the shapes with the
same height.
Bring forward Bring this shape one step further to the top relative to
all shapes with the same height.
Line->Surface
and v.v.
Turn the line into a shape and vice versa.
Line width Set the drawing width of the line.
Height Set the height of the shape. A shape has one height,
it can not be tilted. All shapes are drawn before the
track is drawn.
Line color Set the drawing color of the line.
Fill color Set the fill color of the surface.
Normal corners Set all corners to normal.
Round corners Set all corners to perfect arcs.
Curved corners Set all corners to elliptical curves.
Rounded point Round the points (for larger line widths).
Save as object Create a user object from the selected line.
Load image Load an image to fill the surface.
Remove image Remove the image that fills the surface.
Width, Height,
Angle
Set the size of the image (in your measurement units),
and the orientation.
Maintain aspect
ratio
Keep the aspect ratio of the original image.
Adjust outline Recalculates the surface outline so it fits the picture
exactly.
Add point Add point at cursor

Reference Guide 101
© 2014 DRail Modelspoor Software
Group Group selected lines and groups (only available when
applicable)
Ungroup Ungroup this group (only available when applicable)
Description Description for the group (only available when
applicable)
2.5.5 Texts tab and menu
More information on working with text can be found here .
The text tab appears only when text is selected.
The Text popup menu appears when you right-click the text.
Delete Delete selected text.
Glue Glue selected text to avoid accidentally moving it.
Rotate Rotate the selected text.
Flip Mirror the selected text.
Layer Select a layer for the text.
Horizontal Position the text horizontally. Click twice to position the
54

AnyRail 5 Manual English102
© 2014 DRail Modelspoor Software
text upside down.
Vertical Position the text vertically. Click twice to position it the
other way around.
Color Set a color for the selected text.
Font face Select a font.
Size Select a font size.
x The x coordinate of this point (left to right).
y The y coordinate of this point (top to bottom).
Height Draw height of the text.
Edit text Click to edit the text. This can also be achieved by double
clicking the text.
TIP: Quickly start editing text by double-clicking it.
2.5.6 Rulers tab and menu
More information on working with rulers can be found here .
Apart from simply dragging its endpoints, you can either click the ruler or
one of its endpoints to manipulate it.
Ruler point
The ruler point tab:
The ruler point does not have a popup menu.
x The x coordinate of this point (left to right).
y The y coordinate of this point (top to bottom).
Move
point
Move only this endpoint of the ruler.
54

Reference Guide 103
© 2014 DRail Modelspoor Software
Move
ruler
Move the whole ruler.
Ruler
When the ruler is selected, the following tab appears:
When the ruler is right-clicked, the following menu appears:
Delete Delete the ruler.
Glue Glue the ruler to avoid accidentally moving it.
Rotate... Rotate the ruler.
Flip Mirror the ruler.
Layer Move the ruler to another layer.
Horizontal Position the ruler horizontally. Click again to put it upside
down.
Vertical Position the ruler vertically. Click again to put it the other
way around.
Length Set the length of the ruler.
Scale The scale of the ruler. The displayed length is relative to
the modeling scale.
Change Change the way the ruler looks.

AnyRail 5 Manual English104
© 2014 DRail Modelspoor Software
style
Font Set the font of the ruler text.
Size Set the font size of the ruler text.

Index 105
© 2014 DRail Modelspoor Software
Index- 3 -3D 68
- A -Adapter track 26
Add isolator 97
Add isolators 94
Add layer 58
Add line/surface 90
Add point 47, 98
Add ruler 90
Add text 90
Add track 13
Adding rulers 54
Adding text 54
Alert on flex too long 92
Alert on too sharp curves 92
Allow mixed rails 92
Analog operation 36
angle 75, 92, 96, 97
Appearance of the track 16
Arc 29
Autoconnect 92
Autosave 66
Autosave folder 80
- B -Bend 28
Bending 28
Bill of materials 66, 69
bmp 67
Bring forward 98
Bring to front 98
- C -Centerline 88
Centimeter 4
Change direction 94
Change style 102
Check for updates 72
Circular arc 29
Close a track library 9
Close gaps 27
Collada 68
Collapse 78
Color 94, 98, 101
Color coded track 36
Compatible track 7
Connect track 18
Connection 18, 19, 92
Connection tab 97
Context sensitive tabs 94
Control 28
Control point 28, 92
Control points 28
Coordinates 46
Copy 21, 88, 94
Copy and paste between layouts 21
Create gradient to this point 42
Create section 94
Creating user objects 60
Crop 67
Curve corners 98
Curved corner 98
Curved turnout 10
Cut 28, 88, 94
Cutting 28
- D -dae 68
Decrease font size 54
Delete 94, 98, 101, 102
Delete layer 58
Delete point 47, 98
Depth 5, 92
Deselect 21
Digital operation 36
Disconnect 19, 94, 97
Disconnect track 19
Distance 92
Docking a library 11
Dotted track 55
Double slipswitch 10

AnyRail 5 Manual English106
© 2014 DRail Modelspoor Software
- E -Easement 29
Edit text 54, 101
Emergency copy 66
Endpoint 19, 92
Endpoint coordinates 46
Endpoint position 46
Endpoint tab 96
English 4
Enlarge 6
export 68
Export as 80
Extend selection 94
- F -Features 46, 74
File tab 80
Filler track 27
Fix 24
Flex 28
Flex arc 29
Flex easement 29
Flex length 69
Flex straight 29
Flex track 10, 28, 29
Flexitrack 28
Flextrack 28
Flip 76, 94, 98, 101, 102
Fold 78
Font face 101
Fraction 4
Full version 71
- G -Gaps 27
Generating pictures 67
Getting started 4
gif 67
Glue 24, 75, 94, 98, 101, 102
Glue track 24
Gluing 75
Grade 42
Gradient 41
Gradients 42
Greyed out options 33
Grid 92
- H -Headroom 42
Height 40, 42, 98
Height display 41
Height lock 40, 42
Height locked 40
Height on plains 41, 88
Height on slopes 41, 88
Hidden 94
Hidden track 46, 55, 88
Home tab 88
Horizontal 101, 102
- I -Imperial 4
Inch 4
Incompatible track 7
Increase font size 54
Insert tab 90
Introduction 4
Invisible 58
Isolated track 37
Isolation 37
- J -Join 18
jpg 67
Junction 10
- K -Key 10
- L -Layer 58, 59, 94, 98, 101, 102
Layers 58
Length 102
License 71

Index 107
© 2014 DRail Modelspoor Software
License check 72
Licensing 71
Limited number of parts 71
Line 47
Line width 98
Line->Surface and v.v. 98
Lines and surfaces 88
Lines and surfaces tab 98
List of materials 66, 69
List of sections 66, 70
Lock height 40, 96, 97
Lower limit 88
- M -Managing user objects 63
Manipulating features 52
Materials 66
Maximum descent percentage 42
Maximum percentage 92
Measurement system 4, 92
Measurement units 46
Metric 4
Millimeter 4
Minimum radius 92
Mirror 76
Modifying the Quick Access Toolbar 77
Mouse coordinates 46
Mouse position 46
Move line 52
Move object to layer 59
Move point 47
Move selection 21
Move to layer 59
Move track 18, 21
- N -Name 94
New 80
Normal corner 98
Normal corners 98
- O -Objects 60, 91
Objects Tab 91
Occupancy detector 36
Occupancy detectors 70
Open 80
Open a track library 7
Options 80
Over-stretch 28
- P -Part number 88
Paste 21, 88
Percentage for slopes 42
Picture 80
Picture resolution 67
Piece 36
png 67
Point 10, 28
Popup menu 33
Popup menus 94
Position 47
Predefined elements 46, 56
Preview 67
Print 67, 80
Print Preview 67, 80
Print scale 67
Print Setup 80
Print the layout 66
Printing 1:1 67
Printing your design 67
- Q -Quick Access Toolbar 77
- R -Recent designs 80
Reference 80
Reference guide 74
Regular turnout 10
Remove isolator 97
Remove layer 58
Remove point 47
Remove section 94
Rename layer 58
Reset AnyRail 77
Resize feature 52

AnyRail 5 Manual English108
© 2014 DRail Modelspoor Software
Resize shape 52
Resolution 67
Ribbon 33, 78
Roadbed 88
Rotate 75, 94, 101
Rotate track 18
Rotate... 98, 102
Round corner 98
Round corners 98
Ruler styles 54
Rulers 88
Rulers tab 102
- S -Save 66, 80
Save As 66, 80
Save as picture 66
Scale 6
Scenery elements 56
Section 36, 37
Section color 36, 37
Section details 46
Section name 36, 37, 88
Section properties 37
Section usage 36, 37, 88
Select section 94
Select stretch 94
Select track 21
Selected track length 46
Send backward 98
Send to back 98
Set height 42, 94
Set height... 96, 97
Settings tab 92
Shape 47
Shapes 46
Sharing user objects 63
Show height 41
Show slope 41
Shown libraries 80
Signals 46, 56
Single slipswitch 10
Size 92, 101
Sleepers 88
Slope percentage 41, 42, 88
Small track icons 80
Smooth slope 94
Snap 18
Snap to grid 92
Square 37
Status bar 8
Straight 29
Stretch 36
Surface 47
Switch 10
- T -Table 5
Text 54
Texts 88
Texts tab 101
Threeway turnout 10
Too tight curves 28
Total flex length 69
Total track length 69
Track 7, 88, 91
Track appearance 16
Track details 8, 46
Track does not connect 18
Track hidden 46, 55
Track length 69
Track library 7
Track symbols 10
Track tab 91, 94
Track visible 46, 55
TrainPlayer 69
Trainplayer export file 80
TrainPlayer integration 69
Transition track 26
Trees 46, 56
Trial 71
Turn 75
Turnout 10
Turntable 26
Turntable does not connect 26
- U -Undo 13
Undocking a library 11
Unfold 78
Updates 72
Upgrades 72

Index 109
© 2014 DRail Modelspoor Software
Uploading user objects 63
Upper limit 88
Usage 94
User objects 60
- V -Vertical 101, 102
View scale 6
Visible 58
Visible track 46, 55, 88
- W -Width 5, 92
Work area 5
- X -x 96, 97, 98, 101, 102
- Y -y 96, 97, 98, 101, 102
Y-turnout 10
- Z -Zoom 6