annex spo spirometer d a t o s p i r - sibelmed pulse oximetry module has ce marking and can not...
TRANSCRIPT

" Annex SpO2"
SPIROMETER
D A T O S P I R - 120 511-890-MU2
*USER'S MANUAL*
2012-11 • Rev.: 2.02


SPIROMETER DATOSPIR-120 USER MANUAL "Annex SpO2 " E. 2.02
1. INSTRUCTIONS FOR USE AND INSTALLATION 1.1. INTRODUCTION 1.2. PULSE OXYMETRY PROGRAM 1.3. PULSE OXYMETRY SETUP 1.4. PULSE OXYMETRY TEST PROCEDURE
1.4.1. INPUT OF TEST DATA 1.4.2. PERFORMANCE OF PULSE OXYMETRY TESTS 1.4.3. SETUP 1.4.4. TRENDS DISPLAY 1.4.5. PRINTING AND/OR SAVING IN THE DATA BASE 1.4.6. TEST TRANSFERENCE
1.5. PULSE OXYMETRY MEASURES DURING SPIROMETRIC TESTS
2. TECHNICAL SPECIFICATIONS
3. FUNCTIONING BASIS
4. CLEANING
5. MODIFICATIONS


SAFETY INDICATIONS FOR USE This oximetry sensor should be used by a physician or under the supervision of medical staff. The pulse oximeter does NOT require calibration. The pulse oximeter has NO physiological WARNINGS. Pulse oximeter probes do NOT allow temporary immersion. The pulse oximeter waveform is NOT normalizzed. Patient movements or excessive lighting can affect the accuracy of the device. The pulse oximetry module has CE marking and can not reach temperatures> 42 º. The oxygen saturation and heart rate measures must be performed using the sensors manufactured by MEDIAID: POX 050-105S (clip) and POX050-820s (Flexible), which have been validated clinically. Otherwise, there may be significant measurement errors. These pulse oximetry probes have been validated for the M15 module from MEDIAID. The wavelengths used are 660 nm (red) and 910 nm (infrared) and the optical power is about 9.6mW. Consult the instructions for use of the probes, before use. Follow strictly manufacturer's safety instructions, as well as those specified in this manual. See instructions for use of the sensor to evaluate the toxicity of SpO2 sensor. The maximum recommended application’s time of an oximeter, in the same place, is 8 hours. The point of placement must be reviewed frequently to determine the position, the movement and the skin sensitivity of the patient. The reaction to the sensors by the patients may be different depending on their health and skin conditions. No adhesive material should be used if the patient has an allergic reaction to it. For log term monitoring, is recommended to use flexible or disposable sensors.

The adult sensor is intended for use on people over 12 years old. The peadiatric probe is for children between 3 and 12 years. Although, the adults probes can be used on any pediatric patient whose fingertip reaches the finger stop of the sensor and on whom the sensor fits securely. The system can measure pulse and functional oxygen saturation. A functional meter can not be used to evaluate the accuracy of pulse oximeter probe or a pulse oximeter monitor. DEGREE OF PROTECTION AGAINST LIQUIDS Degree of protection against harmful ingress of water. Drip-proof IPX1 RISKS OF CONTAMINATION Although unlikely, the organisms can be transmitted by pulse oximetry. Therefore, the pulse oximeter finger clip should be cleaned after each patient use by either soapy water or the disinfectant solution specified by the manufacturer. RISK OF INTERFERENCE Avoid interference such as electromagnetic disturbances, stroke, abnormal hemoglobin, intravascular contrast, states of low perfusion and skin pigmentation can affect the operation pulse oximeter. RISKS FOF EXPLOSION DO NOT use the equipment in the presence of flammable anesthetics or gases. THAT MAY CAUSE EXPLOSION. REMOVAL OF WASTE FROM ELECTRICAL AND ELECTRONIC APPLIANCES BY DOMESTIC USERS IN THE EUROPEAN UNION
The product must be recycled as the WEEE directive. (For more information, consult the user’s manual of DATOSPIR -110/120).

2
1. INSTRUCTIONS FOR USE AND INSTALLATION 1.1. INTRODUCTION
This manual is an annex to the user's manual of the Spirometer DATOSPIR-120, for the pulse oxymetry functioning. For consults and observations referred to the device go to chapter 1 of the general manual.
With the Pulse oxymetry option , the DATOSPIR-120 can perform individual measures of the Oxigen Saturation (SpO ) and of the Pulse Rate (PR), or long duration studies for the control of patients during sleep or any other situation (desaturations measure, etc...).
In case of long duration studies, we will be able to display the Trends afterwards .By trends we mean the evolution of signals SPO2 and PR versus time.
It will also be possible to calculate the parameters associated to the trends, print them and save them in the data base.
1.2. PULSE OXYMETRY PROGRAM
Next the options of the pulse oxymetry program are shown:
Test Data Patient
Code Name and surname Age, height, weight and sex
Setup
WARNING Thresholds Acoustic WARNINGS SpO Averaging
Enable/Disable Acoustic WARNING
Trends Recording
Trends Display Setup Forwarding and Backwarding the signal Test Parameters
Parameters Printing Saving parameters in the Data Base

2
1.3. PULSEOXIMETRY SETUP
The SpO module is an option included in the DATOSPIR-120. It is advisable for any user to set it up according to his needs.
To enter the Pulse oxymetry setup menu, press the key F2 in the main menu, and then F7.
F1 ESC, exit from this screen and goes back to the previous one.
F3 Deletes the selected value F5 y F6 Takes the cursor back to the previous field or advances it to the
next
F7 Validates the entered data and goes to the next screen.
This screen enables to configurate the different parameters of the pulse oxymetry:
- Maximum and minimum values of SpO2 (30-100 %) and PR (20-250 BPM)
WARNINGS - Average of SpO
(between 4 and 16 samples). The Average of PR is fixed
(10 samples) - Superior and inferior level for display of trends of SpO - Value of the reference line for both channels. - Time of record on screen (between 5s and 29m 59s).
and PR.
It is also possible to setup quickly and directly these values from inside the pulse oxymetry or trends screen.
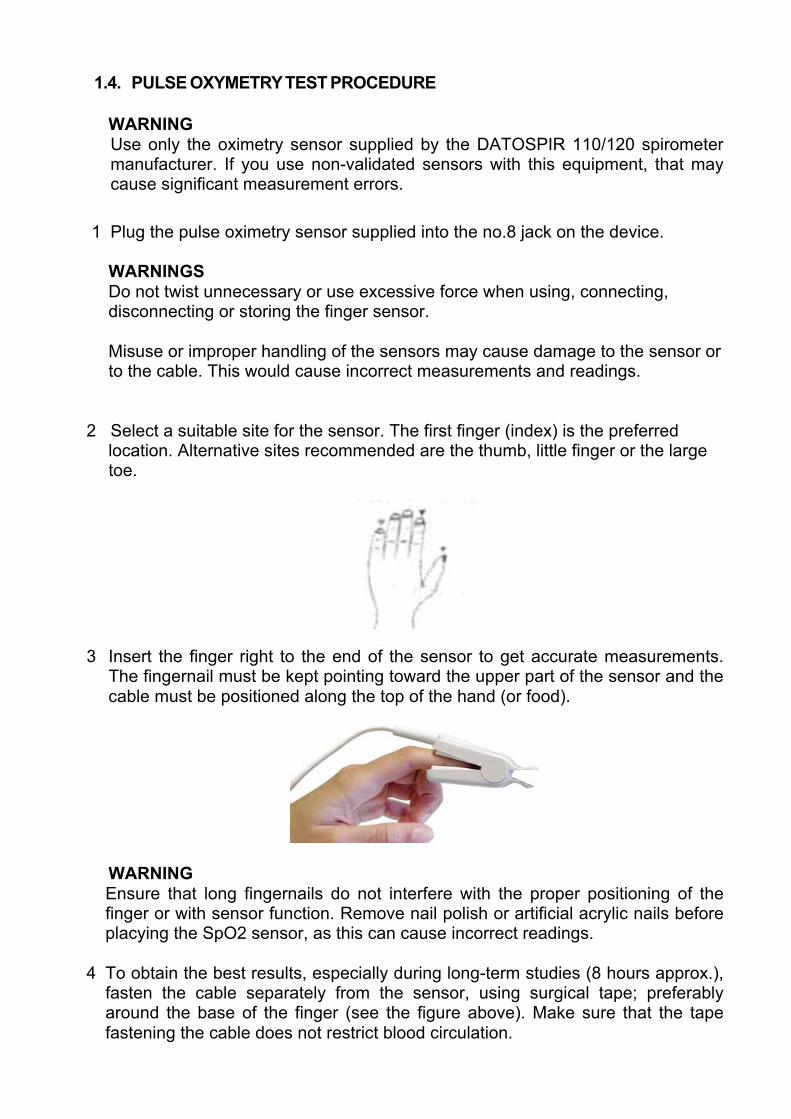
1.4. PULSE OXYMETRY TEST PROCEDURE
WARNING Use only the oximetry sensor supplied by the DATOSPIR 110/120 spirometer manufacturer. If you use non-validated sensors with this equipment, that may cause significant measurement errors.
1 Plug the pulse oximetry sensor supplied into the no.8 jack on the device.
WARNINGS Do not twist unnecessary or use excessive force when using, connecting, disconnecting or storing the finger sensor. Misuse or improper handling of the sensors may cause damage to the sensor or to the cable. This would cause incorrect measurements and readings.
2 Select a suitable site for the sensor. The first finger (index) is the preferred
location. Alternative sites recommended are the thumb, little finger or the large toe.
3 Insert the finger right to the end of the sensor to get accurate measurements.
The fingernail must be kept pointing toward the upper part of the sensor and the cable must be positioned along the top of the hand (or food).
WARNING Ensure that long fingernails do not interfere with the proper positioning of the finger or with sensor function. Remove nail polish or artificial acrylic nails before placying the SpO2 sensor, as this can cause incorrect readings.
4 To obtain the best results, especially during long-term studies (8 hours approx.), fasten the cable separately from the sensor, using surgical tape; preferably around the base of the finger (see the figure above). Make sure that the tape fastening the cable does not restrict blood circulation.
2
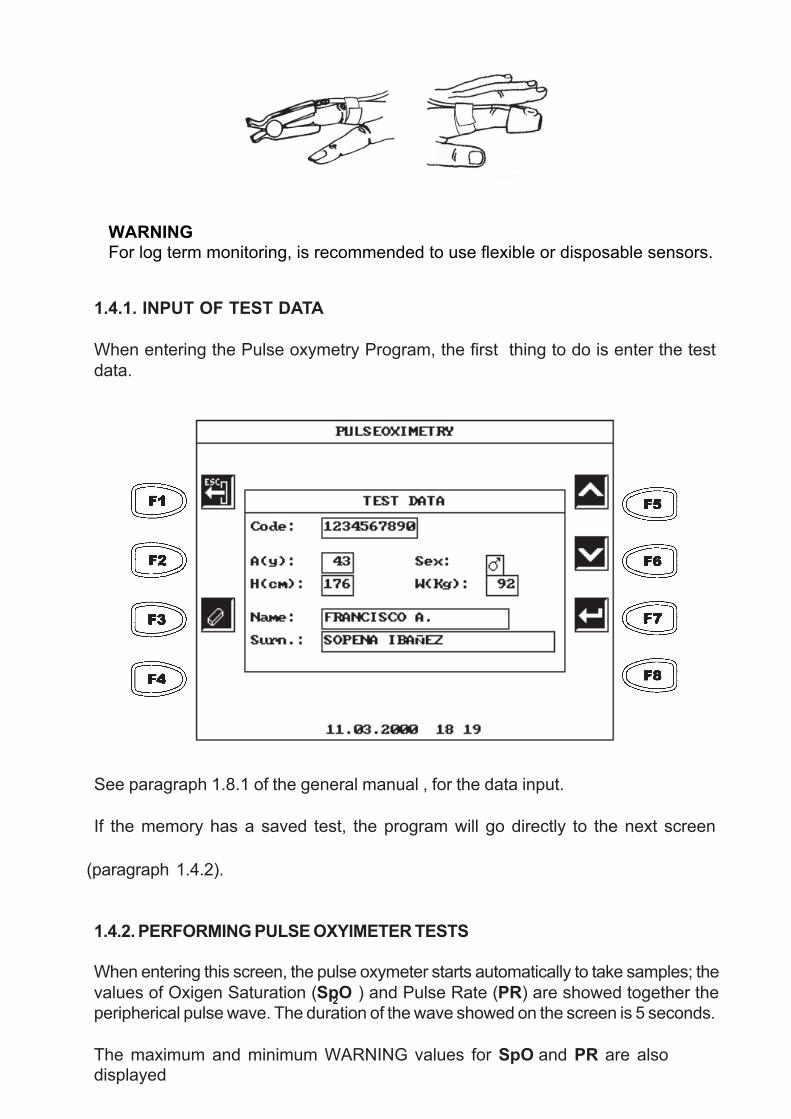
WARNING For log term monitoring, is recommended to use flexible or disposable sensors.
1.4.1. INPUT OF TEST DATA
When entering the Pulse oxymetry Program, the first thing to do is enter the test data.
See paragraph 1.8.1 of the general manual , for the data input.
If the memory has a saved test, the program will go directly to the next screen
(paragraph 1.4.2). 1.4.2. PERFORMING PULSE OXYIMETER TESTS When entering this screen, the pulse oxymeter starts automatically to take samples; the values of Oxigen Saturation (SpO ) and Pulse Rate (PR) are showed together the peripherical pulse wave. The duration of the wave showed on the screen is 5 seconds.
The maximum and minimum WARNING values for SpO and PR are also displayed

respectively on screen. If the value for an WARNING is surpassed, an intermittent warning is displayed in the bottom part of the screen. If the Acoustic WARNING is activated, a sound will be heard.
In the upper part of the screen the time of signal (trends) saved in the memory up to that moment is indicated.
F1 ESC, exit form this screen and go back to the previous one. F2 Setup the WARNINGS and the Averaging (See Paragraph 1.4.3) F3 Enables or Disables the acoustic warning in case of WARNING. F4 Enables to modify the test data. F5 Starts or stops the record of a study. F6 Enters the Trends Menu (See Paragraph 1.4.4) F8 Deletes the study in memory.
WARNING When the quality of the signal is low or the finger is not present, the SpO2 values are set to zero to avoid showing incorrect values. The device does not lost patient data if it is turned off. The SpO2 data are updated every second, the value of SpO2 and pulse rate is directly provided by the module. A) INSTANT TESTS
In the instant pulse oxymetry measures, the screen indicates the values for SpO2 and PR according to the setup average. If you need to print the results, you must record previously the signal (by pressing the key F5 of start) during the desired time and then follow the instructions detailed in

2
Paragraphs1.4.4 and 1.4.5. B) LONG DURATION TESTS
In long duration tests, press F5 to start the recording. An intermittent message ("RECORDING") in the central part of the screen indicates that the study is being recorded.
When more than 5 minutes recording the signal without pressing any key, the Display light is switched off automatically, to avoid dirturbing the patient in a long duration study. When pressing any key, the light is switched on again.
It is important to point out that the signal in memory is related to the patient code entered. If you start and stops the study without changing the patient code or without deleting the study, fragments of signal one after one will be saved up to 8 hours. The device understands that all the fragments correspond to the same patient and the calculation of parameters is made for the total memory. El equipo interpretará que todos los fragmentos corresponden a un mismo paciente y el cálculo de los parámetros lo realizará sobre el total de la memoria.
To perform the test to other patient, delete the test (pressing F8) and change the patient data (pressing F4).
To display the saved signal and calculate the parameters, enter the trends screen through the key F6.
If the dedal disconnects, the signals SpO and PR will be presented with value 0. These periods of time will not be taken into account for calculating the parameters and test duration.
1.4.3. SETUP
During the acquisition of oxymetry and pulse wave signals, it is possible to enter the setup menu to modify some of the data displayed on the screen.

It is possible to modify the maximum and minimum SpO2 and PR WARNING thresholds..
The acoustic signal of the WARNING and of the "beep" (signal coinciding with each pulse), can be enabled o disabled.
The averaged value of SpO2 can be changed between 4 and 16 samples. The lower the selected averaged value is, the quicker the response will be, but also more sensitive to artefacts. On the contrary, if the selected averaged value is higher, the measure is more stable and the response will be slower.
For a instant measure, it is advisable a high averaged value. On the contrary for a desaturation study, a low value is better.

1.4.4. TRENDS DISPLAY
Only if a study has been recorded, it will be possible to enter the trends menu.
F1 ESC, exit from this screen and goes bact to the previous one. F2 Setups the Trends screen. F4 y F8 Goes backwards or goes forwards a page. F5 Enables to go to a specific page (signal fragment). F6 It moves to Search Mode. F7 Calculates and displays the parameters values.
The screen displays the signal fragment of SpO2 time of screen .
and PR according to the selected
In the upper left part, the time related to the start of the study is displayed (hh:mm:ss). Each channel shows a discontinuous line of reference to be selected by the user in the setup. This line is useful when verifying if the samples surpasse a certain value.
The key F2, enters the trends setup screen.
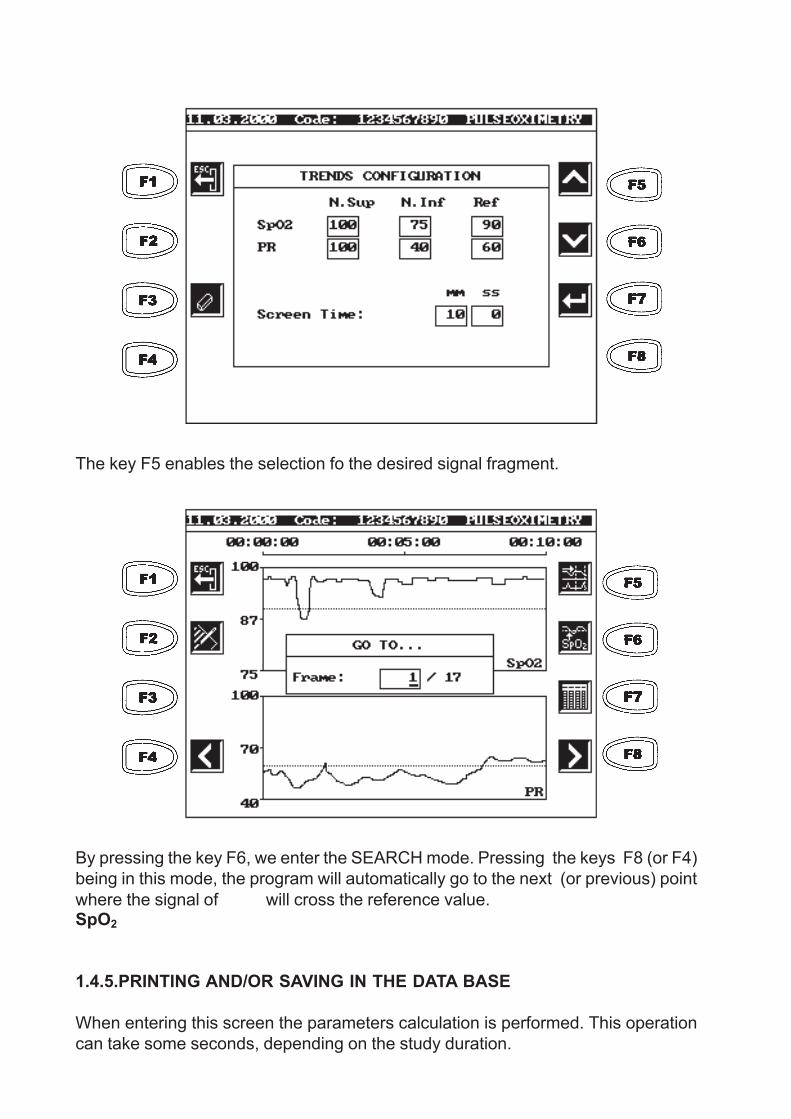
The key F5 enables the selection fo the desired signal fragment.
By pressing the key F6, we enter the SEARCH mode. Pressing the keys F8 (or F4) being in this mode, the program will automatically go to the next (or previous) point where the signal of SpO2
will cross the reference value.
1.4.5.PRINTING AND/OR SAVING IN THE DATA BASE
When entering this screen the parameters calculation is performed. This operation can take some seconds, depending on the study duration.

F1 ESC, exit from this screen and goes back to the previous one. F4 Prints the report of the study. F8 Saves the Parameters in the Data Base.
Once a test is saved in the Data Base, it can be restored in the same way as any spirometric test, entering the base through F1 (from the main menu screen ).

The parameters calculated to display, print or save in the Data Base are the following:
* CT90 %of the time when the SpO2 is under 90% * CT80 %of the time when the SpO2 is under 80% * CT70 %of the time when the SpO2 is under 70% * IDH-4 rate of desaturations (>= 4%) per hour * IDH-3 rate of desaturations (>= 3%) per hour * IDH-2 rate of desaturations (>= 2%) per hour * SpO2 Max maximum value of Saturation * SpO2 Med average value of Saturation * SpO2 Min minimum value of Saturation * SpO2Std standard deviation of Saturation * PR Max maximum value of the pulse rate * PR Med average value of the pulse rate * PR Min minimum value of the pulse rate *PR Std standard deviation of the pulse rate
*Test Time useful time of the test (the disconnection
NOTE: In the calculation of parameters and Test Time, the disconnections of the probel are not taken into account.
2
1.4.6. TEST TRANSFERENCE As in the spirometric tests, the pulse oxymetry tests saved in the data base can be transferred to the computer (See point 1.16.1 of the general manual). 1.5. PULSEOXIMETRY MEASURES DURING SPIROMETRIC TESTS
It is possible to perform pulse oxymetry measures during spirometry tests (only in the FVC, VC and MVV tests).
For that, when starting the spirometry with F5, the pulse oxymetry probe must be connected.
While the spirometric test is being performed, the curve and the Saturation values (SpO ) and Pulse (PR) wil be displayed on screen and they will be saved in the memory.
When the test ends, the average of both values will be displayed.
If you want to restore from memory all the values measured, enter the menu Pulse oxymetry (F6 from the main menu). It will be handled like a Pulse oxymetry test saved in memory.
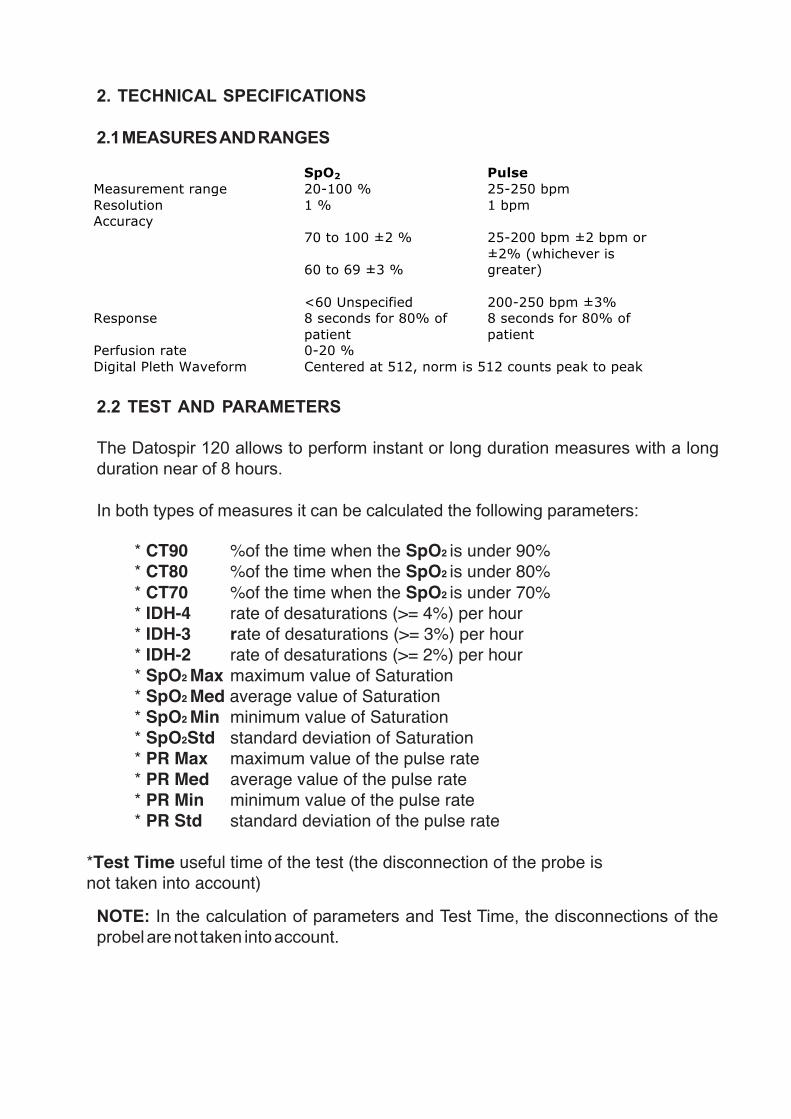
2. TECHNICAL SPECIFICATIONS
2.1 MEASURES AND RANGES
2.2 TEST AND PARAMETERS
The Datospir 120 allows to perform instant or long duration measures with a long duration near of 8 hours.
In both types of measures it can be calculated the following parameters:
* CT90 %of the time when the SpO2 is under 90% * CT80 %of the time when the SpO2 is under 80% * CT70 %of the time when the SpO2 is under 70% * IDH-4 rate of desaturations (>= 4%) per hour * IDH-3 rate of desaturations (>= 3%) per hour * IDH-2 rate of desaturations (>= 2%) per hour * SpO2 Max maximum value of Saturation * SpO2 Med average value of Saturation * SpO2 Min minimum value of Saturation * SpO2Std standard deviation of Saturation * PR Max maximum value of the pulse rate * PR Med average value of the pulse rate * PR Min minimum value of the pulse rate * PR Std standard deviation of the pulse rate
*Test Time useful time of the test (the disconnection of the probe is not taken into account)
NOTE: In the calculation of parameters and Test Time, the disconnections of the probel are not taken into account.
SpO2 Pulse Measurement range 20-100 % 25-250 bpm Resolution 1 % 1 bpm Accuracy
70 to 100 ±2 % 60 to 69 ±3 % <60 Unspecified
25-200 bpm ±2 bpm or ±2% (whichever is greater) 200-250 bpm ±3%
Response 8 seconds for 80% of patient
8 seconds for 80% of patient
Perfusion rate 0-20 % Digital Pleth Waveform Centered at 512, norm is 512 counts peak to peak

Fleisch/Des Turbina Data Base "H" 300 540 900
2.3 CONTROL If only Oximetry tests are saved, there are space for 150 tests in Data Base "L", and more than 1100 in Data Base "H". In this case, Data Base "H" for spirometry is reduced taking into account the next table (compare with table in 1.14):
With Graphics Without Graphics
2.4 APPLICABLE STANDARDS
PULSE OXIMETRY • EN ISO 9919:2009 General requirements for basic safety and essential performance for medical pulse oximetry DEGREE OF PORTECTION AGAINST WATER • IEC 60529:1989 + M1: 1999 Ed 2.1 degrees of protection provided by enclosures.
3. FUNCTIONING BASIS
The DATOSPIR-120 incorporates an electronic board dedicated to take samples of Oxygen Saturation and Heart Pulse Rate exclusively.
This board is powered from the spirometer's main board and the data are exchanged using a specific serial port.
The pulse oxymetry measure is based in the different absortion of some wavelengths of light (red and infrared) by the arterias, depending on the quantity of hemoglobine which are carried by red globules.
Las wavelengths used are 660 nm the red, and 910 nm the infrared.

4. CLEANING The clip sensor can be cleaned by wiping it off with a soap or ortho-phthalaldehyde solution. SpO2 sensor equipment must be disconnected before cleaning or disinfection. WARNING The SpO2 sensor should not be sterilized by autoclave, ETO or immerse in water or other solutions

5. MODIFICATIONS
