android development 2 - o’reilly media - technology and...
TRANSCRIPT

Android Development 2Lesson 1: Fragment s
The Sandbox EnvironmentAbout EclipsePerspectives and the Red Leaf IconWorking Sets
Andro id FragmentsUsing Fragments Programatically
Wrapping Up
Quiz 1 Pro ject 1 Lesson 2: Lo aders
Why Use a Loader?
Performing Tasks in a Loader
Wrapping Up
Quiz 1 Pro ject 1 Lesson 3: Advanced Layo ut s
Supporting Orientation Changes
Persisting Data on Rotation
Supporting Multiple Screen Sizes
Wrapping Up
Quiz 1 Pro ject 1 Lesson 4: Cust o m View Co mpo nent s
Defining a Custom Component
Implementing View Attributes in a Custom Component
Wrapping Up
Quiz 1 Pro ject 1 Lesson 5: Basic Services
Creating, Declaring, and Starting a Service
Wrapping Up
Quiz 1 Pro ject 1 Lesson 6 : No t if icat io ns
Creat and Update a Notification
Responding To User Taps On A Notification
Updating A Notification
Wrapping Up
Quiz 1 Pro ject 1 Pro ject 2 Lesson 7: Co nt ent Pro viders
Creating and Using a Content ProviderExamining the Code
Wrapping Up
Quiz 1 Pro ject 1 Lesson 8 : Camera Basics: Using t he Built -in Camera Applicat io n
Starting the Built- in Camera Using an Intent
Saving Image to External Storage
Wrapping Up
Quiz 1 Pro ject 1 Lesson 9 : Camera Advanced: Building a Cust o m Camera Applicat io n
Using the Camera API
Camera Parameters
Checking for a Camera and Handling Multiple Cameras
Camera Features and the Andro id Manifest
Wrapping Up
Quiz 1 Pro ject 1 Lesson 10: Bro adcast Receivers
Creating a BroadcastReceiver fo r System Events
Creating a BroadcastReceiver fo r Service Events
Using the LocalBroadcastManager
Wrapping Up
Quiz 1 Pro ject 1 Lesson 11: Media: Audio
Creating a MediaPlayer and Playing an Audio File
Handling MediaPlayer State and the Activity Lifecycle
Handling MediaPlayer Events and UI Updates
Wrapping Up Audio
Quiz 1 Pro ject 1 Lesson 12: Media: Video
Video Playback with a VideoView
Adding a MediaContro ller to a VideoView
VideoView Events and Methods
Wrapping UP
Quiz 1 Pro ject 1 Lesson 13: WebView
WebView Basics
Using WebSettings
Using a WebChromeClient
Using WebViewClient
Using WebView Methods
Enabling JavaScript
WebView Wrap-up
Quiz 1 Quiz 2 Pro ject 1 Lesson 14: Andro id 2 Final Pro ject
Final Pro ject
Pro ject 1
Copyright © 1998-2014 O'Reilly Media, Inc.
This work is licensed under a Creative Commons Attribution-ShareAlike 3.0 Unported License.See http://creativecommons.org/licenses/by-sa/3.0/legalcode for more information.
Fragments
Welcome to the O'Reilly School o f Technology Andro id 2 course!
Course ObjectivesWhen you complete this course, you will be able to :
create applications optimized for both phones and tablets.support o ld and new devices using the Andro id support library.utilize various Andro id systems for sharing with and receiving data from other Andro id applications.create media rich applications with audio and video.
Note
If you're new to Andro id, we highly recommend that you contact us to complete the first Andro id course beforetaking this one. The lessons in this Andro id 2 course will all assume you have a firm grasp on Object OrientedProgramming, the Java programming language, and the basics o f Andro id application development with theAndro id SDK.
If you've already completed the first Andro id course in this series or are already familiar with using Eclipse underthe remote development process for O'Reilly School o f Technology, you can skip ahead to the Andro idFragments section.
Lesson Objectives
When you complete this lesson, you will be able to :
learn about the UserActive method o f learning.read About the Learning Sandbox Environment.set Up Eclipse for Working with Andro id Applications.create A Simple Website.add Web Contro ls to Your Website.
Learning with O'Reilly School of Technology CoursesAs with every O'Reilly School o f Technology course, we'll take a user-active approach to learning. This means that you(the user) will be active! You'll learn by do ing, building live programs, testing them and experimenting with them—hands-on!
To learn a new skill o r techno logy, you have to experiment. The more you experiment, the more you learn. Our systemis designed to maximize experimentation and help you learn to learn a new skill.
We'll program as much as possible to be sure that the principles sink in and stay with you.
Each time we discuss a new concept, you'll put it into code and see what YOU can do with it. On occasion we'll evengive you code that doesn't work, so you can see common mistakes and how to recover from them. Making mistakesis actually another good way to learn.
Above all, we want to help you to learn to learn. We give you the too ls to take contro l o f your own learning experience.
When you complete an OST course, you know the subject matter, and you know how to expand your knowledge, soyou can handle changes like software and operating system updates.
Here are some tips for using O'Reilly School o f Technology courses effectively:
T ype t he co de. Resist the temptation to cut and paste the example code we give you. Typing the codeactually gives you a feel fo r the programming task. Then play around with the examples to find out what elseyou can make them do, and to check your understanding. It's highly unlikely you'll break anything byexperimentation. If you do break something, that's an indication to us that we need to improve our system!T ake yo ur t ime. Learning takes time. Rushing can have negative effects on your progress. Slow down andlet your brain absorb the new information thoroughly. Taking your time helps to maintain a relaxed, positive
let your brain absorb the new information thoroughly. Taking your time helps to maintain a relaxed, positiveapproach. It also gives you the chance to try new things and learn more than you o therwise would if youblew through all o f the coursework too quickly.Experiment . Wander from the path o ften and explore the possibilities. We can't anticipate all o f yourquestions and ideas, so it's up to you to experiment and create on your own. Your instructor will help if yougo completely o ff the rails.Accept guidance, but do n't depend o n it . Try to so lve problems on your own. Going frommisunderstanding to understanding is the best way to acquire a new skill. Part o f what you're learning isproblem so lving. Of course, you can always contact your instructor fo r hints when you need them.Use all available reso urces! In real- life problem-so lving, you aren't bound by false limitations; in OSTcourses, you are free to use any resources at your disposal to so lve problems you encounter: the Internet,reference books, and online help are all fair game.Have f un! Relax, keep practicing, and don't be afraid to make mistakes! Your instructor will keep you at ituntil you've mastered the skill. We want you to get that satisfied, "I'm so coo l! I did it!" feeling. And you'll havesome pro jects to show off when you're done.
Lesson FormatWe'll try out lo ts o f examples in each lesson. We'll have you write code, look at code, and edit existing code. The codewill be presented in boxes that will indicate what needs to be done to the code inside.
Whenever you see white boxes like the one below, you'll type the contents into the editor window to try the exampleyourself. The CODE TO TYPE bar on top o f the white box contains directions for you to fo llow:
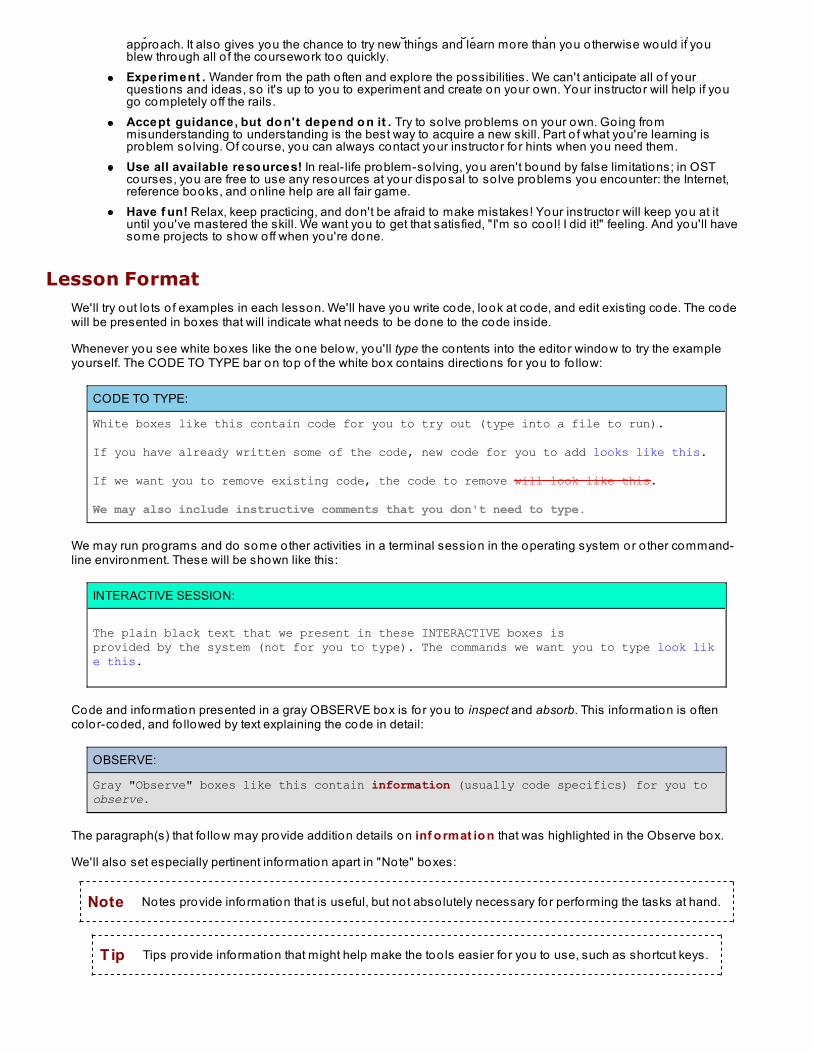
CODE TO TYPE:
White boxes like this contain code for you to try out (type into a file to run).
If you have already written some of the code, new code for you to add looks like this. If we want you to remove existing code, the code to remove will look like this. We may also include instructive comments that you don't need to type.
We may run programs and do some other activities in a terminal session in the operating system or o ther command-line environment. These will be shown like this:
INTERACTIVE SESSION:
The plain black text that we present in these INTERACTIVE boxes is provided by the system (not for you to type). The commands we want you to type look like this.
Code and information presented in a gray OBSERVE box is fo r you to inspect and absorb. This information is o ftenco lor-coded, and fo llowed by text explaining the code in detail:
OBSERVE:
Gray "Observe" boxes like this contain information (usually code specifics) for you to observe.
The paragraph(s) that fo llow may provide addition details on inf o rmat io n that was highlighted in the Observe box.
We'll also set especially pertinent information apart in "Note" boxes:
Note Notes provide information that is useful, but not abso lutely necessary for performing the tasks at hand.
Tip Tips provide information that might help make the too ls easier fo r you to use, such as shortcut keys.

WARNING Warnings provide information that can help prevent program crashes and data loss.
The Sandbox Environment
About Eclipse
We're using an Integrated Development Environment (IDE) called Eclipse. It's the program filling up yourscreen right now. IDEs assist programmers by performing many o f the tasks that need to be done repetitively.IDEs can also help to edit and debug code, and organize pro jects.
Note You'll make some changes to your working environment during this lesson, so when youcomplete the lesson, you'll need to exit Eclipse to save those changes.
The Eclipse window displays lesson content, and provides space for you to create, manage, and runprograms:
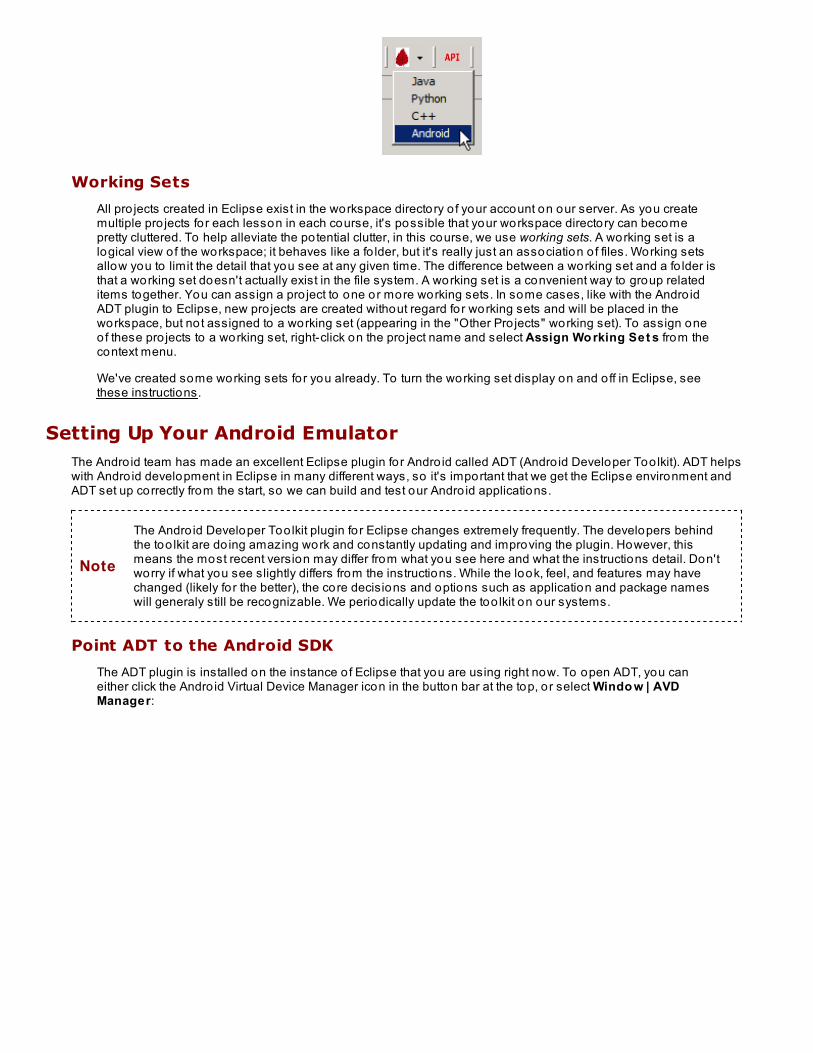
Perspectives and the Red Leaf Icon
The Ellipse Plug-in fo r Eclipse, developed by the O'Reilly School o f Technology, adds an icon to the too l barin Eclipse. This icon is your "panic button." Since Eclipse is so versatile, you are allowed to move thingsaround, like views, too lbars, and such. If you become confused and want to return to the default perspective(window layout), clicking on the Red Leaf icon allows you to do that right away.
The icon has these functions:
To reset the current perspective, click the icon.To change perspectives, click the drop-down arrow beside the icon and select a series name(Andro id, Java, Python, C++, etc.). Most o f the perspectives look similar, but subtle changes maybe present "behind the scenes," so it's best to use the correct perspective for the course. For thiscourse, select Andro id.
Working Sets
All pro jects created in Eclipse exist in the workspace directory o f your account on our server. As you createmultiple pro jects fo r each lesson in each course, it's possible that your workspace directory can becomepretty cluttered. To help alleviate the potential clutter, in this course, we use working sets. A working set is alogical view of the workspace; it behaves like a fo lder, but it's really just an association o f files. Working setsallow you to limit the detail that you see at any given time. The difference between a working set and a fo lder isthat a working set doesn't actually exist in the file system. A working set is a convenient way to group relateditems together. You can assign a pro ject to one or more working sets. In some cases, like with the Andro idADT plugin to Eclipse, new pro jects are created without regard for working sets and will be placed in theworkspace, but not assigned to a working set (appearing in the "Other Pro jects" working set). To assign oneof these pro jects to a working set, right-click on the pro ject name and select Assign Wo rking Set s from thecontext menu.
We've created some working sets for you already. To turn the working set display on and o ff in Eclipse, seethese instructions.
Setting Up Your Android EmulatorThe Andro id team has made an excellent Eclipse plugin for Andro id called ADT (Andro id Developer Too lkit). ADT helpswith Andro id development in Eclipse in many different ways, so it's important that we get the Eclipse environment andADT set up correctly from the start, so we can build and test our Andro id applications.
Note
The Andro id Developer Too lkit plugin for Eclipse changes extremely frequently. The developers behindthe too lkit are do ing amazing work and constantly updating and improving the plugin. However, thismeans the most recent version may differ from what you see here and what the instructions detail. Don'tworry if what you see slightly differs from the instructions. While the look, feel, and features may havechanged (likely fo r the better), the core decisions and options such as application and package nameswill generaly still be recognizable. We periodically update the too lkit on our systems.
Point ADT to the Android SDK
The ADT plugin is installed on the instance o f Eclipse that you are using right now. To open ADT, you caneither click the Andro id Virtual Device Manager icon in the button bar at the top, or select Windo w | AVDManager:
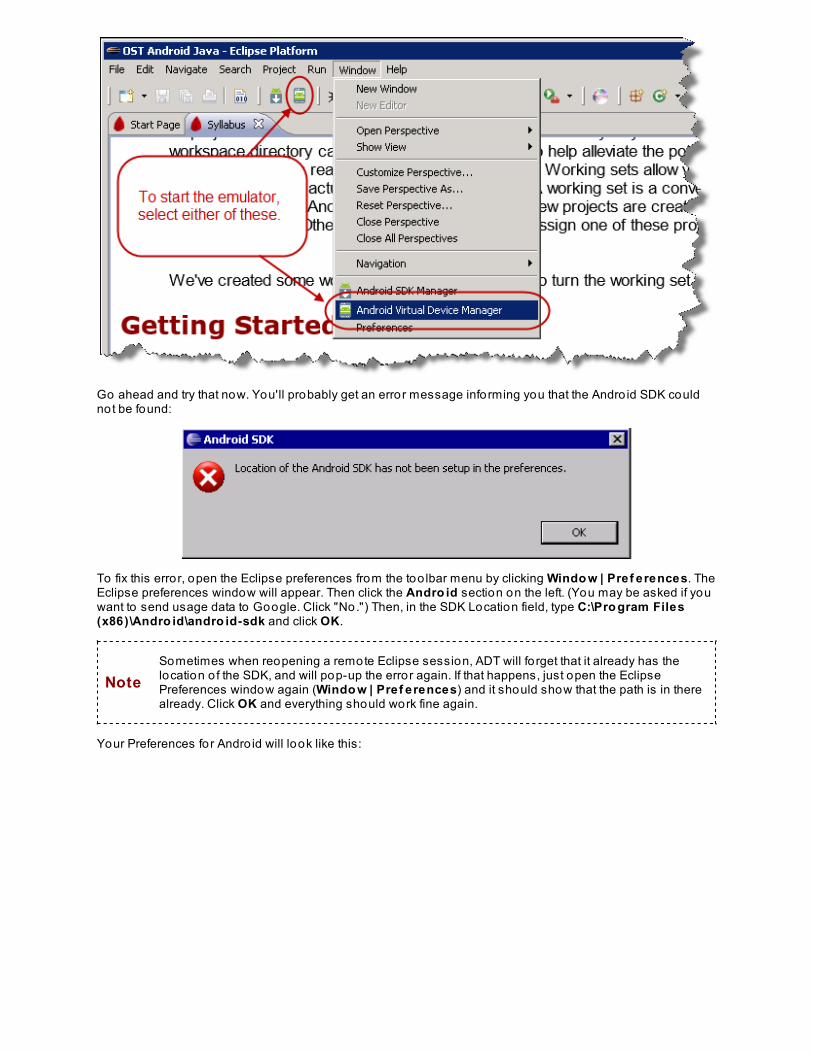
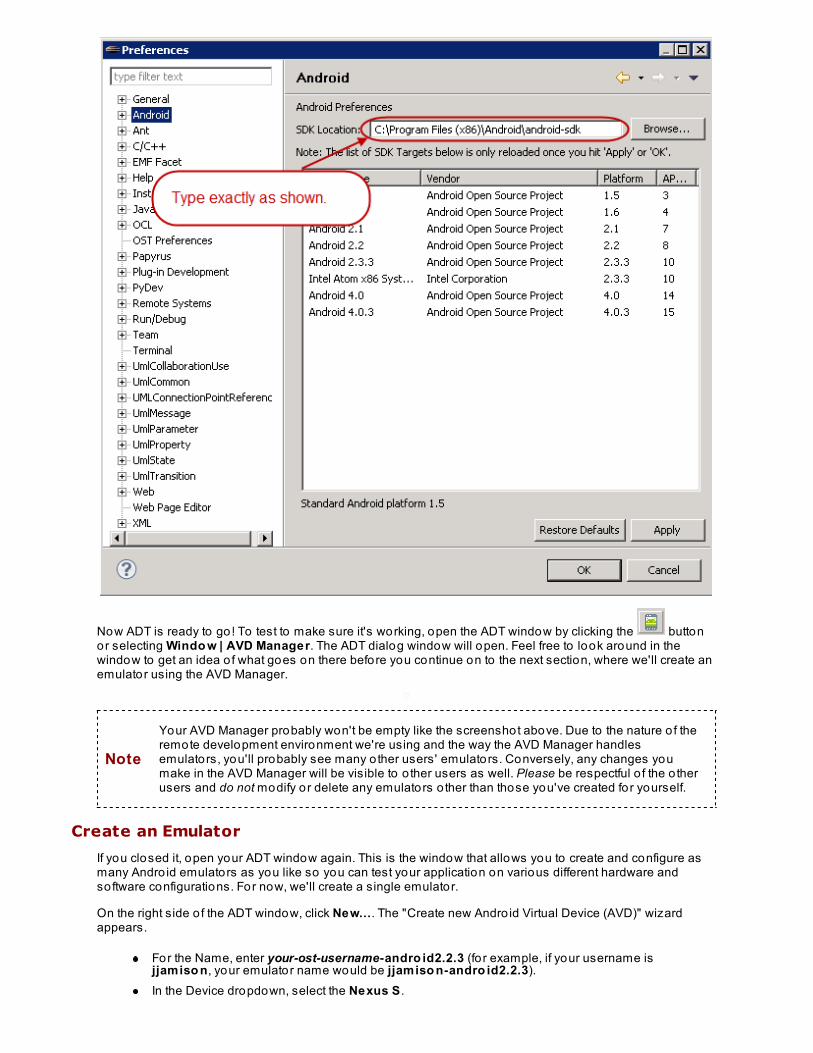
Go ahead and try that now. You'll probably get an error message informing you that the Andro id SDK couldnot be found:
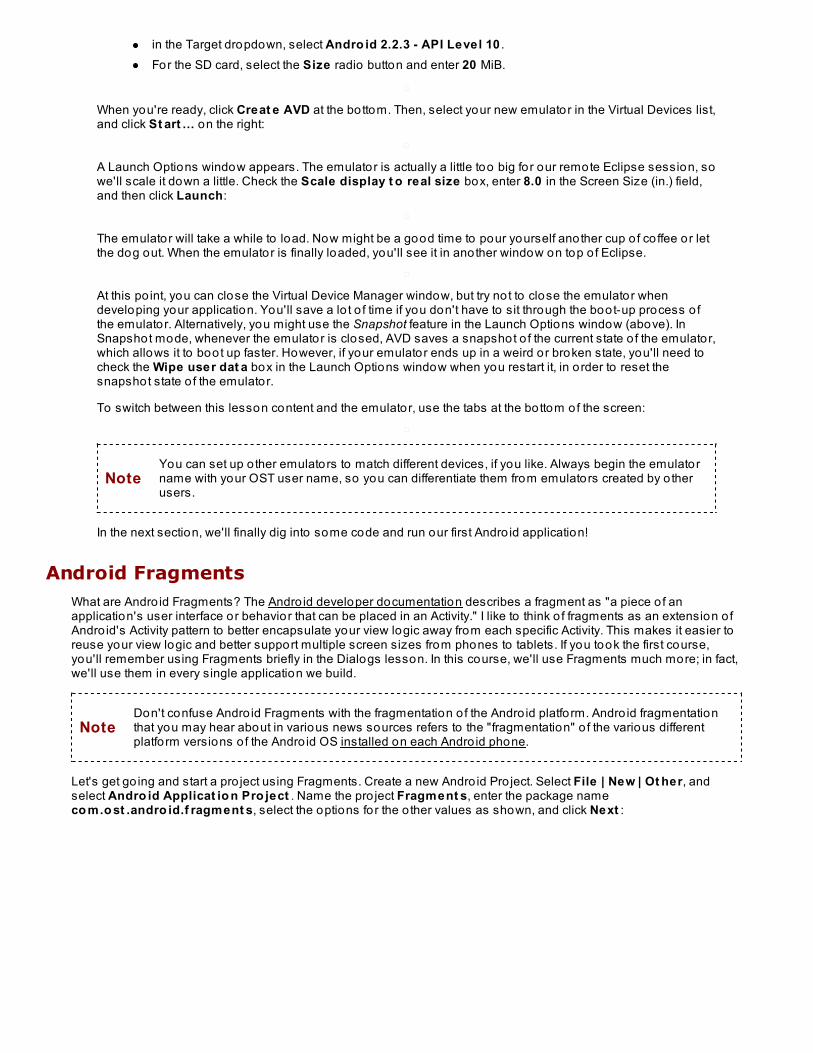
To fix this error, open the Eclipse preferences from the too lbar menu by clicking Windo w | Pref erences. TheEclipse preferences window will appear. Then click the Andro id section on the left. (You may be asked if youwant to send usage data to Google. Click "No.") Then, in the SDK Location field, type C:\Pro gram Files(x86)\Andro id\andro id-sdk and click OK.
NoteSometimes when reopening a remote Eclipse session, ADT will fo rget that it already has thelocation o f the SDK, and will pop-up the error again. If that happens, just open the EclipsePreferences window again (Windo w | Pref erences) and it should show that the path is in therealready. Click OK and everything should work fine again.
Your Preferences for Andro id will look like this:
Now ADT is ready to go! To test to make sure it's working, open the ADT window by clicking the buttonor selecting Windo w | AVD Manager. The ADT dialog window will open. Feel free to look around in thewindow to get an idea o f what goes on there before you continue on to the next section, where we'll create anemulator using the AVD Manager.
Note
Your AVD Manager probably won't be empty like the screenshot above. Due to the nature o f theremote development environment we're using and the way the AVD Manager handlesemulators, you'll probably see many o ther users' emulators. Conversely, any changes youmake in the AVD Manager will be visible to o ther users as well. Please be respectful o f the o therusers and do not modify or delete any emulators o ther than those you've created for yourself.
Create an Emulator
If you closed it, open your ADT window again. This is the window that allows you to create and configure asmany Andro id emulators as you like so you can test your application on various different hardware andsoftware configurations. For now, we'll create a single emulator.
On the right side o f the ADT window, click New.... The "Create new Andro id Virtual Device (AVD)" wizardappears.
For the Name, enter your-ost-username-andro id2.2.3 (fo r example, if your username isjjamiso n, your emulator name would be jjamiso n-andro id2.2.3).In the Device dropdown, select the Nexus S .
in the Target dropdown, select Andro id 2.2.3 - API Level 10 .For the SD card, select the Size radio button and enter 20 MiB.
When you're ready, click Creat e AVD at the bottom. Then, select your new emulator in the Virtual Devices list,and click St art ... on the right:
A Launch Options window appears. The emulator is actually a little too big for our remote Eclipse session, sowe'll scale it down a little. Check the Scale display t o real size box, enter 8.0 in the Screen Size (in.) field,and then click Launch:
The emulator will take a while to load. Now might be a good time to pour yourself another cup o f co ffee or letthe dog out. When the emulator is finally loaded, you'll see it in another window on top o f Eclipse.
At this po int, you can close the Virtual Device Manager window, but try not to close the emulator whendeveloping your application. You'll save a lo t o f time if you don't have to sit through the boot-up process o fthe emulator. Alternatively, you might use the Snapshot feature in the Launch Options window (above). InSnapshot mode, whenever the emulator is closed, AVD saves a snapshot o f the current state o f the emulator,which allows it to boot up faster. However, if your emulator ends up in a weird or broken state, you'll need tocheck the Wipe user dat a box in the Launch Options window when you restart it, in order to reset thesnapshot state o f the emulator.
To switch between this lesson content and the emulator, use the tabs at the bottom of the screen:
NoteYou can set up o ther emulators to match different devices, if you like. Always begin the emulatorname with your OST user name, so you can differentiate them from emulators created by o therusers.
In the next section, we'll finally dig into some code and run our first Andro id application!
Android FragmentsWhat are Andro id Fragments? The Andro id developer documentation describes a fragment as "a piece o f anapplication's user interface or behavior that can be placed in an Activity." I like to think o f fragments as an extension o fAndro id's Activity pattern to better encapsulate your view logic away from each specific Activity. This makes it easier toreuse your view logic and better support multiple screen sizes from phones to tablets. If you took the first course,you'll remember using Fragments briefly in the Dialogs lesson. In this course, we'll use Fragments much more; in fact,we'll use them in every single application we build.
NoteDon't confuse Andro id Fragments with the fragmentation o f the Andro id platform. Andro id fragmentationthat you may hear about in various news sources refers to the "fragmentation" o f the various differentplatform versions o f the Andro id OS installed on each Andro id phone.
Let's get go ing and start a pro ject using Fragments. Create a new Andro id Pro ject. Select File | New | Ot her, andselect Andro id Applicat io n Pro ject . Name the pro ject Fragment s, enter the package nameco m.o st .andro id.f ragment s, select the options for the o ther values as shown, and click Next :

Uncheck the Creat e cust o m launcher ico n box, check the Add pro ject t o wo rking set s box and click Select tochoose the Andro id2_Lesso ns working set:
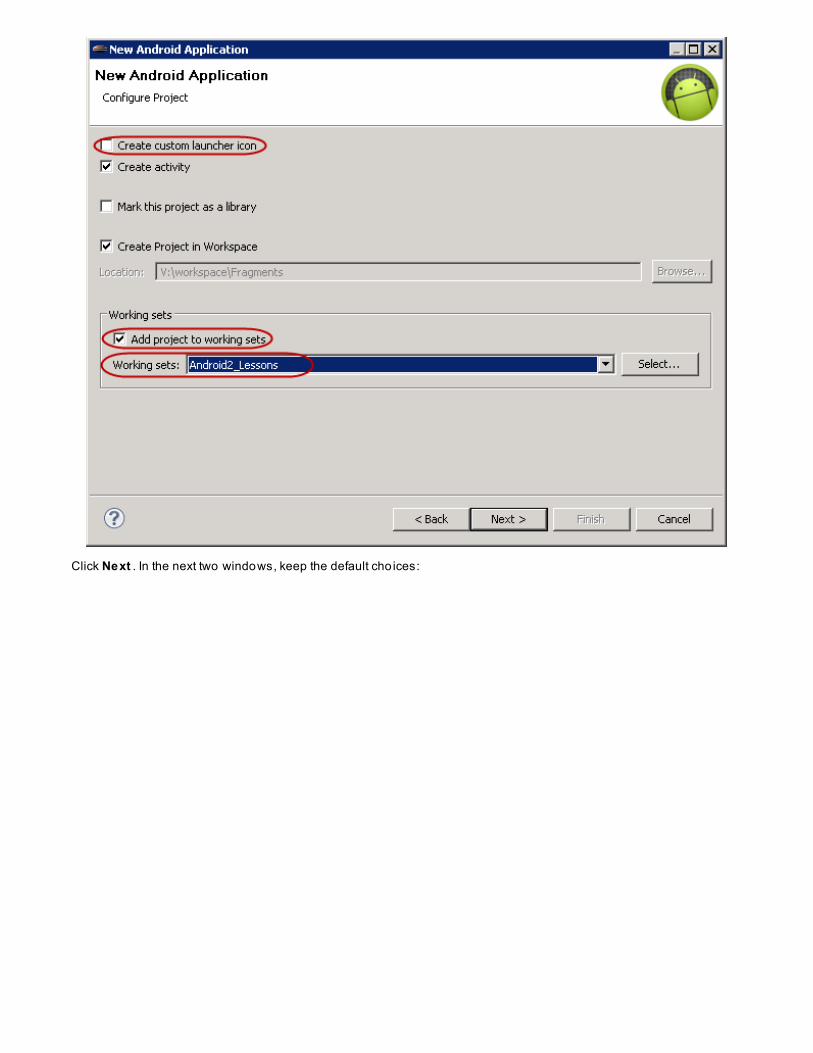
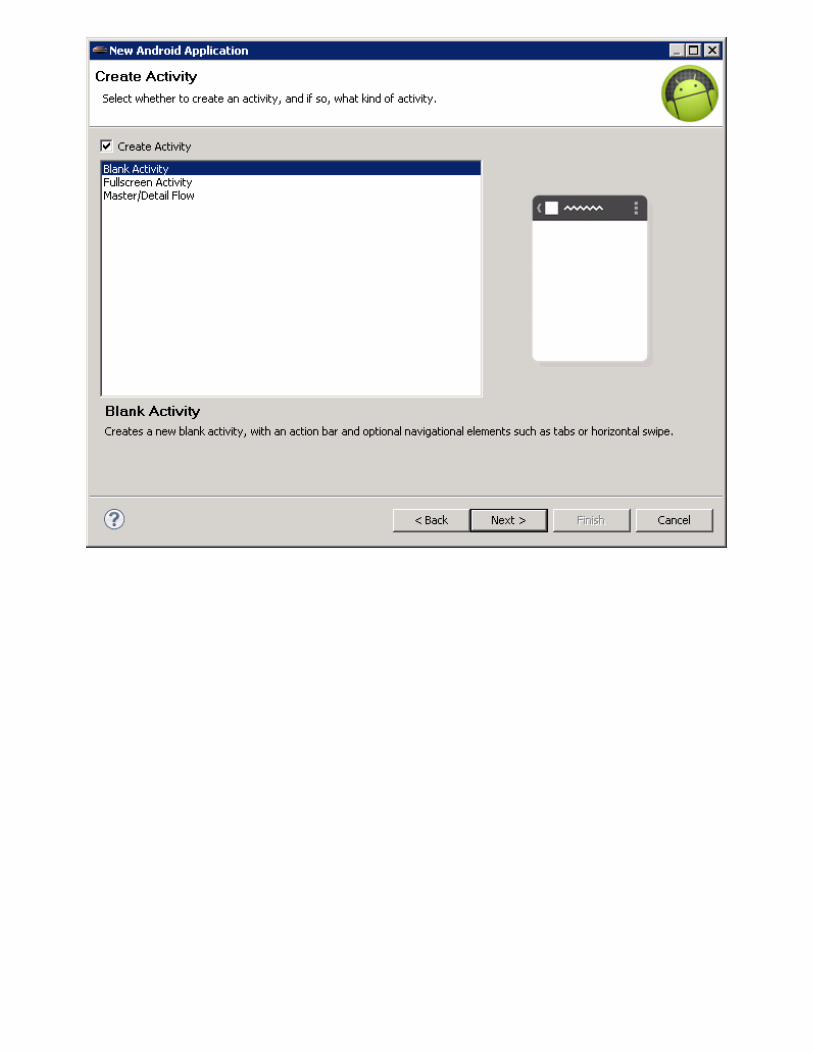
Click Next . In the next two windows, keep the default cho ices:
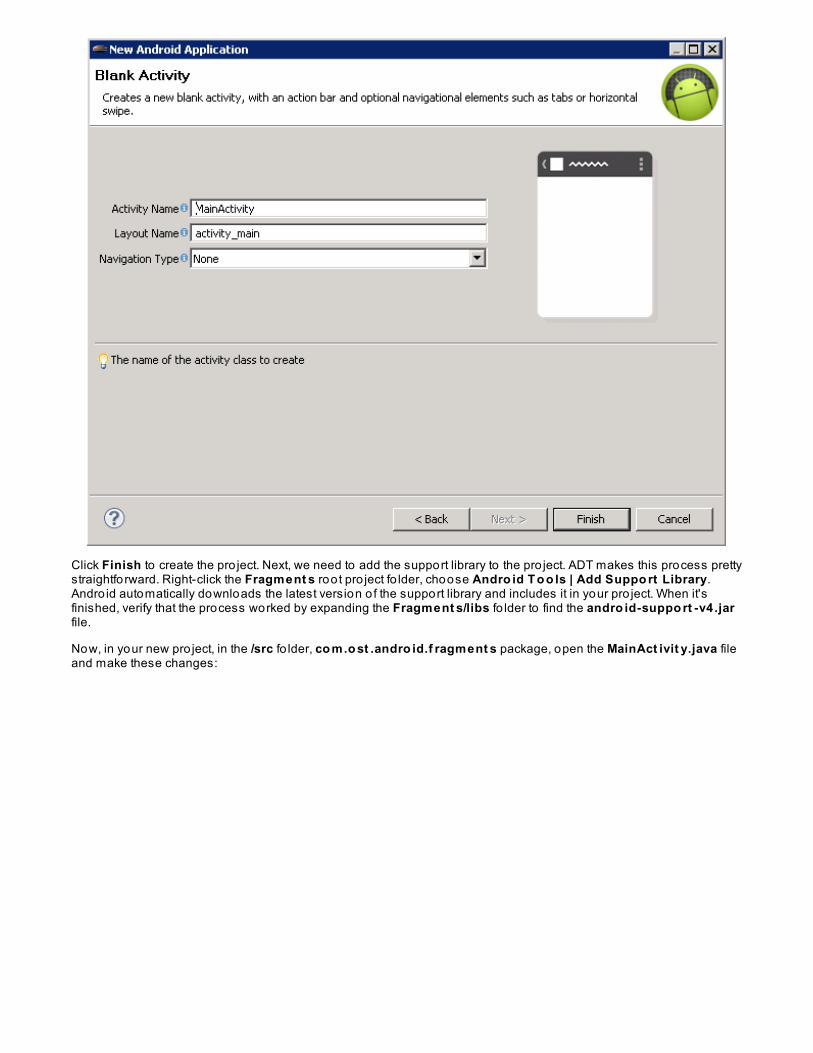
Click Finish to create the pro ject. Next, we need to add the support library to the pro ject. ADT makes this process prettystraightforward. Right-click the Fragment s root pro ject fo lder, choose Andro id T o o ls | Add Suppo rt Library.Andro id automatically downloads the latest version o f the support library and includes it in your pro ject. When it'sfinished, verify that the process worked by expanding the Fragment s/libs fo lder to find the andro id-suppo rt -v4.jarfile.
Now, in your new pro ject, in the /src fo lder, co m.o st .andro id.f ragment s package, open the MainAct ivit y.java fileand make these changes:
CODE TO TYPE: MainActivity.java
package com.ost.android.fragments;
import android.os.Bundle;import android.app.Activity;import android.view.Menu;import android.support.v4.app.FragmentActivity;
public class MainActivity extends FragmentActivity { @Override public void onCreate(Bundle savedInstanceState) { super.onCreate(savedInstanceState); setContentView(R.layout.activity_main); }
@Override public boolean onCreateOptionsMenu(Menu menu) { // Inflate the menu; this adds items to the action bar if it is present. getMenuInflater().inflate(R.menu.main, menu); return true; }}
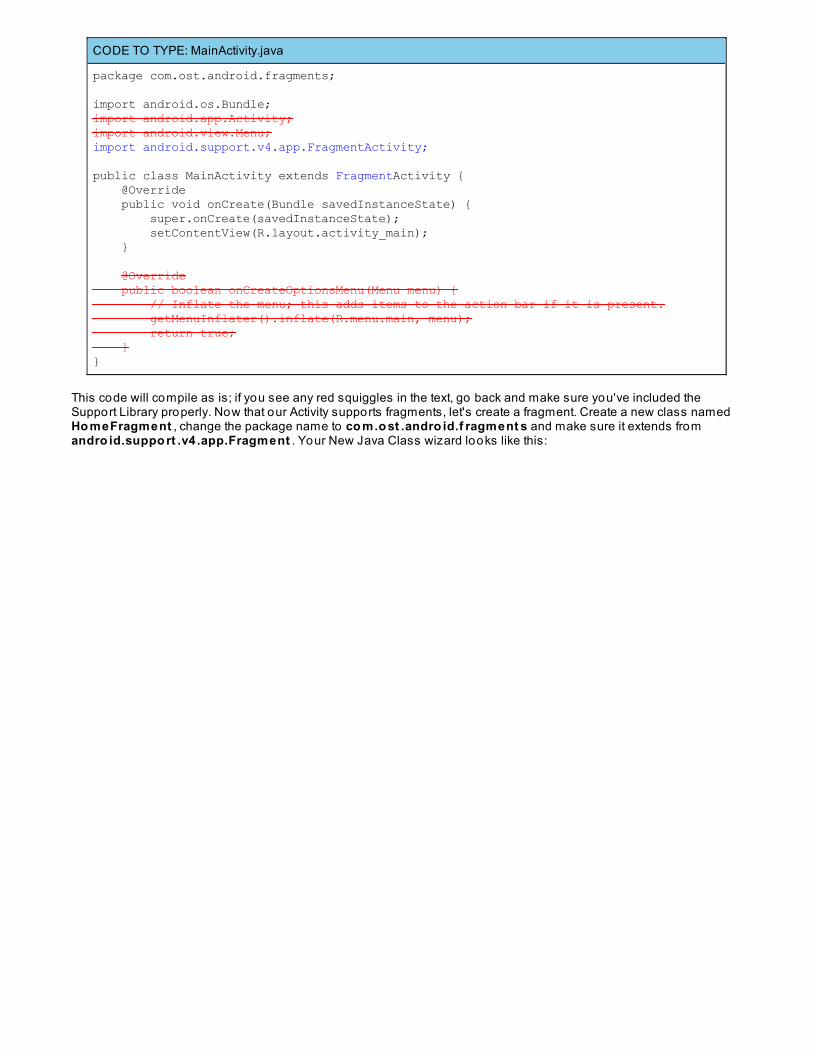
This code will compile as is; if you see any red squiggles in the text, go back and make sure you've included theSupport Library properly. Now that our Activity supports fragments, let's create a fragment. Create a new class namedHo meFragment , change the package name to co m.o st .andro id.f ragment s and make sure it extends fromandro id.suppo rt .v4.app.Fragment . Your New Java Class wizard looks like this:
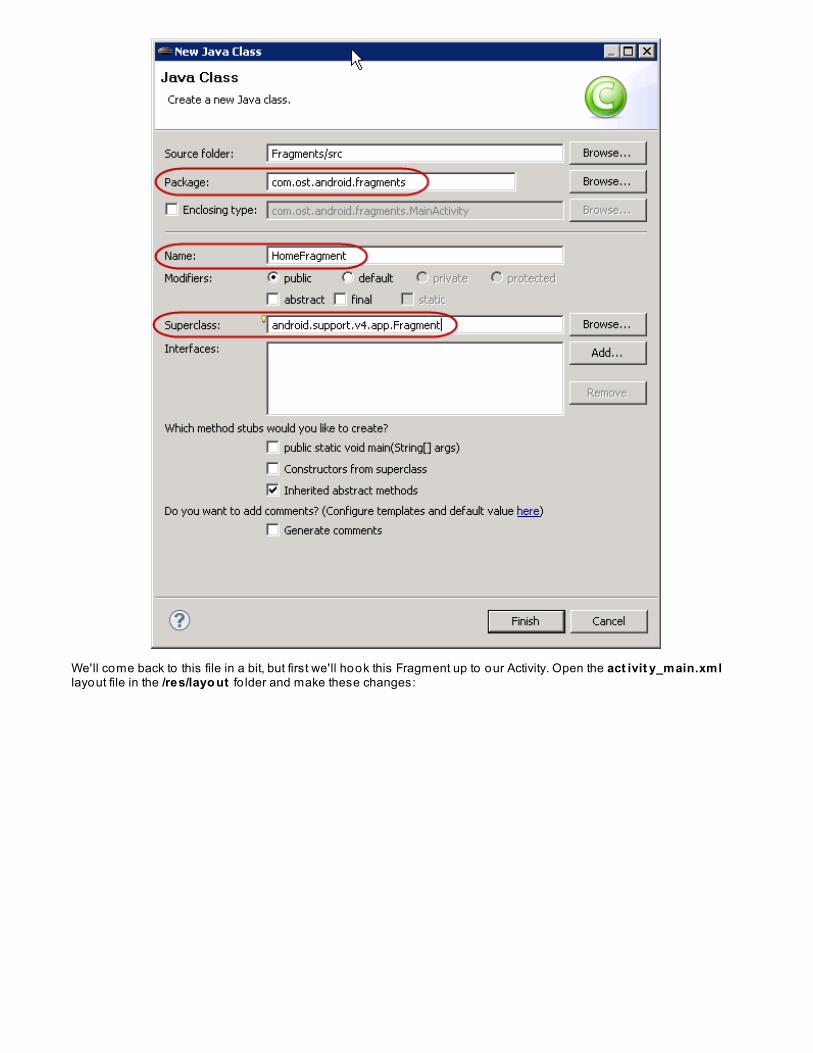
We'll come back to this file in a bit, but first we'll hook this Fragment up to our Activity. Open the act ivit y_main.xmllayout file in the /res/layo ut fo lder and make these changes:

/res/layout/activity_main.xml
<RelativeLinearLayout xmlns:android="http://schemas.android.com/apk/res/android" xmlns:tools="http://schemas.android.com/tools" android:layout_width="match_parent" android:layout_height="match_parent" android:paddingBottom="@dimen/activity_vertical_margin" android:paddingLeft="@dimen/activity_horizontal_margin" android:paddingRight="@dimen/activity_horizontal_margin" android:paddingTop="@dimen/activity_vertical_margin" android:orientation="vertical" tools:context=".MainActivity" >
<TextView android:layout_width="wrap_content" android:layout_height="wrap_content" android:text="@string/hello_world" /> <fragment android:layout_width="match_parent" android:layout_height="match_parent" android:id="@+id/homefragment" class="com.ost.android.fragments.HomeFragment"/>
</RelativeLinearLayout>
Now the Activity will load the new fragment automatically as soon as the view is loaded. Let's run it. Right-click theFragment s root pro ject name and select Run As | Andro id Applicat io n. The application will crash. Check LogCatfor the error (you may have to double-click on the LogCat window tab to expand the window and see the errormessage clearly):
There's a lo t o f red text here so it could be tough to find the exact information we need. We'll look for references to fileswe've actually created in the application, which in this case is HomeFragment. The error tells us "Fragmentcom.ost.andro id.fragments.HomeFragment did not create a view." We are on the right track. Our Fragment is beingloaded, but hasn't created a view yet so it's crashing the application right away. Let's fix that. Create a new Andro id XMLLayout file named ho me_f ragment .xml and then modify it as shown:
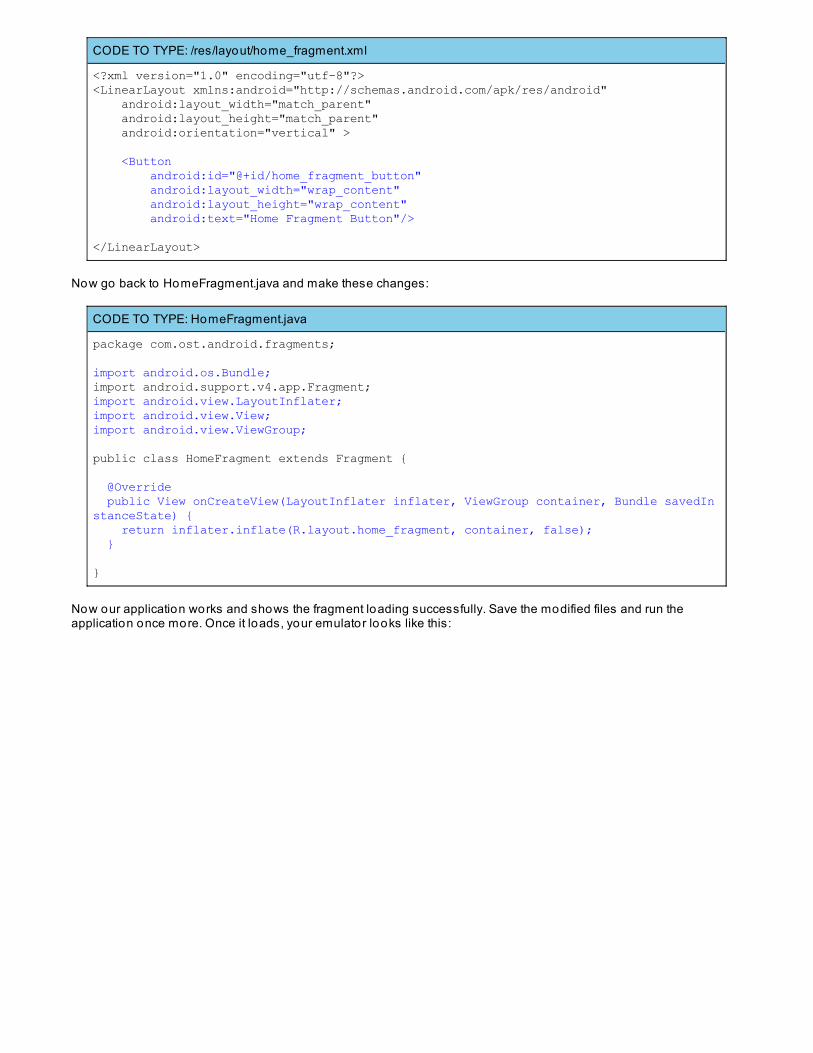
CODE TO TYPE: /res/layout/home_fragment.xml
<?xml version="1.0" encoding="utf-8"?><LinearLayout xmlns:android="http://schemas.android.com/apk/res/android" android:layout_width="match_parent" android:layout_height="match_parent" android:orientation="vertical" > <Button android:id="@+id/home_fragment_button" android:layout_width="wrap_content" android:layout_height="wrap_content" android:text="Home Fragment Button"/>
</LinearLayout>
Now go back to HomeFragment.java and make these changes:
CODE TO TYPE: HomeFragment.java
package com.ost.android.fragments;
import android.os.Bundle;import android.support.v4.app.Fragment;import android.view.LayoutInflater;import android.view.View;import android.view.ViewGroup;
public class HomeFragment extends Fragment {
@Override public View onCreateView(LayoutInflater inflater, ViewGroup container, Bundle savedInstanceState) { return inflater.inflate(R.layout.home_fragment, container, false); }
}
Now our application works and shows the fragment loading successfully. Save the modified files and run theapplication once more. Once it loads, your emulator looks like this:
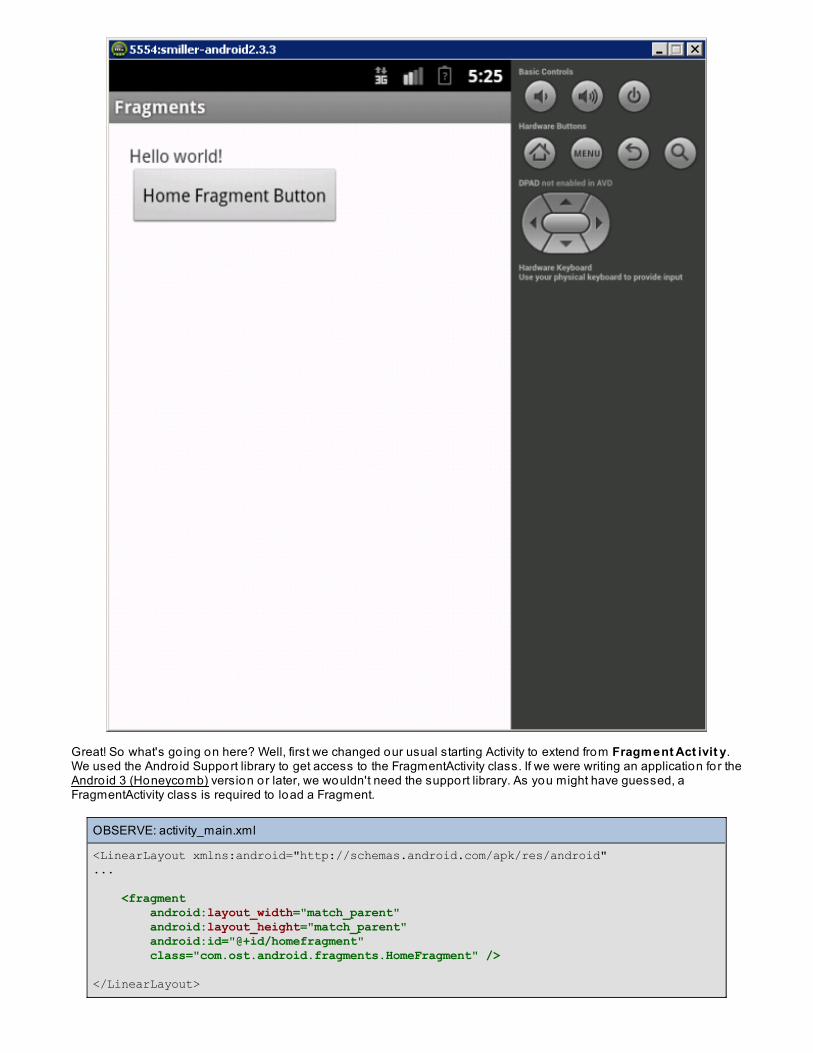
Great! So what's go ing on here? Well, first we changed our usual starting Activity to extend from Fragment Act ivit y.We used the Andro id Support library to get access to the FragmentActivity class. If we were writing an application for theAndro id 3 (Honeycomb) version or later, we wouldn't need the support library. As you might have guessed, aFragmentActivity class is required to load a Fragment.
OBSERVE: activity_main.xml
<LinearLayout xmlns:android="http://schemas.android.com/apk/res/android"... <fragment android:layout_width="match_parent" android:layout_height="match_parent" android:id="@+id/homefragment" class="com.ost.android.fragments.HomeFragment" />
</LinearLayout>
We used the MainActivity's view to load the fragment. In activity_main.xml, we added the f ragment xml node to ourlayout. The fragment node tells the Activity to load a Fragment and place the Fragment's view into the layout in its place.The layout widt h and height properties are applied to the Fragment's view:
OBSERVE: HomeFragment.java
package com.ost.android.fragments;
import com.ost.android.fragments.R;import android.os.Bundle;import android.support.v4.app.Fragment;import android.view.LayoutInflater;import android.view.View;import android.view.ViewGroup;
import com.ost.android.fragments.R;
public class HomeFragment extends Fragment {
@Override public View onCreateView(LayoutInflater inflater, ViewGroup container, Bundle savedInstanceState) { return inflater.inflate(R.layout.home_fragment, container, false); }
}
In our newly created HomeFragment class (that extends the Fragment class from the Support Library) weimplemented the o nCreat eView method in order to load a view for the Fragment properly. The method receives areference to a Layo ut Inf lat er object, so we use that to inflate a view we defined in XML and return that inflated view.The second parameter sent to the inflate method is the ViewGro up that will eventually contain this view. By sendingthe ViewGroup co nt ainer, our new view will inherit the layout parameters from this ViewGroup. The last paramet erdefines whether we want to attach this view automatically to the container ViewGroup from the second parameter. Wedon't want to do that though because it's already go ing to be handled automatically in the framework classes, so wepass in f alse here.
So, Fragments are loaded into Activities and have their own views. You can learn more in the Andro id documentationfor the Fragment class. If you take a look at the lifecycle, you see it has a similar lifecycle to that o f the Activity class.Just like Activity, Fragment has o nCreat e , o nSt art , and o nResume methods, as well as their correspondingdeconstruction methods o nPause , o nSt o p, and o nDest ro y. There are also some other lifecycle methods thatdistinguish Fragment from the Activity class.
Perhaps the most important difference between a Fragment and an Activity is that the Fragment class is not anextension o f Co nt ext . Fragments get their context from the Activity that creates them, so they cannot exist without anActivity. A Fragment can always get a reference to its parent Activity, and thus a Context reference, by calling theget Act ivit y() method. However, when implementing a Fragment you must make sure that the parent Activity hasn'tbeen destroyed. This is where the new Fragment lifecycle method o nAct ivit yCreat ed comes in handy. If a Fragmentmust perform logic requiring a context when it is loaded, then you place that logic in the o nAct ivit yCreat ed methodwhere you can guarantee that the parent Activity has already finished its creation lifecycle and is ready to be used as aContext.
Using Fragments Programatically
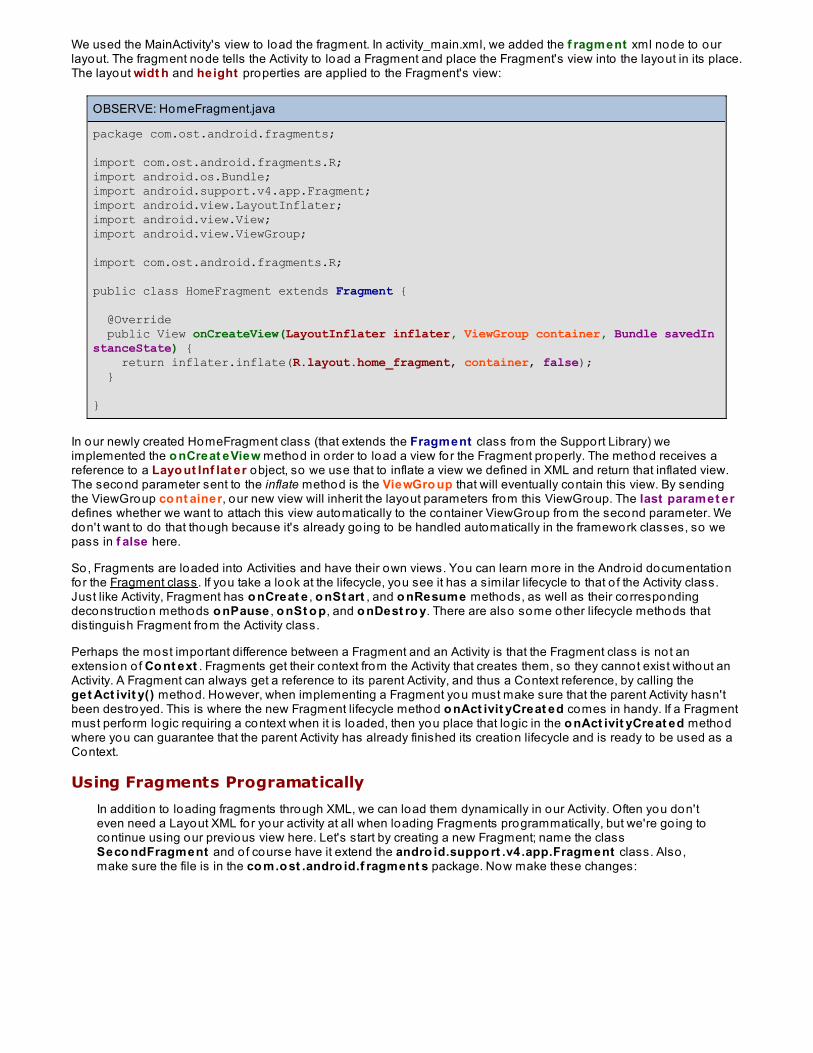
In addition to loading fragments through XML, we can load them dynamically in our Activity. Often you don'teven need a Layout XML for your activity at all when loading Fragments programmatically, but we're go ing tocontinue using our previous view here. Let's start by creating a new Fragment; name the classSeco ndFragment and o f course have it extend the andro id.suppo rt .v4.app.Fragment class. Also,make sure the file is in the co m.o st .andro id.f ragment s package. Now make these changes:
CODE TO TYPE: SecondFragment.java
package com.ost.android.fragments;
import android.os.Bundle;import android.support.v4.app.Fragment;import android.view.LayoutInflater;import android.view.View;import android.view.ViewGroup;
import com.ost.android.fragments.R;
public class SecondFragment extends Fragment {
@Override public View onCreateView(LayoutInflater inflater, ViewGroup container, Bundle savedInstanceState) { return inflater.inflate(R.layout.second_fragment, container, false); }
}
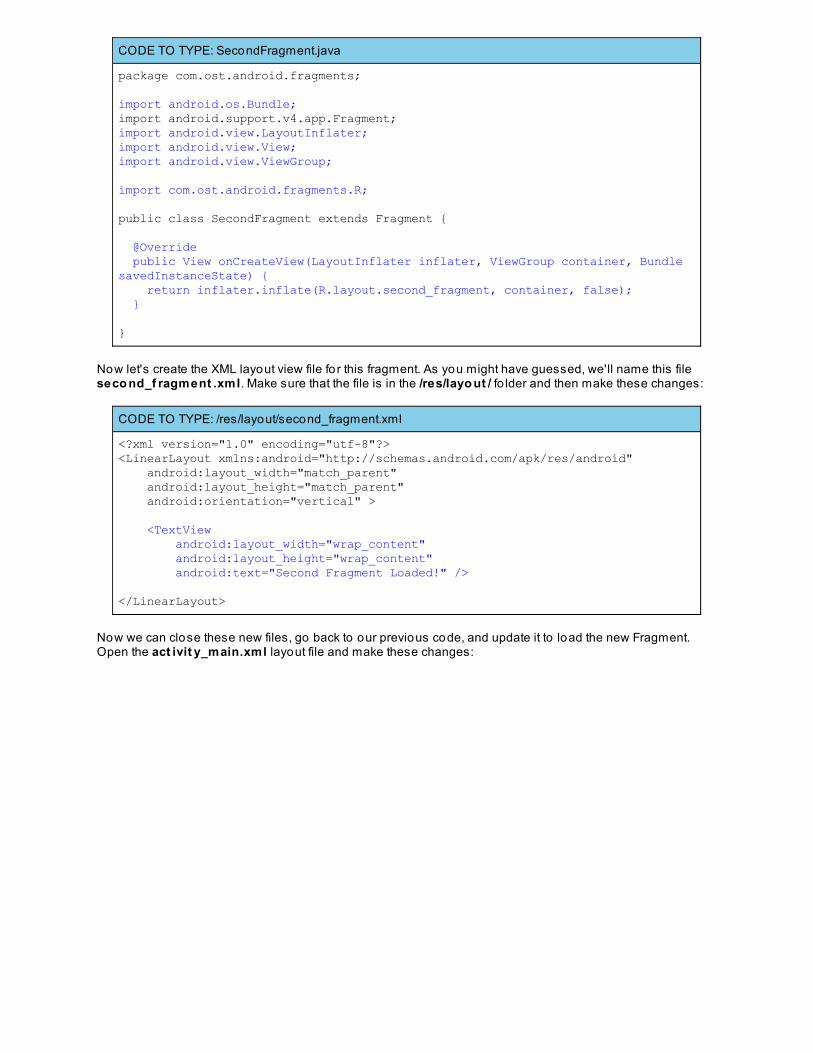
Now let's create the XML layout view file fo r this fragment. As you might have guessed, we'll name this fileseco nd_f ragment .xml. Make sure that the file is in the /res/layo ut / fo lder and then make these changes:
CODE TO TYPE: /res/layout/second_fragment.xml
<?xml version="1.0" encoding="utf-8"?><LinearLayout xmlns:android="http://schemas.android.com/apk/res/android" android:layout_width="match_parent" android:layout_height="match_parent" android:orientation="vertical" >
<TextView android:layout_width="wrap_content" android:layout_height="wrap_content" android:text="Second Fragment Loaded!" />
</LinearLayout>
Now we can close these new files, go back to our previous code, and update it to load the new Fragment.Open the act ivit y_main.xml layout file and make these changes:
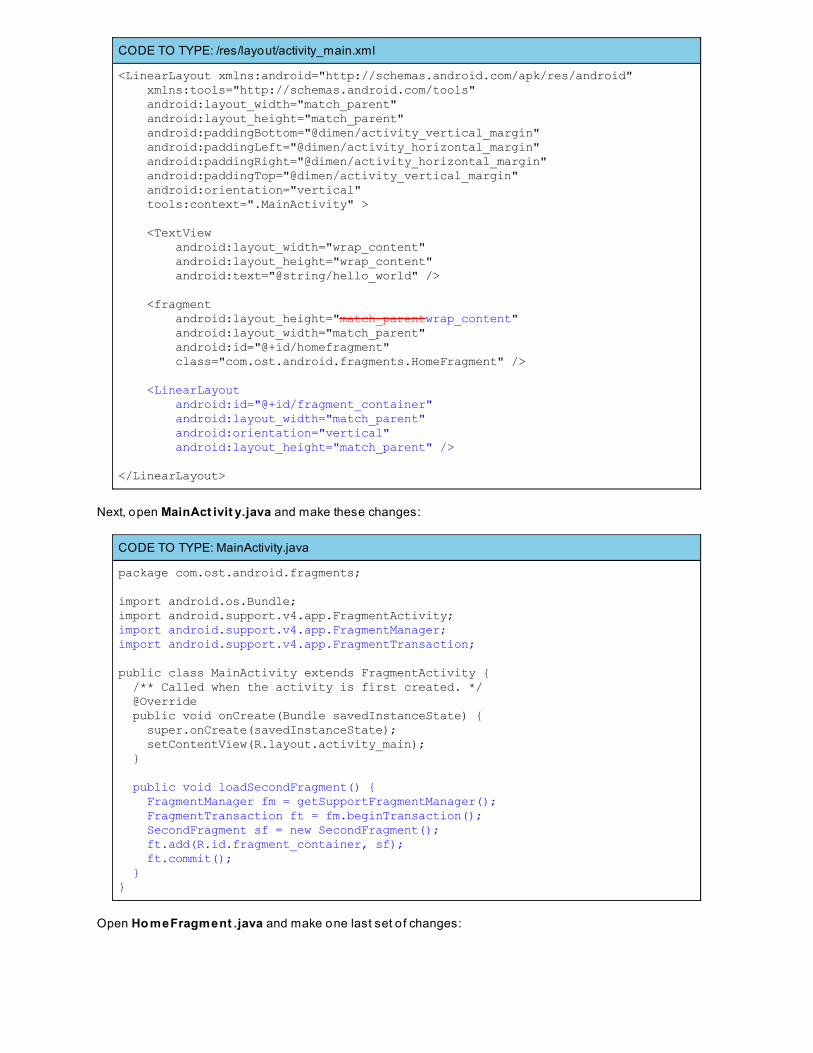
CODE TO TYPE: /res/layout/activity_main.xml
<LinearLayout xmlns:android="http://schemas.android.com/apk/res/android" xmlns:tools="http://schemas.android.com/tools" android:layout_width="match_parent" android:layout_height="match_parent" android:paddingBottom="@dimen/activity_vertical_margin" android:paddingLeft="@dimen/activity_horizontal_margin" android:paddingRight="@dimen/activity_horizontal_margin" android:paddingTop="@dimen/activity_vertical_margin" android:orientation="vertical" tools:context=".MainActivity" >
<TextView android:layout_width="wrap_content" android:layout_height="wrap_content" android:text="@string/hello_world" />
<fragment android:layout_height="match_parentwrap_content" android:layout_width="match_parent" android:id="@+id/homefragment" class="com.ost.android.fragments.HomeFragment" />
<LinearLayout android:id="@+id/fragment_container" android:layout_width="match_parent" android:orientation="vertical" android:layout_height="match_parent" />
</LinearLayout>
Next, open MainAct ivit y.java and make these changes:
CODE TO TYPE: MainActivity.java
package com.ost.android.fragments;
import android.os.Bundle;import android.support.v4.app.FragmentActivity;import android.support.v4.app.FragmentManager;import android.support.v4.app.FragmentTransaction;
public class MainActivity extends FragmentActivity { /** Called when the activity is first created. */ @Override public void onCreate(Bundle savedInstanceState) { super.onCreate(savedInstanceState); setContentView(R.layout.activity_main); }
public void loadSecondFragment() { FragmentManager fm = getSupportFragmentManager(); FragmentTransaction ft = fm.beginTransaction(); SecondFragment sf = new SecondFragment(); ft.add(R.id.fragment_container, sf); ft.commit(); }}
Open Ho meFragment .java and make one last set o f changes:
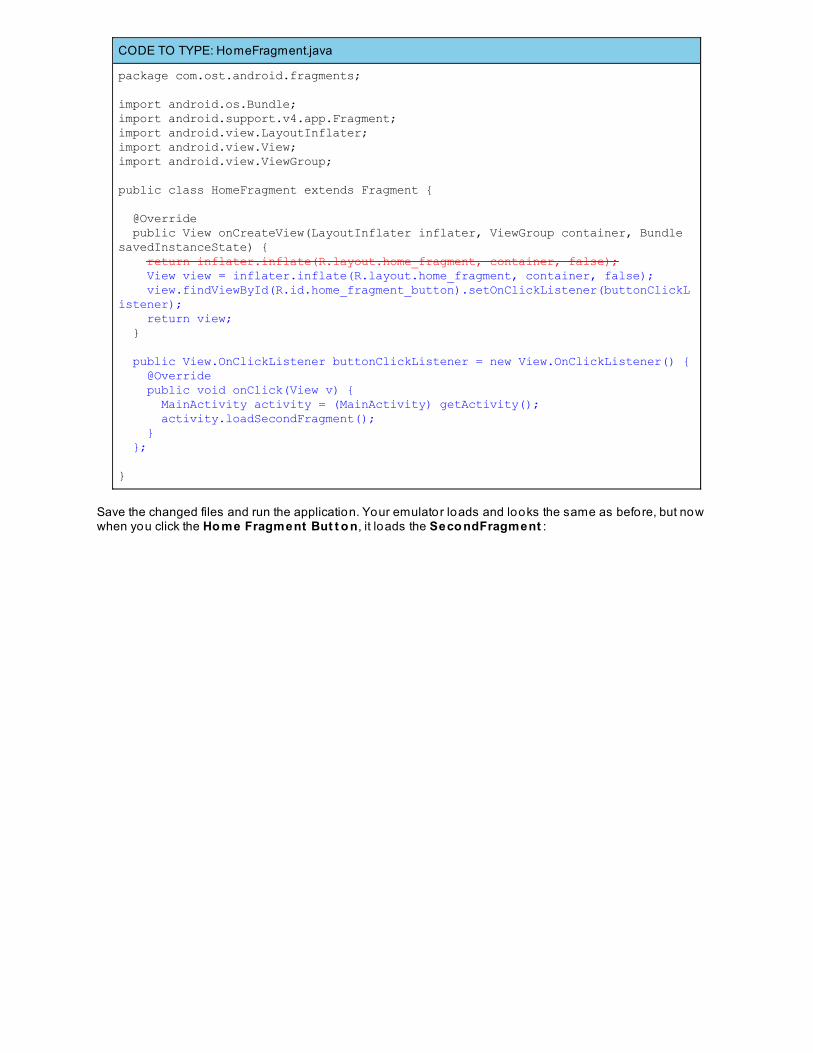
CODE TO TYPE: HomeFragment.java
package com.ost.android.fragments;
import android.os.Bundle;import android.support.v4.app.Fragment;import android.view.LayoutInflater;import android.view.View;import android.view.ViewGroup;
public class HomeFragment extends Fragment {
@Override public View onCreateView(LayoutInflater inflater, ViewGroup container, Bundle savedInstanceState) { return inflater.inflate(R.layout.home_fragment, container, false); View view = inflater.inflate(R.layout.home_fragment, container, false); view.findViewById(R.id.home_fragment_button).setOnClickListener(buttonClickListener); return view; }
public View.OnClickListener buttonClickListener = new View.OnClickListener() { @Override public void onClick(View v) { MainActivity activity = (MainActivity) getActivity(); activity.loadSecondFragment(); } };
}
Save the changed files and run the application. Your emulator loads and looks the same as before, but nowwhen you click the Ho me Fragment But t o n, it loads the Seco ndFragment :
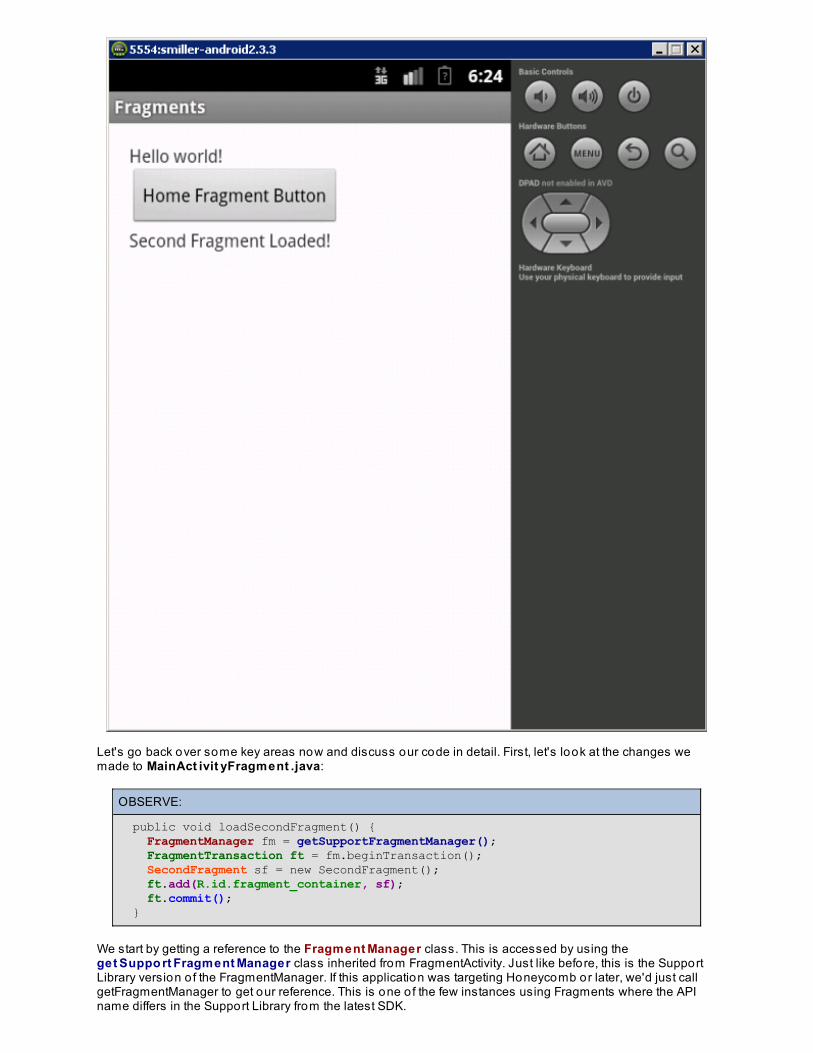
Let's go back over some key areas now and discuss our code in detail. First, let's look at the changes wemade to MainAct ivit yFragment .java:
OBSERVE:
public void loadSecondFragment() { FragmentManager fm = getSupportFragmentManager(); FragmentTransaction ft = fm.beginTransaction(); SecondFragment sf = new SecondFragment(); ft.add(R.id.fragment_container, sf); ft.commit(); }
We start by getting a reference to the Fragment Manager class. This is accessed by using theget Suppo rt Fragment Manager class inherited from FragmentActivity. Just like before, this is the SupportLibrary version o f the FragmentManager. If this application was targeting Honeycomb or later, we'd just callgetFragmentManager to get our reference. This is one o f the few instances using Fragments where the APIname differs in the Support Library from the latest SDK.
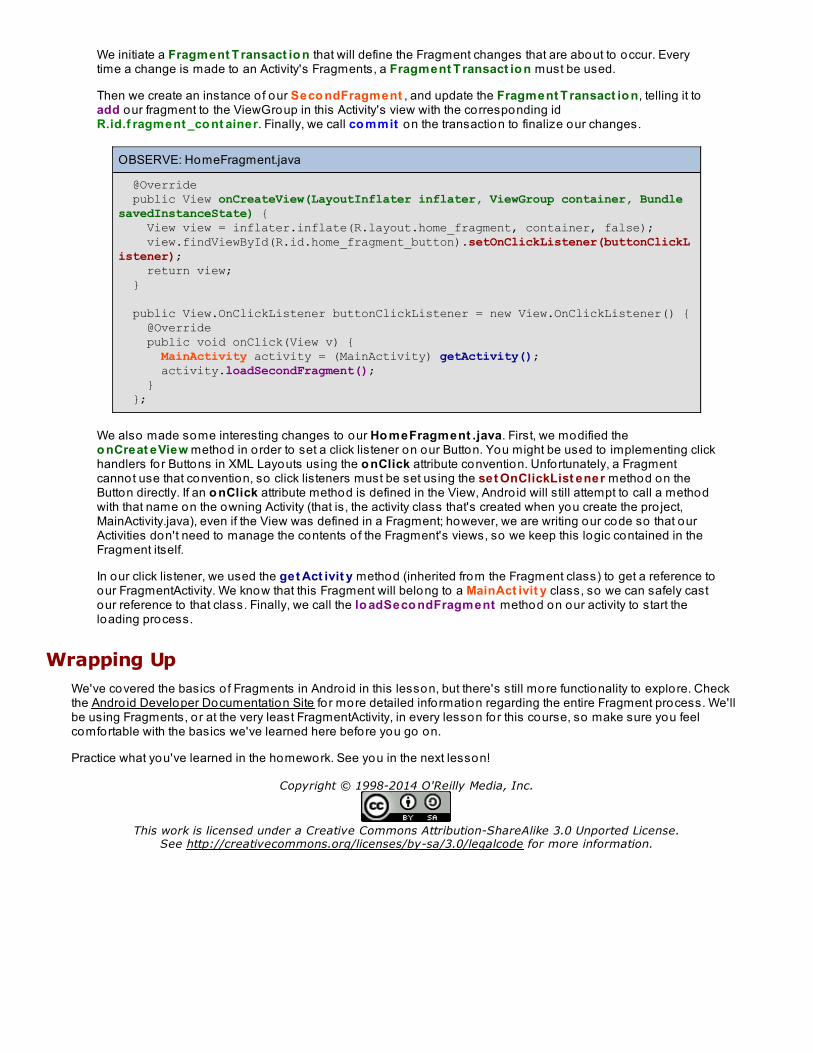
We initiate a Fragment T ransact io n that will define the Fragment changes that are about to occur. Everytime a change is made to an Activity's Fragments, a Fragment T ransact io n must be used.
Then we create an instance o f our Seco ndFragment , and update the Fragment T ransact io n, telling it toadd our fragment to the ViewGroup in this Activity's view with the corresponding idR.id.f ragment _co nt ainer. Finally, we call co mmit on the transaction to finalize our changes.
OBSERVE: HomeFragment.java
@Override public View onCreateView(LayoutInflater inflater, ViewGroup container, Bundle savedInstanceState) { View view = inflater.inflate(R.layout.home_fragment, container, false); view.findViewById(R.id.home_fragment_button).setOnClickListener(buttonClickListener); return view; }
public View.OnClickListener buttonClickListener = new View.OnClickListener() { @Override public void onClick(View v) { MainActivity activity = (MainActivity) getActivity(); activity.loadSecondFragment(); } };
We also made some interesting changes to our Ho meFragment .java. First, we modified theo nCreat eView method in order to set a click listener on our Button. You might be used to implementing clickhandlers for Buttons in XML Layouts using the o nClick attribute convention. Unfortunately, a Fragmentcannot use that convention, so click listeners must be set using the set OnClickList ener method on theButton directly. If an o nClick attribute method is defined in the View, Andro id will still attempt to call a methodwith that name on the owning Activity (that is, the activity class that's created when you create the pro ject,MainActivity.java), even if the View was defined in a Fragment; however, we are writing our code so that ourActivities don't need to manage the contents o f the Fragment's views, so we keep this logic contained in theFragment itself.
In our click listener, we used the get Act ivit y method (inherited from the Fragment class) to get a reference toour FragmentActivity. We know that this Fragment will belong to a MainAct ivit y class, so we can safely castour reference to that class. Finally, we call the lo adSeco ndFragment method on our activity to start theloading process.
Wrapping UpWe've covered the basics o f Fragments in Andro id in this lesson, but there's still more functionality to explore. Checkthe Andro id Developer Documentation Site fo r more detailed information regarding the entire Fragment process. We'llbe using Fragments, or at the very least FragmentActivity, in every lesson for this course, so make sure you feelcomfortable with the basics we've learned here before you go on.
Practice what you've learned in the homework. See you in the next lesson!
Copyright © 1998-2014 O'Reilly Media, Inc.
This work is licensed under a Creative Commons Attribution-ShareAlike 3.0 Unported License.See http://creativecommons.org/licenses/by-sa/3.0/legalcode for more information.

LoadersLesson Objectives
In this lesson, you will:
write and implement a Loader.replace an AsyncTask with a Loader.implement LoaderCallbacks to handle Loader results.register a Loader and LoaderCallbacks with the LoaderManager.
Welcome back! In this lesson we'll cover Loaders, a great new feature in Andro id that helps to load data asynchronously.Loaders are managed outside o f the scope o f an activity, which allows us to retrieve data from a Loader even if the activity hasbeen destroyed and recreated (like when the user ro tates the screen). Like Fragments, Loaders first became available in API 11(Honeycomb), and are available to applications targeting earlier APIs through the support library.
Why Use a Loader?At first glance, Loaders might not seem vital. After all, we already have AsyncTasks to perform long-runningprocesses. However, AsyncTasks don't exactly cooperate with Andro id's life-cycle for Views and Fragments. Theexample will help illustrate the need for Loaders.
Let's get started. Create a new Andro id pro ject using these criteria:
Name the pro ject Lo aders.Use the package name co m.o st .andro id.lo aders.Uncheck the Creat e cust o m launcher ico n box.Assign the Andro id2_Lesso ns working set to the pro ject.
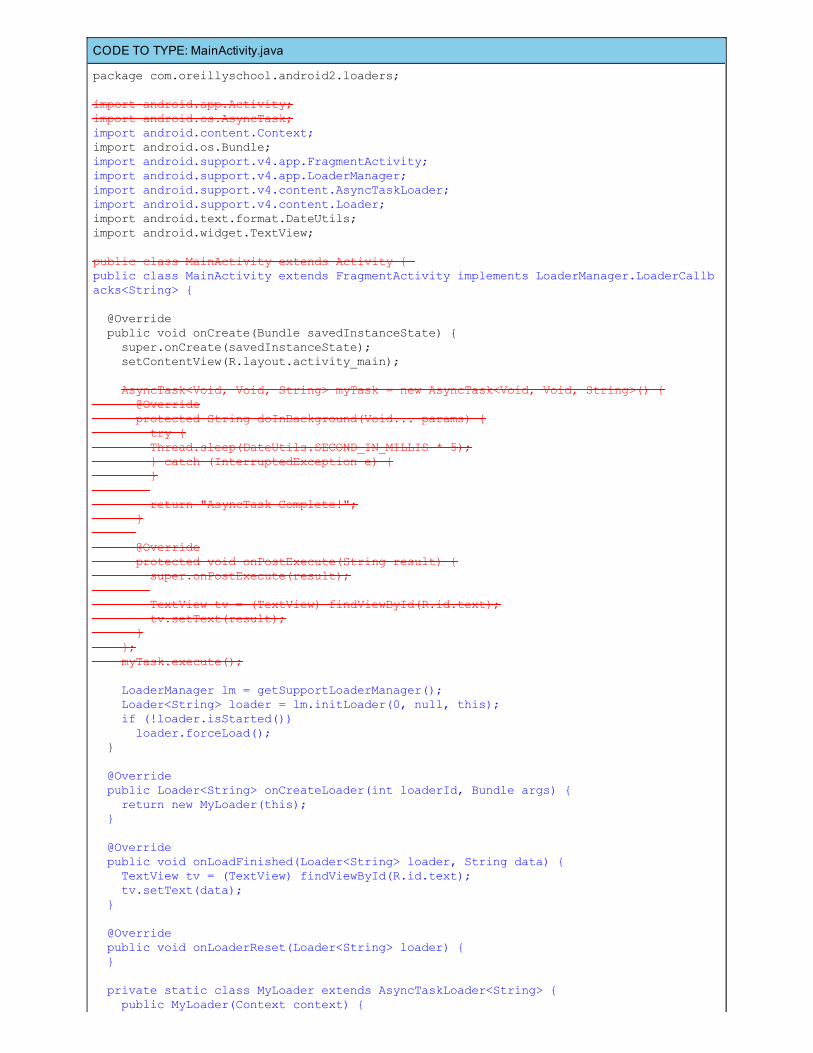
We'll begin by demonstrating the shortcomings o f AsyncTask. In MainAct ivit y.java, make these changes:
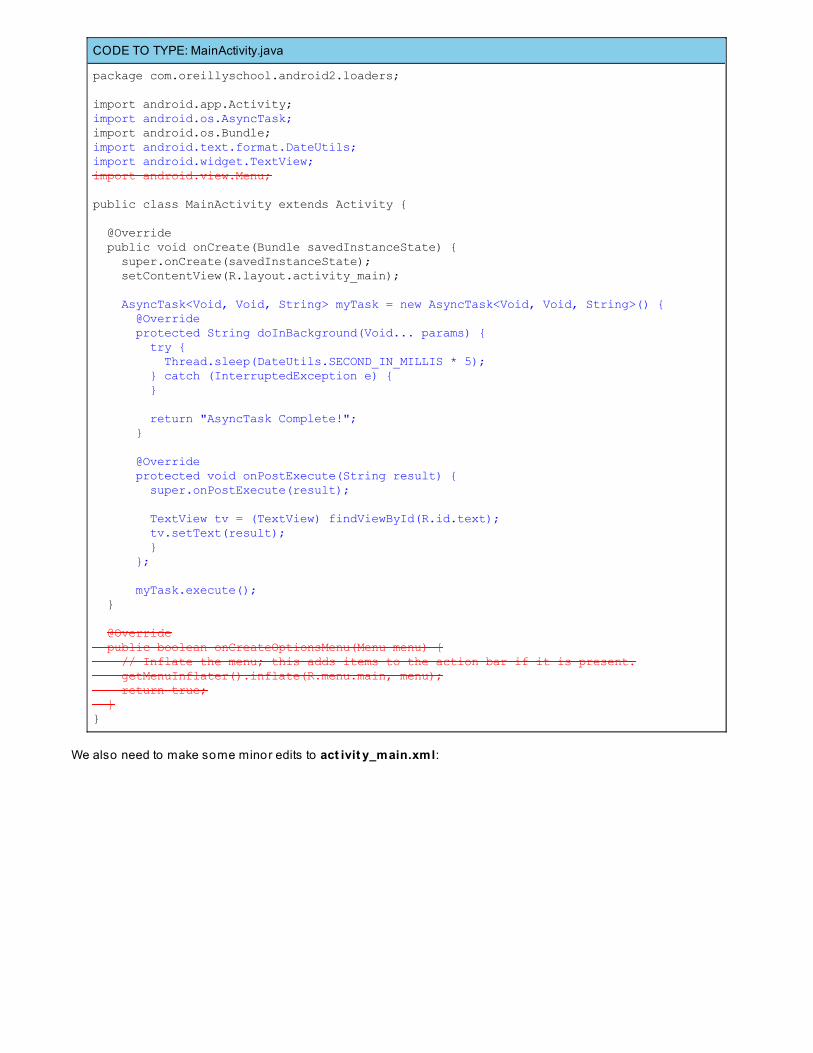
CODE TO TYPE: MainActivity.java
package com.oreillyschool.android2.loaders;
import android.app.Activity;import android.os.AsyncTask;import android.os.Bundle;import android.text.format.DateUtils;import android.widget.TextView;import android.view.Menu;
public class MainActivity extends Activity {
@Override public void onCreate(Bundle savedInstanceState) { super.onCreate(savedInstanceState); setContentView(R.layout.activity_main); AsyncTask<Void, Void, String> myTask = new AsyncTask<Void, Void, String>() { @Override protected String doInBackground(Void... params) { try { Thread.sleep(DateUtils.SECOND_IN_MILLIS * 5); } catch (InterruptedException e) { } return "AsyncTask Complete!"; } @Override protected void onPostExecute(String result) { super.onPostExecute(result); TextView tv = (TextView) findViewById(R.id.text); tv.setText(result); } }; myTask.execute(); } @Override public boolean onCreateOptionsMenu(Menu menu) { // Inflate the menu; this adds items to the action bar if it is present. getMenuInflater().inflate(R.menu.main, menu); return true; }}
We also need to make some minor edits to act ivit y_main.xml:
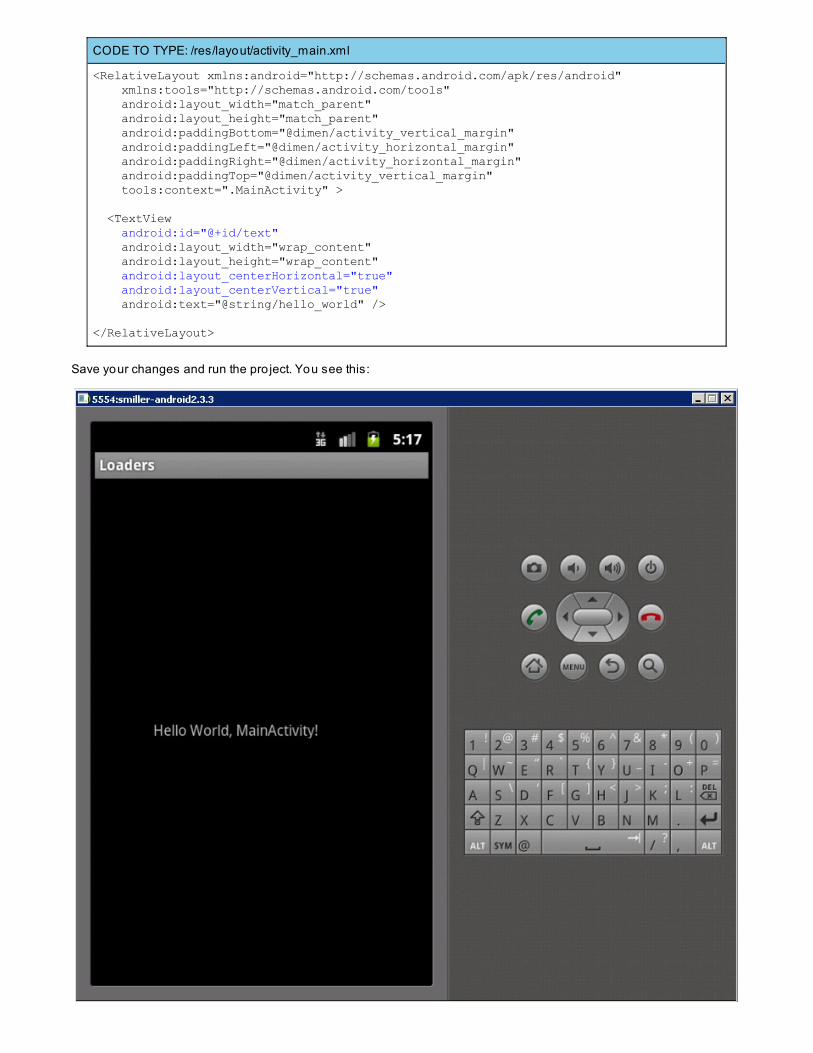
CODE TO TYPE: /res/layout/activity_main.xml
<RelativeLayout xmlns:android="http://schemas.android.com/apk/res/android" xmlns:tools="http://schemas.android.com/tools" android:layout_width="match_parent" android:layout_height="match_parent" android:paddingBottom="@dimen/activity_vertical_margin" android:paddingLeft="@dimen/activity_horizontal_margin" android:paddingRight="@dimen/activity_horizontal_margin" android:paddingTop="@dimen/activity_vertical_margin" tools:context=".MainActivity" > <TextView android:id="@+id/text" android:layout_width="wrap_content" android:layout_height="wrap_content" android:layout_centerHorizontal="true" android:layout_centerVertical="true" android:text="@string/hello_world" /> </RelativeLayout>
Save your changes and run the pro ject. You see this:
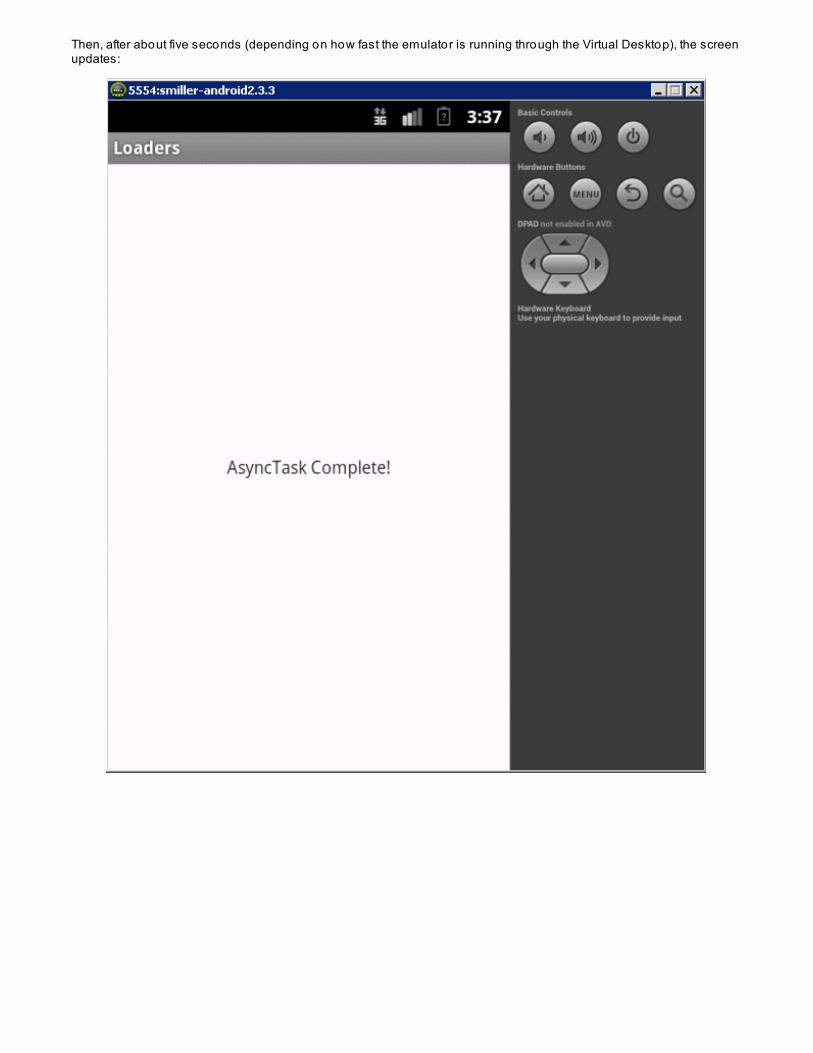
Then, after about five seconds (depending on how fast the emulator is running through the Virtual Desktop), the screenupdates:
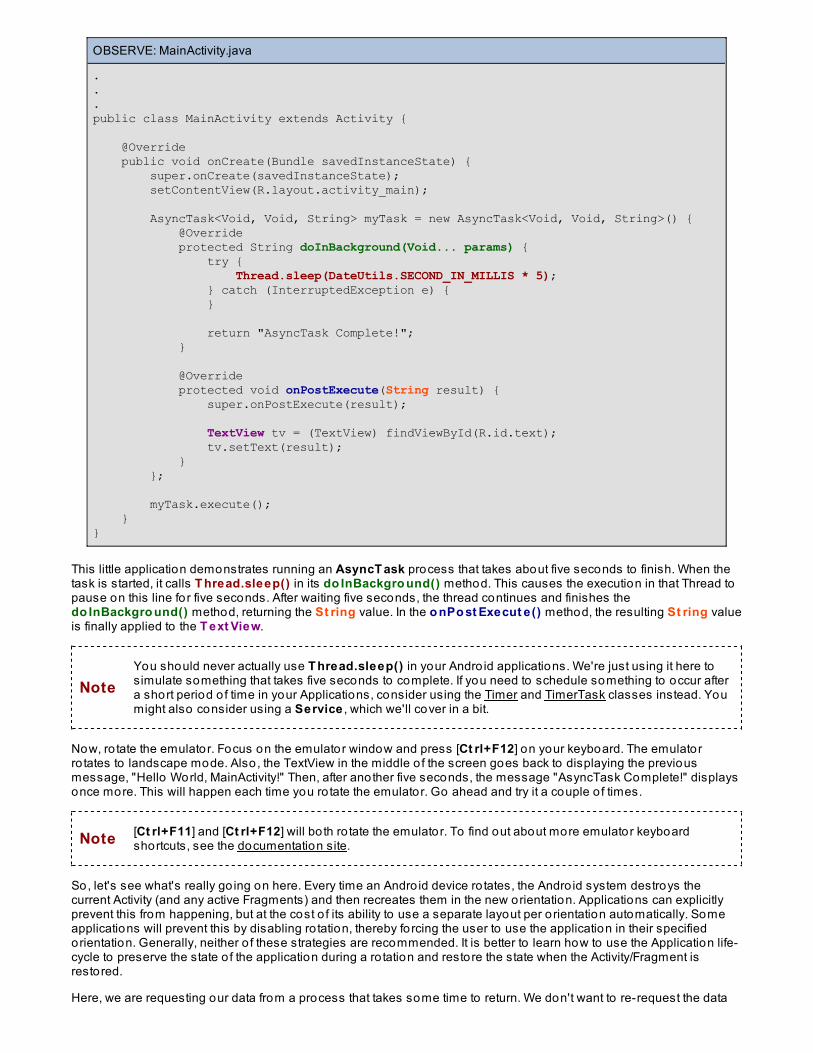
OBSERVE: MainActivity.java
.
.
.public class MainActivity extends Activity {
@Override public void onCreate(Bundle savedInstanceState) { super.onCreate(savedInstanceState); setContentView(R.layout.activity_main); AsyncTask<Void, Void, String> myTask = new AsyncTask<Void, Void, String>() { @Override protected String doInBackground(Void... params) { try { Thread.sleep(DateUtils.SECOND_IN_MILLIS * 5); } catch (InterruptedException e) { } return "AsyncTask Complete!"; } @Override protected void onPostExecute(String result) { super.onPostExecute(result); TextView tv = (TextView) findViewById(R.id.text); tv.setText(result); } }; myTask.execute(); }}
This little application demonstrates running an AsyncT ask process that takes about five seconds to finish. When thetask is started, it calls T hread.sleep() in its do InBackgro und() method. This causes the execution in that Thread topause on this line for five seconds. After waiting five seconds, the thread continues and finishes thedo InBackgro und() method, returning the St ring value. In the o nPo st Execut e() method, the resulting St ring valueis finally applied to the T ext View.
NoteYou should never actually use T hread.sleep() in your Andro id applications. We're just using it here tosimulate something that takes five seconds to complete. If you need to schedule something to occur aftera short period o f time in your Applications, consider using the Timer and TimerTask classes instead. Youmight also consider using a Service , which we'll cover in a bit.
Now, ro tate the emulator. Focus on the emulator window and press [Ct rl+F12] on your keyboard. The emulatorro tates to landscape mode. Also, the TextView in the middle o f the screen goes back to displaying the previousmessage, "Hello World, MainActivity!" Then, after another five seconds, the message "AsyncTask Complete!" displaysonce more. This will happen each time you ro tate the emulator. Go ahead and try it a couple o f times.
Note [Ct rl+F11] and [Ct rl+F12] will bo th ro tate the emulator. To find out about more emulator keyboardshortcuts, see the documentation site.
So, let's see what's really go ing on here. Every time an Andro id device ro tates, the Andro id system destroys thecurrent Activity (and any active Fragments) and then recreates them in the new orientation. Applications can explicitlyprevent this from happening, but at the cost o f its ability to use a separate layout per orientation automatically. Someapplications will prevent this by disabling ro tation, thereby forcing the user to use the application in their specifiedorientation. Generally, neither o f these strategies are recommended. It is better to learn how to use the Application life-cycle to preserve the state o f the application during a ro tation and restore the state when the Activity/Fragment isrestored.
Here, we are requesting our data from a process that takes some time to return. We don't want to re-request the data

each time the device ro tates. We could pass the necessary data to the next Activity using the Andro id life-cyclemethods (specifically o nSaveInst anceSt at e()), but the user could also ro tate before the task actually finishes. Weshouldn't have to start our request over just because the user ro tated before the task returned. This is where Loaderscome in handy.
Performing Tasks in a LoaderLet's update the Application to use a Loader instead o f an AsyncTask. Edit MainAct ivit y.java as shown:
CODE TO TYPE: MainActivity.java
package com.oreillyschool.android2.loaders;
import android.app.Activity;import android.os.AsyncTask;import android.content.Context;import android.os.Bundle;import android.support.v4.app.FragmentActivity;import android.support.v4.app.LoaderManager;import android.support.v4.content.AsyncTaskLoader;import android.support.v4.content.Loader;import android.text.format.DateUtils;import android.widget.TextView;
public class MainActivity extends Activity { public class MainActivity extends FragmentActivity implements LoaderManager.LoaderCallbacks<String> { @Override public void onCreate(Bundle savedInstanceState) { super.onCreate(savedInstanceState); setContentView(R.layout.activity_main); AsyncTask<Void, Void, String> myTask = new AsyncTask<Void, Void, String>() { @Override protected String doInBackground(Void... params) { try { Thread.sleep(DateUtils.SECOND_IN_MILLIS * 5); } catch (InterruptedException e) { } return "AsyncTask Complete!"; } @Override protected void onPostExecute(String result) { super.onPostExecute(result); TextView tv = (TextView) findViewById(R.id.text); tv.setText(result); } }; myTask.execute(); LoaderManager lm = getSupportLoaderManager(); Loader<String> loader = lm.initLoader(0, null, this); if (!loader.isStarted()) loader.forceLoad(); } @Override public Loader<String> onCreateLoader(int loaderId, Bundle args) { return new MyLoader(this); } @Override public void onLoadFinished(Loader<String> loader, String data) { TextView tv = (TextView) findViewById(R.id.text); tv.setText(data); } @Override public void onLoaderReset(Loader<String> loader) { } private static class MyLoader extends AsyncTaskLoader<String> { public MyLoader(Context context) {
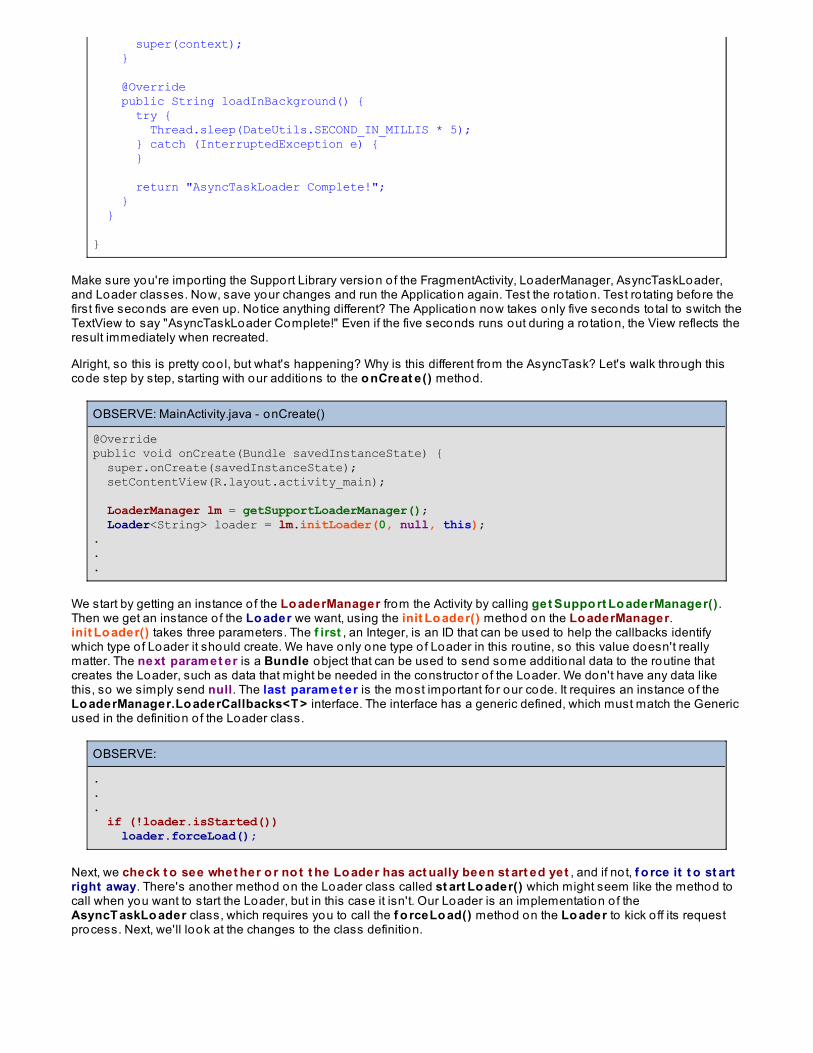
super(context); } @Override public String loadInBackground() { try { Thread.sleep(DateUtils.SECOND_IN_MILLIS * 5); } catch (InterruptedException e) { } return "AsyncTaskLoader Complete!"; } }
}
Make sure you're importing the Support Library version o f the FragmentActivity, LoaderManager, AsyncTaskLoader,and Loader classes. Now, save your changes and run the Application again. Test the ro tation. Test ro tating before thefirst five seconds are even up. Notice anything different? The Application now takes only five seconds to tal to switch theTextView to say "AsyncTaskLoader Complete!" Even if the five seconds runs out during a ro tation, the View reflects theresult immediately when recreated.
Alright, so this is pretty coo l, but what's happening? Why is this different from the AsyncTask? Let's walk through thiscode step by step, starting with our additions to the o nCreat e() method.
OBSERVE: MainActivity.java - onCreate()
@Overridepublic void onCreate(Bundle savedInstanceState) { super.onCreate(savedInstanceState); setContentView(R.layout.activity_main); LoaderManager lm = getSupportLoaderManager(); Loader<String> loader = lm.initLoader(0, null, this);...
We start by getting an instance o f the Lo aderManager from the Activity by calling get Suppo rt Lo aderManager() .Then we get an instance o f the Lo ader we want, using the init Lo ader() method on the Lo aderManager.init Lo ader() takes three parameters. The f irst , an Integer, is an ID that can be used to help the callbacks identifywhich type o f Loader it should create. We have only one type o f Loader in this routine, so this value doesn't reallymatter. The next paramet er is a Bundle object that can be used to send some additional data to the routine thatcreates the Loader, such as data that might be needed in the constructor o f the Loader. We don't have any data likethis, so we simply send null. The last paramet er is the most important fo r our code. It requires an instance o f theLo aderManager.Lo aderCallbacks<T > interface. The interface has a generic defined, which must match the Genericused in the definition o f the Loader class.
OBSERVE:
.
.
. if (!loader.isStarted()) loader.forceLoad();
Next, we check t o see whet her o r no t t he Lo ader has act ually been st art ed yet , and if no t, f o rce it t o st artright away. There's another method on the Loader class called st art Lo ader() which might seem like the method tocall when you want to start the Loader, but in this case it isn't. Our Loader is an implementation o f theAsyncT askLo ader class, which requires you to call the f o rceLo ad() method on the Lo ader to kick o ff its requestprocess. Next, we'll look at the changes to the class definition.
OBSERVE: MainActivity class
public class MainActivity extends FragmentActivity implements LoaderManager.LoaderCallbacks<String>
Our regular "pre-Honeycomb" Activity class doesn't actually support getting an instance o f the Lo aderManager class,so we need to change our class to extend the support library version o f Fragment Act ivit y instead. Also, in order tosend "this" to the Lo aderManager.init Lo ader() method, we have to implement t he Lo aderCallbacks interfaceas well. We want our Lo ader to return a St ring value, so we define the generic parameter here as the St ring class.Next, we'll look at the methods required to implement Lo aderCallbacks:
OBSERVE: MainActivity.java - LoaderCallbacks methods
@Overridepublic Loader<String> onCreateLoader(int loaderId, Bundle args) { return new MyLoader(this);}
@Overridepublic void onLoadFinished(Loader<String> loader, String data) { TextView tv = (TextView) findViewById(R.id.text); tv.setText(data);} @Overridepublic void onLoaderReset(Loader<String> data) {}
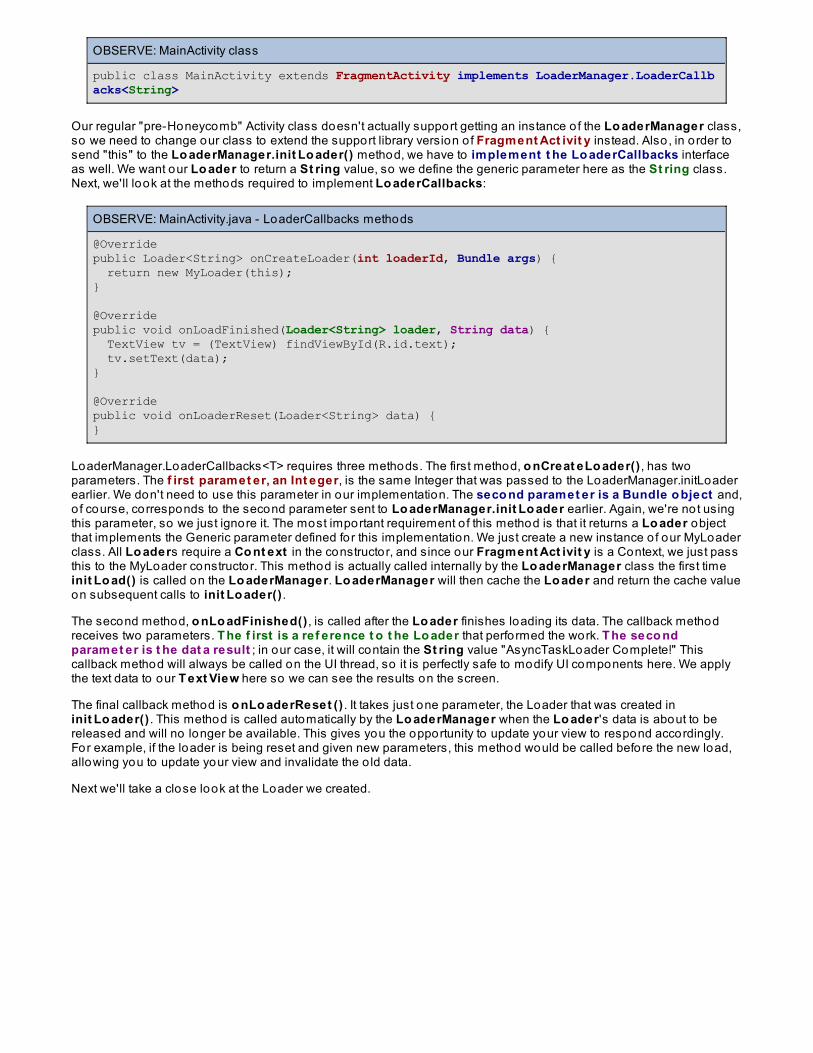
LoaderManager.LoaderCallbacks<T> requires three methods. The first method, o nCreat eLo ader() , has twoparameters. The f irst paramet er, an Int eger, is the same Integer that was passed to the LoaderManager.initLoaderearlier. We don't need to use this parameter in our implementation. The seco nd paramet er is a Bundle o bject and,o f course, corresponds to the second parameter sent to Lo aderManager.init Lo ader earlier. Again, we're not usingthis parameter, so we just ignore it. The most important requirement o f this method is that it returns a Lo ader objectthat implements the Generic parameter defined for this implementation. We just create a new instance o f our MyLoaderclass. All Lo aders require a Co nt ext in the constructor, and since our Fragment Act ivit y is a Context, we just passthis to the MyLoader constructor. This method is actually called internally by the Lo aderManager class the first timeinit Lo ad() is called on the Lo aderManager. Lo aderManager will then cache the Lo ader and return the cache valueon subsequent calls to init Lo ader() .
The second method, o nLo adFinished() , is called after the Lo ader finishes loading its data. The callback methodreceives two parameters. T he f irst is a ref erence t o t he Lo ader that performed the work. T he seco ndparamet er is t he dat a result ; in our case, it will contain the St ring value "AsyncTaskLoader Complete!" Thiscallback method will always be called on the UI thread, so it is perfectly safe to modify UI components here. We applythe text data to our T ext View here so we can see the results on the screen.
The final callback method is o nLo aderReset () . It takes just one parameter, the Loader that was created ininit Lo ader() . This method is called automatically by the Lo aderManager when the Lo ader's data is about to bereleased and will no longer be available. This gives you the opportunity to update your view to respond accordingly.For example, if the loader is being reset and given new parameters, this method would be called before the new load,allowing you to update your view and invalidate the o ld data.
Next we'll take a close look at the Loader we created.
OBSERVE: MyLoader class
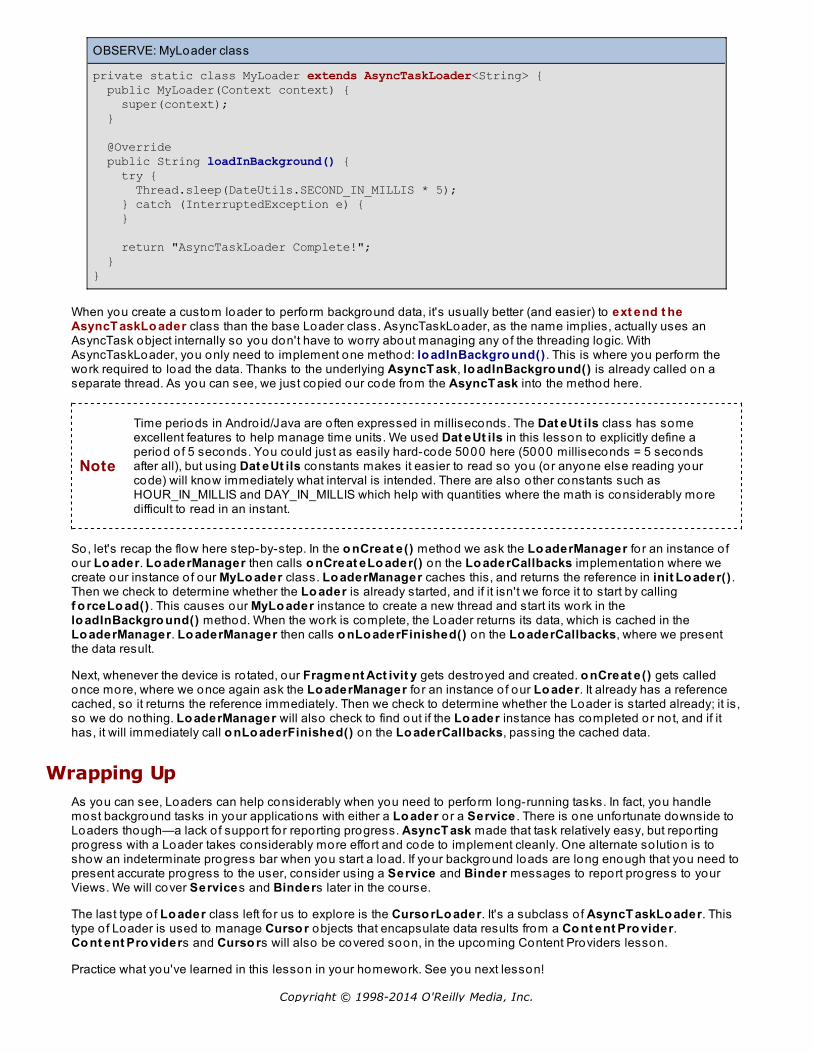
private static class MyLoader extends AsyncTaskLoader<String> { public MyLoader(Context context) { super(context); } @Override public String loadInBackground() { try { Thread.sleep(DateUtils.SECOND_IN_MILLIS * 5); } catch (InterruptedException e) { } return "AsyncTaskLoader Complete!"; }}
When you create a custom loader to perform background data, it's usually better (and easier) to ext end t heAsyncT askLo ader class than the base Loader class. AsyncTaskLoader, as the name implies, actually uses anAsyncTask object internally so you don't have to worry about managing any o f the threading logic. WithAsyncTaskLoader, you only need to implement one method: lo adInBackgro und() . This is where you perform thework required to load the data. Thanks to the underlying AsyncT ask, lo adInBackgro und() is already called on aseparate thread. As you can see, we just copied our code from the AsyncT ask into the method here.
Note
Time periods in Andro id/Java are o ften expressed in milliseconds. The Dat eUt ils class has someexcellent features to help manage time units. We used Dat eUt ils in this lesson to explicitly define aperiod o f 5 seconds. You could just as easily hard-code 5000 here (5000 milliseconds = 5 secondsafter all), but using Dat eUt ils constants makes it easier to read so you (or anyone else reading yourcode) will know immediately what interval is intended. There are also o ther constants such asHOUR_IN_MILLIS and DAY_IN_MILLIS which help with quantities where the math is considerably moredifficult to read in an instant.
So, let's recap the flow here step-by-step. In the o nCreat e() method we ask the Lo aderManager fo r an instance o four Lo ader. Lo aderManager then calls o nCreat eLo ader() on the Lo aderCallbacks implementation where wecreate our instance o f our MyLo ader class. Lo aderManager caches this, and returns the reference in init Lo ader() .Then we check to determine whether the Lo ader is already started, and if it isn't we force it to start by callingf o rceLo ad() . This causes our MyLo ader instance to create a new thread and start its work in thelo adInBackgro und() method. When the work is complete, the Loader returns its data, which is cached in theLo aderManager. Lo aderManager then calls o nLo aderFinished() on the Lo aderCallbacks, where we presentthe data result.
Next, whenever the device is ro tated, our Fragment Act ivit y gets destroyed and created. o nCreat e() gets calledonce more, where we once again ask the Lo aderManager fo r an instance o f our Lo ader. It already has a referencecached, so it returns the reference immediately. Then we check to determine whether the Loader is started already; it is,so we do nothing. Lo aderManager will also check to find out if the Lo ader instance has completed or not, and if ithas, it will immediately call o nLo aderFinished() on the Lo aderCallbacks, passing the cached data.
Wrapping UpAs you can see, Loaders can help considerably when you need to perform long-running tasks. In fact, you handlemost background tasks in your applications with either a Lo ader o r a Service . There is one unfortunate downside toLoaders though—a lack o f support fo r reporting progress. AsyncT ask made that task relatively easy, but reportingprogress with a Loader takes considerably more effort and code to implement cleanly. One alternate so lution is toshow an indeterminate progress bar when you start a load. If your background loads are long enough that you need topresent accurate progress to the user, consider using a Service and Binder messages to report progress to yourViews. We will cover Services and Binders later in the course.
The last type o f Lo ader class left fo r us to explore is the Curso rLo ader. It's a subclass o f AsyncT askLo ader. Thistype o f Loader is used to manage Curso r objects that encapsulate data results from a Co nt ent Pro vider.Co nt ent Pro viders and Curso rs will also be covered soon, in the upcoming Content Providers lesson.
Practice what you've learned in this lesson in your homework. See you next lesson!
Copyright © 1998-2014 O'Reilly Media, Inc.

Copyright © 1998-2014 O'Reilly Media, Inc.
This work is licensed under a Creative Commons Attribution-ShareAlike 3.0 Unported License.See http://creativecommons.org/licenses/by-sa/3.0/legalcode for more information.
Advanced LayoutsLesson Objectives
In this lesson you will:
create alternate layouts using resource qualifiers.reuse a fragment in both tablet and phone layouts.use a single activity to handle both phone and tablet layouts using fragments.
Welcome back! In previous lessons we've created layouts for our applications using XML, but we've still only scratched thesurface. In this lesson we'll go over some of the more advanced too ls and features available for making layouts in Andro id,including alternate layouts for orientation and screen size (that is, fo r phones and tablets) as well as some layout optimizationtoo ls.
Let's get started. Create a new Andro id pro ject using these criteria:
Name the pro ject AdvancedLayo ut s.Use the package name co m.o st .andro id.advancedlayo ut s.Uncheck the Creat e cust o m launcher ico n box.Assign the Andro id2_Lesso ns working set to the pro ject.
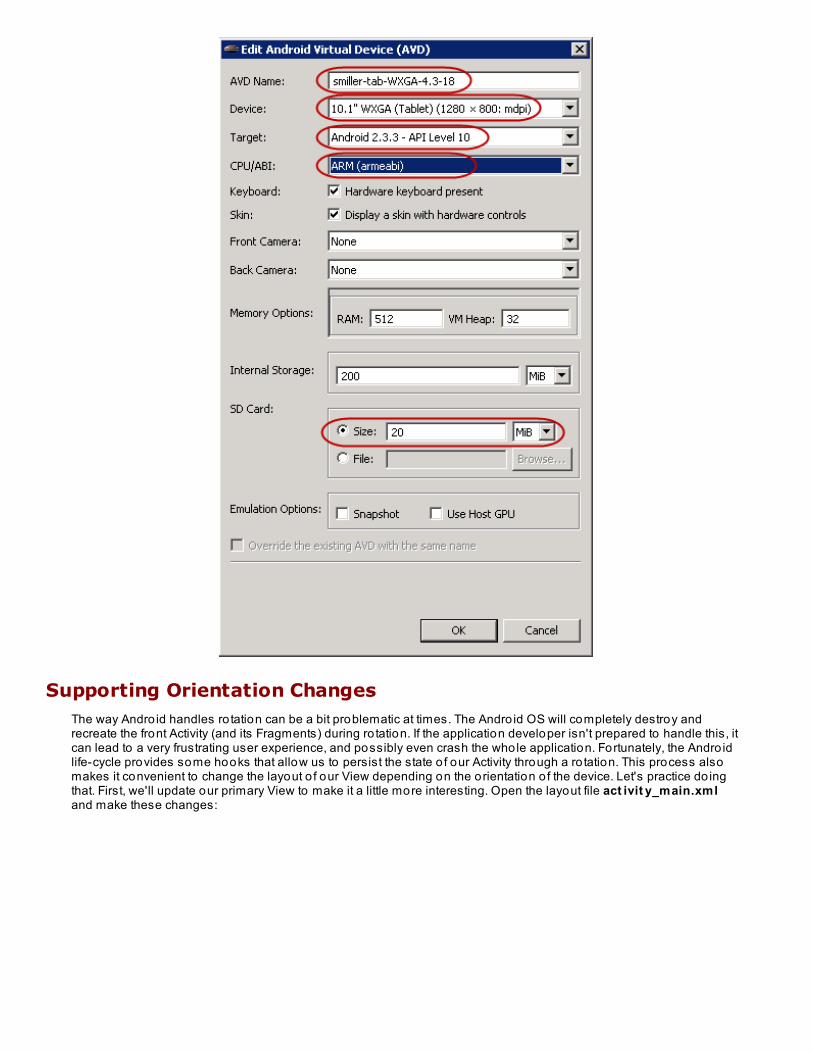
We'll need a tablet-sized emulator fo r this lesson. Click the Andro id Virt ual Device Manager button ( ) at the top o f theEclipse window. In the Device Manager window, click New. In the Create New Andro id Virtual Device (AVD) window, give thedevice an appropriate name, like username-t ab-WXGA-4.3-18. For Device, select 10.1" WXGA (T ablet ) (1280 x 800:mdpi) . Set the Target to Andro id 2.3.3 - API Level 10 . For CPU/ABI, select the ARM (armeabi-v7a) option. For SD card,select a Size o f 20 MiB. Click OK. Back in the Andro id Virtual Device Manager window, make sure the new AVD is selected andclick St art ... to start the emulator. In the Launch Options dialog, select Scale display t o real size , enter 8 fo r the screen size,and click Launch.
Supporting Orientation ChangesThe way Andro id handles ro tation can be a bit problematic at times. The Andro id OS will completely destroy andrecreate the front Activity (and its Fragments) during ro tation. If the application developer isn't prepared to handle this, itcan lead to a very frustrating user experience, and possibly even crash the whole application. Fortunately, the Andro idlife-cycle provides some hooks that allow us to persist the state o f our Activity through a ro tation. This process alsomakes it convenient to change the layout o f our View depending on the orientation o f the device. Let's practice do ingthat. First, we'll update our primary View to make it a little more interesting. Open the layout file act ivit y_main.xmland make these changes:
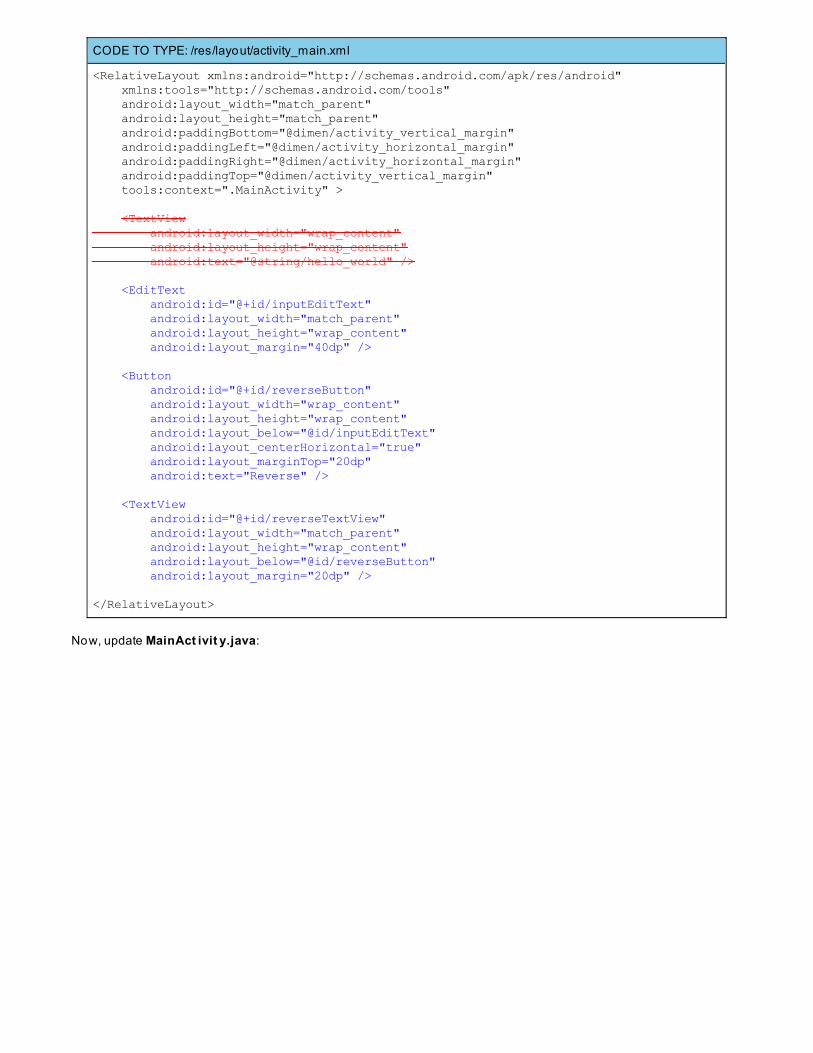
CODE TO TYPE: /res/layout/activity_main.xml
<RelativeLayout xmlns:android="http://schemas.android.com/apk/res/android" xmlns:tools="http://schemas.android.com/tools" android:layout_width="match_parent" android:layout_height="match_parent" android:paddingBottom="@dimen/activity_vertical_margin" android:paddingLeft="@dimen/activity_horizontal_margin" android:paddingRight="@dimen/activity_horizontal_margin" android:paddingTop="@dimen/activity_vertical_margin" tools:context=".MainActivity" > <TextView android:layout_width="wrap_content" android:layout_height="wrap_content" android:text="@string/hello_world" /> <EditText android:id="@+id/inputEditText" android:layout_width="match_parent" android:layout_height="wrap_content" android:layout_margin="40dp" /> <Button android:id="@+id/reverseButton" android:layout_width="wrap_content" android:layout_height="wrap_content" android:layout_below="@id/inputEditText" android:layout_centerHorizontal="true" android:layout_marginTop="20dp" android:text="Reverse" /> <TextView android:id="@+id/reverseTextView" android:layout_width="match_parent" android:layout_height="wrap_content" android:layout_below="@id/reverseButton" android:layout_margin="20dp" /> </RelativeLayout>
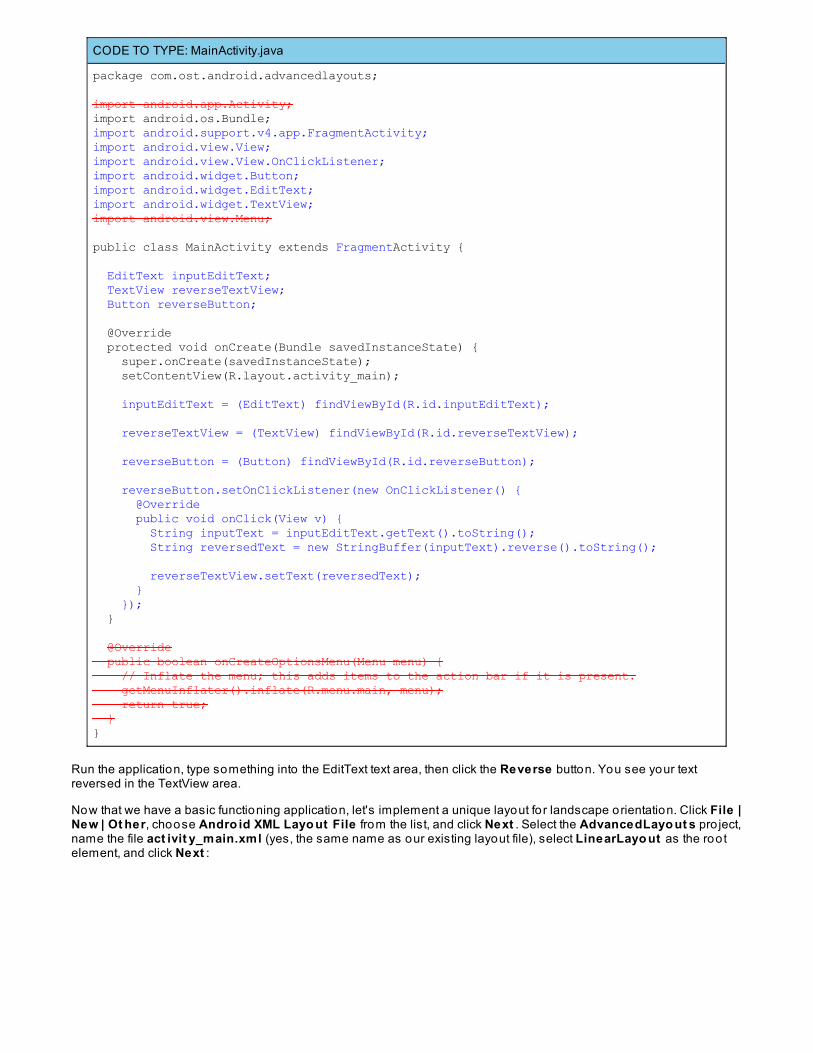
Now, update MainAct ivit y.java:
CODE TO TYPE: MainActivity.java
package com.ost.android.advancedlayouts; import android.app.Activity;import android.os.Bundle;import android.support.v4.app.FragmentActivity;import android.view.View;import android.view.View.OnClickListener;import android.widget.Button;import android.widget.EditText;import android.widget.TextView;import android.view.Menu;
public class MainActivity extends FragmentActivity { EditText inputEditText; TextView reverseTextView; Button reverseButton; @Override protected void onCreate(Bundle savedInstanceState) { super.onCreate(savedInstanceState); setContentView(R.layout.activity_main); inputEditText = (EditText) findViewById(R.id.inputEditText); reverseTextView = (TextView) findViewById(R.id.reverseTextView); reverseButton = (Button) findViewById(R.id.reverseButton); reverseButton.setOnClickListener(new OnClickListener() { @Override public void onClick(View v) { String inputText = inputEditText.getText().toString(); String reversedText = new StringBuffer(inputText).reverse().toString(); reverseTextView.setText(reversedText); } }); } @Override public boolean onCreateOptionsMenu(Menu menu) { // Inflate the menu; this adds items to the action bar if it is present. getMenuInflater().inflate(R.menu.main, menu); return true; }}
Run the application, type something into the EditText text area, then click the Reverse button. You see your textreversed in the TextView area.
Now that we have a basic functioning application, let's implement a unique layout fo r landscape orientation. Click File |New | Ot her, choose Andro id XML Layo ut File from the list, and click Next . Select the AdvancedLayo ut s pro ject,name the file act ivit y_main.xml (yes, the same name as our existing layout file), select LinearLayo ut as the rootelement, and click Next :
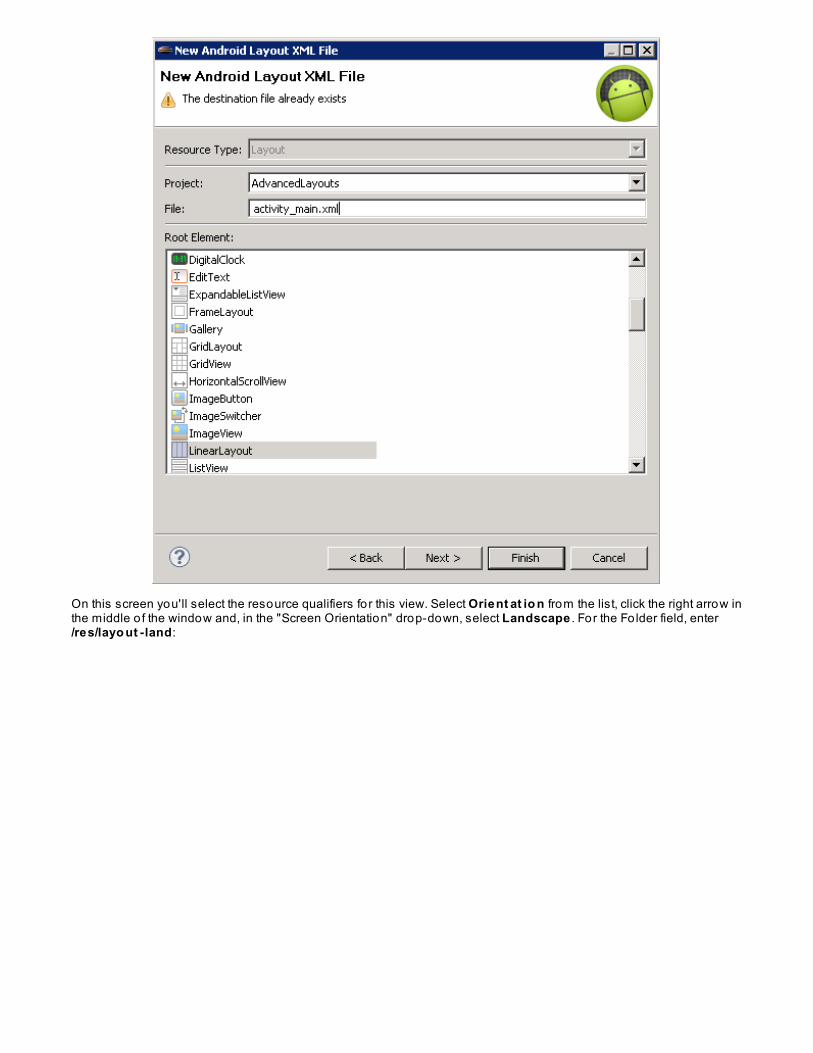
On this screen you'll select the resource qualifiers fo r this view. Select Orient at io n from the list, click the right arrow inthe middle o f the window and, in the "Screen Orientation" drop-down, select Landscape . For the Fo lder field, enter/res/layo ut -land:
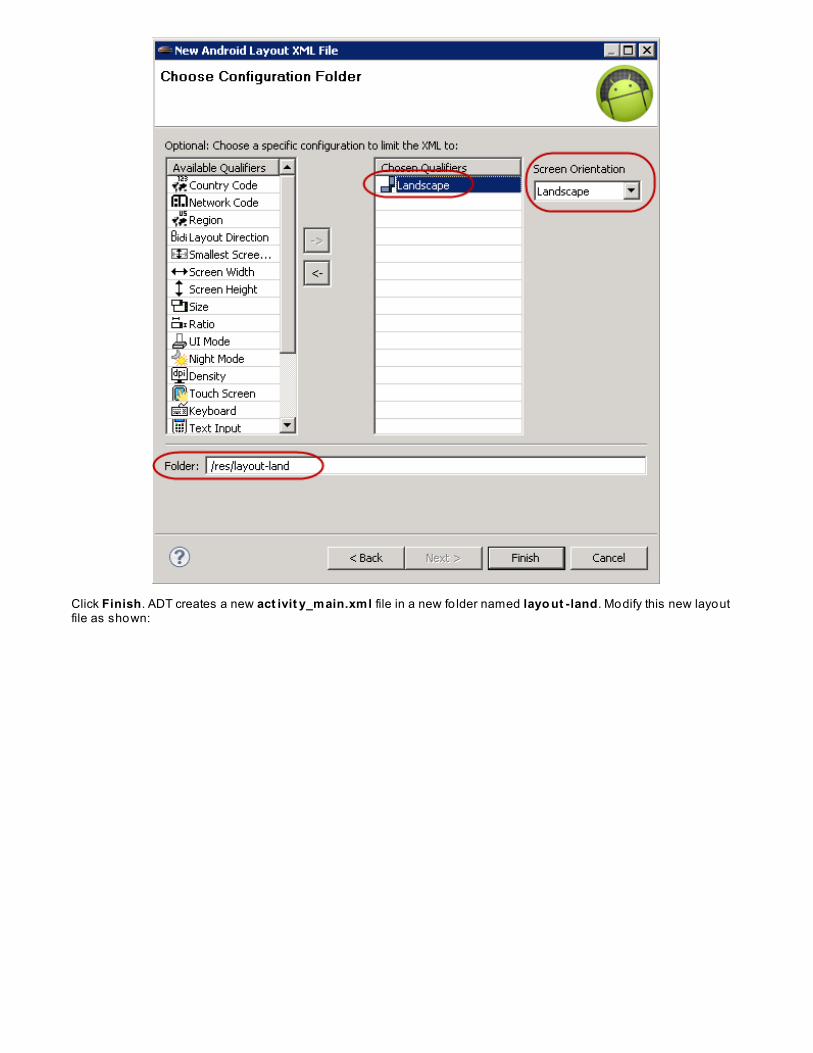
Click Finish. ADT creates a new act ivit y_main.xml file in a new fo lder named layo ut -land. Modify this new layoutfile as shown:
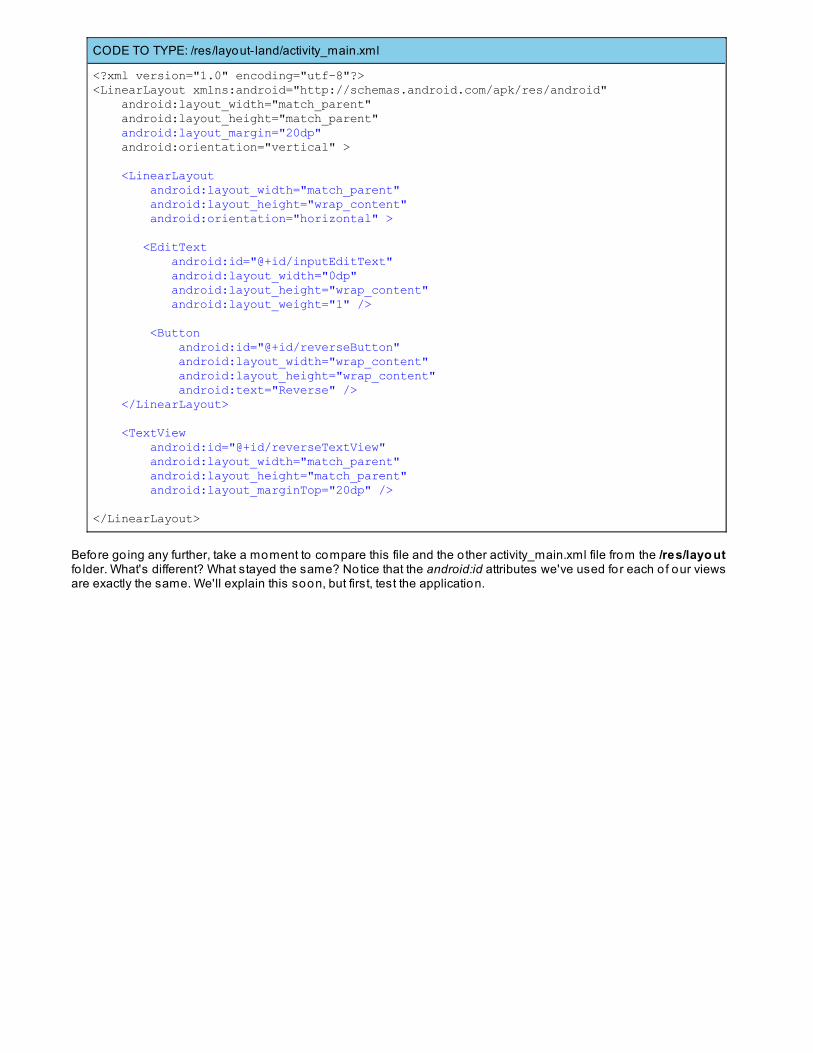
CODE TO TYPE: /res/layout-land/activity_main.xml
<?xml version="1.0" encoding="utf-8"?><LinearLayout xmlns:android="http://schemas.android.com/apk/res/android" android:layout_width="match_parent" android:layout_height="match_parent" android:layout_margin="20dp" android:orientation="vertical" > <LinearLayout android:layout_width="match_parent" android:layout_height="wrap_content" android:orientation="horizontal" > <EditText android:id="@+id/inputEditText" android:layout_width="0dp" android:layout_height="wrap_content" android:layout_weight="1" /> <Button android:id="@+id/reverseButton" android:layout_width="wrap_content" android:layout_height="wrap_content" android:text="Reverse" /> </LinearLayout> <TextView android:id="@+id/reverseTextView" android:layout_width="match_parent" android:layout_height="match_parent" android:layout_marginTop="20dp" /> </LinearLayout>
Before go ing any further, take a moment to compare this file and the o ther activity_main.xml file from the /res/layo utfo lder. What's different? What stayed the same? Notice that the android:id attributes we've used for each o f our viewsare exactly the same. We'll explain this soon, but first, test the application.

Rotate the emulator (by pressing [Ct rl+F12]) and notice the changes in the view layout:
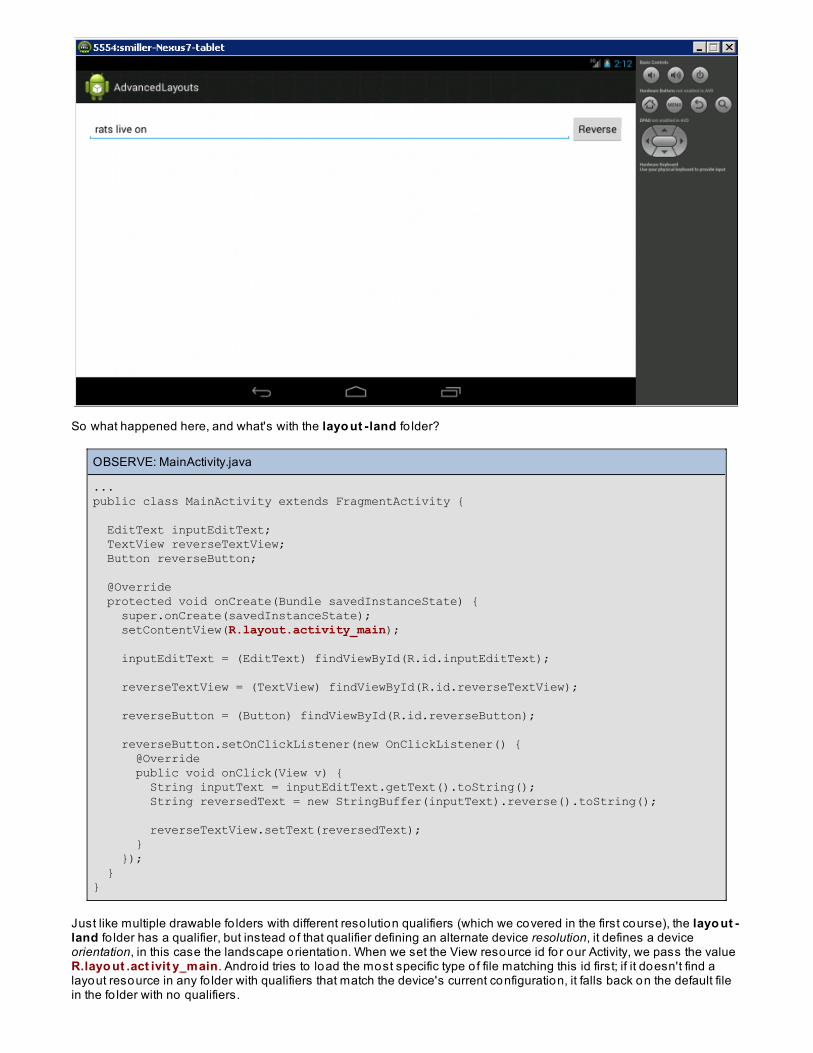
So what happened here, and what's with the layo ut -land fo lder?
OBSERVE: MainActivity.java
...public class MainActivity extends FragmentActivity { EditText inputEditText; TextView reverseTextView; Button reverseButton; @Override protected void onCreate(Bundle savedInstanceState) { super.onCreate(savedInstanceState); setContentView(R.layout.activity_main); inputEditText = (EditText) findViewById(R.id.inputEditText); reverseTextView = (TextView) findViewById(R.id.reverseTextView); reverseButton = (Button) findViewById(R.id.reverseButton); reverseButton.setOnClickListener(new OnClickListener() { @Override public void onClick(View v) { String inputText = inputEditText.getText().toString(); String reversedText = new StringBuffer(inputText).reverse().toString(); reverseTextView.setText(reversedText); } }); }}
Just like multiple drawable fo lders with different reso lution qualifiers (which we covered in the first course), the layo ut -land fo lder has a qualifier, but instead o f that qualifier defining an alternate device resolution, it defines a deviceorientation, in this case the landscape orientation. When we set the View resource id fo r our Activity, we pass the valueR.layo ut .act ivit y_main. Andro id tries to load the most specific type o f file matching this id first; if it doesn't find alayout resource in any fo lder with qualifiers that match the device's current configuration, it falls back on the default filein the fo lder with no qualifiers.
You could also create a new act ivit y_main.xml layout file in a /res/layo ut -po rt fo lder. Layout files in this fo lderwould then be used for portrait o rientation. If you did this, you technically wouldn't need a act ivit y_main.xml in thedefault /res/layo ut fo lder. However, we don't recommend removing that default activity_main.xml. Always keep adefault layout file fo r each view and only put specialized layout files for different device configurations in their respectiveresource qualifier fo lders as needed. If an application attempts to load a layout file and it can't find a file in any fo lderwith matching qualifiers, the application will crash.
Persisting Data on RotationYou might have noticed a problem in the previous application while ro tating the emulator. While the text you typed inthe EditText is still present after a ro tation, the TextView no longer contains the reversed text. The EditText componenthas an "auto-save" feature in Andro id that allows it to automatically persist its data on ro tation, but the TextViewcomponent does not have this feature. Many applications never have to worry about this limitation o f the TextViewcomponent. Often the TextView text will already be defined by a String resource constant, and thus will be loaded eachtime the layout is loaded, even on ro tation. Or perhaps the o nCreat eView() method is automatically defining the textfor each TextView. But, obviously, there are some situations (like ours) where the data should probably be persistedthrough ro tation.
We could just "recompute" the reversed String after a ro tation, but there's a better and more reliable way to make thefix. Modify MainAct ivit y.java once again as shown:
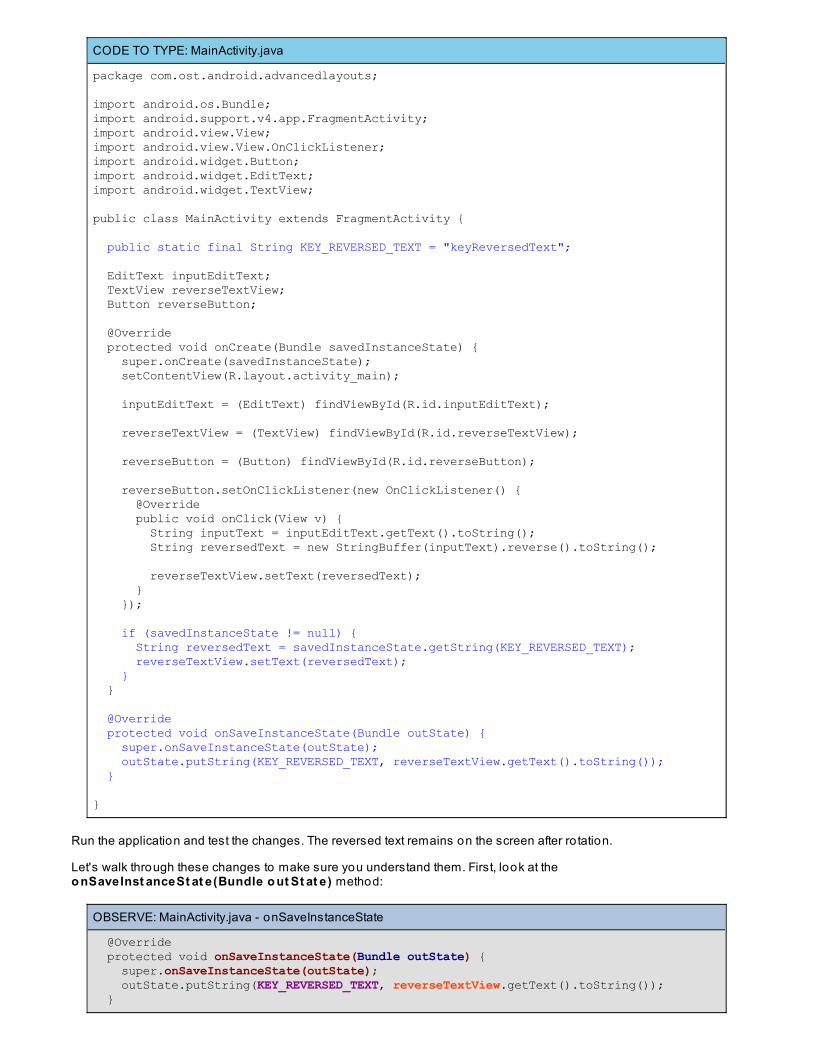
CODE TO TYPE: MainActivity.java
package com.ost.android.advancedlayouts;
import android.os.Bundle;import android.support.v4.app.FragmentActivity;import android.view.View;import android.view.View.OnClickListener;import android.widget.Button;import android.widget.EditText;import android.widget.TextView;
public class MainActivity extends FragmentActivity {
public static final String KEY_REVERSED_TEXT = "keyReversedText"; EditText inputEditText; TextView reverseTextView; Button reverseButton; @Override protected void onCreate(Bundle savedInstanceState) { super.onCreate(savedInstanceState); setContentView(R.layout.activity_main); inputEditText = (EditText) findViewById(R.id.inputEditText); reverseTextView = (TextView) findViewById(R.id.reverseTextView); reverseButton = (Button) findViewById(R.id.reverseButton); reverseButton.setOnClickListener(new OnClickListener() { @Override public void onClick(View v) { String inputText = inputEditText.getText().toString(); String reversedText = new StringBuffer(inputText).reverse().toString(); reverseTextView.setText(reversedText); } }); if (savedInstanceState != null) { String reversedText = savedInstanceState.getString(KEY_REVERSED_TEXT); reverseTextView.setText(reversedText); } }
@Override protected void onSaveInstanceState(Bundle outState) { super.onSaveInstanceState(outState); outState.putString(KEY_REVERSED_TEXT, reverseTextView.getText().toString()); }
}
Run the application and test the changes. The reversed text remains on the screen after ro tation.
Let's walk through these changes to make sure you understand them. First, look at theo nSaveInst anceSt at e(Bundle o ut St at e) method:
OBSERVE: MainActivity.java - onSaveInstanceState
@Override protected void onSaveInstanceState(Bundle outState) { super.onSaveInstanceState(outState); outState.putString(KEY_REVERSED_TEXT, reverseTextView.getText().toString()); }
Here we override the o nSaveInst anceSt at e(Bundle o ut St at e) method, a method on Activity (also on Fragments)that is called when the Activity is go ing away for any reason and the state o f the Activity needs to be saved. The methodreceives a Bundle object, which is intended to be used to store the current state o f the Activity. A Bundle is a uniqueAndro id class that has many methods for storing data o f various types. It also has matching methods for readingpreviously stored data o f each type. The data types supported are mostly just the standard primitive types, like int andlong; Bundles can also store String, Array, ArrayList, Parcelable, and Serializable object types, which typically are usedfor more complex state models.
We only need to store a simple String on Bundle. The values are stored in a Key-Value pattern similar to a HashMap.However, unlike a HashMap, the Key in a Bundle must be a String. We use a st at ic f inal defined String key constantKEY_REVERSED_T EXT to make sure we're using the same key to store and retrieve the data.
OBSERVE: MainActivity.java - onCreate(Bundle savedInstanceState)
if (savedInstanceState != null) { String reversedText = savedInstanceState.getString(KEY_REVERSED_TEXT); reverseTextView.setText(reversedText); }
We've seen the parameter "Bundle savedInstanceState" that's passed to the onCreate method many times, but neverused it. As you might have guessed, this savedInst anceSt at e object will have all the state data you savedpreviously to the o ut St at e object in the o nSaveInst anceSt at e method. We must do a null-check first, because thisobject will always be null the first time the Activity is created. After that, we retrieve our saved state data using the samekey we used to save the data—in this case, o ur reversed St ring. Take note that you are not limited to just onevariable at a time, so feel free to store all the state data you need between ro tations on the o ut St at e object.
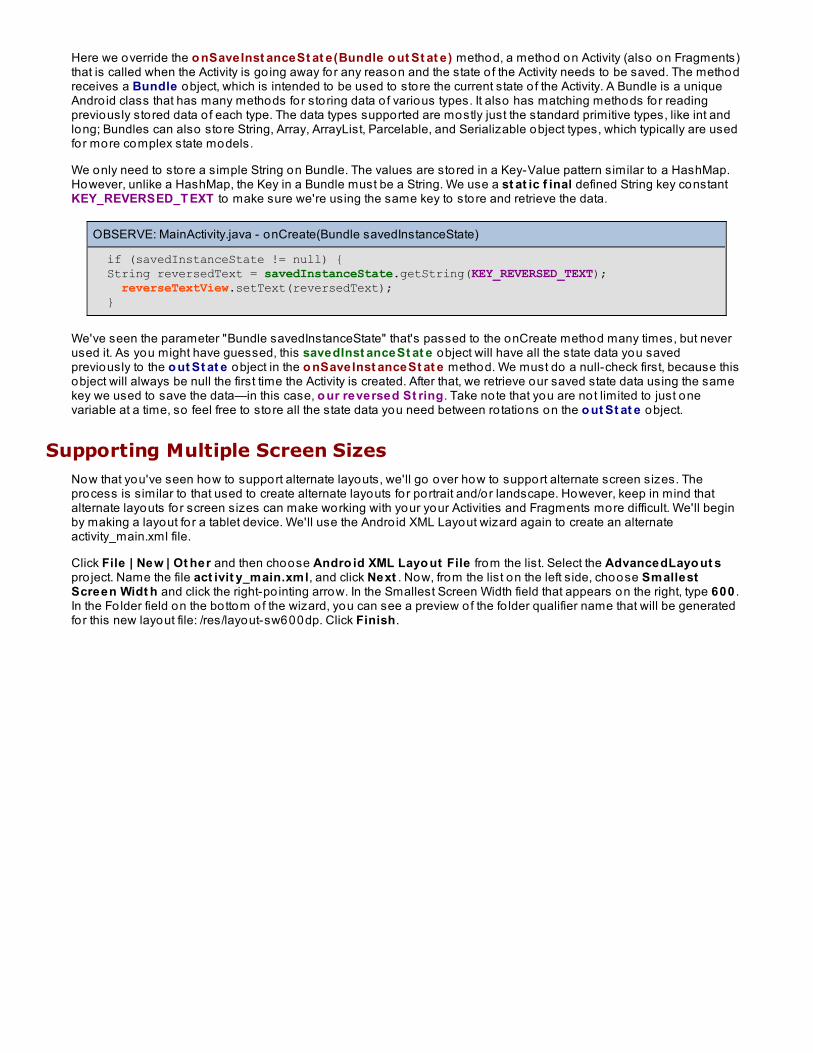
Supporting Multiple Screen SizesNow that you've seen how to support alternate layouts, we'll go over how to support alternate screen sizes. Theprocess is similar to that used to create alternate layouts for portrait and/or landscape. However, keep in mind thatalternate layouts for screen sizes can make working with your your Activities and Fragments more difficult. We'll beginby making a layout fo r a tablet device. We'll use the Andro id XML Layout wizard again to create an alternateactivity_main.xml file.
Click File | New | Ot her and then choose Andro id XML Layo ut File from the list. Select the AdvancedLayo ut spro ject. Name the file act ivit y_main.xml, and click Next . Now, from the list on the left side, choose SmallestScreen Widt h and click the right-po inting arrow. In the Smallest Screen Width field that appears on the right, type 600 .In the Fo lder field on the bottom of the wizard, you can see a preview of the fo lder qualifier name that will be generatedfor this new layout file: /res/layout-sw600dp. Click Finish.
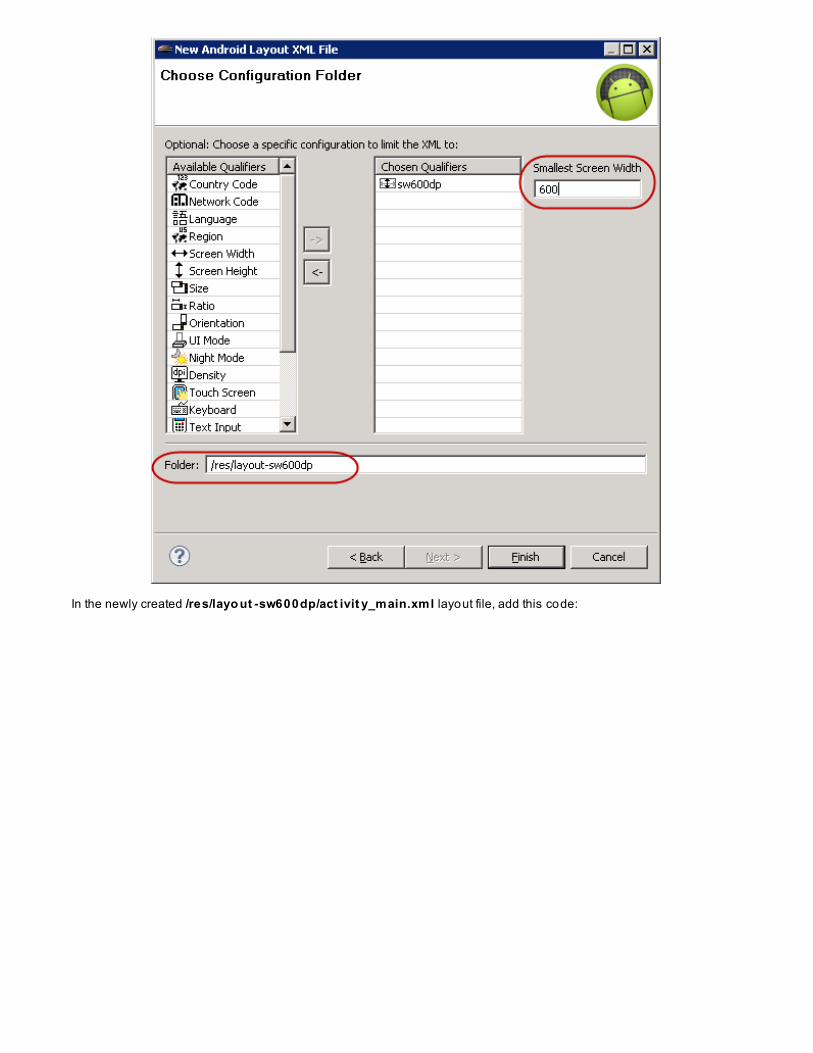
In the newly created /res/layo ut -sw600dp/act ivit y_main.xml layout file, add this code:
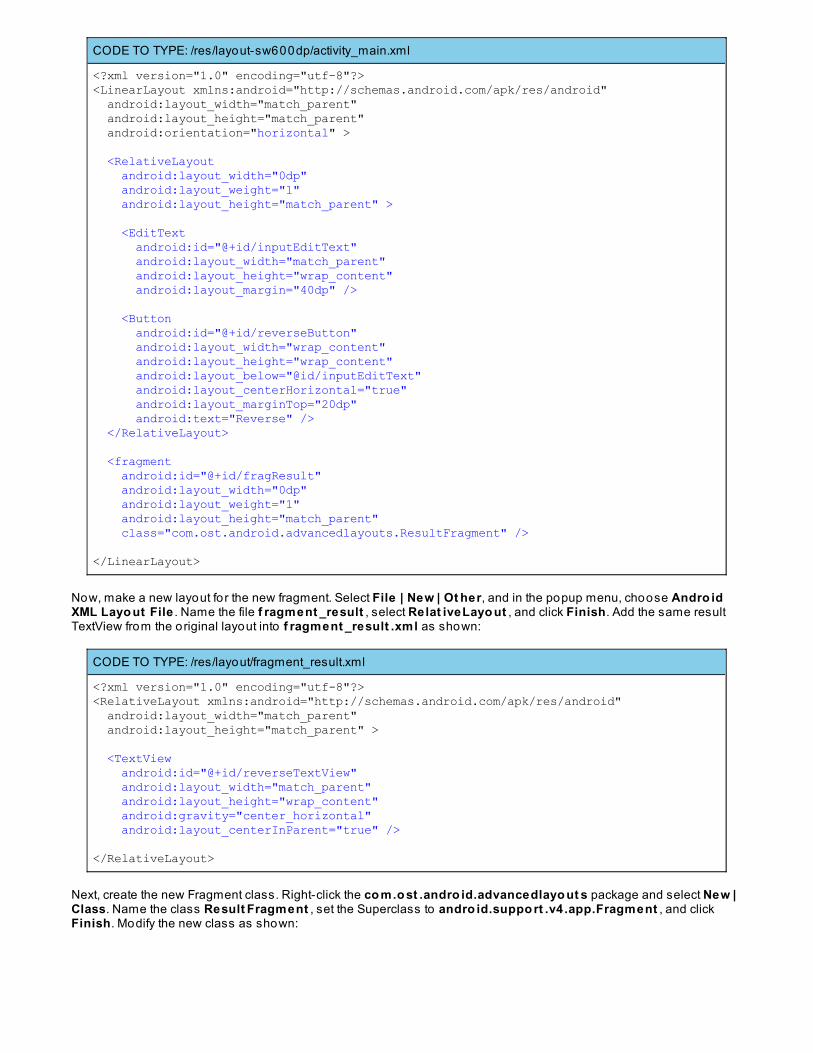
CODE TO TYPE: /res/layout-sw600dp/activity_main.xml
<?xml version="1.0" encoding="utf-8"?><LinearLayout xmlns:android="http://schemas.android.com/apk/res/android" android:layout_width="match_parent" android:layout_height="match_parent" android:orientation="horizontal" > <RelativeLayout android:layout_width="0dp" android:layout_weight="1" android:layout_height="match_parent" > <EditText android:id="@+id/inputEditText" android:layout_width="match_parent" android:layout_height="wrap_content" android:layout_margin="40dp" /> <Button android:id="@+id/reverseButton" android:layout_width="wrap_content" android:layout_height="wrap_content" android:layout_below="@id/inputEditText" android:layout_centerHorizontal="true" android:layout_marginTop="20dp" android:text="Reverse" /> </RelativeLayout> <fragment android:id="@+id/fragResult" android:layout_width="0dp" android:layout_weight="1" android:layout_height="match_parent" class="com.ost.android.advancedlayouts.ResultFragment" /> </LinearLayout>
Now, make a new layout fo r the new fragment. Select File | New | Ot her, and in the popup menu, choose Andro idXML Layo ut File . Name the file f ragment _result , select Relat iveLayo ut , and click Finish. Add the same resultTextView from the original layout into f ragment _result .xml as shown:
CODE TO TYPE: /res/layout/fragment_result.xml
<?xml version="1.0" encoding="utf-8"?><RelativeLayout xmlns:android="http://schemas.android.com/apk/res/android" android:layout_width="match_parent" android:layout_height="match_parent" > <TextView android:id="@+id/reverseTextView" android:layout_width="match_parent" android:layout_height="wrap_content" android:gravity="center_horizontal" android:layout_centerInParent="true" /> </RelativeLayout>
Next, create the new Fragment class. Right-click the co m.o st .andro id.advancedlayo ut s package and select New |Class. Name the class Result Fragment , set the Superclass to andro id.suppo rt .v4.app.Fragment , and clickFinish. Modify the new class as shown:
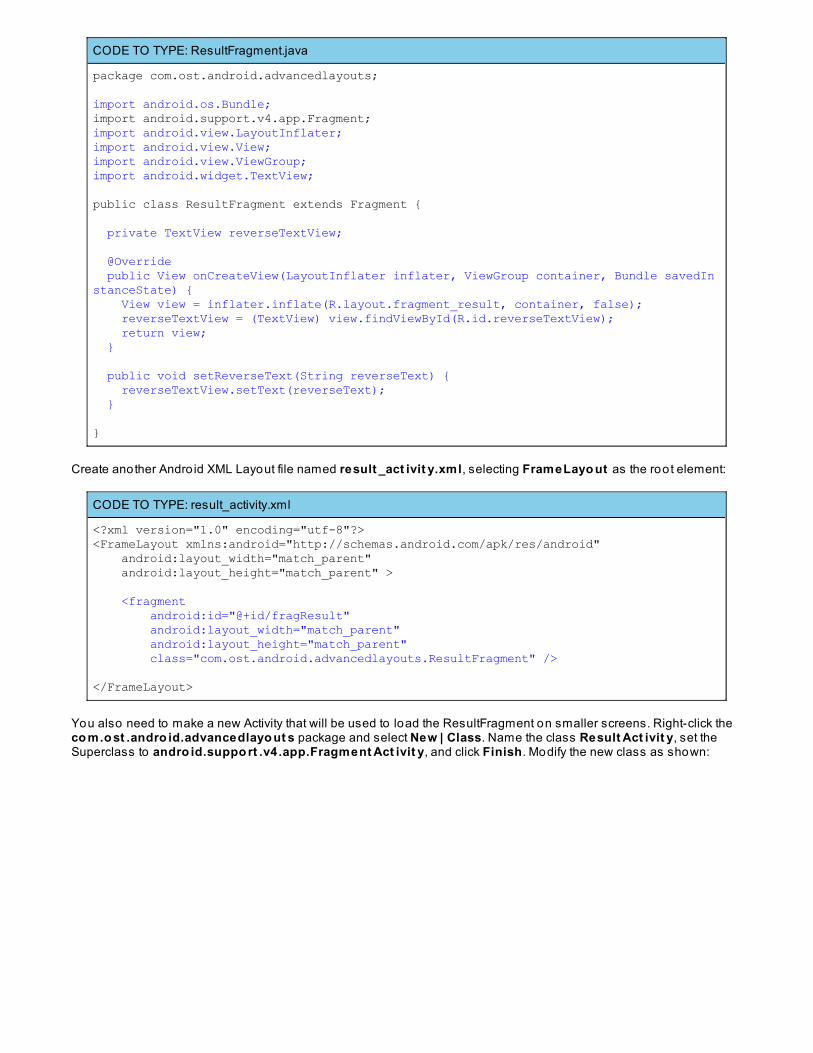
CODE TO TYPE: ResultFragment.java
package com.ost.android.advancedlayouts;
import android.os.Bundle;import android.support.v4.app.Fragment;import android.view.LayoutInflater;import android.view.View;import android.view.ViewGroup;import android.widget.TextView;
public class ResultFragment extends Fragment { private TextView reverseTextView; @Override public View onCreateView(LayoutInflater inflater, ViewGroup container, Bundle savedInstanceState) { View view = inflater.inflate(R.layout.fragment_result, container, false); reverseTextView = (TextView) view.findViewById(R.id.reverseTextView); return view; } public void setReverseText(String reverseText) { reverseTextView.setText(reverseText); } }
Create another Andro id XML Layout file named result _act ivit y.xml, selecting FrameLayo ut as the root element:
CODE TO TYPE: result_activity.xml
<?xml version="1.0" encoding="utf-8"?><FrameLayout xmlns:android="http://schemas.android.com/apk/res/android" android:layout_width="match_parent" android:layout_height="match_parent" > <fragment android:id="@+id/fragResult" android:layout_width="match_parent" android:layout_height="match_parent" class="com.ost.android.advancedlayouts.ResultFragment" /> </FrameLayout>
You also need to make a new Activity that will be used to load the ResultFragment on smaller screens. Right-click theco m.o st .andro id.advancedlayo ut s package and select New | Class. Name the class Result Act ivit y, set theSuperclass to andro id.suppo rt .v4.app.Fragment Act ivit y, and click Finish. Modify the new class as shown:
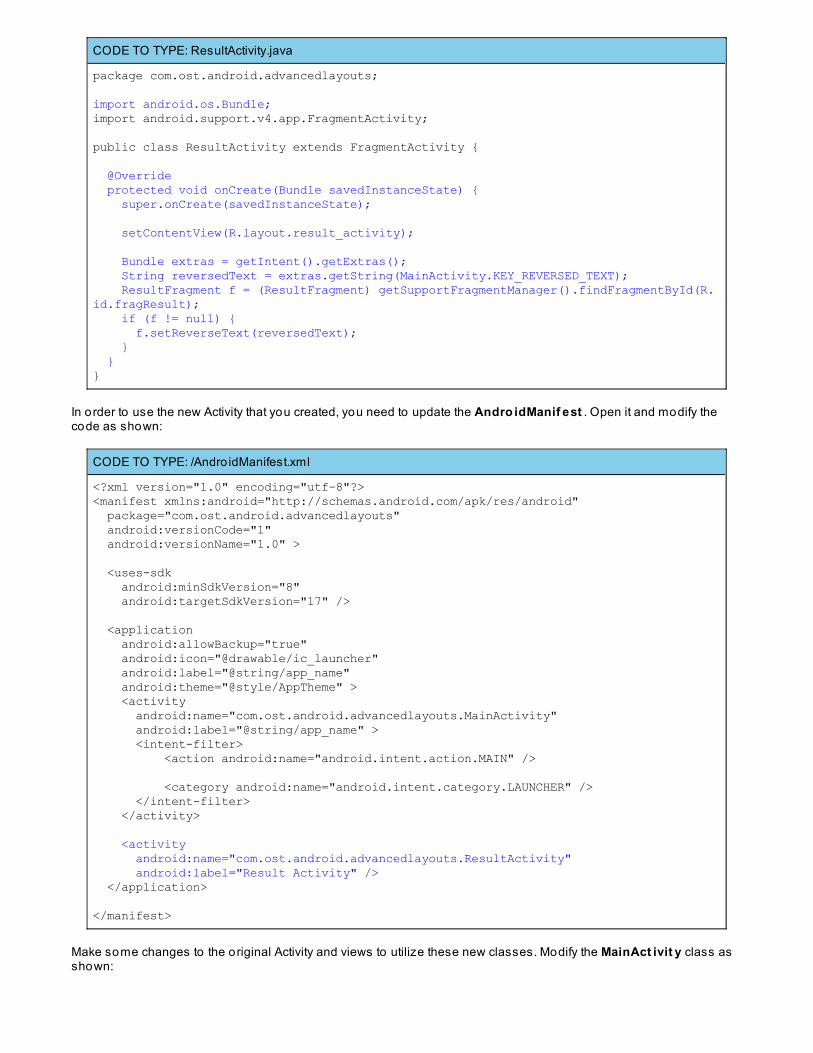
CODE TO TYPE: ResultActivity.java
package com.ost.android.advancedlayouts;
import android.os.Bundle;import android.support.v4.app.FragmentActivity;
public class ResultActivity extends FragmentActivity { @Override protected void onCreate(Bundle savedInstanceState) { super.onCreate(savedInstanceState); setContentView(R.layout.result_activity); Bundle extras = getIntent().getExtras(); String reversedText = extras.getString(MainActivity.KEY_REVERSED_TEXT); ResultFragment f = (ResultFragment) getSupportFragmentManager().findFragmentById(R.id.fragResult); if (f != null) { f.setReverseText(reversedText); } }}
In order to use the new Activity that you created, you need to update the Andro idManif est . Open it and modify thecode as shown:
CODE TO TYPE: /Andro idManifest.xml
<?xml version="1.0" encoding="utf-8"?><manifest xmlns:android="http://schemas.android.com/apk/res/android" package="com.ost.android.advancedlayouts" android:versionCode="1" android:versionName="1.0" > <uses-sdk android:minSdkVersion="8" android:targetSdkVersion="17" /> <application android:allowBackup="true" android:icon="@drawable/ic_launcher" android:label="@string/app_name" android:theme="@style/AppTheme" > <activity android:name="com.ost.android.advancedlayouts.MainActivity" android:label="@string/app_name" > <intent-filter> <action android:name="android.intent.action.MAIN" /> <category android:name="android.intent.category.LAUNCHER" /> </intent-filter> </activity> <activity android:name="com.ost.android.advancedlayouts.ResultActivity" android:label="Result Activity" /> </application> </manifest>
Make some changes to the original Activity and views to utilize these new classes. Modify the MainAct ivit y class asshown:
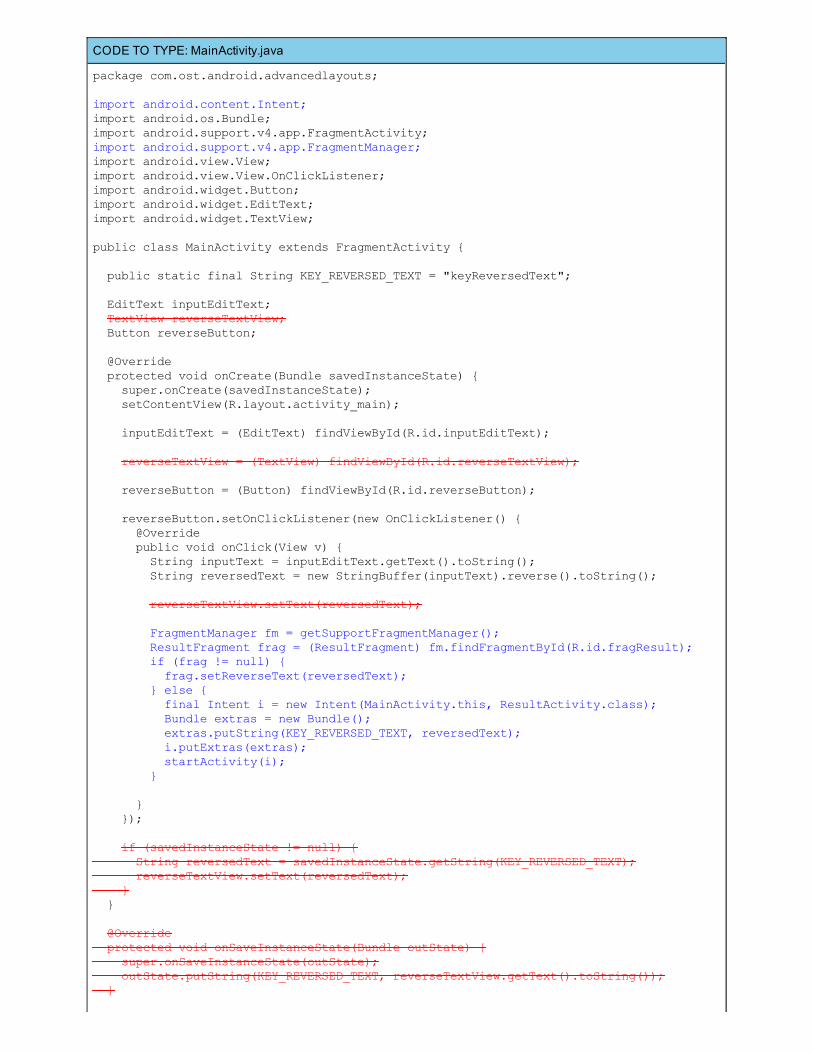
CODE TO TYPE: MainActivity.java
package com.ost.android.advancedlayouts;
import android.content.Intent;import android.os.Bundle;import android.support.v4.app.FragmentActivity;import android.support.v4.app.FragmentManager;import android.view.View;import android.view.View.OnClickListener;import android.widget.Button;import android.widget.EditText;import android.widget.TextView;
public class MainActivity extends FragmentActivity {
public static final String KEY_REVERSED_TEXT = "keyReversedText"; EditText inputEditText; TextView reverseTextView; Button reverseButton; @Override protected void onCreate(Bundle savedInstanceState) { super.onCreate(savedInstanceState); setContentView(R.layout.activity_main); inputEditText = (EditText) findViewById(R.id.inputEditText); reverseTextView = (TextView) findViewById(R.id.reverseTextView); reverseButton = (Button) findViewById(R.id.reverseButton); reverseButton.setOnClickListener(new OnClickListener() { @Override public void onClick(View v) { String inputText = inputEditText.getText().toString(); String reversedText = new StringBuffer(inputText).reverse().toString(); reverseTextView.setText(reversedText); FragmentManager fm = getSupportFragmentManager(); ResultFragment frag = (ResultFragment) fm.findFragmentById(R.id.fragResult); if (frag != null) { frag.setReverseText(reversedText); } else { final Intent i = new Intent(MainActivity.this, ResultActivity.class); Bundle extras = new Bundle(); extras.putString(KEY_REVERSED_TEXT, reversedText); i.putExtras(extras); startActivity(i); } } }); if (savedInstanceState != null) { String reversedText = savedInstanceState.getString(KEY_REVERSED_TEXT); reverseTextView.setText(reversedText); } } @Override protected void onSaveInstanceState(Bundle outState) { super.onSaveInstanceState(outState); outState.putString(KEY_REVERSED_TEXT, reverseTextView.getText().toString()); }
}
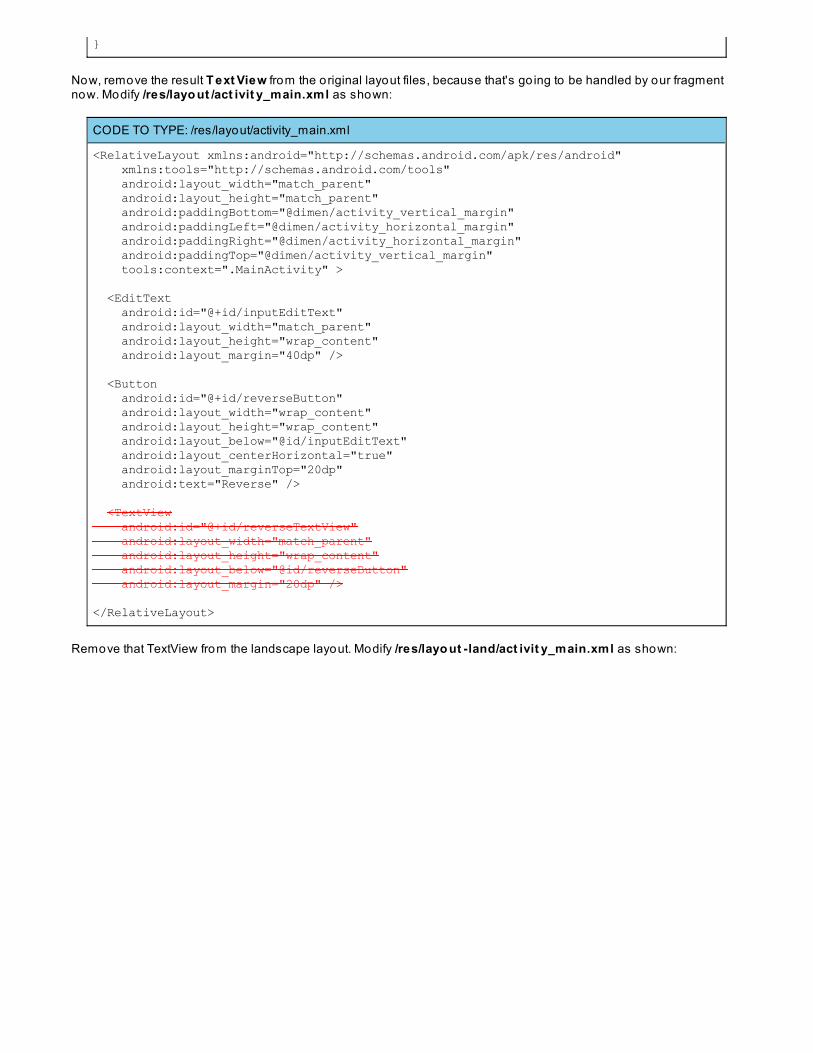
Now, remove the result T ext View from the original layout files, because that's go ing to be handled by our fragmentnow. Modify /res/layo ut /act ivit y_main.xml as shown:
CODE TO TYPE: /res/layout/activity_main.xml
<RelativeLayout xmlns:android="http://schemas.android.com/apk/res/android" xmlns:tools="http://schemas.android.com/tools" android:layout_width="match_parent" android:layout_height="match_parent" android:paddingBottom="@dimen/activity_vertical_margin" android:paddingLeft="@dimen/activity_horizontal_margin" android:paddingRight="@dimen/activity_horizontal_margin" android:paddingTop="@dimen/activity_vertical_margin" tools:context=".MainActivity" > <EditText android:id="@+id/inputEditText" android:layout_width="match_parent" android:layout_height="wrap_content" android:layout_margin="40dp" /> <Button android:id="@+id/reverseButton" android:layout_width="wrap_content" android:layout_height="wrap_content" android:layout_below="@id/inputEditText" android:layout_centerHorizontal="true" android:layout_marginTop="20dp" android:text="Reverse" /> <TextView android:id="@+id/reverseTextView" android:layout_width="match_parent" android:layout_height="wrap_content" android:layout_below="@id/reverseButton" android:layout_margin="20dp" /> </RelativeLayout>
Remove that TextView from the landscape layout. Modify /res/layo ut -land/act ivit y_main.xml as shown:
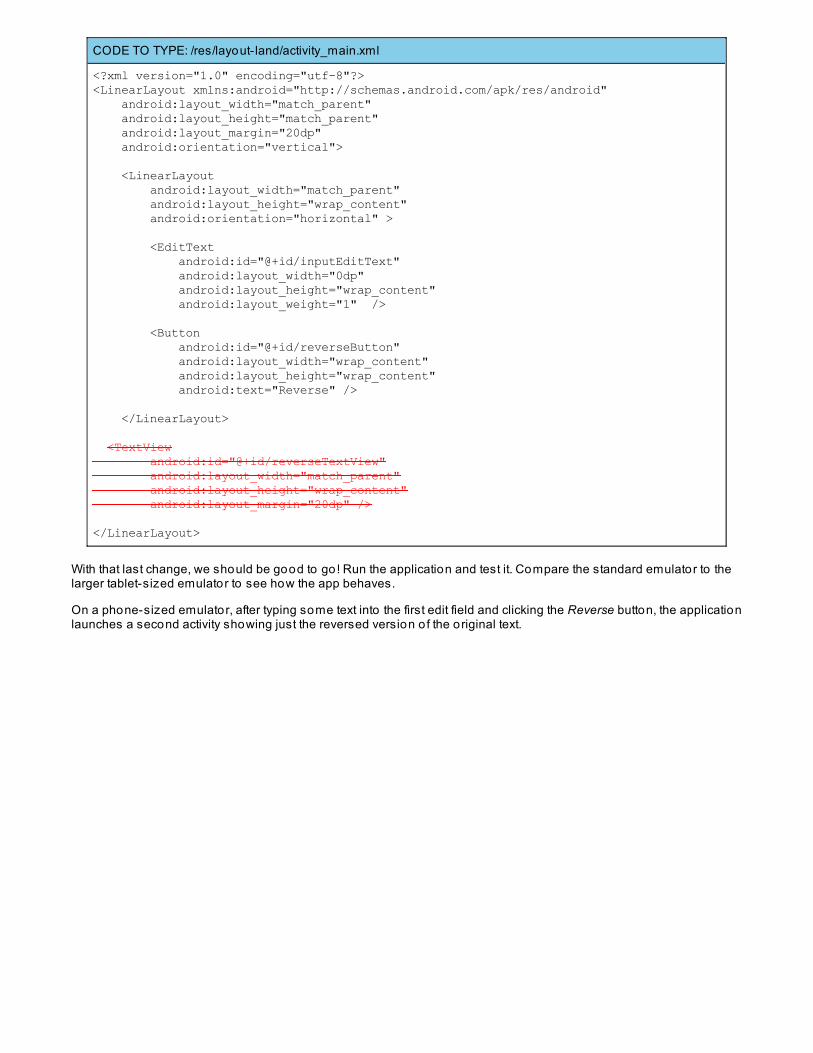
CODE TO TYPE: /res/layout-land/activity_main.xml
<?xml version="1.0" encoding="utf-8"?><LinearLayout xmlns:android="http://schemas.android.com/apk/res/android" android:layout_width="match_parent" android:layout_height="match_parent" android:layout_margin="20dp" android:orientation="vertical"> <LinearLayout android:layout_width="match_parent" android:layout_height="wrap_content" android:orientation="horizontal" > <EditText android:id="@+id/inputEditText" android:layout_width="0dp" android:layout_height="wrap_content" android:layout_weight="1" /> <Button android:id="@+id/reverseButton" android:layout_width="wrap_content" android:layout_height="wrap_content" android:text="Reverse" /> </LinearLayout> <TextView android:id="@+id/reverseTextView" android:layout_width="match_parent" android:layout_height="wrap_content" android:layout_margin="20dp" /> </LinearLayout>
With that last change, we should be good to go! Run the application and test it. Compare the standard emulator to thelarger tablet-sized emulator to see how the app behaves.
On a phone-sized emulator, after typing some text into the first edit field and clicking the Reverse button, the applicationlaunches a second activity showing just the reversed version o f the original text.
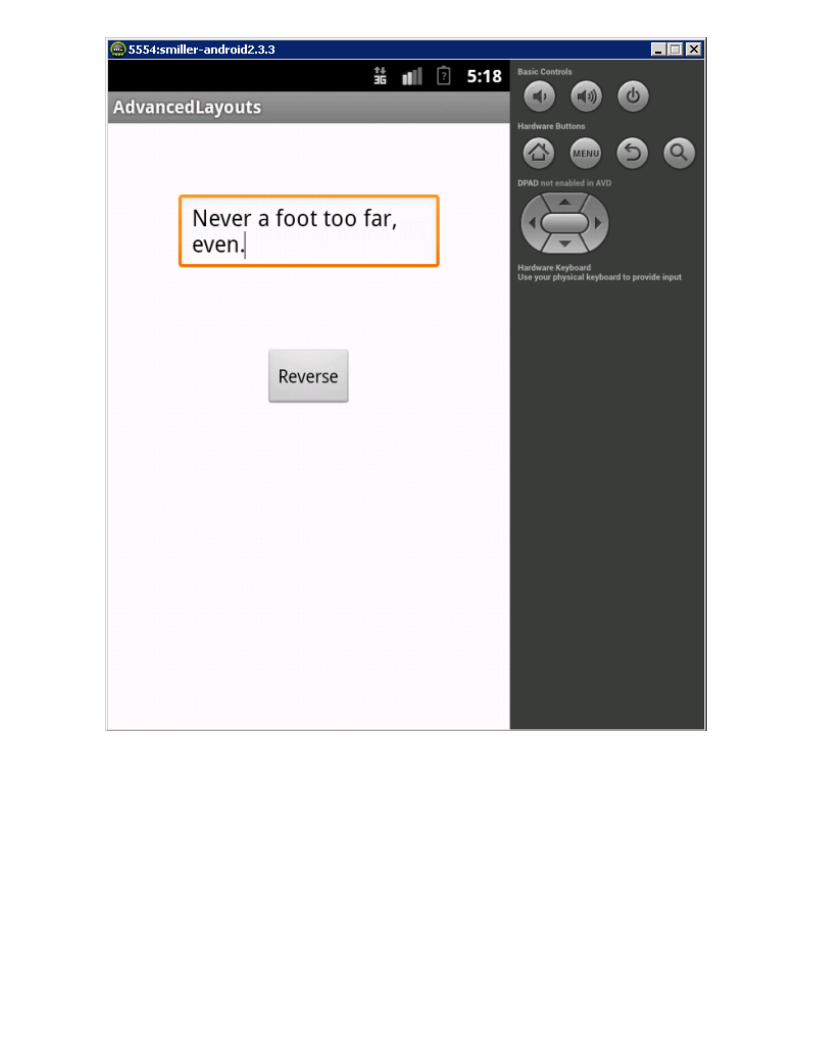
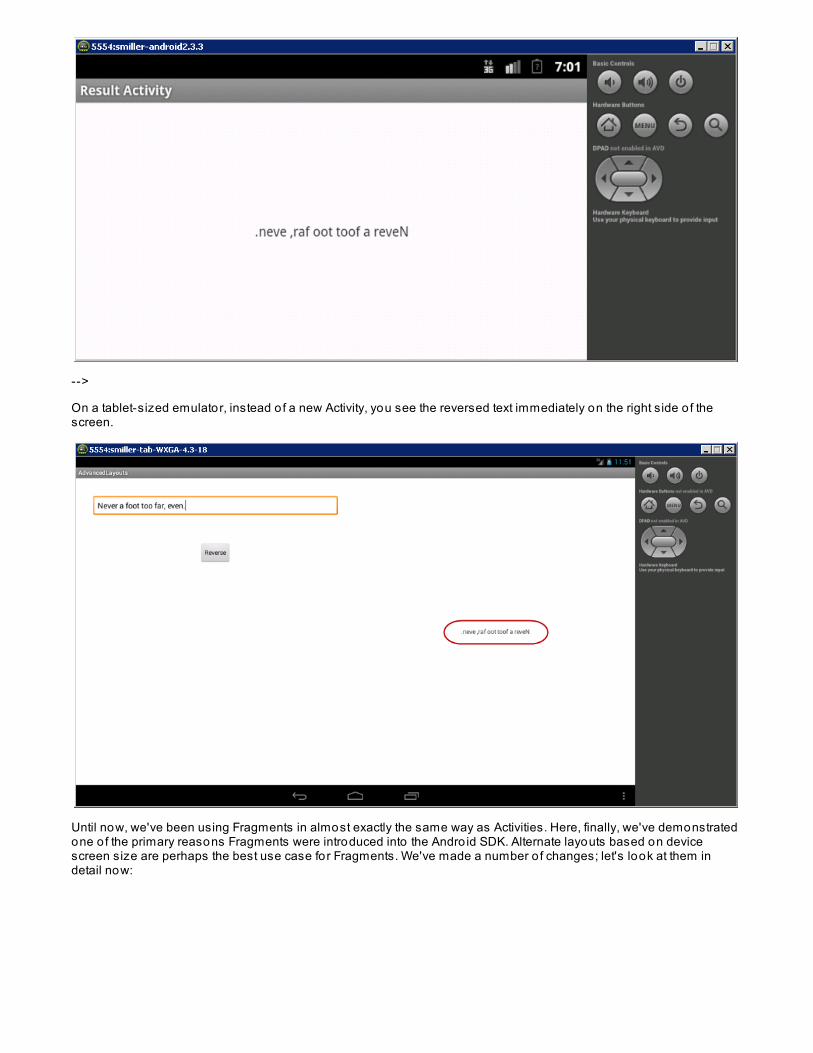
-->
On a tablet-sized emulator, instead o f a new Activity, you see the reversed text immediately on the right side o f thescreen.
Until now, we've been using Fragments in almost exactly the same way as Activities. Here, finally, we've demonstratedone o f the primary reasons Fragments were introduced into the Andro id SDK. Alternate layouts based on devicescreen size are perhaps the best use case for Fragments. We've made a number o f changes; let's look at them indetail now:
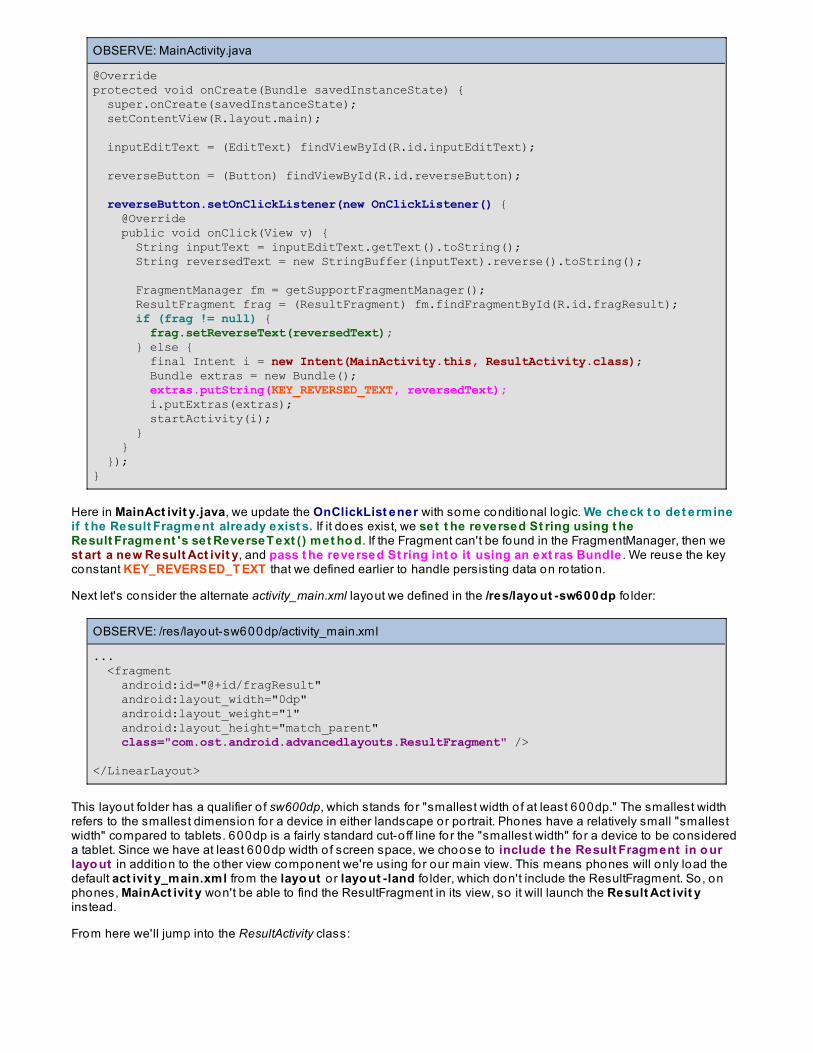
OBSERVE: MainActivity.java
@Overrideprotected void onCreate(Bundle savedInstanceState) { super.onCreate(savedInstanceState); setContentView(R.layout.main); inputEditText = (EditText) findViewById(R.id.inputEditText); reverseButton = (Button) findViewById(R.id.reverseButton); reverseButton.setOnClickListener(new OnClickListener() { @Override public void onClick(View v) { String inputText = inputEditText.getText().toString(); String reversedText = new StringBuffer(inputText).reverse().toString(); FragmentManager fm = getSupportFragmentManager(); ResultFragment frag = (ResultFragment) fm.findFragmentById(R.id.fragResult); if (frag != null) { frag.setReverseText(reversedText); } else { final Intent i = new Intent(MainActivity.this, ResultActivity.class); Bundle extras = new Bundle(); extras.putString(KEY_REVERSED_TEXT, reversedText); i.putExtras(extras); startActivity(i); } } });}
Here in MainAct ivit y.java, we update the OnClickList ener with some conditional logic. We check t o det ermineif t he Result Fragment already exist s. If it does exist, we set t he reversed St ring using t heResult Fragment 's set ReverseT ext () met ho d. If the Fragment can't be found in the FragmentManager, then west art a new Result Act ivit y, and pass t he reversed St ring int o it using an ext ras Bundle . We reuse the keyconstant KEY_REVERSED_T EXT that we defined earlier to handle persisting data on ro tation.
Next let's consider the alternate activity_main.xml layout we defined in the /res/layo ut -sw600dp fo lder:
OBSERVE: /res/layout-sw600dp/activity_main.xml
... <fragment android:id="@+id/fragResult" android:layout_width="0dp" android:layout_weight="1" android:layout_height="match_parent" class="com.ost.android.advancedlayouts.ResultFragment" /> </LinearLayout>
This layout fo lder has a qualifier o f sw600dp, which stands for "smallest width o f at least 600dp." The smallest widthrefers to the smallest dimension for a device in either landscape or portrait. Phones have a relatively small "smallestwidth" compared to tablets. 600dp is a fairly standard cut-o ff line for the "smallest width" fo r a device to be considereda tablet. Since we have at least 600dp width o f screen space, we choose to include t he Result Fragment in o urlayo ut in addition to the o ther view component we're using for our main view. This means phones will only load thedefault act ivit y_main.xml from the layo ut o r layo ut -land fo lder, which don't include the ResultFragment. So, onphones, MainAct ivit y won't be able to find the ResultFragment in its view, so it will launch the Result Act ivit yinstead.
From here we'll jump into the ResultActivity class:
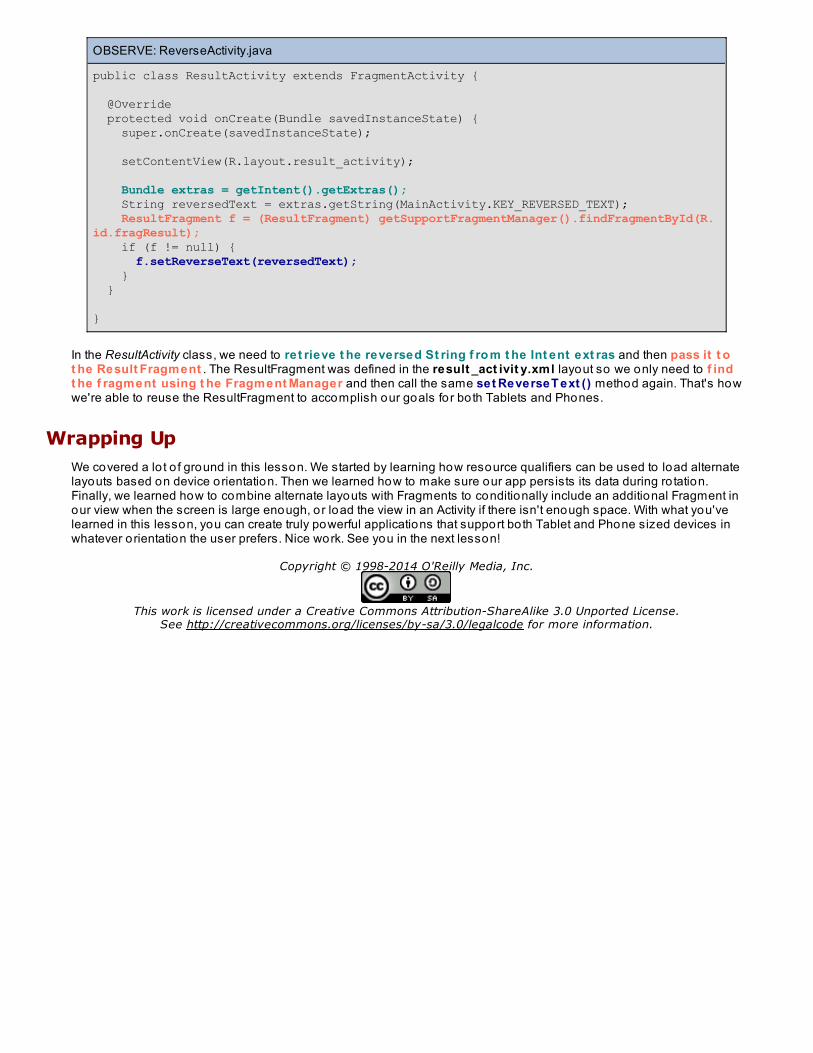
OBSERVE: ReverseActivity.java
public class ResultActivity extends FragmentActivity { @Override protected void onCreate(Bundle savedInstanceState) { super.onCreate(savedInstanceState); setContentView(R.layout.result_activity); Bundle extras = getIntent().getExtras(); String reversedText = extras.getString(MainActivity.KEY_REVERSED_TEXT); ResultFragment f = (ResultFragment) getSupportFragmentManager().findFragmentById(R.id.fragResult); if (f != null) { f.setReverseText(reversedText); } } }
In the ResultActivity class, we need to ret rieve t he reversed St ring f ro m t he Int ent ext ras and then pass it t ot he Result Fragment . The ResultFragment was defined in the result _act ivit y.xml layout so we only need to f indt he f ragment using t he Fragment Manager and then call the same set ReverseT ext () method again. That's howwe're able to reuse the ResultFragment to accomplish our goals fo r both Tablets and Phones.
Wrapping UpWe covered a lo t o f ground in this lesson. We started by learning how resource qualifiers can be used to load alternatelayouts based on device orientation. Then we learned how to make sure our app persists its data during ro tation.Finally, we learned how to combine alternate layouts with Fragments to conditionally include an additional Fragment inour view when the screen is large enough, or load the view in an Activity if there isn't enough space. With what you'velearned in this lesson, you can create truly powerful applications that support both Tablet and Phone sized devices inwhatever orientation the user prefers. Nice work. See you in the next lesson!
Copyright © 1998-2014 O'Reilly Media, Inc.
This work is licensed under a Creative Commons Attribution-ShareAlike 3.0 Unported License.See http://creativecommons.org/licenses/by-sa/3.0/legalcode for more information.
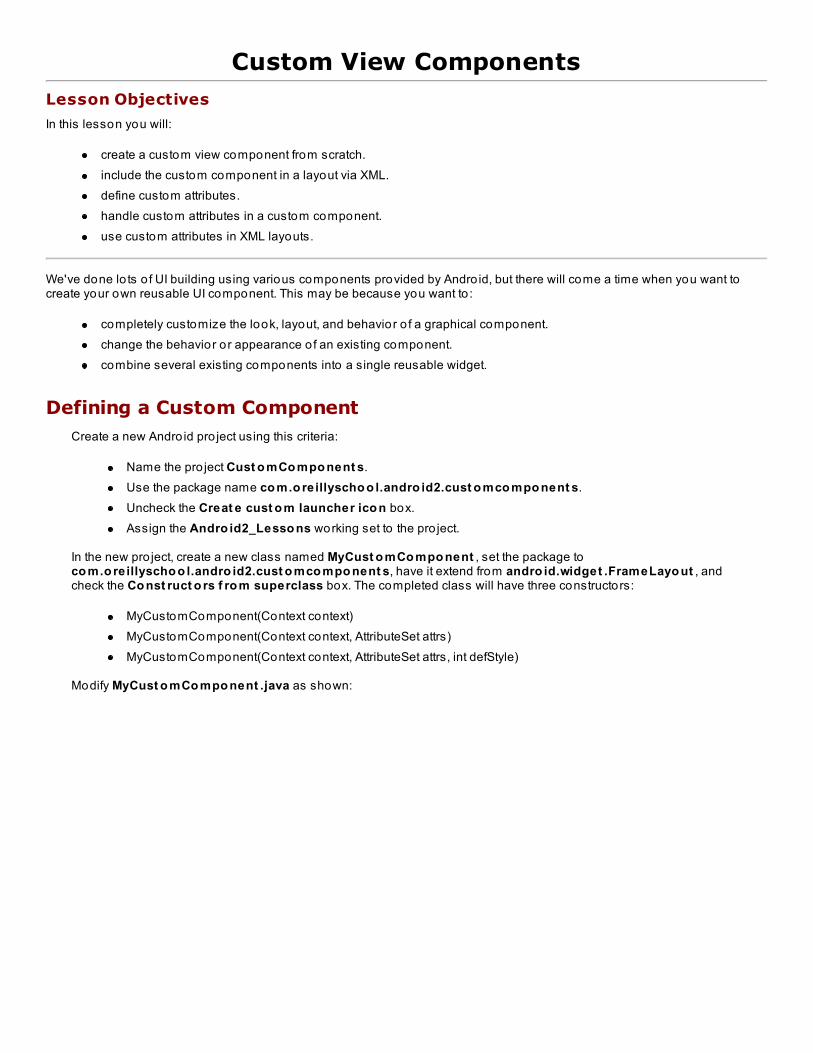
Custom View ComponentsLesson Objectives
In this lesson you will:
create a custom view component from scratch.include the custom component in a layout via XML.define custom attributes.handle custom attributes in a custom component.use custom attributes in XML layouts.
We've done lo ts o f UI building using various components provided by Andro id, but there will come a time when you want tocreate your own reusable UI component. This may be because you want to :
completely customize the look, layout, and behavior o f a graphical component.change the behavior or appearance o f an existing component.combine several existing components into a single reusable widget.
Defining a Custom ComponentCreate a new Andro id pro ject using this criteria:
Name the pro ject Cust o mCo mpo nent s.Use the package name co m.o reillyscho o l.andro id2.cust o mco mpo nent s.Uncheck the Creat e cust o m launcher ico n box.Assign the Andro id2_Lesso ns working set to the pro ject.
In the new pro ject, create a new class named MyCust o mCo mpo nent , set the package toco m.o reillyscho o l.andro id2.cust o mco mpo nent s, have it extend from andro id.widget .FrameLayo ut , andcheck the Co nst ruct o rs f ro m superclass box. The completed class will have three constructors:
MyCustomComponent(Context context)MyCustomComponent(Context context, AttributeSet attrs)MyCustomComponent(Context context, AttributeSet attrs, int defStyle)
Modify MyCust o mCo mpo nent .java as shown:
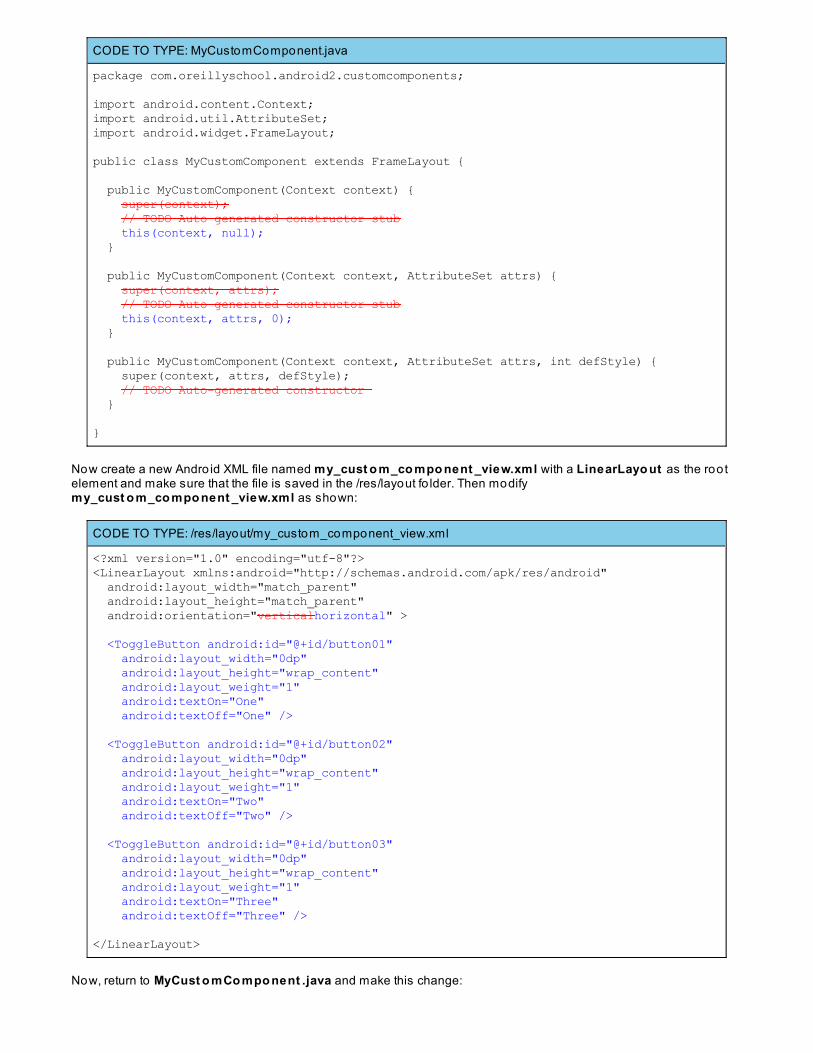
CODE TO TYPE: MyCustomComponent.java
package com.oreillyschool.android2.customcomponents;
import android.content.Context;import android.util.AttributeSet;import android.widget.FrameLayout;
public class MyCustomComponent extends FrameLayout {
public MyCustomComponent(Context context) { super(context); // TODO Auto-generated constructor stub this(context, null); } public MyCustomComponent(Context context, AttributeSet attrs) { super(context, attrs); // TODO Auto-generated constructor stub this(context, attrs, 0); } public MyCustomComponent(Context context, AttributeSet attrs, int defStyle) { super(context, attrs, defStyle); // TODO Auto-generated constructor }
}
Now create a new Andro id XML file named my_cust o m_co mpo nent _view.xml with a LinearLayo ut as the rootelement and make sure that the file is saved in the /res/layout fo lder. Then modifymy_cust o m_co mpo nent _view.xml as shown:
CODE TO TYPE: /res/layout/my_custom_component_view.xml
<?xml version="1.0" encoding="utf-8"?><LinearLayout xmlns:android="http://schemas.android.com/apk/res/android" android:layout_width="match_parent" android:layout_height="match_parent" android:orientation="verticalhorizontal" > <ToggleButton android:id="@+id/button01" android:layout_width="0dp" android:layout_height="wrap_content" android:layout_weight="1" android:textOn="One" android:textOff="One" /> <ToggleButton android:id="@+id/button02" android:layout_width="0dp" android:layout_height="wrap_content" android:layout_weight="1" android:textOn="Two" android:textOff="Two" /> <ToggleButton android:id="@+id/button03" android:layout_width="0dp" android:layout_height="wrap_content" android:layout_weight="1" android:textOn="Three" android:textOff="Three" />
</LinearLayout>
Now, return to MyCust o mCo mpo nent .java and make this change:
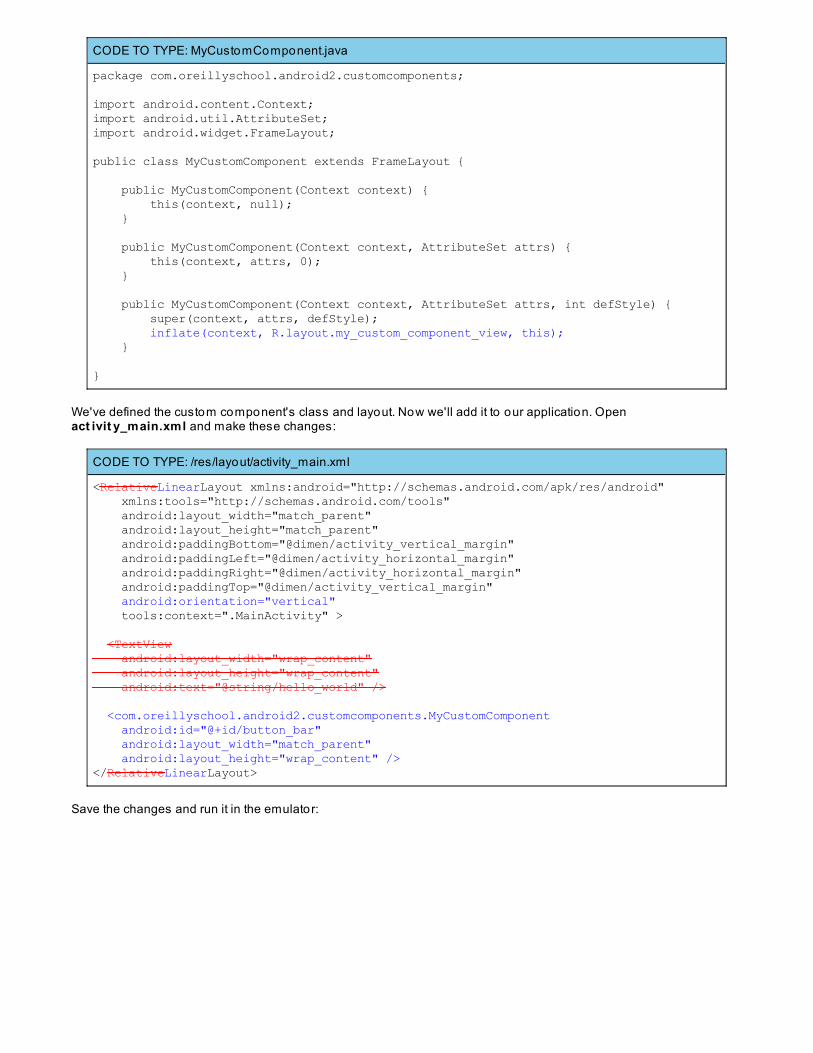
CODE TO TYPE: MyCustomComponent.java
package com.oreillyschool.android2.customcomponents;
import android.content.Context;import android.util.AttributeSet;import android.widget.FrameLayout;
public class MyCustomComponent extends FrameLayout {
public MyCustomComponent(Context context) { this(context, null); }
public MyCustomComponent(Context context, AttributeSet attrs) { this(context, attrs, 0); }
public MyCustomComponent(Context context, AttributeSet attrs, int defStyle) { super(context, attrs, defStyle); inflate(context, R.layout.my_custom_component_view, this); }
}
We've defined the custom component's class and layout. Now we'll add it to our application. Openact ivit y_main.xml and make these changes:
CODE TO TYPE: /res/layout/activity_main.xml
<RelativeLinearLayout xmlns:android="http://schemas.android.com/apk/res/android" xmlns:tools="http://schemas.android.com/tools" android:layout_width="match_parent" android:layout_height="match_parent" android:paddingBottom="@dimen/activity_vertical_margin" android:paddingLeft="@dimen/activity_horizontal_margin" android:paddingRight="@dimen/activity_horizontal_margin" android:paddingTop="@dimen/activity_vertical_margin" android:orientation="vertical" tools:context=".MainActivity" > <TextView android:layout_width="wrap_content" android:layout_height="wrap_content" android:text="@string/hello_world" /> <com.oreillyschool.android2.customcomponents.MyCustomComponent android:id="@+id/button_bar" android:layout_width="match_parent" android:layout_height="wrap_content" /></RelativeLinearLayout>
Save the changes and run it in the emulator:
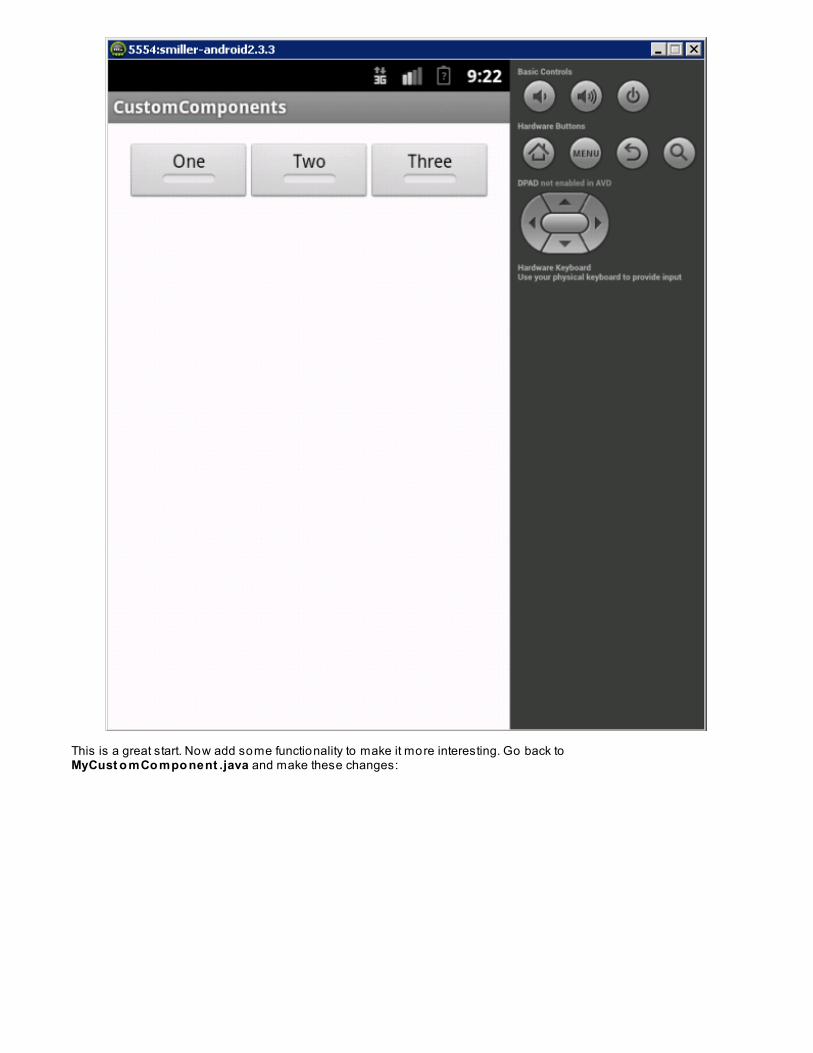
This is a great start. Now add some functionality to make it more interesting. Go back toMyCust o mCo mpo nent .java and make these changes:
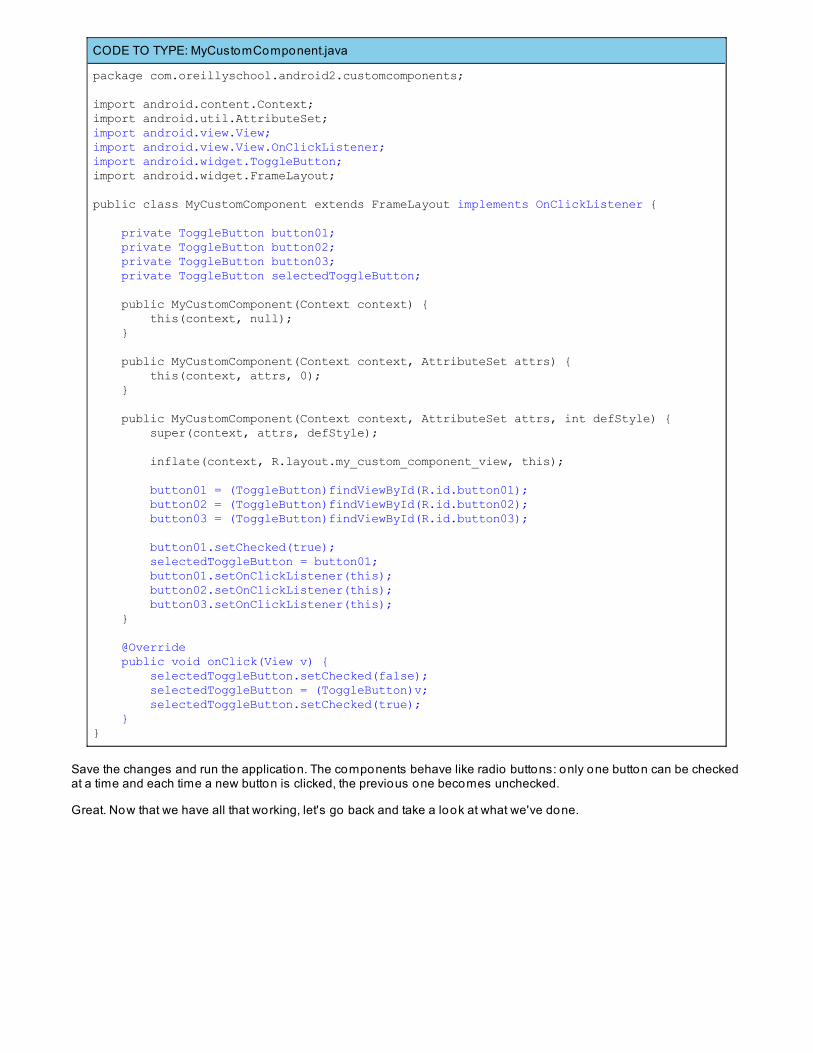
CODE TO TYPE: MyCustomComponent.java
package com.oreillyschool.android2.customcomponents;
import android.content.Context;import android.util.AttributeSet;import android.view.View;import android.view.View.OnClickListener;import android.widget.ToggleButton;import android.widget.FrameLayout;
public class MyCustomComponent extends FrameLayout implements OnClickListener {
private ToggleButton button01; private ToggleButton button02; private ToggleButton button03; private ToggleButton selectedToggleButton; public MyCustomComponent(Context context) { this(context, null); }
public MyCustomComponent(Context context, AttributeSet attrs) { this(context, attrs, 0); }
public MyCustomComponent(Context context, AttributeSet attrs, int defStyle) { super(context, attrs, defStyle); inflate(context, R.layout.my_custom_component_view, this);
button01 = (ToggleButton)findViewById(R.id.button01); button02 = (ToggleButton)findViewById(R.id.button02); button03 = (ToggleButton)findViewById(R.id.button03); button01.setChecked(true); selectedToggleButton = button01; button01.setOnClickListener(this); button02.setOnClickListener(this); button03.setOnClickListener(this); }
@Override public void onClick(View v) { selectedToggleButton.setChecked(false); selectedToggleButton = (ToggleButton)v; selectedToggleButton.setChecked(true); }}
Save the changes and run the application. The components behave like radio buttons: only one button can be checkedat a time and each time a new button is clicked, the previous one becomes unchecked.
Great. Now that we have all that working, let's go back and take a look at what we've done.
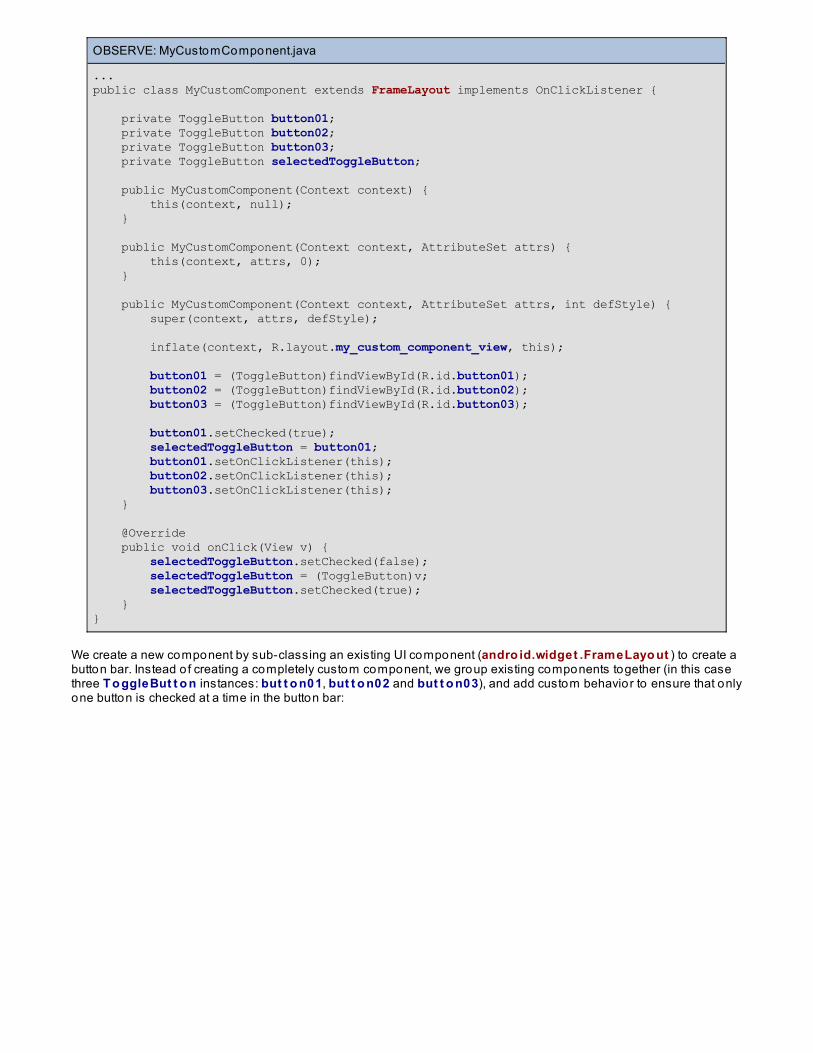
OBSERVE: MyCustomComponent.java
...public class MyCustomComponent extends FrameLayout implements OnClickListener {
private ToggleButton button01; private ToggleButton button02; private ToggleButton button03; private ToggleButton selectedToggleButton; public MyCustomComponent(Context context) { this(context, null); }
public MyCustomComponent(Context context, AttributeSet attrs) { this(context, attrs, 0); }
public MyCustomComponent(Context context, AttributeSet attrs, int defStyle) { super(context, attrs, defStyle); inflate(context, R.layout.my_custom_component_view, this);
button01 = (ToggleButton)findViewById(R.id.button01); button02 = (ToggleButton)findViewById(R.id.button02); button03 = (ToggleButton)findViewById(R.id.button03); button01.setChecked(true); selectedToggleButton = button01; button01.setOnClickListener(this); button02.setOnClickListener(this); button03.setOnClickListener(this); }
@Override public void onClick(View v) { selectedToggleButton.setChecked(false); selectedToggleButton = (ToggleButton)v; selectedToggleButton.setChecked(true); }}
We create a new component by sub-classing an existing UI component (andro id.widget .FrameLayo ut ) to create abutton bar. Instead o f creating a completely custom component, we group existing components together (in this casethree T o ggleBut t o n instances: but t o n01, but t o n02 and but t o n03), and add custom behavior to ensure that onlyone button is checked at a time in the button bar:
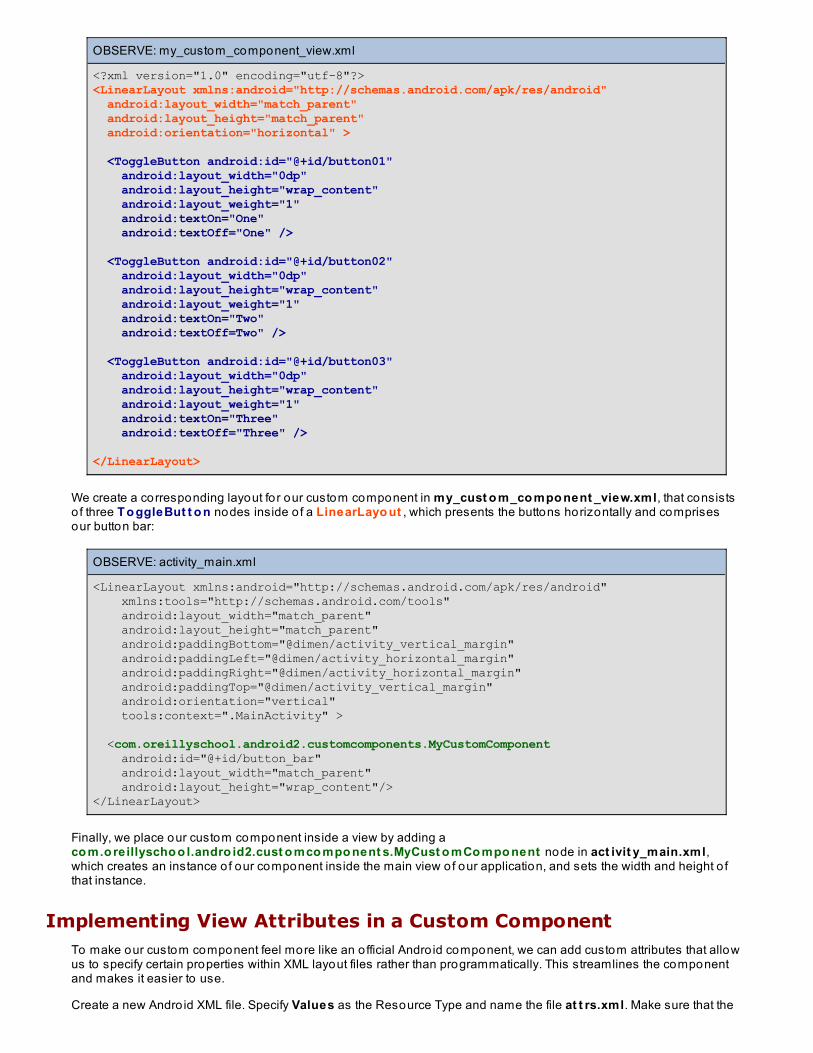
OBSERVE: my_custom_component_view.xml
<?xml version="1.0" encoding="utf-8"?><LinearLayout xmlns:android="http://schemas.android.com/apk/res/android" android:layout_width="match_parent" android:layout_height="match_parent" android:orientation="horizontal" > <ToggleButton android:id="@+id/button01" android:layout_width="0dp" android:layout_height="wrap_content" android:layout_weight="1" android:textOn="One" android:textOff="One" />
<ToggleButton android:id="@+id/button02" android:layout_width="0dp" android:layout_height="wrap_content" android:layout_weight="1" android:textOn="Two" android:textOff=Two" /> <ToggleButton android:id="@+id/button03" android:layout_width="0dp" android:layout_height="wrap_content" android:layout_weight="1" android:textOn="Three" android:textOff="Three" />
</LinearLayout>
We create a corresponding layout fo r our custom component in my_cust o m_co mpo nent _view.xml, that consistso f three T o ggleBut t o n nodes inside o f a LinearLayo ut , which presents the buttons horizontally and comprisesour button bar:
OBSERVE: activity_main.xml
<LinearLayout xmlns:android="http://schemas.android.com/apk/res/android" xmlns:tools="http://schemas.android.com/tools" android:layout_width="match_parent" android:layout_height="match_parent" android:paddingBottom="@dimen/activity_vertical_margin" android:paddingLeft="@dimen/activity_horizontal_margin" android:paddingRight="@dimen/activity_horizontal_margin" android:paddingTop="@dimen/activity_vertical_margin" android:orientation="vertical" tools:context=".MainActivity" > <com.oreillyschool.android2.customcomponents.MyCustomComponent android:id="@+id/button_bar" android:layout_width="match_parent" android:layout_height="wrap_content"/></LinearLayout>
Finally, we place our custom component inside a view by adding aco m.o reillyscho o l.andro id2.cust o mco mpo nent s.MyCust o mCo mpo nent node in act ivit y_main.xml,which creates an instance o f our component inside the main view of our application, and sets the width and height o fthat instance.
Implementing View Attributes in a Custom ComponentTo make our custom component feel more like an o fficial Andro id component, we can add custom attributes that allowus to specify certain properties within XML layout files rather than programmatically. This streamlines the componentand makes it easier to use.
Create a new Andro id XML file. Specify Values as the Resource Type and name the file at t rs.xml. Make sure that the
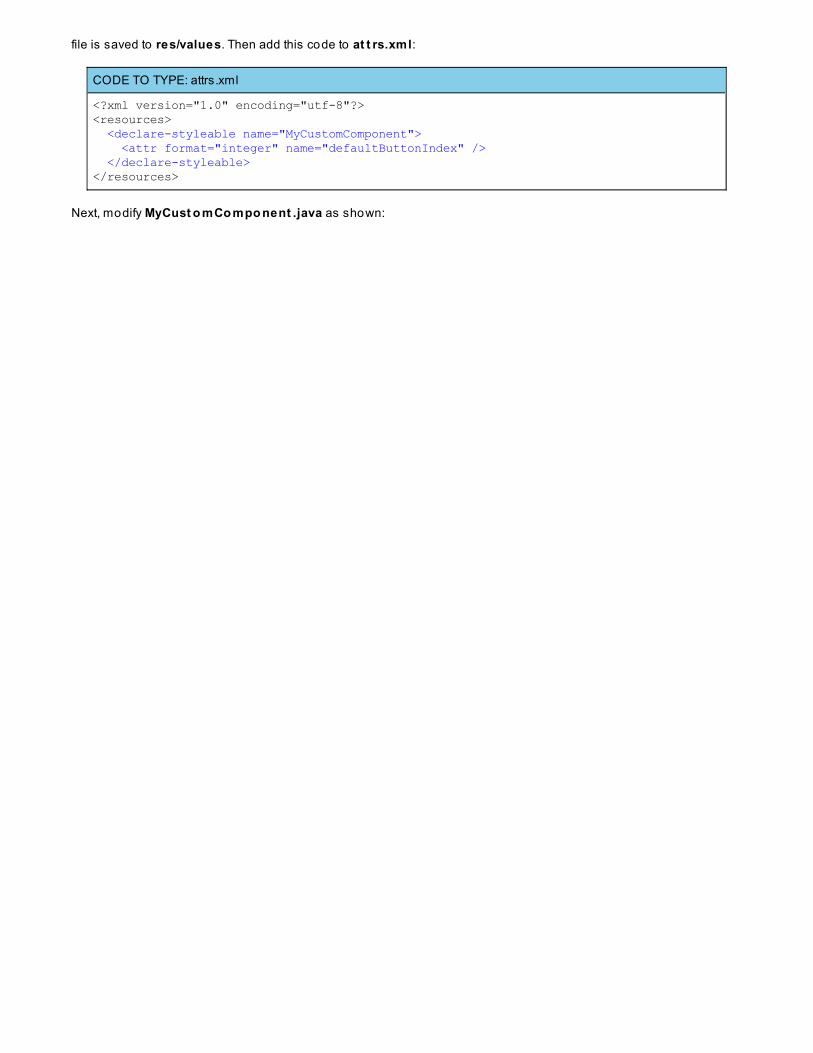
file is saved to res/values. Then add this code to at t rs.xml:
CODE TO TYPE: attrs.xml
<?xml version="1.0" encoding="utf-8"?><resources> <declare-styleable name="MyCustomComponent"> <attr format="integer" name="defaultButtonIndex" /> </declare-styleable></resources>
Next, modify MyCust o mCo mpo nent .java as shown:
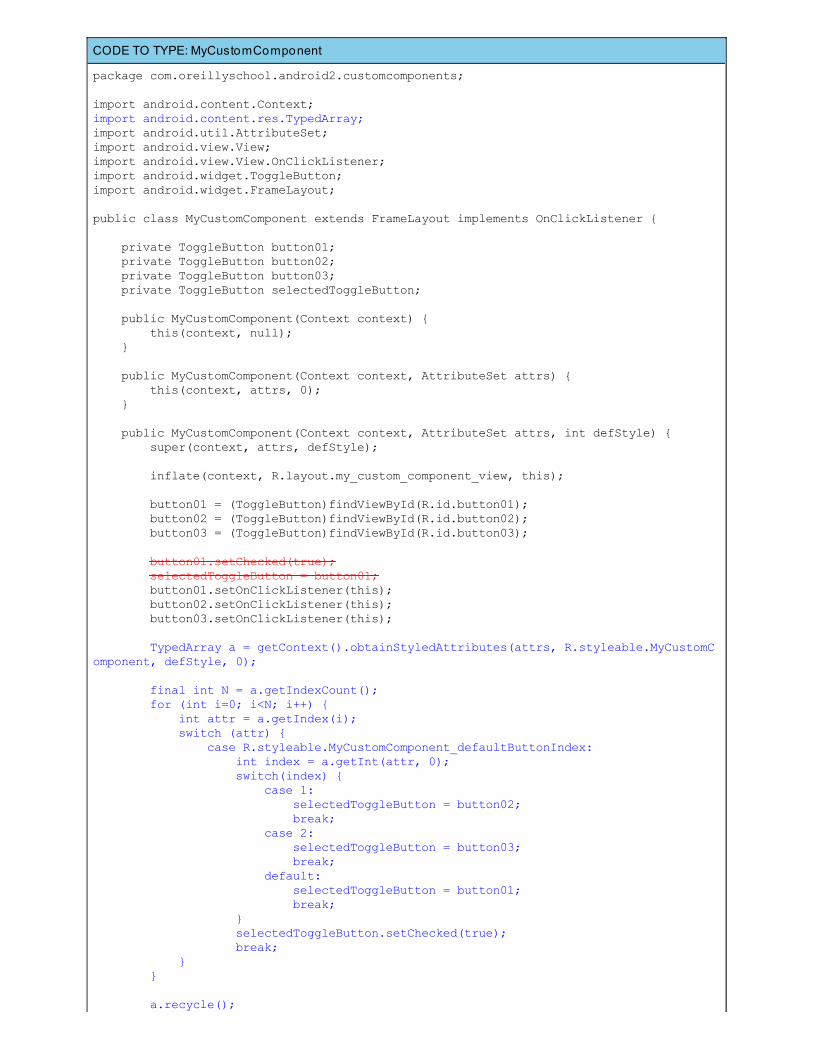
CODE TO TYPE: MyCustomComponent
package com.oreillyschool.android2.customcomponents;
import android.content.Context;import android.content.res.TypedArray;import android.util.AttributeSet;import android.view.View;import android.view.View.OnClickListener;import android.widget.ToggleButton;import android.widget.FrameLayout;
public class MyCustomComponent extends FrameLayout implements OnClickListener {
private ToggleButton button01; private ToggleButton button02; private ToggleButton button03; private ToggleButton selectedToggleButton; public MyCustomComponent(Context context) { this(context, null); }
public MyCustomComponent(Context context, AttributeSet attrs) { this(context, attrs, 0); }
public MyCustomComponent(Context context, AttributeSet attrs, int defStyle) { super(context, attrs, defStyle); inflate(context, R.layout.my_custom_component_view, this);
button01 = (ToggleButton)findViewById(R.id.button01); button02 = (ToggleButton)findViewById(R.id.button02); button03 = (ToggleButton)findViewById(R.id.button03); button01.setChecked(true); selectedToggleButton = button01; button01.setOnClickListener(this); button02.setOnClickListener(this); button03.setOnClickListener(this); TypedArray a = getContext().obtainStyledAttributes(attrs, R.styleable.MyCustomComponent, defStyle, 0); final int N = a.getIndexCount(); for (int i=0; i<N; i++) { int attr = a.getIndex(i); switch (attr) { case R.styleable.MyCustomComponent_defaultButtonIndex: int index = a.getInt(attr, 0); switch(index) { case 1: selectedToggleButton = button02; break; case 2: selectedToggleButton = button03; break; default: selectedToggleButton = button01; break; } selectedToggleButton.setChecked(true); break; } }
a.recycle();
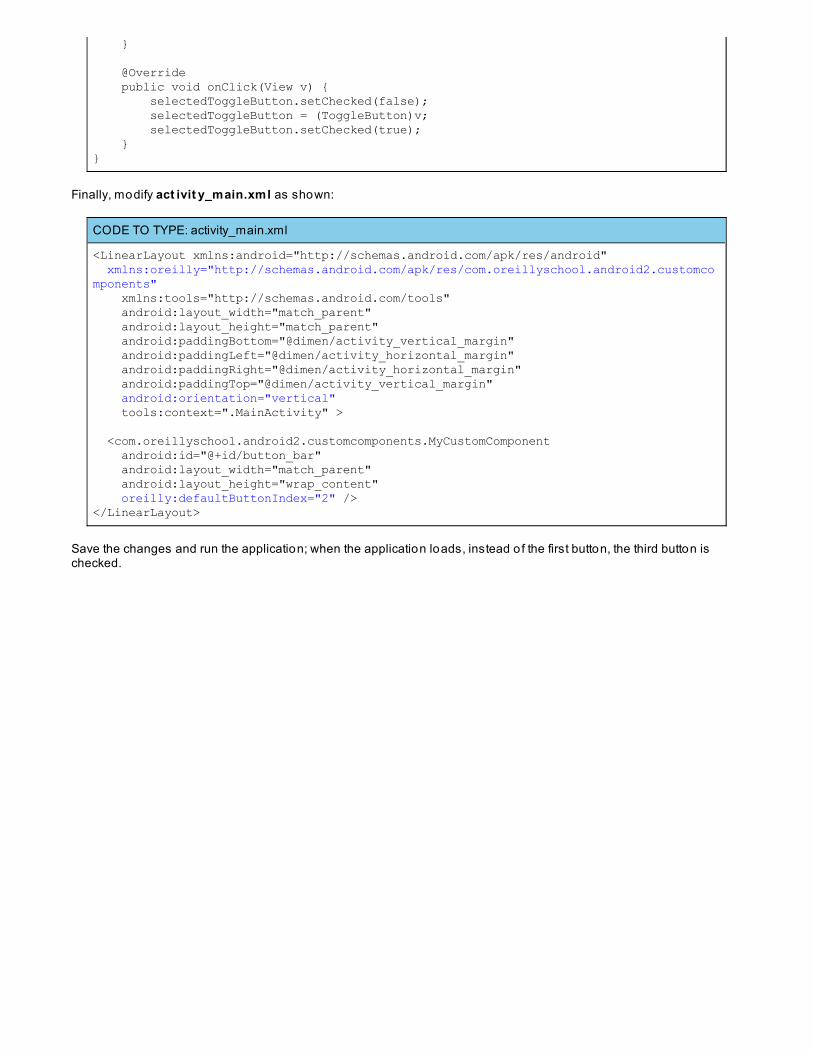
}
@Override public void onClick(View v) { selectedToggleButton.setChecked(false); selectedToggleButton = (ToggleButton)v; selectedToggleButton.setChecked(true); }}
Finally, modify act ivit y_main.xml as shown:
CODE TO TYPE: activity_main.xml
<LinearLayout xmlns:android="http://schemas.android.com/apk/res/android" xmlns:oreilly="http://schemas.android.com/apk/res/com.oreillyschool.android2.customcomponents" xmlns:tools="http://schemas.android.com/tools" android:layout_width="match_parent" android:layout_height="match_parent" android:paddingBottom="@dimen/activity_vertical_margin" android:paddingLeft="@dimen/activity_horizontal_margin" android:paddingRight="@dimen/activity_horizontal_margin" android:paddingTop="@dimen/activity_vertical_margin" android:orientation="vertical" tools:context=".MainActivity" >
<com.oreillyschool.android2.customcomponents.MyCustomComponent android:id="@+id/button_bar" android:layout_width="match_parent" android:layout_height="wrap_content" oreilly:defaultButtonIndex="2" /></LinearLayout>
Save the changes and run the application; when the application loads, instead o f the first button, the third button ischecked.
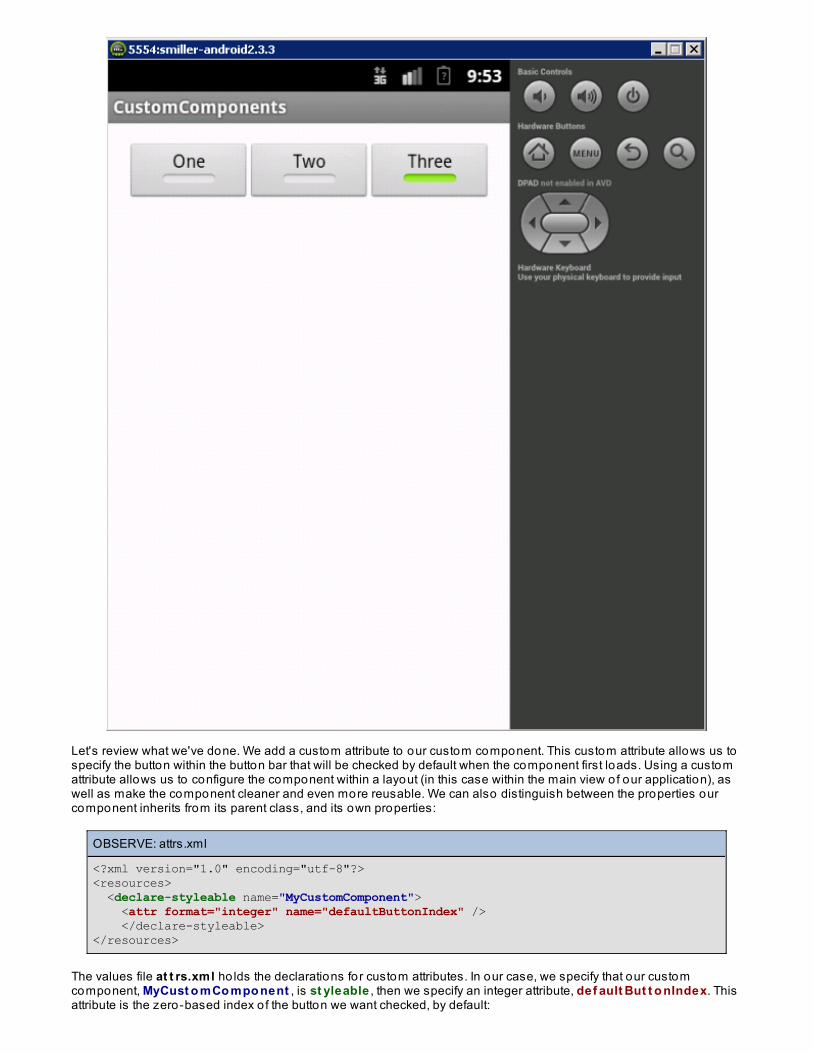
Let's review what we've done. We add a custom attribute to our custom component. This custom attribute allows us tospecify the button within the button bar that will be checked by default when the component first loads. Using a customattribute allows us to configure the component within a layout (in this case within the main view of our application), aswell as make the component cleaner and even more reusable. We can also distinguish between the properties ourcomponent inherits from its parent class, and its own properties:
OBSERVE: attrs.xml
<?xml version="1.0" encoding="utf-8"?><resources> <declare-styleable name="MyCustomComponent"> <attr format="integer" name="defaultButtonIndex" /> </declare-styleable></resources>
The values file at t rs.xml ho lds the declarations for custom attributes. In our case, we specify that our customcomponent, MyCust o mCo mpo nent , is st yleable , then we specify an integer attribute, def ault But t o nIndex. Thisattribute is the zero-based index o f the button we want checked, by default:
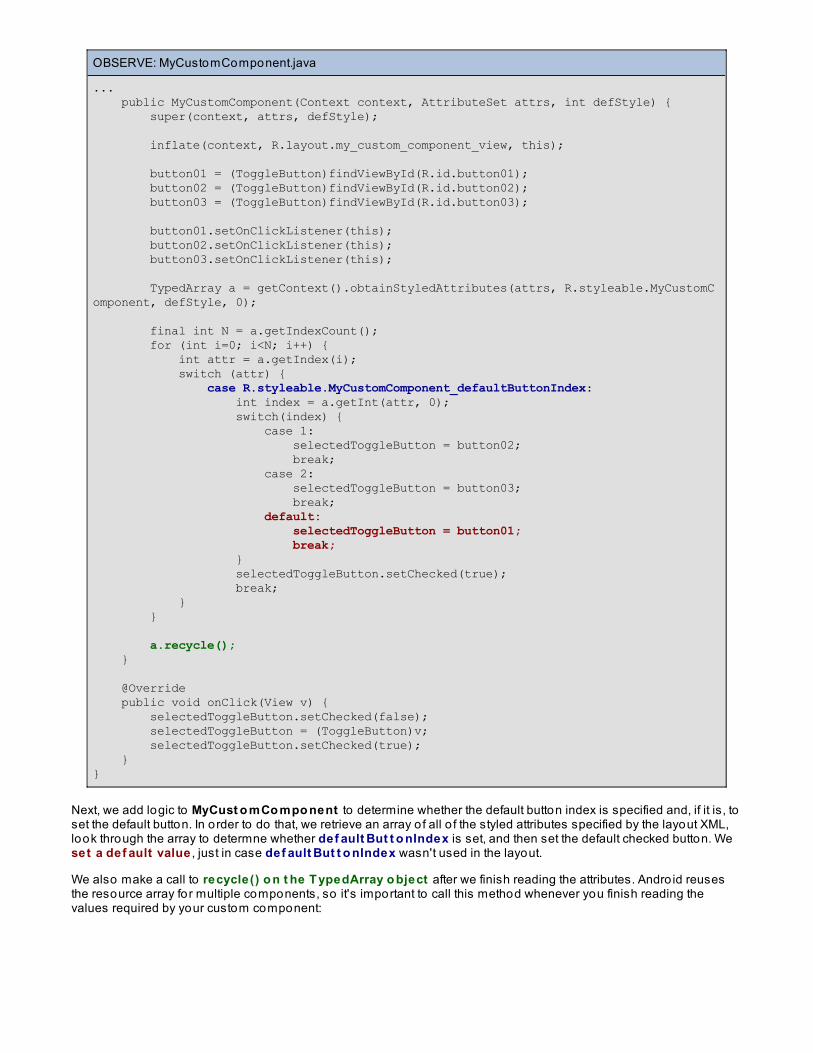
OBSERVE: MyCustomComponent.java
... public MyCustomComponent(Context context, AttributeSet attrs, int defStyle) { super(context, attrs, defStyle); inflate(context, R.layout.my_custom_component_view, this); button01 = (ToggleButton)findViewById(R.id.button01); button02 = (ToggleButton)findViewById(R.id.button02); button03 = (ToggleButton)findViewById(R.id.button03); button01.setOnClickListener(this); button02.setOnClickListener(this); button03.setOnClickListener(this); TypedArray a = getContext().obtainStyledAttributes(attrs, R.styleable.MyCustomComponent, defStyle, 0); final int N = a.getIndexCount(); for (int i=0; i<N; i++) { int attr = a.getIndex(i); switch (attr) { case R.styleable.MyCustomComponent_defaultButtonIndex: int index = a.getInt(attr, 0); switch(index) { case 1: selectedToggleButton = button02; break; case 2: selectedToggleButton = button03; break; default: selectedToggleButton = button01; break; } selectedToggleButton.setChecked(true); break; } } a.recycle(); } @Override public void onClick(View v) { selectedToggleButton.setChecked(false); selectedToggleButton = (ToggleButton)v; selectedToggleButton.setChecked(true); }}
Next, we add logic to MyCust o mCo mpo nent to determine whether the default button index is specified and, if it is, toset the default button. In order to do that, we retrieve an array o f all o f the styled attributes specified by the layout XML,look through the array to determne whether def ault But t o nIndex is set, and then set the default checked button. Weset a def ault value , just in case def ault But t o nIndex wasn't used in the layout.
We also make a call to recycle() o n t he T ypedArray o bject after we finish reading the attributes. Andro id reusesthe resource array for multiple components, so it's important to call this method whenever you finish reading thevalues required by your custom component:

OBSERVE: activity_main.xml
<LinearLayout xmlns:android="http://schemas.android.com/apk/res/android" xmlns:oreilly="http://schemas.android.com/apk/res/com.oreillyschool.android2.customcomponents" xmlns:tools="http://schemas.android.com/tools" android:layout_width="match_parent" android:layout_height="match_parent" android:paddingBottom="@dimen/activity_vertical_margin" android:paddingLeft="@dimen/activity_horizontal_margin" android:paddingRight="@dimen/activity_horizontal_margin" android:paddingTop="@dimen/activity_vertical_margin" android:orientation="vertical" tools:context=".MainActivity" >
<com.oreillyschool.android2.customcomponents.MyCustomComponent android:id="@+id/button_bar" android:layout_width="match_parent" android:layout_height="wrap_content" oreilly:defaultButtonIndex="2" /></LinearLayout>
Finally, we go to our application's layout and add a namespace f o r o ur cust o m at t ribut es (the full package nameof our application). Then, using that namespace, we set t he cust o m at t ribut e o n o ur cust o m co mpo nent .
Wrapping UpWhew! We covered a lo t o f fairly advanced topics. When you know how to create custom components properly inAndro id, it opens up a lo t o f options in your application development. Now you aren't limited to basic Andro idcomponents. Now when Andro id doesn't provide the component you're looking for, you can just create your own!
Good luck with the homework and see you next lesson!
Copyright © 1998-2014 O'Reilly Media, Inc.
This work is licensed under a Creative Commons Attribution-ShareAlike 3.0 Unported License.See http://creativecommons.org/licenses/by-sa/3.0/legalcode for more information.
Basic ServicesLesson Objectives
In this lesson you will:
create an Andro id Service implementation from scratch.perform a long running task in a Service.define/register a Service in an application manifest.start and stop a service programatically.
There are two main uses for an Andro id Service:
They allow you to specify long-running parts o f your application to run in the background, leaving the rest o f yourapplication available for user interaction. (For example, if you had a media player application that could downloadnew content, you would want the media downloading to occur in a Service.)They allow you to specify functionality in your application that you can make available to o ther applications as well.(For example, you might have a Twitter client that exposes its uploading/tweeting service to o ther applications so thatyou can post tweets or images from them.)
The Andro id Developer documentation clarifies that Services are not threads themselves, or separate processes, but rather ameans o f letting the system know what functionality you want to run in the background or share with o ther applications, and thatthe system itself takes charge o f the Service functionality and its callbacks.
Creating, Declaring, and Starting a ServiceLet's get started. Create a new Andro id pro ject with this criteria:
Name the pro ject BasicServices.Use the package name co m.o reillyscho o l.andro id2.basicservices.Uncheck the Creat e cust o m launcher ico n box.Assign the Andro id2_Lesso ns working set to the pro ject.
Let's start with our Service class. Create a new class in the co m.o reillyscho o l.andro id2.basicservices packagethat extends from andro id.app.Service . Name it SimpleService . You see a stub for a single method:o nBind(Int ent arg0) (we'll change that to o nBind(Int ent int ent ) .) Right-click the SimpleService filename andselect So urce | Override/Implement Met ho ds. A window appears showing methods in the Service parent classthat you can override. Select o nCreat e() , o nDest ro y() , and o nSt art Co mmand(Int ent , int , int ) and click OK.Now you see stubs for those three methods as well.
Okay, make these changes:
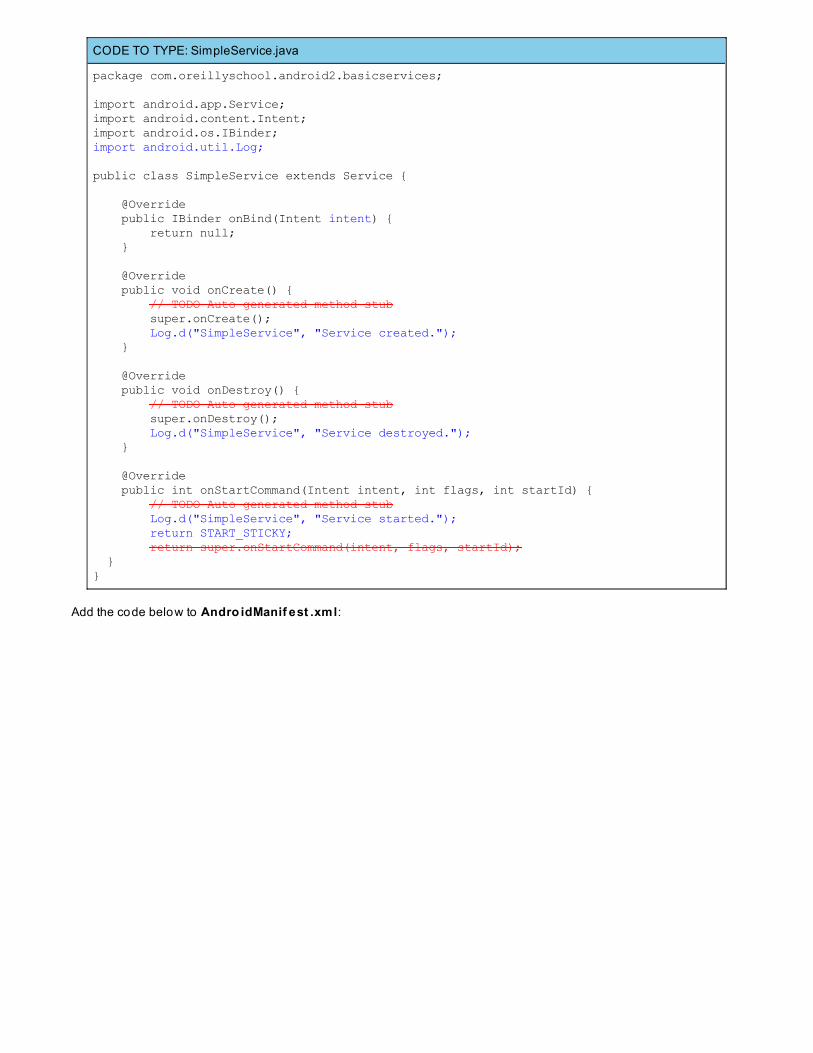
CODE TO TYPE: SimpleService.java
package com.oreillyschool.android2.basicservices;
import android.app.Service;import android.content.Intent;import android.os.IBinder;import android.util.Log;
public class SimpleService extends Service { @Override public IBinder onBind(Intent intent) { return null; } @Override public void onCreate() { // TODO Auto-generated method stub super.onCreate(); Log.d("SimpleService", "Service created."); } @Override public void onDestroy() { // TODO Auto-generated method stub super.onDestroy(); Log.d("SimpleService", "Service destroyed."); } @Override public int onStartCommand(Intent intent, int flags, int startId) { // TODO Auto-generated method stub Log.d("SimpleService", "Service started."); return START_STICKY; return super.onStartCommand(intent, flags, startId); }}
Add the code below to Andro idManif est .xml:

CODE TO TYPE: Andro idManifest.xml
<?xml version="1.0" encoding="utf-8"?><manifest xmlns:android="http://schemas.android.com/apk/res/android" package="com.oreillyschool.android2.basicservices" android:versionCode="1" android:versionName="1.0" > <uses-sdk android:minSdkVersion="10" /> <application android:allowBackup="true" android:icon="@drawable/ic_launcher" android:label="@string/app_name" android:theme="@style/AppTheme" > <service android:name=".SimpleService" /> <activity android:name=".MainActivity" android:label="@string/app_name" > <intent-filter> <action android:name="android.intent.action.MAIN" /> <category android:name="android.intent.category.LAUNCHER" /> </intent-filter> </activity> </application>
</manifest>
Finally, make these changes in MainAct ivit y:
CODE TO TYPE: MainActivity.java
package com.oreillyschool.android2.basicservices;
import android.app.Activity;import android.content.Intent;import android.os.Bundle;import android.os.Handler;import android.view.Menu; public class MainActivity extends Activity { /** Called when the activity is first created. */ @Override public void onCreate(Bundle savedInstanceState) { super.onCreate(savedInstanceState); setContentView(R.layout.activity_main); startService(new Intent(MainActivity.this, SimpleService.class));
Handler handler = new Handler(); handler.postDelayed(new Runnable() { @Override public void run() { stopService(new Intent(MainActivity.this, SimpleService.class)); } }, 10000); }
@Override public boolean onCreateOptionsMenu(Menu menu) { // Inflate the menu; this adds items to the action bar if it is present. getMenuInflater().inflate(R.menu.main, menu); return true; }}
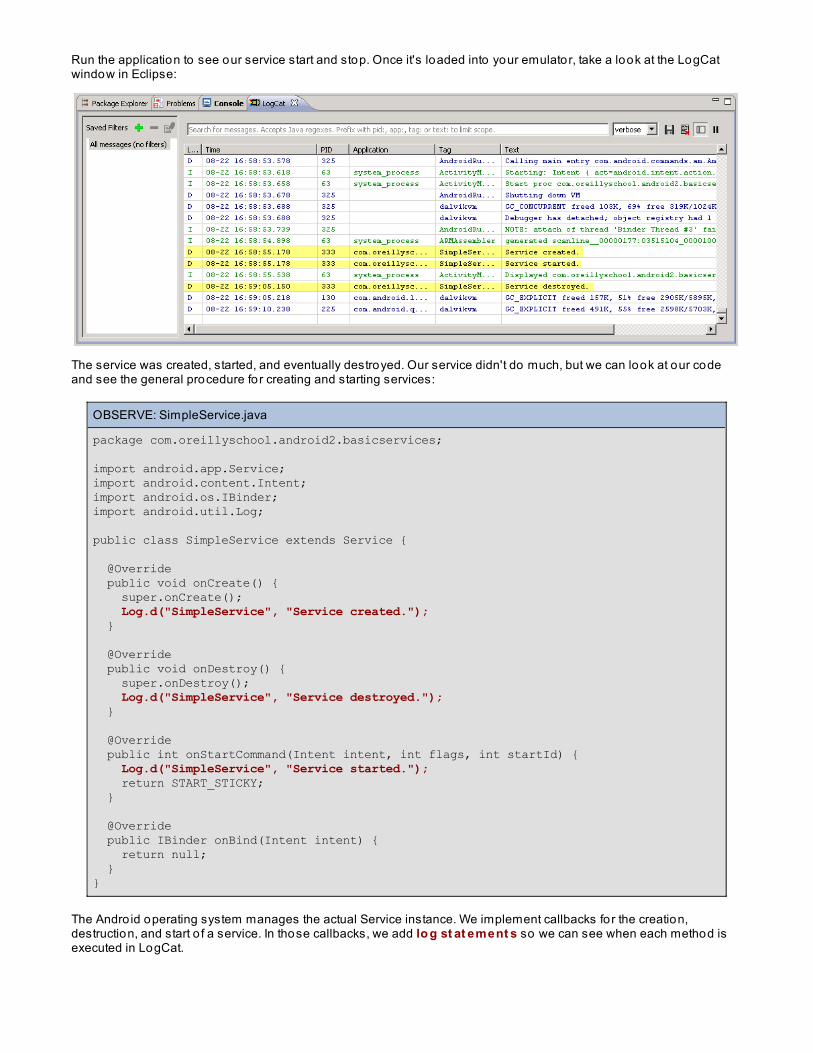
Run the application to see our service start and stop. Once it's loaded into your emulator, take a look at the LogCatwindow in Eclipse:
The service was created, started, and eventually destroyed. Our service didn't do much, but we can look at our codeand see the general procedure for creating and starting services:
OBSERVE: SimpleService.java
package com.oreillyschool.android2.basicservices;
import android.app.Service;import android.content.Intent;import android.os.IBinder;import android.util.Log;
public class SimpleService extends Service {
@Override public void onCreate() { super.onCreate(); Log.d("SimpleService", "Service created."); } @Override public void onDestroy() { super.onDestroy(); Log.d("SimpleService", "Service destroyed."); } @Override public int onStartCommand(Intent intent, int flags, int startId) { Log.d("SimpleService", "Service started."); return START_STICKY; } @Override public IBinder onBind(Intent intent) { return null; }}
The Andro id operating system manages the actual Service instance. We implement callbacks for the creation,destruction, and start o f a service. In those callbacks, we add lo g st at ement s so we can see when each method isexecuted in LogCat.
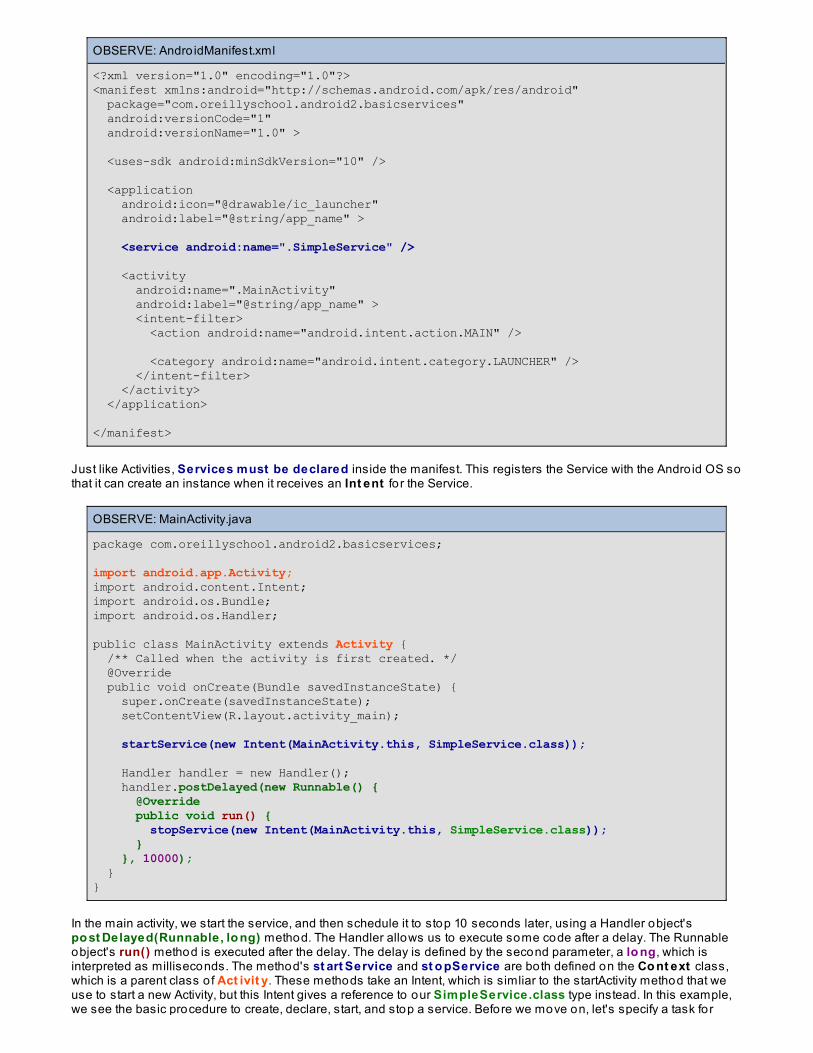
OBSERVE: Andro idManifest.xml
<?xml version="1.0" encoding="1.0"?><manifest xmlns:android="http://schemas.android.com/apk/res/android" package="com.oreillyschool.android2.basicservices" android:versionCode="1" android:versionName="1.0" > <uses-sdk android:minSdkVersion="10" /> <application android:icon="@drawable/ic_launcher" android:label="@string/app_name" > <service android:name=".SimpleService" /> <activity android:name=".MainActivity" android:label="@string/app_name" > <intent-filter> <action android:name="android.intent.action.MAIN" /> <category android:name="android.intent.category.LAUNCHER" /> </intent-filter> </activity> </application>
</manifest>
Just like Activities, Services must be declared inside the manifest. This registers the Service with the Andro id OS sothat it can create an instance when it receives an Int ent fo r the Service.
OBSERVE: MainActivity.java
package com.oreillyschool.android2.basicservices;
import android.app.Activity;import android.content.Intent;import android.os.Bundle;import android.os.Handler;
public class MainActivity extends Activity { /** Called when the activity is first created. */ @Override public void onCreate(Bundle savedInstanceState) { super.onCreate(savedInstanceState); setContentView(R.layout.activity_main);
startService(new Intent(MainActivity.this, SimpleService.class));
Handler handler = new Handler(); handler.postDelayed(new Runnable() { @Override public void run() { stopService(new Intent(MainActivity.this, SimpleService.class)); } }, 10000); }}
In the main activity, we start the service, and then schedule it to stop 10 seconds later, using a Handler object'spo st Delayed(Runnable, lo ng) method. The Handler allows us to execute some code after a delay. The Runnableobject's run() method is executed after the delay. The delay is defined by the second parameter, a lo ng, which isinterpreted as milliseconds. The method's st art Service and st o pService are both defined on the Co nt ext class,which is a parent class o f Act ivit y. These methods take an Intent, which is simliar to the startActivity method that weuse to start a new Activity, but this Intent gives a reference to our SimpleService.class type instead. In this example,we see the basic procedure to create, declare, start, and stop a service. Before we move on, let's specify a task for
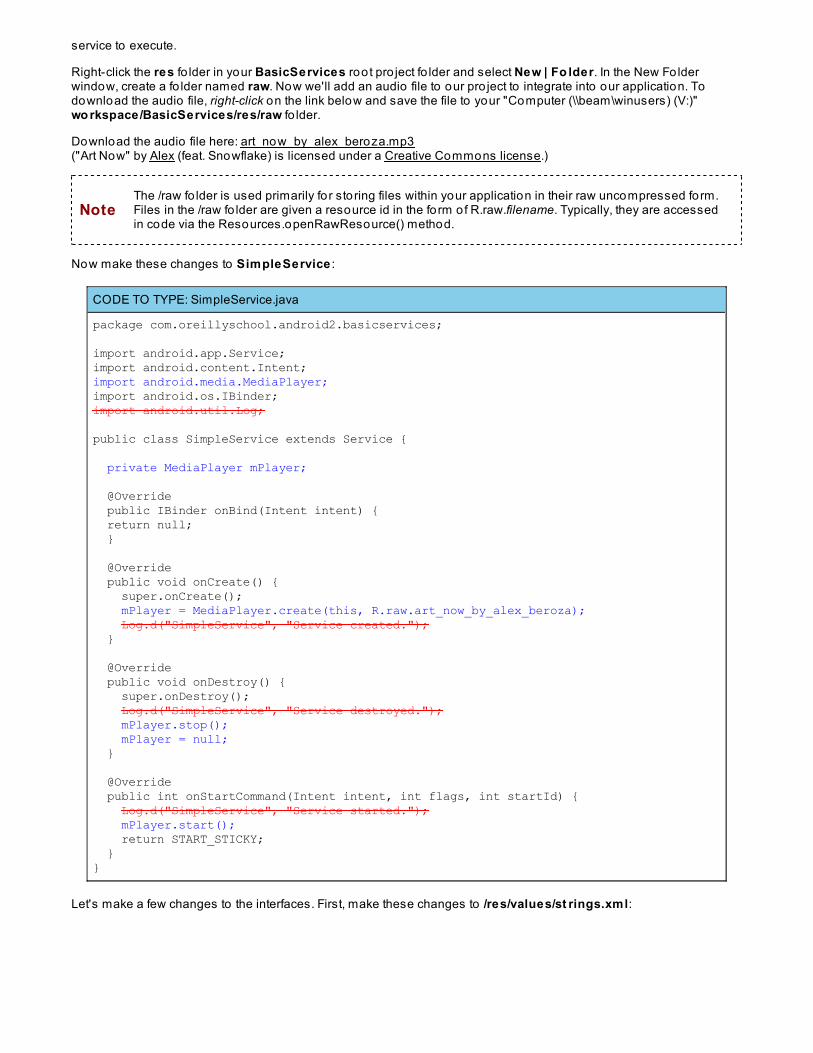
service to execute.
Right-click the res fo lder in your BasicServices root pro ject fo lder and select New | Fo lder. In the New Fo lderwindow, create a fo lder named raw. Now we'll add an audio file to our pro ject to integrate into our application. Todownload the audio file, right-click on the link below and save the file to your "Computer (\\beam\winusers) (V:)"wo rkspace/BasicServices/res/raw fo lder.
Download the audio file here: art_now_by_alex_beroza.mp3("Art Now" by Alex (feat. Snowflake) is licensed under a Creative Commons license.)
NoteThe /raw fo lder is used primarily fo r storing files within your application in their raw uncompressed form.Files in the /raw fo lder are given a resource id in the form of R.raw.filename. Typically, they are accessedin code via the Resources.openRawResource() method.
Now make these changes to SimpleService :
CODE TO TYPE: SimpleService.java
package com.oreillyschool.android2.basicservices;
import android.app.Service;import android.content.Intent;import android.media.MediaPlayer;import android.os.IBinder;import android.util.Log;
public class SimpleService extends Service {
private MediaPlayer mPlayer; @Override public IBinder onBind(Intent intent) { return null; } @Override public void onCreate() { super.onCreate(); mPlayer = MediaPlayer.create(this, R.raw.art_now_by_alex_beroza); Log.d("SimpleService", "Service created."); } @Override public void onDestroy() { super.onDestroy(); Log.d("SimpleService", "Service destroyed."); mPlayer.stop(); mPlayer = null; } @Override public int onStartCommand(Intent intent, int flags, int startId) { Log.d("SimpleService", "Service started."); mPlayer.start(); return START_STICKY; }}
Let's make a few changes to the interfaces. First, make these changes to /res/values/st rings.xml:
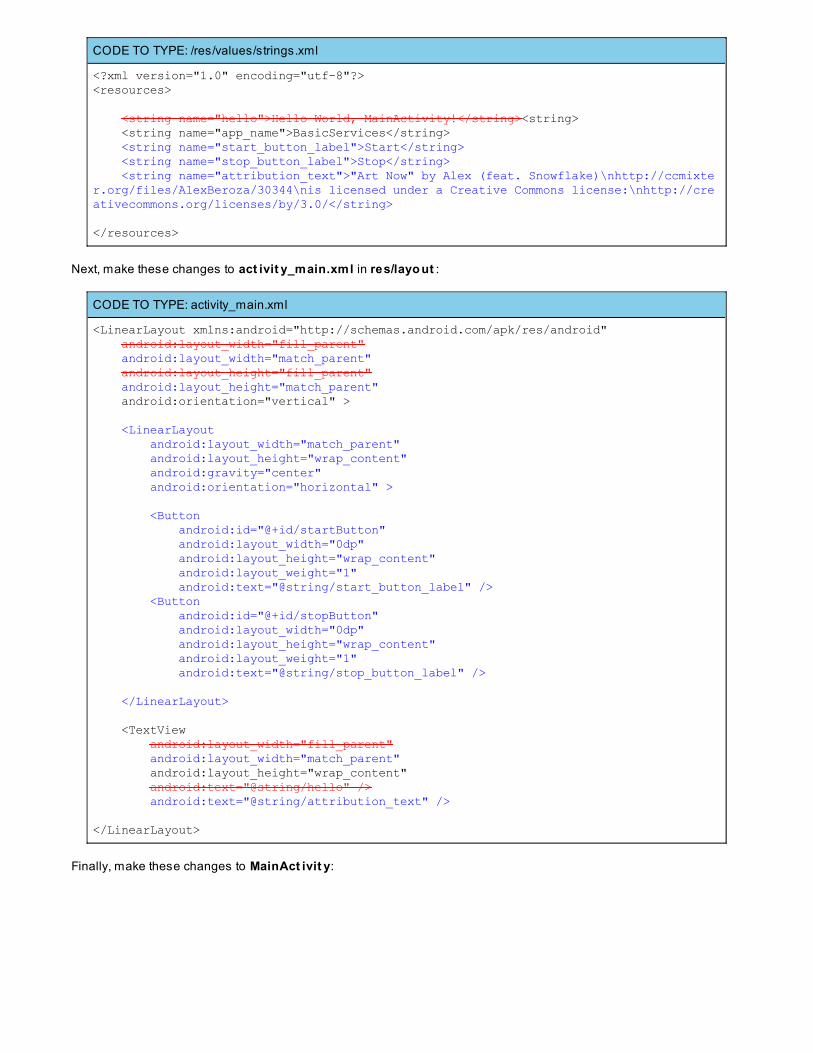
CODE TO TYPE: /res/values/strings.xml
<?xml version="1.0" encoding="utf-8"?><resources>
<string name="hello">Hello World, MainActivity!</string><string> <string name="app_name">BasicServices</string> <string name="start_button_label">Start</string> <string name="stop_button_label">Stop</string> <string name="attribution_text">"Art Now" by Alex (feat. Snowflake)\nhttp://ccmixter.org/files/AlexBeroza/30344\nis licensed under a Creative Commons license:\nhttp://creativecommons.org/licenses/by/3.0/</string>
</resources>
Next, make these changes to act ivit y_main.xml in res/layo ut :
CODE TO TYPE: activity_main.xml
<LinearLayout xmlns:android="http://schemas.android.com/apk/res/android" android:layout_width="fill_parent" android:layout_width="match_parent" android:layout_height="fill_parent" android:layout_height="match_parent" android:orientation="vertical" > <LinearLayout android:layout_width="match_parent" android:layout_height="wrap_content" android:gravity="center" android:orientation="horizontal" > <Button android:id="@+id/startButton" android:layout_width="0dp" android:layout_height="wrap_content" android:layout_weight="1" android:text="@string/start_button_label" /> <Button android:id="@+id/stopButton" android:layout_width="0dp" android:layout_height="wrap_content" android:layout_weight="1" android:text="@string/stop_button_label" /> </LinearLayout> <TextView android:layout_width="fill_parent" android:layout_width="match_parent" android:layout_height="wrap_content" android:text="@string/hello" /> android:text="@string/attribution_text" />
</LinearLayout>
Finally, make these changes to MainAct ivit y:
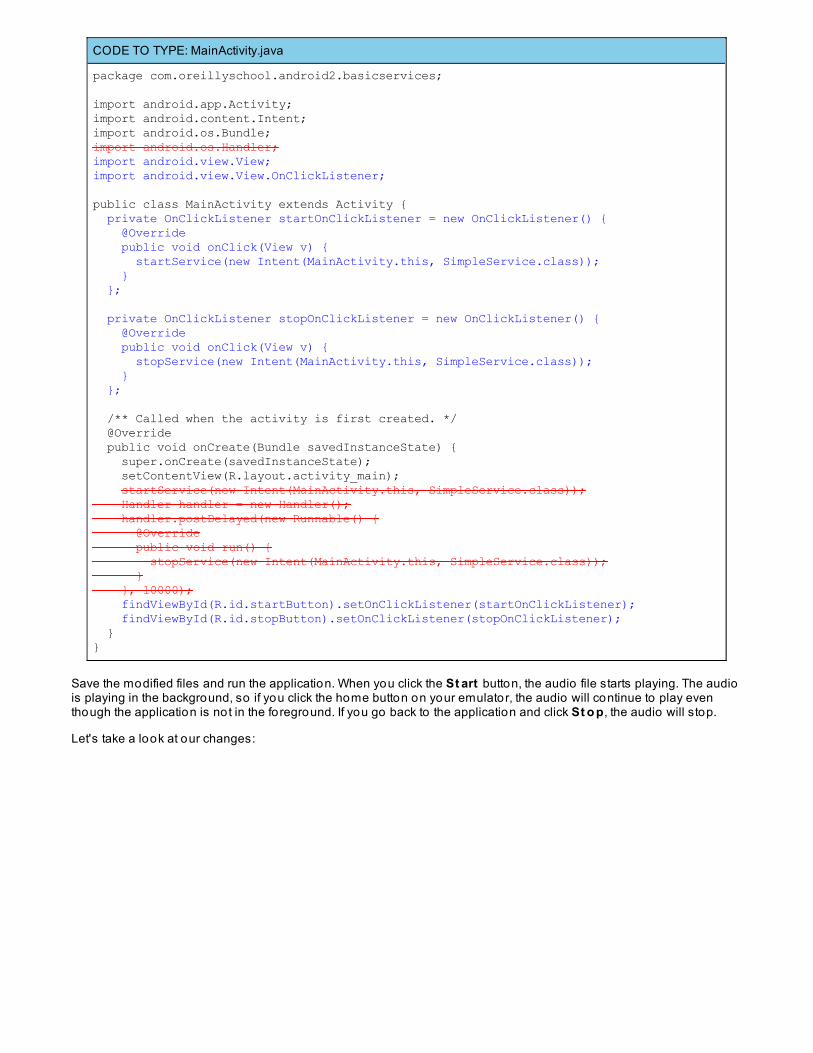
CODE TO TYPE: MainActivity.java
package com.oreillyschool.android2.basicservices;
import android.app.Activity;import android.content.Intent;import android.os.Bundle;import android.os.Handler;import android.view.View;import android.view.View.OnClickListener;
public class MainActivity extends Activity { private OnClickListener startOnClickListener = new OnClickListener() { @Override public void onClick(View v) { startService(new Intent(MainActivity.this, SimpleService.class)); } }; private OnClickListener stopOnClickListener = new OnClickListener() { @Override public void onClick(View v) { stopService(new Intent(MainActivity.this, SimpleService.class)); } }; /** Called when the activity is first created. */ @Override public void onCreate(Bundle savedInstanceState) { super.onCreate(savedInstanceState); setContentView(R.layout.activity_main); startService(new Intent(MainActivity.this, SimpleService.class)); Handler handler = new Handler(); handler.postDelayed(new Runnable() { @Override public void run() { stopService(new Intent(MainActivity.this, SimpleService.class)); } }, 10000); findViewById(R.id.startButton).setOnClickListener(startOnClickListener); findViewById(R.id.stopButton).setOnClickListener(stopOnClickListener); }}
Save the modified files and run the application. When you click the St art button, the audio file starts playing. The audiois playing in the background, so if you click the home button on your emulator, the audio will continue to play eventhough the application is not in the foreground. If you go back to the application and click St o p, the audio will stop.
Let's take a look at our changes:
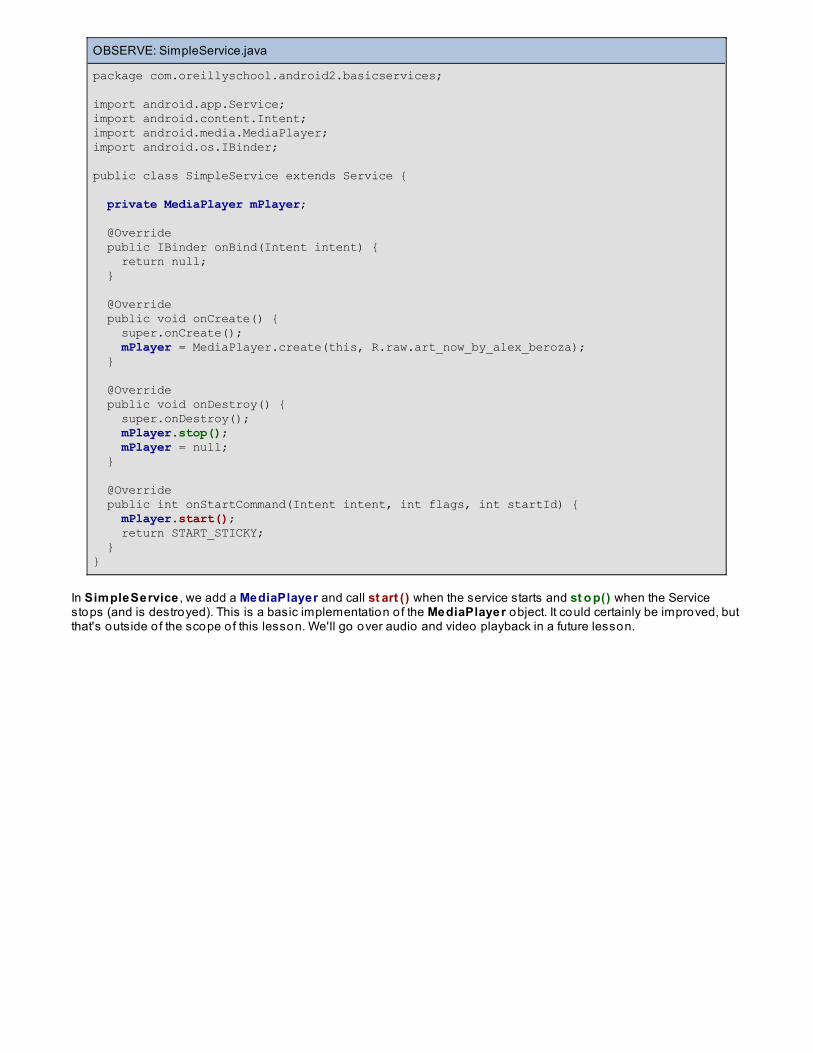
OBSERVE: SimpleService.java
package com.oreillyschool.android2.basicservices;
import android.app.Service;import android.content.Intent;import android.media.MediaPlayer;import android.os.IBinder;
public class SimpleService extends Service {
private MediaPlayer mPlayer; @Override public IBinder onBind(Intent intent) { return null; } @Override public void onCreate() { super.onCreate(); mPlayer = MediaPlayer.create(this, R.raw.art_now_by_alex_beroza); } @Override public void onDestroy() { super.onDestroy(); mPlayer.stop(); mPlayer = null; } @Override public int onStartCommand(Intent intent, int flags, int startId) { mPlayer.start(); return START_STICKY; }}
In SimpleService , we add a MediaPlayer and call st art () when the service starts and st o p() when the Servicestops (and is destroyed). This is a basic implementation o f the MediaPlayer object. It could certainly be improved, butthat's outside o f the scope o f this lesson. We'll go over audio and video playback in a future lesson.
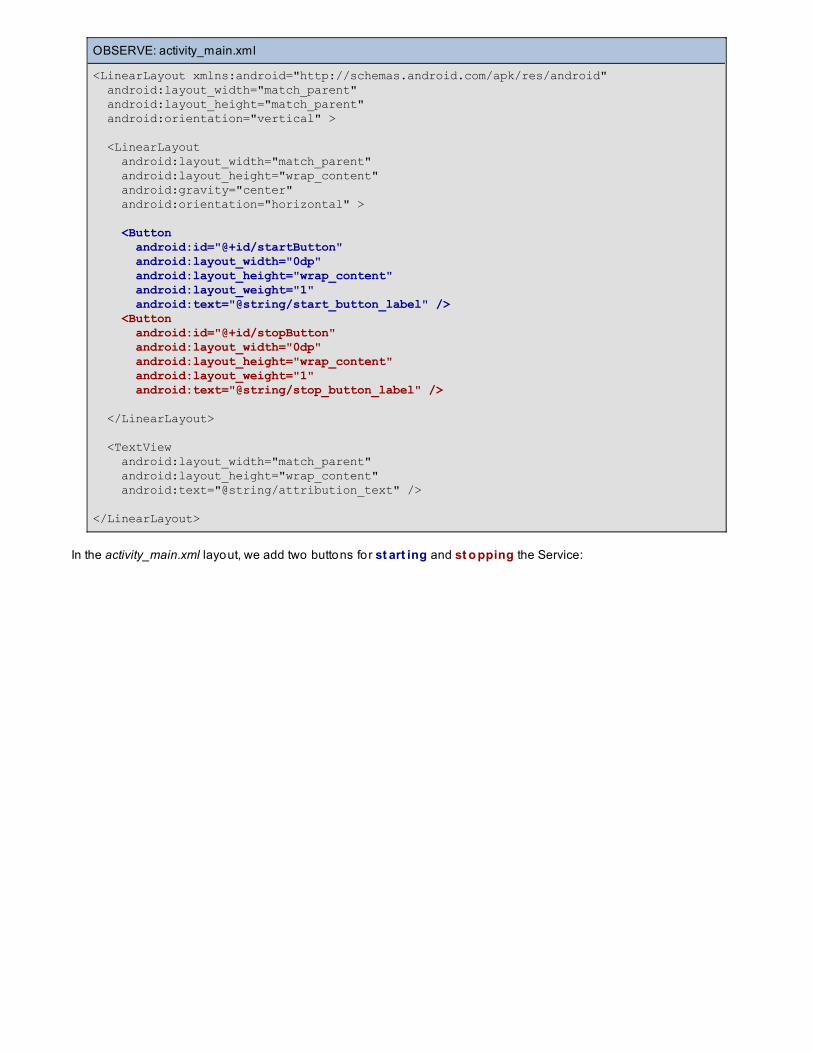
OBSERVE: activity_main.xml
<LinearLayout xmlns:android="http://schemas.android.com/apk/res/android" android:layout_width="match_parent" android:layout_height="match_parent" android:orientation="vertical" >
<LinearLayout android:layout_width="match_parent" android:layout_height="wrap_content" android:gravity="center" android:orientation="horizontal" > <Button android:id="@+id/startButton" android:layout_width="0dp" android:layout_height="wrap_content" android:layout_weight="1" android:text="@string/start_button_label" /> <Button android:id="@+id/stopButton" android:layout_width="0dp" android:layout_height="wrap_content" android:layout_weight="1" android:text="@string/stop_button_label" /> </LinearLayout> <TextView android:layout_width="match_parent" android:layout_height="wrap_content" android:text="@string/attribution_text" />
</LinearLayout>
In the activity_main.xml layout, we add two buttons for st art ing and st o pping the Service:
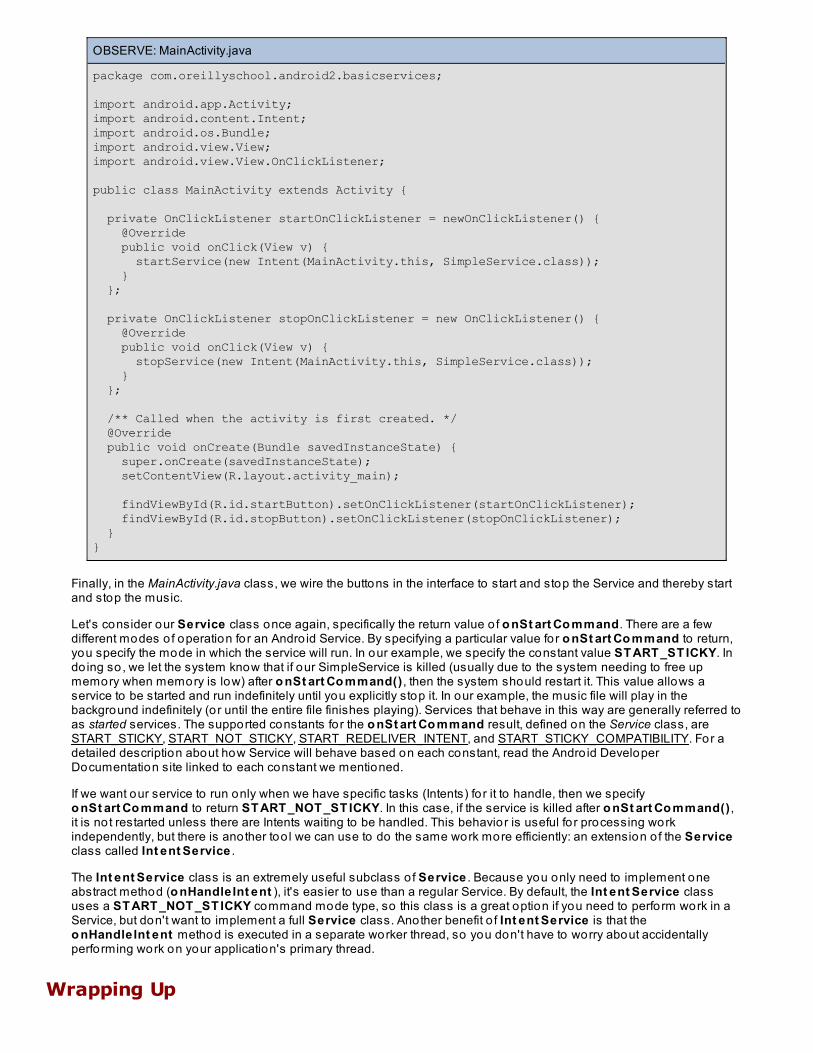
OBSERVE: MainActivity.java
package com.oreillyschool.android2.basicservices;
import android.app.Activity;import android.content.Intent;import android.os.Bundle;import android.view.View;import android.view.View.OnClickListener;
public class MainActivity extends Activity {
private OnClickListener startOnClickListener = newOnClickListener() { @Override public void onClick(View v) { startService(new Intent(MainActivity.this, SimpleService.class)); } }; private OnClickListener stopOnClickListener = new OnClickListener() { @Override public void onClick(View v) { stopService(new Intent(MainActivity.this, SimpleService.class)); } }; /** Called when the activity is first created. */ @Override public void onCreate(Bundle savedInstanceState) { super.onCreate(savedInstanceState); setContentView(R.layout.activity_main); findViewById(R.id.startButton).setOnClickListener(startOnClickListener); findViewById(R.id.stopButton).setOnClickListener(stopOnClickListener); }}
Finally, in the MainActivity.java class, we wire the buttons in the interface to start and stop the Service and thereby startand stop the music.
Let's consider our Service class once again, specifically the return value o f o nSt art Co mmand. There are a fewdifferent modes o f operation for an Andro id Service. By specifying a particular value for o nSt art Co mmand to return,you specify the mode in which the service will run. In our example, we specify the constant value ST ART _ST ICKY. Indo ing so, we let the system know that if our SimpleService is killed (usually due to the system needing to free upmemory when memory is low) after o nSt art Co mmand() , then the system should restart it. This value allows aservice to be started and run indefinitely until you explicitly stop it. In our example, the music file will play in thebackground indefinitely (or until the entire file finishes playing). Services that behave in this way are generally referred toas started services. The supported constants for the o nSt art Co mmand result, defined on the Service class, areSTART_STICKY, START_NOT_STICKY, START_REDELIVER_INTENT, and START_STICKY_COMPATIBILITY. For adetailed description about how Service will behave based on each constant, read the Andro id DeveloperDocumentation site linked to each constant we mentioned.
If we want our service to run only when we have specific tasks (Intents) fo r it to handle, then we specifyo nSt art Co mmand to return ST ART _NOT _ST ICKY. In this case, if the service is killed after o nSt art Co mmand() ,it is not restarted unless there are Intents waiting to be handled. This behavior is useful fo r processing workindependently, but there is another too l we can use to do the same work more efficiently: an extension o f the Serviceclass called Int ent Service .
The Int ent Service class is an extremely useful subclass o f Service . Because you only need to implement oneabstract method (o nHandleInt ent ), it's easier to use than a regular Service. By default, the Int ent Service classuses a ST ART _NOT _ST ICKY command mode type, so this class is a great option if you need to perform work in aService, but don't want to implement a full Service class. Another benefit o f Int ent Service is that theo nHandleInt ent method is executed in a separate worker thread, so you don't have to worry about accidentallyperforming work on your application's primary thread.
Wrapping Up

Services are an essential too l o f the Andro id SDK. In this lesson, we learned about creating a basic Service classimplementation. We covered how to stop and start a service from our Application, and learned a bit about how the lifecycle o f a Service can be affected by the o nSt art Co mmand return value. We also learned about a convenientsubclass alternative to Service called Int ent Service . Get cozy and comfortable creating and using Services in yourown applications. Practice in the homework and see you next lesson!
Copyright © 1998-2014 O'Reilly Media, Inc.
This work is licensed under a Creative Commons Attribution-ShareAlike 3.0 Unported License.See http://creativecommons.org/licenses/by-sa/3.0/legalcode for more information.
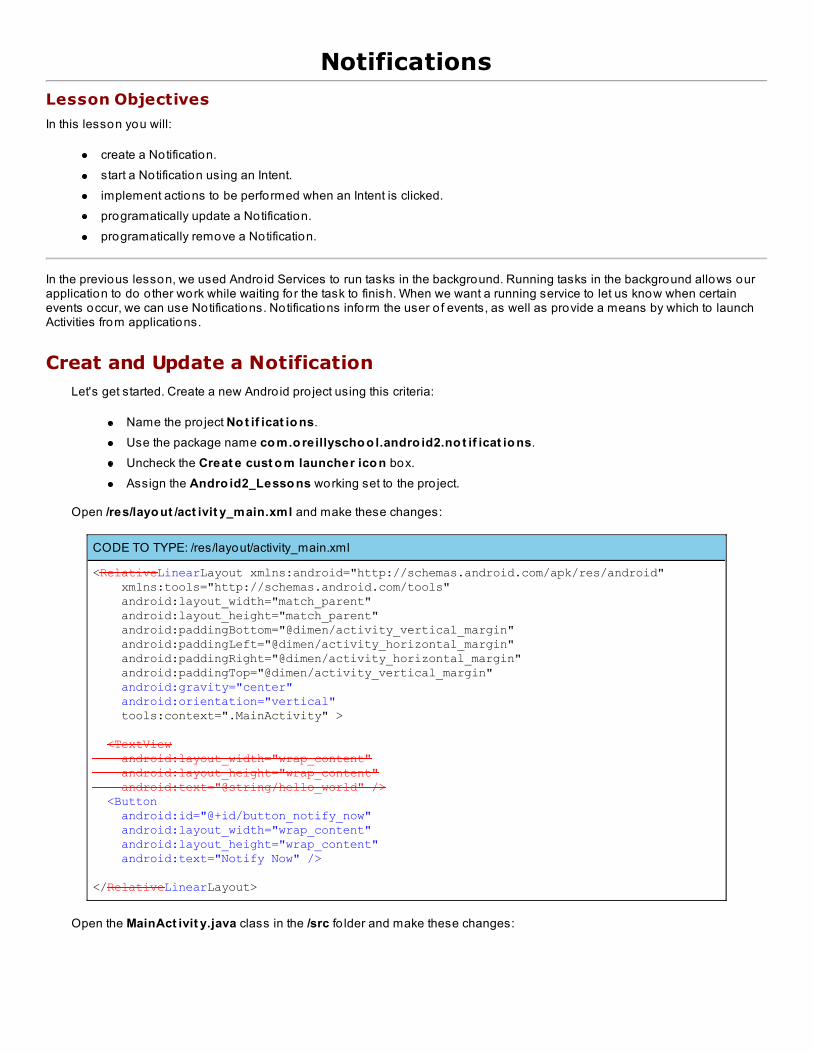
NotificationsLesson Objectives
In this lesson you will:
create a Notification.start a Notification using an Intent.implement actions to be performed when an Intent is clicked.programatically update a Notification.programatically remove a Notification.
In the previous lesson, we used Andro id Services to run tasks in the background. Running tasks in the background allows ourapplication to do o ther work while waiting for the task to finish. When we want a running service to let us know when certainevents occur, we can use Notifications. Notifications inform the user o f events, as well as provide a means by which to launchActivities from applications.
Creat and Update a NotificationLet's get started. Create a new Andro id pro ject using this criteria:
Name the pro ject No t if icat io ns.Use the package name co m.o reillyscho o l.andro id2.no t if icat io ns.Uncheck the Creat e cust o m launcher ico n box.Assign the Andro id2_Lesso ns working set to the pro ject.
Open /res/layo ut /act ivit y_main.xml and make these changes:
CODE TO TYPE: /res/layout/activity_main.xml
<RelativeLinearLayout xmlns:android="http://schemas.android.com/apk/res/android" xmlns:tools="http://schemas.android.com/tools" android:layout_width="match_parent" android:layout_height="match_parent" android:paddingBottom="@dimen/activity_vertical_margin" android:paddingLeft="@dimen/activity_horizontal_margin" android:paddingRight="@dimen/activity_horizontal_margin" android:paddingTop="@dimen/activity_vertical_margin" android:gravity="center" android:orientation="vertical" tools:context=".MainActivity" >
<TextView android:layout_width="wrap_content" android:layout_height="wrap_content" android:text="@string/hello_world" /> <Button android:id="@+id/button_notify_now" android:layout_width="wrap_content" android:layout_height="wrap_content" android:text="Notify Now" />
</RelativeLinearLayout>
Open the MainAct ivit y.java class in the /src fo lder and make these changes:
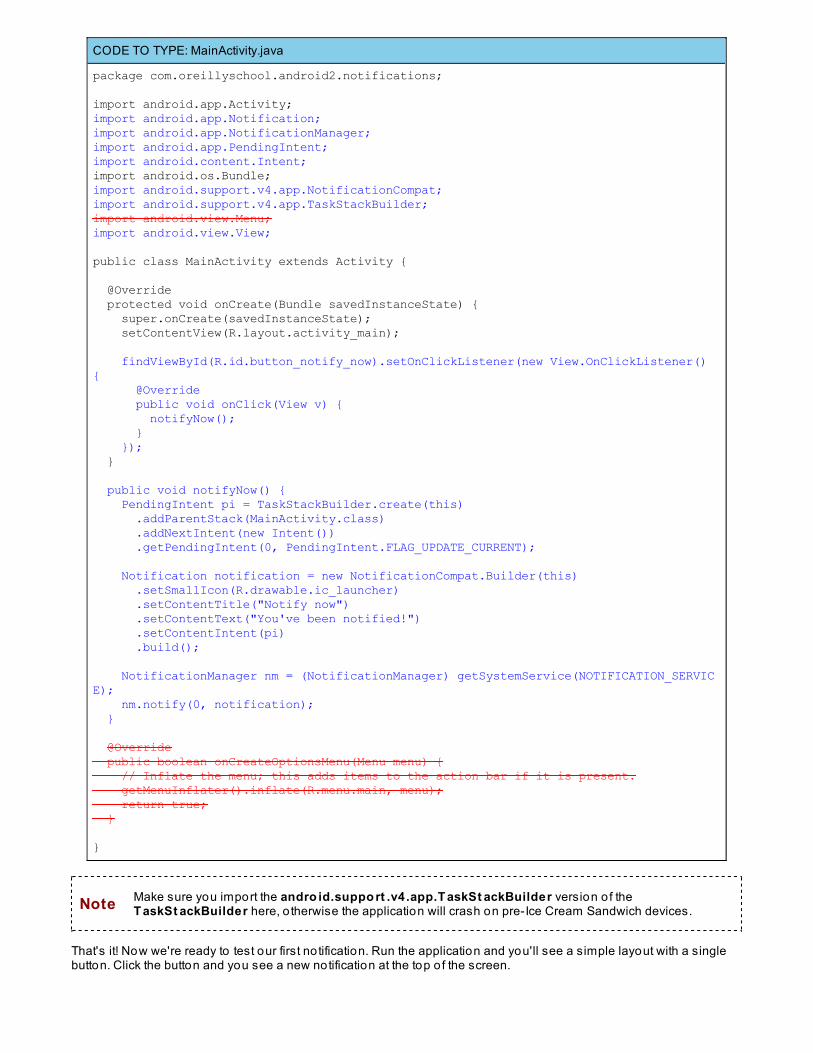
CODE TO TYPE: MainActivity.java
package com.oreillyschool.android2.notifications;
import android.app.Activity;import android.app.Notification;import android.app.NotificationManager;import android.app.PendingIntent;import android.content.Intent;import android.os.Bundle;import android.support.v4.app.NotificationCompat;import android.support.v4.app.TaskStackBuilder;import android.view.Menu;import android.view.View;
public class MainActivity extends Activity {
@Override protected void onCreate(Bundle savedInstanceState) { super.onCreate(savedInstanceState); setContentView(R.layout.activity_main); findViewById(R.id.button_notify_now).setOnClickListener(new View.OnClickListener() { @Override public void onClick(View v) { notifyNow(); } }); } public void notifyNow() { PendingIntent pi = TaskStackBuilder.create(this) .addParentStack(MainActivity.class) .addNextIntent(new Intent()) .getPendingIntent(0, PendingIntent.FLAG_UPDATE_CURRENT); Notification notification = new NotificationCompat.Builder(this) .setSmallIcon(R.drawable.ic_launcher) .setContentTitle("Notify now") .setContentText("You've been notified!") .setContentIntent(pi) .build(); NotificationManager nm = (NotificationManager) getSystemService(NOTIFICATION_SERVICE); nm.notify(0, notification); }
@Override public boolean onCreateOptionsMenu(Menu menu) { // Inflate the menu; this adds items to the action bar if it is present. getMenuInflater().inflate(R.menu.main, menu); return true; }
}
Note Make sure you import the andro id.suppo rt .v4.app.T askSt ackBuilder version o f theT askSt ackBuilder here, o therwise the application will crash on pre-Ice Cream Sandwich devices.
That's it! Now we're ready to test our first notification. Run the application and you'll see a simple layout with a singlebutton. Click the button and you see a new notification at the top o f the screen.
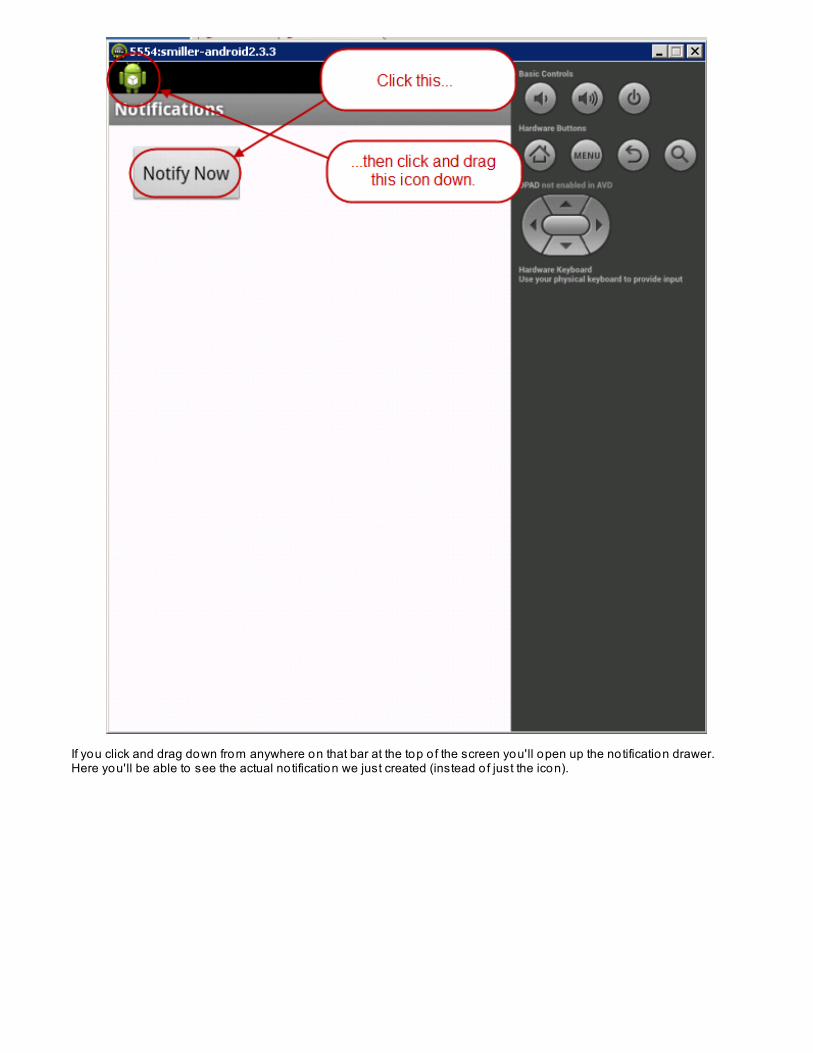
If you click and drag down from anywhere on that bar at the top o f the screen you'll open up the notification drawer.Here you'll be able to see the actual notification we just created (instead o f just the icon).
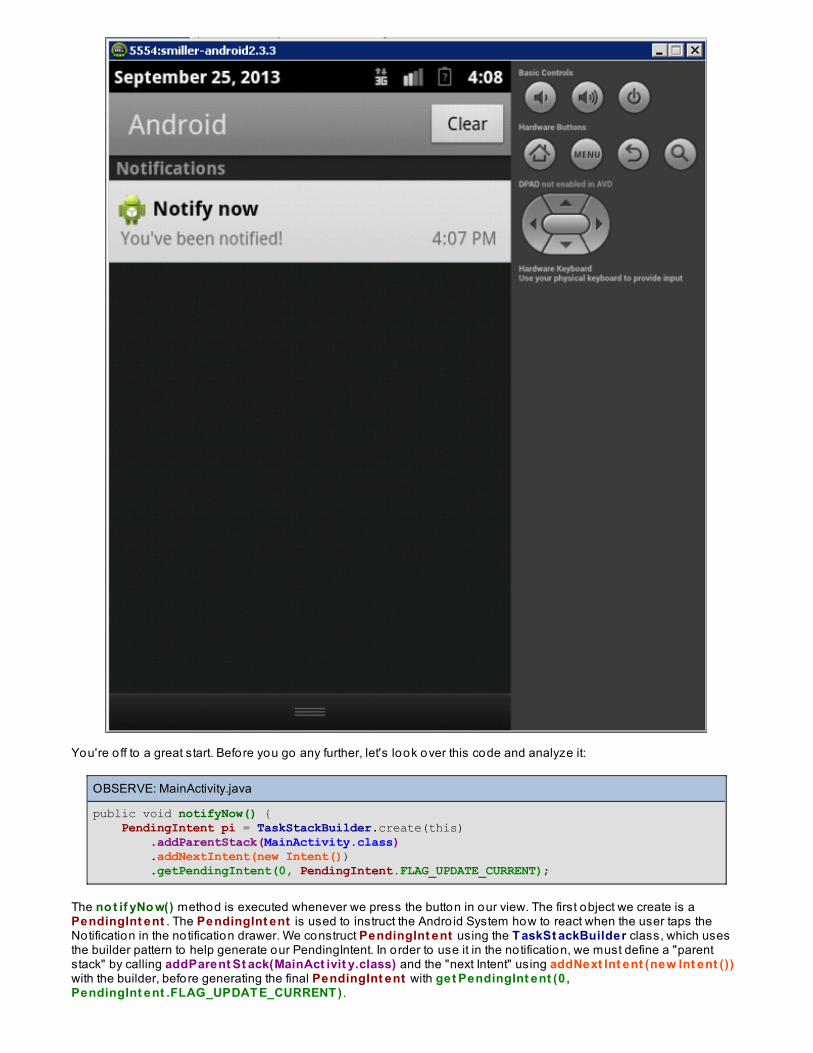
You're o ff to a great start. Before you go any further, let's look over this code and analyze it:
OBSERVE: MainActivity.java
public void notifyNow() { PendingIntent pi = TaskStackBuilder.create(this) .addParentStack(MainActivity.class) .addNextIntent(new Intent()) .getPendingIntent(0, PendingIntent.FLAG_UPDATE_CURRENT);
The no t if yNo w() method is executed whenever we press the button in our view. The first object we create is aPendingInt ent . The PendingInt ent is used to instruct the Andro id System how to react when the user taps theNotification in the notification drawer. We construct PendingInt ent using the T askSt ackBuilder class, which usesthe builder pattern to help generate our PendingIntent. In order to use it in the notification, we must define a "parentstack" by calling addParent St ack(MainAct ivit y.class) and the "next Intent" using addNext Int ent (new Int ent ())with the builder, before generating the final PendingInt ent with get PendingInt ent (0 ,PendingInt ent .FLAG_UPDAT E_CURRENT ) .

The addParent St ack method requires a parameter reference to an Act ivit y class or object, so here we can just usethe keyword t his. If we were making a notification from within a Service, we would use a class reference instead, suchas MainAct ivit y.class. The addNext Int ent method requires an Intent as its only parameter. This Int ent will startwhen the user taps the Notification. We send a new, plain Int ent object that doesn't launch anything when it'sexecuted. The final method, get PendingInt ent , requires at least two parameters: an Integer request code parameterthat can be attached to the intent, and an Integer flag that defines how the system should handle o ther PendingIntentswith the same notification id that it receives from our app. The PendingInt ent .FLAG_UPDAT E_CURRENT flag,retains any PendingIntent that matches our notification id and replaces its extra data with the data attached to this newPendingIntent. This notification id is referenced later, and is not related to the requestCode we just defined.
OBSERVE:
Notification notification = new NotificationCompat.Builder(this) .setSmallIcon(R.drawable.ic_launcher) .setContentTitle("Notify now") .setContentText("You've been notified!") .setContentIntent(pi) .build();
After constructing PendingInt ent , we have to construct an actual No t if icat io n object. We use a builder to do this aswell. We use the No t if icat io nCo mpat .Builder class reference so our notification works on pre-Ice CreamSandwich devices. We have four methods we must call here before building the final notification. First, set SmallIco ndefines the icon that is used in the notification drawer. set Co nt ent T it le and set Co nt ent T ext define the title andcontent o f the notification, respectively. Then we call set Co nt ent Int ent with the PendingInt ent we generatedearlier to register the intent with our notification. The final method, build() , takes no parameters and simply finalizesthe builder, returning the generated notification object.
OBSERVE:
NotificationManager nm = (NotificationManager) getSystemService(NOTIFICATION_SERVICE); nm.notify(0, notification);
Finally, we find a reference to the device's No t if icat io nManager using the get Syst emService() method, passingthe NOT IFICAT ION_SERVICE constant, and casting the result to the pro per class t ype . We call the no t if y method,passing a no t if icat io n id which acts as the identifier fo r the notification unique within our app, and the generat edno t if icat io n o bject as well.
Responding To User Taps On A NotificationLet's update our code so it actually does something when we tap our notification. As you might have guessed, weneed to define a different "next Intent" fo r our PendingInt ent . Before we do that though, we'll make a new Activity thatwe want to have launched when a user taps the notification. Create a new class named Next Act ivit y, and make surethe package name is the same as the o thers (co m.o reillyscho o l.andro id2.no t if icat io ns). Also make sure to setthe superclass as andro id.app.Act ivit y. Now, make these changes to the class:
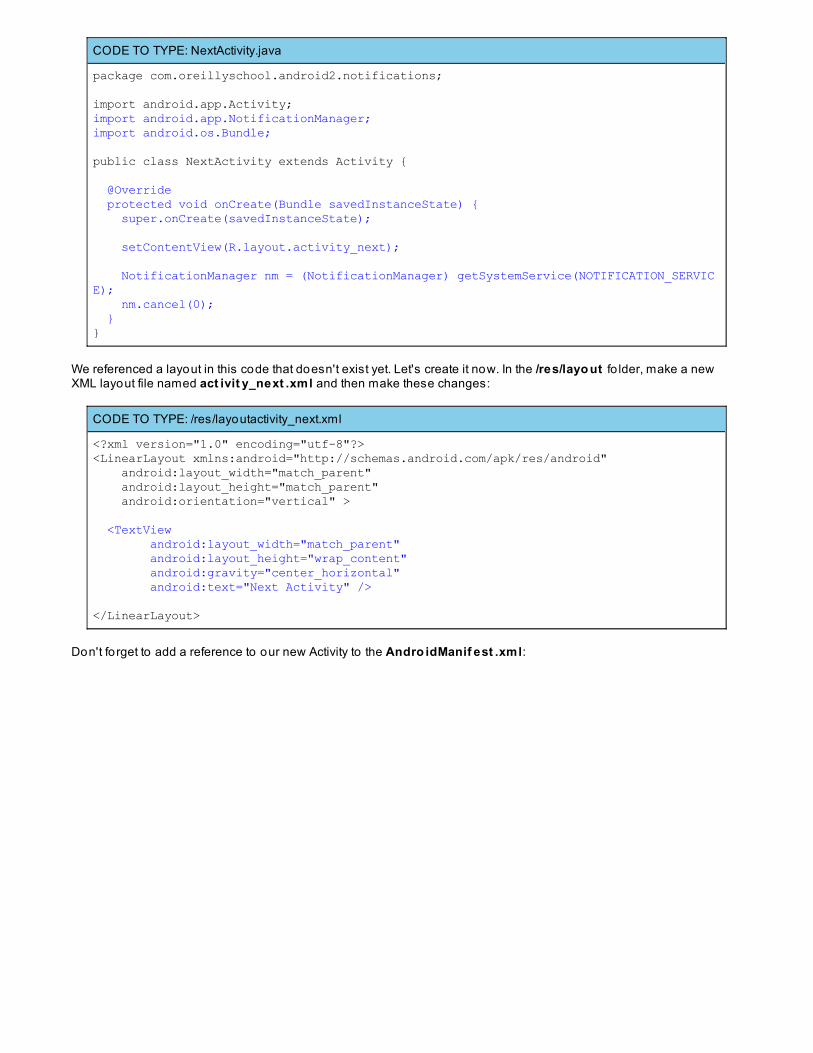
CODE TO TYPE: NextActivity.java
package com.oreillyschool.android2.notifications;
import android.app.Activity;import android.app.NotificationManager;import android.os.Bundle;
public class NextActivity extends Activity {
@Override protected void onCreate(Bundle savedInstanceState) { super.onCreate(savedInstanceState); setContentView(R.layout.activity_next); NotificationManager nm = (NotificationManager) getSystemService(NOTIFICATION_SERVICE); nm.cancel(0); }}
We referenced a layout in this code that doesn't exist yet. Let's create it now. In the /res/layo ut fo lder, make a newXML layout file named act ivit y_next .xml and then make these changes:
CODE TO TYPE: /res/layoutactivity_next.xml
<?xml version="1.0" encoding="utf-8"?><LinearLayout xmlns:android="http://schemas.android.com/apk/res/android" android:layout_width="match_parent" android:layout_height="match_parent" android:orientation="vertical" >
<TextView android:layout_width="match_parent" android:layout_height="wrap_content" android:gravity="center_horizontal" android:text="Next Activity" />
</LinearLayout>
Don't fo rget to add a reference to our new Activity to the Andro idManif est .xml:
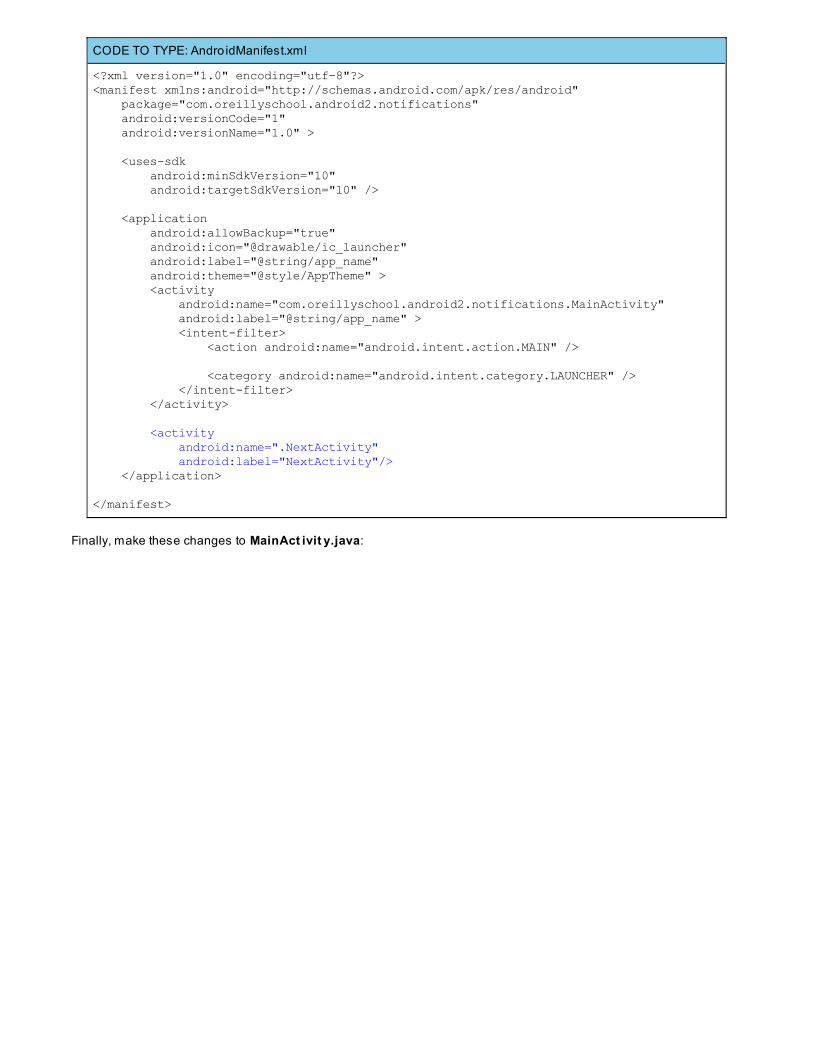
CODE TO TYPE: Andro idManifest.xml
<?xml version="1.0" encoding="utf-8"?><manifest xmlns:android="http://schemas.android.com/apk/res/android" package="com.oreillyschool.android2.notifications" android:versionCode="1" android:versionName="1.0" >
<uses-sdk android:minSdkVersion="10" android:targetSdkVersion="10" />
<application android:allowBackup="true" android:icon="@drawable/ic_launcher" android:label="@string/app_name" android:theme="@style/AppTheme" > <activity android:name="com.oreillyschool.android2.notifications.MainActivity" android:label="@string/app_name" > <intent-filter> <action android:name="android.intent.action.MAIN" />
<category android:name="android.intent.category.LAUNCHER" /> </intent-filter> </activity> <activity android:name=".NextActivity" android:label="NextActivity"/> </application>
</manifest>
Finally, make these changes to MainAct ivit y.java:
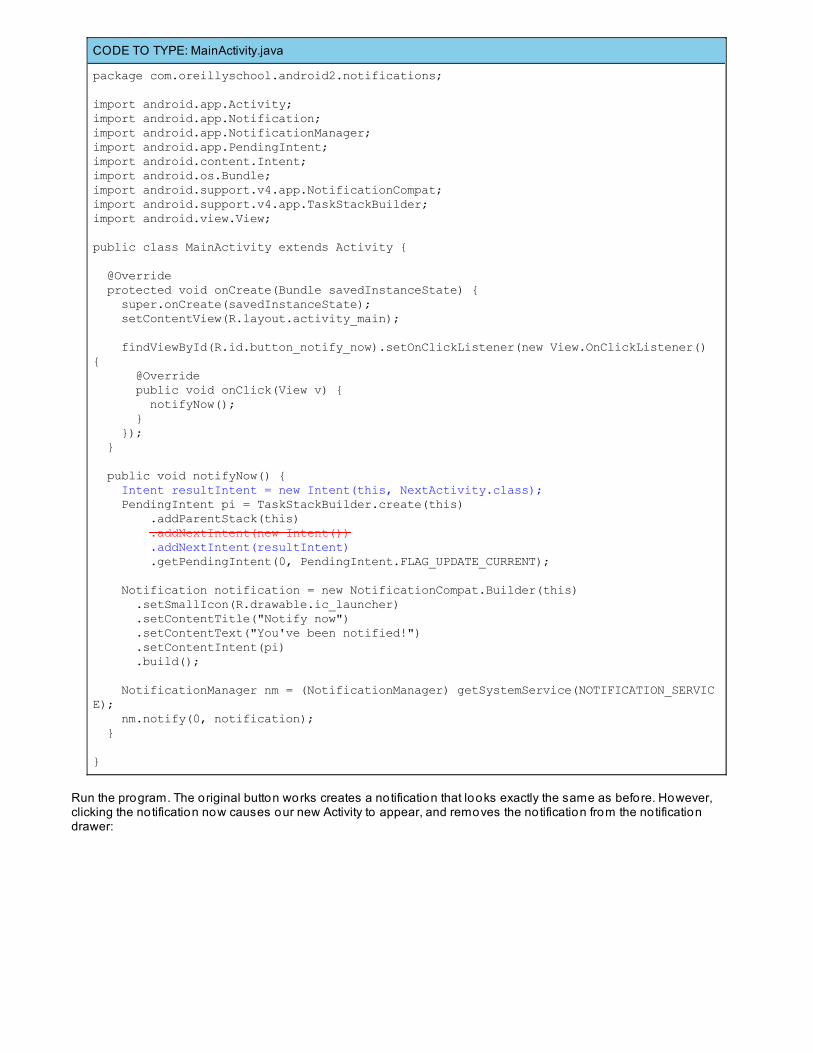
CODE TO TYPE: MainActivity.java
package com.oreillyschool.android2.notifications;
import android.app.Activity;import android.app.Notification;import android.app.NotificationManager;import android.app.PendingIntent;import android.content.Intent;import android.os.Bundle;import android.support.v4.app.NotificationCompat;import android.support.v4.app.TaskStackBuilder;import android.view.View;
public class MainActivity extends Activity {
@Override protected void onCreate(Bundle savedInstanceState) { super.onCreate(savedInstanceState); setContentView(R.layout.activity_main); findViewById(R.id.button_notify_now).setOnClickListener(new View.OnClickListener() { @Override public void onClick(View v) { notifyNow(); } }); } public void notifyNow() { Intent resultIntent = new Intent(this, NextActivity.class); PendingIntent pi = TaskStackBuilder.create(this) .addParentStack(this) .addNextIntent(new Intent()) .addNextIntent(resultIntent) .getPendingIntent(0, PendingIntent.FLAG_UPDATE_CURRENT); Notification notification = new NotificationCompat.Builder(this) .setSmallIcon(R.drawable.ic_launcher) .setContentTitle("Notify now") .setContentText("You've been notified!") .setContentIntent(pi) .build(); NotificationManager nm = (NotificationManager) getSystemService(NOTIFICATION_SERVICE); nm.notify(0, notification); }
}
Run the program. The original button works creates a notification that looks exactly the same as before. However,clicking the notification now causes our new Activity to appear, and removes the notification from the notificationdrawer:
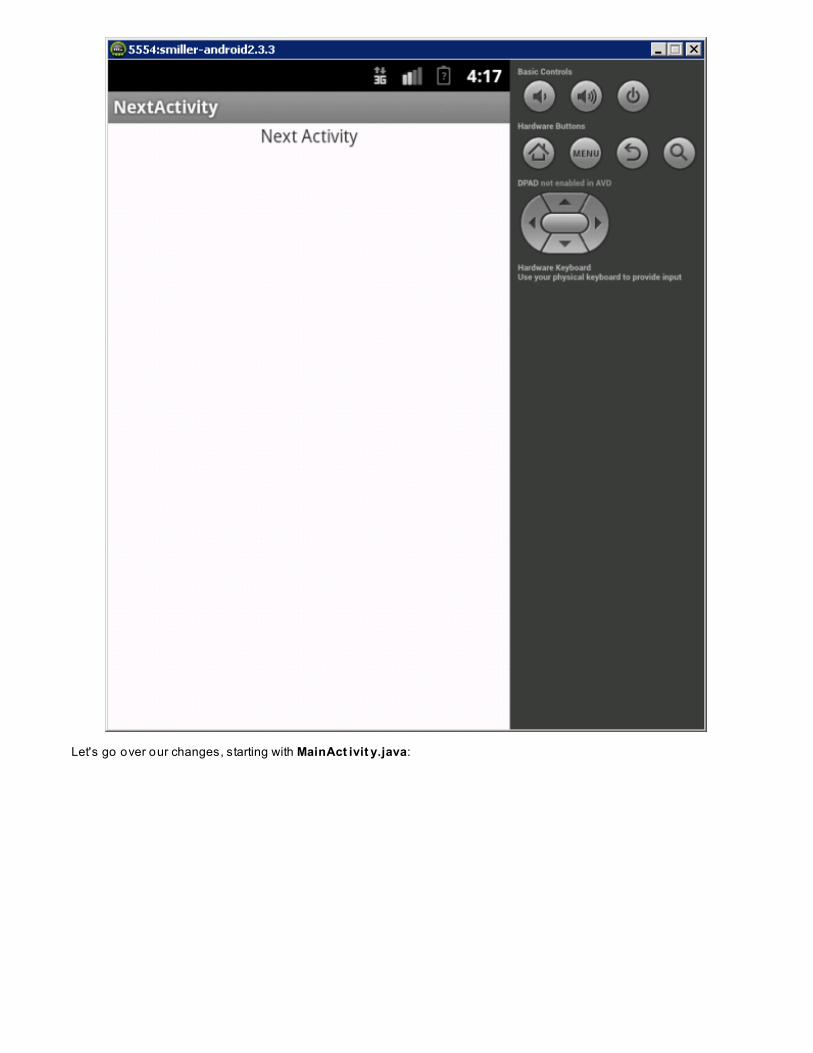
Let's go over our changes, starting with MainAct ivit y.java:
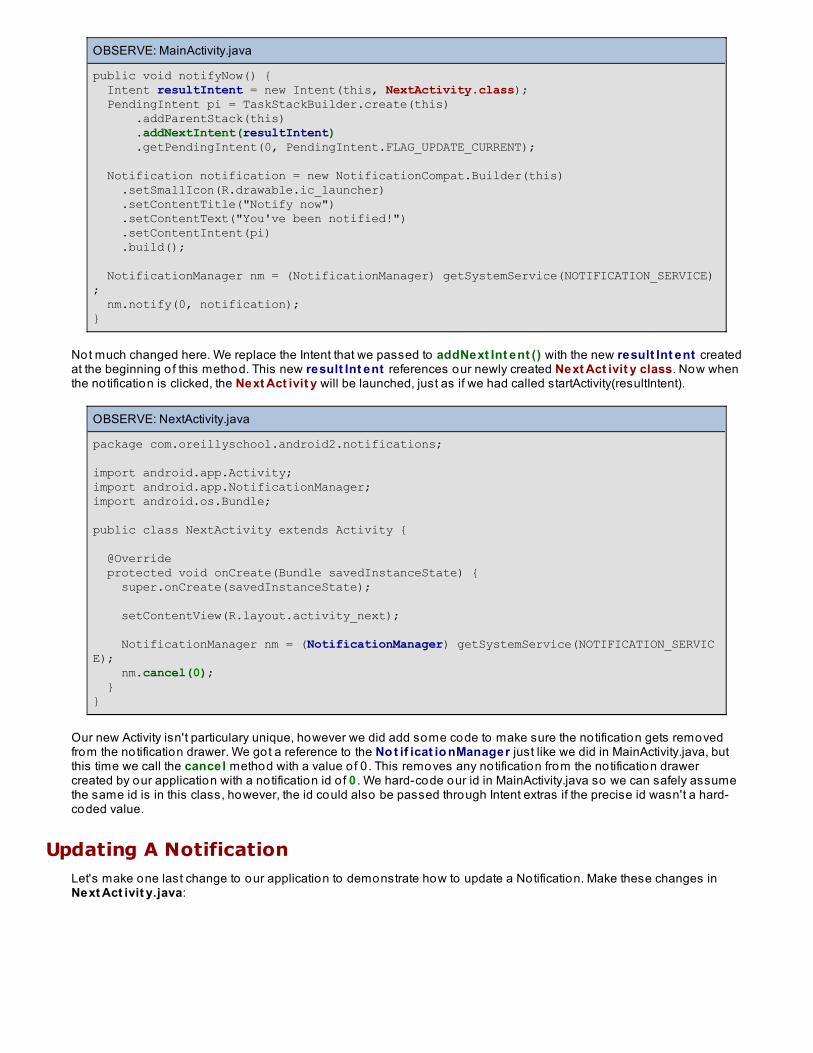
OBSERVE: MainActivity.java
public void notifyNow() { Intent resultIntent = new Intent(this, NextActivity.class); PendingIntent pi = TaskStackBuilder.create(this) .addParentStack(this) .addNextIntent(resultIntent) .getPendingIntent(0, PendingIntent.FLAG_UPDATE_CURRENT); Notification notification = new NotificationCompat.Builder(this) .setSmallIcon(R.drawable.ic_launcher) .setContentTitle("Notify now") .setContentText("You've been notified!") .setContentIntent(pi) .build(); NotificationManager nm = (NotificationManager) getSystemService(NOTIFICATION_SERVICE); nm.notify(0, notification);}
Not much changed here. We replace the Intent that we passed to addNext Int ent () with the new result Int ent createdat the beginning o f this method. This new result Int ent references our newly created Next Act ivit y class. Now whenthe notification is clicked, the Next Act ivit y will be launched, just as if we had called startActivity(resultIntent).
OBSERVE: NextActivity.java
package com.oreillyschool.android2.notifications;
import android.app.Activity;import android.app.NotificationManager;import android.os.Bundle;
public class NextActivity extends Activity {
@Override protected void onCreate(Bundle savedInstanceState) { super.onCreate(savedInstanceState); setContentView(R.layout.activity_next); NotificationManager nm = (NotificationManager) getSystemService(NOTIFICATION_SERVICE); nm.cancel(0); }}
Our new Activity isn't particulary unique, however we did add some code to make sure the notification gets removedfrom the notification drawer. We got a reference to the No t if icat io nManager just like we did in MainActivity.java, butthis time we call the cancel method with a value o f 0 . This removes any notification from the notification drawercreated by our application with a notification id o f 0 . We hard-code our id in MainActivity.java so we can safely assumethe same id is in this class, however, the id could also be passed through Intent extras if the precise id wasn't a hard-coded value.
Updating A NotificationLet's make one last change to our application to demonstrate how to update a Notification. Make these changes inNext Act ivit y.java:
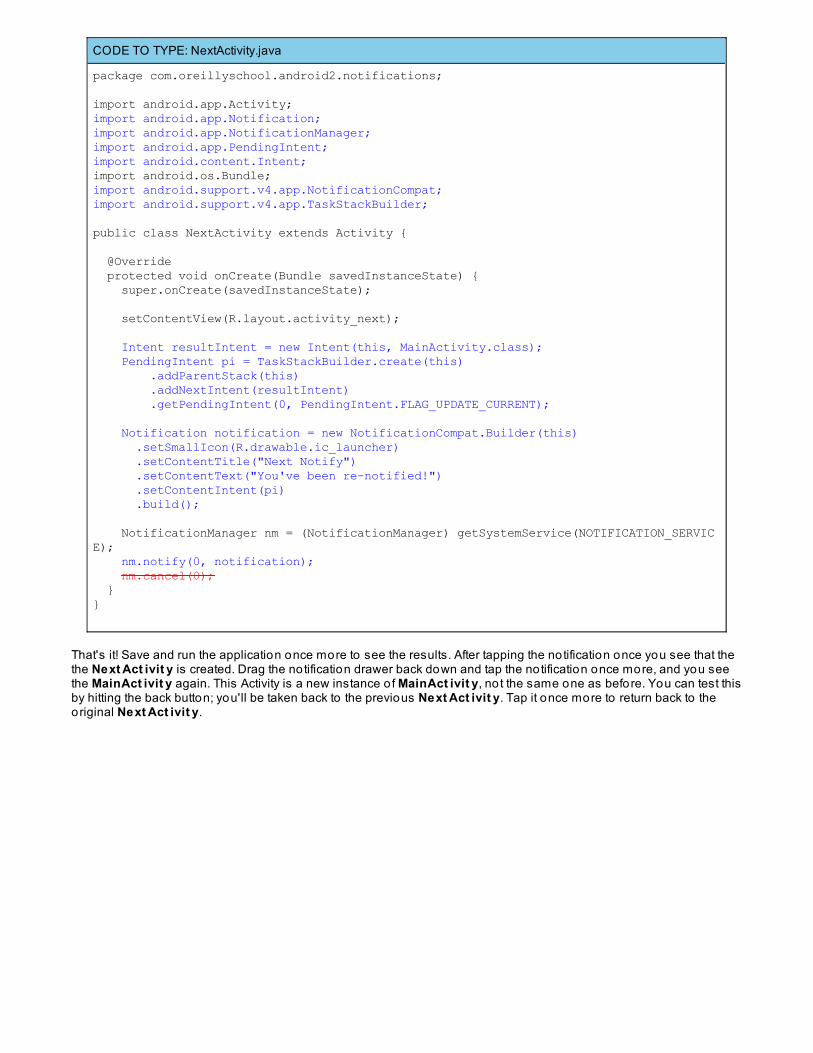
CODE TO TYPE: NextActivity.java
package com.oreillyschool.android2.notifications;
import android.app.Activity;import android.app.Notification;import android.app.NotificationManager;import android.app.PendingIntent;import android.content.Intent;import android.os.Bundle;import android.support.v4.app.NotificationCompat;import android.support.v4.app.TaskStackBuilder;
public class NextActivity extends Activity {
@Override protected void onCreate(Bundle savedInstanceState) { super.onCreate(savedInstanceState); setContentView(R.layout.activity_next); Intent resultIntent = new Intent(this, MainActivity.class); PendingIntent pi = TaskStackBuilder.create(this) .addParentStack(this) .addNextIntent(resultIntent) .getPendingIntent(0, PendingIntent.FLAG_UPDATE_CURRENT); Notification notification = new NotificationCompat.Builder(this) .setSmallIcon(R.drawable.ic_launcher) .setContentTitle("Next Notify") .setContentText("You've been re-notified!") .setContentIntent(pi) .build(); NotificationManager nm = (NotificationManager) getSystemService(NOTIFICATION_SERVICE); nm.notify(0, notification); nm.cancel(0); }}
That's it! Save and run the application once more to see the results. After tapping the notification once you see that thethe Next Act ivit y is created. Drag the notification drawer back down and tap the notification once more, and you seethe MainAct ivit y again. This Activity is a new instance o f MainAct ivit y, no t the same one as before. You can test thisby hitting the back button; you'll be taken back to the previous Next Act ivit y. Tap it once more to return back to theoriginal Next Act ivit y.
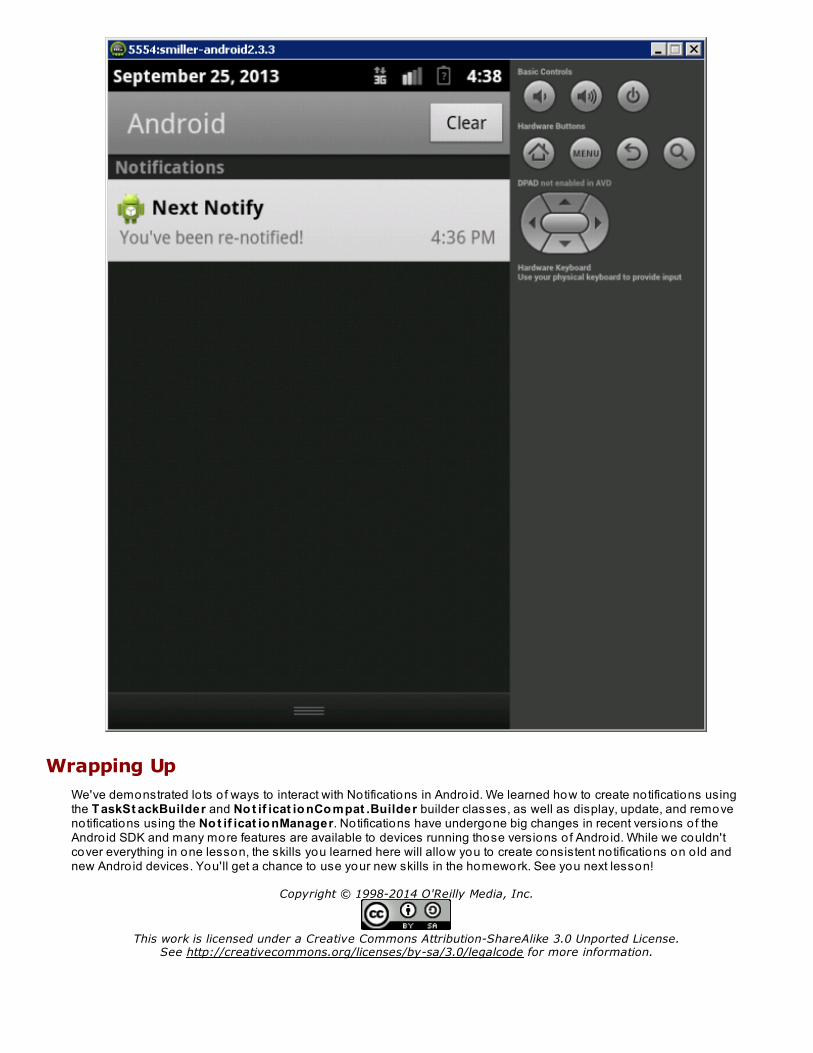
Wrapping UpWe've demonstrated lo ts o f ways to interact with Notifications in Andro id. We learned how to create notifications usingthe T askSt ackBuilder and No t if icat io nCo mpat .Builder builder classes, as well as display, update, and removenotifications using the No t if icat io nManager. Notifications have undergone big changes in recent versions o f theAndro id SDK and many more features are available to devices running those versions o f Andro id. While we couldn'tcover everything in one lesson, the skills you learned here will allow you to create consistent notifications on o ld andnew Andro id devices. You'll get a chance to use your new skills in the homework. See you next lesson!
Copyright © 1998-2014 O'Reilly Media, Inc.
This work is licensed under a Creative Commons Attribution-ShareAlike 3.0 Unported License.See http://creativecommons.org/licenses/by-sa/3.0/legalcode for more information.
Content ProvidersLesson Objectives
In the lesson you will:
create a ContentProvider from scratch.create a database using SQLiteOpenHelper.access ContentProvider data through the ContentReso lver.insert new data into a ContentProvider.display ContentProvider results in a list using Cursor and CursorAdapter.
In this lesson, we'll cover an Andro id feature called Content Providers. Content Providers encapsulate an application'sinteraction with structured data stored on the device. They provide simple Create, Read, Update, and Delete (o ften called CRUD)methods, access to external Application sharing, and security. A Content Provider is typically backed by a SQLite databaseinstance, but the actual implementation is contro lled by the developer.
Creating and Using a Content ProviderWe have a lo t o f code to write before we'll be able to test this application, so let's get started. Create a new Andro idpro ject with these criteria:
Name the pro ject Co nt ent Pro viders.Use the package name co m.o reillyscho o l.andro id2.co nt ent pro viders.Assign the Andro id2_Lesso ns working set to the pro ject.Uncheck the Creat e cust o m launcher ico n box.
Now let's work with our views. Open the act ivit y_main.xml layout file and make these changes:

CODE TO TYPE: /res/layout/activity_main.xml
<RelativeLinearLayout xmlns:android="http://schemas.android.com/apk/res/android" xmlns:tools="http://schemas.android.com/tools" android:layout_width="match_parent" android:layout_height="match_parent" android:paddingBottom="@dimen/activity_vertical_margin" android:paddingLeft="@dimen/activity_horizontal_margin" android:paddingRight="@dimen/activity_horizontal_margin" android:paddingTop="@dimen/activity_vertical_margin" android:orientation="vertical" tools:context=".MainActivity" > <TextView android:layout_width="wrap_content" android:layout_height="wrap_content" android:text="@string/hello_world" /> <LinearLayout android:layout_width="match_parent" android:layout_height="wrap_content" android:orientation="horizontal" > <TextView android:layout_width="wrap_content" android:layout_height="wrap_content" android:text="Data:" /> <EditText android:id="@+id/data_label_edit" android:layout_width="0dp" android:layout_height="wrap_content" android:layout_weight="2" android:hint="Label" android:imeOptions="actionNext" android:inputType="text" /> <EditText android:id="@+id/data_value_edit" android:layout_width="0dp" android:layout_height="wrap_content" android:layout_weight="1" android:hint="Value" android:imeOptions="actionDone" android:inputType="number" /> <Button android:id="@+id/add_data_button" android:layout_width="wrap_content" android:layout_height="wrap_content" android:text="Add" /> </LinearLayout> <ListView android:id="@android:id/list" android:layout_width="match_parent" android:layout_height="0dp" android:layout_weight="1" android:choiceMode="singleChoice" />
</RelativeLinearLayout>
Next, create a new layout xml that we'll use for our list items. Create a new Andro id Layout XML file in the /res/layo utfo lder named it em_dat a.xml, then make these changes.
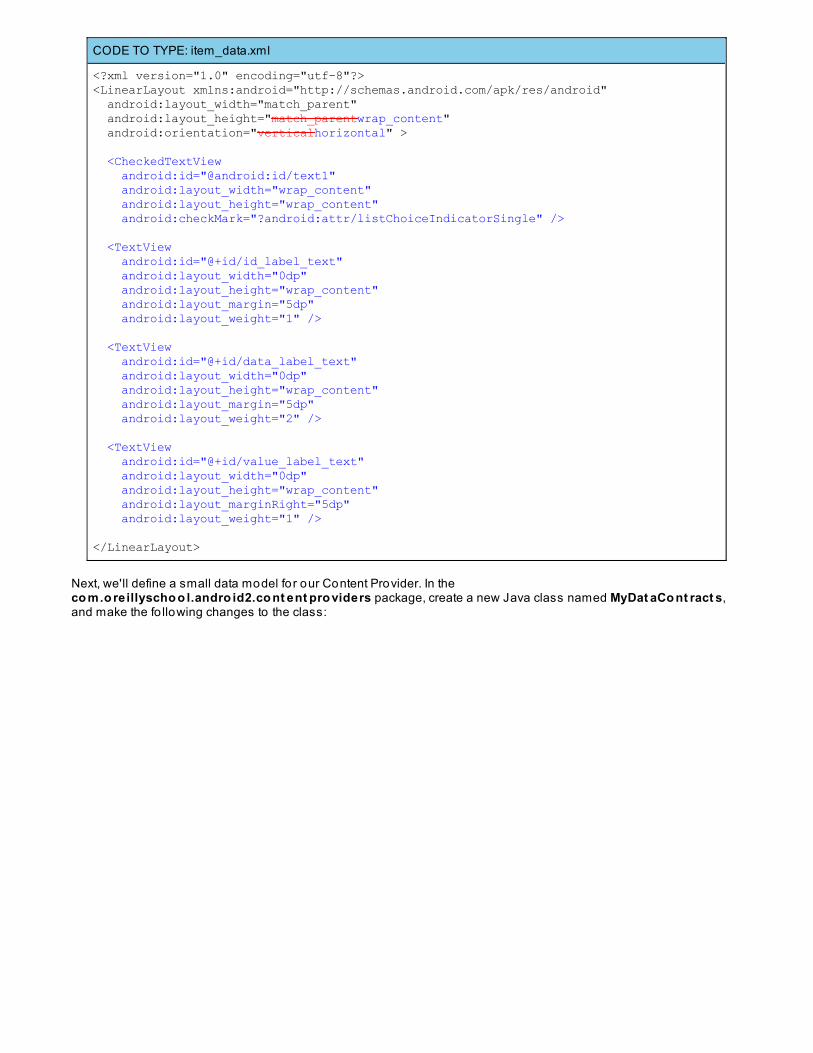
CODE TO TYPE: item_data.xml
<?xml version="1.0" encoding="utf-8"?><LinearLayout xmlns:android="http://schemas.android.com/apk/res/android" android:layout_width="match_parent" android:layout_height="match_parentwrap_content" android:orientation="verticalhorizontal" > <CheckedTextView android:id="@android:id/text1" android:layout_width="wrap_content" android:layout_height="wrap_content" android:checkMark="?android:attr/listChoiceIndicatorSingle" /> <TextView android:id="@+id/id_label_text" android:layout_width="0dp" android:layout_height="wrap_content" android:layout_margin="5dp" android:layout_weight="1" /> <TextView android:id="@+id/data_label_text" android:layout_width="0dp" android:layout_height="wrap_content" android:layout_margin="5dp" android:layout_weight="2" /> <TextView android:id="@+id/value_label_text" android:layout_width="0dp" android:layout_height="wrap_content" android:layout_marginRight="5dp" android:layout_weight="1" />
</LinearLayout>
Next, we'll define a small data model fo r our Content Provider. In theco m.o reillyscho o l.andro id2.co nt ent pro viders package, create a new Java class named MyDat aCo nt ract s,and make the fo llowing changes to the class:
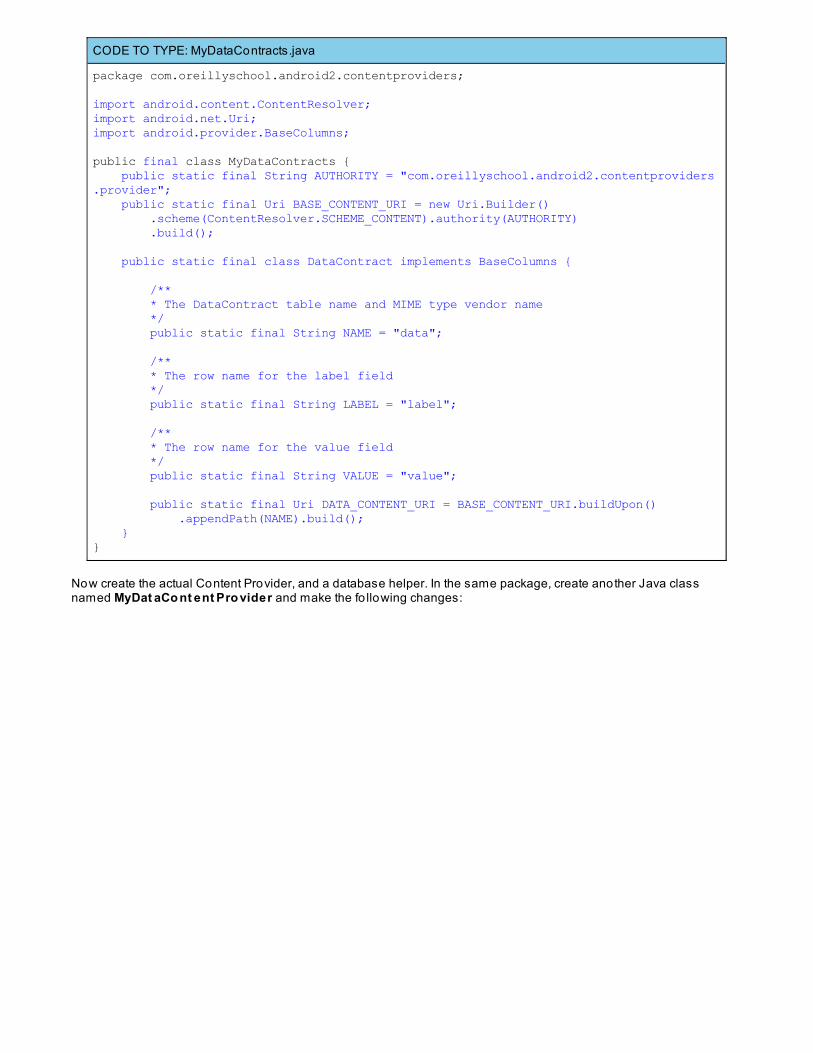
CODE TO TYPE: MyDataContracts.java
package com.oreillyschool.android2.contentproviders;
import android.content.ContentResolver;import android.net.Uri;import android.provider.BaseColumns;
public final class MyDataContracts { public static final String AUTHORITY = "com.oreillyschool.android2.contentproviders.provider"; public static final Uri BASE_CONTENT_URI = new Uri.Builder() .scheme(ContentResolver.SCHEME_CONTENT).authority(AUTHORITY) .build(); public static final class DataContract implements BaseColumns { /** * The DataContract table name and MIME type vendor name */ public static final String NAME = "data"; /** * The row name for the label field */ public static final String LABEL = "label"; /** * The row name for the value field */ public static final String VALUE = "value"; public static final Uri DATA_CONTENT_URI = BASE_CONTENT_URI.buildUpon() .appendPath(NAME).build(); }}
Now create the actual Content Provider, and a database helper. In the same package, create another Java classnamed MyDat aCo nt ent Pro vider and make the fo llowing changes:
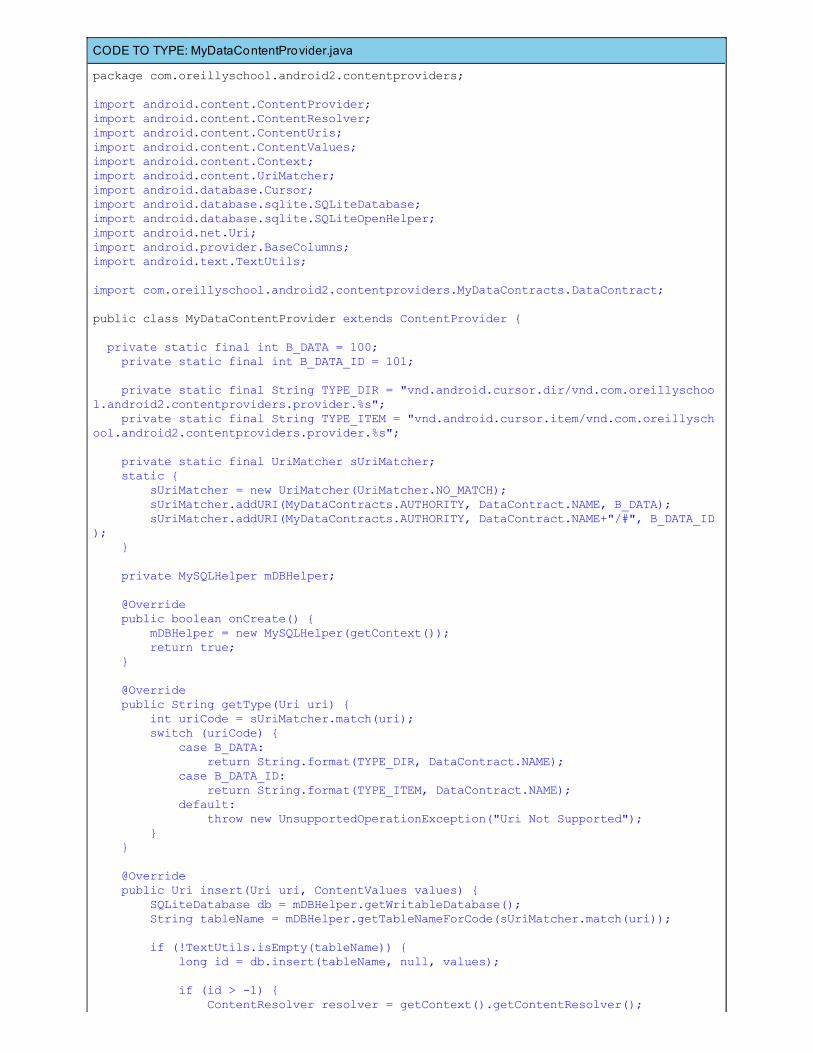
CODE TO TYPE: MyDataContentProvider.java
package com.oreillyschool.android2.contentproviders;
import android.content.ContentProvider;import android.content.ContentResolver;import android.content.ContentUris;import android.content.ContentValues;import android.content.Context;import android.content.UriMatcher;import android.database.Cursor;import android.database.sqlite.SQLiteDatabase;import android.database.sqlite.SQLiteOpenHelper;import android.net.Uri;import android.provider.BaseColumns;import android.text.TextUtils;
import com.oreillyschool.android2.contentproviders.MyDataContracts.DataContract;
public class MyDataContentProvider extends ContentProvider { private static final int B_DATA = 100; private static final int B_DATA_ID = 101; private static final String TYPE_DIR = "vnd.android.cursor.dir/vnd.com.oreillyschool.android2.contentproviders.provider.%s"; private static final String TYPE_ITEM = "vnd.android.cursor.item/vnd.com.oreillyschool.android2.contentproviders.provider.%s"; private static final UriMatcher sUriMatcher; static { sUriMatcher = new UriMatcher(UriMatcher.NO_MATCH); sUriMatcher.addURI(MyDataContracts.AUTHORITY, DataContract.NAME, B_DATA); sUriMatcher.addURI(MyDataContracts.AUTHORITY, DataContract.NAME+"/#", B_DATA_ID); } private MySQLHelper mDBHelper;
@Override public boolean onCreate() { mDBHelper = new MySQLHelper(getContext()); return true; }
@Override public String getType(Uri uri) { int uriCode = sUriMatcher.match(uri); switch (uriCode) { case B_DATA: return String.format(TYPE_DIR, DataContract.NAME); case B_DATA_ID: return String.format(TYPE_ITEM, DataContract.NAME); default: throw new UnsupportedOperationException("Uri Not Supported"); } }
@Override public Uri insert(Uri uri, ContentValues values) { SQLiteDatabase db = mDBHelper.getWritableDatabase(); String tableName = mDBHelper.getTableNameForCode(sUriMatcher.match(uri)); if (!TextUtils.isEmpty(tableName)) { long id = db.insert(tableName, null, values); if (id > -1) { ContentResolver resolver = getContext().getContentResolver();
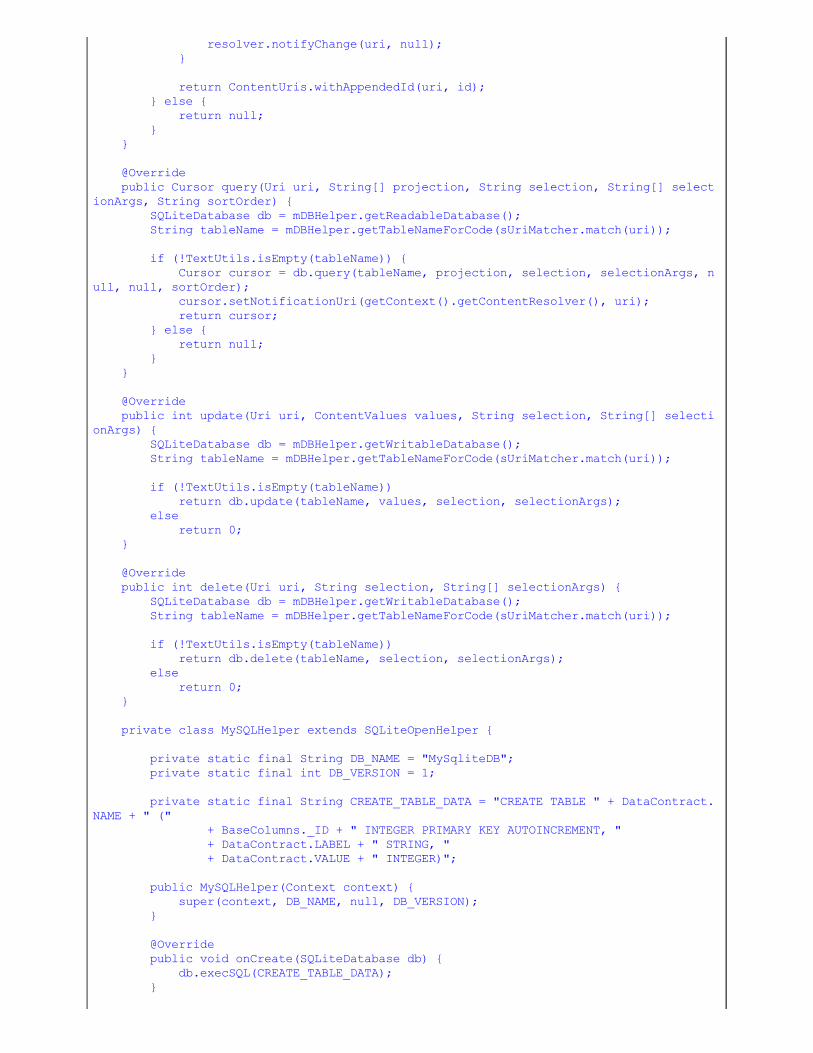
resolver.notifyChange(uri, null); } return ContentUris.withAppendedId(uri, id); } else { return null; } } @Override public Cursor query(Uri uri, String[] projection, String selection, String[] selectionArgs, String sortOrder) { SQLiteDatabase db = mDBHelper.getReadableDatabase(); String tableName = mDBHelper.getTableNameForCode(sUriMatcher.match(uri)); if (!TextUtils.isEmpty(tableName)) { Cursor cursor = db.query(tableName, projection, selection, selectionArgs, null, null, sortOrder); cursor.setNotificationUri(getContext().getContentResolver(), uri); return cursor; } else { return null; } }
@Override public int update(Uri uri, ContentValues values, String selection, String[] selectionArgs) { SQLiteDatabase db = mDBHelper.getWritableDatabase(); String tableName = mDBHelper.getTableNameForCode(sUriMatcher.match(uri)); if (!TextUtils.isEmpty(tableName)) return db.update(tableName, values, selection, selectionArgs); else return 0; } @Override public int delete(Uri uri, String selection, String[] selectionArgs) { SQLiteDatabase db = mDBHelper.getWritableDatabase(); String tableName = mDBHelper.getTableNameForCode(sUriMatcher.match(uri)); if (!TextUtils.isEmpty(tableName)) return db.delete(tableName, selection, selectionArgs); else return 0; } private class MySQLHelper extends SQLiteOpenHelper { private static final String DB_NAME = "MySqliteDB"; private static final int DB_VERSION = 1; private static final String CREATE_TABLE_DATA = "CREATE TABLE " + DataContract.NAME + " (" + BaseColumns._ID + " INTEGER PRIMARY KEY AUTOINCREMENT, " + DataContract.LABEL + " STRING, " + DataContract.VALUE + " INTEGER)";
public MySQLHelper(Context context) { super(context, DB_NAME, null, DB_VERSION); }
@Override public void onCreate(SQLiteDatabase db) { db.execSQL(CREATE_TABLE_DATA); }
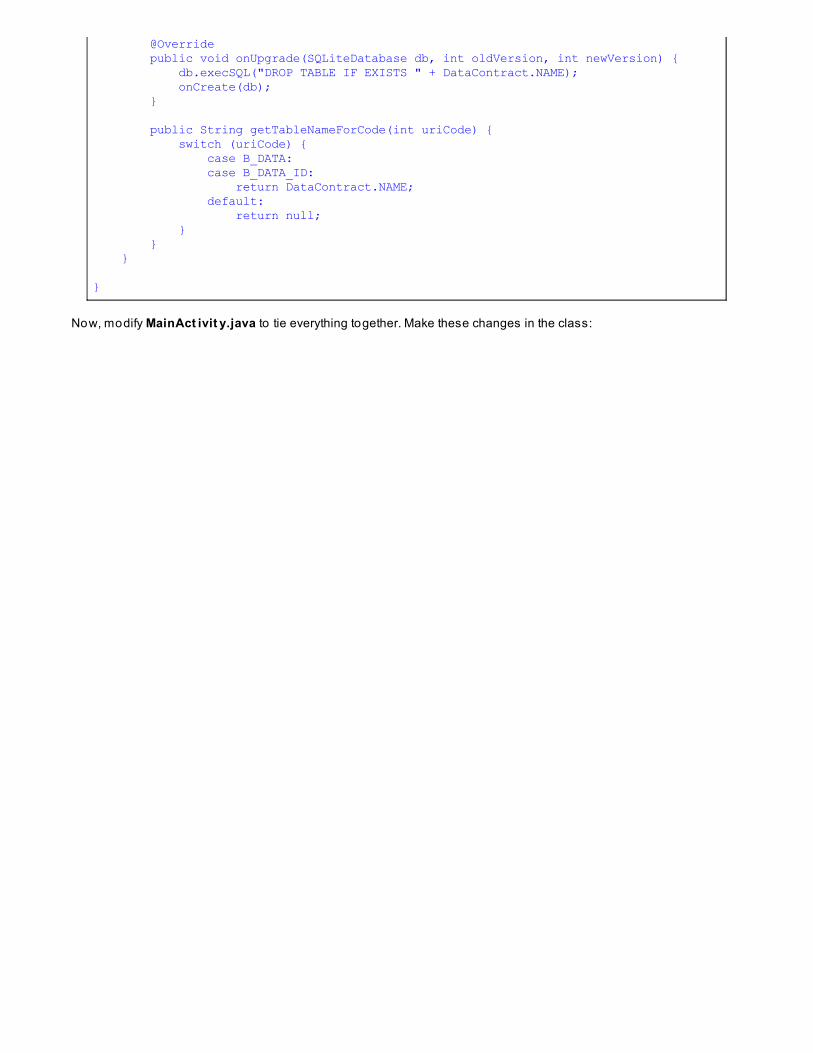
@Override public void onUpgrade(SQLiteDatabase db, int oldVersion, int newVersion) { db.execSQL("DROP TABLE IF EXISTS " + DataContract.NAME); onCreate(db); } public String getTableNameForCode(int uriCode) { switch (uriCode) { case B_DATA: case B_DATA_ID: return DataContract.NAME; default: return null; } } }
}
Now, modify MainAct ivit y.java to tie everything together. Make these changes in the class:
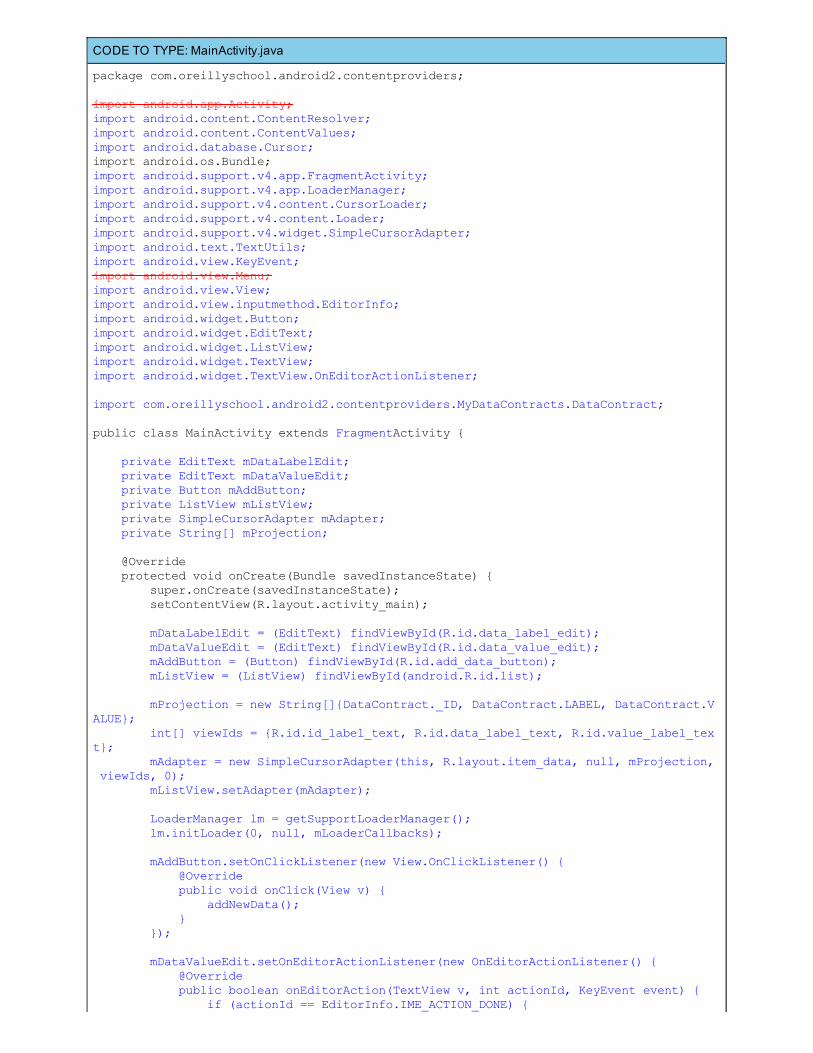
CODE TO TYPE: MainActivity.java
package com.oreillyschool.android2.contentproviders;
import android.app.Activity;import android.content.ContentResolver;import android.content.ContentValues;import android.database.Cursor;import android.os.Bundle;import android.support.v4.app.FragmentActivity;import android.support.v4.app.LoaderManager;import android.support.v4.content.CursorLoader;import android.support.v4.content.Loader;import android.support.v4.widget.SimpleCursorAdapter;import android.text.TextUtils;import android.view.KeyEvent;import android.view.Menu;import android.view.View;import android.view.inputmethod.EditorInfo;import android.widget.Button;import android.widget.EditText;import android.widget.ListView;import android.widget.TextView;import android.widget.TextView.OnEditorActionListener;
import com.oreillyschool.android2.contentproviders.MyDataContracts.DataContract;
public class MainActivity extends FragmentActivity {
private EditText mDataLabelEdit; private EditText mDataValueEdit; private Button mAddButton; private ListView mListView; private SimpleCursorAdapter mAdapter; private String[] mProjection;
@Override protected void onCreate(Bundle savedInstanceState) { super.onCreate(savedInstanceState); setContentView(R.layout.activity_main); mDataLabelEdit = (EditText) findViewById(R.id.data_label_edit); mDataValueEdit = (EditText) findViewById(R.id.data_value_edit); mAddButton = (Button) findViewById(R.id.add_data_button); mListView = (ListView) findViewById(android.R.id.list); mProjection = new String[]{DataContract._ID, DataContract.LABEL, DataContract.VALUE}; int[] viewIds = {R.id.id_label_text, R.id.data_label_text, R.id.value_label_text}; mAdapter = new SimpleCursorAdapter(this, R.layout.item_data, null, mProjection, viewIds, 0); mListView.setAdapter(mAdapter);
LoaderManager lm = getSupportLoaderManager(); lm.initLoader(0, null, mLoaderCallbacks); mAddButton.setOnClickListener(new View.OnClickListener() { @Override public void onClick(View v) { addNewData(); } }); mDataValueEdit.setOnEditorActionListener(new OnEditorActionListener() { @Override public boolean onEditorAction(TextView v, int actionId, KeyEvent event) { if (actionId == EditorInfo.IME_ACTION_DONE) {
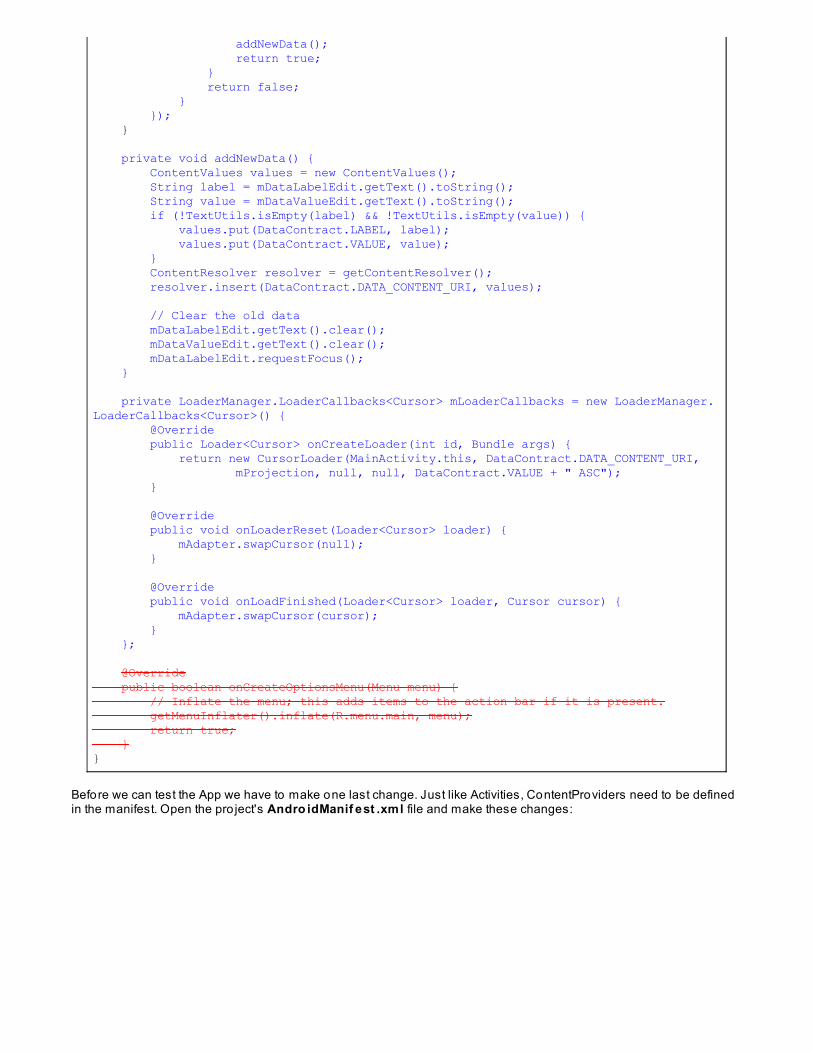
addNewData(); return true; } return false; } }); } private void addNewData() { ContentValues values = new ContentValues(); String label = mDataLabelEdit.getText().toString(); String value = mDataValueEdit.getText().toString(); if (!TextUtils.isEmpty(label) && !TextUtils.isEmpty(value)) { values.put(DataContract.LABEL, label); values.put(DataContract.VALUE, value); } ContentResolver resolver = getContentResolver(); resolver.insert(DataContract.DATA_CONTENT_URI, values); // Clear the old data mDataLabelEdit.getText().clear(); mDataValueEdit.getText().clear(); mDataLabelEdit.requestFocus(); }
private LoaderManager.LoaderCallbacks<Cursor> mLoaderCallbacks = new LoaderManager.LoaderCallbacks<Cursor>() { @Override public Loader<Cursor> onCreateLoader(int id, Bundle args) { return new CursorLoader(MainActivity.this, DataContract.DATA_CONTENT_URI, mProjection, null, null, DataContract.VALUE + " ASC"); } @Override public void onLoaderReset(Loader<Cursor> loader) { mAdapter.swapCursor(null); } @Override public void onLoadFinished(Loader<Cursor> loader, Cursor cursor) { mAdapter.swapCursor(cursor); } }; @Override public boolean onCreateOptionsMenu(Menu menu) { // Inflate the menu; this adds items to the action bar if it is present. getMenuInflater().inflate(R.menu.main, menu); return true; }}
Before we can test the App we have to make one last change. Just like Activities, ContentProviders need to be definedin the manifest. Open the pro ject's Andro idManif est .xml file and make these changes:
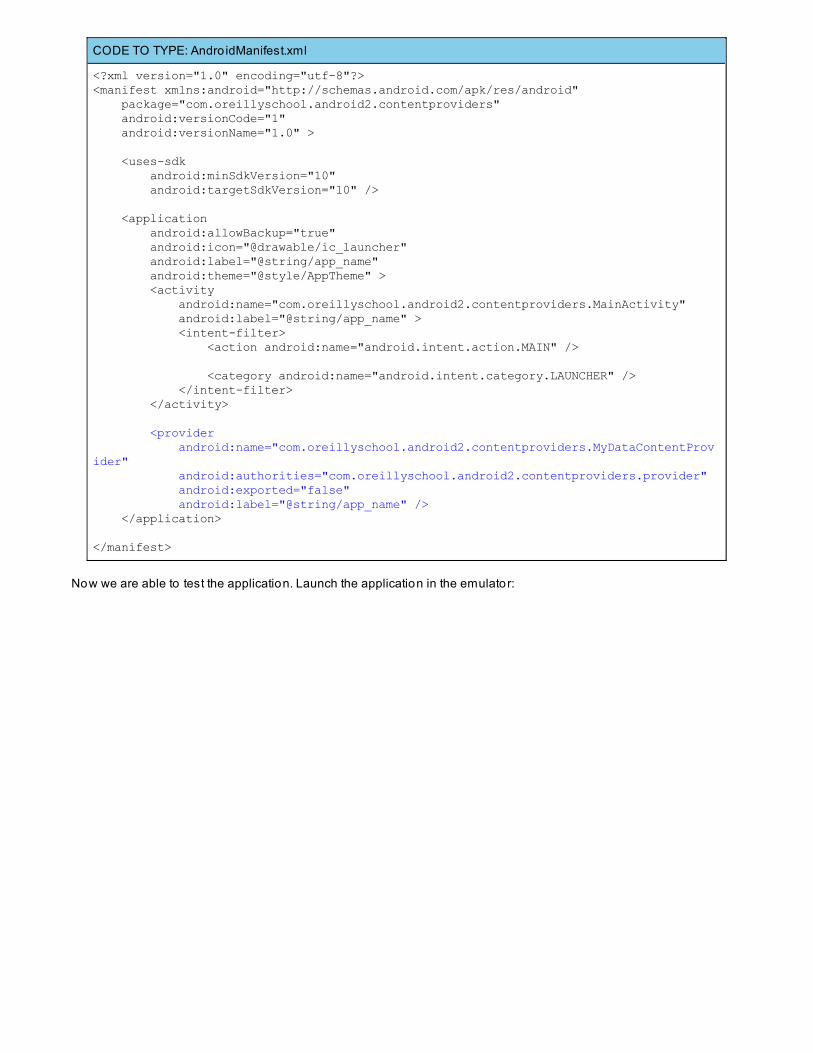
CODE TO TYPE: Andro idManifest.xml
<?xml version="1.0" encoding="utf-8"?><manifest xmlns:android="http://schemas.android.com/apk/res/android" package="com.oreillyschool.android2.contentproviders" android:versionCode="1" android:versionName="1.0" >
<uses-sdk android:minSdkVersion="10" android:targetSdkVersion="10" />
<application android:allowBackup="true" android:icon="@drawable/ic_launcher" android:label="@string/app_name" android:theme="@style/AppTheme" > <activity android:name="com.oreillyschool.android2.contentproviders.MainActivity" android:label="@string/app_name" > <intent-filter> <action android:name="android.intent.action.MAIN" />
<category android:name="android.intent.category.LAUNCHER" /> </intent-filter> </activity> <provider android:name="com.oreillyschool.android2.contentproviders.MyDataContentProvider" android:authorities="com.oreillyschool.android2.contentproviders.provider" android:exported="false" android:label="@string/app_name" /> </application>
</manifest>
Now we are able to test the application. Launch the application in the emulator:
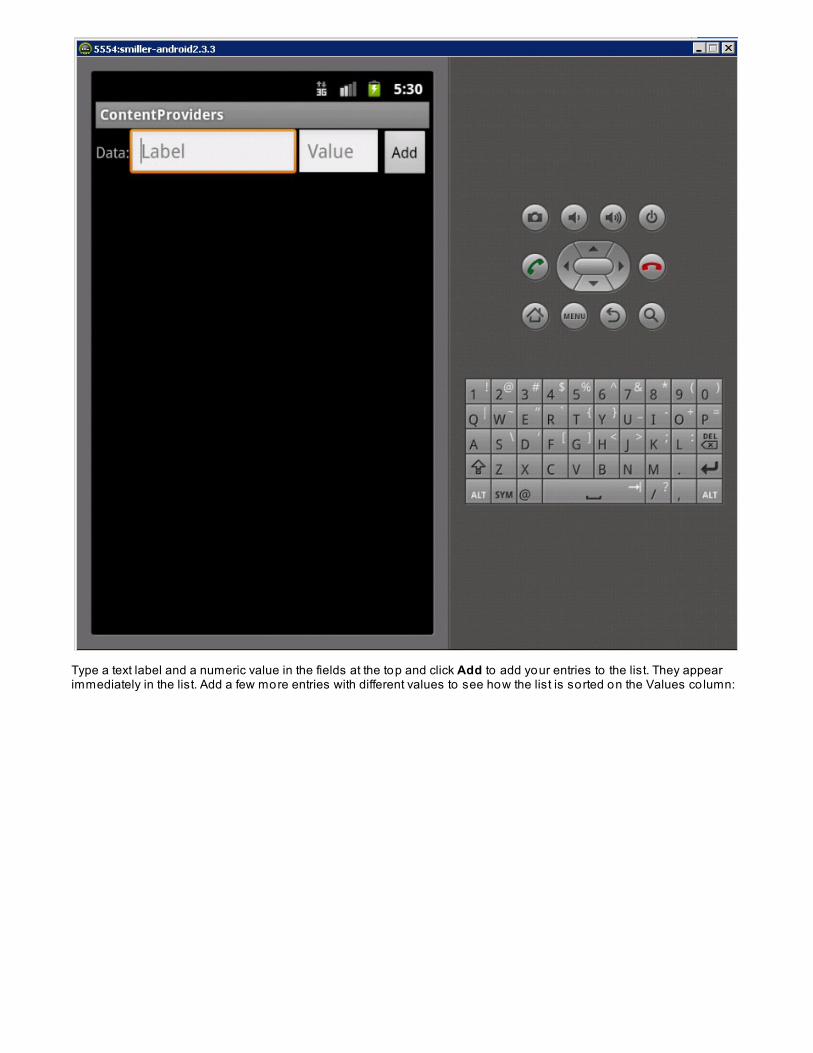
Type a text label and a numeric value in the fields at the top and click Add to add your entries to the list. They appearimmediately in the list. Add a few more entries with different values to see how the list is sorted on the Values co lumn:
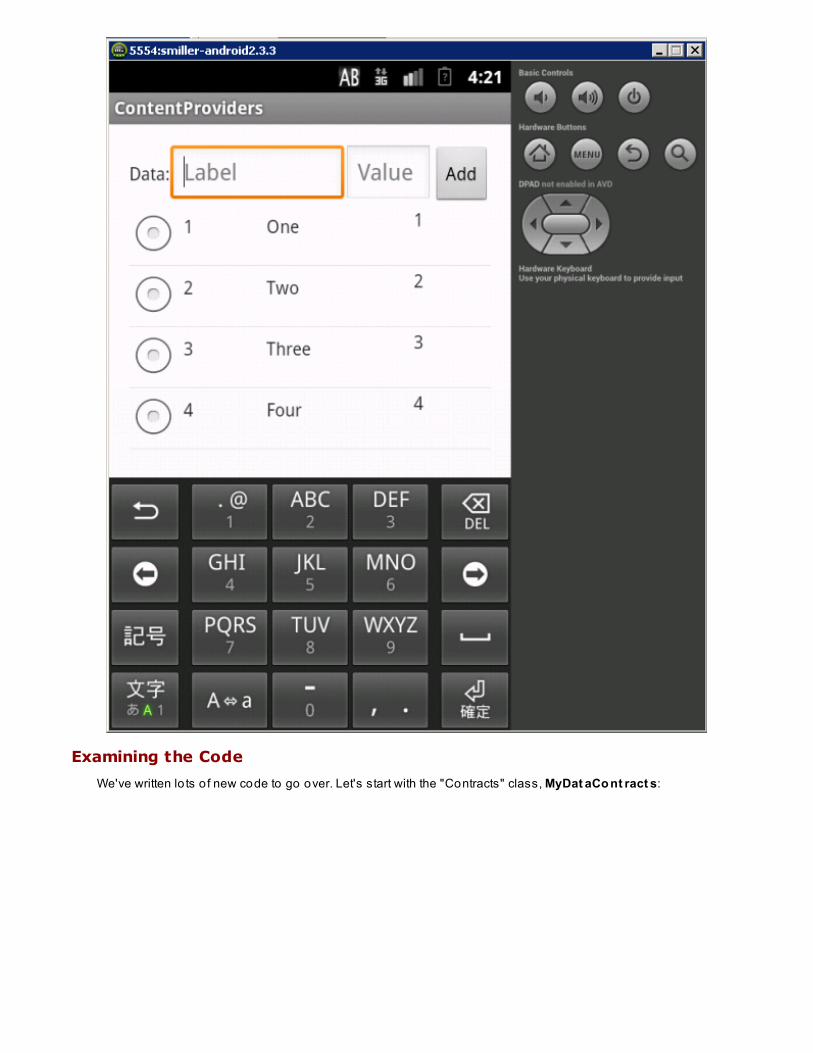
Examining the Code
We've written lo ts o f new code to go over. Let's start with the "Contracts" class, MyDat aCo nt ract s:
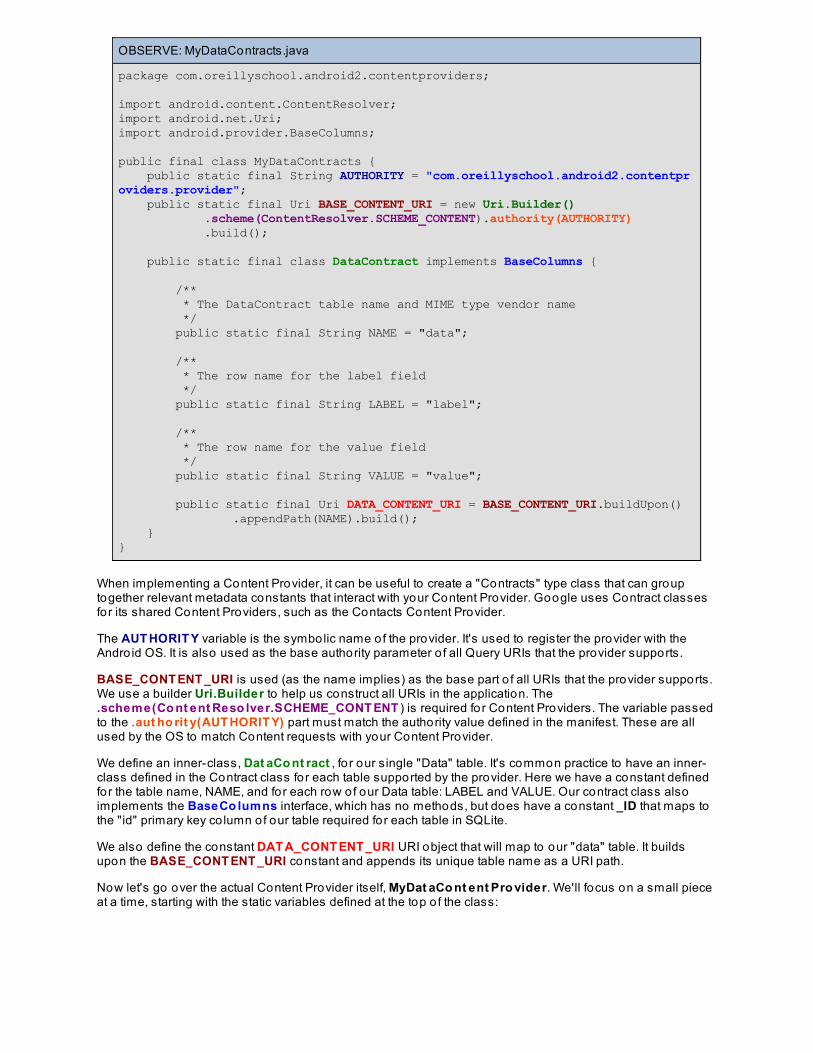
OBSERVE: MyDataContracts.java
package com.oreillyschool.android2.contentproviders;
import android.content.ContentResolver;import android.net.Uri;import android.provider.BaseColumns;
public final class MyDataContracts { public static final String AUTHORITY = "com.oreillyschool.android2.contentproviders.provider"; public static final Uri BASE_CONTENT_URI = new Uri.Builder() .scheme(ContentResolver.SCHEME_CONTENT).authority(AUTHORITY) .build();
public static final class DataContract implements BaseColumns { /** * The DataContract table name and MIME type vendor name */ public static final String NAME = "data"; /** * The row name for the label field */ public static final String LABEL = "label"; /** * The row name for the value field */ public static final String VALUE = "value"; public static final Uri DATA_CONTENT_URI = BASE_CONTENT_URI.buildUpon() .appendPath(NAME).build(); }}
When implementing a Content Provider, it can be useful to create a "Contracts" type class that can grouptogether relevant metadata constants that interact with your Content Provider. Google uses Contract classesfor its shared Content Providers, such as the Contacts Content Provider.
The AUT HORIT Y variable is the symbolic name of the provider. It's used to register the provider with theAndro id OS. It is also used as the base authority parameter o f all Query URIs that the provider supports.
BASE_CONT ENT _URI is used (as the name implies) as the base part o f all URIs that the provider supports.We use a builder Uri.Builder to help us construct all URIs in the application. The.scheme(Co nt ent Reso lver.SCHEME_CONT ENT ) is required for Content Providers. The variable passedto the .aut ho rit y(AUT HORIT Y) part must match the authority value defined in the manifest. These are allused by the OS to match Content requests with your Content Provider.
We define an inner-class, Dat aCo nt ract , fo r our single "Data" table. It's common practice to have an inner-class defined in the Contract class for each table supported by the provider. Here we have a constant definedfor the table name, NAME, and for each row of our Data table: LABEL and VALUE. Our contract class alsoimplements the BaseCo lumns interface, which has no methods, but does have a constant _ID that maps tothe "id" primary key co lumn of our table required for each table in SQLite.
We also define the constant DAT A_CONT ENT _URI URI object that will map to our "data" table. It buildsupon the BASE_CONT ENT _URI constant and appends its unique table name as a URI path.
Now let's go over the actual Content Provider itself, MyDat aCo nt ent Pro vider. We'll focus on a small pieceat a time, starting with the static variables defined at the top o f the class:
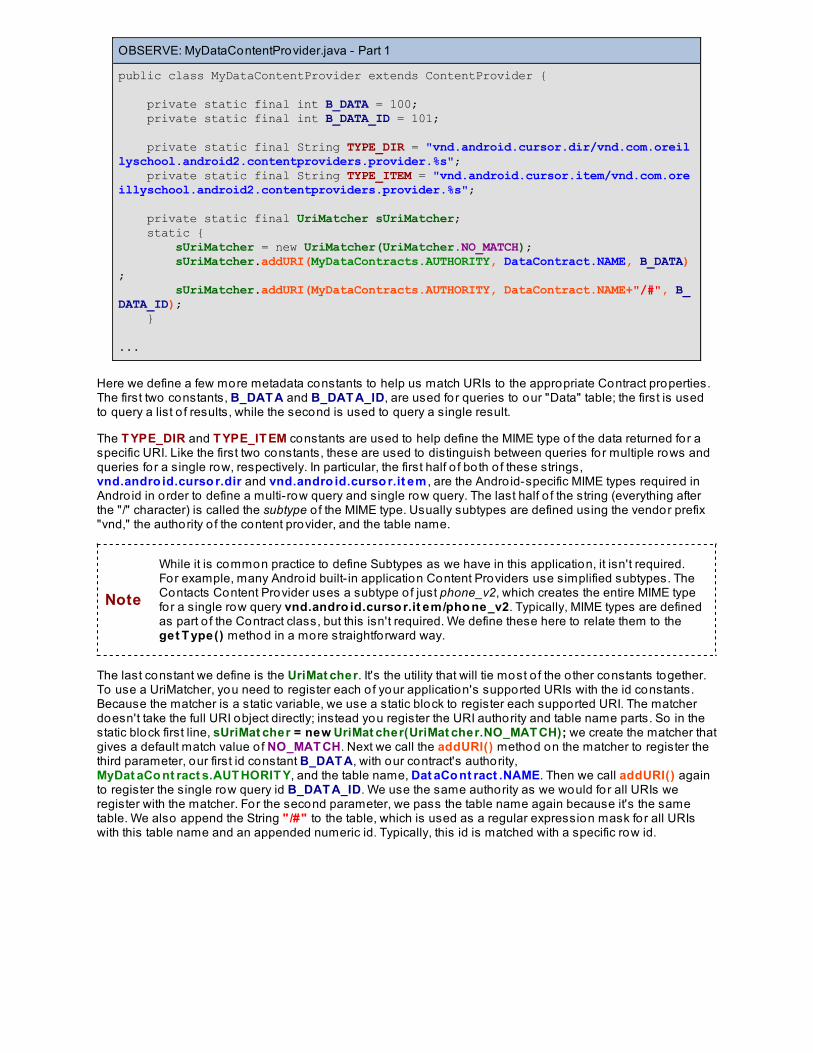
OBSERVE: MyDataContentProvider.java - Part 1
public class MyDataContentProvider extends ContentProvider { private static final int B_DATA = 100; private static final int B_DATA_ID = 101; private static final String TYPE_DIR = "vnd.android.cursor.dir/vnd.com.oreillyschool.android2.contentproviders.provider.%s"; private static final String TYPE_ITEM = "vnd.android.cursor.item/vnd.com.oreillyschool.android2.contentproviders.provider.%s"; private static final UriMatcher sUriMatcher; static { sUriMatcher = new UriMatcher(UriMatcher.NO_MATCH); sUriMatcher.addURI(MyDataContracts.AUTHORITY, DataContract.NAME, B_DATA); sUriMatcher.addURI(MyDataContracts.AUTHORITY, DataContract.NAME+"/#", B_DATA_ID); }
...
Here we define a few more metadata constants to help us match URIs to the appropriate Contract properties.The first two constants, B_DAT A and B_DAT A_ID, are used for queries to our "Data" table; the first is usedto query a list o f results, while the second is used to query a single result.
The T YPE_DIR and T YPE_IT EM constants are used to help define the MIME type o f the data returned for aspecific URI. Like the first two constants, these are used to distinguish between queries for multiple rows andqueries for a single row, respectively. In particular, the first half o f both o f these strings,vnd.andro id.curso r.dir and vnd.andro id.curso r.it em , are the Andro id-specific MIME types required inAndro id in order to define a multi-row query and single row query. The last half o f the string (everything afterthe "/" character) is called the subtype o f the MIME type. Usually subtypes are defined using the vendor prefix"vnd," the authority o f the content provider, and the table name.
Note
While it is common practice to define Subtypes as we have in this application, it isn't required.For example, many Andro id built- in application Content Providers use simplified subtypes. TheContacts Content Provider uses a subtype o f just phone_v2, which creates the entire MIME typefor a single row query vnd.andro id.curso r.it em/pho ne_v2. Typically, MIME types are definedas part o f the Contract class, but this isn't required. We define these here to relate them to theget T ype() method in a more straightforward way.
The last constant we define is the UriMat cher. It's the utility that will tie most o f the o ther constants together.To use a UriMatcher, you need to register each o f your application's supported URIs with the id constants.Because the matcher is a static variable, we use a static block to register each supported URI. The matcherdoesn't take the full URI object directly; instead you register the URI authority and table name parts. So in thestatic block first line, sUriMat cher = new UriMat cher(UriMat cher.NO_MAT CH); we create the matcher thatgives a default match value o f NO_MAT CH. Next we call the addURI() method on the matcher to register thethird parameter, our first id constant B_DAT A, with our contract's authority,MyDat aCo nt ract s.AUT HORIT Y, and the table name, Dat aCo nt ract .NAME. Then we call addURI() againto register the single row query id B_DAT A_ID. We use the same authority as we would for all URIs weregister with the matcher. For the second parameter, we pass the table name again because it's the sametable. We also append the String " /#" to the table, which is used as a regular expression mask for all URIswith this table name and an appended numeric id. Typically, this id is matched with a specific row id.
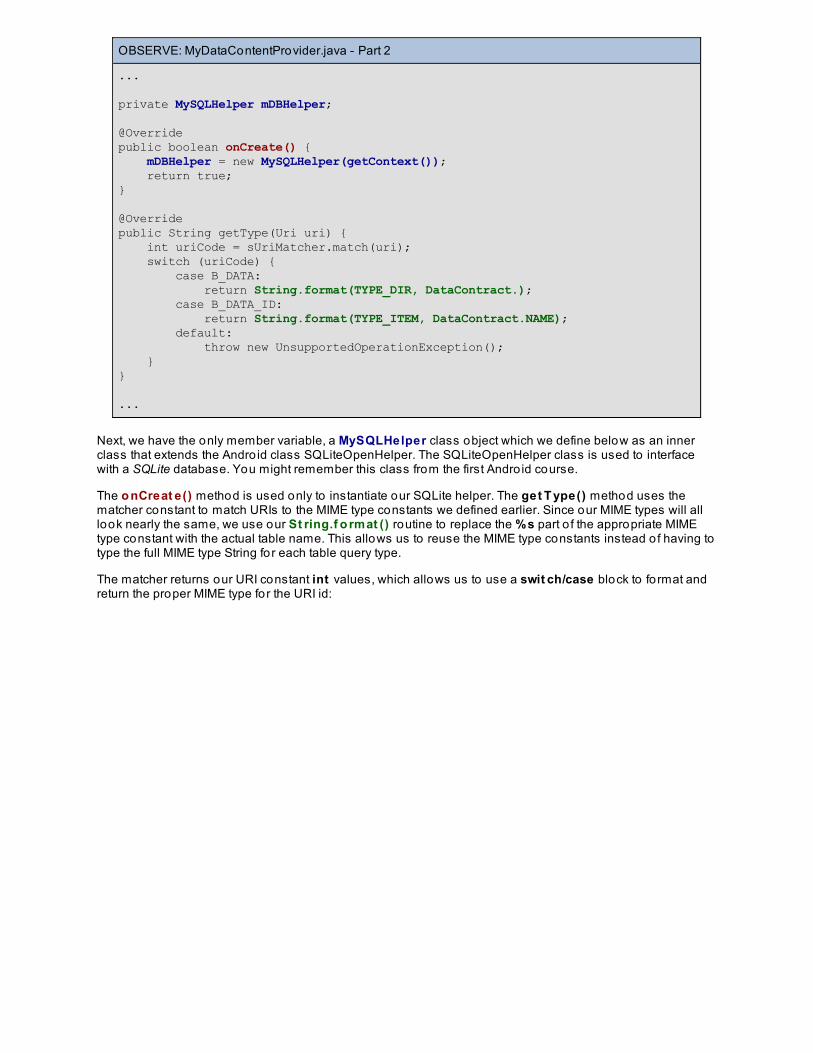
OBSERVE: MyDataContentProvider.java - Part 2
...
private MySQLHelper mDBHelper;
@Overridepublic boolean onCreate() { mDBHelper = new MySQLHelper(getContext()); return true;}
@Overridepublic String getType(Uri uri) { int uriCode = sUriMatcher.match(uri); switch (uriCode) { case B_DATA: return String.format(TYPE_DIR, DataContract.); case B_DATA_ID: return String.format(TYPE_ITEM, DataContract.NAME); default: throw new UnsupportedOperationException(); }}
...
Next, we have the only member variable, a MySQLHelper class object which we define below as an innerclass that extends the Andro id class SQLiteOpenHelper. The SQLiteOpenHelper class is used to interfacewith a SQLite database. You might remember this class from the first Andro id course.
The o nCreat e() method is used only to instantiate our SQLite helper. The get T ype() method uses thematcher constant to match URIs to the MIME type constants we defined earlier. Since our MIME types will alllook nearly the same, we use our St ring.f o rmat () routine to replace the %s part o f the appropriate MIMEtype constant with the actual table name. This allows us to reuse the MIME type constants instead o f having totype the full MIME type String for each table query type.
The matcher returns our URI constant int values, which allows us to use a swit ch/case block to format andreturn the proper MIME type for the URI id:

OBSERVE: MyDataContentProvider.java - Part 3
@Overridepublic Uri insert(Uri uri, ContentValues values) { SQLiteDatabase db = mDBHelper.getWritableDatabase(); String tableName = mDBHelper.getTableNameForCode(sUriMatcher.match(uri)); if (!TextUtils.isEmpty(tableName)) { long id = db.insert(tableName, null, values); if (id > -1) { ContentResolver resolver = getContext().getContentResolver(); resolver.notifyChange(uri, null); } return ContentUris.withAppendedId(uri, id); } else { return null; }}
@Overridepublic Cursor query(Uri uri, String[] projection, String selection, String[] selectionArgs, String sortOrder) { SQLiteDatabase db = mDBHelper.getReadableDatabase(); String tableName = mDBHelper.getTableNameForCode(sUriMatcher.match(uri)); if (!TextUtils.isEmpty(tableName)) { Cursor cursor = db.query(tableName, projection, selection, selectionArgs, null, null, sortOrder); cursor.setNotificationUri(getContext().getContentResolver(), uri); return cursor; } else { return null; }}
@Overridepublic int update(Uri uri, ContentValues values, String selection, String[] selectionArgs) { SQLiteDatabase db = mDBHelper.getWritableDatabase(); String tableName = mDBHelper.getTableNameForCode(sUriMatcher.match(uri)); if (!TextUtils.isEmpty(tableName)) return db.update(tableName, values, selection, selectionArgs); else return 0;}
@Overridepublic int delete(Uri uri, String selection, String[] selectionArgs) { SQLiteDatabase db = mDBHelper.getWritableDatabase(); String tableName = mDBHelper.getTableNameForCode(sUriMatcher.match(uri)); if (!TextUtils.isEmpty(tableName)) return db.delete(tableName, selection, selectionArgs); else return 0;}
Continuing with the member methods, we have the four "CRUD" methods: insert () , query() , updat e() anddelet e() . All four o f these use the SQLit eOpenHelper to perform its action on the database. The query()method gets a read-only version o f the database, while the o ther three methods use a read-write version o fthe database because they are actually making changes to the data. All four use the helper methodget T ableNameFo rCo de() , that we added on the DB helper class. get T ableNameFo rCo de() takes theURI id found by the matcher and gives the appropriate table name. In addition, each method performs someerror checking to make sure that we have a valid table name, then performs its respective action.
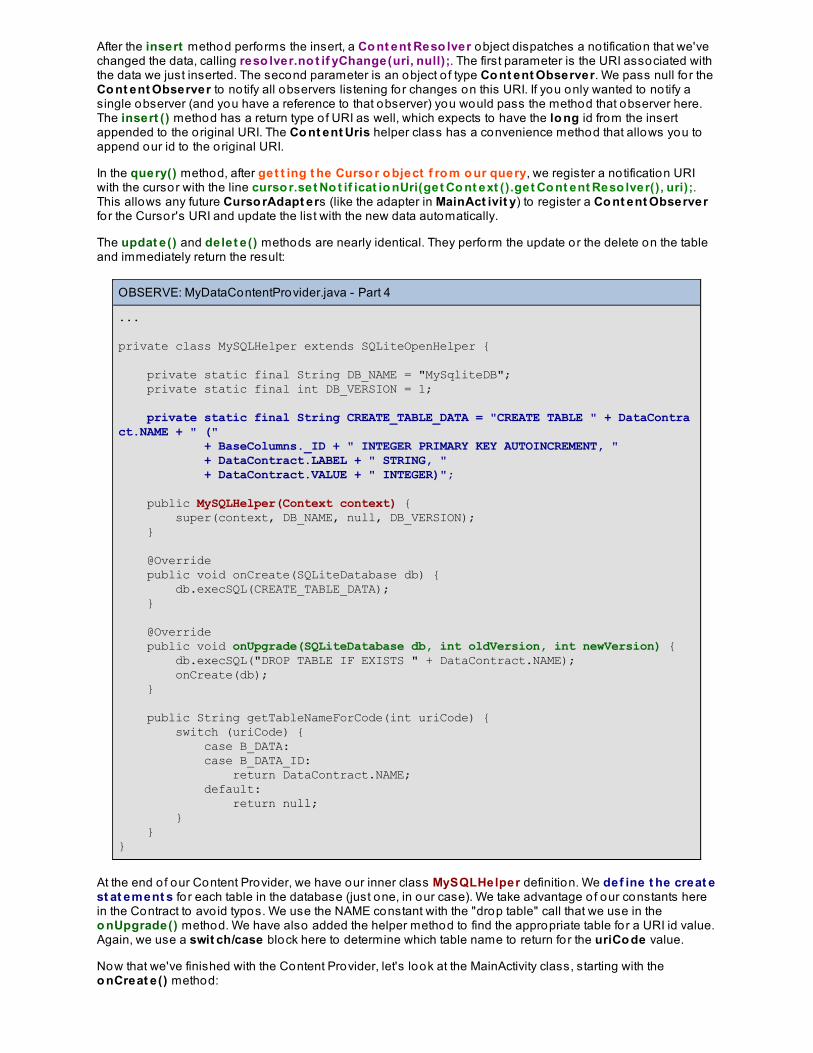
After the insert method performs the insert, a Co nt ent Reso lver object dispatches a notification that we'vechanged the data, calling reso lver.no t if yChange(uri, null);. The first parameter is the URI associated withthe data we just inserted. The second parameter is an object o f type Co nt ent Observer. We pass null fo r theCo nt ent Observer to notify all observers listening for changes on this URI. If you only wanted to notify asingle observer (and you have a reference to that observer) you would pass the method that observer here.The insert () method has a return type o f URI as well, which expects to have the lo ng id from the insertappended to the original URI. The Co nt ent Uris helper class has a convenience method that allows you toappend our id to the original URI.
In the query() method, after get t ing t he Curso r o bject f ro m o ur query, we register a notification URIwith the cursor with the line curso r.set No t if icat io nUri(get Co nt ext ().get Co nt ent Reso lver(), uri);.This allows any future Curso rAdapt ers (like the adapter in MainAct ivit y) to register a Co nt ent Observerfo r the Cursor's URI and update the list with the new data automatically.
The updat e() and delet e() methods are nearly identical. They perform the update or the delete on the tableand immediately return the result:
OBSERVE: MyDataContentProvider.java - Part 4
...
private class MySQLHelper extends SQLiteOpenHelper { private static final String DB_NAME = "MySqliteDB"; private static final int DB_VERSION = 1; private static final String CREATE_TABLE_DATA = "CREATE TABLE " + DataContract.NAME + " (" + BaseColumns._ID + " INTEGER PRIMARY KEY AUTOINCREMENT, " + DataContract.LABEL + " STRING, " + DataContract.VALUE + " INTEGER)";
public MySQLHelper(Context context) { super(context, DB_NAME, null, DB_VERSION); }
@Override public void onCreate(SQLiteDatabase db) { db.execSQL(CREATE_TABLE_DATA); }
@Override public void onUpgrade(SQLiteDatabase db, int oldVersion, int newVersion) { db.execSQL("DROP TABLE IF EXISTS " + DataContract.NAME); onCreate(db); } public String getTableNameForCode(int uriCode) { switch (uriCode) { case B_DATA: case B_DATA_ID: return DataContract.NAME; default: return null; } }}
At the end o f our Content Provider, we have our inner class MySQLHelper definition. We def ine t he creat est at ement s fo r each table in the database (just one, in our case). We take advantage o f our constants herein the Contract to avo id typos. We use the NAME constant with the "drop table" call that we use in theo nUpgrade() method. We have also added the helper method to find the appropriate table for a URI id value.Again, we use a swit ch/case block here to determine which table name to return for the uriCo de value.
Now that we've finished with the Content Provider, let's look at the MainActivity class, starting with theo nCreat e() method:

OBSERVE: MainActivity.java onCreate()
@Overrideprotected void onCreate(Bundle savedInstanceState) { super.onCreate(savedInstanceState); setContentView(R.layout.activity_main); mDataLabelEdit = (EditText) findViewById(R.id.data_label_edit); mDataValueEdit = (EditText) findViewById(R.id.data_value_edit); mAddButton = (Button) findViewById(R.id.add_data_button); mListView = (ListView) findViewById(android.R.id.list); mProjection = new String[]{DataContract._ID, DataContract.LABEL, DataContract.VALUE}; int[] viewIds = {R.id.id_label_text, R.id.data_label_text, R.id.value_label_text}; mAdapter = new SimpleCursorAdapter(this, R.layout.item_data, null, mProjection, viewIds, 0); mListView.setAdapter(mAdapter);
LoaderManager lm = getSupportLoaderManager(); lm.initLoader(0, null, mLoaderCallbacks); mAddButton.setOnClickListener(new View.OnClickListener() { @Override public void onClick(View v) { addNewData(); } }); mDataValueEdit.setOnEditorActionListener(new OnEditorActionListener() { @Override public boolean onEditorAction(TextView v, int actionId, KeyEvent event) { if (actionId == EditorInfo.IME_ACTION_DONE) { addNewData(); return true; } return false; } });}
The first part o f this method is fairly standard. We set the layout and find all the views based on their ids. Thenwe do some work to prepare our Curso rAdapt er. We're actually using an extension o f Curso rAdapt ercalled SimpleCurso rAdapt er, which will map data co lumn values to views automatically, based on the dataco lumn name and view id, respectively. First, we define our two arrays: an array o f each co lumn in o urt able t hat we are displaying (all o f t hem) , and an array o f the ids f o r t he views in o urit em_dat a.xml layo ut where we want these values displayed. Finally, we creat e o ur adapt er, passingthe Co nt ext t his, the list item layout R.layo ut .it em_dat a, null fo r our Cursor since we don't have one yet,our two arrays mPro ject io n and viewIds, and 0 fo r the flag parameter (since we don't need to use theadapter flags). Then, as with all list adapters, we call mList View.set Adapt er(mAdapt er); to set thisadapter on the list view.
We are using a Curso rLo ader to request our data, so we use the Lo aderManager to initialize our loader,giving the init Lo ader() met ho d o ur mLo aderCallbacks variable fo r theLo aderManager.Lo aderCallbacks parameter. Finally, we register a callback method for the "Add" button:
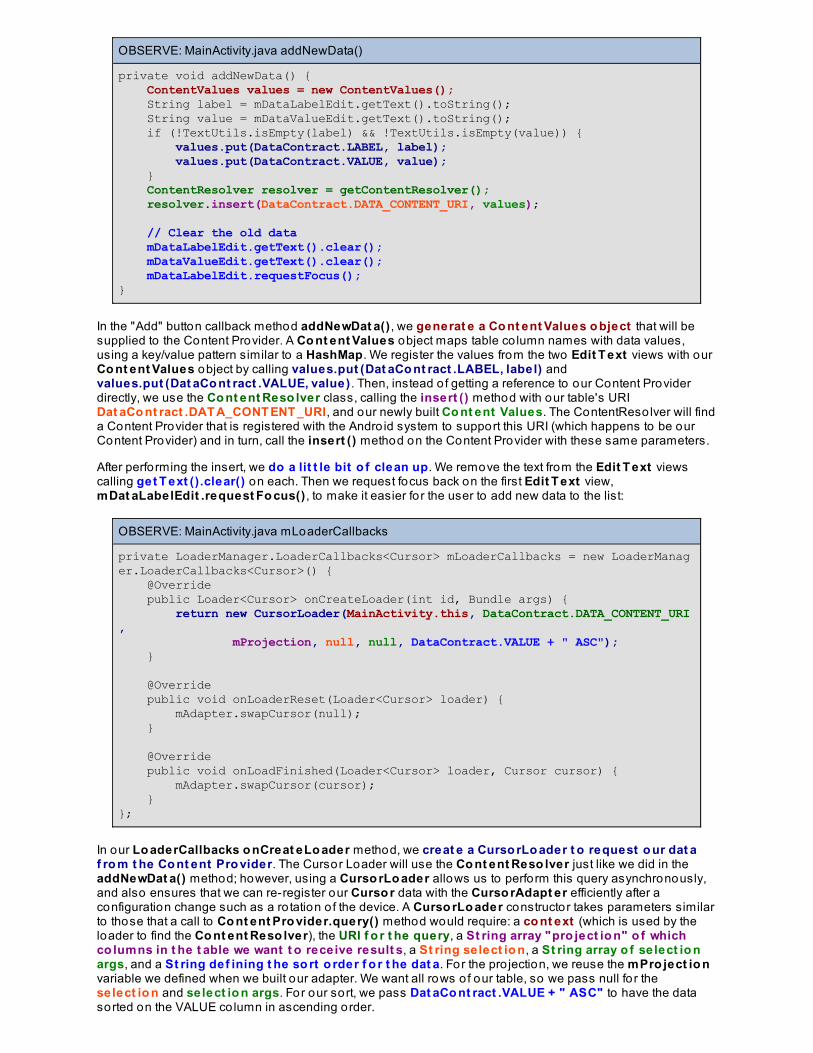
OBSERVE: MainActivity.java addNewData()
private void addNewData() { ContentValues values = new ContentValues(); String label = mDataLabelEdit.getText().toString(); String value = mDataValueEdit.getText().toString(); if (!TextUtils.isEmpty(label) && !TextUtils.isEmpty(value)) { values.put(DataContract.LABEL, label); values.put(DataContract.VALUE, value); } ContentResolver resolver = getContentResolver(); resolver.insert(DataContract.DATA_CONTENT_URI, values); // Clear the old data mDataLabelEdit.getText().clear(); mDataValueEdit.getText().clear(); mDataLabelEdit.requestFocus();}
In the "Add" button callback method addNewDat a() , we generat e a Co nt ent Values o bject that will besupplied to the Content Provider. A Co nt ent Values object maps table co lumn names with data values,using a key/value pattern similar to a HashMap. We register the values from the two Edit T ext views with ourCo nt ent Values object by calling values.put (Dat aCo nt ract .LABEL, label) andvalues.put (Dat aCo nt ract .VALUE, value) . Then, instead o f getting a reference to our Content Providerdirectly, we use the Co nt ent Reso lver class, calling the insert () method with our table's URIDat aCo nt ract .DAT A_CONT ENT _URI, and our newly built Co nt ent Values. The ContentReso lver will finda Content Provider that is registered with the Andro id system to support this URI (which happens to be ourContent Provider) and in turn, call the insert () method on the Content Provider with these same parameters.
After performing the insert, we do a lit t le bit o f clean up. We remove the text from the Edit T ext viewscalling get T ext ().clear() on each. Then we request focus back on the first Edit T ext view,mDat aLabelEdit .request Fo cus() , to make it easier fo r the user to add new data to the list:
OBSERVE: MainActivity.java mLoaderCallbacks
private LoaderManager.LoaderCallbacks<Cursor> mLoaderCallbacks = new LoaderManager.LoaderCallbacks<Cursor>() { @Override public Loader<Cursor> onCreateLoader(int id, Bundle args) { return new CursorLoader(MainActivity.this, DataContract.DATA_CONTENT_URI, mProjection, null, null, DataContract.VALUE + " ASC"); } @Override public void onLoaderReset(Loader<Cursor> loader) { mAdapter.swapCursor(null); } @Override public void onLoadFinished(Loader<Cursor> loader, Cursor cursor) { mAdapter.swapCursor(cursor); }};
In our Lo aderCallbacks o nCreat eLo ader method, we creat e a Curso rLo ader t o request o ur dat af ro m t he Co nt ent Pro vider. The Cursor Loader will use the Co nt ent Reso lver just like we did in theaddNewDat a() method; however, using a Curso rLo ader allows us to perform this query asynchronously,and also ensures that we can re-register our Curso r data with the Curso rAdapt er efficiently after aconfiguration change such as a ro tation o f the device. A Curso rLo ader constructor takes parameters similarto those that a call to Co nt ent Pro vider.query() method would require: a co nt ext (which is used by theloader to find the Co nt ent Reso lver), the URI f o r t he query, a St ring array "pro ject io n" o f whichco lumns in t he t able we want t o receive result s, a St ring select io n, a St ring array o f select io nargs, and a St ring def ining t he so rt o rder f o r t he dat a. For the pro jection, we reuse the mPro ject io nvariable we defined when we built our adapter. We want all rows o f our table, so we pass null fo r theselect io n and select io n args. For our sort, we pass Dat aCo nt ract .VALUE + " ASC" to have the datasorted on the VALUE co lumn in ascending order.
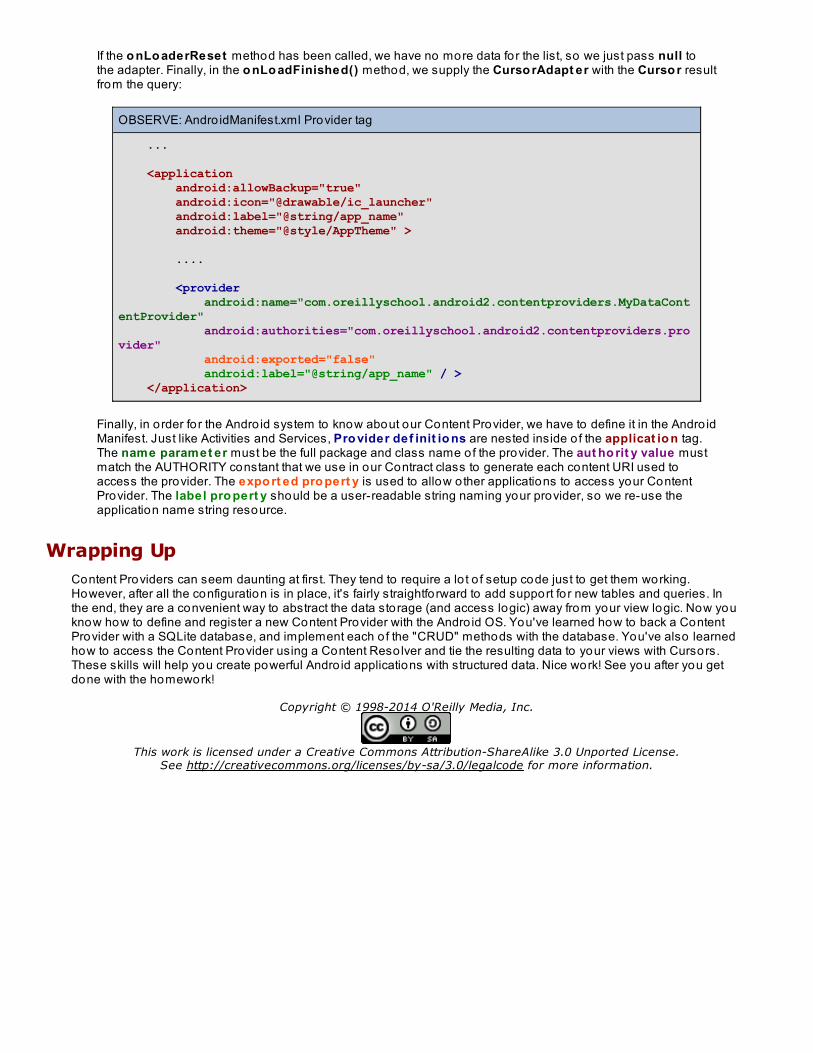
If the o nLo aderReset method has been called, we have no more data for the list, so we just pass null tothe adapter. Finally, in the o nLo adFinished() method, we supply the Curso rAdapt er with the Curso r resultfrom the query:
OBSERVE: Andro idManifest.xml Provider tag
...
<application android:allowBackup="true" android:icon="@drawable/ic_launcher" android:label="@string/app_name" android:theme="@style/AppTheme" > .... <provider android:name="com.oreillyschool.android2.contentproviders.MyDataContentProvider" android:authorities="com.oreillyschool.android2.contentproviders.provider" android:exported="false" android:label="@string/app_name" / > </application>
Finally, in order fo r the Andro id system to know about our Content Provider, we have to define it in the Andro idManifest. Just like Activities and Services, Pro vider def init io ns are nested inside o f the applicat io n tag.The name paramet er must be the full package and class name of the provider. The aut ho rit y value mustmatch the AUTHORITY constant that we use in our Contract class to generate each content URI used toaccess the provider. The expo rt ed pro pert y is used to allow o ther applications to access your ContentProvider. The label pro pert y should be a user-readable string naming your provider, so we re-use theapplication name string resource.
Wrapping UpContent Providers can seem daunting at first. They tend to require a lo t o f setup code just to get them working.However, after all the configuration is in place, it's fairly straightforward to add support fo r new tables and queries. Inthe end, they are a convenient way to abstract the data storage (and access logic) away from your view logic. Now youknow how to define and register a new Content Provider with the Andro id OS. You've learned how to back a ContentProvider with a SQLite database, and implement each o f the "CRUD" methods with the database. You've also learnedhow to access the Content Provider using a Content Reso lver and tie the resulting data to your views with Cursors.These skills will help you create powerful Andro id applications with structured data. Nice work! See you after you getdone with the homework!
Copyright © 1998-2014 O'Reilly Media, Inc.
This work is licensed under a Creative Commons Attribution-ShareAlike 3.0 Unported License.See http://creativecommons.org/licenses/by-sa/3.0/legalcode for more information.
Camera Basics: Using the Built-in Camera ApplicationLesson Objectives
In this lesson you will:
create an Intent to launch the built- in camera application.load a Bitmap returned as a result from the built- in camera application.save images from the built- in camera to external storage.
Starting the Built-in Camera Using an IntentLike many Andro id's features, there are a couple o f different ways to access an Andro id device's camera. The easiestway is to hand o ff the camera utilization to the device's default camera application. This doesn't allow for muchcustomization o f the photo-taking process, but it's relatively simple to implement. We'll cover the specifics o f thiprocess in this lesson.
Create a new Andro id pro ject with this criteria:
Name the pro ject CameraBasics.Use the package name co m.o reillyscho o l.andro id2.camerabasics.Uncheck the Creat e cust o m launcher ico n box.Assign the Andro id2_Lesso ns working set to the pro ject.
Now update some strings in st rings.xml. Open it up and make these changes:
CODE TO TYPE: /res/values/strings.xml
<?xml version="1.0" encoding="utf-8"?><resources> <string name="app_name">Camera Basics</string> <string name="action_settings">Settings</string> <string name="hello_world">Hello World, MainActivity!</string> <string name="capture_image">Snap it!</string>
</resources>
Open act ivit y_main.xml and make these changes:
CODE TO TYPE: activity_main.xml
<RelativeLinearLayout xmlns:android="http://schemas.android.com/apk/res/android" xmlns:tools="http://schemas.android.com/tools" android:layout_width="match_parent" android:layout_height="match_parent" android:paddingBottom="@dimen/activity_vertical_margin" android:paddingLeft="@dimen/activity_horizontal_margin" android:paddingRight="@dimen/activity_horizontal_margin" android:paddingTop="@dimen/activity_vertical_margin" android:gravity="center_horizontal" android:orientation="vertical" tools:context=".MainActivity" > <TextView android:layout_width="wrap_content" android:layout_height="wrap_content" android:text="@string/hello_world" /> <ImageView android:id="@+id/camera_image_view" android:layout_width="match_parent" android:layout_height="0dp" android:layout_weight="1" />
<Button android:id="@+id/capture_image_button" android:layout_width="150dp" android:layout_height="wrap_content" android:text="@string/capture_image" />
</RelativeLinearLayout>
Next, open Andro idManif est .xml and make these changes:
CODE TO TYPE: Andro idManifest.xml
<?xml version="1.0" encoding="utf-8"?><manifest xmlns:android="http://schemas.android.com/apk/res/android" package="com.oreillyschool.android2.camerabasics" android:versionCode="1" android:versionName="1.0" >
<uses-sdk android:minSdkVersion="10" android:targetSdkVersion="10" /> <application android:allowBackup="true" android:icon="@drawable/ic_launcher" android:label="@string/app_name" android:theme="@style/AppTheme" > <activity android:name="com.oreillyschool.android2.camerabasics.MainActivity" android:label="@string/app_name" android:screenOrientation="landscape" > <intent-filter> <action android:name="android.intent.action.MAIN" /> <category android:name="android.intent.category.LAUNCHER" /> </intent-filter> </activity> </application>
</manifest>
Finally, open MainAct ivit y.java and make these changes:

CODE TO TYPE: MainActivity.java
package com.oreillyschool.android2.camerabasics;
import android.app.Activity;import android.content.Intent;import android.graphics.Bitmap;import android.os.Bundle;import android.provider.MediaStore;import android.view.Menu;import android.view.View;import android.view.View.OnClickListener;import android.widget.ImageView;
public class MainActivity extends Activity {
private static final int TAKE_PICTURE_REQUEST_B = 100; private ImageView mCameraImageView; private Bitmap mCameraBitmap; private OnClickListener mCaptureImageButtonClickListener = new OnClickListener() { @Override public void onClick(View v) { startImageCapture(); } }; @Override protected void onCreate(Bundle savedInstanceState) { super.onCreate(savedInstanceState); setContentView(R.layout.activity_main); mCameraImageView = (ImageView) findViewById(R.id.camera_image_view); findViewById(R.id.capture_image_button).setOnClickListener(mCaptureImageButtonClickListener); } @Override protected void onActivityResult(int requestCode, int resultCode, Intent data) { if (requestCode == TAKE_PICTURE_REQUEST_B) { if (resultCode == RESULT_OK) { // Recycle the previous bitmap. if (mCameraBitmap != null) { mCameraBitmap.recycle(); mCameraBitmap = null; } Bundle extras = data.getExtras(); mCameraBitmap = (Bitmap) extras.get("data"); mCameraImageView.setImageBitmap(mCameraBitmap); } else { mCameraBitmap = null; } } } private void startImageCapture() { startActivityForResult(new Intent(MediaStore.ACTION_IMAGE_CAPTURE), TAKE_PICTURE_REQUEST_B); }
@Override public boolean onCreateOptionsMenu(Menu menu) { // Inflate the menu; this adds items to the action bar if it is present. getMenuInflater().inflate(R.menu.main, menu); return true; }
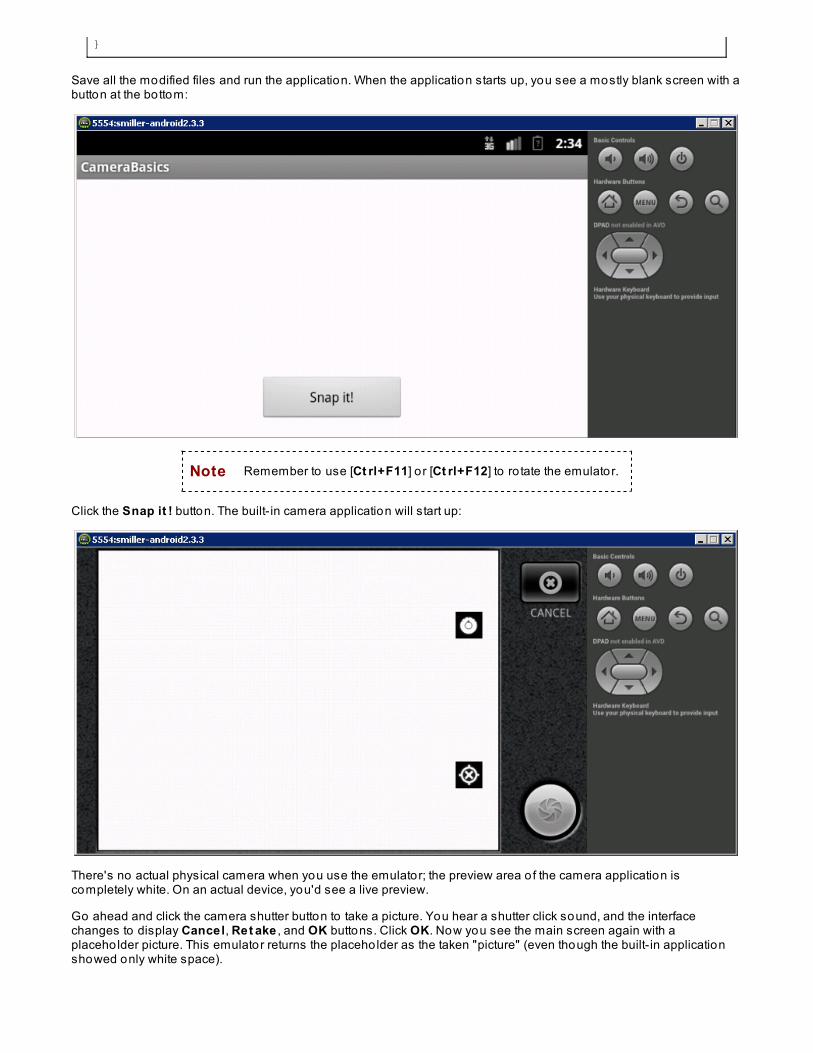
}
Save all the modified files and run the application. When the application starts up, you see a mostly blank screen with abutton at the bottom:
Note Remember to use [Ct rl+F11] o r [Ct rl+F12] to ro tate the emulator.
Click the Snap it ! button. The built- in camera application will start up:
There's no actual physical camera when you use the emulator; the preview area o f the camera application iscompletely white. On an actual device, you'd see a live preview.
Go ahead and click the camera shutter button to take a picture. You hear a shutter click sound, and the interfacechanges to display Cancel, Ret ake , and OK buttons. Click OK. Now you see the main screen again with aplaceho lder picture. This emulator returns the placeho lder as the taken "picture" (even though the built- in applicationshowed only white space).
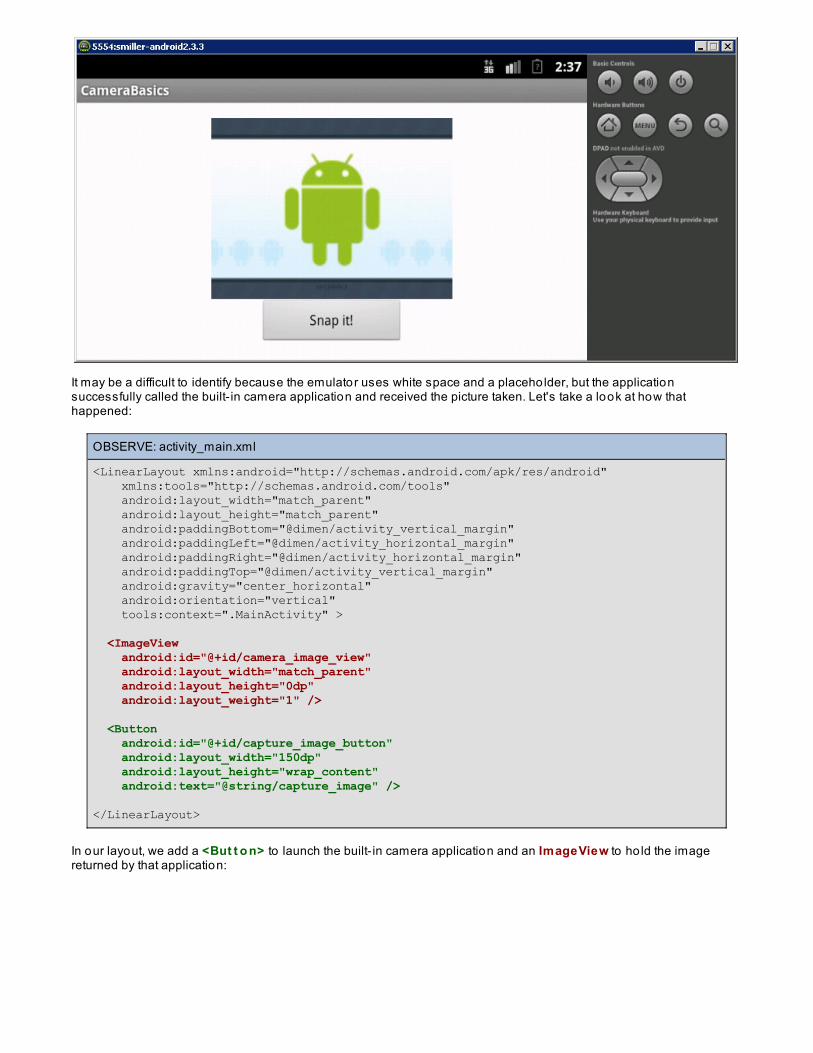
It may be a difficult to identify because the emulator uses white space and a placeho lder, but the applicationsuccessfully called the built- in camera application and received the picture taken. Let's take a look at how thathappened:
OBSERVE: activity_main.xml
<LinearLayout xmlns:android="http://schemas.android.com/apk/res/android" xmlns:tools="http://schemas.android.com/tools" android:layout_width="match_parent" android:layout_height="match_parent" android:paddingBottom="@dimen/activity_vertical_margin" android:paddingLeft="@dimen/activity_horizontal_margin" android:paddingRight="@dimen/activity_horizontal_margin" android:paddingTop="@dimen/activity_vertical_margin" android:gravity="center_horizontal" android:orientation="vertical" tools:context=".MainActivity" >
<ImageView android:id="@+id/camera_image_view" android:layout_width="match_parent" android:layout_height="0dp" android:layout_weight="1" /> <Button android:id="@+id/capture_image_button" android:layout_width="150dp" android:layout_height="wrap_content" android:text="@string/capture_image" /> </LinearLayout>
In our layout, we add a <But t o n> to launch the built- in camera application and an ImageView to ho ld the imagereturned by that application:
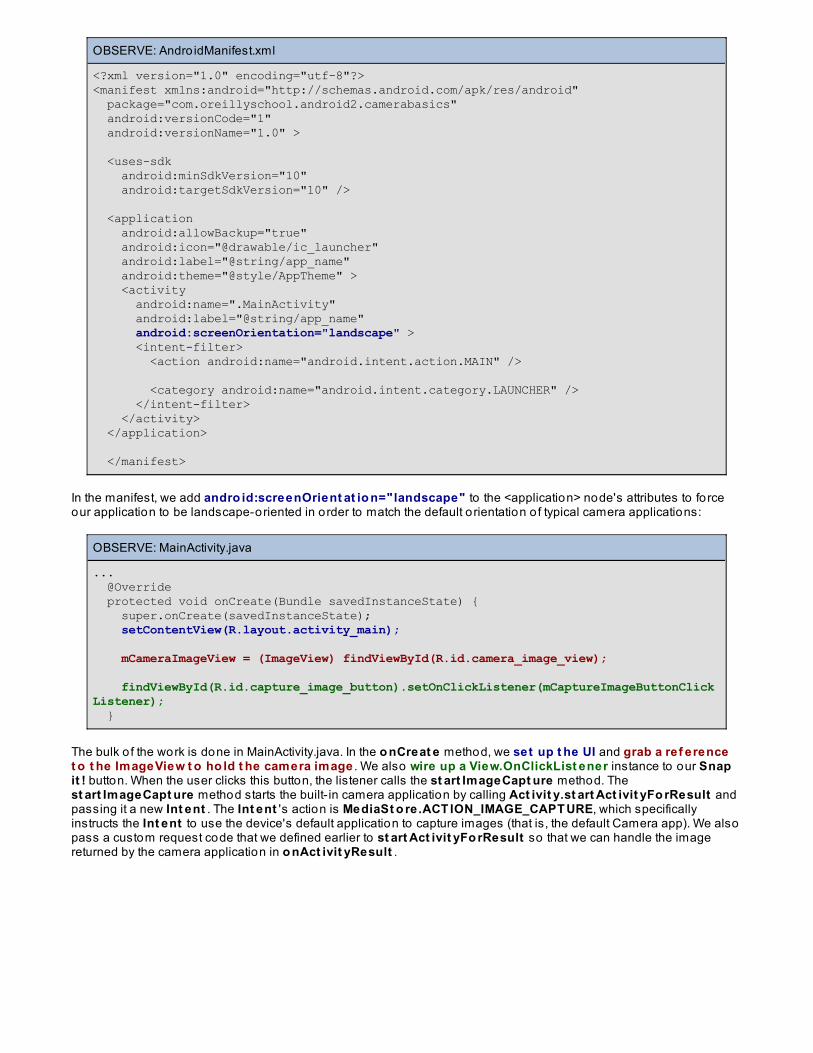
OBSERVE: Andro idManifest.xml
<?xml version="1.0" encoding="utf-8"?><manifest xmlns:android="http://schemas.android.com/apk/res/android" package="com.oreillyschool.android2.camerabasics" android:versionCode="1" android:versionName="1.0" > <uses-sdk android:minSdkVersion="10" android:targetSdkVersion="10" /> <application android:allowBackup="true" android:icon="@drawable/ic_launcher" android:label="@string/app_name" android:theme="@style/AppTheme" > <activity android:name=".MainActivity" android:label="@string/app_name" android:screenOrientation="landscape" > <intent-filter> <action android:name="android.intent.action.MAIN" /> <category android:name="android.intent.category.LAUNCHER" /> </intent-filter> </activity> </application> </manifest>
In the manifest, we add andro id:screenOrient at io n="landscape" to the <application> node's attributes to forceour application to be landscape-oriented in order to match the default o rientation o f typical camera applications:
OBSERVE: MainActivity.java
... @Override protected void onCreate(Bundle savedInstanceState) { super.onCreate(savedInstanceState); setContentView(R.layout.activity_main); mCameraImageView = (ImageView) findViewById(R.id.camera_image_view); findViewById(R.id.capture_image_button).setOnClickListener(mCaptureImageButtonClickListener); }
The bulk o f the work is done in MainActivity.java. In the o nCreat e method, we set up t he UI and grab a ref erencet o t he ImageView t o ho ld t he camera image . We also wire up a View.OnClickList ener instance to our Snapit ! button. When the user clicks this button, the listener calls the st art ImageCapt ure method. Thest art ImageCapt ure method starts the built- in camera application by calling Act ivit y.st art Act ivit yFo rResult andpassing it a new Int ent . The Int ent 's action is MediaSt o re.ACT ION_IMAGE_CAPT URE, which specificallyinstructs the Int ent to use the device's default application to capture images (that is, the default Camera app). We alsopass a custom request code that we defined earlier to st art Act ivit yFo rResult so that we can handle the imagereturned by the camera application in o nAct ivit yResult .
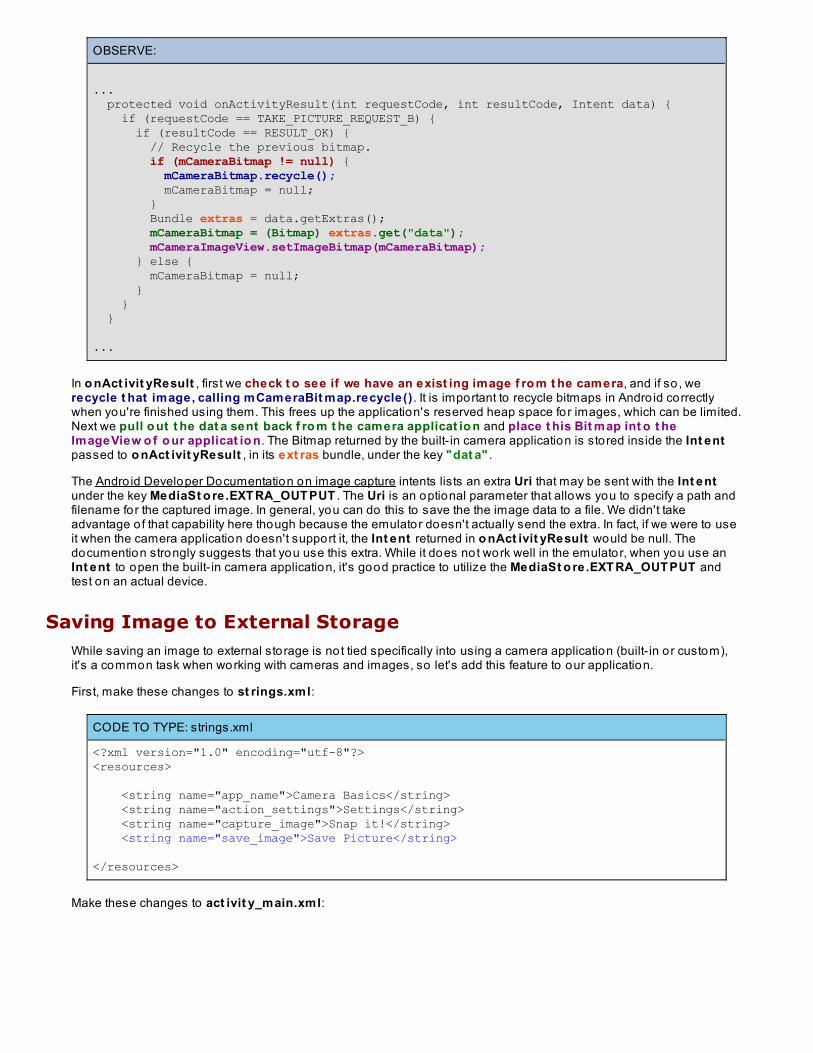
OBSERVE:
... protected void onActivityResult(int requestCode, int resultCode, Intent data) { if (requestCode == TAKE_PICTURE_REQUEST_B) { if (resultCode == RESULT_OK) { // Recycle the previous bitmap. if (mCameraBitmap != null) { mCameraBitmap.recycle(); mCameraBitmap = null; } Bundle extras = data.getExtras(); mCameraBitmap = (Bitmap) extras.get("data"); mCameraImageView.setImageBitmap(mCameraBitmap); } else { mCameraBitmap = null; } } } ...
In o nAct ivit yResult , first we check t o see if we have an exist ing image f ro m t he camera, and if so , werecycle t hat image, calling mCameraBit map.recycle() . It is important to recycle bitmaps in Andro id correctlywhen you're finished using them. This frees up the application's reserved heap space for images, which can be limited.Next we pull o ut t he dat a sent back f ro m t he camera applicat io n and place t his Bit map int o t heImageView o f o ur applicat io n. The Bitmap returned by the built- in camera application is stored inside the Int entpassed to o nAct ivit yResult , in its ext ras bundle, under the key "dat a" .
The Andro id Developer Documentation on image capture intents lists an extra Uri that may be sent with the Int entunder the key MediaSt o re.EXT RA_OUT PUT . The Uri is an optional parameter that allows you to specify a path andfilename for the captured image. In general, you can do this to save the the image data to a file. We didn't takeadvantage o f that capability here though because the emulator doesn't actually send the extra. In fact, if we were to useit when the camera application doesn't support it, the Int ent returned in o nAct ivit yResult would be null. Thedocumention strongly suggests that you use this extra. While it does not work well in the emulator, when you use anInt ent to open the built- in camera application, it's good practice to utilize the MediaSt o re.EXT RA_OUT PUT andtest on an actual device.
Saving Image to External StorageWhile saving an image to external storage is not tied specifically into using a camera application (built- in or custom),it's a common task when working with cameras and images, so let's add this feature to our application.
First, make these changes to st rings.xml:
CODE TO TYPE: strings.xml
<?xml version="1.0" encoding="utf-8"?><resources>
<string name="app_name">Camera Basics</string> <string name="action_settings">Settings</string> <string name="capture_image">Snap it!</string> <string name="save_image">Save Picture</string>
</resources>
Make these changes to act ivit y_main.xml:
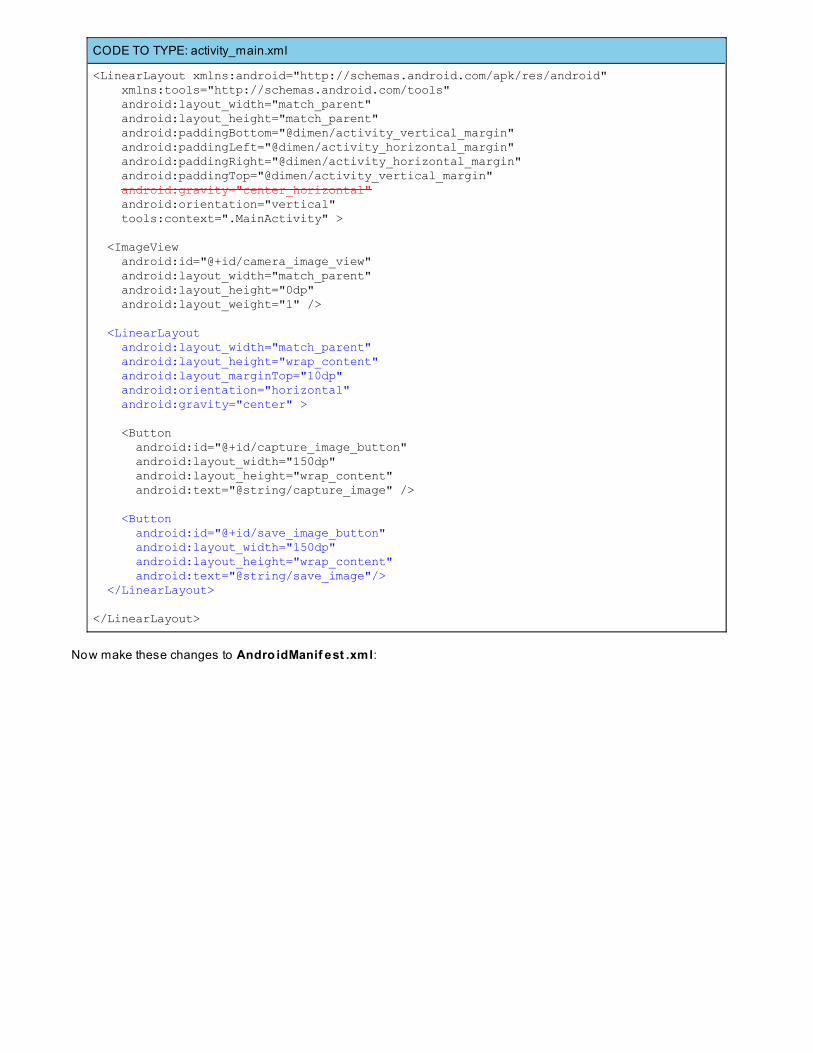
CODE TO TYPE: activity_main.xml
<LinearLayout xmlns:android="http://schemas.android.com/apk/res/android" xmlns:tools="http://schemas.android.com/tools" android:layout_width="match_parent" android:layout_height="match_parent" android:paddingBottom="@dimen/activity_vertical_margin" android:paddingLeft="@dimen/activity_horizontal_margin" android:paddingRight="@dimen/activity_horizontal_margin" android:paddingTop="@dimen/activity_vertical_margin" android:gravity="center_horizontal" android:orientation="vertical" tools:context=".MainActivity" > <ImageView android:id="@+id/camera_image_view" android:layout_width="match_parent" android:layout_height="0dp" android:layout_weight="1" />
<LinearLayout android:layout_width="match_parent" android:layout_height="wrap_content" android:layout_marginTop="10dp" android:orientation="horizontal" android:gravity="center" >
<Button android:id="@+id/capture_image_button" android:layout_width="150dp" android:layout_height="wrap_content" android:text="@string/capture_image" /> <Button android:id="@+id/save_image_button" android:layout_width="150dp" android:layout_height="wrap_content" android:text="@string/save_image"/> </LinearLayout>
</LinearLayout>
Now make these changes to Andro idManif est .xml:
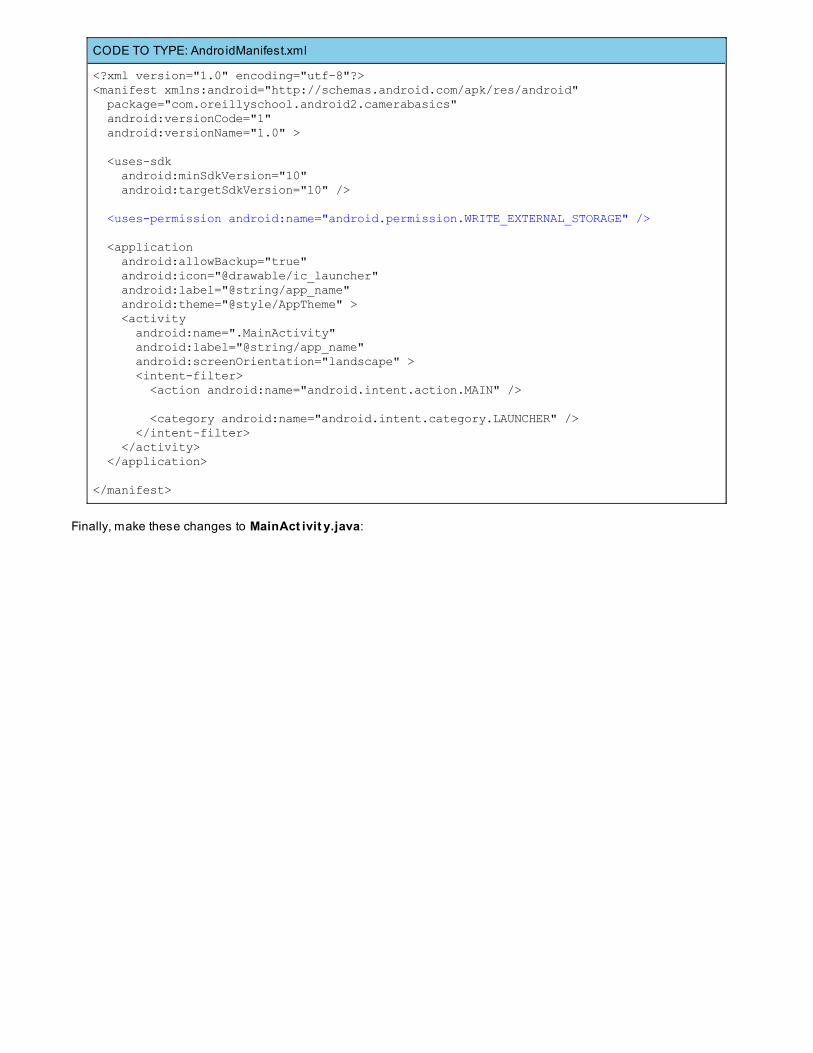
CODE TO TYPE: Andro idManifest.xml
<?xml version="1.0" encoding="utf-8"?><manifest xmlns:android="http://schemas.android.com/apk/res/android" package="com.oreillyschool.android2.camerabasics" android:versionCode="1" android:versionName="1.0" > <uses-sdk android:minSdkVersion="10" android:targetSdkVersion="10" />
<uses-permission android:name="android.permission.WRITE_EXTERNAL_STORAGE" /> <application android:allowBackup="true" android:icon="@drawable/ic_launcher" android:label="@string/app_name" android:theme="@style/AppTheme" > <activity android:name=".MainActivity" android:label="@string/app_name" android:screenOrientation="landscape" > <intent-filter> <action android:name="android.intent.action.MAIN" /> <category android:name="android.intent.category.LAUNCHER" /> </intent-filter> </activity> </application>
</manifest>
Finally, make these changes to MainAct ivit y.java:
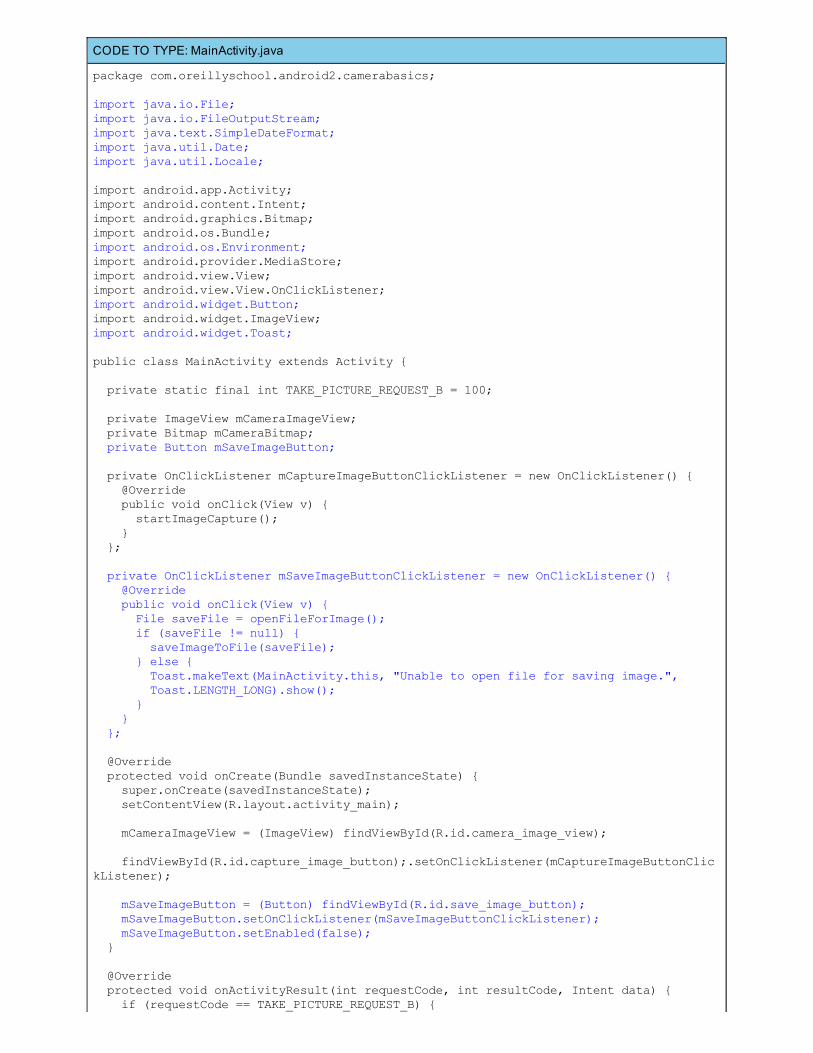
CODE TO TYPE: MainActivity.java
package com.oreillyschool.android2.camerabasics;
import java.io.File;import java.io.FileOutputStream;import java.text.SimpleDateFormat;import java.util.Date;import java.util.Locale;
import android.app.Activity;import android.content.Intent;import android.graphics.Bitmap;import android.os.Bundle;import android.os.Environment;import android.provider.MediaStore;import android.view.View;import android.view.View.OnClickListener;import android.widget.Button;import android.widget.ImageView;import android.widget.Toast;
public class MainActivity extends Activity { private static final int TAKE_PICTURE_REQUEST_B = 100; private ImageView mCameraImageView; private Bitmap mCameraBitmap; private Button mSaveImageButton; private OnClickListener mCaptureImageButtonClickListener = new OnClickListener() { @Override public void onClick(View v) { startImageCapture(); } }; private OnClickListener mSaveImageButtonClickListener = new OnClickListener() { @Override public void onClick(View v) { File saveFile = openFileForImage(); if (saveFile != null) { saveImageToFile(saveFile); } else { Toast.makeText(MainActivity.this, "Unable to open file for saving image.", Toast.LENGTH_LONG).show(); } } }; @Override protected void onCreate(Bundle savedInstanceState) { super.onCreate(savedInstanceState); setContentView(R.layout.activity_main); mCameraImageView = (ImageView) findViewById(R.id.camera_image_view); findViewById(R.id.capture_image_button);.setOnClickListener(mCaptureImageButtonClickListener); mSaveImageButton = (Button) findViewById(R.id.save_image_button); mSaveImageButton.setOnClickListener(mSaveImageButtonClickListener); mSaveImageButton.setEnabled(false); } @Override protected void onActivityResult(int requestCode, int resultCode, Intent data) { if (requestCode == TAKE_PICTURE_REQUEST_B) {

if (resultCode == RESULT_OK) { // Recycle the previous bitmap. if (mCameraBitmap != null) { mCameraBitmap.recycle(); mCameraBitmap = null; } Bundle extras = data.getExtras(); mCameraBitmap = (Bitmap) extras.get("data"); mCameraImageView.setImageBitmap(mCameraBitmap); mSaveImageButton.setEnabled(true); } else { mCameraBitmap = null; mSaveImageButton.setEnabled(false); } } } private void startImageCapture() { startActivityForResult(new Intent(MediaStore.ACTION_IMAGE_CAPTURE), TAKE_PICTURE_REQUEST_B); } private File openFileForImage() { File imageDirectory = null; String storageState = Environment.getExternalStorageState(); if (storageState.equals(Environment.MEDIA_MOUNTED)) { imageDirectory = new File( Environment.getExternalStoragePublicDirectory(Environment.DIRECTORY_PICTURES), "com.oreillyschool.android2.camerabasics"); if (!imageDirectory.exists() && !imageDirectory.mkdirs()) { imageDirectory = null; } else { SimpleDateFormat dateFormat = new SimpleDateFormat("yyyy_mm_dd_hh_mm", Locale.getDefault());
return new File(imageDirectory.getPath() + File.separator + "image_" + dateFormat.format(new Date()) + ".png"); } } return null; } private void saveImageToFile(File file) { if (mCameraBitmap != null) { FileOutputStream outStream = null; try { outStream = new FileOutputStream(file); if (!mCameraBitmap.compress(Bitmap.CompressFormat.PNG, 100, outStream)) { Toast.makeText(MainActivity.this, "Unable to save image to file.", Toast.LENGTH_LONG).show(); } else { Toast.makeText(MainActivity.this, "Saved image to: " + file.getPath(), Toast.LENGTH_LONG).show(); } outStream.close(); } catch (Exception e) { Toast.makeText(MainActivity.this, "Unable to save image to file.", Toast.LENGTH_LONG).show(); } } }}
Save the modified files and run the application. Now we have two buttons instead o f one: Snap it ! and Save Image :
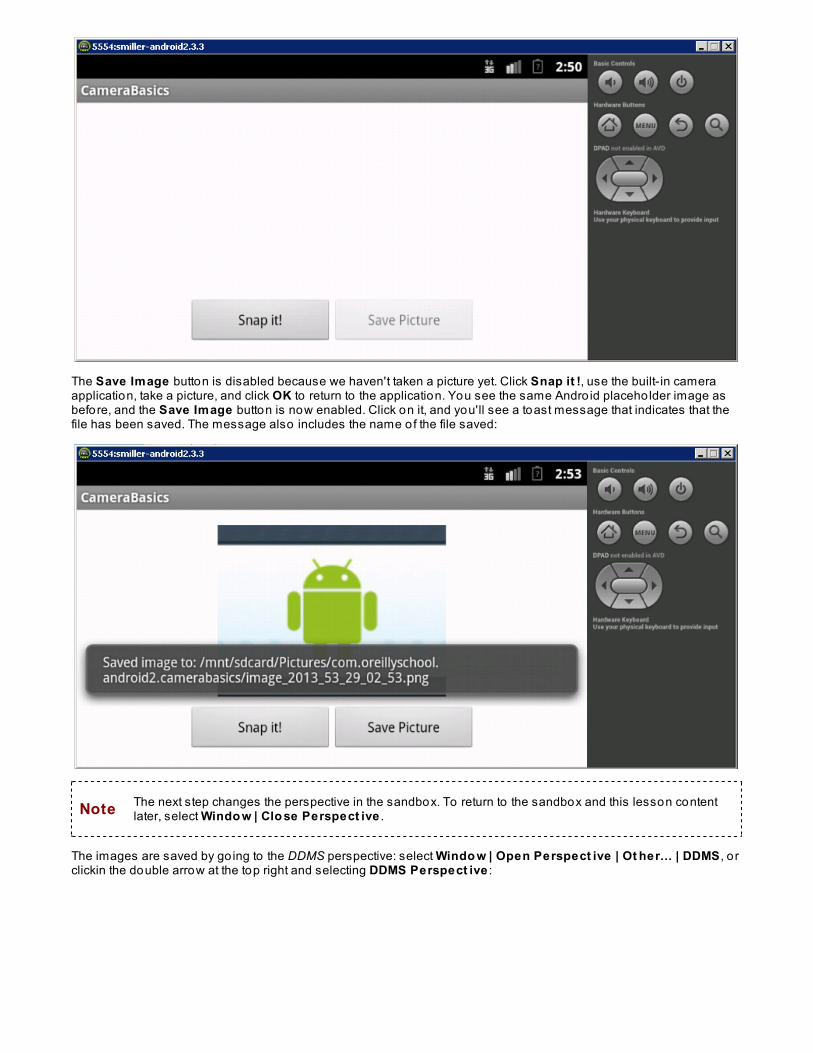
The Save Image button is disabled because we haven't taken a picture yet. Click Snap it !, use the built- in cameraapplication, take a picture, and click OK to return to the application. You see the same Andro id placeho lder image asbefore, and the Save Image button is now enabled. Click on it, and you'll see a toast message that indicates that thefile has been saved. The message also includes the name of the file saved:
Note The next step changes the perspective in the sandbox. To return to the sandbox and this lesson contentlater, select Windo w | Clo se Perspect ive .
The images are saved by go ing to the DDMS perspective: select Windo w | Open Perspect ive | Ot her... | DDMS , o rclickin the double arrow at the top right and selecting DDMS Perspect ive :
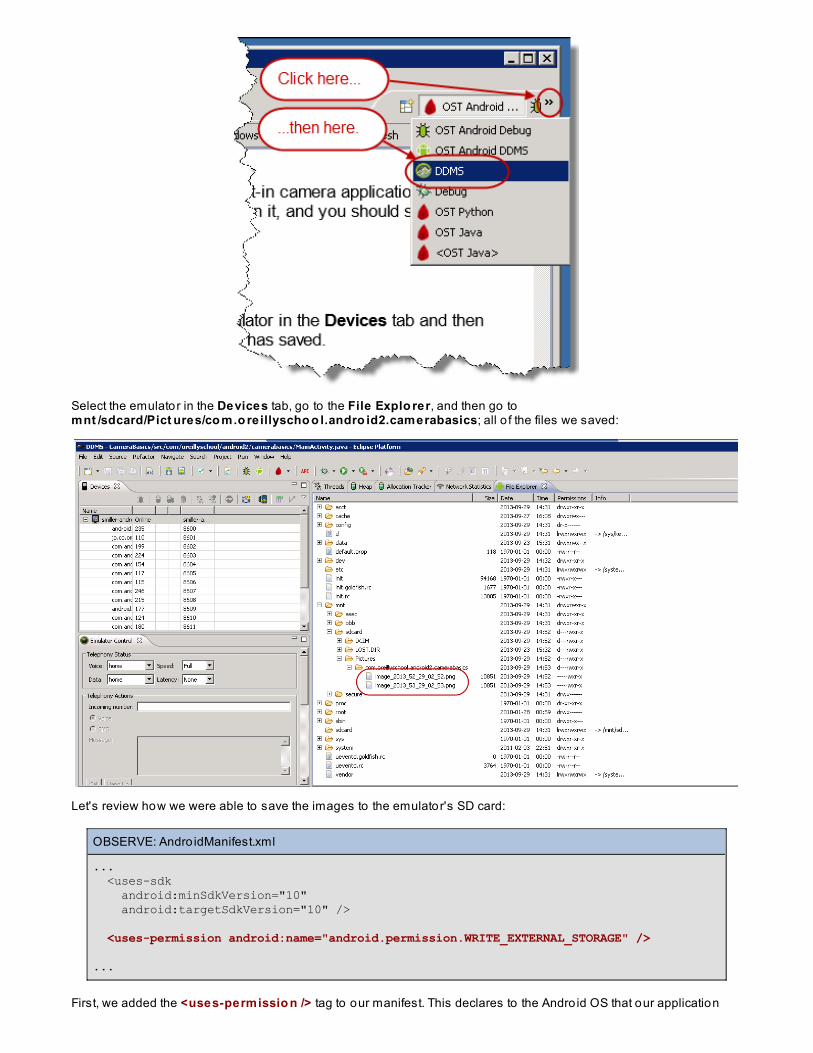
Select the emulator in the Devices tab, go to the File Explo rer, and then go tomnt /sdcard/Pict ures/co m.o reillyscho o l.andro id2.camerabasics; all o f the files we saved:
Let's review how we were able to save the images to the emulator's SD card:
OBSERVE: Andro idManifest.xml
... <uses-sdk android:minSdkVersion="10" android:targetSdkVersion="10" />
<uses-permission android:name="android.permission.WRITE_EXTERNAL_STORAGE" /> ...
First, we added the <uses-permissio n /> tag to our manifest. This declares to the Andro id OS that our application
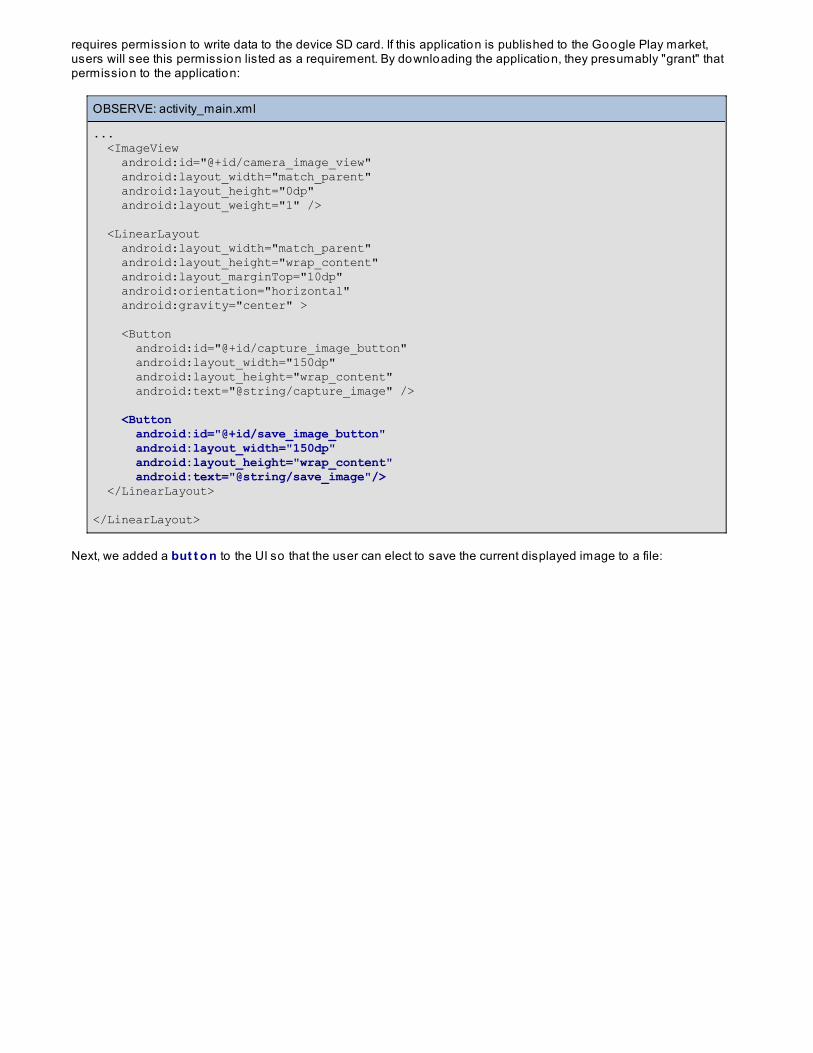
requires permission to write data to the device SD card. If this application is published to the Google Play market,users will see this permission listed as a requirement. By downloading the application, they presumably "grant" thatpermission to the application:
OBSERVE: activity_main.xml
... <ImageView android:id="@+id/camera_image_view" android:layout_width="match_parent" android:layout_height="0dp" android:layout_weight="1" /> <LinearLayout android:layout_width="match_parent" android:layout_height="wrap_content" android:layout_marginTop="10dp" android:orientation="horizontal" android:gravity="center" > <Button android:id="@+id/capture_image_button" android:layout_width="150dp" android:layout_height="wrap_content" android:text="@string/capture_image" /> <Button android:id="@+id/save_image_button" android:layout_width="150dp" android:layout_height="wrap_content" android:text="@string/save_image"/> </LinearLayout>
</LinearLayout>
Next, we added a but t o n to the UI so that the user can elect to save the current displayed image to a file:
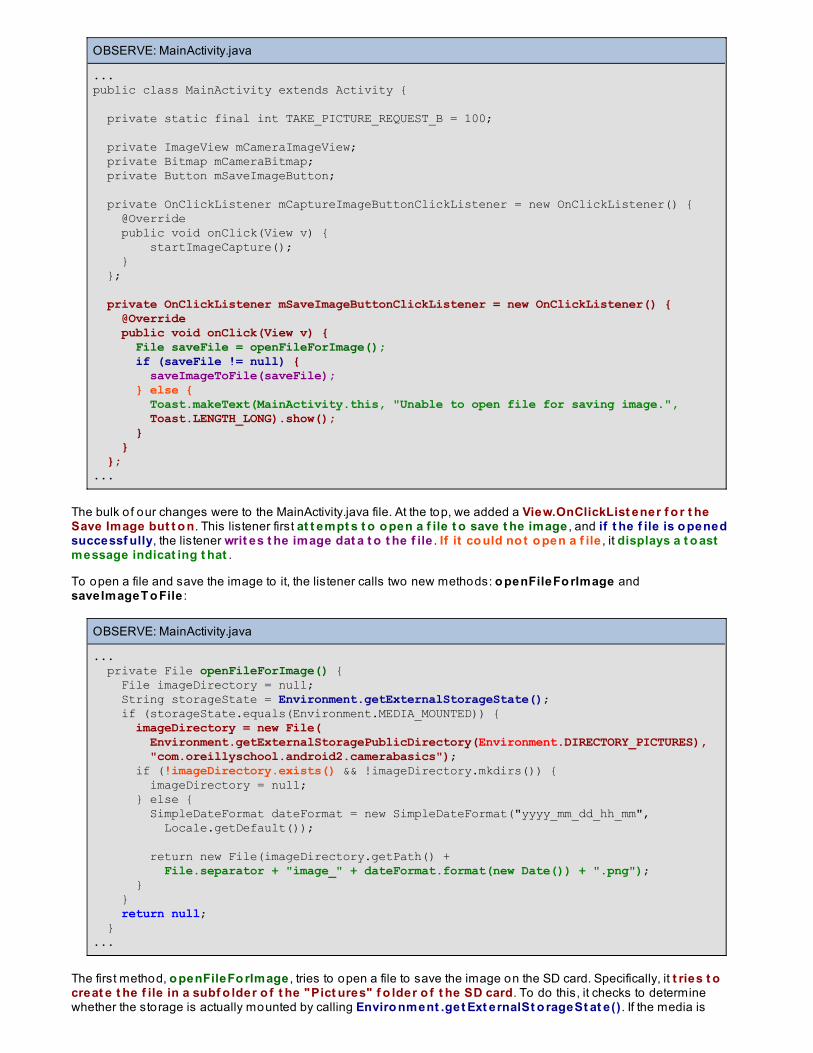
OBSERVE: MainActivity.java
...public class MainActivity extends Activity {
private static final int TAKE_PICTURE_REQUEST_B = 100; private ImageView mCameraImageView; private Bitmap mCameraBitmap; private Button mSaveImageButton; private OnClickListener mCaptureImageButtonClickListener = new OnClickListener() { @Override public void onClick(View v) { startImageCapture(); } };
private OnClickListener mSaveImageButtonClickListener = new OnClickListener() { @Override public void onClick(View v) { File saveFile = openFileForImage(); if (saveFile != null) { saveImageToFile(saveFile); } else { Toast.makeText(MainActivity.this, "Unable to open file for saving image.", Toast.LENGTH_LONG).show(); } } };...
The bulk o f our changes were to the MainActivity.java file. At the top, we added a View.OnClickList ener f o r t heSave Image but t o n. This listener first at t empt s t o o pen a f ile t o save t he image , and if t he f ile is o penedsuccessf ully, the listener writ es t he image dat a t o t he f ile . If it co uld no t o pen a f ile , it displays a t o astmessage indicat ing t hat .
To open a file and save the image to it, the listener calls two new methods: o penFileFo rImage andsaveImageT o File :
OBSERVE: MainActivity.java
... private File openFileForImage() { File imageDirectory = null; String storageState = Environment.getExternalStorageState(); if (storageState.equals(Environment.MEDIA_MOUNTED)) { imageDirectory = new File( Environment.getExternalStoragePublicDirectory(Environment.DIRECTORY_PICTURES), "com.oreillyschool.android2.camerabasics"); if (!imageDirectory.exists() && !imageDirectory.mkdirs()) { imageDirectory = null; } else { SimpleDateFormat dateFormat = new SimpleDateFormat("yyyy_mm_dd_hh_mm", Locale.getDefault());
return new File(imageDirectory.getPath() + File.separator + "image_" + dateFormat.format(new Date()) + ".png"); } } return null; }...
The first method, o penFileFo rImage , tries to open a file to save the image on the SD card. Specifically, it t ries t ocreat e t he f ile in a subf o lder o f t he "Pict ures" f o lder o f t he SD card. To do this, it checks to determinewhether the storage is actually mounted by calling Enviro nment .get Ext ernalSt o rageSt at e() . If the media is
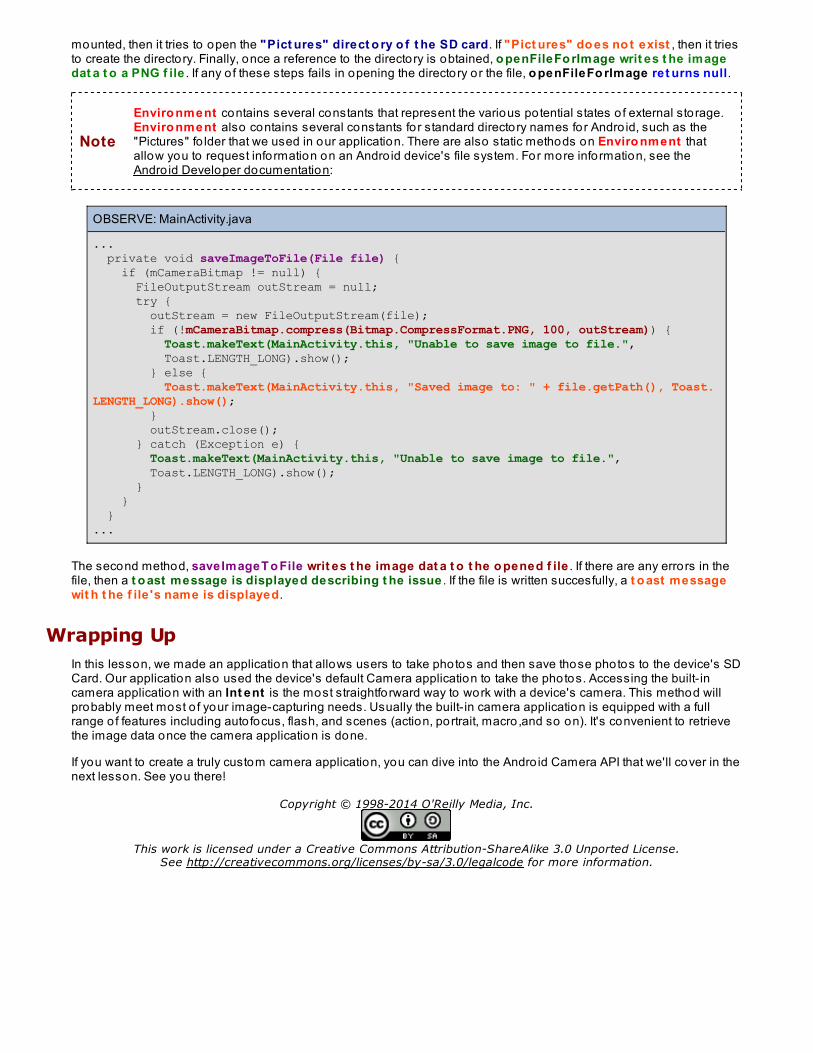
mounted, then it tries to open the "Pict ures" direct o ry o f t he SD card. If "Pict ures" do es no t exist , then it triesto create the directory. Finally, once a reference to the directory is obtained, o penFileFo rImage writ es t he imagedat a t o a PNG f ile . If any o f these steps fails in opening the directory or the file, o penFileFo rImage ret urns null.
Note
Enviro nment contains several constants that represent the various potential states o f external storage.Enviro nment also contains several constants for standard directory names for Andro id, such as the"Pictures" fo lder that we used in our application. There are also static methods on Enviro nment thatallow you to request information on an Andro id device's file system. For more information, see theAndro id Developer documentation:
OBSERVE: MainActivity.java
... private void saveImageToFile(File file) { if (mCameraBitmap != null) { FileOutputStream outStream = null; try { outStream = new FileOutputStream(file); if (!mCameraBitmap.compress(Bitmap.CompressFormat.PNG, 100, outStream)) { Toast.makeText(MainActivity.this, "Unable to save image to file.", Toast.LENGTH_LONG).show(); } else { Toast.makeText(MainActivity.this, "Saved image to: " + file.getPath(), Toast.LENGTH_LONG).show(); } outStream.close(); } catch (Exception e) { Toast.makeText(MainActivity.this, "Unable to save image to file.", Toast.LENGTH_LONG).show(); } } }...
The second method, saveImageT o File writ es t he image dat a t o t he o pened f ile . If there are any errors in thefile, then a t o ast message is displayed describing t he issue . If the file is written succesfully, a t o ast messagewit h t he f ile 's name is displayed.
Wrapping UpIn this lesson, we made an application that allows users to take photos and then save those photos to the device's SDCard. Our application also used the device's default Camera application to take the photos. Accessing the built- incamera application with an Int ent is the most straightforward way to work with a device's camera. This method willprobably meet most o f your image-capturing needs. Usually the built- in camera application is equipped with a fullrange o f features including auto focus, flash, and scenes (action, portrait, macro,and so on). It's convenient to retrievethe image data once the camera application is done.
If you want to create a truly custom camera application, you can dive into the Andro id Camera API that we'll cover in thenext lesson. See you there!
Copyright © 1998-2014 O'Reilly Media, Inc.
This work is licensed under a Creative Commons Attribution-ShareAlike 3.0 Unported License.See http://creativecommons.org/licenses/by-sa/3.0/legalcode for more information.
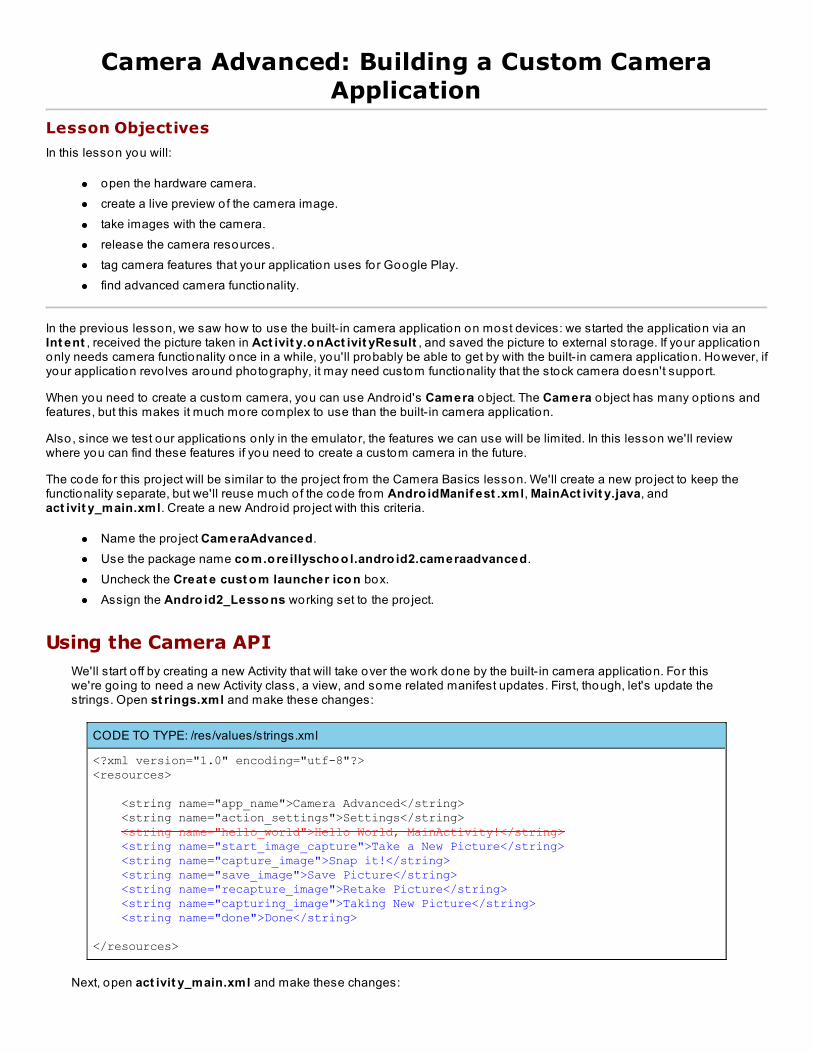
Camera Advanced: Building a Custom CameraApplication
Lesson Objectives
In this lesson you will:
open the hardware camera.create a live preview of the camera image.take images with the camera.release the camera resources.tag camera features that your application uses for Google Play.find advanced camera functionality.
In the previous lesson, we saw how to use the built- in camera application on most devices: we started the application via anInt ent , received the picture taken in Act ivit y.o nAct ivit yResult , and saved the picture to external storage. If your applicationonly needs camera functionality once in a while, you'll probably be able to get by with the built- in camera application. However, ifyour application revo lves around photography, it may need custom functionality that the stock camera doesn't support.
When you need to create a custom camera, you can use Andro id's Camera object. The Camera object has many options andfeatures, but this makes it much more complex to use than the built- in camera application.
Also, since we test our applications only in the emulator, the features we can use will be limited. In this lesson we'll reviewwhere you can find these features if you need to create a custom camera in the future.
The code for this pro ject will be similar to the pro ject from the Camera Basics lesson. We'll create a new pro ject to keep thefunctionality separate, but we'll reuse much o f the code from Andro idManif est .xml, MainAct ivit y.java, andact ivit y_main.xml. Create a new Andro id pro ject with this criteria.
Name the pro ject CameraAdvanced.Use the package name co m.o reillyscho o l.andro id2.cameraadvanced.Uncheck the Creat e cust o m launcher ico n box.Assign the Andro id2_Lesso ns working set to the pro ject.
Using the Camera APIWe'll start o ff by creating a new Activity that will take over the work done by the built- in camera application. For thiswe're go ing to need a new Activity class, a view, and some related manifest updates. First, though, let's update thestrings. Open st rings.xml and make these changes:
CODE TO TYPE: /res/values/strings.xml
<?xml version="1.0" encoding="utf-8"?><resources>
<string name="app_name">Camera Advanced</string> <string name="action_settings">Settings</string> <string name="hello_world">Hello World, MainActivity!</string> <string name="start_image_capture">Take a New Picture</string> <string name="capture_image">Snap it!</string> <string name="save_image">Save Picture</string> <string name="recapture_image">Retake Picture</string> <string name="capturing_image">Taking New Picture</string> <string name="done">Done</string>
</resources>
Next, open act ivit y_main.xml and make these changes:
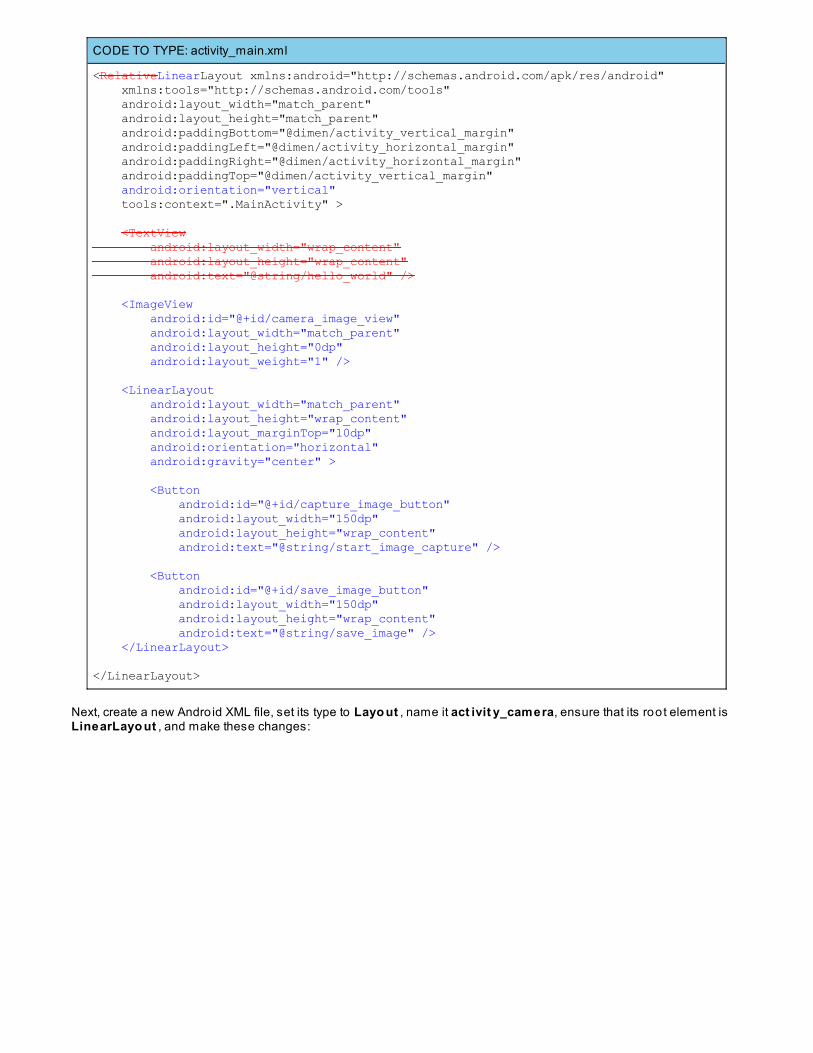
CODE TO TYPE: activity_main.xml
<RelativeLinearLayout xmlns:android="http://schemas.android.com/apk/res/android" xmlns:tools="http://schemas.android.com/tools" android:layout_width="match_parent" android:layout_height="match_parent" android:paddingBottom="@dimen/activity_vertical_margin" android:paddingLeft="@dimen/activity_horizontal_margin" android:paddingRight="@dimen/activity_horizontal_margin" android:paddingTop="@dimen/activity_vertical_margin" android:orientation="vertical" tools:context=".MainActivity" >
<TextView android:layout_width="wrap_content" android:layout_height="wrap_content" android:text="@string/hello_world" />
<ImageView android:id="@+id/camera_image_view" android:layout_width="match_parent" android:layout_height="0dp" android:layout_weight="1" /> <LinearLayout android:layout_width="match_parent" android:layout_height="wrap_content" android:layout_marginTop="10dp" android:orientation="horizontal" android:gravity="center" > <Button android:id="@+id/capture_image_button" android:layout_width="150dp" android:layout_height="wrap_content" android:text="@string/start_image_capture" /> <Button android:id="@+id/save_image_button" android:layout_width="150dp" android:layout_height="wrap_content" android:text="@string/save_image" /> </LinearLayout>
</LinearLayout>
Next, create a new Andro id XML file, set its type to Layo ut , name it act ivit y_camera, ensure that its root element isLinearLayo ut , and make these changes:
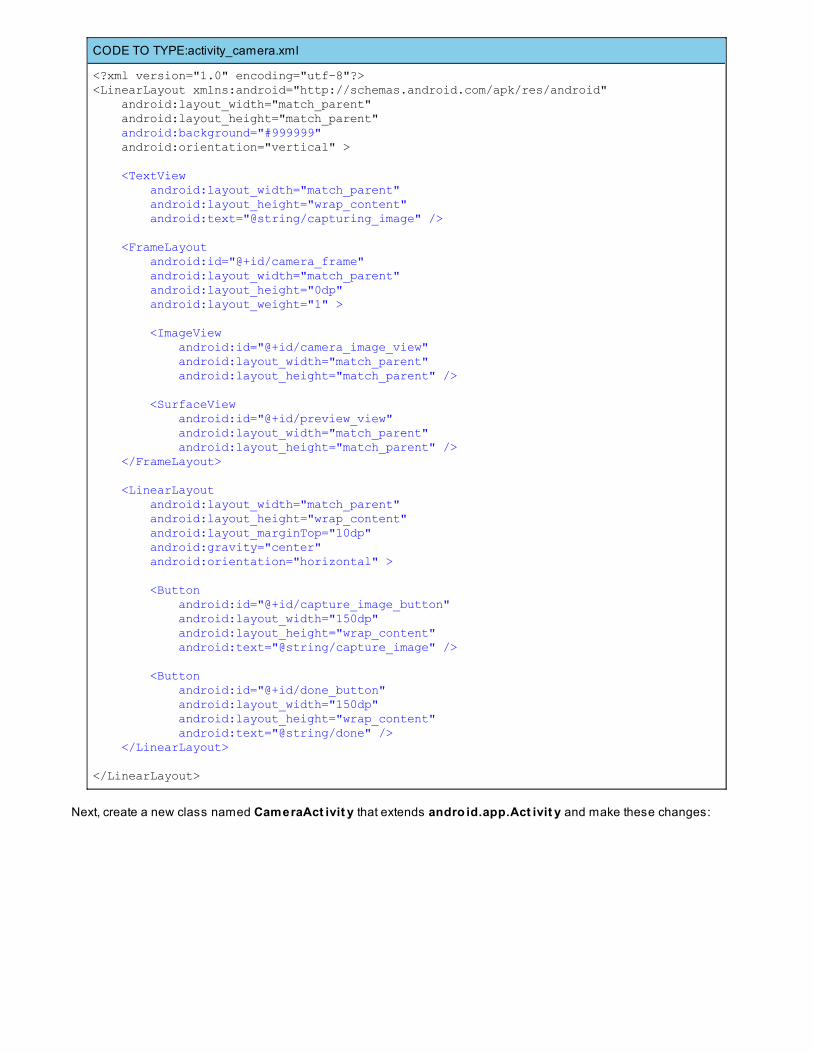
CODE TO TYPE:activity_camera.xml
<?xml version="1.0" encoding="utf-8"?><LinearLayout xmlns:android="http://schemas.android.com/apk/res/android" android:layout_width="match_parent" android:layout_height="match_parent" android:background="#999999" android:orientation="vertical" > <TextView android:layout_width="match_parent" android:layout_height="wrap_content" android:text="@string/capturing_image" /> <FrameLayout android:id="@+id/camera_frame" android:layout_width="match_parent" android:layout_height="0dp" android:layout_weight="1" > <ImageView android:id="@+id/camera_image_view" android:layout_width="match_parent" android:layout_height="match_parent" /> <SurfaceView android:id="@+id/preview_view" android:layout_width="match_parent" android:layout_height="match_parent" /> </FrameLayout> <LinearLayout android:layout_width="match_parent" android:layout_height="wrap_content" android:layout_marginTop="10dp" android:gravity="center" android:orientation="horizontal" > <Button android:id="@+id/capture_image_button" android:layout_width="150dp" android:layout_height="wrap_content" android:text="@string/capture_image" /> <Button android:id="@+id/done_button" android:layout_width="150dp" android:layout_height="wrap_content" android:text="@string/done" /> </LinearLayout>
</LinearLayout>
Next, create a new class named CameraAct ivit y that extends andro id.app.Act ivit y and make these changes:
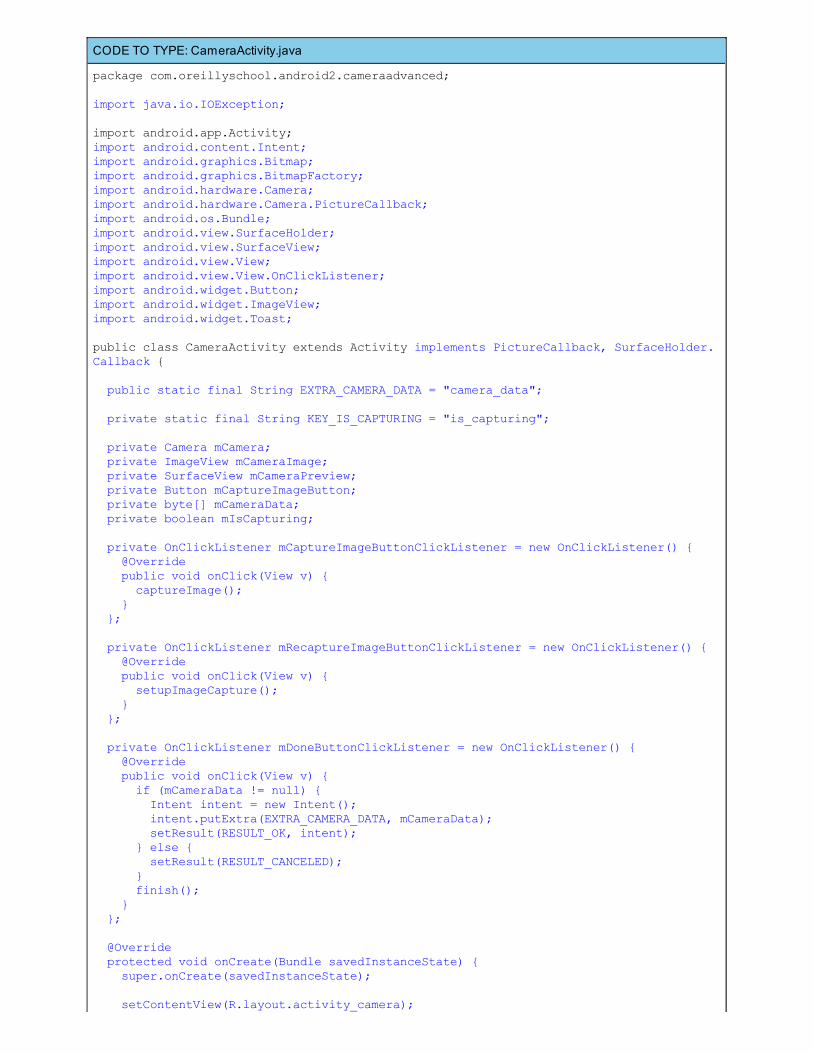
CODE TO TYPE: CameraActivity.java
package com.oreillyschool.android2.cameraadvanced;
import java.io.IOException;
import android.app.Activity;import android.content.Intent;import android.graphics.Bitmap;import android.graphics.BitmapFactory;import android.hardware.Camera;import android.hardware.Camera.PictureCallback;import android.os.Bundle;import android.view.SurfaceHolder;import android.view.SurfaceView;import android.view.View;import android.view.View.OnClickListener;import android.widget.Button;import android.widget.ImageView;import android.widget.Toast;
public class CameraActivity extends Activity implements PictureCallback, SurfaceHolder.Callback {
public static final String EXTRA_CAMERA_DATA = "camera_data"; private static final String KEY_IS_CAPTURING = "is_capturing"; private Camera mCamera; private ImageView mCameraImage; private SurfaceView mCameraPreview; private Button mCaptureImageButton; private byte[] mCameraData; private boolean mIsCapturing; private OnClickListener mCaptureImageButtonClickListener = new OnClickListener() { @Override public void onClick(View v) { captureImage(); } }; private OnClickListener mRecaptureImageButtonClickListener = new OnClickListener() { @Override public void onClick(View v) { setupImageCapture(); } }; private OnClickListener mDoneButtonClickListener = new OnClickListener() { @Override public void onClick(View v) { if (mCameraData != null) { Intent intent = new Intent(); intent.putExtra(EXTRA_CAMERA_DATA, mCameraData); setResult(RESULT_OK, intent); } else { setResult(RESULT_CANCELED); } finish(); } }; @Override protected void onCreate(Bundle savedInstanceState) { super.onCreate(savedInstanceState); setContentView(R.layout.activity_camera);
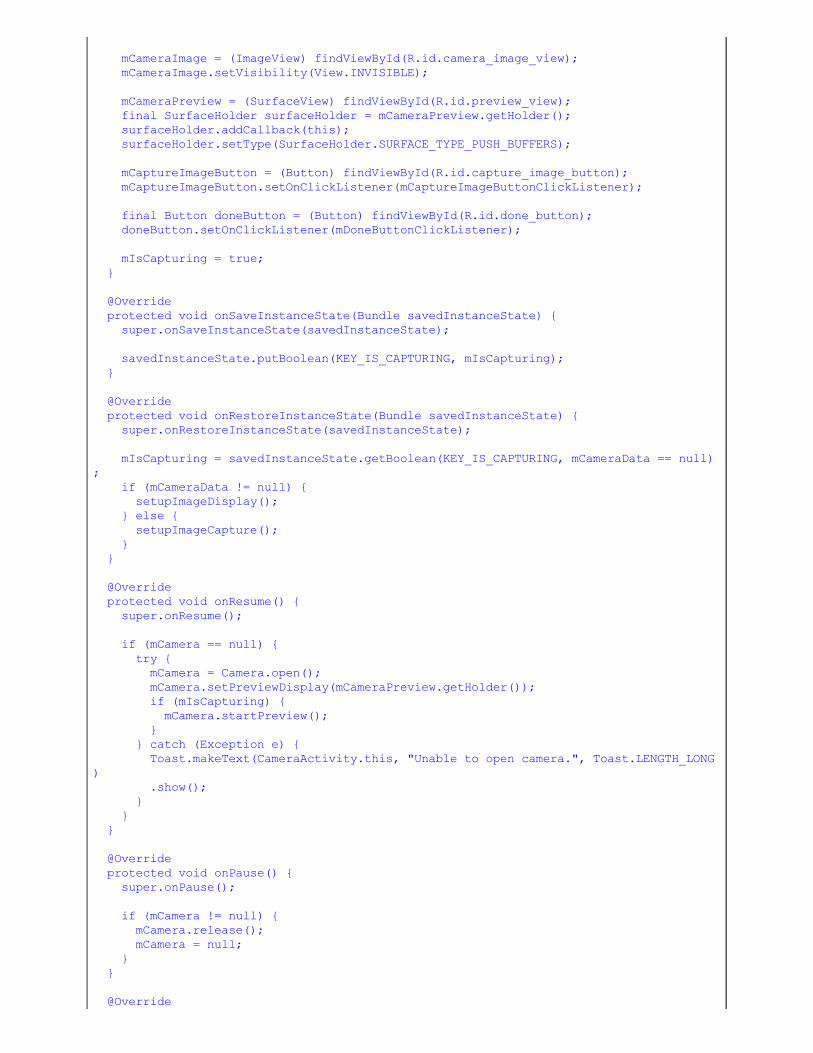
mCameraImage = (ImageView) findViewById(R.id.camera_image_view); mCameraImage.setVisibility(View.INVISIBLE); mCameraPreview = (SurfaceView) findViewById(R.id.preview_view); final SurfaceHolder surfaceHolder = mCameraPreview.getHolder(); surfaceHolder.addCallback(this); surfaceHolder.setType(SurfaceHolder.SURFACE_TYPE_PUSH_BUFFERS); mCaptureImageButton = (Button) findViewById(R.id.capture_image_button); mCaptureImageButton.setOnClickListener(mCaptureImageButtonClickListener); final Button doneButton = (Button) findViewById(R.id.done_button); doneButton.setOnClickListener(mDoneButtonClickListener); mIsCapturing = true; } @Override protected void onSaveInstanceState(Bundle savedInstanceState) { super.onSaveInstanceState(savedInstanceState); savedInstanceState.putBoolean(KEY_IS_CAPTURING, mIsCapturing); } @Override protected void onRestoreInstanceState(Bundle savedInstanceState) { super.onRestoreInstanceState(savedInstanceState); mIsCapturing = savedInstanceState.getBoolean(KEY_IS_CAPTURING, mCameraData == null); if (mCameraData != null) { setupImageDisplay(); } else { setupImageCapture(); } } @Override protected void onResume() { super.onResume(); if (mCamera == null) { try { mCamera = Camera.open(); mCamera.setPreviewDisplay(mCameraPreview.getHolder()); if (mIsCapturing) { mCamera.startPreview(); } } catch (Exception e) { Toast.makeText(CameraActivity.this, "Unable to open camera.", Toast.LENGTH_LONG) .show(); } } } @Override protected void onPause() { super.onPause(); if (mCamera != null) { mCamera.release(); mCamera = null; } } @Override
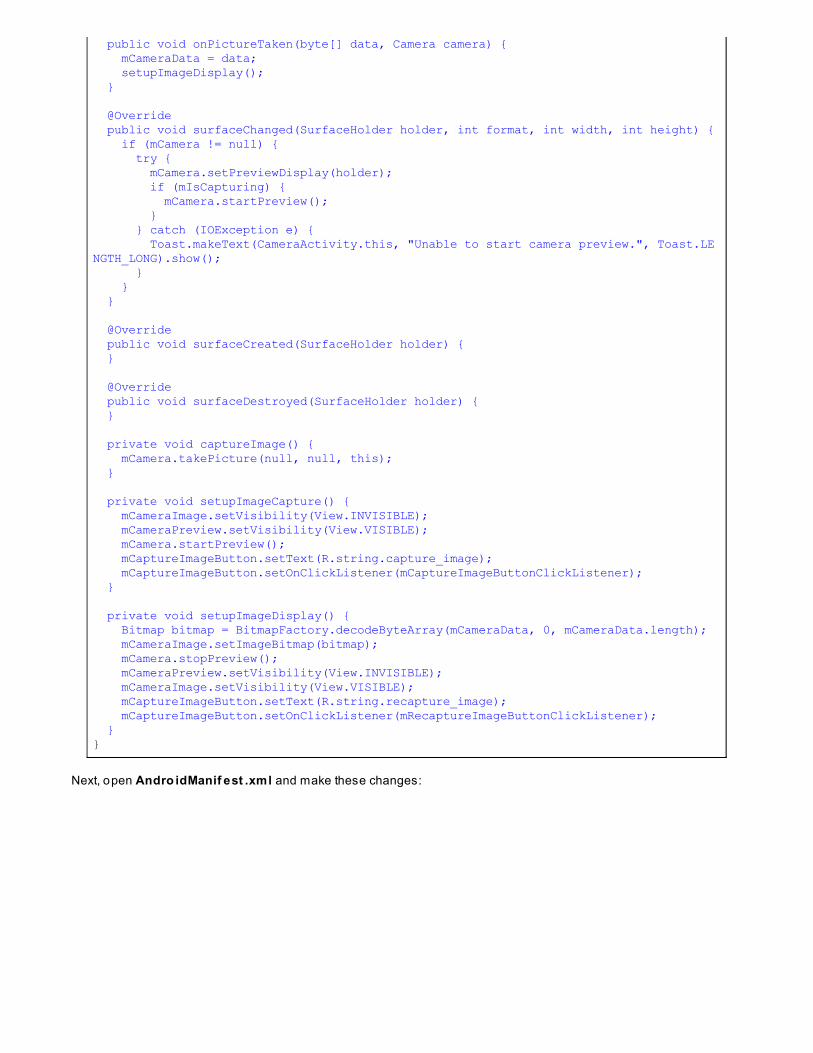
public void onPictureTaken(byte[] data, Camera camera) { mCameraData = data; setupImageDisplay(); } @Override public void surfaceChanged(SurfaceHolder holder, int format, int width, int height) { if (mCamera != null) { try { mCamera.setPreviewDisplay(holder); if (mIsCapturing) { mCamera.startPreview(); } } catch (IOException e) { Toast.makeText(CameraActivity.this, "Unable to start camera preview.", Toast.LENGTH_LONG).show(); } } } @Override public void surfaceCreated(SurfaceHolder holder) { } @Override public void surfaceDestroyed(SurfaceHolder holder) { } private void captureImage() { mCamera.takePicture(null, null, this); } private void setupImageCapture() { mCameraImage.setVisibility(View.INVISIBLE); mCameraPreview.setVisibility(View.VISIBLE); mCamera.startPreview(); mCaptureImageButton.setText(R.string.capture_image); mCaptureImageButton.setOnClickListener(mCaptureImageButtonClickListener); } private void setupImageDisplay() { Bitmap bitmap = BitmapFactory.decodeByteArray(mCameraData, 0, mCameraData.length); mCameraImage.setImageBitmap(bitmap); mCamera.stopPreview(); mCameraPreview.setVisibility(View.INVISIBLE); mCameraImage.setVisibility(View.VISIBLE); mCaptureImageButton.setText(R.string.recapture_image); mCaptureImageButton.setOnClickListener(mRecaptureImageButtonClickListener); }}
Next, open Andro idManif est .xml and make these changes:
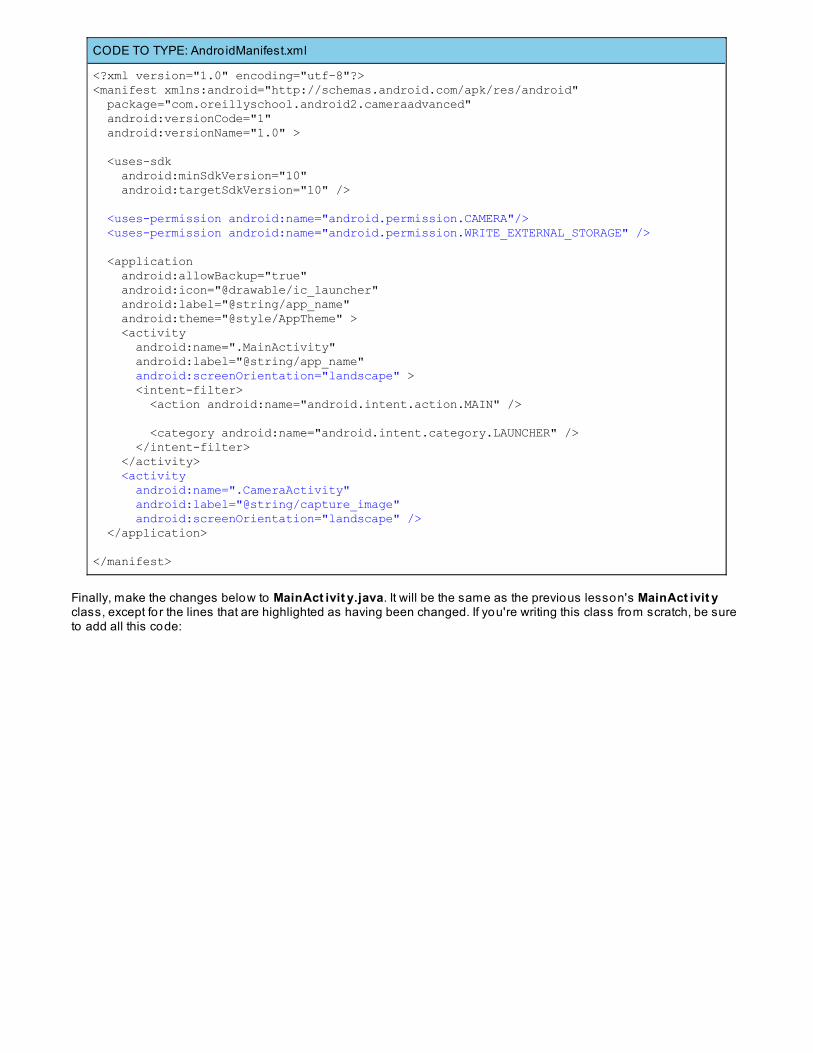
CODE TO TYPE: Andro idManifest.xml
<?xml version="1.0" encoding="utf-8"?><manifest xmlns:android="http://schemas.android.com/apk/res/android" package="com.oreillyschool.android2.cameraadvanced" android:versionCode="1" android:versionName="1.0" > <uses-sdk android:minSdkVersion="10" android:targetSdkVersion="10" />
<uses-permission android:name="android.permission.CAMERA"/> <uses-permission android:name="android.permission.WRITE_EXTERNAL_STORAGE" /> <application android:allowBackup="true" android:icon="@drawable/ic_launcher" android:label="@string/app_name" android:theme="@style/AppTheme" > <activity android:name=".MainActivity" android:label="@string/app_name" android:screenOrientation="landscape" > <intent-filter> <action android:name="android.intent.action.MAIN" /> <category android:name="android.intent.category.LAUNCHER" /> </intent-filter> </activity> <activity android:name=".CameraActivity" android:label="@string/capture_image" android:screenOrientation="landscape" /> </application>
</manifest>
Finally, make the changes below to MainAct ivit y.java. It will be the same as the previous lesson's MainAct ivit yclass, except fo r the lines that are highlighted as having been changed. If you're writing this class from scratch, be sureto add all this code:
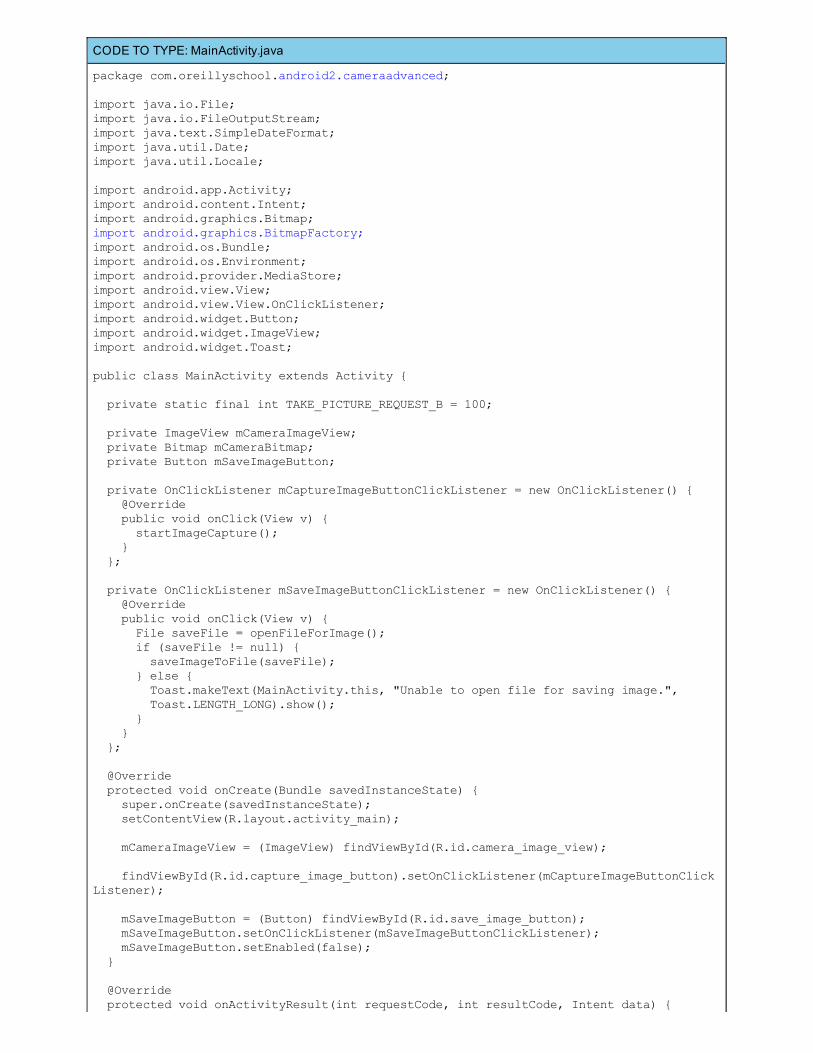
CODE TO TYPE: MainActivity.java
package com.oreillyschool.android2.cameraadvanced;
import java.io.File;import java.io.FileOutputStream;import java.text.SimpleDateFormat;import java.util.Date;import java.util.Locale;
import android.app.Activity;import android.content.Intent;import android.graphics.Bitmap;import android.graphics.BitmapFactory;import android.os.Bundle;import android.os.Environment;import android.provider.MediaStore;import android.view.View;import android.view.View.OnClickListener;import android.widget.Button;import android.widget.ImageView;import android.widget.Toast;
public class MainActivity extends Activity {
private static final int TAKE_PICTURE_REQUEST_B = 100; private ImageView mCameraImageView; private Bitmap mCameraBitmap; private Button mSaveImageButton; private OnClickListener mCaptureImageButtonClickListener = new OnClickListener() { @Override public void onClick(View v) { startImageCapture(); } }; private OnClickListener mSaveImageButtonClickListener = new OnClickListener() { @Override public void onClick(View v) { File saveFile = openFileForImage(); if (saveFile != null) { saveImageToFile(saveFile); } else { Toast.makeText(MainActivity.this, "Unable to open file for saving image.", Toast.LENGTH_LONG).show(); } } }; @Override protected void onCreate(Bundle savedInstanceState) { super.onCreate(savedInstanceState); setContentView(R.layout.activity_main); mCameraImageView = (ImageView) findViewById(R.id.camera_image_view); findViewById(R.id.capture_image_button).setOnClickListener(mCaptureImageButtonClickListener); mSaveImageButton = (Button) findViewById(R.id.save_image_button); mSaveImageButton.setOnClickListener(mSaveImageButtonClickListener); mSaveImageButton.setEnabled(false); } @Override protected void onActivityResult(int requestCode, int resultCode, Intent data) {
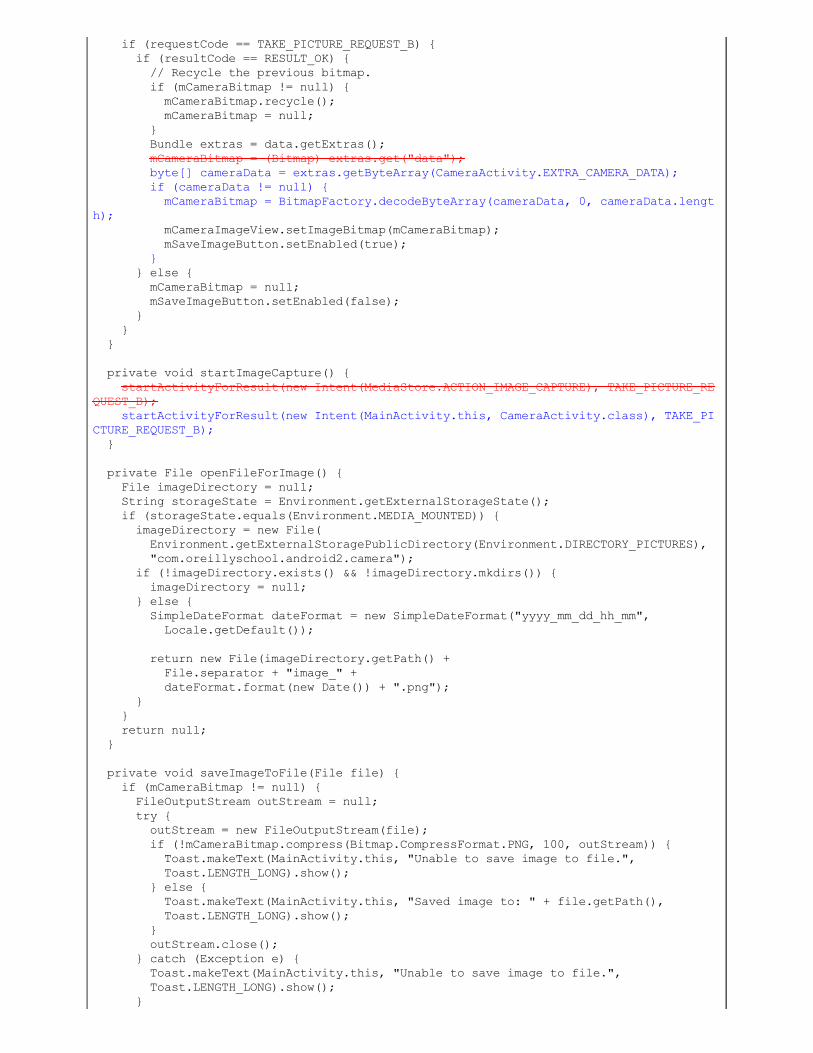
if (requestCode == TAKE_PICTURE_REQUEST_B) { if (resultCode == RESULT_OK) { // Recycle the previous bitmap. if (mCameraBitmap != null) { mCameraBitmap.recycle(); mCameraBitmap = null; } Bundle extras = data.getExtras(); mCameraBitmap = (Bitmap) extras.get("data"); byte[] cameraData = extras.getByteArray(CameraActivity.EXTRA_CAMERA_DATA); if (cameraData != null) { mCameraBitmap = BitmapFactory.decodeByteArray(cameraData, 0, cameraData.length); mCameraImageView.setImageBitmap(mCameraBitmap); mSaveImageButton.setEnabled(true); } } else { mCameraBitmap = null; mSaveImageButton.setEnabled(false); } } } private void startImageCapture() { startActivityForResult(new Intent(MediaStore.ACTION_IMAGE_CAPTURE), TAKE_PICTURE_REQUEST_B); startActivityForResult(new Intent(MainActivity.this, CameraActivity.class), TAKE_PICTURE_REQUEST_B); } private File openFileForImage() { File imageDirectory = null; String storageState = Environment.getExternalStorageState(); if (storageState.equals(Environment.MEDIA_MOUNTED)) { imageDirectory = new File( Environment.getExternalStoragePublicDirectory(Environment.DIRECTORY_PICTURES), "com.oreillyschool.android2.camera"); if (!imageDirectory.exists() && !imageDirectory.mkdirs()) { imageDirectory = null; } else { SimpleDateFormat dateFormat = new SimpleDateFormat("yyyy_mm_dd_hh_mm", Locale.getDefault()); return new File(imageDirectory.getPath() + File.separator + "image_" + dateFormat.format(new Date()) + ".png"); } } return null; } private void saveImageToFile(File file) { if (mCameraBitmap != null) { FileOutputStream outStream = null; try { outStream = new FileOutputStream(file); if (!mCameraBitmap.compress(Bitmap.CompressFormat.PNG, 100, outStream)) { Toast.makeText(MainActivity.this, "Unable to save image to file.", Toast.LENGTH_LONG).show(); } else { Toast.makeText(MainActivity.this, "Saved image to: " + file.getPath(), Toast.LENGTH_LONG).show(); } outStream.close(); } catch (Exception e) { Toast.makeText(MainActivity.this, "Unable to save image to file.", Toast.LENGTH_LONG).show(); }
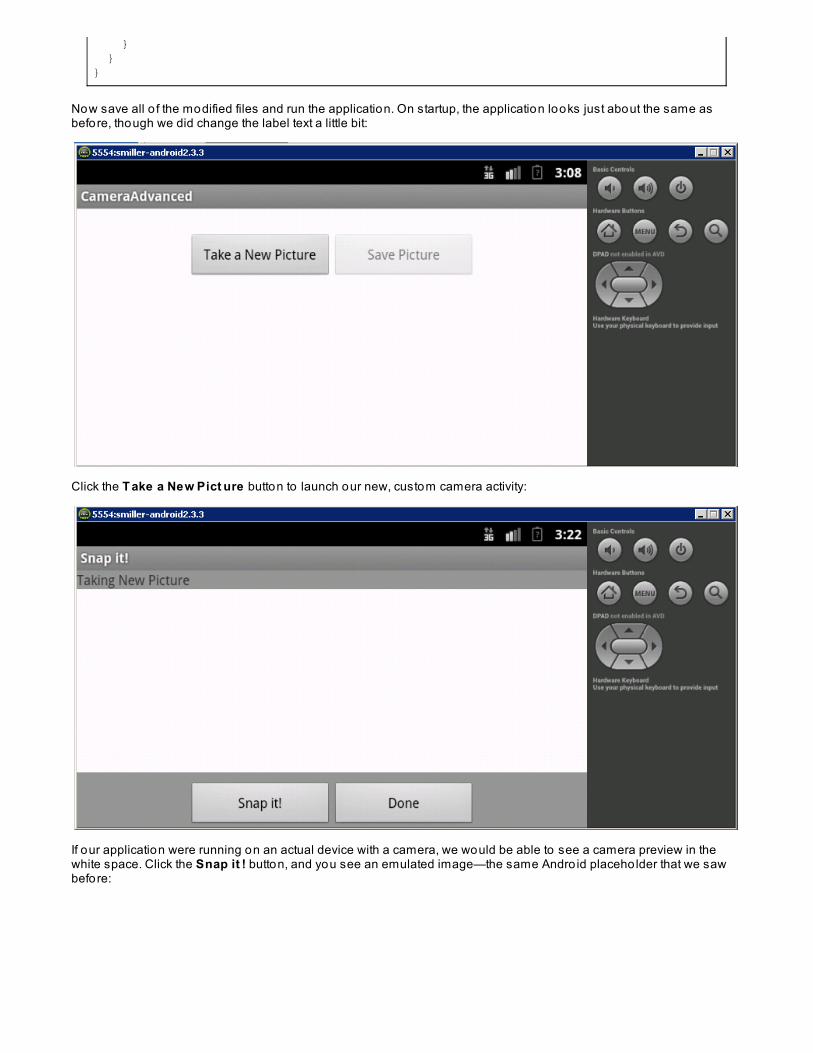
} }}
Now save all o f the modified files and run the application. On startup, the application looks just about the same asbefore, though we did change the label text a little bit:
Click the T ake a New Pict ure button to launch our new, custom camera activity:
If our application were running on an actual device with a camera, we would be able to see a camera preview in thewhite space. Click the Snap it ! button, and you see an emulated image—the same Andro id placeho lder that we sawbefore:
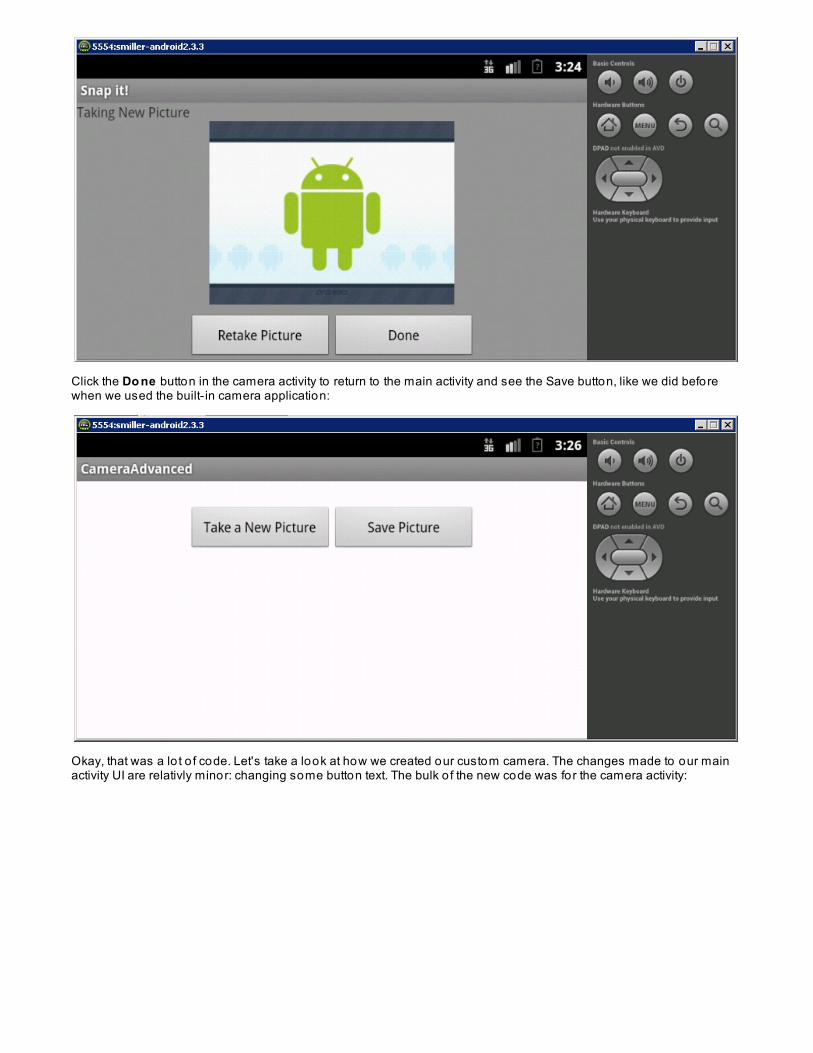
Click the Do ne button in the camera activity to return to the main activity and see the Save button, like we did beforewhen we used the built- in camera application:
Okay, that was a lo t o f code. Let's take a look at how we created our custom camera. The changes made to our mainactivity UI are relativly minor: changing some button text. The bulk o f the new code was for the camera activity:
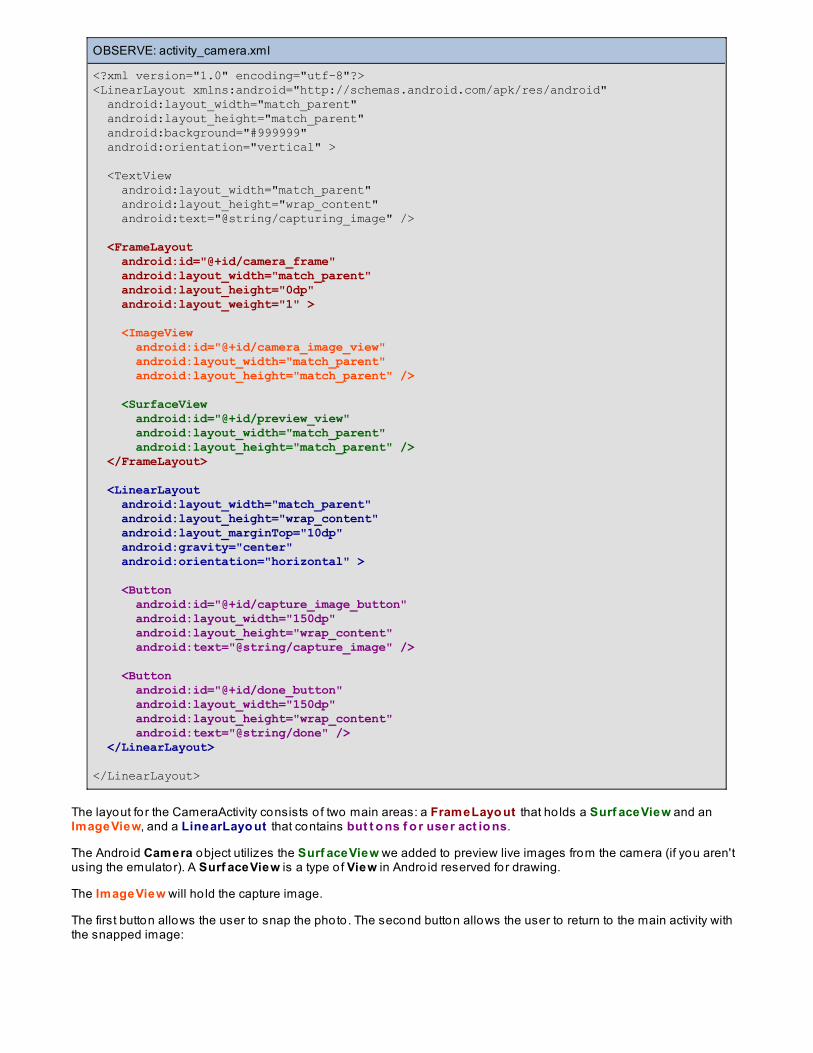
OBSERVE: activity_camera.xml
<?xml version="1.0" encoding="utf-8"?><LinearLayout xmlns:android="http://schemas.android.com/apk/res/android" android:layout_width="match_parent" android:layout_height="match_parent" android:background="#999999" android:orientation="vertical" > <TextView android:layout_width="match_parent" android:layout_height="wrap_content" android:text="@string/capturing_image" /> <FrameLayout android:id="@+id/camera_frame" android:layout_width="match_parent" android:layout_height="0dp" android:layout_weight="1" > <ImageView android:id="@+id/camera_image_view" android:layout_width="match_parent" android:layout_height="match_parent" /> <SurfaceView android:id="@+id/preview_view" android:layout_width="match_parent" android:layout_height="match_parent" /> </FrameLayout> <LinearLayout android:layout_width="match_parent" android:layout_height="wrap_content" android:layout_marginTop="10dp" android:gravity="center" android:orientation="horizontal" > <Button android:id="@+id/capture_image_button" android:layout_width="150dp" android:layout_height="wrap_content" android:text="@string/capture_image" /> <Button android:id="@+id/done_button" android:layout_width="150dp" android:layout_height="wrap_content" android:text="@string/done" /> </LinearLayout>
</LinearLayout>
The layout fo r the CameraActivity consists o f two main areas: a FrameLayo ut that ho lds a Surf aceView and anImageView, and a LinearLayo ut that contains but t o ns f o r user act io ns.
The Andro id Camera object utilizes the Surf aceView we added to preview live images from the camera (if you aren'tusing the emulator). A Surf aceView is a type o f View in Andro id reserved for drawing.
The ImageView will ho ld the capture image.
The first button allows the user to snap the photo . The second button allows the user to return to the main activity withthe snapped image:
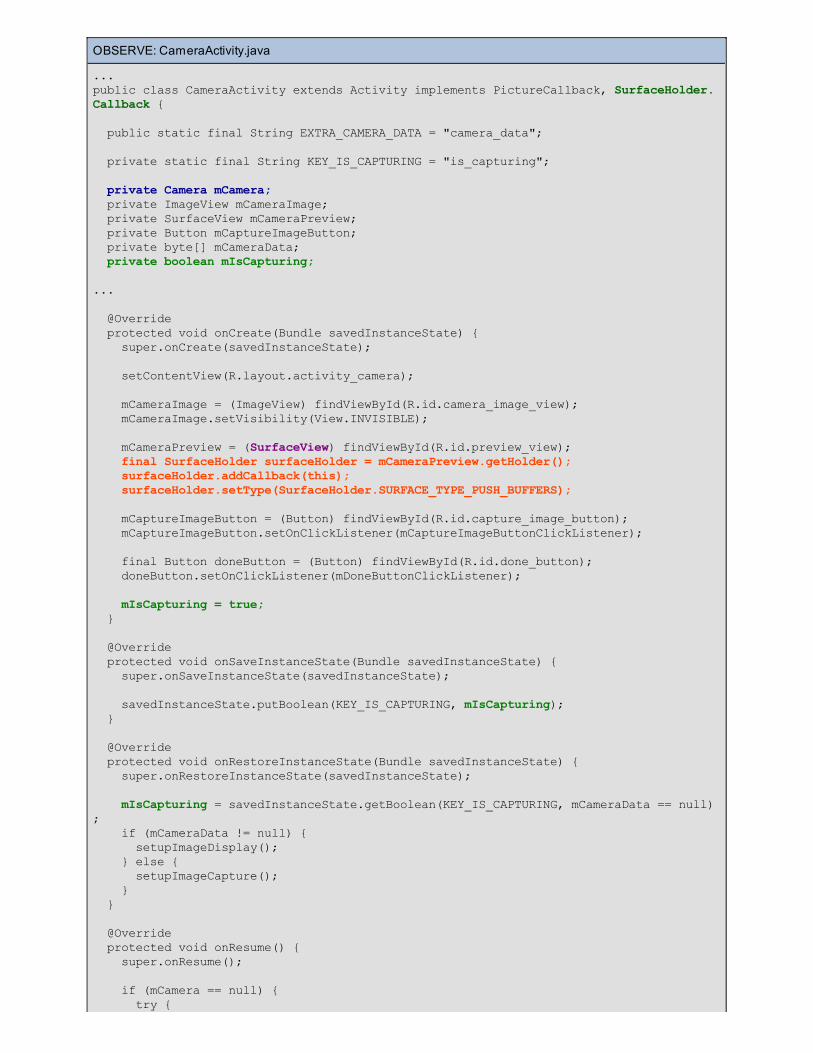
OBSERVE: CameraActivity.java
...public class CameraActivity extends Activity implements PictureCallback, SurfaceHolder.Callback { public static final String EXTRA_CAMERA_DATA = "camera_data";
private static final String KEY_IS_CAPTURING = "is_capturing";
private Camera mCamera; private ImageView mCameraImage; private SurfaceView mCameraPreview; private Button mCaptureImageButton; private byte[] mCameraData; private boolean mIsCapturing;
... @Override protected void onCreate(Bundle savedInstanceState) { super.onCreate(savedInstanceState);
setContentView(R.layout.activity_camera);
mCameraImage = (ImageView) findViewById(R.id.camera_image_view); mCameraImage.setVisibility(View.INVISIBLE);
mCameraPreview = (SurfaceView) findViewById(R.id.preview_view); final SurfaceHolder surfaceHolder = mCameraPreview.getHolder(); surfaceHolder.addCallback(this); surfaceHolder.setType(SurfaceHolder.SURFACE_TYPE_PUSH_BUFFERS);
mCaptureImageButton = (Button) findViewById(R.id.capture_image_button); mCaptureImageButton.setOnClickListener(mCaptureImageButtonClickListener);
final Button doneButton = (Button) findViewById(R.id.done_button); doneButton.setOnClickListener(mDoneButtonClickListener);
mIsCapturing = true; }
@Override protected void onSaveInstanceState(Bundle savedInstanceState) { super.onSaveInstanceState(savedInstanceState);
savedInstanceState.putBoolean(KEY_IS_CAPTURING, mIsCapturing); }
@Override protected void onRestoreInstanceState(Bundle savedInstanceState) { super.onRestoreInstanceState(savedInstanceState);
mIsCapturing = savedInstanceState.getBoolean(KEY_IS_CAPTURING, mCameraData == null); if (mCameraData != null) { setupImageDisplay(); } else { setupImageCapture(); } }
@Override protected void onResume() { super.onResume();
if (mCamera == null) { try {
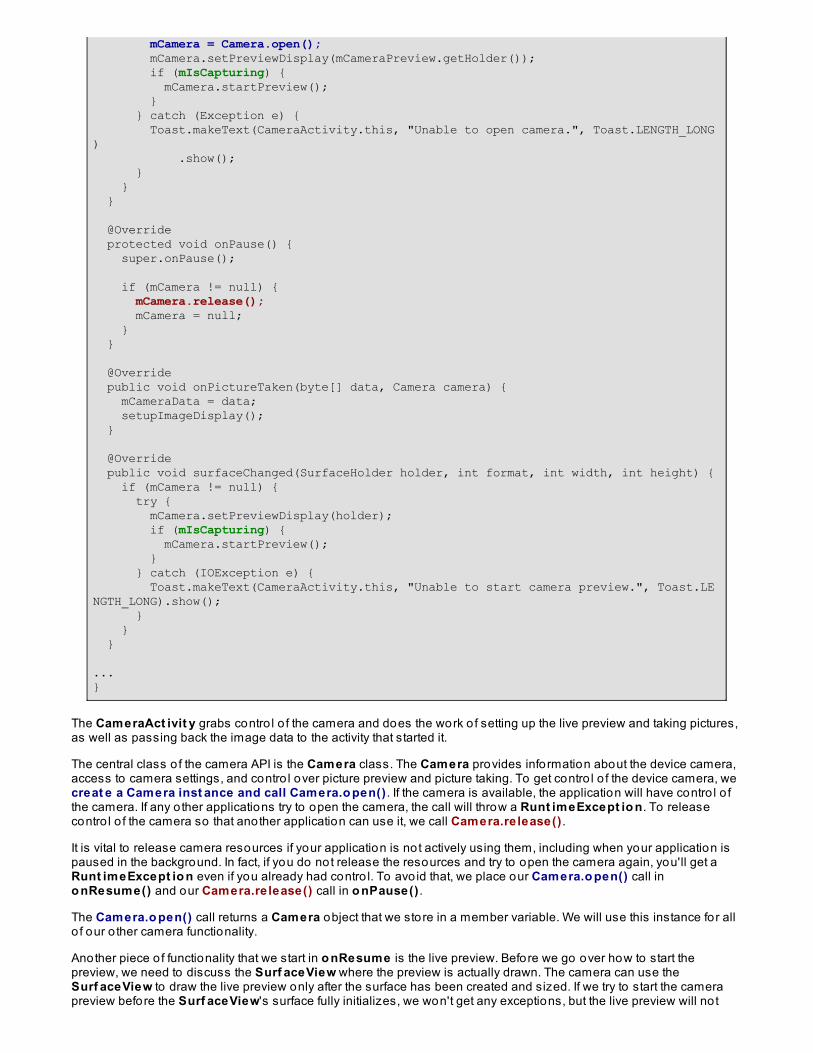
mCamera = Camera.open(); mCamera.setPreviewDisplay(mCameraPreview.getHolder()); if (mIsCapturing) { mCamera.startPreview(); } } catch (Exception e) { Toast.makeText(CameraActivity.this, "Unable to open camera.", Toast.LENGTH_LONG) .show(); } } }
@Override protected void onPause() { super.onPause();
if (mCamera != null) { mCamera.release(); mCamera = null; } }
@Override public void onPictureTaken(byte[] data, Camera camera) { mCameraData = data; setupImageDisplay(); }
@Override public void surfaceChanged(SurfaceHolder holder, int format, int width, int height) { if (mCamera != null) { try { mCamera.setPreviewDisplay(holder); if (mIsCapturing) { mCamera.startPreview(); } } catch (IOException e) { Toast.makeText(CameraActivity.this, "Unable to start camera preview.", Toast.LENGTH_LONG).show(); } } }
...}
The CameraAct ivit y grabs contro l o f the camera and does the work o f setting up the live preview and taking pictures,as well as passing back the image data to the activity that started it.
The central class o f the camera API is the Camera class. The Camera provides information about the device camera,access to camera settings, and contro l over picture preview and picture taking. To get contro l o f the device camera, wecreat e a Camera inst ance and call Camera.o pen() . If the camera is available, the application will have contro l o fthe camera. If any o ther applications try to open the camera, the call will throw a Runt imeExcept io n. To releasecontro l o f the camera so that another application can use it, we call Camera.re lease() .
It is vital to release camera resources if your application is not actively using them, including when your application ispaused in the background. In fact, if you do not release the resources and try to open the camera again, you'll get aRunt imeExcept io n even if you already had contro l. To avo id that, we place our Camera.o pen() call ino nResume() and our Camera.re lease() call in o nPause() .
The Camera.o pen() call returns a Camera object that we store in a member variable. We will use this instance for allo f our o ther camera functionality.
Another piece o f functionality that we start in o nResume is the live preview. Before we go over how to start thepreview, we need to discuss the Surf aceView where the preview is actually drawn. The camera can use theSurf aceView to draw the live preview only after the surface has been created and sized. If we try to start the camerapreview before the Surf aceView's surface fully initializes, we won't get any exceptions, but the live preview will no t

render. In order to start the preview after the surface is initialized, we have CameraAct ivit y implement theSurf aceHo lder.Callback interface. Surf aceHo lder is an interface for manipulating the surface o f a Surf aceViewand is in fact what we pass to the Camera fo r the preview. By having Camera implement the callback interface, we canhave our Camera instance start the preview after the surface initializes inSurf aceHo lder.Callback.surf aceChanged.. So in o nCreat e , we get a reference to the Surf aceView, and thenuse it s Surf aceHo lder t o add t he CameraAct ivit y as a callback and also set t he surf ace's t ype .
Note
The valid constant values for Surf aceHo lder.set T ype areSurf aceHo lder.SURFACE_T YPE_NORMAL andSurf aceHo lder.SURFACE_T YPE_PUSH_BUFFERS . However, this method and these constants aredeprecated as o f API 11. So, in your pro jects, if your minimum build target is an API higher than 10, you donot need to call this method because the type is set automatically when needed. For more information,see the Andro id Developer Documentation.
The Surf aceHo lder.Callback consists o f three methods: surf aceCreat ed, surf aceChanged, andsuf aceDest ro yed. The only one we need for our purposes is surf aceChanged. In our implementation o fsurf aceChanged, we check to determine whether CameraAct ivit y has a valid Camera instance; if it does weassign the Surf aceHo lder to the Camera as its display surface. At the top o f the class, we add a member variable,mIsCapt uring as a flag to differentiate when we are previewing the camera and when we are displaying a takenpicture. So in surf aceChanged, we check this flag; if we are currently trying to capture an image, we go ahead and callCamera.st art Preview() to start the preview drawing. These method calls are all wrapped in a try-catch block so that ifthere are any issues starting the preview, we can display a toast message to the user indicating the problem.
To take a picture, our capt ureImage() method simply calls the Camera.t akePict ure method. There are twoversions o f Camera.t akePict ure :
public final vo id takePicture (Camera.ShutterCallback shutter, Camera.PictureCallback raw,Camera.PictureCallback jpeg)public final vo id takePicture (Camera.ShutterCallback shutter, Camera.PictureCallback raw,Camera.PictureCallback postview, Camera.PictureCallback jpeg)
The first method calls the second method with all its parameters, but passes null fo r the Camera.Pict ureCallbackpo st view argument. Let's analyze the second method. The first argument is a Camera.Shut t erCallback. Thiscallback is called the moment the image is captured. The second argument is a Camera.Pict ureCallback. It is calledwhen raw image data is available. The third argument is a Camera.Pict ureCallback. It is called when the scaled,processed "postview" image is available. The last argument fo r both is a Camera.Pict ureCallback. It is called whenJPEG image data is called. It's okay to pass null fo r any o f these arguments if you don't care about that particularcallback.
In our application, we use the first version and only set a callback for JPEG image data. We set the o thers to nullbecause we don't need them. We have the CameraAct ivit y implement Pict ureCallback, so when the picture istaken and the JPEG data is available, o nPict ureT aken is called. The callback is passed a byte array containing thepicture data, then we save the data to a member variable and call the set upImageDisplay() method to callCamera.st o pPreview() , hide the Surf aceView, and decode the byte array into a Bit map, which is then displayed inthe ImageView. Also , we change the "Snap it!" button text to "Retake." When clicked, instead o f callingCamera.t akePict ure , the "Retake" button, will call set upImageCapt ure , which hides the ImageView, shows theSurf aceView, calls Camera.st art Preview() to start the live preview again, and changes the "Retake" button textback to "Snap it!"
The final piece is to return the image data to our MainAct ivit y. We accomplish this with the "Done" button. In the clicklistener fo r this button, we take the byte array received in o nPict ureT aken and place that as an extra in a new Int entinstance. Then we set this Int ent as the result fo r this activity via Act ivit y.set Result and call Act ivit y.f inish() toreturn to end the CameraAct ivit y, and return to the MainAct ivit y.

OBSERVE: MainActivity.java
... @Override protected void onActivityResult(int requestCode, int resultCode, Intent data) { if (requestCode == TAKE_PICTURE_REQUEST_B) { if (resultCode == RESULT_OK) { // Recycle the previous bitmap. if (mCameraBitmap != null) { mCameraBitmap.recycle(); mCameraBitmap = null; } Bundle extras = data.getExtras(); byte[] cameraData = extras.getByteArray(CameraActivity.EXTRA_CAMERA_DATA); if (cameraData != null) { mCameraBitmap = BitmapFactory.decodeByteArray(cameraData, 0, cameraData.length); mCameraImageView.setImageBitmap(mCameraBitmap); mSaveImageButton.setEnabled(true); } } else { mCameraBitmap = null; mSaveImageButton.setEnabled(false); } } } private void startImageCapture() { startActivityForResult(new Intent(MainActivity.this, CameraActivity.class), TAKE_PICTURE_REQUEST_B); }...
Back in MainAct ivit y we made a couple o f minor changes to our previous application. We can still retrieve the datafrom CameraAct ivit y in o nAct ivit yResult like we did with the built- in camera. However, here t he key f o r t hevalue st o red in t he Int ent is different, because we made our own constant. Also , since we were passing back abyte array, instead o f assigning a Bit map to the MainAct ivit y's ImageView, MainAct ivit y.o nAct ivit yResultret rieves t he byt e array, deco des it int o a Bit map, and then assigns it t o t he ImageView.
Camera ParametersMost cameras on newer devices have many settings that you can access through the Camera API. Unfortunately, theyare hard to test on an emulator. Regardless, let's still review how you would access these camera parameters, thekind o f settings you can manipulate with the Camera.Paramet ers class, and adjust camera settings.
The current settings for a Camera instance are obtained by calling Camera.get Paramet ers() . There are severalsettings you can change by calling setters on the Camera.Paramet ers instance returned. For example, you can setanti-banding, co loring effects (sepia, negative, and so on), flash mode, focus mode, scene mode, white balance,preview size, and JPEG quality, among o ther things. For complete details on settings and possible values, see theAndro id Developer Documentation. Remember that when you change values on the Camera.Paramet ers instancefrom Camera.get Paramet ers() , the settings are not actually changed until you call Camera.set Paramet ers(Camera.Paramet ers params) and pass the Camera.Paramet ers with the changed values.
In relation to live previews, the Camera.Paramet ers actually provides a list o f preview sizes from which you canselect to find the most appropriate preview size (as a Camera.Size object) fo r your application.
There are lo ts o f useful features on Camera.Paramet ers that you can use to implement a custom camera. For moreinformation on even more features, as well as API level limitations, see the Andro id Developer Documentation.
Checking for a Camera and Handling Multiple CamerasIf camera functionality is optional in your application and you need to check whether the device running yourapplication has a camera, you can use the PackageManager to determine programmatically whether the device has acamera. You do that using this line o f code from inside an Act ivit y:
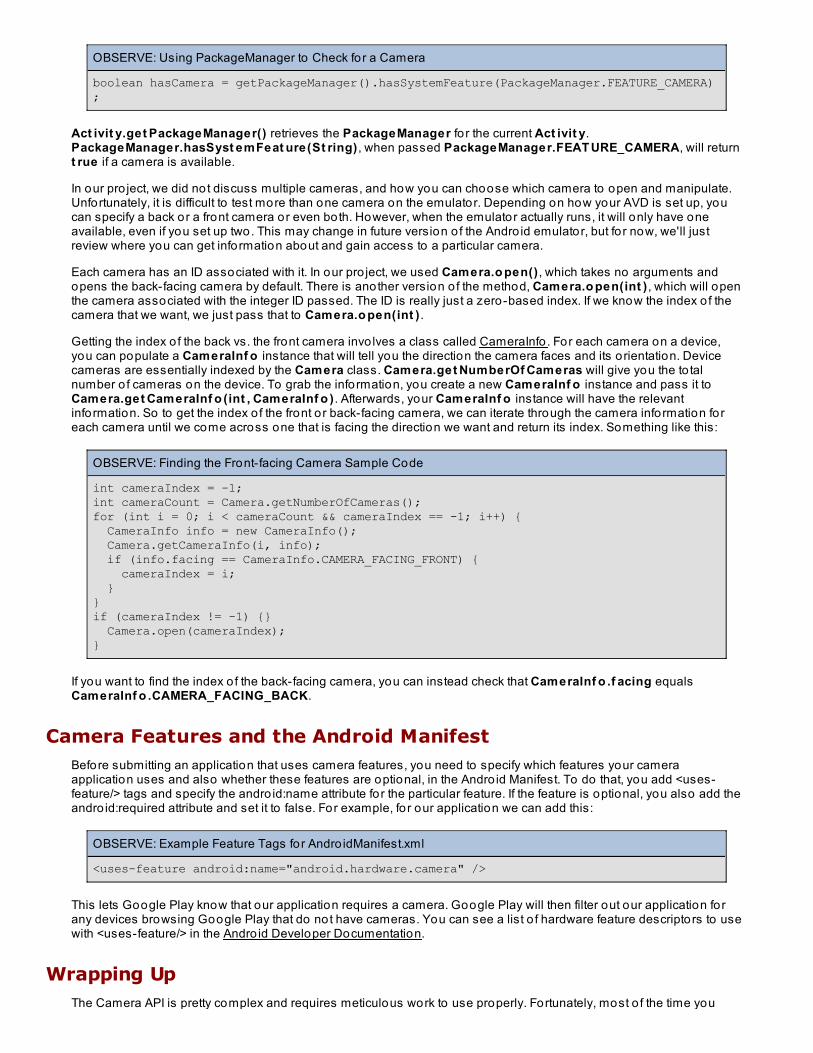
OBSERVE: Using PackageManager to Check for a Camera
boolean hasCamera = getPackageManager().hasSystemFeature(PackageManager.FEATURE_CAMERA);
Act ivit y.get PackageManager() retrieves the PackageManager fo r the current Act ivit y.PackageManager.hasSyst emFeat ure(St ring) , when passed PackageManager.FEAT URE_CAMERA, will returnt rue if a camera is available.
In our pro ject, we did not discuss multiple cameras, and how you can choose which camera to open and manipulate.Unfortunately, it is difficult to test more than one camera on the emulator. Depending on how your AVD is set up, youcan specify a back or a front camera or even both. However, when the emulator actually runs, it will only have oneavailable, even if you set up two. This may change in future version o f the Andro id emulator, but fo r now, we'll justreview where you can get information about and gain access to a particular camera.
Each camera has an ID associated with it. In our pro ject, we used Camera.o pen() , which takes no arguments andopens the back-facing camera by default. There is another version o f the method, Camera.o pen(int ) , which will openthe camera associated with the integer ID passed. The ID is really just a zero-based index. If we know the index o f thecamera that we want, we just pass that to Camera.o pen(int ) .
Getting the index o f the back vs. the front camera invo lves a class called CameraInfo . For each camera on a device,you can populate a CameraInf o instance that will tell you the direction the camera faces and its orientation. Devicecameras are essentially indexed by the Camera class. Camera.get NumberOf Cameras will give you the to talnumber o f cameras on the device. To grab the information, you create a new CameraInf o instance and pass it toCamera.get CameraInf o (int , CameraInf o ) . Afterwards, your CameraInf o instance will have the relevantinformation. So to get the index o f the front or back-facing camera, we can iterate through the camera information foreach camera until we come across one that is facing the direction we want and return its index. Something like this:
OBSERVE: Finding the Front-facing Camera Sample Code
int cameraIndex = -1;int cameraCount = Camera.getNumberOfCameras();for (int i = 0; i < cameraCount && cameraIndex == -1; i++) { CameraInfo info = new CameraInfo(); Camera.getCameraInfo(i, info); if (info.facing == CameraInfo.CAMERA_FACING_FRONT) { cameraIndex = i; }}if (cameraIndex != -1) {} Camera.open(cameraIndex);}
If you want to find the index o f the back-facing camera, you can instead check that CameraInf o .f acing equalsCameraInf o .CAMERA_FACING_BACK.
Camera Features and the Android ManifestBefore submitting an application that uses camera features, you need to specify which features your cameraapplication uses and also whether these features are optional, in the Andro id Manifest. To do that, you add <uses-feature/> tags and specify the andro id:name attribute for the particular feature. If the feature is optional, you also add theandro id:required attribute and set it to false. For example, fo r our application we can add this:
OBSERVE: Example Feature Tags for Andro idManifest.xml
<uses-feature android:name="android.hardware.camera" />
This lets Google Play know that our application requires a camera. Google Play will then filter out our application forany devices browsing Google Play that do not have cameras. You can see a list o f hardware feature descriptors to usewith <uses-feature/> in the Andro id Developer Documentation.
Wrapping UpThe Camera API is pretty complex and requires meticulous work to use properly. Fortunately, most o f the time you

won't need it, but if you do, the API is expansive enough to allow you to create a fully-featured Camera application.While availability o f certain features varies across Andro id API level and device, there are plenty o f ways for you toassess a device's capabilities and take advantage o f them accordingly. Hopefully, by now you are comfortable usingthe Camera API to grab contro l o f camera resources, take images, store images, and (most importantly) release thecamera back to the system. You should also now know where to look to find more advanced camera features toleverage in your application. See you next lesson!
Copyright © 1998-2014 O'Reilly Media, Inc.
This work is licensed under a Creative Commons Attribution-ShareAlike 3.0 Unported License.See http://creativecommons.org/licenses/by-sa/3.0/legalcode for more information.
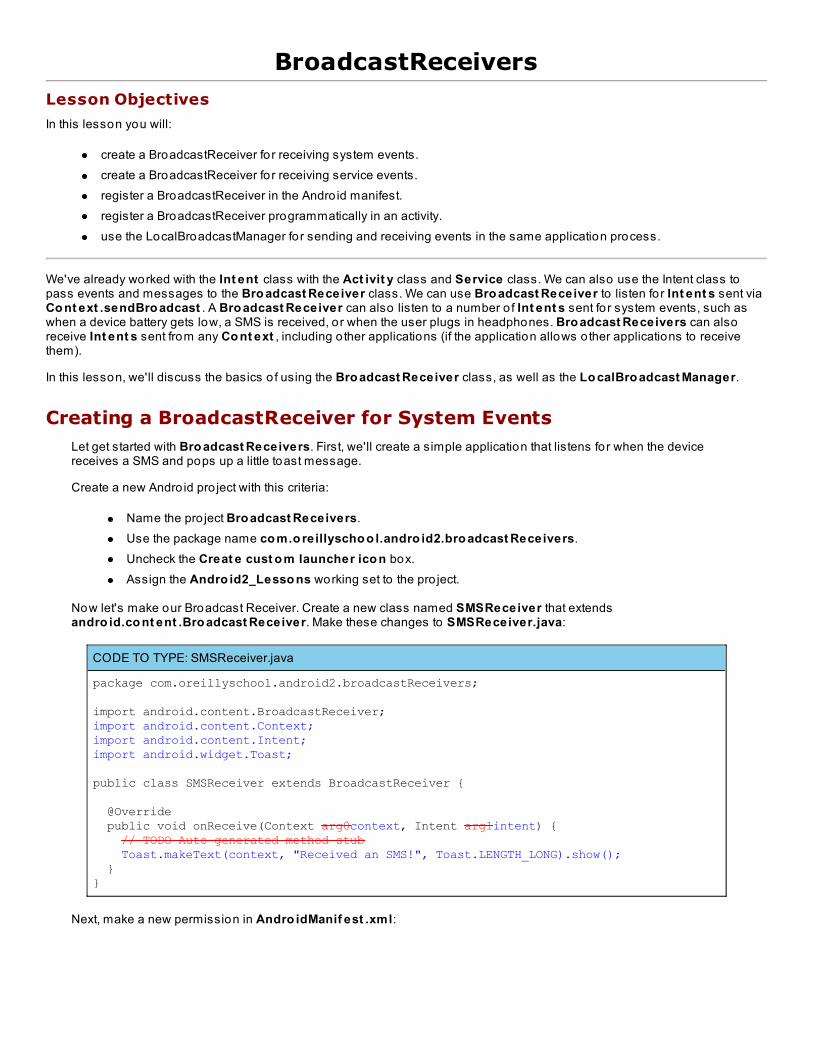
BroadcastReceiversLesson Objectives
In this lesson you will:
create a BroadcastReceiver fo r receiving system events.create a BroadcastReceiver fo r receiving service events.register a BroadcastReceiver in the Andro id manifest.register a BroadcastReceiver programmatically in an activity.use the LocalBroadcastManager for sending and receiving events in the same application process.
We've already worked with the Int ent class with the Act ivit y class and Service class. We can also use the Intent class topass events and messages to the Bro adcast Receiver class. We can use Bro adcast Receiver to listen for Int ent s sent viaCo nt ext .sendBro adcast . A Bro adcast Receiver can also listen to a number o f Int ent s sent fo r system events, such aswhen a device battery gets low, a SMS is received, or when the user plugs in headphones. Bro adcast Receivers can alsoreceive Int ent s sent from any Co nt ext , including o ther applications (if the application allows o ther applications to receivethem).
In this lesson, we'll discuss the basics o f using the Bro adcast Receiver class, as well as the Lo calBro adcast Manager.
Creating a BroadcastReceiver for System EventsLet get started with Bro adcast Receivers. First, we'll create a simple application that listens for when the devicereceives a SMS and pops up a little toast message.
Create a new Andro id pro ject with this criteria:
Name the pro ject Bro adcast Receivers.Use the package name co m.o reillyscho o l.andro id2.bro adcast Receivers.Uncheck the Creat e cust o m launcher ico n box.Assign the Andro id2_Lesso ns working set to the pro ject.
Now let's make our Broadcast Receiver. Create a new class named SMSReceiver that extendsandro id.co nt ent .Bro adcast Receiver. Make these changes to SMSReceiver.java:
CODE TO TYPE: SMSReceiver.java
package com.oreillyschool.android2.broadcastReceivers;
import android.content.BroadcastReceiver;import android.content.Context;import android.content.Intent;import android.widget.Toast;
public class SMSReceiver extends BroadcastReceiver {
@Override public void onReceive(Context arg0context, Intent arg1intent) { // TODO Auto-generated method stub Toast.makeText(context, "Received an SMS!", Toast.LENGTH_LONG).show(); }}
Next, make a new permission in Andro idManif est .xml:
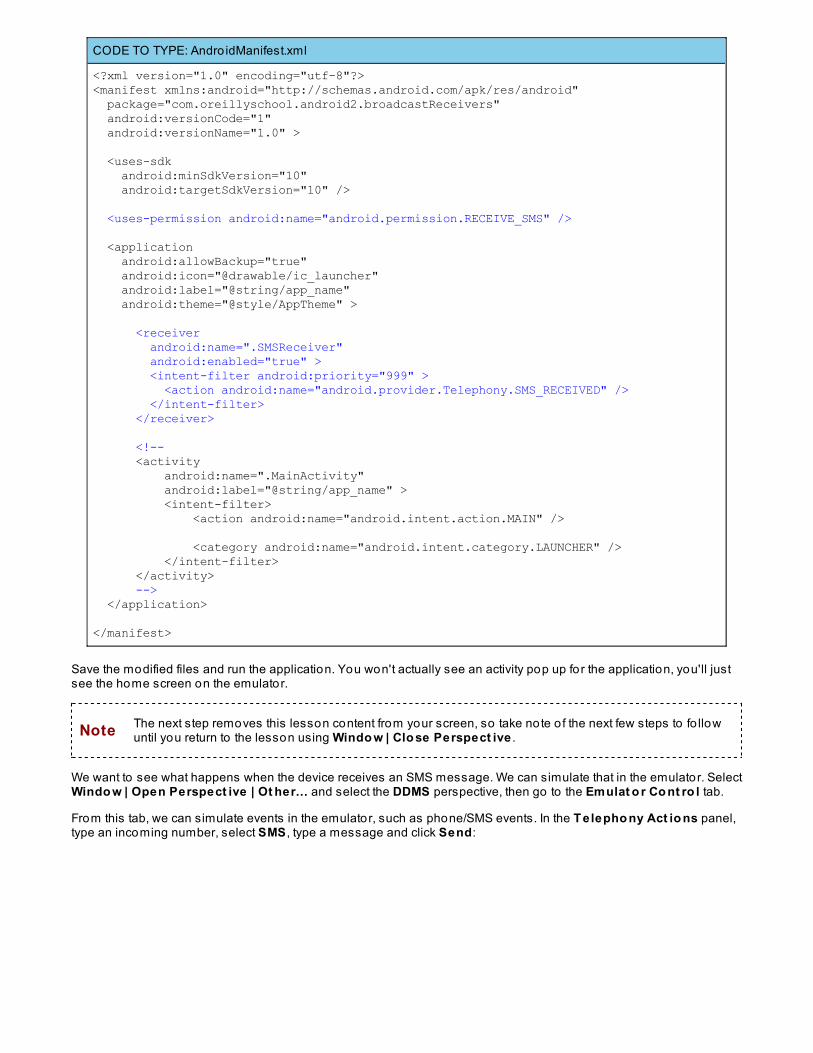
CODE TO TYPE: Andro idManifest.xml
<?xml version="1.0" encoding="utf-8"?><manifest xmlns:android="http://schemas.android.com/apk/res/android" package="com.oreillyschool.android2.broadcastReceivers" android:versionCode="1" android:versionName="1.0" >
<uses-sdk android:minSdkVersion="10" android:targetSdkVersion="10" />
<uses-permission android:name="android.permission.RECEIVE_SMS" />
<application android:allowBackup="true" android:icon="@drawable/ic_launcher" android:label="@string/app_name" android:theme="@style/AppTheme" >
<receiver android:name=".SMSReceiver" android:enabled="true" > <intent-filter android:priority="999" > <action android:name="android.provider.Telephony.SMS_RECEIVED" /> </intent-filter> </receiver>
<!-- <activity android:name=".MainActivity" android:label="@string/app_name" > <intent-filter> <action android:name="android.intent.action.MAIN" />
<category android:name="android.intent.category.LAUNCHER" /> </intent-filter> </activity> --> </application>
</manifest>
Save the modified files and run the application. You won't actually see an activity pop up for the application, you'll justsee the home screen on the emulator.
Note The next step removes this lesson content from your screen, so take note o f the next few steps to fo llowuntil you return to the lesson using Windo w | Clo se Perspect ive .
We want to see what happens when the device receives an SMS message. We can simulate that in the emulator. SelectWindo w | Open Perspect ive | Ot her... and select the DDMS perspective, then go to the Emulat o r Co nt ro l tab.
From this tab, we can simulate events in the emulator, such as phone/SMS events. In the T elepho ny Act io ns panel,type an incoming number, select SMS , type a message and click Send:
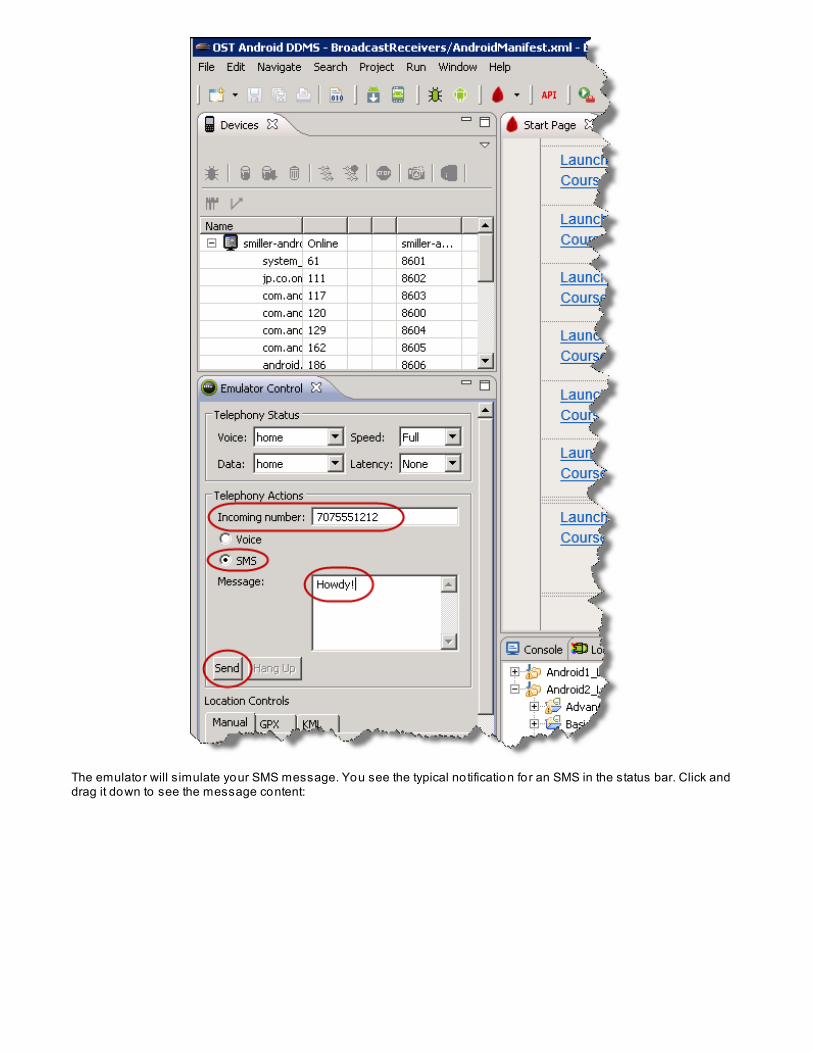
The emulator will simulate your SMS message. You see the typical notification for an SMS in the status bar. Click anddrag it down to see the message content:
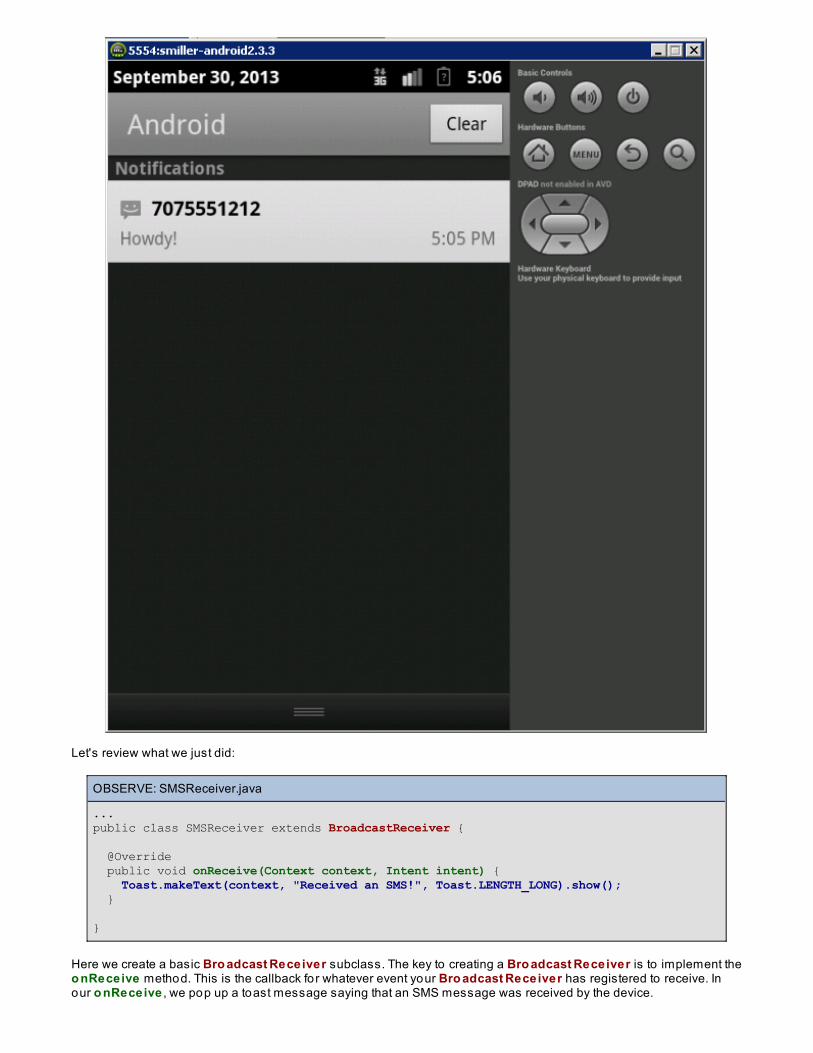
Let's review what we just did:
OBSERVE: SMSReceiver.java
...public class SMSReceiver extends BroadcastReceiver {
@Override public void onReceive(Context context, Intent intent) { Toast.makeText(context, "Received an SMS!", Toast.LENGTH_LONG).show(); }
}
Here we create a basic Bro adcast Receiver subclass. The key to creating a Bro adcast Receiver is to implement theo nReceive method. This is the callback for whatever event your Bro adcast Receiver has registered to receive. Inour o nReceive , we pop up a toast message saying that an SMS message was received by the device.

OBSERVE: Andro idManifest.xml
... <uses-permission android:name="android.permission.RECEIVE_SMS" />
<application android:allowBackup="true" android:icon="@drawable/ic_launcher" android:label="@string/app_name" android:theme="@style/AppTheme" >
<receiver android:name=".SMSReceiver" android:enabled="true" > <intent-filter android:priority="999" > <action android:name="android.provider.Telephony.SMS_RECEIVED" /> </intent-filter> </receiver> <!-- <activity android:name=".MainActivity" android:label="@string/app_name" > <intent-filter> <action android:name="android.intent.action.MAIN" />
<category android:name="android.intent.category.LAUNCHER" /> </intent-filter> </activity> --> </application>
</manifest>
The first addition to the Manifest is a t ag t o request permissio n t o act ually receive bro adcast s o f any SMSmessages.
We also co mment ed o ut t he MainAct ivit y; since we aren't actually do ing anything in the MainAct ivit y, weremoved it from the application. We need to register our Bro adcast Receiver with the system, so we added the<receiver> tag. The tag has two attributes: the name o f o ur Bro adcast Receiver class and an enabled value .The <receiver> tag also contains an <int ent -f ilt er> . By adding this <int ent -f ilt er> to the receiver registration, weset up the Bro adcast Receiver to receive Int ent s with a particular action. We add a filter fo r theandro id.pro vider.T elepho ny.SMS_RECEIVED action, which the system broadcasts whenever it receives a SMSmessage. Though it really doesn't matter in this application, we set a prio rit y o n t he int ent f ilt er just todemonstrate how it can be used with a broadcast receiver. By setting this value, you can enforce an order or apreference for the way broadcasts are received. For more information on optional attributes, see the documentation onthe receiver tag and the intent-filter tag.
By registering our broadcast receiver in the manifest, we allow the system to contro l its lifecycle. We do not have toenable or disable the broadcast receiver explicitly fo r it to be able to receive intents. The Andro id OS will take care o frunning its code in our application's process.
The OS cannot guarantee the validity o f our Bro adcast Receiver instance outside o f the o nReceive method. Whilethe system will treat the process running the Bro adcast Receiver.o nReceive code as a foreground process for theduration, if there are no o ther application components running after o nReceive finishes execution, the process will beconsidered empty and subsequently removed to free up resources. That's why the Andro id Documentation on theBroadcastReceiver lifecycle warns against starting any asynchronous operations from o nReceive—theBro adcast Receiver may no longer be valid when those operations return.
Now we have an application that uses a Bro adcast Receiver to listen for and respond to a system event. There areseveral o ther system events that you can leverage in this way, including when device boot completes or a package isinstalled or changes. In the next section, we'll switch gears and use Bro adcast Receivers with our own applicationservices.
Creating a BroadcastReceiver for Service EventsLet's get started with Bro adcast Receivers and Services. Suppose we want to make an application that listens forand displays news headlines as they come. We want to focus on the Bro adcast Receiver side o f things, so we'll just

create a dummy service for the headlines. Create a new class named HeadlineService that extendsandro id.app.Service and make these changes:
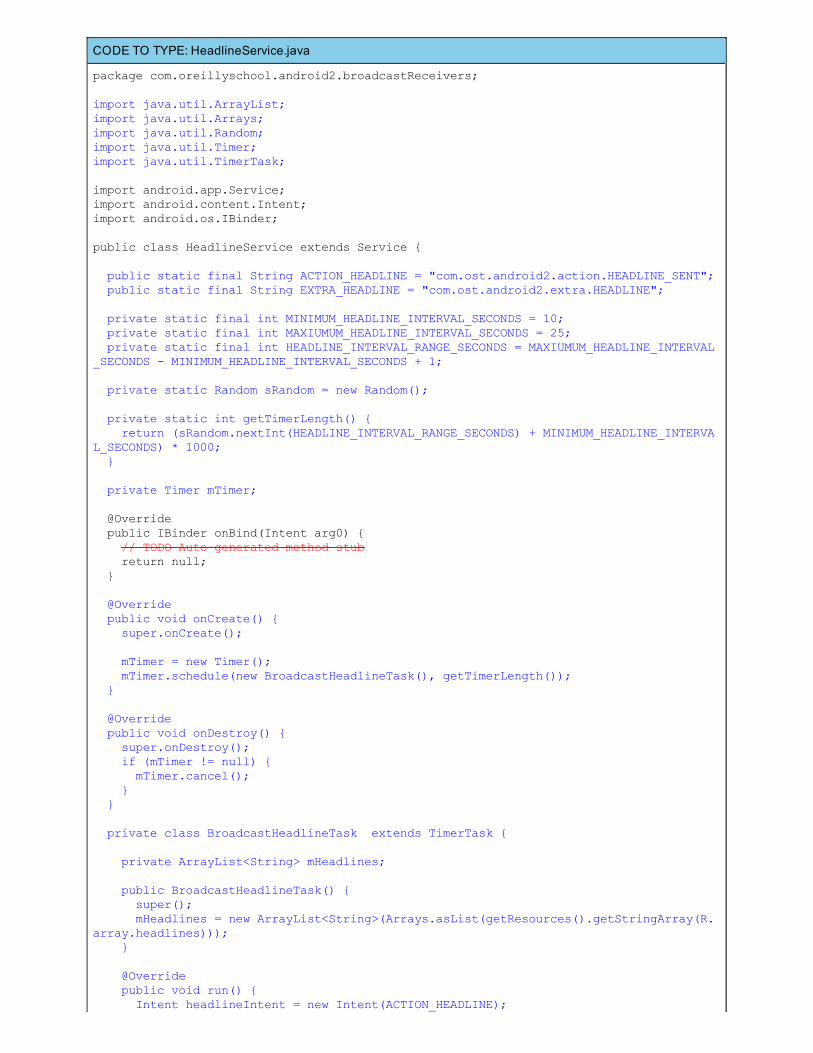
CODE TO TYPE: HeadlineService.java
package com.oreillyschool.android2.broadcastReceivers;
import java.util.ArrayList;import java.util.Arrays;import java.util.Random;import java.util.Timer;import java.util.TimerTask;
import android.app.Service;import android.content.Intent;import android.os.IBinder;
public class HeadlineService extends Service { public static final String ACTION_HEADLINE = "com.ost.android2.action.HEADLINE_SENT"; public static final String EXTRA_HEADLINE = "com.ost.android2.extra.HEADLINE"; private static final int MINIMUM_HEADLINE_INTERVAL_SECONDS = 10; private static final int MAXIUMUM_HEADLINE_INTERVAL_SECONDS = 25; private static final int HEADLINE_INTERVAL_RANGE_SECONDS = MAXIUMUM_HEADLINE_INTERVAL_SECONDS - MINIMUM_HEADLINE_INTERVAL_SECONDS + 1; private static Random sRandom = new Random(); private static int getTimerLength() { return (sRandom.nextInt(HEADLINE_INTERVAL_RANGE_SECONDS) + MINIMUM_HEADLINE_INTERVAL_SECONDS) * 1000; } private Timer mTimer;
@Override public IBinder onBind(Intent arg0) { // TODO Auto-generated method stub return null; }
@Override public void onCreate() { super.onCreate(); mTimer = new Timer(); mTimer.schedule(new BroadcastHeadlineTask(), getTimerLength()); } @Override public void onDestroy() { super.onDestroy(); if (mTimer != null) { mTimer.cancel(); } }
private class BroadcastHeadlineTask extends TimerTask { private ArrayList<String> mHeadlines;
public BroadcastHeadlineTask() { super(); mHeadlines = new ArrayList<String>(Arrays.asList(getResources().getStringArray(R.array.headlines))); }
@Override public void run() { Intent headlineIntent = new Intent(ACTION_HEADLINE);
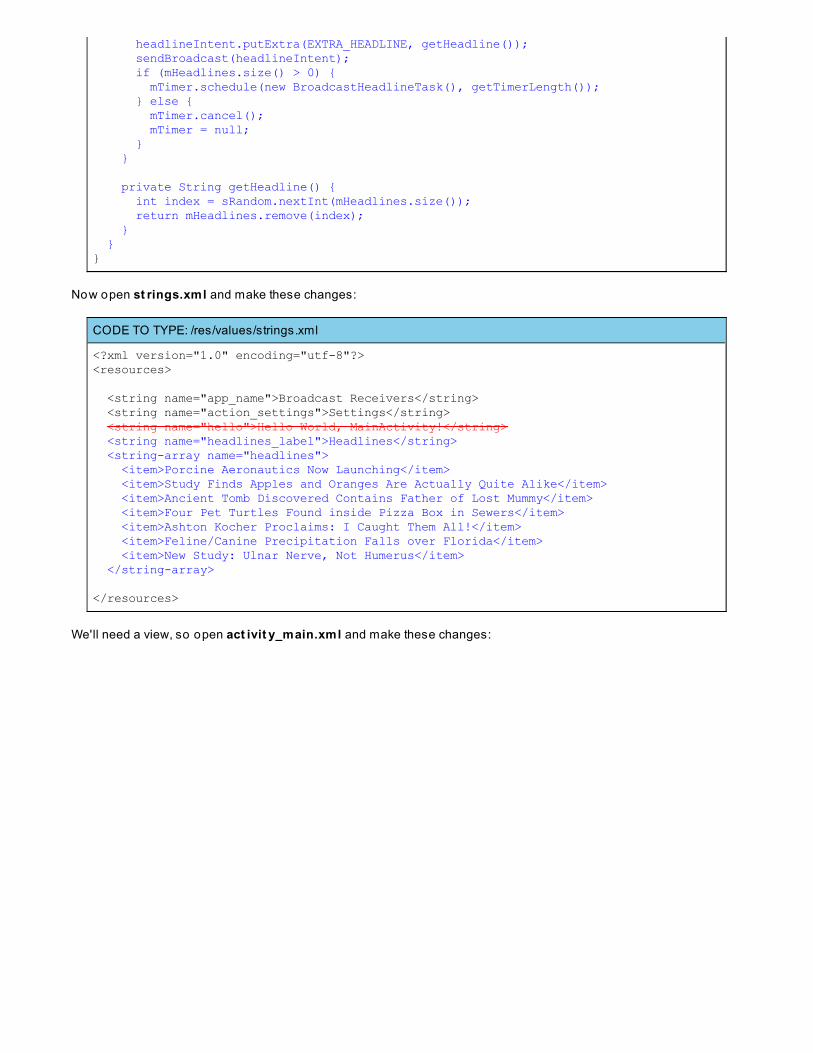
headlineIntent.putExtra(EXTRA_HEADLINE, getHeadline()); sendBroadcast(headlineIntent); if (mHeadlines.size() > 0) { mTimer.schedule(new BroadcastHeadlineTask(), getTimerLength()); } else { mTimer.cancel(); mTimer = null; } } private String getHeadline() { int index = sRandom.nextInt(mHeadlines.size()); return mHeadlines.remove(index); } }}
Now open st rings.xml and make these changes:
CODE TO TYPE: /res/values/strings.xml
<?xml version="1.0" encoding="utf-8"?><resources>
<string name="app_name">Broadcast Receivers</string> <string name="action_settings">Settings</string> <string name="hello">Hello World, MainActivity!</string> <string name="headlines_label">Headlines</string> <string-array name="headlines"> <item>Porcine Aeronautics Now Launching</item> <item>Study Finds Apples and Oranges Are Actually Quite Alike</item> <item>Ancient Tomb Discovered Contains Father of Lost Mummy</item> <item>Four Pet Turtles Found inside Pizza Box in Sewers</item> <item>Ashton Kocher Proclaims: I Caught Them All!</item> <item>Feline/Canine Precipitation Falls over Florida</item> <item>New Study: Ulnar Nerve, Not Humerus</item> </string-array>
</resources>
We'll need a view, so open act ivit y_main.xml and make these changes:
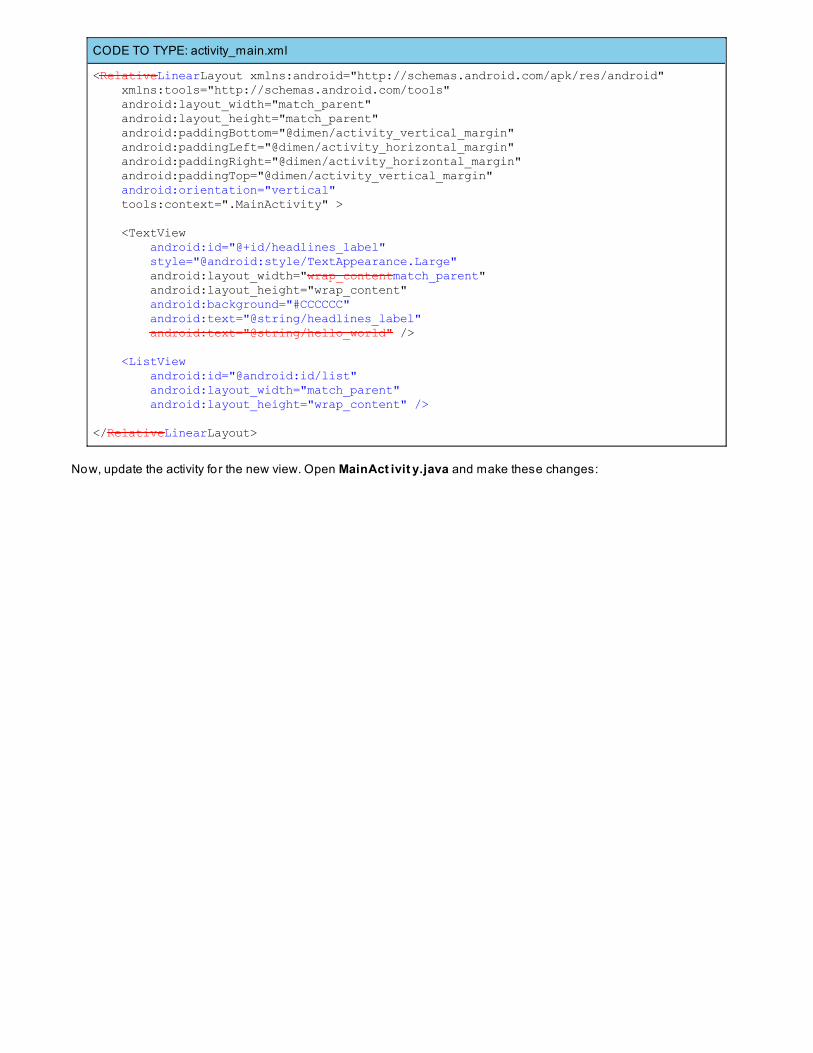
CODE TO TYPE: activity_main.xml
<RelativeLinearLayout xmlns:android="http://schemas.android.com/apk/res/android" xmlns:tools="http://schemas.android.com/tools" android:layout_width="match_parent" android:layout_height="match_parent" android:paddingBottom="@dimen/activity_vertical_margin" android:paddingLeft="@dimen/activity_horizontal_margin" android:paddingRight="@dimen/activity_horizontal_margin" android:paddingTop="@dimen/activity_vertical_margin" android:orientation="vertical" tools:context=".MainActivity" > <TextView android:id="@+id/headlines_label" style="@android:style/TextAppearance.Large" android:layout_width="wrap_contentmatch_parent" android:layout_height="wrap_content" android:background="#CCCCCC" android:text="@string/headlines_label" android:text="@string/hello_world" /> <ListView android:id="@android:id/list" android:layout_width="match_parent" android:layout_height="wrap_content" />
</RelativeLinearLayout>
Now, update the activity fo r the new view. Open MainAct ivit y.java and make these changes:
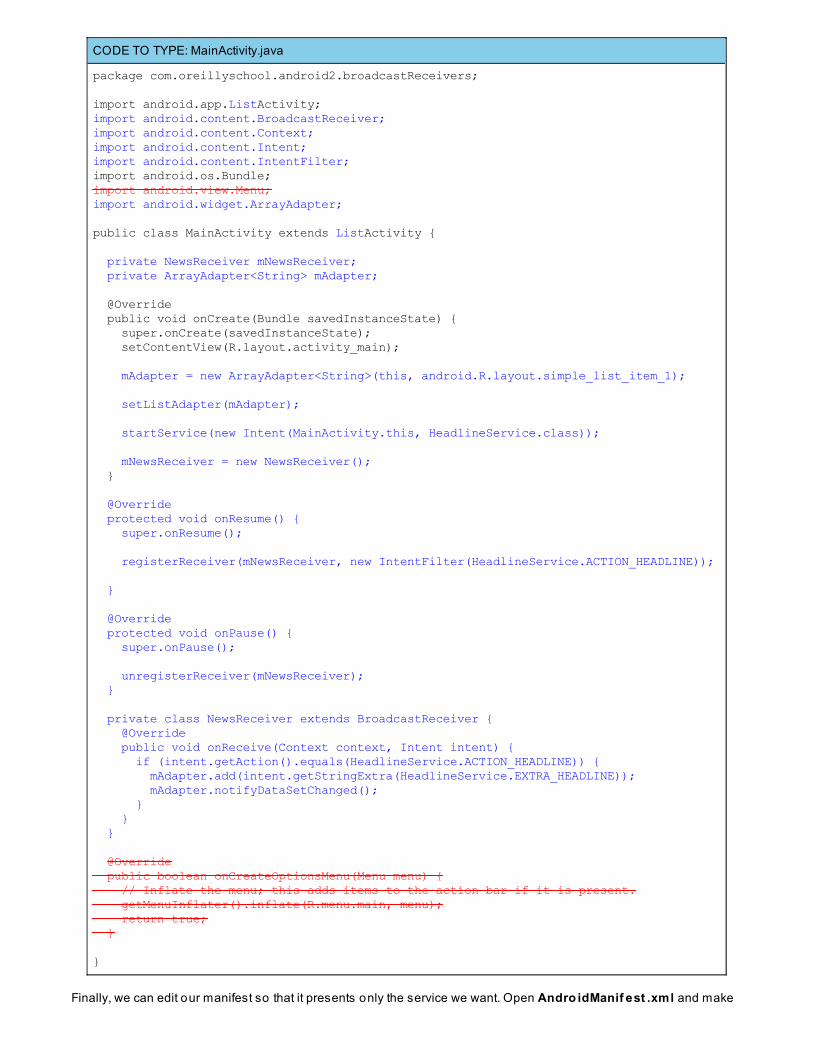
CODE TO TYPE: MainActivity.java
package com.oreillyschool.android2.broadcastReceivers;
import android.app.ListActivity;import android.content.BroadcastReceiver;import android.content.Context;import android.content.Intent;import android.content.IntentFilter;import android.os.Bundle;import android.view.Menu;import android.widget.ArrayAdapter;
public class MainActivity extends ListActivity {
private NewsReceiver mNewsReceiver; private ArrayAdapter<String> mAdapter;
@Override public void onCreate(Bundle savedInstanceState) { super.onCreate(savedInstanceState); setContentView(R.layout.activity_main);
mAdapter = new ArrayAdapter<String>(this, android.R.layout.simple_list_item_1); setListAdapter(mAdapter);
startService(new Intent(MainActivity.this, HeadlineService.class));
mNewsReceiver = new NewsReceiver(); }
@Override protected void onResume() { super.onResume();
registerReceiver(mNewsReceiver, new IntentFilter(HeadlineService.ACTION_HEADLINE));
}
@Override protected void onPause() { super.onPause();
unregisterReceiver(mNewsReceiver); }
private class NewsReceiver extends BroadcastReceiver { @Override public void onReceive(Context context, Intent intent) { if (intent.getAction().equals(HeadlineService.ACTION_HEADLINE)) { mAdapter.add(intent.getStringExtra(HeadlineService.EXTRA_HEADLINE)); mAdapter.notifyDataSetChanged(); } } } @Override public boolean onCreateOptionsMenu(Menu menu) { // Inflate the menu; this adds items to the action bar if it is present. getMenuInflater().inflate(R.menu.main, menu); return true; }
}
Finally, we can edit our manifest so that it presents only the service we want. Open Andro idManif est .xml and make
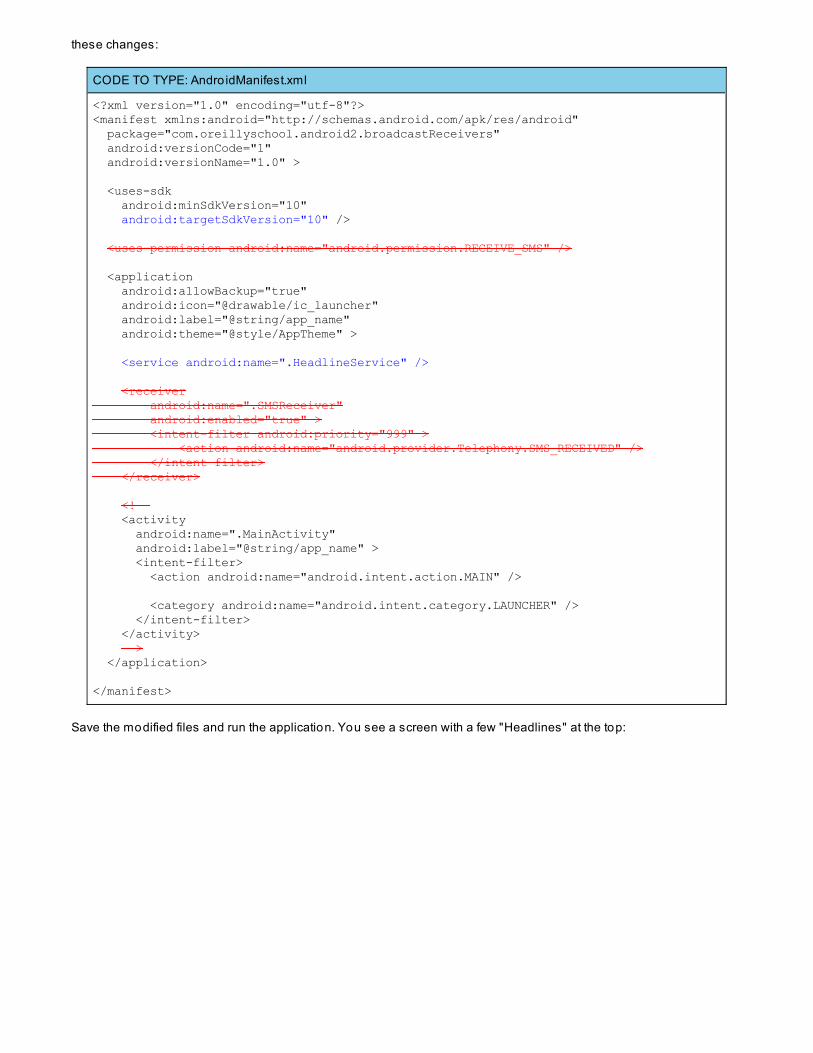
these changes:
CODE TO TYPE: Andro idManifest.xml
<?xml version="1.0" encoding="utf-8"?><manifest xmlns:android="http://schemas.android.com/apk/res/android" package="com.oreillyschool.android2.broadcastReceivers" android:versionCode="1" android:versionName="1.0" >
<uses-sdk android:minSdkVersion="10" android:targetSdkVersion="10" />
<uses-permission android:name="android.permission.RECEIVE_SMS" />
<application android:allowBackup="true" android:icon="@drawable/ic_launcher" android:label="@string/app_name" android:theme="@style/AppTheme" >
<service android:name=".HeadlineService" />
<receiver android:name=".SMSReceiver" android:enabled="true" > <intent-filter android:priority="999" > <action android:name="android.provider.Telephony.SMS_RECEIVED" /> </intent-filter> </receiver>
<!-- <activity android:name=".MainActivity" android:label="@string/app_name" > <intent-filter> <action android:name="android.intent.action.MAIN" />
<category android:name="android.intent.category.LAUNCHER" /> </intent-filter> </activity> --> </application>
</manifest>
Save the modified files and run the application. You see a screen with a few "Headlines" at the top:
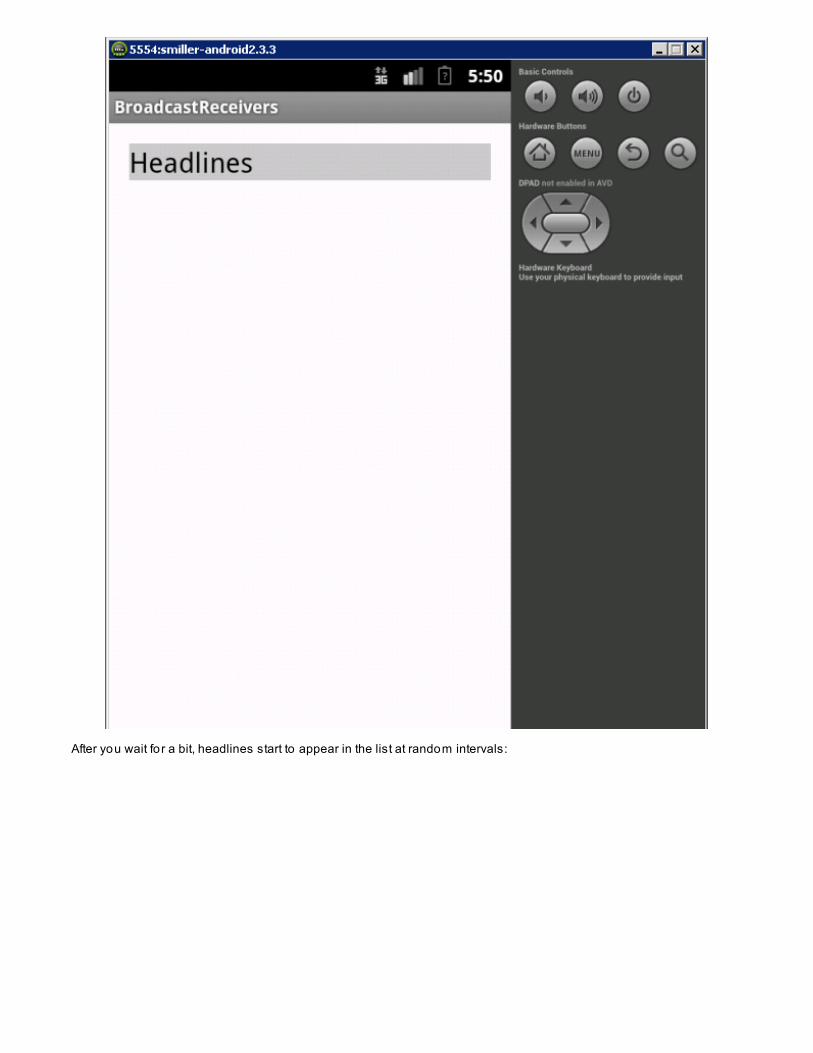
After you wait fo r a bit, headlines start to appear in the list at random intervals:

Here we start a dummy headline service that broadcasts headlines via Int ent s In our main activity, we use aBro adcast Receiver to receive these broadcasts and display them to the user. Let's take a closer look at how weaccomplished that:
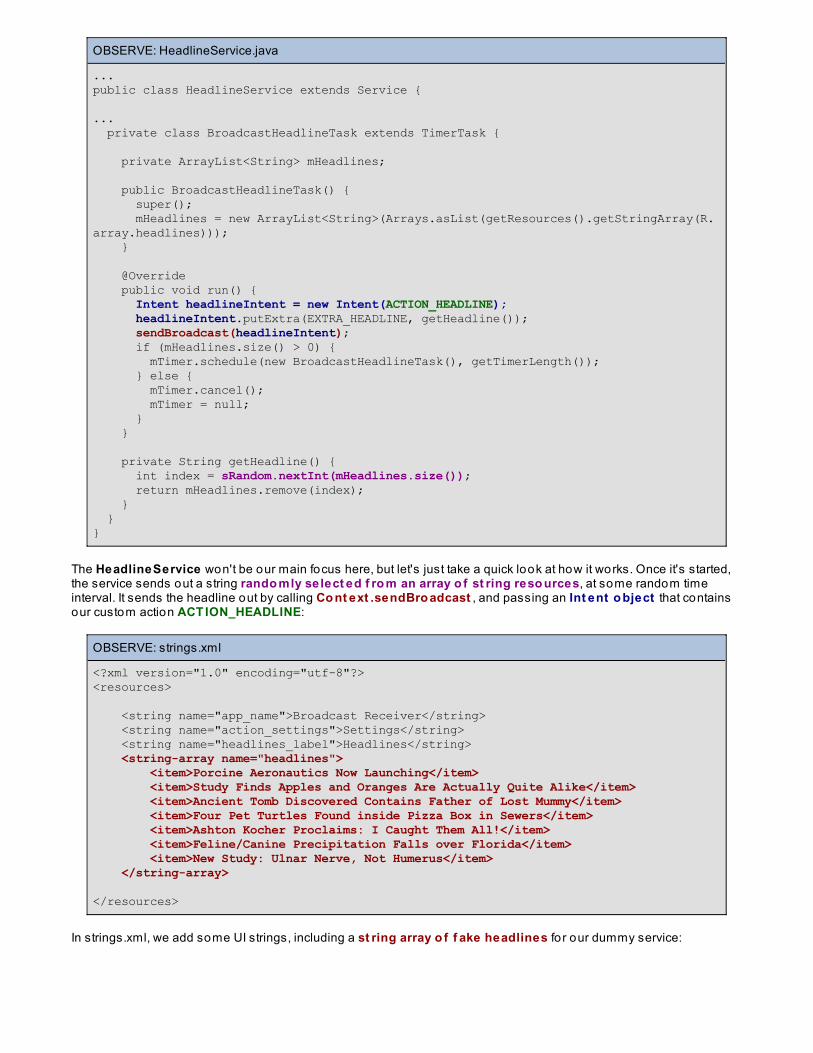
OBSERVE: HeadlineService.java
...public class HeadlineService extends Service { ... private class BroadcastHeadlineTask extends TimerTask { private ArrayList<String> mHeadlines;
public BroadcastHeadlineTask() { super(); mHeadlines = new ArrayList<String>(Arrays.asList(getResources().getStringArray(R.array.headlines))); }
@Override public void run() { Intent headlineIntent = new Intent(ACTION_HEADLINE); headlineIntent.putExtra(EXTRA_HEADLINE, getHeadline()); sendBroadcast(headlineIntent); if (mHeadlines.size() > 0) { mTimer.schedule(new BroadcastHeadlineTask(), getTimerLength()); } else { mTimer.cancel(); mTimer = null; } } private String getHeadline() { int index = sRandom.nextInt(mHeadlines.size()); return mHeadlines.remove(index); } }}
The HeadlineService won't be our main focus here, but let's just take a quick look at how it works. Once it's started,the service sends out a string rando mly select ed f ro m an array o f st ring reso urces, at some random timeinterval. It sends the headline out by calling Co nt ext .sendBro adcast , and passing an Int ent o bject that containsour custom action ACT ION_HEADLINE:
OBSERVE: strings.xml
<?xml version="1.0" encoding="utf-8"?><resources>
<string name="app_name">Broadcast Receiver</string> <string name="action_settings">Settings</string> <string name="headlines_label">Headlines</string> <string-array name="headlines"> <item>Porcine Aeronautics Now Launching</item> <item>Study Finds Apples and Oranges Are Actually Quite Alike</item> <item>Ancient Tomb Discovered Contains Father of Lost Mummy</item> <item>Four Pet Turtles Found inside Pizza Box in Sewers</item> <item>Ashton Kocher Proclaims: I Caught Them All!</item> <item>Feline/Canine Precipitation Falls over Florida</item> <item>New Study: Ulnar Nerve, Not Humerus</item> </string-array>
</resources>
In strings.xml, we add some UI strings, including a st ring array o f f ake headlines fo r our dummy service:
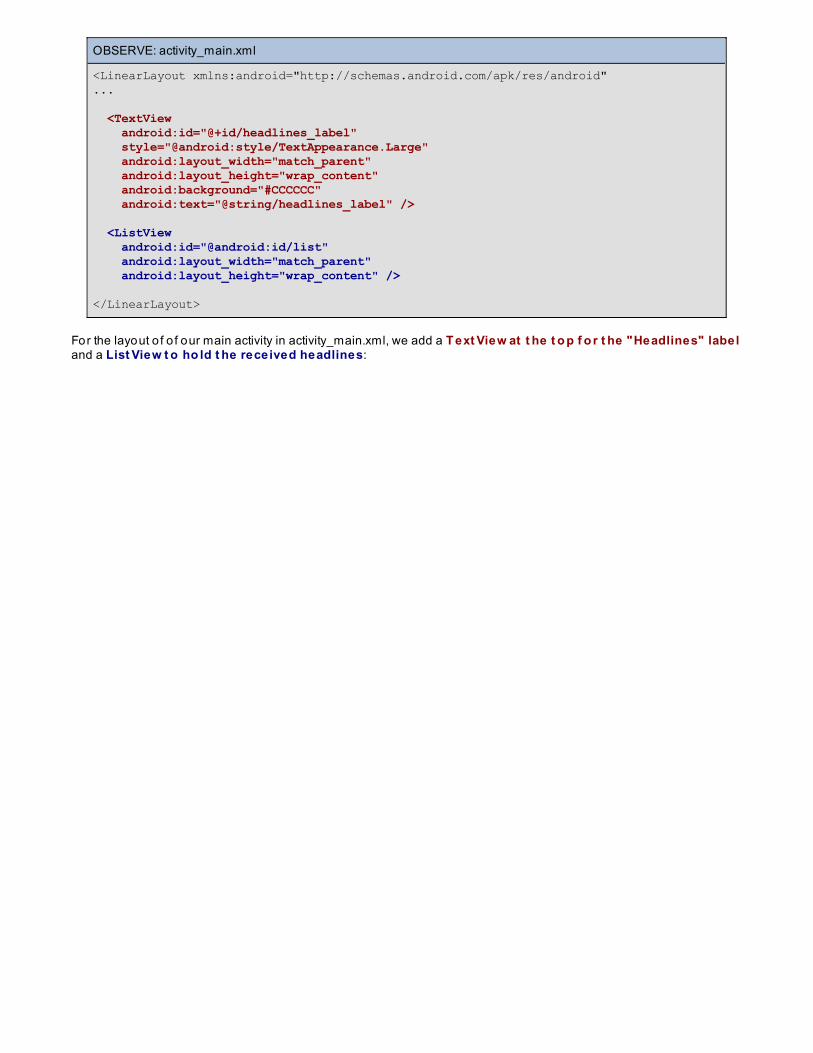
OBSERVE: activity_main.xml
<LinearLayout xmlns:android="http://schemas.android.com/apk/res/android"...
<TextView android:id="@+id/headlines_label" style="@android:style/TextAppearance.Large" android:layout_width="match_parent" android:layout_height="wrap_content" android:background="#CCCCCC" android:text="@string/headlines_label" />
<ListView android:id="@android:id/list" android:layout_width="match_parent" android:layout_height="wrap_content" />
</LinearLayout>
For the layout o f o f our main activity in activity_main.xml, we add a T ext View at t he t o p f o r t he "Headlines" labeland a List View t o ho ld t he received headlines:
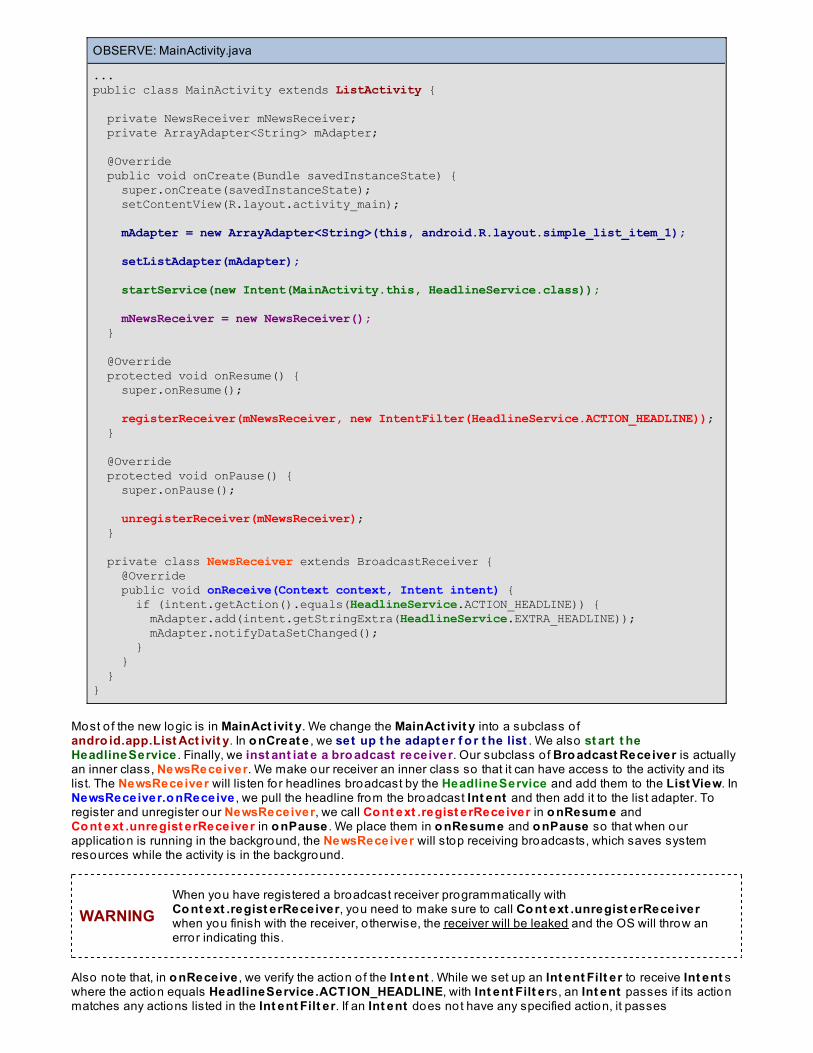
OBSERVE: MainActivity.java
...public class MainActivity extends ListActivity {
private NewsReceiver mNewsReceiver; private ArrayAdapter<String> mAdapter;
@Override public void onCreate(Bundle savedInstanceState) { super.onCreate(savedInstanceState); setContentView(R.layout.activity_main);
mAdapter = new ArrayAdapter<String>(this, android.R.layout.simple_list_item_1); setListAdapter(mAdapter);
startService(new Intent(MainActivity.this, HeadlineService.class));
mNewsReceiver = new NewsReceiver(); }
@Override protected void onResume() { super.onResume();
registerReceiver(mNewsReceiver, new IntentFilter(HeadlineService.ACTION_HEADLINE)); }
@Override protected void onPause() { super.onPause();
unregisterReceiver(mNewsReceiver); }
private class NewsReceiver extends BroadcastReceiver { @Override public void onReceive(Context context, Intent intent) { if (intent.getAction().equals(HeadlineService.ACTION_HEADLINE)) { mAdapter.add(intent.getStringExtra(HeadlineService.EXTRA_HEADLINE)); mAdapter.notifyDataSetChanged(); } } }}
Most o f the new logic is in MainAct ivit y. We change the MainAct ivit y into a subclass o fandro id.app.List Act ivit y. In o nCreat e , we set up t he adapt er f o r t he list . We also st art t heHeadlineService . Finally, we inst ant iat e a bro adcast receiver. Our subclass o f Bro adcast Receiver is actuallyan inner class, NewsReceiver. We make our receiver an inner class so that it can have access to the activity and itslist. The NewsReceiver will listen for headlines broadcast by the HeadlineService and add them to the List View. InNewsReceiver.o nReceive , we pull the headline from the broadcast Int ent and then add it to the list adapter. Toregister and unregister our NewsReceiver, we call Co nt ext .regist erReceiver in o nResume andCo nt ext .unregist erReceiver in o nPause . We place them in o nResume and o nPause so that when ourapplication is running in the background, the NewsReceiver will stop receiving broadcasts, which saves systemresources while the activity is in the background.
WARNINGWhen you have registered a broadcast receiver programmatically withCo nt ext .regist erReceiver, you need to make sure to call Co nt ext .unregist erReceiverwhen you finish with the receiver, o therwise, the receiver will be leaked and the OS will throw anerror indicating this.
Also note that, in o nReceive , we verify the action o f the Int ent . While we set up an Int ent Filt er to receive Int ent swhere the action equals HeadlineService.ACT ION_HEADLINE, with Int ent Filt ers, an Int ent passes if its actionmatches any actions listed in the Int ent Filt er. If an Int ent does not have any specified action, it passes
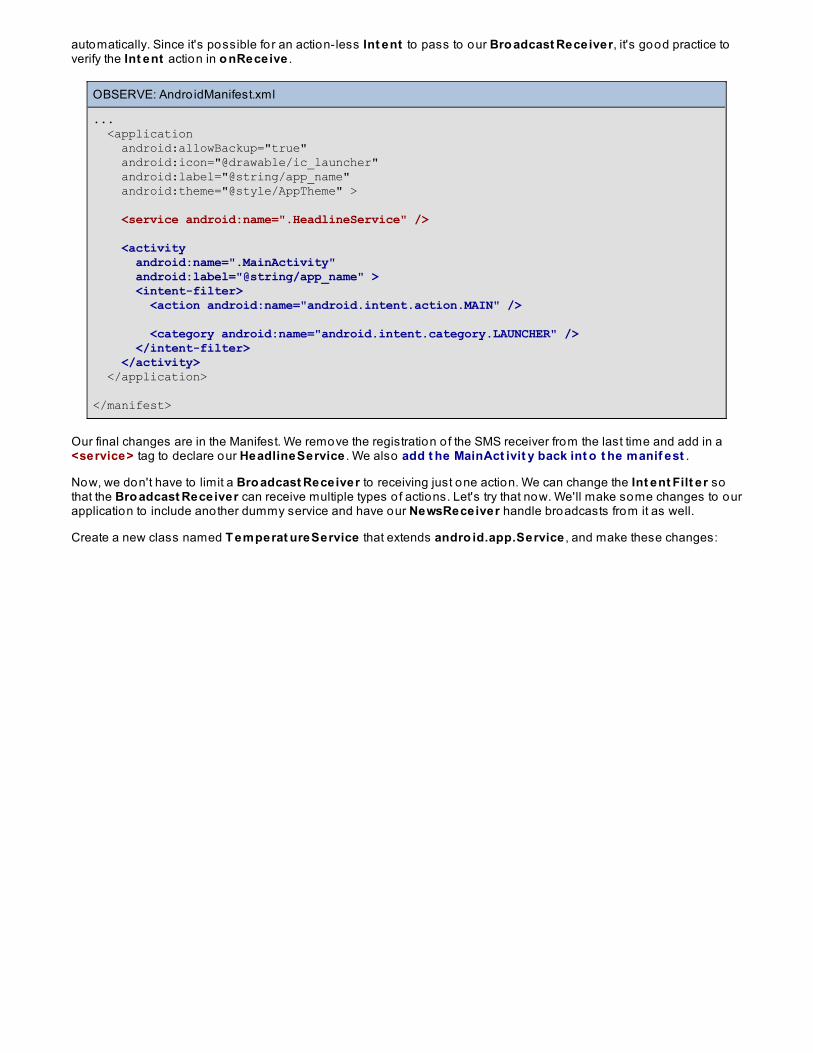
automatically. Since it's possible for an action-less Int ent to pass to our Bro adcast Receiver, it's good practice toverify the Int ent action in o nReceive .
OBSERVE: Andro idManifest.xml
... <application android:allowBackup="true" android:icon="@drawable/ic_launcher" android:label="@string/app_name" android:theme="@style/AppTheme" >
<service android:name=".HeadlineService" />
<activity android:name=".MainActivity" android:label="@string/app_name" > <intent-filter> <action android:name="android.intent.action.MAIN" />
<category android:name="android.intent.category.LAUNCHER" /> </intent-filter> </activity> </application>
</manifest>
Our final changes are in the Manifest. We remove the registration o f the SMS receiver from the last time and add in a<service> tag to declare our HeadlineService . We also add t he MainAct ivit y back int o t he manif est .
Now, we don't have to limit a Bro adcast Receiver to receiving just one action. We can change the Int ent Filt er sothat the Bro adcast Receiver can receive multiple types o f actions. Let's try that now. We'll make some changes to ourapplication to include another dummy service and have our NewsReceiver handle broadcasts from it as well.
Create a new class named T emperat ureService that extends andro id.app.Service , and make these changes:
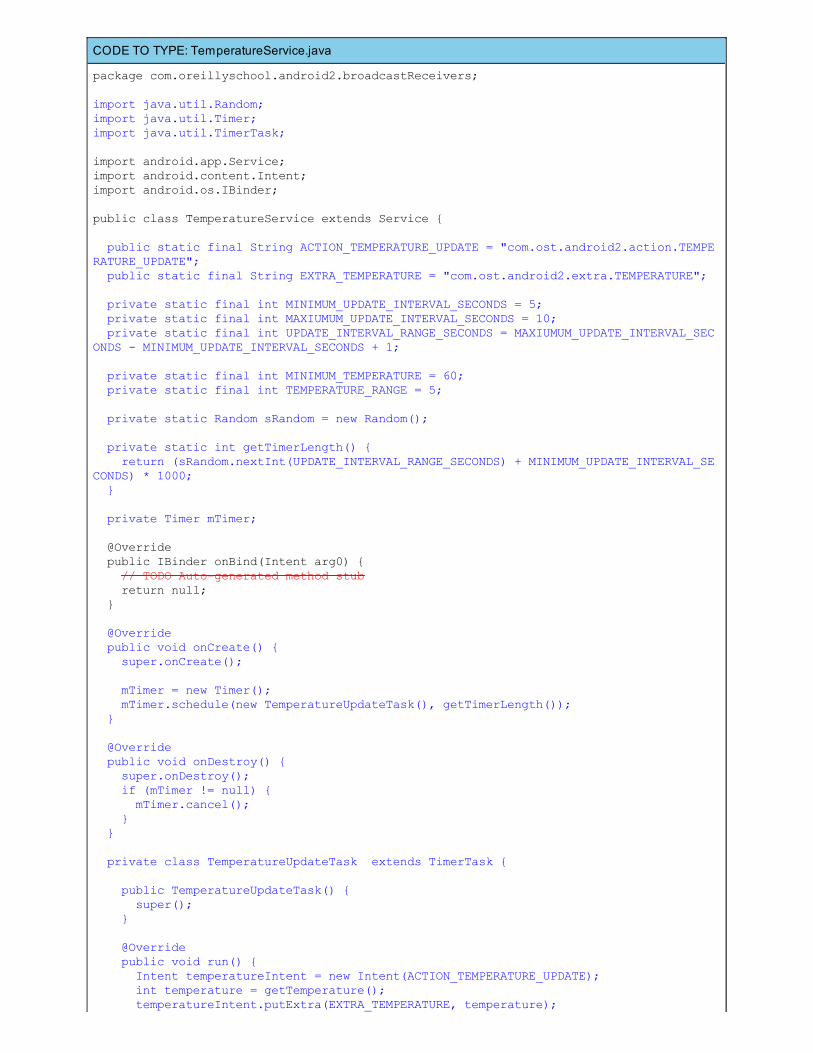
CODE TO TYPE: TemperatureService.java
package com.oreillyschool.android2.broadcastReceivers;
import java.util.Random;import java.util.Timer;import java.util.TimerTask;
import android.app.Service;import android.content.Intent;import android.os.IBinder;
public class TemperatureService extends Service { public static final String ACTION_TEMPERATURE_UPDATE = "com.ost.android2.action.TEMPERATURE_UPDATE"; public static final String EXTRA_TEMPERATURE = "com.ost.android2.extra.TEMPERATURE"; private static final int MINIMUM_UPDATE_INTERVAL_SECONDS = 5; private static final int MAXIUMUM_UPDATE_INTERVAL_SECONDS = 10; private static final int UPDATE_INTERVAL_RANGE_SECONDS = MAXIUMUM_UPDATE_INTERVAL_SECONDS - MINIMUM_UPDATE_INTERVAL_SECONDS + 1; private static final int MINIMUM_TEMPERATURE = 60; private static final int TEMPERATURE_RANGE = 5; private static Random sRandom = new Random(); private static int getTimerLength() { return (sRandom.nextInt(UPDATE_INTERVAL_RANGE_SECONDS) + MINIMUM_UPDATE_INTERVAL_SECONDS) * 1000; } private Timer mTimer;
@Override public IBinder onBind(Intent arg0) { // TODO Auto-generated method stub return null; }
@Override public void onCreate() { super.onCreate(); mTimer = new Timer(); mTimer.schedule(new TemperatureUpdateTask(), getTimerLength()); } @Override public void onDestroy() { super.onDestroy(); if (mTimer != null) { mTimer.cancel(); } }
private class TemperatureUpdateTask extends TimerTask { public TemperatureUpdateTask() { super(); }
@Override public void run() { Intent temperatureIntent = new Intent(ACTION_TEMPERATURE_UPDATE); int temperature = getTemperature(); temperatureIntent.putExtra(EXTRA_TEMPERATURE, temperature);
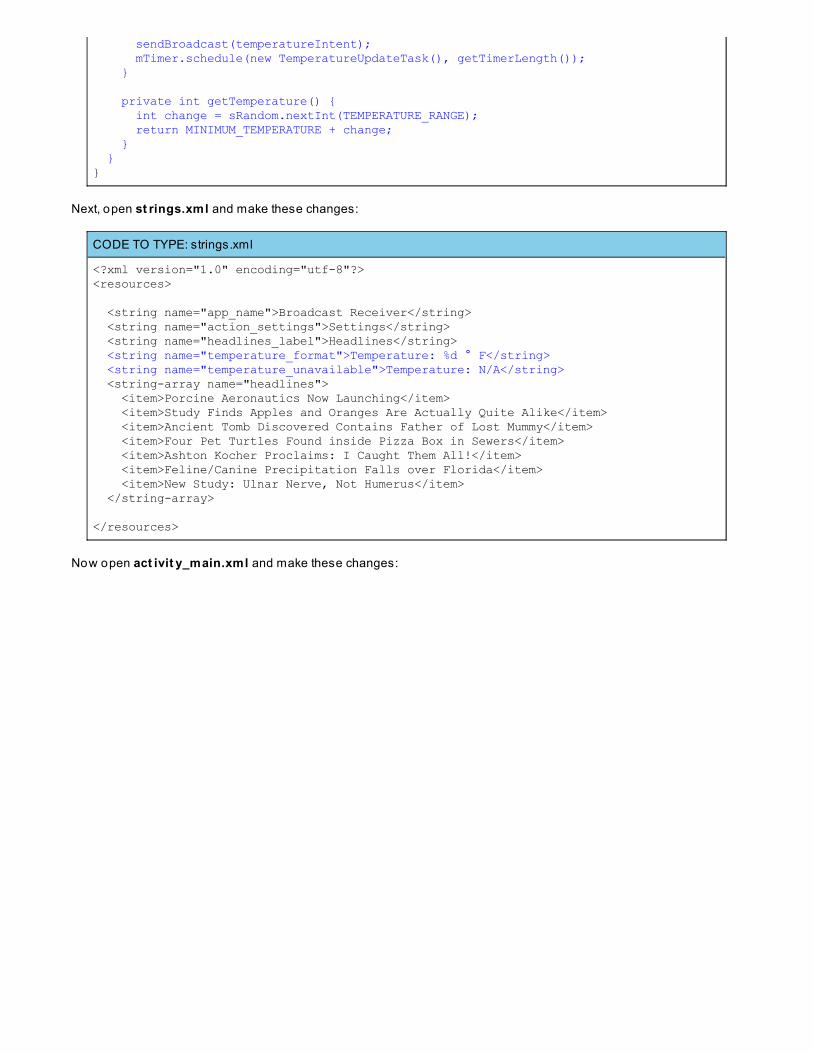
sendBroadcast(temperatureIntent); mTimer.schedule(new TemperatureUpdateTask(), getTimerLength()); } private int getTemperature() { int change = sRandom.nextInt(TEMPERATURE_RANGE); return MINIMUM_TEMPERATURE + change; } }}
Next, open st rings.xml and make these changes:
CODE TO TYPE: strings.xml
<?xml version="1.0" encoding="utf-8"?><resources>
<string name="app_name">Broadcast Receiver</string> <string name="action_settings">Settings</string> <string name="headlines_label">Headlines</string> <string name="temperature_format">Temperature: %d ° F</string> <string name="temperature_unavailable">Temperature: N/A</string> <string-array name="headlines"> <item>Porcine Aeronautics Now Launching</item> <item>Study Finds Apples and Oranges Are Actually Quite Alike</item> <item>Ancient Tomb Discovered Contains Father of Lost Mummy</item> <item>Four Pet Turtles Found inside Pizza Box in Sewers</item> <item>Ashton Kocher Proclaims: I Caught Them All!</item> <item>Feline/Canine Precipitation Falls over Florida</item> <item>New Study: Ulnar Nerve, Not Humerus</item> </string-array>
</resources>
Now open act ivit y_main.xml and make these changes:
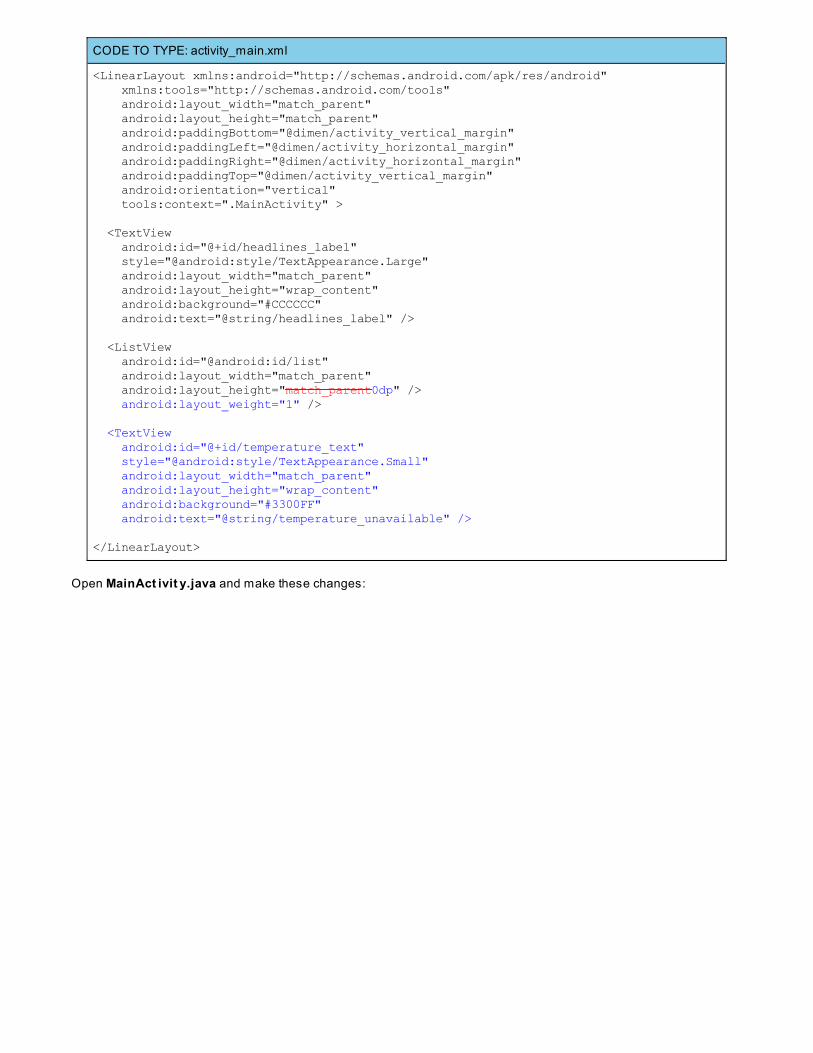
CODE TO TYPE: activity_main.xml
<LinearLayout xmlns:android="http://schemas.android.com/apk/res/android" xmlns:tools="http://schemas.android.com/tools" android:layout_width="match_parent" android:layout_height="match_parent" android:paddingBottom="@dimen/activity_vertical_margin" android:paddingLeft="@dimen/activity_horizontal_margin" android:paddingRight="@dimen/activity_horizontal_margin" android:paddingTop="@dimen/activity_vertical_margin" android:orientation="vertical" tools:context=".MainActivity" >
<TextView android:id="@+id/headlines_label" style="@android:style/TextAppearance.Large" android:layout_width="match_parent" android:layout_height="wrap_content" android:background="#CCCCCC" android:text="@string/headlines_label" />
<ListView android:id="@android:id/list" android:layout_width="match_parent" android:layout_height="match_parent0dp" /> android:layout_weight="1" />
<TextView android:id="@+id/temperature_text" style="@android:style/TextAppearance.Small" android:layout_width="match_parent" android:layout_height="wrap_content" android:background="#3300FF" android:text="@string/temperature_unavailable" />
</LinearLayout>
Open MainAct ivit y.java and make these changes:
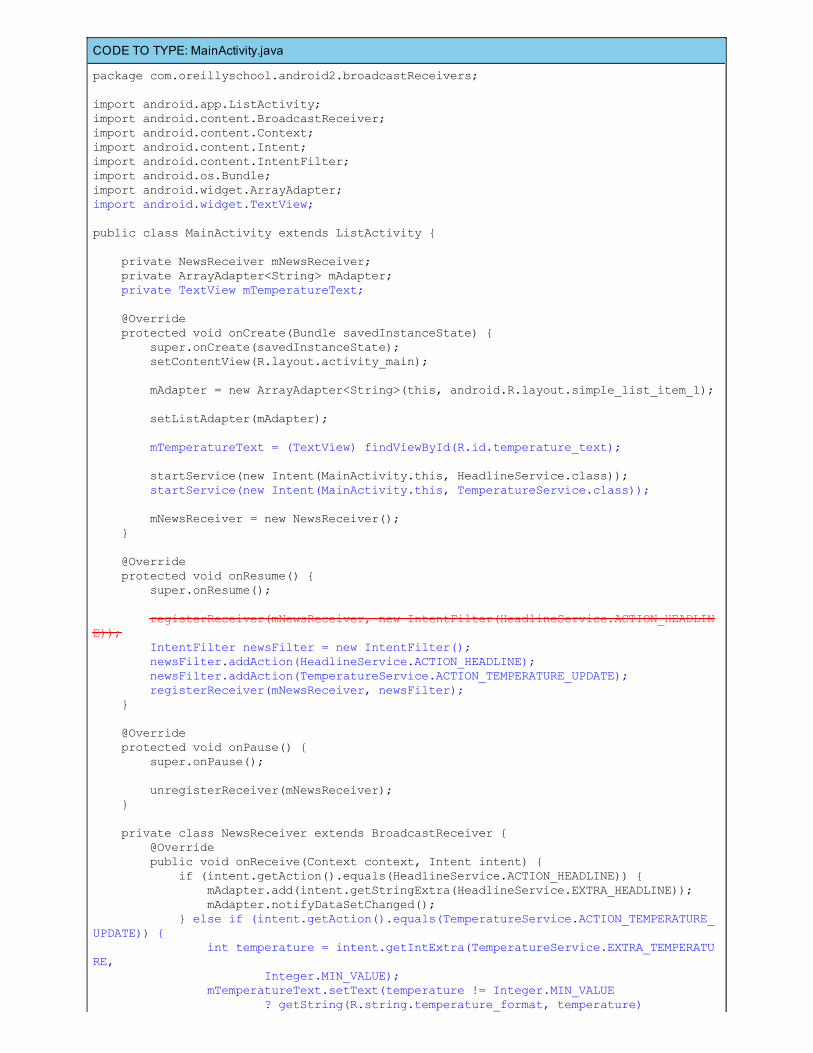
CODE TO TYPE: MainActivity.java
package com.oreillyschool.android2.broadcastReceivers;
import android.app.ListActivity;import android.content.BroadcastReceiver;import android.content.Context;import android.content.Intent;import android.content.IntentFilter;import android.os.Bundle;import android.widget.ArrayAdapter;import android.widget.TextView;
public class MainActivity extends ListActivity {
private NewsReceiver mNewsReceiver; private ArrayAdapter<String> mAdapter; private TextView mTemperatureText;
@Override protected void onCreate(Bundle savedInstanceState) { super.onCreate(savedInstanceState); setContentView(R.layout.activity_main);
mAdapter = new ArrayAdapter<String>(this, android.R.layout.simple_list_item_1);
setListAdapter(mAdapter);
mTemperatureText = (TextView) findViewById(R.id.temperature_text);
startService(new Intent(MainActivity.this, HeadlineService.class)); startService(new Intent(MainActivity.this, TemperatureService.class));
mNewsReceiver = new NewsReceiver(); }
@Override protected void onResume() { super.onResume();
registerReceiver(mNewsReceiver, new IntentFilter(HeadlineService.ACTION_HEADLINE)); IntentFilter newsFilter = new IntentFilter(); newsFilter.addAction(HeadlineService.ACTION_HEADLINE); newsFilter.addAction(TemperatureService.ACTION_TEMPERATURE_UPDATE); registerReceiver(mNewsReceiver, newsFilter); }
@Override protected void onPause() { super.onPause();
unregisterReceiver(mNewsReceiver); }
private class NewsReceiver extends BroadcastReceiver { @Override public void onReceive(Context context, Intent intent) { if (intent.getAction().equals(HeadlineService.ACTION_HEADLINE)) { mAdapter.add(intent.getStringExtra(HeadlineService.EXTRA_HEADLINE)); mAdapter.notifyDataSetChanged(); } else if (intent.getAction().equals(TemperatureService.ACTION_TEMPERATURE_UPDATE)) { int temperature = intent.getIntExtra(TemperatureService.EXTRA_TEMPERATURE, Integer.MIN_VALUE); mTemperatureText.setText(temperature != Integer.MIN_VALUE ? getString(R.string.temperature_format, temperature)
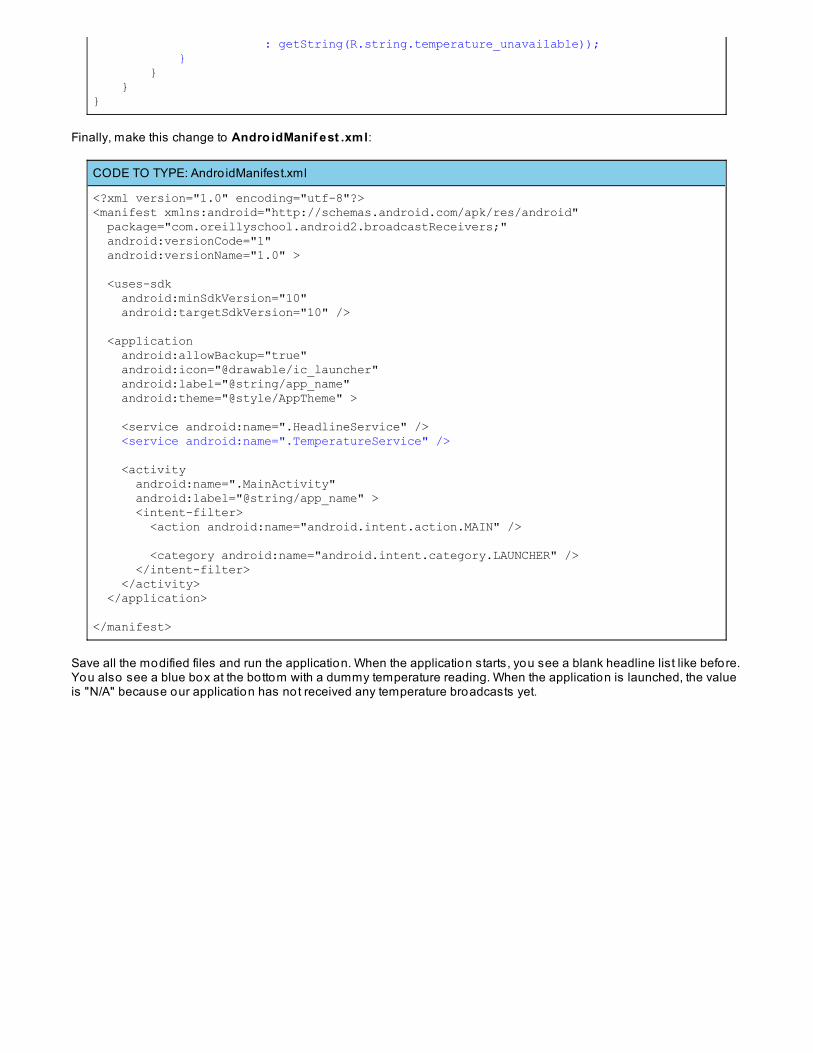
: getString(R.string.temperature_unavailable)); } } }}
Finally, make this change to Andro idManif est .xml:
CODE TO TYPE: Andro idManifest.xml
<?xml version="1.0" encoding="utf-8"?><manifest xmlns:android="http://schemas.android.com/apk/res/android" package="com.oreillyschool.android2.broadcastReceivers;" android:versionCode="1" android:versionName="1.0" >
<uses-sdk android:minSdkVersion="10" android:targetSdkVersion="10" />
<application android:allowBackup="true" android:icon="@drawable/ic_launcher" android:label="@string/app_name" android:theme="@style/AppTheme" >
<service android:name=".HeadlineService" /> <service android:name=".TemperatureService" />
<activity android:name=".MainActivity" android:label="@string/app_name" > <intent-filter> <action android:name="android.intent.action.MAIN" />
<category android:name="android.intent.category.LAUNCHER" /> </intent-filter> </activity> </application>
</manifest>
Save all the modified files and run the application. When the application starts, you see a blank headline list like before.You also see a blue box at the bottom with a dummy temperature reading. When the application is launched, the valueis "N/A" because our application has not received any temperature broadcasts yet.

After a while, the headlines populate like they did before. Eventually the temperature will get a valid value and theoccasional update will take place:
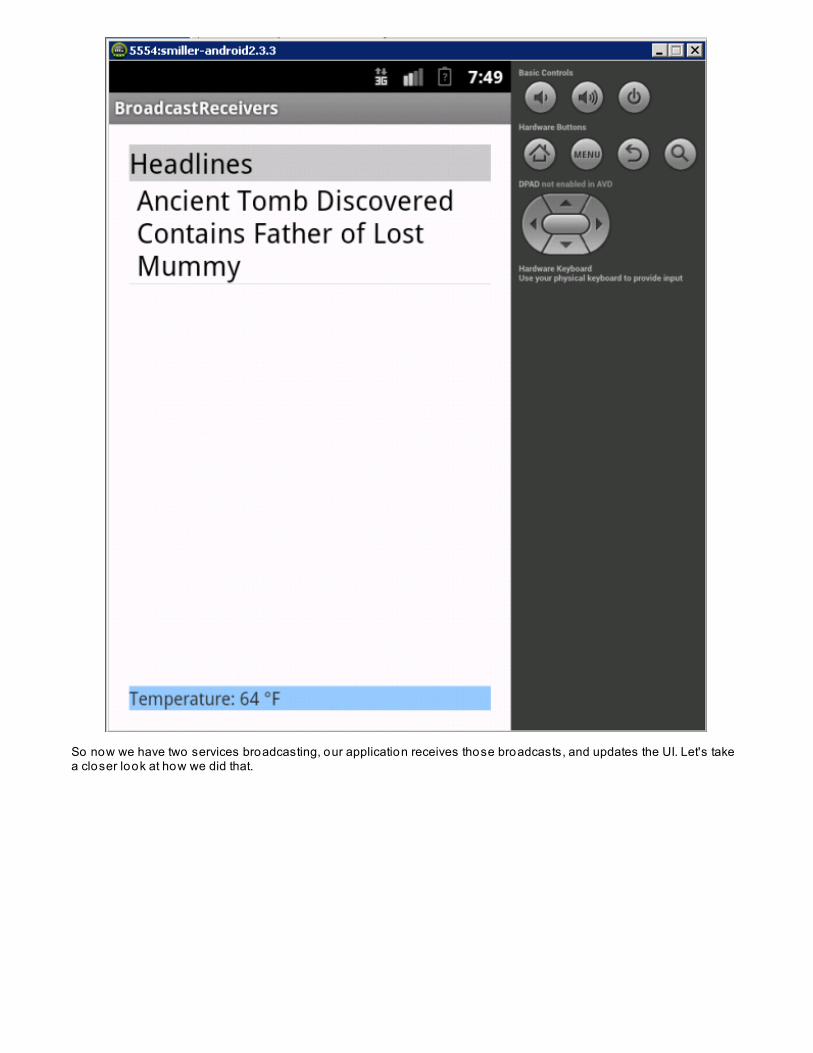
So now we have two services broadcasting, our application receives those broadcasts, and updates the UI. Let's takea closer look at how we did that.

OBSERVE: TemperatureService.java
... private class TemperatureUpdateTask extends TimerTask { public TemperatureUpdateTask() { super(); }
@Override public void run() { Intent temperatureIntent = new Intent(ACTION_TEMPERATURE_UPDATE); int temperature = getTemperature(); temperatureIntent.putExtra(EXTRA_TEMPERATURE, temperature); sendBroadcast(temperatureIntent); mTimer.schedule(new TemperatureUpdateTask(), getTimerLength()); } private int getTemperature() { int change = sRandom.nextInt(TEMPERATURE_RANGE); return MINIMUM_TEMPERATURE + change; } }}
The T emperat ureService is similar to the HeadlineService , only instead o f broadcasting an Int ent with a randomheadline, the T emperat ureService broadcasts a rando m t emperat ure reading.
OBSERVE: Andro idManifest.xml
<?xml version="1.0" encoding="utf-8"?><manifest xmlns:android="http://schemas.android.com/apk/res/android" package="com.oreillyschool.android2.broadcastReceivers" android:versionCode="1" android:versionName="1.0" >
<uses-sdk android:minSdkVersion="10" android:targetSdkVersion="10" />
<application android:allowBackup="true" android:icon="@drawable/ic_launcher" android:label="@string/app_name" android:theme="@style/AppTheme" >
<service android:name=".HeadlineService" /> <service android:name=".TemperatureService" />
<activity android:name=".MainActivity" android:label="@string/app_name" > <intent-filter> <action android:name="android.intent.action.MAIN" />
<category android:name="android.intent.category.LAUNCHER" /> </intent-filter> </activity> </application>
</manifest>
In the Manifest, we add the declarat io n f o r t he T emperat ureService .

OBSERVE: activity_main.xml
<LinearLayout xmlns:android="http://schemas.android.com/apk/res/android"...
<TextView android:id="@+id/headlines_label" style="@android:style/TextAppearance.Large" android:layout_width="match_parent" android:layout_height="wrap_content" android:background="#CCCCCC" android:text="@string/headlines_label" />
<ListView android:id="@android:id/list" android:layout_width="match_parent" android:layout_height="0dp" android:layout_weight="1" />
<TextView android:id="@+id/temperature_text" style="@android:style/TextAppearance.Small" android:layout_width="match_parent" android:layout_height="wrap_content" android:background="#3300FF" android:text="@string/temperature_unavailable" />
</LinearLayout>
In the main activity's layout, we add a T ext View at the bottom and change the List View to fill the space above it in theLinearLayout.
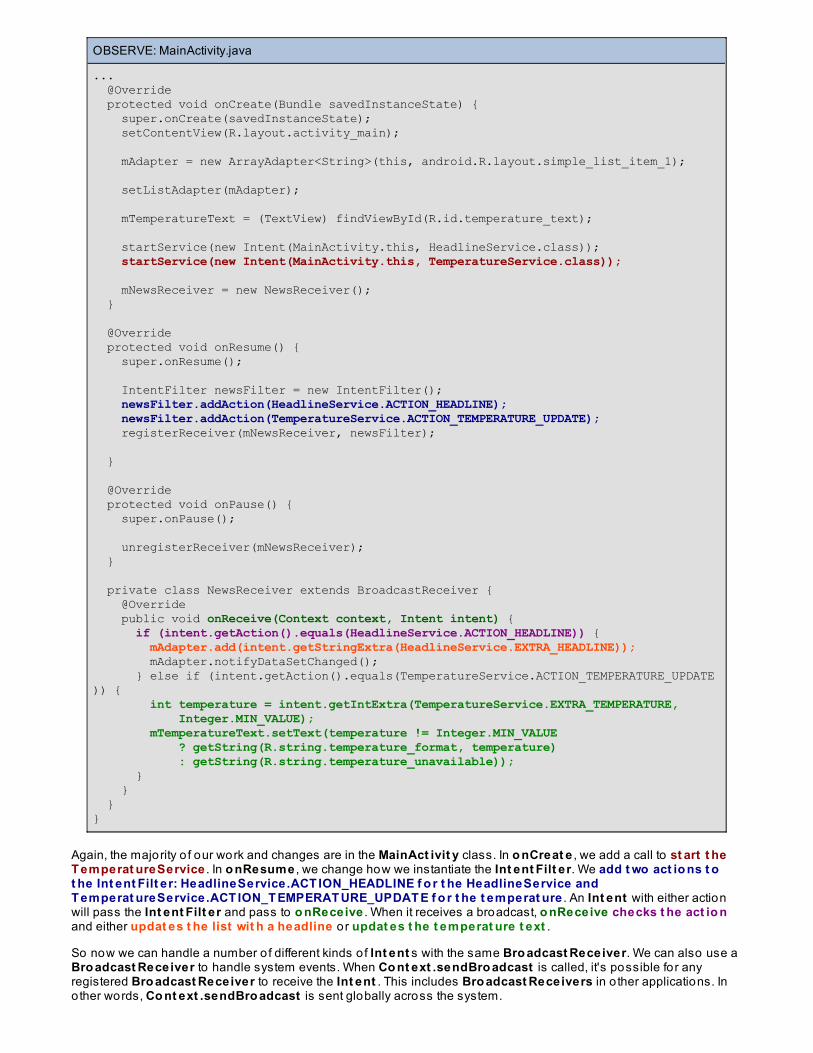
OBSERVE: MainActivity.java
... @Override protected void onCreate(Bundle savedInstanceState) { super.onCreate(savedInstanceState); setContentView(R.layout.activity_main);
mAdapter = new ArrayAdapter<String>(this, android.R.layout.simple_list_item_1);
setListAdapter(mAdapter);
mTemperatureText = (TextView) findViewById(R.id.temperature_text);
startService(new Intent(MainActivity.this, HeadlineService.class)); startService(new Intent(MainActivity.this, TemperatureService.class));
mNewsReceiver = new NewsReceiver(); }
@Override protected void onResume() { super.onResume();
IntentFilter newsFilter = new IntentFilter(); newsFilter.addAction(HeadlineService.ACTION_HEADLINE); newsFilter.addAction(TemperatureService.ACTION_TEMPERATURE_UPDATE); registerReceiver(mNewsReceiver, newsFilter);
}
@Override protected void onPause() { super.onPause();
unregisterReceiver(mNewsReceiver); }
private class NewsReceiver extends BroadcastReceiver { @Override public void onReceive(Context context, Intent intent) { if (intent.getAction().equals(HeadlineService.ACTION_HEADLINE)) { mAdapter.add(intent.getStringExtra(HeadlineService.EXTRA_HEADLINE)); mAdapter.notifyDataSetChanged(); } else if (intent.getAction().equals(TemperatureService.ACTION_TEMPERATURE_UPDATE)) { int temperature = intent.getIntExtra(TemperatureService.EXTRA_TEMPERATURE, Integer.MIN_VALUE); mTemperatureText.setText(temperature != Integer.MIN_VALUE ? getString(R.string.temperature_format, temperature) : getString(R.string.temperature_unavailable)); } } }}
Again, the majority o f our work and changes are in the MainAct ivit y class. In o nCreat e , we add a call to st art t heT emperat ureService . In o nResume , we change how we instantiate the Int ent Filt er. We add t wo act io ns t ot he Int ent Filt er: HeadlineService.ACT ION_HEADLINE f o r t he HeadlineService andT emperat ureService.ACT ION_T EMPERAT URE_UPDAT E f o r t he t emperat ure . An Int ent with either actionwill pass the Int ent Filt er and pass to o nReceive . When it receives a broadcast, o nReceive checks t he act io nand either updat es t he list wit h a headline o r updat es t he t emperat ure t ext .
So now we can handle a number o f different kinds o f Int ent s with the same Bro adcast Receiver. We can also use aBro adcast Receiver to handle system events. When Co nt ext .sendBro adcast is called, it's possible for anyregistered Bro adcast Receiver to receive the Int ent . This includes Bro adcast Receivers in o ther applications. Inother words, Co nt ext .sendBro adcast is sent globally across the system.
You will o ften find that you just need to broadcast between components in the same application. If this is the case,there is a better way to send and receive broadcasts that should remain local to an application:Lo calBro adcast Manager. We'll look at that next.
Using the LocalBroadcastManagerThe Lo calBro adcast Manager is a class that has its own implementation o f sendBro adcast , regist erReceiver,and unregist erReceiver. Int ent s broadcasted via the Lo calBro adcast Manager can only be received byBro adcast Receivers that were registered with the Lo calBro adcast Manager. Also , Bro adcast Receiversregistered with the Lo calBro adcast Manager cannot receive Int ent s sent by Co nt ext .sendBro adcast .
If you only need broadcasting between components in the same application, use the Lo calBro adcast Manager.Using Lo calBro adcast Manager prevents data from your application from being broadcast to o ther applications andit prevents o ther applications broadcasting to yours. It's also more efficient than using a Co nt ext to broadcast.
Let's add Lo calBro adcast Manager to our pro ject.
Open T emperat ureService.java and make these changes:
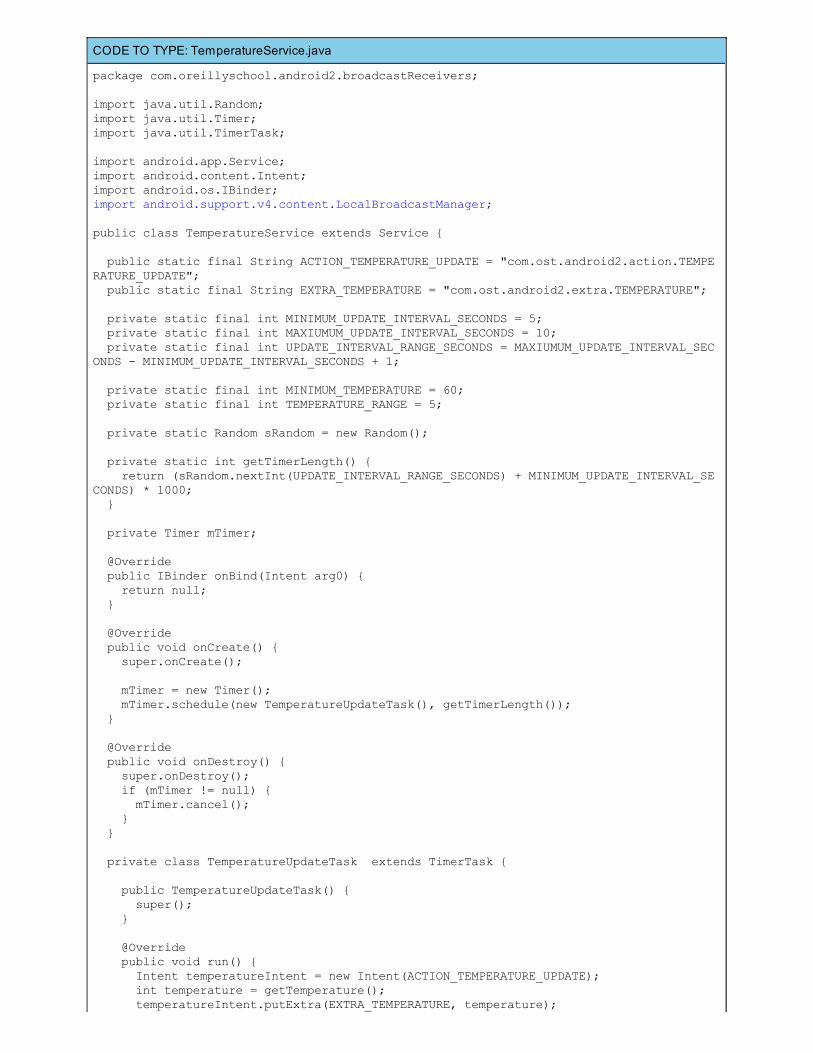
CODE TO TYPE: TemperatureService.java
package com.oreillyschool.android2.broadcastReceivers;
import java.util.Random;import java.util.Timer;import java.util.TimerTask;
import android.app.Service;import android.content.Intent;import android.os.IBinder;import android.support.v4.content.LocalBroadcastManager;
public class TemperatureService extends Service { public static final String ACTION_TEMPERATURE_UPDATE = "com.ost.android2.action.TEMPERATURE_UPDATE"; public static final String EXTRA_TEMPERATURE = "com.ost.android2.extra.TEMPERATURE"; private static final int MINIMUM_UPDATE_INTERVAL_SECONDS = 5; private static final int MAXIUMUM_UPDATE_INTERVAL_SECONDS = 10; private static final int UPDATE_INTERVAL_RANGE_SECONDS = MAXIUMUM_UPDATE_INTERVAL_SECONDS - MINIMUM_UPDATE_INTERVAL_SECONDS + 1; private static final int MINIMUM_TEMPERATURE = 60; private static final int TEMPERATURE_RANGE = 5; private static Random sRandom = new Random(); private static int getTimerLength() { return (sRandom.nextInt(UPDATE_INTERVAL_RANGE_SECONDS) + MINIMUM_UPDATE_INTERVAL_SECONDS) * 1000; } private Timer mTimer;
@Override public IBinder onBind(Intent arg0) { return null; }
@Override public void onCreate() { super.onCreate(); mTimer = new Timer(); mTimer.schedule(new TemperatureUpdateTask(), getTimerLength()); } @Override public void onDestroy() { super.onDestroy(); if (mTimer != null) { mTimer.cancel(); } }
private class TemperatureUpdateTask extends TimerTask { public TemperatureUpdateTask() { super(); }
@Override public void run() { Intent temperatureIntent = new Intent(ACTION_TEMPERATURE_UPDATE); int temperature = getTemperature(); temperatureIntent.putExtra(EXTRA_TEMPERATURE, temperature);
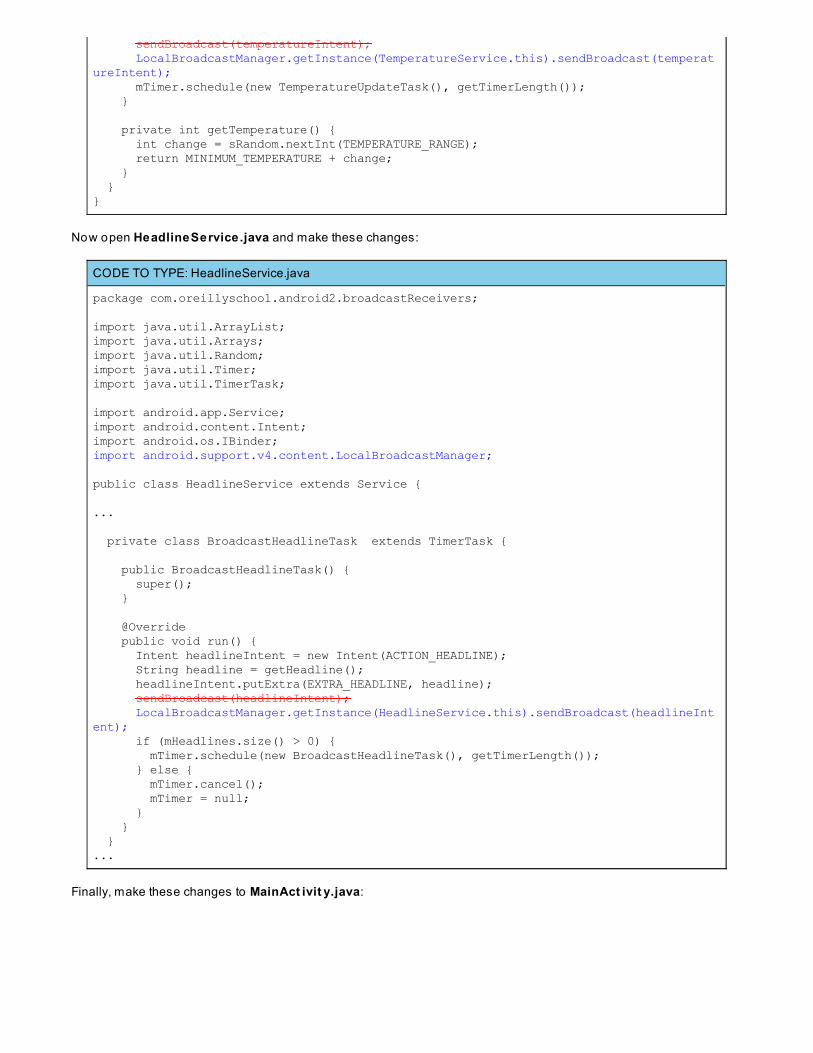
sendBroadcast(temperatureIntent); LocalBroadcastManager.getInstance(TemperatureService.this).sendBroadcast(temperatureIntent); mTimer.schedule(new TemperatureUpdateTask(), getTimerLength()); } private int getTemperature() { int change = sRandom.nextInt(TEMPERATURE_RANGE); return MINIMUM_TEMPERATURE + change; } }}
Now open HeadlineService.java and make these changes:
CODE TO TYPE: HeadlineService.java
package com.oreillyschool.android2.broadcastReceivers;
import java.util.ArrayList;import java.util.Arrays;import java.util.Random;import java.util.Timer;import java.util.TimerTask;
import android.app.Service;import android.content.Intent;import android.os.IBinder;import android.support.v4.content.LocalBroadcastManager;
public class HeadlineService extends Service { ... private class BroadcastHeadlineTask extends TimerTask { public BroadcastHeadlineTask() { super(); }
@Override public void run() { Intent headlineIntent = new Intent(ACTION_HEADLINE); String headline = getHeadline(); headlineIntent.putExtra(EXTRA_HEADLINE, headline); sendBroadcast(headlineIntent); LocalBroadcastManager.getInstance(HeadlineService.this).sendBroadcast(headlineIntent); if (mHeadlines.size() > 0) { mTimer.schedule(new BroadcastHeadlineTask(), getTimerLength()); } else { mTimer.cancel(); mTimer = null; } } } ...
Finally, make these changes to MainAct ivit y.java:
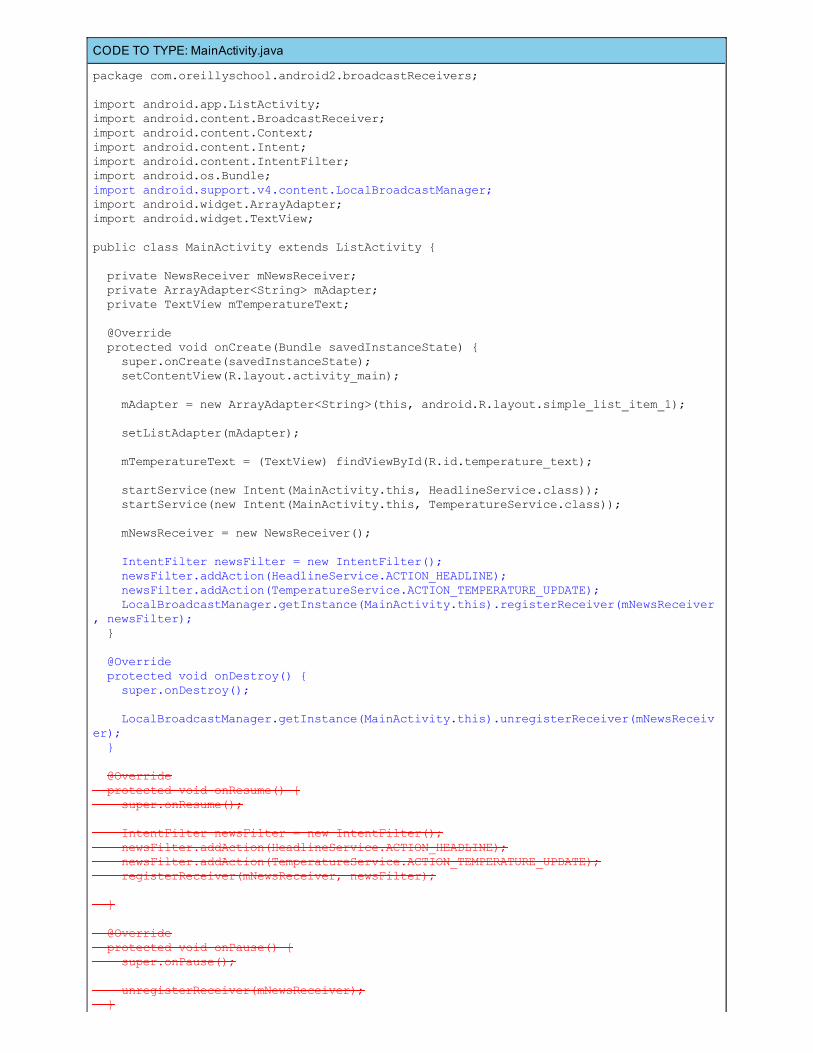
CODE TO TYPE: MainActivity.java
package com.oreillyschool.android2.broadcastReceivers;
import android.app.ListActivity;import android.content.BroadcastReceiver;import android.content.Context;import android.content.Intent;import android.content.IntentFilter;import android.os.Bundle;import android.support.v4.content.LocalBroadcastManager;import android.widget.ArrayAdapter;import android.widget.TextView;
public class MainActivity extends ListActivity {
private NewsReceiver mNewsReceiver; private ArrayAdapter<String> mAdapter; private TextView mTemperatureText;
@Override protected void onCreate(Bundle savedInstanceState) { super.onCreate(savedInstanceState); setContentView(R.layout.activity_main);
mAdapter = new ArrayAdapter<String>(this, android.R.layout.simple_list_item_1);
setListAdapter(mAdapter);
mTemperatureText = (TextView) findViewById(R.id.temperature_text);
startService(new Intent(MainActivity.this, HeadlineService.class)); startService(new Intent(MainActivity.this, TemperatureService.class));
mNewsReceiver = new NewsReceiver();
IntentFilter newsFilter = new IntentFilter(); newsFilter.addAction(HeadlineService.ACTION_HEADLINE); newsFilter.addAction(TemperatureService.ACTION_TEMPERATURE_UPDATE); LocalBroadcastManager.getInstance(MainActivity.this).registerReceiver(mNewsReceiver, newsFilter); } @Override protected void onDestroy() { super.onDestroy(); LocalBroadcastManager.getInstance(MainActivity.this).unregisterReceiver(mNewsReceiver); }
@Override protected void onResume() { super.onResume();
IntentFilter newsFilter = new IntentFilter(); newsFilter.addAction(HeadlineService.ACTION_HEADLINE); newsFilter.addAction(TemperatureService.ACTION_TEMPERATURE_UPDATE); registerReceiver(mNewsReceiver, newsFilter);
}
@Override protected void onPause() { super.onPause();
unregisterReceiver(mNewsReceiver); }
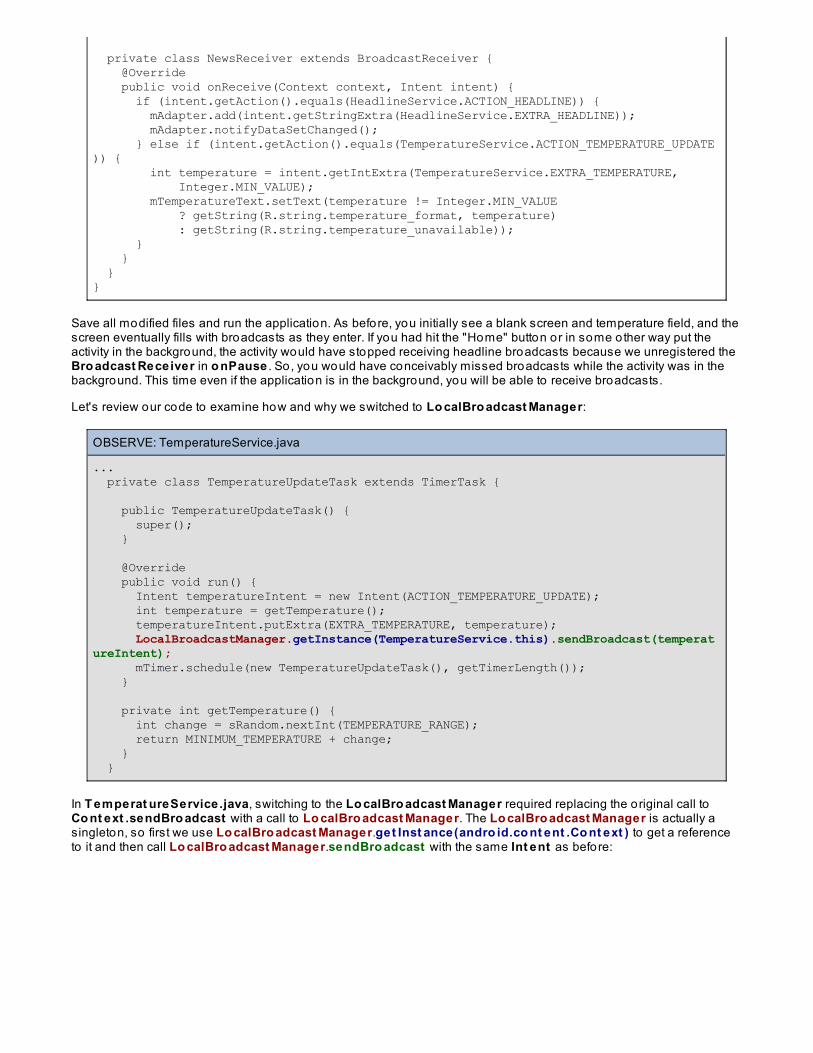
private class NewsReceiver extends BroadcastReceiver { @Override public void onReceive(Context context, Intent intent) { if (intent.getAction().equals(HeadlineService.ACTION_HEADLINE)) { mAdapter.add(intent.getStringExtra(HeadlineService.EXTRA_HEADLINE)); mAdapter.notifyDataSetChanged(); } else if (intent.getAction().equals(TemperatureService.ACTION_TEMPERATURE_UPDATE)) { int temperature = intent.getIntExtra(TemperatureService.EXTRA_TEMPERATURE, Integer.MIN_VALUE); mTemperatureText.setText(temperature != Integer.MIN_VALUE ? getString(R.string.temperature_format, temperature) : getString(R.string.temperature_unavailable)); } } }}
Save all modified files and run the application. As before, you initially see a blank screen and temperature field, and thescreen eventually fills with broadcasts as they enter. If you had hit the "Home" button or in some other way put theactivity in the background, the activity would have stopped receiving headline broadcasts because we unregistered theBro adcast Receiver in o nPause . So, you would have conceivably missed broadcasts while the activity was in thebackground. This time even if the application is in the background, you will be able to receive broadcasts.
Let's review our code to examine how and why we switched to Lo calBro adcast Manager:
OBSERVE: TemperatureService.java
... private class TemperatureUpdateTask extends TimerTask { public TemperatureUpdateTask() { super(); }
@Override public void run() { Intent temperatureIntent = new Intent(ACTION_TEMPERATURE_UPDATE); int temperature = getTemperature(); temperatureIntent.putExtra(EXTRA_TEMPERATURE, temperature); LocalBroadcastManager.getInstance(TemperatureService.this).sendBroadcast(temperatureIntent); mTimer.schedule(new TemperatureUpdateTask(), getTimerLength()); } private int getTemperature() { int change = sRandom.nextInt(TEMPERATURE_RANGE); return MINIMUM_TEMPERATURE + change; } }
In T emperat ureService.java, switching to the Lo calBro adcast Manager required replacing the original call toCo nt ext .sendBro adcast with a call to Lo calBro adcast Manager. The Lo calBro adcast Manager is actually asingleton, so first we use Lo calBro adcast Manager.get Inst ance(andro id.co nt ent .Co nt ext ) to get a referenceto it and then call Lo calBro adcast Manager.sendBro adcast with the same Int ent as before:
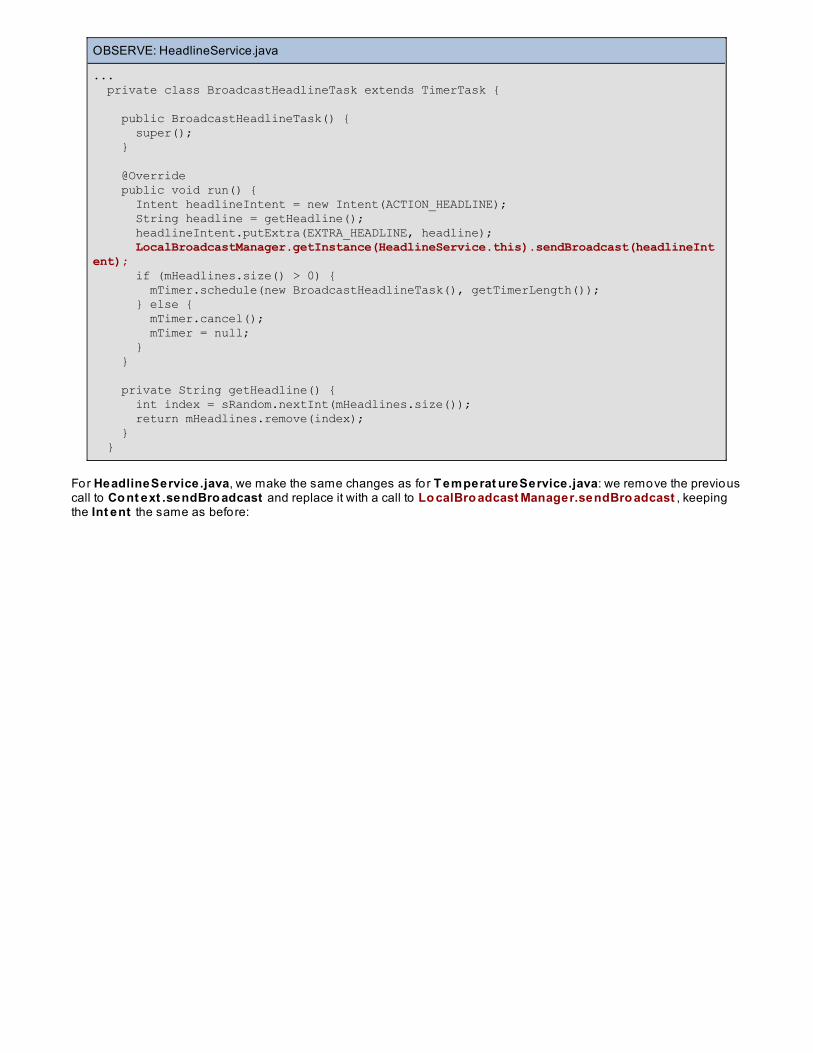
OBSERVE: HeadlineService.java
... private class BroadcastHeadlineTask extends TimerTask { public BroadcastHeadlineTask() { super(); }
@Override public void run() { Intent headlineIntent = new Intent(ACTION_HEADLINE); String headline = getHeadline(); headlineIntent.putExtra(EXTRA_HEADLINE, headline); LocalBroadcastManager.getInstance(HeadlineService.this).sendBroadcast(headlineIntent); if (mHeadlines.size() > 0) { mTimer.schedule(new BroadcastHeadlineTask(), getTimerLength()); } else { mTimer.cancel(); mTimer = null; } } private String getHeadline() { int index = sRandom.nextInt(mHeadlines.size()); return mHeadlines.remove(index); } }
For HeadlineService.java, we make the same changes as for T emperat ureService.java: we remove the previouscall to Co nt ext .sendBro adcast and replace it with a call to Lo calBro adcast Manager.sendBro adcast , keepingthe Int ent the same as before:
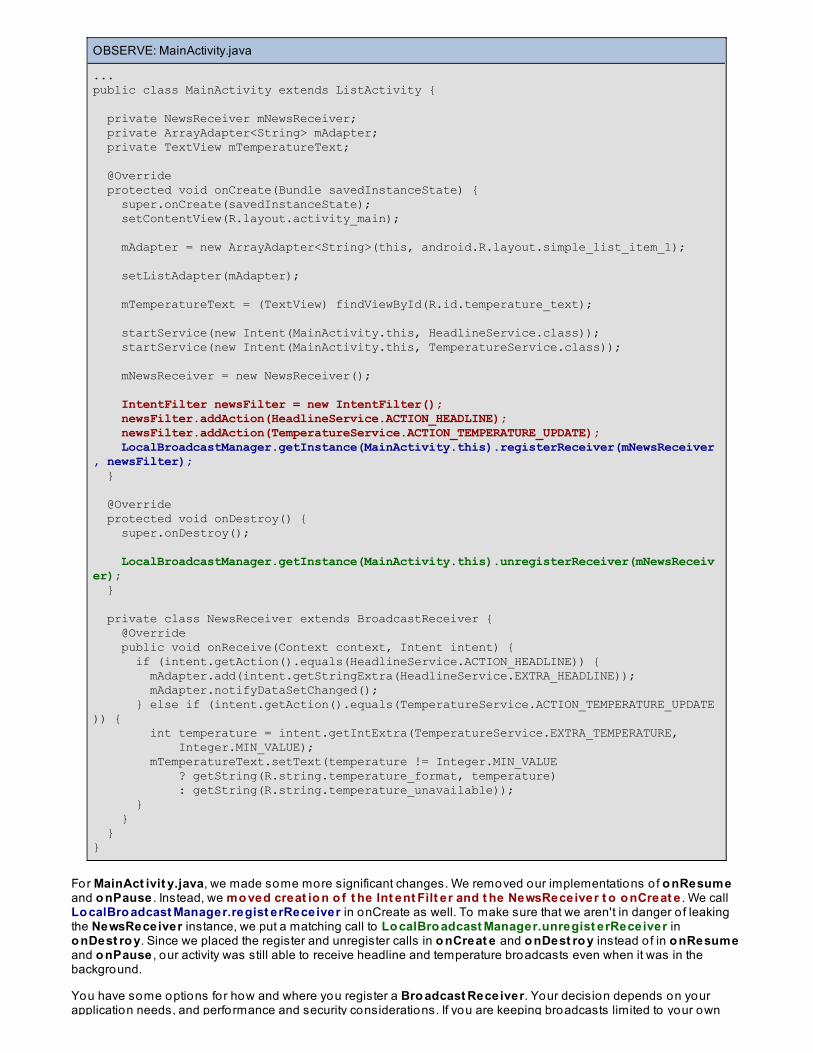
OBSERVE: MainActivity.java
...public class MainActivity extends ListActivity {
private NewsReceiver mNewsReceiver; private ArrayAdapter<String> mAdapter; private TextView mTemperatureText;
@Override protected void onCreate(Bundle savedInstanceState) { super.onCreate(savedInstanceState); setContentView(R.layout.activity_main);
mAdapter = new ArrayAdapter<String>(this, android.R.layout.simple_list_item_1);
setListAdapter(mAdapter);
mTemperatureText = (TextView) findViewById(R.id.temperature_text);
startService(new Intent(MainActivity.this, HeadlineService.class)); startService(new Intent(MainActivity.this, TemperatureService.class));
mNewsReceiver = new NewsReceiver();
IntentFilter newsFilter = new IntentFilter(); newsFilter.addAction(HeadlineService.ACTION_HEADLINE); newsFilter.addAction(TemperatureService.ACTION_TEMPERATURE_UPDATE); LocalBroadcastManager.getInstance(MainActivity.this).registerReceiver(mNewsReceiver, newsFilter); } @Override protected void onDestroy() { super.onDestroy(); LocalBroadcastManager.getInstance(MainActivity.this).unregisterReceiver(mNewsReceiver); }
private class NewsReceiver extends BroadcastReceiver { @Override public void onReceive(Context context, Intent intent) { if (intent.getAction().equals(HeadlineService.ACTION_HEADLINE)) { mAdapter.add(intent.getStringExtra(HeadlineService.EXTRA_HEADLINE)); mAdapter.notifyDataSetChanged(); } else if (intent.getAction().equals(TemperatureService.ACTION_TEMPERATURE_UPDATE)) { int temperature = intent.getIntExtra(TemperatureService.EXTRA_TEMPERATURE, Integer.MIN_VALUE); mTemperatureText.setText(temperature != Integer.MIN_VALUE ? getString(R.string.temperature_format, temperature) : getString(R.string.temperature_unavailable)); } } }}
For MainAct ivit y.java, we made some more significant changes. We removed our implementations o f o nResumeand o nPause . Instead, we mo ved creat io n o f t he Int ent Filt er and t he NewsReceiver t o o nCreat e . We callLo calBro adcast Manager.regist erReceiver in onCreate as well. To make sure that we aren't in danger o f leakingthe NewsReceiver instance, we put a matching call to Lo calBro adcast Manager.unregist erReceiver ino nDest ro y. Since we placed the register and unregister calls in o nCreat e and o nDest ro y instead o f in o nResumeand o nPause , our activity was still able to receive headline and temperature broadcasts even when it was in thebackground.
You have some options for how and where you register a Bro adcast Receiver. Your decision depends on yourapplication needs, and performance and security considerations. If you are keeping broadcasts limited to your own

application needs, and performance and security considerations. If you are keeping broadcasts limited to your ownapplication components, Lo calBro adcast Manager is the best option for you.
Wrapping UpIn this lesson, we went through the basics o f utilizing the Bro adcast Receiver class. It's relatively straightforward touse and provides much flexibility. You can choose to register your receiver in the Andro id manifest or in code. You canchoose to use the Co nt ext broadcast methods or use Lo calBro adcast Manager. You can listen for broadcastsfrom your own application, from other applications, and from the system. You can use an inner class for yourBro adcast Receiver o r a stand-alone.
The Bro adcast Receiver is a powerful too l fo r communication, but the trick is to use the options andimplementations that best fit your application, and make sure that you always consider efficiency and security. Also ,consider the lifecycle o f Bro adcast Receiver instances, particularly when you register in the Andro id manifest.
Well, that should get you a good start on Bro adcast Receivers. See you next lesson!
Copyright © 1998-2014 O'Reilly Media, Inc.
This work is licensed under a Creative Commons Attribution-ShareAlike 3.0 Unported License.See http://creativecommons.org/licenses/by-sa/3.0/legalcode for more information.
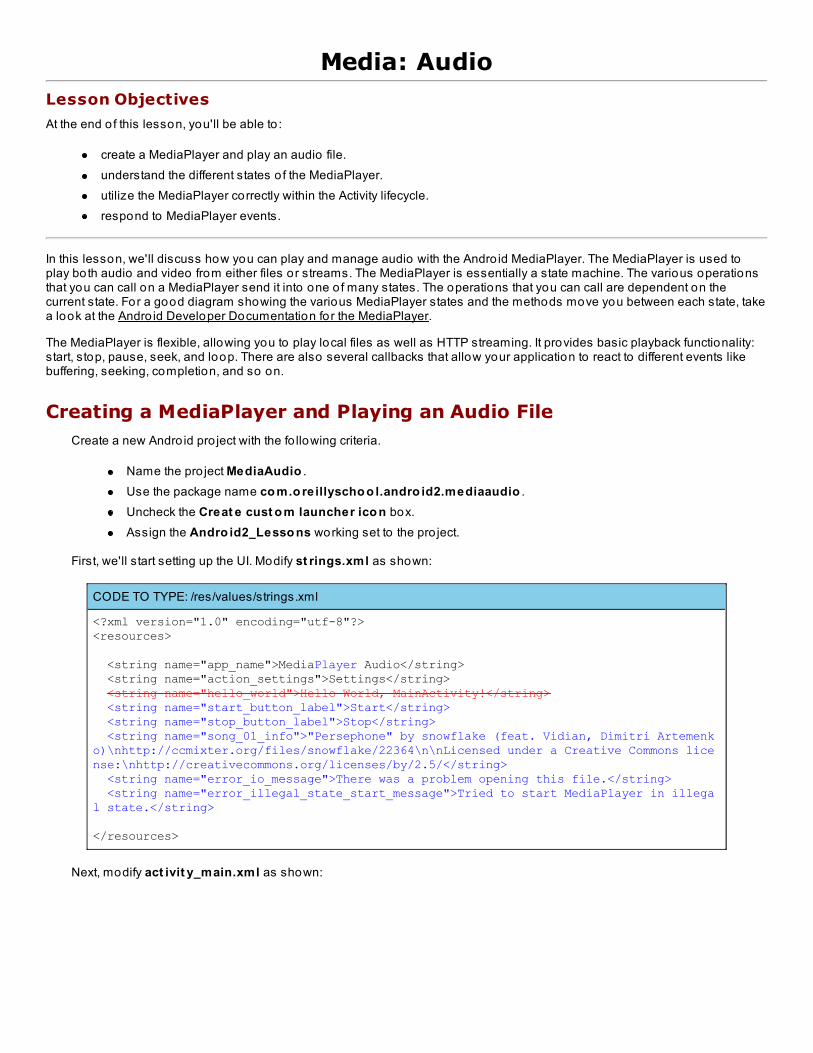
Media: AudioLesson Objectives
At the end o f this lesson, you'll be able to :
create a MediaPlayer and play an audio file.understand the different states o f the MediaPlayer.utilize the MediaPlayer correctly within the Activity lifecycle.respond to MediaPlayer events.
In this lesson, we'll discuss how you can play and manage audio with the Andro id MediaPlayer. The MediaPlayer is used toplay both audio and video from either files or streams. The MediaPlayer is essentially a state machine. The various operationsthat you can call on a MediaPlayer send it into one o f many states. The operations that you can call are dependent on thecurrent state. For a good diagram showing the various MediaPlayer states and the methods move you between each state, takea look at the Andro id Developer Documentation for the MediaPlayer.
The MediaPlayer is flexible, allowing you to play local files as well as HTTP streaming. It provides basic playback functionality:start, stop, pause, seek, and loop. There are also several callbacks that allow your application to react to different events likebuffering, seeking, completion, and so on.
Creating a MediaPlayer and Playing an Audio FileCreate a new Andro id pro ject with the fo llowing criteria.
Name the pro ject MediaAudio .Use the package name co m.o reillyscho o l.andro id2.mediaaudio .Uncheck the Creat e cust o m launcher ico n box.Assign the Andro id2_Lesso ns working set to the pro ject.
First, we'll start setting up the UI. Modify st rings.xml as shown:
CODE TO TYPE: /res/values/strings.xml
<?xml version="1.0" encoding="utf-8"?><resources>
<string name="app_name">MediaPlayer Audio</string> <string name="action_settings">Settings</string> <string name="hello_world">Hello World, MainActivity!</string> <string name="start_button_label">Start</string> <string name="stop_button_label">Stop</string> <string name="song_01_info">"Persephone" by snowflake (feat. Vidian, Dimitri Artemenko)\nhttp://ccmixter.org/files/snowflake/22364\n\nLicensed under a Creative Commons license:\nhttp://creativecommons.org/licenses/by/2.5/</string> <string name="error_io_message">There was a problem opening this file.</string> <string name="error_illegal_state_start_message">Tried to start MediaPlayer in illegal state.</string>
</resources>
Next, modify act ivit y_main.xml as shown:
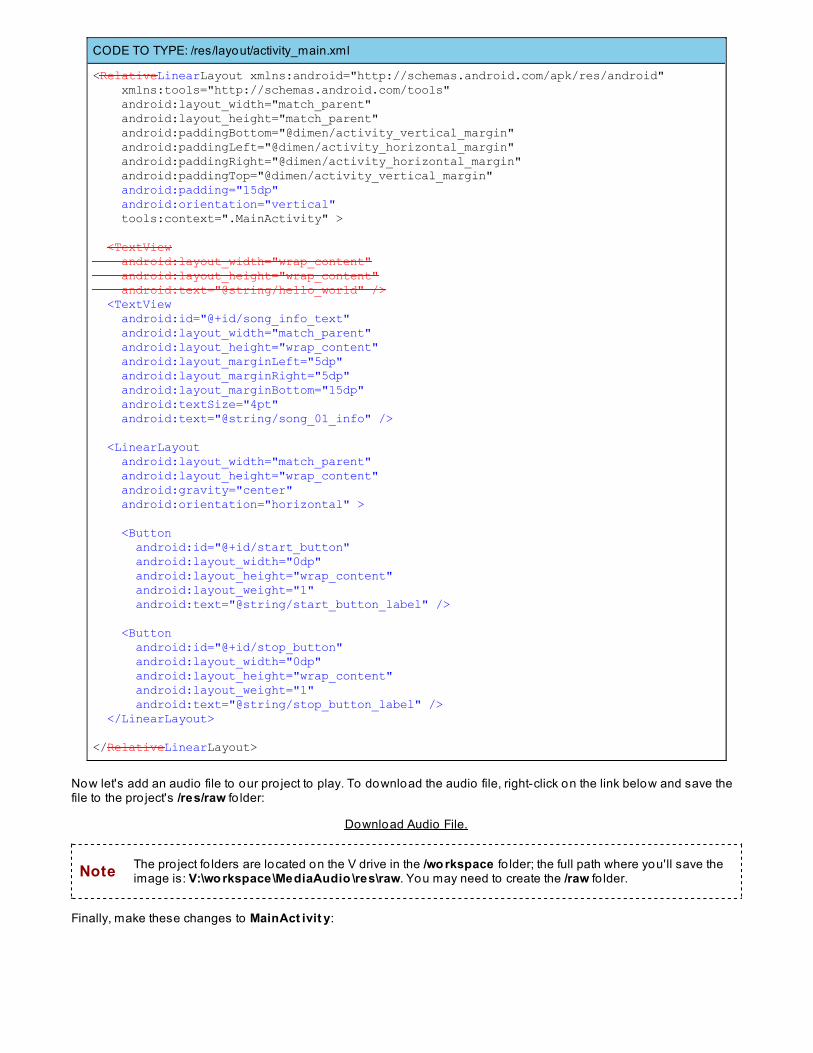
CODE TO TYPE: /res/layout/activity_main.xml
<RelativeLinearLayout xmlns:android="http://schemas.android.com/apk/res/android" xmlns:tools="http://schemas.android.com/tools" android:layout_width="match_parent" android:layout_height="match_parent" android:paddingBottom="@dimen/activity_vertical_margin" android:paddingLeft="@dimen/activity_horizontal_margin" android:paddingRight="@dimen/activity_horizontal_margin" android:paddingTop="@dimen/activity_vertical_margin" android:padding="15dp" android:orientation="vertical" tools:context=".MainActivity" >
<TextView android:layout_width="wrap_content" android:layout_height="wrap_content" android:text="@string/hello_world" /> <TextView android:id="@+id/song_info_text" android:layout_width="match_parent" android:layout_height="wrap_content" android:layout_marginLeft="5dp" android:layout_marginRight="5dp" android:layout_marginBottom="15dp" android:textSize="4pt" android:text="@string/song_01_info" />
<LinearLayout android:layout_width="match_parent" android:layout_height="wrap_content" android:gravity="center" android:orientation="horizontal" >
<Button android:id="@+id/start_button" android:layout_width="0dp" android:layout_height="wrap_content" android:layout_weight="1" android:text="@string/start_button_label" />
<Button android:id="@+id/stop_button" android:layout_width="0dp" android:layout_height="wrap_content" android:layout_weight="1" android:text="@string/stop_button_label" /> </LinearLayout>
</RelativeLinearLayout>
Now let's add an audio file to our pro ject to play. To download the audio file, right-click on the link below and save thefile to the pro ject's /res/raw fo lder:
Download Audio File.
Note The pro ject fo lders are located on the V drive in the /wo rkspace fo lder; the full path where you'll save theimage is: V:\wo rkspace\MediaAudio \res\raw. You may need to create the /raw fo lder.
Finally, make these changes to MainAct ivit y:
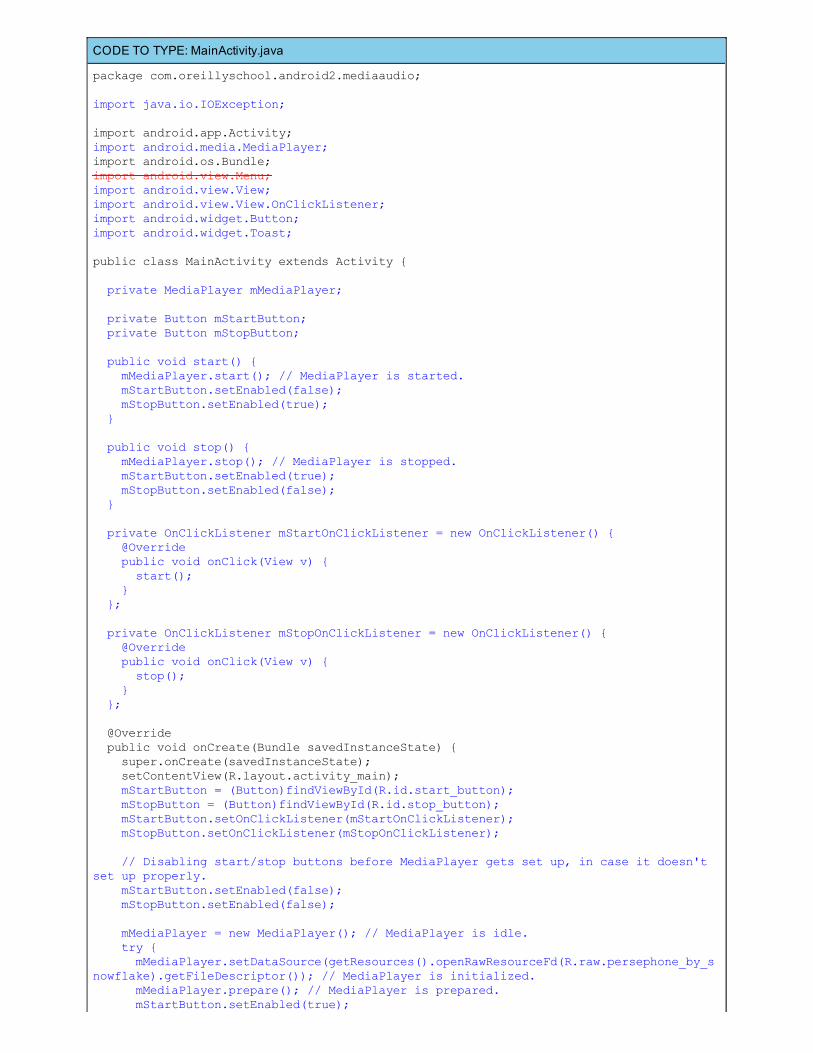
CODE TO TYPE: MainActivity.java
package com.oreillyschool.android2.mediaaudio;
import java.io.IOException;
import android.app.Activity;import android.media.MediaPlayer;import android.os.Bundle;import android.view.Menu;import android.view.View;import android.view.View.OnClickListener;import android.widget.Button;import android.widget.Toast;
public class MainActivity extends Activity {
private MediaPlayer mMediaPlayer;
private Button mStartButton; private Button mStopButton;
public void start() { mMediaPlayer.start(); // MediaPlayer is started. mStartButton.setEnabled(false); mStopButton.setEnabled(true); } public void stop() { mMediaPlayer.stop(); // MediaPlayer is stopped. mStartButton.setEnabled(true); mStopButton.setEnabled(false); }
private OnClickListener mStartOnClickListener = new OnClickListener() { @Override public void onClick(View v) { start(); } };
private OnClickListener mStopOnClickListener = new OnClickListener() { @Override public void onClick(View v) { stop(); } };
@Override public void onCreate(Bundle savedInstanceState) { super.onCreate(savedInstanceState); setContentView(R.layout.activity_main); mStartButton = (Button)findViewById(R.id.start_button); mStopButton = (Button)findViewById(R.id.stop_button); mStartButton.setOnClickListener(mStartOnClickListener); mStopButton.setOnClickListener(mStopOnClickListener);
// Disabling start/stop buttons before MediaPlayer gets set up, in case it doesn't set up properly. mStartButton.setEnabled(false); mStopButton.setEnabled(false);
mMediaPlayer = new MediaPlayer(); // MediaPlayer is idle. try { mMediaPlayer.setDataSource(getResources().openRawResourceFd(R.raw.persephone_by_snowflake).getFileDescriptor()); // MediaPlayer is initialized. mMediaPlayer.prepare(); // MediaPlayer is prepared. mStartButton.setEnabled(true);
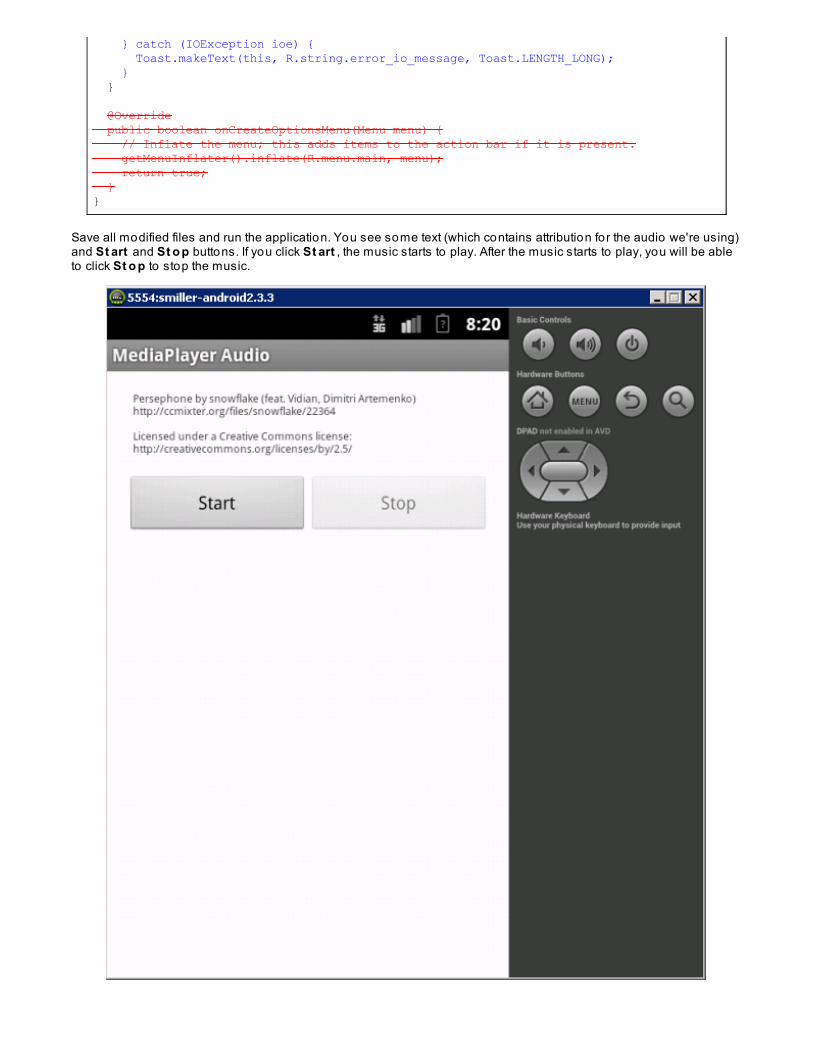
} catch (IOException ioe) { Toast.makeText(this, R.string.error_io_message, Toast.LENGTH_LONG); } } @Override public boolean onCreateOptionsMenu(Menu menu) { // Inflate the menu; this adds items to the action bar if it is present. getMenuInflater().inflate(R.menu.main, menu); return true; }}
Save all modified files and run the application. You see some text (which contains attribution for the audio we're using)and St art and St o p buttons. If you click St art , the music starts to play. After the music starts to play, you will be ableto click St o p to stop the music.

Note
In this lesson, we'll use a lo t o f audio and video files. If you try to run the application in the emulator andyou get an INST ALL_FAILED_INSUFFICIENT _ST ORAGE error in the conso le, you need to increasethe amount o f storage in the emulator. To do this, select Run | Debug Co nf igurat io ns, .... In theDebug Co nf igurat io ns window, select the T arget tab. In the Emulator Launch Parameters section, inthe Additional Emulator Command Line Options box, enter -part it io n-size 1024 . The partition size is inmegabytes; it's good practice to make sure that it is twice as big as your APK size.
Let's take a closer look at the MediaPlayer code in MainAct ivit y:
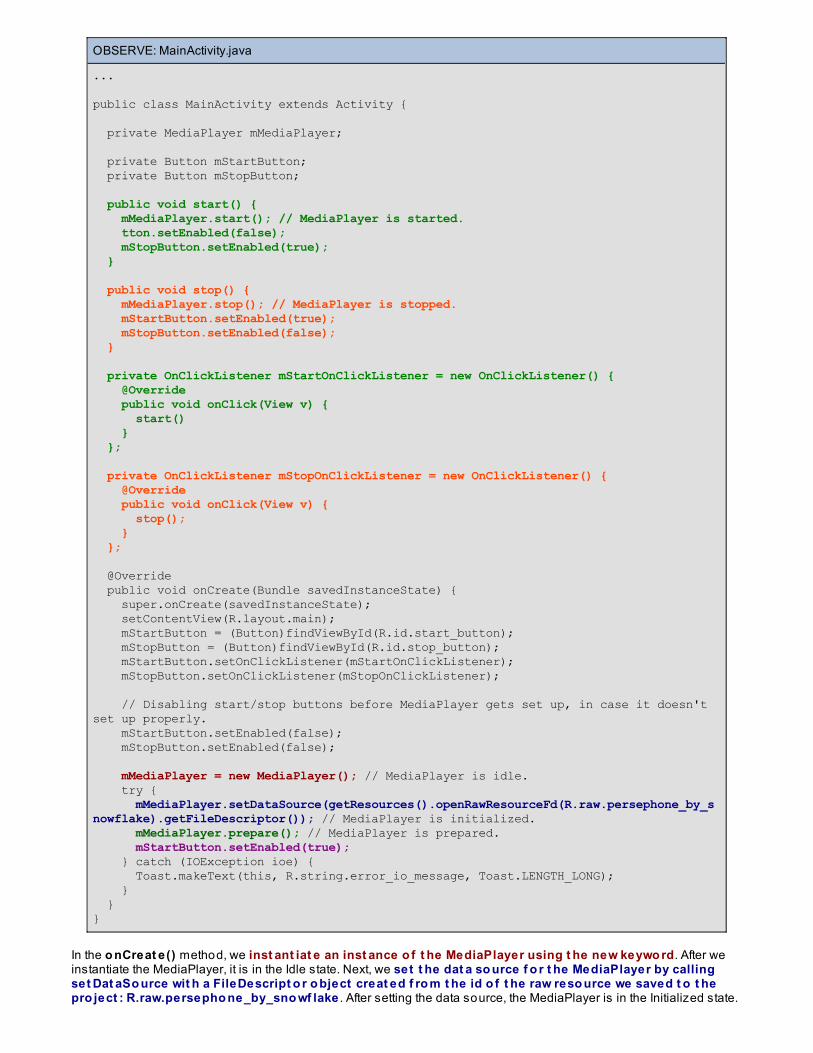
OBSERVE: MainActivity.java
...
public class MainActivity extends Activity {
private MediaPlayer mMediaPlayer;
private Button mStartButton; private Button mStopButton;
public void start() { mMediaPlayer.start(); // MediaPlayer is started. tton.setEnabled(false); mStopButton.setEnabled(true); } public void stop() { mMediaPlayer.stop(); // MediaPlayer is stopped. mStartButton.setEnabled(true); mStopButton.setEnabled(false); }
private OnClickListener mStartOnClickListener = new OnClickListener() { @Override public void onClick(View v) { start() } };
private OnClickListener mStopOnClickListener = new OnClickListener() { @Override public void onClick(View v) { stop(); } };
@Override public void onCreate(Bundle savedInstanceState) { super.onCreate(savedInstanceState); setContentView(R.layout.main); mStartButton = (Button)findViewById(R.id.start_button); mStopButton = (Button)findViewById(R.id.stop_button); mStartButton.setOnClickListener(mStartOnClickListener); mStopButton.setOnClickListener(mStopOnClickListener);
// Disabling start/stop buttons before MediaPlayer gets set up, in case it doesn't set up properly. mStartButton.setEnabled(false); mStopButton.setEnabled(false);
mMediaPlayer = new MediaPlayer(); // MediaPlayer is idle. try { mMediaPlayer.setDataSource(getResources().openRawResourceFd(R.raw.persephone_by_snowflake).getFileDescriptor()); // MediaPlayer is initialized. mMediaPlayer.prepare(); // MediaPlayer is prepared. mStartButton.setEnabled(true); } catch (IOException ioe) { Toast.makeText(this, R.string.error_io_message, Toast.LENGTH_LONG); } }}
In the o nCreat e() method, we inst ant iat e an inst ance o f t he MediaPlayer using t he new keywo rd. After weinstantiate the MediaPlayer, it is in the Idle state. Next, we set t he dat a so urce f o r t he MediaPlayer by callingset Dat aSo urce wit h a FileDescript o r o bject creat ed f ro m t he id o f t he raw reso urce we saved t o t hepro ject : R.raw.persepho ne_by_sno wf lake . After setting the data source, the MediaPlayer is in the Initialized state.
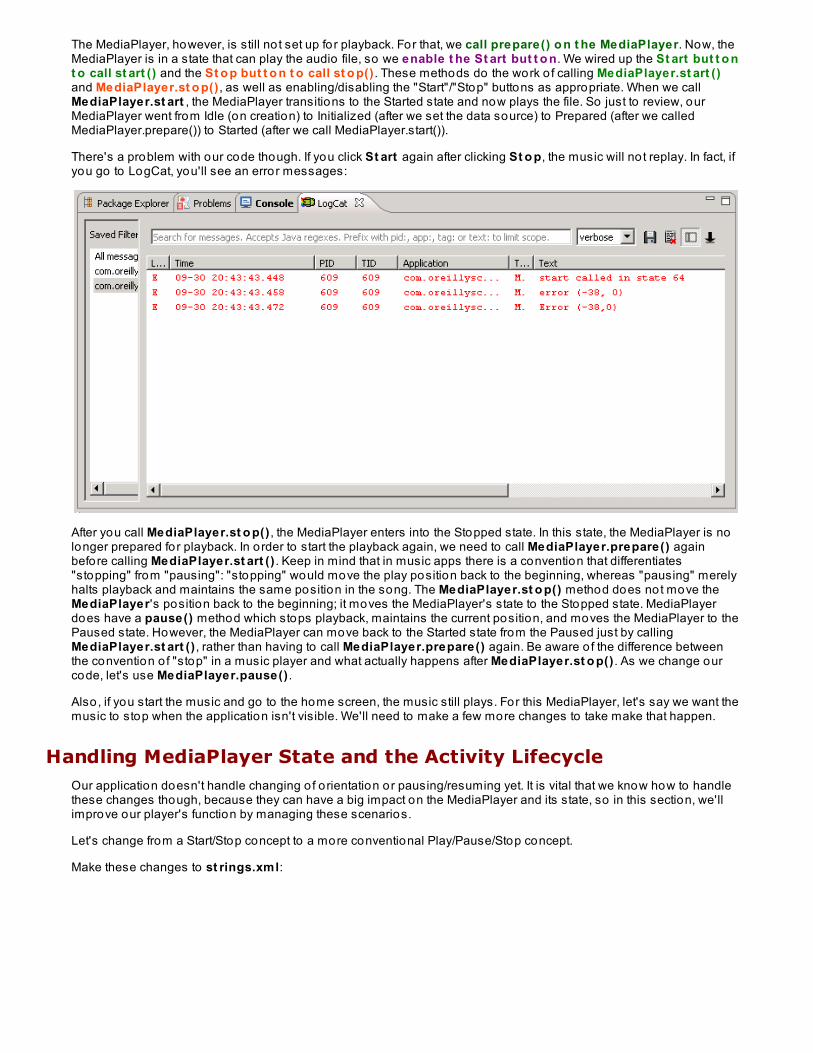
The MediaPlayer, however, is still no t set up for playback. For that, we call prepare() o n t he MediaPlayer. Now, theMediaPlayer is in a state that can play the audio file, so we enable t he St art but t o n. We wired up the St art but t o nt o call st art () and the St o p but t o n t o call st o p() . These methods do the work o f calling MediaPlayer.st art ()and MediaPlayer.st o p() , as well as enabling/disabling the "Start"/"Stop" buttons as appropriate. When we callMediaPlayer.st art , the MediaPlayer transitions to the Started state and now plays the file. So just to review, ourMediaPlayer went from Idle (on creation) to Initialized (after we set the data source) to Prepared (after we calledMediaPlayer.prepare()) to Started (after we call MediaPlayer.start()).
There's a problem with our code though. If you click St art again after clicking St o p, the music will no t replay. In fact, ifyou go to LogCat, you'll see an error messages:
After you call MediaPlayer.st o p() , the MediaPlayer enters into the Stopped state. In this state, the MediaPlayer is nolonger prepared for playback. In order to start the playback again, we need to call MediaPlayer.prepare() againbefore calling MediaPlayer.st art () . Keep in mind that in music apps there is a convention that differentiates"stopping" from "pausing": "stopping" would move the play position back to the beginning, whereas "pausing" merelyhalts playback and maintains the same position in the song. The MediaPlayer.st o p() method does not move theMediaPlayer's position back to the beginning; it moves the MediaPlayer's state to the Stopped state. MediaPlayerdoes have a pause() method which stops playback, maintains the current position, and moves the MediaPlayer to thePaused state. However, the MediaPlayer can move back to the Started state from the Paused just by callingMediaPlayer.st art () , rather than having to call MediaPlayer.prepare() again. Be aware o f the difference betweenthe convention o f "stop" in a music player and what actually happens after MediaPlayer.st o p() . As we change ourcode, let's use MediaPlayer.pause() .
Also , if you start the music and go to the home screen, the music still plays. For this MediaPlayer, let's say we want themusic to stop when the application isn't visible. We'll need to make a few more changes to take make that happen.
Handling MediaPlayer State and the Activity LifecycleOur application doesn't handle changing o f orientation or pausing/resuming yet. It is vital that we know how to handlethese changes though, because they can have a big impact on the MediaPlayer and its state, so in this section, we'llimprove our player's function by managing these scenarios.
Let's change from a Start/Stop concept to a more conventional Play/Pause/Stop concept.
Make these changes to st rings.xml:
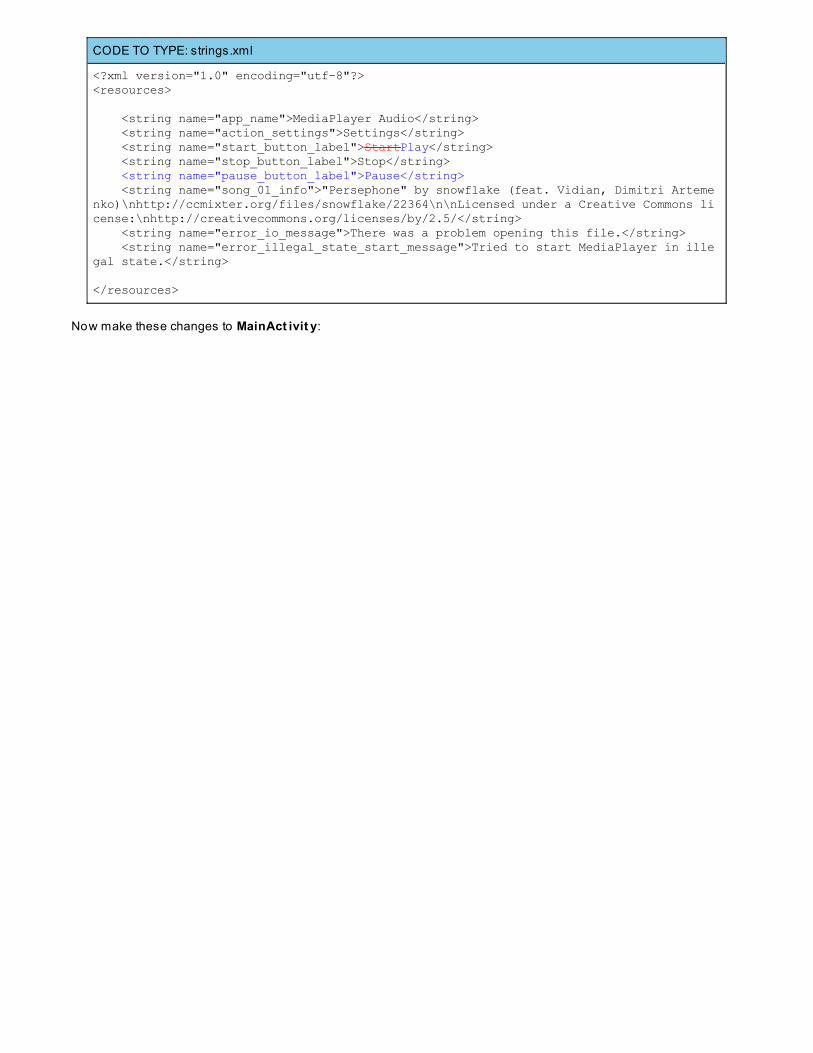
CODE TO TYPE: strings.xml
<?xml version="1.0" encoding="utf-8"?><resources>
<string name="app_name">MediaPlayer Audio</string> <string name="action_settings">Settings</string> <string name="start_button_label">StartPlay</string> <string name="stop_button_label">Stop</string> <string name="pause_button_label">Pause</string> <string name="song_01_info">"Persephone" by snowflake (feat. Vidian, Dimitri Artemenko)\nhttp://ccmixter.org/files/snowflake/22364\n\nLicensed under a Creative Commons license:\nhttp://creativecommons.org/licenses/by/2.5/</string> <string name="error_io_message">There was a problem opening this file.</string> <string name="error_illegal_state_start_message">Tried to start MediaPlayer in illegal state.</string>
</resources>
Now make these changes to MainAct ivit y:
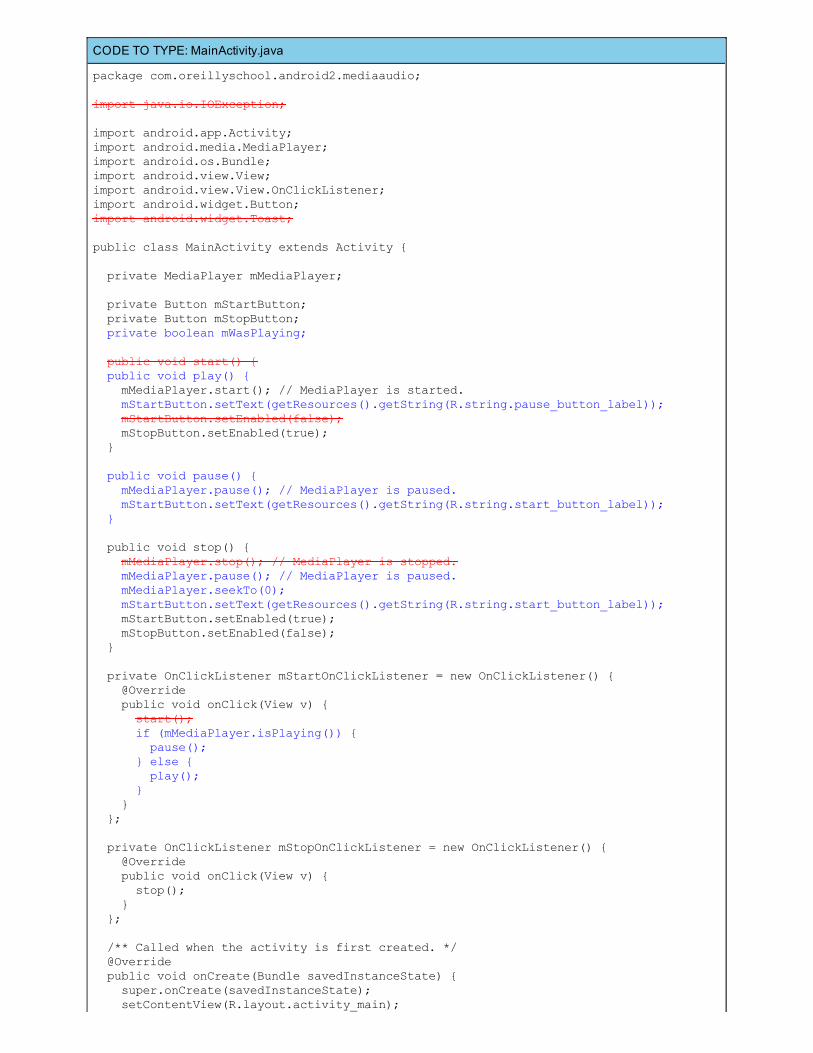
CODE TO TYPE: MainActivity.java
package com.oreillyschool.android2.mediaaudio;
import java.io.IOException;
import android.app.Activity;import android.media.MediaPlayer;import android.os.Bundle;import android.view.View;import android.view.View.OnClickListener;import android.widget.Button;import android.widget.Toast;
public class MainActivity extends Activity {
private MediaPlayer mMediaPlayer;
private Button mStartButton; private Button mStopButton; private boolean mWasPlaying; public void start() { public void play() { mMediaPlayer.start(); // MediaPlayer is started. mStartButton.setText(getResources().getString(R.string.pause_button_label)); mStartButton.setEnabled(false); mStopButton.setEnabled(true); }
public void pause() { mMediaPlayer.pause(); // MediaPlayer is paused. mStartButton.setText(getResources().getString(R.string.start_button_label)); } public void stop() { mMediaPlayer.stop(); // MediaPlayer is stopped. mMediaPlayer.pause(); // MediaPlayer is paused. mMediaPlayer.seekTo(0); mStartButton.setText(getResources().getString(R.string.start_button_label)); mStartButton.setEnabled(true); mStopButton.setEnabled(false); }
private OnClickListener mStartOnClickListener = new OnClickListener() { @Override public void onClick(View v) { start(); if (mMediaPlayer.isPlaying()) { pause(); } else { play(); } } };
private OnClickListener mStopOnClickListener = new OnClickListener() { @Override public void onClick(View v) { stop(); } };
/** Called when the activity is first created. */ @Override public void onCreate(Bundle savedInstanceState) { super.onCreate(savedInstanceState); setContentView(R.layout.activity_main);
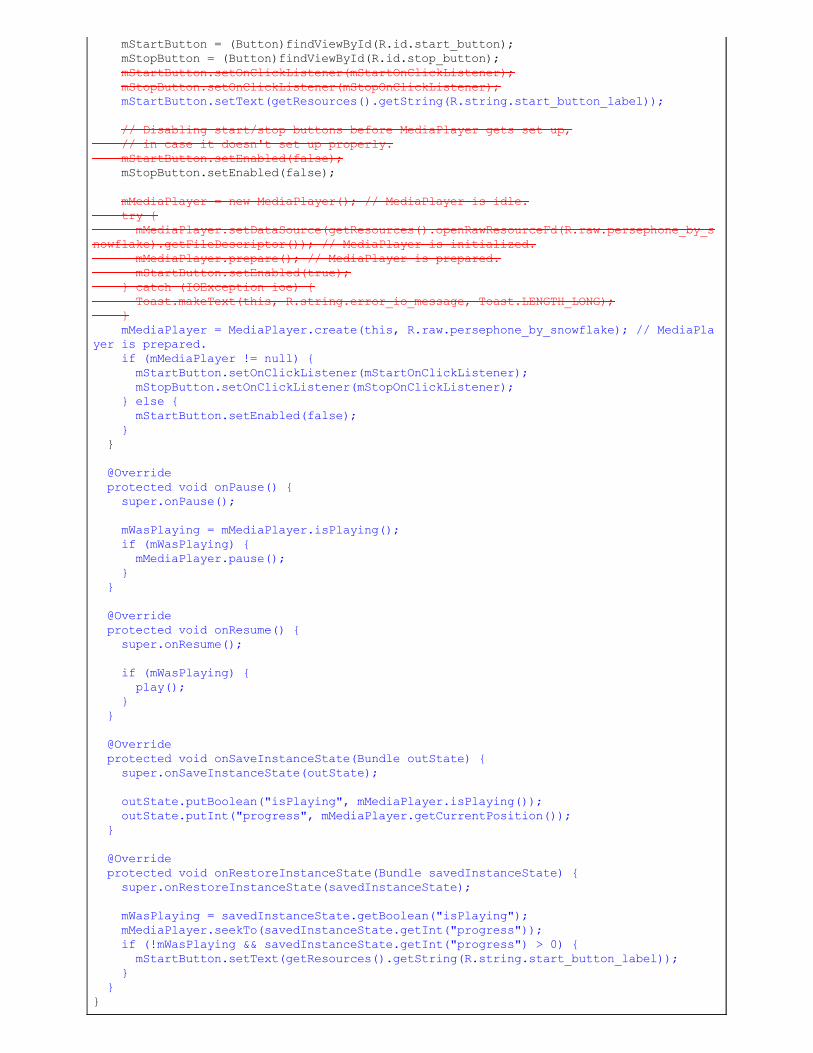
mStartButton = (Button)findViewById(R.id.start_button); mStopButton = (Button)findViewById(R.id.stop_button); mStartButton.setOnClickListener(mStartOnClickListener); mStopButton.setOnClickListener(mStopOnClickListener); mStartButton.setText(getResources().getString(R.string.start_button_label));
// Disabling start/stop buttons before MediaPlayer gets set up, // in case it doesn't set up properly. mStartButton.setEnabled(false); mStopButton.setEnabled(false);
mMediaPlayer = new MediaPlayer(); // MediaPlayer is idle. try { mMediaPlayer.setDataSource(getResources().openRawResourceFd(R.raw.persephone_by_snowflake).getFileDescriptor()); // MediaPlayer is initialized. mMediaPlayer.prepare(); // MediaPlayer is prepared. mStartButton.setEnabled(true); } catch (IOException ioe) { Toast.makeText(this, R.string.error_io_message, Toast.LENGTH_LONG); } mMediaPlayer = MediaPlayer.create(this, R.raw.persephone_by_snowflake); // MediaPlayer is prepared. if (mMediaPlayer != null) { mStartButton.setOnClickListener(mStartOnClickListener); mStopButton.setOnClickListener(mStopOnClickListener); } else { mStartButton.setEnabled(false); } }
@Override protected void onPause() { super.onPause();
mWasPlaying = mMediaPlayer.isPlaying(); if (mWasPlaying) { mMediaPlayer.pause(); } }
@Override protected void onResume() { super.onResume();
if (mWasPlaying) { play(); } }
@Override protected void onSaveInstanceState(Bundle outState) { super.onSaveInstanceState(outState);
outState.putBoolean("isPlaying", mMediaPlayer.isPlaying()); outState.putInt("progress", mMediaPlayer.getCurrentPosition()); }
@Override protected void onRestoreInstanceState(Bundle savedInstanceState) { super.onRestoreInstanceState(savedInstanceState);
mWasPlaying = savedInstanceState.getBoolean("isPlaying"); mMediaPlayer.seekTo(savedInstanceState.getInt("progress")); if (!mWasPlaying && savedInstanceState.getInt("progress") > 0) { mStartButton.setText(getResources().getString(R.string.start_button_label)); } }}

Now save the modified files and run the application. Instead o f St art and St o p buttons, we now have Play and St o pbuttons. When you press Play, the music begins to play and the Play button changes to Pause . Pressing Pause willhalt the playback at its current position. This button will continue to toggle back and forth between Play and Pause asyou click. If you press St o p, instead o f just pausing the music, the playback stops and the next time you press Playthe audio file plays from the beginning.
When you ro tate the emulator, the application maintains the correct state; if the audio was playing before the ro tation, itwill play after the ro tation. If the audio was stopped or paused, it will be the same after the ro tation. Similarly, if you goto the home screen and then come back, the application should be in the same state as when you left.
Let's go over the changes we just made:
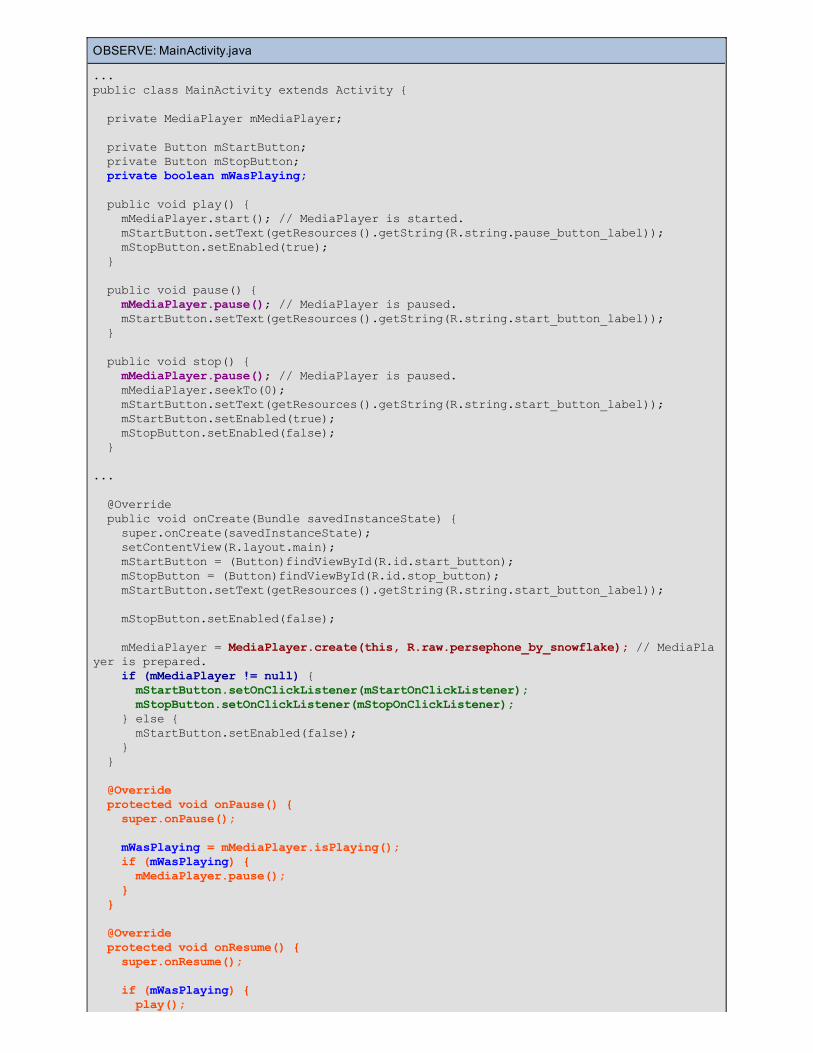
OBSERVE: MainActivity.java
...public class MainActivity extends Activity {
private MediaPlayer mMediaPlayer;
private Button mStartButton; private Button mStopButton; private boolean mWasPlaying; public void play() { mMediaPlayer.start(); // MediaPlayer is started. mStartButton.setText(getResources().getString(R.string.pause_button_label)); mStopButton.setEnabled(true); } public void pause() { mMediaPlayer.pause(); // MediaPlayer is paused. mStartButton.setText(getResources().getString(R.string.start_button_label)); } public void stop() { mMediaPlayer.pause(); // MediaPlayer is paused. mMediaPlayer.seekTo(0); mStartButton.setText(getResources().getString(R.string.start_button_label)); mStartButton.setEnabled(true); mStopButton.setEnabled(false); }
...
@Override public void onCreate(Bundle savedInstanceState) { super.onCreate(savedInstanceState); setContentView(R.layout.main); mStartButton = (Button)findViewById(R.id.start_button); mStopButton = (Button)findViewById(R.id.stop_button); mStartButton.setText(getResources().getString(R.string.start_button_label));
mStopButton.setEnabled(false); mMediaPlayer = MediaPlayer.create(this, R.raw.persephone_by_snowflake); // MediaPlayer is prepared. if (mMediaPlayer != null) { mStartButton.setOnClickListener(mStartOnClickListener); mStopButton.setOnClickListener(mStopOnClickListener); } else { mStartButton.setEnabled(false); } }
@Override protected void onPause() { super.onPause();
mWasPlaying = mMediaPlayer.isPlaying(); if (mWasPlaying) { mMediaPlayer.pause(); } }
@Override protected void onResume() { super.onResume();
if (mWasPlaying) { play();
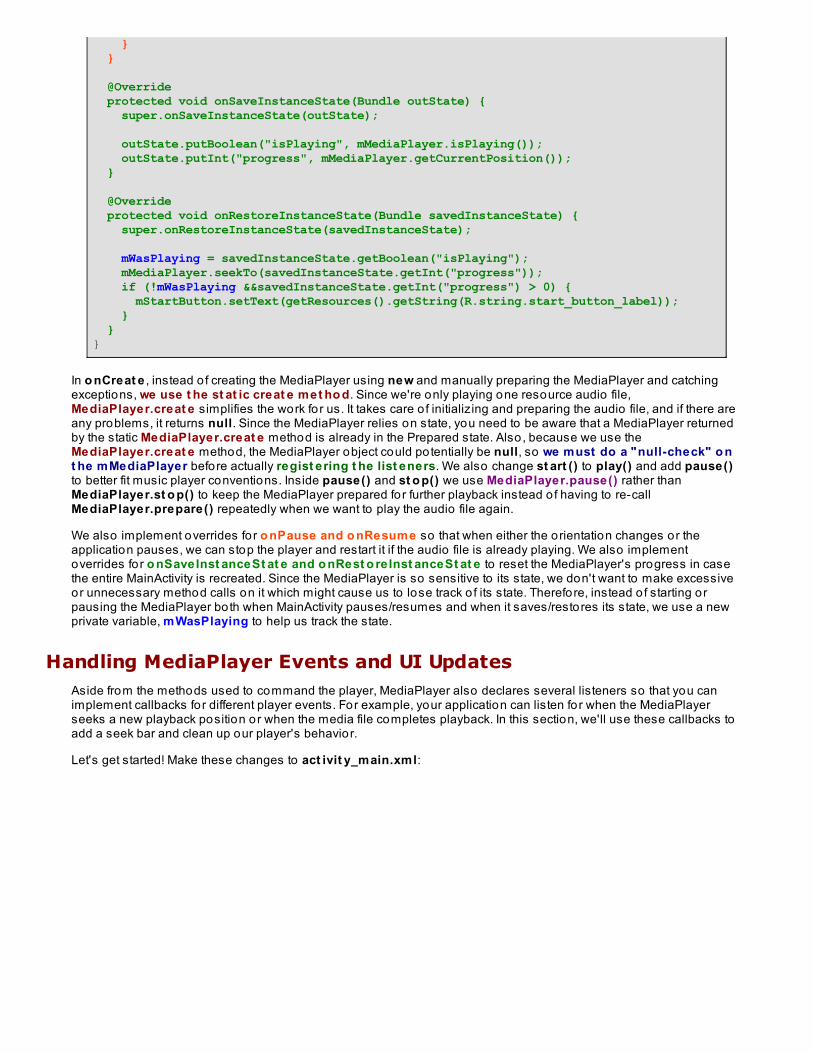
} }
@Override protected void onSaveInstanceState(Bundle outState) { super.onSaveInstanceState(outState);
outState.putBoolean("isPlaying", mMediaPlayer.isPlaying()); outState.putInt("progress", mMediaPlayer.getCurrentPosition()); }
@Override protected void onRestoreInstanceState(Bundle savedInstanceState) { super.onRestoreInstanceState(savedInstanceState);
mWasPlaying = savedInstanceState.getBoolean("isPlaying"); mMediaPlayer.seekTo(savedInstanceState.getInt("progress")); if (!mWasPlaying &&savedInstanceState.getInt("progress") > 0) { mStartButton.setText(getResources().getString(R.string.start_button_label)); } }}
In o nCreat e , instead o f creating the MediaPlayer using new and manually preparing the MediaPlayer and catchingexceptions, we use t he st at ic creat e met ho d. Since we're only playing one resource audio file,MediaPlayer.creat e simplifies the work for us. It takes care o f initializing and preparing the audio file, and if there areany problems, it returns null. Since the MediaPlayer relies on state, you need to be aware that a MediaPlayer returnedby the static MediaPlayer.creat e method is already in the Prepared state. Also, because we use theMediaPlayer.creat e method, the MediaPlayer object could potentially be null, so we must do a "null-check" o nt he mMediaPlayer before actually regist ering t he list eners. We also change st art () to play() and add pause()to better fit music player conventions. Inside pause() and st o p() we use MediaPlayer.pause() rather thanMediaPlayer.st o p() to keep the MediaPlayer prepared for further playback instead o f having to re-callMediaPlayer.prepare() repeatedly when we want to play the audio file again.
We also implement overrides for o nPause and o nResume so that when either the orientation changes or theapplication pauses, we can stop the player and restart it if the audio file is already playing. We also implementoverrides for o nSaveInst anceSt at e and o nRest o reInst anceSt at e to reset the MediaPlayer's progress in casethe entire MainActivity is recreated. Since the MediaPlayer is so sensitive to its state, we don't want to make excessiveor unnecessary method calls on it which might cause us to lose track o f its state. Therefore, instead o f starting orpausing the MediaPlayer both when MainActivity pauses/resumes and when it saves/restores its state, we use a newprivate variable, mWasPlaying to help us track the state.
Handling MediaPlayer Events and UI UpdatesAside from the methods used to command the player, MediaPlayer also declares several listeners so that you canimplement callbacks for different player events. For example, your application can listen for when the MediaPlayerseeks a new playback position or when the media file completes playback. In this section, we'll use these callbacks toadd a seek bar and clean up our player's behavior.
Let's get started! Make these changes to act ivit y_main.xml:
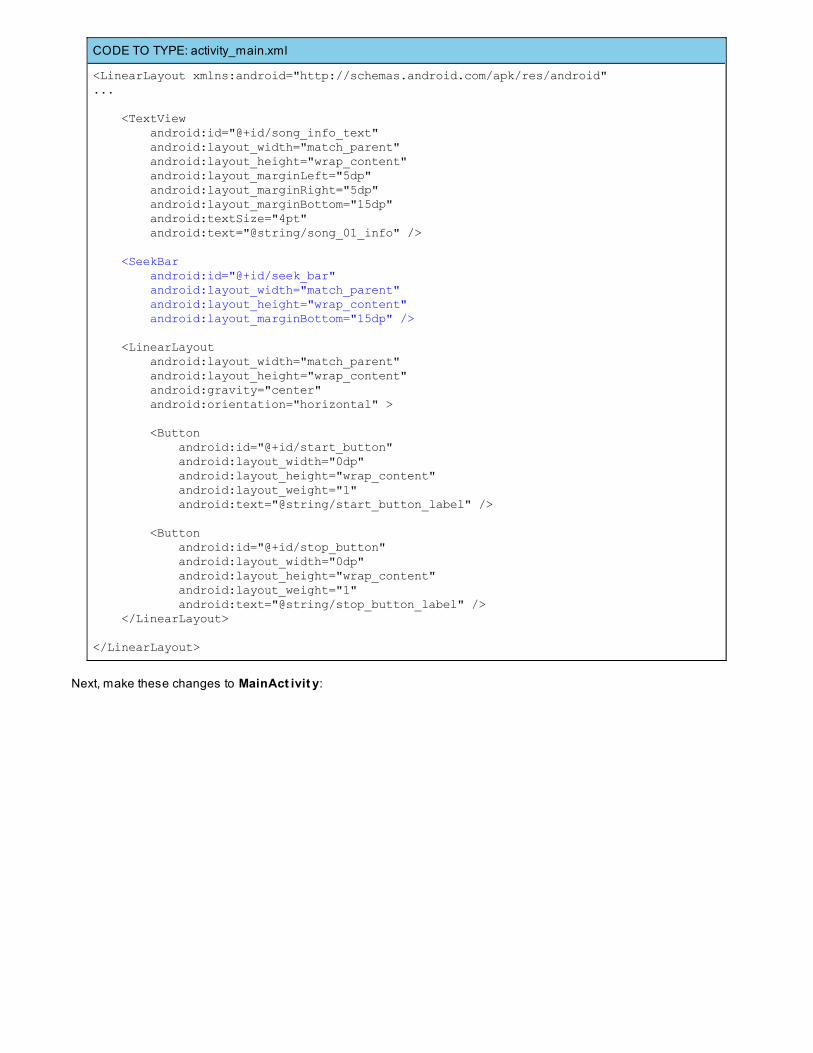
CODE TO TYPE: activity_main.xml
<LinearLayout xmlns:android="http://schemas.android.com/apk/res/android"...
<TextView android:id="@+id/song_info_text" android:layout_width="match_parent" android:layout_height="wrap_content" android:layout_marginLeft="5dp" android:layout_marginRight="5dp" android:layout_marginBottom="15dp" android:textSize="4pt" android:text="@string/song_01_info" /> <SeekBar android:id="@+id/seek_bar" android:layout_width="match_parent" android:layout_height="wrap_content" android:layout_marginBottom="15dp" />
<LinearLayout android:layout_width="match_parent" android:layout_height="wrap_content" android:gravity="center" android:orientation="horizontal" >
<Button android:id="@+id/start_button" android:layout_width="0dp" android:layout_height="wrap_content" android:layout_weight="1" android:text="@string/start_button_label" />
<Button android:id="@+id/stop_button" android:layout_width="0dp" android:layout_height="wrap_content" android:layout_weight="1" android:text="@string/stop_button_label" /> </LinearLayout>
</LinearLayout>
Next, make these changes to MainAct ivit y:
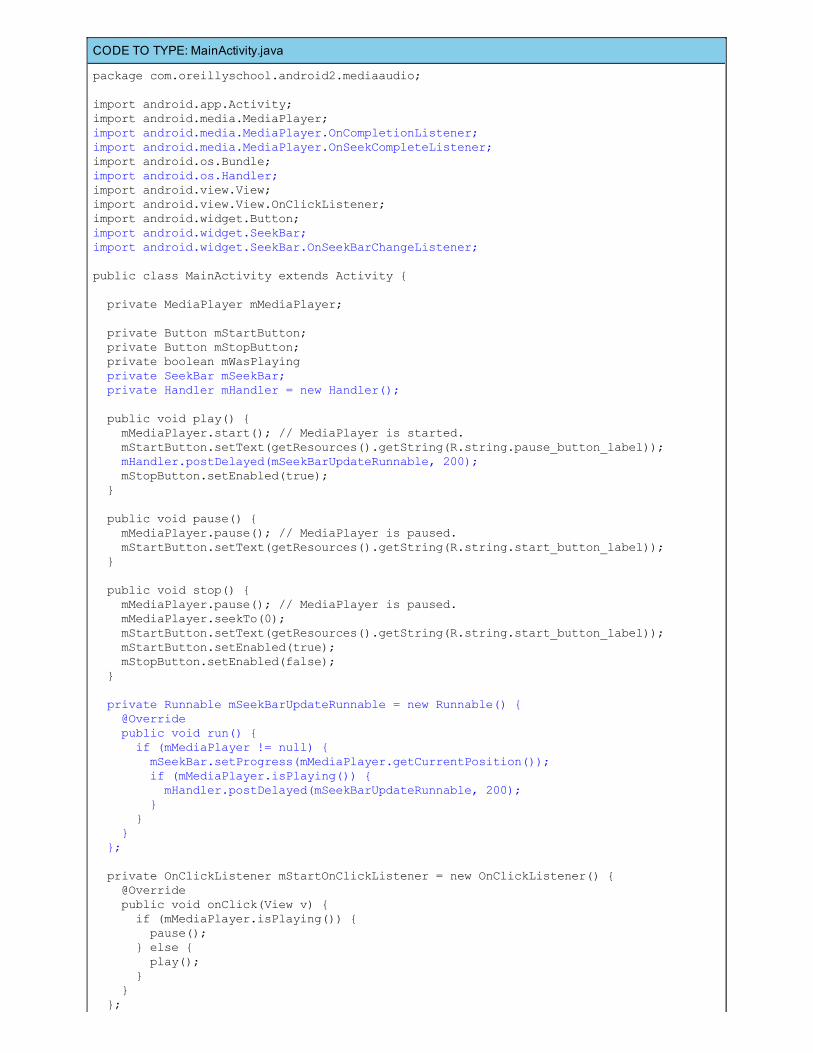
CODE TO TYPE: MainActivity.java
package com.oreillyschool.android2.mediaaudio;
import android.app.Activity;import android.media.MediaPlayer;import android.media.MediaPlayer.OnCompletionListener;import android.media.MediaPlayer.OnSeekCompleteListener;import android.os.Bundle;import android.os.Handler;import android.view.View;import android.view.View.OnClickListener;import android.widget.Button;import android.widget.SeekBar;import android.widget.SeekBar.OnSeekBarChangeListener;
public class MainActivity extends Activity {
private MediaPlayer mMediaPlayer;
private Button mStartButton; private Button mStopButton; private boolean mWasPlaying private SeekBar mSeekBar; private Handler mHandler = new Handler();
public void play() { mMediaPlayer.start(); // MediaPlayer is started. mStartButton.setText(getResources().getString(R.string.pause_button_label)); mHandler.postDelayed(mSeekBarUpdateRunnable, 200); mStopButton.setEnabled(true); }
public void pause() { mMediaPlayer.pause(); // MediaPlayer is paused. mStartButton.setText(getResources().getString(R.string.start_button_label)); }
public void stop() { mMediaPlayer.pause(); // MediaPlayer is paused. mMediaPlayer.seekTo(0); mStartButton.setText(getResources().getString(R.string.start_button_label)); mStartButton.setEnabled(true); mStopButton.setEnabled(false); }
private Runnable mSeekBarUpdateRunnable = new Runnable() { @Override public void run() { if (mMediaPlayer != null) { mSeekBar.setProgress(mMediaPlayer.getCurrentPosition()); if (mMediaPlayer.isPlaying()) { mHandler.postDelayed(mSeekBarUpdateRunnable, 200); } } } };
private OnClickListener mStartOnClickListener = new OnClickListener() { @Override public void onClick(View v) { if (mMediaPlayer.isPlaying()) { pause(); } else { play(); } } };

private OnClickListener mStopOnClickListener = new OnClickListener() { @Override public void onClick(View v) { stop(); } };
private OnSeekBarChangeListener mSeekBarChangeListener = new OnSeekBarChangeListener() { @Override public void onStartTrackingTouch(SeekBar seekBar) { }
@Override public void onStopTrackingTouch(SeekBar seekBar) { }
@Override public void onProgressChanged(SeekBar seekBar, int progress, boolean fromUser) { if (progress != mMediaPlayer.getCurrentPosition()) { mMediaPlayer.seekTo(progress); } } };
private OnCompletionListener mMediaPlayerCompletionListener = new OnCompletionListener() {
@Override public void onCompletion(MediaPlayer mp) { mStartButton.setText(getResources().getString(R.string.start_button_label)); mStopButton.setEnabled(false); } };
private OnSeekCompleteListener mMediaPlayerSeekCompleteListener = new OnSeekCompleteListener() { @Override public void onSeekComplete(MediaPlayer mp) { mSeekBar.setProgress(mp.getCurrentPosition()); } };
@Override public void onCreate(Bundle savedInstanceState) { super.onCreate(savedInstanceState); setContentView(R.layout.activity_main); mStartButton = (Button)findViewById(R.id.start_button); mStopButton = (Button)findViewById(R.id.stop_button); mSeekBar = (SeekBar)findViewById(R.id.seek_bar); mStartButton.setText(getResources().getString(R.string.start_button_label)); mStopButton.setEnabled(false);
mMediaPlayer = MediaPlayer.create(this, R.raw.persephone_by_snowflake); // MediaPlayer is prepared. if (mMediaPlayer != null) { mStartButton.setOnClickListener(mStartOnClickListener); mStopButton.setOnClickListener(mStopOnClickListener); mSeekBar.setMax(mMediaPlayer.getDuration()); mSeekBar.setProgress(0); mSeekBar.setOnSeekBarChangeListener(mSeekBarChangeListener); mMediaPlayer.setOnSeekCompleteListener(mMediaPlayerSeekCompleteListener); mMediaPlayer.setOnCompletionListener(mMediaPlayerCompletionListener); } else { mStartButton.setEnabled(false); } }
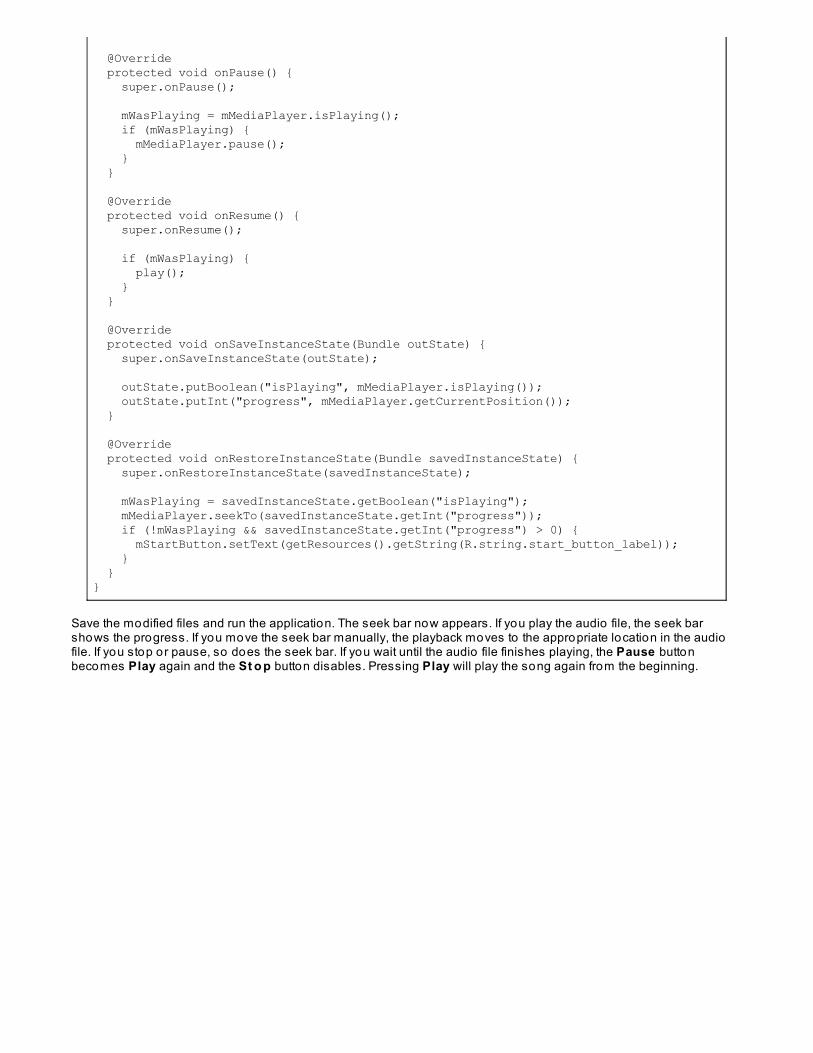
@Override protected void onPause() { super.onPause();
mWasPlaying = mMediaPlayer.isPlaying(); if (mWasPlaying) { mMediaPlayer.pause(); } }
@Override protected void onResume() { super.onResume();
if (mWasPlaying) { play(); } }
@Override protected void onSaveInstanceState(Bundle outState) { super.onSaveInstanceState(outState);
outState.putBoolean("isPlaying", mMediaPlayer.isPlaying()); outState.putInt("progress", mMediaPlayer.getCurrentPosition()); }
@Override protected void onRestoreInstanceState(Bundle savedInstanceState) { super.onRestoreInstanceState(savedInstanceState);
mWasPlaying = savedInstanceState.getBoolean("isPlaying"); mMediaPlayer.seekTo(savedInstanceState.getInt("progress")); if (!mWasPlaying && savedInstanceState.getInt("progress") > 0) { mStartButton.setText(getResources().getString(R.string.start_button_label)); } }}
Save the modified files and run the application. The seek bar now appears. If you play the audio file, the seek barshows the progress. If you move the seek bar manually, the playback moves to the appropriate location in the audiofile. If you stop or pause, so does the seek bar. If you wait until the audio file finishes playing, the Pause buttonbecomes Play again and the St o p button disables. Pressing Play will play the song again from the beginning.
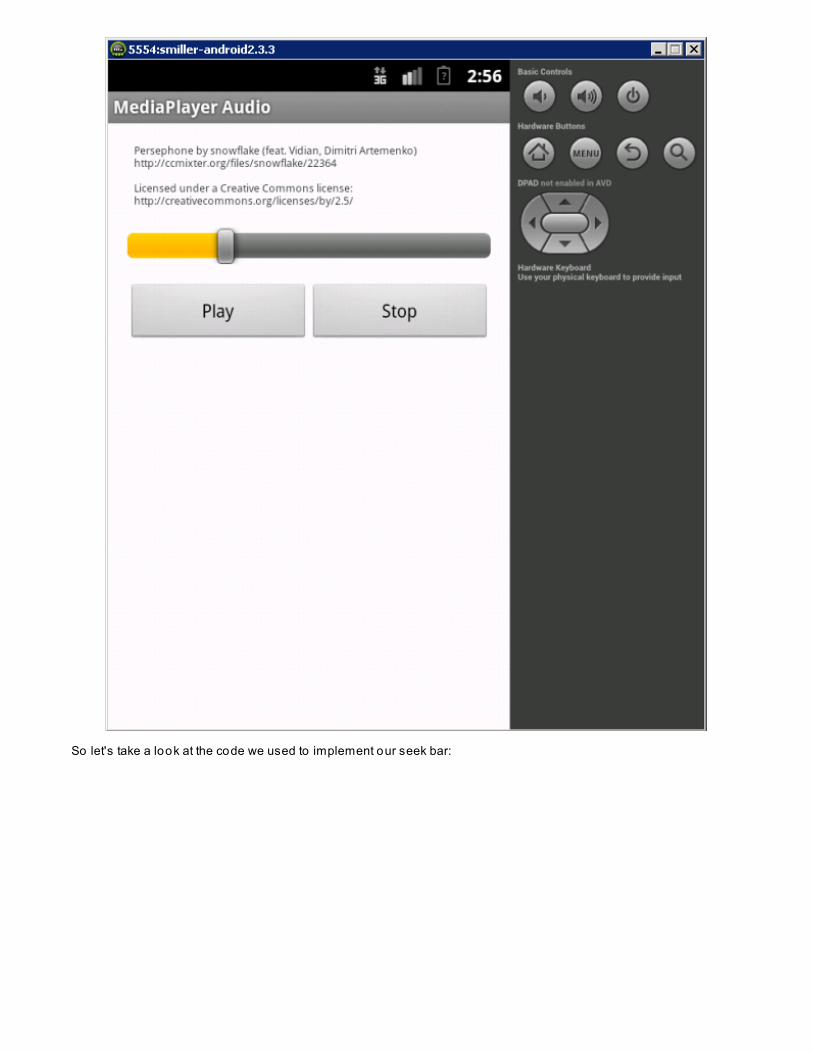
So let's take a look at the code we used to implement our seek bar:
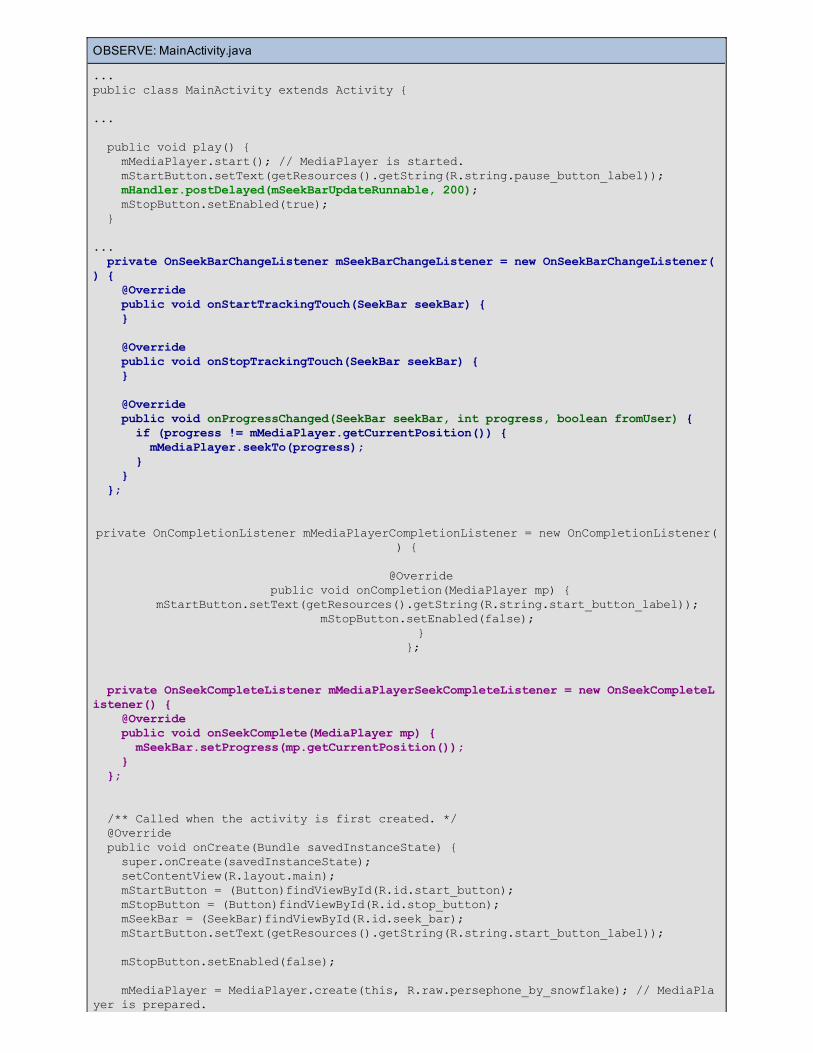
OBSERVE: MainActivity.java
...public class MainActivity extends Activity {
...
public void play() { mMediaPlayer.start(); // MediaPlayer is started. mStartButton.setText(getResources().getString(R.string.pause_button_label)); mHandler.postDelayed(mSeekBarUpdateRunnable, 200); mStopButton.setEnabled(true); } ... private OnSeekBarChangeListener mSeekBarChangeListener = new OnSeekBarChangeListener() { @Override public void onStartTrackingTouch(SeekBar seekBar) { }
@Override public void onStopTrackingTouch(SeekBar seekBar) { }
@Override public void onProgressChanged(SeekBar seekBar, int progress, boolean fromUser) { if (progress != mMediaPlayer.getCurrentPosition()) { mMediaPlayer.seekTo(progress); } } };
private OnCompletionListener mMediaPlayerCompletionListener = new OnCompletionListener(
) {
@Override public void onCompletion(MediaPlayer mp) {
mStartButton.setText(getResources().getString(R.string.start_button_label)); mStopButton.setEnabled(false);
} };
private OnSeekCompleteListener mMediaPlayerSeekCompleteListener = new OnSeekCompleteListener() { @Override public void onSeekComplete(MediaPlayer mp) { mSeekBar.setProgress(mp.getCurrentPosition()); } };
/** Called when the activity is first created. */ @Override public void onCreate(Bundle savedInstanceState) { super.onCreate(savedInstanceState); setContentView(R.layout.main); mStartButton = (Button)findViewById(R.id.start_button); mStopButton = (Button)findViewById(R.id.stop_button); mSeekBar = (SeekBar)findViewById(R.id.seek_bar); mStartButton.setText(getResources().getString(R.string.start_button_label));
mStopButton.setEnabled(false);
mMediaPlayer = MediaPlayer.create(this, R.raw.persephone_by_snowflake); // MediaPlayer is prepared.
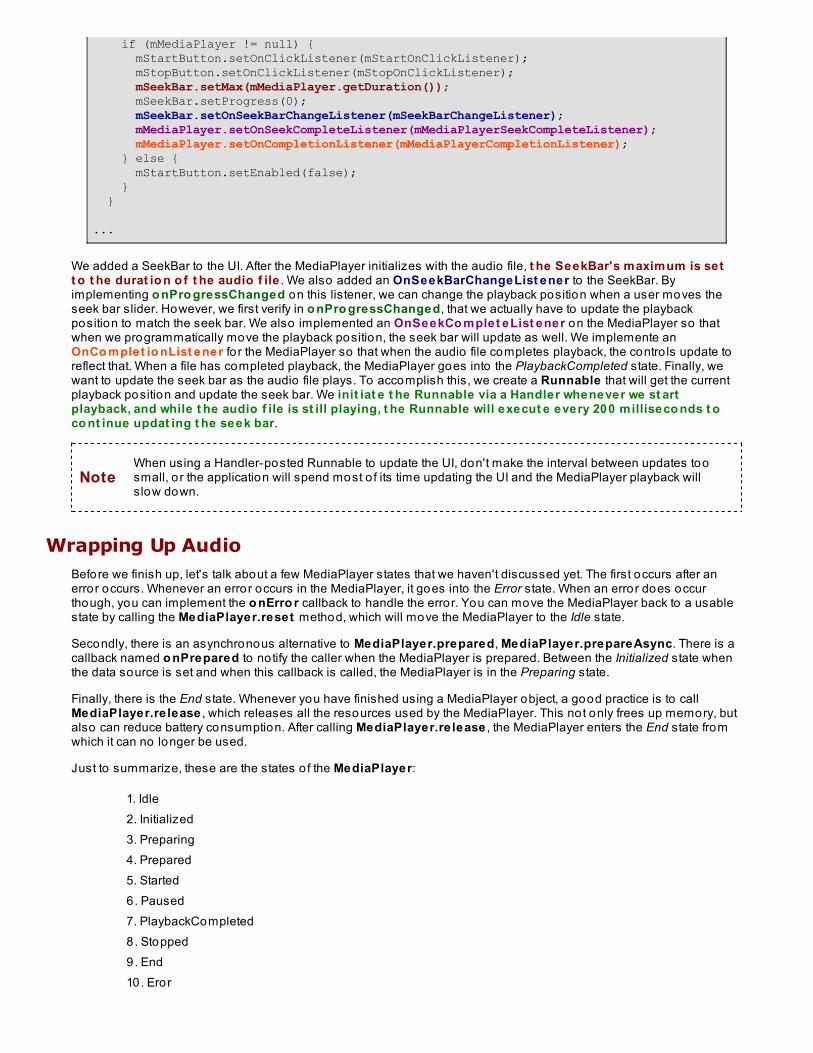
if (mMediaPlayer != null) { mStartButton.setOnClickListener(mStartOnClickListener); mStopButton.setOnClickListener(mStopOnClickListener); mSeekBar.setMax(mMediaPlayer.getDuration()); mSeekBar.setProgress(0); mSeekBar.setOnSeekBarChangeListener(mSeekBarChangeListener); mMediaPlayer.setOnSeekCompleteListener(mMediaPlayerSeekCompleteListener); mMediaPlayer.setOnCompletionListener(mMediaPlayerCompletionListener); } else { mStartButton.setEnabled(false); } }
...
We added a SeekBar to the UI. After the MediaPlayer initializes with the audio file, t he SeekBar's maximum is sett o t he durat io n o f t he audio f ile . We also added an OnSeekBarChangeList ener to the SeekBar. Byimplementing o nPro gressChanged on this listener, we can change the playback position when a user moves theseek bar slider. However, we first verify in o nPro gressChanged, that we actually have to update the playbackposition to match the seek bar. We also implemented an OnSeekCo mplet eList ener on the MediaPlayer so thatwhen we programmatically move the playback position, the seek bar will update as well. We implemente anOnCo mplet io nList ener fo r the MediaPlayer so that when the audio file completes playback, the contro ls update toreflect that. When a file has completed playback, the MediaPlayer goes into the PlaybackCompleted state. Finally, wewant to update the seek bar as the audio file plays. To accomplish this, we create a Runnable that will get the currentplayback position and update the seek bar. We init iat e t he Runnable via a Handler whenever we st artplayback, and while t he audio f ile is st ill playing, t he Runnable will execut e every 200 milliseco nds t oco nt inue updat ing t he seek bar.
NoteWhen using a Handler-posted Runnable to update the UI, don't make the interval between updates toosmall, o r the application will spend most o f its time updating the UI and the MediaPlayer playback willslow down.
Wrapping Up AudioBefore we finish up, let's talk about a few MediaPlayer states that we haven't discussed yet. The first occurs after anerror occurs. Whenever an error occurs in the MediaPlayer, it goes into the Error state. When an error does occurthough, you can implement the o nErro r callback to handle the error. You can move the MediaPlayer back to a usablestate by calling the MediaPlayer.reset method, which will move the MediaPlayer to the Idle state.
Secondly, there is an asynchronous alternative to MediaPlayer.prepared, MediaPlayer.prepareAsync. There is acallback named o nPrepared to notify the caller when the MediaPlayer is prepared. Between the Initialized state whenthe data source is set and when this callback is called, the MediaPlayer is in the Preparing state.
Finally, there is the End state. Whenever you have finished using a MediaPlayer object, a good practice is to callMediaPlayer.re lease , which releases all the resources used by the MediaPlayer. This not only frees up memory, butalso can reduce battery consumption. After calling MediaPlayer.re lease , the MediaPlayer enters the End state fromwhich it can no longer be used.
Just to summarize, these are the states o f the MediaPlayer:
1. Idle2. Initialized3. Preparing4. Prepared5. Started6. Paused7. PlaybackCompleted8. Stopped9. End10. Eror

Now that you've had an introduction to the MediaPlayer and working with audio files, in the next lesson we'll startcovering how to play video files. See you there!
Copyright © 1998-2014 O'Reilly Media, Inc.
This work is licensed under a Creative Commons Attribution-ShareAlike 3.0 Unported License.See http://creativecommons.org/licenses/by-sa/3.0/legalcode for more information.
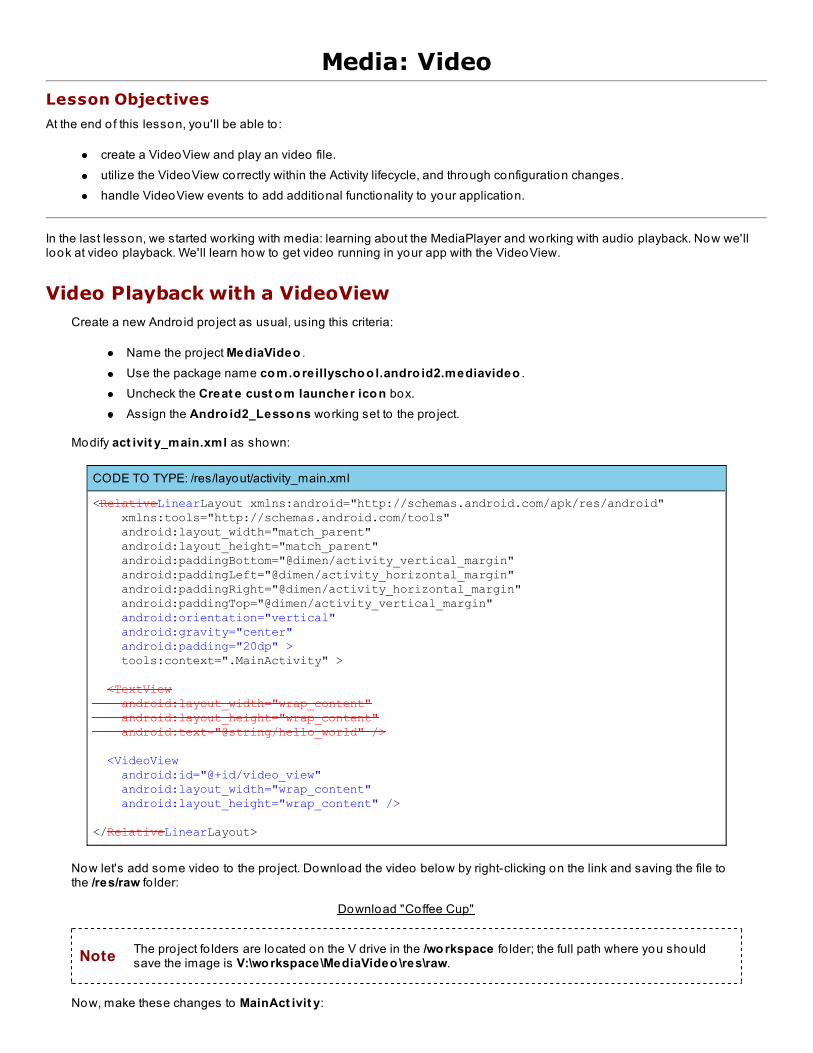
Media: VideoLesson Objectives
At the end o f this lesson, you'll be able to :
create a VideoView and play an video file.utilize the VideoView correctly within the Activity lifecycle, and through configuration changes.handle VideoView events to add additional functionality to your application.
In the last lesson, we started working with media: learning about the MediaPlayer and working with audio playback. Now we'lllook at video playback. We'll learn how to get video running in your app with the VideoView.
Video Playback with a VideoViewCreate a new Andro id pro ject as usual, using this criteria:
Name the pro ject MediaVideo .Use the package name co m.o reillyscho o l.andro id2.mediavideo .Uncheck the Creat e cust o m launcher ico n box.Assign the Andro id2_Lesso ns working set to the pro ject.
Modify act ivit y_main.xml as shown:
CODE TO TYPE: /res/layout/activity_main.xml
<RelativeLinearLayout xmlns:android="http://schemas.android.com/apk/res/android" xmlns:tools="http://schemas.android.com/tools" android:layout_width="match_parent" android:layout_height="match_parent" android:paddingBottom="@dimen/activity_vertical_margin" android:paddingLeft="@dimen/activity_horizontal_margin" android:paddingRight="@dimen/activity_horizontal_margin" android:paddingTop="@dimen/activity_vertical_margin" android:orientation="vertical" android:gravity="center" android:padding="20dp" > tools:context=".MainActivity" >
<TextView android:layout_width="wrap_content" android:layout_height="wrap_content" android:text="@string/hello_world" />
<VideoView android:id="@+id/video_view" android:layout_width="wrap_content" android:layout_height="wrap_content" />
</RelativeLinearLayout>
Now let's add some video to the pro ject. Download the video below by right-clicking on the link and saving the file tothe /res/raw fo lder:
Download "Coffee Cup"
Note The pro ject fo lders are located on the V drive in the /wo rkspace fo lder; the full path where you shouldsave the image is V:\wo rkspace\MediaVideo \res\raw.
Now, make these changes to MainAct ivit y:
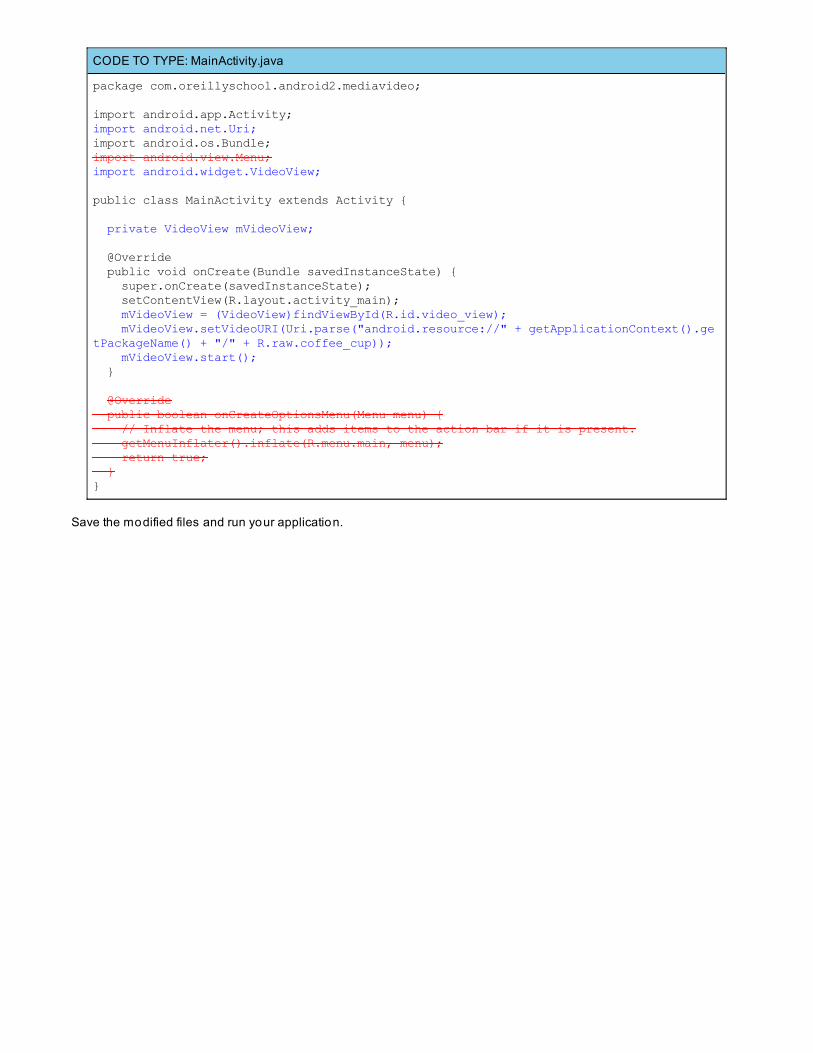
CODE TO TYPE: MainActivity.java
package com.oreillyschool.android2.mediavideo;
import android.app.Activity;import android.net.Uri;import android.os.Bundle;import android.view.Menu;import android.widget.VideoView;
public class MainActivity extends Activity {
private VideoView mVideoView;
@Override public void onCreate(Bundle savedInstanceState) { super.onCreate(savedInstanceState); setContentView(R.layout.activity_main); mVideoView = (VideoView)findViewById(R.id.video_view); mVideoView.setVideoURI(Uri.parse("android.resource://" + getApplicationContext().getPackageName() + "/" + R.raw.coffee_cup)); mVideoView.start(); }
@Override public boolean onCreateOptionsMenu(Menu menu) { // Inflate the menu; this adds items to the action bar if it is present. getMenuInflater().inflate(R.menu.main, menu); return true; }}
Save the modified files and run your application.
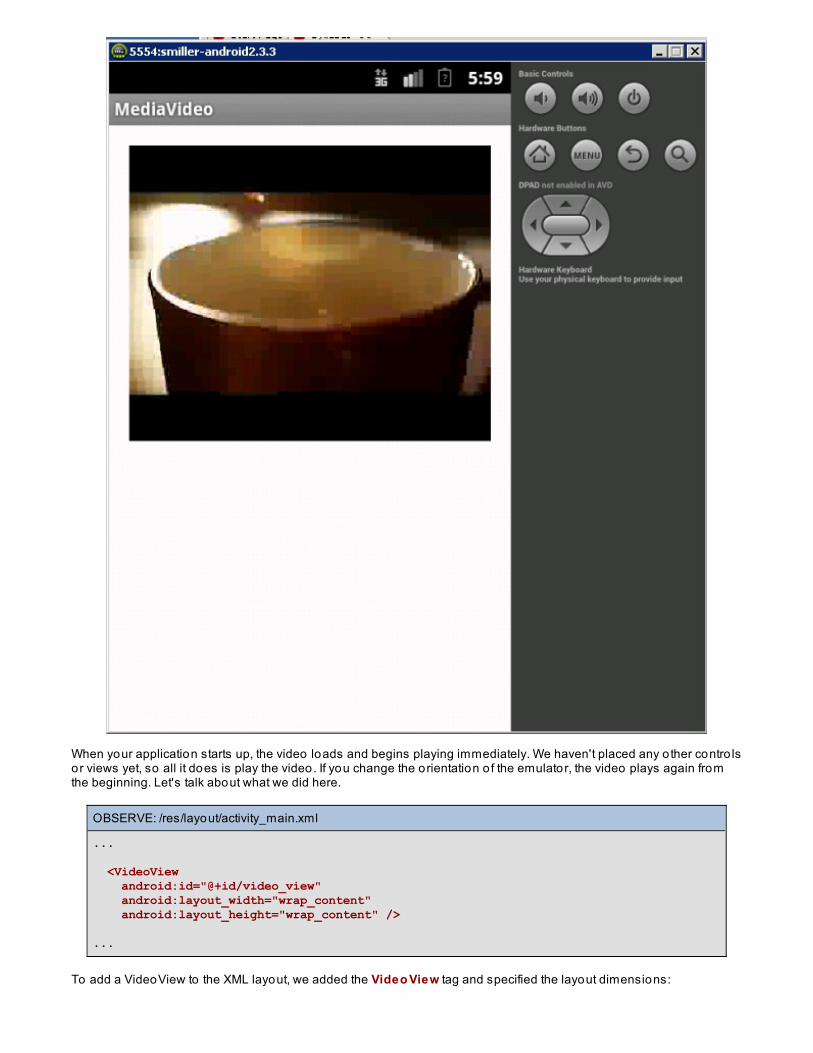
When your application starts up, the video loads and begins playing immediately. We haven't placed any o ther contro lsor views yet, so all it does is play the video. If you change the orientation o f the emulator, the video plays again fromthe beginning. Let's talk about what we did here.
OBSERVE: /res/layout/activity_main.xml
... <VideoView android:id="@+id/video_view" android:layout_width="wrap_content" android:layout_height="wrap_content" />
...
To add a VideoView to the XML layout, we added the Video View tag and specified the layout dimensions:

OBSERVE: MainActivity.java
...public class MainActivity extends Activity {
private VideoView mVideoView;
/** Called when the activity is first created. */ @Override public void onCreate(Bundle savedInstanceState) { super.onCreate(savedInstanceState); setContentView(R.layout.main); mVideoView = (VideoView)findViewById(R.id.video_view); mVideoView.setVideoURI(Uri.parse("android.resource://" + getApplicationContext().getPackageName() + "/" + R.raw.angel_of_peace)); mVideoView.start(); }}
In the MainAct ivit y class, we actually set the source for the VideoView. You can specify the source by a String path orby a Uri object, using either Video View.set Video Pat h o r Video View.set Video URI. Here we used a Uri o bjectf o r t he raw reso urce t hat we do wnlo aded previo usly.Then we called Video View.st art () to play the video. Thevideo will begin to play again when we change ro tation. Since we haven't implemented any state saving/restoringbehavior, when the orientation changes o nCreat e will run again, restarting the video.
The Andro id convention for embedded resource file paths is "andro id.resource://[package]/[res id]", where "[package]"is the application package name (such as com.oreillyschoo l.andro id2.mediavideo) and "[res id]" is the id generated inthe R.java file that identifies the resource (such as "R.raw.coffee_cup").
NoteThe video format we are displaying is H.263, which has the .3gp extension. When video is played in yourAndro id application, make sure that it is in a format supported by Andro id. For a list o f supported formats,see the Andro id Developer Documentation.
Adding a MediaController to a VideoViewNow that video appears in our application, we'll want to give our users some contro l over the video playback. To dothis, we'll provide a MediaContro ller, which contains conventional playback contro ls: play/pause, fo rward, and rewind.Let's get started.
Add the fo llowing changes to MainAct ivit y:
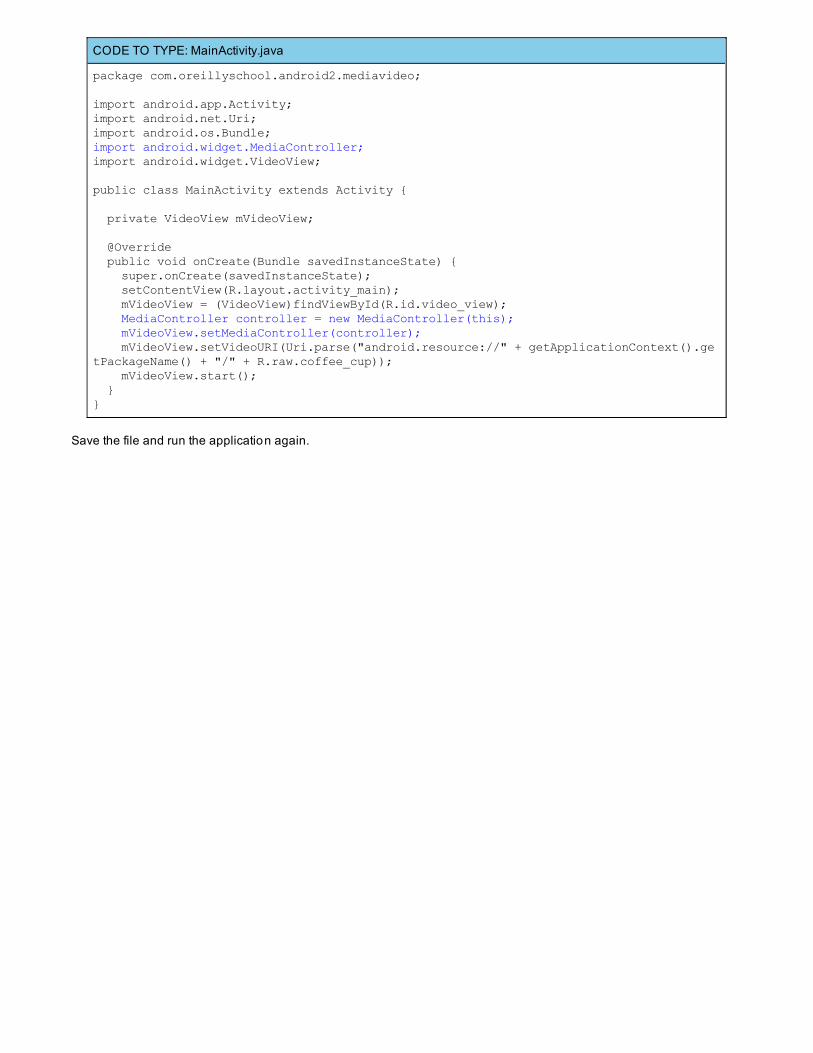
CODE TO TYPE: MainActivity.java
package com.oreillyschool.android2.mediavideo;
import android.app.Activity;import android.net.Uri;import android.os.Bundle;import android.widget.MediaController;import android.widget.VideoView;
public class MainActivity extends Activity {
private VideoView mVideoView;
@Override public void onCreate(Bundle savedInstanceState) { super.onCreate(savedInstanceState); setContentView(R.layout.activity_main); mVideoView = (VideoView)findViewById(R.id.video_view); MediaController controller = new MediaController(this); mVideoView.setMediaController(controller); mVideoView.setVideoURI(Uri.parse("android.resource://" + getApplicationContext().getPackageName() + "/" + R.raw.coffee_cup)); mVideoView.start(); }}
Save the file and run the application again.
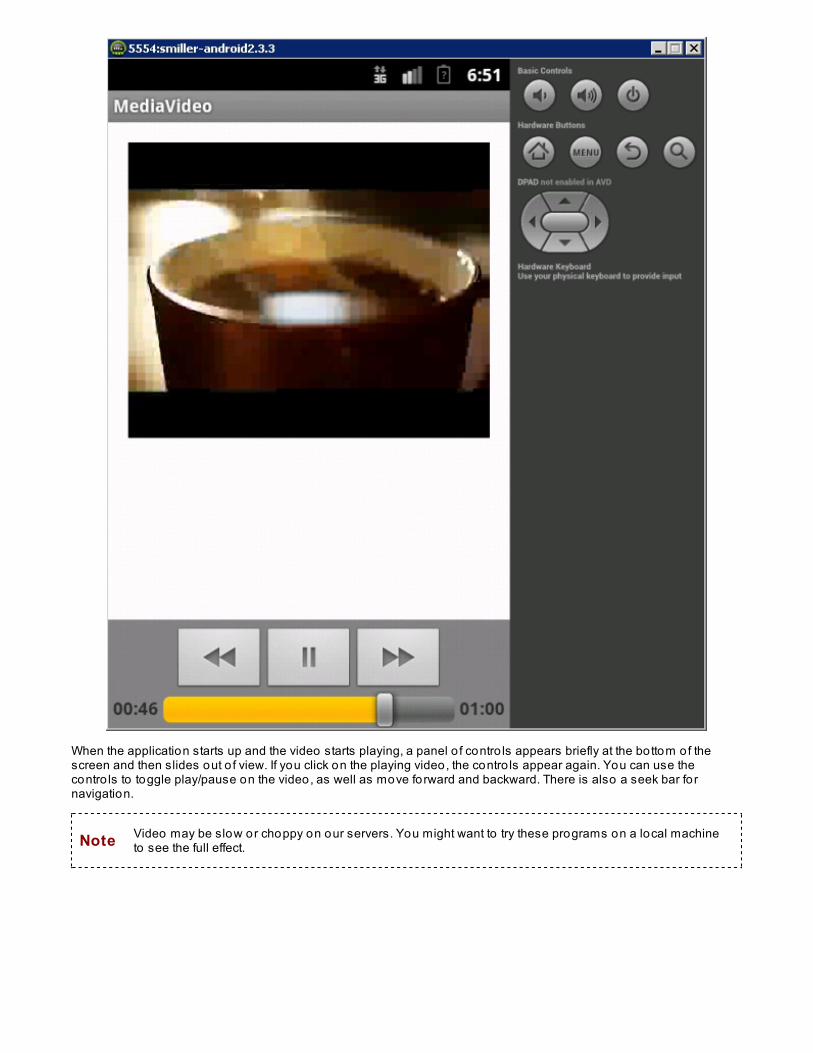
When the application starts up and the video starts playing, a panel o f contro ls appears briefly at the bottom of thescreen and then slides out o f view. If you click on the playing video, the contro ls appear again. You can use thecontro ls to toggle play/pause on the video, as well as move forward and backward. There is also a seek bar fo rnavigation.
Note Video may be slow or choppy on our servers. You might want to try these programs on a local machineto see the full effect.

OBSERVE: MainActivity.java
@Override public void onCreate(Bundle savedInstanceState) { super.onCreate(savedInstanceState); setContentView(R.layout.activity_main); mVideoView = (VideoView)findViewById(R.id.video_view); MediaController controller = new MediaController(this); mVideoView.setMediaController(controller); mVideoView.setVideoURI(Uri.parse("android.resource://" + getApplicationContext().getPackageName() + "/" + R.raw.coffee_cup)); mVideoView.start(); }}
Here we creat e a new MediaCo nt ro ller o bject wit h t he current Co nt ext and then callVideo Player.set MediaCo nt ro ller wit h t his inst ance .
VideoView Events and MethodsThe VideoView class provides methods for contro lling playback programmatically, as well as callbacks for differentevents that you can use to add more functionality to your application. Let's explore some of these methods andcallbacks.
First, we'll grab a couple more videos to add to our pro ject. Right-click on each o f the links below and save the files tothe /res/raw fo lder:
Download "Angel o f Peace"
Download "Window Blinds"
Next, make these changes to st rings.xml:
CODE TO TYPE: /res/values/strings.xml
<?xml version="1.0" encoding="utf-8"?><resources>
<string name="app_name">MediaVideo</string> <string name="action_settings">Settings</string> <string name="hello_world">Hello World!</string> <string name="loop_label">Loop</string> <string name="next_label">Next</string> <string name="previous_label">Previous</string> <string name="size_text_format">%1$dx%2$d</string>
</resources>
Now make these changes to act ivit y_main.xml:
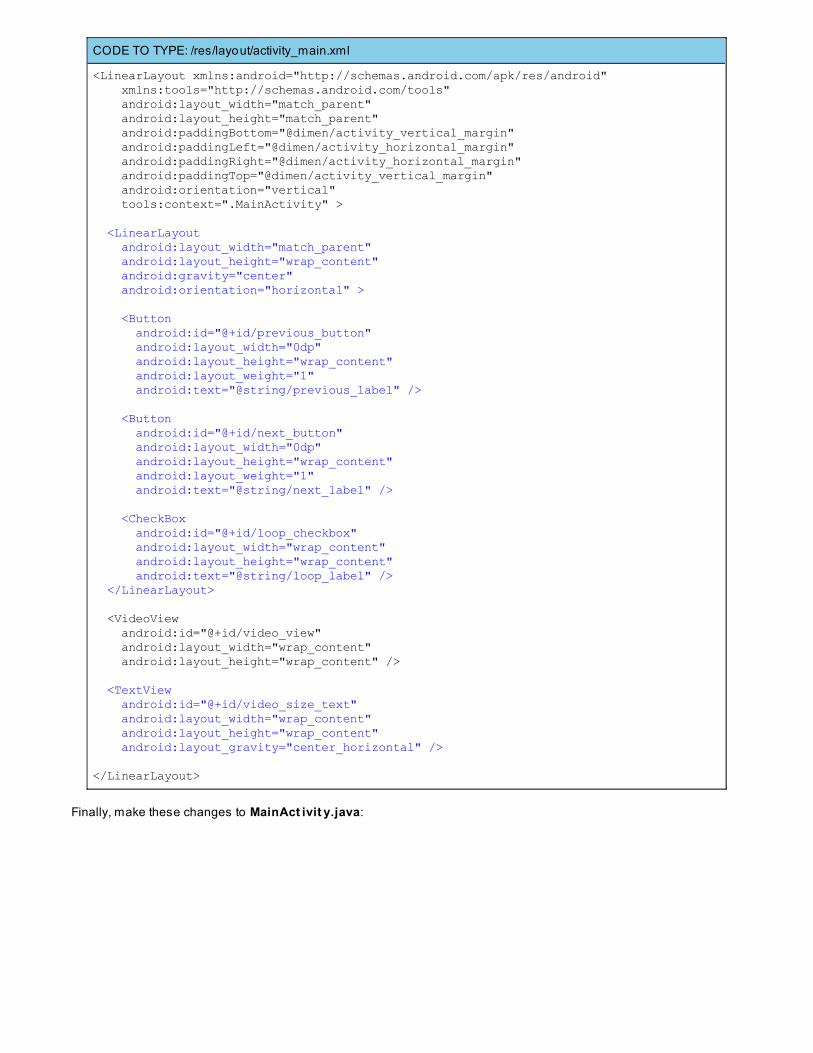
CODE TO TYPE: /res/layout/activity_main.xml
<LinearLayout xmlns:android="http://schemas.android.com/apk/res/android" xmlns:tools="http://schemas.android.com/tools" android:layout_width="match_parent" android:layout_height="match_parent" android:paddingBottom="@dimen/activity_vertical_margin" android:paddingLeft="@dimen/activity_horizontal_margin" android:paddingRight="@dimen/activity_horizontal_margin" android:paddingTop="@dimen/activity_vertical_margin" android:orientation="vertical" tools:context=".MainActivity" >
<LinearLayout android:layout_width="match_parent" android:layout_height="wrap_content" android:gravity="center" android:orientation="horizontal" >
<Button android:id="@+id/previous_button" android:layout_width="0dp" android:layout_height="wrap_content" android:layout_weight="1" android:text="@string/previous_label" />
<Button android:id="@+id/next_button" android:layout_width="0dp" android:layout_height="wrap_content" android:layout_weight="1" android:text="@string/next_label" />
<CheckBox android:id="@+id/loop_checkbox" android:layout_width="wrap_content" android:layout_height="wrap_content" android:text="@string/loop_label" /> </LinearLayout>
<VideoView android:id="@+id/video_view" android:layout_width="wrap_content" android:layout_height="wrap_content" />
<TextView android:id="@+id/video_size_text" android:layout_width="wrap_content" android:layout_height="wrap_content" android:layout_gravity="center_horizontal" />
</LinearLayout>
Finally, make these changes to MainAct ivit y.java:
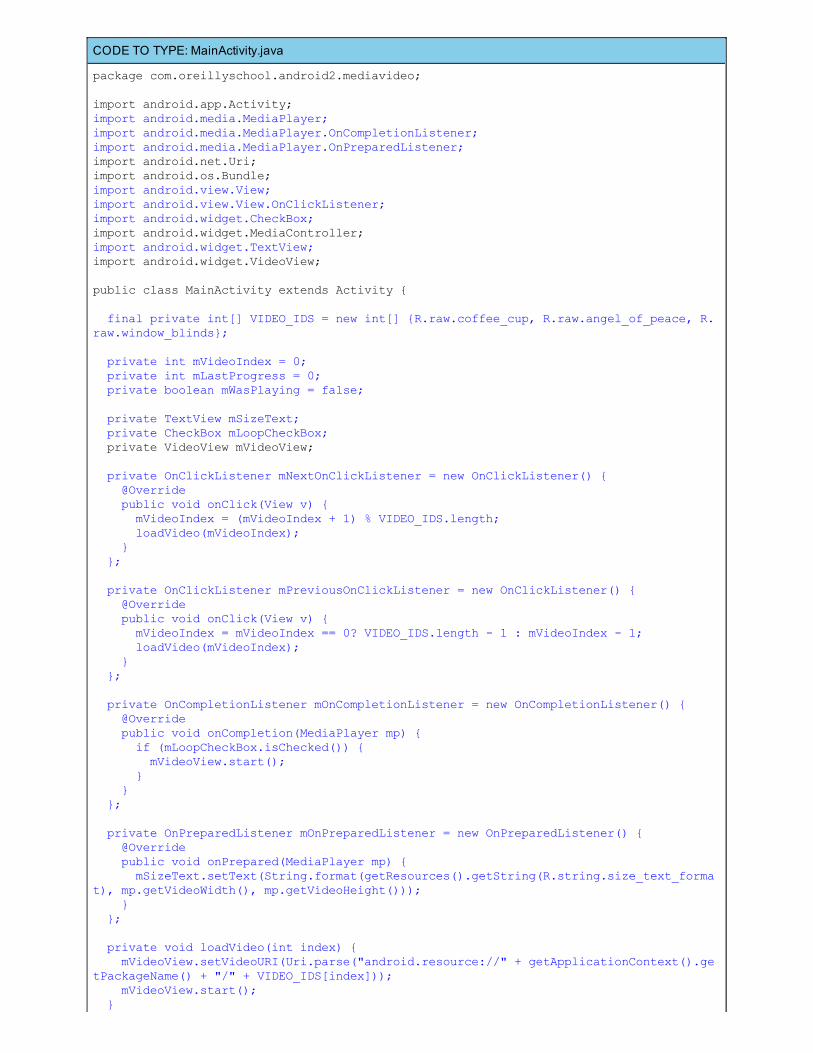
CODE TO TYPE: MainActivity.java
package com.oreillyschool.android2.mediavideo;
import android.app.Activity;import android.media.MediaPlayer;import android.media.MediaPlayer.OnCompletionListener;import android.media.MediaPlayer.OnPreparedListener;import android.net.Uri;import android.os.Bundle;import android.view.View;import android.view.View.OnClickListener;import android.widget.CheckBox;import android.widget.MediaController;import android.widget.TextView;import android.widget.VideoView;
public class MainActivity extends Activity {
final private int[] VIDEO_IDS = new int[] {R.raw.coffee_cup, R.raw.angel_of_peace, R.raw.window_blinds}; private int mVideoIndex = 0; private int mLastProgress = 0; private boolean mWasPlaying = false; private TextView mSizeText; private CheckBox mLoopCheckBox; private VideoView mVideoView; private OnClickListener mNextOnClickListener = new OnClickListener() { @Override public void onClick(View v) { mVideoIndex = (mVideoIndex + 1) % VIDEO_IDS.length; loadVideo(mVideoIndex); } }; private OnClickListener mPreviousOnClickListener = new OnClickListener() { @Override public void onClick(View v) { mVideoIndex = mVideoIndex == 0? VIDEO_IDS.length - 1 : mVideoIndex - 1; loadVideo(mVideoIndex); } }; private OnCompletionListener mOnCompletionListener = new OnCompletionListener() { @Override public void onCompletion(MediaPlayer mp) { if (mLoopCheckBox.isChecked()) { mVideoView.start(); } } };
private OnPreparedListener mOnPreparedListener = new OnPreparedListener() { @Override public void onPrepared(MediaPlayer mp) { mSizeText.setText(String.format(getResources().getString(R.string.size_text_format), mp.getVideoWidth(), mp.getVideoHeight())); } }; private void loadVideo(int index) { mVideoView.setVideoURI(Uri.parse("android.resource://" + getApplicationContext().getPackageName() + "/" + VIDEO_IDS[index])); mVideoView.start(); }
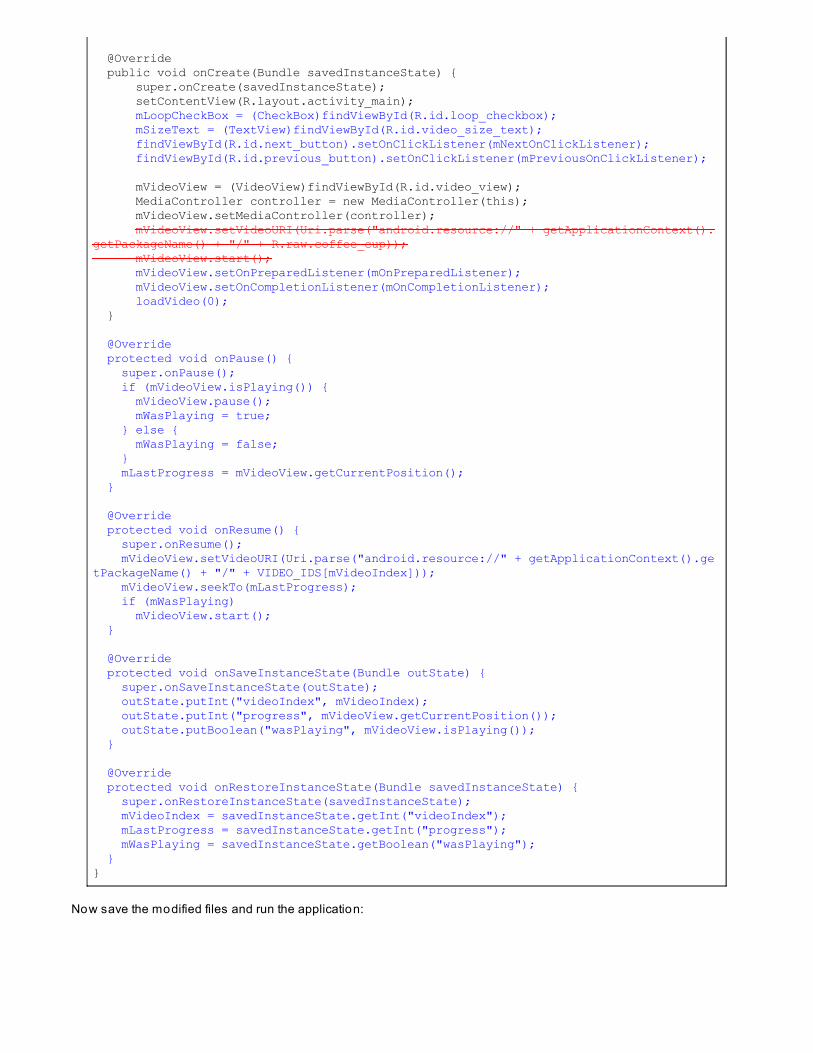
@Override public void onCreate(Bundle savedInstanceState) { super.onCreate(savedInstanceState); setContentView(R.layout.activity_main); mLoopCheckBox = (CheckBox)findViewById(R.id.loop_checkbox); mSizeText = (TextView)findViewById(R.id.video_size_text); findViewById(R.id.next_button).setOnClickListener(mNextOnClickListener); findViewById(R.id.previous_button).setOnClickListener(mPreviousOnClickListener); mVideoView = (VideoView)findViewById(R.id.video_view); MediaController controller = new MediaController(this); mVideoView.setMediaController(controller); mVideoView.setVideoURI(Uri.parse("android.resource://" + getApplicationContext().getPackageName() + "/" + R.raw.coffee_cup)); mVideoView.start(); mVideoView.setOnPreparedListener(mOnPreparedListener); mVideoView.setOnCompletionListener(mOnCompletionListener); loadVideo(0); }
@Override protected void onPause() { super.onPause(); if (mVideoView.isPlaying()) { mVideoView.pause(); mWasPlaying = true; } else { mWasPlaying = false; } mLastProgress = mVideoView.getCurrentPosition(); } @Override protected void onResume() { super.onResume(); mVideoView.setVideoURI(Uri.parse("android.resource://" + getApplicationContext().getPackageName() + "/" + VIDEO_IDS[mVideoIndex])); mVideoView.seekTo(mLastProgress); if (mWasPlaying) mVideoView.start(); } @Override protected void onSaveInstanceState(Bundle outState) { super.onSaveInstanceState(outState); outState.putInt("videoIndex", mVideoIndex); outState.putInt("progress", mVideoView.getCurrentPosition()); outState.putBoolean("wasPlaying", mVideoView.isPlaying()); } @Override protected void onRestoreInstanceState(Bundle savedInstanceState) { super.onRestoreInstanceState(savedInstanceState); mVideoIndex = savedInstanceState.getInt("videoIndex"); mLastProgress = savedInstanceState.getInt("progress"); mWasPlaying = savedInstanceState.getBoolean("wasPlaying"); }}
Now save the modified files and run the application:
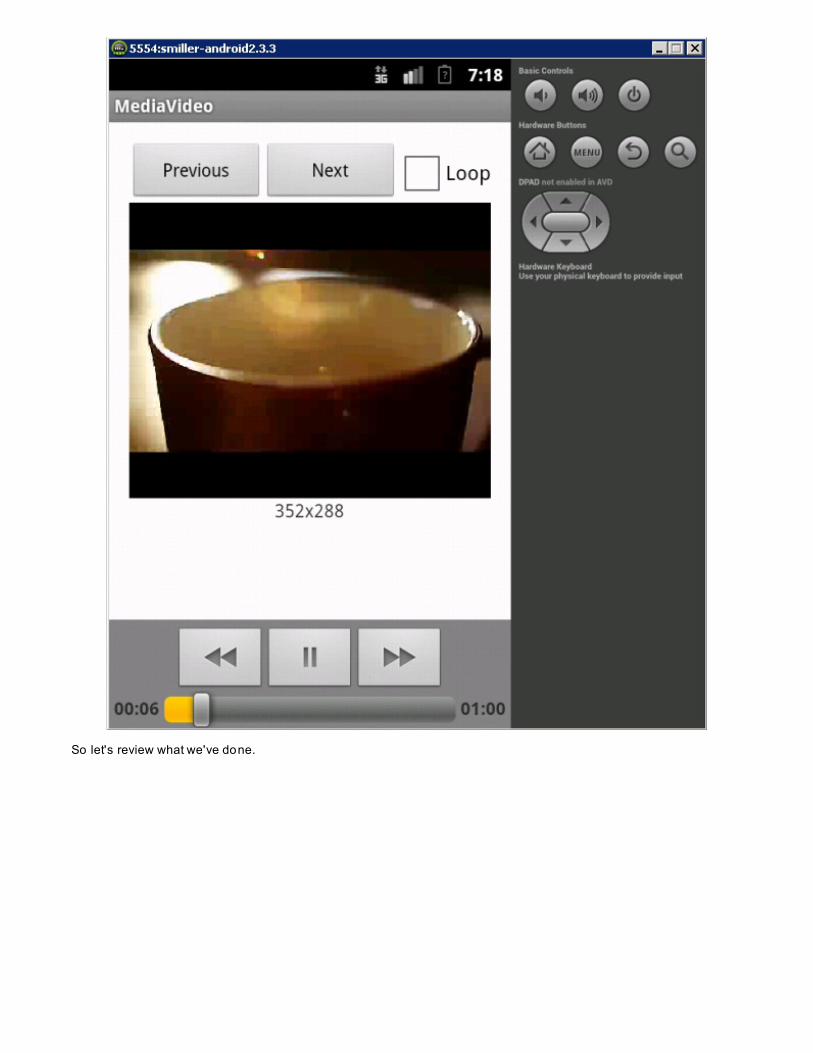
So let's review what we've done.
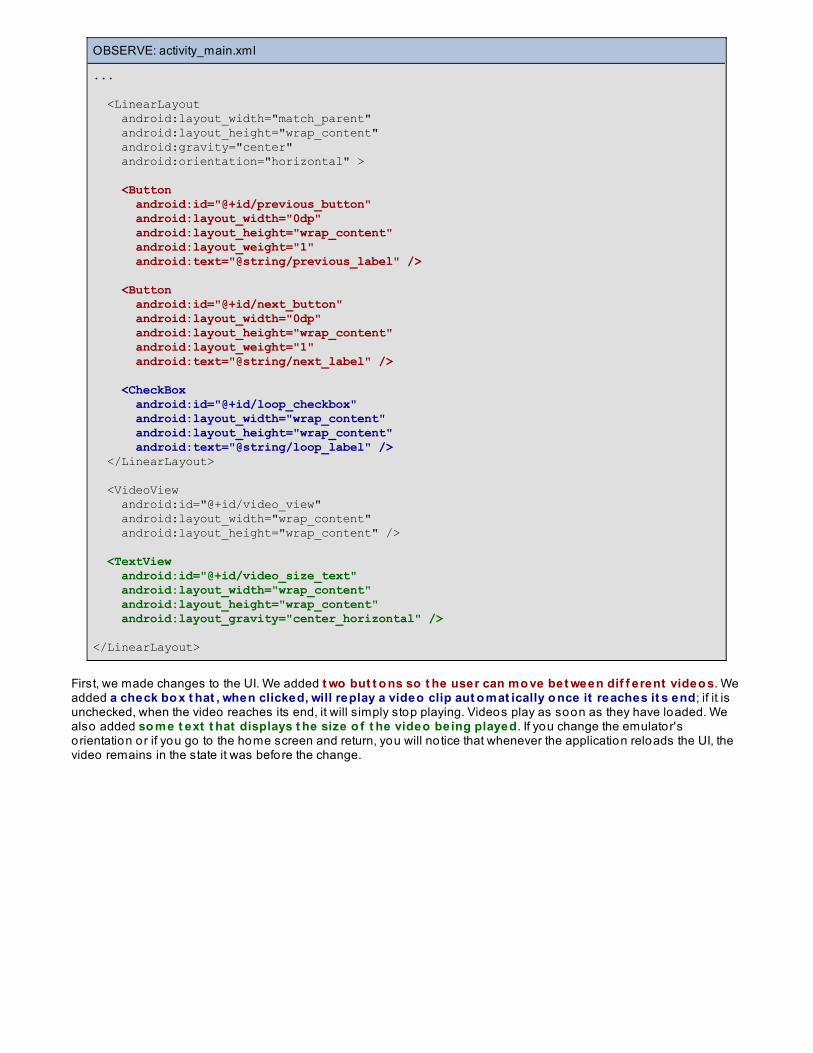
OBSERVE: activity_main.xml
...
<LinearLayout android:layout_width="match_parent" android:layout_height="wrap_content" android:gravity="center" android:orientation="horizontal" >
<Button android:id="@+id/previous_button" android:layout_width="0dp" android:layout_height="wrap_content" android:layout_weight="1" android:text="@string/previous_label" />
<Button android:id="@+id/next_button" android:layout_width="0dp" android:layout_height="wrap_content" android:layout_weight="1" android:text="@string/next_label" />
<CheckBox android:id="@+id/loop_checkbox" android:layout_width="wrap_content" android:layout_height="wrap_content" android:text="@string/loop_label" /> </LinearLayout>
<VideoView android:id="@+id/video_view" android:layout_width="wrap_content" android:layout_height="wrap_content" />
<TextView android:id="@+id/video_size_text" android:layout_width="wrap_content" android:layout_height="wrap_content" android:layout_gravity="center_horizontal" />
</LinearLayout>
First, we made changes to the UI. We added t wo but t o ns so t he user can mo ve bet ween dif f erent video s. Weadded a check bo x t hat , when clicked, will replay a video clip aut o mat ically o nce it reaches it s end; if it isunchecked, when the video reaches its end, it will simply stop playing. Videos play as soon as they have loaded. Wealso added so me t ext t hat displays t he size o f t he video being played. If you change the emulator'sorientation or if you go to the home screen and return, you will no tice that whenever the application reloads the UI, thevideo remains in the state it was before the change.
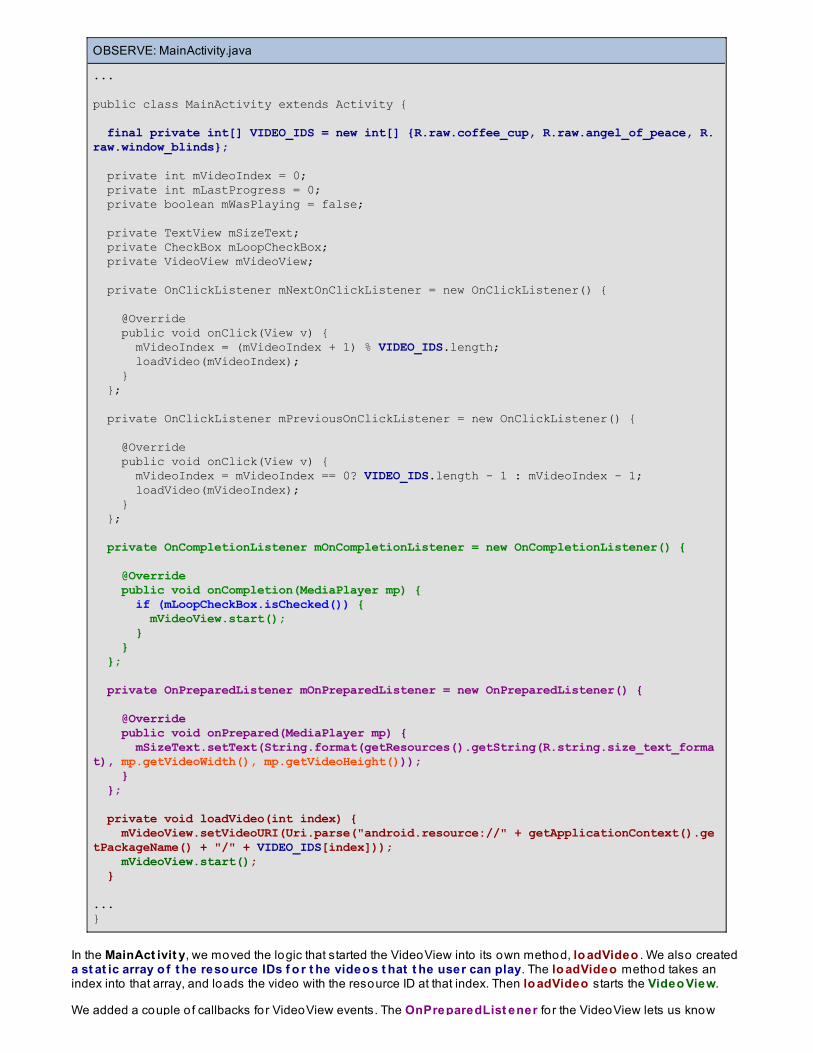
OBSERVE: MainActivity.java
...
public class MainActivity extends Activity {
final private int[] VIDEO_IDS = new int[] {R.raw.coffee_cup, R.raw.angel_of_peace, R.raw.window_blinds}; private int mVideoIndex = 0; private int mLastProgress = 0; private boolean mWasPlaying = false; private TextView mSizeText; private CheckBox mLoopCheckBox; private VideoView mVideoView; private OnClickListener mNextOnClickListener = new OnClickListener() { @Override public void onClick(View v) { mVideoIndex = (mVideoIndex + 1) % VIDEO_IDS.length; loadVideo(mVideoIndex); } }; private OnClickListener mPreviousOnClickListener = new OnClickListener() { @Override public void onClick(View v) { mVideoIndex = mVideoIndex == 0? VIDEO_IDS.length - 1 : mVideoIndex - 1; loadVideo(mVideoIndex); } }; private OnCompletionListener mOnCompletionListener = new OnCompletionListener() { @Override public void onCompletion(MediaPlayer mp) { if (mLoopCheckBox.isChecked()) { mVideoView.start(); } } };
private OnPreparedListener mOnPreparedListener = new OnPreparedListener() { @Override public void onPrepared(MediaPlayer mp) { mSizeText.setText(String.format(getResources().getString(R.string.size_text_format), mp.getVideoWidth(), mp.getVideoHeight())); } }; private void loadVideo(int index) { mVideoView.setVideoURI(Uri.parse("android.resource://" + getApplicationContext().getPackageName() + "/" + VIDEO_IDS[index])); mVideoView.start(); } ...}
In the MainAct ivit y, we moved the logic that started the VideoView into its own method, lo adVideo . We also createda st at ic array o f t he reso urce IDs f o r t he video s t hat t he user can play. The lo adVideo method takes anindex into that array, and loads the video with the resource ID at that index. Then lo adVideo starts the Video View.
We added a couple o f callbacks for VideoView events. The OnPreparedList ener fo r the VideoView lets us know

We added a couple o f callbacks for VideoView events. The OnPreparedList ener fo r the VideoView lets us knowwhen the VideoView is ready to start playback. Once the VideoView is prepared, we can look at properties o f the videoto be played. In this case, once the VideoView is prepared, we f ind o ut t he widt h and height o f t he video anddisplay that in the UI. The OnCo mplet io nList ener fo r the VideoView fires when the video playback is done. In ourcallback, we check t o det ermine whet her t he user has checked t he "Lo o p" check bo x; if they have, we startthe video again.
We also added callbacks for when MainAct ivit y pauses/resumes and saves/restores state. We added class fieldsthat ho ld the video 's index, the current playback progress, and whether the video was actually playing when the activitywas paused. Then we use the values o f those fields to make sure that, when MainAct ivit y resumes, the VideoView isonce again in the state as before the pause.
Wrapping UPIn this lesson, we learned how to display video in our application using the VideoView component. If you ever need todo advanced video playback, such as adding effects to the rendering, or you just want more contro l over the playback,you might want to look into using the MediaPlayer class and a SurfaceView to display video (though be warned thatthis method is much more complex and prone to bugs). VideoView actually uses a MediaPlayer and a SurfaceViewinternally to do its video rendering and takes care o f the more complex details. If you need simple video display,VideoView is probably the best way to go.
By now you have a good base on which to build video-enabled applications. Good luck and see you next lesson!
Copyright © 1998-2014 O'Reilly Media, Inc.
This work is licensed under a Creative Commons Attribution-ShareAlike 3.0 Unported License.See http://creativecommons.org/licenses/by-sa/3.0/legalcode for more information.
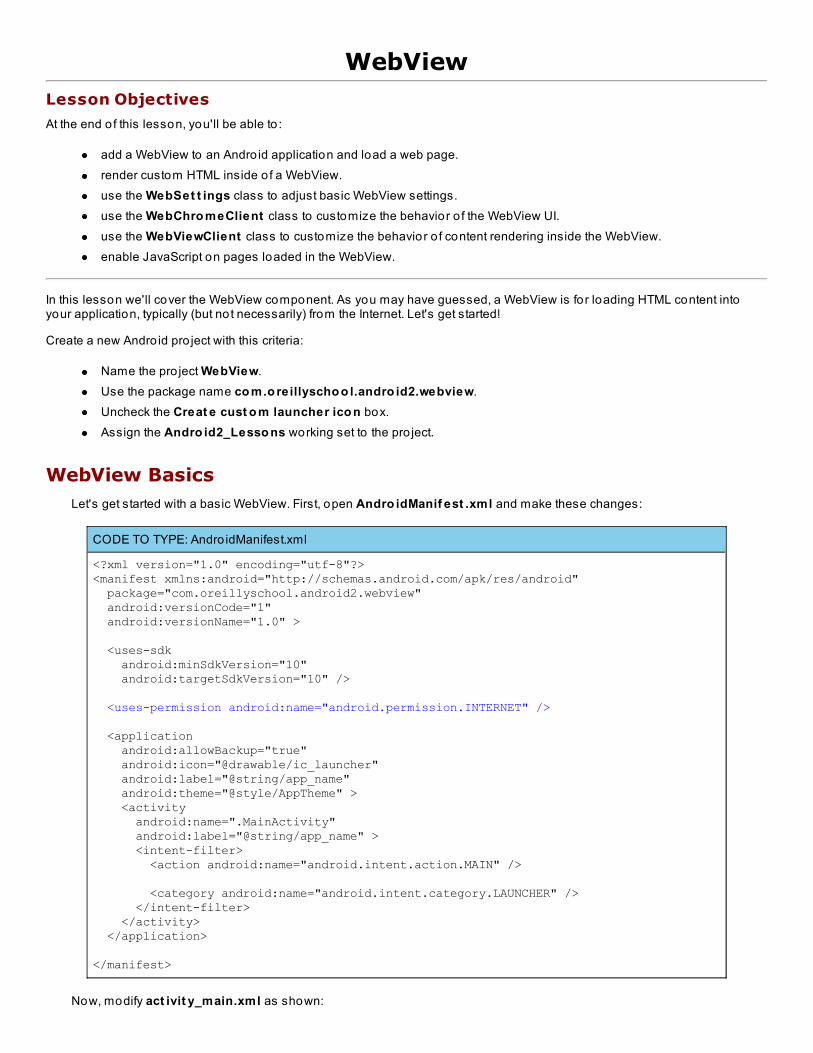
WebViewLesson Objectives
At the end o f this lesson, you'll be able to :
add a WebView to an Andro id application and load a web page.render custom HTML inside o f a WebView.use the WebSet t ings class to adjust basic WebView settings.use the WebChro meClient class to customize the behavior o f the WebView UI.use the WebViewClient class to customize the behavior o f content rendering inside the WebView.enable JavaScript on pages loaded in the WebView.
In this lesson we'll cover the WebView component. As you may have guessed, a WebView is fo r loading HTML content intoyour application, typically (but not necessarily) from the Internet. Let's get started!
Create a new Andro id pro ject with this criteria:
Name the pro ject WebView.Use the package name co m.o reillyscho o l.andro id2.webview.Uncheck the Creat e cust o m launcher ico n box.Assign the Andro id2_Lesso ns working set to the pro ject.
WebView BasicsLet's get started with a basic WebView. First, open Andro idManif est .xml and make these changes:
CODE TO TYPE: Andro idManifest.xml
<?xml version="1.0" encoding="utf-8"?><manifest xmlns:android="http://schemas.android.com/apk/res/android" package="com.oreillyschool.android2.webview" android:versionCode="1" android:versionName="1.0" > <uses-sdk android:minSdkVersion="10" android:targetSdkVersion="10" /> <uses-permission android:name="android.permission.INTERNET" /> <application android:allowBackup="true" android:icon="@drawable/ic_launcher" android:label="@string/app_name" android:theme="@style/AppTheme" > <activity android:name=".MainActivity" android:label="@string/app_name" > <intent-filter> <action android:name="android.intent.action.MAIN" /> <category android:name="android.intent.category.LAUNCHER" /> </intent-filter> </activity> </application>
</manifest>
Now, modify act ivit y_main.xml as shown:
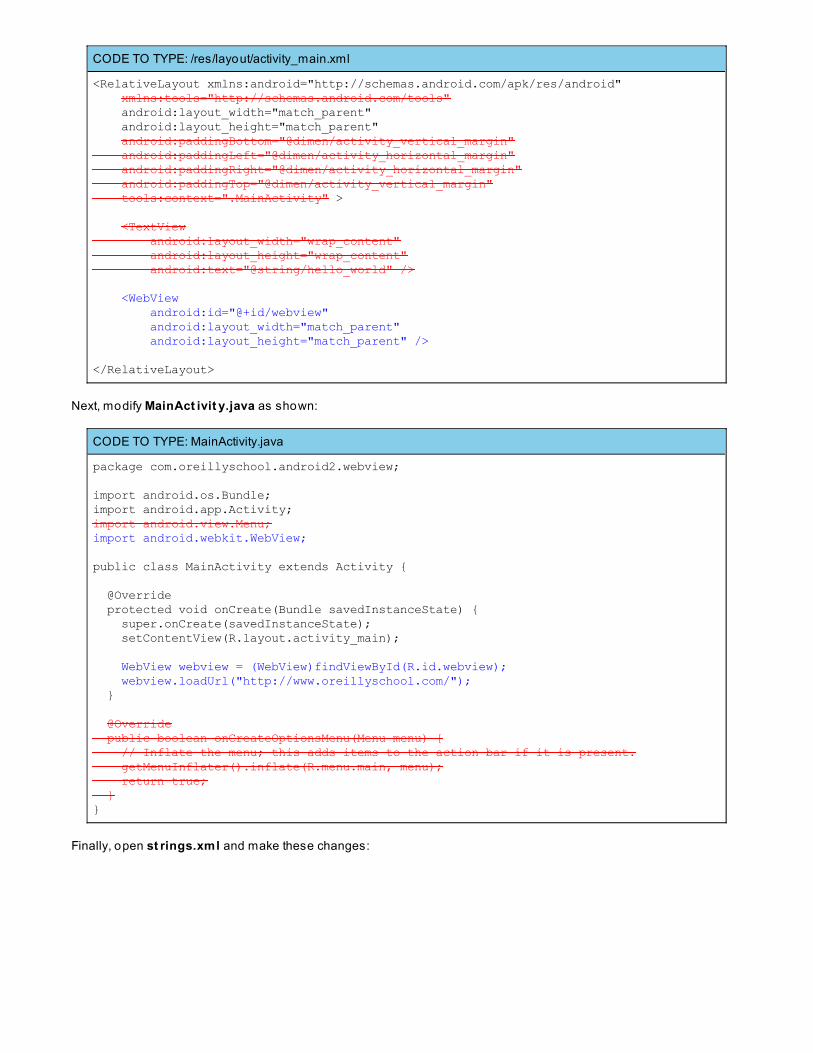
CODE TO TYPE: /res/layout/activity_main.xml
<RelativeLayout xmlns:android="http://schemas.android.com/apk/res/android" xmlns:tools="http://schemas.android.com/tools" android:layout_width="match_parent" android:layout_height="match_parent" android:paddingBottom="@dimen/activity_vertical_margin" android:paddingLeft="@dimen/activity_horizontal_margin" android:paddingRight="@dimen/activity_horizontal_margin" android:paddingTop="@dimen/activity_vertical_margin" tools:context=".MainActivity" > <TextView android:layout_width="wrap_content" android:layout_height="wrap_content" android:text="@string/hello_world" />
<WebView android:id="@+id/webview" android:layout_width="match_parent" android:layout_height="match_parent" />
</RelativeLayout>
Next, modify MainAct ivit y.java as shown:
CODE TO TYPE: MainActivity.java
package com.oreillyschool.android2.webview;
import android.os.Bundle;import android.app.Activity;import android.view.Menu;import android.webkit.WebView;
public class MainActivity extends Activity {
@Override protected void onCreate(Bundle savedInstanceState) { super.onCreate(savedInstanceState); setContentView(R.layout.activity_main); WebView webview = (WebView)findViewById(R.id.webview); webview.loadUrl("http://www.oreillyschool.com/"); } @Override public boolean onCreateOptionsMenu(Menu menu) { // Inflate the menu; this adds items to the action bar if it is present. getMenuInflater().inflate(R.menu.main, menu); return true; }}
Finally, open st rings.xml and make these changes:
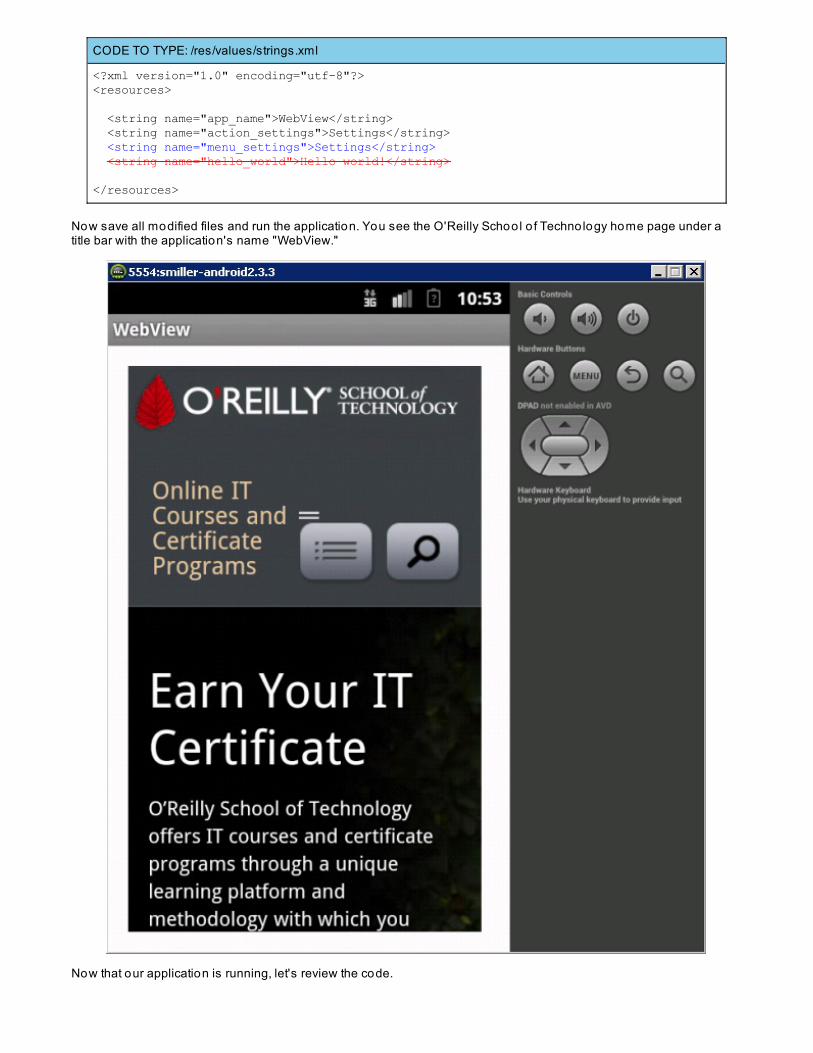
CODE TO TYPE: /res/values/strings.xml
<?xml version="1.0" encoding="utf-8"?><resources>
<string name="app_name">WebView</string> <string name="action_settings">Settings</string> <string name="menu_settings">Settings</string> <string name="hello_world">Hello world!</string> </resources>
Now save all modified files and run the application. You see the O'Reilly School o f Technology home page under atitle bar with the application's name "WebView."
Now that our application is running, let's review the code.
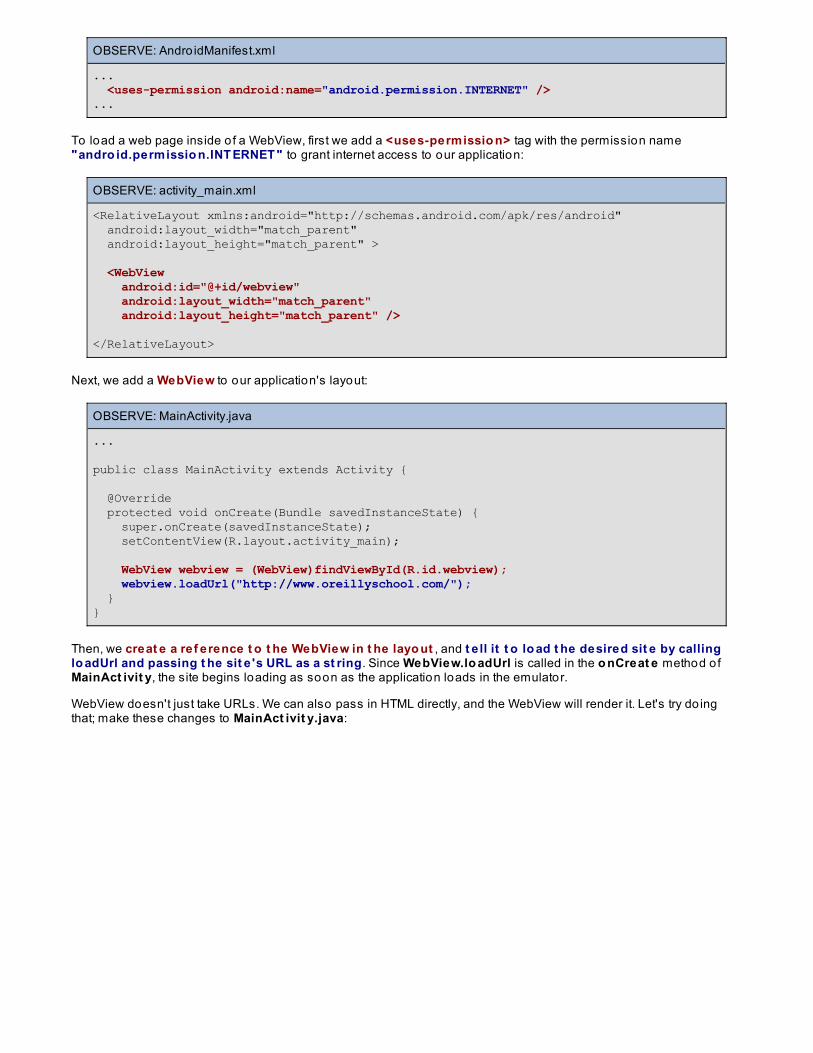
OBSERVE: Andro idManifest.xml
... <uses-permission android:name="android.permission.INTERNET" />...
To load a web page inside o f a WebView, first we add a <uses-permissio n> tag with the permission name"andro id.permissio n.INT ERNET " to grant internet access to our application:
OBSERVE: activity_main.xml
<RelativeLayout xmlns:android="http://schemas.android.com/apk/res/android" android:layout_width="match_parent" android:layout_height="match_parent" > <WebView android:id="@+id/webview" android:layout_width="match_parent" android:layout_height="match_parent" />
</RelativeLayout>
Next, we add a WebView to our application's layout:
OBSERVE: MainActivity.java
...
public class MainActivity extends Activity { @Override protected void onCreate(Bundle savedInstanceState) { super.onCreate(savedInstanceState); setContentView(R.layout.activity_main); WebView webview = (WebView)findViewById(R.id.webview); webview.loadUrl("http://www.oreillyschool.com/"); }}
Then, we creat e a ref erence t o t he WebView in t he layo ut , and t e ll it t o lo ad t he desired sit e by callinglo adUrl and passing t he sit e 's URL as a st ring. Since WebView.lo adUrl is called in the o nCreat e method o fMainAct ivit y, the site begins loading as soon as the application loads in the emulator.
WebView doesn't just take URLs. We can also pass in HTML directly, and the WebView will render it. Let's try do ingthat; make these changes to MainAct ivit y.java:
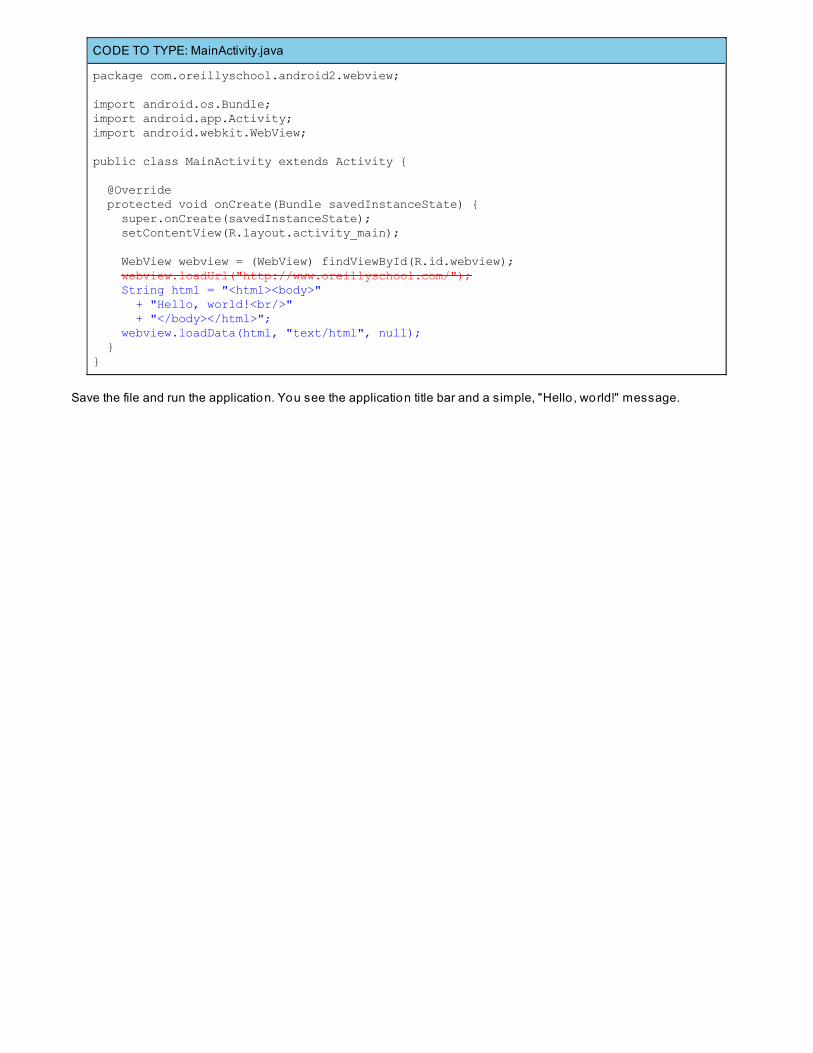
CODE TO TYPE: MainActivity.java
package com.oreillyschool.android2.webview;
import android.os.Bundle;import android.app.Activity;import android.webkit.WebView;
public class MainActivity extends Activity { @Override protected void onCreate(Bundle savedInstanceState) { super.onCreate(savedInstanceState); setContentView(R.layout.activity_main); WebView webview = (WebView) findViewById(R.id.webview); webview.loadUrl("http://www.oreillyschool.com/"); String html = "<html><body>" + "Hello, world!<br/>" + "</body></html>"; webview.loadData(html, "text/html", null); }}
Save the file and run the application. You see the application title bar and a simple, "Hello , world!" message.
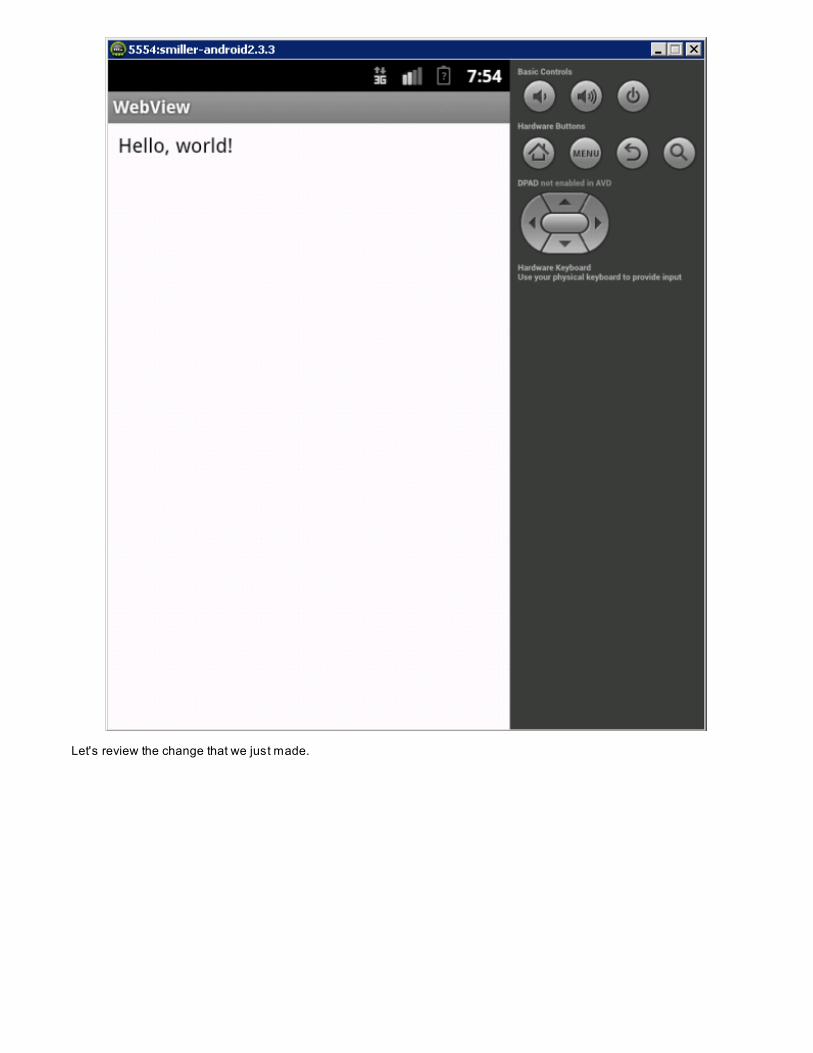
Let's review the change that we just made.
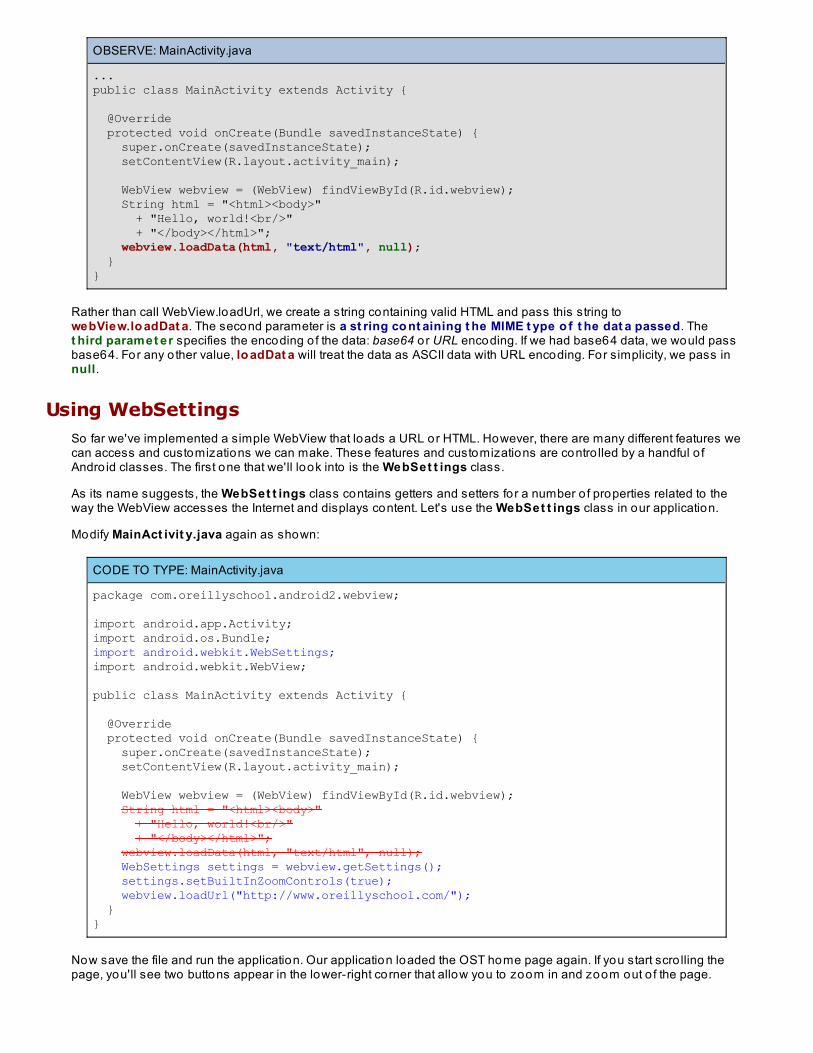
OBSERVE: MainActivity.java
...public class MainActivity extends Activity {
@Override protected void onCreate(Bundle savedInstanceState) { super.onCreate(savedInstanceState); setContentView(R.layout.activity_main); WebView webview = (WebView) findViewById(R.id.webview); String html = "<html><body>" + "Hello, world!<br/>" + "</body></html>"; webview.loadData(html, "text/html", null); }}
Rather than call WebView.loadUrl, we create a string containing valid HTML and pass this string towebView.lo adDat a. The second parameter is a st ring co nt aining t he MIME t ype o f t he dat a passed. Thet hird paramet er specifies the encoding o f the data: base64 o r URL encoding. If we had base64 data, we would passbase64. For any o ther value, lo adDat a will treat the data as ASCII data with URL encoding. For simplicity, we pass innull.
Using WebSettingsSo far we've implemented a simple WebView that loads a URL or HTML. However, there are many different features wecan access and customizations we can make. These features and customizations are contro lled by a handful o fAndro id classes. The first one that we'll look into is the WebSet t ings class.
As its name suggests, the WebSet t ings class contains getters and setters for a number o f properties related to theway the WebView accesses the Internet and displays content. Let's use the WebSet t ings class in our application.
Modify MainAct ivit y.java again as shown:
CODE TO TYPE: MainActivity.java
package com.oreillyschool.android2.webview;
import android.app.Activity;import android.os.Bundle;import android.webkit.WebSettings;import android.webkit.WebView;
public class MainActivity extends Activity {
@Override protected void onCreate(Bundle savedInstanceState) { super.onCreate(savedInstanceState); setContentView(R.layout.activity_main); WebView webview = (WebView) findViewById(R.id.webview); String html = "<html><body>" + "Hello, world!<br/>" + "</body></html>"; webview.loadData(html, "text/html", null); WebSettings settings = webview.getSettings(); settings.setBuiltInZoomControls(true); webview.loadUrl("http://www.oreillyschool.com/"); }}
Now save the file and run the application. Our application loaded the OST home page again. If you start scro lling thepage, you'll see two buttons appear in the lower-right corner that allow you to zoom in and zoom out o f the page.

Let's review what we did.
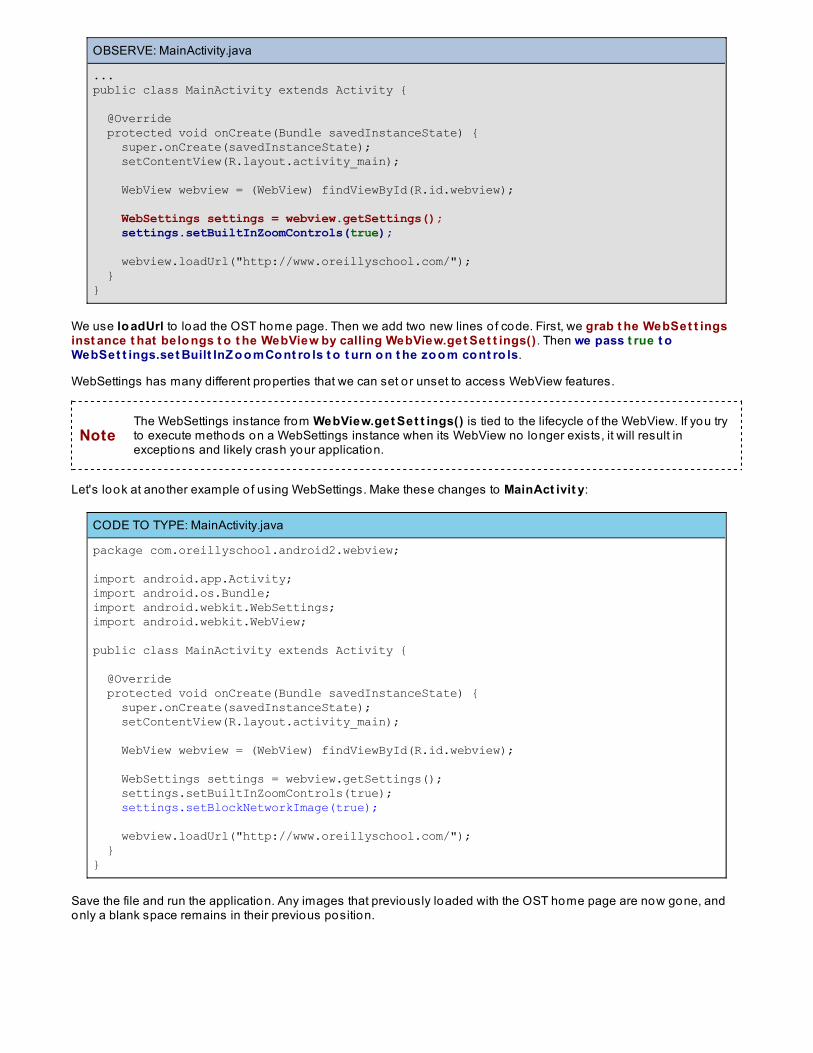
OBSERVE: MainActivity.java
...public class MainActivity extends Activity {
@Override protected void onCreate(Bundle savedInstanceState) { super.onCreate(savedInstanceState); setContentView(R.layout.activity_main); WebView webview = (WebView) findViewById(R.id.webview); WebSettings settings = webview.getSettings(); settings.setBuiltInZoomControls(true); webview.loadUrl("http://www.oreillyschool.com/"); }}
We use lo adUrl to load the OST home page. Then we add two new lines o f code. First, we grab t he WebSet t ingsinst ance t hat belo ngs t o t he WebView by calling WebView.get Set t ings() . Then we pass t rue t oWebSet t ings.set Built InZ o o mCo nt ro ls t o t urn o n t he zo o m co nt ro ls.
WebSettings has many different properties that we can set or unset to access WebView features.
NoteThe WebSettings instance from WebView.get Set t ings() is tied to the lifecycle o f the WebView. If you tryto execute methods on a WebSettings instance when its WebView no longer exists, it will result inexceptions and likely crash your application.
Let's look at another example o f using WebSettings. Make these changes to MainAct ivit y:
CODE TO TYPE: MainActivity.java
package com.oreillyschool.android2.webview;
import android.app.Activity;import android.os.Bundle;import android.webkit.WebSettings;import android.webkit.WebView;
public class MainActivity extends Activity { @Override protected void onCreate(Bundle savedInstanceState) { super.onCreate(savedInstanceState); setContentView(R.layout.activity_main); WebView webview = (WebView) findViewById(R.id.webview); WebSettings settings = webview.getSettings(); settings.setBuiltInZoomControls(true); settings.setBlockNetworkImage(true); webview.loadUrl("http://www.oreillyschool.com/"); }}
Save the file and run the application. Any images that previously loaded with the OST home page are now gone, andonly a blank space remains in their previous position.

Let's examine what we just did.
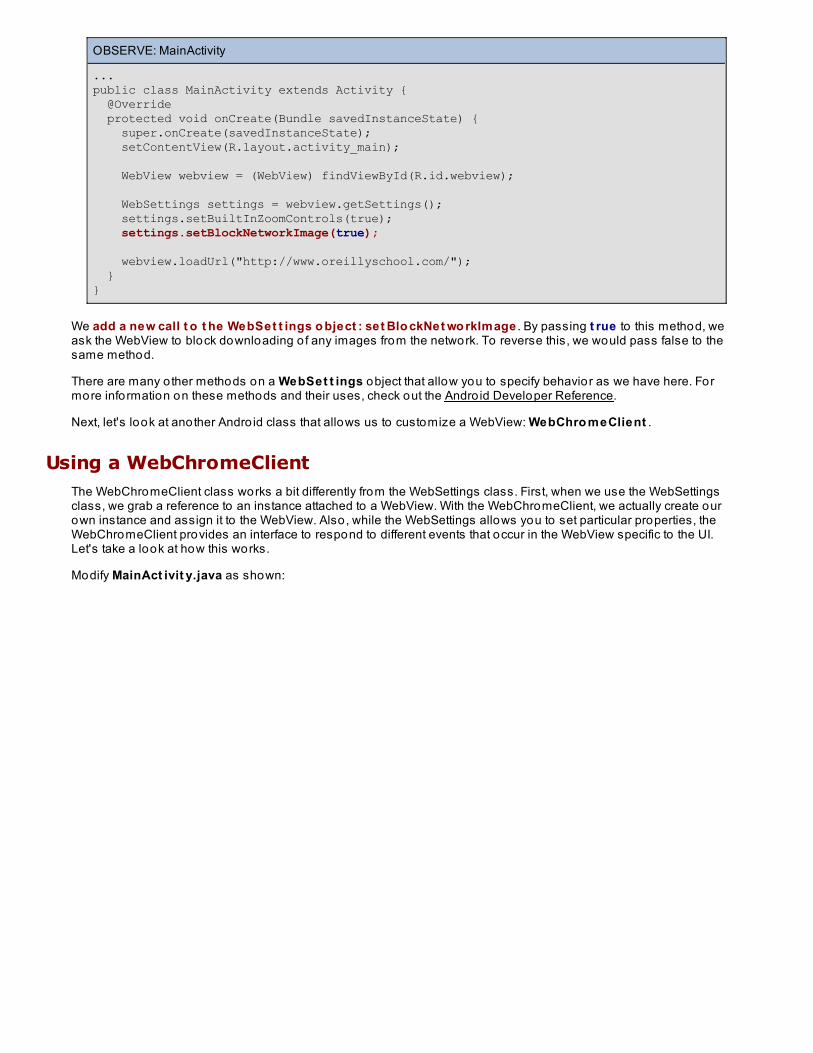
OBSERVE: MainActivity
...public class MainActivity extends Activity { @Override protected void onCreate(Bundle savedInstanceState) { super.onCreate(savedInstanceState); setContentView(R.layout.activity_main); WebView webview = (WebView) findViewById(R.id.webview); WebSettings settings = webview.getSettings(); settings.setBuiltInZoomControls(true); settings.setBlockNetworkImage(true); webview.loadUrl("http://www.oreillyschool.com/"); }}
We add a new call t o t he WebSet t ings o bject : set Blo ckNet wo rkImage . By passing t rue to this method, weask the WebView to block downloading o f any images from the network. To reverse this, we would pass false to thesame method.
There are many o ther methods on a WebSet t ings object that allow you to specify behavior as we have here. Formore information on these methods and their uses, check out the Andro id Developer Reference.
Next, let's look at another Andro id class that allows us to customize a WebView: WebChro meClient .
Using a WebChromeClientThe WebChromeClient class works a bit differently from the WebSettings class. First, when we use the WebSettingsclass, we grab a reference to an instance attached to a WebView. With the WebChromeClient, we actually create ourown instance and assign it to the WebView. Also, while the WebSettings allows you to set particular properties, theWebChromeClient provides an interface to respond to different events that occur in the WebView specific to the UI.Let's take a look at how this works.
Modify MainAct ivit y.java as shown:
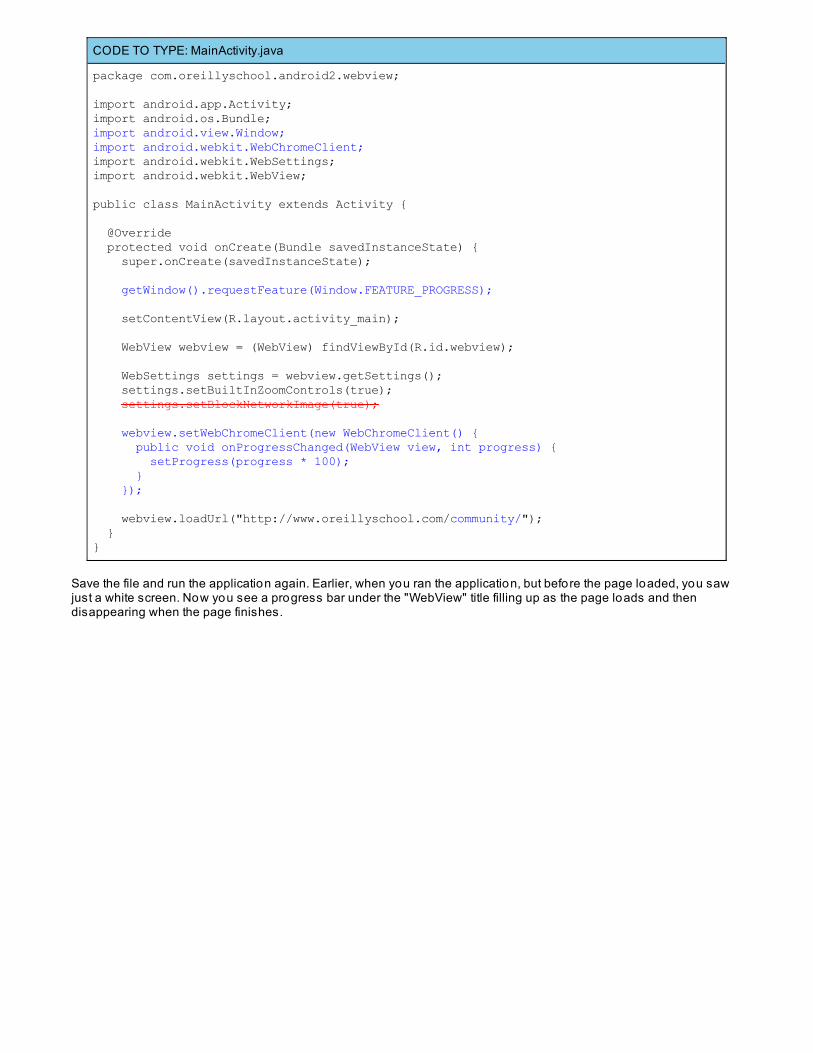
CODE TO TYPE: MainActivity.java
package com.oreillyschool.android2.webview;
import android.app.Activity;import android.os.Bundle;import android.view.Window;import android.webkit.WebChromeClient;import android.webkit.WebSettings;import android.webkit.WebView;
public class MainActivity extends Activity { @Override protected void onCreate(Bundle savedInstanceState) { super.onCreate(savedInstanceState); getWindow().requestFeature(Window.FEATURE_PROGRESS); setContentView(R.layout.activity_main); WebView webview = (WebView) findViewById(R.id.webview); WebSettings settings = webview.getSettings(); settings.setBuiltInZoomControls(true); settings.setBlockNetworkImage(true); webview.setWebChromeClient(new WebChromeClient() { public void onProgressChanged(WebView view, int progress) { setProgress(progress * 100); } }); webview.loadUrl("http://www.oreillyschool.com/community/"); }}
Save the file and run the application again. Earlier, when you ran the application, but before the page loaded, you sawjust a white screen. Now you see a progress bar under the "WebView" title filling up as the page loads and thendisappearing when the page finishes.
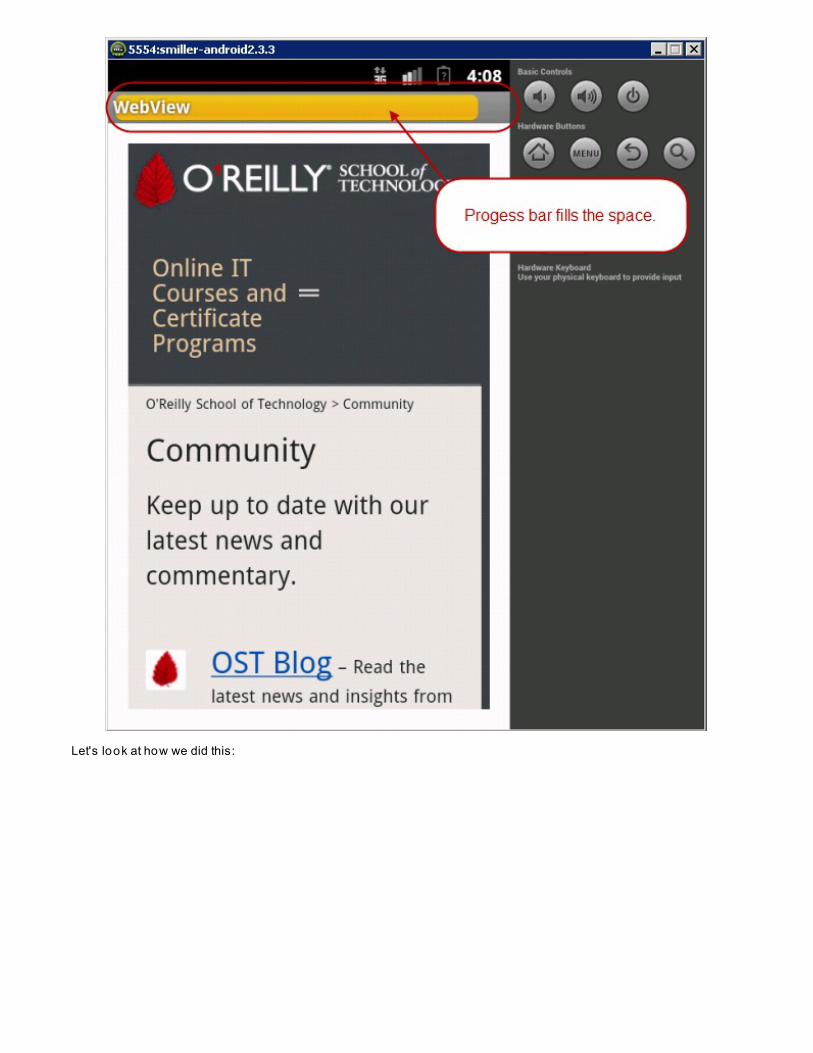
Let's look at how we did this:
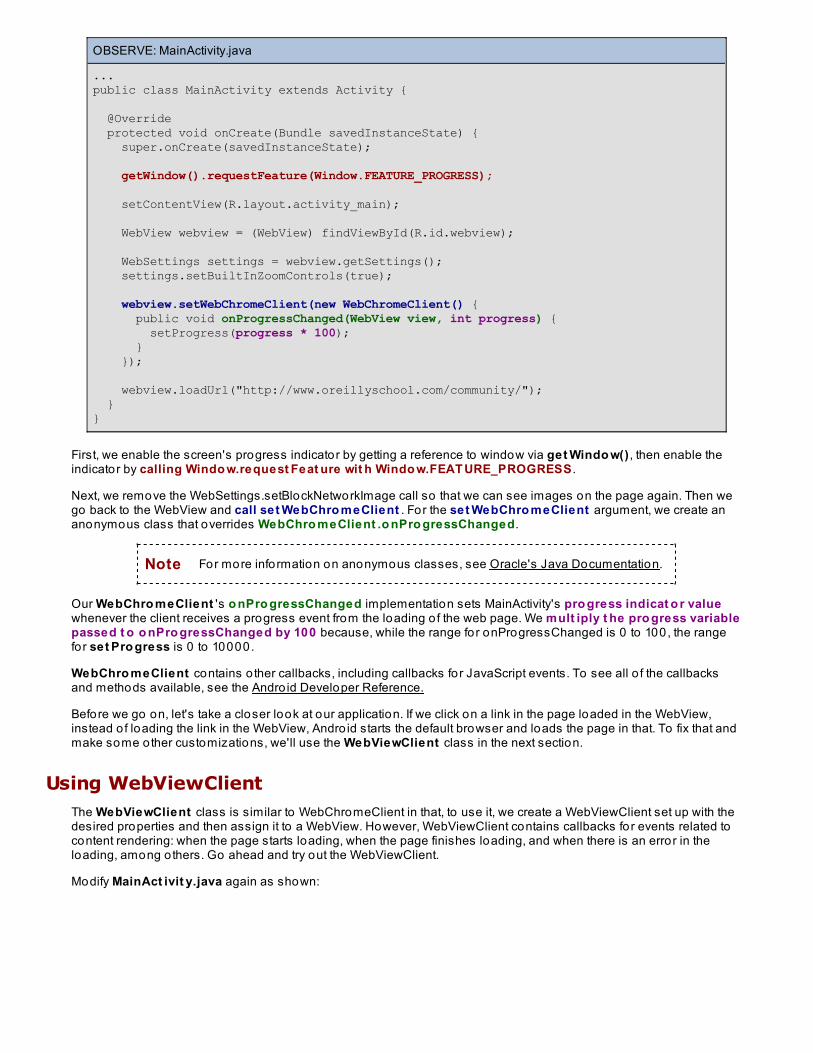
OBSERVE: MainActivity.java
...public class MainActivity extends Activity { @Override protected void onCreate(Bundle savedInstanceState) { super.onCreate(savedInstanceState); getWindow().requestFeature(Window.FEATURE_PROGRESS); setContentView(R.layout.activity_main); WebView webview = (WebView) findViewById(R.id.webview); WebSettings settings = webview.getSettings(); settings.setBuiltInZoomControls(true); webview.setWebChromeClient(new WebChromeClient() { public void onProgressChanged(WebView view, int progress) { setProgress(progress * 100); } }); webview.loadUrl("http://www.oreillyschool.com/community/"); }}
First, we enable the screen's progress indicator by getting a reference to window via get Windo w() , then enable theindicator by calling Windo w.request Feat ure wit h Windo w.FEAT URE_PROGRESS .
Next, we remove the WebSettings.setBlockNetworkImage call so that we can see images on the page again. Then wego back to the WebView and call set WebChro meClient . For the set WebChro meClient argument, we create ananonymous class that overrides WebChro meClient .o nPro gressChanged.
Note For more information on anonymous classes, see Oracle's Java Documentation.
Our WebChro meClient 's o nPro gressChanged implementation sets MainActivity's pro gress indicat o r valuewhenever the client receives a progress event from the loading o f the web page. We mult iply t he pro gress variablepassed t o o nPro gressChanged by 100 because, while the range for onProgressChanged is 0 to 100, the rangefor set Pro gress is 0 to 10000.
WebChro meClient contains o ther callbacks, including callbacks for JavaScript events. To see all o f the callbacksand methods available, see the Andro id Developer Reference.
Before we go on, let's take a closer look at our application. If we click on a link in the page loaded in the WebView,instead o f loading the link in the WebView, Andro id starts the default browser and loads the page in that. To fix that andmake some other customizations, we'll use the WebViewClient class in the next section.
Using WebViewClientThe WebViewClient class is similar to WebChromeClient in that, to use it, we create a WebViewClient set up with thedesired properties and then assign it to a WebView. However, WebViewClient contains callbacks for events related tocontent rendering: when the page starts loading, when the page finishes loading, and when there is an error in theloading, among o thers. Go ahead and try out the WebViewClient.
Modify MainAct ivit y.java again as shown:
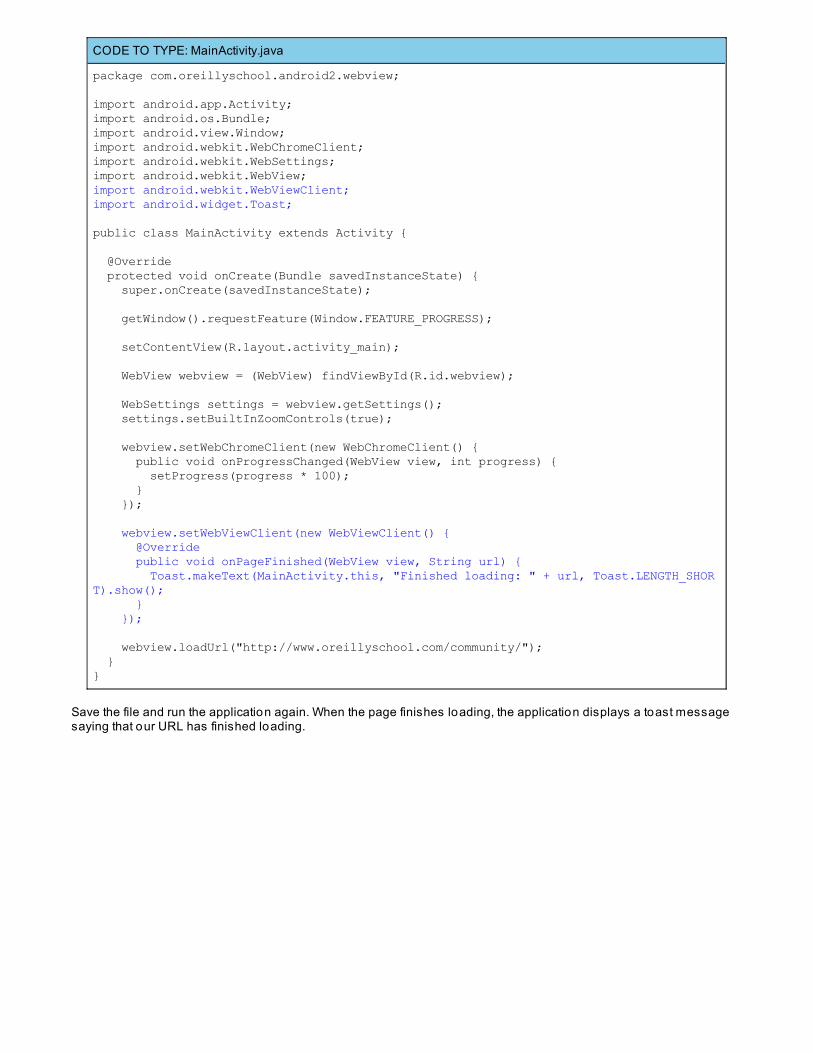
CODE TO TYPE: MainActivity.java
package com.oreillyschool.android2.webview;
import android.app.Activity;import android.os.Bundle;import android.view.Window;import android.webkit.WebChromeClient;import android.webkit.WebSettings;import android.webkit.WebView;import android.webkit.WebViewClient;import android.widget.Toast;
public class MainActivity extends Activity {
@Override protected void onCreate(Bundle savedInstanceState) { super.onCreate(savedInstanceState); getWindow().requestFeature(Window.FEATURE_PROGRESS); setContentView(R.layout.activity_main); WebView webview = (WebView) findViewById(R.id.webview); WebSettings settings = webview.getSettings(); settings.setBuiltInZoomControls(true); webview.setWebChromeClient(new WebChromeClient() { public void onProgressChanged(WebView view, int progress) { setProgress(progress * 100); } }); webview.setWebViewClient(new WebViewClient() { @Override public void onPageFinished(WebView view, String url) { Toast.makeText(MainActivity.this, "Finished loading: " + url, Toast.LENGTH_SHORT).show(); } }); webview.loadUrl("http://www.oreillyschool.com/community/"); }}
Save the file and run the application again. When the page finishes loading, the application displays a toast messagesaying that our URL has finished loading.

Let's review how we used WebViewClient to show the toast message.
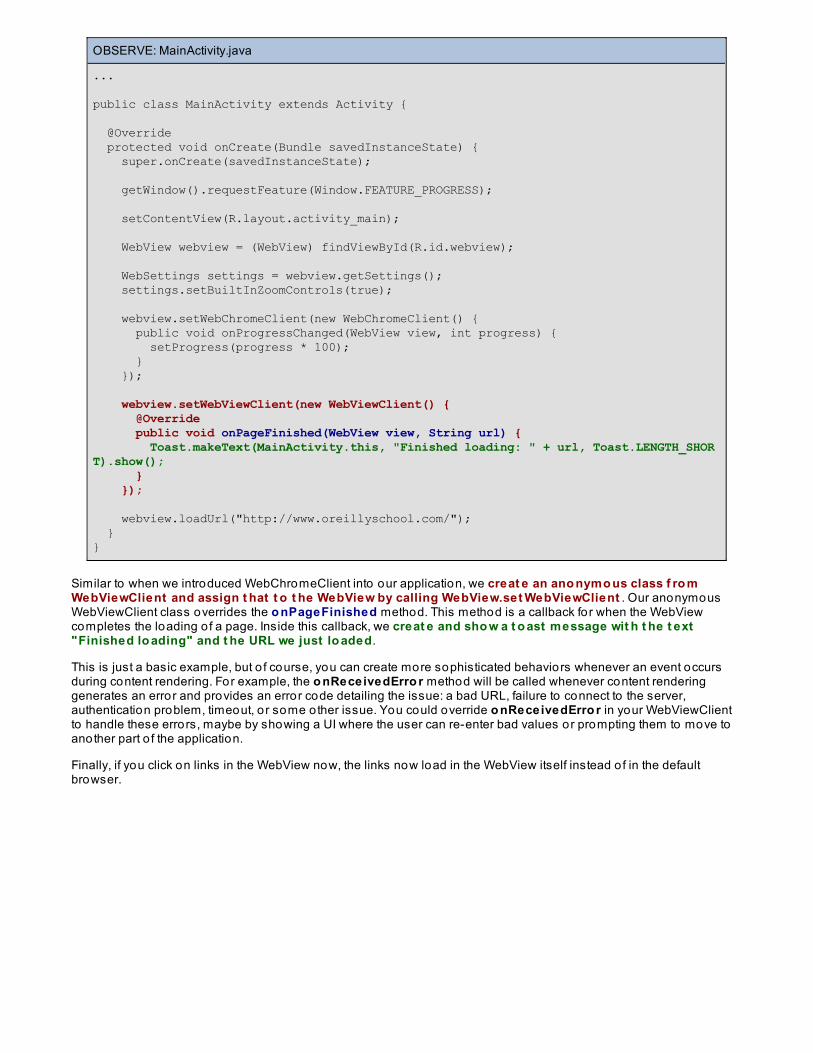
OBSERVE: MainActivity.java
...
public class MainActivity extends Activity {
@Override protected void onCreate(Bundle savedInstanceState) { super.onCreate(savedInstanceState); getWindow().requestFeature(Window.FEATURE_PROGRESS); setContentView(R.layout.activity_main); WebView webview = (WebView) findViewById(R.id.webview); WebSettings settings = webview.getSettings(); settings.setBuiltInZoomControls(true); webview.setWebChromeClient(new WebChromeClient() { public void onProgressChanged(WebView view, int progress) { setProgress(progress * 100); } }); webview.setWebViewClient(new WebViewClient() { @Override public void onPageFinished(WebView view, String url) { Toast.makeText(MainActivity.this, "Finished loading: " + url, Toast.LENGTH_SHORT).show(); } }); webview.loadUrl("http://www.oreillyschool.com/"); }}
Similar to when we introduced WebChromeClient into our application, we creat e an ano nymo us class f ro mWebViewClient and assign t hat t o t he WebView by calling WebView.set WebViewClient . Our anonymousWebViewClient class overrides the o nPageFinished method. This method is a callback for when the WebViewcompletes the loading o f a page. Inside this callback, we creat e and sho w a t o ast message wit h t he t ext"Finished lo ading" and t he URL we just lo aded.
This is just a basic example, but o f course, you can create more sophisticated behaviors whenever an event occursduring content rendering. For example, the o nReceivedErro r method will be called whenever content renderinggenerates an error and provides an error code detailing the issue: a bad URL, failure to connect to the server,authentication problem, timeout, o r some other issue. You could override o nReceivedErro r in your WebViewClientto handle these errors, maybe by showing a UI where the user can re-enter bad values or prompting them to move toanother part o f the application.
Finally, if you click on links in the WebView now, the links now load in the WebView itself instead o f in the defaultbrowser.

WebViewClient contains a method called sho uldOverrideUrlLo ading. This method determines whether theWebView or the application handles the loading o f a URL. When there is no WebViewClient on the WebView, theapplication's Act ivit yManager decides which too l should handle the URL (usually the default browser). When there isa WebViewClient assigned to the WebView, WebViewClient .sho uldOverrideUrlLo ading is called to determinewhether the WebView or the application handles the URL. The base implementation o f this method always has theWebView handle the URL. So we had to assign a WebViewClient to the WebView to have it handle all links.
These are just a few of the tasks you can accomplish with the WebViewClient. Now we'll go back to the WebView itselfand examine some handy methods for navigating its history and implementing a more browser-like UI.
Using WebView MethodsThe WebView class has many methods that provide functionality we find in traditional browsers: browsing history,finding text on the page, reloading the page, clearing the cache, and so on. Let's look at some examples o fimplementing some browser-style UIs with a WebView.
First, open st rings.xml and make these changes:
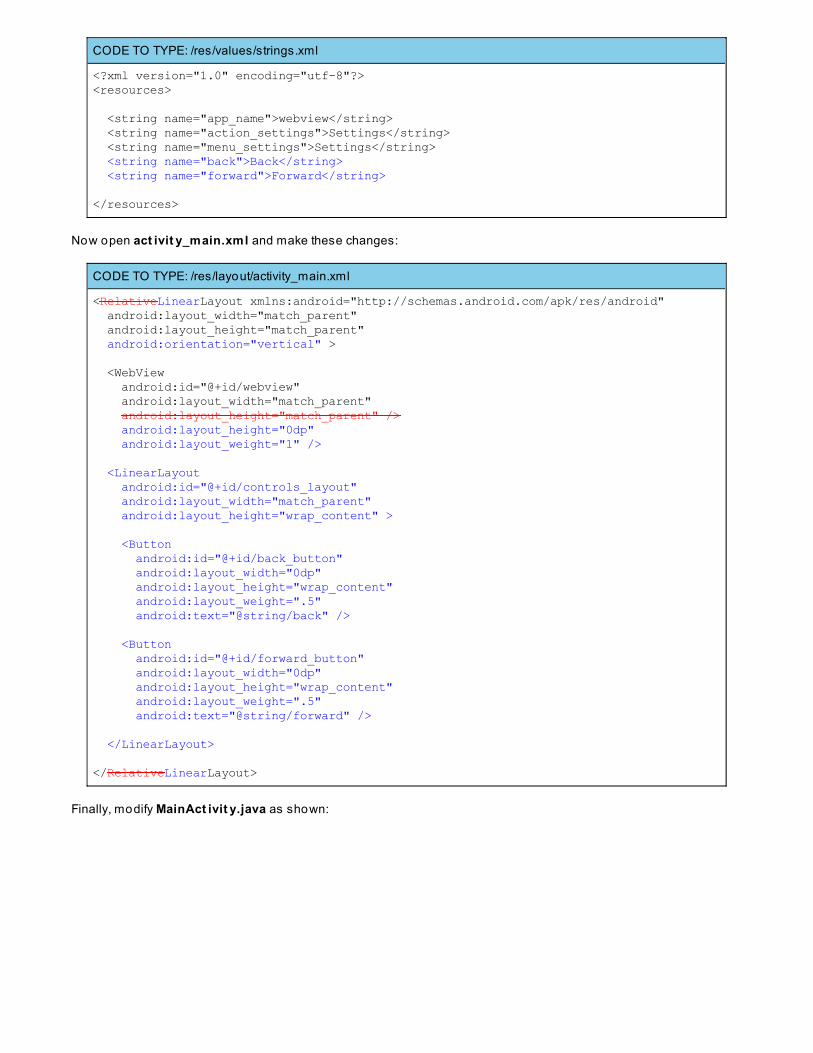
CODE TO TYPE: /res/values/strings.xml
<?xml version="1.0" encoding="utf-8"?><resources>
<string name="app_name">webview</string> <string name="action_settings">Settings</string> <string name="menu_settings">Settings</string> <string name="back">Back</string> <string name="forward">Forward</string>
</resources>
Now open act ivit y_main.xml and make these changes:
CODE TO TYPE: /res/layout/activity_main.xml
<RelativeLinearLayout xmlns:android="http://schemas.android.com/apk/res/android" android:layout_width="match_parent" android:layout_height="match_parent" android:orientation="vertical" > <WebView android:id="@+id/webview" android:layout_width="match_parent" android:layout_height="match_parent" /> android:layout_height="0dp" android:layout_weight="1" /> <LinearLayout android:id="@+id/controls_layout" android:layout_width="match_parent" android:layout_height="wrap_content" > <Button android:id="@+id/back_button" android:layout_width="0dp" android:layout_height="wrap_content" android:layout_weight=".5" android:text="@string/back" /> <Button android:id="@+id/forward_button" android:layout_width="0dp" android:layout_height="wrap_content" android:layout_weight=".5" android:text="@string/forward" /> </LinearLayout>
</RelativeLinearLayout>
Finally, modify MainAct ivit y.java as shown:
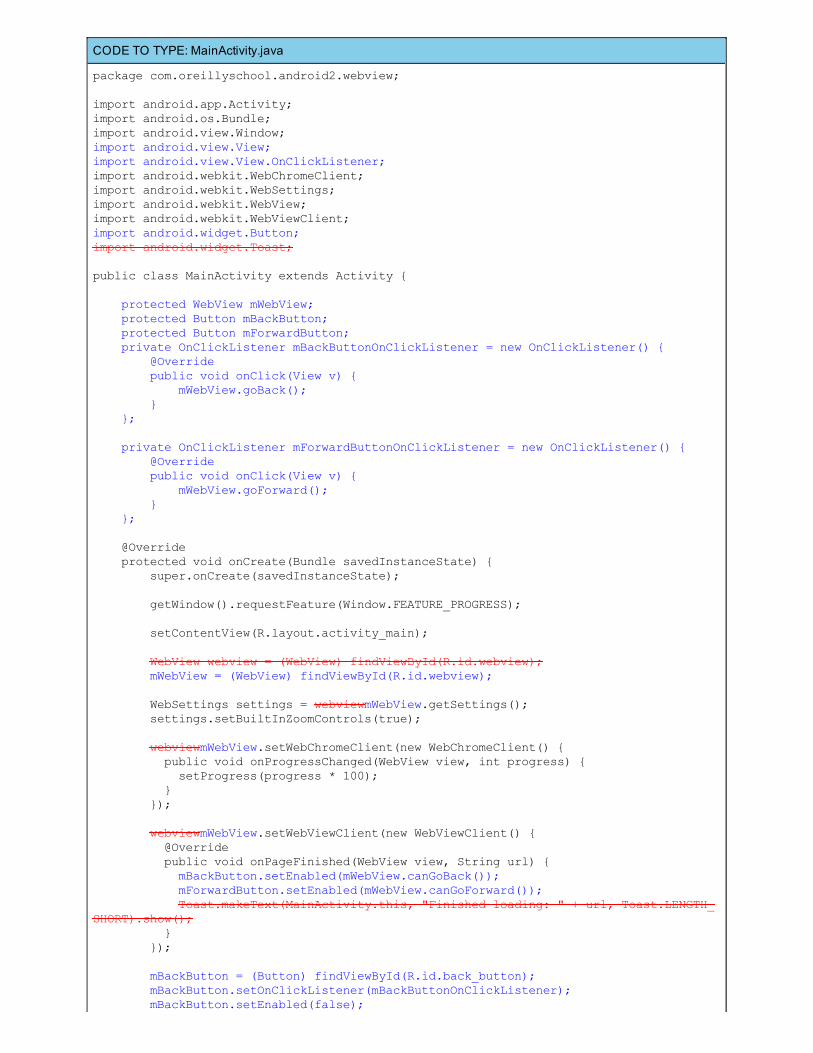
CODE TO TYPE: MainActivity.java
package com.oreillyschool.android2.webview;
import android.app.Activity;import android.os.Bundle;import android.view.Window;import android.view.View;import android.view.View.OnClickListener;import android.webkit.WebChromeClient;import android.webkit.WebSettings;import android.webkit.WebView;import android.webkit.WebViewClient;import android.widget.Button;import android.widget.Toast;
public class MainActivity extends Activity {
protected WebView mWebView; protected Button mBackButton; protected Button mForwardButton; private OnClickListener mBackButtonOnClickListener = new OnClickListener() { @Override public void onClick(View v) { mWebView.goBack(); } };
private OnClickListener mForwardButtonOnClickListener = new OnClickListener() { @Override public void onClick(View v) { mWebView.goForward(); } };
@Override protected void onCreate(Bundle savedInstanceState) { super.onCreate(savedInstanceState);
getWindow().requestFeature(Window.FEATURE_PROGRESS);
setContentView(R.layout.activity_main);
WebView webview = (WebView) findViewById(R.id.webview); mWebView = (WebView) findViewById(R.id.webview);
WebSettings settings = webviewmWebView.getSettings(); settings.setBuiltInZoomControls(true);
webviewmWebView.setWebChromeClient(new WebChromeClient() { public void onProgressChanged(WebView view, int progress) { setProgress(progress * 100); } });
webviewmWebView.setWebViewClient(new WebViewClient() { @Override public void onPageFinished(WebView view, String url) { mBackButton.setEnabled(mWebView.canGoBack()); mForwardButton.setEnabled(mWebView.canGoForward()); Toast.makeText(MainActivity.this, "Finished loading: " + url, Toast.LENGTH_SHORT).show(); } });
mBackButton = (Button) findViewById(R.id.back_button); mBackButton.setOnClickListener(mBackButtonOnClickListener); mBackButton.setEnabled(false);
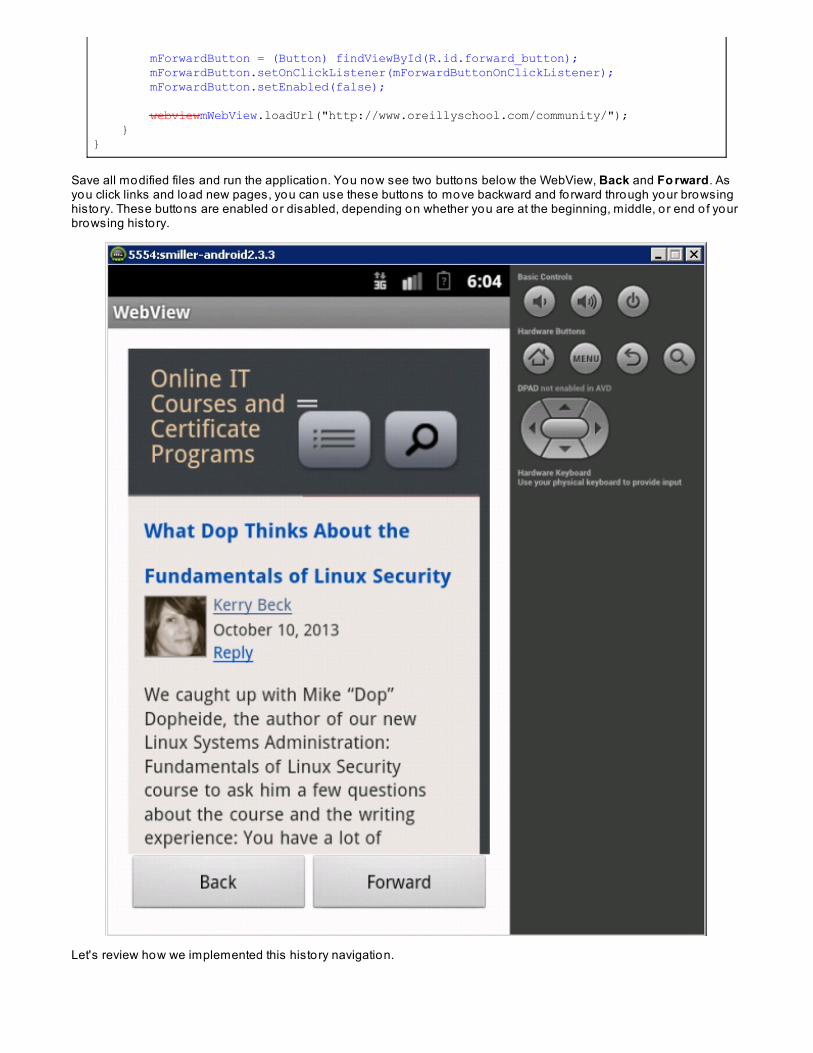
mForwardButton = (Button) findViewById(R.id.forward_button); mForwardButton.setOnClickListener(mForwardButtonOnClickListener); mForwardButton.setEnabled(false);
webviewmWebView.loadUrl("http://www.oreillyschool.com/community/"); }}
Save all modified files and run the application. You now see two buttons below the WebView, Back and Fo rward. Asyou click links and load new pages, you can use these buttons to move backward and forward through your browsinghistory. These buttons are enabled or disabled, depending on whether you are at the beginning, middle, or end o f yourbrowsing history.
Let's review how we implemented this history navigation.
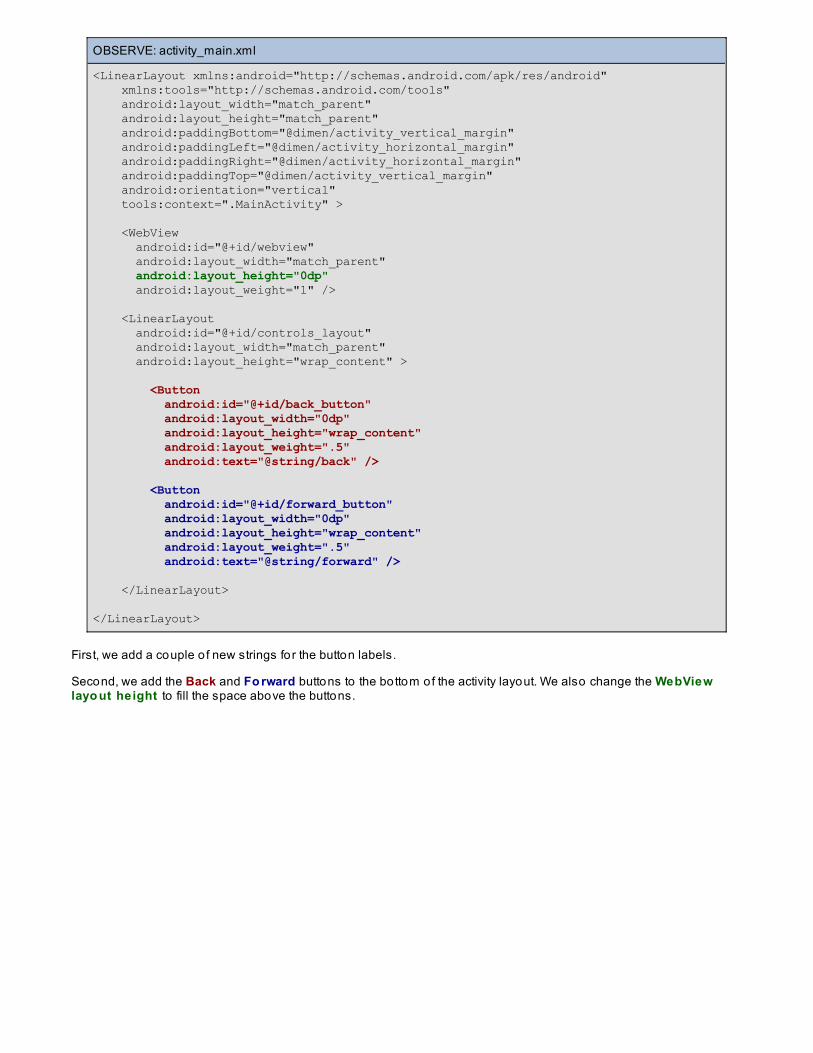
OBSERVE: activity_main.xml
<LinearLayout xmlns:android="http://schemas.android.com/apk/res/android" xmlns:tools="http://schemas.android.com/tools" android:layout_width="match_parent" android:layout_height="match_parent" android:paddingBottom="@dimen/activity_vertical_margin" android:paddingLeft="@dimen/activity_horizontal_margin" android:paddingRight="@dimen/activity_horizontal_margin" android:paddingTop="@dimen/activity_vertical_margin" android:orientation="vertical" tools:context=".MainActivity" >
<WebView android:id="@+id/webview" android:layout_width="match_parent" android:layout_height="0dp" android:layout_weight="1" />
<LinearLayout android:id="@+id/controls_layout" android:layout_width="match_parent" android:layout_height="wrap_content" >
<Button android:id="@+id/back_button" android:layout_width="0dp" android:layout_height="wrap_content" android:layout_weight=".5" android:text="@string/back" />
<Button android:id="@+id/forward_button" android:layout_width="0dp" android:layout_height="wrap_content" android:layout_weight=".5" android:text="@string/forward" />
</LinearLayout>
</LinearLayout>
First, we add a couple o f new strings for the button labels.
Second, we add the Back and Fo rward buttons to the bottom of the activity layout. We also change the WebViewlayo ut height to fill the space above the buttons.
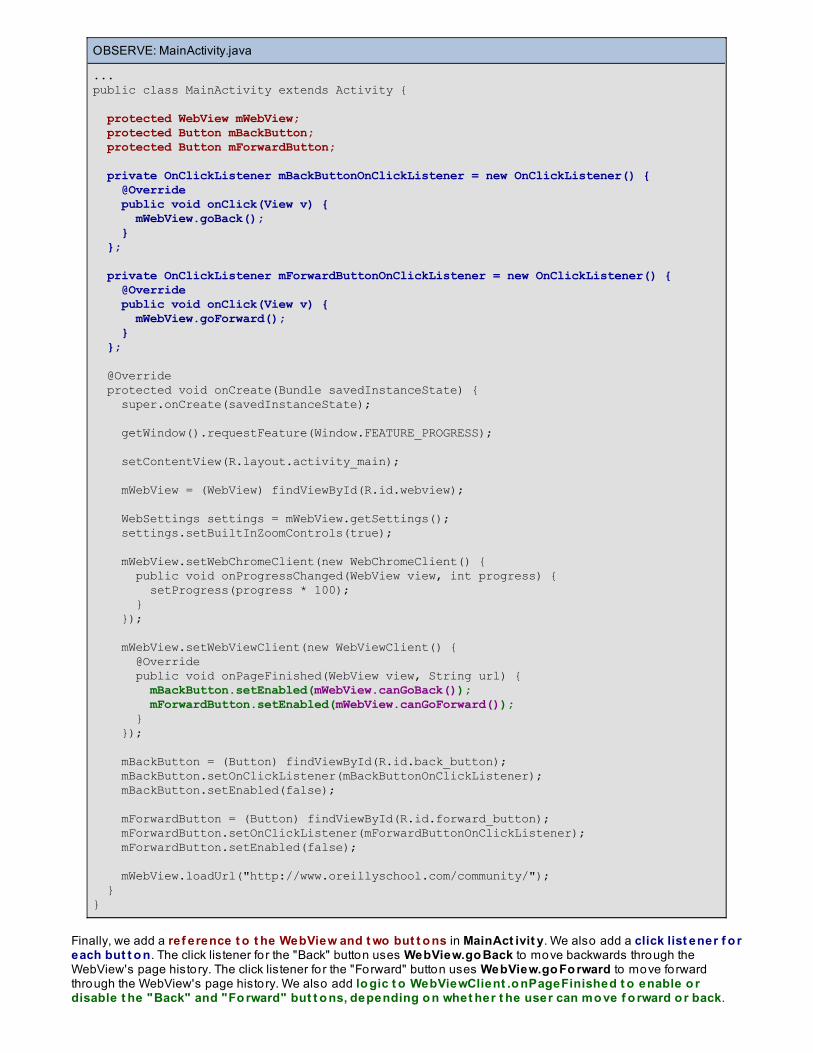
OBSERVE: MainActivity.java
...public class MainActivity extends Activity {
protected WebView mWebView; protected Button mBackButton; protected Button mForwardButton; private OnClickListener mBackButtonOnClickListener = new OnClickListener() { @Override public void onClick(View v) { mWebView.goBack(); } };
private OnClickListener mForwardButtonOnClickListener = new OnClickListener() { @Override public void onClick(View v) { mWebView.goForward(); } };
@Override protected void onCreate(Bundle savedInstanceState) { super.onCreate(savedInstanceState);
getWindow().requestFeature(Window.FEATURE_PROGRESS);
setContentView(R.layout.activity_main);
mWebView = (WebView) findViewById(R.id.webview);
WebSettings settings = mWebView.getSettings(); settings.setBuiltInZoomControls(true);
mWebView.setWebChromeClient(new WebChromeClient() { public void onProgressChanged(WebView view, int progress) { setProgress(progress * 100); } });
mWebView.setWebViewClient(new WebViewClient() { @Override public void onPageFinished(WebView view, String url) { mBackButton.setEnabled(mWebView.canGoBack()); mForwardButton.setEnabled(mWebView.canGoForward()); } });
mBackButton = (Button) findViewById(R.id.back_button); mBackButton.setOnClickListener(mBackButtonOnClickListener); mBackButton.setEnabled(false);
mForwardButton = (Button) findViewById(R.id.forward_button); mForwardButton.setOnClickListener(mForwardButtonOnClickListener); mForwardButton.setEnabled(false);
mWebView.loadUrl("http://www.oreillyschool.com/community/"); }}
Finally, we add a ref erence t o t he WebView and t wo but t o ns in MainAct ivit y. We also add a click list ener f o reach but t o n. The click listener fo r the "Back" button uses WebView.go Back to move backwards through theWebView's page history. The click listener fo r the "Forward" button uses WebView.go Fo rward to move forwardthrough the WebView's page history. We also add lo gic t o WebViewClient .o nPageFinished t o enable o rdisable t he "Back" and "Fo rward" but t o ns, depending o n whet her t he user can mo ve f o rward o r back.

To determine whether the user can move forward or back, we call the WebView.canGo Back andWebView.canGo Fo rward methods. So, we are able to use the WebView's methods in order to create navigation forthe WebView's history via UI components.
Before we finish with the WebView, we'll swing back to the WebSet t ings class and talk briefly about JavaScript.
Enabling JavaScriptA WebView can also run JavaScript on a loaded page. JavaScript is not enabled by default, but we can enable it. First,let's take a look at a page that uses JavaScript. Modify the URL in MainAct ivit y.java as shown:
CODE TO TYPE: MainActivity.java
... mWebView.loadUrl("http://www.oreillyschool.com/community/http://www.google.com/logos/2013/zamboni.html"); }}
Save the file and run the application. You'll see an o ld homepage image for Google (a Google Doogle). If you'rehaving trouble because the image is wide, try ro tating the emulator to landscape mode. If you viewed this page withJavaScript enabled, you would see a little zamboni driving across the image, and when you clicked the image, it wouldlink you to a JavaScript game on another page. However, since our WebView does not have JavaScript enabled, wejust see a static image link that does nothing when we click on it.
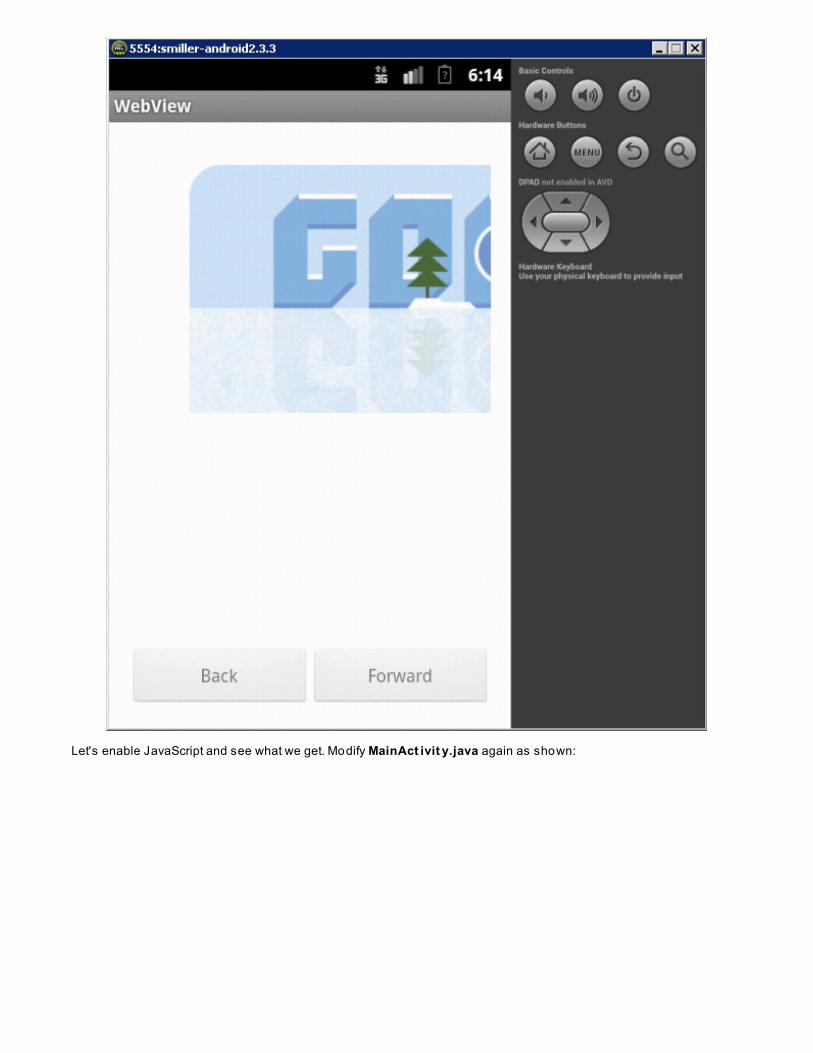
Let's enable JavaScript and see what we get. Modify MainAct ivit y.java again as shown:
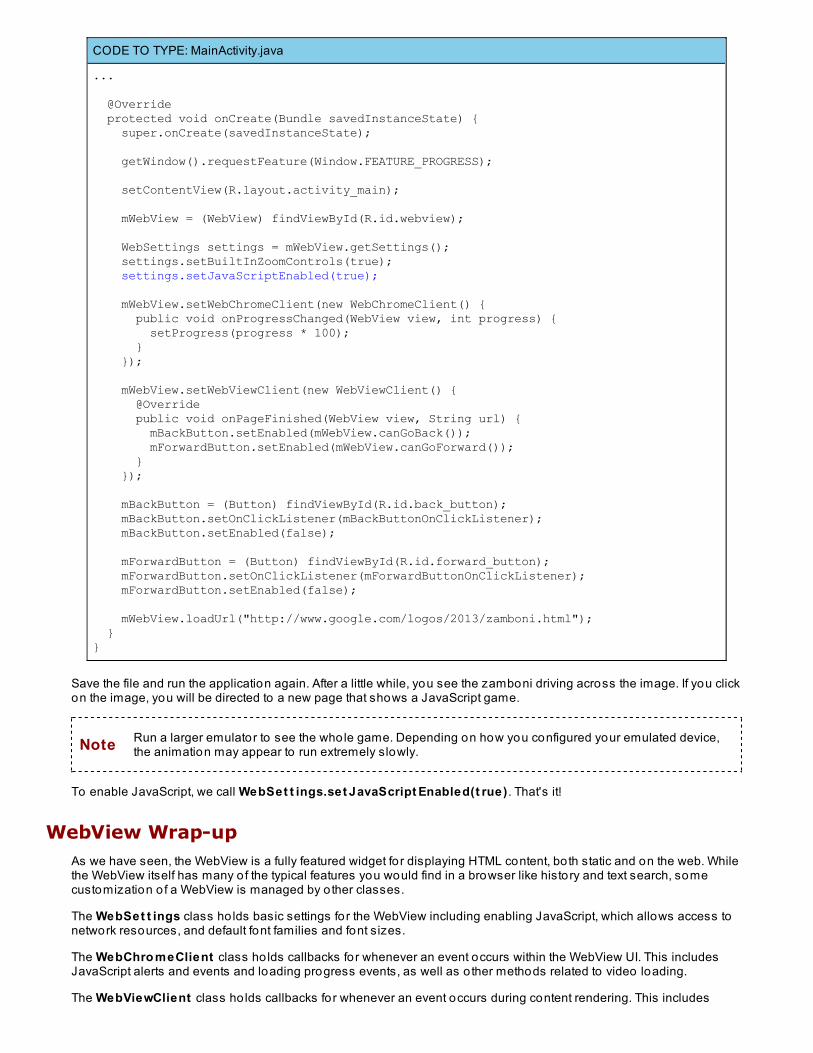
CODE TO TYPE: MainActivity.java
...
@Override protected void onCreate(Bundle savedInstanceState) { super.onCreate(savedInstanceState); getWindow().requestFeature(Window.FEATURE_PROGRESS); setContentView(R.layout.activity_main); mWebView = (WebView) findViewById(R.id.webview); WebSettings settings = mWebView.getSettings(); settings.setBuiltInZoomControls(true); settings.setJavaScriptEnabled(true); mWebView.setWebChromeClient(new WebChromeClient() { public void onProgressChanged(WebView view, int progress) { setProgress(progress * 100); } }); mWebView.setWebViewClient(new WebViewClient() { @Override public void onPageFinished(WebView view, String url) { mBackButton.setEnabled(mWebView.canGoBack()); mForwardButton.setEnabled(mWebView.canGoForward()); } }); mBackButton = (Button) findViewById(R.id.back_button); mBackButton.setOnClickListener(mBackButtonOnClickListener); mBackButton.setEnabled(false); mForwardButton = (Button) findViewById(R.id.forward_button); mForwardButton.setOnClickListener(mForwardButtonOnClickListener); mForwardButton.setEnabled(false); mWebView.loadUrl("http://www.google.com/logos/2013/zamboni.html"); }}
Save the file and run the application again. After a little while, you see the zamboni driving across the image. If you clickon the image, you will be directed to a new page that shows a JavaScript game.
Note Run a larger emulator to see the whole game. Depending on how you configured your emulated device,the animation may appear to run extremely slowly.
To enable JavaScript, we call WebSet t ings.set JavaScript Enabled(t rue) . That's it!
WebView Wrap-upAs we have seen, the WebView is a fully featured widget fo r displaying HTML content, both static and on the web. Whilethe WebView itself has many o f the typical features you would find in a browser like history and text search, somecustomization o f a WebView is managed by o ther classes.
The WebSet t ings class ho lds basic settings for the WebView including enabling JavaScript, which allows access tonetwork resources, and default font families and font sizes.
The WebChro meClient class ho lds callbacks for whenever an event occurs within the WebView UI. This includesJavaScript alerts and events and loading progress events, as well as o ther methods related to video loading.
The WebViewClient class ho lds callbacks for whenever an event occurs during content rendering. This includes

when pages start and finish loading, when page load errors occur, o r when there is an authentication/logic request.The WebViewClient also contro ls how links within a WebView's loaded page are handled.
By leveraging all o f these classes, you can fully utilize web content inside your Andro id application and even create amore custom experience over the default browser.
Copyright © 1998-2014 O'Reilly Media, Inc.
This work is licensed under a Creative Commons Attribution-ShareAlike 3.0 Unported License.See http://creativecommons.org/licenses/by-sa/3.0/legalcode for more information.
Android 2 Final Project
Final ProjectCongratulations on completing the lessons! For the final pro ject you will create another Andro id application. The typeof application you create is entirely up to you, as long as you incorporate some of the features you have learned fromthe lessons in this course. Below are a few sample ideas that you might use for your pro ject:
A journal application. This type o f application allows the user to create journal entries. The entries are storedin the application's ContentProvider, and include the date, a title, the description, and an optional photo .An RSS reader application. An RSS feed (such as the OST blog, or Stack Overflow) is consumed by aService in the application. The user is notified when a new feed item appears. Any links in the feed can beloaded in a WebView inside the application.An updated version o f your application from the first Andro id Course. Start with whatever you made from thefirst course for the final pro ject, but update it to use fragments, support tablets, and include new featuressuch as Camera, VideoPlayer, a ContentProvider storage, or Notifications.
Whatever final pro ject you decide to take on, your application must meet these requirements:
Incorporate functions on Andro id devices running Andro id 2.3 and later.Use Fragments and FragmentActivities.Has alternate optimized layouts for tablets.All data loading is performed using a Loader, such that if the device is ro tated while loading the loadingprocess is preserved and not restarted.The application resources are used properly. That is, all hard-coded strings are loaded from a strings.xmlresource, dimensions via a dimens.xml, styles via a styles.xml, and a theme is defined for the applicationloaded via a themes.xml resource.
Make an application that you are proud to have created! Keep your code clean, organized, and bug-free! You mighteven consider publishing your work on the Andro id Market when you are finished. Thanks for taking the course andgood luck!
Copyright © 1998-2014 O'Reilly Media, Inc.
This work is licensed under a Creative Commons Attribution-ShareAlike 3.0 Unported License.See http://creativecommons.org/licenses/by-sa/3.0/legalcode for more information.