anatomy: palpation list term2 - k e a l a . o r g · pdf fileanatomy: palpation list term2...
TRANSCRIPT
1
Anatomy: Palpation List Term2
HEAD, NECK, FACEBonesNAME What to do… What to say…
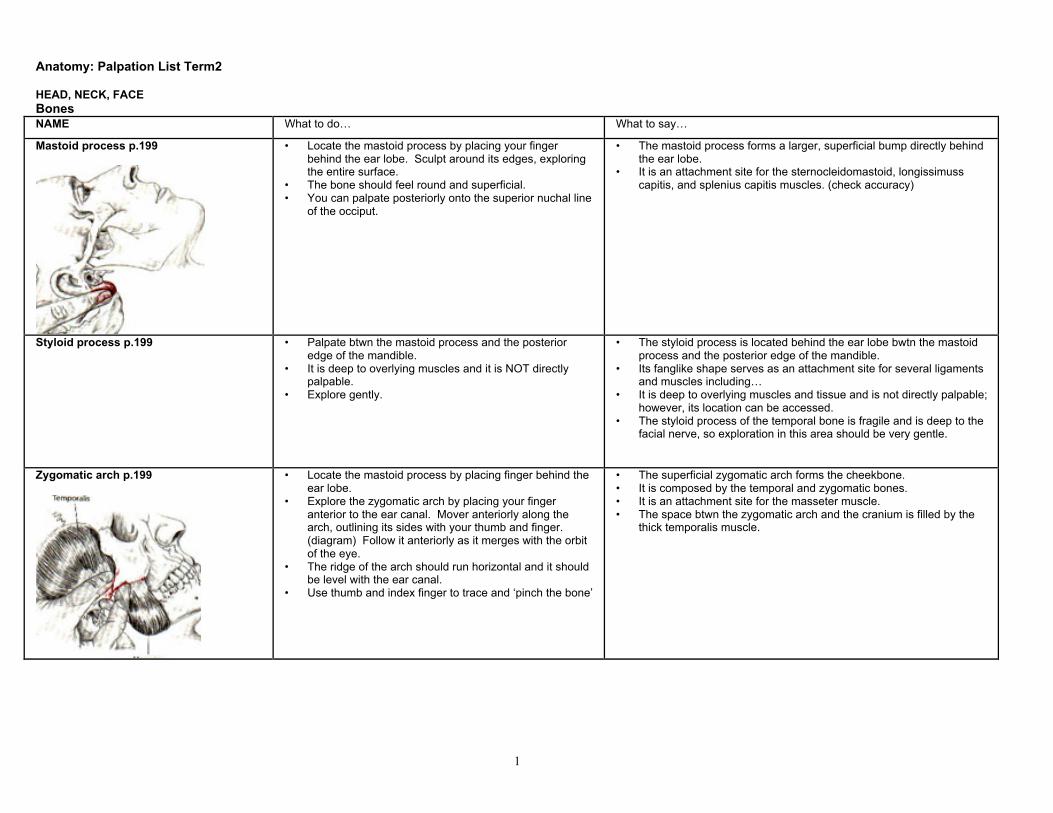
Mastoid process p.199 • Locate the mastoid process by placing your fingerbehind the ear lobe. Sculpt around its edges, exploringthe entire surface.
• The bone should feel round and superficial.• You can palpate posteriorly onto the superior nuchal line
of the occiput.
• The mastoid process forms a larger, superficial bump directly behindthe ear lobe.
• It is an attachment site for the sternocleidomastoid, longissimusscapitis, and splenius capitis muscles. (check accuracy)
Styloid process p.199 • Palpate btwn the mastoid process and the posterioredge of the mandible.
• It is deep to overlying muscles and it is NOT directlypalpable.
• Explore gently.
• The styloid process is located behind the ear lobe bwtn the mastoidprocess and the posterior edge of the mandible.
• Its fanglike shape serves as an attachment site for several ligamentsand muscles including…
• It is deep to overlying muscles and tissue and is not directly palpable;however, its location can be accessed.
• The styloid process of the temporal bone is fragile and is deep to thefacial nerve, so exploration in this area should be very gentle.
Zygomatic arch p.199 • Locate the mastoid process by placing finger behind theear lobe.
• Explore the zygomatic arch by placing your fingeranterior to the ear canal. Mover anteriorly along thearch, outlining its sides with your thumb and finger.(diagram) Follow it anteriorly as it merges with the orbitof the eye.
• The ridge of the arch should run horizontal and it shouldbe level with the ear canal.
• Use thumb and index finger to trace and ‘pinch the bone’
• The superficial zygomatic arch forms the cheekbone.• It is composed by the temporal and zygomatic bones.• It is an attachment site for the masseter muscle.• The space btwn the zygomatic arch and the cranium is filled by the
thick temporalis muscle.
2
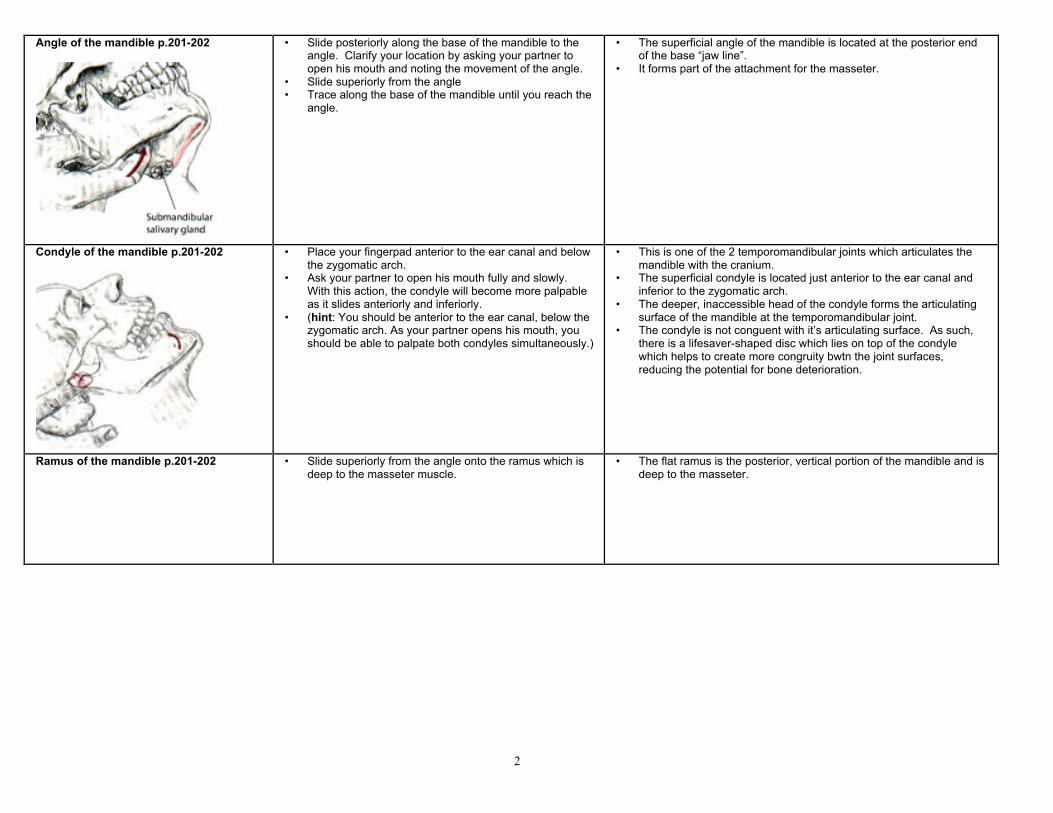
Angle of the mandible p.201-202 • Slide posteriorly along the base of the mandible to theangle. Clarify your location by asking your partner toopen his mouth and noting the movement of the angle.
• Slide superiorly from the angle• Trace along the base of the mandible until you reach the
angle.
• The superficial angle of the mandible is located at the posterior endof the base “jaw line”.
• It forms part of the attachment for the masseter.
Condyle of the mandible p.201-202 • Place your fingerpad anterior to the ear canal and belowthe zygomatic arch.
• Ask your partner to open his mouth fully and slowly.With this action, the condyle will become more palpableas it slides anteriorly and inferiorly.
• (hint: You should be anterior to the ear canal, below thezygomatic arch. As your partner opens his mouth, youshould be able to palpate both condyles simultaneously.)
• This is one of the 2 temporomandibular joints which articulates themandible with the cranium.
• The superficial condyle is located just anterior to the ear canal andinferior to the zygomatic arch.
• The deeper, inaccessible head of the condyle forms the articulatingsurface of the mandible at the temporomandibular joint.
• The condyle is not conguent with it’s articulating surface. As such,there is a lifesaver-shaped disc which lies on top of the condylewhich helps to create more congruity bwtn the joint surfaces,reducing the potential for bone deterioration.
Ramus of the mandible p.201-202 • Slide superiorly from the angle onto the ramus which isdeep to the masseter muscle.
• The flat ramus is the posterior, vertical portion of the mandible and isdeep to the masseter.
3
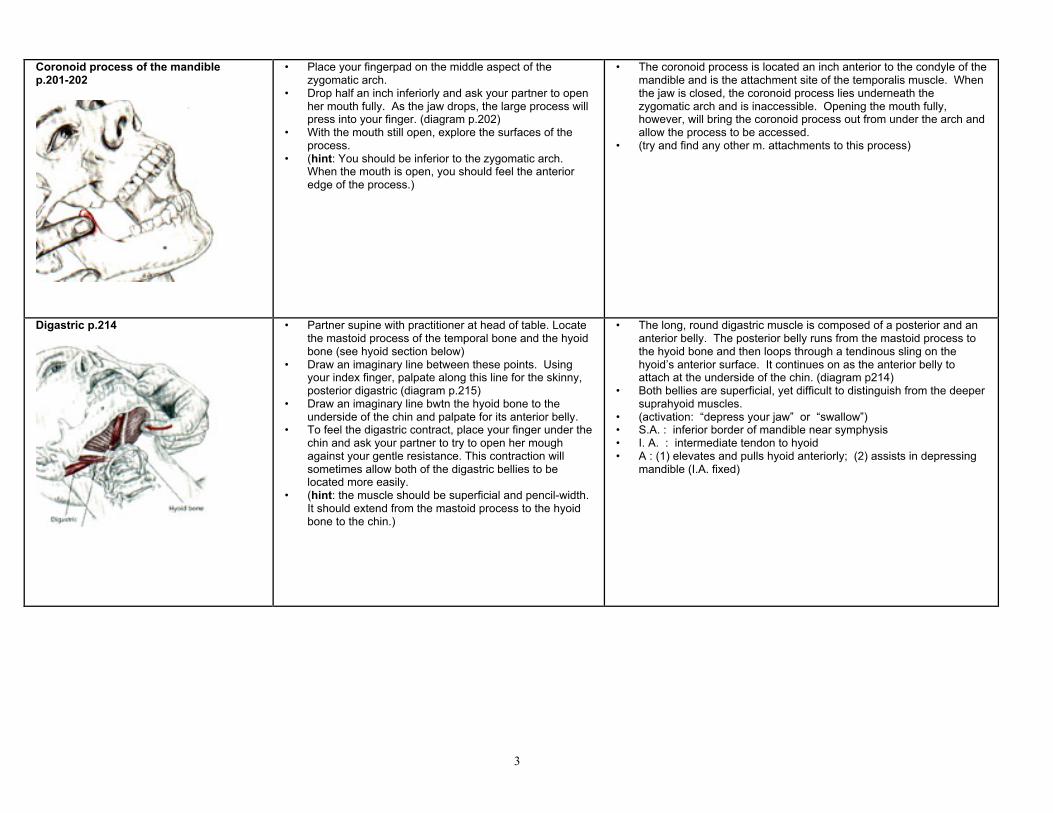
Coronoid process of the mandiblep.201-202
• Place your fingerpad on the middle aspect of thezygomatic arch.
• Drop half an inch inferiorly and ask your partner to openher mouth fully. As the jaw drops, the large process willpress into your finger. (diagram p.202)
• With the mouth still open, explore the surfaces of theprocess.
• (hint: You should be inferior to the zygomatic arch.When the mouth is open, you should feel the anterioredge of the process.)
• The coronoid process is located an inch anterior to the condyle of themandible and is the attachment site of the temporalis muscle. Whenthe jaw is closed, the coronoid process lies underneath thezygomatic arch and is inaccessible. Opening the mouth fully,however, will bring the coronoid process out from under the arch andallow the process to be accessed.
• (try and find any other m. attachments to this process)
Digastric p.214 • Partner supine with practitioner at head of table. Locatethe mastoid process of the temporal bone and the hyoidbone (see hyoid section below)
• Draw an imaginary line between these points. Usingyour index finger, palpate along this line for the skinny,posterior digastric (diagram p.215)
• Draw an imaginary line bwtn the hyoid bone to theunderside of the chin and palpate for its anterior belly.
• To feel the digastric contract, place your finger under thechin and ask your partner to try to open her moughagainst your gentle resistance. This contraction willsometimes allow both of the digastric bellies to belocated more easily.
• (hint: the muscle should be superficial and pencil-width.It should extend from the mastoid process to the hyoidbone to the chin.)
• The long, round digastric muscle is composed of a posterior and ananterior belly. The posterior belly runs from the mastoid process tothe hyoid bone and then loops through a tendinous sling on thehyoid’s anterior surface. It continues on as the anterior belly toattach at the underside of the chin. (diagram p214)
• Both bellies are superficial, yet difficult to distinguish from the deepersuprahyoid muscles.
• (activation: “depress your jaw” or “swallow”)• S.A. : inferior border of mandible near symphysis• I. A. : intermediate tendon to hyoid• A : (1) elevates and pulls hyoid anteriorly; (2) assists in depressing
mandible (I.A. fixed)
4
Hyoid p.203 • Supine or seated. Place your index finger upon thethyroid cartilage (place fingers on Adam’s Apple, thenask your partner to swallow, you will feel it move up anddown.)
• Roll your fingerpad superiorly over the thyroid cartilageand onto the hyoid.
• Then gently palpate the sides of the hyoid with your firstfinger and thumb. (diagram) The hyoid will be wider thanthe trachea.
• Using gentle pressure, explore the surface of the hyoidas well as its small side to side movements.
• If you have difficulty accessing the hyoid, ecourage yourpartner to relax her tongue and jaw.
• Hint: you should be superior to they thyroid cartilage.You should be able to move the hyoid from side to side.
• With your first finger and thumb on either side of thehyoid, ask your partner to swallow. You should be ableto feel the hyoid rise up and then return. (diagram)
• The hyoid bone is horse-shoe shaped.• Located superior to the thyroid cartilage.• It is roughly an inch in diameter and lies parallel to the base of the
mandible (jaw line) and the 3rd and 4th cervical vertebra.• It serves as an attachment site for the supra and infrahyoid muscles.
It is accessible and elevates upon swallowing.
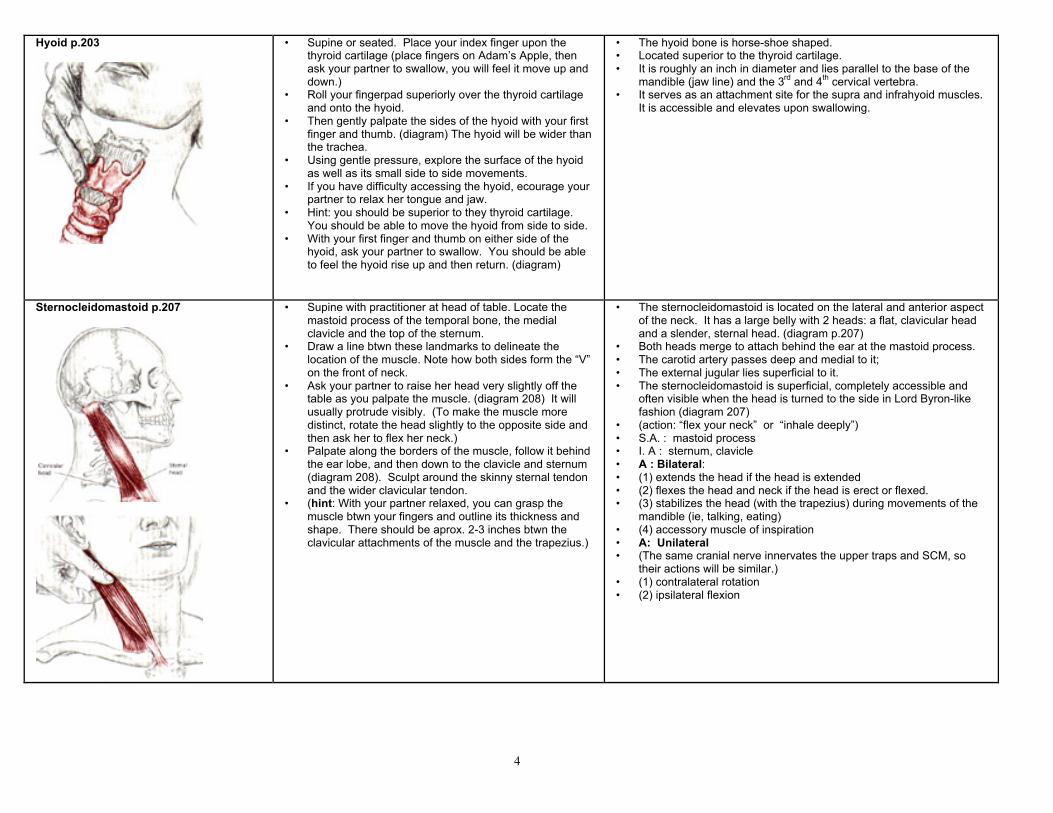
Sternocleidomastoid p.207 • Supine with practitioner at head of table. Locate themastoid process of the temporal bone, the medialclavicle and the top of the sternum.
• Draw a line btwn these landmarks to delineate thelocation of the muscle. Note how both sides form the “V”on the front of neck.
• Ask your partner to raise her head very slightly off thetable as you palpate the muscle. (diagram 208) It willusually protrude visibly. (To make the muscle moredistinct, rotate the head slightly to the opposite side andthen ask her to flex her neck.)
• Palpate along the borders of the muscle, follow it behindthe ear lobe, and then down to the clavicle and sternum(diagram 208). Sculpt around the skinny sternal tendonand the wider clavicular tendon.
• (hint: With your partner relaxed, you can grasp themuscle btwn your fingers and outline its thickness andshape. There should be aprox. 2-3 inches btwn theclavicular attachments of the muscle and the trapezius.)
• The sternocleidomastoid is located on the lateral and anterior aspectof the neck. It has a large belly with 2 heads: a flat, clavicular headand a slender, sternal head. (diagram p.207)
• Both heads merge to attach behind the ear at the mastoid process.• The carotid artery passes deep and medial to it;• The external jugular lies superficial to it.• The sternocleidomastoid is superficial, completely accessible and
often visible when the head is turned to the side in Lord Byron-likefashion (diagram 207)
• (action: “flex your neck” or “inhale deeply”)• S.A. : mastoid process• I. A : sternum, clavicle• A : Bilateral:• (1) extends the head if the head is extended• (2) flexes the head and neck if the head is erect or flexed.• (3) stabilizes the head (with the trapezius) during movements of the
mandible (ie, talking, eating)• (4) accessory muscle of inspiration• A: Unilateral• (The same cranial nerve innervates the upper traps and SCM, so
their actions will be similar.)• (1) contralateral rotation• (2) ipsilateral flexion
5
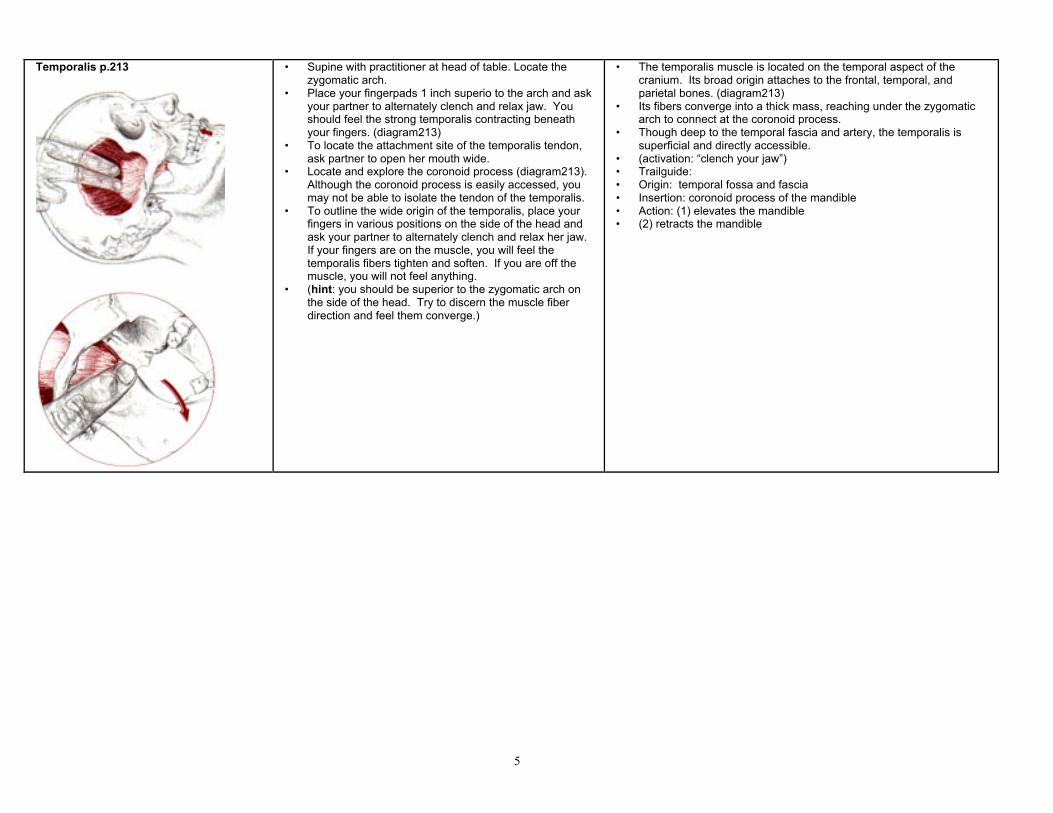
Temporalis p.213 • Supine with practitioner at head of table. Locate thezygomatic arch.
• Place your fingerpads 1 inch superio to the arch and askyour partner to alternately clench and relax jaw. Youshould feel the strong temporalis contracting beneathyour fingers. (diagram213)
• To locate the attachment site of the temporalis tendon,ask partner to open her mouth wide.
• Locate and explore the coronoid process (diagram213).Although the coronoid process is easily accessed, youmay not be able to isolate the tendon of the temporalis.
• To outline the wide origin of the temporalis, place yourfingers in various positions on the side of the head andask your partner to alternately clench and relax her jaw.If your fingers are on the muscle, you will feel thetemporalis fibers tighten and soften. If you are off themuscle, you will not feel anything.
• (hint: you should be superior to the zygomatic arch onthe side of the head. Try to discern the muscle fiberdirection and feel them converge.)
• The temporalis muscle is located on the temporal aspect of thecranium. Its broad origin attaches to the frontal, temporal, andparietal bones. (diagram213)
• Its fibers converge into a thick mass, reaching under the zygomaticarch to connect at the coronoid process.
• Though deep to the temporal fascia and artery, the temporalis issuperficial and directly accessible.
• (activation: “clench your jaw”)• Trailguide:• Origin: temporal fossa and fascia• Insertion: coronoid process of the mandible• Action: (1) elevates the mandible• (2) retracts the mandible
6
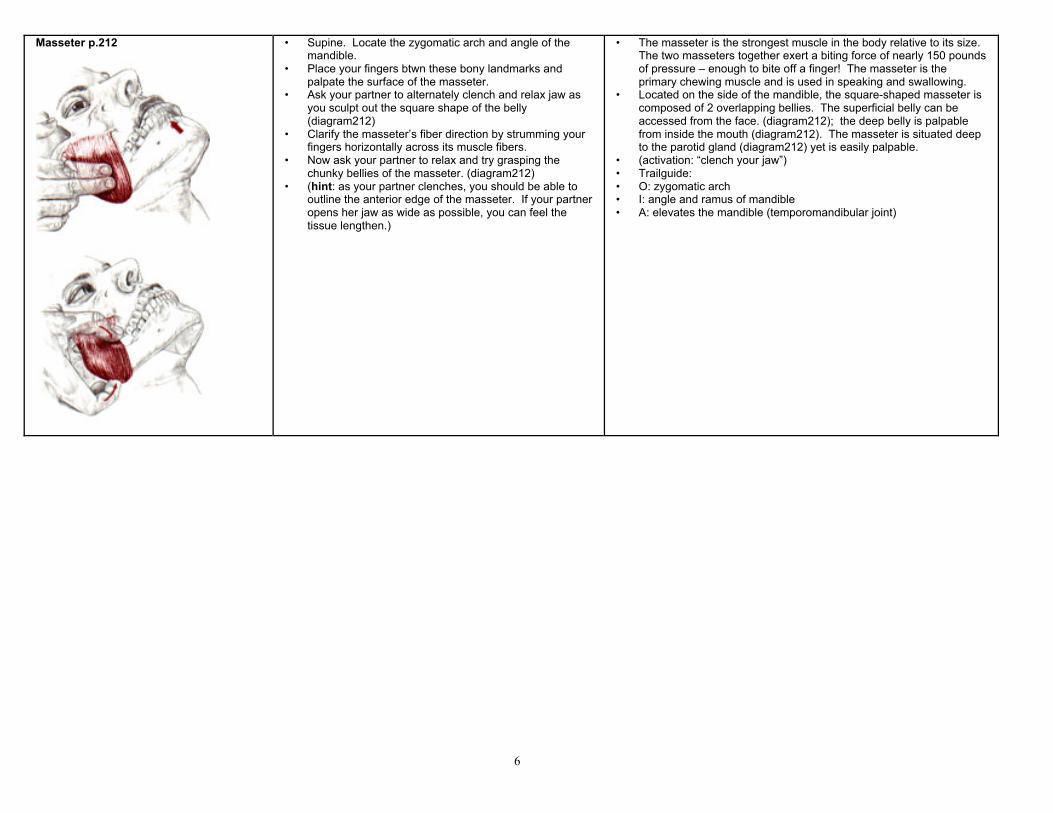
Masseter p.212 • Supine. Locate the zygomatic arch and angle of themandible.
• Place your fingers btwn these bony landmarks andpalpate the surface of the masseter.
• Ask your partner to alternately clench and relax jaw asyou sculpt out the square shape of the belly(diagram212)
• Clarify the masseter’s fiber direction by strumming yourfingers horizontally across its muscle fibers.
• Now ask your partner to relax and try grasping thechunky bellies of the masseter. (diagram212)
• (hint: as your partner clenches, you should be able tooutline the anterior edge of the masseter. If your partneropens her jaw as wide as possible, you can feel thetissue lengthen.)
• The masseter is the strongest muscle in the body relative to its size.The two masseters together exert a biting force of nearly 150 poundsof pressure – enough to bite off a finger! The masseter is theprimary chewing muscle and is used in speaking and swallowing.
• Located on the side of the mandible, the square-shaped masseter iscomposed of 2 overlapping bellies. The superficial belly can beaccessed from the face. (diagram212); the deep belly is palpablefrom inside the mouth (diagram212). The masseter is situated deepto the parotid gland (diagram212) yet is easily palpable.
• (activation: “clench your jaw”)• Trailguide:• O: zygomatic arch• I: angle and ramus of mandible• A: elevates the mandible (temporomandibular joint)
7
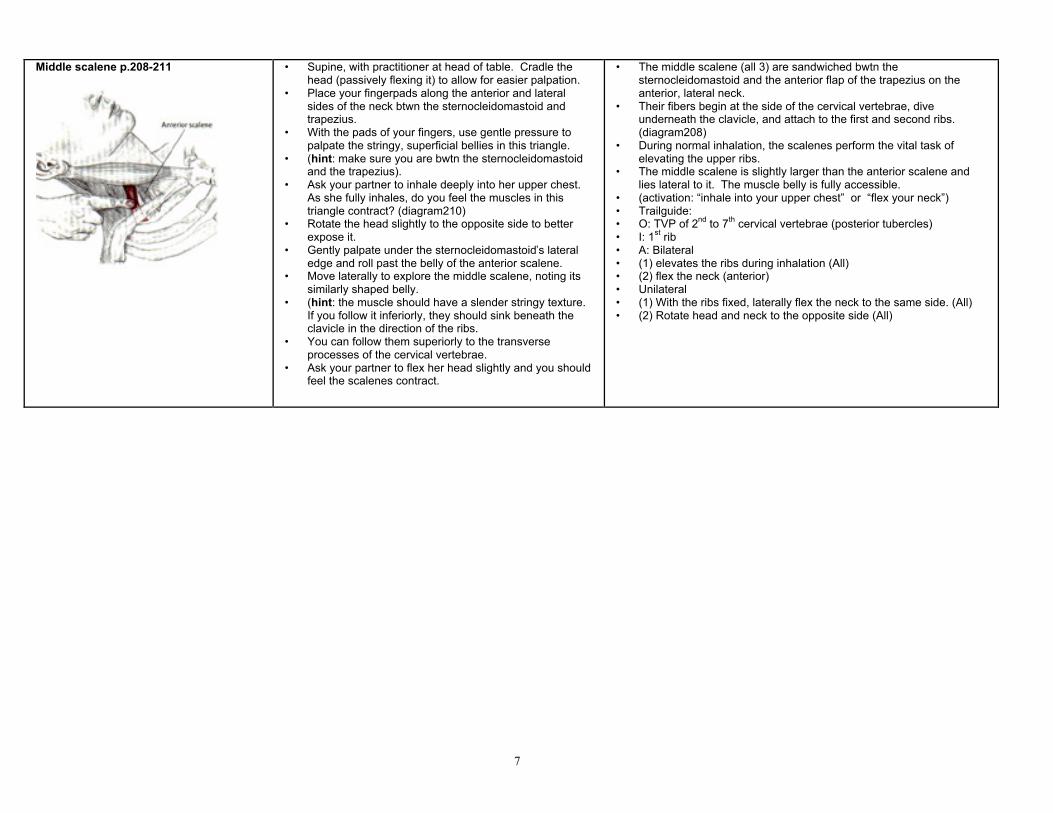
Middle scalene p.208-211 • Supine, with practitioner at head of table. Cradle thehead (passively flexing it) to allow for easier palpation.
• Place your fingerpads along the anterior and lateralsides of the neck btwn the sternocleidomastoid andtrapezius.
• With the pads of your fingers, use gentle pressure topalpate the stringy, superficial bellies in this triangle.
• (hint: make sure you are bwtn the sternocleidomastoidand the trapezius).
• Ask your partner to inhale deeply into her upper chest.As she fully inhales, do you feel the muscles in thistriangle contract? (diagram210)
• Rotate the head slightly to the opposite side to betterexpose it.
• Gently palpate under the sternocleidomastoid’s lateraledge and roll past the belly of the anterior scalene.
• Move laterally to explore the middle scalene, noting itssimilarly shaped belly.
• (hint: the muscle should have a slender stringy texture.If you follow it inferiorly, they should sink beneath theclavicle in the direction of the ribs.
• You can follow them superiorly to the transverseprocesses of the cervical vertebrae.
• Ask your partner to flex her head slightly and you shouldfeel the scalenes contract.
• The middle scalene (all 3) are sandwiched bwtn thesternocleidomastoid and the anterior flap of the trapezius on theanterior, lateral neck.
• Their fibers begin at the side of the cervical vertebrae, diveunderneath the clavicle, and attach to the first and second ribs.(diagram208)
• During normal inhalation, the scalenes perform the vital task ofelevating the upper ribs.
• The middle scalene is slightly larger than the anterior scalene andlies lateral to it. The muscle belly is fully accessible.
• (activation: “inhale into your upper chest” or “flex your neck”)• Trailguide:• O: TVP of 2nd to 7th cervical vertebrae (posterior tubercles)• I: 1st rib• A: Bilateral• (1) elevates the ribs during inhalation (All)• (2) flex the neck (anterior)• Unilateral• (1) With the ribs fixed, laterally flex the neck to the same side. (All)• (2) Rotate head and neck to the opposite side (All)
8
SHOULDER AND ARM
Bicipital groove aka intertuberculargroove p.63
• Place your thumb on the greater tubercle(diagram63)
• Begin to rotate the arm laterally. As the humerusrotates, the greater tubercle will move out fromunder your thumb and be replaced by the slenderditch of the intertubercular groove.
• As you continue to laterally rotate, your thumb willrise out of the groove onto the lesser tubercle.
• After placing thumb on the greater tubercle, trypassively rotating the arm medially and laterally.You should feel the “bump-ditch-bump” sequenceas the 3 landmarks (greater tubercle-bicipitalgroove-lesser tubercle) pass beneath your thumb.
• Make sure you are horizontal to the level of thecoracoid process.
• The bicipital groove aka intertubercular groove, issituated btwn the greater and lesser tubercles, and isroughly a pencil’s width in diameter.
• Within the groove lies the tendon of the long head ofthe biceps brachii, which can be tender, requiring agentle touch
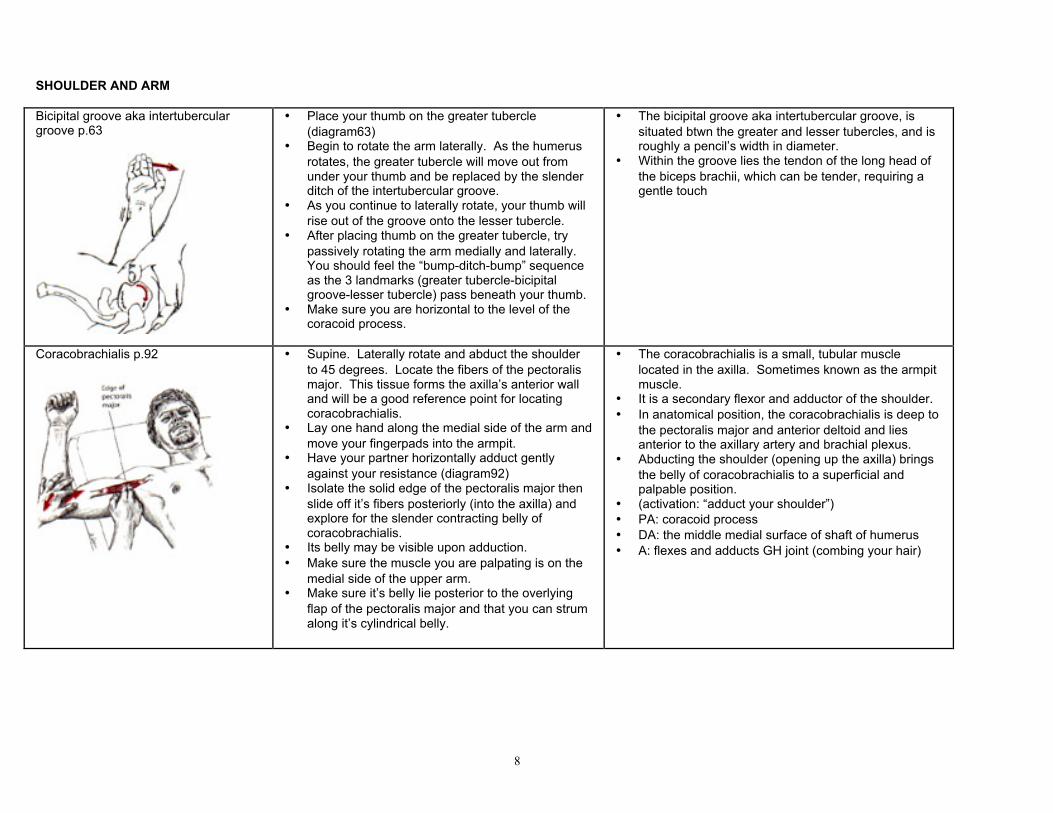
Coracobrachialis p.92 • Supine. Laterally rotate and abduct the shoulderto 45 degrees. Locate the fibers of the pectoralismajor. This tissue forms the axilla’s anterior walland will be a good reference point for locatingcoracobrachialis.
• Lay one hand along the medial side of the arm andmove your fingerpads into the armpit.
• Have your partner horizontally adduct gentlyagainst your resistance (diagram92)
• Isolate the solid edge of the pectoralis major thenslide off it’s fibers posteriorly (into the axilla) andexplore for the slender contracting belly ofcoracobrachialis.
• Its belly may be visible upon adduction.• Make sure the muscle you are palpating is on the
medial side of the upper arm.• Make sure it’s belly lie posterior to the overlying
flap of the pectoralis major and that you can strumalong it’s cylindrical belly.
• The coracobrachialis is a small, tubular musclelocated in the axilla. Sometimes known as the armpitmuscle.
• It is a secondary flexor and adductor of the shoulder.• In anatomical position, the coracobrachialis is deep to
the pectoralis major and anterior deltoid and liesanterior to the axillary artery and brachial plexus.
• Abducting the shoulder (opening up the axilla) bringsthe belly of coracobrachialis to a superficial andpalpable position.
• (activation: “adduct your shoulder”)• PA: coracoid process• DA: the middle medial surface of shaft of humerus• A: flexes and adducts GH joint (combing your hair)
9
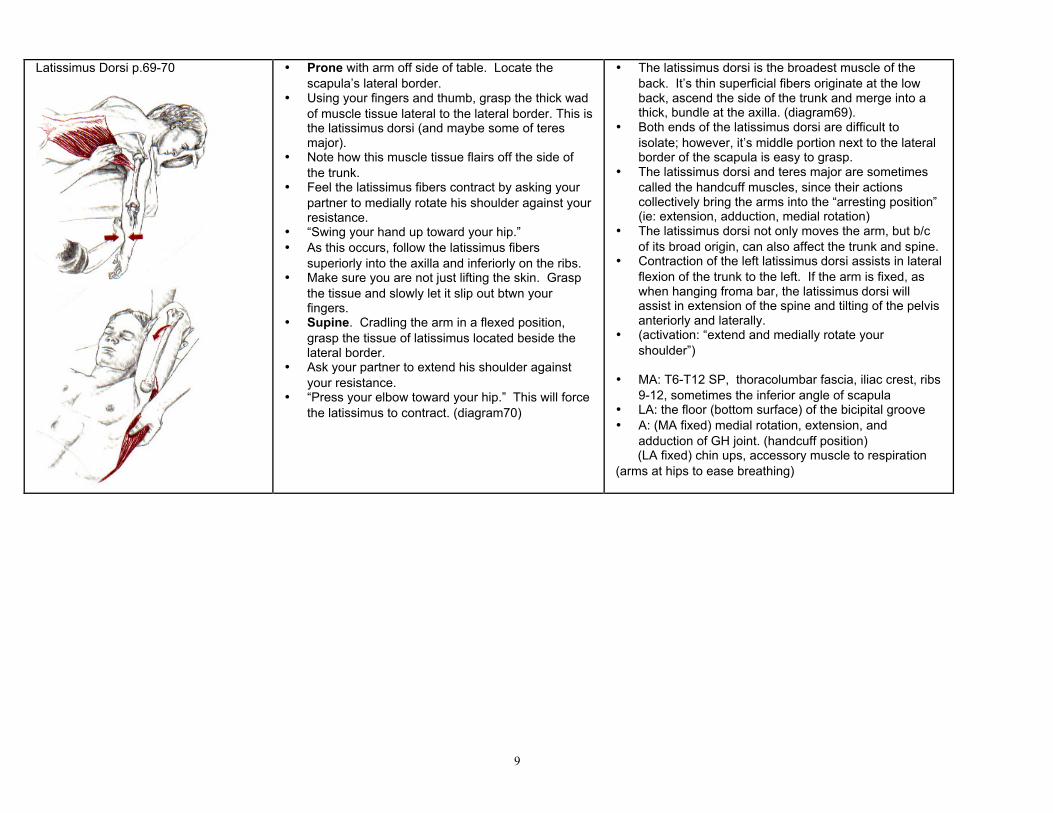
Latissimus Dorsi p.69-70 • Prone with arm off side of table. Locate thescapula’s lateral border.
• Using your fingers and thumb, grasp the thick wadof muscle tissue lateral to the lateral border. This isthe latissimus dorsi (and maybe some of teresmajor).
• Note how this muscle tissue flairs off the side ofthe trunk.
• Feel the latissimus fibers contract by asking yourpartner to medially rotate his shoulder against yourresistance.
• “Swing your hand up toward your hip.”• As this occurs, follow the latissimus fibers
superiorly into the axilla and inferiorly on the ribs.• Make sure you are not just lifting the skin. Grasp
the tissue and slowly let it slip out btwn yourfingers.
• Supine. Cradling the arm in a flexed position,grasp the tissue of latissimus located beside thelateral border.
• Ask your partner to extend his shoulder againstyour resistance.
• “Press your elbow toward your hip.” This will forcethe latissimus to contract. (diagram70)
• The latissimus dorsi is the broadest muscle of theback. It’s thin superficial fibers originate at the lowback, ascend the side of the trunk and merge into athick, bundle at the axilla. (diagram69).
• Both ends of the latissimus dorsi are difficult toisolate; however, it’s middle portion next to the lateralborder of the scapula is easy to grasp.
• The latissimus dorsi and teres major are sometimescalled the handcuff muscles, since their actionscollectively bring the arms into the “arresting position”(ie: extension, adduction, medial rotation)
• The latissimus dorsi not only moves the arm, but b/cof its broad origin, can also affect the trunk and spine.
• Contraction of the left latissimus dorsi assists in lateralflexion of the trunk to the left. If the arm is fixed, aswhen hanging froma bar, the latissimus dorsi willassist in extension of the spine and tilting of the pelvisanteriorly and laterally.
• (activation: “extend and medially rotate yourshoulder”)
• MA: T6-T12 SP, thoracolumbar fascia, iliac crest, ribs9-12, sometimes the inferior angle of scapula
• LA: the floor (bottom surface) of the bicipital groove• A: (MA fixed) medial rotation, extension, and
adduction of GH joint. (handcuff position) (LA fixed) chin ups, accessory muscle to respiration(arms at hips to ease breathing)
10
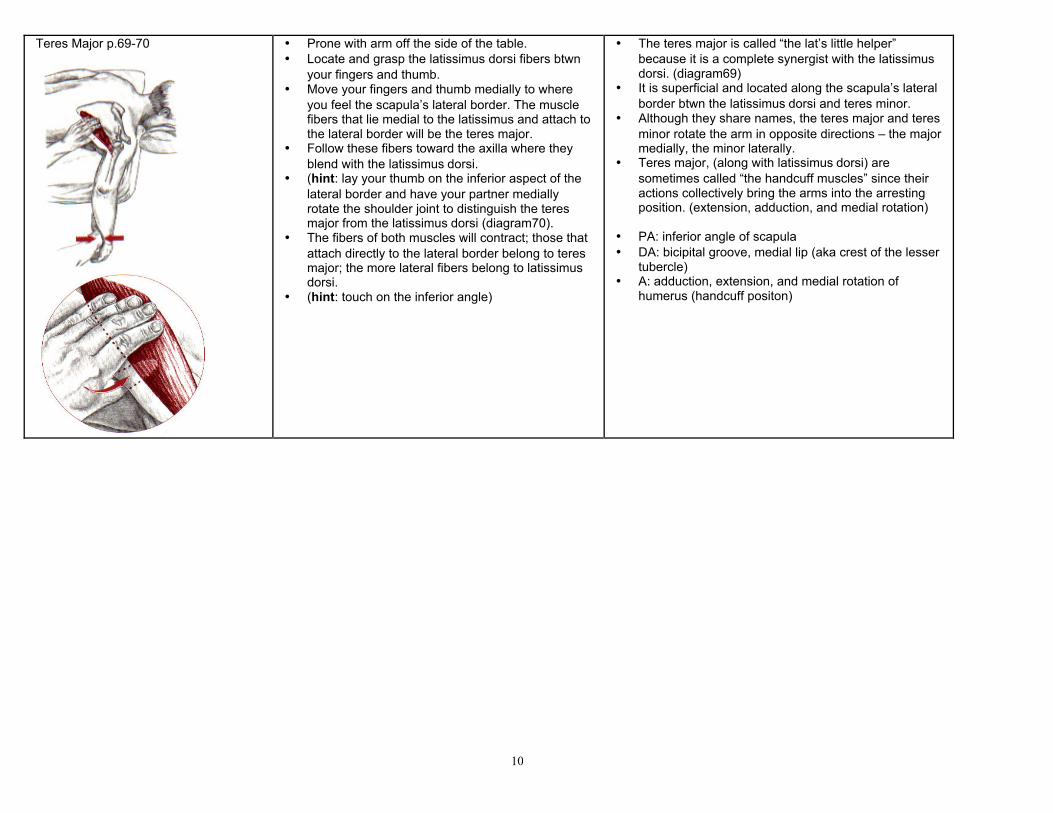
Teres Major p.69-70 • Prone with arm off the side of the table.• Locate and grasp the latissimus dorsi fibers btwn
your fingers and thumb.• Move your fingers and thumb medially to where
you feel the scapula’s lateral border. The musclefibers that lie medial to the latissimus and attach tothe lateral border will be the teres major.
• Follow these fibers toward the axilla where theyblend with the latissimus dorsi.
• (hint: lay your thumb on the inferior aspect of thelateral border and have your partner mediallyrotate the shoulder joint to distinguish the teresmajor from the latissimus dorsi (diagram70).
• The fibers of both muscles will contract; those thatattach directly to the lateral border belong to teresmajor; the more lateral fibers belong to latissimusdorsi.
• (hint: touch on the inferior angle)
• The teres major is called “the lat’s little helper”because it is a complete synergist with the latissimusdorsi. (diagram69)
• It is superficial and located along the scapula’s lateralborder btwn the latissimus dorsi and teres minor.
• Although they share names, the teres major and teresminor rotate the arm in opposite directions – the majormedially, the minor laterally.
• Teres major, (along with latissimus dorsi) aresometimes called “the handcuff muscles” since theiractions collectively bring the arms into the arrestingposition. (extension, adduction, and medial rotation)
• PA: inferior angle of scapula• DA: bicipital groove, medial lip (aka crest of the lesser
tubercle)• A: adduction, extension, and medial rotation of
humerus (handcuff positon)

11
Levator Scapula p.79-80 • Prone, supine, or sidelying. Palpating through thetrapezius, locate the superior angle of the scapula.(diagram80) and the upper region of the medialborder.
• Place your fingers just off the superior angle andfirmly strum across the belly of the levator. Thefibers will likely have a ropy texture.
• Follow these fibers superiorly as they extend to thelateral side of the neck to the transverse processesof the cervical vertebrae.
• Try to differentiate btwn the fibers of levator andtrapezius. Levator fibers should lead you towardthe lateral side of the neck.
Alternative method:• Locate upper fibers of trapezius• Roll 2 fingers anteriorly off the trapezius and press
into the tissue of the neck.• Gently strum your fingers anteriorly and posteriorly
across the levator fibers. (diagram80) Often youwill feel a distinct band of tissue that leadssuperiorly toward the lateral neck and inferiorlyunder the trapezius.
• Place your fingertips on the levator and ask yourpartner to alternately elevate and relax hisscapula.
• You should feel it contract and relax beneath yourfingertips.
• ***** SUPINE. Passively rotate the head 45degrees away from the side you are palpating willshift the cervical transverse processes furtheranteriorly. Also it gives the levator scapula morepalpable tension.
• Conversely, this position shortens and softensthe overlying trapezius fibers.
• Located along the lateral and posterior sides of theneck. Its inferior portion is deep to the uppertrapezius; however, as the levator ascends the lateralside of the neck, its fibers come out from under thetrapezius and become superficial. (diagram79)
• Its belly is aprox. 2 fingers wide with fibers thatnaturally twist around themselves.
• It attaches to the transverse processes of the cervicalvertebrae. (diagram79) Located on the lateral side ofthe neck, all of these small protuberances extendlaterally at aprox. The same width, except for theprocesses of C1 which are broader.
• When accessing the processes to locate the origin ofthe levator scapula, begin by using your softfingerpads to avoid compressing a brachial plexusnerve.
• The levator is completely accessible by palpatingeither through the upper fibers of the trapezius ordirectly from the side of the neck.
• The levator is situated btwn the splenius capitis andposterior scalene muscles on the lateral side of theneck. (diagram79)
• It can be distinguished from these neighbouringmuscles during palpation b/c it moves the scapula.
• No other muscle deep to the upper trapezius orattaching to the lateral cervical vertebrae is capable ofthis action.
• (activation: “elevate your scapula”)
• SA: C1-C4 TVP• IA: superior part of medial border of scapula• A: (SA fixed) (1) downward rotation (medial rotation)
of scapula; (2) elevation of scapula with uppertrapezius
• (IA fixed) (1) lateral flexion of neck; (2) ipsilateralrotation of neck
12
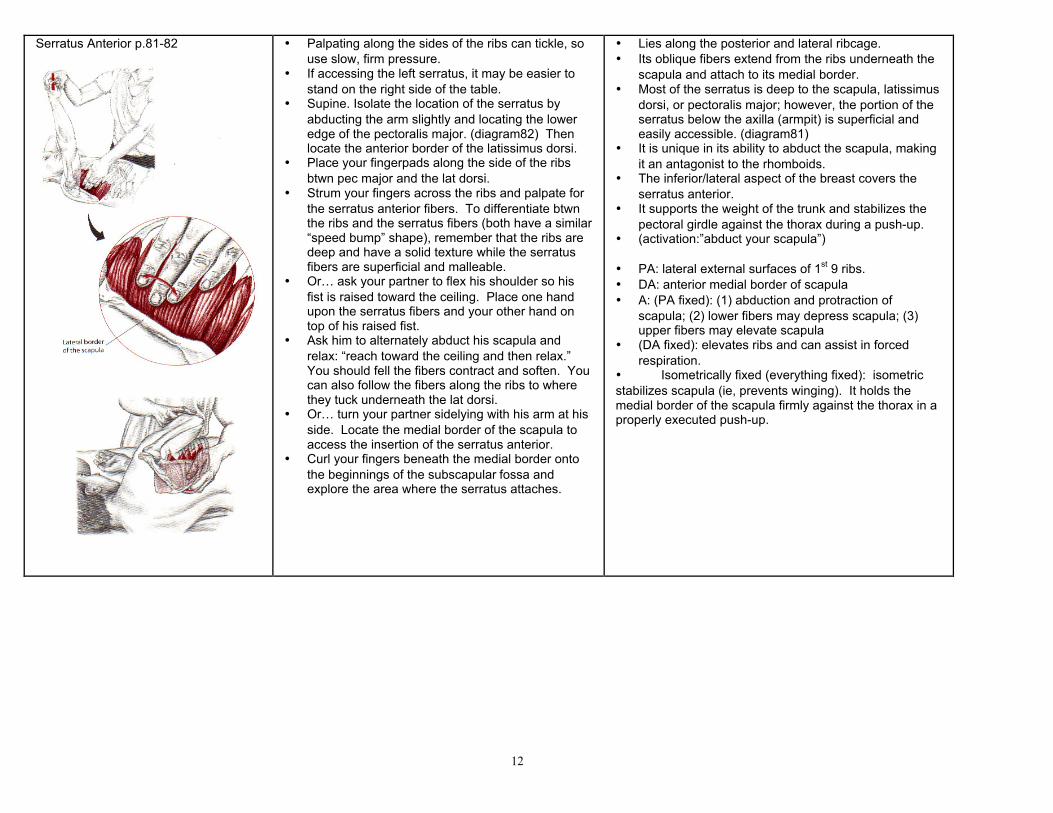
Serratus Anterior p.81-82 • Palpating along the sides of the ribs can tickle, souse slow, firm pressure.
• If accessing the left serratus, it may be easier tostand on the right side of the table.
• Supine. Isolate the location of the serratus byabducting the arm slightly and locating the loweredge of the pectoralis major. (diagram82) Thenlocate the anterior border of the latissimus dorsi.
• Place your fingerpads along the side of the ribsbtwn pec major and the lat dorsi.
• Strum your fingers across the ribs and palpate forthe serratus anterior fibers. To differentiate btwnthe ribs and the serratus fibers (both have a similar“speed bump” shape), remember that the ribs aredeep and have a solid texture while the serratusfibers are superficial and malleable.
• Or… ask your partner to flex his shoulder so hisfist is raised toward the ceiling. Place one handupon the serratus fibers and your other hand ontop of his raised fist.
• Ask him to alternately abduct his scapula andrelax: “reach toward the ceiling and then relax.”You should fell the fibers contract and soften. Youcan also follow the fibers along the ribs to wherethey tuck underneath the lat dorsi.
• Or… turn your partner sidelying with his arm at hisside. Locate the medial border of the scapula toaccess the insertion of the serratus anterior.
• Curl your fingers beneath the medial border ontothe beginnings of the subscapular fossa andexplore the area where the serratus attaches.
• Lies along the posterior and lateral ribcage.• Its oblique fibers extend from the ribs underneath the
scapula and attach to its medial border.• Most of the serratus is deep to the scapula, latissimus
dorsi, or pectoralis major; however, the portion of theserratus below the axilla (armpit) is superficial andeasily accessible. (diagram81)
• It is unique in its ability to abduct the scapula, makingit an antagonist to the rhomboids.
• The inferior/lateral aspect of the breast covers theserratus anterior.
• It supports the weight of the trunk and stabilizes thepectoral girdle against the thorax during a push-up.
• (activation:”abduct your scapula”)
• PA: lateral external surfaces of 1st 9 ribs.• DA: anterior medial border of scapula• A: (PA fixed): (1) abduction and protraction of
scapula; (2) lower fibers may depress scapula; (3)upper fibers may elevate scapula
• (DA fixed): elevates ribs and can assist in forcedrespiration.
• Isometrically fixed (everything fixed): isometricstabilizes scapula (ie, prevents winging). It holds themedial border of the scapula firmly against the thorax in aproperly executed push-up.
13
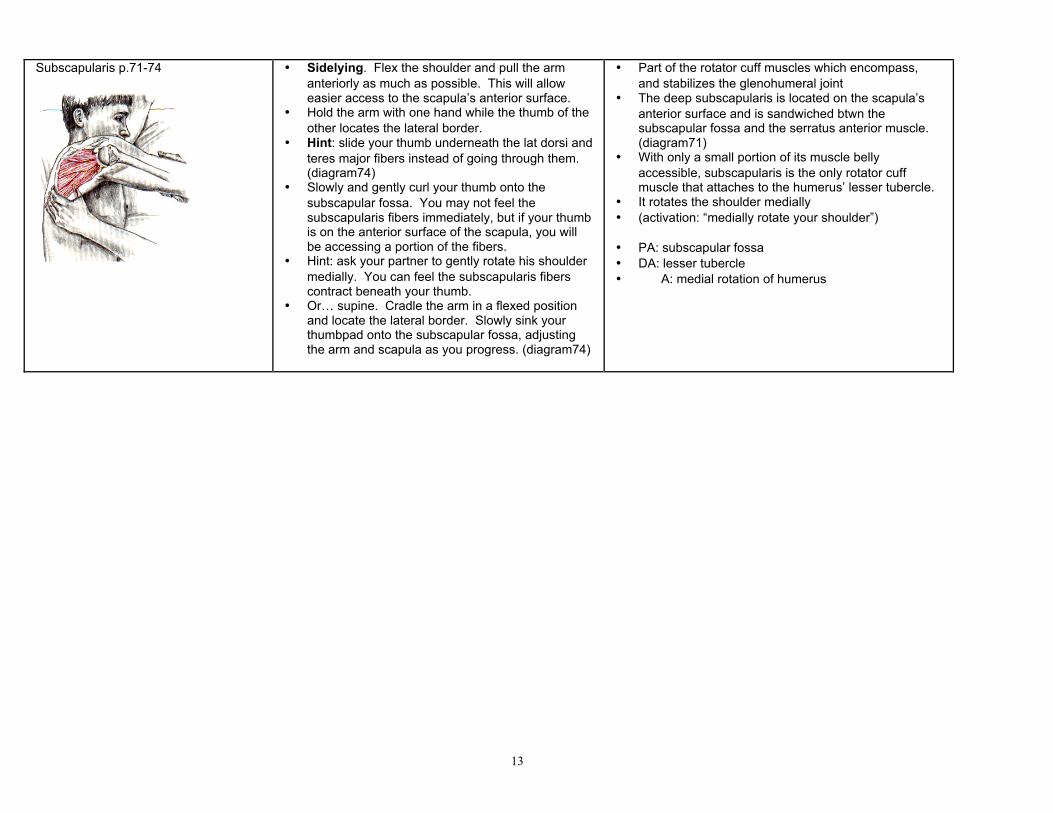
Subscapularis p.71-74 • Sidelying. Flex the shoulder and pull the armanteriorly as much as possible. This will alloweasier access to the scapula’s anterior surface.
• Hold the arm with one hand while the thumb of theother locates the lateral border.
• Hint: slide your thumb underneath the lat dorsi andteres major fibers instead of going through them.(diagram74)
• Slowly and gently curl your thumb onto thesubscapular fossa. You may not feel thesubscapularis fibers immediately, but if your thumbis on the anterior surface of the scapula, you willbe accessing a portion of the fibers.
• Hint: ask your partner to gently rotate his shouldermedially. You can feel the subscapularis fiberscontract beneath your thumb.
• Or… supine. Cradle the arm in a flexed positionand locate the lateral border. Slowly sink yourthumbpad onto the subscapular fossa, adjustingthe arm and scapula as you progress. (diagram74)
• Part of the rotator cuff muscles which encompass,and stabilizes the glenohumeral joint
• The deep subscapularis is located on the scapula’santerior surface and is sandwiched btwn thesubscapular fossa and the serratus anterior muscle.(diagram71)
• With only a small portion of its muscle bellyaccessible, subscapularis is the only rotator cuffmuscle that attaches to the humerus’ lesser tubercle.
• It rotates the shoulder medially• (activation: “medially rotate your shoulder”)
• PA: subscapular fossa• DA: lesser tubercle• A: medial rotation of humerus
14
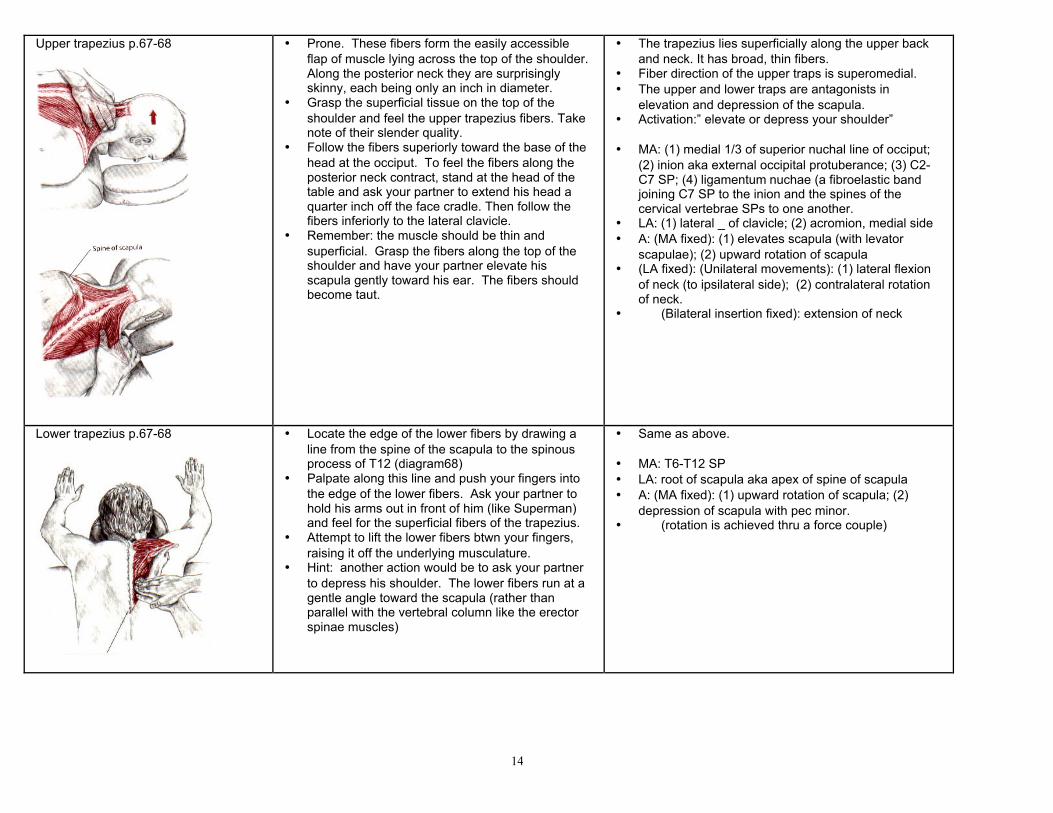
Upper trapezius p.67-68 • Prone. These fibers form the easily accessibleflap of muscle lying across the top of the shoulder.Along the posterior neck they are surprisinglyskinny, each being only an inch in diameter.
• Grasp the superficial tissue on the top of theshoulder and feel the upper trapezius fibers. Takenote of their slender quality.
• Follow the fibers superiorly toward the base of thehead at the occiput. To feel the fibers along theposterior neck contract, stand at the head of thetable and ask your partner to extend his head aquarter inch off the face cradle. Then follow thefibers inferiorly to the lateral clavicle.
• Remember: the muscle should be thin andsuperficial. Grasp the fibers along the top of theshoulder and have your partner elevate hisscapula gently toward his ear. The fibers shouldbecome taut.
• The trapezius lies superficially along the upper backand neck. It has broad, thin fibers.
• Fiber direction of the upper traps is superomedial.• The upper and lower traps are antagonists in
elevation and depression of the scapula.• Activation:” elevate or depress your shoulder”
• MA: (1) medial 1/3 of superior nuchal line of occiput;(2) inion aka external occipital protuberance; (3) C2-C7 SP; (4) ligamentum nuchae (a fibroelastic bandjoining C7 SP to the inion and the spines of thecervical vertebrae SPs to one another.
• LA: (1) lateral _ of clavicle; (2) acromion, medial side• A: (MA fixed): (1) elevates scapula (with levator
scapulae); (2) upward rotation of scapula• (LA fixed): (Unilateral movements): (1) lateral flexion
of neck (to ipsilateral side); (2) contralateral rotationof neck.
• (Bilateral insertion fixed): extension of neck
Lower trapezius p.67-68 • Locate the edge of the lower fibers by drawing aline from the spine of the scapula to the spinousprocess of T12 (diagram68)
• Palpate along this line and push your fingers intothe edge of the lower fibers. Ask your partner tohold his arms out in front of him (like Superman)and feel for the superficial fibers of the trapezius.
• Attempt to lift the lower fibers btwn your fingers,raising it off the underlying musculature.
• Hint: another action would be to ask your partnerto depress his shoulder. The lower fibers run at agentle angle toward the scapula (rather thanparallel with the vertebral column like the erectorspinae muscles)
• Same as above.
• MA: T6-T12 SP• LA: root of scapula aka apex of spine of scapula• A: (MA fixed): (1) upward rotation of scapula; (2)
depression of scapula with pec minor.• (rotation is achieved thru a force couple)
15
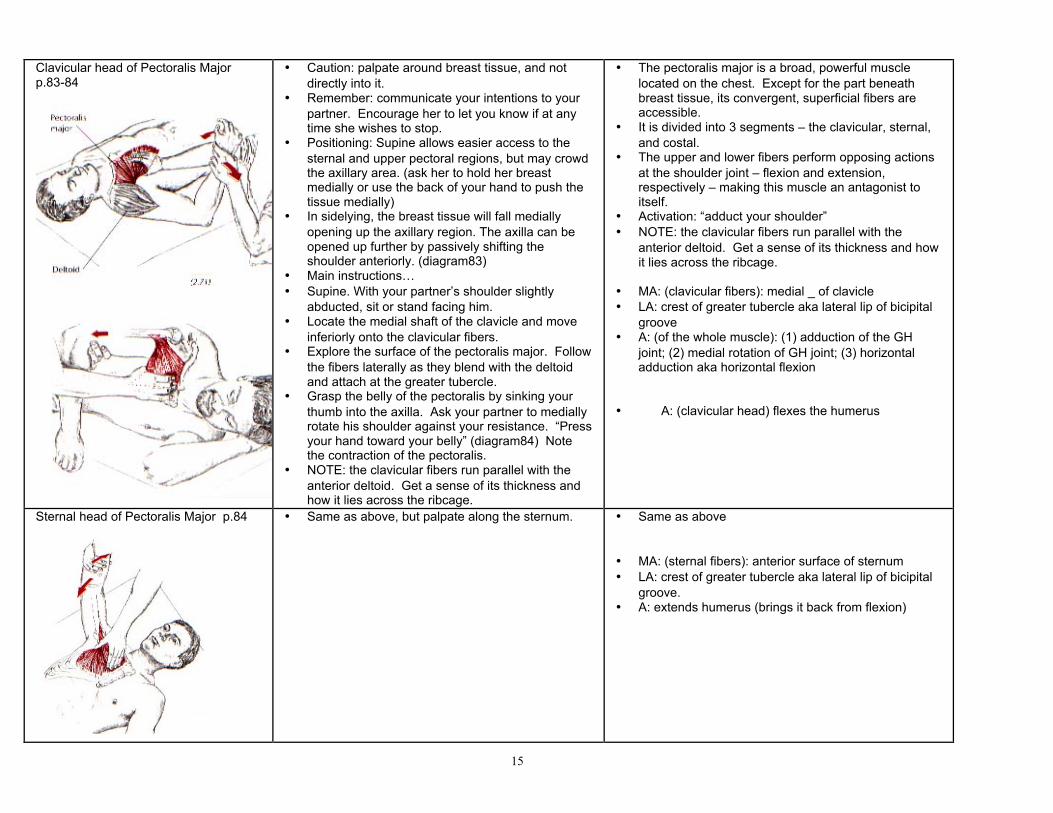
Clavicular head of Pectoralis Majorp.83-84
• Caution: palpate around breast tissue, and notdirectly into it.
• Remember: communicate your intentions to yourpartner. Encourage her to let you know if at anytime she wishes to stop.
• Positioning: Supine allows easier access to thesternal and upper pectoral regions, but may crowdthe axillary area. (ask her to hold her breastmedially or use the back of your hand to push thetissue medially)
• In sidelying, the breast tissue will fall mediallyopening up the axillary region. The axilla can beopened up further by passively shifting theshoulder anteriorly. (diagram83)
• Main instructions…• Supine. With your partner’s shoulder slightly
abducted, sit or stand facing him.• Locate the medial shaft of the clavicle and move
inferiorly onto the clavicular fibers.• Explore the surface of the pectoralis major. Follow
the fibers laterally as they blend with the deltoidand attach at the greater tubercle.
• Grasp the belly of the pectoralis by sinking yourthumb into the axilla. Ask your partner to mediallyrotate his shoulder against your resistance. “Pressyour hand toward your belly” (diagram84) Notethe contraction of the pectoralis.
• NOTE: the clavicular fibers run parallel with theanterior deltoid. Get a sense of its thickness andhow it lies across the ribcage.
• The pectoralis major is a broad, powerful musclelocated on the chest. Except for the part beneathbreast tissue, its convergent, superficial fibers areaccessible.
• It is divided into 3 segments – the clavicular, sternal,and costal.
• The upper and lower fibers perform opposing actionsat the shoulder joint – flexion and extension,respectively – making this muscle an antagonist toitself.
• Activation: “adduct your shoulder”• NOTE: the clavicular fibers run parallel with the
anterior deltoid. Get a sense of its thickness and howit lies across the ribcage.
• MA: (clavicular fibers): medial _ of clavicle• LA: crest of greater tubercle aka lateral lip of bicipital
groove• A: (of the whole muscle): (1) adduction of the GH
joint; (2) medial rotation of GH joint; (3) horizontaladduction aka horizontal flexion
• A: (clavicular head) flexes the humerus
Sternal head of Pectoralis Major p.84 • Same as above, but palpate along the sternum. • Same as above
• MA: (sternal fibers): anterior surface of sternum• LA: crest of greater tubercle aka lateral lip of bicipital
groove.• A: extends humerus (brings it back from flexion)

16
Triceps p.90-91 • Prone. Bring the arm off the side of the table andpalpate the posterior aspect of the arm. Outlinethe edge of the posterior deltoid and then explorethe size and shape of the triceps.
• Locate the olecranon process to outline the distaltendon of the triceps. Then ask your partner toextend his elbow as you apply resistance at hisforearm. (diagram91) Slide your other hand off theolecranon process proximally and onto the broadtriceps tendon.
• With your partner still contracting, widen yourfingers and palpate the medial and lateral headson either side of the tendon.
• Hint: the muscle should tighten when your partnerextends his elbow. The medial and lateral tricepsheads should bulge on either side of the distaltendon.
• The only muscle located on the posterior arm.• It creates extension at the elbow and shoulder and is
an antagonist at both these joints to the bicepsbrachii.
• It has 3 heads: long, lateral, and medial.• The long head exends off the infraglenoid tubercle of
the scapula, weaving btwn the teres major and minor.• The lateral head lies superficially beside the deltoid.• The medial head lies mostly underneath the long
head.• All 3 heads converge into a thick, distal tendon
proximal to the elbow.• Aside from its proximal portion, which is deep to the
deltoid, the triceps is superficial and easily accessible.
• PA: (long head): infraglenoid tubercle and neck ofscapula
• (lateral head): humerus, posterior surface superior tothe radial (spiral) groove.
• (medial head): humerus, posterior surface inferior tothe radial (spiral) groove
• DA: olecranon• A: (whole muscle): extension at the elbow joint• (long head): extends GH joint (weak)
Tendon of the long head of tricepsbrachii p.91
• Prone. Place one hand on the proximal elbow andask your partner to bring his elbow toward theceiling against your resistance. This action willcontract the long head of the triceps.
• Locate it’s belly along the proximal and medialaspects of the arm. Follow the muscle proximallyby strumming across the belly. Note how itdisappears underneath the posterior deltoid towardthe infraglenoid tubercle.
• With the arm relaxed, press through the posteriordeltoid and strum across its skinny tendon as itattaches to the infraglenoid tubercle.
• Hint: the long head of the triceps crosses over theteres major and under the teres minor. You canfollow the long head up to the division f the teresmuscles.
• Have your partner medially and laterally rotate hisshoulder to differentiate the teres muscles.(diagram91)
• Hint: it is the only band of muscle on the posterior armthat runs superiorly along the proximal and medialaspect of the arm. The deltoid fibers run at a morediagonal direction than the long head of the triceps.
• See above for attachments.
17
FOREARM AND HAND
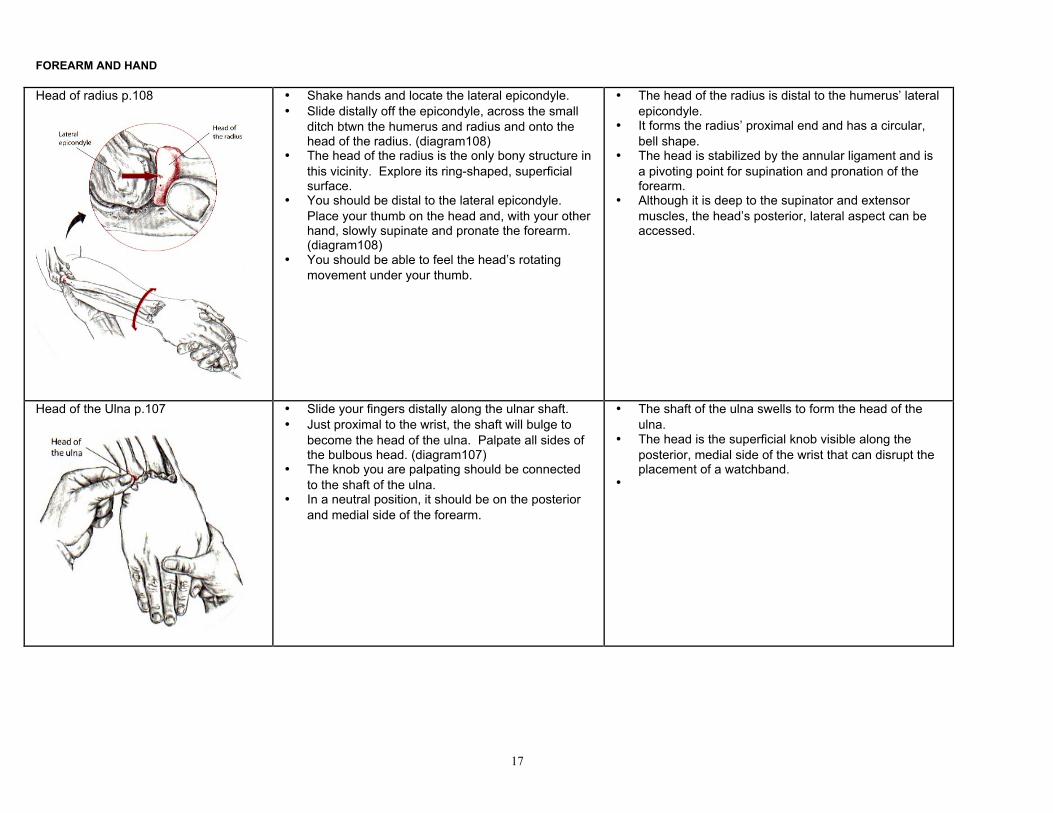
Head of radius p.108 • Shake hands and locate the lateral epicondyle.• Slide distally off the epicondyle, across the small
ditch btwn the humerus and radius and onto thehead of the radius. (diagram108)
• The head of the radius is the only bony structure inthis vicinity. Explore its ring-shaped, superficialsurface.
• You should be distal to the lateral epicondyle.Place your thumb on the head and, with your otherhand, slowly supinate and pronate the forearm.(diagram108)
• You should be able to feel the head’s rotatingmovement under your thumb.
• The head of the radius is distal to the humerus’ lateralepicondyle.
• It forms the radius’ proximal end and has a circular,bell shape.
• The head is stabilized by the annular ligament and isa pivoting point for supination and pronation of theforearm.
• Although it is deep to the supinator and extensormuscles, the head’s posterior, lateral aspect can beaccessed.
Head of the Ulna p.107 • Slide your fingers distally along the ulnar shaft.• Just proximal to the wrist, the shaft will bulge to
become the head of the ulna. Palpate all sides ofthe bulbous head. (diagram107)
• The knob you are palpating should be connectedto the shaft of the ulna.
• In a neutral position, it should be on the posteriorand medial side of the forearm.
• The shaft of the ulna swells to form the head of theulna.
• The head is the superficial knob visible along theposterior, medial side of the wrist that can disrupt theplacement of a watchband.
•
18
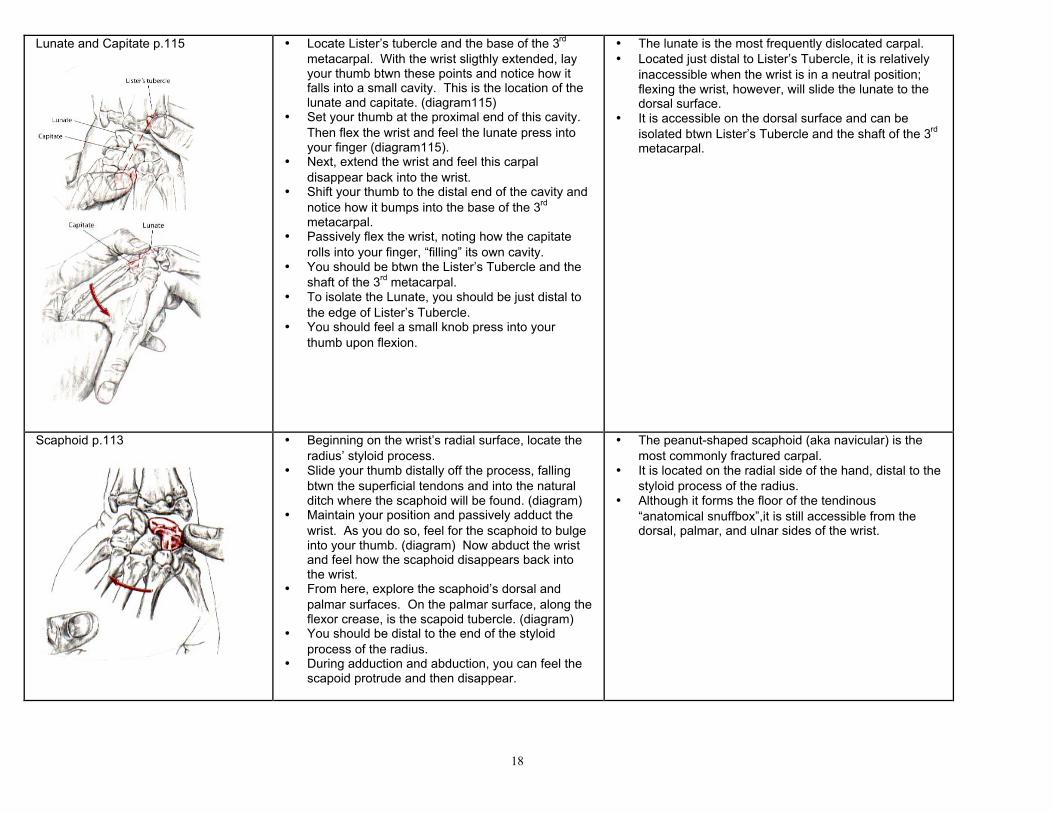
Lunate and Capitate p.115 • Locate Lister’s tubercle and the base of the 3rd
metacarpal. With the wrist sligthly extended, layyour thumb btwn these points and notice how itfalls into a small cavity. This is the location of thelunate and capitate. (diagram115)
• Set your thumb at the proximal end of this cavity.Then flex the wrist and feel the lunate press intoyour finger (diagram115).
• Next, extend the wrist and feel this carpaldisappear back into the wrist.
• Shift your thumb to the distal end of the cavity andnotice how it bumps into the base of the 3rd
metacarpal.• Passively flex the wrist, noting how the capitate
rolls into your finger, “filling” its own cavity.• You should be btwn the Lister’s Tubercle and the
shaft of the 3rd metacarpal.• To isolate the Lunate, you should be just distal to
the edge of Lister’s Tubercle.• You should feel a small knob press into your
thumb upon flexion.
• The lunate is the most frequently dislocated carpal.• Located just distal to Lister’s Tubercle, it is relatively
inaccessible when the wrist is in a neutral position;flexing the wrist, however, will slide the lunate to thedorsal surface.
• It is accessible on the dorsal surface and can beisolated btwn Lister’s Tubercle and the shaft of the 3rd
metacarpal.
Scaphoid p.113 • Beginning on the wrist’s radial surface, locate theradius’ styloid process.
• Slide your thumb distally off the process, fallingbtwn the superficial tendons and into the naturalditch where the scaphoid will be found. (diagram)
• Maintain your position and passively adduct thewrist. As you do so, feel for the scaphoid to bulgeinto your thumb. (diagram) Now abduct the wristand feel how the scaphoid disappears back intothe wrist.
• From here, explore the scaphoid’s dorsal andpalmar surfaces. On the palmar surface, along theflexor crease, is the scapoid tubercle. (diagram)
• You should be distal to the end of the styloidprocess of the radius.
• During adduction and abduction, you can feel thescapoid protrude and then disappear.
• The peanut-shaped scaphoid (aka navicular) is themost commonly fractured carpal.
• It is located on the radial side of the hand, distal to thestyloid process of the radius.
• Although it forms the floor of the tendinous“anatomical snuffbox”,it is still accessible from thedorsal, palmar, and ulnar sides of the wrist.
19
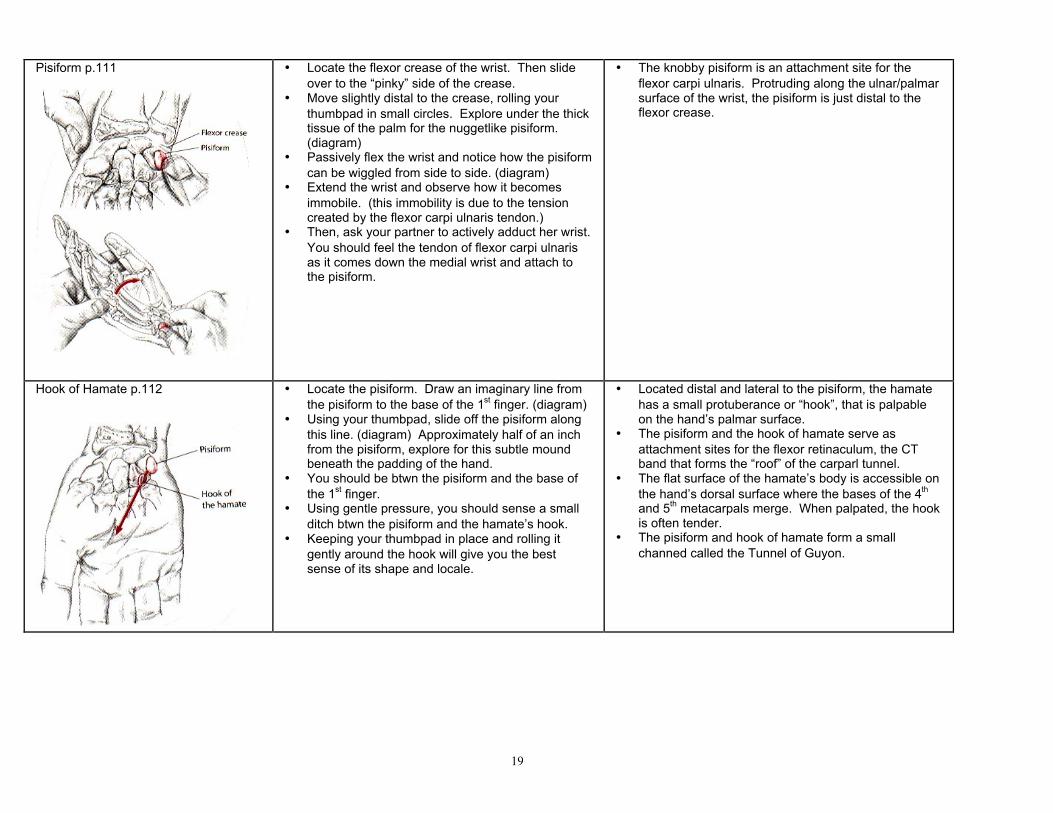
Pisiform p.111 • Locate the flexor crease of the wrist. Then slideover to the “pinky” side of the crease.
• Move slightly distal to the crease, rolling yourthumbpad in small circles. Explore under the thicktissue of the palm for the nuggetlike pisiform.(diagram)
• Passively flex the wrist and notice how the pisiformcan be wiggled from side to side. (diagram)
• Extend the wrist and observe how it becomesimmobile. (this immobility is due to the tensioncreated by the flexor carpi ulnaris tendon.)
• Then, ask your partner to actively adduct her wrist.You should feel the tendon of flexor carpi ulnarisas it comes down the medial wrist and attach tothe pisiform.
• The knobby pisiform is an attachment site for theflexor carpi ulnaris. Protruding along the ulnar/palmarsurface of the wrist, the pisiform is just distal to theflexor crease.
Hook of Hamate p.112 • Locate the pisiform. Draw an imaginary line fromthe pisiform to the base of the 1st finger. (diagram)
• Using your thumbpad, slide off the pisiform alongthis line. (diagram) Approximately half of an inchfrom the pisiform, explore for this subtle moundbeneath the padding of the hand.
• You should be btwn the pisiform and the base ofthe 1st finger.
• Using gentle pressure, you should sense a smallditch btwn the pisiform and the hamate’s hook.
• Keeping your thumbpad in place and rolling itgently around the hook will give you the bestsense of its shape and locale.
• Located distal and lateral to the pisiform, the hamatehas a small protuberance or “hook”, that is palpableon the hand’s palmar surface.
• The pisiform and the hook of hamate serve asattachment sites for the flexor retinaculum, the CTband that forms the “roof” of the carparl tunnel.
• The flat surface of the hamate’s body is accessible onthe hand’s dorsal surface where the bases of the 4th
and 5th metacarpals merge. When palpated, the hookis often tender.
• The pisiform and hook of hamate form a smallchanned called the Tunnel of Guyon.
20
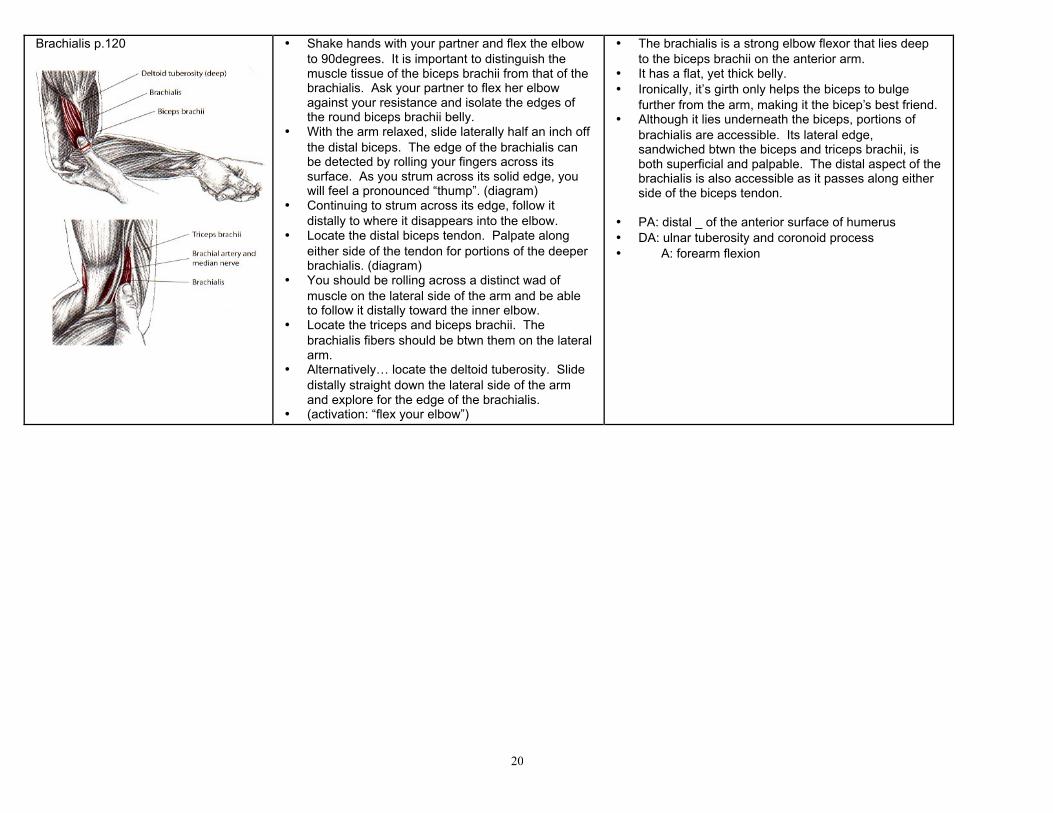
Brachialis p.120 • Shake hands with your partner and flex the elbowto 90degrees. It is important to distinguish themuscle tissue of the biceps brachii from that of thebrachialis. Ask your partner to flex her elbowagainst your resistance and isolate the edges ofthe round biceps brachii belly.
• With the arm relaxed, slide laterally half an inch offthe distal biceps. The edge of the brachialis canbe detected by rolling your fingers across itssurface. As you strum across its solid edge, youwill feel a pronounced “thump”. (diagram)
• Continuing to strum across its edge, follow itdistally to where it disappears into the elbow.
• Locate the distal biceps tendon. Palpate alongeither side of the tendon for portions of the deeperbrachialis. (diagram)
• You should be rolling across a distinct wad ofmuscle on the lateral side of the arm and be ableto follow it distally toward the inner elbow.
• Locate the triceps and biceps brachii. Thebrachialis fibers should be btwn them on the lateralarm.
• Alternatively… locate the deltoid tuberosity. Slidedistally straight down the lateral side of the armand explore for the edge of the brachialis.
• (activation: “flex your elbow”)
• The brachialis is a strong elbow flexor that lies deepto the biceps brachii on the anterior arm.
• It has a flat, yet thick belly.• Ironically, it’s girth only helps the biceps to bulge
further from the arm, making it the bicep’s best friend.• Although it lies underneath the biceps, portions of
brachialis are accessible. Its lateral edge,sandwiched btwn the biceps and triceps brachii, isboth superficial and palpable. The distal aspect of thebrachialis is also accessible as it passes along eitherside of the biceps tendon.
• PA: distal _ of the anterior surface of humerus• DA: ulnar tuberosity and coronoid process• A: forearm flexion
21
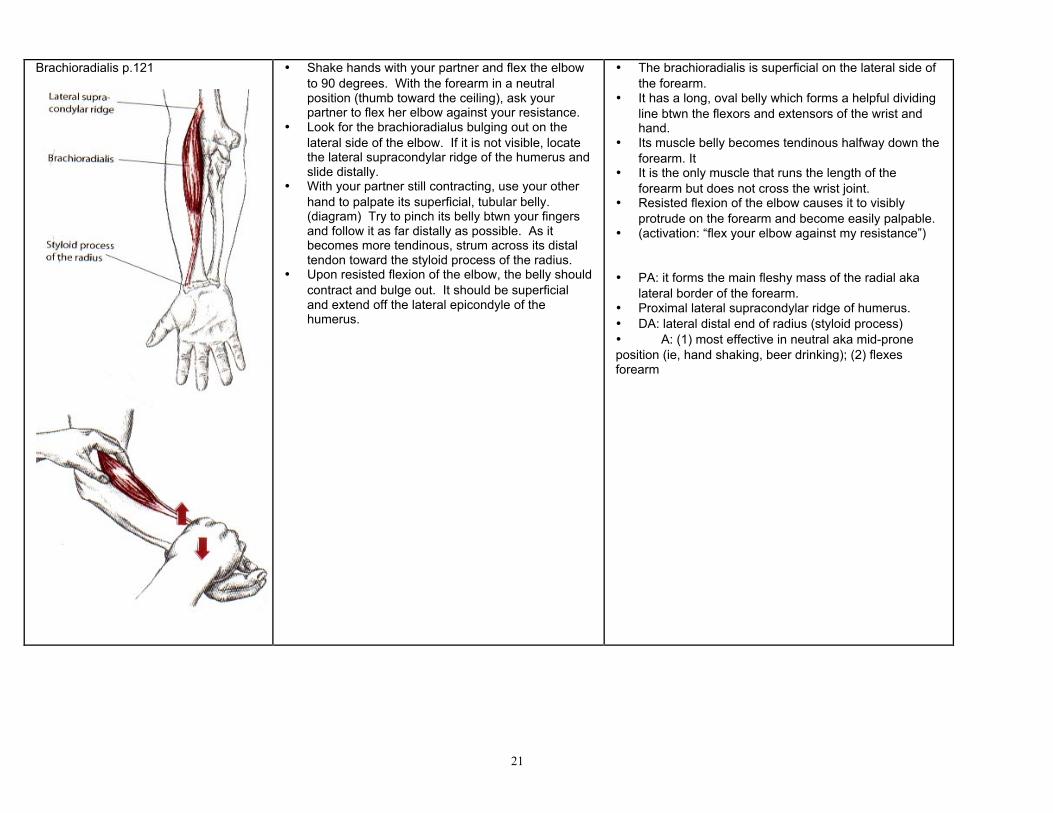
Brachioradialis p.121 • Shake hands with your partner and flex the elbowto 90 degrees. With the forearm in a neutralposition (thumb toward the ceiling), ask yourpartner to flex her elbow against your resistance.
• Look for the brachioradialus bulging out on thelateral side of the elbow. If it is not visible, locatethe lateral supracondylar ridge of the humerus andslide distally.
• With your partner still contracting, use your otherhand to palpate its superficial, tubular belly.(diagram) Try to pinch its belly btwn your fingersand follow it as far distally as possible. As itbecomes more tendinous, strum across its distaltendon toward the styloid process of the radius.
• Upon resisted flexion of the elbow, the belly shouldcontract and bulge out. It should be superficialand extend off the lateral epicondyle of thehumerus.
• The brachioradialis is superficial on the lateral side ofthe forearm.
• It has a long, oval belly which forms a helpful dividingline btwn the flexors and extensors of the wrist andhand.
• Its muscle belly becomes tendinous halfway down theforearm. It
• It is the only muscle that runs the length of theforearm but does not cross the wrist joint.
• Resisted flexion of the elbow causes it to visiblyprotrude on the forearm and become easily palpable.
• (activation: “flex your elbow against my resistance”)
• PA: it forms the main fleshy mass of the radial akalateral border of the forearm.
• Proximal lateral supracondylar ridge of humerus.• DA: lateral distal end of radius (styloid process)• A: (1) most effective in neutral aka mid-proneposition (ie, hand shaking, beer drinking); (2) flexesforearm
22
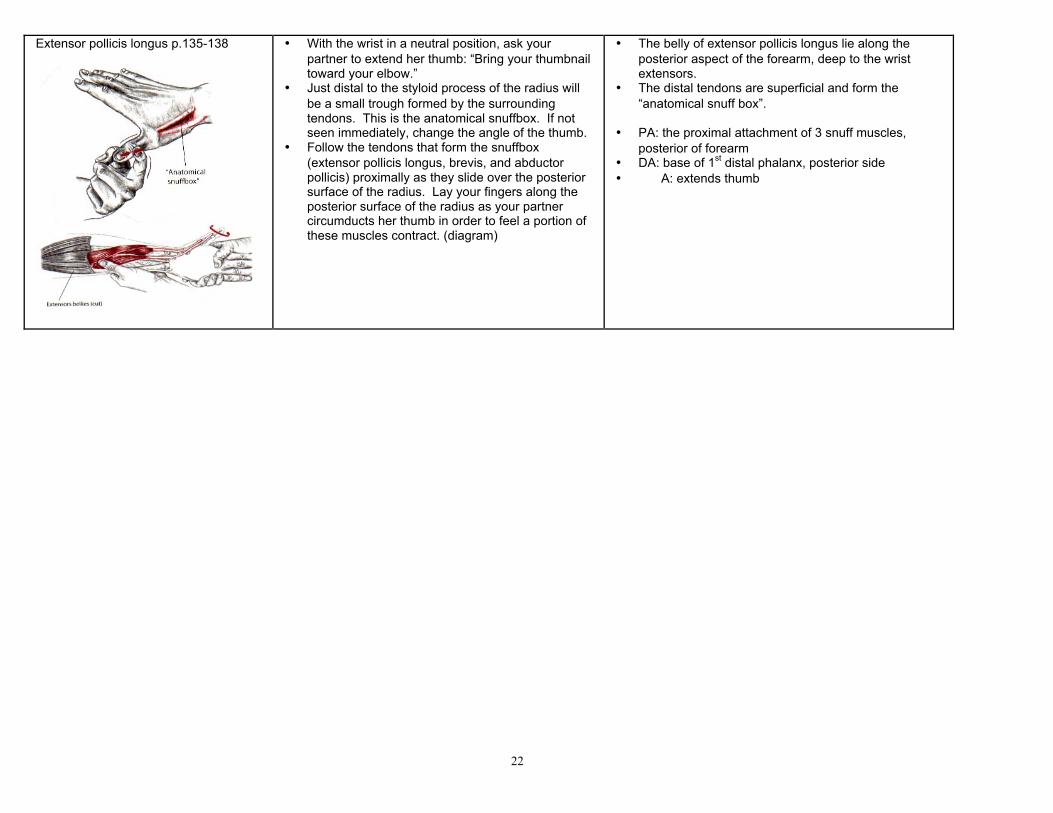
Extensor pollicis longus p.135-138 • With the wrist in a neutral position, ask yourpartner to extend her thumb: “Bring your thumbnailtoward your elbow.”
• Just distal to the styloid process of the radius willbe a small trough formed by the surroundingtendons. This is the anatomical snuffbox. If notseen immediately, change the angle of the thumb.
• Follow the tendons that form the snuffbox(extensor pollicis longus, brevis, and abductorpollicis) proximally as they slide over the posteriorsurface of the radius. Lay your fingers along theposterior surface of the radius as your partnercircumducts her thumb in order to feel a portion ofthese muscles contract. (diagram)
• The belly of extensor pollicis longus lie along theposterior aspect of the forearm, deep to the wristextensors.
• The distal tendons are superficial and form the“anatomical snuff box”.
• PA: the proximal attachment of 3 snuff muscles,posterior of forearm
• DA: base of 1st distal phalanx, posterior side• A: extends thumb
23
HIP AND THIGH
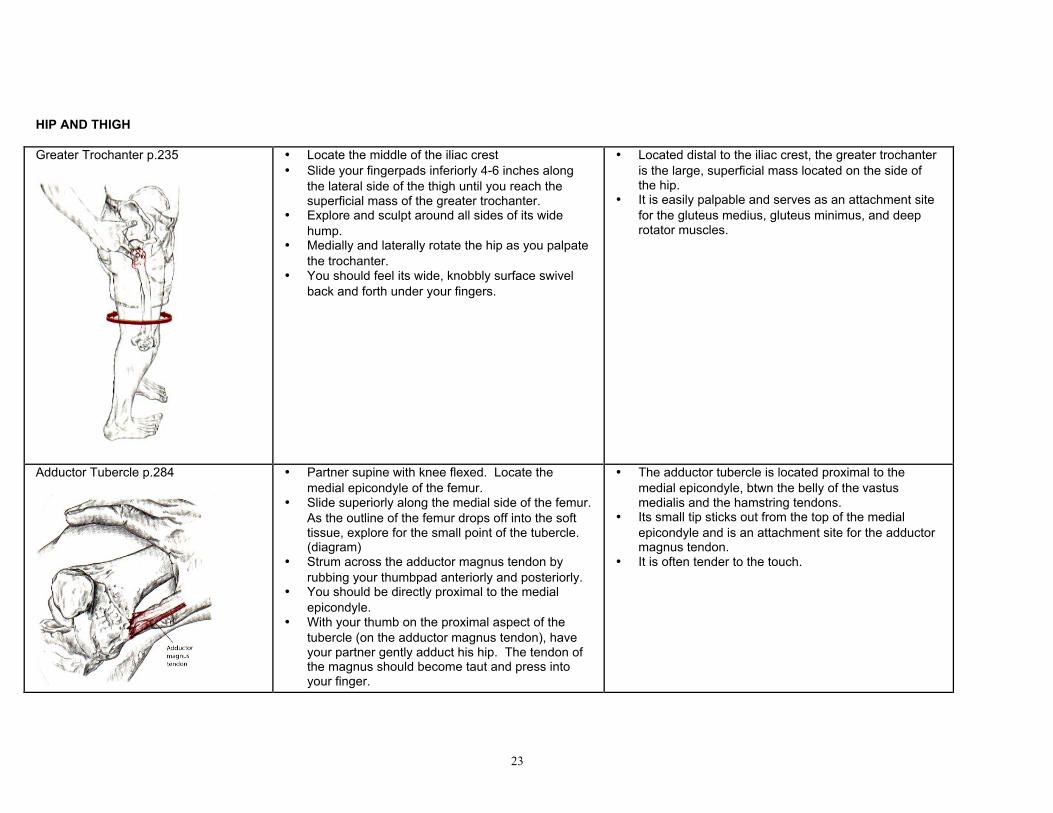
Greater Trochanter p.235 • Locate the middle of the iliac crest• Slide your fingerpads inferiorly 4-6 inches along
the lateral side of the thigh until you reach thesuperficial mass of the greater trochanter.
• Explore and sculpt around all sides of its widehump.
• Medially and laterally rotate the hip as you palpatethe trochanter.
• You should feel its wide, knobbly surface swivelback and forth under your fingers.
• Located distal to the iliac crest, the greater trochanteris the large, superficial mass located on the side ofthe hip.
• It is easily palpable and serves as an attachment sitefor the gluteus medius, gluteus minimus, and deeprotator muscles.
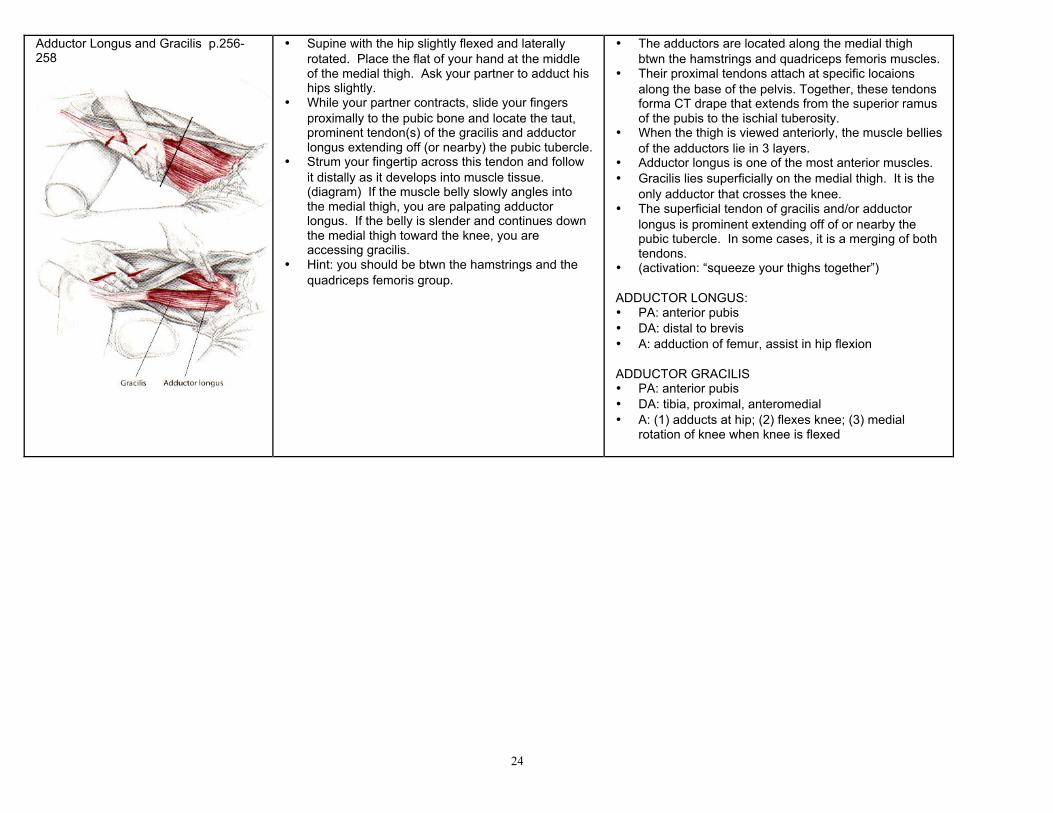
Adductor Tubercle p.284 • Partner supine with knee flexed. Locate themedial epicondyle of the femur.
• Slide superiorly along the medial side of the femur.As the outline of the femur drops off into the softtissue, explore for the small point of the tubercle.(diagram)
• Strum across the adductor magnus tendon byrubbing your thumbpad anteriorly and posteriorly.
• You should be directly proximal to the medialepicondyle.
• With your thumb on the proximal aspect of thetubercle (on the adductor magnus tendon), haveyour partner gently adduct his hip. The tendon ofthe magnus should become taut and press intoyour finger.
• The adductor tubercle is located proximal to themedial epicondyle, btwn the belly of the vastusmedialis and the hamstring tendons.
• Its small tip sticks out from the top of the medialepicondyle and is an attachment site for the adductormagnus tendon.
• It is often tender to the touch.
24
Adductor Longus and Gracilis p.256-258
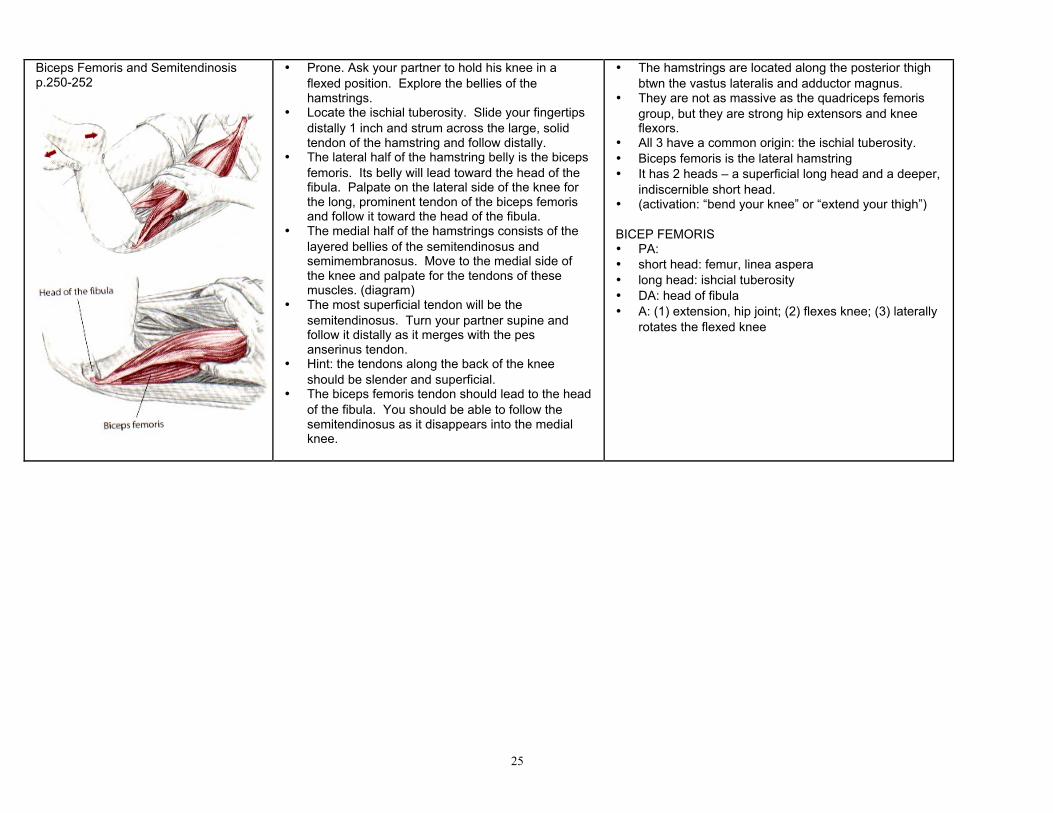
• Supine with the hip slightly flexed and laterallyrotated. Place the flat of your hand at the middleof the medial thigh. Ask your partner to adduct hiships slightly.
• While your partner contracts, slide your fingersproximally to the pubic bone and locate the taut,prominent tendon(s) of the gracilis and adductorlongus extending off (or nearby) the pubic tubercle.
• Strum your fingertip across this tendon and followit distally as it develops into muscle tissue.(diagram) If the muscle belly slowly angles intothe medial thigh, you are palpating adductorlongus. If the belly is slender and continues downthe medial thigh toward the knee, you areaccessing gracilis.
• Hint: you should be btwn the hamstrings and thequadriceps femoris group.
• The adductors are located along the medial thighbtwn the hamstrings and quadriceps femoris muscles.
• Their proximal tendons attach at specific locaionsalong the base of the pelvis. Together, these tendonsforma CT drape that extends from the superior ramusof the pubis to the ischial tuberosity.
• When the thigh is viewed anteriorly, the muscle belliesof the adductors lie in 3 layers.
• Adductor longus is one of the most anterior muscles.• Gracilis lies superficially on the medial thigh. It is the
only adductor that crosses the knee.• The superficial tendon of gracilis and/or adductor
longus is prominent extending off of or nearby thepubic tubercle. In some cases, it is a merging of bothtendons.
• (activation: “squeeze your thighs together”)
ADDUCTOR LONGUS:• PA: anterior pubis• DA: distal to brevis• A: adduction of femur, assist in hip flexion
ADDUCTOR GRACILIS• PA: anterior pubis• DA: tibia, proximal, anteromedial• A: (1) adducts at hip; (2) flexes knee; (3) medial
rotation of knee when knee is flexed
25
Biceps Femoris and Semitendinosisp.250-252
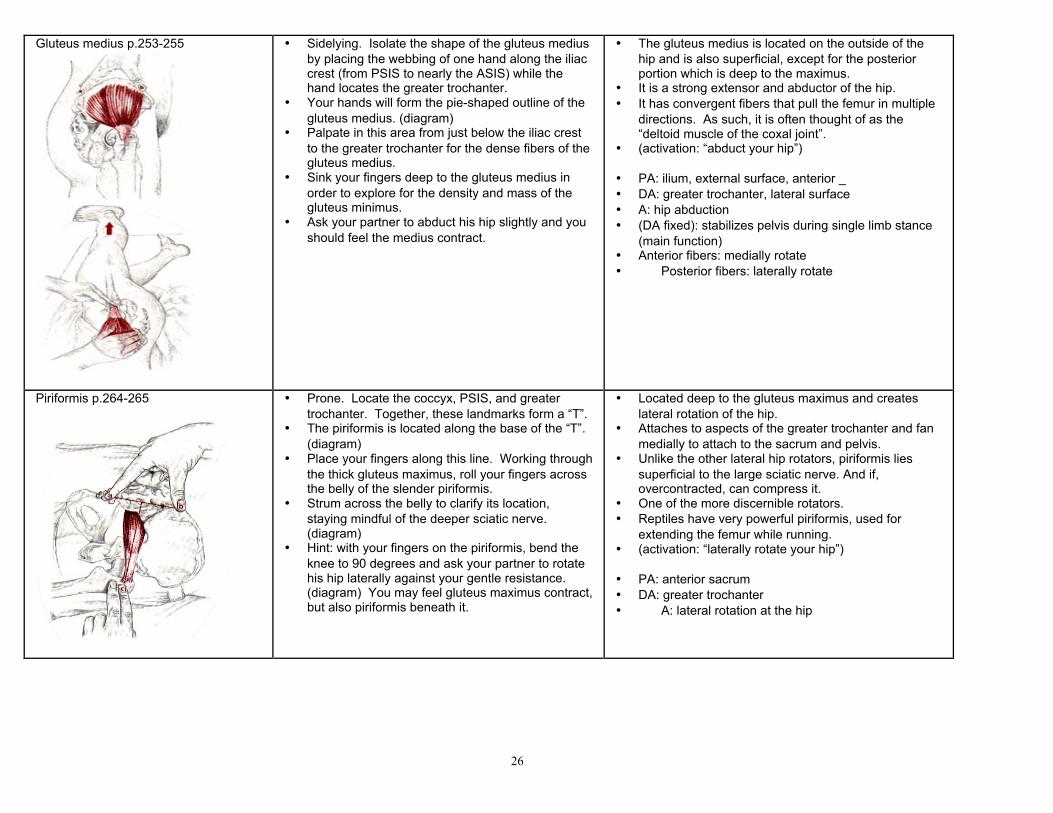
• Prone. Ask your partner to hold his knee in aflexed position. Explore the bellies of thehamstrings.
• Locate the ischial tuberosity. Slide your fingertipsdistally 1 inch and strum across the large, solidtendon of the hamstring and follow distally.
• The lateral half of the hamstring belly is the bicepsfemoris. Its belly will lead toward the head of thefibula. Palpate on the lateral side of the knee forthe long, prominent tendon of the biceps femorisand follow it toward the head of the fibula.
• The medial half of the hamstrings consists of thelayered bellies of the semitendinosus andsemimembranosus. Move to the medial side ofthe knee and palpate for the tendons of thesemuscles. (diagram)
• The most superficial tendon will be thesemitendinosus. Turn your partner supine andfollow it distally as it merges with the pesanserinus tendon.
• Hint: the tendons along the back of the kneeshould be slender and superficial.
• The biceps femoris tendon should lead to the headof the fibula. You should be able to follow thesemitendinosus as it disappears into the medialknee.
• The hamstrings are located along the posterior thighbtwn the vastus lateralis and adductor magnus.
• They are not as massive as the quadriceps femorisgroup, but they are strong hip extensors and kneeflexors.
• All 3 have a common origin: the ischial tuberosity.• Biceps femoris is the lateral hamstring• It has 2 heads – a superficial long head and a deeper,
indiscernible short head.• (activation: “bend your knee” or “extend your thigh”)
BICEP FEMORIS• PA:• short head: femur, linea aspera• long head: ishcial tuberosity• DA: head of fibula• A: (1) extension, hip joint; (2) flexes knee; (3) laterally
rotates the flexed knee
26
Gluteus medius p.253-255 • Sidelying. Isolate the shape of the gluteus mediusby placing the webbing of one hand along the iliaccrest (from PSIS to nearly the ASIS) while thehand locates the greater trochanter.
• Your hands will form the pie-shaped outline of thegluteus medius. (diagram)
• Palpate in this area from just below the iliac crestto the greater trochanter for the dense fibers of thegluteus medius.
• Sink your fingers deep to the gluteus medius inorder to explore for the density and mass of thegluteus minimus.
• Ask your partner to abduct his hip slightly and youshould feel the medius contract.
• The gluteus medius is located on the outside of thehip and is also superficial, except for the posteriorportion which is deep to the maximus.
• It is a strong extensor and abductor of the hip.• It has convergent fibers that pull the femur in multiple
directions. As such, it is often thought of as the“deltoid muscle of the coxal joint”.
• (activation: “abduct your hip”)
• PA: ilium, external surface, anterior _• DA: greater trochanter, lateral surface• A: hip abduction• (DA fixed): stabilizes pelvis during single limb stance
(main function)• Anterior fibers: medially rotate• Posterior fibers: laterally rotate
Piriformis p.264-265 • Prone. Locate the coccyx, PSIS, and greatertrochanter. Together, these landmarks form a “T”.
• The piriformis is located along the base of the “T”.(diagram)
• Place your fingers along this line. Working throughthe thick gluteus maximus, roll your fingers acrossthe belly of the slender piriformis.
• Strum across the belly to clarify its location,staying mindful of the deeper sciatic nerve.(diagram)
• Hint: with your fingers on the piriformis, bend theknee to 90 degrees and ask your partner to rotatehis hip laterally against your gentle resistance.(diagram) You may feel gluteus maximus contract,but also piriformis beneath it.
• Located deep to the gluteus maximus and createslateral rotation of the hip.
• Attaches to aspects of the greater trochanter and fanmedially to attach to the sacrum and pelvis.
• Unlike the other lateral hip rotators, piriformis liessuperficial to the large sciatic nerve. And if,overcontracted, can compress it.
• One of the more discernible rotators.• Reptiles have very powerful piriformis, used for
extending the femur while running.• (activation: “laterally rotate your hip”)
• PA: anterior sacrum• DA: greater trochanter• A: lateral rotation at the hip
27
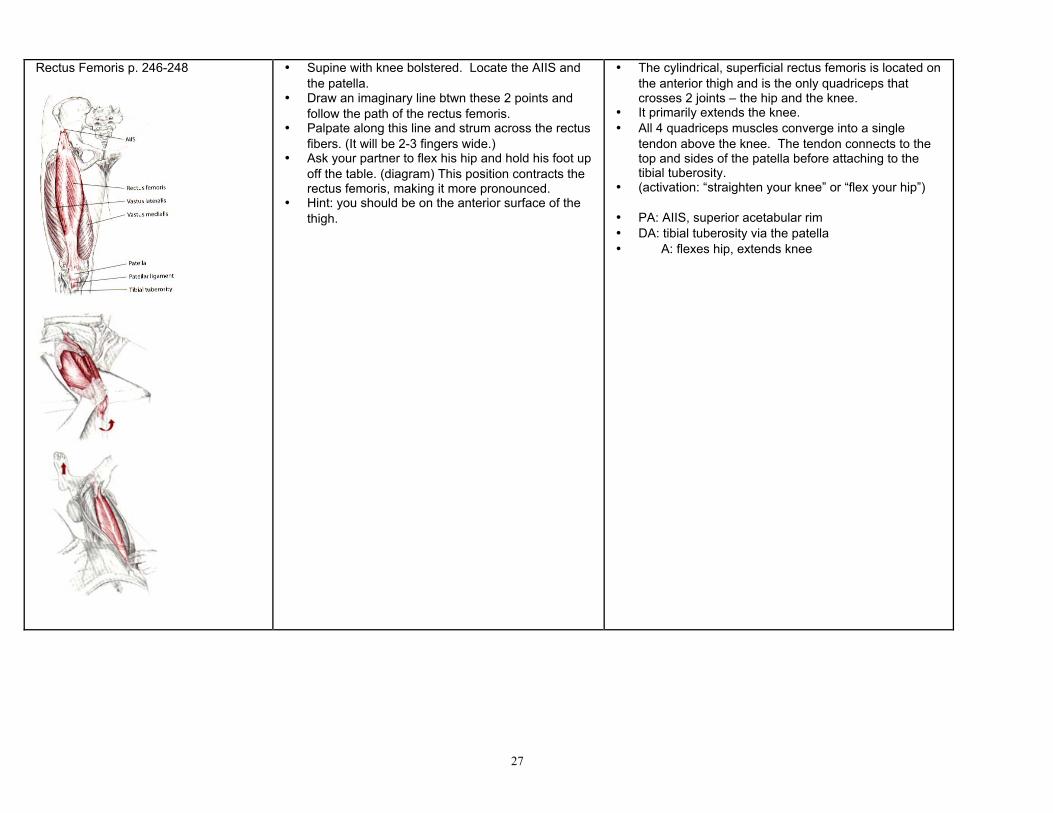
Rectus Femoris p. 246-248 • Supine with knee bolstered. Locate the AIIS andthe patella.
• Draw an imaginary line btwn these 2 points andfollow the path of the rectus femoris.
• Palpate along this line and strum across the rectusfibers. (It will be 2-3 fingers wide.)
• Ask your partner to flex his hip and hold his foot upoff the table. (diagram) This position contracts therectus femoris, making it more pronounced.
• Hint: you should be on the anterior surface of thethigh.
• The cylindrical, superficial rectus femoris is located onthe anterior thigh and is the only quadriceps thatcrosses 2 joints – the hip and the knee.
• It primarily extends the knee.• All 4 quadriceps muscles converge into a single
tendon above the knee. The tendon connects to thetop and sides of the patella before attaching to thetibial tuberosity.
• (activation: “straighten your knee” or “flex your hip”)
• PA: AIIS, superior acetabular rim• DA: tibial tuberosity via the patella• A: flexes hip, extends knee
28
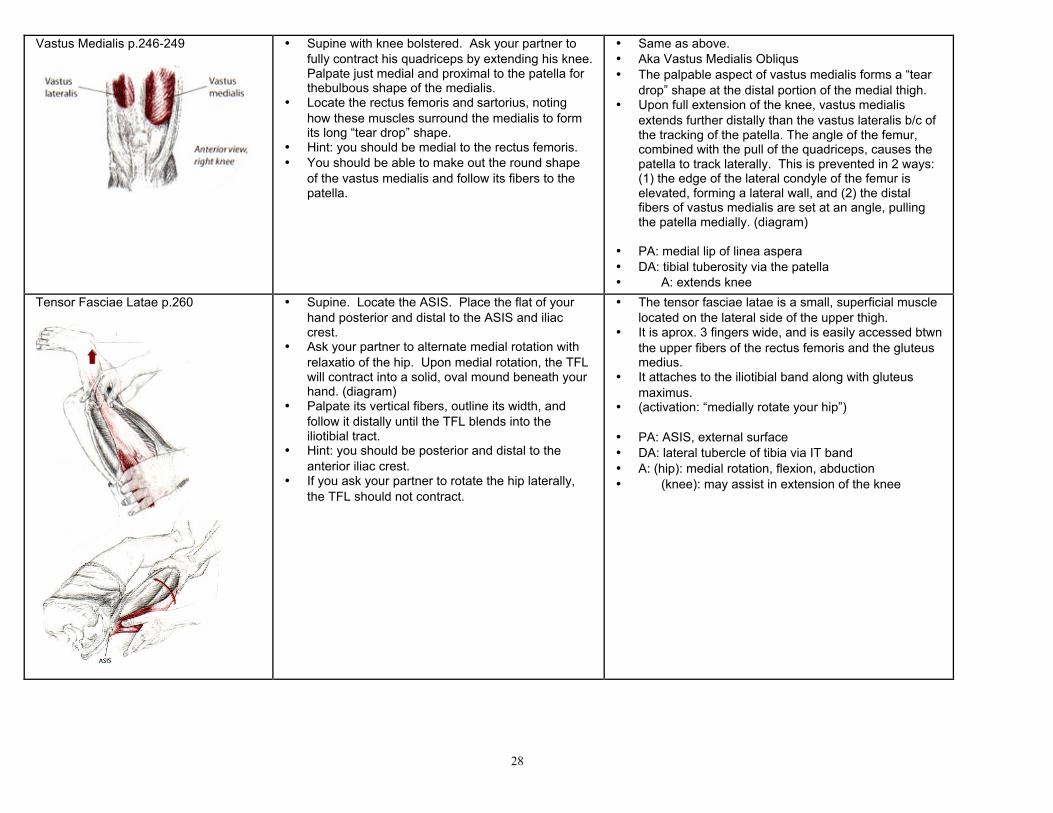
Vastus Medialis p.246-249 • Supine with knee bolstered. Ask your partner tofully contract his quadriceps by extending his knee.Palpate just medial and proximal to the patella forthebulbous shape of the medialis.
• Locate the rectus femoris and sartorius, notinghow these muscles surround the medialis to formits long “tear drop” shape.
• Hint: you should be medial to the rectus femoris.• You should be able to make out the round shape
of the vastus medialis and follow its fibers to thepatella.
• Same as above.• Aka Vastus Medialis Obliqus• The palpable aspect of vastus medialis forms a “tear
drop” shape at the distal portion of the medial thigh.• Upon full extension of the knee, vastus medialis
extends further distally than the vastus lateralis b/c ofthe tracking of the patella. The angle of the femur,combined with the pull of the quadriceps, causes thepatella to track laterally. This is prevented in 2 ways:(1) the edge of the lateral condyle of the femur iselevated, forming a lateral wall, and (2) the distalfibers of vastus medialis are set at an angle, pullingthe patella medially. (diagram)
• PA: medial lip of linea aspera• DA: tibial tuberosity via the patella• A: extends knee
Tensor Fasciae Latae p.260 • Supine. Locate the ASIS. Place the flat of yourhand posterior and distal to the ASIS and iliaccrest.
• Ask your partner to alternate medial rotation withrelaxatio of the hip. Upon medial rotation, the TFLwill contract into a solid, oval mound beneath yourhand. (diagram)
• Palpate its vertical fibers, outline its width, andfollow it distally until the TFL blends into theiliotibial tract.
• Hint: you should be posterior and distal to theanterior iliac crest.
• If you ask your partner to rotate the hip laterally,the TFL should not contract.
• The tensor fasciae latae is a small, superficial musclelocated on the lateral side of the upper thigh.
• It is aprox. 3 fingers wide, and is easily accessed btwnthe upper fibers of the rectus femoris and the gluteusmedius.
• It attaches to the iliotibial band along with gluteusmaximus.
• (activation: “medially rotate your hip”)
• PA: ASIS, external surface• DA: lateral tubercle of tibia via IT band• A: (hip): medial rotation, flexion, abduction• (knee): may assist in extension of the knee
29
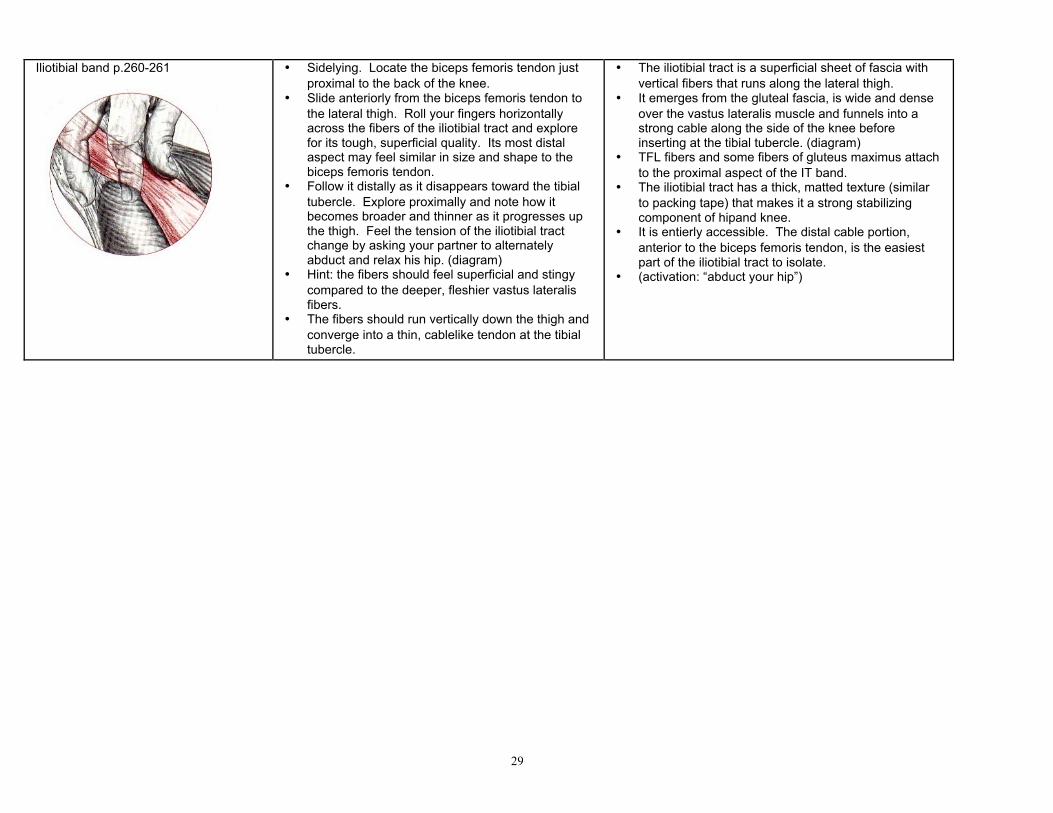
Iliotibial band p.260-261 • Sidelying. Locate the biceps femoris tendon justproximal to the back of the knee.
• Slide anteriorly from the biceps femoris tendon tothe lateral thigh. Roll your fingers horizontallyacross the fibers of the iliotibial tract and explorefor its tough, superficial quality. Its most distalaspect may feel similar in size and shape to thebiceps femoris tendon.
• Follow it distally as it disappears toward the tibialtubercle. Explore proximally and note how itbecomes broader and thinner as it progresses upthe thigh. Feel the tension of the iliotibial tractchange by asking your partner to alternatelyabduct and relax his hip. (diagram)
• Hint: the fibers should feel superficial and stingycompared to the deeper, fleshier vastus lateralisfibers.
• The fibers should run vertically down the thigh andconverge into a thin, cablelike tendon at the tibialtubercle.
• The iliotibial tract is a superficial sheet of fascia withvertical fibers that runs along the lateral thigh.
• It emerges from the gluteal fascia, is wide and denseover the vastus lateralis muscle and funnels into astrong cable along the side of the knee beforeinserting at the tibial tubercle. (diagram)
• TFL fibers and some fibers of gluteus maximus attachto the proximal aspect of the IT band.
• The iliotibial tract has a thick, matted texture (similarto packing tape) that makes it a strong stabilizingcomponent of hipand knee.
• It is entierly accessible. The distal cable portion,anterior to the biceps femoris tendon, is the easiestpart of the iliotibial tract to isolate.
• (activation: “abduct your hip”)
30
LEG AND FOOT
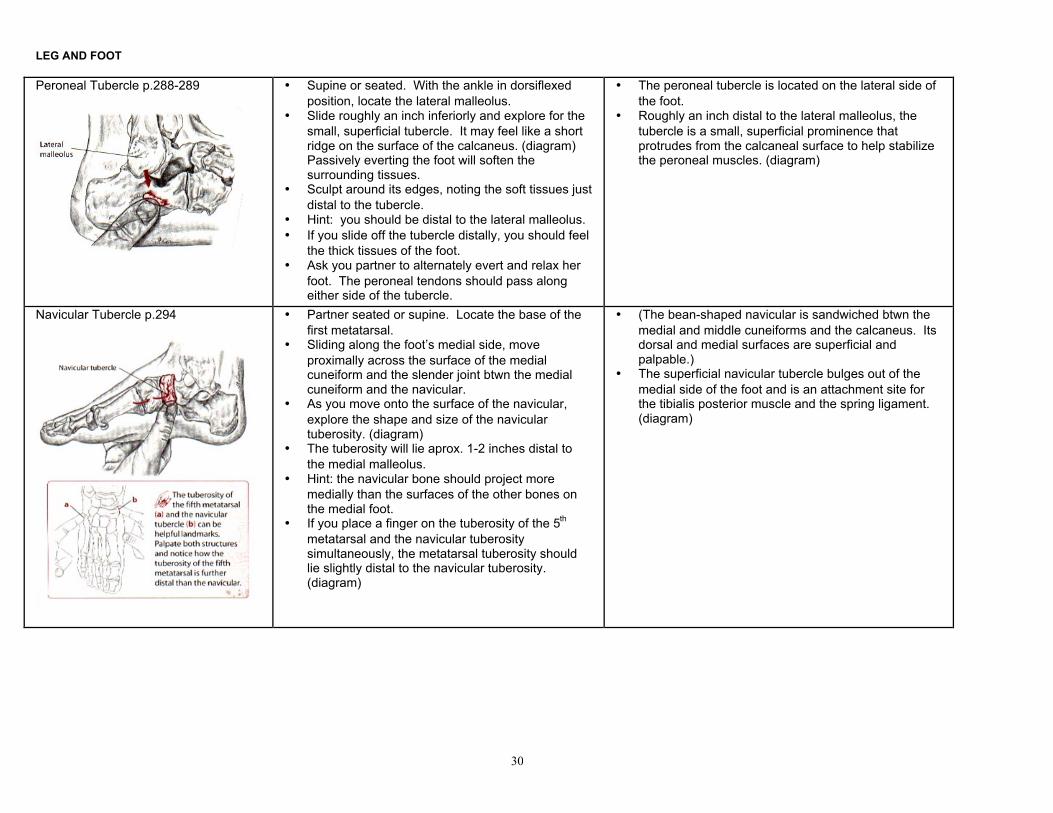
Peroneal Tubercle p.288-289 • Supine or seated. With the ankle in dorsiflexedposition, locate the lateral malleolus.
• Slide roughly an inch inferiorly and explore for thesmall, superficial tubercle. It may feel like a shortridge on the surface of the calcaneus. (diagram)Passively everting the foot will soften thesurrounding tissues.
• Sculpt around its edges, noting the soft tissues justdistal to the tubercle.
• Hint: you should be distal to the lateral malleolus.• If you slide off the tubercle distally, you should feel
the thick tissues of the foot.• Ask you partner to alternately evert and relax her
foot. The peroneal tendons should pass alongeither side of the tubercle.
• The peroneal tubercle is located on the lateral side ofthe foot.
• Roughly an inch distal to the lateral malleolus, thetubercle is a small, superficial prominence thatprotrudes from the calcaneal surface to help stabilizethe peroneal muscles. (diagram)
Navicular Tubercle p.294 • Partner seated or supine. Locate the base of thefirst metatarsal.
• Sliding along the foot’s medial side, moveproximally across the surface of the medialcuneiform and the slender joint btwn the medialcuneiform and the navicular.
• As you move onto the surface of the navicular,explore the shape and size of the naviculartuberosity. (diagram)
• The tuberosity will lie aprox. 1-2 inches distal tothe medial malleolus.
• Hint: the navicular bone should project moremedially than the surfaces of the other bones onthe medial foot.
• If you place a finger on the tuberosity of the 5th
metatarsal and the navicular tuberositysimultaneously, the metatarsal tuberosity shouldlie slightly distal to the navicular tuberosity.(diagram)
• (The bean-shaped navicular is sandwiched btwn themedial and middle cuneiforms and the calcaneus. Itsdorsal and medial surfaces are superficial andpalpable.)
• The superficial navicular tubercle bulges out of themedial side of the foot and is an attachment site forthe tibialis posterior muscle and the spring ligament.(diagram)
31
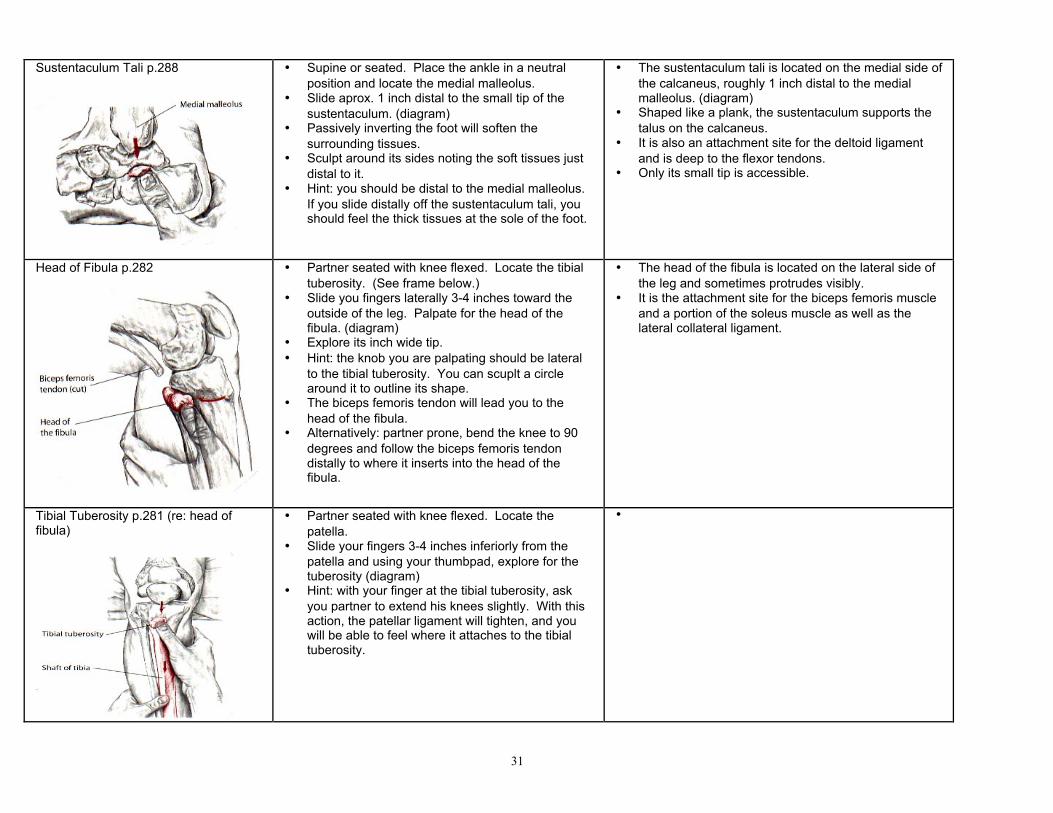
Sustentaculum Tali p.288 • Supine or seated. Place the ankle in a neutralposition and locate the medial malleolus.
• Slide aprox. 1 inch distal to the small tip of thesustentaculum. (diagram)
• Passively inverting the foot will soften thesurrounding tissues.
• Sculpt around its sides noting the soft tissues justdistal to it.
• Hint: you should be distal to the medial malleolus.If you slide distally off the sustentaculum tali, youshould feel the thick tissues at the sole of the foot.
• The sustentaculum tali is located on the medial side ofthe calcaneus, roughly 1 inch distal to the medialmalleolus. (diagram)
• Shaped like a plank, the sustentaculum supports thetalus on the calcaneus.
• It is also an attachment site for the deltoid ligamentand is deep to the flexor tendons.
• Only its small tip is accessible.
Head of Fibula p.282 • Partner seated with knee flexed. Locate the tibialtuberosity. (See frame below.)
• Slide you fingers laterally 3-4 inches toward theoutside of the leg. Palpate for the head of thefibula. (diagram)
• Explore its inch wide tip.• Hint: the knob you are palpating should be lateral
to the tibial tuberosity. You can scuplt a circlearound it to outline its shape.
• The biceps femoris tendon will lead you to thehead of the fibula.
• Alternatively: partner prone, bend the knee to 90degrees and follow the biceps femoris tendondistally to where it inserts into the head of thefibula.
• The head of the fibula is located on the lateral side ofthe leg and sometimes protrudes visibly.
• It is the attachment site for the biceps femoris muscleand a portion of the soleus muscle as well as thelateral collateral ligament.
Tibial Tuberosity p.281 (re: head offibula)
• Partner seated with knee flexed. Locate thepatella.
• Slide your fingers 3-4 inches inferiorly from thepatella and using your thumbpad, explore for thetuberosity (diagram)
• Hint: with your finger at the tibial tuberosity, askyou partner to extend his knees slightly. With thisaction, the patellar ligament will tighten, and youwill be able to feel where it attaches to the tibialtuberosity.
•
32
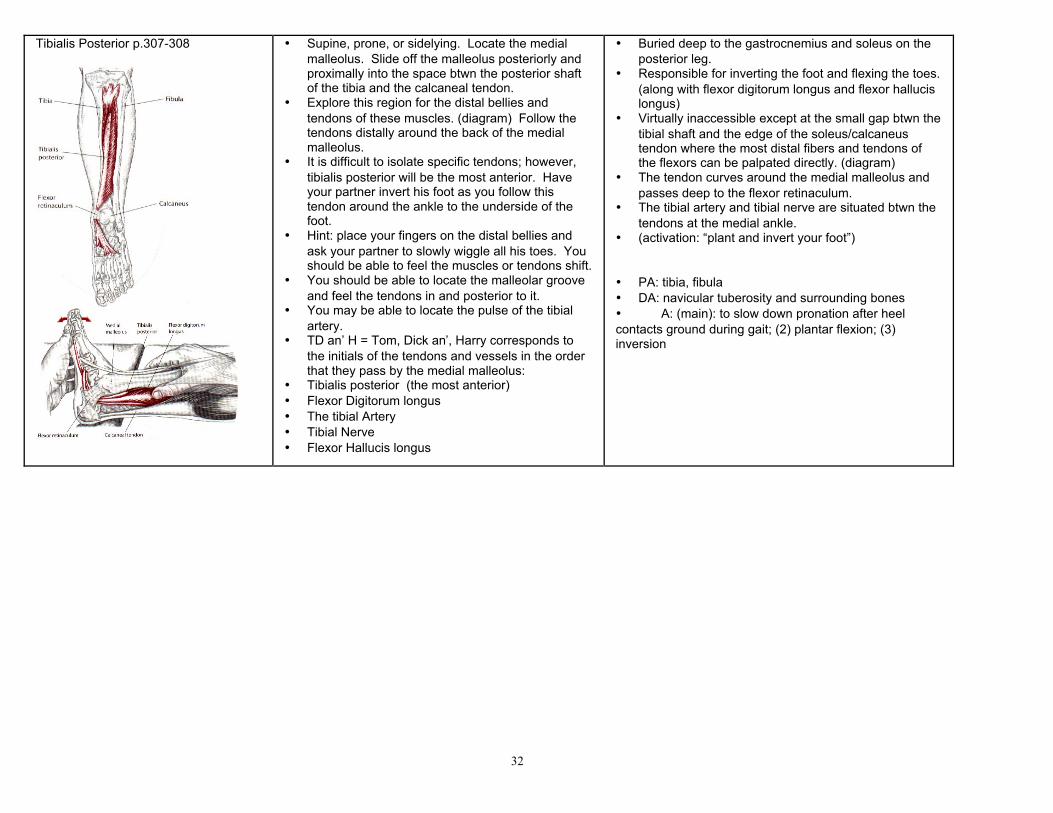
Tibialis Posterior p.307-308 • Supine, prone, or sidelying. Locate the medialmalleolus. Slide off the malleolus posteriorly andproximally into the space btwn the posterior shaftof the tibia and the calcaneal tendon.
• Explore this region for the distal bellies andtendons of these muscles. (diagram) Follow thetendons distally around the back of the medialmalleolus.
• It is difficult to isolate specific tendons; however,tibialis posterior will be the most anterior. Haveyour partner invert his foot as you follow thistendon around the ankle to the underside of thefoot.
• Hint: place your fingers on the distal bellies andask your partner to slowly wiggle all his toes. Youshould be able to feel the muscles or tendons shift.
• You should be able to locate the malleolar grooveand feel the tendons in and posterior to it.
• You may be able to locate the pulse of the tibialartery.
• TD an’ H = Tom, Dick an’, Harry corresponds tothe initials of the tendons and vessels in the orderthat they pass by the medial malleolus:
• Tibialis posterior (the most anterior)• Flexor Digitorum longus• The tibial Artery• Tibial Nerve• Flexor Hallucis longus
• Buried deep to the gastrocnemius and soleus on theposterior leg.
• Responsible for inverting the foot and flexing the toes.(along with flexor digitorum longus and flexor hallucislongus)
• Virtually inaccessible except at the small gap btwn thetibial shaft and the edge of the soleus/calcaneustendon where the most distal fibers and tendons ofthe flexors can be palpated directly. (diagram)
• The tendon curves around the medial malleolus andpasses deep to the flexor retinaculum.
• The tibial artery and tibial nerve are situated btwn thetendons at the medial ankle.
• (activation: “plant and invert your foot”)
• PA: tibia, fibula• DA: navicular tuberosity and surrounding bones• A: (main): to slow down pronation after heelcontacts ground during gait; (2) plantar flexion; (3)inversion
33
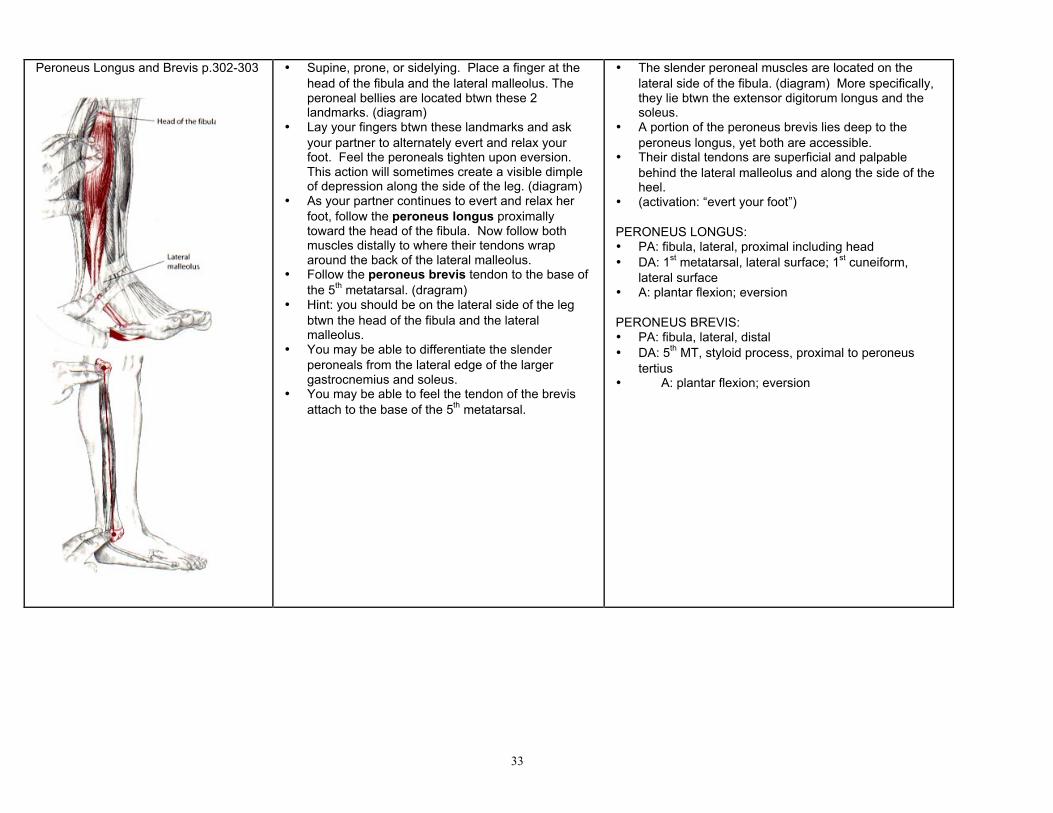
Peroneus Longus and Brevis p.302-303 • Supine, prone, or sidelying. Place a finger at thehead of the fibula and the lateral malleolus. Theperoneal bellies are located btwn these 2landmarks. (diagram)
• Lay your fingers btwn these landmarks and askyour partner to alternately evert and relax yourfoot. Feel the peroneals tighten upon eversion.This action will sometimes create a visible dimpleof depression along the side of the leg. (diagram)
• As your partner continues to evert and relax herfoot, follow the peroneus longus proximallytoward the head of the fibula. Now follow bothmuscles distally to where their tendons wraparound the back of the lateral malleolus.
• Follow the peroneus brevis tendon to the base ofthe 5th metatarsal. (dragram)
• Hint: you should be on the lateral side of the legbtwn the head of the fibula and the lateralmalleolus.
• You may be able to differentiate the slenderperoneals from the lateral edge of the largergastrocnemius and soleus.
• You may be able to feel the tendon of the brevisattach to the base of the 5th metatarsal.
• The slender peroneal muscles are located on thelateral side of the fibula. (diagram) More specifically,they lie btwn the extensor digitorum longus and thesoleus.
• A portion of the peroneus brevis lies deep to theperoneus longus, yet both are accessible.
• Their distal tendons are superficial and palpablebehind the lateral malleolus and along the side of theheel.
• (activation: “evert your foot”)
PERONEUS LONGUS:• PA: fibula, lateral, proximal including head• DA: 1st metatarsal, lateral surface; 1st cuneiform,
lateral surface• A: plantar flexion; eversion
PERONEUS BREVIS:• PA: fibula, lateral, distal• DA: 5th MT, styloid process, proximal to peroneus
tertius• A: plantar flexion; eversion
34
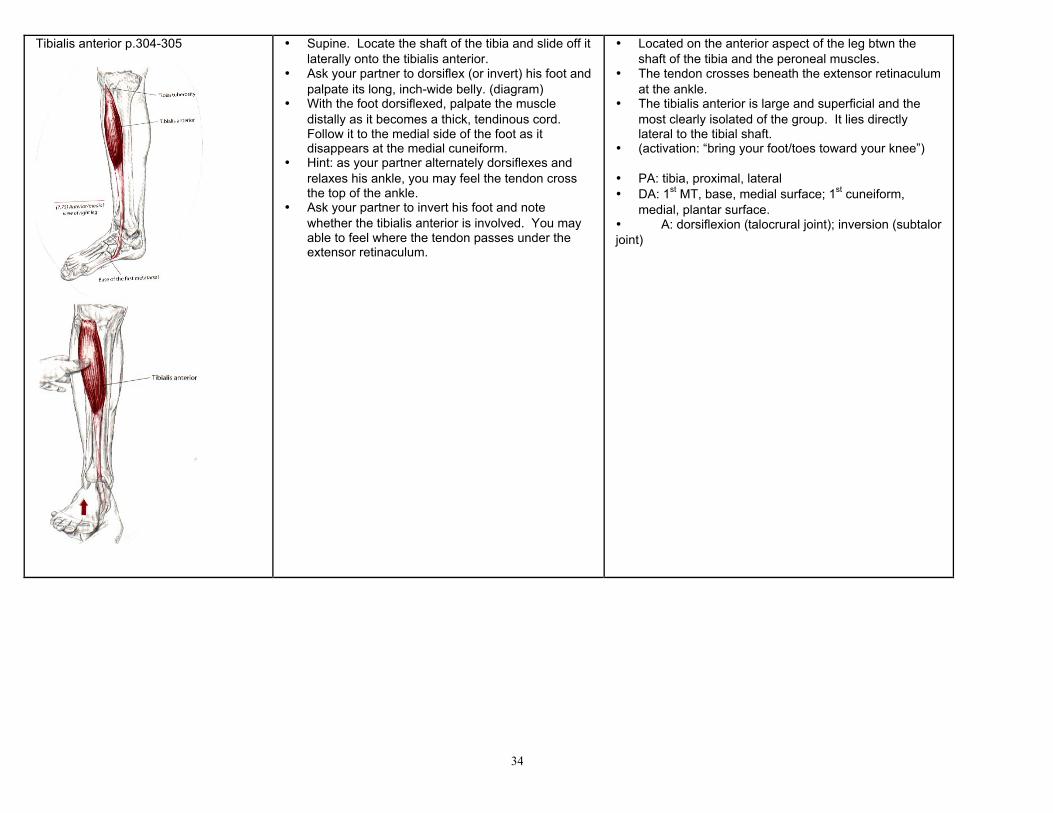
Tibialis anterior p.304-305 • Supine. Locate the shaft of the tibia and slide off itlaterally onto the tibialis anterior.
• Ask your partner to dorsiflex (or invert) his foot andpalpate its long, inch-wide belly. (diagram)
• With the foot dorsiflexed, palpate the muscledistally as it becomes a thick, tendinous cord.Follow it to the medial side of the foot as itdisappears at the medial cuneiform.
• Hint: as your partner alternately dorsiflexes andrelaxes his ankle, you may feel the tendon crossthe top of the ankle.
• Ask your partner to invert his foot and notewhether the tibialis anterior is involved. You mayable to feel where the tendon passes under theextensor retinaculum.
• Located on the anterior aspect of the leg btwn theshaft of the tibia and the peroneal muscles.
• The tendon crosses beneath the extensor retinaculumat the ankle.
• The tibialis anterior is large and superficial and themost clearly isolated of the group. It lies directlylateral to the tibial shaft.
• (activation: “bring your foot/toes toward your knee”)
• PA: tibia, proximal, lateral• DA: 1st MT, base, medial surface; 1st cuneiform,
medial, plantar surface.• A: dorsiflexion (talocrural joint); inversion (subtalorjoint)
35
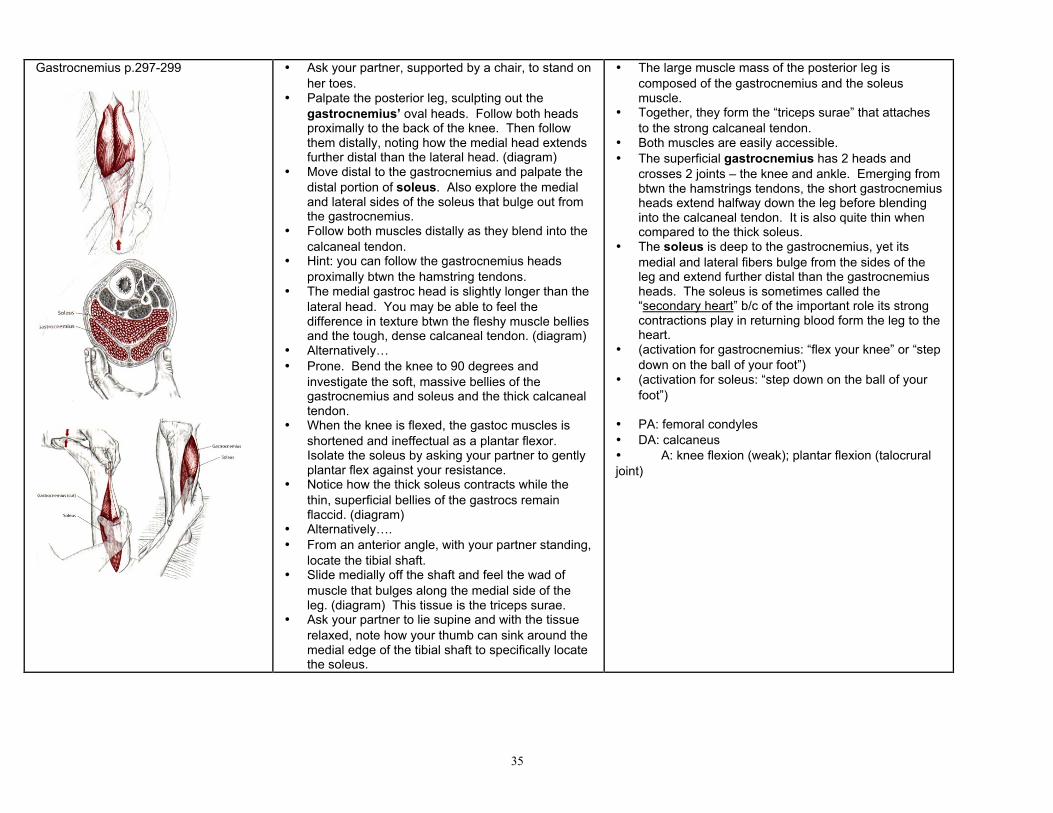
Gastrocnemius p.297-299 • Ask your partner, supported by a chair, to stand onher toes.
• Palpate the posterior leg, sculpting out thegastrocnemius’ oval heads. Follow both headsproximally to the back of the knee. Then followthem distally, noting how the medial head extendsfurther distal than the lateral head. (diagram)
• Move distal to the gastrocnemius and palpate thedistal portion of soleus. Also explore the medialand lateral sides of the soleus that bulge out fromthe gastrocnemius.
• Follow both muscles distally as they blend into thecalcaneal tendon.
• Hint: you can follow the gastrocnemius headsproximally btwn the hamstring tendons.
• The medial gastroc head is slightly longer than thelateral head. You may be able to feel thedifference in texture btwn the fleshy muscle belliesand the tough, dense calcaneal tendon. (diagram)
• Alternatively…• Prone. Bend the knee to 90 degrees and
investigate the soft, massive bellies of thegastrocnemius and soleus and the thick calcanealtendon.
• When the knee is flexed, the gastoc muscles isshortened and ineffectual as a plantar flexor.Isolate the soleus by asking your partner to gentlyplantar flex against your resistance.
• Notice how the thick soleus contracts while thethin, superficial bellies of the gastrocs remainflaccid. (diagram)
• Alternatively….• From an anterior angle, with your partner standing,
locate the tibial shaft.• Slide medially off the shaft and feel the wad of
muscle that bulges along the medial side of theleg. (diagram) This tissue is the triceps surae.
• Ask your partner to lie supine and with the tissuerelaxed, note how your thumb can sink around themedial edge of the tibial shaft to specifically locatethe soleus.
• The large muscle mass of the posterior leg iscomposed of the gastrocnemius and the soleusmuscle.
• Together, they form the “triceps surae” that attachesto the strong calcaneal tendon.
• Both muscles are easily accessible.• The superficial gastrocnemius has 2 heads and
crosses 2 joints – the knee and ankle. Emerging frombtwn the hamstrings tendons, the short gastrocnemiusheads extend halfway down the leg before blendinginto the calcaneal tendon. It is also quite thin whencompared to the thick soleus.
• The soleus is deep to the gastrocnemius, yet itsmedial and lateral fibers bulge from the sides of theleg and extend further distal than the gastrocnemiusheads. The soleus is sometimes called the“secondary heart” b/c of the important role its strongcontractions play in returning blood form the leg to theheart.
• (activation for gastrocnemius: “flex your knee” or “stepdown on the ball of your foot”)
• (activation for soleus: “step down on the ball of yourfoot”)
• PA: femoral condyles• DA: calcaneus• A: knee flexion (weak); plantar flexion (talocruraljoint)
36
SPINE AND THORAX
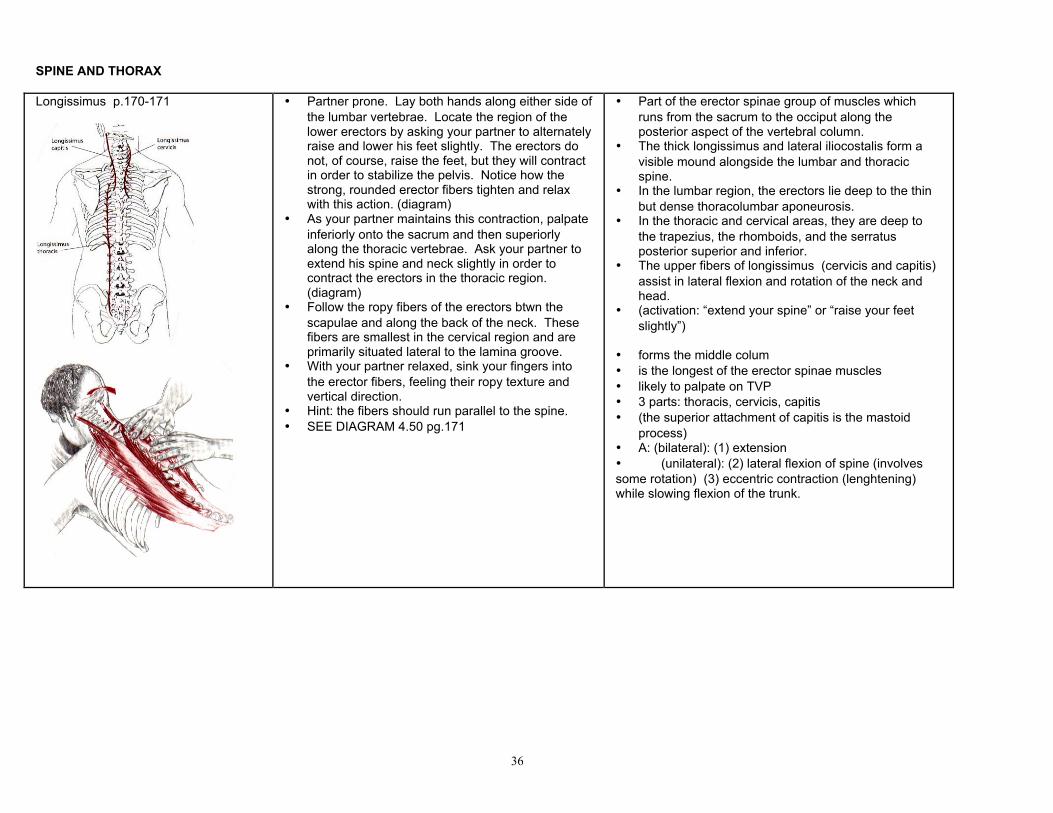
Longissimus p.170-171 • Partner prone. Lay both hands along either side ofthe lumbar vertebrae. Locate the region of thelower erectors by asking your partner to alternatelyraise and lower his feet slightly. The erectors donot, of course, raise the feet, but they will contractin order to stabilize the pelvis. Notice how thestrong, rounded erector fibers tighten and relaxwith this action. (diagram)
• As your partner maintains this contraction, palpateinferiorly onto the sacrum and then superiorlyalong the thoracic vertebrae. Ask your partner toextend his spine and neck slightly in order tocontract the erectors in the thoracic region.(diagram)
• Follow the ropy fibers of the erectors btwn thescapulae and along the back of the neck. Thesefibers are smallest in the cervical region and areprimarily situated lateral to the lamina groove.
• With your partner relaxed, sink your fingers intothe erector fibers, feeling their ropy texture andvertical direction.
• Hint: the fibers should run parallel to the spine.• SEE DIAGRAM 4.50 pg.171
• Part of the erector spinae group of muscles whichruns from the sacrum to the occiput along theposterior aspect of the vertebral column.
• The thick longissimus and lateral iliocostalis form avisible mound alongside the lumbar and thoracicspine.
• In the lumbar region, the erectors lie deep to the thinbut dense thoracolumbar aponeurosis.
• In the thoracic and cervical areas, they are deep tothe trapezius, the rhomboids, and the serratusposterior superior and inferior.
• The upper fibers of longissimus (cervicis and capitis)assist in lateral flexion and rotation of the neck andhead.
• (activation: “extend your spine” or “raise your feetslightly”)
• forms the middle colum• is the longest of the erector spinae muscles• likely to palpate on TVP• 3 parts: thoracis, cervicis, capitis• (the superior attachment of capitis is the mastoid
process)• A: (bilateral): (1) extension• (unilateral): (2) lateral flexion of spine (involvessome rotation) (3) eccentric contraction (lenghtening)while slowing flexion of the trunk.
37
Multifidi p.173-174 • Partner prone. Locate the spinous processes ofthe lumbar vertebrae. Slide your fingers laterallyoff the spinous processes, sinking btwn them andthe erector spinae fibers.
• Pushing the erectors laterally out of the way,explore deeply for the dense, diagonal fibers of themultifidi. (diagram) Progress inferiorly to thesacrum, rolling your fingers in a perpendiculardirection to the multifidi fibers.
• Move superiorly, exploring the lamina groove ofthe thoracic and cervical areas. Then turn yourpartner supine and palpate the cervical region.
• Hint: you should be bwtn the spinous andtransverse processes. You can get a sense ofthese smaller, deeper fibers that stretch at anoblique angle.
• Multifidi is part of the transversospinalis muscle group.• It extends the length of the vertebral column and
consists of many short, diagonal fibers.• These fibers form an intricate stitch-like design that
links the vertebrae together.• These muscle fibers extend at varying lengths from
the transverse and spinous processes of thevertebrae.
• The surprisingly thick multifidi are directly accessiblein the lumbar spine. They are the only muscles withfibers that lie across the posterior surface of thesacrum.
• It can be difficult to isolate the individual bellies of thetransversospinalis muscles as they are closelyinterwoven; however, as a group, their mass ordensity can be easily felt along the lamina groove ofthe thoracic and lumbar vertebrae.
• (activation: “extend and/or rotate your spine”)• as a group, goes from sacrum to T2• multifidi crosses 1-4 vertebrae• best developed in the lumbar region• A: conventional action: contralateral rotation
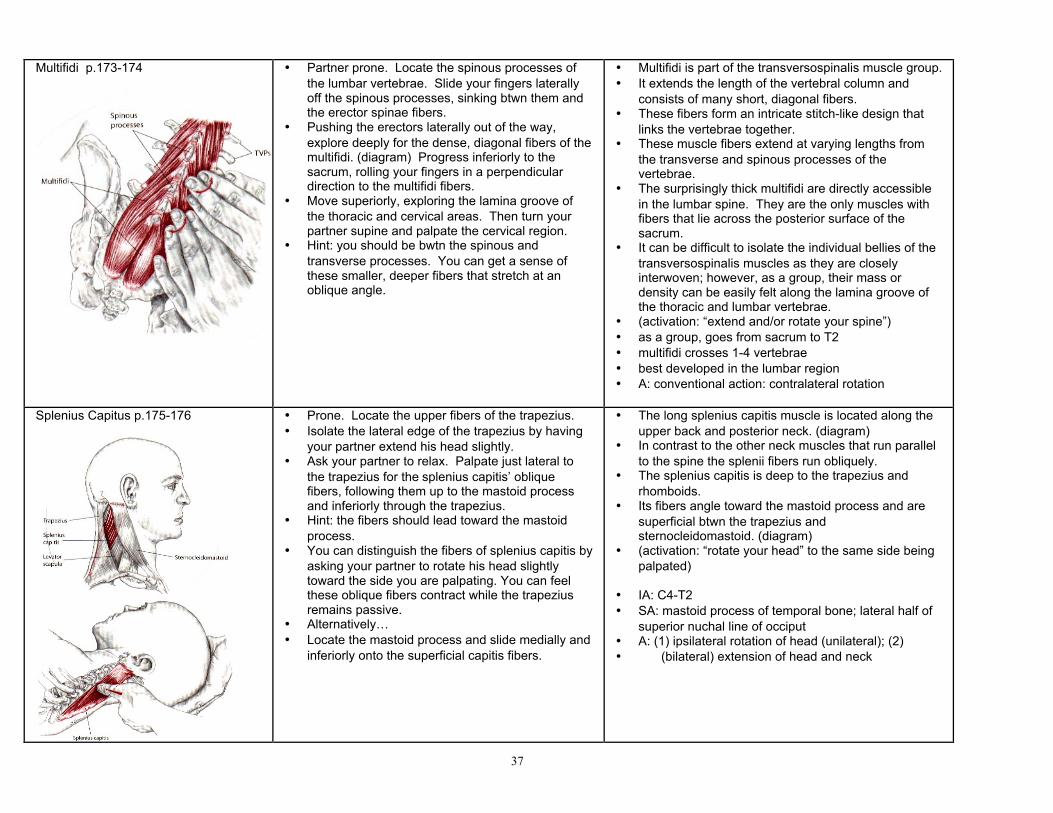
Splenius Capitus p.175-176 • Prone. Locate the upper fibers of the trapezius.• Isolate the lateral edge of the trapezius by having
your partner extend his head slightly.• Ask your partner to relax. Palpate just lateral to
the trapezius for the splenius capitis’ obliquefibers, following them up to the mastoid processand inferiorly through the trapezius.
• Hint: the fibers should lead toward the mastoidprocess.
• You can distinguish the fibers of splenius capitis byasking your partner to rotate his head slightlytoward the side you are palpating. You can feelthese oblique fibers contract while the trapeziusremains passive.
• Alternatively…• Locate the mastoid process and slide medially and
inferiorly onto the superficial capitis fibers.
• The long splenius capitis muscle is located along theupper back and posterior neck. (diagram)
• In contrast to the other neck muscles that run parallelto the spine the splenii fibers run obliquely.
• The splenius capitis is deep to the trapezius andrhomboids.
• Its fibers angle toward the mastoid process and aresuperficial btwn the trapezius andsternocleidomastoid. (diagram)
• (activation: “rotate your head” to the same side beingpalpated)
• IA: C4-T2• SA: mastoid process of temporal bone; lateral half of
superior nuchal line of occiput• A: (1) ipsilateral rotation of head (unilateral); (2)• (bilateral) extension of head and neck

38
Anatomy: Palpation List Term2 1
HEAD, NECK, FACE 1
SHOULDER AND ARM 8
FOREARM AND HAND 17
HIP AND THIGH 23
LEG AND FOOT 30
SPINE AND THORAX 36