analyst software - applied biosystems · instrumentation from a functional perspective. •the...
TRANSCRIPT

Analyst® Software
Laboratory Director�s Guide to Security and Regulatory Compliance
Part Number: 1008650 AJune 2003

This document is provided to customers who have purchased MDS Sciex equipment to use in the operation of such MDS Sciex equipment. This document is copyright protected and any reproduction of this document or any part of this document is strictly prohibited, except as MDS Sciex may authorize in writing.
Equipment that may be described in this document is protected under one or more patents filed in the United States, Canada, and other countries. Additional patents are pending.
Software that may be described in this document is furnished under a license agreement. It is against the law to copy, modify, or distribute the software on any medium, except as specifically allowed in the license agreement. Furthermore, the license agreement may prohibit the software from being disassembled, reverse engineered, or decompiled for any purpose.
Portions of this document may make reference to other manufacturers’ products, which may contain parts that are patented and may contain parts whose names are registered as trademarks and/or function as trademarks. Any such usage is intended only to designate those manufacturers’ products as supplied by Applied Biosystems/MDS Sciex for incorporation into its equipment and does not imply any right and/or license to use or permit others to use such product names as trademarks.
All products and company names mentioned herein may be the trademarks of their respective owners.
Applied Biosystems/MDS Sciex makes no warranties or representations as to the fitness of this equipment for any particular purpose and assumes no responsibility or contingent liability, including indirect or consequential damages, for any use to which the purchaser may put the equipment described herein, or for any adverse circumstances arising therefrom.
Applied Biosystems/MDS Sciex is a joint venture between Applera Corporation and MDS Sciex, the instrument technology division of MDS Inc.
ANALYST is a registered trademark owned by Applera Corporation or its subsidiaries in the United States and certain other countries.
For Research Use Only. Not for use in diagnostic procedures.
ISO9001
REGISTEREDCOMPANY
Equipment built by MDS Sciex, a division of MDS Inc., at 71 Four Valley Dr., Concord, Ontario, Canada L4K 4V8.
MDS Sciex and Applied Biosystems are ISO 9001 registered.
© 2003 Edition MDS Sciex, a division of MDS Inc., and Applera Corporation, Joint Owners. All rights reserved.
Printed in Canada.

ContentsForeword . . . . . . . . . . . . . . . . . . . . . . . . . . . . . . . . . . . . . . . . . . . . . . . v
Audience . . . . . . . . . . . . . . . . . . . . . . . . . . . . . . . . . . . . . . . . . . . . . vGuide Organization . . . . . . . . . . . . . . . . . . . . . . . . . . . . . . . . . . . . . vRelated Documentation. . . . . . . . . . . . . . . . . . . . . . . . . . . . . . . . . viiTechnical Support . . . . . . . . . . . . . . . . . . . . . . . . . . . . . . . . . . . . . vii
Chapter 1. Security and Regulatory Compliance. . . . . . . . . . . . . . . 9Security Requirements . . . . . . . . . . . . . . . . . . . . . . . . . . . . . . . . . . 9Analyst and Windows Security: Working Together . . . . . . . . . . . 10Audit Trails within Analyst and Windows . . . . . . . . . . . . . . . . . . 12Analyst and 21 CFR Part 11 . . . . . . . . . . . . . . . . . . . . . . . . . . . . . 13
Chapter 2. Windows and Analyst Security Configuration . . . . . . 15Security and Installation Process Overview . . . . . . . . . . . . . . . . . 15
Chapter 3. Windows Security . . . . . . . . . . . . . . . . . . . . . . . . . . . . . . 19Steps for Configuring Windows Security . . . . . . . . . . . . . . . . . . . 19Definition of Users and Groups . . . . . . . . . . . . . . . . . . . . . . . . . . 20Users and Groups . . . . . . . . . . . . . . . . . . . . . . . . . . . . . . . . . . . . . 21
Active Directory Support . . . . . . . . . . . . . . . . . . . . . . . . . . . . 22Windows File System . . . . . . . . . . . . . . . . . . . . . . . . . . . . . . . . . . 22System Auditing . . . . . . . . . . . . . . . . . . . . . . . . . . . . . . . . . . . . . . 22
Event Viewer. . . . . . . . . . . . . . . . . . . . . . . . . . . . . . . . . . . . . . 23File and Folder Permissions . . . . . . . . . . . . . . . . . . . . . . . . . 23
Alerts . . . . . . . . . . . . . . . . . . . . . . . . . . . . . . . . . . . . . . . . . . . . . . . 24
Chapter 4. Analyst Installation . . . . . . . . . . . . . . . . . . . . . . . . . . . . 25Release Notes . . . . . . . . . . . . . . . . . . . . . . . . . . . . . . . . . . . . . . . . 25System Requirements . . . . . . . . . . . . . . . . . . . . . . . . . . . . . . . . . . 26
iii

Installing Analyst . . . . . . . . . . . . . . . . . . . . . . . . . . . . . . . . . . 26Regulated Environment Options. . . . . . . . . . . . . . . . . . . . . . . . . . 27Software Component Verification . . . . . . . . . . . . . . . . . . . . . . . . 27Understanding Analyst Files. . . . . . . . . . . . . . . . . . . . . . . . . . . . . 27
Folder Structure . . . . . . . . . . . . . . . . . . . . . . . . . . . . . . . . . . . 28Flat Files . . . . . . . . . . . . . . . . . . . . . . . . . . . . . . . . . . . . . . . . 29
Network Acquisition . . . . . . . . . . . . . . . . . . . . . . . . . . . . . . . . . . . 30
Chapter 5. Analyst Security Configuration . . . . . . . . . . . . . . . . . . 33Steps for Configuring Analyst Security . . . . . . . . . . . . . . . . . . . . 33Configuring Security Mode . . . . . . . . . . . . . . . . . . . . . . . . . . . . . 34
Acquisition Process . . . . . . . . . . . . . . . . . . . . . . . . . . . . . . . . 36Screen Lock and Auto Logout. . . . . . . . . . . . . . . . . . . . . . . . . 38
Configuring People and Roles . . . . . . . . . . . . . . . . . . . . . . . . . . . 40Accessing the Analyst Software . . . . . . . . . . . . . . . . . . . . . . . 42
Configuring Project Security . . . . . . . . . . . . . . . . . . . . . . . . . . . . 47Setting Access Rights for Projects and Files . . . . . . . . . . . . . 49
Configuring Remote Sample Queue Monitoring . . . . . . . . . . . . . 54Printing Your Security Configurations. . . . . . . . . . . . . . . . . . 56
Chapter 6. Audit Trails . . . . . . . . . . . . . . . . . . . . . . . . . . . . . . . . . . . 57Audit Trail Manager . . . . . . . . . . . . . . . . . . . . . . . . . . . . . . . . . . . 58
Instrument Audit Trail . . . . . . . . . . . . . . . . . . . . . . . . . . . . . . 59Project Audit Trail . . . . . . . . . . . . . . . . . . . . . . . . . . . . . . . . . 60Changing the Audit Trail Settings . . . . . . . . . . . . . . . . . . . . . 61Quantitation Audit Trail . . . . . . . . . . . . . . . . . . . . . . . . . . . . . 62Changing the Results Tables Settings. . . . . . . . . . . . . . . . . . . 63Archiving . . . . . . . . . . . . . . . . . . . . . . . . . . . . . . . . . . . . . . . . 65
Electronic Mail Notification . . . . . . . . . . . . . . . . . . . . . . . . . . . . . 65Enabling or Disabling Data File Checksum . . . . . . . . . . . . . . . . . 66Searching Audit Trail Records . . . . . . . . . . . . . . . . . . . . . . . . . . . 66Exploring Processing History . . . . . . . . . . . . . . . . . . . . . . . . . . . . 67
Chapter 7. Data System Conversion . . . . . . . . . . . . . . . . . . . . . . . . 69Translating MassChrom Data Files to Analyst Format . . . . . . . . 70
The Instrument File Generator. . . . . . . . . . . . . . . . . . . . . . . . 71The Experiment File Converter . . . . . . . . . . . . . . . . . . . . . . . 72
Index . . . . . . . . . . . . . . . . . . . . . . . . . . . . . . . . . . . . . . . . . . . . . . . . . . 73
iv

ForewordThis guide explains the security features of the Analyst® software and how these features work with Windows security. It also describes how to install and configure Analyst stations. For a list of platforms supported and detailed installation instructions, please refer to the release notes included on your software installation CD.
AudienceThe information contained in this guide is intended for two primary audiences:
• The Laboratory Administrator, who is concerned with the daily operation and use of the Analyst software and attached instrumentation from a functional perspective.
• The System Administrator, who is concerned with system security and system and data integrity.
Guide OrganizationThis guide is organized in the chronological order in which tasks should be performed to install, configure, and administer the Analyst software.
Chapter 1�Security and Regulatory ComplianceThis section provides an overview of the Analyst software security features.
v

Foreword
Chapter 2�Windows and Analyst Security Configuration Process Overview
This section describes how the Analyst software access control and auditing components work in conjunction with Windows access control and auditing components.
Chapter 3�Windows Security ConfigurationThis section describes how to configure Windows security prior to installing the Analyst software. System configuration is usually performed by network administrators or people with network and local administration rights.
Chapter 4�Installing the Analyst SoftwareThis section explains how to install the Analyst software. The Analyst software comes with an installation CD to guide you step-by-step through the installation process.
Chapter 5�Analyst Security ConfigurationThis section describes procedures on how to configure Analyst security. Windows Users and Groups are available to the Analyst security Configuration so that you can control access to the Analyst software.
Chapter 6�Setting up the Audit TrailThis section explains the various types of audit trails available in the Analyst software and how they are used.
Chapter 7�Data Systems ConversionsThis section explains how to migrate data from the Applied Biosystems/MDS Sciex Macintosh MassChrom software to the Analyst software.
vi

Analyst Laboratory Director�s Guide
Related DocumentationThe Analyst software comes with comprehensive online Help to assist you in the daily operation of the software. In addition, before installing the software, you should read the release notes contained on the software installation CD.
The following documentation is also available for reference:
• Analyst Operator’s Manual
• Analyst Online CD Manuals
Technical Support• If you encounter problems configuring or using the Analyst
software, consult the following documentation for assistance before contacting support:
! Analyst online Help
! Release notes
• If you have a technical question or request for assistance please contact Applied Biosystems/MDS Sciex support:
! Toll Free (North America only): 1-800-831-6844
! Web: http://www.appliedbiosystems.com
vii

Foreword
viii

11
Security and Regulatory ComplianceThis section provides an overview of the Analyst® software security features. The Applied Biosystems/MDS Sciex Analyst software provides the laboratory director with the following:
• Customizable administration to meet the needs of both research and regulatory requirements.
• Security and auditing tools which adhere to 21 CFR Part 11 guidelines for the use of electronic record keeping.
• Flexible and effective management of access to critical instrument functions.
• Controlled and audited access to your vital data and reports.
• Easy security management linking to Windows security.
Security RequirementsSecurity requirements range from relatively open environments, such as research or academic laboratories, to the most stringently regulated, such as forensic laboratories.
Laboratory monitoring agencies such as the Food and Drug Administration (FDA) and the Environmental Protection Agency (EPA) require adherence to Good Laboratory Practices (GLP). The Analyst software supports regulated laboratory environments and assists you in
9

Security and Regulatory Compliance
achieving GLP compliance. In particular, the Analyst software auditing and access control components are designed to help you meet the recommendations of the Code of Federal Regulations (CFR), Title 21, Chapter I, Part 11, Electronic Records; Electronic Signatures Final Rule, for file and process security, validation, and data tracking.
This introduction will help you understand how the Analyst software incorporates several layers of security to allow the laboratory director complete control over access to the instruments and data, and the flexibility to ensure compliance at any level.
Analyst and Windows Security: Working Together
The Analyst software and the Windows New Technology File System (NTFS) both have security features designed to control system and data access. Understanding how these features work together is critical to implementing the desired level of security for data acquisition and processing.
Windows is typically used in a network environment, thus the ability to control access to systems and data is critical. Windows security provides the first level of protection by requiring users to log on to the network by means of a unique user identity and password. This ensures that only those who are recognized by the Windows Local or Network security settings can have access to your systems. For more information, see “Windows Security” on page 19.
The Analyst software has three progressively secure system access modes:
• Single User Mode
• Integrated Mode
• Mixed Mode
Single User Mode: This mode treats the current user that is logged onto Windows as an Analyst Administrator with full access to all Analyst
10

Analyst Laboratory Director�s Guide
software functionality. Anyone who can successfully log on to Windows on the computer will have Analyst Administrator privileges.
Note: In Single User Mode, the People and Roles tabs are not available. For more information, see “Configuring Security Mode” on page 34.
Integrated Mode: This mode allows the current user who is logged onto Windows to have access to the Analyst software, providing that the Windows user is also someone who should have and is allowed access to the Analyst software.
Mixed Mode: This mode allows the user who is logged onto the Analyst software to be different (or the same) as the current user who is logged onto Windows. The user logged on to the Analyst software can be assigned to a specified role in the same way as in Integrated Mode. The difference is that the user logged on to the Analyst software may be different from the user logged on to Windows. This provides the possibility of having a group login for Windows with a known password, while requiring the Analyst software user to log on to the Analyst program using a unique user name, password, and if required, domain. If you select Mixed Mode, the Screen Lock/Auto Logout feature is available for use.
Each security mode adds functionality to the previous mode, and all modes provide the administrator with the ability to configure access to project information (methods, data, and reports).
The Analyst project security configuration is tied to the Windows NTFS, therefore there is no need to set the NTFS object permissions externally. The Analyst software functionality is a subset of the functionality available in Windows, but it allows you to manage project security directly with the Analyst software. For more information, see “Analyst Security Configuration” on page 33.
The Analyst software also provides completely configurable Analyst Roles that are distinguished from the User Groups associated with Windows. Through the use of Roles, the laboratory director can easily control access to the instrument, on a function-by-function basis. For more information, see “Configuring People and Roles” on page 40.
11

Security and Regulatory Compliance
Audit Trails within Analyst and Windows
The auditing features within the Analyst software compliment the built-in Windows auditing components. Together, they are key in the creation and management of electronic records.
The Analyst software provides a system of audit trails specifically geared towards addressing the requirements of electronic record keeping. Separate audit trails record changes to instrument parameters, maintenance, project information (methods, data, batches, and data acquisition), and results table and report generation. Electronic signatures may be applied to critical tuning, acquisition, processing, and review activities. For more information, see “Audit Trails” on page 57.
The Audit Trail Manager (ATM) module within the Analyst software allows easy configuration and review of audit trail information. The Audit Trail Manager allows record sorting, printing, searching, and processing review. The ATM may be configured to provide e-mail notification of attempted unauthorized use of the system. For more information, see “Audit Trail Manager” on page 58.
Windows maintains three audit trails, known as event logs, which capture a range of security, system, and application related events. In most cases, the auditing is designed to capture exceptional events, such as a logon failure. The administrator may configure this system to capture a wide range of events, such as access to specific files or Windows administrative activities. For more information, see “System Auditing” on page 22.
The Analyst software uses the Application Event log to capture information about the operation of the software. This log may be used as a troubleshooting aid since instrument, device, and software interactions are recorded in detail here. Windows also provides the Event Viewer tool to access the event log information.
The Analyst Security Structure diagram provides an overview of the levels of security that the Administrator can configure when installing the Analyst software.
12

Analyst Laboratory Director�s Guide
Analyst security interaction
Analyst and 21 CFR Part 11Electronic record keeping is generally understood to be an activity that can significantly reduce the burden associated with traditional paper records.
The Analyst software provides a secure user environment, which conforms to the 21 CFR Part 11 requirements for the creation of electronic records, with the implementation of:
• Mixed Mode and Integrated Mode Security linked to Windows security.
• Controlled Access to Functionality through customizable roles.
• Controlled Access to Project Data on a role-by-role or group basis.
• Audit Trails for instrument operation, maintenance, data acquisition, data review, and report generation.
13

Security and Regulatory Compliance
• Electronic Signatures utilizing a combination of user ID and password.
Within 21 CFR Part 11 there are requirements for the control of electronic records that extend beyond the domain of the Analyst software. These requirements include the distribution and control of records in a closed or open system.
As a tool for producing electronic records, the Analyst software forms a part of an overall strategy of compliance, and provides a simple, yet powerful suite of tools to ensure that records created conform to the 21 CFR Part 11 standards for electronic records in a secure GLP environment.
14

22
Windows and Analyst Security ConfigurationThis section describes how the Analyst® access control and auditing components work in conjunction with Windows access control and auditing components.
Since the Analyst software works with the security, application, and system event auditing components of the Windows Administrative Tools, you must configure Windows security appropriately. After installing the Analyst software you can set Analyst security and authorizations for your system.
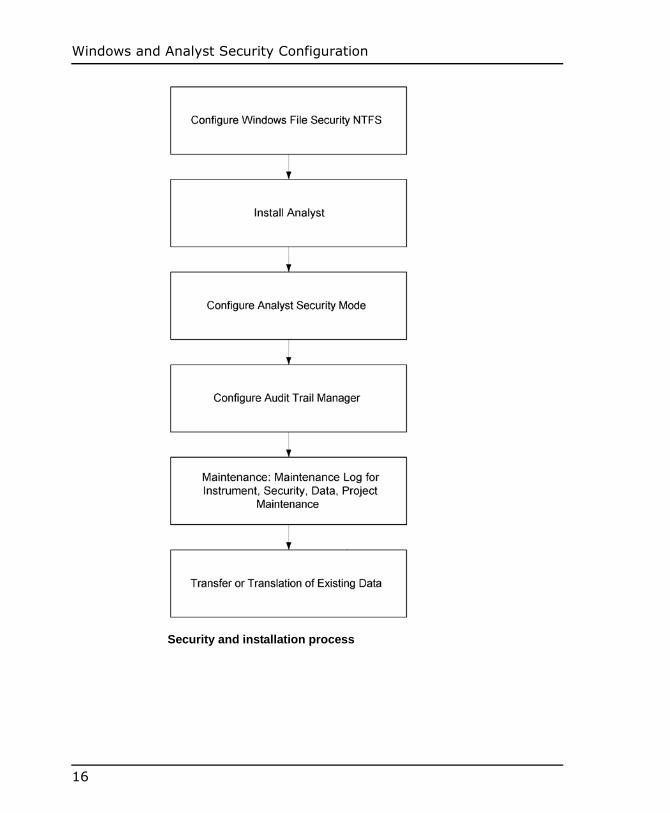
Security and Installation Process Overview
The following shows the workflow process for configuring the Analyst security features.
15
Windows and Analyst Security Configuration
Security and installation process
16

Analyst Laboratory Director�s Guide
You can configure security at the following levels:
• Access to Windows.
• Access to the Analyst software.
• Selective access to the Analyst software functionality.
• Access to specific projects.
• Access to instrument station status.
The Security Configuration table indicates the options for setting the various levels of security.
Security Configuration
CFR Mid-Range Non GLP
Windows Security
Format Drives to NTFS Yes Yes Optional
Configure Users/Groups Yes Yes Optional
Enable Windows Auditing, and File and Directory Auditing
Yes Optional Optional
Set File Permissions Yes Optional Optional
Install Analyst
Install Analyst Yes Yes Yes
Select CFR Options Yes Optional No
Event Viewer (Inspect Install)
Yes Yes Yes
Analyst Security
Select Security Mode Integrated or Mixed
Any Single User
Add/Configure Analyst Roles and People
Yes Yes Optional
Configure Audit Trail Manager, Instrument, Project and Quantitation Audit Trails
Yes Optional No
17

Windows and Analyst Security Configuration
Configure E-Mail Notification
Yes Optional No
Activate Checksum Yes Optional No
Common Tasks
Add New Projects and Sub-Projects
Yes Yes Yes
Configure Project Audit Trail for new Projects and Sub-Projects
Yes Optional No
Transfer Existing Data Yes Yes Yes
Maintenance:• Maintenance Log
for Instrument
• Security, Data, Project Maintenance
Yes
Yes
Yes
Yes
Yes
Yes
Security Configuration (Continued)
CFR Mid-Range Non GLP
18

33
Windows SecurityThis section describes how to configure Windows security prior to installing the Analyst® software. System configuration is usually performed by network administrators or people with network and local administration rights.
Steps for Configuring Windows Security
In order to use the Analyst software to manage security, the Analyst Administrator must have the right to change permissions for the project folder and all the subfolders. If the root directory is on a local computer, then the Analyst Administrator could be part of the local administrators group. Only the Analyst user who manages security must be in the local administrators group.
In order for the Analyst software to work well, users should be part of the Windows local user group. If certain users need to be able to stop the Analyst Service, this specific right can be set up without giving the user all the local administrator rights and thereby compromising local security.
If you plan to use network acquisition, the network administrator must set up Windows security so that the Analyst Administrator has the right to change permissions for the required folders. It is not recommended that local users on acquisition computers be added to a network project security folder.
19

Windows Security
For the workflow process for configuring Windows security, see the following figure, Workflow process for configuring Windows security.
Workflow process for configuring Windows security
Definition of Users and GroupsUser: Any user who may log on to Windows.
Groups: Method of defining or classifying user rights by group identity on a Windows system.
Administrators Group: A group of users with administrative rights on the network domain(s).
Local Administrators Group: A group of users with administrative rights on the local computer.
Global Group: A group of users who exist throughout a domain.
20
Analyst Laboratory Director�s Guide
Analyst People: A Windows user or group of users who has been granted rights to access and use Analyst software components.
Analyst Role: Method of defining or classifying Analyst users’ rights by group identity for operating Analyst components and accessing Analyst files.
Active Directory: The Active Directory system allows you to allocate and find resources on the network.
For more information on Analyst users, see “Configuring People and Roles” on page 40.
Users and GroupsThe Analyst software uses the user names and passwords recorded in the primary domain controller security database or Active Directory. Passwords are managed using the tools provided with Windows.
Before you configure your security requirements, you must do the following:
• Remove all unnecessary Users and User Groups such as replicator, power user, backup operator from both local and network.
• Establish User Groups with the purpose of holding non-administrative, Analyst People, and configuring system permission.
• Create suitable procedures and account policies for Users in Group Policy.
See your Windows documentation for more information on the following:
• Users and Groups and Active Directory Users.
• Password and Account Lockout Policies for User Accounts.
• User Rights Policy.
When working in an Active Directory environment, the Active Directory group policy settings affect the workstation security. Please discuss group policies with your Active Directory administrator as part of a comprehensive Analyst software deployment.
21

Windows Security
Active Directory SupportActive Directory can work in two environments, mixed and native. The Analyst security configuration window and Analyst security database allows user accounts to be specified in user principal name (UPN) format, and administrators can add new people in the Add Person/Role dialog box in UPN format.
Mixed Environment: The network is comprised of both Windows 2000 and Windows NT servers and clients.
Native Environment: The network is comprised of Windows 2000 servers and clients.
If the Analyst software starts in the mixed environment, the logon window contains the user name, password, and domain fields. If you are using a Windows NT account, you should provide all three parameters. If you are using a Windows 2000 account, you can enter your user name in UPN format, and the domain field is ignored.
If the Analyst software starts in the native environment, the domain field is not displayed, and the Analyst software accepts your user name in UPN format only. The Analyst Status window will also display your user name in UPN format.
Windows File SystemThe Analyst software requires that files and directories be located on a hard-disk partition formatted as the Windows New Technology File System (NTFS), which can control and audit access to Analyst files. The FAT file system cannot control or audit access to folders or files and is therefore not suitable for a secure environment.
System AuditingEnabling system auditing can inform you of events that pose security risks and can detect security breaches. For example, auditing failed log ons to Windows can indicate attempted log ons using random passwords. Auditing successful log ons can be used to help detect actual log ons using stolen passwords. Auditing successful and failed file writes and other processes can be used to help check for viruses. You
22

Analyst Laboratory Director�s Guide
might want to audit successful and failed access to sensitive files, directories, and printers.
It is recommended that you only audit abnormal occurrences such as failed log on attempts, attempts to access sensitive data, and changes to security settings.
It is suggested that you customize the event logs as follows:
• Set appropriate event log size.
• Set automatic overwrite of old events.
It is also recommended that you set Windows computer security settings. Additionally, you might want to implement a process of review and archival. For more information regarding security settings and audit policies, refer to your Windows documentation.
Event ViewerYou can launch the Event Viewer through the Analyst software or through Windows Administrative Tools. The Event Viewer records the audited events in the Security Log, System Log, or Application Log. Refer to your Windows documentation for information about viewing the details of audited events in the Event Log dialog box.
File and Folder PermissionsIn order to manage security on a network drive, the Analyst Administrator must have the right to change permissions for the Analyst Data folder and all the subfolders. As this folder is on the network, the Analyst Administrator, by default, may not have access. Access must be set up by the network administrator.
Before selecting the events or actions that will be audited, set the permissions (or detailed permissions) for the files and folders. The permissions for folders can be applied to subfolders and/or files in the folder. Once file and folder permissions have been set, you can define the events that will be written to the Security log.
Note: You must consider the access needs of users to the drive and folder on each computer. You must configure sharing and associated permissions. For more information about file sharing, refer to the operating system documentation.
For information on the Analyst software files and folder permissions, see “Configuring Project Security” on page 47.
23

Windows Security
AlertsIn the event of a system or user problem, a network message can be sent to a designated person, such as the System Administrator, on the same or another computer. For more information about creating an alert object, refer to the operating system documentation.
24

44
Analyst InstallationThis section explains how to install the Analyst® software. The Analyst software comes with a software installation CD to guide you step-by-step through the installation process. Before installing the software, you should understand the difference between a processing workstation and an acquisition workstation, and then complete the appropriate installation procedure. For more information, please refer to the release notes included on your software installation CD.
Note: To install the Analyst software, you must have local administrator privileges for the workstation on which you are installing the software.
Release NotesRelease notes are shipped with the Analyst software, and should be read before installation.
The release notes contain information related to:
• Minimum hardware requirements
• Supported devices
• Minimum software requirements
• Issues or notes
Note: The release notes can also be found on the software CD and can be read with WordPad or Adobe Acrobat Reader.
25

Analyst Installation
System RequirementsFor minimum installation requirements, please refer to the release notes included on your software installation CD.
Installing AnalystAn acquisition workstation is used for controlling instrumentation and acquiring data. If you are setting up an acquisition workstation, you must first install the software for the National Instruments GPIB Interface Card and, if necessary, upgrade the mass spectrometer firmware as part of the installation process.
General Sequence for data processing and acquisition workstations
Item CommentsProcessingStation
Instrument Station Instructions
Install GPIB and Drivers.
Must install. No Yes Release Notes
Install Serial Card and Drivers.
Probably need to install.
No Optional Release Notes
Install ADC and Drivers.
May need to install.
No Optional Release Notes
Install MDAC.
Must install if not previously installed.
Yes Yes
Install Analyst/Verify Installation.
Must install. Yes Yes Release Notes. See also “Software Component Verification” on page 27.
Verify/Upgrade mass spectrometer firmware.
Must complete if mass spectrometer firmware is not current.
No Yes Release Notes
26

Analyst Laboratory Director�s Guide
Regulated Environment OptionsBy default, all audit trail settings are set to off. After installation, the Analyst Administrator can change the selection in the Security Configuration module or in the Audit Trail Manager component.
Software Component VerificationAfter you install the Analyst software, a Software Component Verification procedure automatically checks that all the necessary software components were successfully installed and generates an installation report. This report is in the form of an event log item from Analyst Installer in the Event Viewer Application log. Verify that the installation was successful immediately after completion. There is an event log for the checksum inspection of the core installed files. For more information about checksum, see “Enabling or Disabling Data File Checksum” on page 66.
To verify Software Component Verification results1. Click Start, point to Settings, and then click Control Panel.
2. Double-click Administrative Tools, and then double-click Event Viewer.
3. In the Tree tab, click Application Log.
4. Click Analyst Installer event. In the Event Detail message scroll down to Total files verified. Errors should read zero.
Understanding Analyst Files When you install the Analyst software, the software creates a default directory structure to provide a consistent and logical means of accessing project files. In addition, as you create new projects, the Analyst software sets up a project directory structure automatically. The installation includes the following projects:
• API Instrument: The API Instrument project contains critical instrument information and should not be used for routine data acquisition.
27

Analyst Installation
• Default: The Default project contains the default instrument configuration information used in configuring new folders.
• Example: The Example project contains information that can be used for building methods and creating batches. It also contains example data files that can be used to explore Analyst.
Folder StructureThe project hierarchy below shows the typical contents of the different subdirectories. For more information on folder structure, refer to the online Help or the Analyst Operator’s Manual.
28

Analyst Laboratory Director�s Guide
Sample folder structure
Flat FilesWhether you acquire data locally or through network acquisition, if you have large data files or if you perform high throughput quantitative analysis, it is recommended that flat files are used.
29

Analyst Installation
“Flat” means these files are ordinary sequential files where data is stored byte after byte and not organized in special structures as in compound documents. Flat files are more stable and less likely to become corrupted. Since the structure is simpler, reading and writing data is more efficient, and provides problem-free transfer of large amounts of data over the network. Data in compound documents are more difficult to transmit over the network because of their structural limitations.
If the flat file format is selected for a .wiff file scan, data from every scan will be stored in separate flat files. For example, the scans of the first sample from Test.wiff will be stored in a file called “Test.wiff.1.Scan”, the scans from the second sample will be stored in a file called “Test.wiff.2.Scan” and so on for each sample.
Network AcquisitionNetwork acquisition allows you to acquire data from several instruments into network-based project folders/.wiff files that can be processed on remote workstations. This process is network-failure tolerant, thus ensuring no data is lost.
At the start of network acquisition, the Analyst software creates a temporary subfolder with the same name as the network project folder in the Wiff_Cache_Backup folder. Data is acquired in a local temporary file. A network file is created using an asynchronous process that takes place in the background. Depending on network performance and file size, the remote file is updated in near real-time.
Locally, the Analyst queue displays the acquisition into the local cache. If a local user opens a file during data acquisition, it is the cache file that is opened. The status of the remote file during acquisition is hidden from the local user. Users from other workstations are able to open network files and view updates during acquisition.
After data acquisition is completed, the Analyst software ensures that the network files were written correctly, and then deletes the temporary files. When the Analyst software starts up, it checks the contents of the Wiff_Cache_Backup folder. If temporary files are present, it means that a previous network acquisition was interrupted and the Analyst software will finish writing the network file.
30

Analyst Laboratory Director�s Guide
To configure network acquisition, you must perform the following steps:
1. Set up acquisition security in Security Configuration. By default, the acquisition account is set to Client. For more information on selecting an acquisition account, see “Acquisition Process” on page 36.
2. If required, set up flat files for network acquisition.
3. Create a root directory.
4. Set the root directory.
5. Set up your projects in the root directory.
To set up flat files (optional)1. In Configure mode, from the Tools menu, point to Settings, and
then select Queue Options.
The Queue Options dialog box appears.
31

Analyst Installation
2. Select Use flat files for scan data if you want to use a split file format for acquisition.
3. Click OK.
To create a root directoryNote: To perform this procedure, you should have the requisite access rights.
1. On the Tools menu, point to Projects, and then select Create Root Directory.
2. Browse to the location where the root directory is to be created.
3. In the New text box, name the directory.
4. Click OK.
To set the root directory1. On the Tools menu, point to Projects, and then select Set Root
Directory.
2. Browse to the location where the root directory is to be created.
3. In the Browse for Folder dialog box, browse to your created root directory.
4. Click OK.
Once the root directory has been set, you can set up your projects.
32
55
Analyst Security ConfigurationThis section describes procedures on how to configure Analyst® security. Windows Users and Groups are available to the Analyst security Configuration so that you can control access to the Analyst software. You can configure security at the following levels:
• Selective access to the Analyst software functionality.
• Access to specific projects, folders, and files.
• Access to computers.
Steps for Configuring Analyst Security
Note: Any changes to the Analyst security configuration take effect after the Analyst software has been restarted.
The following diagram illustrates the general workflow process for configuring the Analyst software:
33

Analyst Security Configuration
Configuring Analyst security
Configuring Security ModeThe Analyst security component allows you to choose a security mode, set up security for the acquisition process, and set up system lockout and auto logout.
The security modes are as follows:
• Single User Mode
• Integrated Mode
• Mixed Mode
For more information about security modes, see “Analyst and Windows Security: Working Together” on page 10.
34

Analyst Laboratory Director�s Guide
To select the security mode1. On the Navigation bar, under Configure, double-click Security
Configuration.
The Security Configuration dialog box appears.
2. In the Security Configuration dialog box, click Advanced.
3. Click the Security tab.
35

Analyst Security Configuration
4. Click a Security Mode: Single User Mode, Mixed Mode, or Integrated Mode.
Note: Any changes to Analyst security configuration take effect after the Analyst software has been restarted.
5. Click Apply, and then click OK.
6. Restart the Analyst software.
Acquisition ProcessYou can setup security for the acquisition process. Client and Special Acquisition Administrator accounts are network accounts that are used for reading and or writing data into project folders during normal acquisition, but not during tuning. It is the network administrator’s responsibility to provide access rights for network accounts.
• Client Account: Uses the same account that you use to log on to the Analyst software. In integrated mode, the user who has logged on to Windows is also logged on to the Analyst software. In mixed mode, the Windows user and the Analyst software user may be different.
36

Analyst Laboratory Director�s Guide
• Special Acquisition Administrator Account: Used in a regulated environment. The operator must provide a user name, domain, and password for this account. Once the network administrator sets up this account, it can be used by the Analyst software to read or write data regardless of who the current the Analyst software user is. This means that although the current user may not have rights to modify data in project folder, data acquisition can still take place. Account information is stored in the registry in encrypted form.
To select an acquisition account mode1. On the Navigation bar, under Configure, double-click Security
Configuration.
The Security Configuration dialog box appears.
2. In the Security Configuration dialog box, click Advanced.
3. Click the Security tab.
4. Click an Acquisition Account option: Client Account or Special Acquisition Administration Account.
If you select Special Acquisition Administration Account, the Set Acquisition Account dialog box will open. If you are using Active Directory in the Native environment, the domain field is not visible and you can enter your username in user principal name (UPN) format.
5. If you selected Special Acquisition Administration Account, type the User name, Password, and if necessary, Domain.
6. Click OK.
37

Analyst Security Configuration
7. Click Apply, and then click OK.
Screen Lock and Auto LogoutFor security purposes, you can set the computer screen to lock after a defined period of inactivity. You can also set an auto logout time where the Analyst client will close after a defined period of inactivity. Screen lock and auto logout are available in Mixed Mode only.
When the screen locks, the Unlock Analyst dialog box indicating that the system has been locked, as well as the currently logged on user name and domain, will appear. If the auto logout option is also set, the time remaining before the Analyst software closes is also displayed. Only the currently logged on user, the Administrator, or the Supervisor can either unlock the Analyst software or close the Analyst software. If the screen is not unlocked, after a defined period, the Analyst client will close and all unsaved data will be lost.
To set up screen lock and auto logoutNote: Screen lock and auto logout are only available in Mixed Mode.
1. On the Navigation bar, under Configure, double-click Security Configuration.
The Security Configuration dialog box appears.
2. In the Security Configuration dialog box, click Advanced.
3. Click the Security tab.
38

Analyst Laboratory Director�s Guide
4. Select Screen Lock.
The Auto Logout and Wait fields are enabled.
5. In the Screen Lock Wait field, type the amount of minutes to elapse before the screen locks.
6. If required, select Auto Logout, and in the Wait field, type the amount of minutes to elapse before the Analyst client closes.
Once the Screen Lock time has elapsed, the Unlock Analyst dialog box appears.
39

Analyst Security Configuration
You have a 10-second grace period to move the mouse or press a key to clear the Unlock Analyst dialog box. Only the current user, Administrator, or Supervisor can either unlock the screen or log out the user. The Unlock Analyst dialog box also indicates the time left before you are logged out.
Important! If you are automatically logged out, the Analyst client closes and all unsaved methods, batches, or quantitation results will be lost.
7. To unlock the screen, type your password, and then click UNLOCK.
8. To log out the user, type your user name if necessary, and password, and then click LOGOUT.
Configuring People and RolesThe Analyst software limits access to people authorized to log on to the workstation and to the Analyst software, using the same user name and password for both. The Analyst software does not allow multiple logons by a single user.
Note: The People and Role tabs are not available in Single User Mode.
An Analyst Administrator can configure an Analyst Person or People from among the Users and Groups that can log on to the Windows
40

Analyst Laboratory Director�s Guide
workstation. Only an Analyst Person or People can be assigned to an Analyst Role or Roles. Only Analyst Roles can access Analyst components.
The Analyst software comes with six predefined roles, which cannot be deleted but their rights can be modified, and that reflect typical users of the Analyst software. You can also choose to define your own Roles and configure system access depending on your own specific requirements. Access to the Analyst software is controlled by Role, not by People, although you can create roles that consist of only a single person.
A summary of the default Role privileges appears in the following table.
Analyst Roles
Role Typical Tasks Access
Administrator System administration.Security configuration.
All Analyst functionality
Analyst Oversees instrument operation.Analyzes data for use by end user.
Acquisition MethodAnalyst ApplicationAudit Trail ManagerCompound OptimizationExploreHardware ConfigurationQuantitationReport Template EditorSample QueueTuneView Status
41

Analyst Security Configuration
Accessing the Analyst SoftwareBefore you can assign a person or people to a specific role, you must first add the person to the Analyst software. To either add a person or
Operator Oversees daily use of the system, including maintenance, sample organization, data gathering, and processing.
Acquisition MethodAnalyst ApplicationAudit Trail ManagerBatchCompound OptimizationExploreExpressViewHardware ConfigurationReport Template EditorSample QueueTuneView Status
End User Provides samples.Receives processed results.Integrates results with input and output from other applications.
Acquisition MethodAnalyst ApplicationAudit Trail ManagerCompound OptimizationExplore ExpressViewReport Template EditorView Status
QAReviewer
Review dataReview audit trailsReview quantitation results
Analyst Application Audit Trail Manager QuantitationReport Template EditorView Status
Supervisor Unlock Analyst or log out user.
Unlock/Logout Application
Analyst Roles
Role Typical Tasks Access
42

Analyst Laboratory Director�s Guide
people and assign them to Analyst Roles, or remove a person or people, you must be logged on as an Analyst Administrator.
Note: If you have one person assigned to a single role, and that role is to be deleted, you will be asked if you want to delete the person as well as the role.
You must also add Windows Users and/or Groups to the Analyst security database before you configure Analyst People and Role access to the Analyst software.
Note: Any changes to Analyst security configuration take effect after the Analyst software has been restarted.
To add People to Analyst1. On the Navigation bar, under Configure, double-click Security
Configuration.
The Security Configuration dialog box appears.
2. In the Security Configuration dialog box, click the People tab.
3. Click New Person.
4. Using the system dialog box, add a user or group.
43

Analyst Security Configuration
5. Click Apply, and then click OK.
6. Proceed to To assign People to Roles
To assign People to Roles1. On the Navigation bar, under Configure, double-click Security
Configuration.
2. In the Security Configuration dialog box, click the People tab.
3. In the left window, select the Person.
4. In the Available Roles window, select the required Role, and then click Add.
5. Click Apply, and then click OK.
To create a user-defined Role1. On the Navigation bar, under Configure, double-click Security
Configuration.
The Security Configuration dialog box appears.
2. In the Security Configuration dialog box, click Advanced.
3. Click the Roles tab.
44

Analyst Laboratory Director�s Guide
4. Click New Role.
The New Role dialog box appears.
5. Type the Role Name and Description, and then click OK.
By default, a user-defined Role will have full access rights to the Analyst software. In the Access to Analyst window, a green check mark denotes system access is enabled; a red “X” denotes system access is disabled.
6. Click Apply, and then click OK.
7. Proceed to To set access rights for a user-defined Role.
45

Analyst Security Configuration
To set access rights for a user-defined Role1. On the Navigation bar, under Configure, double-click Security
Configuration.
2. In the Security Configuration dialog box, click Advanced.
3. Click the Roles tab.
4. In the Roles window, select the Role to be configured.
5. In the Access to Analyst window, select the access requirement, and then click the Enable/Disable toggle button.
Double-click components in the Access Rights list to enable or disable access as appropriate. To configure access at a functional level, expand the components, and then double-click the functionality to enable or disable it.
6. Click Apply, and then click OK.
To delete a user-defined Role1. On the Navigation bar, under Configure, double-click Security
Configuration.
2. In the Security Configuration dialog box, click Advanced.
3. Click the Roles tab.
4. In the Roles window, select the Role to be deleted, and then click Delete.
If you have a person who is assigned to a single role, and that role is to deleted, you will be asked if you want to delete the person as well as the role.
5. Click Yes to confirm or No to close the dialog box.
6. Click Apply, and then click OK.
To remove People from Roles1. On the Navigation bar, under Configure, double-click Security
Configuration.
2. In the Security Configuration dialog box, click the People tab.
3. In the left-hand window, select the Person.
4. In the Role(s) Selected window, select the required Role, and then click Remove
46

Analyst Laboratory Director�s Guide
5. Click Apply, and then click OK.
To delete People1. On the Navigation bar, under Configure, double-click Security
Configuration.
2. In the Security Configuration dialog box, click the People tab.
3. In the left window, select the Person/People to be deleted, and then click Delete.
4. Click Yes to confirm or No to close the dialog box.
5. Click Apply, and then click OK.
Configuring Project SecurityYou can configure access to projects and project files by People or Roles. The Analyst software organizes all Analyst files into project folders under the Analyst Data folder (except the compound database and the library search database, which is stored in the Analyst Data folder). The API Instrument folder contains information about the instrument and related instrument configurations. All other files generated while using the Analyst software will be saved in folders within the active project folder, which can be one of the project folders provided with the Analyst software or, typically, a project folder created by an operator. For more information on creating projects, refer to the online Help.
Common Analyst file types and folders are listed in the following table. The API Instrument folder has all the subdirectories, except Processing Methods and Results. Asterisked (*) subdirectories exist only in the API instrument folder. All other subfolders exist within each project folder. They may be in the project level folder or within each sub-project.
Analyst User Files
Extension File Type Sub-folder Name
.aasf Acquisition script Acquisition Scripts
.aasf Acquisition script (supplied Example)
Example Scripts
47

Analyst Security Configuration
.ata Audit trail archives Project Information
.atd Instrument audit trail dataInstrument audit trail settingsProject audit trail dataProject audit trail settings
Project Information
.dab Acquisition batch files Batch
.dam Acquisition method Acquisition Methods
.dat Acquisition batch template Batch\Templates
.dab Batch Batch
.dll Dynamic link library Processing Scripts
.eph Explore processing history data
Processing Methods
.hwpf Hardware profile Configuration*
.ins Instrument data calibration information
Instrument Data*
.mdb MS Access database
.pdf Exported data
.psf Parameter settings Parameter Settings*
.qmf Quantitation method Quantitation Methods
.rdb Result table. Holds Quantitation audit trail data.
Results
.rpt Report template TemplatesTemplates\MethodTemplates\ReportTemplates\Workspace
.rtf Rich text format
.rtf Log records from automated collection
Log
.sdb Quantitation audit trail settings
Project Information
Analyst User Files (Continued)
Extension File Type Sub-folder Name
48

Analyst Laboratory Director�s Guide
In the Example Project, several formats are supported for importing batch information: .mdb, .txt, .xls, and .dbf: d base 5 and Fox Pro.
In the Security Configuration dialog box, the Projects tab displays the project directories, subdirectories, and files, and the People and Roles with access to the objects.
Using the Analyst software security configuration, you can configure access to projects and project files. You can control access by People or by Role. In addition, you can control how files exported to other workstations are accessed by operators not defined in the Analyst software security database.
To use this feature of Analyst security, you must have NTFS for your work route. If you elect not to set up project security, operator access to the project files depends on the data setup for each Windows user in NTFS. For more information, see “Windows File System” on page 22.
Setting Access Rights for Projects and FilesYou can configure how users access files that are exported to computers other than the computer on which the projects, folders, and files were created. You can allow files to have a default access method, and also configure certain files to have specific access rights.
You can also set global access rights for all your Analyst files (data objects) that you export, or you can set access rights for an individual data object you select for export.
Alternatively, if you routinely compare files to see if they match, and you do not want to have access rights set for all your files, you can select a computer with which you can share files without setting any export privileges.
.tun Tuning preference file Preferences*
.txt Text file
.wiff Mass spectrometry data Tuning Cache*
.wiff Mass spectrometry data Data
.xls Excel spreadsheet Batch
Analyst User Files (Continued)
Extension File Type Sub-folder Name
49

Analyst Security Configuration
To set access rights to projects and project files1. On the Navigation bar, under Configure, double-click Security
Configuration.
2. In the Security Configuration dialog box, click the Projects tab.
3. In the left window, select the folder or file for which you wish to configure access.
4. Click Add Person/Role to open the Add Person/Role dialog box.
50

Analyst Laboratory Director�s Guide
5. Select a Domain and an Account, or a Role.
6. Under Rights, set the access rights: NoAccess, ReadOnly, Write, or Delete.
7. Click OK.
The Person/Role and rights appear in the Access Rights window.
8. Click Apply, and then click OK.
To view or change access rights1. On the Navigation bar, under Configure, double-click Security
Configuration.
2. In the Security Configuration dialog box, click the Projects tab.
3. In the Access Rights window, select the Person/Role you want to view or change.
4. Click View/Change.
The View/Change dialog box appears.
51

Analyst Security Configuration
5. View or change the access rights as required.
6. If required, select Include subfolders to have access rights applied to the project’s subfolders.
7. Click OK to apply the changes or Cancel to close the dialog box.
8. Click Apply, and then click OK.
To remove a Person/Role from a project or folder1. On the Navigation bar, under Configure, double-click Security
Configuration.
2. In the Security Configuration dialog box, click the Projects tab.
3. In the Access Rights window, select the Person/Role you want to remove.
4. Click Delete.
5. Click Yes to confirm or No to close the dialog box.
6. Click Apply, and then click OK.
To set global access rights for exported files1. On the Navigation bar, under Configure, double-click Security
Configuration.
2. In the Security Configuration dialog box, click the Projects tab.
3. On the Default drop-down list, select a permission: ReadWrite, NoAccess, or ReadOnly.
The default state is ReadWrite.
52

Analyst Laboratory Director�s Guide
4. Click Apply, and then click OK.
Note: The above procedure will only affect new files created in the current security domain. The following procedure will affect existing files.
To set export access rights for an individual project fileNote: The selected access right will be applied as you create new files. You can also change access rights to existing files.
1. On the Navigation bar, under Configure, double-click Security Configuration.
2. In the Security Configuration dialog box, click the Projects tab.
3. In the project window, navigate to the specific file.
The No Access, Read Only, and Read Write access rights options are now available.
4. Click an option.
5. Click Apply, and then click OK.
To select a computer for file sharing1. On the Navigation bar, under Configure, double-click Security
Configuration.
2. In the Security Configuration dialog box, click Advanced.
3. Click the Security tab.
4. In the Select Domain area, browse to the required computer.
5. Click Apply, and then click OK.
The selected computer can now share files created on your workstation.
53

Analyst Security Configuration
Configuring Remote Sample Queue Monitoring
Using Analyst security, you can set up a list of instruments whose queues you may wish to routinely monitor. This procedure describes how to configure access to an instrument through the Remote Viewers tab.
To add access to a workstation1. On the Navigation bar, under Configure, double-click Security
Configuration.
The Security Configuration dialog box appears.
2. In the Security Configuration dialog box, click the Remote Viewers tab.
3. Click Add.
The New Instrument dialog box appears.
54

Analyst Laboratory Director�s Guide
4. Type the instrument station in the Name field.
If you are using Active Directory in the Native environment, the domain field is not visible and you can enter your username in user principal name (UPN) format.
5. To select a Domain and Computer, click Browse.
6. Using the Select Computers dialog box, select an instrument.
7. If desired, type location information in the Location field.
8. If desired, type a description in the Description field.
9. Click OK.
The information is displayed in the Remote Viewers tab.
10. Click Apply, and then click OK.
To remove a workstation1. On the Navigation bar, under Configure, double-click Security
Configuration.
2. In the Security Configuration dialog box, click the Remote Viewers tab
3. In the left window, select an instrument.
4. Click Delete.
5. Click Yes to confirm or No to close the dialog box.
6. Click Apply, and then click OK.
55

Analyst Security Configuration
Printing Your Security ConfigurationsYou can print out a copy of your security configurations to keep on file as a backup.
To print your security configurations1. On the Navigation bar, double-click Security Configuration
under Configure.
2. In any tab, click Print.
56

66
Audit TrailsThis section explains the various types of audit trails available in the Analyst® software and how they are used. The Analyst Audit Trail System records audited events from the Configure, Tune, Acquire, Explore, and Quantitate modes. Audit tracking helps ensure the integrity of data in the Analyst software files by logging changes to files, so that a third party (such as an auditor or QA reviewer) can determine the history of the data.
The Instrument Audit Trail records events associated with:
• Configuring
• Tuning
• Acquiring
The Project Audit Trail records events associated with:
• Configuring
• Tuning
• Acquiring
• Explore Processing
The Quantitation Audit Trail records events for:
• Results in the result table
Each event has a record number, a date and time stamp, user name, Analyst module, reason for the change, and description of the modification. Some events require a user to enter an electronic signature. The Instrument Audit Trail history records additions or
57

Audit Trails
replacements to the mass calibration table or resolution table and records entries into the Instrument Maintenance Log. The Quantitation Audit Trail history records the quantitation method and parameters, sample, and peak for later read-only reprocessing of the MS data file. The Quantitation Audit Trail history does not include sample list or window settings information.
The Project, Instrument, and Quantitation audit trails are encrypted files. All audit trail files are stored in the project directories under the Analyst Data directory.
Audit Trail ManagerThe Audit Trail Manager (ATM), available on the View menu in all modes, is the user interface to the instrument, project, and quantitation audit trails generated by the Audit Trail System.
For new installations, the audit trail settings for default folder settings are set to off. Once installed, the Analyst Administrator can modify the audit trail settings for new or existing objects. During an upgrade, if an existing Analyst Data directory is used, the current audit trail settings are preserved.
Instrument Audit Trail: Enabling the Instrument Audit Trail starts auditing for instrument maintenance and changes to the instrument resolutions and mass calibrations, sample queues, and hardware profiles.
Project Audit Trail: Enabling the Project Audit Trail starts auditing for project-level events in all projects.
Quantitation Audit Trail: Enabling the Quantitation Audit Trail starts auditing for result table events in all projects.
Electronic Signatures: Enabling the use of electronic signatures allows modifications to the Analyst software files only if the user enters his ID and password.
58

Analyst Laboratory Director�s Guide
Instrument Audit TrailThe Instrument Audit Trail (IAT) records instrument maintenance and changes to the instrument resolutions and mass calibrations, sample queues, and hardware profiles. There is only one Instrument Audit Trail.
The following events are recorded in the IAT data file.
For more information on setting the Instrument Audit Trail, refer to the online Help.
EventElectronic Signature required
Mode
Log on/logoff Analyst No N/A
Enable/Disable audit trail Yes Audit Trail
Enable/Disable electronic signatures
Yes Audit Trail
Activate or deactivate a Hardware (HW) profile
No Configure
Add an entry to the Instrument Maintenance Log
Yes Tune
Add or replace a resolution table or mass calibration table
Yes Tune
Submit or move a batch in the Queue
No Acquire
Acquire a sample, reacquire or reorder samples in the Queue
No Acquire
59

Audit Trails
Project Audit TrailFor each project, the Project Audit Trail (PAT) records creation, modification, and deletion events for project, data, quantitation, method, batch, tuning, result table, and report template files, as well as module opening and closing and printing events. When a project is created, the audit trail settings for the project audit trail is taken from the default Project Settings Template, which may be viewed and edited through the ATM. Once a project has been created, the audit trail settings for that project can also be viewed and edited through the ATM.
The following events are recorded in the PAT data file.
EventElectronic Signature requirement
Mode
Enable/Disable audit trail Yes Audit Trail
Enable/Disable electronic signatures
Yes Audit Trail
Open or close a Resolution Optimization
No Tune
Open or close QuantitativeOptimization
No Tune
Open or close Manual Tuning No Tune
Open or close Acquisition Batch Editor
No Acquire
Open or close Acquisition Method Editor
No Acquire
Create acquisition method files No Acquire
Save acquisition methods with a different name or overwrite acquisitionmethods
Yes(By default, overwrite made available to Administrator only)
Acquire
Create batch and batch template files
No Acquire
Create data files (including tuning data files) or add samples to data files
No Acquire
Create quantitation method files No Acquire
60

Analyst Laboratory Director�s Guide
Changing the Audit Trail SettingsWhen you create a new Analyst project, the audit trail settings for the project are copied from the default project under Audit Trail Settings Templates in the ATM. Once you have created a project, if you want to change the default Quantitation Audit Trail settings for that project, you can change the settings in the ATM.
To set the default audit trail settings for Projects1. On the View menu, click Audit Trail Manager.
The Audit Trail Manager window appears.
2. Expand the Audit Trail Settings Templates folder, and then expand the Default subfolder.
3. Click Project Settings Template.
4. Select or clear the auditing features for the project as required.
5. Click Apply.
Depending on the auditing level for the project, you may be prompted for a reason and an electronic signature.
To view or change the audit trail settings for projects1. On the View menu, click Audit Trail Manager.
The Audit Trail Manager window appears.
Open or close Explore No Explore
Open a data file No Explore
Save an Explore Processing History file
Yes Explore
Create result table files No Quantitate
Create report template files No Configure
Start printing from any mode Yes all
End printing includes error status, if any
No all
EventElectronic Signature requirement
Mode
61
Audit Trails
2. Expand the Audit Trail Data folder, and then expand the Projects subfolder.
3. Click the desired project.
The History tab will shows the audit trail data for the project.
4. In the right pane, click the Settings tab.
5. Select or clear the auditing features for the project.
6. Click Apply.
Depending on the auditing level for the project, you may be prompted for a reason and an electronic signature.
For more information about setting the Project Audit Trail, refer to the online Help.
Quantitation Audit TrailThe audit trail for Quantitation Results Tables records the following:
• User name.
• Date and time modified.
• Category.
• Reason for the modification.
• Description of the modification, such as the points removed from a calibration, automatic and manual baseline fitting, and curve fitting changes.
The Results Tables audit trail information is stored in the History tab in the ATM. The Quantitation Audit Trail records the following changes to the results table:
EventElectronic Signature requirement
Mode
Enable/disable the audit trail No/Yes Audit Trail
Clear the audit trail Yes Audit Trail
Enable/disable electronic signatures
No/Yes Audit Trail
Open result table by QA Reviewer
No Quantitate
62

Analyst Laboratory Director�s Guide
The Analyst software users can create and save a results table, but they do not have permission to change Audit Trail/Electronic Signature settings; these buttons are read-only on the Quantitation tool bar.
Changing the Results Tables SettingsWhen a project is created, the audit trail settings for the Results Tables audit trail is taken from the default Quantitation Settings Template, which may be viewed and edited through the ATM. By default, all new results tables for the project will have the same settings. Once you create and save a results table, the default project quantitation audit trail settings are applied to that table.
If you want to set the Results Tables audit trail settings for new results tables on a per project basis, you can change the audit trail settings using the Table Settings dialog box. Current table settings can also be edited using the Table Settings>Edit option on the shortcut menu in the Results Table.
To set the default audit trail settings for the Results Tables1. On the View menu, click Audit Trail Manager.
The Audit Trail Manager window appears.
2. Expand the Audit Trail Settings Templates folder, and then expand the Default subfolder.
3. Click Quantitation Settings Template.
Close result table by QA Reviewer (and add a comment if saved)
Yes Quantitate
Create result table No Quantitate
Calibrate curves Yes Quantitate
Re-integrate peaks Yes Quantitate
Change integration parameters Yes Quantitate
Modify methods Yes Quantitate
Add or remove samples Yes Quantitate
Change sample type Yes Quantitate
EventElectronic Signature requirement
Mode
63

Audit Trails
4. Select or clear the auditing features for the project as required.
5. Click Apply.
Depending on the auditing level for the project, you may be prompted for a reason and an electronic signature.
To change a project�s audit trail settings for the Results Tables
1. On the Navigation bar, click Quantitate.
2. On the Tools menu, point to Settings, and then click New Quantitation Results Table Settings.
The Table Settings dialog box appears.
3. Expand the Default folder, click Audit Trail, and then click Edit.
The Audit Trail Settings dialog box appears.
4. Select or clear the Audit Trail settings as required.
5. Click OK to apply the changes or Cancel to close the dialog box.
6. Click Done on the Table Settings dialog box.
To change the current settings for the Results Tables1. Right-click on the Results Table.
2. On the shortcut menu, point to Settings, and then click Edit.
The Table Settings dialog box appears.
3. If necessary, expand the Current Table Settings folder, and then the Default folder.
4. Double-click on Audit Trail.
The Audit Trail Settings dialog box appears.
5. Select or clear the Audit Trail settings as required.
6. Click OK to apply the changes or Cancel to close the dialog box.
7. Click Done on the Table Settings dialog box.
For more information about setting the Quantitation Audit Trail, refer to the online Help.
64

Analyst Laboratory Director�s Guide
ArchivingAuditing records accumulate in the Project Audit Trail and Instrument Audit Trail and can make large files that are difficult to navigate and manage. (Results Tables audit trails typically have a manageable number of records.)
When a Project Audit Trail or the Instrument Audit Trail reaches 1000 records, a final record stating that the file has been archived is added. The audit trail is automatically saved with a name indicating the type of audit trail and the date and time, for example “PAT-Archive-200012311923.ata,” in the Project Information folder. A new Project Audit Trail or Instrument Audit Trail is started. The first record states the path of the previously archived audit trail.
For more information about viewing an archived audit trail, refer to the online Help.
Electronic Mail NotificationIf the workstation is in Integrated Mode and there are three logon errors within one day, an electronic mail message can be sent to a user-defined electronic mail address.
Note: Electronic Mail Notification must be configured before it can be used.
To access electronic mail notification1. On the View menu, click the Audit Trail Manager.
2. Right-click in the left pane of the Audit Trail Manager.
3. Click Options, and then click E-Mail Notification Settings.
65

Audit Trails
Enabling or Disabling Data File Checksum
Whenever a Mass Spectrometry data file is created, the Analyst software can generate a checksum value, using an algorithm based on the MD5 public encryption algorithm, and enter the value into the MS data file. By default, the checksum setting is disabled.
Whenever an MS data file is opened, you can choose to verify the checksum.
Data File Checksum can be disabled to save time. The checksum calculation can take over a minute for a one-gigabyte MS data file. Therefore, checksum verification of a large data file can delay file opening longer than convenient for most users. When Data File Checksum is enabled and disabled, “invalid” or “not found” warnings can occur at checksum verification.
To access Data Sum Checksum1. On the View menu, click the Audit Trail Manager.
2. Right-click in the left pane of the Audit Trail Manager.
3. Click Options, and then click Data File Checksum.
Searching Audit Trail RecordsAudit trail records can be searched by record number, date and time modified, user name, complete user name, Analyst module, reason for the modification, description of the modification, or electronic signature requirement using the Audit Trail Search dialog box.
To search the audit trail records1. On the View menu, click the Audit Trail Manager.
2. In the left pane of the Audit Trail Manager, expand Audit Trail Data, and then click Instrument.
3. In the History tab, right-click to open the shortcut menu, and then click Search.
The AuditTrail Search dialog box appears.
66

Analyst Laboratory Director�s Guide
4. In the Display all records where: drop-down list, select a parameter.
5. In the Contains text field, enter a value.
6. In the Created between: calendar, select start and end dates.
7. Click OK.
Exploring Processing HistoryThe Explore Processing History (.eph) is a requirement for CFR 23. The Explore Processing History can record changes to processing parameters, also called Processing Options, when a data file (extension .wiff) is processed in Explore mode. Processing parameters can involve smoothing, finding the centroid, subtracting a baseline, filtering noise, and so forth. The processing history is stored in a file with an .eph extension.
67

Audit Trails
Explore Processing History window
The Explore Processing History (EPH) window contains the processing history and a separate Explore window containing the corresponding graph. The EPH window displays the audit trail type, file name and path, date and time of the report, and number of records. The table displays the record number, date and time modified, user name, complete user name, module (Explore), and description of the modification. The Change Description field names the MS data file opened or the processing parameters changed. For more information on Explore Processing History, refer to the online Help.
68

77
Data System ConversionThis section explains how to migrate data from the Applied Biosystems/MDS Sciex Macintosh MassChrom software to Analyst®. There are several factors you need to consider if you are migrating. If you intend to use data files developed with MassChrom in the Analyst system, you must convert these files to the Analyst file format (.wiff). The conversion must be done on a Macintosh computer.
Previous versions of the Analyst software and MassChrom included Macintosh translator utilities. The installation disk contains the following items:
Computer System RequirementsThe software requires a Power Macintosh or a G3 with a minimum of 32 MB of RAM, 230 MB of internal hard disk storage, and a CD drive.
The API File Converters are fully compatible with Systems 8.0, 8.1, and 8.5.x (including HFS+).
Installation Disk Contents
Name Description
InstFileGenerator Instrument file conversion program
ExptFile Converter Experiment file conversion program
Examples Example Mac files used in the file converters
Read Me First Release Notes
69

Data System Conversion
Translating MassChrom Data Files to Analyst Format
Macintosh formatted API data files can be translated (or converted) to single or multiple Analyst format files (WIFF). Single or multiple Macintosh formatted data files can be selected before performing any file translation. Translated files will not have a checksum because they were collected by earlier versions of the Analyst software that did not have the checksum feature.
To translate API files to .wiff files1. Run the File Translator program.
2. Click the Translate menu.
A list showing the different file translation options appears.
3. To convert multiple Macintosh files to Analyst files, from the list choose API to Multiple WIFF.
Multiple Macintosh files translate to the same number of .wiff files. The .wiff file names are the same as the Macintosh file names with .wiff appended to the end.
4. To convert multiple Macintosh files to a single .wiff file, from the list choose API to Single WIFF.
5. Click Select Destination Folder to choose a location for the .wiff files.
6. Use the File dialog box to navigate to the desired destination folder.
7. Click Select Files for Translation to select file(s).
8. Use the directory dialog box to navigate to the appropriate folder that contains the files to be translated.
9. Click Translate.
If you have selected the single .wiff file option, you will be prompted for a destination folder and .wiff file name.
The program window shows the translation process, and a progress bar shows the progress of the conversion. Once the conversion is complete, you can transfer the files to an Analyst workstation and read them using the Analyst software.
70

Analyst Laboratory Director�s Guide
The Instrument File GeneratorThe Instrument File Generator (InstFileGenerator) combines the necessary parts of Macintosh state and calibration files to generate an Analyst instrument file (INS file).
To convert instrument files to INS formatThe main window for the Instrument File Generator program contains seven control buttons, one menu, and a scrollable log window.
1. Run the Instrument File Generator program.
The Instrument File Generator window appears.
2. Choose an instrument type or model from the Instrument Model menu.
All supported models are listed on the menu, with the API 3000 being the default. If you select a single quadrupole instrument, the Q3 file buttons on the right become unavailable.
3. To open a state or calibration file, click the corresponding Load file button.
A dialog box appears prompting you for a file name.
4. Enter the name of the desired file.
After the file is loaded, the corresponding button becomes unavailable.
5. To begin generating the INS files for the chosen instrument model, click Generate.
The log window records all actions taken by the user from the start of the program. Any errors found are also recorded in this window. The contents of the window can be printed out using the Print command available on the File menu.
71

Data System Conversion
The Experiment File ConverterThe Experiment File Converter (ExptFileConverter) combines the necessary parts of Macintosh state file and a Macintosh experiment file to generate an Analyst data acquisition method file (DAM).
To convert experiment files to DAM filesThe main window for the Experiment File Converter program contains three control buttons, one menu, and a scrollable log window.
1. Run the Experiment File Converter program.
The Experiment File Converter window appears.
2. Choose an instrument type or model from the Instrument Model menu.
All supported models are listed on the menu. This selection determines which parameters to include in the DAM file.
3. To open a state or experiment file, click either Load State File or Load Expt File.
A dialog box appears prompting you for a file name.
4. Select the name of the desired file.
After the file is loaded, the corresponding button becomes unavailable.
5. To begin generating the DAM files for the chosen instrument model, click Convert.
The log window records all actions taken by the user from the start of the program. Any errors found are also recorded in this window. The contents of the window can be printed out using the Print command available on the File menu.
72

Analyst Laboratory Director�s Guide
Index
Aaccess modes, in Analyst 10access rights
adding user-defined roles 44configuring for user-defined roles 46setting file export access 53setting global access rights 52to Analyst 42viewing or changing 51
access, configuring instrument workstation 54
acquisition modes, types of 36Active Directory, definition 21alerts, sending 24Analyst
default directory structure 27file and folder permissions 49people and roles, defined 20security modes, configuring 34
Analyst Data folder, and project folders 47API Instrument folder, contents of 47Application log, and audited events 23archiving, Project Audit Trail and
Instrument Audit Trail records 65Audit Trail Manager
described 12setting up audit trails 58
audit trail settingschanging project settings 61changing Results Tables settings 63
audit trailsAudit Trail System 57in Analyst 12Instrument Audit Trail 59Project Audit Trail 60Quantitation Audit Trail 62Results Tables settings 73searching 66
setting up audit trails 58
Cconverting
experiment files to DAM files 72instrument files 71
Ddata file checksum, enabling and disabling
66data objects. See filesdirectory structure in Analyst 27
Eenabling and disabling data file checksum
66Event Viewer and event logs 23experiment files, converting to DAM 72Explore Processing History, using 67
FFAT file system and NTFS, file
requirements 22file and folder permissions 23file translation, system requirements 69files
Analyst, types of 47permissions 23setting access rights for exported files 53setting global access rights 52sharing on remote computer 53translating API files to WIFF files 70
73

Index
IIAT. See Instrument Audit TrailInstrument Audit Trail
archiving 65described 59
instrument file generator, and Macintosh files 71
integrated mode, defined 11
Mmixed mode, defined 11modes, security modes in Analyst 34
Nnetwork acquisition, overview and
configuration of 30network messages, sending 24NTFS
and file and folder permissions 23described 22
PPAT. See Project Audit Trail 60people
adding 43assigning to roles 44configuring 40define 20deleting from Analyst 47removing from projects 52removing from roles 46
printing security configurations 56privileges. See access rightsprocess overview
security and installation 15processing options and parameters, and
exploring processing history 67
Project Audit Trailarchiving 65changing audit trail settings 61defined 60
projectssecurity, configuring 47setting access rights 49setting access rights for files 52viewing or changing access rights 51
projects tab, in Security Configuration dialog box 49
QQuantitation Audit Trail, described 62
Rrequirements
for file translation 69security 9system 26
Results Tables, changing audit trail settings 63
rolesassigning people to roles 44configuring user-defined roles 46defined 20deleting 46removing from projects 52
Ssearching, audit trail records 66security
and installation process overview 15configuring project and file security 47printing security configuration 56requirements 9security modes in Analyst, selecting 34
Security log, and audited events 23sending alerts 24
74

Analyst Laboratory Director�s Guide
single user mode, defined 10software component verification 27System log, and audited events 23system requirements
for file translation 69minimum requirements 26
Ttranslating
API files to WIFF files 70experiment files to DAM files 72files to INS instrument files 71
Uuser-defined roles
adding 44configuring access rights 46deleting 46
WWindows New Technology File System
(NTFS). See NTFSWindows users and groups, defined 20workstations, configuring access 54
75

Index
76