analogue bass synth - · pdf fileperformance keyboard for stage use, not just for lines played...
TRANSCRIPT

BassStationANALOGUE BASS SYNTH
OWNER'S MANUALOWNER'S MANUAL

Contents & Introduction Contents & Introduction
Introduction
Front Panel Controls & Features
Rear Panel Connections & Features
Preparation & Connections
How The Controls Work
Appendix
Preparation ........................................................................................................... page 3
Connections .......................................................................................................... page 4
Quick Guide .......................................................................................................... page 4
Control Section ...................................................................................................... page 5
Memory Section .................................................................................................... page 7
Analogue Voice Architecture ................................................................................. page 7
LFO Section .......................................................................................................... page 8
Oscillators 1&2 Section ......................................................................................... page 9
Oscillators 1&2 Modulation Section .................................................................... page 10
Filter Section ........................................................................................................ page 11
Envelopes 1&2 Section ....................................................................................... page 12
MIDI Control ........................................................................................................ page 14
Specification ........................................................................................................ page 15
Introduction
Contents
Thank you for buying the Novation BassStation Analogue Bass Synthesiser. The keyboard you have purchased is ideal for producing the kind of bass sounds which have returned to popularity in recent years, but it is capable of far more than just that. Analogue synthesis is also suitable for melody lines and lead solos as well as sound effects.
Coming from the Novation stable, it is also obvious that the BassStation makes an ideal performance keyboard for stage use, not just for lines played using it's bass and lead sounds, but also for polyphonic control of MIDI sound modules with velocity, pitch bend, modulation and after touch control.
The MIDI on the BassStation allows for real-time transmission and reception of controller information. This means that the live 'tweaking' of controls during a performance which is particularly appropriate for analogue sounds can be recorded into a sequencer along with the notes played and the entire performance recreated on playback. Bulk Dumps of the 7 Memory locations can also be sent and received, allowing you to build a large library of analogue sounds for different applications.

BassStationOn/Off9vDCExt.Cont.MIDI In
6
6
4
4
3
3
2
2
MIDI OutLine Out
PITCH CONTROLLER
+/ Up
OCTAVE SELECT
Compare
/ Down_
Write
MOD VOLA.TOUCHCONTROLLER ASSIGN
1 2 3 4 5 9 11 12 13 14 15 16 RXTX8 1076MIDI CHANNEL SELECT
SINGLE ALLSAVEMEMORY
SINGLELOAD
ALL
1 2ENVELOPE
ENV 2LFO12dB 24dB MOD SOURCE CUT- OFFSHAPE
LFO FILTER ENVELOPEOSC 1 OSC 2
WAVEFORMPROTECTEDIT/ WRITE R'DOM SAW
TRIGGERINGMULTIAUTOGLIDE SINGLEENABLE TRISPEED
RESONANCEFREQUENCY MOD DEPTH ATTACK DECAYDELAY
BassStationANALOGUE BASS SYNTHMOD WHEEL DEPTH
FILTER OFF PITCHUTIL. MODE
OFFKEY'B TUNING
SPEED
MAN LFOENV 2PWM SOURCEWAVEFORM
PULSE WIDTH MIX SEMI-TONEDETUNE LFO
1 2OSCILLATOR
ENVELOPE
OSC 1-2 MODULATION
RANGE16' 8' 2'4'
PORTAMENTOVOLUME
MEMORY
WRITE
1
4
7
MANUAL
2
5
6
3
_5 5+ _
5 5+ _5 5+ _
5 5+0 12+_ +OSC1 OSC20 10 0 10 0 10 0 10 0 10 0 10 0 10 0 10
SUSTAIN RELEASE VELOCITY
0 10 0 10 0 10
Front Panel Controls & FeaturesFront Panel Controls & Features
Rear Panel Connections & FeaturesRear Panel Connections & Features
1
1
5
5
7
7 8 9 10 11
8
9
11
10
6
4
3
2
1 5
7
Power On/Off Switch MIDI In Connector
MIDI Out Connector
Line Out Connector
External 9vDC Input
Battery Compartment
External Pitch Bend / Controller Wheel Grip Connector
6
4
3
2
1
5
7
Keyboard
Memory Section
LFO Section
Oscillator 1 Section
Oscillator 2 Section
Oscillator 1 & 2 Modulation Section
Filter Section
Envelope Section
Performance Wheels
Octave Select / Up & Down Buttons etc.
Control Section
Full size key, 25 note velocity sensitive keyboard. This section contains the LFO Speed, Depth and Waveform Shape controls.
This section contains the Oscillator 1 Waveform and Oscillator 1 / 2 Mixcontrols.
This section contains the Oscillator 2 Waveform, Range, Detune andSemi-Tone transposition controls.
This section contains the Oscillator select, PWM Source, Envelope Modulation, LFO Modulation and Pulse Width Depth controls.
This section contains the Modulation Source, Frequency, ResonanceCut-off slope and Modulation Depth controls.
This section contains the Envelope select, Triggering, Attack, Decay, Sustain, Release and Velocity controls.
Pitch bend wheel / Controller wheel - assignable to Modulation,After Touch or Volume.
These buttons control 3 functions depending on the selectedoperating mode.
This section contains the Master Volume, Portamento, Mod WheelDepth and Utility Mode controls.
This section contains the 8 way Memory selector, edit/write Led and program "write" switch.
Slide to the "On" position to turn the BassStation on, and to the "Off"position to turn it off.
This connector is used to receive MIDI data from an external device..
This connector is used to transmit MIDI data to an external device.
This 1/4 jack delivers a line-level output signal for connection to amixing desk or amplifier input.
Use this jack to power the BassStation from an optional DC adapter.
The BassStation uses six AA size ( SUM - 3 or R6P ) batteries.
Use this connector when using the optional Controller Grip ( ECG-1 ).
Normal Mode -
Memory Mode -
Tuning Mode -
See page 4
See page 5
See page 3

Using a Power Adapter
Power Switch
If you wish to use the optional DC Power Adapter ( PSU - 2 ), plug the connector intothe 9vDC jack on the rear panel, then plug the adapter into a convenient wall AC power socket.
Move this switch to the "On" position to turn the BassStation on, and to the "Off" position toturn the power off.
PSU - 2
9vDC
Correct battery insertion
AA 1.5VAA 1.5V
AA 1.5V AA 1.5V AA 1.5V
AA 1.5V
PreparationPreparation
Power Supply
Using Batteries
Removing The Battery Cover
Battery Insertion
Replace Cover
Caution
When to Replace the Batteries
Preparation
3
The BassStation will operate either from batteries or an optional DC adapter.
Six AA size batteries must first be installed in the battery compartment.
Replace the battery compartment cover, making sure that it locks firmly in place.
To prevent any possible damage due to battery leakage, remove the batteries from the BassStation if it is not to be used for an extended period of time.
Your BassStation will run for approximately 40 hours on alkaline batteries. When the batteries run down the BassStation's output will become distorted. When this happens,
Remove the battery cover - located on the bottom panel - by pressing down on the texturedpads and sliding in the direction of the arrows, as shown in the illustration.
Insert the six batteries as shown in the diagram.Note that three batteries fit in one direction and three in the other as shown by the polarity indications inside the compartment. The spring always fits against the negative end of the battery.
replace the batteries with a complete set of six new batteries.

Connections & Quick GuideConnections & Quick Guide
9vDC In Jack
MIDI In Connector
MIDI Out Connector
Line Out Connector
Fitting the Strap Buttons
Powering up for the first time
Connections
Quick Guide
4
This jack is used to power the BassStation from an optional external DC adapter instead of batteries. The plug of a Novation PSU-2 should be plugged into this jack. The batteries are
the front panel.
Use this connector when you wish to play the BassStation's sounds from an external MIDI device i.e. a sequencer or keyboard.
Use this connector to play external MIDI devices using the BassStation's 2 octave, polyphonic keyboard or to store sounds on a MIDI data recorder.
This 1/4" jack delivers a line-level audio output signal from the BassStation for connection toan amplifier or mixing desk input. The output level is adjusted using the "Volume" knob on
automatically disconnected when the plug is inserted.
The BassStation comes with 2 strap buttons which, when fitted, allow you to attach a guitar strap for use on stage or when in a mobile situation. Use the 2 screws provided to secure the plastic buttons to the threaded brass inserts at each end of the case.
When you have connected the power supply or inserted a set of batteries and connected the 'Line Out' socket to a suitable amplifier or mixing desk, you can listen to the 7 factory sounds programmed into the BassStation's memory.
First, set the 'Volume' control to a reasonably high output level (8-9). This will maintain a good signal to noise ratio on the line level output from the BassStation, but be sure that the input volume setting on your amplifier or mixer is initially set at a low level to ensure a comfortable listening volume when the first notes are played. Move the rotary 'Memory' selector to position '1'. Ensure that the 'Mod Wheel Depth' and 'Util.Mode' switches in the Control Section are at their central 'off' positions and that the 'Write' switch in the Memory Section is in the 'Protect' position.
Now, move the 'Power On/Off' switch located on the rear panel to the 'On' position. The LFO speed LED should be flashing at a constant rate. If this does not happen, check that the batteries are new and correctly fitted or that the power supply is of the specified type. Play the keyboard and you will hear the sound that is stored in memory location number 1. Use the 'Memory' knob to select all 7 of the factory demonstration sounds.
Reading the following chapter "How the controls work" in detail, will help you to understand how these sounds were set up and allow you to explore the extensive sonic capabilities of the BassStation so you can easily create your own, individual sounds.

MIDI ChannelKeys 1-18 govern the MIDI channels on which the BassStation transmits (TX) and receives (RX). To set the transmit channel, first press the key labelled "TX" followed by the key corresponding to the MIDI channel on which you want the BassStation to transmit. Similarly, to set the receive channel, press the key labelled "RX" followed by the key corresponding to the MIDI channel on which you want the BassStation to receive. N.B. Remember to press the "TX" or "RX" key first, otherwise you will change the pitch bend setting if a key numbered 1 to 12 is pressed.Important note: When playing the BassStation from it's own keyboard you must always set the transmit and receive channels to the same number. If no sound appears and the volume is turned up, check that the TX and RX channels are set to the same value.
MOD WHEEL DEPTHFILTER OFF PITCH
UTIL. MODEOFFKEY'B TUNING
PORTAMENTOVOLUME
0 10 0 10
How The Controls WorkHow The Controls Work
5
Control Section
Volume
Mod Wheel Depth
Util. Mode
Tuning the BassStation
Accessing The Keyboard Parameters
Pitch Bend Wheel Range
This knob allows you to adjust the volume output of the BassStation. Turn to the left to reduce the volume and to the right to increase the volume. Because the BassStation also acts as a polyphonic MIDI keyboard controller, you may also want to use this knob to silence the sound of the BassStation whilst playing external sounds on the same MIDI channel.
This switch allows you to alter the amount of Pitch or Filter modulation depth available on the controller wheel. These settings can be stored with each Memory for custom setups. When set to either the Pitch or Filter position, the Controller Wheel is used to set the maximum depth of modulation from the wheel at it's 'full on' position. Whilst playing a note(s) on the keyboard, adjust the Controller Wheel to set the required depth of either the Filter or Pitch. i.e. the amount of depth set during this procedure will have effect at the full "end stop" position of the Controller Wheel. N.B. Ensure this switch is in the " Off " position during normal use.
The "Utility Mode" switch allows you to access the keyboard functions or adjust the tuning. N.B. When playing the BassStation normally you should keep this switch in the central 'off' position.
When the above switch is in the Tuning position, you can use the "Octave Select" buttons to adjust the tuning of the oscillators. When you switch it on, the BassStation automatically tunes itself to concert pitch (A-440Hz), so you will not normally need to adjust the tuning. However, if you need to adjust the tuning to play with musicians who are not tuned to concert pitch, press the -/Down button to lower the tuning (flat) or the +/Up button to raise it (sharp). The LED next to the tuning position of the switch will flash whenever the tuning is not set to 440Hz. This means that if you need to readjust the tuning back to 440Hz, you simply adjust the pitch until the LED stops flashing.
When this switch is set to the Key'b position, the BassStation's keyboard changes function. It is no longer used to make the instrument sound but to set the following parameters:
Use the keys numbered 1 to 12 to set the amount of pitch bend in semi-tones. i.e. if, for instance you want to bend a note up or down 5 semi-tones, press the key number 5.
- Rotary
- Switch
- Switch
This section allows you to set up the main control parameters of the BassStation. These parameters need to be accessed less often than other controls along the front panel and so they are grouped together into this area.

How The Controls WorkHow The Controls Work
6
Control Section - Continued
Load - Memory - Save
Controller Assign
Load Single
Load All
Save Single
Save All
Portamento
Octave Select
The last four keys on the keyboard allow you to load and save the sounds you have created on the BassStation using a computer or external MIDI data storage device.
The next three keys are used to set the function of the Controller Wheel. To make the Controller Wheel send Aftertouch ( pressure), press the key labelled "A.Touch". To make it send modulation, press the key labelled "Mod". To make it send MIDI Volume, press the key labelled "Vol".
To load a single sound, you must first move the Write switch in the Memory section from the Protect to the Enable position. Then move the Memory Rotary switch to the position in which you want to store the incoming sound. Now press the "Load Single" Key. The BassStation is now waiting to receive the incoming sound data which you must transmit from your computer or other data storage device. When the data is received, the "Edit/Write" LED will flash rapidly for a few moments to confirm that the BassStation has stored the transmitted sound. If no data is received within 20 seconds, the BassStation will revert to normal mode. This means you must press the "Load Single" key to receive a sound.
To load all 7 sounds into the BassStation's memory, you must again make sure that the Write switch in the Memory section is in the Enable position. Now press the "Load All" Key and then transmit the bulk dump from your computer or other data storage device. When the data is received, the Edit/Write LED will flash rapidly for a few moments to confirm that the BassStation has stored all seven sounds. Again if no data is received within 20 seconds, the BassStation will revert to normal mode. You must press the "Load All" key again to load a bulk dump. N.B. When you have finished loading, make sure you turn the Write switch back to the Protect position to prevent any sounds being accidentally erased.
To save a single sound to a computer or other data storage device, you must first move the Memory rotary switch to the position of the sound you want to save. Make sure the computer or data storage device is ready to accept the data and then press the "Save Single" key.
To save all seven sounds in the BassStation's memory to a computer or other data storage device, ensure that the computer or data storage device is ready to accept the bulk dump and then press the "Save All" key. All seven sounds will be transmitted via the MIDI Out socket.
This knob controls the speed of the glide between the last pitch and the next. All the way to the left, the pitch changes instantaneously so you will not hear any glide. As you move the knob to the right, the time taken for the pitch to change between notes is increased and you begin to hear the glide. At the far right, this takes 5 seconds.
These two buttons are situated between the Performance Wheels and the Control Section. In Normal playing mode, i.e. when the Mod Wheel Depth/Utility Mode switches are in their off position and the Memory Write switch is in the Protect position, you can use these two buttons to shift the BassStations keyboard up or down it's 8 octave range in single octave steps. When a sound is stored in memory the current octave setting is also stored, i.e. the same sound could be stored with a low octave setting (for bass) in one memory and a high octave setting (for lead sounds) in another.
- Rotary
- Buttons

Analogue Voice Architecture
The BassStation features all the classic elements of analogue or 'subtractive' synthesis; two oscillators with standard waveshapes, a voltage-controlled filter with resonance and an LFO and two envelopes for amplitude and filter/pitch/pulse width modulation. The term subtractive gives a clue to the way analogue synthesis works. You start with sound which contains more than you need and remove parts of it until you are left with the required timbre and shape. The oscillators provide the starting sound, each waveshape providing a complex set of harmonics which can be further enriched with de-tuning and pulse width modulation. The filter allows you to remove those harmonics which you don't need and the envelopes allow you to change both this harmonic content and the volume in real time to give the sound a 'shape'. The LFO allows you to control the speed of vibrato and other regular timbral changes.
If you are already familiar with the basics of analogue synthesis you can use this section as a reference guide to exactly how any element is programmed and routed, but if you are new to this analogue business (having grown up on sample replay instruments - welcome back to the real synthesiser), you should get a good grounding in the basics of synthesis by working your way through each section.
PROTECTEDIT/ WRITE ENABLE
MEMORY
WRITE
1
4
7
MANUAL
2
5
6
3
How The Controls WorkHow The Controls Work
7
Memory Section
Memory Select
Editing a Memory
Writing a New Memory
To select an existing sound stored in the BassStation, simply turn the Memory knob to the position where that sound is stored. If you turn the knob to the Manual position, then the BassStation will revert to the "live" position settings of each knob and switch in the programming section. This is ideal for creating a new sound from scratch.
Once you have selected the memory you want to edit, simply adjust the parameters you want to change. The Edit LED will light to show that you are no longer listening to the stored memory. If you do not store this new edit before you switch to another memory position it will be lost.
To store an edited sound, move the WRITE switch to the Enable position. This will allow you to use the button marked "Compare" to safely find a location to store the sound without overwriting a sound you need to keep. To hear the sound previously stored in a location selected with the rotary Memory switch , press the Compare button. You will now be able to hear the sound stored in the currently selected memory location. Pressing the Compare button again will return you to your edited sound. You can toggle backwards and forwards between the edited sound and the stored sound as many times as you like by repeatedly pressing the compare button. Once you have selected a position you can safely use, press the Write button to store the sound in that location. The Edit/Write LED will flash momentarily to confirm that the sound has been stored. The sound that was previously in that location will be overwritten (lost), so be sure you no longer need it before you erase it. N.B. Always return the Write switch to the "Protect" position immediately after storing a sound to avoid overwriting a Memory accidentally
This is where you select the sounds you have previously created on the BassStation and store newly edited sounds. When editing a stored sound, the current position of a knob or switch will probably be totally different to that of the memory sound selected. When you move a rotary control more than a few degrees, the sound will "ping" to the new knob position, whilst moving a switch will immediately call up the new
- Rotary

SHAPE
LFO
R'DOM SAWTRISPEED
DELAYSPEED
0 10 0 10
How The Controls WorkHow The Controls Work
8
LFO Section
Speed
Delay
Shape
The LFO (Low Frequency Oscillator) produces regular electronic variations which are too low to be heard when converted into audio vibrations. However, they can be used to modify various elements of the sound, producing regular changes in pitch (vibrato), pulse width or filter cut-off (two different controls on the harmonic content of the sound).
This knob controls the rate at which these changes take place and a visual indication of the speed set is given by the flashing of the LED directly below this knob. Faster speeds are set by turning the knob to the right and are more suitable for vibrato and tremolo effects whilst slower speeds to the left are more pleasing for Pulse Width changes of harmonic content.
USING THE CONTROLLER WHEEL TO OPEN & CLOSE THE FILTER 1. Move the Speed knob fully left to it's '0' position. This will stop the LFO running completely.2. Using the Mod Wheel Depth switch and Controller Wheel, set the Pitch Depth to zero and the Filter Depth to full - see 'Control Section' on page 5.3. Select the 24dB mode and turn the Frequency knob fully to the left - Filter closed.4. Using the Mod Source switch, set 'LFO' and 'Env 2' to zero ( knob in central position ).
Now you can use the Controller Wheel to open and close the Filter.
This switch selects the waveform which defines the "shape" of the LFO movement. The options are as follows :
This knob controls how long after the note is struck the LFO begins to take effect. If the knob is all the way to the left, the LFO effect will begin immediately. As the knob is turned to the right it will take increasingly longer for the LFO effect to be introduced. This is particularly useful for vibrato effects which if present (ie. when the Delay knob is all the way to the left) as the note is struck can make the note sound out of tune. By setting the LFO Delay to the right, the LFO effect will not be introduced until after the note is struck, thereby removing the problem. If you have problems getting the LFO to take effect, make sure the Delay knob is not set all the way to the right!
- Rotary
- Rotary
- Switch
R'DOM - This stands for random, sometimes also referred to as Sample & Hold. At a regular interval (governed by the Speed knob), the level of the LFO jumps to a new random level and stays there until the next jump. This creates a rhythmic effect particularly if routed to the Filter Cut-off (see Filter Section). Routing this to Pitch gives a less musical result, but is useful for computer or machinery sound effects.
TRI - Short for Triangle, this waveform gives the smoothest, continuous change in level to the LFO and is therefor probably the most generally useful setting. When routed to Pitch, it gives you vibrato (if used with higher speed and lesser depth) or a siren effect (with lower speed and greater depth). If routed to Filter Cut-off, a tremolo or "Leslie" effect results.
SAW - This waveform looks like the teeth of a saw (from which it gets it's name) and gives you a falling level which then jumps back up to the full level. Routed to the Filter Cut-off, it produces a rhythmic pulse effect, similar to a sequenced repeated bass line. Routing it to Pitch produces "alarm" type sounds.
OSC 1 OSC 2
WAVEFORM WAVEFORM
MIX SEMI-TONEDETUNE
RANGE16' 8' 2'4'
0 12+_ +OSC1 OSC2
How The Controls WorkHow The Controls Work
9
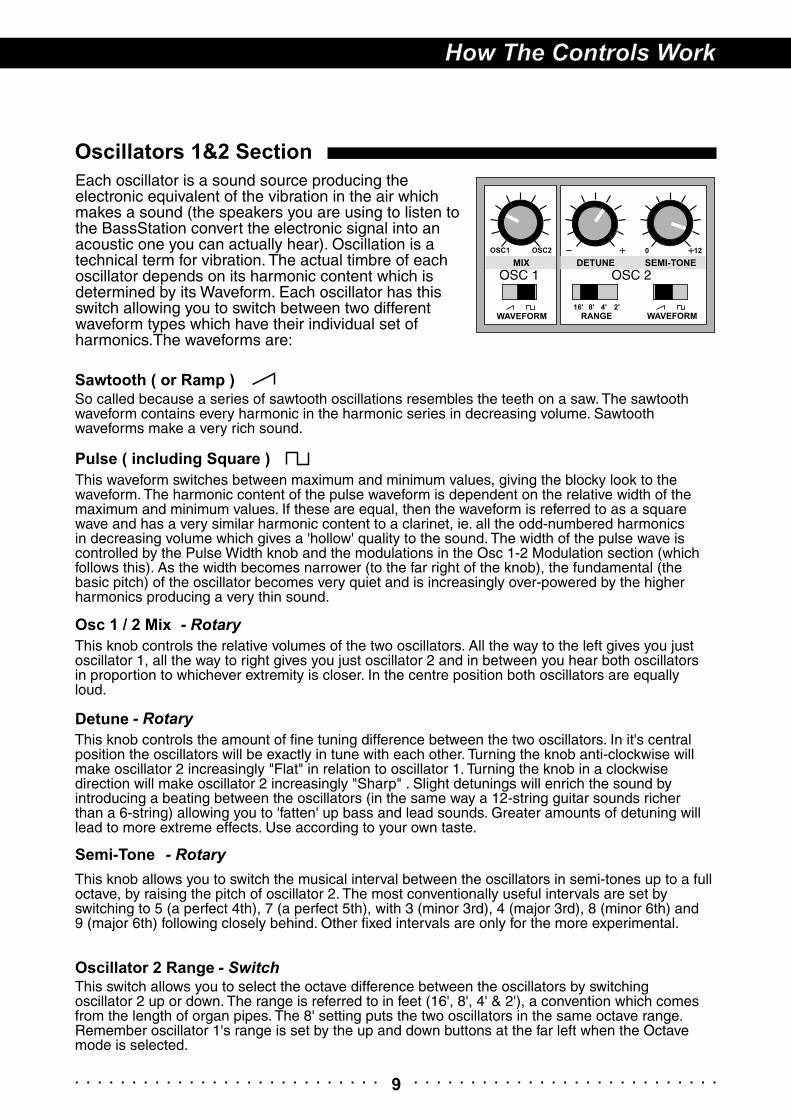
Oscillators 1&2 Section
Sawtooth ( or Ramp )
Pulse ( including Square )
Osc 1 / 2 Mix
Detune
Semi-Tone
Oscillator 2 Range
Each oscillator is a sound source producing the electronic equivalent of the vibration in the air which makes a sound (the speakers you are using to listen to the BassStation convert the electronic signal into an acoustic one you can actually hear). Oscillation is a technical term for vibration. The actual timbre of each oscillator depends on its harmonic content which is determined by its Waveform. Each oscillator has this switch allowing you to switch between two different waveform types which have their individual set of harmonics.The waveforms are:
So called because a series of sawtooth oscillations resembles the teeth on a saw. The sawtooth waveform contains every harmonic in the harmonic series in decreasing volume. Sawtooth waveforms make a very rich sound.
This waveform switches between maximum and minimum values, giving the blocky look to the waveform. The harmonic content of the pulse waveform is dependent on the relative width of the maximum and minimum values. If these are equal, then the waveform is referred to as a square wave and has a very similar harmonic content to a clarinet, ie. all the odd-numbered harmonics in decreasing volume which gives a 'hollow' quality to the sound. The width of the pulse wave is controlled by the Pulse Width knob and the modulations in the Osc 1-2 Modulation section (which follows this). As the width becomes narrower (to the far right of the knob), the fundamental (the basic pitch) of the oscillator becomes very quiet and is increasingly over-powered by the higher harmonics producing a very thin sound.
This knob controls the relative volumes of the two oscillators. All the way to the left gives you just oscillator 1, all the way to right gives you just oscillator 2 and in between you hear both oscillators in proportion to whichever extremity is closer. In the centre position both oscillators are equally loud.
This knob controls the amount of fine tuning difference between the two oscillators. In it's central position the oscillators will be exactly in tune with each other. Turning the knob anti-clockwise will make oscillator 2 increasingly "Flat" in relation to oscillator 1. Turning the knob in a clockwise direction will make oscillator 2 increasingly "Sharp" . Slight detunings will enrich the sound by introducing a beating between the oscillators (in the same way a 12-string guitar sounds richer than a 6-string) allowing you to 'fatten' up bass and lead sounds. Greater amounts of detuning will lead to more extreme effects. Use according to your own taste.
This knob allows you to switch the musical interval between the oscillators in semi-tones up to a full octave, by raising the pitch of oscillator 2. The most conventionally useful intervals are set by switching to 5 (a perfect 4th), 7 (a perfect 5th), with 3 (minor 3rd), 4 (major 3rd), 8 (minor 6th) and 9 (major 6th) following closely behind. Other fixed intervals are only for the more experimental.
This switch allows you to select the octave difference between the oscillators by switching oscillator 2 up or down. The range is referred to in feet (16', 8', 4' & 2'), a convention which comes from the length of organ pipes. The 8' setting puts the two oscillators in the same octave range. Remember oscillator 1's range is set by the up and down buttons at the far left when the Octave mode is selected.
- Rotary
- Rotary
- Rotary
- Switch

MAN LFOENV 2PWM SOURCE
PULSE WIDTHLFO
1 2OSCILLATOR
ENVELOPE
OSC 1-2 MODULATION
_5 5+ _
5 5+ _5 5+
How The Controls Work
10
Oscillator 1&2 Modulation Section
Oscillator 1 2
Envelope
LFO
Pulse Width
This section allows you to setup modulations (automatic changes) to the pitch timbre of the oscillators whilst they are playing back. This gives the sound more "life", by making it more interesting to the ear. Pitch changes include the amount of vibrato and auto bends or slides. Timbral changes are achieved by varying the pulse width and thereby the harmonic content.
This switch selects the oscillator whose modulation you are currently setting. Any changes to the three knobs and the other switch in this section you make will be applied to whichever oscillator is currently selected. When you switch to the other oscillator, you will need to alter the positions of the knobs and switches in this section to make their current positions apply to the new oscillator, otherwise the previous settings will still apply.
This knob controls the amount of pitch modulation to the currently selected oscillator (see above) from envelope 2. In the centre position there is no effect on the oscillator's pitch, to the left the effect is negative (ie. the pitch drops and then rises) and to the right positive (the pitch rises and then falls). The further you set the knob from the central position the further the pitch rises and falls. See the "Envelope Section" later for the exact programming of the rise and fall times.
This knob controls the amount of pitch modulation to the oscillator, ie. how much above and below the set pitch the oscillator regularly rises and falls. If the LFO is set to Triangle wave and it's speed is above the centre of its range, then this will normally produce a vibrato effect, but other effects like a siren or seagull cries are possible with more extreme settings. See the LFO section later for more detail on adjusting the LFO parameters to create these effects.
This knob has a direct effect on the Pulse Width when the waveform of the selected oscillator is set to Pulse (Square). When the Mod Source switch is set to Manual, the position of this knob controls the actual width of the Pulse. At the far left, the Width is 50% (ie. minimum and maximum values are of equal length) giving a special case which we refer to as a square wave, which contains all the odd-numbered harmonics giving a 'hollow' sound reminiscent of a clarinet. As you move the knob to the right the Pulse Width gets narrower and more and more high harmonics are added at the expense of the fundamental pitch giving the sound a thin, trebly quality. At the far right the fundamental has almost disappeared and the sound becomes very thin indeed. When the Mod Source switch is set to Env 2 or LFO, this knob governs the amount of variation in the pulse width in a negative or positive direction about a central 'off' position. As the knob is moved to the left, the variation in the Pulse Width will increase progressively in a negative manner whilst moving it to the right will vary the Pulse Width in a positive manner.
- Rotary
- Rotary
- Switch
- Rotary

ENV 224dB LFO12dB MOD SOURCE CUT- OFF
FILTERRESONANCEFREQUENCY MOD DEPTH
_5 5+0 10 0 10
How The Controls WorkHow The Controls Work
11
Oscillator 1&2 Modulation Section - Continued
Filter Section
PWM Source
Frequency
Resonance
This switch selects how the Width of the Pulse Wave (if selected on either or both oscillators) is controlled. In the MAN (manual) position, the width is directly controlled by the position of the Pulse Width knob above. In the ENV 2 position, the variation in the Pulse Width is controlled by the second Envelope, starting and finishing at 50% with the amount of shift away from this setting being controlled by the Pulse Width knob above. In the LFO position, the variation of the Pulse Width around the central 50% is controlled by an additional fixed speed, internal LFO ( not to be confused with the main variable LFO on the front panel ), with the amount of variation being controlled by the Pulse Width knob above. Variation in the harmonic content of an oscillator (which is what changing the Pulse Width achieves) is very pleasing to the ear, especially at lower pitches where all the associated harmonics fall within the audio range and can clearly be heard. When selected to Env 2, the effect is best appreciated using fairly slow changes, so longer Envelope 2 Attack and Decay times are best.
This is where the unwanted frequencies in the sound are removed. The filter on the BassStation is the most popular type, a Low Pass Filter, which removes the higher harmonics first and as it is closed down removes the lower harmonics until only the fundamental or nothing is left. This is the type supplied on all synthesisers and the most musically useful, especially for bass.
This knob controls the basic cut-off frequency of the filter. All the way to the right, the filter is wide open allowing all the frequencies produced by the Oscillators to sound. As you turn the knob to the left it closes the filter, cutting out harmonics, starting with the highest but increasingly lower ones until only the fundamental or nothing at all is allowed to sound (at the far left). If ever the BassStation is making no sound at all and the Volume knob is turned up, the most likely cause is that the Filter is fully closed. Turn the Frequency knob to the right to let the sound out.
This knob allows you to boost or emphasise the frequencies around the Cut-off frequency (set by Frequency knob above). For this reason on some synths this control is known as Emphasis. At the far left there is no boosting of the cut-off frequency, but as you turn to the right this frequency will be boosted until at the far left it goes in to oscillation producing a new pitched element (similar to feedback on an electric guitar). If ever the BassStation produces a high whistling sound, the chances are this knob is too far to the right. Unless you want this self-oscillating effect, keep the resonance control away from the extreme right setting. Increasing the Resonance is very good for bringing out modulation (movement or change) in the filter cut-off frequency, such as in Acid basslines and other very up-front sounds. Keep the resonance to a minimum if you want more subtle less striking sounds.
- Rotary
- Rotary
- Switch

This switch allows you to change how drastically the frequencies above the cut-off point are removed from the sound. In the 12dB position, the cut-off slope is less steep so the higher frequencies are not attenuated (reduced in volume) as much as they are in the 24dB position. This makes the resulting filtering in the 12dB position more subtle than the 24dB, which you should select if you want the cut-off to be more obvious.
1 2ENVELOPE
ENVELOPE
TRIGGERINGMULTIAUTOGLIDE SINGLE
ATTACK DECAY
BassStationANALOGUE BASS SYNTH
0 10 0 10
SUSTAIN RELEASE VELOCITY
0 10 0 10 0 10
How The Controls WorkHow The Controls Work
12
Filter Section - Continued
Envelopes (1&2) Section
Mod Depth
Mod Source
Cut- Off
Envelope 1 2
This knob controls the amount of change to the filter cut-off set by the Frequency knob to the left. In its central position there is no change to the filter cut-off frequency. To the left of centre there will be an increasing amount of negative modulation, ie. the filter will be closed more and to the right the modulation is positive, ie. the filter will be increasingly opened by the modulation sources. The Filter Mod switch below selects which source will produce this modulation or change in the filter cut-off frequency.
This switch selects whether the amount of variation in the filter cut-off frequency set by the Modulation knob above is controlled by the LFO or by Envelope 2. If the LFO is selected then the filter cut-off will be moved around the starting point set by the Frequency knob at a rate set by the Speed knob in the LFO Section. The amount of movement is set by the Modulation knob above. If Env 2 is selected then the filter cut-off will be moved away from and back to the starting point set by the Frequency knob. If the Modulation knob is set to a negative amount, the Attack of Envelope 2 will close the filter and the Decay/Release will re-open it back to the starting point. If the amount is positive, the Attack will open the filter further and the Decay/Release will close it back to its starting point. Using positive Modulation from Env 2 will emphasize the attack of the note (especially if the Resonance is turned up), whereas LFO modulation will provide a tremolo effect.
The envelopes are used to shape the sound over time. Envelope 1 is hard-wired' to amplitude or volume. It is used to decide how quickly the sound starts when you hit a note and how it sustains or dies away. Envelope 2 can be used to control both Pulse Width and/or Filter Frequency changes depending on the settings of the Mod Source switch below Pulse Width and the Filter Mod switch in the Filter section. Of course, if neither of these is switched to Env 2, you will hear no change when you alter the settings of Envelope 2. Switch one or the other to Env 2 to hear the changes you are making.
This switch selects which envelope you are currently making changes to. If 1 is selected then changes to the knobs in this section will change the way the amplitude or volume envelope responds when you hit, hold and release a note. If 2 is selected, then changes to the Envelope knobs will affect the Pulse Width and/or Filter Frequency modulation (depending on which is switched to Env 2 in the appropriate sections). N.B. the settings of each envelope will be unaffected until you move the appropriate knobs, as the current settings of those knobs are ignored until they moved (otherwise each Envelope would automatically copy the settings of the other when you switched between them.
- Switch
- Rotary
- Switch
- Switch

AttackThis knob sets how quickly the envelope rises to its maximum level when a note is struck. At the far left, this is 1 millisecond (instantaneous to our ears) increasing exponentially to 10 seconds at the far right. This mean that the left hand side of the range can make very fine adjustments to quick attack times, whilst greater changes can be made to longer attack times on the right hand side.
- Rotary
How The Controls WorkHow The Controls Work
13
Envelope (1&2) Section - Continued
Decay
Sustain
Release
Velocity
Triggering
This knob sets how quickly the envelope drops off to the sustain level once the maximum level has been reached. At the far left this time is 3 milliseconds (still instantaneous to our ears) increasing exponentially to 10 seconds at the far right. Again fine adjustment of short times can be made on the left and bigger changes to longer decay times on the right.
This knob sets the level at which the envelope remains after the Decay phase until the keyboard is released. At the far left the envelope will decay all the way to zero without being interrupted. As the knob is moved to the right, the level at which the decay is halted increases until at the far right, there is no decay at all.
This knobs sets how quickly the envelope drops from the sustain level to zero once the key has been released. At the far left this time is 3 milliseconds (still instantaneous to our ears) increasing exponentially to 10 seconds at the far right. Again fine adjustment of short times can be made on the left and bigger changes to longer release times on the right.
This knob sets how much effect velocity has on the envelope. Hard key strikes will always make the envelope reach its peak level, but softer strokes will produce a varying peak dependent on the setting of the Velocity knob. At the far left there will be no velocity effect, ie. soft strokes will produce exactly the same effect as hard ones. As you turn the knob to the fight, softer strokes will open the envelope less and less, until at the far right the softest stroke will not open the envelope at all. Obviously on envelope 1, this will result in quieter notes from soft keys strokes, whereas on envelope 2 softer notes will produce less Pulse Width and/or Filter Frequency Modulation, depending on which are switched to Env 2 in their appropriate sections.
This switch determines how the trigger for the envelopes is derived. The options are as follows :
AUTOGLIDE - In this position, if a note is held down and a second note pressed, the oscillators will glide to the new note without re-running the envelopes. This setting ( labelled 'Slide' on Roland's TB303) produces a similar effect to a note slide on a guitar.
SINGLE - In this position, only the first note played (and held) will run the envelopes.
MULTI - In this position, every note played will run the envelopes.
- Rotary
- Rotary
- Rotary
- Rotary
- Switch

Once again, you can record any changes made with these controls into a sequencer whilst playing notes on the keyboard or at a later time to enhance the performance.
How The Controls WorkHow The Controls Work
14
MIDI Control
Keyboard
Memory Select
Filter Section Controls
Envelope Section Controls
Although the internal synthesiser is monophonic, the BassStation's two octave keyboard actually transmits polyphonic MIDI data. To use the keyboard as a master controller whilst the internal synth is playing back from a sequencer, simply set the transmit (TX) channel to any channel other than the receive (RX) channel. For example, you could use the BassStation to play a bass part on ch.2 whilst playing chords, melody lines etc. at the same time on ch.8. To set the basic transmit and receive channels refer to the 'MIDI Channel' paragraph on page 5.
Using the MIDI 'Program Change' command you can call up any of the 7 sounds stored in the BassStation from your sequencer or other MIDI device as follows :
The Frequency, Resonance and Mod Depth rotary controls in this section are assigned to the following MIDI controllers :
The Attack and Decay rotary controls of envelopes 1 & 2 in this section are assigned to the following MIDI controllers :
You can record any changes made with these controls into a sequencer whilst playing notes on the keyboard. If you want to concentrate on playing the notes first you can go back and record any filter changes later to enhance all or part of the performance.
In addition to all the standard MIDI functions, the BassStation has the ability to transmit and receive changes to the filter and envelope controls during a performance. You can also call up any of the on-board memory sounds.
Program Change No.
Controller Number
Controller Number
BassStation Memory
Filter Control
Envelope Control
0123456
1234567
FrequencyResonanceMod Depth
105106107
AttackDecaySustainReleaseVelocity
108109
AttackDecaySustainReleaseVelocity
Autoglide on/off
114115
-------
---
----- ----- -
Env 1
Env 2

The Roland TB303.........
The BassStation.........
Setting Up A TB303 Sound
The Roland TB303 Bass Line has a very familiar and unique sound for an analogue synthesiser. The BassStation can emulate this sound and indeed create a much wider range of sounds. The TB303 has a single oscillator and single envelope that control both the level of the sound and the way in which the filter contours that sound. The most frequently used controls on the TB303 are the CUT OFF FREQ, RESONANCE, DECAY and ENV MOD and by "tweaking" these the well known "bleeps and burps" are attainable.
With its dual oscillators and two envelopes, the BassStation has far greater sound creating capability than the TB303, however to produce the sound of the TB303 it is important to use just a single oscillator and mimic the single envelope. The filter section on the BassStation has been designed such that when the CUT-OFF switch is in the 12dB position the FREQUENCY, RESONANCE, MOD DEPTH and ENVELOPE 2 DECAY controls act in a similar fashion to the TB303.
Turn the PORTAMENTO control to 2. In the OSC 1 section, turn the MIX control fully anticlockwise in order to only listen to oscillator 1. The WAVEFORM switch may be set as desired since the TB303 also has this selection switch. For the moment set it to Sawtooth.
In the OSC 1-2 MODULATION section set the OSCILLATOR 1 2 switch to position 1 and make sure that the ENVELOPE and LFO controls are set to 0 ( Central position ). The TB303 does not have these controls so we want to make sure they have no effect.
In the filter section set the CUT - OFF switch to the 12dB position. Set the MOD SOURCE switch to the LFO position and turn the MOD DEPTH control to its middle position. Again, the TB303 does not have this control so any LFO modulation must be removed. Now, set the MOD SOURCE switch back to the ENV 2 position. In the 12dB position the MOD SOURCE control does not act as shown on the label i.e. there is only positive MOD available between 0 ( fully anti-clockwise ) and 10 ( fully clockwise ) as on the TB303.
Set the ENVELOPE switch to 1 so the envelope controls have an affect on envelope 1. Set the ATTACK to 0, DECAY to 4, SUSTAIN to 10 and RELEASE to 3. Move the ENVELOPE switch to 2 and set the ATTACK to 0, SUSTAIN to 0 and RELEASE to 3. The DECAY control can now be adjusted as on the TB303.
The VELOCITY can be adjusted as desired but for now, set it to 0 so that the volume is always the same no matter how hard the keyboard is played. To get the"twangy" TB303 sound turn the RESONANCE control up. When the control is set to 8 the sound should get more "Watery". To simulate the glide on the TB303, switch to AUTOGLIDE in the ENVELOPE section. If you play a note and then, whilst holding it, play another one, the new note will glide or 'slur' up to the new pitch. If it goes instantly to the new pitch adjust the Portamento control a little until the glide is noticeable.
Once you are happy with this new sound save it in a memory for future use.
* Copyright Roland Corporation, Japan
How The Controls WorkHow The Controls Work
15
Set Up For Roland TB303* Emulation

16
AppendixAppendix
Specification
Monophonic Sound Source:
Keyboard and Controls etc.:
Oscillator 1
Oscillator 2
Mixer
Triggering
Filter
VCA
Portamento
Pitch Bend Wheel
Keyboard
Controller Wheel
MIDI
Power
Dimensions / Weight
Range C-2 to C7
Envelope 1
Attack time 1ms to 5 SecsDecay time 3ms to 10 SecsSustain levelRelease time 3ms to 10 SecsVelocity Variable sensitivity control
Envelope 2
Attack time 1ms to 5 SecsDecay time 3ms to 10 SecsSustain levelRelease time 3ms to 10 SecsVelocity Variable sensitivity control
Range C-3 to C10
Cut-off 5Hz to 10KHz Frequency
Master volumecontrol
Range Variable mix control between Oscillator 1 and 2
Waveform Square Sawtooth Pulse (Continuously variable)
Waveform Square Sawtooth Pulse (Continuously variable)
Pulse Width Variable depth control and Modulation source of Modulation selectable from Manual, LFO or Envelope 2
Semi-tone +12 Semi-tonesTune
Autoglide 2nd key pressed triggers oscillator glide to new note without re-running envelopesSingle No re-runs of envelopesMulti Re-runs envelopes
Resonance 0 to Self Oscillation
Range Auto, 0 to 5 Secs ramp time
Range 0 to 12 Semi-tones, 7 bit resolution
Range 2 octave (transposable over 8 octaves) full size, velocity sensitive keys
Assignable to LFO Mod depth and/ or Filter Cut-off Frequency, After- touch or MIDI Volume
Keyboard : Transmits polyphonic MIDI data.Filter : Frequency, Resonance and Mod Depth
Batteries : 6 x 'AA' batteries
External : PSU-2
Width : 465mm ( 18.75" )Depth : 215mm ( 8.25" )Height : 55mm ( 2" ) Weight : Less than 2.5Kg
Envelopes : Attack, Decay.
Program 7 MemoriesChange :
Specification subject to change without prior notice.
Envelope Variable+ and - control of Envelope 2 depth of ModulationCut-off slope Switchable between 12dB and 24dB
Master Fine +/-50 Centstune
Detune +/-50 Cents
LFO Variable + and - control of LFO depth of Modulation

Novation Electronic Music Systems Ltd.
The information contained in this manual is believed to be correct at the time of going topress. However, Novation reserves the rightto change or modify the specification withoutnotice or obligation to update existing units.
Specifications subject to change:
Printed in England
Copyright 1994
1. IMPORTANT NOTICE: DO NOT MODIFY THIS UNIT! This product, when installed as indicated in the instructions contained in this Manual,meets FCC requirements. Modifications not expressly approved by Novation may void your authority, granted by the FCC, to use the product.
2. IMPORTANT:
FCC Information ( U.S.A.)
When connecting this product to accessories and/or another product use only high quality shielded cables. Cable/s suppliedwith this product MUST be used. Follow all installation instructions. Failure to follow instructions could void your FCC authorisation to use thisproduct in the USA.
3. NOTE: This product has been tested and found to comply with the requirements listed in FCC Regulations, Part 15 for Class "B" digitaldevices. Compliance with these requirements provides a reasonable level of assurance that your use of this product in residential environmentwill not result in harmful interference with other electronic devices. This equipment generates/uses radio frequencies and, if not installed andused according to the instructions found in the users manual, may cause interference harmful to the operation of other electronic devices.Compliance with FCC regulations does not guarantee that interference will not occur in all installations. If this product is found to be the sourceof interference, which can be determined by turning the unit "OFF" and "ON", please try to eliminate the problem by using one of the followingmeasures:
In the case of radio or TV interference, relocate/re orient the antenna. If the antenna lead-in is 300 ohm ribbon lead, change the lead-in to co-axialtype cable.If these corrective measures do not produce satisfactory results, please contact the local retailer authorised to distribute this type of product.
The statements above apply ONLY to products distributed in the USA.
This only applies to products distributed in Canada.Ceci ne s'applique qu'aux produits distribues dans Canada.
Utilise power outlets that are on different branch (Circuit breaker or fuse) circuits or install AC line filter/s.
Relocate either this product or the device that is being affected by the interference.
Dette apparat overholder det gaeldenda EF-direktiv vedrørendareadiostøj.
Cet appareil est conforme aux prescriptions de la directivecommunautaire 89/336/EC
Diese Geräte entsprechen der EG-Richtlinie 89/336/EC.
This product complies with the radio frequency interferencerequirements of the Council Directive 89/336/EC.
Other Standards ( Rest of World )
CANADAThe digital section of this apparatus does not exceed the "Class B" limits for radio noise emissions from digital apparatus set out in the radio interference regulation of the Canadian Department of Communications.
Le present appareil numerique n'emet pas de bruits radioelectriques depassant les limites applicables aux appareils numeriques de la "Classe B" prescrites dans le reglement sur le brouillage radioelectrique edicte par le Ministere Des Communications du Canada.
ABOUT THE ROLAND TB303 .......
The Roland TB303 Bass Line has a very familiar and unique sound for an analogue synthesiser. The BassStation can emulate this sound and indeed create a much wider range of sounds. The TB303 has a single oscillator and single envelope that control both the level of the sound and the way in which the filter contours that sound. The most frequently used controls on the TB303 are the CUT OFF FREQ, RESONANCE, DECAY and ENV MOD and by "tweaking" these the well known "bleeps and burps" are attainable.
THE BASS STATION .......
With its dual oscillators and two envelopes, the BassStation has far greater sound creating capability than the TB303, however to produce the sound of the TB303 it is important to use just a single oscillator and mimic the single envelope. The filter section on the BassStation has been designed such that when the CUT-OFF switch is in the 12dB position the FREQUENCY, RESONANCE, MOD DEPTH and ENVELOPE 2 DECAY controls act in a similar fashion to the TB303.
SETTING UP A TB303 SOUND
Turn the PORTAMENTO control to 2. In the OSC 1 section, turn the MIX control fully anticlockwise in order to only listen to oscillator 1. The WAVEFORM switch may be set as desired since the TB303 also has this selection switch. For the moment set it to Sawtooth.
In the OSC 1-2 MODULATION section set the OSCILLATOR 1 2 switch to position 1 and make sure that the ENVELOPE and LFO controls are set to 0 ( Central position ). The TB303 does not have these controls so we want to make sure they have no effect.
In the filter section set the CUT - OFF switch to the 12dB position. Set the MOD SOURCE switch to the LFO position and turn the MOD DEPTH control to its middle position. Again, the TB303 does not have this control so any LFO modulation must be removed. Now, set the MOD SOURCE switch back to the ENV 2 position. In the 12dB position the MOD SOURCE control does not act as shown on the label i.e. there is only positive MOD available between 0 ( fully anti-clockwise ) and 10 ( fully clockwise ) as on the TB303.
Set the ENVELOPE switch to 1 so the envelope controls have an affect on envelope 1. Set the ATTACK to 0, DECAY to 4, SUSTAIN to 10 and RELEASE to 3. Move the ENVELOPE switch to 2 and set the ATTACK to 0, SUSTAIN to 0 and RELEASE to 3. The DECAY control can now be adjusted as on the TB303.
The VELOCITY can be adjusted as desired but for now, set it to 0 so that the volume is always the same no matter how hard the keyboard is played. To get the"twangy" TB303 sound turn the RESONANCE control up. When the control is set to 8 the sound should get more "Watery". To simulate the glide on the TB303, switch to AUTOGLIDE in the ENVELOPE section. If you play a note and then, whilst holding it, play another one, the new note will glide or 'slur' up to the new pitch. If it goes instantly to the new pitch adjust the Portamento control a little until the glide is noticeable.
Once you are happy with this new sound save it in a memory for future use.
AddendumAddendum
Set Up For Roland TB303* Emulation
* Copyright Roland Corporation, Japan
ADDITIONAL NOTE
The BassStation is capable of saving the Pitch Bend and Controller wheel settings with a sound thus allowing you to customise these effects specifically to each sound. If you want to alter these settings without changing the sound, you must remember to go through the save procedure otherwise the changes made will be lost.

Novation Electronic Music Systems Ltd. Unit A4 Westacott Business Centre, Maidenhead Office Park, Maidenhead, Berkshire, England. SL6 3RTTelephone: +44 (0)1628 828888Fax: +44 (0)1628 825599
Regulated 9vDC powersupply.
A soft, padded carrying case to protect the BassStation whilst travelling. No Longer Available.
ECG-1OptionalAccesories :
PSU-4 CC-1This hand grip was never available