an3919, mma8450q single/double and directional tap detection · inputs or for changing pictures in...
TRANSCRIPT

AN3919Rev 0, 02/2010
Freescale Semiconductor Application Note
MMA8450Q Single/Double and Directional Tap Detectionby: Kimberly Tuck
Applications Engineer
1.0 IntroductionTapping is a new way that users employ interacting with
hand held products that have an integrated accelerometer. For example, a single tap can be used to silence the sound; a double tap could be used to send an incoming call directly to voicemail. Directional tapping from the positive and negative directions of X, Y, and Z can be used in gaming for motion inputs or for changing pictures in slide show mode or as other generic functions. Tap as an input to the product device allows users to enjoy a more advanced and interactive user experience. The tap replaces the need for the mouse to point and click and select options.
The MMA8450Q has embedded single tap and double tap capabilities. Directional tap is not embedded in the device but directional tap can be accomplished using the embedded tap while flushing the FIFO after the event occurs to extract the direction information. Examples and explanations of how to configure the device for the embedded tap as well as the software algorithm for directional tap will be given in this application note. Note that in the data sheet the register names for tap are sometimes referred to as “pulse”. The signature of the tap signal from the accelerometer looks like a pulse, and that is where this reference derives. Pulse and double pulse are considered the same as tap and double tap in the literature.
1.1 Key WordsAccelerometer, Output Data Rate, Current Consumption, Tap, Directional Tap, Double Tap, Pulse, Double Pulse, Menu Selection, Threshold, Timing Window, Latency Timer, Second Tap, Sample Rate, Double Pulse Abort, Interrupt, FIFO
TABLE OF CONTENTS1.0 Introduction. . . . . . . . . . . . . . . . . . . . . . . . . . . . . . . . . . . . . . . . . . . . . . . . . . 1
1.1 Key Words . . . . . . . . . . . . . . . . . . . . . . . . . . . . . . . . . . . . . . . . . . . . . . . . . . . 11.2 Summary . . . . . . . . . . . . . . . . . . . . . . . . . . . . . . . . . . . . . . . . . . . . . . . . . . . . 2
2.0 MMA8450Q Consumer 3-axis Accelerometer 3 x 3 x 1 mm . . . . . . . . . . . 22.1 Key Features of the MMA8450Q . . . . . . . . . . . . . . . . . . . . . . . . . . . . . . . . . . 22.2 Two (2) Programmable Interrupt Pins for 8 Interrupt Sources. . . . . . . . . . . . . 32.3 Application Notes for the MMA8450Q . . . . . . . . . . . . . . . . . . . . . . . . . . . . . . . 3
3.0 Tap Detection Applications Using the MMA8450Q Accelerometer . . . . 33.1 Single Tap . . . . . . . . . . . . . . . . . . . . . . . . . . . . . . . . . . . . . . . . . . . . . . . . . . . . 43.2 Double Tap . . . . . . . . . . . . . . . . . . . . . . . . . . . . . . . . . . . . . . . . . . . . . . . . . . . 43.3 Various Scenarios Using Double Pulse Abort Conditions . . . . . . . . . . . . . . . 5
4.0 Configuring Registers for Single and Double Tap Detection . . . . . . . . . 84.1 Register 0x2F: PULSE_CFG Pulse Configuration Register . . . . . . . . . . . . . . 8
4.1.1 Example Settings for Configuration of Single and/or Double Pulse Detection . . . . . . . . . . . . . . . . . . . . . . . . . . . . . . . . . . . . . . . . . . . . . . . . . . . . 8
4.2 Registers 0x31-0x33 PULSE_THSX, Y, Z Pulse Threshold for X,Y & Z Registers . . . . . . . . . . . . . . . . . . . . . . . . . . . . . . . . . . . . . . . . . . . . . 84.2.1 Example: Set the tap detection threshold for 2g on X, 2g on Y and 3g on Z . . . . . . . . . . . . . . . . . . . . . . . . . . . . . . . . . . . . . . . . . . . . . . . . . . 9
4.3 Register 0x34: PULSE_TMLT Pulse Time Window 1 Register . . . . . . . . . . . 94.3.1 Example Settings for the Pulse Time Limit . . . . . . . . . . . . . . . . . . . . . . 9
4.4 Register 0x35: PULSE_LTCY Pulse Latency Timer Register . . . . . . . . . . . . . 94.4.1 Example Settings for Pulse Latency Timer. . . . . . . . . . . . . . . . . . . . . 10
4.5 Register 0x36: PULSE_WIND Second Pulse Time Window Register . . . . . 104.5.1 Example Settings for Pulse Window for Detecting a Double Tap. . . . 10
4.6 Register 0x30: PULSE_SRC Pulse Source Register . . . . . . . . . . . . . . . . . . 105.0 Configuring the Tap Detection to an Interrupt Pin . . . . . . . . . . . . . . . . . 116.0 Details for Configuring the MMA8450Q for Single and Double Tap . . . 12
6.1 Example Single Tap Only: 8g mode, 400 Hz ODR . . . . . . . . . . . . . . . . . . . 126.2 Double Tap Only: 8g mode, 400 Hz ODR - Procedure . . . . . . . . . . . . . . . . . 136.3 Single Tap and Double Tap 8g mode, 200 Hz ODR - Procedure . . . . . . . . . 13
7.0 Writing an Algorithm to Detect Directional Tap. . . . . . . . . . . . . . . . . . . . 157.1 Sampling Rate Requirements for Tap Signatures . . . . . . . . . . . . . . . . . . . . 157.2 Procedure for Directional Tap using the MMA8450Q . . . . . . . . . . . . . . . . . . 15
© Freescale Semiconductor, Inc., 2010. All rights reserved.

1.2 SummaryA. A tap signature has a fast response time: sampling speed is important. The timing windows and conditions for
detecting single and double tap are adjustable in the MMA8450Q to eliminate false tapsB. The signature of a tap is somewhat dependent on the user as well as on the mounting conditions of the
accelerometer in the product.C. The embedded single tap and the FIFO are used for directional tap which saves on current consumption. The
event is interrupt driven and the processor can go into a low power mode until the event occurs.D. The MMA8450Q can be configured to detect a single tap only, a double tap only or both single and double taps to
the same interrupt pin. It can also detect the direction of the tap from an interrupt in conjunction with analyzing the direction thresholds from the FIFO data.
E. The conditions for double tap detection and rejection are given in various scenario diagrams to assist the user to configure the tap feature appropriately.
F. The latch (ELE bit set) will hold the EA bit (event active) in the status register until the status register is read, but the other bits in the status register are never latched. The status must be read before the user definable latency timer times out to determine the condition of the axes when the event occurs.
G. The X, Y, and Z tap thresholds for single and double tap can be changed in either active or standby mode.
2.0 MMA8450Q Consumer 3-axis Accelerometer 3 x 3 x 1 mmThe MMA8450Q has a selectable dynamic range of ±2g, ±4g and ±8g with sensitivities of 1024 counts/g, 512 counts/g and
256 counts/g respectively. The device offers either 8-bit or 12-bit XYZ output data for algorithm development. The chip shot and pinout are shown in Figure 1.
Figure 1. MMA8450Q Consumer 3-axis Accelerometer 3 x 3 x 1 mm
2.1 Key Features of the MMA8450Q1. Shutdown Mode: Typical < 1 μA, Standby Mode 3 μA2. Low Power Mode current consumption ranges from 27 μA (1.56 - 50 Hz) to 120 μA (400 Hz)3. Normal Mode current consumption ranges from 42 μA (1.56 - 50 Hz) to 225 μA (400 Hz)4. I2C digital output interface (operates up to 400 kHz Fast Mode) 5. 12-bit and 8-bit data output, 8-bit high pass filtered data output6. Post Board Mount Offset < ±50 mg typical7. Self Test X, Y and Z axes
1
GND
VDD
SCL
NC
INT2
INT1
GND
GND
SDA
SA0
VD
DEN
NC
NC
NC
GND
MMA8450Q2
16
12
13
1415
11
10
3
4
56 7 8
9
16 Pin QFN3mm x 3 mm x 1mm
AN3919
Sensors 2 Freescale Semiconductor
2.2 Two (2) Programmable Interrupt Pins for 8 Interrupt Sources1. Embedded 4 channels of Motion detection
a. Freefall or Motion detection: 2 channels b. Tap detection: 1 channelc. Transient detection: 1 channel
2. Embedded orientation (Portrait/Landscape) detection with hysteresis compensation3. Embedded automatic ODR change for auto-wake-up and return-to-sleep4. Embedded 32 sample FIFO5. Data Ready Interrupt
2.3 Application Notes for the MMA8450QThe following is a list of Freescale Application Notes written for the MMA8450Q:
• AN3915, Embedded Orientation Detection Using the MMA8450Q• AN3916, Offset Calibration of the MMA8450Q• AN3917, Motion and Freefall Detection Using the MMA8450Q• AN3918, High Pass Filtered Data and Transient Detection Using the MMA8450Q• AN3919, MMA8450Q Single/Double and Directional Tap Detection• AN3920, Using the 32 Sample First In First Out (FIFO) in the MMA8450Q • AN3921, Low Power Modes and Auto-Wake/Sleep Using the MMA8450Q• AN3922, Data Manipulation and Basic Settings of the MMA8450Q • AN3923, MMA8450Q Design Checklist and Board Mounting Guidelines
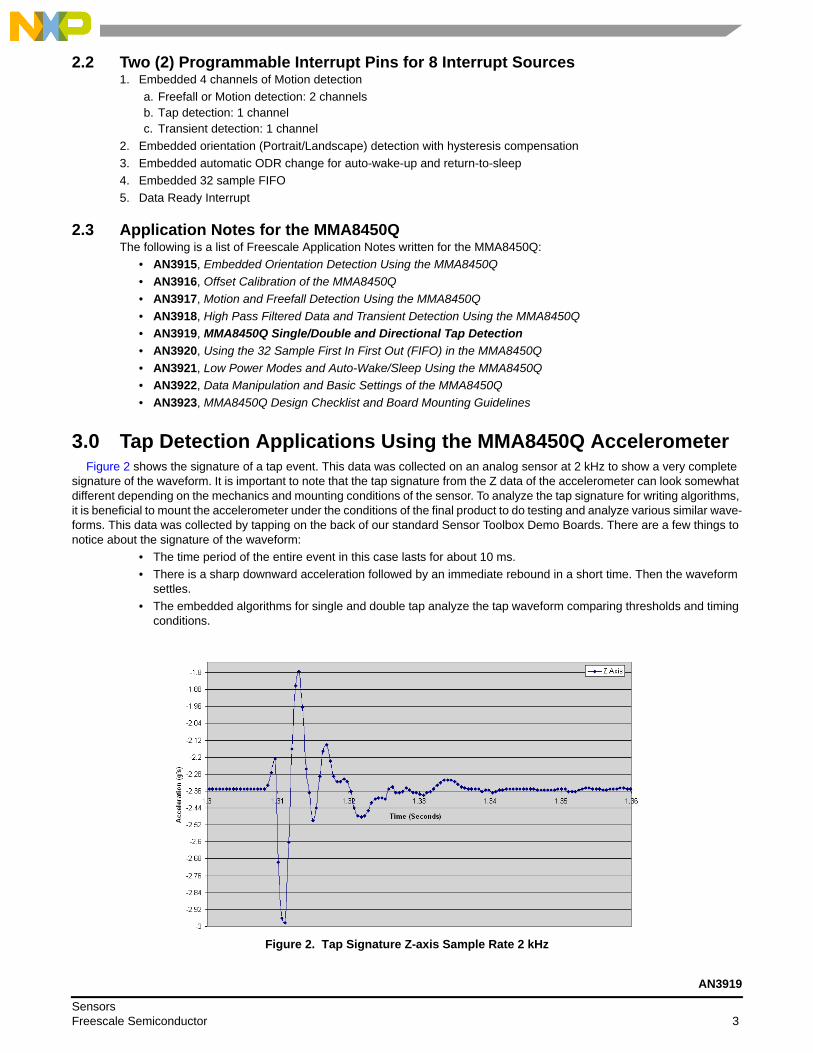
3.0 Tap Detection Applications Using the MMA8450Q AccelerometerFigure 2 shows the signature of a tap event. This data was collected on an analog sensor at 2 kHz to show a very complete
signature of the waveform. It is important to note that the tap signature from the Z data of the accelerometer can look somewhat different depending on the mechanics and mounting conditions of the sensor. To analyze the tap signature for writing algorithms, it is beneficial to mount the accelerometer under the conditions of the final product to do testing and analyze various similar wave-forms. This data was collected by tapping on the back of our standard Sensor Toolbox Demo Boards. There are a few things to notice about the signature of the waveform:
• The time period of the entire event in this case lasts for about 10 ms.• There is a sharp downward acceleration followed by an immediate rebound in a short time. Then the waveform
settles. • The embedded algorithms for single and double tap analyze the tap waveform comparing thresholds and timing
conditions.
Figure 2. Tap Signature Z-axis Sample Rate 2 kHz
AN3919
Sensors Freescale Semiconductor 3

3.1 Single TapFor a single tap event there are three key parameters to consider.
1. Time Window for the tap signature to cross a threshold and drop below it (PULSE_TMLT)2. Threshold Value to Trigger the event (PULSE_THSX, PULSE_THSY, PULSE_THSZ)3. Latency time to hold the event conditions (PULSE_LTCY)
Single tap is embedded in the design of the MMA8450Q. The tap event function must first be enabled to detect a single tap event with the corresponding axes enabled. A single tap event is configured by specifying two things; the threshold to be crossed and the time duration that it lasts. A single tap event is detected when the acceleration value is greater than the value set in the PULSE_THSX (Reg 0x31), PULSE_THSY (Reg 0x32) and PULSE_THSZ (Reg 0x33) registers. The time period of the event must be shorter than the time set in the PULSE_TMLT (Reg 0x34) time limit register.
When configured for a single tap event, an interrupt is generated when the input acceleration on the selected axis exceeds the programmed threshold, and returns below it within a time window defined by PULSE_TMLT. If the ELE bit (bit 6) of the PULSE_CFG (Reg 0x2F) register is not set, the interrupt is kept high for the duration of the Latency window PULSE_LTCY (Reg 0x35). The latency window is a user-definable period of delay after each pulse. This latency window applies either for single pulse or double pulse detection. If the ELE bit is set, the interrupt (EA bit) is kept high until the PULSE_SRC (Reg 0x30) register is read.
Figure 3, shows a valid and invalid pulse condition.A. Note in condition (a) the interrupt is asserted since the acceleration due to a pulse exceeds the specified
acceleration threshold (value set in the PULSE_THSX) and crosses up and down before the specified Pulse Time Limit (value set in PULSE_TMLT) expires.
B. Note that in condition (b) the acceleration due to a pulse exceeds the specified acceleration threshold limit, but does not go below the threshold before the specified Pulse Time Limit expires. Therefore, this is an invalid pulse and the interrupt will not be triggered. Also note that the Latency is not shown for this example.
Figure 3. Single Tap Detection Conditions
3.2 Double TapA double tap event is detected when the device is configured for two single taps within defined time periods. The second time
must occur after the time specified by the PULSE_LTCY (Reg 0x35) register, but also within the time limit of the PULSE_WIND (Reg 0x36) register.
If the device is configured for double tap detection, an interrupt is generated after both taps are recognized. The recognition of the second tap occurs only if the event satisfies the constraints defined by the Pulse Latency, Pulse Time Limit and Double Pulse Abort. In particular, after the first tap has been recognized, the second tap detection procedure is delayed for an interval defined by the Latency register. This means that after the first tap has been recognized, the second tap detection procedure will start only if the input acceleration exceeds the threshold after the Pulse Latency window but before the Pulse Window has expired or if the acceleration is still above the threshold after the Latency has expired.
AN3919
Sensors 4 Freescale Semiconductor
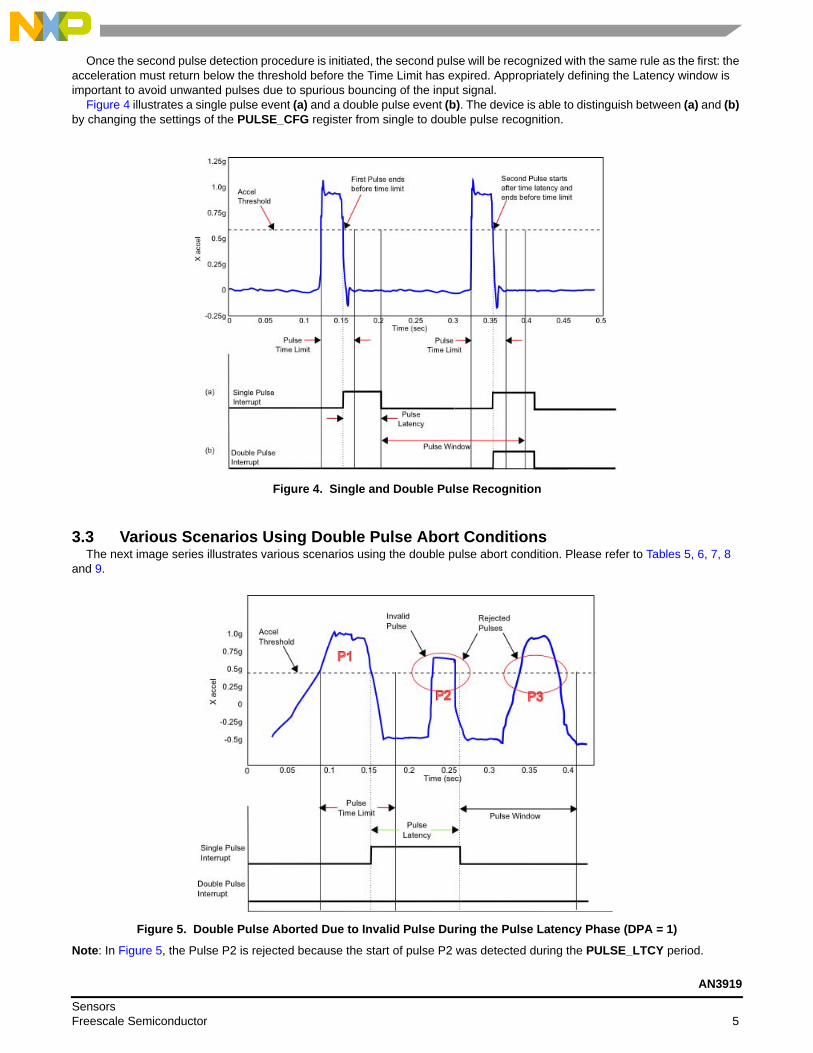
Once the second pulse detection procedure is initiated, the second pulse will be recognized with the same rule as the first: the acceleration must return below the threshold before the Time Limit has expired. Appropriately defining the Latency window is important to avoid unwanted pulses due to spurious bouncing of the input signal.
Figure 4 illustrates a single pulse event (a) and a double pulse event (b). The device is able to distinguish between (a) and (b) by changing the settings of the PULSE_CFG register from single to double pulse recognition.
Figure 4. Single and Double Pulse Recognition
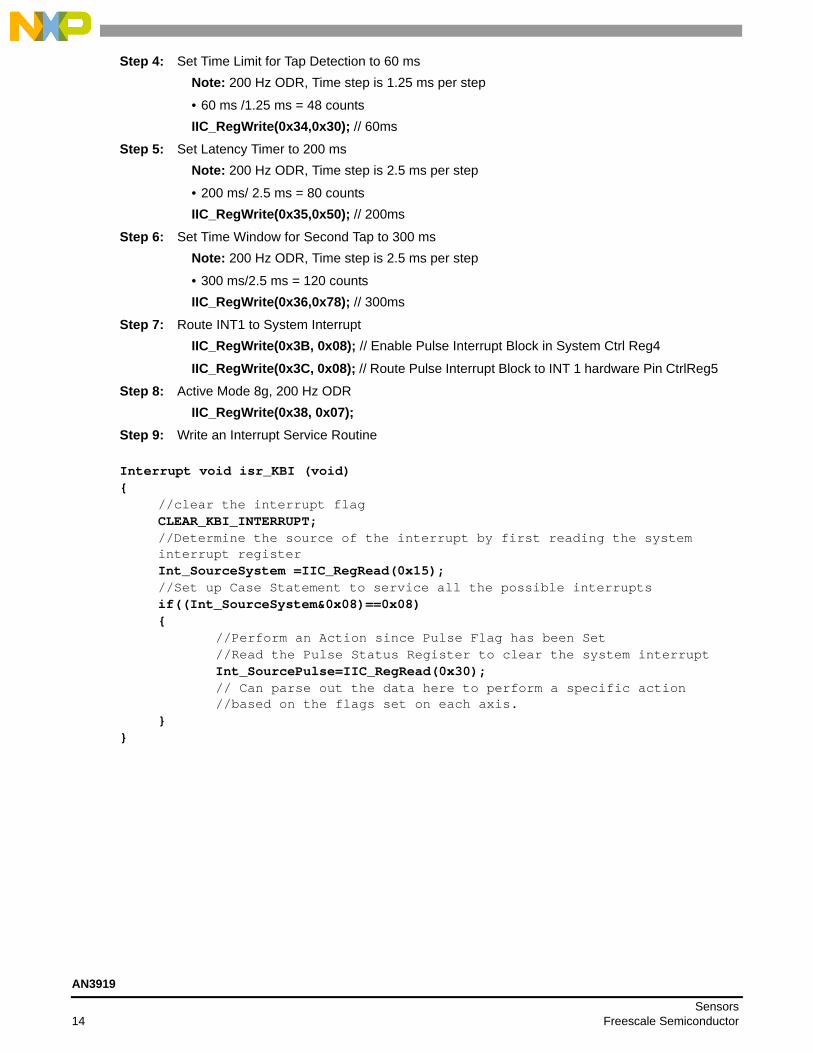
3.3 Various Scenarios Using Double Pulse Abort ConditionsThe next image series illustrates various scenarios using the double pulse abort condition. Please refer to Tables 5, 6, 7, 8
and 9.
Figure 5. Double Pulse Aborted Due to Invalid Pulse During the Pulse Latency Phase (DPA = 1)
Note: In Figure 5, the Pulse P2 is rejected because the start of pulse P2 was detected during the PULSE_LTCY period.
AN3919
Sensors Freescale Semiconductor 5

Figure 6. Double Pulse Detected Irrespective of the Invalid Pulse Status (DPA = 0)
Note: In Figure 6, Pulse P1 is detected as a valid single pulse, P2 is ignored because it occurs during the time period specified by the PULSE_LTCY register; but pulse P3 is detected as double pulse because the DPA bit is set to 0 and pulse P2 was ignored.
Figure 7. Double Pulse Rejected Due to Second Pulse Width Exceeding Pulse_TMLT Period (DPA = 1)
Note: In Figure 7, the second pulse is rejected because its pulse width is longer than the time period specified by the PULSE_TMLT register. After the PULSE_WIND period has expired, a new single pulse detection can begin.
AN3919
Sensors 6 Freescale Semiconductor

Figure 8. Double Pulse Rejected Due to Invalid Pulse During the Pulse Latency Phase (DPA = 1)
Note: In Figure 8, Pulse P2 is rejected as a double pulse because it starts before the expiration of the time period specified by the PULSE_LTCY register. Pulse P3 is detected as a new single pulse while pulse P4 is detected as a single and double pulse.
Figure 9. Single Pulse Rejected Due to First Pulse Width Exceeding Pulse_TMLT Period (DPA = 1)
Note: In Figure 9, Pulse P1 is rejected because its pulse width is longer than the time period specified by the PULSE_TMLT register.
AN3919
Sensors Freescale Semiconductor 7

4.0 Configuring Registers for Single and Double Tap DetectionTo utilize the single and/or double tap detection the following eight (8) registers must be configured.
1. Register 0x2F: PULSE_CFG The Pulse Configuration Register2. Register 0x30: PULSE_SRC Pulse Source Register3. Register 0x31-0x33: PULSE_THSX,Y,Z Pulse Threshold for X, Y and Z Registers4. Register 0x34: PULSE_TMLT Pulse Time Window 1 Register5. Register 0x35: PULSE_LTCY Pulse Latency Timer Register6. Register 0x36: PULSE_WIND Second Pulse Time Window Register
4.1 Register 0x2F: PULSE_CFG Pulse Configuration RegisterThis register configures the event flag for the tap detection interrupt function for enabling/disabling single and double pulse on
each of the axes. This register determines the following:• Which axes will be involved• Whether the event to detect is a single tap or a double tap• Whether the event active bit will be latched or not in the source register, Table 1 provides an example for enabling:
- Single tap only- Double tap only or,- Both single and double tap by combining the two, setting Register 0x2F to 0x7F
4.1.1 Example Settings for Configuration of Single and/or Double Pulse DetectionExample X, Y and Z configured for Single Tap with Latch enabled
Code Example: IIC_RegWrite(0x2F, 0x55);
Example X, Y and Z configured for Double Tap with Latch enabled
Code Example: IIC_RegWrite(0x2F, 0x6A);
Example X, Y and Z configured for Single Tap and Double Tap with Latch enabled
Code Example: IIC_RegWrite(0x2F, 0x7F);
4.2 Registers 0x31-0x33 PULSE_THSX, Y, Z Pulse Threshold for X,Y & Z RegistersThe pulse threshold can be set separately for the X, Y, and Z axes. This allows for the same change in acceleration for all axes
to be set regardless of the static orientation. The threshold values range from 0 to 31 (5 bits expressed as an absolute value) with steps of 0.258g/LSB at a fixed 8g acceleration range.
The PULSE_THSX, PULSE_THSY and PULSE_THSZ registers define the threshold for each of the axes. These are shown in Tables 2, 3, and 4.
Note: The thresholds can be changed in either standby or active mode. This is very useful since if there is a change in orientation the thresholds can all be changed immediately to compensate without interrupting the detection process.
Table 1. Register 0x2F PULSE_CFG Register (Read/Write) and Description
Tap EnableBit 7 Bit 6 Bit 5 Bit 4 Bit 3 Bit 2 Bit 1 Bit 0DPA ELE ZDPEFE ZSPEFE YDPEFE YSPEFE XDPEFE XSPEFE
Single Tap 0 1 0 1 0 1 0 1Double Tap 0 1 1 0 1 0 1 0Both S & D 0 1 1 1 1 1 1 1
Table 2. Register 0x31 PULSE_THSX Register (Read/Write) Bit 7 Bit 6 Bit 5 Bit 4 Bit 3 Bit 2 Bit 1 Bit 0
0 0 0 THSX4 THSX3 THSX2 THSX1 THSX0
Table 3. Register 0x32 PULSE_THSY Register (Read/Write) Bit 7 Bit 6 Bit 5 Bit 4 Bit 3 Bit 2 Bit 1 Bit 0
0 0 0 THSY4 THSY3 THSY2 THSY1 THSY0
Table 4. Register 0x33 PULSE_THSZ Register (Read/Write)Bit 7 Bit 6 Bit 5 Bit 4 Bit 3 Bit 2 Bit 1 Bit 0
0 0 0 THSZ4 THSZ3 THSZ2 THSZ1 THSZ0
AN3919
Sensors 8 Freescale Semiconductor

4.2.1 Example: Set the tap detection threshold for 2g on X, 2g on Y and 3g on Z2g/0.258g/count = 8 counts
3g/0.258g/count =12 countsCode Example: IIC_RegWrite(0x31, 0x08); //Set X Threshold to 8 counts or 2g
Code Example: IIC_RegWrite(0x32, 0x08); //Set Y Threshold to 8 counts or 2g
Code Example: IIC_RegWrite(0x33, 0x0C); //Set Z Threshold to 12 counts or 3g
4.3 Register 0x34: PULSE_TMLT Pulse Time Window 1 RegisterThe byte PULSE_TMLT (bit fields defined as Tmlt7 through Tmlt0) define the maximum time interval that can elapse between
the start of the acceleration on the selected axis exceeding the specified threshold and the end when the axes of acceleration must go back below the specified threshold.
The minimum time step for the pulse time limit is defined in Table 6. Maximum time for a given ODR is the minimum time step multiplied by 255. The time steps available are dependent on whether the device is in Normal Power Mode or in Low Power Mode. Notice in Table 6 that the time step is twice as long in Low Power Mode.
Therefore, an ODR setting of 400 Hz with normal power mode would result in a maximum pulse time limit of (0.625 ms * 255) ≥ 159 ms.
4.3.1 Example Settings for the Pulse Time LimitExample: To set the Pulse Time Limit for 30 ms at 200 Hz ODR in Normal Mode
A. 30 ms/1.25 ms = 24 counts
Code Example: IIC_RegWrite(0x34, 0x18);
4.4 Register 0x35: PULSE_LTCY Pulse Latency Timer RegisterThe Pulse Latency Timer Register is the time duration that the tap event can be read from the source register to detect the X,
Y, and Z for single pulse or double pulse events. The source register only latches the “event active” bit; therefore, by increasing the latency time, the events will remain in the source register for a longer time period. The duration of any specified latency time is valid each time a single or double pulse occurs. The latency time duration for every pulse is the value specified by Register 0x35 shown in Table 7.
The Pulse Latency Register (bit fields defined as Ltcy7 through Ltcy0) defines the time interval that starts after the first pulse detection, from which point the pulse detection function ignores the start of new pulses. This register must be set for single pulse and for double pulse.
Table 5. Register 0x34 PULSE_TMLT Register (Read/Write)Bit 7 Bit 6 Bit 5 Bit 4 Bit 3 Bit 2 Bit 1 Bit 0Tmlt7 Tmlt6 Tmlt5 Tmlt4 Tmlt3 Tmlt2 Tmlt1 Tmlt0
Table 6. Time Step for PULSE Time Limit at ODR and Power ModeODR (Hz) Step at Normal Mode Step LP Mode Max Time Normal Mode Max Time LP Mode
400 0.625 ms 1.25 ms 159.375 ms 318.75 ms200 1.25 ms 2.5 ms 318.75 ms 637.5 ms100 2.5 ms 5.0 ms 637.5 ms 127.5 ms50 5 ms 10 ms 127.5 ms 255 ms
12.5 5 ms 10 ms 127.5 ms 255 ms1.56 5 ms 10 ms 127.5 ms 255 ms
Table 7. Register 0x35 PULSE_LTCY Register (Read/Write)Bit 7 Bit 6 Bit 5 Bit 4 Bit 3 Bit 2 Bit 1 Bit 0Ltcy7 Ltcy6 Ltcy5 Ltcy4 Ltcy3 Ltcy2 Ltcy1 Ltcy0
AN3919
Sensors Freescale Semiconductor 9

The minimum time step for the pulse latency is defined in Table 8. The maximum time is the minimum time step at the ODR and Power Mode multiplied by 255. Notice that the time step is twice the duration of that in Normal Mode when operating in Low Power Mode.
4.4.1 Example Settings for Pulse Latency TimerSet the Pulse Latency Timer to 200 ms, 200 Hz ODR Low Power Mode
200 ms/5.0 ms = 40 counts
Code Example: IIC_RegWrite(0x35, 0x28);
4.5 Register 0x36: PULSE_WIND Second Pulse Time Window Register
The PULSE_WIND register with (bit fields Wind7 through Wind0) defines the maximum interval of time that can elapse after the end of the latency interval within which the start of the second pulse event must be detected (provided the device has been configured with double pulse detection enabled). The detected second pulse width must be shorter than the time limit constraints specified by the PULSE_TMLT register, but the double pulse need not cross the threshold within the time specified by the PULSE_WIND register. The minimum time step for the pulse window is defined in Table 10. The maximum time is the time step at the ODR and Power Mode multiplied by 255.
4.5.1 Example Settings for Pulse Window for Detecting a Double TapSet the Pulse window to 300 ms, 100 Hz ODR Low Power Mode
300 ms/20 ms = 15 counts
Code Example: IIC_RegWrite(0x36, 0x0F);
4.6 Register 0x30: PULSE_SRC Pulse Source RegisterThis register sets a flag for the appropriate bit if a double or single pulse event has occurred on any axis. Note: The corre-
sponding axis and event has to be enabled above in Register 0x2F for the event to be seen in the source register. The event active flag will remain high if the latch is enabled but the status of the X,Y, Z single and double pulse events will automatically clear after the latency time specified in the PULSE_LTCY expires.
Register 0x30 must be read immediately after the interrupt (i.e., after the EA bit goes high) to determine the source of the interrupt.
Table 8. Time step for PULSE Latency at ODR and Power ModeODR (Hz) Step at Normal Mode Step at LP Mode Max Time Normal Mode Max Time LP Mode
400 1.25 ms 2.5 ms 318.75ms 637.5s200 2.5 ms 5.0 ms 637.5ms 1.275s100 5.0 ms 20 ms 1.275s 2.55s50 10 ms 20 ms 2.55s 5.1s
12.5 10 ms 20 ms 2.55s 5.1s1.56 10 ms 20 ms 2.55s 5.1s
Table 9. Register 0x36 PULSE_WIND Register (Read/Write)Bit 7 Bit 6 Bit 5 Bit 4 Bit 3 Bit 2 Bit 1 Bit 0
Wind7 Wind6 Wind5 Wind4 Wind3 Wind2 Wind1 Wind0
Table 10. Time Step for PULSE Detection Window at ODR and Power ModeODR (Hz) Step at Normal Mode Step at LP Mode Max Time Normal Mode Max Time LP Mode
400 1.25 ms 2.5 ms 318.75 ms 637.5 ms200 2.5 ms 5.0 ms 637.5 ms 1.275s100 5.0 ms 20 ms 1.275s 2.55s50 10 ms 20 ms 2.55s 5.1s
12.5 10 ms 20 ms 2.55s 5.1s1.56 10 ms 20 ms 2.55s 5.1s
Table 11. Register 0x30 PULSE_SRC Register (Read Only) and DescriptionBit 7 Bit 6 Bit 5 Bit 4 Bit 3 Bit 2 Bit 1 Bit 0
- EA ZDPE ZSPE YDPE YSPE XDPE XSPE
AN3919
Sensors 10 Freescale Semiconductor

5.0 Configuring the Tap Detection to an Interrupt PinIn order to set up the system to route to a hardware interrupt pin, the System Interrupt (bit 3 in Reg 0x3B) must be enabled.
The MMA8450Q allows for eight (8) separate types of interrupts. One (1) of these is reserved for tap.
Step 1: Enable the Interrupt in Register 0x3B.
The INT_EN_PULSE interrupt enable bit allows the tap function to route its event detection flag to the interrupt controller of the system. The interrupt controller routes the enabled function to either the INT1 or INT2 pin. To enable the Pulse (Tap) block, set bit 3 in Register 0x3B as follows:Code Example: IIC_RegWrite(0x3B, 0x08);
Step 2: Route the interrupt to INT1 or to INT2. This is done in register 0x3C.
Note: To route the Tap I to INT1 set bit 3 in register 0x3C. Clear bit 3 to route tap to INT2.
Code Example: IIC_RegWrite(0x3C,0x08); // Set Tap to INT1
5.1 Reading the System Interrupt Status Source RegisterIn the interrupt source register, the status of the various embedded functions can be determined. The bits that are set (logic
‘1’) indicate which function has asserted an interrupt; conversely, the bits that are cleared (logic ‘0’) indicate which function has not asserted or has de-asserted an interrupt. The interrupts are rising edge sensitive. The bits are set by a low to high transition and are cleared by reading the appropriate interrupt source register.
Table 12. 0x3B CTRL_REG4 Register (Read/Write) and DescriptionBit 7 Bit 6 Bit 5 Bit 4 Bit 3 Bit 2 Bit 1 Bit 0
INT_EN _ASLP INT_EN _FIFO INT_EN_TRANS INT_EN _LNDPRT INT_EN_PULSE INT_EN_FF_MT_1 INT_EN_FF_MT_2 INT_EN_DRDY
Table 13. 0x3C CTRL_REG5 Register (Read/Write) and DescriptionBit 7 Bit 6 Bit 5 Bit 4 Bit 3 Bit 2 Bit 1 Bit 0
INT_CFG_ASLP INT_CFG_FIFO INT_CFG_TRANS INT_CFG_LNDPRT INT_CFG_PULSE INT_CFG_FF_MT_1 INT_CFG_FF_MT_2 INT_CFG_DRDY
Table 14. 0x15 INT_SOURCE: System Interrupt Status Register (Read Only)Bit 7 Bit 6 Bit 5 Bit 4 Bit 3 Bit 2 Bit 1 Bit 0
SRC_ASLP SRC_FIFO SRC_TRANS SRC_LNDPRT SRC_PULSE SRC_FF_MT_1 SRC_FF_MT_2 SRC_DRDY
AN3919
Sensors Freescale Semiconductor 11

6.0 Details for Configuring the MMA8450Q for Single and Double TapThe registers of importance for configuring the MMA8450Q for tap detection are listed below in Table 15.
6.1 Example Single Tap Only: 8g mode, 400 Hz ODR Step 1: To set up any configuration make sure to be in Standby Mode.
IIC_RegWrite(0x38, 0x00); // 400Hz Standby Mode
Step 2: Enable X and Y and Z Single PulseIIC_RegWrite(0x2F, 0x15);
Step 3: Set Threshold 1.55g on X and 2.58g on ZNote: Each step is 0.258g per count
• 1.55g/0.258g = 6 counts• 2.58g/0.258g = 10 countsIIC_RegWrite(0x31, 0x06); // Set X Threshold to 1.55g
IIC_RegWrite(0x32, 0x06); // Set Y Threshold to 1.55g
IIC_RegWrite(0x33, 0x0A); // Set Z Threshold to 2.58g
Step 4: Set Time Limit for Tap Detection to 50 ms• Data Rate 400 Hz, time step is 0.625 ms• 50 ms/0.625 ms = 80 countsIIC_RegWrite(0x34,0x50); // 50ms
Step 5: Set Latency Time to 300 ms• Data Rate 400 Hz, time step is 1.25 ms• 300 ms/1.25 ms = 240 countsIIC_RegWrite(0x35,0xF0); // 300 ms
Step 6: Route INT1 to System InterruptIIC_RegWrite(0x3B, 0x08); // Enable Pulse Interrupt Block in System Ctrl Reg4
IIC_RegWrite(0x3C, 0x08); // Route Pulse Interrupt Block to INT 1 hardware Pin CtrlReg5
Step 7: Active Mode 8g, 400 Hz ODRIIC_RegWrite(0x38, 0x03);
Table 15. Registers of Importance for Embedded Single and Double Tap DetectionReg Name Definition Bit 7 Bit 6 Bit 5 Bit4 Bit3 Bit 2 Bit 1 Bit0
15 INT_SOURCE Interrupt Status R SRC_ASLP SRC_FIFO SRC_TRANS SRC_LNDPRT SRC_PULSE SRC_FF_MT_1 SRC_FF_MT_2 SRC_DRDY
2F PULSE_CFG Pulse Config R/W DPA ELE ZDPEFE ZSPEFE YDPEFE YSPEFE XDPEFE XSPEFE30 PULSE_SRC Pulse Source R - EA ZDPE ZSPE YDPE YSPE XDPE XSPE31 PULSE_THSX Pulse X Threshold R/W 0 0 0 THSX4 THSX3 THSX2 THSX1 THSX032 PULSE_THSY Pulse Y Threshold R/W 0 0 0 THSY4 THSY3 THSY2 THSY1 THSY033 PULSE_THSZ Pulse Z Threshold R/W 0 0 0 THSZ4 THSZ3 THSZ2 THSZ1 THSZ034 PULSE_TMLT Pulse First Timer R/W Tmlt7 Tmlt6 Tmlt5 Tmlt4 Tmlt3 Tmlt2 Tmlt1 Tmlt035 PULSE_LTCY Pulse Latency R/W Ltcy7 Ltcy6 Ltcy5 Ltcy4 Ltcy3 Ltcy2 Ltcy1 Ltcy0
36 PULSE_WIND Pulse 2nd Window R/W Wind7 Wind6 Wind5 Wind4 Wind3 Wind2 Wind1 Wind0
3B CTRL_REG4 Control Reg4 R/W (Interrupt Enable Map) INT_EN _ASLP INT_EN _FIFO INT_EN _TRANS INT_EN _LNDPRT INT_EN _PULSE INT_EN _FF_MT_1 INT_EN _FF_MT_2 INT_EN_DRDY
3C CTRL_REG5Control reg5 R/W
(Interrupt Configuration)
INT_CFG_ASLP INT_CFG_FIFO INT_CFG_TRANS INT_CFG_LNDPRT INT_CFG_PULSE INT_CFG_FF_MT_1 INT_CFG_FF_MT_2 INT_CFG_DRDY
AN3919
Sensors 12 Freescale Semiconductor

6.2 Double Tap Only: 8g mode, 400 Hz ODR - ProcedureStep 1: To set up any configuration make sure to be in Standby Mode.
IIC_RegWrite(0x38, 0x00); // 400Hz, Standby ModeStep 2: Enable X, Y and Z Double Pulse with DPA = 0 no double pulse abort
IIC_RegWrite(0x2F, 0x2A);Step 3: Set Threshold 3g on X and Y and 5g on Z
Note: Every step is 0.258g
• 3.10g/0.258g = 12 counts• 5.16g/0.258g = 20 countsIIC_RegWrite(0x31, 0x0C); // Set X Threshold to 3.10g
IIC_RegWrite(0x32, 0x0C); // Set Y Threshold to 3.10g
IIC_RegWrite(0x33, 0x14); // Set Z Threshold to 5.16g
Step 4: Set Time Limit for Tap Detection to 60 msNote: 400 Hz ODR, Time step is 0.625 ms per step
• 60 ms/0.625 ms = 96 countsIIC_RegWrite(0x34,0x60); // 60ms
Step 5: Set Latency Time to 200 msNote: 400 Hz ODR, Time step is 1.25 ms per step
• 200 ms/1.25 ms = 160IIC_RegWrite(0x35,0xA0); // 200ms
Step 6: Set Time Window for second tap to 300 msNote: 400 Hz ODR, Time step is 1.25 ms per step
• 300 ms/1.25 ms = 240 countsIIC_RegWrite(0x36,0xF0); // 300ms
Step 7: Route INT1 to System InterruptIIC_RegWrite(0x3B, 0x08); // Enable Pulse Interrupt in System Ctrl Reg4
IIC_RegWrite(0x3C, 0x08); // Route Pulse Interrupt to INT 1 hardware Pin CtrlReg5
Step 8: Set Active Mode 8g, 400 Hz ODRIIC_RegWrite(0x38, 0x03);
6.3 Single Tap and Double Tap 8g mode, 200 Hz ODR - ProcedureStep 1: Go to Standby Mode to change configuration settings.
IIC_RegWrite(0x38, 0x04); // 200Hz, Standby Mode
Step 2: Enable X, Y, Z Single Pulse and X, Y and Z Double Pulse with DPA = 0 no double pulse abortIIC_RegWrite(0x2F, 0x3F);
Step 3: Set Threshold 2.06g on X and Y and 4.13g on ZNote: Every step is 0.258g
• 2.063g / 0.258g = 8 counts• 4.13g/ 0.258g = 16 countsIIC_RegWrite(0x31, 0x08); // Set X Threshold to 2.06g
IIC_RegWrite(0x32, 0x08); // Set Y Threshold to 2.06g
IIC_RegWrite(0x33, 0x10); // Set Z Threshold to 4.13g
AN3919
Sensors Freescale Semiconductor 13
Step 4: Set Time Limit for Tap Detection to 60 msNote: 200 Hz ODR, Time step is 1.25 ms per step
• 60 ms /1.25 ms = 48 countsIIC_RegWrite(0x34,0x30); // 60ms
Step 5: Set Latency Timer to 200 msNote: 200 Hz ODR, Time step is 2.5 ms per step
• 200 ms/ 2.5 ms = 80 countsIIC_RegWrite(0x35,0x50); // 200ms
Step 6: Set Time Window for Second Tap to 300 msNote: 200 Hz ODR, Time step is 2.5 ms per step
• 300 ms/2.5 ms = 120 countsIIC_RegWrite(0x36,0x78); // 300ms
Step 7: Route INT1 to System InterruptIIC_RegWrite(0x3B, 0x08); // Enable Pulse Interrupt Block in System Ctrl Reg4
IIC_RegWrite(0x3C, 0x08); // Route Pulse Interrupt Block to INT 1 hardware Pin CtrlReg5
Step 8: Active Mode 8g, 200 Hz ODRIIC_RegWrite(0x38, 0x07);
Step 9: Write an Interrupt Service Routine
Interrupt void isr_KBI (void){
//clear the interrupt flagCLEAR_KBI_INTERRUPT;//Determine the source of the interrupt by first reading the system interrupt registerInt_SourceSystem =IIC_RegRead(0x15);//Set up Case Statement to service all the possible interruptsif((Int_SourceSystem&0x08)==0x08){
//Perform an Action since Pulse Flag has been Set//Read the Pulse Status Register to clear the system interrupt Int_SourcePulse=IIC_RegRead(0x30);// Can parse out the data here to perform a specific action //based on the flags set on each axis.
}}
AN3919
Sensors 14 Freescale Semiconductor

7.0 Writing an Algorithm to Detect Directional TapDirectional tap detection has various challenges due to the mechanics and vibration and placement of the sensor. The orien-
tation that the object is tapped may not be on the axis where the accelerometer is placed. This can cause challenges in designing a repeatable algorithm for directional tap on all 6 faces of a 3D object. The MMA8450Q does not have a directional tap algorithm internally but by using the 32 sample FIFO and the embedded single tap detection the directional information can be extracted.
7.1 Sampling Rate Requirements for Tap SignaturesIn order to detect the full signature of a tap a sample rate of 600 Hz or greater is required. The tap function sample rate is
1600 Hz internally when the ODR is set at 400 Hz. The tap signature shown in Figure 2 was sampled at 2 kHz from an analog accelerometer to show the full signature of the tap. Therefore, trying to write a tap algorithm purely by using the FIFO data at 400 Hz may be somewhat limiting in that the faster taps and some of the signature of the tap may be missing. By using the em-bedded tap detection at 400 Hz with the FIFO, the directional information can be extracted without the need for continuous data polling. The tap is detected internally at 1600 Hz, while the directional information is analyzed at 400 Hz flushing the FIFO.
In many applications such as menu selections, typically there is only one or maybe two axes of importance. This simplifies the algorithm. For example, on a remote control to change the channel tapping in one axis in both directions is the only input. For simplified applications such as this the directional tap can work very well. There are larger challenges when all axes are enabled at the same time to reliably detect the axis of interest. There is often a lot of cross coupling due to vibrations and mounting of the accelerometer and also from the variation arising due to how different users tap.
7.2 Procedure for Directional Tap using the MMA8450QStep 1: Configure the accelerometer to be in 400 Hz 8g Mode, either Low Power Mode or Normal Mode
depending on extra power savings required.Step 2: Configure the FIFO to be in Circular Buffer Mode so that the data continuously overwrites. Refer
to AN3920. Step 3: Configure the embedded single pulse detection for detecting X, Y, Z single pulse with
X, Y = 3.67g and Z = 6.19g. Set the Time Limit to 50 ms for the pulse and set the latency to 500 ms.
Step 4: Set up the Pulse Detection in the System Interrupt Detection to detect on INT1.Step 5: Configure the MCU to stay in Sleep Mode until INT1 is asserted if this is desired for additional
current savings.Step 6: When INT1 is asserted while the MCU is in sleep mode, wake the MCU/processor (3 ms max) Step 7: Read the Pulse Source Register to determine which axes asserted the tap.Step 8: Flush the FIFO approximately 12 ms after the interrupt is detected to collect the full signature of
the tap.Step 9: Read out the FIFO data and store it in a 32 sample buffer.Step 10: Look at the Max and Min values of each axis whose flag was detected in the pulse source
register.Step 11: Determine the direction: If the first peak is greater in absolute value than the second peak, it is a
positive tap, otherwise it is a negative tap.Step 12: If more than one axis has triggered a valid tap, determine which event occurred first by analyzing
the FIFO data.Step 13: If the taps all occurred at the same time, the axis with the largest value calculating max-min is the
axis the event occurred on.For more in-depth details of developing a robust directional tap algorithm please contact Freescale for further assistance.
There is a demo available in the Sensor Toolbox Software.
AN3919
Sensors Freescale Semiconductor 15

How to Reach Us:
Home Page:www.freescale.com
Web Support:http://www.freescale.com/support
USA/Europe or Locations Not Listed:Freescale Semiconductor, Inc.Technical Information Center, EL5162100 East Elliot Road Tempe, Arizona 85284 1-800-521-6274 or +1-480-768-2130www.freescale.com/support
Europe, Middle East, and Africa:Freescale Halbleiter Deutschland GmbHTechnical Information CenterSchatzbogen 781829 Muenchen, Germany+44 1296 380 456 (English)+46 8 52200080 (English)+49 89 92103 559 (German)+33 1 69 35 48 48 (French)www.freescale.com/support
Japan:Freescale Semiconductor Japan Ltd. Headquarters ARCO Tower 15F 1-8-1, Shimo-Meguro, Meguro-ku, Tokyo 153-0064 Japan 0120 191014 or +81 3 5437 [email protected]
Asia/Pacific:Freescale Semiconductor China Ltd. Exchange Building 23F No. 118 Jianguo Road Chaoyang District Beijing 100022 China +86 10 5879 [email protected]
For Literature Requests Only:1-800-441-2447 or +1-303-675-2140Fax: [email protected]
AN3919Rev. 002/2010
Information in this document is provided solely to enable system and software implementers to use Freescale Semiconductor products. There are no express or implied copyright licenses granted hereunder to design or fabricate any integrated circuits or integrated circuits based on the information in this document.
Freescale Semiconductor reserves the right to make changes without further notice to any products herein. Freescale Semiconductor makes no warranty, representation or guarantee regarding the suitability of its products for any particular purpose, nor does Freescale Semiconductor assume any liability arising out of the application or use of any product or circuit, and specifically disclaims any and all liability, including without limitation consequential or incidental damages. “Typical” parameters that may be provided in Freescale Semiconductor data sheets and/or specifications can and do vary in different applications and actual performance may vary over time. All operating parameters, including “Typicals”, must be validated for each customer application by customer’s technical experts. Freescale Semiconductor does not convey any license under its patent rights nor the rights of others. Freescale Semiconductor products are not designed, intended, or authorized for use as components in systems intended for surgical implant into the body, or other applications intended to support or sustain life, or for any other application in which the failure of the Freescale Semiconductor product could create a situation where personal injury or death may occur. Should Buyer purchase or use Freescale Semiconductor products for any such unintended or unauthorized application, Buyer shall indemnify and hold Freescale Semiconductor and its officers, employees, subsidiaries, affiliates, and distributors harmless against all claims, costs, damages, and expenses, and reasonable attorney fees arising out of, directly or indirectly, any claim of personal injury or death associated with such unintended or unauthorized use, even if such claim alleges that Freescale Semiconductor was negligent regarding the design or manufacture of the part.
Freescale™ and the Freescale logo are trademarks of Freescale Semiconductor, Inc. All other product or service names are the property of their respective owners.© Freescale Semiconductor, Inc. 2010. All rights reserved.