an open source, low-cost, multi camera full … open source, low-cost, multi camera full-body 3d ......
TRANSCRIPT

An Open Source, Low-Cost, Multi Camera Full-Body 3D Scanner
Richard Garsthagen* 3Dmij.nl, Zoetermeer, The Netherlands
http://dx.doi.org/10.15221/14.174
Abstract
This paper discusses the possibility of using low-cost camera’s and single-board computer modules1
for building a full body 3D Scanning system with the purpose of creating mini-figures / 3D selfies of people, both adults and kids. The design, architecture and results of a 3D scanner based on the Raspberry PI camera and the advantages over a DSLR based system will be discussed. Keywords: 3d body scanning, 3D Selfie, raspberry pi
1. Introduction
There are many (cheap) ways of trying to make a 3D scan, commonly used systems uses Kinect2
cameras or single camera systems with a turn table. All these methods require the subject to stand still for a long period of time (1 to 5 minutes). While an average adult can hold a pose for this duration, children cannot, rendering any system like that unusable for children. The most common way of scanning in an instance of a second a human is by the use of multiple cameras. Lee Perry-Smith from infinite-realities
3 is one of the leaders in creating such a system, based
on 115 Canon DSLR camera at 18 Megapixel resolution. While a system like this works, it is very expensive and cost in the range of +$100.000 When the low-cost ($25) Raspberry PI camera was released in 2013 using a 5 megapixel sensor based on the omnivision 5647 sensor I started investigating if it would be possible to use this module as the base for a multi camera setup for full body scanning.
Figure 1: 98 Raspberry pi 3D Scanner with 98 5 Megapixel Cameras
* CTO 3Dmij, [email protected]; www.3dmij.nl / www.pi3dscan.com
5th International Conference on 3D Body Scanning Technologies, Lugano, Switzerland, 21-22 October 2014
- 174 -
2. Single-board computer modules vs DLSR camera setup
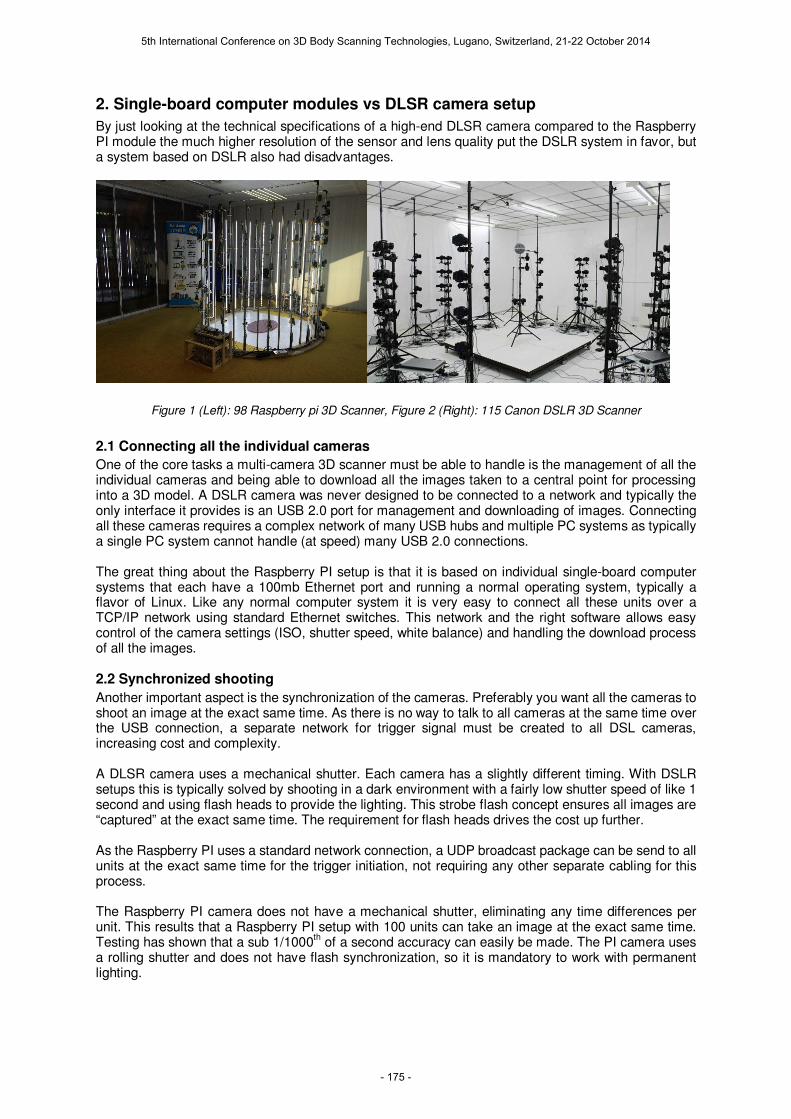
By just looking at the technical specifications of a high-end DLSR camera compared to the Raspberry PI module the much higher resolution of the sensor and lens quality put the DSLR system in favor, but a system based on DSLR also had disadvantages.
Figure 1 (Left): 98 Raspberry pi 3D Scanner, Figure 2 (Right): 115 Canon DSLR 3D Scanner
2.1 Connecting all the individual cameras
One of the core tasks a multi-camera 3D scanner must be able to handle is the management of all the individual cameras and being able to download all the images taken to a central point for processing into a 3D model. A DSLR camera was never designed to be connected to a network and typically the only interface it provides is an USB 2.0 port for management and downloading of images. Connecting all these cameras requires a complex network of many USB hubs and multiple PC systems as typically a single PC system cannot handle (at speed) many USB 2.0 connections. The great thing about the Raspberry PI setup is that it is based on individual single-board computer systems that each have a 100mb Ethernet port and running a normal operating system, typically a flavor of Linux. Like any normal computer system it is very easy to connect all these units over a TCP/IP network using standard Ethernet switches. This network and the right software allows easy control of the camera settings (ISO, shutter speed, white balance) and handling the download process of all the images. 2.2 Synchronized shooting
Another important aspect is the synchronization of the cameras. Preferably you want all the cameras to shoot an image at the exact same time. As there is no way to talk to all cameras at the same time over the USB connection, a separate network for trigger signal must be created to all DSL cameras, increasing cost and complexity. A DLSR camera uses a mechanical shutter. Each camera has a slightly different timing. With DSLR setups this is typically solved by shooting in a dark environment with a fairly low shutter speed of like 1 second and using flash heads to provide the lighting. This strobe flash concept ensures all images are “captured” at the exact same time. The requirement for flash heads drives the cost up further. As the Raspberry PI uses a standard network connection, a UDP broadcast package can be send to all units at the exact same time for the trigger initiation, not requiring any other separate cabling for this process. The Raspberry PI camera does not have a mechanical shutter, eliminating any time differences per unit. This results that a Raspberry PI setup with 100 units can take an image at the exact same time. Testing has shown that a sub 1/1000
th of a second accuracy can easily be made. The PI camera uses
a rolling shutter and does not have flash synchronization, so it is mandatory to work with permanent lighting.
5th International Conference on 3D Body Scanning Technologies, Lugano, Switzerland, 21-22 October 2014
- 175 -

3. Design and Architecture
All the hardware plans are available as open source. The 3D model files for the brackets are available from thingiverse.com
4 and building instructions are available on instructables.com
5
A basic listen and initiation script has been made available as open source
5. Besides that I have
developed commercial available software to control the setup from a Windows machine also managing the logistics of processing the scans and providing an easy to use user interface.
3.1 Frame setup
To keep the system low-cost, no standard (expensive) photography equipment has been used. The 3D scanner is constructed of 19 metal poles (2 meter long radiator pipes from a standard DIY store) at a cost of $5 per pole placed in an up-side-down table foot ($4). The brackets for mounting the Raspberry PI boards and cameras are self-designed and 3D printed in plastic on an Ultimaker 3D printer. The material cost of each bracket is below $1.
Figure 3. A single Raspberry PI computer with front mounted the Raspberry PI Camera
Between each pole is a 2 meter aluminum strip with attached a high power LED strip. The strip contains 240 LEDs per meter and consumes 19.2watts per meter, so roughly 40 watts per stip. There are 20 of these LED poles in the setup.
3.2 Network design and power supply
Each Raspberry Pi features a 100Mb Ethernet port. These are connected to 2nd
hand low-cost and widely available “old-school” 100Mb switches (average price on ebay $50 per 48 port switch). The switches used should have 2 or 4 Gigabit uplink ports. This allows for very fast transfer speeds to the management PC as 10 raspberry PI units can in parallel send images aggregated over the 1Gb link. The management software is written to support this multi-threaded download design.
5th International Conference on 3D Body Scanning Technologies, Lugano, Switzerland, 21-22 October 2014
- 176 -
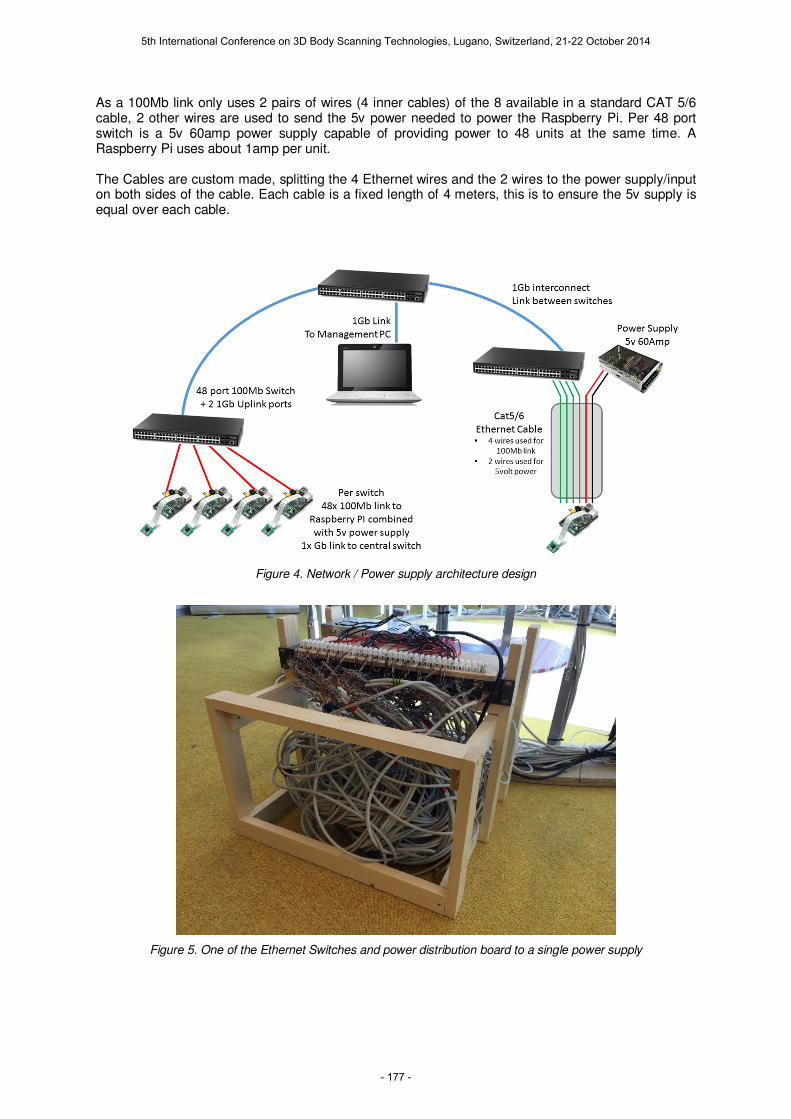
As a 100Mb link only uses 2 pairs of wires (4 inner cables) of the 8 available in a standard CAT 5/6 cable, 2 other wires are used to send the 5v power needed to power the Raspberry Pi. Per 48 port switch is a 5v 60amp power supply capable of providing power to 48 units at the same time. A Raspberry Pi uses about 1amp per unit. The Cables are custom made, splitting the 4 Ethernet wires and the 2 wires to the power supply/input on both sides of the cable. Each cable is a fixed length of 4 meters, this is to ensure the 5v supply is equal over each cable.
Figure 4. Network / Power supply architecture design
Figure 5. One of the Ethernet Switches and power distribution board to a single power supply
5th International Conference on 3D Body Scanning Technologies, Lugano, Switzerland, 21-22 October 2014
- 177 -

3.3 Software
3.3.1 Client Software on the Raspberry PI
Each Raspberry device runs on Raspbian Linux. On the boot partition (on the SD card) is an ID file that assigns the Raspberry with a unique ID and also uses this ID to configure its local IP address. On startup a “listen” script is run, written in python that listen to UDP broadcasts. Over these broadcast commands are send from the management PC to take a photo, transmit camera settings and provide software updates.
3.3.2. PC Management Software for Microsoft Windows
I have created central management software for Microsoft Windows that allows you to control all the Raspberry Units. Core functionality of the software are:
- Central control of camera settings (ISO, White Balance, Shutter speed) - Central control of supporting projectors (Grid density, Grid color) - Unit check, reports each Raspberry’s core stats (Temperature, Disk Space, Firmware version,
Configuration) - Live review any image takes by any camera - Compare various shoots with each other, to assist in selection process - Register scan, connecting personal information (email, name) to a particular scan - Multi-Threaded downloading capability. Download in parallel from any 10 devices at the same
time the registered or selected scans - Central Firmware management
4. Results
4.1 Photogrammetry software for processing
In all my tests I have mainly used 2 solutions for turning the images into 3D models. - Online Cloud Software from Autodesk called Recap
5 (rendering happens in the Cloud)
- Local commercial software from Agisoft6 called Photoscan (rendering happens on local PC)
Initial tests (using less cameras) showed that Autodesk’s recap solution was constantly providing significant better and cleaner 3D model files. Where Agisoft Photoscan would have holes in models or “moon like” surfaces for skin, recap provides clean models with smooth services, that often require little post processing. With the latest version of the 3D Scanner, using 98 cameras and good all-around LED lighting, agisoft is also starting to produce good results. The mesh quality sometimes still lacks, but especially the texture mapping is of a higher quality then recap. 4.2 Processing for 3D Printing
No matter what setup is being used (DSLR or Raspberry PI), no scan will be out-of-the-box good enough for 3D printing. There likely will always be areas that the cameras did not have good visibility, the model is not water tight and you might want to place the model on a platform. I found that the post processing work is very time consuming and is about half the cost of making a mini figure (besides the printing costs).
5th International Conference on 3D Body Scanning Technologies, Lugano, Switzerland, 21-22 October 2014
- 178 -

Figure 6. A “raw” 3D model with no post processing done. Model created with Autodesk Recap
Figure 7. A cleaned 3D model, about 2 hours of work. Model cleaned in Zbrush
5th International Conference on 3D Body Scanning Technologies, Lugano, Switzerland, 21-22 October 2014
- 179 -

Figure 8. A printed 3D model at 1/10
th scale (18cm Height)
4.3 3D Printing Limitations
For the purpose of printing mini-figures of people, we have found that the 5 megapixel Raspberry Pi camera is not the limitation. The resolution we generate in these models, especially the texture is significantly higher then what today’s 3D printers can handle.
Figure 9. Digital Model Texture vs Actual 3D Print
5th International Conference on 3D Body Scanning Technologies, Lugano, Switzerland, 21-22 October 2014
- 180 -

5. Further 3D Scanning improvements
While the 3D Scanner is working, there are some challenges. Especially “difficult” clothing, like pure white and black and especially black leather. Any photogrammetry solution, no matter what resolution cameras you use will have this challenge. To solve this problem, the Raspberry PI 3D scanner is capable of taking 2 images quickly in a row (within 1 second). On the first set of images, digital projectors display a grid over the subject. On the second set of images this projection is not being displayed. These 2 sets of images can now be used to produce an even better 3D model file. The first set of images, with the grid projection, will be used to produce the mesh. The second set of images will be used for the texture overlay, so that the actual grid will not be visible in the mini figure. This processing is only possible today with Agisoft Photoscan, not with Autodesk Recap as they do not support using 2 sets of images. Each projector has again a Raspberry PI connected to it by a HDMI cable. The software on the Raspberry is responsible for displaying a grid at the right time.
Figure 10. 3D Scan with the help of grid projection
Besides normal scanning of “difficult” clothes, children seem to pose an extra challenge as well, due to their often very tight skin with little “details” in the face region and arms/legs. Again here projection seems to make a significant improvement in capturing more details.
Figure 11. Difference between 3D model without and with grid projection.
5th International Conference on 3D Body Scanning Technologies, Lugano, Switzerland, 21-22 October 2014
- 181 -

6. Examples produced by the Raspberry PI 3D Scanner
5th International Conference on 3D Body Scanning Technologies, Lugano, Switzerland, 21-22 October 2014
- 182 -

References
[1] Raspberry PI Model B and Raspberry PI Camera module – http://www.raspberrypi.org [2] Kinect based 3D Scanning solution from reconstuctMe -
http://reconstructme.net/qa_faqs/how-do-i-create-a-3d-selfie/ [3] Infinite-realities - http://ir-ltd.net/ [4] Thingiverse 3D files - http://www.thingiverse.com/anykey/designs [5] Instructables page for the Raspberry pi scanner -
http://www.instructables.com/id/Multiple-Raspberry-PI-3D-Scanner/ [6] Autodesk Recap - http://recap.autodesk.com [7] Agisoft Photoscan - http://www.agisoft.com/
5th International Conference on 3D Body Scanning Technologies, Lugano, Switzerland, 21-22 October 2014
- 183 -