an introduction to writing plugins for sigil
TRANSCRIPT

An introduction to writing plugins for Sigil
9/8/2015 P a g e | 1
Introduction When I scan books or articles that are no longer published into a PDF document and then convert them to an ePub a range of formatting errors arise in the ePub file. Over time, I wrote a range of regular expressions to deal with these formatting errors using the Find and Replace facility in Sigil. However, a large number of these regular expressions need to be applied to each ePub and sometimes it is possible to omit some so when it became possible to write plugins for Sigil I decided to write a plugin that would include all these regular expressions to enable me to run my regular expressions with one click. Finding information on how to write plugins for Sigil was not easy; by analysing available code and using trial and error I gained an understanding of how to write plugins for Sigil. I am hoping that this brief introduction to writing plugins for Sigil will be of benefit to others, and encourage them to write and share their own plugins on the Mobile Read website. As I am learning python, I am including some notes on python in this document.
The constituents of a Sigil plugin A plugin for Sigil consists of a minimum of two files with the following names: plugin.xml plugin.py These files must be placed together in a folder. Zipping the folder and these files together produces the Sigil plugin.

An introduction to writing plugins for Sigil
9/8/2015 P a g e | 2
The contents of the plugin.xml file The content of this file is well-defined. It contains
name of the writer
type of plugin. There are four types of plugins for Sigil: o Edit – this enables the ePub to be edited o Input o Output o Validation
a description of the plugin
the version number(s) of the python interpreter that it will run under
a plugin version number
the operating systems(s) under which it will run. Note: This document focuses on plugins that have the type Edit. This type of plugin enables the ePub
to be edited as its name suggests.
A typical plugin.xml file is shown:
<?xml version="1.0" encoding="UTF-8"?> <plugin> <name>Name _of_Plugin</name> <type>edit</type> <author>Name_ofAuthor</author> <description>Put a description here</description> <engine>python2.7</engine> <engine>python2.7</engine> <engine>python3.4</engine> <version>0.1.0Alpha</version> <oslist>osx,win,unx</oslist> </plugin>
When a plugin has been installed, Sigil's Plugin's page of the Prefences dialog shows information from this file including the name of the plugin, its version number, the name of the author, the plugin type and the description of the plugin. TIP: The file must be saved in UTF-8 format otherwise the plugin may fail.

An introduction to writing plugins for Sigil
9/8/2015 P a g e | 3
The plugin.py file This file contains the main program code. It must include a run() function. This function has one parameter that depends on the plugin type. For example, to edit an ebook, this parameter is bk. The basic structure of a plugin.py file for editing an eBook is shown.
The return value of this function is important. The function should return 0 if successful, otherwise it should return 1. TIP: The file plugin.py must be saved in UTF-8 format otherwise the plugin may fail.
Creating a plugin to edit an ePub book This document assumes that the python interpreter will be version 3.4 or greater and will run on a Windows operating system only (this is because the code has been tested with these factors). The steps required are
Write the plugin.xml file
Write the plugin.py file
Combine these files in a zip file.
Writing the plugin.xml file The plugin file is shown for the plugins in this document and should be self-explanatory.
<?xml version="1.0" encoding="UTF-8"?> <plugin> <name>Edit1</name> <type>edit</type> <author>JohnC</author> <description>My first plugin</description> <engine>python3.4</engine> <version>0.1.0Alpha</version> <oslist>win</oslist> </plugin>
#!/usr/bin/env python # -*- coding: utf-8 -*- import sys def run(bk): return 0 def main(): print ("I reached main when I should not have\n") return -1 if __name__ == "__main__": sys.exit(main())
An introduction to writing plugins for Sigil
9/8/2015 P a g e | 4
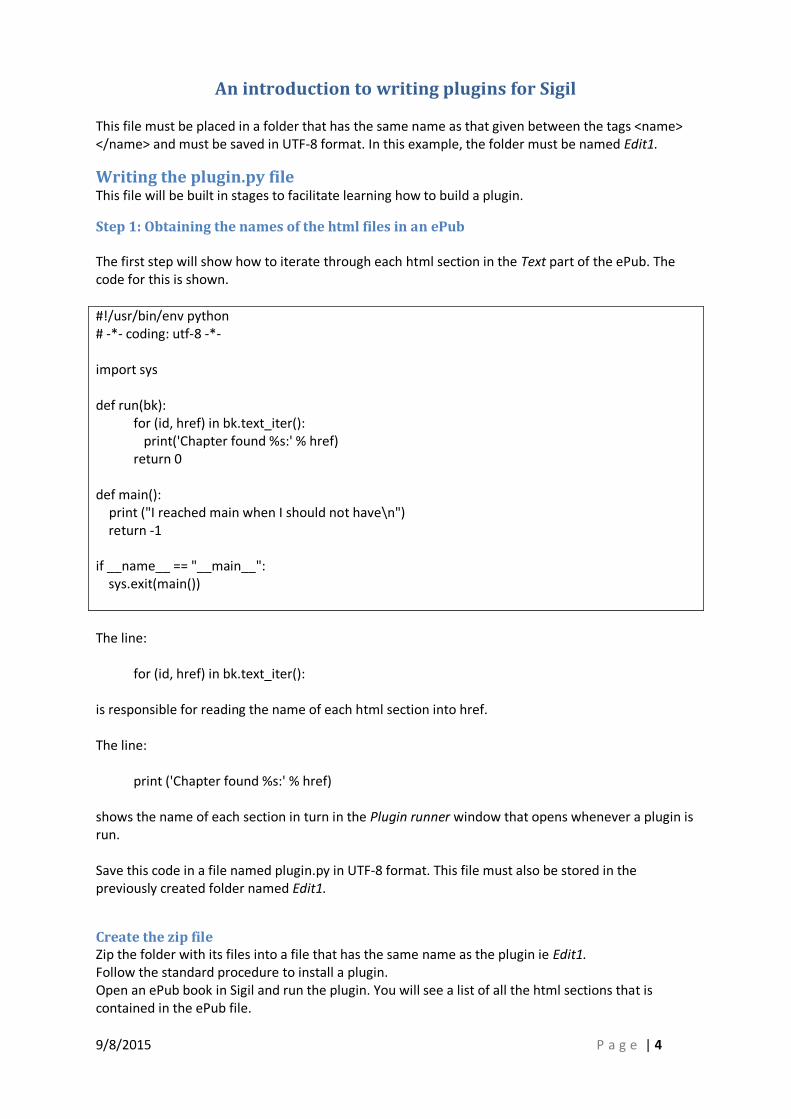
This file must be placed in a folder that has the same name as that given between the tags <name> </name> and must be saved in UTF-8 format. In this example, the folder must be named Edit1.
Writing the plugin.py file This file will be built in stages to facilitate learning how to build a plugin.
Step 1: Obtaining the names of the html files in an ePub The first step will show how to iterate through each html section in the Text part of the ePub. The code for this is shown.
#!/usr/bin/env python # -*- coding: utf-8 -*- import sys def run(bk): for (id, href) in bk.text_iter(): print('Chapter found %s:' % href) return 0 def main(): print ("I reached main when I should not have\n") return -1 if __name__ == "__main__": sys.exit(main())
The line: for (id, href) in bk.text_iter(): is responsible for reading the name of each html section into href. The line: print ('Chapter found %s:' % href) shows the name of each section in turn in the Plugin runner window that opens whenever a plugin is run. Save this code in a file named plugin.py in UTF-8 format. This file must also be stored in the previously created folder named Edit1.
Create the zip file Zip the folder with its files into a file that has the same name as the plugin ie Edit1. Follow the standard procedure to install a plugin. Open an ePub book in Sigil and run the plugin. You will see a list of all the html sections that is contained in the ePub file.

An introduction to writing plugins for Sigil
9/8/2015 P a g e | 5
Step 2: Accessing the contents of each html file in an ePub book The text in an html file needs to be retrieved before it can be edited. This step shows how to obtain the text for all html files in an ePub book. The code for this step iterates through each html file as before and prints its name.
#!/usr/bin/env python # -*- coding: utf-8 -*- import sys text_type = str def run(bk): for (id, href) in bk.text_iter(): #For each html file in the 'text' section of the epbu print('Chapter found %s:' % href) #Print the section name html = bk.readfile(id) #Read the section into html if not isinstance(html, text_type): #If the section is not str html = text_type(html, 'utf-8') #then sets its type to 'utf-8' print(html) #Print the entire section of text return 0 # 0 - means success, anything else means failure def main(): print ("I reached main when I should not have\n") return -1 if __name__ == "__main__": sys.exit(main())
The line: html = bk.readfile(id) reads the html file with the identity id into a storage area named html . The text in this storage area needs to be in utf-8 format, and if this is not the case, it is converted using the line:
html = bk.readfile(id) Finally the stored text is shown on screen using the line: print(html)

An introduction to writing plugins for Sigil
9/8/2015 P a g e | 6
Step 3: Using regular expressions for search and replace operations on html sections
A brief note on the python function re.sub() for search and replace operations The function re.sub() is used for searching and replacing text using regular expressions. The syntax of the re.sub() function is:
re.sub(FIND, REPLACE, string, max=0, flags=0) This function will replace all occurrences of FIND in string with REPLACE and returns the modified string. It will find the first max instances if a value for max is specified. For more details on flags refer to a book on python. The expressions FIND and REPLACE are put in single or double quote marks. Single quote marks are best if the expression contains a double quote mark and double quote marks are best if the expression contains a single quote mark. The expressions may be preceded by the letter 'r' to indicate a raw string. Raw strings remove the need to escape backslashes, thereby making the code more readable. The exemplar code uses the re.sub() expression in the form:
html = re.sub(r'FIND', r'REPLACE', html) Before this function can be used, the program must include the line:
import re Note: The REPLACE expression can be a function. For more details see appendix 1. If the replace expression includes straight single quotes and straight double quotes then do not use raw strings. Instead, use three single quotes to start and end the REPLACE term. Example:
html = re.sub('''<p>' ''', '''<p>\'''', html)

An introduction to writing plugins for Sigil
9/8/2015 P a g e | 7
Using the python function re.sub() for search and replace operations One issue with some converted books is that a space sometimes appears before an exclamation mark, a question mark, a semicolon, a colon or closing curly speech marks. The following regular expression can be used with Sigil's Find and Replace facility to remove these spaces: Find: [ ](!|\?|;|:|’|”) Replace: \1 The re.sub() function can incorporate these expressions as shown. html = re.sub(r'[ ](\?|!|:|;|”|"</p|,|’</p|’ )', r'\1', html) The code on the next page shows how to incorporate this regular expression into a plugin.py file. The code will read and process each html section in turn, removing spaces that appear before an exclamation mark, a question mark, a semicolon, a colon or closing curly speech marks. The program iterates through each html file as before, carrying out the instructions in the additional code (shaded). This additional code copies the html text to html_orig then it applies the regular expression to the text in html. The program checks to see whether the text has changed by comparing the text in html with html_orig and if so it writes the updated text back to the ePub file using the line: bk.writefile(id, html)

An introduction to writing plugins for Sigil
9/8/2015 P a g e | 8
#!/usr/bin/env python # -*- coding: utf-8 -*- import sys
import re
text_type = str def run(bk): for (id, href) in bk.text_iter(): #For each html file in the 'text' section of the epbu print('Chapter found %s:' % href) #Print the section name html = bk.readfile(id) #Read the section into html if not isinstance(html, text_type): #If the section is not str html = text_type(html, 'utf-8') #then sets its type to 'utf-8'
html_orig = html #Copy the text to html_orig html = re.sub(r'[ ](\?|!|:|;|”|"</p|,|’</p|’ )', r'\1', html) if not html == html_orig: #If the text has changed bk.writefile(id, html) #Write the amended text to the book return 0 #0 - means success, anything else means failure def main(): print ("I reached main when I should not have\n") return -1 if __name__ == "__main__": sys.exit(main())
An introduction to writing plugins for Sigil
9/8/2015 P a g e | 9
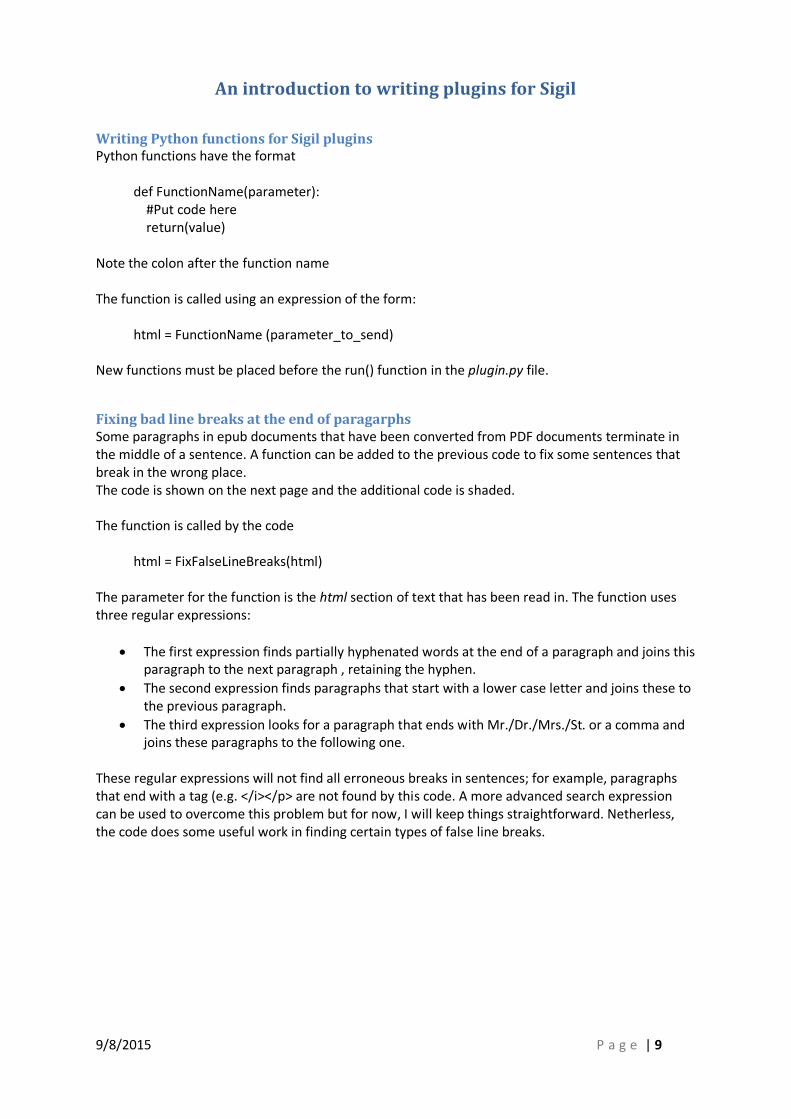
Writing Python functions for Sigil plugins Python functions have the format def FunctionName(parameter): #Put code here return(value) Note the colon after the function name The function is called using an expression of the form: html = FunctionName (parameter_to_send) New functions must be placed before the run() function in the plugin.py file.
Fixing bad line breaks at the end of paragarphs Some paragraphs in epub documents that have been converted from PDF documents terminate in the middle of a sentence. A function can be added to the previous code to fix some sentences that break in the wrong place. The code is shown on the next page and the additional code is shaded. The function is called by the code html = FixFalseLineBreaks(html) The parameter for the function is the html section of text that has been read in. The function uses three regular expressions:
The first expression finds partially hyphenated words at the end of a paragraph and joins this paragraph to the next paragraph , retaining the hyphen.
The second expression finds paragraphs that start with a lower case letter and joins these to the previous paragraph.
The third expression looks for a paragraph that ends with Mr./Dr./Mrs./St. or a comma and joins these paragraphs to the following one.
These regular expressions will not find all erroneous breaks in sentences; for example, paragraphs that end with a tag (e.g. </i></p> are not found by this code. A more advanced search expression can be used to overcome this problem but for now, I will keep things straightforward. Netherless, the code does some useful work in finding certain types of false line breaks.

An introduction to writing plugins for Sigil
9/8/2015 P a g e | 10
#!/usr/bin/env python # -*- coding: utf-8 -*- import sys import re text_type = str def FixFalseLineBreaks(html): #After running this, do a manual search/replace using: #FIND: ([a-z])</p>\s+<p> #REPLACE:\1 There is a space after \1 html = re.sub(r'-</p>\s+<p[^>]*>', r'-', html) html = re.sub(r'</p>\s+<p[^>]*>([a-z])', r' \1', html) html = re.sub(r'(((Mr|Dr|Mrs|St)\.)|,)</p>\s+<p>', r'\1 ', html) return (html) def run(bk): for (id, href) in bk.text_iter(): #For each html file in the 'text' section of the epbu print('Chapter found %s:' % href) #Print the section name html = bk.readfile(id) #Read the section into html if not isinstance(html, text_type): #If the section is not str html = text_type(html, 'utf-8') #then sets its type to 'utf-8' html_orig = html #Copy the text to html_orig html = re.sub(r'[ ](\?|!|:|;|”|"</p|,|’</p|’ )', r'\1', html) html = FixFalseLineBreaks(html) if not html == html_orig: #If the text has changed bk.writefile(id, html) #Write the amended text to the book return 0 #0 - means success, anything else means failure def main(): print ("I reached main when I should not have\n") return -1 if __name__ == "__main__": sys.exit(main())

An introduction to writing plugins for Sigil
9/8/2015 P a g e | 11
Obtaining input from the user Unfortunately it is necessary to do a manual search for any remaining paragraphs that end without a punctuation mark. In some cases a full stop may need to be inserted manually, in other cases it will be necessary to join the paragraph without a punctuation mark to the next paragraph. In the following example the paragraphs must remain separate and a full stop needs to be inserted at the end of the first paragraph <p>The car crawled to a stop</p> <p>Unfortunately, the fuel tank was empty </p> In this example, the paragraphs need to be joined: <p>she drove all the way to</p> <p>California</p> A regular expression cannot be used to make this judgement. However, depending on the book or article scanned only one of these issues may occur, in which case a regular expression could be used to join the paragraphs together. The user will need to make as judgement call as to whether or not to run a regular expression to join these types of sentences together. The user needs to be offered a choice as to whether or not to run the additional regular expression and this can be achieved using a standard message box in Windows. The message box can include standard icons, such as an exclamation mark, and buttons Yes, No, Ok and cancel.
Setting up a message box. Add ctypes to the list of imports for the program import ctypes Next, declare flags for the messagebox: MB_OK = 0x0 MB_OKCXL = 0x01 MB_YESNOCXL = 0x03 MB_YESNO = 0x04 MB_HELP = 0x4000 ICON_EXCLAIM=0x30 ICON_INFO = 0x40 ICON_STOP = 0x10 MB_SYSTEMMODAL=4096 These flags can be OR'd together if required, for example: MB_YESNO | ICON_EXCLAIM

An introduction to writing plugins for Sigil
9/8/2015 P a g e | 12
To open a messagebox use: reply = ctypes.windll.user32.MessageBoxW(None, "TEXT", "CAPTION", FLAGS) TEXT will appear under the CAPTION for the box and the selected FLAGS will apply. Part of the modified program is shown on the next page. Additional code is highlighted. The full code for the updated function FixFalseLineBreaks() is shown.
Updated program The additional import instruction and the flags for the message box are at the top of the program. A global variable, ParaJoin, has been added to the first line of the run() function. This variable accepts the user response from the messagebox and needs to be global so that its value can be accessed in the function FixFalseLineBreaks(). When the plugin runs, the message box opens and asks the user whether or not to join broken paragraphs. The response is stored in ParaJoin. If the user clicks the No button, then a message is displayed advising the user to do a manual search for incorrect line breaks. When the program runs the function FixFalseLineBreaks(), uses the value of ParaJoin to determine whether or not to run the extra regular expression.

An introduction to writing plugins for Sigil
9/8/2015 P a g e | 13
#!/usr/bin/env python # -*- coding: utf-8 -*- import sys import re
import ctypes text_type = str MB_OK = 0x0 MB_OKCXL = 0x01 MB_YESNOCXL = 0x03 MB_YESNO = 0x04 MB_HELP = 0x4000 ICON_EXCLAIM=0x30 ICON_INFO = 0x40 ICON_STOP = 0x10 MB_SYSTEMMODAL=4096 def FixFalseLineBreaks(html): html = re.sub(r'-</p>\s+<p[^>]*>', r'-', html) html = re.sub(r'(|</(i|b|span)>)</p>\s+<p[^>]*>[ ]?(((|<\2[^>]*>))[a-z])', r'\1 \3', html) html = re.sub(r'(((Mr|Dr|Mrs|St)\.)|,)</p>\s+<p[^>]*>[ ]?', r'\1 ', html) if ParaJoin==6: #Yes was selected html = re.sub(r'([a-z])</p>\s+<p[^>]*>([A-Z])', r'\1 \2', html) return(html) def run(bk): global ParaJoin ParaJoin = ctypes.windll.user32.MessageBoxW(None, "Do you want to join paragraphs with missing full stops?", "Option for joining paragraphs!!!", MB_YESNO|ICON_EXCLAIM) if ParaJoin==7: #No was selected ctypes.windll.user32.MessageBoxW(None, "Please do a manual search for paragraphs with missing full stops.", "Option for joining paragraphs!!!", ICON_INFO|MB_OK) for (id, href) in bk.text_iter(): #For each html file in the 'text' section of the epbu ...

An introduction to writing plugins for Sigil
9/8/2015 P a g e | 14
Saving options to a file The issue with using a messagebox to get user choices is that if many choices are offered then a messagebox will be needed each time. An alternative is to save user preferences to a file. Sigil plugins can save options to a .json file. This file is automatically stored in a folder in Sigil's preferences location which may be located by selecting Preferences from the Edit menu to open a Preferences dialog box. Select Plugins from the list on the left and click on Open preferences location to open an Explorer window for Sigil. The preferences file is stored in the folder plugins_prefs. The code for reading and writing user preferences to a json file is shown.
#!/usr/bin/env python # -*- coding: utf-8 -*- prefs = {} def run(bk): global prefs prefs = bk.getPrefs() #Read preferences from a json file # Set defaults if json doesn't yet exist (first run, or file deleted) prefs.defaults['JoinParagraphs'] = 'No' #Do something with the value here print(prefs['JoinParagraphs']) # Save prefs to a *.json file #bk.savePrefs(prefs) return 0 def main(): print ('I reached main when I should not have\n') return -1 if __name__ == "__main__": sys.exit(main())
The preferences file is a python dictionary and this must be initiated with the line: prefs = {} Setting prefs as a global variable in the run() function enables preferences to be accessed by other functions if required.

An introduction to writing plugins for Sigil
9/8/2015 P a g e | 15
Read user preferences using the code: prefs = bk.getPrefs() There is no need to specify a filename or directory – Sigil takes care of this for you. The json file may not exist, or the required value may not exist in the file. A default value for items that do not exist can be specified using: prefs.defaults['NAME'] = 'VALUE' where NAME is a name for the option and VALUE is its value. The user must set a preference for joining paragraphs so in the code shown NAME is JoinParagraphs and the default VALUE is No. Note there is a full stop after prefs. Access preferences using the code: prefs['NAME'] Note there is not a full stop after prefs. The above example prints the value of JoinParagraphs using: print(prefs['JoinParagraphs']) Save user preferences to a json file using: #bk.savePrefs(prefs) There is no need to specify a name for this file or a directory – Sigil takes care of this automatically. If you run the above program, a json file will not be saved to disk. This is because Sigil will not save default values.
IMPORTANT – If you specify default preferences these are not saved to disk, and if your program contains default preferences only, then a file will not be saved to disk (I spent a lot of time figuring this out and wondering why a preferences file was not being created!!!).
In my view it is probably best not to specify default values using prefs.defaults['NAME'] = 'VALUE' The code on the next page shows how to set values so that they can be saved to a json file.

An introduction to writing plugins for Sigil
9/8/2015 P a g e | 16
#!/usr/bin/env python # -*- coding: utf-8 -*- prefs = {} def run(bk): global prefs prefs = bk.getPrefs() #Read preferences from a json file if not prefs: #If the file does not exist prefs['JoinParagraphs'] = 'No' #then set a value #Do something with a preference value print(prefs['JoinParagraphs']) # Save prefs to a *.json file bk.savePrefs(prefs) return 0 def main(): print ('I reached main when I should not have\n') return -1 if __name__ == "__main__": sys.exit(main())
The code is similar to that of the previous program except that instead of setting default preference values it has: if not prefs: #If the file does not exist prefs['JoinParagraphs'] = 'No' #then set a value This code determines whether or not a preference file exists, and if not, it sets a value for JoinParagraphs. This value will be saved by the code: bk.savePrefs(prefs) The value of JoinParagraphs may be changed by the program using: prefs['JoinParagraphs'] = 'Yes'

An introduction to writing plugins for Sigil
9/8/2015 P a g e | 17
The json file will contain:
{
"JoinParagraphs": "No"
}
Creating a user interface to set options It is relatively straight forward to create a user interface in python using tkinter, its built in graphical user interface (GUI). Tkinter 8.5 and above comes with a set of widgets, such as checkboxes, that can be placed in the GUI. It includes top-level windows, such as tk_dialog, and it also provides geometry managers that controls the position of the widgets on screen. Widgets will appear on screen only if they have been positioned using a geometry manager. First, add to the list of import statements:
import tkinter.ttk as tkinter_ttk import tkinter.constants as tkinter_constants from tkinter import *
A function is used to set up the main window and display the checkboxes. When the user has set the checkboxes to the required states, a button labelled Go is clicked, closing the window and exiting the function. The code in another part of the program can then act on the states that were set. Set up the gui window using the code shown
root = Tk() #Root widget – provides the main window root.title("Options for tidying ePub books") #Title for the main window mainframe = ttk.Frame(root, padding="3 4 12 12") mainframe.grid(column=0, row=0, sticky=(N, W, E, S)) mainframe.columnconfigure(0, weight=1) mainframe.rowconfigure(0, weight=1)
The first line provides a root widget which consists of the main window. Its title is set by the second line. ttk.Frame() is a rectangular frame container widget for other widgets. The first parameter specifies the parent of the frame; in this case it is the main window. The padding values specify a space around the four inside edges of the frame that will be kept clear when items are added to the frame. mainframe.grid puts a grid in the frame container. Sticky specifies the edge(s) that the grid will stretch to. In this case the grid will reach all four sides of the frame container. Widgets will be placed within the cells of the grid. The width of each row and the height of each column depends on the height of the widgets that are placed in the grid cells and this is controlled automatically. Columnconfigure() and rowconfigure() are used when the window is resized. The value of weight specifies how much the specified column or row (first parameter) should grow if there is room available to do so. Without this option the column/row will not grow.

An introduction to writing plugins for Sigil
9/8/2015 P a g e | 18
Checkboxes Checkboxes will enable the user to select options. Checkboxes use a variable to represent their state (checked or unchecked). This variable has an integer value by default. However, this will be changed to a text variable that will have the value 'Yes' or 'No' to match the data stored in the json file. Variables for checkboxes may be of type IntVar() or StringVar(). Internal functions are used to set or get these variables: var.set() is used to set the variable var.get() is used to get the value. The code to set the value for the checkbox for processing italics is shown.
chkProcessItalics = StringVar() chkProcessItalics.set(prefs['ProcessItalics'])
The checkbox is put into the window using the code:
check = ttk.Checkbutton(mainframe, text='Process italics', variable=chkProcessItalics, onvalue='Yes', offvalue='No').grid(column=1, row=3, sticky=W)
The checkbox has the following settings: text : the text that will appear next to the checkbox variable: The name of the variable that represents the state of the checkbox onvalue: the string that represents the state of the checkbox when is it checked. offvalue: the string that represents the state of the checkbox when is it is unchecked. The grid parameters position the checkbox in the required column and row. The sticky value, W, places the checkbox to the left side of the cell in which it is placed. The interface has a button to close the window:
ttk.Button(mainframe, text="Go", command=root.quit).grid(column=2, row=4, sticky=W)
The parameters include the text that is shown in the button, the command root.quit to close the window, and position the button in the grid. Another piece of code puts some spacing around the widgets so that they do not appear to be squashed together.
for child in mainframe.winfo_children(): child.grid_configure(padx=5, pady=5)
The final requirement is to add the code for the main loop:
root.mainloop()

An introduction to writing plugins for Sigil
9/8/2015 P a g e | 19
The variables that store the state of the checkboxes are global so that they can be accessed by other functions. The function is shown.
def ShowOptions(): global chkJoinParagraphs, chkReplaceHTMLCode, chkProcessItalics root = Tk() root.title("Options for tidying ePub books") mainframe = ttk.Frame(root, padding="10 10 10 10") mainframe.grid(column=0, row=0, sticky=(N, W, E, S)) mainframe.columnconfigure(0, weight=1) mainframe.rowconfigure(0, weight=1) chkJoinParagraphs = StringVar() chkReplaceHTMLCode = StringVar() chkProcessItalics = StringVar() chkJoinParagraphs.set(prefs['JoinParagraphs']) chkReplaceHTMLCode.set(prefs['ReplaceHTMLCode']) chkProcessItalics.set(prefs['ProcessItalics']) check = ttk.Checkbutton(mainframe, text='Fix ALL broken line endings', variable=chkJoinParagraphs, onvalue='Yes', offvalue='No').grid(column=1, row=1, sticky=W) check = ttk.Checkbutton(mainframe, text='Replace HTML eg &nsbc;', variable=chkReplaceHTMLCode, onvalue='Yes', offvalue='No').grid(column=1, row=2, sticky=W) check = ttk.Checkbutton(mainframe, text='Process italics', variable=chkProcessItalics, onvalue='Yes', offvalue='No').grid(column=1, row=3, sticky=W) ttk.Button(mainframe, text="Process book", command=root.quit).grid(column=2, row=4, sticky=W) for child in mainframe.winfo_children(): child.grid_configure(padx=5, pady=5) root.mainloop()

An introduction to writing plugins for Sigil
9/8/2015 P a g e | 20
The variables that represent the state of the checkboxes are read into the preference directory using
prefs['JoinParagraphs'] = chkJoinParagraphs.get() prefs['ReplaceHTMLCode'] = chkReplaceHTMLCode.get() prefs['ProcessItalics'] = chkProcessItalics.get()
A sequence of if statements reads the value of each preferences and calls the relevant function if the value is set to "yes".
if prefs['ProcessItalics'] == 'Yes': html = ProcessItalics(html) if prefs['ReplaceHTMLCode'] == 'Yes' : html = ReplaceHTMLCode(html)
Centring the window The window is centred on the screen using the code shown: Hide the window before putting controls in it so that it does not flash when it is moved into position using
root.withdraw() #Hide window to avoid flashing when it is moved to the correct position
Place this code directly before root.mainloop()
root.update_idletasks() # Update "requested size" from geometry manager xpos = (root.winfo_screenwidth() - root.winfo_reqwidth()) / 2 ypos = (root.winfo_screenheight() - root.winfo_reqheight()) / 2 root.geometry("+%d+%d" % (xpos, ypos)) root.deiconify()
This determines the x and y co-ordinates for the window. root.geometry () moves the window to this location and root.deiconify() shows the window.

An introduction to writing plugins for Sigil
9/8/2015 P a g e | 21
Appendix 1: Notes on Python functions
Using functions as a parameter with re.sub() The function re.sub(FIND, REPLACE, string, max=0, flags=0) can include a function as the REPLACE parameter. For example, if the function is FnReplace() then the re.sub() expression becomes: html = re.sub('FIND', FnReplace, text) text is passed to the FnReplace function as its parameter, par, in the following example: def FnReplace (par): #do something here if : return <alternative 1> return <alternative 2>