an introduction to visual studio 2012 (visual c++) part ics2103/ay1516s2/files/an introduction...
TRANSCRIPT
1
An Introduction to Visual Studio 2012
(Visual C++) – Part I
Author: Henry Chia
Contributors: Huang Da, Low Wei Lin, Xie Kai, Zeng Yong
Last modified: 2015 Jan 19
You can help us improve this document by reporting typos, or areas that are
erroneous or unclear. Kindly email us at [email protected].
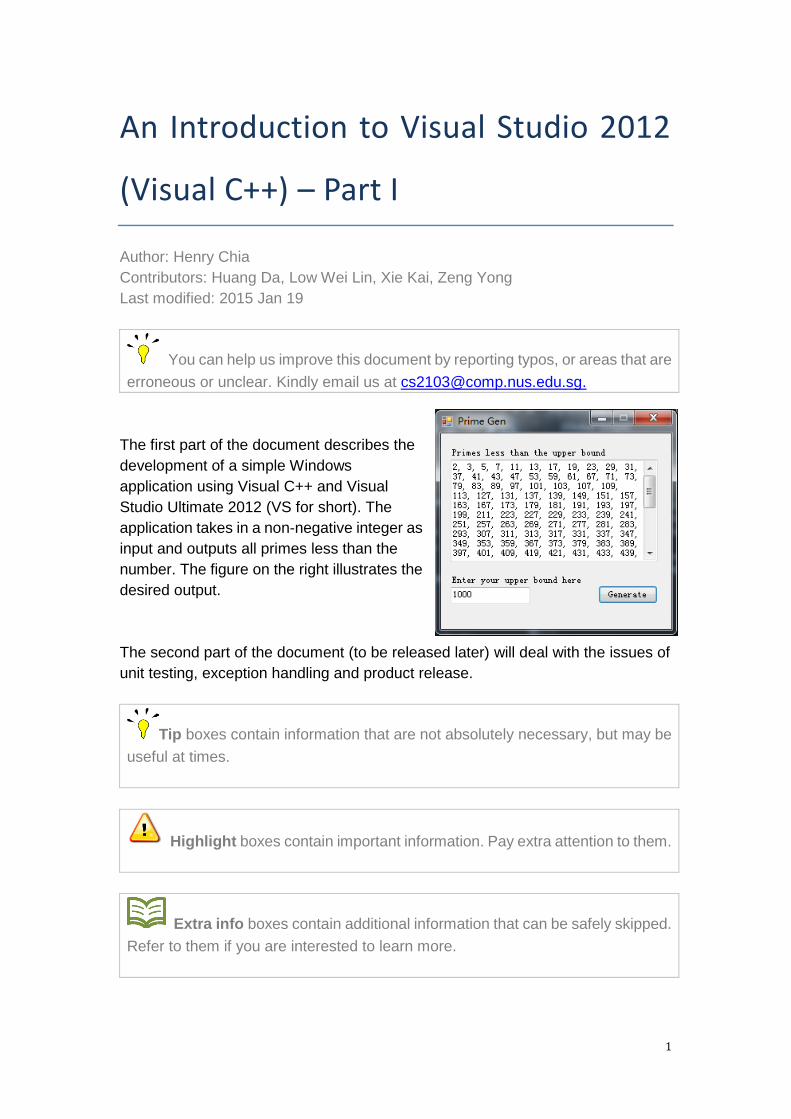
The first part of the document describes the
development of a simple Windows
application using Visual C++ and Visual
Studio Ultimate 2012 (VS for short). The
application takes in a non-negative integer as
input and outputs all primes less than the
number. The figure on the right illustrates the
desired output.
The second part of the document (to be released later) will deal with the issues of
unit testing, exception handling and product release.
Tip boxes contain information that are not absolutely necessary, but may be
useful at times.
Highlight boxes contain important information. Pay extra attention to them.
Extra info boxes contain additional information that can be safely skipped.
Refer to them if you are interested to learn more.

2
CONTENTS
VISUAL STUDIO (VS) DOWNLOAD AND INSTALL .................................................................... 3
DOWNLOADING VS ........................................................................................................................................... 3
INSTALLING VS ................................................................................................................................................. 5
CHAPTER 1 – GETTING STARTED ................................................................................................ 6
CUSTOMIZATION ............................................................................................................................................... 6
VS WINDOWS .................................................................................................................................................... 8
VS MENUS .......................................................................................................................................................... 8
CHAPTER 2 – CREATING A PROJECT .........................................................................................12
CREATING A NEW PROJECT........................................................................................................................... 12
BUILDING AND RUNNING A PROJECT .......................................................................................................... 15
CHAPTER 3 – DEBUGGING ...........................................................................................................16
SETTING BREAK POINTS ............................................................................................................................... 16
SINGLE STEP TRACE ...................................................................................................................................... 17
TERMINATING THE DEBUGGING SESSION .................................................................................................. 18
CHAPTER 4 – CREATING THE USER INTERFACE ...................................................................19
CONFIGURING THE PROJECTS ...................................................................................................................... 20
SETTING THE ENTRY POINT ......................................................................................................................... 23
BUILDING AND RUNNING .............................................................................................................................. 25
CHAPTER 5 – DEVELOPING THE UI ...........................................................................................26
DESIGNER TOOLBOX AND PROPERTIES ..................................................................................................... 26
ADD COMPONENTS TO THE UI .................................................................................................................... 27
CONFIGURE THE COMPONENTS ................................................................................................................... 27
BINDING EVENT HANDLERS TO EVENTS .................................................................................................... 30
INTERACTING WITH A LIBRARY ................................................................................................................... 32

3
Visual Studio (VS) download and install
This chapter describes the download and installation of Visual Studio 2012
Ultimate from Microsoft DreamSpark.
At the time of revision of this document, Microsoft DreamSpark has updated
the latest version of VS to Visual Studio 2013 Ultimate. The download and
installation procedure is almost similar to that of Visual Studio 2012.
Downloading VS
Download Visual Studio 2012 Ultimate from DreamSpark at this link. On the main
page, you should see this:
Now simply click “Sign in” at top-right corner of the page and sign in using
NUSNET account:
4
If you are not a registered user or encounter problems logging in, you may
send an email to [email protected].
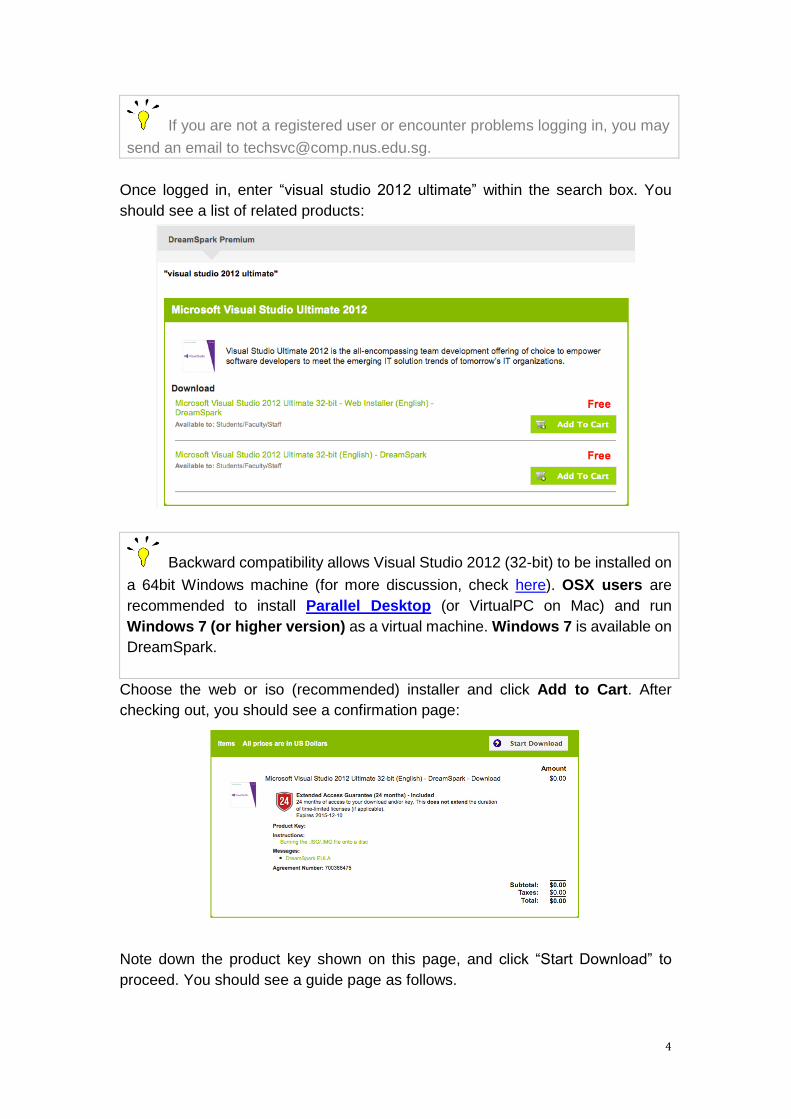
Once logged in, enter “visual studio 2012 ultimate” within the search box. You
should see a list of related products:
Backward compatibility allows Visual Studio 2012 (32-bit) to be installed on
a 64bit Windows machine (for more discussion, check here). OSX users are
recommended to install Parallel Desktop (or VirtualPC on Mac) and run
Windows 7 (or higher version) as a virtual machine. Windows 7 is available on
DreamSpark.
Choose the web or iso (recommended) installer and click Add to Cart. After
checking out, you should see a confirmation page:
Note down the product key shown on this page, and click “Start Download” to
proceed. You should see a guide page as follows.

5
Follow the steps to download Visual Studio 2012 Ultimate.
Installing VS
With an .iso file downloaded, open/unzip it, and run the installer:
If you encounter any notifications about missing files during the
installation, just choose “download from online”.
If you install VS2012 alongside VS2010, you may get into trouble when
converting a VS2010 solution to VS2012. You can solve the problem according to
Andy Rushton’s suggestion given here.

6
Chapter 1 – Getting started
This chapter provides instructions on customizing Visual Studio 2012 (VS).
Customization
VS allows us to choose from a selection of pre-defined environment settings, each
of which is optimized for building different types of applications.
Choose Visual C++ Development Settings.
You can always reset your current setting or use other pre-defined
settings via TOOLS Import and Export Settings.
Additional customization to Visual Studio, such as changing the color theme,
font and size of the code, foreground and background color of the editing area,
etc. can be made via TOOLS Options.

7
Changing VS color theme
Open the Options dialog box:
In the Environment section, choose General, and you should see a drop-down
list of available color themes with Light as the default. We shall change it to Dark.
Click OK to confirm the changes. The IDE should now look like this:

8
VS windows
Within VS, identify the tool windows, the menus and toolbars, and the main window
space. Tool windows are docked on the left and right sides of the application
window. The Quick Launch, Menu bar, and the standard toolbar are located at
the top. At the center of the application window is the Start Page. When a file is
loaded, a text editor and/or designer will appear in this space.
VS menus
Visual Studio has docked most of the options that are frequently used at the
standard toolbar, such as Create a new solution, Open an existing solution, Copy
and Paste, Debug type, etc. You may add or remove buttons docked on the
standard toolbar by clicking the dropdown button at the right-most end of the
toolbar.
Generally, if you do not know the location of an option, just type the associated key
words within the Quick Launch box (or press Ctrl + Q). For example, if we want to
create a new project, simply search for “new project” using Quick Launch.
Some of the commonly used menu items are listed below.

9
Use the FILE menu for file manipulation, such as New or Open project
solution, Save file(s), Recent files, Print options, etc.
Use the EDIT menu for text editing, such as Copy and Paste, Undo and
Redo, Find and Replace, etc.
Use the VIEW menu to enable various Explorer and Windows to help you
manage your project better. We suggest to keep two windows docked on
the application window: Solution Explorer and Class View.
Solution Explorer and Class View
Solution Explorer provides an overview of all projects under the current solution
(these two terms are defined here). Each project may be expanded to display the
individual components:
This explorer is docked at the left side of the application by default. If you close it by
mistake, re-open it by selecting VIEW Solution Explorer.

10
Unlike the Solution Explorer which shows a hierarchical view of a project in terms
of files, Class View does the same but in terms of classes. You can view all
namespaces and classes created in each of the project, as well as to check its
member functions, variables and their accessibility.
The class view is docked at the left side of the application window by default. If you
close by mistake, re-open it by selecting VIEW Class View.

11
When developing a solution, other menus will appear:
PROJECT menu provides methods to structure the solution and configure
a project.
BUILD menu provides functionalities to compile the code and build the
executable. In particular, the solution may be configured to be built under
the Debug Mode or Release Mode.
DEBUG menu provides functionalities to debug the whole project, such as
stepping into or stepping over an instruction, or stepping out of a program
fragment. Break points may be also be set.
TEST menu provides options to work with test cases during testing. The
same options can also be found within Test Explorer.
Having gone through all the required menus, it’s time to begin our first project in
Visual Studio. In the next chapter, we will set up a project and structure the solution
step by step.

12
Chapter 2 – Creating a project
Within Visual Studio, a solution is built to solve a problem. This solution comprises
one or more projects, each of which solves a sub-problem. We shall begin by
developing a C++ project (named Library) that provides functionality to generate a
list of primes. This project will eventually serve as a back-end library to the GUI
interface to be developed later.
Creating a new project
From the VS main window, select FILE New Project, or press the hot key
combination Ctrl + Shift + N, to bring up the New Project Dialog window:
There are several options listed under Visual C++. Choose General Empty
Project. Specify the project name as “Library” and the solution name as
“PrimeGenerator”. Specify a location, if necessary, and click OK. The current
solution and associated projects are now listed within the Solution Explorer.

13
Create a class in Library by right-clicking Source Files and select Add Class.
Within the Add Class dialog, select the C++ tab, and select C++ Class. Click Add.
Within the Generic C++ Class Wizard, specify the class name as
PrimeGenerator and click Finish.
Notice that the Library project now includes a header file PrimeGenerator.h and a
source file PrimeGenerator.cpp.

14
Edit PrimeGenerator.h by creating one public function and one private vector.
#pragma once
#include <vector>
class PrimeGenerator {
private:
std::vector<int> primeList;
static const int primeBound = 1000;
public:
PrimeGenerator(void);
~PrimeGenerator(void);
std::vector<int> GetPrimeLessThan(int);
};
To enable line numbering, go to TOOLS Options Text Editor All
Languages General Display and check Line Numbers.
The coding standard provided by Visual Studio is slightly different from the
coding standard taught in CS2103. To conform to the standard, we shall change
them manually.
Include all necessary header files in the .h file instead of the .cpp file. It is
usually NOT a good practice to include “using namespaces”, especially “using
namespace std”. This is because omitting namespace in function definitions may
result in ambiguous functions when two functions in two namespaces share the
same name and parameter list. You can check this page for more discussions.
Define the function implementation in the source file PrimeGenerator.cpp. For
now, we include some “dummy” statements for the purpose of testing.
#include "PrimeGenerator.h"
PrimeGenerator::PrimeGenerator(void) {
primeList.push_back(2);
}
PrimeGenerator::~PrimeGenerator(void) {
}

15
std::vector<int> PrimeGenerator::GetPrimeLessThan(int upperBound) {
return primeList;
}
Include a main function as follows.
int main(void) {
PrimeGenerator* prime = new PrimeGenerator();
std::vector<int> primeList = prime->GetPrimeLessThan(2);
return 0;
}
Building and running a project
Before running the project, right click on the solution in Solution Explorer and
select Build.
The progress of building appears in the output window docked at the bottom of
main application window.
We can now run it. VS provides two modes for running: with Debug mode and
without Debug mode (we will discuss more on this topic in a later chapter). Click
on DEBUG menu, and select Start without Debugging

16
Chapter 3 – Debugging
This chapter describes some useful debugging features provided by VS.
To go into the debugging mode, choose DEBUG Step Into. When you are in
debug mode, you will see two new panels docked at the bottom of main window.
Typically, Autos and Watch are located in the left panel, and the Call Stack
located in the right panel. These are sufficient for debugging.
Autos displays the current value for all active objects and variables. Watch allows
you to define the variables and objects that needs to be traced. Call Stack displays
the function stack information.
A yellow pointer at the program side bar points to the current instruction. Although
you can drag the pointer around from a point to another statement, doing so is not
recommended as it may sometimes mess up the execution order.
Setting break points
To jump to a particular statement, set a break point beside that statement and then
use Continue button to continue execution until the break point.
To set a break point, single click on the side bar of editing area beside the line you
are interested in.

17
A red dot shows up to indicate a break point.
Press the Continue ( ) button on the toolbar under Debug mode.
You can also view the current value stored in a variable by hovering your mouse on
the variable’s name, as shown above.
Single step trace
The single step trace mode allows you to trace your code line by line. You can
choose to step into, step over or step out a function.

18
Consider the following program fragment:
std::vector<int> PrimeGenerator::GetPrimeLessThan(int upperBound) {
return primeList;
}
int main(void) {
PrimeGenerator* prime = new PrimeGenerator();
std::vector<int> primeList = prime->GetPrimeLessThan(2);
return 0;
}
Step into will bring you into the implementation a function. Stepping into the red
line will advance to the green line.
When using step out, the current function finishes execution and returns. In the
example above, stepping out of the green line returns to the red line with the
variable primeList assigned to a valid vector.
Step over is step into followed by step out. In the example above, stepping over
the red line advances directly to the blue line, but prior to executing that line.
All three single step functions ( ) can be found on the toolbar under
Debug mode. Alternatively, you can find them in DEBUG menu.
Terminating the debugging session
To terminate debugging, click the Stop button.
Avoid modifying the code in Debug mode. Terminate debugging first.
Have a go at modifying PrimeGenerator.cpp to generate a list of primes less than
an input upper bound via a command line interface. The debugging tips covered in
this might come in handy.
In the next chapter, we shall work on the GUI component.
19
Chapter 4 – Creating the user interface
A graphical user interface UI passes input from the user to the back-end Library,
and displays the results returned from Library. This chapter describes how the
solution can be structured with the inclusion of a new UI project.
UI will be developed using Windows Forms which is based on the Common
Language Runtime (CLR) environment.
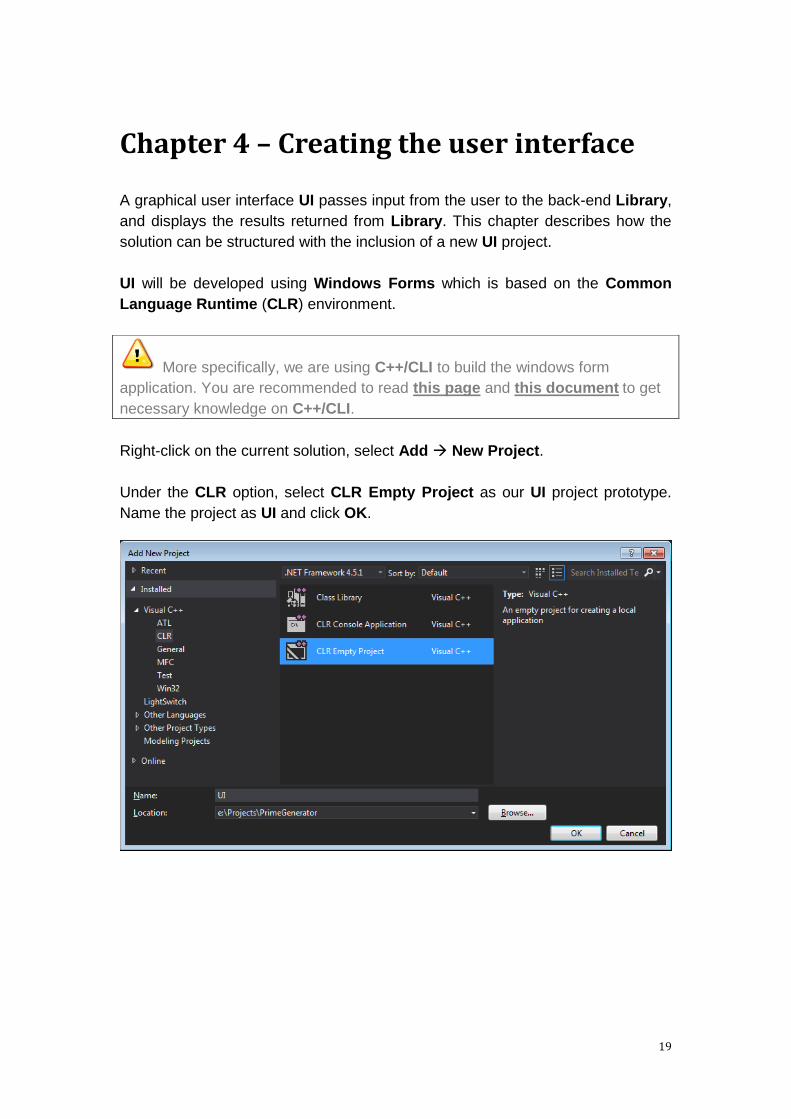
Right-click on the current solution, select Add New Project.
Under the CLR option, select CLR Empty Project as our UI project prototype.
Name the project as UI and click OK.
More specifically, we are using C++/CLI to build the windows form
application. You are recommended to read this page and this document to get
necessary knowledge on C++/CLI.

20
There are now two projects under our solution PrimeGenerator:
Configuring the projects
Let us begin by configuring the Library project.
Library provides all necessary functional classes and static functions. It is
independent from all other components such as UI, i.e. it does not require the
functionalities of UI. In essence, only functions within UI call the functions of
Library. As such, we set our Library project as a Static Library project to realize
the independence.
Right click on the Library project in Solution Explorer, and select Properties.
In the General page, you should see an option Configuration Type. By default,
this option is set as Application (.exe). From the dropdown list, choose Static
library (.lib). Click OK.

21
To configure the UI project as a Windows Form Application, right-click on the UI
project in Solution Explorer, and select Properties. Navigate to the Linker
section, and select System page.
From the dropdown list of SubSystem, select Windows. Click OK.
Now it’s time to connect the two components, bearing in mind that UI depends on
Library.
Right click on UI project, and select References. Click Add New Reference.
Within Add Reference, check the Library project. Click OK.

22
To avoid having to specify functions headers with long relative paths, we need to
set the additional include path.
If the additional include path is not set, you will need to use
#include “../AnotherProjectDirectory/SomeHeader.h”
instead of simply
#include “SomeHeader.h”.
If the include path is set incorrectly, compiling your program produces the
error “Fatal Error C1083: Cannot open include file”.
In UI Property Pages, select Configuration Properties. Under C/C++, select
General.
From the dropdown list of Additional Include Directories select <Edit..>. Within
the Additional Include Directories window, click the “folder” icon at the top. Add
new include directories by typing “..\Library” as the path, or navigate to the correct
directory by clicking on “…”.

23
Click OK to apply the changes.
Setting the entry point
An entry point refers to the first function (entry function) that the program starts
executing (typically the main function). In our project, the UI should start up when
the project is run. As such, the entry function should be the main function of the UI
project. To achieve this, set the UI project as a Startup Project, and set the main
function of UI as the entry function.
Right clicking on UI in the Solution Explorer and choose Set as Startup Project.
Notice that UI is now in bold.
To create the main function, right click on Source Files under UI and select
AddNew Item. In the Add New Item window, navigate to the UI tab, and choose
Windows Form. Name the file PrimeGeneratorGUI.h and click Add.

24
Notice that a header file PrimeGeneratorGUI.h is created, together with a source
file PrimeGeneratorGUI.cpp. The header file defines the properties and event
handlers of all the components of the Windows Form in the form of a class. This
class is instantiated in the source file and run in an infinite loop. The source file is
the entry point as it is responsible for constructing the graphical user interface.
Double click PrimeGeneratorGUI.cpp file. Insert the following program fragment:
#include "PrimeGeneratorGUI.h"
using namespace System;
using namespace System::Windows::Forms;
[STAThread]
void main(array<String^>^ args) {
Application::EnableVisualStyles();
Application::SetCompatibleTextRenderingDefault(false);
UI::PrimeGeneratorGUI mainWindow;
Application::Run(%mainWindow);
}
All C++/CLI object should be managed, unlike native C++ objects, which
are ‘unmanaged’. For managed objects, ‘^’ is similar (but not equivalent) to ‘*’ in
native C++, and ‘%’ is similar (but not equivalent) to ‘&’ in native C++. In
addition, to instantiate a managed object in CLR, use gcnew keyword, instead of
new.
[STAThread] Single Thread Application Attribute
STAThread within square brackets is an attribute to indicate that the current
application runs on a thread containing a Single Thread Application. You can
learn more on STAThread attribute on MSDN or this blog.
To set the main function as the entry function, right click on the UI project in the
Solution Explorer, select Properties, navigate to Linker tab, and then select
Advanced. In Entry Point box, enter main and click OK.

25
Building and running
Right click on the solution in Solution Explorer and select Build. With the two
projects built successfully, we can now run it. You should see an empty GUI
window. We now have a skeletal solution.
Remember to close the window before proceeding.

26
Chapter 5 – Developing the UI
In this section, we look at the design of the UI and how it can be made to interface
with the functions of the Library.
Designer Toolbox and Properties
Double click PrimeGeneratorGUI.h under UI project.
This produces the Designer page within the main editing area. Alternatively, right
click on PrimeGenerator.h, and select View Designer.
Note the Toolbox and Property windows. By default, they should appear at the
right side of the main application window.

27
If you accidentally close Toolbox, you can reopen the window through
VIEW Toolbox. For opening Property window, right click the target object in
the designer view and select Property.
The Toolbox window provides the components to build the GUI, such as Textbox,
Label, Button, etc. The Property window allows the property of a component
object to be edited. In addition, an event handler function can be bound to a
certain event.
Add components to the UI
We will demonstrate by creating a very simple GUI comprising two Labels, two
Textboxes, and one Button. Drag and drop the components from the Toolbox
into the designer, and make adjustments to the location of the components.
Configure the components
Change the text content of labels and buttons by configuring the Text property of
the components. Let us change the text of label1 to “Primes less than upper
bound:”. Right click on label1 and select Properties.

28
You may change the text, as well as the associated text font and size. Notice that
the change is reflected in the designer.
Repeat the same procedure for the other components.
Next we will configure the text boxes. To configure a multiple-line display box, right
click the upper text box and select Properties. Look for the Multiline property
under the Behavior section.

29
By default, the text box is configured as a single-line box, so change Multiline
property to true. Resize the textbox via the handles accordingly.
In addition, enable the textbox as read-only and include a vertical scrollbar. Do
these via the Readonly and Scrollbar properties.
Now build and run the project. The UI looks fine but has a potential layout problem
if the window is resized or maximized. To disable the Maximize function of the
window and fix the border, right click on the form, and select Properties.
Under Appearance, set FormBorderStyle to FixedSingle.

30
Under Window Style, set MaximizeBox to false.
Now build and run again. The window can no longer be resized nor maximized.
With the configurations completed, right click PrimeGeneratorGUI.h under the UI
project and select View Code.
Notice that the code for initializing components has been created automatically.
For better code quality, we should change the components names. We can do
this directly within the code, or preferably within the designer via the Properties
window. For each component, configure the (Name) property under Design.
As an example, component label1 is renamed as outputBoxInstructionLabel.
Repeat this step until all components are given a proper name. In particular,
rename the button as generateButton and the multiline textbox as outputBox.
Now, view the code again and you will see the changes being applied.
Binding event handlers to events
Clicking a button, getting a textbox into focus, and focus-leaving a textbox are
examples of events. When an event occurs, an event handler is triggered. It
defines the reaction of the program to that event. For example, when the minimize
window button is clicked, a system event handler is called. This event handler is
associated with instructions that hide the window. In general, an event handler
defines a routine that the program should take when a specific event occurs. We
will define an event handler when the Generate button is clicked. Specifically, a list
of primes is displayed upon clicking the button.

31
To bind an event handler to a Click event, right click on the Generate button and
select Properties. In the properties window, click on the “lightning” icon at the top .
This brings up the Events page.
To bind an event handler to the Click event, under Action section, double click the
editing area to the right of Click. An event handler generateButton_Click will be
created and bound to the event.
MouseClick event behaves slightly differently as the event will be triggered
only if the button is clicked by a mouse. However, Click event will be triggered
as long as the button is pressed (via the mouse or keyboard).
The prototype of the event handler is now included within PrimeGeneratorGUI.h.
Let us insert a “hello world” output statement to test the functionality.
private: System::Void generateButton_Click(
System::Object^ sender,
System::EventArgs^ e) {
MessageBox::Show("hello world!");
}
Build and run the project again. When the Generate button is clicked, “hello world!”
is displayed in a message box window.

32
Interacting with a library
Note that UI itself cannot generate a prime list, it needs support Library. To use
functions from another project, we need to include its header file. With
dependencies and reference path specified, the header can be simply included
without specifying the full path.
Modify PrimeGeneratorGUI.h by including the Library header file. With this
header file included, we can now use the functions defined in the header file. In
particular, the implementation of the generateButton_Click function that outputs
“hello world” can now include a statement to generate a vector primeList.
#pragma once
# include "PrimeGenerator.h"
# include <vector>
namespace UI {
...
/// <summary>
/// Summary for PrimeGeneratorGUI
/// </summary>
public ref class PrimeGeneratorGUI : public System::Windows::Forms::Form {
private:
PrimeGenerator* prime;
public:
PrimeGeneratorGUI(void) {
InitializeComponent();
prime = new PrimeGenerator();
}
protected:
/// <summary>
/// Clean up any resources being used.
/// </summary>
~PrimeGeneratorGUI() {
if (components) {
delete components;
delete prime;
}
}

33
...
private:
System::Void generateButton_Click(System::Object^ sender,
System::EventArgs^ e) {
std::vector<int> primeList = prime->GetPrimeLessThan(2);
MessageBox::Show("hello world!");
};
}
Build the project again and ensure that both projects build successfully.
Modify the generateButton_Click function again to the following.
System::Void generateButton_Click(System::Object^ sender,
System::EventArgs^ e) {
std::vector<int> primeList = prime->GetPrimeLessThan(2);
int totalPrime = primeList.size();
String^ s = “”;
for (int I = 0; I < totalPrime; I ++) {
s = s + primeList[i].ToString();
if (I != totalPrime – 1) {
s = s + “,”;
}
}
outputBox->Text = s;
}
Build and run the solution. Click the Generate button and you will see the
contents of the vector displayed in the output box.
This concludes the first part of the document. In part two of this document, we shall
continue with unit testing, exception handling and product release.