an introduction to activstudio professional edition
TRANSCRIPT

An Introduction to ACTIVstudio Professional Edition
(Version 2.5 for Windows)
Training Manual

2 An Introduction to ACTIVprimary2 USA DRAFT COPY © 2006 Promethean Technologies Group Ltd
TP-1512-UK Version 3
Copyright © 2006 Promethean Technologies Group Limited. All rights reserved.
If this guide is distributed with ACTIVstudio software, it may only be reproduced for use within the institution to which the software is licensed. For use outside of your institution, no part of this guide may be reproduced, transmitted, stored in a retrieval system or translated into any other language without the prior permission of Promethean Technologies Group Limited. Please note that the content in this guide is protected under copyright law, even if it is not distributed with software that includes an end user licence agreement.
Please remember that existing artwork or images that you may want to include in your ACTIVstudio projects may be protected under copyright law. The unauthorized incorporation of such material into
your Flipcharts could be a violation of the rights of the copyright owner; please be sure to obtain any permission required.
Although every care has been taken in the compilation of this training manual, Promethean Technologies Group Limited accepts no responsibility for errors or omissions, or for damages resulting from the use of information contained within the following pages.
Trademark acknowledgements Promethean Technologies Group Limited would like to acknowledge the following trademark material:
Microsoft Word is a registered trademark of the Microsoft Corporation. Microsoft Word © 1983-2001 Microsoft Corporation. All rights reserved. Google™ search engine and Google Image Search™ search service are trademarks of Google Technology.
COPYRIGHT INFORMATION

An Introduction to ACTIVstudio Professional Edition © 2006 Promethean Technologies Group Ltd i
CONTENTS
PART ONE
Introduction to ACTIVstudio PE 1-1
ACTIVstudio toolboxes 1-3
PART TWO
Functionality 2-1
PART THREE
ACTIVstudio tutorials introduction 3-1
Tutorial One Pens, erasers and text 3-3
Tutorial Two Text, shapes and colours 3-13
Tutorial Three The Resource Library 3-21
Tutorial Four ‘Rub and reveal’ and spotlights 3-35
Tutorial Five Grids 3-41
Tutorial Six Working with images 3-51
Tutorial Seven Numbers 2-61
Tutorial Eight Links 3-75
Tutorial Nine Clocks, tickertapes and dice 3-85
Tutorial Ten Organising pages and more presentation techniques 3-99

ii An Introduction to ACTIVstudio Professional Edition © 2006 Promethean Technologies Group Ltd

An Introduction to ACTIVstudio Professional Edition © 2006 Promethean Technologies Group Ltd 1-1
PART ONE Introduction to ACTIVstudio PE
What is ACTIVstudio PE?Can you imagine a lesson where every student is focused and motivated? ACTIVstudio PE helps achieve this by creating a collaborative classroom environment in which teachers have the opportunity to produce and deliver truly interactive teaching materials for their students.
ACTIVstudio PE has been developed by listening to the needs of the teachers and learners who use our software. With improved functionality, it is now easier than ever to create visually exciting lessons.
What are the benefits of using ACTIVstudio PE?• Tailor lessons to suit the learning needs of individual students• Support a broad range of learning styles• Bring the subject matter alive with interaction• Help students visualise key concepts with imagery• Encourage students to construct meaning through play and
experimentation• ACTIVstudio PE makes learning fun!

1-2 An Introduction to ACTIVstudio Professional Edition © 2006 Promethean Technologies Group Ltd
PART ONE
What is an ACTIVpen?An ACTIVpen is a self powered device that communicates with your PC through an ACTIVboard or an ACTIVslate. It’s best to think of the ACTIVpen as a mouse - it performs the same left and right-click functions and it enables you to control the cursor in the same way.
Pen movementTo move the cursor, hold the ACTIVpen near to the
ACTIVboard and gently slide the pen nib over the board’s surface. When not presenting at the board,
you can use the ACTIVpen in conjunction with an ACTIVslate.
Barrel buttonThe barrel button has the same function as a right mouse button. It can be used when holding the ACTIVpen close to the board (less than one centimetre away).
Pen nibPressing firmly on the board’s surface with the tip of the pen has the same effect as left-clicking with the mouse.
Pressing firmly on the board’s surface and then moving the pen is equivalent to a left-click while simultaneously moving the mouse - ‘clicking and dragging’.
If you normally open applications by double-clicking with the mouse, two rapid taps or pushes on the ACTIVboard will have the same effect. You may need to practise to get the right pressure and speed.
1-2 An Introduction to ACTIVstudio Professional Edition © 2006 Promethean Technologies Group Ltd
PART ONE

An Introduction to ACTIVstudio Professional Edition © 2006 Promethean Technologies Group Ltd 1-3
PART ONE
As you explore ACTIVstudio, you’ll encounter a range of toolboxes. Each toolbox has a different purpose, enabling you to access key editing functions or specific features.
In part two, we’ll introduce you to each of the ACTIVstudio toolboxes.
1. Main Toolbox
2. Power Tools Toolbox
3. Flipchart Toolstrip
4. Object Edit Toolbox
5. Page Edit Toolbox
6. Quick Select Toolbox
ACTIVstudio toolboxes
2 3
4
5
6
An Introduction to ACTIVstudio Professional Edition © 2006 Promethean Technologies Group Ltd 1-3
PART ONEACTIVstudio toolboxes
1

1-4 An Introduction to ACTIVstudio Professional Edition © 2006 Promethean Technologies Group Ltd

An Introduction to ACTIVstudio Professional Edition © 2006 Promethean Technologies Group Ltd 2-1
PART TWO Functionality
PART TWO Functionality
About the Main toolboxThe Main toolbox contains a wide range of tools for creating, selecting and manipulating objects in your Flipcharts. Additional tools can be freely added to the Main toolbox. This means that as you become more familiar with ACTIVstudio, you will be able to customise the Main toolbox to include the tools of your choice.
The Main toolbox can be minimised or moved around the screen. It also floats on top of other running Windows applications, allowing you to use the features of ACTIVstudio in conjunction with other software.
1. Title Bar
2. Main Menu Button
3. Roll Up/Down Button
4. Roll In/Out Button
5. Flipchart Button
6. Annotate Over Desktop
7. Pen Width Selector
8. Colour Palette
9. Marquee Select Tool
10. Pen Tool
11. Highlighter Tool
12. Eraser Tool
13. Text Tool
14. Clear Tool
15. Undo
16. Redo
17. Reveal Tool
18. Spotlight Tool
19. Camera Tool
20. Page Zoom
21. Power Tools
22. Recognition Tool
23. Fill Tool
24. ACTIVote

2-2 An Introduction to ACTIVstudio Professional Edition © 2006 Promethean Technologies Group Ltd
PART TWO Functionality
A closer look at the Main toolboxTitle BarClick and drag to reposition the Main toolbox.
Main Menu ButtonAccess the key functions of ACTIVstudio - customise your toolboxes and settings.
Roll Up/Down Button Hide the Main toolbox to free up screen space.
Roll Out/In Button Display and hide the Shortcut bar.
Flipchart Button Show or hide your Flipchart, and alternate between ACTIVstudio and Windows applications. Create a new Flipchart if there isn’t one already open.
Annotate Over DesktopMake notes or draw on top of your Windows applications.
Pen Width SelectorClick and drag to select different sizes for your Pen, Highlighter or Eraser tools.
Colour PaletteSelect colours for your Flipcharts and the objects within them.
Marquee Select ToolClick an object to select it, or click and drag to select multiple objects; selected objects can be edited, moved and manipulated.
Pen ToolAnnotate, write or draw on your Flipchart page.
Highlighter ToolGive emphasis to text, annotations and images with a translucent pen.
Eraser ToolUsed to hide objects on the Flipchart.
Text ToolAdd titles, labels or notes to your Flipchart.
Clear ToolRemove items and certain Flipchart properties.
UndoReverse the last edit or command performed in your Flipchart.
RedoRe-apply an action reversed by the Undo Tool.
Reveal ToolMask the Flipchart and then reveal it from one of four directions - top, bottom, left, or right.
Spotlight ToolMask all but the specified spotlight area.
Camera ToolCapture images from your screen to use in your Flipcharts.
Page ZoomMagnify or reduce the Flipchart page.
Power ToolsAccess a selection of special tools through the Power Tools toolbox (see page 2-3).
Recognition Tool Recognises and converts freehand shapes into smooth geometric shapes, and handwriting into editable text.
Fill ToolFill a specific area with a colour of your choice.
ACTIVote Access the ACTIVote Session box to begin using your ACTIVote devices.

An Introduction to ACTIVstudio Professional Edition © 2006 Promethean Technologies Group Ltd 2-3
PART TWO Functionality
About the Power Tools toolbox
Title BarClick and drag to reposition the Power Tools toolbox. Close the toolbox by clicking the cross.
Ruler ToolLaunch a graduated, re-sizable on-screen ruler.
Compass ToolDraw circles or arcs of any colour, radius or line thickness.
Protractor ToolLaunch a graduated, scaleable on-screen protractor.
Dice ToolGenerate random numbers for games and numeracy activities.
Fraction Creator ToolboxCreate fractions for your maths activities.
Floating CalculatorPerform mathematic calculations.
Floating KeyboardLaunch an on-screen keyboard and output text to the Flipchart page.
Web BrowserAccess the internet during your ACTIVstudio session.
TickertapeCreate a customisable scrolling text message.
Notes and PointersAttach editable Post-it style notes or pointers to your screen.
XY OriginPlaces a rotation point on the Flipchart page. All objects can be rotated around this point
Flipchart RecorderRecord the actions performed on a Flipchart page and play them back as an animation.
ClockDisplay a clock or counter on the screen.
You can launch the Power Tools toolbox by clicking on the Power Tools button in the Main toolbox.
The Power Tools toolbox contains a range of additional useful tools. It can also be customised to include your preferred selection of up to twenty tools.
A closer look at the Power Tools toolbox

2-4 An Introduction to ACTIVstudio Professional Edition © 2006 Promethean Technologies Group Ltd
PART TWO Functionality
About the Flipchart toolstripThe Flipchart toolstrip provides you with a special range of tools to assist in the organisation and navigation of your Flipcharts.
A closer look at the Flipchart toolstripNext PageNavigate forwards through your Flipchart pages. Add a new page to the end of the Flipchart.
Previous PageNavigate backwards through your Flipchart pages.
Page SelectorView thumbnails of your Flipchart pages and select a page to work on.
Page OrganiserArrange your Flipchart pages.
Page ResetRevert to the last saved version of the Flipchart page - only effective on a previously saved Flipchart.
Resource LibraryAccess a wide range of resources to use in your presentations.
Scroll BarMove up and down the Flipchart page.

An Introduction to ACTIVstudio Professional Edition © 2006 Promethean Technologies Group Ltd 2-5
PART TWO Functionality
About the Page Edit toolbox
Launch the Page Edit toolbox by double-clicking on the Flipchart page. Use the tools to change the properties of the Flipchart page and edit the structure of your Flipcharts.
A closer look at the Page Edit toolboxTitle BarClick and drag to reposition the Page Edit toolbox. Close the toolbox by clicking the cross.
CutRemove the current Flipchart page and place it into ACTIVstudio’s memory so that it can be pasted elsewhere.
CopyCopy the current Flipchart page into ACTIVstudio’s memory so that it can be pasted elsewhere.
PasteInsert the last cut or copied page into the Flipchart.
DeleteDelete the current Flipchart page.
PropertiesEdit the appearance and the identifying properties of the Flipchart page.
Page ResetRevert to the last saved version of the Flipchart page.
DuplicateDuplicate the current Flipchart page.

2-6 An Introduction to ACTIVstudio Professional Edition © 2006 Promethean Technologies Group Ltd
PART TWO Functionality
About the Quick Select toolbox
The Quick Select toolbox allows you to access a useful range of tools while you are presenting at your ACTIVboard. To display the Quick Select toolbox right-click on a page or object.
The Quick Select toolbox can be configured to include up to 12 tools of your choice. You may find that you use some tools more than others while presenting at the ACTIVboard; the Quick Select toolbox provides you with immediate access to these tools.
A closer look at the Quick Select toolboxTitle BarClick and drag to reposition the Quick Select toolbox. Close the toolbox by clicking the cross.
Marquee Select ToolClick an object to select it, or click and drag to select multiple objects; selected objects can be edited, moved and manipulated.
Pen ToolAnnotate, write or draw on your Flipchart page.
Highlighter ToolGive emphasis to text, annotations and images with a translucent pen.
Eraser ToolRemove all or part of an annotation object.
Fill ToolChange the colour of your Flipcharts and the objects within them.
Menu ButtonEnables instant access to a range of options via menus (see next page).
Note: You may need to alter your toolbox settings before the Quick Select toolbox will display. Click on the Main Menu button. Select Studio Settings...>Toolboxes and select the Show Quick Select toolbox checkbox.

An Introduction to ACTIVstudio Professional Edition © 2006 Promethean Technologies Group Ltd 2-7
PART TWO Functionality
Right-click menuThe right-click menu offers you a wide range of options, from changing the layer of an item to copying and pasting items on your page. Just right-click on the page to see the right-click menu. If the Quick Select toolbox has been activated, right-clicking will open the Quick Select toolbox. You can still access the right-click menu by selecting the Menu button in the Quick Select toolbox.

2-8 An Introduction to ACTIVstudio Professional Edition © 2006 Promethean Technologies Group Ltd
PART TWO Functionality
About the Object Edit toolbox
You can access a wide range of editing options through the Object Edit toolbox. The Object Edit toolbox is launched when you double-click on an object. It automatically displays options relevant to the selected object. The Object Edit toolbox shown here is for annotation objects.
A closer look at the Object Edit toolboxTitle BarClick and drag to reposition the Object Edit toolbox. Close the toolbox by clicking the cross.
CutRemove the selected object and place it into ACTIVstudio’s memory so that it can be pasted elsewhere.
CopyCopy the selected object into ACTIVstudio’s memory so that it can be pasted elsewhere.
PasteInsert the last cut or copied object into the Flipchart.
DeleteRemove the selected object from your Flipchart page.
PropertiesEdit the appearance and the identifying properties of the selected object.
Text RecognitionConvert freehand writing into editable text.
Shape RecognitionConvert freehand shapes into smooth geometric shapes.
Increase Object SizeIncrease the size of the selected object.
Decrease Object SizeDecrease the size of the selected object.
DuplicateDuplicate the selected object.

An Introduction to ACTIVstudio Professional Edition © 2006 Promethean Technologies Group Ltd 2-9
PART TWO Functionality
About the Resource LibraryThe Resource Library is full of useful assets that you can use in your Flipcharts. From images and sounds to complete activities and curriculum specific Flipcharts, we’ve provided you with thousands of ready made resources to get you started.
To open the Resource Library, click on the Resource Library button in the Flipchart toolstrip.
A closer look at the Resource LibraryMenu ButtonAccess the Resource Library Help files and reveal options to change how the Resource Library is displayed.
Shared Resource LibraryResources added to this folder can be shared with other users. The folder also contains the resources supplied with the software.
My Resource LibraryAccess folders where you can store resources for your personal use.
Search For ResourcesSearch for specific resources by type or keyword. The resources supplied with ACTIVstudio have already been categorised so just enter your search criteria and click the Quick Search button.
Other Resource FolderShows the contents of the folder selected with the Browse to Another Folder button. Enables you to toggle between the Shared Resources folders, the My Resources folders and the contents of the folder you have selected.
Browse to Another FolderBrowse for resources on your own computer. Click on this button to navigate through your folders.
Roll Up/Down ButtonHide the Resource Library to free up screen space.
Show/Hide Resource TreeDisplay and hide the Resource Tree window.
Resource TreeDisplay the selected category’s sub-categories.
Thumbnails PanelPreview a small image of each resource before adding it to your Flipchart.

2-10 An Introduction to ACTIVstudio Professional Edition © 2006 Promethean Technologies Group Ltd
PART TWO Functionality
Shared/My ResourcesWhen you view the Shared Resource Library or My Resource Library, the buttons shown to the right become available for selection.
Clicking a button allows you to view all the resources of a specific type within your chosen library. To view text resources, click the Shared/My Text button. To view grid resources, click the Shared/My Grids button. To view resources containing a combination of resource types, click the Shared/My Collections button.
1. Shared/My Collections2. Shared/My Backgrounds3. Shared/My Grids4. Shared/My Images5. Shared/My Text6. Shared/My Shapes7. Shared/My Lines8. Shared/My Annotations9. Shared/My Sounds10. Shared/My Flipcharts11. Shared/My Flipchart Pages12. Shared/My Tickertapes13. Shared/My Notes and Pointers14. Shared/My Videos15. Shared/My Web Links16. Shared/My Activities
By selecting the options below, you can change the way in which annotations are added to, and displayed on, the Flipchart page.
TransparentMake the background of your chosen image transparent when it’s dragged onto the Flipchart page.
Drag and DropSelect a thumbnail and drag it onto the Flipchart page.
Rubber StampSelect a thumbnail and drag it onto the Flipchart page to position the image. Click on the Flipchart page again to place additional copies of the object in the position of your cursor.
Grow ObjectsSelect a thumbnail, click on the Flipchart page and then drag diagonally to size the object.

An Introduction to ACTIVstudio Professional Edition © 2006 Promethean Technologies Group Ltd 3-1
PART THREEPART THREEACTIVstudio tutorials
introduction
About the tutorialsThis training manual has been developed to introduce the main features of ACTIVstudio PE in a structured way. Although confident computer users are encouraged to delve in and experiment for themselves, this manual has been designed to help fill in the gaps missed by experimentation alone. Less confident computer users, in the meantime, can use the manual to learn the software from scratch. When you have completed all ten tutorials you will be able to produce exciting, interactive Flipcharts and hopefully, the manual will give you the confidence to go on and explore further.
What is an ACTIVstudio Flipchart?‘Flipchart’ is the name we give to an ACTIVstudio presentation. Like a traditional paper-based flipchart, an ACTIVstudio Flipchart can contain as many pages as you wish to create. However, unlike a traditional Flipchart, your ACTIVstudio Flipcharts can contain much more than just notes and images. You can incorporate a number of different media forms into your Flipcharts including sound files, videos, animations, interactive activities and web-links – and the extensive Resource Library is full of items for you to use if you don’t have the time to source your own. The only real limit is your own imagination!
More training ideasAn advanced training manual is available to download: http://www.prometheanworld.com/uk/html/training/manuals.shtml
Online, interactive tutorials are also available:http://www.prometheanworld.com/uk/html/training/tutorials.shtml
You can also book training courses online:http://www.prometheanworld.com/uk/html/training
A number of forums are available online:http://www.prometheanworld.com/uk/forum
Hundreds of free Flipchart are available to provide you with ideas for new activities:http://www.prometheanworld.com/uk/resources

3-2 An Introduction to ACTIVstudio Professional Edition © 2006 Promethean Technologies Group Ltd
PART THREEAccreditation
Professional User AccreditationWhen you have finished these tutorials you can have your achievement officially recognised by applying for Professional User accreditation. This is the first of three accreditation levels available with the ACTIVstudio software.
To reach Professional User Level, you need to fulfil two criteria:
1 Complete the tutorials in this book.The first page of each tutorial in this book includes a checklist of activities. Tick the activities as you do them and then date the sheet when you have finished the tutorial. Send us the summarised Accreditation Form on page 3-109 with the completion dates of each tutorial.
2 Put your ACTIVstudio skills into practice.You can show us evidence that you have done this in one of two ways. Either send us the Flipchart(s) you create with these tutorials or create your own Flipchart. If you choose to create your own Flipchart, it can be in a subject area of your choice and should be a minimum of five pages.
It must include at least one example of the following:Use of the Camera toolLayered objectsTexts in different fontsA page backgroundAn embedded hyperlink or a link objectA gridUse of the Snap to Grid featureAt least one page should include Page Notes explaining the features you have incorporated and, if you wish, how the Flipchart should be used.
Submit the Accreditation Form and your Flipchart(s) in the following way:
By post:Send your Flipchart, on floppy disk or CD, along with your Accreditation Form to the following address:
The Training ManagerPromethean Technologies Group LtdPromethean House, Lower Philips Road,Blackburn, Lancashire,BB1 5TH United Kingdom
By email:If you prefer, send an email to [email protected] and we will forward the Accreditation Form in Microsoft Word format. You can then email the completed document back to us, along with your finished Flipchart(s).
For further details about the accreditation process, please see the Training section of our UK website: http://www.prometheanworld.com/uk/html/training/index.shtml

An Introduction to ACTIVstudio Professional Edition © 2006 Promethean Technologies Group Ltd 3-3
PART THREETutorial One
Pens, erasers and text
PART THREETutorial One
Pens, erasers and text
1. Launching ACTIVstudio for the first time
2. Creating a new Flipchart
3. Using the Pen tool
4. Choosing a pen colour and pen width
5. Using the Pen Width Selector
6. Selecting and editing multiple objects
7. Using the Undo tool
8. Using the Redo tool
9. Using the Clear tool
10. Using the Eraser tool
11. Understanding the Eraser tool
12. Deleting an object using the Flipchart Bin
13. Deleting an object through the Object Edit toolbox
14. Duplicating objects using the Object Edit toolbox
15. Using the Text tool and applying text properties
16. Changing text properties
17. Using the Highlighter tool
18. Saving the Flipchart
Date completed

3-4 An Introduction to ACTIVstudio Professional Edition © 2006 Promethean Technologies Group Ltd
PART THREETutorial OnePens, erasers and text

An Introduction to ACTIVstudio Professional Edition © 2006 Promethean Technologies Group Ltd 3-5
PART THREETutorial One
Pens, erasers and text
1 Launching ACTIVstudio for the first timeTo launch ACTIVstudio, double-click the icon on your desktop or find ACTIVstudio via the start menu.
How the software starts will depend on whether you are running the software for the first time or if settings have been changed.
Some information windows may open, for the moment click OK on any of these windows.
The Main toolbox will now appear indicating that ACTIVstudio is now running.
The Main toolbox contains all the ACTIVstudio’s core tools and settings. The Shortcut bar, a third columns of icons alongside the Main toolbox, may be open. The Shortcut bar contains links to various files and applications. It will be explained in greater detail in Tutorial Seven. You can open or close the Shortcut bar by clicking on the Roll In/Roll Out button.
This tutorial starts with opening the ACTIVstudio program and goes on to describe the basic tools required to produce Flipcharts. You will produce and edit objects and be introduced to the Text tool. This is an important tutorial as it covers the basics of the software.

3-6 An Introduction to ACTIVstudio Professional Edition © 2006 Promethean Technologies Group Ltd
PART THREETutorial OnePens, erasers and text
It is possible to hide the Flipchart at any time by clicking on the same button again.
2 Creating a new FlipchartIn the Main toolbox click on the Flipchart button to create a new full-screen Flipchart.
Clicking on the Flipchart button once more will reopen the Flipchart.

An Introduction to ACTIVstudio Professional Edition © 2006 Promethean Technologies Group Ltd 3-7
PART THREETutorial One
Pens, erasers and text
3 Using the Pen toolBefore attempting anything too adventurous, it’s worth getting to grips with the basic tools and functions. Most of these can be accessed through the Main toolbox.
Notice that one tool in the Main toolbox - the Marquee Select tool - has a faint chequered background and a noticeable square border; this indicates that it is the active tool.
The Marquee Select tool, as its name suggests, is used predominantly for selecting objects.
However, as you don’t yet have anything on your page to select, activate the Pen tool instead. To activate a tool, you just click on it.
Now you can write the letter a on your Flipchart page.
4 Choosing a pen colour and pen widthNotice that one colour in the Main toolbox is surrounded by a blue border indicating that it is currently the active colour. Change the colour of the Pen tool to red by clicking on the red colour swatch (if red is already active, you can choose another colour instead).
The pen width can also be changed – just click on the number 6 in the Main toolbox. Add the letter b to the Flipchart page to see your new settings take effect.
5 Using the Pen Width SelectorSelect another bright colour and drag the Pen Width Selector to the right. This is just another way of changing the width of the Pen tool.
When you have increased the Pen tool’s width, you can add the letter c to the Flipchart page.

3-8 An Introduction to ACTIVstudio Professional Edition © 2006 Promethean Technologies Group Ltd
PART THREETutorial OnePens, erasers and text
8 Using the Redo toolConversely, the Redo tool re-applies actions undone with the Undo tool.
Experiment by clicking a number of times on the Undo tool, followed by a number of clicks on the Redo tool.
9 Using the Clear toolThere are other ways to delete content.
Click on the Clear tool and select Clear Page from the pop-up menu.
This is the quickest and easiest way to clear the screen. The other options in the pop-up menu allow you to clear specific elements from the Flipchart page.
Note: To bring back work that you’ve cleared, just use the Undo tool to reverse the Clear Page action - never forget the power of the Undo tool!
6 Selecting and editing multiple objectsSelect the Marquee Select tool and ‘click and drag’ over all three letters.
How to click and drag:1. Click on the page, to the top-left of the items you
want to select.2. Hold the mouse button/the ACTIVpen’s tip down
and move diagonally to the bottom right of all the objects you want to select.
3. Let go of the mouse button or release the ACTIVpen from the board. Pick-up Boxes will surround the letters, showing that they have been selected.
Select a different colour and pen width. Any changes you make will now be applied to all the letters.
7 Using the Undo toolDon’t worry about making mistakes at this stage as most changes made in ACTIVstudio can be reversed.
One click on the Undo tool reverses your last action – try this now. Each click reverses a further edit so it’s possible to undo to the point where you first opened the Flipchart.

An Introduction to ACTIVstudio Professional Edition © 2006 Promethean Technologies Group Ltd 3-9
PART THREETutorial One
Pens, erasers and text
10 Using the Eraser toolNow select blue from the colour palette and a pen width of 8. Re-write the letters abc on the Flipchart page.
The Eraser tool can be used to hide objects on a Flipchart. Select the Eraser tool and hover the cursor over the page. Like the Pen tool, the Eraser tool has a pre-defined thickness that can be adjusted as required with the Pen Width Selector. Like the Pen tool, the Eraser tool has a pre-defined thickness that can be adjusted as required with the the Pen Width Selector. Make sure a thickness of 20 is selected.
Use the Eraser tool in the same way as you would use the Pen tool and erase the letter a.
If you now increase the Eraser’s width to 50 you’ll see that you can erase a greater amount from the page at one time.
Erase the letter c.
11 Understanding the Eraser toolIt is important to understand that the Eraser tool functions quite differently from how you might expect. Although the tool appears to be removing items from the page, it actually works by painting a new object – the same colour as the page background - over the top of them.
To illustrate this point, choose the Marquee Select tool and click the area you have just erased, when its selected Pick-up Boxes should appear around the erase object.
12 Deleting an object using the Flipchart BinTo permanently delete an object, select and drag it into the Flipchart Bin.
Click on the erase object over the letter c and drag it to the Flipchart Bin. The bin lid will open when you can release the object.
Note: There may be multiple ‘erase objects’ on the page if you didn’t use one continuous movement when erasing.

3-10 An Introduction to ACTIVstudio Professional Edition © 2006 Promethean Technologies Group Ltd
PART THREETutorial OnePens, erasers and text
14 Duplicating objects using the Object Edit toolboxWith the Marquee Select tool, ‘click and drag’ from top left to bottom right to select all three letters again. Double-click on one of the letters, taking care to click on the line that makes the letter.
Click on the Duplicate button a number of times. Each time you click on the Duplicate button, a new copy of the letters will be added to the Flipchart page.
15 Using the Text tool and applying text propertiesAlthough you can write on the Flipchart page with the ACTIVpen, typing is also possible. Select the Text tool and click somewhere in the middle of your page.
Notice that a cursor appears in the page to indicate where the text will be positioned when you type.
Now type abc.
Note: If you’re working at an ACTIVboard, please see Tutorial Seven for guidance on using ACTIVstudio’s Floating Keyboard.
13 Deleting an object through the Object Edit toolboxThe Delete button can also be used to delete objects; this can be found in the Object Edit toolbox.
To launch this toolbox, choose the Marquee Select tool and double-click on the object that you want to remove – in this case the ‘erase object’ covering letter a.
Now click on the Delete button.
The Text Edit toolbox enables you to select different text styles, such as colour, size and effects. Choose a different font and larger text size from each of the drop-down menus.
Finally, click the Italic and Shadow buttons, and select a different colour from the Set Text Colour drop-down menu. If you wish, you can also underline the text.
When you have finished, click in the cross in the Text Edit toolbox to finalise the text.

An Introduction to ACTIVstudio Professional Edition © 2006 Promethean Technologies Group Ltd 3-11
PART THREETutorial One
Pens, erasers and text
16 Changing text propertiesYou can also change the style of the text after it’s been added to the page.
Select the Marquee Select tool and double-click on the abc text.
The Object Edit toolbox will appear again and from it you should select the Edit Text button.
Now click the All button from the Text Edit toolbox. This selects the text enabling you to experiment with different text styles again if you wish.
Note: If you increase the font size, there’s a chance that the text will spill over onto more than one line. If this happens, drag out the right-hand Alter Object Width Pick-up Box. This should bring the text up onto one line.
Close the Text Edit toolbox.
17 Using the Highlighter toolClick on the Highlighter tool then select a colour you like.
You can use the Highlighter tool to highlight the letters.
Draw a line over the letters on your page to highlight them.

3-12 An Introduction to ACTIVstudio Professional Edition © 2006 Promethean Technologies Group Ltd
PART THREETutorial OnePens, erasers and text
18 Saving the FlipchartClick on the Main Menu button, the top left button in the Main toolbox.
Select Flipchart>Save To. You’ll be given the option of where to save your Flipchart: to your My Flipcharts folder, to your Shared Flipcharts folder, or to another location of your choice.
In this instance, select My Flipcharts - it’s a good idea to keep all your Flipcharts saved together in this folder so that you can easily find them.
The Save a Flipchart box should appear. Type myTutorials 1 as the File name and then click the Save button.
Hopefully, you now feel comfortable using a selection of ACTIVstudio’s core tools.
Click on the Main Menu button and select Exit to quit ACTIVstudio.
Alternatively you can click on the cross to close the application.

An Introduction to ACTIVstudio Professional Edition © 2006 Promethean Technologies Group Ltd 3-13
PART THREETutorial Two
Text, shapes and colours
1. Opening a previously saved Flipchart
2. Re-saving a Flipchart with a different file name
3. Creating a new Flipchart page
4. Using the Text tool to create a page heading
5. Using the Pen Modifier toolbox
6. Filling a shape with colour
7. Customising the Colour Palette
8. Filling the page background with colour
9. Using Pen Modifier tools to create a custom shape
10. Grouping individual objects
11. The Point to Point tool
12. Filling a shape
Date completed
PART THREETutorial Two
Text, shapes and colours

3-14 An Introduction to ACTIVstudio Professional Edition © 2006 Promethean Technologies Group Ltd
PART THREETutorial TwoText, shapes and colours

An Introduction to ACTIVstudio Professional Edition © 2006 Promethean Technologies Group Ltd 3-15
PART THREETutorial Two
Text, shapes and colours
1 Opening a previously saved FlipchartLaunch ACTIVstudio as you did in Tutorial One. When the Main toolbox appears on the screen, click on the Main Menu button and select Flipchart>Open From>My Flipcharts. You can then select myTutorial_1 and press OK. The Flipchart that you worked on in the first tutorial should now open.
2 Re-saving a Flipchart with a different file nameBefore making any changes to the Flipchart, you need to save it with a different name; this will protect the work you’ve done so far, preventing you from overwriting it by mistake. Click on the Main Menu button and select Flipchart>Save To>My Flipcharts, then type myTutorial 2 as your new file name.
At any time, you can select the Main Menu button then Flipchart>Save to save your work.
This tutorial develops the skills learned in the first tutorial. A number of different ways of creating objects are described. The tutorial also shows how you can colour objects using the Colour Palette and the Fill tool.
3 Creating a new Flipchart pageCurrently your Flipchart has just one page. You can confirm this by selecting the Page Selector button from the Flipchart toolstrip.
A new panel will appear on your page. This panel will contain thumbnail images of your Flipchart pages. This panel can appear along the sides or the bottom of the page.
To move it you will need to use right-click. If you are using an ACTIVpen hold it a few millimetres off the board and click the barrel button. It’s worth practising this a few times.
Using right-click/barrel button click on the side or bottom of the screen where you want the panel to move.

3-16 An Introduction to ACTIVstudio Professional Edition © 2006 Promethean Technologies Group Ltd
PART THREETutorial TwoText, shapes and colours
4 Using the Text tool to create a page headingSelect the Text tool. You will now create a page heading, so click in the top left-hand corner of the page to designate where the heading will begin.
Type Creating shapes and exploring the Fill tool as your heading. If necessary drag out the text box so that all the text fits neatly on the page.
At this point there’s just one thumbnail image in the panel. Select the Next Page button (the brown arrow in the Flipchart toolstrip).
This will add a new page to the end of your Flipchart - notice the appearance of an additional thumbnail image in the Page Selector Panel.
The red border around the thumbnail image shows that Page 2 is the active page. At any time, you can change the active page by clicking on a different thumbnail image.
Make sure that Page 2 is active and then click the Page Selector button again to return to a normal page view.

An Introduction to ACTIVstudio Professional Edition © 2006 Promethean Technologies Group Ltd 3-17
PART THREETutorial Two
Text, shapes and colours
5 Using the Pen Modifier toolboxSelect the Pen tool and draw a freehand square on the page. Although the Pen tool enables you to draw freely, the end result is often uneven and lacking precision. A number of tools are available to help you create neater shapes.
A number of pre-defined shapes and pen effects are available to you in the Pen Modifier toolbox. This can be launched by clicking on the Pen tool with the right mouse button or the barrel button. Select the Rectangle tool and then choose a new colour and pen width as if you were using the Pen tool in its normal mode.
To place and size the shape, just click and drag on the page. You can make the shape as square or as rectangular as you like.
6 Filling a shape with colourNow select the Fill tool and choose any colour from the Colour Palette. Click in the centre of the new rectangle shape to fill it with your new colour.

3-18 An Introduction to ACTIVstudio Professional Edition © 2006 Promethean Technologies Group Ltd
PART THREETutorial TwoText, shapes and colours
7 Customising the Colour PaletteAt the moment, you have a choice of just eight colours. Click the Main Menu button and select Toolbox Customise>Colours>24 and the Color Palette will offer a more comprehensive set of swatches to choose from.
8 Filling the page background with colourChanging the colour of the page background is similar to filling a shape. Select a new colour, but this time, click outside the shapes, on the page background. The background will be filled with the new colour.
Before moving on to the next step, refill the page background with white.
9 Using Pen Modifier tools to create a custom shapeThe Pen Modifer toolbox contains three straight line tools. These tools can be used to create shapes, for example a triangle.
Select black as the colour and a line width of 8.
Select the Horizontal Line tool and draw the base line of your triangle. Make sure you draw your triangle in a clear space on the Flipchart page.
Select the Straight Line tool and draw the remaining adjacent sides of the triangle.
Remember, the Undo tool is there to fix any mistakes.

An Introduction to ACTIVstudio Professional Edition © 2006 Promethean Technologies Group Ltd 3-19
PART THREETutorial Two
Text, shapes and colours
10 Grouping individual objectsAt this stage, you can select, move and edit the individual lines of your triangle independently of each other. By grouping its lines, the triangle can be selected with one click and then moved, scaled or rotated in exactly the same way as the shapes in the Pen Modifier toolbox.
Close the box by clicking the cross on its top right-hand corner.
If you click and drag on any line which makes up the triangle the whole triangle can be moved as required.
To group the triangle, use the Marquee Select tool to drag over the three lines.
When Pick-up Boxes surround the entire shape, double-click on one of the lines, click on the Properties button in the Object Edit toolbox and then select Grouped from the box that appears.
11 The Point to Point toolThe Point to Point tool offers another way to draw shapes using straight lines. We will draw a triangle using this tool.
Select the Point to Point tool and click on the page where you want the triangle to begin. A line will now follow the cursor as you move it around the page.
Click on another point where you want to place the next corner of the triangle. A line will be fixed on the page connecting your two points.

3-20 An Introduction to ACTIVstudio Professional Edition © 2006 Promethean Technologies Group Ltd
PART THREETutorial TwoText, shapes and colours
Select the Fill tool and choose a new colour from the Colour Palette. Click inside the triangle and it should fill with the colour you have selected.
12 Filling a shape
Click on a third point and another line will be created to connect up all the points.
Click back on the first point and the triangle will close. When a shape is closed, the line will no longer follow the cursor around the page.
The Undo tool is available if you make any mistakes.
Save the Flipchart and Exit ACTIVstudio.

An Introduction to ACTIVstudio Professional Edition © 2006 Promethean Technologies Group Ltd 3-21
PART THREETutorial Three
The Resource Library
1. Loading a previously saved Flipchart and creating a new page
2. Copying an item from one Flipchart page to another
3. Editing a text object
4. Opening the Resource Library
5. Using Tool tips
6. Accessing the Shared Resource Library
7. Using the Resource Tree to view resources
8. Choosing a Shared image from the Resource Library
9. Adding items from the Resource Library to the Flipchart page
10. Roll up the Resource Library
11. Using the Object Edit toolbox to duplicate an image
12. Resize and rotate an object
13. Using the Delete button
14. Configuring the Recognition tool
15. Producing editable text objects with the Recognition tool
16. Selecting a shared background
Date completed

3-22 An Introduction to ACTIVstudio Professional Edition © 2006 Promethean Technologies Group Ltd
PART THREETutorial ThreeThe Resource Library

An Introduction to ACTIVstudio Professional Edition © 2006 Promethean Technologies Group Ltd 3-23
PART THREETutorial Three
The Resource Library
1 Loading a previously saved Flipchart and creating a new pageLaunch ACTIVstudio, load myTutorial 2.
Use the Next Page tool to create a new page at the end of the Flipchart.
Save the Flipchart to My Flipcharts as myTutorial 3.
2 Copying an item from one Flipchart page to anotherClick the Page Selector button to check that the Flipchart has three pages and then click on the second thumbnail image to make Page 2 the active Flipchart page. Although you’ll be working on Page 3, you first need to copy the heading from Page 2. Of course, you could type the new heading from scratch, but this method will ensure that the heading appears in the same place on each page.
Make sure that the Marquee Select tool is active and then simply drag the Page 2 heading from the main Flipchart page directly onto the Page 3 thumbnail image.
Select Copy Here from the pop-up menu that appears.
ACTIVstudio is supplied with a folder containing a large number of resources, including images, grids and backgrounds. They are found in the Resource Library. In this tutorial we show how the Resource Library works. This tutorial also covers the Recognition tool. When using a pen at the whiteboard the Recognition tool converts your handwritten text into type.

3-24 An Introduction to ACTIVstudio Professional Edition © 2006 Promethean Technologies Group Ltd
PART THREETutorial ThreeThe Resource Library
3 Editing a text objectYou should now be on page 3.
Now you need to edit the heading. Double-click on the heading. The Object Edit toolbox will open.
Select the Edit Text button to open the Text Edit toolbox.
To select all the text click on the All button in the Text Edit toolbox. Now type in your new heading:
Exploring the Resource Library
As you type, the old heading will be replaced.
Close the Text Edit toolbox.
Page 3 becomes the active page - indicated by the red border surrounding the thumbnail image. Click on the Page Selector button again to return to a normal view of Page 3.

An Introduction to ACTIVstudio Professional Edition © 2006 Promethean Technologies Group Ltd 3-25
PART THREETutorial Three
The Resource Library
4 Opening the Resource Library Click on the Resource Library button in the Flipchart toolstrip. The Resource Library window opens.
The Resource Library is very important part of the ACTIVstudio software so it is worth spending some time looking at what’s available.
5 Using Tool tipsIf you hover over each of ACTIVstudio’s tools and buttons with your cursor and then pause, a small boxed description called a Tool tip will appear. Tool tips can be useful for reminding you of a button’s function.
6 Accessing the Shared Resource LibraryWhen the software was installed thousands of resources were placed in the Shared Resource Library ready for you to use. Click on the Shared Resource Library button to find these resources.
7 Using the Resource Tree to view resourcesThe buttons on the left-hand side of the Resource Library can be used to select the type of resource you want.
Click on the Shared Images button. A few small images (thumbnails) may appear in the adjacent thumbnail panel.
To find more images use the Resource Tree. If the Resource Tree isn’t visible click on the Show Resource Tree button.
In the Resource Tree you can see all the folders that contain shared images. The plus symbol by some folders indicates that more folders are contained inside it. When you click on a folder in the Resource Tree its contents are displayed in the thumbnail panel.
Experiment with the folders and files in the Shared Resource Library to get a feel of how it works.

3-26 An Introduction to ACTIVstudio Professional Edition © 2006 Promethean Technologies Group Ltd
PART THREETutorial ThreeThe Resource Library
9 Adding items from the Resource Library to the Flipchart page
At the bottom of the Resource Library window there are four options.
Make sure Transparent is selected, this will make the background of the image transparent.
Make sure Drag and Drop is also selected rather than Rubber Stamp or Grow Objects.
Find an insect you like. Click and drag it with your mouse or pen onto the Flipchart page.
If it’s in your way you can move the Resource Library by clicking and dragging its title bar.
Drag two more insect images onto the Flipchart page.
10 Roll up the Resource LibraryWhen the images are in place on your page, move the Resource Library to the top left-hand corner of the page and then click on the Roll Up button. In its rolled-up state, the Resource Library takes up less screen space; however, it still remains accessible. Just click on the Roll Up button again next time you want to use the Resource Library.
8 Choosing a Shared image from the Resource Library Now we will find some insect images.
Make sure Shared Images button is still selected.
In the Resource Tree find the Animals folder. Open the Animals folder by clicking on the plus button.
Click on the Insects folder. The contents of the folder is displayed in the thumbnail panel.
Hopefully there are names under each images, if there isn’t click on the Menu button at the top left of the Resource Library window and select ‘Labels’ from the drop-down menu.

An Introduction to ACTIVstudio Professional Edition © 2006 Promethean Technologies Group Ltd 3-27
PART THREETutorial Three
The Resource Library
11 Using the Object Edit toolbox to duplicate an imageNow with the Marquee Select tool, double-click in the centre of one of the images.
When the Object Edit toolbox is launched, click on the Duplicate button twice so that you have three copies of the image on the page. Drag each new instance of the image into its own space.
12 Resize and rotate an objectUsing some of the Object Edit toolbox’s other tools, you can change the appearance of the scene.
Double click on one of the three duplicated images this will open the Object Edit toolbox.
Click on the Increase Size button a number of times – the image will get bigger.
Now double click on another image. This time select the decrease Object Size button in the Object Edit toolbox - the image will get smaller. Now all three images are different sizes.
Select any of the images on your page with the Marquee Select tool. Change its facing direction by dragging the Rotate Object Pick-up Box.

3-28 An Introduction to ACTIVstudio Professional Edition © 2006 Promethean Technologies Group Ltd
PART THREETutorial ThreeThe Resource Library
13 Using the Delete buttonDouble-click on any other image and delete it with the Delete button – you will be left with four images on the page.
Note: You could use the Flipchart Bin to delete the image. However, when you’re presenting at the board, it’s usually much easier to reach the Object Edit toolbox, which is always launched next to the selected image, than the Flipchart Bin, which may be a few steps away.
14 Configuring the Recognition tool Click on the Recognition tool in the Main toolbox. The Recognition toolbox opens.
The on/off button should be green, if it’s red click on the button to switch recognition on.
In the bottom left-hand corner of the Recognition toolbox is the Recognition Mode button.
This has four settings. Click on the button to change the options:
letter recognition
shape recognition
number recognition
letter and number recognition.
Click on the button until you see the letter recognition icon. By default, the tool should already be set to recognise UK English.
Finally the slider should be set to the halfway position; this sets the delay that will occur before handwriting is converted to text.
Don’t close the Recognition toolbox just yet.
Note: The Recognition feature only works when you have an ACTIVboard or ACTIVslate connected.
An Introduction to ACTIVstudio Professional Edition © 2006 Promethean Technologies Group Ltd 3-29
PART THREETutorial Three
The Resource Library
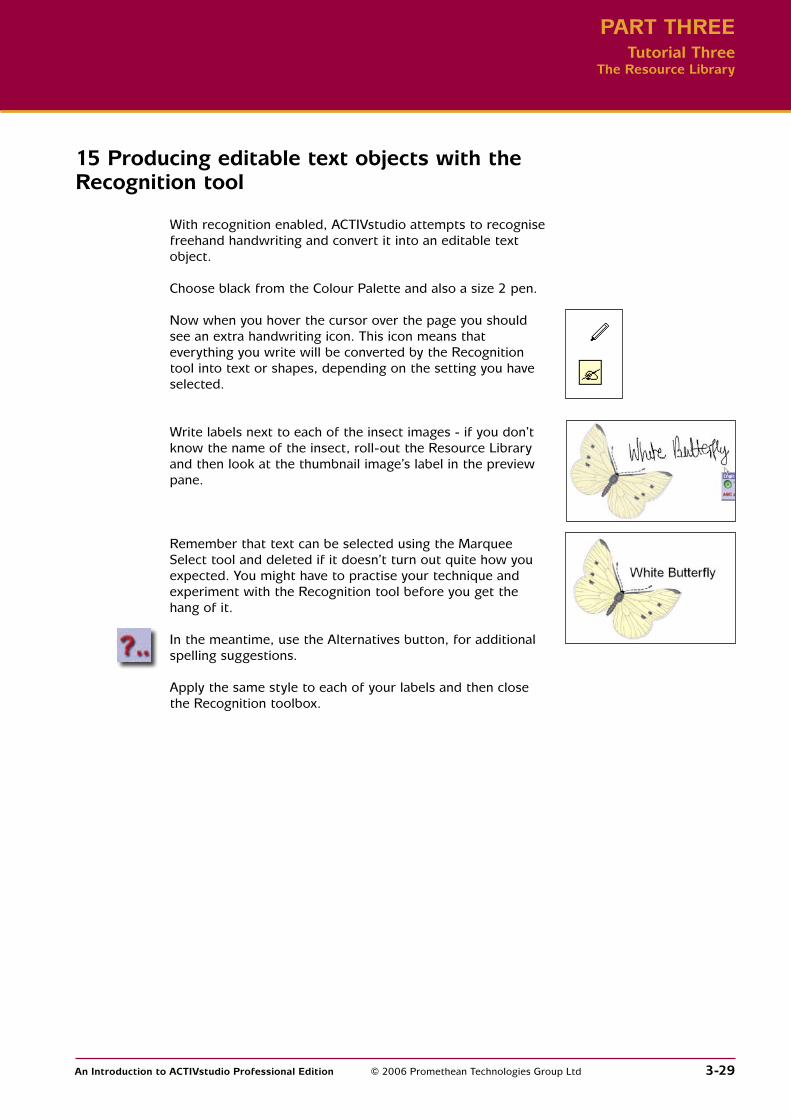
15 Producing editable text objects with the Recognition tool
With recognition enabled, ACTIVstudio attempts to recognise freehand handwriting and convert it into an editable text object.
Choose black from the Colour Palette and also a size 2 pen.
Now when you hover the cursor over the page you should see an extra handwriting icon. This icon means that everything you write will be converted by the Recognition tool into text or shapes, depending on the setting you have selected.
Remember that text can be selected using the Marquee Select tool and deleted if it doesn’t turn out quite how you expected. You might have to practise your technique and experiment with the Recognition tool before you get the hang of it.
In the meantime, use the Alternatives button, for additional spelling suggestions.
Apply the same style to each of your labels and then close the Recognition toolbox.
Write labels next to each of the insect images - if you don’t know the name of the insect, roll-out the Resource Library and then look at the thumbnail image’s label in the preview pane.

3-30 An Introduction to ACTIVstudio Professional Edition © 2006 Promethean Technologies Group Ltd
PART THREETutorial ThreeThe Resource Library
16 Selecting a shared background
Click the Shared Backgrounds button followed by Other from the Resource Tree. You can use the thumbnails to preview the different backgrounds in this category.
Sometimes backgrounds do not fill the page.
Double-click on the new page background and then click the Properties button to open the Properties and Actions window. Make sure that Appearance is selected in the left-hand pane of the Properties and Actions window.
Make sure that Drag and Drop is selected. Choose an appropriate background for your picture of insects. Click and drag it onto the page. We have used a background called ‘sky and clouds’.
You can make your background fit the page, if necessary, by selecting Stretch Fit from the ‘Tile fit’ drop-down menu.
Open the Resource Library if its not already open.

An Introduction to ACTIVstudio Professional Edition © 2006 Promethean Technologies Group Ltd 3-31
PART THREETutorial Three
The Resource Library
Close the Properties and Actions window.
You can now save your Flipchart and quit ACTIVstudio.

3-32 An Introduction to ACTIVstudio Professional Edition © 2006 Promethean Technologies Group Ltd
PART THREETutorial ThreeThe Resource Library

An Introduction to ACTIVstudio Professional Edition © 2006 Promethean Technologies Group Ltd 3-33
PART THREETutorial Four
‘Rub and reveal’ and spotlights
1. Loading a previously saved Flipchart
2. Duplicating a Flipchart page
3. Clearing a page background
4. The ‘rub and reveal’ technique
5. Using the Spotlight tool - presenting a rub and reveal
6. Using the Eraser tool - presenting a rub and reveal
Date completed
PART THREETutorial Four
‘Rub and reveal’ and spotlights

3-34 An Introduction to ACTIVstudio Professional Edition © 2006 Promethean Technologies Group Ltd
PART THREETutorial Four‘Rub and reveal’ and spotlights

An Introduction to ACTIVstudio Professional Edition © 2006 Promethean Technologies Group Ltd 3-35
PART THREETutorial Four
‘Rub and reveal’ and spotlights
1 Loading a previously saved FlipchartOpen ACTIVstudio, load myTutorial 3, and before you do anything else, re-save the Flipchart as myTutorial 4.
Page 4 will use much of the same content as Page 3, including some of the images and labels. However, thankfully you don’t have to create everything again from scratch; you don’t even have to copy and paste as it’s much easier to duplicate the entire page and then delete the bits you don’t need.
2 Duplicating a Flipchart pageClick on the Page Selector button in the Flipchart toolstrip and then make sure that Page 3 is the active page by clicking on its thumbnail.
Double-click on the main page 3 background, and then select the Duplicate Page button from the Page Edit toolbar.
When you do this, a fourth thumbnail image will appear.
Click on it to make Page 4 the active page and then click the Page Selector button again to return to a normal page view.
Creating new Flipcharts is an important part of ACTIVstudio but equally important are the tools and skills required when presenting at the board. This tutorial introduces these tools through an example Flipchart.

3-36 An Introduction to ACTIVstudio Professional Edition © 2006 Promethean Technologies Group Ltd
PART THREETutorial Four‘Rub and reveal’ and spotlights
3 Clearing a page backgroundNow remove the background from the page – the reason for this will soon become apparent. Click on the Clear tool and select Clear Background from the menu.
Instead of leaving the background white, choose the Fill tool and a light blue colour from the Colour Palette. Click on the Flipchart page to fill it light blue.
4 The ‘rub and reveal’ techniqueClick on the Pen tool and then select the same colour as your background – light blue. Making sure that your pen width is thick enough, use the Pen tool to cover up the labels.
You should now save your Flipchart.
5 Using the Spotlight tool - presenting a rub and revealNot all of the tools in ACTIVstudio are used to create Flipcharts – some have been designed purely to aid presentation.
One such tool is the Spotlight tool. Select it and then choose Circular Spotlight from the menu.
You can now highlight specific areas of the screen by moving the cursor over the Flipchart page - if the spotlight area is too large or too small, click and drag on the Flipchart page to adjust it.
You can highlight each of the images in turn. You could encourage your students to come up to the ACTIVboard and write their own freehand label next to the image - just click on the Spotlight tool again when you want to cancel it.

An Introduction to ACTIVstudio Professional Edition © 2006 Promethean Technologies Group Ltd 3-37
PART THREETutorial Four
‘Rub and reveal’ and spotlights
6 Using the Eraser tool - presenting a rub and revealYou can show your students whether their answers are right or wrong.
Select the Eraser tool. Erase both the students’ labels and also the light blue label masks that you used to cover up your original labels.
The original labels won’t be erased as they’re on a different layer; the Eraser tool is only active on the front layer.
You can exit ACTIVstudio when you’re ready – make sure that you don’t save again or the next time you present the Flipchart, you’ll see that your doodles have been saved onto the page.
Note: Annotations are placed on the top layer in ACTIVstudio - labels created with the Recognition tool are placed onto the middle layer.

3-38 An Introduction to ACTIVstudio Professional Edition © 2006 Promethean Technologies Group Ltd

An Introduction to ACTIVstudio Professional Edition © 2006 Promethean Technologies Group Ltd 3-39
PART THREETutorial Five
Grids
PART THREETutorial Five
Grids
1. Loading a previously saved Flipchart
2. Creating a grid
3. Changing the size of a grid
4. Enabling Snap to Grid
5. Creating labels
6. Lining up objects to a grid
7. Adding resources to the Resource Library
8. Configuring the Recognition tool - language
9. Using the Recognition tool
10. Turning off grid visibility
11. Using the Reveal tool during a presentation
Date completed

3-40 An Introduction to ACTIVstudio Professional Edition © 2006 Promethean Technologies Group Ltd
PART THREETutorial FiveGrids

An Introduction to ACTIVstudio Professional Edition © 2006 Promethean Technologies Group Ltd 3-41
PART THREETutorial Five
Grids
1 Loading a previously saved FlipchartLaunch ACTIVstudio, open myTutorial 4 and add a new page to the end of the Flipchart. When you’ve done this, check that your Flipchart has five pages and then re-save it as myTutorial 5.
2 Creating a gridFor this activity, you need a grid background. However, instead of drawing your own grid from scratch, you can use one of ACTIVstudio’s ready made grid backgrounds.
Open the Resource Library and make sure that ACTIVstudio is set to search within the Shared Resource Library.
Select the Shared Grids section – you’ll see thumbnail images of all the grids available to you within this category. Find ‘grid 1 x 1’ and drag it from Shared Grids onto the new Flipchart page.
Close the Resource Library.
3 Changing the size of a gridCurrently the grid units are quite small; however, the size of the grid can be adjusted to suit your individual needs. For this exercise, you need to create a much larger grid.
To increase the grid size, double-click on the Flipchart page. Launch the Page Edit toolbox and then repeatedly click the Increase Object Size button until only four horizontal lines are displayed on the page.
Here you extend the work covered in Tutorial Four. Much of this tutorial concentrates on the use of grids. As well as being useful in maths, grids can be useful when positioning things on your Flipchart.

3-42 An Introduction to ACTIVstudio Professional Edition © 2006 Promethean Technologies Group Ltd
PART THREETutorial FiveGrids
4 Enabling Snap to GridThe first advantage of using a grid from the Resource Library is that you can then apply the Snap to Grid feature.
Double-click on the grid background and notice that the Snap to Grid tool is now available to you in the Page Edit toolbox.
The Snap to Grid tool can be toggled on and off; this means that when the button is pressed, the function becomes active, and when the button is depressed it is made inactive again.
Click on the Snap to Grid tool now to activate it.
Close the Page Edit toolbox.
5 Creating labelsSelect the Recognition tool.
Click on the Font Selector button in the Recognition toolbox. The Font window will open choose a size of 72 and then click OK.
Write the word spring with your ACTIVpen or mouse. When you have finished writing the handwritten word should be converted to normal text.
Write the other seasons in turn.
Close the Recognition tool.
Note: Remember the Recognition tool only works when a board or slate are connected to the computer.

An Introduction to ACTIVstudio Professional Edition © 2006 Promethean Technologies Group Ltd 3-43
PART THREETutorial Five
Grids
6 Lining up objects to a gridUsing the Marquee Select tool, drag the spring label so that it’s lined up with the uppermost horizontal grid line and the far left vertical grid line. Notice what happens - the label ‘snaps’ to the lines of the grid.
Now using the far left vertical line as your guide, line up the remaining labels, one under the other, with each label on its own horizontal line.
7 Adding resources to the Resource LibraryYou may be able to use these labels again in future projects so it would be a good idea to add them to your Resource Library.
Click on the Resource Library button in the Flipchart toolstrip and then select the My Resource Library button; this is where you should store any resources that you create or define yourself.
Click on the My Text button and then drag the first label into the area to the right of it.

3-44 An Introduction to ACTIVstudio Professional Edition © 2006 Promethean Technologies Group Ltd
PART THREETutorial FiveGrids
8 Configuring the Recognition tool - languageAt the moment, the Recognition tool is probably configured to recognise UK English, but it can be set to recognise a wide range of languages.
Choose the User Input option, and look under ‘Handwriting Recognition Language’. It will probably say English(UK). Whatever the current setting select French from the drop-down menu.
You’ll be prompted to enter a name for your label. Type spring in the first space, and then type label and also seasons into the description area below - it’s always worth adding a description or keywords so that ACTIVstudio has a better chance of locating your resource during a keyword search.
Close the Resource Library when you’ve added the remaining labels to it.
To check this, click on the Main Menu button then select Studio Settings.
Note: If necessary you can create a new folder for storing files in the Resource Tree. Right-click anywhere in the Resource Tree panel and a small drop-down window will open. Select the option to create a new folder, naming it appropriately.

An Introduction to ACTIVstudio Professional Edition © 2006 Promethean Technologies Group Ltd 3-45
PART THREETutorial Five
Grids
9 Using the Recognition toolNow when you use the Recognition tool and enable handwriting recognition, ACTIVstudio will convert your freehand writing to French characters; however, note that it will not provide translations for you.
Choose a shade of red from the Colour Palette and add four more labels to the Flipchart page:
printempsétéautomnehiver
These are the French equivalents of the English seasons.
Using the Marquee Select tool, line-up the French labels in a column to the right of your first column and use the grid as a guide. Take care to ensure that the labels are scrambled and not lined-up next to their English equivalents.
Close the Recognition toolbox.
Finally, illustrate the page with some seasonal images from the Resource Library.
Click on Shared Images and then search through the many categories available in the Resource Tree until you find a suitable image for each season. You may have to dig deep to find the image you want so take this opportunity to see what categories are available.
When you have finished, reset the Recognition tool to UK English before moving on.

3-46 An Introduction to ACTIVstudio Professional Edition © 2006 Promethean Technologies Group Ltd
PART THREETutorial FiveGrids
10 Turning off grid visibilityNow add the final touches to your Flipchart before it can be presented to your class.
Double-click on the Flipchart page and choose the Grid Mask tool from the Page Edit toolbox.
This is another toggle tool so the function will remain active until the button is clicked again. When you mask a grid it becomes invisible, but it doesn’t cease to function.
As a final touch, why not use the Fill tool to colour the page background pale blue or pale yellow?
When you are happy with the way your page looks, save the Flipchart.

An Introduction to ACTIVstudio Professional Edition © 2006 Promethean Technologies Group Ltd 3-47
PART THREETutorial Five
Grids
11 Using the Reveal tool during a presentationYou can liven up the presentation of your Flipchart by using another of ACTIVstudio’s presentation tools - the Reveal tool.
When you activate it, you’ll see that the screen is blacked out.
You’ll also notice that when you hover over the screen with your cursor, it changes to indicate the direction in which the Reveal tool will work - clicking in the top section and then dragging downwards reveals the screen from the top, while clicking in the bottom section and dragging upwards will reveal the screen from the bottom.
You could then invite your students to drag the French labels to their English equivalents. Each label will snap to the grid, even though you’ve made it invisible.
When you want to cancel the Reveal function, click on the Reveal tool again.
Finally exit ACTIVstudio without saving any changes.
Drag the reveal from left to right until the English labels are visible - stop just before you reveal your French labels. You could ask your class if they know the names of the seasons in French before revealing the remainder of the Flipchart.

3-48 An Introduction to ACTIVstudio Professional Edition © 2006 Promethean Technologies Group Ltd

An Introduction to ACTIVstudio Professional Edition © 2006 Promethean Technologies Group Ltd 3-49
PART THREETutorial Six
Working with images
PART THREETutorial Six
Working with images
1. Opening a previously saved Flipchart
2. Creating a heading
3. Using shared images
4. Using the aspect sizer
5. Moving objects between layers
6. Adding the Colour Picker tool to the Main toolbox
7. Re-defining a colour swatch using the Colour Picker tool
8. Using the Page Zoom tool to magnify an image
9. Using the Page Scale button to restore the page view
10. Selecting a specific colour from your image
11. Using the Fill tool to fill a text object
12. Saving text in Page Notes
13. Adding text from Page Notes to the Flipchart page
14. Using the Page Reset button
Date completed

3-50 An Introduction to ACTIVstudio Professional Edition © 2006 Promethean Technologies Group Ltd
PART THREETutorial SixWorking with images

An Introduction to ACTIVstudio Professional Edition © 2006 Promethean Technologies Group Ltd 3-51
PART THREETutorial Six
Working with images
1 Opening a previously saved FlipchartLaunch ACTIVstudio, open myTutorial_5 and then create a new page at the end of your Flipchart.
Use the Page Selector tool to check that the Flipchart has six pages and then resave the Flipchart as myTutorial_6.
2 Creating a headingSelect the Text tool and create a heading for the page. First, choose a suitable font size and then type World Map. If necessary, bring the heading up on to one line by dragging the top right hand Pick-up Box to the right.
Close the Text Edit window.
3 Using shared imagesOpen the Resource Library and navigate to Shared Resource Library>Shared Images>Maps.
Make sure that the Transparent and Drag and Drop options are checked.
If you have problems finding this map, you can use any other multi-coloured map. Later on in the tutorial we will be adding the names of the oceans to the map, so make sure there is space to do this.
Close the Resource Library.
Drag the map labelled ‘world continents’ onto the Flipchart page.
Images from the Resource Library can be edited on the Flipchart page. An example Flipchart is developed during this tutorial which illustrates a number of ways of adapting images.
Note: If you cannot see the images’ names in the thumbnail panel, click on the Resource Library’s Menu button and select ‘Labels’.

3-52 An Introduction to ACTIVstudio Professional Edition © 2006 Promethean Technologies Group Ltd
PART THREETutorial SixWorking with images
4 Using the aspect sizerSelect the image and look carefully at the Pick-up Boxes – you’ll see that the bottom right hand Pick-up Box is similar to all the others except it has a diagonal line running through it.
This is the Size Object (Keep Aspect) Pick-up Box. Using it ensures that the aspect ratio of an image is maintained when scaled – in other words, the image retains its proportions.
Click and drag this Pick-up Box diagonally to increase the size of the map.
By moving the image and using this Pick-up Box, fill the page as much as possible with the map image.

An Introduction to ACTIVstudio Professional Edition © 2006 Promethean Technologies Group Ltd 3-53
PART THREETutorial Six
Working with images
5 Moving objects between layersNow that it’s been enlarged, some of the map image may obscure parts of the heading. To overcome this, you can move the image onto the layer behind the heading.
Double-click on the image and then click on the Properties button in the Object Edit toolbox. Select Appearance and change the Layer from Middle to Bottom.
6 Adding the Colour Picker tool to the Main toolboxYou can now colour the background of your page. Previously you’ve used the colours in the Colour Palette as your fill colour; however, this limits your choice of colours.
Click on the Main Menu button then select Toolbox Customise>Tool Store and drag the Colour Picker tool from the Tool Store into the Main toolbox.
Move the map image and the heading so they neatly fill the page.
Close the Page Properties window.
Click Finish to close the Tool Store.

3-54 An Introduction to ACTIVstudio Professional Edition © 2006 Promethean Technologies Group Ltd
PART THREETutorial SixWorking with images
7 Re-defining a colour swatch using the Colour Picker toolNow you can assign any colour from the Flipchart page to the Color Palette.
When you select the colour picker, you’ll see that it already has a colour assigned to it – the swatch with the blue border in the Colour Palette; at the moment, if you use the colour picker, this colour will be overwritten when you choose your new colour from the Flipchart page.
Select the luminous green colour swatch. You have three other greens available to you in the Colour Palette so it isn’t too important that you keep this particular shade.
When the Colour Picker tool is active, the cursor changes to show a cross hair when you move it over the map.
The colour picker selects the colour directly under the cross hair when you click on the page. If you have the world continents map, click on Antarctica, otherwise click on one of the pale colours on your map. The new colour will replace the green swatch and become the active colour.
Experiment with the Fill tool. Try filling one of the continents or the page background with the new colour.
You may keep your changes if you like them, or click on the Undo tool to take you back to where you started before moving on.
Note: if you ever overwrite a colour by mistake, just click on the Main Menu button and select Studio Settings>Toolboxes>Reset all Toolboxes. Be aware, however, that you will also reset all your toolboxes when you do this

An Introduction to ACTIVstudio Professional Edition © 2006 Promethean Technologies Group Ltd 3-55
PART THREETutorial Six
Working with images
Select the Page Zoom tool and then click on the page and hold. After a second or two, the magnification of the Flipchart page will start to increase.
8 Using the Page Zoom tool to magnify an image
9 Using the Page Scale button to restore the page viewA right-click and hold (or barrel-click and hold), as opposed to a left-click and hold, zooms the page back out. However, a quick method of decreasing the scale again is to select the Page Scale button from the title bar, followed by Original Scale.
10 Selecting a specific colour from your imageThe Page Zoom tool is useful when you want to select a very specific colour from an image. Zoom in on a dark line on your map – we have chosen to zoom in on a letter in the word Africa - and use the Colour Picker tool to select the line’s colour.
Take the page back to its original size by clicking on the Page Scale button and selecting Original Scale again.

3-56 An Introduction to ACTIVstudio Professional Edition © 2006 Promethean Technologies Group Ltd
PART THREETutorial SixWorking with images
11 Using the Fill tool to fill a text objectSelect the Fill tool and then colour the page heading with the new colour by clicking on each of the words. Make sure that you click exactly on the letters or you may unintentionally flood the Flipchart page with colour. The colour may only change slightly, depending on the colour you picked.
12 Saving text in Page NotesClick the Page Notes button, which is next to the Page Scale button in the Flipchart’s title bar.
Type a vertical list of the oceans in the window:
Atlantic OceanPacific OceanArctic OceanAntarctic OceanIndian Ocean
If the window obscures your view of the map, move it to the top right-hand corner of the page. If necessary, resize the window by dragging its edges.
Close the Page Notes window. Now you should save the Flipchart – note that Page Notes are automatically saved with the Flipchart.

An Introduction to ACTIVstudio Professional Edition © 2006 Promethean Technologies Group Ltd 3-57
PART THREETutorial Six
Working with images
13 Adding text from Page Notes to the Flipchart pageWhen presenting your Flipchart, you can open your Page Notes again – notice that ACTIVstudio remembers the position you chose for the Page Notes window.
Highlight the first ocean label and add it to the page by clicking the Add to Page button at the bottom of the Page Notes window.
Repeat this for each of the labels and drag each label to its correct position on the map.
Note: If you select the required text you can drag it onto the page.

3-58 An Introduction to ACTIVstudio Professional Edition © 2006 Promethean Technologies Group Ltd
PART THREETutorial SixWorking with images
14 Using the Page Reset buttonWhen your students have had a minute to take in the name and position of each ocean, click the Page Reset button in the Flipchart toolstrip; this reverts to the previously saved version of the Flipchart page - a page with no labels.
Your students could then be invited up to the board to place and line up the labels for themselves.
Close your Flipchart and exit ACTIVstudio.
Remember not to save the Flipchart again as this will save the labels in their current position on the page.

An Introduction to ACTIVstudio Professional Edition © 2006 Promethean Technologies Group Ltd 3-59
1. Opening a previously saved Flipchart
2. Ruler options
3. Drawing a triangle using the ruler
4. Using the protractor
5. Creating filled segments
6. Using Snap to Grid
7. Creating axes
8. Adding the XY Origin icon to the Power Tools toolbox
9. Positioning the XY Origin icon
10. Drawing a triangle
11. Duplicating the triangle
12. Masking the grid
13. Rotating the triangle
14. Other number tools - an overview
Date completed
PART THREETutorial Seven
Numbers

3-60 An Introduction to ACTIVstudio Professional Edition © 2006 Promethean Technologies Group Ltd
PART THREETutorial Seven Numbers

An Introduction to ACTIVstudio Professional Edition © 2006 Promethean Technologies Group Ltd 3-61
PART THREETutorial Seven
Numbers
Launch ACTIVstudio and open myTutorial_6 from My Flipcharts. Create a new page at the end of the Flipchart and then use the Page Selector to check that there are seven pages. Re-save the Flipchart as myTutorial_7.
Type the heading Working with numbers.
Close the Text Edit toolbox.
1 Opening a previously saved Flipchart
2 Ruler optionsClick on the Power Tools icon in the Main toolbox
Select the Ruler tool(cm) from the Power Tools toolbox.
When selected, a ruler will appear on the page.
Practise rotating the ruler and notice that the angle of rotation – the angle between the ruler and the horizontal - is displayed in the centre of the ruler.
Hover the cursor over the bottom half of the ruler and the cursor will change to a cross.
In this tutorial we look at a range of tools used for measuring, drawing and working with numbers. Any teacher who is interested in creating well organised Flipcharts, and anyone who uses numbers or lines in their lessons, will be interested in the tools studied in this tutorial.
Hover the cursor over the top half of the ruler and the cursor will change to the rotation symbol.
This is the symbol for picking up and moving the ruler. Move the ruler to the centre of the page.

3-62 An Introduction to ACTIVstudio Professional Edition © 2006 Promethean Technologies Group Ltd
PART THREETutorial Seven Numbers
Click on the Increase Object Size button and the ruler length will extend.
Click on the Decrease Object Size button and the ruler length will decrease.
Click on the Delete icon (the bin) and the ruler will disappear.
3 Drawing a triangle using the ruler Re-select the ruler (cm).
Close the Power Tools toolbox. Double-click on the ruler and alter the length to just over 16cm. Close the Maths toolbox.
Place the ruler in the bottom centre of the Flipchart page.
Select the Pen tool from the Main toolbox (size 2 and red). Hover the cursor over the top edge of the ruler. The cursor will change to a pencil with a line above it, indicating that you can draw a straight line.
Starting at 0, draw a line 16cm long using the edge of the ruler as a guide.
Double-click on the ruler and you will get a Maths toolbox.

An Introduction to ACTIVstudio Professional Edition © 2006 Promethean Technologies Group Ltd 3-63
PART THREETutorial Seven
Numbers
Keeping the 0 of the ruler on the beginning of the original line, rotate the ruler anticlockwise by 40 degrees. (The number in the centre of the ruler will change as you rotate it).
Draw another line 16cm long as before.
Move the ruler and position it so that the 0 mark is on the end of the second line you have drawn. Rotate the ruler so that it closes the triangle; draw the third side of the triangle.
Drag the ruler to the Flipchart Bin. Label the three vertices of the triangle, A, B and C.

3-64 An Introduction to ACTIVstudio Professional Edition © 2006 Promethean Technologies Group Ltd
PART THREETutorial Seven Numbers
4 Using the protractorFrom the Power Tools toolbox, select the 180º protractor (Half).
Close the Power Tools toolbox.
5 Creating filled segmentsMove the protractor so that the key point (0) is over vertex B. Double-click on the protractor to open the Maths toolbox.
Click on the Decrease Object Size button a number of times until the protractor is around the size shown in the image.
Close the Maths toolbox.
Now, with the Pen tool, you should be able to draw a line around the curved edge of the protractor in the same way you did with the ruler.

An Introduction to ACTIVstudio Professional Edition © 2006 Promethean Technologies Group Ltd 3-65
PART THREETutorial Seven
Numbers
When you finish the line, however, a filled segment will automatically be created.
Move the protractor and draw two more segments in the other angles, changing the pen colour each time.
When you have finished, drag the Protractor to the Flipchart Bin.
Maths teachers like to create filled segments in this way so they can move the segments together to show how the three angles of a triangle add up to 180°.

3-66 An Introduction to ACTIVstudio Professional Edition © 2006 Promethean Technologies Group Ltd
PART THREETutorial Seven Numbers
6 Using Snap to GridGo on to the next Flipchart page. Open the Resource Library.
Click on the Shared Resource Library button. Select the Shared Grids icon then, in the Resource Tree select the Shared Grids folder. Drag ‘grid 1 x 1’ onto the page.
Close the Resource Library.
Double-click on the grid to launch the Page Edit toolbox. Click repeatedly on the Increase Object Size button to enlarge the grid until it is approximately 12 x 9 squares.
8 Adding the XY Origin icon to the Power Tools toolboxOpen your Power Tool toolbox and check whether it includes the XY Origin icon.
If not, select Main Menu>Toolbox Customise>Tool Store. Drag the XY Origin icon into the Power Tools toolbox. Click on Finish to close the Tool Store.
7 Creating axesRight-click over the Pen tool to launch the Pen Modifier toolbox.
Using the vertical and horizontal straight lines (red; size 4), draw vertical and horizontal axes which cross as near to the centre of the page as possible.
Close the Pen Modifier toolbox.

An Introduction to ACTIVstudio Professional Edition © 2006 Promethean Technologies Group Ltd 3-67
PART THREETutorial Seven
Numbers
9 Positioning the XY Origin iconClick on the XY Origin tool in the Power Tools toolbox.
Ensure the Marquee Select tool is selected and then drag the XY Origin tool to where your axes meet.
Close the Power Tools toolbox.
10 Drawing a triangleUsing the Point to Point tool from the Pen Modifier toolbox, draw a right angled triangle in the top right quarter of the page.
Two of your lines should be on top of the grid lines.
Fill the triangle with green. Close the Pen Modifier toolbox.
Click on the Marquee Select tool and drag a selection box around both the fill colour and the triangle.
Double-click on the triangle to launch the Object Edit toolbox. Click on the Properties icon to open the Properties and Actions box. Select Identification and tick the Grouped box.
Close the window.
11 Duplicating the triangleDouble-click on the triangle to launch the Object Edit toolbox.
Click on Duplicate to create an identical triangle.
Position the second triangle exactly over the top of the first. Close the Object Edit toolbox.

3-68 An Introduction to ACTIVstudio Professional Edition © 2006 Promethean Technologies Group Ltd
PART THREETutorial Seven Numbers
12 Masking the gridDouble-click on a blank area of the page to launch the Page Edit toolbox. Select Mask Grid. This will hide the grid but not remove it. Close the Page Edit toolbox.
13 Rotating the triangleSelect the triangle and rotate it 180º using the Rotate Object Pick-up Box.
Notice that, instead of rotating around its own centre point, the triangle rotates around the XY Origin icon placed at the origin of the axes. This allows you to rotate the triangle into the different quadrants of the axes.
The original triangle will still be in the top right quarter.
The two triangles need labels. You could type the label on your computer but this can be inconvenient when you are at the board.
Select the Text tool and click to the side of the first triangle.
Open the Power Tools toolbox.
Click on the Floating Keyboard icon. Now text can be added by clicking with the pen on the keyboard to create the text Original Triangle. Now click to the side of the other triangle and label it Rotated Triangle.

An Introduction to ACTIVstudio Professional Edition © 2006 Promethean Technologies Group Ltd 3-69
PART THREETutorial Seven
Numbers
14 Other number tools - an overviewIn the Power Tools toolbox, there are three remaining tools designed specifically to help you work with numbers: the Fraction Creator toolbox, the floating calculator and the Compass tool.
The fraction creator is a simple way to create typed fractions.
Open the Power Tools toolbox and click on the Fraction Creator button.
A new window will open.
Write the number 1 in the top box and the number 2 in the lower box.
Click on the Add to Flipchart Page button and the fraction will appear on the Flipchart.
The fraction will use the last font selected using the Text tool.
Delete the fraction from the page and close the Fraction Creator toolbox.
Click on the Floating Calculator button now to open the floating calculator.
The floating calculator works in a similar way to the floating keyboard. Click on the numbers with your Activpen or mouse to perform any calculations.
Note that if you right-click on the calculator you can change its appearance or output any numbers to your Flipchart page.
Close the floating calculator.
Note: Fraction recognition will only work if a board or slate is connected to the computer.

3-70 An Introduction to ACTIVstudio Professional Edition © 2006 Promethean Technologies Group Ltd
PART THREETutorial Seven Numbers
The last tool we will look at is the Compass tool. The Compass tool can be used to draw arcs or circles of any colour, size or line thickness.
Click on the Compass icon. A virtual compass will appear on the page. The compass has different sections.
Click and drag on the top of the compass or the point arm to move the compass around the page.
Click and drag the pen arm to rotate the compass without drawing a circle.
Click on the pen holder to open and close the compass points.

An Introduction to ACTIVstudio Professional Edition © 2006 Promethean Technologies Group Ltd 3-71
PART THREETutorial Seven
Numbers
Click and drag on the pen to draw the circle or arc.
When you have finished experimenting with the compass, double-click on the compass image to open the same Maths toolbox you saw with the ruler and the protractor.
Delete the compass from the page using the Delete icon in the Maths toolbox.
Save your changes to the Flipchart. Close the Flipchart and exit ACTIVstudio.

3-72 An Introduction to ACTIVstudio Professional Edition © 2006 Promethean Technologies Group Ltd

An Introduction to ACTIVstudio Professional Edition © 2006 Promethean Technologies Group Ltd 3-73
PART THREETutorial Eight
Links
PART THREETutorial Eight
Links
1. Getting started
2. Using the web browser to define a link object
3. Enable actions
4. Disabling actions
5. Editing the style of a link object
6. Using an image from a website on a Flipchart page
7. Saving an image for use in a Flipchart
8. Drag from the browser onto the page
9. Using the Camera tool
10. Adding a link to an image
11. Copying text from a website to a Flipchart page
12. Linking to sound files
Date completed

3-74 An Introduction to ACTIVstudio Professional Edition © 2006 Promethean Technologies Group Ltd
PART THREETutorial EightLinks

An Introduction to ACTIVstudio Professional Edition © 2006 Promethean Technologies Group Ltd 3-75
PART THREETutorial Eight
Links
1 Getting startedLaunch ACTIVstudio and open myTutorial 7 from My Flipcharts. Create a new page at the end of the Flipchart and then use the Page Selector to check that there are nine pages. Save the tutorial as myTutorial 8 before continuing.
2 Using the web browser to define a link object Click on the Power Tools button in the Main toolbox.
Click on the Web Browser button in the Power Tools toolbox. ACTIVstudio’s web browser will be launched.
In the address bar type www.nasa.gov/home and press Enter on your keyboard.
The NASA website should open.
Click on the Link button and select ‘Add URL as Text Object’. The web address will be added to the Flipchart page.
Close the browser.
This tutorial shows how to link directly to the internet or other applications from the Flipchart by clicking on text or images. You will need to be connected to the internet for part of this tutorial, which uses some of the excellent resources from NASA’s website (www.nasa.gov).

3-76 An Introduction to ACTIVstudio Professional Edition © 2006 Promethean Technologies Group Ltd
PART THREETutorial EightLinks
3 Enable actionsRight-click on the Flipchart page.
If working at an interactive whiteboard, don’t forget that to right-click you need to hover the ACTIVpen over the board and click on the barrel button.
When you right-click on the Flipchart page you will see either:
The Quick Select toolbox
Or the right-click menu
For this tutorial is easier if the Quick Select toolbox is turned off.
If you didn’t see the Quick Select toolbox when you right-clicked on the page, skip the next paragraph.
If the Quick Select toolbox appears on your Flipchart page click on the Main Menu button. Select Studio Settings…>Toolboxes and deselect ‘Show Quick Select toolbox’.
Right-click on the page to open the right-click menu. the ‘Enable Actions’ option should be ticked. If it is not ticked, click on Enable Actions now. You need Enable Actions to be ticked for your links to work.
Move your cursor over the web address and you will see the icon change. This means that your link is active. Click on it and the web page will open in the browser.
Click on the cross in the top right corner of the browser to close it.

An Introduction to ACTIVstudio Professional Edition © 2006 Promethean Technologies Group Ltd 3-77
PART THREETutorial Eight
Links
4 Disabling actionsThe link might not be where you want it to be on your page. At the moment it is difficult to move the link because the NASA website is launched whenever you click on it.
Right-click or barrel-click on the Flipchart page to open the right-click menu and deselect Enable Actions.
You can now move the link to where you require it on the page, without having to worry about accidentally activating the link.
5 Editing the style of a link objectWhen actions are disabled you can also edit the size and the colour of the text.
You may prefer different text altogether.
Double-click on the text.
Select the Edit Text tool.
Click on the ‘All’ button in the Text Edit toolbox. Set the text to 48 and the colour to light green. Type in NASA website.
Close the Text Edit toolbox.
Right-click or barrel click on the Flipchart page to open the right-click menu. Select Enable Actions. Now move the cursor over the text to check the link works.

3-78 An Introduction to ACTIVstudio Professional Edition © 2006 Promethean Technologies Group Ltd
PART THREETutorial EightLinks
6 Using an image from a website on a Flipchart pageTo find an image from the NASA site, click on the NASA web link you have made to launch the website. Highlight the web address and overwrite it with the following address to find an image of the Earth:
http://grin.hq.nasa.gov/IMAGES/SMALL/GPN-2000-001138.jpg
There are various ways to capture this image:- Saving it onto your computer- Dragging it directly onto the flipchart page- Using the Camera tool.We will look at each method in turn.
7 Saving an image for use in a FlipchartYou can save the image from your browser onto your computer.
Right-click or barrel-click on the image and select ‘Save Picture As’.
Give the image a name and place it in a suitable location such as My Images inside your ACTIVstudio folder.
Open the Resource Library.
Click on the Browser to Another Folder button. Find the location of your image in the ‘Browser for Folder’ box.
Click on OK and the folder’s contents will be placed in the Resource Library’s thumbnail panel. The image can be dragged onto the Flipchart page at this stage. However, we are going to explore different ways of aquiring images, so close the Resource Library.

An Introduction to ACTIVstudio Professional Edition © 2006 Promethean Technologies Group Ltd 3-79
PART THREETutorial Eight
Links
8 Drag from the browser onto the pageReopen the web browser. The photo should still be in the web browser. If not, retype the address mentioned previously.
With the browser open on top of the Flipchart, click and drag the image from the browser to the Flipchart.
Note: This feature does not work with all images. Some websites, for example, limit your ability to copy images.
Delete the image from the page before moving on.
A menu will appear when you finish dragging. Select ‘Add Objects’ and the image should appear on the page.
9 Using the Camera toolOpen the internet browser again, making sure you can see the full image.
Click on the Camera tool in the Main toolbox. Select Area from the drop-down menu.

3-80 An Introduction to ACTIVstudio Professional Edition © 2006 Promethean Technologies Group Ltd
PART THREETutorial EightLinks
The Photograph toolbox and a number of Pick-up Boxes should appear over your browser window. Adjust the box so that it covers the part of the image that you want.
Click on the first button in the Photograph toolbox. This will copy the image directly onto your Flipchart page.
Close the browser.
Move and adjust the image so it looks similar to the one below.

An Introduction to ACTIVstudio Professional Edition © 2006 Promethean Technologies Group Ltd 3-81
PART THREETutorial Eight
Links
10 Adding a link to an imageDouble-click on the image and click on the Properties icon to open the Properties and Actions box.
Select Actions in the left panel. From the drop-down menu select ‘Open Document or File’.
In the box type www.nasa.gov/home. Click on OK.
Close the Properties and Actions box.
Now when you click on the image, the NASA website should be launched
Note: From the drop-down menu you can create different sorts of links from a text box or image. Sounds in particular can be a powerful learning tool.
Click on the Set button to open the ‘Create a Link Object’ box.
Note: Website addresses can be very long. It can be easier to copy the web address from the address bar then paste it into the ‘Enter a path/filename or URL to link to… box.’

3-82 An Introduction to ACTIVstudio Professional Edition © 2006 Promethean Technologies Group Ltd
PART THREETutorial EightLinks
Double-click on the text. Select the Edit Text tool then click on the All button. Change the colour of the text to light green. Change the font and the font size if you wish.
With the Fill tool, fill the image around the photo with black.
11 Copying text from a website to a Flipchart pageIt is often possible to copy text from a website. In this case we went to a site at NASA: http//www.nasa.gov/facts. Make sure that ACTIVstudio’s web browser is open on top of the Flipchart.
Select a text by clicking and dragging over it. We have chosen the following text:
‘The acronym “NASA” stands for National Aeronautics and Space Administration’.
There are two ways to copy the text onto the Flipchart.
1. ClickanddragthetextdirectlyfromthewebsiteintotheFlipchart.
2. Right-clickorbarrel-clickonthetextandselectCopy.
Right-clickorbarrel-clickonthepageandselectPaste>From Clipboard>Text.
Take care with where you paste the text as it could paste on the black background of the image. If this is the case, select the text and move it onto the white background so that it is visible.
Close the web browser.

An Introduction to ACTIVstudio Professional Edition © 2006 Promethean Technologies Group Ltd 3-83
PART THREETutorial Eight
Links
12 Linking to sound filesOpen the Resource Library.
Click on Shared Images.
Make sure Shared Images is selected in the Resource Tree.
Scroll through the thumbnail images until you find an image of the Earth in the Resource Library.
Drag this image onto your Flipchart page.
Close the Resource Library.
Resize the image and move it to the bottom left hand corner of the flipchart page.
Double-click on the small ‘earth’ image to launch the Object Edit toolbox.
Select the Properties icon to open the Properties and Actions box. Select Actions in the left-hand panel.
From the drop-down menu select Play Sound and click on Set.
Select ‘cheer kids’ from the list that appears.
Close the Properties and Actions box
When you have finished, make sure that actions are enabled and test your links.
Save the Flipchart and exit ACTIVstudio.

3-84 An Introduction to ACTIVstudio Professional Edition © 2006 Promethean Technologies Group Ltd
PART THREETutorial EightLinks
13 Using ACTIVstudio with another applicationYou already know now how to show or hide your Flipchart. This button is a quick way to access your main desktop and open other applications.
It is sometimes useful to be able to use ACTIVstudio tools with other applications. For example you may want to add annotations over a Word or web page. The Annotate over Desktop button allows you to do this.
Click on the Annotate over Desktop button button now.
Your Flipchart will immediately be hidden and a blue border should appear around your display. With the Marquee Select tool you can now access your desktop as normal. You can open any folders and applications you require. The difference is that now you have access to the tools in ACTIVstudio. You can use the Pen or Highlighter tool or you might like to try one of the Presentation features in ACTIVstudio like the Reveal tool.
Note: The Flipchart tool strip is still available. This means you can create a new page by clicking on the Next Page button.

An Introduction to ACTIVstudio Professional Edition © 2006 Promethean Technologies Group Ltd 3-85
PART THREETutorial Nine
Clocks, tickertapes and dice
1. Designing a game board
2. Use the Camera tool to add resources to the Resource Library
3. Designing a number game
4. The Dice tool
5. The Clock tool
6. Tickertapes
7. Launching tickertapes from a Flipchart page
8. How to play the game
Date completed

3-86 An Introduction to ACTIVstudio Professional Edition © 2006 Promethean Technologies Group Ltd
PART THREETutorial NineClocks, tickertapes and dice

An Introduction to ACTIVstudio Professional Edition © 2006 Promethean Technologies Group Ltd 3-87
PART THREETutorial Nine
Clocks, tickertapes and dice
Launch ACTIVstudio and open myTutorial_8 from My Flipcharts. Create a new page at the end of the Flipchart and then use the Page Selector to check that there are ten pages. Save the tutorial as myTutorial_9 before continuing.
1 Designing a game board
In the Resource Library go to Shared Grids.
Drag ‘grid 1x1’ onto the Flipchart page.
Roll up the Resource Library.
Double-click on the grid to launch the Page Edit toolbox.
Increase the grid until you have roughly eight squares by six on the page.
In this tutorial we will create a games template which can be used with the Clock tool, the Tickertape tool and the Dice tool.
This tutorial will take you through the stages of making a game which can be adapted for any subject. There are several stages to the design and the whole purpose of the game may only become clear at the end!

3-88 An Introduction to ACTIVstudio Professional Edition © 2006 Promethean Technologies Group Ltd
PART THREETutorial NineClocks, tickertapes and dice
Select the Rectangle tool.
Drag out a rectangle of five squares by three. Close the Pen Modifier toolbox.
Close the Page Edit toolbox.
In the Main toolbox, change the pen size to 20 and change the pen colour to black. Right-click on the Pen tool to open the Pen Modifier toolbox.

An Introduction to ACTIVstudio Professional Edition © 2006 Promethean Technologies Group Ltd 3-89
PART THREETutorial Nine
Clocks, tickertapes and dice
2 Use the Camera tool to add resources to the Resource Library
Using the Area option of the Camera tool, take a snapshot of the rectangle. For neatness, take care not to snapshot the grid outside the rectangle.
Place the snapshot on the current Flipchart page.
Click on the Clear icon and select Clear Annotations. Click on the Clear icon again and select Clear Grid.
This will leave you with the snapshot of the grid.
Change the pen size to 8 now right click on the Pen tool. Select the Arrow tool in the Pen Modifier toolbox and draw four arrows on the page as shown.
Using the Text tool, label the arrows as shown.
Place the grid centrally on the page. Right click over it and choose Edit>Layer>Lock on Background.

3-90 An Introduction to ACTIVstudio Professional Edition © 2006 Promethean Technologies Group Ltd
PART THREETutorial NineClocks, tickertapes and dice
3 Designing a number gameThis grid can be used for many activities. In this tutorial we will create a number game. The board can, however, be adapted for all subjects.
Using the Text tool on the Main toolbox, create 15, two digit numbers (Avoid prime numbers for the purpose of the game).
When you have finished, select all the numbers with the Marquee Select tool. Right-click on one of the numbers
In the right-click menu select Edit>Layer>Lock on Background.
Right-click on the Pen tool to open the Pen Modifier toolbox.
Click on the Square button and cover one of the game board’s squares with a thick square.
The basic game template is now finished.

An Introduction to ACTIVstudio Professional Edition © 2006 Promethean Technologies Group Ltd 3-91
PART THREETutorial Nine
Clocks, tickertapes and dice
4 The Dice tool Click on the Power tools button. Select the Dice tool from the Power Tools toolbox. This will open a new window.
If you click the drop-down button on the left of the window you can select the number of dice you want to roll. Select two dice.
Then click the Roll the Dice button.
A dice animation will appear displaying the results.
In this case the dice shows three and two. When the game is played this will mean that the player will move three units horizontally (left or right) and two units (up or down).
Close the Dice Roller box.

3-92 An Introduction to ACTIVstudio Professional Edition © 2006 Promethean Technologies Group Ltd
PART THREETutorial NineClocks, tickertapes and dice
5 The Clock toolWhen we come to play the game, we can time the task using the Clock tool.
The Power tools toolbox should still be open.
Select the Clock tool and five options will appear: Analogue; Digital; Both; Count Down; Count Up.
The first three options open different types of clock. The last two options open different types of timer. We will explore the Count Down timer now.
Select Count Down and a new box should open allowing you to set the time and the action of the clock when it reaches zero.
Set the clock for one minute, initially. You can do this by clicking the arrows next to the Minute box, or by clicking inside the box, deleting the number and typing 01.
We can set a sound to be played when the clock hits zero. Click on the drop-down menu beneath ‘After timeout, play the following sound’ and set it to Bong.wav.

An Introduction to ACTIVstudio Professional Edition © 2006 Promethean Technologies Group Ltd 3-93
PART THREETutorial Nine
Clocks, tickertapes and dice
Beneath that is another drop-down menu: ‘After timeout, perform the following action’. This will carry out an action when the clock hits zero. Set it to ‘Start Reveal tool’. The screen will be covered up when the timeout reaches zero.
Notice that when the Clock Counter window is open you can’t edit the Flipchart until it is closed. Click OK to start the Count Down.
The current window will disappear and a new one will open displaying the count down.
Click and drag on the top of the Clock box to move it out of the way of the game.
You can pause this by pressing the Pause button.
Allow the stopwatch to get to zero. When it does, the Reveal tool will be activated and the ‘bong’ sound file will be played.
Deselect the Reveal tool by clicking on the Reveal button on the Main toolbox. Close the Clock box and the Sound Control box.

3-94 An Introduction to ACTIVstudio Professional Edition © 2006 Promethean Technologies Group Ltd
PART THREETutorial NineClocks, tickertapes and dice
6 TickertapesFrom the Power Tools toolbox, select the Tickertape tool.
Select New>Define.
The Tickertape Definer box will appear. Type in Which numbers multiply together to create the number in the black square.
As you type, the tickertape will appear at the top of the screen.
Use the Tickertape Definer box to experiment with changing the tickertape’s colour, size and background. When you are happy with the tickertape, click OK.
Underneath the tickertape is a toolbar. Use the slider to change the speed of the tickertape. A Pause button and a Stop button are also available.
Click on the Tickertape icon in the Power Tools toolbox and select Save To>My Tickertapes. Give the tickertape the name ‘Numbers game’ and click on Save.
Click on the cross beneath the tickertape to stop it.
Note: You can make any text into a tickertape. To do this, right-click on the text and select Make Tickertape.

An Introduction to ACTIVstudio Professional Edition © 2006 Promethean Technologies Group Ltd 3-95
PART THREETutorial Nine
Clocks, tickertapes and dice
7 Launching tickertapes from a Flipchart page
Right-click, or barrel-click on the page. Make sure that Enable Actions is not selected.
Move the tickertape icon on your Flipchart to the top right of your Flipchart
Right-click or barrel click again, and select Enable Actions. Now you can click on the Tickertape icon to launch the tickertape.
Save the Flipchart. Now, if you re-open the Flipchart, you will be able to launch the tickertape directly by clicking on the icon on the page.
Open the Resource Library.
Click on the My Resource Library icon then click on My Tickertapes. The icon for your new tickertape should be displayed in the thumbnail panel.
Drag the icon of the tickertape you just added to the Resource Library onto your Flipchart.
Close the Resource Library.
Note: This game can be adapted for all subjects. Language teachers in particular could use the grid to revise vocabulary. Other teachers could use it as a way to revise recently studied topics. Adapt the tickertape message to something like “Give five correct uses of the word…” or “Give four facts about…”.

3-96 An Introduction to ACTIVstudio Professional Edition © 2006 Promethean Technologies Group Ltd
8 How to play the gameSet the Count Down clock to the amount of time you want to play the game. Set the tickertape going with the question of your choice. Roll two dice.
Move the square left and right by the number shown on the first dice – if the square gets to the edge it must bounce back.
Move the square up or down using the second dice.
Split the students into as many teams as you want. The active team gets a point if they answer the tickertape question correctly (the pupils cannot multiply by one in the maths version of the game). The other teams have to tell you if the active team’s answers are wrong.
Close all boxes and Flipcharts. Exit ACTIVstudio.

An Introduction to ACTIVstudio Professional Edition © 2006 Promethean Technologies Group Ltd 3-97
1. Opening a previously saved Flipchart
2. Arranging and deleting Flipchart pages
3. Adding page effects
4. Creating a new page
5. Creating a page link
6. To make a link back to the menu/page
7. Using Page Notes when sharing Flipcharts
8. Adding a Page Notes icon to your Flipchart page
9. Notes and Pointers
10. Saving the Main toolbox’s current layout
11. A final save
Date completed
PART THREETutorial Ten
Organising pages and more presentation techniques

3-98 An Introduction to ACTIVstudio Professional Edition © 2006 Promethean Technologies Group Ltd
PART THREETutorial TenOrganising pages and more presentation techniques

An Introduction to ACTIVstudio Professional Edition © 2006 Promethean Technologies Group Ltd 3-99
PART THREETutorial Ten
Organising pages and more presentation techniques
1 Opening a previously saved FlipchartLaunch ACTIVstudio and open myTutorial 9 from My Flipcharts. Save the tutorial as myTutorial 10 before continuing.
2 Arranging and deleting Flipchart pagesClick the Page Organiser button in the Flipchart toolstrip; this enables you to view thumbnail images of all of the pages in your Flipchart and also to make changes to its structure.
Select the third thumbnail image. When you click on it, the thumbnail acquires a red border. This shows that it’s the active page - any edits will be applied to this page only.
Click the Delete button in the Page Organiser toolbar to remove Page 3 from your Flipchart – you don’t need this page as it’s just a less complete version of Page 4. If you wish, you can also re-order the pages - just select a thumbnail and drag it to the left or to the right.
Click the Return to Page View button to close the Page Organiser.
In this tutorial you will learn how to create a menu page for your flipchart. This is a very useful for flipcharts that contain multiple activities. We will create one page link from a menu page to the NASA site page. You can then create other page links for this tutorial flipchart. We will also show you how to use Page Notes to remind you of the Flipchart’s purpose.

3-100 An Introduction to ACTIVstudio Professional Edition © 2006 Promethean Technologies Group Ltd
PART THREETutorial TenOrganising pages and more presentation techniques
3 Adding page effectsNow add some finishing touches to your Flipchart.
Right-click on the Next Page button in the Flipchart toolstrip and then from under the Effect drop-down menu choose Cube Face Rotate and a Speed of 1.
Note: This menu can be accessed by right-clicking on both the Next Page button and the Previous Page button.
Close the window and move backwards and forwards between pages to view the effect you’ve just applied. Experiment with the different page turn effects if you wish.
4 Creating a new pageMake sure you are on the first page of the Flipchart.
Right-click on the page and from the Menu select Insert –New Page before current page. This inserts a new page at the beginning.
Go to the new page 1.
5 Creating a page linkUse the Text tool and choose your own colour, font and font size, type Making Links onto your Flipchart page. Close the Text Edit toolbox.
Double-click on the text you have just created. Click on the Properties icon to open the Properties and Actions box. Select Actions in the left pane of the Properties and Actions box.
From the drop-down menu, select Another Page. A box will appear with a list of the pages in the Flipchart. Browse over the list of pages and you will see a thumbnail image of the pages appear in the box above the list.
Click on the page with the NASA Earth image. Close the Properties and Actions box.
Click on the text again (making sure Enable Actions is ticked in the right-click menu). You should go immediately to the page of the NASA links.

An Introduction to ACTIVstudio Professional Edition © 2006 Promethean Technologies Group Ltd 3-101
PART THREETutorial Ten
Organising pages and more presentation techniques
6 To make a link back to the menu/pageOpen the Resource Library.
Click on the Shared Resource Library button and the Shared Images button. In the Resource Tree select ‘Action objects’. All the images in this category have been made with actions already added. Using the scroll bar, find the ‘previous page’ image and drag it onto the page. It may be added to the page behind the Resource Library. Close the Resource Library.
Right-click on the page and deselect Enable Actions. Now you can move items around the page without having to worry about activating any links.
At the moment, the action on this image means that we will go to the previous page when the image is clicked. We will change this, so that the action takes us back to the Flipchart’s menu page:
1. Move the previous page image next to the small image of the Earth.
2. Double-click on the image and select the Properties
icon in the Object Edit toolbox.
3. In the Properties and Actions box, make sure that Actions is selected in the left pane.
4. In the drop-down box it will currently say ‘Previous Page’. Click on the drop-down arrow and change this to ‘Another Page’.
5. Click on the Set button, and browse through the list of pages, selecting the menu page.
6. Close the Properties and Actions box.
Right-click on the page and tick Enable Actions. Now click on the image to return to your menu page.
Create more page links from the menu page to other flipchart pages.

3-102 An Introduction to ACTIVstudio Professional Edition © 2006 Promethean Technologies Group Ltd
PART THREETutorial TenOrganising pages and more presentation techniques
7 Using Page Notes when sharing FlipchartsWe have already looked at one use of Page Notes in tutorial six. Page Notes, however, are particularly important when you have finished a Flipchart.
With Page Notes you can add a presentation outline, a summary or a lesson plan to your Flipchart.
Using Page Notes you will know exactly what the Flipchart is for when you re-visit it; Page Notes also make it easier to share your Flipcharts with colleagues.
Make sure you are on Page 1 of the Flipchart and select the Page Notes button in the title bar.
Type in a summary of the Flipchart such as:
This Flipchart contains all the elements covered in ‘An Introduction to ACTIVstudio Professional Edition’.
Close the Page Notes box, the Page Notes are automatically saved as part of the page.
8 Adding a Page Notes icon to your Flipchart pagePage Notes can always be accessed using the Page Notes button. It is useful to add an icon to every page with Page Notes, so you know when Page Notes are available.
Open the Resource Library and click on the Shared Resource Library button.
Select Shared Images and, in the Resource Tree, select ‘Action objects’.
Right-click or barrel-click on the display. Make sure that Enable Actions is not selected.

An Introduction to ACTIVstudio Professional Edition © 2006 Promethean Technologies Group Ltd 3-103
PART THREETutorial Ten
Organising pages and more presentation techniques
Select the image shown here and drag it to the top right-hand corner of the Flipchart.
Right-click on the Flipchart page.
Right-click or barrel-click and select Enable Actions.
Click on the new icon and the Page Notes will appear. Close the box.
Close the Resource Library.
Now, when you return to this Flipchart in future, you will know that the first page contains Page Notes.
9 Notes and PointersNotes and Pointers are messages which can be placed on your display for the whole time ACTIVstudio is open. Teachers use Notes, for example, to show the date on their display. The date will remain on screen between Flipcharts and even between classes, as long as ACTIVstudio is open in some way.
Click on the Power Tools icon and select the Notes and Pointers tool. Three options are currently available: New Note; New Pointer and Open From. Select New Note.

3-104 An Introduction to ACTIVstudio Professional Edition © 2006 Promethean Technologies Group Ltd
PART THREETutorial TenOrganising pages and more presentation techniques
Type a sentence such as:
The Flipchart I produced using ‘An introduction to ACTIVstudio Professional Edition’.
Change the text style and size if you wish. Click on the OK button and the message will be pasted onto your display.
Click and drag the Note to the top of the screen. You can change the size of the note by clicking on the edge of the note and dragging it to the size you want.
A box called ‘Edit your Desktop Note’ will appear along with the Text Edit toolbox.

An Introduction to ACTIVstudio Professional Edition © 2006 Promethean Technologies Group Ltd 3-105
PART THREETutorial Ten
Organising pages and more presentation techniques
Now click on the Next Page button repeatedly and you will see that the Note stays on the screen. This feature can be used to display the title of a Flipchart, so that it can remain on the screen as the pages of the Flipchart are turned.
If you want to save the Note, click on the Notes and Pointers button and select ‘Save To’.
Otherwise select Close and click on the cross when asked if you want to save the Note. You can also remove the Note from the display by right-clicking or barrel-clicking on the screen and selecting Remove.

3-106 An Introduction to ACTIVstudio Professional Edition © 2006 Promethean Technologies Group Ltd
PART THREETutorial TenOrganising pages and more presentation techniques
10 Saving the Main toolbox’s current layoutDuring previous tutorials, you’ve modified the Main toolbox - it now includes tools that weren’t a part of the default set-up. You’ll probably find particular tools and toolbox configurations useful at different times.
Fortunately, you don’t have to re-customise the toolbox every time you need a different set of tools. ACTIVstudio enables you to save multiple toolbox layouts.
To save the current Main toolbox layout, click on the Main Menu button and select Toolbox Customise>Toolbox Layout>Save As - you can then type tutorialLayout as the file name.
You can open a different toolbox at any time - just click on the Main Menu button and select Toolbox Customise>Toolbox Layout>Open, and then choose the layout you require.
11 A final saveSave the Flipchart to My Flipcharts as myTutorial_10. Hopefully, you now feel confident enough to explore the rest of ACTIVstudio and make some Flipcharts of your own. Remember, you’ve only been introduced to the very basics of the program and there’s still a lot more to discover for yourself.

An Introduction to ACTIVstudio Professional Edition © 2006 Promethean Technologies Group Ltd 3-107

3-108 An Introduction to ACTIVstudio Professional Edition © 2006 Promethean Technologies Group Ltd
PART THREETutorial TenOrganising pages and more presentation techniques

An Introduction to ACTIVstudio Professional Edition © 2006 Promethean Technologies Group Ltd 3-109
Well done!You have now finished the ACTIVstudio tutorials. You should now have ten dated checklists showing that you have completed this book.
You will have created Flipcharts with these tutorials or may wish to use your skills to create a Flipchart in a subject area of your choice. Send the Accreditation Form on page 3-109 to us, along with the Flipchart(s). If you are successful, we will send you a Professional User Level certificate. This is the first of three levels of accreditation available for ACTIVstudio.
For a full list of the criteria necessary to attain Professional User Level accreditation, see page 3-2.
Please visit the Training section of our website for further details about the next levels of accreditation. Keep checking the website for the latest training developments.

3-110 An Introduction to ACTIVstudio Professional Edition © 2006 Promethean Technologies Group Ltd

An Introduction to ACTIVstudio Professional Edition © 2006 Promethean Technologies Group Ltd 3-111
TUTORIALS Date Completed
1. Pens, erasers and text
2. Text, shapes and colours 3. The Resource Library
4. ‘Rub and reveal’ and spotlights
5. Grids
6. Working with images
7. Numbers
8. Links
9. Clocks, tickertapes and dice
10. Organising pages and more presentation techniques
Please accept this form as part of my assessment for Professional User Level accreditation for ACTIVstudio PE.
I am submitting my Flipchart(s), with this form, by: Floppy Disk
CD
Name ........................................................................................................
School/Organisation .................................................................................
Address ....................................................................................................
...................................................................................................................
...................................................................................................................
Postcode ...................................................................................................
Tel No. ......................................................................................................
Email .........................................................................................................
Accreditation Form

3-112 An Introduction to ACTIVstudio Professional Edition © 2006 Promethean Technologies Group Ltd


4-2 An Introduction to ACTIVstudio2 Professional Edition © 2006 Promethean Technologies Group Ltd
INDEX
Please send questions and suggestions to:
Promethean Technologies Group LtdThe Training ManagerPromethean HouseLower Philips Road
BlackburnLancashireBB1 5TH
United Kingdom
Email: [email protected] Tel: +44 (0) 870 241 3194