an excerpt from technoartist a primary technology project
TRANSCRIPT

SAMPLESESSION 5 Frame It! In this session, students frame it! To gain inspiration, they study a collection of
picture frames. They then apply their skills to create one of their own. Using
digital paint tools, students produce an attractive design. They fill the center of
the design with a white shape to produce an original frame that will hold their
artwork. Students learn how to save the file so that they can use it to paint a
picture in the upcoming session.
Assignment 13: Study It
Assignment 14: Decorate and Save It
Session 5 Review: Match It
Session 5 Skill Review: Erase It
Session 5 Extension Activity: Edit It
Learn more about TechnoPainter

SAMPLE
TECHNOPAINTER SESSION 5
TECHNOKIDS INC. 5-1
Session 5: Frame It
Getting Started
Overview
In this session, students frame it! To gain inspiration they study a collection of picture frames. They
then apply their skills to create one of their own. Using digital paint tools, students produce an
attractive design. They fill the center of the design with a white shape to produce an original
frame that will hold their artwork. Students learn how to save the file so that they can use it to
paint a picture in the upcoming session.
Materials
• Paint
• Paint Flashcards (optional)
o Home tab, Paint Button, Quick Access Toolbar, Text tab
• Painter Folder
o Workbook folder – individual assignments, reviews, skill reviews, extension activities
o Blank template
o Edit It folder (Edit It Extension Activity)
o Frames folder
• Session 5 Review: Match It (optional)
• Session 5 Skill Review: Erase It (optional)
Teacher Preparation
(Refer to the Preparing to Teach section of this guide for instructions)
• Make the Painter folder available to students.
• (Optional) Gather the flashcards listed in the materials list for this session.
• (Optional) Set Paint as the default program for PNG files. - refer to Step 8 in the Preparing
to Teach section
Teaching Strategy
In this session, students design a picture frame. Explain scenario to students.
In this session, you are going to use your skills to make a picture frame. To start, you look
at frames that were created using Paint to get ideas. Next, you use digital paint tools to
produce a unique design for your own frame. You learn how to save the file. This will
allow you to use it over and over again.

SAMPLE
TECHNOPAINTER
5-2 TECHNOKIDS INC.
Assignment 13 Study It
In this assignment, students view the frames created in Paint to gather inspiration. They locate
their favorite and double click it to have it open in the Paint program. If time permits, students
can use digital art tools to create a picture inside the frame.
Assignment 14 Decorate and Save It
In this assignment, students make their own picture frames using Paint. This art activity provides
an excellent opportunity to practice using digital paint tools. Once the frame is created,
students learn how to save a file. This can be a challenging concept for beginners. It is a good
idea to review the saving tips listed at the end of the assignment.
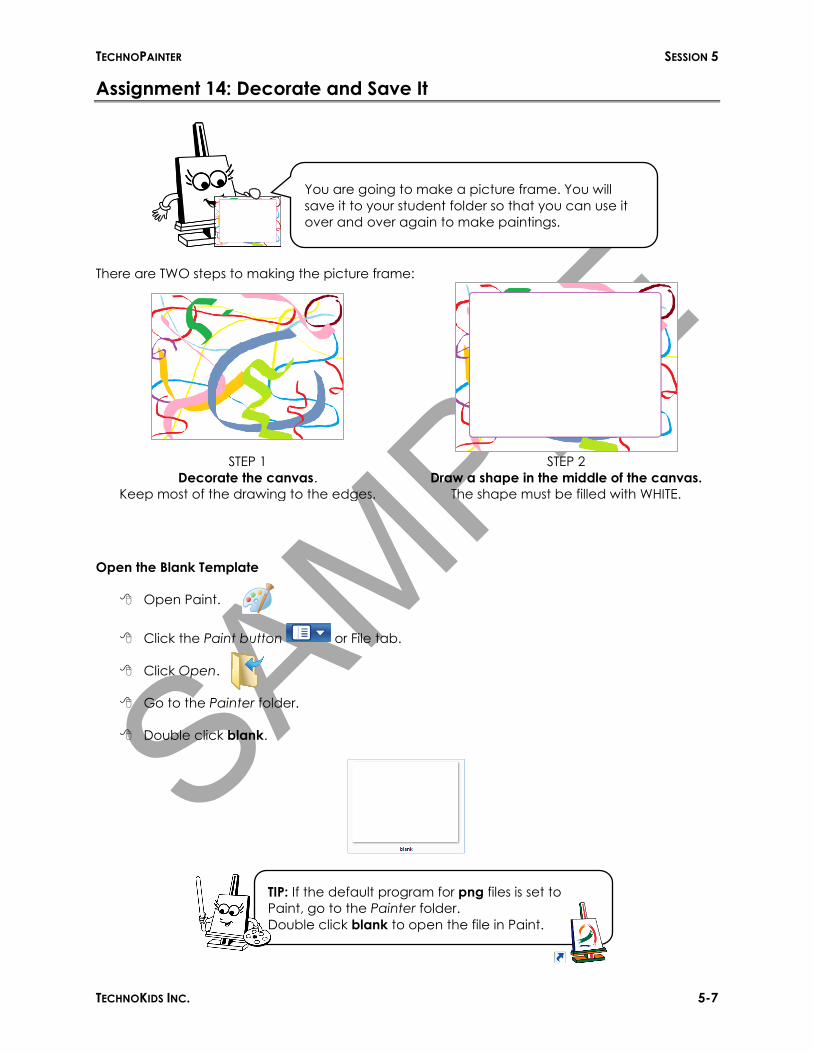
There are TWO steps to making the picture frame:
STEP 1: Decorate the canvas. STEP 2: Draw a shape in the middle of the canvas.
Encourage your students to be creative. Below are some design tips:
• Use Keyboard Shortcuts: To get a larger tool size, press the CTRL key along with the + key
on the Num pad on the keyboard. To reduce the size, press the CTRL key along with the –
key on the Num pad on the keyboard.
• Make a Perfect Shape: To make a perfect square, circle, or straight line, press and hold
the SHIFT key while clicking and dragging the mouse.
• Undo and Redo: Mistakes are easy to correct. Remind students to use the Undo and
Redo tools on the Quick Access toolbar.
• Focus on the Edges: The edges of the canvas form the frame. Direct students to
decorate in this area.
• Center It: The shape creates the drawing area. It should be in the middle of the canvas.
It should be sized so that the edges of the canvas are visible, thus creating the frame.
• Select a Large Shape: Students need to select a shape that is large enough to draw
inside. For example, a rectangle, circle, or heart provide a large enough drawing area.
Whereas, a lightning bolt or arrow will not offer enough space.
TEACHER TIP: SET THE DEFAULT PROGRAM
In this assignment, students open Paint first. They then use Open to locate the
Frames folder. The frames are PNG files. If you think it will be easier for your
students, you can have them open the Painter folder, and then DOUBLE
CLICK a file in the Frames folder to have it open in Paint. To have this work,
Paint must be set as the default program. This will ensure the file opens in
Paint and not another program. Refer to Step 8 in the Preparing to Teach
section of this guide for instructions on how to set the default program.

SAMPLE
TECHNOPAINTER SESSION 5
TECHNOKIDS INC. 5-3
Lesson Plan
Assignment 13 - Study It
• Open the Frames folder.
• Change the folder view to Extra Large Icons.
• Preview each of the sample frames.
• Double click to open a picture in Paint.
• Identify the frame liked the most.
• Use digital paint tools to create a picture inside the frame (optional).
• Close Paint.
Assignment 14 - Decorate and Save It
• Open Paint.
• Open the Blank template.
• Apply digital paint tools to create a unique design on the canvas.
• Add a shape to the drawing area to form a picture frame.
• Save the picture as art.
• Add student name to the frame, print the file, and then use crayons to create a picture
(optional)
• Close Paint.
• Review saving tips.
• Answer questions about saving student work.
TEACHER TIP: MAKE MORE THAN ONE FRAME
Inspire creativity! Have your students make more than one frame. By
creating multiple files, it encourages your students to take risks because
they do not have to worry about making the PERFECT frame. Instead, they
can try new things. Each new file can be saved as art 1, art 2, and art 3.

SAMPLE
TECHNOPAINTER
5-4 TECHNOKIDS INC.
Learning Objectives
Below is a list of learning objectives. Students should be able to complete each task
independently.
Content Knowledge:
demonstrate an awareness of themselves as artists
explore design elements including color, line, shape, and texture in visual arts
use their imagination to create a colorful picture frame
accurately type student name
Technical Skills:
Operating Environment
open and close a program
open a document (optional)
select a tool option from a palette, menu, or gallery
preview an option before applying it to a selection
print a document
save a file to a student folder
Mouse Skills
position the mouse pointer on the screen
point and click the mouse
left click the mouse
right click the mouse
click and drag the mouse
triple click or double click the mouse
Graphics
draw a line with the pencil
select a color from a palette
set the tool size
fill a closed object with color
remove part of a picture using the eraser
paint using various brush styles
select a color from a palette
remove part of a picture using the eraser
undo an action
redo an action
adjust the magnification level to zoom in or zoom out
draw shapes
resize an object
position an object on the canvas
set the outline color using Color 1 box
set the fill color using Color 2 box
apply an outline style such as solid, crayon, marker, oil, natural pencil, and watercolor
apply a fill style such as solid, crayon, marker, oil, natural pencil, and watercolor
Word Processing
add a text box to a document
enter text into a text box
type a capital letter using the SHIFT key
position a text box on the canvas
deselect a text box
Applied Technology
apply the creative process to produce a digital picture frame

SAMPLE
TECHNOPAINTER SESSION 5
TECHNOKIDS INC. 5-5
Assignment 13: Study It
Open the Frames Folder
Open Paint.
Click the Paint button or File tab.
Click Open.
Go to the Painter folder.
Double click the Frames folder.
Click the More options arrow on the Change your View button. Click Large Icons.
View picture frames inside the Frames folder.
They were all made with Paint.
Pick the one you like best.
What makes you like it?
TIP: If the default program for png files is set to Paint,
go to the Painter folder.
Double click the Frames folder.

SAMPLE
TECHNOPAINTER
5-6 TECHNOKIDS INC.
Open the Frame Picture
Double click the frame that you like, to open it in Paint.
1. Draw a circle around the frame that you like the best.
Paint a Picture (Optional)
Use your skills to paint a picture.
Use the Text tool to type your name.
Print the picture.
Close Paint
Click the Close button.
If asked, click Don't Save when asked to save the changes.
Draw a picture inside the frame.
SAMPLE
TECHNOPAINTER SESSION 5
TECHNOKIDS INC. 5-7
Assignment 14: Decorate and Save It
There are TWO steps to making the picture frame:
STEP 1
Decorate the canvas.
Keep most of the drawing to the edges.
STEP 2
Draw a shape in the middle of the canvas.
The shape must be filled with WHITE.
Open the Blank Template
Open Paint.
Click the Paint button or File tab.
Click Open.
Go to the Painter folder.
Double click blank.
You are going to make a picture frame. You will
save it to your student folder so that you can use it
over and over again to make paintings.
TIP: If the default program for png files is set to
Paint, go to the Painter folder.
Double click blank to open the file in Paint.

SAMPLE
TECHNOPAINTER
5-8 TECHNOKIDS INC.
Design a Picture Frame
Step 1 - Decorate the Canvas
Use your skills to decorate the page.
Some tools you might want to try:
brushes fill with color pencil shapes gallery shape outline shape fill
Step 2 – Draw a Shape in the Middle of the Canvas
Draw a shape.
Pick an outline color.
Pick WHITE for the fill color.
Pick an outline style.
Pick an outline size.
Pick SOLID COLOR as the fill style.

SAMPLE
TECHNOPAINTER SESSION 5
TECHNOKIDS INC. 5-9
Save Your Design
From the Quick Access Toolbar, click Save.
Go to the place where you save your work.
In the File name box, type art.
Click Save.
Finish the Picture with Crayons (Optional)
Close Paint
Click the Close button.
You are going to SAVE your frame.
Ask your teacher where you should save your work.
Add you name to your frame.
Print your work.
Use your crayons to draw a picture inside the frame.
Type art
Click Save
The name of the picture
is in the title bar.

SAMPLE
TECHNOPAINTER
5-10 TECHNOKIDS INC.
Saving Tips
• If you do not save your work, you will LOSE IT. When you close the program the file is
gone.
• Every file that you save must have a DIFFERENT NAME. If you use the same name, it will
erase your first picture and replace it with the one you just saved.
• You must save your work in your OWN FOLDER. This will make it easy for you to find the file
when you want to reopen it.
• Save OFTEN. While you are making your picture, you can click the Save button over and
over again. This will stop you from losing your work if the computer breaks.
• You only need to name the file ONE TIME. Once you click Save and give the file a name
you do not need to do that step again. Instead, each time you click Save the latest
changes are updated to the file.
• Give your file a NAME that makes sense. If you name the file art, when you go to reopen
the file, you will remember the file. If you name the file sgdrft, you will have no clue what
the picture is about.
Questions about Saving your Work
1. Where do you save your work?
2. Why is it a good idea to save your work?
3. You just made a picture of your favorite animal. What file name should you give the
picture?
SAMPLE
TECHNOPAINTER SESSION 5
TECHNOKIDS INC. 5-11
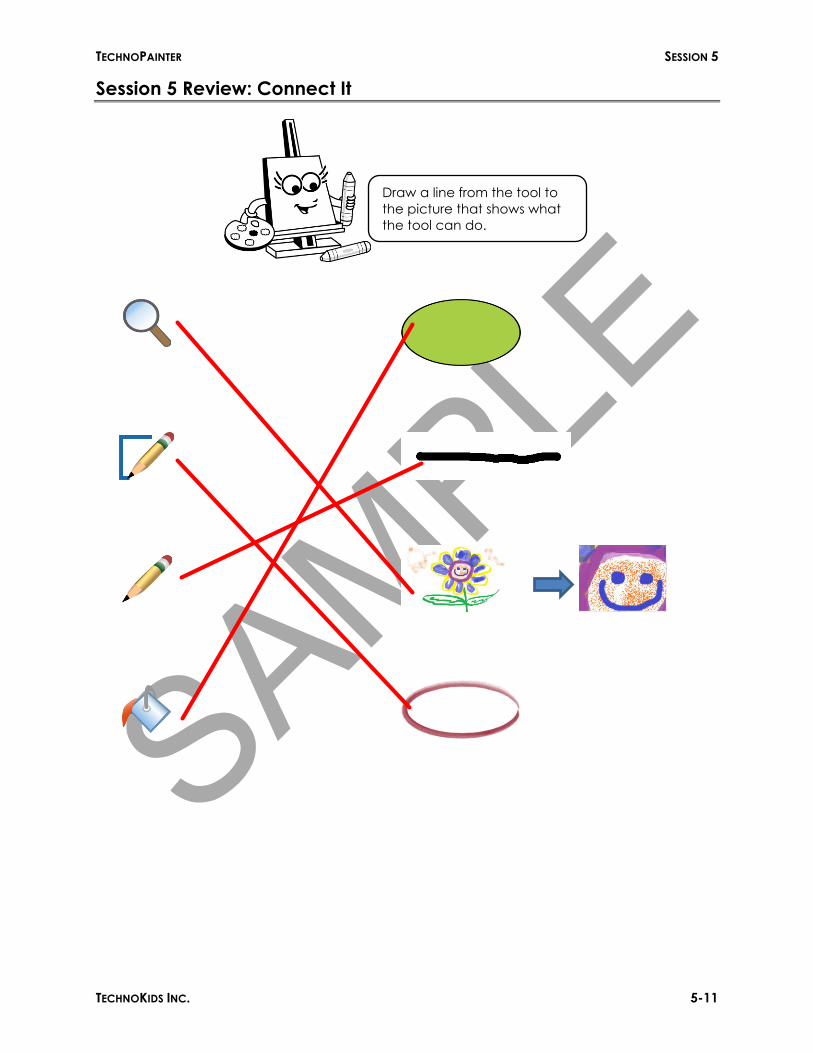
Session 5 Review: Connect It
Draw a line from the tool to
the picture that shows what
the tool can do.

SAMPLE
TECHNOPAINTER SESSION 5
TECHNOKIDS INC. 5-13
Session 5 Skill Review: Erase It
1. Open Paint.
2. Draw a rectangle.
It should be as big as the canvas.
3. Select the fill color and style.
a. Click the Color 2 square. Pick a BRIGHT COLOR for the background.
b. Click Fill. Select a style.
4. Draw with the Eraser.
a. Click Eraser.
b. Click the Color 2 square. Pick WHITE.
Draw a shape with a texture fill. Then
use the eraser to draw a picture inside
the shape.

SAMPLE
TECHNOPAINTER
5-14 TECHNOKIDS INC.
c. Select the size of the eraser.
d. Click and drag to "erase" a picture.
5. Add student name to the picture.
6. Print the picture.
7. Save the picture as eraser.
8. Close Paint.

SAMPLE
TECHNOPAINTER SESSION 5
TECHNOKIDS INC. 5-15
Session 5 Extension Activity: Edit It
draw tail add ice caps turn frown into a smile draw a petal and leaf
1. Open Paint.
2. Click the Paint Button or File tab.
3. Click Open.
4. Go to the Painter folder.
5. Double click the Edit It folder to open it.
6. Click the More options arrow on the Change your View button. Click Extra Large Icons.
7. Double click on a picture you want to edit. It will open in Paint.
8. Use your skills to fix the picture and make it look great!
9. Type your name.
10. Print the picture.
11. Close Paint.
Pick a picture and then fix the
mistake to make it better!