an environmental awareness and recreation program for the
TRANSCRIPT

An Environmental Awareness and Recreation Program for the Youth Conservation Corps of Indiana
An Honors Thesis (ID 499)
By
Elizabeth Street Thomas
Dr. Donald VanMeter
Ball State University
Muncie, Indiana
August, 1979

ACKNOWLEDGMENTS
I wish to thank Dr. Donald VanMeter
of Ball State University for his
guidance, encouragement, and help
in the completing of this thesis.
i

TABLE OF CONTENTS
Page
INTRODUCTION . . . . . . . . . . . . . . . . . . . . 1
(Calendar)--WEEK NUMBER ONE BASIC ECOLOGICAL PRINCIPLES. . . . . · · · · · · · · · 7
Lesson plan # 1: Individual Environmental Aware-ness Projects · · · · · · · · · 11
Lesson plan # 2: The Clock Mixer · · · · · · · · 15
Lesson plan # 3: "The Monster" · · · · · · , 21
Lesson plan # 4: The Blindfold Game • , · , 24
Lesson plan # 5: Orienteering Skills · • · · · · 26
Lesson plan # 6: Ecology Hike · · · · · · · · · 36
Environmental Awareness Evaluation Form · · · 46
Lesson plan # 7: Soil Investigation · • · · · · 50
WEEK NUNIBER TWO, SOIL INVESTIGATIONS · · · · · · · 59
Lesson plan # 8: Analyzing Soil Data · · · · · • 62
Lesson plan # 9: Making Trail Snacks • · · · 72
Recipes for Trail Snacks . . . • · · · · 75
Lifestyle Analysis Exercise · · · · · · · 78
Lesson plan # 10: Water Investigation · • · · • 81
WEEK NUMBER THREE, WATER INVESTIGATIONS · · · · · · • 88
Lesson plan # 11: Wildlife Investigation · · 92
Lesson plan # 12 : Analyzing Water Data · · · 99
ii

WEEK NUMBER FOUR, WILDLIFE INVESTIGATIONS
fu~
107
Lesson plan # I): Animal Activity Investigation. 110
iii

CHART
I
II
III
IV
V
VI
VII
VIII
IX
X
XI
TABLE OF CHARTS
Relationship of Color to Soil Conditions •.
Effects of Texture on Soil Conditions • • · Effects of Structure on Soil Conditions • •
pH: Range of Plants • · · · • · • • • · •
(No title) . . . • · · · · · · · · · · · · · Soil Temperature • • · · · · · · · · · · · · Land Use Chart . · · • · · • · · · · Occupancy Land Uses by Man · · · · • · · pH Ranges that Support Aquatic Life · · · · Dissolved Oxygen Requirements for Native Fish and Other Aquatic Life · · · · · · · · · · · Temperature Ranges (approximate) Required for G,rowth of Certain Organisms · · · · · ·
iv
Page
· . 64
· • 64
• · 65
· • 65
· · 66
· · 66
· · 68
· • 69
· · 85
· · 86
· • 86

AN ENVIRONMENTAL AWARENESS AND RECREATION PROGRAM
FOR THE YOUTH CONSERVATION CORPS OF INDIANA
The Youth Conservation Corps was first established
as a three-year pilot program in the Dept. of the Interior
and the Dept. of Agriculture through Public Law 91-378.
This occurred on August 13. 1970. The purpose of the act
was to further the development and maintenance of the natu
ral resources of the United States by youth; the youth to
whom will fall the ultimate responsibility for maintaining
and managing these resources in the future. Along with the
purpose of development and maintenance of natural resources.
the purpose of Public Law 91-378 provided for the employ-
ment of American youth during the summer months.
young people represent all segments of society.
These
The youth
are employed in an outdoor atmosphere of the National Park
system, the National Forest system, the National Wildlife
Refuge system, and other public land and water areas admin
istered by the Secretary of the Interior and the Secretary
of Agriculture; thus creating an opportunity for understand
ing and appreciation of the Nation's natural environment and
heritage.
The campers are young men and women who are perman
ent residents of the United States and its territories or

2
possessions. These young people must have attained the age
of 15 but have not yet attained the age of 19. The YCC pro
gram is open to both sexes and youth of all social, economic,
and racial classifications. No person may be employed as a
member of the corps for a term in excess of ninety days dur
ing any single year. The Secretaries of the Interior and
Agriculture may employ these youth during summer months with
out regard to civil service or classification laws, rules,
or regulations. All programs developed for the YCC are de
veloped with "safety first" in mind. This is to insure the
safety, health, and welfare of its members.
On October 27, 1972, Congress expanded the YCC pilot
program by passing Public Law 92-597. This law established
a pilot grant program for state YCC projects. Through this
program, grants are made to the States to assist them in
meeting the cost of projects for the employment of young
people to develop, preserve, and maintain non-Federal pub
lic lands and waters within the States. The next amendment
came on September J, 1974 in the form of Public Law 9J-408.
Congress had found that the YCC pilot program had demon
strated a high degree of success in meeting the purposes of
the Act. Therefore, the intention of PL 9J-408 is to expand
the State program and to make the Federal YCC program perma
nent.
The Youth Conservation Corps has three equally im
portant objectives. These three objectives for the Youth

Conservation Corps, as stated in PL 9J-408, are as follows:
1) To provide gainful employment of America's youth, from ages 15 through 18, during the summer months in a healthful outdoor atmosphere.
2) To provide an opportunity for understanding and appreciating the Nation's natural environment and heritage.
J) To provide further development and maintenance of the natural resources of the U.S. by the youth who will ultimately be responsible for maintaining and managing these resources.
The purpose of this thesis is to develop a quality
environmental awareness and recreation program that is
J
structured, yet flexible, and able to be modified to meet
the needs of individual Youth Conservation Corps (YCC) camps
in any area of Indiana. The program is designed to be used
as a guide. This program establishes a base from which to
develop individual environmental awareness and recreation
programs within the YCC structure. It is expected to be
changed and modified for each particular camp situation.
A hypothetical YCC camp situation was used to develop
this environmental awareness and recreation program. The
camp is residential, consisting of approximately fifty camp-
ers. The coeducational camp has two sessions. Each session
is four weeks long. Environmental awareness and recreation
are the only aspects of the total YCC program in considera
tion for this thesis.
This environmental awareness program is to be used
as a guide in developing a quality environmental awareness
program in balance with the whole YCC program. The total

4
YCC experience includes the work projects, group living, in-
terpersonal relations, recreation, and free time activities.
Although this particular program does not involve the work
projects, it must be stressed that the work projects are an
important part of the total environmental awareness exper-
ience. As each camp will have its own unique work projects,
they must integrate environmental awareness time into these
projects. Environmental awareness will have more meaning
and effect if it is not restricted to a scheduled time peri-
od each day or week. Instead, it must encompass the entire
YCC experience. The integration of environmental awareness
into the entire camp strengthens the program; helps to moti-
vate the camp; increases decision making, teamwork, pride,
and satisfaction in the work accomplishments; and increases
knowledge about the environment and its management. l
This environmental awareness and recreation program
was developed to achieve the following goals:
1) To help YCC campers acquire strong feelings of concern for the environment and the motivation for actively participating in its protection and improvement.
2) To help YCC campers acquire a basic understanding of the total environment, its associated problems, and humanity's critically responsible presence and role in it.
3) To help YCC campers acquire social values and the ability to make sound choices while developing in them a sensitivity to the environment.
These goals are based on a set of objectives developed by
the International Workshop in Environmental Education held
in Belgrade, Yugoslavia, October 13-22, 1975. These goals

5
should broaden each individual camper's own awareness, knowl
edge, and attitude of the environment in which he lives.
To accomplish these goals, this program includes a vari
ety of projects, investigations, field trips, recreation,
and camp activities. These activities are arranged on a
weekly schedule. The four weeks of tne session are divided
into four different environmental categories. The basis for
the first week's activities are the basic ecological princi
ples necessary for the understanding of our ecosystem. The
second week centers on soil investigations, and the third
week includes the study of water resources. Wildlife is the
major theme for the final week. These four main topics will
not only be studied individually, but will also be integrat
ed into activities throughout the total program to show the
importance of their interdependence upon each other within
the environment. The importance of the interrelationships
of these four topics will be stressed. Although the week's
activities will be based on the one theme, the activities
will not be limited to just that theme. It is important to
include activities that reflect the interest of the campers,
their work projects, and their camp living location.
The week's activities are then broken down into specif
ic days. Each week's section will begin with a calendar of
that week's events. The events will then be described using
a lesson plan format. This is for the reader's ease in us
ing the material. Educational resources are listed in the
footnote section.

6
The activities developed for tnis environmental a
wareness program are based on the author's own experience
with the Youth Conservation Corp. The author has spent one
summer working as a "group living aid" for the Lincoln Hills
YCC camp in the Hoosier National Forest. The duties includ
ed supervising tne campers in their camp living situation
and assisting the Assistant Camp Director and the Environ
mental Awareness Coordinator in providing an environmental
education program. Through the environmental education pro
gram, the author taught a mini-class each week, assisted
with the recreation program, led wildlife habitat investiga
tions each week, and supervised field trips and camping
trips.
A second summer was spent at Camp Olden YCC camp at
Brookville, Indiana. As a staff co-leader, the author de
veloped and implemented the entire YCC camp program. This
included developing and leading tne environmental awareness
and recreation program for Camp Olden.

CALENDAR - WEEK NUMBER 1
BASIC ECOLOGICAL PRINCIPLES
Environmental Awareness Hours: 16
Day 1
Campers arrive; film of YCC, and slides of last
year's camp are available. Evening, after dinner:
Orientation, 45 minutes:
1. Explain purpose of YCC, the work projects, the environmental education program, and the individual EA projects.
2. Present syllabus of the four weeks.
3. Present rules.
Campfire, two hours:
1. Clock Mixer
2. Sing-a-long
Day 2
Morning, one and one-half hours:
1. Give Environmental Awareness Appraisal Test.
2. Initiative games
a. "The Monster" b. Blindfold game
Evening, two hours:
1. Group # 1 - Orienteering skills.
2. Group # 2 - Introduction to Ecology - Hike

Day 3
Evening, two hours:
1. Group # 2 - Orienteering skills
2. Group # 1 - Introduction to Ecology - Hike
Day 4
Evening
1. Swimming
2. Softball
3. Other
Day 5
Evening, two hours:
1. Blocked time for campers' individual environmental awareness projects.
Day 6
Noon, five minutes:
1. Evaluation of week's EA activities.
2. Recreation
a. Swimming b. Softball c. Other
Day 7
Morning, two hours:
Investigation
1. Soil
Afternoon, four hours:
8

9
Field Trip
1. State Park
a. Visit the Nature Center. b. Arrange meeting with Naturalist. c. Hike with Naturalist. d. Arrange meeting with Park Ranger.
FIRST DAY; SUNDAY
The first week starts off with the campers arrival.
In one area of the camp a YCC film should be set up to help
explain the YCC program to the new campers and their par
ents. 2 The campers always like to see slides of the last
year's camp; if slides are available, have them set up in
another area of camp. Various forms of recreation should be
available to the campers once they are unpacked and settled.
A staff person should be at each recreational site to lead
the recreation, and to get acquainted with the campers.
Volleyball is a good game to have set up. It starts the
campers off early working as a team.
After the evening meal it is a good idea to have a
short orientation session before the campfire begins. The
author suggests having the orientation session in the dining
hall immediately following the meal. During orientation all
of the staff should be introduced, including the Camp Direc-
tor, the Assistant Director, the Work Project Coordinator,
and the Environmental Awareness Coordinator. Explain the
purpose of the Youth Conservation Corps and its goals and

10
objectives. Also, each individual camp should have its own
goals for the summer. If it does not then the campers may
participate in creating their own goals.
The work projects need to be presented along with
the environmental awareness program. The importance of the
environmental education aspect of camp should be stressed.
Give the campers an idea of what to expect and what to look
forward to in the coming four weeks of camp. This is a good
time to present the individual environmental awareness pro
jects described in the following lesson plan. And of course,
do not forget to cover the rules!
The campfire is next. Have the campers bring their
flashlights. Those who have guitars should be encouraged to
bring them to the campfire.
The author suggests starting the campfire off with a
"get-to-know-ya" game. This particular game is called the
Clock Mixer. This game is great in providing the opportuni
ty for the campers to get to know each other and the staff.
The game is explained in lesson plan number two.
After the Clock Mixer, have a couple of song leaders
start the sing-a-long. If the sing-a-long is begun with en
thusiasm, all the campers will soon be singing right along.

LESSON PLAN # 1
INDIVIDUAL ENVIRONMENTAL AWARENESS PROJECTS
Objectives:
1)
2)
To promote further development of a camper's own special interest in the outdoors.
To create an interest in an area that is little known to the camper.
11
J) To develop camper's own skills in working individually toward his/her own goal with the project.
Materials:
Each camper must make his/her own list of materials
that are needed for the project. The costs should be kept
down to a minimum. Whenever it is needed, substitutes for
an item can be made. The substitutes should meet the camp-
er's approval. The camp's own tools and materials should be
used wht?never possible, and when necessary, supervised by
the staff. All campers need to be aware of safety while
they are working on their projects.
Procedures I
During the orientation of the new YCC campers, the
individual work projects should be explained thoroughly. A
list of possible projects, or projects that have been done
in previous years, should be made known to the campers. (A
list of examples follows this lesson plan.) It is best for
each camper to develop his/her own idea.

12
When the camper's project idea is approved by their
staff person, a project contract is made for the camper.
This contract lists the goals of the project and the means
to which these goals will be accomplished. It also gives
the date of completion. Three weeks are usually given to
the campers to work on the project. And blocked time each
week must be given to the campers to work on their projects.
Sometime during the last week of camp a presentation
of all the projects should be made. This can be done in
several ways. A YCC fair can be set up to display the proj
ects. Other special events should be organized along with
the displayed projects. Or the projects can be presented a
mong each camper's living group. The counselor and his/her
campers would organize a special time to have a small party
to present the projects.
There are many ways for the campers to present proj
ects to their fellow campers. It will depend a lot on the
number of campers involved and their feelings on how they
want to present their projects.
Evaluation:
The individual projects work best with a small group
of campers. If you feel that you have too many campers for
each camper to have an individual project, try breaking them
into small groups. When they work alone there is a sense of
pride in accomplishing their goals as expressed in the con
tract; and they are able to take home their project. But
when thE! camper is part of a small group, they learn how to

1.3
work with each other to get something done. Whether working
individually or in small groups, the environmental awareness
project is a valuable experience.
In both cases, the campers should learn how to use
various resources in putting together their projects. They
should feel free to talk with any of the camp personal for
suggestions or help with their projects. A few hours at the
local library might be helpful to some. The community peo-
pIe who have knowledge in the area of a camper's project are
also a resource for the campers to use.
The presentation of the project is just as important
as the time spent Working on the project. The atmosphere
during the presentations should be friendly and informal to
put the campers at ease. The campers should develop some
speaking skills and listening skills through the presenta
tion of their projects.
Follow-up:
The campers should be encouraged to take their proj
ects home with them and to present their projects to their
family members.
Examples of Individual Environmental Awareness Projects:
1) Plan and cook a meal over a campfire using various techniques.
2) Bake homemade bread in a campfire pit .
.3) Make a reflector oven and demonstrate its use.
4) Design and present a primitive first-aid course for backpackers.

14
5) Cook a meal using wild edibles.
6) Lead a specialty hike.
7) Make a special collection (collect and identify).
a. insect b. butterfly c. leaf d. wildflower e. edible wild plants
8) Build a shelter for survival.
9) Build a bird house (specify bird).
10) Make teas using wild plants.
11) Cast several animal tracks in plaster and identify.
12) Use writing or artistic skills in expressing nature.
13) Make a wildlife check list and record the wildlife seen in the area.
14) Take slides of the camp and present as a slide sho~
15) Demonstrate backpack cooking.

Objectivesl
LESSON PLAN # 2
THE CLOCK MIXER
15
1) To provide an opportunity for the campers to talk with each other.
2) To help the campers get to know each other, and to feel comfortable with each other.
3) To provide an opportunity for the campers and the staff to talk with each other.
Materials:
1) Flashlight
2) Pencils
3) A mimeographed copy of the "Clock Mixer" game sheet for each camper.
Procedures:
Each camper and staff person should have a Clock
Mixer game sheet and a pencil. The first part of the game
consists of filling in the twelve blanks with twelve names.
The campers and staff have five minutes to fill these blanks
in. To fill the blanks in one must find another person to
exchange sheets with. These two people sign their names on
the numbered line. For instance, they both sign their names
on line number four. The sheets are returned to the origin-
al owner and then another person is sought out. After the
five minutes is over the twelve lines should be filled in

16
with names.
Then the game leader calls out a number (1-12) and
each person finds the camper who has his/her name on their
sheet. These two people get together and talk for approxi
mately two minutes. Then another number is called and the
matching two people find each other and they talk for two
minutes. This continues until all twelve numbers have been
called.
Game Sheet:
Evaluation:
•
The Clock Mixer is a great game to play with a group

17
of people who do not know each other. The first five min
utes when the campers are scrambling to fill their sheets
with names gets the game off to a fun start. This five min
utes is a short warm up to make the campers feel at ease.
It is a good listening exercise too, for they must learn to
give time for their partner to talk.
If there is enough time left before the sing-a-long,
the Clock Mixer can be run through another time. But each
person must find a person that they have not talked with yet
to sign their sheets.
Follow Up:
During the rest of the four weeks, the campers
should be encouraged to get to know all of their fellow
campers. Although each camper will find a few very close
friends, the importance of not limiting oneself to this
small group of friends should be stressed to all campers.

18
SECOND DAY; MONDAY
The second day of camp starts off with the Environ
mental Awareness Appraisal test. This test contains ques
tions about some of the things the campers will be learning
throughout the summer. The Environmental Awareness Apprais
al serves both as a pre-test and post-test for YCC partici
pants.
This test serves three purposes. Taken together,
the scores from all the camps in the United States are used
as an indicator of program effectiveness that the administra
tion uses to justify the YCC program to Congress. A second
purpose is to give feedback to the staff on the effective
ness of their environmental awareness activities relative to
the objectives of the program. Third, the test can help the
enrollees; at the time of the pre-test it can show them some
of the things they need to learn, and at the time of the
post-test it can serve to review the things they learned dur
ing the summer.
The test should be administered at the beginning of
camp and again at the end of camp. The pre-test should be
given as close to the beginning of camp as possible. The
author suggests giving the test before beginning environmen
tal awareness instruction. The post-test should be adminis
tered during the last week of camp.
During the administration of the test create a relax
ed atmosphere. Refer to the instrument as an appraisal

19
rather than a test. The campers should be told that they
are not being graded. Explain to them the reasons that the
appraisal ,is given. If it is possible, the appraisal should
be administered out of doors to get away from the "class-
room" atmosphere.
The enrollees may correct their own test while the
answers are being read. It is a good idea to discuss the r~
suIts with the campers. Have the enrollees look over the
test to see which items they missed. This will also help
them to see some of the material that will be taught during
the session. After this discussion, the test should be put
away until the administration of the post-test during the
final w~3ek of camp.
When the campers have finished with the Environmen-
tal Awareness Appraisal, the author suggests playing two
games to continue the orientation of the campers. The first
activit:{ is considered an "initiative" game. An initiative
game is a clearly defined physical and/or mental task which
a group is required to do. The initiative game is designed
to require a joint effort to complete the task. It is a le~
son in determination, teamwork, and Planning.) The second
game is a sense sharpening exercise. This activity is re-
lated to perceiving the environment in new ways, becoming a-
ware of more subtle facets of the environment, and discover
ing the different perspectives of peoPle. 4 These games are
explained in lesson plans three and four.

20
The campers should be split into two groups of 36
and 14. The group of 36 will start with the initiative game
and then move on to the sense sharpening exercise. The
group of 14 will start with the sense sharpening exercise.
Monday evening is the beginning of the environmental
education instruction. Following the evening meal, the camp
ers should be divided into two groups. Group one will be
learning orienteering skills, and group two will be taking a
hike to identify some basic ecological principles. Each
group should be divided further into smaller groups, about
eight or nine campers per leader. Thus there will be three
staff persons leading three separate groups in orienteering
skills and three staff persons leading three groups on the
hike. The following evening, the campers will switch groUP&
Each camper must participate in both the orienteering lesson
and the hike.

Objectivesl
LESSON PLAN # 3
"THE MONSTER .. 5
21
1) To develop a participant's awareness of the decision making process.
a. To accept and to recognize the problem.
b. To think through and analyze the situation.
c. To negotiate a solution to the problem.
2) To develop a participant's awareness of the roles involving leadership.
3) To develop a participant's awareness of the obligation of each and every member of a group confronted with a problem.
Procedures I
The leader should try to choose a task which is suit
ed to the ability of the group. The instructor should make
sure all rules, procedures, and safety considerations are
understood before the activity begins. Always consider saf~
ty of the group and use spotters when some danger is possi-
ble. The objectives should be stated along with the presen
tation of the problem. Then the leader should step back and
allow the group the opportunity to devise a plan to solve
the problem. The instructor knows the solution but should
let the group work on it alone, although sometimes the group
may need a hint. If the group is not working together it

might be wise to have them start again.
The problema
The group must join themselves together to form
a monster that walks with both hands and feet on the
ground. The monster must have one more foot than
the number of group members, and one less arm. Once
th·e monster is created , it must move the distance of
five feet and make a sound.
The group of 36 campers can try the "nine man mon-
ster." The group of 14 can try the "seven man monster."
Some Possible Solutions:
9-man monster 7-man monster
22
The staff might want to try working out the solu
tions themselves before presenting the game to the campers.
After a group has either completed or attempted the
monster game, the instructor should take the time to discuss
with the group all that happened. Questions that might be
asked include the following: Did everyone participate? Who
did not say anything? Why did someone not talk? What about
the rolt3s of the male versus female, the young versus the
old, the strong versus the weak? How does this experience

2J
relate to solving real life problems? The discussion should
be thought provoking and, if possible, done by the partici
pants willingly.
Evaluation:
Besides being fun, the initiative game is a morale
booster. Being able to say "We did it!" provides encourage
ment when the campers find themselves in other problem solv
ing situations. The initiative game should also be helpful
in developing a participant's awareness of the decision mak
ing process, the roles involving leadership, and the obliga
tions of each and every member of a group confronted with a
problem.
The initiative game promotes group interaction,
while at the same time, the problem requires the partici
pants to take advantage of each group member's abilities.
The group must also deal with the handicaps of the members,
whether these limitations are ones of weight, strength, size,
and so on.
Follow-Up:
Various types of initiative games may be played
throughout the summer to strengthen group cooperation. The
three step approach in solving a problem (Objective # 1)
should be discussed several times during the camp session.
The work crew leaders should begin each new work problem by
going over these problem solving steps.

Objectives:
LESSON PLAN # 4
THE BLINDFOLD GAME6
24
1) To be able to perceive the environment in new ways.
2) To become more aware of the subtle aspects of the environment.
J) To discover and accept the different perspectives of people.
Materials:
1 cloth blindfold (bandanna) for each pair of campers.
Procedures:
The blindfold game includes a series of three walks,
each about 10 minutes long. The campers are divided into
pairs, one person being blindfolded. During the first 10
minute walk, one person guides the blindfolded camper by the
hand. 'rhey should remain silent unless safety required
speech. The second walk allows no physical contact between
the two. The blindfolded person is required to self-orient
and self-direct and the guide should only speak when safety
demanded. In the third walk the blindfolded person should
be brought to a plant and allowed to explore it in any non
visual ways he chooses. After being dis-oriented and led a-
way, the blindfolded walker should go back without the blind
fold and try to relocate the plant.

25
After each part of the activity the campers should
discuss and compare their experiences with the other partic
ipants. Some of the discoveries the campers will make dur
ing the activity include wind changes, the different tex
tures and qualities of ground covers, subtle temperature
changes between micro-environments, shading caused by ob
jects in the path, and the amount of noise present. Each
person will discover something different, and each person
will have a different experience.
Evaluation&
From the experiences in the blindfold walks, enrol
lees should be able to identify more subtle environmental
factors in later activities. The campers should also be
better able to recognize environmental problems that are not
visually apparent, and become more aware of many more ef
fects on the environment by their work projects.
Follow-Upl
A shorter version of the blindfold game may be play
ed by work crew members during a lunchbreak. This will re
affirm the new ways of perceiving the environment experi
enced during the first blindfold walks.

Objectives:
LESSON PLAN # 5
ORIENTEERING SKILLS?
26
1) To develop the campers' map reading skills.
2) To develop the campers' ability to use a compass in the field.
3) To develop the campers' ability to determine his/ her location in the field with the help of landscape features, map, and compass.
Materials:
1) Topographic map of the area for each camper, or a map of the area drawn using map symbols. It should be drawn as close to scale as possible.
2) Handout of map symbols.
3) Orienteering compass for each camper.
4) Pencil for each camper.
5) Ten orienteering controls. May use red and white paper or flags.
Procedures:
Orienteering is the skill or the process of finding
one's way in the field with map and compass combined. This
lesson plan is an introduction to the various skills involv-
ed in Orienteering. Other lessons or activities in Orien-
teering should be planned throughout the weeks of camp. The
campers, with many opportunities to use the map and compass,
will develop the skill to use the map and the compass with

27
ease, and will also find their powers of observation steadi
ly developing.
PART ONE: MAP READING
Introduction
The activity leaders should first give an introduc
tion to the topographic map. Then the practice game can be
played. The following four paragraphs contain important ma
terial for the introduction.
A map is a reduced representation of a portion of
the surface of the earth. The kind of map that is best used
in Orienteering is a topographic map. Each topographic map
is drawn to a specific scale. A scale is the amount that a
distance in the field has been reduced for inclusion on the
map. The three scales most commonly used are the scales of
1 unit to 250,000 units, 1 unit to 62,500 units, and I unit
to 24,000 units. The larger the fraction the larger and
clearer the details shown on it, and the smaller the terri
tory covered by the same size map sheet.
Topographic map symbols show the details of a land
scape. These map symbols are mapping's alphabet--they spell
out the lay of the land. There are four types of map sym
bols uSI~d in Orienteering. Each has its own distinctive
color:
Man-made features - Black
Water features - Blue

Vegetation features - Green
Elevation features - Brown
A map symbols handout should be given to the campers for
their ease in learning the symbols. A sample of a handout
is supplied at the end of the lesson plan.
28
Before an Orienteering exercise is begun, it is im-
portant to find the directions on a map. When a topographic
map is placed with the reading matter right side up, what's
up is north and what's down is south. That means the left
margin is west and the right margin is east. The easiest
way to know what direction to go on a map is by "orienting"
the map. To "orient" a map means to turn it in such a way
that north on the map fits north in the landscape, and that
terrain features shown on the map, such as roads and rivers,
are lined up with these features in the field.
Landmark Hunt
Objective:
1) Training in orienting a map and in locating landmarks.
Materials:
1) Map of the camp.
2) Pencil.
3) List of 10 landmarks to locate on the map.
4) Controls - 10.
Procedure:
Take the group to a starting place where a number
of different landmarks can be seen. Provide each

29
player or buddy team with a map of the area, a pencil,
and a list of 10 landmarks to be located on the map.
(Controls should be set up at each landmark for the
campers to find.) Before starting, the campers should
circle each of the 10 landmarks on the map. The point
where they are standing should also be cirCled.
The campers then have a certain amount of time,
such as twenty minutes, to find the 10 landmarks. When
a control is found, its letter should be recorded on
the circled landmark on the map. Score 10 points for
each landmark correctly found and circled on the map.
The total score will be 100 points for all ten.
PART TWO, TRAVELING BY COMPASS
Introduction
Again, a short introduction to the compass is neces-
sary before the actual practice game is played.
The best compass to use in Orienteering is the Ori-
enteering compass. The conventional compass was improved in-
to the modern Orienteering compass in which the compass hous
ing revolves on a transparent base plate that acts as a pro
tractor and direction finder.
The three main purposes for which the compass is us
ed alone are these:
1. Finding directions - "bearings" - from a location.
2. Following a direction - a "bearing" - from a location.

30
3. Returning to an original location.
The Orienteering compass consists of three basic
parts: (1) a magnetic needle, (2) a revolving compass hous
ing, and. (3) a transparent base plate. The magnetic needle
of the compass is suspended on a needle-sharp point around
which it swings freely on a sapphire bearing. The north end
of the needle is painted red.
The rim of the compass housing is marked with the in
itials of the four cardinal points--North, East, South, and
West--and is divided into degree lines. The transparent in
side bottom of the compass is provided with an arrow that
points directly to the housing's 3600 N marking. This ar
row is the It orienting arrow." The compass is oriented, turn
ed so that the north marking of the compass points toward
the ma~~etic North Pole, whenever the red north end of the
needle lies over the orienting arrow, pointing toward the
letter N on the rim of the housing. In the bottom of the
compass housing are engraved several lines which run paral
lel with the orienting arrow. These lines are the compass'
orienting lines.
The compass housing is attached to a rectangular
transparent base plate. This is attached in such a way that
it can be turned easily. A line to show direction is engrav
ed on the base plate. It runs from the rim of the compass
housing to the front edge of the plate where it spreads into
the direction-of-travel arrow.

31
To find a bearing with the Orienteering compass,
face squarely a distant point or landmark. Hold the Orien
teering compass so that the direction-of-travel arrow is
pointing straight ahead. Orient the compass by turning the
compass housing without moving the base plate until the com
pass needle lies over the orienting arrow on the inside bot
tom of the compass housing, with its north part pointing to
the letter N. Read the bearing, the degrees of the direc-
tion, on the rim of the compass housing at the spot where
the black index pointer shows it to be.
To follow a bearing, set the compass for the direc-
tion in which the landmark lies by holding the compass with
the direction-of-travel arrow pointing toward the destina-
tion. Turn the compass housing until the red north part of
the compass needle points to the letter N on the rim of the
housing. Proceed straight ahead in the direction the direc-
tion-of-travel arrow points.
Compass Competition
Objective:
1) Training in following compass bearings and measuring distances by walking.
Materials:
1) Orienteering compass.
2) Instruction card.
Procedure:
Before the start of the compass competition, each
participant needs to know the length of his/her step,

32
or pace. To do this, mark off a distance of 200 feet
over which the campers can walk to determine the length
of their steps. The campers count off each time they
put down the left foot. The campers should walk the
200 feet and back again, counting both ways. Divide
the complete length covered, 400 feet, by the number of
paces taken. This will give the length of the average
pac,e, approxirna tely five feet.
The compass course for the competition consists of
twenty markers placed five feet apart on a straight
east-west line. Number the markers consecutively from
1 to 20, with number 1 on the most westerly marker.
When ready to start, each participant is provided
with an Orienteering compass and with an instruction
card telling him/her at what mark to start and how to
proceed. The instructions for the cards of ten players
arl~ below.
Start at Point 1 Start at Point 2
Go 36 degrees for 122 feet Go 17 degrees for 104 feet Then 149 degrees for 58 feet Then 150 degrees for 52 feet Then 235 degrees for 86 feet Then 142 degrees for 64 feet
Destination reached: No •.• ~?~ Destination reached: No •. ~f?l
Start at Point 3 Start at Point 4
Go 3:3 degrees for 125 feet Go 36 degrees for 122 feet Then 23? degrees for 90 feet Then 174 degrees for 50 feet Then 186 degrees for 50 feet Then 228 degrees for 74 feet
Destination reached: (2 ) No •••••• Destination reached: (8) No ••••••

33
Start at Point 5 Start at Point 6
Go 2:2 degrees for 107 feet Go 3 degrees for 100 feet Then 158 degrees for 54 feet Then 132 degrees for 74 feet Then 186 degrees for 50 feet Then 225 degrees for 69 feet
Destination reached: (16) No •••••• Destination reached: (8)
No ••••••
Start at Point 7 Start at Point 8
Go 34 degrees for 119 feet Go 346 degrees for 102 feet Then 186 degrees for 50 feet Then 129 degrees for 78 feet Then 228 degrees for 74 feet Then 211 degrees for 58 feet
Destination reached: (8) No •••••• Destination reached: No ••• ~?~
Start at Point 9 Start at Point 10
Go 346 degrees for 102 feet Go 343 degrees for 104 feet Then 129 degrees for 78 feet Then 141 degrees for 64 feet Then 186 degrees for 50 feet Then 145 degrees for 61 feet
Destination reached: (15) No •••••• Destination reached: No •• ~t?~
Each participant goes to the marker which has the
number that corresponds to the starting point on his card
and proceeds according to instructions. When he/she has
finished., he/she writes down the number of the marker near
est to the destination he/she has reached (all the routes
lead back to markers on the course line) and turns the card
over to the judge. The correct destinations for each of the
starting points are found in parenthesis.
If the player reaches the correct destination he re
ceives a score of 100 points. Otherwise, the judge deducts
from his score of 100 points, 1 point for each foot of error,
or 5 points for each marker from the correct one. Run the
game three times with different starting points for a possi
ble maximum score of 300 points.
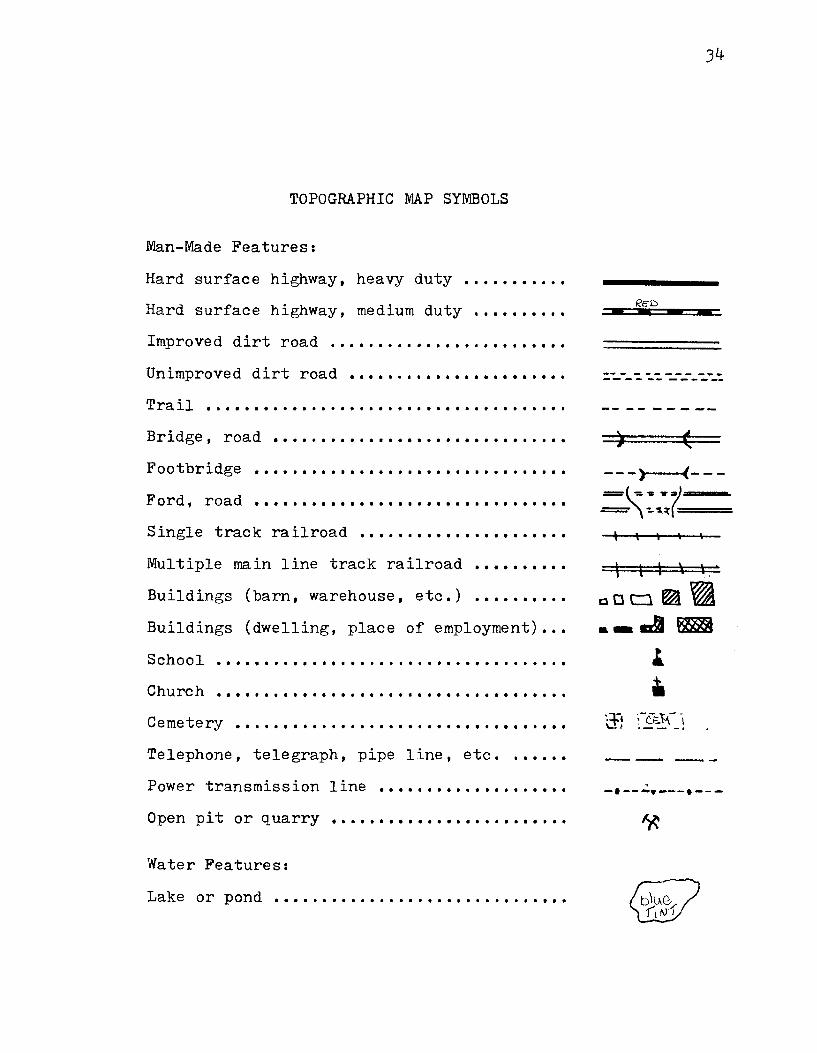
TOPOGRAPHIC ~~P SYMBOLS
Man-MadH Features:
Hard surface highway, heavy duty ........... Hard surface highway, medium duty · ........ . Improved dirt road ....................... Unimproyed dirt road . . . . . . . . . . . . . . . . . . . . . . . Trail . . . . . . . . . . . . . . . . . . . . . . . . . . . . . . . . . . . . . . Bridge, road . . . . . . . . . . . . . . . . . . . . . . . . . . . . . . . Footbridge ................................. Ford, road . . . . . . . . . . . . . . . . . . . . . . . . . . . . . . . . . Single track railroad ...................... Multiple main line track railroad • • • • • • • • • •
Buildings (barn, warehouse, etc.) · . . . . . . Buildings (dwelling, place of employment) • • •
School ..................................... Church ..................................... Cemetery ................................... Telephone, telegraph, pipe line, etc. . . . . . . Power transmission line . . . . . . . . . . . . . . . . . . . . Open pit or quarry . . . . . . . . . . . . . . . . . . . . . . . . . Water Features:
Lake or pond ...............................
f<?CLJ __ -
34
-
-- - - - - - - - - ------ -- ------
) (
---) (---
::\:;~=
\ t , '\ ~.
'.:p '-.j ~-[t.M.- 0\ ._- -.
, -I --.-..---. ---

Perennial streams · ........................ . Spring .................................... .
Water well . . . . . . . . . . . . . . . . . . . . . . . . . . . . . . . . . Marsh or Swamp . . . . . . . . . . . . . . . . . . . . . . . . . . . . . Vegetation Featuresl
Woods - brushwood · . . . . . . . . . . . . . . . . . . . . . . . . . Orchard .................................... Vineyard . . . . . . . . . . . . . . . . . . . . . . . . . . . . . . . . . . . Scrub . . . . . . . . . . . . . . . . . . . . . . . . . . . . . . . . . . . . . . Elevation Featuresl
Index contour . . . . . . . . . . . . . . . . . . . . . . . . . . . . . . Intermediate contour ....................... Depression contours •••••••••••••••.••••••••
Cut . . . . . . . . . . . . . . . . . . . . . . . . . . . . . . . . . . . . . . . . Fill . . . . . . . . . . . · . . . . . . . . . . . . . . . . . . . . . . . . . Large earth dam or levee ••••••••••.••••••••
Sand area, sand dunes . . . . . . . . . . . . . . . . . . . . . . Monumented bench mark, spirit level elev. . .
35
0"-
o
(Solid b-<~ -nl\+ r
... ----___ ~_ ~~ ____ ._w
~ ~t®
wIll 7J r lJ\ ~'