an electronic voucher distribution...
TRANSCRIPT

An Electronic Voucher Distribution SystemUser Manual
Version 1.0

Cell Power User Manual (v1.0) 2
Cell Power EVD User Manual v1.0
Document Revision: 0 (November 2009)
Expertron Group (Pty) Ltd
The Innovation Hub, Enterprise Building, 6 Mark Shuttleworth Street, Persequor Ext 10, 0020, South Africa
Tel: +27 12 844 0330
Fax: +27 12 844 0331
Web: http://www.expertron.co.za
Email: [email protected]
Copyright © 2000-2008 Expertron Group (Pty) Ltd. All rights reserved.
Expertron, Expertron Group and the Expertron logo are registered trademarks of Expertron Group (Pty) Ltd.
Expertron reserves the right to change, without notice, product offerings or specifications. No part of this publication may be reproduced in any form without written permission of Expertron Group (Pty) Ltd.
The name “Creon” belongs to SPECTRA Technologies Holdings Co. Ltd.
Figures 4, 5 and 6 have been reproduced courtesy of SPECTRA Technologies Holdings Co. Ltd.

Cell Power User Manual (v1.0) 3
Table of Contents1 Introduction........................................................................................................................................................................6
2 Definitions and Terminology..............................................................................................................................................6
3 Abbreviations.....................................................................................................................................................................7
4 The Creon Terminal...........................................................................................................................................................8
5 Requirements.....................................................................................................................................................................9
6 Quick Start.........................................................................................................................................................................9
7 Manage the Creon Terminal............................................................................................................................................11
7.1 Inserting the SIM Card..............................................................................................................................................11
7.2 Ethernet Connection.................................................................................................................................................12
7.3 Inserting Paper..........................................................................................................................................................13
7.4 Switch On..................................................................................................................................................................14
7.5 Charging the Battery.................................................................................................................................................15
7.6 SIM Card Airtime Balance.........................................................................................................................................16
8 The Menu Interface..........................................................................................................................................................17
8.1 The Root Menu.........................................................................................................................................................17
8.2 The Login Menu........................................................................................................................................................17
8.3 The Super User Menu...............................................................................................................................................18
8.4 The Operator Management Menu.............................................................................................................................19
9 Shifts................................................................................................................................................................................21
9.1 Starting a Shift..........................................................................................................................................................21
9.2 Ending a Shift............................................................................................................................................................21
9.2.1 Detailed Report..................................................................................................................................................23
9.2.2 Accept Shift and Scheduled Call.......................................................................................................................24
10 Operators.......................................................................................................................................................................26
10.1 Adding an Operator.................................................................................................................................................26
10.2 Deleting an Operator...............................................................................................................................................26
10.3 Changing an Operator PIN.....................................................................................................................................27
11 Services.........................................................................................................................................................................28
11.1 Airtime.....................................................................................................................................................................28
11.1.1 Purchase..........................................................................................................................................................29
11.1.2 Check Balance.................................................................................................................................................31
11.1.3 Cancel..............................................................................................................................................................31
11.2 Electricity.................................................................................................................................................................31
11.2.1 Purchase..........................................................................................................................................................31
11.2.2 Reprint.............................................................................................................................................................34
11.2.3 Check Balance.................................................................................................................................................34
11.2.4 Cancel..............................................................................................................................................................34
12 Printing Options.............................................................................................................................................................35
12.1.1 Merchant Receipt.............................................................................................................................................35
12.1.2 EOS Report......................................................................................................................................................36

Cell Power User Manual (v1.0) 4
FiguresFigure 1: The Creon terminal................................................................................................................................................8
Figure 2: The battery of the Creon terminal can be removed by pressing down on the latch (indicated by the circle)......11
Figure 3: The SIM card must be inserted into the slot (indicated by the circle) as shown by the image next to the SIM slot (also indicated by the circle)...............................................................................................................................................12
Figure 4: The Creon Ethernet terminal has a power connector and an Ethernet connector. This image is courtesy of SPECTRA Technologies Holdings Co. Ltd.........................................................................................................................13
Figure 5: The process of inserting a roll of paper into the Creon terminal. This image is courtesy of SPECTRA Technologies Holdings Co. Ltd...........................................................................................................................................14
Figure 6: The power cable can be connected to the terminal by inserting it into the power connector. This image is courtesy of SPECTRA Technologies Holdings Co. Ltd......................................................................................................15
Figure 7: The Root menu appears when the terminal is switched on.................................................................................17
Figure 8: A representation of the prompt for the super user password..............................................................................17
Figure 9: Enter the super user password. In this example the super user password is the default password...................18
Figure 10: The Login menu is displayed if the super user password was entered correctly..............................................18
Figure 11: A representation of the prompt for the super user password............................................................................18
Figure 12: Enter the super user password. In this example the super user password is the default password.................19
Figure 13: An illustration of the Super User menu..............................................................................................................19
Figure 14: A representation of the options found in the Operator Management menu......................................................19
Figure 15: An illustration of the prompt for the operator ID................................................................................................20
Figure 16: Enter the relevant operator ID. In this example the operator ID is “000001”.....................................................20
Figure 17: A representation of the menu displayed after the summary end of shift report has been printed....................22
Figure 18: An example of the summary end of shift report printout....................................................................................23
Figure 19: A representation of the menu displayed after the detailed end of shift report has been printed.......................24
Figure 20: An example of the detailed end of shift report printout......................................................................................24
Figure 21: A representation of the prompt for an operator's PIN........................................................................................26
Figure 22: Enter the operator's PIN. In this example the PIN is “1234”, but it can be any 4 digits.....................................26
Figure 23: A representation of the prompt for the operator's new PIN...............................................................................27
Figure 24: Enter the operator's new PIN. In this example the new PIN is “1234”, but it can be any 4 digits.....................27
Figure 25: An example of the Operator menu. Services' names and types may differ......................................................28
Figure 26: A representation of the available options for the “Airtime” service....................................................................28
Figure 27: An example of the menu where an airtime provider can be selected. To view more providers, select “Next...” (see Figure 28)....................................................................................................................................................................29
Figure 28: An example of the rest of the airtime providers, which are displayed after the option “Next...” was selected (see Figure 27)....................................................................................................................................................................29
Figure 29: An example of the available vouchers that can be selected. This menu is displayed after selecting an airtime provider. To view more vouchers, select the option “Next....”.............................................................................................30
Figure 30: An illustration of the prompt for the quantity (number of vouchers). The quantity is limited to a minimum of 1 and a maximum of 9. The actual quantity that can be entered will depend on the balance available on the merchant's account...............................................................................................................................................................................30
Figure 31: An example of the information displayed while the Creon terminal is connecting to the server. The first line shows the name of the server.............................................................................................................................................30
Figure 32: A representation of the available options for the “Electricity” service...............................................................31
Figure 33: A representation of the prompt for the meter number.......................................................................................32
Figure 34: Enter the meter number. In this example the meter number is “07037709032”. The number will be provided by the customer..................................................................................................................................................................32
Figure 35: A representation of the prompt for the amount of the purchase. The minimum amount is also specified........32

Cell Power User Manual (v1.0) 5
Figure 36: Enter the amount. In this example the amount is “10”, which implies R10.......................................................32
Figure 37: An example of the customer's information. Before the transaction is completed, the operator should confirm that the details of the customer are correct........................................................................................................................33
Figure 38: An example of the information displayed while the Creon terminal is connecting to the server. The first line shows the name of the server.............................................................................................................................................33
Figure 39: An illustration of the Printing Options menu......................................................................................................35
Figure 40: An example of the available services. The printing of the merchant's receipt can be deactivated or activated for any of these...................................................................................................................................................................35
Figure 41: A representation of the prompt that is displayed after a service is selected. Press 1 to deactivate or press 0 to activate the printing of the merchant's receipt....................................................................................................................36
Figure 42: In this example, 1 was pressed. This will deactivate the printing of the merchant's receipt for the selected service.................................................................................................................................................................................36
Figure 43: A representation of the prompt to select the level of detail for the detailed end of shift report. Press 1 for less detail or press 0 for more detail.........................................................................................................................................36
Figure 44: In this example, 1 was pressed. Thus less detail will be displayed when printing the detailed end of shift report. This means that less paper will be used.................................................................................................................37
Cell Power User Manual (v1.0) 6
1 Introduction
Cell Power is an Electronic Voucher Distribution (EVD) system that uses standard GSM (Global System for Mobile communications) mobile phones and printer-based POS (Point-of-Sales) devices to sell and distribute prepaid airtime and electricity vouchers (or tokens). Vendors buy airtime and electricity stock from Cell Power, and resell their stock to consumers. Cell Power makes it possible to engage the people from the community directly with the business opportunities provided by the vending of prepaid airtime and electricity.
Mobile phones are ideal for selling prepaid airtime and electricity to a small customer base. However, when the number of customers increase, the printer-based POS device may provide a better solution.
There are several advantages in using a POS device and may lead to a vendor attracting more customers, namely:
• A POS device is faster than a mobile phone.
• A POS device provides higher sales volume than a mobile phone.
• A customer receipt can be printed.
• The software on the POS device provides an easy-to-use interface to the users.
This manual explains how to utilise a POS device, specifically a Creon terminal, to vend prepaid airtime and electricity vouchers.
2 Definitions and Terminology
The following list provides definitions to terminology used throughout the document.
Airtime service provider
A company that provides services to mobile phones. This can include prepaid airtime, subscriptions, and so forth.
Electricity provider
A company or municipality that provides electricity to a particular region or country.
Operator
An individual that sells prepaid airtime or electricity from the Creon terminal.
Services
The services that are available from the Creon terminal, namely “Airtime” and “Electricity”.
Super user
The individual, usually the owner of the Creon terminal, that has full access to all the user functions available on the terminal. The super user (also called the supervisor) is the individual that manages operators, starts and ends shifts, and so forth.

Cell Power User Manual (v1.0) 7
3 Abbreviations
This section provides a list of all abbreviations used in the document.
DHCP Dynamic Host Configuration Protocol
EVD Electronic Voucher Distribution
EOS End of Shift
GPRS General Packet Radio Service
GSM Global System for Mobile communications
ID Identification
PIN Personal Identification Number
POS Point of Sales
SIM Subscriber Identity Module
USSD Unstructured Supplementary Service Data

Cell Power User Manual (v1.0) 8
4 The Creon Terminal
The Creon terminal is used to vend prepaid airtime and electricity vouchers fast and effectively. Figure 1, apart from showing the Creon terminal, also highlights important buttons on the terminal. Options presented through the user interface can be selected by pressing the corresponding button, for instance, to select option 1, press “1” on the keypad.
Figure 1: The Creon terminal
The buttons on the Creon terminal (Figure 1) provide the following functions:
• Enter/Power
This button is used to confirm the user input, for instance, to confirm the entered password, press the “Enter” button. The button is also used to turn on the Creon terminal.
• Cancel
Some processes can be aborted (or canceled) by pressing the “Cancel” button.
• Clear
This button can be used to clear entered numbers. For instance when a password is entered incorrectly, press the “Clear” button to clear the numbers, and re-enter the correct password.
• Reprint
During certain operations, the information displayed on the screen can be printed by pressing the “Reprint” button.
• Function
Only used by Cell Power technicians during terminal setup.
• Feed
Pressing this button will feed the paper through the printer without printing on it.
• Paper release
The paper roll can be accessed by pressing down on this button.

Cell Power User Manual (v1.0) 9
5 Requirements
There are two types of Creon terminals, namely one that utilises a GPRS-enabled SIM card and one that uses an Ethernet connection.
The components required to utilise the Creon GPRS terminal are listed below.
• A Creon GPRS terminal (with a battery)
• A power cable (or cord)
• A GPRS-enabled SIM card
• A roll of thermal paper
The components required to utilise the Creon Ethernet terminal are listed below.
• A Creon Ethernet terminal
• A power cable (or cord)
• An Ethernet cable
• A network that can access the Internet and has an Ethernet connection point.
• A roll of thermal paper
6 Quick Start
This section is a quick guide on how to operate the terminal and use it to vend prepaid airtime or electricity vouchers. The remainder of this manual discusses the points mentioned below in detail.
To complete any transaction, an operator must have been added and a shift must have been started.
1. Charge the battery of the Creon terminal (refer to section 7.5 on page 15 for instructions). This is especially necessary if the battery has not previously been charged. The Creon GPRS terminal can function on a charged battery for several hours. However, it is better to power the Creon Ethernet terminal from the power outlet.
2. The next step depends on the type of Creon terminal, namely:
i. The Creon GPRS terminal
Insert the SIM card (refer to section 7.1 on page 11 for instructions). The SIM card (prepaid or subscription) must be GPRS-enabled.
ii. The Creon Ethernet terminal
Connect the terminal (via the Ethernet cable) to a network that has an Internet connection. The network must have DHCP configured.
3. Insert a roll of thermal paper (refer to section 7.3 on page 13 for instructions).
4. Switch the terminal on by pressing the “Enter” button (refer to section 7.4 on page 14). If the Creon terminal is connected to a power outlet, it will switch on automatically.
5. If no operators have previously been added, add an operator by following these steps (also refer to section 10.1 on page 26):
i. Select “Add Operator” from the Operator Management menu (refer to section 8.4 on page 19 for a discussion on how to reach the menu).
ii. Enter the 6 digit operator ID at the prompt and press “Enter”.
iii. Enter the 4 digit operator PIN at the prompt and press “Enter”.

Cell Power User Manual (v1.0) 10
6. Select “Start shift” from the Root menu (refer to section 8.1 on page 17 for a discussion on how to reach the menu). A shift must be started for any transaction to be performed (also refer to section 9.1 on page 21).
7. Select “Login” from the Login menu (refer to section 8.2 on page 17 for a discussion on how to reach the menu). Enter the 6 digit operator ID and 4 digit PIN when prompted for it.
8. Select the service, for instance “Airtime” to vend prepaid airtime vouchers, from the Operator menu. Refer to section 11 on page 28 for a discussion on the various services, the options available for each, and instructions on vending vouchers to customers.
9. To sell vouchers, select “Purchase” from the Select Operation menu and follow the prompts.
10. If no further transactions are to be made, the operator should log off by selecting “Log off” from the Operator menu.
11. A shift should be ended daily. After a shift has been ended a scheduled call must be performed. To end a shift select “End shift” from the Login menu. The shift will successfully be ended when “Accept shift” is selected from the EOS menu. To perform a scheduled call, select “Scheduled Call” from the Super User menu. Refer to section 9.2 on page 21 for a discussion on ending a shift and performing a scheduled call.

Cell Power User Manual (v1.0) 11
7 Manage the Creon Terminal
The following sections provide discussions on the general management of the Creon terminal. This includes topics like inserting the SIM card, charging the battery, and so forth.
7.1 Inserting the SIM Card
This section is only relevant to the Creon GPRS terminal.
The Creon GPRS terminal uses the GSM network as a communications channel when performing transactions. This is the same network used by mobile phones. Thus the terminal requires a SIM card to operate. A SIM card from any airtime service provider will be sufficient.
Please ensure that the SIM card is GPRS-enabled before inserting it. This can be done by placing the SIM card in a GPRS-enabled mobile phone and contacting the airtime service provider. The remainder of this section will explain how to properly insert the SIM card into the Creon terminal.
Please follow the steps listed below to insert the SIM card.
1. Hold the Creon terminal up with the keypad pointing toward the user.
2. Turn the Creon terminal upside down (the keypad should still be pointing toward the user).
3. If the battery is inserted, it will need to be removed. A latch should be visible at the bottom of the terminal (Figure 2). The latch must be pressed down to release the battery. The battery can now be removed.
Figure 2: The battery of the Creon terminal can be removed by pressing down on the latch (indicated by the circle).

Cell Power User Manual (v1.0) 12
4. After the battery has been removed, four SIM slots should be visible. There is a fifth SIM slot located away from the other four. It can be seen by tilting the Creon terminal slightly downward, and is indicated in Figure 3. The SIM card must be inserted into the fifth slot (and not any of the other four). There is an image to indicate how to insert the SIM card next to the fifth slot. It can also be seen in Figure 3.
5. Re-insert the battery.
Figure 3: The SIM card must be inserted into the slot (indicated by the circle) as shown by the image next to the SIM slot (also indicated by the circle).
7.2 Ethernet Connection
This section is only relevant to the Creon Ethernet terminal.
The Creon Ethernet terminal must be connected to the Internet via an Ethernet connection. Follow the steps listed below.
1. The network (that the terminal is connected to) must have access to the Internet and DHCP (Dynamic Host Configuration Protocol) should be configured.
Cell Power User Manual (v1.0) 13
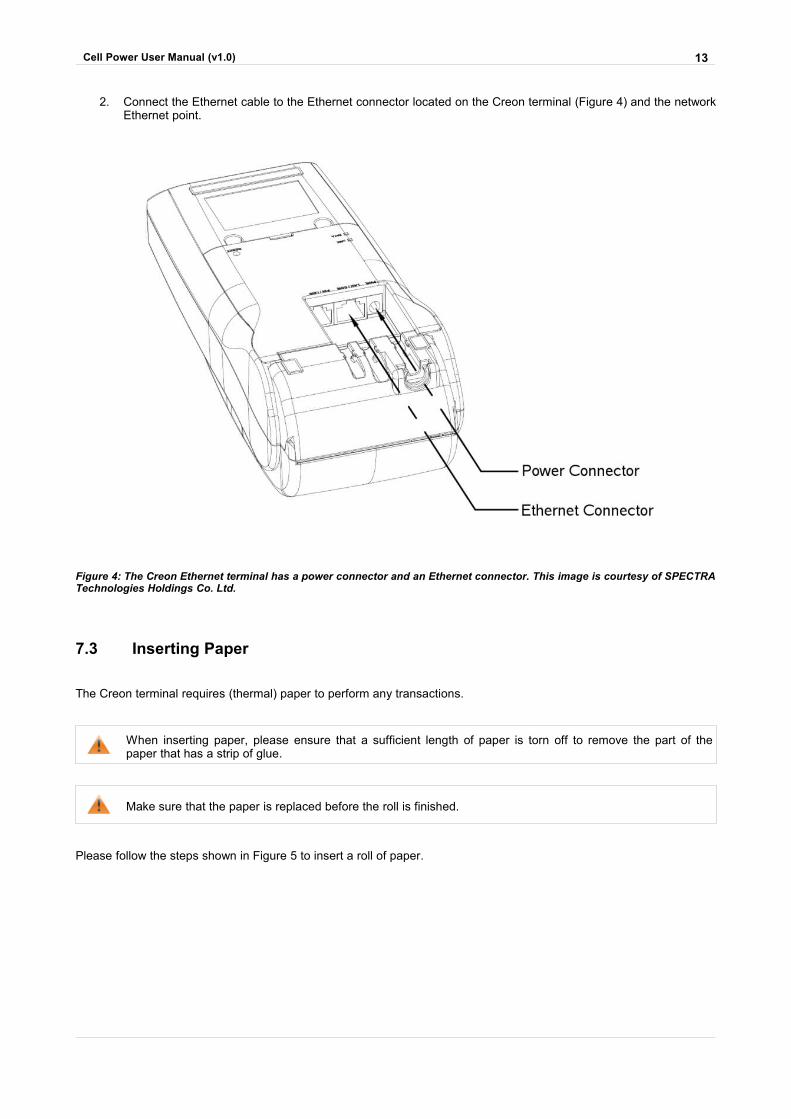
2. Connect the Ethernet cable to the Ethernet connector located on the Creon terminal (Figure 4) and the network Ethernet point.
Figure 4: The Creon Ethernet terminal has a power connector and an Ethernet connector. This image is courtesy of SPECTRA Technologies Holdings Co. Ltd.
7.3 Inserting Paper
The Creon terminal requires (thermal) paper to perform any transactions.
When inserting paper, please ensure that a sufficient length of paper is torn off to remove the part of the paper that has a strip of glue.
Make sure that the paper is replaced before the roll is finished.
Please follow the steps shown in Figure 5 to insert a roll of paper.

Cell Power User Manual (v1.0) 14
Figure 5: The process of inserting a roll of paper into the Creon terminal. This image is courtesy of SPECTRA Technologies Holdings Co. Ltd.
7.4 Switch On
The Creon terminal can be powered from the battery or a power outlet. Battery power (for the Creon GPRS terminal) will last for several hours, however the battery will need to be charged (refer to section 7.5 on page 15). It is recommended that the Creon Ethernet terminal always be powered from the power outlet, as its battery power will not last long.

Cell Power User Manual (v1.0) 15
To power the Creon terminal from a power outlet, connect the power cord (or cable) to a power outlet and to the power connector on the Creon terminal. The power connector for the Creon GPRS terminal is indicated in Figure 6 below, and the power connector for the Creon Ethernet terminal is shown in Figure 4 on page 13. The Creon terminal will switch on automatically when the power cable is plugged in.
Figure 6: The power cable can be connected to the terminal by inserting it into the power connector. This image is courtesy of SPECTRA Technologies Holdings Co. Ltd.
To power the Creon terminal from the battery, the battery must be charged. The Creon terminal can be switched on by pressing the “Enter/Power” button (refer to Figure 1 on page 8).
The system takes a few moments to start. Please wait until the Root menu appears (discussed in section 8.1 on page 17).
7.5 Charging the Battery
The Creon GPRS terminal can run on battery power for several hours, however the battery must be charged beforehand. It is recommended that the Creon Ethernet terminal always be powered from the power outlet, as its battery power will not last long.
To charge the battery, connect the power cord (or cable) to a power outlet and to the power connector on the Creon terminal (indicated in Figure 6 on page 15). The Creon terminal will switch on automatically when the power cable is plugged in.

Cell Power User Manual (v1.0) 16
7.6 SIM Card Airtime Balance
This section is only relevant to the Creon GPRS terminal.
The available airtime on the prepaid SIM card (inserted in the terminal) can be checked from the Creon terminal. Using standard USSD requests it is possible to retrieve the balance, as well as load more airtime, just as it can be done on any mobile phone.
Select “USSD request” from the Super User menu (discussed in section 8.3 on page 18), enter the USSD request at the prompt, and press “Enter”.

Cell Power User Manual (v1.0) 17
8 The Menu Interface
Functions on the Creon terminal are accessed from several menus. These menus are discussed in the following sections.
8.1 The Root Menu
The root menu (Figure 7) will appear when the terminal is switched on and there is no active shift (i.e. a shift has been started, but not ended). This menu can be used to start a shift, gain access to the Super User menu or switch off the terminal. To select an option, press the corresponding button on the keypad, for instance, to select option 1, “Start shift”, press 1.
ROOT MENU:
1. Start shift
2. Super User
9. Power off
Figure 7: The Root menu appears when the terminal is switched on.
8.2 The Login Menu
Operators can log in to perform transactions from the Login menu (Figure 10). It can also be used to gain access to the Super User menu, end a shift or switch off the terminal. To select an option, press the corresponding button on the keypad, for instance, to select option 1, “Login”, press 1.
From the Root menu (Figure 7 on page 17) select “Start shift”, by pressing the corresponding button on the keypad. This will display the prompt for the super user password (Figure 8).
Super User P@ssword:
Figure 8: A representation of the prompt for the super user password.
Enter the super user password (the default super user password is 8 zeros) as illustrated in Figure 9 below.
Cell Power User Manual (v1.0) 18
Super User P@ssword:
00000000
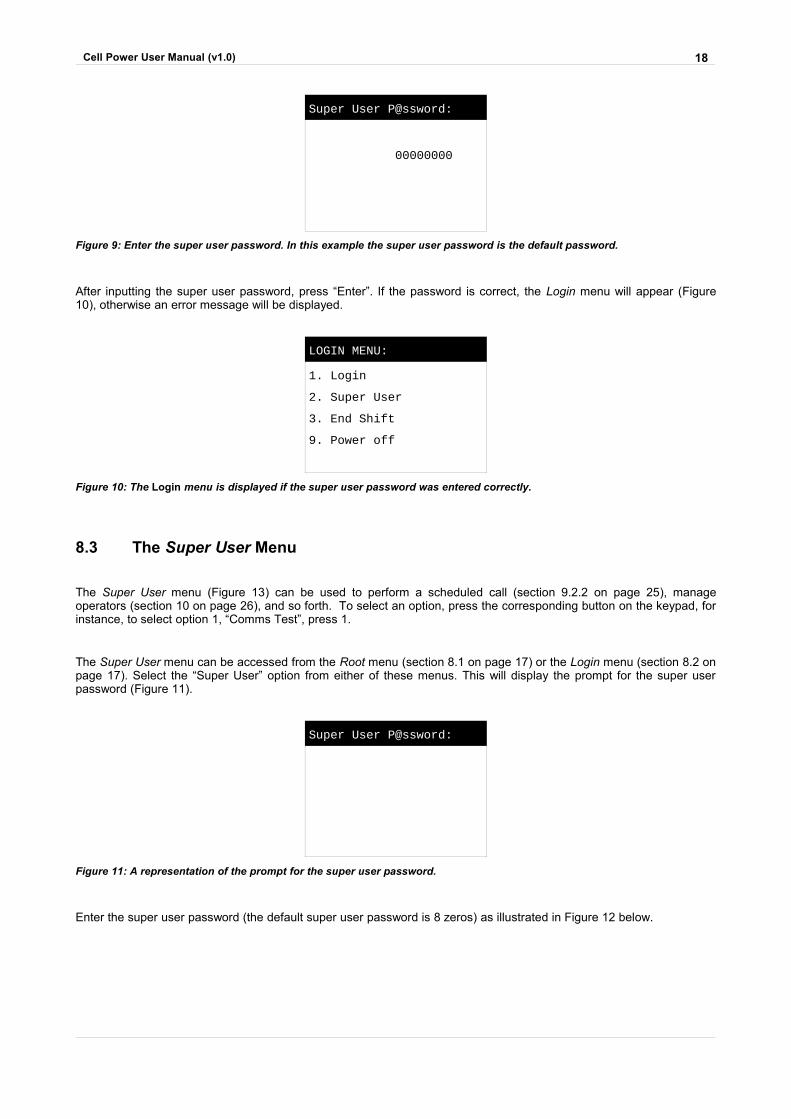
Figure 9: Enter the super user password. In this example the super user password is the default password.
After inputting the super user password, press “Enter”. If the password is correct, the Login menu will appear (Figure10), otherwise an error message will be displayed.
LOGIN MENU:
1. Login
2. Super User
3. End Shift
9. Power off
Figure 10: The Login menu is displayed if the super user password was entered correctly.
8.3 The Super User Menu
The Super User menu (Figure 13) can be used to perform a scheduled call (section 9.2.2 on page 25), manage operators (section 10 on page 26), and so forth. To select an option, press the corresponding button on the keypad, for instance, to select option 1, “Comms Test”, press 1.
The Super User menu can be accessed from the Root menu (section 8.1 on page 17) or the Login menu (section 8.2 on page 17). Select the “Super User” option from either of these menus. This will display the prompt for the super user password (Figure 11).
Super User P@ssword:
Figure 11: A representation of the prompt for the super user password.
Enter the super user password (the default super user password is 8 zeros) as illustrated in Figure 12 below.

Cell Power User Manual (v1.0) 19
Super User P@ssword:
00000000
Figure 12: Enter the super user password. In this example the super user password is the default password.
After inputting the super user password, press “Enter”. If the password is correct, the Super User menu (Figure 13) will appear, otherwise an error message will be displayed.
Super User Menu:
1. Comms Test
2. Scheduled Call
3. Manage Operators
4. Configure servers
5. Printing options
6. USSD request
9. Return
Figure 13: An illustration of the Super User menu.
To exit the Super User menu, select “Return”.
8.4 The Operator Management Menu
The Operator Management menu can be accessed from the Super User menu (section 8.3 on page 18) by selecting “Manage Operators”.
The Operator Management menu is shown in Figure 14 below. From this menu the user will be able to add an operator, delete an operator or change an existing operator's PIN (discussed in section 10 on page 26). To select an option, press the corresponding button on the keypad, for instance, to select option 1, “Add Operator”, press 1.
OPERATOR MANAGEMENT:
1. Add Operator
2. Delete Operator
3. Operator P!N
9. Return
Figure 14: A representation of the options found in the Operator Management menu.
When an operator is added or deleted or an operator's PIN is changed, the user will be prompted for the 6 digit operator ID (Figure 15).

Cell Power User Manual (v1.0) 20
Operator ID:
Figure 15: An illustration of the prompt for the operator ID.
Enter the operator ID, for instance “000001” (Figure 16).
Operator ID:
000001
Figure 16: Enter the relevant operator ID. In this example the operator ID is “000001”.
After entering the operator ID, press “Enter” and the next menu or prompt will be displayed.
To exit the Operator Management menu and return to the Super User menu, select “Return” (Figure 14) from the menu.

Cell Power User Manual (v1.0) 21
9 Shifts
A shift is a way of keeping track of when sales were started and ended. Shifts can be linked to specific operators or to certain time periods.
9.1 Starting a Shift
A shift needs to be started before any transaction can occur.
It is important to end a shift at the end of the day. This will ensure that the Creon terminal will continue to work optimally.
The shift can only be started (or ended) by the super user. It requires an 8 digit password, which should be kept secure at all times. The default password is 8 zeros. The password can only be changed by contacting a technician at Cell Power.
It is recommended that the super user password should be changed by contacting a Cell Power technician. This will ensure that the password is more secure.
To start a shift, follow these steps:
1. From the Root menu (section 8.1 on page 17), select “Start shift” (press the corresponding button on the keypad).
2. Enter the 8 digit super user password at the prompt and then press “Enter”.
3. If the password is correct, the Login menu (section 8.2 on page 17) will appear. This means the shift was started successfully. If the password is incorrect an error message will be displayed.
9.2 Ending a Shift
The management of shifts is very important. A shift must be ended. If shifts are not ended regularly, the Creon terminal will run out of free memory, and no further transactions can be made.
It is recommended that a shift be ended on a daily basis.
There is a maximum limit of 1000 transactions for each transaction type (e.g. airtime or electricity) per shift. If the shift is not ended before the limit is reached, the memory will become full, preventing further transactions. In such a case, an error message, “Journal full”, will be displayed. If this happens, the shift must be ended and accepted, followed by a scheduled call. A scheduled call can be performed from the Super User menu (section 9.2.2 on page 25).
Only a super user can end the shift, as it requires the super user password.
To end a shift follow these steps:
1. From the Login menu (section 8.2 on page 17), select “End shift” (press the corresponding button on the keypad).
2. Enter the 8 digit super user password at the prompt and then press “Enter”.
3. The Creon terminal will print out a summary of the shift (Figure 18).

Cell Power User Manual (v1.0) 22
4. The EOS menu will appear (Figure 17). The super user can select to do one of the following:
i. If the super user is satisfied with the summary report, select “Accept shift” from the EOS menu to end the shift (refer to section 9.2.2 on page 25).
ii. To print a more detailed report which provides information on every transaction, select “Detailed report” from the EOS menu (refer to section 9.2.1 on page 23).
The detailed report can use a lot of paper, depending on the number of transactions. Thus before choosing this option, ensure that there is enough paper in the Creon terminal.
iii. To cancel the end of shift, select “Cancel”. This will abort the procedure.
EOS MENU:
1. Accept shift
2. Detailed report
9. Cancel
Figure 17: A representation of the menu displayed after the summary end of shift report has been printed.

Cell Power User Manual (v1.0) 23
Shift started: 2009-06-30 15:37
Shift ended: 2009-06-30 15:39
*****************************
SUMMARY FOR OPERATOR 000001
*****************************
SUMMARY FOR: Airtime
*** Airtime Provider 1 ***
TYPE QTY SUBTOTAL
R30 1 R30.00
SUBTOTAL (1 vouchers):
R30.00
SUMMARY FOR: Electricity
SUBTOTAL (1 vouchers):
R10.00
OPERATOR TOTAL: R40.00
Balance Airtime:
BALANCE: R9290.05
CREDIT LIMIT: R0.00
Balance Electricity:
BALANCE: R7260.68
CREDIT LIMIT: R0.00
Figure 18: An example of the summary end of shift report printout.
9.2.1 Detailed Report
A detailed report is a printout with information on every transaction during the shift. To print a detailed report select “Detailed report” from the EOS menu (Figure 17). Afterward, the menu shown in Figure 19 will be displayed.
If the super user is satisfied with the details of the transactions, the shift can be accepted and ended by selecting “Accept shift” (refer to section 9.2.2 on page 25).
EOS MENU:
1. Accept shift
2. Reject shift
9. Cancel

Cell Power User Manual (v1.0) 24
Figure 19: A representation of the menu displayed after the detailed end of shift report has been printed.
There is also an option to reject the shift (select “Reject shift”). This should only be done when there is a discrepancy between the totals in the printout and the received cash. When a shift is rejected, the terminal is blocked and cannot be used. The super user must contact a technician from Cell Power to handle the problem.
An example of the detailed report printout is shown in Figure 20.
Shift started: 2009-06-30 15:37
Shift ended: 2009-06-30 15:39
*****************************
SUMMARY FOR OPERATOR 000001
*****************************
SUMMARY FOR: Airtime
*** Airtime Provider 1 ***
R30
Time: 2009-06-30 15:37
SERIAL: 7003 -> R30.00
QTY: 1 Subtotal: R30.00
SUBTOTAL (1 vouchers):
R30.00
SUMMARY FOR: Electricity
Time: 2009-05-30 15:38
07037709032: R10.00
SUBTOTAL (1 vouchers):
R10.00
OPERATOR TOTAL: R40.00
Balance Airtime:
BALANCE: R9290.05
CREDIT LIMIT: R0.00
Balance Electricity:
BALANCE: R7260.68
CREDIT LIMIT: R0.00
Figure 20: An example of the detailed end of shift report printout.

Cell Power User Manual (v1.0) 25
9.2.2 Accept Shift and Scheduled Call
A shift can only the ended successfully by accepting the shift and completing a scheduled call.
When a shift is accepted the Creon terminal will attempt to communicate with the Cell Power server. This may take a few minutes to complete. The Creon terminal will display dots (“...”) to indicate the progress of the shift acceptance. The number of dots displayed is directly related to the number of transactions during the shift. The entire screen may fill with dots and it will appear that the Creon terminal has stopped working. It has not! Please wait patiently until the Root menu appears. This may take several minutes.
Accepting shifts will take less time if they are ended more frequently.
The Root menu will appear after the shift has been accepted. At this stage a scheduled call is required. This can be done by selecting “Scheduled Call” from the Super User menu (section 8.3 on page 18). An automatic scheduled call will also occur during the night – this can only happen if the terminal is left on. Please note that if a lot of dots were printed when the shift was accepted, a lot of “sSrR” messages will be printed during the scheduled call. The screen may even be filled. Please wait patiently until the call completes on its own. It may take several minutes.

Cell Power User Manual (v1.0) 26
10 Operators
An operator sells prepaid airtime and electricity vouchers to customers. Naturally, the super user can also be an operator. Each operator has a unique operator ID and PIN. This ensures that sales can be attributed to specific operators by printing the detailed end of shift report (refer to section 9.2.1 on page 23). The Creon terminal is limited to a maximum of ten operators.
10.1 Adding an Operator
The super user must add operators and operators must log in before any transactions can be performed.
To add an operator:
1. Select “Add Operator” from the Operator Management menu (section 8.4 on page 19).
2. Enter the 6 digit operator ID (section 8.4 on page 19) at the prompt and press “Enter”.
3. The super user will be prompted for a 4 digit PIN for the operator (Figure 21). Enter any 4 digit PIN, for instance “1234” (Figure 22), and press “Enter”.
It is advised that operators choose their own PIN, to ensure that only they can sell with that operator ID. The end of shift report will show information on a per operator basis and can be used to evaluate sales with regards to specific operators.
P!N:
Figure 21: A representation of the prompt for an operator's PIN.
P!N:
1234
Figure 22: Enter the operator's PIN. In this example the PIN is “1234”, but it can be any 4 digits.
4. If the operator ID does not exist, it will be added to the Creon terminal and the Operator Management menu will appear. An error message will be displayed if the operator ID could not be added.

Cell Power User Manual (v1.0) 27
10.2 Deleting an Operator
Operators can be deleted from the Operator Management menu (section 8.4 on page 19).
To delete an operator, follow the steps listed below.
1. Select “Delete operator” from the Operator Management menu.
2. Enter the 6 digit operator ID to be deleted at the prompt, and press “Enter”. Press the “Cancel” button to abort the delete process.
3. If the operator ID exists, it will be deleted and the Operator Management menu will appear. An error message will be displayed if the delete process failed.
10.3 Changing an Operator PIN
In the event that an operator has forgotten their PIN, or the PIN has been overheard, the super user can change the PIN by following these steps.
1. Select “Operator P!N” from the Operator Management menu (section 8.4 on page 19).
2. Enter the 6 digit operator ID at the prompt, and press “Enter”.
3. The super user will be prompted for a new 4 digit PIN for the operator (Figure 23). Enter any 4 digit PIN, for instance “1234” (Figure 24), and press “Enter”.
It is advised that operators choose their own PIN, to ensure that only they can sell with that operator ID. The end of shift report will show information on a per operator basis and can be used to evaluate sales with regards to specific operators.
New P!N:
Figure 23: A representation of the prompt for the operator's new PIN.
New P!N:
1234
Figure 24: Enter the operator's new PIN. In this example the new PIN is “1234”, but it can be any 4 digits.
4. If the PIN has been successfully changed, the Operator Management menu will appear, otherwise an error message will be displayed.

Cell Power User Manual (v1.0) 28
11 Services
There are several services (e.g. “Airtime” or “Electricity”) available from the Creon terminal. These services can be accessed from the Operator menu (Figure 25). After selecting a service, the user will be able to perform other operations specific to a particular service (e.g. selling prepaid airtime vouchers).
The following steps explain how to access the Operator menu:
1. Select “Login” from the Login menu (section 8.2 on page 17).
2. Enter the 6 digit operator ID at the prompt and press “Enter”.
3. Enter the 4 digit PIN at the prompt and press “Enter”.
4. If the operator ID and the operator PIN are correct, the Operator menu (Figure 25) will be displayed.
OPERATOR MENU:
1. Airtime
2. Electricity
9. Log off
Figure 25: An example of the Operator menu. Services' names and types may differ.
The Operator menu will display the different types of services, for instance “Airtime” and “Electricity”.
Please note that services' names and types may differ.
To exit the Operator menu and return to the Login menu, select “Log off”.
11.1 Airtime
Select “Airtime” from the Operator menu (Figure 25 on page 28). The user will be presented with a list of operations that can be performed (Figure 26).
SELECT OPERATION:
1. Purchase
2. Check Balance
9. Cancel
Figure 26: A representation of the available options for the “Airtime” service.

Cell Power User Manual (v1.0) 29
From this menu, the user can select to:
• Purchase
Purchase a prepaid electricity voucher (i.e. complete a transaction). Refer to section 11.1.1 on page 29.
• Check Balance
Check the account's current balance. Refer to section 11.1.2 on page 31.
• Cancel
Return to the Operator menu. Refer to section 11.1.3 on page 31.
11.1.1 Purchase
To vend prepaid airtime vouchers, follow the steps discussed below.
1. Select “Purchase” (Figure 26) to view a list of prepaid airtime providers (Figure 27 and Figure 28). If more airtime providers are available for selection, an additional option, “Next...”, will be displayed (refer to Figure 27 below). Selecting this option will display the rest of the airtime providers, as illustrated in Figure 28.
SELECT OPERATOR:
1. Airtime Provider 1
2. Airtime Provider 2
3. Airtime Provider 3
4. Airtime Provider 4
5. Next...
9. Cancel
Figure 27: An example of the menu where an airtime provider can be selected. To view more providers, select “Next...” (see Figure 28).
SELECT OPERATOR:
1. Airtime Provider 5
2. Airtime Provider 6
9. Cancel
Figure 28: An example of the rest of the airtime providers, which are displayed after the option “Next...” was selected (see Figure 27).
2. Select the desired prepaid airtime provider (Figure 27 and Figure 28), for instance “Airtime Provider 1”. The user will be presented with a list of available prepaid airtime vouchers from the selected airtime provider (Figure 29). The option “Next...” can be used to view the rest of the vouchers.

Cell Power User Manual (v1.0) 30
SELECT VOUCHER:
1. R5 Voucher
2. R10 Voucher
3. R15 Voucher
4. R30 Voucher
5. Next...
9. Cancel
Figure 29: An example of the available vouchers that can be selected. This menu is displayed after selecting an airtime provider. To view more vouchers, select the option “Next....”.
3. Select the desired prepaid airtime voucher, for instance “R10 Voucher”.
4. At the prompt (Figure 30), enter the quantity (number of vouchers) that the customer would like to purchase and press “Enter”. The quantity is limited to a minimum of 1 and a maximum of 9. This means that the quantity can be selected by pressing a number from 1 to 9 on the keypad, followed by the “Enter” button. If “Enter” is pressed without entering a quantity, a quantity of 1 will be selected by default.
Quantity:
Min: 1
Max: 9
Figure 30: An illustration of the prompt for the quantity (number of vouchers). The quantity is limited to a minimum of 1 and a maximum of 9. The actual quantity that can be entered will depend on the balance available on the merchant's account.
5. The Creon terminal will attempt to connect to the Cell Power server in order to purchase the voucher(s). It will display multiple “sSrR” messages (that indicate successful send and receive operations) on the screen. As the customer's receipt is printed, the screen will display “r” messages. An example is shown in Figure 31.
CONNECTING TO:
Airtime
sSrRsSrRsSrRsSrRsSrRsSrRsSrRsSrR
rrrr
Press any key...
Figure 31: An example of the information displayed while the Creon terminal is connecting to the server. The first line shows the name of the server.
6. Tear off the customer's receipt and press any key to print the merchant's receipt.
7. The balance for the merchant's account will be displayed on the screen after the merchant's receipt has been printed.
Afterward the Operator menu (Figure 25 on page 28) will be displayed again.

Cell Power User Manual (v1.0) 31
At this time the user can log off, by selecting “Log off” from the Operator menu. It is recommended, if no further transactions are to be done, that the operator log off. This will ensure that no one else can sell with that operator's ID.
11.1.2 Check Balance
The balance of the merchant's account can be retrieved by selecting “Check Balance” from the option list shown in Figure 26 on page 28. The Creon terminal will attempt to connect to the Cell Power server. The current balance will be displayed if it was successful, otherwise the balance acquired from the previously successful connection to the server will be shown instead.
11.1.3 Cancel
To return to the Operator menu, select “Cancel” from the option list.
11.2 Electricity
Select “Electricity” from the Operator menu (Figure 25 on page 28). The user will be presented with a list of operations that can be performed (Figure 32).
SELECT OPERATION:
1. Purchase
3. Reprint
4. Check Balance
9. Cancel
Figure 32: A representation of the available options for the “Electricity” service.
From this menu, the user can select to:
• Purchase
Purchase a prepaid electricity voucher (i.e. complete a transaction). Refer to section 11.2.1 on page 32.
• Reprint
Reprint the customer's receipt if there was an error during printing. Refer to section 11.2.2 on page 34.
• Check Balance
Check the account's current balance. Refer to section 11.2.3 on page 34.
• Cancel
Return to the Operator menu. Refer to section 11.2.4 on page 34.
Cell Power User Manual (v1.0) 32
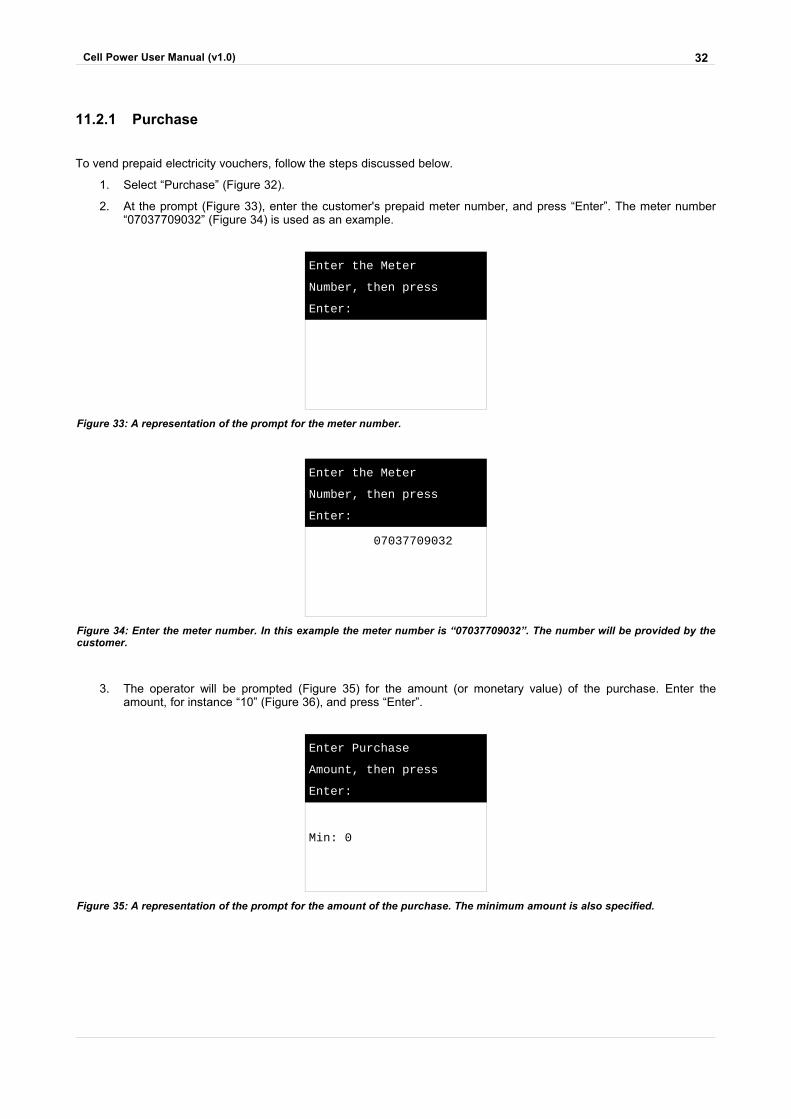
11.2.1 Purchase
To vend prepaid electricity vouchers, follow the steps discussed below.
1. Select “Purchase” (Figure 32).
2. At the prompt (Figure 33), enter the customer's prepaid meter number, and press “Enter”. The meter number “07037709032” (Figure 34) is used as an example.
Enter the Meter
Number, then press
Enter:
Figure 33: A representation of the prompt for the meter number.
Enter the Meter
Number, then press
Enter:
07037709032
Figure 34: Enter the meter number. In this example the meter number is “07037709032”. The number will be provided by the customer.
3. The operator will be prompted (Figure 35) for the amount (or monetary value) of the purchase. Enter the amount, for instance “10” (Figure 36), and press “Enter”.
Enter Purchase
Amount, then press
Enter:
Min: 0
Figure 35: A representation of the prompt for the amount of the purchase. The minimum amount is also specified.

Cell Power User Manual (v1.0) 33
Enter Purchase
Amount, then press
Enter:
10
Min: 0
Figure 36: Enter the amount. In this example the amount is “10”, which implies R10.
4. The Creon terminal will attempt to retrieve the customer's information from the Cell Power server. The customer's information (an example is shown in Figure 37) will be displayed if it was successful, otherwise an error message will be shown. The operator should use this information to confirm that the details of the customer are correct before completing the transaction.
07037709032:
Name: JAMBALA, KM
Addr:
Limit:R0.05-
Levy:R0.00
Arrears:R0.05 Days:1
Buy R10.00?
Y/N
Figure 37: An example of the customer's information. Before the transaction is completed, the operator should confirm that the details of the customer are correct.
5. There are three options available to the operator at this time, namely:
i. Press the “Enter” button to continue with the purchase.
ii. Press the “Cancel” button to cancel the purchase.
iii. Press the “Reprint” button to print the information displayed on the screen. If a customer is in arrears, the amount of electricity received is the difference between the requested amount and the arrears.
6. The Creon terminal will attempt to connect to the Cell Power server to finalise the transaction. It will display multiple “sSrR” messages (that indicate successful send and receive operations) on the screen. As the customer's receipt is printed, the screen will display “r” messages. An example is shown in Figure 38.
CONNECTING TO:
Electricity
sSrRsSrRsSrRsSrRsSrRsSrRsSrRsSrR
rrrr
Press any key...
Figure 38: An example of the information displayed while the Creon terminal is connecting to the server. The first line shows the name of the server.
Cell Power User Manual (v1.0) 34
7. Tear off the customer's receipt and press any key to print the merchant's receipt.
8. The balance for the merchant's account will be displayed on the screen after the merchant's receipt has been printed.
Afterward the Operator menu (Figure 25 on page 28) will be displayed again.
At this time the user can log off, by selecting “Log off” from the Operator menu. It is recommended, if no further transactions are to be done, that the operator log off. This will ensure that no one else can sell with that operator's ID.
11.2.2 Reprint
If an error occurred during the printing of the voucher, for instance there was no paper or the voucher PIN is unreadable, the voucher can be reprinted as follows.
1. Select “Reprint” from the option list shown in Figure 32 on page 31.
2. Enter the customer's meter number at the prompt and press “Enter”.
3. The Creon terminal will attempt to connect to the Cell Power server. The most recently purchased voucher PIN will be returned if it is successful, otherwise an error message will be displayed.
11.2.3 Check Balance
The balance of the merchant's account can be retrieved by selecting “Check Balance” from the option list shown in Figure 32 on page 31. The Creon terminal will attempt to connect to the Cell Power server. The current balance will be displayed if it was successful, otherwise the balance acquired from the previously successful connection to the server will be shown instead.
11.2.4 Cancel
To return to the Operator menu, select “Cancel” from the option list.

Cell Power User Manual (v1.0) 35
12 Printing Options
In any business, the main goal is to minimise expenses, while maximising profit. By using the Creon terminal, the daily number of sales will increase. Unfortunately, so will the amount of paper used by the printer. There are several options available to the super user to help minimise the paper usage. These options can be found in the Printing Options menu.
The Printing Options menu (Figure 39) can be accessed by selecting “Printing options” from the Super User menu (refer to section 8.3 on page 18).
PRINTING OPTIONS:
1. Merchant Receipt
2. EOS report
9. Cancel
Figure 39: An illustration of the Printing Options menu.
12.1.1 Merchant Receipt
The “Merchant Receipt” option shown in Figure 39 on page 35 allows the super user to deactivate (or activate) the printing of the merchant’s receipt. The customer’s receipt will always be printed.
The printing of the merchant's receipt should only be deactivated if the super user is confident that proof of a transaction is not necessary. Each transaction will be listed in the detailed report, which is printed during an end of shift.
Follow the steps listed below to change the printing options for the merchant's receipt.
1. Select “Merchant Receipt” from the Printing Options menu (Figure 39 on page 35). This will display a list of available service (Figure 40). The services' names and types may differ.
2. Select a service, for instance “Airtime”. The user will be able to active or deactivate the printing of the merchant's receipt for the selected service.
SELECT SERVER:
1. Airtime
2. Electricity
9. Cancel
Figure 40: An example of the available services. The printing of the merchant's receipt can be deactivated or activated for any of these.
3. Press 1 to deactivate the printing of the merchant’s receipt OR press 0 to activate the printing of the merchant’s receipt, as indicated in Figure 41 and Figure 42, and then press “Enter”.

Cell Power User Manual (v1.0) 36
print merchant slip?
Old value:
0
New value:
0 = print
1 = not print
Figure 41: A representation of the prompt that is displayed after a service is selected. Press 1 to deactivate or press 0 to activate the printing of the merchant's receipt.
print merchant slip?
Old value:
0
New value:
1
0 = print
1 = not print
Figure 42: In this example, 1 was pressed. This will deactivate the printing of the merchant's receipt for the selected service.
The user will be returned to the Printing Options menu after deactivating or activating the printing of the merchant's receipt.
12.1.2 EOS Report
The reports printed at the end of a shift can use a lot of paper. It is possible to disable (or enable) some of the detail of the report, which would result in less (or more) paper being used.
Follow the steps listed below to change the detail of the report.
1. Select “EOS report” from the Printing Options menu (Figure 39 on page 35).
2. On the next screen (Figure 43 and Figure 44), press 1 for less detail OR press 0 for more detail, and then press “Enter”.
less eos detail?
Old value:
0
New value:
0 = more detail
1 = less detail
Figure 43: A representation of the prompt to select the level of detail for the detailed end of shift report. Press 1 for less detail or press 0 for more detail.

Cell Power User Manual (v1.0) 37
less eos detail?
Old value:
0
New value:
1
0 = more detail
1 = less detail
Figure 44: In this example, 1 was pressed. Thus less detail will be displayed when printing the detailed end of shift report. This means that less paper will be used.
The detail for the report will be set and the user will be returned to the Printing Options menu.