amt firmware rework instructions v1.00 - fujitsu united...
TRANSCRIPT
K:\Service & Support\Level 3\AMT Firmware\AMT Firmware Rework Instructions V1.00.doc
1
Intel® Management Engine (ME) Firmware and BIOS Update
For Fujitsu Platforms with Intel® AMT
Rework Instruction
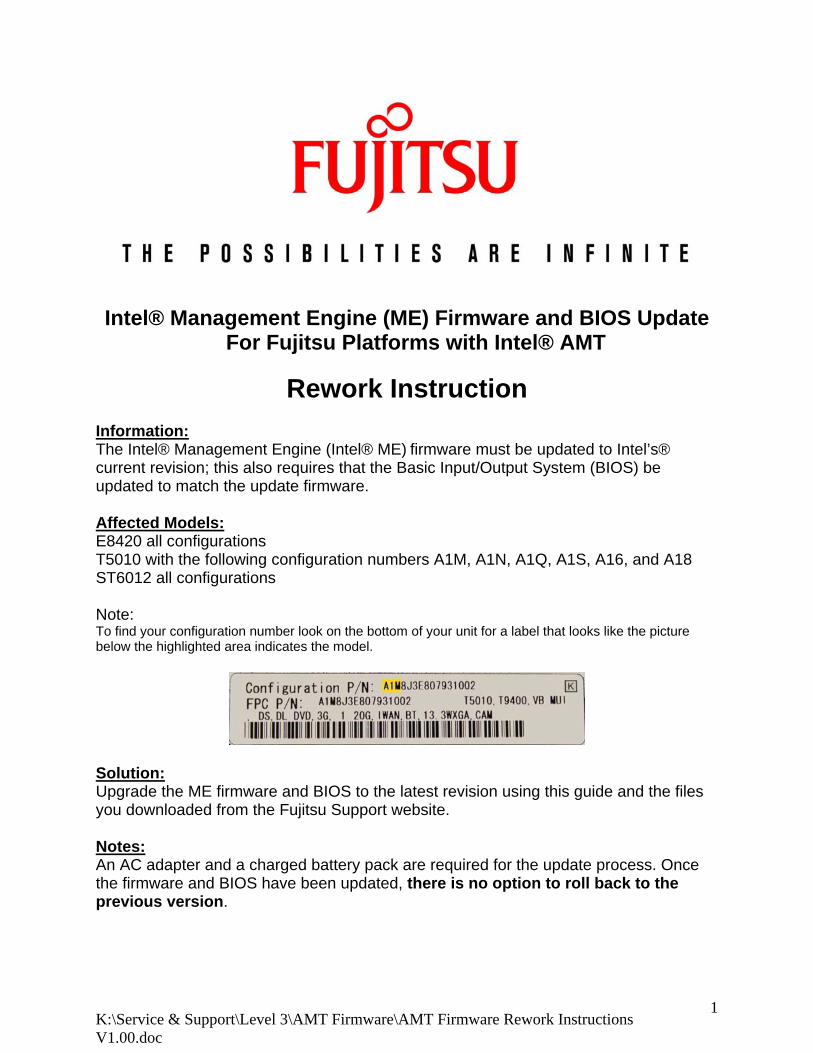
Information: The Intel® Management Engine (Intel® ME) firmware must be updated to Intel’s® current revision; this also requires that the Basic Input/Output System (BIOS) be updated to match the update firmware. Affected Models: E8420 all configurations T5010 with the following configuration numbers A1M, A1N, A1Q, A1S, A16, and A18 ST6012 all configurations Note: To find your configuration number look on the bottom of your unit for a label that looks like the picture below the highlighted area indicates the model.
Solution: Upgrade the ME firmware and BIOS to the latest revision using this guide and the files you downloaded from the Fujitsu Support website. Notes: An AC adapter and a charged battery pack are required for the update process. Once the firmware and BIOS have been updated, there is no option to roll back to the previous version.
K:\Service & Support\Level 3\AMT Firmware\AMT Firmware Rework Instructions V1.00.doc
2
Update Procedure.
Ensure the system you have is on the list of affected units above.
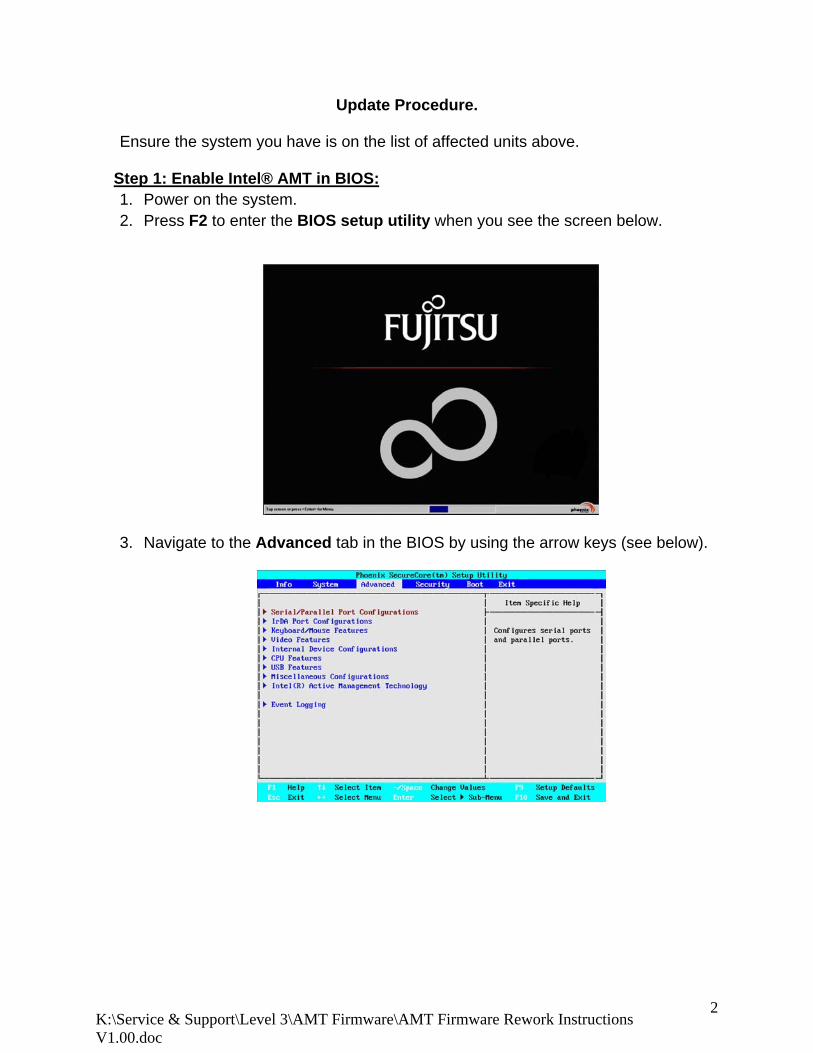
Step 1: Enable Intel® AMT in BIOS: 1. Power on the system. 2. Press F2 to enter the BIOS setup utility when you see the screen below.
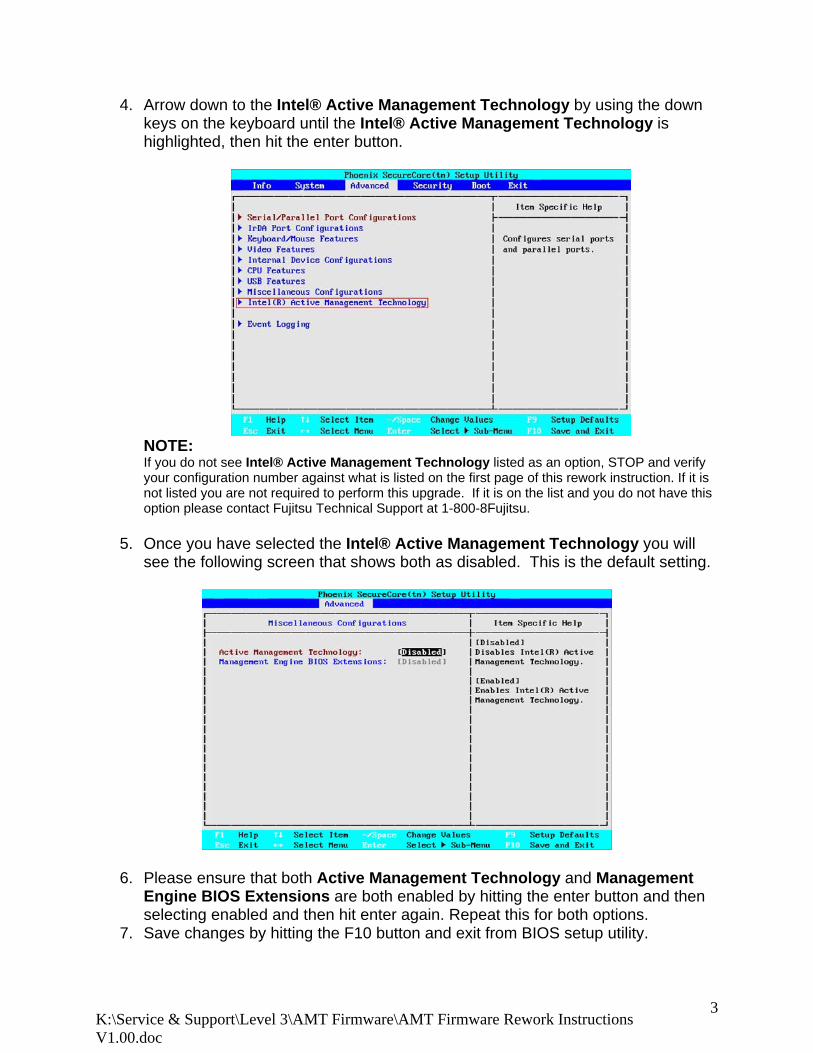
3. Navigate to the Advanced tab in the BIOS by using the arrow keys (see below).
K:\Service & Support\Level 3\AMT Firmware\AMT Firmware Rework Instructions V1.00.doc
3
4. Arrow down to the Intel® Active Management Technology by using the down keys on the keyboard until the Intel® Active Management Technology is highlighted, then hit the enter button.
NOTE: If you do not see Intel® Active Management Technology listed as an option, STOP and verify your configuration number against what is listed on the first page of this rework instruction. If it is not listed you are not required to perform this upgrade. If it is on the list and you do not have this option please contact Fujitsu Technical Support at 1-800-8Fujitsu.
5. Once you have selected the Intel® Active Management Technology you will
see the following screen that shows both as disabled. This is the default setting.
6. Please ensure that both Active Management Technology and Management Engine BIOS Extensions are both enabled by hitting the enter button and then selecting enabled and then hit enter again. Repeat this for both options.
7. Save changes by hitting the F10 button and exit from BIOS setup utility.
K:\Service & Support\Level 3\AMT Firmware\AMT Firmware Rework Instructions V1.00.doc
4
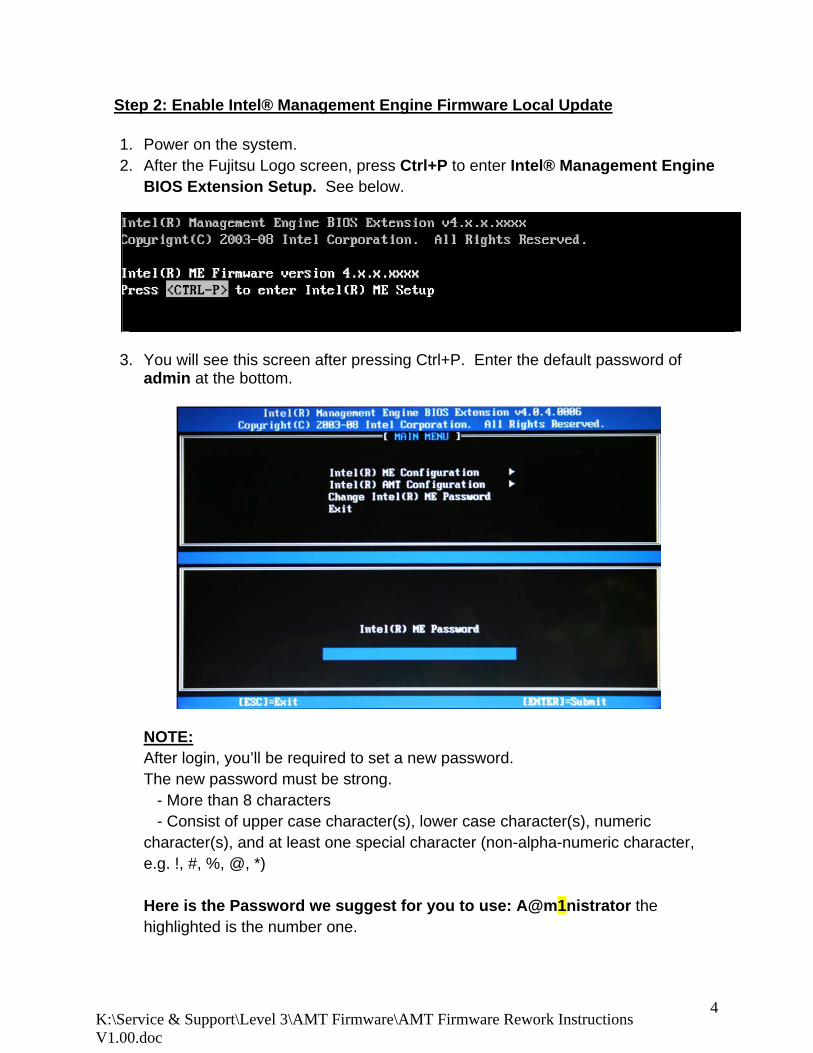
Step 2: Enable Intel® Management Engine Firmware Local Update 1. Power on the system. 2. After the Fujitsu Logo screen, press Ctrl+P to enter Intel® Management Engine
BIOS Extension Setup. See below.
3. You will see this screen after pressing Ctrl+P. Enter the default password of admin at the bottom.
NOTE: After login, you’ll be required to set a new password. The new password must be strong. - More than 8 characters - Consist of upper case character(s), lower case character(s), numeric character(s), and at least one special character (non-alpha-numeric character, e.g. !, #, %, @, *) Here is the Password we suggest for you to use: A@m1nistrator the highlighted is the number one.
K:\Service & Support\Level 3\AMT Firmware\AMT Firmware Rework Instructions V1.00.doc
5
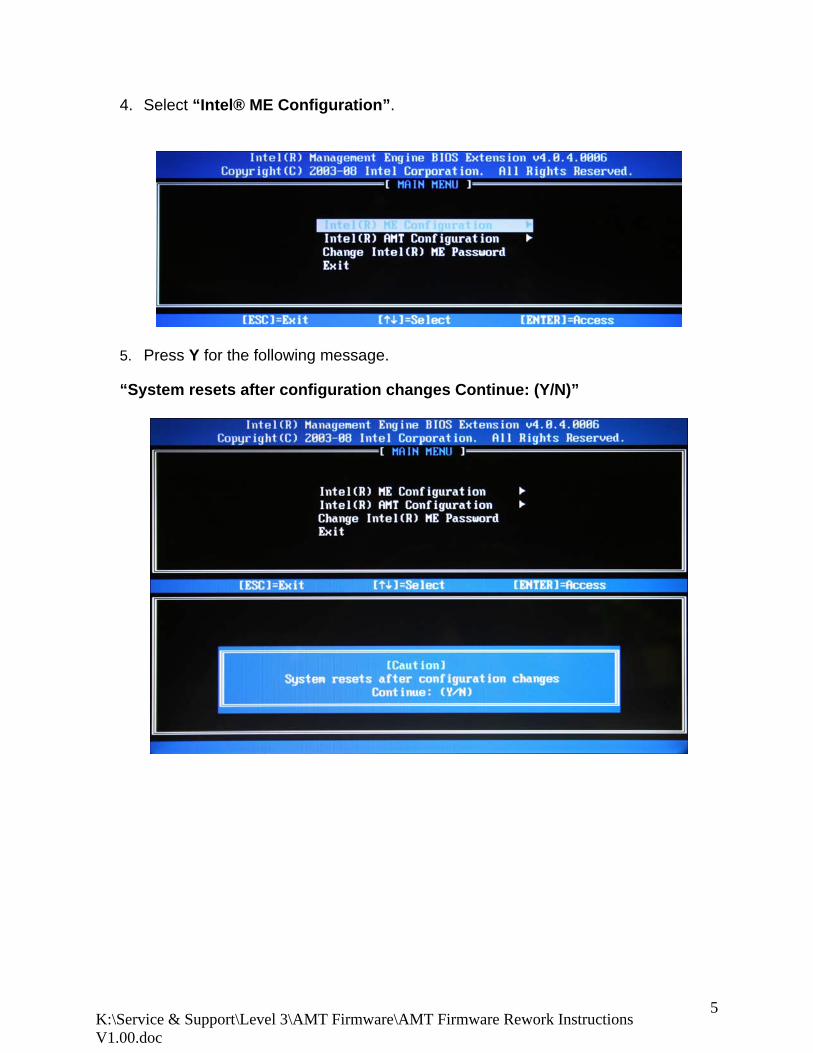
4. Select “Intel® ME Configuration”.
5. Press Y for the following message.
“System resets after configuration changes Continue: (Y/N)”
K:\Service & Support\Level 3\AMT Firmware\AMT Firmware Rework Instructions V1.00.doc
6
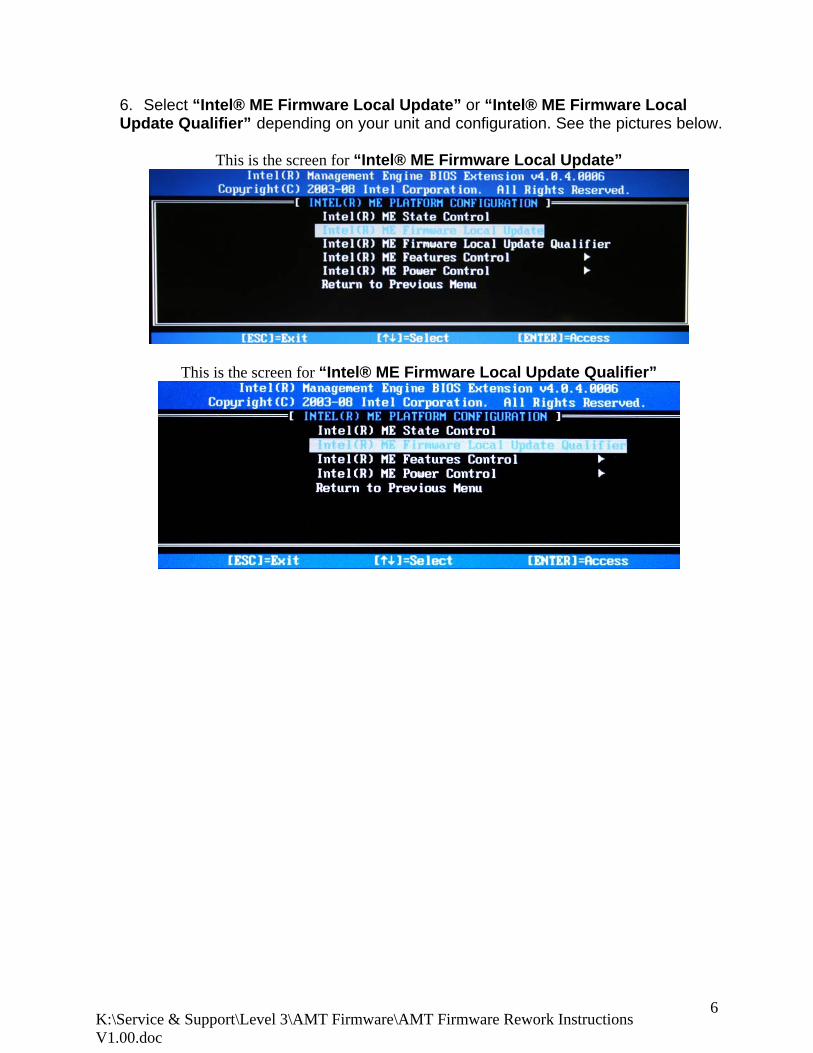
6. Select “Intel® ME Firmware Local Update” or “Intel® ME Firmware Local Update Qualifier” depending on your unit and configuration. See the pictures below.
This is the screen for “Intel® ME Firmware Local Update”
This is the screen for “Intel® ME Firmware Local Update Qualifier”
K:\Service & Support\Level 3\AMT Firmware\AMT Firmware Rework Instructions V1.00.doc
7
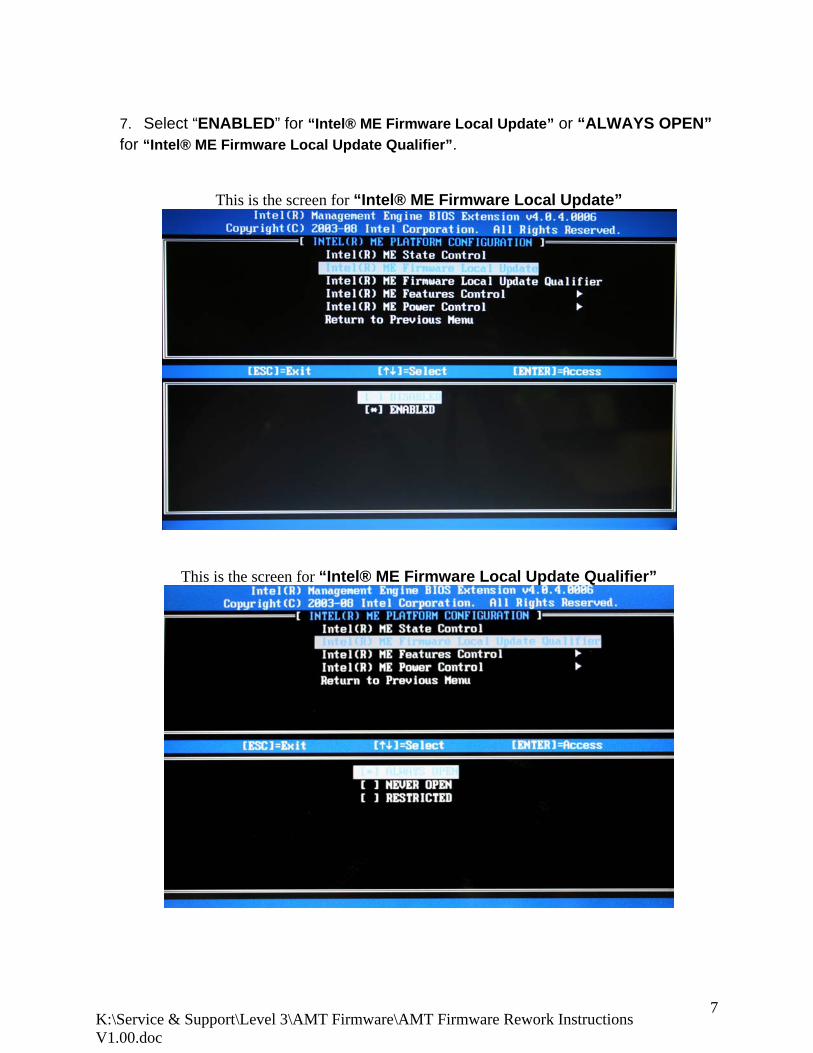
7. Select “ENABLED” for “Intel® ME Firmware Local Update” or “ALWAYS OPEN” for “Intel® ME Firmware Local Update Qualifier”.
This is the screen for “Intel® ME Firmware Local Update”
This is the screen for “Intel® ME Firmware Local Update Qualifier”
K:\Service & Support\Level 3\AMT Firmware\AMT Firmware Rework Instructions V1.00.doc
8
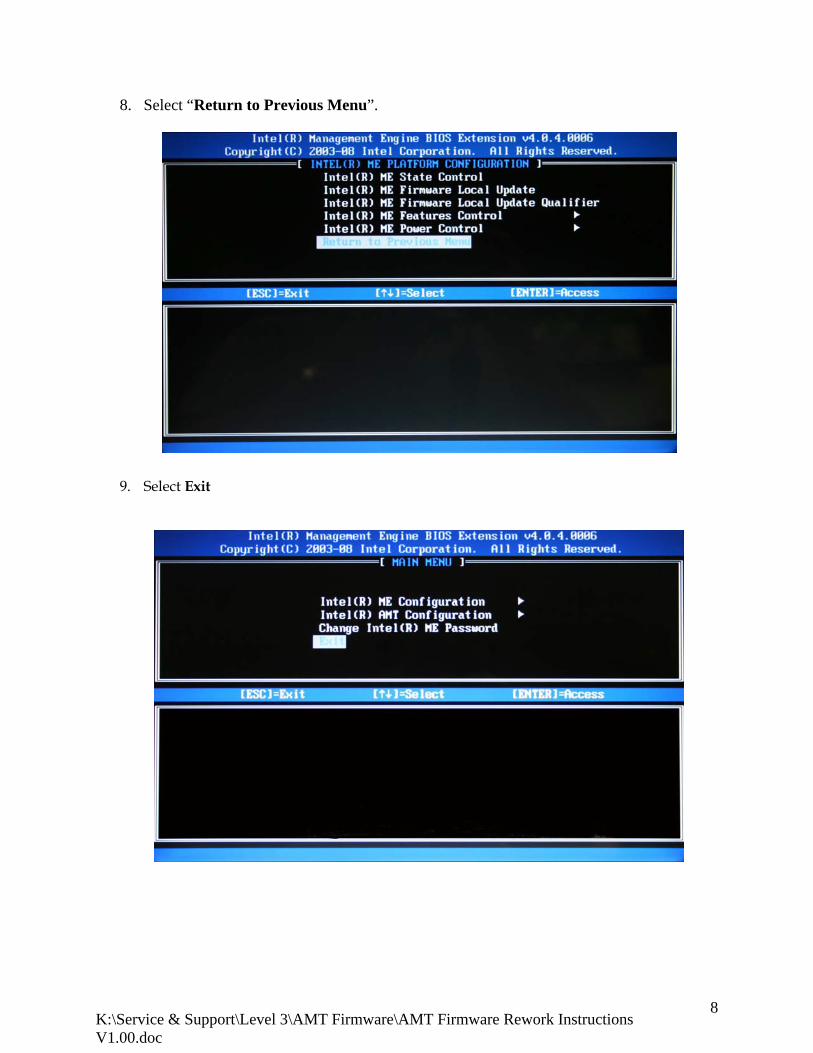
8. Select “Return to Previous Menu”.
9. Select Exit
K:\Service & Support\Level 3\AMT Firmware\AMT Firmware Rework Instructions V1.00.doc
9
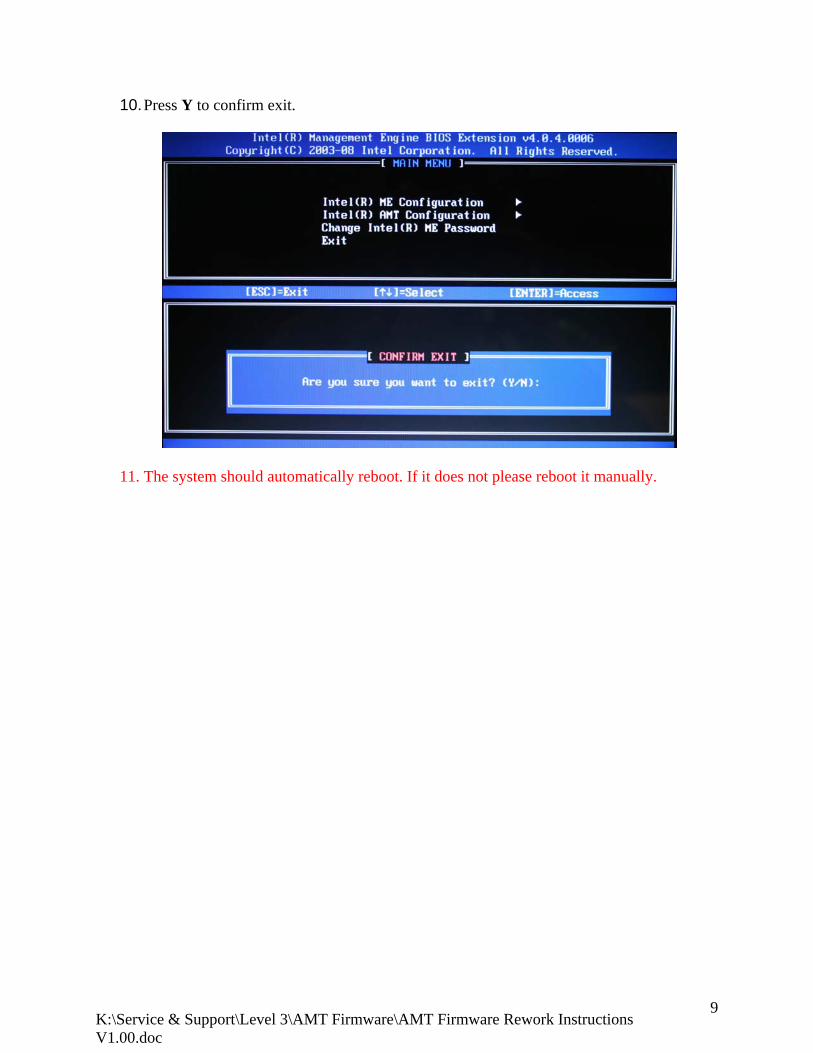
10. Press Y to confirm exit.
11. The system should automatically reboot. If it does not please reboot it manually.
K:\Service & Support\Level 3\AMT Firmware\AMT Firmware Rework Instructions V1.00.doc
10
Step 3: Upgrade the Firmware and BIOS
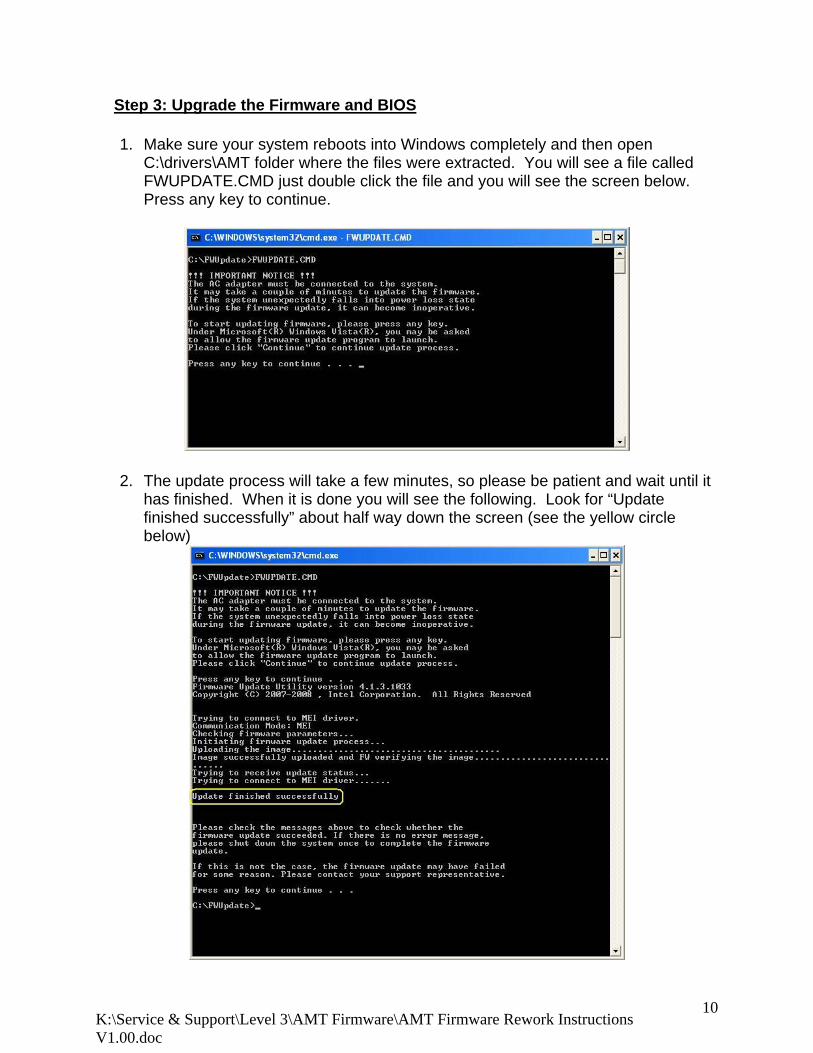
1. Make sure your system reboots into Windows completely and then open C:\drivers\AMT folder where the files were extracted. You will see a file called FWUPDATE.CMD just double click the file and you will see the screen below. Press any key to continue.
2. The update process will take a few minutes, so please be patient and wait until it has finished. When it is done you will see the following. Look for “Update finished successfully” about half way down the screen (see the yellow circle below)
K:\Service & Support\Level 3\AMT Firmware\AMT Firmware Rework Instructions V1.00.doc
11
3. If you get Update finished successfully, you are done with the firmware update portion and now it is time for the BIOS updates.
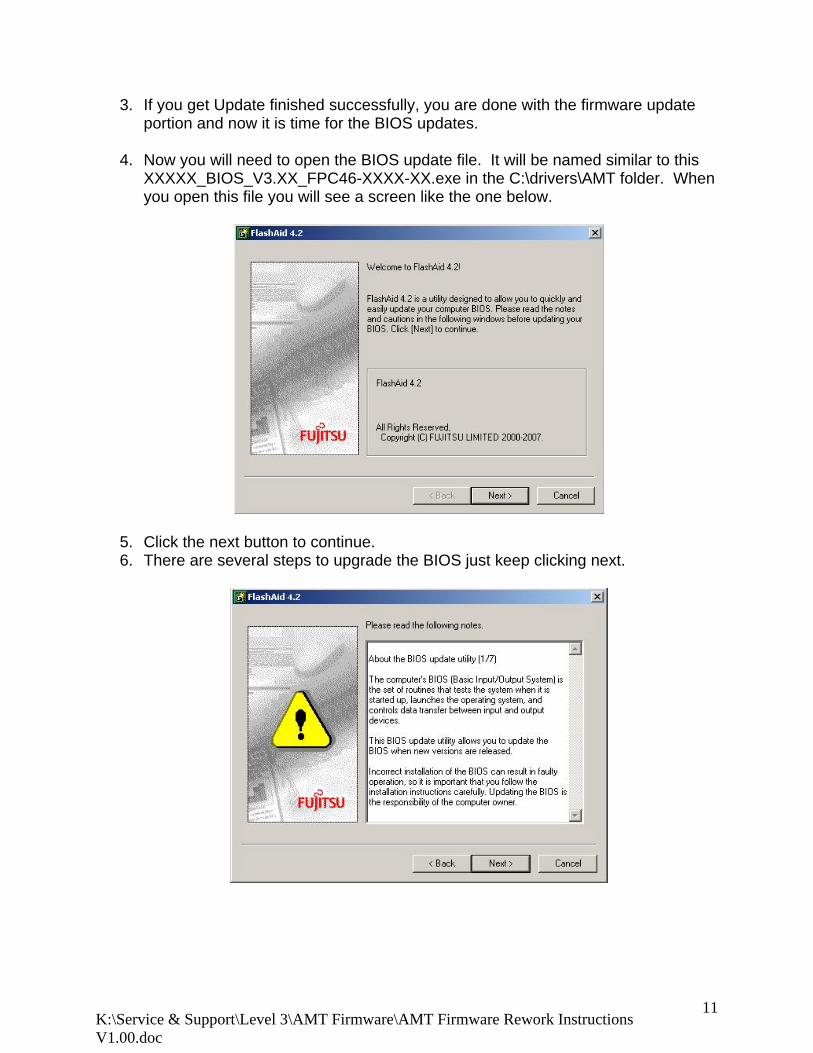
4. Now you will need to open the BIOS update file. It will be named similar to this
XXXXX_BIOS_V3.XX_FPC46-XXXX-XX.exe in the C:\drivers\AMT folder. When you open this file you will see a screen like the one below.
5. Click the next button to continue. 6. There are several steps to upgrade the BIOS just keep clicking next.

K:\Service & Support\Level 3\AMT Firmware\AMT Firmware Rework Instructions V1.00.doc
12
7 Continue pressing next until you reach the screen below.
8. Check all boxes by using the mouse. Once all boxes have been checked you will see the following happen. The “Next” button is no longer grayed out and the yellow box to the left will appear. If you do not see this please ensure all boxes have been checked, there are 7 boxes total.
K:\Service & Support\Level 3\AMT Firmware\AMT Firmware Rework Instructions V1.00.doc
13
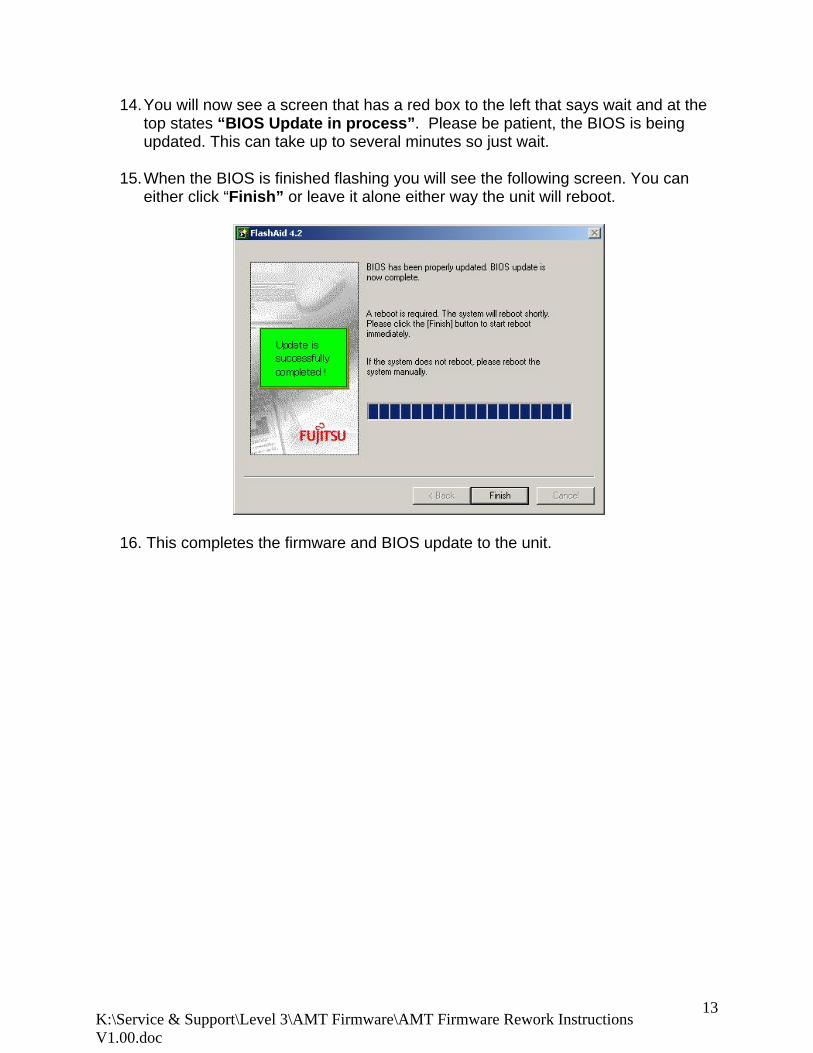
14. You will now see a screen that has a red box to the left that says wait and at the top states “BIOS Update in process”. Please be patient, the BIOS is being updated. This can take up to several minutes so just wait.
15. When the BIOS is finished flashing you will see the following screen. You can
either click “Finish” or leave it alone either way the unit will reboot.
16. This completes the firmware and BIOS update to the unit.

K:\Service & Support\Level 3\AMT Firmware\AMT Firmware Rework Instructions V1.00.doc
14
Step 4: Reset BIOS and clear the AMT password In order to reset the unit back to defaults you need to disable the AMT settings in the BIOS. 1. Press F2 at the startup screen to get into the BIOS. 2. Using the arrow key, go to the Advanced tab.
3. Scroll down to the bottom of this screen until you get to the Intel® Active
Management Technology and then click enter.
K:\Service & Support\Level 3\AMT Firmware\AMT Firmware Rework Instructions V1.00.doc
15
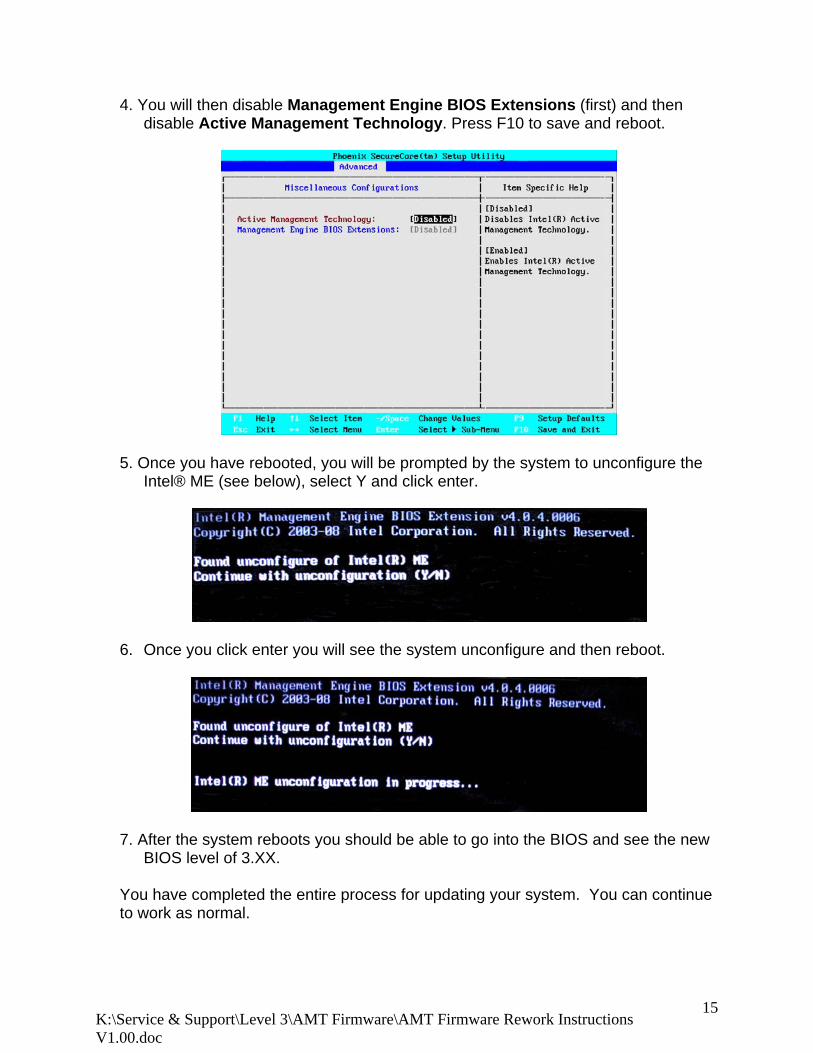
4. You will then disable Management Engine BIOS Extensions (first) and then disable Active Management Technology. Press F10 to save and reboot.
5. Once you have rebooted, you will be prompted by the system to unconfigure the Intel® ME (see below), select Y and click enter.
6. Once you click enter you will see the system unconfigure and then reboot.
7. After the system reboots you should be able to go into the BIOS and see the new BIOS level of 3.XX.
You have completed the entire process for updating your system. You can continue to work as normal.