amphibians learning lapbook with study guide page sample
TRANSCRIPT
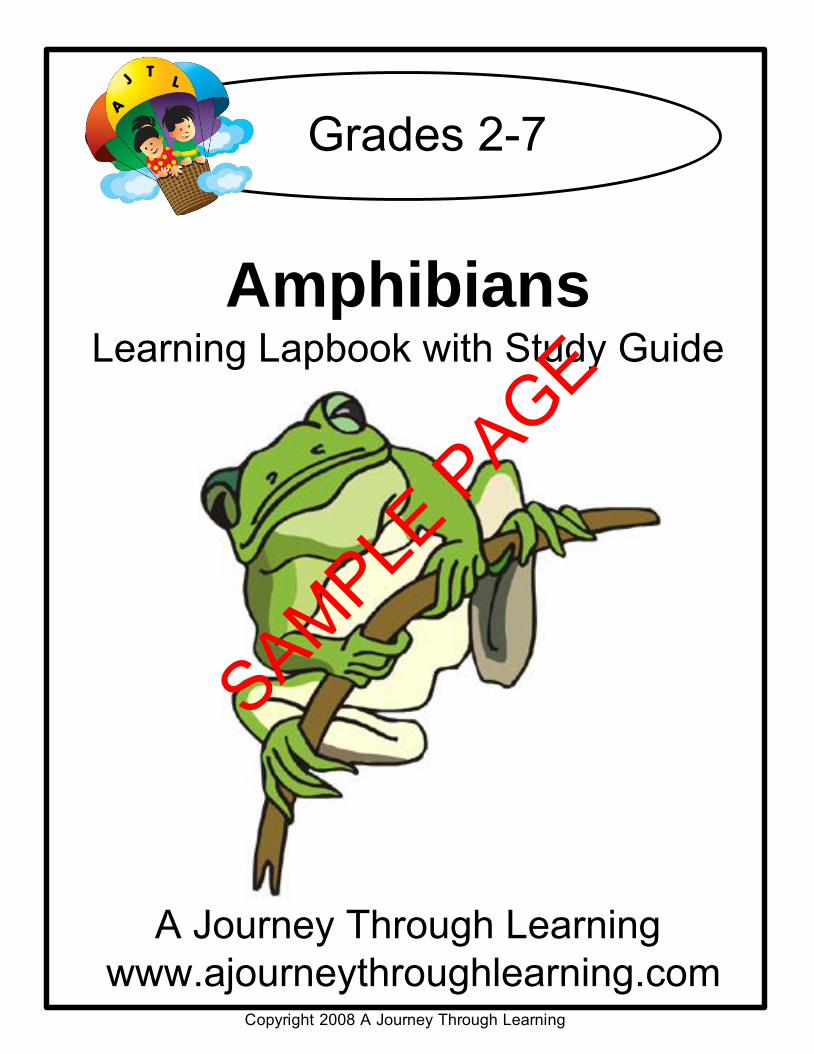
Grades 2-7
A Journey Through Learning www.ajourneythroughlearning.com
AmphibiansLearning Lapbook with Study Guide
A
JT
L
Copyright 2008 A Journey Through Learning
SAMPLE PAGE

Authors-Paula Winget and Nancy Fileccia
Copyright © 2008 A Journey Through Learning
Pages may be copied for other members of household only. For group use,
please see our website to purchase a classroom/co-op license.
Please check our website at:
www.ajourneythroughlearning.com
While you are there, sign up for our email newsletter and
receive a FREE lapbook!
You’ll also receive great discount codes, special offers, find out
what’s new and what’s to come!
Join us on Facebook!
Clipart is from www.clipart.com with permission and
Art Explosion 800,000 by Nova Development
ISBN-978-0-9841297-9-9 Printed Format
ISBN-978-1-936146-56-7 CD Format
Copyright 2008 A Journey Through Learning
SAMPLE PAGE
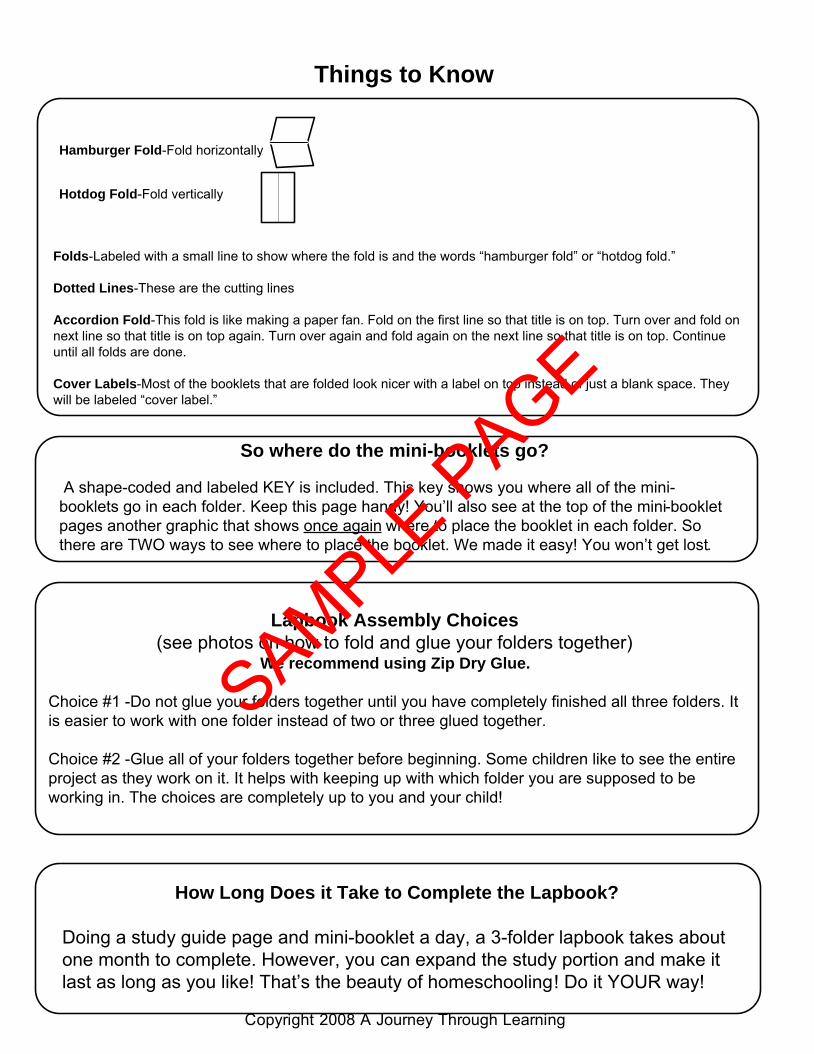
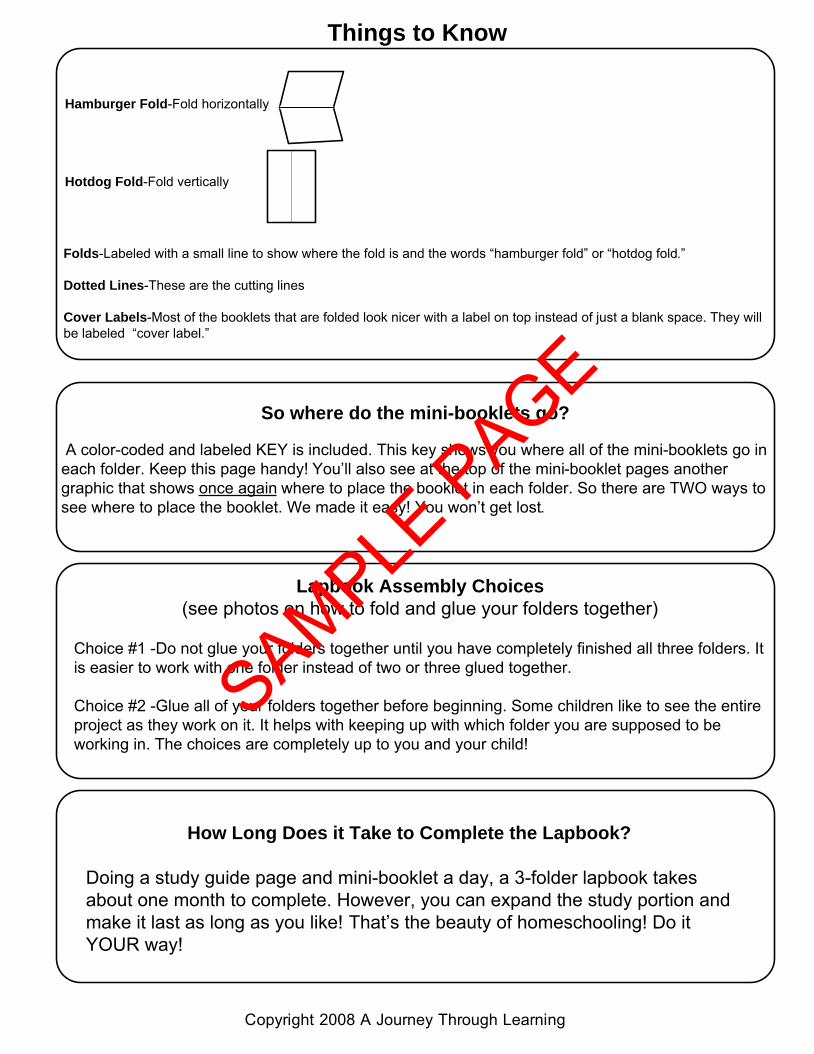
So where do the mini-booklets go?
A shape-coded and labeled KEY is included. This key shows you where all of the mini-booklets go in each folder. Keep this page handy! You’ll also see at the top of the mini-booklet pages another graphic that shows once again where to place the booklet in each folder. So there are TWO ways to see where to place the booklet. We made it easy! You won’t get lost.
Things to Know
Hamburger Fold-Fold horizontally
Hotdog Fold-Fold vertically
Folds-Labeled with a small line to show where the fold is and the words “hamburger fold” or “hotdog fold.”
Dotted Lines-These are the cutting lines
Accordion Fold-This fold is like making a paper fan. Fold on the first line so that title is on top. Turn over and fold on next line so that title is on top again. Turn over again and fold again on the next line so that title is on top. Continue until all folds are done.
Cover Labels-Most of the booklets that are folded look nicer with a label on top instead of just a blank space. They will be labeled “cover label.”
Lapbook Assembly Choices
(see photos on how to fold and glue your folders together)We recommend using Zip Dry Glue.
Choice #1 -Do not glue your folders together until you have completely finished all three folders. It is easier to work with one folder instead of two or three glued together.
Choice #2 -Glue all of your folders together before beginning. Some children like to see the entire project as they work on it. It helps with keeping up with which folder you are supposed to be working in. The choices are completely up to you and your child!
How Long Does it Take to Complete the Lapbook?
Doing a study guide page and mini-booklet a day, a 3-folder lapbook takes about one month to complete. However, you can expand the study portion and make it last as long as you like! That’s the beauty of homeschooling! Do it YOUR way!
Copyright 2008 A Journey Through Learning
SAMPLE PAGE

Study Choices
Choice #1- Read the first page of the study guide. Then use the internet and fun children’s books to learn more about the topic that is covered in that study guide. For instance-our American Indians lapbook has a study guide page about Geronimo. Dig into Geronimo. There are probably lots of interesting things to learn about him that the study guide does not cover. Spend a day on Geronimo or spend a week! The pace you take for the lapbook is completely up to you. When your child has completed studying that particular topic, it will be time to do the mini-booklet for that topic. The mini-booklet patterns are found right after the study guide page that it goes with. Or, your child might want to do the mini-booklet before he/she delves deeper into the subject. Once again, the order is completely up to you and your child.
Choice #2- Read only the study guide page and do the mini-booklet that goes with it. The mini-booklet patterns are found right after the study guide page that it goes with. You may choose to do one study guide/mini-booklet per day, two per day, two per week, three per week, etc. It doesn’t matter. The pace is completely up to you. At one per day, it will take about a month to complete a 3 folder lapbook.
How It All Goes Together
What you need to get started
*A printed copy of the lapbook by A Journey Through Learning*3 colored file folders*Scissors*Glue*Hole puncher*Brads*Stapler
To make the storage system (optional-directions under “Keeping it all together)
*Duct tape (preferably at least two different colors but not necessary)*One 3-ring binder
Copyright 2008 A Journey Through Learning
SAMPLE PAGE

1. Label your tabs: Study Guide, Book Log, NICK, Biography Reports, Outlines (Copywork and Notebooking, if using these).
2. Make copies of NICK notes and outline forms and put them behind the tabs. Your child can use either the NICK notes form (easier) or the outline form (a bit harder) after any of the study guides. These serve as a good review of the material in the study guide.
3. Hole punch your study guide and mini-booklets sheets and place behind the Study Guide tab. You will read a page of a study guide. Behind the study guide are all of the booklets that go with that study guide.
4. Keeping your office supplies handy-Measure the bottom of a quart size zip-lock bag. Then measure out a strip of duct tape that length. Lay the zip-lock bag on the lower edge of the tape. Fold the other end of the tape down on the zip-lock bag. Your duct tape should be sticking out from the bag. Now, you can hole punch the duct tape strip. DO NOT HOLE PUNCH INTO THE BAG! Then put it into your 3-ring binder. Use this bag to store items you will be using for your lapbook. Glue, scissors, hole puncher, stapler and extra staples, crayons, pencils, brads, ribbon, and any unfinished work. Doing this one step keeps you from having to constantly gather supplies every time you want to work on your lapbook!
Supplies Need:
½ inch three-ring binder
5 tabs (if you are using our copywork and/or notebooking pages, you will need to have 7 tabs. Label with copywork and notebooking)
Quart size baggies
Duct tape
Your study guide and mini-booklets pages
Office supplies-glue, scissors, brads, stapler, pencils, crayons, and ribbon (if needed)
Tips and tricks to go the extra mile!
Copyright 2008 A Journey Through Learning
SAMPLE PAGE

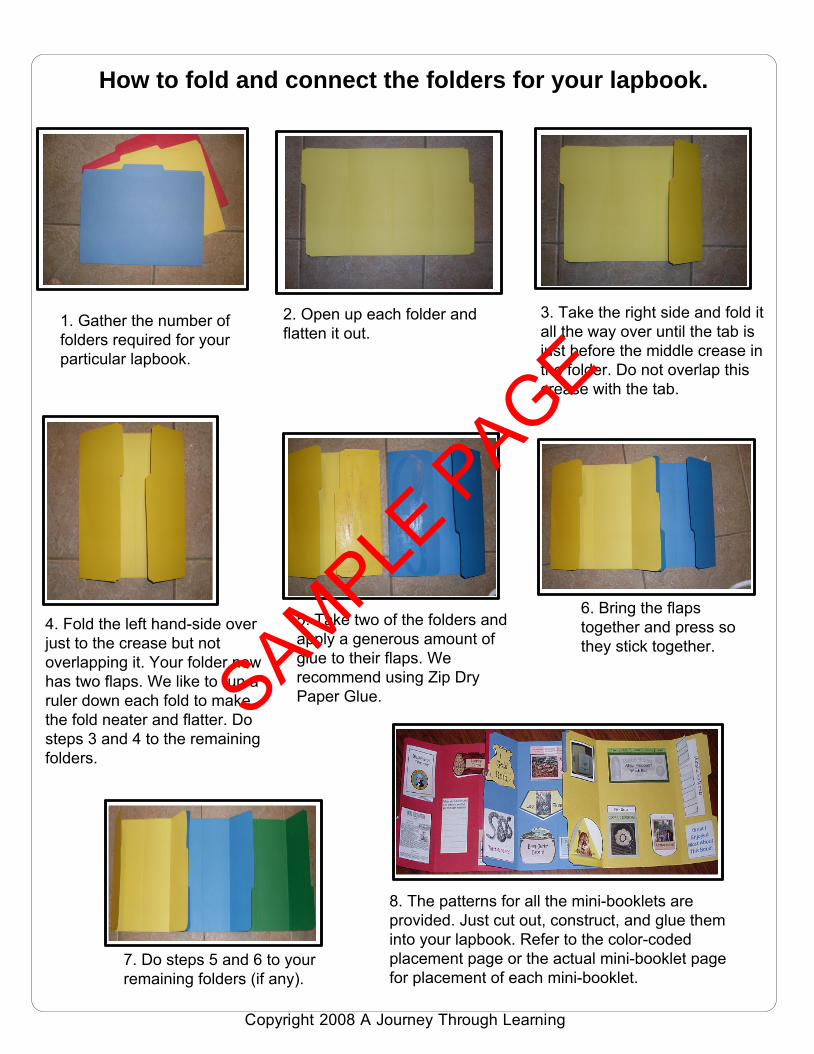
1. Gather the number of folders required for your particular lapbook.
2. Open up each folder and flatten it out.
3. Take the right side and fold it all the way over until the tab is just before the middle crease in the folder. Do not overlap this crease with the tab.
4. Fold the left hand-side over just to the crease but not overlapping it. Your folder now has two flaps. We like to run a ruler down each fold to make the fold neater and flatter. Do steps 3 and 4 to the remaining folders.
5. Take two of the folders and apply a generous amount of glue to their flaps. We recommend using Zip Dry Paper Glue.
6. Bring the flaps together and press so they stick together.
7. Do steps 5 and 6 to your remaining folders (if any).
8. The patterns for all the mini-booklets are provided. Just cut out, construct, and glue them into your lapbook. Refer to the color-coded placement page or the actual mini-booklet page for placement of each mini-booklet.
How to fold and connect the folders for your lapbook.
Copyright 2008 A Journey Through Learning
SAMPLE PAGE

Roll out enough duct tape to go across the folders lengthwise.
Put duct tape sticky side up. Place binded edge of lapbook on the duct tape (no more than ¼ inch!).
Then stick duct tape to the other side again about ¼
inch. There will need to be enough tape to hole punch.
Stick duct tape into hole puncher but be careful not to punch holes in your folders.
It will look like this. Store folders in 3-ring binder.
How to make a storage system for your lapbook(s)
Can I store all of my lapbooks in ONE location?
Yes! A Journey Through Learning has come up with a way that you can store all of your lapbooks from your books in ONE convenient location. A 3-ring binder serves as a great place to keep your lapbooks. This method of storage not only keeps your lapbooks from getting lost but also keeps them neat and readily available to show to dad, grandparents, friends, etc. When they are not being shown off, just place the binder on your bookshelf! On the next page, we have given you step-by-step directions (with pictures) of how to create a storage binder.
Copyright 2008 A Journey Through Learning
SAMPLE PAGE

Folder 1
Amphibians
The Defense Mechanisms
of Amphibians
Anura, Caudata, Gymnophiona
List
of A
mph
ibia
ns
Life Cycle
MyK-W-L cards
AboutAmphibians
Folder 2
Habitats
Is it
an Amphibian?
Label the
frog
My Amphibian
ReportTadpoles
Folder 3
Vocabulary
The Characteristics of Frogs and Toads
What and how do frogs and toads
eat?
Comparing Frogs and Toads
CaeciliansSala
man
ders
Toadfact
Salamanderfact
Frogfact
Food Chain
Caecilianfact
Copyright 2008 A Journey Through Learning
SAMPLE PAGE
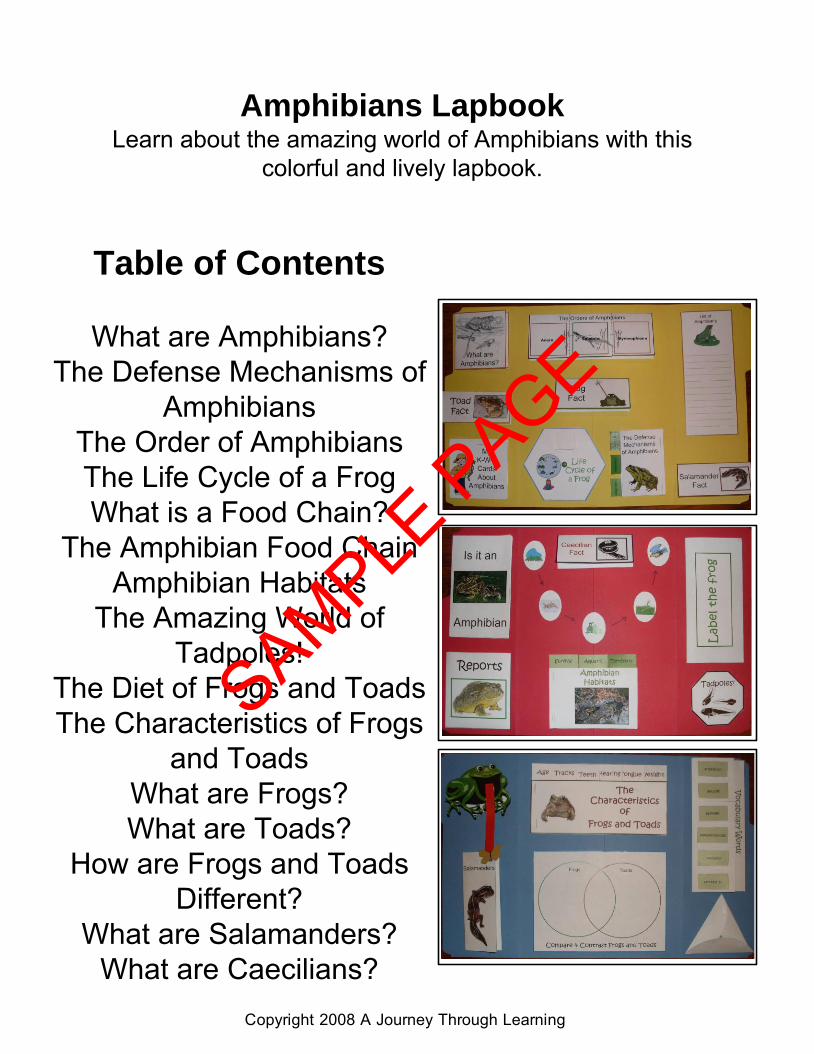
Table of Contents
What are Amphibians?The Defense Mechanisms of
AmphibiansThe Order of AmphibiansThe Life Cycle of a FrogWhat is a Food Chain?
The Amphibian Food ChainAmphibian Habitats
The Amazing World of Tadpoles!
The Diet of Frogs and ToadsThe Characteristics of Frogs
and ToadsWhat are Frogs?What are Toads?
How are Frogs and Toads Different?
What are Salamanders?What are Caecilians?
Amphibians LapbookLearn about the amazing world of Amphibians with this
colorful and lively lapbook.
Copyright 2008 A Journey Through Learning
SAMPLE PAGE
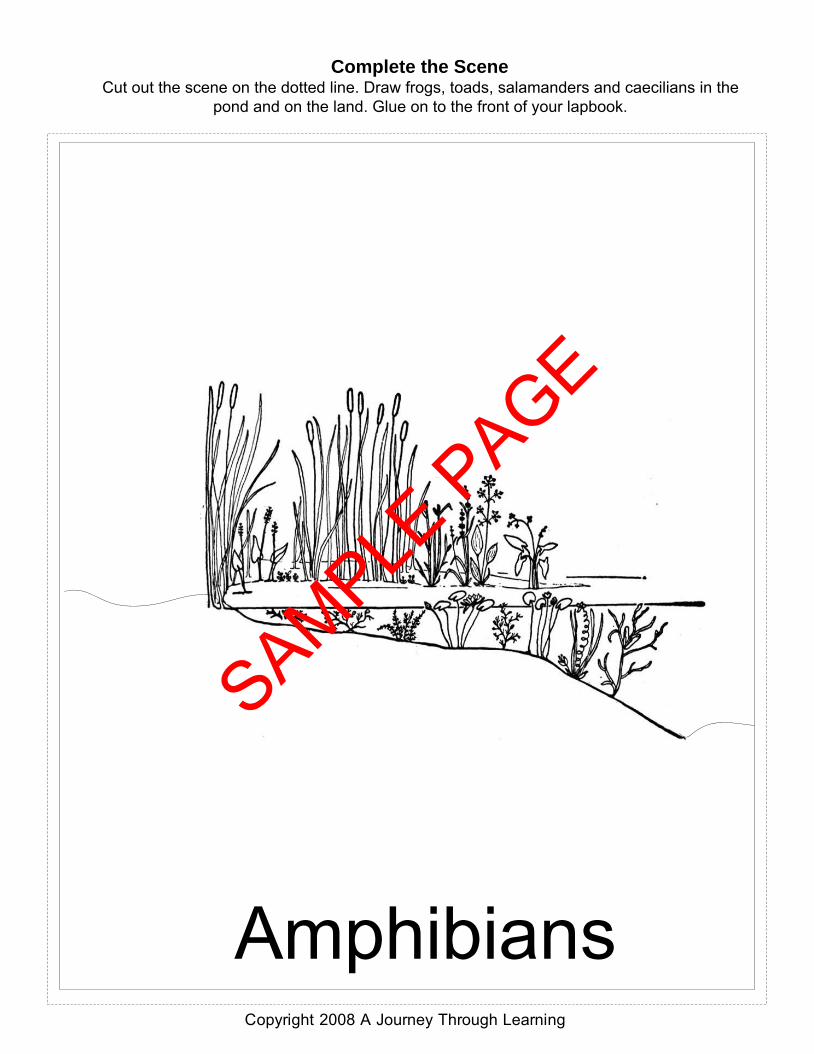
Complete the SceneCut out the scene on the dotted line. Draw frogs, toads, salamanders and caecilians in the
pond and on the land. Glue on to the front of your lapbook.
AmphibiansCopyright 2008 A Journey Through Learning
SAMPLE PAGE

An amphibian is an animal that begins its life in the water and then lives the rest of its life on land. The word “amphibian” means “both sides of life.” The life cycle an amphibian goes through is called “metamorphosis.” This means that it changes as it grows from a baby into an adult.
Amphibians are characterized by a glandular skin without external scales, gills during development, and by jelly-coated eggs. Most amphibians also have four limbs. Their limbs help them swim in the water, and their lungs allow them to live on land.
Because this animal must remain moist, it spends a lot of time hiding in damp places. Some believe it is hibernating, but it is actually estivating, or in a state of dormancy. This happens a lot in desert climates, where it is hot and dry. Estivation protects amphibians from high temperatures and drought.
Amphibians have inner skeletons with a backbone. They have webbed feet and no claws. Their limbs are attached at their shoulders and hips. The frog and the toad both have shorter front legs with longer stronger rear legs.
It has a brain, a digestive system, and a nervous system. Its body temperature is the same as its surrounding environment, making it a cold-blooded animal. Oxygen is taken in though its skin and is circulated through the bloodstream.
How long do amphibians live? Well, it depends on their environment and their type. Those in captivity live about 20 years. Those in the wild live anywhere from 10 to 40 years.
What are Amphibians?
Copyright 2008 A Journey Through Learning
SAMPLE PAGE
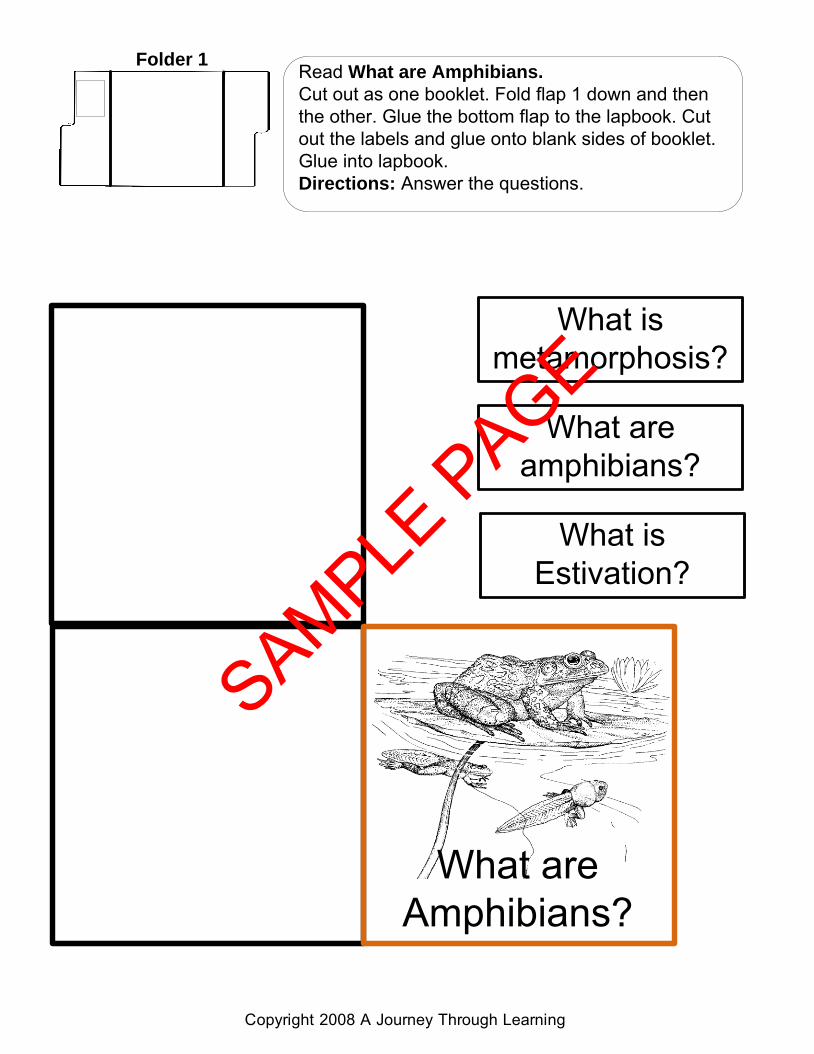
Read What are Amphibians.
Cut out as one booklet. Fold flap 1 down and then the other. Glue the bottom flap to the lapbook. Cut out the labels and glue onto blank sides of booklet. Glue into lapbook.Directions: Answer the questions.
What are Amphibians?
What is metamorphosis?
What are amphibians?
Folder 1
What is Estivation?
Copyright 2008 A Journey Through Learning
SAMPLE PAGE

Folder 1
ToadFact
Cut out as one piece. Hamburger fold on middle line. Glue into lapbook. Directions: Inside booklet, write down an interesting fact you have learned about toads from the study guide.
Copyright 2008 A Journey Through Learning
SAMPLE PAGE
Grades 1-4
A Journey Through Learning www.ajourneythroughlearning.com
Mammals (Vertebrate)Learning Lapbook with Study Guide
A
JT
L
Copyright 2012 A Journey Through Learning 1
SAMPLE P
AGE

Authors-Paula Winget and Nancy FilecciaCopyright © 2012 A Journey Through Learning
Pages may be copied for other members of household only. For group use, please see our website to purchase a classroom/co-op license.
Please check our website at:www.ajourneythroughlearning.com
While you are there, sign up for our email newsletter and receive a FREE lapbook!
You’ll also receive great discount codes, special offers, find out what’s new and what’s to come!
Join us on Facebook!
Clipart is from www.clipart.com with permission.
ISBN Black and White – 978-1-938059-53-7
Copyright 2012 A Journey Through Learning 2
SAMPLE P
AGE

Things to Know
Hamburger Fold-Fold horizontally Hotdog Fold-Fold vertically
Dotted Lines-These are the cutting lines.
Accordion Fold-This fold is like making a paper fan. Fold on the first line so that title is on top. Turn over and fold on next line so that title is on top again. Turn over again and fold again on the next line so that title is on top. Continue until all folds are done.
Cover Labels-Most of the booklets that are folded look nicer with a label on top instead of just a blank space. They will be referred to as “cover label.”
Folder 1This placement key tells you the template goes in the first folder at the top of the left flap.
How do I know where to place each template in the folder?
How Long Does it Take to Complete the Lapbook?
Doing a study guide page and mini-booklet a day, a 3-folder lapbook takes about one month to complete. However, you can expand the study portion and make it last as long as you like! That’s the beauty of homeschooling! Do it YOUR way!
Lapbook Assembly Choices
(see photos on how to fold and glue your folders together)We recommend using Zip Dry Glue or Elmer's Extreme.
Choice #1 -Do not glue your folders together until you have completely finished all three folders. It is easier to work with one folder instead of two or three glued together.
Choice #2 -Glue all of your folders together before beginning. Some children like to see the entire project as they work on it. It helps with keeping up with which folder you are supposed to be working in. The choices are completely up to you and your child!
Keep in mind that children of the same age can have very different academic and motor skills. Some children may have trouble writing in some of the smaller spaces of this lapbook. If this
describes your child, we encourage you to let your child dictate the answers and you write for him. A lapbook is to be a fun project, not stressful.
Copyright 2012 A Journey Through Learning 3
SAMPLE P
AGE

Folding a Lapbook Base
Gather the number of folders required for the project. Fold them flat as seen here.
Original fold line
For each folder, fold the left and right sides inward toward the original line to create two flaps. Crease so that the highest part of each flap is touching the original line. It is important not to let the two flaps overlap. You may want
to take a ruler and run it down each crease to
make it sharper.
Highest part of flap.
GLUE
GLUE
Glue your folders together by putting glue (or you may staple) on the inside of the flaps. Then press the newly glued flaps together with your hands until they get a good strong hold to each other. Follow this step to add as many folders as you need for your project. Most of our lapbooks have either 2 or 3 folders.
GLUE
GLUE
Photo of a completedlapbook base
Copyright 2012 A Journey Through Learning 4
SAMPLE P
AGE
*Lapbook Pages*3 Colored File Folders*Scissors*Glue*Stapler*Brads (not needed for every lapbook. If brads are not available, a stapler will do.)*Hole Puncher (again, not needed for every lapbook.)
To make the storage system (optional)
See details below about the use of a storage system.
*Duct tape (any color)*One 3-ring binder*Hole Puncher
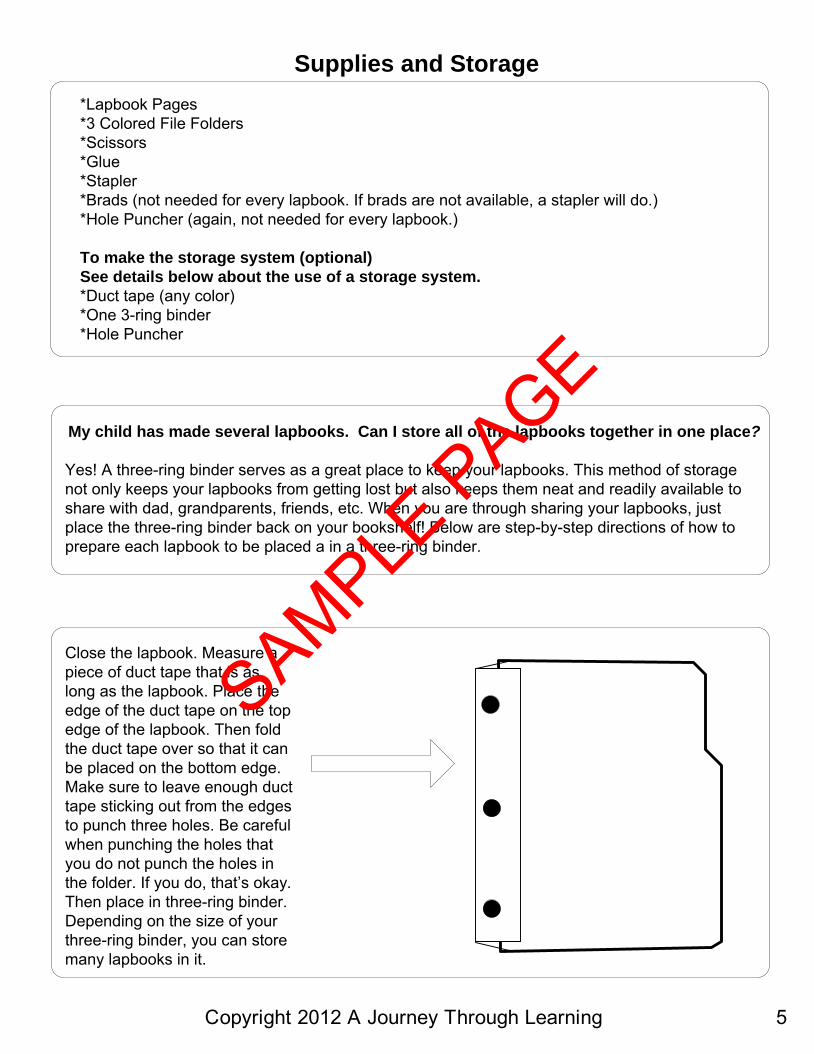
My child has made several lapbooks. Can I store all of the lapbooks together in one place?
Yes! A three-ring binder serves as a great place to keep your lapbooks. This method of storage not only keeps your lapbooks from getting lost but also keeps them neat and readily available to share with dad, grandparents, friends, etc. When you are through sharing your lapbooks, just place the three-ring binder back on your bookshelf! Below are step-by-step directions of how to prepare each lapbook to be placed a in a three-ring binder.
Supplies and Storage
Close the lapbook. Measure a piece of duct tape that is as long as the lapbook. Place the edge of the duct tape on the top edge of the lapbook. Then fold the duct tape over so that it can be placed on the bottom edge. Make sure to leave enough duct tape sticking out from the edges to punch three holes. Be careful when punching the holes that you do not punch the holes in the folder. If you do, that’s okay. Then place in three-ring binder. Depending on the size of your three-ring binder, you can store many lapbooks in it.
Copyright 2012 A Journey Through Learning 5
SAMPLE P
AGE

Folder 2
Folder 3
Life Cycle
Growing Up
Staying Alive
FavoriteMarsu-
pial
Marine Mammal
Ferocious Mammals
Research It Cool Facts
Folder 1
Homes
Mammals
Body
Time to Eat
Natural Snacks
Primates
Copyright 2012 A Journey Through Learning 6
SAMPLE P
AGE
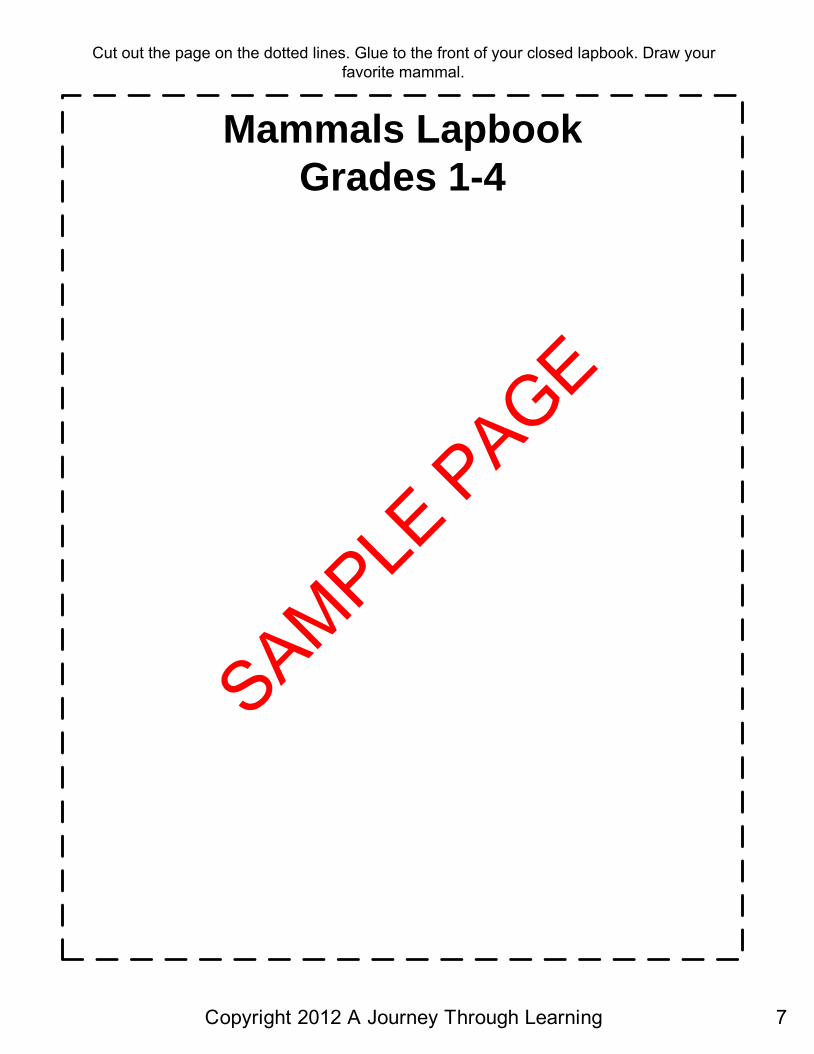
Cut out the page on the dotted lines. Glue to the front of your closed lapbook. Draw your favorite mammal.
Mammals Lapbook
Grades 1-4
Copyright 2012 A Journey Through Learning 7
SAMPLE P
AGE

Earth is brimming with animals. Animals can be divided in groups according to the traits they share. Mammals are one of the main groups or classes of animals. Mammals are vertebrates. That means they have a backbone.
Mammals come in all shape and sizes but, regardless of the species, all mammals share certain characteristics or traits. All mammals are warm blooded. A warm blooded animal is able to regulate or control the temperature of its body from the inside. Their bodies are built in such a way that, whether the outside temperature is hot or cold, their body temperature stays the same. This trait allows mammals to be present in all sorts of climates and places.
Mammals are hairy animals. All mammals have hair or fur. The hair of a mammal can be very short or very long. Sometimes, the hair is so fine that you have to look very carefully to even see it! Some mammals only have hair in part of their body. Others, only have hair at some point in their life.
Mammals drink milk. All mammals are fed from the milk that is produced or made by their mothers. With very few exceptions, mammals give birth to live young. The babies are born and the mother feeds them milk. Because they depend on their mother's milk, baby mammals stay close to their mothers for an extended period of time. Dogs, whales, bears, and elephants are different from each other but they are all mammals.
Hairy Animals: Mammals
Copyright 2012 A Journey Through Learning 8
SAMPLE P
AGE

Read Hairy Animals: Mammals.
Cut out each piece. Stack with title on top. Fasten together at the top with a brad (or staple). Glue into lapbook. Directions: List on the pieces the traits we find in mammals.
Folder 1
Mammals
x
Traits of mammals
Traits of mammals Traits of mammalsCopyright 2012 A Journey Through Learning 9
SAMPLE P
AGE

Mammals have adapted to life in all different climates and places. Mammals live in water and land, in cold and hot regions, above ground and underground. Anywhere you visit, most likely you will find a mammal there!
Many mammals, like the prairie dog and rabbits, have underground homes where they live, have their babies and hide in case of trouble. Others, like the mole, rarely live underground. There are mammals that, during the day, make their homes in caves or hollow trees; but, at night, these creatures soar in the sky looking for their next meal. There are still some mammals that cannot fly but live high up in trees. Monkeys are some of these tree dwellers.
Most mammals are land dwellers. A few, like whales and dolphins, make their home in the ocean. There are mammals, like the jaguar, that make their homes in the depth of the rain forest where it rains every single day. Others, like camels, live in hot and dry places called deserts where it hardly ever rains. Polar bears make their home in the polar regions where the ground is covered with snow most of the year.
Mammals, like mountain goats, live on the slopes of high mountains. While others, like giraffes and zebras, graze in the vast African plains. Most mammals live wild in their natural habitats, but some have been domesticated and make their homes in our homes.
Mammals Make their Homes Everywhere
Copyright 2012 A Journey Through Learning 10
SAMPLE P
AGE

Read Mammals Make their Homes Everywhere.
Cut out the booklet. Glue into the lapbook.Directions: In each box, draw or tell about the different homes of mammals.
Folder 1
Homes of Mammals
Underground Cave or Tree
Land Ocean
Copyright 2012 A Journey Through Learning 11
SAMPLE P
AGE

Even though mammals are very different from one another, there are some traits common to the bodies of most mammals. On the outside, the body of a mammal is covered with a layer of hair or fur. This helps the animal to stay warm. The hair is coated with a waterproof substance called sebum. This substance keeps the animal dry. Hair can be of different colors and patterns which might help the animal to hide or camouflage itself.
A mammal also has limbs. A limb can take the form of an arm, a leg, a wing or a flipper. Mammals use their limbs to hold things and to move around either by walking, running, hopping, swimming or even flying or gliding.
On the inside, the body of a mammal has a backbone. A backbone is a line of bones that runs along the animal's back. Mammals have teeth. Their teeth are set on their jaws and helps them to tear, chew and grind their food in a very efficient way.
The body of a mammal is more complex than the body of other vertebrates. They have more complicated organs and systems. The skeleton of a mammal, besides giving support to the animal, also helps protect the internal organs like the brain, the heart and the lungs. The brain of a mammal is more developed than the brain of other animals. Because of this, mammals have more learning ability and can adapt better to changes in their environment.
A Mammal's Body
Copyright 2012 A Journey Through Learning 12
SAMPLE P
AGE

Read A Mammal's Body.
Cut out the booklet as one piece. Hotdog fold in half. Glue into lapbook. Directions: Inside of the booklet, tell about the body of a mammal.
Folder 1
The
Body
of a
Mammal
Copyright 2012 A Journey Through Learning 13
SAMPLE P
AGE

Grades 1-4
A Journey Through Learning www.ajourneythroughlearning.com
BirdsLearning Lapbook with Study Guide
A
JT
L
Copyright 2012 A Journey Through Learning 1
SAMPLE P
AGE

Authors-Paula Winget and Nancy FilecciaCopyright © 2012 A Journey Through Learning
Pages may be copied for other members of household only. For group use, please see our website to
purchase a classroom/co-op license.
Please check our website at:www.ajourneythroughlearning.com
While you are there, sign up for our email newsletter and receive a FREE lapbook!
You’ll also receive great discount codes, special offers, find out what’s new and what’s to come!
Join us on Facebook!
Clipart is from www.clipart.com with permission and
Copyright 2012 A Journey Through Learning 2
SAMPLE P
AGE

Things to Know
Hamburger Fold-Fold horizontally Hotdog Fold-Fold vertically
Dotted Lines-These are the cutting lines.
Accordion Fold-This fold is like making a paper fan. Fold on the first line so that title is on top. Turn over and fold on next line so that title is on top again. Turn over again and fold again on the next line so that title is on top. Continue until all folds are done.
Cover Labels-Most of the booklets that are folded look nicer with a label on top instead of just a blank space. They will be referred to as “cover label.”
Folder 1This placement key tells you the template goes in the first folder at the top of the left flap.
How do I know where to place each template in the folder?
How Long Does it Take to Complete the Lapbook?
Doing a study guide page and mini-booklet a day, a 3-folder lapbook takes about one month to complete. However, you can expand the study portion and make it last as long as you like! That’s the beauty of homeschooling! Do it YOUR way!
Lapbook Assembly Choices
(see photos on how to fold and glue your folders together)We recommend using Zip Dry Glue or Elmer's Extreme.
Choice #1 -Do not glue your folders together until you have completely finished all three folders. It is easier to work with one folder instead of two or three glued together.
Choice #2 -Glue all of your folders together before beginning. Some children like to see the entire project as they work on it. It helps with keeping up with which folder you are supposed to be working in. The choices are completely up to you and your child!
Keep in mind that children of the same age can have very different academic and motor skills. Some children may have trouble writing in some of the smaller spaces of this lapbook. If this
describes your child, we encourage you to let your child dictate the answers and you write for him. A lapbook is to be a fun project, not stressful.
Copyright 2012 A Journey Through Learning 3
SAMPLE P
AGE

Folding a Lapbook Base
Gather the number of folders required for the project. Fold them flat as seen here.
Original fold line
For each folder, fold the left and right sides inward toward the original line to create two flaps. Crease so that the highest part of each flap is touching the original line. It is important not to let the two flaps overlap. You may want
to take a ruler and run it down each crease to
make it sharper.
Highest part of flap.
GLUE
GLUE
Glue your folders together by putting glue (or you may staple) on the inside of the flaps. Then press the newly glued flaps together with your hands until they get a good strong hold to each other. Follow this step to add as many folders as you need for your project. Most of our lapbooks have either 2 or 3 folders.
GLUE
GLUE
Photo of a completedlapbook base
Copyright 2012 A Journey Through Learning 4
SAMPLE P
AGE

*Lapbook Pages*3 Colored File Folders*Scissors*Glue*Stapler*Brads (not needed for every lapbook. If brads are not available, a stapler will do.)*Hole Puncher (again, not needed for every lapbook.)
To make the storage system (optional)
See details below about the use of a storage system.
*Duct tape (any color)*One 3-ring binder*Hole Puncher
My child has made several lapbooks. Can I store all of the lapbooks together in one place?
Yes! A three-ring binder serves as a great place to keep your lapbooks. This method of storage not only keeps your lapbooks from getting lost but also keeps them neat and readily available to share with dad, grandparents, friends, etc. When you are through sharing your lapbooks, just place the three-ring binder back on your bookshelf! Below are step-by-step directions of how to prepare each lapbook to be placed a in a three-ring binder.
Supplies and Storage
Close the lapbook. Measure a piece of duct tape that is as long as the lapbook. Place the edge of the duct tape on the top edge of the lapbook. Then fold the duct tape over so that it can be placed on the bottom edge. Make sure to leave enough duct tape sticking out from the edges to punch three holes. Be careful when punching the holes that you do not punch the holes in the folder. If you do, that’s okay. Then place in three-ring binder. Depending on the size of your three-ring binder, you can store many lapbooks in it.
Copyright 2012 A Journey Through Learning 5
SAMPLE P
AGE
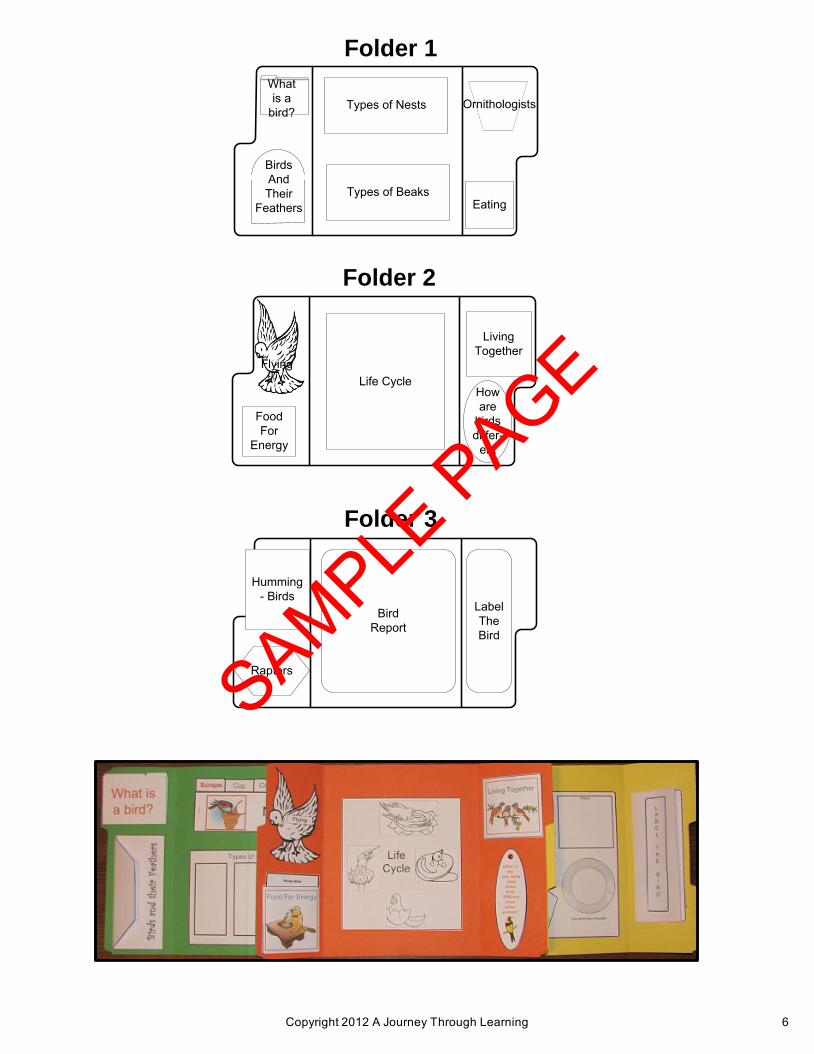
Folder 1
Folder 2
Life Cycle
Types of Nests
Eating
Folder 3
LabelTheBird
BirdReport
What is a
bird?
Types of Beaks
Ornithologists
BirdsAndTheir
Feathers
Food For
Energy
Living Together
Humming- Birds
Raptors
Flying
How are
birds differ-
ent
Copyright 2012 A Journey Through Learning 6
SAMPLE P
AGE

Cut out the page on the dotted lines. Glue to the front of your closed lapbook. Draw your favorite bird in the tree.
Birds Lapbook
Grades 1-4
Copyright 2012 A Journey Through Learning 7
SAMPLE P
AGE

Animals with Feathers: Birds
Whether you live in the country or the city, chances are that you have seen birds soaring in the sky. Birds are vertebrates, or animals with a backbone. Birds are easy to recognize. All birds have feathers, beaks and wings.
Birds are the only animals with feathers. Feathers cover the bird's body giving it its unique coloration. Feathers keep the bird protected and help them to fly. They also serve as a way to communicate and attract other birds. Birds take care or preen their feathers by spreading oil on them with their beaks. Most birds replace or molt their feathers at least once a year.
Birds do not have teeth. Their beaks are light and shaped according to the way the bird eats. Birds use their beaks to get and eat food. Birds are high energy animals. Flying takes a lot of energy. To generate energy, birds need to eat frequently. Their bodies are built to digest or break down the food they eat very quickly. Birds are not picky eaters. They eat all sort of things like worms, insects, and seeds.
Birds do not have arms. Instead they have wings. Wings help the bird to fly. Even though all birds have wings, not all birds can fly. Some birds, like ostriches and penguins, do not fly. Most birds are good builders. They build their own nests to lay their eggs. Birds vary in size. Some birds, like the hummingbird, are very small. Others, like the ostrich and the eagle, are big.
Copyright 2012 A Journey Through Learning 8
SAMPLE P
AGE

Read Animals with Feathers: Birds.
Cut out the booklet as one piece. Fold in half. Glue into lapbook. Directions: Inside of the booklet, answer the question.
Folder 1
What is a bird?
Copyright 2012 A Journey Through Learning 9
SAMPLE P
AGE

Feathers are the special covering of a bird's body. They are made of a protein called keratin. Feathers have different coloration according to species. Some birds have stunningly beautiful feathers. Others have mute colors. Regardless of the color, a bird has mainly two different kinds of feathers: contour and down feathers.
Contour feathers are the feathers that cover the whole body of the bird. These feathers smooth the lines of the bird's body giving it a more streamlined shape. That makes moving through air, and sometimes water, easier. Contour feathers overlap each other and help to make the body waterproof. They also protect the bird from the wind.
Under the contour feathers, there are tiny down feathers. Down feathers act much in the way your coat does - they keep the bird warm.
Because their feathers are so important, birds spend a lot of time taking care of them. At the base of their tail, most birds have a gland that produces a special oil. Using their beaks, birds spread this oil over all their feathers. This makes them waterproof. When a bird uses his beak to spread oil, it is called preening.
Feathers wear out. When they do, birds molt. Molting is replacing the old feathers with new ones. Most birds molt twice a year: in spring and after nesting. Sometimes, when they molt, birds grow feathers of another color.
All About Feathers
Copyright 2012 A Journey Through Learning 10
SAMPLE P
AGE

Read All About Feathers.
Cut out the booklet on the outside lines as one piece. Fold up the bottom section. Next, fold down the top section. This creates an envelope. Glue or staple the sides of your envelope so that things will stay inside. Glue into lapbook. Directions: Go on a nature walk and find bird feathers to put in your envelope booklet. If you can not find real feathers, then draw and color some, cut them out, and put them in your envelope.
Folder 1
Birds and their Feathers
Copyright 2012 A Journey Through Learning 11
SAMPLE P
AGE
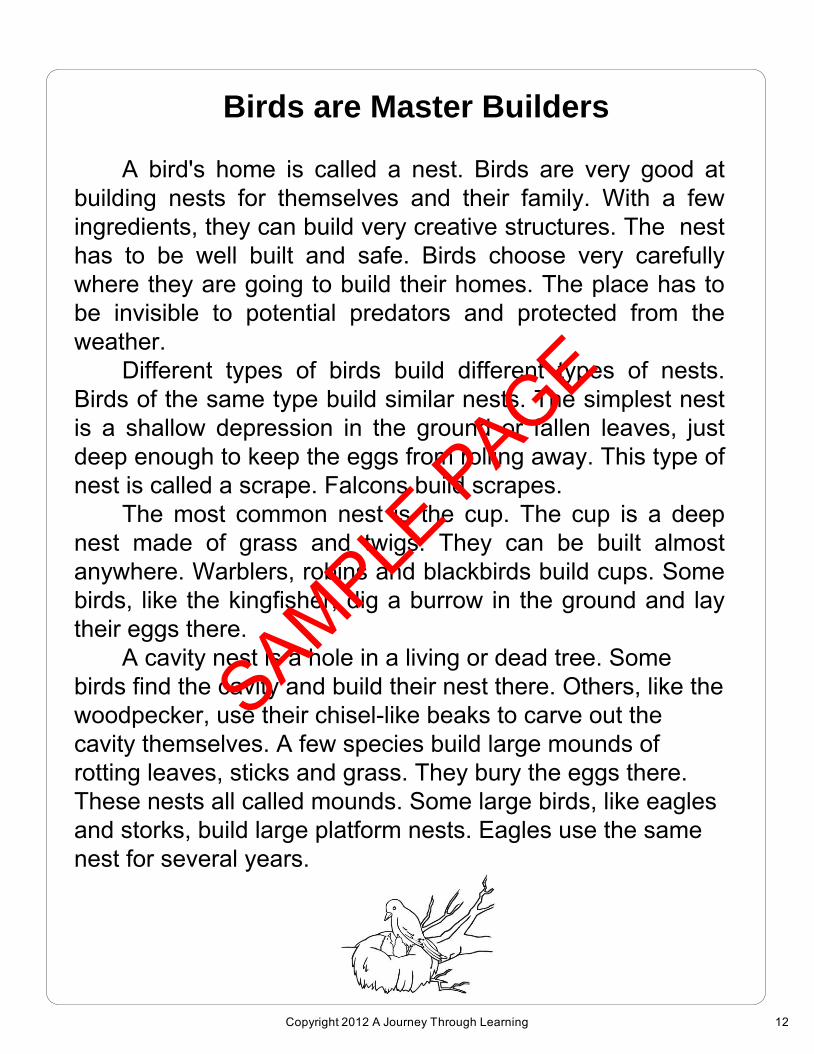
A bird's home is called a nest. Birds are very good at building nests for themselves and their family. With a few ingredients, they can build very creative structures. The nest has to be well built and safe. Birds choose very carefully where they are going to build their homes. The place has to be invisible to potential predators and protected from the weather.
Different types of birds build different types of nests. Birds of the same type build similar nests. The simplest nest is a shallow depression in the ground or fallen leaves, just deep enough to keep the eggs from rolling away. This type of nest is called a scrape. Falcons build scrapes.
The most common nest is the cup. The cup is a deep nest made of grass and twigs. They can be built almost anywhere. Warblers, robins and blackbirds build cups. Some birds, like the kingfisher, dig a burrow in the ground and lay their eggs there.
A cavity nest is a hole in a living or dead tree. Some birds find the cavity and build their nest there. Others, like the woodpecker, use their chisel-like beaks to carve out the cavity themselves. A few species build large mounds of rotting leaves, sticks and grass. They bury the eggs there. These nests all called mounds. Some large birds, like eagles and storks, build large platform nests. Eagles use the same nest for several years.
Birds are Master Builders
Copyright 2012 A Journey Through Learning 12
SAMPLE P
AGE

Read Birds are Master Builders.
Cut out each piece on this page and the pieces on the next two pages. Stack with title page on top and tabs in order. Staple down left-hand side. Glue into lapbook. Directions: On each booklet, draw or glue a picture of the listed nest in the box. Then, tell about the nest.
Folder 1
Scrape
TypesOf
Nests
Copyright 2012 A Journey Through Learning 13
SAMPLE P
AGE
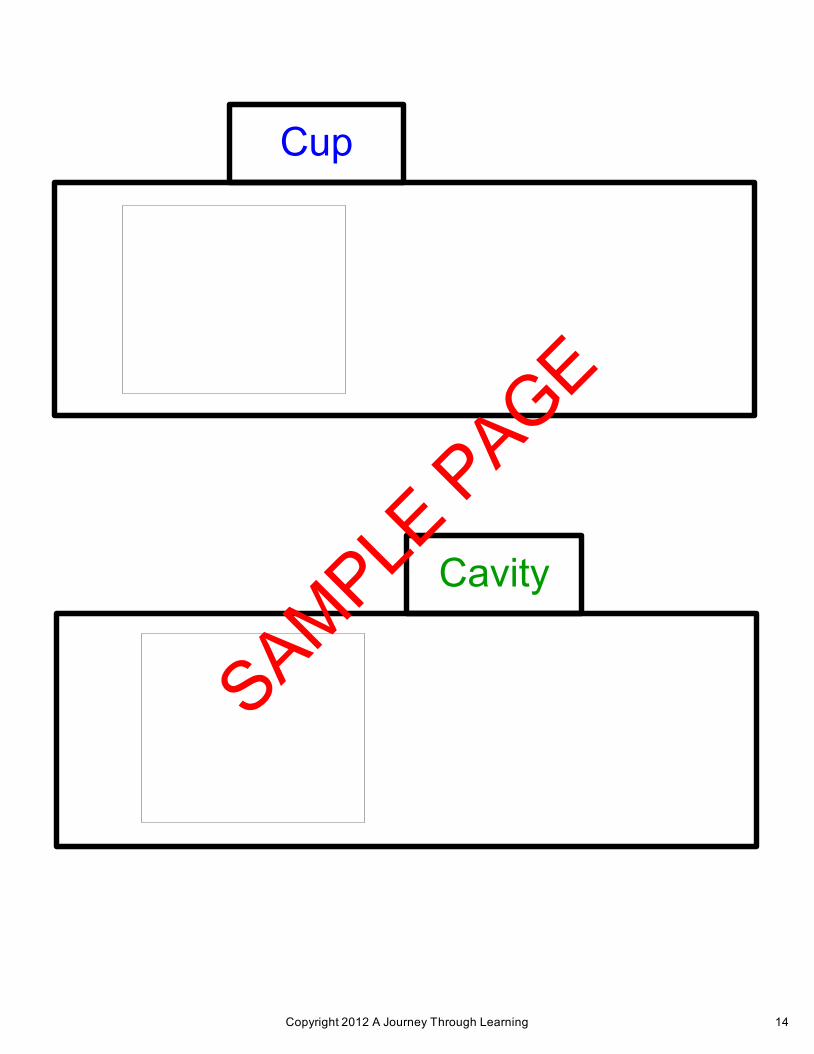
Cup
Cavity
Copyright 2012 A Journey Through Learning 14
SAMPLE P
AGE

Mounds
Copyright 2012 A Journey Through Learning 15
SAMPLE P
AGE

The mouth of a bird is sometimes called a beak and sometimes a bill. Some scientists that study birds (they are called ornithologists) say that the whole mouth of a bird is the bill and the outside layer that covers the bone is the beak. This layer is made of keratin, the same material your fingernails are made of. Where the beak meets the head, we find the nostrils. The nostrils are the little holes where air comes in and out so the bird can breathe.
Birds eat with their beaks. Birds have a variety of diets or food they eat. Different diets require different beaks. The beak of a type of bird is then suited to the type of food they eat. Birds of prey, like the eagle, have hooked beaks. With them they are able to tear the meat from the bones. Parrots also have a hooked bill but theirs is suited to open the covering of seeds. Wading birds - birds that live around shallow waters - have long, sharp bills that help them to spear the fish. Insect eaters, like the woodpecker, have strong, chisel-like beaks that can bore into wood when looking for insects. Nectar eaters, like the hummingbird, have long, slender beaks that can go deep into the flowers as they look for nectar.
Birds use their beaks all the time. The beak wears out. Like your fingernails, beaks grow constantly. As it grows, the outside layer sheds and gets replaced by a new layer. This way the beak is always fit and ready for its job.
All About Beaks (or Bills)
Copyright 2012 A Journey Through Learning 16
SAMPLE P
AGE

Folder 1
Read All About Beaks (or Bills).
Cut out booklet. Glue into lapbook. Directions: In each box, draw the beak or glue a picture of the type of bird that has that style beak.
5
Chisel Hooked Long slender
Types of Beaks
Copyright 2012 A Journey Through Learning 17
SAMPLE P
AGE
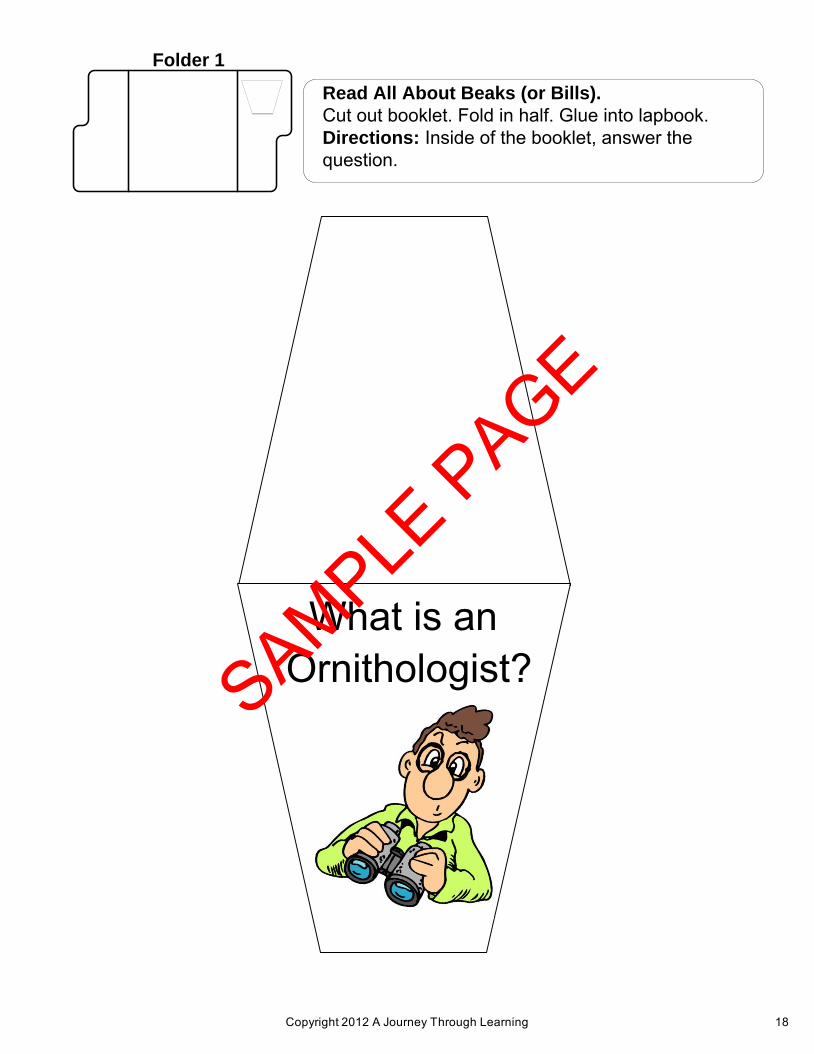
Read All About Beaks (or Bills).
Cut out booklet. Fold in half. Glue into lapbook. Directions: Inside of the booklet, answer the question.
Folder 1
What is anOrnithologist?
Copyright 2012 A Journey Through Learning 18
SAMPLE P
AGE

Grades 2-7
A Journey Through Learning www.ajourneythroughlearning.com
Ocean AnimalsLearning Lapbook with Study Guide
A
JT
L
copywork 2010 A Journey Through Learning
SAMPLE PAGE

Authors-Paula Winget and Nancy Fileccia
Copyright © 2009 A Journey Through Learning
Pages may be copied for other members of household only. For group use,
please see our website to purchase a classroom/co-op license.
Please check our website at:
www.ajourneythroughlearning.com
While you are there, sign up for our email newsletter and
receive a FREE lapbook!
You’ll also receive great discount codes, special offers, find out
what’s new and what’s to come!
Join us on Facebook!
Clipart is from www.clipart.com with permission and
Art Explosion 800,000 by Nova Development
ISBN-978-1-936146-81-9 printed Format
copywork 2010 A Journey Through Learning
SAMPLE PAGE

So where do the mini-booklets go?
A shape-coded and labeled KEY is included. This key shows you where all of the mini-booklets go in each folder. Keep this page handy! You’ll also see at the top of the mini-booklet pages another graphic that shows once again where to place the booklet in each folder. So there are TWO ways to see where to place the booklet. We made it easy! You won’t get lost.
Things to Know
Hamburger Fold-Fold horizontally
Hotdog Fold-Fold vertically
Folds-Labeled with a small line to show where the fold is and the words “hamburger fold” or “hotdog fold.”
Dotted Lines-These are the cutting lines
Accordion Fold-This fold is like making a paper fan. Fold on the first line so that title is on top. Turn over and fold on next line so that title is on top again. Turn over again and fold again on the next line so that title is on top. Continue until all folds are done.
Cover Labels-Most of the booklets that are folded look nicer with a label on top instead of just a blank space. They will be labeled “cover label.”
Lapbook Assembly Choices
(see photos on how to fold and glue your folders together)We recommend using Zip Dry Glue.
Choice #1 -Do not glue your folders together until you have completely finished all three folders. It is easier to work with one folder instead of two or three glued together.
Choice #2 -Glue all of your folders together before beginning. Some children like to see the entire project as they work on it. It helps with keeping up with which folder you are supposed to be working in. The choices are completely up to you and your child!
How Long Does it Take to Complete the Lapbook?
Doing a study guide page and mini-booklet a day, a 3-folder lapbook takes about one month to complete. However, you can expand the study portion and make it last as long as you like! That’s the beauty of homeschooling! Do it YOUR way!
copywork 2010 A Journey Through Learning
SAMPLE PAGE

Study Choices
Choice #1- Read the first page of the study guide. Then use the internet and fun children’s books to learn more about the topic that is covered in that study guide. For instance-our American Indians lapbook has a study guide page about Geronimo. Dig into Geronimo. There are probably lots of interesting things to learn about him that the study guide does not cover. Spend a day on Geronimo or spend a week! The pace you take for the lapbook is completely up to you. When your child has completed studying that particular topic, it will be time to do the mini-booklet for that topic. The mini-booklet patterns are found right after the study guide page that it goes with. Or, your child might want to do the mini-booklet before he/she delves deeper into the subject. Once again, the order is completely up to you and your child.
Choice #2- Read only the study guide page and do the mini-booklet that goes with it. The mini-booklet patterns are found right after the study guide page that it goes with. You may choose to do one study guide/mini-booklet per day, two per day, two per week, three per week, etc. It doesn’t matter. The pace is completely up to you. At one per day, it will take about a month to complete a 3 folder lapbook.
How It All Goes Together
What you need to get started
*A printed copy of the lapbook by A Journey Through Learning*colored file folders*Scissors*Glue (We recommend Zip Dry Glue)*Hole puncher*Brads*Stapler
To make the storage system (optional-see directions)
*Duct tape One 3-ring binder
copywork 2010 A Journey Through Learning
SAMPLE PAGE

1. Gather the number of folders required for your particular lapbook.
2. Open up each folder and flatten it out.
3. Take the right side and fold it all the way over until the tab is just before the middle crease in the folder. Do not overlap this crease with the tab.
4. Fold the left hand-side over just to the crease but not overlapping it. Your folder now has two flaps. We like to run a ruler down each fold to make the fold neater and flatter. Do steps 3 and 4 to the remaining folders.
5. Take two of the folders and apply a generous amount of glue to their flaps. We recommend using Zip Dry Paper Glue.
6. Bring the flaps together and press so they stick together.
7. Do steps 5 and 6 to your remaining folders (if any).
8. The patterns for all the mini-booklets are provided. Just cut out, construct, and glue them into your lapbook. Refer to the color-coded placement page or the actual mini-booklet page for placement of each mini-booklet.
How to fold and connect the folders for your lapbook.
copywork 2010 A Journey Through Learning
SAMPLE PAGE
1. Label your tabs: Study Guide, Book Log, NICK, Biography Reports, Outlines (Copywork and Notebooking, if using these).
2. Make copies of NICK notes and outline forms and put them behind the tabs. Your child can use either the NICK notes form (easier) or the outline form (a bit harder) after any of the study guides. These serve as a good review of the material in the study guide.
3. Hole punch your study guide and mini-booklets sheets and place behind the Study Guide tab. You will read a page of a study guide. Behind the study guide is all of the booklets that go with that study guide.
4. Keeping your office supplies handy-Measure the bottom of a quart size zip-lock bag. Then measure out a strip of duct tape that length. Lay the zip-lock bag on the lower edge of the tape. Fold the other end of the tape down on the zip-lock bag. Your duct tape should be sticking out from the bag. Now, you can hole punch the duct tape strip. DO NOT HOLE PUNCH INTO THE BAG! Then put it into your 3-ring binder. Use this bag to store items you will be using for your lapbook. Glue, scissors, hole puncher, stapler and extra staples, crayons, pencils, brads, ribbon, and any unfinished work. Doing this one step keeps you from having to constantly gather supplies every time you want to work on your lapbook!
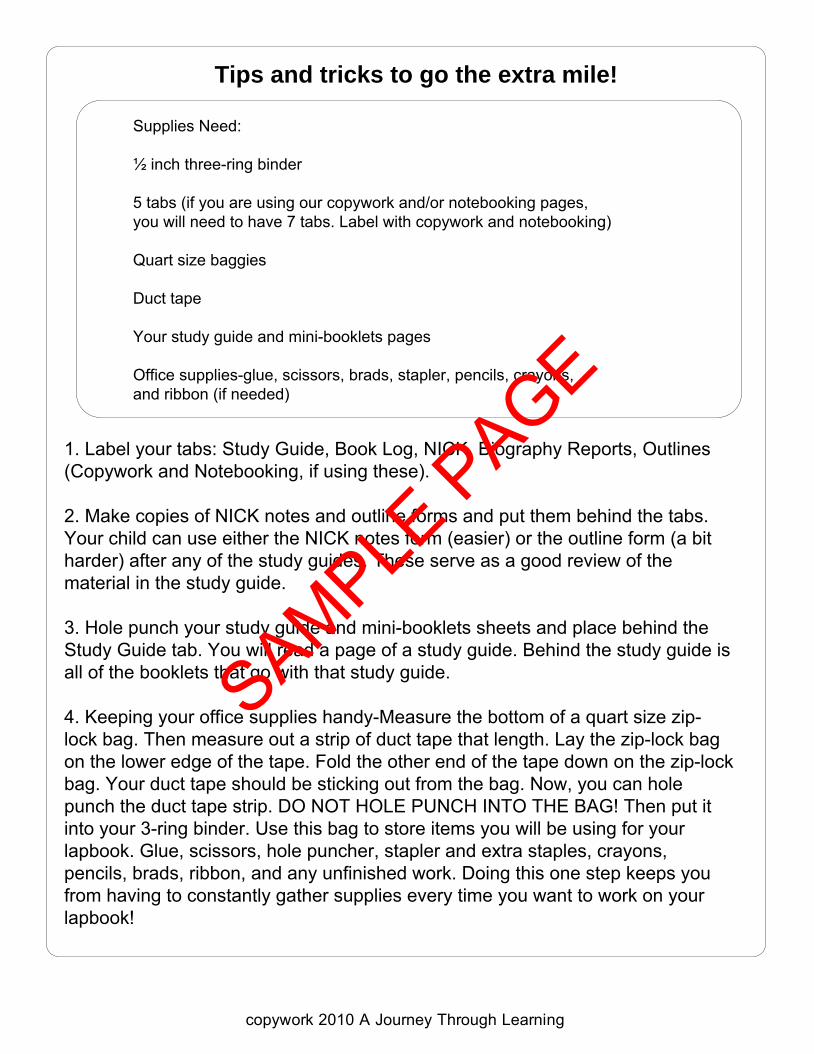
Supplies Need:
½ inch three-ring binder
5 tabs (if you are using our copywork and/or notebooking pages, you will need to have 7 tabs. Label with copywork and notebooking)
Quart size baggies
Duct tape
Your study guide and mini-booklets pages
Office supplies-glue, scissors, brads, stapler, pencils, crayons, and ribbon (if needed)
Tips and tricks to go the extra mile!
copywork 2010 A Journey Through Learning
SAMPLE PAGE

Roll out enough duct tape to go across the folders lengthwise.
Put duct tape sticky side up. Place binded edge of lapbook on the duct tape (no more than ¼ inch!).
Then stick duct tape to the other side again about ¼
inch. There will need to be enough tape to hole punch.
Stick duct tape into hole puncher but be careful not to punch holes in your folders.
It will look like this. Store folders in 3-ring binder.
How to make a storage system for your lapbook(s)
Can I store all of my lapbooks in ONE location?
Yes! A Journey Through Learning has come up with a way that you can store all of your lapbooks from your books in ONE convenient location. A 3-ring binder serves as a great place to keep your lapbooks. This method of storage not only keeps your lapbooks from getting lost but also keeps them neat and readily available to show to dad, grandparents, friends, etc. When they are not being shown off, just place the binder on your bookshelf! Below, we have given you step-by-step directions (with pictures) of how to create a storage binder.
copywork 2010 A Journey Through Learning
SAMPLE PAGE

Folder 1
Folder 2
Folder 3
Where are the animals found?
The Ocean
CoralReef
Predators
Jellyfish
K-W-L
Turtles
dolphinSquid
Swordfish Marlin
Manta Ray
Wahoo
Black Tip Reef Shark
Humpback Whale
Killer Whale
My Favorite Ocean Animal
AnimalFriendsCards
BookReport
Underwater Zebra
copywork 2010 A Journey Through Learning
SAMPLE PAGE

Table of Contents
Welcome to the OceanMy K-W-L Cards
Animals that Live Right by the OceanWhat is Coral Reef?
What Predators Live in the Coral Reef?What is a Jellyfish and Does it Sting?
What is a Sea Turtle and How Many Times Can it Cross an Ocean?
What is a Dolphin and is it really Intelligent?What is a Squid and is it really of a Monstrous Size?
What is a Squid and how does it use its Sword?What is a Marlin and does it really Weigh a Ton?
What is a Manta Ray and will it really come to Greet You?What is a Wahoo and can it Swim as Fast as a Car can Go?
My Ocean Animal CardsWhat is a Killer Whale and will it really Kill You?
What is a Humpback Whale and does it have Fingerprints Similar to Humans?
What is a Black Tip Reef Shark and where are its Black Tips?What is my Favorite Ocean Animal?
The Oddest Ocean Animal I Learned About!A Book That I have Read about Ocean Animals!
copywork 2010 A Journey Through Learning
SAMPLE PAGE
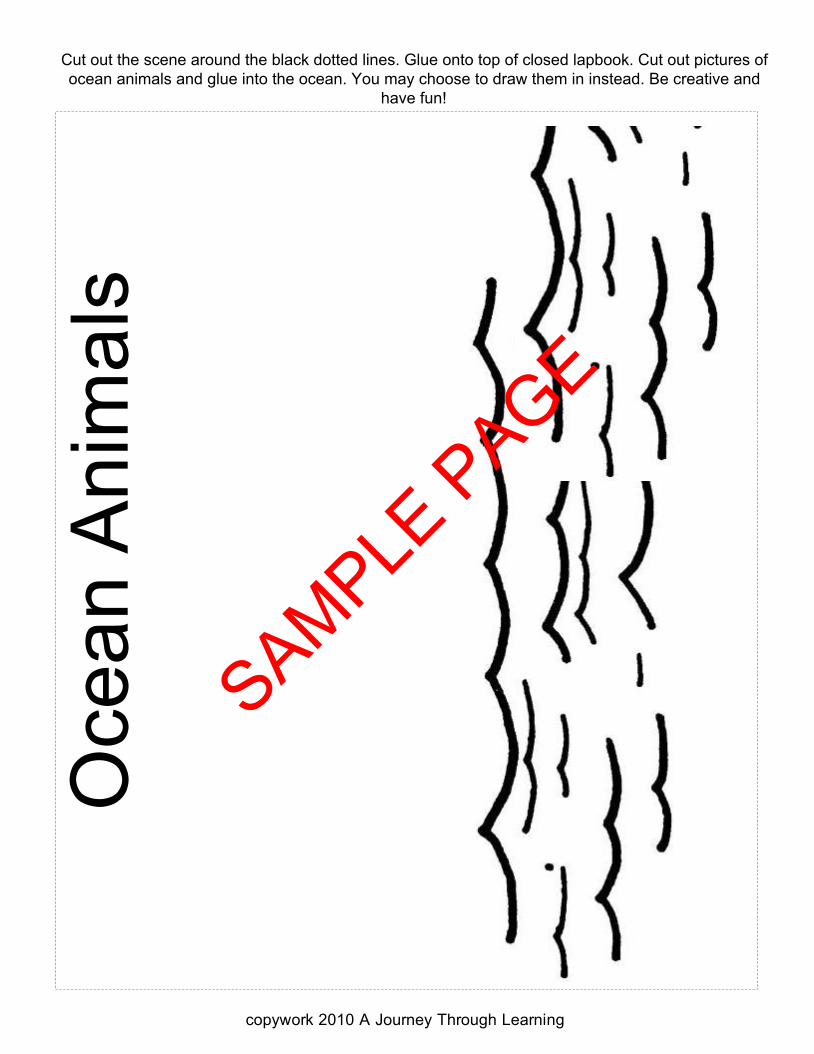
Cut out the scene around the black dotted lines. Glue onto top of closed lapbook. Cut out pictures of ocean animals and glue into the ocean. You may choose to draw them in instead. Be creative and
have fun!O
cean
Ani
mal
s
copywork 2010 A Journey Through Learning
SAMPLE PAGE

Welcome to the Ocean
What is the first thing you think of when you think of the ocean? For me, it is the beach! I love the feel of the hot sand on my feet. I love building sandcastles and chasing the tide in and out. However, I often wonder what lives in the ocean? What lives beyond what I can see?
Oceans cover thousands of miles. They also can be thousands of feet deep. In fact, some oceans are so deep, that they have never even been fully explored! When you stand on the shore and look out, the ocean can seem like a terribly empty space. But, if you were to take a trip to the world below, you would find a lively, exciting world.
Thousands of animals call the ocean home. Everything from microscopic creatures to the largest whale all live together in the deep, blue, world called the ocean. Most of the animals that call the ocean home live in the top 650 feet of the water. This is where the ocean is the warmest. The top layer of the water is warmed by the sun's heat. If you have ever walked around in the ocean, you know that at the very shallow parts you can see your feet. The deeper you get, the darker the water gets. This is because the sun's rays cannot reach that deep.
copywork 2010 A Journey Through Learning
SAMPLE PAGE

Folder 1
The Ocean
Hotdog fold
Read Welcome to the Ocean.
Cut out the booklet. Hotdog fold in half. Glue into lapbook. Directions: Write what you learn about the ocean.
copywork 2010 A Journey Through Learning
SAMPLE PAGE
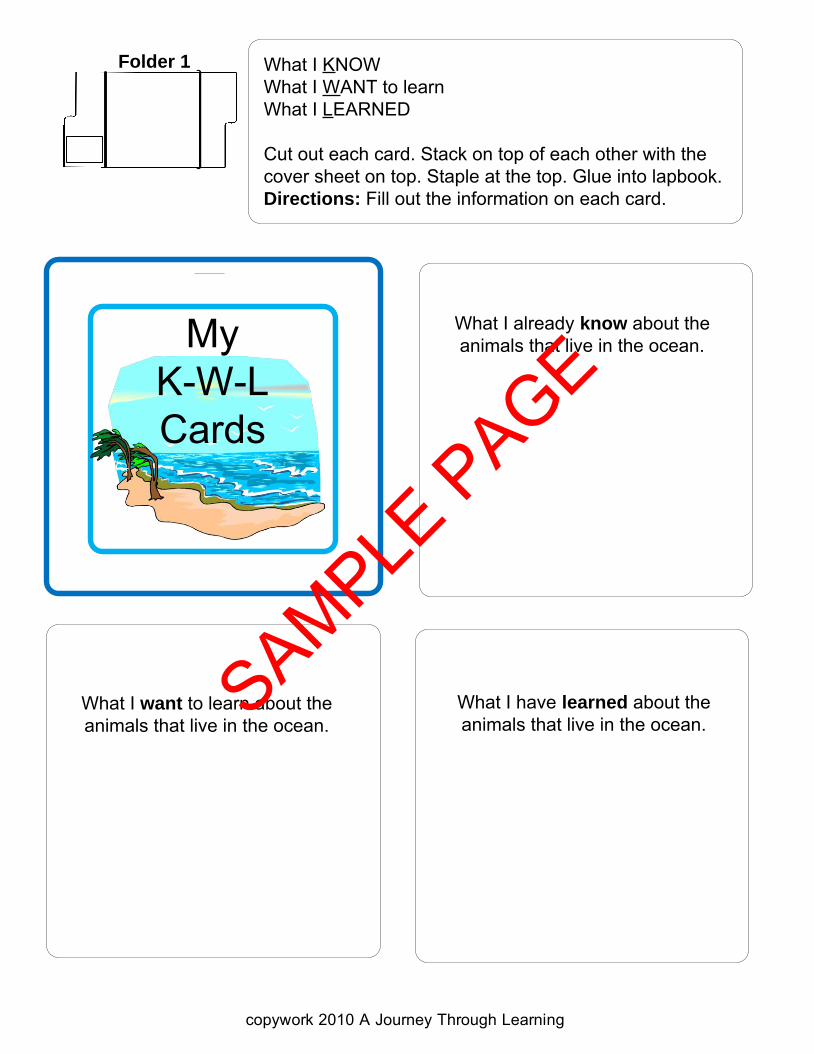
What I already know about the animals that live in the ocean.
What I want to learn about the animals that live in the ocean.
What I have learned about the animals that live in the ocean.
What I KNOWWhat I WANT to learnWhat I LEARNED
Cut out each card. Stack on top of each other with the cover sheet on top. Staple at the top. Glue into lapbook. Directions: Fill out the information on each card.
Folder 1
MyK-W-L Cards
copywork 2010 A Journey Through Learning
SAMPLE PAGE

Many animals that you see in, near or along the ocean may not actually live in the ocean. They may live in thousands of miles of shoreline and beaches that surround the ocean. Along these shorelines and beaches are rocky cliffs, mudflats, and sand islands. Animals may spend some of their time in the ocean, like when they are searching for food, but may actually live in one of these areas.
Rocky shorelines make excellent homes for small ocean animals. Tide pools, which are created when water is trapped between rocks and cannot return to the ocean, make great miniature worlds for crabs, snails, barnacles, seaweed, and starfish.
Birds, like the puffins, seabirds, and razorbills, hunt out of the ocean, but their home is usually in a cliff that borders the ocean. The high cliffs are usually very windy and are continuously sprayed with the ocean’s salty seawater. High in these cliffs the birds are safe from predators like foxes and wild cats.
Cockles, sea urchins, and the weaver fish love to burrow down into the warm sandy beaches of the ocean. Lugworms, snails, and oysters dig deep into the cool mud that forms at the bottom of rocky cliffs. This area is known as a mudflat. Nesting turtles, Horseshoe crabs, and Dungeness crabs use the sandy islands to lay their eggs.
Animals That Live Right By the Ocean
copywork 2010 A Journey Through Learning
SAMPLE PAGE

Read Animals That Live Right by the Ocean. Cut out the pieces. DO NOT CUT OFF TABS. Stack together with title page on top and staple down the left side. Glue into lapbook. Directions: Fill out the information for each page.
Folder 1
Rocky Cliff
Animals Right
by the Ocean
copywork 2010 A Journey Through Learning
SAMPLE PAGE

Mudflats
Sand Islands
copywork 2010 A Journey Through Learning
SAMPLE PAGE
Grades 2-7
A Journey Through Learning www.ajourneythroughlearning.com
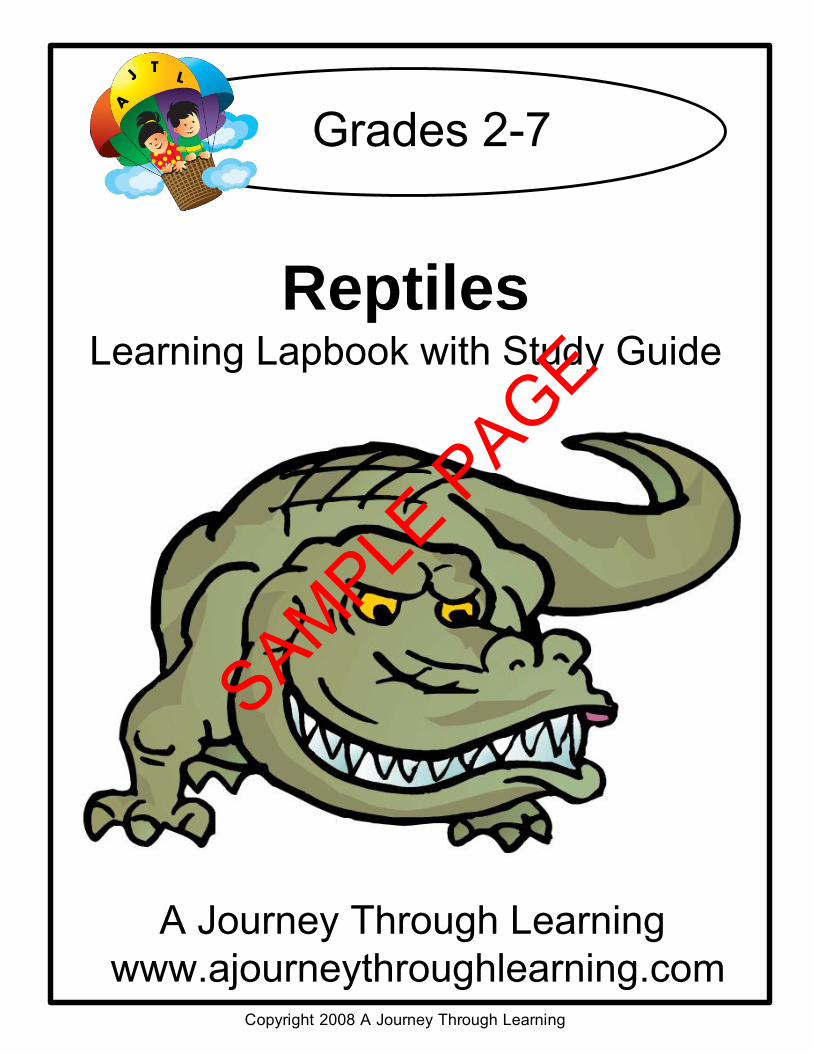
ReptilesLearning Lapbook with Study Guide
A
JT
L
Copyright 2008 A Journey Through Learning
SAMPLE PAGE

Authors-Paula Winget and Nancy Fileccia
Copyright © 2008 A Journey Through Learning
Pages may be copied for other members of household only. For group use,
please see our website to purchase a classroom/co-op license.
Please check our website at:
www.ajourneythroughlearning.com
While you are there, sign up for our email newsletter and
receive a FREE lapbook!
You’ll also receive great discount codes, special offers, find out
what’s new and what’s to come!
Join us on Facebook!
Clipart is from www.clipart.com with permission and
Art Explosion 800,000 by Nova Development
ISBN-978-1-936146-83-3 Printed Format
ISBN-978-1-936146-60-4 CD Format
Copyright 2008 A Journey Through Learning
SAMPLE PAGE
So where do the mini-booklets go?
A color-coded and labeled KEY is included. This key shows you where all of the mini-booklets go in each folder. Keep this page handy! You’ll also see at the top of the mini-booklet pages another graphic that shows once again where to place the booklet in each folder. So there are TWO ways to see where to place the booklet. We made it easy! You won’t get lost.
Things to Know
Hamburger Fold-Fold horizontally
Hotdog Fold-Fold vertically
Folds-Labeled with a small line to show where the fold is and the words “hamburger fold” or “hotdog fold.”
Dotted Lines-These are the cutting lines
Cover Labels-Most of the booklets that are folded look nicer with a label on top instead of just a blank space. They will be labeled “cover label.”
Lapbook Assembly Choices
(see photos on how to fold and glue your folders together)
Choice #1 -Do not glue your folders together until you have completely finished all three folders. It is easier to work with one folder instead of two or three glued together.
Choice #2 -Glue all of your folders together before beginning. Some children like to see the entire project as they work on it. It helps with keeping up with which folder you are supposed to be working in. The choices are completely up to you and your child!
How Long Does it Take to Complete the Lapbook?
Doing a study guide page and mini-booklet a day, a 3-folder lapbook takes about one month to complete. However, you can expand the study portion and make it last as long as you like! That’s the beauty of homeschooling! Do it YOUR way!
Copyright 2008 A Journey Through Learning
SAMPLE PAGE

Study Choices
Choice #1- Read the first page of the study guide. Then use the internet and fun children’s books to learn more about the topic that is covered in that study guide. For instance-our American Indians lapbook has a study guide page about Geronimo. Dig into Geronimo. There are probably lots of interesting things to learn about him that the study guide does not cover. Spend a day on Geronimo or spend a week! The pace you take for the lapbook is completely up to you. When your child has completed studying that particular topic, it will be time to do the mini-booklet for that topic. The mini-booklet patterns are found right after the study guide page that it goes with. Or, your child might want to do the mini-booklet before he/she delves deeper into the subject. Once again, the order is completely up to you and your child.
Choice #2- Read only the study guide page and do the mini-booklet that goes with it. The mini-booklet patterns are found right after the study guide page that it goes with. You may choose to do one study guide/mini-booklet per day, two per day, two per week, three per week, etc. It doesn’t matter. The pace is completely up to you. At one per day, it will take about a month to complete a 3 folder lapbook.
How It All Goes Together
What you need to get started
*A printed copy of the lapbook by A Journey Through Learning*3 colored file folders*Scissors*Glue*Hole puncher*Brads*Stapler
To make the storage system (optional-directions under “Keeping it all together)
*Duct tape (preferably at least two different colors but not necessary)*One 3-ring binder
Copyright 2008 A Journey Through Learning
SAMPLE PAGE
1. Gather the number of folders required for your particular lapbook.
2. Open up each folder and flatten it out.
3. Take the right side and fold it all the way over until the tab is just before the middle crease in the folder. Do not overlap this crease with the tab.
4. Fold the left hand-side over just to the crease but not overlapping it. Your folder now has two flaps. We like to run a ruler down each fold to make the fold neater and flatter. Do steps 3 and 4 to the remaining folders.
5. Take two of the folders and apply a generous amount of glue to their flaps. We recommend using Zip Dry Paper Glue.
6. Bring the flaps together and press so they stick together.
7. Do steps 5 and 6 to your remaining folders (if any).
8. The patterns for all the mini-booklets are provided. Just cut out, construct, and glue them into your lapbook. Refer to the color-coded placement page or the actual mini-booklet page for placement of each mini-booklet.
How to fold and connect the folders for your lapbook.
Copyright 2008 A Journey Through Learning
SAMPLE PAGE

Roll out enough duct tape to go across the folders lengthwise.
Put duct tape sticky side up. Place binded edge of lapbook on the duct tape (no more than ¼ inch!).
Then stick duct tape to the other side again about ¼
inch. There will need to be enough tape to hole punch.
Stick duct tape into hole puncher but be careful not to punch holes in your folders.
It will look like this. Store folders in 3-ring binder.
How to make a storage system for your lapbook(s)
Can I store all of my lapbooks in ONE location?
Yes! A Journey Through Learning has come up with a way that you can store all of your lapbooks from your books in ONE convenient location. A 3-ring binder serves as a great place to keep your lapbooks. This method of storage not only keeps your lapbooks from getting lost but also keeps them neat and readily available to show to dad, grandparents, friends, etc. When they are not being shown off, just place the binder on your bookshelf! On the next page, we have given you step-by-step directions (with pictures) of how to create a storage binder.
Copyright 2008 A Journey Through Learning
SAMPLE PAGE

1. Label your tabs: Study Guide, Book Log, NICK, Biography Reports, Outlines (Copywork and Notebooking, if using these).
2. Make copies of NICK notes and outline forms and put them behind the tabs. Your child can use either the NICK notes form (easier) or the outline form (a bit harder) after any of the study guides. These serve as a good review of the material in the study guide.
3. Hole punch your study guide and mini-booklets sheets and place behind the Study Guide tab. You will read a page of a study guide. Behind the study guide are all of the booklets that go with that study guide.
4. Keeping your office supplies handy-Measure the bottom of a quart size zip-lock bag. Then measure out a strip of duct tape that length. Lay the zip-lock bag on the lower edge of the tape. Fold the other end of the tape down on the zip-lock bag. Your duct tape should be sticking out from the bag. Now, you can hole punch the duct tape strip. DO NOT HOLE PUNCH INTO THE BAG! Then put it into your 3-ring binder. Use this bag to store items you will be using for your lapbook. Glue, scissors, hole puncher, stapler and extra staples, crayons, pencils, brads, ribbon, and any unfinished work. Doing this one step keeps you from having to constantly gather supplies every time you want to work on your lapbook!
Supplies Need:
½ inch three-ring binder
5 tabs (if you are using our copywork and/or notebooking pages, you will need to have 7 tabs. Label with copywork and notebooking)
Quart size baggies
Duct tape
Your study guide and mini-booklets pages
Office supplies-glue, scissors, brads, stapler, pencils, crayons, and ribbon (if needed)
Tips and tricks to go the extra mile!
Copyright 2008 A Journey Through Learning
SAMPLE PAGE

Folder 1
Folder 2
Folder 3
CharacteristicsOf reptiles
My ReptileReport
Life Cycle
MyK-W-L cardsAbout
Reptiles
Eggs
Lizards
VenomousSnakes
Scales
SNAKES
CrocodiliaTestudinessquamata
crocodiles
turtles
Turtledefense
Wha
t the
y ea
t
Snake bite
Colorfulchameleon
chameleonscroc
defense
Snakedefense
chameleondefense
lizarddefense
GoodPoint
TurtleFood Chain
Copyright 2008 A Journey Through Learning
SAMPLE PAGE

Table of Contents
What Are the Characteristics of Reptiles?
How Do Reptiles Defend Themselves Against Predators?
What Are the Different Classes of Reptiles?
Eggs, Eggs, and More Eggs!
What Do Reptiles Eat When They Get Hungry?
What Is a Food Chain?
Reptile Food Chain—FYI
Chameleons Are Very Strange Creatures!
Tell Me about Crocodiles!
Tell Me about Lizards!
Tell Me about Turtles!
Tell Me About Snakes!
Scales! And Not the One in Your Bathroom!
Beware! Venomous Snakes Ahead!
Snake Bite Rescue!
Reptiles Lapbook
Learning all about reptiles is what you will find in this lapbook! Each topic comes with a study guide that is written for a child to understand and also includes a mini booklet for each topic! Science comes alive with this educational hands- on way to learn!
Copyright 2008 A Journey Through Learning
SAMPLE PAGE
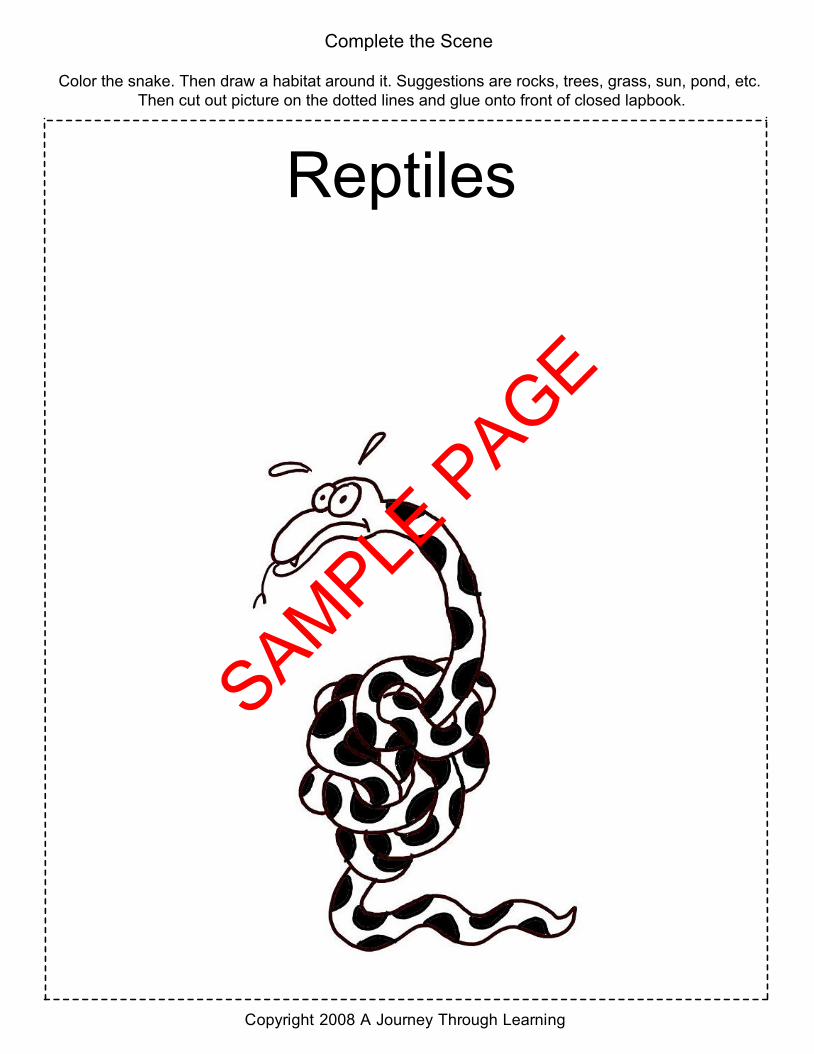
Complete the Scene
Color the snake. Then draw a habitat around it. Suggestions are rocks, trees, grass, sun, pond, etc. Then cut out picture on the dotted lines and glue onto front of closed lapbook.
Reptiles
Copyright 2008 A Journey Through Learning
SAMPLE PAGE

What Are the Characteristics of Reptiles?
Crocodiles, alligators, turtles, lizards, and snakes are all reptiles. Reptiles are vertebrates. A vertebrate is an animal that has an internal skeleton with a backbone. Reptiles inhabit every continent, with the exception of Antarctica. Most reptiles (except snakes) have four legs. The word “reptile” means “to
creep.” They lay eggs that have a waterproof, protective shell filled with amniotic fluid. A reptile’s skin is tough and covered in scales. It is used as part of the animal’s defense. Reptiles breathe with their lungs, so occasionally they must come out of the water for air.
Most reptiles are cold-blooded. However, the term “cold-blooded” is not only
misleading but also out-dated. Scientists now use the term “ectotherm” to describe
animals who rely on their surroundings to keep them warm or cool. Ecto means “outside” and therm means “heat.”
Define the word Characteristics:
What are YOUR characteristics? Do you have any of the same characteristics of a reptile?
Copyright 2008 A Journey Through Learning
SAMPLE PAGE

Characteristics of
Reptiles
Folder 1Read What are the Characteristics of Reptiles? Cut out each piece. Staple the two sheets together with title page on top. Glue into lapbook. Directions: Cut out answers from next page that tell a characteristic of a reptile. Glue them to blank squares.
Copyright 2008 A Journey Through Learning
SAMPLE PAGE
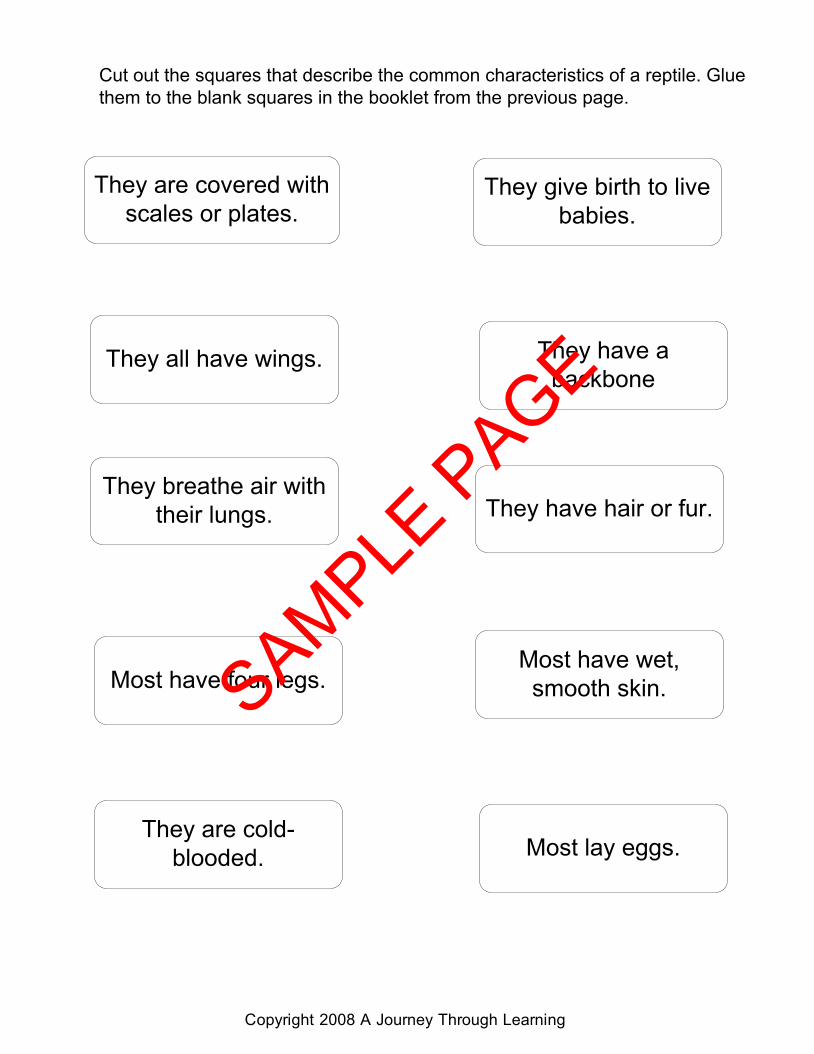
They have a backbone
They are covered with scales or plates.
They breathe air with their lungs.
Most have four legs.Most have wet, smooth skin.
They all have wings.
They give birth to live babies.
They have hair or fur.
They are cold-blooded. Most lay eggs.
Cut out the squares that describe the common characteristics of a reptile. Glue them to the blank squares in the booklet from the previous page.
Copyright 2008 A Journey Through Learning
SAMPLE PAGE