amigurumi dalek - two hearts crochet - craft. - · pdf fileamigurumi dalek materials: - size...
TRANSCRIPT

Amigurumi Dalek Materials:
- Size C/2.75mm Clover Amour crochet hook
- Yarn needle
- Worsted weight yarn in brown, gold, black, light gray and aqua
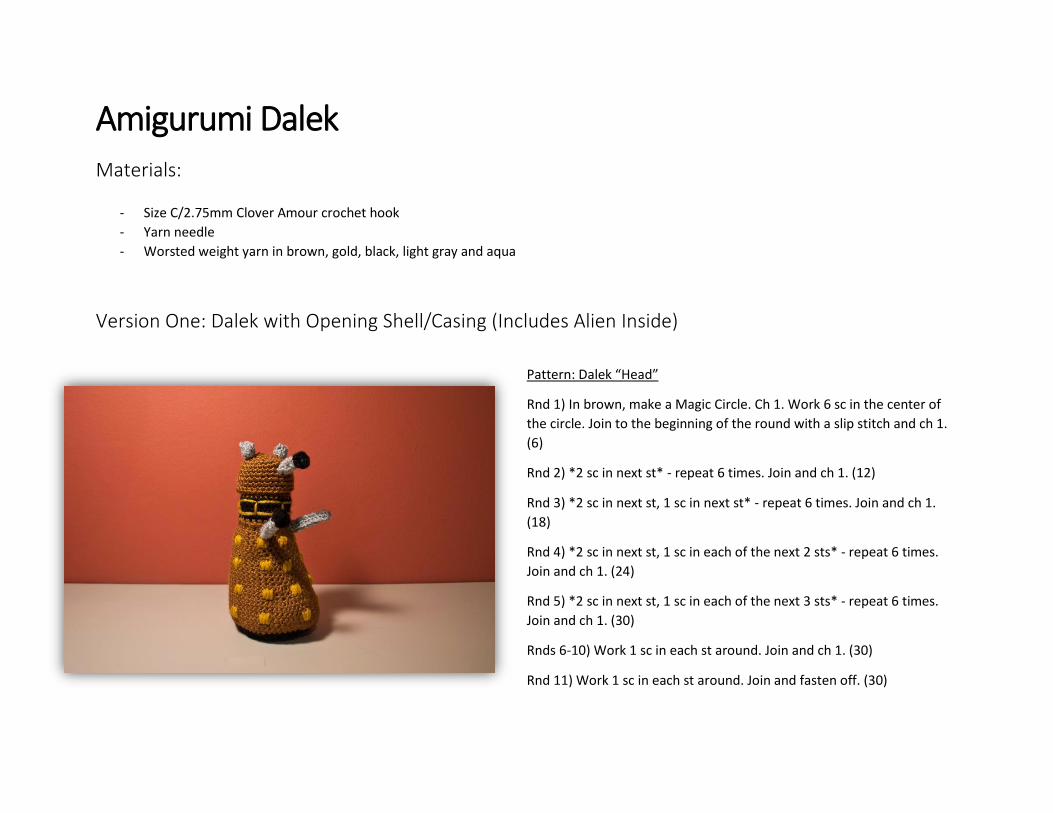
Version One: Dalek with Opening Shell/Casing (Includes Alien Inside)
Pattern: Dalek “Head”
Rnd 1) In brown, make a Magic Circle. Ch 1. Work 6 sc in the center of
the circle. Join to the beginning of the round with a slip stitch and ch 1.
(6)
Rnd 2) *2 sc in next st* - repeat 6 times. Join and ch 1. (12)
Rnd 3) *2 sc in next st, 1 sc in next st* - repeat 6 times. Join and ch 1.
(18)
Rnd 4) *2 sc in next st, 1 sc in each of the next 2 sts* - repeat 6 times.
Join and ch 1. (24)
Rnd 5) *2 sc in next st, 1 sc in each of the next 3 sts* - repeat 6 times.
Join and ch 1. (30)
Rnds 6-10) Work 1 sc in each st around. Join and ch 1. (30)
Rnd 11) Work 1 sc in each st around. Join and fasten off. (30)
Continue onto the Dalek “Middle”.
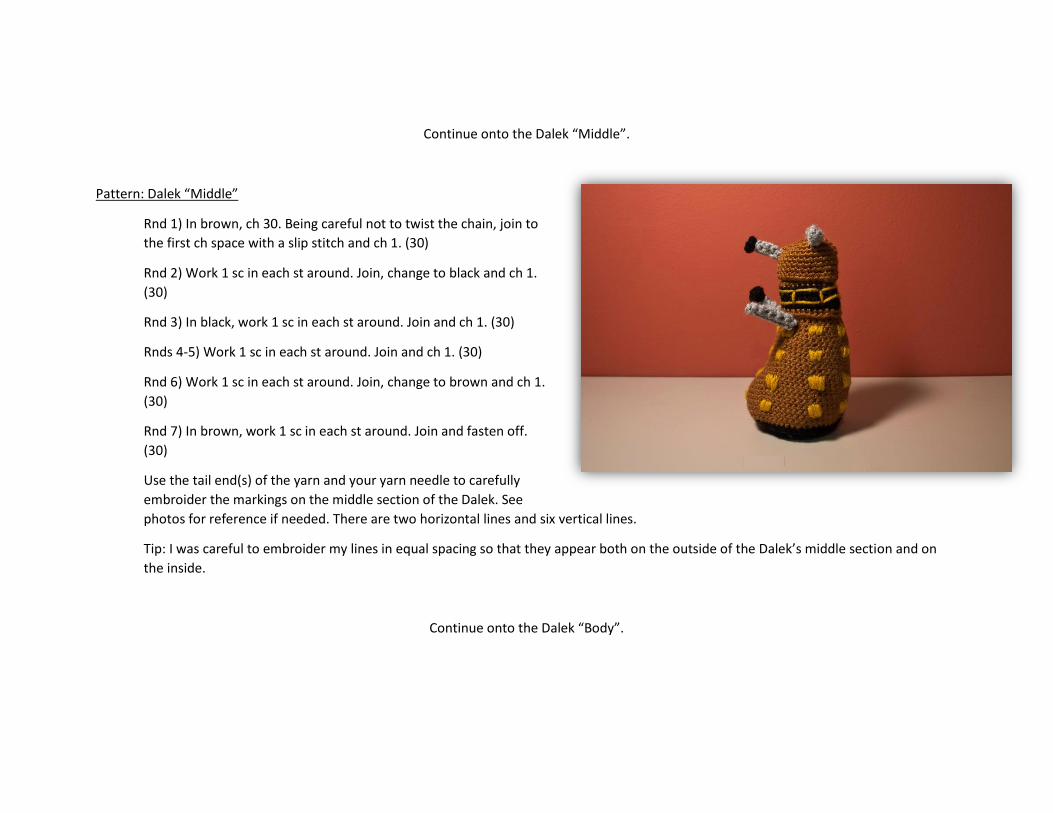
Pattern: Dalek “Middle”
Rnd 1) In brown, ch 30. Being careful not to twist the chain, join to
the first ch space with a slip stitch and ch 1. (30)
Rnd 2) Work 1 sc in each st around. Join, change to black and ch 1.
(30)
Rnd 3) In black, work 1 sc in each st around. Join and ch 1. (30)
Rnds 4-5) Work 1 sc in each st around. Join and ch 1. (30)
Rnd 6) Work 1 sc in each st around. Join, change to brown and ch 1.
(30)
Rnd 7) In brown, work 1 sc in each st around. Join and fasten off.
(30)
Use the tail end(s) of the yarn and your yarn needle to carefully
embroider the markings on the middle section of the Dalek. See
photos for reference if needed. There are two horizontal lines and six vertical lines.
Tip: I was careful to embroider my lines in equal spacing so that they appear both on the outside of the Dalek’s middle section and on
the inside.
Continue onto the Dalek “Body”.
Pattern: Dalek “Body”
Rnd 1) In brown, make a Magic Circle. Ch 1. Work 6 sc in the center of the circle. Join to the beginning of the round with a slip stitch and
ch 1. (6)
Rnd 2) *2 sc in next st* - repeat 6 times. Join and ch 1. (12)
Rnd 3) *2 sc in next st, 1 sc in next st* - repeat 6 times. Join and ch 1. (18)
Rnd 4) *2 sc in next st, 1 sc in each of the next 2 sts* - repeat 6 times. Join and ch 1. (24)
Rnd 5) *2 sc in next st, 1 sc in each of the next 3 sts* - repeat 6 times. Join and ch 1. (30)
Rnds 6-9) Work 1 sc in each st around. Join and ch 1. (30)
Rnd 10) Work 3 sc in the first st, 1 sc in each of the next 10 sts, 3 sc in next st, 1 sc in each of the next 7 sts, 3 sc in next st, and 1 sc in
each of the last 10 sts. Join and ch 1. (36)
Rnds 11-12) Work 1 sc in each st around. Join and ch 1. (36)
Rnd 13) Work 3 sc in the first st, 1 sc in each of the next 12 sts, 3 sc in next st, 1 sc in each of the next 9 sts, 3 sc in next st, and 1 sc in
each of the last 12 sts. Join and ch 1. (42)
Rnds 14-17) Work 1 sc in each st around. Join and ch 1. (42)
Rnd 18) Work 3 sc in the first st, 2 sc in the next st, 1 sc in each of the next 41 sts, and 2 sc in the last st. Join and ch 1. (48)
Rnds 19-21) Work 1 sc in each st around. Join and ch 1. (48)
Rnd 22) Work 3 sc in the first st, 1 sc in the next st, 2 sc in the next st, 1 sc in each of the next 41 sts, 2 sc in the next st, and 1 sc in the
last st. Join and ch 1. (50)
Rnds 23-27) Work 1 sc in each st around. Join and ch 1. (50)
Rnd 28) Work 1 sc in each st around. Join, change to black and ch 1. (50)
Rnd 29) In black, work 1 sc in each st around. Join and ch 1. (50)
Rnd 30) In back loops only, *sc decrease, 3 sc* - repeat 10 times. Join and ch 1. (40)
Rnd 31) In both loops, *sc decrease, 3 sc* - repeat 8 times. Join and ch 1. (32)
Rnd 32) *sc decrease, 2 sc* - repeat 8 times. Join and ch 1. (24)
Rnd 33) *sc decrease, sc* - repeat 8 times. Join and ch 1. (16)
Carefully insert some stuffing into the body of the Dalek, but do not overstuff!
Rnd 34) *sc decrease* - repeat 8 times. Join and ch 1. (8)
Rnd 35) *sc decrease* - repeat 4 times. Join and fasten off. (4)
Use the tail end of the yarn and a yarn needle to sew the remaining opening closed, making sure that no stuffing is able to get out.
Weave in ends.
Continue onto the Dalek “firing arm”.

Pattern: Dalek “Firing Arm”
Row 1) In light gray, ch 11. Starting in the 2nd chain space from the
hook: 10 sc. Ch 1 & turn. (10)
Row 2) 10 sc. Ch 1 and turn. (10)
Row 3) 10 sc. Fasten off. (10)
Fold the firing arm in half to make a long, narrow tube. Use the tail
end(s) of the yarn and a yarn needle to sew along the folded edges.
Sew to the Dalek body and weave in ends. See photos for placement if
necessary.
Continue onto the Dalek “plunger arm”.
Pattern: Dalek “Plunger Arm”
Arm - Row 1) In light gray, ch 11. Starting in the 2nd chain space from the hook: 10 sc. Ch 1 & turn. (10)
Arm - Row 2) 10 sc. Ch 1 and turn. (10)
Arm - Row 3) 10 sc. Fasten off. (10)
Fold the firing arm in half to make a long, narrow tube. Use the tail end(s) of the yarn and a yarn needle to sew along the folded edges.
Plunger - Rnd 1) In black, make a Magic Circle. Ch 1. Work 6 sc in the center of the circle. Join to the beginning of the round with a slip
stitch and ch 1. (6)
Plunger - Rnd 2) Work 1 sc in each st around. Join and fasten off. (6)
Use the tail end(s) of the yarn and a yarn needle to sew the plunger onto the arm. Weave the end(s) of the black yarn through the body
of the arm so that they are invisible & trim to length.
Use the tail end(s) of the yarn from the plunger arm and a yarn
needle to sew the arm to the Dalek body. Weave in ends. See
photos for placement if necessary.
Continue onto the Dalek eyestalk.
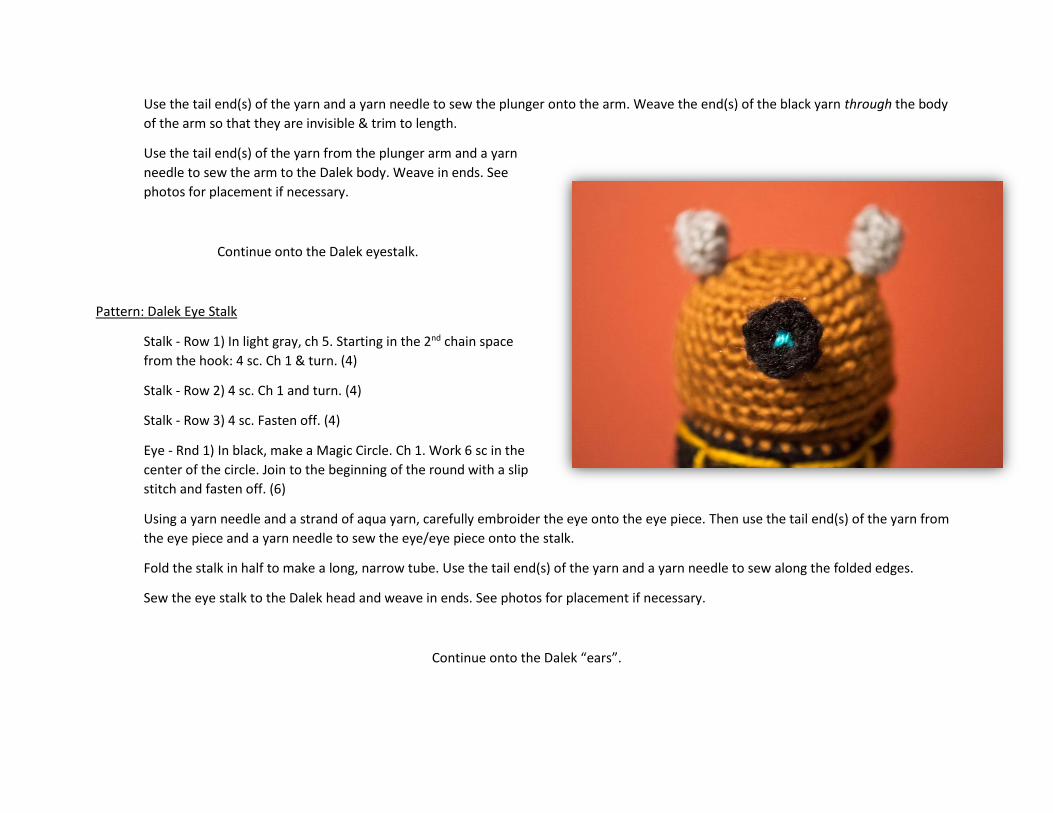
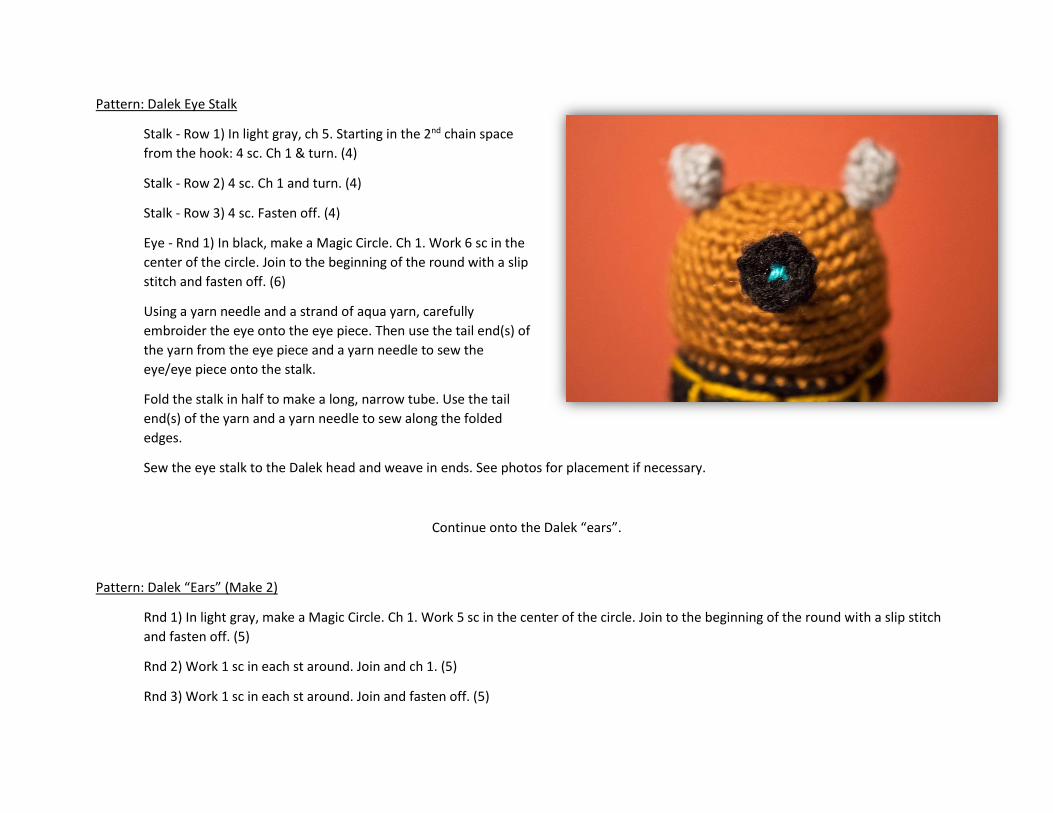
Pattern: Dalek Eye Stalk
Stalk - Row 1) In light gray, ch 5. Starting in the 2nd chain space
from the hook: 4 sc. Ch 1 & turn. (4)
Stalk - Row 2) 4 sc. Ch 1 and turn. (4)
Stalk - Row 3) 4 sc. Fasten off. (4)
Eye - Rnd 1) In black, make a Magic Circle. Ch 1. Work 6 sc in the
center of the circle. Join to the beginning of the round with a slip
stitch and fasten off. (6)
Using a yarn needle and a strand of aqua yarn, carefully embroider the eye onto the eye piece. Then use the tail end(s) of the yarn from
the eye piece and a yarn needle to sew the eye/eye piece onto the stalk.
Fold the stalk in half to make a long, narrow tube. Use the tail end(s) of the yarn and a yarn needle to sew along the folded edges.
Sew the eye stalk to the Dalek head and weave in ends. See photos for placement if necessary.
Continue onto the Dalek “ears”.
Pattern: Dalek “Ears” (Make 2)
Rnd 1) In light gray, make a Magic Circle. Ch 1. Work 5 sc in the center of the circle. Join to the beginning of the round with a slip stitch
and fasten off. (5)
Rnd 2) Work 1 sc in each st around. Join and ch 1. (5)
Rnd 3) Work 1 sc in each st around. Join and fasten off. (5)
Use the tail end(s) of the yarn and a yarn needle to carefully sew the ears to the Dalek head. Carefully weave in ends. See photos for
placement if necessary.
Continue onto the Dalek “bobbles”.
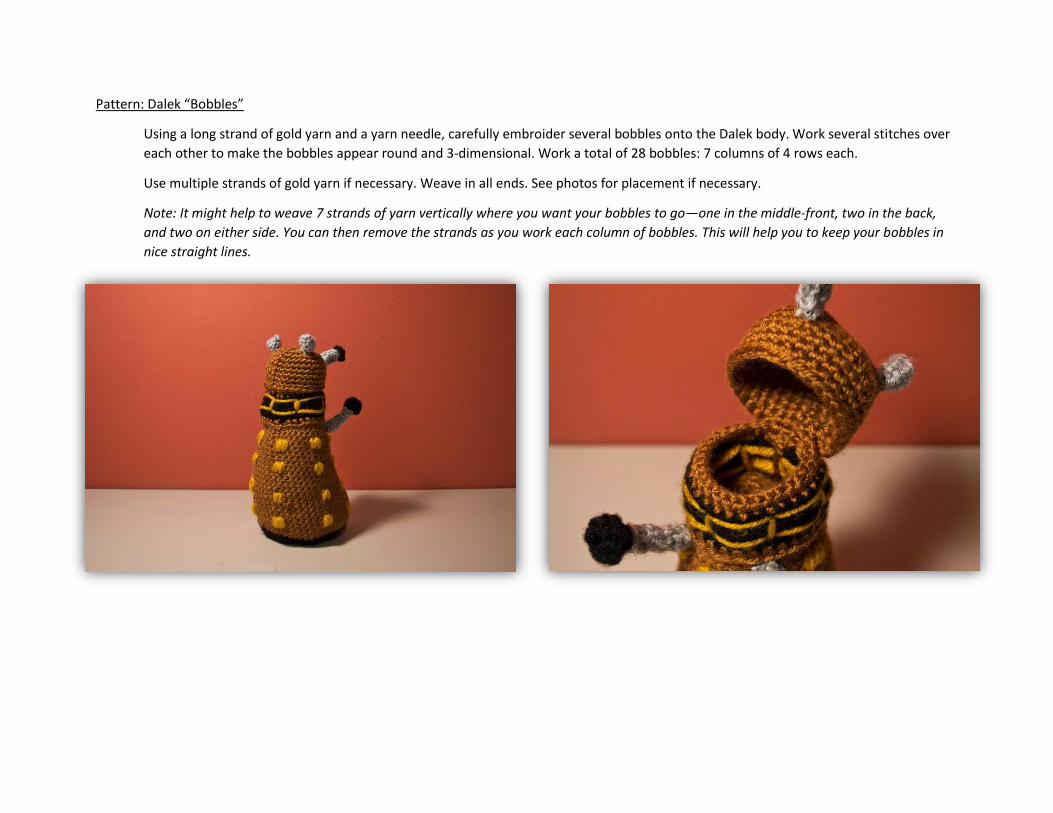
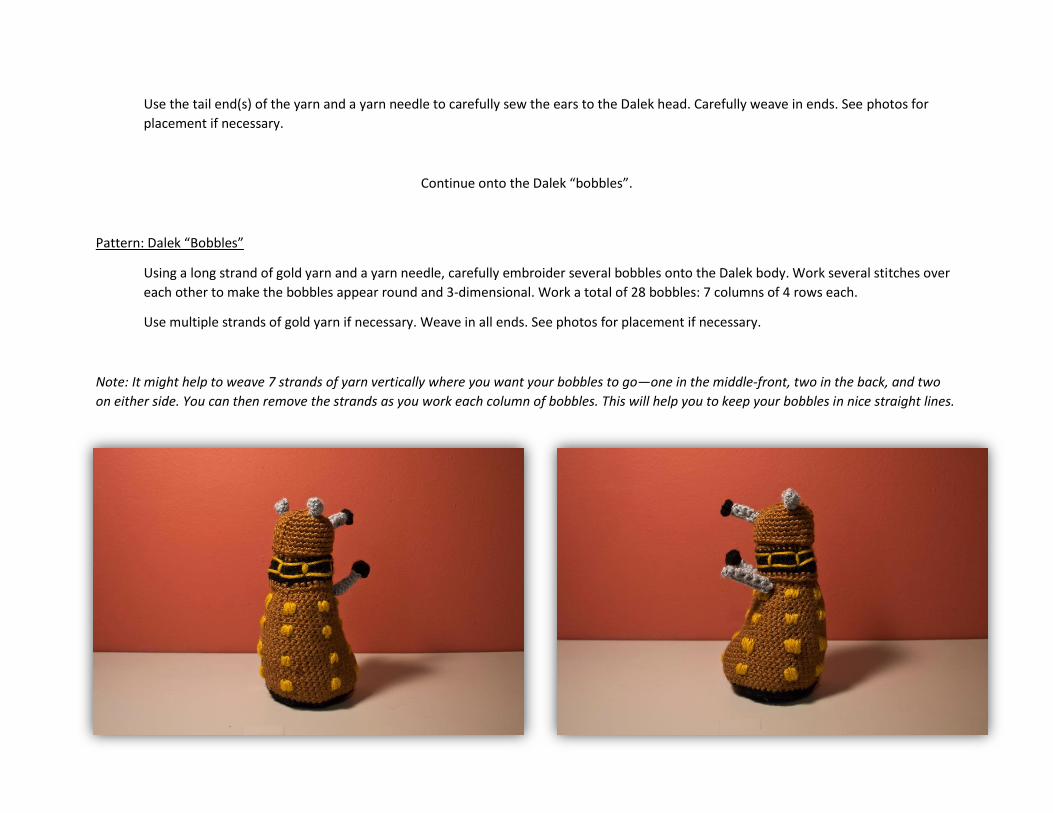
Pattern: Dalek “Bobbles”
Using a long strand of gold yarn and a yarn needle, carefully embroider several bobbles onto the Dalek body. Work several stitches over
each other to make the bobbles appear round and 3-dimensional. Work a total of 28 bobbles: 7 columns of 4 rows each.
Use multiple strands of gold yarn if necessary. Weave in all ends. See photos for placement if necessary.
Note: It might help to weave 7 strands of yarn vertically where you want your bobbles to go—one in the middle-front, two in the back,
and two on either side. You can then remove the strands as you work each column of bobbles. This will help you to keep your bobbles in
nice straight lines.
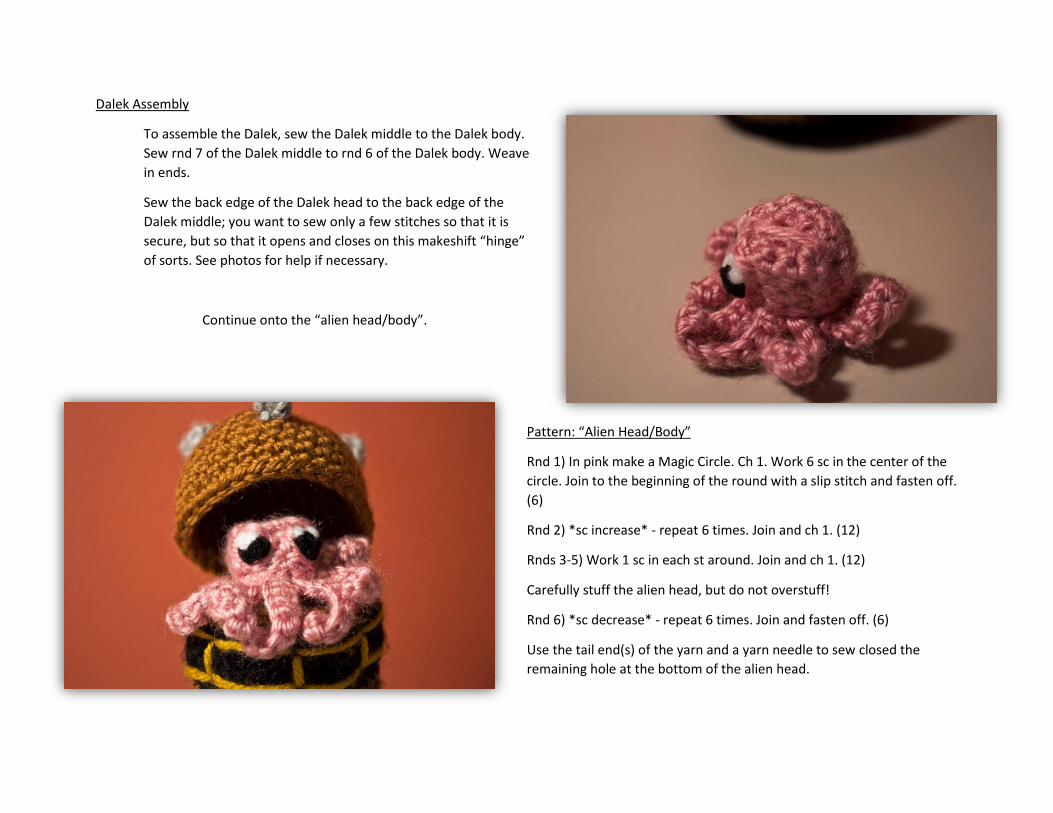
Dalek Assembly
To assemble the Dalek, sew the Dalek middle to the Dalek body.
Sew rnd 7 of the Dalek middle to rnd 6 of the Dalek body. Weave
in ends.
Sew the back edge of the Dalek head to the back edge of the
Dalek middle; you want to sew only a few stitches so that it is
secure, but so that it opens and closes on this makeshift “hinge”
of sorts. See photos for help if necessary.
Continue onto the “alien head/body”.
Pattern: “Alien Head/Body”
Rnd 1) In pink make a Magic Circle. Ch 1. Work 6 sc in the center of the
circle. Join to the beginning of the round with a slip stitch and fasten off.
(6)
Rnd 2) *sc increase* - repeat 6 times. Join and ch 1. (12)
Rnds 3-5) Work 1 sc in each st around. Join and ch 1. (12)
Carefully stuff the alien head, but do not overstuff!
Rnd 6) *sc decrease* - repeat 6 times. Join and fasten off. (6)
Use the tail end(s) of the yarn and a yarn needle to sew closed the
remaining hole at the bottom of the alien head.
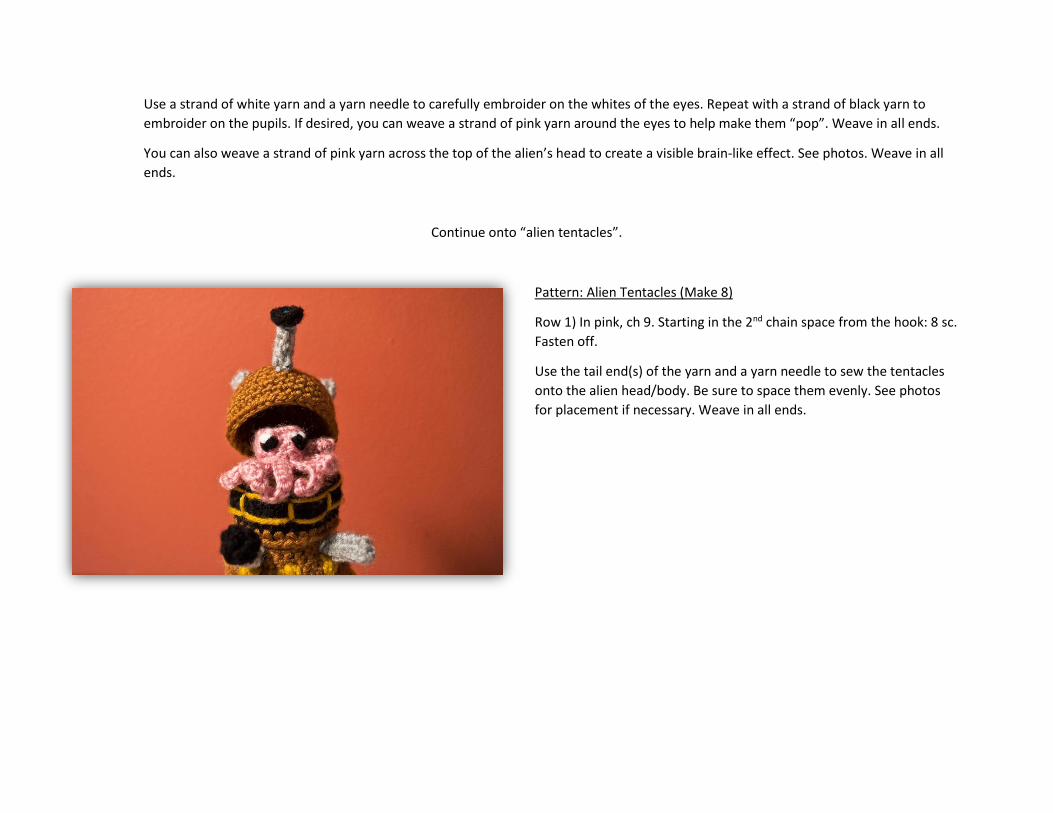
Use a strand of white yarn and a yarn needle to carefully embroider on the whites of the eyes. Repeat with a strand of black yarn to
embroider on the pupils. If desired, you can weave a strand of pink yarn around the eyes to help make them “pop”. Weave in all ends.
You can also weave a strand of pink yarn across the top of the alien’s head to create a visible brain-like effect. See photos. Weave in all
ends.
Continue onto “alien tentacles”.
Pattern: Alien Tentacles (Make 8)
Row 1) In pink, ch 9. Starting in the 2nd chain space from the hook: 8 sc.
Fasten off.
Use the tail end(s) of the yarn and a yarn needle to sew the tentacles
onto the alien head/body. Be sure to space them evenly. See photos
for placement if necessary. Weave in all ends.
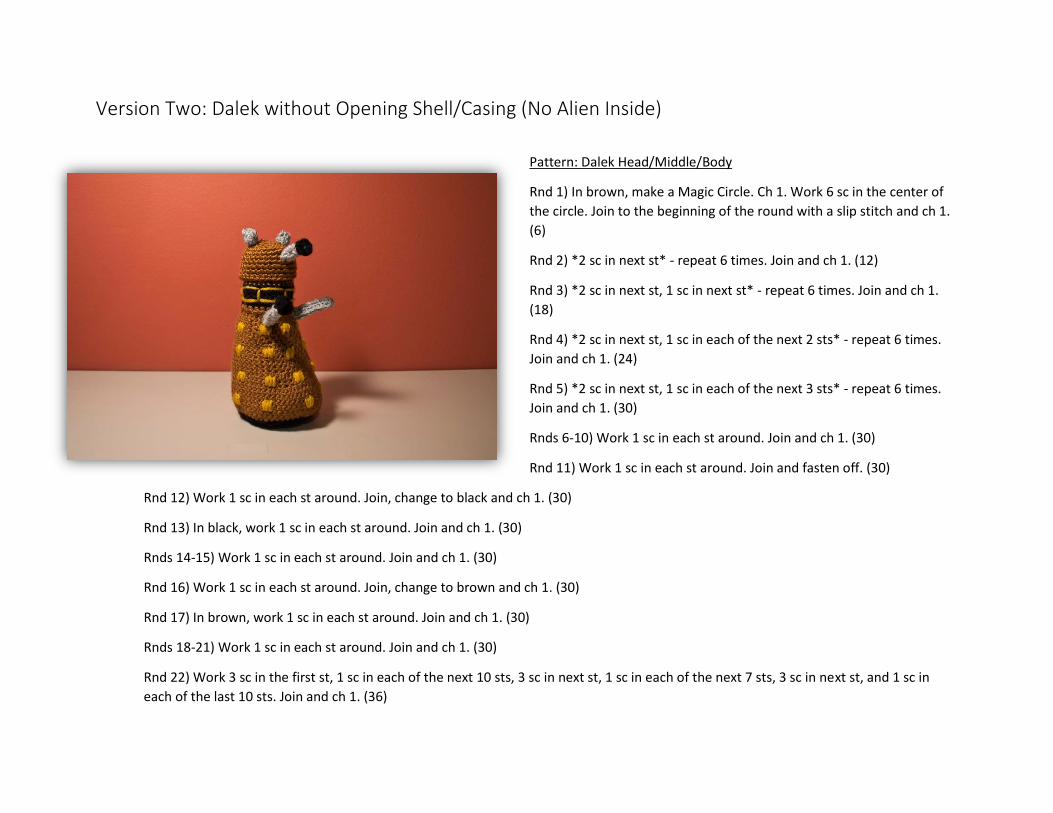
Version Two: Dalek without Opening Shell/Casing (No Alien Inside)
Pattern: Dalek Head/Middle/Body
Rnd 1) In brown, make a Magic Circle. Ch 1. Work 6 sc in the center of
the circle. Join to the beginning of the round with a slip stitch and ch 1.
(6)
Rnd 2) *2 sc in next st* - repeat 6 times. Join and ch 1. (12)
Rnd 3) *2 sc in next st, 1 sc in next st* - repeat 6 times. Join and ch 1.
(18)
Rnd 4) *2 sc in next st, 1 sc in each of the next 2 sts* - repeat 6 times.
Join and ch 1. (24)
Rnd 5) *2 sc in next st, 1 sc in each of the next 3 sts* - repeat 6 times.
Join and ch 1. (30)
Rnds 6-10) Work 1 sc in each st around. Join and ch 1. (30)
Rnd 11) Work 1 sc in each st around. Join and fasten off. (30)
Rnd 12) Work 1 sc in each st around. Join, change to black and ch 1. (30)
Rnd 13) In black, work 1 sc in each st around. Join and ch 1. (30)
Rnds 14-15) Work 1 sc in each st around. Join and ch 1. (30)
Rnd 16) Work 1 sc in each st around. Join, change to brown and ch 1. (30)
Rnd 17) In brown, work 1 sc in each st around. Join and ch 1. (30)
Rnds 18-21) Work 1 sc in each st around. Join and ch 1. (30)
Rnd 22) Work 3 sc in the first st, 1 sc in each of the next 10 sts, 3 sc in next st, 1 sc in each of the next 7 sts, 3 sc in next st, and 1 sc in
each of the last 10 sts. Join and ch 1. (36)
Rnds 23-24) Work 1 sc in each st around. Join and ch 1. (36)
Rnd 25) Work 3 sc in the first st, 1 sc in each of the next 12 sts, 3
sc in next st, 1 sc in each of the next 9 sts, 3 sc in next st, and 1
sc in each of the last 12 sts. Join and ch 1. (42)
Rnds 26-29) Work 1 sc in each st around. Join and ch 1. (42)
Rnd 30) Work 3 sc in the first st, 2 sc in the next st, 1 sc in each
of the next 41 sts, and 2 sc in the last st. Join and ch 1. (48)
Rnds 31-33) Work 1 sc in each st around. Join and ch 1. (48)
Rnd 34) Work 3 sc in the first st, 1 sc in the next st, 2 sc in the
next st, 1 sc in each of the next 41 sts, 2 sc in the next st, and 1
sc in the last st. Join and ch 1. (50)
Rnds 35-39) Work 1 sc in each st around. Join and ch 1. (50)
Rnd 40) Work 1 sc in each st around. Join, change to black and
ch 1. (50)
Rnd 41) In black, work 1 sc in each st around. Join and ch 1. (50)
Rnd 42) In back loops only, *sc decrease, 3 sc* - repeat 10 times. Join and ch 1. (40)
Rnd 43) In both loops, *sc decrease, 3 sc* - repeat 8 times. Join and ch 1. (32)
Rnd 44) *sc decrease, 2 sc* - repeat 8 times. Join and ch 1. (24)
Rnd 45) *sc decrease, sc* - repeat 8 times. Join and ch 1. (16)
Carefully insert some stuffing into the body of the Dalek, but do not overstuff!
Rnd 46) *sc decrease* - repeat 8 times. Join and ch 1. (8)
Rnd 47) *sc decrease* - repeat 4 times. Join and fasten off. (4)

Use the tail end of the yarn and a yarn needle to sew the remaining opening closed, making sure that no stuffing is able to get out.
Weave in ends.
Use the tail end(s) of the yarn and your yarn needle to carefully embroider the markings on the middle section of the Dalek. See photos
for reference if needed. There are two horizontal lines and six vertical lines.
Tip: I was careful to embroider my lines in equal spacing so that they appear both on the outside of the Dalek’s middle section and on
the inside.
Continue onto the Dalek “firing arm”.
Pattern: Dalek “Firing Arm”
Row 1) In light gray, ch 11. Starting in the 2nd chain space from the hook:
10 sc. Ch 1 & turn. (10)
Row 2) 10 sc. Ch 1 and turn. (10)
Row 3) 10 sc. Fasten off. (10)
Fold the firing arm in half to make a long, narrow tube. Use the tail
end(s) of the yarn and a yarn needle to sew along the folded edges.
Sew to the Dalek body and weave in ends. See photos for placement if
necessary.
Continue onto the Dalek “plunger arm”.
Pattern: Dalek “Plunger Arm”
Arm - Row 1) In light gray, ch 11. Starting in the 2nd chain space from the hook: 10 sc. Ch 1 & turn. (10)
Arm - Row 2) 10 sc. Ch 1 and turn. (10)
Arm - Row 3) 10 sc. Fasten off. (10)
Fold the firing arm in half to make a long, narrow tube. Use the tail end(s) of the yarn and a yarn needle to sew along the folded edges.
Plunger - Rnd 1) In black, make a Magic Circle. Ch 1. Work 6 sc in the center of the circle. Join to the beginning of the round with a slip
stitch and ch 1. (6)
Plunger - Rnd 2) Work 1 sc in each st around. Join and fasten off. (6)
Use the tail end(s) of the yarn and a yarn needle to sew the plunger onto the arm. Weave the end(s) of the black yarn through the body
of the arm so that they are invisible & trim to length.
Use the tail end(s) of the yarn from the plunger arm and a yarn needle to sew the arm to the Dalek body. Weave in ends. See photos for
placement if necessary.
Continue onto the Dalek eyestalk.
Pattern: Dalek Eye Stalk
Stalk - Row 1) In light gray, ch 5. Starting in the 2nd chain space
from the hook: 4 sc. Ch 1 & turn. (4)
Stalk - Row 2) 4 sc. Ch 1 and turn. (4)
Stalk - Row 3) 4 sc. Fasten off. (4)
Eye - Rnd 1) In black, make a Magic Circle. Ch 1. Work 6 sc in the
center of the circle. Join to the beginning of the round with a slip
stitch and fasten off. (6)
Using a yarn needle and a strand of aqua yarn, carefully
embroider the eye onto the eye piece. Then use the tail end(s) of
the yarn from the eye piece and a yarn needle to sew the
eye/eye piece onto the stalk.
Fold the stalk in half to make a long, narrow tube. Use the tail
end(s) of the yarn and a yarn needle to sew along the folded
edges.
Sew the eye stalk to the Dalek head and weave in ends. See photos for placement if necessary.
Continue onto the Dalek “ears”.
Pattern: Dalek “Ears” (Make 2)
Rnd 1) In light gray, make a Magic Circle. Ch 1. Work 5 sc in the center of the circle. Join to the beginning of the round with a slip stitch
and fasten off. (5)
Rnd 2) Work 1 sc in each st around. Join and ch 1. (5)
Rnd 3) Work 1 sc in each st around. Join and fasten off. (5)
Use the tail end(s) of the yarn and a yarn needle to carefully sew the ears to the Dalek head. Carefully weave in ends. See photos for
placement if necessary.
Continue onto the Dalek “bobbles”.
Pattern: Dalek “Bobbles”
Using a long strand of gold yarn and a yarn needle, carefully embroider several bobbles onto the Dalek body. Work several stitches over
each other to make the bobbles appear round and 3-dimensional. Work a total of 28 bobbles: 7 columns of 4 rows each.
Use multiple strands of gold yarn if necessary. Weave in all ends. See photos for placement if necessary.
Note: It might help to weave 7 strands of yarn vertically where you want your bobbles to go—one in the middle-front, two in the back, and two
on either side. You can then remove the strands as you work each column of bobbles. This will help you to keep your bobbles in nice straight lines.