amfit32 orthotic fabrication system - amfit...
TRANSCRIPT

Amfit Orthotic Fabrication System
Medical Manual
Amfit, Inc. May 2006

Important Notice: Information in this document is subject to change and does not represent a commitment on the part of Amfit, Inc. The software described in this document is furnished under a license agreement. The software may be used or copied only in accordance with the terms of the agreement.
No part of this manual may be reproduced or transmitted in any form or by any means, electronic or mechanical, including photocopying and recording, for any purpose without the express written permission of Amfit, Inc.
© 1982-2006 Amfit, Inc.
Published in the United States. Printed in the United States.
Amfit, the Amfit logo, Footfax, Footfax - SL, Archcrafter, and the Archcrafter logo are registered trademarks of Amfit, Inc.
Microsoft, MS-DOS, Windows and the Windows logo are registered trademarks of Microsoft Corporation.
Intel, 486DX, Pentium, and Intel Inside are registered trademarks of Intel Corporation.
Amfit, Inc. 5408 NE 88th Ave.
Vancouver, WA. 98665
PHONE: 800-356-FOOT (3668) FAX: 360-566-1380 SALES: 800-356-3668 (x266) TECHNICAL SUPPORT: 888-699-2100 CENTRAL FABRICATION: 888-356-3668 (x254) CLINICAL SUPPORT: 800-722-2217
www.amfit.com


Amfit32 Orthotic Fabrication System OVERVIEW •••• v
Contents
OVERVIEW..................................................1 General ......................................................................... 1 Introduction .................................................................. 2
Footfax® SL Contact Digitizer.............................. 2 Mill Carving Station .............................................. 2
INSTALLATION..........................................3 This Manual.................................................................. 3 Installation Considerations ........................................... 4
Safety Notes........................................................... 4 Power Requirements.............................................. 5
Equipment Checklist..................................................... 5 Operations Software .............................................. 6 Footfax - SL Digitizer/Scanner.............................. 7 Amfit Milling Machine.......................................... 8 Dust Stand ............................................................. 8
Uncrating the System.................................................... 9 Unpacking the Digitizer......................................... 9 Unpacking the Mill .............................................. 10 Making Connections............................................ 10
SYSTEM OPERATION.............................13 General ....................................................................... 13
Manual Conventions............................................ 13 Options and Settings ................................................... 14
Options Tab ......................................................... 14 Settings Tab......................................................... 15
BASICS ........................................................17 Operational Overview................................................. 17
A Quick Run Through... ...................................... 18 Digitizing............................................................. 21 Milling ................................................................. 28
Preforms ..................................................................... 30
DIGITIZE....................................................33 Overview.....................................................................33 Controls.......................................................................34 Toe Plate .....................................................................35
Positioning the Toe Plate .....................................36 Scanning a Foot...........................................................37
The Digitize Window...........................................37 Digitize Window Overview .................................38
Operation.....................................................................39 Calibration ...........................................................39 General.................................................................41
Menus..........................................................................44 Files......................................................................44 Records ................................................................45 Help......................................................................45
Positioning ..................................................................46 Positioning Overview...........................................46 Neutral Position ...................................................47 Weight Bearing ....................................................48
Mechanical Adjustments and Positioning ...................49 Placing a Mechanical Adjustment........................50 Recording a Plaster Cast ......................................53
Editing /Adjustments...................................55 General........................................................................55 Edit Window Overview...............................................56 Controlling the Two-Dimensional Display..................57
Elevation Legend .................................................58 Controlling the Three-Dimensional Display ...............59
Viewpoint.............................................................59 Elements Window................................................59 Adjustments Window...........................................60
Shape Library..............................................................64 Overview..............................................................64 Right Click Menu.................................................65 Pre-Made Shapes .................................................66
Menus..........................................................................69

iv •••• OVERVIEW Amfit32 Orthotic Fabrication System
Contents (cont’d.)
Milling ..........................................................73 Overview..................................................................... 73
The Milling Process............................................. 74 Enabling the Mill ........................................................ 74 Calibrating the Mill..................................................... 75
Z Depth Calibration ............................................. 76 X-Y Position Calibration ..................................... 76
Insoles......................................................................... 78 General ................................................................ 78 Insole Types......................................................... 79 Sizes and Styles ................................................... 79 Insole Blank Placement ....................................... 80
Controlling the Milling Process .................................. 81 Mill Window........................................................ 81
Communications .........................................85 Overview..................................................................... 85
Telephone Transfer.............................................. 85 Serial Cable Transfer ........................................... 85 File Transfer ........................................................ 85 FTP Transfer........................................................ 85
Selecting Files to Transfer .......................................... 87 Transfer database records... ................................. 87 Receive database records... .................................. 90 AutoMerge database records ............................... 90
Maintenance ................................................93 General........................................................................ 93
After each patient................................................. 93 Daily .................................................................... 93 Every 10 pairs...................................................... 93 Every 1000 pairs.................................................. 94 Annual service ..................................................... 94 Moving the system............................................... 94
Troubleshooting ..........................................95 General........................................................................ 95
The Computer ...................................................... 96 The Milling Machine ........................................... 97 The Digitizer........................................................ 99
Ordering Supplies from Amfit.................101 Placing an Amfit Order .............................................101 Returns/Credit ...........................................................102 Amfit Supplies...........................................................102
Orthotic Blanks ..................................................102 Blank Styles .......................................................103 Cover Materials..................................................103 Patterns...............................................................103
Glossary of Terms .....................................105
Amfit32 Orthotic Fabrication System OVERVIEW •••• v
Contents (cont’d.)
List of Figures Figure Description Page Figure Description Page
Fig. 1. The Amfit System ....................................... 1 Fig. 2. The Amfit Footfax - SL Scanner................. 7 Fig. 3. Dust Stand................................................... 8 Fig. 4. Connection Schematic............................... 11 Fig. 5. Options and Settings Window –
Options Tab .............................................. 14 Fig. 6. Options and Settings Window –
Settings Tab .............................................. 15 Fig. 7. Customer Information Window ................ 19 Fig. 8. Existing Client Window............................ 21 Fig. 9. Digitizer Window ..................................... 22 Fig. 10. Toe Plate Placement ................................. 23 Fig. 11. Digitizer Control Panel ............................. 24 Fig. 12. Edit Window............................................. 25 Fig. 13. Comments Portion of the Workspace ....... 26 Fig. 14. Adjustment Portion of the Workspace ...... 26 Fig. 15. Shapes Tab of the Workspace................... 27 Fig. 16. Milling Window........................................ 28 Fig. 17. Preform Window....................................... 30 Fig. 18. Preform Window—Drag-n-Drop .............. 31 Fig. 19. Preform Window—After Drag-n-Drop..... 32 Fig. 20. Amfit Digitizer/Scanner ............................ 33 Fig. 21. Digitizer Control Panel ............................. 34 Fig. 22. Toe Plate Orientation................................ 35 Fig. 23. Digitizer Window ..................................... 37
Fig. 24. Digitizer Calibration and Diagnostics Window.....................................................39
Fig. 25. Positioning the Patient’s Heel ...................42 Fig. 26. Digitizer Needs Information (Select
Foot) Window ...........................................44 Fig. 27. Digitizer Warning Message Box ...............44 Fig. 28. Open Database Window............................45 Fig. 29. Metatarsal Pad Placement .........................51 Fig. 30. Heel Wedge Placement .............................52 Fig. 31. Edit Window and Workspace....................55 Fig. 32. Elevation Legend Window........................58 Fig. 33. Adjustments Window................................60 Fig. 34. Shapes Library Window............................65 Fig. 35. Amfit Milling Machine..............................73 Fig. 36. Install Cuts Dialog Box .............................75 Fig. 37. Mill Calibration & Diagnostics
Window.....................................................75 Fig. 38. Amfit Insole Blank ....................................78 Fig. 39. Amfit Insole Cassette ................................80 Fig. 40. Mill Window .............................................81 Fig. 41. Transfer Box in the Workspace.................87 Fig. 42. Receive Files Setup Window.....................90 Fig. 43. AutoMerge Setup Window........................90 Fig. 44. Amfit Order Form ...................................104
List of Tables Table Description Page Table Description Page
Table 1. Milling Machine and Digitizer Power Requirements .............................................. 5
Table 2. Digitizer Equipment List............................. 5 Table 3. Milling Machine Equipment List ................ 6 Table 4. Customer Information Window
Overview of Entries .................................. 20 Table 5. Overview of the Milling Process............... 29 Table 6. Mechanical Adjustments Kit..................... 49 Table 7. Edit Window Elements ............................. 56 Table 8. 2-D Display Elements ............................... 57 Table 9. 3-D Display Elements ............................... 59 Table 10. Types of Wedges ...................................... 61
Table 11. Right Click Menu Options.........................65 Table 12. Edit Window Menus/Sub-Menus ..............69 Table 13. Performing Z Depth Calibration................76 Table 14. Performing X-Y Calibration......................76 Table 15. Types of Insole Blanks ..............................79 Table 16. Sizes and Styles of Insole Blanks ..............79 Table 17. Performing Operations in Select
Records......................................................88 Table 18. Solving Milling Machine Problems...........97 Table 19. Solving Digitizer Problems .....................100 Table 20. Amfit Orthotic Blanks .............................102 Table 21. Styles of Insole Blanks ............................103

vi •••• OVERVIEW Amfit32 Orthotic Fabrication System
Amfit32 Orthotic Fabrication System OVERVIEW •••• 1
OVERVIEW
General
CAD/CAM - Computer Aided Design - Computer Aided Manufacturing
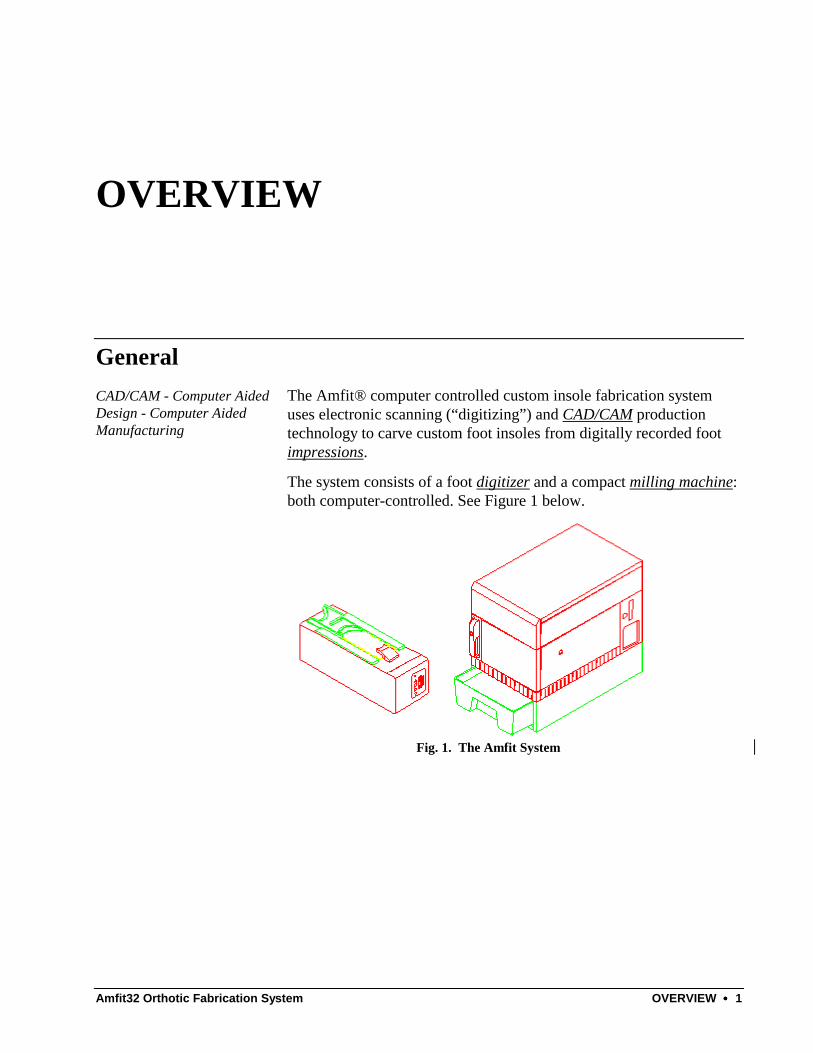
The Amfit® computer controlled custom insole fabrication system uses electronic scanning (“digitizing”) and CAD/CAM production technology to carve custom foot insoles from digitally recorded foot impressions.
The system consists of a foot digitizer and a compact milling machine: both computer-controlled. See Figure 1 below.
Fig. 1. The Amfit System
2 •••• OVERVIEW Amfit32 Orthotic Fabrication System
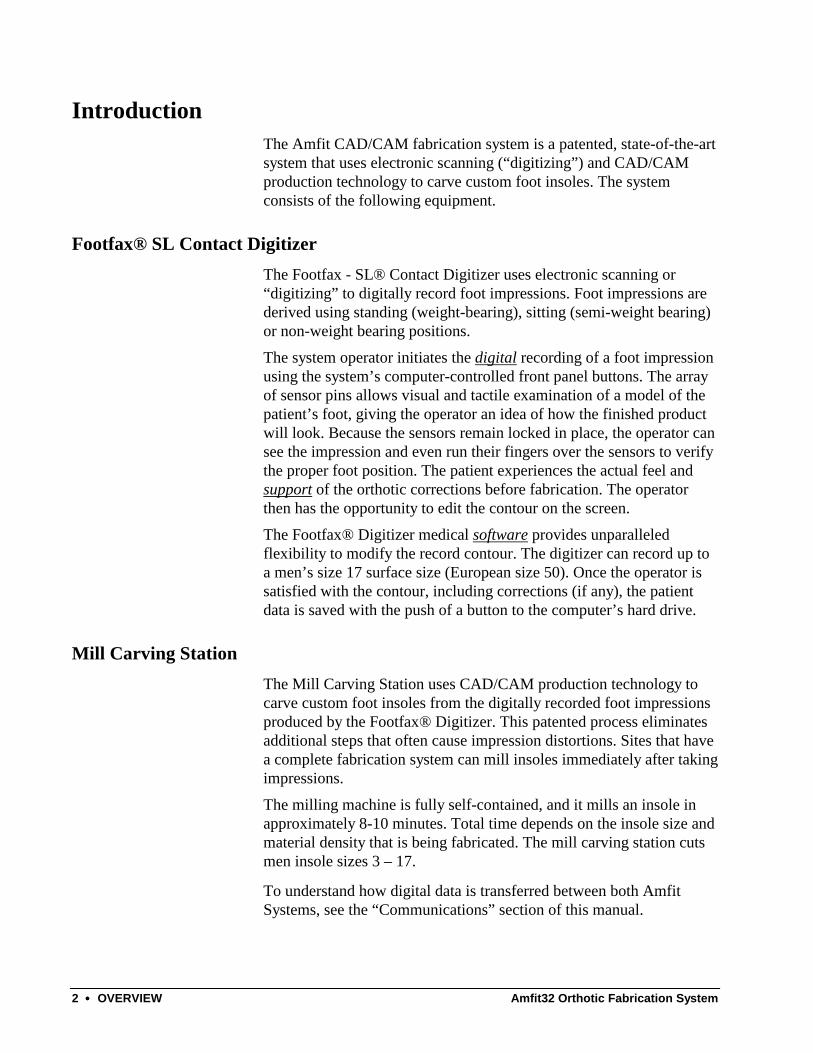
Introduction The Amfit CAD/CAM fabrication system is a patented, state-of-the-art system that uses electronic scanning (“digitizing”) and CAD/CAM production technology to carve custom foot insoles. The system consists of the following equipment.
Footfax® SL Contact Digitizer The Footfax - SL® Contact Digitizer uses electronic scanning or “digitizing” to digitally record foot impressions. Foot impressions are derived using standing (weight-bearing), sitting (semi-weight bearing) or non-weight bearing positions.
The system operator initiates the digital recording of a foot impression using the system’s computer-controlled front panel buttons. The array of sensor pins allows visual and tactile examination of a model of the patient’s foot, giving the operator an idea of how the finished product will look. Because the sensors remain locked in place, the operator can see the impression and even run their fingers over the sensors to verify the proper foot position. The patient experiences the actual feel and support of the orthotic corrections before fabrication. The operator then has the opportunity to edit the contour on the screen.
The Footfax® Digitizer medical software provides unparalleled flexibility to modify the record contour. The digitizer can record up to a men’s size 17 surface size (European size 50). Once the operator is satisfied with the contour, including corrections (if any), the patient data is saved with the push of a button to the computer’s hard drive.
Mill Carving Station The Mill Carving Station uses CAD/CAM production technology to carve custom foot insoles from the digitally recorded foot impressions produced by the Footfax® Digitizer. This patented process eliminates additional steps that often cause impression distortions. Sites that have a complete fabrication system can mill insoles immediately after taking impressions.
The milling machine is fully self-contained, and it mills an insole in approximately 8-10 minutes. Total time depends on the insole size and material density that is being fabricated. The mill carving station cuts men insole sizes 3 – 17.
To understand how digital data is transferred between both Amfit Systems, see the “Communications” section of this manual.

Amfit32 Orthotic Fabrication System INSTALLATION •••• 3
INSTALLATION
This Manual This manual is a combination installation guide and operator’s manual. Topics covered include:
Installation of the system: • Selecting the proper location for the system • Unpacking • Connecting the components.
Operation of the system: • Creating a patient file • Positioning the foot • Scanning a foot • Editing the contour • Milling the insole blank • Maintenance.
Finishing the insoles.
Troubleshooting.
Ordering Amfit supplies.
4 •••• INSTALLATION Amfit32 Orthotic Fabrication System
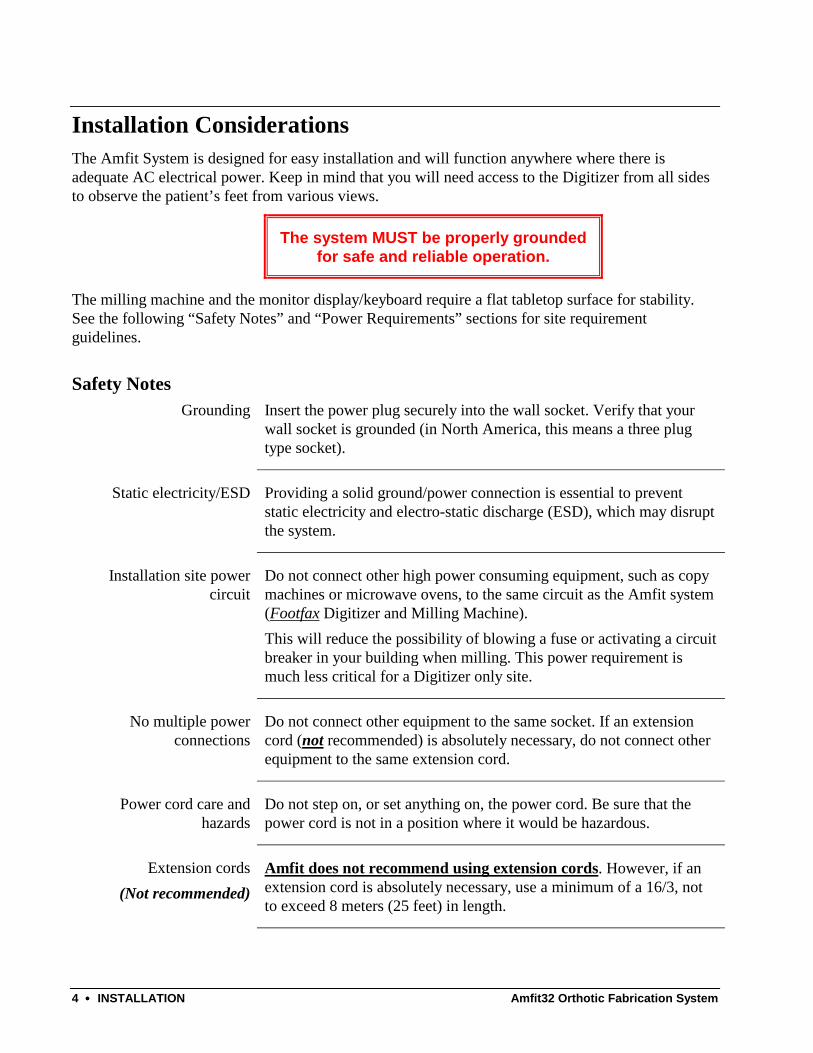
Installation Considerations The Amfit System is designed for easy installation and will function anywhere where there is adequate AC electrical power. Keep in mind that you will need access to the Digitizer from all sides to observe the patient’s feet from various views.
The system MUST be properly grounded for safe and reliable operation.
The milling machine and the monitor display/keyboard require a flat tabletop surface for stability. See the following “Safety Notes” and “Power Requirements” sections for site requirement guidelines.
Safety Notes Grounding Insert the power plug securely into the wall socket. Verify that your
wall socket is grounded (in North America, this means a three plug type socket).
Static electricity/ESD Providing a solid ground/power connection is essential to prevent static electricity and electro-static discharge (ESD), which may disrupt the system.
Installation site power circuit
Do not connect other high power consuming equipment, such as copy machines or microwave ovens, to the same circuit as the Amfit system (Footfax Digitizer and Milling Machine). This will reduce the possibility of blowing a fuse or activating a circuit breaker in your building when milling. This power requirement is much less critical for a Digitizer only site.
No multiple power connections
Do not connect other equipment to the same socket. If an extension cord (not recommended) is absolutely necessary, do not connect other equipment to the same extension cord.
Power cord care and hazards
Do not step on, or set anything on, the power cord. Be sure that the power cord is not in a position where it would be hazardous.
Extension cords (Not recommended)
Amfit does not recommend using extension cords. However, if an extension cord is absolutely necessary, use a minimum of a 16/3, not to exceed 8 meters (25 feet) in length.
Amfit32 Orthotic Fabrication System INSTALLATION •••• 5
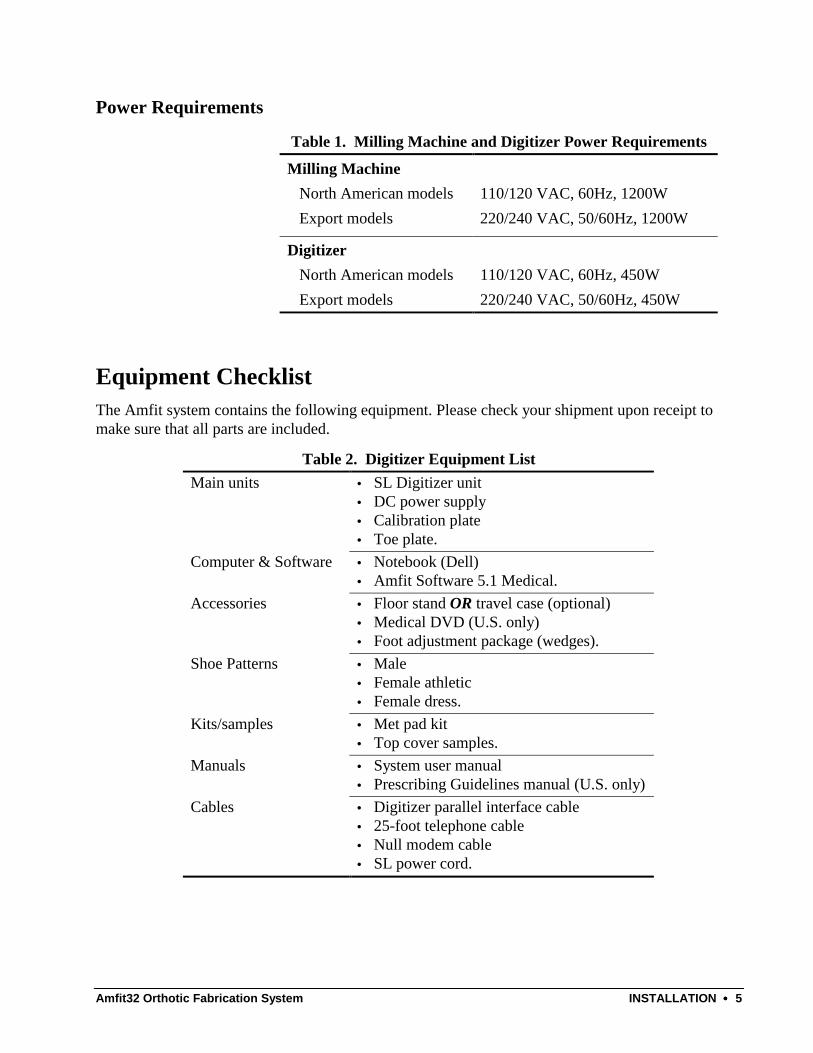
Power Requirements
Table 1. Milling Machine and Digitizer Power Requirements
Milling Machine North American models 110/120 VAC, 60Hz, 1200W Export models
220/240 VAC, 50/60Hz, 1200W
Digitizer North American models 110/120 VAC, 60Hz, 450W Export models 220/240 VAC, 50/60Hz, 450W
Equipment Checklist The Amfit system contains the following equipment. Please check your shipment upon receipt to make sure that all parts are included.
Table 2. Digitizer Equipment List Main units • SL Digitizer unit
• DC power supply • Calibration plate • Toe plate.
Computer & Software • Notebook (Dell) • Amfit Software 5.1 Medical.
Accessories • Floor stand OR travel case (optional) • Medical DVD (U.S. only) • Foot adjustment package (wedges).
Shoe Patterns • Male • Female athletic • Female dress.
Kits/samples • Met pad kit • Top cover samples.
Manuals • System user manual • Prescribing Guidelines manual (U.S. only)
Cables • Digitizer parallel interface cable • 25-foot telephone cable • Null modem cable • SL power cord.

6 •••• INSTALLATION Amfit32 Orthotic Fabrication System
Table 3. Milling Machine Equipment List Main units • Milling machine unit
• Flat screen LCD monitor • USB keyboard • USB trackball mouse • Calibration plate • Insole tray.
Accessories • Support for monitor/keyboard • Floor stand/dust bin • Spare fuses.
Kits/Samples • Sample blank package.
Manuals/Videos • System user manual • Medical DVD (U.S. only) • Prescribing Guidelines manual (U.S. only)
Cables • 25-foot telephone cable • Monitor AC power cord • Mill AC power cord
Operations Software Amfit’s easy-to-use software… Amfit’s Foot Orthosis design software operates in a familiar Windows-based environment, offering a wide array of features and functionality in a fully self-contained workspace environment. A few of the software features are listed below:
• Full Windows XP compatibility • High-Speed 3-D viewing • Drag-n-drop of all user-defined adjustments • Easy management of client's foot records • Multi-modal data transfer • Easy management of milling functions.
Amfit32 Orthotic Fabrication System INSTALLATION •••• 7
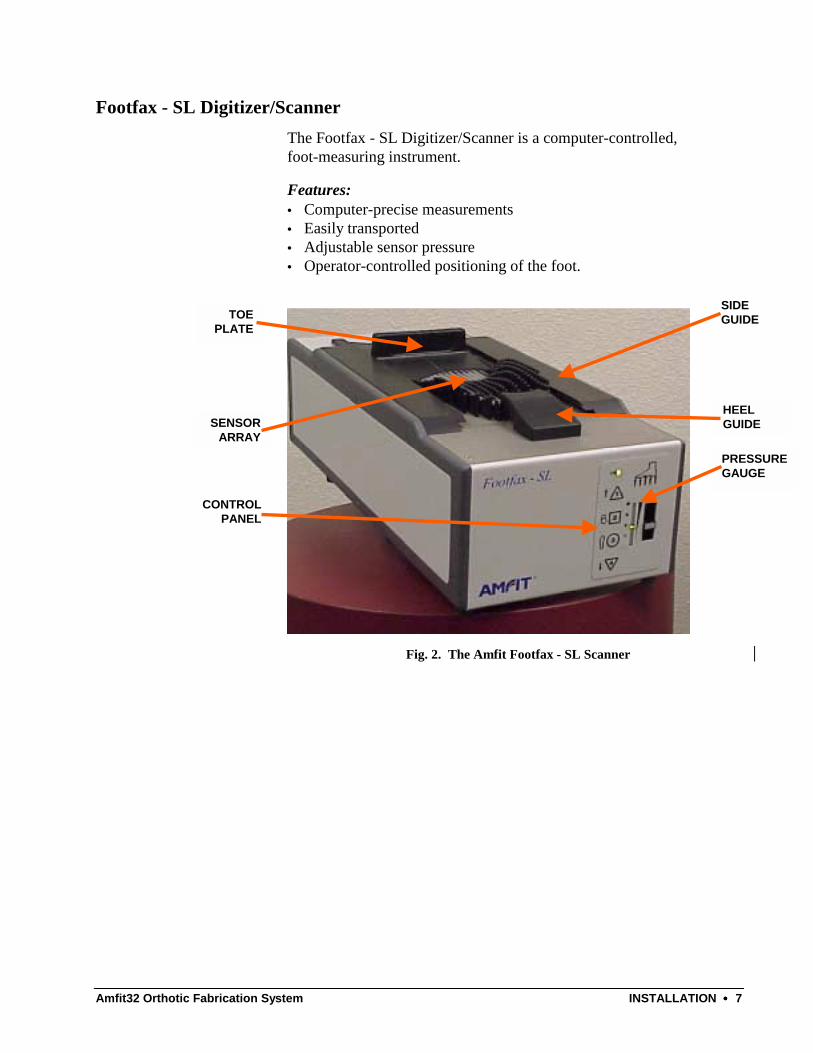
Footfax - SL Digitizer/Scanner The Footfax - SL Digitizer/Scanner is a computer-controlled, foot-measuring instrument.
Features: • Computer-precise measurements • Easily transported • Adjustable sensor pressure • Operator-controlled positioning of the foot.
Fig. 2. The Amfit Footfax - SL Scanner
SIDE GUIDE TOE
PLATE
SENSORARRAY
HEEL GUIDE
PRESSUREGAUGE
CONTROL PANEL
8 •••• INSTALLATION Amfit32 Orthotic Fabrication System
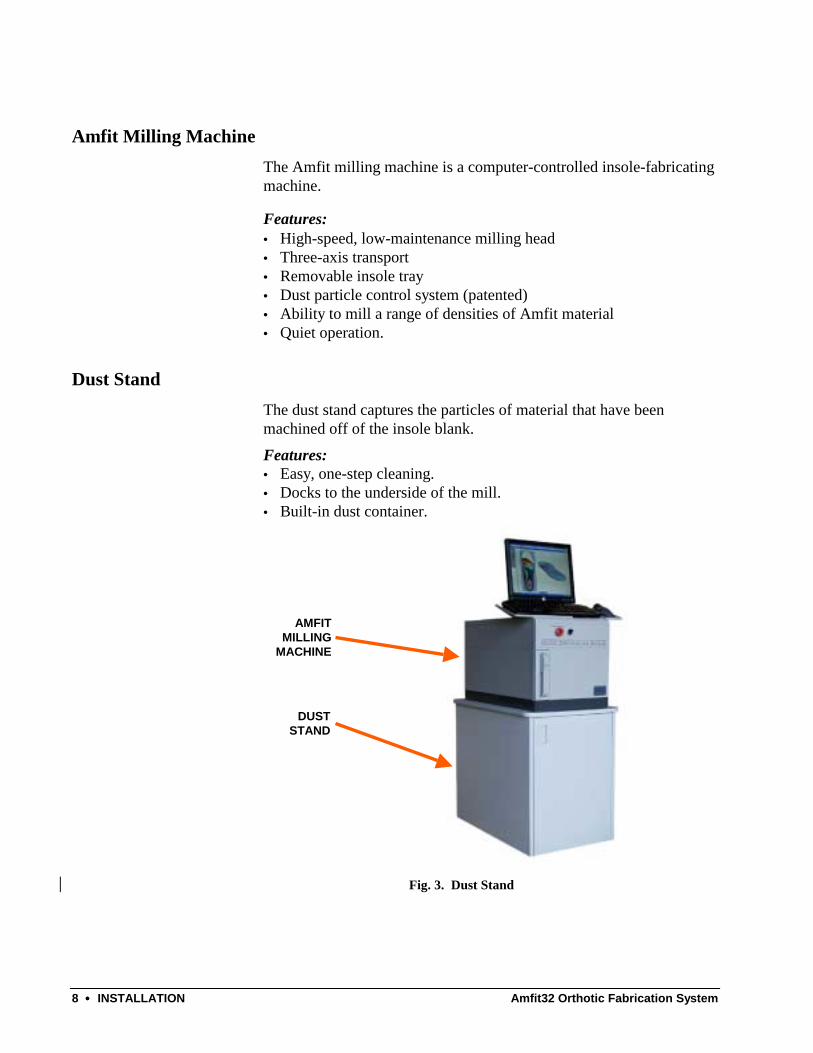
Amfit Milling Machine The Amfit milling machine is a computer-controlled insole-fabricating machine.
Features: • High-speed, low-maintenance milling head • Three-axis transport • Removable insole tray • Dust particle control system (patented) • Ability to mill a range of densities of Amfit material • Quiet operation.
Dust Stand The dust stand captures the particles of material that have been machined off of the insole blank.
Features: • Easy, one-step cleaning. • Docks to the underside of the mill. • Built-in dust container.
Fig. 3. Dust Stand
AMFITMILLING
MACHINE
DUSTSTAND

Amfit32 Orthotic Fabrication System INSTALLATION •••• 9
Uncrating the System
Unpacking the Digitizer Set the SL Digitizer shipping carton upright (it’s the box with the 20XX model number).
Open the shipping carton and carefully remove the white accessory box on top of the foam. Remove both sides of the foam covers, and lift the SL Digitizer out of the shipping carton.
This requires two people.
The shipping carton also contains a separate box that includes the system notebook computer with accessories.
Also part of the shipment is the SL Digitizer floor stand, which has two separate boxes. The floor stand consists of two parts: the floor stand itself, and the handrail.
To assemble, remove the handrail and floor stand from their separate boxes. Four screws, located in the Floor Stand box, are required to attach the handrail to the floor stand. The handrail, when installed, bends toward the front of the SL Digitizer.
Slide the handrail into the holes at the top rear of the floor stand. Insert the screws from the rear to secure the handrail to the floor stand. (To line up the screw holes, you may have to maneuver the “upright.”) Be careful not to cross-thread the screws, and firmly tighten the screws.
Place the completed floor stand in the desired location.
Remove the foam panels from the sides of the SL Digitizer inside the floor stand.
Do not connect the cables at this time.
10 •••• INSTALLATION Amfit32 Orthotic Fabrication System
Unpacking the Mill There are two (2) shipping pallets that contain the milling machine system. The first box is the mill itself, which is the smaller of the two boxes. Cut the two plastic straps on the outside of the cardboard box and lift gently to remove it from the pallet. Please note that an AC power cord and the calibration plate are attached to the exterior of the mill. Remove and set them aside.
Next, remove the shipping wrap from the two brown accessory boxes located on top of the mill stand. Set the boxes aside. One box contains the keyboard, mouse, monitor, and other mill accessories. The second box contains a sample set of insole blanks.
Remove the outer cardboard box from the mill stand and remove the protective foam end caps. The dust collection drawer is located inside the mill stand.
Notice that the mill stand and the milling machine are designed to “dock” together. Take care to ensure they both mate securely.
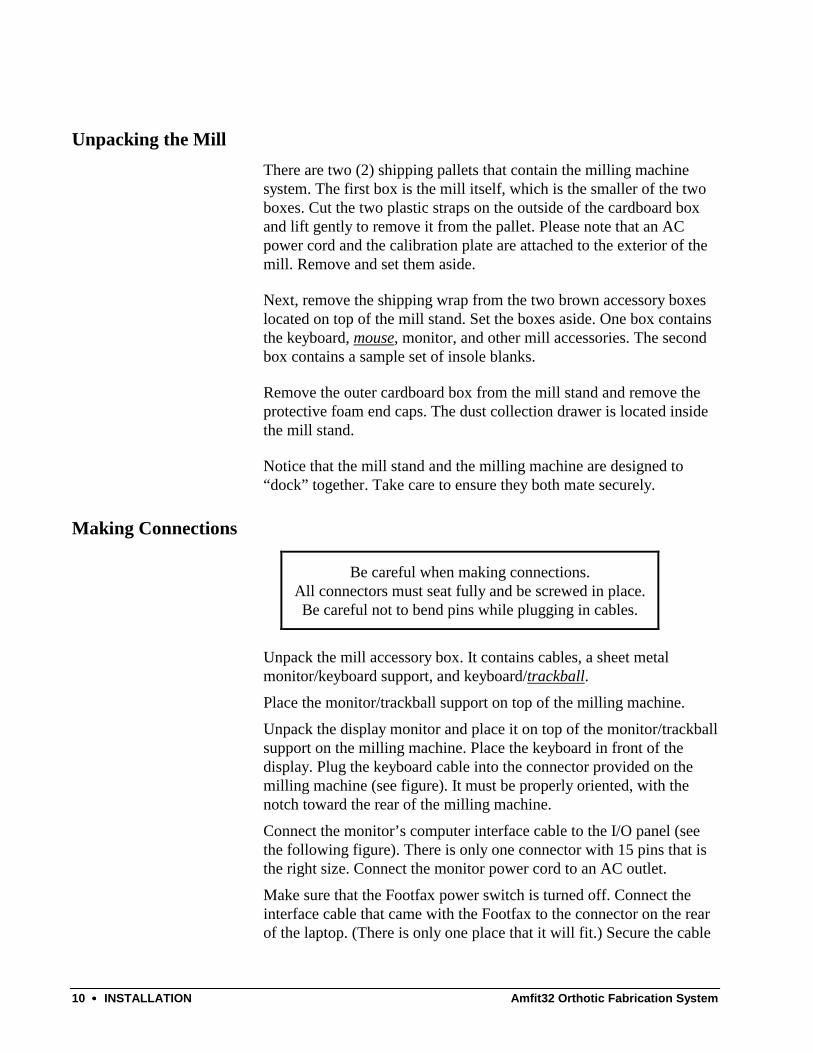
Making Connections
Be careful when making connections. All connectors must seat fully and be screwed in place. Be careful not to bend pins while plugging in cables.
Unpack the mill accessory box. It contains cables, a sheet metal monitor/keyboard support, and keyboard/trackball. Place the monitor/trackball support on top of the milling machine.
Unpack the display monitor and place it on top of the monitor/trackball support on the milling machine. Place the keyboard in front of the display. Plug the keyboard cable into the connector provided on the milling machine (see figure). It must be properly oriented, with the notch toward the rear of the milling machine.
Connect the monitor’s computer interface cable to the I/O panel (see the following figure). There is only one connector with 15 pins that is the right size. Connect the monitor power cord to an AC outlet.
Make sure that the Footfax power switch is turned off. Connect the interface cable that came with the Footfax to the connector on the rear of the laptop. (There is only one place that it will fit.) Secure the cable
Amfit32 Orthotic Fabrication System INSTALLATION •••• 11
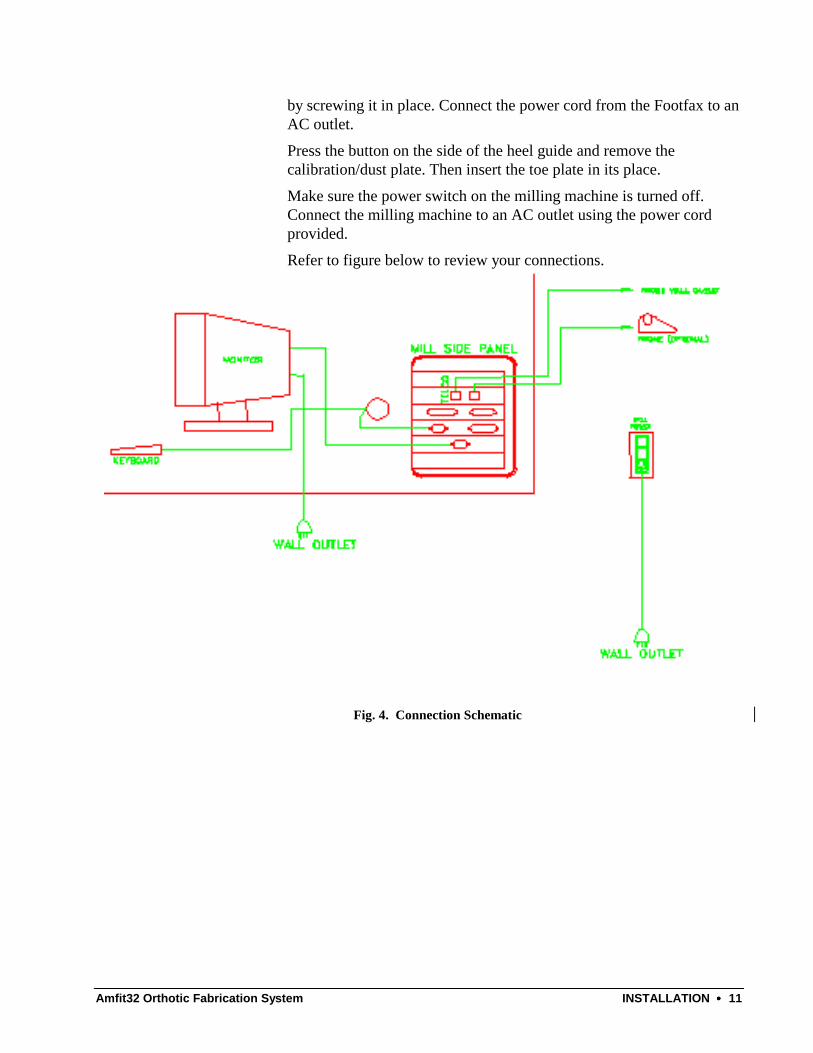
by screwing it in place. Connect the power cord from the Footfax to an AC outlet.
Press the button on the side of the heel guide and remove the calibration/dust plate. Then insert the toe plate in its place.
Make sure the power switch on the milling machine is turned off. Connect the milling machine to an AC outlet using the power cord provided.
Refer to figure below to review your connections.
Fig. 4. Connection Schematic

12 •••• INSTALLATION Amfit32 Orthotic Fabrication System

Amfit32 Orthotic Fabrication System SYSTEM OPERATION •••• 13
SYSTEM OPERATION
General The Amfit System is computerized. While this may seem like stating the obvious, it does mean that there are certain aspects to the operation of the system that may be new to you.
Manual Conventions The following standards are used throughout this manual for clarity:
Text that the operator needs to type into the computer will be…
LIKE THIS.
Text that the computer displays on the screen will be either a picture of the screen or…
Like this.
The manual frequently makes reference to parts of the computer’s keyboard, display and mouse/pointing device. That text will be…
Like this.
The first occurrence of a word that is in the Glossary will be…
Like this.
14 •••• SYSTEM OPERATION Amfit32 Orthotic Fabrication System
Options and Settings
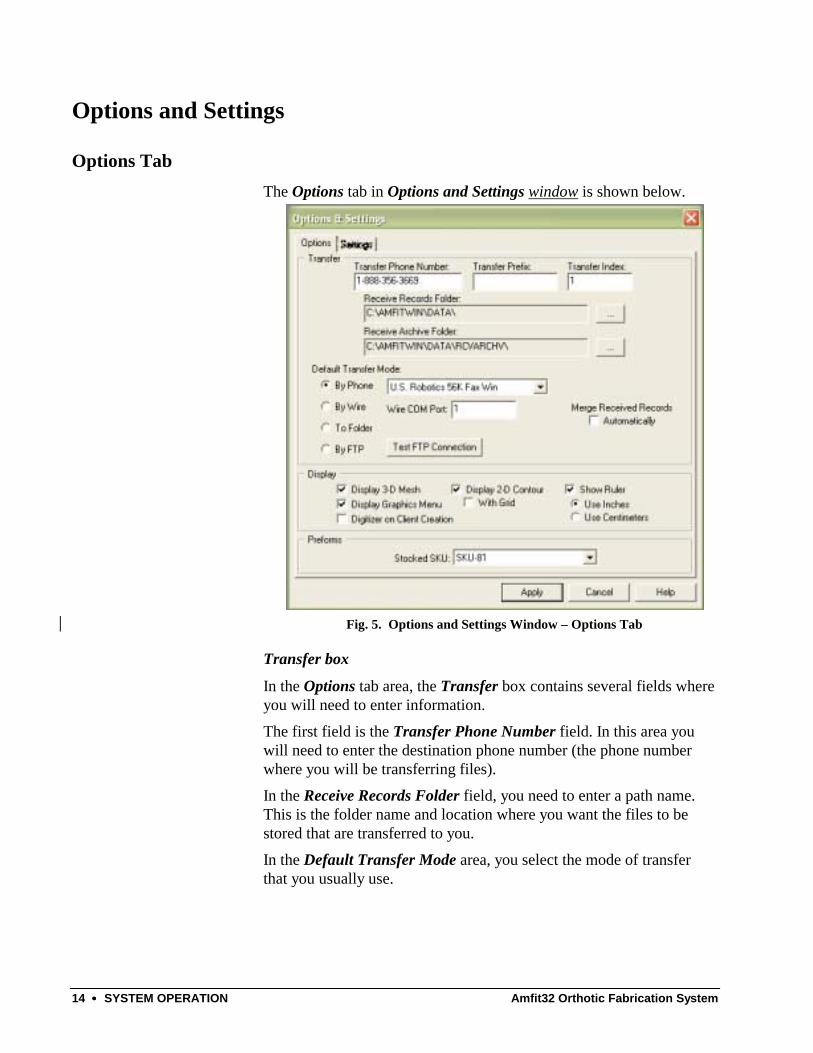
Options Tab The Options tab in Options and Settings window is shown below.
Fig. 5. Options and Settings Window – Options Tab
Transfer box
In the Options tab area, the Transfer box contains several fields where you will need to enter information.
The first field is the Transfer Phone Number field. In this area you will need to enter the destination phone number (the phone number where you will be transferring files).
In the Receive Records Folder field, you need to enter a path name. This is the folder name and location where you want the files to be stored that are transferred to you.
In the Default Transfer Mode area, you select the mode of transfer that you usually use.
Amfit32 Orthotic Fabrication System SYSTEM OPERATION •••• 15
Display Box
The Display box allows you to set defaults to the Editor window.
If you would like to display the 2-D contour after a scan, check the Display 2-D contour box. If you would you like to view the grid as well, check the With Grid option.
In the Show ruler field, you need to decide if you would like to display the ruler. If you do want to see the ruler, check the Show ruler option. If so, choose which unit of measurement you would like to see on the ruler. Check either the Use Inches or Use Centimeters box.
If you to want to display the 3-D view in mesh, check the Display 3-D Mesh option.
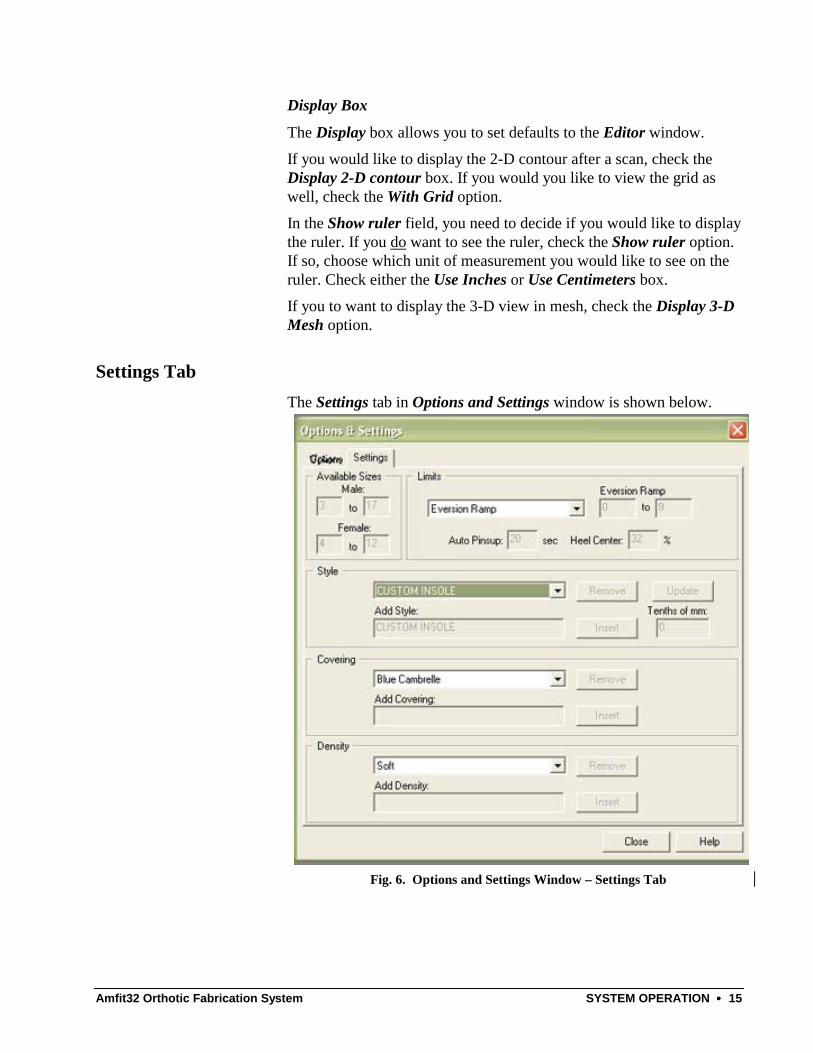
Settings Tab The Settings tab in Options and Settings window is shown below.
Fig. 6. Options and Settings Window – Settings Tab

16 •••• SYSTEM OPERATION Amfit32 Orthotic Fabrication System
Available Sizes
The Available Sizes box allows you to enter default numbers for shoe sizes—for both male and female. In the example above, the range is set for Male sizes 3 to 17. When you create a new male client, his shoe size (entered in the Customer Information window) will have to be between 3 and 17 or an error message will appear. This same rule applies for female.
Limits
Like the size box, the Limits box allows you to set default thicknesses when you are entering new customers. The limits you set here will determine the “range” you are allowed when you create a new customer. If you enter information outside of this range, an error message will appear.
Style, Covering, and Density
Style, covering, and density are three selections that you will need to make when you are entering a new client. However, because over time the selections change, this area allows you to add and remove selections that are new or no longer available.
To add a new option, type the name of the option you would like to add in the corresponding Add style, Add Covering, or Add Density box. Then click the Insert button. This will then fill in or “populate” the field above it with your new option.
To remove an option, use the drop down box to select the option you want to delete. When the option is in the box, use the corresponding Remove button to delete it from the list.
When you are finished making changes to the Options and Settings page, click Apply to save changes and exit. If, however, you do not wish to save any changes you have made, click Cancel to exit without saving changes.
Amfit32 Orthotic Fabrication System BASICS •••• 17
BASICS
Operational Overview This section describes the entire process involved in recording (digitizing or scanning) Amfit computer aided orthotics. It is assumed that the steps outlined in the “Installation” chapter have been completed.
This section first walks you through the steps required, and then covers the specifics of patient interaction and positioning.
The following steps are involved in fabricating Amfit computerized insoles:
Step Description 1 Greet the client and explain the process and the time
involved.
2 Create the patient file.
3 Digitize or scan the patient’s “corrected” foot. a) Position the patient. If needed, use mechanical
adjustments to aid in proper positioning. b) Scan the contour. c) Examine the contour. d) Edit the contour (optional). e) Repeat for other foot.

18 •••• BASICS Amfit32 Orthotic Fabrication System
Step Description 4 Machine the insole blanks, or else go to step 5 below. a) Select proper insole blanks, along with a topping
material, for the customer. Note: Double check that you have chosen the correct
size blanks and desired topping material. b) Carefully position and firmly adhere insole in the insole
tray. c) Define the cut in the mill window.
d) After milling is complete, finish the insoles by covering them with a topping material.
5 Transmit client data to the central milling site. a) Prepare list of records to transmit. b) Establish connection with milling site.
c) Transfer client data.
A Quick Run Through...
Turning the System ON
For sites with a complete system, turn on the Footfax and laptop (the power switch is at the center rear) and turn on the Milling machine. The power switch is on the front panel. If the milling machine’s does not power on, check to see if the red emergency stop button is depressed. If it is, turn it ¼ turn until it pops out. If the power light is on but the monitor does not come on, turn the monitor on as well.
After a few seconds, the computer inside the mill and/or the Footfax laptop should beep, and the monitor will start to display the start up sequence of the computer. The computer will perform a self-test on the scanner and the mill and display the Windows® desktop.
To start running the Amfit for Windows® application, double click on the Amfit icon on the desktop.

Amfit32 Orthotic Fabrication System BASICS •••• 19
After the machines are booted up and the Amfit program is running, the most common action at this point is to create a new patient file. This is where you enter the text-based information about this client that will be stored in the computer. Click on Records and select Create New.... The following Customer Information window will be displayed, allowing you to enter new client information.
New Client
The Customer Information window shown below is where you will enter information for each patient.
Fig. 7. Customer Information Window
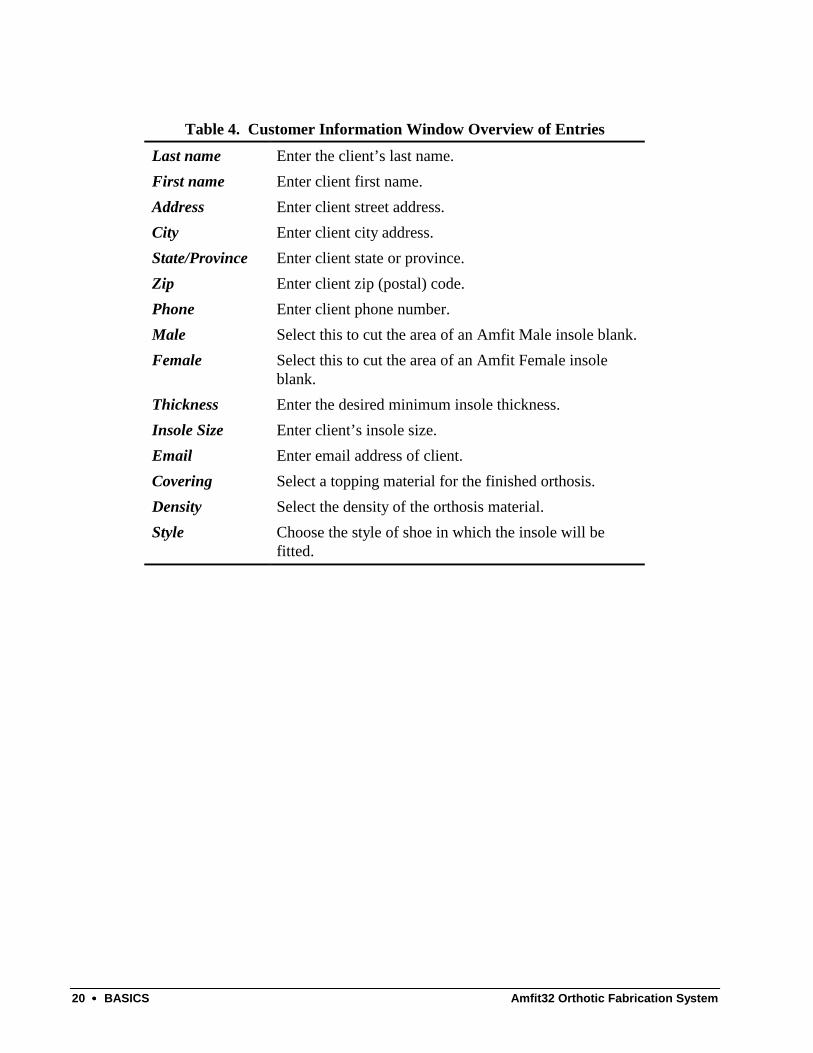
The following table provides an overview of the information the computer needs. All items are mandatory.
After one line is filled in, use the TAB key to move to the next line. You can also use the mouse to move the arrow to the spot where you would like to enter information and press the left button on the mouse. If you make a mistake while typing in an area, simply use the backspace key. The backspace key is located above the ENTER key.
If you notice an error in an earlier entry, use the mouse to move the arrow on top of the entry to correct it at the location of the error. Now use the backspace key and correct the error. You can also move back one line by typing SHIFT-TAB.
Information must be entered in a way that makes sense. If you enter a letter for the insole size, an error message will appear.
When you are done, click OK.
20 •••• BASICS Amfit32 Orthotic Fabrication System
Table 4. Customer Information Window Overview of Entries Last name Enter the client’s last name. First name Enter client first name. Address Enter client street address. City Enter client city address. State/Province Enter client state or province. Zip Enter client zip (postal) code. Phone Enter client phone number. Male Select this to cut the area of an Amfit Male insole blank. Female Select this to cut the area of an Amfit Female insole
blank. Thickness Enter the desired minimum insole thickness. Insole Size Enter client’s insole size. Email Enter email address of client. Covering Select a topping material for the finished orthosis. Density Select the density of the orthosis material. Style Choose the style of shoe in which the insole will be
fitted.
Amfit32 Orthotic Fabrication System BASICS •••• 21
Existing Client
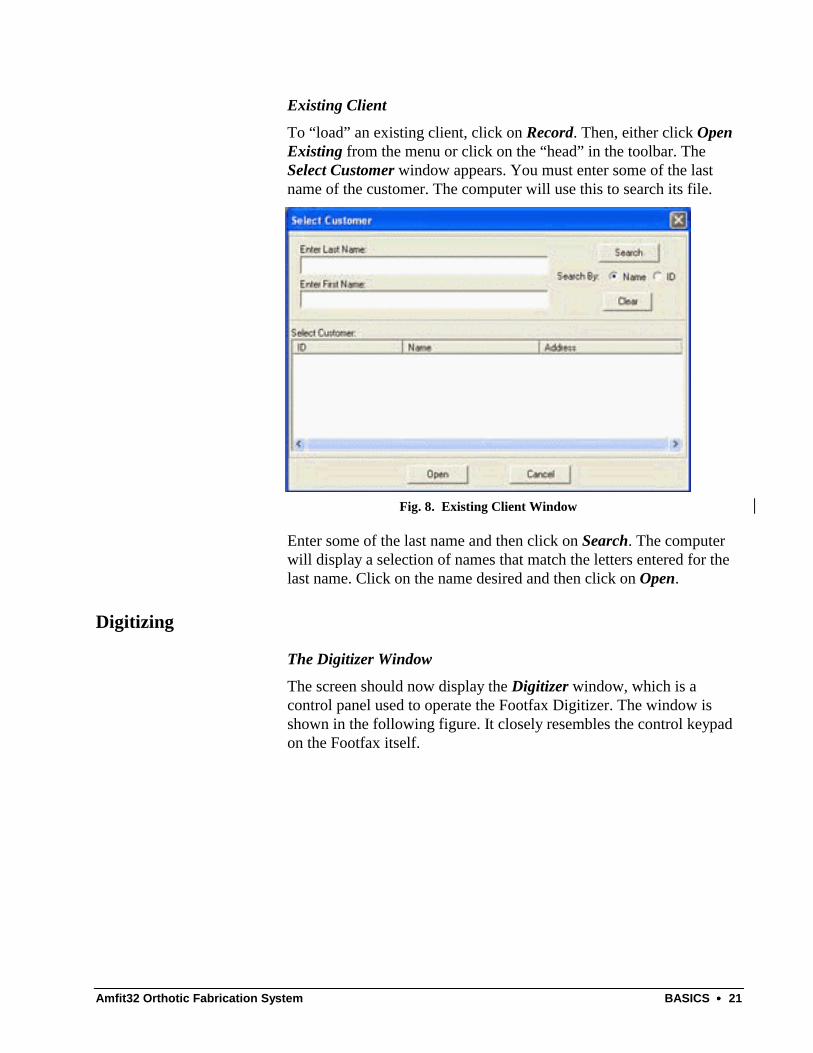
To “load” an existing client, click on Record. Then, either click Open Existing from the menu or click on the “head” in the toolbar. The Select Customer window appears. You must enter some of the last name of the customer. The computer will use this to search its file.
Fig. 8. Existing Client Window
Enter some of the last name and then click on Search. The computer will display a selection of names that match the letters entered for the last name. Click on the name desired and then click on Open.
Digitizing
The Digitizer Window
The screen should now display the Digitizer window, which is a control panel used to operate the Footfax Digitizer. The window is shown in the following figure. It closely resembles the control keypad on the Footfax itself.

22 •••• BASICS Amfit32 Orthotic Fabrication System
Fig. 9. Digitizer Window
The window displays the four control buttons for the Footfax.
The top of the window shows the current client’s name and other information. You can have the system automatically center the heel by clicking on Center Heel.
Scanning
Place a foot (right or left) on the top of the scanner. Position the heel in the center of the heel guide. Then slide the toe plate back so that the edge of the plate is under the toes. The toe plate may have to be removed, turned around, and re-inserted. Its shape makes proper orientation obvious (see next figure).
Amfit32 Orthotic Fabrication System BASICS •••• 23
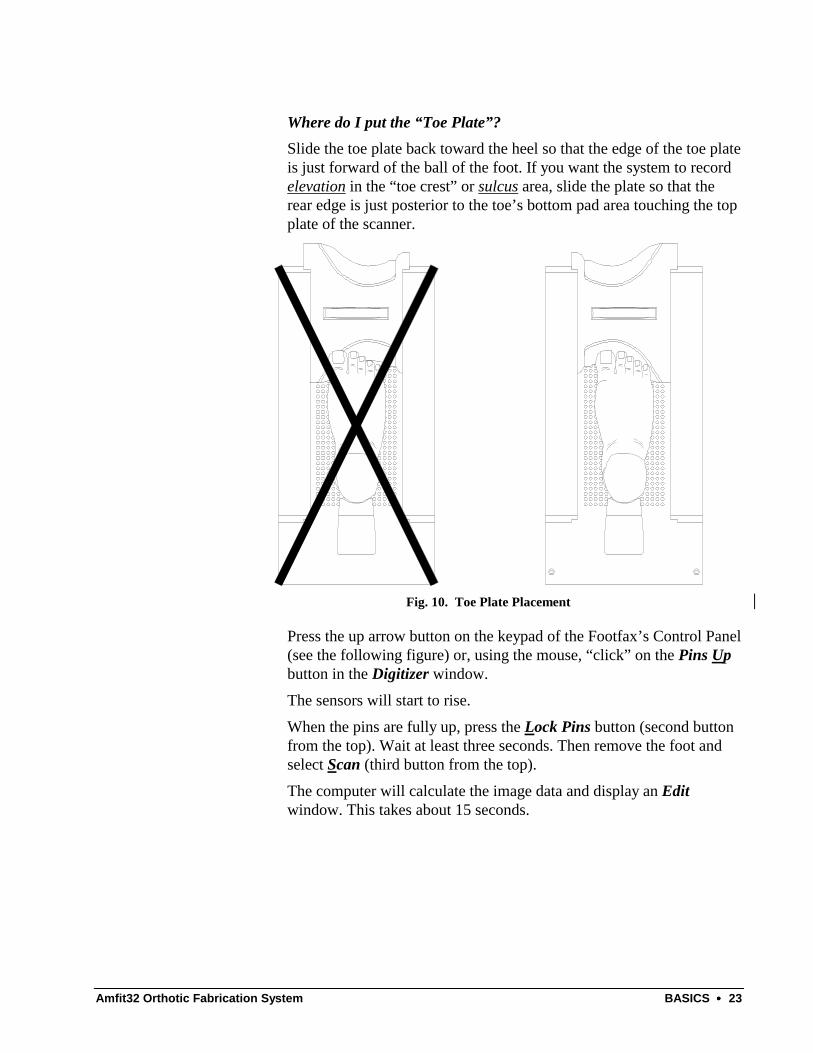
Where do I put the “Toe Plate”? Slide the toe plate back toward the heel so that the edge of the toe plate is just forward of the ball of the foot. If you want the system to record elevation in the “toe crest” or sulcus area, slide the plate so that the rear edge is just posterior to the toe’s bottom pad area touching the top plate of the scanner.
Fig. 10. Toe Plate Placement
Press the up arrow button on the keypad of the Footfax’s Control Panel (see the following figure) or, using the mouse, “click” on the Pins Up button in the Digitizer window.
The sensors will start to rise.
When the pins are fully up, press the Lock Pins button (second button from the top). Wait at least three seconds. Then remove the foot and select Scan (third button from the top).
The computer will calculate the image data and display an Edit window. This takes about 15 seconds.
24 •••• BASICS Amfit32 Orthotic Fabrication System
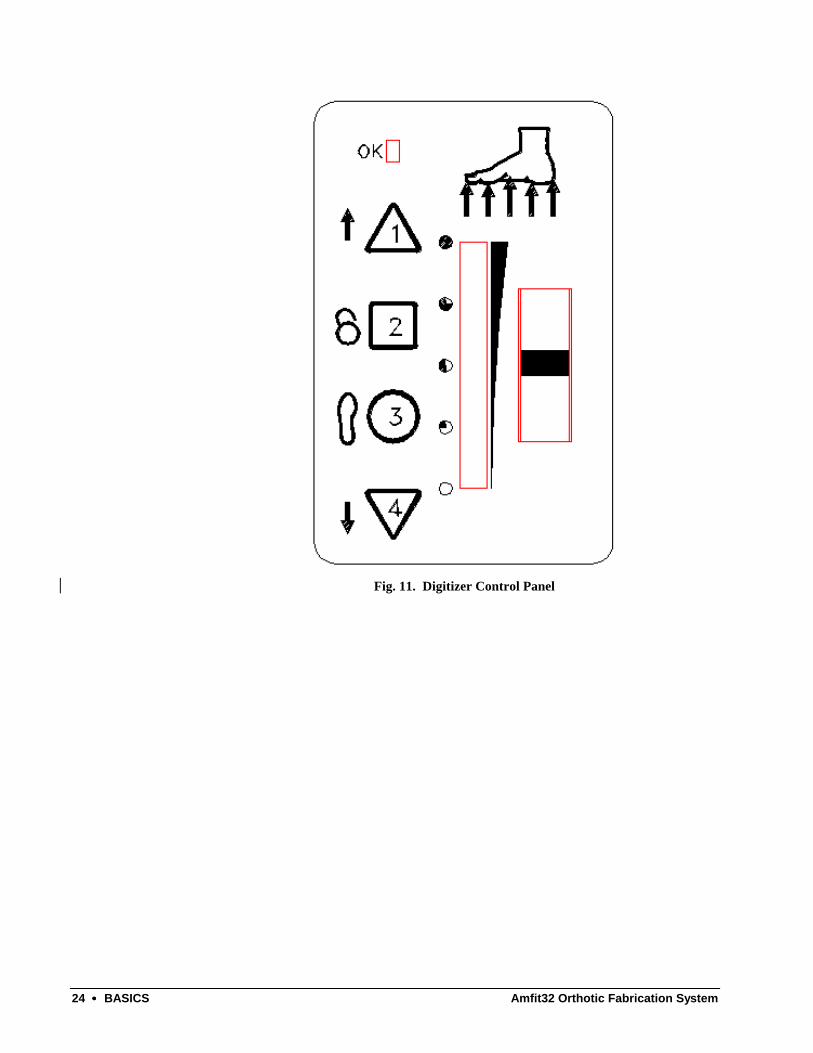
Fig. 11. Digitizer Control Panel
Amfit32 Orthotic Fabrication System BASICS •••• 25
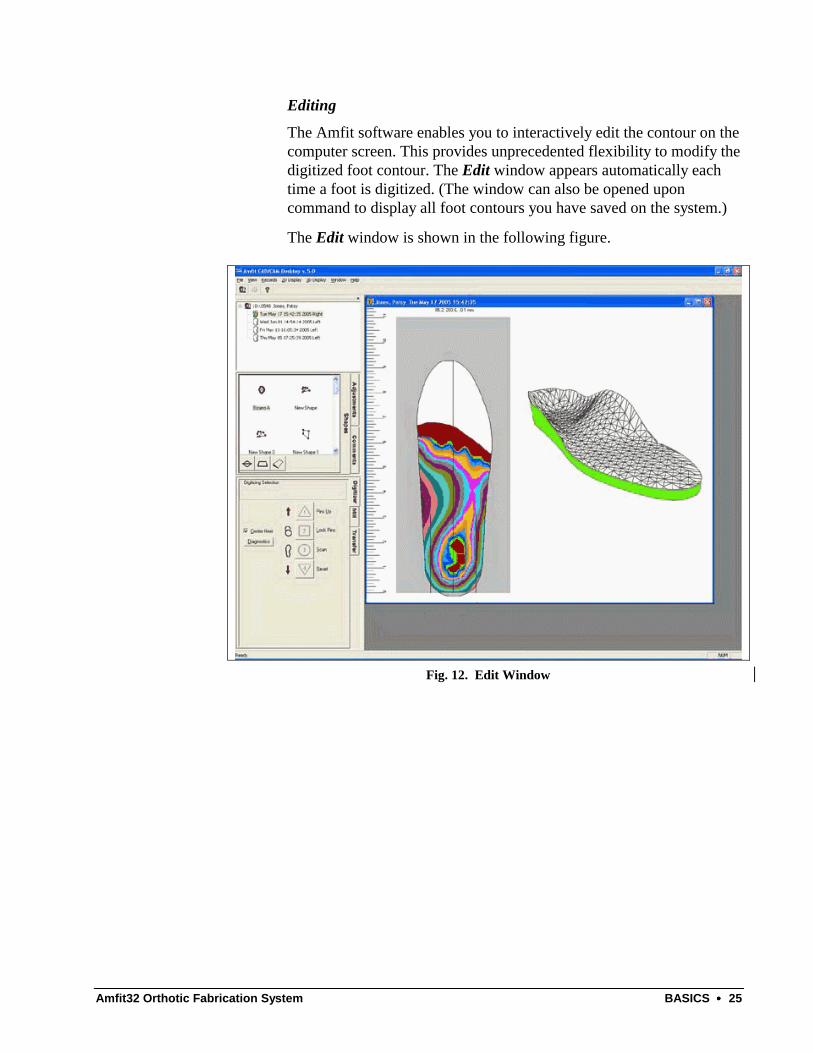
Editing
The Amfit software enables you to interactively edit the contour on the computer screen. This provides unprecedented flexibility to modify the digitized foot contour. The Edit window appears automatically each time a foot is digitized. (The window can also be opened upon command to display all foot contours you have saved on the system.)
The Edit window is shown in the following figure.
Fig. 12. Edit Window
26 •••• BASICS Amfit32 Orthotic Fabrication System
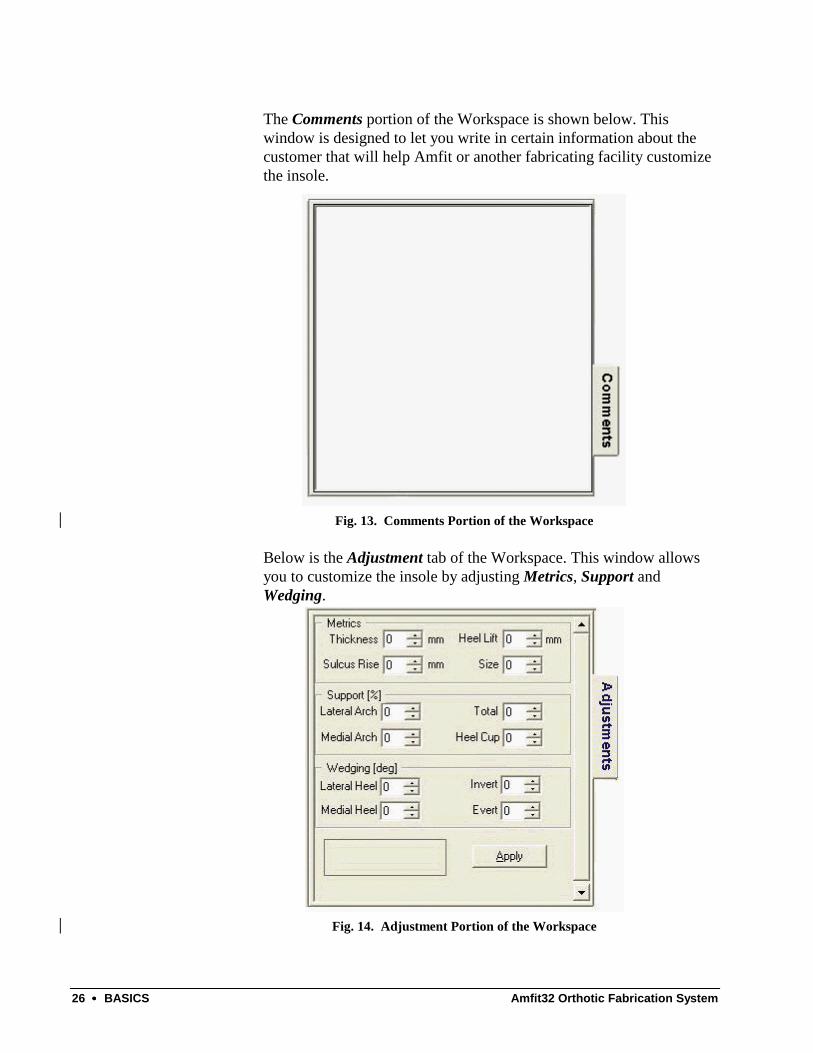
The Comments portion of the Workspace is shown below. This window is designed to let you write in certain information about the customer that will help Amfit or another fabricating facility customize the insole.
Fig. 13. Comments Portion of the Workspace
Below is the Adjustment tab of the Workspace. This window allows you to customize the insole by adjusting Metrics, Support and Wedging.
Fig. 14. Adjustment Portion of the Workspace
Amfit32 Orthotic Fabrication System BASICS •••• 27
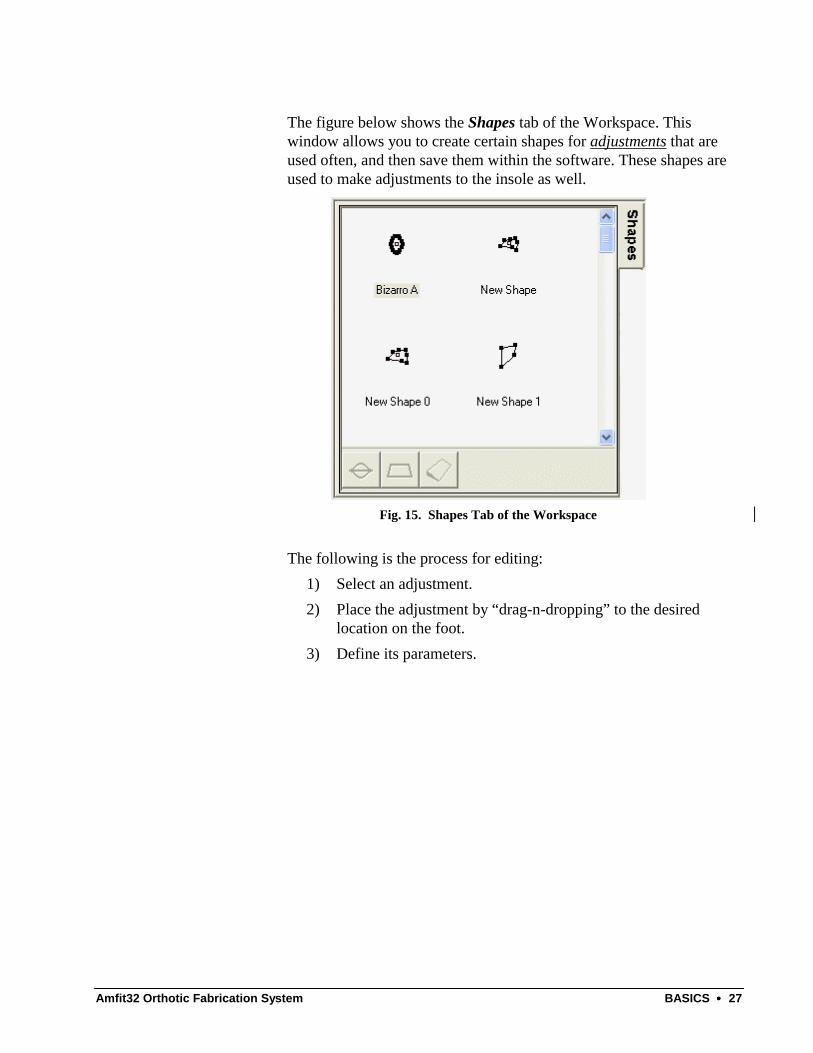
The figure below shows the Shapes tab of the Workspace. This window allows you to create certain shapes for adjustments that are used often, and then save them within the software. These shapes are used to make adjustments to the insole as well.
Fig. 15. Shapes Tab of the Workspace
The following is the process for editing:
1) Select an adjustment. 2) Place the adjustment by “drag-n-dropping” to the desired
location on the foot. 3) Define its parameters.
28 •••• BASICS Amfit32 Orthotic Fabrication System
Milling
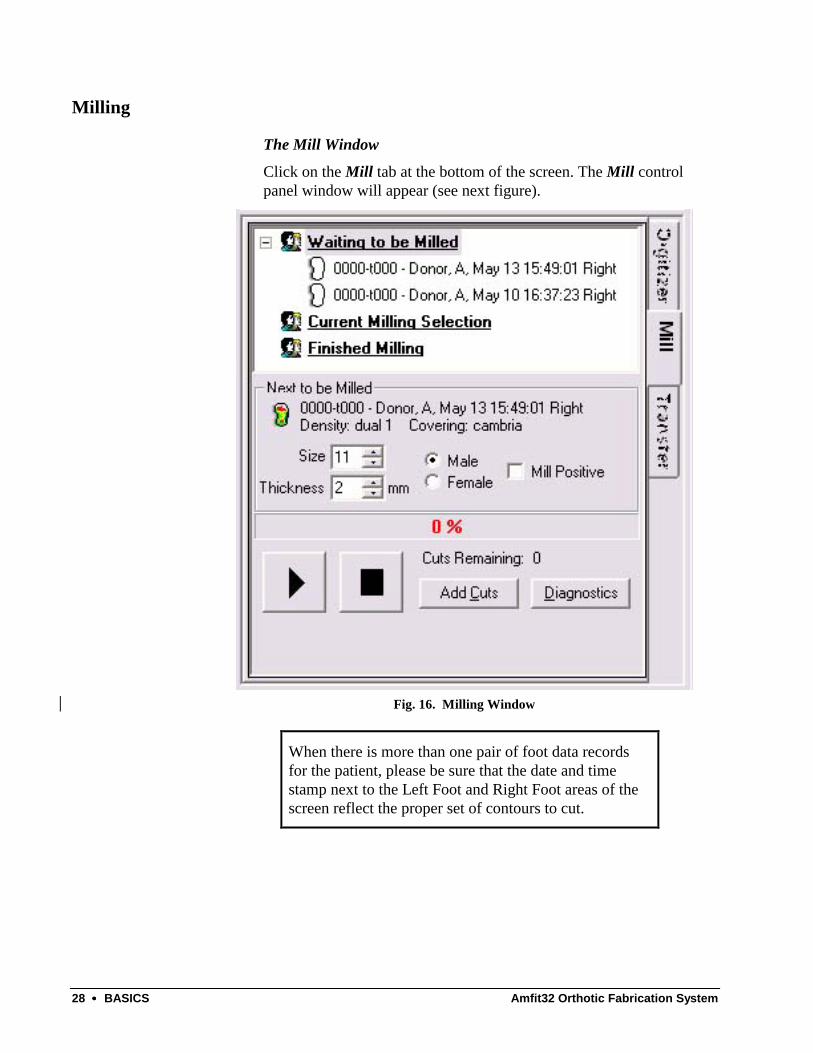
The Mill Window
Click on the Mill tab at the bottom of the screen. The Mill control panel window will appear (see next figure).
Fig. 16. Milling Window
When there is more than one pair of foot data records for the patient, please be sure that the date and time stamp next to the Left Foot and Right Foot areas of the screen reflect the proper set of contours to cut.

Amfit32 Orthotic Fabrication System BASICS •••• 29
Overview of the Milling Process
The milling window provides the Amfit system with your instructions on what you want the milling machine to do. It also displays information about the patient’s orthosis that the system will produce—and how far along the process has progressed.
The process of milling an orthosis is quite simple (see below).
Table 5. Overview of the Milling Process Step Description
1. Select the proper size blank. Select a size that matches the size of foot entered in the New Client window
2. Press the “pushbutton” on the insole tray cassette handle of the milling machine. The catch will flip out, and the tray can now be pulled out of the machine. Set it down on a table and notice the lines on the tray surface.
3. Remove the protective backing from the insole tape and place it on the insole tray.
4. Now press the blank onto the tray: • The line at the heel should line up with the end of the
arrow on the insole tray. • The notch at the toe end of the insole blank should line up
with the lengthwise line on the insole tray.
5. Press the blank firmly onto the tray.
Take extra care with this step! If the blank comes loose during milling, it will usually need to be discarded—a waste of material and time.
6. Now slide the tray back into the milling machine and press the flip latch down until it locks.
7. On the milling window of the computer screen, select left or right as appropriate and click the Play button (see below).
30 •••• BASICS Amfit32 Orthotic Fabrication System
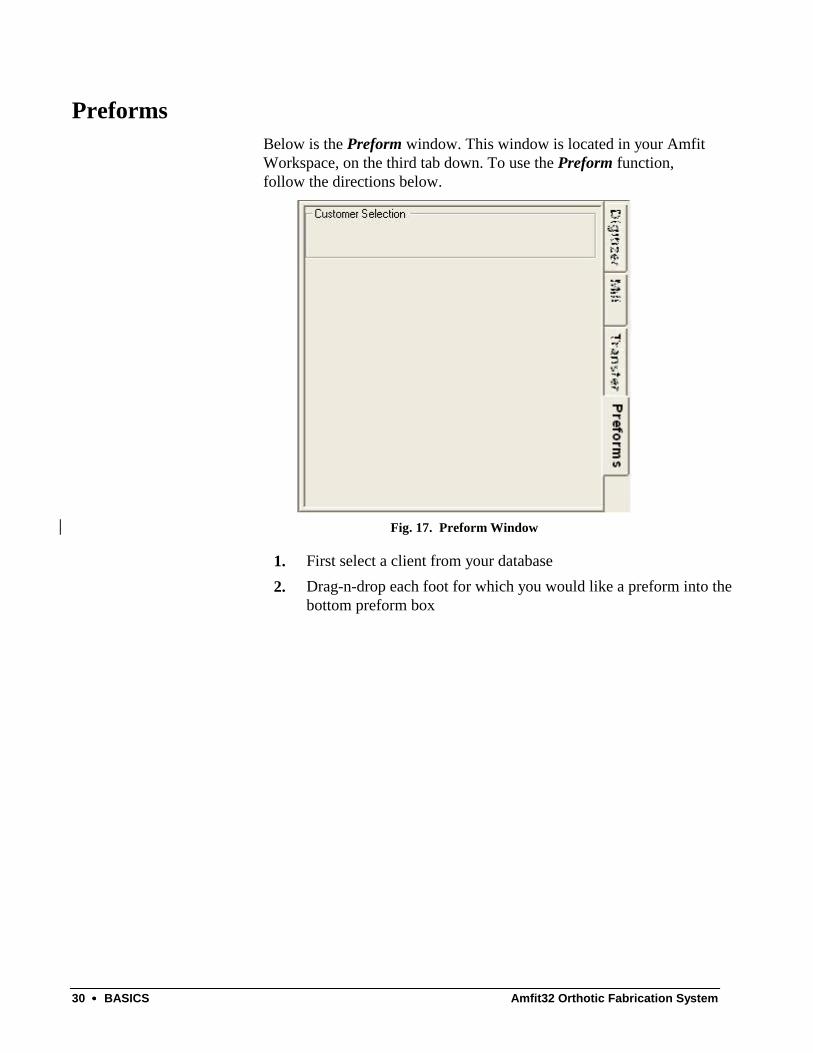
Preforms Below is the Preform window. This window is located in your Amfit Workspace, on the third tab down. To use the Preform function, follow the directions below.
Fig. 17. Preform Window
1. First select a client from your database 2. Drag-n-drop each foot for which you would like a preform into the
bottom preform box
Amfit32 Orthotic Fabrication System BASICS •••• 31
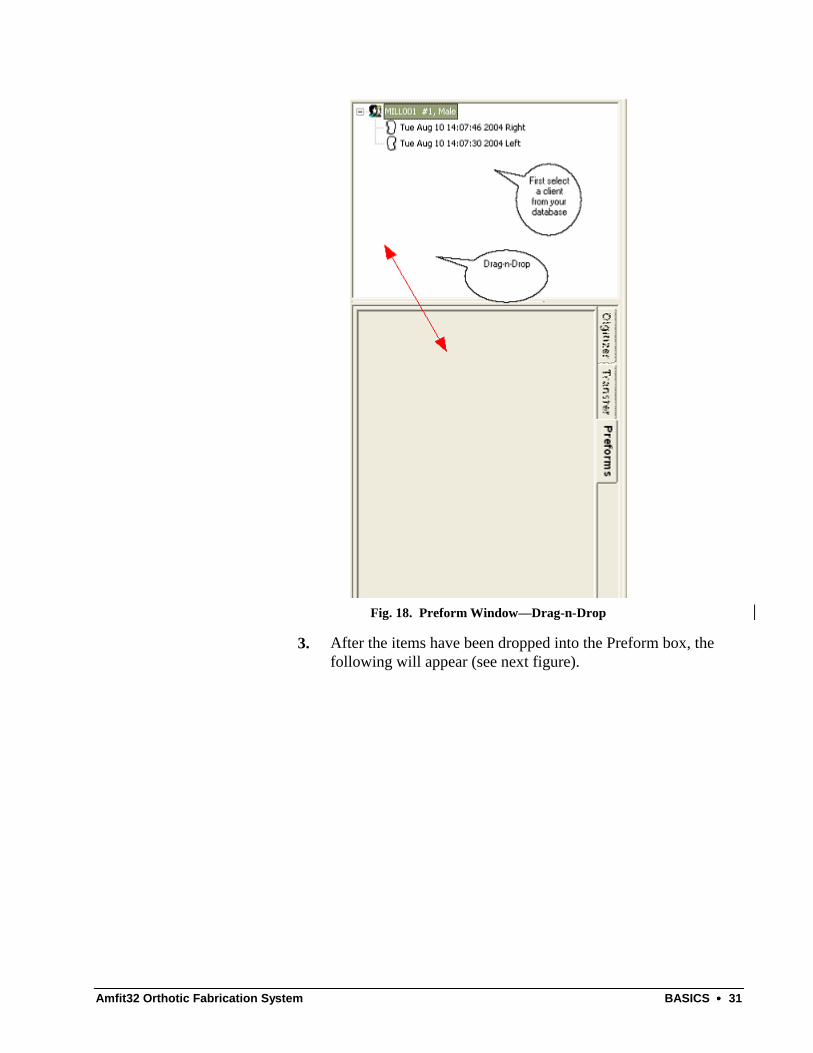
Fig. 18. Preform Window—Drag-n-Drop
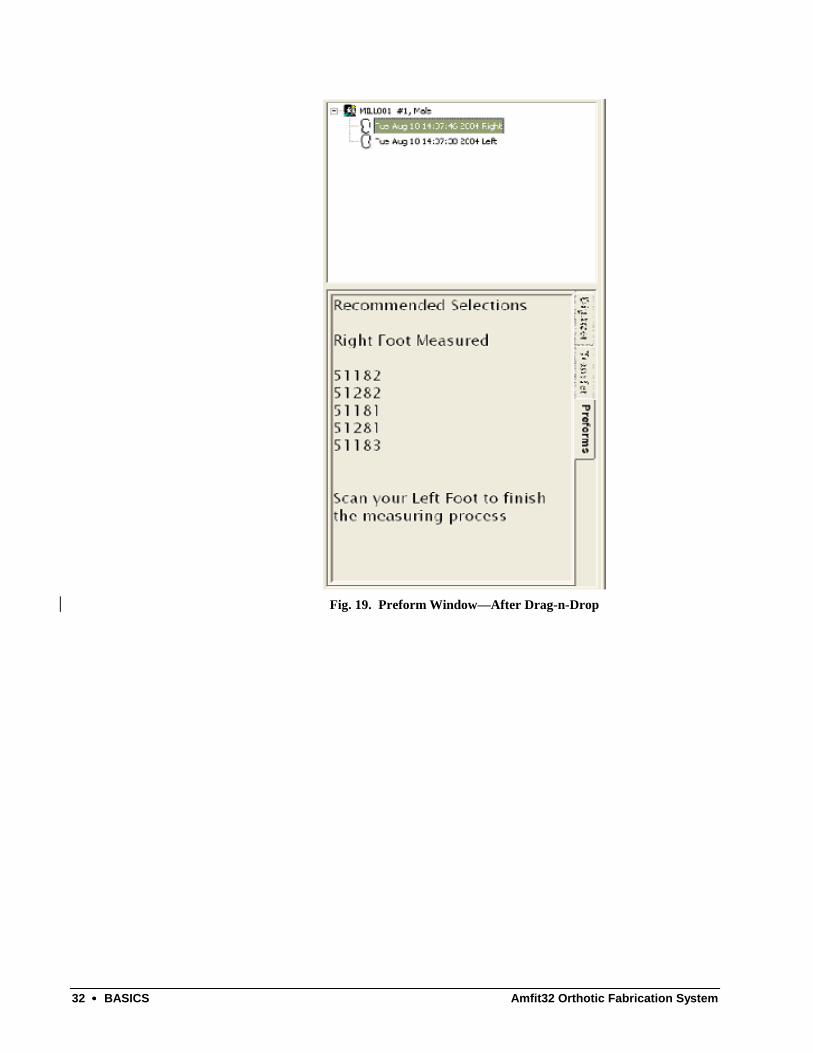
3. After the items have been dropped into the Preform box, the following will appear (see next figure).
32 •••• BASICS Amfit32 Orthotic Fabrication System
Fig. 19. Preform Window—After Drag-n-Drop
Amfit32 Orthotic Fabrication System DIGITIZE •••• 33
DIGITIZE
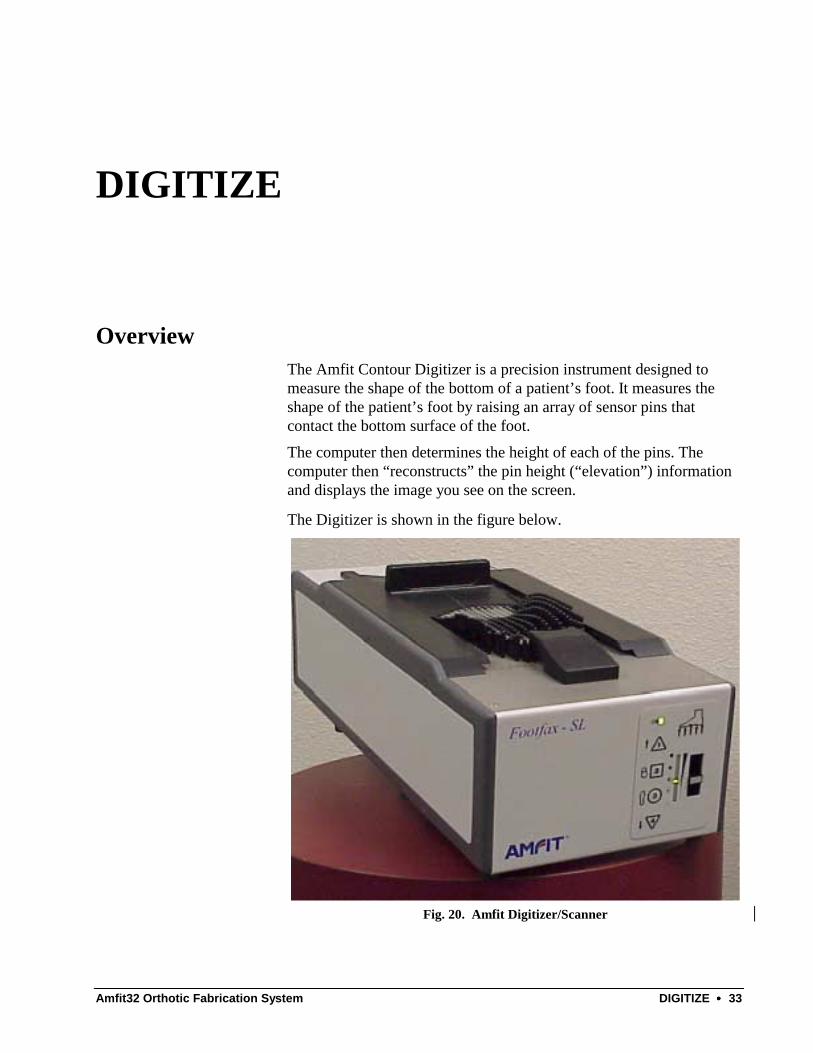
Overview The Amfit Contour Digitizer is a precision instrument designed to measure the shape of the bottom of a patient’s foot. It measures the shape of the patient’s foot by raising an array of sensor pins that contact the bottom surface of the foot.
The computer then determines the height of each of the pins. The computer then “reconstructs” the pin height (“elevation”) information and displays the image you see on the screen.
The Digitizer is shown in the figure below.
Fig. 20. Amfit Digitizer/Scanner
34 •••• DIGITIZE Amfit32 Orthotic Fabrication System
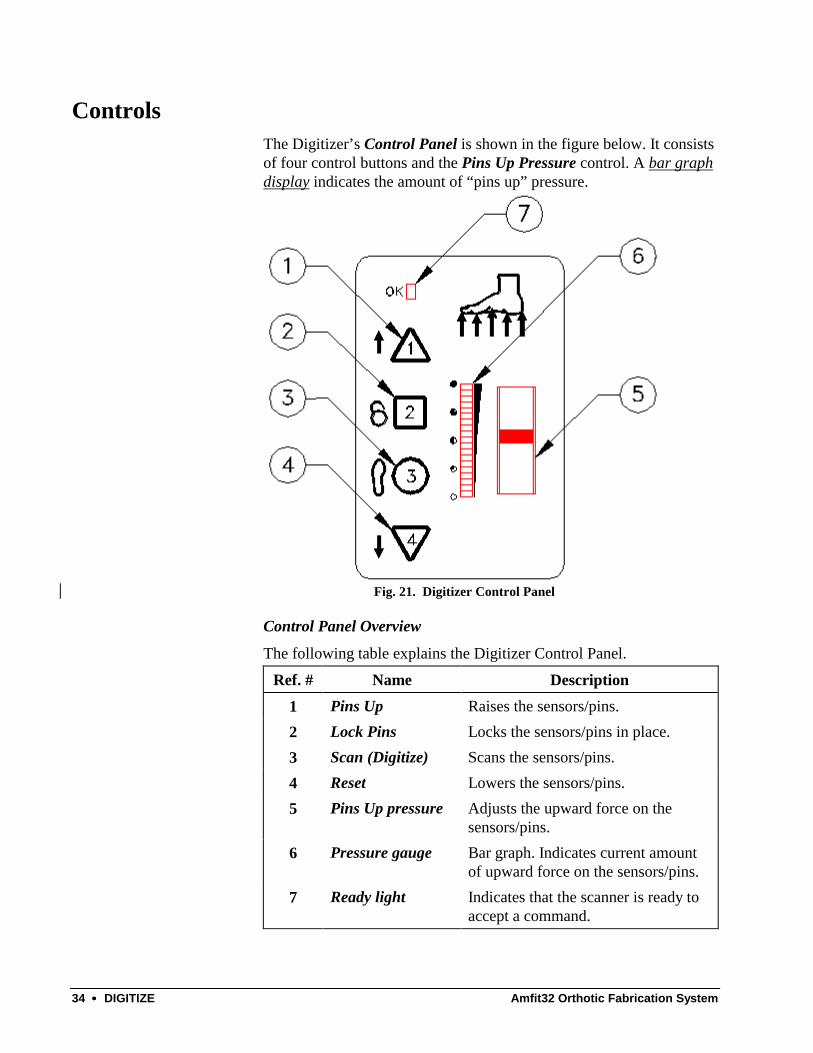
Controls The Digitizer’s Control Panel is shown in the figure below. It consists of four control buttons and the Pins Up Pressure control. A bar graph display indicates the amount of “pins up” pressure.
Fig. 21. Digitizer Control Panel
Control Panel Overview
The following table explains the Digitizer Control Panel.
Ref. # Name Description 1 Pins Up Raises the sensors/pins. 2 Lock Pins Locks the sensors/pins in place. 3 Scan (Digitize) Scans the sensors/pins. 4 Reset Lowers the sensors/pins. 5 Pins Up pressure Adjusts the upward force on the
sensors/pins. 6 Pressure gauge Bar graph. Indicates current amount
of upward force on the sensors/pins. 7 Ready light Indicates that the scanner is ready to
accept a command.
Amfit32 Orthotic Fabrication System DIGITIZE •••• 35
The Pins Up Pressure knob allows you to vary the amount of pressure used to raise the pins. Slide it up to increase the support, or slide it down to reduce it. This function can be quite helpful for positioning and inducing an arch in a patient with flat feet. The bar graph pressure gauge display indicates the relative amount of support.
The “normal” setting is approximately 1/2 full scale. In other words, the bar graph reading should be near the 1/2 full circle mark.
If you select a Pins Up Pressure setting that is too high, the bar graph display will flash. If this happens, slide the Pins Up Pressure knob down until the pressure gauge displays normally.
Toe Plate The primary purpose of the toe plate is to keep the toes from getting pushed up by the slight pressure while the sensor pins are raised. It also allows you to control the amount of sulcus that is recorded while the Digitizer is taking the impression.
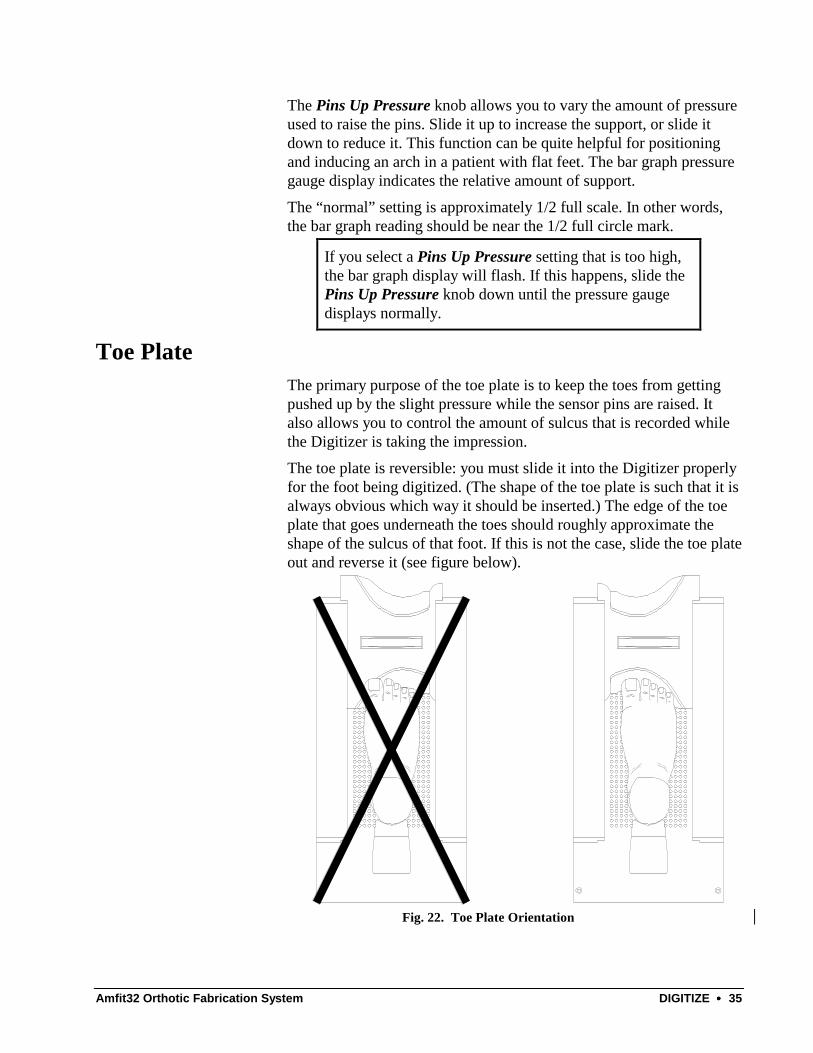
The toe plate is reversible: you must slide it into the Digitizer properly for the foot being digitized. (The shape of the toe plate is such that it is always obvious which way it should be inserted.) The edge of the toe plate that goes underneath the toes should roughly approximate the shape of the sulcus of that foot. If this is not the case, slide the toe plate out and reverse it (see figure below).
Fig. 22. Toe Plate Orientation
36 •••• DIGITIZE Amfit32 Orthotic Fabrication System
Positioning the Toe Plate
What is the proper position for the Toe Plate?
In brief, if a sulcus ridge is desired, the toe plate is placed just forward of the sulcus. If no sulcus ridge is desired, slide the toe plate back to the forward edge of the ball of the foot.
There are times when this may not apply. If the patient has no toes, or has some other forefoot deformity, it would probably be good to slide the toe plate to a position further toward the heel. Another situation where you might slide the toe plate further toward the heel is if the patient is an athlete—who may not want a sulcus.
Generally, you slide the toe plate back toward the heel so that the edge of the toe plate is just forward of the ball of the foot. If you want the system to record elevation in the “toe crest” or “sulcus” area, slide the plate so that the rear edge is just posterior to the toe’s bottom pad area where it is touching the top plate of the scanner.
Keep these things in mind while positioning the toe plate:
• Is the toe plate inserted in the correct direction into the Digitizer for the foot currently being digitized?
• Is the toe plate in the proper position (front/rear)? • Be careful not to place the toe plate too far toward the heel.
The toe plate should never be under the ball of the foot. Placing the toe plate that far to the rear may produce an insole with a bad horizontal ridge under the metatarsal heads.
What about a toe box filler?
The Amfit system can produce a toe box filler to allow patients with an amputated forefoot or other similar foot deformity to wear normal shoes. In this case, record the patient’s foot without a toe plate.
The toe plate’s shape is used by the Amfit program to determine which foot (left or right) is being digitized. When no toe plate is used (as in a toe box filler), the computer will ask which foot is being digitized. The operator simply answers “left” or “right” as appropriate.
Keep in mind...
The sulcus can be removed at any time by using software adjustments. However, while a sulcus can be synthesized, the original sulcus ridge can never be put back if it was not recorded in the first place. When in doubt, place the toe plate edge just in front of the sulcus.
Amfit32 Orthotic Fabrication System DIGITIZE •••• 37
Scanning a Foot
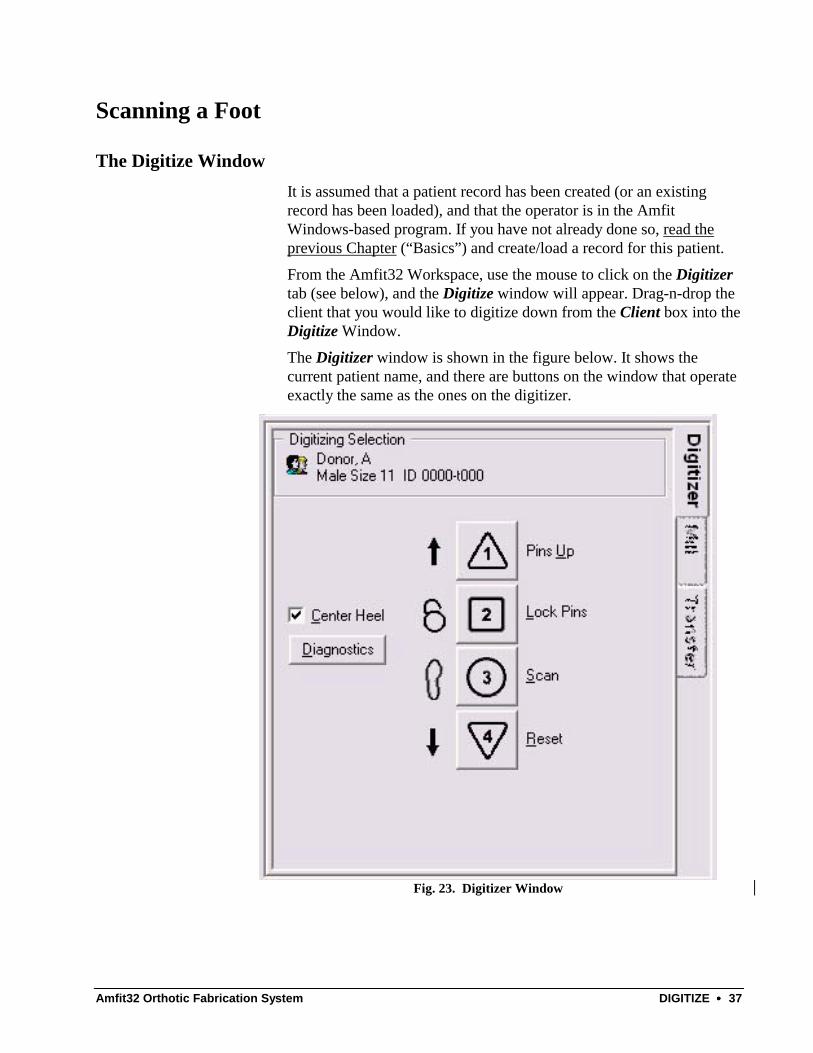
The Digitize Window It is assumed that a patient record has been created (or an existing record has been loaded), and that the operator is in the Amfit Windows-based program. If you have not already done so, read the previous Chapter (“Basics”) and create/load a record for this patient.
From the Amfit32 Workspace, use the mouse to click on the Digitizer tab (see below), and the Digitize window will appear. Drag-n-drop the client that you would like to digitize down from the Client box into the Digitize Window.
The Digitizer window is shown in the figure below. It shows the current patient name, and there are buttons on the window that operate exactly the same as the ones on the digitizer.
Fig. 23. Digitizer Window

38 •••• DIGITIZE Amfit32 Orthotic Fabrication System
Digitize Window Overview The following table explains the elements in the Digitizer window shown in the previous figure.
Name Description Digitizing Selection Displays the current patient information. Diagnostics This is a diagnostics tool used in-house only
by Amfit’s technical representatives. Control buttons: Pins Up, Lock Pins, Scan, Reset
The four control buttons function the same as the buttons on the Digitizer’s control panel.
Center Heel When checked, will automatically center the patient’s heel.
Data
The Amfit system is able to maintain a number of databases.
A database is a collection of patient records. A database is analogous to a file cabinet that contains many similar items. Many Amfit system operators will use only one database—the one that comes with the system as shipped from the factory.
The ability to manage databases allows you to segregate groups of clients. This could, for instance, be useful to group patients who are referred from the same doctor.
Comments
There is a Comments tab to allow you to enter miscellaneous information about the current patient.
Some examples are: patient indications, special fabrication instructions for the person who actually produces the orthosis, or any other information that you may want to save with the patient’s contour.
Making Entries
To enter text into the comments area, use the mouse to click on the Comments tab in the middle portion of your screen.
Amfit32 Orthotic Fabrication System DIGITIZE •••• 39
Operation
Calibration To calibrate the digitizer, take the following steps.
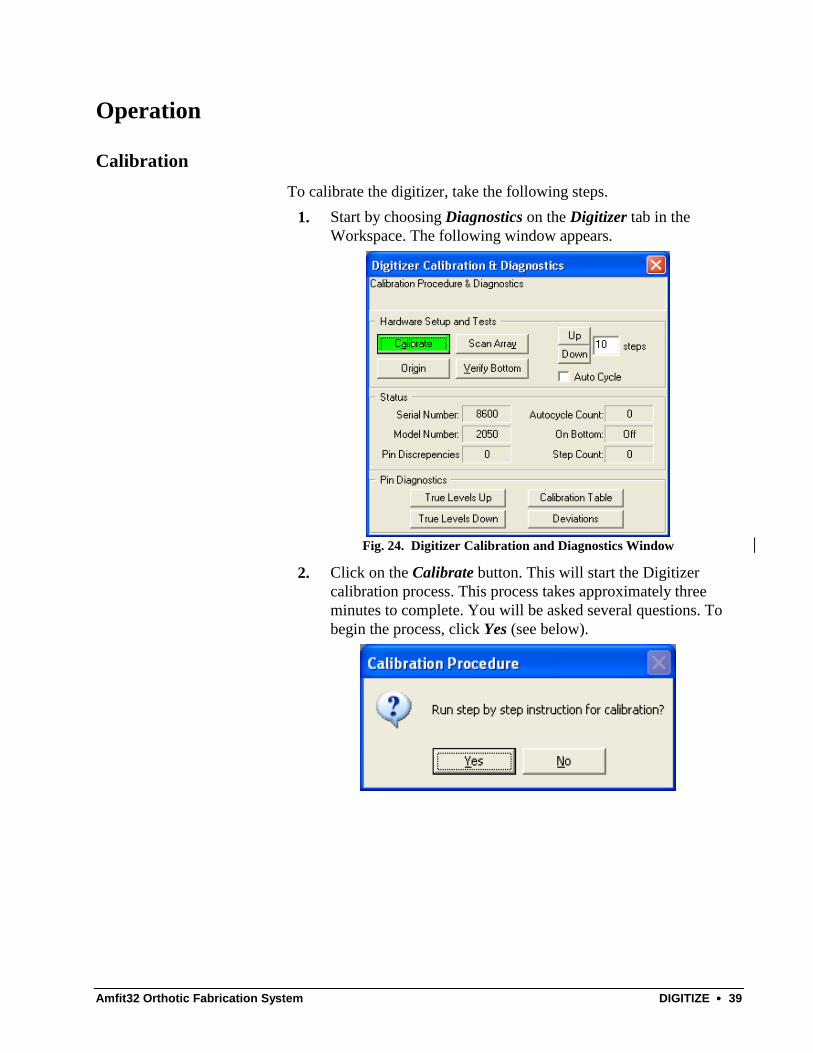
1. Start by choosing Diagnostics on the Digitizer tab in the Workspace. The following window appears.
Fig. 24. Digitizer Calibration and Diagnostics Window
2. Click on the Calibrate button. This will start the Digitizer calibration process. This process takes approximately three minutes to complete. You will be asked several questions. To begin the process, click Yes (see below).
40 •••• DIGITIZE Amfit32 Orthotic Fabrication System
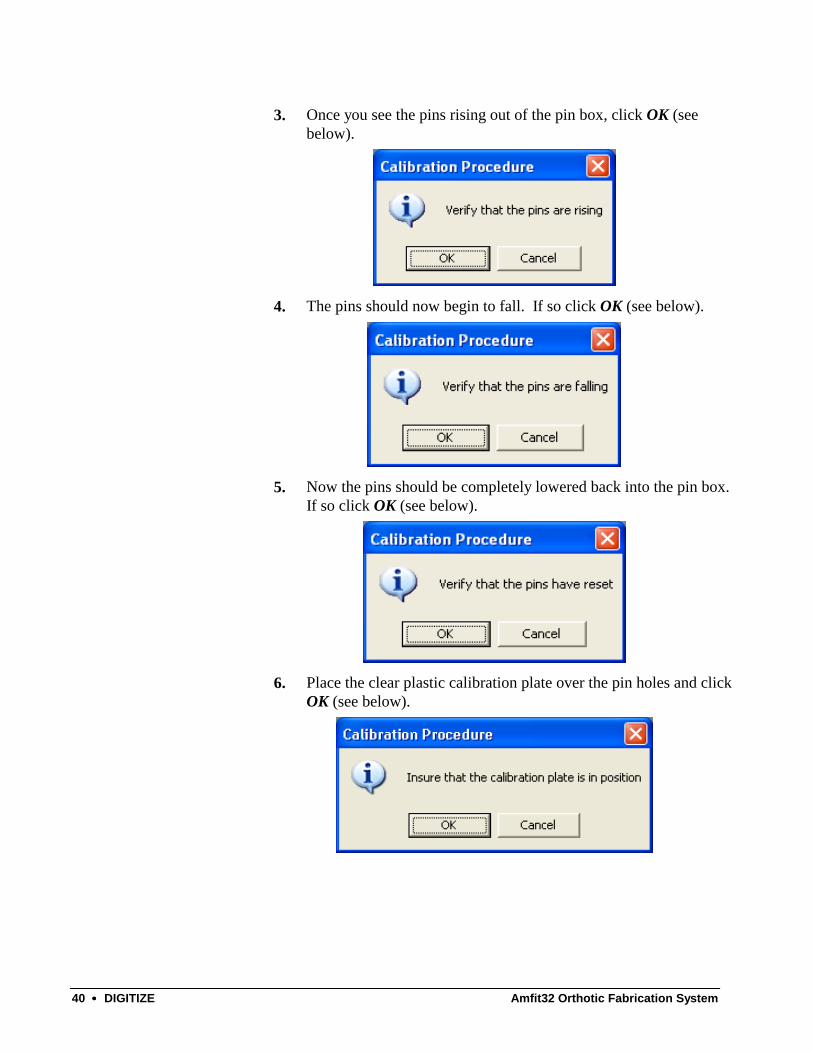
3. Once you see the pins rising out of the pin box, click OK (see below).
4. The pins should now begin to fall. If so click OK (see below).
5. Now the pins should be completely lowered back into the pin box. If so click OK (see below).
6. Place the clear plastic calibration plate over the pin holes and click OK (see below).
Amfit32 Orthotic Fabrication System DIGITIZE •••• 41
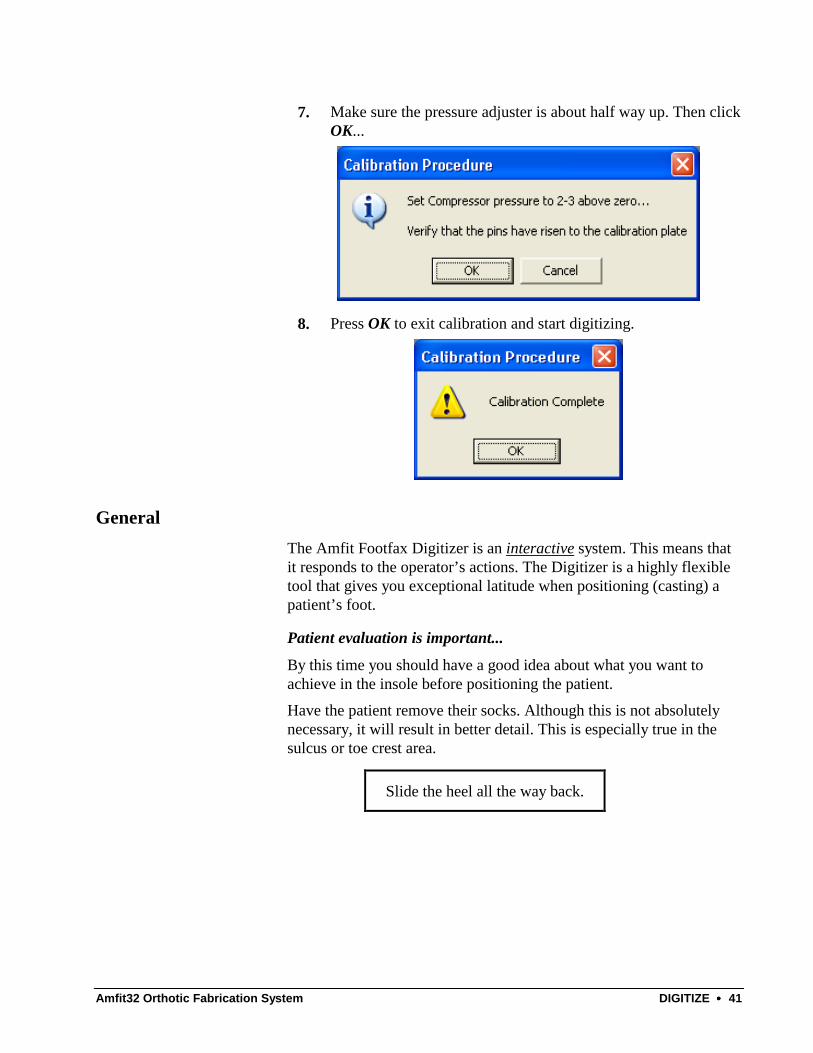
7. Make sure the pressure adjuster is about half way up. Then click OK...
8. Press OK to exit calibration and start digitizing.
General The Amfit Footfax Digitizer is an interactive system. This means that it responds to the operator’s actions. The Digitizer is a highly flexible tool that gives you exceptional latitude when positioning (casting) a patient’s foot.
Patient evaluation is important...
By this time you should have a good idea about what you want to achieve in the insole before positioning the patient.
Have the patient remove their socks. Although this is not absolutely necessary, it will result in better detail. This is especially true in the sulcus or toe crest area.
Slide the heel all the way back.
42 •••• DIGITIZE Amfit32 Orthotic Fabrication System
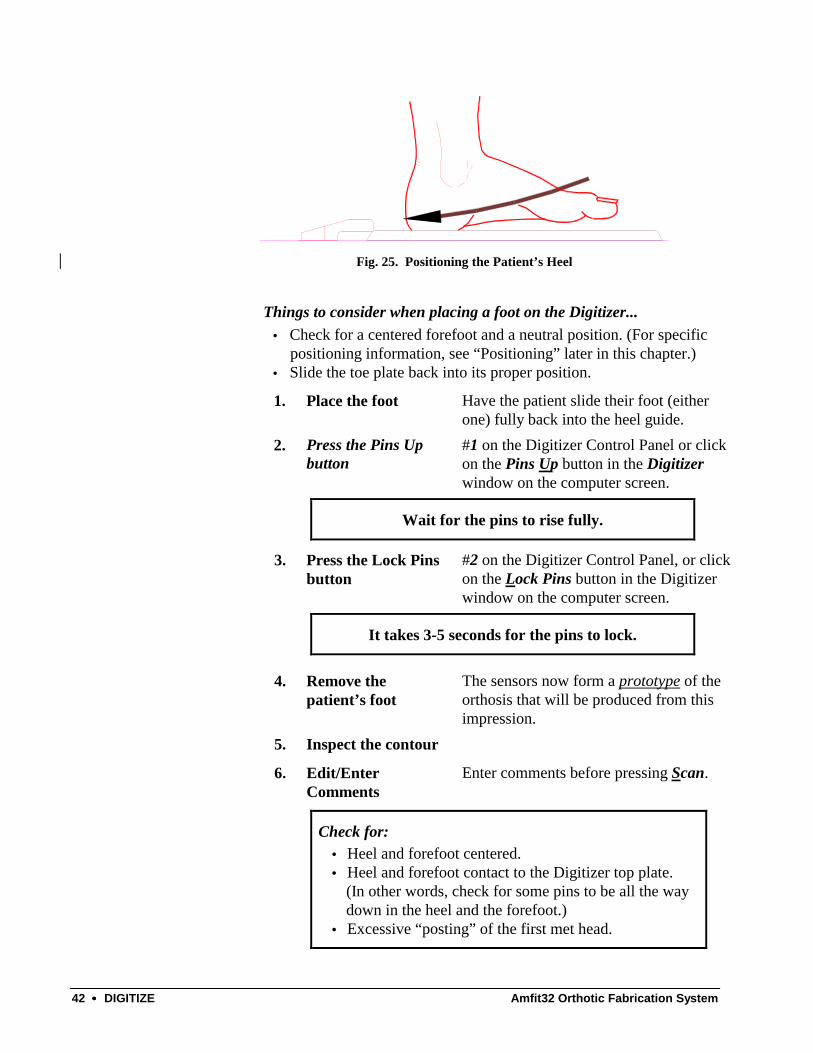
Fig. 25. Positioning the Patient’s Heel
Things to consider when placing a foot on the Digitizer...
• Check for a centered forefoot and a neutral position. (For specific positioning information, see “Positioning” later in this chapter.)
• Slide the toe plate back into its proper position.
1. Place the foot Have the patient slide their foot (either one) fully back into the heel guide.
2. Press the Pins Up button
#1 on the Digitizer Control Panel or click on the Pins Up button in the Digitizer window on the computer screen.
Wait for the pins to rise fully.
3. Press the Lock Pins button
#2 on the Digitizer Control Panel, or click on the Lock Pins button in the Digitizer window on the computer screen.
It takes 3-5 seconds for the pins to lock.
4. Remove the patient’s foot
The sensors now form a prototype of the orthosis that will be produced from this impression.
5. Inspect the contour
6. Edit/Enter Comments
Enter comments before pressing Scan.
Check for: • Heel and forefoot centered. • Heel and forefoot contact to the Digitizer top plate.
(In other words, check for some pins to be all the way down in the heel and the forefoot.)
• Excessive “posting” of the first met head.

Amfit32 Orthotic Fabrication System DIGITIZE •••• 43
7. Press the Scan button
#3 on the Digitizer control panel (the button looks like a foot), or click on the Scan button in the Digitizer window on the computer screen.
The Digitizer will now determine the height of all of the sensors in the pin array. The process takes about 15 seconds. After the computer analyzes the data, the Edit window will appear, displaying a topographical, three-dimensional representation of the foot data.
The green READY light will remain off while the machine is scanning.
When the green light turns back on...
8. Press the Reset button
#4 on the Digitizer Control Panel, or click on the down arrow button in the Digitizer window on the computer screen.
The pins will drop and the Digitizer is ready to record the next contour.
The pins will “reset” automatically after about two minutes if no keys are touched on the Digitizer. If you need to keep the pins locked for a period longer than two minutes, simply press the Lock Pins key periodically.
Digitizer Needs Information Window
You may record as many right and left feet as desired. Each time you record a foot, it displays a new Edit window.
In most cases, the computer is able to determine which foot was digitized. The computer looks at the data and the orientation of the toe plate to reach determine whether it is a right or left foot.
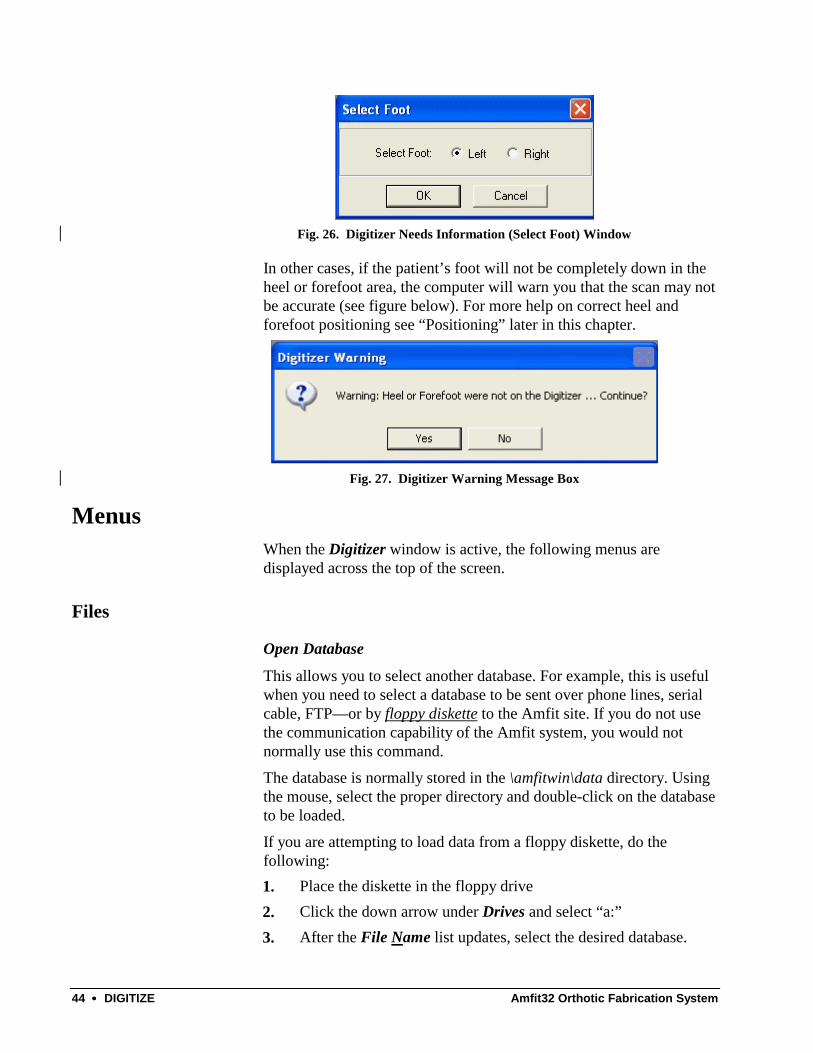
In some cases, (such as a bad bridge arch, a reverse arch, or no toe plate used in a session), the computer will not be able to make a left/right determination. In those cases, the computer displays the Select Foot window (see figure below). Click on the correct foot, Left or Right; and then OK.
44 •••• DIGITIZE Amfit32 Orthotic Fabrication System
Fig. 26. Digitizer Needs Information (Select Foot) Window
In other cases, if the patient’s foot will not be completely down in the heel or forefoot area, the computer will warn you that the scan may not be accurate (see figure below). For more help on correct heel and forefoot positioning see “Positioning” later in this chapter.
Fig. 27. Digitizer Warning Message Box
Menus When the Digitizer window is active, the following menus are displayed across the top of the screen.
Files
Open Database
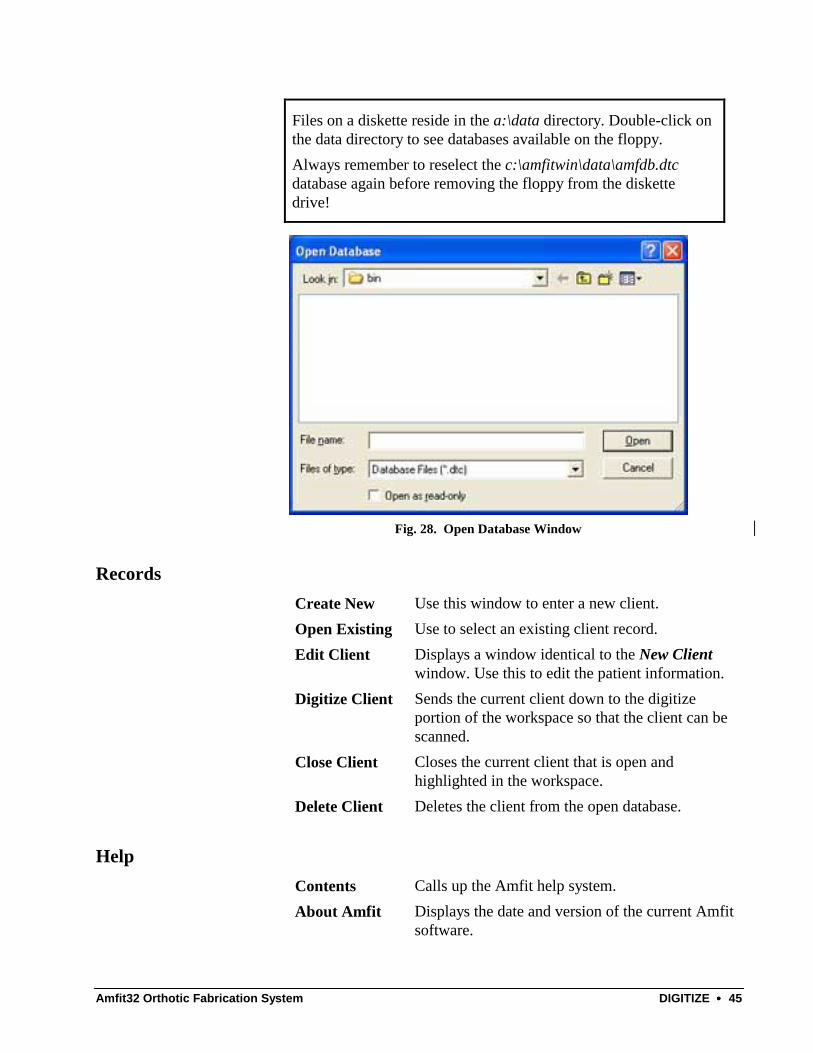
This allows you to select another database. For example, this is useful when you need to select a database to be sent over phone lines, serial cable, FTP—or by floppy diskette to the Amfit site. If you do not use the communication capability of the Amfit system, you would not normally use this command.
The database is normally stored in the \amfitwin\data directory. Using the mouse, select the proper directory and double-click on the database to be loaded.
If you are attempting to load data from a floppy diskette, do the following:
1. Place the diskette in the floppy drive 2. Click the down arrow under Drives and select “a:” 3. After the File Name list updates, select the desired database.
Amfit32 Orthotic Fabrication System DIGITIZE •••• 45
Files on a diskette reside in the a:\data directory. Double-click on the data directory to see databases available on the floppy. Always remember to reselect the c:\amfitwin\data\amfdb.dtc database again before removing the floppy from the diskette drive!
Fig. 28. Open Database Window
Records
Create New Use this window to enter a new client. Open Existing Use to select an existing client record. Edit Client Displays a window identical to the New Client
window. Use this to edit the patient information. Digitize Client Sends the current client down to the digitize
portion of the workspace so that the client can be scanned.
Close Client Closes the current client that is open and highlighted in the workspace.
Delete Client Deletes the client from the open database.
Help
Contents Calls up the Amfit help system. About Amfit Displays the date and version of the current Amfit
software.
46 •••• DIGITIZE Amfit32 Orthotic Fabrication System
Positioning The top quality orthotic insole that the Amfit system produces is only as good as the positioning of the patient. “Positioning” refers to the controlled placement of the foot on the Digitizer. Positioning can be as simple as:
• Placing the foot “back” against the heel guide • Centering the forefoot • Holding the foot in neutral.
For patients who need more of a correction, you can add a wide variety of intrinsic, or built-in, mechanical corrections to the basic contour.
Positioning Overview The basics for positioning are the same regardless of the corrections required. They include:
1. Manipulate the foot to a neutral position (see “Neutral Position” later in this chapter).
2. Press Pins Up on the Digitizer. This raises the pins around the foot.
3. Press Lock Pins. The patient’s foot can now be removed.
If you wish to digitize the contour at this time, the machine will record a quality, neutral-positioned insole.
Mechanical Adjustments
If mechanical adjustments are required as well, you need to also perform steps 4-8.
A mechanical adjustment (as opposed to a computer or software adjustment), is an adjustment that modifies the shape of the digitized anatomy. In practice, this involves placing a particular shape (such as a metatarsal pad) under the patient’s foot when it is being digitized. Mechanical adjustments are covered in detail later in this chapter.
4. Determine the location for the correction. 5. Place the pad or wedge in the proper location on the top of the
Digitizer. 6. Replace the foot. 7. Press Pins Up on the Digitizer. Raise the pins through the pad or
wedge and press Lock. 8. Digitize the contour. After the scan is complete, the computer
displays the impression.

Amfit32 Orthotic Fabrication System DIGITIZE •••• 47
Do it again!
Repeat for the other foot. If, for any reason, the contour is less than perfect, simply re-digitize the foot in question.
Neutral Position The foot impression is typically taken with the foot in a neutral position.
What is Neutral Position?
“Neutral Position” means that the foot is neither pronated (turned in) nor supinated (turned out).
The joint that determines neutral position is the subtalar joint. Neutral is really the relationship of the talus (the bone at the bottom of the tibia and fibula, and above the calcaneus/heel bone) to the rest of the foot.
Therefore, the way you find neutral position is by feeling the head of the talus.
How do I find Neutral Position?
Place your: • Thumb just in front of the bump on the outside of your leg
(lateral malleolus), and • Your index finger in front (and below) the bump on the
inside of the lower leg (medial malleolus).
As the patient turns their foot inwards (pronates), you should feel a bump under your finger. This is the inner head of the talus. As the patient turns their foot outwards (supinates), you should feel a bump under your thumb. This bump is the outside of the talus.
As the foot moves from inside to outside, and back to inside, there is a point where you can’t feel either bump—or you feel them equally on both sides. This is neutral position.
By keeping your thumb or finger on the inside point of the foot as the impression is being recorded, you will be able to detect if the foot is moving out of neutral. If the foot does move, you must start over again, instructing the patient not to move the foot.
Neutral may also be determined by aligning the Achilles tendon vertically (at a 90° angle) to the top of the Digitizer.
48 •••• DIGITIZE Amfit32 Orthotic Fabrication System
Why Neutral Position?
By taking the impression in a neutral position, this provides support for the foot in a position that is optimal for balance and control of the foot and skeletal structure.
Neutral position allows normal movements of the foot during activity, without predisposing it to an excess of any of those movements. In fact, providing the balance and control at the start should help prevent excessive movements associated with injury.
The foot may be digitized in this neutral position when it is under full, partial, or non-weight bearing.
Weight Bearing The contour recorded by the digitizer will change depending on the amount of weight placed on that foot. This can be a great advantage.
By standing on the Digitizer with even weight on both feet, a full weight-bearing contour is recorded.
By limiting the weight on the foot, and especially the heel, you can achieve a contour with more aggressive heel cupping. The heel can actually be recorded slightly above the top plate of the Digitizer. The computer will automatically lower the heel to produce the expected insole thickness.
Amfit32 Orthotic Fabrication System DIGITIZE •••• 49
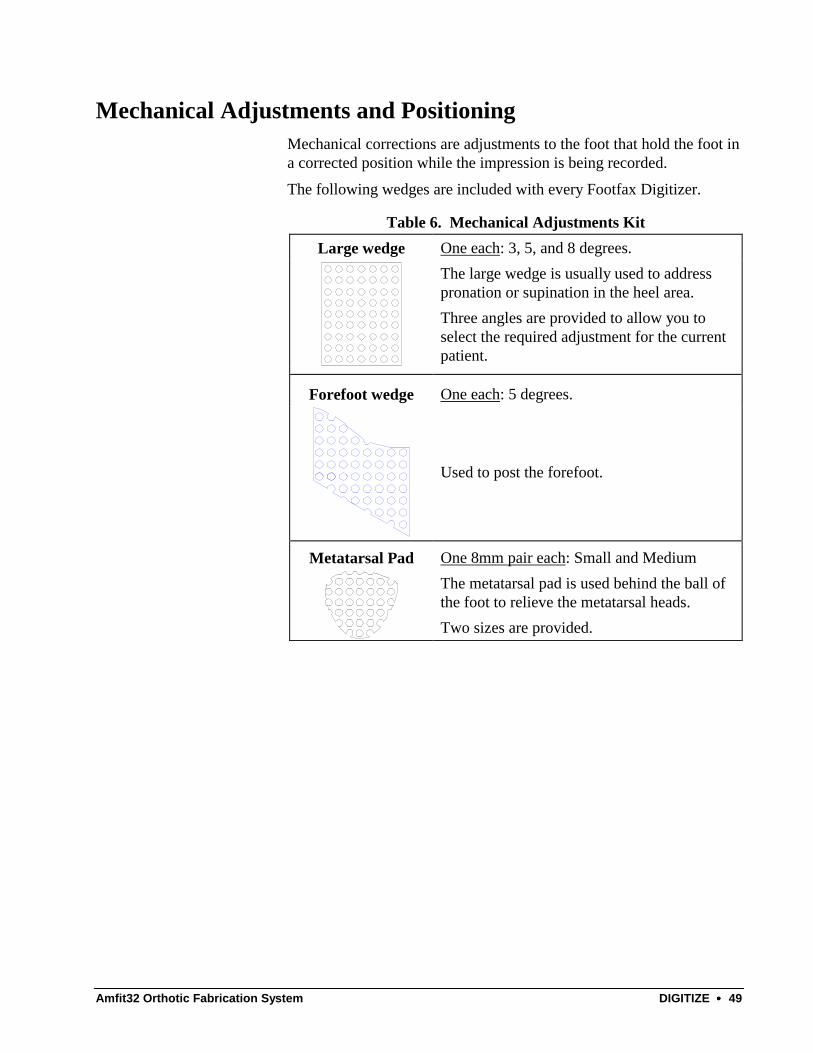
Mechanical Adjustments and Positioning Mechanical corrections are adjustments to the foot that hold the foot in a corrected position while the impression is being recorded.
The following wedges are included with every Footfax Digitizer.
Table 6. Mechanical Adjustments Kit Large wedge One each: 3, 5, and 8 degrees.
The large wedge is usually used to address pronation or supination in the heel area. Three angles are provided to allow you to select the required adjustment for the current patient.
Forefoot wedge One each: 5 degrees.
Used to post the forefoot.
Metatarsal Pad One 8mm pair each: Small and Medium
The metatarsal pad is used behind the ball of the foot to relieve the metatarsal heads. Two sizes are provided.
50 •••• DIGITIZE Amfit32 Orthotic Fabrication System
Placing a Mechanical Adjustment Using a mechanical adjustment to correct a foot’s placement on the Digitizer is the same regardless of the adjustment.
1. The patient stands on the Digitizer and the operator presses the Pins Up key on the unit.
2. Wait for the pins to rise fully and press the Lock Pins key. 3. Have the patient remove their foot from the Digitizer. 4. Place the mechanical adjustment on the top of the Digitizer at the
location where the adjustment should be made. 5. Have the patient place their foot onto the top of the Digitizer
again. Be careful to position the foot back in exactly the same location where it was in previously.
6. Press Pins Up once again. The pins will now rise up through the mechanical pad or wedge and contact the foot.
7. Press Lock Pins. Have the patient remove their foot from the Digitizer.
8. Inspect the contour. Make sure that the pins have risen fully through the mechanical adjustment.
9. If the contour is acceptable, press Scan.
It is often helpful to use some sort of transfer medium (such as lipstick) to assist in locating the proper point for a correction. Place a dot on the bottom of the foot and have the patient stand on an insole or the top of the Digitizer itself. The dot will transfer to the proper location.
Amfit32 Orthotic Fabrication System DIGITIZE •••• 51
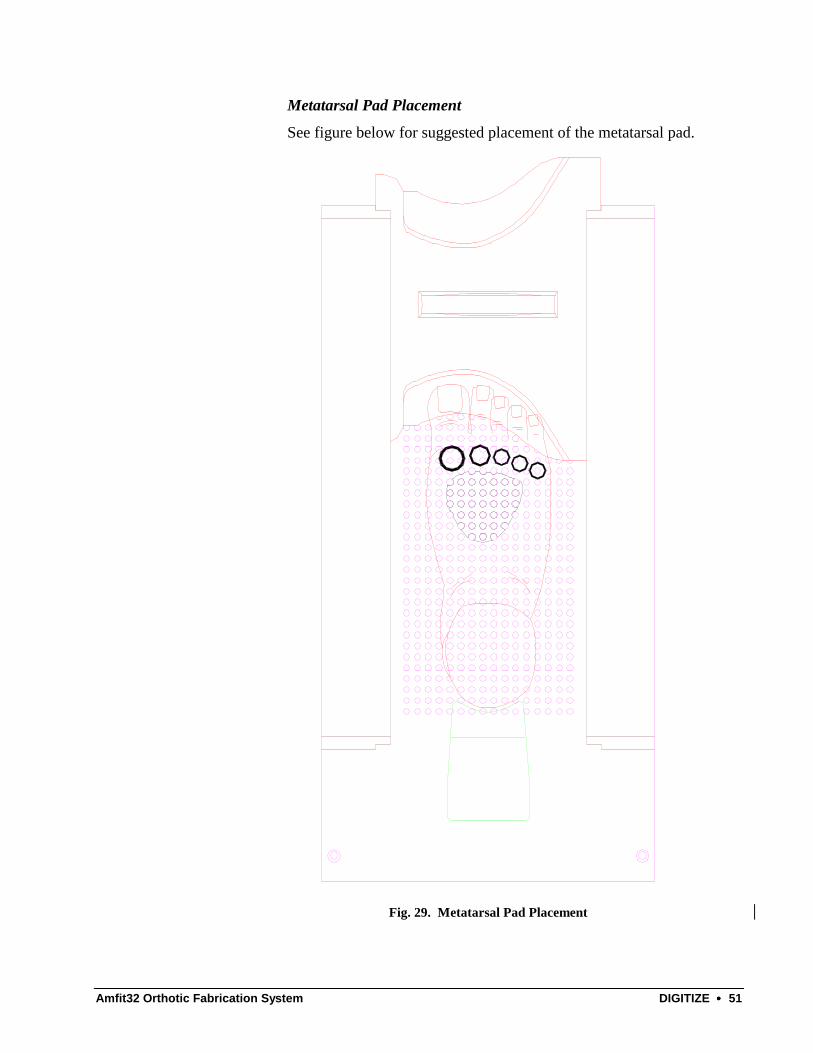
Metatarsal Pad Placement
See figure below for suggested placement of the metatarsal pad.
Fig. 29. Metatarsal Pad Placement
52 •••• DIGITIZE Amfit32 Orthotic Fabrication System
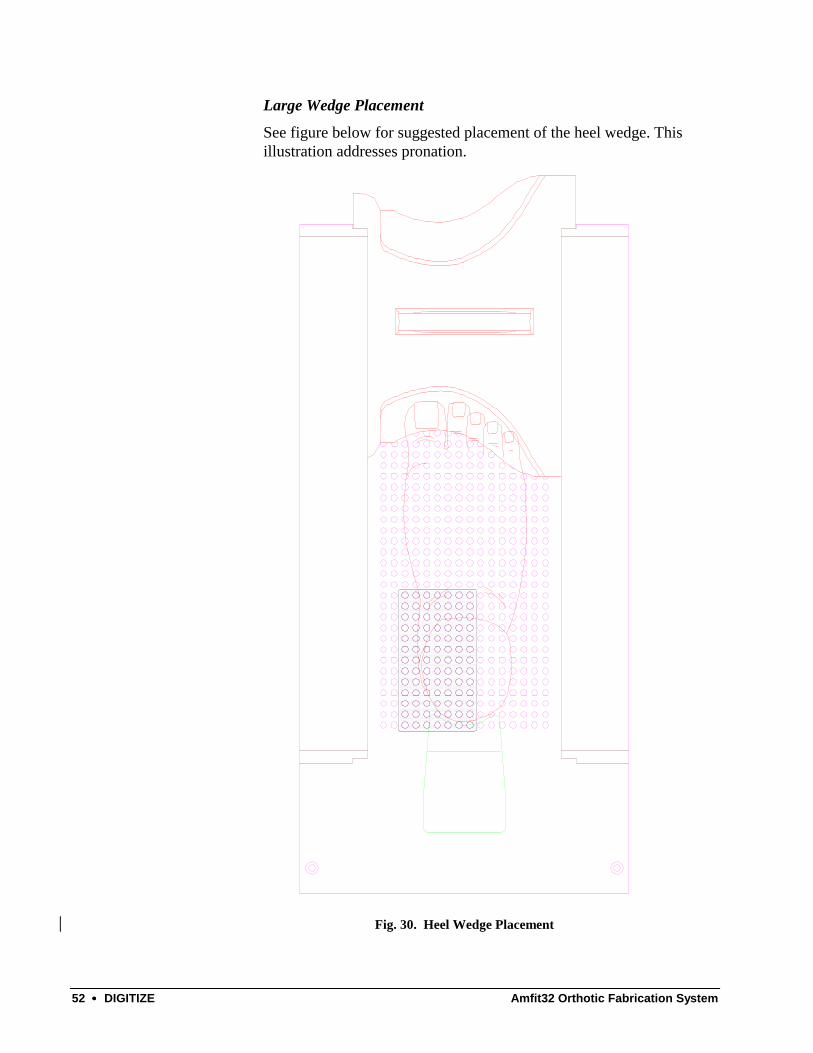
Large Wedge Placement
See figure below for suggested placement of the heel wedge. This illustration addresses pronation.
Fig. 30. Heel Wedge Placement

Amfit32 Orthotic Fabrication System DIGITIZE •••• 53
Recording a Plaster Cast A plaster cast is recorded just like a foot, except that you must approximate the neutral position without the benefit of having the patient.
To ensure that no plaster chips get into the top of the Digitizer, it is highly recommended that you place the cast in a plastic bag. If chips of plaster get into the digitizer, this could result in sticky pins.
1. Place the plaster cast all the way back in the heel guide, position the toe plate, and press Pins Up.
Since a plaster cast is a solid, you will need to take care when using the toe plate. Be sure that the ball of the foot is resting on the top plate of the digitizer. You may have to move the toe plate forward from its optimal position to accomplish this. This may entail grinding the insole in the forefoot somewhat.
2. Press Lock. 3. Remove the cast and press Scan.

54 •••• DIGITIZE Amfit32 Orthotic Fabrication System
Amfit32 Orthotic Fabrication System Editing/Adjustments •••• 55
Editing/Adjustments
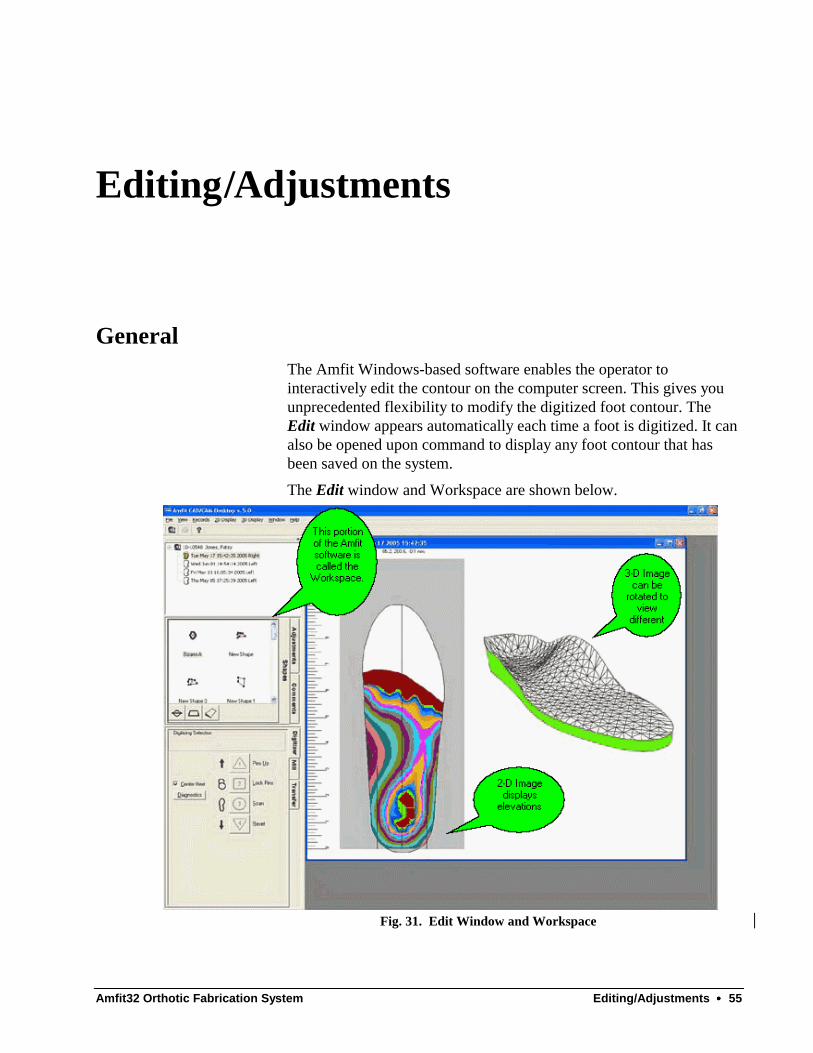
General The Amfit Windows-based software enables the operator to interactively edit the contour on the computer screen. This gives you unprecedented flexibility to modify the digitized foot contour. The Edit window appears automatically each time a foot is digitized. It can also be opened upon command to display any foot contour that has been saved on the system.
The Edit window and Workspace are shown below.
Fig. 31. Edit Window and Workspace
56 •••• Editing/Adjustments Amfit32 Orthotic Fabrication System
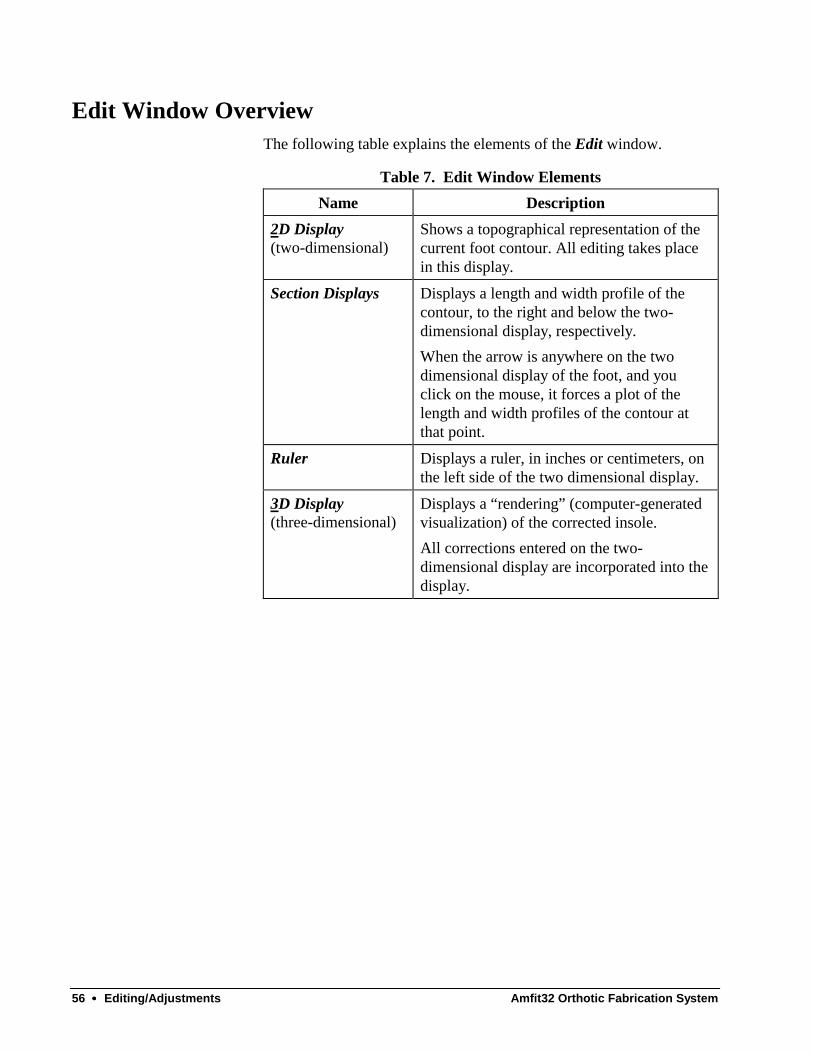
Edit Window Overview The following table explains the elements of the Edit window.
Table 7. Edit Window Elements Name Description
2D Display (two-dimensional)
Shows a topographical representation of the current foot contour. All editing takes place in this display.
Section Displays Displays a length and width profile of the contour, to the right and below the two-dimensional display, respectively. When the arrow is anywhere on the two dimensional display of the foot, and you click on the mouse, it forces a plot of the length and width profiles of the contour at that point.
Ruler Displays a ruler, in inches or centimeters, on the left side of the two dimensional display.
3D Display (three-dimensional)
Displays a “rendering” (computer-generated visualization) of the corrected insole. All corrections entered on the two-dimensional display are incorporated into the display.
Amfit32 Orthotic Fabrication System Editing/Adjustments •••• 57
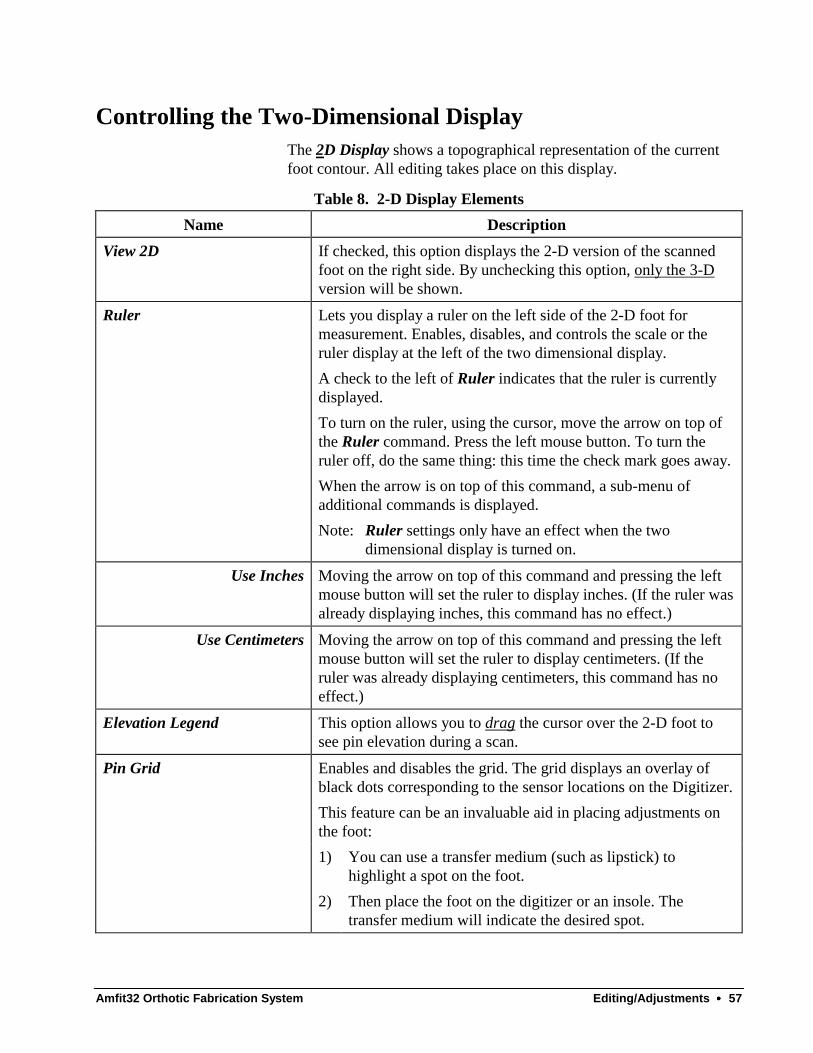
Controlling the Two-Dimensional Display The 2D Display shows a topographical representation of the current foot contour. All editing takes place on this display.
Table 8. 2-D Display Elements Name Description
View 2D If checked, this option displays the 2-D version of the scanned foot on the right side. By unchecking this option, only the 3-D version will be shown.
Ruler Lets you display a ruler on the left side of the 2-D foot for measurement. Enables, disables, and controls the scale or the ruler display at the left of the two dimensional display. A check to the left of Ruler indicates that the ruler is currently displayed. To turn on the ruler, using the cursor, move the arrow on top of the Ruler command. Press the left mouse button. To turn the ruler off, do the same thing: this time the check mark goes away. When the arrow is on top of this command, a sub-menu of additional commands is displayed. Note: Ruler settings only have an effect when the two
dimensional display is turned on.
Use Inches Moving the arrow on top of this command and pressing the left mouse button will set the ruler to display inches. (If the ruler was already displaying inches, this command has no effect.)
Use Centimeters Moving the arrow on top of this command and pressing the left mouse button will set the ruler to display centimeters. (If the ruler was already displaying centimeters, this command has no effect.)
Elevation Legend This option allows you to drag the cursor over the 2-D foot to see pin elevation during a scan.
Pin Grid Enables and disables the grid. The grid displays an overlay of black dots corresponding to the sensor locations on the Digitizer. This feature can be an invaluable aid in placing adjustments on the foot:
1) You can use a transfer medium (such as lipstick) to highlight a spot on the foot.
2) Then place the foot on the digitizer or an insole. The transfer medium will indicate the desired spot.
58 •••• Editing/Adjustments Amfit32 Orthotic Fabrication System
Table 8. 2-D Display Elements Name Description
3) You can now use the grid to locate this area on the 2-D display. A check to the left of Pin Grid indicates that the grid is currently displayed. Pin Grid is initially turned off (no check mark). To turn on the grid, using the cursor, move the arrow on top of the Pin Grid command. Press the left mouse button. To turn the grid off, do the same thing: this time the check mark goes away. Note: Pin Grid settings have an effect if the two-
dimensional display is turned on.
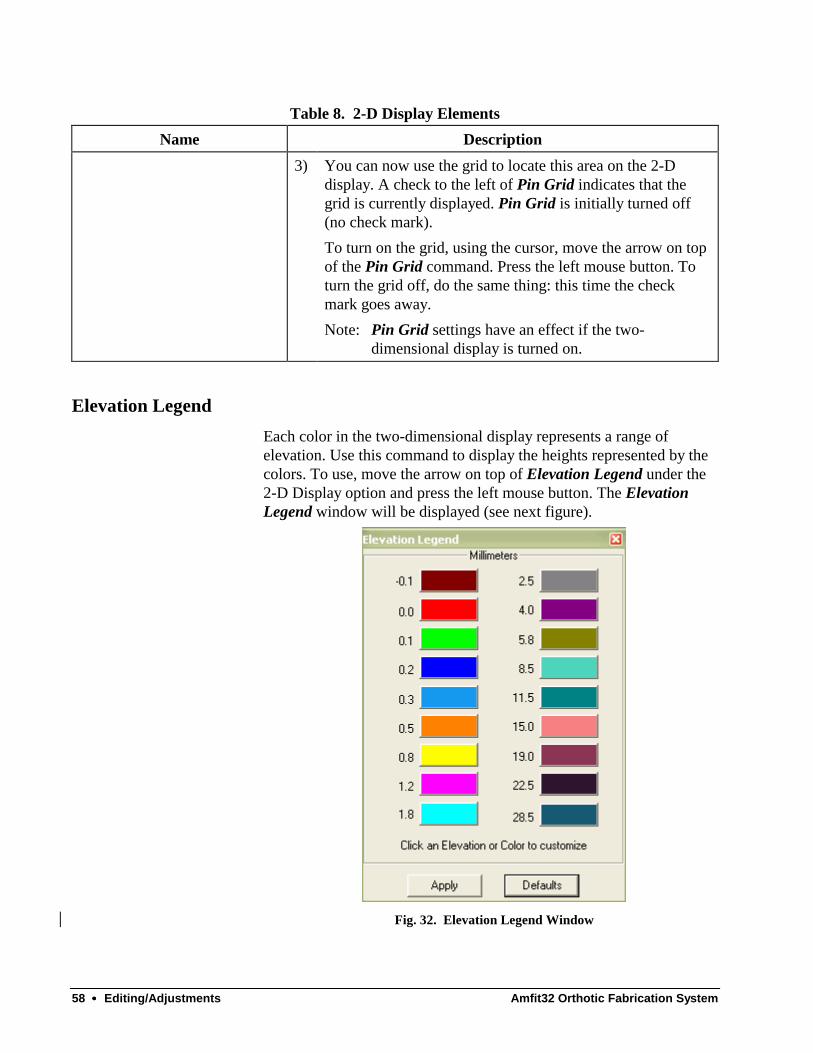
Elevation Legend Each color in the two-dimensional display represents a range of elevation. Use this command to display the heights represented by the colors. To use, move the arrow on top of Elevation Legend under the 2-D Display option and press the left mouse button. The Elevation Legend window will be displayed (see next figure).
Fig. 32. Elevation Legend Window
Amfit32 Orthotic Fabrication System Editing/Adjustments •••• 59
Controlling the Three-Dimensional Display The 3D Display shows a “rendering” or computer-generated visualization of the corrected insole. All corrections that have been entered in the two-dimensional display are incorporated into the three-dimensional display.
Any change to the settings of the three dimensional display will force the computer to regenerate the three-dimensional display.
Viewpoint The viewpoint, or the direction the computer uses to determine which side of the contour to display, is controlled by a click of the mouse. To rotate the image, simply “grab” the display by clicking on the left mouse button while dragging it in the direction you would like it to rotate.
The features of the display are controlled by the View 3d drop down menu. To view these options, position the arrow on View 3d in the title bar at the top of the screen and press the left button on the mouse. The menu bar will drop down.
Elements Window The following table explains the 3D Display Elements window.
Table 9. 3-D Display Elements Name Description
3D Display Enables and disables the 3-D display. To make the 3-D display active, place the cursor on top of 3D Display and press the left mouse button (a “check mark” appears). To turn it off, do the same thing; this time the check mark goes away.
Show Negative/Positive
Controls the appearance of the three-dimensional display and what the image looks like. Move the arrow on top of this command with the mouse and press the left button.
Show Positive Displays an image that resembles the bottom of the foot.

60 •••• Editing/Adjustments Amfit32 Orthotic Fabrication System
Table 9. 3-D Display Elements Name Description
Show Negative Displays an image that resembles a machined insole blank. Depending upon the image currently displayed, the command line in the menu changes from Show Positive to Show Negative and back again. Moving the arrow on top of this command, and pressing the left mouse button, turns on the indicated display mode. Initially set to Show Negative.
Adjustments Window
Using the Adjustments Window
1. Click on the Adjustments tab located in the middle section of the Amfit Windows-based workspace. The Adjustments window appears (see below).
Fig. 33. Adjustments Window
Amfit32 Orthotic Fabrication System Editing/Adjustments •••• 61
2. Using the mouse, position the arrow on the screen in the text area after the adjustment you would like to change. Then press the left button on the mouse and type in the desired adjustment.
3. If more than one adjustment is required, simply move the arrow to the next text area and press the left mouse button again. Type in the desired adjustment.
4. Continue until you have entered all adjustments.
5. Click on Apply when you are done.
Overview of Wedges
The following table gives an overview of the various wedges.
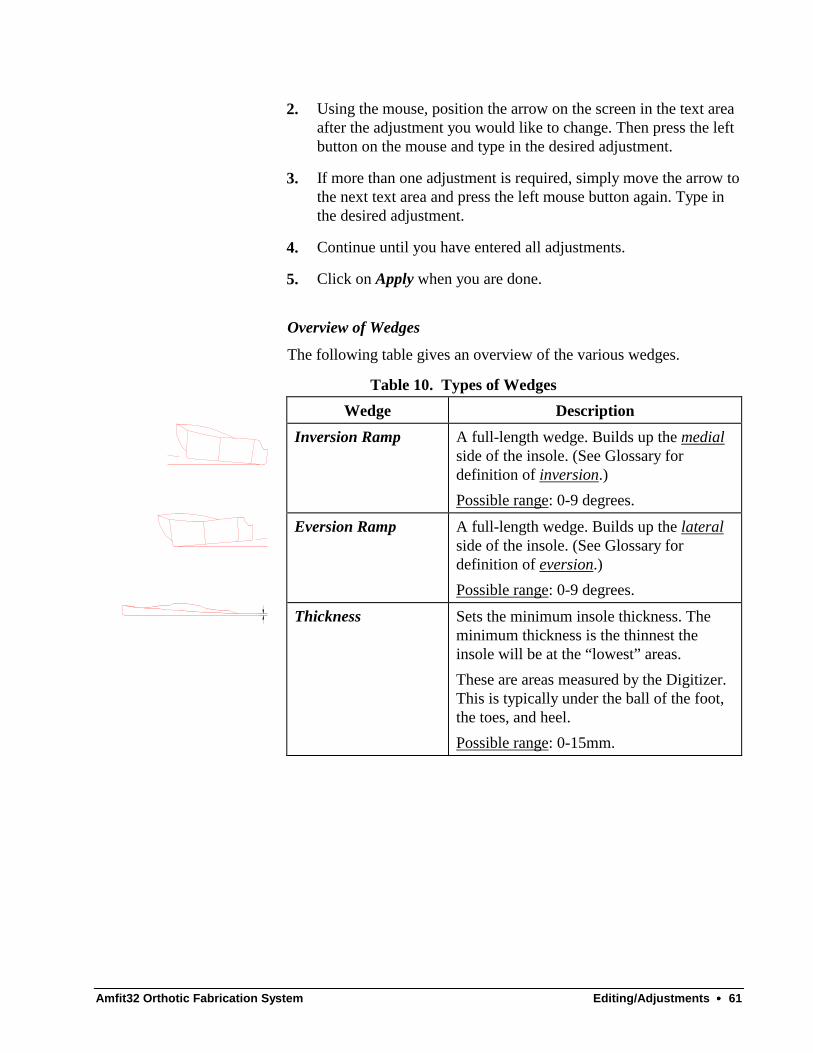
Table 10. Types of Wedges Wedge Description
Inversion Ramp A full-length wedge. Builds up the medial side of the insole. (See Glossary for definition of inversion.) Possible range: 0-9 degrees.
Eversion Ramp A full-length wedge. Builds up the lateral
side of the insole. (See Glossary for definition of eversion.) Possible range: 0-9 degrees.
Thickness Sets the minimum insole thickness. The minimum thickness is the thinnest the insole will be at the “lowest” areas. These are areas measured by the Digitizer. This is typically under the ball of the foot, the toes, and heel. Possible range: 0-15mm.
62 •••• Editing/Adjustments Amfit32 Orthotic Fabrication System
Table 10. Types of Wedges Wedge Description
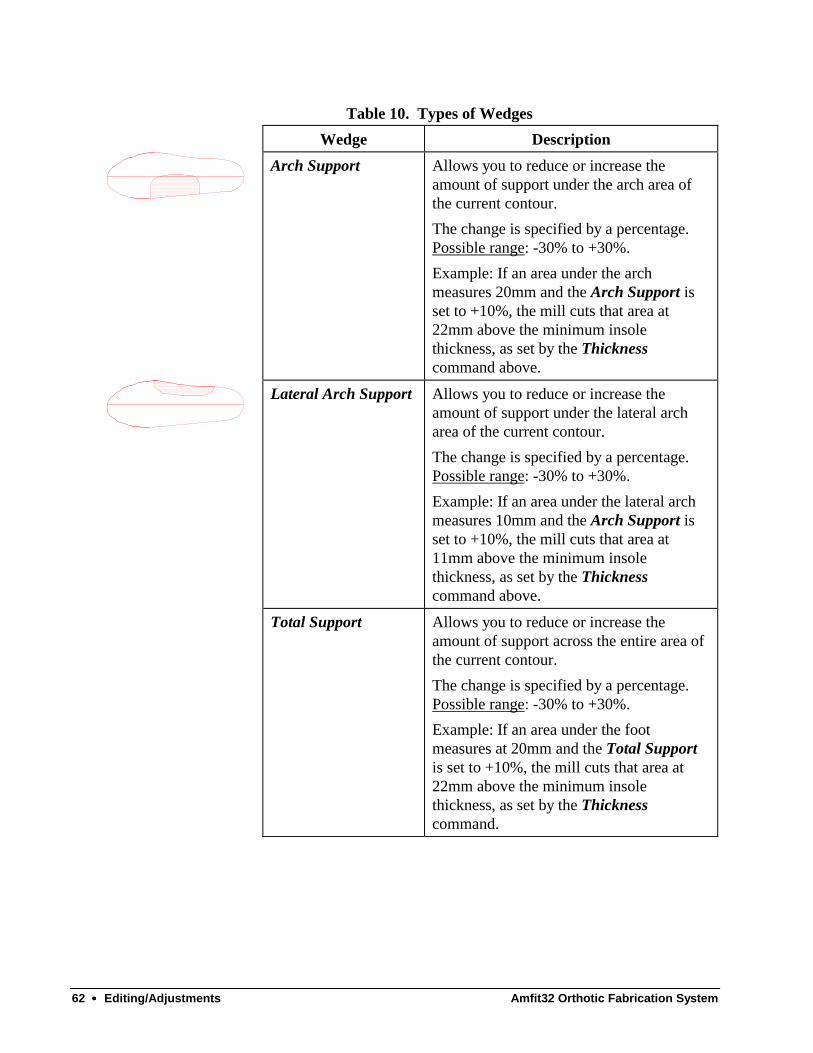
Arch Support Allows you to reduce or increase the amount of support under the arch area of the current contour. The change is specified by a percentage. Possible range: -30% to +30%. Example: If an area under the arch measures 20mm and the Arch Support is set to +10%, the mill cuts that area at 22mm above the minimum insole thickness, as set by the Thickness command above.
Lateral Arch Support Allows you to reduce or increase the amount of support under the lateral arch area of the current contour. The change is specified by a percentage. Possible range: -30% to +30%. Example: If an area under the lateral arch measures 10mm and the Arch Support is set to +10%, the mill cuts that area at 11mm above the minimum insole thickness, as set by the Thickness command above.
Total Support Allows you to reduce or increase the amount of support across the entire area of the current contour. The change is specified by a percentage. Possible range: -30% to +30%. Example: If an area under the foot measures at 20mm and the Total Support is set to +10%, the mill cuts that area at 22mm above the minimum insole thickness, as set by the Thickness command.

Amfit32 Orthotic Fabrication System Editing/Adjustments •••• 63
Table 10. Types of Wedges Wedge Description
Heel Lift Ramp A linear ramp that runs from the ball of the foot to the heel. It will increase the minimum thickness under the heel. This is typically used for additional cushioning under the heel—or to allow for a leg length discrepancy.
Heel Cupping Allows you to reduce or increase the amount of support around the heel area of the current contour. The change is specified by a percentage. Possible range: -30% to +30%. Example: If an area around the heel measures at 20mm, and the Heel Cupping is set to +10%, the mill cuts that area at 22mm above the minimum insole thickness and the heel lift, as set by the Thickness and Heel Lift Ramp commands above.
Arch Support, Heel Cupping, Lateral Arch Support, and Total Support are summed by the computer.
This means that if you set Arch Support to +10% and Total Support to +10%,
the adjustment under the arch will in fact be +20%!
Medial Heel Wedge A pre-defined wedge is placed from the centerline of the foot toward the medial side. It runs from the back of the contour to approximately 8mm in front of the low point in the heel. It blends in for an additional 8mm further forward. The change is specified in degrees. Possible range: 0-9 degrees.
64 •••• Editing/Adjustments Amfit32 Orthotic Fabrication System
Table 10. Types of Wedges Wedge Description
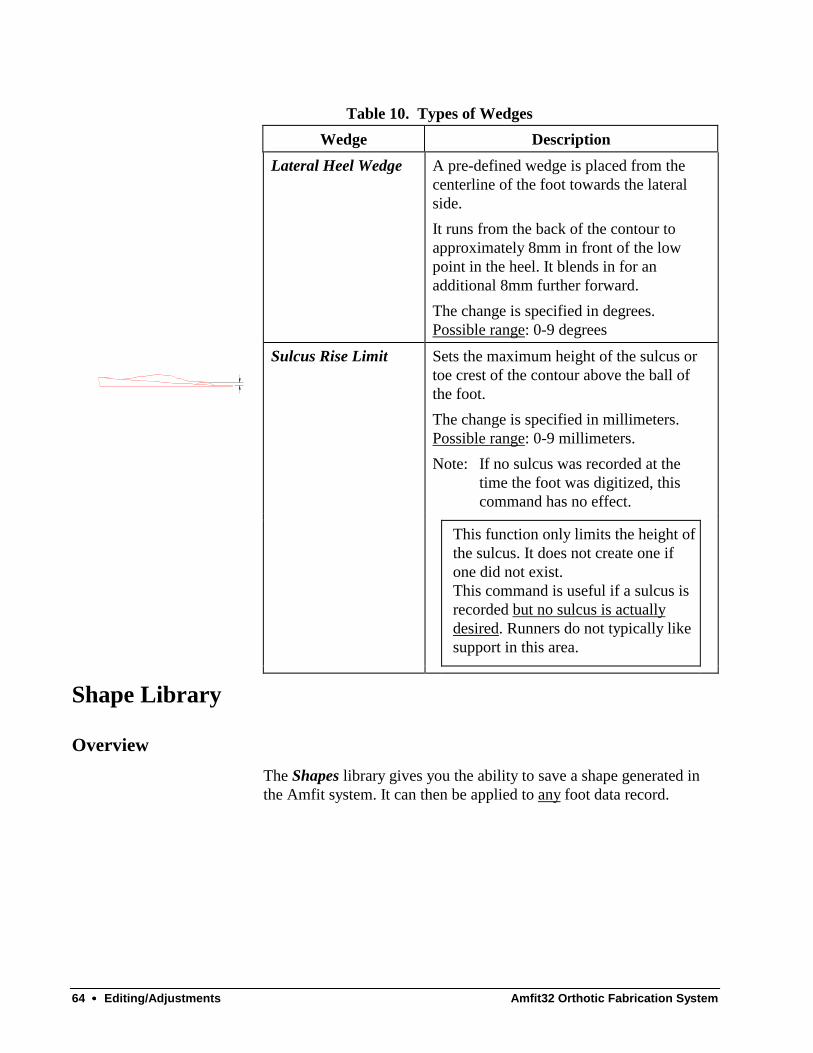
Lateral Heel Wedge A pre-defined wedge is placed from the centerline of the foot towards the lateral side. It runs from the back of the contour to approximately 8mm in front of the low point in the heel. It blends in for an additional 8mm further forward. The change is specified in degrees. Possible range: 0-9 degrees
Sulcus Rise Limit Sets the maximum height of the sulcus or toe crest of the contour above the ball of the foot. The change is specified in millimeters. Possible range: 0-9 millimeters. Note: If no sulcus was recorded at the
time the foot was digitized, this command has no effect.
This function only limits the height of the sulcus. It does not create one if one did not exist. This command is useful if a sulcus is recorded but no sulcus is actually desired. Runners do not typically like support in this area.
Shape Library
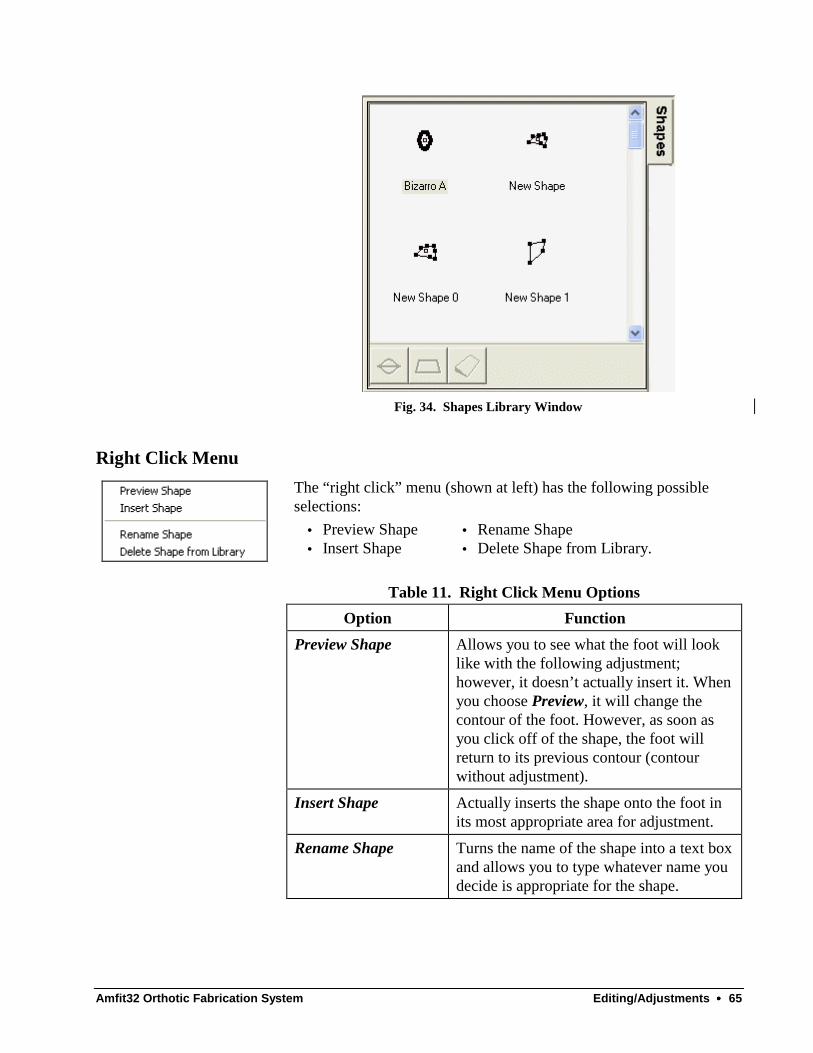
Overview The Shapes library gives you the ability to save a shape generated in the Amfit system. It can then be applied to any foot data record.
Amfit32 Orthotic Fabrication System Editing/Adjustments •••• 65
Fig. 34. Shapes Library Window
Right Click Menu
The “right click” menu (shown at left) has the following possible selections:
• Preview Shape • Insert Shape
• Rename Shape • Delete Shape from Library.
Table 11. Right Click Menu Options Option Function
Preview Shape Allows you to see what the foot will look like with the following adjustment; however, it doesn’t actually insert it. When you choose Preview, it will change the contour of the foot. However, as soon as you click off of the shape, the foot will return to its previous contour (contour without adjustment).
Insert Shape Actually inserts the shape onto the foot in its most appropriate area for adjustment.
Rename Shape Turns the name of the shape into a text box and allows you to type whatever name you decide is appropriate for the shape.

66 •••• Editing/Adjustments Amfit32 Orthotic Fabrication System
Table 11. Right Click Menu Options Option Function
Delete Shape from Library
Choosing Delete Shape from Library will do exactly that. It permanently deletes that shape from the library.
Pre-Made Shapes
At the bottom of the Shape tab are the following pre-made shapes: • Bump tool • Pad tool • Wedge tool. These shapes are the most popular.
Pad Tool
Use the Pad Tool to place a user-defined shape with an area inside the shape all at one elevation: positive or negative. This is similar in appearance to a mesa.
The following describes how to use the Pad tool. 1. Click on the Pad button (it looks like a bump with a flat top).
The button becomes indented (“sinks”), and its outline fades. 2. Using the mouse, move the arrow into the two-dimensional view
of the foot. Position the arrow at any point on the perimeter of the proposed pad. Press the left mouse button. The computer will draw a black square at the first point. These black squares are called control points.
3. Now move the arrow to the next point on the perimeter. Press the left mouse button. The computer will once again draw a square at the point defined. In addition, the computer draws a line between this point and the previous point.
4. Continue defining points until the last point is defined. 5. To close the shape (connect the last point with the first point),
double click on the second-to-last point on the perimeter.
Wedge Tool

Amfit32 Orthotic Fabrication System Editing/Adjustments •••• 67
Use the Wedge Tool to place a user-defined shape, with a slope in one of four directions: medial, lateral, forefoot, or heel at any reasonable angle.
The following describes how to use the Wedge tool. 1. Click on the Wedge button (it looks like a wedge viewed from
one end). The button becomes indented (“sinks”), and its outline fades.
2. Using the mouse, move the arrow into the two-dimensional view of the foot. Position the arrow on any corner of the proposed wedge. Press the left mouse button. The computer draws a black square at the first point. These black squares are called control points.
3. Now move the arrow to the next corner of the wedge. Press the left mouse button. The computer will once again draw a square at the point defined. In addition, the computer draws a line between this point and the previous point. Continue defining points until the last point is defined.
4. To close the shape (connect the last point with the first point), double click on the second-to-last point on the wedge.
5. The operator must define the: • Direction of the slope: forefoot, heel, medial, or lateral • Angle of the correction.
Slope The side of the wedge where the altitude will be. • A forefoot wedge will be highest at the toe end of
the wedge. • A heel wedge will be highest at the heel end. • A medial wedge will be highest on the medial
(arch) side of the foot. • A lateral wedge will be highest on the lateral
(inside) of the foot. Angle Defined in degrees. The valid range is 0-9 degrees.
Bump Tool
Use the Bump Tool to place a user-defined shape with an area inside the shape all at one elevation; positive or negative. This is similar in appearance to a table.
The following describes how to use the Bump tool.
1. Click on the Bump button (it looks like an eye). The button

68 •••• Editing/Adjustments Amfit32 Orthotic Fabrication System
becomes indented (“sinks”), and its outline fades. 2. Now using the mouse, move the arrow into the two-dimensional
view of the foot. Position the arrow on one corner of the proposed wedge. Press the left mouse button. The computer will draw a black square at the first point. These black squares are called control points.
3. Now move the arrow to the next corner of the wedge. Press the left mouse button. The computer will once again draw a square at the point defined. In addition, the computer draws a line between this point and the previous point. Continue defining points until the last point is defined.
4. To close the shape (connect the last point with the first point), double-click on the second-to-last point on the wedge.
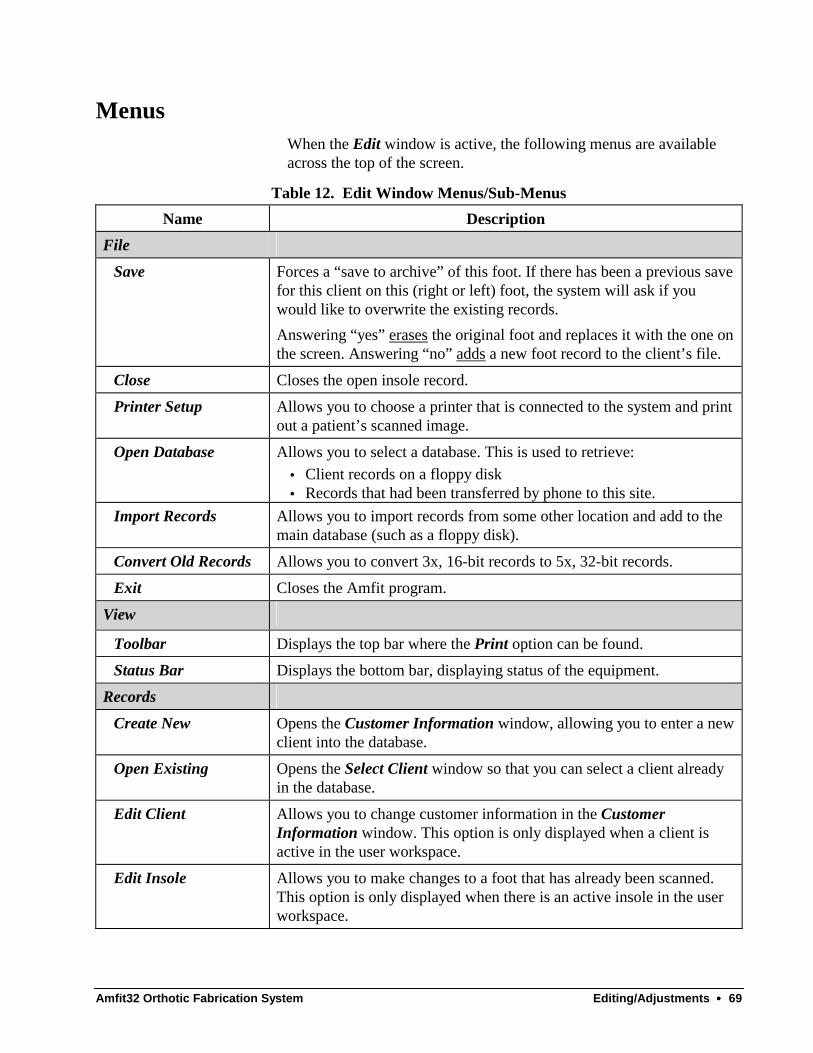
Amfit32 Orthotic Fabrication System Editing/Adjustments •••• 69
Menus When the Edit window is active, the following menus are available across the top of the screen.
Table 12. Edit Window Menus/Sub-Menus Name Description
File
Save Forces a “save to archive” of this foot. If there has been a previous save for this client on this (right or left) foot, the system will ask if you would like to overwrite the existing records. Answering “yes” erases the original foot and replaces it with the one on the screen. Answering “no” adds a new foot record to the client’s file.
Close Closes the open insole record.
Printer Setup Allows you to choose a printer that is connected to the system and print out a patient’s scanned image.
Open Database Allows you to select a database. This is used to retrieve: • Client records on a floppy disk • Records that had been transferred by phone to this site.
Import Records Allows you to import records from some other location and add to the main database (such as a floppy disk).
Convert Old Records Allows you to convert 3x, 16-bit records to 5x, 32-bit records.
Exit Closes the Amfit program.
View
Toolbar Displays the top bar where the Print option can be found.
Status Bar Displays the bottom bar, displaying status of the equipment.
Records
Create New Opens the Customer Information window, allowing you to enter a new client into the database.
Open Existing Opens the Select Client window so that you can select a client already in the database.
Edit Client Allows you to change customer information in the Customer Information window. This option is only displayed when a client is active in the user workspace.
Edit Insole Allows you to make changes to a foot that has already been scanned. This option is only displayed when there is an active insole in the user workspace.
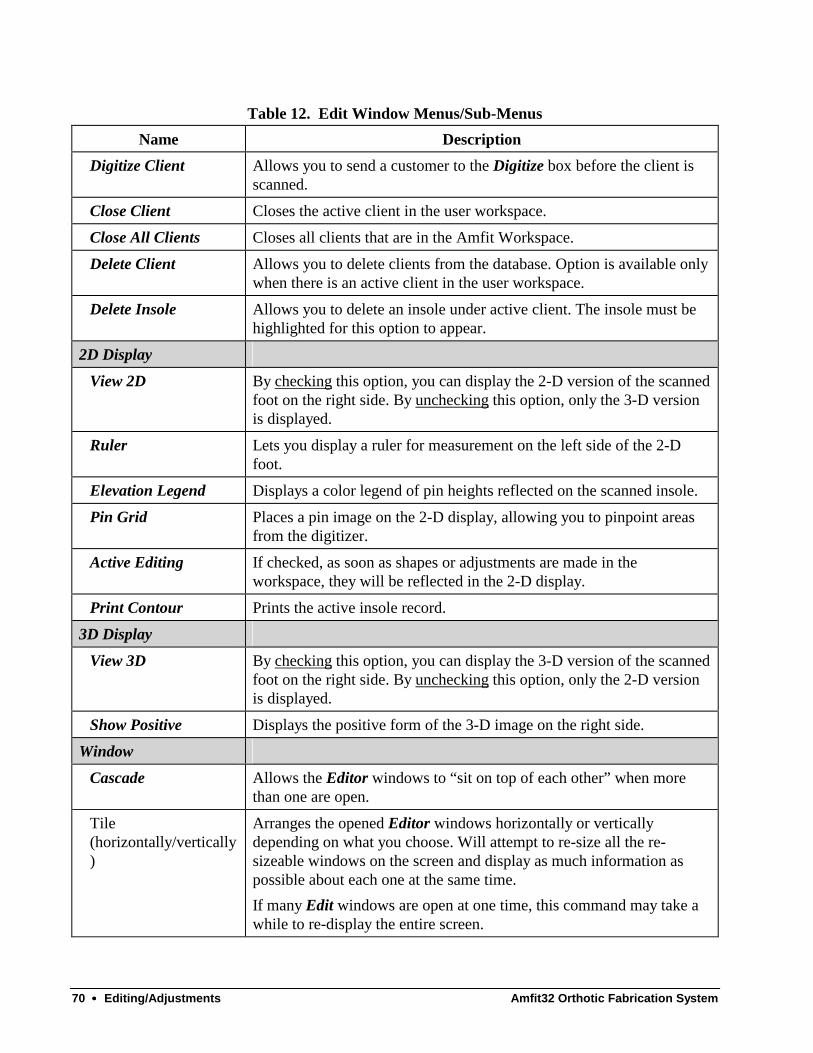
70 •••• Editing/Adjustments Amfit32 Orthotic Fabrication System
Table 12. Edit Window Menus/Sub-Menus Name Description
Digitize Client Allows you to send a customer to the Digitize box before the client is scanned.
Close Client Closes the active client in the user workspace.
Close All Clients Closes all clients that are in the Amfit Workspace.
Delete Client Allows you to delete clients from the database. Option is available only when there is an active client in the user workspace.
Delete Insole Allows you to delete an insole under active client. The insole must be highlighted for this option to appear.
2D Display
View 2D By checking this option, you can display the 2-D version of the scanned foot on the right side. By unchecking this option, only the 3-D version is displayed.
Ruler Lets you display a ruler for measurement on the left side of the 2-D foot.
Elevation Legend Displays a color legend of pin heights reflected on the scanned insole.
Pin Grid Places a pin image on the 2-D display, allowing you to pinpoint areas from the digitizer.
Active Editing If checked, as soon as shapes or adjustments are made in the workspace, they will be reflected in the 2-D display.
Print Contour Prints the active insole record.
3D Display
View 3D By checking this option, you can display the 3-D version of the scanned foot on the right side. By unchecking this option, only the 2-D version is displayed.
Show Positive Displays the positive form of the 3-D image on the right side.
Window
Cascade Allows the Editor windows to “sit on top of each other” when more than one are open.
Tile (horizontally/vertically)
Arranges the opened Editor windows horizontally or vertically depending on what you choose. Will attempt to re-size all the re-sizeable windows on the screen and display as much information as possible about each one at the same time. If many Edit windows are open at one time, this command may take a while to re-display the entire screen.

Amfit32 Orthotic Fabrication System Editing/Adjustments •••• 71
Table 12. Edit Window Menus/Sub-Menus Name Description
Arrange Icons Arranges minimized insole icons into order by date/time.
Options & Settings Displays the Options and Settings window.
Help
Contents Calls up Amfit Help system.
About Displays a “splash” screen displaying version and date information.

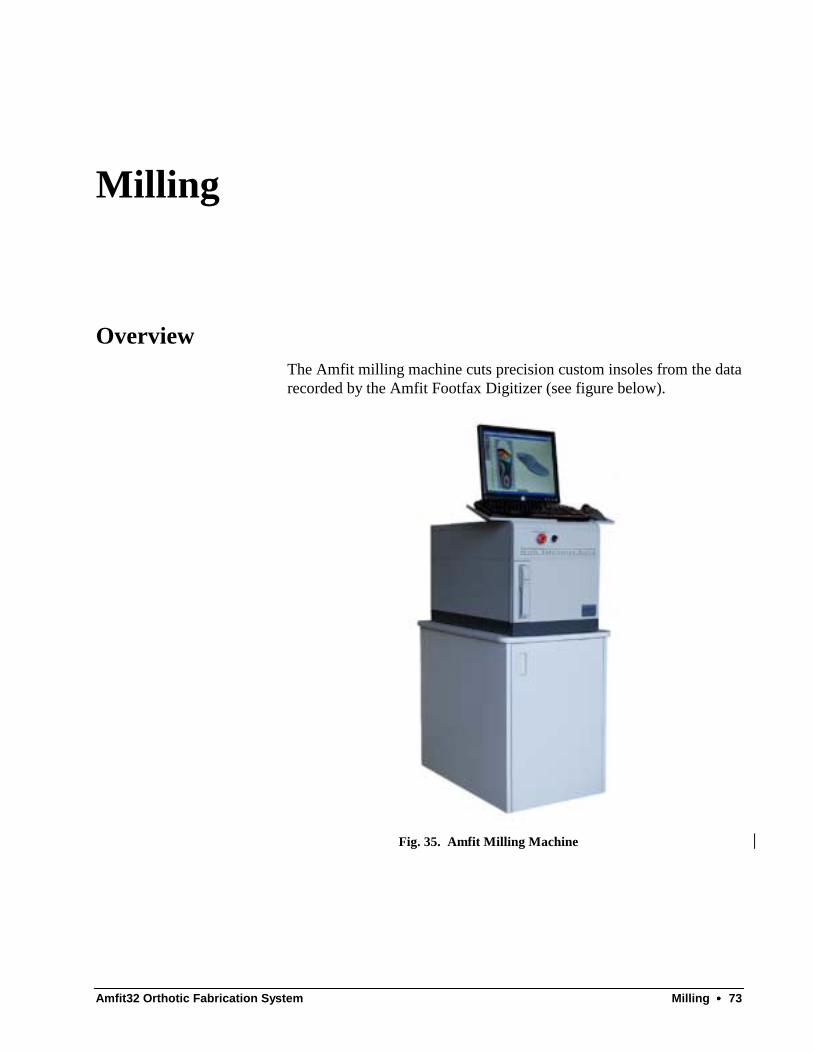
Amfit32 Orthotic Fabrication System Milling •••• 73
Milling
Overview The Amfit milling machine cuts precision custom insoles from the data recorded by the Amfit Footfax Digitizer (see figure below).
Fig. 35. Amfit Milling Machine
74 •••• Milling Amfit32 Orthotic Fabrication System
The Milling Process These are the only steps required to mill Amfit insoles: 1. Load a patient file. 2. Edit the contour and make computer adjustments (if required). 3. Select the proper insole blanks and secure one of them to the
insole tray. 4. Place the insole tray in the milling machine and lock it in place. 5. Drag-n-drop the patient’s foot record down into the “mill”
portion of the Amfit workspace. 6. Define the foot (left or right) minimum thickness, and whether
you want a positive or negative of the contour. 7. GO! 8. When the milling process is finished, remove the insole from the
insole tray. Vacuum the tray and the insole. 9. Finish off the insole by applying a topping material to the insole. 10. Repeat steps 3 through 9 for the other foot.
Enabling the Mill The milling machine has an “odometer” feature that will disable the mill after a certain number of insole cuts.
Each time you order insole blanks from Amfit, Inc., you will receive an email with an alpha-numeric code you will need to enter into your system. The code will “unlock” your mill for a specified number of cuts. The number of insoles ordered will determine that number.
To use the code, start up the Amfit program and then click on the Mill tab in the lower portion of the Workspace. On the Mill tab there will be a button named Add Cuts. Click on Add Cuts to display the Install Cuts window (see below). After you have entered the code into your system, click the Install button. See the following dialog box.
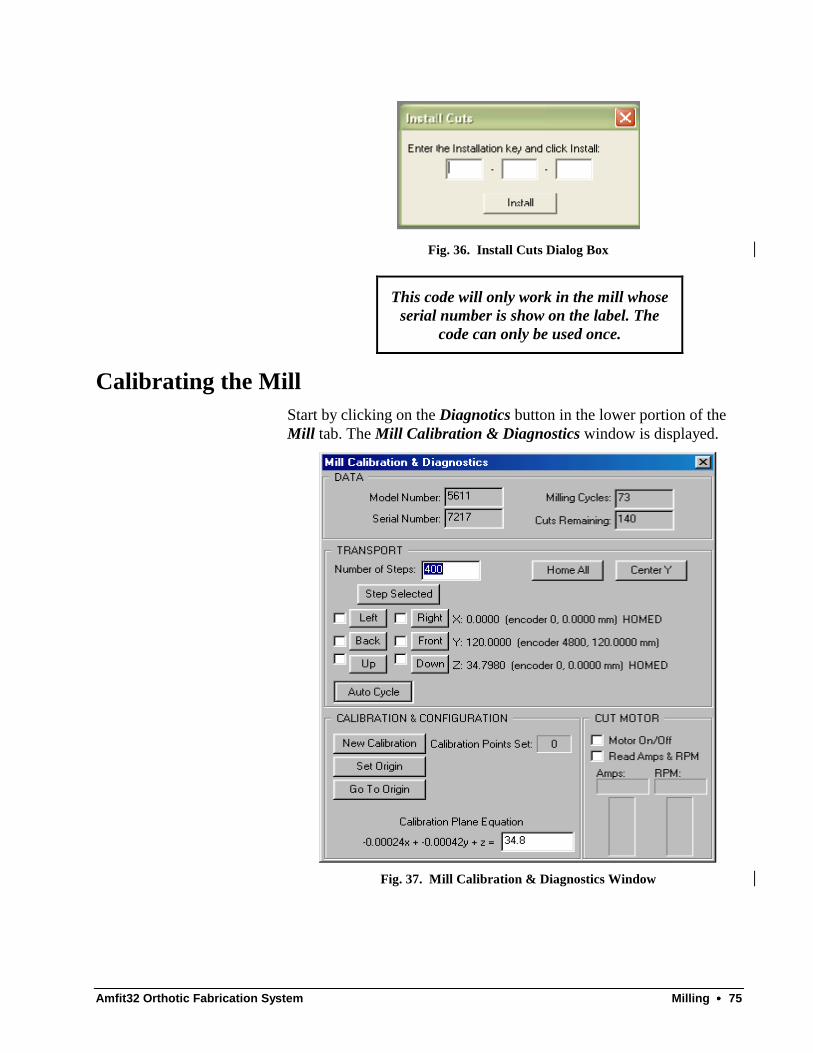
Amfit32 Orthotic Fabrication System Milling •••• 75
Fig. 36. Install Cuts Dialog Box
This code will only work in the mill whose serial number is show on the label. The
code can only be used once.
Calibrating the Mill Start by clicking on the Diagnotics button in the lower portion of the Mill tab. The Mill Calibration & Diagnostics window is displayed.
Fig. 37. Mill Calibration & Diagnostics Window
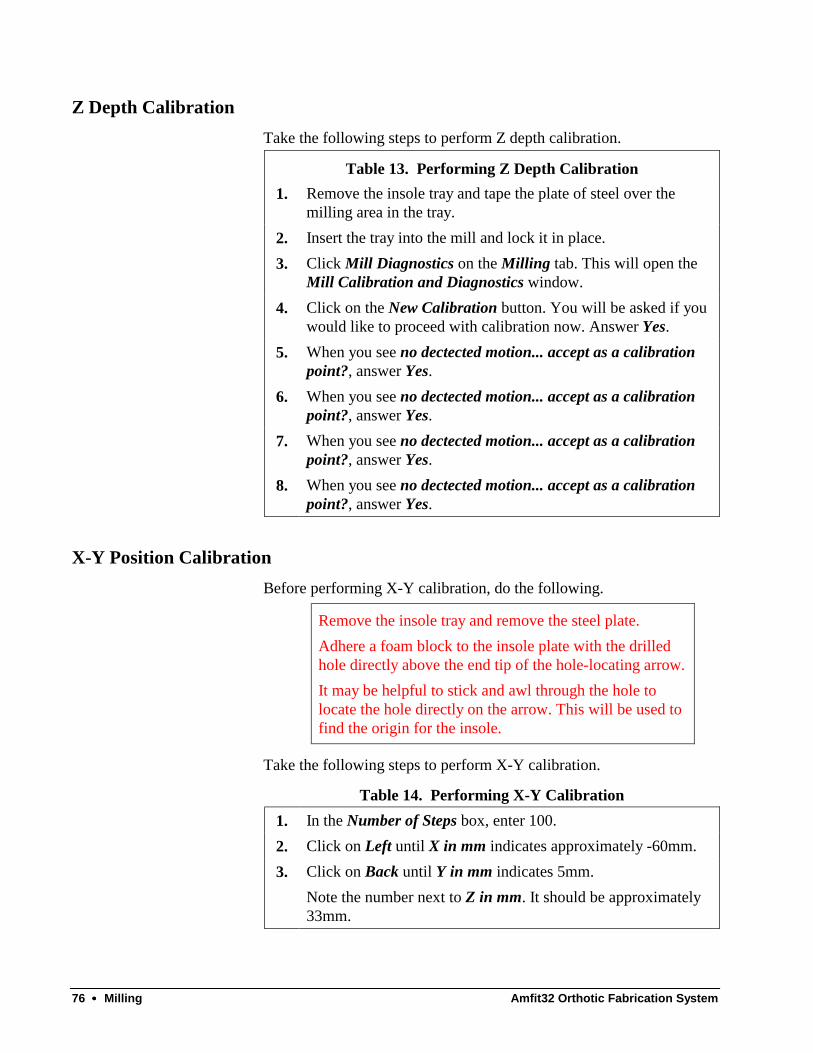
76 •••• Milling Amfit32 Orthotic Fabrication System
Z Depth Calibration Take the following steps to perform Z depth calibration.
Table 13. Performing Z Depth Calibration 1. Remove the insole tray and tape the plate of steel over the
milling area in the tray. 2. Insert the tray into the mill and lock it in place. 3. Click Mill Diagnostics on the Milling tab. This will open the
Mill Calibration and Diagnostics window. 4. Click on the New Calibration button. You will be asked if you
would like to proceed with calibration now. Answer Yes. 5. When you see no dectected motion... accept as a calibration
point?, answer Yes. 6. When you see no dectected motion... accept as a calibration
point?, answer Yes. 7. When you see no dectected motion... accept as a calibration
point?, answer Yes. 8. When you see no dectected motion... accept as a calibration
point?, answer Yes.
X-Y Position Calibration Before performing X-Y calibration, do the following.
Remove the insole tray and remove the steel plate. Adhere a foam block to the insole plate with the drilled hole directly above the end tip of the hole-locating arrow. It may be helpful to stick and awl through the hole to locate the hole directly on the arrow. This will be used to find the origin for the insole.
Take the following steps to perform X-Y calibration.
Table 14. Performing X-Y Calibration 1. In the Number of Steps box, enter 100. 2. Click on Left until X in mm indicates approximately -60mm. 3. Click on Back until Y in mm indicates 5mm.
Note the number next to Z in mm. It should be approximately 33mm.
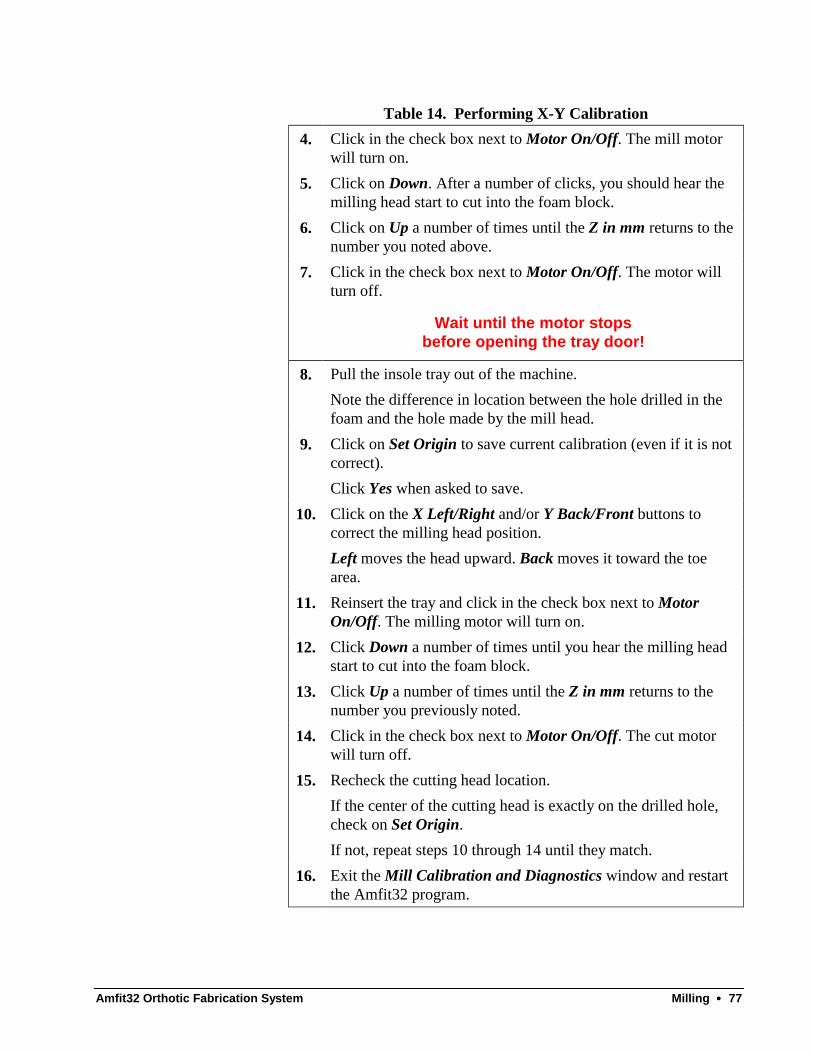
Amfit32 Orthotic Fabrication System Milling •••• 77
Table 14. Performing X-Y Calibration 4. Click in the check box next to Motor On/Off. The mill motor
will turn on. 5. Click on Down. After a number of clicks, you should hear the
milling head start to cut into the foam block. 6. Click on Up a number of times until the Z in mm returns to the
number you noted above. 7. Click in the check box next to Motor On/Off. The motor will
turn off.
Wait until the motor stops before opening the tray door!
8. Pull the insole tray out of the machine. Note the difference in location between the hole drilled in the foam and the hole made by the mill head.
9. Click on Set Origin to save current calibration (even if it is not correct). Click Yes when asked to save.
10. Click on the X Left/Right and/or Y Back/Front buttons to correct the milling head position. Left moves the head upward. Back moves it toward the toe area.
11. Reinsert the tray and click in the check box next to Motor On/Off. The milling motor will turn on.
12. Click Down a number of times until you hear the milling head start to cut into the foam block.
13. Click Up a number of times until the Z in mm returns to the number you previously noted.
14. Click in the check box next to Motor On/Off. The cut motor will turn off.
15. Recheck the cutting head location. If the center of the cutting head is exactly on the drilled hole, check on Set Origin. If not, repeat steps 10 through 14 until they match.
16. Exit the Mill Calibration and Diagnostics window and restart the Amfit32 program.

78 •••• Milling Amfit32 Orthotic Fabrication System
Insoles The Amfit pre-molded insole blank has been designed for quick, easy insole fabrication. The insole has many intrinsic features (see figure below).
General Five basic types of insoles are available for the Amfit System, and they are available in a wide variety of sizes and three pattern styles. In addition, special “blanks” are available for producing positive forms.
Fig. 38. Amfit Insole Blank
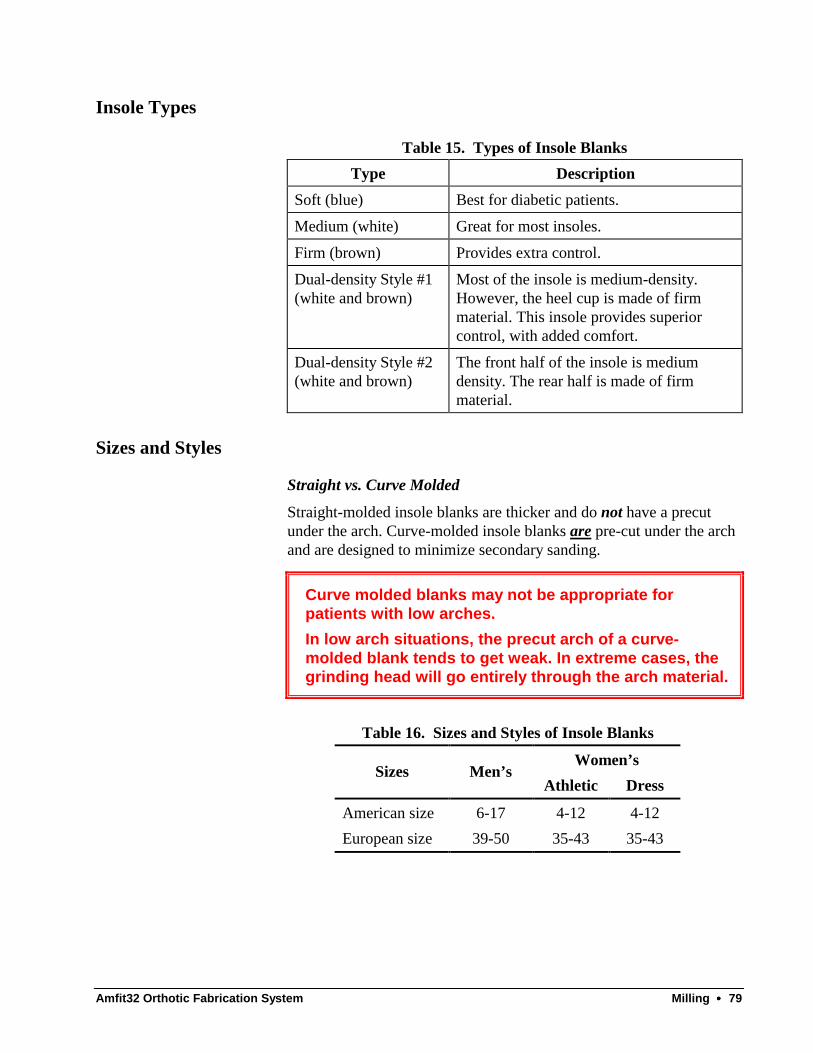
Amfit32 Orthotic Fabrication System Milling •••• 79
Insole Types
Table 15. Types of Insole Blanks Type Description
Soft (blue) Best for diabetic patients.
Medium (white) Great for most insoles.
Firm (brown) Provides extra control.
Dual-density Style #1 (white and brown)
Most of the insole is medium-density. However, the heel cup is made of firm material. This insole provides superior control, with added comfort.
Dual-density Style #2 (white and brown)
The front half of the insole is medium density. The rear half is made of firm material.
Sizes and Styles
Straight vs. Curve Molded
Straight-molded insole blanks are thicker and do not have a precut under the arch. Curve-molded insole blanks are pre-cut under the arch and are designed to minimize secondary sanding.
Curve molded blanks may not be appropriate for patients with low arches. In low arch situations, the precut arch of a curve-molded blank tends to get weak. In extreme cases, the grinding head will go entirely through the arch material.
Table 16. Sizes and Styles of Insole Blanks
Women’s Sizes Men’s
Athletic Dress
American size 6-17 4-12 4-12 European size 39-50 35-43 35-43
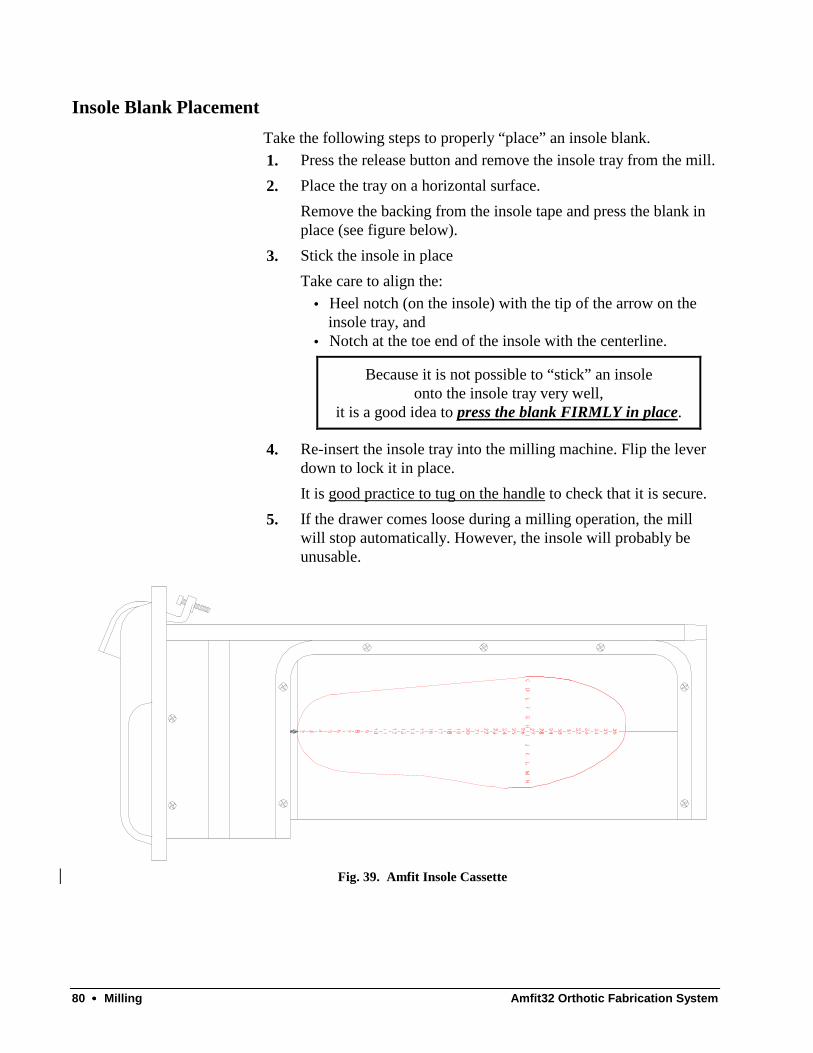
80 •••• Milling Amfit32 Orthotic Fabrication System
Insole Blank Placement Take the following steps to properly “place” an insole blank. 1. Press the release button and remove the insole tray from the mill. 2. Place the tray on a horizontal surface.
Remove the backing from the insole tape and press the blank in place (see figure below).
3. Stick the insole in place Take care to align the:
• Heel notch (on the insole) with the tip of the arrow on the insole tray, and
• Notch at the toe end of the insole with the centerline.
Because it is not possible to “stick” an insole onto the insole tray very well,
it is a good idea to press the blank FIRMLY in place.
4. Re-insert the insole tray into the milling machine. Flip the lever down to lock it in place. It is good practice to tug on the handle to check that it is secure.
5. If the drawer comes loose during a milling operation, the mill will stop automatically. However, the insole will probably be unusable.
Fig. 39. Amfit Insole Cassette
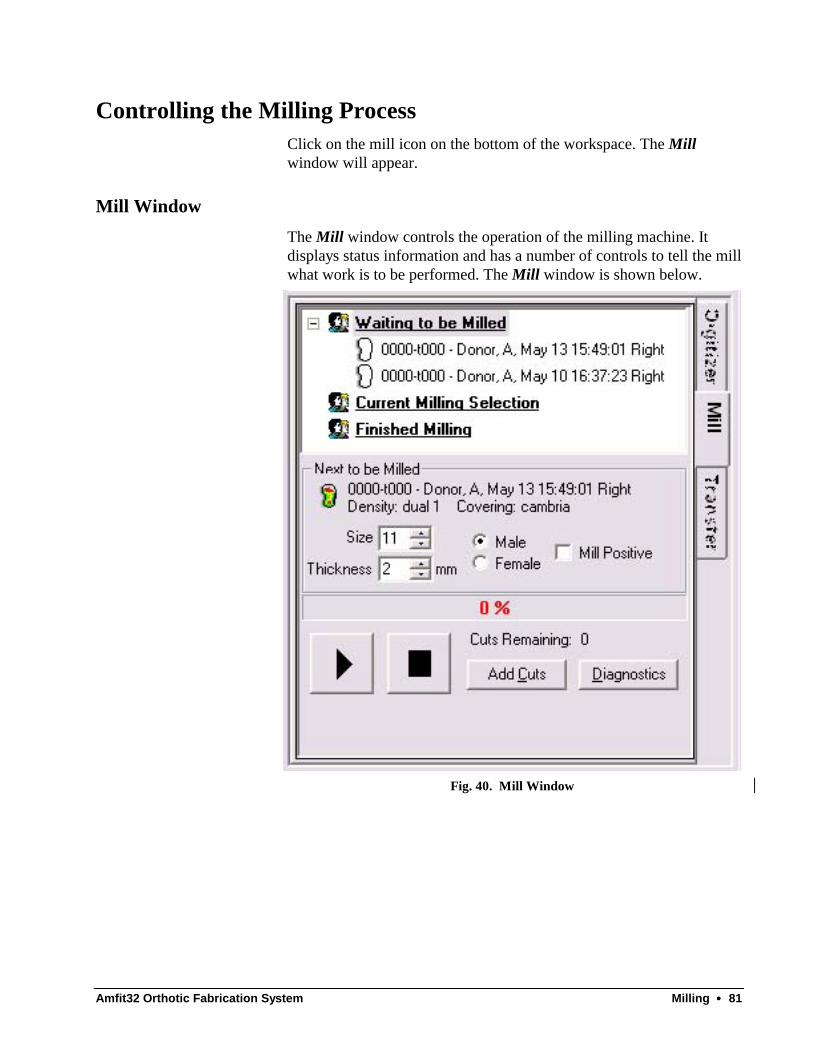
Amfit32 Orthotic Fabrication System Milling •••• 81
Controlling the Milling Process Click on the mill icon on the bottom of the workspace. The Mill window will appear.
Mill Window The Mill window controls the operation of the milling machine. It displays status information and has a number of controls to tell the mill what work is to be performed. The Mill window is shown below.
Fig. 40. Mill Window

82 •••• Milling Amfit32 Orthotic Fabrication System
Command Overview
The following table gives an overview of the “command” fields.
Field Name Type Description Waiting to be Milled
Reference Displays patient files that are in the queue to be milled.
Current Milling Selection
Reference Displays which foot is being milled.
Finished Milling
Reference Displays which feet files have completed the milling process.
Insole Size Control Displays the current patient’s default insole size.
This must be the size of the blankthat you will actually be milling.
This number may be changed at milling time. If changed, it will not change the default insole size entered under client information.
Male Control Informs the mill that a male insole blank is in the insole tray.
Female Control Informs the mill that a female insole blank is in the insole tray.
Thickness Control Allows you to manually set the minimum insole thickness.
Mill Positive
Control Instructs the mill to carve a positive out of the insole selected.
GO Control Instructs the mill to start milling the blank that has been loaded in the insole tray. (Play button.)
Stop Control Halts the milling process. It is normal for the computer to sometimes respond slowly to this button at some places during the cut process. (Stop button.)
Cuts Remaining
Reference Displays the number of cuts remaining on the milling machine before more need to be added.
Add Cuts Control Allows you to add cuts to the Amfit system after a blank order.

Amfit32 Orthotic Fabrication System Milling •••• 83
Field Name Type Description Diagnostics Control Diagnostic tool: mostly used by Amfit
Technical Support.
The length of time it takes between the time you click on GO and when the milling starts will vary. It depends upon the number of corrections made to the contour in the editing window. It will range from 5 seconds to 30 seconds, or more.

84 •••• Milling Amfit32 Orthotic Fabrication System
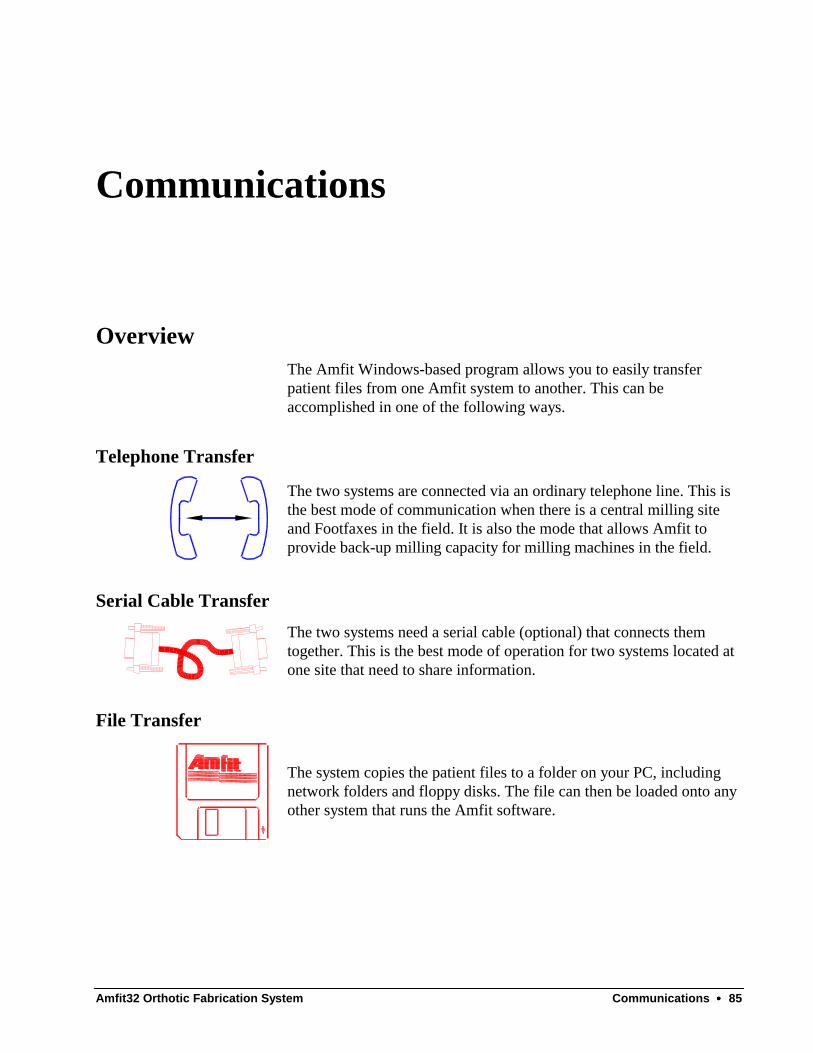
Amfit32 Orthotic Fabrication System Communications •••• 85
Communications
Overview The Amfit Windows-based program allows you to easily transfer patient files from one Amfit system to another. This can be accomplished in one of the following ways.
Telephone Transfer
The two systems are connected via an ordinary telephone line. This is the best mode of communication when there is a central milling site and Footfaxes in the field. It is also the mode that allows Amfit to provide back-up milling capacity for milling machines in the field.
Serial Cable Transfer
The two systems need a serial cable (optional) that connects them together. This is the best mode of operation for two systems located at one site that need to share information.
File Transfer
The system copies the patient files to a folder on your PC, including network folders and floppy disks. The file can then be loaded onto any other system that runs the Amfit software.

86 •••• Communications Amfit32 Orthotic Fabrication System
FTP Transfer
This is the language used for file transfer from computer to computer across the Internet. An anonymous FTP is a file transfer between locations that does not require users to identify themselves with a password or log-in
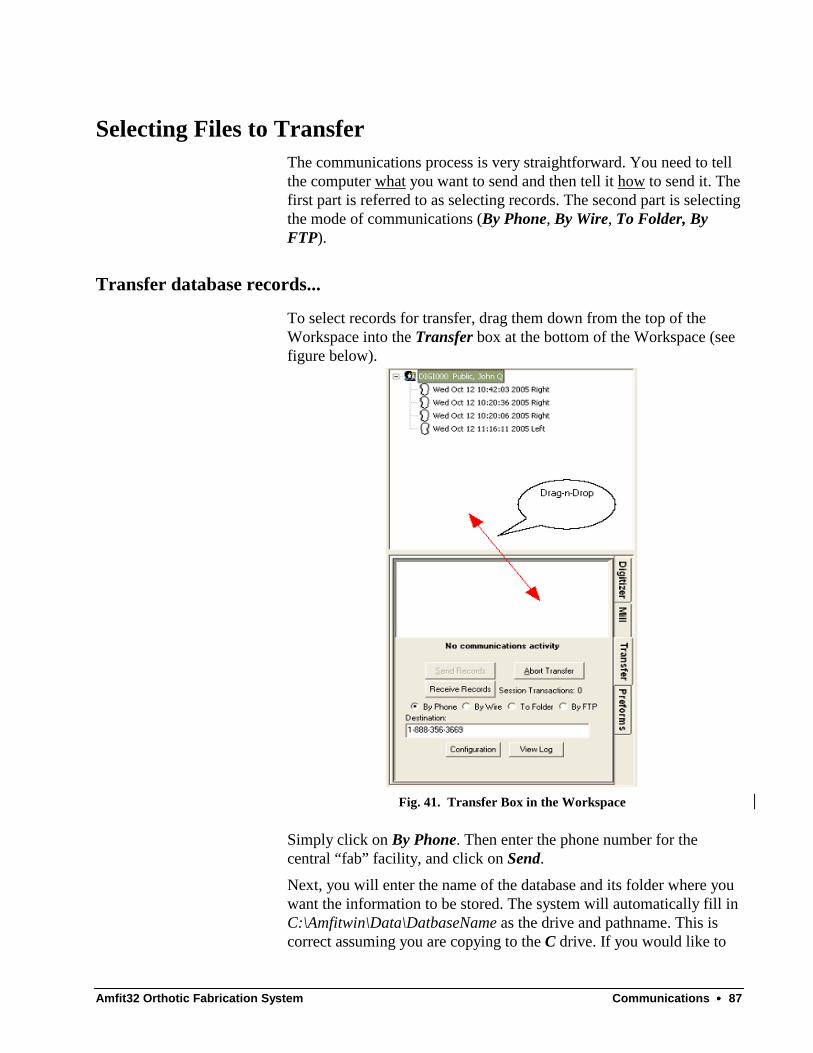
Amfit32 Orthotic Fabrication System Communications •••• 87
Selecting Files to Transfer The communications process is very straightforward. You need to tell the computer what you want to send and then tell it how to send it. The first part is referred to as selecting records. The second part is selecting the mode of communications (By Phone, By Wire, To Folder, By FTP).
Transfer database records...
To select records for transfer, drag them down from the top of the Workspace into the Transfer box at the bottom of the Workspace (see figure below).
Fig. 41. Transfer Box in the Workspace
Simply click on By Phone. Then enter the phone number for the central “fab” facility, and click on Send.
Next, you will enter the name of the database and its folder where you want the information to be stored. The system will automatically fill in C:\Amfitwin\Data\DatbaseName as the drive and pathname. This is correct assuming you are copying to the C drive. If you would like to

88 •••• Communications Amfit32 Orthotic Fabrication System
copy the database to a floppy diskette, simply erase what is in the box and type A:\Data\DatabaseName.
Send Customer Records Command Overview By Phone By Wire To Folder By FTP
When By Phone is checked, the computer will send files to another system via modem. When By Wire is checked, the computer sends files via a serial cable between the two systems. When To Folder is selected, it sends the new database to a specified folder. You must enter a user-defined name in the text box after C:\. When By FTP is selected, it sends the new database to Amfit’s FTP site, which will then be received by the central fabrication department.
Phone Number When By Phone is checked, the system sends files to the number entered here. The computer automatically remembers the last number dialed.
Drive:\Path\Name Enter the name of the database to be written to the folder here. The system automatically displays C:\ as the drive.
Send Records Start the transfer. Abort Transfer Abort the process.
Table 17. Performing Operations in Select Records To… Do this… Delete an individual record
Right click on the record you would like to delete from the transfer portion of the workspace. Then choose Remove Insole.
Delete multiple records
Right click on a record in the transfer portion of the workspace. Then choose Remove All Insoles.

Amfit32 Orthotic Fabrication System Communications •••• 89
Table 17. Performing Operations in Select Records To… Do this… Add individual records
Click on the picture of the “head” above the Workspace. The Select Customer window will appear. Enter information about the customer’s name and click on Open. The customer will now appear with their digitized feet in the Workspace. Drag-n-drop the feet you would like to transfer into the transfer box in the lower portion of the Workspace.
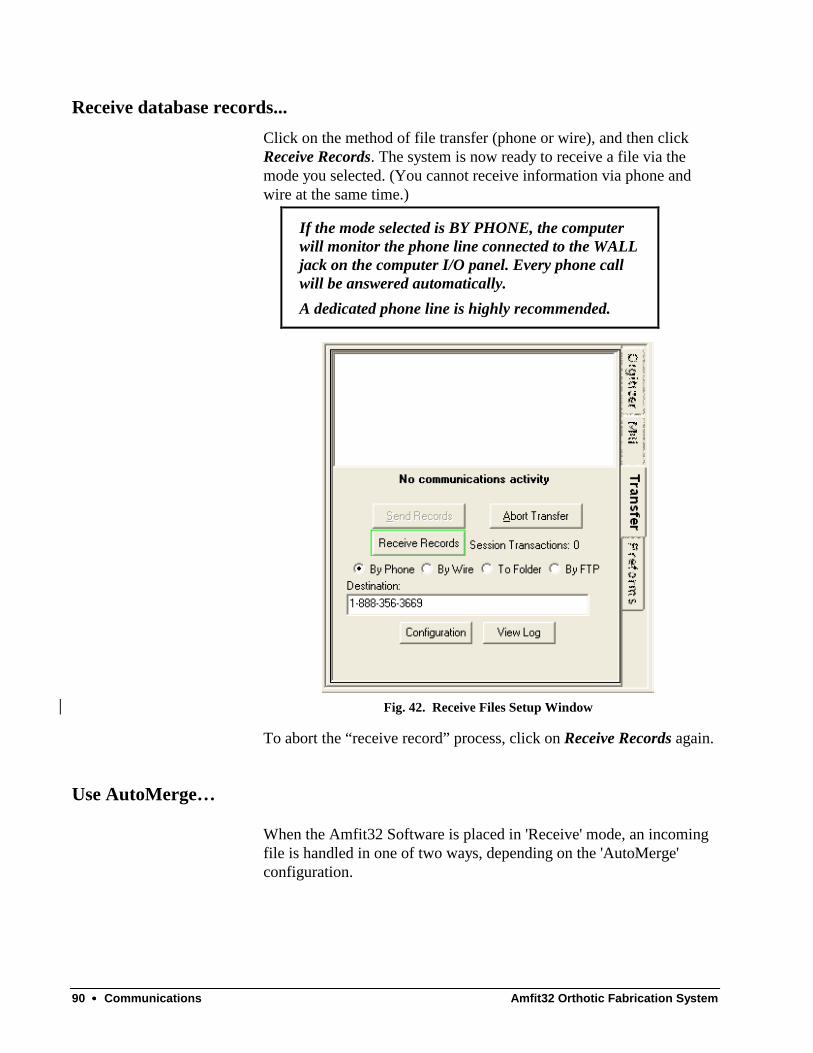
90 •••• Communications Amfit32 Orthotic Fabrication System
Receive database records... Click on the method of file transfer (phone or wire), and then click Receive Records. The system is now ready to receive a file via the mode you selected. (You cannot receive information via phone and wire at the same time.)
If the mode selected is BY PHONE, the computer will monitor the phone line connected to the WALL jack on the computer I/O panel. Every phone call will be answered automatically. A dedicated phone line is highly recommended.
Fig. 42. Receive Files Setup Window
To abort the “receive record” process, click on Receive Records again.
Use AutoMerge…
When the Amfit32 Software is placed in 'Receive' mode, an incoming file is handled in one of two ways, depending on the 'AutoMerge' configuration.
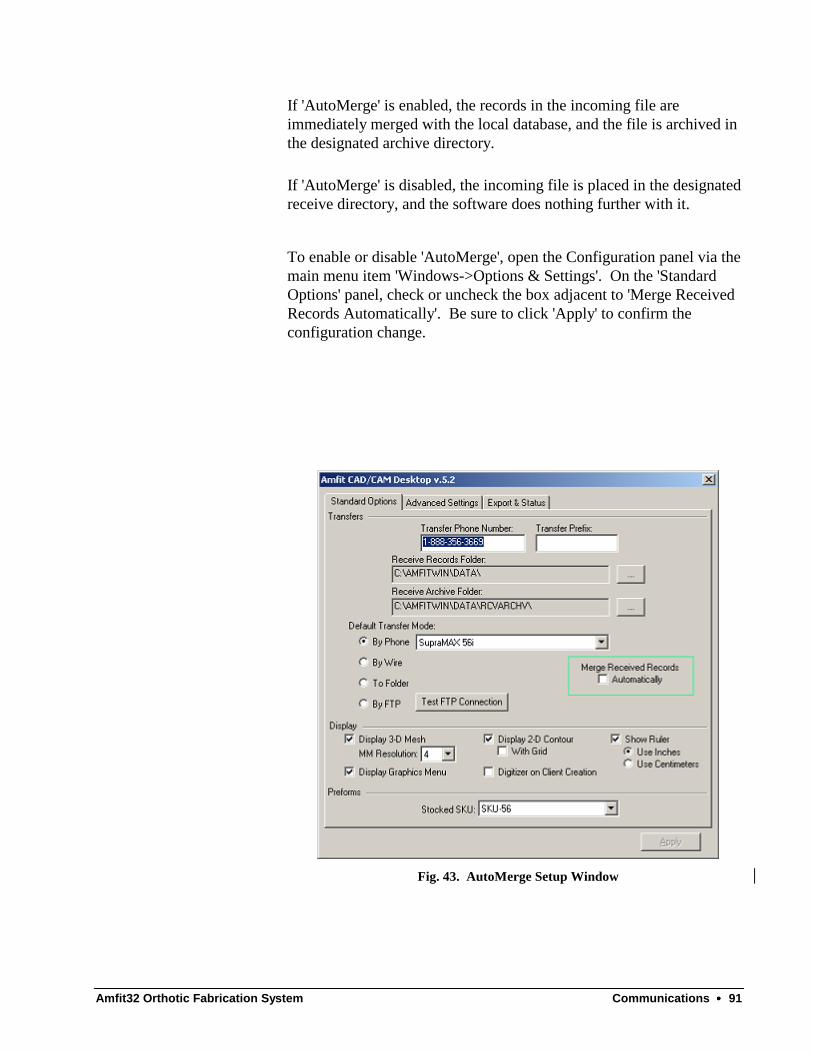
Amfit32 Orthotic Fabrication System Communications •••• 91
If 'AutoMerge' is enabled, the records in the incoming file are immediately merged with the local database, and the file is archived in the designated archive directory.
If 'AutoMerge' is disabled, the incoming file is placed in the designated receive directory, and the software does nothing further with it.
To enable or disable 'AutoMerge', open the Configuration panel via the main menu item 'Windows->Options & Settings'. On the 'Standard Options' panel, check or uncheck the box adjacent to 'Merge Received Records Automatically'. Be sure to click 'Apply' to confirm the configuration change.
Fig. 43. AutoMerge Setup Window


Amfit32 Orthotic Fabrication System Maintenance •••• 93
Maintenance
General The Amfit system is designed for years of service with little attention. However, some maintenance is recommended.
After each patient After each use, clean the Digitizer with a damp (not dripping), lint-free cloth. This ensures that it will be clean for the next patient.
Daily At the end of each day it is recommended that you do the following:
1. Press Lock Pins to lock the top of the Digitizer. 2. Vacuum the Digitizer pins. 3. Reset the pins by pressing Reset. Then press Pins Up. 4. Verify that all the pins are free to move up and down. 5. Press Reset to lower the pins again.
Every 10 pairs After ten pairs, you must clean the dust drawer.
1. Turn the system power off. 2. Pull the dust drawer out from under the milling machine. 3. Dump the contents into a garbage can. 4. Carefully slide the drawer back into the mill.

94 •••• Maintenance Amfit32 Orthotic Fabrication System
Every 1000 pairs On the mill, clean the filters at the rear of the machine:
Air fans There are two filters in front of the air fans. Remove their plastic grilles, and vacuum the filters until they are clean.
Dust drawer The dust drawer filter is located at the lower rear of the machine. Remove the filter and vacuum it until it is clean. Replace the filter if it is damaged.
Annual service The Amfit system should be serviced annually: contact Amfit.
Moving the system The Amfit system can be moved using normal care in handling. To minimize the risk of damage, we recommend using the original shipping containers.

Amfit32 Orthotic Fabrication System Troubleshooting •••• 95
Troubleshooting
General This guide is not intended to train anyone to become an experienced Amfit service technician. Instead, it provides you with a summary of common, simple problems—and their solutions.
The troubleshooting process...
1. The first task when troubleshooting a system is to try to ascertain the system “block” that is at fault. The Amfit System consists of two main systems: • The milling machine/dust tray • The Digitizer.
2. Inside each of these machines, there are also a number of sub-systems. If you encounter a problem while operating either machine, you may already have a good idea which system “block” is at fault.
3. Before resorting to the troubleshooting lists, make sure that: • The system is connected to the AC line, that it is turned on,
and that there is power at the outlet. • All cable connections are secure and (where applicable),
screwed into place. • All fuses are good.
The Milling machine has two fuses. The Digitizer has none. The milling machine fuses are located just above the power
switch. To remove them, you will need a tool: a small standard screwdriver works well. Insert the tip into the indentation below the fuse drawer and press up and inward. The drawer containing the fuses should pop out. Replace fuses with the same type and voltage rating.
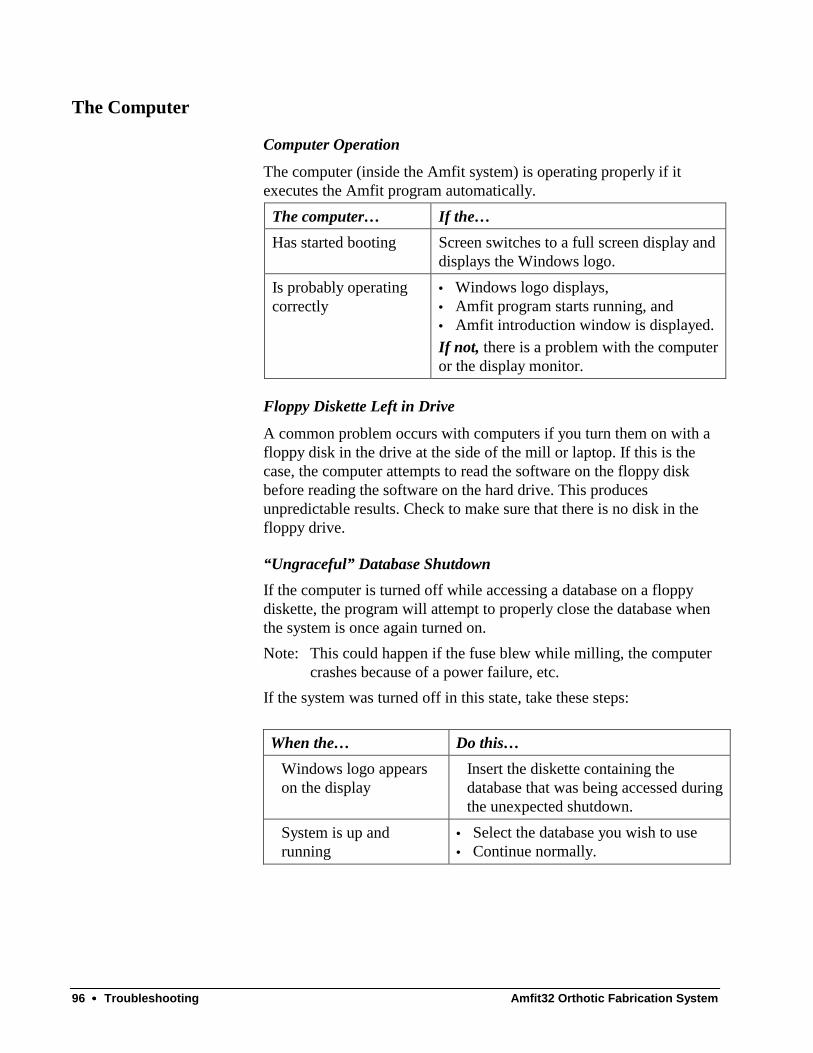
96 •••• Troubleshooting Amfit32 Orthotic Fabrication System
The Computer
Computer Operation
The computer (inside the Amfit system) is operating properly if it executes the Amfit program automatically.
The computer… If the… Has started booting Screen switches to a full screen display and
displays the Windows logo. Is probably operating correctly
• Windows logo displays, • Amfit program starts running, and • Amfit introduction window is displayed. If not, there is a problem with the computer or the display monitor.
Floppy Diskette Left in Drive
A common problem occurs with computers if you turn them on with a floppy disk in the drive at the side of the mill or laptop. If this is the case, the computer attempts to read the software on the floppy disk before reading the software on the hard drive. This produces unpredictable results. Check to make sure that there is no disk in the floppy drive.
“Ungraceful” Database Shutdown
If the computer is turned off while accessing a database on a floppy diskette, the program will attempt to properly close the database when the system is once again turned on. Note: This could happen if the fuse blew while milling, the computer
crashes because of a power failure, etc. If the system was turned off in this state, take these steps:
When the… Do this… Windows logo appears on the display
Insert the diskette containing the database that was being accessed during the unexpected shutdown.
System is up and running
• Select the database you wish to use • Continue normally.
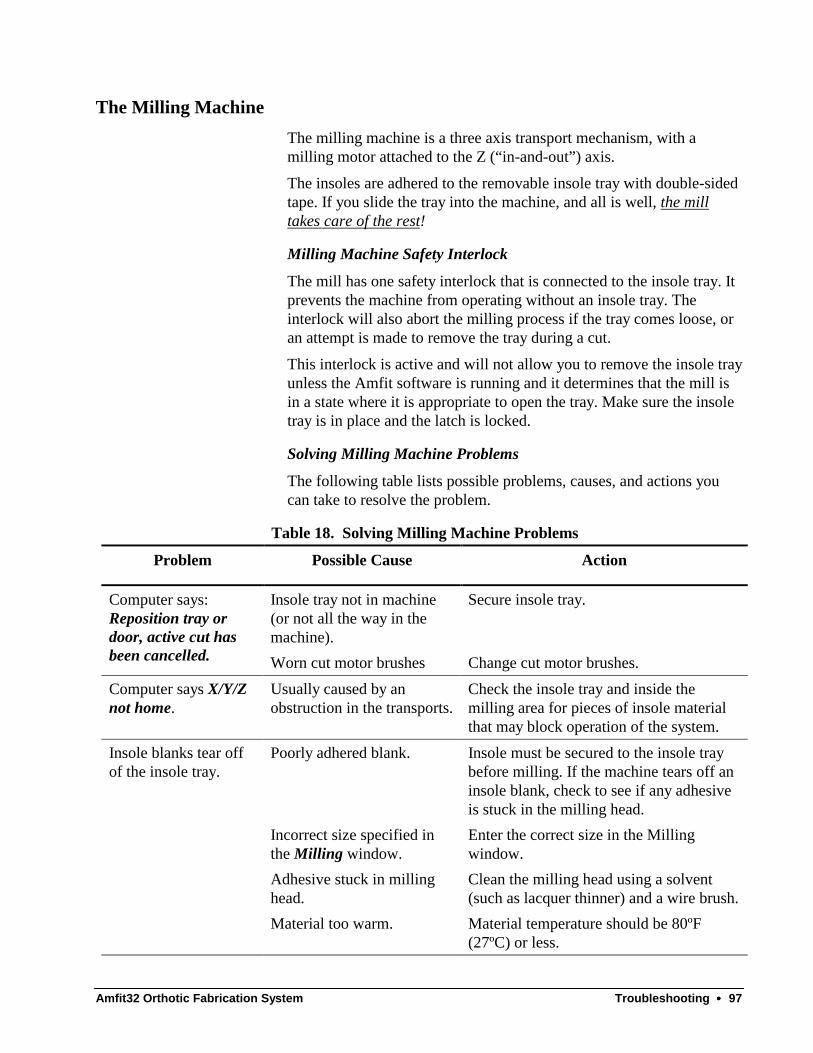
Amfit32 Orthotic Fabrication System Troubleshooting •••• 97
The Milling Machine The milling machine is a three axis transport mechanism, with a milling motor attached to the Z (“in-and-out”) axis.
The insoles are adhered to the removable insole tray with double-sided tape. If you slide the tray into the machine, and all is well, the mill takes care of the rest!
Milling Machine Safety Interlock
The mill has one safety interlock that is connected to the insole tray. It prevents the machine from operating without an insole tray. The interlock will also abort the milling process if the tray comes loose, or an attempt is made to remove the tray during a cut.
This interlock is active and will not allow you to remove the insole tray unless the Amfit software is running and it determines that the mill is in a state where it is appropriate to open the tray. Make sure the insole tray is in place and the latch is locked.
Solving Milling Machine Problems
The following table lists possible problems, causes, and actions you can take to resolve the problem.
Table 18. Solving Milling Machine Problems
Problem Possible Cause Action
Insole tray not in machine (or not all the way in the machine).
Secure insole tray. Computer says: Reposition tray or door, active cut has been cancelled. Worn cut motor brushes Change cut motor brushes. Computer says X/Y/Z not home.
Usually caused by an obstruction in the transports.
Check the insole tray and inside the milling area for pieces of insole material that may block operation of the system.
Insole blanks tear off of the insole tray.
Poorly adhered blank. Insole must be secured to the insole tray before milling. If the machine tears off an insole blank, check to see if any adhesive is stuck in the milling head.
Incorrect size specified in the Milling window.
Enter the correct size in the Milling window.
Adhesive stuck in milling head.
Clean the milling head using a solvent (such as lacquer thinner) and a wire brush.
Material too warm. Material temperature should be 80ºF (27ºC) or less.
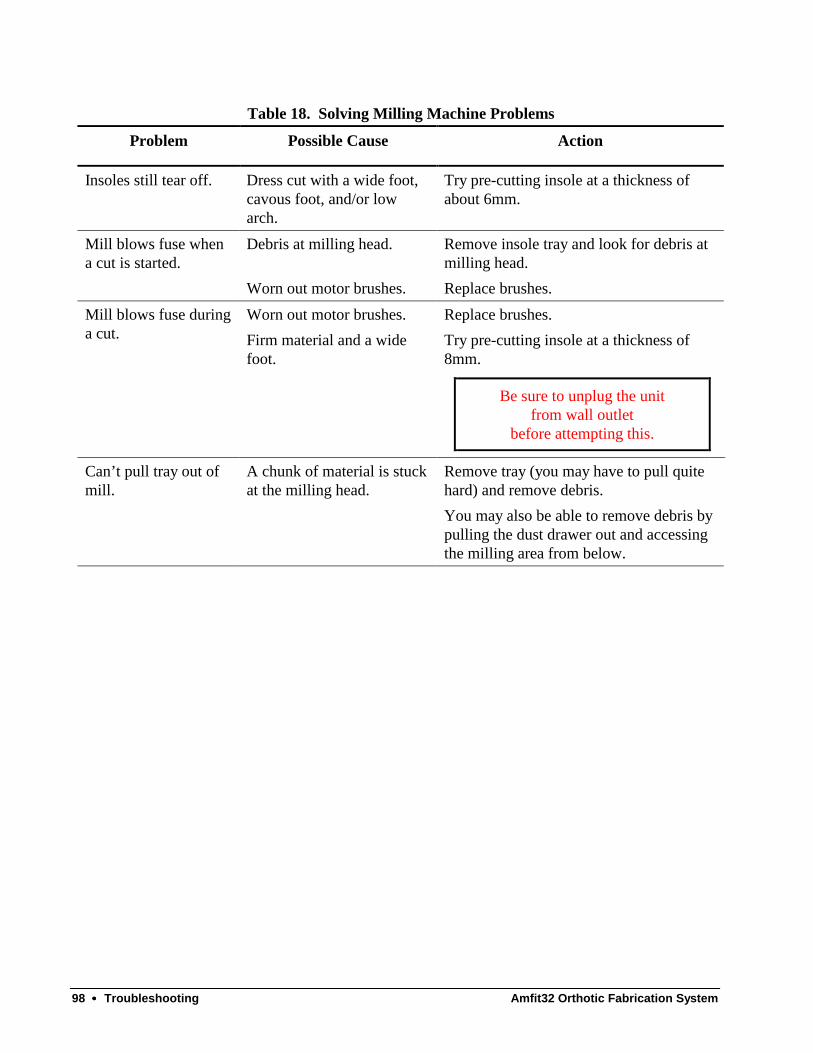
98 •••• Troubleshooting Amfit32 Orthotic Fabrication System
Table 18. Solving Milling Machine Problems
Problem Possible Cause Action
Insoles still tear off. Dress cut with a wide foot, cavous foot, and/or low arch.
Try pre-cutting insole at a thickness of about 6mm.
Mill blows fuse when a cut is started.
Debris at milling head. Remove insole tray and look for debris at milling head.
Worn out motor brushes. Replace brushes. Worn out motor brushes. Replace brushes. Mill blows fuse during
a cut. Firm material and a wide foot.
Try pre-cutting insole at a thickness of 8mm.
Be sure to unplug the unit from wall outlet
before attempting this.
Can’t pull tray out of mill.
A chunk of material is stuck at the milling head.
Remove tray (you may have to pull quite hard) and remove debris. You may also be able to remove debris by pulling the dust drawer out and accessing the milling area from below.

Amfit32 Orthotic Fabrication System Troubleshooting •••• 99
The Digitizer The Digitizer converts the height (or “elevation”) of the sensor pins into numbers that the computer uses to define the shape of the bottom of the patient’s foot.
The basic operation of the machine is quite simple.
1. When activated, the green Ready light illuminates on the control panel.
2. When the Pins Up button is pressed, the system provides air to the gauge on the control panel and the bladder located under the sensor pin array. This raises the pins.
3. Next, when the Lock button is pressed, it sends air pressure to an array of tubes between the rows of pins to lock the pins in place.
4. When the Scan (digitize) button is pressed, the scanner system measures the elevation of each of the 576 pins.
5. During this process, the system also pumps the air out of the bladder. This way, when the Reset key is pressed:
• All of the pins drop almost instantly, and • The unit is ready for the next impression.
6. The computer then analyzes the pin height data to determine: • Was the left/right foot digitized? • Is the foot centered? • Is the foot too far forward? • Was the foot level (front/rear) on the digitizer?

100 •••• Troubleshooting Amfit32 Orthotic Fabrication System
Solving Digitizer Problems
The following table lists possible problems, causes, and actions you can take to resolve a problem.
Table 19. Solving Digitizer Problems
Problem Possible Cause Action
Pins don’t rise, or they rise slowly.
Pins Up pressure is set too low.
Increase Pins Up pressure to mid-range on the bar display.
Some pins stay up after the Reset is pressed.
Dust or dirt is in the top of system.
Some slightly sticky pins are normal. They should drop with a slight touch. Frequent vacuuming of the top of the Digitizer will minimize this problem.
Pins don’t lock. Response delay. The computer normally “looks” at the control panel switches four times a second. Press the switch long enough so that the computer detects the switch. The computer will “look” at the control panel less often when milling or printing and digitizing at the same time.

Amfit32 Orthotic Fabrication System Ordering Supplies from Amfit •••• 101
Ordering Supplies from Amfit
Placing an Amfit Order Now that you are an Amfit customer, you will be purchasing supplies for your new Amfit system.
Available Materials
A wide variety of materials are available from Amfit to serve your customer needs.
Contacting Amfit
Orders can be placed by:
Fax 1-360-566-1380 Phone 1-800-356-FOOT toll-free (1-800-356-3668)
Shipments
We usually ship your order within 48 hours of receipt.
To speed processing of your order, please use the Amfit order form
(located at the end of this section).
Amfit Credit Policy
Amfit customers in good standing receive “net 30” terms.

102 •••• Ordering Supplies from Amfit Amfit32 Orthotic Fabrication System
Returns/Credit If Amfit has made an error in an order (shipped the wrong item), we will accept a return and ship out the correct item. If Amfit shipped short on an item, we will either issue credit for the item or ship out the shorted material(s).
If materials are defective due to manufacturing or workmanship errors, we will repair or replace them at our option. All claims must be made within 30 days.
Amfit will issue credit… For blanks that are destroyed due to machine failure.
Amfit will not issue credit… For blanks that were improperly recorded, poorly adhered in the milling machine, or otherwise destroyed or defective due to operator error.
Amfit Supplies
Orthotic Blanks Amfit orthotic blanks are available in the following densities (hardness).
Table 20. Amfit Orthotic Blanks Density Description Comments
Soft Shore A durometer of less than 30. Ideal for diabetic patients. Material is blue in color.
Medium Shore A durometer of between 30 and 45.
Ideal for most patients. Provides control with comfort.
Firm Shore A durometer greater than 55. Provides maximum control. Dual-Density #1 Most of the blank is medium
density, with a horse shoe of firm material around the heel.
Provides extra control in the heel, while still maintaining a high degree of comfort. There is a premium for the dual density material.
Dual-Density #2 (Men’s only)
Most of the blank is medium density, with a firm material in the heel.
Provides extra control in the heel, while still maintaining a high degree of comfort. There is a premium for the dual-density material.
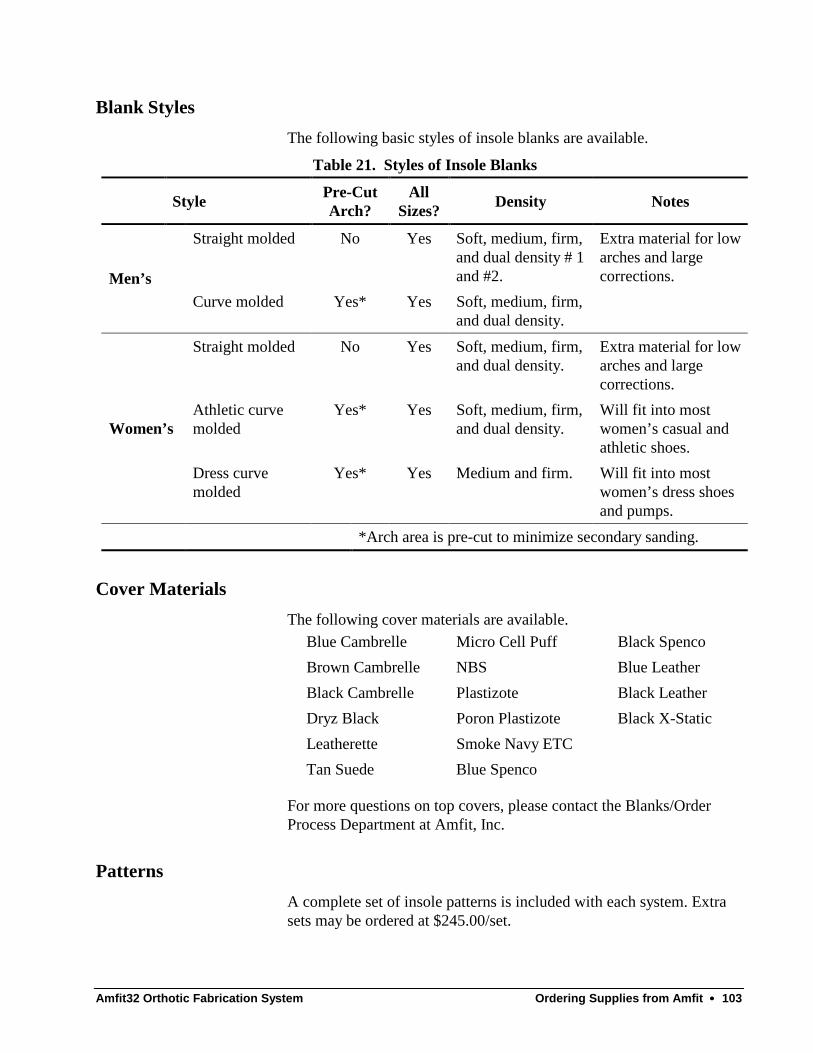
Amfit32 Orthotic Fabrication System Ordering Supplies from Amfit •••• 103
Blank Styles The following basic styles of insole blanks are available.
Table 21. Styles of Insole Blanks
Style Pre-CutArch?
All Sizes? Density Notes
Straight molded No Yes Soft, medium, firm, and dual density # 1 and #2.
Extra material for low arches and large corrections. Men’s
Curve molded Yes* Yes Soft, medium, firm, and dual density.
Straight molded No Yes Soft, medium, firm, and dual density.
Extra material for low arches and large corrections.
Athletic curve molded
Yes* Yes Soft, medium, firm, and dual density.
Will fit into most women’s casual and athletic shoes.
Women’s
Dress curve molded
Yes* Yes Medium and firm. Will fit into most women’s dress shoes and pumps.
*Arch area is pre-cut to minimize secondary sanding.
Cover Materials The following cover materials are available.
Blue Cambrelle Micro Cell Puff Black Spenco Brown Cambrelle NBS Blue Leather Black Cambrelle Plastizote Black Leather Dryz Black Poron Plastizote Black X-Static Leatherette Smoke Navy ETC Tan Suede Blue Spenco
For more questions on top covers, please contact the Blanks/Order Process Department at Amfit, Inc.
Patterns A complete set of insole patterns is included with each system. Extra sets may be ordered at $245.00/set.

104 •••• Ordering Supplies from Amfit Amfit32 Orthotic Fabrication System
Please fill out and fax to Natalya Sova at (360) 566-1380
Fig. 44. Amfit Order Form

Amfit32 Orthotic Fabrication System Glossary of Terms •••• 105
Glossary of Terms
Adjustment A modification to the contour measured by the Digitizer. The modification’s purpose is to create some positive effect.
Bar graph display A series of lights to provide a visual indication of a quantity. On the Amfit Footfax Digitizer, it indicates the amount of support provided by the scanner during casting.
CAD/CAM Computer-Aided Design/Computer-Aided Manufacturing. The Amfit computer system is used to design a custom foot insole by first scanning a patient’s foot impression and then controlling the process of carving the foot insole.
Dialog box A window displayed by the computer when it needs information from the operator or when the computer wants to make the operator aware or something, such as an error.
Digital Any information that is stored or processed in a format that a computer can manipulate.
Digitizer A device that converts user input into a format that can be manipulated by a computer. In the Amfit system, it refers to the foot scanner.
Diskette A storage media for a computer that can be taken from one computer to another. The Amfit system uses 3.5" DSHD diskettes that are formatted for IBM type computers.
Drag The process of moving an item on the screen. Select the item to be moved with the mouse by pressing the left button. As you move the mouse, the computer “re-draws” a picture of the item. This process is called dragging. When you release the left button, the item assumes its new location.
Elevation Height relative to something else. In the Amfit system, it refers to the height above the lowest point measured.
Error message A message displayed on the computer screen, indicating that the computer cannot continue to correctly process information. For example, you would see a message if you entered a “letter” instead of a “number” to tell the computer what size insole to produce.
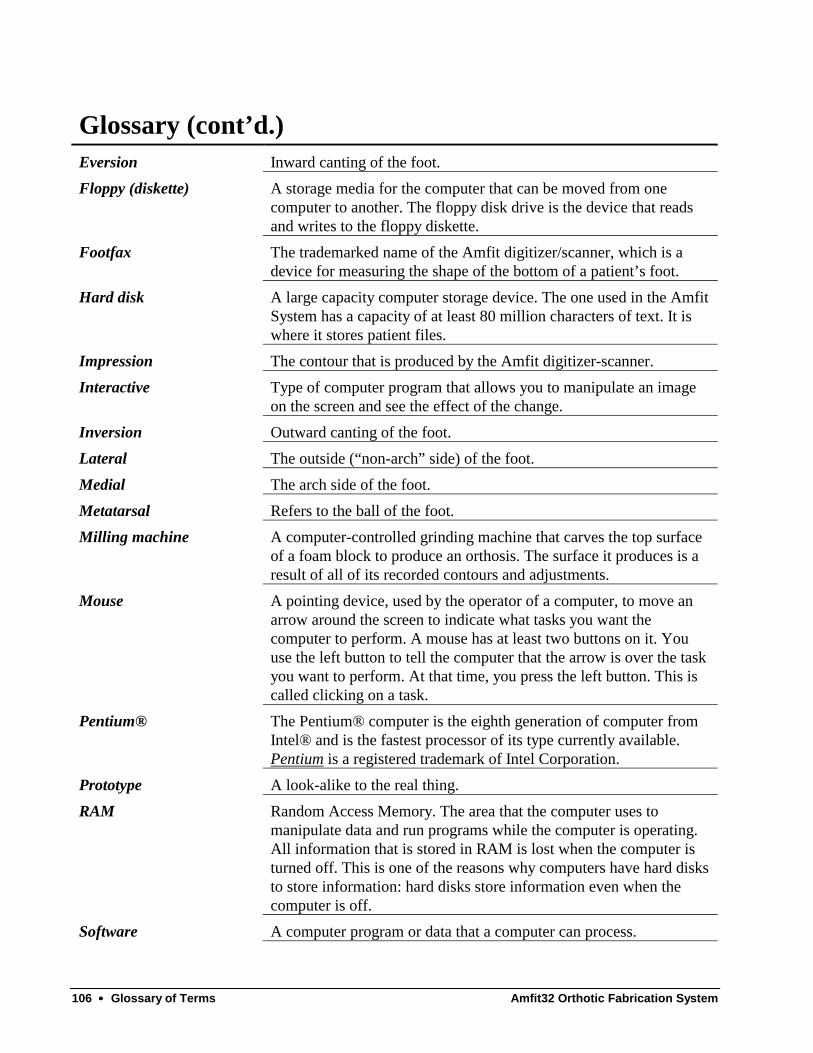
106 •••• Glossary of Terms Amfit32 Orthotic Fabrication System
Glossary (cont’d.) Eversion Inward canting of the foot. Floppy (diskette) A storage media for the computer that can be moved from one
computer to another. The floppy disk drive is the device that reads and writes to the floppy diskette.
Footfax The trademarked name of the Amfit digitizer/scanner, which is a device for measuring the shape of the bottom of a patient’s foot.
Hard disk A large capacity computer storage device. The one used in the Amfit System has a capacity of at least 80 million characters of text. It is where it stores patient files.
Impression The contour that is produced by the Amfit digitizer-scanner. Interactive Type of computer program that allows you to manipulate an image
on the screen and see the effect of the change. Inversion Outward canting of the foot. Lateral The outside (“non-arch” side) of the foot. Medial The arch side of the foot. Metatarsal Refers to the ball of the foot. Milling machine A computer-controlled grinding machine that carves the top surface
of a foam block to produce an orthosis. The surface it produces is a result of all of its recorded contours and adjustments.
Mouse A pointing device, used by the operator of a computer, to move an arrow around the screen to indicate what tasks you want the computer to perform. A mouse has at least two buttons on it. You use the left button to tell the computer that the arrow is over the task you want to perform. At that time, you press the left button. This is called clicking on a task.
Pentium® The Pentium® computer is the eighth generation of computer from Intel® and is the fastest processor of its type currently available. Pentium is a registered trademark of Intel Corporation.
Prototype A look-alike to the real thing. RAM Random Access Memory. The area that the computer uses to
manipulate data and run programs while the computer is operating. All information that is stored in RAM is lost when the computer is turned off. This is one of the reasons why computers have hard disks to store information: hard disks store information even when the computer is off.
Software A computer program or data that a computer can process.

Amfit32 Orthotic Fabrication System Glossary of Terms •••• 107
Glossary (cont’d.) Sulcus The area between the ball of the foot and the toes where the system
will measure a slight elevation. Sum The result of adding one or more numbers together. Support Refers to the difference in the amount of elevation relative to the
original casting. For example, if elevation is modified and raised upward by 10%, the height at that point on the orthosis will be 10% higher than the original casting.
SVGA Super Video Graphics Array. The latest in high resolution computer display adapters for IBM type personal computers. An SVGA card is the computer card that the computer uses to communicate to the display monitor.
Trackball A pointing device, much like a mouse. It is operated by rolling a ball to move the arrow on the screen to the desired location. Trackballs have three “pick” buttons. You use the left one to select and/or move items.
Wedge Angular raised area. In the Amfit system, it refers to an angular adjustment to the contour.
Window A frame displayed on the computer screen that contains, or groups, related elements in order to organize unrelated tasks. Windows can also allow you to dialog with the computer. The screen can display many frames at once, often with one on top of the other.