amazon elastic cloud (ec2) - uk borland user group
TRANSCRIPT

Amazon Elastic Cloud (EC2): An Easy Route to Your Own Dedicated Web-serverThe Amazon Elastic Cloud is a service which allows anyone to create their own dedicated web-servers which Aamazon manage & run. The whole process can be done from a web-browser, and the resulting machines are fully functional servers. You have to set up an account with Amazon, which is straightforward, and involves various steps which I won't detail here.
The simple, great thing about Amazon cloud servers is that they allow you to create "WAN" or internet accessed service and manage them surprisingly easily, once you have understood a few key aspects to how Amazon operate. The only complexity is the horrific barrage of Amazon jargon you have to cope with en-route.
Once your account is set up you can access the AWS Management Console, which is the on-line management tool, it gives total control of all your servers. (https://console.aws.amazon.com/ec2/home).
I would emphasize that I am a long-time solo programmer in the Delphi / Object Oriented space, I am not linked to or employed by Amazon in any way.
Typical Uses for Amazon EC2• To create a server on a Wide Area Network to host a database accessed by customers from a variety of
offices in different locations. The ElevateDB databases are a good example of a database which works best on a dedicated server as many public web-servers are unwilling to open the ports it requires.
• To create a dedicated web-server to host a set of websites which cannot easily be placed in more conventional web-hosting. For example websites with large data-access requirements or websites built with tools like Morfik (www.morfik.com).
• To use as a repository for a Subversion (or other) version control system.
• To create a server for testing purposes, which might only run for a few hours before being shut down.
Key powerful features of the Amazon Cloud:• You can create as many web-servers as you like, with Linux or Windows Operating systems in any / all
possible flavours and sizes.
• You can switch these servers on and off from the management console, as well as being able to change various firewall and security permissions from the same place.
• You are only charged per hour while a server is actually running, if you switch a server off you are not charged. Full pricing is detailed at aws.amazon.com/ec2/pricing/, and consists of a per hour charge plus a per terabyte charge. There are a number of pricing options (depending on size of server, RAM, processor etc.) but from my perspective costs are very cheap. The server my business uses consistently costs us less then £30 per month.
• If you have a "standard set up" for a server which you need to re-use you can create it once and then save it. Creating a new server identical to this saved server set up is then extremely easy. These saved servers are called "AMI's" (Amazon-Machine-Instances, in the confusing jargon of the Amazon cloud). You can create as many as you want. They are very similar in concept to saved machine-images in VMWare.
• You can allocate yourself IP addresses and then associate these with a server.
• If you need to maintain a server you can switch the IP address to a different server and take the first server off-line for maintenance, and this can be done from within your browser.
• I do not use Amazon cloud for testing, but I imagine it could be incredibly powerful, as it is possible to set up sets of servers and potentially have automated testing systems running on all or many, mimicking the operation of a conventional LAN.
• You can “scale up” and “scale down” machines on demand, to cope with peaks in use. Note that the costs for larger Amazon servers are considerably higher than for their entry-level “micro” instances, but are still

highly competitive.
Creating a new "Instance"The Amazon Cloud is full of jargon. "Instance" is probably the first piece of jargon you need to understand. It is Amazon's term for your virtual-server, i.e. your "computer in the cloud". Amazon Instances are not "real" dedicated servers, rather they are some sort of virtual machine running a larger computer. You set up and Instance and can then switch it on and off at will. You are only charged for the service while the instance is running.
Instances can be various flavours of Linux or Windows, with a wide variety of scales from "micro" (single processor with 600 meg of RAM) up to really massive multi-core processors. Pricing rises with machine-size.
fig 1: The Amazon Management Console "Instances" page.
Once you have set up an account, open the Amazon Management Console. When you first get there it is bloody confusing. There are lots of tabs with strange names like "Elastic MapReduce", and most of the pages under the tabs don't contain any information until you fill out various details and get an account for that particular sub-service.
To manage your own servers the tab you want is "EC2" (which stands for "Elastic Cloud 2" ...) Click on this, then click on "Instances" (marked 1. in the figure above).
Managing "Instances"Click on the "launch instance" button (marked 2. in the figure above) to create a new cloud-computer. You are presented with a multi-page form (Wizard) which takes you through the steps. I will go through this process in more detail below, it is fairly straightforward, though several of the steps involve Amazon-centric jargon which is a bit hard to understand at first.
Once you have set up an Instance you can control it by right clicking on it with the mouse to access a context menu which allows you to undertake a variety of actions on that Instance including start, stop, terminate & retrieve password.

Setting IP addresses and Security Groups for your Instance
fig 2 Amazon Elastic IPs
In the Management Console there is an "Elastic IP" heading (marked 1 in the figure above). Click on this then click on "Allocate new Address" (marked 2 above) to be allocated a new dedicated IP address you can use. Once you have the address right click on the address in the grid (marked 3 above) and choose "associate" from the context-menu to actually link your address to a particular server.
Firewall Access and Permissions
fig 3: Windows Firewall settings on your server
The way Amazon manages Firewalls is a tiny bit confusing. You can of course manage the firewall of your Instance yourself. You do this with Windows Advanced Firewall on the machine (shown in fig 3, above). How to set up and manage this is beyond the scope of this article, but there is plenty of information on the web.

fig 4: Security Groups
The important thing to realise is that Amazon have a secondary external firewall set up for all cloud computers. They call this is their "Security Groups" feature. This lists the permissions which have been granted by Amazon for access to your Instance.
Each named security group represents a selection of permissions for access through Amazon's firewall into your server. You can open the port on your server manually using Windows Advanced Firewall on the machine, but no-one will be able to use this port unless it is also open on the Security Group associated with that Instance.
Security Groups can be edited and changed using the Management Console as shown in the figure above.
The "Launch Instance" Wizard
fig 5: Step 1: Pick your base operating system
Key things to note in the above:• There is a "My AMIs" tab, and a "Community AMIs" tab. These tabs show lists of pre-configured servers.
Literally machine-images of the full operating system, installed programmes and hard-disk for virtual machines which you can call into existence. Very similar to the concept of a virtual machine in VMWare.
• The "Quick start" gives a small selection of commonly used operating systems, note that pricing varies according to the set up you choose!
• Of course you can create any server you want, but if you want to create a server to use with Morfik & their auto-deployment it should be Windows Server 2008, either 32 or 64 bit.
Subsequent pages of the wizard allow you to choose the size of the instance and its location. There are advanced instance options, which I am guessing only matter once you have many machines working simultaneously.
Then come some sections which confused me at first, so I think deserve a bit of clarification
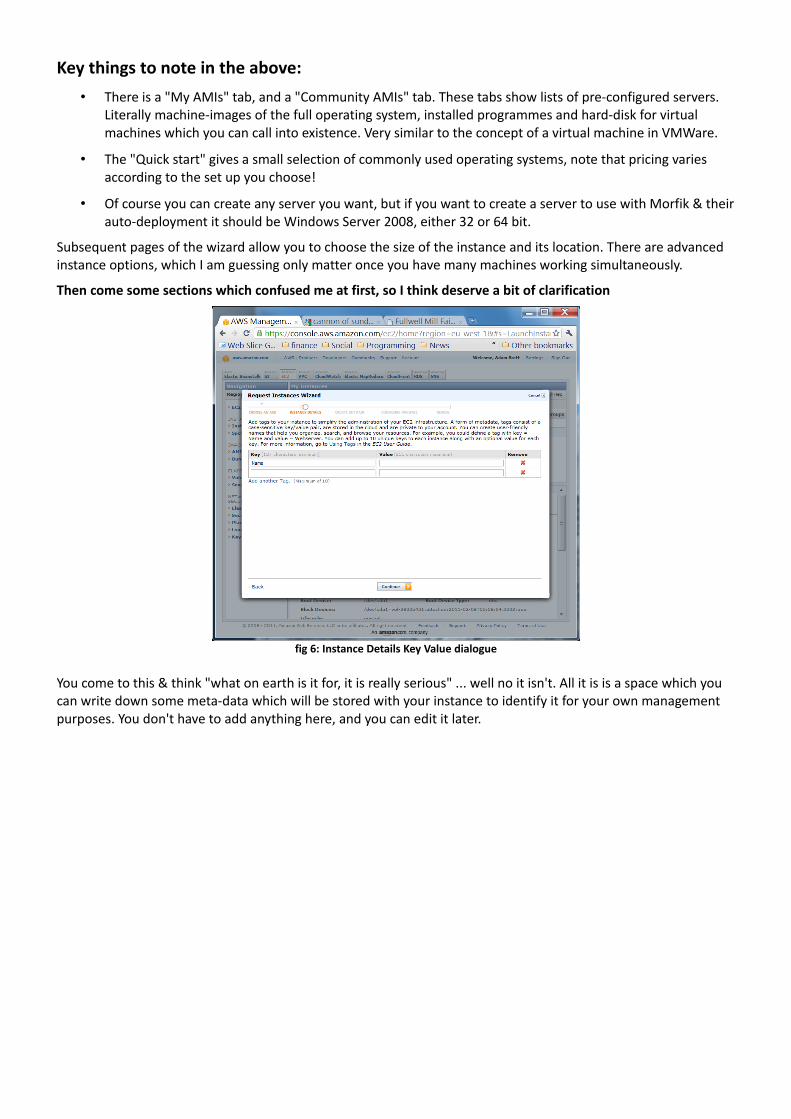
fig 6: Instance Details Key Value dialogue
You come to this & think "what on earth is it for, it is really serious" ... well no it isn't. All it is is a space which you can write down some meta-data which will be stored with your instance to identify it for your own management purposes. You don't have to add anything here, and you can edit it later.
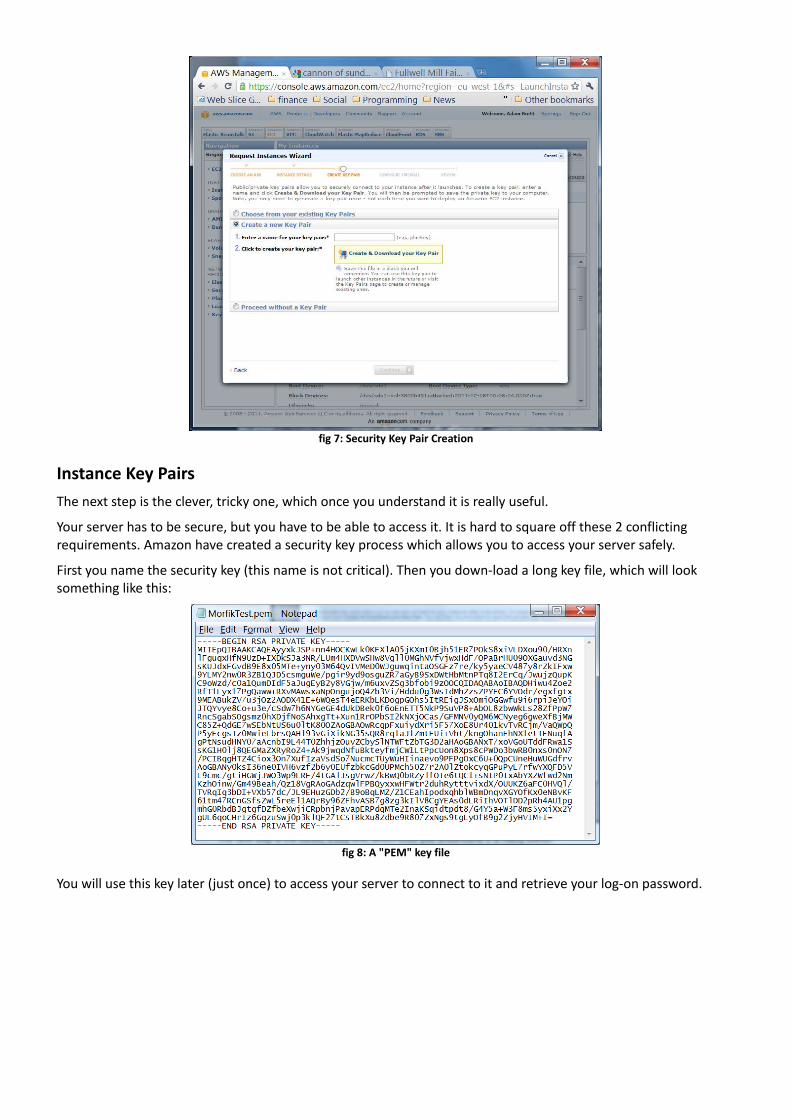
fig 7: Security Key Pair Creation
Instance Key PairsThe next step is the clever, tricky one, which once you understand it is really useful.
Your server has to be secure, but you have to be able to access it. It is hard to square off these 2 conflicting requirements. Amazon have created a security key process which allows you to access your server safely.
First you name the security key (this name is not critical). Then you down-load a long key file, which will look something like this:
fig 8: A "PEM" key file
You will use this key later (just once) to access your server to connect to it and retrieve your log-on password.
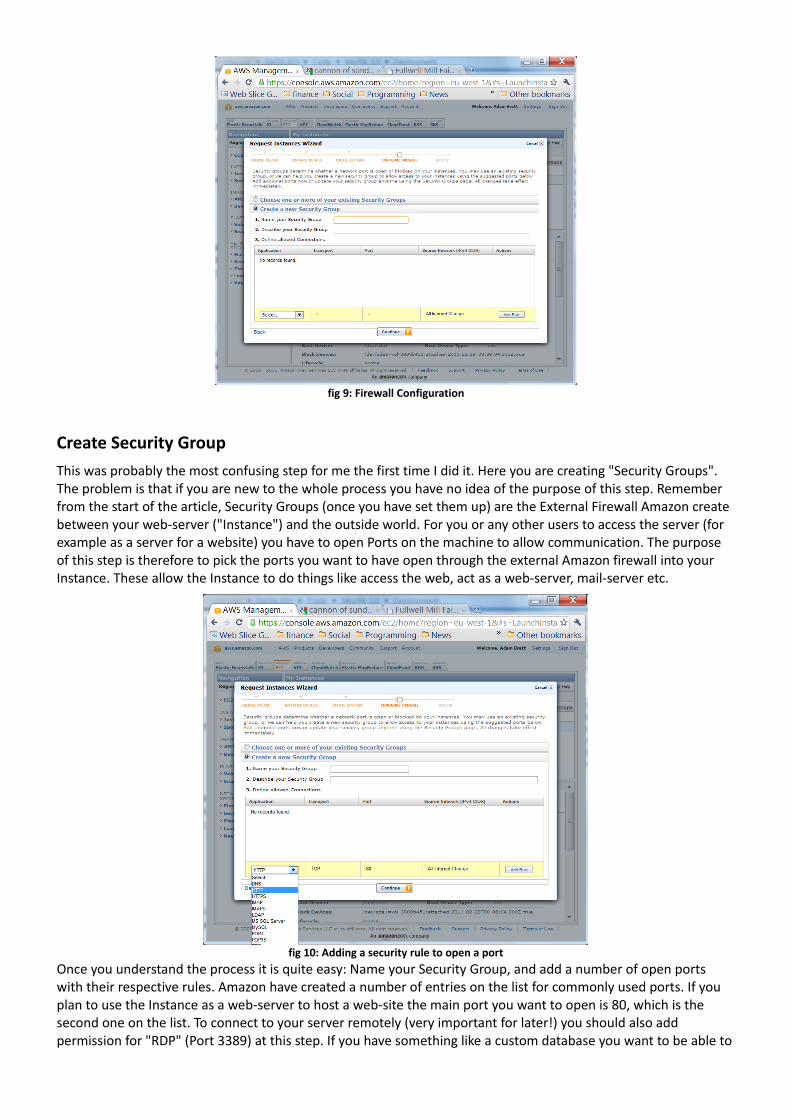
fig 9: Firewall Configuration
Create Security GroupThis was probably the most confusing step for me the first time I did it. Here you are creating "Security Groups". The problem is that if you are new to the whole process you have no idea of the purpose of this step. Remember from the start of the article, Security Groups (once you have set them up) are the External Firewall Amazon create between your web-server ("Instance") and the outside world. For you or any other users to access the server (for example as a server for a website) you have to open Ports on the machine to allow communication. The purpose of this step is therefore to pick the ports you want to have open through the external Amazon firewall into your Instance. These allow the Instance to do things like access the web, act as a web-server, mail-server etc.
fig 10: Adding a security rule to open a portOnce you understand the process it is quite easy: Name your Security Group, and add a number of open ports with their respective rules. Amazon have created a number of entries on the list for commonly used ports. If you plan to use the Instance as a web-server to host a web-site the main port you want to open is 80, which is the second one on the list. To connect to your server remotely (very important for later!) you should also add permission for "RDP" (Port 3389) at this step. If you have something like a custom database you want to be able to

access on the server you will need to add Custom rules on this screen detailing the ports you need to open.
Explaining the purpose of different open ports is beyond the scope of this article, but there is lots of information about it on the web. This is the last step in creating an Instance, the wizard now shows a "review" page, which allows you to double check what you have done & make changes prior to clicking the "launch" button.
Actually connecting to your Instance
fig 11: ConnectingOnce the instance is created it takes a few minutes to set up & get working, so go & make a cup of coffee. Then, back in the main Management Console, right click on the Instance you have just created and click "get windows password" you will be prompted to paste in the "PEM Key" (shown in fig 8, above). The system will work for a while & then give you an Administrator Password. Note this down carefully somewhere.
Your server now exists, and is running. You can start and stop it in the Management Console, you can also Terminate it (which permanently erases the whole machine!). As a small aside, you can now also click on the "Monitoring" tab to see activity on the machine, and allocate it an IP address to the Instance if it is going to need one.
But what you really want to do is actually log on to it. This process is fairly easy with newer versions of Windows. I know it is a bit more complicated with earlier versions, I only explain it for Windows 7 here.
fig 11: Remote Connection log-in
First run "Remote Desktop Connection". Type this into the "start" menu if you don't know where it is hiding. The only thing to note here is that I have typed the Elastic IP address I have allocated to the machine into the "computer" field.
Click on Connect, and you will be prompted for log on credentials and password
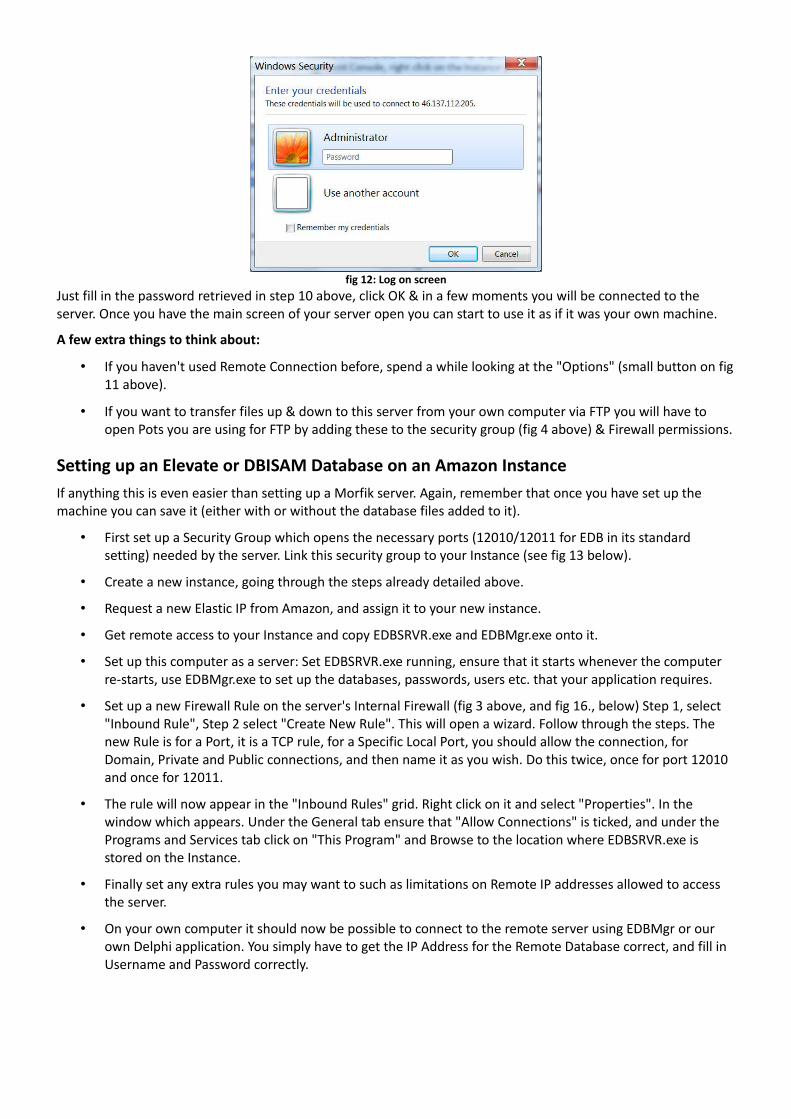
fig 12: Log on screenJust fill in the password retrieved in step 10 above, click OK & in a few moments you will be connected to the server. Once you have the main screen of your server open you can start to use it as if it was your own machine.
A few extra things to think about:
• If you haven't used Remote Connection before, spend a while looking at the "Options" (small button on fig 11 above).
• If you want to transfer files up & down to this server from your own computer via FTP you will have to open Pots you are using for FTP by adding these to the security group (fig 4 above) & Firewall permissions.
Setting up an Elevate or DBISAM Database on an Amazon InstanceIf anything this is even easier than setting up a Morfik server. Again, remember that once you have set up the machine you can save it (either with or without the database files added to it).
• First set up a Security Group which opens the necessary ports (12010/12011 for EDB in its standard setting) needed by the server. Link this security group to your Instance (see fig 13 below).
• Create a new instance, going through the steps already detailed above.
• Request a new Elastic IP from Amazon, and assign it to your new instance.
• Get remote access to your Instance and copy EDBSRVR.exe and EDBMgr.exe onto it.
• Set up this computer as a server: Set EDBSRVR.exe running, ensure that it starts whenever the computer re-starts, use EDBMgr.exe to set up the databases, passwords, users etc. that your application requires.
• Set up a new Firewall Rule on the server's Internal Firewall (fig 3 above, and fig 16., below) Step 1, select "Inbound Rule", Step 2 select "Create New Rule". This will open a wizard. Follow through the steps. The new Rule is for a Port, it is a TCP rule, for a Specific Local Port, you should allow the connection, for Domain, Private and Public connections, and then name it as you wish. Do this twice, once for port 12010 and once for 12011.
• The rule will now appear in the "Inbound Rules" grid. Right click on it and select "Properties". In the window which appears. Under the General tab ensure that "Allow Connections" is ticked, and under the Programs and Services tab click on "This Program" and Browse to the location where EDBSRVR.exe is stored on the Instance.
• Finally set any extra rules you may want to such as limitations on Remote IP addresses allowed to access the server.
• On your own computer it should now be possible to connect to the remote server using EDBMgr or our own Delphi application. You simply have to get the IP Address for the Remote Database correct, and fill in Username and Password correctly.
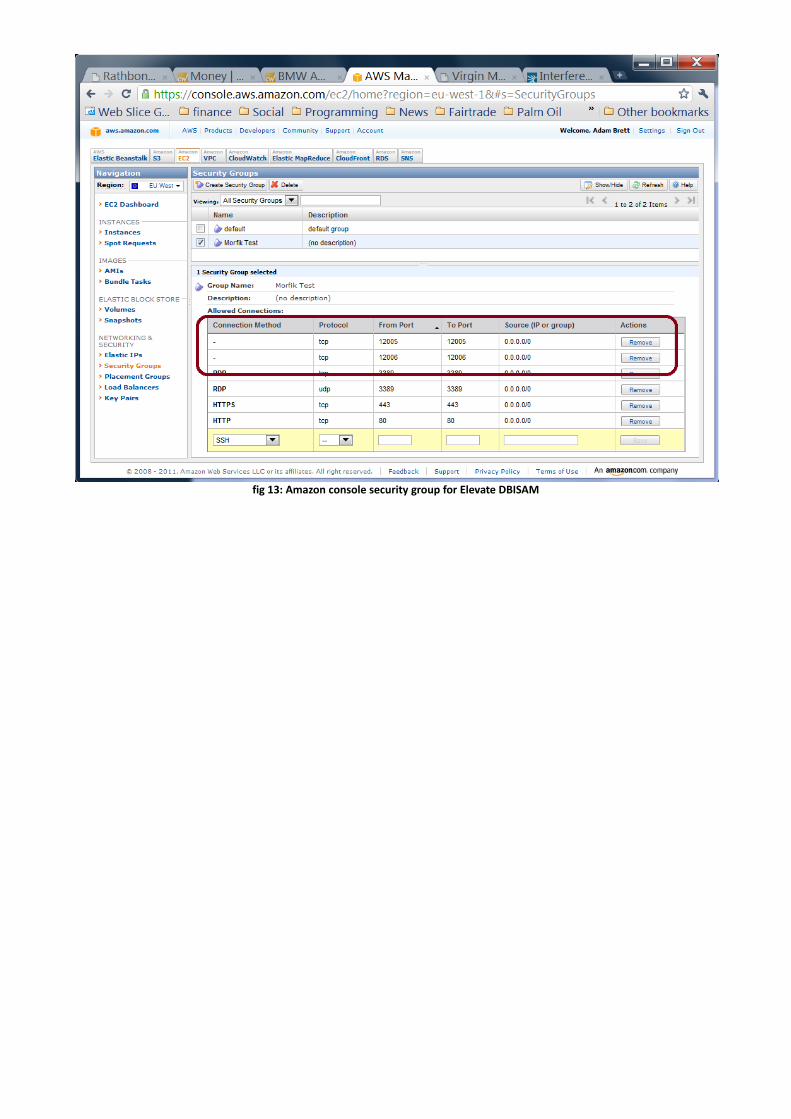
fig 13: Amazon console security group for Elevate DBISAM

fig 16. Windows Firewall steps to create access permissions.
PricingI have been using a "Micro Instance" with Windows 2008.
As standard this comes in at $0.035 per hour (hosted in Ireland), which equated to roughly £195 per annum for an always-on machine. I will convert this to a "reserved" (always on) micro instance once I am sure I have it set up right. This only costs $0.016 per hour plus an annual fee equating to £124.00 annually.
If I were to upgrade this to larger reserved instances the annual fee would be: "Small" £485.00, "Large" £1,943.00. I am not certain why there is such a big jump between "micro" and "small", my guess is that some of the more memory-hungry large databases require the larger servers, making this extra charging possible.
If you were to run on Linux (not currently possible with Morfik Auto-deployment as far as I understand) the above costs fall by 33%.
The above costs do not include data-transfer. This is priced as follows: First 1gb is free. Thereafter prices start at roughly £0.10 per gb, and fall to £0.05 per gb in bands set in tens of Terabytes. Note that if you house several Amazon cloud servers together and transfer data between them there is no charge for these inter-machine transfers so long as they are in the same region (i.e. Eastern USA, Western USA or Europe).