altru database guide - fundraising for nonprofits ... database acknowledgement ... this guide...
TRANSCRIPT

Altru Database Guide

063011Altru©2011 Blackbaud, Inc. This publication, or any part thereof, may not be reproduced or transmitted in any form or by any means, electronic, or mechanical, including photocopying, recording, storage in an information retrieval system, or otherwise, without the prior written permission of Blackbaud, Inc.
The information in this manual has been carefully checked and is believed to be accurate. Blackbaud, Inc., assumes no responsibility for any inaccuracies, errors, or omissions in this manual. In no event will Blackbaud, Inc., be liable for direct, indirect, special, incidental, or consequential damages resulting from any defect or omission in this manual, even if advised of the possibility of damages.
In the interest of continuing product development, Blackbaud, Inc., reserves the right to make improvements in this manual and the products it describes at any time, without notice or obligation.
All Blackbaud product names appearing herein are trademarks or registered trademarks of Blackbaud, Inc.
All other products and company names mentioned herein are trademarks of their respective holder.
GettingStartedWithTheAltruDatabaseGuide‐2011

1chapter
Getting Started with the Altru Database
Acknowledgement Letters . . . . . . . . . . . . . . . . . . . . . . . . . . . . . . . . . . . . . . . . . . . . . . . . . . . . . . . . . . 2
Appeal Mailings . . . . . . . . . . . . . . . . . . . . . . . . . . . . . . . . . . . . . . . . . . . . . . . . . . . . . . . . . . . . . . . . . . . 3
Constituent One-Off Merge Letter . . . . . . . . . . . . . . . . . . . . . . . . . . . . . . . . . . . . . . . . . . . . . . . . . . . . 5
Ask Ladder . . . . . . . . . . . . . . . . . . . . . . . . . . . . . . . . . . . . . . . . . . . . . . . . . . . . . . . . . . . . . . . . . . . . . . . 6
Ticket and Merchandise Discounts . . . . . . . . . . . . . . . . . . . . . . . . . . . . . . . . . . . . . . . . . . . . . . . . . . . 7
Membership Promotions. . . . . . . . . . . . . . . . . . . . . . . . . . . . . . . . . . . . . . . . . . . . . . . . . . . . . . . . . . . . 8
Export Definitions . . . . . . . . . . . . . . . . . . . . . . . . . . . . . . . . . . . . . . . . . . . . . . . . . . . . . . . . . . . . . . . . . 9
Export Process . . . . . . . . . . . . . . . . . . . . . . . . . . . . . . . . . . . . . . . . . . . . . . . . . . . . . . . . . . . . . . . . . . . 9
Smart Fields . . . . . . . . . . . . . . . . . . . . . . . . . . . . . . . . . . . . . . . . . . . . . . . . . . . . . . . . . . . . . . . . . . . . . 10
Queries . . . . . . . . . . . . . . . . . . . . . . . . . . . . . . . . . . . . . . . . . . . . . . . . . . . . . . . . . . . . . . . . . . . . . . . . . 10
Reason Codes . . . . . . . . . . . . . . . . . . . . . . . . . . . . . . . . . . . . . . . . . . . . . . . . . . . . . . . . . . . . . . . . . . . 14
Title Code Defaults . . . . . . . . . . . . . . . . . . . . . . . . . . . . . . . . . . . . . . . . . . . . . . . . . . . . . . . . . . . . . . . 15
Constituent Note Types . . . . . . . . . . . . . . . . . . . . . . . . . . . . . . . . . . . . . . . . . . . . . . . . . . . . . . . . . . . 15
Relationship Settings . . . . . . . . . . . . . . . . . . . . . . . . . . . . . . . . . . . . . . . . . . . . . . . . . . . . . . . . . . . . . 16
Batch Templates . . . . . . . . . . . . . . . . . . . . . . . . . . . . . . . . . . . . . . . . . . . . . . . . . . . . . . . . . . . . . . . . . 17
Membership Retention KPI . . . . . . . . . . . . . . . . . . . . . . . . . . . . . . . . . . . . . . . . . . . . . . . . . . . . . . . . . 17
The Altru database comes with a number of default settings and processes. Your organization may be able to use these defaults without any adjustment or editing, however it is recommend that you review all default settings to ensure they meet your needs. This guide highlights the default settings in Altru, and includes instructions for how to edit them.
1

2 CHAPTER 1
Acknowledgement LettersAcknowledgement Letters are sent to donors to acknowledge revenue (typically donations and payments) that your organization receives. Before you run Acknowledgement Letters, we recommend you review the default letters, and edit them if necessary.
Edit default acknowledgement letters
1. From Marketing and Communications, click Acknowledgements. The Acknowledgements page appears.
2. Select the Letters tab.
3. In the Letters grid, select Default Altru Acknowledgement Letter, and click Update template on the action bar. The Update template screen appears.
4. In the Word template field, click the Ack Receipt Combo.docx link. The merge letter opens in Microsoft Word.
5. Make changes to the document as necessary, such as to add verbiage specific to your organization, or add a logo.
6. Save and close the document when you are finished.
7. On the Update template screen, click Save. The changes you made to the document are now saved in Altru.
To change what revenue is acknowledged when you run an acknowledgement process, edit the Revenue for Acknowledgement (Ad‐hoc Query) selection.
Edit the default selection
1. From Analysis, click Ad‐hoc query search. The Ad‐hoc Query Search screen appears.
2. Search for, and select the Revenue for Acknowledgement ad‐hoc query. The Ad‐hoc Query: Revenue for Acknowledgement page appears.
3. Under Tasks, click Edit definition. The Revenue for Acknowledgement ‐ Altru Ad‐hoc Query screen appears.
4. Edit the current the filter criteria, or add new filters as necessary.
5. Click Save.
The Assign Letter Process automatically assigns acknowledgement letters to revenue when it is run. This prevents users from having to assign letters to revenue during data entry.
Edit the assign letter process
1. From Marketing and Communications, click Acknowledgements. The Acknowledgements page appears.
2. Select the Letters tab.
3. In the Assign letters processes grid, select Altru Default Assign Letter Process, and click Edit on the action bar. The Edit assign letters process screen appears
4. Edit the default assign letters process as necessary, and click Save.
GETT ING STARTED WITH THE ALTRU DATABASE 3
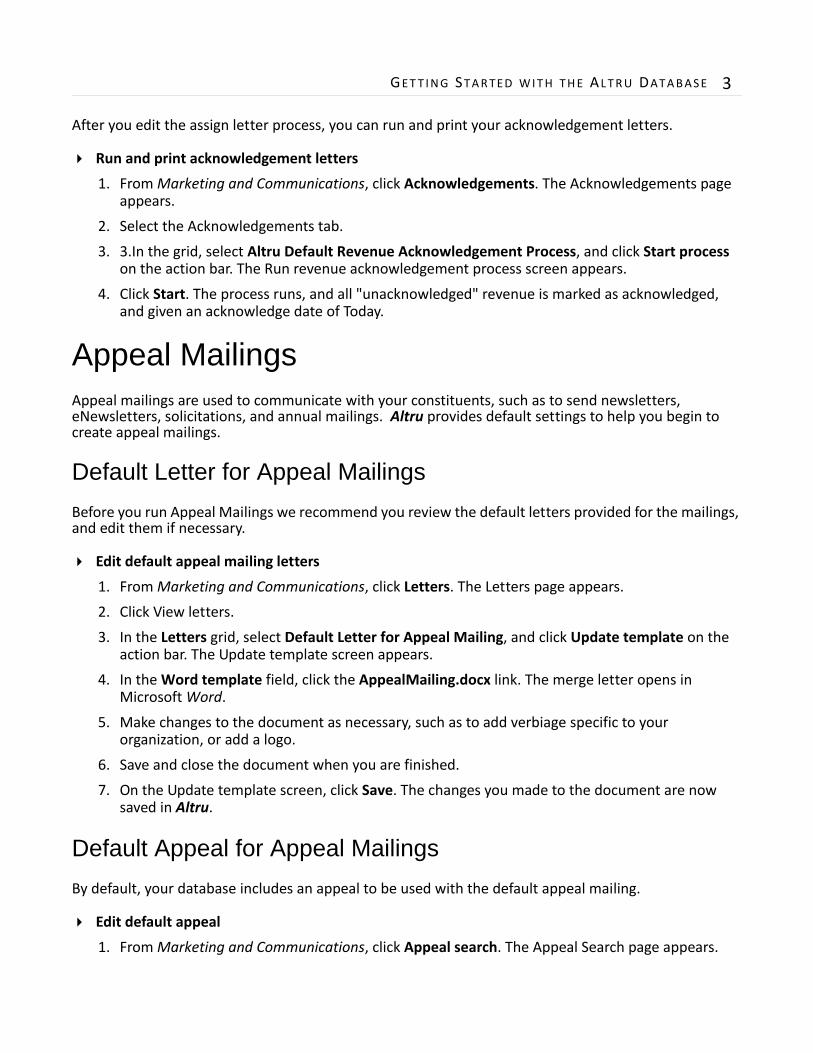
After you edit the assign letter process, you can run and print your acknowledgement letters.
Run and print acknowledgement letters
1. From Marketing and Communications, click Acknowledgements. The Acknowledgements page appears.
2. Select the Acknowledgements tab.
3. 3.In the grid, select Altru Default Revenue Acknowledgement Process, and click Start process on the action bar. The Run revenue acknowledgement process screen appears.
4. Click Start. The process runs, and all "unacknowledged" revenue is marked as acknowledged, and given an acknowledge date of Today.
Appeal MailingsAppeal mailings are used to communicate with your constituents, such as to send newsletters, eNewsletters, solicitations, and annual mailings. Altru provides default settings to help you begin to create appeal mailings.
Default Letter for Appeal MailingsBefore you run Appeal Mailings we recommend you review the default letters provided for the mailings, and edit them if necessary.
Edit default appeal mailing letters
1. From Marketing and Communications, click Letters. The Letters page appears.
2. Click View letters.
3. In the Letters grid, select Default Letter for Appeal Mailing, and click Update template on the action bar. The Update template screen appears.
4. In the Word template field, click the AppealMailing.docx link. The merge letter opens in Microsoft Word.
5. Make changes to the document as necessary, such as to add verbiage specific to your organization, or add a logo.
6. Save and close the document when you are finished.
7. On the Update template screen, click Save. The changes you made to the document are now saved in Altru.
Default Appeal for Appeal MailingsBy default, your database includes an appeal to be used with the default appeal mailing.
Edit default appeal
1. From Marketing and Communications, click Appeal search. The Appeal Search page appears.

4 CHAPTER 1
2. Search for, and select Default Altru Annual Appeal.
3. The Default Altru Annual Appeal page appears.
4. Under Tasks, click Edit Default Altru Annual Appeal. The Edit an appeal screen appears.
5. Edit the name and description as needed, and click Save.
Default Export Definition for Appeal MailingsExport definitions are used to select the merge fields that will be used in an appeal mailing. You can add more fields to the default export definition to personalize your mailings.
Edit default export definition
1. From Marketing and Communications, click Export definitions. The Export Definitions page appears.
2. In the Export definitions grid, select Default Altru Direct Marketing Export Definition, and click Edit on the action bar. The Default Altru Direct Marketing Export Definition ‐ Altru Export Definition screen appears.
3. Add the necessary fields, and click Save.
Add Fields to Default Merge LettersIf you have added new merge fields, you can insert them in the default letter for your appeal mailings.
Add merge fields to default appeal mailings
1. From Marketing and Communications, click Export definitions. The Export Definitions page appears.
2. In the Export definitions grid, select Default Altru Direct Marketing Export Definition, and click Generate header file on the action bar. The Generate header file screen appears.
3. Browse to a location on your computer and save the file.
4. Return to Marketing and Communications, and click Letters. The Letters page appears.
5. Click View letters.
6. In the Letters grid, select Default Letter for Appeal Mailing, and click Update template on the action bar. The Update template screen appears.
7. In the Word template field, click the AppealMailing.docx link. The merge letter opens in Microsoft Word.
8. On the Mailings tab, click Start Mail Merge, then select Step by Step Mail Merge Wizard.
9. Follow the steps of the Mail Merge Wizard, and when you must select recipients, browse to and select the header file you previously saved.
10. Save and close the document.
11. On the Update template screen, click Save. The changes you made to the document are now saved in Altru.

GETT ING STARTED WITH THE ALTRU DATABASE 5
Default Package for Appeal MailingsBy default, your database includes a package to be used with the default appeal mailing. You can edit this package as necessary.
Edit default packages
1. From Marketing and Communications, click Packages. The Packages page appears.
2. Click View packages.
3. In the grid, select Default Altru Mail Package, and click Edit on the action bar. The Edit email package screen appears.
4. Edit the package as necessary, and click Save.
Default Appeal MailingThe default appeal mailing record is where all options for the mailing are selected. You select which records to include or exclude, as well as other options. You can edit the mailing as necessary.
Edit default appeal mailing
1. From Marketing and Communications, click Appeal mailings. The Appeal Mailings page appears.
2. In the grid, select Default Altru Appeal Mailing, and click Edit on the action bar. The Edit an appeal mailing screen appears.
3. On this screen, you can edit all aspects of the mailings, such as the name of the mailing, select a different appeal, or select constituents to exclude. We recommend you view the default setting on each tab.
4. Click Save.
After you edit the default appeal mailing, you can run the mailing.
Run default appeal mailing
1. From Marketing and Communications, click Appeal mailings. The Appeal Mailings page appears.
2. In the grid, select Default Altru Appeal Mailing, and click Go to mailing on the action bar. The appeal mailing record appears.
3. Click Start mailing under Tasks. The Start mailing screen appears.
4. Enter a mail date, and click Start.
5. The process runs, and a process status page appears.
Constituent One-Off Merge LetterThe one‐off constituent merge letter allows users to write a letter directly from a constituent record. For example, while on John Doe's record you need to write a follow‐up letter, you can use the default constituent letter to quickly accomplish this task. When you write the letter, a copy of it is automatically saved to the constituent record. You can edit the contents of the default constituent letter as necessary.
6 CHAPTER 1
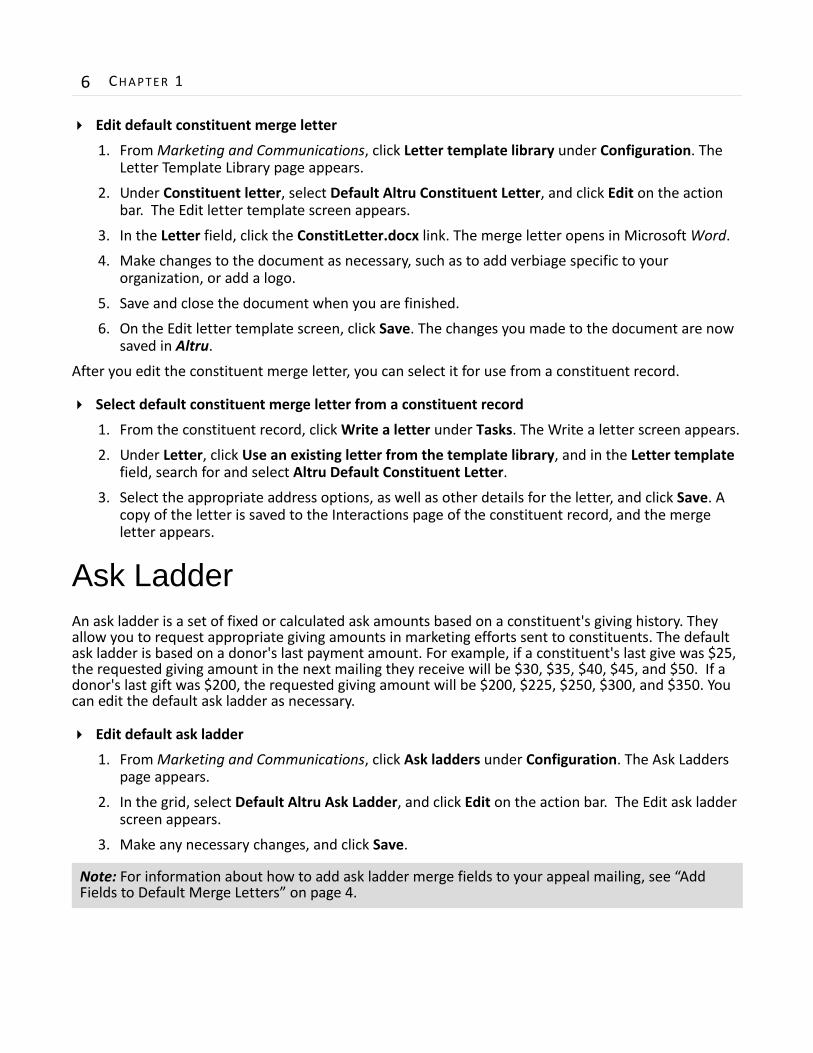
Edit default constituent merge letter
1. From Marketing and Communications, click Letter template library under Configuration. The Letter Template Library page appears.
2. Under Constituent letter, select Default Altru Constituent Letter, and click Edit on the action bar. The Edit letter template screen appears.
3. In the Letter field, click the ConstitLetter.docx link. The merge letter opens in Microsoft Word.
4. Make changes to the document as necessary, such as to add verbiage specific to your organization, or add a logo.
5. Save and close the document when you are finished.
6. On the Edit letter template screen, click Save. The changes you made to the document are now saved in Altru.
After you edit the constituent merge letter, you can select it for use from a constituent record.
Select default constituent merge letter from a constituent record
1. From the constituent record, click Write a letter under Tasks. The Write a letter screen appears.
2. Under Letter, click Use an existing letter from the template library, and in the Letter template field, search for and select Altru Default Constituent Letter.
3. Select the appropriate address options, as well as other details for the letter, and click Save. A copy of the letter is saved to the Interactions page of the constituent record, and the merge letter appears.
Ask LadderAn ask ladder is a set of fixed or calculated ask amounts based on a constituent's giving history. They allow you to request appropriate giving amounts in marketing efforts sent to constituents. The default ask ladder is based on a donor's last payment amount. For example, if a constituent's last give was $25, the requested giving amount in the next mailing they receive will be $30, $35, $40, $45, and $50. If a donor's last gift was $200, the requested giving amount will be $200, $225, $250, $300, and $350. You can edit the default ask ladder as necessary.
Edit default ask ladder
1. From Marketing and Communications, click Ask ladders under Configuration. The Ask Ladders page appears.
2. In the grid, select Default Altru Ask Ladder, and click Edit on the action bar. The Edit ask ladder screen appears.
3. Make any necessary changes, and click Save.
Note: For information about how to add ask ladder merge fields to your appeal mailing, see “Add Fields to Default Merge Letters” on page 4.

GETT ING STARTED WITH THE ALTRU DATABASE 7
Ticket and Merchandise DiscountsSeveral ticket and merchandise discounts are also included in your database. You can edit these discounts as needed to meet your organization's specific needs.
Edit default ticket and merchandise discounts
1. From Tickets, click Discounts and promotions. The Discounts and promotions page appears.
2. Click Ticket and merchandise discounts. The Discounts page appears.
3. In the grid, select a discount, and click Go to discount on the action bar. The discount record appears.
4. From the discount record, you can edit all aspects of the discount, such as the value, availability, and eligibility requirements. Use the edit options under Tasks, and on the action bar to edit the discount.
The following default ticket and merchandise discounts are included:• Discount name: AAA $1.00 off ticketsDiscount type: Standard
Applies to: Item
Selected for use: Manually
Calculation type: Amount off
Value: $1.00
Price Type Details: <any price type>
Programs: Admission
• Discount Name: BOGODiscount type: With required purchase
Applies to: Item
Selected for use: Manually
Calculation type: Percent off
Value: 100%
Programs: Admission
• Discount Name: Member discount 1 ticketDiscount type: Standard
Applies to: Item
Selected for use: Automatically
Calculation type: Percent off

8 CHAPTER 1
Value: 100%
Programs: Admission
Eligibility: Membership, Program: Membership, Level: Individual
• Discount Name: Member discount 2 ticketsDiscount type: Standard
Applies to: Item
Selected for use: Automatically
Calculation type: Percent off
Value: 100%
Programs: Admission
Eligibility: Membership, Program: Membership, Level: Family
Membership PromotionsSeveral membership promotions are included in your database. You can edit these as needed to meet your organization's specific needs.
Edit default membership promotions
1. From Tickets, click Discounts and promotions. The Discounts and promotions page appears.
2. Click Membership promotions. The Membership Promotions page appears.
3. In the grid, select a membership promotion, and click Edit on the action bar. The Edit membership promotion screen appears.
4. From this screen, you can edit all aspects of the promotion, such as the name, term extension, amount or percent off, and application type.
The following default membership promotions are included:• Promotion name: 3 month term extensionApplication type: Manually
Promotion type: Term extension
Extend term by: 3
• Promotion name: 1 month term extensionApplication type: Manually
Promotion type: Term extension
Extend term by: 1

GETT ING STARTED WITH THE ALTRU DATABASE 9
• Promotion name: 10% off membership priceApplication type: Manually
Promotion type: Discount
Discount type: Percent off
Export DefinitionsExport definitions are used to select the fields that are pulled out of your Altru database during an export process. Basically, they provide the specific information you would like to view in your output file. The Altru Default Constituent Export Definition includes a number of fields you may frequently use. You can add new fields to the default export definition if necessary.
Edit default export definitions
1. From Administration, click Export definitions. The Export definitions page appears.
2. In the grid, select Altru Default Constituent Export Definition, and click Edit on the action bar. The Altru Default Constituent Export Definition ‐ Altru Export Definition screen papers.
3. Add the necessary fields, and click Save.
Export ProcessExport processes allow you to export data from Altru in an output file that you can use in Microsoft Excel, or other applications. The export process ties together a query (the who) and the export definition (the what) to create an output file. You can edit the default export process if necessary, such as to select which query to use in the process.
Edit default export process
1. From Administration, click Export. The Export page appears.
2. In the grid, select Default Altru Export Process, and click Edit on the action bar. The Edit export process screen papers.
3. In the Ad‐hoc query field, you can search for and select a different query to use, or edit the current query, such as to add more filters.
4. Click Save.
After you edit the export process, you can run the process.
Edit default export process
1. From Administration, click Export. The Export page appears.
2. In the grid, select Default Altru Export Process, and click Start export on the action bar. The process starts, and the process status page appears.
Note: For information about how to add ask ladder merge fields to your appeal mailing, see “Add Fields to Default Merge Letters” on page 4.

10 CHAPTER 1
3. When the export process completes, you can click Download output on the action bar to download the output as a single file or multiple files.
Smart FieldsSmart fields help provide users quick access to specific information that otherwise would require time and the configuration of queries and reports to view. They appear on constituent records, and provide information such as when a constituent gave their first donation, largest donation amount, or the most recent donation date. When the smart field process is run, this information appears on the Smart Fields tab of the constituent record. These values can be useful for querying records for mailings, or other processes. You can edit default smart fields if necessary.
Edit default export process
1. From Administration, click Smart fields. The Smart Fields page appears.
2. In the grid, select the smart field to edit, and click Edit on the action bar. The Edit smart field screen papers.
3. Make the necessary changes, such as add more parameters.
4. Click Save.
You can also update the information Smart Field tab of the constituent record.
Update smart fields on the constituent record
1. From Administration, click Smart fields. The Smart Fields page appears.
2. In the grid, select the smart field to update, and click Process smart field on the action bar. The process runs, and a process status page appears.
QueriesThere are several frequently run queries included in your Altru database. We recommend you review each query prior to using the results in any process such as mailings, in order to ensure it meets your organization's specific needs. You can edit default queries if necessary.
Edit default queries
1. From Analysis, click Query. The Query page appears.
2. In the grid, select the query to edit, and click Edit on the action bar. The query screen appears.
3. To edit filters, select the filter to edit in the Filters grid, and click Edit filter (funnel, with pencil icon).
4. Apply the necessary criteria and click OK. You return to the query screen.
5. Click Save.
Note: This updates the smart field a single time. To set up a job to regularly update smart fields, select the Job Schedules tab, and click Add on the action bar. On the Create job screen, enter a job name, select a schedule type, and determine the frequency of the job. Click Save.

GETT ING STARTED WITH THE ALTRU DATABASE 11
By default, the following queries are included:• Name: Active constituentsDescription: This query returns all active constituents. Constituents marked as inactive or deceased are excluded from the results.
Filter: Constituents, Inactive is equal to Yes, and Deceased is equal to No
• Name: Constituents added between date rangeDescription: This query returns constituents that were added to Altru between two dates. To modify the dates, change the Date Added filter value to the appropriate date range.
Filter: Constituents, System Fields, Date Added > between 1/1/2011 and 12/31/2011
• Name: Constituents with constituency codeDescription: This query returns constituents who have a constituency value. To modify the constituency value, change the Constituency filter value to the appropriate value or values using the Equal To or One Of filter.
Filter: Constituency, Constituency, value equals to Donor
• Name: Constituent lifetime giving valueDescription: This query returns constituents who have a lifetime giving value greater than or equal to an amount. To modify the amount, change the filter value to the appropriate value using the operator Greater Than or Equal To or Between.
Filter: Smart Fields, Constituent lifetime giving Smart Field, Value is greater than or equal to 1000
• Name: Constituents with revenue between date rangeDescription: This query returns constituents who have revenue in a specified date range. To modify the date range, change the Revenue Date filter value to the appropriate date range.
Filter: Revenue, Date is between 1/1/2011 and 12/31/2011
• Name: Constituents with an active membershipDescription: This query returns constituents with an active membership.
Filter: Member, Membership, Status is equal to Active
• Name: Constituents by membership levelDescription: This query returns constituents who have a membership at a specific level. To modify the membership level, change the Membership Level filter value to the appropriate level.
Filter: Member, Membership, Membership Level is equal to Individual

12 CHAPTER 1
• Name: Constituents with a revenue transaction amount betweenDescription: This query returns constituents who have a revenue transaction amount between a specific range.
Filter: Revenue, Amount is between 50 and 100
• Name: Constituents by record typeDescription: This query returns constituents by record type. To modify the type of records, change the Type filter value to the appropriate record type.
Filter: Constituents, Type equal to Individual
• Name: Constituents that made a payment within a date rangeDescription: This query returns constituents who made a payment within a specific date range. To modify the payment types or date range, change the filter value to the desired types or date range.
Filter: Revenue, Transaction Type is one of Payment AND Revenue, Date is between 1/1/2011 and 12/31/2011
• Name: Constituents without an email addressDescription: This query returns constituent records with no email address.
Filter: Email Addresses, Email Address, is Blank
• Name: Revenue for AcknowledgementDescription: This query returns all revenue records in the database for Acknowledgement. This excludes Gift, Membership, Event Registration, Sponsorship, and Other. Select to Create a dynamic selection.
Filter: Application Details, Type is one of Gift, Membership, Event registration, Other, Sponsorship
• Name: Revenue by AppealDescription: This query returns revenue records associated with an appeal. To modify the appeal, change the filter to the desired appeal using the operator Equals To or One Of.
Filter: Appeal, Appeal Record is not blank
• Name: Revenue by DesignationDescription: This query returns revenue records associated with a designation. To modify the designation, change the filter to the desired designation using the operator Equals To or One Of.
Filter: Application Details, Designation, Designation record is not blank
• Name: Revenue by date range

GETT ING STARTED WITH THE ALTRU DATABASE 13
Description: This query returns revenue records made within a specified date range. To modify the date range change the filter to the desired date range.
Filter: Revenue, Date range is between 1/1/2011 and 12/31/2011
• Name: Revenue entered in a specific batch numberDescription: This query returns revenue records that were entered in a specific batch. To modify the batch number change the filter to the desired batch number.
Filter: Revenue, Batch number is equal to 1
• Name: Revenue greater than or equal to an amountDescription: This query returns revenue records that are greater than or equal to a specific amount. To modify the amount, change the filter to the desired amount.
Filter: Revenue, Amount, Greater than or equal to 250
• Name: Sales orders by amountDescription: This query returns sales order records that are greater than or equal to a specific amount. To modify the amount change the filter to the desired amount or the operator to Equals To or Between.
Filter: Sales Order, Amount is Greater Than Or Equal To 15
• Name: Sales orders by dateDescription: This query returns sales order records that were added in a specific date range. To modify the date range, change the filter to the desired date or date range using the operator Equal To or Between.
Filter: Sales Order, Transaction Date is greater than or equal to 1/1/2011
• Name: Sales orders by programDescription: This query returns sale order records for a specific program. To modify the program, change the filter to the appropriate program using the operator Equal To or One Of.
Filter: Sales Order Item, Sales Orders Item Ticket, Program, Program Record Equal To Admission
• Name: Sales order by fundraising eventDescription: This query returns sale order records for a fundraising event. To modify the fundraising event, change the filter to the appropriate event using the operator Equal To or One Of.
Filter: Sales Order Item, Sales Orders Item Ticket, Program Events, Event Record is not blank
• Name: Sales orders by sales method type

14 CHAPTER 1
Description: This query returns sale order records by sales method type. To modify the sales method type change the filter to the appropriate method type using the operator Equal To or One Of.
Filter: Sales Orders, Sales Method Type equal to Daily Sales.
• Name: Registrants to an eventDescription: This query returns registrant records to an event. To modify the event, change the filter to the appropriate event using the operator Equal To or One Of.
Filter: Event, Event Record is not blank
• Name: Registrants who did/did not attend an eventDescription: This query returns registrants to an event that did/did not attend. To modify the event or attendance, change the filter to the appropriate event or attendance using the operator Equal To or One Of.
Filter: Event, Event Record is not blank AND Registrants, Attended Equal To Yes
• Name: Registrants who did not payDescription: This query returns registrants to an event that did not pay or have an outstanding event balance. To modify the event or balance amount change the filter to the appropriate event or amount using the operator Equal To or Greater Than.
Filter: Event, Event Record is not blank and Registrant, Balance is greater than 10
Reason CodesReason codes are used to validate an action that has been taken on a record. For example, when a constituent record is marked as inactive, the user is prompted to enter a reason as to why the record should be marked as inactive. Default reason codes are available in Altru, and you can edit them as necessary.
Edit default reason codes
1. From Constituents, click Reason codes under Configuration. The Reason Codes page appears.
2. In the grid, select the reason code to edit, and click Edit on the action bar. The Edit reason code screen appears.
3. Make the necessary changes, and click Save.
By default, the following reason codes are included:• Mark a constituent as inactiveDEC ‐ Constituent is deceased
REQ ‐ Requested by constituent
LOST ‐ Bad address/No forwarding information
MOV ‐ Constituent moved away

GETT ING STARTED WITH THE ALTRU DATABASE 15
• Write‐off a PledgeNP ‐ Donor established new pledge
UNCOL ‐ Uncollectable
• Override a Gift FeeEE ‐ Entity exempt
NFG ‐ No fee (grandfathered)
• Adjust RevenueERR ‐ Data entry error
NSF ‐ Bounced check
• Re‐receipt RevenuePrtErr ‐ Printer error
PatReq ‐ Patron request
Title Code DefaultsTitle code defaults automatically set the gender of a constituent record, based on the title that is assigned to the record. For example, if a title of Mr. is added to a new constituent record, the gender will automatically be set to Male. Default title codes are available in Altru, and you can edit them as necessary, or add new codes.
Edit title code defaults
1. From Constituents, click Title code defaults under Configuration. The Title Code Defaults page appears.
2. In the grid, select the title code default to edit, and click Edit on the action bar. The Edit a title code screen appears.
3. Make the necessary changes, and click Save.
Constituent Note TypesConstituent note types are used to classify the type of note added to a constituent record, such as a "Follow‐up" note. Default constituent note types are available in Altru, and you can edit them as necessary, or add new note types.
Note: To create new title code defaults, click Add on the action bar.
16 CHAPTER 1
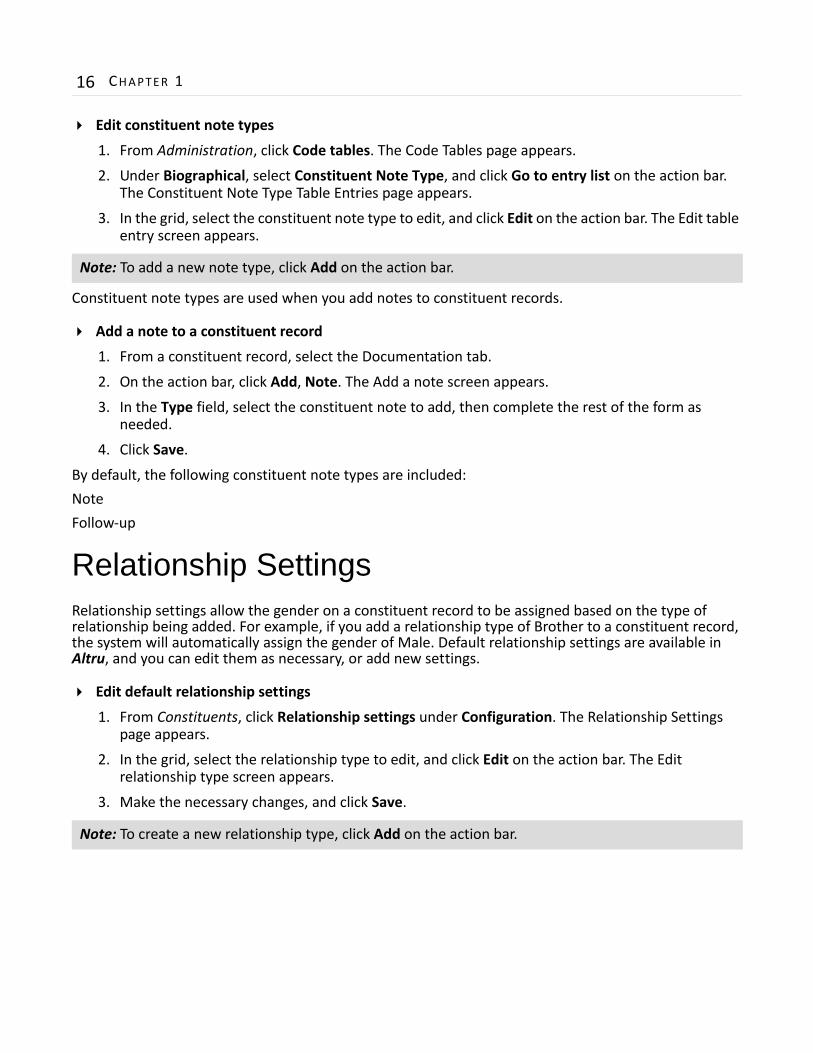
Edit constituent note types
1. From Administration, click Code tables. The Code Tables page appears.
2. Under Biographical, select Constituent Note Type, and click Go to entry list on the action bar. The Constituent Note Type Table Entries page appears.
3. In the grid, select the constituent note type to edit, and click Edit on the action bar. The Edit table entry screen appears.
Constituent note types are used when you add notes to constituent records.
Add a note to a constituent record
1. From a constituent record, select the Documentation tab.
2. On the action bar, click Add, Note. The Add a note screen appears.
3. In the Type field, select the constituent note to add, then complete the rest of the form as needed.
4. Click Save.
By default, the following constituent note types are included:NoteFollow‐up
Relationship SettingsRelationship settings allow the gender on a constituent record to be assigned based on the type of relationship being added. For example, if you add a relationship type of Brother to a constituent record, the system will automatically assign the gender of Male. Default relationship settings are available in Altru, and you can edit them as necessary, or add new settings.
Edit default relationship settings
1. From Constituents, click Relationship settings under Configuration. The Relationship Settings page appears.
2. In the grid, select the relationship type to edit, and click Edit on the action bar. The Edit relationship type screen appears.
3. Make the necessary changes, and click Save.
Note: To add a new note type, click Add on the action bar.
Note: To create a new relationship type, click Add on the action bar.

GETT ING STARTED WITH THE ALTRU DATABASE 17
Batch TemplatesIn Batch entry, you enter and update information on records quickly because you do not open each individual record. Instead, you create a batch template to specify the fields to add or update in each various type of record. The program lists the selected fields as fields in a spreadsheet, called a batch, so you can efficiently enter information in the database. Default batch templates are included in the Altru database. You can edit default batch templates as necessary, or add a new batch template.
Edit default batch templates
1. From Revenue, click Batch entry. The Batch Entry page appears.
2. Click Batch templates under Configuration. The Batch Templates page appears.
3. In the grid, select the batch template to edit, and click Edit on the action bar. The Edit batch template screen appears.
4. On this screen you can edit the name and description, add or remove fields, and set default field values.
5. Click Save.
Membership Retention KPIThe default membership retention KPI allows you to quickly view membership retention rates. You can view a dashboard that displays current levels, as well as goals you define. You can edit the default membership retention KPI if necessary, or create a new KPI.
Edit default membership retention KPI
1. From Analysis, click KPIs. The KPIs page appears.
2. In the grid, select Default Altru Membership Retention KPI and click Edit on the action bar. The Default Altru Membership Retention KPI ‐ Blackbaud Application KPI screen appears.
3. On this screen you can edit membership programs and levels to display, the start date, and goals.
4. Click Save.
Note: To create a new batch template, click Add on the action bar.
Note: To view the Default Altru Membership Retention KPI, from Analysis click KPI dashboard. The KPI dashboard page appears, and the Default Altru Membership Retention KPI dashboard appears.