alpha gold - american messaging · loss of use of equipment or power system, cost of capital, ......
TRANSCRIPT

P
AG
ER
P
RO
GR
AM
MIN
G
G
UID
E
Alpha Gold
Product Family-Alpha Gold
6880309P66-O

1. LICENSE GRANT
In connection with the transfer of possession of the software package provided with this Agreement,Unication, (LICENSOR) hereby grants to pos-sessor (LICENSEE) a non-exclusive license to use the software program(s) (SOFTWARE) and documentation (DOCUMENTATION) of said software package with a single-user computer system. LICENSEE may, upon request-ing and receiving written permission of LICENSOR, transfer possession of the software package including SOFTWARE and DOCUMENTATION and trans-fer this license to another party if the other party agrees in writing to accept the terms and conditions of this agreement
2. OWNERSHIP
LICENSEE is given possession of a program module(s) with the software package in or on which Software is copied, but title to the SOFTWARE and DOCUMENTATION, all copies thereof and all rights therein, including all rights in the patents, copyrights, and trade secrets applicable thereto, shall remain vested in LICENSOR, regardless of the form or media in or on which the original and other copies of software and documentation may subsequently exist. Nothing contained herein shall be deemed to convey any title or owner-ship interest in the program module(s), SOFTWARE or DOCUMENTATION to LICENSEE.
LICENSEE agrees not to disclose, transfer, provide on any form, except as otherwise provided in this agreement, the software package or any portion thereof, to any person other than employees of LICENSEE without prior written consent of LICENSOR, and any such disclosure or transfer shall be consistent with the use in the single-user computer system.
LICENSEE agrees not to reverse compile or disassemble SOFTWARE.LICENSEE agrees that it will not in any form, export, re-export, resell,
ship, or divert or cause to be exported, re-exported, resold, shipped, or diverted, directly or indirectly, the SOFTWARE and DOCUMENTATION or a direct product thereof to any country for which the United States government or any agency thereof at the time of export or re-export requires an export license or other government approval without first obtaining such license or approval.
3. COPYING RIGHTS
LICENSEE may make copy(s) of SOFTWARE and DOCUMENTATION, required for backup or modification purposes in support of the use of the SOFTWARE with the single-user computer system, but LICENSEE must include existing copyright notices on any such copy, modifications, or portion of SOFTWARE merged into another program. Such notice(s) may appear in several forms, including machine-readable form, and LICENSEE agrees to reproduce such notice(s) in each form in which it appears, to the extent it is physically possible to do so.
4.TRANSFERABILITY
LICENSEE may not transfer SOFTWARE and DOCUMENTATION, or any copy(s) thereof, in whole or in part, except as expressly provided in this agreement. If Licensee transfers SOFTWARE and DOCUMENTATION to another party as expressly provided in this agreement, LICENSEE must at the same time either transfer all copies whether printed or machine-readable form to the same party or destroy any copies not transferred; this includes all modifications and portions of SOFTWARE contained or merged into another program.
If LICENSEE transfers SOFTWARE and/or DOCUMENTATION or any copy, modification, or merged portion of SOFTWARE to another party without written permission of LICENSOR, this license is automatically terminated.
5. TERM
The term of this license agreement is for as long as LICENSEE uses the SOFTWARE for its intended purpose. This agreement may be terminated by LICENSEE upon one month’s prior written notice. LICENSOR may terminate this agreement if LICENSEE is in default of any of the terms and conditions of this agreement, and termination is effective if LICENSEE fails to correct such default within thirty (30) days after written notice thereof by LICENSOR.
Within one month after termination of this agreement, LICENSEE will certify to LICENSOR in writing that through its best efforts, and to the best of its knowledge, the original and all copies, in whole or in part, in any form, of the SOFTWARE and DOCUMENTATION have been destroyed or returned to LICENSOR.
6. ASSIGNMENT, SUBLICENSE, OR TRANSFER
LICENSEE shall not (by contract, operation of law, or otherwise) assign, sublicense under or transfer this agreement for any right of interest in this agreement, or delegate performance of any of its obligations under this agreement, without the prior written consent of the LICENSOR. Any such assignment, sublicense, transfer, or delegation without the LICENSOR’s prior written consent shall be voidable at the LICENSOR’s option.
7. WARRANTY AND MAINTENANCE
LICENSOR warrants that under normal use, SOFTWARE shall perform the functions specified in its DOCUMENTATION. If SOFTWARE does not conform to its DOCUMENTATION such that its functional performance is significantly affected and LICENSOR is notified promptly, in writing, within ninety (90) days from the date of shipment of the software package, LICEN-SOR will correct such nonconformance by repair, or at its option, make available a replacement program module(s) providing there is no misuse of the nonconforming program module(s).
If LICENSOR or its distributor is unable to deliver a replacement module(s) having SOFTWARE which conforms substantially to its DOCU-MENTATION, LICENSOR may terminate this license by providing a refund to LICENSEE upon LICENSEE’s return of such program modules, except as provided in Section 3 above, any modification in SOFTWARE by LICENSEE or third parties shall void this warranty.
LICENSOR does not represent or warrant that the SOFTWARE or DOCUMENTATION furnished hereunder is free of infringement of any of the third parties, copyrights, trade secrets, or other intellectual property rights.
LICENSOR shall not be responsible for maintenance or field service of the program module(s) and SOFTWARE under this agreement.
THE FOREGOING WARRANTIES ARE EXCLUSIVE AND IN LIEU OF ALL OTHER WARRANTIES WHETHER STATUTORY, EXPRESS OR IMPLIED (INCLUDING ALL WARRANTIES OF MERCHANTABLILITY AND FITNESS FOR A PARTICULAR PURPOSE AND ALL WARRANTIES ARISING FROM COURSE OR DEALING OR USAGE OF TRADE) WITH RESPECT TO THE PROGRAM MODULE(S), SOFTWARE, OR DOCUMEN-TATION FURNISHED BY LICENSOR UNDER THIS AGREEMENT OR ANY USE OF SUCH SOFTWARE OR DOCUMENTATION BY THE LICENSEE.
The remedies provided above are the LICENSEE’s exclusive remedies for any failure of LICENSOR to meet its warranty obligations. Actions by LICENSOR in the manner provided above shall constitute complete fulfill-ment of all the warranty liabilities of LICENSOR whether the claims of the LICENSEE are based on contract, in tort (including negligence and strict liability, or otherwise with respect to or arising out of the program module(s), SOFTWARE or DOCUMENTATION furnished hereunder.
8. LIMITATION OF LIABILITY
LICENSOR, its subcontractors and suppliers of any tier, shall not be liable in contract, in tort (including negligence and strict liability), or otherwise for damages or loss of other property or equipment, loss of profits or revenue, loss of use of equipment or power system, cost of capital, cost of purchased or replacement power or temporary equipment (including additional expenses incurred in using existing facilities), claims of customers of the LICENSEE, or for any special, indirect incidental or consequential damages whatsoever.
The remedies of the LICENSEE set forth herein are exclusive where so stated and the total cumulative liability of the LICENSOR with respect to this agreement, or anything done in connection therewith, whether in contract, in tort (including negligence and strict liability) or otherwise, shall not exceed the price of the product in which such liability is based.
9. NOTICE
All notices in connection with this agreement shall be in writing and shall be given by certified mail, return receipt requested, at the following address: Unication co.,Ltd., 3F 6 Wu Kung 5th RD.Wu Ku IND., TW 242ATTENTION: Group Patent Counsel.
10, GOVERNING LAW
This agreement shall be governed and interpreted by the laws of the state of Illinois.
11.AGREEMENT
LICENSEE ACKNOWLEDGES THAT THIS AGREEMENT HAS BEEN READ AND UNDERSTOOD AND AGREES TO BE BOUND BY ITS TERMS AND CONDITIONS. LICENSEE FURTHER AGREES THAT THIS AGREEMENT CONSTITUTES THE ENTIRE UNDERSTANDING OF LIC-ENSEE AND LICENSOR WITH RESPECT TO THE SUBJECT MATTER HEREOF AND COMPLETELY SUPERCEDES ANY PRIOR UNDER-STANDINGS, EITHER ORAL OR WRITTEN. ANY MODIFICATION OF THIS AGREEMENT SHALL BE MADE ONLY BY MUTUAL AGREEMENT AND EVIDENCED BY WRITTEN AMMENDMENT SIGNED BY BOTH LICENSOR AND LICENSEE.
Alpha Gold
SOFTWARE LICENSE AGREEMENT

i
August 2003 6880309P66-O
PAGER PROGRAMMING SOFTWARE Product Family Alpha Gold
Contents
Contents
Scope of This Manual . . . . . . . . . . . . . . . . . . . . . . . . . . . . . . . . . . . . . . . . . . . . . . . . . . . . . . . . . . . . . . . . . . . . . . . . . . i
Information Presentation. . . . . . . . . . . . . . . . . . . . . . . . . . . . . . . . . . . . . . . . . . . . . . . . . . . . . . . . . . . . . . . . . iField Description Information . . . . . . . . . . . . . . . . . . . . . . . . . . . . . . . . . . . . . . . . . . . . . . . . . . . . . . . . . i
Getting Started . . . . . . . . . . . . . . . . . . . . . . . . . . . . . . . . . . . . . . . . . . . . . . . . . . . . . . . . . . . . . . . . . . . . . . . . . . . . . . . 1
Equipment Required . . . . . . . . . . . . . . . . . . . . . . . . . . . . . . . . . . . . . . . . . . . . . . . . . . . . . . . . . . . . . . . . . . . . 1Equipment Setup . . . . . . . . . . . . . . . . . . . . . . . . . . . . . . . . . . . . . . . . . . . . . . . . . . . . . . . . . . . . . . . . . . . . . . . 2
Personal Computer Configuration . . . . . . . . . . . . . . . . . . . . . . . . . . . . . . . . . . . . . . . . . . . . . . . . . . . . . 3Preparing a Pager for Reading or Programming . . . . . . . . . . . . . . . . . . . . . . . . . . . . . . . . . . . . . . . . . . 3
Installing the Software . . . . . . . . . . . . . . . . . . . . . . . . . . . . . . . . . . . . . . . . . . . . . . . . . . . . . . . . . . . . . . . . . . 3Installation Parameters . . . . . . . . . . . . . . . . . . . . . . . . . . . . . . . . . . . . . . . . . . . . . . . . . . . . . . . . . . . . . . 3
Starting the Software . . . . . . . . . . . . . . . . . . . . . . . . . . . . . . . . . . . . . . . . . . . . . . . . . . . . . . . . . . . . . . . . . . . 7Software Password . . . . . . . . . . . . . . . . . . . . . . . . . . . . . . . . . . . . . . . . . . . . . . . . . . . . . . . . . . . . . . . . . . . . . 7
Using Your PPS . . . . . . . . . . . . . . . . . . . . . . . . . . . . . . . . . . . . . . . . . . . . . . . . . . . . . . . . . . . . . . . . . . . . . . . . . . . . . . 8
Basic Overview for Programming Pagers . . . . . . . . . . . . . . . . . . . . . . . . . . . . . . . . . . . . . . . . . . . . . . . . . . . 8Getting Help . . . . . . . . . . . . . . . . . . . . . . . . . . . . . . . . . . . . . . . . . . . . . . . . . . . . . . . . . . . . . . . . . . . . . . . 8
Main Menu . . . . . . . . . . . . . . . . . . . . . . . . . . . . . . . . . . . . . . . . . . . . . . . . . . . . . . . . . . . . . . . . . . . . . . . . . . . . 9Service Menu . . . . . . . . . . . . . . . . . . . . . . . . . . . . . . . . . . . . . . . . . . . . . . . . . . . . . . . . . . . . . . . . . . . . . . . . . 10Service Test Options . . . . . . . . . . . . . . . . . . . . . . . . . . . . . . . . . . . . . . . . . . . . . . . . . . . . . . . . . . . . . . . . . . . 11Adjust Hardware Tuned Values . . . . . . . . . . . . . . . . . . . . . . . . . . . . . . . . . . . . . . . . . . . . . . . . . . . . . . . . . . 12Code Options . . . . . . . . . . . . . . . . . . . . . . . . . . . . . . . . . . . . . . . . . . . . . . . . . . . . . . . . . . . . . . . . . . . . . . . . . 13Code Options (Sequential) . . . . . . . . . . . . . . . . . . . . . . . . . . . . . . . . . . . . . . . . . . . . . . . . . . . . . . . . . . . . . . 15Prompts . . . . . . . . . . . . . . . . . . . . . . . . . . . . . . . . . . . . . . . . . . . . . . . . . . . . . . . . . . . . . . . . . . . . . . . . . . . . . 16More Prompts . . . . . . . . . . . . . . . . . . . . . . . . . . . . . . . . . . . . . . . . . . . . . . . . . . . . . . . . . . . . . . . . . . . . . . . . 17Alert Options . . . . . . . . . . . . . . . . . . . . . . . . . . . . . . . . . . . . . . . . . . . . . . . . . . . . . . . . . . . . . . . . . . . . . . . . . 18OTA Programming Options . . . . . . . . . . . . . . . . . . . . . . . . . . . . . . . . . . . . . . . . . . . . . . . . . . . . . . . . . . . . . 21General Options . . . . . . . . . . . . . . . . . . . . . . . . . . . . . . . . . . . . . . . . . . . . . . . . . . . . . . . . . . . . . . . . . . . . . . . 23More Features . . . . . . . . . . . . . . . . . . . . . . . . . . . . . . . . . . . . . . . . . . . . . . . . . . . . . . . . . . . . . . . . . . . . . . . . 27Program . . . . . . . . . . . . . . . . . . . . . . . . . . . . . . . . . . . . . . . . . . . . . . . . . . . . . . . . . . . . . . . . . . . . . . . . . . . . . 29Save . . . . . . . . . . . . . . . . . . . . . . . . . . . . . . . . . . . . . . . . . . . . . . . . . . . . . . . . . . . . . . . . . . . . . . . . . . . . . . . . 30Print a Pager Configuration . . . . . . . . . . . . . . . . . . . . . . . . . . . . . . . . . . . . . . . . . . . . . . . . . . . . . . . . . . . . . 31Setup Menu . . . . . . . . . . . . . . . . . . . . . . . . . . . . . . . . . . . . . . . . . . . . . . . . . . . . . . . . . . . . . . . . . . . . . . . . . .32Setup Options . . . . . . . . . . . . . . . . . . . . . . . . . . . . . . . . . . . . . . . . . . . . . . . . . . . . . . . . . . . . . . . . . . . . . . . . 33Color Options . . . . . . . . . . . . . . . . . . . . . . . . . . . . . . . . . . . . . . . . . . . . . . . . . . . . . . . . . . . . . . . . . . . . . . . . . 35
Technical Description . . . . . . . . . . . . . . . . . . . . . . . . . . . . . . . . . . . . . . . . . . . . . . . . . . . . . . . . . . . . . . . . . . . . . . . . 36
Maintenance Information . . . . . . . . . . . . . . . . . . . . . . . . . . . . . . . . . . . . . . . . . . . . . . . . . . . . . . . . . . . . . . . 36Parts Replacement . . . . . . . . . . . . . . . . . . . . . . . . . . . . . . . . . . . . . . . . . . . . . . . . . . . . . . . . . . . . . . . . . . . . 37Exploded View Diagram and Parts List . . . . . . . . . . . . . . . . . . . . . . . . . . . . . . . . . . . . . . . . . . . . . . . . . . . . 38
Troubleshooting Guide . . . . . . . . . . . . . . . . . . . . . . . . . . . . . . . . . . . . . . . . . . . . . . . . . . . . . . . . . . . . . . . . . . . . . . . 39Glossary . . . . . . . . . . . . . . . . . . . . . . . . . . . . . . . . . . . . . . . . . . . . . . . . . . . . . . . . . . . . . . . . . . . . . . . . . . . . . . . . . . . 40

6880309P66-O August 2003
iii
Product Family Alpha Gold PAGER PROGRAMMING SOFTWARE
Scope of This Manual
Scope of This Manual
This pager programming guide contains five sections to assist you in the use of the Alpha Gold Pager Programming Software (PPS):• Getting Started—information about equipment requirements, installation,
setup, and use of the software.• Using Your PPS—the sequence of screens used to read and program one or
more pager(s).• Technical Description—a description of the Pager Mechanical Interface.• Troubleshooting Guide—a listing of common questions/problems and their
solutions.• Glossary—technical terms used in this guide.
Information Presentation
This manual presents information in different ways:• Information that you need to type is printed in
boldface type
.• When information from the screen is referred to in the text,
it looks like this
.• When you need to press a key on the keyboard, the key is represented graphi-
cally. For example, instead of “Press the Enter Key,” you see “Press
E
.”
Special characters are used to emphasize certain conditions.
Field Description Information
Any screen that contains fields is followed by a table of field descriptions. These tables are divided into two columns.1.
Field Name
—shown exactly the way it appears on the screen.2.
Description
— a complete description of what the field is for, how you can useit, what the valid entries are, and how a specific entry in this field can affectthe status of another field.
➧
Product names are subject to change without notice. Some product names are available only in certain markets.
➧
Note: Emphasizes additional information pertinent to the subject matter.
G
Caution: Emphasizes information about actions which may result in equipment damage.
E
Warning: Emphasizes information about actions which may result in personal injury.

6880309P66-O August 2003
1
Product Family Alpha Gold PAGER PROGRAMMING SOFTWARE
Getting Started
Getting Started
Alpha Gold PPS and interface package,combined with
an IBM personal computer (or compatible), provides the flexibility to program. The Product Alpha Gold pagers to meet individual requirements. This software has a modern look and ease-of-use operation. To obtain the best results from the product, please take a few minutes to read this instruction guide.
Equipment Required
•
IBM Personal Computer or compatible
(not included)The Product Family Alpha Gold PPS is designed to operate on an IBM personal computer or compatible with DOS version 3.3 or higher, a serial port, and 512K of available RAM. If your computer is equipped with a color monitor and a color graphics card, the software runs in color.
•
Programming Interface
(not included)This unit provides communication between the computer and the Pager Mechanical Interface. This package includes all cables necessary for connection with the computer, the power source and the Pager Mechanical Interface.
•
Pager Mechanical Interface
(included)This fixture is designed specifically for the Product Family Alpha Gold pager. It allows the pager to be connected to the computer via the Programming Interface. The Pager Mechanical Interface is connected to the Programming Interface with the coiled cable.
•
Pager Programming Software
(included)This software program, designed specifically for the Product Family AlphaGold pager, allows you to select the desired information to programinto the pager. A3.5-inch program diskette is provided to facilitate the programming procedure.
G
Use only the latest model of the Programming Interface, NRN8815, with the Product Family Alpha Gold pager and pager programming software. Use only the Unication-supplied cable for connection between the Pager Mechanical Interface and the Programming Interface. Use of non-approved cables can result in improper operation and/or incorrect programming of the pager.
Product Family 5846881023B20-DPAGER PROGRAMMING SOFTWAREPAGER PROGRAMMING SOFTWARE

2 August 2003 6880309P66-O
PAGER PROGRAMMING SOFTWARE Product Family Alpha Gold
Getting Started
Equipment Setup Refer to Figure 1 while performing the following steps.1. Plug the appropriate connector of the interface cable into the Programming
Interface. Connect the other end of the cable to the serial port on your computer.
2. Plug one end of the coiled cable into the Programming Interface. Plug the otherend into the Pager Mechanical Interface.
3. Plug the power supply cable into the Programming Interface and plug theac/dc adapter into a 120 Vac (or 220 Vac) electrical outlet.
➧ The program uses COM1 as the default communication port. If both a serial port and a modem are used on the computer, it is recommended that COM1 be used as the serial port. If COM1 cannot be used, change the default to COM2, COM3 or COM4 in the Setup menu after installing the software.
G Use only the Unication-supplied cable for connection between the Programming Interface and the Pager Mechanical Interface. Use of non-approved cables can result in improper operation and/or incorrect programming of the pager.
AIPB 953123-B
Figure 1. Equipment Connection Diagram
COMPUTER
INTERFACE CABLE(*3005020S09/10)
POWER SUPPLYCABLE
(*2505044J02) 110V(*2502469M02) 220V
ac/dcADAPTER
PROGRAMMINGINTERFACE(*NRN8815)
Product Family Alpha Gold PAGER
COILED CABLE(*3005187R02)
PAGERMECHANICALINTERFACE
(**0102719J35)
* This item is part of theProgramming Interface kit (NLN3548) ** These items are part of theProgramming Package (NYN1435)

6880309P66-O August 2003
3
Product Family Alpha Gold PAGER PROGRAMMING SOFTWARE
Getting Started
Personal Computer Configuration
View the CONFIG.SYS file for the following statements and minimum values:
BUFFERS = 20FILES = 35
Edit the CONFIG.SYS file if necessary.
Preparing a Pager for Reading or Programming
1. Turn the pager on.2. Align the pager contact pin holes with the contact pins of the Pager Mechanical
Interface. A red light illuminates on the Programming Interface to indicateproper contact.
3. Press down on the pager until it is tight in the fixture. The pager is now readyto read or program.
Installing the Software
The Product Family Alpha Gold programming software diskette includes the file SETUP.EXE. This file automates installing the software onto either a removable (floppy) diskette or the hard disk of your computer.
Installation Parameters
You can install the PPS either onto a new floppy diskette or onto the hard drive of your computer.1. Place the Product Family Alpha Gold Programming Software diskette
into the diskette drive of your computer (for example, drive A or B).2. Type A: (or B:) and press E.3. Type SETUP and press E.4. A copyright and version-number screen displays with the instruction Press
any key to Continue. Press any key, and the following instructions display.
➧ Only one configuration for the programming software is allowed; therefore, to keep an old version of the programming software, it must use the same setup as the new software (for example, password, archive path, comm port, and so on.)

4 August 2003 6880309P66-O
PAGER PROGRAMMING SOFTWARE Product Family Alpha Gold
Getting Started
After you have pressed E, the following screen is displayed.
➧ Press J or F at any time on any menu to end the program and return to the DOS prompt.

6880309P66-O August 2003 5
Product Family Alpha Gold PAGER PROGRAMMING SOFTWARE
Getting Started
If you respond with a Y, the programming software is copied to the destination indicated by the value in the Your Destination Drive field. Press E to display the default setting in each field. The fields are described on the next page.
If you respond with an N, the following screen is displayed and the programming software is copied to the drive you selected:

6 August 2003 6880309P66-O
PAGER PROGRAMMING SOFTWARE Product Family Alpha Gold
Getting Started
Enter the drive letter and path where you want to install the software. Press T to move among fields or click on the field.
When you are satisfied with your selection and field entries, press J to continue the installation.
If you want to end the installation, press F.
Field Name Description
Source Drive This is the drive where your diskette is inserted.
Your Destination Drive This is the drive where you want the software installed. Press E to select the default drive displayed.
Disk Drive Specify the drive letter where the diskette is located (A or B).
PF169.EXE Program Path The program path defines an exact location where the software is installed. It is recommended that you specify a subdirectory of the root for installation. Type a drive letter, colon, backslash, and a subdirectory name, for example: A:\PF169
Archive Files Path The archive files path defines an exact location where the pager configuration files will be stored. This information is based upon the entry in the PF169.EXE Program Path field. If the response to Are you installing the Product Family Alpha Gold Pager Programming Software onto a hard disk? is Y, the software will be installed onto a hard disk. If N is selected, the software willl be installed onto a floppy disk.
Com Port Select the communication port used to connect the computer to the Programming Interface. Valid entries are 1, 2, 3 or 4, depending upon the serial ports available on the computer.NOTE: The program uses COM1 as the default communication port. If both a serial port and a modem are used on the computer, it is recommended that COM1 be used as the serial port.
Printer Port If a printer is used, select the PRN1, PRN2, COM1, COM2,COM3 and COM4. It can be changed in the Setup menu.
valid port to which it is connected. Valid choices are
If COM1 cannot be used, change the default to COM2,COM3 or COM4 in the Setup menu after installing the software.
Alpha Gold Software Password
You can enter a software password to prevent unauthorized use of your program. If no password is required, leave this field blank.

6880309P66-O August 2003 7
Product Family Alpha Gold PAGER PROGRAMMING SOFTWARE
Getting Started
Starting the SoftwareIf you have installed the software to the HARD disk, follow these steps:1. Turn on your computer.2. At the C: prompt, type cd\PF169. The path name is the directory path where
the PF169 software is installed.3. Type PF169 and press E. An introductory message displays. Press any key
to continue.
If you have installed the software to a FLOPPY disk, follow these steps:1. Turn on and boot your computer.2. Put your working copy of the PF169 diskette into drive A or B.3. At the C: prompt, type A: or B: (depending upon the drive you used in Step 2)
and press E.
4. Type PF169 and press E. An introductory message displays. Press any keyto continue.
Software PasswordIf you selected a password during setup, enter it on the screen shown below and press E. Press B and D to correct any typing errors while entering the password.
If you did not select a password during installation, this screen is not displayed. If a incorrect password is entered, the program ends.
➧ Press J or F in any menu to end the program and return to the Main menu.

8 August 2003 6880309P66-O
PAGER PROGRAMMING SOFTWARE Product Family Alpha Gold
Using Your PPS
Using Your PPS
Basic Overview for Programming Pagers1. Use the Main menu to select the Read/Program Pager options.2. Enter information on the program screens.3. Choose the program pager options from the Program Menu.
These steps are shown below:
Getting Help
The key is used for help. On-screen help is available whenever you see F1 Help in the lower left-hand corner of the screen. Press Q to see the next page of Help, if available. Press P to see a previous page of Help. All menus in this program use A for help.
MAIN MENU
PROGRAM MENU
OPTION SCREENS
A

6880309P66-O August 2003 9
Product Family Alpha Gold PAGER PROGRAMMING SOFTWARE
Using Your PPS
Main MenuThe Main menu provides selections for reading and programming a pager and setting up your computer configuration. Each task is explained in detail as you continue through this manual.
Press B to set the pager in Test Mode or Operation Mode.
Press C to read a pager and display its configuration.
Press E to program a single pager. The PPS establishes communication with the pager and reads the configuration if there is no data in the PPS. Otherwise it will go to code page instead.
Press F to program sequential pagers.
Press H to retrieve a pager archive file if one exists.
Press I to set up your computer configuration.
Press j to exit to DOS.

10 August 2003 6880309P66-O
PAGER PROGRAMMING SOFTWARE Product Family Alpha Gold
Using Your PPS
Service MenuThe Service menu allows you to make selections for placing the pager in test modes or operations modes.
Press C to display the Adjust Hardware Tuned Values screen. Certain values are tuned for each pager and they are dependent upon the specific hardware being programmed. This screen allows you to adjust these values when the pager decoder board needs repair or replacement.
Press E to select the Service Test Options screen.
Press F to set the pager in a QUICK PAGE mode. This test allows you to check the pager RF sensitivity. It enables you to consecutively page a pager in both phases of every frame.
Press G to discard all errored, incoming messages.
Press H to set the receiver to always ON mode.
Press I to set the pager to the chirp alert mode.
Press j to exit to the Main menu.

6880309P66-O August 2003 11
Product Family Alpha Gold PAGER PROGRAMMING SOFTWARE
Using Your PPS
Service Test OptionsThe pager supports two types of test modes: quick test mode and extended test mode. The Service: TestMode screen allows you to test the pager’s various functions For more information about testing, refer to the Self-Diagnostic Feature section in the Product Family Alpha Gold Service Manual.
Press U or W to move the cursor from field to field.
Press c after you have selected a field to perform the individual test.
Press j to exit to the Service menu.

12 August 2003 6880309P66-O
PAGER PROGRAMMING SOFTWARE Product Family Alpha Gold
Using Your PPS
Adjust Hardware Tuned ValuesThis screen allows you to adjust certain values for the specific hardware for each pager.
Press B to program the pager.
Field Name Description
Clock Second Adjustment
This feature allows you to set the crystal of the pager. You can adjust the crystal to a + or - value to satisfy time loss or gain within a 24-hour period. Valid selections are: 0, +1, +2, +3, +4, +5, +6, +7, +8, -1, -2, -3, -4, -5, -6,-7, and -8.
LCD Contrast Adjustment
This selects the display contrast on pagers. 0–15 are manual contrast settings; 16–255 are auto contrast settings.

6880309P66-O August 2003 13
Product Family Alpha Gold PAGER PROGRAMMING SOFTWARE
Using Your PPS
Code OptionsThis screen provides fields for entering essential pager code and function informa-tion, allowing you to select the configuration you want to use to program the pager.
Press U or W to move the cursor from field to field.
Press B to program the pager.
Press D to select the Prompts screens.
Press E to select the Alert Options screen.
Press F to select the OTA Programming Options screen.
Press H to select the General Options (Features) screen.
Press I to reset all of the options to default and return to the Code Options screen.
Press j or F to return to the Main menu.
➧ Not all of the options are available on all pagers.

14 August 2003 6880309P66-O
PAGER PROGRAMMING SOFTWARE Product Family Alpha Gold
Using Your PPS
Field Name Descr iption
Serial No. This non-editab field displays the serial number programmed into the pager at the factor y and should match the ser ial number on one of the labels attached to the pager . If this label is not available, refer to the order form for the appropriate serial number.
Inventory Control No. This field allows you to enter an In ventory Control Number (up to ten char acters) that is stored in the pager . Unlik e the serial number , this number can be changed as needed.
Operating Mode This field allo ws you to silence all alerts, including pr iority alert when Deaf Pager is selected. Normal selection for this field is Standard.
Coding Format/Baud Rate
This field designates either :POCSAG 512POCSAG 1200POCSAG 2400Press the spacebar to toggle among choices .
Receiver Type The pager supports both crystallized or synthesized receivers . The correct pager receiver type ( Crystal or Synthesized) must be selected in this field. If an incorrect type is entered, the pager is not able to receive messages .
Frequency This field designates the frequency on which the pager oper ates .
Functions This field allows you to select the operation of each address:N = Numer icT = ToneA = Alphan umericI = Ideog raphicX = Inactiv eIdeographic can be selected only when the pager is equipped with a char acter-generated ROM (CG R OM).
Priority This field allo ws y ou to select any address to pro vide a pr iority aler t when a message is receiv ed. Valid selections are Y and N.
Code Type This field allo ws y ou to select the type of code:IndividualGroup CallMail DropPress the space bar to toggle among selections .
Maildrop History This field is only a vailable on Maildrop addresses , not on Super-Maildrop addresses . The pager can k eep up to f our histor y files for each Maildrop source for which the Maildrop History option has been enab led. Valid selections are Y or N.

6880309P66-O August 2003 15
Product Family Alpha Gold PAGER PROGRAMMING SOFTWARE
Using Your PPS
Code Options (Sequential)This screen provides fields for entering essential pager code and function informa-tion, allowing you to select the configuration you want to use to program the pager sequentially.
Press U or W to move the cursor from field to field.
Press B to program a pager.
Press D to select the Prompts screens.
Press E to select the Alert Options screen.
Press F to select the OTA Programming Options screen.
Press H to select the General Options (Features) screen.
Press I to reset all the options to default and return to the Code Options screen.
Press j or F to return to the Main menu.
Press Ah to increase the Sequential Code StepUp number.
Press Q or P for the next or previous screen.
➧ Not all of the options are available on all pagers. Also, the fields on this screen are the same as on the Code Options screen except for the Sequential Code Increment field, only that field will be defined here. Refer back to the Code Options screen for the other definitions.

16 August 2003 6880309P66-O
PAGER PROGRAMMING SOFTWARE Product Family Alpha Gold
Using Your PPS
Prompts This screen shows the first half of the pager prompts available with the Product Family Alpha Gold .
Press U or W to move the cursor from field to field.
Press b to program a pager.
Press c to select the Code Options screen.
Press D to select the More Prompts screens.
Press E to select the Alert Options screen.
Press F to select the OTA Programming Options screen.
Press H to select the Features (General Options) screen.
Press I to reset all of the options to default and return to the Code Options screen.
Press j or F to return to the Main menu.
Field Name Description
Sequential Code IncrementCode ACode BCode CCode D
The pager codes (7 digits) are entered in this field, up to two frames are recommended. A frame is the remainder of the division of the pager code of 8.
➧ Each prompt can be customized if desired. The text typed in the associated source is displayed at the end of the message. Only uppercase is accepted.

6880309P66-O August 2003 17
Product Family Alpha Gold PAGER PROGRAMMING SOFTWARE
Using Your PPS
More PromptsThis screen is the second half of the pager prompts available with the Product Family Alpha Gold pager, and is shown with the default settings.
Press U or W to move the cursor from field to field.
Press b to program a pager.
Press c to select the Code Options screen.
Press D to select the Prompts screens.
Press E to select the Alert Options screens.
Press F to select the OTA Programming Options screen.
Press H to select the Features (General Options) screen.
Press I to reset all of the options to default and return to the Code Options screen.
Press j or F to return to the Main menu.
Field Name Description
Show Source Each source, 1-16, has a programmable source prompt. Each prompt can be customized in the codeplug, if desired, or the defaults can be used. If selected, the text programmed is displayed at the end of the message.
➧ Not all of the options are available on all pagers.

18 August 2003 6880309P66-O
PAGER PROGRAMMING SOFTWARE Product Family Alpha Gold
Using Your PPS
Alert OptionsThis menu shows the alert options available with the Product Family Alpha Gold pager and is shown with the default option settings.
Press U or W to move the cursor from field to field.
Press b to program a pager.
Press c to select the Code Options screen.
Press D to select the Prompts screens.
Press F to select the OTA Programming Options screen.
Press H to select the Features (General Options) screen.
Press I to reset all of the options to default and return to the Code Options screen.
Press j or F to return to the Main menu.
➧ Not all of the options are available on all pagers.
Field Name Description
Disable All Alerts When Yes is selected all audible and vibrating alerts are disabled. All alert options and user-changeable alert modes are dependent upon this option.

6880309P66-O August 2003 19
Product Family Alpha Gold PAGER PROGRAMMING SOFTWARE
Us ing Y our P P S
Alert Frequency T he available selections for s tandard alerts are:3.84 kHz3.2 kHz
2.7 kHz2.5 kHz1.37 kHz1.24 kHZ
Alert Duration Pager alerts can be conÞgured for short (2 sec) or long (12 sec) non-priority alerts . If the Manual Alert R eset is set to Yes, the option is set for s ilent alerts only.
User Changeable Alert Mode
When Yes is selected, the alert mode can be changed by us ing the pagerÕs function menu. If No is selected, the pager is always in the audible mode, unless the deaf pager option is enabled.
User Selectable Alerts With this option enabled, you are able to select either s tandard alerts , one of the seven pleas ing alerts , chirp alerts , or no alerts us ing a special Òset alerts screenÓ menu. T his menu is accessed through the pagerÕs function menu.
Reminder Alert Interval
With the alert interval time programmed into the pager, the pager emits a chirp or vibration every reminder aler t time intervalÓ until all unread messages are read. Valid selections are: None2 min3.07 min4 min5.07 min10 min15.07 min30 min
Reminder Alert Timeout With this option selected, the time period begins with a newly arrived message and is reset every time a new message is received. When the time period expires, the pager does not emit any more reminder alerts until a new message arrives. Valid time period selections are:None2 min3.07 min4 min5.07 min10 min15.07 min30 min
Enable Maildrop Alert If Yes is selected, all maildrop messages alert with a chirp alert. If None is selected, there is no alert for maildrop messages.
Manual Alert Reset With this option selected and the pager in the audible mode, an incoming message alert can only be stopped manually by press ing any button on the pager.
F ield Name Des c ription
3.0 kHz

20 August 2003 6880309P66-O
PAGER PROGRAMMING SOFTWARE Product Family Alpha Gold
Using Your PPS
Low Battery Alert If Yes is selected, the pager emits a (one second) low battery cell ale rt when the batter y reaches a low cell state .
Key Click If Yes is selected, a key clic k occurs when a pager button is pressed. The click sound is caused by turning on the transducer for a very shor t time. If silent mode is selected, key click is disabled.
Alarm Always Audible If Yes is selected, the gener al and individual message alarms are always audible.
Real Time Clock With this option selected, a real time clock displaying the time and date displays .
International Date(DD/MM/YY)
When Yes is selected, the date is displayed in the inter national (da y-month) format.
Show Time Stamp The pager displays a message 's time stamp when a message is being read. The time stamp is shown at the very end of the message after the source prompt, if show source is enabled.
Individual Message Alarm
If Yes is selected, you can attach an aler t to a particular message, with a specified time to initiate the alert.
Auto Alarm Turn On With this option selected and any type of alarm enabled, the pager automatically turns on and gives an alarm aler t rather than a power up aler t if it is off when the alarm expires .
Alert If Yes is selected, the pager chirps when it is automatically turned on or off . If the pager is in the vibrate mode , it vibrates for 2 seconds . If No is selected, the pager turns off silently and turns on as if it were turned on manually .
Out of Range Time With an out-of-range time speciÞed by the codeplug, the pager is considered "out of range" when it does not detect a P OC S A G synchronization word for that time per iod. The out-of-r ange icon displa ys at this time . Valid selections are: None32 sec64 sec2 min3.07 min4 min5.07 min6 min10 min15.07 min
Out of Range Alert With this option, the pager alerts when it becomes out of range .
Vibrator If Yes is chosen, you can enable the vibrator in the pager. If y ou change the aler t mode to silent and No is selected, the pager does not vibrate.
Function 4 Repeat Period
This field allows you to select a 2 second Function 4 repeat time or a 1 second Function 4 repeat time f or true POCSAG with the 1/16th second pulse duration.
Field Name Description
Private Time
Private Time
Allows the pager to use Private Time which is a time period specified by the user when the pager goes into completely silent mode. When activated, the pager cont-inues to receive messages but does not generate any alerts.

6880309P66-O August 2003 21
Product Family Alpha Gold PAGER PROGRAMMING SOFTWARE
Using Your PPS
OTA Programming OptionsThis screen shows some of the less common options available with the Product Family Alpha Gold pager. This screen is shown with the default settings.
Press U or W to move the cursor from field to field.
Press b to program the pager.
Press c to select the Code Options screen.
Press D to select the Prompts screens.
Press E to select the Alert Options screen.
Press H to select the Features (General Options) screen.
Press I to reset all of the options to default and return to the Code Options screen.
Press j or F to return to the Main menu.
Function 4 Tone Pulse This field allows you to select a 1/8th second tone pulse or a 1/16th second pulse.
Field Name Description

22 August 2003 6880309P66-O
PAGER PROGRAMMING SOFTWARE Product Family Alpha Gold
Using Your PPS
Field Name Description
Download Security Level
The security levels are either no password requirement for any type of download communication (None) or a password required for everything except test mode (Maximum).
Download Password Depending upon the level of security selected, the download password may or may not be required for download. Up to ten characters (A-Z, 0-9, space) can be used.
OTA Programming With this option selected, a pager or pagers can be remotely reconfigured. It can be used to change options, enable a temporarily disabled pager or disabling a pager and changing codeplug data. The OTA page cannot enable a dead (more than eight attempts with an incorrect password) pager.
Silent OTA Programming With this option selected, the pager powers-up silently after it has been programmed over the air.
Personal OTA Password A personal OTA password is required to perform an OTA page to personal source. Ten characters (A-Z, 0-9, space) are used.
Group OTA Password A group OTA password is required to perform an OTA page on a group or maildrop source. Ten characters (A-Z, 0-9, space) are used.
Data Inversion Certain frequencies require data to be inverted, refer to applicable service manuals for frequencies and their corresponding Data Inversion settings.
6880309P66-O August 2003 23
Product Family Alpha Gold PAGER PROGRAMMING SOFTWARE
Using Your PPS
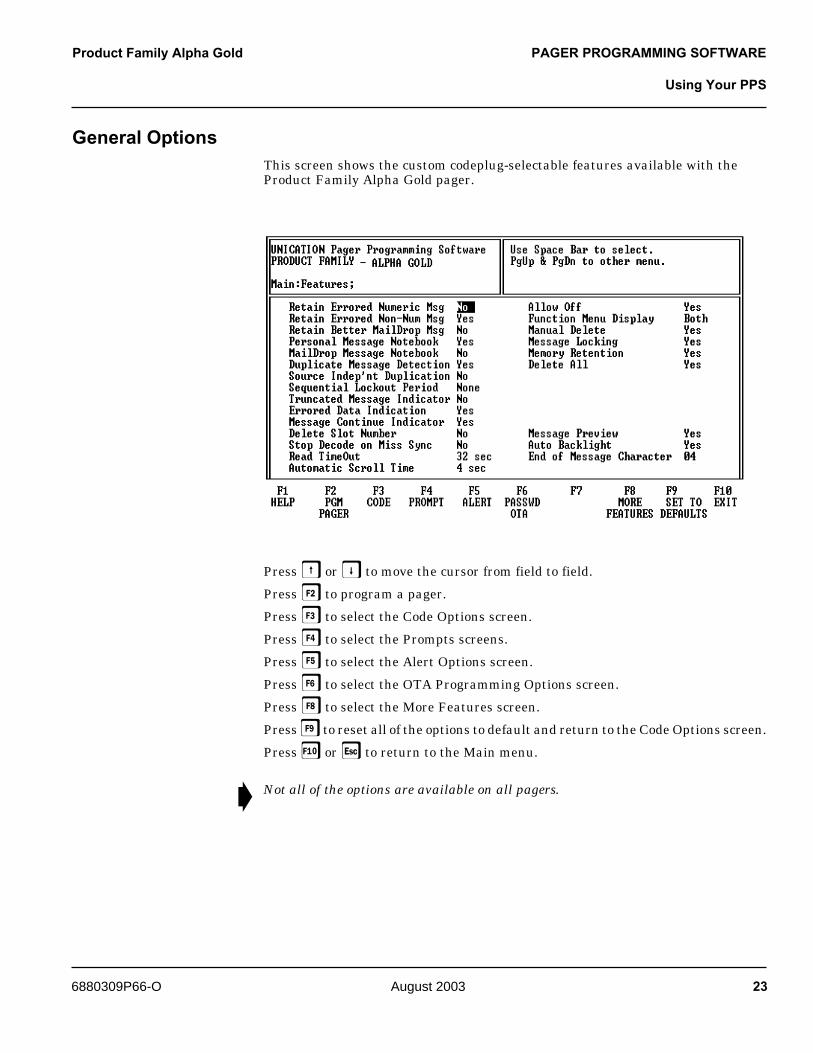
General OptionsThis screen shows the custom codeplug-selectable features available with the Product Family Alpha Gold pager.
Press U or W to move the cursor from field to field.
Press b to program a pager.
Press c to select the Code Options screen.
Press D to select the Prompts screens.
Press E to select the Alert Options screen.
Press F to select the OTA Programming Options screen.
Press H to select the More Features screen.
Press I to reset all of the options to default and return to the Code Options screen.
Press j or F to return to the Main menu.
➧ Not all of the options are available on all pagers.

24 August 2003 6880309P66-O
PAGER PROGRAMMING SOFTWARE Product Family Alpha Gold
Using Your PPS
Field Name Description
Retain Errored Numeric Msg
If Yes is selected, the pager retains numeric messages that contain errors. If No is selected, the pager discards errored messages.
Retain Errored Non-Num Msg
If Yes is selected, the pager retains non-numeric (alphanumeric and ideographic) messages that contain errors. If No is selected, the pager discards errored messages.
Retain Better Maildrop Msg
If Yes is selected, the pager allows a new maildrop message to replace an existing message. This occurs only when the new message contains no errors, or has the same amount of more good characters than the one being replaced.
Personal Message Notebook
This option is available if the pager has been configured to receive personal messages. If the option is available and Yes has been selected, you can add personal messages to the personal notebook.
Maildrop Message Notebook
This option is available if the pager has been configured to receive maildrop messages. If Yes is selected, you can add maildrop messages to the maildrop notebook.
Duplicate Message Detection
If Yes is selected, duplication detection is performed on all personal messages with the same message type as the new message, on a character by character basis. Errored characters are ignored during the check.If all non-errored characters in both messages match, the existing matching message is flagged as a duplicate. The message with the least number of errors is stored and the other messages are discarded. Duplication is not performed on maildrop messages.
Source Indep’nt Duplication
When Yes is selected, duplication is performed on all messages with the same function type as the new message. If No is selected, duplication is performed only on messages with the same source and function type.
Sequential Lockout Period
When Yes is selected, a sequential lockout timer begins when a message arrives and is flagged as being sequentially locked out. If duplicate messages arrive, one of the messages is disregarded and not flagged as a duplicate.
Truncated Message Indicator
When Yes is selected, an errored truncated message or a normal truncated message is displayed. A “truncated message” indicator displays over the last character in the message.
Errored Data Indication
When Yes is selected, the error character alternately displays with the “best guess” of the errored data. If No is selected, the “best guess” of the errored data is displayed without any indication that it contains errors.
Message Continue Indicator
If this option is selected, the last character on a screen alternately flashes every 0.5 seconds with a “down” arrow if the message contains more data. If the last character on the screen is errored and Errored Data Indication = Yes, the Errored Data Indicator does not appear on that character. The Message Continued Indicator overrides the Errored Data Indicator.
Delete Slot Number If Yes is selected, the pager displays the message slot number of personal messages.
Stop Decode on Miss Sync
If Yes is selected, pager address falsing on noise is reduced by disabling the detection of any new page from the time an invalid sync word is detected until the next valid sync has been detected.

6880309P66-O August 2003 25
Product Family Alpha Gold PAGER PROGRAMMING SOFTWARE
Using Your PPS
Read TimeOut The current pager display changes after the selected time frame has expired. Valid selections are:16 sec32 sec64 sec5.07 min
Automatic Scroll Time While reading a message in the Fast Scroll mode, the display advances forward one screen every "fast scroll time" period. Valid values are: 1/2 sec, 1 sec, 2 sec, 3 sec, 4 sec, 6 sec, 8 sec, 10 sec, and 30 sec.
Allow Off This option allows the pager to be turned off. If this option is not selected, the pager cannot be turned off without removing the battery.
Function Menu Display The pager allows you to perform various functions on the pager and on messages. Some of these functions have a corresponding pager option that dictates whether the function is available to you via the pager's function menu. If none of the options are enabled, the MODE button on the pager is disabled and the Function Menu is not displayed. The function menu consists of a series of icons, prompts, or a combination of the two. The default is to show the icons with the corresponding prompts above the icons (Both ); however, when ideographic prompts are desired, the pager only displays either the prompts (Prompts) or the icons (Icons).
Manual Delete When this option is selected, you can manually delete one message at a time. Protected (locked) messages cannot be deleted.
Message Locking When this option is selected, up to 10 personal messages can be protected (locked). When a message is locked, it cannot be automatically deleted by the pager.
Memory Retention This option is also called Non-Volatile Memory. If selected, the pager retains all message information when the pager is turned off and back on.
Delete All All read, unprotected personal messages are deleted and moved to the firstavailable memory slot. All read maildrop messages are deleted when selected.
Field Name Description

26 August 2003 6880309P66-O
PAGER PROGRAMMING SOFTWARE Product Family Alpha Gold
Using Your PPS
Message Preview With Yes selected, all messages can be previewed by moving the cursor left or right. The pager displa ys the first line (or source prompt) of each message . Eliminating reading the entire message .
Auto Backlight With Yes selected, the pager senses when it is in a dark environment. If in a dark environment and a button is pressed, the bac klight automatically turns on.
End of Message Character
With Yes selected, you to enter the end of message character. Valid selections are:00-7F
Field Name Description

6880309P66-O August 2003 27
Product Family Alpha Gold PAGER PROGRAMMING SOFTWARE
Using Your PPS
More FeaturesThis screen shows additional custom code-plug-selectable features available with the Product Family Alpha Gold pager.
Press B to program the pager.
Press c to select the Code Options screen.
Press D to select the Prompts screens.
Press E to select the Alert Options screen.
Press F to select the OTA Programming Options screen.
Press H to return to the Features (General Options) screen.
Press I to reset all of the options to default and return to the Code Options screen.
Press j or F to return to the Main menu.
➧ Not all of the options are available on all pagers.

28 August 2003 6880309P66-O
PAGER PROGRAMMING SOFTWARE Product Family Alpha Gold
Using Your PPS
Field Name Description
Enable Battery Gauge With Yes selected, the battery gauge indicator is displayed in Þve different levels on the pager . Valid indicators are: Full, 3/4, 1/2, 1/4, and Empty
Battery Gauge Level- High 1.43v
This v alue represents the battery voltage level necessary for the battery gauge to displa y a full battery. If the battery voltage is higher or equal to this value , the full battery gauge icon is displayed. Valid selections are: 1.63V, 1.58V, 1.53V, 1.48V, 1.43V, 1.39V, 1.34V, 1.29V, 1.24V, 1.19V, 1.14V, 1.09V, 1.05V, 1.00V, 0.95V, and 0.90V. The High level must be greater than the Med level, and the Med level must be greater than the Low level. None of the le vels can be equal to each other .
Battery Gauge Level - Med 1.39v
This value represents the battery voltage level necessary for the battery gauge to displa y a full battery . If the battery voltage is higher or equal to this value , the full battery gauge icon is displayed. Valid selections are: 1.63V, 1.58V, 1.53V, 1.48V, 1.43V, 1.39V, 1.34V, 1.29V, 1.24V, 1.19V, 1.14V, 1.09V, 1.05V, 1.00V, 0.95V, and 0.90V. The High level must be greater than the Med level, and the Med level must be greater than the Low level. None of the le vels can be equal to each other .
Battery Gauge Level - Low 1.29v
This value represents the battery voltage level necessary for the battery gauge to display a full battery . If the battery voltage is higher or equal to this value , the full battery gauge icon is displayed. Valid selections are: 1.63V, 1.58V, 1.53V, 1.48V, 1.43V, 1.39V, 1.34V, 1.29V, 1.24V, 1.19V, 1.14V, 1.09V, 1.05V, 1.00V, 0.95V, and 0.90V. The High level must be greater than the Med level, and the Med level must be greater than the Low level. None of the le vels can be equal to each other .
Periodic Low Battery Check
The low battery periodic check is based upon the selected value . Valid selections are: None and from 1hr to 15 hrs (in hour ly increments).
Show Memory Full Prompt
Zoom This field determines whether the pager can enlarge the characters in the display to two times their normal size. The four-line pager looks like a two-line pager, increasing message visibility.
With Yes selected, the pager displays the memor y full prompt and icon. With No selected, only the icon is displayed.

6880309P66-O August 2003 29
Product Family Alpha Gold PAGER PROGRAMMING SOFTWARE
Using Your PPS
ProgramThis screen allows you to program the configuration to disk or a specified path.
Press D to program the pager.
Press G or P to display the previous screen.
Press H or Q to display the next screen.
Press j or F to return to the Main menu.
➧ To get this screen. Please jump to " More features " screen first, then press for one time.
Q

30 August 2003 6880309P66-O
PAGER PROGRAMMING SOFTWARE Product Family Alpha Gold
Using Your PPS
SaveThis screen allows you to save the configuration to disk or a specified path.
Press D to save the pager configuration to disk for future use.
Press G or P to display the previous screen.
Press H or Q to display the next screen.
Press j or F to return to the Main menu.
After pressing D, enter a file name in the File Name field. To enter comments about the configuration file, press E before pressing h to save the file. Press h to save the configuration. Press j to exit the program.
➧ To get this screen. Please jump to " More features " screen first, then press for two time.
Q

6880309P66-O August 2003 31
Product Family Alpha Gold PAGER PROGRAMMING SOFTWARE
Using Your PPS
Print a Pager ConfigurationThis screen provides options to read, save, or program a pager configuration, to print the current pager configuration, and to setup the computer configuration.
Press D to print a pager configuration.
Press G or P to display the previous screen.
Press H or Q to display the next screen.
Press j or F to return to the Main menu.
The current selection of the pager configuration will be printed. Your printer must be connected to either a serial port or a parallel printer port.
➧ To get this screen. Please jump to " More features " screen first, then press for three time.
Q

32 August 2003 6880309P66-O
PAGER PROGRAMMING SOFTWARE Product Family Alpha Gold
Using Your PPS
Setup MenuThis screen provides the choice of selecting the communication path and color configuration screen.
Press c to select the Setup Options (Communication Setup) screen.
Press g to select the Color Options (Color Configuration) screen.
Press j or F to return to the Main menu.
➧ Press I from the Main menu to access this screen.
➧ The Color Options screen does not display if you are using a monochrome mon-itor.

6880309P66-O August 2003 33
Product Family Alpha Gold PAGER PROGRAMMING SOFTWARE
Using Your PPS
Setup OptionsThis screen allows you to set up your own computer configuration. You can select the disk drive and pathname in which your configuration files are archived and the communication port used to communicate to the Programming Interface. Similar to the ability to select password protection in the initial setup program, you can either change or delete that password in the Setup screen shown below.
After you have set up the desired configuration, save the configuration by pressing h. Otherwise, the setup is only valid during this session.
➧ The parameters for a communication port to the pager have been selected: 4800 baud, no parity, 8 data bits, and 1 stop bit in Product Family Alpha Goldpagers. Make sure they are set correctly.
➧ The program uses COM1 as the default communication port. If both a serial port and a modem are used on the computer, it is recommended that COM1 be used as the serial port. If COM1 cannot be used, change the default to COM2 in the computer configuration screen.
Field Name Description
Arch Path This is the path used to save the archived information.
SW Password A software password can be entered to prevent unauthorized use of this program. If no password is required, leave this field blank.

34 August 2003 6880309P66-O
PAGER PROGRAMMING SOFTWARE Product Family Alpha Gold
Using Your PPS
Com Port Select the communication port used to communicate with the paging terminal. Valid entries are COM1: to COM4:, depending upon the communication ports the computer is equipped with. Ensure the communication port selected is not used by another software application, some RAM-resident desktop organizers reserve a communication port for their own use.
Bit Rate This is the rate or speed the communication port sends data bits. Pressing the space bar toggles through the valid choices:120024004800960019200
Parity The method is used to check for parity or error. Pressing the space bar toggles through the valid choices of None, Even and Odd.
Data Bits Select either 7 or 8, this is the number of data bits per byte. Pressing the space bar toggles between the valid choices.
Stop Bits Select either 1 or 2, this is the number of stop bits to use. Pressing the space bar toggles between the valid choices.
Printer Port Select one of the following options:PRN1:PRN2:COM1:COM2:
Field Name Description

6880309P66-O August 2003 35
Product Family Alpha Gold PAGER PROGRAMMING SOFTWARE
Using Your PPS
Color OptionsThis screen allows you to select the color of the text that corresponds to categories, headings or highlighted areas on the program screens.
Pressing G from the Main: Setup menu brings up the Color Options screen shown above.
Press U or W to move the cursor from field to field.
Press E to reset to the default selections.
Press h to save the selections.
Press j or F to return to the Main menu.

36 August 2003 6880309P66-O
PAGER PROGRAMMING SOFTWARE Product Family Alpha Gold
Technical Description
Technical DescriptionThe Product Family Alpha Gold Pager Mechanical Interface is a passive interconnection between the NRN8815 Programming Interface and the Product Family Alpha Gold pager. The fixture has a receptacle (J1) that accepts the RJ-11 type plug of the coiled cable from the Programming Interface. Programming information is sent through the spring-loaded pins that make the appropriate contacts in the Product Family Alpha Gold pager.
Programming information is sent to the Product Family Alpha Gold pager from the Programming Interface through the coiled cable. The operation of the Programming Interface is described in the manual (6881010B39) provided with it.
There are no active devices in the Product Family Alpha Gold Pager Mechanical Interface. A schematic diagram of the signal paths is shown in Figure 2.
Maintenance InformationMaintenance of the Product Family Alpha Gold Pager Mechanical Interface consists of keeping the spring-loaded contacts clean and making sure the RJ-11 plugs are properly seated in the receptacle on the Pager Mechanical Interface and the Programming Interface.
The contacts can be cleaned with a soft, dry cloth. Do not use any solvents to clean the contacts or the outside of the interface. If necessary, a damp (not wet) cloth can be used to clean the outside of the fixture. Do not immerse in water or other liquid. In case of erratic operation, inspect the coiled cable between the Programming Interface and the Pager Mechanical Interface. If it appears to be damaged, or the contacts on the plug at either end appear weak or damaged, replace the cable.
G
Use only the Unication-supplied cable for connection between the Programming Interface and the Pager Mechanical Interface. Use of non-approved cables can result in improper operation and/or incorrect programming of the pager.

6880309P66-O August 2003 37
Product Family Alpha Gold PAGER PROGRAMMING SOFTWARE
Technical Description
Parts ReplacementWhen ordering replacement parts or equipment information, complete identifica-tion numbers must be included. This applies to all components, kits, and chassis. If the component part number is not known, the order must include the number of the chassis or kit number of which it is a part. If the identical replacement part is not locally available, check the parts list for the proper Unication part number and order the part from the nearest Unication replacement parts depot, listed below.
MAIL ORDERS
International:Unication.co.,LtdServices DivisionAttn: Customer Service3F 6 Wu Kung5TH RD. Wu Ku IND
Replacement Parts ,Manuals :Unication.co.,Ltd
Attn: Customer Service3F 6 Wu Kung5TH RD.
Services Division
Wu Ku IND
Send written orders to the following addresses:
CUSTOMER SERVICEReplacement Parts, Manuals :Call: (886) 2-22999678
Parts IdentiÞcation:Call: (886)2-22999678
Customer Response Center:(Sales and Service Assistance)
Call: (800) 247-2346
FAX: (800) 232-9272
TELEPHONE ORDERS
Replacement Parts, Manuals :Call: (886) 2-22999678
Product Services Technical Support:Call: (886) 2-22999678

38 August 2003 6880309P66-O
PAGER PROGRAMMING SOFTWARE Product Family Alpha Gold
Technical Description
Exploded View Diagram and Parts List
AIPB-932751-D
Figure 3. Exploded View DiagramAIPB D
PRODUCT FAMILY Alpha GoldPAGER MECHANICAL INTERFACE
(1002719J35)
LATCH(5505969E01)
CONTACT PIN (Qty. 2)(3904059F01)
INSERT(4305968F01)
REMOVE BEFOREPROGRAMMING
HOUSING(1505975F01)
CONNECTOR JACK(0962110A04)
SCREW(0300136422)
PAD(7505424M02)
CONTACT PIN RECEPTACLE (Qty. 2)
(0904058F01)
PC BOARD(8404060F01)
BASE(2705978C01)
PAD BASE(7505424M01)

6880309P66-O August 2003 39
Product Family Alpha Gold PAGER PROGRAMMING SOFTWARE
Troubleshooting Guide
Troubleshooting Guide
Problem Solution
Does Product Family Alpha Gold programming software run on COM3 or COM4?
Yes, as long as no other device is connected to these ports.
When reading a pager, either the mouse no longer works or communication with the pager cannot be re-established.
This error often results from setting an asynchronous mouse to the same communication port interrupt used for the programming software. It is recommended that one of the communication ports be changed. Check that both devices are not set to even.Check that both devices are not set to odd.If either of these conditions exist, reset one device opposite of the other port.
The programming software reports a Data Communications error and never reads the pager.
Check the Programming Interface cable for correct installation. This is usually a 9- or 25-pin male connector on the back of the computer.Make sure the power supply cable is connected to a power source.Make sure the pager is in the ON position and firmly seated in the Mechanical Interface. (The red LED is illuminated.)Check if there are any RAM-resident programs running.
Pager does not function after programming has been performed.
Make sure the capcode has not been changed.Check all functions; ensure the entries have not been programmed as either inactive or incorrectly.Make sure the Data Inversion parameter has not been changed.

40 August 2003 6880309P66-O
PAGER PROGRAMMING SOFTWARE Product Family Alpha Gold
Glossary
GlossaryArchive File
This is a file that contains pager configuration information. This type of file is created from the Save menu.
Cadences
This refers to the balanced, rhythmic flow of sound; the measure or beat of movement from one sound to the next.
Default
This is information automatically generated by the software program. Basically, any field that contains a preset selection is called a default. Default information can be changed as necessary. It is used to ensure that a basic entry is present for required information.
Field
This is an area on the screen into which you enter information.
Highlight Bar
This refers to when the cursor is not represented by a single character space, but instead, by a long bar.
Pager Clock Crystal
This is a crystal used inside the pager to control the time-keeping function.
Sequential
This refers to programming more than one pager.
Toggle
This refers to scrolling through a list of selections.

A
US
ER’S
GU
IDE
ii
Contents
PageGetting the Most from Your Pager ...............................1Display Symbols .........................................................2Controls ......................................................................2Pager Symbols............................................................3Turning Your Pager On ................................................4Turning Your Pager Off ................................................4Receiving and Reading Your Messages......................5Using the Function Menu ............................................6Backlighting.................................................................6Locking and Unlocking Messages ..............................6Setting the Time and Date ..........................................7Setting the Alarm ........................................................8Setting the Message Alarm.........................................9 Setting the Alert Mode ..............................................10Setting the Alert Pattern............................................10Turning the Maildrop Alert On and Off ......................11Deleting Messages from Memory .............................11Moving Messages to Your Notebooks .......................12Deleting Messages From Your Notebooks ................13Setting Auto On/Off...................................................13Other Features..........................................................14Battery Information ...................................................15Care of Your Pager ....................................................16Cleaning Your Pager..................................................16Repair and Maintenance...........................................17
1
Getting the Most from Your Pager
• Spend a few minutes learning all of the functionsand messaging capabilities of your pager.
• Give your pager number to your business associ-ates, friends, family, children’s school, and the baby-sitter so you can always be reached in an emer-gency.
• Include your pager number on business cards andon your answering machine message.
2
Display Symbols
Controls
ESCAPE
È Ñ å É ó ò ï ñ í Ö 
Set Auto
On/Off
Add To Note-book
SetMessage
AlarmChoose
Alert
Set Audible/Silent Alert
TurnPager
Off
Escape(to status screen)
Delete All Messages
Lock/Unlock
Message
Set Timeand Alarm
DeleteMessage
A
Left/Right Directional
Buttons
Function/Select Button
Read/Escape/
Power OnButton
Up/Down Directional
Buttons
Warranty...................................................................17

3
Pager Symbols
Pager Status Symbols: (Left column)
ë Power OnÍ Audible Alert Mode
Auto On/OffÖ Alarm
Message Status Symbols: (Top two rows of display)
í Locked MessageÕ Maildrop Indicator (Alert Enabled)V Maildrop Indicator (Alert Disabled)ü Message In Memory Indicatoré Memory Full IndicatorÖ Alarmed Message
Function Menu Symbols: (Bottom row of display)
È Choose AlertÑ Set Time and Alarmå Set Auto On/OffÉ Set Audible AlertÇ Set Silent Alertó Turn Pager Offò Escape (to status screen)ï Delete Messageñ Delete All Messagesí Lock Messageì Unlock MessageÕ Maildrop Indicator (Alert Enabled)Ì Maildrop Indicator (Alert Disabled)Ö Set Message Alarm ¶ Add to Notebook
4
Other Symbols:
å Enter Auto On/Off Menu and Auto On/Off Enabled
õ Auto On/Off Disabledô 24 Hour Time AM AM TimePM PM Time à Disable Alarmc Enable AlarmÇ No Message Alert (On Choose Alert Menu)Õ Chirping Alert (On Choose Alert Menu)
( Full Battery Gauge, Low Battery GaugeT Out of Range Ü Message Continuation
Truncated Message<..> Alphanumeric Missing Fragment Indicator*
- - - - - Long Numeric Missing Fragment Indicator*ú Errored Data Indicator
* These symbols apply to ADVISOR II FLX only.
Turning Your Pager On
Press Ë. Your pager alerts and shows ë in the left column ofthe display. The time and date are shown at the bottomof the display.
Turning Your Pager Off
➊ Press Á to display the function menu.➋ Press ä to move the cursor to ó.➌ Press Á twice to turn the pager off.
5
Receiving and Reading Your Messages
When a message is received, your pager alerts anddisplays a flashing ü symbol.➊ Press any button to stop the alert.➋ Press Ë to display your message.The pager automatically stores the message and thetime and date it is received.A flashing arrow Ü at the bottom right corner of thescreen indicates the message you are reading contin-ues beyond the four lines of the display. Press Ë to advance to the next screen of the mes-sage.Press to read your message line by line.Press and hold Ë to rapidly scroll through your mes-sage, screen by screen.If more than one message exists, press ä or ã toselect the message you want to read. The symbol Óindicates the location of the message. Press Ë todisplay your message. While reading your messages,you can press H or I to view the previous or nextmessage.A flashing ësymbol indicates you have a messagethat has not been read. The pager alerts at predeter-mined intervals to remind you of any unread mes-sages.ADVISOR II pagers store up to 19 personal messagesin memory.
6
Using the Function Menu
Press Á to display the function menu. The function menu gives you access to the many featuresof your pager through a series of symbols and prompts.For example, when the function menu screen is first dis-played, the ò symbol flashes, indicating the presentposition of the cursor. You can now press ä or ã tomove the cursor within the function menu.
NOTE: To exit from any menu without making changes,press Ë.
Backlighting
The pager’s backlight illuminates in low-light condi-tions when any button is pressed. You can manuallyactivate or deactivate the backlight at any time bypressing and holding Á for two seconds. If no otherbuttons are pressed, the backlight automatically turnsoff when the pager returns to the standby mode.
Locking and Unlocking Messages
Up to 10 messages can be locked in memory, preventingthem from being replaced when memory is full (indicatedby the é symbol).➊ Press Ë.➋ Press ä or ã to select the message to lock.➌ Press Á to display the function menu.➍ Press ã to move the cursor to lock (í) or unlock
(ì).➎ Press Á to lock or unlock the message.➏ The symbol í or ì is displayed, indicating the status
of the message in memory.

7
Setting the Time and Date
➊ Press Á to display the function menu.➋ Press ä to move the cursor to Ñ.➌ Press Á to display the set-time screen.➍ Press ã to move the cursor to the hour digit.➎ Press or to adjust the hour.➏ Press ã to move the cursor to the minute digit.➐ Press or to adjust the minute.➑ Repeat the process for each set of digits: AM/PM/
24 hr., month/day/year.➒ Press Á to activate the time and date change.
If you move the cursor past the last symbol in the row(far right), it automatically wraps around and displaysat the first symbol in the beginning of the same row (farleft).
NOTE: To exit from any menu without making changes,press Ë .
●Ñ22:23ô05/06/96●
Ã0:00ô--/--/--
SET TIME
Example of Set-Time Screen
8
Setting the Alarm
The alarm on your pager can be set for a specific timeand date, or it can be used as a daily alarm.To set the alarm for a specific time and date:➊ Press Á to display the function menu.➋ Press ä to move the cursor to Ñ.➌ Press Á to display the set-time-and-alarm screen.➍ Press to move the cursor to Ö.
The alarm symbol defines the alarm status—eitheralarm enabled (c) or alarm disabled (Ã).➎ Press ã to move the cursor to Ö.➏ Press or to enable or disable the alarm.➐ Press ã to move the cursor to the hour digit.➑ Repeat the process for each entry (minute, AM/PM,
and date).➒ Press Á to activate your selection. The Ö symbol
is shown on the display.At the selected time, your pager emits a 12-secondaudible alert even if the pager is in the silent mode. To set the alarm to alert daily:Follow the steps previously described, except whensetting the date, press for the date entries until yousee a blank month, day, and year (--/--/--). The alarm isnow set to alert every day at this specified time.NOTE: If the alarm expires without being acknowl-edged, the Ö symbol flashes until any button ispressed.NOTE: To exit from any menu without making changes,press Ë.
Ñ22:23ô05/06/96
●Ã0:00ô--/--/--●
SET ALARM
Example of Set-Time-and-Alarm Screen
9
Setting the Message Alarm
This feature allows you to set a one-time or a dailyalarm for a particular personal message. You can setan alarm for up to five personal messages.To set a one-time message alarm:➊ Press Ë.➋ Press ä or ã to select the message you want to
alarm.➌ Press Á to display the function menu.➍ Press ã to move the cursor to Ö.➎ Press Á to display the set-message-alarm screen.When the screen is first displayed, the cursor is at thefar left position.This symbol defines the alarm status—either alarmenabled (c) or alarm disabled (Ã).➏ From the set-message-alarm screen, follow the
same steps described in Setting the Alarm. To set a daily message alarm: Follow the instructions above to set the alarm time,then follow the instructions in “To set the alarm to alertdaily” under Setting the Alarm.The b symbol replaces the m symbol when the mes-sage alarm is set.At the selected time, your pager vibrates or emits a 12-second alert, depending on the current alert mode.Press J to display the message for which the alarm isset.The m symbol replaces the b symbol after the alarmhas sounded unless the alarm is set to alert daily .
NOTE: If the alarm expires without being acknowl-edged, the Ö flashes until the message is read.
10
Setting the Alert Mode
The alert can be set as either audible or silent.➊ Press Á to display the function menu.➋ Press ä to move the cursor to É or Œ. The É symbol is displayed if the pager is in the silent alertmode (prompting you to enter the audible mode, ifdesired). The Œsymbol is displayed if the pager is in theaudible alert mode (prompting you to enter the silentmode, if desired).➌ Press Á to select the desired alert mode.If the selected mode is audible (É), your pager emits ashort chirp. If the selected mode is silent (Œ) and yourpager is equipped with a vibrator, your pager vibrates.
Setting the Alert Pattern
NOTE: The pager must be in the audible alert mode toselect the alert pattern.
Your pager has a standard alert (1), seven different pleas-ing alerts (2 through 8), and a chirping alert (Õ), allowingyou to select and change the alert. You can also select noalert (Œ). To change your alert:➊ Press Á to display the function menu.➋ Press ä to move the cursor to È, then press Á.➌ Press ä or ã to move the cursor to the desired alert.The pager gives a sample of each alert when scrollingthrough the selections.➍ Press Á to activate the alert.

11
Turning the Maildrop Alert On and Off
You can set your pager to alert when a maildrop (alsoknown as information service) message is received.➊ Press Ë.➋ Press to move the cursor to Õ.➌ Press Á to display the function menu.➍ Press ã to move the cursor to the alert on (Õ) or
alert off (Ì) symbol.The symbol Õ is displayed if the maildrop alert is on(prompting you to turn it off, if desired). The symbol Ì is displayed if the maildrop alert is off(prompting you to turn it on, if desired).➎ Press Á to select the desired maildrop alert mode.
Deleting Messages from Memory
You can delete an unlocked and un-alarmed messagefrom memory while you are viewing the message orthrough the function menu.To delete messages using the function menu:➊ Press ä or ã to select the message you want to
delete from memory. ➋ Press Á to display the function menu.➌ Press ã to move the cursor to ï.➍ Press Á to receive confirmation of the request.➎ Press Á to delete the message.
1 2 3 4 5 6 7 8 j r PLEASING ALERT
Example of the Alert Pattern Screen
12
To delete all unlocked, un-alarmed and read messages from memory: ➊ Press Á to display the function menu.➋ Press ã to move the cursor to ñ.➌ Press Á twice.All unlocked, un-alarmed and read messages are nowdeleted.
NOTE: Personal and maildrop notebooks are notdeleted with this feature.
Moving Messages to Your Notebooks
Your pager has two notebook areas: a personal note-book for storing personal messages, and a maildropnotebook for storing information service messages.To store a message in your personal notebook:➊ Press Ë .➋ Press ä or ã to move the cursor to select the mes-
sage you desire to move into your personal note-book.
➌ Press Á to display the function menu.➍ Press ã to move the cursor to ¶ .➎ Press Á to move the message into your personal
notebook.The ¶ symbol is shown in the top right-hand corner ofthe display.To store a message in the maildrop (informationservice) notebook:Follow the same steps as described for storing per-sonal notebook messages.The ¶ symbol is shown in the second row, right-handcorner of the display.
13
Deleting Messages from Your Notebooks
➊ Press ã to move the cursor to ¶ .➋ Press Ë to display a list of notebook messages.➌ Press F or G to scroll through the list until K is dis-
played at the notebook message you want to delete.➍ Press Á to display the function menu.➎ Press ã to move the cursor to ï.➏ Press Á to confirm the delete request.➐ Press Á to delete the message. Repeat these
steps to delete each message.
Setting Auto On/Off
To set your pager’s auto on/off feature, proceed as fol-lows:➊ Press Á to display the function menu.➋ Press ä to move the cursor to å.➌ Press Á to display the auto on/off screen.When the screen is first displayed, the cursor is at thefarthest left position. The enabled (å) or disabled (õ)symbol indicates the current status.
➍ Press or to select å or õ.➎ Press ã to move the cursor to the hour digit. The
Auto On time is displayed on the left and the AutoOff time is displayed on the right.
➏ Press or to adjust the hour.
ON OFF
õ 0:00ô 0:00ô
Example of Auto On/Off Screen
14
➐ Repeat the process for each set of digits for both theon time and the off time (hour, minute, AM/PM ifyour pager is set to display time in the 12 hourmode).
➑ Press Á to activate auto on/off.The å symbol is displayed if the auto on/off function isenabled. If the on time is equal to the off time, thepager does not enable the auto on/off function.
Other Features
Battery Gauge: The battery gauge indicator is locatedon the status screen and keeps you informed of thebattery energy level. The five indicators range from fullto low: ( (full), ) (3/4), * (1/2), + (1/4),and , (low).Key Click: When this feature is enabled, and thepager is in the audible mode, a “click” is emitted when-ever a button is pressed. The click is not heard whenthe pager is in the silent mode.Duplicate Message: If the same message is receivedmore than once, DUPLICATE MESSAGE is displayedat the beginning of the new message. The new mes-sage contains the latest time and date stamp.Out of Range: With this option enabled, T is dis-played whenever you are out of range of the paging trans-mitter. Your pager can also alert you of this if this feature isenabled. The symbol T is no longer displayed whenyou return to your transmitting area.Errored Data Indicator: The ú symbol displays whenpotentially corrupt data is received. The indicator alter-nates with the corrupted character.

15
Alphanumeric and Long Numeric Missing Frag-ment Indicators: If part of the message has not beenreceived, <...> or - - - - - is displayed. Note: This appliesto ADVISOR II FLX pagers only.Maildrop History: When this option is enabled, thepager stores up to five history files per maildrop (infor-mation services) slot selected. When a new maildropmessage is received on a specific slot, the existingmessage is “pushed” into the history area and the newmessage is stored in the maildrop slot. When a sixthhistory file is received, the oldest history file is deleted.
Battery Information
Your pager is designed to operate with a single AA-sizealkaline battery (carbon zinc batteries are not recom-mended). See the diagram on the following page for thebattery door location.To install or replace the battery, place the pager facedown and proceed as follows:➊ Unlock the battery door by sliding the door latch
away from the battery door. ➋ Slide the battery door in the direction of the arrow
(toward the outer edge).➌ Lift the battery door away from the housing to
remove it. Lift the battery out of the battery compart-ment, taking note of the positive (+) and negative (-)markings on the battery and the pager housing.
16
To install a new battery, reverse this procedure, takingnote of the positive (+) and negative (-) markings.CAUTION: Do not insert the battery backwards or themessages stored or locked in memory will be erased.
Care of Your Pager
To maintain the fine optical quality of the display in thepager, do not subject it to extreme temperatures andmoisture.
Cleaning Your Pager
To clean smudges and grime from the exterior of thehousing, use a soft, nonabrasive cloth moistened in a mildsoap and water solution. Rinse the surface using a sec-ond cloth moistened in clean water. Do not immerse thepager in water. Do not use any other cleaning solu-tions.
ADVISOR II Pager Battery Replacement (rear view)
17
Repair and Maintenance
Your pager, properly handled, is capable of manyyears of trouble-free service. However, i f your pager ever requires service,Motorola’s Service Organization, staffed with speciallytrained technicians, offers conveniently located repairand maintenance facilities throughout the world.Please contact your paging service representative or aMotorola sales office for more information.
ONE (1) YEAR STANDARD LIMITED WARRANTY AND PROVISIONS (U. S. A. ONLY) Motorola warrants the pager against defects in material and workmanship under normal use and service for the period of time specified below. This express warranty is extended by Motorola to the original end user purchaser only and is not assignable or transferable to any other party. This warranty sets forth the full extent of MOTOROLA's responsibi l i t ies regarding the pager. Repair , replacement, or refund of the purchase price, at MOTOROLA's option, is the exclusive remedy. THIS WARRANTY IS GIVEN IN LIEU OF ALL OTHER WARRANTIES, EXPRESS OR IMPLIED, INCLUDING WITHOUT LIMITATION, IMPLIED WARRANTIES OF
Warranty
MERCHANTABILITY AND FITNESS FOR A PARTICULAR PURPOSE. THIS WARRANTY IS LIMITED TO THE DURATION CHOSEN. IN NO EVENT SHALL MOTOROLA BE LIABLE FOR DAMAGES IN EXCESS OF THE PURCHASE PRICE OF THE MOTOROLA PAGER, FOR ANY LOSS OF USE, LOSS OF TIME, INCONVENIENCE,
COMMERCIAL LOSS, LOST PROFITS OR SAVINGS OR OTHER INCIDENTAL, SPECIAL OR CONSEQUENTIAL DAMAGES ARISING OUT OF THE USE OR INABILITY TO USE SUCH PRODUCT, TO THE FULL EXTENT SUCH MAY BE DISCLAIMED BY LAW. Motorola pagers are shipped from the factory with a standard limited warranty of one (1) year on parts and labor from date of purchase by the original end user purchaser, based on proof of purchase. In the event of a defect, malfunction, or failure to conform to specifications during the warranty period, Motorola, at its option, will either repair, replace or refund the purchase price of the pager. Repair, at Motorola's option, may include the replacement of parts or boards with functionally equivalent reconditioned or new parts or boards. Replaced parts and boards are warranted for the balance of the original warranty period. (continued) LIMITED WARRANTY AND PROVISIONS(U. S. A. ONLY) continued All parts and boards removed in the replacement process shall become the property of Motorola. This warranty does not cover defects, malfunctions, performance failures or damages to the unit resulting from use in other than its normal and customary manner, misuse, accident or neglect, the use of non- conforming parts, or improper alterations or repairs. This warranty does not cover wear and tear on covers or housings, nor the coverage or range over which the pager will receive signals. For information on how to receive service on Motorola pagers or covered accessories, call 1- 800-422-4210 or 1- 800- 522-5210 (TTY). Pager warranty will be VOID if any of the following conditions occur: • Pagers that are incomplete such as those in which boards or components are missing and/ or incompatible.
18

• Pagers whose serial numbers do not match on the boards, or pagers in which the board serial numbers don’t match the housing. • Pagers that have been opened by, or had work performed by, anyone other than a Motorola authorized pager service center. • Pagers received with non- conforming or non- Motorola housings or parts. Flat rate repair fees apply to pagers and accessories not covered under warranty. STATE LAW RIGHTS SOME STATES DO NOT ALLOW THE EXCLUSION OR LIMITATION OF INCIDENTAL OR CONSEQUENTIAL DAMAGES, OR LIMITATION ON HOW LONG AN IMPLIED WARRANTY LASTS, THEREFORE THE ABOVE LIMITATIONS OR EXCLUSIONS MAY NOT APPLY.
t, Motorola, ADVISOR are trademarks or registered trademarks of Motorola, Inc.
© 2003 by Motorola, Inc.All Rights Reserved.
Customer Care Services1307 E. Algonquin Road -1 floor
Schaumburg, IL 60196 USA
@6881027B05@6880309P64-O19