alpha drone alpha drone - kaiser baasdownloads.kaiserbaas.com/...kba15001_alphadrone_eu.pdf · 3 4...
TRANSCRIPT

1
ALPHAdrone
Complete User GuideAlpha Drone

Join the social movement and follow us on
Pre-flight
Safety Precautions
Flight Equipment
Your Drone
Remote Control Transmitter
Remote Control Screen
Set Up
Flight Planning
Pairing Tips
Flight Basics
360° Flip
Filming Basics
Flight Maintenance
FAQ
Specifications
Support
03
03
05
06
07
09
10
12
13
14
18
20
21
23
24
25
DISCOVER: FREEDOM
Share your footage with us on social media
#KBdiscover
To view the entire Kaiser Baas product range visit:
www.kaiserbaas.com
Contents
3 4
Disclaimers & WarningsPlease read this section carefully before using your Kaiser Baas Alpha Drone. By operating this product, you hereby agree to these disclaimers and signify that you have read and understood the warnings and conditions fully.
THIS PRODUCT IS NOT SUITABLE FOR PEOPLE UNDER THE AGE OF 14.
Always observe the safe flying instructions within this User Guide, as well as the guidelines and regulations of your local aviation authorities.
Above all, maintain a safe distance from people and property when operating your Alpha Drone – a safe distance of 10m is recommended. Kaiser Baas accepts no liability for damage(s) or injuries incurred directly or indirectly from the use of this product, including but not limited to the following conditions:
• Failure to follow the full instructions and cautions in the User Guide, pertaining to correct assembly and safe operation.
• Damage(s) or injuries caused by erratic operation or poor piloting decisions.
• Damage(s) or injuries caused by mechanical failures as a result of neglect, including the erosion and aging of product components.
• Damage(s) or injuries caused by the Drone being flown in the following conditions:
• Unfavourable lighting; where the Pilot’s ability to see the Drone clearly is diminished.
• Inclement weather; moderate to high winds, rain, snow or hail.
• Flying near electrical hazards, such as power lines or towers.
• Flying in or near fire, floods, tsunamis, ice, avalanche, landslide, earthquake, etc.
• Damage(s) or injuries incurred due to users under the influence of drugs or alcohol, suffering dizziness, fatigue, nausea and any other condition; physical or mental that could impair the Pilot’s ability to fly responsibly and within the boundaries of the law.
• Damage(s) or injuries caused by malfunctions or “hacks”, refits or the replacement of original components with non-Kaiser Baas provided accessories and/or parts.
• Damage(s) or injuries caused by the misuse or incorrect operation of the battery, protection circuits, Remote Control Remote Control Transmitter or Battery Charger.
• Damage(s) or injuries caused by flying the Drone in abnormal conditions and allowing external substances to come into contact with the Drone e.g. water, oil, soil, sand or any other material that could enter the Drone and its internal compartments, including the battery.
• Damage(s) or injuries caused by flying in areas such as those with: magnetic interference, radio
interference, government regulated no-fly zones or airports.
• Any other losses that are not covered by the scope of Kaiser Baas liability.
Before first use: read the user’s information together with your child.Please keep this user guide for later reference.
Kaiser Baas reserves the right to make changes to this User Guide if required. Please check the Kaiser Baas website for the most up to date version of this guide: www.kaiserbaas.com/support. The information within this manual is subject to change without notice.
Safety Warnings & Operating GuidelinesEven though the Alpha Drone may look small and light, there are important safety considerations to bear in mind when operating this device. Always observe the following guidelines:
Flying the drone requires skill and users must be trained under direct supervision of an adult.
DO NOT fly the Drone within 10m of people anywhere. Consider your personal liability when you choose to operate your Drone.
DO NOT attempt to handle or catch the Drone while it is in operation.
DO NOT attempt to handle the Drone while the Rotor Blades are still spinning.
DO NOT allow others to approach the Drone while it is in operation and the Rotor Blades are in motion.
Hands, hair and loose clothes must be kept away from the spinning Rotor Blades.
Always make sure that you have completely “disarmed” the Drone before handling.
Always maintain Visual Line-of-Sight (VLOS) with the Drone.
Always fly between official sunrise and official sunset, local time.
Never engage in careless or reckless manoeuvres. Consider the impact reckless behaviour might have on other Drone enthusiasts and future Pilots.
Never operate your Drone when intoxicated or when you are incapacitated in any other way.
Always ensure the room where the drone is used is sufficiently large and free from obstacles and persons.
Always follow your local aviation authority’s guidelines.
Adult supervisors should always check the drone is assembled as instructed within this user guide. All assembly shall be performed under adult supervision.
5 6
Pre-Flight Drone Battery Safety
Warnings concerning the use of the battery
Safety Precautions
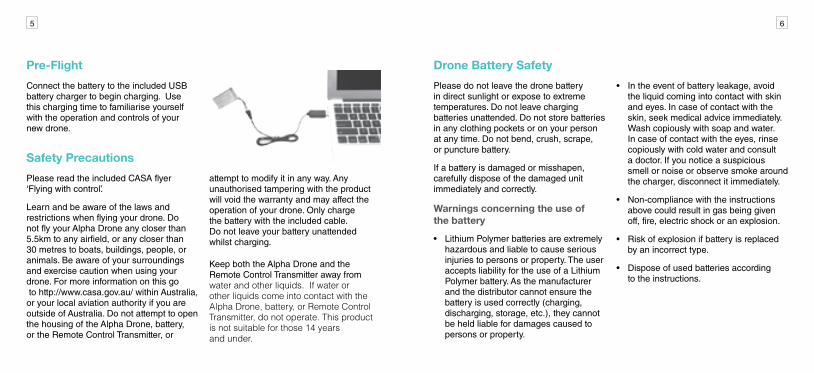
Connect the battery to the included USB battery charger to begin charging. Use this charging time to familiarise yourself with the operation and controls of your new drone.
Please do not leave the drone battery in direct sunlight or expose to extreme temperatures. Do not leave charging batteries unattended. Do not store batteries in any clothing pockets or on your person at any time. Do not bend, crush, scrape, or puncture battery.
If a battery is damaged or misshapen, carefully dispose of the damaged unit immediately and correctly.
• Lithium Polymer batteries are extremely hazardous and liable to cause serious injuries to persons or property. The user accepts liability for the use of a Lithium Polymer battery. As the manufacturer and the distributor cannot ensure the battery is used correctly (charging, discharging, storage, etc.), they cannot be held liable for damages caused to persons or property.
Please read the included CASA flyer ‘Flying with control’.
Learn and be aware of the laws and restrictions when flying your drone. Do not fly your Alpha Drone any closer than 5.5km to any airfield, or any closer than 30 metres to boats, buildings, people, or animals. Be aware of your surroundings and exercise caution when using your drone. For more information on this go to http://www.casa.gov.au/ within Australia, or your local aviation authority if you are outside of Australia. Do not attempt to open the housing of the Alpha Drone, battery, or the Remote Control Transmitter, or
attempt to modify it in any way. Any unauthorised tampering with the product will void the warranty and may affect the operation of your drone. Only charge the battery with the included cable. Do not leave your battery unattended whilst charging.
Keep both the Alpha Drone and the Remote Control Transmitter away from water and other liquids. If water or other liquids come into contact with the Alpha Drone, battery, or Remote Control Transmitter, do not operate. This product is not suitable for those 14 years and under.
• In the event of battery leakage, avoid the liquid coming into contact with skin and eyes. In case of contact with the skin, seek medical advice immediately. Wash copiously with soap and water. In case of contact with the eyes, rinse copiously with cold water and consult a doctor. If you notice a suspicious smell or noise or observe smoke around the charger, disconnect it immediately.
• Non-compliance with the instructions above could result in gas being given off, fire, electric shock or an explosion.
• Risk of explosion if battery is replaced by an incorrect type.
• Dispose of used batteries according to the instructions.
7 8
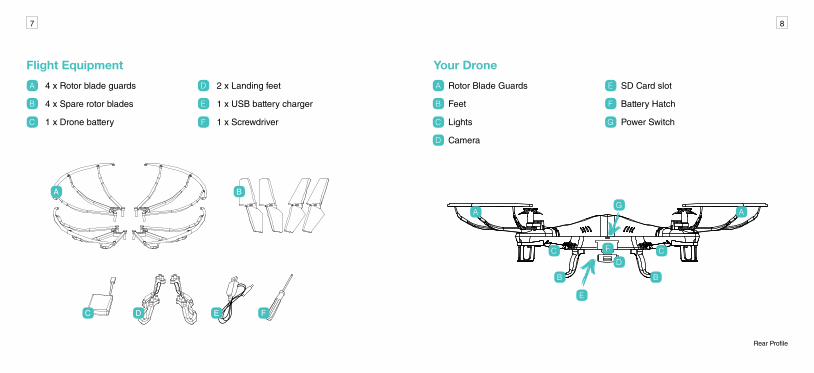
Flight Equipment Your Drone4 x Rotor blade guards
4 x Spare rotor blades
1 x Drone battery
Rotor Blade Guards
Feet
Lights
Camera
Rear Profile
C E
BA
D F
A A
B B
D
E
F
G
C C
2 x Landing feet
1 x USB battery charger
1 x Screwdriver
SD Card slot
Battery Hatch
Power Switch
AA D E
BB E F
CC F G
D

9 10
Remote Control TransmitterIndicator
Power switch
Mode switch
LCD display
Capture Photo
Capture Video
360˚ flip
High/Low sensitivity adjustments
A
BC DE
F
G
H
I J
K
L
M
N
O
Left Stick (ascend, descend / rotate left, right)
Right Stick (pitch left, right / roll forward, back)
Pitch fine-tuning (left, right)
Roll fine-tuning (up, down)
Rotate fine-tuning (left, right)
Light control
Trimming reset
A I
B J
C K
D L
E M
F N
G O
H

11 12
Remote Control ScreenDrone diagram
Signal strength
Remote battery level
Mode
Accelerator fine-tuning level
Rotation fine-tuning level
A G
B H
C I
D J
E K
F L
Set UpCharging
Plug your USB charging cable into a powered USB port (wall adaptor not included). When connected correctly, the USB plug will glow red. Connect your Alpha Drone battery to the USB charging cable. When charging correctly, the red light should turn off. The red light will turn back on once charging is complete (to avoid shortening battery life, do not remove the battery from charge until charge sequence is complete).
Initial Assembly
Alpha Drone Feet
Insert the feet into the guide holes on the underside of the Alpha Drone in the allocated position. Push the Alpha Drone feet into the underside of the body until the feet are secure and flush against the body of the Alpha Drone.
Rotor blade guards
Insert rotor blade guards into guide holes in the allocated position. Use the included screwdriver to secure the propeller guards to the Alpha Drone, making sure not to over-tighten.
Camera
Ensure that the camera cable is connected to the Alpha Drone and insert the Micro SD card* into the allocated slot.
Battery
Slide the battery hatch out on the Alpha Drone and lift gently to open. With the Alpha Drone turned off, insert the battery into the opening with the cable end facing outward, ready for connection. Plug the battery cable into the socket, then close and lock the hatch by sliding gently back in place.
*MicroSD Card not included
Pitch fine-tuning level
Roll fine-tuning level
Photo indicator
Video indicator
Light indicator
Motor power level
A
B C
D D
E H
GF
I
J
L
K
13 14
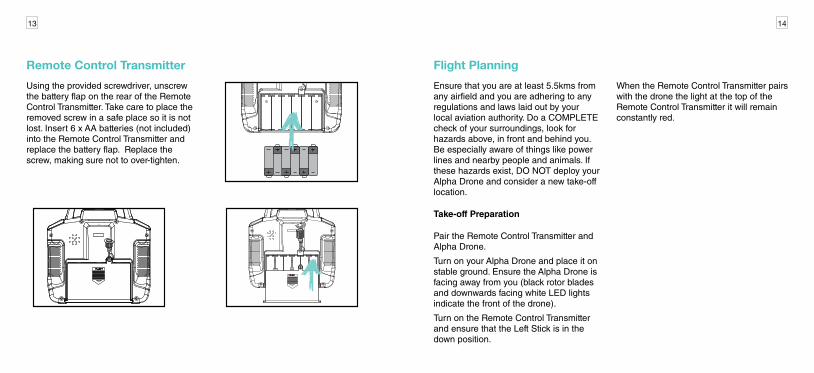
Remote Control Transmitter Flight PlanningUsing the provided screwdriver, unscrew the battery flap on the rear of the Remote Control Transmitter. Take care to place the removed screw in a safe place so it is not lost. Insert 6 x AA batteries (not included) into the Remote Control Transmitter and replace the battery flap. Replace the screw, making sure not to over-tighten.
Ensure that you are at least 5.5kms from any airfield and you are adhering to any regulations and laws laid out by your local aviation authority. Do a COMPLETE check of your surroundings, look for hazards above, in front and behind you. Be especially aware of things like power lines and nearby people and animals. If these hazards exist, DO NOT deploy your Alpha Drone and consider a new take-off location.
Take-off Preparation
Pair the Remote Control Transmitter and Alpha Drone.
Turn on your Alpha Drone and place it on stable ground. Ensure the Alpha Drone is facing away from you (black rotor blades and downwards facing white LED lights indicate the front of the drone).
Turn on the Remote Control Transmitter and ensure that the Left Stick is in the down position.
When the Remote Control Transmitter pairs with the drone the light at the top of the Remote Control Transmitter it will remain constantly red.

15 16
Pairing Tips Flight BasicsBefore you deploy your Alpha Drone, the downwards facing lights on the Alpha Drone should be constant. If they are flashing:
The Remote Control Transmitter has not connected to the Alpha Drone, try turning the drone off and on again
OR the battery in the Alpha Drone is low. Charge the battery.
Before you deploy your Alpha Drone, the red light at the Remote Control Transmitter should be constant. If it is flashing:
The Left Stick is not in its lowest position. Move the Left Stick to the lowest point and wait 3 - 4 seconds for the red light to turn constant.
OR the Remote Control Transmitter has not connected to the Alpha Drone, try
Manoeuvringturning the Remote Control Transmitter off and on again.
OR the batteries in the Remote Control Transmitter are low, remove them and replace with a fresh set of 6 x AA batteries.
Stand at least 2 metres away from your Alpha Drone before deployment.
Deploy! Elevation / Descent
Rotation

17 18
Left/Right Roll (Tilt)
Left/Right Pitch (Tilt) Forward/Backward
Indicators
There are LED lights on the underside of the Alpha Drone that indicate when the Alpha Drone is operational (constant) or when the Alpha Drone is running low on battery (flashing). It is important to pay attention to the indicators to avoid an uncontrolled landing, potentially putting your drone and its surroundings at risk.
Modes
The Mode switch swaps the Yaw and Pitch controllability on the thumb sticks.
High / Low
There are four sensitivity levels for the Alpha Drone that can be cycled through by using the High/Low button on the Remote Control Transmitter.
These sensitivity levels increase and decrease the overall responsiveness
of the thumb sticks on the Remote Control Transmitter. The Alpha Drone will start up in the lowest sensitivity level 25% responsiveness (advised level for learners). Pressing the High/Low button once will enter the medium sensitivity level 50% responsiveness.
The Remote Control Transmitter will beep twice and indicate the sensitivity on the Motor Power indicator. Pressing the High/Low button again the Remote Control Transmitter will beep three times and show the high responsiveness setting of 75% on the Motor Power indicator.
Pressing the High/Low button a third time will assign the highest sensitivity level which will be indicated by four beeps and the Motor Power indicator displaying 100% responsiveness. The 100% Motor Power mode is for advanced pilots. This mode also enables 360° flips. Please refer to the 360° Flips section for further information.
19 20
Trimming (Fine Tuning)
Control of the Alpha Drone can be trimmed using the fine-tuning buttons on the Remote Control Transmitter. If the Alpha Drone is drifting off during a hover or other flight manoeuvre, these buttons are used to counter this drift.
The calibration is displayed on the display screen of the Remote Control Transmitter. You will see the trimming levels displayed in the fine tuning bars on the display which will show in which direction the drone controls have been trimmed.
To reset all trimming and calibration, hold the Reset button for five seconds.
360° FlipTo perform a forward flip press the Flip button!
The drone will launch forward and descend during the flip so make sure that the drone is at an adequate height before performing this manoeuvre.
Advanced Flip Mode
The Drone also features an advanced flip mode that will enable it to flip in all directions.
To use this feature, toggle the through the High/Low settings until you reach 100%; the Remote Control Transmitter will emit 4 consecutive beeps.
The drone will emit a beeping sound while the throttle has power. This indicates that whilst in this mode the Right Stick will let you flip the drone in any direction.
When the Right Stick is pushed to its extreme in any direction, the drone will flip accordingly. Please note the sensitivity is increased and this mode is for advanced pilots.
Ensure you have given the drone at least 5 metres of clearance.
To return back to normal flight mode,press the High/Low button toggle.
TIP - Pressing the High/Low button again will return the sensitivity level to the lowest setting.

21 22
Left Flip
Right Flip
Front Flip
Backwards Flip
360°
360°
360°
360°
Filming BasicsCamera
The camera is controlled using the Photo and Video buttons on the Transmitter.
Always ensure you have a Micro SD card* inserted when you want to capture photo and video content.
The LED lights on the camera will flash red and green when no Micro SD card is present. Once a Micro SD card is inserted, the LED lights will shine a constant green. If the LED light does not shine a constant green, turn off the Alpha Drone, remove and re-insert the Micro SD card.
Taking photos
When the photo function is triggered, the LED camera light will flash red when a photo is successfully taken. It will return to green in between shots.
Shooting video
To start recording press the video camera button once. When the video function is triggered, the LED camera light will flash red. To stop recording press the video camera button again.
Note: You cannot take photos while recording video. Please stop recording to take photos otherwise any video you are filming may be lost.
TIP - For best results use a class 10 SDHC micro SD card (not included) 32GB or smaller.
23 24
Flight MaintenanceTry not to land your drone in sandy or wet areas where water and dust particles can damage the motors and camera components. Use a soft brush to remove any particles from the accessible surfaces of the drone.
Do not attempt to open the housing of your Alpha Drone, as this will void your warranty and may impede the operation of your Alpha Drone.
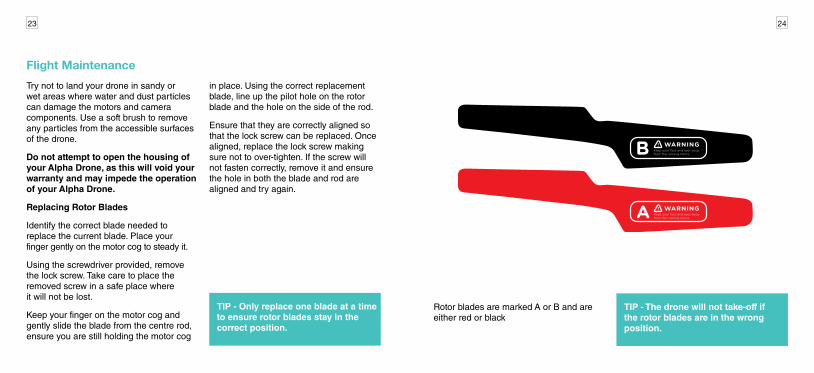
Replacing Rotor Blades
Identify the correct blade needed to replace the current blade. Place your finger gently on the motor cog to steady it.
Using the screwdriver provided, remove the lock screw. Take care to place the removed screw in a safe place where it will not be lost.
Keep your finger on the motor cog and gently slide the blade from the centre rod, ensure you are still holding the motor cog
TIP - Only replace one blade at a time to ensure rotor blades stay in the correct position.
Rotor blades are marked A or B and are either red or black
Keep your face and eyes away from the running rotors.
Keep your face and eyes away from the running rotors.
TIP - The drone will not take-off if the rotor blades are in the wrong position.
in place. Using the correct replacement blade, line up the pilot hole on the rotor blade and the hole on the side of the rod.
Ensure that they are correctly aligned so that the lock screw can be replaced. Once aligned, replace the lock screw making sure not to over-tighten. If the screw will not fasten correctly, remove it and ensure the hole in both the blade and rod are aligned and try again.

25 26
FAQ1. One of the motors is not spinning Make sure that the larger cog on the underside of the motor housing is connected and moving properly. This may require gently pressing on the smaller cog to ensure that all cogs are aligned correctly.
2. The Alpha Drone/Transmitter LEDs keep flashing
The battery in the Alpha Drone or the Remote Control Transmitter is running low. In either case it is advisable to switch off both devices and restart with fresh/charged batteries.
3. The drone will not hover in one place
Try trimming your Alpha Drone using the fine-tuning buttons to counter any instability (Note: The Alpha Drone will become slightly less stable when running low on battery)
Place the Alpha Drone on level ground. Then hold the Triming Reset button for 5 seconds until you hear a beep. The trim and calibration have now been reset.
4. Footage is jumpy/grainy
Kaiser Baas recommends that a class 10 SDHC Micro SD card, with a capacity of 32GB or lower, is used to capture footage.
Dimensions: 33.1 X 33.1 X 7.7cm
Weight: 109g
Channels: 4
Battery: 550mAh
Motors: 4 X 3.7V, 2.5-2.6A, 12000rpm
Transmitter Battery: 6 X AA (not included)
Screen: LCD Display
Frequency: 2.4 Ghz
Camera Resolution: 720P 30FPS
Photo: 2MP
Video format: AVI
Photo format: JPG
Memory: Micro SD card (Max 32GB, not included)
PRODUCT SPECIFICATIONS

27 28
Got a question about your Kaiser Baas Drone?
Live Chat: www.kaiserbaas.com/support
Email: [email protected]
For further information please visit:www.kaiserbaas.com
Kaiser Baas Support

29