aloaha pdf suite · aloaha pdf suite windows manual. aloaha pdf suite 2.1.15 now includes the...
TRANSCRIPT

Aloaha
PDF Suite
WINDOWS
Manual

2
Wrocklage Intermedia GmbHRudolf-Diesel-Straße 28 49479 IbbenbürenGermany
Tel.: +49 (0) 54 51 9 43 50 Fax: +49 (0) 54 51 4 54 69Web: http://www.aloaha.comInformation: [email protected]: [email protected]: [email protected]
Aloaha Software

3
IntroductionWith the Aloaha PDF Suite PDF documents can be created completely transparently and souser friendly, that no additional training or administration is needed. Documents created withany application can be converted to PDF while retaining their original look and integrity. As a requirement for electronic document exchange and Digital Rights Management (DRM),Aloaha is also able to encrypt (40 or 128 Bit) and digitally sign all created documents.
The software can be installed in two modes, server or client mode. In server mode Aloahaworks as a Windows Server service and will monitor all, or selected, print queues to convertany document that is printed, on any of the monitored printers, to PDF. No further userinteraction is required.
In client mode, users can print to PDF from any application. After printing, a dialog will pop upto allow the user to configure several PDF options such as encryption, digital rights andsignatures on a per document basis.
Contact usAloaha is an established software development company, which forms part of WrocklageIntermedia. We offer other products apart our awarding winning Aloaha PDF suite such asAloaha Spam Rejector, Aloaha Fairy and many others.
We also deliver custom made applications, IT services and consulting. Our offices are situated in GermanyReseller support is also based in England.

4

5
ContentsIntroduction . . . . . . . . . . . . . . . . . . . . . . . . . . . . . . . . . . . . . . . . . . . . . . . . . . . . . . . . . . . . . . . . . . . . . . . . . . . . . 3Contact us . . . . . . . . . . . . . . . . . . . . . . . . . . . . . . . . . . . . . . . . . . . . . . . . . . . . . . . . . . . . . . . . . . . . . . . . . . . . . . 3Contents . . . . . . . . . . . . . . . . . . . . . . . . . . . . . . . . . . . . . . . . . . . . . . . . . . . . . . . . . . . . . . . . . . . . . . . . . . . . . . . 5Installation . . . . . . . . . . . . . . . . . . . . . . . . . . . . . . . . . . . . . . . . . . . . . . . . . . . . . . . . . . . . . . . . . . . . . . . . . . . . . . 7
Requirements for successful installation . . . . . . . . . . . . . . . . . . . . . . . . . . . . . . . . . . . . . . . . . . . . . . . 7How does it work? . . . . . . . . . . . . . . . . . . . . . . . . . . . . . . . . . . . . . . . . . . . . . . . . . . . . . . . . . . . . . . . . . . . . . . 9Options . . . . . . . . . . . . . . . . . . . . . . . . . . . . . . . . . . . . . . . . . . . . . . . . . . . . . . . . . . . . . . . . . . . . . . . . . . . . . . . 11
PDF . . . . . . . . . . . . . . . . . . . . . . . . . . . . . . . . . . . . . . . . . . . . . . . . . . . . . . . . . . . . . . . . . . . . . . . . . . . . . . . . . 11File attachments . . . . . . . . . . . . . . . . . . . . . . . . . . . . . . . . . . . . . . . . . . . . . . . . . . . . . . . . . . . . . . . . . . . . . 12More advanced PDF options can be configured if you choose the Save Tab . . . . . . . . . . . . 12
CanPrint . . . . . . . . . . . . . . . . . . . . . . . . . . . . . . . . . . . . . . . . . . . . . . . . . . . . . . . . . . . . . . . . . . . . . . . . 13CanPrintFull . . . . . . . . . . . . . . . . . . . . . . . . . . . . . . . . . . . . . . . . . . . . . . . . . . . . . . . . . . . . . . . . . . . . . 13CanChange . . . . . . . . . . . . . . . . . . . . . . . . . . . . . . . . . . . . . . . . . . . . . . . . . . . . . . . . . . . . . . . . . . . . . 13CanAddNotes . . . . . . . . . . . . . . . . . . . . . . . . . . . . . . . . . . . . . . . . . . . . . . . . . . . . . . . . . . . . . . . . . . . 13CanCopy . . . . . . . . . . . . . . . . . . . . . . . . . . . . . . . . . . . . . . . . . . . . . . . . . . . . . . . . . . . . . . . . . . . . . . . 13CanCopyAccess . . . . . . . . . . . . . . . . . . . . . . . . . . . . . . . . . . . . . . . . . . . . . . . . . . . . . . . . . . . . . . . . 13CanAssemble . . . . . . . . . . . . . . . . . . . . . . . . . . . . . . . . . . . . . . . . . . . . . . . . . . . . . . . . . . . . . . . . . . . 13CanFillFields . . . . . . . . . . . . . . . . . . . . . . . . . . . . . . . . . . . . . . . . . . . . . . . . . . . . . . . . . . . . . . . . . . . . 13
The automatic generated PDF can directly send via email . . . . . . . . . . . . . . . . . . . . . . . . . . . . . . 14Print Engine . . . . . . . . . . . . . . . . . . . . . . . . . . . . . . . . . . . . . . . . . . . . . . . . . . . . . . . . . . . . . . . . . . . . . . . . . 14Digital Signatures . . . . . . . . . . . . . . . . . . . . . . . . . . . . . . . . . . . . . . . . . . . . . . . . . . . . . . . . . . . . . . . . . . . . 15
How do I get a digital Certificate for Testing Purposes? . . . . . . . . . . . . . . . . . . . . . . . . . . . . . . 15Signature Stamp . . . . . . . . . . . . . . . . . . . . . . . . . . . . . . . . . . . . . . . . . . . . . . . . . . . . . . . . . . . . . . . . . . . . . 16
Signature Regulations . . . . . . . . . . . . . . . . . . . . . . . . . . . . . . . . . . . . . . . . . . . . . . . . . . . . . . . . . . . . . 16Letterhead/Watermark imposition . . . . . . . . . . . . . . . . . . . . . . . . . . . . . . . . . . . . . . . . . . . . . . . . . . . . 17
Server Mode . . . . . . . . . . . . . . . . . . . . . . . . . . . . . . . . . . . . . . . . . . . . . . . . . . . . . . . . . . . . . . . . . . . . . . . . . . 18Folder Settings . . . . . . . . . . . . . . . . . . . . . . . . . . . . . . . . . . . . . . . . . . . . . . . . . . . . . . . . . . . . . . . . . . . . . . 19
Enable save to folder . . . . . . . . . . . . . . . . . . . . . . . . . . . . . . . . . . . . . . . . . . . . . . . . . . . . . . . . . . . . 19Save to folder . . . . . . . . . . . . . . . . . . . . . . . . . . . . . . . . . . . . . . . . . . . . . . . . . . . . . . . . . . . . . . . . . . . 19Sort Files by User and Printer . . . . . . . . . . . . . . . . . . . . . . . . . . . . . . . . . . . . . . . . . . . . . . . . . . . . 19Generate information file . . . . . . . . . . . . . . . . . . . . . . . . . . . . . . . . . . . . . . . . . . . . . . . . . . . . . . . . . 19
Email Settings . . . . . . . . . . . . . . . . . . . . . . . . . . . . . . . . . . . . . . . . . . . . . . . . . . . . . . . . . . . . . . . . . . . . . . . 19Server . . . . . . . . . . . . . . . . . . . . . . . . . . . . . . . . . . . . . . . . . . . . . . . . . . . . . . . . . . . . . . . . . . . . . . . . . . 19Port . . . . . . . . . . . . . . . . . . . . . . . . . . . . . . . . . . . . . . . . . . . . . . . . . . . . . . . . . . . . . . . . . . . . . . . . . . . . 19Default from . . . . . . . . . . . . . . . . . . . . . . . . . . . . . . . . . . . . . . . . . . . . . . . . . . . . . . . . . . . . . . . . . . . . . 19To . . . . . . . . . . . . . . . . . . . . . . . . . . . . . . . . . . . . . . . . . . . . . . . . . . . . . . . . . . . . . . . . . . . . . . . . . . . . . . 19Subject . . . . . . . . . . . . . . . . . . . . . . . . . . . . . . . . . . . . . . . . . . . . . . . . . . . . . . . . . . . . . . . . . . . . . . . . . 19

6
Autoprint Folder . . . . . . . . . . . . . . . . . . . . . . . . . . . . . . . . . . . . . . . . . . . . . . . . . . . . . . . . . . . . . . . . . . . . . . . . 20PDF autoprint . . . . . . . . . . . . . . . . . . . . . . . . . . . . . . . . . . . . . . . . . . . . . . . . . . . . . . . . . . . . . . . . . . . . . . . . 20Autoprint of non PDF Documents . . . . . . . . . . . . . . . . . . . . . . . . . . . . . . . . . . . . . . . . . . . . . . . . . . . . . 20SPL to EMF Converter . . . . . . . . . . . . . . . . . . . . . . . . . . . . . . . . . . . . . . . . . . . . . . . . . . . . . . . . . . . . . . . 20EML autoprint . . . . . . . . . . . . . . . . . . . . . . . . . . . . . . . . . . . . . . . . . . . . . . . . . . . . . . . . . . . . . . . . . . . . . . . 20File type based Actions . . . . . . . . . . . . . . . . . . . . . . . . . . . . . . . . . . . . . . . . . . . . . . . . . . . . . . . . . . . . . . 21
Automailer . . . . . . . . . . . . . . . . . . . . . . . . . . . . . . . . . . . . . . . . . . . . . . . . . . . . . . . . . . . . . . . . . . . . . . . . . . . . 22Enable the Aloaha Automailer . . . . . . . . . . . . . . . . . . . . . . . . . . . . . . . . . . . . . . . . . . . . . . . . . . . . . . . . . . 22
Command Syntax . . . . . . . . . . . . . . . . . . . . . . . . . . . . . . . . . . . . . . . . . . . . . . . . . . . . . . . . . . . . . . . . . . . 22Available Automailer Commands . . . . . . . . . . . . . . . . . . . . . . . . . . . . . . . . . . . . . . . . . . . . . . . . . . . . . 23
Mailtoline . . . . . . . . . . . . . . . . . . . . . . . . . . . . . . . . . . . . . . . . . . . . . . . . . . . . . . . . . . . . . . . . . . . . . . . 23Mailccline . . . . . . . . . . . . . . . . . . . . . . . . . . . . . . . . . . . . . . . . . . . . . . . . . . . . . . . . . . . . . . . . . . . . . . . 23Mailfrom . . . . . . . . . . . . . . . . . . . . . . . . . . . . . . . . . . . . . . . . . . . . . . . . . . . . . . . . . . . . . . . . . . . . . . . 23Subject . . . . . . . . . . . . . . . . . . . . . . . . . . . . . . . . . . . . . . . . . . . . . . . . . . . . . . . . . . . . . . . . . . . . . . . . . 23Body . . . . . . . . . . . . . . . . . . . . . . . . . . . . . . . . . . . . . . . . . . . . . . . . . . . . . . . . . . . . . . . . . . . . . . . . . . . 23

7
Installation
Requirements for successful installation:
Software:– Windows NT® 4.0, Windows 2000, Windows 2003, Windows XP.– Adobe Acrobat Reader® or Adobe Acrobat® are NOT REQUIRED
Installing Aloaha PDF suite:– Download the latest version from our website www.aloaha.com and save the file to disk.– Open aloaha_pdf.zip and run the file printer.exe.– The installation will start now. You will see the following screen.
– Click “Next” to enter the installation folder;

8
– Click “Next” after setting the installation folder to continue;– Now you will be asked in which mode Aloaha PDF suite should be installed, here you
have two options:
Install as service (best option for server installation).Startup folder link (best option for client installation – suggested).
– Click “Next” after selecting the installation mode and Aloaha PDF suite will be ready to install.
– When the installation is finished just click Finish to finalize the installation.

9
How does it work?
Aloaha PDF suite does not need a special printer driver but to keep the installation simpleand transparent it will install its own PDF printer. After installation you can print any documentto PDF.
To print documents to PDF do the following:
1. Open the document;
2. Select File > Print;
3. Select the Wrocklage PDF printer from the list;

10
4. After you click OK the Aloaha PDF suite window will open;
5. In the above window you can decide what to do with the PDF file, e. g. preview, print, saveor email. In case you wish to embed files into the PDF Documents just drag & drop theminto the PDF preview pane.
As soon you press one of the first four buttons, your PDF will also be copied to yourclipboard.
Other settings can also be edited here, such as changing the letterhead, applying a digitalsignature and/or encryption.
Note: To use the Preview option you need to have PDF viewing software installed, such asthe Adobe Acrobat reader.

11
Please note that Paper size does NOT instruct Aloaha to resize the PDF Output. This option is ONLY used if amonitored printer does NOT deliver DPI or Paper size information to the spooler.
Options
If you press “Options” in the POP UP Dialog above you will see the dialog below. Here youcan configure which Printer Queue to monitor, which paper size the generated PDFdocuments should have, encryption, signatures, etc.
Optionally you can choose to generate smaller, compressed PDF Files.
Please note that with a right click on the tray icon you can also change settingssuch as PDF User Password or send the dialog to the background.
By default Aloaha PDF Suite generates 40 Bit encrypted PDF Files. The advantage of 40 Bit is that nearly all current PDF viewers (Adobe® Reader 3 and upwards) are able to displaythem. Unfortunately, 40 bit encryption is not considered strong enough and is there not a safemethod to ensure confidentiality. It is much better to use the 128 Bit encryption if you wishyour document to remain confidential, for document transit or for archiving. Acrobat Read 5(or above) is required in order to read 128 Bit encrypted PDF Files. Optional you can enable“attach spool files” to include the original spool files as document attachments. This is useful ifyou use the Suite as archiving system.

12
File attachments
It can be very useful to include files inside the PDF Document. For example you might want to include your electronic business card or the original document.
Aloaha PDF Suite might be used to archive all printed documents into the company’sdocument management system. Some governments require archiving of documents inraw/original format. In that case it is useful to include the original spool files as fileattachments.
Another easy way to embed files into the PDF Document is just to drag and drop the fileswith the windows explorer into the PDF Preview Pane.
More advanced PDF options can be configured if you choose the Save Tab.

13
For Digital Rights Management (DRM) it is always useful to choose 128 Bit encryption plusone or all of the options below
CanPrintThis Option allows the reader to be able to print the document to a standard printer (ticked)or to deny print access.
CanPrintFullGrants the PDF reader then permission to submit the generated Document to a printinghouse for high resolution print.
CanChangeGrants the PDF user the permission to edit the document (ticked) or make it readable only.
CanAddNotesGrants the PDF user then permission to be able add notes to the document
CanCopyAllows the PDF user the ability to copy any part of the document to the Windows clipboardfor user in other documents.
CanCopyAccessContent Extraction for Accessibility features like “Read Loud”. This option can be used inconjunction with sight and/or healing impaired applications.
CanAssembleAllows re-assembly of PDF Document.
CanFillFieldsInteresting option if your document workflow solutions need to add form fields.
14
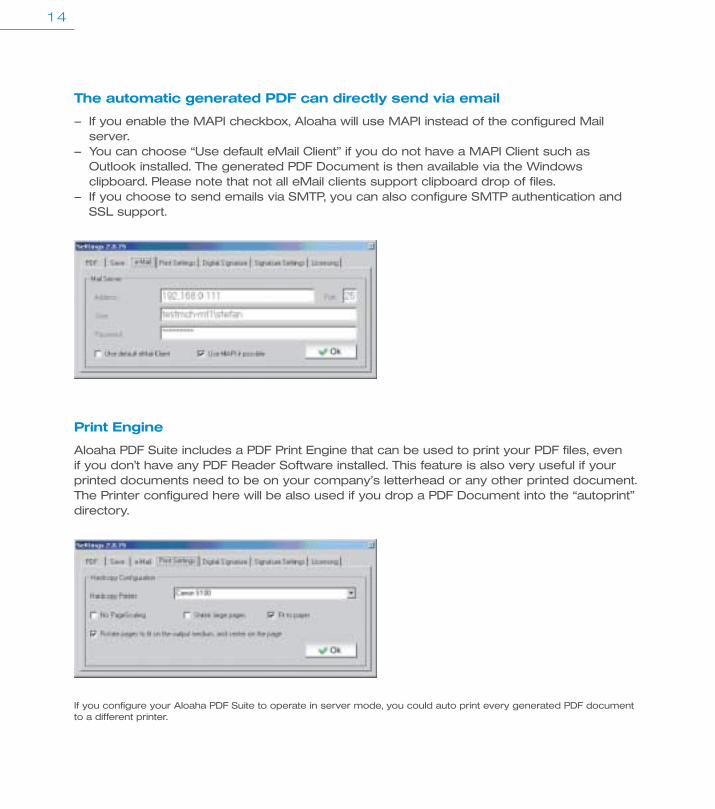
The automatic generated PDF can directly send via email
– If you enable the MAPI checkbox, Aloaha will use MAPI instead of the configured Mailserver.
– You can choose “Use default eMail Client” if you do not have a MAPI Client such asOutlook installed. The generated PDF Document is then available via the Windows clipboard. Please note that not all eMail clients support clipboard drop of files.
– If you choose to send emails via SMTP, you can also configure SMTP authentication andSSL support.
Print Engine
Aloaha PDF Suite includes a PDF Print Engine that can be used to print your PDF files, even if you don’t have any PDF Reader Software installed. This feature is also very useful if yourprinted documents need to be on your company’s letterhead or any other printed document.The Printer configured here will be also used if you drop a PDF Document into the “autoprint”directory.
If you configure your Aloaha PDF Suite to operate in server mode, you could auto print every generated PDF documentto a different printer.

15
Digital Signatures
Directive 1999/93/EC of the European Parliament and of the Council of 13 December 1999 ona Community framework for electronic signatures defines the use of Digital Signatures fordocument exchange in EU Member states. But Digital Signatures are not only a requirementin EU Member States. Other countries, such as the United States of America, have the e-SignAct and the Uniform Electronic Transaction ACT. In the United States of America, for instance,court filings have to be provided electronically via PDF Documents.
To choose your digital certificate to sign the PDF file, click the Digital Signature Tab. In thecase you do not have a digital signature yet, Wrocklage Intermedia is able to supply you withfree test certificates. You can also use self signing certificates. Please note that this free testcertificates are not included in any reader applications, as being from a “Trusted” or “Root”source and should only be used for testing purposes.
After you choose your digital certificate you should configure the signing reason in the dropdown list below. In most countries a valid electronic signature requires the signing reason. For highest compatibility with older PDF Reader it is also wise to enable “do not encryptsigned PDF”.
How do I get a digital Certificate for Testing Purposes?You have two possibilities. Wrocklage Intermedia GmbH is operating a non accreditedCertification Server. Just go to http://certserv.wrocklage.de/certsrv to issue yourself a freedigital certificate for testing.
With a few clicks everybody is able to setup his own certification authority. Instructions canbe found on:http://www.aloaha.com/download/ca_authority_manual.pdf

16
Signature Regulations
Directive 1999/93/EC of the European Parliament:http://www.europa.eu.int/smartapi/cgi/sga_doc?smartapi!celexplus!prod!CELEXnumdoc&lg=en&numdoc=31999L0093
German Bundeministerium der Finanzen:http://www.aloaha.com/download/bmf.pdf
Malta Electronic Commerce Act:http://www.aloaha.com/download/chapt426.pdf
United States Uniform Electronic Transactions Act:http://www.aloaha.com/cache/ueta.pdf
Signature Stamp
A digital signature is saved as invisible content to the document itself. To make a signatureoptically more prominent it is wise to configure a visible signature stamp in “Signature Set-tings”. As you can see in the screenshot below, you can use a placeholder for the date andsignature name.
The position and size of the signature stamp can be defined in “Position on Page”. The defaultsetting is the right bottom of the first page. Please note that the numbers are percentages ofthe absolute page size. The left bottom corner of every page is the 0,0 co-ordinate.
17
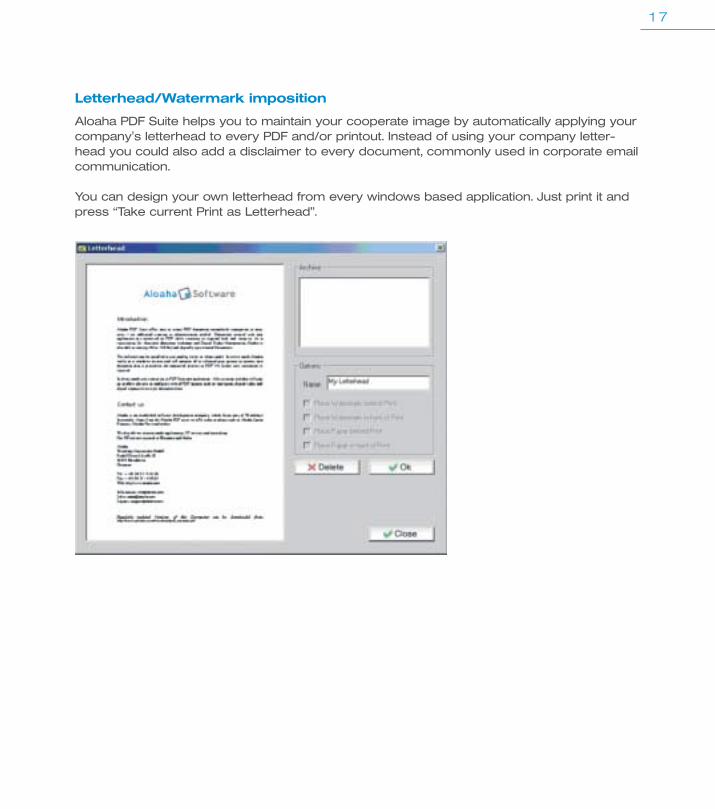
Letterhead/Watermark imposition
Aloaha PDF Suite helps you to maintain your cooperate image by automatically applying yourcompany's letterhead to every PDF and/or printout. Instead of using your company letter-head you could also add a disclaimer to every document, commonly used in corporate emailcommunication.
You can design your own letterhead from every windows based application. Just print it andpress “Take current Print as Letterhead”.

18
Server Mode
Aloaha PDF Suite can also be installed in “Server Mode”. The Aloaha PDF engine will work asa Windows service and can monitor shared printers. The main difference between usermode and server mode is that Aloaha works non interactively. No dialog boxes are shown.Generated PDF documents can be written to a defined folder and/or emailed via SMTP to auser or mail enabled Exchange public folder. To switch Aloaha to non interactive (server)mode please run creator.exe from the Aloaha PDF Suite installation directory.
To switch Aloaha to non interactive (server) mode please deactivate the option “ServiceInteractive” and enable “Enable Save to folder” and/or “Email Settings”.

19
Folder Settings:
Aloaha can be configured to keep every generated PDF Document on disk. This can beuseful for document archiving purposes. In some countries it is even required by law toarchive every printed document.
Enable save to folderEnables the automatic archiving of generated PDF Documents to a given disk folder.
Save to folderStorage folder for automatically generated PDF Documents.
Sort Files by User and PrinterEnabling this option will create a subfolder structure like<Save to folder>\<user>\<printer>\<date>_<JobNumber>.pdf
Generate information fileIf you enable this option, every document will have an information file generated for it.
Email Settings:
The integrated SMTP engine allows Aloaha to email generated documents back to the user,to an Exchange public folder or to your archiving/document management system.
ServerSMTP Server to be used as mail relay.
PortService Port of used SMTP Server.
Default fromEmail from of generated Mails.
ToDefault email recipient. If Active Directory is available the AD will be mapped to a file calleduser.ini. This file can be edited with notepad to override AD email addresses.
SubjectEmail Subject.
Please note that you can also generate test prints/PDF here. Print Jobs will show in the upperlist box. You can right click on these jobs and choose further actions.

20
Autoprint Folder
Aloaha PDF Suite also supports batch printing and batch conversion of documents. You candrop files which need to be printed and/or converted simply, into the autoprint subfolder ofthe Aloaha PDF Suite installation directory. Aloaha will print them to the default windowsprinter. The Wrocklage PDF Printer can be configured as the Windows default, to batchconvert your documents to PDF.
PDF autoprint
It makes no sense to print a PDF document again to the Wrocklage PDF Printer. PDFdocuments will be printed to a different printer to enable you to produce fully automatichardcopies. To decide which printer to use for hardcopy production, this function will first lookfor a registry key called autoprintprinter. If this key does not contain a valid printer name, it will check the hardcopy printer configured for the Wrocklage PDF Printer. (Please refer toOptions/Print Engine of this manual.)In case even that is not configured it will default to the default system printer.
Autoprint of non PDF Documents
The autoprint folder can be used to batch convert any recognized file type to PDF. Every nonPDF Document dropped into the autoprint folder will be printed to the default system printer.If you configure the Wrocklage PDF Printer as the default system printer all files will be batchconverted to PDF. Please note that only file types which show a print option when you rightclick on them will be printed.
SPL to EMF Converter
The autoprint folder can also be used to convert SPL files into EMF files. Just drop your SPLspool files into the autoprint directory. Unless these files are in raw format Aloaha will convertthem to EMF and print them.
EML autoprint
EML files can contain attachments you might want to print automatically. For example youcould regularly poll a POP3 mailbox and drop the mails into the autoprint folder. Every EMLfile dropped into this folder will be converted to MHT and its attachments will be stripped offand re-submitted to this folder for printing.

21
File type based Actions
It is possible to override the default printing procedure if you want to use 3rd party softwarefor printing or if you want to connect your own scripts. For every file extension, you can add aregistry entry, as shown below (in the example for jpg and txt files). %1 is being used as aplaceholder for the file.
A very fast and convenient way to convert pictures is the shimgvw.dll from Windows.
The entry to be used would look like:rundll32.exe shimgvw.dll,ImageView_PrintTo/pt "%1" "Wrocklage PDF Printer"
Windows Registry Editor Version 5.00
[HKEY_LOCAL_MACHINE\SOFTWARE\Aloaha\pdf\autoprint\jpg]"action"="rundll32.exe shimgvw.dll,ImageView_PrintTo /pt \"%1\" \"Wrocklage PDF Printer\""
[HKEY_LOCAL_MACHINE\SOFTWARE\Aloaha\pdf\autoprint\txt]"action"="notepad /p %1"

22
Automailer
The Aloaha PDF Suite Automailer was introduced to be able to email fully automaticallygenerated PDF Documents based on commands embedded into the original Document. To use the Aloaha PDF Suite Automailer Aloaha needs to be in non interactive mode.
Enable the Aloaha Automailer
The Aloaha Automailer makes use of the inbuilt Aloaha Scripting Engine. The Aloaha ScriptingEngine extracts the content of the first page, parses it and evaluates the embeddedcommands. You enable the Aloaha Scripting Engine/Automailer by starting the creator.exefrom the Aloaha installation directory. To re-initialize the engine you need to enable the option“Scripting” and restart the the PDF Suite Service or the creator.exe process.
Command Syntax
It is essential for the Aloaha Scripting Engine that every scripting line is formatted in the sameFont, color and size. If this is not given the scripting engine might not find the commands.Obviously you are able to embed the commands in white text on white ground to make theminvisible for the recipient.
The easiest way to learn the engine is to open Notepad and fill in the following example andprint it to the Wrocklage PDF Printer:
eMailFrom: “Me” [email protected]: “You” [email protected]: “CC” [email protected]
Subject: Please find my PDF Document attachedBody: The content of this email is attached as PDF Document
Please note that this sentence will be not visible in the email body but in the PDF Document.The reason is that it does not start with the Keyword Body:
Kind RegardsJohn Doe

23
Available Automailer Commands
Per default the following Automailer commands are available. Please note that these areconfigured in the registry an can be changed/edited. In case you need additional commandsplease contact our support department.
MailtolineHandles the Mail recipients. You can define the recipient(s) of the created PDF Document.Please note that you need one command/per recipient. It is possible to include the displayname of the recipient as well. Please see below some examples.
eMailTo: [email protected]: “Stefan” [email protected]: “support” <[email protected]>
MailcclineThe Mailccline defines the "Carbon Copy" recipients of the PDF Document. The default syntaxis similar as the eMailTo Command. Please see the example below.
eMailCC: “Stefan” <[email protected]>
MailfromEven the mailfrom has the same syntax as the two commands explained above. The onlydifference is that only the first Mailfrom command will be evaluated.
eMailFrom: “Me” [email protected]
SubjectDefines the Subject of the email. Only the first subject command will be executed. Pleasehave a look at the example below.
Subject: Please find attached the discussed contract!
BodyThe body command defines the TextBody of the email. All Body commands will be added upto one TextBody.
Body: As discussed in our meetingBody: I am sending you the discussed proposal.Body: Please note that I signed the PDF Document with my digital certificate.