all four!!title block here.1 = 20' 1 = 30' (standard civil...

16

Upload: duongbao

Post on 03-Jul-2018

213 views

Category:

Documents


0 download

TRANSCRIPT

been6447
Line
been6447
Text Box
All four!!
been6447
Line
been6447
Text Box
Use these in Stadia for coordinates of three traverse points
been6447
Rectangle
been6447
Text Box
Proper fold
been6447
Text Box
(adjusted)
been6447
Text Box
(adjusted)
been6447
Rectangle
been6447
Rectangle
been6447
Line
been6447
Line
been6447
Line
been6447
Line
been6447
Line
been6447
Line
been6447
Line
been6447
Line
been6447
Line
been6447
Text Box
Title Block Here.
been6447
Line
been6447
Line
been6447
Line
been6447
Line
been6447
Line
been6447
Line
been6447
Text Box
This side in binder
been6447
Arrow
been6447
Text Box
From Traverse last two columns
been6447
Arrow
been6447
Arrow
been6447
Line
been6447
Line
been6447
Rectangle
been6447
Text Box
1" = 20' 1" = 30' (Standard Civil Scales) 1" = 40' MAKE SURE TO CHECK 1" = 50' THAT YOUR PRINTED 1" = 60' SCALE IS CORRECT!
been6447
Text Box
NOT 1" = 25' ! Not 1:0.00437
been6447
Rectangle
been6447
Line

Getting started AutoCAD Civil 3D CVEN2012 Spring 2016

If you would like help learning the basics of AutoCAD Civil 3D before starting the project in the class, see

the links below. I included the most useful sources I know of, so you can learn the basics quickly and

perhaps struggle a little less as you complete the project.

You may complete the project entirely by hand (no computer drawing). This will give you an

understanding of topography because when you do the triangulation manually, rather than relying on

Civil 3D to do it for you, you will get a feeling for what contours actually represent in three dimensions.

Unfortunately, I have heard of many vases where professional surveyors got into serious trouble when

they rely on CAD too much and fail to use common sense checks routinely. Practical understanding is

much more important in practice than being proficient in computer programs. If you need to

understand AutoCAD Civil 3D at your office, they will teach you in much greater detail than we can cover

in this class; at this point you should be getting a solid foundation in the fundamentals of surveying.

While AutoCAD is generally being phased out of use for structural engineering drawings and replaced

with Revit, the Civil 3D component of AutoCAD is widely used in grading and land planning, so learning

the program would be very useful to you if you plan to do civil design and planning.

CAD tutorials (from the most basic to advanced features of CAD)

http://mycadsite.com/tutorials/index.htm

Civil 3D (these pertain specifically to the surveying features of CAD Civil 3D (inserting points,

creating surfaces, adjusting topographic lines, and so on)

Go to this link and click the “Access Lynda” link (see arrow below:

http://www.colorado.edu/oit/lynda

After signing into Lynda, go to this link in the same browser:

http://www.lynda.com/Civil-3D-tutorials/Civil-3D-Essential-Training/187856-2.html

This source contains a pretty comprehensive training in Civil 3D, and if you want to intern with a

company doing civil infrastructure, you should consider going through the tutorials and simultaneously

completing them in CAD. Otherwise, here are the ones I recommend you complete to do well in this

class:

Chapter 2 Creating and Managing Points

“Creating point groups”

Chapter 3 Defining Existing Ground Surfaces – all six videos:

“Creating a surface from point data”

“Controlling Build Properties”

“Adding breaklines to improve accuracy”

“Editing surface triangulation”

“Labeling contours”

“Understanding object layers”
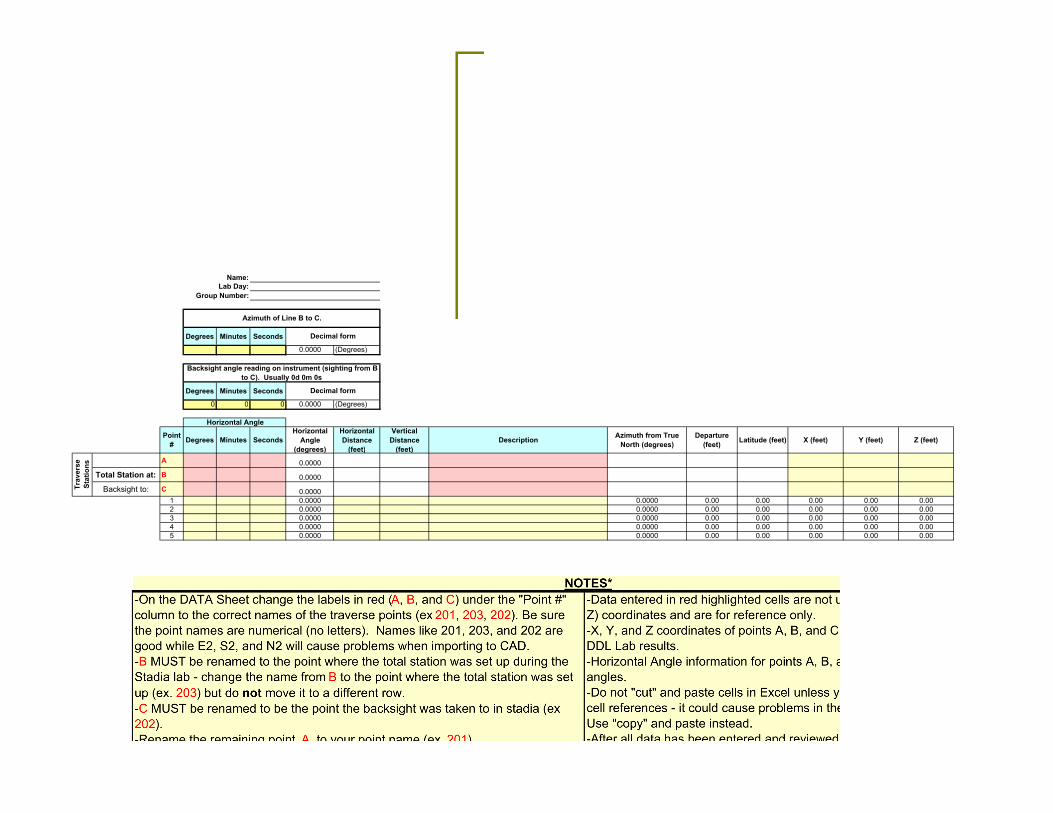
been6447
Ellipse
been6447
Text Box
Use these angles to compute your azimuths, starting with your given initial azimuth or bearing.
been6447
Ellipse
been6447
Ellipse
been6447
Ellipse
been6447
Text Box
Use these measured average distances for the "Length" column on the traverse sheet
been6447
Ellipse
been6447
Text Box
From Lab #3: Distances
been6447
Ellipse
been6447
Text Box
Computed from given initial azimuth and interior angles from Lab 2: Interior Angle Measurement
been6447
Arrow
been6447
Arrow
been6447
Ellipse
been6447
Ellipse
been6447
Text Box
Make sure you are able to come back exactly to your initial given azimuth!
been6447
Arrow
been6447
Arrow
been6447
Ellipse
been6447
Text Box
Use these elevations on the Stadia Spreadsheet for the elevations of your three traverse points

Name:

Lab Day:

Group Number:

Degrees Minutes Seconds

0.0000 (Degrees)

Degrees Minutes Seconds

0 0 0 0.0000 (Degrees)

Point

#Degrees Minutes Seconds

Horizontal

Angle

(degrees)

Horizontal

Distance

(feet)

Vertical

Distance

(feet)

DescriptionAzimuth from True

North (degrees)

Departure

(feet)Latitude (feet) X (feet) Y (feet) Z (feet)

A 0.0000

Total Station at: B 0.0000

Backsight to: C 0.0000

1 0.0000 0.0000 0.00 0.00 0.00 0.00 0.00

2 0.0000 0.0000 0.00 0.00 0.00 0.00 0.00

3 0.0000 0.0000 0.00 0.00 0.00 0.00 0.00

4 0.0000 0.0000 0.00 0.00 0.00 0.00 0.00

5 0.0000 0.0000 0.00 0.00 0.00 0.00 0.00

Backsight angle reading on instrument (sighting from B

to C). Usually 0d 0m 0s

Decimal form

Horizontal Angle

Decimal form

Tra

vers

e

Sta

tio

ns

Azimuth of Line B to C.

been6447
Snapshot
been6447
Text Box
203
been6447
Text Box
202
been6447
Text Box
100.00ft
been6447
Text Box
Stadia spreadsheet assumes these are equal!
been6447
Arrow
been6447
Arrow
been6447
Snapshot
been6447
Text Box
Field Book Notes
been6447
Rectangle
been6447
Text Box
Stadia Spreadsheet (Excel)
been6447
Line
been6447
Line
been6447
Line
been6447
Line
been6447
Line
been6447
Line
been6447
Arrow
been6447
Text Box
(continues)
been6447
Arrow
been6447
Text Box
(continues)
been6447
Line
been6447
Line
been6447
Line
been6447
Line
been6447
Line
been6447
Line
been6447
Line
been6447
Line
been6447
Line
been6447
Line
been6447
Text Box
IMPERIAL
been6447
Text Box
P E N Z D
been6447
Text Box
(POINT) (easting - X) (northing - Y) (elevation - Z) (optional description)
been6447
Image
been6447
Text Box
Make sure this is set to Civil 3D
been6447
Arrow
been6447
Text Box
Go to the insert tab
been6447
Arrow
been6447
Ellipse
been6447
Text Box
Insert points from file
been6447
Arrow
been6447
Text Box
Single-word (only the first word will be imported into CAD)
been6447
Text Box
all lines and text will print at the same tint (black and white only)
been6447
Line
been6447
Text Box
If you use the template provided on the website, then you don't need to follow these instructions on text styles. (Refer to notes from Benjamin's presentation.)
been6447
Rectangle
been6447
Text Box
For contour lines, either use Civil 3D as described, or to get a better understanding of how interpolation works, draw the contours by hand. Personally, I strongly recommend plotting them by hand (Professor Halek has approved this). If you need to use CAD in the future they will teach you at your office. Civil 3D can do all sorts of advanced contour manipulation beyond the scope of this surveying course, which is intended to teach you with the fundamentals of surveying, not to teach AutoCAD Civil 3D.
been6447
Rectangle
been6447
Text Box
been6447
Text Box
To import symbols in AutoCAD such as trees, shrubs, north arrows etc.: Go to the "Design Center" [Ctrl + 2] and navigate through the maze of subdirectories to: C:\Program Files\Autodesk\AutoCAD 2016\Sample\en-us\DesignCenter\Landscaping.dwg Double-click on blocks to see several symbols that can be inserted into the project.