airmaster dragon wings 1388 - kuryakyn · your address to: küryakyn, p.o. box 339, somerset, wi...
TRANSCRIPT
PARTS INCLUDED 1 Upper Vent, Right 1 Upper Vent, Left 1 Right Dragon Wing 1 Left Dragon Wing 1 Hardware Kit Including: 4 Short Mounting Brackets 2 Long Mounting Brackets 6 1/4”-20 x 5/8” Pan Head Screws (PHS) 6 1/4”-20 Locking Nuts 2 M5 x .08 x 25mm Pan Head Screws (PHS) 2 M5 Flat Washers 2 Nylon Spacers 1 Installation Instructions Please read and understand entire instructions before starting installation.
THANK YOU FOR CHOOSING KϋRYAKYN! IN ORDER TO PROTECT YOU AND OTHERS FROM POSSIBLE INJURY AND/OR PROPERTY DAMAGE OR LOSS, PLEASE PAY CLOSE ATTENTION TO ALL INSTRUCTIONS, WARNINGS, CAUTIONS AND NOTICES REGARDING THE USE AND CARE OF THIS PRODUCT.
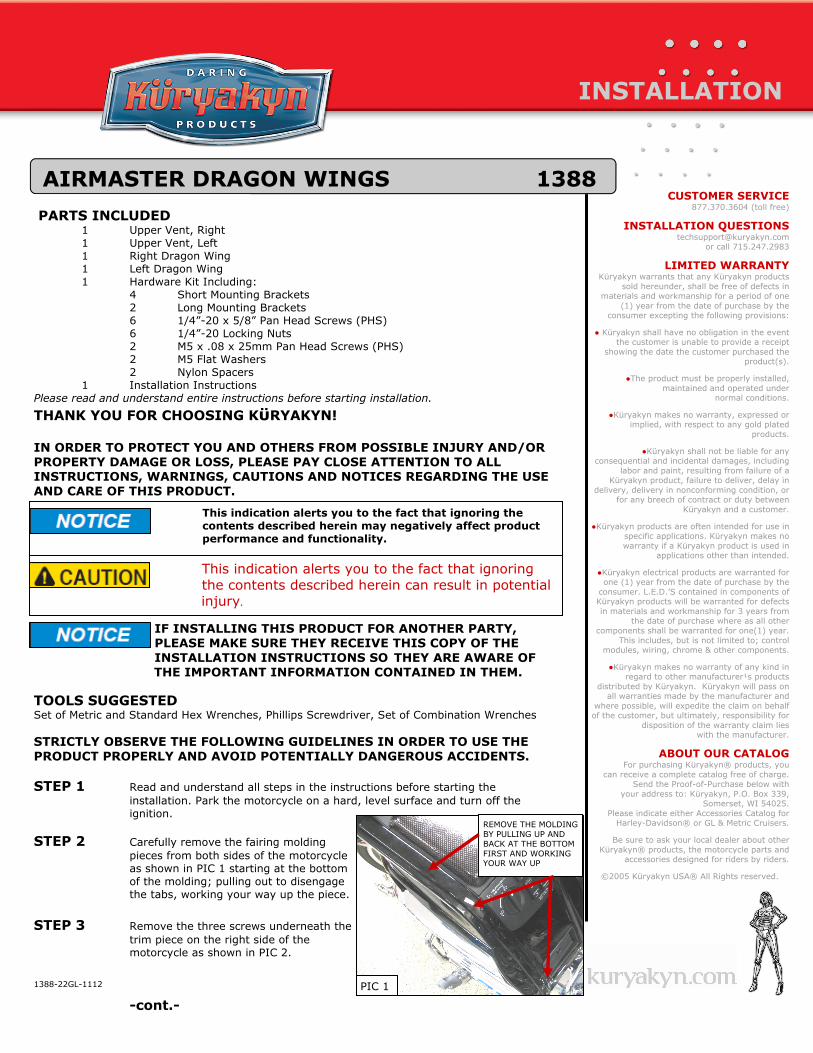
TOOLS SUGGESTED Set of Metric and Standard Hex Wrenches, Phillips Screwdriver, Set of Combination Wrenches STRICTLY OBSERVE THE FOLLOWING GUIDELINES IN ORDER TO USE THE PRODUCT PROPERLY AND AVOID POTENTIALLY DANGEROUS ACCIDENTS. STEP 1 Read and understand all steps in the instructions before starting the installation. Park the motorcycle on a hard, level surface and turn off the ignition. STEP 2 Carefully remove the fairing molding pieces from both sides of the motorcycle as shown in PIC 1 starting at the bottom of the molding; pulling out to disengage the tabs, working your way up the piece. STEP 3 Remove the three screws underneath the trim piece on the right side of the motorcycle as shown in PIC 2.
INSTALLATION
CUSTOMER SERVICE 877.370.3604 (toll free)
INSTALLATION QUESTIONS
[email protected] or call 715.247.2983
LIMITED WARRANTY
Küryakyn warrants that any Küryakyn products sold hereunder, shall be free of defects in
materials and workmanship for a period of one (1) year from the date of purchase by the
consumer excepting the following provisions:
● Küryakyn shall have no obligation in the event the customer is unable to provide a receipt
showing the date the customer purchased the product(s).
●The product must be properly installed,
maintained and operated under normal conditions.
●Küryakyn makes no warranty, expressed or
implied, with respect to any gold plated products.
●Küryakyn shall not be liable for any
consequential and incidental damages, including labor and paint, resulting from failure of a
Küryakyn product, failure to deliver, delay in delivery, delivery in nonconforming condition, or
for any breech of contract or duty between Küryakyn and a customer.
●Küryakyn products are often intended for use in
specific applications. Küryakyn makes no warranty if a Küryakyn product is used in
applications other than intended.
●Küryakyn electrical products are warranted for one (1) year from the date of purchase by the
consumer. L.E.D.’S contained in components of Küryakyn products will be warranted for defects in materials and workmanship for 3 years from
the date of purchase where as all other components shall be warranted for one(1) year.
This includes, but is not limited to; control modules, wiring, chrome & other components.
●Küryakyn makes no warranty of any kind in
regard to other manufacturer¹s products distributed by Küryakyn. Küryakyn will pass on
all warranties made by the manufacturer and where possible, will expedite the claim on behalf of the customer, but ultimately, responsibility for disposition of the warranty claim lies
with the manufacturer.
ABOUT OUR CATALOG For purchasing Küryakyn® products, you
can receive a complete catalog free of charge. Send the Proof-of-Purchase below with
your address to: Küryakyn, P.O. Box 339, Somerset, WI 54025.
Please indicate either Accessories Catalog for Harley-Davidson® or GL & Metric Cruisers.
Be sure to ask your local dealer about other
Küryakyn® products, the motorcycle parts and accessories designed for riders by riders.
©2005 Küryakyn USA® All Rights reserved.
AIRMASTER DRAGON WINGS 1388
1388-22GL-1112
-cont.-
This indication alerts you to the fact that ignoring the contents described herein may negatively affect product performance and functionality.
IF INSTALLING THIS PRODUCT FOR ANOTHER PARTY, PLEASE MAKE SURE THEY RECEIVE THIS COPY OF THE INSTALLATION INSTRUCTIONS SO THEY ARE AWARE OF
THE IMPORTANT INFORMATION CONTAINED IN THEM.
This indication alerts you to the fact that ignoring the contents described herein can result in potential
injury.
PIC 1
REMOVE THE MOLDING BY PULLING UP AND BACK AT THE BOTTOM FIRST AND WORKING YOUR WAY UP
PAGE
2
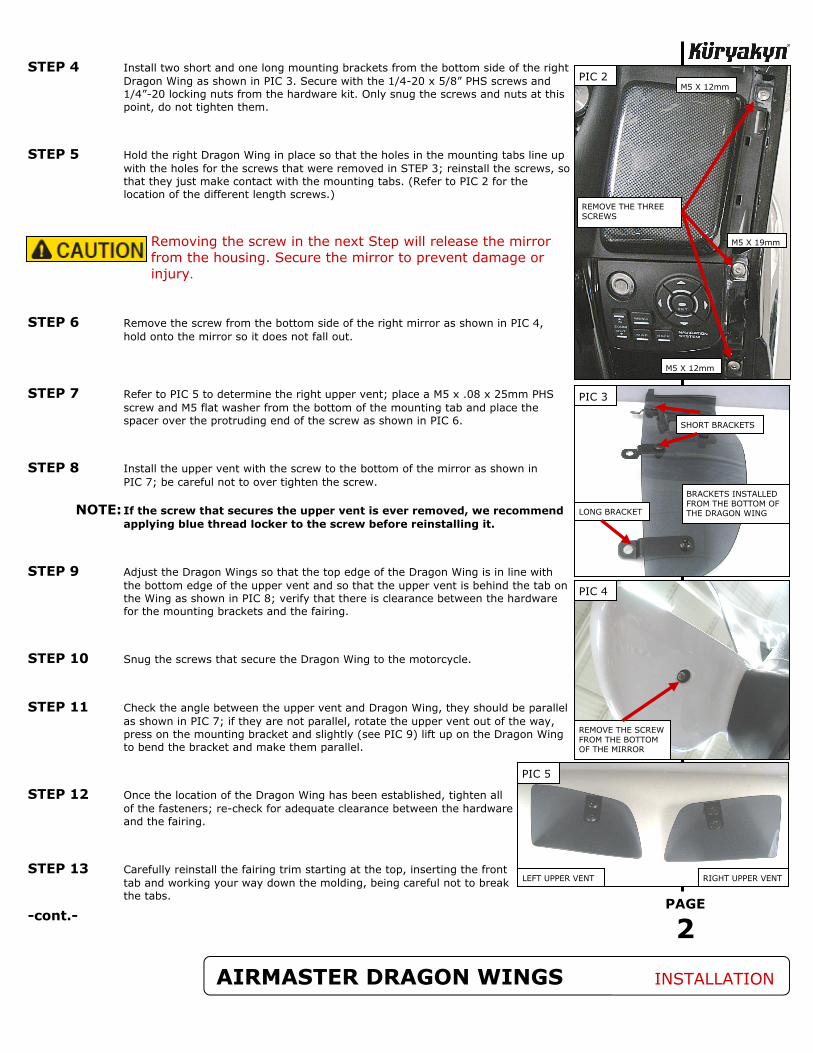
STEP 4 Install two short and one long mounting brackets from the bottom side of the right Dragon Wing as shown in PIC 3. Secure with the 1/4-20 x 5/8” PHS screws and 1/4”-20 locking nuts from the hardware kit. Only snug the screws and nuts at this point, do not tighten them. STEP 5 Hold the right Dragon Wing in place so that the holes in the mounting tabs line up with the holes for the screws that were removed in STEP 3; reinstall the screws, so that they just make contact with the mounting tabs. (Refer to PIC 2 for the location of the different length screws.)
Removing the screw in the next Step will release the mirror from the housing. Secure the mirror to prevent damage or injury.
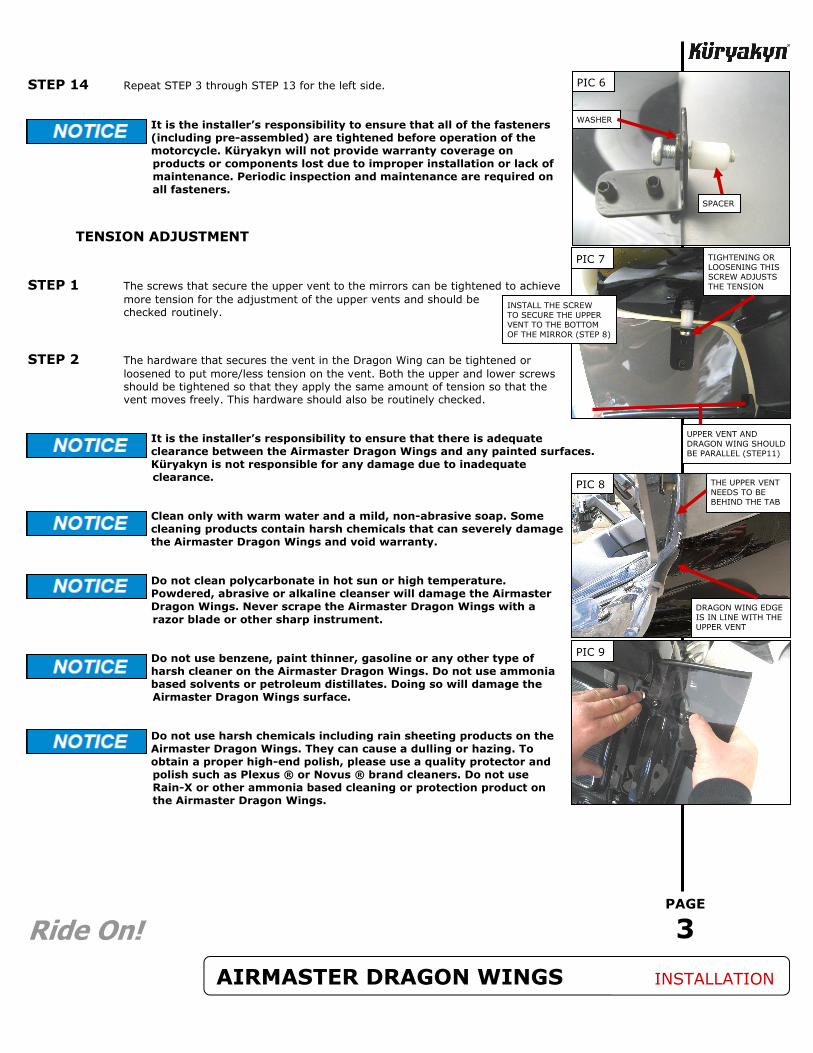
STEP 6 Remove the screw from the bottom side of the right mirror as shown in PIC 4, hold onto the mirror so it does not fall out. STEP 7 Refer to PIC 5 to determine the right upper vent; place a M5 x .08 x 25mm PHS screw and M5 flat washer from the bottom of the mounting tab and place the spacer over the protruding end of the screw as shown in PIC 6. STEP 8 Install the upper vent with the screw to the bottom of the mirror as shown in PIC 7; be careful not to over tighten the screw. NOTE: If the screw that secures the upper vent is ever removed, we recommend applying blue thread locker to the screw before reinstalling it. STEP 9 Adjust the Dragon Wings so that the top edge of the Dragon Wing is in line with the bottom edge of the upper vent and so that the upper vent is behind the tab on the Wing as shown in PIC 8; verify that there is clearance between the hardware for the mounting brackets and the fairing. STEP 10 Snug the screws that secure the Dragon Wing to the motorcycle. STEP 11 Check the angle between the upper vent and Dragon Wing, they should be parallel as shown in PIC 7; if they are not parallel, rotate the upper vent out of the way, press on the mounting bracket and slightly (see PIC 9) lift up on the Dragon Wing to bend the bracket and make them parallel. STEP 12 Once the location of the Dragon Wing has been established, tighten all of the fasteners; re-check for adequate clearance between the hardware and the fairing. STEP 13 Carefully reinstall the fairing trim starting at the top, inserting the front tab and working your way down the molding, being careful not to break the tabs.
AIRMASTER DRAGON WINGS INSTALLATION
-cont.-
PIC 5
PIC 4
PIC 3
PIC 2
REMOVE THE THREE SCREWS
M5 X 12mm
M5 X 19mm
M5 X 12mm
SHORT BRACKETS
LONG BRACKET
BRACKETS INSTALLED FROM THE BOTTOM OF THE DRAGON WING
REMOVE THE SCREW FROM THE BOTTOM OF THE MIRROR
LEFT UPPER VENT RIGHT UPPER VENT
PAGE
3
STEP 14 Repeat STEP 3 through STEP 13 for the left side.
It is the installer’s responsibility to ensure that all of the fasteners (including pre-assembled) are tightened before operation of the motorcycle. Küryakyn will not provide warranty coverage on
products or components lost due to improper installation or lack of maintenance. Periodic inspection and maintenance are required on all fasteners. TENSION ADJUSTMENT STEP 1 The screws that secure the upper vent to the mirrors can be tightened to achieve more tension for the adjustment of the upper vents and should be checked routinely. STEP 2 The hardware that secures the vent in the Dragon Wing can be tightened or loosened to put more/less tension on the vent. Both the upper and lower screws should be tightened so that they apply the same amount of tension so that the vent moves freely. This hardware should also be routinely checked.
It is the installer’s responsibility to ensure that there is adequate clearance between the Airmaster Dragon Wings and any painted surfaces. Küryakyn is not responsible for any damage due to inadequate
clearance.
Clean only with warm water and a mild, non-abrasive soap. Some cleaning products contain harsh chemicals that can severely damage the Airmaster Dragon Wings and void warranty.
Do not clean polycarbonate in hot sun or high temperature. Powdered, abrasive or alkaline cleanser will damage the Airmaster Dragon Wings. Never scrape the Airmaster Dragon Wings with a
razor blade or other sharp instrument.
Do not use benzene, paint thinner, gasoline or any other type of harsh cleaner on the Airmaster Dragon Wings. Do not use ammonia based solvents or petroleum distillates. Doing so will damage the
Airmaster Dragon Wings surface.
Do not use harsh chemicals including rain sheeting products on the Airmaster Dragon Wings. They can cause a dulling or hazing. To obtain a proper high-end polish, please use a quality protector and
polish such as Plexus ® or Novus ® brand cleaners. Do not use Rain-X or other ammonia based cleaning or protection product on the Airmaster Dragon Wings.
Ride On! AIRMASTER DRAGON WINGS INSTALLATION
PIC 9
PIC 8
PIC 6
WASHER
SPACER
UPPER VENT AND DRAGON WING SHOULD BE PARALLEL (STEP11)
INSTALL THE SCREW TO SECURE THE UPPER VENT TO THE BOTTOM OF THE MIRROR (STEP 8)
PIC 7 TIGHTENING OR LOOSENING THIS SCREW ADJUSTS THE TENSION
THE UPPER VENT NEEDS TO BE BEHIND THE TAB
DRAGON WING EDGE IS IN LINE WITH THE UPPER VENT