airfix how to build… - hawker typhoon mk.lb
TRANSCRIPT

7/23/2019 Airfix How to Build… - Hawker Typhoon Mk.lb
http://slidepdf.com/reader/full/airfix-how-to-build-hawker-typhoon-mklb 1/76
HOW TOBUILD... AIRFIX 1:24
HAWKERTYPHOON Mk.Ib
From the publishers of Tamiya Model Magazine International,
Model Military International, Model Airplane International
and Military Illustrated Modeller
Brett Green
INCLUDESCOMPREHENSIVE BUILDS PLUS:■ Typhoon Walk Around
■ Wartime Reference Photos
■ Step by Step – tips and techniquesfor building the ultimate Typhoon
■ Hawker Typhoon in 1:72, 1:48 & 1:32■ Aftermarket decal and accessory summary
FEATURING THE WORK OFBrett Green, Marcus Nichollsand Chris Wauchop
7/23/2019 Airfix How to Build… - Hawker Typhoon Mk.lb
http://slidepdf.com/reader/full/airfix-how-to-build-hawker-typhoon-mklb 2/76
2 How to Build... - Airfix 1:24 Hawker Typhoon Mk.Ib
FOREWORD AND ACKNOWLEDGEMENTS
In my very early teens, I asked for the Airfix 1:24 scale
Spitfire Mk.I for Christmas.
This was without a question the wonder kit of its
day. It was released in 1970, followed by a 1:24 scale
Messerschmitt Bf 109 E, a Ju 87 B Stuka and a HawkerHurricane. A 1:24 scale Hawker Harrier joined this large-
scale lineup too.
These kits boasted accurate outlines and admirably
restrained recessed surface detail. Instructions were
comprehensive and the boxes were adorned with
evocative artwork by the legendary Roy Cross. And of
course, they were big!
Yet in other ways, these kits were a product of their age.
They were burdened with workable features, including
retractable undercarriage and removable cowlings, which
impinged somewhat on detail accuracy and scale. Detail
was pretty basic too, especially in the Spitfire’s engine
bay and wheel wells.Even so, these kits loom large in the memories of those
who built them in the 1970s or any of the subsequent
decades in which they have been regularly re-released.
During 2009, Airfix breathed new life into their 1:24
scale series with a very nice Mosquito – long rumoured
and well received. This was a major improvement over
the original releases, but still looked like a scaled-up
model in some areas.
The brand new 1:24 scale Hawker Typhoon Mk.Ib stands
apart from all those that have gone before it. This model
radiates quality. Surface texture is positively daring with
its rippled oilcan effect and the combination of raised
and recessed rivets. Detail is dense, just as it was on theoriginal aircraft. In fact, this kit conveys the rugged core
of this aircraft so completely that there is very little to add.
If the modeller wishes to display the engine or the wing
cannon bays, Airfix offers a number of options that do not
compromise scale or detail. Even more remarkable is that all
of this detail is delivered in injection-moulded plastic alone.
Airfix has undoubtedly delivered a true scale classic for
our time.
The main purpose of this book is to deliver a step-by-
step illustrated guide to building the big Airfix Typhoon,
clarifying construction and suggesting sequences for
sub-assemblies and painting.
Any modelling book is an ensemble effort and this
title is no exception. I would like to extend my sincere
appreciation to Marcus Nicholls and Chris Wauchop,
whose wonderful work appears on these pages. Thanks
to both of you for your efforts.
Thanks also to Alex Hall, who has once again
transformed raw text and images into the attractive
illustrated journey you see before you.
We are very grateful to Airfix for providing the kits built
in this book.
I would also like to thank David Hannant from
Hannants, airscale, R.B Productions and Testor for the
aftermarket parts used on our big Typhoons.
The photos of the Typhoon at Hendon in the Close-Up
section were kindly provided by Bryan Ribbans; while Dan
Jackett sourced the wartime reference photos.
Thanks to all!
Brett Green, June 2014
How to build... AIRFIX 1:24 HAWKER TYPHOON Mk.Ib
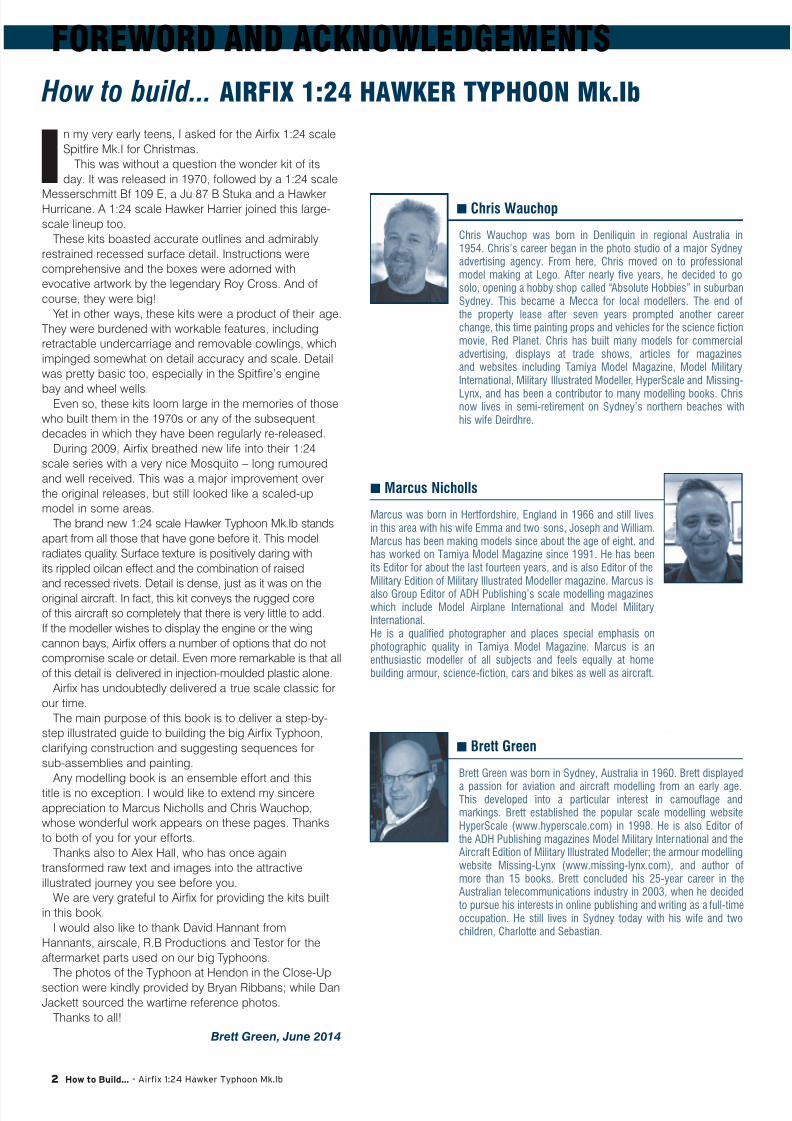
Chris Wauchop was born in Deniliquin in regional Australia in1954. Chris’s career began in the photo studio of a major Sydneyadvertising agency. From here, Chris moved on to professionalmodel making at Lego. After nearly five years, he decided to gosolo, opening a hobby shop called “Absolute Hobbies” in suburbanSydney. This became a Mecca for local modellers. The end of the property lease after seven years prompted another careerchange, this time painting props and vehicles for the science fictionmovie, Red Planet. Chris has built many models for commercialadvertising, displays at trade shows, articles for magazinesand websites including Tamiya Model Magazine, Model MilitaryInternational, Military Illustrated Modeller, HyperScale and Missing-
Lynx, and has been a contributor to many modelling books. Chrisnow lives in semi-retirement on Sydney’s northern beaches withhis wife Deirdhre.
nChris Wauchop
Brett Green was born in Sydney, Australia in 1960. Brett displayed
a passion for aviation and aircraft modelling from an early age.This developed into a particular interest in camouflage andmarkings. Brett established the popular scale modelling websiteHyperScale (www.hyperscale.com) in 1998. He is also Editor of the ADH Publishing magazines Model Military International and theAircraft Edition of Military Illustrated Modeller; the armour modellingwebsite Missing-Lynx (www.missing-lynx.com), and author ofmore than 15 books. Brett concluded his 25-year career in theAustralian telecommunications industry in 2003, when he decided to pursue his interests in online publishing and writing as a full-timeoccupation. He still lives in Sydney today with his wife and twochildren, Charlotte and Sebastian.
nBrett Green
Marcus was born in Hertfordshire, England in 1966 and still livesin this area with his wife Emma and two sons, Joseph and William.Marcus has been making models since about the age of eight, andhas worked on Tamiya Model Magazine since 1991. He has beenits Editor for about the last fourteen years, and is also Editor of theMilitary Edition of Military Illustrated Modeller magazine. Marcus isalso Group Editor of ADH Publishing’s scale modelling magazineswhich include Model Airplane International and Model MilitaryInternational.He is a qualified photographer and places special emphasis onphotographic quality in Tamiya Model Magazine. Marcus is anenthusiastic modeller of all subjects and feels equally at homebuilding armour, science-fiction, cars and bikes as well as aircraft.
nMarcus Nicholls

7/23/2019 Airfix How to Build… - Hawker Typhoon Mk.lb
http://slidepdf.com/reader/full/airfix-how-to-build-hawker-typhoon-mklb 3/76
How to Build... Tamiya’s 1:32 F4U-1 Corsair 3
CONTENTS
Page 2 Foreword
Page 4 Background
Page 6 Chapter 1
Hawker Typhoon Close Up
Page 12 Chapter 2
Typhoon in Other Scales
Page 18 Chapter 3
Typhoon In The Box
Page 26 Chapter 4
Typhoon Step by Step
Page
50 Chapter 5
Cockpit and Engine Detail by Marcus Nicholls
Page 62 Chapter 6
Painting and Finishing by Chris Wauchop
Page 74 Appendix 1
After-Market Accessories and Decals
Page 74 Appendix 2
Selected Hawker Typhoon References
Copyright © 2014 ADH Publishing Ltd.All rights reserved. Reproduction in part orwhole of any text or photographs withoutwritten permission from the publisher is strictlyprohibited. While due care has been taken toensure the contents of this book are accurate,
the publisher cannot accept liability for errors.
First Published in the United Kingdom by:ADH Publishing Ltd., Doolittle Mill, Doolittle Lane,Totternhoe, Bedfordshire, LU6 1QX Telephone: 44 (0) 1525 222573Fax: 44 (0) 1525 222574
Email: [email protected]: www.adhpublishing.com
Designed by Alex Hall
7/23/2019 Airfix How to Build… - Hawker Typhoon Mk.lb
http://slidepdf.com/reader/full/airfix-how-to-build-hawker-typhoon-mklb 4/76
4 Background
BACKGROUND
Hawker Aircraft was formed
in 1920 and delivered a
number of classic fighter
and bomber designs for
the RAF in the inter-war period.
These included the Nimrod, the
Fury, Audax and Demon – allbiplanes with fixed-pitch wooden
propellers and non-retractable
undercarriage.
In 1935, Hawker Aircraft designed
the first low-wing monoplane fighter
to see service with the RAF – the
Hawker Hurricane. Although the
Hurricane was undoubtedly a great
leap forward compared to Hawker’s
previous biplane fighters, it retained
many of that earlier generations’
characteristics including box girder
fuselage structure and fabric-covered formers and stringers. The
earliest Hurricanes were even still
fitted with two-bladed fixed pitch
propellers and fabric covered wings.
Hawker were considering a
more modern replacement for the
Hurricane as early as 1937. Planned
as a medium-altitude interceptor,
the Hawker Typhoon was powered
by the 24 cylinder H-block Napier-
Sabre engine and featured a thick
inverted gull wing. The Typhoon was
expected to achieve a top speed of460 mph, but the drag induced by
its thick wing limited this to just over
400 mph. Climb rate and general
performance above 20,000 feet
failed to meet expectations too.
As if these shortcomings were
not bad enough, the big Napier-
Sabre engine was prone to catch
fire as it started; and a number
of early Typhoons suffered from
catastrophic airframe failure when
the entire tail unit separated from
the fuselage in flight. The former
problem was addressed by having
ground crew with a fire extinguisher
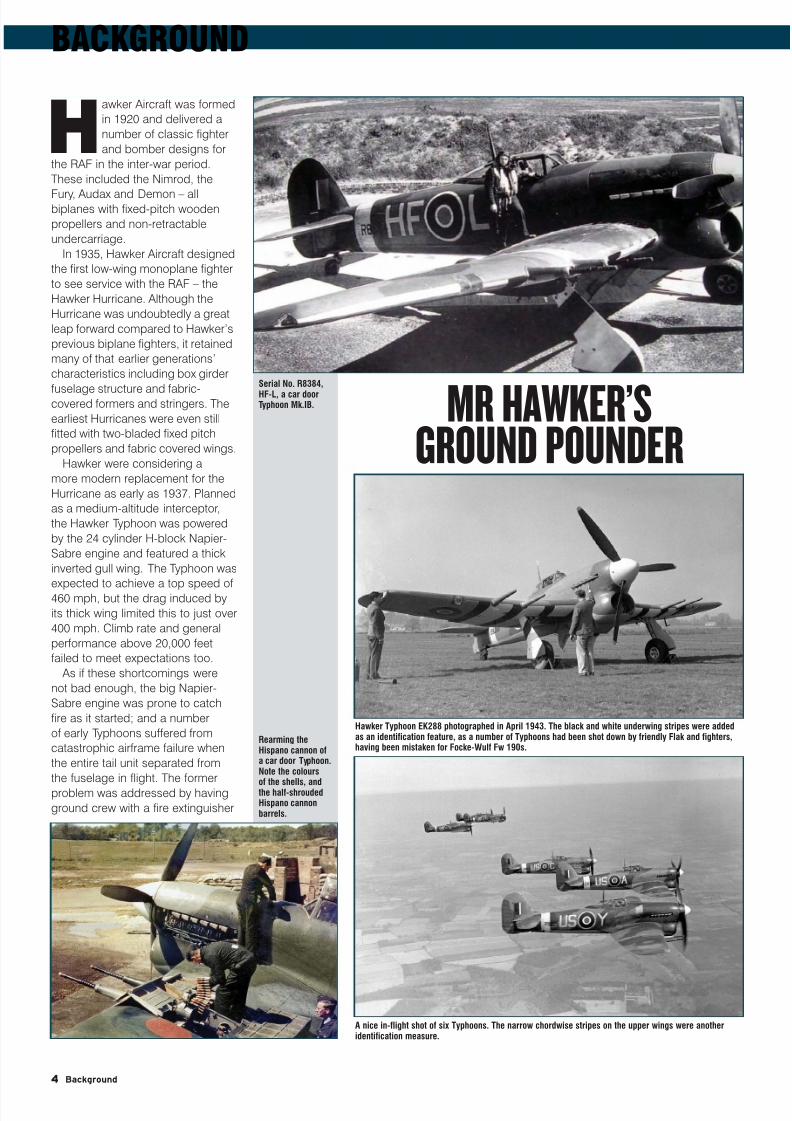
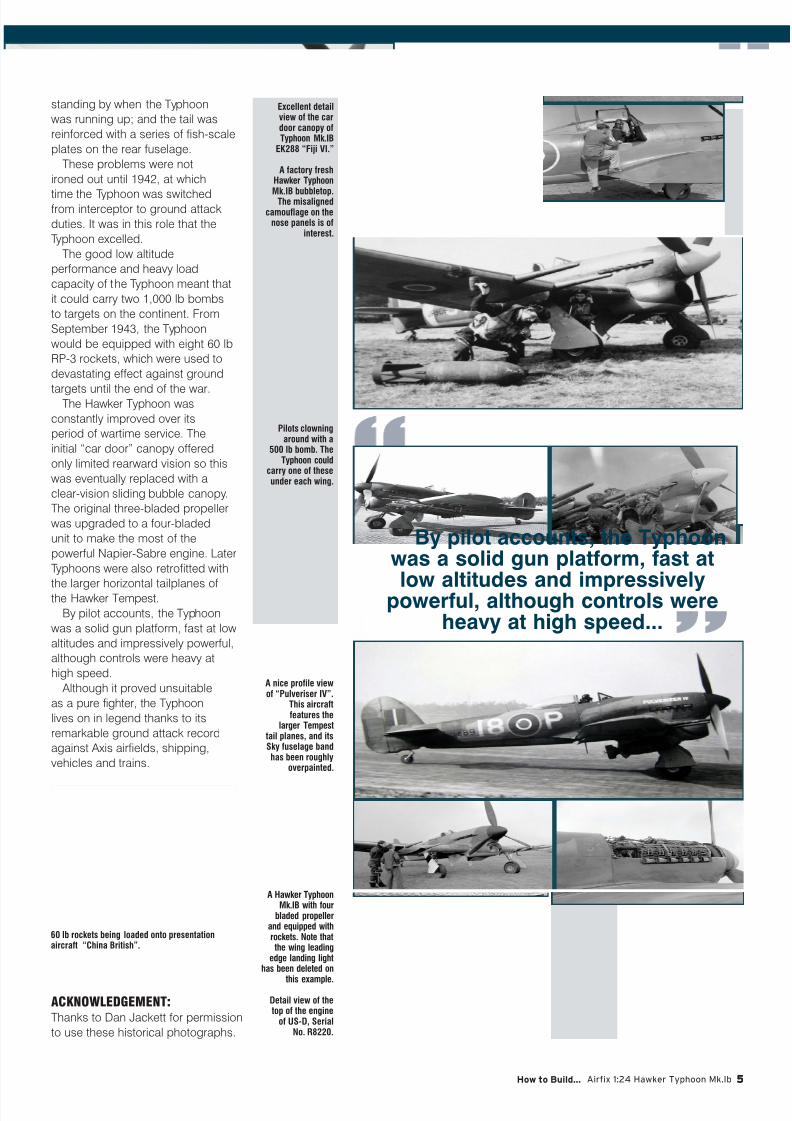
MR HAWKER’SGROUND POUNDER
Serial No. R8384,
HF-L, a car doorTyphoon Mk.IB.
Rearming theHispano cannon ofa car door Typhoon.Note the colours
of the shells, andthe half-shroudedHispano cannonbarrels.
Hawker Typhoon EK288 photographed in April 1943. The black and white underwing stripes were addedas an identification feature, as a number of Typhoons had been shot down by friendly Flak and fighters,having been mistaken for Focke-Wulf Fw 190s.
A nice in-flight shot of six Typhoons. The narrow chordwise stripes on the upper wings were anotheridentification measure.
7/23/2019 Airfix How to Build… - Hawker Typhoon Mk.lb
http://slidepdf.com/reader/full/airfix-how-to-build-hawker-typhoon-mklb 5/76
How to Build... Airfix 1:24 Hawker Typhoon Mk.Ib 5
ACKNOWLEDGEMENT:
Thanks to Dan Jackett for permission
to use these historical photographs.
standing by when the Typhoon
was running up; and the tail was
reinforced with a series of fish-scale
plates on the rear fuselage.
These problems were not
ironed out until 1942, at which
time the Typhoon was switchedfrom interceptor to ground attack
duties. It was in this role that the
Typhoon excelled.
The good low altitude
performance and heavy load
capacity of the Typhoon meant that
it could carry two 1,000 lb bombs
to targets on the continent. From
September 1943, the Typhoon
would be equipped with eight 60 lb
RP-3 rockets, which were used to
devastating effect against ground
targets until the end of the war.The Hawker Typhoon was
constantly improved over its
period of wartime service. The
initial “car door” canopy offered
only limited rearward vision so this
was eventually replaced with a
clear-vision sliding bubble canopy.
The original three-bladed propeller
was upgraded to a four-bladed
unit to make the most of the
powerful Napier-Sabre engine. Later
Typhoons were also retrofitted with
the larger horizontal tailplanes ofthe Hawker Tempest.
By pilot accounts, the Typhoon
was a solid gun platform, fast at low
altitudes and impressively powerful,
although controls were heavy at
high speed.
Although it proved unsuitable
as a pure fighter, the Typhoon
lives on in legend thanks to its
remarkable ground attack record
against Axis airfields, shipping,
vehicles and trains.
By pilot accounts, the Typhoonwas a solid gun platform, fast at
low altitudes and impressivelypowerful, although controls wereheavy at high speed...
60 lb rockets being loaded onto presentationaircraft “China British”.
Excellent detailview of the cardoor canopy ofTyphoon Mk.IB
EK288 “Fiji VI.”
A factory freshHawker TyphoonMk.IB bubbletop.
The misalignedcamouflage on the
nose panels is ofinterest.
Pilots clowningaround with a
500 lb bomb. TheTyphoon could
carry one of theseunder each wing.
A nice profile viewof “Pulveriser IV”.
This aircraftfeatures the
larger Tempesttail planes, and itsSky fuselage bandhas been roughly
overpainted.
A Hawker TyphoonMk.IB with four
bladed propellerand equipped withrockets. Note thatthe wing leading
edge landing lighthas been deleted on
this example.
Detail view of thetop of the engine
of US-D, SerialNo. R8220.
7/23/2019 Airfix How to Build… - Hawker Typhoon Mk.lb
http://slidepdf.com/reader/full/airfix-how-to-build-hawker-typhoon-mklb 6/76
6 Chapter 1 - Hawker Typhoon Close Up
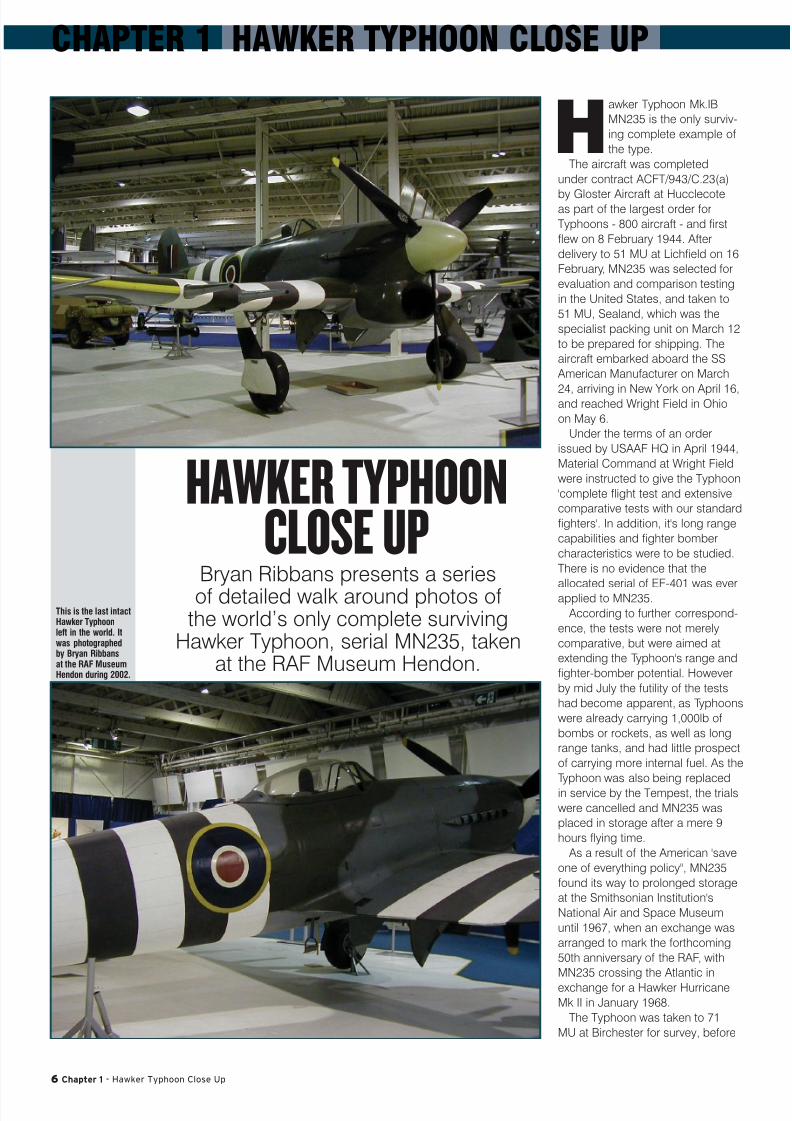
CHAPTER 1 HAWKER TYPHOON CLOSE UP
Hawker Typhoon Mk.IB
MN235 is the only surviv-
ing complete example of
the type.
The aircraft was completed
under contract ACFT/943/C.23(a)
by Gloster Aircraft at Hucclecoteas part of the largest order for
Typhoons - 800 aircraft - and first
flew on 8 February 1944. After
delivery to 51 MU at Lichfield on 16
February, MN235 was selected for
evaluation and comparison testing
in the United States, and taken to
51 MU, Sealand, which was the
specialist packing unit on March 12
to be prepared for shipping. The
aircraft embarked aboard the SS
American Manufacturer on March
24, arriving in New York on April 16,and reached Wright Field in Ohio
on May 6.
Under the terms of an order
issued by USAAF HQ in April 1944,
Material Command at Wright Field
were instructed to give the Typhoon
'complete flight test and extensive
comparative tests with our standard
fighters'. In addition, it's long range
capabilities and fighter bomber
characteristics were to be studied.
There is no evidence that the
allocated serial of EF-401 was everapplied to MN235.
According to further correspond-
ence, the tests were not merely
comparative, but were aimed at
extending the Typhoon's range and
fighter-bomber potential. However
by mid July the futility of the tests
had become apparent, as Typhoons
were already carrying 1,000lb of
bombs or rockets, as well as long
range tanks, and had little prospect
of carrying more internal fuel. As the
Typhoon was also being replaced
in service by the Tempest, the trials
were cancelled and MN235 was
placed in storage after a mere 9
hours flying time.
As a result of the American 'save
one of everything policy", MN235
found its way to prolonged storage
at the Smithsonian Institution's
National Air and Space Museum
until 1967, when an exchange was
arranged to mark the forthcoming
50th anniversary of the RAF, with
MN235 crossing the Atlantic in
exchange for a Hawker Hurricane
Mk II in January 1968.
The Typhoon was taken to 71
MU at Birchester for survey, before
HAWKER TYPHOONCLOSE UP
Bryan Ribbans presents a seriesof detailed walk around photos of
the world’s only complete survivingHawker Typhoon, serial MN235, taken
at the RAF Museum Hendon.
This is the last intactHawker Typhoonleft in the world. Itwas photographedby Bryan Ribbansat the RAF MuseumHendon during 2002.

7/23/2019 Airfix How to Build… - Hawker Typhoon Mk.lb
http://slidepdf.com/reader/full/airfix-how-to-build-hawker-typhoon-mklb 7/76
How to Build... Airfix 1:24 Hawker Typhoon Mk.Ib 7
Starboard sideof the nose.
The upside-down“T” shaped pitottube may be seen
under the wing.
Overlappingfuselage panels
and the “oilcanning” effect
may be seen here.
The rectangularplates, often called“fish plates”, werereinforcements for
the tail section.
The nose of theTyphoon.
Note the quitedistinct forwardand aft sections
of the cannonfairings.
Several exhaustconfigurations
were fitted to theTyphoon. Thisis one of the
shrouded types.
Note the roughalignment and
poor fit of someof the panels and
exhaust shrouds.
7/23/2019 Airfix How to Build… - Hawker Typhoon Mk.lb
http://slidepdf.com/reader/full/airfix-how-to-build-hawker-typhoon-mklb 8/76
8 Chapter 1 - Hawker Typhoon Close Up
CHAPTER 1 HAWKER TYPHOON CLOSE UP
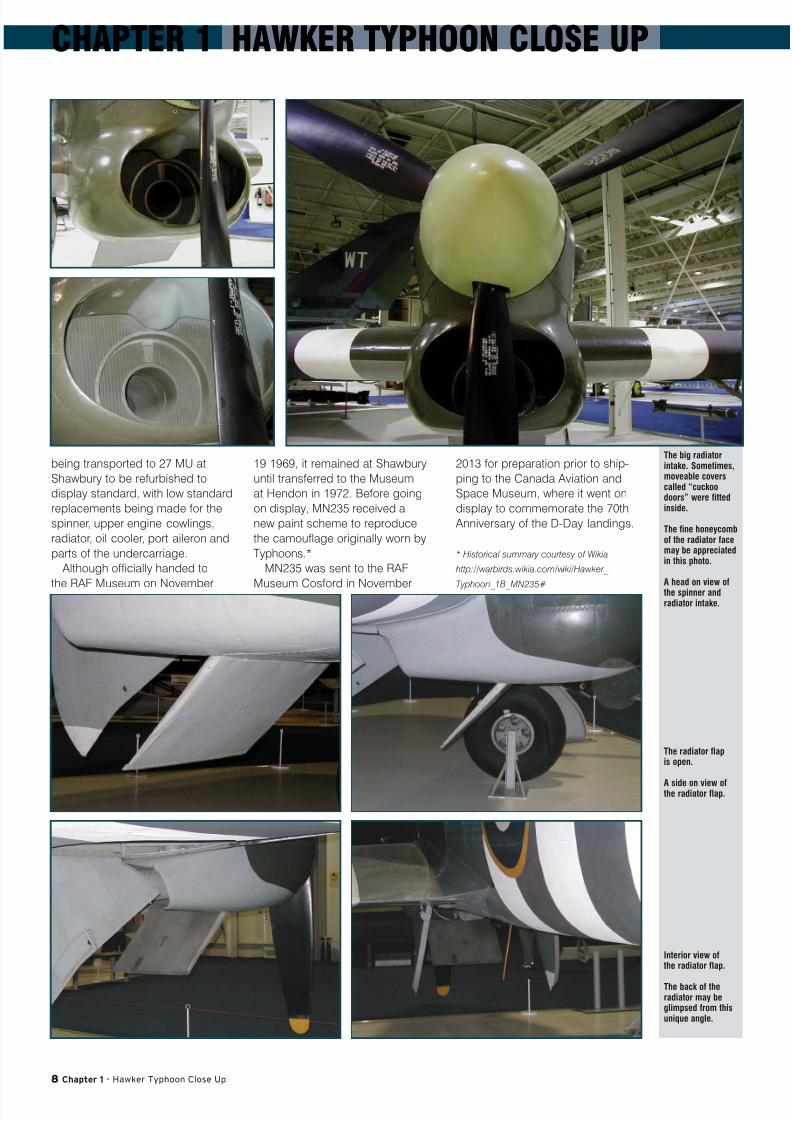
being transported to 27 MU at
Shawbury to be refurbished to
display standard, with low standard
replacements being made for the
spinner, upper engine cowlings,
radiator, oil cooler, port aileron and
parts of the undercarriage.
Although officially handed to
the RAF Museum on November
19 1969, it remained at Shawbury
until transferred to the Museum
at Hendon in 1972. Before going
on display, MN235 received a
new paint scheme to reproduce
the camouflage originally worn by
Typhoons.*
MN235 was sent to the RAF
Museum Cosford in November
2013 for preparation prior to ship-
ping to the Canada Aviation and
Space Museum, where it went on
display to commemorate the 70th
Anniversary of the D-Day landings.
* Historical summary courtesy of Wikia
http://warbirds.wikia.com/wiki/Hawker_
Typhoon_1B_MN235#
The big radiatorintake. Sometimes,moveable coverscalled “cuckoodoors” were fittedinside.
The fine honeycombof the radiator facemay be appreciatedin this photo.
A head on view of
the spinner andradiator intake.
Interior view ofthe radiator flap.
The back of theradiator may beglimpsed from thisunique angle.
The radiator flapis open.
A side on view ofthe radiator flap.

7/23/2019 Airfix How to Build… - Hawker Typhoon Mk.lb
http://slidepdf.com/reader/full/airfix-how-to-build-hawker-typhoon-mklb 9/76
How to Build... Airfix 1:24 Hawker Typhoon Mk.Ib 9
The anti-shimmytail wheel. Therear starboardnavigation lightmay be seen atthe rear root of thehorizontal stabilizer
too.
Not the greatestshot due to low lightand shadow, buthere we can see thewide groove aroundthe solid tyre’scircumference.
One of the mainwheels. Note thesmooth tread.
The outer viewof the portundercarriage.
The pilot’sretractable step.
A 3” rocket with60 lb head. Eightof these couldbe carried by theTyphoon.
7/23/2019 Airfix How to Build… - Hawker Typhoon Mk.lb
http://slidepdf.com/reader/full/airfix-how-to-build-hawker-typhoon-mklb 10/76
10 Chapter 1 - Hawker Typhoon Close Up
CHAPTER 1 HAWKER TYPHOON CLOSE UP
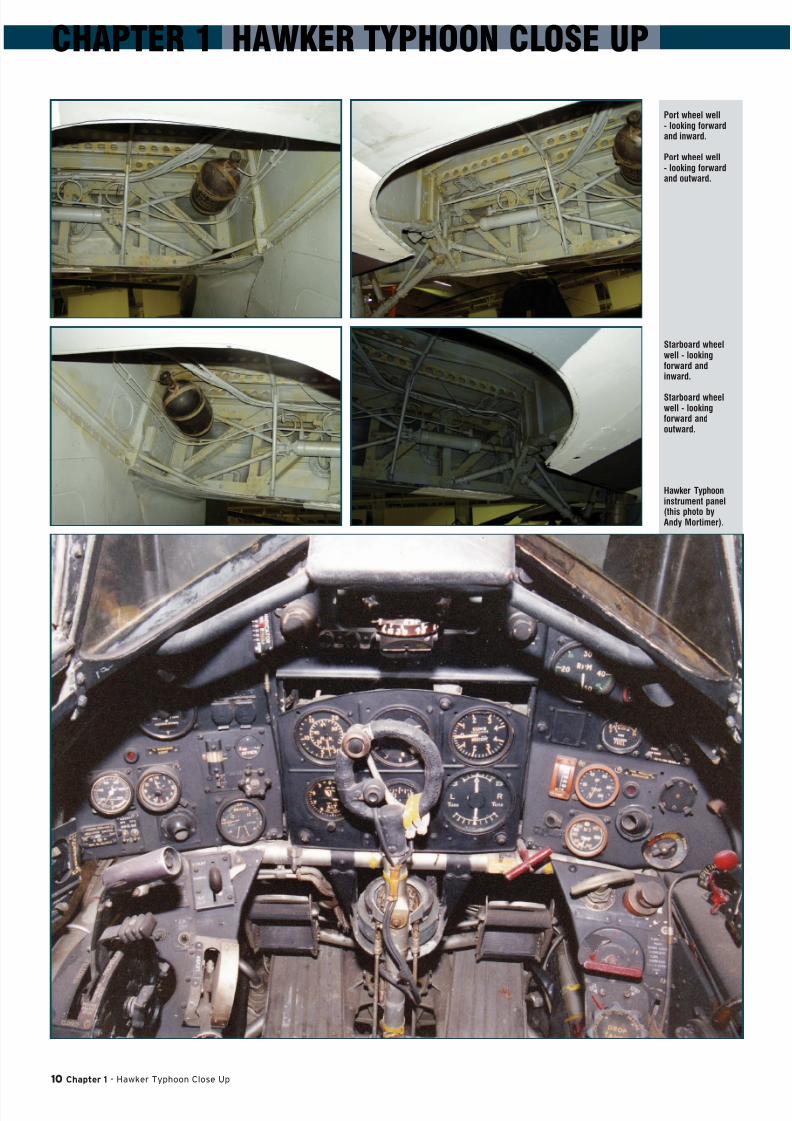
Port wheel well- looking forwardand inward.
Port wheel well- looking forwardand outward.
Starboard wheelwell - lookingforward andinward.
Starboard wheelwell - lookingforward andoutward.
Hawker Typhooninstrument panel(this photo byAndy Mortimer).
7/23/2019 Airfix How to Build… - Hawker Typhoon Mk.lb
http://slidepdf.com/reader/full/airfix-how-to-build-hawker-typhoon-mklb 11/76
How to Build... Airfix 1:24 Hawker Typhoon Mk.Ib 11
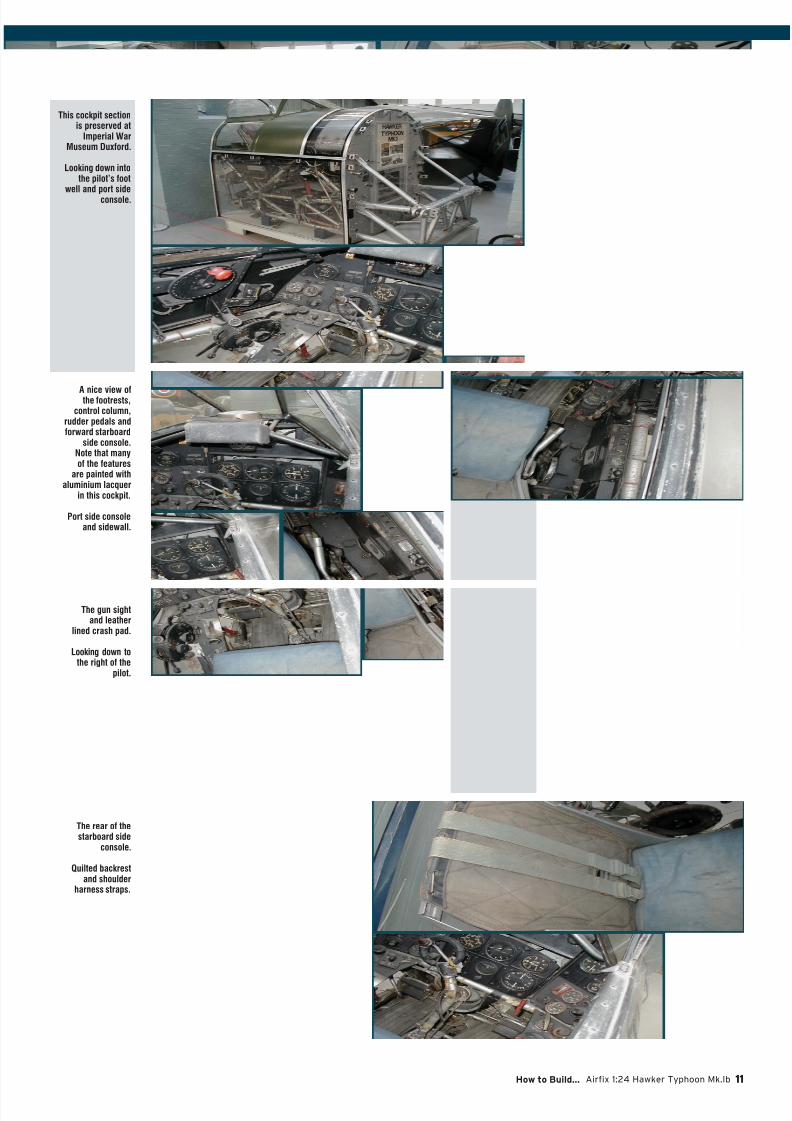
This cockpit sectionis preserved at
Imperial WarMuseum Duxford.
Looking down intothe pilot’s foot
well and port side
console.
A nice view ofthe footrests,control column,
rudder pedals andforward starboard
side console.Note that manyof the features
are painted withaluminium lacquer
in this cockpit.
Port side consoleand sidewall.
The gun sightand leather
lined crash pad.
Looking down tothe right of the
pilot.
The rear of thestarboard side
console.
Quilted backrestand shoulder
harness straps.

7/23/2019 Airfix How to Build… - Hawker Typhoon Mk.lb
http://slidepdf.com/reader/full/airfix-how-to-build-hawker-typhoon-mklb 12/76
12 Chapter 2 - Hawker Typhoon in Other Scales
CHAPTER 2 HAWKER TYPHOON IN OTHER SCALES
HAWKER TYPHOON IN OTHER SCALES
HAWKER TYPHOON IN 1:72 SCALEMark Davies examines the Airfix 1:72
scale Hawker Typhoon Mk.IB.
Although there is not a very
wide range of models
available, the quality of
Hawker Typhoon models
in 1:72 scale is good. The two main
choices are from Brengun and Airfix.
The pick of these 1:72 Typhoon
kits is the recent Airfix release.
AIRFIX KIT NO. A02041 – 1:72
SCALE HAWKER TYPHOON MK.IB
Airfix released their all-new 1:72
Hawker Typhoon Mk.IB during 2013.
The kit is moulded with reason-
ably fine recessed panel lines, and
some acceptable raised detail on
the wings. Unfortunately, the panel
lines are almost the same width
as the hinge lines for the control
surfaces, the gap being about right
for the latter. The panel lines on the
wings and cowl seem finer than
those on the rear fuselage. The finer
lines approach the standard set by
some better brands. Some of the
sprue gates are extremely chunky
and limited-run in nature, leaving
some large lumps to be cleaned
up from parts like the wing leading
edges. There are some quite fine
parts; although again, these are not
quite up with the best.
The clear canopy parts are thin
with good clarity, although the
windscreen is not as polished as
the sliding hood.
This kit’s cockpit detail betters all
previous long-run injection moulded
kits, but is not as good as the
Brengun or Pavla short-run kits. The
cockpit features tubular framework
and other detail moulded integrally
with the fuselage halves. It has an
open floor with heel-boards in true
Hawker-fashion.
Rather unusual is the way the
floor is moulded with the wheel
wells and part of the radiator duct-
ing to form a single assembly. This
tooling approach gives the best
Fishtail plates aremoulded to thefuselage.
The undercarriagebay is mouldedintegrally with theducting and thecockpit floor.
Detail is evenprovided on theinsides of theundercarriagedoors – a far cryfrom old 1:72 scaleAirfix kits.
7/23/2019 Airfix How to Build… - Hawker Typhoon Mk.lb
http://slidepdf.com/reader/full/airfix-how-to-build-hawker-typhoon-mklb 13/76
How to Build... Airfix 1:24 Hawker Typhoon Mk.Ib 13
rendition of the upper radiator duct-
ing I have seen in this scale.
The seat is quite nicely done with
quilted leather back-padding and
separate armour, although the seat
pan looks a little short; perhaps due
to the thickness of the plastic edge.There is no seat harness, but this is
can be added easily enough.
The instrument panel is smooth
and uses a crude decal for instru-
ments; where all of the dial outlines
on the panel are white on black.
Rudder pedals, a control column
and gun-sight complete this sub-
assembly. Two tubes that are not
included braced the mount, but
these can easily be scratch-built
from rod or stretched sprue. There
is no clear gun-sight reflector, whichis correct, as Typhoons with bubble
canopies projected the reticule
image onto the windscreen
Cockpit detail colours are given,
but I am not convinced that a
totally grey-green cockpit interior
as advised is correct. I understand
that Gloster, which built most
Typhoons, finished their cockpits in
matt black above waist level, with
aluminium tubular framing, seat
and lower panels. The preserved
cockpit in the Imperial War Museumand illustrations in the Pilot’s Notes
support this. Hawker-built airframes
may have had a grey-green finish
where Gloster used black, but I
cannot be sure.
The radiator and oil-cooler matrix
comes as one part, with a separate
carburettor. The matrix is very finely
represented.
The wheel-well/cockpit floor
assembly mentioned earlier also
provides the ducting roof for the
rear of the radiator. A nice touch is
the separate radiator vent, allowing
it to be positioned open if desired.
Interestingly, and I think a first for
Typhoon kits, Airfix have included a
tropical air filter that mounts behind
the radiator between the main
wheel wells. This filter was fitted to
late production Typhoons, but its
location makes it very hard to see in
period photos (and I have yet to see
published plans featuring it either).
It is not the same as fitted to earlier
Typhoons used for tropical testing,
nor is it the same as the albeit
similar arrangement applied to the
Tempest Mk.VI, which has appeared
in published plans. Presumably,
there was some arrangement to
close off the annular intake in the
radiator when the engine breathed
through the ventral filter on the
ground, but I have no idea how this
looked. If readers are aware of how
the intake air was rerouted pleasee-mail me with the details.
The fuselage halves enclose
the cockpit, radiator matrix and
tail-wheel, leaving the wheel wells
protruding either side of the assem-
bled fuselage. These in turn serve
to help locate the wings. The wings
include the option of cutting open
the gun access panels to display
the cannon and their ammunition
boxes. Some nicely moulded open
doors are provided to replace the
sections cut out.However, the gun breech and
ammo-feed detail is basic, and I feel
this is a bit of gimmick; but it may
appeal to some, including younger
modellers. However, no harm is
down as the wings come with the
access hatches moulded shut.
The wings lack landing lights;
however, early in 1944 the starboard
light was deleted, and some
Typhoons had their lights plated
over when carrying rockets, so
check references for your selectedcolour scheme.
Continuing with the fuselage,
the curvature of the fin does not
quite look right to me, as it finishes
almost horizontally, rather than on
a slight downward curve where the
top meets the rudder; but this is
a very slight issue. The fuselage
is also around a 2-mm or so
shorter than the Brengun, CMR
and Academy Typhoons, and A.L
Bentley’s plans as well. The differ-
ence appears to be in the length of
the fuselage forward of the cockpit,
but I think that this variation of a
scale 6-inches matters little. The
fishplates are moulded as raised
detail, and so are somewhat exag-
gerated, although a little better than
Academy in this regard.
I think some light sanding will
improve their appearance. Airfix pro-
vides only un-shrouded exhausts.
These, and the shrouded type, were
the most common styles of exhaust
used, although there were other
variations; so check your references.
The four-blade propeller looks
good. I also like the way the prop,
mounts to a separate collar that can
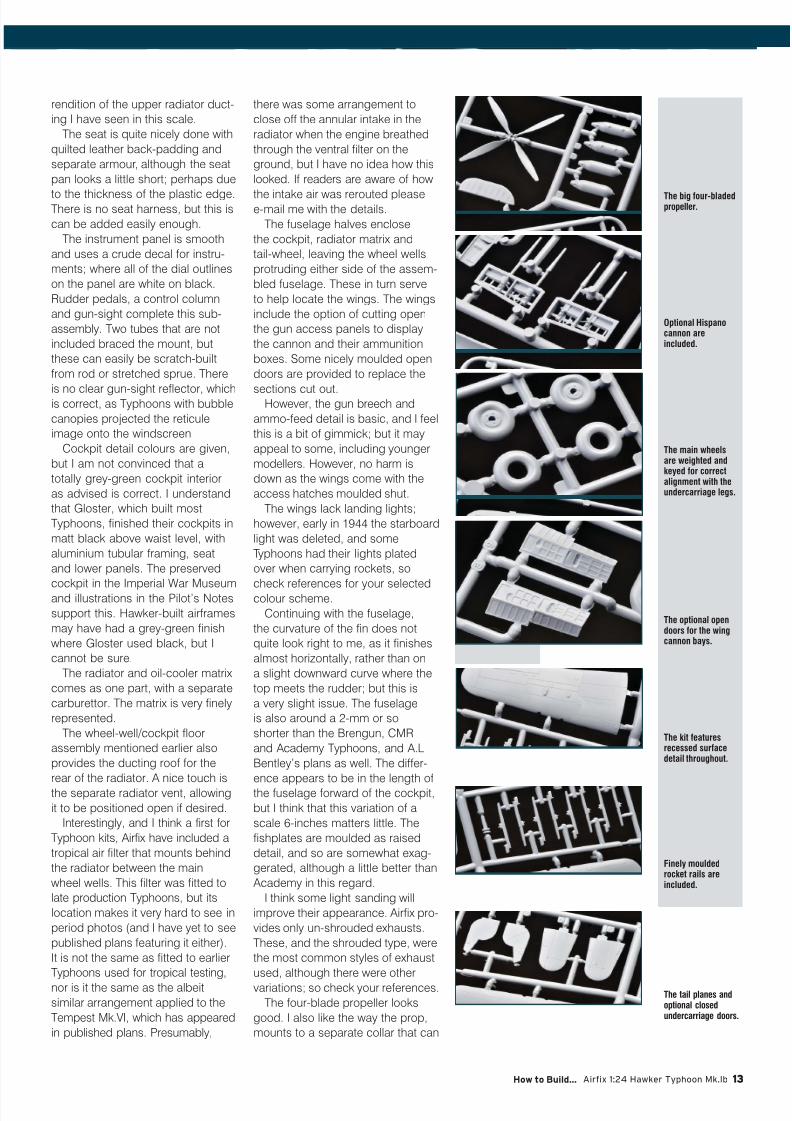
The big four-bladedpropeller.
Optional Hispanocannon areincluded.
The main wheelsare weighted andkeyed for correctalignment with theundercarriage legs.
The optional opendoors for the wingcannon bays.
The kit featuresrecessed surfacedetail throughout.
Finely mouldedrocket rails areincluded.
The tail planes andoptional closedundercarriage doors.
7/23/2019 Airfix How to Build… - Hawker Typhoon Mk.lb
http://slidepdf.com/reader/full/airfix-how-to-build-hawker-typhoon-mklb 14/76
14 Chapter 2 - Hawker Typhoon in Other Scales
CHAPTER 2 HAWKER TYPHOON IN OTHER SCALES
inserted to the fuselage after paint-
ing is complete, as this enables a
rotating propeller to be modelled
without it being in the way during
assembly and painting.
Airfix has made a nice job of the
undercarriage. The commendablydeep and detailed main wheel
wells mount to the wing underside,
ensuring that there is an undercut
rather than walls that conform to the
outline wheel well opening as on
some other kits. The oxygen bottles
located in the wheel wells are pro-
vided, along with the main leg and
ancillary door retraction jacks. The
undercarriage doors are nicely done,
with faceted internal panels like the
original. The axles have the correct
camber to the axles, rather thanbeing perpendicular to the undercar-
riage leg. The colour call-out for the
inside of the main undercarriage
doors is medium sea grey. A friend
of mine who spent a long time
researching his 1:48 scale Typhoon
project advised me that aluminium is
the more likely colour here.
The main wheels consist of two
halves, with a complete hub on one
half, which can serve to aid painting
a little. The tyres have flats moulded
in place to simulate weight- bear-ing, and location keys that ensure
these are at the correct angle to the
undercarriage legs. The tail wheel is
simple and nicely done, and is the
anti-shimmy kind generally found on
later Typhoons, although the deep
groove in the centre tread area is
missing due to moulding limitations;
so this needs to be added for
the tyre to look correct. There are
separate single-piece doors to cater
for a retracted undercarriage, which
is a nice touch.
Rocket launch rails or bomb
pylons mounting holes are indi-
cated by partial holes on the inside
face of the lower wing and the
instructions identify which should
be drilled through for rockets or
bombs. The rocket rails are okay,
but possibly a little too chunky. They
and are the steel Mk.I pattern that
taper towards the tip, the aluminium
Mk.III type was a little longer and
un-tapered, but Airfix have not pro-
vided these as an option; although
it would be nice to have for late
production example. The rockets
are reasonable given the limitations
of injection moulding. Airfix includes
two 1,000-lb bombs, and these are
also reasonably well done.
Not a lot remains to describe.
The bubble canopy and windscreen
are separate so it can be modelled
open. That just leaves an underwing
pitot, and the retractable boardingstep. This last item will benefit from
some refinement, as it is perhaps a
little chunky in appearance.
I think that this kit should be very
straightforward to build, certainly
far more so than its closest rival by
Brengun.
CONCLUSION
This is a good effort from Airfix.
The moulding is not quite up to the
standard of the better brands from
the Far East, but it is a real advanceon the first new tool releases by
Airfix under Hornby’s ownership.
Its main competitor for this
subject is Brengun’s Typhoon kit.
The Airfix kit’s surface and cockpit
detail almost as refined as the
Brengun kit; but its big advantage
is that it avoids the Czech kit’s very
undesirable need for major tail
surgery that results from the same
fuselage moulds being used for
three and four-blade options. The
Airfix kit is much easier to build inthis regard; and in fact, I would
expect it to build better all-round.
I suspect that many will regard its
scale finesse is close enough to
Brengun’s anyway. Approaching
half the Czech kit’s price, the more
readily available Airfix kit is sure to
be a winner.
Price considerations aside, I am
tempted rate the two brands equal
best for a four-blade Typhoon in
1:72 scale. Choosing one over
the other comes down largely to a
preference between detail refine-
ment versus ease of construction.
Brengun’s kit remains the best
choice for a three-blade Typhoon
however, as Airfix does not cover
this option.
This is a very nice kit from Airfix.
I am sure it will be well received
by many. If they would just refine
their panel lines a bit more, Airfix’s
new products could be up there
with some of the best. Despite this,
I still think that Airfix is the best
four-blade Typhoon choice for the
majority of modellers in the One
True Scale.
I recommended this kit highly.
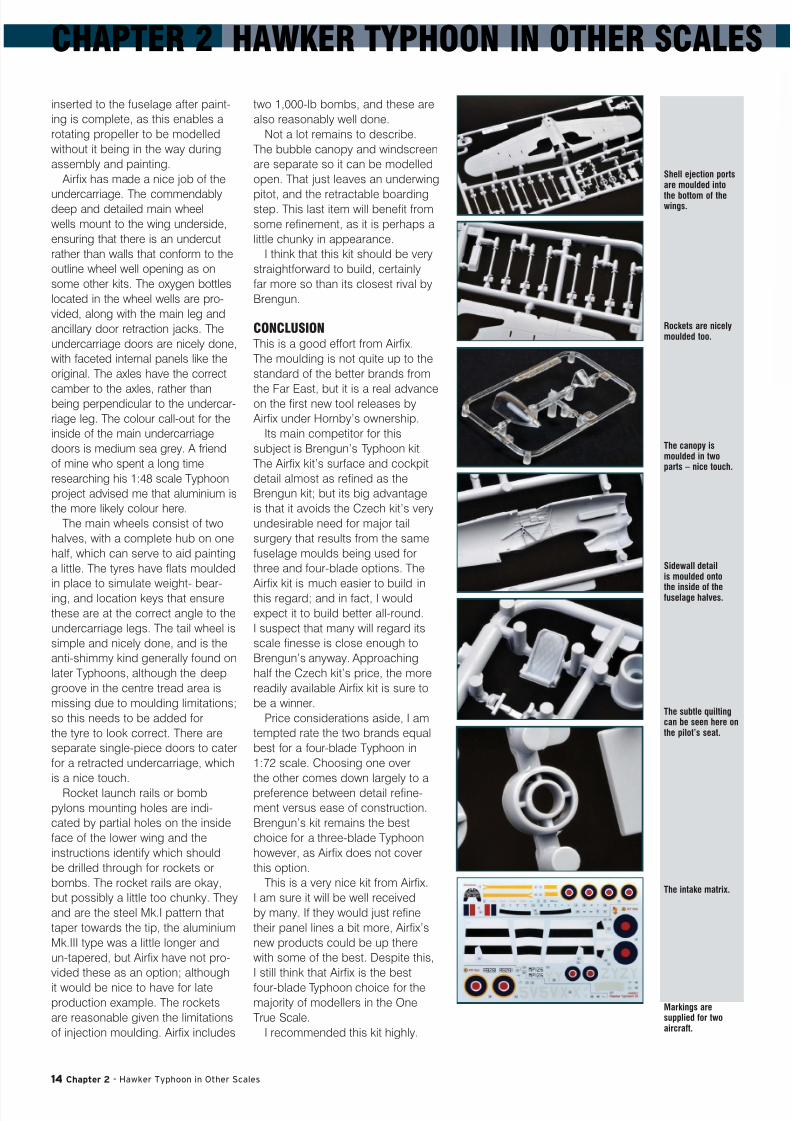
Shell ejection portsare moulded into
the bottom of thewings.
Rockets are nicelymoulded too.
The canopy ismoulded in twoparts – nice touch.
Sidewall detailis moulded onto
the inside of thefuselage halves.
The subtle quiltingcan be seen here onthe pilot’s seat.
The intake matrix.
Markings aresupplied for twoaircraft.

7/23/2019 Airfix How to Build… - Hawker Typhoon Mk.lb
http://slidepdf.com/reader/full/airfix-how-to-build-hawker-typhoon-mklb 15/76
How to Build... Airfix 1:24 Hawker Typhoon Mk.Ib 15
Hasegawa released several
1:48 scale versions of the
Hawker Typhoon, starting
with the Car Door ‘Early
Version’ in early 1999.
This kit comprises 82 parts inmedium grey coloured plastic,
12 parts in clear and markings for
two aircraft.
The model is very accurate in
terms of outline and detail.
Surface detail stands up well
even by today’s highest standards
with fine, crisp and consistent
recessed panel lines plus selected
rivet lines and fasteners. Two
configurations of the car door
canopy are supplied - one single
closed piece, and another with
separate side door and top hatch,
which may both be posed open.
Two 500 lb bombs and three
styles of Hispano 20mm cannon
barrels (two uncovered and one
covered) are included. Both
shrouded and unshrouded
exhausts are supplied too.
Cockpit detail is adequate
straight from the box, with the
typical “bottomless” floor well rep-
resented. The wheel wells feature
raised structural detail and some
plumbing moulded in place.
Hasegawa’s bubbletop Typhoon,
released later in 1999, is substan-
tially the same kit but with different
inserts for the upper cockpit area, a
clear vision sliding canopy and four-
bladed propeller assembly. Eight
rockets and rails are included too.
THE FLY IN THE OINTMENT
Hasegawa started making the most
of their mouldings during the 1990s
by tooling parts with separate
inserts to permit multiple versions of
a particular aircraft.
While I am sure that this
approach will be applauded by
accountants everywhere, it does
have its disadvantages.
The first problem is
that join seams do not
always coincide with
natural panel lines, meaning
that some filling, sanding and
rescribing may be necessary.
The second issue is that fit is
sometimes awful.
This edition of Hasegawa’s 1:48
scale Hawker Typhoon features
inserts in each upper mid fuselage
area to accommodate the car door
configuration. In later releases, a
different set of fuselage inserts for
the bubble top was included.
Forearmed with the knowledge
of potential fit problems, I started
construction by gluing the inserts
into each fuselage side. I worked on
each side separately as this allowed
me to align the curved edges of the
HAWKER TYPHOON IN 1:48 SCALEHasegawa produces the best 1:48 scale
Hawker Typhoon kits available today.Brett Green examines these kits.
Hasegawa’s 1:48 scale Car DoorTyphoon, built by Brett Green
Note the longinsert in the upperfuselage. Thisaccommodateseither the early “cardoor” canopy, or thelater bubble top, by
the use of differentinserts.
Cockpit detail isquite basic, butthere are a numberof after marketoptions to enhancethis area.
The best way totackle the fuselageinsert is to fiteach part to eachfuselage side beforethe fuselage halvesare joined. There isstill plenty of fillingand sanding neededthough, as the insertdoes not fall onnatural panel lines.
The biggest problemnow is a very largegap between thefuselage halveswhere the insertsmeet.
For this project, thegaps were shimmedwith plastic andsteps were filledwith Milliput two-part epoxy putty.
The fuselage withfilling and sandingcomplete.
A number of keypanel lines were lostduring the filling andsanding stage. Thesewere reinstatedusing a scriber anda length of self-adhesive Dymo tapeas a guide.

7/23/2019 Airfix How to Build… - Hawker Typhoon Mk.lb
http://slidepdf.com/reader/full/airfix-how-to-build-hawker-typhoon-mklb 16/76
CHAPTER 2 HAWKER TYPHOON IN OTHER SCALES
16 Chapter 2 - Hawker
inserts with the contours of the fuse-
lage sides. It would be much easier
to deal with a gap along the top of
the fuselage than to fill, recontour
and sand the fuselage sides.
As it turned out, I was able to
line up the inserts and the fuselage
sides pretty well, although therewould be a few stray join seams to
clean up later.
However, test fitting the fuselage
halves exposes the real problem.
There was a prominent gap of
between 1 and 2 mm on the top
fuselage centreline between the
inserts. This gap needed some seri-
ous attention further down the track.
CONCLUSION
Hasegawa’s 1:48 scale Hawker
Typhoon Mk.IB might have been
released more than 14 years ago,
but it still holds up well by today’s
standards. The relatively small
parts count makes it appropriate for
even a beginner modeller, with onlythe poorly fitting fuselage inserts
complicating the build.
If you like more of a challenge,
there are plenty of aftermarket
accessories and markings out
there. I can highly recommend the
Barracuda Studios cockpit, wheels,
exhausts and intakes. They lift this
model to a different level.
The car doorversion providesunder wing bombs.
All this work deliversthe desired result –no steps or gaps.
Chris Wauchop builtthe Hasegawa 1:48scale bubbletopTyphoon Mk.IB. Thiskit is supplied witheight rockets and
rails.
The bubbletopversion suffersfrom the same fitproblems as the cardoor kit.
Markings are fromAeromaster Decals’item No. 48-436 –Storms in the SkyPt. X.
Some of these earlyTyphoons featured
a high contrast,hard-edged finish. Iwanted to duplicatethis for my project.

7/23/2019 Airfix How to Build… - Hawker Typhoon Mk.lb
http://slidepdf.com/reader/full/airfix-how-to-build-hawker-typhoon-mklb 17/76
How to Build... Airfix 1:24 Hawker Typhoon Mk.Ib 17
It seems remarkable that we do
not yet have a high quality 1:32
scale injection moulded plastic
kit of an aircraft as important as
the Hawker Typhoon.
Until the middle of the last dec-
ade, our only choice was the very
old and very basic Revell 1:32 scale
Typhoon, with its raised surface
details and clunky moving parts.
Model Design Construction
offered some respite with their
limited run multimedia HawkerTyphoon Mk.IB, released in 2006.
MDC's 1:32 Hawker Typhoon Mk.IB
comprises 83 parts in grey coloured
resin, 7 parts in clear resin; photo-
etched fret; 2 parts in cast brass;
clear vacform canopy (plus one
spare); and markings for six aircraft.
The kit is carefully packed in a
stout box, with parts for each sub-
assembly inside a separate plastic
bag. The large, hollow fuselage
halves and vacform canopies are
also protected by a packing tubeinside the main box.
The kit features superb surface
detail - crisply engraved panel lines
combined with raised structural
details including fasteners and rein-
forcement tabs where appropriate.
The fuselage halves are especially
noteworthy in this respect.
Each wing is supplied as a single
part. They are amazing pieces of
resin in their own right, each with a
deep and wonderfully detailed wheel
well cast in place. How the heck
would they get this out of the mould?
The trailing edges are ready for
the separate ailerons and flaps with
recessed locating positions making
it easy to position these control sur-
faces. The flaps are especially nice,
with all rib detail cast into the parts
Smaller details are no less
impressive. The cockpit includes
full internal framing and a delicately
detailed seat with a convincingly
quilted backrest. This front office is
accurately "bottomless", with footrails
forming the minimal pilot's floor. The
instrument panel features flat disks
for dials, ready for the nicely detailed
MDC RAF instrument decals.
Harness straps are supplied in the
photo-etched fret.
The tube framing does have a bit
of feather-like flash to clean up, but
the effort will be well worthwhile.
The kit provides clear resin
navigation lights. These look
cloudy on the casting block, but
will probably polish up nicely and
should respond to a quick bath in
Future Floor Polish.
This model is supported by cast
brass undercarriage legs - probablyjust as well considering the hefty
weight of the finished airframe.
MDC rounds out the package
with a choice of three-bladed or
four-bladed propeller assemblies.
The kit does not supply ordnance
(rockets may be purchased
separately) or the early, smaller
horizontal tailplanes often seen on
Typhoons before they were fitted
with the large Tempest tailplanes.
Five marking options are supplied
on two high-quality decal sheetsprinted by Fantasy Printshop.
Unlike some limited run kits,
MDC's Typhoon has been designed
with a number of clever assembly
aids, including ridges and locating
points mating surfaces of the
fuselage halves, locating tabs on
the tailplanes, and stout holes in the
wing roots to accurately position
those heavy wings.
There will be some cleanup, but it
is mostly lightweight. There are no
heavy casting blocks on any of the
resin parts.
CONCLUSION
MDC’s 1:32 scale Typhoon is a gor-
geous chunk of resin that is impres-
sively detailed, cleverly designed,
perfectly cast and accurate.
Considering the amount of effort
that must go into casting each of
these masterpieces, the purchase
price is pretty reasonable too. I did
not hesitate in forking out my cash.
You will definitely need experience
with resin kits if you want to
tackle this project, but MDC's
thoughtful engineering should make
workbench time a real pleasure.
HAWKER TYPHOON IN 1:32 SCALEChoices in 1:32 scale are limited,but MDC’s resin kit is a beauty.
The MDCmultimedia 1:32scale Typhoon.
The full-length fuselagehalves feature largeTempest-style tailplanes.
Each wing isa single largecasting, includingwheel well detail.
Luxurious castbrass mainundercarriage legs.
Eight markingoptions are offered.Two more decalsheets are included.

7/23/2019 Airfix How to Build… - Hawker Typhoon Mk.lb
http://slidepdf.com/reader/full/airfix-how-to-build-hawker-typhoon-mklb 18/76
18 Chapter 3 – Airfix 1:24 Typhoon In the Box
CHAPTER 3 AIRFIX 1:24 TYPHOON IN THE BOX
The Airfix 1:24 scale Hawker
Typhoon Mk.IB comprises
430 parts on 13 sprues in
pale grey coloured plastic
and 19 parts in clear plastic.
The model may be built as anyof the common Typhoon bubbletop
sub-variants, with options includ-
ing three or four bladed propeller
assemblies; three styles of spinner;
shrouded or unshrouded exhausts;
alternative radiator intakes, “cuckoo
doors” and tropical filter; leading
edge or lower wing mounted land-
ing lights; and early small tail planes
or later large (Tempest) tail planes.
An excellent selection of
ordnance is offered including
eight rockets, two styles of rocket
rails, streamlined wing fuel tanks,
two 250lb bombs and two 500lb
bombs. The undercarriage may be
built lowered or retracted, and the
wing cannon may be displayed with
the access covers open or closed.
Parts for the early car door ver-
sion are not included but the fuse-
lage breakdown suggests that it
might be a possible future release.
SURFACE TEXTURE
The first thing that struck me when I
examined the contents was the sur-
face texture. Airfix has moulded this
kit with a rippled “oilcan” texture
on all the exterior metal surfaces.
AIRFIX 1:24 TYPHOON IN THE BOX1.
3.
5.
7. 8.
6.
4.
2.
1. The two mainfuselage halves onthe sprues.
2. Note the rippled“oilcan” effect on
the main surfaces.
3. The surfacesare also coveredwith lines of holesrepresenting rivets.Note the raised“fish plates”,which werereinforcements forthe tail.
4. The lower wingcentre section.
5. One of theoverlapping upperwing panels.
6. The opening inthe upper wing willallow the cannonbay to be displayed.
7. You’ll need todecide early onwhether you arefitting rockets,bombs or tanks,as the appropriatelocating holes needto be drilled outbefore the wingsare assembled.
8. The earlyhorizontal tail
planes have asmaller surfacearea, although it ishard to pick withthe naked eye.
7/23/2019 Airfix How to Build… - Hawker Typhoon Mk.lb
http://slidepdf.com/reader/full/airfix-how-to-build-hawker-typhoon-mklb 19/76
How to Build... Airfix 1:24 Hawker Typhoon Mk.Ib 19
This creates the effect of a slight
bulge between rows of rivets. It is
quite a daring move on Airfix’s part,
but the result is both striking and
convincing.
The fuselage and wings are cov-
ered with rows of recessed holesrepresenting rivets. Although rivets
may have been better represented
by recessed circles rather than
the holes, the effect is more than
acceptable, especially when viewed
more than a few inches from the
surface of the plastic.
The fuselage and wings also
boast a number of raised surface
features – panels, fairings and bulg-
es – that contribute to the overall
impression of a robust design that
favoured functionality over elegance.Of particular note is the inclusion
of raised “fish plates” – external
reinforcements for the tail after a
number of early structural failures.
The elevators and ailerons are
moulded with raised domed rivets.
I think these look great, and
they are certainly appropriate for
these metal surfaces. The rudder
presents the believable impression
of fabric stretched over framework,
capped by a metal fairing at the
bottom. The rudder, ailerons andelevators are all designed to be
workable. The landing flaps may be
posed open or closed.
KIT ENGINEERING
The fuselage is moulded with a
number of inserts. The upper and
lower cowls are separate parts,
as are upper cockpit panels. The
bottom of the fuselage is also a
separate part, as is the vertical
stabiliser (fin) and a section of
fuselage at its base.
The fuselage cowling inserts
allow four different configurations
for the engine:
1. All the cowling panels may
be glued in place, completely
enclosing the engine.
2. The upper and lower panels may
be left off, displaying the top of
the engine and the radiator with
its associated plumbing and
mounting hardware.
3. The bottom panels may be glued
in place and the top panel left off
to display the top of the engine, or
4. The centre side engine cowling
sections may be cut off the front
of the fuselage to display the
9.
11.
13.
15.
17.
19. 20.
18.
16.
14.
12.
10.
9. These are the
larger Tempest-styletail planes, alsoprovided by Airfixas an option.
10. The elevators,with their prominentdome-headedraised rivets.
11. Fabric textureon the kit rudder.
12. The aileronsalso feature raisedrivets moulded ontothe top and bottomsurfaces.
13. Although the finis the same size onthe early and latetails, the mountingposition for thehorizontal tailplanes are different.This is the earlysmall version.
14. The fin sectionfor the lateTempest-style tailplanes. Note thatthe root for thehorizontal stabilisercomes furtherforward than the
early version.
15. Two styles ofexhaust shroudsare included,although neitherare called out in theinstructions.
16. This style ismore fully covered.
17. The stirrup-styleretractable pilot’sstep.
18. The uppercockpit sidewallsections are
separate inserts,suggesting thatwe might seealternative piecesfor a car doorTyphoon in thefuture. Note thetropical filter onthis sprue too. Thisfilter was fittedto late productionTyphoons.
19. Close up detailof the rivet andinspection hatchdetail.
20. Two full set ofdoors is provided
for the wing cannonbay. These aredesigned to bedisplayed open.
7/23/2019 Airfix How to Build… - Hawker Typhoon Mk.lb
http://slidepdf.com/reader/full/airfix-how-to-build-hawker-typhoon-mklb 20/76
20 Chapter 3 – Airfix 1:24 Typhoon In the Box
CHAPTER 3 AIRFIX 1:24 TYPHOON IN THE BOX
engine in its entirety.
It would appear that the model is
not designed to make the cowlings
removable (i.e. taking the cowlings
on and off the completed engine),
although the top cowl might be
partially removable with a littleextra work.
The separate upper cockpit
fuselage panels appear to be an
indication that we might see the
car door early version Typhoon in
the future.
The lower fuselage insert is
probably an engineering feature to
permit the moulding of the sophis-
ticated surface detail without suffer-
ing from moulding imperfections.
The upper tail insert allows either
the early small tail surfaces or thelate Tempest tail to be used.
The pilot’s hand holds and
footholds on the fuselage side are
separate parts that may be posed
open or closed. The retracting
stirrup-style step is also supplied as
a separate part.
Detail is very complete in almost
every area.
COCKPIT
The cockpit looks fantastic,
being built up in layers of tubularframework and detail parts just like
the real thing. Construction takes
place in steps, adding consoles,
the quadrant, control column and
actuators, wheels, knobs, handles
and the rest. Electrical cabling and
hydraulic wires are also present in
the cockpit. The seat is made up
from four pieces and features gor-
geous subtle quilted texture for the
pilot’s backrest. The harness straps
are supplied as injection moulded
plastic parts. A separate seat cush-
ion is provided too, if desired.
A seated pilot figure is also
offered as an option. Moulding
quality is very good, and the pose
is quite natural – right hand on the
control yoke and left hand on the
throttle. We don’t get to see much
of the face, as he is wearing his
flying helmet and oxygen mask,
but what we can see looks excel-
lent – good eye detail and even
creases on the skin of his forehead.
Interestingly, in the instructions, the
pilot appears to be wearing modern
glasses. I am wondering if this is
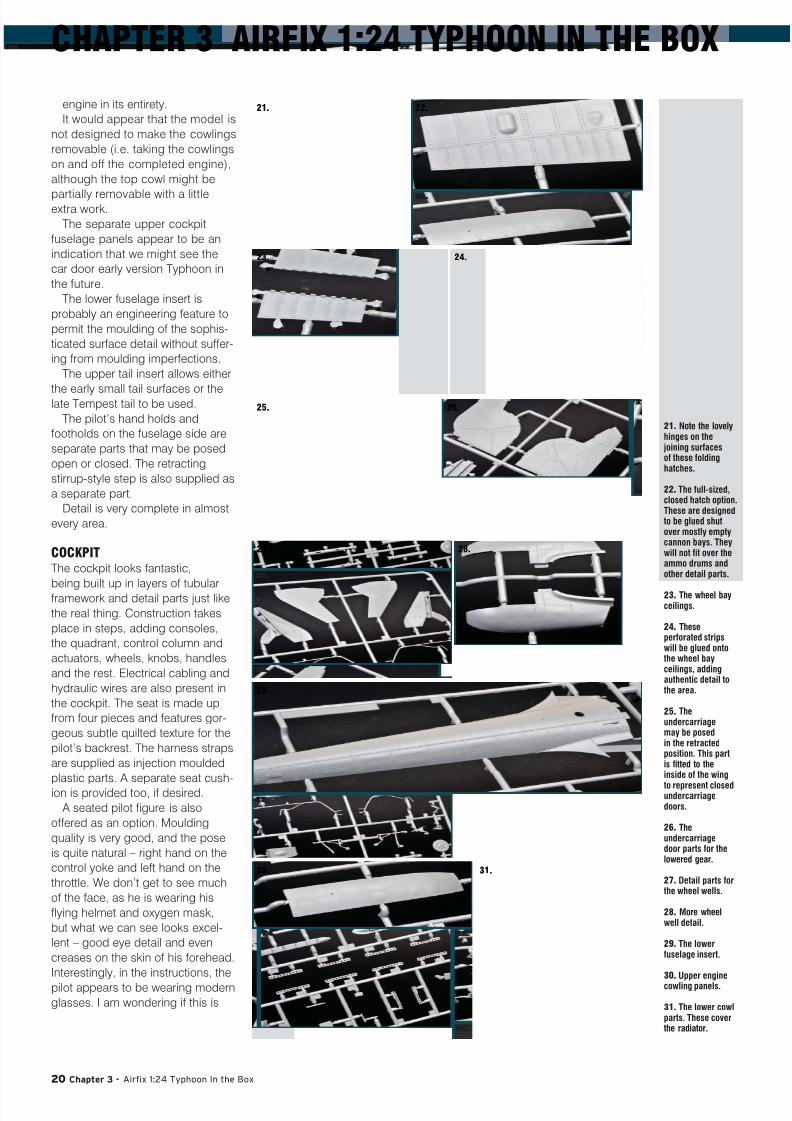
21.
23.
25.
27.
29.
30. 31.
28.
26.
24.
22.
21. Note the lovelyhinges on thejoining surfacesof these foldinghatches.
22. The full-sized,closed hatch option.These are designedto be glued shutover mostly emptycannon bays. Theywill not fit over theammo drums andother detail parts.
23. The wheel bayceilings.
24. Theseperforated stripswill be glued ontothe wheel bayceilings, addingauthentic detail tothe area.
25. Theundercarriagemay be posedin the retractedposition. This partis fitted to theinside of the wing
to represent closedundercarriagedoors.
26. Theundercarriagedoor parts for thelowered gear.
27. Detail parts forthe wheel wells.
28. More wheelwell detail.
29. The lowerfuselage insert.
30. Upper enginecowling panels.
31. The lower cowlparts. These coverthe radiator.
7/23/2019 Airfix How to Build… - Hawker Typhoon Mk.lb
http://slidepdf.com/reader/full/airfix-how-to-build-hawker-typhoon-mklb 21/76
How to Build... Airfix 1:24 Hawker Typhoon Mk.Ib 21
some sort of Airfix “in” joke.
The instrument panel is a
sandwich of clear and grey plastic
parts with decals designed to
represent dials on the back of the
clear section.
ENGINE AND INTERNAL
WING STRUCTURE
The engine is a marvel of modern
plastic engineering. Once again, it
is built up in many layers and detail
is very complete.
Airfix offers an electric motor –
available separately – as an option
if you want your propeller to spin.
The internal wing structure is
fully represented including spars,
frames, fuel tanks, wheel wells and
a full cannon bay on each side.The four Hispano cannon are quite
simple in parts breakdown but they
look effective when complete. The
bottom of the gun bays have a few
ejector pin circles that should be
cleaned up before assembly – one
of the few places where moulding
imperfections will be visible after the
model is built. Cannon bay covers
are supplied. These may be posed
in open or closed configuration.
The wheel wells are each made
up from a large plastic part for theceiling supplemented by seven
perforated strips to add authentic
structure to this space. The wheel
well is boxed in on all sides by the
spars and other panels. A jumble of
injection-moulded wiring completes
the wheel wells.
FINISHING TOUCHES
The undercarriage legs are simple
but accurate.
Airfix supplies five-spoke main
wheels and a solid anti-shimmy tail
wheel. The main wheels are flat-
tened and bulged.
The canopy may be posed open
or closed, but is not designed to
actually slide.
INSTRUCTIONS
Instructions are called out over a
whopping 229 steps. Each step is
well illustrated, with a clear indica-
tion of part numbers where applica-
ble. There are no construction notes
to accompany the illustrations.
Paint callouts are solely numbers
of Humbrol enamel paints.
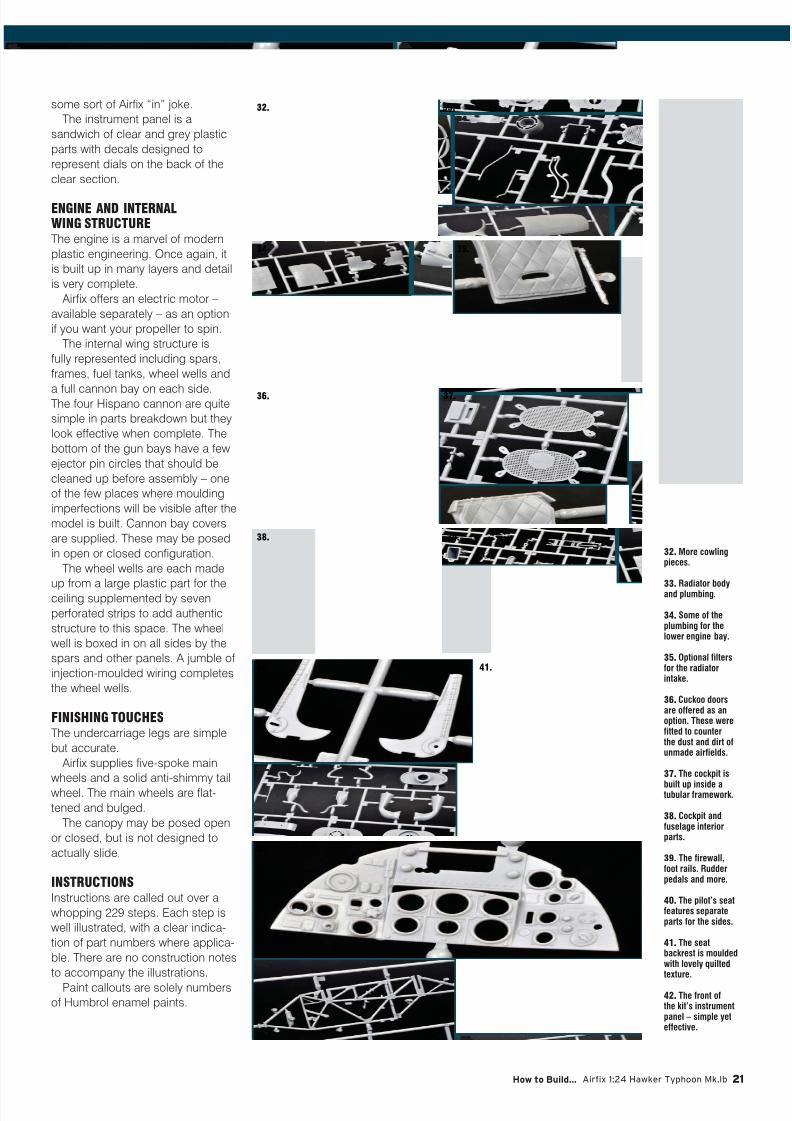
32.
34.
36.
38.
40.
42.
41.
39.
37.
35.
33.
32. More cowlingpieces.
33. Radiator bodyand plumbing.
34. Some of theplumbing for thelower engine bay.
35. Optional filtersfor the radiatorintake.
36. Cuckoo doorsare offered as anoption. These werefitted to counterthe dust and dirt ofunmade airfields.
37. The cockpit is
built up inside atubular framework.
38. Cockpit andfuselage interiorparts.
39. The firewall,foot rails. Rudderpedals and more.
40. The pilot’s seatfeatures separateparts for the sides.
41. The seatbackrest is mouldedwith lovely quiltedtexture.
42. The front ofthe kit’s instrumentpanel – simple yeteffective.

7/23/2019 Airfix How to Build… - Hawker Typhoon Mk.lb
http://slidepdf.com/reader/full/airfix-how-to-build-hawker-typhoon-mklb 22/76
22 Chapter 3 – Airfix 1:24 Typhoon In the Box
CHAPTER 3 AIRFIX 1:24 TYPHOON IN THE BOX
MARKINGS
A large decal sheet with markings
for four aircraft is included:
1. Hawker Typhoon 1B, Wing
Commander Charles Green, No121
Wing, RAF.2. Hawker Typhoon 1B, No. 247
Sqn, 2nd Tactical Air Force.
3. Hawker Typhoon 1B, No. 245
Sqn, 2nd Tactical Air Force. With
shark mouth.
4. Hawker Typhoon 1B, No 440
Sqn, RCAF 2nd Tactical Air Force.
Extensive stencil markings and
a variety of national markings are
also included.
CONCLUSION Airfix has delivered a truly stunning
kit with this 1:24 scale Typhoon
Mk.IB. In my opinion, it is easily the
best kit that Airfix has produced.
As nice as the 1:24 scale Mosquito
was, this one is quite clearly better.
Whereas in places the Mosquito
felt a bit like a scaled-up project,
the Typhoon does not. The detail
stands close scrutiny – quite a feat
for such a large model.
The whole package is very
complete and beautifully delivered. You really won’t need to add
much detail to any area of the kit.
Engineering is clever too, although
tight tolerances will mean chal-
lenges in constructions here and
there. Options are abundant and fit
is generally excellent.
Furthermore, the fact that Airfix
has delivered a model to this
exemplary standard using only
plastic parts is a real tribute to the
designers’ ambition and f lair. They
really have managed to squeeze
the maximum from the medium.
It won’t be a fast build, and it
might not be easy either, but it will
be a memorable journey delivering
a spectacular result!
43.
45.
46.
47. 48.
44.
43. Port sideconsole.
44. The starboardside console.
45. The cockpit ismounted on topof the stout wingspars.
46. A seated pilotfigure is included.
47. Facial featuresare excellent. Heshould look greatafter a careful paintjob.
48. A separate seatcushion is offeredas an option.
7/23/2019 Airfix How to Build… - Hawker Typhoon Mk.lb
http://slidepdf.com/reader/full/airfix-how-to-build-hawker-typhoon-mklb 23/76
How to Build... Airfix 1:24 Hawker Typhoon Mk.Ib 23
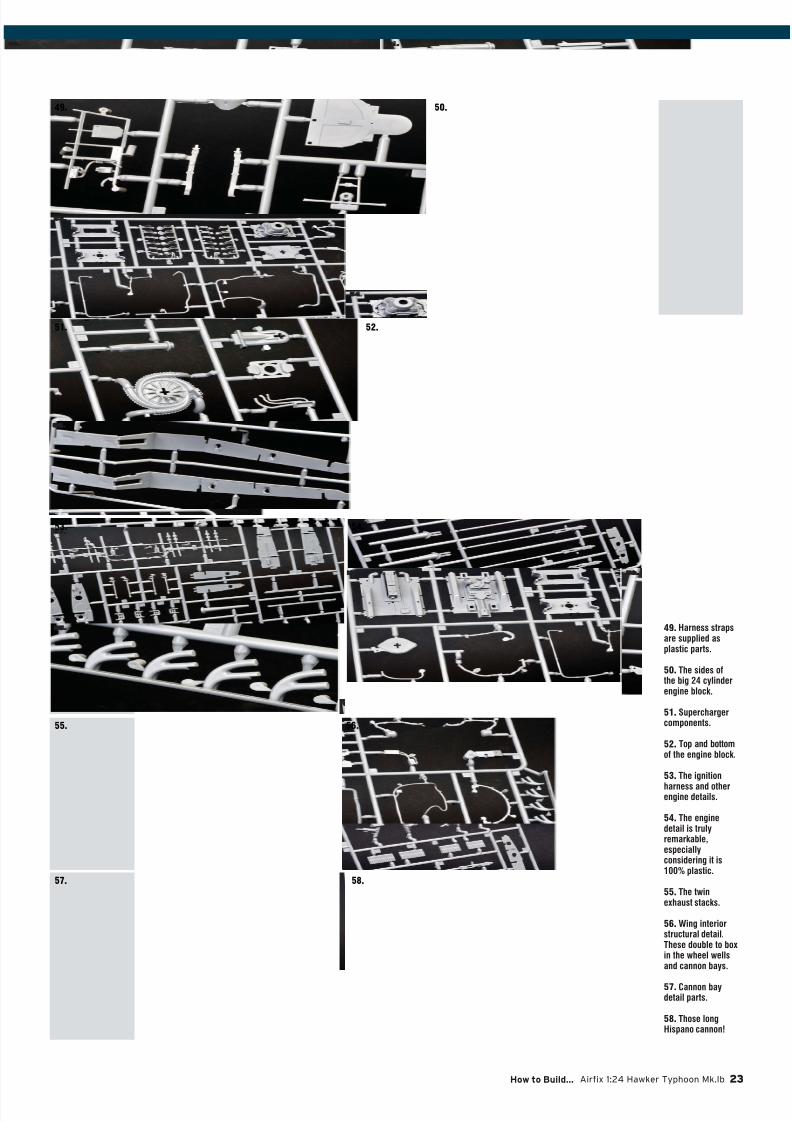
49.
51.
53.
55.
57. 58.
56.
54.
52.
50.
49. Harness strapsare supplied asplastic parts.
50. The sides ofthe big 24 cylinderengine block.
51. Superchargercomponents.
52. Top and bottomof the engine block.
53. The ignition
harness and otherengine details.
54. The enginedetail is trulyremarkable,especiallyconsidering it is100% plastic.
55. The twinexhaust stacks.
56. Wing interiorstructural detail.These double to boxin the wheel wellsand cannon bays.
57. Cannon baydetail parts.
58. Those longHispano cannon!
7/23/2019 Airfix How to Build… - Hawker Typhoon Mk.lb
http://slidepdf.com/reader/full/airfix-how-to-build-hawker-typhoon-mklb 24/76
24 Chapter 3 – Airfix 1:24 Typhoon In the Box
CHAPTER 3 AIRFIX 1:24 TYPHOON IN THE BOX
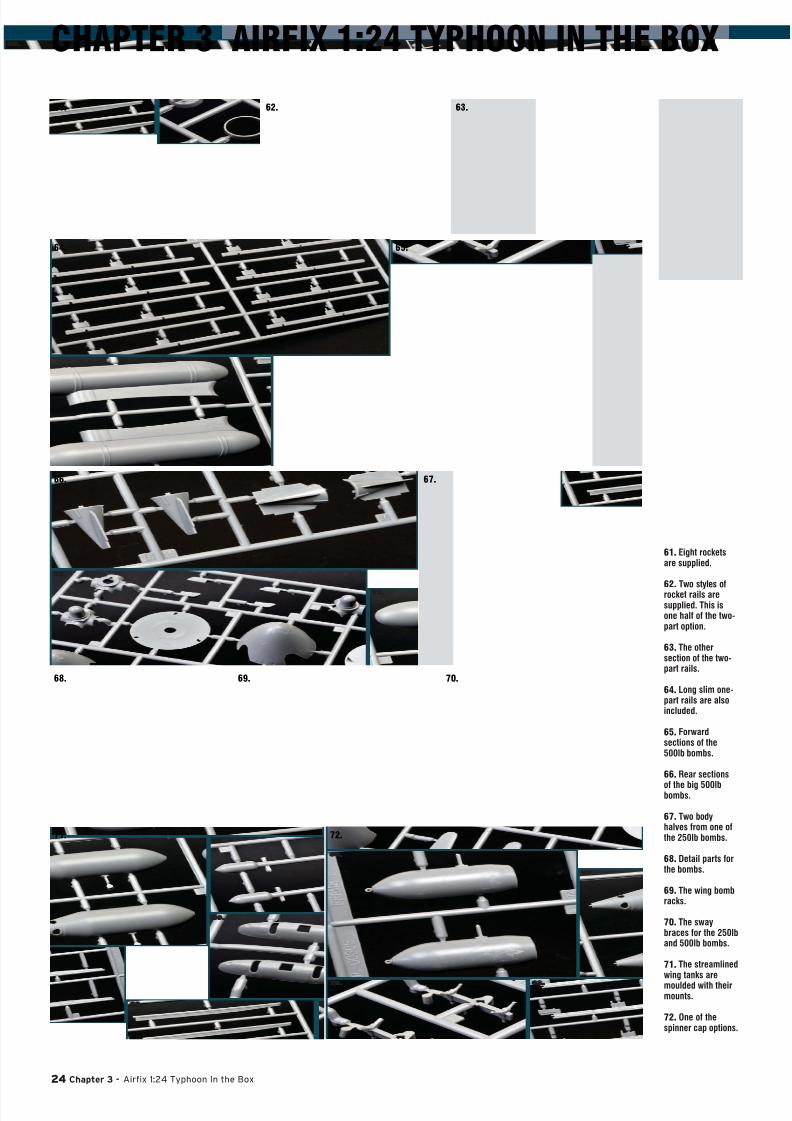
61.
64.
66.
68.
71. 72.
69. 70.
67.
65.
62. 63.
61. Eight rocketsare supplied.
62. Two styles ofrocket rails aresupplied. This isone half of the two-part option.
63. The othersection of the two-part rails.
64. Long slim one-part rails are alsoincluded.
65. Forwardsections of the500lb bombs.
66. Rear sections
of the big 500lbbombs.
67. Two bodyhalves from one ofthe 250lb bombs.
68. Detail parts forthe bombs.
69. The wing bombracks.
70. The swaybraces for the 250lband 500lb bombs.
71. The streamlinedwing tanks are
moulded with theirmounts.
72. One of thespinner cap options.

7/23/2019 Airfix How to Build… - Hawker Typhoon Mk.lb
http://slidepdf.com/reader/full/airfix-how-to-build-hawker-typhoon-mklb 25/76
How to Build... Airfix 1:24 Hawker Typhoon Mk.Ib 25
73.
75.
78.
80.
82. 83.
81.
79.
76. 77.
74.
73. Two morespinner caps.
74. Propeller bladesare common to allspinner options.
75. These fuel tanksthat will be hiddeninside the wings.
76. The five spokemain wheels.
77. No vinyltyres here, thankgoodness!
78. The kit
windscreen –beautifully thin andfree from distortion.
79. Additional clearparts.
80. The kit decalsheet suppliesmarkings for fouroptions.
81. The colours lookgood and printingis crisp.
82. Plenty of smalland colourful detaildecals are included.
83. Instrument dialsare supplied asindividual decalstoo.

7/23/2019 Airfix How to Build… - Hawker Typhoon Mk.lb
http://slidepdf.com/reader/full/airfix-how-to-build-hawker-typhoon-mklb 26/76
26 Chapter 4 - Step by Step
CHAPTER 4 STEP BY STEP
STEP BY STEPBUILDING THE AIRFIX 1:24 SCALEHAWKER TYPHOON MK.IB An illustrated guide to construction,straight from the box.
7/23/2019 Airfix How to Build… - Hawker Typhoon Mk.lb
http://slidepdf.com/reader/full/airfix-how-to-build-hawker-typhoon-mklb 27/76
How to Build... Airfix 1:24 Hawker Typhoon Mk.Ib 27
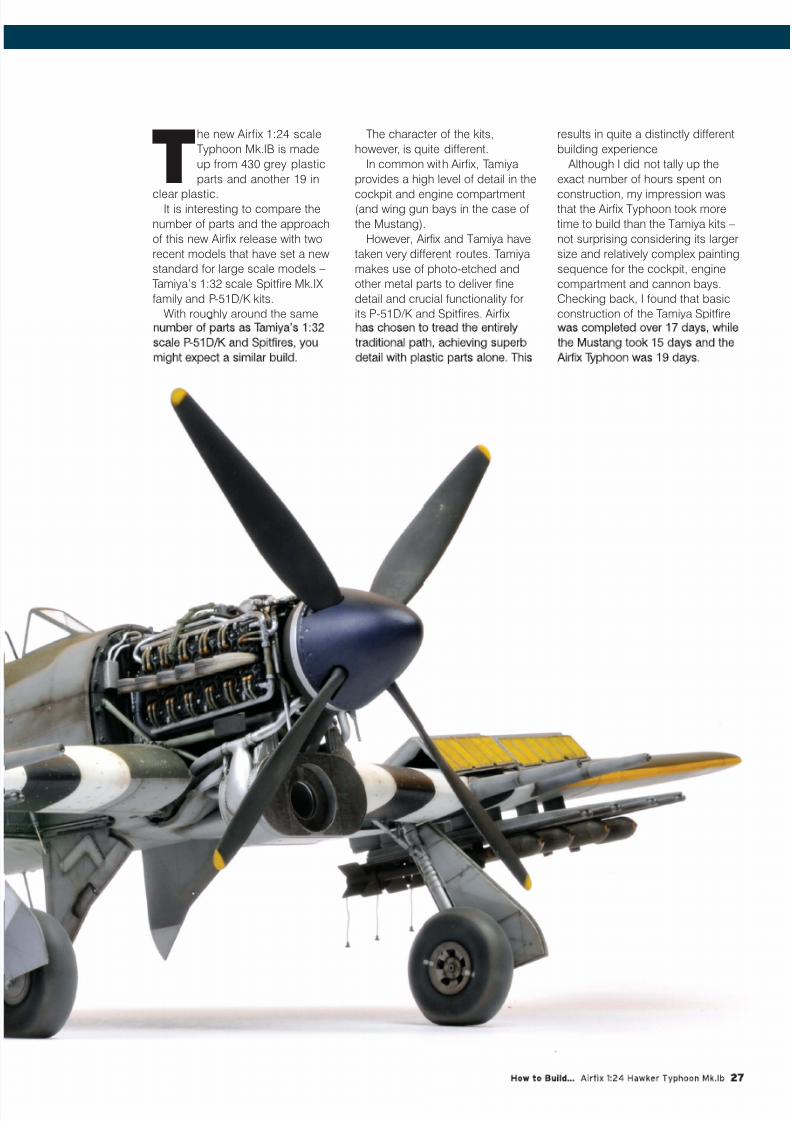
The new Airfix 1:24 scale
Typhoon Mk.IB is made
up from 430 grey plastic
parts and another 19 in
clear plastic.It is interesting to compare the
number of parts and the approach
of this new Airfix release with two
recent models that have set a new
standard for large scale models –
Tamiya’s 1:32 scale Spitfire Mk.IX
family and P-51D/K kits.
With roughly around the same
number of parts as Tamiya’s 1:32
scale P-51D/K and Spitfires, you
might expect a similar build.
The character of the kits,
however, is quite different.
In common with Airfix, Tamiya
provides a high level of detail in the
cockpit and engine compartment(and wing gun bays in the case of
the Mustang).
However, Airfix and Tamiya have
taken very different routes. Tamiya
makes use of photo-etched and
other metal parts to deliver fine
detail and crucial functionality for
its P-51D/K and Spitfires. Airfix
has chosen to tread the entirely
traditional path, achieving superb
detail with plastic parts alone. This
results in quite a distinctly different
building experience.
Although I did not tally up the
exact number of hours spent on
construction, my impression wasthat the Airfix Typhoon took more
time to build than the Tamiya kits –
not surprising considering its larger
size and relatively complex painting
sequence for the cockpit, engine
compartment and cannon bays.
Checking back, I found that basic
construction of the Tamiya Spitfire
was completed over 17 days, while
the Mustang took 15 days and the
Airfix Typhoon was 19 days.
7/23/2019 Airfix How to Build… - Hawker Typhoon Mk.lb
http://slidepdf.com/reader/full/airfix-how-to-build-hawker-typhoon-mklb 28/76
28 Chapter 4 - Step by Step
CHAPTER 4 STEP BY STEP
In common with Tamiya’s
Spitfires and Mustangs, you
do need to stay focused and
pay close attention to the Airfix
instructions during assembly. In
this case, the instructions aresupplied across 229 construction
steps in a 36 page booklet.
Before you start the model,
I strongly recommend that you
spend plenty of time getting familiar
with the contents of the
instructions. Walk through
the construction mentally
before you break out the
sprue cutter. Make notes on
the instruction booklet as you read
through it, or highlight elements that
you think might be important as yourmodel takes shape. The instruction
booklet can be a useful tool, so
make the most of it.
BEFORE WE START
Airfix’s plastic is perhaps slightly
softer than average, so take care
not to scar the surface of the parts
when cleaning them up.
There was some fine flash on
parts in my sample, but this may
have been due to the fact that I
had been issued an early test shot.There are also a number of deep
sink marks and sink lines, as well
as visible ejector pin circles. It is
worth spending as much time as
needed with a hobby knife, putty
and sanding stick to make sure
that parts are properly cleaned up
before they are assembled.
Fit is generally excellent, but
tolerances are very tight in places
so it is imperative that the parts are
completely free from flash and any
remnants of sprue attachments.
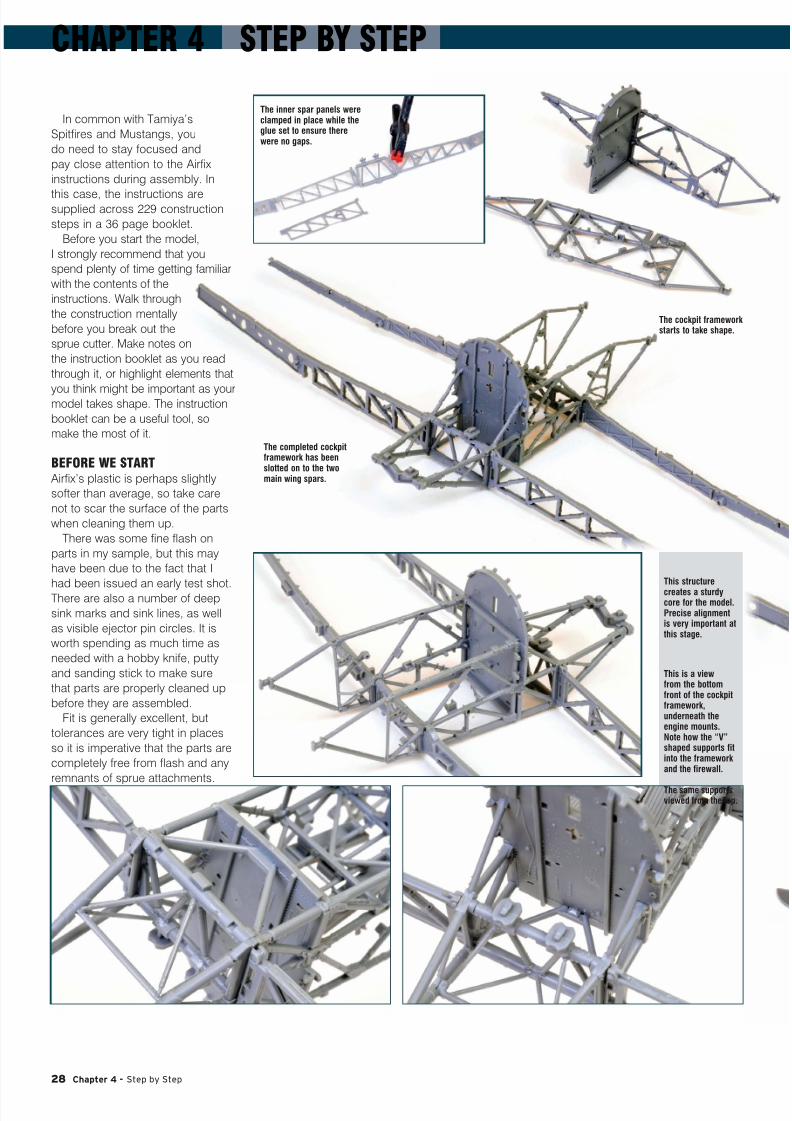
The inner spar panels wereclamped in place while theglue set to ensure therewere no gaps.
The cockpit frameworkstarts to take shape.
The completed cockpitframework has beenslotted on to the twomain wing spars.
This structure
creates a sturdycore for the model.Precise alignmentis very important atthis stage.
This is a viewfrom the bottomfront of the cockpitframework,underneath theengine mounts.Note how the “V”shaped supports fitinto the frameworkand the firewall.
The same supportsviewed from the top.
7/23/2019 Airfix How to Build… - Hawker Typhoon Mk.lb
http://slidepdf.com/reader/full/airfix-how-to-build-hawker-typhoon-mklb 29/76
How to Build... Airfix 1:24 Hawker Typhoon Mk.Ib 29
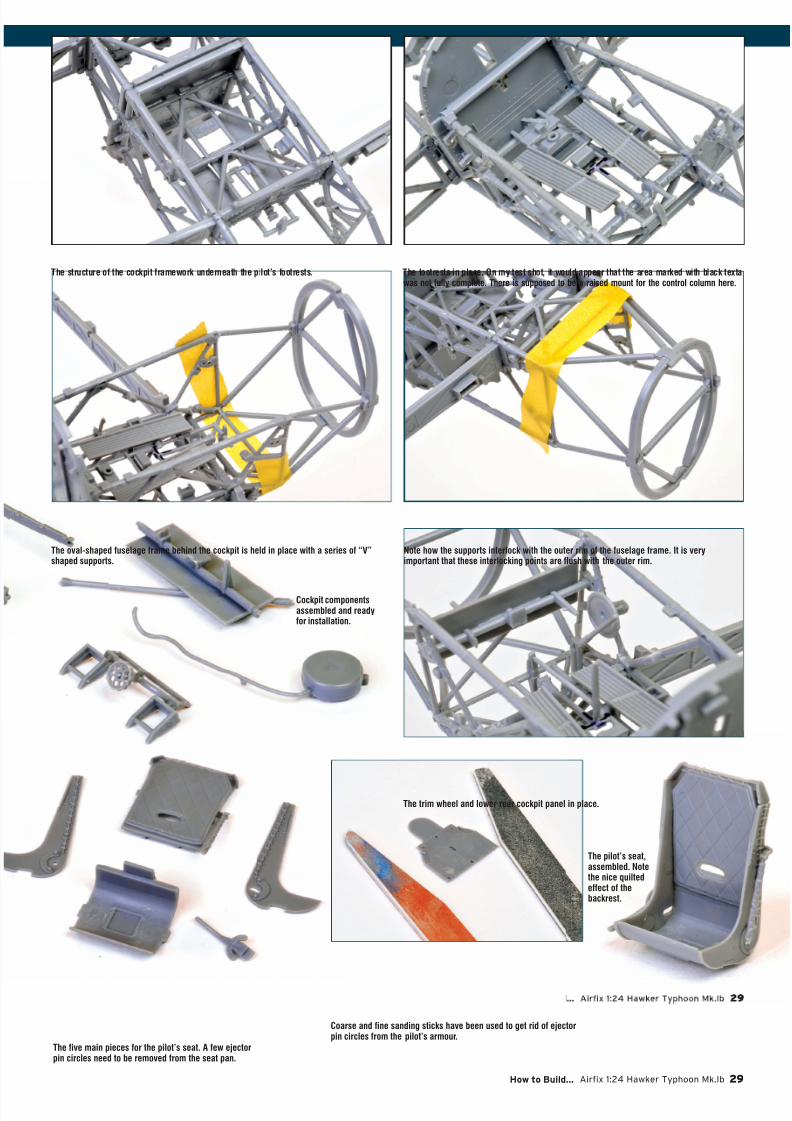
The structure of the cockpit framework underneath the pilot’s footrests. The footrests in place. On my test shot, it would appear that the area marked with black textawas not fully complete. There is supposed to be a raised mount for the control column here.
The oval-shaped fuselage frame behind the cockpit is held in place with a series of “V”shaped supports.
Note how the supports interlock with the outer rim of the fuselage frame. It is veryimportant that these interlocking points are flush with the outer rim.
Cockpit componentsassembled and readyfor installation.
The trim wheel and lower rear cockpit panel in place.
The five main pieces for the pilot’s seat. A few ejectorpin circles need to be removed from the seat pan.
Coarse and fine sanding sticks have been used to get rid of ejectorpin circles from the pilot’s armour.
The pilot’s seat,assembled. Notethe nice quiltedeffect of thebackrest.
7/23/2019 Airfix How to Build… - Hawker Typhoon Mk.lb
http://slidepdf.com/reader/full/airfix-how-to-build-hawker-typhoon-mklb 30/76
30 Chapter 4 - Step by Step
CHAPTER 4 STEP BY STEP
The instructions are very good
with nice clear diagrams, but I
found some of the perspectives abit confusing. I have tried to provide
as many photos as possible
showing the actual location of parts
from different angles to minimize
the likelihood of misplacement.
Airfix’s layered approach means
that painting of the cockpit, engine
and wing cannon bays really must
take place during construction.
Careful planning and forethought
about painting sub-assemblies will
be helpful.
Airfix has chosen to provide colourcallouts only in the form of Humbrol
enamel paint numbers. This is fine
if you are planning to use Humbrol
paints, but I was not. I wrote up a listof the Humbrol numbers alongside
their real-life colour name, and kept
it on my modelling desk for the
course of the project.
GETTING UNDERWAY
Construction commences with
the framework for the cockpit and
the wing spars. Just like the real
aeroplane, this framework forms a
solid core for the entire aeroplane
so it is absolutely crucial that the
parts are accurately assembled.Take plenty of time test-fitting before
you commit to glue here.
The forward inner spar sections
(parts A16 and A17) are separateparts to maximize detail, so make
sure that these are completely flush
with the main wing spar. I used
clamps to guarantee that there were
no gaps.
The wing spars slot into the
bottom of the cockpit frame. Once
again, make sure that the slots in the
spars are pushed all the way home.
At this point, I started to think
about when I should paint the
cockpit and wing spar sub-
assemblies.
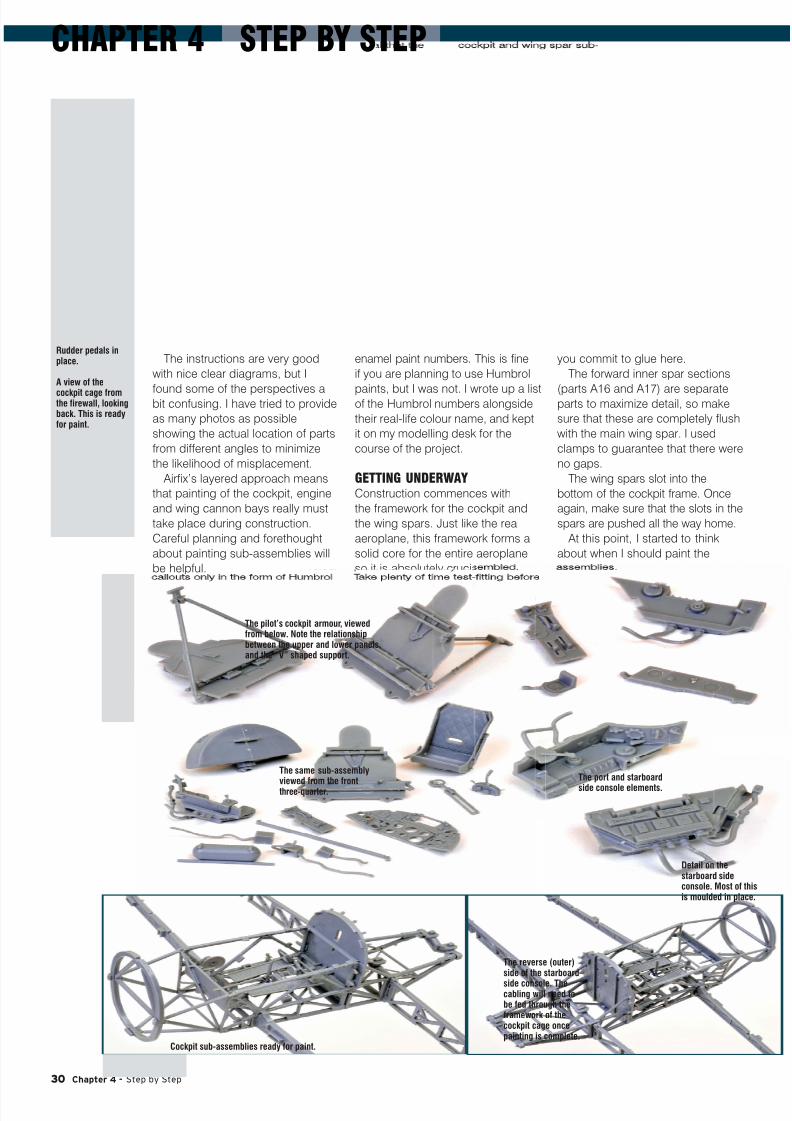
Rudder pedals inplace.
A view of the
cockpit cage fromthe firewall, lookingback. This is readyfor paint.
The pilot’s cockpit armour, viewedfrom below. Note the relationshipbetween the upper and lower panels,and the “V” shaped support.
The same sub-assembly
viewed from the frontthree-quarter.
The port and starboard
side console elements.
Cockpit sub-assemblies ready for paint.
Detail on thestarboard sideconsole. Most of thisis moulded in place.
The reverse (outer)side of the starboard
side console. Thecabling will need tobe fed through theframework of thecockpit cage oncepainting is complete.

7/23/2019 Airfix How to Build… - Hawker Typhoon Mk.lb
http://slidepdf.com/reader/full/airfix-how-to-build-hawker-typhoon-mklb 31/76
How to Build... Airfix 1:24 Hawker Typhoon Mk.Ib 31
PAINTING THE COCKPIT
Steps 4 to 27 cover the addition
of structural and detail parts to the
cockpit.
Rather than glue all of theseparts in place per the instructions,
instead I prepared a number of
sub-assemblies. These were:
• The basic cockpit frame with
footrests and rudder pedal
assembly
• The pilot’s seat (without the
harness straps)
• Pilot’s armour plate and mounts
• Port side console
• Starboard side console
• Throttle quadrant
• Oxygen bottle and mount• Oil tank (parts A01 and A02)
I also cleaned up a number of
other cockpit parts but did not
attach them at this stage. These
included the control column, the
grey plastic front section of the
instrument panel, some electrical
boxes and braces.
These sub-assemblies and parts
were separated into three groups
according to their ultimate colour.
These colours would be Cockpit
Green, Black and Silver.
I used Tamiya acrylic XF-71
Cockpit Green (IJN) as the base
colour for my cockpit. The main
cockpit frame and the wing spars
were painted this colour.
A thin mix of water, Future floor
polish and Tamiya X-18 Semi-Gloss
Black paint was brushed over the
Cockpit Green surfaces, leaving
a dark residue in natural shadow
areas. This was followed by subtle
dry-brushing with a lightened
version of Cockpit Green, applied
with a clean square-tipped brush.
The backrest for the pilot’s seat is
moulded with a quilted texture. This
is really impressive. The texture also
Tamiya XF-71Cockpit Green wasused as the basecolour. Note thatblack brush paintingof some of theupper framework
has alreadycommenced.
The firewall and
upper cockpitframes havebeen paintedblack by brush.
The front ofthe firewall isblack too.
Detail partswere temporarilyattached to a smallbox via Blu Tackto make handlingeasier duringpainting.
The instrument panel, pilot’s armour,consoles, throttle quadrant and smallboxes were sprayed “scale black” – a50/50 mix of Tamiya XF-1 Flat Blackand XF-64 Red Brown.
The trim wheeland rudder pedal
adjuster have beenpainted a shade of
red brown.
7/23/2019 Airfix How to Build… - Hawker Typhoon Mk.lb
http://slidepdf.com/reader/full/airfix-how-to-build-hawker-typhoon-mklb 32/76
32 Chapter 4 - Step by Step
CHAPTER 4 STEP BY STEP
includes
stitching at
the top and rivetsalong the bottom. Careful
painting will render a very
convincing result. I brush painted
the quilted rectangle dark brown,
then dry-brushed three shades of
progressively paler browns over the
top. The mix of Future and Tamiya
X-18 Semi-Gloss Black was then
flowed over the entire backrest,
settling in the low-lying areas.
The stitching at the top was then
painted Tamiya XF-55 Deck Tan
with a fine brush.The kit’s plastic harness straps
were now painted. The lap belts
were glued in place, but the
shoulder straps were let off until
the seat had been attached to the
armour plate.
I mixed a 50:50 blend of Tamiya
XF-1 Flat Black and XF-64 Red
Brown to obtain a shade of “scale
black”. The consoles, the pilot’s
head armour, throttle quadrant,
electrical boxes and the instrument
panel were sprayed with this colour.The same “scale black” mix was
used to brush paint some of the
upper cockpit frames, the front
cockpit firewall and the footrests.
The black areas were dry-
brushed progressively paler shades
of grey.
Details were now picked out with
Vallejo acrylic paints and a fine
paintbrush.
The instrument panel was next
on the painting menu. The panel
is made up from a front section in
grey plastic and a rear section in
clear. The instrument lenses are
raised on the clear section, so they
poke through the holes in the front
section. The production kit has
decals for the dials, but I did not
have these for my build. I therefore
used Airscale’s Generic WWII RAF
Instrument Dial Decals, Item No.
AS24RAF.
Please note that since finishing
my model, Airscale has released
a 1:24 scale dial and placard set
specifically for the Airfix Typhoon.
First, the back of the clear rear
section was sprayed black, then the
entire clear section was dipped in
I took some timeto weather thepaintwork on thewing spars, but thiswas a bit of a waste.
The time spent on the quiltedbackrest was well worthwhilethough! Here, the backrest hasbeen painted and dry brushed,and a dark wash of thinnedWinsor & Newton has beenbrushed over the seat.
The join seam was very prominenton the oil tank. The seam wasfilled with a mix of super glue andtalcum powder…
…then sanded back and polished before respraying.
My test shotwas not suppliedwith instrumentdecals so I usedairscale’s 1:24scale generic WW2RAF Instrument DialDecals, Item No.AS24RAF.
The three sections of the instrument panel,painted and ready for assembly. The top isfront panel, in the middle is the clear insertwith the decals in place, and at the bottom isthe master compass and its mounting rail.
The assembledinstrument panel
(minus the mastercompass).
7/23/2019 Airfix How to Build… - Hawker Typhoon Mk.lb
http://slidepdf.com/reader/full/airfix-how-to-build-hawker-typhoon-mklb 33/76
How to Build... Airfix 1:24 Hawker Typhoon Mk.Ib 33
Future floor polish. The dial decals
were then simply applied to the top
of the raised circles. The three sparebulbs for the gun sight were painted
Tamiya X-24 Clear Yellow.
Details were then picked out on
the front of the instrument panel;
and the master compass and its
mounting rail were painted and set
aside for later assembly.
A few stencil generic Airscale
placard decals were applied over a
glossy coat of Future floor polish.
All the Cockpit Green and scale
black sub-assemblies were now
flattened down with several thincoats of Alclad II Klear Kote Matte.
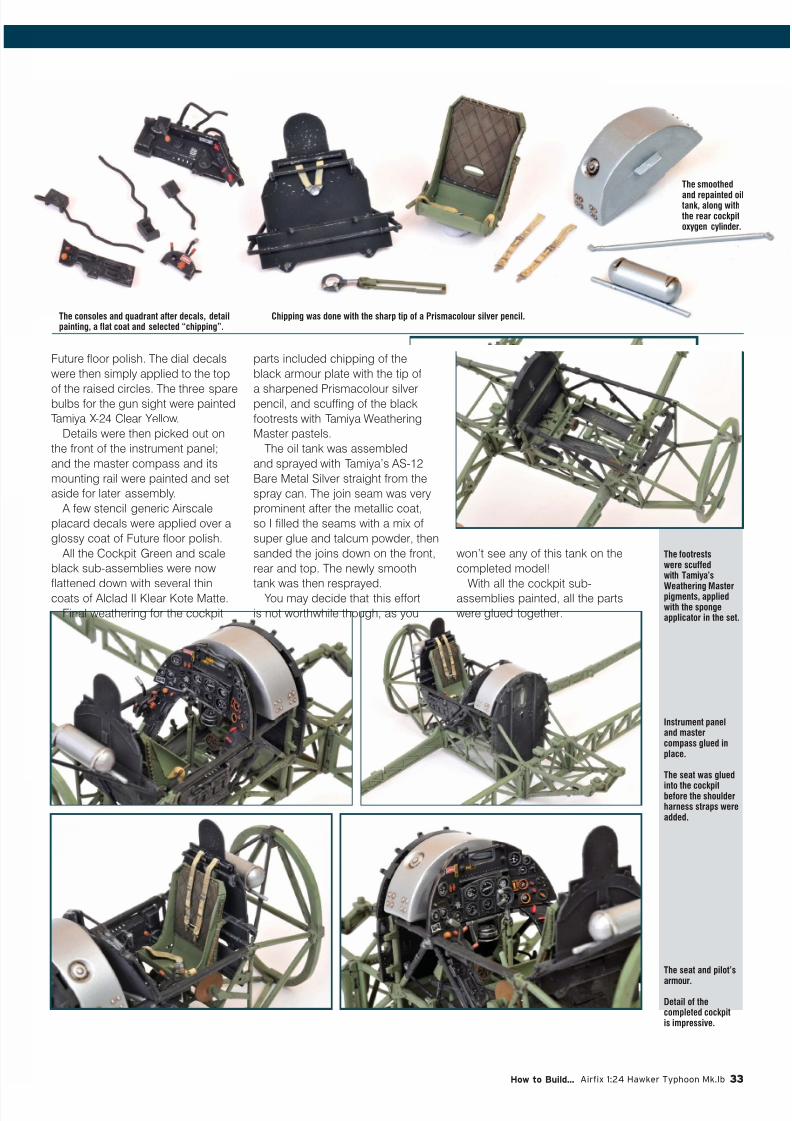
Final weathering for the cockpit
parts included chipping of the
black armour plate with the tip of
a sharpened Prismacolour silverpencil, and scuffing of the black
footrests with Tamiya Weathering
Master pastels.
The oil tank was assembled
and sprayed with Tamiya’s AS-12
Bare Metal Silver straight from the
spray can. The join seam was very
prominent after the metallic coat,
so I filled the seams with a mix of
super glue and talcum powder, then
sanded the joins down on the front,
rear and top. The newly smooth
tank was then resprayed. You may decide that this effort
is not worthwhile though, as you
won’t see any of this tank on the
completed model!
With all the cockpit sub-assemblies painted, all the parts
were glued together.
The consoles and quadrant after decals, detailpainting, a flat coat and selected “chipping”.
The smoothed
and repainted oiltank, along withthe rear cockpitoxygen cylinder.
Chipping was done with the sharp tip of a Prismacolour silver pencil.
The footrestswere scuffedwith Tamiya’s
Weathering Masterpigments, appliedwith the spongeapplicator in the set.
Instrument paneland mastercompass glued inplace.
The seat was glued
into the cockpitbefore the shoulderharness straps wereadded.
The seat and pilot’s
armour. Detail of thecompleted cockpitis impressive.

7/23/2019 Airfix How to Build… - Hawker Typhoon Mk.lb
http://slidepdf.com/reader/full/airfix-how-to-build-hawker-typhoon-mklb 34/76
34 Chapter 4 - Step by Step
CHAPTER 4 STEP BY STEP
ASSEMBLING THE ENGINE BAY
Steps 39 to 87 cover the assembly
of the engine and all the associated
mounts and equipment.
Airfix offers a number of options
through these steps, including an
electric motor to spin the propeller.
It is also worth noting that if you are
planning to build your model with all
the engine cowlings buttoned up,
you can get away with fitting just
the basic engine and radiator parts.
Most of the detail parts can be left
off in that configuration.
However, I decided that it would
be a terrible waste to hide all that
detail so I was going to build the
entire engine and display the model
without the cowlings.
Once again, I tackled this area as
a series of sub-assemblies.
The engine block and
supercharger were quite fast and
easy to assemble. Once this was
done, the block was painted Tamiya
XF-18 Semi Gloss Black, and some
Assembly of the engine blockis quite straightforward.
Clamps were used to make sure the partsstayed firmly together as the glue set.
The propeller willrotate if you arecareful to avoidgetting any glue onthe propeller shaftor its mount.
Here is whatthe propellershaft mount
should look likefrom the rearafter assembly.
Clamping the sides of theengine block. Can’t hurt!
The superchargerwas taped to the
rear of the engineblock to ensure a
perfect fit.
Detail partsfrom Steps 51to 59 paintedand awaitinginstallation.
The assembled engine block was sprayedTamiya acrylic X-18 Semi Gloss Black and given
a wash of MIG Productions’ Neutral Wash,which settled naturally into recesses. Boltheads were picked out in silver.
More detail parts, thistime fitted underneaththe engine.

7/23/2019 Airfix How to Build… - Hawker Typhoon Mk.lb
http://slidepdf.com/reader/full/airfix-how-to-build-hawker-typhoon-mklb 35/76
How to Build... Airfix 1:24 Hawker Typhoon Mk.Ib 35
of the bolt heads were spotted with
silver paint.
The engine block fits onto two
pegs at the front of the engine
mounts, and into a cross-shaped
insert in the front of the firewall. The
fit is good – pretty much a tightpress fit – but I found that some
force was required to push the
block fully onto the pegs and the
cross-slot.
At this stage I clipped off and
cleaned up all the detail parts for
the top and sides of the engine,
covered by the instructions from
Steps 51 to 67. These were
divided by ultimate colour again.
The groups were black, green
and silver. Once the base colours
were sprayed, the parts weredetail-painted with a fine brush and
attached after careful reference to
the instructions. There are some
complex sequences in these steps,
so pay close attention, test fit and
double check.
I repeated this painting and
installation process for the detail on
the underside of the engine – Steps
68 to 76.
The oil tank tube,Part C21, must bethreaded through
the firewall andglued into the
bottom of the tankbefore the engine is
glued in place.
A bit of time wasspent painting and
weathering theprominent ignition
harness.
The engine block was now pressedonto the locating tabs on the front ofthe mount and into the cross-shapedrecess in the firewall.
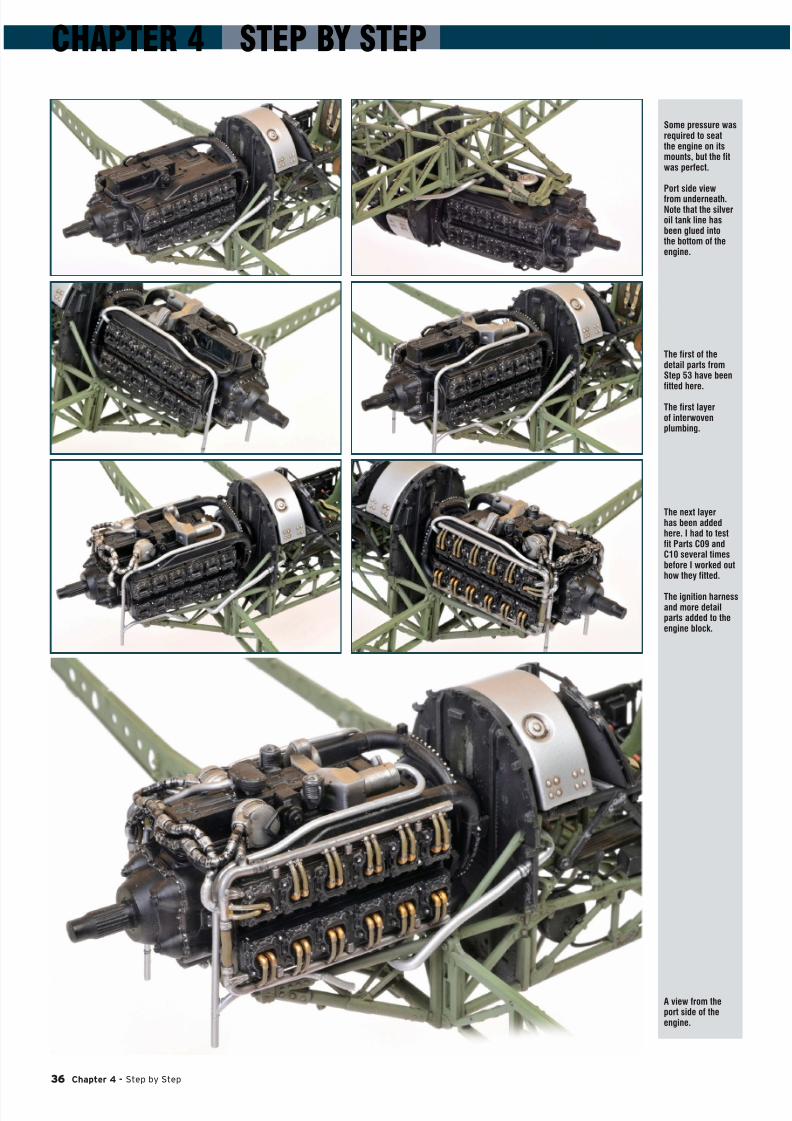
7/23/2019 Airfix How to Build… - Hawker Typhoon Mk.lb
http://slidepdf.com/reader/full/airfix-how-to-build-hawker-typhoon-mklb 36/76
36 Chapter 4 - Step by Step
CHAPTER 4 STEP BY STEP
Some pressure wasrequired to seatthe engine on itsmounts, but the fitwas perfect.
Port side view
from underneath.Note that the silveroil tank line hasbeen glued intothe bottom of theengine.
The first of thedetail parts fromStep 53 have beenfitted here.
The first layerof interwovenplumbing.
The next layerhas been addedhere. I had to testfit Parts C09 andC10 several timesbefore I worked outhow they fitted.
The ignition harnessand more detailparts added to theengine block.
A view from theport side of theengine.

7/23/2019 Airfix How to Build… - Hawker Typhoon Mk.lb
http://slidepdf.com/reader/full/airfix-how-to-build-hawker-typhoon-mklb 37/76
How to Build... Airfix 1:24 Hawker Typhoon Mk.Ib 37
RADIATOR AND DUCTING
Next up came the radiator, the
ducting and associated pipes and
details.
The radiator body was
assembled (Parts D05, D12, D13and D14) before being sprayed
AS-12 Silver. The radiator faces
were washed with a thin mix of
Winsor & Newton Lamp Black and
Raw Umber oil paint, highlighting
the subtle raised mesh texture.
The sides of the radiator assembly
(Parts D07 and D08) received the
same treatment.
Fitting the two side radiator pipes
(D22 and D23) is tricky. The back
of the pipes fit into slots in the front
of the wing roots after the pipes arefed through holes in the shield (Part
D15). At first, I could not figure out
how these would fit. The pipes are
a very tight fit in the holes, and the
angle is not entirely obvious. My
best advise is to check the photos
in this Chapter, and have faith
that the parts will fit perfectly once
you’ve figured out the angles.
Also note the orientation of the
front radiator extension (Part D17)
if you are fitting it. The correct
orientation is shown in Step 86.Once I had finished the cockpit
and engine bay, things moved on
pretty quickly.
A second batch ofengine detail partspainted silver and
ready for assembly,this time from Steps
60 to 76.
Black paintedparts from thesame batch of
detail parts.
The assembledradiator unit viewedfrom the front…
…and from the rear.The lovely subduedmesh effect hasbeen highlightedwith a dark oil wash. Note the location of the three pipes at the bottom of the engine terminating on the firewall. These are Parts
D24 and D26. This is another tricky sequence that may require a few dry runs before committing to glue.
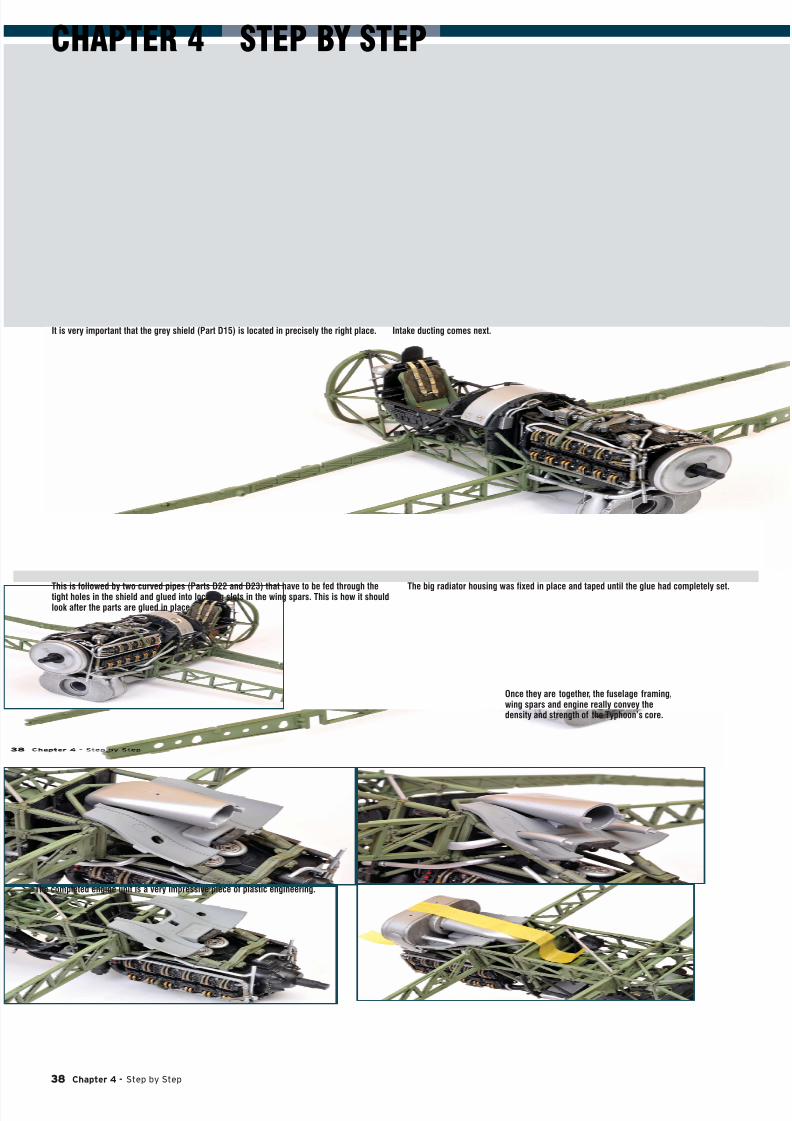
7/23/2019 Airfix How to Build… - Hawker Typhoon Mk.lb
http://slidepdf.com/reader/full/airfix-how-to-build-hawker-typhoon-mklb 38/76
38 Chapter 4 - Step by Step
CHAPTER 4 STEP BY STEP
It is very important that the grey shield (Part D15) is located in precisely the right place.
This is followed by two curved pipes (Parts D22 and D23) that have to be fed through thetight holes in the shield and glued into locating slots in the wing spars. This is how it shouldlook after the parts are glued in place.
The big radiator housing was fixed in place and taped until the glue had completely set.
Intake ducting comes next.
The completed engine unit is a very impressive piece of plastic engineering.
Once they are together, the fuselage framing,wing spars and engine really convey thedensity and strength of the Typhoon’s core.

7/23/2019 Airfix How to Build… - Hawker Typhoon Mk.lb
http://slidepdf.com/reader/full/airfix-how-to-build-hawker-typhoon-mklb 39/76
How to Build... Airfix 1:24 Hawker Typhoon Mk.Ib 39
WINGS AND THINGS
As we start to work on the wings,we have to make a few decisions.
These are:
• Undercarriage position – up or
down?
• Ordnance – bombs, rockets or
fuel tanks?
• Wing cannon bays – open or
closed?
Airfix provides two sets of main
undercarriage mounts – one set for
retracted and one set for lowered.
These are not interchangeable
once installed, so make sure youchoose the right option for your
choice. I built my model with the
undercarriage lowered, so I used
Part Nos. F42 and F43.
Step 90 clearly lays out which
holes need to be opened up for
ordnance. This is best done before
the mid-lower wing is attached
So much to look at, and entirely constructed of plastic! An upper view of the detail on top of the engine.
Moving onto the wings, the holes for the rockets were drilled outwith a pin vise.
The large drill bit left plastic residue on the outer surface of thewing. This was cleaned up with the tip of a hobby knife.
Silver parts sprayedprior to wing assembly.
The stout undercarriage mounts wereglued to the wing spars. I should havetaken care of that big sink mark!
Taking no chances,the wing spars werecomprehensivelyclamped to the bottomcentre wing section toguarantee perfect fit inthis critical area.
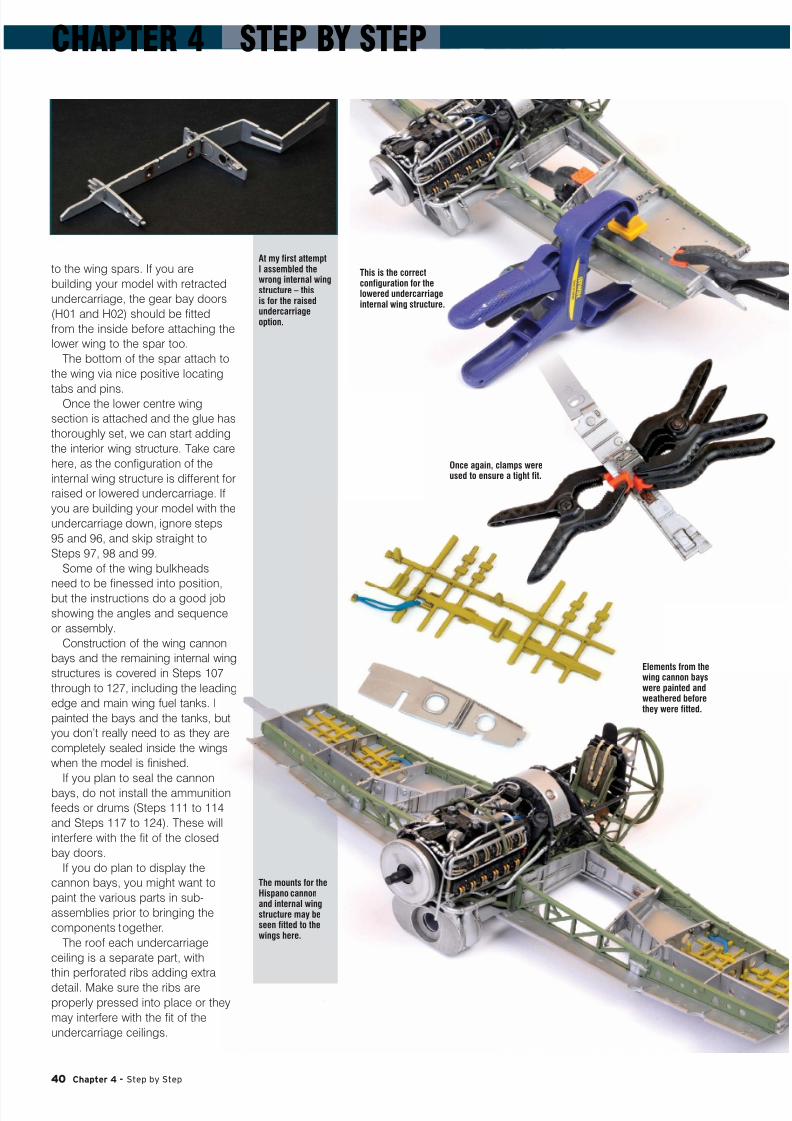
7/23/2019 Airfix How to Build… - Hawker Typhoon Mk.lb
http://slidepdf.com/reader/full/airfix-how-to-build-hawker-typhoon-mklb 40/76
40 Chapter 4 - Step by Step
CHAPTER 4 STEP BY STEP
to the wing spars. If you are
building your model with retracted
undercarriage, the gear bay doors
(H01 and H02) should be fitted
from the inside before attaching the
lower wing to the spar too.
The bottom of the spar attach to
the wing via nice positive locating
tabs and pins.Once the lower centre wing
section is attached and the glue has
thoroughly set, we can start adding
the interior wing structure. Take care
here, as the configuration of the
internal wing structure is different for
raised or lowered undercarriage. If
you are building your model with the
undercarriage down, ignore steps
95 and 96, and skip straight to
Steps 97, 98 and 99.
Some of the wing bulkheads
need to be finessed into position,but the instructions do a good job
showing the angles and sequence
or assembly.
Construction of the wing cannon
bays and the remaining internal wing
structures is covered in Steps 107
through to 127, including the leading
edge and main wing fuel tanks. I
painted the bays and the tanks, but
you don’t really need to as they are
completely sealed inside the wings
when the model is finished.
If you plan to seal the cannon
bays, do not install the ammunition
feeds or drums (Steps 111 to 114
and Steps 117 to 124). These will
interfere with the fit of the closed
bay doors.
If you do plan to display the
cannon bays, you might want to
paint the various parts in sub-
assemblies prior to bringing the
components together.
The roof each undercarriage
ceiling is a separate part, with
thin perforated ribs adding extra
detail. Make sure the ribs are
properly pressed into place or they
may interfere with the fit of the
undercarriage ceilings.
At my first attemptI assembled thewrong internal wingstructure – thisis for the raisedundercarriageoption.
The mounts for theHispano cannonand internal wingstructure may beseen fitted to thewings here.
This is the correctconfiguration for thelowered undercarriageinternal wing structure.
Once again, clamps wereused to ensure a tight fit.
Elements from thewing cannon bayswere painted andweathered beforethey were fitted.

7/23/2019 Airfix How to Build… - Hawker Typhoon Mk.lb
http://slidepdf.com/reader/full/airfix-how-to-build-hawker-typhoon-mklb 41/76
How to Build... Airfix 1:24 Hawker Typhoon Mk.Ib 41
Once again, the detail is built upin layers in the cannon bays.
The simple parts breakdown of thelong Hispano cannon and drums.
The ends of the barrels are solid,so they were hollowed out with thetip of a sharp hobby knife blade.Note the unattractive seam line too.
The ammo feeds awaiting assembly.
The leading edgeand main wing fueltanks, assembledprior to painting.
In fact, you couldreally skip paintingthese as they willbe hidden inside thewings.
My paint numbertranslation list!
The Hispano cannon and associatedsub-assemblies painted and weathered.
The empty bays just yearn for allthat busy cannon detail!
The barrels must be bentand threaded through theholes in the wing spars.Luckily, the soft plasticbent and did not break.
Those long barrels areexposed and vulnerableduring the remainingassembly.
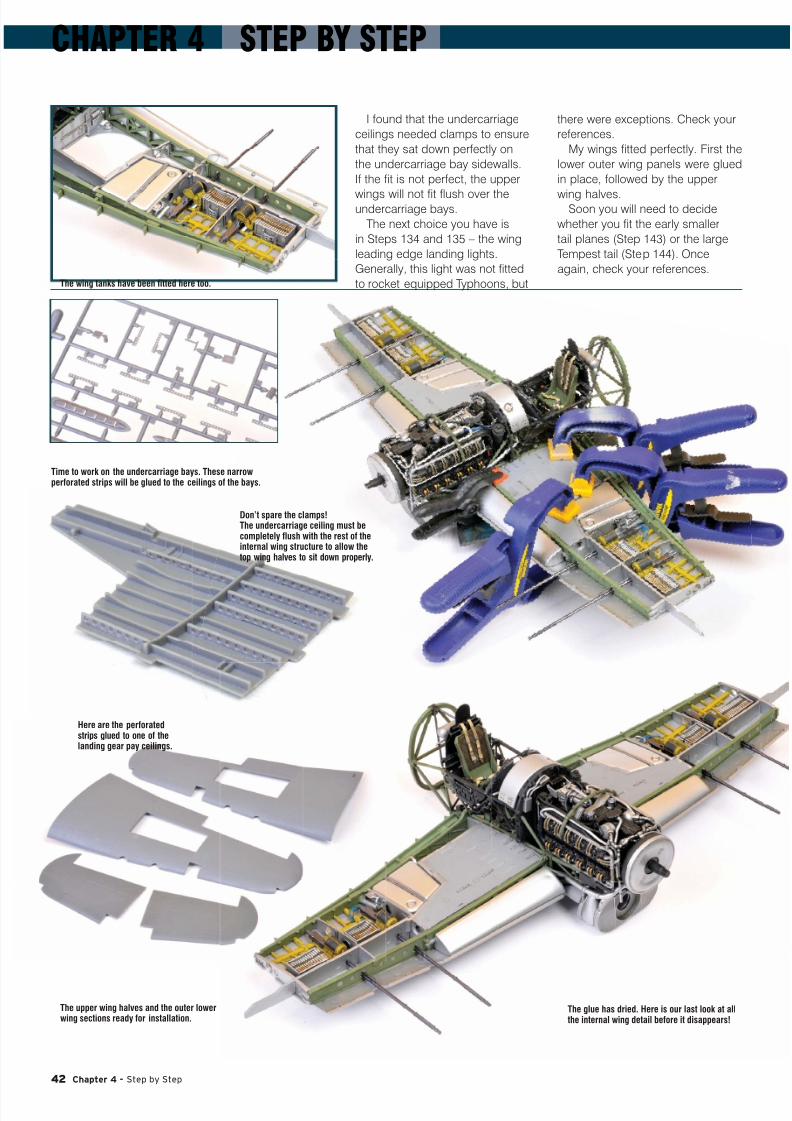
7/23/2019 Airfix How to Build… - Hawker Typhoon Mk.lb
http://slidepdf.com/reader/full/airfix-how-to-build-hawker-typhoon-mklb 42/76
42 Chapter 4 - Step by Step
CHAPTER 4 STEP BY STEP
I found that the undercarriage
ceilings needed clamps to ensure
that they sat down perfectly on
the undercarriage bay sidewalls.
If the fit is not perfect, the upper
wings will not fit flush over theundercarriage bays.
The next choice you have is
in Steps 134 and 135 – the wing
leading edge landing lights.
Generally, this light was not fitted
to rocket equipped Typhoons, but
there were exceptions. Check your
references.
My wings fitted perfectly. First the
lower outer wing panels were glued
in place, followed by the upper
wing halves.Soon you will need to decide
whether you fit the early smaller
tail planes (Step 143) or the large
Tempest tail (Step 144). Once
again, check your references.The wing tanks have been fitted here too.
Time to work on the undercarriage bays. These narrowperforated strips will be glued to the ceilings of the bays.
Here are the perforatedstrips glued to one of thelanding gear pay ceilings.
Don’t spare the clamps!The undercarriage ceiling must becompletely flush with the rest of theinternal wing structure to allow thetop wing halves to sit down properly.
The upper wing halves and the outer lowerwing sections ready for installation.
The glue has dried. Here is our last look at allthe internal wing detail before it disappears!

7/23/2019 Airfix How to Build… - Hawker Typhoon Mk.lb
http://slidepdf.com/reader/full/airfix-how-to-build-hawker-typhoon-mklb 43/76
How to Build... Airfix 1:24 Hawker Typhoon Mk.Ib 43
The lower outerwing panels areglued in place first.Fit is excellent.
The outer wingsupports and spars
work exactly asadvertised.
Fit of the upper winghalves was excellent too.
Sanding sticks were used tospread the pressure of theclamps evenly, even over theopen cannon bays.
Detail in theport side open
cannon bay.
We still have aglimpse of theleading edge fueltank through theforward wing spar.
The cupboardis a bit bare…
…but Airfix has takencare of that with additional
detail parts for theundercarriage bays.
Test fit, testfit, and test fit
again. Patienceis a virtuewhen dealingwith the wheelwell detail!
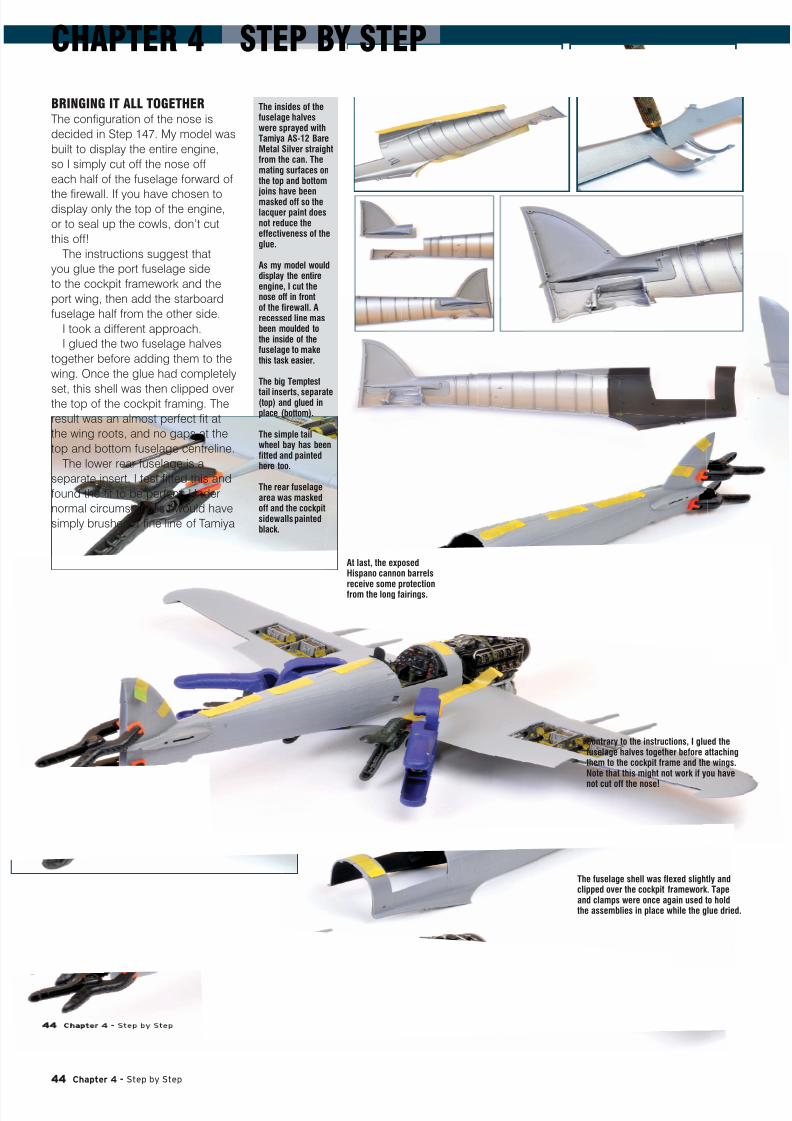
7/23/2019 Airfix How to Build… - Hawker Typhoon Mk.lb
http://slidepdf.com/reader/full/airfix-how-to-build-hawker-typhoon-mklb 44/76
44 Chapter 4 - Step by Step
CHAPTER 4 STEP BY STEP
BRINGING IT ALL TOGETHER
The configuration of the nose is
decided in Step 147. My model was
built to display the entire engine,
so I simply cut off the nose off
each half of the fuselage forward of
the firewall. If you have chosen todisplay only the top of the engine,
or to seal up the cowls, don’t cut
this off!
The instructions suggest that
you glue the port fuselage side
to the cockpit framework and the
port wing, then add the starboard
fuselage half from the other side.
I took a different approach.
I glued the two fuselage halves
together before adding them to the
wing. Once the glue had completely
set, this shell was then clipped overthe top of the cockpit framing. The
result was an almost perfect fit at
the wing roots, and no gaps at the
top and bottom fuselage centreline.
The lower rear fuselage is a
separate insert. I test fitted this and
found the fit to be perfect. Under
normal circumstances I would have
simply brushed a fine line of Tamiya
The insides of thefuselage halveswere sprayed withTamiya AS-12 BareMetal Silver straightfrom the can. Themating surfaces onthe top and bottomjoins have beenmasked off so thelacquer paint doesnot reduce theeffectiveness of theglue.
As my model woulddisplay the entireengine, I cut thenose off in frontof the firewall. Arecessed line masbeen moulded tothe inside of thefuselage to makethis task easier.
The big Temptest
tail inserts, separate(top) and glued inplace (bottom).
The simple tailwheel bay has beenfitted and paintedhere too.
The rear fuselagearea was maskedoff and the cockpitsidewalls paintedblack.
At last, the exposedHispano cannon barrelsreceive some protectionfrom the long fairings.
Contrary to the instructions, I glued thefuselage halves together before attachingthem to the cockpit frame and the wings.Note that this might not work if you have
not cut off the nose!
The fuselage shell was flexed slightly andclipped over the cockpit framework. Tapeand clamps were once again used to holdthe assemblies in place while the glue dried.

7/23/2019 Airfix How to Build… - Hawker Typhoon Mk.lb
http://slidepdf.com/reader/full/airfix-how-to-build-hawker-typhoon-mklb 45/76
How to Build... Airfix 1:24 Hawker Typhoon Mk.Ib 45
The results were impressive. The lower rear fuselage insert slots into the back of the wing, then can be pressed downand glued in place.
Now it’s starting tolook like a Typhoon!
Pret ty good fit at the por t side wing root . Excellent fit at the starboard side wing root – no fille r orsanding here yet.
The slight gap only appeared on my second attempt to gluedown the lower fuselage insert. The first attempt while dryfitting suggested a perfect fit.
Constructioncommences with theframework for the
cockpit and the wingspars. Just like thereal aeroplane, thisframework forms a
solid core for the entireaeroplane so it is
absolutely crucial that
the parts are accuratelyassembled...
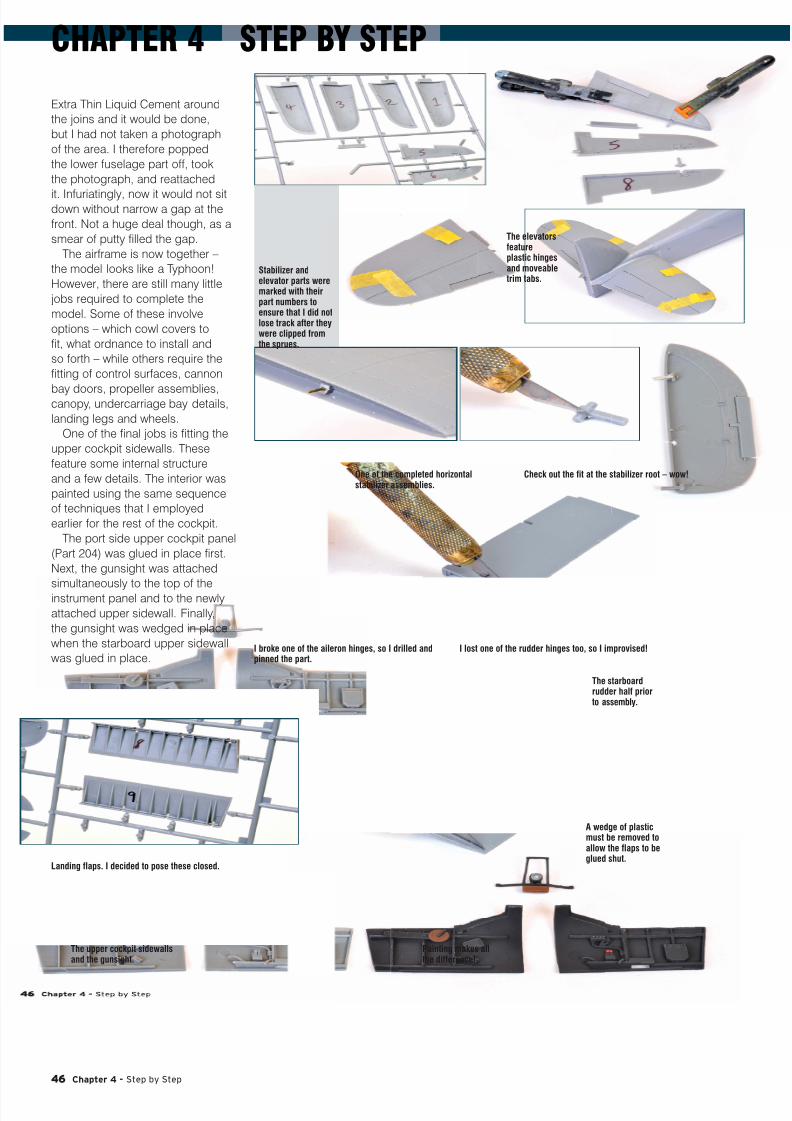
7/23/2019 Airfix How to Build… - Hawker Typhoon Mk.lb
http://slidepdf.com/reader/full/airfix-how-to-build-hawker-typhoon-mklb 46/76
46 Chapter 4 - Step by Step
CHAPTER 4 STEP BY STEP
Extra Thin Liquid Cement around
the joins and it would be done,
but I had not taken a photograph
of the area. I therefore popped
the lower fuselage part off, took
the photograph, and reattached
it. Infuriatingly, now it would not sitdown without narrow a gap at the
front. Not a huge deal though, as a
smear of putty filled the gap.
The airframe is now together –
the model looks like a Typhoon!
However, there are still many little
jobs required to complete the
model. Some of these involve
options – which cowl covers to
fit, what ordnance to install and
so forth – while others require the
fitting of control surfaces, cannon
bay doors, propeller assemblies,canopy, undercarriage bay details,
landing legs and wheels.
One of the final jobs is fitting the
upper cockpit sidewalls. These
feature some internal structure
and a few details. The interior was
painted using the same sequence
of techniques that I employed
earlier for the rest of the cockpit.
The port side upper cockpit panel
(Part 204) was glued in place first.
Next, the gunsight was attached
simultaneously to the top of theinstrument panel and to the newly
attached upper sidewall. Finally,
the gunsight was wedged in place
when the starboard upper sidewall
was glued in place.
Stabilizer andelevator parts weremarked with theirpart numbers toensure that I did notlose track after theywere clipped fromthe sprues.
The elevatorsfeatureplastic hingesand moveabletrim tabs.
One of the completed horizontalstabilizer assemblies.
Check out the fit at the stabilizer root – wow!
I broke one of the aileron hinges, so I drilled andpinned the part.
I lost one of the rudder hinges too, so I improvised!
The starboardrudder half priorto assembly.
Landing flaps. I decided to pose these closed.
A wedge of plasticmust be removed toallow the flaps to beglued shut.
The upper cockpit sidewallsand the gunsight.
Painting makes allthe difference!
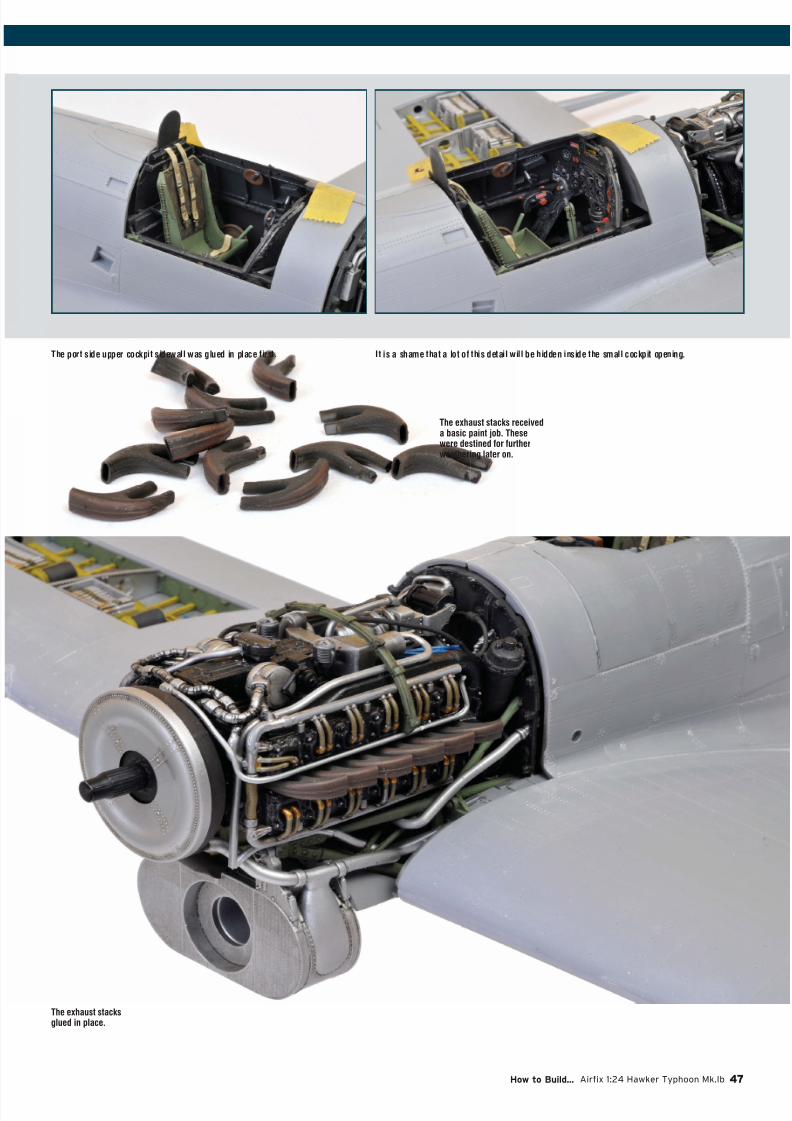
7/23/2019 Airfix How to Build… - Hawker Typhoon Mk.lb
http://slidepdf.com/reader/full/airfix-how-to-build-hawker-typhoon-mklb 47/76
How to Build... Airfix 1:24 Hawker Typhoon Mk.Ib 47
The port side upper cockpit sidewall was glued in place first. It is a shame that a lot of this detail will be hidden inside the small cockpit opening.
The exhaust stacks receiveda basic paint job. Thesewere destined for furtherweathering later on.
The exhaust stacksglued in place.

7/23/2019 Airfix How to Build… - Hawker Typhoon Mk.lb
http://slidepdf.com/reader/full/airfix-how-to-build-hawker-typhoon-mklb 48/76
48 Chapter 4 - Step by Step
CHAPTER 4 STEP BY STEP
The model with controlsurfaces all glued in place.
The open foldedcannon bay coverswere assembledat this stage.
Airfix has chosento tread the entirely
traditional path, achievingsuperb detail with plastic
parts alone...

7/23/2019 Airfix How to Build… - Hawker Typhoon Mk.lb
http://slidepdf.com/reader/full/airfix-how-to-build-hawker-typhoon-mklb 49/76
How to Build... Airfix 1:24 Hawker Typhoon Mk.Ib 49
The gap at the bottom of the fuselage insert was filled with Milliput.
We’re ready for masking and painting!
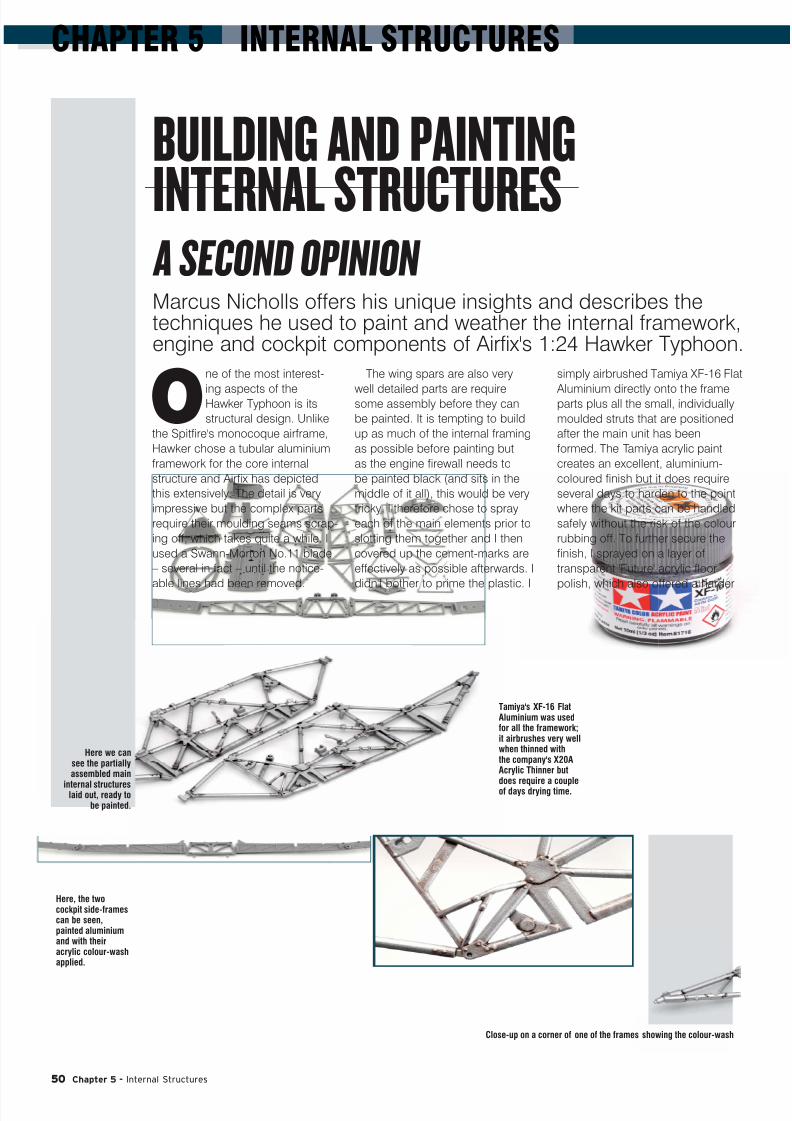
7/23/2019 Airfix How to Build… - Hawker Typhoon Mk.lb
http://slidepdf.com/reader/full/airfix-how-to-build-hawker-typhoon-mklb 50/76
50 Chapter 5 - Internal Structures
CHAPTER 5 INTERNAL STRUCTURES
One of the most interest-
ing aspects of theHawker Typhoon is its
structural design. Unlike
the Spitfire's monocoque airframe,
Hawker chose a tubular aluminium
framework for the core internal
structure and Airfix has depicted
this extensively. The detail is very
impressive but the complex parts
require their moulding seams scrap-
ing off, which takes quite a while. I
used a Swann-Morton No.11 blade
– several in fact – until the notice-
able lines had been removed.
The wing spars are also very
well detailed parts are requiresome assembly before they can
be painted. It is tempting to build
up as much of the internal framing
as possible before painting but
as the engine firewall needs to
be painted black (and sits in the
middle of it all), this would be very
tricky. I therefore chose to spray
each of the main elements prior to
slotting them together and I then
covered up the cement-marks are
effectively as possible afterwards. I
didn't bother to prime the plastic. I
simply airbrushed Tamiya XF-16 Flat
Aluminium directly onto the frameparts plus all the small, individually
moulded struts that are positioned
after the main unit has been
formed. The Tamiya acrylic paint
creates an excellent, aluminium-
coloured finish but it does require
several days to harden to the point
where the kit parts can be handled
safely without the risk of the colour
rubbing off. To further secure the
finish, I sprayed on a layer of
transparent 'Future' acrylic floor
polish, which also offered a harder
BUILDING AND PAINTING
INTERNAL STRUCTURESA SECOND OPINION Marcus Nicholls offers his unique insights and describes thetechniques he used to paint and weather the internal framework,engine and cockpit components of Airfix's 1:24 Hawker Typhoon.
Here we cansee the partiallyassembled main
internal structureslaid out, ready to
be painted.
Tamiya's XF-16 FlatAluminium was usedfor all the framework;it airbrushes very wellwhen thinned withthe company's X20AAcrylic Thinner butdoes require a coupleof days drying time.
Here, the twocockpit side-framescan be seen,painted aluminiumand with theiracrylic colour-washapplied.
Close-up on a corner of one of the frames showing the colour-wash
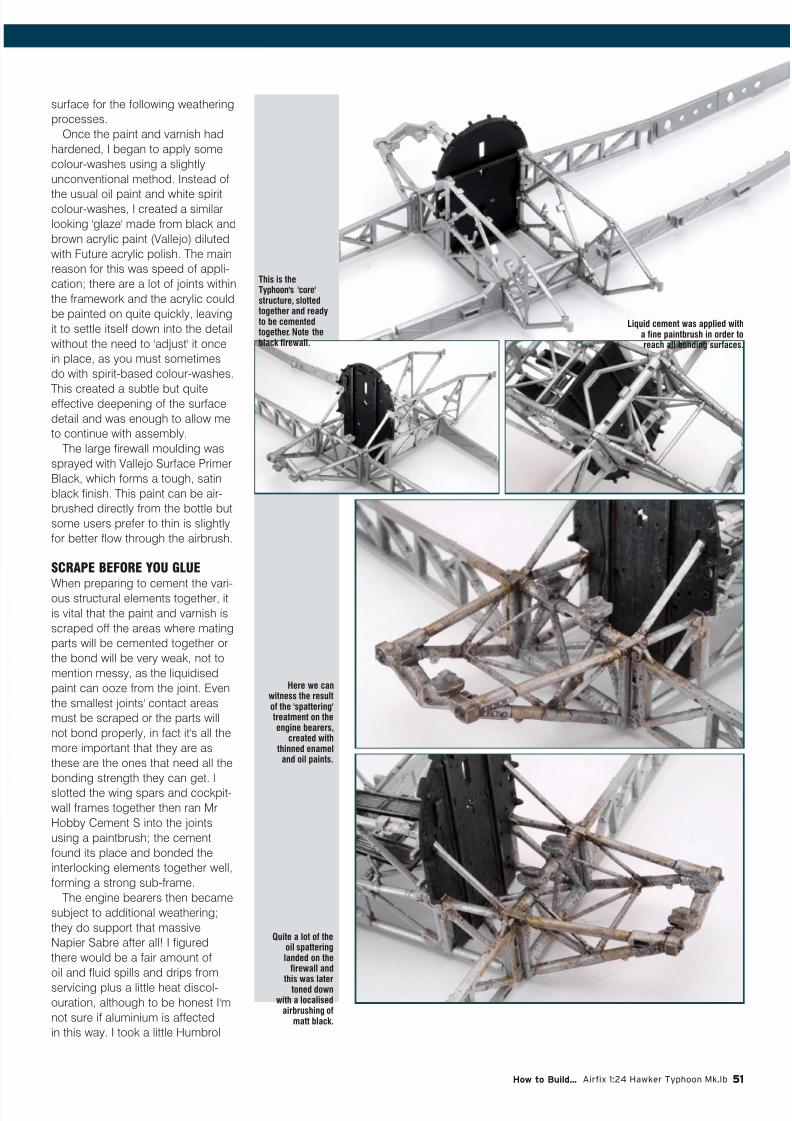
7/23/2019 Airfix How to Build… - Hawker Typhoon Mk.lb
http://slidepdf.com/reader/full/airfix-how-to-build-hawker-typhoon-mklb 51/76
How to Build... Airfix 1:24 Hawker Typhoon Mk.Ib 51
surface for the following weathering
processes.
Once the paint and varnish had
hardened, I began to apply some
colour-washes using a slightly
unconventional method. Instead of
the usual oil paint and white spiritcolour-washes, I created a similar
looking 'glaze' made from black and
brown acrylic paint (Vallejo) diluted
with Future acrylic polish. The main
reason for this was speed of appli-
cation; there are a lot of joints within
the framework and the acrylic could
be painted on quite quickly, leaving
it to settle itself down into the detail
without the need to 'adjust' it once
in place, as you must sometimes
do with spirit-based colour-washes.
This created a subtle but quiteeffective deepening of the surface
detail and was enough to allow me
to continue with assembly.
The large firewall moulding was
sprayed with Vallejo Surface Primer
Black, which forms a tough, satin
black finish. This paint can be air-
brushed directly from the bottle but
some users prefer to thin is slightly
for better flow through the airbrush.
SCRAPE BEFORE YOU GLUE
When preparing to cement the vari-ous structural elements together, it
is vital that the paint and varnish is
scraped off the areas where mating
parts will be cemented together or
the bond will be very weak, not to
mention messy, as the liquidised
paint can ooze from the joint. Even
the smallest joints' contact areas
must be scraped or the parts will
not bond properly, in fact it's all the
more important that they are as
these are the ones that need all the
bonding strength they can get. I
slotted the wing spars and cockpit-
wall frames together then ran Mr
Hobby Cement S into the joints
using a paintbrush; the cement
found its place and bonded the
interlocking elements together well,
forming a strong sub-frame.
The engine bearers then became
subject to additional weathering;
they do support that massive
Napier Sabre after all! I figured
there would be a fair amount of
oil and fluid spills and drips from
servicing plus a little heat discol-
ouration, although to be honest I'm
not sure if aluminium is affected
in this way. I took a little Humbrol
This is theTyphoon's 'core'structure, slottedtogether and readyto be cementedtogether. Note theblack firewall.
Liquid cement was applied witha fine paintbrush in order toreach all bonding surfaces.
Here we canwitness the resultof the 'spattering'treatment on theengine bearers,
created withthinned enameland oil paints.
Quite a lot of theoil spatteringlanded on the
firewall and
this was latertoned downwith a localised
airbrushing ofmatt black.
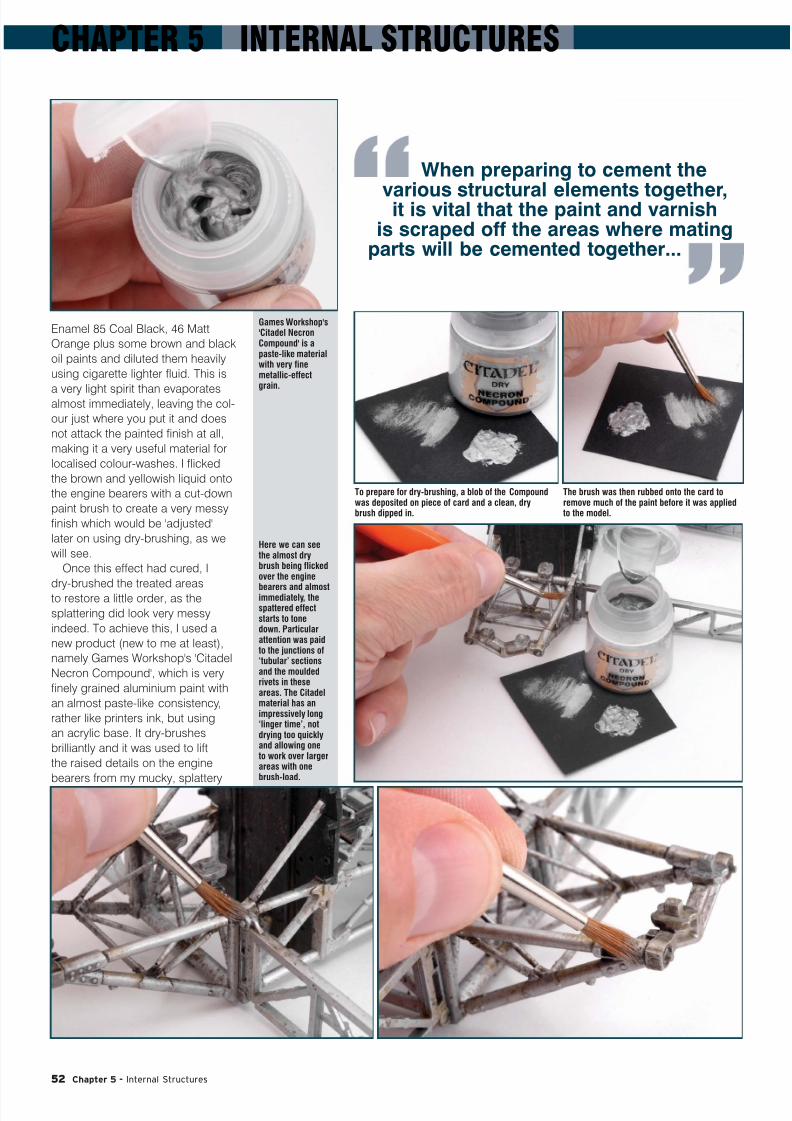
7/23/2019 Airfix How to Build… - Hawker Typhoon Mk.lb
http://slidepdf.com/reader/full/airfix-how-to-build-hawker-typhoon-mklb 52/76
52 Chapter 5 - Internal Structures
CHAPTER 5 INTERNAL STRUCTURES
Enamel 85 Coal Black, 46 Matt
Orange plus some brown and black
oil paints and diluted them heavily
using cigarette lighter fluid. This is
a very light spirit than evaporatesalmost immediately, leaving the col-
our just where you put it and does
not attack the painted finish at all,
making it a very useful material for
localised colour-washes. I flicked
the brown and yellowish liquid onto
the engine bearers with a cut-down
paint brush to create a very messy
finish which would be 'adjusted'
later on using dry-brushing, as we
will see.
Once this effect had cured, I
dry-brushed the treated areasto restore a little order, as the
splattering did look very messy
indeed. To achieve this, I used a
new product (new to me at least),
namely Games Workshop's 'Citadel
Necron Compound', which is very
finely grained aluminium paint with
an almost paste-like consistency,
rather like printers ink, but using
an acrylic base. It dry-brushes
brilliantly and it was used to lift
the raised details on the engine
bearers from my mucky, splattery
When preparing to cement the
various structural elements together,it is vital that the paint and varnishis scraped off the areas where mating
parts will be cemented together...
Games Workshop's'Citadel NecronCompound' is apaste-like materialwith very finemetallic-effectgrain.
Here we can seethe almost drybrush being flickedover the engine
bearers and almostimmediately, thespattered effectstarts to tonedown. Particularattention was paidto the junctions of‘tubular’ sectionsand the mouldedrivets in theseareas. The Citadelmaterial has animpressively long‘linger time’, notdrying too quicklyand allowing oneto work over largerareas with onebrush-load.
To prepare for dry-brushing, a blob of the Compoundwas deposited on piece of card and a clean, drybrush dipped in.
The brush was then rubbed onto the card toremove much of the paint before it was appliedto the model.
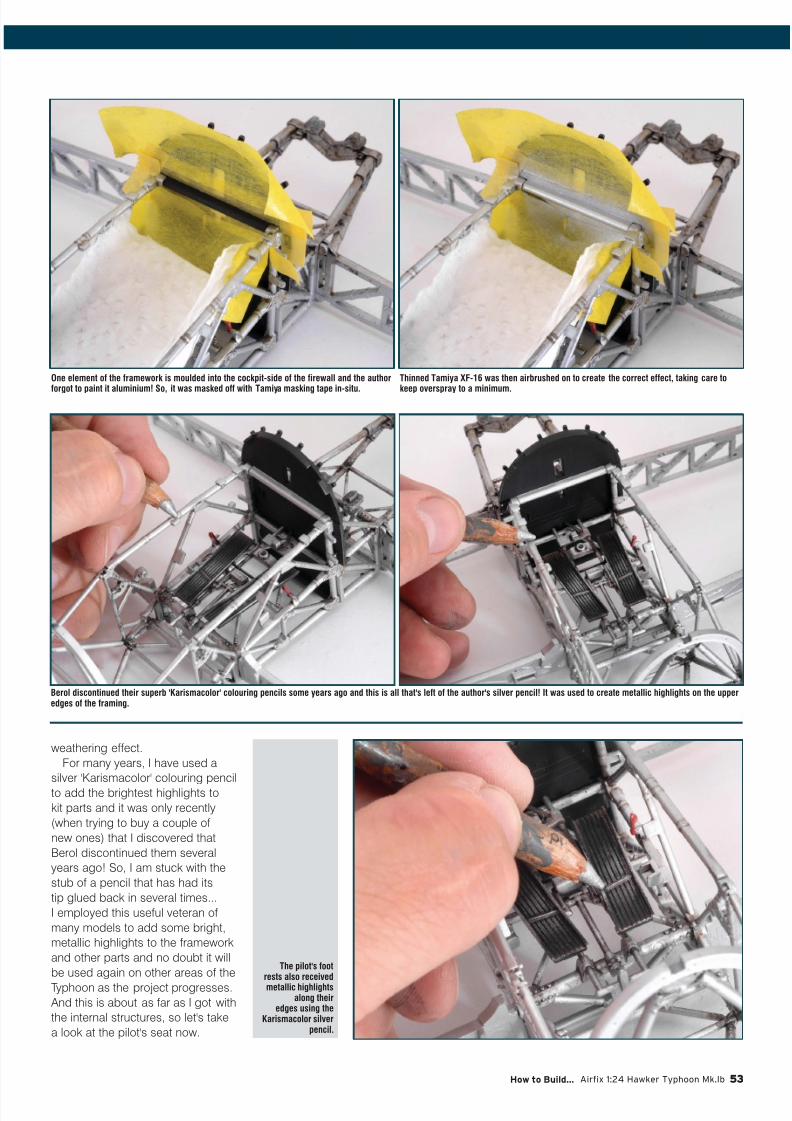
7/23/2019 Airfix How to Build… - Hawker Typhoon Mk.lb
http://slidepdf.com/reader/full/airfix-how-to-build-hawker-typhoon-mklb 53/76
How to Build... Airfix 1:24 Hawker Typhoon Mk.Ib 53
weathering effect.
For many years, I have used a
silver 'Karismacolor' colouring pencil
to add the brightest highlights to
kit parts and it was only recently
(when trying to buy a couple of
new ones) that I discovered that
Berol discontinued them several
years ago! So, I am stuck with the
stub of a pencil that has had its
tip glued back in several times...
I employed this useful veteran of
many models to add some bright,
metallic highlights to the framework
and other parts and no doubt it will
be used again on other areas of the
Typhoon as the project progresses.
And this is about as far as I got with
the internal structures, so let's take
a look at the pilot's seat now.
One element of the framework is moulded into the cockpit-side of the firewall and the author
forgot to paint it aluminium! So, it was masked off with Tamiya masking tape in-situ.
Thinned Tamiya XF-16 was then airbrushed on to create the correct effect, taking care to
keep overspray to a minimum.
Berol discontinued their superb 'Karismacolor' colouring pencils some years ago and this is all that's left of the author's silver pencil! It was used to create metallic highlights on the upperedges of the framing.
The pilot's footrests also receivedmetallic highlights
along theiredges using the
Karismacolor silverpencil.
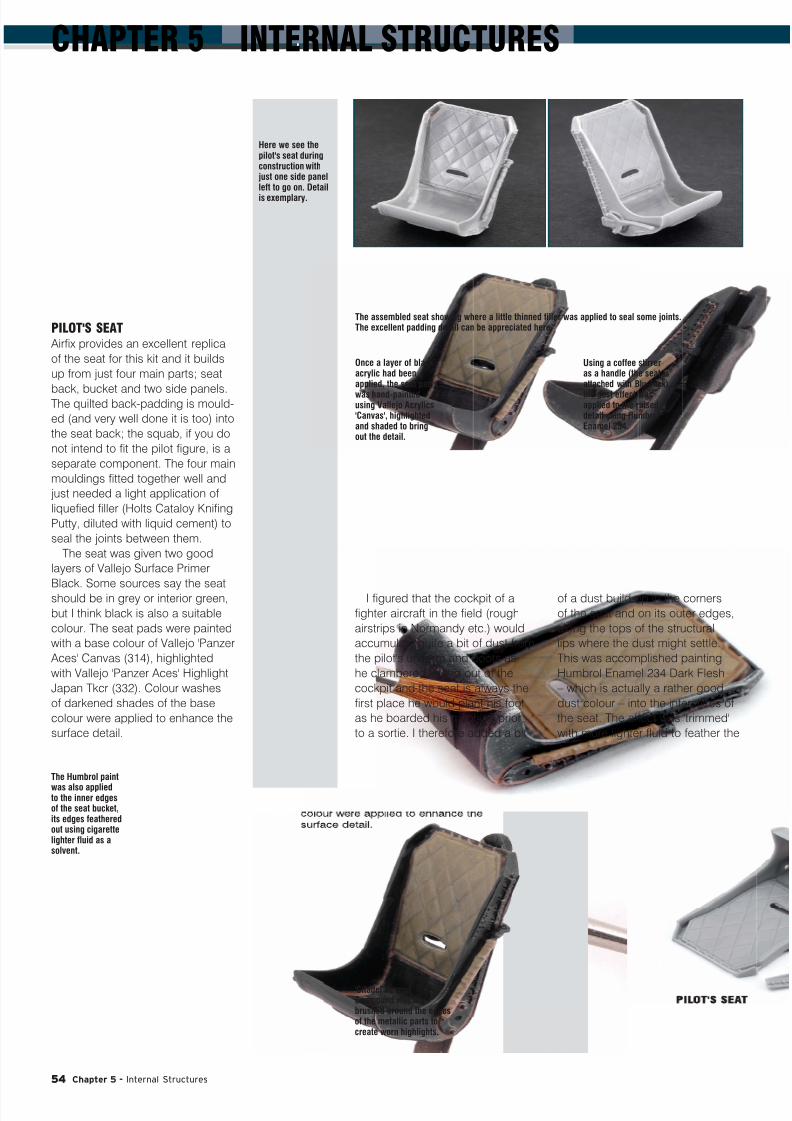
7/23/2019 Airfix How to Build… - Hawker Typhoon Mk.lb
http://slidepdf.com/reader/full/airfix-how-to-build-hawker-typhoon-mklb 54/76
54 Chapter 5 - Internal Structures
CHAPTER 5 INTERNAL STRUCTURES
PILOT'S SEAT
Airfix provides an excellent replica
of the seat for this kit and it builds
up from just four main parts; seat
back, bucket and two side panels.The quilted back-padding is mould-
ed (and very well done it is too) into
the seat back; the squab, if you do
not intend to fit the pilot figure, is a
separate component. The four main
mouldings fitted together well and
just needed a light application of
liquefied filler (Holts Cataloy Knifing
Putty, diluted with liquid cement) to
seal the joints between them.
The seat was given two good
layers of Vallejo Surface Primer
Black. Some sources say the seatshould be in grey or interior green,
but I think black is also a suitable
colour. The seat pads were painted
with a base colour of Vallejo 'Panzer
Aces' Canvas (314), highlighted
with Vallejo 'Panzer Aces' Highlight
Japan Tkcr (332). Colour washes
of darkened shades of the base
colour were applied to enhance the
surface detail.
Here we see thepilot's seat duringconstruction withjust one side panelleft to go on. Detail
is exemplary.
The assembled seat showing where a little thinned filler was applied to seal some joints.The excellent padding detail can be appreciated here.
I figured that the cockpit of a
fighter aircraft in the field (rough
airstrips in Normandy etc.) would
accumulate quite a bit of dust from
the pilot's uniform and boots as
he clambered in and out of the
cockpit and the seat is always the
first place he would plant his foot
as he boarded his machine prior,
to a sortie. I therefore added a bit
of a dust build-up in the corners
of the seat and on its outer edges,
along the tops of the structural
lips where the dust might settle.
This was accomplished painting
Humbrol Enamel 234 Dark Flesh
– which is actually a rather good
dust colour – into the interstices of
the seat. The effect was 'trimmed'
with more lighter fluid to feather the
Once a layer of blackacrylic had beenapplied, the seat pad
was hand-paintedusing Vallejo Acrylics'Canvas', highlightedand shaded to bringout the detail.
Using a coffee stirreras a handle (the seat isattached with Blu-Tack),
the dust effect wasapplied to the raiseddetail using HumbrolEnamel 234.
The Humbrol paint
was also appliedto the inner edgesof the seat bucket,its edges featheredout using cigarettelighter fluid as asolvent.
'Citadel NecronCompound was dry-brushed around the edgesof the metallic parts tocreate worn highlights.
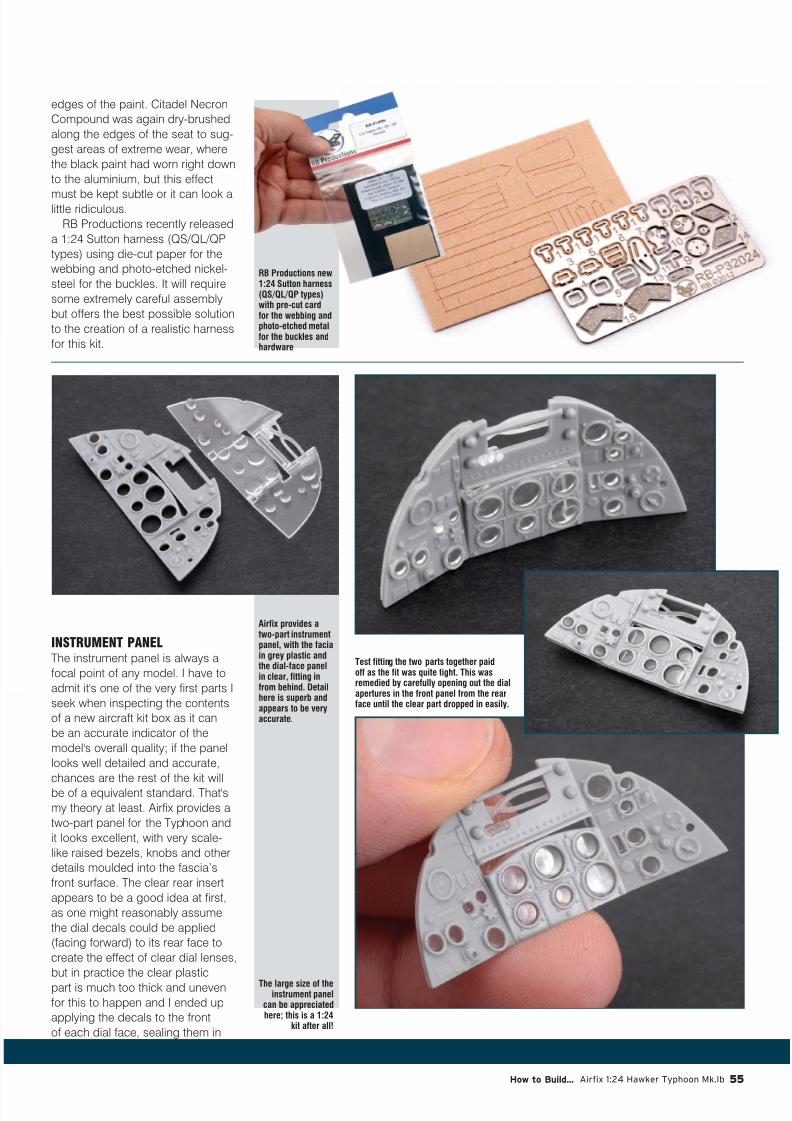
7/23/2019 Airfix How to Build… - Hawker Typhoon Mk.lb
http://slidepdf.com/reader/full/airfix-how-to-build-hawker-typhoon-mklb 55/76
How to Build... Airfix 1:24 Hawker Typhoon Mk.Ib 55
edges of the paint. Citadel Necron
Compound was again dry-brushed
along the edges of the seat to sug-
gest areas of extreme wear, where
the black paint had worn right down
to the aluminium, but this effect
must be kept subtle or it can look alittle ridiculous.
RB Productions recently released
a 1:24 Sutton harness (QS/QL/QP
types) using die-cut paper for the
webbing and photo-etched nickel-
steel for the buckles. It will require
some extremely careful assembly
but offers the best possible solution
to the creation of a realistic harness
for this kit.
RB Productions new1:24 Sutton harness(QS/QL/QP types)with pre-cut cardfor the webbing andphoto-etched metalfor the buckles andhardware
Airfix provides atwo-part instrumentpanel, with the faciain grey plastic andthe dial-face panelin clear, fitting infrom behind. Detailhere is superb andappears to be veryaccurate.
The large size of theinstrument panel
can be appreciatedhere; this is a 1:24
kit after all!
INSTRUMENT PANEL
The instrument panel is always a
focal point of any model. I have to
admit it's one of the very first parts I
seek when inspecting the contents
of a new aircraft kit box as it can
be an accurate indicator of the
model's overall quality; if the panel
looks well detailed and accurate,
chances are the rest of the kit will
be of a equivalent standard. That's
my theory at least. Airfix provides a
two-part panel for the Typhoon and
it looks excellent, with very scale-
like raised bezels, knobs and other
details moulded into the fascia’s
front surface. The clear rear insert
appears to be a good idea at first,
as one might reasonably assume
the dial decals could be applied
(facing forward) to its rear face to
create the effect of clear dial lenses,
but in practice the clear plastic
part is much too thick and uneven
for this to happen and I ended up
applying the decals to the front
of each dial face, sealing them in
Test fitting the two parts together paidoff as the fit was quite tight. This wasremedied by carefully opening out the dialapertures in the front panel from the rearface until the clear part dropped in easily.

7/23/2019 Airfix How to Build… - Hawker Typhoon Mk.lb
http://slidepdf.com/reader/full/airfix-how-to-build-hawker-typhoon-mklb 56/76
56 Chapter 5 - Internal Structures
CHAPTER 5 INTERNAL STRUCTURES
with Future polish once dry. This
was a slight disappointment and
in hindsight I would have cut out
some thin acetate plates to replace
the clear moulding. The final effect
is perfectly adequate however and
the panel looks fantastic oncecomplete.
The kit comes with all of the side
consoles too. These were painted
in the same way as the main panel.
The trim wheel was finished with
varying shades of brown to closely
replicate the Bakelite material of
the original component. Airscale
also produces a sheet of WW2 RAF
cockpit placards and some were
used (some trimmed to fit) on the
main and side panels.
Once a base coatof Vallejo SurfacePrimer Black hadbeen sprayed on,the dials that wouldhave colouredbezels wereundercoated withmatt white.
An orange colour wasmixed up and carefullyapplied over the whitebezel edges.
The kit's decal sheet provides decals for the dials but for anadded touch of refinement, Airscale's WW2 RAF dial decalswere used instead.
Thanks to the thickness of the clear plastic, plus its unevensurface, the dial decals had to be applied to the front ofeach dial face instead of the rear as originally planned.
Here we see the completed facia panel which alsoreceived a little of the same dust treatment that was usedon the seat.
The finished instrument panel withclear rear insert fitted. The Airscaledecals look superb.
The side consoles, throttleand 'Bakelite' trim wheelawait installation.
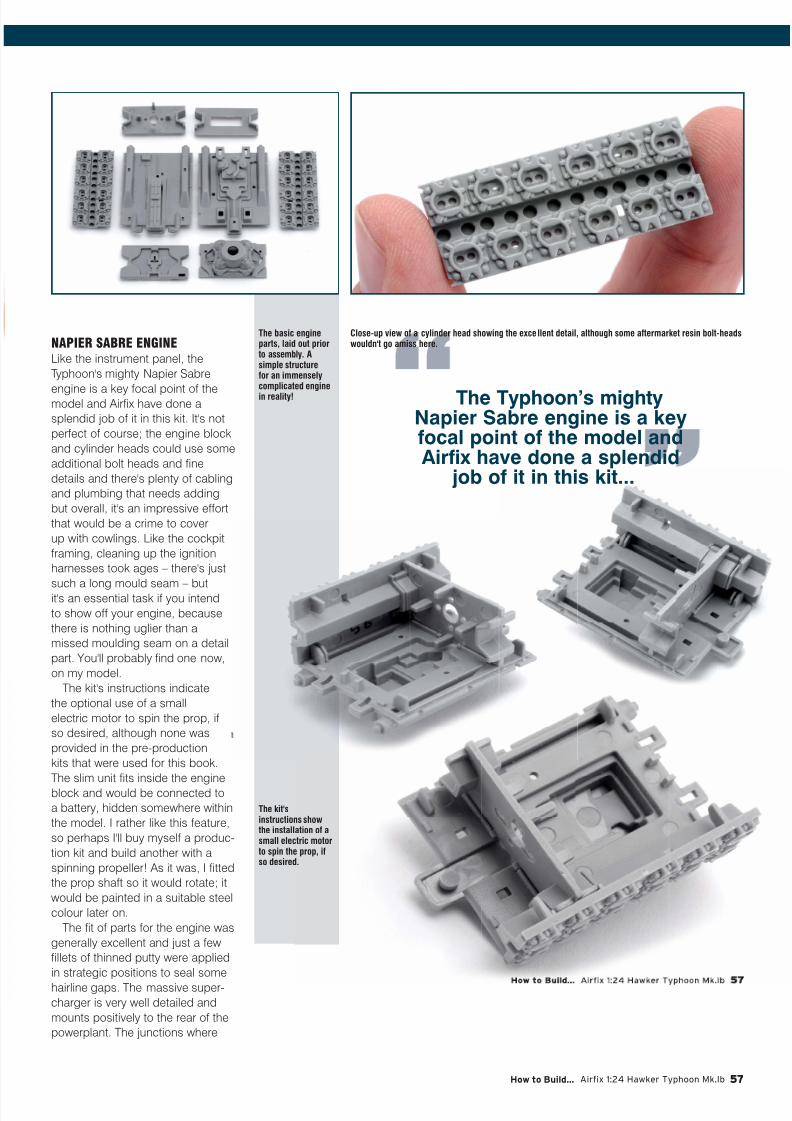
7/23/2019 Airfix How to Build… - Hawker Typhoon Mk.lb
http://slidepdf.com/reader/full/airfix-how-to-build-hawker-typhoon-mklb 57/76
How to Build... Airfix 1:24 Hawker Typhoon Mk.Ib 57
NAPIER SABRE ENGINE
Like the instrument panel, the
Typhoon's mighty Napier Sabre
engine is a key focal point of themodel and Airfix have done a
splendid job of it in this kit. It's not
perfect of course; the engine block
and cylinder heads could use some
additional bolt heads and fine
details and there's plenty of cabling
and plumbing that needs adding
but overall, it's an impressive effort
that would be a crime to cover
up with cowlings. Like the cockpit
framing, cleaning up the ignition
harnesses took ages – there's just
such a long mould seam – butit's an essential task if you intend
to show off your engine, because
there is nothing uglier than a
missed moulding seam on a detail
part. You'll probably find one now,
on my model.
The kit's instructions indicate
the optional use of a small
electric motor to spin the prop, if
so desired, although none was
provided in the pre-production
kits that were used for this book.
The slim unit fits inside the engine
block and would be connected to
a battery, hidden somewhere within
the model. I rather like this feature,
so perhaps I'll buy myself a produc-
tion kit and build another with a
spinning propeller! As it was, I fitted
the prop shaft so it would rotate; it
would be painted in a suitable steel
colour later on.
The fit of parts for the engine was
generally excellent and just a few
fillets of thinned putty were applied
in strategic positions to seal some
hairline gaps. The massive super-
charger is very well detailed and
mounts positively to the rear of the
powerplant. The junctions where
The basic engineparts, laid out priorto assembly. Asimple structurefor an immenselycomplicated enginein reality!
Close-up view of a cylinder head showing the excellent detail, although some aftermarket resin bolt-headswouldn't go amiss here.
The kit'sinstructions showthe installation of asmall electric motorto spin the prop, ifso desired.
The Typhoon’s mightyNapier Sabre engine is a keyfocal point of the model andAirfix have done a splendid
job of it in this kit...

7/23/2019 Airfix How to Build… - Hawker Typhoon Mk.lb
http://slidepdf.com/reader/full/airfix-how-to-build-hawker-typhoon-mklb 58/76
58 Chapter 5 - Internal Structures
CHAPTER 5 INTERNAL STRUCTURES
its four compressed-air pipes (?) fit
to the corresponding ducts on the
engine were wrapped with narrow
strips of plastic card to emulate the
unions of the real thing; these are
much more complex in reality but it
was better than nothing.Once again, I used Vallejo black
primer to undercoat the engine
block as the real thing was painted
in a rather dull overall black. As
I progress with this model (the
finished thing will appear within
one of ADH Publishing’s model
magazines) I will add further metal-
lic finishes to the engine's ancillary
parts and this will create a more
complex, visually engaging appear-
ance without straying too far from
the bounds of accuracy.The ignition harnesses were
sprayed with Alclad II Aluminum
and once dry, given an acrylic
colour-wash using a yellow-brown
shade (diluted with Future) to
replicate the real thing's finish as
closely as possible. The short
ignition cables were braided steel
in reality so they were touched in
with a mixture of Humbrol Metalcote
Aluminium and matt white to create
a semi-metallic finish.
With the internal framing, engine,instrument panel, seat and other
interior components now prepared,
I was well into the build of this
magnificent new production from
Airfix, and I have enjoyed every
minute of it so far. As mentioned
previously, this model will appear
in its completed form in one of
ADH Publishing's scale modelling
magazines so please keep an eye
out for it at www.adhpublishing.com
Here we see the massive superchargerand its peripheral components. Perfectalignment to the engine block isassured thanks to solidly moulded,cruciform lug that runs through thecentre of the various elements.
The supercharge issturdily engineeredand sports somefine surface detail.
The fit of parts
here is good and alittle thinned puttywas painted oversome joint lines fora perfectly sealedsurface.
Vallejo Surface Primer Black was applied over thewhole engine block. In reality, the finish would havehad more of a sheen to it, but the satin finish of themodel paint seemed more in-scale.

7/23/2019 Airfix How to Build… - Hawker Typhoon Mk.lb
http://slidepdf.com/reader/full/airfix-how-to-build-hawker-typhoon-mklb 59/76
How to Build... Airfix 1:24 Hawker Typhoon Mk.Ib 59
A light application of a 'dust-wash' using Humbrol Enamel 234 (thinned withlighter fluid) added a mild touch of weathering.
At this stage, theengine was test-fitted to its bearersto make sure that
paint build-upwouldn't causeproblems later on.
The ignition harnesses were sprayedwith Alclad II Aluminum and thengiven an acrylic colour-wash to add alittle colour and to deepen the detail.
Here we see theengine block with someancillary parts fitted,ready for the next stageof construction.
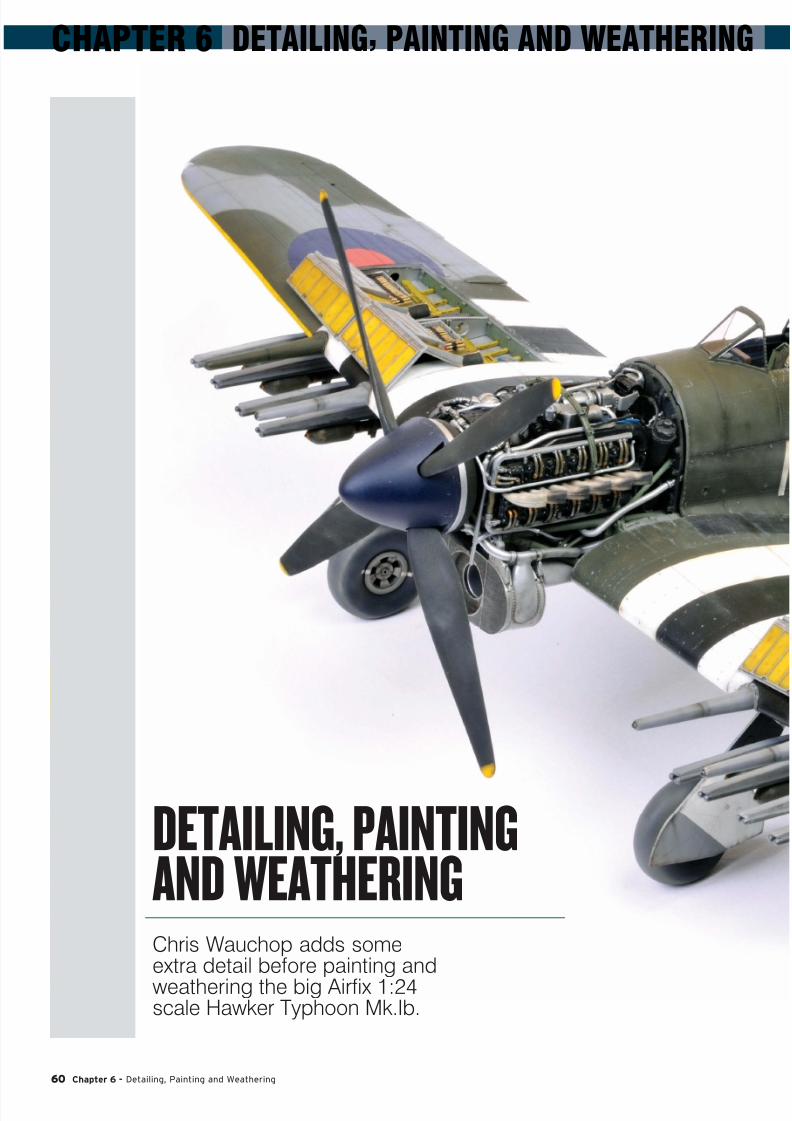
7/23/2019 Airfix How to Build… - Hawker Typhoon Mk.lb
http://slidepdf.com/reader/full/airfix-how-to-build-hawker-typhoon-mklb 60/76
60 Chapter 6 - Detailing, Painting and Weathering
CHAPTER 6 DETAILING, PAINTING AND WEATHERING
DETAILING, PAINTINGAND WEATHERINGChris Wauchop adds someextra detail before painting andweathering the big Airfix 1:24scale Hawker Typhoon Mk.Ib.

7/23/2019 Airfix How to Build… - Hawker Typhoon Mk.lb
http://slidepdf.com/reader/full/airfix-how-to-build-hawker-typhoon-mklb 61/76
How to Build... Airfix 1:24 Hawker Typhoon Mk.Ib 61
A
fter I had finished basic
construction of the Airfix
Typhoon, I handed it
over to master modeller
Chris Wauchop for painting and
weathering. I had never seen Chris
so eager to start a paint job – not
surprising as the Typhoon is one
of Chris’s favourite aircraft and that
the big Airfix kit provides an expan-
sive canvas for his talent.
The model was passed on to
Chris as it was seen at the end
of Chapter 4. The airframe was
assembled, but the propeller and
undercarriage assemblies had not
yet been added. Ordnance was still
on the sprues too.
Chris now takes up the story:
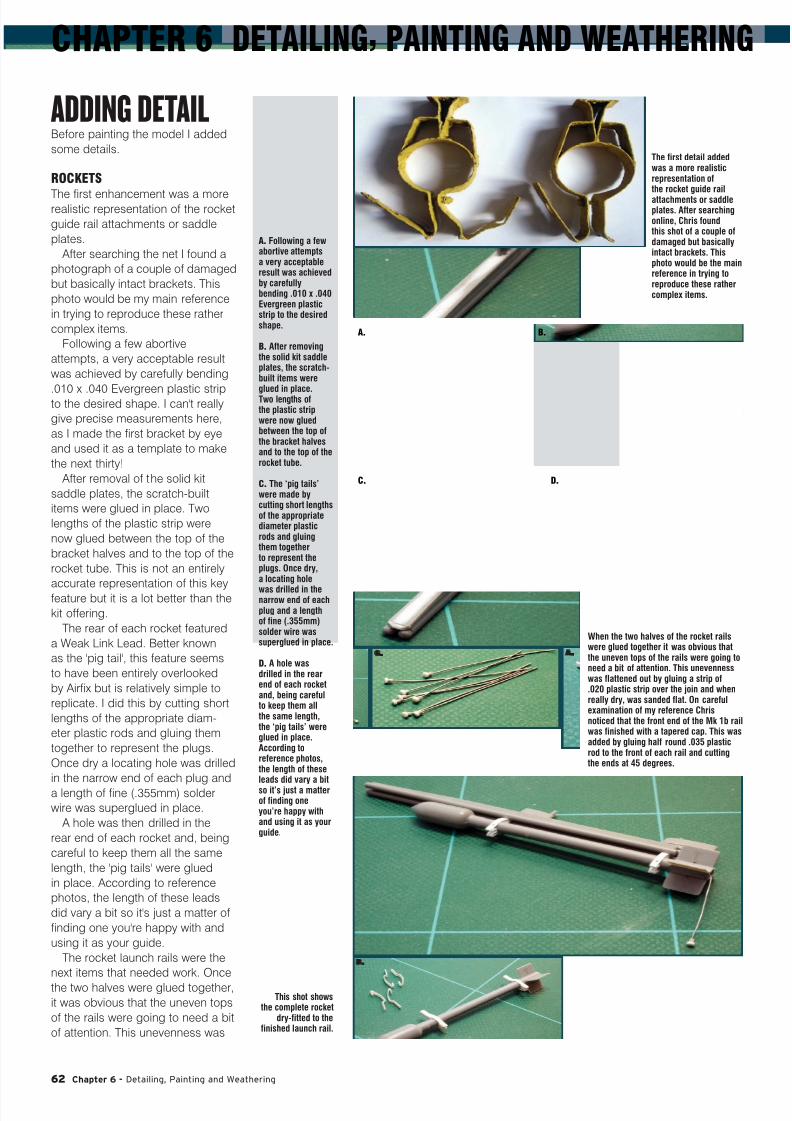
7/23/2019 Airfix How to Build… - Hawker Typhoon Mk.lb
http://slidepdf.com/reader/full/airfix-how-to-build-hawker-typhoon-mklb 62/76
62 Chapter 6 - Detailing, Painting and Weathering
CHAPTER 6 DETAILING, PAINTING AND WEATHERING
ADDING DETAILBefore painting the model I added
some details.
ROCKETS
The first enhancement was a morerealistic representation of the rocket
guide rail attachments or saddle
plates.
After searching the net I found a
photograph of a couple of damaged
but basically intact brackets. This
photo would be my main reference
in trying to reproduce these rather
complex items.
Following a few abortive
attempts, a very acceptable result
was achieved by carefully bending
.010 x .040 Evergreen plastic stripto the desired shape. I can't really
give precise measurements here,
as I made the first bracket by eye
and used it as a template to make
the next thirty!
After removal of the solid kit
saddle plates, the scratch-built
items were glued in place. Two
lengths of the plastic strip were
now glued between the top of the
bracket halves and to the top of the
rocket tube. This is not an entirely
accurate representation of this keyfeature but it is a lot better than the
kit offering.
The rear of each rocket featured
a Weak Link Lead. Better known
as the 'pig tail', this feature seems
to have been entirely overlooked
by Airfix but is relatively simple to
replicate. I did this by cutting short
lengths of the appropriate diam-
eter plastic rods and gluing them
together to represent the plugs.
Once dry a locating hole was drilled
in the narrow end of each plug and
a length of fine (.355mm) solder
wire was superglued in place.
A hole was then drilled in the
rear end of each rocket and, being
careful to keep them all the same
length, the 'pig tails' were glued
in place. According to reference
photos, the length of these leads
did vary a bit so it's just a matter of
finding one you're happy with and
using it as your guide.
The rocket launch rails were the
next items that needed work. Once
the two halves were glued together,
it was obvious that the uneven tops
of the rails were going to need a bit
of attention. This unevenness was
A. Following a fewabortive attemptsa very acceptableresult was achievedby carefullybending .010 x .040Evergreen plasticstrip to the desiredshape.
B. After removingthe solid kit saddleplates, the scratch-built items were
glued in place.Two lengths ofthe plastic stripwere now gluedbetween the top ofthe bracket halvesand to the top of therocket tube.
C. The ‘pig tails’were made bycutting short lengthsof the appropriatediameter plasticrods and gluingthem togetherto represent theplugs. Once dry,a locating hole
was drilled in thenarrow end of eachplug and a lengthof fine (.355mm)solder wire wassuperglued in place.
D. A hole wasdrilled in the rearend of each rocketand, being carefulto keep them allthe same length,the ‘pig tails’ wereglued in place.According toreference photos,the length of theseleads did vary a bitso it’s just a matterof finding oneyou’re happy withand using it as yourguide.
This shot showsthe complete rocket
dry-fitted to thefinished launch rail.
The first detail addedwas a more realisticrepresentation ofthe rocket guide rail
attachments or saddleplates. After searchingonline, Chris foundthis shot of a couple ofdamaged but basicallyintact brackets. Thisphoto would be the mainreference in trying toreproduce these rathercomplex items.
When the two halves of the rocket railswere glued together it was obvious thatthe uneven tops of the rails were going toneed a bit of attention. This unevennesswas flattened out by gluing a strip of.020 plastic strip over the join and whenreally dry, was sanded flat. On carefulexamination of my reference Chrisnoticed that the front end of the Mk 1b railwas finished with a tapered cap. This wasadded by gluing half round .035 plasticrod to the front of each rail and cuttingthe ends at 45 degrees.
A.
C. D.
B.
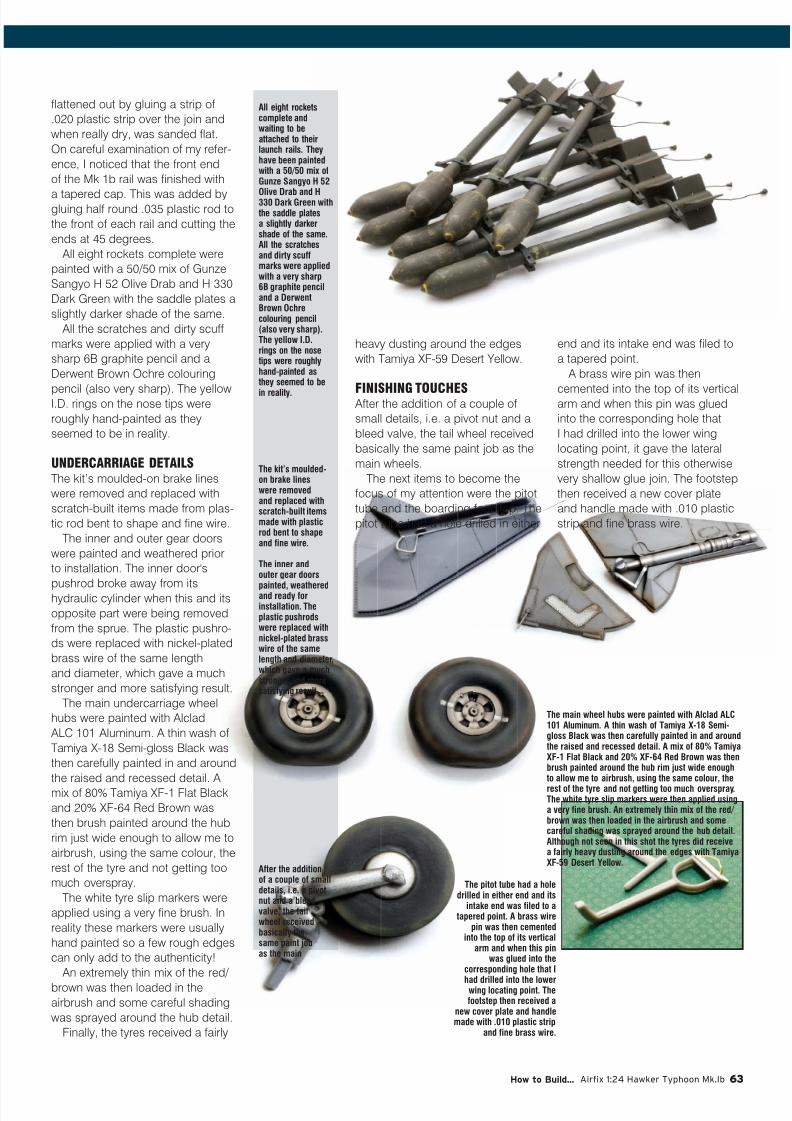
7/23/2019 Airfix How to Build… - Hawker Typhoon Mk.lb
http://slidepdf.com/reader/full/airfix-how-to-build-hawker-typhoon-mklb 63/76
How to Build... Airfix 1:24 Hawker Typhoon Mk.Ib 63
flattened out by gluing a strip of
.020 plastic strip over the join and
when really dry, was sanded flat.
On careful examination of my refer-
ence, I noticed that the front end
of the Mk 1b rail was finished with
a tapered cap. This was added bygluing half round .035 plastic rod to
the front of each rail and cutting the
ends at 45 degrees.
All eight rockets complete were
painted with a 50/50 mix of Gunze
Sangyo H 52 Olive Drab and H 330
Dark Green with the saddle plates a
slightly darker shade of the same.
All the scratches and dirty scuff
marks were applied with a very
sharp 6B graphite pencil and a
Derwent Brown Ochre colouring
pencil (also very sharp). The yellowI.D. rings on the nose tips were
roughly hand-painted as they
seemed to be in reality.
UNDERCARRIAGE DETAILS
The kit’s moulded-on brake lines
were removed and replaced with
scratch-built items made from plas-
tic rod bent to shape and fine wire.
The inner and outer gear doors
were painted and weathered prior
to installation. The inner door's
pushrod broke away from itshydraulic cylinder when this and its
opposite part were being removed
from the sprue. The plastic pushro-
ds were replaced with nickel-plated
brass wire of the same length
and diameter, which gave a much
stronger and more satisfying result.
The main undercarriage wheel
hubs were painted with Alclad
ALC 101 Aluminum. A thin wash of
Tamiya X-18 Semi-gloss Black was
then carefully painted in and around
the raised and recessed detail. A
mix of 80% Tamiya XF-1 Flat Black
and 20% XF-64 Red Brown was
then brush painted around the hub
rim just wide enough to allow me to
airbrush, using the same colour, the
rest of the tyre and not getting too
much overspray.
The white tyre slip markers were
applied using a very fine brush. In
reality these markers were usually
hand painted so a few rough edges
can only add to the authenticity!
An extremely thin mix of the red/
brown was then loaded in the
airbrush and some careful shading
was sprayed around the hub detail.
Finally, the tyres received a fairly
heavy dusting around the edges
with Tamiya XF-59 Desert Yellow.
FINISHING TOUCHES After the addition of a couple of
small details, i.e. a pivot nut and a
bleed valve, the tail wheel received
basically the same paint job as the
main wheels.
The next items to become the
focus of my attention were the pitot
tube and the boarding footstep. The
pitot tube had a hole drilled in either
end and its intake end was filed to
a tapered point.
A brass wire pin was then
cemented into the top of its verticalarm and when this pin was glued
into the corresponding hole that
I had drilled into the lower wing
locating point, it gave the lateral
strength needed for this otherwise
very shallow glue join. The footstep
then received a new cover plate
and handle made with .010 plastic
strip and fine brass wire.
All eight rocketscomplete andwaiting to beattached to theirlaunch rails. Theyhave been paintedwith a 50/50 mix ofGunze Sangyo H 52
Olive Drab and H330 Dark Green withthe saddle platesa slightly darkershade of the same.All the scratchesand dirty scuffmarks were appliedwith a very sharp6B graphite penciland a DerwentBrown Ochrecolouring pencil(also very sharp).The yellow I.D.rings on the nosetips were roughlyhand-painted asthey seemed to be
in reality.
The main wheel hubs were painted with Alclad ALC101 Aluminum. A thin wash of Tamiya X-18 Semi-gloss Black was then carefully painted in and aroundthe raised and recessed detail. A mix of 80% TamiyaXF-1 Flat Black and 20% XF-64 Red Brown was thenbrush painted around the hub rim just wide enoughto allow me to airbrush, using the same colour, the
rest of the tyre and not getting too much overspray.The white tyre slip markers were then applied usinga very fine brush. An extremely thin mix of the red/ brown was then loaded in the airbrush and somecareful shading was sprayed around the hub detail.Although not seen in this shot the tyres did receivea fairly heavy dusting around the edges with TamiyaXF-59 Desert Yellow.
The kit’s moulded-on brake lineswere removedand replaced withscratch-built itemsmade with plasticrod bent to shapeand fine wire. The inner andouter gear doors
painted, weatheredand ready forinstallation. Theplastic pushrodswere replaced withnickel-plated brasswire of the samelength and diameter,which gave a muchstronger and moresatisfying result.
After the additionof a couple of smalldetails, i.e. a pivotnut and a bleedvalve, the tailwheel receivedbasically thesame paint jobas the main
The pitot tube had a holedrilled in either end and its
intake end was filed to atapered point. A brass wire
pin was then cementedinto the top of its vertical
arm and when this pinwas glued into the
corresponding hole that I
had drilled into the lowerwing locating point. Thefootstep then received a
new cover plate and handlemade with .010 plastic strip
and fine brass wire.
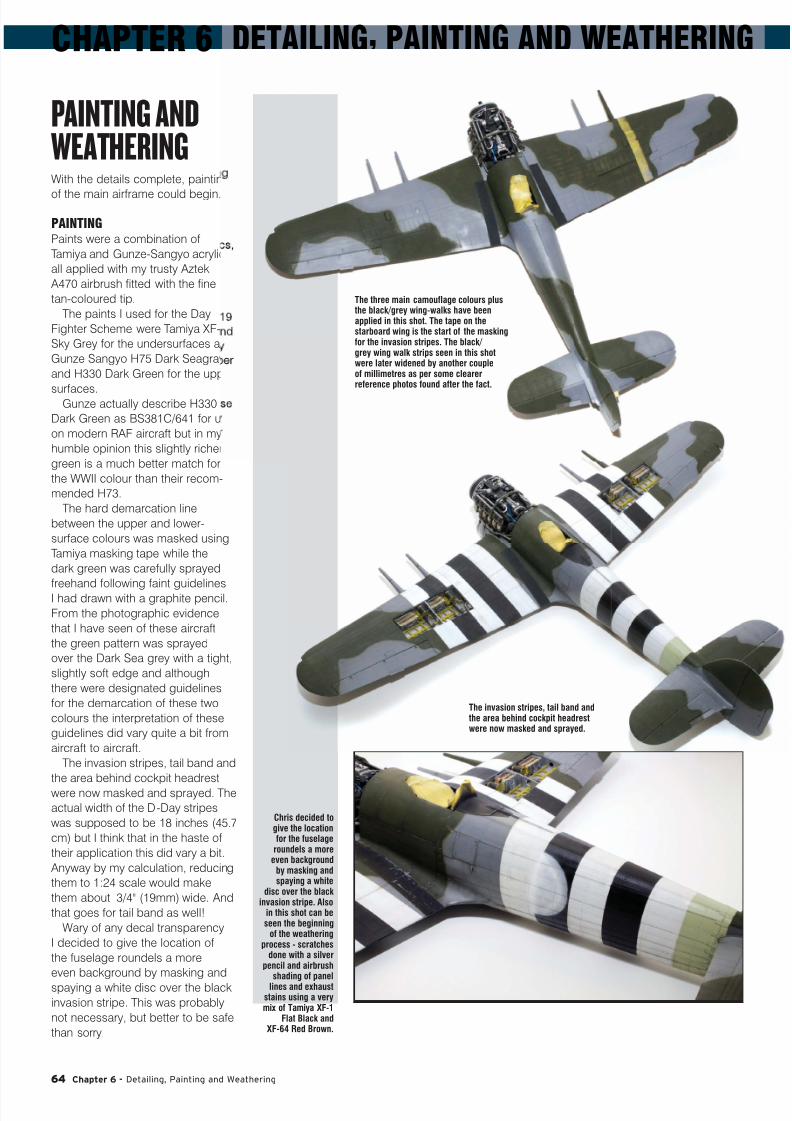
7/23/2019 Airfix How to Build… - Hawker Typhoon Mk.lb
http://slidepdf.com/reader/full/airfix-how-to-build-hawker-typhoon-mklb 64/76
64 Chapter 6 - Detailing, Painting and Weathering
CHAPTER 6 DETAILING, PAINTING AND WEATHERING
PAINTING AND WEATHERINGWith the details complete, painting
of the main airframe could begin.
PAINTING
Paints were a combination of
Tamiya and Gunze-Sangyo acrylics,
all applied with my trusty Aztek
A470 airbrush fitted with the fine
tan-coloured tip.
The paints I used for the Day
Fighter Scheme were Tamiya XF-19
Sky Grey for the undersurfaces and
Gunze Sangyo H75 Dark Seagray
and H330 Dark Green for the upper
surfaces.Gunze actually describe H330
Dark Green as BS381C/641 for use
on modern RAF aircraft but in my
humble opinion this slightly richer
green is a much better match for
the WWII colour than their recom-
mended H73.
The hard demarcation line
between the upper and lower-
surface colours was masked using
Tamiya masking tape while the
dark green was carefully sprayed
freehand following faint guidelinesI had drawn with a graphite pencil.
From the photographic evidence
that I have seen of these aircraft
the green pattern was sprayed
over the Dark Sea grey with a tight,
slightly soft edge and although
there were designated guidelines
for the demarcation of these two
colours the interpretation of these
guidelines did vary quite a bit from
aircraft to aircraft.
The invasion stripes, tail band and
the area behind cockpit headrest
were now masked and sprayed. The
actual width of the D-Day stripes
was supposed to be 18 inches (45.7
cm) but I think that in the haste of
their application this did vary a bit.
Anyway by my calculation, reducing
them to 1:24 scale would make
them about 3/4" (19mm) wide. And
that goes for tail band as well!
Wary of any decal transparency
I decided to give the location of
the fuselage roundels a more
even background by masking and
spaying a white disc over the black
invasion stripe. This was probably
not necessary, but better to be safe
than sorry.
The three main camouflage colours plusthe black/grey wing-walks have beenapplied in this shot. The tape on thestarboard wing is the start of the maskingfor the invasion stripes. The black/ grey wing walk strips seen in this shotwere later widened by another coupleof millimetres as per some clearerreference photos found after the fact.
The invasion stripes, tail band andthe area behind cockpit headrestwere now masked and sprayed.
Chris decided togive the locationfor the fuselage
roundels a moreeven background
by masking andspaying a white
disc over the blackinvasion stripe. Also
in this shot can beseen the beginning
of the weatheringprocess - scratches
done with a silverpencil and airbrush
shading of panellines and exhaust
stains using a verymix of Tamiya XF-1
Flat Black andXF-64 Red Brown.
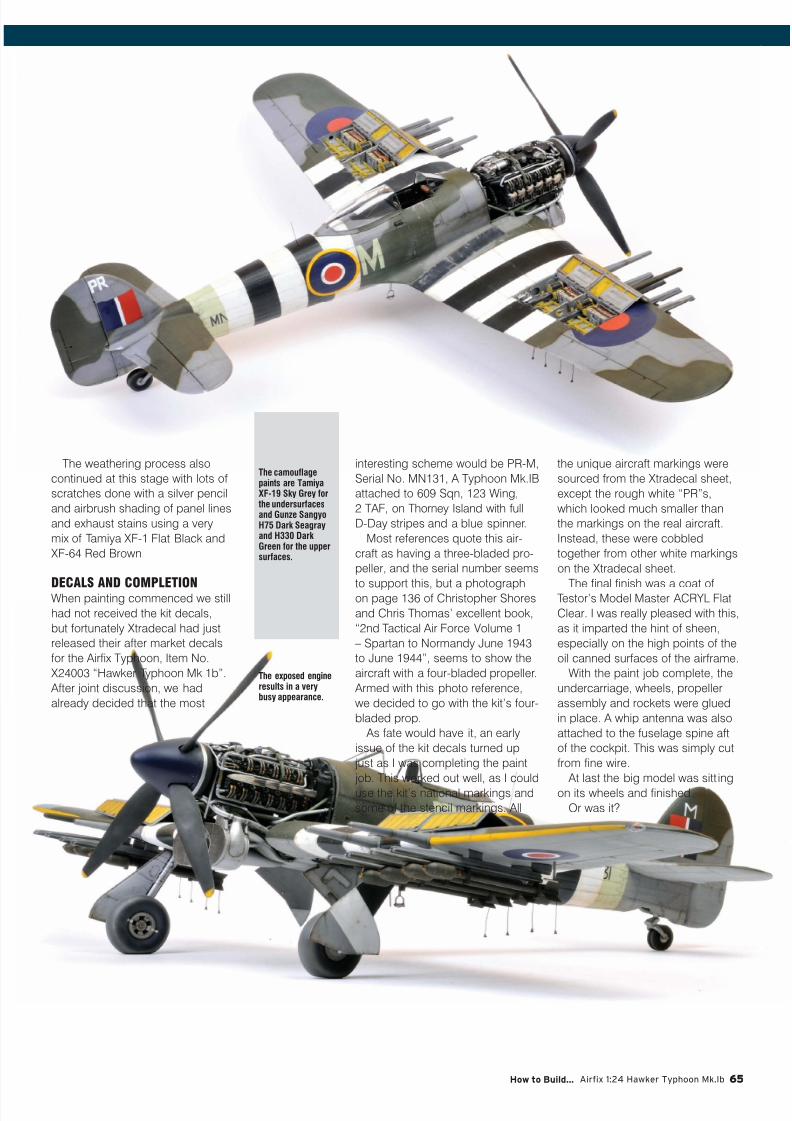
7/23/2019 Airfix How to Build… - Hawker Typhoon Mk.lb
http://slidepdf.com/reader/full/airfix-how-to-build-hawker-typhoon-mklb 65/76
How to Build... Airfix 1:24 Hawker Typhoon Mk.Ib 65
The weathering process also
continued at this stage with lots of
scratches done with a silver pencil
and airbrush shading of panel lines
and exhaust stains using a very
mix of Tamiya XF-1 Flat Black and
XF-64 Red Brown.
DECALS AND COMPLETION
When painting commenced we still
had not received the kit decals,
but fortunately Xtradecal had just
released their after market decals
for the Airfix Typhoon, Item No.
X24003 “Hawker Typhoon Mk 1b”.
After joint discussion, we had
already decided that the most
interesting scheme would be PR-M,
Serial No. MN131, A Typhoon Mk.IB
attached to 609 Sqn, 123 Wing,
2 TAF, on Thorney Island with full
D-Day stripes and a blue spinner.
Most references quote this air-
craft as having a three-bladed pro-
peller, and the serial number seems
to support this, but a photographon page 136 of Christopher Shores
and Chris Thomas’ excellent book,
“2nd Tactical Air Force Volume 1
– Spartan to Normandy June 1943
to June 1944”, seems to show the
aircraft with a four-bladed propeller.
Armed with this photo reference,
we decided to go with the kit’s four-
bladed prop.
As fate would have it, an early
issue of the kit decals turned up
just as I was completing the paint
job. This worked out well, as I could
use the kit’s national markings and
some of the stencil markings. All
the unique aircraft markings were
sourced from the Xtradecal sheet,
except the rough white “PR”s,
which looked much smaller than
the markings on the real aircraft.
Instead, these were cobbled
together from other white markings
on the Xtradecal sheet.
The final finish was a coat ofTestor’s Model Master ACRYL Flat
Clear. I was really pleased with this,
as it imparted the hint of sheen,
especially on the high points of the
oil canned surfaces of the airframe.
With the paint job complete, the
undercarriage, wheels, propeller
assembly and rockets were glued
in place. A whip antenna was also
attached to the fuselage spine aft
of the cockpit. This was simply cut
from fine wire.
At last the big model was sitt ing
on its wheels and finished.
Or was it?
The camouflagepaints are TamiyaXF-19 Sky Grey forthe undersurfacesand Gunze SangyoH75 Dark Seagrayand H330 DarkGreen for the uppersurfaces.
The exposed engineresults in a verybusy appearance.
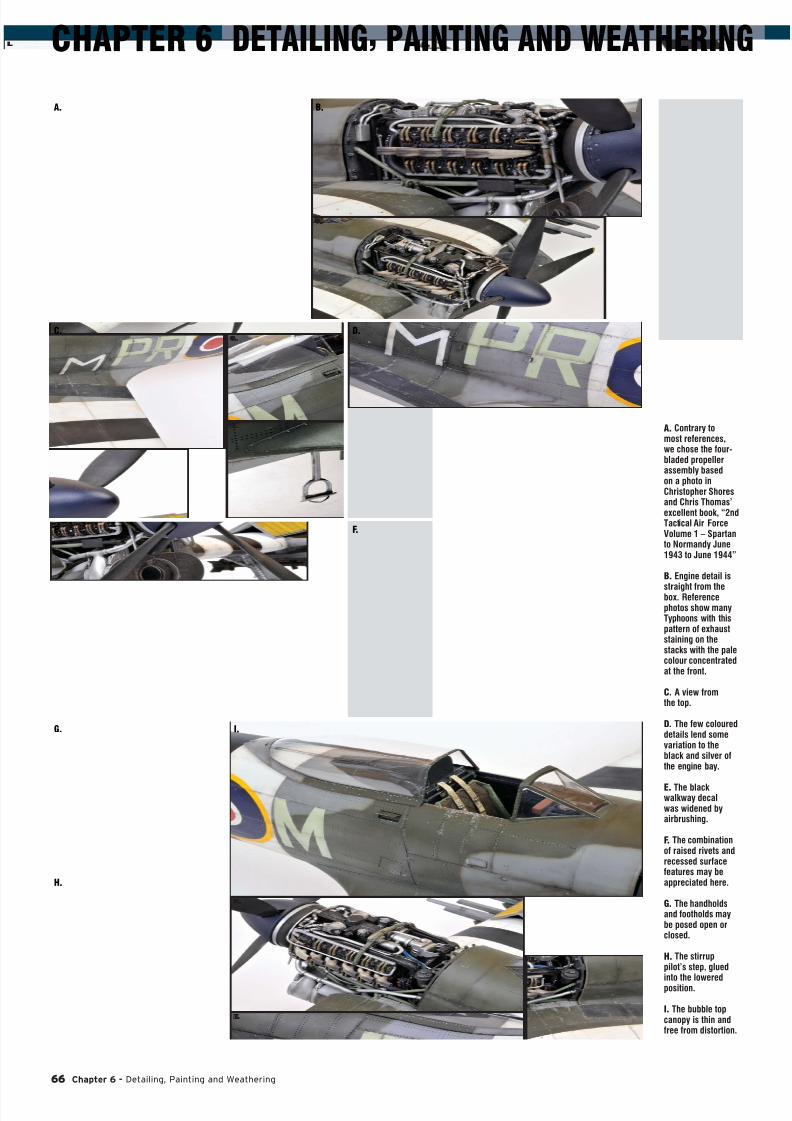
7/23/2019 Airfix How to Build… - Hawker Typhoon Mk.lb
http://slidepdf.com/reader/full/airfix-how-to-build-hawker-typhoon-mklb 66/76
66 Chapter 6 - Detailing, Painting and Weathering
CHAPTER 6 DETAILING, PAINTING AND WEATHERING
A. Contrary tomost references,we chose the four-bladed propellerassembly basedon a photo inChristopher Shoresand Chris Thomas’excellent book, “2ndTactical Air ForceVolume 1 – Spartanto Normandy June1943 to June 1944”
B. Engine detail is
straight from thebox. Referencephotos show manyTyphoons with thispattern of exhauststaining on thestacks with the palecolour concentratedat the front.
C. A view fromthe top.
D. The few coloureddetails lend somevariation to theblack and silver ofthe engine bay.
E. The blackwalkway decalwas widened byairbrushing.
F. The combinationof raised rivets andrecessed surfacefeatures may beappreciated here.
G. The handholdsand footholds maybe posed open orclosed.
H. The stirruppilot’s step, glued
into the loweredposition.
I. The bubble topcanopy is thin andfree from distortion.
A.
C.
E.
G. I.
H.
D.
F.
B.

7/23/2019 Airfix How to Build… - Hawker Typhoon Mk.lb
http://slidepdf.com/reader/full/airfix-how-to-build-hawker-typhoon-mklb 67/76
How to Build... Airfix 1:24 Hawker Typhoon Mk.Ib 67
J. Chris carefullyreproducedthe unusualdemarcation of theforward invasionstripe, and theoverpainting of theport side fuselageroundel.
K. The white “PR”was cobbledtogether from whitedecal pieces.
L. The “M”s on theother side were theright size.
M. Detail of thekit tail wheel andthe chunky but
authentic surfacetextures on thelower empennage.
N. Chris painted theinside of the cannonbay doors.
O. Carefulweathering hashelped create animpressive result.
P. Chris scribed aline around each ofthe cannon fairingsto match referencephotos.
Q. The starboardnavigation light.
R. The kit wheelsare subtly bulgedand flattened.Note the white tyrealignment marks.
S. Theundercarriagedoors have beenweathered to matchthe undersurface ofthe model.
T. Rockets in placewith pig tails
dangling!
U. A view of therockets fromunderneath thewings.
J.
L. N.
M.
O.
Q.
T. U.
R. S.
P.
K.

7/23/2019 Airfix How to Build… - Hawker Typhoon Mk.lb
http://slidepdf.com/reader/full/airfix-how-to-build-hawker-typhoon-mklb 68/76
68 Chapter 6 - Detailing, Painting and Weathering
CHAPTER 6 DETAILING, PAINTING AND WEATHERING
The model was initiallyfinished with all the engineand cannon bay detailexposed.

7/23/2019 Airfix How to Build… - Hawker Typhoon Mk.lb
http://slidepdf.com/reader/full/airfix-how-to-build-hawker-typhoon-mklb 69/76
How to Build... Airfix 1:24 Hawker Typhoon Mk.Ib 69
Port side profile of this powerful ground attack aircraft.
The whip antenna was cutfrom a length of fine wire.
The hard demarcationline between the upper
and lower-surface colourswas masked using Tamiya
masking tape while thedark green was carefullysprayed freehand...
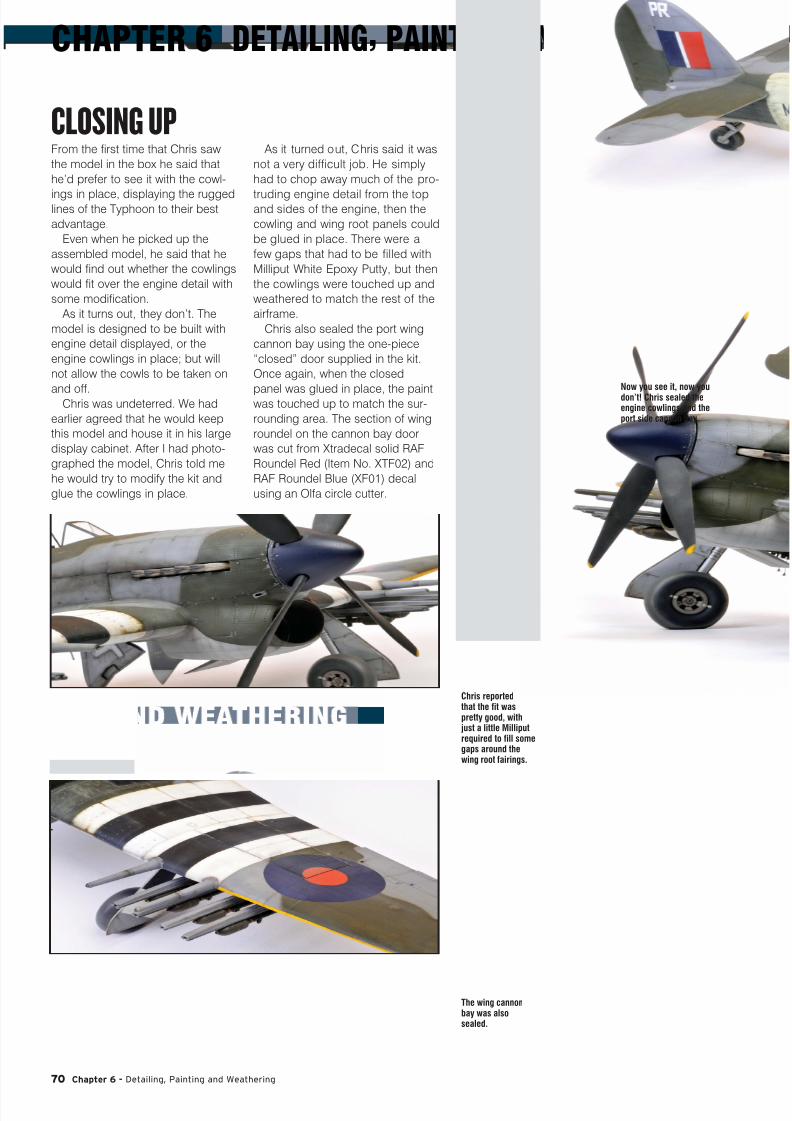
7/23/2019 Airfix How to Build… - Hawker Typhoon Mk.lb
http://slidepdf.com/reader/full/airfix-how-to-build-hawker-typhoon-mklb 70/76
70 Chapter 6 - Detailing, Painting and Weathering
CHAPTER 6 DETAILING, PAINTING AND WEATHERING
CLOSING UPFrom the first time that Chris saw
the model in the box he said that
he’d prefer to see it with the cowl-
ings in place, displaying the ruggedlines of the Typhoon to their best
advantage.
Even when he picked up the
assembled model, he said that he
would find out whether the cowlings
would fit over the engine detail with
some modification.
As it turns out, they don’t. The
model is designed to be built with
engine detail displayed, or the
engine cowlings in place; but will
not allow the cowls to be taken on
and off.Chris was undeterred. We had
earlier agreed that he would keep
this model and house it in his large
display cabinet. After I had photo-
graphed the model, Chris told me
he would try to modify the kit and
glue the cowlings in place.
As it turned out, Chris said it was
not a very difficult job. He simply
had to chop away much of the pro-
truding engine detail from the topand sides of the engine, then the
cowling and wing root panels could
be glued in place. There were a
few gaps that had to be filled with
Milliput White Epoxy Putty, but then
the cowlings were touched up and
weathered to match the rest of the
airframe.
Chris also sealed the port wing
cannon bay using the one-piece
“closed” door supplied in the kit.
Once again, when the closed
panel was glued in place, the paintwas touched up to match the sur-
rounding area. The section of wing
roundel on the cannon bay door
was cut from Xtradecal solid RAF
Roundel Red (Item No. XTF02) and
RAF Roundel Blue (XF01) decal
using an Olfa circle cutter.
Chris reportedthat the fit waspretty good, withjust a little Milliputrequired to fill somegaps around thewing root fairings.
The wing cannonbay was alsosealed.
Now you see it, now youdon’t! Chris sealed theengine cowlings and theport side cannon bay.

7/23/2019 Airfix How to Build… - Hawker Typhoon Mk.lb
http://slidepdf.com/reader/full/airfix-how-to-build-hawker-typhoon-mklb 71/76
How to Build... Airfix 1:24 Hawker Typhoon Mk.Ib 71
Protruding details had to bechopped off the engine toallow the cowlings to fit. Thecowlings were then gluedin place.

7/23/2019 Airfix How to Build… - Hawker Typhoon Mk.lb
http://slidepdf.com/reader/full/airfix-how-to-build-hawker-typhoon-mklb 72/76
72 Chapter 6 - Detailing, Painting and Weathering
CHAPTER 6 DETAILING, PAINTING AND WEATHERING
Tools and Accessories Used:
• Lots of Tamiya masking tape
• Evergreen – 102 plastic strip .010 x
.040 and various size plastic rod
• XTRADECAL – X24003 Hawker
Typhoon Mk 1b
• XTRADECAL Item No. XTF01 - RAF
Roundel Blue
• XTRADECAL Item No. XTF02 - RAF
Roundel Red
• Airscale Item No. AS24 - RAFGeneric
WWII RAF Instrument Dial Decals
Paints and Finishing Products Used:
• Gunze Sangyo Acrylics – H75 Dark
Seagray, H330 Dark Green, H74 Sky
(Duck Egg Green)
• Tamiya Acrylics – XF-19 Sky Grey,
XF-1 Flat Black, XF-2 Flat White, XF-64
Red Brown• Alclad II Lacquer - Aluminum ALC 101
• Model Master ACRYL – 4636/Flat Clear
MODELSPEC
Airfix 1:24 Hawker Typhoon Mk.IB.
Kit No. AX19002
The clean lines of the buttoned-upTiffie may be appreciated here.
Airfix’s 1:24 scale Typhoonis a truly impressive model...

7/23/2019 Airfix How to Build… - Hawker Typhoon Mk.lb
http://slidepdf.com/reader/full/airfix-how-to-build-hawker-typhoon-mklb 73/76
How to Build... Airfix 1:24 Hawker Typhoon Mk.Ib 73
The section of upper wingroundel on the port wingcannon bay was replacedwith solid colour decal cutusing an Olfa circle cutter.
The beast complete. Airfix’s 1:24 scaleTyphoon is a truly impressive model.
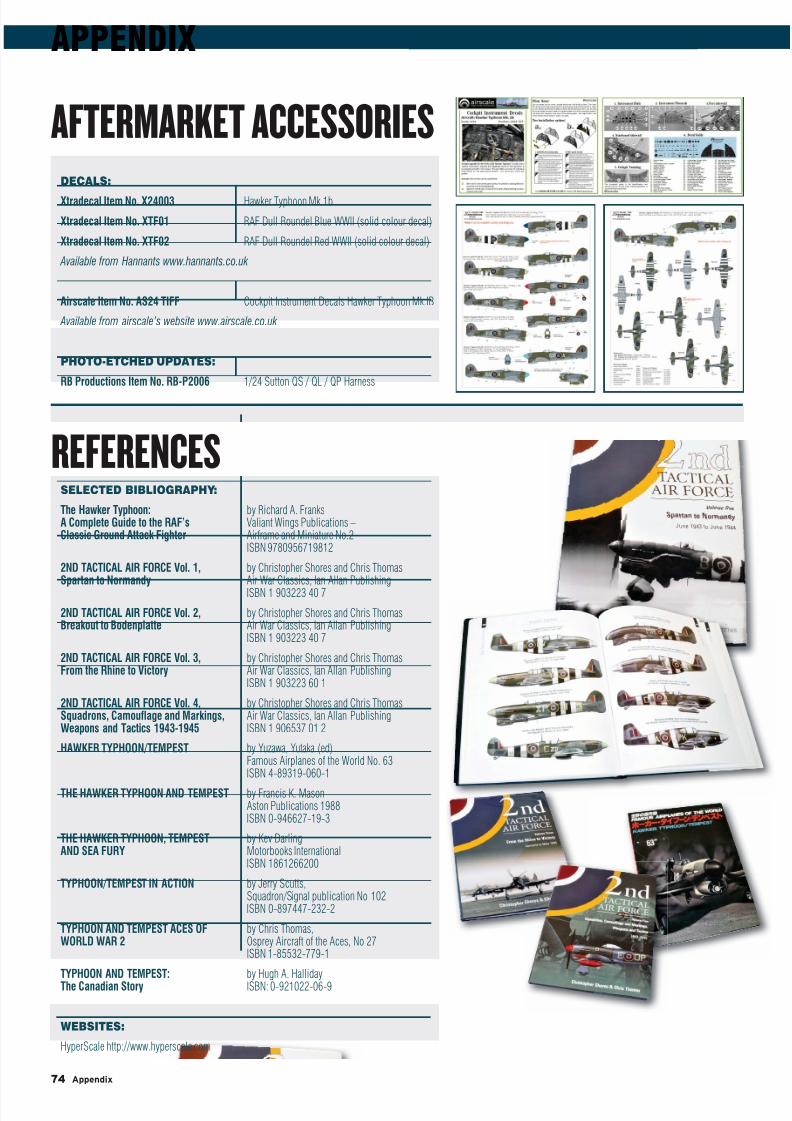
7/23/2019 Airfix How to Build… - Hawker Typhoon Mk.lb
http://slidepdf.com/reader/full/airfix-how-to-build-hawker-typhoon-mklb 74/76
74 Appendix
APPENDIX
AFTERMARKET ACCESSORIES
REFERENCES
DECALS:
Xtradecal Item No. X24003 Hawker Typhoon Mk.1b
Xtradecal Item No. XTF01 RAF Dull Roundel Blue WWII (solid colour decal)
Xtradecal Item No. XTF02 RAF Dull Roundel Red WWII (solid colour decal)
Available from Hannants www.hannants.co.uk
Airscale Item No. AS24 TIFF Cockpit Instrument Decals Hawker Typhoon Mk.IB
Available from airscale’s website www.airscale.co.uk
PHOTO-ETCHED UPDATES:
RB Productions Item No. RB-P2006 1/24 Sutton QS / QL / QP Harness
SELECTED BIBLIOGRAPHY:
The Hawker Typhoon: by Richard A. FranksA Complete Guide to the RAF’s Valiant Wings Publications –Classic Ground Attack Fighter Airframe and Miniature No.2 ISBN 9780956719812
2ND TACTICAL AIR FORCE Vol. 1, by Christopher Shores and Chris ThomasSpartan to Normandy Air War Classics, Ian Allan Publishing ISBN 1 903223 40 7
2ND TACTICAL AIR FORCE Vol. 2, by Christopher Shores and Chris ThomasBreakout to Bodenplatte Air War Classics, Ian Allan Publishing ISBN 1 903223 40 7
2ND TACTICAL AIR FORCE Vol. 3, by Christopher Shores and Chris ThomasFrom the Rhine to Victory Air War Classics, Ian Allan Publishing ISBN 1 903223 60 1
2ND TACTICAL AIR FORCE Vol. 4, by Christopher Shores and Chris ThomasSquadrons, Camouflage and Markings, Air War Classics, Ian Allan PublishingWeapons and Tactics 1943-1945 ISBN 1 906537 01 2
HAWKER TYPHOON/TEMPEST by Yuzawa, Yutaka (ed) Famous Airplanes of the World No. 63 ISBN 4-89319-060-1
THE HAWKER TYPHOON AND TEMPEST by Francis K. MasonAston Publications 1988
ISBN 0-946627-19-3
THE HAWKER TYPHOON, TEMPEST by Kev DarlingAND SEA FURY Motorbooks International ISBN 1861266200
TYPHOON/TEMPEST IN ACTION by Jerry Scutts,Squadron/Signal publication No 102
ISBN 0-897447-232-2
TYPHOON AND TEMPEST ACES OF by Chris Thomas,WORLD WAR 2 Osprey Aircraft of the Aces, No 27 ISBN 1-85532-779-1
TYPHOON AND TEMPEST: by Hugh A. HallidayThe Canadian Story ISBN: 0-921022-06-9
WEBSITES:
HyperScale http://www.hyperscale.com

7/23/2019 Airfix How to Build… - Hawker Typhoon Mk.lb
http://slidepdf.com/reader/full/airfix-how-to-build-hawker-typhoon-mklb 75/76
T e HOW TO BUILD... ser es
V s t www.adhbooks.com
pre-production cover
7/23/2019 Airfix How to Build… - Hawker Typhoon Mk.lb
http://slidepdf.com/reader/full/airfix-how-to-build-hawker-typhoon-mklb 76/76
Hawker Typhoon Mk.Ib
The Hawker Typhoon was constantly improved over itsperiod of wartime service. The initial “car door” canopy
offered only limited rearward vision so this was eventuallyreplaced with a clear-vision sliding bubble canopy.
By pilot accounts, the Typhoon was a solid gun platform,fast at low altitudes and impressively powerful, althoughcontrols were heavy at high speed.
Despite proving unsuitable as a pure fighter, the Typhoonlives on in legend thanks to its remarkable ground attack
record against Axis airfields, shipping, vehicles and trains.
Airfix’s brand new 1:24 scale Hawker Typhoon Mk.Ibis an outstanding model.
Surface texture is positively daring with its rippled oilcan effect
and the combination of raised and recessed rivets. Detail isdense, just as it was on the original aircraft. If the modellerwishes to display the engine or the wing cannon bays, Airfixoffers a number of options that do not compromise scale or
detail. Even more remarkable is that all of this detail is deliveredin injection-moulded plastic alone.
Airfix has undoubtedly delivered a true scale classic for our time.
This new book features an exhaustive step-by-step guide tobuilding this remarkable model with contributions from Brett
Green, Marcus Nicholls and Chris Wauchop.
Analysis of the 1:72 Airfix Typhoon, 1:48 Hasegawa kits and the1:32 scale multimedia offering from MDC are also included.
Hundreds of construction photos reference images a museum
Airfix has undoubtedlydelivered a true scaleclassic for our time.