aircraft finishing - windows finishing - windows section 1 - page 14 of 14 file w1-25 the bottom of...
TRANSCRIPT

STOLCH 801
Zenith Aircraft Companywww.zenithair.com
Revision 3.1 (8/00)© 2000, Zenith Aircraft Co.
AIRCRAFT FINISHING - WindowsSECTION 1 - Page 1 of 14
STOL CH 801
AIRCRAFT FINISHING - WINDOWS
SECTION 1
“INSTALLATION OF THE WINDSHIELD AND WINDOWS”
Windshield and top window installation:1. Install the top window stabilizer 8F21-1 and 8F21-22. Install the top window3. Install the windshield to overlap over the top window.
Rear Window installation• The rear windows can be installed with the wings bolted to the fuselage• The flaperon control rod cover 8C6-6 must first be drilled and clecoed to the
fuselage• Remove cover 8C6-6 and door post trim 8C5-11• Try out windows referenced on rivet line for 8C6-6

STOLCH 801
Zenith Aircraft Companywww.zenithair.com
Revision 3.1 (8/00)© 2000, Zenith Aircraft Co.
AIRCRAFT FINISHING - WindowsSECTION 1 - Page 2 of 14
file w1-1
The window stabilizer isfirst installed to the cross(diagonal) cabin frametube. The windowstabilizer is made up oftwo channels: the lowerstabilizer 8F21-1 and thetop stabilizer 8F21-2.
file w1-2
Trim 8F21-2: Approx. 45 mm. at the center (the width of the channel) andthe height of the ¾” tube of the cabin frame at both ends.

STOLCH 801
Zenith Aircraft Companywww.zenithair.com
Revision 3.1 (8/00)© 2000, Zenith Aircraft Co.
AIRCRAFT FINISHING - WindowsSECTION 1 - Page 3 of 14
file w1-3
Trim both sides of the channel.
file w1-4
Crimp the top stabilizer 8F21-2 to follow the curvature of the trimmedlower stabilizer 8F21-1. Approx. 80 mm. between crimps.
file w1-5
The tip of 8F21-2 (top)fits inside the tip of 8F21-1 (bottom).

STOLCH 801
Zenith Aircraft Companywww.zenithair.com
Revision 3.1 (8/00)© 2000, Zenith Aircraft Co.
AIRCRAFT FINISHING - WindowsSECTION 1 - Page 4 of 14
file w1-6
The ends of 8F21-2 are positioned flush with the fuselage.
Rivet 8F21-1 to the cabin frame: A4, pitch 180.
The top stabilizer 8F21-2 fits into the lower stabilizer 8F21-1, and isriveted to the lower stabilizer: rivet 8F21-2 between the crimps: 13 x A4(pitch 80)
file w1-6a
Foam tape is applied to the top of the stabilizer to cushion the topwindow.

STOLCH 801
Zenith Aircraft Companywww.zenithair.com
Revision 3.1 (8/00)© 2000, Zenith Aircraft Co.
AIRCRAFT FINISHING - WindowsSECTION 1 - Page 5 of 14
file w1-7
The formed windshield.
The windshield issupplied with aprotective rubberizedcoating on both sides ofthe formed acrylicwindshield.
file w1-8
Position the formed windshield on the fuselage assembly (there is notrimming necessary along the front).

STOLCH 801
Zenith Aircraft Companywww.zenithair.com
Revision 3.1 (8/00)© 2000, Zenith Aircraft Co.
AIRCRAFT FINISHING - WindowsSECTION 1 - Page 6 of 14
file w1-9
Trim windshield to go around the front of the cabin frame.
Use a handheld grinderwith a cutting wheel totrim the windshield.
file w1-10
Trim the top and sides of the windshield.
Trim the windshield tosize before drilling thescrew holes.

STOLCH 801
Zenith Aircraft Companywww.zenithair.com
Revision 3.1 (8/00)© 2000, Zenith Aircraft Co.
AIRCRAFT FINISHING - WindowsSECTION 1 - Page 7 of 14
file w1-11
The top window 8F22-3 (view from rear).The windshield overlaps on top of the top window. The top window issecured to the airframe with screws along the front of the windshield intothe 1 3/8” steel cabin frame tube. The sides of the top window arescrewed into the ¾” cabin tube frame. The back of the window is rivetedto the fuselage top skin.
Install the top windowand the windshield withthe wings removed.
file w1-12
The top fuselage skin overhangs past the top channel 8F5-3 forattachment to the rear of the top window.
The top window (viewfrom inside, right seat).
(Note: on the picturedfactory prototype thediagonal was installedfrom front-left to rear-right).
(The right side of thephoto is the front of theaircraft).

STOLCH 801
Zenith Aircraft Companywww.zenithair.com
Revision 3.1 (8/00)© 2000, Zenith Aircraft Co.
AIRCRAFT FINISHING - WindowsSECTION 1 - Page 8 of 14
Peel back the protective layer. With a grease pencil mark the center linesof the tube on the windshield and layout the pitch. With a sharp #40 drillbit, drill through plexiglass and steel tube of the cabin frame. Cleco.
file w1-13
Remove the windshield from the aircraft and open up the drilled pilotholes to ¼” using a “unibit.”
file w1-14
Cut plastic bushingsfrom the ¼” poly tubeused for the brakes lines.Bushing length: 1/8”.Insert the bushing in the¼” holes.

STOLCH 801
Zenith Aircraft Companywww.zenithair.com
Revision 3.1 (8/00)© 2000, Zenith Aircraft Co.
AIRCRAFT FINISHING - WindowsSECTION 1 - Page 9 of 14
file w1-15
The top windshield trim 8F22-8 is positioned over the overlap of thewindshield with the top window.Secure with 10R x ¾” OHA oval head screws with SNW-2012 finishingwashers.Pitch: 50 mm.
The top window – detailof the front left (pilot’s)side from top.
file w1-16
The top window and windshield – detail of the left (pilot’s) side

STOLCH 801
Zenith Aircraft Companywww.zenithair.com
Revision 3.1 (8/00)© 2000, Zenith Aircraft Co.
AIRCRAFT FINISHING - WindowsSECTION 1 - Page 10 of 14
file w1-17
Seal the corners of the windshield with a silicon sealer.
The front windshield andthe top window – detailof the front right(passenger) side – viewfrom top front.
Before final assembly,seal the between theoverlap of the topwindow and windshieldwith a silicon sealer tokeep rain out.
file w1-18
Side channel 8F22-7 overlaps the side of the windshield and is securedwith screws to the cabin frame. SNST-18P screws with SNW-2012finishing washers. Pitch: 80 mm.Silicon caulking is used to seal the front of the windshield – joining thebottom edge of the windshield to the top skin 8F14-4.
Detail view of thewindshield – right side(passenger) bottomcorner of the windshield.

STOLCH 801
Zenith Aircraft Companywww.zenithair.com
Revision 3.1 (8/00)© 2000, Zenith Aircraft Co.
AIRCRAFT FINISHING - WindowsSECTION 1 - Page 11 of 14
file w1-19
The top window – detail of the side channel and siliconed front seal.
file w1-20
Detail view of the front of the windshield with silicon caulk sealer.The front of the windshield is positioned behind the rivet line through thefirewall.

STOLCH 801
Zenith Aircraft Companywww.zenithair.com
Revision 3.1 (8/00)© 2000, Zenith Aircraft Co.
AIRCRAFT FINISHING - WindowsSECTION 1 - Page 12 of 14
file w1-21
Detail of Rear Windows (right side) and the flaperon control.
The flaperon control rod cover 8C6-6 is installed to clear the flaperonvertical control rod 8C9-2.
file w1-22
The flaperon control rod cover 8C6-6

STOLCH 801
Zenith Aircraft Companywww.zenithair.com
Revision 3.1 (8/00)© 2000, Zenith Aircraft Co.
AIRCRAFT FINISHING - WindowsSECTION 1 - Page 13 of 14
file w1-23
Rear Windows (view from the left side)
The rear back window ispositioned and sized:
• 40 mm. above cabinside extrusion.
• 40 mm. forward of8F5-9.
• 130 mm. from the topof the side skin
file w1-24
Rear Windows (right side).
The front rear window:• Front edge of window is riveted through the door post trim 8F5-11• The top is riveted to gusset 8F2-6• The rear edge of the front rear window is riveted to the flaperon
control rod cover 8C6-6• The bottom of the window is riveted to the upholstery trim angle
The height of the rearfront window is positionedand sized:
• Top: 170 mm. fromthe top of the frontside skin.
• Bottom: 600 mm. fromthe top of the frontside skin.
STOLCH 801
Zenith Aircraft Companywww.zenithair.com
Revision 3.1 (8/00)© 2000, Zenith Aircraft Co.
AIRCRAFT FINISHING - WindowsSECTION 1 - Page 14 of 14
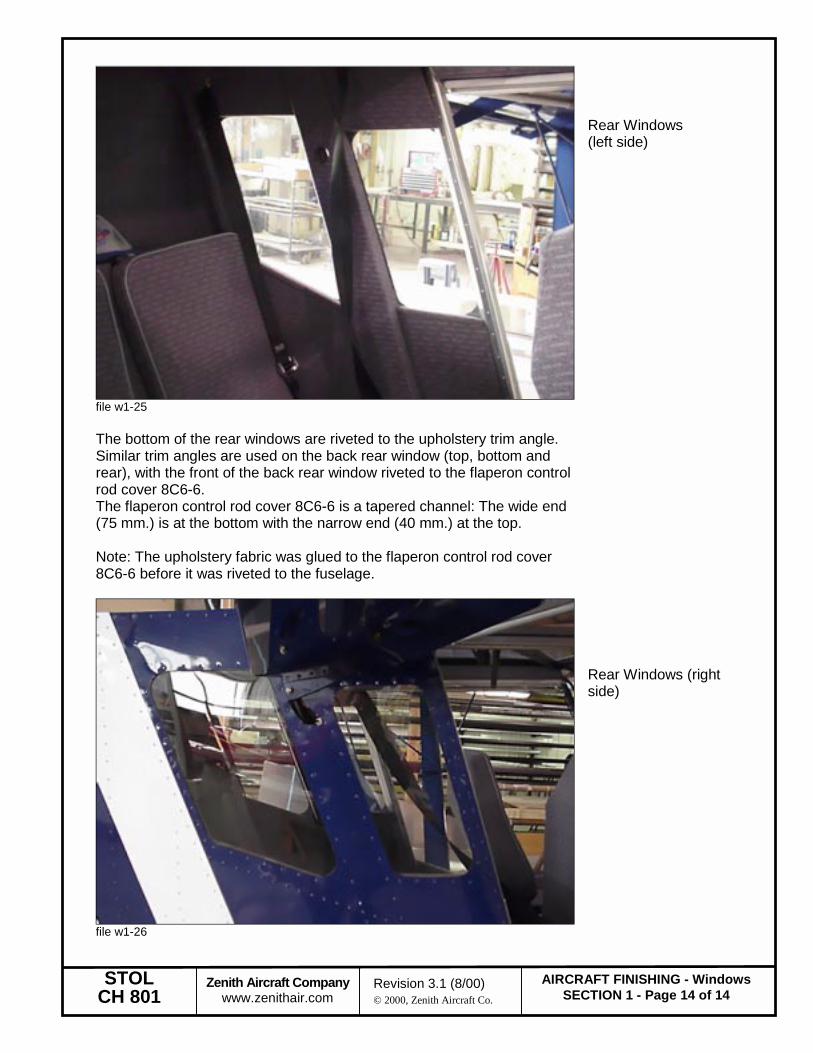
file w1-25
The bottom of the rear windows are riveted to the upholstery trim angle.Similar trim angles are used on the back rear window (top, bottom andrear), with the front of the back rear window riveted to the flaperon controlrod cover 8C6-6.The flaperon control rod cover 8C6-6 is a tapered channel: The wide end(75 mm.) is at the bottom with the narrow end (40 mm.) at the top.
Note: The upholstery fabric was glued to the flaperon control rod cover8C6-6 before it was riveted to the fuselage.
Rear Windows(left side)
file w1-26
Rear Windows (rightside)