air fryer - rollibot · dear rollibot air fryer owner, welcome to the new age of cooking! the air...
TRANSCRIPT

USER MANUAL
AIR FRYER
In order to continue serving our customers and providing the best products, our product information including our user manuals
may receive updates from time to time. Please check our website for the latest user manuals and product materials.

www.rollibot.com
Customer Service: 1-844-585-6295
Updated on 060717

Dear Rollibot Air Fryer Owner,
Welcome to the new age of cooking!
The Air Fryer by RolliBot™ is an all-new way to reinvent all your favorite foods! Cut down on fat and even a little guilt as this fryer cooks food faster and with drastically less oil than you would with traditional frying in a skillet or ordinary types of fryers. Best of all, it’s easy to use and even includes six presets for almost eff ortless food preparations.
Let’s get cooking!
— The RolliBot Team

4
TABLE OF CONTENTS
Section 1. Safety Warnings .................................................................................... 5
1.2 Disposal at End-of-Life ...................................................................................... 6
Section 2. Air Fryer Overview ................................................................................. 7
2.1 Overview & Box Contents ................................................................................. 7
2.2 Smart Digital Screen Overview ........................................................................ 7
Section 3. General Usage ........................................................................................ 8
3.1. Mode Selection ................................................................................................. 10
3.2. How to Begin Cooking...................................................................................... 10
3.3. How to Finish Cooking ..................................................................................... 11
Section 4. Cleaning and Maintenance ................................................................... 11
Section 5. Warranty Information ............................................................................ 12
Recipes ..................................................................................................................... 13

5
Section 1. Safety Warnings
WARNING • Do not submerge the power cord, plug, or housing in water or under the tap during cleaning
as this may cause shock and/or damage.• Do not allow any liquid to enter the appliance or come in contact with the appliance’s internal
electronic components as this may cause shock or short-circuiting.• Do not cover the air inlet and outlet of the appliance while it is powered on.• Parts may get hot during cooking e.g. basket, toast rack, tray, etc. Use heat-resistant gloves or
mitts when touching or moving any part.• Do not place or use the appliance on or near fl ammable materials, such as tablecloths,
curtains, or wallpaper, in order to avoid burning.• Do not use extension cords etc. Only plug the indoor unit into a grounded wall outlet.• The appliance’s inner chambers will heat up during operation; please do not put plastic, glass,
or materials inside other than food and the accessories provided with the appliance.• The appliance should be placed on a horizontal and stable surface during use. • As surrounding surfaces may be close to heat, do not place the appliance on cutting boards or
any surface which may melt or otherwise sustain damage. • Do not place the appliance against wall or too close to other appliances. All surrounding
objects should be at least 4 in. away from the appliance.• Do not place anything on the top of appliance.• Do not leaving the appliance unattended while in use.• During cooking, the appliance may emit hot steam through the air outlet. Keep hands a safe
distance from steam and the air outlets.• After cooking, the appliance may emit hot steam when opened and/or as any accessory is
removed from inside the appliance. Do not allow any part of your body to come in contact with steam as this may cause burns.
• After cooking, do not touch the interior chamber or the heating components of the appliance as these may be hot.
• If, in some case, the timer is set too long and food overcooks, smoke may emit from the air outlets. If this occurs, immediately unplug the appliance, allow all food and surfaces to cool and clean out the inside of the appliance.
• After using the appliance, use the power button to turn it off and unplug it from the wall outlet.
• Only use parts received from RolliBot™ or that have been included in the original packaging.• This appliance may only be used indoors. Do not use outdoors. • Ensure any accessory is clean before using it or placing it inside the appliance. • The appliance features a built-in safety lock. The appliance may not be put in standby mode if
the door is not fully closed. • Always unplug the appliance while it is not in use. • Do not use the appliance for any purpose other than described in this user manual.

6
1.2 Disposal at End-of-Life
This product must not be disposed of by incineration, landfi lling, or mixing with household trash. Improper disposal of the battery contained within this product may result in the battery heating up, rupturing, or igniting which may cause serious injury. The substances contained inside the battery present chemical risks to the environment. The recommended disposal for any RolliBot Air Fryer at its end-of-life is to dispose of the entire unit at or through an e-waste recycling center, program, or facility. Local regulations and laws pertaining to the recycling and disposal of lithium ion batteries and/or products containing them will vary according to country, state, and local governments. You must check laws and regulations corresponding to where you live in order to properly dispose of the battery and/or unit. It is the user’s responsibility to dispose of their waste equipment properly with accordance with local regulations and laws.
For additional information about where you should drop off your batteries and electrical or electronic waste, please contact your local or regional waste-management offi ce, your household waste disposal service, or your point-of-sale.

7
Section 2. Air Fryer Overview
2.1 Overview & Box Contents
2.2 Smart Digital Screen Overview
1
1
2
5
6
7
8
23
3
9
9
8
7
6
5
4
Control Panel
Power Cord
4 Air Outlet
Tempered Glass Door
Tray
Toast Rack
Basket & Basket Handle
Oven Mitt
Tongs
Increase Temp. Button
Decrease Temp. Button
Menu Button
Power Button
Start/Stop Button
Temperature/Time
Preset Programs
Heating IndicatorTime Symbol

8
Section 3. General Usage
1. Place the appliance on a stable, level surface. Leave at least 4 in. between the appliance and any other surfaces including walls and other appliances. Ensure there are no fl ammable materials nearby as the appliance may generate heat in the surround space during operation.
2. The tray should be inserted between the ridges on both sides of the bottom of the metal interior. See pics 1-4 for reference.
3. Insert the toast rack between the two ridges. See pics 5-6 for reference.
Note:
*Insert the toast rack the right side up with the edges facing down.
*Always use an oven mitt to take out the toast rack or tray after cooking fi nished.
*Make sure you have the rack and tray in position before adding food. After cooking, use an oven mitt to remove the rack and
tray.
> 4”
> 4”
Pic. 1 Pic. 2 Pic. 3
The middle of two ridges
Pic. 4
Pic. 5 Pic. 6
The middle of two ridges
Notch Up

9
4. Attach the handle to the basket then place food into the basket. Place the basket into the inner chamber. Remove the basket handle and close the door to begin cooking. See pics 7-10 for reference.
Note:
*If using basket to cook, please make sure the tray and toast rack are in the
right order i.e. basket, toast rack, tray, from top to bottom.
* Do not fi ll the basket to maximum capacity. If cooking the type of food
that expands, be sure to check any recipe and do not cook more than the
specifi ed amount of ingredients.
* There is a safety lock. (See the image on the right.)
* Only after the door has been closed, can the appliance function properly.
Otherwise the appliance may sound an alarm when you attempt to start
or stop cooking.
Pic. 7 Pic. 8 Pic. 9 Pic. 10
Safety Lock
10
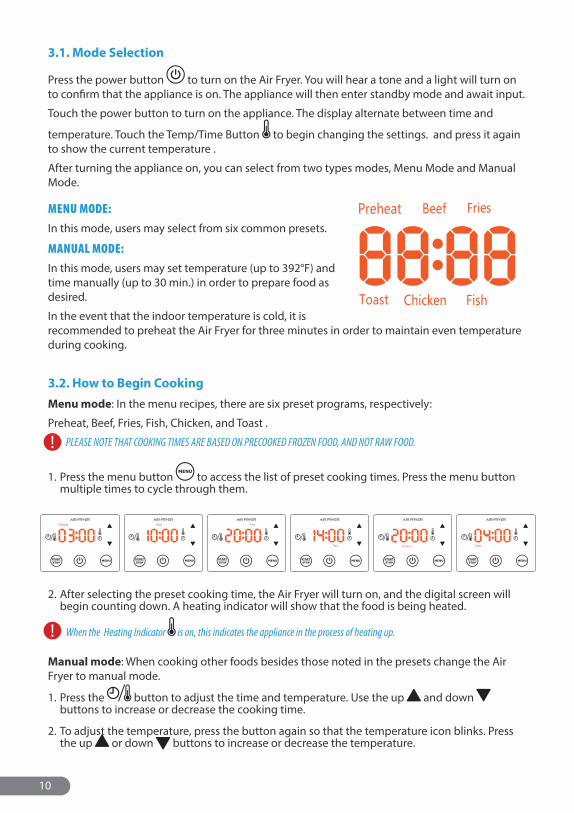
3.1. Mode Selection
Press the power button to turn on the Air Fryer. You will hear a tone and a light will turn on to confi rm that the appliance is on. The appliance will then enter standby mode and await input.
Touch the power button to turn on the appliance. The display alternate between time and
temperature. Touch the Temp/Time Button to begin changing the settings. and press it again to show the current temperature .
After turning the appliance on, you can select from two types modes, Menu Mode and Manual Mode.
MENU MODE: In this mode, users may select from six common presets.
MANUAL MODE: In this mode, users may set temperature (up to 392°F) and time manually (up to 30 min.) in order to prepare food as desired.
In the event that the indoor temperature is cold, it is recommended to preheat the Air Fryer for three minutes in order to maintain even temperature during cooking.
3.2. How to Begin Cooking
Menu mode: In the menu recipes, there are six preset programs, respectively:
Preheat, Beef, Fries, Fish, Chicken, and Toast .
PLEASE NOTE THAT COOKING TIMES ARE BASED ON PRECOOKED FROZEN FOOD, AND NOT RAW FOOD.
1. Press the menu button to access the list of preset cooking times. Press the menu button multiple times to cycle through them.
2. After selecting the preset cooking time, the Air Fryer will turn on, and the digital screen will begin counting down. A heating indicator will show that the food is being heated.
When the Heating Indicator is on, this indicates the appliance in the process of heating up.
Manual mode: When cooking other foods besides those noted in the presets change the Air Fryer to manual mode.
1. Press the button to adjust the time and temperature. Use the up and down buttons to increase or decrease the cooking time.
2. To adjust the temperature, press the button again so that the temperature icon blinks. Press the up or down buttons to increase or decrease the temperature.

11
3. After selecting the desired time and temperature, press the button to turn on the Air Fryer.
In the process of cooking irregular or oddly shaped food, it is recommended that you reduce the temperature and increase the
cooking time.
DO NOT UNDER ANY CIRCUMSTANCES, TOUCH THE BASKET, TOAST RACK, OR TRAY WHILE FOOD IS COOKING.
4. Every time you pull out the basket to fl ip your food, press the button to stop the timer. After placing the basket in the pan again, press the button to continue working.
After pressing the button, if you do not press the button within 3 minutes, the Air Fryer will enter standby mode.
3.3. How to Finish Cooking
1. When the timer reaches 00:00, the Air Fryer will emit 5 beeping sounds.
The motor will run for 30 sec in order to help cool the temperature inside the Air
Fryer.
2. After the Air Fryer is done cooking, check to make sure the motor is off , and place the basket handle on the basket; making sure that the two are fastened tightly together before removing and plating.
Be careful when using the handle. Avoid pressing down on it to keep from
releasing the basket components.
After cooking, the Air Fryer temperature will be extremely high. To avoid scald-
ing, place a pot holder under the basket or other accessory..
3. Remove the food from the basket or accessory and plate as desired.
The food and basket will be hot after cooking is complete. Exercise caution and
use an oven mitt when handling the basket.
4. After you are fi nished cooking, press the power button to turn the Air Fryer off and unplug it.
Section 4. Cleaning and Maintenance
Be sure to unplug the appliance before cleaning.
• Clean the basket, toast rack, and tray with hot water, a mild detergent, and a nonabrasive sponge.
• If the Air Fryer’s exterior needs cleaned, wipe it with moist, non-abrasive cloth. Do not use any type of cleaner.
Do not submerge the power cord, plug, or housing in water or under the tap
during cleaning as this may cause shock and/or damage.
• After rinsing any accessory, allow drying time before returning to the Air Fryer.

12
Section 5. Warranty Information
ONE YEAR LIMITED HARDWARE WARRANTY
Your Rollibot Air Fryer (“Product”) includes a One Year Limited Hardware Warranty (“Warranty”). The Warranty covers product defects in materials and workmanship under normal use. This Warranty is limited to residents of the United States and Canada only and is available only to original purchasers. This Warranty gives you specifi c legal rights and you may also have other rights which vary from state to state.
This Warranty starts on the date of your purchase and lasts for one year (the “Warranty Period”). The Warranty Period is not extended if the Product is repaired or replaced. We may change the availability of this limited warranty at our discretion, but any changes will not be retroactive.
Warranty services are provided by Warranty Pro. If a hardware defect arises and a valid claim is received within the Warranty Period, at its option and to the extent permitted by law, RolliBot will: (1) repair the hardware defect by using new or refurbished parts that are equivalent to new in performance and reliability; or (2) exchange the Product with a product that is new or refurbished which is substantially equivalent to the original product. This Warranty is for one replacement only of like-items and does not cover items out of production if the product is no longer made or stocked. This Warranty is not assignable or transferable. The original purchaser may call RolliBot’s toll-free number at 1-844-585-6295 for service request.
When a product or part is exchanged, any replacement item becomes your property and the replaced item becomes RolliBot’s property. This warranty only covers technical hardware defectiveness during the warranty period and under normal use conditions. RolliBot does not warrant uninterrupted or error-free operation of this Product.
This Warranty does not cover any damage due to: (a) transportation; (b) storage; (c) improper use; (d) failure to follow the product instructions or to perform any preventive maintenance; (e) modifi cations; (f ) unauthorized repair; (g) normal wear and tear; or (h) external causes such as accidents, abuse, or other actions or events beyond our reasonable control.
Important: Do not disassemble the Product. Disassembling the Product will void this Warranty. Only RolliBot or a party expressly authorized by Rollibot should perform service on this Product.
DISCLAIMER OF WARRANTY: THE REMEDIES DESCRIBED ABOVE ARE YOUR SOLE AND EXCLUSIVE REMEDIES AND OUR ENTIRE LIABILITY FOR ANY BREACH OF THIS LIMITED WARRANTY. OUR LIABILITY SHALL UNDER NO CIRCUMSTANCES EXCEED THE ACTUAL AMOUNT PAID BY YOU FOR THE DEFECTIVE PRODUCT, NOR SHALL WE UNDER ANY CIRCUMSTANCES BE LIABLE FOR ANY CONSEQUENTIAL, INCIDENTAL, SPECIAL OR PUNITIVE DAMAGES OR LOSSES, WHETHER DIRECT OR INDIRECT.
SOME STATES DO NOT ALLOW THE EXCLUSION OR LIMITATION OF INCIDENTAL OR CONSEQUENTIAL DAMAGES, SO THE ABOVE LIMITATION OR EXCLUSION MAY NOT APPLY TO YOU.
THE DURATION AND REMEDIES OF ALL IMPLIED WARRANTIES, INCLUDING WITHOUT LIMITATION THE WARRANTIES OF MERCHANTABILITY AND FITNESS FOR A PARTICULAR PURPOSE ARE LIMITED TO THE DURATION OF THIS EXPRESS LIMITED WARRANTY.

13
Recipes
CHICKEN WINGS Ingredients• Chicken wings (up to 8 or so)• ½ cup of olive oil• 1 tsp of salt• 1 tsp of hot or sweet paprika • 1 tsp of pepper
Directions
1. Use a bowl to mix olive oil, salt, paprika, and pepper.
2. Use the olive oil mix and marinate your wings in the refrigerator for at least 30 minutes.
3. Preheat your Air Fryer to 360°F (~182°C).
4. Place the wings on the cooking tray and put the tray inside the Air Fryer.
5. Set the timer and cook for 18-22 minutes. Halfway through, remove the tray and fl ip the wings to cook evenly.
6. Finish cooking and transfer wings to a bowl or platter.
7. Serve while hot.
FRENCH FRIES Ingredients• 2 russet potatoes, peeled and cut into strips• 1 tbsp. of canola oil• Garlic, salt, or seasoning to taste
Directions
1. Add potatoes to bowl, add water to cover, and soak for 30 minutes.
2. Preheat the Air Fryer to 360°F (~182°C).
3. Drain and rinse the potatoes. Place on a towel-lined baking sheet, pat dry, and remove as much moisture as possible.
4. Transfer potatoes to a bowl, add oil, and toss to coat.
5. Place the potatoes in the fry basket and put the basket inside the Air Fryer.
6. Cook for approx. 15 minutes or until the potatoes are golden brown. Periodically remove and shake the basket to cook evenly.
7. Transfer the potatoes to a bowl, sprinkle with preferred seasoning, and toss to coat evenly.
Please note that cooking times are for reference and additional time may need to be added. Actual cooking time may vary according to ingredients used and other factors.
14
8. Serve while hot.
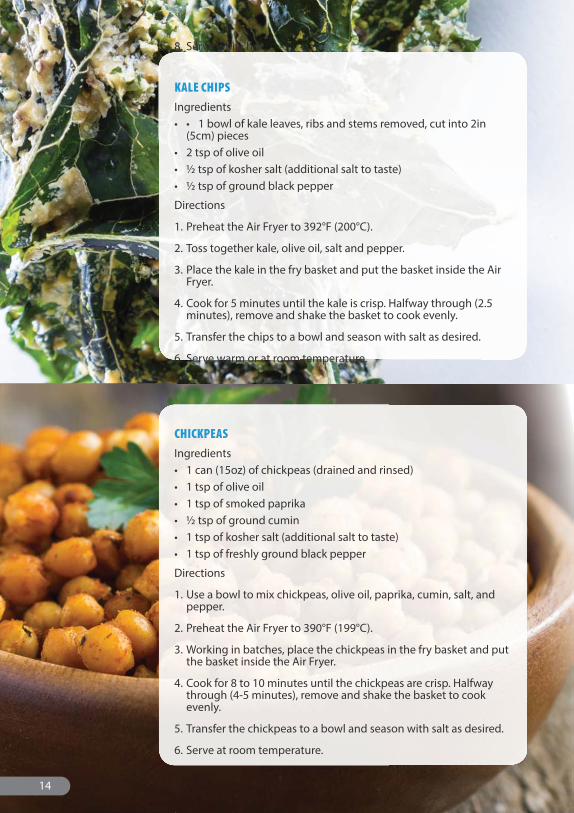
KALE CHIPS Ingredients• • 1 bowl of kale leaves, ribs and stems removed, cut into 2in
(5cm) pieces• 2 tsp of olive oil• ½ tsp of kosher salt (additional salt to taste)• ½ tsp of ground black pepper
Directions
1. Preheat the Air Fryer to 392°F (200°C).
2. Toss together kale, olive oil, salt and pepper.
3. Place the kale in the fry basket and put the basket inside the Air Fryer.
4. Cook for 5 minutes until the kale is crisp. Halfway through (2.5 minutes), remove and shake the basket to cook evenly.
5. Transfer the chips to a bowl and season with salt as desired.
6. Serve warm or at room temperature.
CHICKPEAS Ingredients• 1 can (15oz) of chickpeas (drained and rinsed) • 1 tsp of olive oil• 1 tsp of smoked paprika• ½ tsp of ground cumin• 1 tsp of kosher salt (additional salt to taste)• 1 tsp of freshly ground black pepper
Directions
1. Use a bowl to mix chickpeas, olive oil, paprika, cumin, salt, and pepper.
2. Preheat the Air Fryer to 390°F (199°C).
3. Working in batches, place the chickpeas in the fry basket and put the basket inside the Air Fryer.
4. Cook for 8 to 10 minutes until the chickpeas are crisp. Halfway through (4-5 minutes), remove and shake the basket to cook evenly.
5. Transfer the chickpeas to a bowl and season with salt as desired.
6. Serve at room temperature.

15
CUPCAKES Ingredients• 100 g caster sugar• ¾ tsp baking powder• 2 eggs• 3 drops of vanilla essence• 100 g softened butter or margarine• 100 g self-raising fl our
Tools• Silicon mini cupcake molds
Optional Topping• Icing • Sprinkles
Directions
1. Use a bowl to mix all the ingredients. Use a hand mixer or whisk until the batter reaches light consistency with some lumpiness.
2. Fill molds 2/3 full with prepared batter.
3. Preheat the Air Fryer to 320°F (160°C).
4. Place the molds on the cooking tray and put the tray inside the Air Fryer.
5. Bake at 320°F (160°C) for 10 to 15 minutes.
6. After 10 minutes, remove the cupcakes and insert a toothpick. If the toothpick doesn’t come out clean, then cook for ten more minutes.
7. After fi nishing baking, remove the cupcakes from the Air Fryer and allow them to cool 10-15 minutes.
8. Top the cupcakes as desired.

Copyright © 2017. Rollibot, LLC. All Rights Reserved