air conditioning system - discodan dot orgdiscodan.org/gfx/celica/servicemanual/chassis/ac.pdfinlet...
TRANSCRIPT

AIR CONDITIONING SYSTEM
–AIR CONDITIONING SYSTEMAC–1

GENERAL INFORMATIONREFRIGERATION SYSTEMPrevention of Refrigerant Release and Excessive quantitiesRefrigerant (CFCs) for automobile air conditioners is be-lieved to cause harm by depleting the ozone layer whichhelps to protect us from the ultraviolet rays of the sun.Therefore, it is necessary to prevent release of refrigerantto the atmosphere and to use the minimum amount whenservicing the air conditioner.1. USE RECOVERY MACHINE TO RECOVERREFRIGERANTWhen discharging refrigerant from the system as follows,use a recovery machine to recover the refrigerant.• Before replacing parts on the refrigerant line.• When moisture or air gets in the refrigerant line.• When excess refrigerant is charged.NOTICE:• When handling the recovery machine, always follow
the directions given in the instruction manual.• After recovery, the amount of compressor oil removed
must be measured and the same amountadded to the system.
2. USE CHARGING HOSES WITH STOP VALVE WHENINSTALLING MANIFOLD GAUGE SETTo prevent release of refrigerant, using charging hoseswith a stop valve when installing the manifold gauge setto the service valves on the refrigerant line.3. TIGHTEN CONNECTING PARTS SECURELYFollow the notices about tightening connecting parts instep 6 on page AC–4.
4. PROPERLY EVACUATE AIR FROM REFRIGERANTSYSTEMTo prevent release and wasteful use of refrigerant, evacu-ate air with care from refrigeration system as follows;• Do not evacuate before recovering refrigerant in system.
–AIR CONDITIONING SYSTEM General InformationAC–2

3. BE CAREFUL THAT LIQUID REFRIGERANT DOES NOTGET IN YOUR EYES OR ON YOUR SKINIf liquid refrigerant gets in your eyes or on your skin;(a) Wash the area with lots of cool water.CAUTION: Do not rub your eyes or skin.(b) Apply clean petroleum jelly to the skin.(c) Go immediately to a physician or hospital for professionaltreatment.CAUTION: Do not attempt to treat yourself.
Handling Precautions for RefrigerantContainer1. NEVER HEAT CONTAINER OR EXPOSE IT TO NAKEDFLAME2. BE CAREFUL NOT TO DROP CONTAINER AND NOTTO APPLY PHYSICAL SHOCKS TO IT
6. USE CHARGING CYLINDER TO CHARGE PROPERAMOUNT OF REFRIGERANTTo prevent excessive use of refrigerant due to overcharging,use a charging cylinder to charge the proper amountof refrigerant.
Handling Precautions for Refrigerant1. DO NOT HANDLE REFRIGERANT IN AN ENCLOSEDAREA OR NEAR AN OPEN FLAME2. ALWAYS WEAR EYE PROTECTION
• Do not perform repeat evacuation of system.
Top–Up Chargingof Refrigerant
ChargingRefrigerant
RefrigerantLeak Check
Evacuation Process
10 minutesor more
Leave for5 minutes
AirtightCheck
Evacuation
–AIR CONDITIONING SYSTEM General InformationAC–3

2. INSERT PLUG IMMEDIATELY IN DISCONNECTEDPARTSInsert a plug immediately in the disconnected parts toprevent the entry of moisture and dust.3. DO NOT REMOVE PLUG FROM NEW PARTS UNTILIMMEDIATELY BEFORE INSTALLATION4. DO NOT USE BURNER FOR BENDING ORLENGTHENING OPERATIONS ON TUBEIf the tubes are heated with a burner, a layer of oxidationforms inside the tube, causing the same kind of trouble asan accumulation of dust.5. DISCHARGE GAS IN NEW COMPRESSOR FROMCHARGING VALVE BEFORE INSTALLING ITIf the gas in new compressor is, not discharged first, com-pressor oil will spray out with gas when the plug is re-moved.
Handling Precautions for Gas–Cylinder TypeGas Leak Tester1. BEFORE USING TESTER MAKE SURE THAT THEREARE NO FLAMMABLE SUBSTANCES NEARBY2. BE CAREFUL NOT TO INHALE POISONOUS GASIf refrigerant gas comes in contact with flame, a poisonous gas is pro-duced. During leak tests, do not inhaleany gas.
6. TIGHTEN CONNECTING PARTS SECURELYSecurely tighten the connecting parts to prevent leakingof refrigerant gas.• Apply a few drops of compressor oil to O–ring fitting for
easy tightening and to prevent leaking of refrigerant gas.• Tighten the nuts using two wrenches to avoid twisting
the tube.
Precautions When Replacing Parts inRefrigerant line1. RECOVER REFRIGERANT IN SYSTEM BEFOREREMOVING PARTSUsing a recovery machine, recover refrigerant in systembefore removing the parts.NOTICE: Do not release refrigerant to atmosphere.
–AIR CONDITIONING SYSTEM General InformationAC–4

2. DO NOT OPEN HIGH PRESSURE VALVE OFMANIFOLD GAUGE WITH COMPRESSOROPERATINGIf the high pressure valve is opened, refrigerant flows inthe reverse direction and could cause the charging cylinderto rupture, so open and close the low pressure valveonly.3. BE CAREFUL NOT TO OVERCHARGE WITHREFRIGERANT IN SYSTEMIf refrigerant is overcharged, it causes trouble such asinsufficient cooling, poor fuel economy, engine overheatingetc.
ELECTRICAL PARTSBefore removing and inspecting the electrical parts, setthe ignition switch to the LOCK position and disconnectthe negative (–) terminal cable from the battery.CAUTION: Work must not be started until after atleast 20 seconds or longer from the time the negative(–) terminal cable is disconnected.
SRS AIRBAG SYSTEMFailure to carry out service operations in the correct se-quence could cause the airbag system to deploy, possiblyleading to a serious accident.When removal or installation of the parts and the yellowwire harness and connector for the airbag is necessary,refer to the precautionary notices in the AB section beforeperforming the operation.
Precautions When Charging Refrigerant1. DO NOT OPERATE COMPRESSOR WITHOUTENOUGH REFRIGERANT IN REFRIGERANT CYCLEIf there is not enough refrigerant in the refrigerant cycle,oil lubrication will be insufficient and compressorburnout may occur, so take care to avoid this.
• Tighten the O–ring fittings or the bolted type fittings tothe specified torque.
–AIR CONDITIONING SYSTEM General InformationAC–5

WIRING DIAGRAM
–AIR CONDITIONING SYSTEM Wiring DiagramAC–6

–AIR CONDITIONING SYSTEM Wiring DiagramAC–7

WIRING DIAGRAM (Cont’d)
–AIR CONDITIONING SYSTEM Wiring DiagramAC–8

–AIR CONDITIONING SYSTEM Wiring DiagramAC–9

PARTS LOCATION
–AIR CONDITIONING SYSTEM Parts LocationAC–10

GENERAL DESCRIPTIONREFRIGERATION CYCLE1. The compressor discharges high temperature and highpressure refrigerant containing the heat absorbed fromthe evaporator plus heat created by the compressor in adischarge stroke.2. This gaseous refrigerant flows into the condenser. In thecondenser, the gaseous refrigerant condenses into liquidrefrigerant.3. This liquid refrigerant flows into the receiver which storesand filters the liquid refrigerant till the evaporator requiresthe refrigerant.
4. The liquid refrigerant is changed by the expansion valve into a low temperature, low pressure liquidand gaseous mixture.5. This cold and foggy refrigerant flows to the evaporator. Vaporizing the liquid in the evaporator, theheat from the warm air stream passing through the evaporator core is transferred to the refrigerant.All the liquid is changed into the gaseous refrigerant in the evaporator and only heat–laden gaseousrefrigerant is drawn into the compressor. Then the process is repeated again.
–AIR CONDITIONING SYSTEM General DescriptionAC–11

PRINCIPLE OF A/C ELECTRICAL CIRCUIT
HOW IS MAGNETIC CLUTCH ENERGIZED?
–AIR CONDITIONING SYSTEM General DescriptionAC–12

DAMPERS POSITIONS
–AIR CONDITIONING SYSTEM General DescriptionAC–13

TROUBLESHOOTINGYou will find the source of the trouble more easily by properly using the table shown below. In this table,the numbers indicate the order of priority of the causes of trouble. Check each part in the order shown.If necessary, replace these parts.
*2 : with Push Type Blower Speed Control Switch A/C Control Assembly
Air Leakage From CoolingUnit or Duct
Cool aircomes outonly at highspeed
Radiator and CondenserFan Motor
Cool aircomes outintermittently
Water Temp. Switch(for Radiator Fan)
Inspect RefrigerationSystem
A/C Control CableAdjustment
Air Inlet Control Servomotor
Inspect RefrigerantVolume
Air Mix Control Servomotor
Ambient Temp. Sensor *1
A/C Water Temp. Switch
Insufficientvelocity ofcool air
Mode Control Servomotor
AUTO A/C Amplifier *1
Wiring or WiringConnection
A/C Control Assembly
Room Temp. Sensor*1
Magnetic Clutch Relay
A/C Fan Relay No. 3
A/C Fan Relay No. 2
Blower Fan Relay *2
* 1: with AUTO A/C
Water Temp. Sensor
Refrigerant Leakage
System Amplifier *2
No warm aircame out
Engine Main Relay
Insufficientcooling
No Cool aircome out
No bloweroperation
Power Transistor*1
No blowercontrol
Magnetic Clutch
Expansion Valve
Fan Relay No. 1
Pressure Switch
Blower Resistor
A/C Amplifier
Solar Sensor *1
Air Inlet Block
Blower Motor
Heater Relay
CO Section
Compressor
Belt Tension
Water Valve
Evaporator
Parts name
Condenser
Thermistor
AC–6 to 9
AC–6 to 9
See page
Receiver
Trouble
AC–48
AC–40
AC–40
AC–40
AC–36
AC–37
AC–36
AC–49
AC–38
AC–28
AC–17
AC–30
AC–34
AC–18
AC–47
AC–40
AC–38
AC–41
AC–43
AC–21
AC–40
AC–15
AC–32
AC–42
AC–29
AC–39
AC–21
AC–41
AC–43
AC–41
AC–42
AC–35
AC–36
AC–39
AC–39
AC–39
Fuses
–AIR CONDITIONING SYSTEM TroubleshootingAC–14

REFRIGERATION SYSTEMINSPECTION OF REFRIGERANTVOLUME1. RUN ENGINE AT APPROX. 2000 RPM2. OPERATE AIR CONDITIONER AT MAXIMUMCOOLING FOR A FEW MINUTES3. CHECK AMOUNT OF REFRIGERANTObserve the sight glass on the receiver.
*: Bubbles in the sight glass with ambient temperatures higher can be considered normal if cooling is sufficient
(1) Check for gas leakage with gasleak tester and repair if necessary(2) Add refrigerant until bubblesdisappear
(1) Check for gas leakage with gasleak tester and repair if necessary(2) Add refrigerant until bubblesdisappear
Immediately after air conditioner isturned off, refrigerant in sight glassstays clear
(1) Recover refrigerant(2) Evacuate air and charge properamount of purified refrigerant
When air conditioner is turned off,refrigerant foams and then stay clear
Temperature between compressorinlet and outlet is noticeably different
No temperature difference betweencompressor inlet and outlet
No bubbles present in sight glass
Bubbles present in sight glass
None, sufficient or too much
Amount of refrigerant
Empty or nearly empty
Refer to items 3 and 4.
Refer to items 5 and 6Proper or too much
Insufficient*
Symptom
Too much
Remedy
Proper
Item
–AIR CONDITIONING SYSTEM Refrigeration SystemAC–15

INSTALLATION OF MANIFOLD GAUGE SETHINT: To prevent releasing refrigerant, use charginghoses with a stop valve when installing the manifoldgauge set to service valves on the refrigerant line.1. CONNECT CHARGING HOSES WITH A STOP VALVETO MANIFOLD GAUGE SETTighten the nuts by hand.CAUTION:• Do not connect the wrong hoses to the high pressure
and the low pressure sides.• To prevent loosening the nuts, do not apply compres-
sor oil to seat of the connection.2. CLOSE HAND VALVES OF BOTH STOP VALVES3. CLOSE BOTH HAND VALVES OF GAUGE SET4. REMOVE PLUGS FROM SERVICE VALVES ONREFRIGERANT LINE5. CONNECT STOP VALVES TO SERVICE VALVESTighten the nuts by hand.CAUTION:• Do not connect the wrong valves to the high pressure
and the low pressure sides.• To prevent loosening the nuts, do not apply compres-
sor oil to seat of the connection.6. OPEN HAND VALVES OF BOTH STOP VALVES
REMOVAL OF MANIFOLD GAUGE SET1. CLOSE BOTH HAND VALVES OF MANIFOLD GAUGESET2. CLOSE HAND VALVES OF BOTH STOP VALVES3. DISCONNECT STOP VALVES FROM SERVICEVALVESON REFRIGERANT LINE4. INSTALL PLUGS TO SERVICE VALVES
–AIR CONDITIONING SYSTEM Refrigeration SystemAC–16

HINT:• ”New belt” refers to a belt which has been used less
than 5 minutes on a running engine.• ”Used belt” refers to a belt which has been used on a
running engine for 5 minutes or more.4. START ENGINE5. TURN ON A/C SWITCHCheck that the A/C operates at each position of theblower switch.6. CHECK MAGNETIC CLUTCH OPERATIONIf magnetic clutch does not engage, check the A/C fuse.7. CHECK THAT IDLE INCREASESWhen the magnetic clutch engages, engine revolutionshould increase.Standard idle–up rpm: 900 –1,000 rpm8. CHECK CONDENSER FAN MOTOR ROTATES9. CHECK AMOUNT OF REFRIGERANTIf you can see bubbles in the sight glass, additional refriger-ant is needed. (See page AC–15)10. IF NO COOLING OR IT IS INSUFFICIENT, INSPECTFOR LEAKAGEUsing a gas leak tester, inspect each component of therefrigeration system.
ON–VEHICLE INSPECTION1. CHECK CONDENSER FINS FOR BLOCKAGE ORDAMAGEIf the fins are clogged, clean them with pressurized water.NOTICE: Be careful not to damage the fins.2. MAKE SURE THAT DRIVE BELT IS INSTALLEDCORRECTLYAfter installing the drive belt, check that it fits properly inthe ribbed grooves.3. CHECK DRIVE BELT TENSIONUsing a belt tension gauge, check the drive belt tension.Belt tension gauge:
Nippondenso BTG–20 (95506–00020) orBorroughs No.BT–33–73F
Drive belt tension:
Used belt (lbf)New belt (Ibf)Engine
–AIR CONDITIONING SYSTEM Refrigeration SystemAC–17

INSPECTION OF REFRIGERATION SYSTEM WITH MANIFOLD GAUGE SETThis is a method in which the trouble is located by using a manifold gauge set. (See ”Installation ofManifold Gauge Set” on page AC–16) Read the manifold gauge pressure when the following conditionsare established:(a) Temperature at the air inlet with the switch set at RECIRC is 30 – 35°C (86 – 95°F)(b) Engine running at 2,000 rpm(c) Blower fan speed control switch set at high speed(d) Temperature control switch set at max. cool sideHINT: It should be noted that the gauge indications may vary slightly due to ambient temperatureconditions.NOTICE:• Always recover refrigerant before removing the parts in the refrigerant line and evacuating air.• Evacuate air and charge proper amount of purified refrigerant after installing the pants in the
refrigerant line.
(1) Replace receiver(2) Remove moisturein system throughrepeatedly evacuating air
During operation, pressure at lowpressure side sometimes becomesa vacuum and sometimes normal
Periodically cools andthen fails to cool
Normally functioningsystem
Moisture present inrefrigeration system
Probable cause
Normal cooling
Condition Remedy
–AIR CONDITIONING SYSTEM Refrigeration SystemAC–18

NOTICE:• Always recover refrigerant before removing the parts in the refrigerant line and evacuating air,• Evacuate air and charge proper amount of purified refrigerant after installing the parts in the
refrigerant line.
HINT at 6:These gauge indications are for when the refrigeration system has been opened and the refrigerantcharged without evacuating air.
(1) Check amount ofrefrigerantIf refrigerant isovercharged(2) Recover refrigerant(3) Evacuate air andcharge properamount of purifiedrefrigerant
(1) Check heat sensingtube installationconditionIf (1) is normal(2) Check expansionvalve and replaceif defective
(1) Replace receiver(2) Check compressoroil to see if dirty(3) Remove air insystem throughrepeatedly evacuating air
(1) Check for gasleakage with gasleak tester andrepair if necessary(2) Add refrigerantuntil bubblesdisappear
• Insufficient cooling• Frost or Large
amount of dewon piping at lowpressure side
Expansion valveimproperly mounted,heat sensing tubedefective(Opens too wide)
Pressure too high at both low and highpressure sides
Pressure low at both low and highpressure sides
• Insufficient cooling• Bubbles seen in
sight glass
• Insufficient cooling• Frost on tubes from
receiver to unit
(1) Clean condenser(2) Check fan motoroperation
Refrigerant flowobstructed by dirt inreceiver
Insufficient coolingof condenser
Refrigerant overcharged
Insufficient refrigerant
Air present in system
Insufficient cooling
Replace receiver
Probable causeCondition Remedy
–AIR CONDITIONING SYSTEM Refrigeration SystemAC–19

NOTICE:• Always recover refrigerant before removing the parts in the refrigerant line and evacuating air.• Evacuate air and charge proper amount of purified refrigerant after installing the parts in the
refrigerant, line.
To perform electrical diagnosisTo perform electrical diagnosisTo perform electrical diagnosisTo evacuate and charge systemIf you require a stop valve, please order this kitTo remove pressure plateTo remove and install pressure plateTo remove and install rotor and stator
(1) Check heat sensingtube for gas leakageand replaceexpansion valve ifdefectiveIf (1) is normal(2) Clean out dirt inexpansion valve byblowing with airIf not able toremove dirt, replaceexpansion valve(3) Replace receiver
OhmmeterVoltage meterAmmeterAir conditioner service tool setCharging hose kit with stop valveMagnetic clutch removerMagnetic clutch stopperSnap ring pliers (External type)
SSM (SPECIAL SERVICE MATERIALS)
• Does not cool(Cools from time totime in some cases)
• Frost or dew seenon piping beforeand after receiveror expansion valve
SPECIAL TOOLS AND EQUIPMENT
Vacuum indicated at low pressure side,very low pressure indicated at highpressure
–––
07110–5801107110–5804007112–6604007112–7606007114–84020
Pressure too high at low pressure side,pressure too low at high pressure side
ND OIL 6,SUNISO No.5GS or equivalent
Refrigerant does notcirculate
Repair or replacecompressor
Insufficient compression
07117–68040–
Probable cause
Does not cool
Compressor
Part Name
Condition Remedy
Part No.
SST No.
Use etc.
Tool Use
–AIR CONDITIONING SYSTEM Refrigeration SystemAC–20

COMPRESSORON–VEHICLE INSPECTION1. INSTALL MANIFOLD GAUGE SET(See page AC–16)2. RUN ENGINE AT FAST IDLE3. CHECK COMPRESSOR FOR FOLLOWING:
(a) High pressure gauge reading is not lower and lowpressure gauge reading is not higher than normal.
(b) Metallic sound(c) Leakage from shaft seal
If defects are found, repair the compressor.4. CHECK MAGNETIC CLUTCH
(a) Inspect the pressure plate and the rotor for signs ofoil.
(b) Check the clutch bearings for noise and grease leak-age.
REVOLUTION DETECTING SENSORUsing an ohmmeter, measure the resistance between twoterminals 2 and 3 of the sensor.Standard resistance: 100 – 130 � at 20°C (68°F)If resistance is not as specified, replace the revolutiondetecting sensor.
(d) Connect the positive (+) lead from the battery toterminal 1, check that the magnetic clutch is en-ergized.
If magnetic clutch is not energized, replace the coil.NOTICE: Do not short the positive (+) lead wire on
the vehicle, applying battery voltage.
(c) Using an ohmmeter, measure the resistance ofthe stator coil between terminal 1 and ground.
Standard resistance: 3.4 – 3.8 � at 20°C (68°F)If resistance is not as specified, replace the coil.
–AIR CONDITIONING SYSTEM CompressorAC–21

REMOVAL OF COMPRESSOR
A Series Engine
S Series Engine
–AIR CONDITIONING SYSTEM CompressorAC–22

1. RUN ENGINE AT IDLE SPEED WITH AIRCONDITIONING ON FOR 10 MINUTES
2. STOP ENGINE3. DISCONNECT NEGATIVE CABLE FROM BATTERY4. REMOVE BATTERY5. DISCONNECT CLUTCH LEAD WIRE FROM WIRING
HARNESS6. RECOVER REFRIGERANT FROM REFRIGERATION
SYSTEM7. DISCONNECT TWO HOSES FROM COMPRESSOR
SERVICE VALVESCap the open fitting immediately to keep moisture out ofthe system.8. REMOVE COMPRESSOR
(a) Loosen the drive belt.(b) Remove the compressor mounting bolts and the
compressor.
DISASSEMBLY OF MAGNETIC CLUTCH
1. REMOVE PRESSURE PLATE(a) Using SST and a socket, remove the shaft bolt.SST 07112–76060
–AIR CONDITIONING SYSTEM CompressorAC–23

(b) Using a plastic hammer, tap the rotor off the shaft.NOTICE: Be careful not to damage the pulleywhen tapping on the rotor.
(c) Using SST and the socket, remove the pressureplate.
SST 07112–76060
2. REMOVE ROTOR(a) Using SST, remove the snap ring.SST 07114–84020
(b) Install SST to the pressure plate.SST 07112–66040
(d) Remove the shims from the pressure plate.
–AIR CONDITIONING SYSTEM CompressorAC–24

3. REMOVE STATOR(a) Disconnect the stator lead wire from the compressor
housing.
(b) Using SST, remove the snap ring.SST 07114–84020
(c) Remove the stator.
–AIR CONDITIONING SYSTEM CompressorAC–25

2. INSTALL ROTOR(a) Install the rotor on the compressor shaft.(b) Using SST, install the new snap ring.SST 07114–84020
ASSEMBLY OF MAGNETIC CLUTCH1. INSTALL STATOR
(a) Install the stator on the compressor.
(c) Connect the stator lead wires to the compressorhousing.
3. INSTALL PRESSURE PLATE(a) Install the shims to the pressure plate.
(b) Using SST, install the new snap ring.SST 07114–84020
–AIR CONDITIONING SYSTEM CompressorAC–26

INSTALLATION OF COMPRESSOR(See page AC–26)1. INSTALL COMPRESSOR WITH THREE MOUNTING
BOLTSTorque: 27 N–m (280 kgf–cm, 20 ft–lbf)2. INSTALL DRIVE BELT(See steps 2 and 3 on page AC–21)3. CONNECT TWO HOSES TO COMPRESSOR SERVICE
VALVESTorque: 25 N–m (250 kgf–cm, 18 ft–lbf)4. CONNECT CLUTCH LEAD WIRE TO WIRING HARNESS5. PLACE BATTERY6. CONNECT NEGATIVE CABLE TO BATTERY7. EVACUATE AIR FROM AIR CONDITIONING SYSTEM8. CHARGE AIR CONDITIONING SYSTEM WITH
REFRIGERANT AND CHECK GAS LEAKAGESpecified amount: 720 ± 50 g (25.4 ± 1.8 oz)
4. CHECK CLEARANCE OF MAGNETIC CLUTCHCheck the clearance between the pressure plate and rotorusing thickness gauge.Standard clearance: 0.5 ± 0.15 mm
(0.0020 ± 0.0059 in.)If the clearance is not within tolerance, change the numberof shims to obtain the standard clearance.
(b) Using SST and torque wrench, install the shaftbolt.
SST 07112–76060Torque: 14 N–m (140 kgf–cm, 10 ft–lbf)
–AIR CONDITIONING SYSTEM CompressorAC–27

INSTALLATION OF RECEIVER1. INSTALL RECEIVER IN RECEIVER HOLDERHINT: Do not remove the blind plugs until ready forconnection.2. CONNECT TWO LIQUID TUBES TO RECEIVERTorque: 13 N–m (135 kgf–cm, 10 ft–lbf)3. IF RECEIVER WAS REPLACED, ADD COMPRESSOR
OIL TO COMPRESSORAdd 20 cc (0.7 fl.oz.)ND OIL 6,SUNISO No. 5GS or equivalent.4. EVACUATE AIR FROM AIR CONDITIONING SYSTEM5. CHARGE AIR CONDITIONING SYSTEM WITH
REFRIGERANT AND CHECK FOR GAS LEAKAGESpecified amount: 720 ±50 g (25.4 ±1.8 oz)
REMOVAL OF RECEIVER1. RECOVER REFRIGERANT FROM REFRIGERATION
SYSTEM2. DISCONNECT TWO LIQUID TUBES FROM RECEIVERHINT: Cap the open fittings immediately to keep moistureout of the system.3. REMOVE RECEIVER FROM RECEIVER HOLDER
RECEIVER(See page AC–10)
ON–VEHICLE INSPECTIONCHECK SIGHT GLASS, FUSIBLE PLUG AND FITTINGSFOR LEAKAGEUse a gas leak detector. Repair as necessary.
–AIR CONDITIONING SYSTEM ReceiverAC–28

REMOVAL OF CONDENSER1. RECOVER REFRIGERANT FROM REFRIGERATION
SYSTEM2. REMOVE FRONT GRILLE AND FRONT UNDER COVER3. REMOVE CENTER BRACE AND HORNS4. REMOVE CONDENSER FAN5. DISCONNECT DISCHARGE HOSE AND LIQUID TUBE
CLAMP FROM CONDENSER INLET FITTING6. DISCONNECT LIQUID TUBE AND LIQUID TUBE
CLAMP FROM CONDENSER OUTLET FITTINGHINT: Cap the open fittings immediately to keep moisture outof the system.7. REMOVE CONDENSERRemove the four nuts and condenser.
CONDENSER(See page AC–10)
ON–VEHICLE INSPECTION1. CHECK CONDENSER FINS FOR BLOCKAGE OR
DAMAGEIf the fins are clogged, wash them with water and drywith compressed air.NOTICE: Be careful not to damage the fins.If the fins are bent, straighten them with a screwdriver orpliers.2. CHECK CONDENSER FITTINGS FOR LEAKAGERepair as necessary.
INSTALLATION OF CONDENSER1. INSTALL CONDENSERinstall the four condenser nuts, making sure the rubbercushions fit on the mounting flanges correctly.2. CONNECT LIQUID TUBE, DISCHARGE HOSE TO
CONDENSERTorque:
Liquid tube 14 N–m (140 kgf–cm, 10 ft–lbf)Discharge hose 23 N–m (230 kgf–cm, 17 ft–lbf)
–AIR CONDITIONING SYSTEM CondenserAC–29

3. INSTALL CONDENSER FAN4. INSTALL CENTER BRACE AND HORNS5. INSTALL FRONT GRILLE AND UNDER COVER6. IF CONDENSER WAS REPLACED, ADD
COMPRESSOR OIL TO COMPRESSORAdd 40 – 50 cc (1.4 – 1.7 fl.oz. )ND OIL 6,SUNISO No. 5GS or equivalent.7. EVACUATE AIR FROM AIR CONDITIONING SYSTEM8. CHARGE AIR CONDITIONING SYSTEM WITH
REFRIGERANT AND CHECK FOR GAS LEAKAGESpecified amount 720 ± 50 g (25.4 ± 1.8 oz)
2. INSTALL MANIFOLD GAUGE SET(See page AC–16)3. RUN ENGINERun the engine at 2,000 rpm at least 5 minutes.4. CHECK EXPANSION VALVEIf the expansion valve is clogged, the low pressurereading will drop to 0 kPa (0 kgf/cm2, 0 psi), otherwise iisOK.
COOLING UNIT(See page AC–10)
ON–VEHICLE INSPECTION OFEXPANSION VALVE1. CHECK QUANTITY OF REFRIGERANT GAS DURING
REFRIGERATION CYCLE
–AIR CONDITIONING SYSTEM Condenser, Cooling UnitAC–30

REMOVAL OF COOLING UNIT1. DISCONNECT NEGATIVE CABLE FROM BATTERY2. RECOVER REFRIGERANT FROM REFRIGERATION
SYSTEM3. DISCONNECT SUCTION TUBE FROM COOLING UNIT
OUTLET FITTING4. DISCONNECT LIQUID TUBE FROM COOLING UNIT
INLET FITTINGHINT: Cap the open fittings immediately to keep moistureout of the system.5. REMOVE GROMMETS FROM INLET AND OUTLET
FITTINGS6. REMOVE GLOVE BOX AND REINFORCEMENT7. DISCONNECT CONNECTORS8. REMOVE COOLING UNITRemove three nuts and four bolts.
DISASSEMBLY OF COOLING UNIT
–AIR CONDITIONING SYSTEM Cooling UnitAC–31
ASSEMBLY OF COOLING UNITINSTALL COMPONENTS ON EVAPORATOR
(a) Connect the expansion valve, suction and liquidtubes to the evaporator. Torque the bolt.
Torque: 5.4 N–m (55 kgf–cm, 47.7 in.–lbf)HINT: Be sure that the 0–rings are positioned on thetube fitting.
(b) Install lower unit case to the evaporator.(c) Install thermistor to the evaporator.(d) Install upper unit case.(e) Install four screws.(f) Install four clips.(g) Connect connectors.
EvaporatorINSPECTION OF EVAPORATOR1. CHECK EVAPORATOR FINS FOR BLOCKAGEIf the fins are clogged, clean them with compressed air.NOTICE: Never use water to clean the evaporator.2. CHECK FITTINGS FOR CRACKS OR SCRATCHESRepair as necessary.
1. REMOVE LOWER AND UPPER UNIT CASES(a) Disconnect connectors.(b) Remove four clips.(c) Remove four screws.(d) Remove upper unit case.(e) Remove thermistor with thermistor holder.(f) Remove lower unit case.
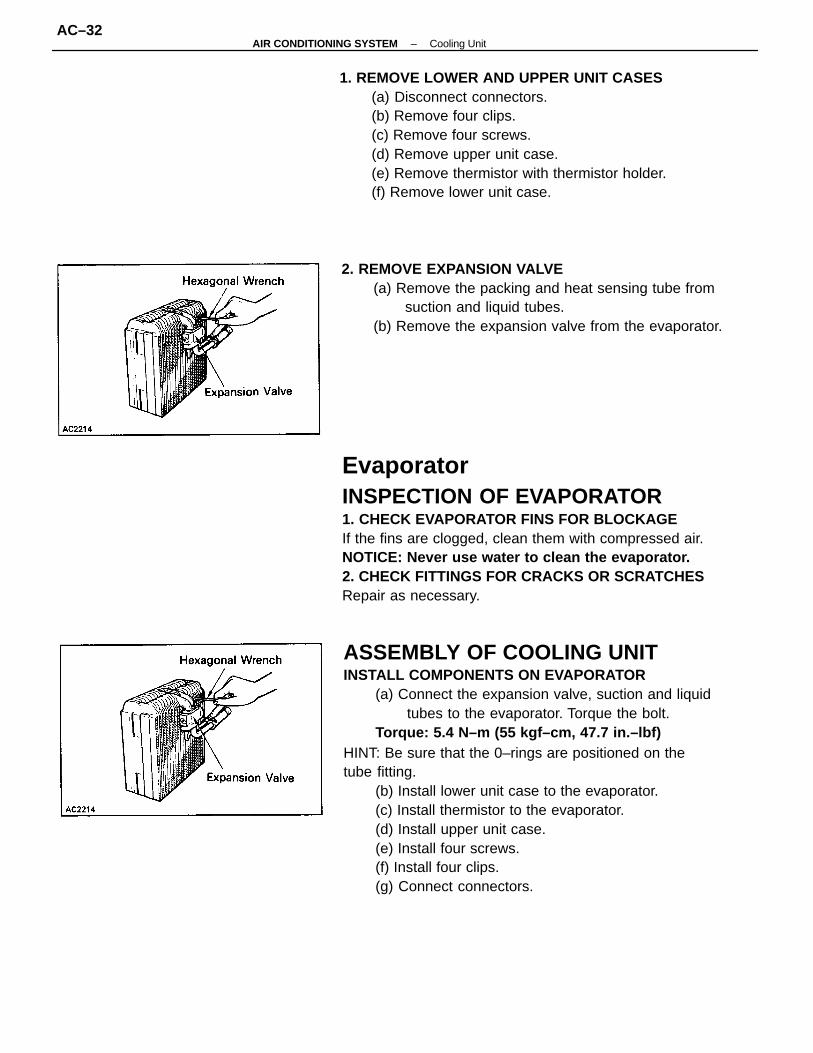
2. REMOVE EXPANSION VALVE(a) Remove the packing and heat sensing tube from
suction and liquid tubes.(b) Remove the expansion valve from the evaporator.
–AIR CONDITIONING SYSTEM Cooling UnitAC–32

INSTALLATION OF COOLING UNIT1. INSTALL COOLING UNITInstall the cooling unit with three nuts and four bolts.2. CONNECT CONNECTORS3. INSTALL GLOVE BOX AND REINFORCEMENT4. INSTALL GROMMETS ON INLET AND OUTLET
FITTINGS5. CONNECT LIQUID TUBE TO COOLING UNIT INLET
FITTINGTorque the nut.Torque: 13 N–m (135 kgf–cm, 10 ft–lbf)
6. CONNECT SUCTION TUBE TO COOLING UNITOUTLET FITTINGTorque the nut.Torque: 32 N–m (325 kgf–cm, 24 ft–lbf)
7. IF EVAPORATOR WAS REPLACED, ADDCOMPRESSOR OIL TO COMPRESSORAdd 40 – 50 cc (1.4 –1.7 fl.oz.)ND OIL 6,SUNISO No. 5GS or equivalent.
8. CONNECT NEGATIVE CABLE TO BATTERY9. EVACUATE AIR FROM AIR CONDITIONING SYSTEM10. CHARGE AIR CONDITIONING SYSTEM WITH
REFRIGERANT AND CHECK ON GAS LEAKAGESpecified amount: 720 ±50 g (25.4 ±1.8 oz)
–AIR CONDITIONING SYSTEM Cooling UnitAC–33

REFRIGERANT LINES
–AIR CONDITIONING SYSTEM Refrigerant LinesAC–34

ON–VEHICLE INSPECTION1. INSPECT HOSES AND TUBES FOR LEAKAGEUse a gas leak detector. Replace, if necessary.2. CHECK THAT HOSE AND TUBE CLAMPS ARE NOT
LOOSETighten or replace as necessary.REPLACEMENT OF REFRIGERANT LINES1. RECOVER REFRIGERANT FROM REFRIGERATION
SYSTEM2. REPLACE FAULTY TUBE OR HOSEHINT: Cap the open fitting immediately to keep moisture outof the system.3. TIGHTENING TORQUE FOR O–RING FITTINGS AND
BOLTED TYPE FITTINGS4. EVACUATE AIR FROM AIR CONDITIONING SYSTEM5. CHARGE AIR CONDITIONING SYSTEM WITH
REFRIGERANT AND CHECK ON GAS LEAKAGESpecified amount: 720 ± 50 g (25.4 + 1.8 oz)
MOTORSINSPECTION OF BLOWER MOTORINSPECT BLOWER MOTOR(S Series Engine)Connect the positive (+) lead from the battery to terminal 2and the negative (–) lead to terminal 1, then checkthat the motor operation is smooth.(A Series Engine)Connect the positive (+) lead from the battery to terminal 1and the negative (–) lead to terminal 2, then checkthat the motor operation is smooth.If operation is not as specified, replace the blower motor.
–AIR CONDITIONING SYSTEM Refrigeration LinesAC–35

INSPECTION OF SERVOMOTORS1. INSPECT AIR INLET CONTROL SERVOMOTOR
(a) Connect the positive (+) lead from the battery toterminal 1 and the negative (–) lead to terminal 3,check that the arm rotates to the ”FRESH” sidesmoothly.
2. INSPECT MODE CONTROL SERVOMOTOR(a) Connect the positive (+) lead from the battery to
terminal 5 and the negative (–) lead to terminal 6.(b) Connect the negative (–) lead from the battery to
each terminal and check that the arm rotates toeach position as shown below.
3. INSPECT AIR MIX CONTROL SERVOMOTOR(Motor Operation)
(a) Connect the positive (+) lead from the battery toterminal 2 and the negative (–) lead to terminal 6,check that the lever moves smoothly from HOT toCOOL.
(b) Connect the positive (+) lead from the battery toterminal 1 and the negative (–) lead to terminal2, check that the arm rotates to the ”RECIRC”side smoothly.
If operation is not as specified, replace the servomotor.
If operation is not as specified, replace the servomotor.
Connected terminal Position
–AIR CONDITIONING SYSTEM MotorsAC–36

2. INSPECT FAN MOTORS(a) Disconnect 2 pins connector of the fan motor.(b) Using the wire harness, apply battery voltage to the
connector.(c) Confirm smooth rotation of the motor within the
specified current flow.Standard current: 6.7 ± 0.7 AIf current is not as specified, replace the motor.
(Position Sensor Operation)(a) Measure the resistance between terminals 1 and 3.Resistance: Approx. 6 k �
(b) Set the arm to COOL position.(c) Check that the resistance between terminals 1 and
4 decreases from approx. 4.8 k� to 1.2 k�, whenthe arm is rotated from COOL to HOT position.
If operation is not as specified, replace the motor.
INSPECTION OF RADIATOR FAN MOTORAND CONDENSER FAN MOTOR1. INSPECT RADIATOR FAN AND CONDENSER FAN
SYSTEM OPERATIONHINT: The fan motor operate at two speeds dependingon the water temperature and the A/C switch.
(b) Connect the positive (+) lead from the battery toterminal 5 and the negative (–) lead to terminal2, check that the lever moves smoothly fromCOOL to HOT.
If operation is not as specified, replace the motor.
Fan MotorSpeed
Water TemperatureMagneticClutch
A/CSwitch
OFForON High
High
Low
OFFOff
–AIR CONDITIONING SYSTEM MotorsAC–37

POWER TRANSISTOR(with AUTO AC)INSPECTION OF POWERTRANSISTORINSPECT POWER TRANSISTOR
(a) Connect the positive (+ ) leads from the battery toterminal 1 through a 3.4 W test bulb and terminal 3of a 120�resistor.
(b) Connect the negative (–) lead from the battery toterminal 2, then check that the test bulb lights up.If operation is not as specified, replace the powertransistor.
BLOWER RESISTORINSPECTION OF BLOWER RESISTORINSPECT BLOWER RESISTOR CONTINUITY(with AUTO A/C: Dial Type Blower Speed ControlSwitch)
If continuity is not as specified, replace the blower re-sistor.
(without AUTO A/C)
Condition
Condition
Constant
Terminal
Terminal
Constant
–AIR CONDITIONING SYSTEM Blower ResistorAC–38

If continuity is not as specified, replace the relay.
INSPECTION OF RELAYS FOR RADIATORFAN AND CONDENSER FAN1. INSPECT FAN RELAY NO. 1 CONTINUITY
If the continuity is not as specified, replace the relay.
INSPECTION OF MAGNETIC CLUTCH RELAYINSPECT MAGNETIC CLUTCH RELAY CONTINUITY
RELAYSINSPECTION OF RELAYS FORBLOWER FAN1. INSPECT HEATER MAIN RELAY CONTINUITY
If continuity is not as specified, replace the relay.2. INSPECT BLOWER FAN RELAY
If continuity is not as specified, replace the relay.
Apply battery voltage toterminals 5 and 6
Apply battery voltage toterminals 1 and 3.
Apply battery voltage toterminals 5 and 7
Apply battery voltage toterminals 5 and 8
Apply battery voltage toterminals 1 and 2.
Apply battery voltage toterminals/and 2.
Condition
Condition
Condition
Condition
Constant
Terminal
Constant
Constant
Constant
Terminal
Terminal
Terminal
–AIR CONDITIONING SYSTEM RelaysAC–39

SWITCHESINSPECTION OF PRESSURE SWITCH1. DISCONNECT CONNECTOR OF PRESSURE SWITCH2. INSPECT PRESSURE SWITCH
(a) Install the manifold gauge set.(b) Observe the gauge reading.(c) Check the continuity between two terminals of
pressure switch shown in the below.
INSPECTION OF A/C WATERTEMPERATURE SWITCH1. DISCONNECT CONNECTOR OF A/C WATER
TEMPERATURE SWITCH2. INSPECT A/C WATER TEMPERATURE SWITCHCheck the continuity between terminal of the temperatureswitch and ground.
If continuity is not as specified, replace the relay.3. INSPECT A/C FAN RELAY NO. 3 CONTINUITYSee Magnetic Clutch Relay on page AC–43.4. INSPECT ENGINE MAIN RELAYSee Heater Main Relay on page AC–43.
2. INSPECT A/C FAN RELAY NO. 2 CONTINUITY
Apply battery voltage toterminal 1 and 2
Condition
Constant
Terminal
–AIR CONDITIONING SYSTEM RelaysAC–40

SENSORSINSPECTION OF ROOM TEMPERATURESENSORINSPECT ROOM TEMPERATURE SENSORCheck the sensor resistance.HINT: If there is an open circuit in the sensor, the system willoperate at maximum heating.Conversely, if there is a short in the system, it will operateat maximum cooling.
INSPECTION OF SOLAR SENSORINSPECT SOLAR SENSORUsing an ohmmeter, check the continuity.HINT: There is the solar sensor on the safety pad of theassistant side.
INSPECTION OF AMBIENT TEMPERATURESENSORINSPECT AMBIENT TEMPERATURE SENSORCheck the sensor resistance.
–AIR CONDITIONING SYSTEM SensorsAC–41

THERMISTORREMOVAL AND INSPECTION OFTHERMISTOR1. DISCONNECT NEGATIVE CABLE FROM BATTERY2. REMOVE GLOVE BOX AND UNDER COVER3. CHECK THERMISTOR INSTALLED OPERATIONUsing an ohmmeter, measure the resistance at the connec-tor.Resistance: 1,500 � at 25°C (77°F)If resistance value is not as specified, replace the thermis-tor.4. REMOVE THERMISTOR
(a) Disconnect the connector.(b) Remove the screw and thermistor from the cooling
unit.5. CHECK THERMISTOR OPERATION
(a) Place the thermistor in cold water. While varying thetemperature of the water, measure the resistance atthe connector and, at the same time, measure thetemperature of the water with a thermometer.
(b) Compare the two readings on the chart.If the intersection is not between the two lines, re-placethe thermistor.
INSTALLATION OF THERMISTOR1. INSTALL THERMISTOR
(a) Install the thermistor with the screw.(b) Connect the connector.
2. INSTALL GLOVE BOX AND UNDER COVER3. CONNECT NEGATIVE CABLE TO BATTERY
INSPECTION OF WATER TEMPERATURESENSORINSPECT WATER TEMPERATURE SENSORUsing an ohmmeter, check the resistance.
If resistance value is not as specified, replace the sensor.
Temperature Resistance
–AIR CONDITIONING SYSTEM SensorsAC–42

INSPECTION OF A/C CONTROL ASSEMBLYIlluminationINSPECT ILLUMINATION
(a) Connect the positive (+) lead from the battery toterminal A–18 and the negative (–) lead to terminalA–17.
(b) Check that the illumination lights up.If the illumination does not light up, test the bulb.
ADJUSTMENT OF AIR MIX CONTROL CABLEADJUST WATER VALVE CONTROL CABLESet the water valve and the temperature control switch to”COOL”, then install the control cable and lock theclamp.HINT: For the servomotor type temperature controlswitch, set the switch to ”COOL” when the ignitionswitch is turned ON and the blower motor is operating.
ADJUSTMENT OF AIR MIX DAMPERCONTROL CABLEADJUST AIR MIX DAMPER CONTROL CABLESet the air mix damper and the temperature controlswitch to ”COOL”, then install the control cable and lockthe clamp.
AC CONTROL ASSEMBLYwith Dial Type Blower Speed ControlSwitch
–AIR CONDITIONING SYSTEM AC Control AssemblyAC–43
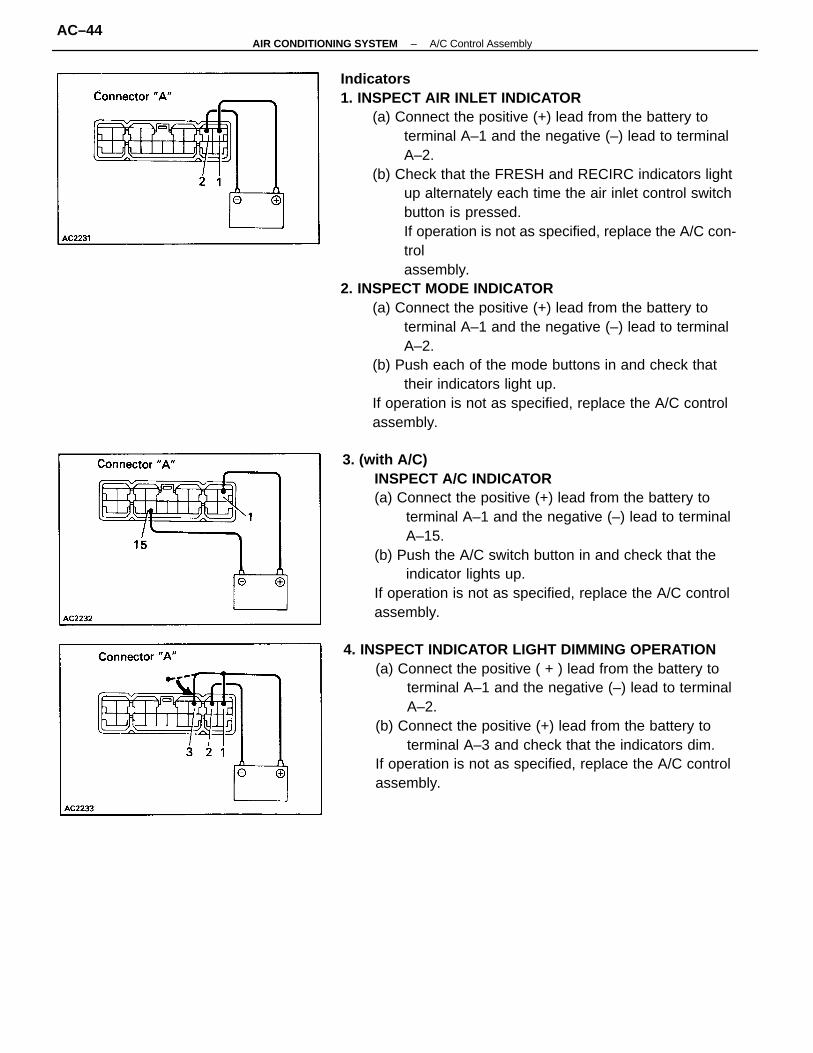
Indicators1. INSPECT AIR INLET INDICATOR
(a) Connect the positive (+) lead from the battery toterminal A–1 and the negative (–) lead to terminalA–2.
(b) Check that the FRESH and RECIRC indicators lightup alternately each time the air inlet control switchbutton is pressed.If operation is not as specified, replace the A/C con-trolassembly.
2. INSPECT MODE INDICATOR(a) Connect the positive (+) lead from the battery to
terminal A–1 and the negative (–) lead to terminalA–2.
(b) Push each of the mode buttons in and check thattheir indicators light up.
If operation is not as specified, replace the A/C controlassembly.
3. (with A/C)INSPECT A/C INDICATOR(a) Connect the positive (+) lead from the battery to
terminal A–1 and the negative (–) lead to terminalA–15.
(b) Push the A/C switch button in and check that theindicator lights up.
If operation is not as specified, replace the A/C controlassembly.
4. INSPECT INDICATOR LIGHT DIMMING OPERATION(a) Connect the positive ( + ) lead from the battery to
terminal A–1 and the negative (–) lead to terminalA–2.
(b) Connect the positive (+) lead from the battery toterminal A–3 and check that the indicators dim.
If operation is not as specified, replace the A/C controlassembly.
–AIR CONDITIONING SYSTEM A/C Control AssemblyAC–44

If continuity is not as specified, replace the A/C controlassembly.3. INSPECT BLOWER SPEED CONTROL SWITCH
CONTINUITY
If continuity is not as specified, replace the A/C controlassembly.2. INSPECT MODE CONTROL SWITCH CONTINUITY
Switches1. INSPECT AIR INLET CONTROL SWITCH CONTINUITY
If continuity is not as specified, replace the A/C controlassembly.
Switch position
Switch position
w/o AUTO A/C
Switch position
w/AUTO A/C
Terminal
Terminal
Terminal
RECIRC
FRESH
AUTO
FOOT
FACE
F/ D
B/L
OFF OFF
DEF
–AIR CONDITIONING SYSTEM A/C Control AssemblyAC–45

4. INSPECT TEMPERATURE CONTROL SWITCH(with AUTO A/C)
(a) Measure the resistance between terminals C–2 andC–3.
Resistance: Approx. 3k �
(b) Check that the resistance between terminals C–1and C–3 increases from 0 to approx. 3 k� when theswitch knob is turned from COOL to HOT.
If operation is not as specified, replace the A/C controlassembly.(without AUTO A/C)Check that the switch knob turns smoothly and that thecontrol cables contract and expands as the switch knobis turned.If operation is not as specified, replace the temperaturecontrol switch.
If continuity is not as specified, replace the A/C controlassembly.
5. (with A/C)INSPECT A/C SWITCH CONTINUITY
Switch position
Terminal
OFF
–AIR CONDITIONING SYSTEM A/C Control AssemblyAC–46

AMPLIFIERSINSPECTION OF A/C AMPLIFIERINSPECT AMPLIFIER CIRCUITDisconnect the amplifier and inspect the connector onthe wire harness side as shown in the chart below.Test conditions:
(1) Ignition switch: ON(2) Temperature control lever: MAX COOL(3) Blower switch: HI
*1: with Variable Volume Control Mechanism Compressor
Engine coolant more than 100°C (212°F)
Engine coolant less than 95°C (203°F)
Approx. 15 k� at 25°C (77°F)
Turn A/C switch off.
Turn A/C switch off.
Turn A/C switch off.
Turn A/C switch on.
Turn A/C switch on.
Turn A/C switch off.
Turn A/C switch on.
Turn A/C switch on.
Approx. 10 to 14 V
Turn A/C switch off.
Turn A/C switch on.
Tester connection
Start the engine.
Stop the engine.
Battery voltage
Battery voltage
Specified value
Battery voltage
Battery voltage
Approx. 115�
No continuity
No continuity
Approx. 12�
No voltage
No voltage
No voltage
No voltage
No voltage
No voltage
No voltage
Continuity
Continuity
Continuity
Continuity
Continuity
Resistance
ConditionCheck for
Constant
Constant
Constant
Constant
Constant
Constant
Voltage
3S–GTE
5S–FE
–AIR CONDITIONING SYSTEM AmplifiersAC–47

HINT: Perform the following check only for vehicleswith AUTO A/C.(b) Connect the connector to the amplifier and in-
spect connector from back side as shown in thechart below.
Test conditions:(1) Engine running(2) A/C switch: ON(3) Blower switch: HI
INSPECTION OF SYSTEM AMPLIFIERINSPECT AMPLIFIER CIRCUIT
(a) Disconnect the amplifier and inspect connector onthe wire harness side as shown in the chart below.
Test conditions:(1) Ignition switch: ON(2) Temperature control switch: MAX COOL
*1: Voltage becomes 0 V when switch is turned, then soon returns to 5 V.
Temperature control switch turned to MAX COOL
Temp. control switch turned to MAX COOL
Temp. control switch turned to MAX COOL
Temp. control switch turned to MAX HOT
Temp. control switch turned to MAX HOT
*1: without AUTO A/C models
Tester connection
Tester connection Specified value
Specified value
Battery voltage
Resistance*1
Check for
Continuity
Condition
ConditionCheck for
Constant
Constant
Constant
Constant
Constant
Constant
Voltage
Voltage
–AIR CONDITIONING SYSTEM AmplifiersAC–48

INSPECTION OF AUTO A/C AMPLIFIER1. False Signal Input to Auto A/C Amplifier
2. System Operation when Input False SignalCondition: Setting Temperature is at 25°C (77°F)
Remove room temp. sensor, and ground the number2 pin of room temp. sensor female connector.
3. System Operation when Input False Signal (Cont’d)
Air mix control servo motor shaft moves towards max–cool side.
Air mix control servo motor shaft moves towards max–hot side.
If necessary, replace the system amplifier.
Blower motor rotates at high speed.
Air Flow ModeControl Servomotor
FRE/RECControl Servomotor
Remove in–car sensor connector.
Recirculation air is ventilated.
Air Mix ControlServomotor
System MainParts
System MainParts
Air Vent Mode Damper
Fresh air is ventilated.
REC Switch ON
FRE Switch ON
False Signal
False Signal
False Signal
Blower Motor
Water Valve
Your Work
BI–LEVEL
Condition
Motion
Motion
CLOSE
Open
OPEN
Open
Close Close
H EAT
Close
CloseClose
VENT
Close
–AIR CONDITIONING SYSTEM AmplifiersAC–49

2. CHECK VACUUM CIRCUIT CONTINUITY IN VSV BYBLOWING AIR INTO PIPE(a) Connect the VSV terminals to the battery terminals
as shown.(b) Blow into pipe ”A”, and check that air comes out of
pipe ”B” but does not come out of filter ”C”.
VACUUM SWITCHING VALVE (VSV)(See page AC–10)
INSPECTION OF VSV1. REMOVE VSV
(c) Disconnect the battery.(d) Blow into pipe ”A” and check that air comes out
of filter ”C” but does not come out of pipe ”B”.If a problem is found, replace the VSV.
VACUUM HOSE CIRCUIT
–AIR CONDITIONING SYSTEM Vacuum Switching Valve (VSV)AC–50

4. CHECK FOR OPEN CIRCUITUsing an ohmmeter, measure the resistance between thetwo terminals of the VSV.Specified resistance: 38 – 43 � at 20°C (68°F)If resistance value is not as specified, replace the VSV.
3. CHECK FOR SHORT CIRCUITUsing and ohmmeter, check that there is continuity betweeneach terminal and the VSV body.If a short circuit is found, repair or replace the VSV.
–AIR CONDITIONING SYSTEM Vacuum Switching Valve (VSV)AC–51