ai vega tm 2000
TRANSCRIPT

15.1
2_EN
_ES_
821
82_V
2
www.palramapplications.com
Vega TM
2000
10mm3/8”
x2
Caulk /Silicon
8mm5/16”
7mm9/32”
Approx. Dim.
200.5Wx202.5Dx243.2H cm 78.9”Wx79.7”Dx95.7”H
Assembly InstructionsInstrucciones de Montaje
After Sales Service:E-Mail: [email protected]
Toll Free: (877) 627-8476

For your information: in the case of missing or damaged parts, do not return product to store . Please contact:
Para su información: en caso de que falten piezas o alguna esté dañada, no devuelva el producto a la tienda.Por favor, contacte con:
15.1
1_82
126_
V2
After Sales Service:E-Mail: [email protected]
Toll Free: (877) 627-8476

Door Cover
Safety Advice• Sortthepartsandcheckagainstthecontentlist.• Forsafetypurposeswestronglyrecommendtheproductbeassembledbytwopeople.• Westronglyrecommendtheuseofworkglovesduringassembly.• DonotattempttoassembletheDoorCoverinwindyorwetconditions.• Alwayswearshoesandsafetygoggles.• Disposeofallplasticbagssafely-keepthemoutofreachofsmallchildren.• Keepchildrenawayfromtheassemblyarea.• DonotattempttoassembletheDoorCoverifyouaretired,havetakendrugs,medicationoralcohol,orifyouarepronetodizzyspells.
• Whenusingastepladderorpowertools,makesurethatyoufollowthemanufacturerssafetyadvice.
• Besuretocheckthattherearenohiddenpipesorcablesinthewallbeforedrilling.• PleaseconsultyourlocalauthoritiesifanypermitsarerequiredtoinstallaDoorCover.• Beforeassembly,considerthedoor’sopening(insideoroutside).• Pleaseapplysiliconesealanttotherearedgeinordertopreventwaterseepage.• Tightenallscrewswhencompletingassembly.• Keeproofandgutterclearofsnow,dirt&leaves.• Heavysnowloadonroofcandamagetheproductmakingitunsafetostandbelowornearby.
Cleaning instructions•Cleantheproductonceassemblyiscomplete.• WhenyourDoorCoverneedscleaning,useamilddetergentsolutionandrinsewithcoldcleanwater.
• Donotuseacetone,abrasivecleanersorotherspecialdetergenttocleanthepanel.
Additional information• Theanchoringwallandgroundkitssuppliedwiththisproductaresuitableonlyforconcrete.Otherwall/groundtypesneedanaccordantwallfixationkit.(Contactyoursupplier)
• Pleaseapplysiliconesealantifneeded• Youaresolelyresponsiblefordeterminingwhetherthehandling,storage,assembly,installationoruseofthisproductissafeandappropriateinanylocationorforanygivenapplication.Palramisnotresponsibleforanydamagesorinjurytoyou,anyotherpersonoranypropertyresultingfromtheimproperhandling,storage,installation,assemblyoruseofthisproduct,orthefailuretofollowPalram’swritteninstructionsregardingthehandling,storage,installation,assemblyanduseofthisproduct.Thisproductisintendedfornormalresidentialuseonly.Donotusethisproductforanyapplicationthatisnotrecommendedintheseinstructionsorbuildingcodesineffectinlocationwherethisproductwillbeused.Alwaystakecareanduseappropriatesafetyequipment(includingeyeprotection)whenassemblingorinstallingthisproduct.
During Assembly
Step 1: Beforeassemblingthisproduct,chooseoneofthe7assemblyoptionsandrefertosizesA&Bofthechosenoption.
Step 3: Important!Pleasemakesuretheback beamisperfectlycenteredbeforefixing,height A should be in accordance with your chosen option from step 1.
Step 4: Pleaseapplysiliconesealantsabovebeam8158,inordertopreventwaterfromseepingin.Step 7: Assemblediagramainaccordancewithyourchosenoptionfromstep1.Step 8: Bracketscanbeadjustedfrom5to30cm(2’’to12”)assuggestedindiagrama.Step 10:Beforeanchoring,please tighten all screws (as shown in the close up diagrams b & c),leveltheprofiles’legs(diagram a)andadaptscrewsandplugstoyourspecificgroundtype.
Please note: Anchoringthisproducttothegroundisessentialtoitsstabilityandrigidity.Itisrequiredtocompletethisstage(Step 10)inorderforyourwarrantytobevalid.
Step 19: Pleaseapplysiliconesealantsontheinnerpartof Profile 8157, andconnectpart8167 asdepictedindrawinga.
Attention!Pleasereadtheseinstructionscarefullybeforeyoustarttoassemblethisproduct.Pleasecarryoutthestepsintheordersetoutintheseinstructions.Keeptheseinstructionsinasafeplaceforfuturereference.
EN
Whenencounteringtheinformationicon,pleaserefertotherelevantassemblystepforadditionalcommentsandassistance.
15.10_
V2
Donottightenscrewsandnutsuntilcompletionofassemblyprocess.These2iconsindicateifscrews’tighteningisrequiredornot.

Cubierta de la puerta
Consejos de seguridad:• Ordenelaspiezasycompruébelasconlalistadecontenidos.• Pormotivosdeseguridadlerecomendamosencarecidamentequeelproductoseamontadoentredospersonas.
• Recomendamosencarecidamenteelusodeguantesdetrabajoduranteelmontaje.• Nointentemontarlacoberturadepuertaencondicionesdevientoohumedad.• Llevesiemprepuestoszapatosygafasdeseguridad.• Deshágasedelasbolsasdeplásticodeformasegura,manteniéndolaslejosdelalcancedeniñospequeños.
• Mantengaalosniñoslejosdelazonademontaje.• Nointentemontarlacoberturadepuertasisufrecansancio,haconsumidodrogas,medicamentosoalcoholosipuedesufrirvértigo.
• Cuandoutiliceunaescalerademanooherramientaseléctricas,asegúresedeseguirlosconsejosdeseguridaddelfabricante.
• Asegúresedequenohaytuberíasocablesocultosenlaparedantesdetaladrarla.• Porfavor,consulteconlasautoridadeslocalesencasodenecesitaralgúnpermiso.•Antesdelmontaje,considerelaaperturadelapuerta(dentroofuera).•Porfavor,apliqueselladordesiliconaalapartetraseraconelfindeprevenirlasfugasdeagua.
• Aprietetodoslostornillosalcompletarelmontaje.• Eltechoycanaletasdebenestarsiemprelimpios,sinnieve,suciedadnihojas.• Unacargapesadadenievesobreeltejadopuededañarelproductohaciendoinseguropermanecerdebajoocercadeél.
Instrucciones de limpieza:•Limpieelproductounavezterminadoelmontaje.• Cuandosucoberturadepuertanecesiteunalimpieza,utiliceunadisoluciónsuavededetergenteyenjuagueacontinuaciónconaguafría.
• Noutiliceacetona,limpiadoresabrasivosuotrosdetergentesespecialesparalimpiarelpanel.
ES
¡Atención!Porfavor,leaestasinstruccionesconcuidadoantesdecomenzarelmontajedeesteproducto.Porfavor,sigalospasosenelordenestablecidoenestasinstrucciones.Mantengaestasinstruccionesenlugarseguroparareferenciafutura.
15.10_
V2
Advertencia:• Loskitsdefijaciónparaparedysueloqueseincluyenconesteproductosolosonaptosparahormigón.Paraotrostiposdesueloopared,necesitaráunkitdefijacióncorrespondiente.(Póngaseencontactoconsuproveedor)
•Porfavor,apliqueselladordesilicona,siesnecesario• Essuresponsabilidadexclusivaeldeterminarsilamanipulación,elalmacenamiento,elmontaje,lainstalaciónoelusodeesteproductoresultansegurosyadecuadosencualquierubicaciónoparacualquierfinalidad.Palramnosehaceresponsabledecualquierdañooperjuicioquepuedacausarleausted,aotrapersonaoacualquierpropiedadlamanipulación,elalmacenamiento,elmontajeoelusoindebidosdeesteproducto,asícomoelnoseguirlasinstruccionesporescritodePalramrelativasalamanipulación,elalmacenamiento,elmontajeyelusodeesteproducto.Esteproductosehadiseñadoúnicamenteparaunusoresidencialnormal.Noutiliceesteproductoparaningunaotrafinalidadquenoserecomiendeenestasinstruccionesoenloscódigosdeconstrucciónenvigordelaubicaciónendondeseusaráesteproducto.Tengasiemprecuidadoyutiliceelequipodeseguridadadecuado(incluyendoprotecciónparalosojos)cuandoprocedaalmontajeolainstalacióndeesteproducto.
Durante el montaje:
Paso 1: Antesdemontarelproducto,elijaunadelas7opcionesdemontajeyseleccioneeltamañoAoBdelaopciónelegida.Paso 3:Importante!Porfavor,asegúresedequelaviga traseraestéperfectamentecentradaantesdefijarla,la altura A debe ser conforme a la opción que eligió en el paso 1. Paso 4:Porfavor,apliqueselladoresdesiliconasobrelaviga8158paraevitarquepuedaentraragua.Paso 7:Monteeldiagramadeacuerdoconlaopciónqueeligióenelpaso1.Paso 8:Lossoportessepuedenajustarde5a30cm(2’’a12”),talycomosesugiereeneldiagramaa.Paso 10:Antesdeanclar,por favor apriete todos los tornillos (tal como se muestra en los diagramas en primer plano b y c),nivelelaspatasdelosperfiles (diagrama a) yadaptelostornillosylosenchufesasutipodesueloespecífico.Por favor, tenga en cuentaqueesimprescindiblefijarelproductoalsueloparaasegurarsuestabilidadysurigidez.Esnecesariocompletarestepaso(Paso 10)paraquesugarantíaseaválida.Paso 19:Porfavor,apliquesellantesdesiliconaenlaparteinteriordelPerfil 8157,yconectelaparte 8167,talycomosemuestraenlailustracióna.
Cuandoveaeliconodeinformación,porfavor,acudaalpasodemontajecorrespondienteparavercomentariosyasistenciaadicional.
Noapretarlostornillosytuercashastaquetermineelprocesodeensamble.Lossiguientes2íconosleindicaránsielajustedelostornillosesnecesarioono.

Contents
Item ItemQty. Qty.
2
3
2
2
8165
8161
8162
2
2
8166
1
1
8157
8158
18159
18164
28160
8167
8169
8168
ItemItem Qty.Qty.
T001
30094
2
1
6
4000 10(+1)
5(+1)
5(+1)
4010 10(+1)
8192
410
17(+2)
4
433 10(+1)
450 16(+2)
466 21(+2)
4008 10(+1)
18163
5000
5001
10(+2)
25(+5)
8170
4006
4009

1
B
A
A =261 cm / 102.7”
B =186 cm / 73.2”
A =259.5 cm / 102”
B =181.5 cm / 71.4”
A =258 cm / 101.5”
B =177.5 cm / 69.8”
A =257 cm / 101.2”
B =173 cm / 68”
A =255.5 cm / 100.5”
B =169 cm / 66.5”
A =254 cm / 100”
B =164.5 cm / 64.7”
A =252.5 cm / 99.4”
B =160 cm / 63”

2
466 48192 48158 1
x4
466
8192
8158
8158

3
8070
8070
A
A
100 cm / 39.3”
100 cm / 39.3”
8158
8158

4
a
b
c
8158
4009
4006
4006 40095 5
x5
x5
x5
8158
8mm5/16”
8 mm5/16”ø

5
a
a
a
8168 4502 88160 2
450
8168
8160
8160
8160

6
a
450
8169
8160
4508169 4 8
a
a

7
a
8164 8163
410
466
1 1
4
4
8164
466
466
410410
8163

8
a
8164
8163
5-30 cm2”-12”
5-30 cm2”-12”
15 c
m /
6”
17 c
m /
6.7”

9
b
d
a
c
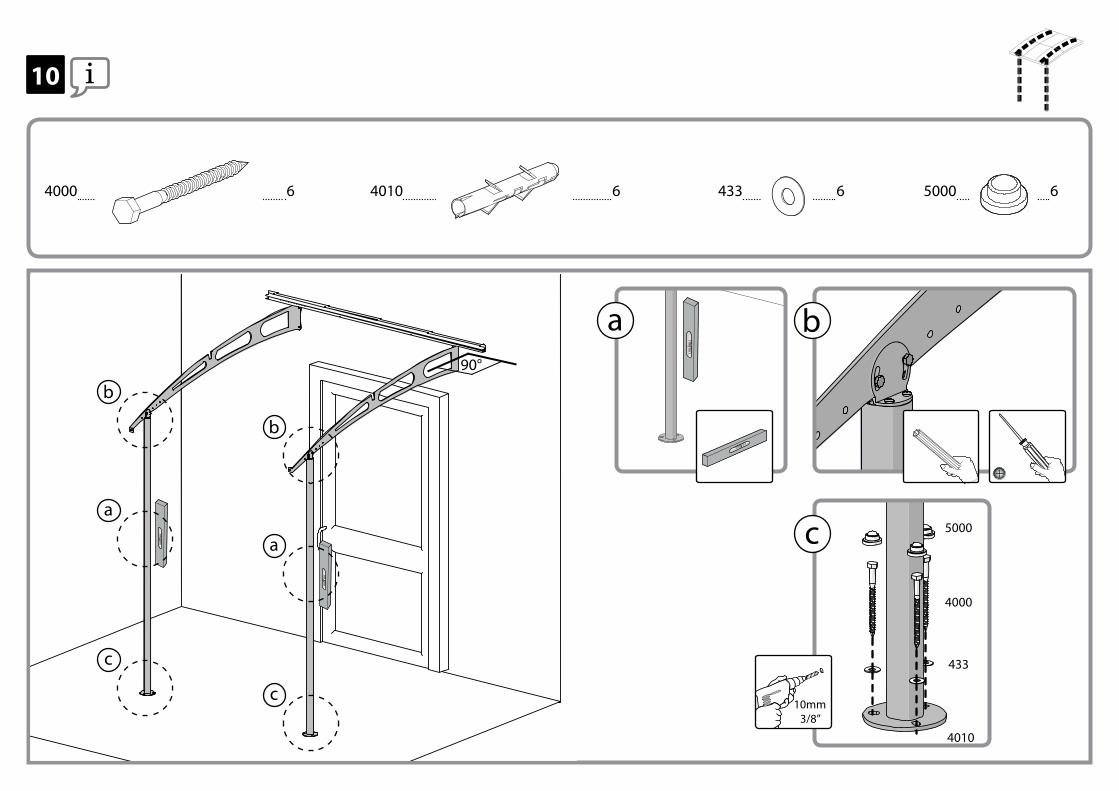
4000 4010 433 50004 4 4 4
81644010
4010
5000
50004000
4000
433
433
8163
10 mm3/8”ø
10mm3/8”
10
4000 4010 433 50006 6 6 6
c
b
c
b
a
a
a b
c
4010
5000
4000
433
90°
10mm3/8”

11
8159 8159
8159 1
8159

12
b
b
b
4668157 21
466
8157
a8157
8192
8192a
a
8157
8192 2

13
8161
8161
8161
x2
8161 2

14
8162 2
8162
8162
8162
8162
x2

15
a
b
c
cb
ba
8192
8192
8192
466
466
466
8192 4664 4

16
a
aa
aa
8192+466

17
81708170
8170
8170
8170 3

18
8192 4664 4
a
b
c
8192+466

19
a
b
c
a
b
ca
b
c
4008 8165 8166 816710 2 2 2
4008
4008
4008
8165
8166
8167
Caulk /Silicon
8167

20
3009 6
a
3009
30093009
3009
30093009
30093009

21
7mm9/32”
7 mm9/32”
5001 38192 4663 3
5001
466
8192

22
mas
ter_
VEG
A_c
np_V
1-5+
5001 22
5001
50015001
5001
5001