ai tracker x documentation - lorby-siinstalled into your simulator first. please refer to the...
TRANSCRIPT

AI Tracker X
Documentation
Version 2.00 - 15.06.2017
© 2017 Lorby-SI http://lorby-si.weebly.com
Table of contents
1. Overview
2. Installation
2.1. Distribution
2.2. Installation
2.3. SimConnect
2.4. Network
2.5. Crash detection and G-Effects
2.6. Limited compatibility to Ultimate Traffic 2
2.7. EZDOK and other external camera addons
2.8. Joysticks assigned to slew mode
2.9. Pause on task switch
3. Performance Considerations

4. Main Window
5. AI Operations
5.1. Starting up the application
5.2. Tweaking the AITX flight model
5.3. AI camera setup
5.4. Additional camera control
5.5. Stationary and chase type cameras
5.6. Follow AI
5.7. Menu options in the simulator
5.8. Keyboard control in the simulator
5.9. Aircraft finder
5.10. Dispatching AI
5.11. AI Systems
5.12. Notes about AI aircraft
5.13. The “reality bubble”

6. Recording and playback
6.1. Recording waypoint lists
6.2. Recording binary flight data
6.3. Recording AI
6.4. Playback dialog
7. Multiplayer
7.1. Network dialog
7.2. Settings
7.3. Flight model / smoothness
7.4. Server window
7.5. Client window
7.6. Weather on the server
7.7. Aircraft assignment dialog
7.8. Sharing individual AI flights
7.9. Sharing all AI flights
7.10. Shared aircraft and shared cockpit

8. The camera pod
9. The AI radar gauge
9.1. Description
9.2. Installation
9.3. The INI file
10. Disclaimer
1. Overview
The AiTracker X (AITX for short) was designed to be the ultimate “plane spotter's” app. It offers many different
options to handle and watch AI aircraft in your simulator.
Feature list:
– Follow AI aircraft during their complete flight from departure to destination in different viewing modes.
– Sit back and relax in your virtual cockpit while an AI “drives” you through the sky.
– Position yourself on the ground and let a stationary camera follow AI around you automatically.
– Record your own flights in two different variants and play them back using any AI aircraft.
– Generate AI following your own flight plans.
– Team up with AI in formation flights.
– Make AI follow either your own aircraft or another AI.
– Track AI flights on a custom AI radar gauge.
– Share your AI formations live over the network with your friends
Multiplayer:
– Cross – platform, participants can use different simulator versions (FSX, FSX SE, P3D V2.5, 3.x, 4.x)
– Share your AI traffic with all players
– Share your cockpit with other players
2. Installation
2.1 Distribution
AiTracker X is distributed as self-extracting installer packages.
2.2 Installation
– Please use the installer intended for your sim:
– FSX Acceleration boxed or dual install with SE: AiTrackerX_Install.exe
– FSX SE stand alone: AiTrackerX_SE_Install.exe
– Prepar3D V2.5: AiTrackerX_P3D_Install.exe
– Prepar3D V3.x: AiTrackerX_P3D_V3_Install.exe
– Prepar3D V4.x: AiTrackerX_P3D_V4_Install.exe

Running the installer:
On the first page you may select optional installation targets:
– “Copy Observer Model to Simulator” (not for P3D V4!): The installer will read the default path to your
simulator from the Windows Registry and copy the camera pod directly into it.
– “Copy Gauge to Simulator” (not for P3D V4!): The installer will read the default path to your simulator
from the Windows Registry and copy the AI radar gauge directly into it.
– “Start Menu Shortcuts”: AiTrackerX will be added to your Start Menu (advised)
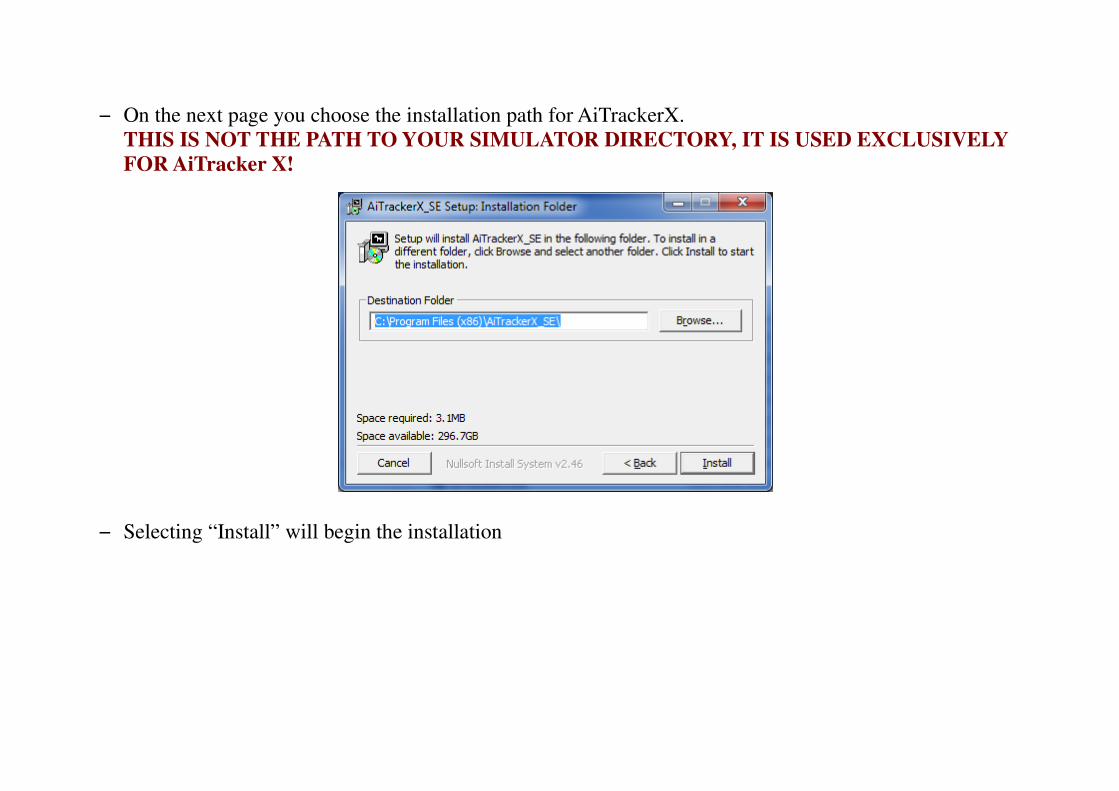
– On the next page you choose the installation path for AiTrackerX.
THIS IS NOT THE PATH TO YOUR SIMULATOR DIRECTORY, IT IS USED EXCLUSIVELY
FOR AiTracker X!
– Selecting “Install” will begin the installation

Troubleshooting:
– If your simulator can not be detected in the registry, the installer will show an error message.
In this case, you will have to copy the necessary files to your main sim directory yourself.
2.3 SimConnect
AiTrackerX relies on SimConnect being installed correctly on your computer. SimConnect is a part of FSX/P3D
and it is set up automatically when you first install the simulator. To save you the trouble of installing the SDK,
the necessary SimConnect DLL for each sim is shipped inside AiTrackerX and gets deployed in your Temp
folder when AiTrackerX is run.
FSX only: In case SimConnect is not installed, and AiTrackerX does not start up, giving you an error message
instead, you will have to install SimConnect manually:
– FSX boxed users can find the “SimConnect.msi” installation file either online or in the FSX SDK folder
“..\Microsoft Flight Simulator X SDK\SDK\Core Utilities Kit\SimConnect SDK\lib”
– FSX SE users find it here: “..\Steam\steamapps\common\FSX\SDK\Core Utilities Kit\SimConnect
SDK\LegacyInterfaces\FSX-SP1\SimConnect.msi “
SimConnect networked: it is possible to run AiTrackerX on another computer, but considering the huge amount
of data that it needs to exchange with the sim, it is not advisable to use a configuration like that, especially in the
“follow-me” modes.

2.4 Network
To use the multi-user features of AITX, two or more computers have to be connected over a network. The version
or make of simulators used are of no consequence, as AITX uses its own protocol for multi user operation. You
can connect any number of FSX boxed, SE or Prepar3D in the same multi user session through AITX.
AITX does not have a dedicated “server” program, instead every AITX installation can be used both as a server
or as a client connecting to that server. There can be only one server at a time.
The depiction of the other player's airplanes by AITX can be turned off too, so as an alternative you can
additionally use the multiplayer features built right into the simulator or any external multiplayer application (for
example like FSHost).
Network parameters:
Port (6076):
AITX wants to communicate over a single UDP port (initially 6076), so you need to allow passage through this
port in your firewall and/or router.
IP-Address:
For the clients to connect to the game “master”, the connections to the relevant IP addresses have to be allowed
too in firewall and router.

If your computer is located behind a router, you will have to add a port forwarding rule to your router for this to
work. This mostly is not needed if all the computers running the simulators are connected to the same local
network (LAN). But port forwarding is always needed, if you are connected to the internet by a local router and
want to use multiplayer features over the internet.
Please refer to the documentation or online resources about
– How to allow a specific UDP port in your Windows firewall
– How to allow access for specific IP-addresses in your Windows firewall
– How to add a port forwarding rule to your router
Aircraft models in multiplayer
In order for AITX to show the correct airplane models in a multi-user environment, these models need to be
installed into your simulator first. Please refer to the documentation coming with these models for the correct
procedure.
The default plane for multi user initially is the Dash 8-100 of the stock AI aircraft, as that one is present in every
version of the ESP based sims.
AITX will automatically try to find the other player's airplane in your sim. If it cannot find it, it will use the
default airplane model.
To add new aircraft models for player aircraft to the AITX, please use the “Aircraft Finder” dialog.

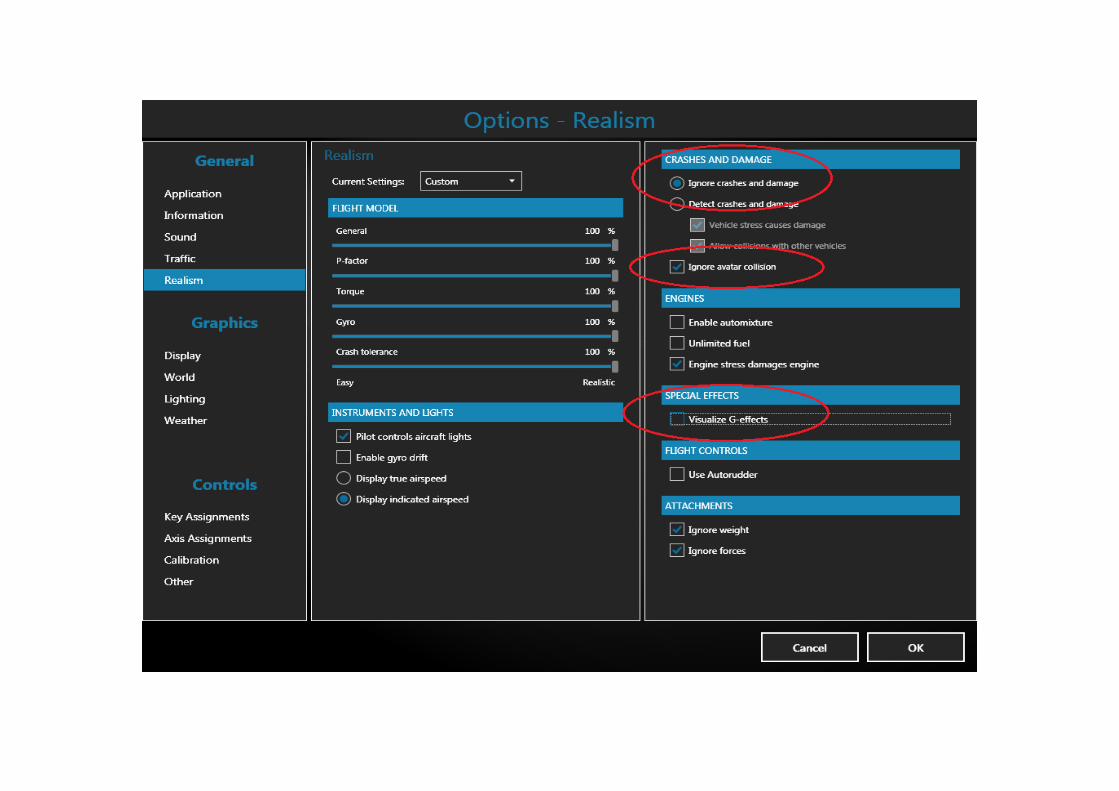
2.5 Crash detection and G-Effects
In some viewing modes when following AI, your own vehicle is very close to the AI and it is moved quite
forcibly. It is advisable to disable the Crash detection and the “G-effects” in the realism menu of your simulator,
otherwise your aircraft will constantly crash or the screen may turn completely black due to excessive G.

2.6 Limited compatibility to Ultimate Traffic 2 / Ultimate Traffic Live
Some of the AI following features of the AiTracker X are not compatible to the traffic generation addons of the
“Ultimate Traffic” series by Flight 1 (UTx for short). The reason is, that UTx detects and reacts to rapid changes
in the user's own position. In AITX, when you select an AI for following in one of the “Track AI” modes, you
will be moved instantly to the position of the AI, then the “follow-it” process will take over. This instant
movement is picked up by UTx, and when the jump has been too far, then all traffic is deleted and generated
again for that position – so the aircraft that you intended to follow is lost, and you are returned to your initial
position.
– Use only the “Floating movement” checkbox option. This way you will no longer be transported
instantly to the AI, but you will be slewed to that position, allowing UTx to retain its AI traffic.
– All viewing modes are working normally. But check out the limitations below; when following an AI, you
must first approach it in “Chase” mode.
Limitations of the UTx compatibility mode:
– You must approach the AI in “Chase” mode. Selecting “Pilot” or “FlyBy” directly will fail in most cases.
After the “follow-AI” mode has engaged close to the aircraft, you can switch to one of the other modes.
– The slewing to the AI can fail, if there are mountains or other obstacles between you and the AI.
– UTx may still decide to regenerate all AI traffic, sending you back to your initial position.
These limitation apply to UT2, UTL or similar external traffic programs based on SimConnect.
All BGL based traffic addons, like MyTraffic or WOAI generally don't have any compatibility

limitation.
2.7 EZDOK and other external camera addons
The AiTracker X camera positioning makes extensive use of the simulator's own camera system. This will on
occasion interfere massively with external camera positioning addons like EZDOK.
All camera features of AITX generally worked with EZDOK in our tests. But there may be setups where
they don't play well together, and EZDOK fights or even blocks the AITX camera movement. In that case
you will have to decide between either using the AITX camera system or EZDOK, but not both at the same
time. (EZDOK can be disabled temporarily by selecting “Global disable” from the EZDOK menu in the
simulator.)
All other functions of AITX are unaffected by this.
Please note: This is a new feature of AITX version 1.01, where the compatibility especially with EZDOK
has been improved. AITX versions before that will not work properly with EZDOK.
2.8 Joysticks assigned to slew mode
If you have your joystick set up to control the movement in slew mode, please make sure that there is no erratic
movement or axis “creep”. This will throw off the positioning system of AITX, and for example in chase mode
the camera pod will not be able to maintain position.
It is advisable to uncouple the joystick axis from slew movement while using the AiTracker X.

2.9 Pause on task switch
AiTracker X is a separate application, a task independent from your simulator.
It is therefore extremely important, that you switch the “Pause On Task Switch” option OFF in your simulator.

3. Performance considerationsSome features of the AITX are very demanding and will push your simulator to its limits. When using certain
camera views, you will notice jittering AI aircraft or even a fair amount of stuttering.
– Limit your FPS. In all testing scenarios, limiting the FPS internally resulted in fairly smooth AI movement.
But the value that is working best depends on the computer in use and the simulator setup, you will have to
try and retry until you find the “sweet spot”. Leaving the FPS unlimited will result in stuttering!
– There are two exceptions to this rule though: running AITX as the server for a networked session and
playing back binary recordings in “Direct mode” will both require all the FPS that your computer can
support – in these cases, even “unlimited” is a valid option.
– Avoid setting FPS to 15, 30, 60. This can cause an interference pattern, that will make the AI aircraft and
the camera pod jump up and down. In our tests values like 24, 28, 33 worked very well.
– In conjunction with the FPS limit, use the “Master refresh rate” slider of AITX, changing it in small
amounts if your AI are constantly jumping or jittering.
– Don't put too much strain on your simulator. Especially in all “follow-me” modes, where an AI or your own
aircraft has to be moved continually, even a small FPS loss will result in stutters.
– Don't use too many complex models as AI. Using complex aircraft models that were designed to be flown
by the user will impact your simulator even further.
– Minimize the AITX window whenever possible.
– Alternatively use the “Suspend on task switch” option – this will disable the constant polling for AI data.
But be aware that some functions will not work in this mode.
– Switch through different camera views. Some camera options in the simulator are less prone to stuttering
than others. For example, using the built-in external AI view usually yields better results than using the VC
camera in “Chase mode”

4. Main Window
Elements of the Main Window explained:
– Buttons “Connect” and “Disconnect”: with these you control the connection to your simulator.
– Clock: This digital readout is displaying the current simulator time. With the two checkboxes below it you

can switch to local time and daylight savings time
– Main List: The main list displays all AI traffic inside the “reality bubble” that your sim assigns to you. This
list can be sorted by clicking on the column headers. The airport columns can be switched to ICAO only or
airport name by right-clicking on a row and selecting the appropriate option from the context menu.
– Section “Track AI”: this group of functions is used to track AI aircraft. More about the different modes
will be explained in the “Operations “ section.
– Button “Install gauge”: Opens the gauge installer dialog
– Section “Create AI”: use this function to create AI aircraft yourself in many different modes.
– Section “Record binary”: This is used to record an accurate representation of your own flight movements
and save it to disk. This recording can be played back with the “Dispatch AI” dialog too.
– Section “Record waypoints”: This is used to record a list of waypoints from your own flight, and save it
to disk. This recording can be played back with the “Dispatch AI” dialog.
– Slider “Detection Range: xx”: influences what is shown on the list, the slider controls the maximum
distance of the AI from your own position to be included in the list.
– Checkbox “Suspend refresh on task switch”: this freezes the refreshing of the main list if you switch to
another window, for example your simulator. This reduces regular stutters in your sim.
– Checkbox “Show sleeping traffic”: by default, the AITX ignores all traffic in the “sleep” traffic state.
Activate this checkbox if you want to see these aircraft too.
– Slider “Master refresh rate: x.xx”: This slider adjusts the internal refresh rate of AITX. If you experience
jumping AI aircraft in follow-me mode or massive stuttering, try lowering this slider very slowly. (see also
the chapter about performance)
– Button “Multiplayer”: opens the dialog for network operations.
– Button “Reset simulator”: will reset your simulator to the initially loaded scenario.
– Button “Reset to default values”: will reset all AITX parameters to their default values.
– Button “Close”: will shut down AITX, with the option to reset your simulator to the initial situation.
5. Operations
5.1 Starting the application
Choosing the correct aircraft:
– If you want to only use the AI following modes “Chase”, “FlyBy” and “Stationary”, please select the
“LORBY-SI Camera Pod” which was installed in your simulator. This is an invisible small aircraft and can
be steered around with the normal aircraft controls.
– If you want to use “Pilot view” or “Detached” mode, make recordings or just fly with the AI yourself, it is
recommended to switch to an aircraft of your choice after the camera pod has finished loading (see also the
next chapter: the reason for this is, that otherwise the simulator reloads the aircraft twice, which can take a
while if you are using complex aircraft).
You can start the application by clicking on the “Connect” button - the main list will fill up with the AI aircraft
currently around you.

5.2 Tweaking the AITX flight model
The AiTracker X uses its own internal flight model to
– move your camera pod in relation to the AI that you are following
– make AI follow you
– make AI follow each other
– playback your recorded flights in “binary” mode.
– Depict the aircraft of the networked players
AITX can move aircraft in two different modes: Buffered and Direct
– Buffered mode is the option with the smoothest movement. But the aircraft being moved in that mode are
put into “slew” mode. That means that animations will stop for the most part (like control surfaces,
propellers or rotors) and that there is no sound (for example when you are following an AI with your pod,
this will be silent)
– Direct mode keeps all aircraft animations and systems intact and you will be able to hear all sounds. But it
is more prone to stutters and very sensitive to what is happening in your simulator, especially creation and
deletion of objects, like simulator controlled AI.
You can turn Direct mode on or off separately for every aspect of the application:
– Chase: means the movement of your camera pod when following AI
– Formation: is the movement of aircraft following you or each other
– Playback: means the movement of aircraft when playing back your
binary recordings
– Network: is the movement of the network players.
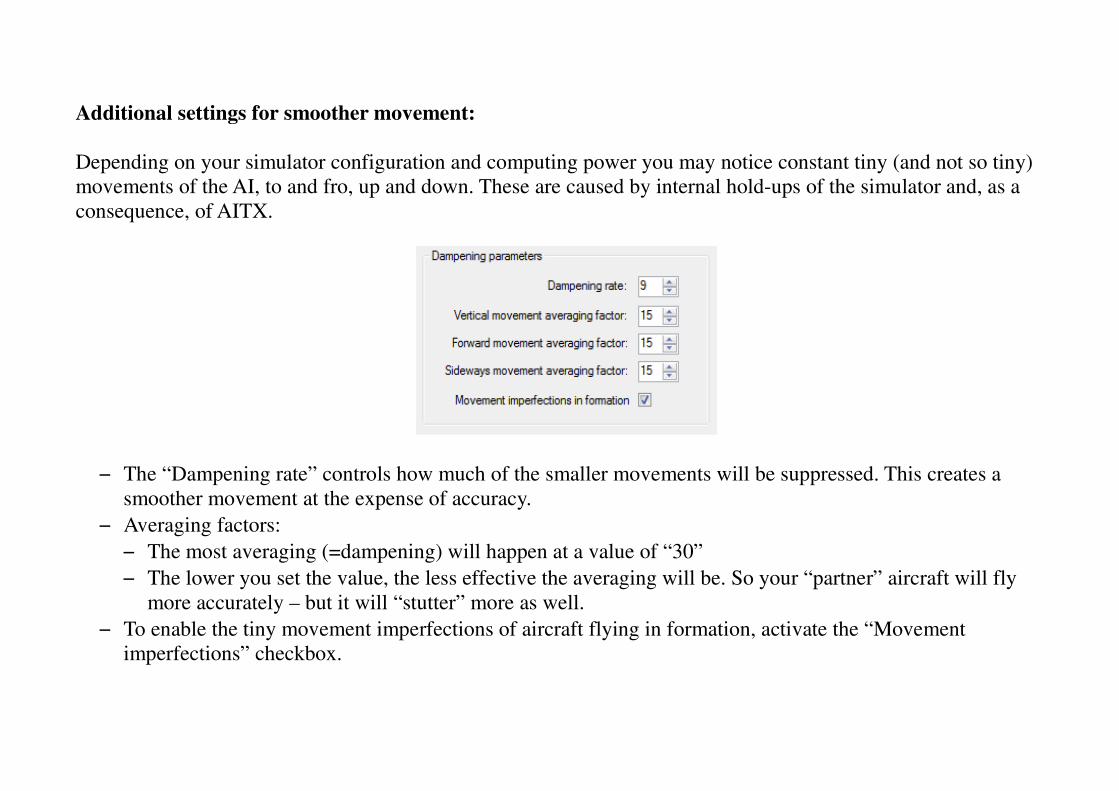
Additional settings for smoother movement:
Depending on your simulator configuration and computing power you may notice constant tiny (and not so tiny)
movements of the AI, to and fro, up and down. These are caused by internal hold-ups of the simulator and, as a
consequence, of AITX.
– The “Dampening rate” controls how much of the smaller movements will be suppressed. This creates a
smoother movement at the expense of accuracy.
– Averaging factors:
– The most averaging (=dampening) will happen at a value of “30”
– The lower you set the value, the less effective the averaging will be. So your “partner” aircraft will fly
more accurately – but it will “stutter” more as well.
– To enable the tiny movement imperfections of aircraft flying in formation, activate the “Movement
imperfections” checkbox.

5.3 AI camera setup
For AiTracker X to be able to switch to the AI view, the AI traffic viewing system of your simulator will be
adjusted:
1. Only at the very first time you press “Connect” the AiTrackerX will check the “cameras.cfg” definition
file of the simulator that you are connecting to. If necessary, the app will alter the “AI traffic” camera
definition in the file, so it can work correctly with the AiTrackerX. A message window will advise you that
this was done.
A simulator restart is required after this is completed!
Troubleshooting: If the AiTrackerX cannot determine the location of the “cameras.cfg”, an explorer
window will open, and you will have to navigate to it's location manually.
2. Every time that you press “Connect”, AiTracker X will reload your current aircraft in the sim to determine
the correct camera setup. Please bear this in mind, when using complex aircraft that take a little while to
load. If you switch to an aircraft while AiTrackerX is already running, the app will get the necessary
information instantly, and no reload will occur.
The best solution is to always start the AiTracker X with the camera pod, and switch to your desired aircraft
after it has finished loading. That way you avoid having to wait twice as long until you can fly.
Please do not change the AI view in the simulator itself, this will throw the application out of sync! To
recover from this, you will have to use the right-click menu in the simulator and select the same AI in the
“AI Traffic” list for depiction that you have selected in the main list of AiTracker X. Another way is
restarting both the simulator and the app.

5.4 Camera control
In slew mode, the normal eyepoint and zoom controls do not work in the simulator.
To give you a certain measure of control over the camera, the AITX includes the option to adjust the provided
camera views by using the following keyboard commands. The exception are camera views that are
automatically following the target, for example the standard AI traffic camera of the simulator.
Note: These controls work on the AITX window and in the simulator. In the sim they will override all functions
associated with these keys!
– Ctrl & NumPad 4 = pan left
– Ctrl & NumPad 6 = pan right
– Ctrl & NumPad 8 = pan down
– Ctrl & NumPad 2 = pan up
– Ctrl & NumPad 9 = tilt left
– Ctrl & NumPad 3 = tilt right
– Shift & Ctrl & NumPad 4 = move left
– Shift & Ctrl & NumPad 6 = move right
– Shift & Ctrl & NumPad 8 = move forward
– Shift & Ctrl & NumPad 2 = move back
– Shift & Ctrl & NumPad 9 = move up
– Shift & Ctrl & NumPad 3 = move down
– Ctrl & “+” = zoom in
– Ctrl & “-” = zoom out
– Ctrl & Enter = reset view
To adjust the speed of the movement, use the “Chase View” parameters dialog (Button “C”)
5.5 Stationary and chase type cameras
In the AiTracker X you can assign and recall cameras at geographical locations (in stationary mode) or relative to
your own aircraft/the camera pod (in chase mode).
The associated functions are described in the chapters about “Chase” and “Stationary” modes below.
If the checkbox “Floating movement” is enabled, the transition between these positions will be made with a
floating effect. Otherwise the switch is instantaneous.
5.6 Follow AI
Following AI is simple: select an AI aircraft from the main list by clicking once on the pertaining row, then click
on “Follow selected AI” - or just doubleclick on the row of the AI that you want to follow. The aircraft that you
have chosen will be marked with an “(F)” in the list, and the application will switch your view depending on the
selected mode.
In all modes except “Detached” and “Stationary” the AITX always keeps you close to the AI. That way it will
never be deleted, except if the simulator decides that it got stuck (which occasionally happens, especially when
waiting for take off on large airfields).
You can switch between the different modes any time, it is not necessary to “Cancel Following” for the switch.
Activating the checkbox “Lock camera to AI” will keep the AI at the center of your view in all modes except
“Pilot view”. Controlling the camera individually is not possible when the view is locked.
Activating the checkbox “Floating movement” will float either the camera or your own position instead of
jumping to the target position. This is useful when using Ultimate Traffic 2, because this addon deletes all traffic
if you “jump” over too large a distance.
Note that “Floating” movements” of your own aircraft will be silent – they happen in slew mode, and sadly
the simulator switches off sound in this mode.
Note: if “Floating movement” is activated, then if you switch between aircraft that are quite far away from
each other, the camera will be floated to the new position. Please make sure that you approach the new
aircraft in Chase mode first, before you switch to AI view, Pilot mode or FlyBy mode. Otherwise your
camera pod will be slewed to the new position in the background, and you won't have sound, probably
without noticing that the slew is happening.

5.6.1. Chase mode
This mode is best used with the LORBY-SI camera pod. You will be positioned on the tail of the selected AI, and
the pod will follow it through all it's flight.
Note: This mode uses “slew” - there is no sound from the simulator!
You can manage individual camera positions in this mode:
– Click on the small button “C” to the right of the “Chase” radio button
– The camera dialog opens
Camera sets
Camera positions are grouped in “sets”, which should be organized by aircraft that you are watching. This is
because the camera position is “rigid” in relation to your own aircraft/ the camera pod. A camera that is 10 meters
ahead of you will always be in that spot – no matter if you are following a Dash-8 or a 747.
Note: the distance that the camera pod keeps to the AI is not always the same. Due to the dynamics in the
simulator, the faster the AI goes, the farther the camera pod will “hang back”. This means that you may need
different camera positions for different speeds, so that the cameras are not offset too much.
Camera positioning
A camera position is controlled by the keys described in chapter 5.3

Dialog elements:
– The dropdown box “Choose camera set” is your main entry point.
Use it to select the camera set that you want to work with.
– The “Delete” button right under it deletes the currently chosen set
– Use the “Name” field to input the name of a set
– The button “Create set” creates a new camera set with that name
– The button “Rename” changes the name of the currently chosen set
to what you entered in “Name”.
– Use the “Choose position” dropdown to select a specific camera.
– Press “Go to selected position” to move the camera pod in the sim to
that location and adjust the camera
– The “Delete” button right under it deletes the currently chosen camera
– Use the “Name” field to input the name of a camera position
– The button “Save position” creates a new camera position with that
name
– The button “Rename” changes the name of the currently chosen camera
to what you entered in “Name”.
– “Camera speed” controls the speed of the camera movement when you are
using the keyboard controls. When “Accelerate” is checked, then this speed
increases as long as you hold down the keys
– The “Aircraft cameras” control lets you select one of the camera positions
that are defined for your own aircraft model.
Note for FSX: If you select a different camera in the sim, then this list will
be out of sync, and you have to manually switch to the desired camera once.

5.6.2. Flyby mode
This mode is best used with the LORBY-SI camera pod.
You will be positioned on the flight path of the AI, watching it fly past. As the AI moves away from you, the pod
will be repositioned to repeat the flyby further down the flight path.
You can change the “jump distance” of the flyby position:
– Click on the small button “F” to the right of the “FlyBy” radio button
– The parameters dialog opens
– Change the distance offset to your liking
(the value is in nm)
– This is the distance that the AI must have reached
from you until your position is relocated forward again.

5.6.3. Pilot view mode
For this mode you can use the camera pod too. But it may be more enjoyable to use an aircraft's virtual cockpit
instead.
You will be positioned directly ahead of the AI, so your view represents close to what the pilot of the AI would
see. The faster the AI goes, the greater the distance will be between you and the AI.
You can change your position relative to the AI:
– Click on the small button “P” to the right of the “Pilot view” radio button
– The parameter dialog opens
– Change the distance offsets to your liking (the values are in feet)
– “Lock to position”: if this is not activated, your own aircraft will pull away
from the one being followed, so the 3D models won't intersect. Turn this on when you want to run a
“hitchhiker” scenario as described in chapter 6.
– Important: If the AI gets stuck on the ground and doesn't want to move, use the “Altitude offset”
control to move your own aircraft a little higher into the air, so it no longer touches the ground.
– Note: In this mode the Dynamic Head Movement built into the simulator may shake the view. We
suggest using a camera definition where the “MomentumEffect” is set to “No” or “False”.
The main view of the AITX Observer camera pod is configured in this manner.
– Note: using a complex aircraft's VC in Pilot view mode may also lead to stutters or shaking. The
workload to manage the pilot view is already very high, so complex gauges in those cockpits may
cause an additional strain on the simulator – resulting in stutters or shaking.

Special example for Pilot view: fully automated flight.
1. Start your flight in an aircraft that has a cockpit that is similar to the aircraft that you want to watch. For
example choose the default B738 if you want to follow an AI 738.
2. Select or dispatch an AI of roughly the same type that you yourself are flying.
3. Select “Pilot view” and “Follow selected AI”
Now you can sit back in your virtual cockpit and let the AI do all the work. You can dispatch an AI with a flight
plan, so you can enjoy this view all the way from taxi out, through the whole flight, until taxiing back in and
parking. The AI will control your throttles, gear and flaps, and it will transmit airspeed and vertical speed. You
can use and click on all other controls in the virtual cockpit, but you cannot influence the flight.
Note: using aircraft with complex models and/or virtual cockpits can have a drastic impact on performance and
fluidity. You may experience stutters or general “shaking” of the aircraft. In that case, try to use simpler cockpit
models for the automated flight, and most importantly, as AI use an aircraft that was designed to be used as AI.
While not as complex as “flyable” aircraft, AI suffer from ill suited flight modelling too.
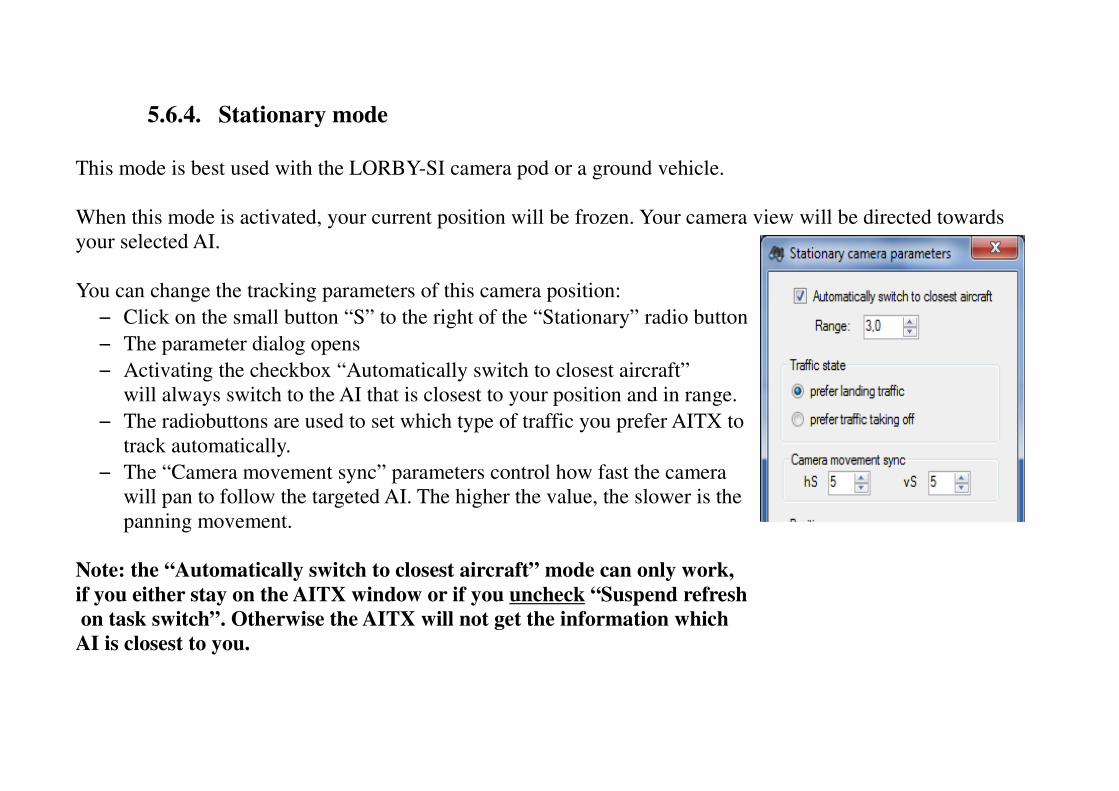
5.6.4. Stationary mode
This mode is best used with the LORBY-SI camera pod or a ground vehicle.
When this mode is activated, your current position will be frozen. Your camera view will be directed towards
your selected AI.
You can change the tracking parameters of this camera position:
– Click on the small button “S” to the right of the “Stationary” radio button
– The parameter dialog opens
– Activating the checkbox “Automatically switch to closest aircraft”
will always switch to the AI that is closest to your position and in range.
– The radiobuttons are used to set which type of traffic you prefer AITX to
track automatically.
– The “Camera movement sync” parameters control how fast the camera
will pan to follow the targeted AI. The higher the value, the slower is the
panning movement.
Note: the “Automatically switch to closest aircraft” mode can only work,
if you either stay on the AITX window or if you uncheck “Suspend refresh
on task switch”. Otherwise the AITX will not get the information which
AI is closest to you.

Stationary camera positions
The AiTracker X has the ability to save multiple stationary camera
positions.
Camera sets
Camera positions are grouped in “sets”, which should be organized by
geographical position – ideally like the airport where you are using it.
Example: if you are defining camera positions at Frankfurt/Main
airport, input “EDDF” into the “Name” field and press “Create set”.
Note: when you connect AITX to the sim, or if you use the standard
“Go to airport” function of the sim, then AITX automatically loads
the camera set that is closest to you.
Camera positions
A camera positions is the location where you are at in the simulator,
plus the individual camera setting.
Example: to set up a view from the control tower, drive to the tower
building in the simulator with the camera pod, align the pod so that
the standard look is towards the runway. The use the AITX internal
camera controls to move the camera upwards to the level where the air traffic controllers sit (or a little above
that). Now save the camera position to the camera set, by giving it a unique name and pressing “Save position”.

Dialog elements:
– The dropdown box “Choose camera set” is your main entry point.
Use it to select the camera set that you want to work with.
– The “Delete” button right under it deletes the currently chosen set
– Use the “Name” field to input the name of a set
– The button “Create set” creates a new camera set with that name
– The button “Rename” changes the name of the currently chosen set
to what you entered in “Name”.
– Camera positions work in the same fashion:
– Use the “Choose position” dropdown to select a specific camera.
– Press “Go to selected position” to move the camera pod in the sim to
that location and adjust the camera
– The “Delete” button right under it deletes the currently chosen camera
– Use the “Name” field to input the name of a camera position
– The button “Save position” creates a new camera position with that
name
– The button “Rename” changes the name of the currently chosen camera
to what you entered in “Name”.

5.6.5. Detached mode
This mode is used when you want to fly your aircraft yourself, but still want a specific AI to be tracked. This is
useful if you want to build formations out of AI aircraft following each other, while you fly among them yourself.
First select an AI that you follow yourself – in Detached mode nothing will happen visually. Now you can
dispatch additional AI to fly formation with the one that you have selected.

5.7 Menu options in the simulator
When connected, the AiTracker X establishes a few menus in your simulator, so you can select AI and switch the
views without having to leave the sim.
Note: if the “Add-ons” menu does not show in your simulator right away, although AITX is connected,
please open the standard map view once and close it again – the top menu should then be reloaded and
now contain the “Add-ons” submenu.
5.7.1. Main menu: “Add-ons → AiTrackerX”
– Show flight info: displays the info bar for the selected AI
– Open AI selection: opens a menu to select another
AI to be followed
– Toggle AI/track view: switches between the AITX
“track views” above and the native simulator “AI view”.
– Toggle camera lock: switches the locking of the camera
view to an AI on or off
– View Modes: switches to the designated view mode
– Stationary/Chase:
Camera selection opens the camera selection menu
Save current position saves your current location in the currently chosen set as a camera named “Pos #”
Toggle closet: activates or deactivates automatic switch to the closest AI aircraft
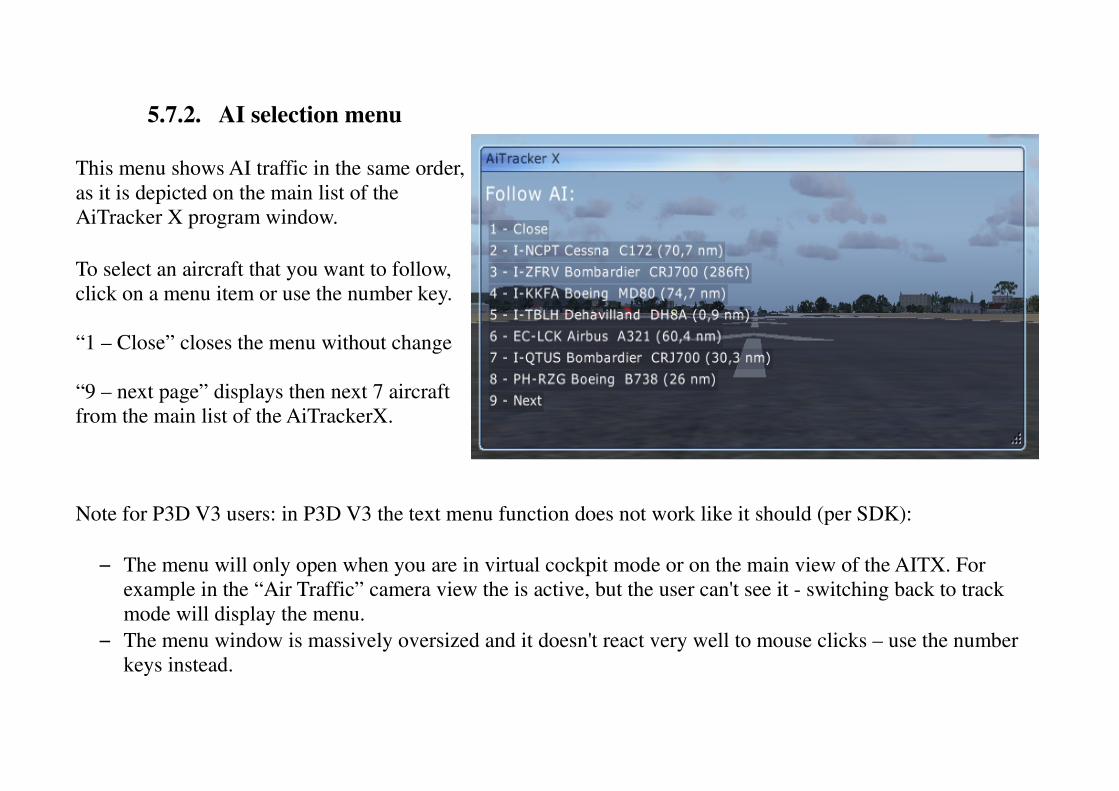
5.7.2. AI selection menu
This menu shows AI traffic in the same order,
as it is depicted on the main list of the
AiTracker X program window.
To select an aircraft that you want to follow,
click on a menu item or use the number key.
“1 – Close” closes the menu without change
“9 – next page” displays then next 7 aircraft
from the main list of the AiTrackerX.
Note for P3D V3 users: in P3D V3 the text menu function does not work like it should (per SDK):
– The menu will only open when you are in virtual cockpit mode or on the main view of the AITX. For
example in the “Air Traffic” camera view the is active, but the user can't see it - switching back to track
mode will display the menu.
– The menu window is massively oversized and it doesn't react very well to mouse clicks – use the number
keys instead.

5.7.3. Camera selection menus
This menu shows the camera positions that
have been saved in the currently chosen
camera set.
To select a camera position, click on a menu
item or use the number key.
“1 – Close” closes the menu without change
Note for P3D V3 users: in P3D V3 the text menu function does not work like it should (per SDK):
– The menu will only open when you are in virtual cockpit mode or on the main view of the AITX. For
example in the “Air Traffic” camera view the is active, but the user can't see it - switching back to track
mode will display the menu.
– The menu window is massively oversized and it doesn't react very well to mouse clicks – use the number
keys instead.

5.8 Keyboard control in the simulator
Some important functions are accessible with key presses in the simulator:
– Shift & C & + = next chase camera
– Shift & C & - = previous chase camera
– Shift & N & + = next stationary camera
– Shift & N & - = previous stationary camera
– Shift & T & + = Enable tracking view
– Shift & T & - = Enable AI view
– Shift & L & + = View lock to AI on
– Shift & L & - = View lock to AI off
– Shift & m & + = Open AI selection menu

5.9 Aircraft finder
To add new models to the drop down list for dispatch, use the
Aircraft finder. It is accessible offline from the dispatcher's
window.
• To remove the model from the list, press “Remove”
• If this dialog has never been used before, the textbox
on top will be empty.
To select a path, use the “Open Explorer” button,
a standard Windows Explorer window will open.
• Navigate to the folder containing your airplane models:
◦ Navigate to your main Simulator directory
for example
“C:\Program Files (x86)\Microsoft Games\
Microsoft Flight Simulator X”
“C:\Program Files (x86)\Steam\SteamApps\
common\FSX”
◦ Open the sub folder “SimObjects”
and inside there the folder “Airplanes”
◦ Click “OK”

• Now press the button “Scan folder”
• After scanning is complete, the treeview “Choose Aircraft” will be populated
• Select an aircraft model from the treelist, and press “Submit” to transfer it to the list of models usable for
dispatch. (Doubleclicking on the model will work too)
Make sure that the selected object can be “seen” by your simulator! The path that you are choosing it from
has to be one of the standard simulator paths (SimObjects/..) or you will have to add that folder as a
“SimObjectPaths.x” tag to your simulator config file (fsx.cfg, prepar3d.cfg).

“Tweak AI aircraft”: this special feature on the aircraft finder can be used to
– add AI sound to a normal aircraft
– copy external sounds as AI sounds to the model
– set a few aircraft parameters relevant for AI.
First select an aircraft in the “Choose Aircraft” tree display, then click on the button “Tweak AI aircraft”. The
following dialog will open:
Sound: The default aircraft in the simulator most already have AI sounds
assigned to them, but other addon aircraft more often than not don't have
this. The aircraft folder has been scanned for standard and AI sounds,
and the buttons below will be activated accordingly:
– “Create AI sound from sound folder”: this will duplicate the standard
sound folder of the aircraft to be suitable as AI sounds.
– “Copy sound from other folder”: this allows you to import sounds
from a completely different aircraft or replacement sound folder.
Whatever the source of the sounds, make sure that they form a valid
sound folder (.wav files with either a sound.cfg or soundai.cfg file
between them).
When you click on the button, a standard Windows explorer window
will open, asking you to navigate to the sound.cfg or soundai.cfg of
the source aircraft or folder.
Upon selecting the file and clicking “Open” on the explorer window, the AITX will copy the whole folder

into the target aircraft as “soundai” and rename the config file appropriately. If there already is a soundai
folder, it will be backed up in the aircraft folder with the current timestamp in it's name.
– “Remove AI sound”: deletes the “soundai” folder of this aircraft.
Parameters:
DO NOT CHANGE THESE PARAMETERS ON AIRCRAFT THAT YOU FLY YOURSELF!!
Max mach: This setting is important if you plan to use this aircraft for the AITX “intercept mode”. After takeoff,
the AI will try to catch up to it's target at a speed corresponding this value. Some aircraft models do not have this
parameter, the value will be 0.0 then.
Toe brakes scale: This parameter controls, how long the aircraft takes to come to a stop after touchdown. A value
lower than 1.0 makes braking less effective, so an AI will take longer to come to a stop.
Save values: Clicking on this button will save the two parameters to the aircraft.cfg of the chosen model. The
original aircraft.cfg/sim.cfg file will be backed up in the aircraft folder with the current timestamp in it's name.

5.10 Dispatching AI
You can dispatch your own AI by bringing up the
dispatch dialog with the button “Dispatch AI”
– Select the desired model from the drop down list at
the top
– To add airplanes to the List, use the “Aircraft finder”
– Provide flight information as you desire
– Choose a dispatching mode:
– AI in Follow-Me mode (formation flying)
– Planned (immediately or timer basesd)
– AI with flight plan
– Play back a recorded waypoint list
– Play back a binary recording
A total of 20 AI aircraft can be dispatched in this mode.
You can use every aircraft model in your hangar, no matter
if it is intended for AI use or not.
Example: if your computer can handle it, you could
use the PMDG 777 as AI too.

5.10.1. Follow-Me modes
You can dispatch the selected aircraft to either follow your own plane or to team up with the AI that you are
currently following on the main dialog (if you don't follow any AI, the button is greyed out).
You can place the AI in relation to the aircraft that should be followed with the following dialog, which will open
when you press either “AI follows my aircraft” or “AI follows other AI”:
Just select a position with the radio buttons, choose a distance and
possible altitude offset and press “Submit”.
To load a previously save formation file from your disk, press “Load
Formation from disk”
The AI will be created close to your own plane (or the followed AI)
and catch up to it's intended position.
From now on the AI will mimic all movements of the leader aircraft,
trying to hold it's relative position.
Note that the AI are moved in slew mode, so unfortunately they cannot
react to changes on the systems of the lead plane.
They will raise and lower the gear, switch lights and afterburner on
and off, but that' is all that they can do on their own. You can use the AI
systems dialog and try to influence the systems manually.

Intercept modes:
You can send out AI aircraft to intercept an airborne target in two modes:
– Intercept from here: will create the chaser aircraft right in front of
you
– Intercept from ICAO: the chaser plane will start as parked AI on
the submitted airfield ICAO. “Check Apts” will open a list of airport
ICAOs near you (but which may still be out of range for AI creation).
Notes about interceptors:
– Make sure that the interceptor can catch the intended target in time. For example, if you send an F-86 Sabre
after a jet airliner in full cruise, the difference in speed is small, and it will take a very long time if the F-86
has to catch up with the airliner.
– The AITX will recognize aircraft with a “max_mach” setting and it will move them at this speed until they
intercept their target. Make sure that the model you intend to use has the “max_mach” setting high enough
in it's aircraft.cfg (you can change this parameter by using the Aircraft finder's “Tweak Ai aircraft” function.
– Take care that interceptor and target do not leave your range – it is best to follow one of them. Otherwise
the simulator will delete them both when it thinks that they are too far away from you.
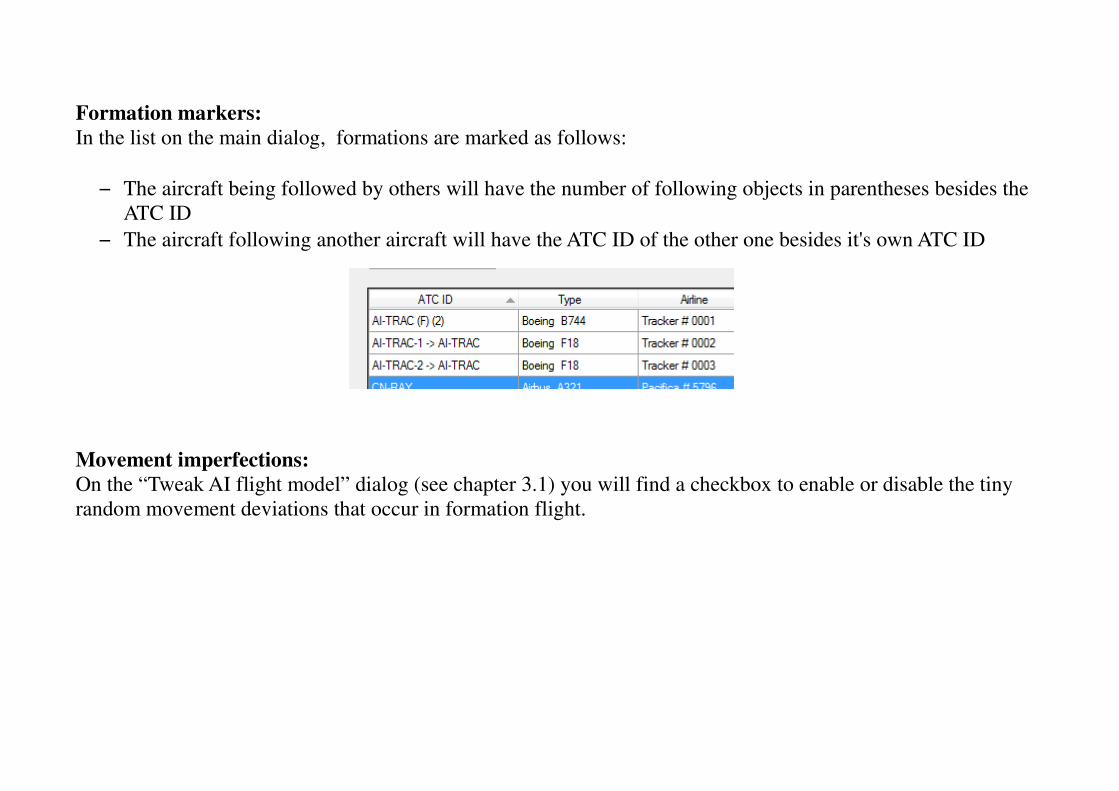
Formation markers:
In the list on the main dialog, formations are marked as follows:
– The aircraft being followed by others will have the number of following objects in parentheses besides the
ATC ID
– The aircraft following another aircraft will have the ATC ID of the other one besides it's own ATC ID
Movement imperfections:
On the “Tweak AI flight model” dialog (see chapter 3.1) you will find a checkbox to enable or disable the tiny
random movement deviations that occur in formation flight.

5.10.2. Repositioning AI in “Follow-Me” mode
You can reposition an AI in “Follow-Me” mode any time.
Right-click on the AI in the main list to get the
context menu and select “Reposition”
The repositioning dialog will open:
The AI will react instantly when you change the settings or
press the Forward/Back/Left/Right buttons on this dialog.

5.10.3. Saving a formation to disk
You can save a formation to your disk with the context menu that you get by right clicking on the
lead aircraft (the one that is being followed by the others):
This will save the positions of the aircraft following the leader to a simple XML file.
You can reload these formations with the Aircraft positioning dialog when dispatching an AI to
follow you or another AI.

5.10.4. Releasing and Deleting AI from the “Follow-Me” modes
Deleting AI will remove them from the simulator instantly.
Released AI will not be deleted from the sim, they enter a circular pattern. There are two options to
release an AI from following you or each other. Note: If an AI is following another AI, it will be
released into the pattern automatically when the primary AI is landing.
1. In the context menu that you get by right-clicking on the main list select
“Release” for an AI following another “Release Formation” and “Delete Formation”
for the lead AI
2. When AI is following you, triggering the event “toggle launch bar” (Shift+U by default) in the
sim will release it.

5.10.5. Dispatch planned AI
You can change the time that this AI will be created with the numeric controls. The AI timer will be added to an
internal list (see the following chapter) and the AI will be dispatched either immediately or when the selected
time is reached on the simulator clock.

5.10.6. Viewing the timer list
AI that were dispatched with the “flightplan” function above are added to an internal list. By using the button
“View AI schedule”, you can view and edit this list.
– AI that are waiting to be created are
displayed in black and white
– AI where the time is already passed
are displayed in grey
– You can save the list to a file with
the button “Save”
– You can load a list from a file with
the button “Load”
Note: this will overwrite the list that
is currently displayed.
– The button “Clear Old” removes all
grey entries from the list.
– The button “Clear All” removes all
entries from the list.
– To remove a single entry, right-click on it in the list and select “Delete Entry”

5.10.7. Dispatching AI with a flight plan
If you press the button “Load flight plan file” a standard Windows explorer window will open. Please choose a
flight plan file in the correct format for your simulator. The app will then automatically generate an AI at the
departure airport or enroute, depending on the situation and the flight plan:
– Departure closer than 30nm: AI will be created parked at the departure airport
– Destination closer than 30nm: AI will be created on the approach path
– All other instances: AI will be created enroute at the waypoint that is closest to you.
Note: If any of the three points is too far away (more than 80 nm) no AI will be created
Flight plans can be generated with every flight planner that you wish. For example, you could use the built-in
flight planner of your sim, choosing departure and destination, VFR or IFR mode, “Find Route”, adjusting cruise
altitude or the flight path, and finally saving the flight plan to disk.
Checkbox “Release AI to simulator control”: if you activate this, then the AiTracker X will not perform
custom actions on the AI. It will be controlled only by the simulator. This is useful if you just want to create
standard AI traffic, without the need for special actions (for example like the automatic closing of doors the the
AITX would normally perform).

5.10.8. Creating AI with recorded waypoint list
If you have recorded a waypoint list previously, the file will be selectable in the drop down control. (If the box is
empty, you have to record a flight first). You can override the model that the recording was made with with the
selected AI from above by activating the checkbox.
You have to options to dispatch an AI with a waypoint list:
– Choosing “Take off now” will create the AI right in front of your own aircraft, and it will immediately
begin to follow the waypoint list
– Providing an “Airport ICAO” will enable the button “Start parked”. Pressing this button will create the AI
on a parking position of the airport with that ID, and it will taxi out and take off before following the
waypoint list. Take special care that the airport is close to you, otherwise AITX cannot create the AI there.
“Check Apts” will open a list of airport ICAOs near you (but which may still be out of range for AI
creation).
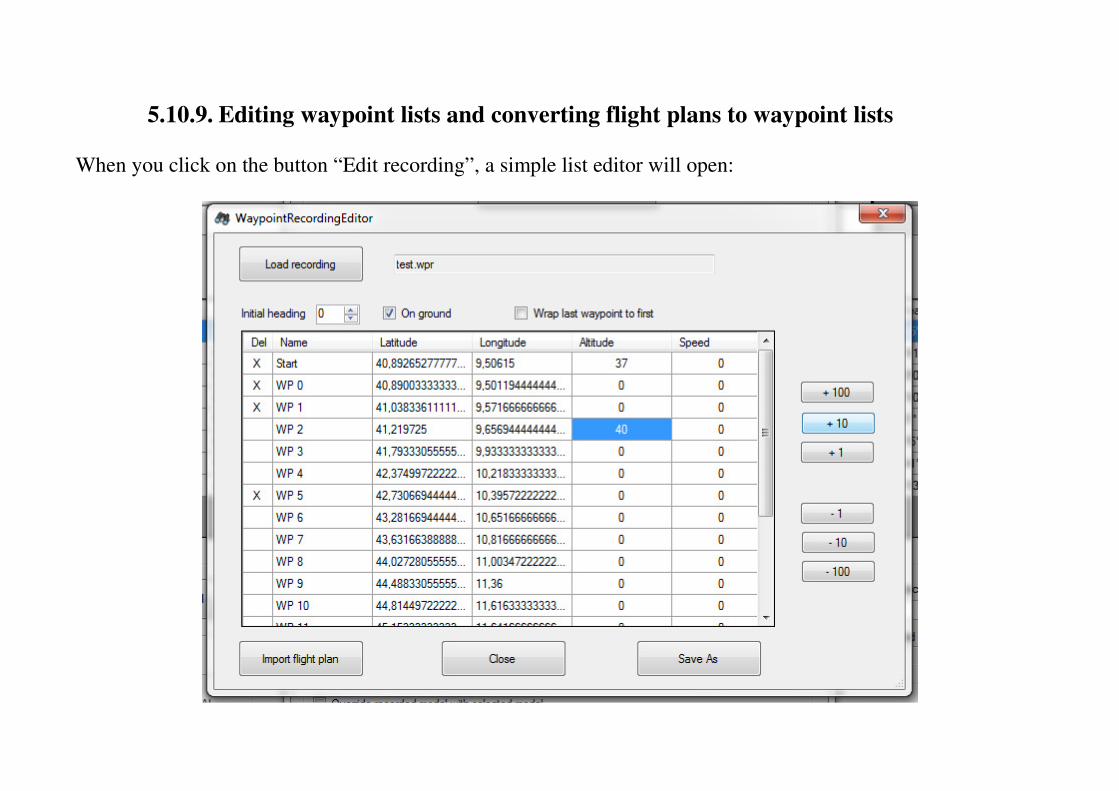
5.10.9. Editing waypoint lists and converting flight plans to waypoint lists
When you click on the button “Edit recording”, a simple list editor will open:

Elements of the dialog explained:
– Button “Load recording”: opens a standard Windows explorer where you can select a recording for editing.
By default, the recording in the dropdown list on the dispatch window is pre-loaded.
– Parameters “Initial heading”, “On Ground”: these parameters decide in which direction the aircraft will
face when it is created at the first waypoint, and if it is on the ground (so the sim would extend the gear).
– Parameter “Wrap last waypoint to first”: turns the waypoint list into a closed pattern. The aircraft
dispatched on it will continuously fly though this waypoint list, always flying back to the first waypoint
after it has past the last one. Note that the AI will really fly back to the beginning on its own terms, it is not
slewed. Take care that the altitudes of these points factor in any mountains etc. between them, otherwise the
AI may crash.
– Main List:
– Column “Del”: by clicking into this column you can set an “X” mark – this means, that when saving the
list, this waypoint will not be included.
– Columns “Latitude/Longitude”: position of the waypoint. Not that these cannot be edited
– Columns “Altitude, Speed”: These columns can be edited, by highlighting the desired cell of the grid by
clicking on it, and then using the 1-10-100 adjustment buttons to the right. Cells can be edited in place
too – take care to only enter integer numbers without decimal or “thousands” delimiter.
– Button “Import flight plan”: this will open a standard Windows explorer window that you can use to
navigate to and select a flight plan file (PLN). After selecting a flight plan, the AITX will import it into the
list, replacing it's contents.
– Button “Save As”: after you have finished editing, save the result by using this button. Changes will not
have any effect if you don't save them!

5.10.10. Creating AI with a binary recording
If you have made binary recordings, these files will be selectable in the drop down control. You can override the
model that the recording was made with with the selected AI from above by activating the checkbox.
“Start playback” will start playing back the previous recording.
5.10.11. Converting recordings made with previous versions of AiTracker X
If you have binary or waypoint recordings that were made with a version of AiTracker X before 2.0, you can
convert then to the new format with the button “Re-Encoder for recordings before AITX 2.0”.
– Select an old recording with the button on top
– Press “Re-Enocde to new format”
– The file will be saved in the new format with its old name
– The original will be duplicated, and saved with the file ending
“.old”

5.11 AI systems
Right-clicking on an AI in the main list will open the AI context menu:
Choosing “Systems” in this menu brings up the AI systems dialog:
Note that not all system activations are possible on AI. Some models
do not offer all systems or animations, and the simulator will interfere
as well.
Activating most systems on aircraft in “slew” mode is not possible,
so you have the option to temporarily “Suspend slew”, for example to
start a propeller depiction (“Start Engines”).

5.12 Notes about AI aircraft
The AI system in the Microsoft ESP based simulators is very powerful. But it has it's quirks, and sometimes AI
aircraft will behave erratic or do strange, even stupid things.
Here are a few of the issues that you will come across, sooner or later.
– You are not limited to aircraft! The AITX will try to create every simulator object that you choose from
your library. If it does not qualify as an aircraft in the simulator's view, then AITX will create it as a normal
sim object. Sim objects will behave differently from AI objects – they can follow waypoint lists, be used as
AI playback or even be used in the follow-me modes. But they usually will not be able to follow flight
plans, and their systems (engines etc.) will be disabled in most cases too.
Example: It is not possible to dispatch helicopters as AI controlled aircraft. This is a restriction that has
been hard coded into the simulator itself since before FSX, probably to avoid simulating the complex flight
manoeuvres that helicopters can pull off. It is possible though, to create a helicopter model in AITX
following a binary recording or flying a formation (these models are created as simple objects, and
technically are not AI).
– Some aircraft models, especially the complex ones, have some animations hard coded into their 3D model,
which often cannot be overcome when they are dispatched as AI.
Examples:
-> If you create the Aerosoft Airbus as AI, you will notice that the control surfaces droop and the rudder is
locked fully left. This is part of the base model and the animations are only activated if you use this aircraft

as your own plane, but not as AI. So the control surfaces will remain stuck in AI mode.
-> Some aircraft open their doors when created on a parking stand as AI. The AITX will close them on
pushback, still there may be the odd hatch or ladder jammed open.
– Formation flight and binary playback are implemented using the slew mode for the AI. Unfortunately it is
not possible to influence the aircraft systems in slew mode, so things like propellers, gear, lights and flaps
are basically non-functional. You can use the systems dialog in AITX to temporarily take the AI out of slew
mode and manipulate the systems then. Put it back into slew mode when you are done with the systems.
– AI have no survival instinct whatsoever. If you send them on a flight plan or waypoint recording that can
potentially intersect with mountains, they will just crash into them. This can even happen even on final
approach, for example in default LICR. Most of the time they will survive these collisions, but not always.
Another example is a LOWI RW08 departure to the north, where the AI will turn left as soon as possible
towards KPT, crashing into the mountain (the solution here is to include the Rattenberg NDB in the flight
plan)
– AI can descend like a stone. Sometimes AI will decide that they can still hit a runway, when you as a pilot
would declare a go-around.
– AI can and will miss runways or land too early.
– The simulator always has the final word about AI. Although special care has been taken in AITX that
followed AI are not deleted by the simulator, it will still happen (mostly when the AI that you are following
is stuck on an airport, waiting to take off)

5.13 The “reality bubble”
The simulator is not managing all objects all the time. What you can see and what is kept in memory is restricted
to a certain radius around your position, the “reality bubble”.
– You cannot create AI on airports that are not in this bubble. Unfortunately that logic is a bit obscure, as the
airport can be in your cache already, but the simulator still refuses to create an AI on it. On the other hand,
an airport may be seemingly at the border of the bubble, but you still can spawn AI there.
Example: When you are located at LIEO, you cannot dispatch AI on LIEA, which is only 40 miles away.
But you can dispatch them from LFKJ, which is almost 80 miles away. The reason why the simulator is
managing things this way is unknown.
– AI and other objects are removed automatically by the simulator itself if they get farther away than the
reality bubble (about 80 nm)
The ICAO list that is generated by AITX on the dispatch dialogs is limited to a range of 40 miles. Inside that
range spawning AI usually works, but there is no guarantee.

6. Recording and playback
6.1. Recording waypoint lists
A waypoint list is basically a simple list of latitude/longitude/altitude/speed points, which an AI can use to fly
along them.
You can use your own aircraft to record certain routes or flights, by starting the waypoint recording feature on the
main dialog with the button “Start recording” in the “Record waypoints” section.
“Stop Recording” ends the recording.
An AI flies through a waypoint list a best as it can, limited by the specific aircraft performance and capabilities.
For example, it is unable to follow a route that contains aerobatic manoeuvres.
The best strategy is to start recording after you have taken off yourself, to avoid ground waypoint cluttering. If a
waypoint list starts a little way off the runway, then the “Start parked” option will work best too.
Waypoints should not be too close together, so you can adjust the “clock” (=the timer when a waypoint is to be
recorded) while flying. Otherwise the AI may miss tight turns and start circling forever.

6.2. Recording binary data
You can use your own aircraft to record your own movements as closely as possible in binary format, by starting
the binary recording feature on the main dialog with the button “Start recording” in the “Record binary” section.
“Stop Recording” ends the operation.
AI dispatched with binary data will replicate every movement that you own aircraft made during the recording,
even if the AI model would normally be incapable of following that flightpath.
“Accuracy” setting: augmenting or reducing this parameters will influence how closely together the binary
snapshots are taken. If you are flying extreme manoeuvres, choose a higher value, if you follow a normal
flightpath, reduce it. You will notice the effect when playing back, if the snapshots are too close together, the AI
may jump or jitter, or even turn around in circles.

6.3. Recording AI
To record other aircraft than your own please use the context menu on the main list:
Selecting the “Recording controls” option will open a recording panel for this aircraft:
This dialog will work in the same way as
described in chapters 6.1, 6.2
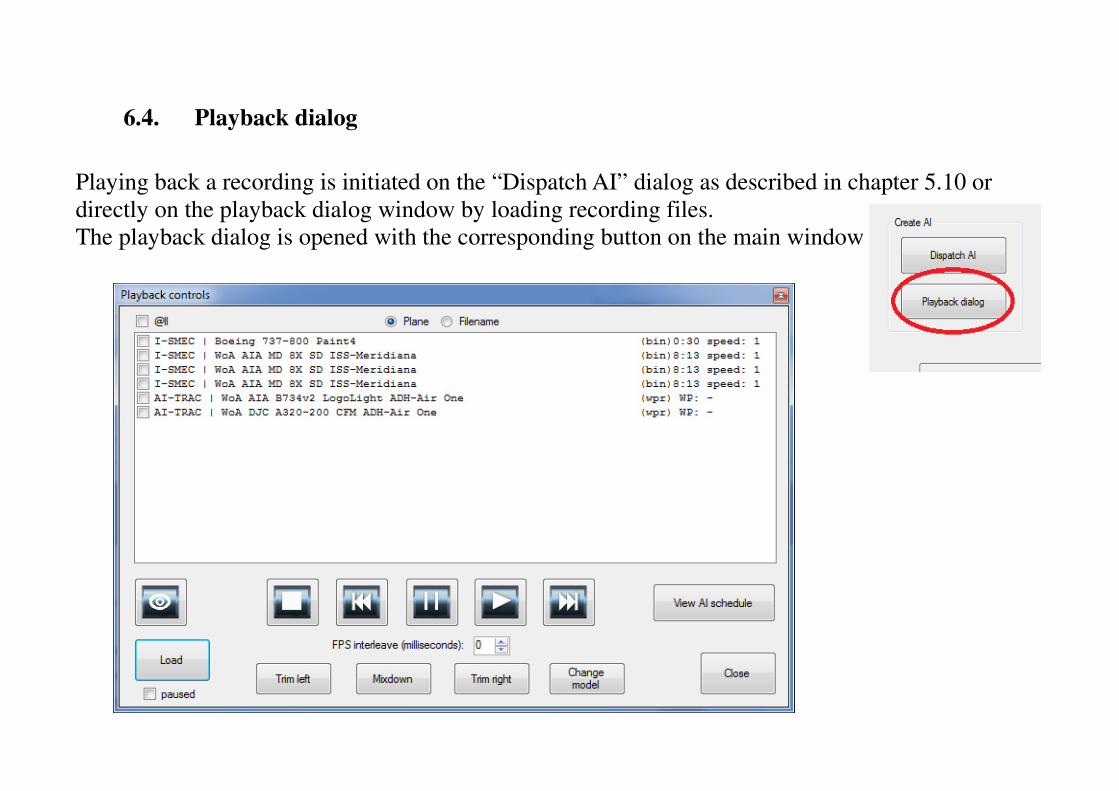
6.4. Playback dialog
Playing back a recording is initiated on the “Dispatch AI” dialog as described in chapter 5.10 or
directly on the playback dialog window by loading recording files.
The playback dialog is opened with the corresponding button on the main window

The list at the top shows all playbacks currently in progress. An aircraft being part of a playback is
marked with a “P” on the main AITX list-
You can load new recordings directly with the button “Load” on the bottom left. This will open a
standard windows explorer window where you can choose one or more recordings.
By activating “paused” prior to loading, the recordings will be initially paused.
Once recordings have been loaded, you can select one or more items with the checkboxes in the left
column. The subsequent action will be processed for every selected recording:
View: This button opens a separate window for each aircraft model.
Stop: Stops the playback and removes the aircraft
Pause: Freezes the playback. For waypoint recordings, the aircraft will be frozen at the
next possible waypoint, binary recordings are paused instantly.
Play: Resumes normal playback. For binary recordings you can adjust the smoothness
by changing the “FPS interleave” factor, introducing a pause between frames.

Rewind:
– For waypoint recordings, the aircraft will be moved to the waypoint before the current
position.
– For binary recordings, the playback will slow down with each press, then run
backwards.
Fast Forward:
– For waypoint recordings, the aircraft will be moved to the waypoint after the current
position.
– For binary recordings, the playback will speed up with each button press.
Mixdown: All selected recordings are combined into one file. This only works for
recordings of the same type!
Trim left: all waypoints before the current position are deleted and the result is saved as a
new recording file
Trim right: all waypoints after the current position are deleted and the result is saved as a
new recording file
Switch between the aircraft model name and the filename of the recording.

Change model: changes the embedded aircraft model for all selected recordings and saves
them as new files:
View AI schedule: shows the current schedule for AI created with AITX

7. Multiplayer
AITX is designed to work either as a server or as a client in a multi user setup, no additional software is needed.
One player has to start his AITX as “server”, the other players can connect to it by using the “client” mode.
In case you already have a multiplayer product (like FSHost) or are using the multiplayer functions built into the
sim, AiTracker X allows you to disable its own depiction modes for the other players aircraft. In that case, only
the AI will be shared between the different installations.
In multiplayer mode the AiTracker X will share the positions of the players and the positions of the AI that
have been created by AITX automatically. The default simulator AI traffic is not replicated onto the clients, as
this would result in a massive load on the network. But you can share up to 100 Ai aircraft by right-clicking
on them in the main list.
7.1. Network dialog
When you click on the button “Multiplayer”
on the main page, the network handler dialog
will open:
7.2. Settings
Before you start, you have to implement the network prerequisites as described in chapter 2.
You then enter the settings as shown in the example below:
– Server IP-Address: IP address of the computer where AITX is running as server to connect to
– UDP-Port: port for connecting
– Own Player name: Your name as displayed in the sim
– Show other players: use this to switch the depiction of the other player's airplanes on or off. Useful if your
computer is not fast enough to allow fluent gameplay when multiple complex objects are visible at the same
time. Uncheck this when using a 3rd party multiplayer solution.
– Send own Position: uncheck this to make your plane disappear from the other player's sims. Again useful
for slower computers or networks. Uncheck this when using a 3rd party multiplayer solution.
The “Show other Players” and “Send own Position” options only influence the depiction mode in the sim. The AI
simulation will still continue, and all players will see the AI generated with AITX.
7.3. Flight model / smoothness
The “Master refresh rate” slider on the main dialog can be used again to improve smoothness – but at the expense
of accuracy. Server and Client can set their refresh rate preferences independently.

7.4. Server
If you decide to run your AITX as a server, the following window will appear:
– Chat: view all messages from other players
– Player list: displays all players present in the network
session
– Message & Send: type in a message and send it to all
players
– Set Weather For Clients: Forces the current time of day
and weather on all connected clients.
– Player Models: opens the aircraft assignment window,
where you can change the model displayed for a player
– Exit: shut down the server.
– Reconnect to <sim>: on occasion it may happen that
SimConnect stops working and does not tie into
AiTracker X any more. The AiTracker X application will
continue to run and the network protocol remains active,
but all airplanes disappear from the simulator on the
server. If this happens, you can reconnect the AiTracker X
to the sim by using this button.
All clients will be disconnected and have to join again.
Note: when running as the Server you should consider using high or unlimited FPS.

7.5. Client
If you want to connect to a server, use the “Run as Client” button
– Button “Connect”: tries to connect you to the server
address and port you specified in the Settings/Network
window.
– Chat: view all messages from other players
– Message & Post: Type and send out a message to all players
– Request Server Weather: sets the global weather and time
of day to the same settings as the Server
– Player Models: opens the aircraft assignment window,
where you can change the model displayed for a player
– Exit: shut down the client.

7.6. Weather on the server
Please note that the AiTracker X reads the current weather report only once every minute. If you change your
weather in your “server” simulator, please wait for one minute before sending it to the clients.
7.7 Player Aircraft assignment window
When you connect two AITX installations via network, they will try to display the aircraft model that the other
player is using.
The best course of action is to exchange the aircraft models you plan to use beforehand, so both simulators have
the same aircraft installed. If this is not possible or not really working (like old FS aircraft in P3D) you can assign
the same aircraft to the other player that you use for AI operations.
Right click on the plane that you want to change and
choose a model from the drop down list, and it will
change in the sim.
If you want to hide a model from view, use the first
entry - “Hide this model”. This will replace the air-
craft with the invidible AiTrackerX Observer.
This is useful if you want to run a scenario where you
don't want the other model displayed, for example
a shared passenger cabin or a “hitchhiker”.

7.8 Sharing individual AI flights
The server can share native simulator AI flights. Use the context menu on the main page for this:
Take care that the client has the same aircraft model installed, or it will be flooded with error messages!
You can end the sharing any time with the same menu:
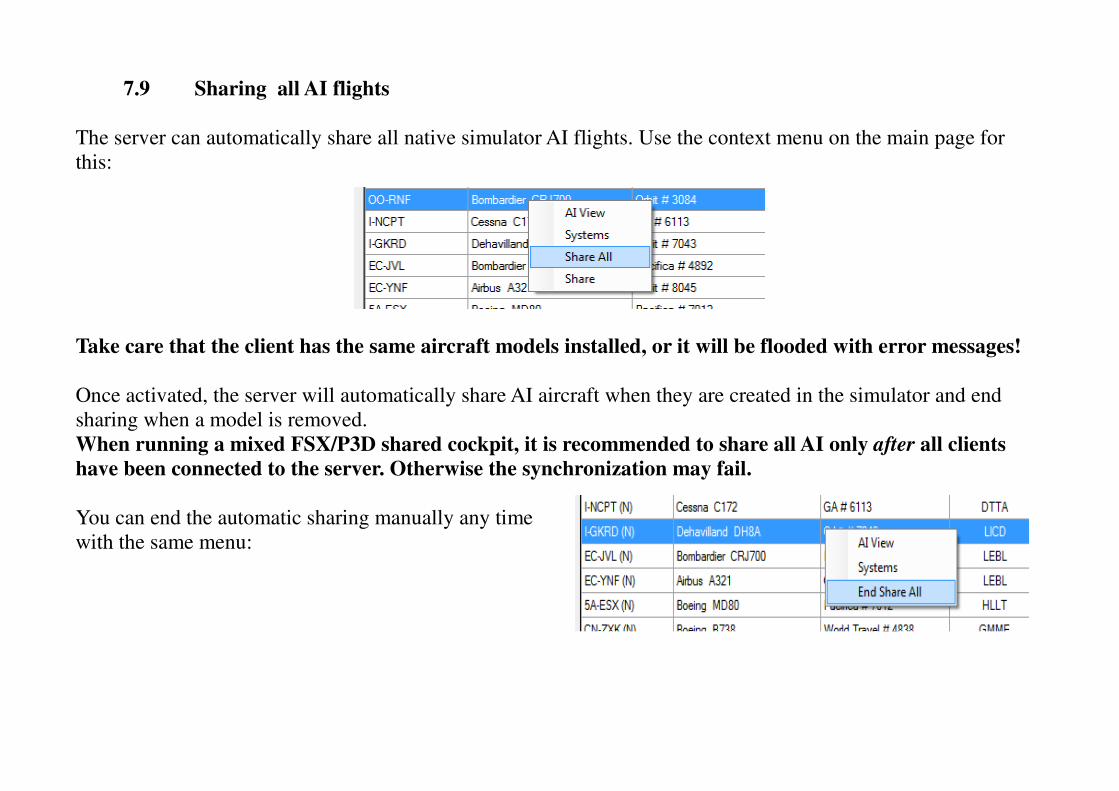
7.9 Sharing all AI flights
The server can automatically share all native simulator AI flights. Use the context menu on the main page for
this:
Take care that the client has the same aircraft models installed, or it will be flooded with error messages!
Once activated, the server will automatically share AI aircraft when they are created in the simulator and end
sharing when a model is removed.
When running a mixed FSX/P3D shared cockpit, it is recommended to share all AI only after all clients
have been connected to the server. Otherwise the synchronization may fail.
You can end the automatic sharing manually any time
with the same menu:
7.10 Shared aircraft and shared cockpit
AiTracker X provides a “shared cockpit” functionality. As you would expect, you can fly an aircraft
cooperatively with one or more players. The network protocol does not cover each and every simulator event, so
it is not suitable to fly complex airliner models together. But the most important controls and systems are there
and can be used by all players.
Alternatively you can stream views of your aircraft to other computers. Imagine running the virtual cockpit on
one computer and having a second one showing for example the passenger cabin, the copilot perspective or an
external view. The views on the second computer are fully dynamic, you can choose any camera position that you
want and look anywhere you like.
Prerequisites:
– It is required that you have a simulator installation on each computer. These don't have to be the same
make and model, as AITX can network different flavors of simulators (FSX, FSX SE, P3D 2.5 and 3.x).
– The aircraft that you fly do not have to be identical on all computers, but the synchronization is better if
they are
– The network setup has to be complete as described in this manual.
Instructions:
– Start the simulators on both computers and select the same aircraft in both
– Turn off AI traffic on the Client computer
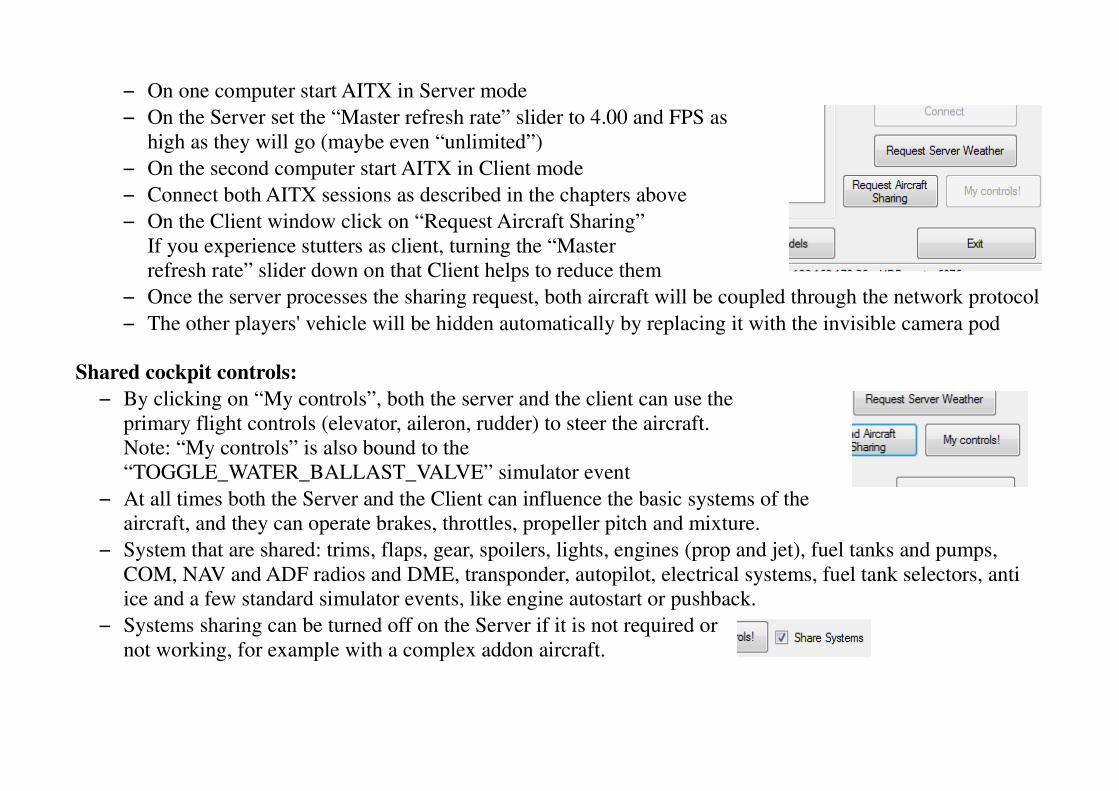
– On one computer start AITX in Server mode
– On the Server set the “Master refresh rate” slider to 4.00 and FPS as
high as they will go (maybe even “unlimited”)
– On the second computer start AITX in Client mode
– Connect both AITX sessions as described in the chapters above
– On the Client window click on “Request Aircraft Sharing”
If you experience stutters as client, turning the “Master
refresh rate” slider down on that Client helps to reduce them
– Once the server processes the sharing request, both aircraft will be coupled through the network protocol
– The other players' vehicle will be hidden automatically by replacing it with the invisible camera pod
Shared cockpit controls:
– By clicking on “My controls”, both the server and the client can use the
primary flight controls (elevator, aileron, rudder) to steer the aircraft.
Note: “My controls” is also bound to the
“TOGGLE_WATER_BALLAST_VALVE” simulator event
– At all times both the Server and the Client can influence the basic systems of the
aircraft, and they can operate brakes, throttles, propeller pitch and mixture.
– System that are shared: trims, flaps, gear, spoilers, lights, engines (prop and jet), fuel tanks and pumps,
COM, NAV and ADF radios and DME, transponder, autopilot, electrical systems, fuel tank selectors, anti
ice and a few standard simulator events, like engine autostart or pushback.
– Systems sharing can be turned off on the Server if it is not required or
not working, for example with a complex addon aircraft.

8. The camera pod
The camera pod “AiTrackerX Observer” is a small invisible vehicle. You can move it around the airport like a
small ultralight aircraft, with the normal flight simulator controls.
It has three instruments that you can use:
1. The AI radar gauge (Shift + 1)
2. The standard GPS 500 (Shift + 2)
3. The standard Bendix King radio stack (Shift + 3)
Example: you could load the same flight plan into your
own GPS, that the AI that you have dispatched is
following (using the flight planner in the sim).
That way you can keep track of where you are while
following an AI in chase mode.

9. The AI radar gauge
8.1 Description
The AI radar is a gauge that can be installed into your aircraft. It can either be added to your 2D or VC panels or
called as an stand-alone instrument panel. It shows the same AI that are visible on the main list of the AITX
window, complete with ATC ID, altitude and direction of movement.
By default this instrument is
installed in the LORBY-SI
camera pod, and can be accessed
with “Shift + 1”.
Note: the gauge can only display
traffic if the checkbox
“Suspend refresh on task switch”
is NOT activated!

Clickspots

8.2 Installation
In preparation for this, you may need the VC2013 redistributable files from Microsoft, in case they are not
already installed on your computer. Please check the Software tab in your Control Panel for these entries:
If no version of the “Visual C++ 2013 Redistributable” is present, please download and install the runtime from
the Microsoft website:
https://www.microsoft.com/en-us/download/details.aspx?id=40784

Automatic Installation
Use the button ”Install gauge” to open the gauge installer window
– 2D windows in panel.cfg: This is a list of all 2D window definitions in the panel.cfg of the aircraft that you
are flying in your sim.
– Add gauge: This will add the AITX Radar gauge
– Remove gauge: This will remove the AITX Radar gauge.
– UP/DOWN: Move the selected item in the list up or down. This way you can change the keyboard
assignment and sequence of the gauges.

– Write to panel.cfg: This will write a new panel.cfg file for your aircraft and reload the aircraft in the sim
afterwards – that way you can use the gauges immediately.
Please note that AiTracker X is writing a new file with different formatting. None of your original
definitions will be lost though, the original file is retained as a backup:
– Restore original panel.cfg: This will restore your original panel.cfg file, before the gauges were
installed.

Manual Installation
Each AITX installation package (FSX boxed or SE, Prepar3D V2, V3, V4) has its own version of the gauge, and
you have to use the correct version and gauge name for your simulator to make it work.
1. Copy the necessary files to your simulator
• If you chose the default copy option when installing the AITX, the gauge files will already been added to
the appropriate folders in your simulator.
• If you chose to copy them manually, then you will find the file in your AITX installation directory in the
subfolder “Gauges”
2. Locate the folder where your aircraft files are stored
• This folder is by default in your simulator main directory, subfolder “\Simobjects\Airplanes”
• The contents of this folder will look something like this:
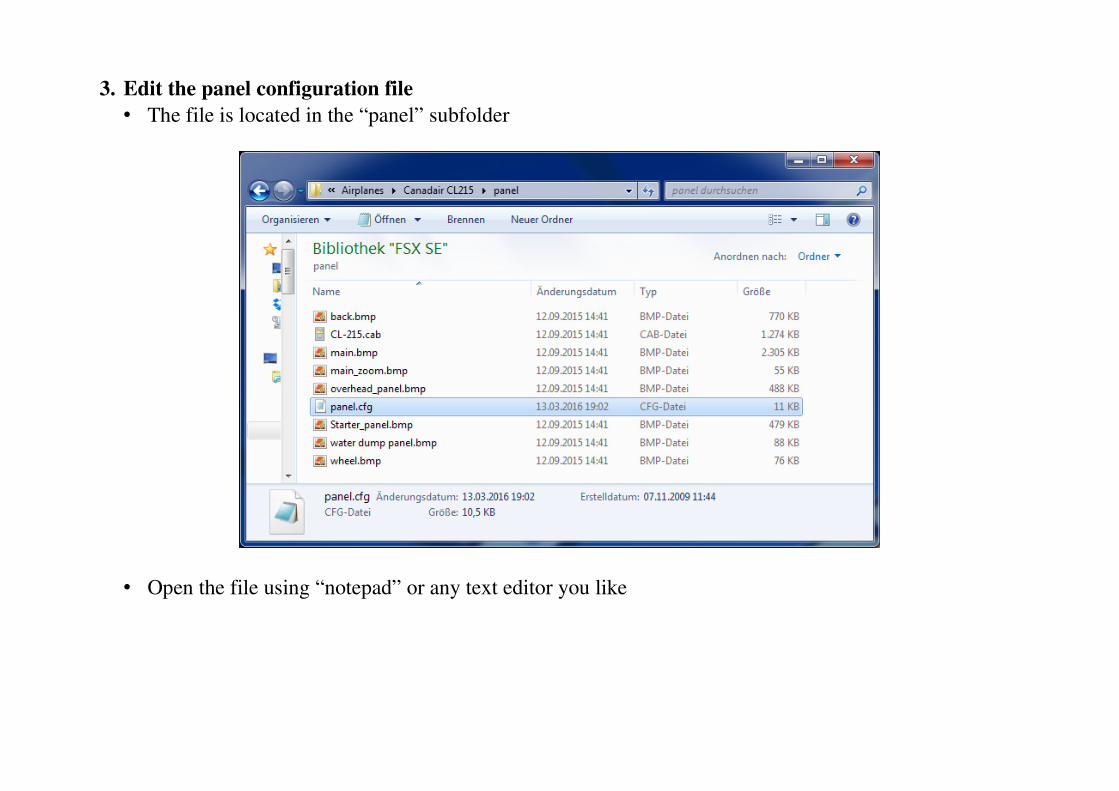
3. Edit the panel configuration file
• The file is located in the “panel” subfolder
• Open the file using “notepad” or any text editor you like

There are basically three ways to add the gauge:
1. Stand alone instrument window
2. Replace a gauge in your 2D panel
3. Replace a gauge in your virtual flightdeck / VC
Options 2/3 will only work if you have the necessary space and a spare gauge that you can replace.

1. Stand alone instrument window
Edit the panel file like this:
Replace or add a window definition:
In this example we disabled the existing window07 and replaced it with the AI radar. (Putting “//” in front of a
line disables it. )

Note: The gauge DLL has a different name for each simulator:
FSX boxed:
gauge00=AITX_Gauge!AiTrackerRadarGauge,0,0,220,220
FSX SE:
gauge00=AITX_Gauge_SE!AiTrackerRadarGauge,0,0,220,220
P3D V 2.5
gauge00=AITX_Gauge_P3D!AiTrackerRadarGauge,0,0,220,220
P3D V3.x
gauge00=AITX_Gauge_P3D_V3!AiTrackerRadarGauge,0,0,220,220
P3D V4.x
gauge00=AITX_Gauge_P3D_V4!AiTrackerRadarGauge,0,0,220,220
Now save and close the panel.cfg. You can access
the AI radar with the usual key controls
(in this case Shift+8) or by using the menu:
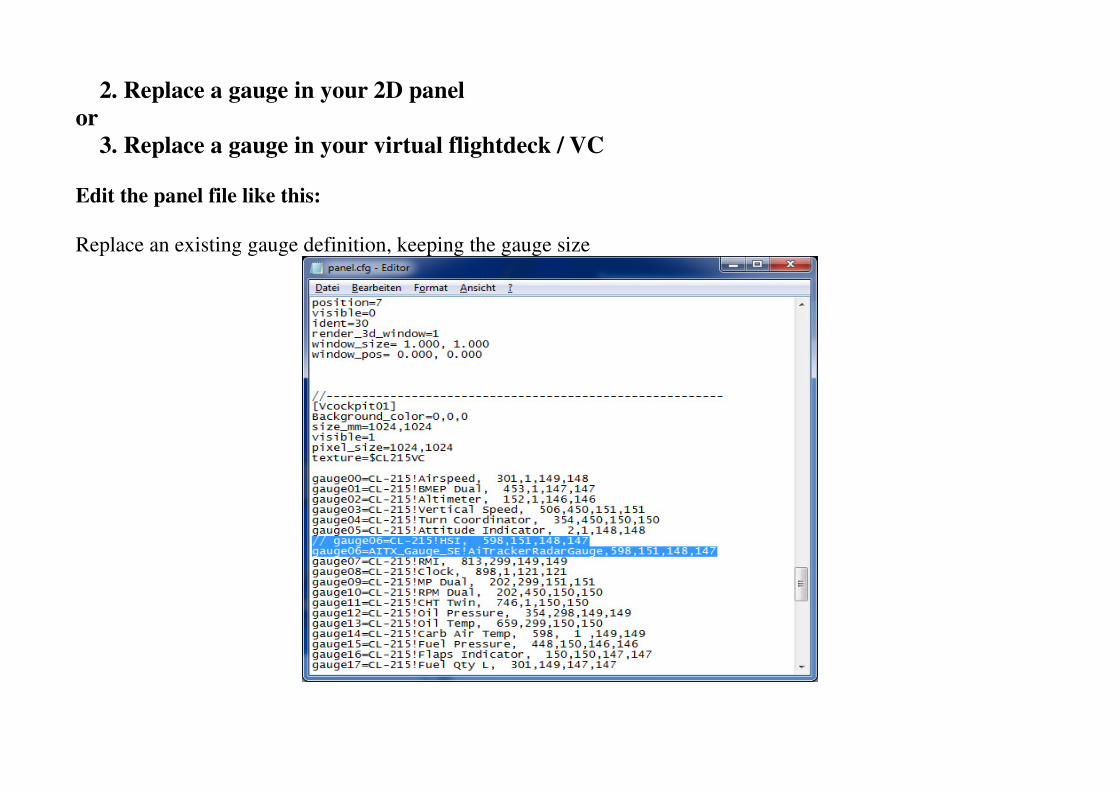
2. Replace a gauge in your 2D panel
or
3. Replace a gauge in your virtual flightdeck / VC
Edit the panel file like this:
Replace an existing gauge definition, keeping the gauge size

In the example we disabled the HSI display on the pilots' instrument panel and replaced it with the AI radar.

8.3 The INI-File
The appearance of the AI radar gauge is configurable by editing the “AITX_Gauge.ini” file.
The file is located in the “\Gauges\AITX_Gauge” folder of your main simulator directory and can be edited with
the standard Windows Notepad.

Options:
– RefreshRate: using this gauge will have an impact on your FPS. With this parameter you can adjust the
refresh rate of the gauge display to best suit your computers' capabilities.
– ScopeRelation: If you replace the background “radar scope” image with one of your own, you may have to
adjust the “gridlines” to reflect the actual distances.
Example: with the default green scope, the relation between the total image height to the radius of the
outermost green ring is 1:0.85. By setting the value 0.85, a blip that is 20 miles out will be placed exactly
on the outermost green ring at range 20.
– ShowRange: Switch the text on the top right corner on or off
– ColoredLabels: Toggle if the aircraft labels should all be green or colored like the blips
– ColoredBlips: Toggle if the blips should all be green or colored red/blue/yellow
– BlueBlipBrightness: Set the brightness of the blips. Accepts values between 0 (dark) and 100 (bright)
– BlipSize: the minimum size that a blip may have.
– BackGroundImageFile: Background image
All picture files have to be located in the same “gauges\AITX_Gauge” folder where the INI itself is.

10. Disclaimer
AiTracker X is licensed for private, non-commercial use only. It is not sold, any property rights remain with the
author.
You may not distribute this package or parts of it. Disassembling, refactoring or changes of any kind to code and
models are prohibited.
Disclaimer of Warranties. The author disclaims to the fullest extent authorized by law any and all other
warranties, whether express or implied, including, without limitation, any implied warranties of title, non-
infringement, merchantability or fitness for a particular purpose. Without limitation of the foregoing, the
author expressly does not warrant that:
• the software will meet your requirements or expectations
• the software or the software content will be free of bugs, errors, viruses or other defects;
• any results, output, or data provided through or generated by the software will be accurate, up-to-date,
complete or reliable;
• the software will be compatible with third party software;
• any errors in the software will be corrected.
• the software will not cause errors or damage to the computer system it is installed on.
(c) 2017 Lorby-SI
Project Management - Development - Consulting
http://lorby-si.weebly.com