agilent openlab cds ezchrom edition · 2019-10-08 · ezchrom edition networked and distributed...
TRANSCRIPT

Agilent Technologies
Agilent OpenLab CDS EZChrom Edition
Networked and Distributed System Installation and Configuration Guide

Notices© Agilent Technologies, Inc. 2010-2018
No part of this manual may be reproduced in any form or by any means (including elec-tronic storage and retrieval or translation into a foreign language) without prior agree-ment and written consent from Agilent Technologies, Inc. as governed by United States and international copyright laws.
Manual Part NumberM8204-90000
EditionRev. B
08/2018
Printed in Germany
Agilent TechnologiesHewlett-Packard-Strasse 8 76337 Waldbronn
Warranty
The material contained in this docu-ment is provided “as is,” and is sub-ject to being changed, without notice, in future editions. Further, to the max-imum extent permitted by applicable law, Agilent disclaims all warranties, either express or implied, with regard to this manual and any information contained herein, including but not limited to the implied warranties of merchantability and fitness for a par-ticular purpose. Agilent shall not be liable for errors or for incidental or consequential damages in connection with the furnishing, use, or perfor-mance of this document or of any information contained herein. Should Agilent and the user have a separate written agreement with warranty terms covering the material in this document that conflict with these terms, the warranty terms in the sep-arate agreement shall control.
Technology Licenses The hardware and/or software described in this document are furnished under a license and may be used or copied only in accor-dance with the terms of such license.
Restricted Rights LegendIf software is for use in the performance of a U.S. Government prime contract or subcon-tract, Software is delivered and licensed as “Commercial computer software” as defined in DFAR 252.227-7014 (June 1995), or as a “commercial item” as defined in FAR 2.101(a) or as “Restricted computer soft-ware” as defined in FAR 52.227-19 (June 1987) or any equivalent agency regulation or contract clause. Use, duplication or dis-closure of Software is subject to Agilent Technologies’ standard commercial license terms, and non-DOD Departments and Agencies of the U.S. Government will
receive no greater than Restricted Rights as defined in FAR 52.227-19(c)(1-2) (June 1987). U.S. Government users will receive no greater than Limited Rights as defined in FAR 52.227-14 (June 1987) or DFAR 252.227-7015 (b)(2) (November 1995), as applicable in any technical data.
Safety Notices
CAUTION
A CAUTION notice denotes a hazard. It calls attention to an operating procedure, practice, or the like that, if not correctly per-formed or adhered to, could result in damage to the product or loss of important data. Do not proceed beyond a CAUTION notice until the indicated condi-tions are fully understood and met.
WARNING
A WARNING notice denotes a hazard. It calls attention to an operating procedure, practice, or the like that, if not correctly performed or adhered to, could result in personal injury or death. Do not proceed beyond a WARNING notice until the indi-cated conditions are fully under-stood and met.
Software RevisionThis guide is valid for revision A.04.09 of Agilent OpenLab CDS EZChrom Edition.
EZChrom Edition Networked and Distributed Systems

In this Guide ...
In this Guide ...
This installation guide provides instructions to install and configure the Agilent OpenLab Chromatography Data System (CDS) Networked Workstations or Distributed Systems.
Table 1 Terms and abbreviations used in this document
Term Description
CDS Chromatography Data System
EZChrom OpenLab CDS EZChrom Edition
Data Store OpenLab Data Store; as of rev. 2.3, the product name is OpenLab Server 2.3
OpenLab Server New product name, formerly known as OpenLab Data Store.
Content Management Data storage component provided as part of OpenLab Server
ECM OpenLab Enterprise Content Manager
AIC Agilent Instrument Controller
Control Panel OpenLab Control Panel
Microsoft Control Panel Part of the Microsoft Windows operating system
Shared Services Set of components and services for licensing, users and roles, instrument configuration, security policy and more.Installed on all computers; accessed via the OpenLab Control Panel.
OpenLab CDS Shared Services Server
Server running the Shared Services.Formerly known as OpenLab Shared Services Server.
EZChrom Edition Networked and Distributed Systems 3

In this Guide ...
1 Introduction
This chapter gives you an overview of the OpenLab CDS EZChrom Edition software. It also includes certain requirements before starting the installation.
2 Configure the Operating System
This chapter describes the configuration of the different operating systems for workstations, clients, and OpenLab CDS Shared Services servers.
3 Install the Software
This chapter describes the preparation of third-party tool and the installation of OpenLab CDS EZChrom Edition on an OpenLab Shared Services server, Networked Workstation, CDS Client, or Agilent Instrument Controller.
4 Post Installation Tasks
This chapter describes tasks that are relevant after finishing the installation.
5 Optional Procedures
This chapter contains information on the Software Verification Tool and other helpful procedures.
6 Licensing
This chapter describes how to obtain and install a license.
7 Configure OpenLab CDS in the Control Panel
This chapter describes the initial configuration steps after installing the software. Refer to the online help for more information.
8 Upgrade to a New Software Version
This chapter describes the upgrade from different revisions of OpenLab CDS EZChrom Edition in a Networked or Distributed System.
9 Uninstall the Software
This chapter contains information on the uninstallation by using the OpenLab CDS Uninstallation Wizard
4 EZChrom Edition Networked and Distributed Systems

Contents
Contents
1 Introduction 10
Who Should Read This Guide? 11
Installation Order Overview 13
Networked Workstation 13Distributed System 15
2 Configure the Operating System 17
About Configuration 18
Security Notes 19
Configure Windows Server 2012 R2/2016 20
Configure Windows 10 23
Configure Windows 7 29
Create and Configure an Enterprise Path 34
Create and Share a Folder on Windows Server 34Configure an Enterprise Path on a Windows Server 35
3 Install the Software 37
Before You Begin 38
Prepare for Installation 40
Copy Installation Files to a Centralized Folder for Installation 41
Install the Third Party Tools 42
Install Adobe PDF Reader 42Install .NET 4.7.1 43
Run the System Configuration Checker 43
Install the OpenLab CDS Shared Services Server 45
License Agreement Screen 45Installation Folder Screen 46
EZChrom Edition Networked and Distributed Systems 5

Contents
Installation Type Screens for Shared Services Server 46Summary Screen: Server Software Installation 48Post Installation Tasks on the Server 49
Install an OpenLab CDS EZChrom Edition Networked Workstation 50
License Agreement Screen 50Installation Folder Screen 50Installation Type Screens 51Summary Screen 52Post Installation Tasks on the Networked Workstation 53
Install an OpenLab CDS EZChrom Edition Client 54
License Agreement Screen 54Installation Folder Screen 55Installation Type Screens 55Summary Screen 57
Install an Agilent Instrument Controller (AIC) 58
License Agreement Screen 58Installation Folder Screen 58Installation Type Screens 59Summary Screen 61
Install a Networked Workstation (Mixed Topology) 62
Scripted Installation 63
About Scripted Installation 63Export as XML 63Parameters and Return Codes 64Installation, Upgrade, or Repair 68Uninstallation 69Logging and Tracing 69
Install Additional Software and Drivers 70
Prepare Network Drives 70Configure Third-Party Instruments 70
6 EZChrom Edition Networked and Distributed Systems

Contents
What to do Next 71
4 Post Installation Tasks 72
Configure the Antivirus Program 73
Setup the Print Server in the Operating System 75
On the AIC: Identify a Domain Account for Running Instrument Services 76
5 Optional Procedures 77
Run a Software Verification after Software Installation 78
Configure Advanced File Security (AFS) 78
Enable Advanced File Security 79
Improve Performance on Offline Machines 81
6 Licensing 82
About OpenLab CDS Licensing 83
License Types 83License File 84
Get a License 85
Obtain a License with SubscribeNet 85Other Ways to Obtain a License 87
Install Your License 89
Configure License Server 89Install Your License 89
7 Configure OpenLab CDS in the Control Panel 91
Set up Authentication Provider and Storage Location 92
Configure Security Policy 94
Configure Users/Groups/Roles 94
Create or import users 95Groups 96
EZChrom Edition Networked and Distributed Systems 7

Contents
Roles and Privileges 96Specific Roles for Individual Instruments 97
Configure Initial Project 98
Configure Initial Instrument 98
Configure the Print Server in OpenLab 100
8 Upgrade to a New Software Version 101
Planning your Upgrade 102
Backward Compatibility During Upgrade 102
Workflow for Upgrading Networked or Distributed Systems 103
Upgrading from OpenLab CDS EZChrom Ed. A.04.07 SR2 or higher 103Upgrading from OpenLab CDS EZChrom Ed. A.04.07, A.04.06, A.04.05, A.04.04,
or A.04.03 104Upgrading from OpenLab CDS EZChrom Ed. A.04.02 or A.04.01 105
License Upgrade 106
Upgrade a Data Store Server/OpenLab Server 106
Run the Upgrade Wizard on the OpenLab CDS Shared Services Server 107
Run Upgrade Wizard on AICs, Clients, or Networked Workstations 108
9 Uninstall the Software 109
About Uninstallation 110
Run the Uninstallation Wizard on a CDS Client 111
Run the Uninstallation Wizard on an Instrument Controller 112
Run the Uninstallation Wizard on the OpenLab Shared Services Server 113
Run the Uninstallation Wizard on a Networked Workstation 114
10 Appendix 115
Change SQL Server Authentication to Mixed Mode 116
8 EZChrom Edition Networked and Distributed Systems

Contents
Sales and Support Assistance 117
EZChrom Edition Networked and Distributed Systems 9
EZChrom Edition Networked and Distributed Systems
1Introduction
This chapter gives you an overview of the OpenLab CDS EZChrom Edition software. It also includes certain requirements before starting the installation.
10Agilent Technologies

Introduction 1Who Should Read This Guide?
Who Should Read This Guide?
This installation guide provides instructions to install and configure Networked Workstations or Distributed Systems for OpenLab EZChrom Edition.
See your Agilent representative for other system configuration installation guides.
Figure 1 Networked Workstation Configuration
EZChrom Edition Networked and Distributed Systems 11

1 Introduction Who Should Read This Guide?
Figure 2 Distributed System Configuration
For an installation with Data Store/OpenLab Server, the Shared Services component and Content Management module are installed on the same server.
12 EZChrom Edition Networked and Distributed Systems

Introduction 1Installation Order Overview
Installation Order Overview
This chapter provides an overview of the required and optional steps for the installation and configuration of Networked Workstations or Distributed Systems. For details on the upgrade procedure, see “Upgrade to a New Software Version” on page 101.
Networked Workstation
Follow these steps to install OpenLab CDS EZChrom Edition on a networked system.
Prerequisites • OpenLab ECM:
If you want to connect to an OpenLab ECM server, this server must already exist. An additional OpenLab Shared Services Server must be installed as described.
• Data Store/OpenLab Server:
If you want to connect to a Data Store/OpenLab Server, this server must already exist.
The Data Store/OpenLab Server already includes the OpenLab Shared Services server components. Therefore an additional OpenLab Shared Services Server is not required.
• Database for OpenLab Shared Services:
The database used by OpenLab Shared Services can be hosted on Oracle, Microsoft SQL Server, or PostgreSQL. Oracle and Microsoft SQL server must be installed prior to the installation of the OpenLab Shared Services server. PostgreSQL will be installed along with the OpenLab Shared Services server.
1 For EZChrom Edition without Data Store/OpenLab Server: On the OpenLab Shared Services server,
“Configure Windows Server 2012 R2/2016” on page 20
2 “Create and Configure an Enterprise Path” on page 34.
EZChrom Edition Networked and Distributed Systems 13

1 Introduction Installation Order Overview
3 On the Workstation PCs:
“Configure Windows 10” on page 23
OR
“Configure Windows 7” on page 29
4 These steps are optional:
a “Copy Installation Files to a Centralized Folder for Installation” on page 41.
b “Run the System Configuration Checker” on page 43.
5 “Install the Third Party Tools” on page 42.
6 For EZChrom Edition without Data Store/OpenLab Server: “Install the OpenLab CDS Shared Services Server” on page 45.
7 “Set up Authentication Provider and Storage Location” on page 92.
Alternatively, this can also be done after the installation is complete.
8 “Install an OpenLab CDS EZChrom Edition Networked Workstation” on page 50.
After installation: “Configure the Antivirus Program” on page 73.
14 EZChrom Edition Networked and Distributed Systems

Introduction 1Installation Order Overview
Distributed System
Follow these steps to install OpenLab CDS EZChrom Edition on a Distributed System.
Prerequisites • OpenLab ECM:
If you want to connect to an OpenLab ECM server, this server must already exist. An additional OpenLab Shared Services Server must be installed as described.
• Data Store/OpenLab Server:
If you want to connect to Data Store/OpenLab Server, this server must already exist.
The Data Store/OpenLab Server already includes the OpenLab Shared Services server components. Therefore an additional OpenLab Shared Services Server is not required.
• Database for OpenLab Shared Services:
The database used by OpenLab Shared Services can be hosted on Oracle, Microsoft SQL Server, or PostgreSQL. Oracle and Microsoft SQL server must be installed prior to the installation of the OpenLab Shared Services server. PostgreSQL will be installed along with the OpenLab Shared Services server.
1 For EZChrom Edition without Data Store/OpenLab Server: On the OpenLab Shared Services server,
“Configure Windows Server 2012 R2/2016” on page 20
2 “Create and Configure an Enterprise Path” on page 34.
3 Configure the AIC:
“Configure Windows 10” on page 23
OR
“Configure Windows 7” on page 29
OR
“Configure Windows Server 2012 R2/2016” on page 20
EZChrom Edition Networked and Distributed Systems 15

1 Introduction Installation Order Overview
4 Configure the EZChrom Clients:
“Configure Windows 10” on page 23
OR
“Configure Windows 7” on page 29
5 These steps are optional:
a “Copy Installation Files to a Centralized Folder for Installation” on page 41.
b “Run the System Configuration Checker” on page 43.
6 “Install the Third Party Tools” on page 42.
7 For EZChrom Edition without Data Store/OpenLab Server: “Install the OpenLab CDS Shared Services Server” on page 45.
After installation:
• “Configure the Antivirus Program” on page 73
• “Setup the Print Server in the Operating System” on page 75
8 “Install an OpenLab CDS EZChrom Edition Client” on page 54
9 “Install an Agilent Instrument Controller (AIC)” on page 58
After installation:
• “On the AIC: Identify a Domain Account for Running Instrument Services” on page 76
• “Configure the Antivirus Program” on page 73
10 In a Distributed System, you can also install Networked Workstations in addition to the AIC and EZChrom Clients, thus creating a mixed topology. For more information on Networked Workstations in Distributed Systems, refer to the OpenLab CDS EZChrom Edition Administration Guide.
16 EZChrom Edition Networked and Distributed Systems

EZChrom Edition Networked and Distributed Systems
2Configure the Operating System
This chapter describes the configuration of the different operating systems for workstations, clients, and OpenLab CDS Shared Services servers.
17Agilent Technologies

2 Configure the Operating System About Configuration
About Configuration
The procedures in this document describe all parameters necessary to configure a non-Agilent Windows system for use with OpenLab CDS EZChrom Edition.
OpenLab CDS EZChrom Edition needs to be installed using an operating system Administrator user account. To run the system with the configured options outlined in this document, all users and power users should use the same settings.
Some changes within this document are mandatory for OpenLab CDS EZChrom Edition to work properly on a Windows system. Some changes will optimize application performance. Other changes will have a graphical or minor impact. To indicate the relative importance of individual settings, each item is categorized as:
• MUST: These changes must be applied.
• PERFORMANCE: These changes will improve system performance.
• OPTIONAL: Most of these changes will affect the graphical display of the application.
NOTE If User Account Control (UAC) is switched on, some configuration steps will require active confirmation to continue.
NOTE For all server-based products, dedicated servers are strongly recommended in order to avoid conflicts with other applications and maximize performance.
18 EZChrom Edition Networked and Distributed Systems

Configure the Operating System 2Security Notes
Security Notes
• Install Windows from the Microsoft installation media. During the setup, provide the computer name, administrator password and network settings. Choose to either join an existing domain or set up the system in a workgroup mode.
• On the OpenLab Shared Services server, do not install or configure any server role or feature.
• To secure your system against viruses please install an antivirus program. Be sure to open the firewall ports listed in the Firewall Settings in the OpenLab CDS EZChrom Edition Requirements guide.
NOTE Keep your computer disconnected from the internet until you have installed the appropriate security patches and hot fixes. It is strongly recommended that you install the latest security fixes as supported from Agilent Technologies and virus definitions prior to connecting to a network.
NOTE Running antivirus programs might influence the behavior and performance of your computer. Some virus scanners might cause issues when used with OpenLab CDS EZChrom Edition. The application is tested with Symantec Endpoint Protection 12.x and with Microsoft Security Essentials.
EZChrom Edition Networked and Distributed Systems 19

2 Configure the Operating System Configure Windows Server 2012 R2/2016
Configure Windows Server 2012 R2/2016
[MUST] 1 System (Microsoft Control Panel) *, and activate Windows.
[MUST] 2 Folder Options (Microsoft Control Panel): In the View tab,
• Enable Always show menus.
• Clear Hide extensions for known file types.
• Enable Display the full path in the title bar (Classic theme only).
Apply these settings to all folders by selecting the Apply to Folders button.
[MUST] 3 File Explorer (go to Start > File Explorer), View ribbon tab:
a Select the Details layout.
b Under Navigation pane, enable Navigation pane.
[MUST] 4 Windows Update (Microsoft Control Panel).
a Check for updates and apply all critical security patches.
c Click Change Settings. Set the Important updates selection to Never check for updates. Deselect the other update options.
[MUST] 5 Disable Services (Microsoft Control Panel):
a Double-click Services.
b Double-click the Application Experience service. Set the startup type to Disabled.
[MUST] 6 Adjust Power Options (Microsoft Control Panel):
a Enable power plan High performance (Show additional plans).
b Click Change Plan settings.
c Click Change advanced power settings.
d Open the nodes for Hard disk, Turn off hard disk after and check that Minutes are set to 0 (=Never).
* View the items by icon to see a list of all items.
NOTE This setting is important to avoid problems due to an automatic system reboot.
20 EZChrom Edition Networked and Distributed Systems

Configure the Operating System 2Configure Windows Server 2012 R2/2016
[MUST] 7 Local Security Policy (Microsoft Control Panel)
a Navigate to Security Settings > Local Policies > Security Options.
b Double-click the following policy listed in the right hand panel: Network Access: Sharing and security model for local accounts.
c In the displayed dialog select the following item from the drop-down list: Classical - local users authenticate as themselves.
[MUST] 8 Time Zone (Microsoft Control Panel): We recommend to use the same time zone for server and clients.
[MUST] 9 Power Management for network devices (Microsoft Control Panel):
a Select Change adapter settings.
b Right-click Ethernet, then select Properties.
c Click Configure.
d On the Power Management tab, uncheck all items.
[MUST] 10 Screen layout (Microsoft Control Panel):
a Click Change window colors.
b Make sure that Windows Basic is selected.
[MUST] 11 .NET settings (Microsoft Control Panel):
a Click Turn Windows features on or off.
The Server Manager opens with the Add Roles and Features Wizard dialog.
b Under Server Selection, select the relevant server.
This enables the Features page.
c On the Features page, enable .NET 3.5 by selecting the .NET Framework 3.5 (includes .NET 2.0 and 3.0) check box
This option requires an internet connection.
d To make sure that all the net.tcp components are properly initialized, non-http activation must be enabled. Expand the .NET Framework 3.5 (includes .NET 2.0 and 3.0) node and select the Windows Communication Foundation Non-HTTP Activation check box.
NOTE If the computer has no internet access, .NET Framework 3.5 will not install.
EZChrom Edition Networked and Distributed Systems 21

2 Configure the Operating System Configure Windows Server 2012 R2/2016
[PERFORMANCE] 12 System Properties (Microsoft Control Panel): click Advanced system settings.
a On the Advanced tab > Performance hit the Settings button.
• Visual Effects tab, uncheck all entries.
• Advanced tab > Virtual Memory: For optimum performance use the Change button to adjust the paging file size to a value of 2 to 3 times of the physical RAM on the PC.
• Data Execution Prevention tab: Enable Turn on DEP for essential Windows programs and services only.
b Advanced > Startup and Recovery > Settings button:
• System startup section: Change both Time to display ... fields from 30 to 3 sec.
[OPTIONAL] 13 Recycle Bin Properties: (right-click on desktop icon Recycle Bin). Enable the following options:
• Custom size; select a size corresponding to approximately 10% of the complete disk space for the drive.
• Check Display delete confirmation dialog.
14 Region (Microsoft Control Panel): Language for non-Unicode programs:
On the Administrative tab, click Change system locale.... From the drop down list, select English (United States).
NOTE Do not the change system locale if you are using an English, Portuguese, Japanese or Chinese Operating System.
22 EZChrom Edition Networked and Distributed Systems

Configure the Operating System 2Configure Windows 10
Configure Windows 10
[MUST] 1 System (Microsoft Control Panel)*: Register Windows with Microsoft.
[MUST] 2 File Explorer Options (Microsoft Control Panel): In the View tab,
• Select Always show menus.
• Select Display the full path in the title bar.
• Clear Hide extensions for known file types.
• Clear Use Sharing Wizard.
[MUST] 3 Start > Settings > Update and Security:
a Click Check for updates to check for updates and apply all critical security patches.Before proceeding, ensure that all updates are downloaded and installed. Ensure that there is no reboot pending.
b Click Advanced options.
c Select the Defer feature updates check box.
d Click Choose how updates are delivered.
e Turn off Updates from more than one place.
[MUST] 4 Settings for updates: Windows Update service MUST NOT be running during installation.
[MUST] 5 Indexing Options (Microsoft Control Panel): Disable indexing.
Click the Modify button. Clear all drives and locations.
[MUST] 6 Start > search for 'gpedit.msc': Windows logon options
a Navigate to Local Computer Policy > Computer Configuration > Administrative Templates > System > Logon.
b Set Hide entry points for Fast User Switching and Always use classic logon to Enabled.
* View the items by icon to see a list of all items.
EZChrom Edition Networked and Distributed Systems 23

2 Configure the Operating System Configure Windows 10
WHEN [MUST] 7 Start > Settings > System > Tablet Mode: For When I sign in, select Use desktop mode.
[MUST] 8 Power Options (Microsoft Control Panel):
a As preferred plan select High performance
b Click Change Plan settings
c Set the option Put the computer to sleep to Never.
d Click Change advanced power settings.
e Open the nodes for Hard disk > Turn off hard disk after.
f Set the Minutes to 0 (=Never).
[MUST] 9 Start > Settings > System > Offline Maps: Turn Metered connections and Map updates off.
[MUST] 10 Administrative Tools (Microsoft Control Panel): Configure security options:
a Double-click Local Security Policy.
b Navigate to Security Settings > Local Policies > Security Options
c Double-click the following policy listed in the right hand panel: Network Access: Sharing and security model for local accounts
d In the displayed dialog select the following item from the drop-down list: Classic - local users authenticate as themselves
[MUST] 11 Start > Settings > System and Security:
a Click Change Windows SmartScreen settings.
b Select Don't do anything (turn off Windows SmartScreen).
[MUST] 12 Date and Time (Microsoft Control Panel): Choose the time zone of your machine's location.
[MUST] 13 Network and Sharing Center (Microsoft Control Panel):
a Select Change adapter settings. Right-click Local Area Connection > Properties > Configure.
b On the Power Management tab, clear all check boxes.
[MUST] 14 Programs and Features (Microsoft Control Panel):
a Click Turn Windows features on or off.
b Enable .NET 3.5 by selecting the .NET Framework 3.5 (includes .NET 2.0 and 3.0) check box.This option requires an internet connection.
24 EZChrom Edition Networked and Distributed Systems

Configure the Operating System 2Configure Windows 10
c To make sure that all the net.tcp components are properly initialized, Non-HTTP activation must be enabled. Expand the .NET Framework 3.5 (includes .NET 2.0 and 3.0) node and select the Windows Communication Foundation Non-HTTP Activation check box.
d Select the .NET Framework 4.6/4.7 Advanced Services check box. Ue the default values for sub items.
e Select the Internet Explorer 11 check box.
f Select the Telnet Client check box.
g Select the TFTP Client check box.
h Reboot the PC.
[MUST] 15 Start > Settings > System > Default Apps: Select Internet Explorer as default Web browser.Do not use Edge, it is not supported. Unpin Edge from the task bar.
[MUST] 16 Disable Compatibility View in Internet Explorer.
a Open Internet Explorer.
b Click the Tools menu, and then click Compatibility View Settings.
c Clear the Display intranet sites in Compatibility View check box.
[MUST] 17 Enable the navigation pane:
Open Windows Explorer, then select View > Navigation pane from the ribbon and make sure that Navigation pane is selected.
[MUST] 18 Disable Admin Approval Mode for the Built-in Administrator account:
a On the Start screen, type Local Security Policy, and press ENTER.
b Navigate to Local Policies > Security Options.
c Double-click the User Account Control: Admin Approval Mode for the Built-in Administrator account policy.
d Select Disabled, and click OK.
NOTE If this procedure does not work as expected, or the computer has no internet access, install .NET 3.5 from the Windows installation media (see details for Windows 10 under https://support.microsoft.com/en-us/kb/2734782). If you do not have installation media, create them as described under https://www.microsoft.com/en-us/software-download/windows10.
EZChrom Edition Networked and Distributed Systems 25

2 Configure the Operating System Configure Windows 10
[MUST] 19 Automatically detect intranet network:
a Open Internet Explorer.
b Click the Tools menu, and then click Internet Options.
c On the Security tab, select Local intranet, and click Sites.
d Select Automatically detect intranet network.
e For Windows 10 version 1703, click Advanced.
f Add the network path from where the EZChrom installer is mapped, and click Close.
[PERFORMANCE] 20 System (Microsoft Control Panel): Change performance options:
a Click Advanced system settings.
b On the Advanced tab > Performance click Settings.
c On the Visual Effects tab, select Adjust for best performance.
d Under Custom, select the following check boxes for better usability:
• Smooth edges of screen fonts
• Show shadows under mouse pointer
• Show shadows under windows
[PERFORMANCE] 21 Start > Settings > Personalization > Colors: Turn Make Start, taskbar, and action center transparent off.
[PERFORMANCE] 22 System (Microsoft Control Panel): Change system properties:
a Click Advanced system settings.
b On the Advanced tab > Performance click Settings.
• Advanced tab > Virtual Memory: For optimum performance use the Change button to adjust the paging file size to a value of 2 to 3 times of the physical RAM on the PC. If possible locate the paging file on a drive different from the system installation drive.
• Data Execution Prevention tab: Select Turn on DEP for essential Windows programs and services only.
26 EZChrom Edition Networked and Distributed Systems

Configure the Operating System 2Configure Windows 10
c Advanced > Startup and Recovery > Settings button:
• System startup section:
Change both Time to display ... fields from 30 to 3 sec.
• System failure section:
Select Automatically restart, in the Write debugging information section select Kernel memory dump from the drop-down list.
d System Protection tab
Make sure that Protection is turned off. If required, click Configure and select Disable system protection.
e Remote tab
• In the Remote Assistance section, clear the check box Allow Remote Assistance connections to this computer.
• In the Remote Desktop section, select Don't allow connections to this computer.
[OPTIONAL] 23 Start > Settings > Personalization: Disable advertising info:
a On the Lock screen page:
• Under Background, select Picture or Slideshow.
• Turn off Get fun facts, tips, tricks, and more on your lock screen.
• Turn off Show lock screen background picture on the sign-in screen.
b On the Start page:
Turn off Occasionally show suggestions in Start.
[OPTIONAL] 24 Start > Settings > Privacy:
a On the General page, turn off the following:
• Let apps use my advertising ID
• Turn on SmartScreen Filter to check web content
• Send Microsoft info about how I write
b On the Location page, turn off Location.
[OPTIONAL] 25 Start > search for 'gpedit.msc': Welcome Center:
a Navigate to Local Computer Policy > Computer Configuration > Administrative Templates > System > Logon.
b Set Don't display the Getting Started welcome screen at logon to Enabled.
EZChrom Edition Networked and Distributed Systems 27

2 Configure the Operating System Configure Windows 10
[OPTIONAL] 26 Recycle Bin Properties: (right-click on desktop icon Recycle Bin) Select the following options:
• Custom size: Select a size corresponding to approximately 10% of the complete disk space for the drive.
• Select Display delete confirmation dialog.
Repeat these steps for all drives of your computer.
27 Region (Microsoft Control Panel): Language for non-Unicode programs:
On the Administrative tab, click Change system locale.... From the drop down list, select English (United States).
[OPTIONAL] 28 Right-click the taskbar to open the Taskbar and Start Menu Properties dialog. In the Taskbar tab, under Taskbar buttons select Combine when taskbar is full.
This will simplify switching between open CDS instances.
NOTE Do not the change system locale if you are using an English, Portuguese, Japanese or Chinese Operating System.
28 EZChrom Edition Networked and Distributed Systems

Configure the Operating System 2Configure Windows 7
Configure Windows 7
[MUST] 1 System (Microsoft Control Panel)*: Register Windows with Microsoft.
[MUST] 2 Folder Options (Microsoft Control Panel): In the View tab,
• Select Always show menus.
• Select Display the full path in the title bar.
• Clear Hide extensions for known file types.
• Clear Use Sharing Wizard.
[MUST] 3 Windows Update (Microsoft Control Panel):
a Click Check for updates to check for updates and apply all critical security patches.
b Click Change settings. In the Important updates section, select Never check for updates. Clear the other update options.
[MUST] 4 Administrative Tools (Microsoft Control Panel): Disable Services.
a Double-click Services.
b Double-click the following services and set their startup type to Disabled:
• Application Experience
• Desktop Window Manager Session Manager
[MUST] 5 Administrative Tools (Microsoft Control Panel): Configure security options:
a Double-click Local Security Policy.
b Navigate to Security Settings > Local Policies > Security Options
c Double-click the following policy listed in the right hand panel: Network Access: Sharing and security model for local accounts
d In the displayed dialog select the following item from the drop-down list: Classic - local users authenticate as themselves
* View the items by icon to see a list of all items.
NOTE This setting is important to avoid data loss due to system reboot during data acquisition.
EZChrom Edition Networked and Distributed Systems 29

2 Configure the Operating System Configure Windows 7
[MUST] 6 Indexing Options (Microsoft Control Panel): Disable indexing.
Click the Modify button. Clear all drives and locations.
[MUST] 7 Power Options (Microsoft Control Panel):
a As preferred plan select High performance
b Click Change Plan settings
c Set the option Put the computer to sleep to Never.
d Click Change advanced power settings.
e Open the nodes for Hard disk > Turn off hard disk after.
f Set the Minutes to 0 (=Never).
[MUST] 8 Region and Language (Go to Control Panel > Region and Language).
a Regional options should be set to English (United States) from the drop-down list.
b If regional format other than English (United States) is used, the following settings are mandatory. The settings can be defined by clicking on the Additional settings... button:
• Decimal symbol = . (point)
• Digit grouping symbol = , (comma)
• List separator =, (comma)
[MUST] 9 Date and Time (Microsoft Control Panel): Choose the time zone of your machine's location.
[MUST] 10 Network and Sharing Center (Microsoft Control Panel):
a Select Change adapter settings. Right-click Local Area Connection > Properties > Configure.
b On the Power Management tab, clear all check boxes.
[MUST] 11 Programs and Features (Microsoft Control Panel): Enable non-http activation.
a Click Turn Windows features on or off.
b Expand the Microsoft .NET Framework 3.5.1 node and select the Windows Communication Foundation Non-HTTP Activation check box.
c Select the Internet Explorer 11 check box.
d Select the Telnet Client check box.
e Select the TFTP Client check box.
f Reboot the PC.
30 EZChrom Edition Networked and Distributed Systems

Configure the Operating System 2Configure Windows 7
[MUST] 12 Windows logon options (Start > search for 'gpedit.msc')
a Navigate to Local Computer Policy > Computer Configuration > Administrative Templates > System > Logon.
b Set Hide entry points for Fast User Switching and Always use classic logon to Enabled.
[MUST] 13 Disable Compatibility View in Internet Explorer.
a Open Internet Explorer.
b Click the Tools menu, and then click Compatibility View Settings.
c Clear the Display intranet sites in Compatibility View check box.
[MUST] 14 Enable the navigation pane:
Open Windows Explorer, then select Organize > Navigation pane and make sure that Navigation pane is selected.
[PERFORMANCE] 15 System (Microsoft Control Panel): Change performance options:
a Click Advanced system settings.
b On the Advanced tab > Performance click Settings.
c On the Visual Effects tab, select Adjust for best performance.
d Under Custom, select the following check boxes for better usability:
• Smooth edges of screen fonts
• Show shadows under mouse pointer
• Show shadows under windows
[PERFORMANCE] 16 System (Microsoft Control Panel): Change system properties:
a Click Advanced system settings.
b On the Advanced tab > Performance click Settings.
• Advanced tab > Virtual Memory: For optimum performance use the Change button to adjust the paging file size to a value of 2 to 3 times of the physical RAM on the PC. If possible locate the paging file on a drive different from the system installation drive.
• Data Execution Prevention tab: Select Turn on DEP for essential Windows programs and services only.
NOTE This step is only required if you use OpenLab Content Management (formerly known as OpenLab Data Store).
EZChrom Edition Networked and Distributed Systems 31

2 Configure the Operating System Configure Windows 7
c Advanced > Startup and Recovery > Settings button:
• System startup section:
Change both Time to display ... fields from 30 to 3 sec.
• System failure section:
Select Automatically restart, in the Write debugging information section select Kernel memory dump from the drop-down list.
d System Protection tab
Make sure that Protection is turned off. If required, click Configure and select Disable system protection.
e Remote tab
• In the Remote Assistance section, clear the check box Allow Remote Assistance connections to this computer.
• In the Remote Desktop section, select Don't allow connections to this computer.
[OPTIONAL] 17 General Layout: (right-click Start > Properties)
a Start Menu Tab: In the Privacy section select both items
b Start Menu Tab > Customize button: In Customize Start Menu dialog:
Clear the following option:
• Favorites menu
Select the following options:
• Computer Display as a link
• Connect To
• Control Panel: Display as a menu
• Default Programs
• Devices and Printers
• Documents: Display as a link
• Enable context menus and dragging and dropping
• Games: Don't display this item
• Help
• Highlight newly installed programs
• Music: Don't display this item
• Network
32 EZChrom Edition Networked and Distributed Systems

Configure the Operating System 2Configure Windows 7
• Open submenus when I pause on them with the mouse pointer
• Personal folder: Display as a link
• Pictures: Display as a link
• Run command
• Search other files and libraries Search with public folders
• Search programs and Control Panel
• Sort All Programs menu by name
• System administrative tools: Display on the All Programs menu and in the Start menu
• Use large icons
[OPTIONAL] 18 Welcome Center (Start > search for 'gpedit.msc'):
a Navigate to Local Computer Policy > Computer Configuration > Administrative Templates > System > Logon.
b Set Don't display the Getting Started welcome screen at logon to Enabled.
[OPTIONAL] 19 Recycle Bin Properties: (right-click on desktop icon Recycle Bin) Select the following options:
• Custom size: Select a size corresponding to approximately 10% of the complete disk space for the drive.
• Select Display delete confirmation dialog.
Repeat these steps for all drives of your computer.
[OPTIONAL] 20 Region and Language (Microsoft Control Panel): Language for non-Unicode programs: On the Administrative tab, click Change system locale.... From the drop down list, select English (United States)
NOTE Do not change the system locale if you are using an English, Japanese or Chinese Operating System.
EZChrom Edition Networked and Distributed Systems 33

2 Configure the Operating System Create and Configure an Enterprise Path
Create and Configure an Enterprise Path
In the Windows Server 2008 version, new caching and enumeration features for file sharing were introduced. These features are not supported by OpenLab CDS EZChrom Edition and must be disabled on the shared Enterprise Path.
When using a Windows Server 2008, 2012, or 2016 operating system to host the Enterprise Path of an OpenLab CDS EZChrom Edition networked or distributed system, the following steps are required to allow a proper operation.
Create and Share a Folder on Windows Server
1 Create the shared folder. For example, D:\Share1.
2 Right-click the newly created folder and click Properties.
3 Select the Sharing tab.
4 To set share permissions, click the Advanced Sharing button.
5 Select the Share this folder check box.
6 Click the Permissions button.
7 To give full permission on the folder, click Everyone in the group name field and click the Add... button.
The created folder is shared.
34 EZChrom Edition Networked and Distributed Systems

Configure the Operating System 2Create and Configure an Enterprise Path
Configure an Enterprise Path on a Windows Server
Preparations
1 To edit the Enterprise Path in its current state, obtain the login credentials of a domain user that has administrative rights.
2 Log in to the server hosting the shared folder.
3 To launch the management window, click Start > Administrative Tools > Server Manager.
4 Windows Server 2012 R2/2016:
a From the navigation pane, select File and Storage Services, then click Shares.
b Right-click the share name, for example Share1, and select Properties from the context menu.
c In the navigation pane, click Settings.
d Clear the Enable access-based enumeration check box.
e Clear the Allow caching of share check box.
5 Windows Server 2008 R2 SP1:
a From the navigation pane, select Roles > File Services > Share and Storage Management.
b Right-click the share name, for example Share1, and select Properties from the context menu.
c On the Sharing tab, click the Advanced button.
d Clear the Enable access-based enumeration check box.
e On the Caching tab, select No files or programs from the share are available offline.
6 Save the settings.
The share folder is ready to be used as Enterprise Path.
• You have created and shared a folder. • The Advanced File Security (AFS) is disabled.
EZChrom Edition Networked and Distributed Systems 35

2 Configure the Operating System Create and Configure an Enterprise Path
36 EZChrom Edition Networked and Distributed Systems

EZChrom Edition Networked and Distributed Systems
3Install the Software
This chapter describes the preparation of third-party tool and the installation of OpenLab CDS EZChrom Edition on an OpenLab Shared Services server, Networked Workstation, CDS Client, or Agilent Instrument Controller.
37Agilent Technologies

3 Install the Software Before You Begin
Before You Begin
Please read this section before you begin the actual software installation. Certain Information and setup steps need to be done.
1 Decide on computer names for all required machines.
It is recommended to keep the computer names unchanged after installing OpenLab CDS EZChrom Edition.
The computer name of an AIC, for example, will be reflected in the instrument configuration. Changing it afterwards leads to a considerable configuration effort.
2 Decide on how audit trails shall be handled. By default, audit trails are disabled and can be activated manually for each single project. The installation wizard offers a function to globally enable audit trails for all projects. Once audit trails are enabled, they cannot be disabled again.
3 For installing OpenLab CDS EZChrom Edition, you need to have administrator privileges for all servers and clients. Power user privileges are not sufficient (the installation does not start).
4 Decide on a Shared Services server and a directory location to store all files related to the data system software, including data, methods, sequences, and configurations.
• CDS clients must be connected via network to the Shared Services server.
• If you plan to use a central data storage, CDS client users must have read/write access to the repository location.
• If you plan to use an existing Oracle DB server, make sure to set up the Oracle database as described in CDS_oracle12.pdf on Disk1/docs/enu.If you plan to use an existing SQL Server, change the SQL Server authentication to Mixed Mode (see “Change SQL Server Authentication to Mixed Mode” on page 116).If you plan to use the default PostgreSQL database, no additional setup steps are required. PostgreSQL will be installed by the OpenLab CDS EZChrom Edition Installer.
38 EZChrom Edition Networked and Distributed Systems

Install the Software 3Before You Begin
5 If you are installing OpenLab CDS EZChrom Edition, create an Enterprise path folder on the file server, with a share status Everyone > Full permissions (see “Create and Configure an Enterprise Path” on page 34). Because the system must access this folder as a uniform naming convention (UNC) share path, it must be created prior to actual installation. UNC paths define the common syntax pattern for share folder location and retrieval.
6 For the Shared Services database, obtain the:
• Database name
• Database administrator user name and password
• Authentication mode
• Administrator user credentials (domain, user name, password)
If you plan to use Data Store/OpenLab Server, refer to the Agilent OpenLab Server Installation Guide.
7 If you plan to use OpenLab ECM with your system, obtain the ECM server name.
8 In order to install and configure OpenLab ECM (Shared Services configuration on the server) the installing user must be both ECM administrator as well as internal OpenLab Shared Services administrator.
9 Create and define the service account of a domain user for the Agilent Instrument Controller (AIC) configuration. You will need to enter this service account information after you install the first AIC in your system.
10 Decide on the software delivery approach you want to use:
• Install directly from the DVDs — Load the disks as required directly to the workstation disk drive (Recommended).
• Copy installation files to a centralized location — You can use the utility to copy the installation files, for example, to a network share folder or USB drive, and run the installation from that location. However, some networks may interfere with installation.
11 When you launch the application, you will be able to review the following PDFs in the installer Planning menu before you install the software:
• OpenLab CDS EZChrom Edition Requirements — Use this PDF to check that your settings comply with the network requirements, and to determine whether your hardware and software will support the system.
• OpenLab CDS EZChrom Edition Networked Workstation and Distributed System — An electronic copy of this installation guide is provided in PDF format for your convenience.
EZChrom Edition Networked and Distributed Systems 39

3 Install the Software Prepare for Installation
12 Set up the necessary power, equipment and hardware connections to run your system. Connections could include any A/D boards, cables, GPIB boards, instrument detectors, and communication cables. For detailed requirements, refer to the OpenLab CDS EZChrom Edition Requirements guide.
13 Make sure that the antivirus software is disabled during the installation.
14 Make sure that no upgrades will run for any software during the installation.
15 Make sure that no system reboot is pending.
Pending reboots are indicated in the Site Preparation Tool (see “Run the System Configuration Checker” on page 43).
Prepare for Installation
To prepare for an installation on a server computer or networked workstation:
1 For the direct approach, insert the OpenLab CDS EZChrom Edition Installation medium.
2 For the shared file approach, copy all installation files to a centralized folder as described below.
3 For the portable data storage device approach, insert the new device in a computer USB port.
To begin installation, navigate to Disk1\Setup.bat. Right-click the file and run it as administrator to proceed to the Planning screen.
40 EZChrom Edition Networked and Distributed Systems

Install the Software 3Prepare for Installation
Copy Installation Files to a Centralized Folder for Installation
Completing this step will enable you to run an installation from a network share.
1 From the Master Installer Planning screen, select Installation from the sidebar menu.
2 Select Preparation of an Installation from Network Share.
3 At the Network Share screen, browse to a directory and create a destination folder as follows:
a Select the button with the three dots.
b Navigate to the directory where you want to create the folder.
c Select Make New Folder.
d Type in the folder name.
e Select OK. The system will return you to the Network Share screen, with the path displayed.
f Select the content you want to copy to the folder, corresponding to the required installation scenario.
g Select Start.
4 When processing is complete, copy the files to the local drive or map the location to a network drive.
5 Close the application and navigate to the directory and folder you created. Open the folder.
6 Select the Disk 1 folder, then execute Setup.bat to run the application.The system will display the installer Planning screen.
NOTE Installations into the root of a drive may cause problems during operations and are not supported.
EZChrom Edition Networked and Distributed Systems 41

3 Install the Software Install the Third Party Tools
Install the Third Party Tools
The OpenLab CDS EZChrom Edition Master Installer offers a list of tools that can be installed directly from the Installation screen.
Install Adobe PDF Reader
If an older version of Acrobat Reader (11 or earlier) is installed on your system, you must deinstall it first. Adobe updates would raise those versions to Acrobat Reader DC Continuous, which pushes automatic updates on a regular basis.
If you install Adobe PDF Reader directly from the installation medium: When OpenLab CDS EZChrom Edition users open a PDF file for the first time, they will be asked to confirm the Adobe Reader license agreement. This dialog will appear for each newly configured instrument.
You need Adobe Reader DC Classic to ...
• view site prep or administrative reports (such as system reports)
• use the Report Viewer feature
• view Software Verification Reports
To install Adobe Reader DC Classic:
1 Select Third Party Tools and then Adobe PDF Reader.
a The Adobe Reader setup screen appears. Click Install to continue.
b If Adobe Reader was successfully installed, click Finish to exist the setup screen.
Alternatively, you can install Adobe Reader from the OpenLab CDS EZChrom Edition installation medium. It is available under Disk1/Tools/Adobe Reader.
Run AcroRdr2015_MUI.bat and follow the instructions of the Adobe Reader Setup wizard.
42 EZChrom Edition Networked and Distributed Systems
Install the Software 3Run the System Configuration Checker
Install .NET 4.7.1
For Windows 7 or Windows 10: If .NET 4.7.1 is not installed on your system, its installation will automatically be triggered by the installation wizard. However, Windows requires write access to the installation files. Installing directly from the DVDs will therefore not be possible.
1 Copy the folder Disk1\Tools\DotNet4.7 to a local disk.
2 Run dotNetFx47_Full_x86_x64.bat.
3 Follow the installation wizard.
Run the System Configuration Checker
1 Run the Master Installer from the DVD or from a centralized folder. From the Planning screen, select System Configuration Checker.
2 The Site Preparation Tool opens. Select the correct edition and setup of the OpenLab CDS EZChrom Edition software you are installing from the drop-down list:
• For the server configuration check, select OpenLab CDS Shared Server Core A.02.XX.
• To check a networked workstation, CDS client, or AIC, select OpenLab CDS EZChrom Edition A.04.XX.
3 Select OK.
4 Complete page 1 of the Contact Information—System details by typing in the fields provided.
• System Location fields
• System Information fields
• Configuration fields
NOTE Microsoft .NET Framework 4.7.1 (Offline Installer) supports the following operating systems: Windows 7 SP1, Windows 8.1, Windows 10 Anniversary Update, Windows 10 Creators Update, Windows Server 2008 R2 SP1, Windows Server 2012, Windows Server 2012 R2, and Windows Server 2016.
EZChrom Edition Networked and Distributed Systems 43

3 Install the Software Run the System Configuration Checker
5 Review the system details and make any necessary entries. The system will follow the paths specified.
6 Select the green check mark icon in the top left corner of the screen to begin the software check. A summary report is displayed showing the results for each check category. Results are expressed as Pass, Warning, Critical Warning, or Fail.
Fail results must be corrected before continuing with the installation. Agilent recommends investigating and correcting any Critical Warnings and Warnings whenever possible before proceeding.
7 To view details of the report, select the appropriate link: System Hardware Details, Operating System and Software Details, or Manual Verification Required.
8 To save the report, select the Save icon at the top left of the screen.
9 E-mail the saved report to your Agilent Service Representative for evaluation, and for validation of your personal computer for Agilent Software Systems Installs.
NOTE If the firewall is controlled by security software, the Site Preparation Tool cannot read the firewall settings because of security limitations and will display Status "Fail" for the firewall settings.
In this case, make sure the firewall is disabled and enter the status in the Site Preparation Tool report manually.
44 EZChrom Edition Networked and Distributed Systems
Install the Software 3Install the OpenLab CDS Shared Services Server
Install the OpenLab CDS Shared Services Server
License Agreement Screen
1 If you plan to host the OpenLab CDS Shared Services database by an Oracle database management system, make sure to set up the Oracle database as described in CDS_oracle12.pdf on Disk1/docs/enu.
2 From the OpenLab CDS EZChrom Edition Master Installer screen, select Installation.
3 Select OpenLab CDS EZChrom Edition.
4 The OpenLab CDS EZChrom Edition Installation Wizard opens. Read the terms of the License Agreement. Master Installer provides a printable PDF of the license agreement under the Resources option of the main menu.
5 Select I agree with the terms and conditions. You cannot proceed with installation unless you agree to these terms.
6 Select Next to proceed to the Installation Folder screen.
NOTE Agilent recommends that you record and store the selections that you use during this installation in a different physical location. The information will be needed to restore your system in the unlikely case of your system becoming inoperable due to a hardware or software failure.
EZChrom Edition Networked and Distributed Systems 45
3 Install the Software Install the OpenLab CDS Shared Services Server
Installation Folder Screen
1 Type the folder name or browse to the directory where you want to store the application components. Folders must have English names.
2 To run an installation verification as part of this Shared Services server installation, select Run Software Verification .
Because there can be several separate installation procedures for networked or distributed systems, you may prefer to run the Software Verification Tool during the last installation, or sometime after your system is completely installed (see “What to do Next” on page 71).
3 Select Next to proceed to the Installation Type screen.
Installation Type Screens for Shared Services Server
1 Under the Installation type screen, select Networked System.
2 Select Next to proceed to the Networked system screen.
3 Select Shared Services Server (w/o Content Management).
4 Select Next.
5 Complete the Database Type Selection screen by selecting the a database type and the installation type. Configure the database as described in the following steps.
6 If you selected New database server with PostgreSQL:
a Type the path or browse to the directory where you want to store the application components. Directory names must be entered without spaces.
b Select Next to proceed to the OpenLab Shared Services Database screen.
c Complete the Database name field.
NOTE Installations into the root of a drive may cause problems during operation and are not supported.
46 EZChrom Edition Networked and Distributed Systems

Install the Software 3Install the OpenLab CDS Shared Services Server
d Select the authentication mode.If you use the database's server authentication, provide the required user credentials.
e Select Next to proceed to the Additional items screen.
7 If you connect to an existing PostgreSQL or Microsoft SQL Server database server:
a Type the database server name in the field provided.If the database resides on the same computer use localhost as database server name.
b For Microsoft SQL Server: Select Use default instance or Use named instance.If you select Use named instance, complete the Database instance name field.
c Select Next to proceed to the OpenLab Shared Services Database screen.
d Select either Create new database or Connect to existing database.
e Provide the required database name and user credentials.
f Click Test Connection... to run a connectivity check.The system will display a Connection succeeded message if the check is successful. Click OK to close the message.
g Select Next to proceed to the Additional items screen.
8 If you connect to an existing Oracle database server:
a Type the database server name in the field provided.
b Select Next to proceed with the server connection type.
c Select the Initialize data check box.
d Provide the required database name, user credentials, and the Listener port number. By default, the Listener port number is 1521.
e Click Test Connection... to run a connectivity check.The system will display a Connection succeeded message if the check is successful. Click OK to close the message.
f Select Next to proceed to the Additional items screen.
EZChrom Edition Networked and Distributed Systems 47

3 Install the Software Install the OpenLab CDS Shared Services Server
9 In the Additional Items screen, select either No Central Storage, or ECM Server.
a If you select ECM Server the Server name field will be enabled. Enter the server name without spaces.
b Click Test Connection... to run a connectivity check. The system will verify that the connection from this machine to the ECM server is functioning.
The system will display a Connection succeeded message if the check is successful. Click OK to close the message.
10 Under OpenLab Shared Services Language, select the correct language from the drop-down list.
11 Select Next to proceed to the Summary screen.
Summary Screen: Server Software Installation
1 Review the installation settings that you have selected in the preceding steps. Select Back as necessary to change installation settings, or Cancel to cancel the installation.
2 Select Start to begin installation.
3 The system performs an automated system check before it proceeds with the listed activities.
If a system check passed message appears, installation continues.
If a system check failed message appears, you can either:
• Decline to view the system report, and continue installation.
• Decline to view the system report and postpone installation.
• View the system report, and decide to continue installation.
• View the system report and postpone installation until the problem is fixed.
NOTE The print server is also listed. It is automatically included in the installation. The print server manages unattended printing during acquisition and reprocessing. It monitors a queue folder for PDF files which are then sent to a printer.
48 EZChrom Edition Networked and Distributed Systems

Install the Software 3Install the OpenLab CDS Shared Services Server
4 If an installation verification was completed as part of this installation, review the Software Verification Report. If the report indicates failure, verify the computer requirements and reinstall the data system. Do not use the system until the Software Verification Report gives a ‘pass’ result.
5 Click Next to proceed to the Installed Features screen.
6 Click Finish to close the installation wizard.
7 Reboot the server after the installation.
Post Installation Tasks on the Server
1 Configure the program, see “Configure the Antivirus Program” on page 73.
2 Setup the print server, “Setup the Print Server in the Operating System” on page 75.
3 Configure OpenLab.
After installing OpenLab CDS Shared Services on the server, you can already set up the authentication provider, storage location, and security policy. Alternatively, this can also be done after the installation of Networked Workstations or Clients is complete. The procedure is the same. See “Set up Authentication Provider and Storage Location” on page 92 and “Configure Security Policy” on page 94.
NOTE To view the system report as PDF file, Adobe PDF Reader must be installed (see “Install Adobe PDF Reader” on page 42).
EZChrom Edition Networked and Distributed Systems 49

3 Install the Software Install an OpenLab CDS EZChrom Edition Networked Workstation
Install an OpenLab CDS EZChrom Edition Networked Workstation
Use these procedures to install the software to any number of workstations linked to the Shared Services server.
License Agreement Screen
1 From the OpenLab CDS EZChrom Edition Master Installer screen, select Installation.
2 Select OpenLab CDS EZChrom Edition.
3 The OpenLab CDS EZChrom Edition Installation Wizard opens. Read the terms of the License Agreement. Master Installer provides a printable PDF of the license agreement under the Resources option of the main menu.
4 Select I agree with the terms and conditions. You cannot proceed with installation unless you agree to these terms.
5 Select Next to proceed to the Installation Folder screen.
Installation Folder Screen
1 Type the folder name or browse to the directory where you want to store the application components.
2 To run an installation verification as part of this installation, select Run Software Verification. The Software Verification Tool provides documentary evidence that your system has been built and installed correctly, and that all design specifications have been met. You can run the Software Verification Tool at a later time if you prefer (see “Run a Software Verification after Software Installation” on page 78).
3 Select Next to proceed to the Installation Type screen.
NOTE Installations into the root of a drive may cause problems during operation and are not supported.
50 EZChrom Edition Networked and Distributed Systems

Install the Software 3Install an OpenLab CDS EZChrom Edition Networked Workstation
Installation Type Screens
1 Under the Installation type screen, select Networked System.
2 In the Networked system screen, select Networked Workstation and hit Next.
3 In the OpenLab Shared Services Settings for Registration screen complete the Server name field.
a Choose the authentication service provider which you configured on the OpenLab Shared Services server.
b Provide the corresponding user credentials (see “Set up Authentication Provider and Storage Location” on page 92).
4 Select Next. The system will perform a connectivity check for the server.
If the connectivity test fails, verify that the server name was entered correctly, without spaces, and select Next to run the test again. If the test is still unsuccessful, you can:
• Enter a new server and try another test.
• Call internal support for assistance if you cannot connect to a server.
5 In the OpenLab CDS EZChrom Edition screen:
a Select the Install print server check box if you want to install the OpenLab CDS print server.
b Enter a valid Enterprise Path in the format \\<host name>\<share name>[\<object name>]. The Enterprise Path has been prepared during the configuration of the OpenLab Shared Services server (see “Create and Configure an Enterprise Path” on page 34).
c Select Next to proceed to the Additional Items screen.
1 In the Additional Items screen, select either EZChrom Enterprise Path, OpenLab Server/OpenLab ECM XT Server, or ECM 3.x Server.
a If you select ECM 3.x Server the Server name field will be enabled. Enter the server name in the correct syntax and without spaces.
b Click Test Connection... to run a connectivity check. The system will verify that the connection from this machine to the ECM server is functioning.
The system will display a Connection succeeded message if the check is successful. Click OK to close the message.
NOTE The correct syntax for the servername is http://servername.
EZChrom Edition Networked and Distributed Systems 51

3 Install the Software Install an OpenLab CDS EZChrom Edition Networked Workstation
c Select Next to proceed to the Global Audit Trail Enforcement (GATE) Settings screen.
2 In the GATE Settings screen, choose whether audit trails shall be automatically enabled on this Networked Workstation. If required, select the Global Audit Trail Enforcement check box.Once enabled, the audit trails option cannot be turned off again.
3 Select Next to proceed to the Summary screen.
Summary Screen
1 Review the installation settings that you have selected in the preceding steps. Select Back as necessary to change installation settings, or Cancel to cancel the installation.
2 Before starting or canceling the installation, you can save an XML file with your installation settings. This XML can then be used for a scripted installation (see “About Scripted Installation” on page 63).
To save the XML file, click the file symbol in the Summary screen.
3 Select Start to begin installation.
4 The system performs an automated system check before it proceeds with the listed activities.
If a system check passed message appears, installation continues.
If a system check failed message appears, you can either:
• Decline to view the system report, and continue installation.
• Decline to view the system report and postpone installation.
• View the system report, and decide to continue installation.
• View the system report and postpone installation until the problem is fixed.
NOTE To view the system report as PDF file, Adobe PDF Reader must be installed (see “Install Adobe PDF Reader” on page 42).
52 EZChrom Edition Networked and Distributed Systems

Install the Software 3Install an OpenLab CDS EZChrom Edition Networked Workstation
5 If an installation verification was completed as part of this installation, review the Software Verification Report. If the report indicates failure, verify the computer requirements and reinstall the data system. Do not use the system until the Software Verification Report gives a ‘pass’ result.
6 Click Next to proceed to the Installed Features screen.
7 Click Finish to close the installation wizard.
Post Installation Tasks on the Networked Workstation
After installing OpenLab CDS EZChrom Edition on a Networked Workstation, configure the antivirus program, see “Configure the Antivirus Program” on page 73.
EZChrom Edition Networked and Distributed Systems 53

3 Install the Software Install an OpenLab CDS EZChrom Edition Client
Install an OpenLab CDS EZChrom Edition Client
Use these procedures to install the software to any number of EZChrom clients connected to the Shared Services server.
Here again you will be running your installation(s) either using the DVDs directly, or from a centralized folder. The installation steps are identical until you start the installation wizard: you won’t be prompted to load the DVDs if you are installing from a centralized location.
License Agreement Screen
1 From the OpenLab CDS EZChrom Edition Master Installer screen, select Installation.
2 Select OpenLab CDS EZChrom Edition.
3 The OpenLab CDS EZChrom Edition Installation Wizard opens. Read the terms of the License Agreement. Master Installer provides a printable PDF of the license agreement under the Resources option of the main menu.
4 Select I agree with the terms and conditions. You cannot proceed with installation unless you agree to these terms.
5 Select Next to proceed to the Installation Folder screen.
54 EZChrom Edition Networked and Distributed Systems

Install the Software 3Install an OpenLab CDS EZChrom Edition Client
Installation Folder Screen
1 Type the folder name or browse to the directory where you want to store the application components.
2 To run an installation verification as part of this CDS client installation, select Run Software Verification.
Because there can be several separate installation procedures for a distributed system, you may prefer to run the Software Verification Tool during the last installation, or sometime after your system is completely installed (see “Run a Software Verification after Software Installation” on page 78 in this manual).
3 Select Next to proceed to the Installation Type screen.
Installation Type Screens
1 Under the Installation type screen, select Networked System.
2 Select Next to proceed to the Networked system screen.
3 Select CDS client.
4 Select Next.
5 In the OpenLab Shared Services Settings for Registration screen complete the Server name field.
a Choose the authentication service provider which you configured on the OpenLab Shared Services server.
b Provide the corresponding user credentials (see “Set up Authentication Provider and Storage Location” on page 92).
6 Select Next. The system will perform a connectivity check for the server.
If the connectivity test fails, verify that the server name was entered correctly, without spaces, and select Next to run the test again. If the test is still unsuccessful, you can:
• Enter a new server and try another test.
• Call internal support for assistance if you cannot connect to a server.
EZChrom Edition Networked and Distributed Systems 55

3 Install the Software Install an OpenLab CDS EZChrom Edition Client
7 In the OpenLab EZChrom Edition screen:
a Select the Install print server check box if you want to install the OpenLab CDS print server.
b Enter a valid Enterprise Path in the format \\<host name>\<share name>[\<object name>]. The Enterprise Path has been prepared during the configuration of the OpenLab Shared Services server (see “Create and Configure an Enterprise Path” on page 34).
c Select Next to proceed to the Additional Items screen.
8 In the Additional Items screen, select either EZChrom Enterprise Path, OpenLab Server/OpenLab ECM XT Server, or ECM 3.x Server.
• If you select ECM 3.x Server the Server name field will be enabled. Enter the server name without spaces.
• Click Test Connection... to run a connectivity check. The system will verify that the connection from this machine to the ECM server is functioning.
The system will display a Connection succeeded message if the check is successful. Click OK to close the message.
d Select Next to proceed to the GATE Settings screen.
9 In the GATE Settings screen, choose whether audit trails shall be automatically enabled. If required, select the Global Audit Trail Enforcement check box.
10 Select Next to proceed to the Summary screen.
NOTE You must install this setting on all OpenLab CDS EZChrom clients and AICs to enable the function correctly in your Distributed System.
Once enabled, the audit trails option cannot be turned off again.
To disable Global Audit Trail Enforcement feature, run the installation or repair procedure again and uncheck the GATE option.
56 EZChrom Edition Networked and Distributed Systems

Install the Software 3Install an OpenLab CDS EZChrom Edition Client
Summary Screen
1 Review the installation settings that you have selected in the preceding steps. Select Back as necessary to change installation settings, or Cancel to cancel the installation.
2 Select Start to begin installation.
3 The system performs an automated system check before it proceeds with the listed activities.
If a system check passed message appears, installation continues.
If a system check failed message appears, you can either:
• Decline to view the system report, and continue installation.
• Decline to view the system report and postpone installation.
• View the system report, and decide to continue installation.
• View the system report and postpone installation until the problem is fixed.
4 If an installation verification was completed as part of this installation, review the Software Verification Report. If the report indicates failure, verify the computer requirements and reinstall the data system. Do not use the system until the Software Verification Report gives a ‘pass’ result.
5 Click Next to proceed to the Installed Features screen.
6 Click Finish to close the installation wizard.
NOTE To view the system report as PDF file, Adobe PDF Reader must be installed (see “Install Adobe PDF Reader” on page 42).
EZChrom Edition Networked and Distributed Systems 57

3 Install the Software Install an Agilent Instrument Controller (AIC)
Install an Agilent Instrument Controller (AIC)
License Agreement Screen
1 From the OpenLab CDS EZChrom Edition Master Installer screen, select Installation.
2 Select OpenLab CDS EZChrom Edition.
3 The OpenLab CDS EZChrom Edition Installation Wizard opens. Read the terms of the License Agreement. Master Installer provides a printable PDF of the license agreement under the Resources option of the main menu.
4 Select I agree with the terms and conditions. You cannot proceed with installation unless you agree to these terms.
5 Select Next to proceed to the Installation Folder screen.
Installation Folder Screen
1 Type the folder name or browse to the directory where you want to store the application components.
2 To run an installation verification as part of this Instrument Controller installation, select Run Software Verification. Because there can be several separate installation procedures for a distributed system, you may prefer to run the Software Verification Tool during the last installation, or sometime after your system is completely installed (see “Run a Software Verification after Software Installation” on page 78 in this manual).
3 Select Next to proceed to the Installation Type screen.
NOTE If the AIC is running with Windows Server 2012 or Windows Server 2016: Log in as a Windows domain user with administrative privileges to install OpenLab CDS EZChrom Edition.
NOTE Configure a physical default printer in Windows before installing the Agilent Instrument Controller.
58 EZChrom Edition Networked and Distributed Systems

Install the Software 3Install an Agilent Instrument Controller (AIC)
Installation Type Screens
1 Under the Installation type screen, select Networked System.
2 Select Next.
3 Select Instrument Controller.
4 Select Next.
5 In the OpenLab Shared Services Settings for Registration screen complete the Server name field.
a Choose the authentication service provider which you configured on the OpenLab Shared Services server.
b Provide the corresponding user credentials (see “Set up Authentication Provider and Storage Location” on page 92).
6 Select Next. The system will perform a connectivity check for the server.
If the connectivity test fails, verify that the server name was entered correctly, without spaces, and select Next to run the test again. If the test is still unsuccessful, you can:
• Enter a new server and try another test.
• Call internal support for assistance if you cannot connect to a server.
7 In the OpenLab CDS EZChrom screen:
a The Install printer server check box is deactivated, because the installation of these components is not supported for AICs.
b Enter a valid Enterprise Path in the format \\<host name>\<share name>[\<object name>]. The Enterprise Path has been prepared during the configuration of the OpenLab CDS Shared Services server (see “Create and Configure an Enterprise Path” on page 34).
c Select Next to proceed to the Additional Items screen.
EZChrom Edition Networked and Distributed Systems 59

3 Install the Software Install an Agilent Instrument Controller (AIC)
7 In the Additional Items screen, select either EZChrom Enterprise Path, OpenLab Server/OpenLab ECM XT Server, or ECM 3.x Server.
• If you select ECM 3.x Server the Server name field will be enabled. Enter the server name without spaces.
• Click Test Connection... to run a connectivity check. The system will verify that the connection from this machine to the ECM server is functioning.
The system will display a Connection succeeded message if the check is successful. Click OK to close the message.
e Select Next to proceed to the GATE Settings screen.
8 In the GATE Settings screen, choose whether audit trails shall be automatically enabled. If required, select the Global Audit Trail Enforcement check box. Note that you must install this setting on all OpenLab CDS EZChrom clients and AICs to enable the function correctly in your Distributed System.Once enabled, the audit trails option cannot be turned off again.
9 Select Next to proceed to the Summary screen.
60 EZChrom Edition Networked and Distributed Systems
Install the Software 3Install an Agilent Instrument Controller (AIC)
Summary Screen
1 Review the installation settings that you have selected in the preceding steps. Select Back as necessary to change installation settings, or Cancel to cancel the installation.
2 Select Start to begin installation.
3 The system performs an automated system check before it proceeds with the listed activities.
If a system check passed message appears, installation continues.
If a system check failed message appears, you can either:
• Decline to view the system report, and continue installation.
• Decline to view the system report and postpone installation.
• View the system report, and decide to continue installation.
• View the system report and postpone installation until the problem is fixed.
4 If an Software Verification Tool was completed as part of this installation, review the Software Verification Report. If the report indicates failure, verify the computer requirements and reinstall the data system. Do not use the system until the Software Verification Report gives a ‘pass’ result.
5 Click Next to proceed to the Installed Features screen.
6 Click Finish to close the installation wizard.
Configure the Program
After installing OpenLab CDS EZChrom Edition on a Networked Workstation, configure the antivirus program, see “Configure the Antivirus Program” on page 73.
NOTE To view the system report as PDF file, Adobe PDF Reader must be installed (see “Install Adobe PDF Reader” on page 42).
EZChrom Edition Networked and Distributed Systems 61

3 Install the Software Install a Networked Workstation (Mixed Topology)
Install a Networked Workstation (Mixed Topology)
In a Distributed System, you can also install Networked Workstations in addition to the AIC and OpenLab CDS EZChrom Edition Clients, thus creating a mixed topology. For more information on the mixed topology, refer to the OpenLab CDS EZChrom Edition Guide for Administrators.
62 EZChrom Edition Networked and Distributed Systems
Install the Software 3Scripted Installation
Scripted Installation
About Scripted Installation
The OpenLab CDS EZChrom Edition Master Installer supports a command line mode for installation, the scripted installation. This mode supports installation, upgrade, repair, and uninstallation. You can execute scripted installations either manually or as part of software management systems such as LANDesk or HP CM. With the corresponding parameter (-q), the scripted installation completes unattended.
Export as XML
The Master Installer supports a feature to export the installation parameters into an XML file which you can then use for the scripted installation.
This feature is also supported for upgrade and repair. However, for these cases the exported installation XML file is not appropriate. For scripted repair and upgrade, you must prepare specific XML files using the respective Master Installer wizards.
1 Launch the OpenLab CDS EZChrom Edition Installation Wizard.
2 Follow the installation instructions.
3 When you have reached the Summary screen, click the icon on the top right corner to export the installation parameters to XML. Save the file on a physical drive.
You can now use the XML file for the scripted installation.
NOTE Installation file and XML file must not be in the same file path.
EZChrom Edition Networked and Distributed Systems 63

3 Install the Software Scripted Installation
Parameters and Return Codes
Parameters
You can call Agilent.OpenLab.CDSInstaller.exe in command line mode with the following parameters:
• -iInstallation, upgrade
• -r repair
• -uUninstallation
• -qSilent mode — no installation or uninstallation wizard will be shown.
• -reboot
Reboot automatically after successful installation, repair, upgrade, or uninstallation. The system will reboot if the return code is either 0 or 17.
A warning message will be shown in the command prompt 10 min before the system is rebooted. In addition, a Windows dialog opens 2 min before reboot.
64 EZChrom Edition Networked and Distributed Systems

Install the Software 3Scripted Installation
• KeepComponents
Optional parameter for the uninstallation process, which can contain one or more shared components that should stay on your system. Without this parameter, all EZChrom components will be removed from your system. To keep certain shared components, list the corresponding IDs from the table below in double quotes and separated by comma.
Component Name Id
Software Verification Tool IQT
Microsoft SQL Server SQLServer
IO Library IOLibraries
• ConfigurationXML="<ConfigurationXMLFilePath>"
The XML file contains all required inputs of the Master Installer to install, upgrade, or repair a certain topology (see “Export as XML” on page 63). Replace <ConfigurationXMLFilePath> with the correct file path and XML file name.
NOTE Do not enter a blank before or after the equals (=) sign. The scripted installation and uninstallation mode will not work as expected.
EZChrom Edition Networked and Distributed Systems 65

3 Install the Software Scripted Installation
Return Codes
After installation, uninstallation, upgrade, or repair in the command line mode, the system will return a number code which is explained below.
Table 1 Return codes
Error/Return Code Return value
Unknown (default) -1
Success 0
CoreComponentFailure 1
NonCoreComponentFailure 2
TestConnectivityFailure 3
ExpectedWindowsInstallerNotInstalled (WI 4.5 missing) 4
ParameterMismatchError 5
CannotProceedWithFreshInstallation 6
CannotProceedWithUpgrade 7
CannotProceedWithUninstallation 8
CannotProceedWithRepair 9
CannotProceedWithReRegistration 10
ReRegistrationNotSupported 11
IncompleteTopologyFound 12
InvalidUNCPath 13
MissingInstallable 14
NotAStrongPassword 15
DowngradeNotSupported 16
RestartRequired 17
RegistryCleanupError 18
InvalidInputXML 19
InvalidMode 20
66 EZChrom Edition Networked and Distributed Systems

Install the Software 3Scripted Installation
SitePrepFailure 21
DatabaseConnectionFailed 22
DotNetFramework4NotInstalled 23
OLSSConnectionFailed 24
PDFReaderNotInstalled 25
AllComponentsInstallationFailed 26
SomeComponentsInstallationFailed 27
Failed 28
AddOnListEmpty 29
EULANotAccepted 30
ScriptedNotSupported 31
Table 1 Return codes
Error/Return Code Return value
EZChrom Edition Networked and Distributed Systems 67

3 Install the Software Scripted Installation
Installation, Upgrade, or Repair
Preparations You must have copied all installation files to a centralized folder (see “Copy Installation Files to a Centralized Folder for Installation” on page 41). This step is mandatory for scripted installation.
In installation mode, the OpenLab CDS EZChrom Edition Master Installer checks if .Net Framework is present on your system. If not, it will automatically be installed. Select Accept to agree with the license agreement.
The Master Installer evaluates the products already installed on your system. Depending on the installed components, the Master Installer will offer one of the following options:
• Start a fresh installation
• Upgrade
• Repair
If a required installable is missing, the Master Installer will create an entry in a log file, and, depending on the component type, will continue or rollback the installation. A corresponding error code will be returned in such scenarios.
1 Right-click the executable of the command prompt or Power shell prompt, and run it as administrator.
You will get a return code for the scripted installation only if you start it as administrator.
Navigate to the location where you have saved the installation files.For example: C:\CDS
2 To start the installation, call Agilent.OpenLab.CDSInstaller.exe with the following syntax:
Agilent.OpenLab.CDSInstaller.exe -i ConfigurationXML="<path to xml file>" -q -reboot
For example:
Agilent.OpenLab.CDSInstaller.exe -i ConfigurationXML="c:\settings\ConfigurationXML.xml" -q -reboot
With this command, you start the installation wizard without a user interface, and automatically reboot the system.
68 EZChrom Edition Networked and Distributed Systems

Install the Software 3Scripted Installation
Uninstallation
1 Right-click the executable of the command prompt or Power shell prompt, and run it as administrator.
You will get a return code for the scripted uninstallation only if you start it as administrator.
2 Navigate to the location where you have saved the installation files.
For example: C:\CDS
3 To start the uninstallation, call Agilent.OpenLab.CDSInstaller.exe with the following syntax:
Agilent.OpenLab.CDSInstaller.exe -u KeepComponents="<list of components>" -q -reboot
For example:
Agilent.OpenLab.CDSInstaller.exe -u KeepComponents="IQT,IOLibraries" -q -reboot
With the KeepComponents parameter, you can specify a list of shared components that you want to keep on the system (see “Parameters” on page 64). With the command given in the example, the OpenLab CDS components Software Verification Tool (IQT) and IO Library (IOLibraries) will be kept.
Logging and Tracing
All exceptions, errors and information messages are logged in the following locations:
• During installation, upgrade, or repair: under <BaseInstallDirectory>\Logs
• During uninstallation: under <User's Temp>\<Company Name>\Logs\<Log folder>\<Wizard Name>.txt
EZChrom Edition Networked and Distributed Systems 69

3 Install the Software Install Additional Software and Drivers
Install Additional Software and Drivers
OpenLab CDS EZChrom Edition offers a wizard to help you installing additional software, such as drivers for third-party instruments. To open the wizard, go to Start > All programs > Agilent Technologies > OpenLab > OpenLab Additional Software and Drivers. Follow the wizard to install the required software.
Prepare Network Drives
If the additional software is located on a network drive, you must prepare the network drive to make it accessible by the wizard. Without this preparation, Windows security prevents the wizard from accessing those drives.
1 Map the drive to a letter.
For example, map the drive as Z: using the shared path "\\<machine-name>\OpenLabCDS".
This maps the drive for the logged-in user.
2 Open the command prompt in elevated mode (run as administrator), and map the drive using the net use command.
For example, net use Z: "\\<machine-name>\OpenLabCDS"
This maps the drive for the local administrator account. The mapped drive is now visible to both logged-in user and administrator, and can be selected in the wizard.
Configure Third-Party Instruments
For details on the configuration of third-party instruments with EZChrom Edition, please refer to the documentation of the respective drivers.
70 EZChrom Edition Networked and Distributed Systems

Install the Software 3What to do Next
What to do Next
The basic installation of the data system software is complete.
There is a 60-day Startup License for this system, and the expiration period starts with the installation.
To request and download your final software license, and add the license file to your system, see the Licensing chapter in this guide.
After you have acquired and installed your final software license, you will continue to prepare your data system for operation by end users by configuring projects, users, and instruments. This is accomplished through the OpenLab CDS Control Panel, see the Configure OpenLab CDS in the Control Panel chapter in this guide.
EZChrom Edition Networked and Distributed Systems 71

EZChrom Edition Networked and Distributed Systems
4Post Installation Tasks
This chapter describes tasks that are relevant after finishing the installation.
72Agilent Technologies

Post Installation Tasks 4Configure the Antivirus Program
Configure the Antivirus Program
Be sure to open the firewall ports listed in the Firewall Settings in the OpenLab CDS EZChrom Edition Requirements guide.
In order for the OpenLab software to function correctly, you should configure any antivirus real time protection software with the following list of folder exclusions. These folders should only be scanned while the instruments are idle and no data acquisition takes place. Refer to your specific antivirus software documentation on how to configure folder exclusions.
• The path that you use to store your data
• C:\programdata\chromatography system\recovery data
• C:\programdata\agilent
• %programfiles%\agilent
• %programfiles(x86)%\agilent
• %programfiles%\common files\agilent
• %programfiles(x86)%\common files\agilent
• %programfiles%\agilent technologies
• %programfiles(x86)%\agilent technologies
• %programfiles%\common files\agilent technologies
• %programfiles(x86)%\common files\agilent technologies
• %programfiles%\common files\agilent shared
• %programfiles(x86)%\common files\agilent shared
NOTE Running antivirus programs might influence the behavior and performance of your computer. Some virus scanners might cause issues when used with OpenLab CDS. The application is tested with Symantec Endpoint Protection 12.x and with Microsoft Security Essentials.
NOTE With Symantec Endpoint Protection, do not use the Aggressive Scan Mode. It may lead to false positive virus detection.
EZChrom Edition Networked and Distributed Systems 73

4 Post Installation Tasks Configure the Antivirus Program
If your antivirus software includes program or executable deny execution settings, ensure that the following program files are not denied execution. You can use the windows search feature to find the specific folder each program file is located in.
• agilentiolibrariesservice.exe
• apg_top.exe
• iprocsvr.exe
• iproc8491.exe
• msinsctl.exe
• httpdmsd.exe
• epcsetup.exe
Process Directory File name
ECM upload/download(if applicable)
%temp% for Windows users(=Users' temp directory)
*.ssizip
Standard reports %temp% for Windows users(=Users' temp directory)
~p3d*.tmp~job*.tmpHpspl00.que
CDS intelligent reports %LOCALAPPDATA%%APPDATA%%PROGRAMDATA%
Files on:• Agilent• Agilent Technologies• Agilent_Technologies,_Inc• IsolatedStorage• Tempe.g.: C:\Users\xxxxx\AppData\Local\ Agilent Technologies\Intelligent Reporting\RawDataFileCache
NOTE Depending on your specific configuration, some of the listed folders or files may not exist on your system.
74 EZChrom Edition Networked and Distributed Systems

Post Installation Tasks 4Setup the Print Server in the Operating System
Setup the Print Server in the Operating System
On the OpenLab CDS Shared Services Server:
1 Browse to the Agilent OpenLab CDS Print Server in Services.
2 Change the Log On As user to a domain user that has access to your printers.
3 Login to the operating system as the user that is logged into the Agilent OpenLab CDS Print Server in Services.
4 Install your printers on the server while logged in as this user.
5 Create a queue folder. This folder needs to be shared. The user logged into the Agilent OpenLab CDS Print Server service needs to have full access to this location. This is the folder that the Print Server will monitor for PDF files. Every printer needs to have its own queue folder.
NOTE Inside each queue folder, there will be a quarantine folder If the connection to the printer fails, print jobs will be added to this quarantine folder. The print jobs be copied back to the queue folder manually, once the connection to the printer has been restored. By default, files are deleted from the quarantine folder after 24 hours.
EZChrom Edition Networked and Distributed Systems 75
4 Post Installation Tasks On the AIC: Identify a Domain Account for Running Instrument Services
On the AIC: Identify a Domain Account for Running Instrument Services
-first AIC installation only-
This essential step must be completed for EZChrom edition after you have installed your first instrument controller using the procedures above.
1 Go to Start > Programs > Agilent Technologies > OpenLab CDS EZChrom Edition > AIC and Driver Install Tool.
2 At the OLSS EZChrom Tool —Login screen, type your User Name, Password, and Domain in the fields provided.
3 Select Login.
4 At the OpenLab Shared Services EZChrom Registrations Functions screen, select the Instrument Service Account tab.
5 Type the Service Account Credentials in the fields provided:
• User name
• Password (non-expiring passwords are recommended. For details on changing the password, refer to the OpenLab CDS Administration Guide)
• Domain
The user specified for this service account must be set as a local administrator on all AICs.
This user must have the privilege to access the Enterprise Path.
6 Select Store.
7 Close the tool.
From this point forward you can install the software to any number of additional instrument controllers linked to the network server and instruments, omitting this step—the system will retrieve the domain account information automatically.
NOTE An instrument service account can only support up to 64 AICs due to a Microsoft limitation.
76 EZChrom Edition Networked and Distributed Systems

EZChrom Edition Networked and Distributed Systems
5Optional Procedures
This chapter describes the installation of OpenLab Data Analysis as an add-on or standalone application. It also contains information on file security, the Software Verification Tool, and performance improvement
77Agilent Technologies

5 Optional Procedures Run a Software Verification after Software Installation
Run a Software Verification after Software Installation
The Software Verification Tool (SVT) provides documentary evidence that your system has been built and installed correctly, and that all design specifications have been met.
1 Using your Windows operating system, go to Start > All Programs > Agilent Technologies > Software Verification Tool.
2 Select Qualify.
The system will run the application and generate a Software Verification Report.
3 If the report indicates failure, verify the computer requirements and reinstall the data system.
Do not use the system until the Software Verification Report gives a ‘pass’ result.
Configure Advanced File Security (AFS)
Advanced file security is an optional configuration for OpenLab CDS EZChrom Edition networked systems. It provides enhanced security on the enterprise path in order to prevent any unauthorized access to project data outside of the data system. This configuration sets the appropriate Windows sharing and security settings to allow only a defined group to access the enterprise data from Windows Explorer. This may only be configured if your system is configured to use Windows Domain as the Shared Services authentication provider.
78 EZChrom Edition Networked and Distributed Systems

Optional Procedures 5Configure Advanced File Security (AFS)
Enable Advanced File Security
1 Prepare your system.
a Verify that your system is configured to use Windows Domain as the authentication provider. (See Configure Security and Storage > Set the authentication provider and the storage system in the online help.)
b Verify that your system is configured to use a storage path that is directly beneath the defined enterprise path.
c Create or define a Windows Domain group that will have access to the enterprise path outside of the data system.
d Define a minimum of two users who are members of the group defined above.
e Under Local Security Policy > Local Policies > User Rights Assignment, grant the users or the group the following rights:
• Act as part of the operating system
• Allow log on locally
f Close all connections to the OpenLab CDS system (i.e. clients, instrument runs, control panels).
g Obtain the login credentials of a domain user that has administrative rights to edit the enterprise path in its current state.
h Obtain the administrative login credentials of the OpenLab Control Panel that were defined during the configuration of domain authentication.
2 On any OpenLab CDS EZChrom Edition client, browse to the directory where the software was installed.
(by default: C:\Program Files\Agilent Technologies\EZChrom)
NOTE Non-expiring passwords are recommended. For details on changing the password in a running system, refer to the EZChrom Administration chapter in the OpenLab CDS Guide for Administrators.
EZChrom Edition Networked and Distributed Systems 79
5 Optional Procedures Configure Advanced File Security (AFS)
3 Launch EnterpriseConfig.exe.
4 An Enterprise Setup Login dialog will display:
a In the OpenLab Control Panel Login section enter the user name, password, and domain of the OpenLab Control Panel Administrator.
b In the Windows User Information section enter the user name and password of the user with edit permission to the enterprise path.
• If this is a domain user account, select Logon from Windows Domain and enter the domain name (recommended).
• If this is a local PC account, select Windows Local PC. This may only be an account local to the machine where the EnterpriseConfig.exe program is being run.
c Click OK.
5 The system will process the above credentials. If they are valid, a warning will display to advise that once this process is completed, it cannot be reversed.
Click OK if you are prepared to proceed.
6 An Enterprise Service Account dialog will display:
a Enter the user name, password, and domain of a user defined to be a member of the AFS group.
b Enter the group name that will have access to the enterprise path under the restrictions of AFS.
c Click OK.
80 EZChrom Edition Networked and Distributed Systems

Optional Procedures 5Improve Performance on Offline Machines
Improve Performance on Offline Machines
Computers running OpenLab CDS EZChrom Edition may exhibit slow performance when they are not connected to the Internet.
The windows operating system has routines built into its operation that causes it to continuously search for an online connection in order to update to all the latest Windows security certificates when using secure software.
Use the following system settings on all workstations, clients, AICs, and servers to remedy this problem.
1 Open Internet Explorer and select Tools > Internet Options. In the Advanced tab, clear the following check boxes:
• Security > Check for publisher's certificate revocation
• Security > Check for server certificate revocation
2 For all Windows systems except Windows 10: Change the following registry keys:
• On 32bit and 64bit systems:[HKEY_LOCAL_MACHINE\SOFTWARE\Policies\Microsoft\SystemCertificates\AuthRoot]
"DisableRootAutoUpdate"=dword:00000001
• On 64bit systems:[HKEY_LOCAL_MACHINE\SOFTWARE\Wow6432Node\Policies\Microsoft\SystemCertificates\AuthRoot]
"DisableRootAutoUpdate"=dword:00000001
3 Document that you turned off the Root Certificates, as this can prevent users from installing other applications.
EZChrom Edition Networked and Distributed Systems 81

EZChrom Edition Networked and Distributed Systems
6Licensing
This chapter describes how to obtain and install a license.
82Agilent Technologies

Licensing 6About OpenLab CDS Licensing
About OpenLab CDS Licensing
License Types
The license file is a collection of Product , Instruments and Add-on's licenses (or activation keys) and is installed to your OpenLab CDS System. Both the OpenLab Workstation PC, or the OpenLab Server in a Client/Server system will act as the license serve.
The licenses or activation keys in the license file can either be Shared or Counted:
• Shared licenses — system computers and other components can have shared, or add-on, licenses — because they share a core license.
• Counted licenses — these licenses are part of the OpenLab CDS EZChrom Edition floating licensing strategy. They are not permanently assigned to any one component. Instead they are automatically assigned to components, such as AICs and instruments, while the components are starting up. The licenses are automatically returned when the component is closed. The license management program controls license issuance and retrieval.
In this case, the only requirement is that a component is licensed while running. You only need enough licenses for all components running concurrently, rather than for each installed component.
A startup license for the system allows you to run OpenLab CDS for 60 days after the installation. In order to run the data system software after the 60-day period, you must install your core license file
EZChrom Edition Networked and Distributed Systems 83

6 Licensing About OpenLab CDS Licensing
License File
A license file will contain your software license. This file is installed on the workstation. The license file is bound to this computer, and cannot be moved to another workstation without regenerating the license in SubscribeNet.
Information in the license file defines the number of instruments and other options that may be used concurrently with your system.
The most efficient way to manage and maintain your licensing is through the Internet. To generate, download, and install a final license for your product, you will need:
• The authorization code label provided in the lavender envelope containing your Software Entitlement Certificate.
• The URL for SubscribeNet from the Software Entitlement Certificate.
If you have not received a lavender envelope for your product, contact your vendor or internal support.
84 EZChrom Edition Networked and Distributed Systems

Licensing 6Get a License
Get a License
Obtain a License with SubscribeNet
If you have Internet access, use the following procedure to generate and download your license for your OpenLab CDS system.
If you do not have Internet access, skip to the section “Other Ways to Obtain a License” on page 87.
If you are a new user who has not registered with SubscribeNet, continue with the section New Users.
If you have registered with SubscribeNet, skip to the section Users registered with SubscribeNet.
New Users
1 From a computer with Internet access, enter the URL provided in the Software Entitlement Certificate in an Internet browser.
2 At the bottom of the login page, click click here to register.
3 On the registration page, enter the authorization code from the label and complete the profile information (required fields are marked with an asterisk *).
The email address you enter will become your login ID.
4 Click Submit. The system will generate and display an account name for you.
SubscribeNet will send a welcome email with your login ID and password.
5 Log in to SubscribeNet using your login ID and password.
Once you log in, you can use the online user manual link for help with any questions you have.
6 Select Generate or View licenses from the left navigation bar.
7 Follow the prompts to generate your new license.
You will be prompted for the HOST NAME of the computer. The host name you enter must match with the network name of the computer where the Control Panel is running. Do not include any DNS suffix (domain.com) references in the entered machine name.
EZChrom Edition Networked and Distributed Systems 85

6 Licensing Get a License
During this process you will have to enter the MAC address of your license server. For workstations, this is the local computer. For client/server systems, this is the server.
To retrieve your MAC address from a computer where OpenLab CDS EZChrom Edition is already installed, open the Control Panel and browse to the Administration > Licenses section. Use the Copy MAC Address or Save MAC Address function to obtain the MAC address for license generation.
8 When the system generated the license, view its details, then click Download License File. Save the license file to your computer and to a backup location (such as a portable storage device).
Use your login ID and password when you revisit the Agilent SubscribeNet site to regenerate a license file, add new authorization codes, or further configure the license for your system.
Users registered with SubscribeNet
1 Login to SubscribeNet with your e-mail address and password.
2 Select the SubscribeNet account associated with this authorization code, if you have more than one account.
3 From the SubscribeNet navigation pane, select Register Authorization Code.
This will allow you to enter your new authorization code and make available the new license entitlements
4 Follow steps 6 through 8 in the previous procedure, New Users, to generate or view your new licenses.
NOTE If any changes are made to the computer name or domain reference after the license is installed, remove the license. A new license will need to be created in SubscribeNet, downloaded, and installed.
NOTE If the network adapter that provides the MAC address used during license creation is removed from the machine, your license will no longer be valid. A new license will need to be generated with a currently available MAC on the license server.
86 EZChrom Edition Networked and Distributed Systems
Licensing 6Get a License
Other Ways to Obtain a License
If you are unable to generate a license, contact your nearest Agilent technical support office. A representative will tell you how to submit an OpenLab CDS License Generation Form in your location.
Offline Licensing
If an internet connection is not available in your laboratory:
You or your local on-site service engineer will collect the necessary information from you to allow Agilent to create a license account on your behalf. For phone support in your region, call the sales and service number for your region. See the Appendix for a list of numbers for various countries.
Required Customer Information for Agilent License Support:
The following information must be provided to Agilent in order to enable us to create a licensing account on your behalf.
1 Collect Account Information:
Your account name will be your company name and Lab name separated by a comma. Employee information provided here will be used to define the first administrator of your account for future access to the system as required. Please prepare the following pieces of information prior to contacting your local Agilent sales and service center in order to expedite service:
• Company Name
• Lab/Department Name
• First Name
• Last Name
• E-mail address
• Job Title
• Phone #
• Address, City, State/Province, Postal Code, Country
2 Collect Authorization Code(s):
EZChrom Edition Networked and Distributed Systems 87

6 Licensing Get a License
The authorization code is an alpha-numeric code provided on a label which is enclosed in a lavender envelope. If you have received more than one code you must provide all codes to ensure that all ordered licenses are granted to your account.
3 Receiving your license:
Once the above information is provided Agilent will then work on your behalf to generate a license file through SubscribeNet. The license file will either be sent to your shipping address (on a CD), or your local FSE will deliver it in person (usually on USB media). Once your license is received follow the below section on “Install your License” to finish installing your license on your CDS system(s).
88 EZChrom Edition Networked and Distributed Systems
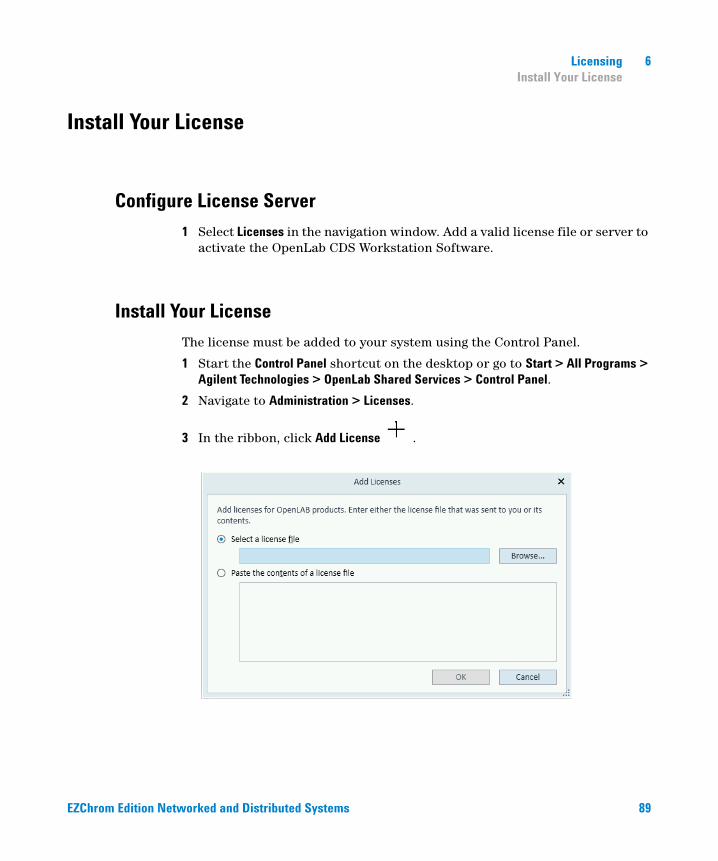
Licensing 6Install Your License
Install Your License
Configure License Server
1 Select Licenses in the navigation window. Add a valid license file or server to activate the OpenLab CDS Workstation Software.
Install Your License
The license must be added to your system using the Control Panel.
1 Start the Control Panel shortcut on the desktop or go to Start > All Programs > Agilent Technologies > OpenLab Shared Services > Control Panel.
2 Navigate to Administration > Licenses.
3 In the ribbon, click Add License .
EZChrom Edition Networked and Distributed Systems 89

6 Licensing Install Your License
4 Choose to install the license by:
• Using the license file option to browse to and open the license file (.lic) saved from the license generation process in SubscribeNet.
• Selecting the License Text option and copying the license text from a text file received into the provided field.
5 Click OK.
The Administration interface in the Control Panel will now display the status of installed licenses.
90 EZChrom Edition Networked and Distributed Systems

EZChrom Edition Networked and Distributed Systems
7Configure OpenLab CDS in the Control Panel
This chapter describes the initial configuration steps after installing the software. Refer to the online help for more information.
91Agilent Technologies

7 Configure OpenLab CDS in the Control Panel Set up Authentication Provider and Storage Location
Set up Authentication Provider and Storage Location
1 Open OpenLab Control Panel from the OpenLab Control Panel shortcut on the desktop, or go to Start > All Programs > Agilent Technologies > OpenLab > OpenLab Control Panel.
2 From the navigation pane, select Administration > System Configuration.
3 In the System Configuration toolbar, select Edit System Settings.
Figure 1 Edit System Settings dialog in the OpenLab Control Panel
4 In the Edit System Settings window, select your authentication provider from the drop-down list.
If you installed a server, the Internal authentication provider is automatically configured during the installation. If required, you can change the authentication provider to Windows domain.
92 EZChrom Edition Networked and Distributed Systems

Configure OpenLab CDS in the Control Panel 7Set up Authentication Provider and Storage Location
5 Select your storage provider from the drop-down list.
The storage type Content Management is available only if OpenLab Server has been deployed.
6 Select Next.
7 Select a user to administrate the system.
a If you selected Internal as an authentication provider:
•Select Create Account.
•In the Create Administrator Account dialog box, enter a Name and a Password.
b If you selected Windows Domain as an authentication provider:
•Select the check box to activate the input fields.
•Enter a Domain, User, and Password.
•Select Select Account.
•Enter a search string.
•In the Search Users dialog box, select Search to view a list of users.
•Select a user.
c If you selected ECM as an authentication provider:
•Provide the ECM Server URL and enter the ECM user credentials.
•Select Select Account.
•Enter a search string.
•In the Search Users dialog box, select Search to view a list of users.
•Select a user.
8 Select OK.
9 Select Next.
10 Review your settings and select Apply.
EZChrom Edition Networked and Distributed Systems 93
7 Configure OpenLab CDS in the Control Panel Configure Security Policy
Configure Security Policy
If you need to comply with specific standards, adjust the security policy as required.
With the authentication provider Internal, you can set all parameters in the Control Panel. With an external authentication provider, you can only set the inactivity time in the Control Panel; all other parameters are defined by the external system.
1 Launch the Control Panel and navigate to Administration.
2 In the navigation pane, select Security Policy.
3 In the ribbon, click Edit Security Policy.
Configure Users/Groups/Roles
1 Launch the OpenLab Control Panel and navigate to Administration
2 Select Users in the Navigation Window. Import/Create Users that will have access to the OpenLab CDS Workstation.
3 Select Groups in the Navigation Window. Import or Create Groups that will have access to the OpenLab CDS Workstation.
4 Select Roles in the Navigation Window. Create/edit Roles and assign Users or Groups to those Roles.
5 If you use ECM: There are several default roles in both ECM and EZChrom Edition. In both systems, you must assign a specific role to each group. Roles and privileges must be configured separately for ECM and EZChrom:
• The privileges set in ECM define the accessible content and functions in ECM.
• The privileges set in the OpenLab Control Panel define the instrument privileges, the functions that are available in EZChrom, and also which administrative tasks can be carried out in the OpenLab Control Panel.
94 EZChrom Edition Networked and Distributed Systems
Configure OpenLab CDS in the Control Panel 7Configure Users/Groups/Roles
Create or import users
Use the OpenLab Control Panel to manage the roles and privileges. You can create custom roles, or assign one or more of the predefined roles to give users varying degrees access.
Add users (Internal Authentication only)
1 From the navigation pane, click Administration > Users.
2 In the Create User dialog, provide the relevant parameters:
• Enter the name and password for the new user.
• By default, the new user will need to change the password at next logon. If this is not required, clear the User must change password at next logon check box.
• In the Role Membership tab, assign the user to an appropriate role. You can use the default roles, or prepare your own roles in the Control Panel under Administration > Roles.
3 Click OK.
Import users
To add Windows domain users to your system, you must have privileges to obtain user and group information from the domain.
1 From the navigation pane, click Administration > Users.
2 In the ribbon, click Import.
3 In the Search Users dialog box, enter search string for the username.
4 From the Search Results list, select the user you want to import, and click Add. The user is added to the Selected Users list.
5 Repeat steps 2 through 4 until you have added all the user names that you want to import to the Selected Users list, then click OK.
EZChrom Edition Networked and Distributed Systems 95

7 Configure OpenLab CDS in the Control Panel Configure Users/Groups/Roles
Groups
If you use an external authentication provider, you can either import the names of groups that exist in the external system, or create new internal groups. There is no limit on the number of groups that can be mapped or created.
Assign users to groups either in the external system or in the Control Panel. If you need additional user assignments that are relevant only for OpenLab CDS EZChrom Edition, create them in the Control Panel. Otherwise it is sufficient to only import the groups and assign the required roles to the groups.
If you delete or unmap a group, the users who were members in this group remain unchanged.
Roles and Privileges
Roles are used to assign privileges to a user or a user group globally or for a specific instrument or location. The system contains a list of predefined roles which are installed as part of the system installation (for example, Instrument Administrator, Instrument User, or Everything). Each role has certain privileges assigned.
Privileges are grouped according to the three main role types (Project role, Instrument role, and Administrative role). When you assign privileges to a role, you first select the required role type and then select the privileges related to this role type. Each role can only have privileges of one specific role type; the only exception is the predefined role Everything, which has all privileges of all role types. Users or groups may require multiple roles to perform system functions. For example, a user with the role Chemist may need another role such as Instrument User with the privilege to run an instrument.
You can create a tree of different locations in the Control Panel, and add instruments to the relevant locations. For each instrument or instrument group, you can assign different Instrument roles (see also “Specific Roles for Individual Instruments” on page 97). For example, a user can have the role Instrument Administrator for one instrument, and Instrument User for another instrument.
96 EZChrom Edition Networked and Distributed Systems

Configure OpenLab CDS in the Control Panel 7Configure Users/Groups/Roles
You can also create a tree of different projects or project groups in the Control Panel, and assign different Project roles for different projects (see also “Specific Roles for Individual Instruments” on page 97). For example, a user can have the role Project Administrator in one project, so that he can manage the settings in the Control Panel. In a second project, he may have a role that allows him to edit the content of a project, but not to change the project settings.
Specific Roles for Individual Instruments
By default, the roles of users or groups are globally set for all locations or instruments. The role settings are inherited from the root node Instruments. In order to assign a different role to a user or group for one specific node, you can deselect the Inherit privileges from parent check box in the Edit Privileges dialog for the required node. Afterwards, you can assign a different role that will be valid only for the specific node.
You can assign Instrument roles to individual locations or instruments.
Administrative roles are always set globally.
Table 2 Description of role types
Role Type Description
Administrative privileges These privileges are globally assigned to a user or group and cannot be changed on the instrument/location level. They are the typical administration privileges such as Backup and restore, Manage security, Manage printers etc.
Instrument privileges These privileges can be assigned globally or on the instrument/location level. Privileges for instruments are, for example, View instrument or location and Run instrument.Users need the View instrument or location privilege on the global level to see the locations and instruments tree in the Control Panel.
Project privileges Privileges for accessing or modifying different levels of data. You can assign these privileges globally or on project level.
EZChrom Edition Networked and Distributed Systems 97

7 Configure OpenLab CDS in the Control Panel Configure Initial Project
Configure Initial Project
1 Launch the Control Panel and navigate to Projects.
2 Create and configure a project:
On the CDS Settings tab:
• Enter the locations for Methods, Sequences, Results, Sequence Templates and Report Templates.
• Consider the required audit trail settings for this project.
For more details, refer to the Control Panel online help.
Configure Initial Instrument
1 Launch the OpenLab Control Panel and navigate to Instruments.
2 Click Create in the ribbon to create a new instrument.
3 Provide the information on the instrument, and click OK.
4 Select the new instrument, and click Configure Instrument in the ribbon.
5 It is recommended that you use Auto Configuration to configure your instruments: Select a module, click Auto Configuration, and enter the Number of Detectors and Number of Pumps. Select Autosampler if necessary.
NOTE Agilent 1120 and 1220 instruments are configurable under the instrument type Agilent Compact LC only. Using the this instrument type you will be able to configure selected Infinity LC modules along with the 1120 or 1220 instrument. Please see the Supported Instruments and Firmware Guide (CDS_SupportedInstFirmware.pdf) for more detail.
The drivers for 1120 and 1220 instruments come with the instruments and are not included by default with OpenLab CDS EZChrom Edition.
98 EZChrom Edition Networked and Distributed Systems

Configure OpenLab CDS in the Control Panel 7Configure Initial Instrument
Alternatively, configure the devices manually:
a Select a module from the Available modules, and click the arrow to move it under Configured modules.
b Double-click a Configured module to open a dialog box pertaining to that module.
c Select Options.
d In the Configuration Options dialog box, select from the following general options: System Suitability, SEC, PDA, and Baseline check.
6 If you use a Distributed System: Configure a default printer for your instrument.
a Click Additional configuration in the bottom right corner of the Configure Instruments dialog.
b Select Default Printer, then select the required printer.
7 Confirm your settings
For more information on the number of instruments that can be configured, please refer to the Requirements guide.
NOTE Select a physical printer to ensure correct function on all clients.
EZChrom Edition Networked and Distributed Systems 99

7 Configure OpenLab CDS in the Control Panel Configure the Print Server in OpenLab
Configure the Print Server in OpenLab
1 On the Shared Services server, log in to the Control Panel, and click on the Printers icon in Administration.
2 Click Add in the Printers menu.
3 Click the Add Monitor button.
4 In the Add New Printer dialog, add the following:
• Monitoring Folder: Enter the UNC or local path to the queue folder (see “Setup the Print Server in the Operating System” on page 75).
• Printer: Select a printer that is installed on the operating system.
• Display Name: – Enter the display name for the print monitor
• Comment: Enter a comment
5 Click OK.
6 In the Print Server, select the printer that you just added.
7 Click Monitor On, and set Set to Monitor for this printer to yes. This will enable the print server to monitor the queue folder.
If you set Set to Monitor to no, then the print server will not monitor this folder and send files to the printer.
8 If the monitor folder uses a UNC name, disable access based enumeration and clear caching so that no files or programs from the share are available offline. For details on how to configure the share, see “Configure an Enterprise Path on a Windows Server” on page 35.
9 Set the print server status Running.
If you click Stop Print Server, the print server service will shut down and the print server will stop functioning. None of the printers will be working at this point.
NOTE To print to the print server in a Distributed System: You can access the print server from any client in the Distributed System. Select your printer in the Print Hardcopy section of the screen when starting a single run, starting a sequence, or reprocessing. The printers in the drop-down list are from the print server.
100 EZChrom Edition Networked and Distributed Systems

EZChrom Edition Networked and Distributed Systems
8Upgrade to a New Software Version
This chapter describes the upgrade from different revisions of OpenLab CDS EZChrom Edition.
101Agilent Technologies

8 Upgrade to a New Software Version Planning your Upgrade
Planning your Upgrade
Depending on the EZChrom revision, upgrading a Networked or Distributed system to A.04.09 can be done directly or requires an intermediate upgrade. The upgrade process for a Networked or Distributed system starts with the Shared Services Server or the Data Store server/OpenLab Server. If you need to upgrade an ECM server, it must be upgraded first before the Shared Services Server. After the server is upgraded, then upgrade the AICs, CDS Clients, or Networked Workstations. See “Workflow for Upgrading Networked or Distributed Systems” on page 103.
The in-place upgrade to Windows 10 operating system is not supported with OpenLab CDS EZChrom Edition.
Backward Compatibility During Upgrade
During an upgrade project there might be different versions of OpenLab CDS in your environment. Please note that the analysis and reprocessing of data is supported only on versions same as or higher than the one used for the acquisition or last reprocessing.
Agilent recommends that an environment with different versions should be used only during the upgrade phase. For more information, please refer to the OpenLab CDS EZChrom Edition Guide for Administrators (CDS_admin.pdf).
102 EZChrom Edition Networked and Distributed Systems
Upgrade to a New Software Version 8Workflow for Upgrading Networked or Distributed Systems
Workflow for Upgrading Networked or Distributed Systems
Upgrading from OpenLab CDS EZChrom Ed. A.04.07 SR2 or higher
EZChrom A.04.09 supports different backend storage products (OpenLab Server, OpenLab ECM XT Server, and ECM 3.x Server). For Networked environments or distributed systems with an OpenLab ECM backend you may keep your OpenLab Shared Services server A.02.02 or upgrade to OpenLab CDS Shared Services Server 2.3. If you have an OpenLab Server/OpenLab ECM XT Server backend, you may keep your existing version or upgrade to OpenLab Server 2.3.
The server must be upgraded to OpenLab CDS Shared Services 2.3 or OpenLab Server 2.3 if you plan to extend the system with CDS Clients or Networked Workstations running on Windows 10, or if you want to use Microsoft SQL Server 2014 to host the OpenLab Shared Services Server database.
If you keep your existing OpenLab Shared Services server A.02.02 ensure the latest software update ("hotfix") is installed.
1 Optional: Upgrade your OpenLab Shared Services server to OpenLab CDS Shared Services 2.3.
OR
Optional: If using OpenLab Server/OpenLab ECM XT Server, upgrade to OpenLab Server 2.3.
2 Upgrade AICs, CDS clients, and Networked Workstations to EZChrom A.04.09.
EZChrom Edition Networked and Distributed Systems 103

8 Upgrade to a New Software Version Workflow for Upgrading Networked or Distributed Systems
Upgrading from OpenLab CDS EZChrom Ed. A.04.07, A.04.06, A.04.05, A.04.04, or A.04.03
When upgrading from OpenLab CDS EZChrom Ed. A.04.07, A.04.06, A.04.05, A.04.04, or A.04.03, a two-step process is required. Both the server and the clients need to be upgraded to a revision supporting a direct upgrade such as OpenLab CDS EZChrom Ed. A.04.07 SR2. Verify that the system is working properly after the intermediate upgrade before upgrading to OpenLab CDS EZChrom Ed. A.04.09.
Step 1: Upgrade to OpenLab CDS A.02.02 (A.04.07 SR2)
1 Upgrade your server:
a Upgrade your OpenLab Shared Services server to revision A.02.02.
or
b If using OpenLab Server/OpenLab ECM XT Server, upgrade to Data Store A.02.02.
2 Upgrade AICs, CDS clients, and Networked Workstations to EZChrom A.04.07 SR2
3 Ensure that the entire system is operational before doing the next step.
Step 2: Upgrade to A.04.09
1 Upgrade your server:
a Upgrade your OpenLab Shared Services server to OpenLab CDS Shared Services 2.3.
or
b If using OpenLab Server/OpenLab ECM XT Server, upgrade to OpenLab Server 2.3.
2 Upgrade AICs, CDS clients, and Networked Workstations to A.04.09.
NOTE It is possible to maintain lab operations during the upgrade with the software update for PCs with versions from A.04.03 to A.04.06. For more details, refer to the Backward Compatibility During Upgrade chapter in the OpenLab CDS EZChrom Edition Guide for Administrators (CDS_admin.pdf).
104 EZChrom Edition Networked and Distributed Systems

Upgrade to a New Software Version 8Workflow for Upgrading Networked or Distributed Systems
Upgrading from OpenLab CDS EZChrom Ed. A.04.02 or A.04.01
There is no upgrade procedure for OpenLab CDS EZChrom Edition A.04.02 or A.04.01. These revisions will need to be uninstalled before A.04.09 can be installed.
Uninstall the application and install A.04.09
1 Uninstall the old revision of the OpenLab Shared Services server.
2 Install OpenLab CDS Shared Services Server 2.3.
3 Uninstall the old revision from AICs, CDS clients, and Networked Workstations.
4 Install OpenLab CDS EZChrom Edition A.04.09 on the AICs, clients, and Networked Workstations.
EZChrom Edition Networked and Distributed Systems 105

8 Upgrade to a New Software Version License Upgrade
License Upgrade
If you are upgrading from a version A.02.01 or older, you will need to get a new license to upgrade to the new version of the software.
Do not perform a license upgrade on a Networked Workstation, an AIC, or Distributed System, without the assistance of an engineer!
See “Sales and Support Assistance” on page 117 to find a sales representative in your region.
Upgrade a Data Store Server/OpenLab Server
For details, please refer to the OpenLab ECM XT Installation Guide.
106 EZChrom Edition Networked and Distributed Systems

Upgrade to a New Software Version 8Run the Upgrade Wizard on the OpenLab CDS Shared Services Server
Run the Upgrade Wizard on the OpenLab CDS Shared Services Server
To upgrade to A.04.09, perform the following steps:
1 Start the Master Installer from the installation medium.
2 From the Master Installer Planning screen, switch to the Installation screen.
3 Select OpenLab CDS Installation. Select I agree with the terms and conditions. You cannot proceed with the upgrade unless you agree to these terms. Click Next.
4 In the Upgrade Type screen, enter the credentials for OpenLab Shared Services. Select the appropriate section in Additional Items screen and click Next. If you selected ECM, enter ECM server name and check Test Connection, if succsessful click Next.
5 In the Summary screen of the Upgrade Wizard, the components for the upgrade are listed. Select Start to start the upgrade.
If an error occurs during the upgrade, an error message appears. When a component is upgraded correctly, the status shown in the Status field changes from Installed to Successfully Upgraded.
6 After the upgrade is completed, a warning message appears, stating that you must restart Windows for some changes to take effect.
Select Yes to restart Windows.
Select No if you want to restart Windows at a later time.
After the upgrade, check the settings in the OpenLab Shared Services Maintenance tool. For more information on server administration, refer to the OpenLab CDS EZChrom Edition Guide for Administrators.
EZChrom Edition Networked and Distributed Systems 107

8 Upgrade to a New Software Version Run Upgrade Wizard on AICs, Clients, or Networked Workstations
Run Upgrade Wizard on AICs, Clients, or Networked Workstations
This procedure describes the A.04.09 OpenLab CDS Upgrade Wizard in the Master Installer.
1 From the Master Installer Planning screen, switch to the Installation screen.
2 Select OpenLab CDS Installation.
If OpenLab CDS is already installed, this automatically opens the OpenLab CDS Upgrade Wizard.
3 The Workstation license must be upgraded, see “License Upgrade” on page 106.
Acknowledge that the license has been upgraded and click Next to continue.
4 Select I agree with the terms and conditions. You cannot proceed with the upgrade unless you agree to these terms. Click Next.
5 If an Authentication Provider has been configured: Enter the username and password of a user with system administration privileges in the OpenLab Shared Services Settings for Registration screen. Click Next.
6 Select the appropriate section in Additional Items screen and click Next.
7 In the GATE Settings screen, choose whether audit trails shall be automatically enabled on the AIC, Client or this Networked Workstation. If required, select the Global Audit Trail Enforcement check box. Click Next.Once enabled, the audit trails option cannot be turned off again.
8 In the Summary screen of the Upgrade Wizard, the components for the upgrade are listed. Click Start to proceed with the upgrade.
If an error occurs during the upgrade, an error message appears.
9 After the upgrade is finished, select Finish to close the OpenLab CDS Upgrade Wizard. Existing instrument configuration can remain unchanged after the upgrade.
NOTE For 35900 instruments, classic driver is automatically installed by Master Installer. If you need to use RC.NET drivers (for example, to split channels between two instruments on an AIC), you must first install the new drivers, and then reconfigure the instruments.
Note that methods created with the classic drivers cannot be used anymore. You will have to create new methods the with RC.Net drivers.
NOTE Starting with A.04.08, classic drivers for fraction collectors are not supported. You must change your instrument configuration and create new methods with RC.NET drivers.
108 EZChrom Edition Networked and Distributed Systems

EZChrom Edition Networked and Distributed Systems
9Uninstall the Software
This chapter contains information on the uninstallation by using the OpenLab CDS EZChrom Edition Uninstallation Wizard.
109Agilent Technologies

9 Uninstall the Software About Uninstallation
About Uninstallation
Like the installation, the uninstallation is automated by the OpenLab CDS EZChrom Edition Master Installer.
For your convenience, the Master Installer uses the same user interfaces for the software uninstallation of all configurations (standalone or networked workstation). The OpenLab CDS EZChrom Edition Uninstallation Wizard under the Maintenance section of the Master Installer guides you through the uninstallation steps.
For uninstalling OpenLab CDS EZChrom Edition, you need to have administrator privileges for all servers and clients. Power user privileges are not sufficient (the uninstallation does not start).
NOTE If the Master Installer was not used for installation, any manually installed additional software such as Headspace, PAL, or third party drivers must be uninstalled using the Windows Control Panel before OpenLab CDS EZChrom Edition can be uninstalled.
NOTE Do not use the Windows uninstallation tool.
110 EZChrom Edition Networked and Distributed Systems

Uninstall the Software 9Run the Uninstallation Wizard on a CDS Client
Run the Uninstallation Wizard on a CDS Client
1 For Windows 7, select Start > OpenLab > Uninstall OpenLab CDS.For Windows 10, Windows Server 2012 R2, and Windows Server 2016, select Start > Uninstall OpenLAB CDS.
The OpenLab CDS EZChrom Edition Uninstallation Wizard opens.
2 In the Shared Components screen, check the Uninstall Software Verification check box.
Note: Software Verification Tool needs to be uninstalled if you wish to re-install OpenLab CDS EZChrom Edition at a later time
3 In the Summary screen under Uninstallation of OpenLab CDS Components, there is a list of the components you want to uninstall.
4 Select Start to start the uninstallation.
If you want to abort the uninstallation, select Cancel. If you want to change any settings, select Back.
All listed components are automatically uninstalled, one after another.
1 When the uninstallation has finished, click Finish to close the uninstallation wizard.
EZChrom Edition Networked and Distributed Systems 111

9 Uninstall the Software Run the Uninstallation Wizard on an Instrument Controller
Run the Uninstallation Wizard on an Instrument Controller
1 For Windows 7, select Start > OpenLab > Uninstall OpenLab CDS.For Windows 10, Windows Server 2012 R2, and Windows Server 2016, select Start > Uninstall OpenLAB CDS.
The OpenLab CDS EZChrom Edition Uninstallation Wizard opens.
2 In the Shared Components screen, check the Uninstall Software Verification check box.
Note: Software Verification Tool needs to be uninstalled if you wish to re-install OpenLab CDS EZChrom Edition at a later time
3 In the Summary screen under Uninstallation of OpenLab CDS Components, there is a list of the components you want to uninstall.
4 Select Start to start the uninstallation.
If you want to abort the uninstallation, select Cancel. If you want to change any settings, select Back.
All listed components are automatically uninstalled, one after another.
5 When the uninstallation has finished, click Finish to close the uninstallation wizard.
112 EZChrom Edition Networked and Distributed Systems

Uninstall the Software 9Run the Uninstallation Wizard on the OpenLab Shared Services Server
Run the Uninstallation Wizard on the OpenLab Shared Services Server
1 For Windows 7, select Start > OpenLab > Uninstall OpenLab CDS.For Windows 10, Windows Server 2012 R2, and Windows Server 2016, select Start > Uninstall OpenLAB CDS.
The OpenLab CDS EZChrom Edition Uninstallation Wizard opens.
2 In the Shared Components screen, check Uninstall Software Verification and Uninstall databases like MS SQL Server 2012 R2, SQL Server 2014 Enterprise or Standard, PostgreSQL 9.3, Oracle 11G R2, and Oracle 12C R1 (as applicable).
Under SQL Instance, select the instance that you want to uninstall from the drop-down list.
3 Select Next to proceed to the Summary screen.
4 In the Summary screen under Uninstallation of OpenLab CDS Components, there is a list of the components you want to uninstall.
5 Select Start to start the uninstallation.
6 If you want to abort the uninstallation, select Cancel. If you want to change any settings, select Back.
All listed components are automatically uninstalled, one after another.
When a component is uninstalled correctly, the status shown in the Status field of the Maintenance screen changes from Installed to Uninstalled successfully.
When the uninstallation has finished, click Finish to close the Uninstallation Wizard.
NOTE The Software Verification Tool needs to be uninstalled if you want to reinstall OpenLab EZChrom Edition CDS at a later time.
EZChrom Edition Networked and Distributed Systems 113

9 Uninstall the Software Run the Uninstallation Wizard on a Networked Workstation
Run the Uninstallation Wizard on a Networked Workstation
1 For Windows 7, select Start > OpenLab > Uninstall OpenLab CDS.For Windows 10, Windows Server 2012 R2, and Windows Server 2016, select Start > Uninstall OpenLAB CDS.
The OpenLab CDS EZChrom Edition Uninstallation Wizard opens.
2 In the Shared Components screen, check the Uninstall Software Verification check box.
Note: Software Verification Tool needs to be uninstalled if you wish to re-install OpenLab CDS EZChrom Edition at a later time
3 In the Summary screen under Uninstallation of OpenLab CDS Components, there is a list of the components you want to uninstall.
4 Select Start to start the uninstallation.
If you want to abort the uninstallation, select Cancel. If you want to change any settings, select Back.
All listed components are automatically uninstalled, one after another.
5 When the uninstallation has finished, click Finish to close the uninstallation wizard.
114 EZChrom Edition Networked and Distributed Systems

EZChrom Edition Networked and Distributed Systems
10Appendix
This chapter contains additional information on Microsoft SQL Server 2012.
115Agilent Technologies

10 Appendix Change SQL Server Authentication to Mixed Mode
Change SQL Server Authentication to Mixed Mode
This procedure describes how you can switch to Mixed Mode in an existing Microsoft SQL Server 2012 installation.
1 Start SQL Server Management Studio.
2 In the Object Explorer, right-click the server name, and select Properties from the context menu.
3 In the Server Properties dialog, select the Security page.
4 Under Server authentication, select SQL Server and Windows Authentication mode.
5 Click OK.
6 Enable login for user sa.
a In the Object Explorer, navigate to Security > Logins.
b Right-click the user sa, and select Properties from the context menu.
c In the Login Properties dialog, select the General page.
d Provide a strong password.
e Select the Status page.
f Under Login, select Enabled.
Click OK.
7 Restart the SQL Server service, and log in with SQL Server Authentication.
116 EZChrom Edition Networked and Distributed Systems

Appendix 10Sales and Support Assistance
Sales and Support Assistance
Please check the following web site for your local sales and support contact:
www.agilent.com/en-us/contact-us/page
If you have purchased a networked configuration including a Software Maintenance Agreement (SMA) from Agilent, you are also entitled to priority support at:
www.agilent-labinformatics.com/support
Register your SMA and receive a number of benefits including:
• Online Ticket Submission, Prioritization and Status Tracking
• Online Feature Request Submission and Tracking
• Readily available self-help tools and useful links
EZChrom Edition Networked and Distributed Systems 117

Agilent Technologies 2010-2018
Printed in Germany 08/2018
*M8204-90000**M8204-90000*M8204-90000
www.agilent.com
Agilent Technologies
In This Book
This installation guide provides instructions to install and configure the Agilent OpenLab Chromatography Data System (CDS) EZChrom Edition Networked Workstations or Distributed Systems.