afnetworking tutorial
DESCRIPTION
This is a good tutorial on afnetworking. Rights reserved by its owner and web site.TRANSCRIPT

6/16/2015 AFNetworking 2.0 Tutorial Ray Wenderlich
http://www.raywenderlich.com/59255/afnetworking20tutorial 1/27
Learn how to use AFNetworking: an easytouse network API for iOS!
AFNetworking 2.0 Tutorial
Update 1/18/2014: Fully updated for iOS 7 and AFNetworking 2.0(original post by Scott Sherwood, update by Joshua Greene).
In iOS 7, Apple introduced NSURLSession as the new, preferredmethod of networking (as opposed to the older NSURLConnectionAPI). Using this raw NSURLSession API is definitely a valid way towrite your networking code – we even have a tutorial on that.
However, there’s an alternative to consider – using the popularthird party networking library AFNetworking.
The latest version of AFNetworking (2.0) is now built on top ofNSURLSession, so you get all of the great features provided there.But you also get a lot of extra cool features – like serialization,reachability support, UIKit integration (such as a handy categoryon asynchronously loading images in a UIImageView), and more.
AFNetworking is incredibly popular – it won our Reader’s Choice2012 Best iOS Library Award. It’s also one of the most widely used,opensource projects with over 10,000 stars, 2,600 forks, and 160contributors on Github.
In this AFNetworking 2.0 tutorial, you will learn about the majorcomponents of AFNetworking by building a Weather App that uses feeds from World Weather Online. You’ll start withstatic weather data, but by the end of the tutorial, the app will be fully connected to live weather feeds.
Today’s forecast: a cool developer learns all about AFNetworking and gets inspired to use it in his/her apps. Let’s getbusy!
Getting StartedFirst download the starter project for this AFNetworking 2.0 tutorial here.
This project provides a basic UI to get you started – no AFNetworking code has been added yet.
Open MainStoryboard.storyboard, and you will see three view controllers:
Joshua Greene on February 17, 2014

6/16/2015 AFNetworking 2.0 Tutorial Ray Wenderlich
http://www.raywenderlich.com/59255/afnetworking20tutorial 2/27
From left to right, they are:
A toplevel navigation controller
A table view controller that will display the weather, one row per day
A custom view controller (WeatherAnimationViewController) that will show the weather for a single day when theuser taps on a table view cell
Build and run the project. You’ll see the UI appear, but nothing works yet. That’s because the app needs to get its datafrom the network, but this code hasn’t been added yet. This is what you will be doing in this tutorial!
The first thing you need to do is include the AFNetworking framework in your project. Download the latest version fromGitHub by clicking on the Download Zip link.
When you unzip the file, you will see that it includes several subfolders and items. Of particular interest, it includes asubfolder called AFNetworking and another called UIKit+AFNetworking as shown below:

6/16/2015 AFNetworking 2.0 Tutorial Ray Wenderlich
http://www.raywenderlich.com/59255/afnetworking20tutorial 3/27
Drag these folders into your Xcode project.

6/16/2015 AFNetworking 2.0 Tutorial Ray Wenderlich
http://www.raywenderlich.com/59255/afnetworking20tutorial 4/27
When presented with options for adding the folders, make sure that Copy items into destination group’s folder (ifneeded) and Create groups for any added folders are both checked.
To complete the setup, open the precompiled header WeatherPrefix.pch from the Supporting Files section of theproject. Add this line after the other imports:
#import "AFNetworking.h"
Adding AFNetworking to the precompiled header means that the framework will be automatically included in all theproject’s source files.
Pretty easy, eh? Now you’re ready to “weather” the code!
Operation JSONAFNetworking is smart enough to load and process structured data over the network, as well as plain old HTTP requests.In particular, it supports JSON, XML and Property Lists (plists).
You could download some JSON and then run it through a parser (like the builtin NSJSONSerialization) yourself, butwhy bother? AFNetworking can do it all!

6/16/2015 AFNetworking 2.0 Tutorial Ray Wenderlich
http://www.raywenderlich.com/59255/afnetworking20tutorial 5/27
First you need the base URL of the test script. Add this to the top of WTTableViewController.m, just underneath all the#import lines.
static NSString * const BaseURLString = @"http://www.raywenderlich.com/demos/weather_sample/";
This is the URL to an incredibly simple “web service” that I created for you for this tutorial. If you’re curious what it lookslike, you can download the source.
The web service returns weather data in three different formats – JSON, XML, and PLIST. You can take a look at the datait can return by using these URLS:
http://www.raywenderlich.com/demos/weather_sample/weather.php?format=json
http://www.raywenderlich.com/demos/weather_sample/weather.php?format=xml
http://www.raywenderlich.com/demos/weather_sample/weather.php?format=plist (might not show correctly in yourbrowser)
The first data format you will be using is JSON. JSON is a very common JavaScriptderived object format. It lookssomething like this:
"data": "current_condition": [ "cloudcover": "16", "humidity": "59", "observation_time": "09:09 PM", ]
Note: If you’d like to learn more about JSON, check out our Working with JSON Tutorial.
When the user taps the JSON button, the app will load and process JSON data from the server. InWTTableViewController.m, find the jsonTapped: method (it should be empty) and replace it with the following:
- (IBAction)jsonTapped:(id)sender // 1

6/16/2015 AFNetworking 2.0 Tutorial Ray Wenderlich
http://www.raywenderlich.com/59255/afnetworking20tutorial 6/27
NSString *string = [NSString stringWithFormat:@"%@weather.php?format=json", BaseURLString]; NSURL *url = [NSURL URLWithString:string]; NSURLRequest *request = [NSURLRequest requestWithURL:url]; // 2 AFHTTPRequestOperation *operation = [[AFHTTPRequestOperation alloc] initWithRequest:request]; operation.responseSerializer = [AFJSONResponseSerializer serializer]; [operation setCompletionBlockWithSuccess:^(AFHTTPRequestOperation *operation, id responseObject) // 3 self.weather = (NSDictionary *)responseObject; self.title = @"JSON Retrieved"; [self.tableView reloadData]; failure:^(AFHTTPRequestOperation *operation, NSError *error) // 4 UIAlertView *alertView = [[UIAlertView alloc] initWithTitle:@"Error Retrieving Weather" message:[error localizedDescription] delegate:nil cancelButtonTitle:@"Ok" otherButtonTitles:nil]; [alertView show]; ]; // 5 [operation start];
Awesome, this is your first AFNetworking code! Since this is all new, I’ll explain it one section at a time.
1. You first create a string representing the full url from the base URL string. This is then used to create an NSURLobject, which is used to make an NSURLRequest.
2. AFHTTPRequestOperation is an allinone class for handling HTTP transfers across the network. You tell it that theresponse should be read as JSON by setting the responseSerializer property to the default JSON serializer.AFNetworking will then take care of parsing the JSON for you.
3. The success block runs when (surprise!) the request succeeds. The JSON serializer parses the received data andreturns a dictionary in the responseObject variable, which is stored in the weather property.
4. The failure block runs if something goes wrong – such as if networking isn’t available. If this happens, you simplydisplay an alert with the error message.
5. You must explicitly tell the operation to “start” (or else nothing will happen).
As you can see, AFNetworking is extremely simple to use. In just a few lines of code, you were able to create anetworking operation that both downloads and parses its response.
Now that the weather data is stored in self.weather, you need to display it. Find thetableView:numberOfRowsInSection: method and replace it with the following:
- (NSInteger)tableView:(UITableView *)tableView numberOfRowsInSection:(NSInteger)section if(!self.weather)

6/16/2015 AFNetworking 2.0 Tutorial Ray Wenderlich
http://www.raywenderlich.com/59255/afnetworking20tutorial 7/27
return 0; switch (section) case 0: return 1; case 1: NSArray *upcomingWeather = [self.weather upcomingWeather]; return [upcomingWeather count]; default: return 0;
The table view will have two sections: the first to display the current weather and the second to display the upcomingweather.
“Wait a minute!”, you might be thinking. What is this [self.weather upcomingWeather]? If self.weather is a plain oldNSDictionary, how does it know what “upcomingWeather” is?
To make it easier to display the data, I added a couple of helper categories on NSDictionary in the starter project:
NSDictionary+weather
NSDictionary+weather_package
These categories add some handy methods that make it a little easier to access the data elements. You want to focus onthe networking part and not on navigating NSDictionary keys, right?
Note: FYI, an alternative way to make working with JSON results a bit easier than looking up keys in dictionaries orcreating special categories like this is to use a third party library like JSONModel.
Still in WTTableViewController.m, find the tableView:cellForRowAtIndexPath: method and replace it with the followingimplementation:
- (UITableViewCell *)tableView:(UITableView *)tableView cellForRowAtIndexPath:(NSIndexPath *)indexPath static NSString *CellIdentifier = @"WeatherCell"; UITableViewCell *cell = [tableView dequeueReusableCellWithIdentifier:CellIdentifier forIndexPath:indexPath]; NSDictionary *daysWeather = nil; switch (indexPath.section) case 0: daysWeather = [self.weather currentCondition]; break; case 1: NSArray *upcomingWeather = [self.weather upcomingWeather]; daysWeather = upcomingWeather[indexPath.row]; break; default: break;

6/16/2015 AFNetworking 2.0 Tutorial Ray Wenderlich
http://www.raywenderlich.com/59255/afnetworking20tutorial 8/27
cell.textLabel.text = [daysWeather weatherDescription]; // You will add code here later to customize the cell, but it's good for now. return cell;
Like the tableView:numberOfRowsInSection: method, the handy NSDictionary categories are used to easily access thedata. The current day’s weather is a dictionary, and the upcoming days are stored in an array.
Build and run your project; tap on the JSON button to get the networking request in motion; and you should see this:
JSON success!
Operation Property ListsProperty lists (or plists for short) are just XML files structured in a certain way (defined by Apple). Apple uses them allover the place for things like storing user settings. They look something like this:
6/16/2015 AFNetworking 2.0 Tutorial Ray Wenderlich
http://www.raywenderlich.com/59255/afnetworking20tutorial 9/27
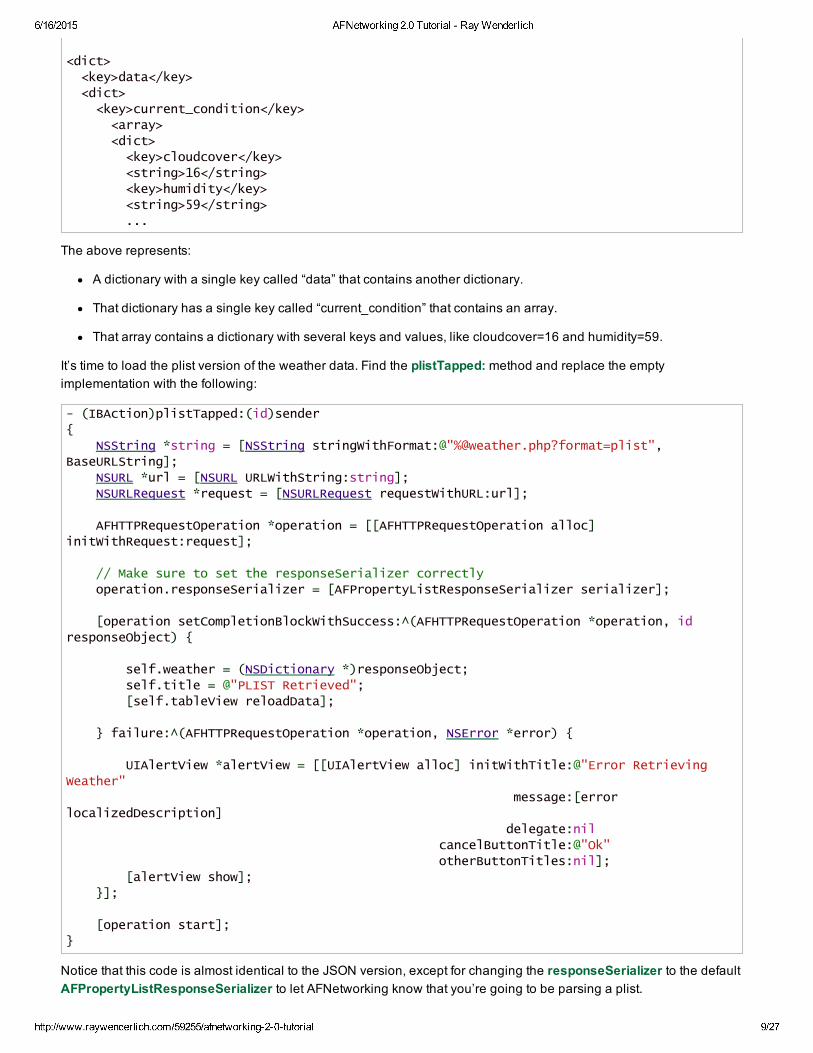
<dict> <key>data</key> <dict> <key>current_condition</key> <array> <dict> <key>cloudcover</key> <string>16</string> <key>humidity</key> <string>59</string> ...
The above represents:
A dictionary with a single key called “data” that contains another dictionary.
That dictionary has a single key called “current_condition” that contains an array.
That array contains a dictionary with several keys and values, like cloudcover=16 and humidity=59.
It’s time to load the plist version of the weather data. Find the plistTapped: method and replace the emptyimplementation with the following:
- (IBAction)plistTapped:(id)sender NSString *string = [NSString stringWithFormat:@"%@weather.php?format=plist", BaseURLString]; NSURL *url = [NSURL URLWithString:string]; NSURLRequest *request = [NSURLRequest requestWithURL:url]; AFHTTPRequestOperation *operation = [[AFHTTPRequestOperation alloc] initWithRequest:request]; // Make sure to set the responseSerializer correctly operation.responseSerializer = [AFPropertyListResponseSerializer serializer]; [operation setCompletionBlockWithSuccess:^(AFHTTPRequestOperation *operation, id responseObject) self.weather = (NSDictionary *)responseObject; self.title = @"PLIST Retrieved"; [self.tableView reloadData]; failure:^(AFHTTPRequestOperation *operation, NSError *error) UIAlertView *alertView = [[UIAlertView alloc] initWithTitle:@"Error Retrieving Weather" message:[error localizedDescription] delegate:nil cancelButtonTitle:@"Ok" otherButtonTitles:nil]; [alertView show]; ]; [operation start];
Notice that this code is almost identical to the JSON version, except for changing the responseSerializer to the defaultAFPropertyListResponseSerializer to let AFNetworking know that you’re going to be parsing a plist.

6/16/2015 AFNetworking 2.0 Tutorial Ray Wenderlich
http://www.raywenderlich.com/59255/afnetworking20tutorial 10/27
That’s pretty neat: your app can accept either JSON or plist formats with just a tiny change to the code!
Build and run your project and try tapping on the PLIST button. You should see something like this:
The Clear button in the top navigation bar will clear the title and table view data so you can reset everything to makesure the requests are going through.
Operation XMLWhile AFNetworking handles JSON and plist parsing for you, working with XML is a little more complicated. This time, it’syour job to construct the weather dictionary from the XML feed.
Fortunately, iOS provides some help via the NSXMLParser class (which is a SAX parser, if you want to read up on it).
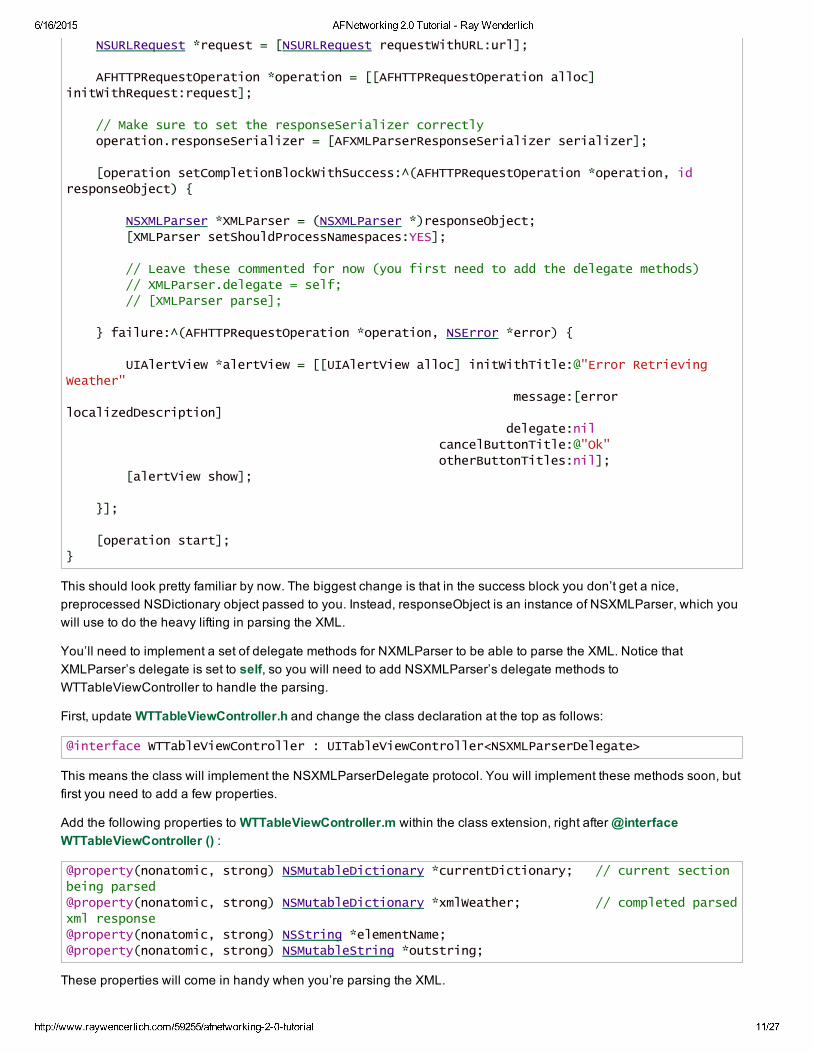
Still in WTTableViewController.m, find the xmlTapped: method and replace its implementation with the following:
- (IBAction)xmlTapped:(id)sender NSString *string = [NSString stringWithFormat:@"%@weather.php?format=xml", BaseURLString]; NSURL *url = [NSURL URLWithString:string];
6/16/2015 AFNetworking 2.0 Tutorial Ray Wenderlich
http://www.raywenderlich.com/59255/afnetworking20tutorial 11/27
NSURLRequest *request = [NSURLRequest requestWithURL:url]; AFHTTPRequestOperation *operation = [[AFHTTPRequestOperation alloc] initWithRequest:request]; // Make sure to set the responseSerializer correctly operation.responseSerializer = [AFXMLParserResponseSerializer serializer]; [operation setCompletionBlockWithSuccess:^(AFHTTPRequestOperation *operation, id responseObject) NSXMLParser *XMLParser = (NSXMLParser *)responseObject; [XMLParser setShouldProcessNamespaces:YES]; // Leave these commented for now (you first need to add the delegate methods) // XMLParser.delegate = self; // [XMLParser parse]; failure:^(AFHTTPRequestOperation *operation, NSError *error) UIAlertView *alertView = [[UIAlertView alloc] initWithTitle:@"Error Retrieving Weather" message:[error localizedDescription] delegate:nil cancelButtonTitle:@"Ok" otherButtonTitles:nil]; [alertView show]; ]; [operation start];
This should look pretty familiar by now. The biggest change is that in the success block you don’t get a nice,preprocessed NSDictionary object passed to you. Instead, responseObject is an instance of NSXMLParser, which youwill use to do the heavy lifting in parsing the XML.
You’ll need to implement a set of delegate methods for NXMLParser to be able to parse the XML. Notice thatXMLParser’s delegate is set to self, so you will need to add NSXMLParser’s delegate methods toWTTableViewController to handle the parsing.
First, update WTTableViewController.h and change the class declaration at the top as follows:
@interface WTTableViewController : UITableViewController<NSXMLParserDelegate>
This means the class will implement the NSXMLParserDelegate protocol. You will implement these methods soon, butfirst you need to add a few properties.
Add the following properties to WTTableViewController.m within the class extension, right after @interfaceWTTableViewController () :
@property(nonatomic, strong) NSMutableDictionary *currentDictionary; // current section being parsed@property(nonatomic, strong) NSMutableDictionary *xmlWeather; // completed parsed xml response@property(nonatomic, strong) NSString *elementName;@property(nonatomic, strong) NSMutableString *outstring;
These properties will come in handy when you’re parsing the XML.

6/16/2015 AFNetworking 2.0 Tutorial Ray Wenderlich
http://www.raywenderlich.com/59255/afnetworking20tutorial 12/27
Now paste this method in WTTableViewController.m, right before @end:
- (void)parserDidStartDocument:(NSXMLParser *)parser self.xmlWeather = [NSMutableDictionary dictionary];
The parser calls this method when it first starts parsing. When this happens, you set self.xmlWeather to a newdictionary, which will hold hold the XML data.
Next paste this method right after this previous one:
- (void)parser:(NSXMLParser *)parser didStartElement:(NSString *)elementName namespaceURI:(NSString *)namespaceURI qualifiedName:(NSString *)qName attributes:(NSDictionary *)attributeDict self.elementName = qName; if([qName isEqualToString:@"current_condition"] || [qName isEqualToString:@"weather"] || [qName isEqualToString:@"request"]) self.currentDictionary = [NSMutableDictionary dictionary]; self.outstring = [NSMutableString string];
The parser calls this method when it finds a new element start tag. When this happens, you keep track of the newelement’s name as self.elementName and then set self.currentDictionary to a new dictionary if the element namerepresents the start of a new weather forecast. You also reset outstring as a new mutable string in preparation for newXML to be received related to the element.
Next paste this method just after the previous one:
- (void)parser:(NSXMLParser *)parser foundCharacters:(NSString *)string if (!self.elementName) return; [self.outstring appendFormat:@"%@", string];
As the name suggests, the parser calls this method when it finds new characters on an XML element. You append thenew characters to outstring, so they can be processed once the XML tag is closed.
Again, paste this next method just after the previous one:
- (void)parser:(NSXMLParser *)parser didEndElement:(NSString *)elementName namespaceURI:(NSString *)namespaceURI qualifiedName:(NSString *)qName // 1 if ([qName isEqualToString:@"current_condition"] || [qName isEqualToString:@"request"]) self.xmlWeather[qName] = @[self.currentDictionary]; self.currentDictionary = nil; // 2 else if ([qName isEqualToString:@"weather"]) // Initialize the list of weather items if it doesn't exist NSMutableArray *array = self.xmlWeather[@"weather"] ?: [NSMutableArray array];

6/16/2015 AFNetworking 2.0 Tutorial Ray Wenderlich
http://www.raywenderlich.com/59255/afnetworking20tutorial 13/27
// Add the current weather object [array addObject:self.currentDictionary]; // Set the new array to the "weather" key on xmlWeather dictionary self.xmlWeather[@"weather"] = array; self.currentDictionary = nil; // 3 else if ([qName isEqualToString:@"value"]) // Ignore value tags, they only appear in the two conditions below // 4 else if ([qName isEqualToString:@"weatherDesc"] || [qName isEqualToString:@"weatherIconUrl"]) NSDictionary *dictionary = @@"value": self.outstring; NSArray *array = @[dictionary]; self.currentDictionary[qName] = array; // 5 else if (qName) self.currentDictionary[qName] = self.outstring; self.elementName = nil;
This method is called when an end element tag is encountered. When that happens, you check for a few special tags:
1. The current_condition element indicates you have the weather for the current day. You add this directly to thexmlWeather dictionary.
2. The weather element means you have the weather for a subsequent day. While there is only one current day,there may be several subsequent days, so you add this weather information to an array.
3. The value tag only appears inside other tags, so it’s safe to skip over it.
4. The weatherDesc and weatherIconUrl element values need to be boxed inside an array before they can bestored. This way, they will match how the JSON and plist versions of the data are structured exactly.
5. All other elements can be stored as is.
Now for the final delegate method! Paste this method just after the previous one:
- (void) parserDidEndDocument:(NSXMLParser *)parser self.weather = @@"data": self.xmlWeather; self.title = @"XML Retrieved"; [self.tableView reloadData];
The parser calls this method when it reaches the end of the document. At this point, the xmlWeather dictionary thatyou’ve been building is complete, so the table view can be reloaded.
Wrapping xmlWeather inside another NSDictionary might seem redundant, but this ensures the format matches upexactly with the JSON and plist versions. This way, all three data formats can be displayed with the same code!

6/16/2015 AFNetworking 2.0 Tutorial Ray Wenderlich
http://www.raywenderlich.com/59255/afnetworking20tutorial 14/27
Now that the delegate methods and properties are in place, return to the xmlTapped: method and uncomment the linesof code from before:
- (IBAction)xmlTapped:(id)sender ... [operation setCompletionBlockWithSuccess:^(AFHTTPRequestOperation *operation, id responseObject) NSXMLParser *XMLParser = (NSXMLParser *)responseObject; [XMLParser setShouldProcessNamespaces:YES]; // These lines below were previously commented XMLParser.delegate = self; [XMLParser parse]; ...
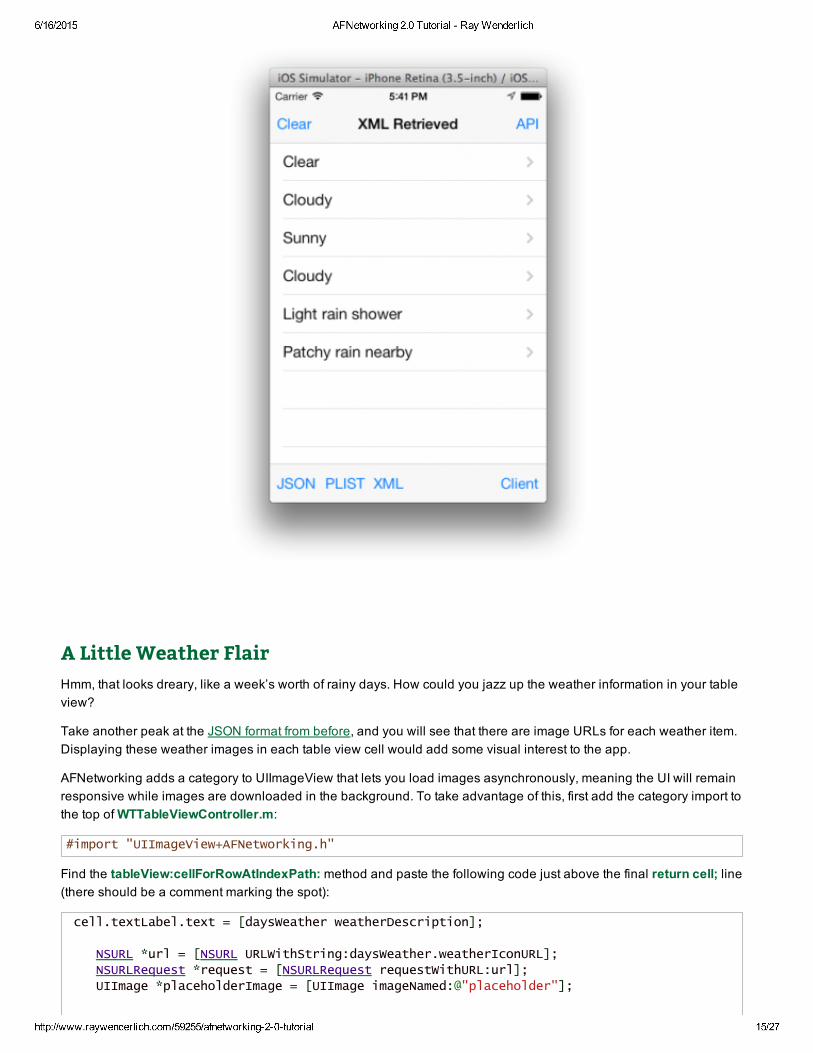
Build and run your project. Try tapping the XML button, and you should see this:
6/16/2015 AFNetworking 2.0 Tutorial Ray Wenderlich
http://www.raywenderlich.com/59255/afnetworking20tutorial 15/27
A Little Weather FlairHmm, that looks dreary, like a week’s worth of rainy days. How could you jazz up the weather information in your tableview?
Take another peak at the JSON format from before, and you will see that there are image URLs for each weather item.Displaying these weather images in each table view cell would add some visual interest to the app.
AFNetworking adds a category to UIImageView that lets you load images asynchronously, meaning the UI will remainresponsive while images are downloaded in the background. To take advantage of this, first add the category import tothe top of WTTableViewController.m:
#import "UIImageView+AFNetworking.h"
Find the tableView:cellForRowAtIndexPath: method and paste the following code just above the final return cell; line(there should be a comment marking the spot):
cell.textLabel.text = [daysWeather weatherDescription]; NSURL *url = [NSURL URLWithString:daysWeather.weatherIconURL]; NSURLRequest *request = [NSURLRequest requestWithURL:url]; UIImage *placeholderImage = [UIImage imageNamed:@"placeholder"];
6/16/2015 AFNetworking 2.0 Tutorial Ray Wenderlich
http://www.raywenderlich.com/59255/afnetworking20tutorial 16/27
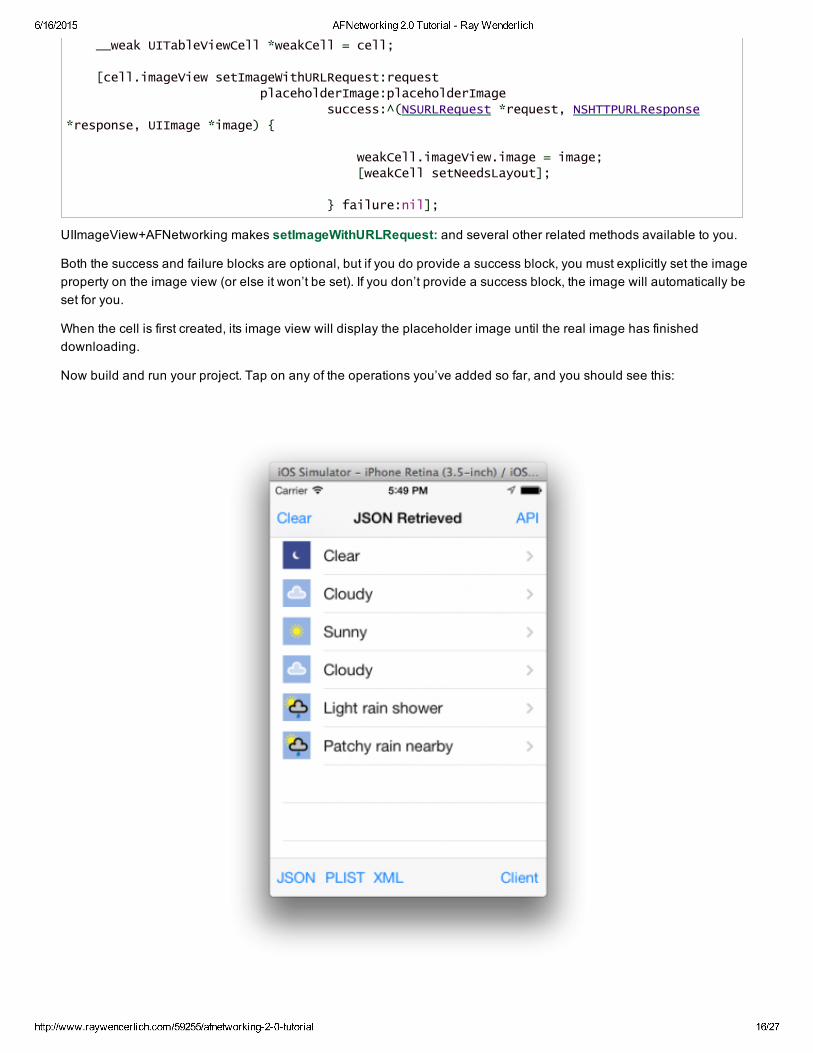
__weak UITableViewCell *weakCell = cell; [cell.imageView setImageWithURLRequest:request placeholderImage:placeholderImage success:^(NSURLRequest *request, NSHTTPURLResponse *response, UIImage *image) weakCell.imageView.image = image; [weakCell setNeedsLayout]; failure:nil];
UIImageView+AFNetworking makes setImageWithURLRequest: and several other related methods available to you.
Both the success and failure blocks are optional, but if you do provide a success block, you must explicitly set the imageproperty on the image view (or else it won’t be set). If you don’t provide a success block, the image will automatically beset for you.
When the cell is first created, its image view will display the placeholder image until the real image has finisheddownloading.
Now build and run your project. Tap on any of the operations you’ve added so far, and you should see this:

6/16/2015 AFNetworking 2.0 Tutorial Ray Wenderlich
http://www.raywenderlich.com/59255/afnetworking20tutorial 17/27
Nice! Asynchronously loading images has never been easier.
A RESTful ClassSo far you’ve been creating oneoff networking operations using AFHTTPRequestOperation.
Alternatively, AFHTTPRequestOperationManager and AFHTTPSessionManager are designed to help you easilyinteract with a single, webservice endpoint.
Both of these allow you to set a base URL and then make several requests to the same endpoint. Both can also monitorfor changes in connectivity, encode parameters, handle multipart form requests, enqueue batch operations, and helpyou perform the full suite of RESTful verbs (GET, POST, PUT, and DELETE).
“Which one should I use?”, you might ask.
If you’re targeting iOS 7 and above, use AFHTTPSessionManager, as internally it creates and usesNSURLSession and related objects.
If you’re targeting iOS 6 and above, use AFHTTPRequestOperationManager, which has similar functionality toAFHTTPSessionManager, yet it uses NSURLConnection internally instead of NSURLSession (which isn’tavailable in iOS 6). Otherwise, these classes are very similar in functionality.
In your weather app project, you’ll be using AFHTTPSessionManager to perform both a GET and PUT operation.
Note: Unclear on what all this talk is about REST, GET, and POST? Check out this explanation of the subject –What is REST?
Update the class declaration at the top of WTTableViewController.h to the following:
@interface WTTableViewController : UITableViewController<NSXMLParserDelegate, CLLocationManagerDelegate, UIActionSheetDelegate>
In WTTableViewController.m, find the clientTapped: method and replace its implementation with the following:
- (IBAction)clientTapped:(id)sender UIActionSheet *actionSheet = [[UIActionSheet alloc] initWithTitle:@"AFHTTPSessionManager" delegate:self cancelButtonTitle:@"Cancel" destructiveButtonTitle:nil otherButtonTitles:@"HTTP GET", @"HTTP POST", nil]; [actionSheet showFromBarButtonItem:sender animated:YES];
This method creates and displays an action sheet asking the user to choose between a GET and POST request. Add thefollowing method at the end of the class implementation (right before @end) to implement the action sheet delegatemethod:
- (void)actionSheet:(UIActionSheet *)actionSheet clickedButtonAtIndex:(NSInteger)buttonIndex if (buttonIndex == [actionSheet cancelButtonIndex]) // User pressed cancel -- abort return;

6/16/2015 AFNetworking 2.0 Tutorial Ray Wenderlich
http://www.raywenderlich.com/59255/afnetworking20tutorial 18/27
// 1 NSURL *baseURL = [NSURL URLWithString:BaseURLString]; NSDictionary *parameters = @@"format": @"json"; // 2 AFHTTPSessionManager *manager = [[AFHTTPSessionManager alloc] initWithBaseURL:baseURL]; manager.responseSerializer = [AFJSONResponseSerializer serializer]; // 3 if (buttonIndex == 0) [manager GET:@"weather.php" parameters:parameters success:^(NSURLSessionDataTask *task, id responseObject) self.weather = responseObject; self.title = @"HTTP GET"; [self.tableView reloadData]; failure:^(NSURLSessionDataTask *task, NSError *error) UIAlertView *alertView = [[UIAlertView alloc] initWithTitle:@"Error Retrieving Weather" message:[error localizedDescription] delegate:nil cancelButtonTitle:@"Ok" otherButtonTitles:nil]; [alertView show]; ]; // 4 else if (buttonIndex == 1) [manager POST:@"weather.php" parameters:parameters success:^(NSURLSessionDataTask *task, id responseObject) self.weather = responseObject; self.title = @"HTTP POST"; [self.tableView reloadData]; failure:^(NSURLSessionDataTask *task, NSError *error) UIAlertView *alertView = [[UIAlertView alloc] initWithTitle:@"Error Retrieving Weather" message:[error localizedDescription] delegate:nil cancelButtonTitle:@"Ok" otherButtonTitles:nil]; [alertView show]; ];
Here’s what’s happening above:
1. You first set up the baseURL and the dictionary of parameters.
2. You then create an instance of AFHTTPSessionManager and set its responseSerializer to the default JSONserializer, similar to the previous JSON example.
3. If the user presses the button index for HTTP GET, you call the GET method on the manager, passing in theparameters and usual pair of success and failure blocks.
4. You do the same with the POST version.

6/16/2015 AFNetworking 2.0 Tutorial Ray Wenderlich
http://www.raywenderlich.com/59255/afnetworking20tutorial 19/27
In this example you’re requesting JSON responses, but you can easily request either of the other two formats asdiscussed previously.
Build and run your project, tap on the Client button and then tap on either the HTTP GET or HTTP POST button to initiatethe associated request. You should see these screens:
At this point, you know the basics of using AFHTTPSessionManager, but there’s an even better way to use it that willresult in cleaner code, which you’ll learn about next.
World Weather OnlineBefore you can use the live service, you’ll first need to register for a free account on World Weather Online. Don’t worry –it’s quick and easy to do!
After you’ve registered, you should receive a confirmation email at the address you provided, which will have a link toconfirm your email address (required). You then need to request a free API key via the My Account page. Go ahead andleave the page open with your API key as you’ll need it soon.
Now that you’ve got your API key, back to AFNetworking…
Hooking into the Live ServiceSo far you’ve been creating AFHTTPRequestOperation and AFHTTPSessionManager directly from the table viewcontroller as you needed them. More often than not, your networking requests will be associated with a single webservice or API.
AFHTTPSessionManager has everything you need to talk to a web API. It will decouple your networking communicationscode from the rest of your code, and make your networking communications code reusable throughout your project.
Here are two guidelines on AFHTTPSessionManager best practices:

6/16/2015 AFNetworking 2.0 Tutorial Ray Wenderlich
http://www.raywenderlich.com/59255/afnetworking20tutorial 20/27
1. Create a subclass for each web service. For example, if you’re writing a social network aggregator, you might wantone subclass for Twitter, one for Facebook, another for Instragram and so on.
2. In each AFHTTPSessionManager subclass, create a class method that returns a shared singleton instance. Thissaves resources and eliminates the need to allocate and spin up new objects.
Your project currently doesn’t have a subclass of AFHTTPSessionManager; it just creates one directly. Let’s fix that.
To begin, create a new file in your project of type iOS\Cocoa Touch\ObjectiveC Class. Call it WeatherHTTPClient andmake it a subclass of AFHTTPSessionManager.
You want the class to do three things: perform HTTP requests, call back to a delegate when the new weather data isavailable, and use the user’s physical location to get accurate weather.
Replace the contents of WeatherHTTPClient.h with the following:
#import "AFHTTPSessionManager.h" @protocol WeatherHTTPClientDelegate; @interface WeatherHTTPClient : AFHTTPSessionManager@property (nonatomic, weak) id<WeatherHTTPClientDelegate>delegate; + (WeatherHTTPClient *)sharedWeatherHTTPClient;- (instancetype)initWithBaseURL:(NSURL *)url;- (void)updateWeatherAtLocation:(CLLocation *)location forNumberOfDays:(NSUInteger)number; @end @protocol WeatherHTTPClientDelegate <NSObject>@optional-(void)weatherHTTPClient:(WeatherHTTPClient *)client didUpdateWithWeather:(id)weather;-(void)weatherHTTPClient:(WeatherHTTPClient *)client didFailWithError:(NSError *)error;@end
You’ll learn more about each of these methods as you implement them. Switch over to WeatherHTTPClient.m and addthe following right after the import statement:
// Set this to your World Weather Online API Keystatic NSString * const WorldWeatherOnlineAPIKey = @"PASTE YOUR API KEY HERE"; static NSString * const WorldWeatherOnlineURLString = @"http://api.worldweatheronline.com/free/v1/";
Make sure you replace @”PASTE YOUR KEY HERE” with your actual World Weather Online API Key.
Next paste these methods just after the @implementation line:
+ (WeatherHTTPClient *)sharedWeatherHTTPClient static WeatherHTTPClient *_sharedWeatherHTTPClient = nil; static dispatch_once_t onceToken; dispatch_once(&onceToken, ^ _sharedWeatherHTTPClient = [[self alloc] initWithBaseURL:[NSURL URLWithString:WorldWeatherOnlineURLString]]; ); return _sharedWeatherHTTPClient; - (instancetype)initWithBaseURL:(NSURL *)url

6/16/2015 AFNetworking 2.0 Tutorial Ray Wenderlich
http://www.raywenderlich.com/59255/afnetworking20tutorial 21/27
self = [super initWithBaseURL:url]; if (self) self.responseSerializer = [AFJSONResponseSerializer serializer]; self.requestSerializer = [AFJSONRequestSerializer serializer]; return self;
The sharedWeatherHTTPClient method uses Grand Central Dispatch to ensure the shared singleton object is onlyallocated once. You initialize the object with a base URL and set it up to request and expect JSON responses from theweb service.
Paste the following method underneath the previous ones:
- (void)updateWeatherAtLocation:(CLLocation *)location forNumberOfDays:(NSUInteger)number NSMutableDictionary *parameters = [NSMutableDictionary dictionary]; parameters[@"num_of_days"] = @(number); parameters[@"q"] = [NSString stringWithFormat:@"%f,%f",location.coordinate.latitude,location.coordinate.longitude]; parameters[@"format"] = @"json"; parameters[@"key"] = WorldWeatherOnlineAPIKey; [self GET:@"weather.ashx" parameters:parameters success:^(NSURLSessionDataTask *task, id responseObject) if ([self.delegate respondsToSelector:@selector(weatherHTTPClient:didUpdateWithWeather:)]) [self.delegate weatherHTTPClient:self didUpdateWithWeather:responseObject]; failure:^(NSURLSessionDataTask *task, NSError *error) if ([self.delegate respondsToSelector:@selector(weatherHTTPClient:didFailWithError:)]) [self.delegate weatherHTTPClient:self didFailWithError:error]; ];
This method calls out to World Weather Online to get the weather for a particular location.
Once the object has loaded the weather data, it needs some way to communicate that data back to whoever’s interested.Thanks to the WeatherHTTPClientDelegate protocol and its delegate methods, the success and failure blocks in theabove code can notify a controller that the weather has been updated for a given location. That way, the controller canupdate what it is displaying.
Now it’s time to put the final pieces together! The WeatherHTTPClient is expecting a location and has a defined delegateprotocol, so you need to update the WTTableViewController class to take advantage of this.
Open up WTTableViewController.h to add an import and replace the @interface declaration as follows:
#import "WeatherHTTPClient.h" @interface WTTableViewController : UITableViewController <NSXMLParserDelegate, CLLocationManagerDelegate, UIActionSheetDelegate, WeatherHTTPClientDelegate>
Also add a new Core Location manager property:
@property (nonatomic, strong) CLLocationManager *locationManager;

6/16/2015 AFNetworking 2.0 Tutorial Ray Wenderlich
http://www.raywenderlich.com/59255/afnetworking20tutorial 22/27
In WTTableViewController.m, add the following lines to the bottom of viewDidLoad::
self.locationManager = [[CLLocationManager alloc] init];self.locationManager.delegate = self;
These lines initialize the Core Location manager to determine the user’s location when the view loads. The CoreLocation manager then reports that location via a delegate callback. Add the following method to the implementation:
- (void)locationManager:(CLLocationManager *)manager didUpdateLocations:(NSArray *)locations // Last object contains the most recent location CLLocation *newLocation = [locations lastObject]; // If the location is more than 5 minutes old, ignore it if([newLocation.timestamp timeIntervalSinceNow] > 300) return; [self.locationManager stopUpdatingLocation]; WeatherHTTPClient *client = [WeatherHTTPClient sharedWeatherHTTPClient]; client.delegate = self; [client updateWeatherAtLocation:newLocation forNumberOfDays:5];
Now when there’s an update to the user’s whereabouts, you can call the singleton WeatherHTTPClient instance torequest the weather for the current location.
Remember, WeatherHTTPClient has two delegate methods itself that you need to implement. Add the following twomethods to the implementation:
- (void)weatherHTTPClient:(WeatherHTTPClient *)client didUpdateWithWeather:(id)weather self.weather = weather; self.title = @"API Updated"; [self.tableView reloadData]; - (void)weatherHTTPClient:(WeatherHTTPClient *)client didFailWithError:(NSError *)error UIAlertView *alertView = [[UIAlertView alloc] initWithTitle:@"Error Retrieving Weather" message:[NSString stringWithFormat:@"%@",error] delegate:nil cancelButtonTitle:@"OK" otherButtonTitles:nil]; [alertView show];
When the WeatherHTTPClient succeeds, you update the weather data and reload the table view. In case of a networkerror, you display an error message.
Find the apiTapped: method and replace it with the following:
- (IBAction)apiTapped:(id)sender [self.locationManager startUpdatingLocation];
Build and run your project (try your device if you have any troubles with your simulator), tap on the API button to initiate

6/16/2015 AFNetworking 2.0 Tutorial Ray Wenderlich
http://www.raywenderlich.com/59255/afnetworking20tutorial 23/27
the WeatherHTTPClient request, and you should see something like this:
Here’s hoping your upcoming weather is as sunny as mine!
I’m Not Dead Yet!You might have noticed that this external web service can take some time before it returns with data. It’s important toprovide your users with feedback when doing network operations so they know the app hasn’t stalled or crashed.

6/16/2015 AFNetworking 2.0 Tutorial Ray Wenderlich
http://www.raywenderlich.com/59255/afnetworking20tutorial 24/27
Luckily, AFNetworking comes with an easy way to provide this feedback: AFNetworkActivityIndicatorManager.
In WTAppDelegate.m, add this import just below the other:
#import "AFNetworkActivityIndicatorManager.h"
Then find the application:didFinishLaunchingWithOptions: method and replace it with the following:
- (BOOL)application:(UIApplication *)application didFinishLaunchingWithOptions:(NSDictionary *)launchOptions [AFNetworkActivityIndicatorManager sharedManager].enabled = YES; return YES;
Enabling the sharedManager automatically displays the network activity indicator whenever a new operation isunderway. You won’t need to manage it separately for every request you make.
Build and run, and you should see the little networking spinner in the status bar whenever there’s a network request:
Now there’s a sign of life for your user even when your app is waiting on a slow web service.
Downloading ImagesIf you tap on a table view cell, the app takes you to a detail view of the weather and an animation illustrating thecorresponding weather conditions.
That’s nice, but at the moment the animation has a very plain background. What better way to update the backgroundthan… over the network!
Here’s the final AFNetworking trick for this tutorial: AFHTTPRequestOperation can also handle image requests by settingits responseSerializer to an instance of AFImageResponseSerializer.
There are two method stubs in WeatherAnimationViewController.m to implement. Find the updateBackgroundImage:method and replace it with the following:
- (IBAction)updateBackgroundImage:(id)sender

6/16/2015 AFNetworking 2.0 Tutorial Ray Wenderlich
http://www.raywenderlich.com/59255/afnetworking20tutorial 25/27
NSURL *url = [NSURL URLWithString:@"http://www.raywenderlich.com/wp-content/uploads/2014/01/sunny-background.png"]; NSURLRequest *request = [NSURLRequest requestWithURL:url]; AFHTTPRequestOperation *operation = [[AFHTTPRequestOperation alloc] initWithRequest:request]; operation.responseSerializer = [AFImageResponseSerializer serializer]; [operation setCompletionBlockWithSuccess:^(AFHTTPRequestOperation *operation, id responseObject) self.backgroundImageView.image = responseObject; [self saveImage:responseObject withFilename:@"background.png"]; failure:^(AFHTTPRequestOperation *operation, NSError *error) NSLog(@"Error: %@", error); ]; [operation start];
This method initiates and handles downloading the new background. On completion, it returns the full image requested.
In WeatherAnimationViewController.m, you will see two helper methods, imageWithFilename: andsaveImage:withFilename:, which will let you store and load any image you download. updateBackgroundImage: callsthese helper methods to save the downloaded images to disk.
Find the deleteBackgroundImage: method and replace it with the following:
- (IBAction)deleteBackgroundImage:(id)sender NSArray *paths = NSSearchPathForDirectoriesInDomains(NSDocumentDirectory, NSUserDomainMask, YES); NSString *path = [[paths objectAtIndex:0] stringByAppendingPathComponent:@"WeatherHTTPClientImages/"]; NSError *error = nil; [[NSFileManager defaultManager] removeItemAtPath:path error:&error]; NSString *desc = [self.weatherDictionary weatherDescription]; [self start:desc];
This method deletes the downloaded background image so that you can download it again when testing the application.
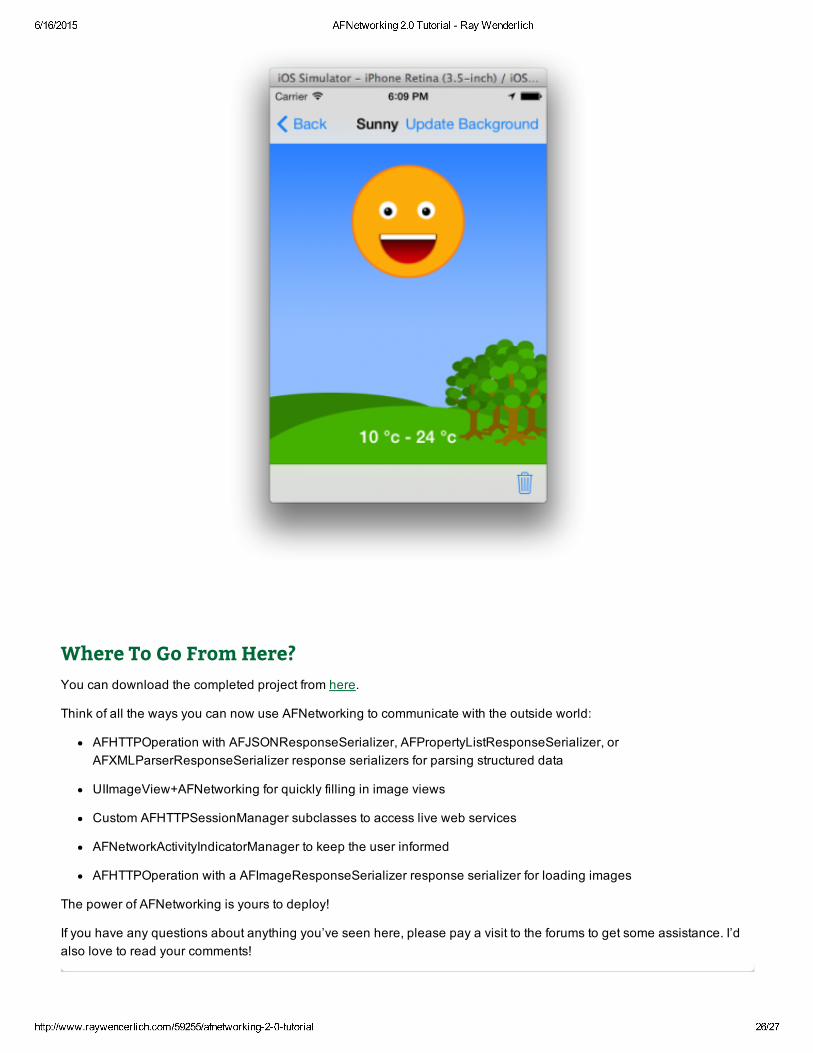
For the final time: build and run, download the weather data and tap on a cell to get to the detailed view. From here, tapthe Update Background button. If you tap on a Sunny cell, you should see this:
6/16/2015 AFNetworking 2.0 Tutorial Ray Wenderlich
http://www.raywenderlich.com/59255/afnetworking20tutorial 26/27
Where To Go From Here?You can download the completed project from here.
Think of all the ways you can now use AFNetworking to communicate with the outside world:
AFHTTPOperation with AFJSONResponseSerializer, AFPropertyListResponseSerializer, orAFXMLParserResponseSerializer response serializers for parsing structured data
UIImageView+AFNetworking for quickly filling in image views
Custom AFHTTPSessionManager subclasses to access live web services
AFNetworkActivityIndicatorManager to keep the user informed
AFHTTPOperation with a AFImageResponseSerializer response serializer for loading images
The power of AFNetworking is yours to deploy!
If you have any questions about anything you’ve seen here, please pay a visit to the forums to get some assistance. I’dalso love to read your comments!

6/16/2015 AFNetworking 2.0 Tutorial Ray Wenderlich
http://www.raywenderlich.com/59255/afnetworking20tutorial 27/27
Joshua GreeneJoshua Greene is a senior iOS developer at Citrix. When he's not slinging code, heenjoys martial arts, Netflix, and spending time with his wonderful wife and daughter.You can reach him by email or on Twitter.