aesthetic anterior composite
TRANSCRIPT
This article was originally published in a journal published byElsevier, and the attached copy is provided by Elsevier for the
author’s benefit and for the benefit of the author’s institution, fornon-commercial research and educational use including without
limitation use in instruction at your institution, sending it to specificcolleagues that you know, and providing a copy to your institution’s
administrator.
All other uses, reproduction and distribution, including withoutlimitation commercial reprints, selling or licensing copies or access,
or posting on open internet sites, your personal or institution’swebsite or repository, are prohibited. For exceptions, permission
may be sought for such use through Elsevier’s permissions site at:
http://www.elsevier.com/locate/permissionusematerial
Autho
r's
pers
onal
co
py
Aesthetic Anterior CompositeRestorations: A Guide to Direct
Placement
Brian P. LeSage, DDSa,b,c,*aBeverly Hills Institute of Dental Esthetics, CA, USA
bUCLA Aesthetic Continuum, CA, USAcDepartment of Restorative Dentistry, UCLA Dental School, CA, USA
Mastering anterior direct composite restorations is a necessity for thecontemporary clinician who appreciates and understands the art and scienceof cosmetic dentistry. In the esthetic zone, composite bonding proceduresare considered the most conservative and least invasive technique to returnmissing, diseased, and unsightly tooth structure to enhanced color, form,and function. The attractiveness and popularity of composites are easy toexplain because these restorations have excellent esthetic potential, verygood to excellent prognosis, and a reasonable fee [1,2].
Composites are the most versatile restorative material available to thedental professional, especially for the esthetic-conscious patients. Therestorative dentist can use this versatile material in a mirage of indicationsand techniques. It is used as a direct and indirect restorative material on an-terior and posterior teeth, orthodontics attachments and bracket cement, in-direct restoration cements, correction of erosive and abfraction lesions,bases, liners, core build-ups and post and cores, mock-up for anterior es-thetic or posterior occlusal trial therapy, splinting, provisionalization, gingi-val stabilization, and so forth.
For composite restorations to mimic natural tooth structure, the clinicianmust have a comprehensive understanding of the material science andtechniques involved in direct bonding procedures. Material science can bebroken down to include types of composites, tints, opaquers, adhesivesystems, and armamentarium. The necessary techniques involve an under-standing of color, adhesive principles, layering to create polychromicity,incisal effects and perfect imperfections, and finishing and polishing.
* 436 North Roxbury Drive, Suite 100, Beverly Hills, CA 90210.
E-mail address: [email protected]
0011-8532/07/$ - see front matter � 2007 Elsevier Inc. All rights reserved.
doi:10.1016/j.cden.2007.02.001 dental.theclinics.com
Dent Clin N Am 51 (2007) 359–378

Autho
r's
pers
onal
co
py
Composite materials
Composition
A composite is a multiphase substance formed from a combination ofmaterials that differ in composition or form, remain bonded together,and retain their identities and properties [1]. They have four main com-ponents: (1) resin (organic polymer matrix); (2) filler (inorganic) parti-cles; (3) coupling agent (silane); and (4) the initiator-accelerator ofpolymerization.
Resin matrix
Manufacturers prefer Bis-GMA resins because they have an aromaticstructure that increases stiffness and compressive strength and lowerswater absorption [2]. Bis-GMA 2,2-bis [4(2-hydroxy-3 methacryloyloxy-propyloxy)-phenyl] propane is the most popular dimethacrylate resin, but toaccommodate better filler load triethylene glycol dimethacrylate or urethanedimethacrylate is added [3].
Fillers
Filler (inorganic) particles provide dimensional stability to the soft resinmatrix [2]. The filler particles used in composites vary in size from less than0.04 u to over 100 u. Common fillers are crystalline quartz; colloidal and py-rolytic silica; and such glasses as lithium, barium, or strontium silicate.
Coupling agent
Silane helps form a good bond between the resin matrix and filler parti-cles during setting. The silane contains functional groups (eg, methoxy) thathydrolyze and react with the inorganic filler, and unsaturated organicgroups that react with the resin matrix during polymerization [3].
Initiators and accelerators of polymerization
Composites contain initiators and accelerators that allow for light-, self-,and dual-cure modes. For visible light activation, camphoroquinones(0.03%–0.09%) start the free radical reaction using blue light in the468 nm � 20 nm range [2]. In the esthetic zone, light-cured compositesare the material of choice because color matching and color stability arethe most predictable.
For chemical-cured composites, aromatic tertiary amine (2%) initiatesthe free radical reaction when the paste and catalyst are mixed. Tertiaryamines (and HEMA found in many adhesive systems) have been found tocause color change in composites on polymerization [4].
360 LESAGE
Autho
r's
pers
onal
co
py
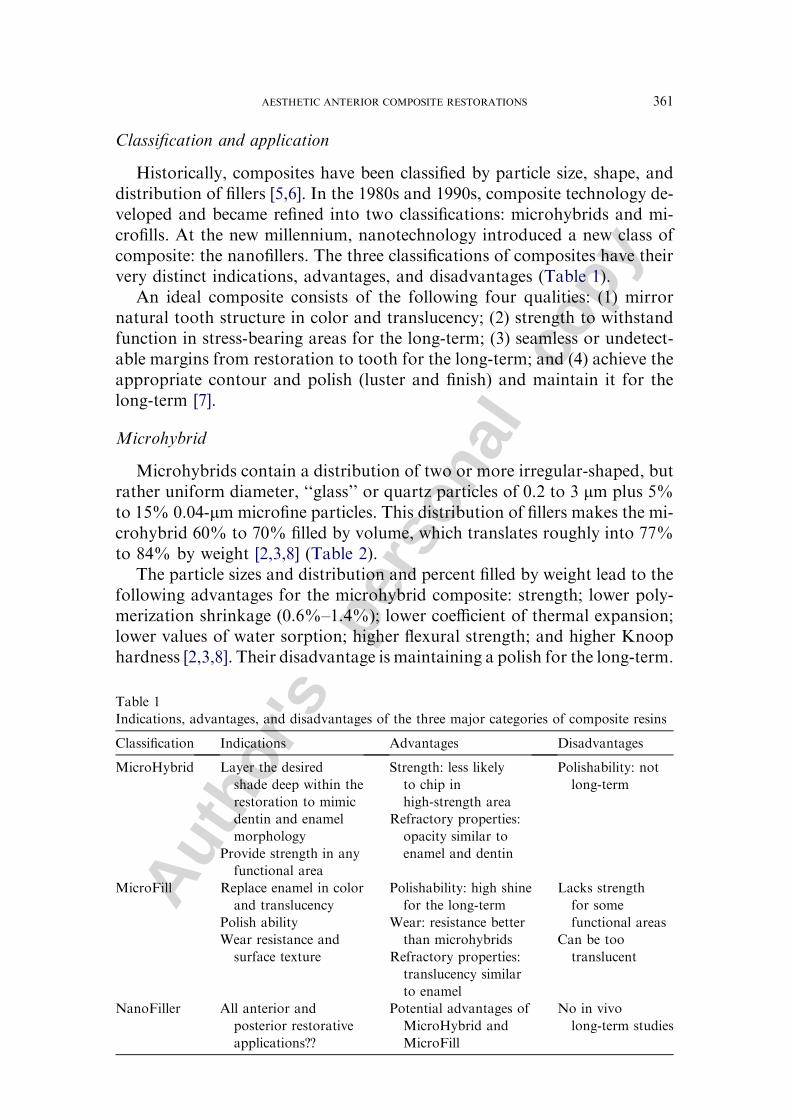
Classification and application
Historically, composites have been classified by particle size, shape, anddistribution of fillers [5,6]. In the 1980s and 1990s, composite technology de-veloped and became refined into two classifications: microhybrids and mi-crofills. At the new millennium, nanotechnology introduced a new class ofcomposite: the nanofillers. The three classifications of composites have theirvery distinct indications, advantages, and disadvantages (Table 1).
An ideal composite consists of the following four qualities: (1) mirrornatural tooth structure in color and translucency; (2) strength to withstandfunction in stress-bearing areas for the long-term; (3) seamless or undetect-able margins from restoration to tooth for the long-term; and (4) achieve theappropriate contour and polish (luster and finish) and maintain it for thelong-term [7].
Microhybrid
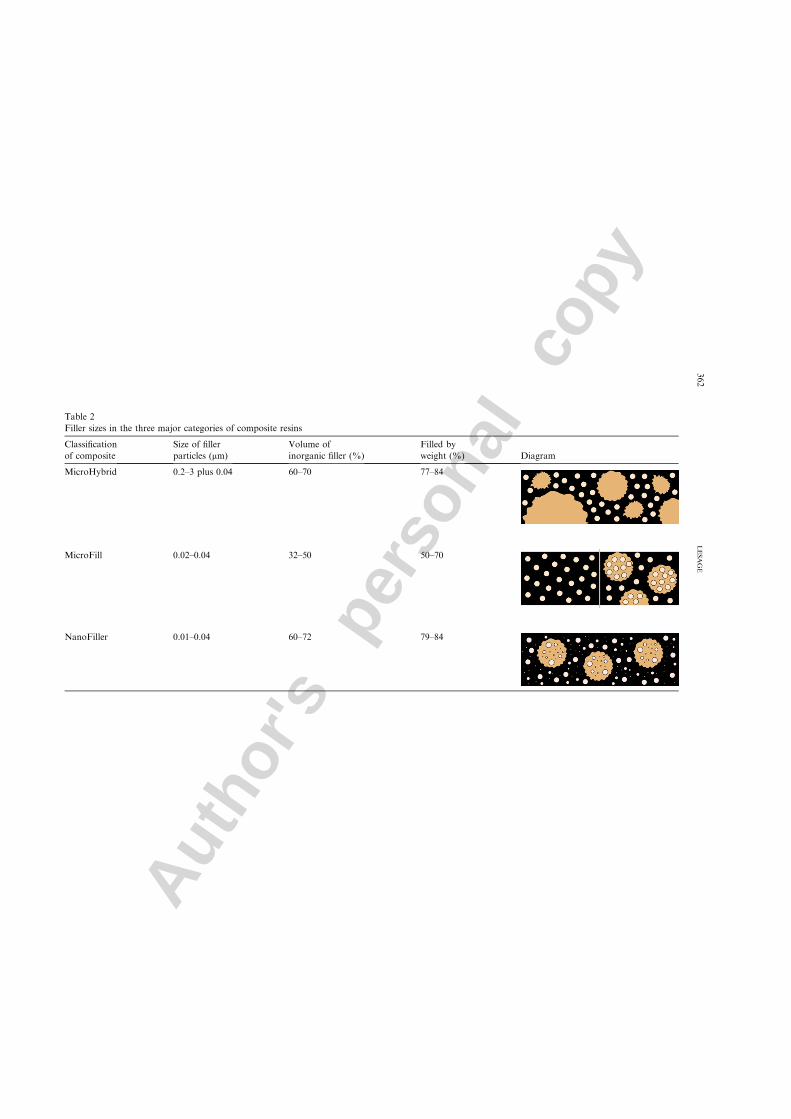
Microhybrids contain a distribution of two or more irregular-shaped, butrather uniform diameter, ‘‘glass’’ or quartz particles of 0.2 to 3 mm plus 5%to 15% 0.04-mmmicrofine particles. This distribution of fillers makes the mi-crohybrid 60% to 70% filled by volume, which translates roughly into 77%to 84% by weight [2,3,8] (Table 2).
The particle sizes and distribution and percent filled by weight lead to thefollowing advantages for the microhybrid composite: strength; lower poly-merization shrinkage (0.6%–1.4%); lower coefficient of thermal expansion;lower values of water sorption; higher flexural strength; and higher Knoophardness [2,3,8]. Their disadvantage is maintaining a polish for the long-term.
Table 1
Indications, advantages, and disadvantages of the three major categories of composite resins
Classification Indications Advantages Disadvantages
MicroHybrid Layer the desired
shade deep within the
restoration to mimic
dentin and enamel
morphology
Provide strength in any
functional area
Strength: less likely
to chip in
high-strength area
Refractory properties:
opacity similar to
enamel and dentin
Polishability: not
long-term
MicroFill Replace enamel in color
and translucency
Polish ability
Wear resistance and
surface texture
Polishability: high shine
for the long-term
Wear: resistance better
than microhybrids
Refractory properties:
translucency similar
to enamel
Lacks strength
for some
functional areas
Can be too
translucent
NanoFiller All anterior and
posterior restorative
applications??
Potential advantages of
MicroHybrid and
MicroFill
No in vivo
long-term studies
361AESTHETIC ANTERIOR COMPOSITE RESTORATIONS
Autho
r's
pers
onal
co
py
Table 2
Filler sizes in the three major categories of composite resins
Classification
of composite
Size of filler
particles (mm)
Volume of
inorganic filler (%)
Filled by
weight (%) Diagram
MicroHybrid 0.2–3 plus 0.04 60–70 77–84
MicroFill 0.02–0.04 32–50 50–70
NanoFiller 0.01–0.04 60–72 79–84
362
LESAGE
Autho
r's
pers
onal
co
py
From an esthetic standpoint, microhybrids have more opacity and are ex-cellent in replacing dentin. Microhybrids with smaller average particle sizesare excellent in replacing enamel and can be good to excellent in holdingtheir polish over time. Examples of contemporary microhybrids includeHerculite and Point 4 (Kerr/Sybron, Orange, California), Filtek Z250 (3MESPE, St. Paul, Minnesota), and Vitw1wescence (Ultradent Products,Inc., South Jordan, Utah).
Microfills
Microfills contain colloidal silica fillers of 0.04-mm particle size and a fillerloading of 32% to 50% by volume, which equates to 50% to 70% by weight[3,8] (see Table 2).
Because microfills are less highly filled, they have higher polymerizationshrinkage, coefficient of thermal expansion, and water sorption comparedwith microhybrid composites. They demonstrate excellent polish and wearcharacteristics. Their disadvantage is strength and in some clinical situationsbeing too translucent.
From an esthetic standpoint, microfills are superior to microhybrids. Mi-crofills are excellent in replacing enamel, creating translucent zones, andhaving appropriate anatomy and high polish for the long-term. Examplesof contemporary microfills include Filtek A110 (3M ESPE, St. Paul, Minne-sota), Renamel (Cosmodent, Chicago, Illinois), and Matrixx Anterior Mi-crofill (Discus Dental, Culver City, California).
Nanofillers
Two nanofillers are the aggregated zirconia-silica cluster filler (3M) withan average cluster particle size of 0.6 to 1.4 mm with primary particle size of5 to 20 nm and a nonagglomerated-nonaggregated 20-nm silica filler [9]; andthe Kerr prepolymerized filler (30–50 mm; barium glass, 0.4 mm; and silicananoparticles, 0.02 mm). Nanofillers contain zirconia-silica nanoclusterfillers of 30 to 50 mm (0.02 mm) plus submicron 0.01 to 0.02 mm silica parti-cles. Nanofillers exhibit filler loading of 60% to 72% by volume, whichequates to 79% to 84% by weight [9] (see Table 2). Examples of contempo-rary nanofillers include Premise (Kerr/Sybron, Orange, California), AeliteAesthetic Enamel (Bisco, Schaumburg, Illinois), and Filtek Supreme PlusUniversal Restorative (3M, St. Paul, Minnesota).
Being relatively new, nanofillers have few long-term in vivo studies, whichis their disadvantage. Some shorter-term studies exist, and empirically thisclassification of composite has the potential to exhibit the advantages andlimit the disadvantages of the other two composite classes. Because of theirhigher volume percent loading they exhibit lower shrinkage and associatedless pull on margins, adhesives, and interproximal contact issues. More stud-ies over a longer period of time are very much needed, however, to supportsuch an opinion.
363AESTHETIC ANTERIOR COMPOSITE RESTORATIONS
Autho
r's
pers
onal
co
py
Adhesive systems and techniques
The success of composite restorations is directly related to the success ofthe adhesive system and technique used. Adhesive dentistry when appliedcorrectly can prevent the dislodgement of composite restorations, preventsensitivity issues, prevent microgap formation or microleakage leading to re-current decay, and so forth. In article by Dr. Perdigao, a complete and com-prehensive understanding of adhesives can be gained.
Tints
A tint is a color that is mixed with white. The tinted range of any one colorcan run from the pure color at its maximum intensity through to white [10].For the restorative dentist, a tint’s primary indication is to match naturaltooth structure in polychromicity and maverick colors. It can also be usedto help mask out the tooth-restoration interface. The effect on color is tolower the value. Tints are very intense colors and need to be used judiciously(Table 3).
Opaquers
Opacity is the opposite of transparency, and describes the degree towhich light is prevented from passing through the color. It sometimes is de-scribed as ‘‘covering power,’’ and is the color’s ability to cover an underlyingcolor, preventing any trace of the latter showing through [10].
The primary indication for an opaquer is to block out any size, shape,and degree of darkness within a tooth using only a thin layer of material.If the restorative dentist can create a stump shade that is uniform in poly-chromatic color, the final restoration need only reproduce the value andtranslucency of enamel. Opaquers can also help to block out the tooth-restorative interface and block out excessive translucency in CL III andIV restorations. Their effect on color is to raise value (see Table 3).
Table 3
Overview of tints and opaquers
Indications
Tints Match natural tooth structure in polychromicity and maverick colors
Help mask out tooth-restorative interface
Lower the value
Opaquers Raise the value
Block dark tooth color in thin layer
Help mask out tooth-restorative interface
Block excessive translucency in CL III and IV restorations
364 LESAGE
Autho
r's
pers
onal
co
py
Layering techniques
Overview
When considering the direct anterior restoration in composite, one needsonly to borrow from nature. If one studies and understands natural toothstructure in color, form, and function, then composite mirroring becomesthe objective. Composite mirroring is the natural replacement of teethwith minimal or no additional removal of the intact, health dentition to nor-mal form and function with tooth-colored material. With this approach, therestorative dentist must indulge the optical, anatomic, and functional char-acteristics of natural teeth.
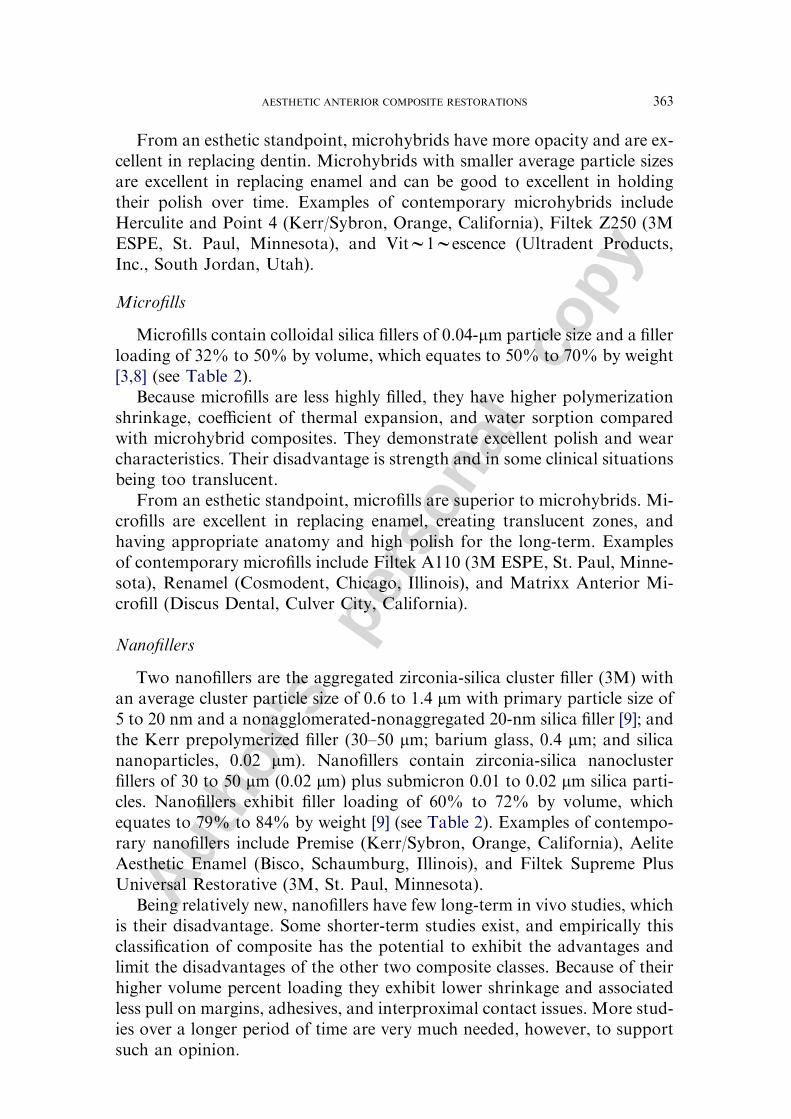
In composite mirroring, the restorative dentist chooses an enamel anddentin replacement material that emulates the missing tooth structure in op-tical properties and strength. Clinically, this can be oversimplified by usinga microhybrid in any area requiring strength or dentin replacement and a mi-crofill for polishability and enamel replacement and effects (Fig. 1, Table 4).Figs. 2–5 shows a more in-depth breakdown of the composite mirroring sys-tem. Nanofillers, with more clinical data, may eventually eliminate the needfor both systems.
When used properly, the composite mirroring system of layering iscrucial in creating life-like restorations in strength and esthetics includingpolychromicity and incisal effects. The layering of composite material canbe simple, involving one or two shades, or advanced, mimicking the ar-tistic skills of the ceramic technician. When describing the four layeringtechnique, trying to simplify or categorize which layering technique is
Fig. 1. Simplified, generalized overview of the composite mirroring system. Brown area usingmi-
crohybrid for the stress-bearing zone (strength for the long-term), and beige area using a microfill
for esthetics (polishability for the long-term). (Courtesy of BrianLeSage,DDS,BeverlyHills, CA.)
365AESTHETIC ANTERIOR COMPOSITE RESTORATIONS
Autho
r's
pers
onal
co
py
best, the clinician needs to consider the patient’s financial commitmentand the esthetic wants of the patient. Visualization, being able to seeand believe in creating the end point, is critical. The purpose of compos-ite layering is to establish the dentin layer and dentinal lobes in a toothand create the wonderful nuances of enamel and enamel effects thattransform into incisal translucency and incisal halo effects [7,11–16,17–21].
Shade selection technique
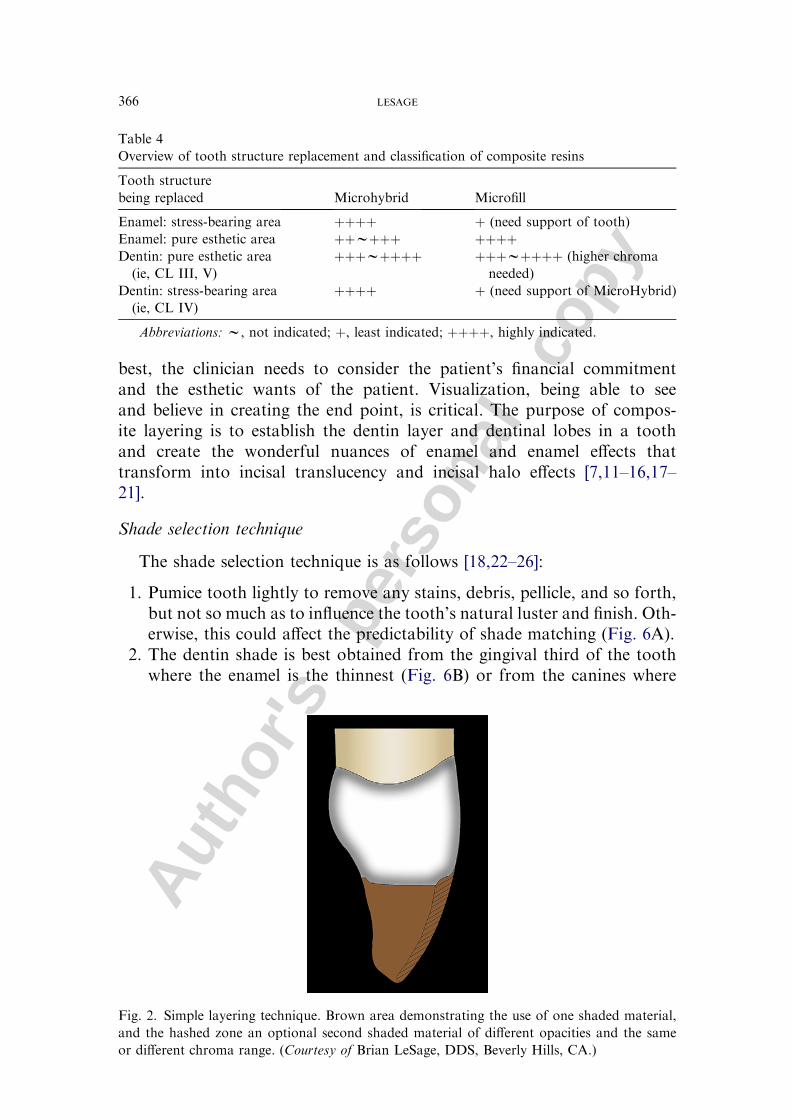
The shade selection technique is as follows [18,22–26]:
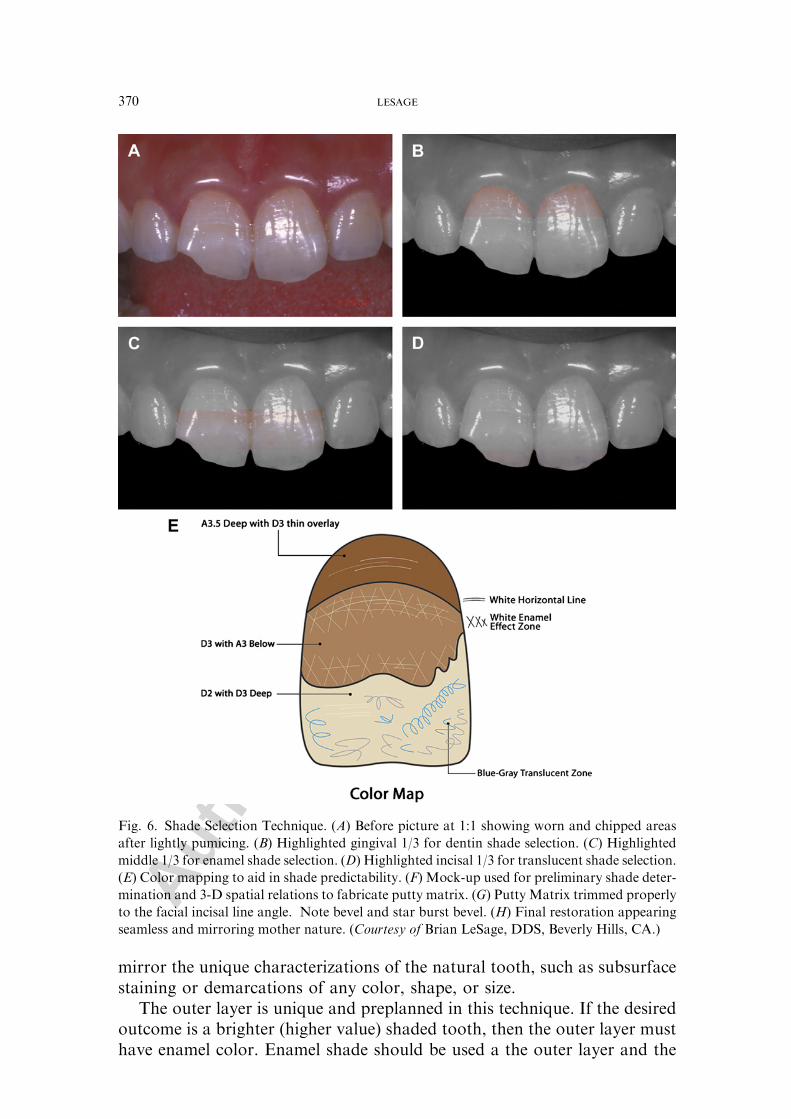
1. Pumice tooth lightly to remove any stains, debris, pellicle, and so forth,but not so much as to influence the tooth’s natural luster and finish. Oth-erwise, this could affect the predictability of shade matching (Fig. 6A).
2. The dentin shade is best obtained from the gingival third of the toothwhere the enamel is the thinnest (Fig. 6B) or from the canines where
Fig. 2. Simple layering technique. Brown area demonstrating the use of one shaded material,
and the hashed zone an optional second shaded material of different opacities and the same
or different chroma range. (Courtesy of Brian LeSage, DDS, Beverly Hills, CA.)
Table 4
Overview of tooth structure replacement and classification of composite resins
Tooth structure
being replaced Microhybrid Microfill
Enamel: stress-bearing area þþþþ þ (need support of tooth)
Enamel: pure esthetic area þþwþþþ þþþþDentin: pure esthetic area
(ie, CL III, V)
þþþwþþþþ þþþwþþþþ (higher chroma
needed)
Dentin: stress-bearing area
(ie, CL IV)
þþþþ þ (need support of MicroHybrid)
Abbreviations: w, not indicated; þ, least indicated; þþþþ, highly indicated.
366 LESAGE
Autho
r's
pers
onal
co
pythe chroma is the greatest. Clinically, this is done by placing a small thinconvenience form of the anticipated shade in the gingival third and lightcuring. This must be done before the teeth dehydrate. It should be notedthat microhybrids generally get darker on light curing, and microfills getlighter when light cured.
3. The enamel shade is conveniently obtained in the middle third of thetooth, where the enamel is the thickest (Fig. 6C).
4. The incisal or translucent shade is observed in the incisal third of thetooth, where the enamel is the thickest and there is little dentin opacity.In most anterior teeth the translucent zone is not limited to the incisaledge but carries into the transitional line angle zones (Fig. 6D).
5. Color mapping by the clinician doing the esthetic composite restorationaids the clinician because these procedures can be lengthy and often theoperator’s eyes fatigue physically and mentally. The color map is a pic-ture or prescription to be used as a guide throughout the fabrication ofthe direct restoration (Fig. 6E).
6. Practice mock-up using the selected shades can be done quickly with-out good adhesive technique to act as a shade evaluation guide andsubsequently to fabricate a putty matrix. Once one is satisfied withthe color based on the mock-up, the clinician turns their attentionto contour. Modify the mock-up to obtain the correct outline form,embrasure form, incisal edge, and incisal plane contour to the facial-incisal line angle (do not spend time getting the facial surface idealat this point). At the same time, get the centric stops and anterior dis-clusion that is needed for longevity. Once the occlusion and contours
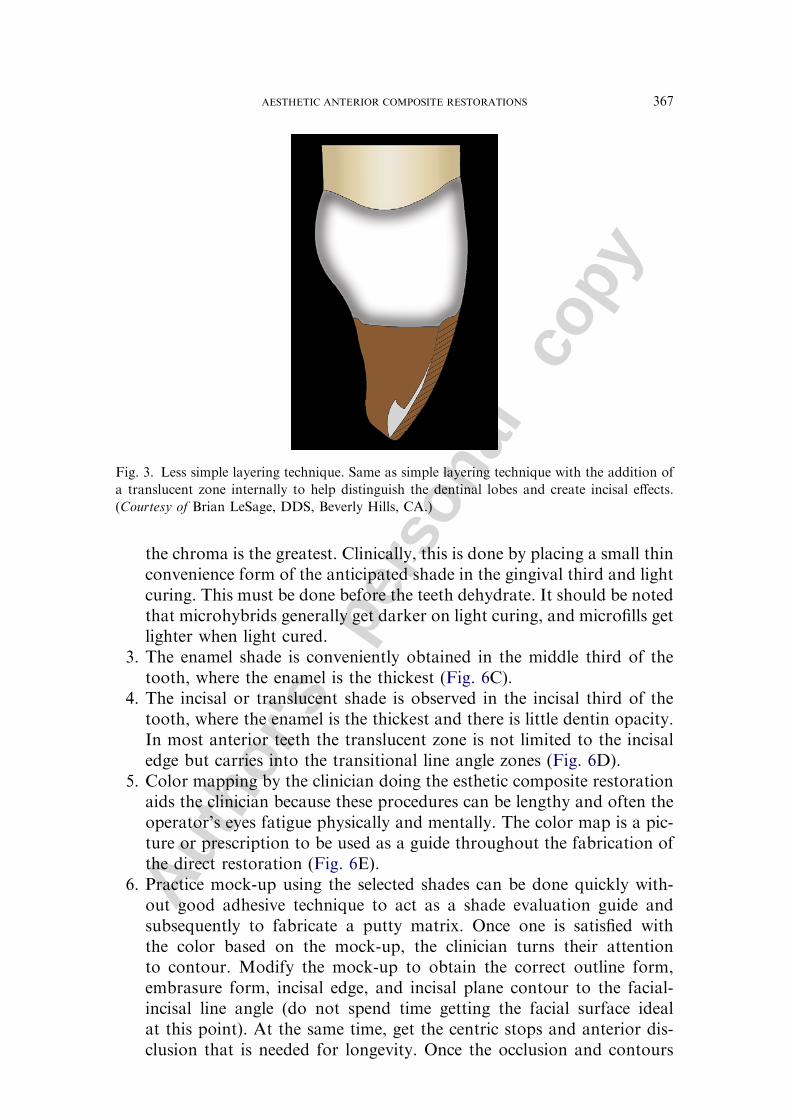
Fig. 3. Less simple layering technique. Same as simple layering technique with the addition of
a translucent zone internally to help distinguish the dentinal lobes and create incisal effects.
(Courtesy of Brian LeSage, DDS, Beverly Hills, CA.)
367AESTHETIC ANTERIOR COMPOSITE RESTORATIONS
Autho
r's
pers
onal
co
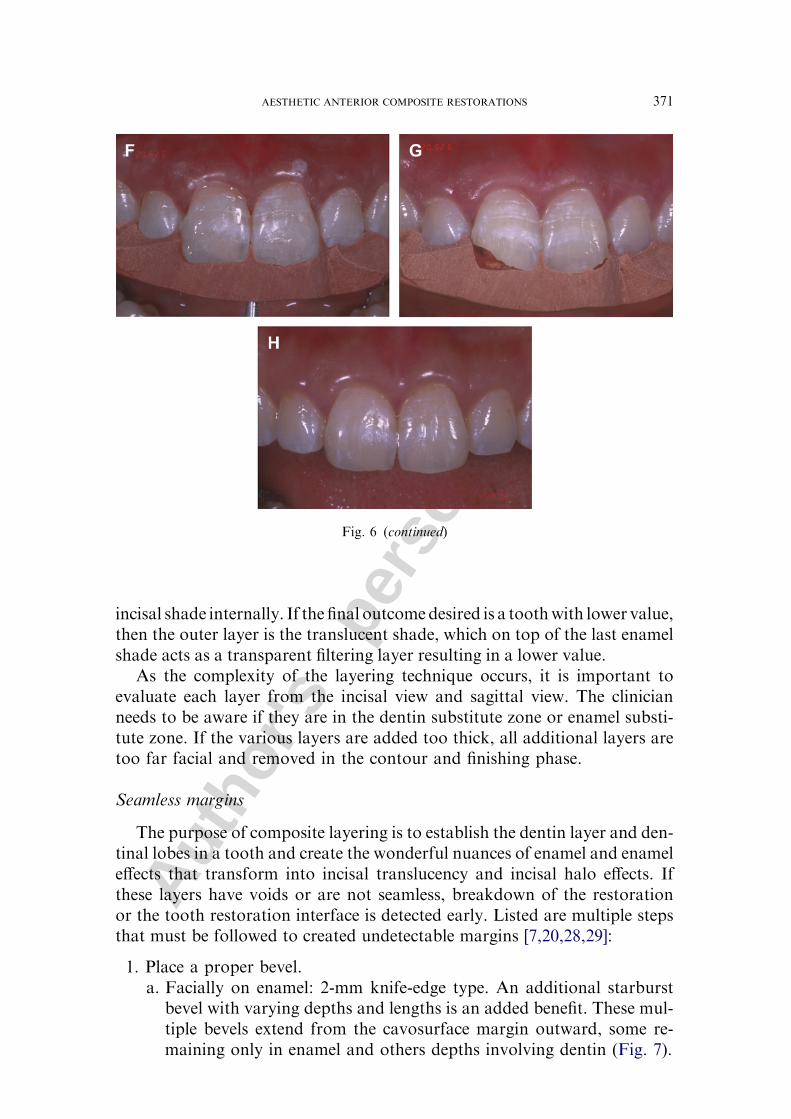
pyare correct, use a stiff VPS material, such as Aquasil Ultra Rigid(Dentsply/Caulk), Affinity (Clinician’s Choice), Imprint II (3MESPE), and Exaimplant (GC), to fabricate a putty matrix that cap-tures the entire lingual contour completely to the facial-incisal line an-gle [27] (Fig. 6F, G, and H).
Simple layering technique
This technique should be considered for the patient who has minimal es-thetic concerns, but when all decisions are based on economics. One or twoshaded materials (with different opacities and the same or different chromarange) suffice (see Fig. 2).
Less simple layering technique
This technique should be considered for the patient who has moderateesthetic concerns, but when decisions are based primarily on economics. Itentails one or two shaded materials (with different opacities and the sameor different chroma range) and another layer using incisal shaded material(Fig. 3).
Three-dimensional advanced layering technique
This technique should be considered for the patient who has a moderateto extensive understanding of esthetics and when finances play minimally
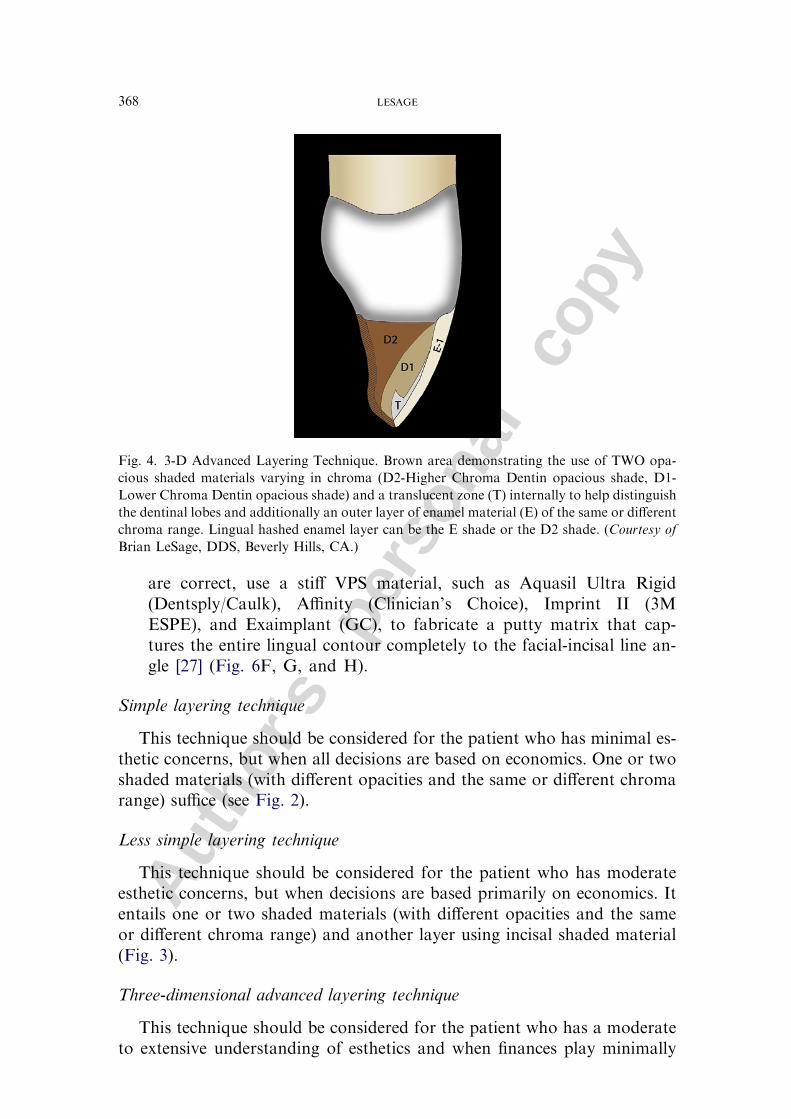
Fig. 4. 3-D Advanced Layering Technique. Brown area demonstrating the use of TWO opa-
cious shaded materials varying in chroma (D2-Higher Chroma Dentin opacious shade, D1-
Lower Chroma Dentin opacious shade) and a translucent zone (T) internally to help distinguish
the dentinal lobes and additionally an outer layer of enamel material (E) of the same or different
chroma range. Lingual hashed enamel layer can be the E shade or the D2 shade. (Courtesy of
Brian LeSage, DDS, Beverly Hills, CA.)
368 LESAGE
Autho
r's
pers
onal
co
py
into their decision-making process. Two shaded materials with differentchromas are used to replace dentin, with an enamel layer for enamel effectsand another layer using incisal shaded material (Fig. 4).
Three-dimensional characterized layering techniques
This technique should be considered for the patient who has a very highesthetic intelligence quotient and is very esthetically demanding, and whenfinances are not part of their decision-making process. Two shaded mate-rials with different chromas are used to replace dentin, two shaded materialswith different chromas are used for the enamel layer for enamel effects, andanother layer uses incisal shaded material. A characterization layer is placedbetween the incisal and enamel layers or the two enamel layers depending onthe intensity of the effect desired (Fig. 5). Tints are placed internally to
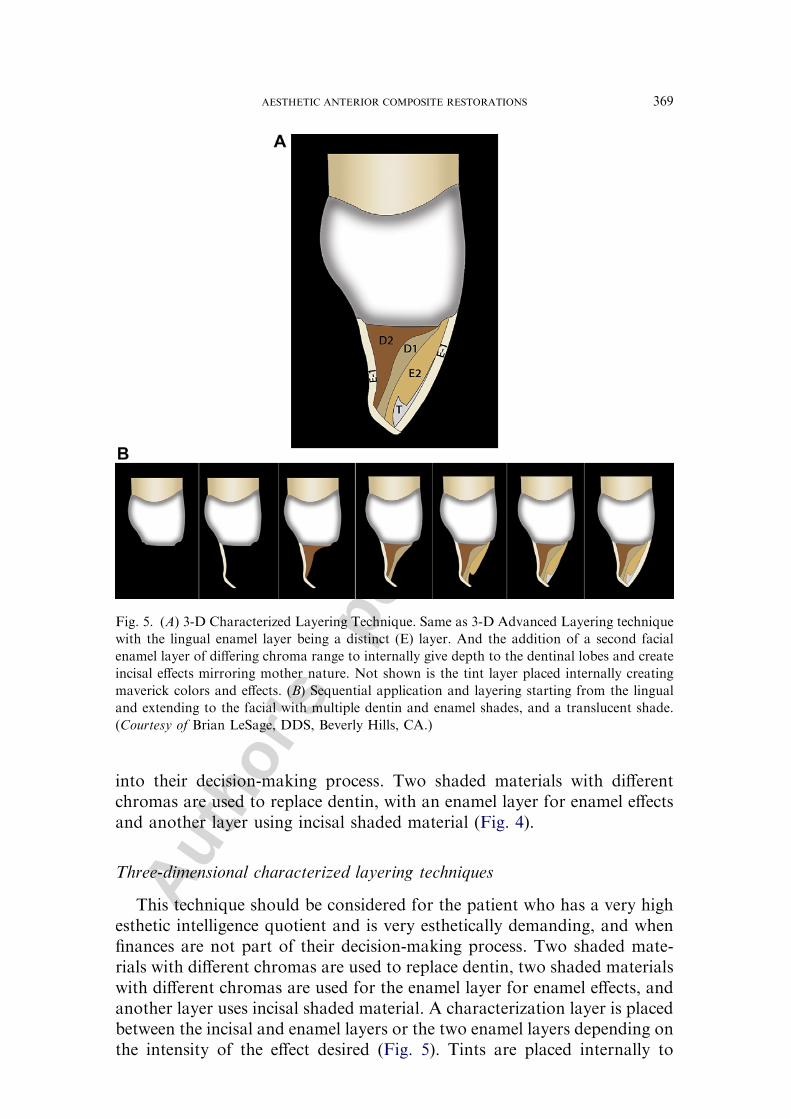
Fig. 5. (A) 3-D Characterized Layering Technique. Same as 3-D Advanced Layering technique
with the lingual enamel layer being a distinct (E) layer. And the addition of a second facial
enamel layer of differing chroma range to internally give depth to the dentinal lobes and create
incisal effects mirroring mother nature. Not shown is the tint layer placed internally creating
maverick colors and effects. (B) Sequential application and layering starting from the lingual
and extending to the facial with multiple dentin and enamel shades, and a translucent shade.
(Courtesy of Brian LeSage, DDS, Beverly Hills, CA.)
369AESTHETIC ANTERIOR COMPOSITE RESTORATIONS
Autho
r's
pers
onal
co
py
mirror the unique characterizations of the natural tooth, such as subsurfacestaining or demarcations of any color, shape, or size.
The outer layer is unique and preplanned in this technique. If the desiredoutcome is a brighter (higher value) shaded tooth, then the outer layer musthave enamel color. Enamel shade should be used a the outer layer and the
Fig. 6. Shade Selection Technique. (A) Before picture at 1:1 showing worn and chipped areas
after lightly pumicing. (B) Highlighted gingival 1/3 for dentin shade selection. (C) Highlighted
middle 1/3 for enamel shade selection. (D) Highlighted incisal 1/3 for translucent shade selection.
(E) Color mapping to aid in shade predictability. (F) Mock-up used for preliminary shade deter-
mination and 3-D spatial relations to fabricate putty matrix. (G) Putty Matrix trimmed properly
to the facial incisal line angle. Note bevel and star burst bevel. (H) Final restoration appearing
seamless and mirroring mother nature. (Courtesy of Brian LeSage, DDS, Beverly Hills, CA.)
370 LESAGE
Autho
r's
pers
onal
co
pyincisal shade internally. If the final outcomedesired is a toothwith lower value,then the outer layer is the translucent shade, which on top of the last enamelshade acts as a transparent filtering layer resulting in a lower value.
As the complexity of the layering technique occurs, it is important toevaluate each layer from the incisal view and sagittal view. The clinicianneeds to be aware if they are in the dentin substitute zone or enamel substi-tute zone. If the various layers are added too thick, all additional layers aretoo far facial and removed in the contour and finishing phase.
Seamless margins
The purpose of composite layering is to establish the dentin layer and den-tinal lobes in a tooth and create the wonderful nuances of enamel and enameleffects that transform into incisal translucency and incisal halo effects. Ifthese layers have voids or are not seamless, breakdown of the restorationor the tooth restoration interface is detected early. Listed are multiple stepsthat must be followed to created undetectable margins [7,20,28,29]:
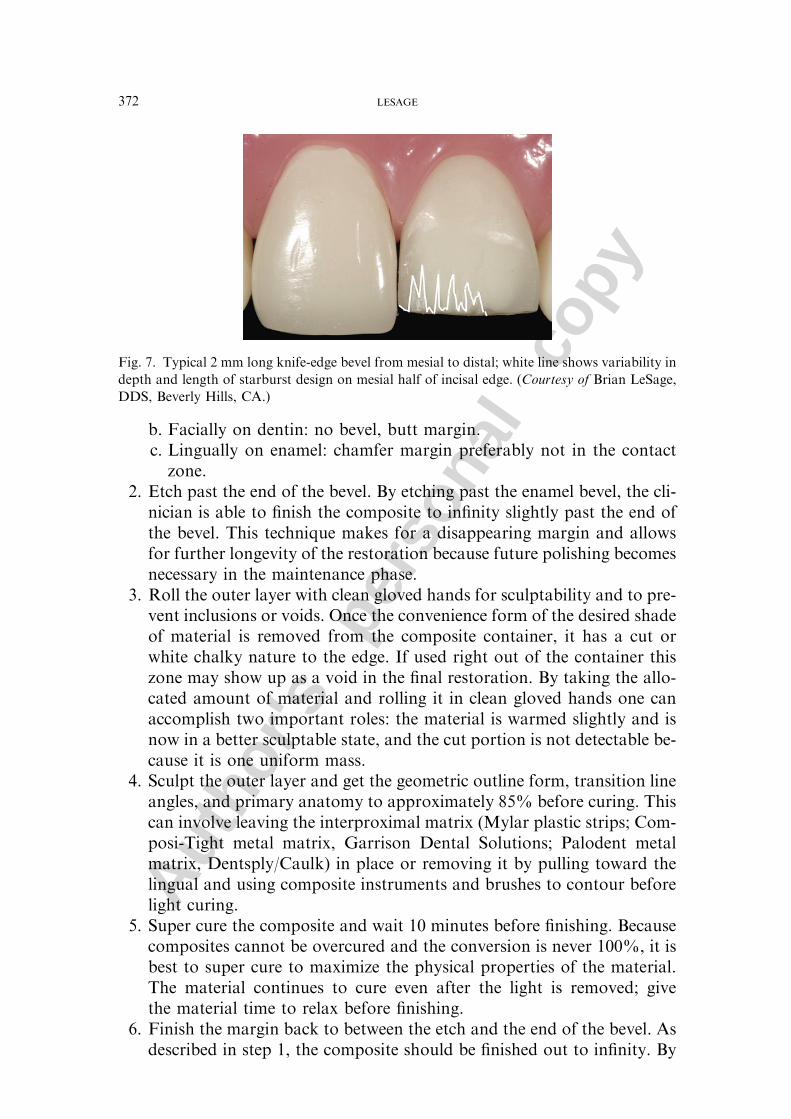
1. Place a proper bevel.a. Facially on enamel: 2-mm knife-edge type. An additional starburst
bevel with varying depths and lengths is an added benefit. These mul-tiple bevels extend from the cavosurface margin outward, some re-maining only in enamel and others depths involving dentin (Fig. 7).
Fig. 6 (continued)
371AESTHETIC ANTERIOR COMPOSITE RESTORATIONS
Autho
r's
pers
onal
co
py
b. Facially on dentin: no bevel, butt margin.c. Lingually on enamel: chamfer margin preferably not in the contact
zone.2. Etch past the end of the bevel. By etching past the enamel bevel, the cli-
nician is able to finish the composite to infinity slightly past the end ofthe bevel. This technique makes for a disappearing margin and allowsfor further longevity of the restoration because future polishing becomesnecessary in the maintenance phase.
3. Roll the outer layer with clean gloved hands for sculptability and to pre-vent inclusions or voids. Once the convenience form of the desired shadeof material is removed from the composite container, it has a cut orwhite chalky nature to the edge. If used right out of the container thiszone may show up as a void in the final restoration. By taking the allo-cated amount of material and rolling it in clean gloved hands one canaccomplish two important roles: the material is warmed slightly and isnow in a better sculptable state, and the cut portion is not detectable be-cause it is one uniform mass.
4. Sculpt the outer layer and get the geometric outline form, transition lineangles, and primary anatomy to approximately 85% before curing. Thiscan involve leaving the interproximal matrix (Mylar plastic strips; Com-posi-Tight metal matrix, Garrison Dental Solutions; Palodent metalmatrix, Dentsply/Caulk) in place or removing it by pulling toward thelingual and using composite instruments and brushes to contour beforelight curing.
5. Super cure the composite and wait 10 minutes before finishing. Becausecomposites cannot be overcured and the conversion is never 100%, it isbest to super cure to maximize the physical properties of the material.The material continues to cure even after the light is removed; givethe material time to relax before finishing.
6. Finish the margin back to between the etch and the end of the bevel. Asdescribed in step 1, the composite should be finished out to infinity. By
Fig. 7. Typical 2 mm long knife-edge bevel from mesial to distal; white line shows variability in
depth and length of starburst design on mesial half of incisal edge. (Courtesy of Brian LeSage,
DDS, Beverly Hills, CA.)
372 LESAGE
Autho
r's
pers
onal
co
py
ending this margin slightly past the bevel, as the margins pick up stainover time there is a very thin zone of material that still remains polish-able and easy to maintain.
7. Rotate finishing armamentarium from restoration to tooth. When usingrubber or silicone finishing discs embedded with silicon carbide, alumi-num oxide (degrees of grit) to prevent the grit from embedding in themargin, have the disc spinning from restoration to tooth.
8. Do not use rubber on the margins. Many manufacturers have excellentrubber polishing systems. These are best used in the body of the resto-ration and not at the margins because the rubber shavings can get em-bedded in the margin.
9. High polish appropriate for the natural dentition. An appropriate polishand luster is the key that maintains itself for the long-term (see sectionon polish and finishing).
Customization
Overview
In the composite mirroring layering technique, the ultimate result was ob-tained by using four to five different shaded or translucent materials witha very particular objective in mind. Tints were also mentioned, but the tech-nique or application is now described.
There are five easily learned techniques to mirror the natural dentition incheck lines, spots, craze lines, and any other maverick color issues seen innature. It must be noted that tints are very strong, and while performingthe layering technique many times the tints tend to disappear. They reappearas the polishing sequence progresses. Tints must never be placed on the sur-face, because finishing and polishing lead to their removal. Tints can bemixed to create a unique, desired color. The five techniques to creating a nat-ural craze line are as follows:
1. Paint and thin: Using a thin paintbrush with the desired tint, usuallywhite or brown, place the tint to mirror the adjacent tooth. The tintis on the tooth but way too wide and so thin the material from bothsides leaves a thin, nonstraight line. Then light cure.
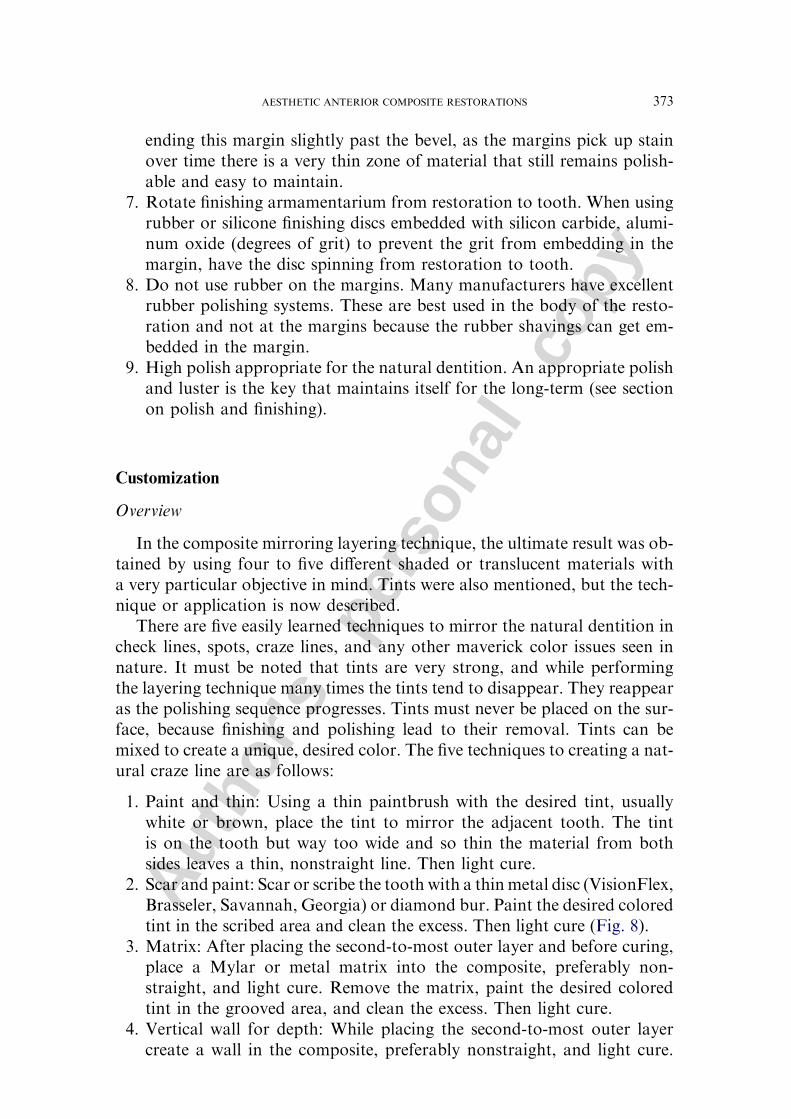
2. Scar and paint: Scar or scribe the tooth with a thinmetal disc (VisionFlex,Brasseler, Savannah, Georgia) or diamond bur. Paint the desired coloredtint in the scribed area and clean the excess. Then light cure (Fig. 8).
3. Matrix: After placing the second-to-most outer layer and before curing,place a Mylar or metal matrix into the composite, preferably non-straight, and light cure. Remove the matrix, paint the desired coloredtint in the grooved area, and clean the excess. Then light cure.
4. Vertical wall for depth: While placing the second-to-most outer layercreate a wall in the composite, preferably nonstraight, and light cure.
373AESTHETIC ANTERIOR COMPOSITE RESTORATIONS
Autho
r's
pers
onal
co
py
Paint the desired colored tint on the walled area and clean the excess.Then light cure.
5. Anneal material over the tint: While placing the most outer enamel ordentin layer create a notch or groove in the composite, preferably non-straight. Paint the desired colored tint in the notched or grooved areaand anneal the composite toward and within itself, preferably in a non-straight pattern. Then light cure.
These techniques are best to learn on extracted teeth or typodont teeth,where the skills can be perfected in a nonclinical setting. Habituation isneeded to master any new technique.
Finishing and polishing
This is considered by many to be the most difficult phase of anterior com-posite restorations. If the clinician follows the described guidelines of thisarticle, this step becomes routine and not one to be feared. Finishing andpolishing is crucial in finalizing the composite restoration to mimic naturein form, function, and longevity [30].
There is no shortcut in fabricating life-like restorations. Properly finishedand polished composites allow for a proper seal of the restoration, which in-fluences its durability and allows for minimal stain accumulation, less pla-que accumulation, and better wear resistance and marginal integrity[28,29,31,32]. The finishing sequence includes diamond burs, followed bypolishing discs or rubber polishing discs, points, wheels, and polishingwith buffing wheels and polishing paste.
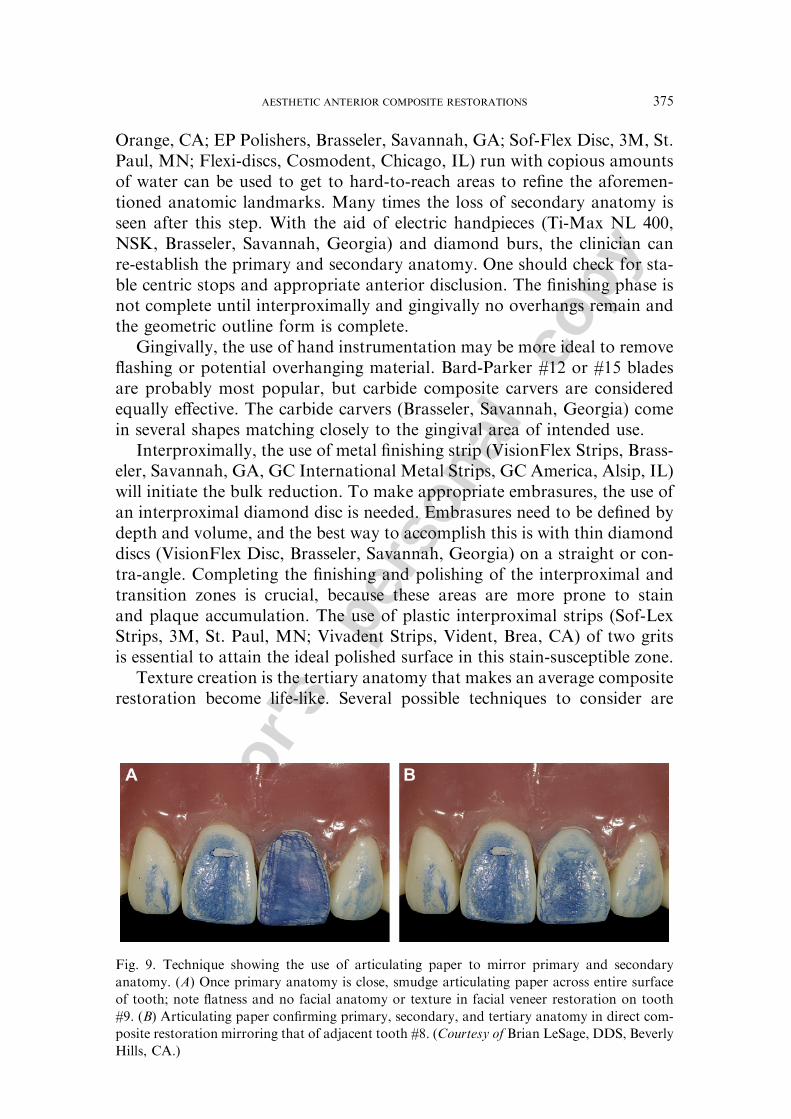
Diamonds burs, specifically submicron diamonds of 50 mm or less UCLALeSage Anterior Preparation Bur System (Brasseler USA, Savannah, Geor-gia), run with copious amounts of water are used to create and modify therestoration to the proper geometric outline form and contours, including theproper line angles and primary and some secondary anatomy [33]. As seen inFig. 9, blue articulating paper can help guide the clinician through thisprocess. In conjunction, course and fine polishing disc (KerrHawe, Kerr,
Fig. 8. (A) Tint application internally showing lines and dot maverick colors in second-to-last
layer. (B) The final restoration. (Courtesy of Brian LeSage, DDS, Beverly Hills, CA.)
374 LESAGE
Autho
r's
pers
onal
co
py
Orange, CA; EP Polishers, Brasseler, Savannah, GA; Sof-Flex Disc, 3M, St.Paul, MN; Flexi-discs, Cosmodent, Chicago, IL) run with copious amountsof water can be used to get to hard-to-reach areas to refine the aforemen-tioned anatomic landmarks. Many times the loss of secondary anatomy isseen after this step. With the aid of electric handpieces (Ti-Max NL 400,NSK, Brasseler, Savannah, Georgia) and diamond burs, the clinician canre-establish the primary and secondary anatomy. One should check for sta-ble centric stops and appropriate anterior disclusion. The finishing phase isnot complete until interproximally and gingivally no overhangs remain andthe geometric outline form is complete.
Gingivally, the use of hand instrumentation may be more ideal to removeflashing or potential overhanging material. Bard-Parker #12 or #15 bladesare probably most popular, but carbide composite carvers are consideredequally effective. The carbide carvers (Brasseler, Savannah, Georgia) comein several shapes matching closely to the gingival area of intended use.
Interproximally, the use of metal finishing strip (VisionFlex Strips, Brass-eler, Savannah, GA, GC International Metal Strips, GC America, Alsip, IL)will initiate the bulk reduction. To make appropriate embrasures, the use ofan interproximal diamond disc is needed. Embrasures need to be defined bydepth and volume, and the best way to accomplish this is with thin diamonddiscs (VisionFlex Disc, Brasseler, Savannah, Georgia) on a straight or con-tra-angle. Completing the finishing and polishing of the interproximal andtransition zones is crucial, because these areas are more prone to stainand plaque accumulation. The use of plastic interproximal strips (Sof-LexStrips, 3M, St. Paul, MN; Vivadent Strips, Vident, Brea, CA) of two gritsis essential to attain the ideal polished surface in this stain-susceptible zone.
Texture creation is the tertiary anatomy that makes an average compositerestoration become life-like. Several possible techniques to consider are
Fig. 9. Technique showing the use of articulating paper to mirror primary and secondary
anatomy. (A) Once primary anatomy is close, smudge articulating paper across entire surface
of tooth; note flatness and no facial anatomy or texture in facial veneer restoration on tooth
#9. (B) Articulating paper confirming primary, secondary, and tertiary anatomy in direct com-
posite restoration mirroring that of adjacent tooth #8. (Courtesy of Brian LeSage, DDS, Beverly
Hills, CA.)
375AESTHETIC ANTERIOR COMPOSITE RESTORATIONS
Autho
r's
pers
onal
co
py
tapping or dragging a course or medium diamond bur or disc with an air orelectric handpiece, using the corner or side of a cross-cut fissure bur, or us-ing a white or green stone with various motions. This completes the finishingphase. All that is left is to establish the appropriate polish and luster.
To obtain the appropriate high polish the use of chammy-type buffingwheels and discs (Flex-Buff Disc, Cosmedent; Chammy wheel, Brasseler, Sa-vannah, Georgia) on contra-angle and straight slow-speed handpiece is re-quired. The use of a polishing paste (Luster Paste, Kerr, Orange, CA;Enamelize, Cosmodent, Chicago, IL; Truluster, Brasseler, Savannah, GA;or Prisma-Gloss, Dentsply/Caulk, Milford, DE) wet then dry will add glossto the final restoration.
Created is a composite restoration that not only mimics the beauty ofdentin and enamel, but also defies detection. There are still two remainingsteps to consider. The first is to clean, etch, rinse, and place a seal or glaze(BisCover LV, Bisco) on the restoration to seal any microcracks or micro-surface defects from staining. The second is to take photos for self-evalua-tion and return of the patient with in 5 days (prescheduled) to make anyalterations detected in the photography and modify any occlusal contacts,especially in anterior guidance movements.
Summary
Taking a systematic approach to direct composite restorations cangreatly enhance the outcome of this multifaceted discipline. To enjoy thetrue art and science of cosmetic dentistry, the clinician must have a thoroughunderstanding of tooth morphology and topography; tooth shade analysis;composite systems and layering techniques; and the use of tints, opaquers,and maverick colors and zones to create restorations that mimic nature.Once the diseased, missing, or unsightly tooth structure has the exquisitebeauty of enamel and dentin in depth of color, contour, and light reflection,the finishing and polishing creates the illusion of reality. Factor in occlusionand maintenance, and direct composite restorations are the most unique andconservative restorations mirroring the reality of a tooth.
References
[1] Lee SM. Preface. Dictionary of composite materials technology. Lancaster (PA): Techmic
Publishing Company; 1989.
[2] Albers HF. Tooth colored restorations: principles and techniques. 9th edition. BC Decker
Publishing; 2002.
[3] Craig R, Powers J. Restorative dental materials. Chapter 9. 11th edition. Mosby; 2002.
[4] Suh B. Update on adhesive dentistry. Presented at International Adhesive Symposium.
Schaumburg (IL): Bisco, February 2007.
[5] Terry D. Application of nanotechnology. Editorial Commentary, Pract Periodontics Aes-
thet Dent 2004;16(3):220–2.
376 LESAGE
Autho
r's
pers
onal
co
py
[6] Leinfelder KF, Sluder TB, Sockwell CL, et al. Clinical evaluation of composite resins as
anterior and posterior restorative materials. J Prosthet Dent 1975;33(4):407–16.
[7] Eubank J, LeSage B. Presented at the UCLA aesthetic continuum, composite lecture and
hands-on workshops, 1997–2006. UCLA Dental School, Los Angeles.
[8] O’Brien WJ, editor. Dental materials and their selection. 3rd edition. Carol Stream (IL):
Quintessence Publishing Co; 2002. p. 114–6.
[9] Mitra S, Wu D, Holmes B. An application of nanotechnology in advanced dental material.
J Am Dent Assoc 2003;134(10):1382–90.
[10] Sidaway I. Color mixing bible. NY: Watson-Guptill Publication; 2002.
[11] Dietschi D. Free-hand composite resin restorations: a key to anterior aesthetics. Pract Peri-
odontics Aesthet Dent 1995;7(7):15–27.
[12] Dietschi D, Dietschi JM. Current developments in composite materials and techniques.
Pract Periodontics Aesthet Dent 1996;8:603–14.
[13] Dietschi D. Free-hand bonding in the esthetic treatment of anterior teeth: creating the illu-
sion. J Esthet Dent 1997;9(4):156–64.
[14] Dietschi D, Ardu S, Krejci I. Exploring the layering concepts for anterior teeth. In: Rouley
JF, Degrange M, editors. Adhesion: the silent revolution in dentistry. Chicago: Quintes-
sence; 2000. p. 235–51.
[15] Chiche G, Pinault A. Aesthetic of anterior fixed prosthodontics. Chicago: Quintessence;
1994.
[16] Dietschi D. Layering concepts in anterior composite restorations. J Adhes Dent 2001;3:
71–80.
[17] Gordon AA, vonderLehr WN, Herrin HK. Bond strength of composite to composite
and bond strength of composite to glass ionomer lining cements. Gen Dent 1986;34:
290–3.
[18] Terry D, Leinfelder K. An integration of composite resin with natural tooth structure: the
CL IV restoration. Pract Proced Aesthet Dent 2004;16(3):235–42.
[19] Miller M. Reality: the information source for esthetic dentistry. Houston (TX): Reality
Publishing; 2006.
[20] Fahl NJ. Predictable aesthetic reconstruction of fractured anterior teeth with composite
resins: a case report. Pract Periodontics Aesthet Dent 1996;8(1):17–30.
[21] DevotoW.Clinical procedure for producing aesthetic stratified composite resin restorations.
Pract Proced Aesthet Dent 2002;14(7):541–3.
[22] Sproul RC. Color matching in dentistry. Part 1. The three-dimensional nature of color.
J Prosthet Dent 2001;86:453–7.
[23] Hall NR, Kafalias MC. Composite colour matching: the development and evaluation of a
restorative colour matching system. Aust Prosthodont J 1991;5:47–52.
[24] Vanini L. Light and color in anterior composite restorations. Pract Periodontics Aesthet
Dent 1996;8(7):673–82.
[25] Deliperi S, Bardwell DN, Congiu MD. Reconstruction of severely damaged endodontically
treated and bleached teeth using a microhybrid composite resin: two-year case report. Pract
Proced Aesthet Dent 2003;15(3):221–6.
[26] Vanini L, Mangani FM. Determination and communication of color using the five color
dimensions of teeth. Pract Proced Aesthet Dent 2001;13(1):19–26.
[27] Behle C. Placement of direct composite veneers utilizing a silicone build-up guide and intrao-
ral mock-up. Pract Periodontics Aesthet Dent 2001;12(3):259–66.
[28] Jefferies SR, Barkmerier WW, Gwinnett AJ. Three composite finishing systems: a multisite
in vitro evaluation. J Esthet Dent 1992;4(6):181–5.
[29] Goldstein RE. Finishing of composite and laminates. Dent Clin North Am 1999;33(2):
305–18.
[30] Miller M. Contouring and polishing resin-based materials. Reality; the techniques.
2003;1:23–29.
377AESTHETIC ANTERIOR COMPOSITE RESTORATIONS
Autho
r's
pers
onal
co
py
[31] Powers JM, Fan PL, Raptis CN. Color stability of new composite restorative materials
under accelerated aging. J Dent Res 1980;59(12):2071–4.
[32] Sarac D, Sarac SY, Kulunk S. The effects of polishing techniques on the surface roughness
and color change of composite resins. J Prosthet Dent 2006;96:33–40.
[33] Blitz N. Diagnosis and treatment evaluation in cosmetic dentistry: a guide to accreditation
criteria. American Academy of Cosmetic Dentistry; Madison (WI).
378 LESAGE