advanced maintenance tools p - g-ec2.images...
TRANSCRIPT

da Vinci 1.0
HD2 3 DP0 1 0 H8
Product Manual P.2-P.4
Heated Bed Adjustment P.6
Service Code Informations P.7
Advanced Maintenance Tools P.5
ENG

GLU
E S
TICK
.Filament Cartridge
.Power Cord
.USB Cable
.Decorative Plate x2.Installation Disc
.User Quick Guide.Cartridge Locker
.Glue Stick
Overview
Important Safety Instruction
Extruder Module
Z-Axis Rod
Heated Bed
USB Port
Filament Slot
Remove thepackaging supports
Remove the heated bed fixingscrews and printing module fixers
Power Switch
Power Connector
Access Door
Product Manual
PRINTING
. Copper Brush
. Cleaning Wire x5
. Scraper
-2-
Key Pad
Display Panel
This guide provides details on how to start off your da Vinci 1.0 3D printer in the right direction. Before you can begin printing, there are some easy procedures you need to become familiar with:● How to open the box safely● How to load filament● Getting to know XYZware software
Do not place the printer in humid or dusty environments such as bathrooms and high traffic areas.Do not place the printer on a rickety surface and/or inclined position. Printer may fall down or tumble and it may cause serious injury.Do not reach inside the printer while in operation. Printer reaches high temperatures and includes moving parts that can cause injury.
●●
●
ENG

AA
B
Packing supports x2
tapes x3
Please removethe filament stopper.
Install the new filament cartridge into the empty slot.
Place and push to click the cartridge locker into the slot.
Push the filament through the filament guide tube to the hole of the extruder and press “LOAD FILAMENT” function on the display menu.
Tips: Pull the released arm ,then load filament shall be easily.
Load the filament
GLUE STICK
PRIN
TING
Open the box
2 3
Open the top door, then remove packaging supports and tapes.
4
Remove the heated bed fixing tapes and foam.6
Remove the screw and the plastic piece from heated bed.
7 Remove the drip tray fixing tapes.
89
1
1
4
2 3
5
A
B
-3-
Open the box and remove the accessories and the layer of foam.
Take out the printer by holding the grip holds.
Remove plastic bag and tapes.
Remove the cardboard.
Connect the printer to your PC first using a USB cable then turn on the power switch.
Product Manual ENG
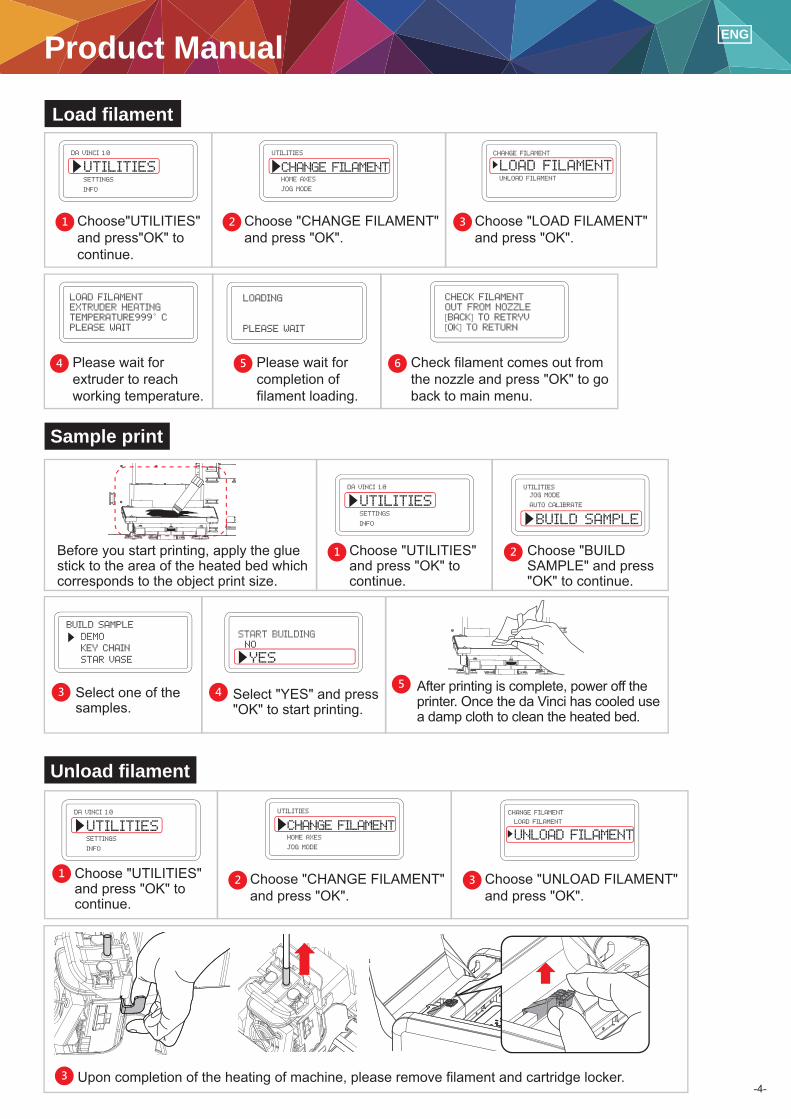
Before you start printing, apply the gluestick to the area of the heated bed whichcorresponds to the object print size.
Choose"UTILITIES"and press"OK" tocontinue.
Unload filament
Sample print
Check filament comes out from the nozzle and press "OK" to go back to main menu.
Choose "LOAD FILAMENT"and press "OK".
Please wait for extruder to reach working temperature.
Select "YES" and press"OK" to start printing.
Choose "BUILDSAMPLE" and press"OK" to continue.
UTILITIESSETTINGS
INFO
DA VINCI 1.0
CHECK FILAMENT
OUT FROM NOZZLE
[BACK] TO RETRYV[OK] TO RETURN
LOAD FILAMENTUNLOAD FILAMENT
CHANGE FILAMENT
LOAD FILAMENT
EXTRUDER HEATING
TEMPERATURE999°C
PLEASE WAIT
no
START BUILDING
yes
BUILD SAMPLE
UTILITIES
JOG MODE
auto CALIBRATe
1 Choose "CHANGE FILAMENT" and press "OK".
CHANGE FILAMENTHOME AXES
JOG MODE
uTILITIES
2
Choose "UTILITIES"and press "OK" tocontinue.
Choose "UTILITIES"and press "OK" tocontinue.
UTILITIESSETTINGS
INFO
DA VINCI 1.0
1 2
3
3
UTILITIESSETTINGS
INFO
DA VINCI 1.0
1
4 5 6
3
Load filament
Select one of thesamples.
dEMO
KEY CHAIN
STAR VASE
build sample
45
-4-
Please wait forcompletion of filament loading.
LOADING
PLEASE WAIT
After printing is complete, power off the printer. Once the da Vinci has cooled use a damp cloth to clean the heated bed.
Upon completion of the heating of machine, please remove filament and cartridge locker.
Product Manual ENG
Choose "UNLOAD FILAMENT"and press "OK".
LOAD FILAMENT
UNLOAD FILAMENT
CHANGE FILAMENT
Choose "CHANGE FILAMENT" and press "OK".
CHANGE FILAMENTHOME AXES
JOG MODE
uTILITIES
2 3

For Mac OS and Win8/8.1 user or software related topics, please visit following webpage for further information and download the proper XYZware version:http://support.xyzprinting.com/downloads
「XYZware 1.0」 is developed by XYZprinting Inc. It is designed for every-one, with or without modeling skill. You can view the model in various perspectives by importing (*.stl) file to it. It is also used to print objects from da Vinci 3D printer.XYZware can be found in the bundle installation disc. To check our latest software updates and further information, please go to:http://support.xyzprinting.com/manuals
Import
View
Move
Rotate
Scale
Info
Remove
Export Save Print Settings Help
Maintenance Tools
PRINTING
Important Safety Instruction
Information and usage of the advanced maintenance tools
Specifications
Know about XYZware
The maintenance tools provided should only be handled by an adult. Please keep tools away from children. Incorrect handling or maintenance of the printer may cause damage to the product or personal injury.
▇ ScraperScraper remove the printed object from the heated bed after completion of printing.(Caution: do not remove the printed object while the heated bed is hot.)
▇ Cleaning WireTo remove the small pieces of filament left from the filament path inside the nozzle. The cleaning wire can be used when an obstruction occurs in the filament path inside the nozzle or when the filament cannot be pushed out while loading the filament.(Caution: the heated bed may be hot while cleaning the filament path, please follow the instruction to descend the heated bed position before you performing the above.)When cleaning the printer nozzle, gears or filament path please ensure to keep handsclear of the heated bed which may be hot.
▇ Copper BrushTo clean and remove the small pieces of filament left from the tip or surface of the extruder and inside the drive gear. In the event of “auto-calibration failed” after several attempts, use the copper brush to clean and remove the filament pieces from the extruder.
Fused Filament FabricationSingle Head20 x 20 x 20 cm60, 90, 120 mm/s
Print TechnologyPrinter HeadBuild Volume(W x D x H)Print Speed
1.75 mm0.4 mm100-240V, 50~60HzUSB 2.0 x 1FSTN LCM (16 Characters x 4)Key x 6BuzzerLED28.5 Kg
Filament DiameterNozzle DiameterAC InputConnectivityDisplayControl MethodIndicatorLightingWeight
Standard 200 micronsSpeed 300 micronsUltra fast 400 micronsCustom 100-400microns
Layer Resolution Settings
FEATURES FEATURESda Vinci 1.0 3D Printer da Vinci 1.0 3D Printer
12 3
-5-(Notice: Some instructions and video tutorials might require online registration to obtain authorization.)
ENG

Heated Bed Adjustment Instructions
Step Chart
Step-by-Step
Repeat,if necessary!
Use the function "UNLOAD FILAMENT" to make the extruder reach to working temperature and it's easier to clean by copper brush.
1.
UTILITIES
SETTINGS
INFO
DA VINCI 1.0
DA VINCI 1.0
SYSTEM VERSION
INFO
CARTRIDGE STATS
STATISTICS
UTILITIESSETTINGS
INFO
AUTO CALIBRATEBUILD SAMPLE
uTILITIES
jOG MODE
I. Show ADJUST SUCCESS
I. Adjust "A" thumbscrew to make the 1st and the 2nd measured value approached.II. Adjust "B" thumbscrew to approach 1st, 2nd measured value if needed.III. Adjust "C" thumbscrew to adjust the value of 3rd, all measured values approached, the process is completed.
II. Show ADJUST FAIL
→Please refer the measured data and follow the calibration steps.
AUTO CALIBRATE
IN PROGRESS
PLEASE WAIT
AUTO CALIBRATEADJUST SUCCESSSZ offset 270[OK] TO SAVE
EXTRUDER HEATING
TEMPERATURE999°C
PLEASE WAIT
AUTO CALIBRATEADJUST SUCCESSSZ offset 270[OK] TO SAVE
AUTO CALIBRATEADJUST fail+245,+305,+315[OK] TO RETURN
→Please stop and press OK to finish calibration
◎ Steps:
(Measurement points)
(Screws position)
Face the front side of the printer
Moving a cycle of screw will show the measured value changed around 50 degree.
Rotation of the screw to the leftMake the heated bed raise up (value increases)Rotation of the screw to the rightMake the heated bed go down (value decreases)
AUTO CALIBRATEADJUST fail+245,+305,+315[OK] TO RETURN
1 321
AB
C23
If the displayed values are 999,999,999, follow these steps to clean up.※ Please Note:
AUTO CALIBRATEADJUST fail+999,+999,+999[OK] TO RETURN
-6-
A. Use of copper brushes to clean the surface of extruder. (Clean the extruder pin and measurement points of heated bed)B. Referring to Step 4, cleaning the measuring points.C. Do the heated bed adjustment again.
The heated print bed is pre-calibrated, please Do NOT make any unnecessary calibrations.Please contact service personnel or visit our website for detailed support information.
Step
1 2 3 4 5Step Step Step Step
Choose"INFO">"SYSTEM VERSION" to know the firmware version and keep the latest one.
4. Please refer the measured data and follow steps for doing calibration.
5. After this step completed, repeat the step 2 again, ADJUST SUCCESS will be displayed if correct ,then press OK to complete the calibration.
2. Choose"UTILITIES">"AUTO CALIBRATE" >"YES" to strat the procedure of calibrations.
3. The printer will measure the level of heated bed automatically, and feedback data on the display after around 2 minutes.
Note: the extruder will be heated in the process of measurement, be careful!
ENG

Service Code Informations
Troubleshooting (Q&A)
Note
Service Code Display Panel Description
0 0 1 3 The temperature of heated bed reach to warning range limited
0 0 1 4 The temperature of extruder reach to warning range limited
0 0 3 0X axis motor failed results moving failed or X axis home sensor failed results home detect failed
0 0 3 1Y axis motor failed results moving failed or Y axis home sensor failed results home detect failed
0 0 3 2Z axis motor failed results moving failed or Z axis home sensor failed results home detect failed
0 0 4 0 Memory storage cannot read/write
0 0 5 0 Flashrom cannot read/write
-7-
For further information and instruction of the service code, please refer to :http://support.xyzprinting.com/manuals
ENG
0 0 1 0 Extruder or heated bed higher/lower than maximum/minimum temperature during printing
0 0 1 1 Extruder or heated bed cannot heat to the specified temperature
Please retain all original packaging material and please ship your product with the original packaging for warranty purpose. Shipping without original packaging material may cause product damaged during the shipment and may cause chargeable service fees.