advanced java and web technologies lab...
TRANSCRIPT

GEC Advanced Java and Web Technologies Lab Manual
Page |1 GEC
ADVANCED JAVA AND WEB TECHNOLOGIES
LAB MANUAL

GEC Advanced Java and Web Technologies Lab Manual
Page |2 GEC
EQUIPMENT REQUIRED FOR CONDUCTING THE LAB
EXPERIMENTS
HARDWARE AND SOFTWARE REQUIRED:
A working computer system with either Windows or Linux
A web browser either IE or firefox
Tomcat web server and Apache web server
XML editor like Altova Xml-spy, Stylusstudio , etc.,
A database either Mysql or Oracle
JVM(Java virtual machine) must be installed on your system
BDK(Bean development kit) must be also be installed

GEC Advanced Java and Web Technologies Lab Manual
Page |3 GEC
LAB OBJECTIVE
The main objective of this Lab is to create a fully functional website
with MVC architecture i.e. to develop an online Book store using which we
can sell books. This lab demonstrates an in-depth understanding of the tools
and Web technologies necessary for business application design and
development. It covers client side scripting like HTML, JavaScript and server side
scripting like servlets, JSPs and also XML and web servers and database
interfacing.
Objectives include:
To make effective use of Java generic types.
To write multi-threaded Java applications, servlets & JSP
To communicate between processes using network sockets.
To develop advanced HTML pages with the help of frames,
scripting languages, and evolving technology like DHTML, XML.
To design dynamic web pages using java sctipt.

GEC Advanced Java and Web Technologies Lab Manual
Page |4 GEC
LIST OF PROGRAMS
S. NO TITLE
1. Design the following static web pages required for an online book store web site. 1) HOME PAGE: The static home page must contain three frames. 2) LOGIN PAGE 3) CATOLOGUE PAGE:The catalogue page should contain
the details of all the books available in the web site in a table.
2. 4) CART PAGE: The cart page contains the details about the books which are added to the cart. 5) REGISTRATION PAGE
3. Write JavaScript to validate the fields of the above registration page.
Write JavaScript to validate the fields of the Login page.
4. Design a web page using CSS which includes the following: 1) Use different font, styles: 2) Set a background image for both the page and single elements on the page. 3) Control the repetition of the image with the background-repeat property. 4) Define styles for links 5) Working with layers 6) Add a customized cursor
5. Write an XML file which will display the Book information. Write a Document Type Definition (DTD) to validate the above XML file. Display the XML file in a table. Use XML schemas XSL and CSS for the above purpose.
6. Create a simple visual bean with a area filled with a color. The shape of the area depends on the property shape. If it is set to true then the shape of the area is Square and it is Circle, if it is false. The color of the area should be changed dynamically for every mouse click. The color should also be changed if we change the color in the “property window “.
7. 1) Install TOMCAT web server and APACHE. 2) Access the above developed static web pages for books web site, using these servers by putting the web pages developed in week-1 and week-2 in the document root.
8. Assume four users user1, user2, user3 and user4 having the passwords pwd1, pwd2, pwd3 and pwd4 respectively. Write a servlet for doing the following. 1. Create a Cookie and add these four user id’s and passwords to this Cookie.
2. Read the user id and passwords entered in the Login form and authenticate with the values available in the cookies.
9. Install a database (Mysql or Oracle). Create a table which should contain at least the following fields: name, password, email-id, phone number Write a java program/servlet/JSP to connect to that database and extract data from the tables and display them. Insert the details of the users who register with the web site, whenever a new user clicks the submit button in the registration page.

GEC Advanced Java and Web Technologies Lab Manual
Page |5 GEC
10. Write a JSP which insert the details of the 3 or 4 users who register with the web site by using registration form. Authenticate the user when he submits the login form using
the user name and password from the database
11. Create tables in the database which contain the details of items (books) of each category. Modify your catalogue page (week 2) in such a way that you should connect to the database and extract data from the tables and display them in the catalogue page using JDBC.
12. Write a JSP program that demonstrates the concept of Session Tracking
ADD ON PROGRAMS
S.NO TITLE PAGE NO
1. Developing application using DHTML Filters
2. Creating animations using CSS3
3. Designing a scientific calculator using java script

GEC Advanced Java and Web Technologies Lab Manual
Page |6 GEC
WEEK-1: Design the following static web pages required for an online book store web site. 1) HOME PAGE: The static home page must contain three frames.
2) LOGIN PAGE 3) CATOLOGUE PAGE: The catalogue page should contain the details of all the books available in the web site in a table.
AIM: To develop Home, Login and Catalogue static web pages for an Online Book Store
DESCRIPTION:
In this program all the web paged are created by using basic HTML tags. Home page is divided into 3 frames by using <frameset> and <frame> tags. A frame is used to display a web page within a web page. <frameset>:
The <frameset> tag defines a frameset. The <frameset> element holds one or more <frame> elements. Each <frame> element can hold a separate document.
The <frameset> element specifies HOW MANY columns or rows there will be in the frameset, and HOW MUCH percentage/pixels of space will occupy each of them.
<frame>: The <frame> tag defines one particular window (frame) within a <frameset>. Each <frame> in a <frameset> can have different attributes, such as border,
scrolling, the ability to resize, etc. PROGRAM:
1) HOME PAGE:
home.html:
<frameset rows="40%,*"> <frame src="top.html" noresize scrolling="NO" name="topframe"> <frameset cols="15%,*"> <frame src="left.html" noresize scrolling="NO" name="leftframe"> <frame src="right.html" noresize name="rightframe" scrolling="auto"> </frameset> </frameset> top.html: <html> <head> <title>Top Frame</title> </head> <body> <img src="images\logo.jpeg" width="85" height="75" align="left"> <center> <marquee bgcolor="yellow" width="650" behavior="alternate"> <font face="Brush Script MT" size="6" color="Blue"><b><i>Online Book Store</i></b>
</font></marquee> <br><font face="Brush Script MT" size="4" color="red"><b>Created & Maintained By G. E. C</b></font> </center><br> <table width="100%" height="50%" cellspacing=10> <tr align="center"> <td> <a href="Home.html" target="_parent"> <img src="images\home.png" height="38"> </a></td> <td> <a href="login.html" target="rightframe"> <img src="images\login.gif" height="38"> </a></td>
GEC Advanced Java and Web Technologies Lab Manual
Page |7 GEC
<td> <a href="registration.html" target="rightframe"> <img src="images\register.jpg" height="38"> </a></td> <td> <a href="catalogue.jsp" target="rightframe"> <img src="images\catalogue.jpg"
height="38"> </a></td> <td> <a href="cart.html" target="rightframe"> <img src="images\cart.jpg" height="40"> </a></td> </tr> </table> </body> </html>
left.html:
<html> <body align="center"><br> <a href="" target="rightframe"> <img src="E:\WebTechnologiesLab\images\cse.jpg" height="35"> </a><br><br> <a href="" target="rightframe"> <img src="E:\WebTechnologiesLab\images\ece.jpg" height="35"> </a><br><br>
<a href="" target="rightframe"> <img src="E:\WebTechnologiesLab\images\eee.jpg" height="25"> </a><br><br> <a href="" target="rightframe"> <img src="E:\WebTechnologiesLab\images\civil.jpg" height="35"> </a><br> </body> </html>
right.html:
<html> <body> <img src="E:\WebTechnologiesLab\images\Books1.jpg" height="170"><br> <center> <font face="Brush Script MT" size="5" color="blue"><b>Welcome to the Online Book Store!!!</b></font><br><br>
<font face="Brush Script MT" size="5" color="red"><b>"A Huge Collection Of Engineering E-Books"</b></font> </center> </body> </html>

GEC Advanced Java and Web Technologies Lab Manual
Page |8 GEC
OUTPUT:

GEC Advanced Java and Web Technologies Lab Manual
Page |9 GEC
2) LOGIN PAGE:
login.html:
<html> <body> <basefont face="Cambria" size="4"> <br> <img src="E:\WebTechnologiesLab\images\loginpage.jpg" align="right"> <center> <font face="Brush Script MT" size="5" color="purple"><b>Enter Login Details:</b></font> </center> <form name="f1" method="post"> <table align="center" width="100" height="150" cellspacing=”15”> <tr><td><b>Login ID:</b></td> <td><input type="text" name="t1"></td></tr> <tr><td><b>Password:</b></td> <td><input type="password" name="t2"></td></tr> <tr align="center"> <td><input type="submit" name="b1" value="Submit"></td> <td><input type="reset" name="b2" value="Reset"></td></tr> </table> </form> </basefont> </body>
</html>
OUTPUT:

GEC Advanced Java and Web Technologies Lab Manual
Page |10 GEC
3) CATALOGUE PAGE:
Catalogue.html:
<html> <body> <br><br> <basefont face="cambria" size="3"> <table align="center" width="100%" height="100%" cellspacing="0" cellpadding="10" border="1"> <tr align="center">
<td><img src="E:\WebTechnologiesLab\images\cseimage1.jpg" height="150"></td> <td><b>Book: WebTechnologies<br>Author: R.K Somani<br> Publication: R.T.U Edition</b></td> <td><b>$43.5</b></td> <td><input type="Submit" value="Add To Cart" name="b1"></td> </tr> <tr align="center">
<td><img src="E:\WebTechnologiesLab\images\cseimage2.jpg" height="150"></td> <td><b>Book: XML Bible<br>Author: E.R Harold<br> Publication: Wiely</b></td> <td><b>$60</b></td> <td><input type="Submit" value="Add To Cart" name="b2"></td> </tr> <tr align="center"> <td><img src="E:\WebTechnologiesLab\images\cseimage3.jpg" height="150"></td>
<td><b>Book: HTML 4 Bible<br>Author: Bill Karow<br> Publication: Bill Publications</b></td> <td><b>$35.5</b></td> <td><input type="Submit" value="Add To Cart" name="b3"></td> </tr> <tr align="center"> <td><img src="E:\WebTechnologiesLab\images\cseimage4.jpg" height="150"></td> <td><b>Book: Java 2 Core Language<br>Author: Al Williams<br> Publication: TMH
Publications</b></td> <td><b>$50</b></td> <td><input type="Submit" value="Add To Cart" name="b4"></td> </tr> </table> </basefont> </body>
</html>

GEC Advanced Java and Web Technologies Lab Manual
Page |11 GEC
OUTPUT:

GEC Advanced Java and Web Technologies Lab Manual
Page |12 GEC
WEEK-2:
4) CART PAGE:
The cart page contains the details about the books which are added to the cart. 5) REGISTRATION PAGE
AIM: To develop cart and registration pages for an Online Book Store
DESCRIPTION:
The cart and registration web pages were designed by using basic HTML tags. The cart page contains the details about the books which are added to the cart. New users can register with the book store using registration page. Registration page contains the details to be filled by the user and is designed using form elements like textfields, checkboxes, radio buttons, buttons and drop down lists.
PROGRAM:
4) CART PAGE:
cart.html:
<html> <head> <basefont color="blue" face="cambria" size="5"/> </head> <body> <form name="f2"> <table bgcolor="yellow" align="center" border="2" bordercolor="purple" cellpadding="0" cellspacing="0" width="100%" height="100%"> <tr> <th>Book Name</th> <th>Price</th> <th>Quantity</th> <th>Amount</th> </tr> <tr align="center"> <td>Java 2</td> <td>$35.5</td> <td>2</td>
<td>$70</td> </tr> <tr align="center"> <td>XML Bible</td> <td>$40.5</td> <td>1</td> <td>$40.5</td> </tr> <tr align="right"> <td colspan="3">Total Amount--</td> <td>$110.5</td> </tr> </table> </form>
</body> </html>

GEC Advanced Java and Web Technologies Lab Manual
Page |13 GEC
OUTPUT:

GEC Advanced Java and Web Technologies Lab Manual
Page |14 GEC
5) REGISTRATION PAGE registration.html:
<html> <body> <basefont face="cambria"> <img src="E:\WebTechnologiesLab\images\registrationpage.gif" height="150" align="right"> <form name="f1" method="post"> <table align="center" cellspacing=15>
<caption align="center"><font color="blue"><h3><u>Registration Form</u></h3></font></caption> <tr> <td><b><font color="red">*</font>Name:</b></td> <td><input type="text" name="t1"></td> </tr> <tr> <td><b><font color="red">*</font>Password:</b></td>
<td><input type="password" name="t2"></td> </tr> <tr> <td><b><font color="red">*</font>Email-Id:</b></td> <td><input type="text" name="t3"></td> </tr> <tr> <td><b><font color="red">*</font>Phone Number:</b></td> <td><input type="text" name="t4"></td> </tr> <tr> <td><b><font color="red">*</font>Sex:</b></td> <td><input type="radio" name="r1">Male<input type="radio" name="r1">Female</td> </tr>
<tr> <td><b><font color="red">*</font>Date Of Birth:</b></td> <td><select name="s1"> <option>DATE</option><option>1</option><option>2</option><option>3</option><option>4</option><option>5</option><option>6</option><option>7</option><option>8</option><option>9</option><option>10</option><option>11</option><option>12</option><option>13</option><option>14</option><option>15</option><option>16</option><option>17</option><option>18</option><option>19</option><option>20</option><option>21</option><option>22</option><option>23</option><option>24</option><option>25</option><option>26</option><option>27</option><option>28</option><option>29</option><option>30</option><option>31</option> </select> <select name="s2"> <option>MONTH</option><option>Jan</option><option>Feb</option><option>Mar</option><option>Apr</option><option>May</option><option>Jun</option><option>Jul</opt
ion><option>Aug</option><option>Sep</option><option>Oct</option><option>Nov</option><option>Dec</option> </select> <select name="s3"> <option>YEAR</option><option>1985</option><option>1986</option><option>1987</option><option>1988</option><option>1989</option><option>1990</option><option>1991</option><option>1992</option><option>1993</option><option>1994</option><op
tion>1995</option><option>1996</option><option>1997</option><option>1998</option><option>1999</option><option>2000</option> </select>

GEC Advanced Java and Web Technologies Lab Manual
Page |15 GEC
<tr> <td><b><font color="red">*</font>Languages Known</b></td> <td><input type="checkbox" name="c1">English<input type="checkbox"
name="c2">Telugu<input type="checkbox" name="c3">Hindi <input type="checkbox" name="c4">Tamil </td> </tr> <tr> <td><b><font color="red">*</font>Address:</b></td> <td><textarea name="txt1" rows="5" cols=25></textarea></td>
</tr> </td> </tr> <tr align="center"> <td><input type="submit" name="b1" value="Submit"></td> <td><input type="reset" name="b2" value="Reset"></td> </tr>
</table> </form> <h4 align="center"><font color="red">* Fields are Mandatory</font></h4> </body> </html>
OUTPUT:

GEC Advanced Java and Web Technologies Lab Manual
Page |16 GEC
WEEK 3: VALIDATION: (i) Write JavaScript to validate the fields of the login page.
(ii) Write JavaScript to validate the following fields of the Registration page.
1. Name (Name should contains alphabets and the length should not be less than 6
characters).
2. Password (Password should not be less than 6 characters length).
3. E-mail id (should not contain any invalid and must follow the standard pattern
4. Phone number (Phone number should contain 10 digits only).
AIM: To validate the fields of login and registration pages using Javascript
DESCRIPTION: In order to validate the fields of login and registration pages Javascript is
used. JavaScript is programming code that can be inserted into HTML pages. JavaScript inserted into
HTML pages, can be executed by all modern web browsers. JavaScript is mainly used for validating the
elements in a form submitted by the user. This Javascript code can react to user events. It consists of
a number of predefined objects like document, window, RegExp etc. Each object contains number of
predefined methods that can be used for performing validation.
PROGRAM:
(i) LOGIN PAGE VALIDATION:
login.html:
<html> <head>
<script language="javascript"> function validate() { var lid=f1.t1.value; var pwd=f1.t2.value; if(lid=="") alert("Enter Login ID");
else if(pwd=="") alert("Enter Password"); else if(lid.length<6) alert("Login ID Should be Minimum Of 6 Chars"); else if(pwd.length<6) alert("Password Should be Minimum Of 6 Chars"); else { for(i=0;i<lid.length;i++) { x=lid.charAt(i);
if(x=='0' || x=='1' || x=='2' || x=='3' || x=='4' || x=='5' || x=='6' || x=='7' || x=='8' || x=='9')
{
c=1; break; }

GEC Advanced Java and Web Technologies Lab Manual
Page |17 GEC
else c=0; }
} if(c==1) alert("Login ID Should Contain Only Alphabets"); else alert("LOGIN SUCCESSFULL"); } </script> </head> <body>
<basefont face="Cambria" size="4"> <br> <img src="E:\WebTechnologiesLab\images\loginpage.jpg" align="right"> <center> <font face="Brush Script MT" size="5" color="purple"><b>Enter Login Details:</b></font> </center>
<form name="f1" method="post" onSubmit="validate()"> <table align="center" width="100" height="150" cellspacing=15> <tr> <td><b>Login ID:</b></td> <td><input type="text" name="t1"></td> </tr> <tr> <td><b>Password:</b></td>
<td><input type="password" name="t2"></td> </tr> <tr align="center"> <td><input type="submit" name="b1" value="Submit"></td> <td><input type="reset" name="b2" value="Reset"></td> </tr> </table>
</form> </basefont> </body> </html>

GEC Advanced Java and Web Technologies Lab Manual
Page |18 GEC
OUTPUT:
(ii) REGISTRATION PAGE VALIDATION
Registration.html:
<html> <head> <script language="javascript"> function validate() {
var name=f1.t1.value; var pwd=f1.t2.value; var eid=f1.t3.value; var ph=f1.t4.value; var e = /^[a-zA-Z][\w\._]*[a-zA-Z0-9]@[a-zA-Z0-9.-]+\.[a-zA-Z]{2,4}$/; if(name=="") alert("Enter Name");
else if(pwd=="") alert("Enter Password"); else if(eid=="") alert("Enter Email ID"); else if(ph=="") alert("Enter Phone Number"); else if(f1.m.checked==false && f1.f.checked==false)
alert("Select sex"); else if(f1.s1.selectedIndex==0) alert("Select Date");

GEC Advanced Java and Web Technologies Lab Manual
Page |19 GEC
else if(f1.s2.selectedIndex==0) alert("Select Month"); else if(f1.s3.selectedIndex==0)
alert("Select Year"); else if(f1.c1.checked==false && f1.c2.checked==false && f1.c3.checked==false && f1.c4.checked==false) alert("Select a Language"); else if(f1.txt1.value=="") alert("Enter Address"); else if(name.length<6)
alert("Name Should be Minimum Of 6 Chars"); else if(pwd.length<6) alert("Password Should be Minimum Of 6 Chars"); else if(isNaN(ph)==true) alert("Enter Valid Phone Number"); else if(ph.length<10 || ph.length>10) alert("Phone Number Should be Of 10 Numbers");
else { for(i=0;i<name.length;i++) { x=name.charAt(i); if(x=="0" || x=="1" || x=="2" || x=="3" || x=="4" || x=="5" || x=="6" || x=="7" || x=="8" || x=="9") {
c=1; break; } else c=0; } } if(c==1) alert("Name Should Contain Only Alphabets");
else { if(e.test(eid)==false) alert("Enter Valid Email ID"); else alert("REGISTRATION SUCCESSFUL"); } }
</script> </head> <body> <basefont face="cambria"> <img src="E:\WebTechnologiesLab\images\registrationpage.gif" height="150" align="right"> <form name="f1" method="post" >
<table align="center" cellspacing="15"> <caption align="center"><font color="blue"><h3><u>Registration Form</u></h3></font></caption> <tr> <td><b>Name:</b></td> <td><input type="text" name="t1"></td> </tr> <tr> <td><b>Password:</b></td> <td><input type="password" name="t2"></td> </tr>

GEC Advanced Java and Web Technologies Lab Manual
Page |20 GEC
<tr> <td><b>Email-Id:</b></td> <td><input type="text" name="t3"></td>
</tr> <tr> <td><b>Phone Number:</b></td> <td><input type="text" name="t4"></td> </tr> <tr> <td><b>Sex:</b></td>
<td><input type="radio" name="r1" id="m">Male<input type="radio" name="r1" id="f">Female</td> </tr> <tr> <td><b>Date Of Birth:</b></td> <td><select name="s1"> <option>DATE</option>
<option>1</option><option>2</option><option>3</option><option>4</option><option>5</option> <option>6</option><option>7</option><option>8</option><option>9</option><option>10</option><option>11</option><option>12</option><option>13</option><option>14</option><option>15</option><option>16</option><option>17</option><option>18</option><option>19</option><option>20</option><option>21</option><option>22</option><option>23</option><option>24</option><option>25</option><option>26</option><option>27</option><option>28</option><option>29</option><option>30</option>
<option>31</option> </select> <select name="s2"> <option>MONTH</option> <option>Jan</option><option>Feb</option><option>Mar</option><option>Apr</option><option>May</option><option>Jun</option><option>Jul</option><option>Aug</option><option>Sep</option><option>Oct</option><option>Nov</option><option>Dec</opti
on> </select> <select name="s3"> <option>YEAR</option> <option>1985</option><option>1986</option><option>1987</option><option>1988</option><option>1989</option><option>1990</option><option>1991</option><option>1992</option><option>1993</option><option>1994</option><option>1995</option><op
tion>1996</option><option>1997</option><option>1998</option><option>1999</option><option>2000</option> </select> <tr> <td><b>Languages Known</b></td> <td><input type="checkbox" name="c1">English<input type="checkbox" name="c2">Telugu<input type="checkbox" name="c3">Hindi
<input type="checkbox" name="c4">Tamil </td> </tr> <tr> <td><b>Address:</b></td> <td><textarea name="txt1" rows="5" cols="25"></textarea></td> </tr> </td> </tr> <tr align="center"> <td><input type="submit" name="b1" value="Submit" onmouseover="validate()"></td>

GEC Advanced Java and Web Technologies Lab Manual
Page |21 GEC
<td><input type="reset" name="b2" value="Reset"></td> </tr> </table>
</form> <h4 align="center"><font color="red">* ALL Fields are Mandatory</font></h4> </body> </html> OUTPUT:

GEC Advanced Java and Web Technologies Lab Manual
Page |22 GEC

GEC Advanced Java and Web Technologies Lab Manual
Page |23 GEC
WEEK-4:
Design a web page using CSS which includes the following:
(i) Use different font styles
(ii) Set a background image for both the page and single elements on the page.
(iii) Control the repetition of the image with the background-repeat property.
(iv) Define styles for links as
A:link
A:visited
A:active
A:hover
(v) Work with layers
(vi) Adding a Customized cursor
AIM: To design web pages using Cascading Style Sheets with different Font styles, background image, link and Layer CSS properties.
DESCRIPTION: CSS stands for Cascading Style Sheets. CSS defines HOW HTML elements are to be displayed. CSS font properties define the font family, boldness, size, and the style
of a text. CSS background properties are used to define the background effects of an element. CSS properties used for background effects:
background-color background-image background-repeat background-attachment background-position
Links can be styled differently depending on what state they are in. The four links states are:
a:link - a normal, unvisited link a:visited - a link the user has visited a:hover - a link when the user mouse’s over it a:active - a link the moment it is clicked
Text can be arranged in the form of layers using Positioning property. The CSS positioning properties allow you to position an element. It can also place an element behind another, and specify what should happen when an element's content is too big. The cursor property specifies the type of cursor to be displayed when pointing on an element.
PROGRAM: (i) Using different Font Styles:
Style1.css:
p.left { text-align:left; color:blue; font-family:Cambria;
font-size:large; text-indent:20px; }

GEC Advanced Java and Web Technologies Lab Manual
Page |24 GEC
p.center { text-align:center;
text-decoration:underline; text-transform:uppercase; letter-spacing:-3px; word-spacing:20px; font-size:larger; } p.right
{ text-align:right; color:red; font-family:Tahoma; font-size:15pt; text-decoration:overline; font-style:italic;
} b#headline { color:orange; font-size:22px; font-family:arial; text-decoration:underline; }
One.html:
<html> <head> <link rel="stylesheet" type="text/css" href="style1.css"> </head> <body bgcolor="cyan">
<p>This Paragraph is a Not Styled</p> <p class="left">This Paragraph is Styled by class "Left"</p> <p class="center">This Paragraph is Styled by class "Center"</p> <p class="right">This Paragraph is Styled by class "Right"</p> <b>This is normal Bold</b> <br> <b id="headline">This Bold Text is Styled </b> </html>

GEC Advanced Java and Web Technologies Lab Manual
Page |25 GEC
OUTPUT:
(ii) Setting Background image to both the page and single elements on the page
(iii) Controlling the repetition of the image with the background-repeat property twothree.html:
<html> <head> <style type="text/css"> h2 {
background-image:url('smiley.gif'); text-align:center; color:red; } body { background-image:url('E:\WebTechnologiesLab\images\logo.jpeg'); background-repeat:repeat; background-position:center top; background-attachment:fixed; background-color:pink; } </style> </head>
<body><br><br><br><br> <h2>Setting Background Image For Single Element on Page</h2>

GEC Advanced Java and Web Technologies Lab Manual
Page |26 GEC
</body> </html>
OUTPUT:
(iv) Defining Styles for Links four.html:
<html> <head> <style type="text/css"> a:link { text-decoration:none;color:red; } a:visited { text-decoration:none;color:orange; } a:hover { text-decoration:underline;color:blue; } a:active { text-decoration:underline;color:purple; } </style> </head>
<body bgcolor="cyan"> <h1><b><a href=" ">This is a link</a></b></h1> </body> </html>

GEC Advanced Java and Web Technologies Lab Manual
Page |27 GEC
OUTPUT:
(v) Defining Styles for Layers
five.html:
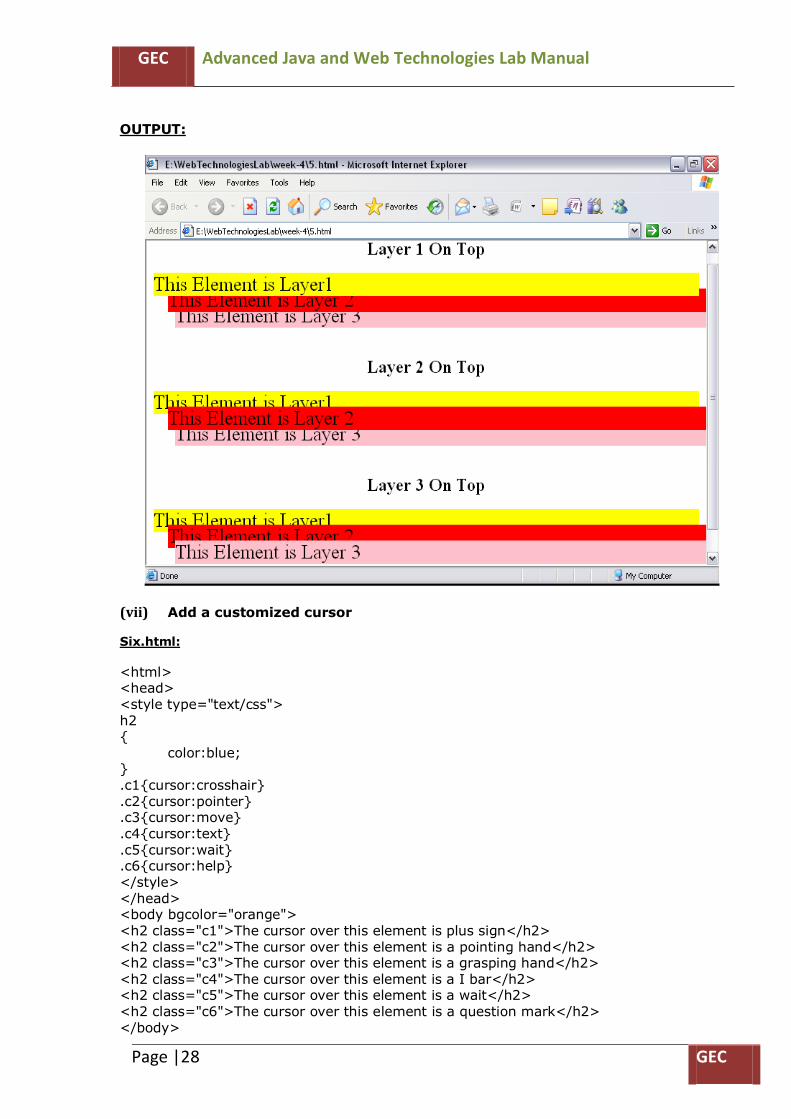
<html> <body>
<h2 style="text-align:center">Layer 1 On Top</h2> <div style="background-color:yellow;font-size:20pt;position:relative;z-index:3;">This Element is Layer1</div> <div style="background-color:red;font-size:20pt;position:relative;z-index:2;top=-10px;left:20px;" >This Element is Layer 2</div> <div style="background-color:pink;font-size:20pt;position:relative;z-index:1;top=-20px;left:30px;">This Element is Layer 3</div> <h2 style="text-align:center">Layer 2 On Top</h2> <div style="background-color:yellow;font-size:20pt;position:relative;z-index:1;">This Element is Layer1</div> <div style="background-color:red;font-size:20pt;position:relative;z-index:3;top=-10px;left:20px;" >This Element is Layer 2</div> <div style="background-color:pink;font-size:20pt;position:relative;z-index:2;top=-20px;left:30px;">This Element is Layer 3</div> <h2 style="text-align:center">Layer 3 On Top</h2>
<div style="background-color:yellow;font-size:20pt;position:relative;z-index:1;">This Element is Layer1</div> <div style="background-color:red;font-size:20pt;position:relative;z-index:2;top=-10px;left:20px;" >This Element is Layer 2</div> <div style="background-color:pink;font-size:20pt;position:relative;z-index:3;top=-20px;left:30px;">This Element is Layer 3</div> </body>
</html>
GEC Advanced Java and Web Technologies Lab Manual
Page |28 GEC
OUTPUT:
(vii) Add a customized cursor Six.html:
<html> <head> <style type="text/css"> h2 { color:blue; } .c1{cursor:crosshair} .c2{cursor:pointer} .c3{cursor:move} .c4{cursor:text} .c5{cursor:wait} .c6{cursor:help}
</style> </head> <body bgcolor="orange"> <h2 class="c1">The cursor over this element is plus sign</h2> <h2 class="c2">The cursor over this element is a pointing hand</h2> <h2 class="c3">The cursor over this element is a grasping hand</h2> <h2 class="c4">The cursor over this element is a I bar</h2> <h2 class="c5">The cursor over this element is a wait</h2> <h2 class="c6">The cursor over this element is a question mark</h2> </body>

GEC Advanced Java and Web Technologies Lab Manual
Page |29 GEC
</html> OUTPUT:

GEC Advanced Java and Web Technologies Lab Manual
Page |30 GEC
WEEK 5:
Write an XML file which will display the Book information which includes the following:
1) Title of the book 2) Author Name 3) ISBN number 4) Publisher name 5) Edition
6) Price. Write a Document Type Definition (DTD) to validate the above XML file.
Display the XML file as follows.
The contents should be displayed in a table. The header of the table should be in color GREY
and the Author names column should be displayed in one color and should be capitalized
and in bold. Use your own colors for remaining columns. Use XML schemas XSL and CSS for
the above purpose.
AIM: To write an XML file that displays book information.
DESCRIPTION:
XML stands for EXtensible Markup Language. XML is a markup language much like HTM and was designed to carry data, not to display data. XML tags are not predefined. You must define your own tags. XML with correct syntax is "Well Formed" XML. The purpose of a DTD is to define the structure of an XML document. It defines the structure with a list of legal elements. XML validated against a DTD is "Valid" XML. With XSLT you can transform an XML document into HTML, before it is displayed by a
browser. PROGRAM:
book.xml:
<?xml version="1.0" ?> <?xml-stylesheet href="book.xsl" type="text/xsl" ?> <!DOCTYPE catalog SYSTEM "book.dtd"> <catalog xmlns:xs="http://www.w3.org/2001/XMLSchema-instance" xs:noNamespaceSchemaLocation="book.xsd"> <bookdetails> <title>XML bible</title> <author>watson</author> <isbn>A121</isbn>
<publication>TMH</publication> <edition>2</edition> <price>50</price> </bookdetails> <bookdetails> <title>HTML Bible</title> <author>chris bates</author> <isbn>B222</isbn>
<publication>Pearson</publication> <edition>5</edition> <price>39</price> </bookdetails> <bookdetails> <title>Beginning Web Programming</title> <author>john duckett</author> <isbn>C234</isbn> <publication>Dreamtech</publication> <edition>4</edition>

GEC Advanced Java and Web Technologies Lab Manual
Page |31 GEC
<price>49</price> </bookdetails> <bookdetails>
<title>Java Server Pages</title> <author>hans bergsten</author> <isbn>D567</isbn> <publication>Pearson</publication> <edition>3</edition> <price>39</price> </bookdetails>
<bookdetails> <title>Programming World Wide Web</title> <author>sebesta</author> <isbn>E890</isbn> <publication>Pearson</publication> <edition>6</edition> <price>45</price>
</bookdetails> </catalog> book.dtd:
<!ELEMENT catalog (bookdetails+)> <!ELEMENT bookdetails (title,author,isbn,publication,edition,price)> <!ELEMENT title (#PCDATA)>
<!ELEMENT author (#PCDATA)> <!ELEMENT isbn (#PCDATA)> <!ELEMENT publication (#PCDATA)> <!ELEMENT edition (#PCDATA)> <!ELEMENT price (#PCDATA)> book.xsd:
<?xml version="1.0" ?> <xs:schema xmlns:xs="http://www.w3.org/2001/XMLSchema"> <xs:element name="catalog"> <xs:complexType> <xs:sequence> <xs:element name="bookdetails" maxOccurs="unbounded"> <xs:complexType> <xs:sequence> <xs:element name="title" type="xs:string" /> <xs:element name="author" type="xs:string" /> <xs:element name="isbn" type="xs:string" /> <xs:element name="publication" type="xs:string" /> <xs:element name="edition" type="xs:integer" /> <xs:element name="price" type="xs:float" />
</xs:sequence> </xs:complexType> </xs:element> </xs:sequence> </xs:complexType> </xs:element> </xs:schema>
book.xsl:

GEC Advanced Java and Web Technologies Lab Manual
Page |32 GEC
<xsl:stylesheet version="1.0" xmlns:xsl="http://www.w3.org/1999/XSL/Transform" > <xsl:template match="/"> <html>
<body> <table border="2" bordercolor="black" cellspacing="0" align="center" style="font-family:calibri;text-align:center"> <caption><h2 style="color:blue;text-decoration:underline">BOOK DETAILS</h2></caption> <tr style="background-color:gray;text-transform:uppercase;"> <th>title</th>
<th>author</th> <th>isbn number</th> <th>publication</th> <th>edition</th> <th>price</th> </tr> <xsl:for-each select="catalog/bookdetails">
<tr> <td style="background-color:orange;"><xsl:value-of select="title" /></td> <td style="background-color:cyan;text-transform:capitalize; font-weight:bold"> <xsl:value-of select="author" /></td> <td style="background-color:pink;"><xsl:value-of select="isbn" /></td> <td style="background-color:violet;"><xsl:value-of select="publication" /></td> <td style="background-color:yellow;"><xsl:value-of select="edition" /></td> <td style="background-color:green;"><xsl:value-of select="price" /></td>
</tr> </xsl:for-each> </table> </body> </html> </xsl:template> </xsl:stylesheet>

GEC Advanced Java and Web Technologies Lab Manual
Page |33 GEC
OUTPUT:
Validating book.xml using “Stylus Studio” XML Editor:

GEC Advanced Java and Web Technologies Lab Manual
Page |34 GEC

GEC Advanced Java and Web Technologies Lab Manual
Page |35 GEC
WEEK-6:
VISUAL BEANS:
Create a simple visual bean with an area filled with a color.
The shape of the area depends on the property shape. If it is set to true then the shape of
the area is Square and it is Circle, if it is false. The color of the area should be changed
dynamically for every mouse click. The color should also be changed if we change the color
in the “property window “.
AIM: To create a simple visual bean with an area filled with a color
DESCRIPTION: Here are the steps that you must follow to create a new Bean: 1. Create a directory for the new Bean. 2. Create the Java source file(s).
3. Compile the source file(s). 4. Create a manifest file. 5. Generate a JAR file. 6. Start the BDK. 7. Test. The following sections discuss each of these steps in detail.
1. Create a Directory for the New Bean:-
You need to make a directory for the Bean. To follow along with this example, create a folder with the name Colors in the directory C:\bdk\demo\sunw\demo. Then change to that directory.
2. Create the Source File for the New Bean:-
The source code for the Colors component is shown in the following listing. It is located in the file Colors.java
3. Compile the Source Code for the New Bean:-
Compile the source code to create a class file. Type the following:
C:\bdk\demo\sunw\demo\Colors> javac Colors.java
4. Create a Manifest File:-
You must now create a manifest file. First, switch to the C:\bdk\demo directory. This is the directory in which the manifest files for the BDK demos are located. Put the source code for your manifest file in the file Colors.mft. It is shown here:
Name: sunw/demo/Colors/Colors.class
Java-Bean: True
5. Generate a JAR File:-
Beans are included in the ToolBox window of the BDK only if they are in JAR files in the
directory C:\bdk\jars. These files are generated with the jar utility. Enter the following:
C:\bdk\demo > jar cfm ..\jars\Colors.jar Colors.mft sunw\demo\Colors\*.class
This command creates the file Colors.jar and places it in the directory C:\bdk\jars

GEC Advanced Java and Web Technologies Lab Manual
Page |36 GEC
6. Start the BDK:-
Change to the directory c:\bdk\beanbox and type run. This causes the BDK to start. You
should see three windows, titled ToolBox, BeanBox, and Properties. The ToolBox window should include an entry labeled “Colors” for your new Bean.
7. Test:-
Create an Instance of the Colors Bean:-
After you complete the preceding steps, create an instance of the Colors Bean in the BeanBox window. Test your new component by pressing the mouse anywhere within its
borders. Its color immediately changes. Use the Properties window to change the Shape property from false to true. Its shape immediately changes.
Create an Instance of the Colors Bean:- Create an instance of the TickTock Bean. The Properties window should show one property for this component. It is “Interval” and its initial value is 5. This represents the number of seconds that elapse between property change events generated by the TickTock Bean. Change the value to 1.
Now you need to map events generated by the TickTock Bean into method calls on the Colors Bean. Follow these steps: 1. Go to the menu bar of the BeanBox and select Edit | Events | propertyChange | propertyChange. You should now see a line extending from the button to the cursor. 2. Move the cursor so that it is inside the Colors Bean display area, and click the left mouse button. You should see the “Event Target Dialog dialog box”. 3. The dialog box allows you to choose a method that should be invoked when this event occurs. Select the entry labeled “change” and click the OK button.
4. You should see a message box appear very briefly, stating that the tool is “Generating and compiling adaptor class.” You should now see the color of your component change every second.

GEC Advanced Java and Web Technologies Lab Manual
Page |37 GEC
PROGRAM:- package sunw.demo.Colors; import java.awt.*;
import java.awt.event.*; public class Colors extends Canvas { private boolean shape; private Color color; public Colors() {
shape=true; setSize(200,100); change(); addMouseListener(new MouseAdapter() { public void mouseClicked(MouseEvent me) {
change(); } }); } public void change() { int r=(int)(255*Math.random()); int g=(int)(255*Math.random());
int b=(int)(255*Math.random()); color=new Color(r,g,b); repaint(); } public void setShape(boolean value) { shape=value;
} public boolean getShape() { return shape; } public void paint(Graphics g) {
g.setColor(color); if(shape==true) g.fillRect(20,10,200,200); else g.fillOval(20,10,200,200); } }

GEC Advanced Java and Web Technologies Lab Manual
Page |38 GEC
OUTPUT:
GEC Advanced Java and Web Technologies Lab Manual
Page |39 GEC
WEEK-7: 1) Install TOMCAT web server and APACHE. 2) Access the above developed static web pages for books web site, using these servers by
putting the web pages developed in week-1 and week-2 in the document root.
AIM: To install TOMCAT web server successfully and to access the static web pages for book web site using TOMCAT.
PROCEDURE:
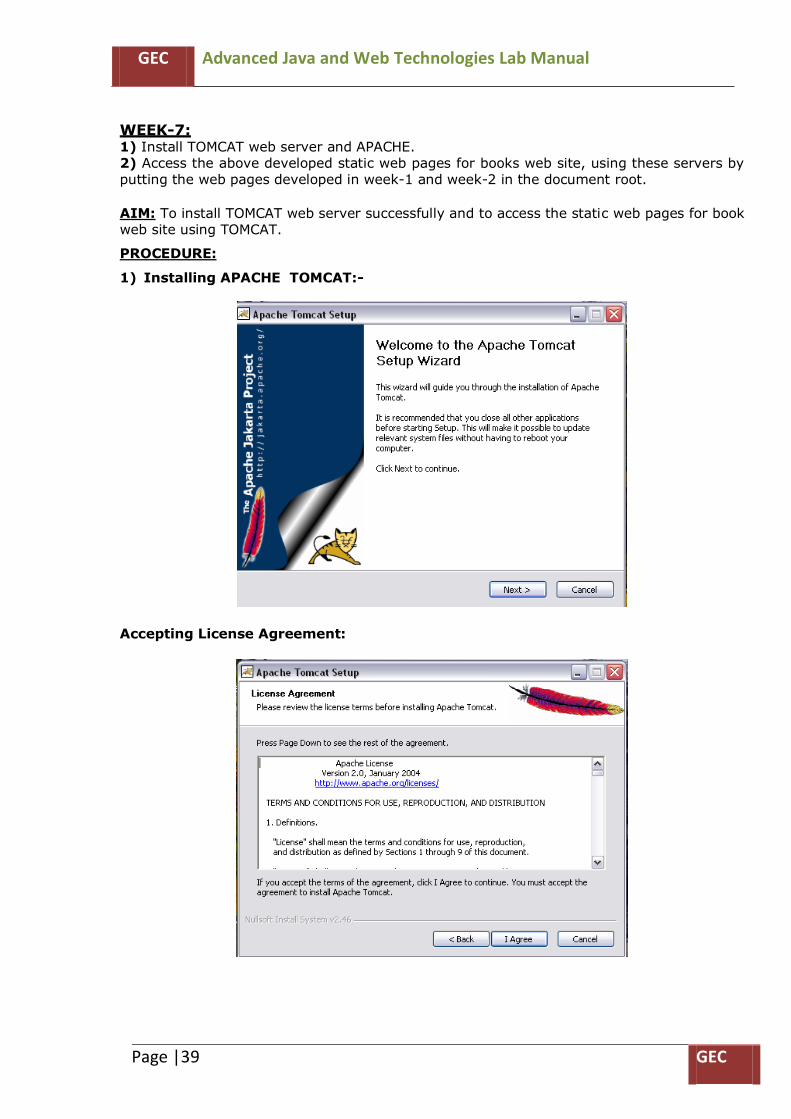
1) Installing APACHE TOMCAT:-
Accepting License Agreement:

GEC Advanced Java and Web Technologies Lab Manual
Page |40 GEC
Choosing Components to be installed:
Configuring Port Number, Username & Password:
Choosing the JVM:-

GEC Advanced Java and Web Technologies Lab Manual
Page |41 GEC
Choosing the Installation location:
Installation Progress:

GEC Advanced Java and Web Technologies Lab Manual
Page |42 GEC
Starting TOMCAT Service:
Configuring TOMCAT:

GEC Advanced Java and Web Technologies Lab Manual
Page |43 GEC
Testing TOMCAT:
2) Access the above developed static web pages for books web site Place the above developed static web pages in the following directory: Tomcat5.5->webapps->ROOT In the Web browser request the webpage as follows http://localhost:8080/WebTechnologies/home.html

GEC Advanced Java and Web Technologies Lab Manual
Page |44 GEC

GEC Advanced Java and Web Technologies Lab Manual
Page |45 GEC
WEEK-8: User Authentication:
Assume four users user1, user2, user3 and user4 having the passwords pwd1, pwd2, pwd3
and pwd4 respectively. Write a servlet for doing the following.
1. (i). Create a Cookie and add these four user id’s and passwords to this Cookie.
(ii). Read the user id and passwords entered in the Login form (week1) and authenticate
with the values (user id and passwords) available in the cookies.
If he is a valid user (i.e., user-name and password match) you should welcome him by
name(user-name) else you should display “ You are not an authenticated user “.
2. Use init-parameters to do this. Store the user-names and passwords in the webinf.xml
and access them in the servlet by using the getInitParameters() method.
AIM: To write a Servlet program that authenticates user login details using Cookies and init parameters.
DESCRIPTION: A Servlet is a Java programming language class used to extend the capabilities of a server. Although servlets can respond to any types of requests, they are commonly used to extend the applications hosted by web servers, so they can be thought of as Java Applets that run on servers instead of in web browsers. A Servlet is an object that receives a request and generates a response based on that request.
A cookie, also known as an HTTP cookie or browser cookie, is usually a small piece of data sent from a website and stored in a user's web browser while a user is browsing a website. When the user browses the same website in the future, the data stored in the cookie can be retrieved by the website to notify the website of the user's previous activity. Cookies were designed to be a reliable mechanism for websites to remember the state of the website or activity the user had taken in the past. This can include clicking particular buttons, logging in, or a record of which pages were visited by the user even months or years ago.
In this program cookies were used to store user login details (username and password) which were then verified with the details entered by the user.
PROGRAM:
1. AddCookieForm.html: <html> <body style="background-color:orange;color:blue">
<form method="get" action="http://localhost:8080/servlets-examples/servlet/AddCookieServlet"> <h2 align="center">ADD COOKIES</h2> <table align="center" cellspacing="20"> <tr> <td><label>Name:<label></td> <td><input type="text" name="t1"></td>
</tr> <tr> <td><label>Value:<label></td> <td><input type="text" name="t2"></td> </tr> <tr align="center"> <td colspan="2">
<input type="submit" value="ADD COOKIE" name="b1"> </td> </tr>

GEC Advanced Java and Web Technologies Lab Manual
Page |46 GEC
</form> </body> </html>
AddCookieServlet.java: import java.io.*; import javax.servlet.*; import javax.servlet.http.*; public class AddCookieServlet extends HttpServlet {
public void doGet(HttpServletRequest request,HttpServletResponse response) throws ServletException,IOException { response.setContentType("text/html"); PrintWriter out=response.getWriter(); String name,value; name=request.getParameter("t1");
value=request.getParameter("t2"); Cookie c=new Cookie(name,value); response.addCookie(c); out.println("<html>"); out.println("<head>"); out.println("<script>alert('COOKIE ADDED');</script>"); out.println("</head>"); out.println("<body>");
out.println("<h2>COOKIE DETAILS</h2>"); out.println("<br>Name: "+c.getName()); out.println("<br>Value:"+c.getValue()); out.println("</body>"); out.println("</html>"); } } login.html:
<html> <body bgcolor="cyan"> <form name="f1" method="get" action="http://localhost:8080/servlets-examples/servlet/VerifyCookieServlet"> <h2 align="center">LOGIN FORM</h2> <table align="center" cellspacing="20">
<tr> <td><b>Login ID:</b></td> <td><input type="text" name="t1"></td> </tr> <tr> <td><b>Password:</b></td> <td><input type="password" name="t2"></td>
</tr> <tr align="center"> <td><input type="submit" name="b1" value="Submit"></td> <td><input type="reset" name="b2" value="Reset"></td> </tr> </table> </form> </body> </html>
VerifyCookieServlet.java:
GEC Advanced Java and Web Technologies Lab Manual
Page |47 GEC
import java.io.*; import javax.servlet.*; import javax.servlet.http.*;
public class VerifyCookieServlet extends HttpServlet { public void doGet(HttpServletRequest request,HttpServletResponse response) throws ServletException,IOException { response.setContentType("text/html");
PrintWriter out=response.getWriter(); String name,value; boolean flag=false; int i,n; name=request.getParameter("t1"); value=request.getParameter("t2"); Cookie c[]=request.getCookies();
n=c.length; for(i=0;i<n;i++) { if(name.equals(c[i].getName())) { if(value.equals(c[i].getValue())) { flag=true;
break; } } } out.println("<html>"); if(flag==true) out.println("<body><h2>Welcome:
"+c[i].getName()+"</h2></body>"); else out.println("<body><h2>You are not an authentic user!</h2></body>"); out.println("</html>"); } }

GEC Advanced Java and Web Technologies Lab Manual
Page |48 GEC
OUTPUT:

GEC Advanced Java and Web Technologies Lab Manual
Page |49 GEC

GEC Advanced Java and Web Technologies Lab Manual
Page |50 GEC
2. GetInitParameters.java: import java.io.*; import javax.servlet.*; import javax.servlet.http.*; public class GetInitParameters extends HttpServlet
{ String u1,p1,u2,p2,u3,p3,u4,p4; public void init(ServletConfig config) { u1=config.getInitParameter("username1"); p1=config.getInitParameter("password1"); u2=config.getInitParameter("username2"); p2=config.getInitParameter("password2");
u3=config.getInitParameter("username3"); p3=config.getInitParameter("password3"); u4=config.getInitParameter("username4");

GEC Advanced Java and Web Technologies Lab Manual
Page |51 GEC
p4=config.getInitParameter("password4"); } public void doGet(HttpServletRequest request,HttpServletResponse response) throws
ServletException,IOException { boolean flag=false; response.setContentType("text/html"); String username=request.getParameter("t1"); String password=request.getParameter("t2"); if(username.equals(u1))
{ if(password.equals(p1)) flag=true; } else if(username.equals(u2)) { if(password.equals(p2))
flag=true; } else if(username.equals(u3)) { if(password.equals(p3)) flag=true; } else if(username.equals(u4))
{ if(password.equals(p4)) flag=true; } PrintWriter out=response.getWriter(); out.println("<html>"); out.println("<body>");
if(flag==true) out.println("<h1>Welcome :"+username+"</h1>"); else out.println("<h1>You are not authentic user</h1>"); out.println("</body>"); out.println("</html>"); }
} Web.xml: <servlet> <servlet-name>GetInitParameters</servlet-name> <servlet-class>GetInitParameters</servlet-class> <init-param>
<param-name>username1</param-name> <param-value>user1</param-value> </init-param> <init-param> <param-name>password1</param-name> <param-value>pwd1</param-value> </init-param> <init-param> <param-name>username2</param-name> <param-value>user2</param-value> </init-param>

GEC Advanced Java and Web Technologies Lab Manual
Page |52 GEC
<init-param> <param-name>password2</param-name> <param-value>pwd2</param-value>
</init-param> <init-param> <param-name>username3</param-name> <param-value>user3</param-value> </init-param> <init-param> <param-name>password3</param-name>
<param-value>pwd3</param-value> </init-param> <init-param> <param-name>username4</param-name> <param-value>user4</param-value> </init-param> <init-param>
<param-name>password4</param-name> <param-value>pwd4</param-value> </init-param> </servlet> <servlet-mapping> <servlet-name>GetInitParameters</servlet-name> <url-pattern>/servlet/GetInitParameters</url-pattern> </servlet-mapping>
login1.html: <html> <body bgcolor="cyan"> <form name="f1" method="get" action="http://localhost:8080/servlets-examples/servlet/GetInitParameters">
<h2 align="center">LOGIN FORM</h2> <table align="center" cellspacing="20"> <tr> <td><b>Login ID:</b></td> <td><input type="text" name="t1"></td> </tr> <tr>
<td><b>Password:</b></td> <td><input type="password" name="t2"></td> </tr> <tr align="center"> <td><input type="submit" name="b1" value="Submit"></td> <td><input type="reset" name="b2" value="Reset"></td> </tr>
</table> </form> </body> </html>

GEC Advanced Java and Web Technologies Lab Manual
Page |53 GEC
OUTPUT:

GEC Advanced Java and Web Technologies Lab Manual
Page |54 GEC
GEC Advanced Java and Web Technologies Lab Manual
Page |55 GEC
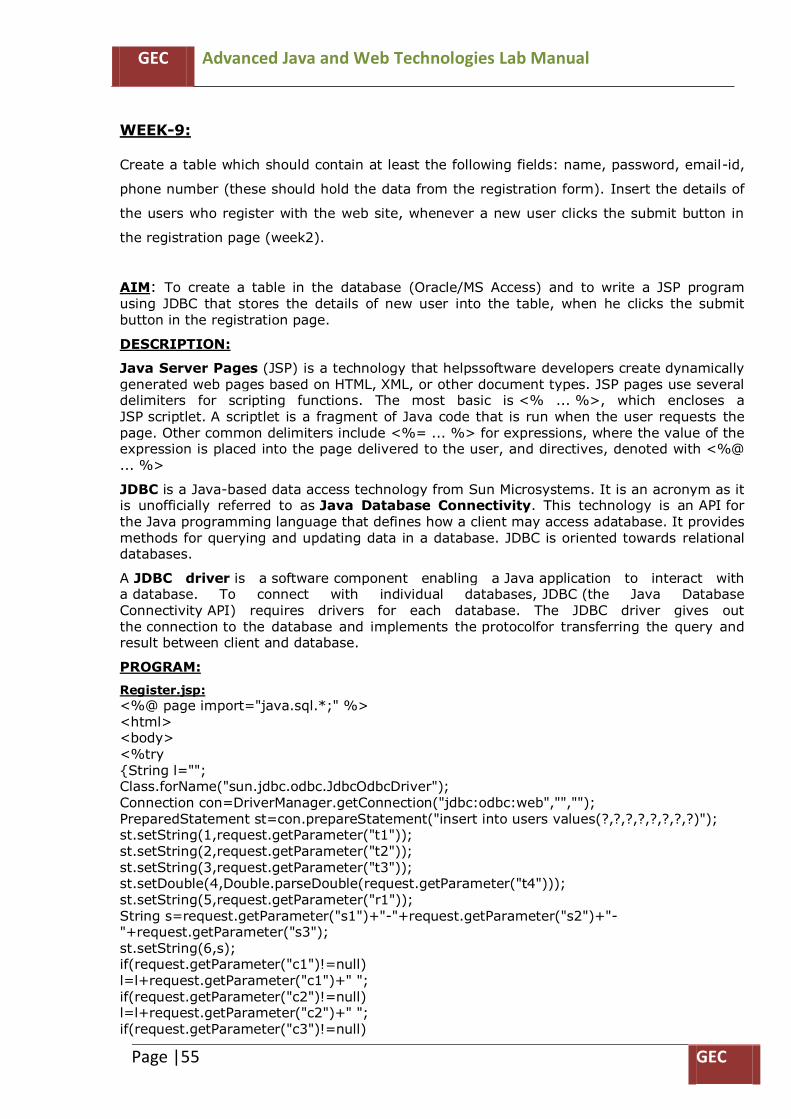
WEEK-9: Create a table which should contain at least the following fields: name, password, email-id,
phone number (these should hold the data from the registration form). Insert the details of
the users who register with the web site, whenever a new user clicks the submit button in
the registration page (week2).
AIM: To create a table in the database (Oracle/MS Access) and to write a JSP program using JDBC that stores the details of new user into the table, when he clicks the submit button in the registration page.
DESCRIPTION:
Java Server Pages (JSP) is a technology that helpssoftware developers create dynamically generated web pages based on HTML, XML, or other document types. JSP pages use several delimiters for scripting functions. The most basic is <% ... %>, which encloses a
JSP scriptlet. A scriptlet is a fragment of Java code that is run when the user requests the page. Other common delimiters include <%= ... %> for expressions, where the value of the expression is placed into the page delivered to the user, and directives, denoted with <%@ ... %>
JDBC is a Java-based data access technology from Sun Microsystems. It is an acronym as it is unofficially referred to as Java Database Connectivity. This technology is an API for
the Java programming language that defines how a client may access adatabase. It provides methods for querying and updating data in a database. JDBC is oriented towards relational databases.
A JDBC driver is a software component enabling a Java application to interact with a database. To connect with individual databases, JDBC (the Java Database Connectivity API) requires drivers for each database. The JDBC driver gives out the connection to the database and implements the protocolfor transferring the query and result between client and database.
PROGRAM:
Register.jsp:
<%@ page import="java.sql.*;" %> <html> <body> <%try
{String l=""; Class.forName("sun.jdbc.odbc.JdbcOdbcDriver"); Connection con=DriverManager.getConnection("jdbc:odbc:web","",""); PreparedStatement st=con.prepareStatement("insert into users values(?,?,?,?,?,?,?,?)"); st.setString(1,request.getParameter("t1")); st.setString(2,request.getParameter("t2")); st.setString(3,request.getParameter("t3")); st.setDouble(4,Double.parseDouble(request.getParameter("t4"))); st.setString(5,request.getParameter("r1")); String s=request.getParameter("s1")+"-"+request.getParameter("s2")+"-"+request.getParameter("s3"); st.setString(6,s); if(request.getParameter("c1")!=null) l=l+request.getParameter("c1")+" ";
if(request.getParameter("c2")!=null) l=l+request.getParameter("c2")+" "; if(request.getParameter("c3")!=null)
GEC Advanced Java and Web Technologies Lab Manual
Page |56 GEC
l=l+request.getParameter("c3")+" "; if(request.getParameter("c4")!=null) l=l+request.getParameter("c4")+" ";
st.setString(7,l); st.setString(8,request.getParameter("txt1")); st.executeUpdate(); %> <script>alert("Registered Successfully!");</script> <h3 style="color:green;font-family:Cambria">Your Account Details:</h3> <h3 style="color:magenta;font-family:Cambria" >Username:
<%out.println(request.getParameter("t1")); %> </h3> <h3 style="color:magenta;font-family:Cambria">Password: <%out.println(request.getParameter("t2")); %> </h3> <% st.close(); con.close(); }catch(Exception e)
{ out.println(“NOT SUCCESSFUL:”+e); }%> </body> </html> OUTPUT:

GEC Advanced Java and Web Technologies Lab Manual
Page |57 GEC

GEC Advanced Java and Web Technologies Lab Manual
Page |58 GEC
WEEK-10:
Write a JSP which does the following job:
Insert the details of the 3 or 4 users who register with the web site (week9) by using
registration form. Authenticate the user when he submits the login form using the user
name and password from the database.
AIM: To write a JSP program using JDBC that stores the details of new user into the database, when he clicks the submit button in the registration page and authenticate the user when he submits the login form using name and password from the database. DESCRIPTION: Java Server Pages (JSP) is a technology that helpssoftware developers create dynamically generated web pages based on HTML, XML, or other document types. JSP pages use several delimiters for scripting functions. The most basic is <% ... %>, which encloses a JSP scriptlet. A scriptlet is a fragment of Java code that is run when the user requests the
page. Other common delimiters include <%= ... %> for expressions, where the value of the expression is placed into the page delivered to the user, and directives, denoted with <%@ ... %>
JDBC is a Java-based data access technology from Sun Microsystems. It is an acronym as it is unofficially referred to as Java Database Connectivity. This technology is an API for the Java programming language that defines how a client may access adatabase. It provides methods for querying and updating data in a database. JDBC is oriented towards relational databases.
A JDBC driver is a software component enabling a Java application to interact with a database. To connect with individual databases, JDBC (the Java Database Connectivity API) requires drivers for each database. The JDBC driver gives out the connection to the database and implements the protocolfor transferring the query and result between client and database.
PROGRAM: Login.jsp:
<%@ page import="java.sql.*;" %> <html> <body> <%
try { Class.forName("sun.jdbc.odbc.JdbcOdbcDriver"); Connection con=DriverManager.getConnection("jdbc:odbc:web","",""); PreparedStatement st=con.prepareStatement("select password from users where username=?"); String s1=request.getParameter("t1");
st.setString(1,s1); ResultSet rs=st.executeQuery(); if(rs.next()) { String s2=request.getParameter("t2"); if(s2.equals(rs.getString(1))) out.println("<h2 style='color:blue;font-family:cambria;text-align:center'>Welcome "+s1+" !!!</h2>"); else

GEC Advanced Java and Web Technologies Lab Manual
Page |59 GEC
out.println("<h3 style='color:blue;font-family:cambria;text-align:center''>Invalid Password!!! Please Enter Correct Password</h3>"); }
else out.println("<h3 style='color:blue;font-family:cambria;text-align:center''>Invalid User!!! Please Register</h3>"); rs.close(); st.close(); con.close(); }
catch(Exception e) { out.println(e); } %>
OUTPUT:

GEC Advanced Java and Web Technologies Lab Manual
Page |60 GEC

GEC Advanced Java and Web Technologies Lab Manual
Page |61 GEC

GEC Advanced Java and Web Technologies Lab Manual
Page |62 GEC
WEEK-11:
Create tables in the database which contain the details of items (books in our case like Book
name, Price, Quantity, Amount) of each category. Modify your catalogue page (week 2) in
such a way that you should connect to the database and extract data from the tables and
display them in the catalogue page using JDBC.
AIM: To create tables in the database that contains the details of books and to write a JSP
program that connects to the database and extract data from the tables and display them in the catalogue page using JDBC.
DESCRIPTION:
JDBC allows multiple implementations to exist and be used by the same application. The API provides a mechanism for dynamically loading the correct Java packages and registering them with the JDBC Driver Manager. The Driver Manager is used as a connection factory for creating JDBC connections.
JDBC connections support creating and executing statements. These may be update statements such as SQL's CREATE, INSERT, UPDATE and DELETE, or they may be query statements such asSELECT. Additionally, stored procedures may be invoked through a JDBC connection. JDBC represents statements using one of the following classes:
Statement – the statement is sent to the database server each and every time.
PreparedStatement – the statement is cached and then the execution path[clarify] is pre-determined on the database server allowing it to be executed multiple times in an efficient manner.
CallableStatement – used for executing stored procedures on the database.
Update statements such as INSERT, UPDATE and DELETE return an update count that indicates how many rows were affected in the database. These statements do not return any
other information.
Query statements return a JDBC row result set. The row result set is used to walk over the result set. Individual columns in a row are retrieved either by name or by column number. There may be any number of rows in the result set. The row result set has metadata that describes the names of the columns and their types.
PROGRAM:
Catalogue.jsp:
<%@ page import="java.sql.*;" %> <html> <body> <h2 style="text-align:center;color:blue;font-family:cambria;">BOOKS DETAILS</h2> <table cellspacing="0" border="1" bordercolor="blue" align="center" style="color:green;text-align:center;font-family:cambria;"> <% try { Class.forName("sun.jdbc.odbc.JdbcOdbcDriver"); Connection con=DriverManager.getConnection("jdbc:odbc:web","",""); Statement st=con.createStatement(); ResultSet rs=st.executeQuery("select * from BooksCatalog");
ResultSetMetaData rsmd=rs.getMetaData(); int cc=rsmd.getColumnCount(); %>

GEC Advanced Java and Web Technologies Lab Manual
Page |63 GEC
<tr style="background-color:pink"> <% for(int i=1;i<=cc;i++)
{ %> <th><%out.println(rsmd.getColumnName(i));%></th> <% } %> </tr>
<% while(rs.next()) { %><tr> <td><% out.println(rs.getString(1)); %></td> <td><% out.println(rs.getString(2)); %></td> <td><% out.println(rs.getString(3)); %></td>
<td><% out.println(rs.getString(4)); %></td> <td><% out.println(rs.getInt(5)); %></td> <td><% out.println(rs.getFloat(6)); %></td> <td><% out.println(rs.getInt(7)); %></td> <td><% out.println(rs.getString(8)); %></td> </tr> <% }
rs.close(); st.close(); con.close(); } catch(Exception e) { out.println(e);
} %> </table> </body> </html> Csebooks.jsp: <%@ page import="java.sql.*;" %> <html> <body> <h2 style="text-align:center;color:blue;font-family:cambria;">COMPUTER ENGINEERING BOOKS</h2> <table cellspacing="0" border="1" bordercolor="blue" align="center" style="color:green;text-align:center;font-family:cambria;">
<% try { Class.forName("sun.jdbc.odbc.JdbcOdbcDriver"); Connection con=DriverManager.getConnection("jdbc:odbc:web","",""); Statement st=con.createStatement(); ResultSet rs=st.executeQuery("select * from BooksCatalog where Category='cse'"); ResultSetMetaData rsmd=rs.getMetaData();
int cc=rsmd.getColumnCount(); %> <tr style="background-color:pink">

GEC Advanced Java and Web Technologies Lab Manual
Page |64 GEC
<% for(int i=1;i<cc;i++) {
%> <th><%out.println(rsmd.getColumnName(i));%></th> <% } %> </tr> <%
while(rs.next()) { %><tr> <td><% out.println(rs.getString(1)); %></td> <td><% out.println(rs.getString(2)); %></td> <td><% out.println(rs.getString(3)); %></td> <td><% out.println(rs.getString(4)); %></td>
<td><% out.println(rs.getInt(5)); %></td> <td><% out.println(rs.getFloat(6)); %></td> <td><% out.println(rs.getInt(7)); %></td> </tr> <% } rs.close(); st.close();
con.close(); } catch(Exception e) { out.println(e); } %>
</table> </body> </html> Ecebooks.jsp:
<%@ page import="java.sql.*;" %> <html> <body> <h2 style="text-align:center;color:blue;font-family:cambria;">ELECTRONICS ENGINEERING BOOKS</h2> <table cellspacing="0" border="1" bordercolor="blue" align="center" style="color:green;text-align:center;font-family:cambria;"> <% try
{ Class.forName("sun.jdbc.odbc.JdbcOdbcDriver"); Connection con=DriverManager.getConnection("jdbc:odbc:web","",""); Statement st=con.createStatement(); ResultSet rs=st.executeQuery("select * from BooksCatalog where Category='ece'"); ResultSetMetaData rsmd=rs.getMetaData(); int cc=rsmd.getColumnCount(); %>
<tr style="background-color:pink"> <% for(int i=1;i<cc;i++)
GEC Advanced Java and Web Technologies Lab Manual
Page |65 GEC
{ %> <th><%out.println(rsmd.getColumnName(i));%></th>
<% } %> </tr> <% while(rs.next()) {
%><tr> <td><% out.println(rs.getString(1)); %></td> <td><% out.println(rs.getString(2)); %></td> <td><% out.println(rs.getString(3)); %></td> <td><% out.println(rs.getString(4)); %></td> <td><% out.println(rs.getInt(5)); %></td> <td><% out.println(rs.getFloat(6)); %></td>
<td><% out.println(rs.getInt(7)); %></td> </tr> <% } rs.close(); st.close(); con.close(); }
catch(Exception e) { out.println(e); } %> </table> </body>
</html> Eeebooks.jsp: <%@ page import="java.sql.*;" %> <html> <body> <h2 style="text-align:center;color:blue;font-family:cambria;">ELECTRICAL ENGINEERING BOOKS</h2> <table cellspacing="0" border="1" bordercolor="blue" align="center" style="color:green;text-align:center;font-family:cambria;"> <% try { Class.forName("sun.jdbc.odbc.JdbcOdbcDriver");
Connection con=DriverManager.getConnection("jdbc:odbc:web","",""); Statement st=con.createStatement(); ResultSet rs=st.executeQuery("select * from BooksCatalog where Category='eee'"); ResultSetMetaData rsmd=rs.getMetaData(); int cc=rsmd.getColumnCount(); %> <tr style="background-color:pink"> <%
for(int i=1;i<cc;i++) { %>

GEC Advanced Java and Web Technologies Lab Manual
Page |66 GEC
<th><%out.println(rsmd.getColumnName(i));%></th> <% }
%> </tr> <% while(rs.next()) { %><tr> <td><% out.println(rs.getString(1)); %></td>
<td><% out.println(rs.getString(2)); %></td> <td><% out.println(rs.getString(3)); %></td> <td><% out.println(rs.getString(4)); %></td> <td><% out.println(rs.getInt(5)); %></td> <td><% out.println(rs.getFloat(6)); %></td> <td><% out.println(rs.getInt(7)); %></td> </tr>
<% } rs.close(); st.close(); con.close(); } catch(Exception e) {
out.println(e); } %> </table> </body> </html> Civilbooks.jsp:
<%@ page import="java.sql.*;" %> <html> <body> <h2 style="text-align:center;color:blue;font-family:cambria;">CIVIL ENGINEERING BOOKS</h2> <table cellspacing="0" border="1" bordercolor="blue" align="center" style="color:green;text-align:center;font-family:cambria;"> <% try { Class.forName("sun.jdbc.odbc.JdbcOdbcDriver"); Connection con=DriverManager.getConnection("jdbc:odbc:web","",""); Statement st=con.createStatement();
ResultSet rs=st.executeQuery("select * from BooksCatalog where Category='civil'"); ResultSetMetaData rsmd=rs.getMetaData(); int cc=rsmd.getColumnCount(); %> <tr style="background-color:pink"> <% for(int i=1;i<cc;i++) {
%> <th><%out.println(rsmd.getColumnName(i));%></th> <%
GEC Advanced Java and Web Technologies Lab Manual
Page |67 GEC
} %> </tr>
<% while(rs.next()) { %><tr> <td><% out.println(rs.getString(1)); %></td> <td><% out.println(rs.getString(2)); %></td> <td><% out.println(rs.getString(3)); %></td>
<td><% out.println(rs.getString(4)); %></td> <td><% out.println(rs.getInt(5)); %></td> <td><% out.println(rs.getFloat(6)); %></td> <td><% out.println(rs.getInt(7)); %></td> </tr> <% }
rs.close(); st.close(); con.close(); }catch(Exception e) { out.println(e); } %> </table>
</body> </html>
OUTPUT:

GEC Advanced Java and Web Technologies Lab Manual
Page |68 GEC
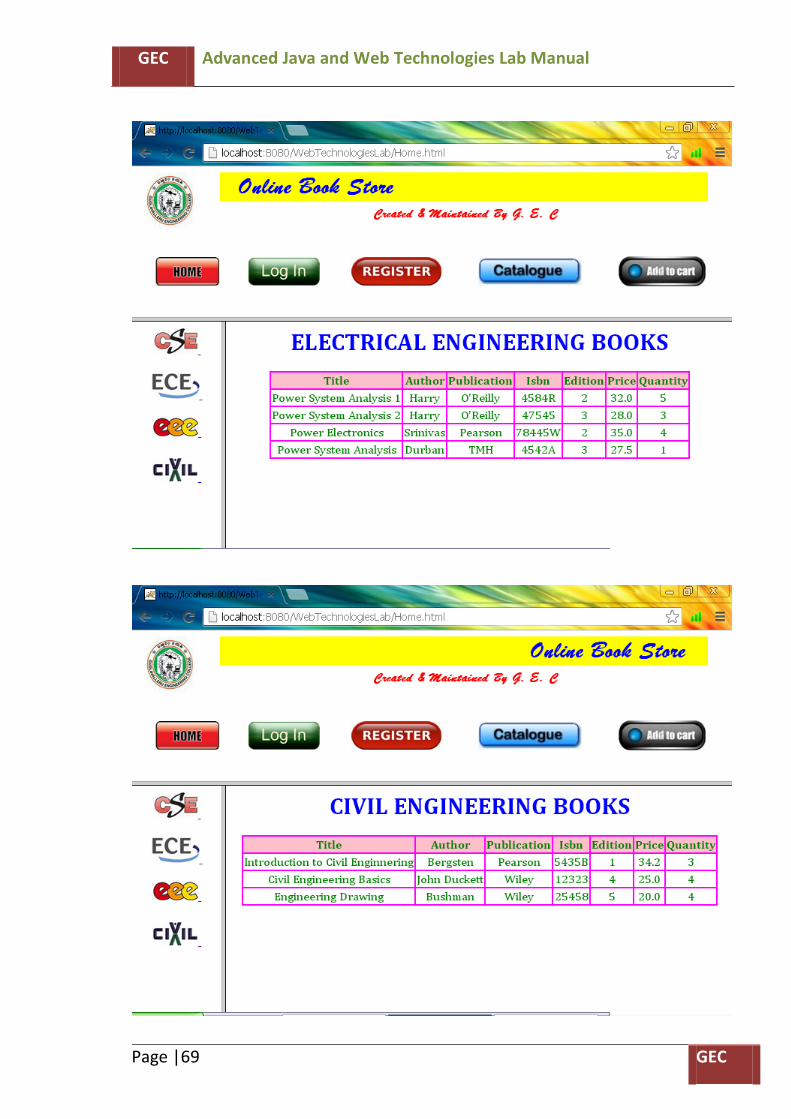
GEC Advanced Java and Web Technologies Lab Manual
Page |69 GEC

GEC Advanced Java and Web Technologies Lab Manual
Page |70 GEC
WEEK 12: Write a JSP program that demonstrates the concept of Session Tracking
AIM: To write a JSP program that demonstrates the concept of Session Tracking DESCRIPTION:
Hyper Text Transfer Protocol is a stateless protocol in which each request is independent of the previous request. HTTP is a protocol using which user can interact with the server via web browser and it cannot remember previously held communications but, sometimes there is serious need to keep track of previous communication sessions. The Session tracking is a mechanism by which we can keep track of previous sessions between server and the browser.
For creating sessions getSession() method can be used. This method returns the object which stores the bindings with the names that use this object. These bindings can be managed using getAttribute(), setAttribute() and removeAttribute() methods.
PROGRAM:
Session.html:
<html> <head> <script language="javascript"> function valid() {
var u=f1.t1.value; var p=f1.t2.value; if(u=="") alert("Enter User Name"); else if(isNaN(u.charAt(0))!=1) alert("Please Enter valid user name"); else { if(p=="") alert("Enter password"); else if(p.length<6) alert("Enter password of length minimum 6 characters"); } } </script> </head> <body> <h2 align="center">User Login</h2> <form method="post" name="f1" action="session.jsp" > <table align="center"> <tr> <td><b>User Name: </b> </td>
<td><input type="text" name="t1"></td> </tr> <tr> <td><b>Password: </b></td> <td><input type="password" name="t2"></td> </tr> <tr> <td><input type="submit" value="Login" onmouseover="valid()"></td> <td><input type="reset" value="Cancel"></td> </tr>

GEC Advanced Java and Web Technologies Lab Manual
Page |71 GEC
</table> </form> </body>
</html> Session.jsp:
<%@page import="java.sql.*;" %> <% try {
String s2=request.getParameter("t1"); session.setAttribute("Name",s2); int i; String s=(String)session.getValue("Name"); if(s!=null) { %><h1><%out.println("Hello---"+s); %> </h1> <% }
else { %><h1><%out.println("Your session is expired");%> <a href="login.html">click here to login</a></h1> <% } %> <% }
catch(Exception e) { out.println(e); } %>

GEC Advanced Java and Web Technologies Lab Manual
Page |72 GEC

GEC Advanced Java and Web Technologies Lab Manual
Page |73 GEC

GEC Advanced Java and Web Technologies Lab Manual
Page |74 GEC
ADDITIONAL PROGRAMS
1. Developing application using DHTML Filters
AIM: To write a program that demonstrates the working of various types of Dynamic HTML filters:
DESCRIPTION: Filters play a very important role in giving various visual effect to the web
pages. The style of the text can be set using filter attribute. We can use various functions such as glow(), blur(), wave(), fliph() and flipv() to give the corresponding text effects. The width property should be properly set in order to get these effects on the text. Using filters following effects can be applied on the image.
Grayscale X-ray Invert
The Grayscale effect is an effect in which all the colors in the image are wiped off and only brightness remains in it.
The X-ray effect is an effect in which the Grayscale effect is inverted.
Invert effect is an effect in which dark positions in the image become light and light portions of the image become dark.
PROGRAM: <HTML> <HEAD> <TITLE>Filter Effect</TITLE> <BODY> <h2 style="width:100% ; filter:glow()">This line is Glowing</h2> <h2 style="width:100% ; filter:blur()">This line is Blur</h2>
<h2 style="width:100% ; filter:wave(strengh=3)">This line is Wavy</h2> <h2 style="width:100% ; filter:shadow()">This line has Shadow</h2> <h2 style="width:100% ; filter:fliph()">Flip - H</h2> <h2 style="width:100% ; filter:flipv()">Flip - V</h2> Original Image<img src="C:\Documents and Settings\Administrator\Desktop\New Folder\pink-floral.gif" style="width:10%"> Inverted Image<img src="C:\Documents and Settings\Administrator\Desktop\New Folder\pink-floral.gif" style="width:10% ; filter:invert">
Gray Scale Image<img src="C:\Documents and Settings\Administrator\Desktop\New Folder\pink-floral.gif" style="width:10% ; filter:gray"> Xray Image<img src="C:\Documents and Settings\Administrator\Desktop\New Folder\pink-floral.gif" style="width:10% ; filter:xray"> </BODY> </HTML>

GEC Advanced Java and Web Technologies Lab Manual
Page |75 GEC

GEC Advanced Java and Web Technologies Lab Manual
Page |76 GEC
2. Creating animations using CSS3 AIM: To write a HTML program that demonstrates how to create animations using
properties defined in Cascading Style Sheets DESCRIPTION:
With CSS3, we can create animations, which can replace animated images, Flash animations, and JavaScript in many web pages.
An animation is an effect that lets an element gradually change from one style to another.
Specify when the change will happen in percent, or the keywords "from" and "to", which is the same as 0% and 100%. 0% is the beginning of the animation, 100% is when the animation is complete.
To create animations in CSS3, @keyframes rule is used.
The @keyframes rule is where the animation is created. Specify a CSS style inside the @keyframes rule and the animation will gradually change from the current style to the new style.
When the animation is created in the @keyframe, bind it to a selector. Bind the animation to a selector by specifying at least these two CSS3 animation properties:
Specify the name of the animation
Specify the duration of the animation
PROGRAM: <html>
<head> <style> div { width:100px; height:100px; background:red; position:relative; -moz-animation:myfirst 5s; -webkit-animation:myfirst 5s; } @-moz-keyframes myfirst /* Firefox */ { 0% {background:red; left:0px; top:0px;} 25% {background:yellow; left:200px; top:0px;} 50% {background:blue; left:200px; top:200px;} 75% {background:green; left:0px; top:200px;} 100% {background:red; left:0px; top:0px;} } @-webkit-keyframes myfirst /* Safari and Chrome */ { 0% {background:red; left:0px; top:0px;}
25% {background:yellow; left:200px; top:0px;} 50% {background:blue; left:200px; top:200px;} 75% {background:green; left:0px; top:200px;} 100% {background:red; left:0px; top:0px;} } </style> </head> <body> <p><b>Note:</b> This example does not work in Internet Explorer.</p>

GEC Advanced Java and Web Technologies Lab Manual
Page |77 GEC
<div></div> </body> </html>
OUTPUT:

GEC Advanced Java and Web Technologies Lab Manual
Page |78 GEC

GEC Advanced Java and Web Technologies Lab Manual
Page |79 GEC
3. Designing a scientific calculator using java script AIM: To design an application that works as a simple calculator using javascript.
DESCRIPTION:
Javascript is mainly designed to add interactivity in the HTML pages. A JavaScript can be executed when an event occurs, like when a user clicks on an HTML element. To execute code when a user clicks on an element, add JavaScript code to an HTML event attribute
Simple web application such as calculator, calendar can be developed using javascript. This calculator application performs all basic arithmetic operations and contains a clear button that clears the previous contents when user clicks this button.
PROGRAM:
<html> <head> <title>Calculator</title> <script language="javascript"> var inputstring="";
function updatestring(value) { inputstring=inputstring+value; document.calculator.input.value=inputstring; } </script> </head> <body> <form name="calculator"> <table border="4" align="center" bgcolor="pink" bordercolor="black"> <tr> <td colspan="4"><input type="text" name="input" maxlength="15" size="27"></td> </tr>
<tr> <td><input type="button" value="clear" onclick="input.value=' ';inputstring=' ' "></td> <td><input type="button" value="mod" onclick="updatestring('%')"></td> <td><input type="button" value="*" onclick="updatestring('*')"> </td> </tr> <tr> <td><input type="button" value="7" onclick="updatestring('7')"> </td> <td><input type="button" value="8" onclick="updatestring('8')"> </td> <td><input type="button" value="9" onclick="updatestring('9')"> </td> <td><input type="button" value="/" onclick="updatestring('/')"> </td> </tr> <tr> <td><input type="button" value="4" onclick="updatestring('4')"> </td> <td><input type="button" value="5" onclick="updatestring('5')"> </td> <td><input type="button" value="6" onclick="updatestring('6')"> </td> <td><input type="button" value="-" onclick="updatestring('-')"> </td> </tr> <tr> <td><input type="button" value="1" onclick="updatestring('1')"> </td> <td><input type="button" value="2" onclick="updatestring('2')"> </td> <td><input type="button" value="3" onclick="updatestring('3')"> </td>
<td><input type="button" value="+" onclick="updatestring('+')"> </td> </tr> <tr>

GEC Advanced Java and Web Technologies Lab Manual
Page |80 GEC
<td><input type="button" value="0" onclick="updatestring('0')"> </td> <td><input type="button" value="00" onclick="updatestring('00')"> </td> <td><input type="button" value="." onclick="updatestring('.')"> </td>
<td><input type="button" value="=" onclick="input.value=eval(inputstring);"> </td> </tr> </table> </form> </body> </html>
OUTPUT:

GEC Advanced Java and Web Technologies Lab Manual
Page |81 GEC