ads/adx turnkey user's guide - rt-solution.comµ„料列表/adsadx... ·...
TRANSCRIPT

ADS/ADX Turnkey User's GuideCode No. LIT-12011177Software Release 6.0Issued June 17, 2013
Supersedes May 10, 2013Refer to the QuickLIT Web site for the most up-to-date version of this document.
Introduction................................................................................................................................3Naming Conventions.................................................................................................................3Power Recovery.........................................................................................................................3Microsoft® SQL Server™ Software Versions and Icons........................................................3Ready Access Portal.................................................................................................................4Metasys Advanced Reporting System - ADX Turnkeys Only................................................4Detailed Procedures for ADS/ADX Turnkeys..........................................................................5
Plugging in the Computer for the First Time....................................................................................5Starting the Computer for the First Time..........................................................................................5Logging in for the First Time.............................................................................................................5Verifying the Computer Name............................................................................................................5Changing Default Password for Turnkey User.................................................................................5Changing Default Password for SQL Server Administrator...........................................................6Launching ADS/ADX Turnkey for the First Time..............................................................................6Turning off the Pop-up Blocker.........................................................................................................6Installing Metasys Software Patches................................................................................................7Creating a Database Backup.............................................................................................................7
Troubleshooting.........................................................................................................................7Network Interface Card (NIC).............................................................................................................7
Appendix: Changing the ADS/ADX Turnkey Name and the Computer Name......................8Overview of Changing the ADS/ADX Turnkey Name and the Computer Name............................8Preparing the Turnkey Computer......................................................................................................8Using an Existing Archive or Creating a New Archive..................................................................10Renaming the Turnkey Computer....................................................................................................11Downloading the ADS/ADX Turnkey...............................................................................................11Finalizing ADS/ADX Turnkey Settings............................................................................................12Finalizing Launcher Settings...........................................................................................................13Uploading ADS/ADX Turnkey Name Changes to the SCT............................................................13Verifying the Metasys Advanced Reporting System Is Working Properly..................................14
Appendix: Ready Access Portal Software.............................................................................15Uninstalling Ready Access Portal Software...................................................................................15Removing the SSL Certificate for Ready Access Portal Software (Windows 7, Windows Server2008 R2).............................................................................................................................................17Installing Ready Access Portal Software.......................................................................................20Licensing the Ready Access Portal Software................................................................................27Preparing a Computer to Browse to the Ready Access Portal UI................................................27Preparing a Handheld Device to Browse to the Ready Access Portal UI....................................28Logging in to the Ready Access Portal UI......................................................................................28Troubleshooting................................................................................................................................32Ports Used by the Ready Access Portal Software.........................................................................36Custom Column Layout for Handheld Devices..............................................................................36Access List........................................................................................................................................37
Appendix: Restoring the ADS/ADX Turnkey.........................................................................38Introduction.......................................................................................................................................38
1ADS/ADX Turnkey User's Guide

Restoring the ADS/ADX Turnkey.....................................................................................................38Obtaining a New Site Key...................................................................................................................39Finding the Site Code and Licensing the ADS/ADX Turnkey.............................................................40
2User's Guide
IntroductionWelcome to your new Application and Data Server/Extended Application Data Server (ADS/ADX) Turnkey! YourTurnkey has been pre-configured with all prerequisite and Johnson Controls® software installed. The ADS/ADX hasbeen named, has many recommended performance settings enabled, and has been tested and verified for properfunctionality prior to shipment.
Important: Keep all collateral shipped with your ADS/ADX in a safe and accessible place. Materials shipped withyour ADS/ADX Turnkey are crucial if you need to service or restore the original ADS/ADX image.
Follow the instructions in Detailed Procedures for ADS/ADX Turnkeys before using your turnkey.
The following sections and appendixes may be used as needed:
• Troubleshooting• Appendix: Changing the ADS/ADX Turnkey Name and the Computer Name: Use this procedure to change the
name of the ADS/ADX and the name of the computer.• Appendix: Restoring the ADS/ADX Turnkey: Use this section if you need to restore your ADS/ADX to the condition
in which you received it.
Naming ConventionsAll ADS/ADX Turnkeys are named prior to shipment with the name that was provided when the order was placed.If you need to change the name of your ADS/ADX Turnkey before placing it into service, please see Appendix:Changing the ADS/ADX Turnkey Name and the Computer Name in this document. If you need to restore yourADS/ADX Turnkey using the recovery media, the custom name is lost and is replaced with these names:
• ADS Turnkey = ADS05-001• ADX Medium Turnkey = ADX10M-001• ADX Large Turnkey = ADX25L-001
Important: Do not rename the ADS/ADX Turnkey computer, unless you strictly follow the instructions in Appendix:Changing the ADS/ADX Turnkey Name and the Computer Name. Follow the rename instructions toavoid damage to your ADS/ADX Turnkey. Any damage may not be repairable and may require you toreturn your ADS/ADX Turnkey. For further assistance, contact the Johnson Controls Field SupportCenter.
Power RecoveryThe Turnkey includes a BIOS recover setting, which ensures power recovery after failure. If power to the Turnkeyis lost, the Turnkey computer automatically restarts once power is restored.
Microsoft® SQL Server™ Software Versions and IconsThe ADS Turnkey ships with SQL Server 2008 Express R2 software (64-bit), and the ADX Turnkey ships with SQLServer 2008 R2 Standard Edition software (64-bit).
Note: For the purposes of this document, the term SQL Server software represents both SQL Server 2008 ExpressR2 software and SQL Server 2008 R2 Standard Edition software.
To verify that SQL Server software is running on the computer, run the SQL Server Configuration Manager, selectthe instance name, and look for the Host Name entry in the Service tab of SQL Server Properties. Refer to the ADS,ADX, and SCT Installation and Upgrade Instructions Wizard Content (LIT-12011331) for details.
3ADS/ADX Turnkey User's Guide

Important: If you use SQL Server software to back up a database on a Turnkey, you cannot restore the databaseon a Turnkey that has an older version of SQL Server software installed, such as SQL Server 2000software, SQL Server 2005 software, or Microsoft Server Desktop Engine (MSDE) 2000 software.
Two SQL Server software formats cannot coexist on the same computer. If you have some customerswho use the older version of SQL software and some customers who use the newer version of SQLsoftware, you must maintain the SQL software versions on separate computers.
You can work around these restrictions by downloading the archive from a system running the newerversion of SQL Server software, and then uploading the archive into a system running an older versionof SQL Server software.
Important: For the ADS Turnkey, you may notice the presence of the SQL Server Compact 3.5 SP2 software.This component is installed as part of the SQL Server 2008 Express R2 SP2 software installation. Thesoftware is not known to interfere with the Metasys® system, so we recommend that you do not manuallyuninstall SQL Server Compact 3.5 SP2 software.
To maintain your Metasys® system SQL Server databases, use the Metasys Database Manager (included on allTurnkeys) or SQL Server management tools from Microsoft Corporation. For more information, refer to the MetasysDatabase Manager Help (LIT- 12011202) and Network and IT Guidance for the BAS Professional Technical Bulletin(LIT-12011279).
Ready Access PortalBoth ADS and ADX Turnkeys ship with Ready Access Portal software installed. For more information on ReadyAccess Portal software and its User Interface (UI), refer to the Ready Access Portal Software Catalog Page(LIT-1900538).
To access the Ready Access Portal UI from a computer with the Windows® Internet Explorer® web browser, browseto http://<host>/MetasysRAP.
To access the Ready Access Portal UI from a mobile device that is running the Windows Mobile® 5 or WindowsMobile 5 operating system, from an Apple® iPhone® device with iOS 3.0 or later, or from an iPod Touch® devicewith iOS 3.0 or later, browse to http://<host>/MetasysRAPMobile.
Note: <host> in the above addresses is the hostname (computer name) or IP address of the Turnkey.
When you first browse to the Ready Access Portal UI, a screen appears asking you to accept a certificate. Thisscreen is related to the self-signed Secure Sockets Layer (SSL) certificate created to encrypt passwords for ReadyAccess Portal software.
Important: If you plan to rename your ADS/ADX Turnkey and use Ready Access Portal software, the SSLcertificates become invalid. You must uninstall Ready Access Portal software, complete the renameprocedure, and then reinstall Ready Access Portal software.
Metasys Advanced Reporting System - ADX Turnkeys OnlyThe ADX Turnkeys ship with the Metasys Advanced Reporting System installed. The reporting system points to aspecific System Configuration Tool (SCT) archive (MyArchive1) that is empty, except for a Site object, and can beused as a starter for site configuration.
For information on using the Metasys Advanced Reporting System, refer to the Metasys Advanced Reporting SystemHelp (LIT-12011312).
The MyArchive1 database contains Metasys Advanced Reporting System internal procedures, which are not createdin databases configured on other computers or with previous releases of the Metasys system. Due to these reportingsystem specific features, you must follow special steps if you want to use an alternate archive created on a differentcomputer with your turnkey Metasys Advanced Reporting System.
Refer the ADS/ADX Commissioning Guide (LIT-1201645) for instructions on changing the database referred to bythe Metasys Advanced Reporting System.
4ADS/ADX Turnkey User's Guide
Detailed Procedures for ADS/ADX TurnkeysPlugging in the Computer for the First TimeYour ADS/ADX Turnkey computer may start up the first time you apply power to the device. Once a startup begins,do not disconnect power after the Windows OS initializes. We recommend that you connect all auxiliary devices (forexample, keyboard, mouse) before applying power to the Turnkey.
Two Ethernet ports exist on the ADS/ADX Turnkey computer, but only one port is enabled. If the Turnkey computerdoes not communicate using one port, move the Ethernet cable to the other port and try again.
Starting the Computer for the First TimeIf your Turnkey is a Dell® PowerEdge® server and you have other Dell PowerEdge hosted server-class computerson the same network, a procedure to prevent a potential hardware IP address conflict is required. Follow these steps:
1. Disconnect the new or existing server-class Turnkey computers from the building network.2. Power up the Turnkey computer.3. As the system starts, press CTRL+E to stop the boot process and access the server’s baseboard management
controller’s (BMC) BIOS settings.4. On the BMC Configuration Utility screen, use the keyboard arrow keys to highlight LAN Parameters. Press
Enter. The LAN Parameters pop-up window appears.5. Resolve the IP address conflict as follows:
• If Dynamic Host Configuration Protocol (DHCP) is enabled on the network, change the IPv4 Address Sourceto DHCP.
• If DHCP is not enabled or you would like to assign a static IP address, change the IPv4 Address Sourcesetting to Static. Manually change the following IP address settings to the desired IP address (based thestatic IP address supplied by your network administrator): IPv4 Address, Subnet Mask, and Default Gateway.
6. Save your changes and exit. The server restarts.
Note: During Microsoft Windows® Setup for your ADS or ADX Turnkey, you do not need to enter the Microsoftlicense product key.
Logging in for the First TimeThe first time you are presented with the Microsoft Windows OS login box on your ADS/ADX Turnkey computer,you may log in as the Administrator user or the TurnkeyUser. Log in by selecting TurnkeyUser as the user and theTurnkeyUser default password. Refer to the documentation shipped with the product or contact your local JohnsonControls representative for this password.
After you log in the first time, a command window appears. This window is present for a fewmoments and disappearswhen the processes are complete. It does not reappear with subsequent logins.
The Settings box for the Metasys Database Manager also appears. You may close this window by clicking OK. Formore information on the Metasys Database Manager, see the Metasys Database Manager Help (LIT-12011202).
Verifying the Computer NameAll ADS/ADX Turnkeys are named at the factory with the name that was provided when the order was placed. Thiscustom computer name is shown on a label affixed to the unit itself. After you log in for the first time, verify the actualcomputer namematches the name on the label. If the computer name does not match the name on the label, contactthe Johnson Controls Field Support Center. If you decide you need to change the name of your ADS/ADX Turnkeybefore placing it into service, see Appendix: Changing the ADS/ADX Turnkey Name and the Computer Name in thisdocument.
Changing Default Password for Turnkey UserThe ADS/ADX Turnkey comes with a default password for the Turnkey user. To ensure the security of your Metasyssystem, we highly recommend that you change the password for the Turnkey user before placing the ADS/ADXTurnkey into service. Follow these steps:
Note: You also need to change the password for your Windows administrator user account.
5ADS/ADX Turnkey User's Guide
1. Press CTRL+ALT+DEL. The operating system background screen appears.2. Click Change a Password. The Change Password screen appears.3. Specify the default TurnkeyUser password as the old password. Enter a new strong password and confirm the
password.
Note: Refer to the documentation shipped with the product, or contact your local Johnson Controls representativefor the default TurnkeyUser password.
4. Click the right-arrow button. The new password is saved.
Changing Default Password for SQL Server AdministratorThe ADS/ADX Turnkey comes with a default password for the SQL Server Administrator (sa) user. To ensure thesecurity of your Metasys system, we highly recommend that you change the sa user password before placing theADS/ADX Turnkey into service. Follow these steps:
1. Select Start or click the Start button and select All Programs > Microsoft SQL Server 2008 R2 > SQL ServerManagement Studio. The Connect to Server window appears.
2. With the local server name listed, select SQL Server Authentication.3. Enter sa for the login name and the default TurnkeyUser password.
Note: Refer to the documentation shipped with the product, or contact your local Johnson Controls representativefor the default TurnkeyUser password.
4. Click Connect to connect to the server. The SQL Server Management Studio screen with Object Explorer appears.5. In Object Explorer, expand Security > Logins. The set of SQL Server users appears.6. Highlight the sa user and right-click. Select Properties. The Login Properties window for the sa user appears.7. Type a new password in the Password field. Type the password again in the Confirm Password field.8. Click OK to save the new password.
Launching ADS/ADX Turnkey for the First TimeAs configured in the factory, the ADS/ADX Turnkey computer has icons for Launcher and SMP on the Desktop,whereas the the ADX Turnkey computer has Launcher and SCT on its Desktop. Double-click the the Launcher iconto start the application. Follow these instructions to verify each icon starts its respective application.
1. On the Launcher screen, click the SMP or SCT tab to locate the device in the profile list.2. Click the Launch button (or right-click the profile in the list and select Launch). The standard Metasys login screen
appears.3. Log in to the Metasys system.4. Click the X icon to close the Launcher.
Turning off the Pop-up BlockerThe ADS/ADX Turnkey’s Windows Internet Explorer® pop-up blocker is disabled, but if you have a third-party pop-upad blocker installed on the computer from which you are browsing to the Ready Access Portal UI, the login screenmay not launch. To fix this problem, turn off the third-party pop-up ad blocker or change its settings to allow theReady Access Portal UI to open a browser window. If you cannot turn off or configure the third-party pop-up adblocker, uninstall it from the computer.
To turn off the pop-up blocker:
1. Open Internet Explorer.2. On the Tools menu, select Pop-up Blocker > Turn Off Pop-up Blocker.
Note: For information on allowing pop-up windows from specific sites only, refer to the Internet Explorer Helpand allow pop-up windows from the IP address of the Ready Access Portal server. This option also allowsyou to access the Ready Access Portal UI without login problems.
6ADS/ADX Turnkey User's Guide
Installing Metasys Software PatchesBe sure to install any applicable Metasys software patches to the ADS/ADX Turnkey.
To install Metasys software patches:
1. Browse to one of the following locations:
Field Support Center (FSC) Product Quick Patch page athttp://publish.cg.na.jci.com:9085/publish/controls/us/eng/fsc/hf/Metasys_Quick_Patches.html.
For North American Authorized Building Controls Specialists (ABCS) Partners, go to the ABCS Exchange siteunder Metasys > Technical Support > Software Patches.
2. Search for patches that apply to the ADS/ADX (including the SCT and Metasys Database Manager components)for the Metasys software release in your ADS/ADX Turnkey solution.
3. Follow patch installation instructions to install the patch.
Creating a Database BackupThe turnkey ships with two 600 GB hard drives configured as a single logical drive using a RAID 1 configuration.This drive includes the operating system and recovery partition. Therefore, it is essential that you create a separatebackup database in the event of a dual hard drive failure. For instructions on creating a separate backup database,refer to the Metasys Database Manager Help (LIT-12011202).
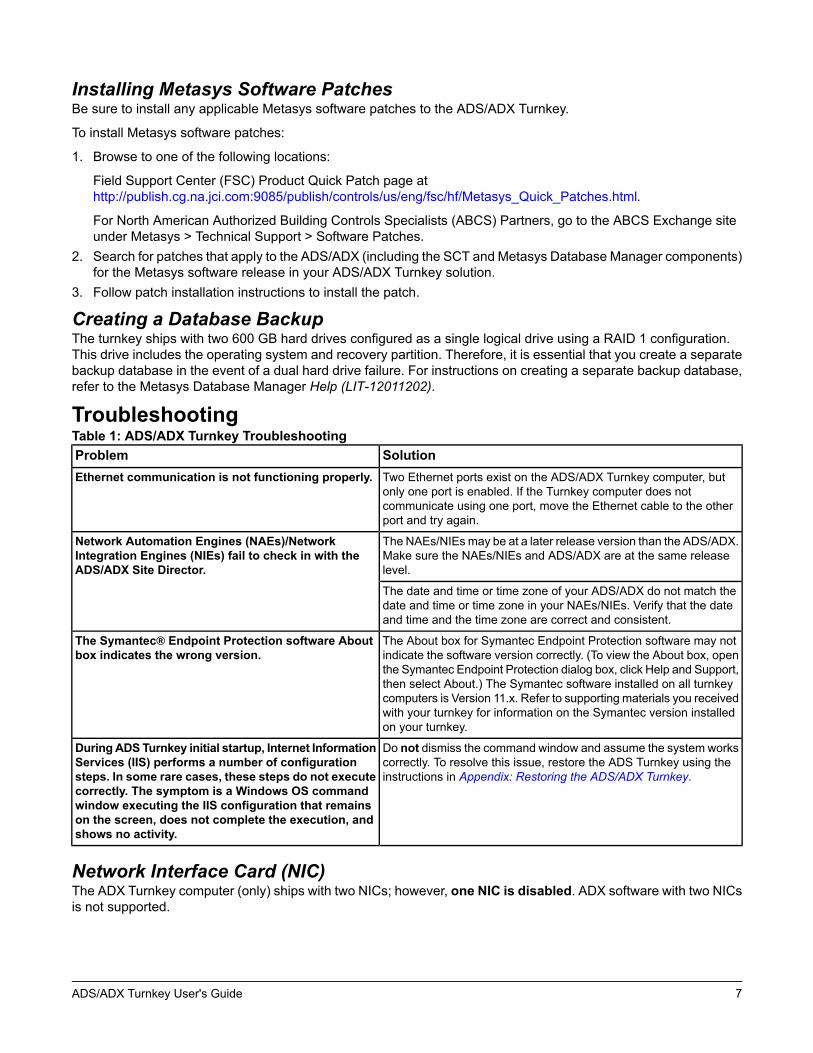
TroubleshootingTable 1: ADS/ADX Turnkey Troubleshooting
SolutionProblemTwo Ethernet ports exist on the ADS/ADX Turnkey computer, butonly one port is enabled. If the Turnkey computer does notcommunicate using one port, move the Ethernet cable to the otherport and try again.
Ethernet communication is not functioning properly.
The NAEs/NIEsmay be at a later release version than the ADS/ADX.Make sure the NAEs/NIEs and ADS/ADX are at the same releaselevel.
Network Automation Engines (NAEs)/NetworkIntegration Engines (NIEs) fail to check in with theADS/ADX Site Director.
The date and time or time zone of your ADS/ADX do not match thedate and time or time zone in your NAEs/NIEs. Verify that the dateand time and the time zone are correct and consistent.
The About box for Symantec Endpoint Protection software may notindicate the software version correctly. (To view the About box, openthe Symantec Endpoint Protection dialog box, click Help and Support,then select About.) The Symantec software installed on all turnkeycomputers is Version 11.x. Refer to supporting materials you receivedwith your turnkey for information on the Symantec version installedon your turnkey.
The Symantec® Endpoint Protection software Aboutbox indicates the wrong version.
Do not dismiss the command window and assume the system workscorrectly. To resolve this issue, restore the ADS Turnkey using theinstructions in Appendix: Restoring the ADS/ADX Turnkey.
DuringADSTurnkey initial startup, Internet InformationServices (IIS) performs a number of configurationsteps. In some rare cases, these steps do not executecorrectly. The symptom is a Windows OS commandwindow executing the IIS configuration that remainson the screen, does not complete the execution, andshows no activity.
Network Interface Card (NIC)The ADX Turnkey computer (only) ships with two NICs; however, one NIC is disabled. ADX software with two NICsis not supported.
7ADS/ADX Turnkey User's Guide

Appendix: Changing the ADS/ADX Turnkey Name and the ComputerNameFollow the steps in this section to change the name of an ADS/ADX Turnkey. The Turnkey name and the computername must match for proper functionality.
Important: After you follow these procedures for a Site Director, the fully qualified item references in historical datado not match the fully qualified item references in historical data, because the references have the newADS/ADX Turnkey name. Note this detail when using tools that can access historical data, such as theMetasys Export Utility, which retrieves data representing the old item references.
Important: Do not rename the ADS/ADX Turnkey computer, unless you strictly follow these instructions exactlyas written. Not following these instructions damages your ADS/ADX Turnkey. You may not be able torepair any damage that results from not following these instructions, which may require you to returnthe computer to the vendor at your own expense. For further assistance, contact the Johnson Controls®Field Support Center. You must have full Administrator rights on the ADS/ADX to complete the renameprocedure. This procedure can take over an hour to complete, depending on the size of your historicaldatabases. Be sure to allow enough time to finish all the steps.
Overview of Changing the ADS/ADX Turnkey Name and the Computer NameThis section provides an overview of the steps to change the name and the computer name. You must perform allthe steps referenced in this section in the correct sequence to ensure success.
1. Prepare the computer. See Preparing the Turnkey Computer.2. Prepare the archive. See Using an Existing Archive or Creating a New Archive.3. Rename the computer. See Renaming the Turnkey Computer.4. Download the ADS/ADX. See Downloading the ADS/ADX Turnkey.5. Test the ADS/ADX. See Finalizing ADS/ADX Turnkey Settings.6. Upload your changes to the SCT. See Uploading ADS/ADX Turnkey Name Changes to the SCT.
Preparing the Turnkey Computer1. If the computer has been running for several days, restart the computer and leave it connected to the network
so that it can use its current IP address. If this is a new computer, connect it to a hub or switch before startingso that the computer can obtain a valid IP address. Type ipconfig in a command window to verify an IP addresshas been assigned.
Important: If you do not obtain a valid IP address in Step 1, the computer rename process may fail.2. Log in to the ADS/ADX Site Management Portal to verify the ADS/ADX is running.3. Exit the ADS/ADX Site Management Portal.4. Make sure the SCT and all other applications are closed.5. If the Ready Access Portal software if installed, remove it now by using the steps in the Ready Access Portal
Software Installation Instructions (LIT-12011523). Make sure you do not remove Ready Access Portal databases.You reinstall the software after the rename procedure.
6. Click or double-click the clock in the lower-right hand corner of the desktop to verify that the time zone and timefor the computer are correct.
7. Write down the new name you want to assign to the ADS/ADX computer. Note the case of each letter becausethe name is case sensitive. The new ADS/ADX name must:
• begin with a letter• contain a maximum of 15 characters• contain only letters A-Z (upper or lower case), numbers 0-9, and hyphens
8. Change the computer name label stamped on the ADS/ADX computer to the new name in Step 7.9. Follow these steps to disable the connection to the network:
8ADS/ADX Turnkey User's Guide
a. Open Control Panel, click Network and Internet > Network and Sharing Center.b. In the left pane, click Change Adapter Settings.c. Right-click the local area connection and click Disable. If you have more than one local connection, be sure
to disable the correct one and take note of the adapter you disabled. Some network connections rely on theMAC address of that connection for connectivity.
d. If prompted by the User Access Control dialog, click Yes.
Important: If you do not disable the network connection using the procedure in Step 9, the computer renameprocess may fail.
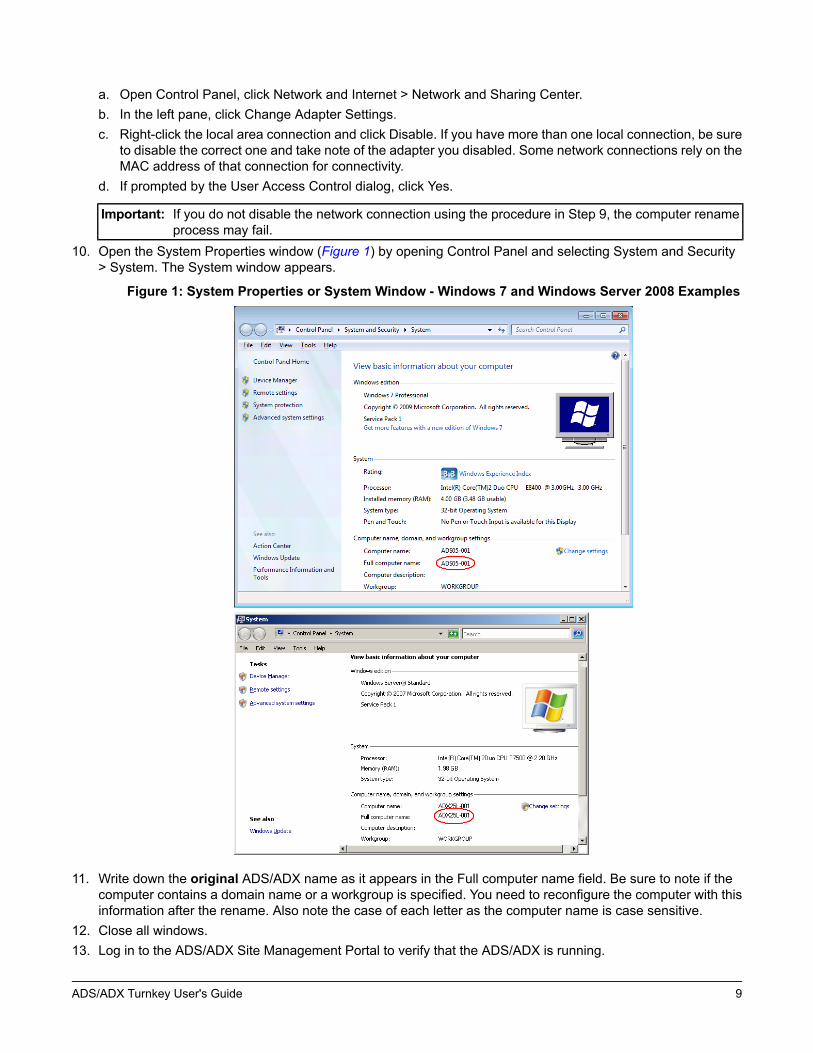
10. Open the System Properties window (Figure 1) by opening Control Panel and selecting System and Security> System. The System window appears.
Figure 1: System Properties or System Window - Windows 7 and Windows Server 2008 Examples
11. Write down the original ADS/ADX name as it appears in the Full computer name field. Be sure to note if thecomputer contains a domain name or a workgroup is specified. You need to reconfigure the computer with thisinformation after the rename. Also note the case of each letter as the computer name is case sensitive.
12. Close all windows.13. Log in to the ADS/ADX Site Management Portal to verify that the ADS/ADX is running.
9ADS/ADX Turnkey User's Guide

Note: Ignore the label for the ADS/ADX that appears in the Navigation Tree.
Note: If you see a screen asking for you to choose an Internet Service Provider, re-enable the networkconnection and go back to Step 2.
14. Exit the ADS/ADX Site Management Portal.15. Go to Using an Existing Archive or Creating a New Archive.
Using an Existing Archive or Creating a New Archive1. Log in to the SCT.2. If you are using the existing archive that came with the ADS/ADX Turnkey (MyArchive1), open that archive and
add a Metasys server to the site using the Insert > Metasys Server menu option. Make sure the name you enterfor the ADS/ADXmatches the original name of the computer. Complete the wizard steps for adding the Metasysserver. Also, if you are outside the Central time zone, adjust the time zone in MyArchive1 to match your timezone. Go to Step 8.
If you are creating a new archive or using an ADS/ADX Turnkey, select Item > New Archive.3. Enter a unique name for the new archive. When you are asked to create a new site, click Yes.4. Follow the Insert Site Wizard instructions to create a new site.
The order of the time zones in the Metasys software does not match the order in which they are presented inthe Windows operating system. Use care to select the correct time zone from the list, expanding the time zonedisplay if needed to view the exact time zone name.
5. Finish the rest of the steps in the Insert Site Wizard.6. When the Create Device box appears, select Metasys server from the drop-down selection box. Click OK.7. Follow the Insert Metasys server instructions to create the Metasys server. On the Identifier screen, enter the
original ADS/ADX computer name from Step 11 of Preparing the Turnkey Computer. Finish the rest of the stepsin the wizard.
When you are finished creating the new device, the name of the Metasys server shown in the navigation treeshould match the original ADS/ADX name.
8. Select the Metasys server in the navigation tree.9. On the Tools menu, click Manage Archive.10. On the Load Type screen, under Type, click Upload from Device.11. Click Next on each Load Wizard screen until you reach the Site Login screen.12. On the Site Login screen, click Test Login. If the name you entered for the matches the computer’s name, the
login process should succeed.13. Click Next on each of the remaining Load Wizard screens to start the upload process.
Note: If the upload is not successful, restart the computer and go to Step 1 in this section.14. When upload Completion Status reports OK, right-click the Metasys server in the navigation tree, and click
Rename. The Rename box appears.15. In the New Name field, enter the new ADS/ADX name from Step 7 of Preparing the Turnkey Computer.16. Click OK.17. Exit the SCT.18. If you have an ADS Turnkey or did not create a new ADX Turnkey archive for the Metasys Advanced Reporting
System, go to Renaming the Turnkey Computer. If you created a new ADX Turnkey archive for the MetasysAdvanced Reporting System, go to Step 19.
19. Select Start > All Programs > Accessories. Then right-click Command Prompt, and select Run as Administrator.Click Continue or Yes if prompted by the User Account Control dialog.
20. In the command window, type the following:
cd C:\ProgramData\Johnson Controls\MetasysIII\SQLData\SCTArchive\ARSDBFix
10ADS/ADX Turnkey User's Guide
21. Press Enter.22. At the prompt, type the following:
ARSDBFix.bat “database name”
Where “database name” is the name of the new archive you created. If the name contains spaces, enclosethe entire name in double quotes as shown above in this step. If the name has no spaces, quotes are notrequired.
23. Press Enter. If errors occur during execution, they appear in the command window.
Note: For more information on the execution, type ARSDBFix.bat /? at the prompt and press Enter.24. Type Exit and press Enter.25. Go to Renaming the Turnkey Computer.
Renaming the Turnkey ComputerImportant: Be sure to complete the steps in Preparing the Turnkey Computer andUsing an Existing Archive or
Creating a New Archive before following the steps in this section. Renaming the computer is only onestep in the process of changing the name of the ADS/ADX.
Note: Make sure you do not skip Step 9 through Step 11; otherwise, the Metasys Database Manager displays theincorrect name for the SQL Server database.
1. In Control Panel click System and Security > System. The System window appears (Figure 1). Click Changesettings. Click Yes if prompted by the User Access Control dialog.
2. Click Change.3. In the Computer name field, enter the new ADS/ADX name from Step 7 of Preparing the Turnkey Computer.
If this computer is a member of a domain, specify the name in the Domain field. If the computer name includeda DNS suffix, enter the DNS suffix.
Note: If you join the computer to a domain, the DNS suffix appears automatically. If you join the computer toa workgroup, the DNS suffix is optional.
4. Click OK.5. Click OK when you are prompted to restart the computer.6. Close all windows.7. Restart the computer, then log in.8. Wait 5 minutes to ensure that all Windows services are fully started.9. Select Start > All Programs > Accessories. Then, right-click Command Prompt and select Run as Administrator.
Click Continue or Yes if prompted by the User Account Control dialog.10. Type this command and press Enter:
cd C:\ProgramData\Johnson Controls\MetasysIII\SQLData\SSRSsync
11. Type SQLRename.bat and press Enter. If you need SA user access rights to SQL Server, type SQLRename.bat<SA user name> <password> and press Enter. A script runs in the command window.
12. When the script is finished, close the Command Prompt window.13. Restart the computer, then log in.14. Go to Downloading the ADS/ADX Turnkey.
Downloading the ADS/ADX TurnkeyAs part of the steps in this section, you enable the ADS/ADX computer connection to the network that you disabledin Step 9 of the Preparing the Turnkey Computer section.
1. Select Start > Control Panel > Network and Internet > Network and Sharing Center.2. Click Change Adapter Settings.
11ADS/ADX Turnkey User's Guide

3. Right-click the local area connection and click Enable. If you have more than one local connection, be sure toenable the correct one.
4. Click Yes if prompted by the User Access Control dialog.5. If you are using Windows 7, select Start > Control Panel > System. Click Change settings. The System window
appears (Figure 1).
If you are using Windows Server 2008 R2, in Control Panel click System and Security > System. Click Changesettings. The System window appears (Figure 1).
6. In the Full computer name field, verify that the computer name matches the new ADS/ADX name from Step7 of Preparing the Turnkey Computer.
7. Close the System Properties window.
Note: Do not log on to the ADS/ADX at this time. It may be in an invalid state. Continue with the steps.8. Verify the name in SQL Server ConfigurationManager matches the new ADS/ADX name fromStep 7 ofPreparing
the Turnkey Computer. For SQL Server 2008, select Start > Programs or All Programs > Microsoft SQL Server2008 > Configuration Tools > SQL Server Configuration Manager. For SQL Server 2008 R2, select Start >Programs or All Programs > Microsoft SQL Server 2008 R2 > Configuration Tools > SQL Server ConfigurationManager.
9. In the tree in the left pane, click SQL Server Services. In the right pane, double-click SQL Server(instancename), where instancename is the name of your SQL Server instance. In the SQL Server(instancename) Properties box, click the Service tab. Verify that the name in the Host Name field matches thenew ADS/ADX name.
Note: It is normal for the name to appear in uppercase letters in the SQL Server Configuration Manager.10. Close all windows.11. Log on to the SCT.12. If you have any user views, open each user view in Edit mode in the SCT, use the Find/Replace function to
change the name to the new name, and save the user view. The Site Director portion of the reference updatesto match the new Site Director name.
13. Click the Metasys server in the navigation tree.
Note: At this time, it is normal for the site name to be the same as the original ADS/ADX name. Do not attemptto change the site name at this time.
14. On the Tools menu, click Manage Archive.15. In the Type drop-down list box, select Download to Device.16. Follow the wizard instructions to download the Metasys server. Be sure to do the following:
a. On the Site Login screen, click Test Login to verify you can communicate with the server.b. On the Device Change screen:
• Do not select Use this option to rename a device via download.• Do not select Use this option to change a device address via download.
17. Click Next and continue with the wizard to start the download process.18. When the completion status reports OK, exit the SCT. The status may also report Server requires a manual
reset (571). This message is normal.19. Restart the ADS/ADX computer, then log on.20. Go to Finalizing ADS/ADX Turnkey Settings.
Finalizing ADS/ADX Turnkey SettingsTo finalize ADS/ADX settings:
1. Log on to the ADS/ADX Site Management Portal.2. Verify no user views are currently open.3. On the View menu, click Extended Labels.
12ADS/ADX Turnkey User's Guide

4. Double-click the Metasys site in the navigation tree.5. Click Edit in the Display pane.6. In the Name and Default ADS Repository attributes, enter the new ADS/ADX name. Note the case of each
letter because the name is case sensitive.7. In the Time Zone attribute, set the time zone to the correct zone.8. Click Save.9. On the Action menu, click Refresh All Tabs. The site and ADS/ADX name now match.10. Exit the ADS/ADX Site Management Portal.11. Restart the computer.12. Go to Finalizing Launcher Settings.
Finalizing Launcher Settings1. On the Desktop, right-click the Metasys SCT or Metasys SMP shortcut and select Delete.2. Double-click the Launcher icon or select Programs > Johnson Controls > Launcher. The Launcher screen appears.3. On the Launcher screen, click the SMP tab if you want to edit an existing SMP profile, or the SCT tab if you want
to edit an existing SCT profile.4. Select the SMP or SCT profile whose description you want to edit and click Edit. (You may also right-click the
profile in the list and select Edit from the menu that appears.) The Edit screen appears.5. In the New Description field, type the new name you selected for the device.
Note: You cannot change the IP address or host name of the device on the Edit screen. To make that change,delete, then add the device again.
6. Click Save. The profile is saved with your changes, and the Launcher main screen appears.7. Recreate shortcuts on the Desktop, if desired.8. Go to Uploading ADS/ADX Turnkey Name Changes to the SCT.
Uploading ADS/ADX Turnkey Name Changes to the SCT1. Log in to the SCT.2. Click the Metasys server in the navigation tree.3. On the Tools menu, click Manage Archive. The Manage Archive Wizard appears.4. In the Type drop-down list box, click Upload From Device.5. On the Select Devices screen, select the Metasys server in the navigation tree.6. Click Next on each Load Wizard screen until you reach the Site Login screen.7. On the Site Login screen, click Test Login.
Note: If this fails, go back to Appendix: Changing the ADS/ADX Turnkey Name and the Computer Name andstart the rename procedure over again.
8. Click Next on each of the remaining Load Wizard screens to finish the upload process.
When upload Completion Status reports OK, the upload is complete. The site and server names now match.9. Exit the SCT.10. Restart the ADS/ADX computer, then log on.11. If you are not using the Metasys Advanced Reporting System, the verification and rename processes are
complete. Go to Step 12.
If you are using the Metasys Advanced Reporting System, go to Verifying the Metasys Advanced ReportingSystem Is Working Properly.
12. If you uninstalled the Ready Access Portal software at the beginning of the rename process, reinstall it by usingthe steps in the Ready Access Portal Software Installation Instructions (LIT-12011523). The verification andrename processes are complete.
13ADS/ADX Turnkey User's Guide

Verifying the Metasys Advanced Reporting System Is Working ProperlyNote: Only the ADX Turnkey ships with the Metasys Advanced Reporting System installed. If you have an ADS
Turnkey, skip this section. You have completed the rename process.
1. Log in to the ADX Site Management Portal from a computer on the local network that is not running a server-classoperating system.
2. On the Tools menu, click Advanced Reporting.3. Log in to the Metasys Advanced Reporting UI.4. Verify the UI appears correctly and that the site and ADX have the correct name.5. Verify the navigation tree that appears in the Metasys Advanced Reporting UI matches that on the SCT/ADX.6. Select Alarm Definition report and click Run.7. Verify the report window appears.
Note: The content of the window is not important at this time. Simply verify that the window opens successfully.8. Close the report window.9. Select Event > Summary report and click Run.10. Verify the report window appears.
Note: The content of the window is not important at this time. Simply verify that the window opens successfully.11. Close the report window.12. Close all windows. If you uninstalled the Ready Access Portal software at the beginning of the rename process,
reinstall it by using the steps in Installing Ready Access Portal Software. The verification and rename processesare complete.
14ADS/ADX Turnkey User's Guide

Appendix: Ready Access Portal SoftwareUninstalling Ready Access Portal SoftwareNote: Both the ADS and ADX Turnkeys ship with the Ready Access Portal software installed.
If you are renaming the computer running Ready Access Portal, we recommend that you uninstall Ready AccessPortal software and delete the Ready Access Portal database before you rename the computer. This procedure iscovered in Table 2. Ready Access Portal needs to resync the entire database after doing the rename. After yourename the computer, reinstall Ready Access Portal software which also recreates the Ready Access Portal database.
If you are upgrading Ready Access Portal software on a computer that contains other Metasys software, you mustuninstall Ready Access Portal software and then install the new version. If you are using Ready Access Portalsoftware on a computer without other Metasys software, you do not need to uninstall the software. Go to InstallingReady Access Portal Software.
Table 2: Ready Access Portal Software Uninstallation StepsTo uninstall, do the following:
1. If you are using Windows 7 OS, Windows Server2008 R2 OS, or Windows 2008 OS, selectPrograms, then Programs and Features.
If you are using Windows XP OS, open ControlPanel and selectAdd/Remove Programs orAddor Remove Programs.
2. Select Metasys Ready Access Portal in theprogram list.
3. Click Remove or Uninstall. If needed, give consentwhen prompted to do so.
Start1.
Click Next.Figure 2: Ready Access Portal Welcome Window2.
15ADS/ADX Turnkey User's Guide

Table 2: Ready Access Portal Software Uninstallation StepsClick Remove, then click Next.Figure 3: Program Maintenance Window3.
Click one of the following:
• Windows authentication credentials of currentuser: Select this option to log on to SQL Serverusing the name and password of the usercurrently logged on to the Windows OS.
• SQL Server authentication using the Login IDand password below: Select this option to usea SQL Server sa ID and password.
Click Next.
A Question box appears and asks if you want toremove the Ready Access Portal databases.
Click Yes.
Figure 4: Uninstall Dataserver Window4.
A question box may appear notifying you that theMetasys Host Service application may need to beshutdown. You may select either option, but werecommend you select the default option:
Automatically close and attempt to restartapplications.
Click OK to continue.
Figure 5: Metasys Host Service Window5.
16ADS/ADX Turnkey User's Guide
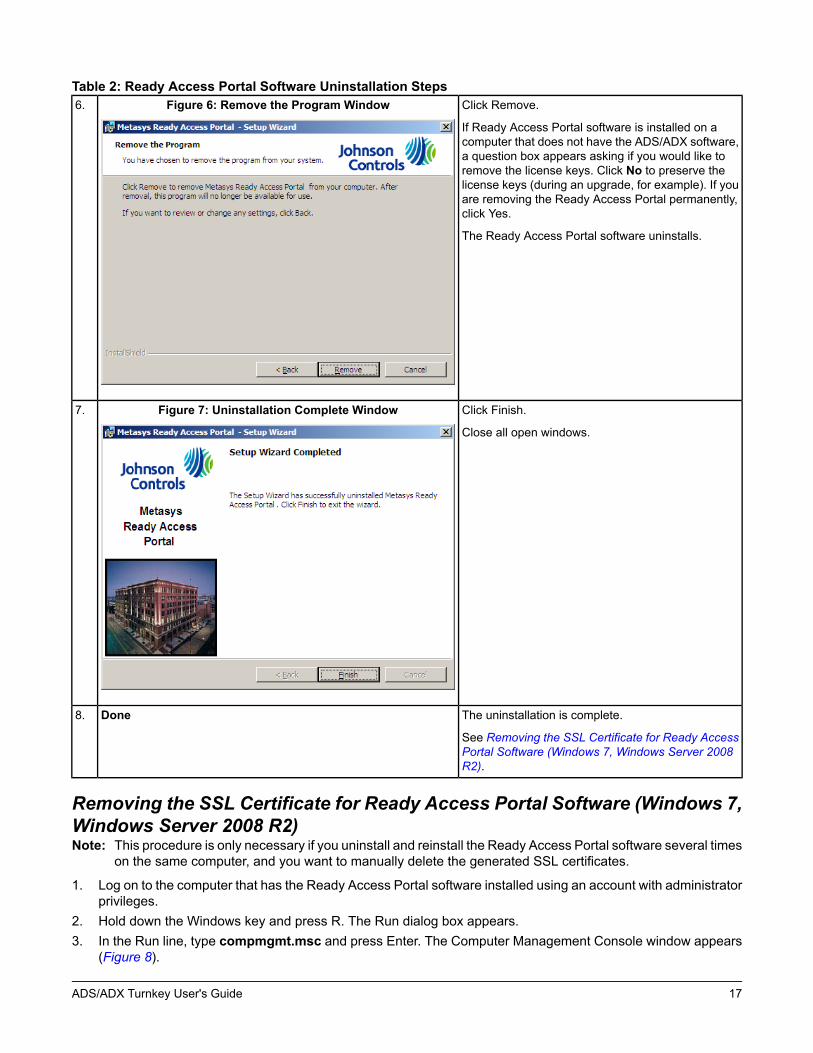
Table 2: Ready Access Portal Software Uninstallation StepsClick Remove.
If Ready Access Portal software is installed on acomputer that does not have the ADS/ADX software,a question box appears asking if you would like toremove the license keys. Click No to preserve thelicense keys (during an upgrade, for example). If youare removing the Ready Access Portal permanently,click Yes.
The Ready Access Portal software uninstalls.
Figure 6: Remove the Program Window6.
Click Finish.
Close all open windows.
Figure 7: Uninstallation Complete Window7.
The uninstallation is complete.
See Removing the SSL Certificate for Ready AccessPortal Software (Windows 7, Windows Server 2008R2).
Done8.
Removing the SSL Certificate for Ready Access Portal Software (Windows 7,Windows Server 2008 R2)Note: This procedure is only necessary if you uninstall and reinstall the Ready Access Portal software several times
on the same computer, and you want to manually delete the generated SSL certificates.
1. Log on to the computer that has the Ready Access Portal software installed using an account with administratorprivileges.
2. Hold down the Windows key and press R. The Run dialog box appears.3. In the Run line, type compmgmt.msc and press Enter. The Computer Management Console window appears
(Figure 8).
17ADS/ADX Turnkey User's Guide

Figure 8: Computer Management Console - Windows 7 Example
4. Expand Services and Applications.5. Select Internet Information Services (IIS).6. Expand Sites.7. In the Connections pane, select the website under which MetasysRAP is listed (typically the Default website).8. With the correct website for MetasysRAP selected, click the Bindings option in the Actions pane. The Site
Bindings window appears (Figure 9).
Figure 9: Site Bindings Window - Windows 7 Example
9. Select the https line.10. Click Edit. The Edit Site Binding window appears (Figure 10).
18ADS/ADX Turnkey User's Guide

Figure 10: Edit Site Binding Window - Windows 7 Example
11. Click View. The Certificate window appears (Figure 11).
Figure 11: Certificate Window - Windows 7 Example
12. Make sure <All> is selected in the Show box.13. Scroll to the bottom of the list and click Thumbprint. Write down the Thumbprint value. You need to use this
value in Step 21.14. Close all windows.15. Hold down the Windows key and press R. The Run dialog box appears.16. In the Run line, type certmgr.msc and press Enter. The Certificate Manager appears.17. Expand Trusted Root Certification Authorities.18. Select Certificates.
19ADS/ADX Turnkey User's Guide
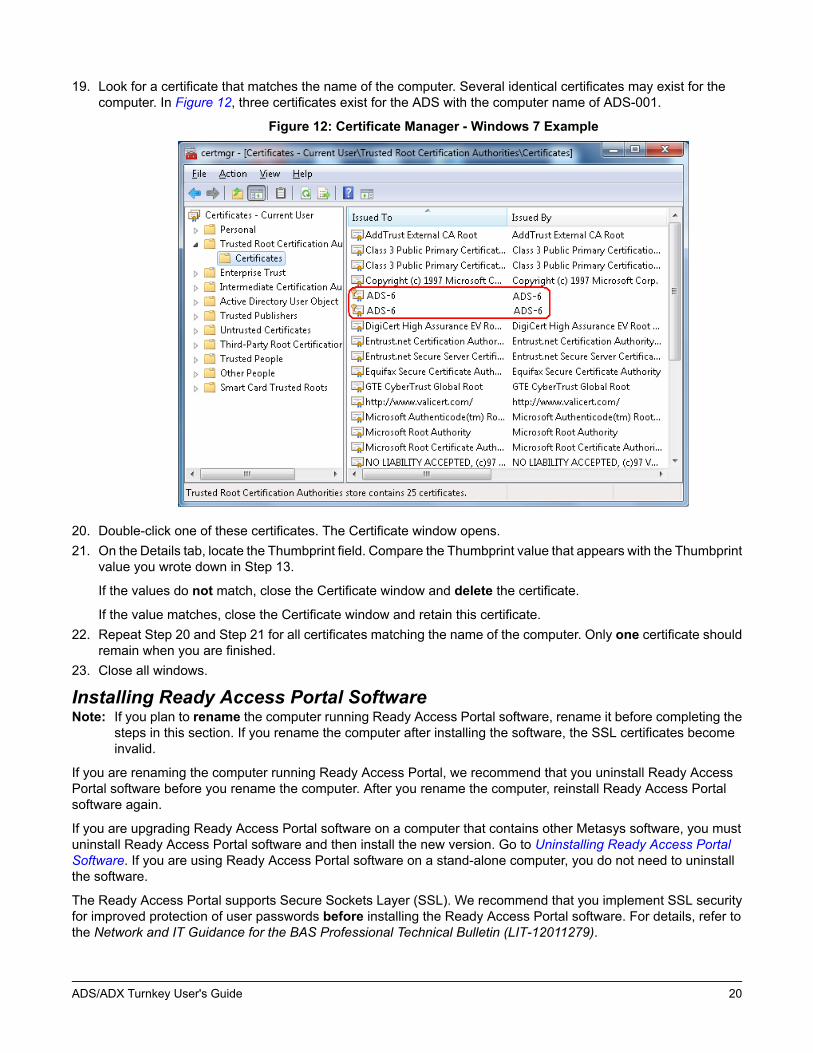
19. Look for a certificate that matches the name of the computer. Several identical certificates may exist for thecomputer. In Figure 12, three certificates exist for the ADS with the computer name of ADS-001.
Figure 12: Certificate Manager - Windows 7 Example
20. Double-click one of these certificates. The Certificate window opens.21. On the Details tab, locate the Thumbprint field. Compare the Thumbprint value that appears with the Thumbprint
value you wrote down in Step 13.
If the values do not match, close the Certificate window and delete the certificate.
If the value matches, close the Certificate window and retain this certificate.22. Repeat Step 20 and Step 21 for all certificates matching the name of the computer. Only one certificate should
remain when you are finished.23. Close all windows.
Installing Ready Access Portal SoftwareNote: If you plan to rename the computer running Ready Access Portal software, rename it before completing the
steps in this section. If you rename the computer after installing the software, the SSL certificates becomeinvalid.
If you are renaming the computer running Ready Access Portal, we recommend that you uninstall Ready AccessPortal software before you rename the computer. After you rename the computer, reinstall Ready Access Portalsoftware again.
If you are upgrading Ready Access Portal software on a computer that contains other Metasys software, you mustuninstall Ready Access Portal software and then install the new version. Go to Uninstalling Ready Access PortalSoftware. If you are using Ready Access Portal software on a stand-alone computer, you do not need to uninstallthe software.
The Ready Access Portal supports Secure Sockets Layer (SSL). We recommend that you implement SSL securityfor improved protection of user passwords before installing the Ready Access Portal software. For details, refer tothe Network and IT Guidance for the BAS Professional Technical Bulletin (LIT-12011279).
20ADS/ADX Turnkey User's Guide

Table 3: Ready Access Portal Software Installation StepsInsert the Ready Access Portal disk.
In the RAP folder, double-click setup.exe. If you areupgrading on a stand-alone computer (you did notuninstall Ready Access Portal software), a boxappears asking if you would like to upgrade. ClickYes.
The new version of Ready Access Portal softwareuses existing settings for the Dashboard and retainsalerts. Click Continue, Allow, or Yes if prompted tobegin the installation. If you are prompted to stop theADS/ADX Device Manager Service, click Yes.
Start1.
Click Next.Figure 13: Ready Access Portal Welcome Window2.
Click Change if you want to change where ReadyAccess Portal software installs on your computer.Click Next.
Figure 14: Destination Folder Window3.
21ADS/ADX Turnkey User's Guide

Table 3: Ready Access Portal Software Installation StepsClick Complete.Note: Custom is not available at this time.Click Next.
Figure 15: Setup Type Window4.
22ADS/ADX Turnkey User's Guide

Table 3: Ready Access Portal Software Installation StepsNote: The instance and credentials entered in this
window allow Ready Access Portal softwareto access SQL Server software during theinstallation only.
In Database Server:
• If you installed the default instance(MSSQLSERVER), select (local).
• If you installed a named instance,type\instancename after (local) whereinstancename is the name of the SQL Serverinstance you installed.
Note: If you install the Ready Access Portal on thesame computer as an ADS/ADX, you mustuse the same SQL Server instance you usedfor the ADS/ADX installation.
Note: If you are upgrading a computer without otherMetasys software, the Database Server fieldappears dimmed and the installation programuses the server you selected during the initialinstallation.
Click one of the following options:
• Windows authentication credentials of currentuser: Click this to log in to SQL Server using thename and password of the user currently loggedin to the Windows operating system.
• SQL Server authentication using the Login IDand password below: Click this to use a SQLServer sa ID and password. You must use thisoption if you are installing the Ready AccessPortal software on the Web/Application server ofa split ADX or if you have another remote SQLServer configuration.
Click Next.
Upgrade on a computer with other Metasyssoftware only:
If a Question box appears, click Yes to preserve yourDashboard settings. If you click No, all Dashboardconfigurations are deleted for all users.
If you kept your Alerts databases during theuninstallation of the Ready Access Portal software orif an Events database is present from other Metasyssoftware, a Question box appears.
Click Yes to preserve your alerts. When installed onthe same computer, the ADS/ADX and Ready AccessPortal share the same Events database. We do notrecommend removing it.
Figure 16: SQL Server Installation Credentials Window5.
23ADS/ADX Turnkey User's Guide
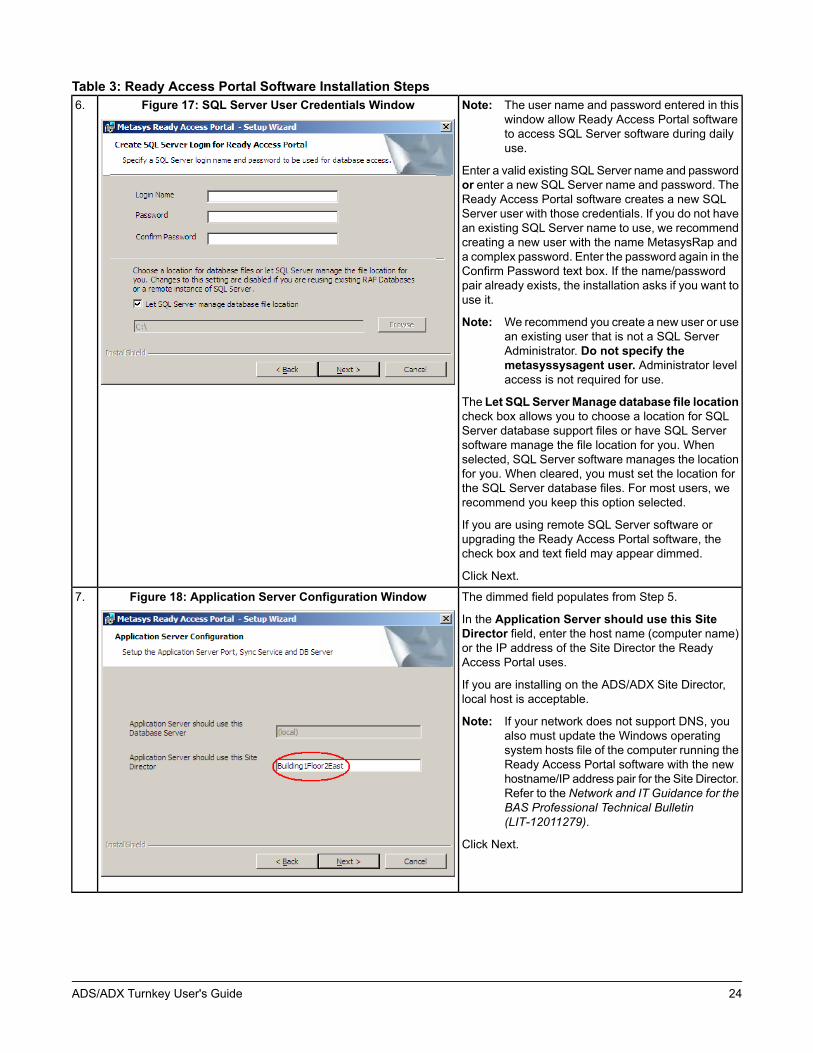
Table 3: Ready Access Portal Software Installation StepsNote: The user name and password entered in this
window allow Ready Access Portal softwareto access SQL Server software during dailyuse.
Enter a valid existing SQL Server name and passwordor enter a new SQL Server name and password. TheReady Access Portal software creates a new SQLServer user with those credentials. If you do not havean existing SQL Server name to use, we recommendcreating a new user with the name MetasysRap anda complex password. Enter the password again in theConfirm Password text box. If the name/passwordpair already exists, the installation asks if you want touse it.
Note: We recommend you create a new user or usean existing user that is not a SQL ServerAdministrator. Do not specify themetasyssysagent user. Administrator levelaccess is not required for use.
The Let SQL Server Manage database file locationcheck box allows you to choose a location for SQLServer database support files or have SQL Serversoftware manage the file location for you. Whenselected, SQL Server software manages the locationfor you. When cleared, you must set the location forthe SQL Server database files. For most users, werecommend you keep this option selected.
If you are using remote SQL Server software orupgrading the Ready Access Portal software, thecheck box and text field may appear dimmed.
Click Next.
Figure 17: SQL Server User Credentials Window6.
The dimmed field populates from Step 5.
In the Application Server should use this SiteDirector field, enter the host name (computer name)or the IP address of the Site Director the ReadyAccess Portal uses.
If you are installing on the ADS/ADX Site Director,local host is acceptable.
Note: If your network does not support DNS, youalso must update the Windows operatingsystem hosts file of the computer running theReady Access Portal software with the newhostname/IP address pair for the Site Director.Refer to the Network and IT Guidance for theBAS Professional Technical Bulletin(LIT-12011279).
Click Next.
Figure 18: Application Server Configuration Window7.
24ADS/ADX Turnkey User's Guide

Table 3: Ready Access Portal Software Installation StepsNote: This screen is used for access to the Ready
Access Portal from a computer. See Step 9for access from a handheld device.
In the Install the Web Server on this local IIS Sitefield, enter an existing IIS website you want to use forthe Ready Access Portal. You can use the default oranother IIS website if you have one.
In the Using this Virtual Directory Name field, enterthe Ready Access Portal virtual directory name youwant to use.
Note: Remember the name you enter in this field.This name appears at the end of the URLused to browse to the Ready Access PortalUI from a computer.
Note: It is acceptable to change this name from thedefault as long as the name entered here isdifferent from the name entered in Step 9.
For the SSL security section, select one of thefollowing:
• Secure only password communications:Clickthis option to secure only login information usedby the browsing computer to access the ReadyAccess Portal. If you do not have a preference,protecting only login information results in bettersystem performance.
• Secure all communications: Click this option tosecure all communications between the browsingcomputer and the Ready Access Portal, includinglogin.
Click Next.
If you have an existing SSL certificate for the IISwebsite you selected, A Question box appears. If youclick Yes, the new certificate replaces any certificateyou currently have. We recommend you click No toretain the existing certificate.
If you do not have an existing SSL certificate for theIIS website you selected, a Question box appears(Figure 20).
You must click Yes to continue with the installation.
Note: If you click No, you cannot advance in theinstallation process.
Figure 20: New SSL Certificate Question Box
Click Next.
Figure 19: Web Server Configuration Window8.
25ADS/ADX Turnkey User's Guide
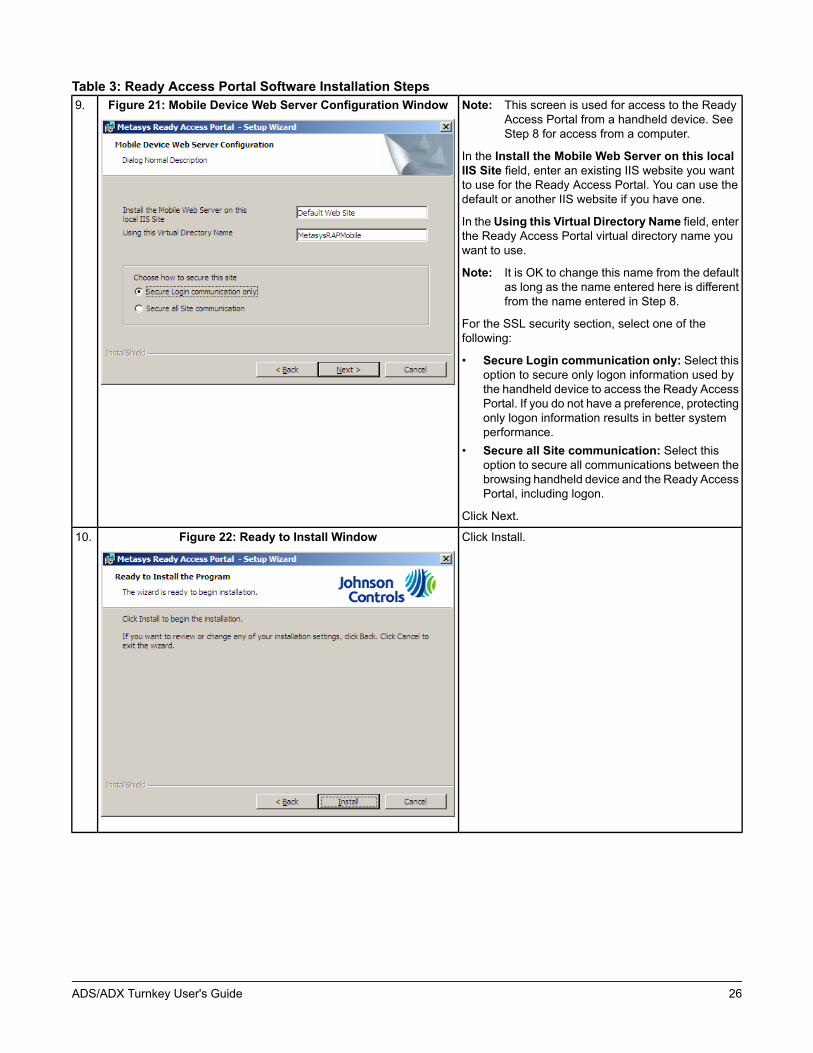
Table 3: Ready Access Portal Software Installation StepsNote: This screen is used for access to the Ready
Access Portal from a handheld device. SeeStep 8 for access from a computer.
In the Install the Mobile Web Server on this localIIS Site field, enter an existing IIS website you wantto use for the Ready Access Portal. You can use thedefault or another IIS website if you have one.
In the Using this Virtual Directory Name field, enterthe Ready Access Portal virtual directory name youwant to use.
Note: It is OK to change this name from the defaultas long as the name entered here is differentfrom the name entered in Step 8.
For the SSL security section, select one of thefollowing:
• Secure Login communication only: Select thisoption to secure only logon information used bythe handheld device to access the Ready AccessPortal. If you do not have a preference, protectingonly logon information results in better systemperformance.
• Secure all Site communication: Select thisoption to secure all communications between thebrowsing handheld device and the Ready AccessPortal, including logon.
Click Next.
Figure 21: Mobile Device Web Server Configuration Window9.
Click Install.Figure 22: Ready to Install Window10.
26ADS/ADX Turnkey User's Guide
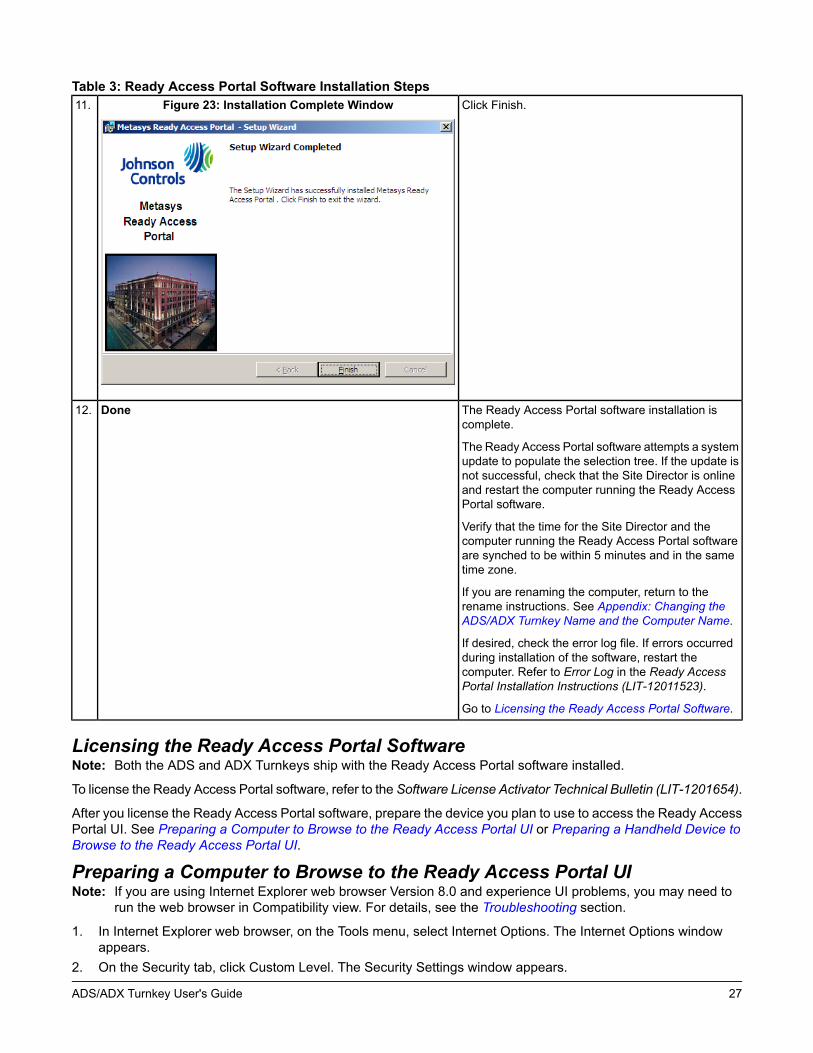
Table 3: Ready Access Portal Software Installation StepsClick Finish.Figure 23: Installation Complete Window11.
The Ready Access Portal software installation iscomplete.
The Ready Access Portal software attempts a systemupdate to populate the selection tree. If the update isnot successful, check that the Site Director is onlineand restart the computer running the Ready AccessPortal software.
Verify that the time for the Site Director and thecomputer running the Ready Access Portal softwareare synched to be within 5 minutes and in the sametime zone.
If you are renaming the computer, return to therename instructions. See Appendix: Changing theADS/ADX Turnkey Name and the Computer Name.
If desired, check the error log file. If errors occurredduring installation of the software, restart thecomputer. Refer to Error Log in the Ready AccessPortal Installation Instructions (LIT-12011523).
Go to Licensing the Ready Access Portal Software.
Done12.
Licensing the Ready Access Portal SoftwareNote: Both the ADS and ADX Turnkeys ship with the Ready Access Portal software installed.
To license the Ready Access Portal software, refer to the Software License Activator Technical Bulletin (LIT-1201654).
After you license the Ready Access Portal software, prepare the device you plan to use to access the Ready AccessPortal UI. See Preparing a Computer to Browse to the Ready Access Portal UI or Preparing a Handheld Device toBrowse to the Ready Access Portal UI.
Preparing a Computer to Browse to the Ready Access Portal UINote: If you are using Internet Explorer web browser Version 8.0 and experience UI problems, you may need to
run the web browser in Compatibility view. For details, see the Troubleshooting section.
1. In Internet Explorer web browser, on the Tools menu, select Internet Options. The Internet Options windowappears.
2. On the Security tab, click Custom Level. The Security Settings window appears.
27ADS/ADX Turnkey User's Guide
3. Scroll down to Scripting > Active Scripting and click Enable. A security warning message appears.4. Click OK.5. Click the Privacy tab.6. In the Settings section, click Advanced. The Advanced Privacy Settings window appears.7. In the Cookies section, select Override automatic cookie handling.8. Under First-party Cookies, select Accept.9. Under Third-party Cookies, select Accept.10. Select Always allow session cookies.11. Click OK.12. Click OK to close the Internet Options window.13. If you are using Windows Internet Explorer 8.0 with Windows 7 or Windows XP, go to Step 17. If you have
Windows Internet Explorer 9.0 with Windows 7, on the Tools menu, verify ActiveX Filtering is not selected. If itis selected, click to clear the selection.
14. On the Tools menu, select SmartScreen Filter > Turn off SmartScreen Filter. The Microsoft SmartScreen Filterwindow appears. (If the selection is Turn on SmartScreen Filter instead, skip this step because the filter isalready off.)
15. Click OK to turn off the SmartScreen Filter.16. On the Tools menu, select Pop-up Blocker > Turn off Pop-up Blocker. (If the selection is Turn on Pop-up Blocker
instead, skip this step because the pop-up blocker is already off.)
Note: Metasys system Standard Access Administrators should set the Dashboard for Tenant users beforeTenant users browse to the Ready Access Portal UI. Refer to Setting the Dashboard for Tenant Usersin the Ready Access Portal Installation Instructions (LIT-12011523).
Preparing a Handheld Device to Browse to the Ready Access Portal UI1. Be sure you are connected to the network, either wirelessly or via a cradle.2. In Internet Explorer web browser, under Menu, select Tools > Options. The Options page appears.3. On the Security tab, make sure Allow cookies is selected.4. Select OK.5. In Internet Explorer web browser, under Menu, select Zoom > Medium. This setting ensures that text displays
correctly.6. If you choose to customize the column layout for the UI, see Custom Column Layout for Handheld Devices in
this document.7. Go to Logging in to the Ready Access Portal UI.
Logging in to the Ready Access Portal UINote: Metasys system Standard Access Administrators should set the Dashboard for Tenant users before Tenant
users browse to the Ready Access Portal UI. Refer to Setting the Dashboard for Tenant Users in the ReadyAccess Portal Installation Instructions (LIT-12011523).
The Ready Access Portal UI supports the Single Sign-On (SSO) capability of the Active Directory service.
To log in to the Ready Access Portal UI, the Site Director must be running and available via the network to thecomputer running Ready Access Portal software. If you just finished installing the Ready Access Portal software,you may need to wait several minutes for the system update process to complete.
28ADS/ADX Turnkey User's Guide

Table 4: Ready Access Portal Login StepsSelect one of these methods:
• Using the Launcher application, click theBookmarks tab and select the configured ReadyAccess Portal URL. Click Launch.
• Using a computer with Internet Explorer webbrowser, browse to http://<host>/MetasysRAP.Note: <host> is the host name (computer
name) or IP address of the computerrunning Ready Access Portal software.
Note: MetasysRAP is the default value for theUsing this Virtual Directory Name fieldin Figure 19. If you chose an alternatename in Figure 19, use that name forMetasysRAP in the URL.
• Using a handheld device with Internet Explorerweb browser, browse tohttp://<host>/MetasysRAPMobile.Note: <host> is the host name (computer
name) or IP address of the computerrunning Ready Access Portal software.
Note: MetasysRAPMobile is the default valuefor the Using this Virtual DirectoryName field in Figure 21. If you chose analternate name in Figure 21, use thatname for MetasysRAPMobile in theURL.
Start1.
The first time you attempt to navigate to the ReadyAccess Portal UI, you must install the SSL certificate.
Note: You must be logged in to the browsingcomputer as an administrator when youattempt this procedure. Only administratorshave the privileges required to install SSLcertificates.
Follow these steps:
1. Verify you have the address entered correctly.2. Click Continue to this website (not
recommended). The Ready Access Portal loginpage appears.
3. In the address bar, click Certificate Error (Figure25).
Figure 25: Certificate Error
4. An Untrusted Certificate window appears (Figure26).
Figure 24: Certificate Screen2.
29ADS/ADX Turnkey User's Guide
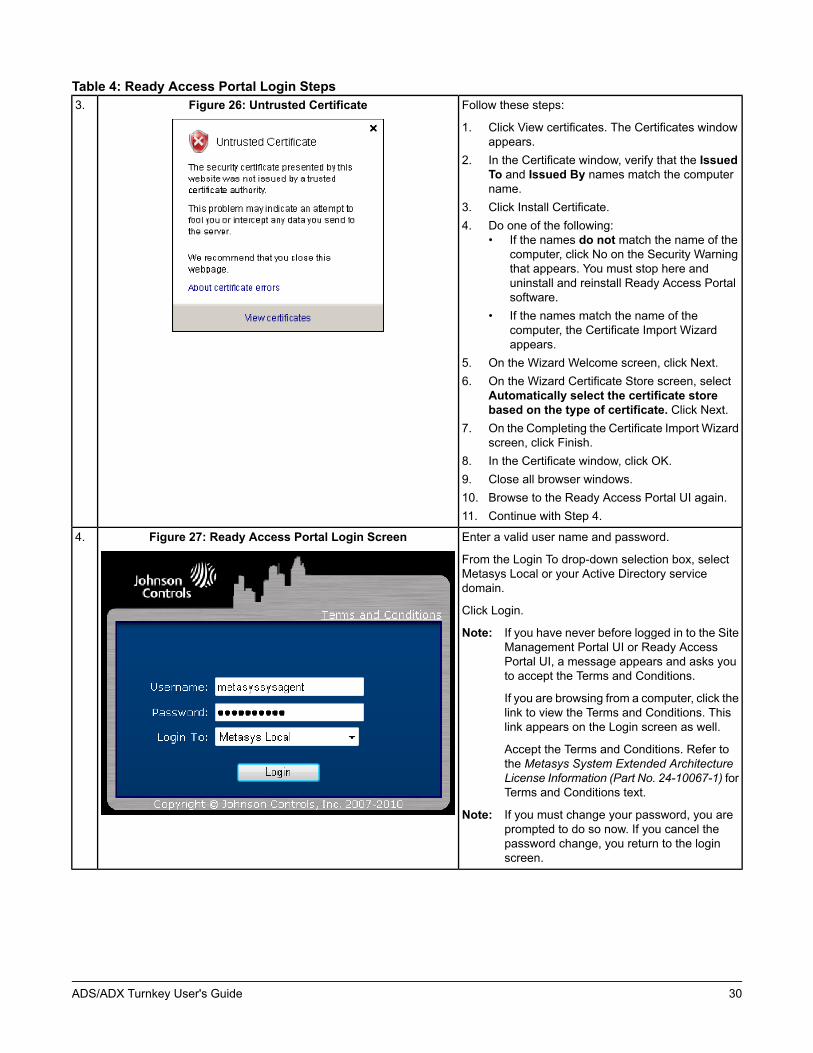
Table 4: Ready Access Portal Login StepsFollow these steps:
1. Click View certificates. The Certificates windowappears.
2. In the Certificate window, verify that the IssuedTo and Issued By names match the computername.
3. Click Install Certificate.4. Do one of the following:
• If the names do not match the name of thecomputer, click No on the Security Warningthat appears. You must stop here anduninstall and reinstall Ready Access Portalsoftware.
• If the names match the name of thecomputer, the Certificate Import Wizardappears.
5. On the Wizard Welcome screen, click Next.6. On the Wizard Certificate Store screen, select
Automatically select the certificate storebased on the type of certificate. Click Next.
7. On the Completing the Certificate Import Wizardscreen, click Finish.
8. In the Certificate window, click OK.9. Close all browser windows.10. Browse to the Ready Access Portal UI again.11. Continue with Step 4.
Figure 26: Untrusted Certificate3.
Enter a valid user name and password.
From the Login To drop-down selection box, selectMetasys Local or your Active Directory servicedomain.
Click Login.
Note: If you have never before logged in to the SiteManagement Portal UI or Ready AccessPortal UI, a message appears and asks youto accept the Terms and Conditions.
If you are browsing from a computer, click thelink to view the Terms and Conditions. Thislink appears on the Login screen as well.
Accept the Terms and Conditions. Refer tothe Metasys System Extended ArchitectureLicense Information (Part No. 24-10067-1) forTerms and Conditions text.
Note: If you must change your password, you areprompted to do so now. If you cancel thepassword change, you return to the loginscreen.
Figure 27: Ready Access Portal Login Screen4.
30ADS/ADX Turnkey User's Guide
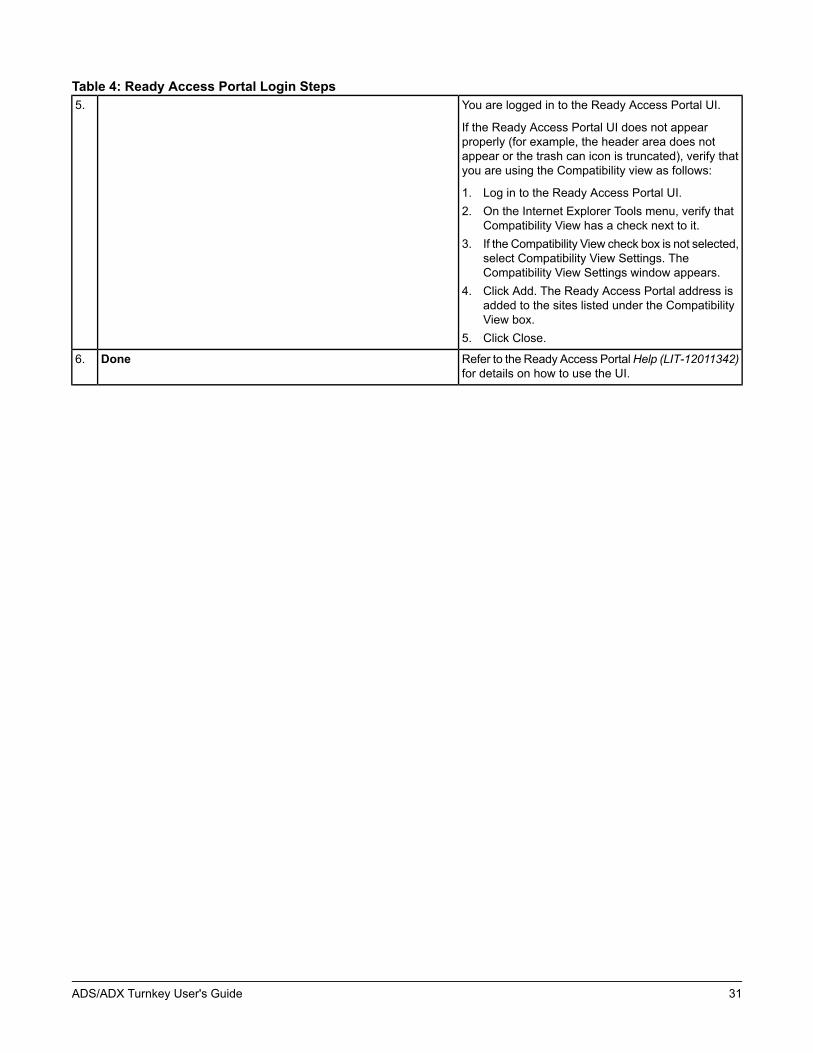
Table 4: Ready Access Portal Login StepsYou are logged in to the Ready Access Portal UI.
If the Ready Access Portal UI does not appearproperly (for example, the header area does notappear or the trash can icon is truncated), verify thatyou are using the Compatibility view as follows:
1. Log in to the Ready Access Portal UI.2. On the Internet Explorer Tools menu, verify that
Compatibility View has a check next to it.3. If the Compatibility View check box is not selected,
select Compatibility View Settings. TheCompatibility View Settings window appears.
4. Click Add. The Ready Access Portal address isadded to the sites listed under the CompatibilityView box.
5. Click Close.
5.
Refer to the Ready Access PortalHelp (LIT-12011342)for details on how to use the UI.
Done6.
31ADS/ADX Turnkey User's Guide

TroubleshootingTable 5 contains troubleshooting information for the Ready Access Portal software.
Table 5: Troubleshooting the Ready Access Portal SoftwareSolutionProblemTomove theReady Access Portal software to a new computerand preserve Dashboard settings:
1. Uninstall the Ready Access Portal from the originalcomputer and do not remove the Dashboard settings.
2. Complete the uninstallation procedure.3. Stop the SQL Server service.4. Copy the MetasysTree.mdf database from this location:
C:\Program Files\Microsoft SQLServer\MSSQL.1\MSSQL\Data
OR
C:\Program Files\Microsoft SQLServer\MSSQL10.MSSQLSERVER\MSSQL\DATA
OR
C:\Program Files\Microsoft SQLServer\MSSQL11.MSSQLSERVER\MSSQL\DATA
5. Copy any log files you wish to preserve.6. Move the MetasysTree.mdf database to the new computer
where you plan to install the Ready Access Portal software.7. Install the Ready Access Portal software on the new
computer.
Note: If you are installing the Ready Access Portal softwareon a computer with other Metasys software on it, installthe other Metasys software first.
You are uncertain how to move the Ready Access Portalsoftware to another computer and preserve currentDashboard settings.
This message appears when access to the Ready Access Portaldatabase is not available. To resolve this error:
1. Verify that this computer has a supported version of SQLServer installed and SQL Server is currently running.
2. Verify that the TCP/IP and Named Pipes protocols in SQLServer Configuration Manager are set to Enabled.
3. Verify that the SQL Server Administrator group calledBUILTIN\Administrators has access to SQL Serverdatabases.
Follow these steps:
1. Start SQL Server Management Studio and log in with thesa user account using SQL Server authentication. You mayalso select Windows authentication and log in with anaccount that has system administrator privileges in SQLServer.
2. Expand Security. Right-click Logins and select New Login.3. In the Login name field, type BUILTIN\Administrators.4. On the same screen, select Server Roles in the left pane
to display the Server Roles for the Administrators group.Select SysAdmin Server Role.
5. Click OK.
You see an error message with the following text when youare installing Ready Access Portal software:
-214721843 Login failed for user '<username>'.
Make sure SQL Server 2005 SP3 or SQL 2005Express SP3 or SQL Server 2008 or SQL Server2008 Express is installed and running. Makesure SQL Remote Connections for TCP/IP and NamedPipes are enabled.
32ADS/ADX Turnkey User's Guide

Table 5: Troubleshooting the Ready Access Portal SoftwareSolutionProblemTo work around this problem:
1. Cancel the installation.2. Start the installation again.3. When you reach the SQL Server Installation Credentials
Window, do not use the Browse button. Instead, do one ofthe following:• If you installed the default instance (MSSQLSERVER),
leave the default of (local).• If you installed a named instance, type \instancename
after (local) where instancename is the name of theSQL Server instance you installed.
You see an error message with the following text when youare installing Ready Access Portal software:
Error 1606
This message appears when you do not have your Dashboardset. To resolve this error:• If you have Tenant user privileges, your Administrator must
set your Dashboard.• If you are not a Tenant user, you must set your Dashboard.
You see the following message when you log in to theReady Access Portal UI:
Your dashboard content has not been defined.
This error message occurs because the Site Director is offlineor inaccessible over the network when you attempt to log in. Toresolve this problem, make sure the Site Director is online andcommunicating over the network and attempt to log in to theReady Access Portal UI.
You attempt to log in to the Ready Access Portal UI andsee the following message:
Cannot login. The Metasys site director deviceis not available.
This error may occur if computer running the Ready AccessPortal software is on a domain and the Site Director is not on adomain.
To resolve this error, add the domain name to the URL of theReady Access Portal UI using this syntax:• http://domainname\hostname/MetasysRAP• http://domainname\hostname/MetasysRAPMobile
You see a Mismatched Address error (Figure 28).
Figure 28: Mismatched Address Error
This error occurs if you change the name of the computerrunning the Ready Access Portal software after you install theReady Access Portal software.
To see the Mismatched Address error itself, click the CertificateError button in the Internet Explorer web browser toolbar.
This error occurs because a name change rendered the SSLcertificate invalid and you are using an Internet Protocol (IP)address to browse to the Ready Access Portal UI.
To resolve this error, uninstall and reinstall the Ready AccessPortal software and create a new certificate during theinstallation process.
A problem with validating the external SSL certificate occurred.Restart the computer that is running the Ready Access Portalsoftware, then try to log in again.
You attempt to log in to the Ready Access Portal UI from aclient computer and see the following message:
Internet Explorer Cannot Display the Web page.The Internet Explorer web browser must be configured to runJavaScript® technology and have cookies enabled. SeePreparing a Computer to Browse to the Ready Access PortalUI for information on these settings.
This problem may occur if you have script blocking enabled forthird-party antivirus software installed on the computer.
To resolve this problem, disable script blocking and attempt theinstallation again. After the installation is complete, enable thescript blocking again.
The installation program stops responding.
33ADS/ADX Turnkey User's Guide
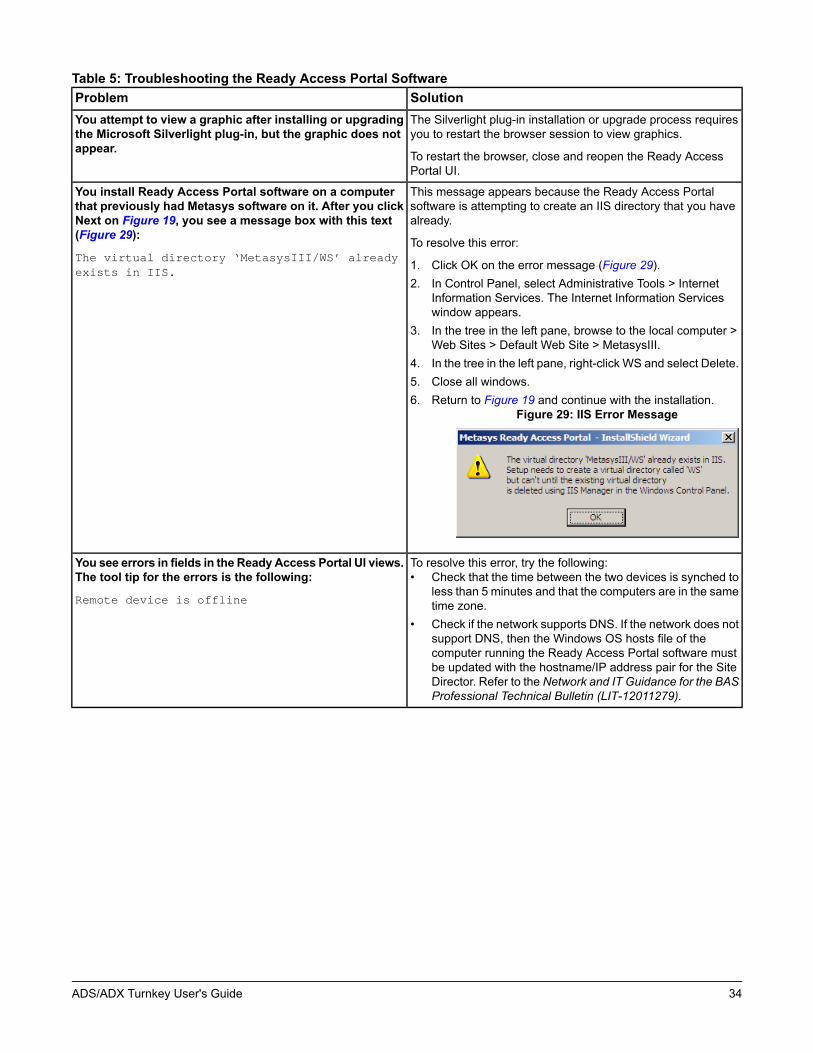
Table 5: Troubleshooting the Ready Access Portal SoftwareSolutionProblemThe Silverlight plug-in installation or upgrade process requiresyou to restart the browser session to view graphics.
To restart the browser, close and reopen the Ready AccessPortal UI.
You attempt to view a graphic after installing or upgradingthe Microsoft Silverlight plug-in, but the graphic does notappear.
This message appears because the Ready Access Portalsoftware is attempting to create an IIS directory that you havealready.
To resolve this error:
1. Click OK on the error message (Figure 29).2. In Control Panel, select Administrative Tools > Internet
Information Services. The Internet Information Serviceswindow appears.
3. In the tree in the left pane, browse to the local computer >Web Sites > Default Web Site > MetasysIII.
4. In the tree in the left pane, right-click WS and select Delete.5. Close all windows.6. Return to Figure 19 and continue with the installation.
Figure 29: IIS Error Message
You install Ready Access Portal software on a computerthat previously had Metasys software on it. After you clickNext on Figure 19, you see a message box with this text(Figure 29):
The virtual directory ‘MetasysIII/WS’ alreadyexists in IIS.
To resolve this error, try the following:• Check that the time between the two devices is synched to
less than 5 minutes and that the computers are in the sametime zone.
• Check if the network supports DNS. If the network does notsupport DNS, then the Windows OS hosts file of thecomputer running the Ready Access Portal software mustbe updated with the hostname/IP address pair for the SiteDirector. Refer to the Network and IT Guidance for the BASProfessional Technical Bulletin (LIT-12011279).
You see errors in fields in the Ready Access Portal UI views.The tool tip for the errors is the following:
Remote device is offline
34ADS/ADX Turnkey User's Guide

Table 5: Troubleshooting the Ready Access Portal SoftwareSolutionProblemIf you are using Internet Explorer web browser Version 8.0,verify that you are using the Compatibility view.
To verify Compatibility view:
1. Log in to the Ready Access Portal UI.2. On the Internet Explorer Tools menu, verify that
Compatibility View has a check next to it.3. If Compatibility View does not have a check next to it, select
Compatibility View Settings.4. Click Add. The Ready Access Portal address appears in
the list of sites in the websites that you’ve added toCompatibility View box.
5. Click Close.
When you use Internet Explorer Web browser Version 8.0to display the Ready Access Portal UI, the UI may notappear properly (for example, the header area does notappear).
During Ready Access Portal software installation, you may havespecified the MetasysSysAgent user as the SQL Server loginfor Ready Access Portal (Figure 17). This user is not permitted.
Uninstall the Ready Access Portal software, then reinstall usinga different SQL Server login, such as MetasysRap.
You see an orange exclamation point iconwith the followingmessage on the Ready Access Portal screen:
Automatic updates are currently unavailable.Refreshing your browser or displaying adifferent view may correct the problem. If thiscondition continues, contact a Metasysadministrator for assistance.
35ADS/ADX Turnkey User's Guide

Ports Used by the Ready Access Portal SoftwareThe Ready Access Portal software uses the Transmission Control Protocol (TCP) ports in Table 6.
Table 6: Ready Access Portal PortsDirectionDetailsPortOutTCP and User DatagramProtocol (UDP)must be turned on for Domain
Name Server (DNS) Lookup.53
In and OutReady Access Portal communicates with the Site Director and InternetInformation Services (IIS) with this port as the default for clientcomputer connections.
80
In (for IIS)Client computer and Ready Access Portal SSL authentication use thisport.
443
In (for SQL Server software)Ready Access Portal uses this port as the default SQL Server softwareport. TCP must be turned on.
1433
NoneReady Access Portal software uses this port internally.8700
NoneReady Access Portal software uses this port internally.8001
Custom Column Layout for Handheld DevicesYou can customize the column layout when viewing the Ready Access Portal UI using a handheld device.
Table 7 contains the columns hidden in the handheld device UI default layout.
Table 7: Columns Hidden by Default in the Handheld UIColumn Hidden by DefaultViewType ColumnAlert Summary View
Status ColumnStandard Summary View
Status ColumnDevice Summary View
Status ColumnSchedule Summary View
Status ColumnSchedule Details View: Scheduled Items List Tab
To customize the column layout for handheld devices:
1. UsingMicrosoft Notepad on the computer where the Ready Access Portal software is installed, openweb.configat one of the following locations:
• For 32-bit operating systems: C:\Program Files\Johnson Controls\Metasys RAP\software_version\mobile• For 64-bit operating systems: C:\Program Files (x86)\Johnson Controls\Metasys RAP\
software_version\mobile
Note: software_version represents the version of the Ready Access Portal software you have.
Note: If you installed the Ready Access Portal software in a drive other than C, browse to that location.2. Under the <appSettings> section, find the following lines:
<add key=” ShowAlertSummaryTypeColumn” value=”false”/>
<add key=” ShowStandardSummaryStatusColumn” value=”false”/>
<add key=” ShowDeviceSummaryStatusColumn” value=”false”/>
<add key=” ShowScheduleSummaryStatusColumn” value=”false”/>
<add key=” ShowScheduledItmesStatusColumn” value=”false”/>
3. For any columns you would like to view in the handheld UI, replace the text false with true.4. Save the file.5. Exit Notepad.
36ADS/ADX Turnkey User's Guide
Access ListThe users, passwords, and certificates listed in Table 8 are required during Ready Access Portal software installation.
Table 8: Users, Passwords, and Certificates Used for Installing Ready Access Portal SoftwareDetailsPassword/CertificateThis user name and password pair is required only duringinstallation of the Ready Access Portal software. See Figure17.
SQL Server System Administrator (SA) User Name andPassword
This user name and password pair is required for Ready AccessPortal software to access SQL Server software in daily use.
We recommend that you create a new SQL Server user andpassword. See Figure 17.
SQL Server User Name and Password
A Windows OS Administrator user name and password arerequired to install new software on the computer.
Windows OS Administrator User Name and Password
SSL is required to use the Ready Access Portal software.
You can use an existing certificate or allow the Ready AccessPortal software to create a new certificate. You can choose tosecure only login information or all transferred information. Ifyou do not have a preference, protecting only login informationresults in better system performance. See Figure 19 and Figure21.
The first time you log in to the Ready Access Portal UI, youmust install the SSL certificate. You must be logged in to thebrowsing computer as an administrator to install the certificate.
SSL Certificate
37ADS/ADX Turnkey User's Guide

Appendix: Restoring the ADS/ADX TurnkeyIntroductionUse this appendix if you need to restore your ADS/ADX Turnkey to the condition in which you received it. Use theprovided media to perform the recovery procedure. After you complete this procedure, be sure to perform the stepsin Detailed Procedures for ADS/ADX Turnkeys.
Important: Keep all collateral shipped with your ADS/ADX in a safe and accessible place. Materials shippedwith your ADS/ADX Turnkey are crucial if you need to service or restore the original ADS/ADX image.
Important: Use this procedure only as a final course of action when you cannot resolve the problems experiencedwith the ADS/ADX Turnkey. Because this procedure involves the loss of all database information andsettings, make sure that before you begin, you back up all Metasys historical databases with the MetasysDatabase Manager and archive all databases with SCT. This procedure returns the ADS/ADX to thestate it was in when you received it, with the exception of the customized computer name that thefactory applied with the ADS/ADX Turnkey order. You need to rename the computer with yourcustom name after the restoration process completes.
Important: Recovery media is to be used only with the ADS/ADX Turnkey computer you purchased. Do not userecovery media on a non-Turnkey computer or on a different Turnkey computer.
Restoring the ADS/ADX TurnkeyTo restore the ADS/ADX Turnkey:
1. Place ADS/ADX bootable media in the drive.2. Restart the ADS/ADX computer. As the computer restarts, the operating system detects the bootable media in
the drive and displays Press any key to boot from CD or DVD.3. Press any key to begin the restore process. If you did not press a key in time, restart the computer and try again.
After a fewmoments, a screen appears to indicate that Windows is loading files. The window eventually changesto Starting Windows, then Initializing, Please wait.
Next, a warning message appears (Figure 30).
Figure 30: Warning Message
38ADS/ADX Turnkey User's Guide
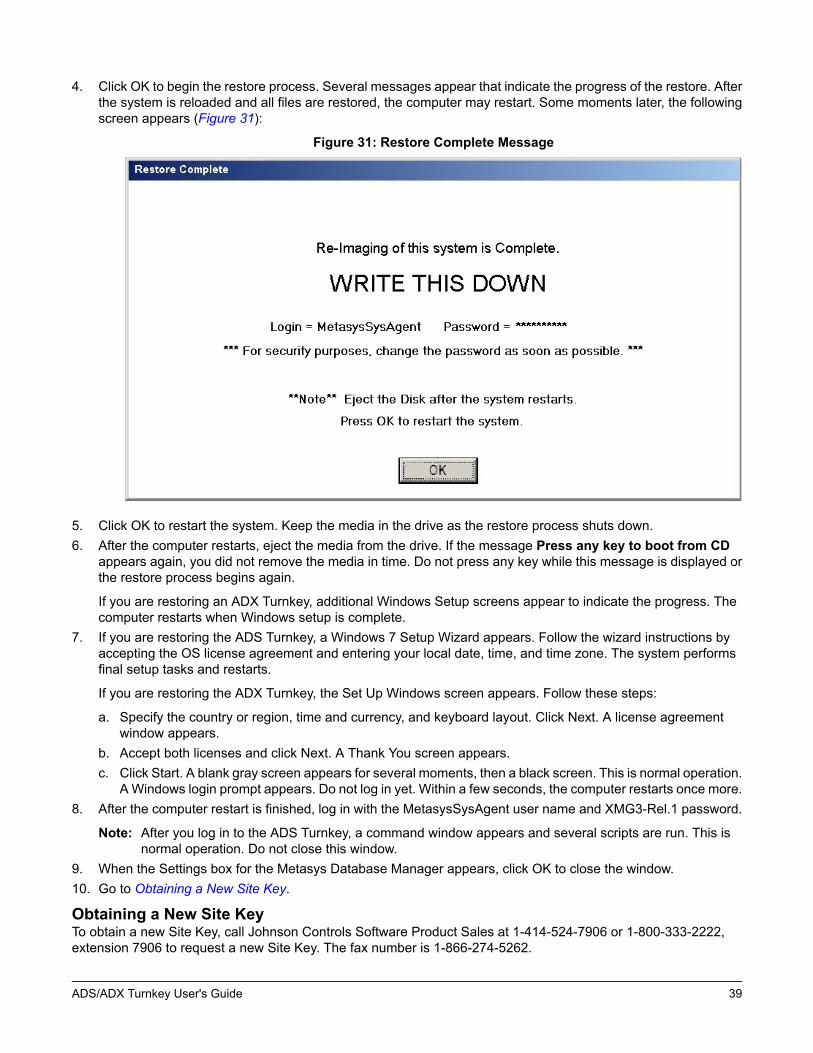
4. Click OK to begin the restore process. Several messages appear that indicate the progress of the restore. Afterthe system is reloaded and all files are restored, the computer may restart. Some moments later, the followingscreen appears (Figure 31):
Figure 31: Restore Complete Message
5. Click OK to restart the system. Keep the media in the drive as the restore process shuts down.6. After the computer restarts, eject the media from the drive. If the message Press any key to boot from CD
appears again, you did not remove the media in time. Do not press any key while this message is displayed orthe restore process begins again.
If you are restoring an ADX Turnkey, additional Windows Setup screens appear to indicate the progress. Thecomputer restarts when Windows setup is complete.
7. If you are restoring the ADS Turnkey, a Windows 7 Setup Wizard appears. Follow the wizard instructions byaccepting the OS license agreement and entering your local date, time, and time zone. The system performsfinal setup tasks and restarts.
If you are restoring the ADX Turnkey, the Set Up Windows screen appears. Follow these steps:
a. Specify the country or region, time and currency, and keyboard layout. Click Next. A license agreementwindow appears.
b. Accept both licenses and click Next. A Thank You screen appears.c. Click Start. A blank gray screen appears for several moments, then a black screen. This is normal operation.
A Windows login prompt appears. Do not log in yet. Within a few seconds, the computer restarts once more.8. After the computer restart is finished, log in with the MetasysSysAgent user name and XMG3-Rel.1 password.
Note: After you log in to the ADS Turnkey, a command window appears and several scripts are run. This isnormal operation. Do not close this window.
9. When the Settings box for the Metasys Database Manager appears, click OK to close the window.10. Go to Obtaining a New Site Key.
Obtaining a New Site KeyTo obtain a new Site Key, call Johnson Controls Software Product Sales at 1-414-524-7906 or 1-800-333-2222,extension 7906 to request a new Site Key. The fax number is 1-866-274-5262.
39ADS/ADX Turnkey User's Guide

Provide the following information to Product Sales to obtain the Site Key:
• Job Name• ADS/ADX software media serial number• Site Code. The Site Code comes from the License Activator. See Finding the Site Code and Licensing the
ADS/ADX Turnkey.• Name of contact person to send the Site Key information
After you obtain a new Site Key, go to Detailed Procedures for ADS/ADX Turnkeys.
Note: For more information on this process, refer to the Software License Activator Technical Bulletin (LIT-1201654).
Finding the Site Code and Licensing the ADS/ADX TurnkeyTo find the Site Code and license the ADS/ADX Turnkey:
1. On the Start menu, click All Programs > Johnson Controls > Metasys > License Activator. The License ActivatorScreen appears (Figure 32).
Figure 32: License Activator Main Dialog Box
2. On the License Activator dialog box, click Activate. The Activate License dialog box appears with the licenseinformation (Figure 33).
40ADS/ADX Turnkey User's Guide
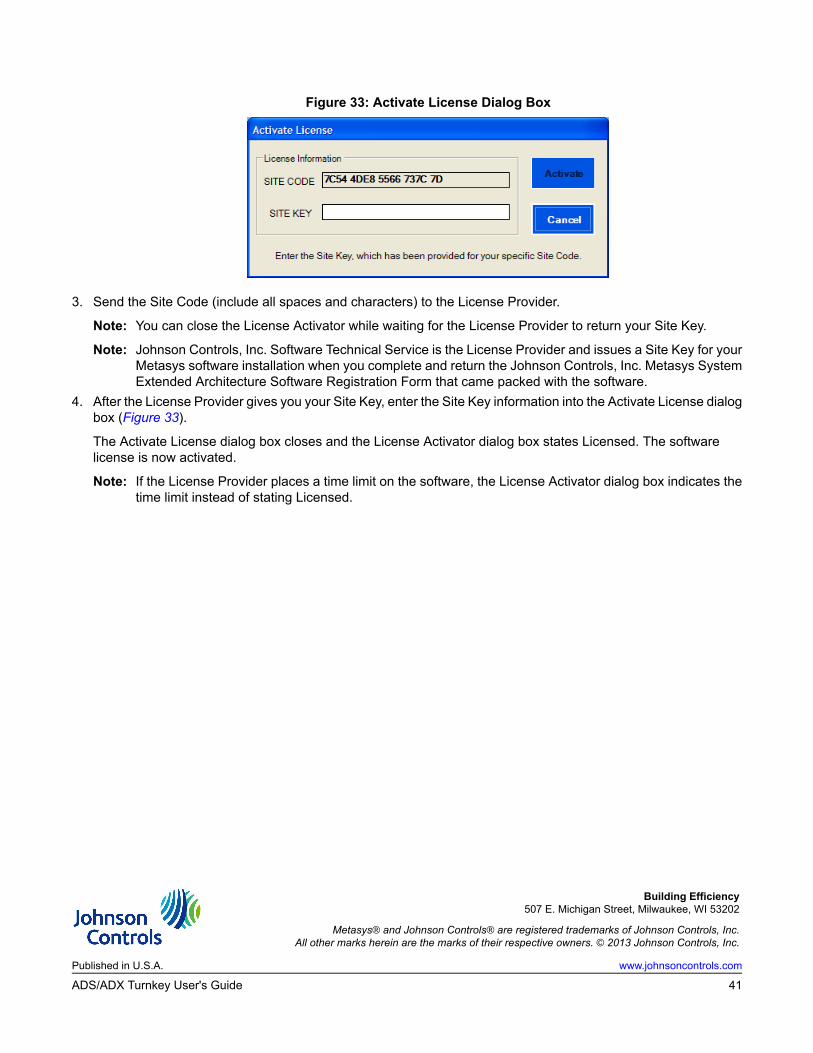
Figure 33: Activate License Dialog Box
3. Send the Site Code (include all spaces and characters) to the License Provider.
Note: You can close the License Activator while waiting for the License Provider to return your Site Key.
Note: Johnson Controls, Inc. Software Technical Service is the License Provider and issues a Site Key for yourMetasys software installation when you complete and return the Johnson Controls, Inc. Metasys SystemExtended Architecture Software Registration Form that came packed with the software.
4. After the License Provider gives you your Site Key, enter the Site Key information into the Activate License dialogbox (Figure 33).
The Activate License dialog box closes and the License Activator dialog box states Licensed. The softwarelicense is now activated.
Note: If the License Provider places a time limit on the software, the License Activator dialog box indicates thetime limit instead of stating Licensed.
Building Efficiency507 E. Michigan Street, Milwaukee, WI 53202
Metasys® and Johnson Controls® are registered trademarks of Johnson Controls, Inc.All other marks herein are the marks of their respective owners. © 2013 Johnson Controls, Inc.
www.johnsoncontrols.comPublished in U.S.A.
41ADS/ADX Turnkey User's Guide