adobe muse...
TRANSCRIPT
Adobe® Muse for ePortfolios How to Create an ePortfolio Website: Instructions for Adobe® Muse Platform Kelsey Barfell, Christin Seifert, Paula Peek, Hye‐Jeong Kim, Veena Chattaraman
2013
Department of Consumer and Design Sciences, College of Human Sciences, Auburn University, Auburn, AL
1
TABLE OF CONTENTS
1. What is Muse? 2
2. Understanding the Muse Interface 6
2.1. Modes 6
2.1.1. Plan Mode 6
2.1.2. Design Mode 6
2.1.3. Preview Mode 6
2.1.4. Publish Mode 6
2.1.5. Manage Mode 6
2.2. Ways to Preview you Site 7
2.3. The Toolbar 8
2.4. The Control Panel 9
2.5. The Layers Panel 9
3. Creating a new site 10
3.1. Setting up a new site 10
3.2. What is a Sitemap? 11
3.3. Creating a Sitemap 12
3.4. Setting up Master Pages/Changing Page Attributes 14
4. Working with Pages 15
4.1. Page Guides 15
4.2. Adding relevant Metadata 15
5. Designing the Master Page 16
5.1. Adding Background and Browser Fill 16
5.2. Establishing Headers and Footers 18
6. Working with Graphics 20
6.1. Preparing Content for Web 20
6.2. Adding graphics 21
6.3. Creating a Document Link for downloadable content 30
2
7. Formatting Objects 32
7.1. Locking Objects 32
7.2. Grouping 32
7.3. Wrapping an Object around Text 33
7.4. Pinning an Object to the Browser 35
8. Working with Text 36
8.1. Adding Text 36
8.2. Editing Text 36
8.3. Web Safe Fonts 36
9. Navigation 38
10. Navigation Bar 39
10.1. Creating Menus 40
11. Adding Hyperlinks 41
11.1. Creating Hyperlinks 42
11.2. Working with Hyperlink Styles 42
12. Using Widgets, and Slideforms 43
12.1. What is a Widget? 43
12.2. Accordion Panel 43
12.3. Tabbed Panel Widget 46
12.4. Creating a Slideshow 48
12.5. Creating a Lightbox Slideshow 52
13. Publishing a Site 56
13.1. External Host 56
13.2. Exporting as HTML 57
14. Creating Mobile Sites 60
14.1. Creating Mobile Sites 60
15. Extra: Embedding Videos 63
16. References 64
3
1. What is Muse?
Muse is an Adobe product that allows the creation of websites for computers and
handheld devices without having to know code3.
WHY MUSE:
MUSE works as a WYSIWYG (what you see is what you get). This means that the
designer works with images and text instead of working with code. What is designed on
the page is what shows up on the webpage. This is accomplished by dragging and
dropping images and designs into their intended place while creating type within the site.
MUSE also has the added feature of meeting all current WEB STANDARDS
automatically! Muse also optimizes your sites for ALL search engines without any
additional effort on your part.
BACKGROUND WORK:
1. What is the purpose of your Website?
Take some time to determine just what your website is for. Are you providing
information or asking for input? Are you promoting brand? Are you selling a product?
What is the ultimate aim of the site?
2. Who is your intended audience?
Determining your target audience will help pinpoint how to design the site most
effectively. Viewers have different needs depending on age, user knowledge, intention,
etc. This decision runs in tandem with the purpose of your site.
3. What to include in your Website?
This depends on the answers to the two questions above. This is your opportunity to
determine the content, sequence and order of the information provided. All pages
should have images as the focal point. The site should have a clear consistent
message (you are qualified, you are talented, you are hirable, etc.). ALL text should be
clear and concise. Bulleted statements (not sentences) are preferable. For text heavy
formats you should consider including a BLOG.
4
4. To About or NOT to About?
Many websites have an area that informs the consumer “ABOUT” the subject. Please
note that professionals use this as a way to GENERALLY inform their potential clients
about their education, certifications, qualifications, accomplishments, etc. Personal
information should NEVER be conveyed. Things to NOT INCLUDE:
Age
Hometown
E-mail Address
Street Address
Phone Number etc.
DO NOT INCLUDE ANY PERSONAL INFORMATION!
Don’t worry! There are multiple ways to get in touch or keep in touch with your
audience. You could include a contact form, create a mailing list, allow access to sign
up for our blog or newsletter, etc., to make sure ALL your potential clients are informed.
Your information will also be included on all your collateral and can be shared with
individuals you trust. Unless you have a secondary and completely independent email
account DO NOT even share your email address through the world wide web.
5
2. Understanding the Muse Interface
2.1. Modes
Muse allows the designer to work on their website in a myriad of user friendly MODES.
The designer can switch between these MODES easily and check on the progress of
the design before publishing. It also allows changes to be made after publishing since it
is so easily re-published with changes or corrections
1. Plan Mode
It is the beginning process of creating a web site. Provides the tools to structure a site
and define how visitors will access each of the sections. You can change the site’s
organization, adjusting the flow by dragging the thumbnails of the pages around to
reposition them. A sitemap that lets you easily add or delete pages, drag and drop to
rearrange and nest them, and create master pages that can be applied by dropping
them onto other pages in your site. You can also customize properties like page size,
the number of columns in each page, and page metadata. Double-clicking pages opens
them for editing.
2. Design Mode
Allows you to use the various tools and panels to create and edit your website’s
individual pages. To enter Design mode, double-click a page thumbnail in the site map
of Plan mode, or choose View Design, or click the Design mode link. Pages are
crafted in Design mode; you can switch among open pages—even multiple sites—in
Photoshop-like tabs. Six tools are available: Selection, Crop, Text, Zoom, Hand, and
Rectangle. A control panel below the toolbar updates depending on your selection,
giving you quick access to Web-safe fill and stroke colors, fonts and text-styling options,
a hyperlink style editor, and more.
6
3. Preview Mode
Allows you to test your site without leaving the application, and you can view the current
page. Preview mode is necessary to test links, show the full functionality of widgets like
slideshows, and more. You can preview either a page or an entire Muse site in the
default browser.
4. Publish Mode
When your site is complete, you can export it as HTML to a folder on your computer for
upload to a server or you can also publish directly to the Web.
5. Manage Mode
Where you can manage your site online, check its use, upgrade the hosting, and other
data.
View this video to learn more about the Modes of Adobe Muse:
http://tv.adobe.com/watch/learn-adobe-muse-cc/working-with-the-different-view-modes/
2.2. Ways to Preview your Site
There are several methods to view your site:
- Click Preview in the Control Panel: Adobe Muse will render the website using
Webkit. In this mode you will be able to select text, test any links and use any
interactivity you have set up on your site.
- For a more accurate preview you will need to view your website in a web browser.
Go to File > Preview Page in Browser. Now your page will open with your default
web browser. The disadvantage of previewing just a page is that the hyperlinks that
you have included in your website will not work.
- To preview the entire website with all the hyperlinks you included in your default
web browser, go to File > Preview Site in Browser. This export may take a while
depending on your date file (e.g. number of pictures etc.)

7
2.3. The Toolbar
Contains the most essential tools:
SELECTION TOOL:
The selection tool is the predominantly used tool at your disposal. The
designer must SELECT any object or text box before manipulating with
any other tool or effect. If any tool is not working the first problem solving
step it so select it and then try manipulating with other tools or effects.
CROP TOOL:
The crop tool allows you to edit a placed image by eliminating extraneous
information. By using the crop tool in MUSE the total size of the file is NOT
eliminated. The information is only eliminated visually. To manage the
site’s overall SIZE edit images in PHOTOSHOP and SAVE AS WEB AND
DEVICES before placing images.
TYPE TOOL:
The type tool creates text boxes for titles, headings, blocks of text, etc.
The type tool allows the designer access to WEB FONTS as well as ALL
FONTS downloaded on the computer being used.
ZOOM TOOL:
The zoom tool works precisely as it does in all other programs. It is NOT
image specific but zooms the entire document.
HAND TOOL:
The hand tool manages the muse page. Although the document will scroll
vertically, horizontal scrolling is not an option. The hand tool allows the
designer to “grab” the page and move it freely in ANY direction.
8
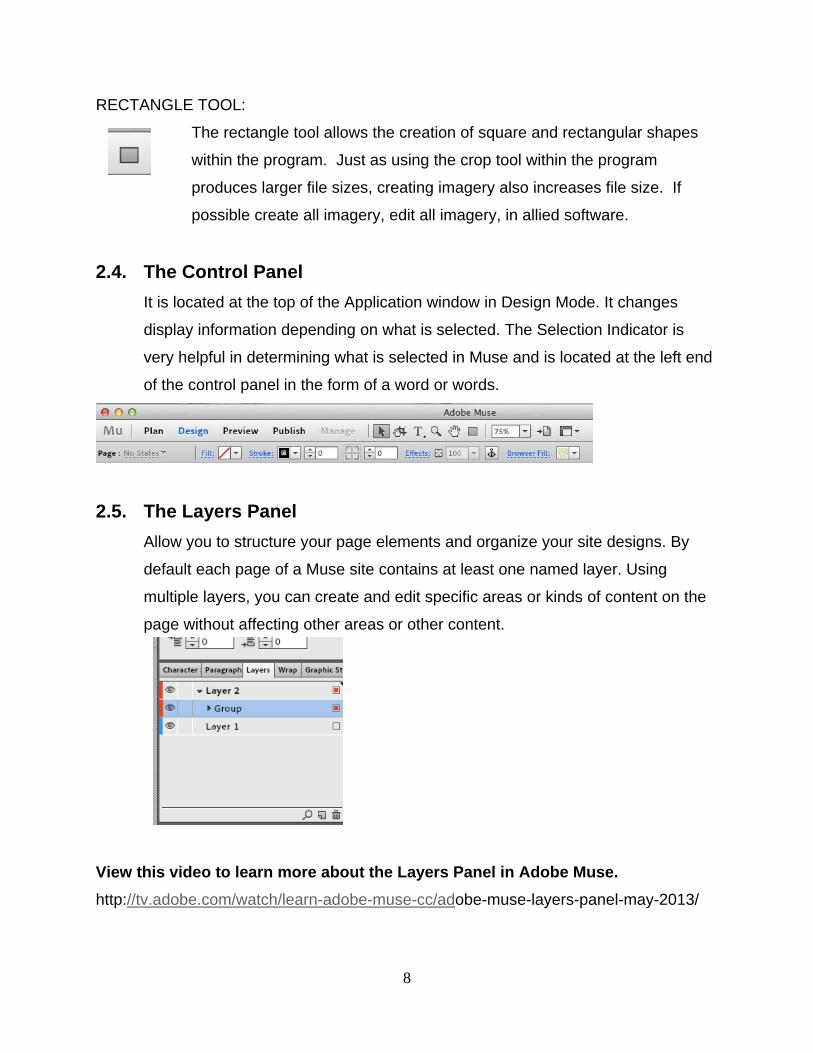
RECTANGLE TOOL:
The rectangle tool allows the creation of square and rectangular shapes
within the program. Just as using the crop tool within the program
produces larger file sizes, creating imagery also increases file size. If
possible create all imagery, edit all imagery, in allied software.
2.4. The Control Panel
It is located at the top of the Application window in Design Mode. It changes
display information depending on what is selected. The Selection Indicator is
very helpful in determining what is selected in Muse and is located at the left end
of the control panel in the form of a word or words.
2.5. The Layers Panel
Allow you to structure your page elements and organize your site designs. By
default each page of a Muse site contains at least one named layer. Using
multiple layers, you can create and edit specific areas or kinds of content on the
page without affecting other areas or other content.
View this video to learn more about the Layers Panel in Adobe Muse.
http://tv.adobe.com/watch/learn-adobe-muse-cc/adobe-muse-layers-panel-may-2013/

9
3. Creating a new Site
3.1. Setting up a new Site
1. Launch Muse, The Welcome screen appears. Choose Create New Site
2. Select “Desktop” on the Initial Layout prompt screen; Default height and width
and single column structure and gutter of 20—click “Ok”

10
3. Choose File Save Site. In the Save Adobe Muse File As dialog box, enter a
name for the site: “Kelsey-Barfell.muse.” Navigate to the location where you
want to save this project (such as a “Website” folder you have created on your
computer) and click Save.
3.2. What is a Sitemap?
All website design begins with an outline of the hierarchy of content within the site. This
outline is then turned into a design tree referred to as the SITEMAP. A sitemap helps
visualize the top down hierarchy of the site’s content. This map establishes how the
website is navigated. You can create pages that are on the same level (no sub-pages)
or you can create site maps that contain different tiers of pages.
PACING = ORGANIZATION FOR IMPACT When determining the content of a website the designer must consider how the site is to
be organized. Effective organization can make the experience more easily understood,
impactful and enjoyable for the audience. Note that all content is organized (movies,
CD’s, books, etc.).
PACING is the arrangement of content in order to manipulate an audience’s attention
and participation. When designing the content pacing consider where the most
successful work / works should be. Beginning? Middle? End? The experience of
listening to an audio CD from beginning to end is an excellent example of content order
design. All CD’s are ordered to catch the audience’s attention first off, the most popular
songs are usually placed just after the middle of the song order. Audible rest is
routinely provided by interspersing slower pieces around a set of more active songs.
And a CD always ends on an upbeat number. This would be considered pacing for
impact.
11
3.3. Creating a Sitemap
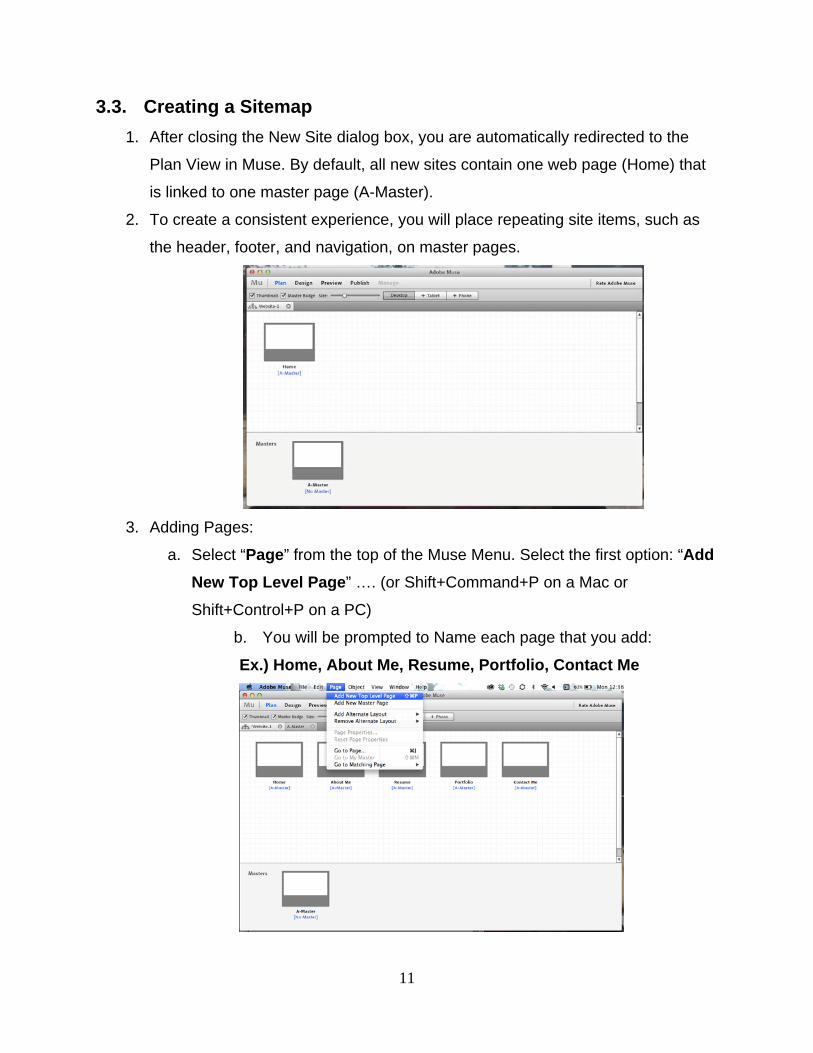
1. After closing the New Site dialog box, you are automatically redirected to the
Plan View in Muse. By default, all new sites contain one web page (Home) that
is linked to one master page (A-Master).
2. To create a consistent experience, you will place repeating site items, such as
the header, footer, and navigation, on master pages.
3. Adding Pages:
a. Select “Page” from the top of the Muse Menu. Select the first option: “Add
New Top Level Page” …. (or Shift+Command+P on a Mac or
Shift+Control+P on a PC)
b. You will be prompted to Name each page that you add:
Ex.) Home, About Me, Resume, Portfolio, Contact Me
12
4. While still in Plan mode, you will also be prompted to create Masters—Double
click and rename: Main Master (see chapter above for Master page)
a. Muse allows you to have a hierarchal structure so that master pages can
inherit other master pages and can also be applied to other pages in site
area
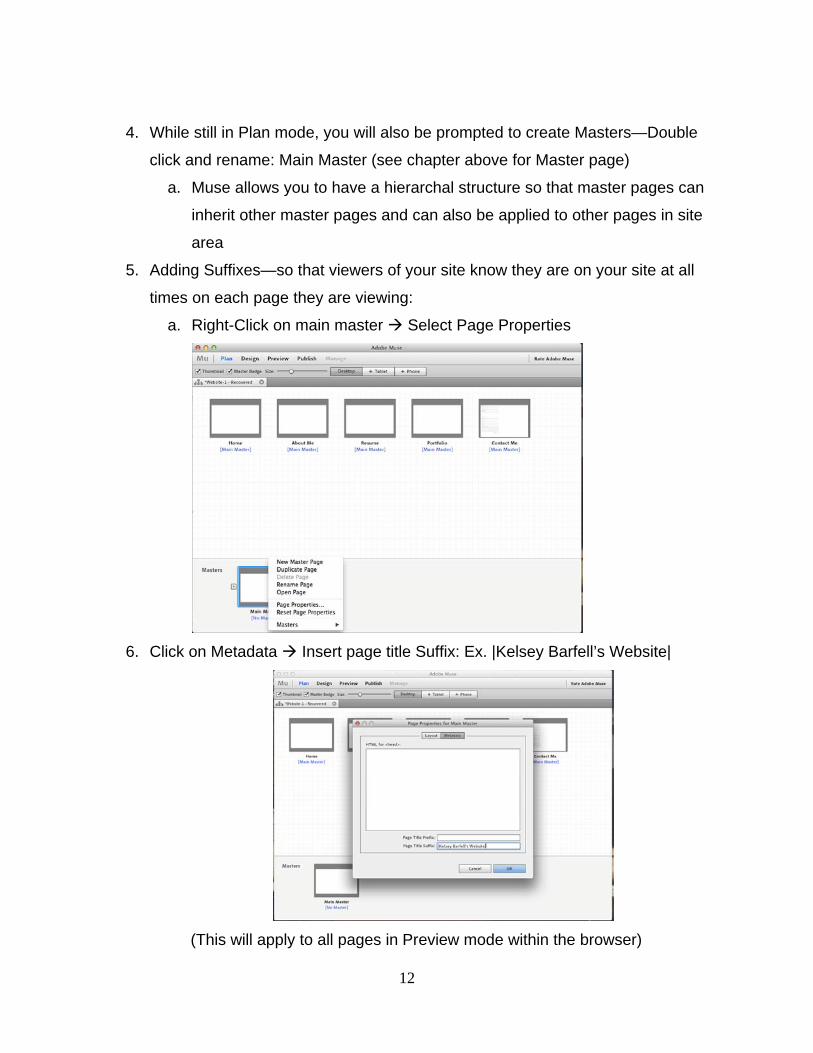
5. Adding Suffixes—so that viewers of your site know they are on your site at all
times on each page they are viewing:
a. Right-Click on main master Select Page Properties
6. Click on Metadata Insert page title Suffix: Ex. |Kelsey Barfell’s Website|
(This will apply to all pages in Preview mode within the browser)
13
3.4. Setting up Master Pages/Changing Page Attributes
What is a Master Page?
A master page is a hidden webpage that contains material that appears on multiple
pages. MASTER PAGEs are then assigned to pages within the SITE MAP. Once
assigned a MASTER PAGE automatically adds it’s content to it’s assigned pages.
This assures continuity and craftsmanship by allowing all images and text on the
master page to maintain its design and positioning on all pages it is assigned. It also
maintains hyperlinks throughout all assigned pages that were linked on the master.
There may be more than one master per website. Although the overall design
scheme may not change the navigation may need to change once the second tier of
the site map is accessed. If there are multiple second tier subjects it may require as
many more master pages. Depending on the design of your site.
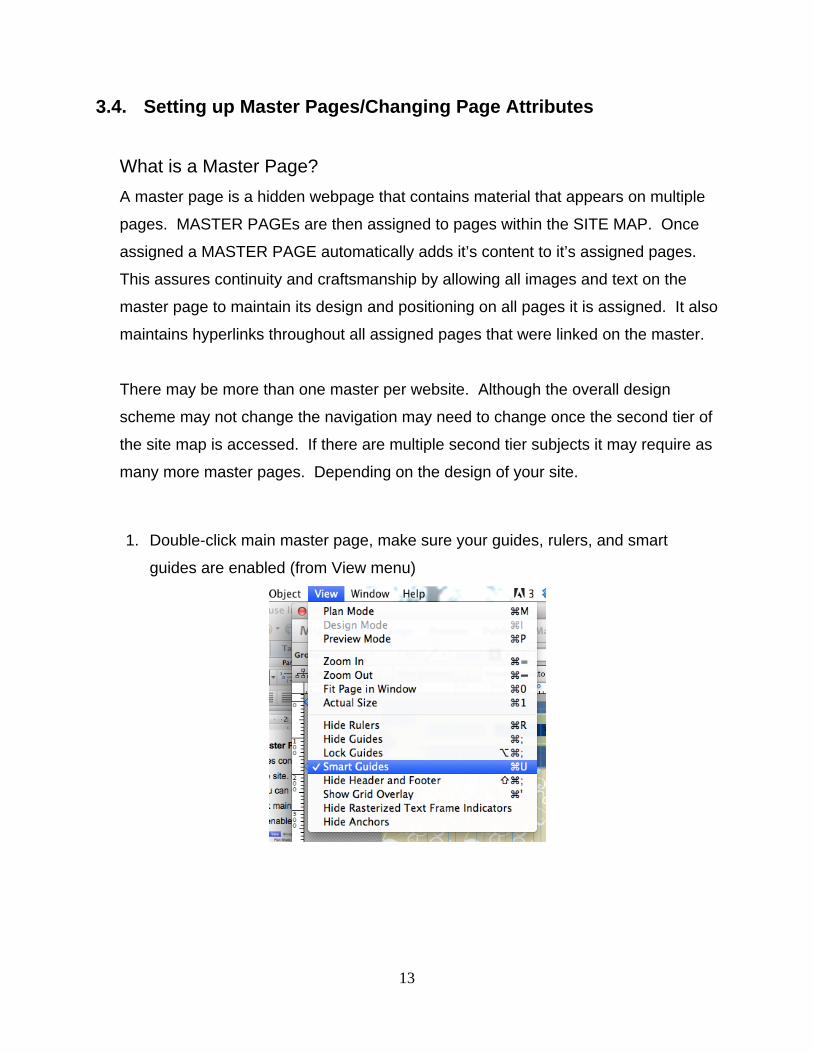
1. Double-click main master page, make sure your guides, rulers, and smart
guides are enabled (from View menu)
14
4. Working with Pages
4.1. Page Guides
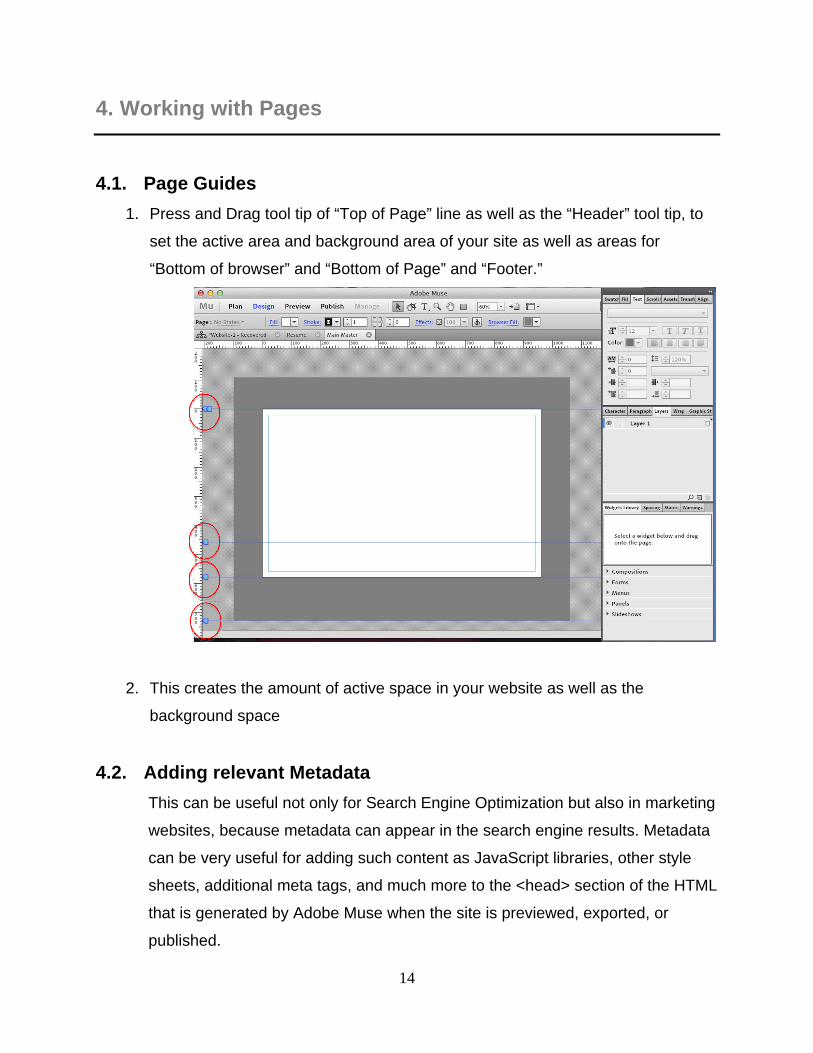
1. Press and Drag tool tip of “Top of Page” line as well as the “Header” tool tip, to
set the active area and background area of your site as well as areas for
“Bottom of browser” and “Bottom of Page” and “Footer.”
2. This creates the amount of active space in your website as well as the
background space
4.2. Adding relevant Metadata
This can be useful not only for Search Engine Optimization but also in marketing
websites, because metadata can appear in the search engine results. Metadata
can be very useful for adding such content as JavaScript libraries, other style
sheets, additional meta tags, and much more to the <head> section of the HTML
that is generated by Adobe Muse when the site is previewed, exported, or
published.
15
5. Designing the Master Page
To begin designing on your first master page be sure you are in PLAN MODE. At the
bottom of the screen in the space designated as Master’s you will find a Master
Thumbnail. Name the Master Thumbnail by double clicking on the area under the
Thumbnail that reads “Master – A”. Name your Master Thumbnail according to the
pages to which it will be assigned in the website (Research, Design, Blog, etc.).
To create additional Master Pages one must return to PLAN MODE. In the Master’s
area you will find the original Master. Scroll over the Master Thumbnail to discover
PLUS boxes on either side of the Thumbnail. Select the PLUS box on the right or left to
create a new Master on that side.
Double click on the master page thumbnail in PLAN MODE to open the Master Page in
DESIGN MODE
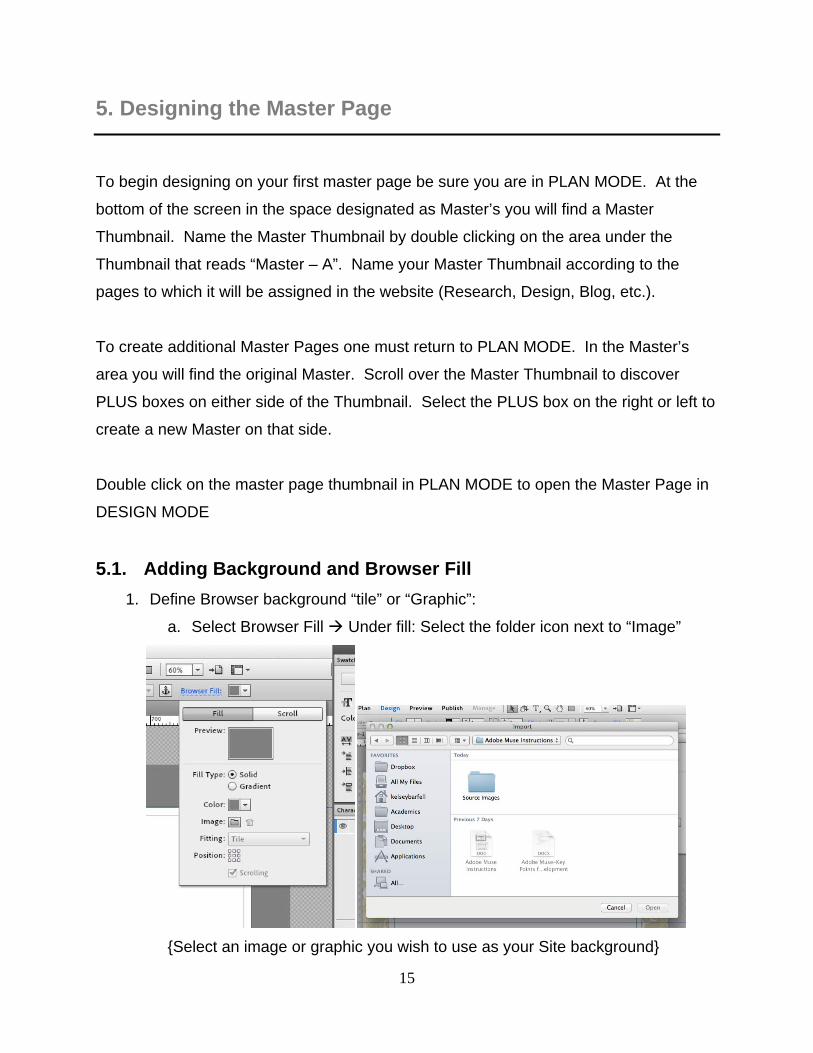
5.1. Adding Background and Browser Fill
1. Define Browser background “tile” or “Graphic”:
a. Select Browser Fill Under fill: Select the folder icon next to “Image”
{Select an image or graphic you wish to use as your Site background}
16
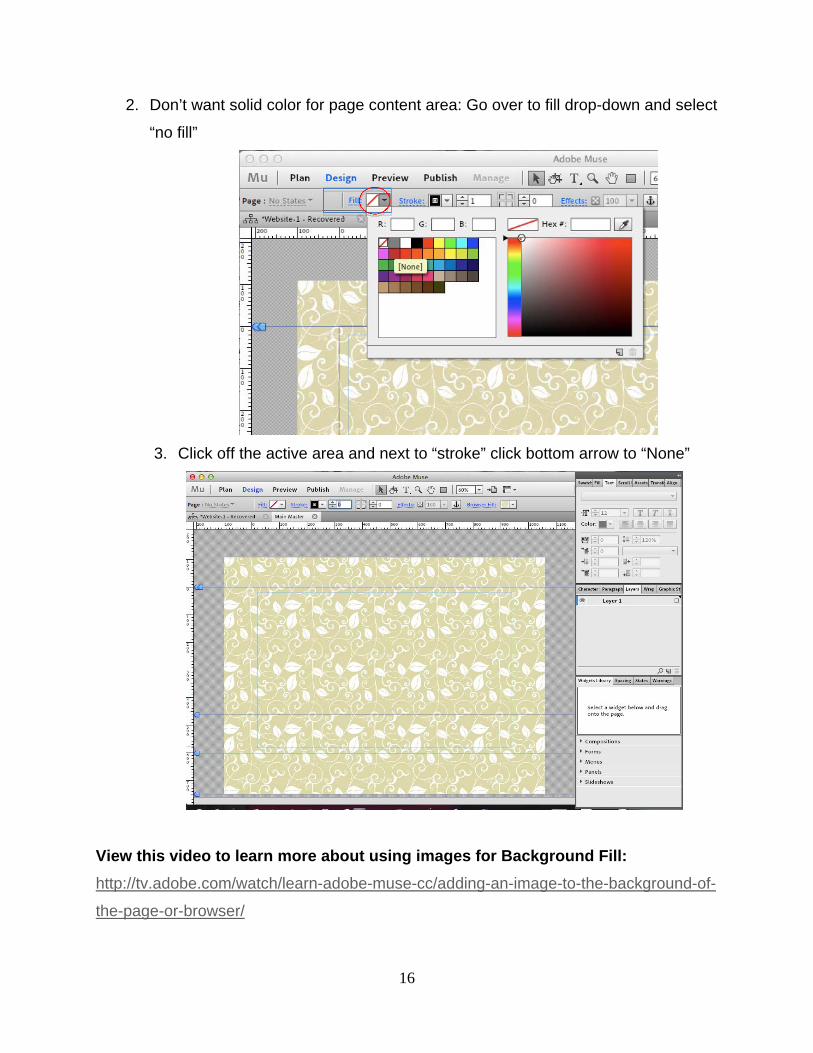
2. Don’t want solid color for page content area: Go over to fill drop-down and select
“no fill”
3. Click off the active area and next to “stroke” click bottom arrow to “None”
View this video to learn more about using images for Background Fill:
http://tv.adobe.com/watch/learn-adobe-muse-cc/adding-an-image-to-the-background-of-
the-page-or-browser/
17
5.2. Establishing Headers and Footers
Individual pages are often varying heights, based on the unique content that is
displayed on each page. You can set up regions so that the header always
remains in place at the top and the footer content always displays directly below
the page content, regardless of each page’s height.
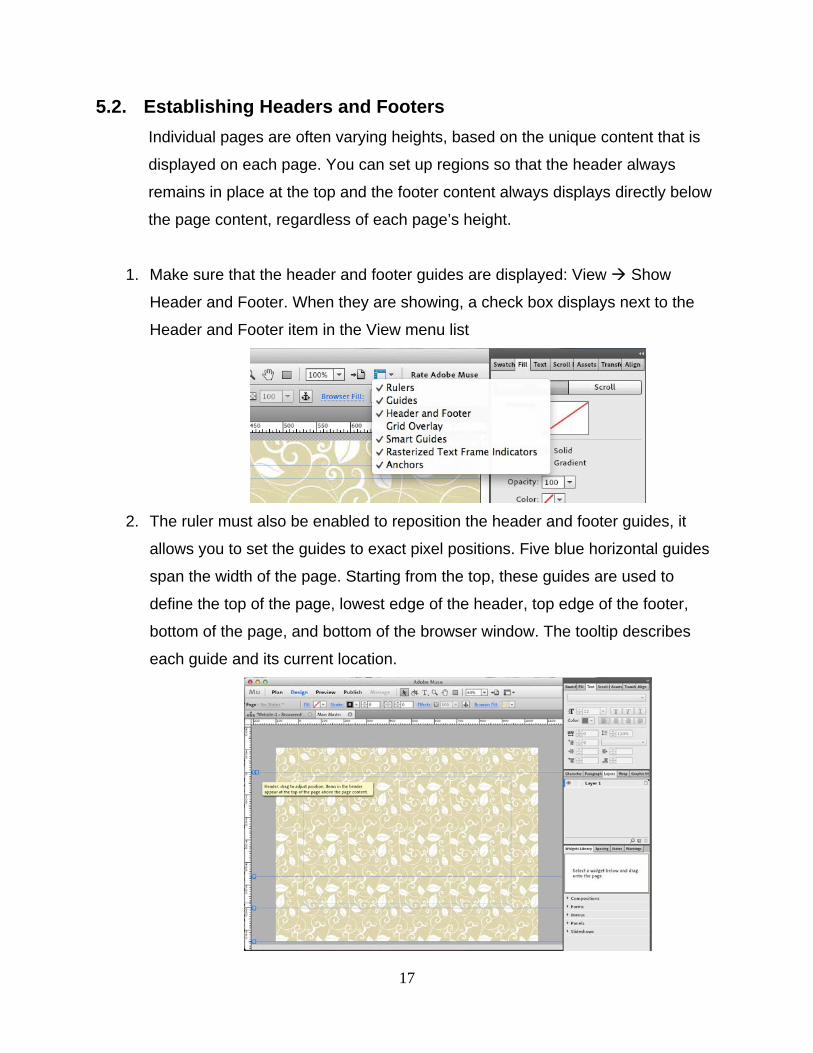
1. Make sure that the header and footer guides are displayed: View Show
Header and Footer. When they are showing, a check box displays next to the
Header and Footer item in the View menu list
2. The ruler must also be enabled to reposition the header and footer guides, it
allows you to set the guides to exact pixel positions. Five blue horizontal guides
span the width of the page. Starting from the top, these guides are used to
define the top of the page, lowest edge of the header, top edge of the footer,
bottom of the page, and bottom of the browser window. The tooltip describes
each guide and its current location.
18
a. Note: The bottom of the browser window dictates the lowest part of the
display area when a visitor views the site in a browser, depending on the
design, you can set a background color or image and set the guide for the
bottom of the page above the bottom of the browser guide to allow that
background to show below the page’s content.
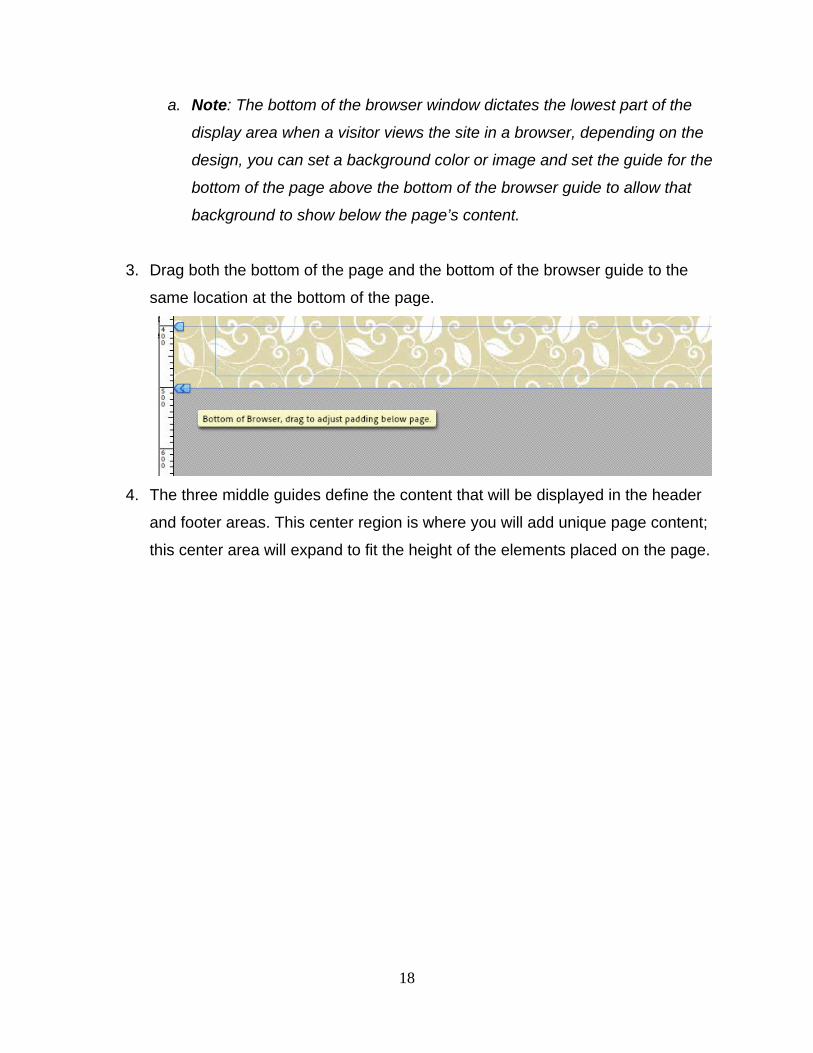
3. Drag both the bottom of the page and the bottom of the browser guide to the
same location at the bottom of the page.
4. The three middle guides define the content that will be displayed in the header
and footer areas. This center region is where you will add unique page content;
this center area will expand to fit the height of the elements placed on the page.
19
6. Working with Graphics
6.1. Preparing Content for Web
1. IMAGE FILES:
ALL images to be placed in MUSE should be saved as PNG’s (Portable Network
Graphics). PNG’s create files that are small enough to be uploaded quickly without
losing clarity or definition. In all allied software the designer has the option to SAVE
FOR WEB AND DEVICES.
Image size is the most important consideration in saving an image file. The image must
be saved large enough so that there is no need to stretch in the document. A good rule
of thumb is to save the image create the image to be as wide as the web page (900 px,
1000 px, 1200 px).
If saving a black and white image PNG 8 (from 8 master colors) will suffice. If saving a
color image PNG 24 should be chosen. Optimization relates to the image either being
type or art heavy. If text that should be readable is involved Text Optimization should
be chosen.
Saving a PNG does not overwrite the original file. ALWAYS keep original files.
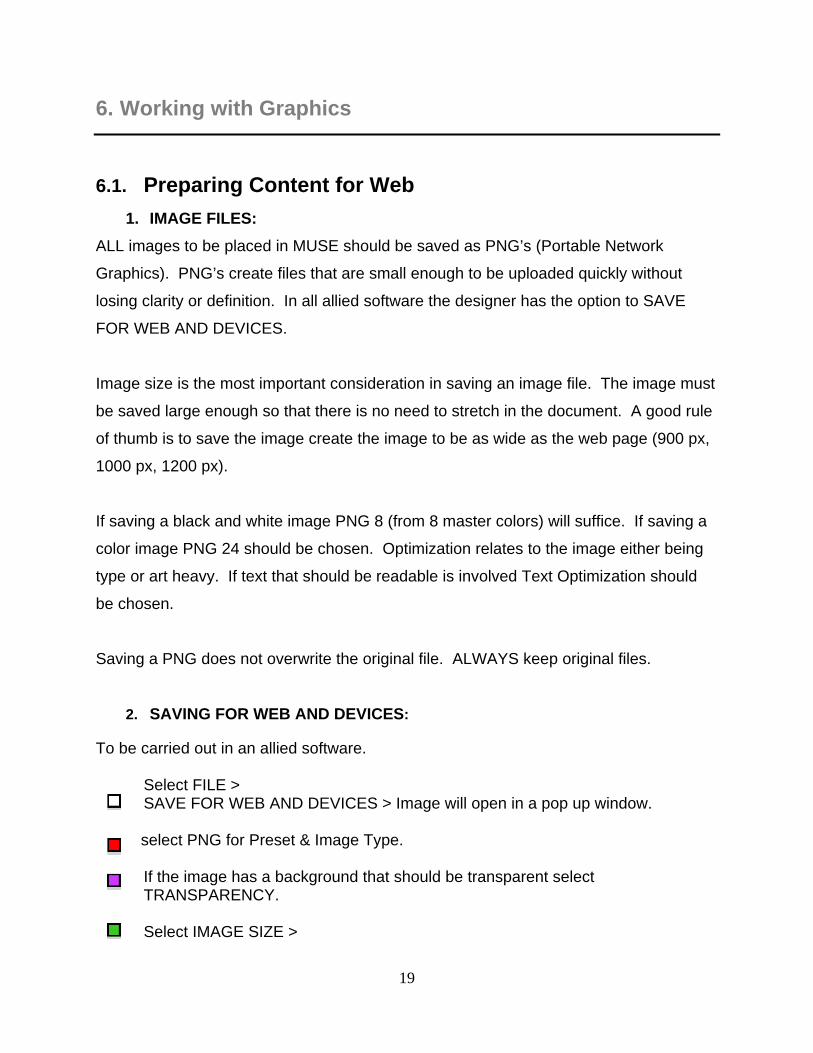
2. SAVING FOR WEB AND DEVICES:
To be carried out in an allied software. Select FILE >
SAVE FOR WEB AND DEVICES > Image will open in a pop up window.
select PNG for Preset & Image Type.
If the image has a background that should be transparent select TRANSPARENCY. Select IMAGE SIZE >
20
select CONSTRAIN PROPORTION > define maximum image width. select appropriate OPTIMIZATION.
select APPLY (if available).
SAVE
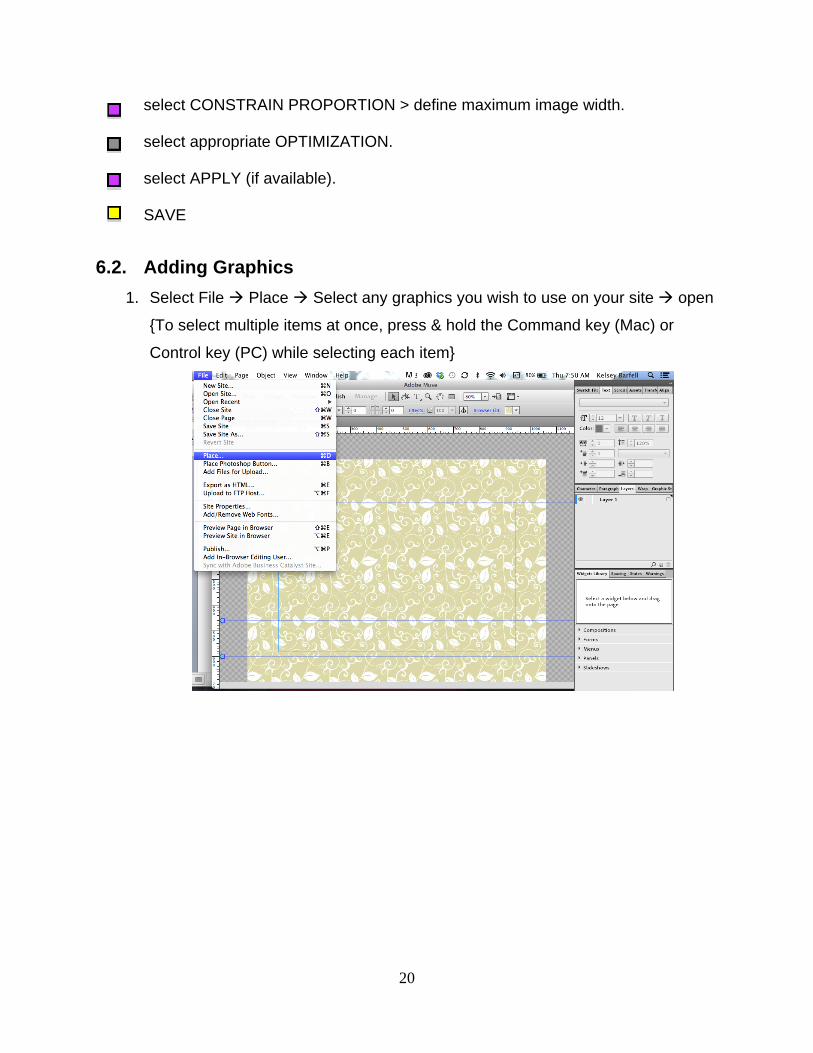
6.2. Adding Graphics
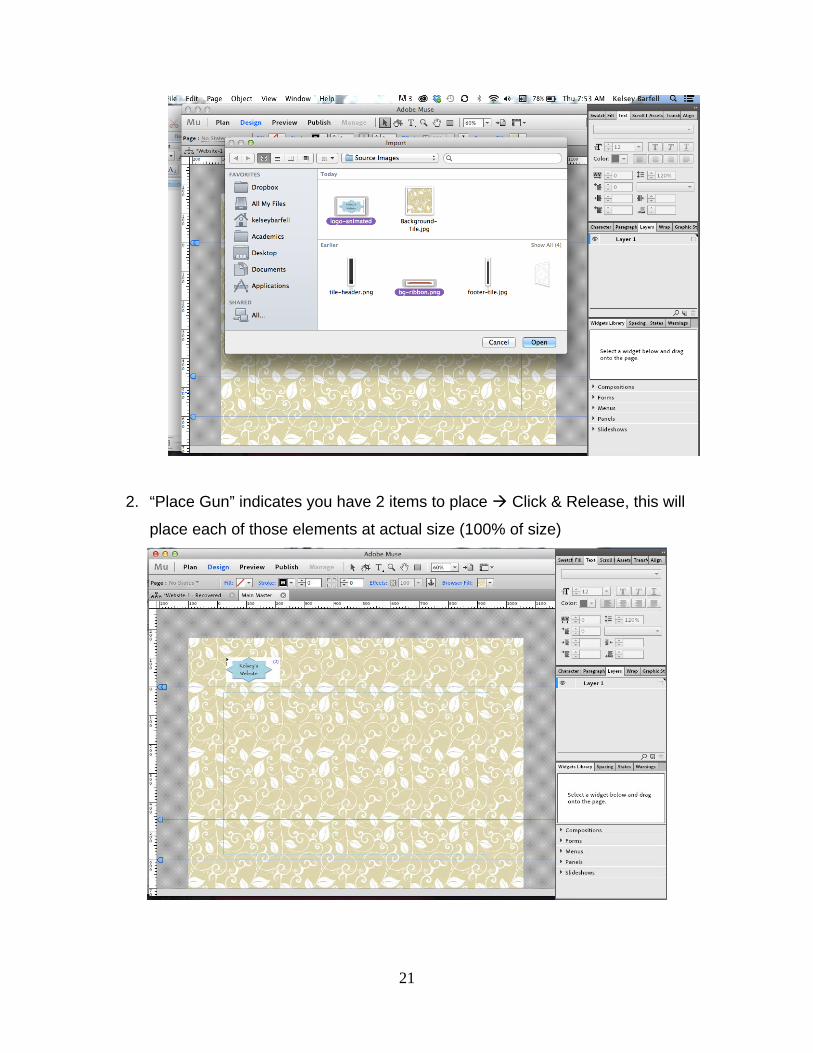
1. Select File Place Select any graphics you wish to use on your site open
{To select multiple items at once, press & hold the Command key (Mac) or
Control key (PC) while selecting each item}
21
2. “Place Gun” indicates you have 2 items to place Click & Release, this will
place each of those elements at actual size (100% of size)
22
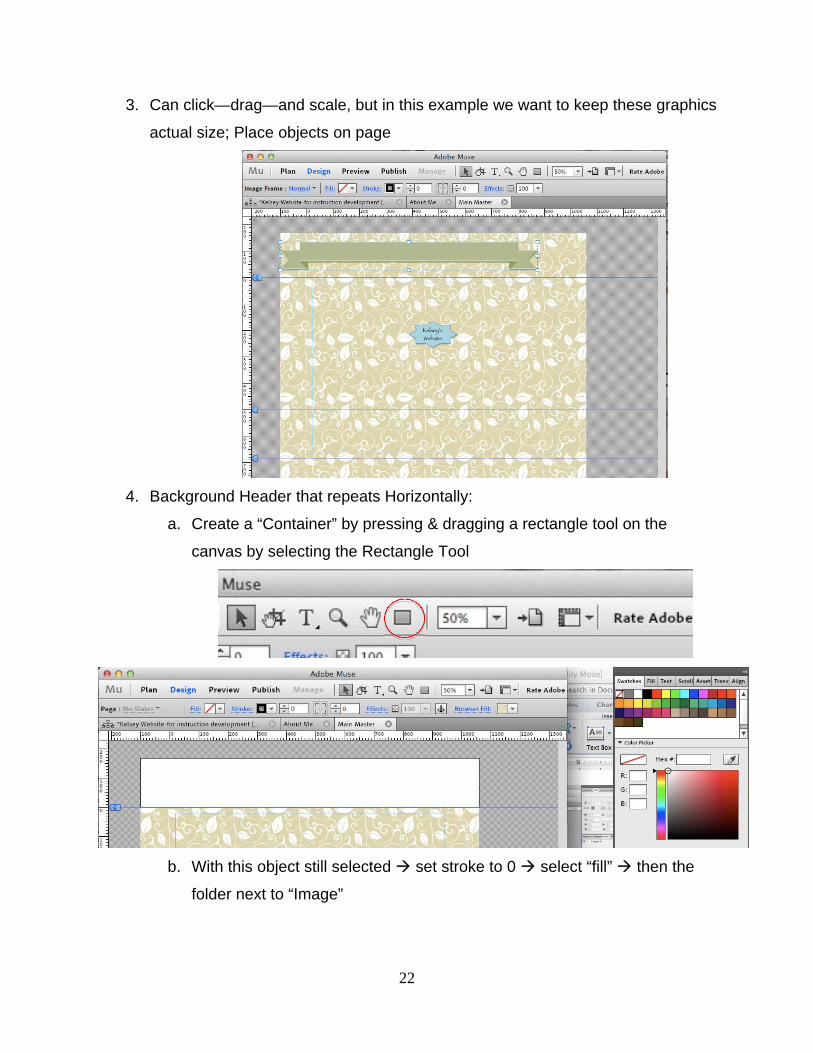
3. Can click—drag—and scale, but in this example we want to keep these graphics
actual size; Place objects on page
4. Background Header that repeats Horizontally:
a. Create a “Container” by pressing & dragging a rectangle tool on the
canvas by selecting the Rectangle Tool
b. With this object still selected set stroke to 0 select “fill” then the
folder next to “Image”
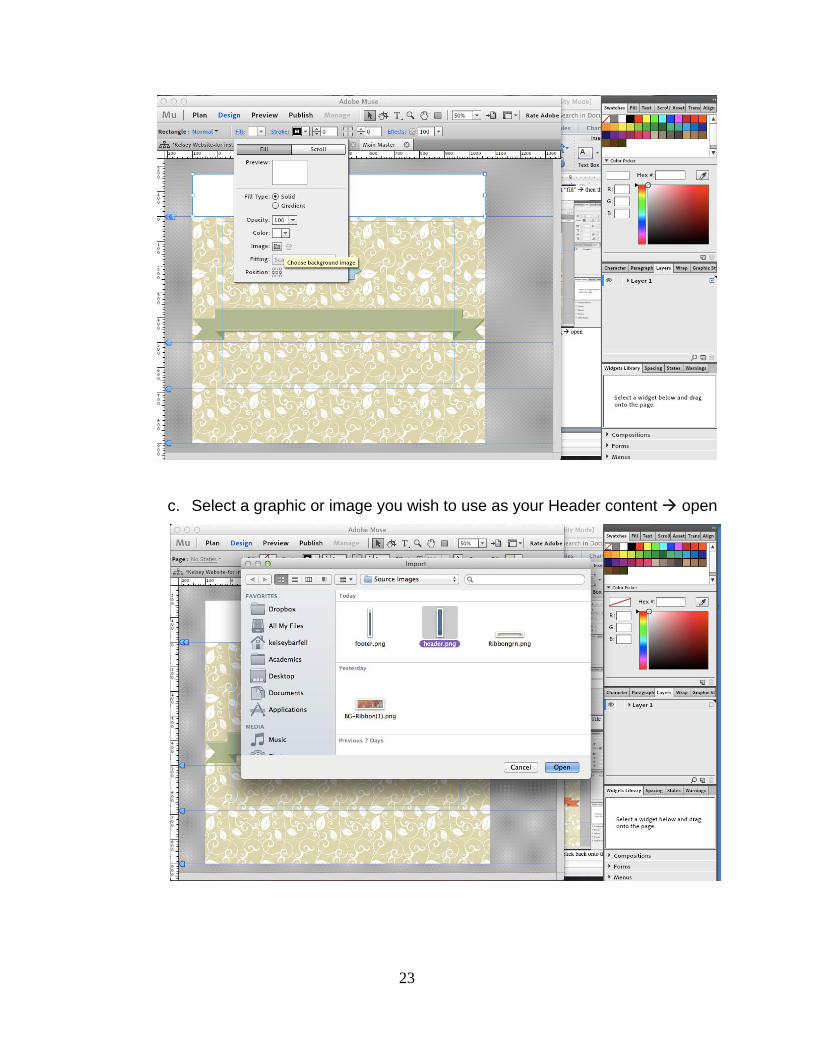
23
c. Select a graphic or image you wish to use as your Header content open
24
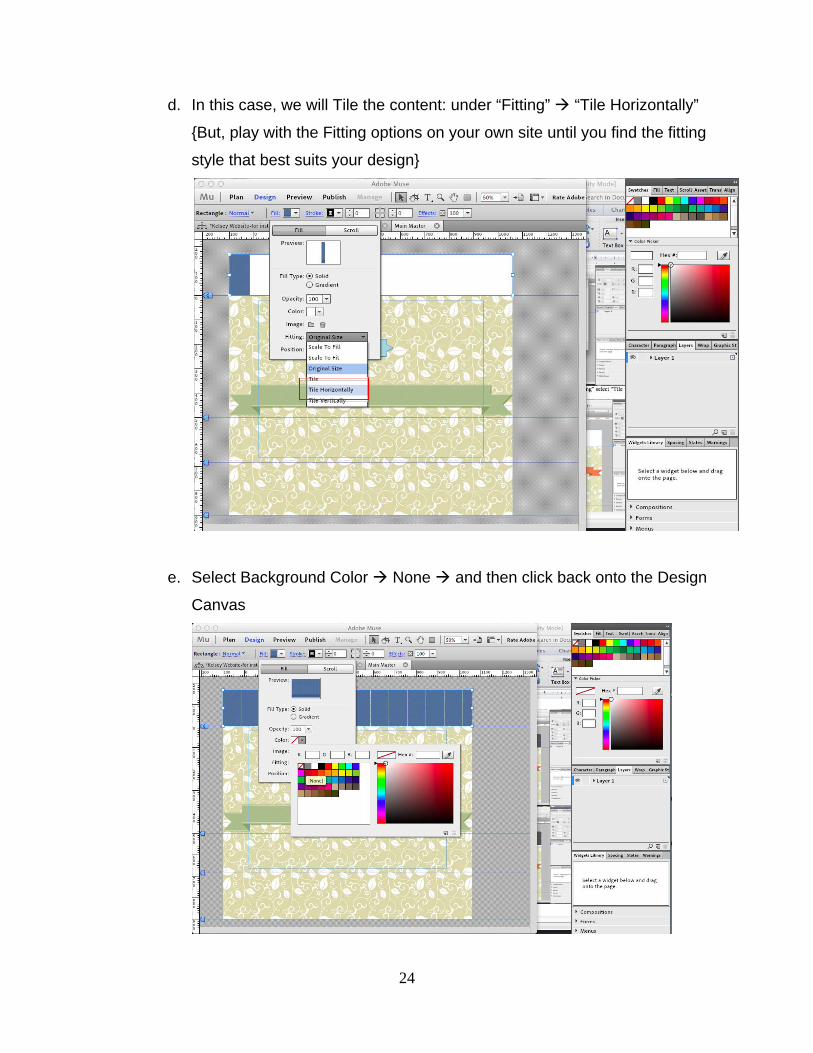
d. In this case, we will Tile the content: under “Fitting” “Tile Horizontally”
{But, play with the Fitting options on your own site until you find the fitting
style that best suits your design}
e. Select Background Color None and then click back onto the Design
Canvas
25
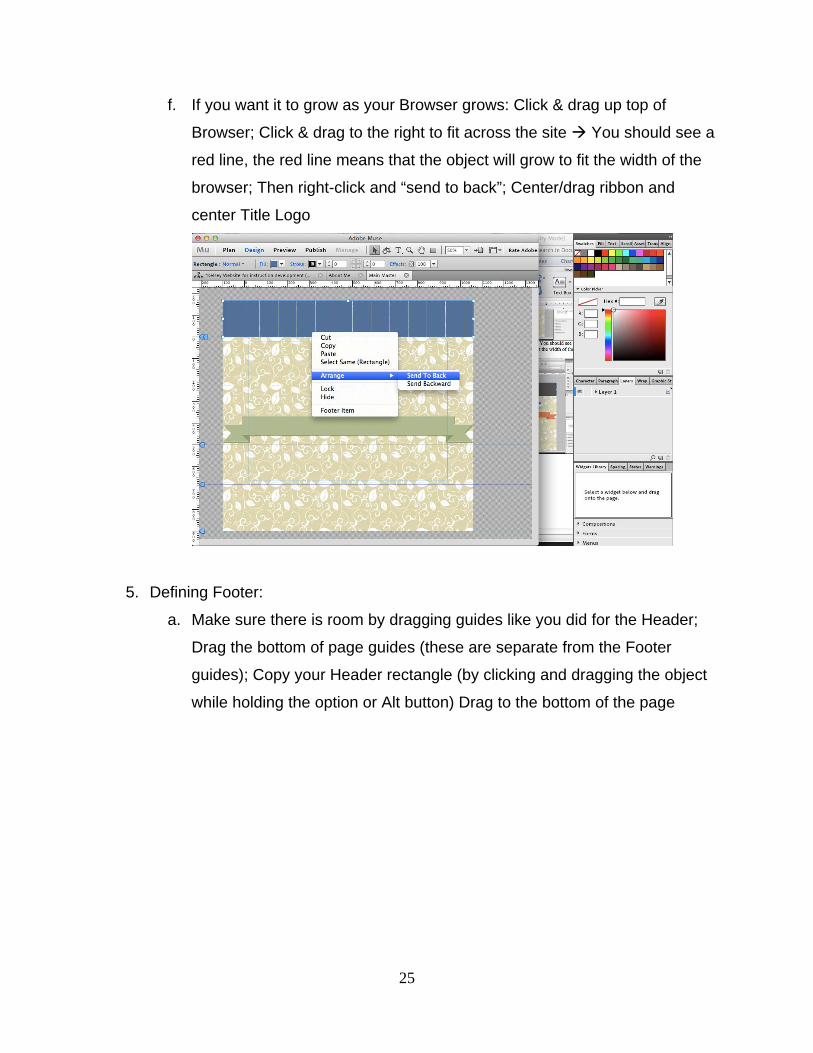
f. If you want it to grow as your Browser grows: Click & drag up top of
Browser; Click & drag to the right to fit across the site You should see a
red line, the red line means that the object will grow to fit the width of the
browser; Then right-click and “send to back”; Center/drag ribbon and
center Title Logo
5. Defining Footer:
a. Make sure there is room by dragging guides like you did for the Header;
Drag the bottom of page guides (these are separate from the Footer
guides); Copy your Header rectangle (by clicking and dragging the object
while holding the option or Alt button) Drag to the bottom of the page
26
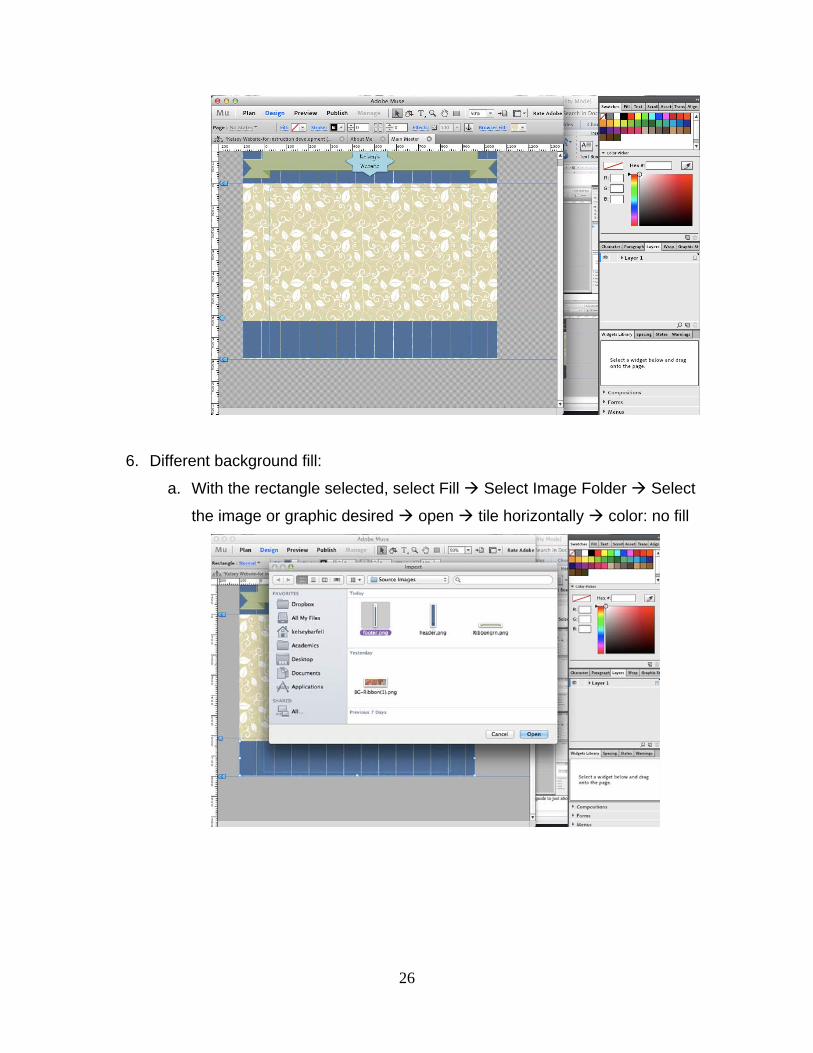
6. Different background fill:
a. With the rectangle selected, select Fill Select Image Folder Select
the image or graphic desired open tile horizontally color: no fill

27
(Bring to the very bottom of the page and move Footer guide to just
above that object)
28
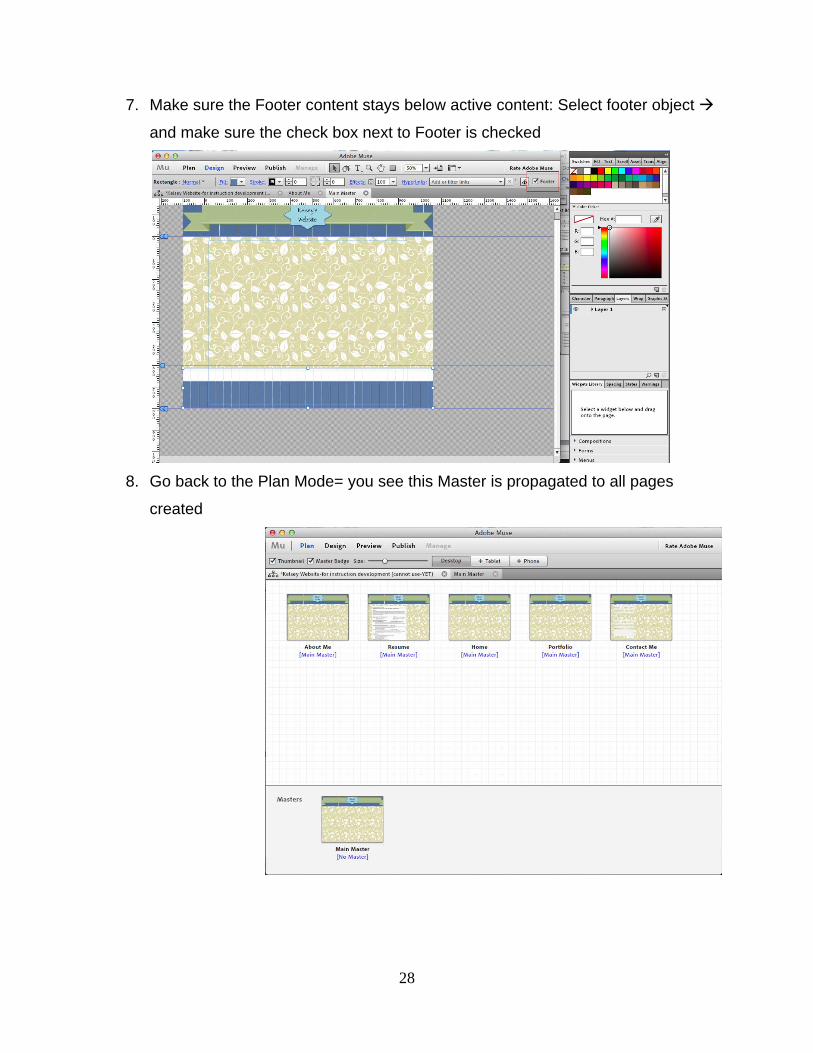
7. Make sure the Footer content stays below active content: Select footer object
and make sure the check box next to Footer is checked
8. Go back to the Plan Mode= you see this Master is propagated to all pages
created
29
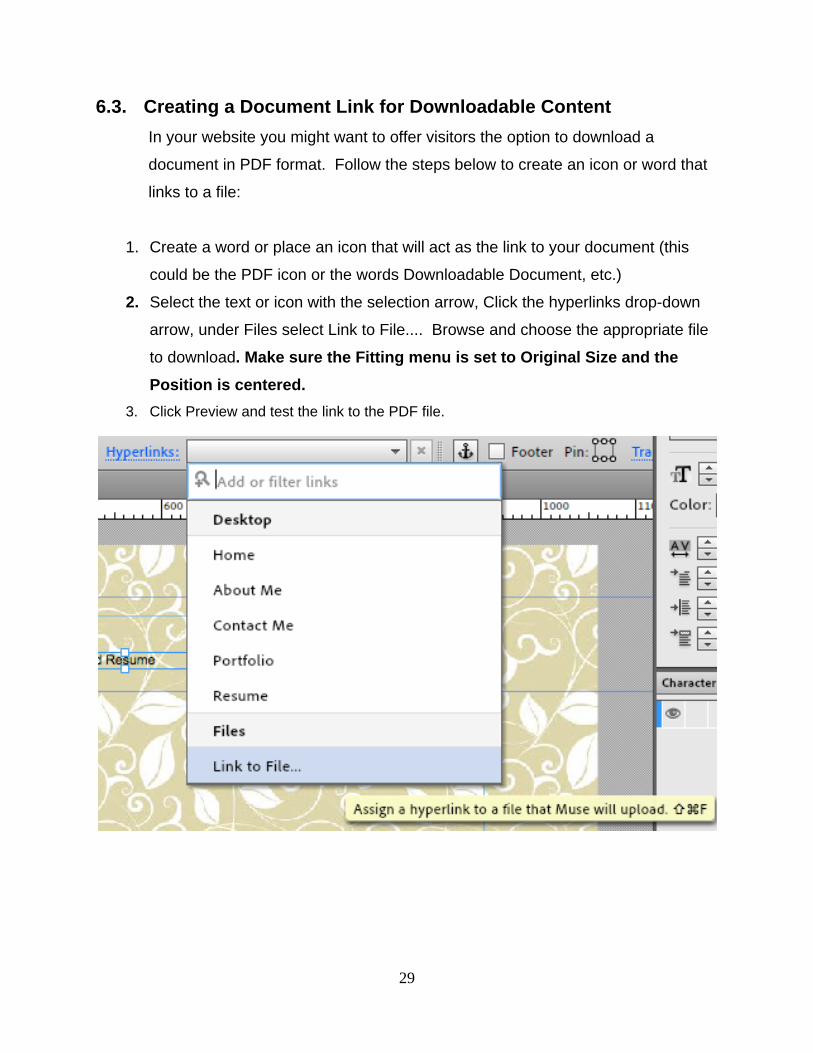
6.3. Creating a Document Link for Downloadable Content
In your website you might want to offer visitors the option to download a
document in PDF format. Follow the steps below to create an icon or word that
links to a file:
1. Create a word or place an icon that will act as the link to your document (this
could be the PDF icon or the words Downloadable Document, etc.)
2. Select the text or icon with the selection arrow, Click the hyperlinks drop-down
arrow, under Files select Link to File.... Browse and choose the appropriate file
to download. Make sure the Fitting menu is set to Original Size and the
Position is centered.
3. Click Preview and test the link to the PDF file.
30
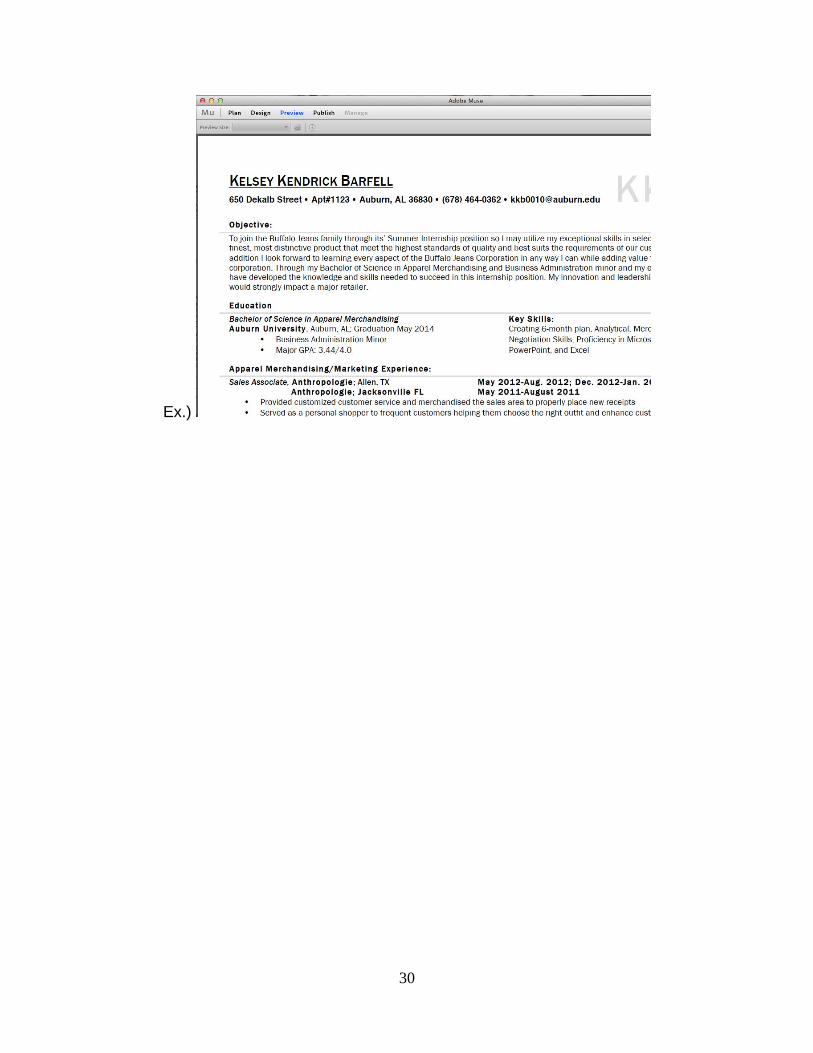
Ex.)
31
7. Formatting Objects
7.1. Locking
Locking ensures that you won’t accidently move or delete any of the finished
elements on a page, because they are no longer selectable.
1. Right-click on a group or selected set of elements and choose Lock from the
context menu.
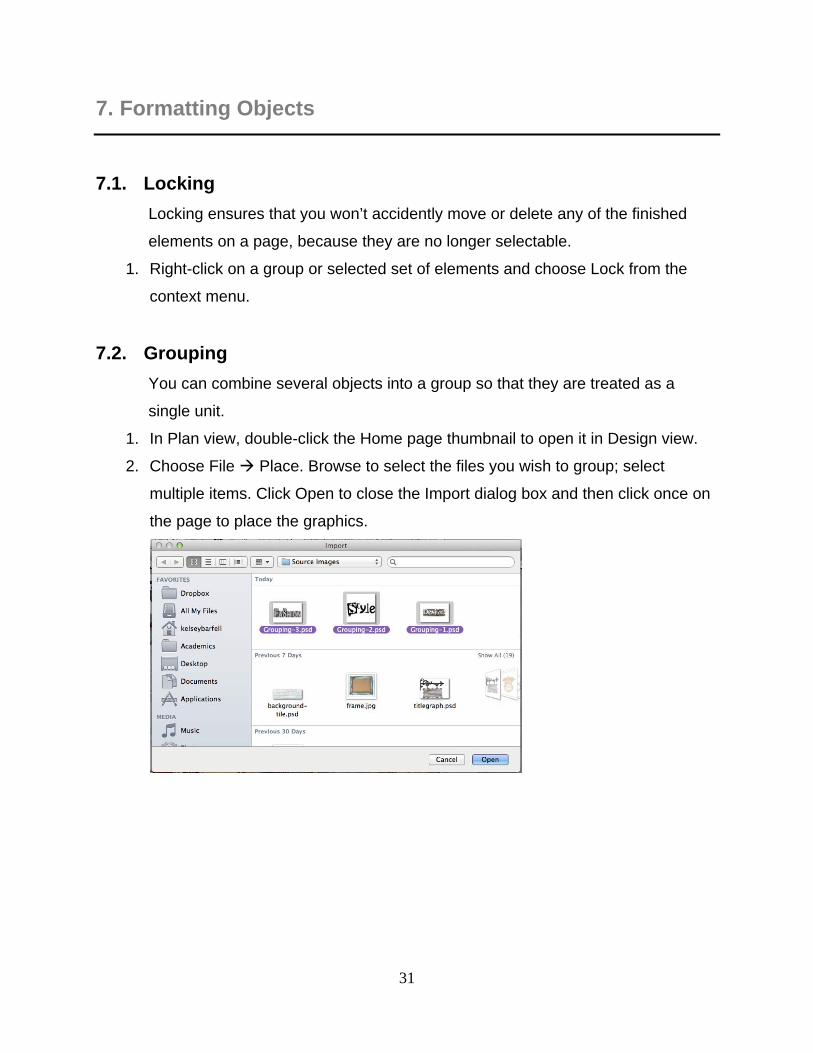
7.2. Grouping
You can combine several objects into a group so that they are treated as a
single unit.
1. In Plan view, double-click the Home page thumbnail to open it in Design view.
2. Choose File Place. Browse to select the files you wish to group; select
multiple items. Click Open to close the Import dialog box and then click once on
the page to place the graphics.
32
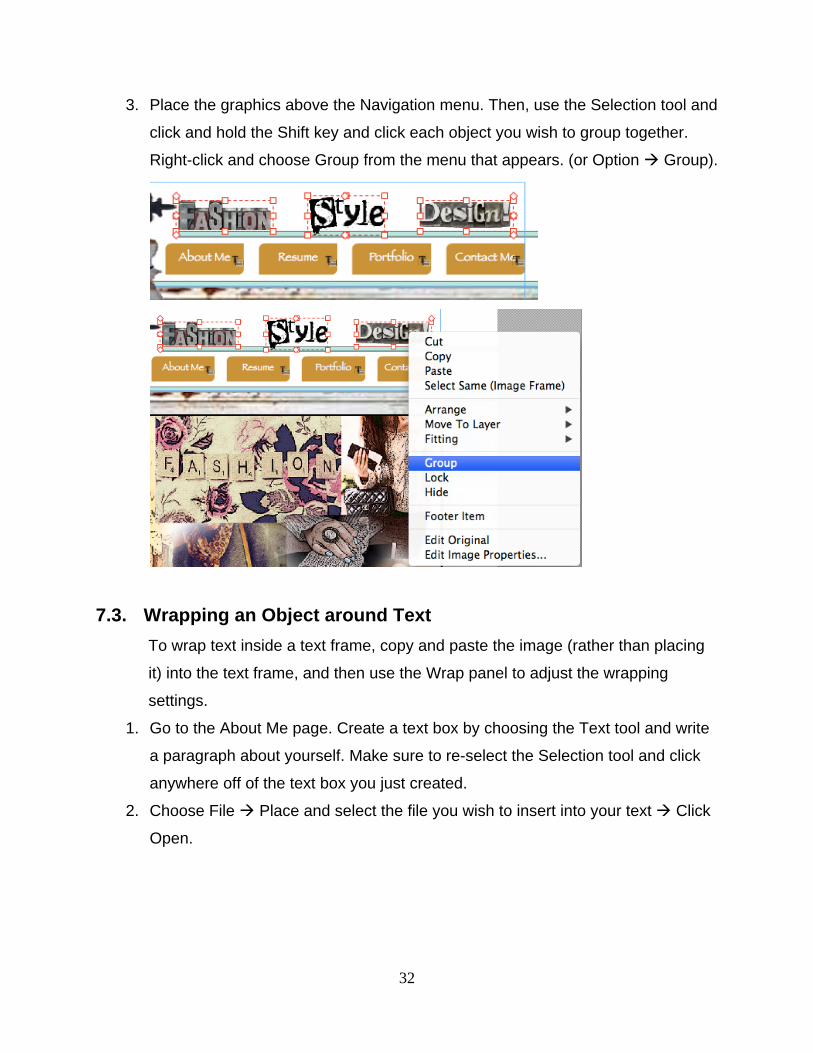
3. Place the graphics above the Navigation menu. Then, use the Selection tool and
click and hold the Shift key and click each object you wish to group together.
Right-click and choose Group from the menu that appears. (or Option Group).
7.3. Wrapping an Object around Text
To wrap text inside a text frame, copy and paste the image (rather than placing
it) into the text frame, and then use the Wrap panel to adjust the wrapping
settings.
1. Go to the About Me page. Create a text box by choosing the Text tool and write
a paragraph about yourself. Make sure to re-select the Selection tool and click
anywhere off of the text box you just created.
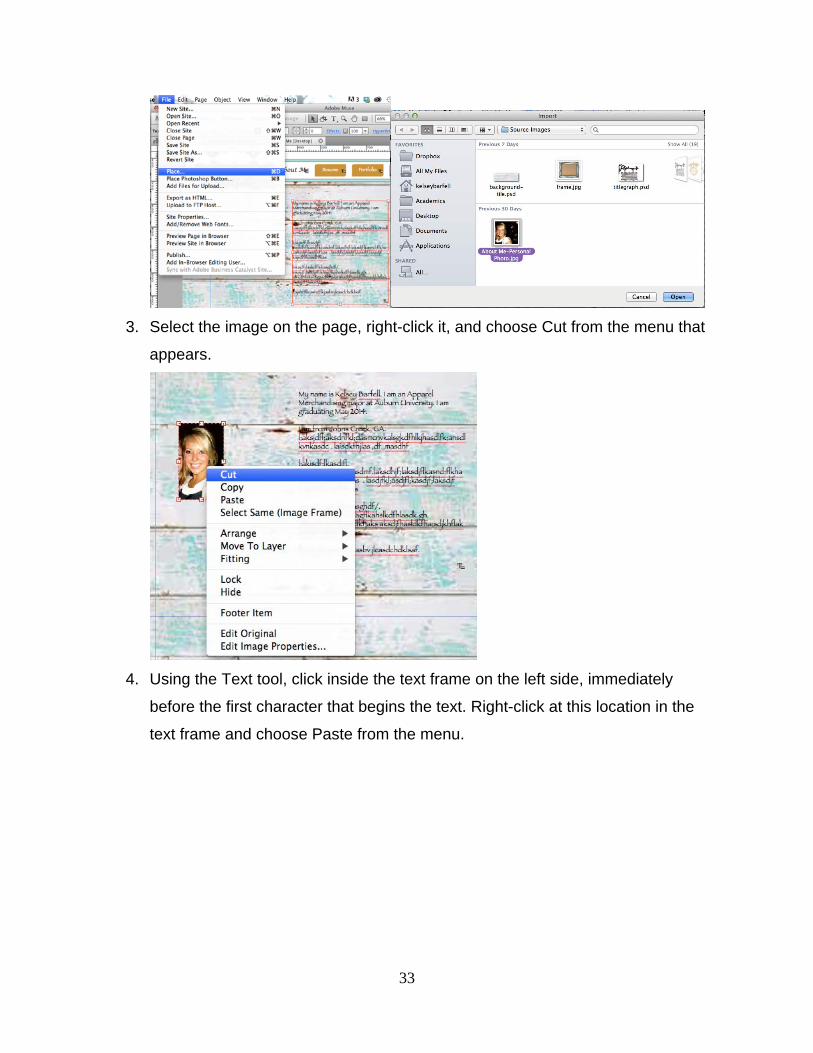
2. Choose File Place and select the file you wish to insert into your text Click
Open.
33
3. Select the image on the page, right-click it, and choose Cut from the menu that
appears.
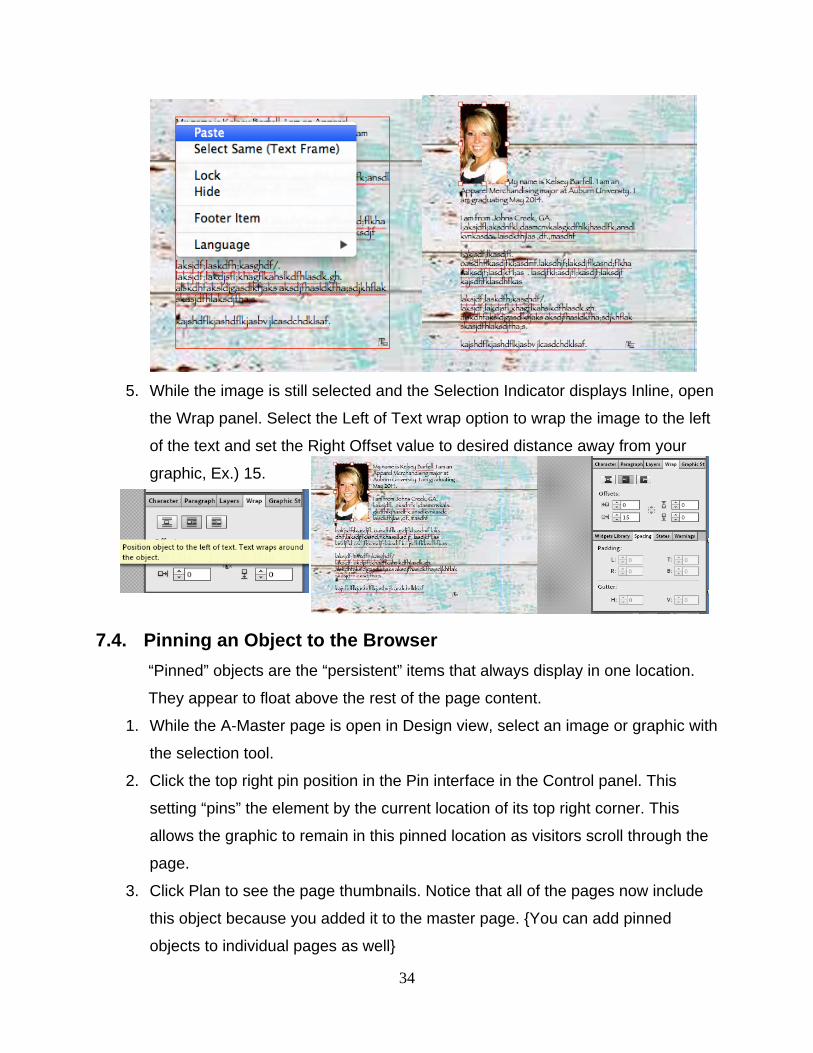
4. Using the Text tool, click inside the text frame on the left side, immediately
before the first character that begins the text. Right-click at this location in the
text frame and choose Paste from the menu.
34
5. While the image is still selected and the Selection Indicator displays Inline, open
the Wrap panel. Select the Left of Text wrap option to wrap the image to the left
of the text and set the Right Offset value to desired distance away from your
graphic, Ex.) 15.
7.4. Pinning an Object to the Browser
“Pinned” objects are the “persistent” items that always display in one location.
They appear to float above the rest of the page content.
1. While the A-Master page is open in Design view, select an image or graphic with
the selection tool.
2. Click the top right pin position in the Pin interface in the Control panel. This
setting “pins” the element by the current location of its top right corner. This
allows the graphic to remain in this pinned location as visitors scroll through the
page.
3. Click Plan to see the page thumbnails. Notice that all of the pages now include
this object because you added it to the master page. {You can add pinned
objects to individual pages as well}
35
8. Working with Text
8.1. Adding Text
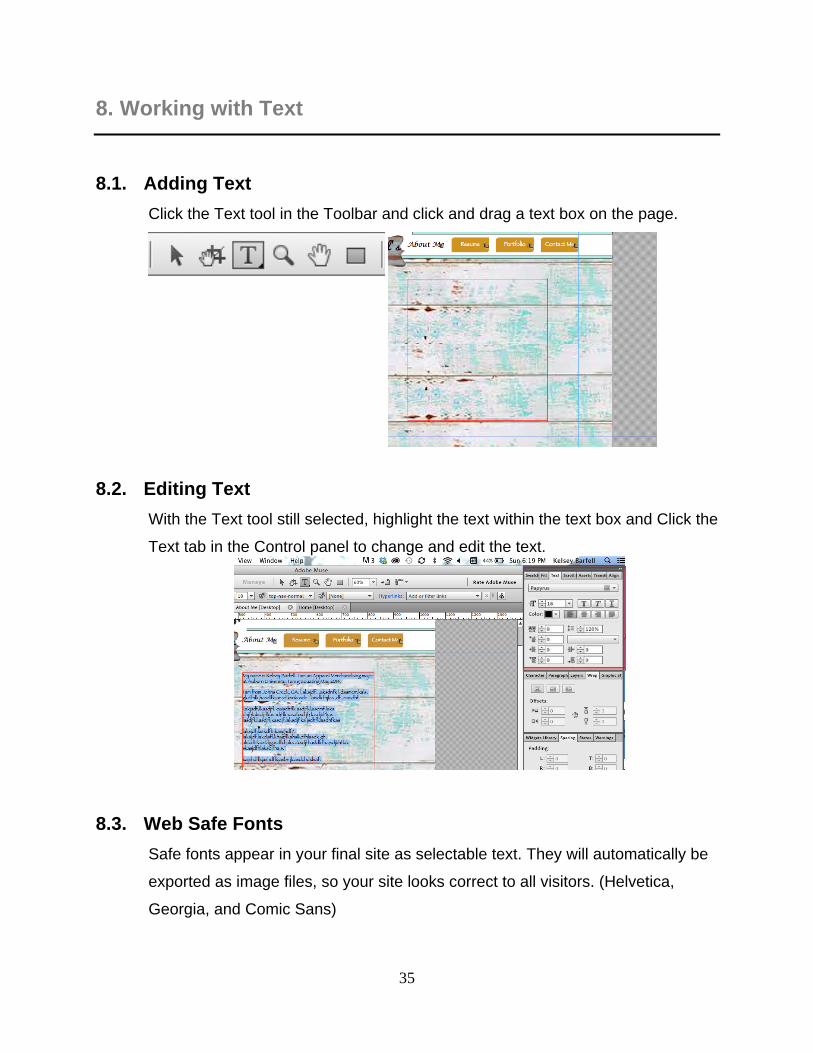
Click the Text tool in the Toolbar and click and drag a text box on the page.
8.2. Editing Text
With the Text tool still selected, highlight the text within the text box and Click the
Text tab in the Control panel to change and edit the text.
8.3. Web Safe Fonts
Safe fonts appear in your final site as selectable text. They will automatically be
exported as image files, so your site looks correct to all visitors. (Helvetica,
Georgia, and Comic Sans)
36
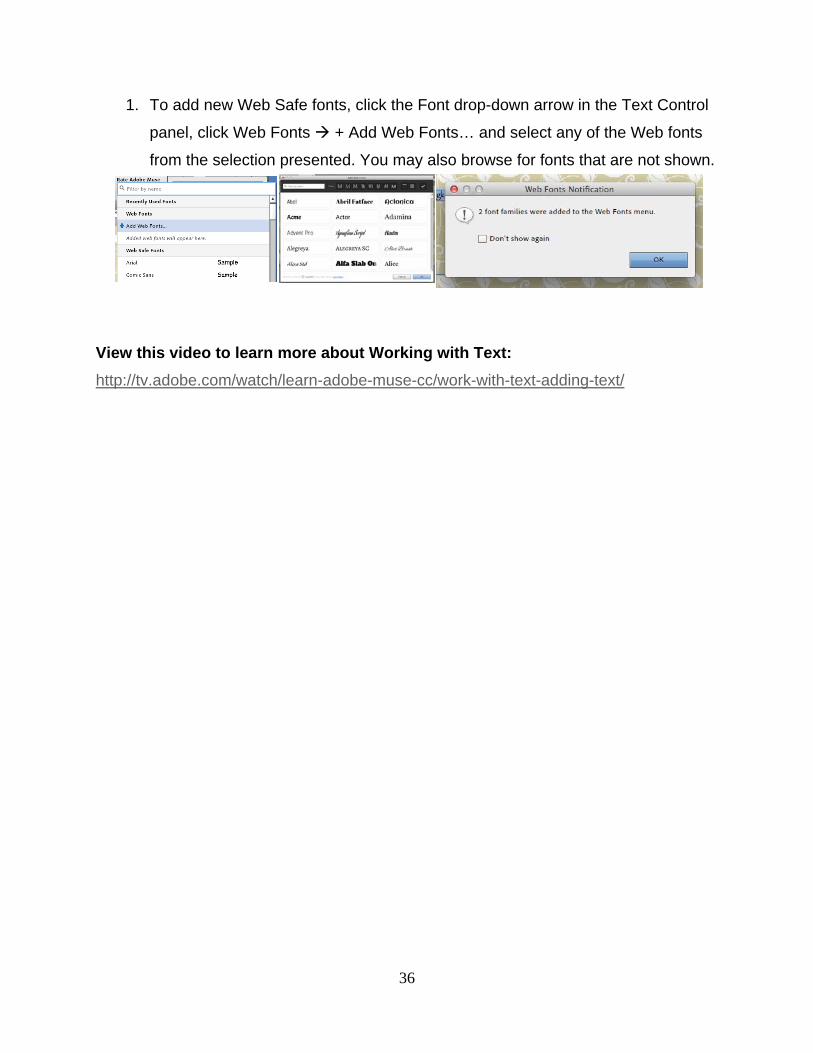
1. To add new Web Safe fonts, click the Font drop-down arrow in the Text Control
panel, click Web Fonts + Add Web Fonts… and select any of the Web fonts
from the selection presented. You may also browse for fonts that are not shown.
View this video to learn more about Working with Text:
http://tv.adobe.com/watch/learn-adobe-muse-cc/work-with-text-adding-text/
37
9. Navigation
Website Navigation will make or break your user’s overall design experience. The key
to successful navigation is CONSISTENCY. In a website navigation may change from
overall / general navigation to more specific / page by page, but should be consistent in
font, typeface, character, size, color, positioning, etc. In muse your navigation is based
on your Site Plan (design tree). Thus, there must be a site plan before navigation can
be enabled.
The goal of navigation on a web page is to achieve the most direct access to
subsequent pages. Inefficient navigation requires multiple pages and sub links to get to
the content requested. Effective navigation is direct and requires ONE LINK.
Navigation can be carried out in two ways:
1. By using a vertical or horizontal form widget (see chapter 12 for how widgets
work and can be manipulated). Warning: having a form widget create
MULTIPLE drop down or pop-up windows for subsequent pages is not the best
solution.
2. Hyperlink on words, images, symbols, icons, etc. to sites or files outside of your
website or to pages within the site itself (see chapter 10) or on a master page to
subsequent tiered pages.
38
10. Navigation Bar
10.1. Creating Menus
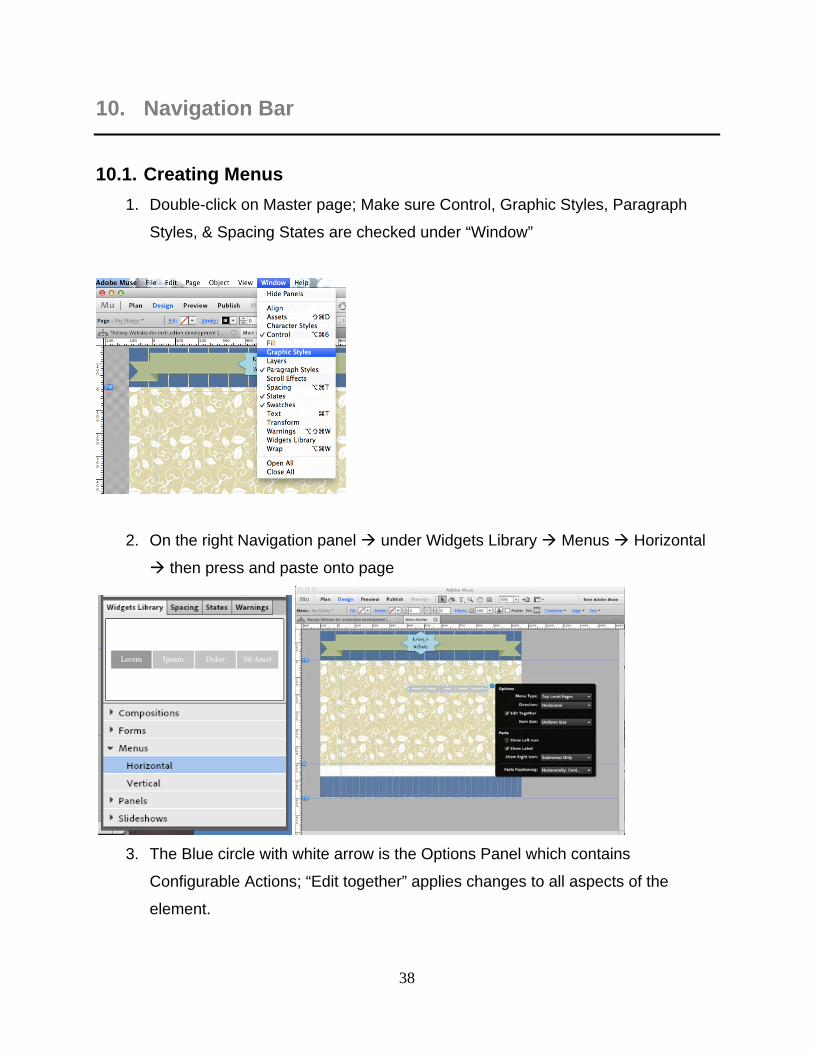
1. Double-click on Master page; Make sure Control, Graphic Styles, Paragraph
Styles, & Spacing States are checked under “Window”
2. On the right Navigation panel under Widgets Library Menus Horizontal
then press and paste onto page
3. The Blue circle with white arrow is the Options Panel which contains
Configurable Actions; “Edit together” applies changes to all aspects of the
element.
39
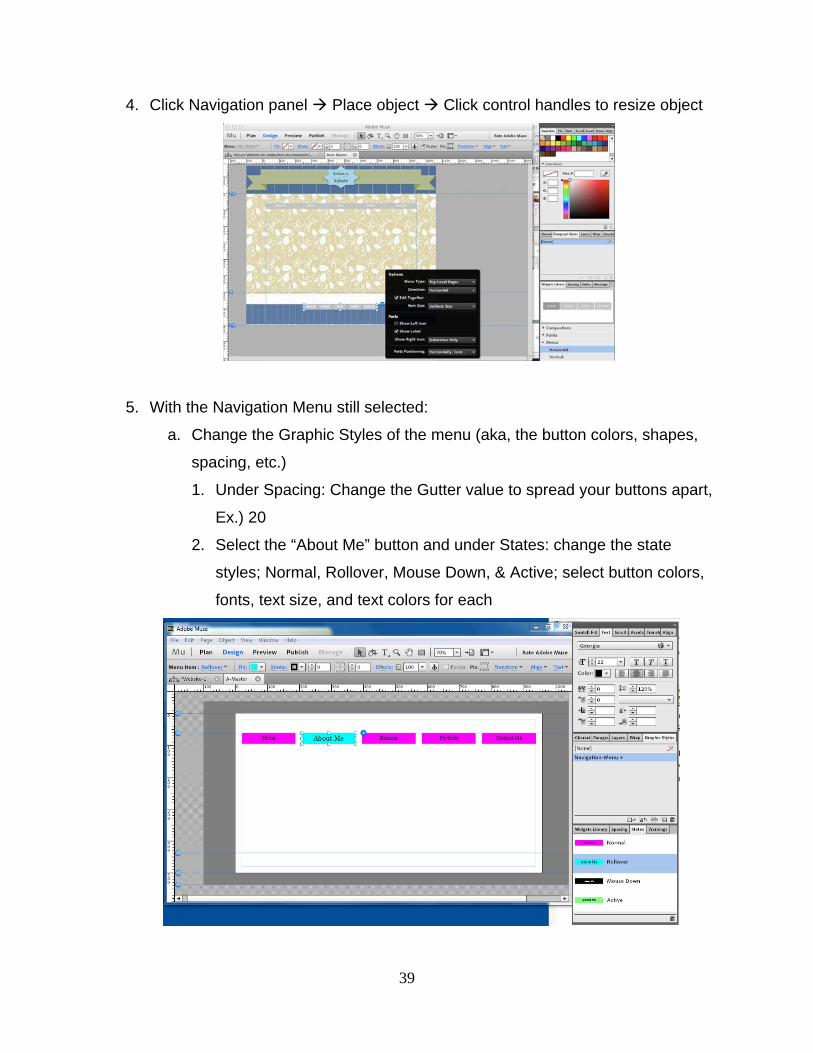
4. Click Navigation panel Place object Click control handles to resize object
5. With the Navigation Menu still selected:
a. Change the Graphic Styles of the menu (aka, the button colors, shapes,
spacing, etc.)
1. Under Spacing: Change the Gutter value to spread your buttons apart,
Ex.) 20
2. Select the “About Me” button and under States: change the state
styles; Normal, Rollover, Mouse Down, & Active; select button colors,
fonts, text size, and text colors for each
40
11. Adding Hyperlinks
11.1. Creating Hyperlinks
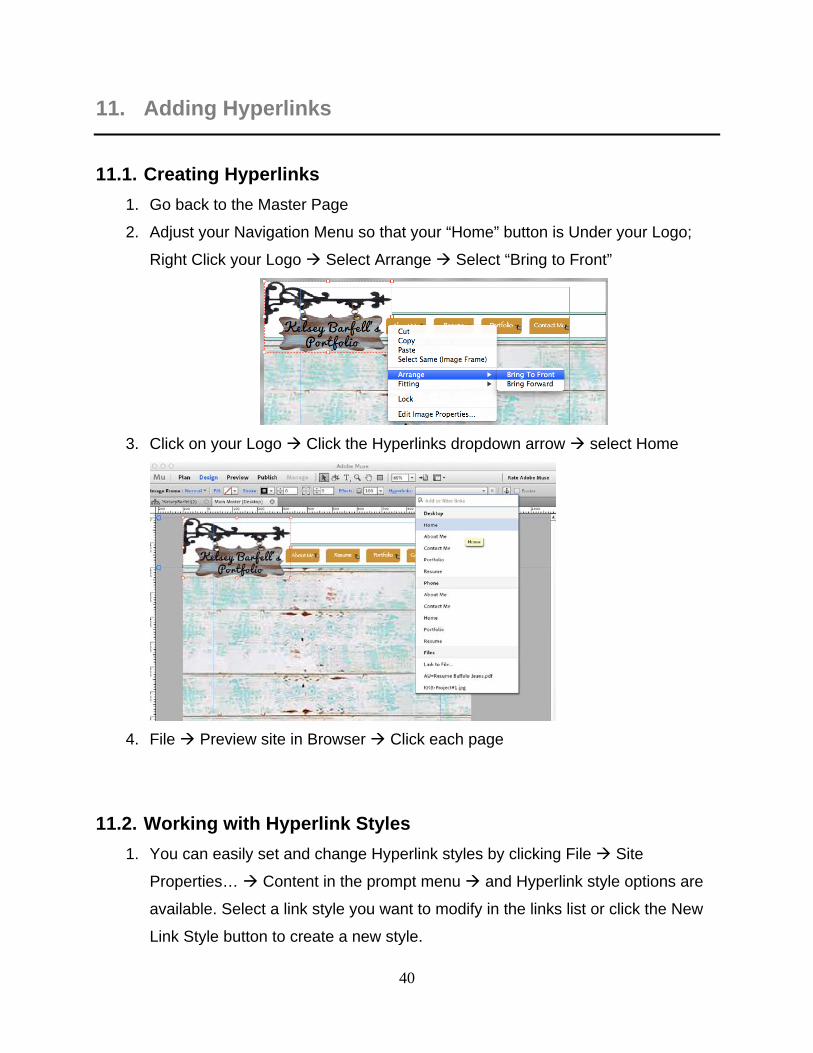
1. Go back to the Master Page
2. Adjust your Navigation Menu so that your “Home” button is Under your Logo;
Right Click your Logo Select Arrange Select “Bring to Front”
3. Click on your Logo Click the Hyperlinks dropdown arrow select Home
4. File Preview site in Browser Click each page
11.2. Working with Hyperlink Styles
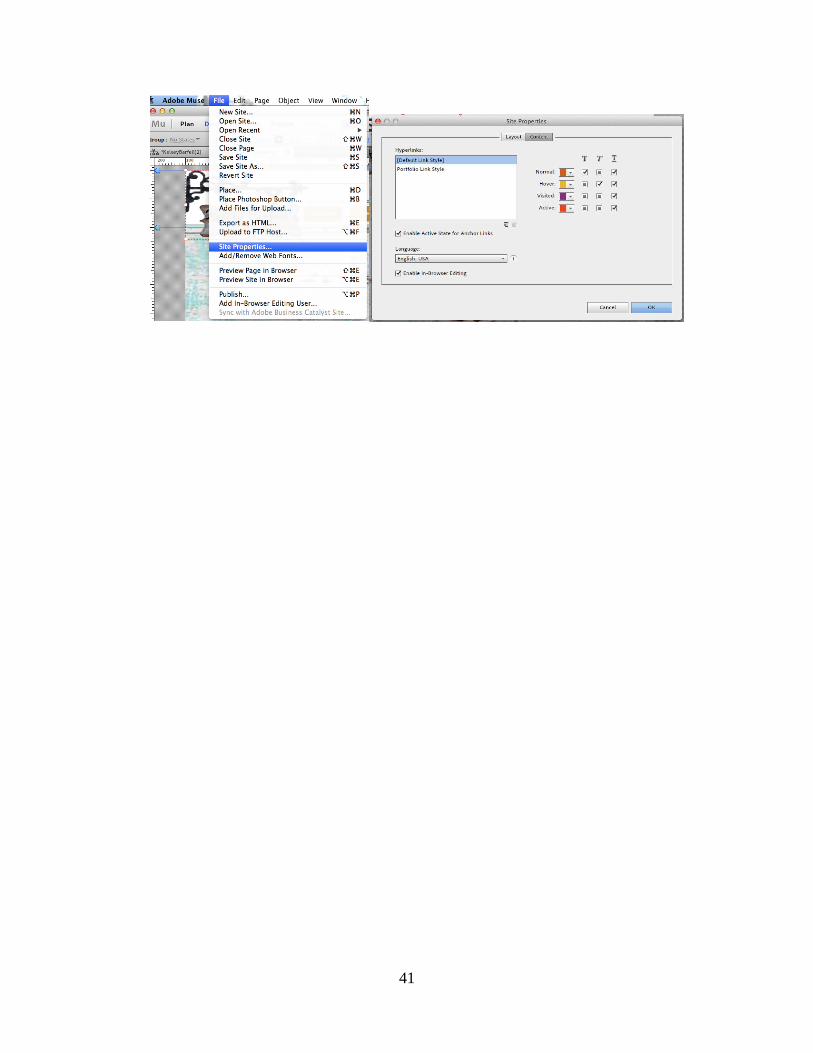
1. You can easily set and change Hyperlink styles by clicking File Site
Properties… Content in the prompt menu and Hyperlink style options are
available. Select a link style you want to modify in the links list or click the New
Link Style button to create a new style.
41
42
12. Using Widgets, and Slideforms
12.1. What is a widget?
Widgets are pre-coded generic samples of commonly used website management
systems. WIDGETS come in the form of image slideshows, menus, contact forms, etc.
Using widgets helps streamline content management and provides continuity throughout
the website.
All widgets are simple templates and can be manipulated in every aspect (font, font
size, color, position on page, object positioning within widget, etc. After dragging,
dropping and placing your chosen widget into its intended position you can make any
changes by selecting the blue circle (with a white arrow) on the upper right corner of the
widget
12.2. Accordion Panel
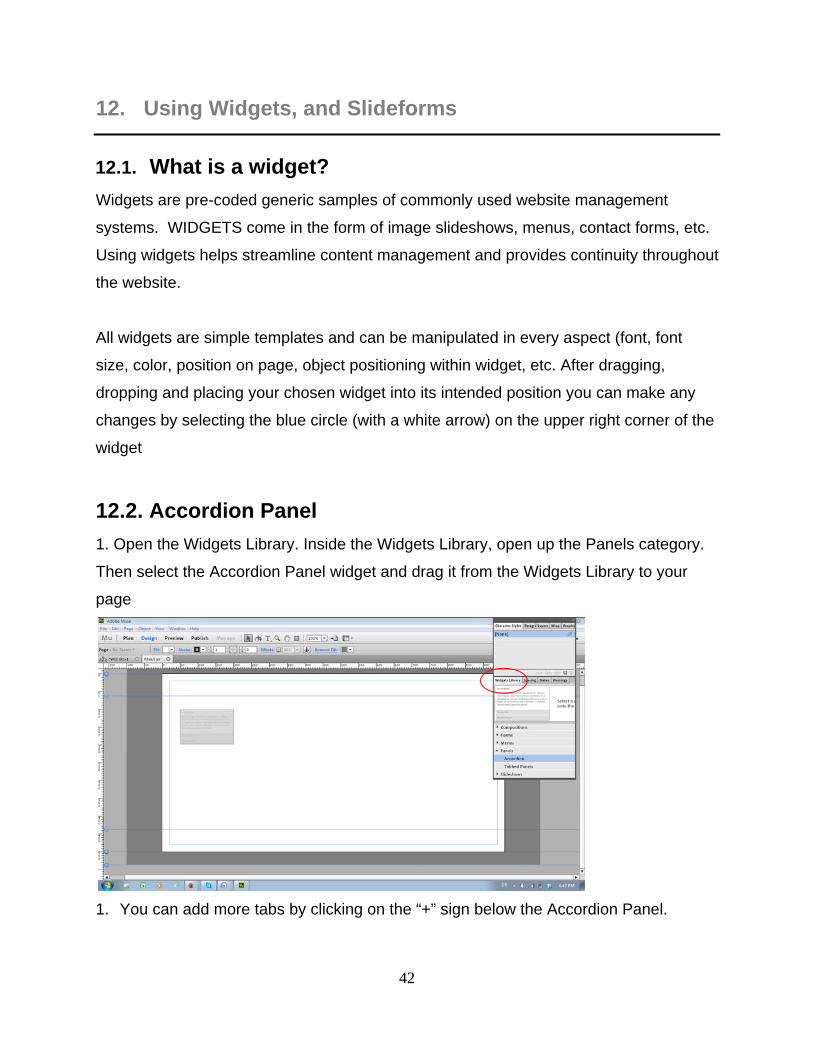
1. Open the Widgets Library. Inside the Widgets Library, open up the Panels category.
Then select the Accordion Panel widget and drag it from the Widgets Library to your
page
1. You can add more tabs by clicking on the “+” sign below the Accordion Panel.
43
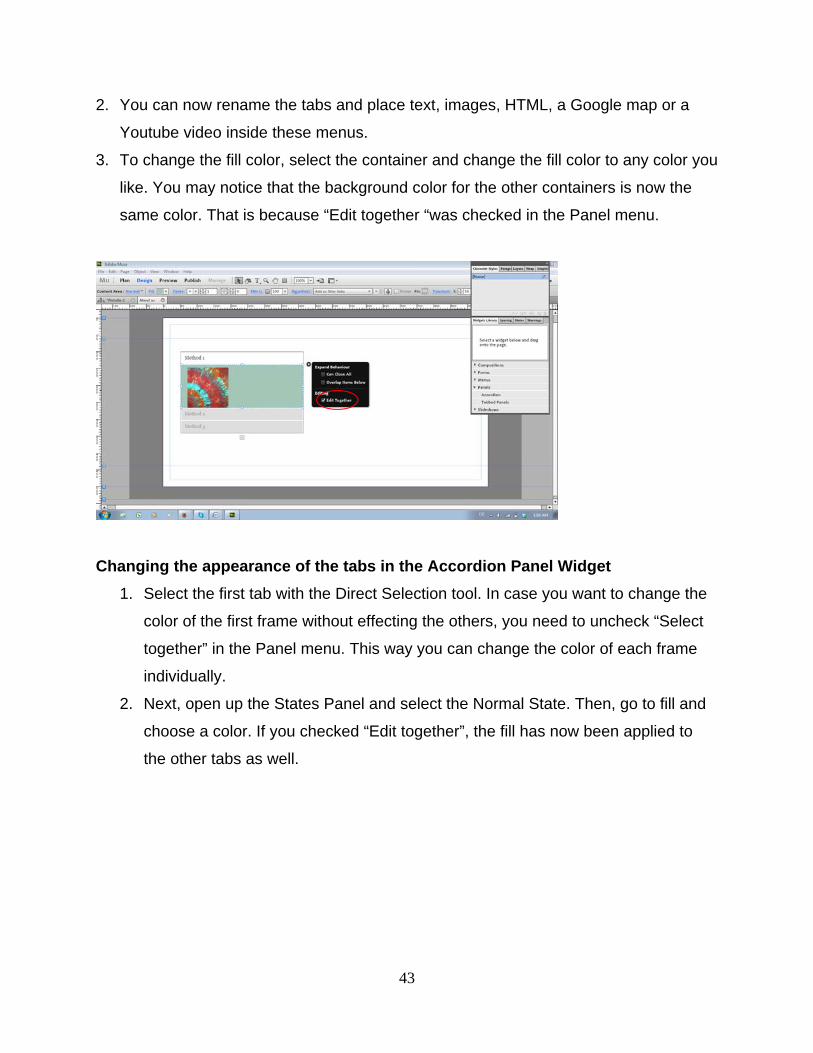
2. You can now rename the tabs and place text, images, HTML, a Google map or a
Youtube video inside these menus.
3. To change the fill color, select the container and change the fill color to any color you
like. You may notice that the background color for the other containers is now the
same color. That is because “Edit together “was checked in the Panel menu.
Changing the appearance of the tabs in the Accordion Panel Widget
1. Select the first tab with the Direct Selection tool. In case you want to change the
color of the first frame without effecting the others, you need to uncheck “Select
together” in the Panel menu. This way you can change the color of each frame
individually.
2. Next, open up the States Panel and select the Normal State. Then, go to fill and
choose a color. If you checked “Edit together”, the fill has now been applied to
the other tabs as well.
44
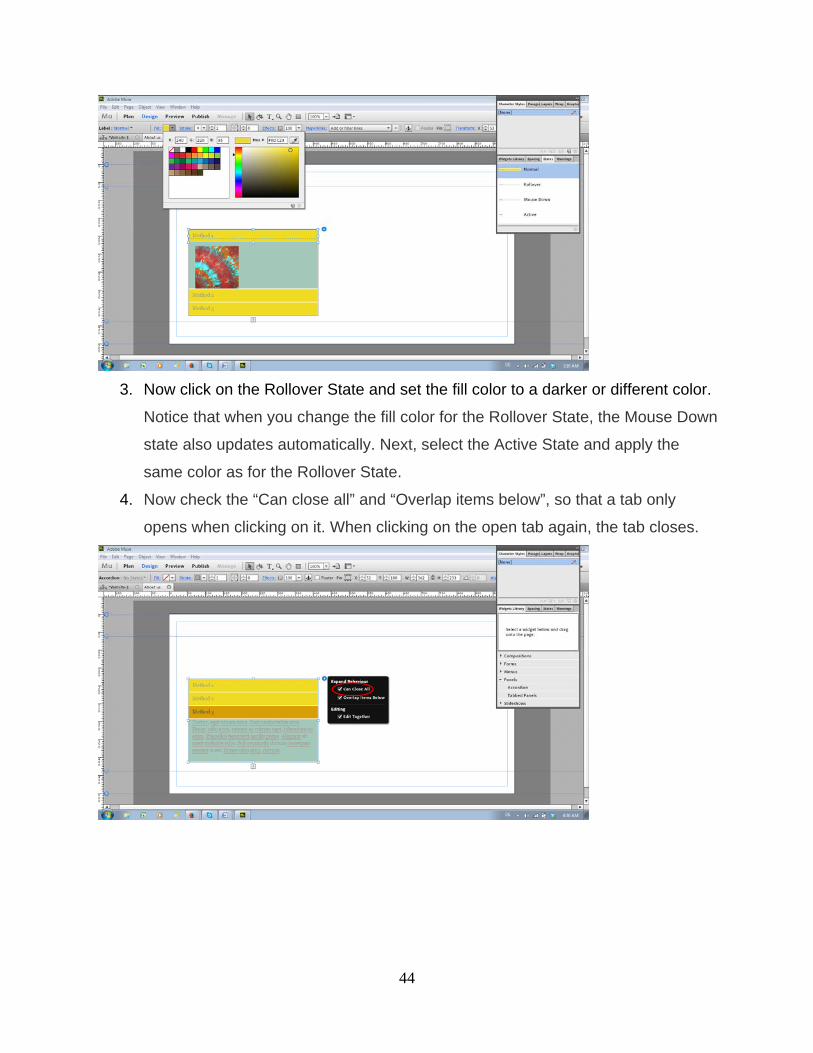
3. Now click on the Rollover State and set the fill color to a darker or different color.
Notice that when you change the fill color for the Rollover State, the Mouse Down
state also updates automatically. Next, select the Active State and apply the
same color as for the Rollover State.
4. Now check the “Can close all” and “Overlap items below”, so that a tab only
opens when clicking on it. When clicking on the open tab again, the tab closes.

45
12.3. Tabbed Panel Widget
Tabbed Panel Widgets are useful if you have a large amount of information to share in a
small amount of space. You can add any content such as text, images, HTML, a google
map or a Youtube, just like you can with the Accordion Widgets.
1. Open the Widgets Library. Inside the Widgets Library, open up the Panels
category. Then select the Tabbed Panel widget and drag it from the Widgets
Library to your page.
2. You can now rename the tabs by clicking
3. Select the bottom container of the tab to place text or images
4. To resize an image, so that it fits the frame: use the selection tool and select the
image. Now, hold down CTRL and drag the graphic frame.
46
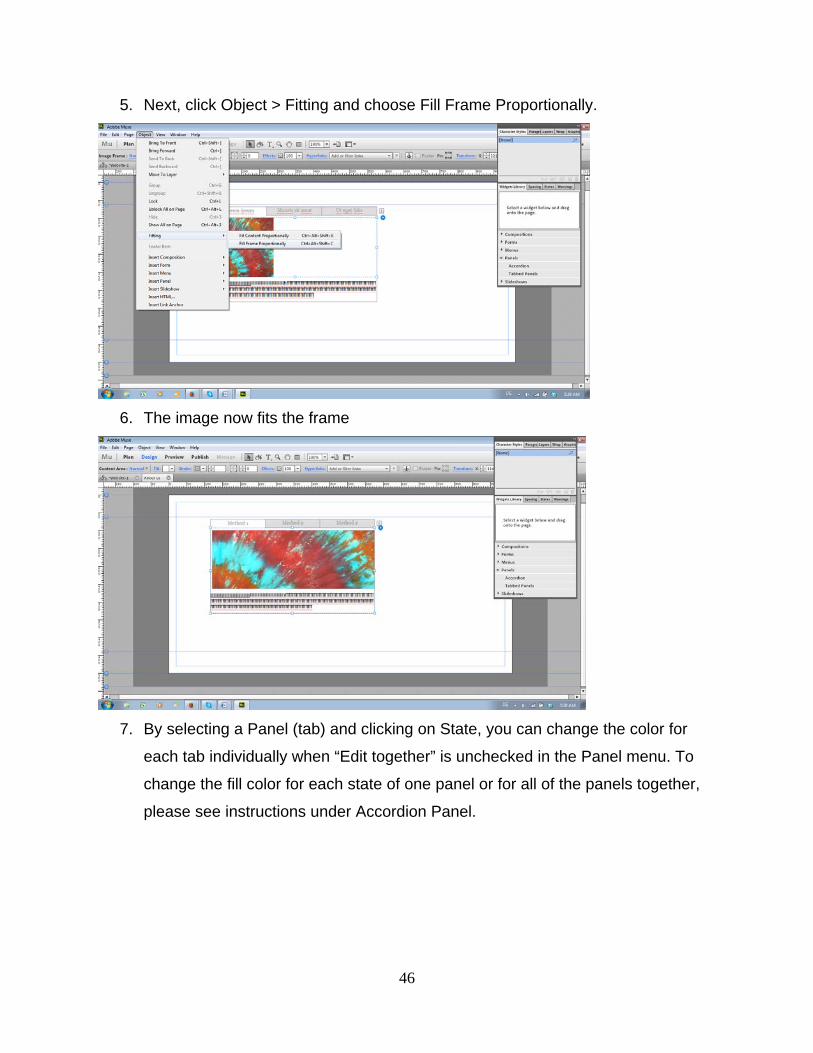
5. Next, click Object > Fitting and choose Fill Frame Proportionally.
6. The image now fits the frame
7. By selecting a Panel (tab) and clicking on State, you can change the color for
each tab individually when “Edit together” is unchecked in the Panel menu. To
change the fill color for each state of one panel or for all of the panels together,
please see instructions under Accordion Panel.
47
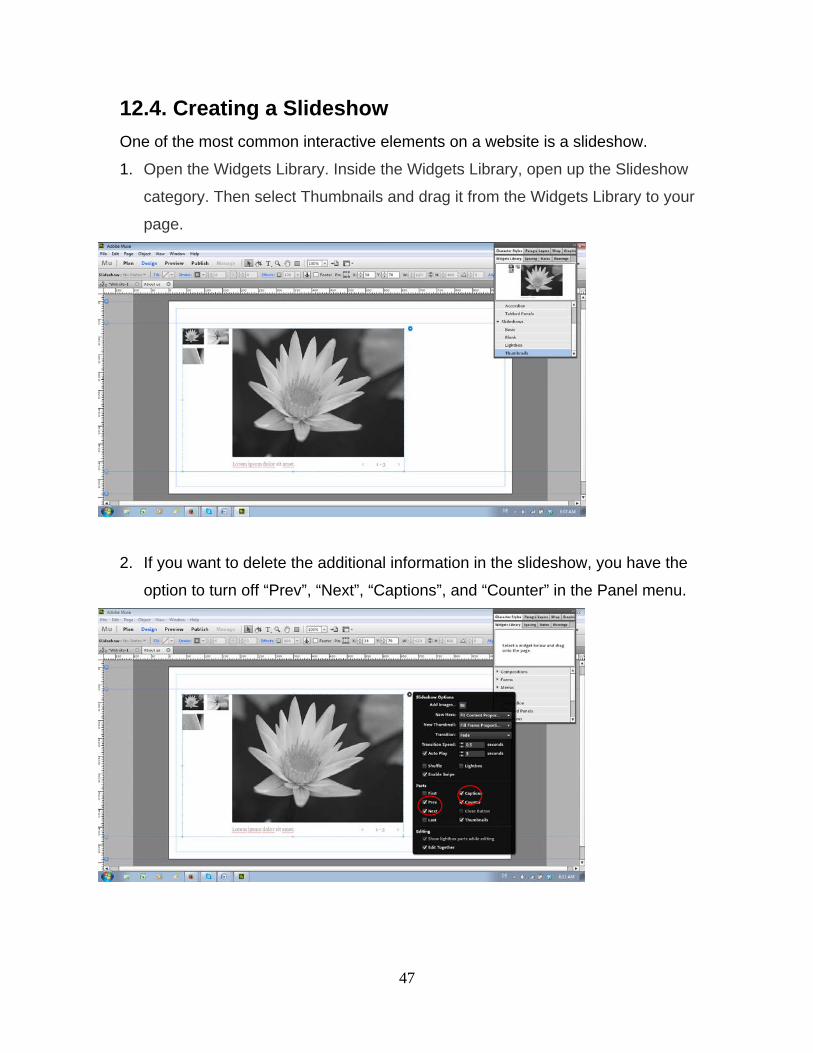
12.4. Creating a Slideshow
One of the most common interactive elements on a website is a slideshow.
1. Open the Widgets Library. Inside the Widgets Library, open up the Slideshow
category. Then select Thumbnails and drag it from the Widgets Library to your
page.
2. If you want to delete the additional information in the slideshow, you have the
option to turn off “Prev”, “Next”, “Captions”, and “Counter” in the Panel menu.
48
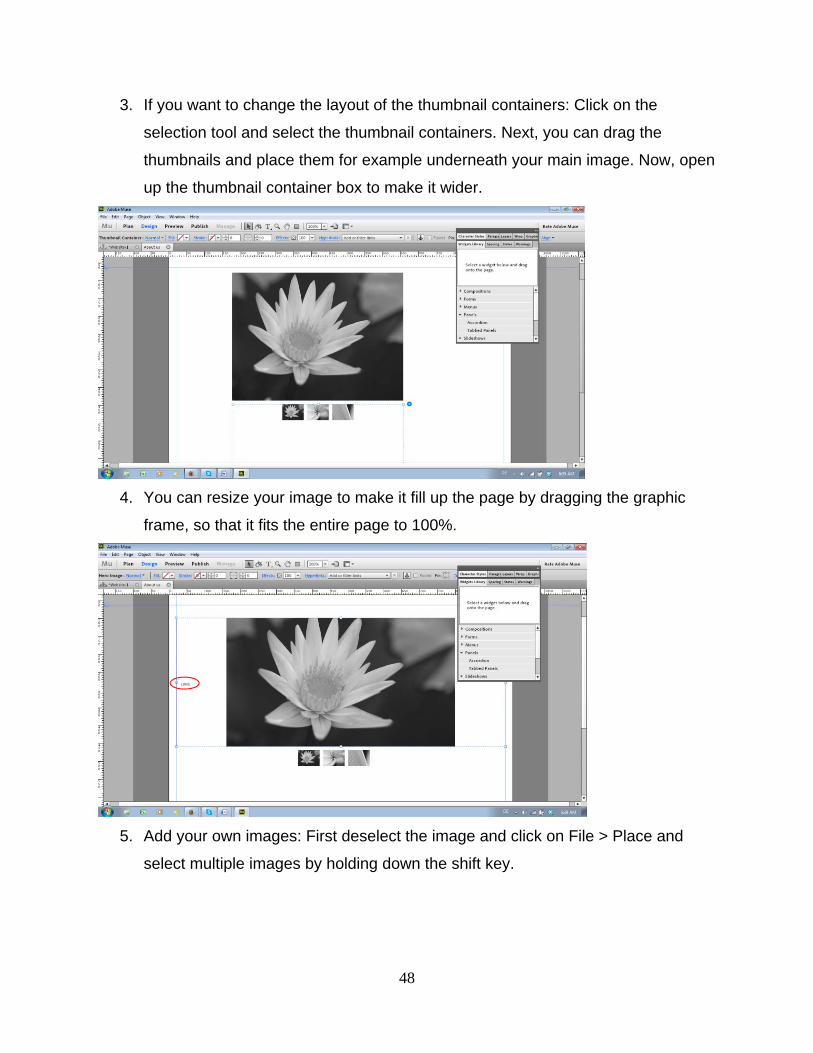
3. If you want to change the layout of the thumbnail containers: Click on the
selection tool and select the thumbnail containers. Next, you can drag the
thumbnails and place them for example underneath your main image. Now, open
up the thumbnail container box to make it wider.
4. You can resize your image to make it fill up the page by dragging the graphic
frame, so that it fits the entire page to 100%.
5. Add your own images: First deselect the image and click on File > Place and
select multiple images by holding down the shift key.
49
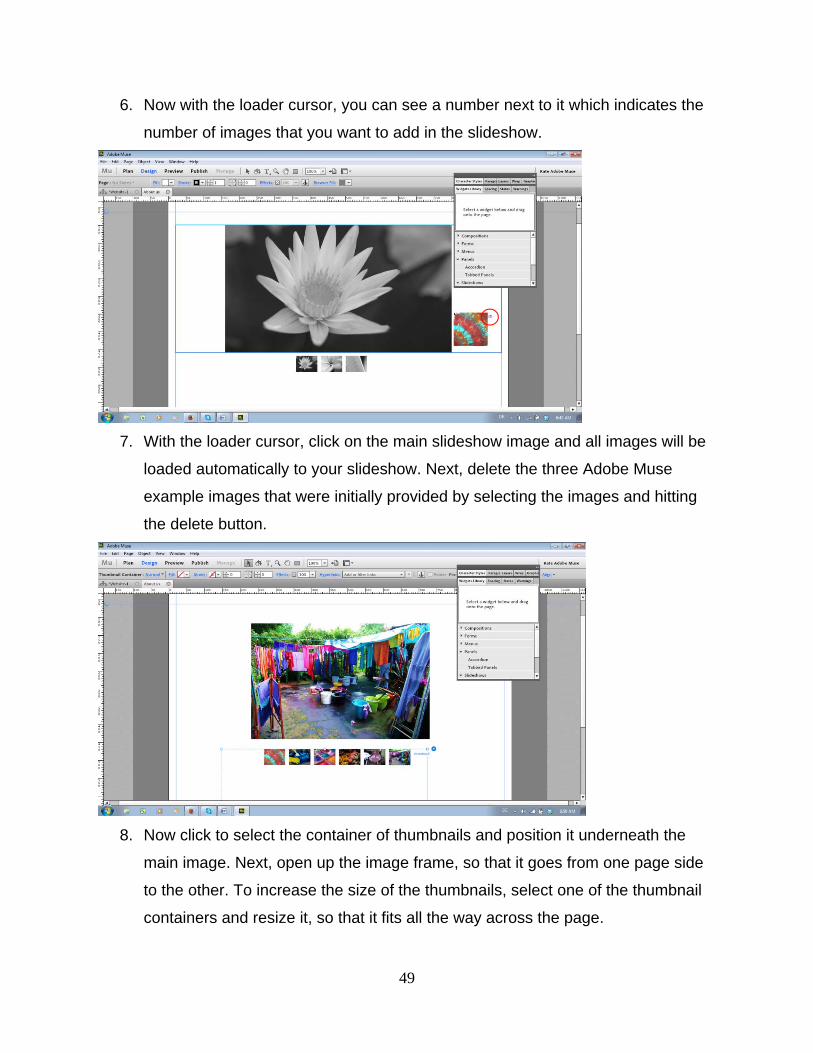
6. Now with the loader cursor, you can see a number next to it which indicates the
number of images that you want to add in the slideshow.
7. With the loader cursor, click on the main slideshow image and all images will be
loaded automatically to your slideshow. Next, delete the three Adobe Muse
example images that were initially provided by selecting the images and hitting
the delete button.
8. Now click to select the container of thumbnails and position it underneath the
main image. Next, open up the image frame, so that it goes from one page side
to the other. To increase the size of the thumbnails, select one of the thumbnail
containers and resize it, so that it fits all the way across the page.

50
9. You can make your slideshow more interesting by changing the Normal and
Rollover State with the opacity. First, select one thumbnail container and click in
the State Panel. For the Normal State, change the opacity to 50%. For Rollover
and Active States, change it back to 100%.
51
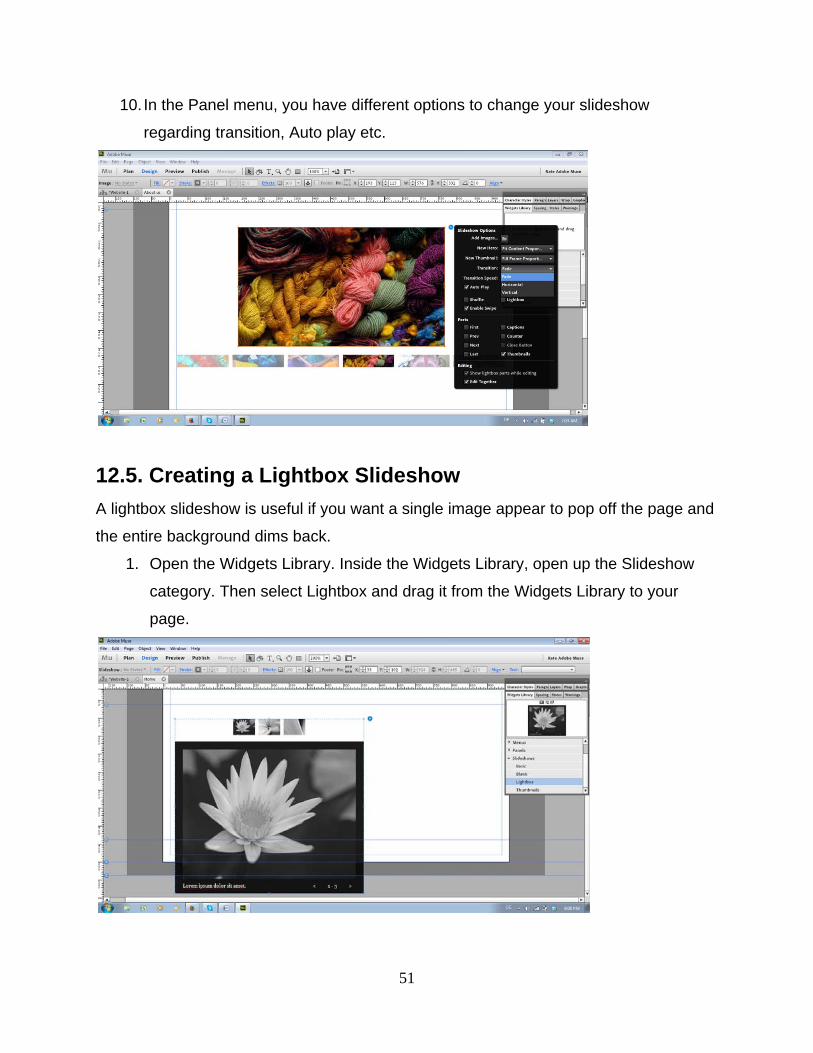
10. In the Panel menu, you have different options to change your slideshow
regarding transition, Auto play etc.
12.5. Creating a Lightbox Slideshow
A lightbox slideshow is useful if you want a single image appear to pop off the page and
the entire background dims back.
1. Open the Widgets Library. Inside the Widgets Library, open up the Slideshow
category. Then select Lightbox and drag it from the Widgets Library to your
page.
52
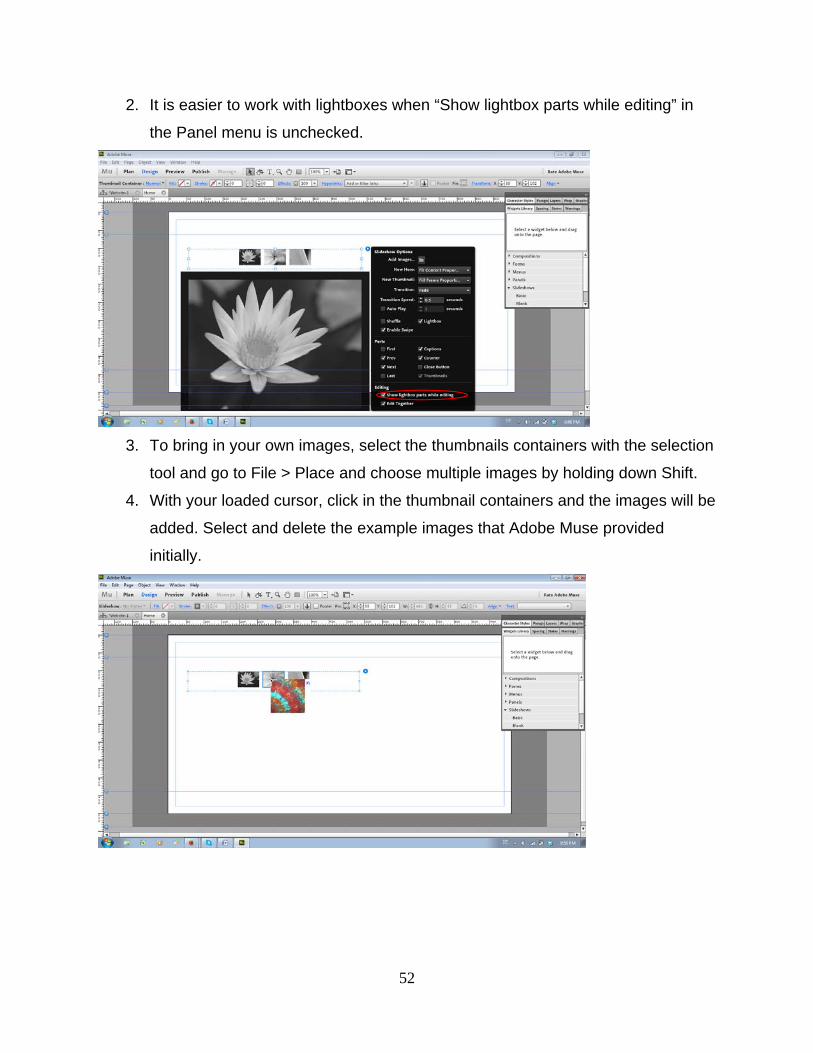
2. It is easier to work with lightboxes when “Show lightbox parts while editing” in
the Panel menu is unchecked.
3. To bring in your own images, select the thumbnails containers with the selection
tool and go to File > Place and choose multiple images by holding down Shift.
4. With your loaded cursor, click in the thumbnail containers and the images will be
added. Select and delete the example images that Adobe Muse provided
initially.
53
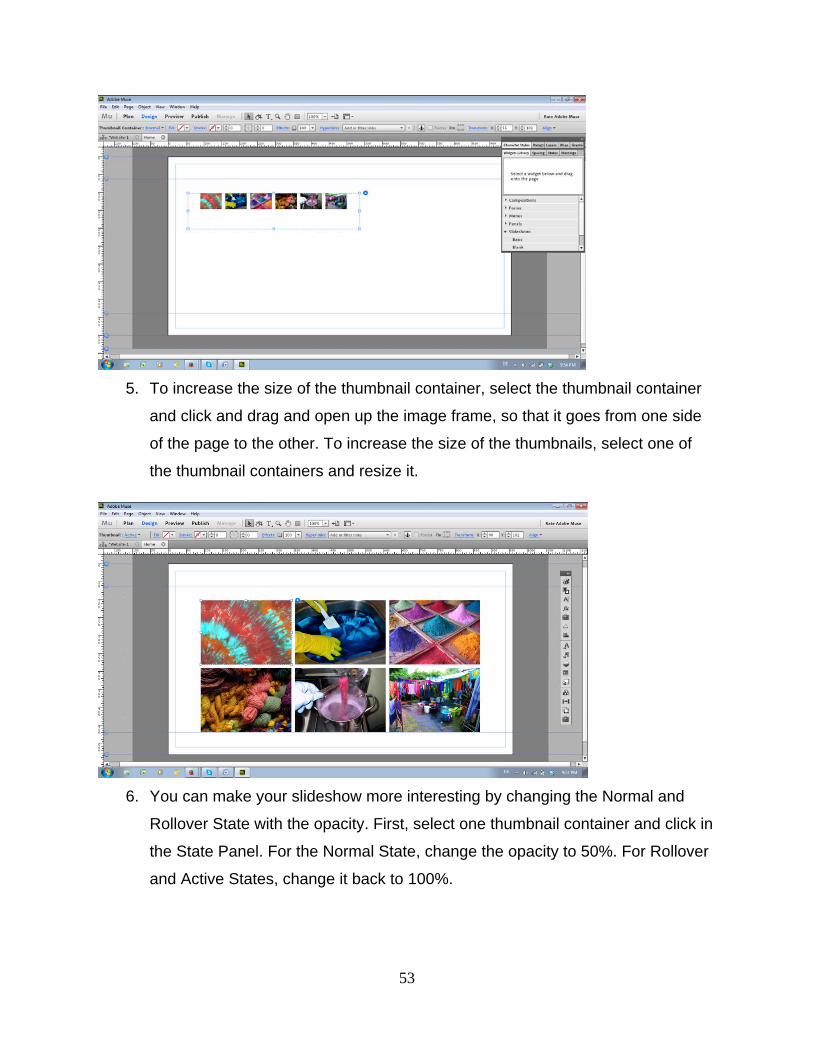
5. To increase the size of the thumbnail container, select the thumbnail container
and click and drag and open up the image frame, so that it goes from one side
of the page to the other. To increase the size of the thumbnails, select one of
the thumbnail containers and resize it.
6. You can make your slideshow more interesting by changing the Normal and
Rollover State with the opacity. First, select one thumbnail container and click in
the State Panel. For the Normal State, change the opacity to 50%. For Rollover
and Active States, change it back to 100%.
54
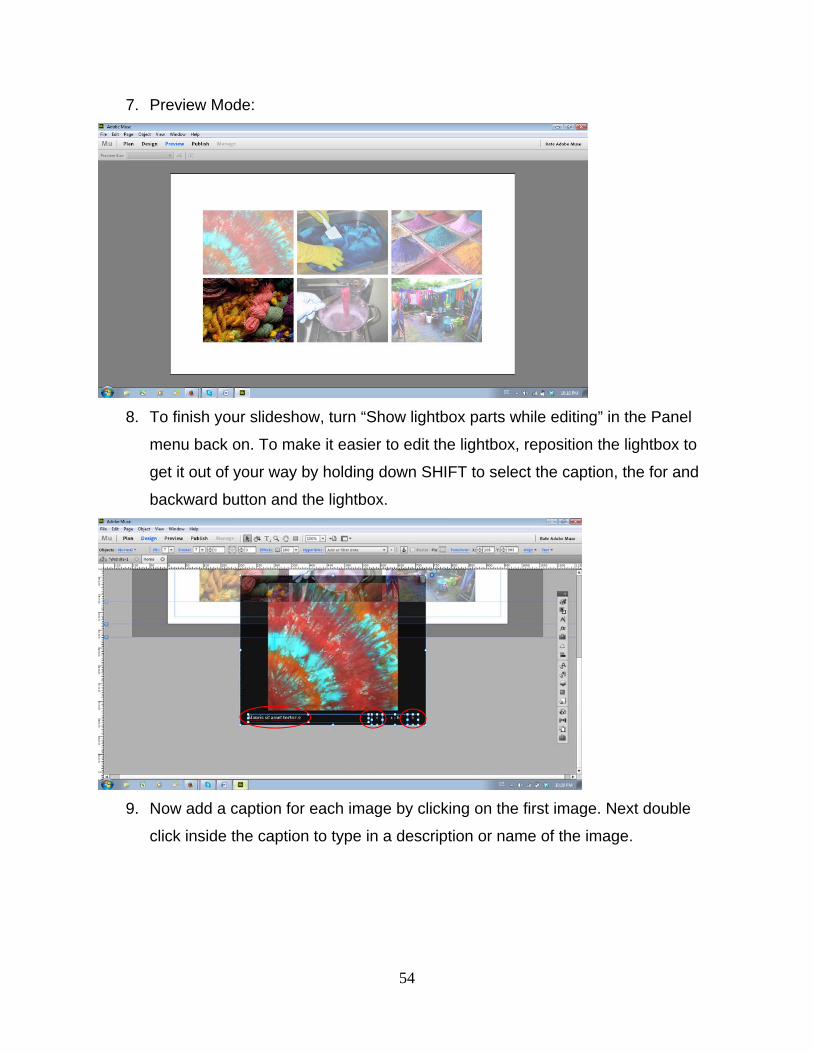
7. Preview Mode:
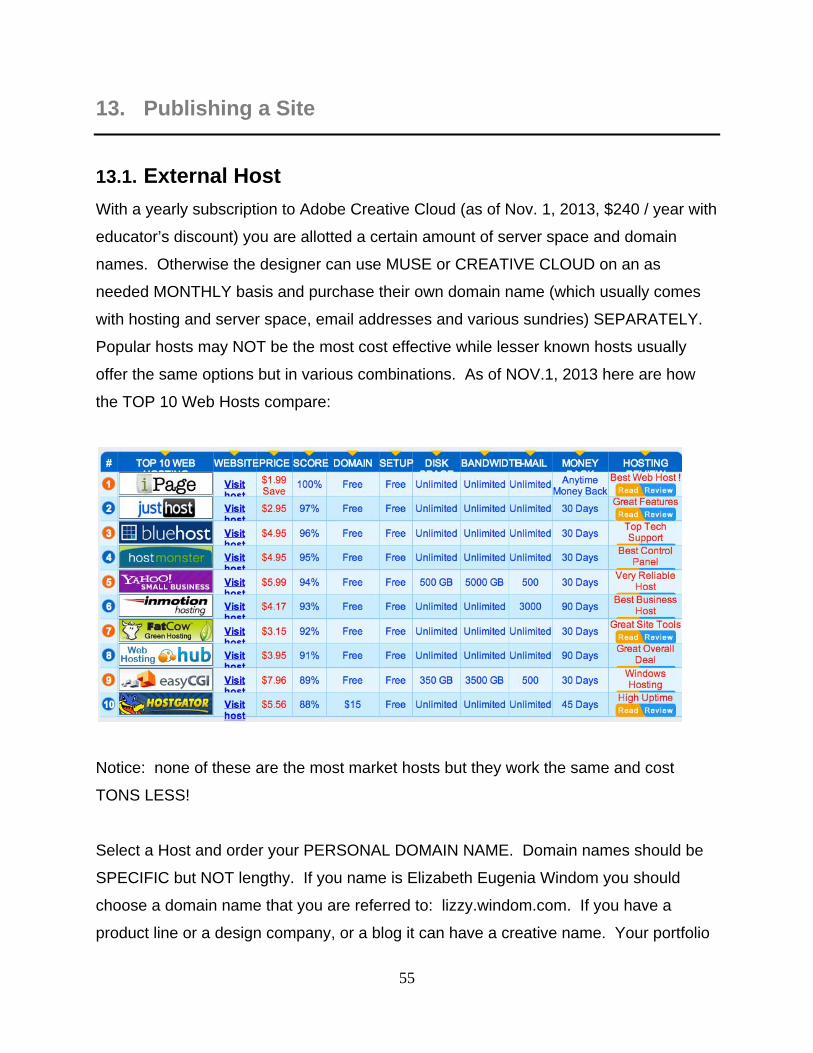
8. To finish your slideshow, turn “Show lightbox parts while editing” in the Panel
menu back on. To make it easier to edit the lightbox, reposition the lightbox to
get it out of your way by holding down SHIFT to select the caption, the for and
backward button and the lightbox.
9. Now add a caption for each image by clicking on the first image. Next double
click inside the caption to type in a description or name of the image.
55
13. Publishing a Site
13.1. External Host
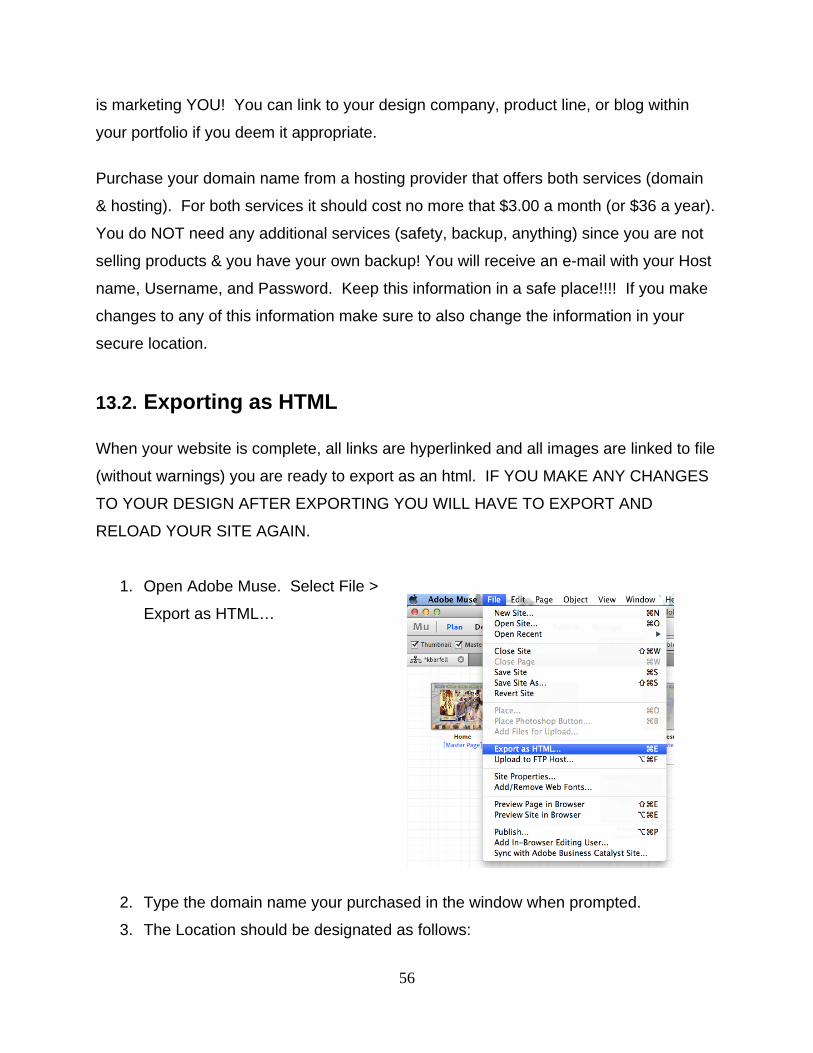
With a yearly subscription to Adobe Creative Cloud (as of Nov. 1, 2013, $240 / year with
educator’s discount) you are allotted a certain amount of server space and domain
names. Otherwise the designer can use MUSE or CREATIVE CLOUD on an as
needed MONTHLY basis and purchase their own domain name (which usually comes
with hosting and server space, email addresses and various sundries) SEPARATELY.
Popular hosts may NOT be the most cost effective while lesser known hosts usually
offer the same options but in various combinations. As of NOV.1, 2013 here are how
the TOP 10 Web Hosts compare:
Notice: none of these are the most market hosts but they work the same and cost
TONS LESS!
Select a Host and order your PERSONAL DOMAIN NAME. Domain names should be
SPECIFIC but NOT lengthy. If you name is Elizabeth Eugenia Windom you should
choose a domain name that you are referred to: lizzy.windom.com. If you have a
product line or a design company, or a blog it can have a creative name. Your portfolio
56
is marketing YOU! You can link to your design company, product line, or blog within
your portfolio if you deem it appropriate.
Purchase your domain name from a hosting provider that offers both services (domain
& hosting). For both services it should cost no more that $3.00 a month (or $36 a year).
You do NOT need any additional services (safety, backup, anything) since you are not
selling products & you have your own backup! You will receive an e-mail with your Host
name, Username, and Password. Keep this information in a safe place!!!! If you make
changes to any of this information make sure to also change the information in your
secure location.
13.2. Exporting as HTML
When your website is complete, all links are hyperlinked and all images are linked to file
(without warnings) you are ready to export as an html. IF YOU MAKE ANY CHANGES
TO YOUR DESIGN AFTER EXPORTING YOU WILL HAVE TO EXPORT AND
RELOAD YOUR SITE AGAIN.
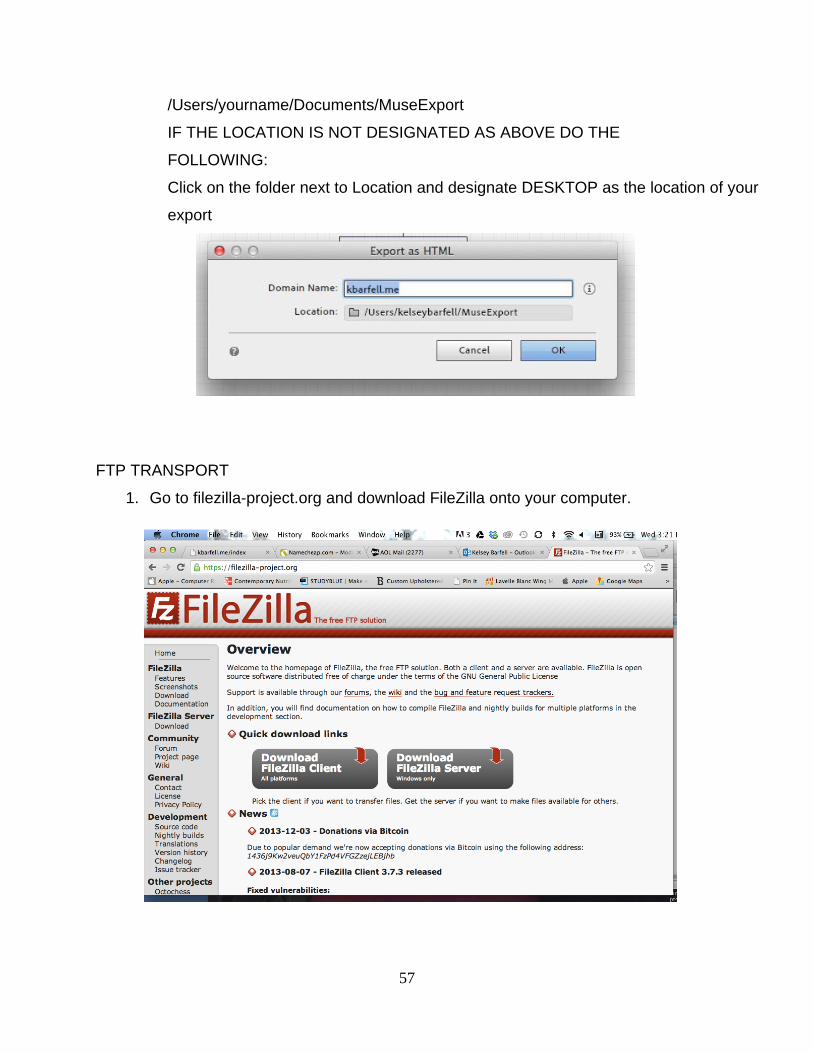
1. Open Adobe Muse. Select File >
Export as HTML…
2. Type the domain name your purchased in the window when prompted.
3. The Location should be designated as follows:
57
/Users/yourname/Documents/MuseExport
IF THE LOCATION IS NOT DESIGNATED AS ABOVE DO THE
FOLLOWING:
Click on the folder next to Location and designate DESKTOP as the location of your
export
FTP TRANSPORT
1. Go to filezilla-project.org and download FileZilla onto your computer.
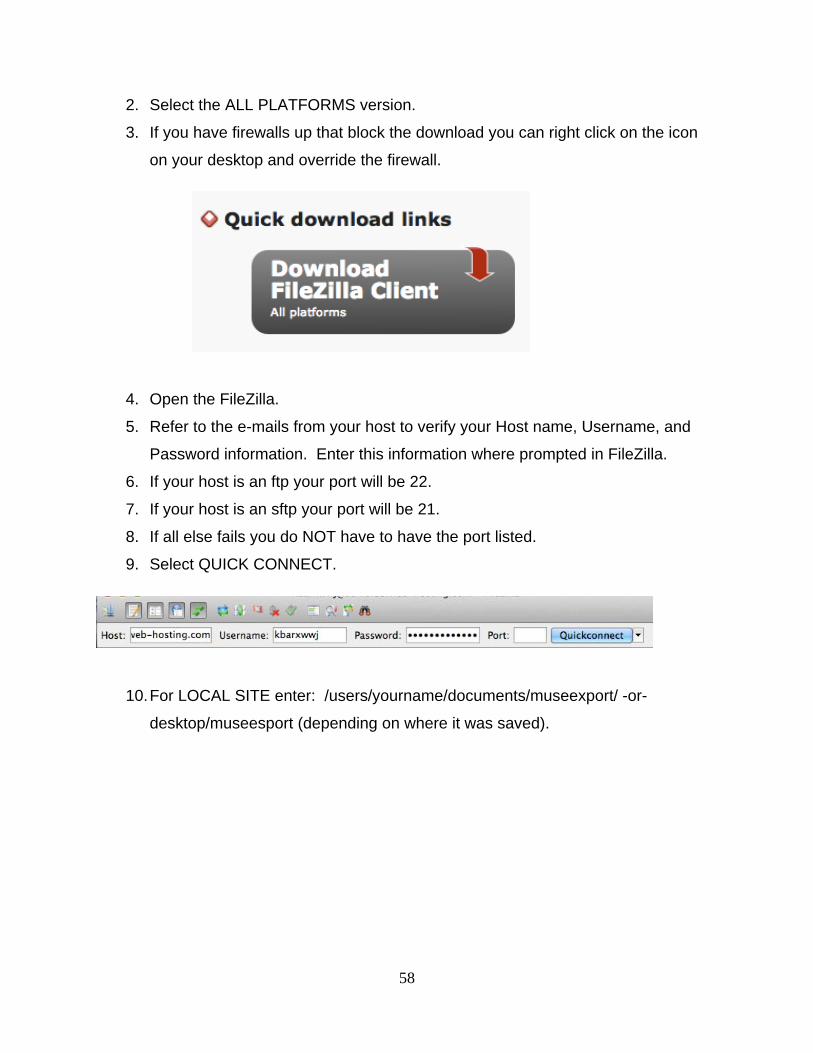
58
2. Select the ALL PLATFORMS version.
3. If you have firewalls up that block the download you can right click on the icon
on your desktop and override the firewall.
4. Open the FileZilla.
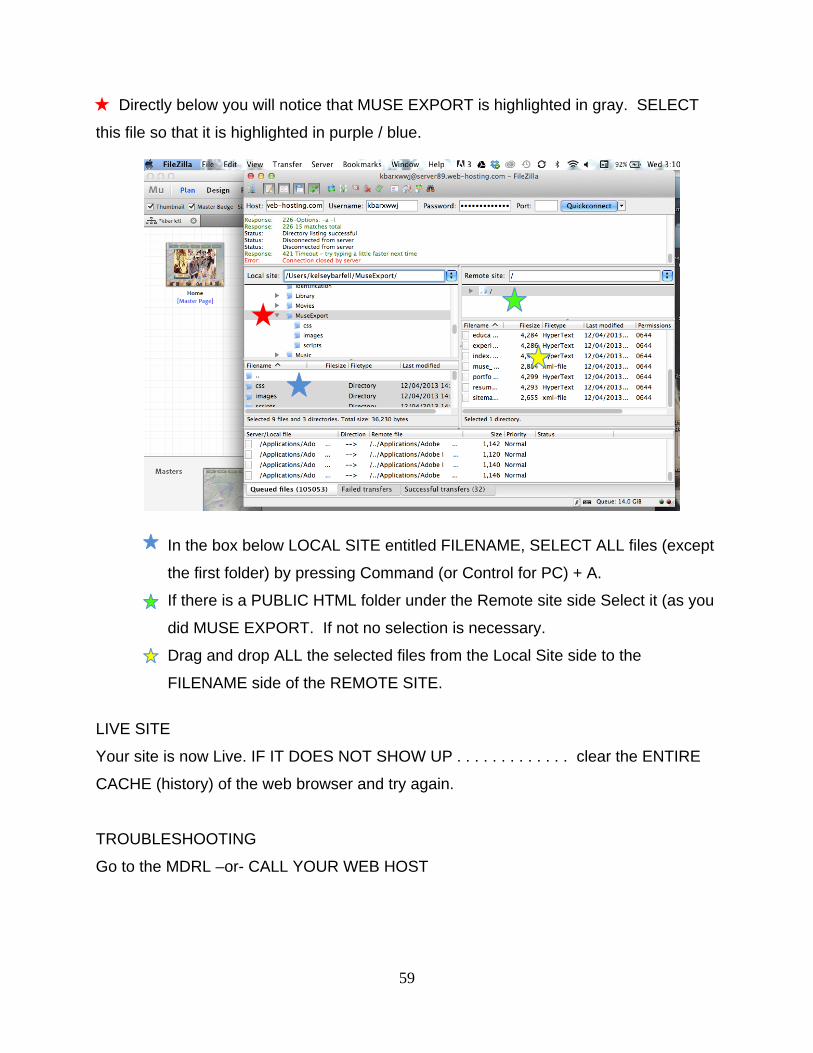
5. Refer to the e-mails from your host to verify your Host name, Username, and
Password information. Enter this information where prompted in FileZilla.
6. If your host is an ftp your port will be 22.
7. If your host is an sftp your port will be 21.
8. If all else fails you do NOT have to have the port listed.
9. Select QUICK CONNECT.
10. For LOCAL SITE enter: /users/yourname/documents/museexport/ -or-
desktop/museesport (depending on where it was saved).
59
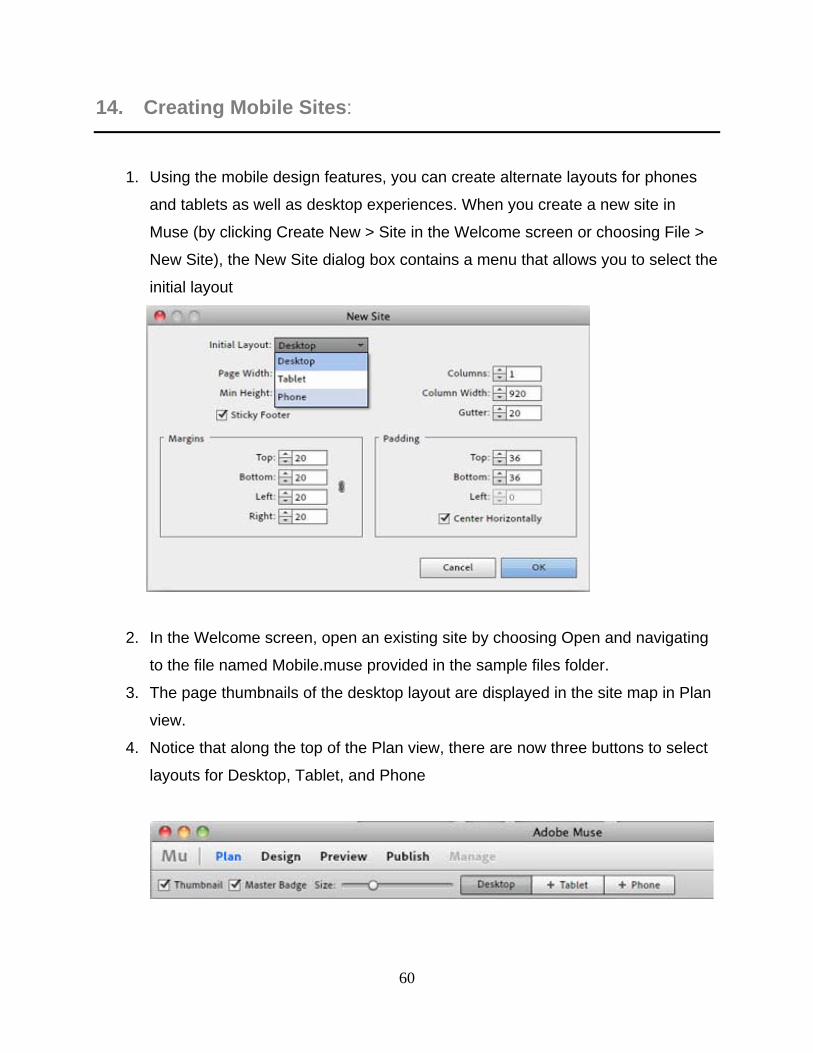
Directly below you will notice that MUSE EXPORT is highlighted in gray. SELECT
this file so that it is highlighted in purple / blue.
In the box below LOCAL SITE entitled FILENAME, SELECT ALL files (except
the first folder) by pressing Command (or Control for PC) + A.
If there is a PUBLIC HTML folder under the Remote site side Select it (as you
did MUSE EXPORT. If not no selection is necessary.
Drag and drop ALL the selected files from the Local Site side to the
FILENAME side of the REMOTE SITE.
LIVE SITE
Your site is now Live. IF IT DOES NOT SHOW UP . . . . . . . . . . . . . clear the ENTIRE
CACHE (history) of the web browser and try again.
TROUBLESHOOTING
Go to the MDRL –or- CALL YOUR WEB HOST
60
14. Creating Mobile Sites:
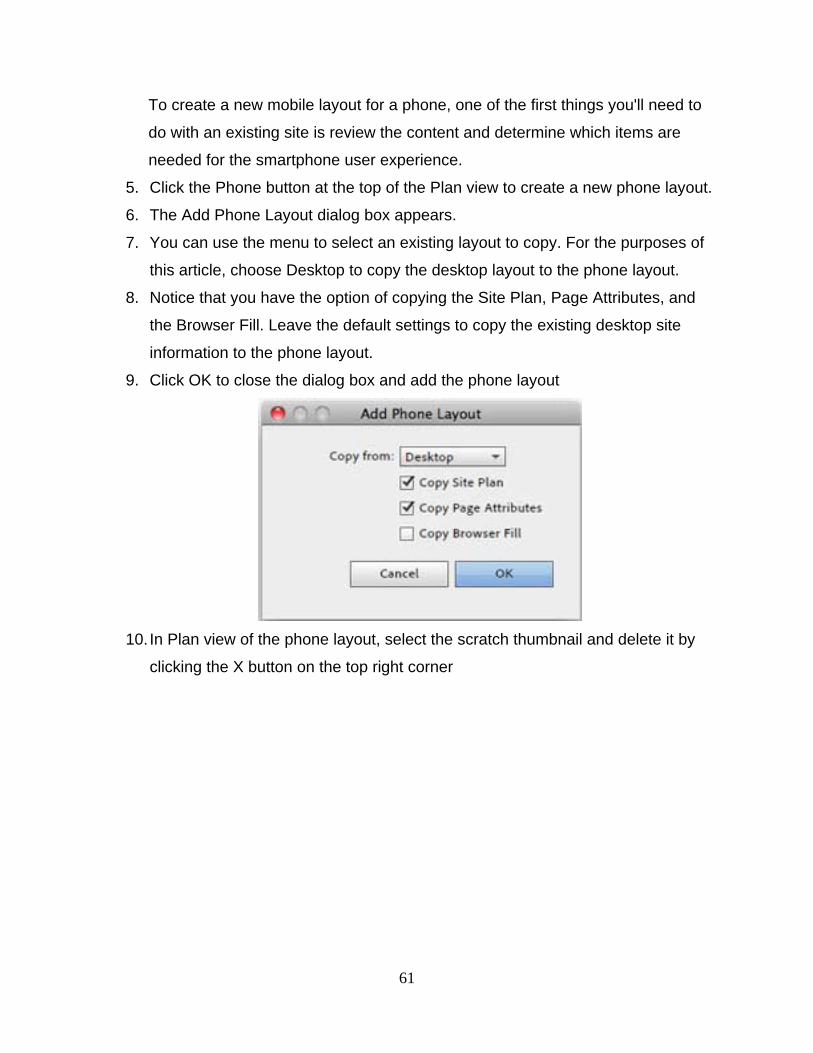
1. Using the mobile design features, you can create alternate layouts for phones
and tablets as well as desktop experiences. When you create a new site in
Muse (by clicking Create New > Site in the Welcome screen or choosing File >
New Site), the New Site dialog box contains a menu that allows you to select the
initial layout
2. In the Welcome screen, open an existing site by choosing Open and navigating
to the file named Mobile.muse provided in the sample files folder.
3. The page thumbnails of the desktop layout are displayed in the site map in Plan
view.
4. Notice that along the top of the Plan view, there are now three buttons to select
layouts for Desktop, Tablet, and Phone
61
To create a new mobile layout for a phone, one of the first things you'll need to
do with an existing site is review the content and determine which items are
needed for the smartphone user experience.
5. Click the Phone button at the top of the Plan view to create a new phone layout.
6. The Add Phone Layout dialog box appears.
7. You can use the menu to select an existing layout to copy. For the purposes of
this article, choose Desktop to copy the desktop layout to the phone layout.
8. Notice that you have the option of copying the Site Plan, Page Attributes, and
the Browser Fill. Leave the default settings to copy the existing desktop site
information to the phone layout.
9. Click OK to close the dialog box and add the phone layout
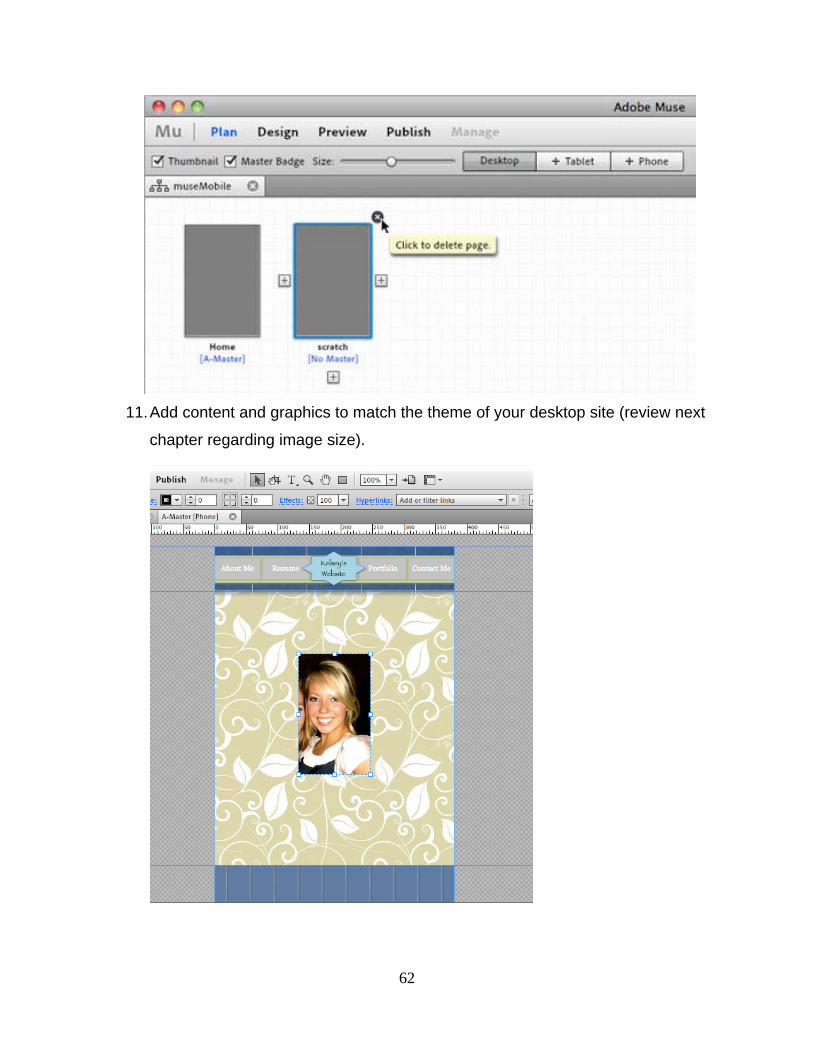
10. In Plan view of the phone layout, select the scratch thumbnail and delete it by
clicking the X button on the top right corner
62
11. Add content and graphics to match the theme of your desktop site (review next
chapter regarding image size).
63
EXTRA:
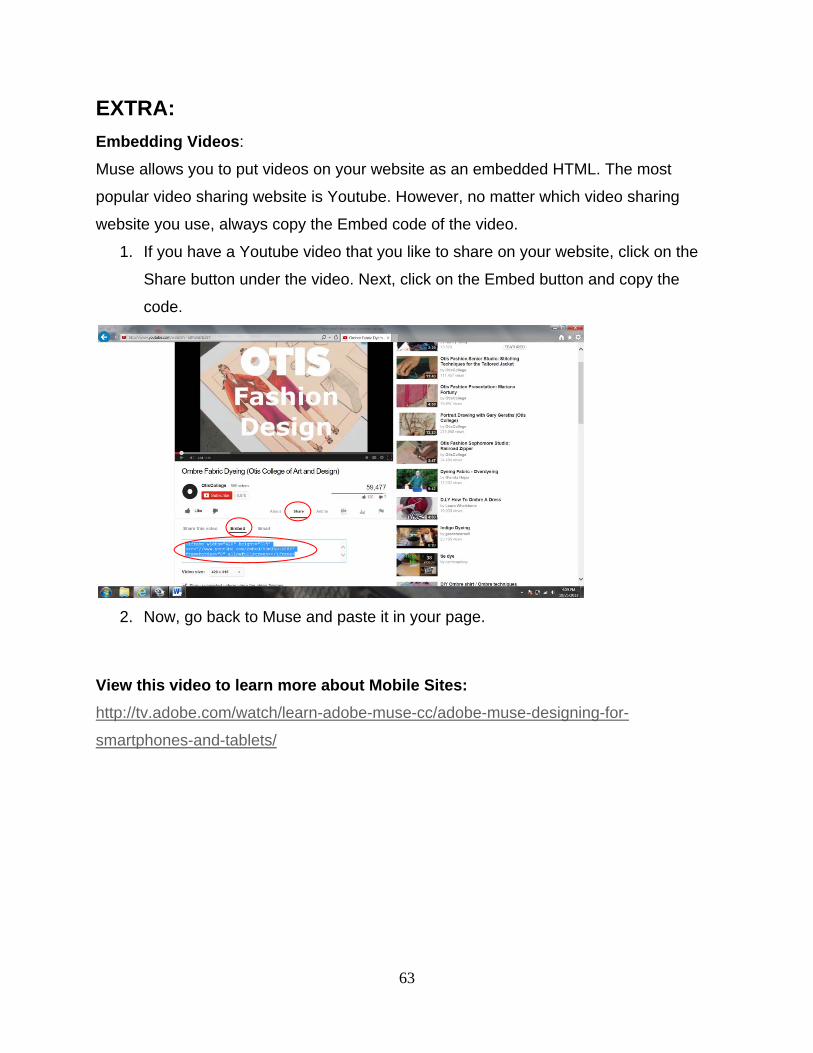
Embedding Videos:
Muse allows you to put videos on your website as an embedded HTML. The most
popular video sharing website is Youtube. However, no matter which video sharing
website you use, always copy the Embed code of the video.
1. If you have a Youtube video that you like to share on your website, click on the
Share button under the video. Next, click on the Embed button and copy the
code.
2. Now, go back to Muse and paste it in your page.
View this video to learn more about Mobile Sites:
http://tv.adobe.com/watch/learn-adobe-muse-cc/adobe-muse-designing-for-
smartphones-and-tablets/
64
REFERENCES
http://helpx.adobe.com/en/muse/tutorials/building-your-first-website-part-
1.html#Installing%20the%20software%20and%20setting%20up%20the
%20sample%20project
http://www.adobekb.com/creating_mobile_layouts_pt01.html#adding
http://helpx.adobe.com/en/muse/tutorials/adding-contact-form-widgets-
muse.html#id_45420
http://www.lynda.com/Muse-tutorials/Muse-Essential-Training