adobe marketing cloud aam admin · pdf fileenable hadoop sequence file transfers for outbound...
TRANSCRIPT

Adobe® Marketing Cloud
AAM Admin
Contents
Audience Manager Admin Home............................................................................4
Log In to Audience Manager Admin......................................................................5
How to Request Functional Admin Access...........................................................6
Companies...............................................................................................................7
Create a Company..................................................................................................................7
Manage Containers.................................................................................................................9
Device Graph Options for Companies...................................................................................11
ID Syncing with Media Optimizer..........................................................................................13
Manage First Party Data Providers.......................................................................................15
Manage Third-Party Data Providers......................................................................................15
Manage Company Destinations............................................................................................17
Create or Edit Company Destinations......................................................................................................17
Delete Company Destinations..................................................................................................................20
Manage Company Limits.......................................................................................................20
Manage Company Users.......................................................................................................22
Edit a Company Profile..........................................................................................................24
Delete a Company.................................................................................................................26
Filter Outbound Data by Active Users Only...........................................................................26
Servers....................................................................................................................28
Create or Edit an FTP Server................................................................................................28
Create or Edit an HTTP Server.............................................................................................29
Create or Edit an S3 Server..................................................................................................30
Delete a Server.....................................................................................................................31
Reporting................................................................................................................33
AAM AdminLast updated 6/1/2017

Create or Edit a Report.........................................................................................................33
Assign a Portal User to Tableau User....................................................................................35
Formats...................................................................................................................36
Enable Hadoop Sequence File Transfers for Outbound........................................................36
File Format Macros...............................................................................................................36
File Format Macro Examples................................................................................................39
HTTP Format Macros............................................................................................................41
HTTP Format Macro Examples.............................................................................................44
Create or Edit a Format.........................................................................................................45
OAuth2 Clients.......................................................................................................48
Create or Edit an OAuth2 Client............................................................................................48
API Requirements and Recommendations...........................................................................49
Integration Users...................................................................................................51
Create or Edit a User............................................................................................................51
Delete a User........................................................................................................................52
My Profile................................................................................................................53
Edit Profile.............................................................................................................................53
Change Password.................................................................................................................54
Destination Setup Troubleshooting.....................................................................56
Beta Environment..................................................................................................58
Documentation Updates.......................................................................................60
AAM AdminLast updated 6/1/2017
Contents

Audience Manager Admin HomeThe Audience Manager Admin tool lets you add and configure companies, servers, reports, formats, and users.Youcan also view or edit your personal profile.
Release NotesNew or Featured Items
Hover over a title for a brief description. • See the latest Marketing Cloud Release Notes for new featuresand fixes.
• API Requirements and Recommendations• See the previous release notes for older announcements.
• Enable Hadoop Sequence File Transfersfor Outbound Marketing Cloud Resources
• Manage Containers • Adobe Marketing Cloud• Device Graph Options for Companies • Adobe Social Community• ID Syncing with Media Optimizer • Adobe Training and Tutorials
• Developer Connection
• Product Documentation Home
4Audience Manager Admin Home

Log In to Audience Manager AdminLog in to the Adobe Audience Manager Admin tool with your web browser. The Audience Manager Admin tool letsyou add and configure companies, servers, reports, formats, and users.You can also view or edit your personalprofile.
1. Access the Audience Manager Admin tool by browsing to the following URL:
https://admin.demdex.com/
2. Select your preferred verification method in the drop-down box and Verify.
5Log In to Audience Manager Admin
How to Request Functional Admin AccessLog into the Account Management portal in Inside Adobe to request Functional Admin Access and follow the stepsdescribed below.
To request functional admin access:
1. Log into the Account Management Portal in Inside Adobe with your PIN + OTP.
2. In the dashboard, search for Access Request > Digital Marketing.
3. In the Manage Digital Marketing Access window, select Request Admin Console Access in the drop-downbox and click Next.
4. In the Request Admin Console Access - User window, type in the user you are requesting the access rightsfor and confirm by pressing Next.
5. In the Request Admin Console Access - Console window, select AAM in the drop-down box and click Next.
6. In the Request Admin Console Access - Groups window, select AAM Functional Admin in the Entitlementsdrop-down box and fill in a Business Justification for your request. Confirm the request by clicking Submit.
7. Your request will need to be approved before you have functional admin access.
6How to Request Functional Admin Access

CompaniesUse the Companies page to view a list of companies in your Audience Management configuration.You can edit ordelete existing companies or create new companies, providing that you have the appropriate user roles assigned.
You can sort each column in ascending or descending order by clicking the desired column's header.
Use the Search box or the pagination controls at the bottom of the list to find the desired company.
The following sections contain more information:
Create a Company
Use the Companies page in the Audience Manager Admin tool to create a new company .
Note: You must have the DEXADMIN role in order to create new companies.
1. Click Companies > Add Company.
2. Fill in the fields:
Name: (Required) Specify the name of the company.
Description: (Required) Provide descriptive information about the company, such as industry or its full name.
Subdomain: (Required) Specify the company's subdomain. The text you enter is what shows as the subdomainof the event call. This can't be changed. It must be a string of URL-valid characters.
For example, if your company was named AcmeCorp, the subdomain would be acmecorp.
Audience Manager uses the subdomain for the Data Collection Server (DCS). In the previous example, if yourcompany's full URL in DCS would be acmecorp.demdex.net.
Lifecyle: Specify the desired stage for the company:
7Companies
• Active: Specify that the company will be an active Audience Manager client. An Active account means a payingcustomer, not just for consulting, but for the Audience Manager SKU.
• Demo: Specify that the company will be for demo purposes only. Reporting data will be automatically faked.
• Prospect: Specify that the company is a prospective Audience Manager client, such as a company being givena free POC or an account setup for a sales demo.
• Test: Specify that the company will be for internal testing purposes only.
Account Types: Specify the full set of account types for this company. No account type is mutually exclusivewith any other type.
• Full AAM: Specify that the company will have a full Adobe Audience Manager account and users will havelogin access.
• MMP: Specify that the company has been enabled to use the Master Marketing Profile (MMP) capabilities.
If you select this account type, Visitor ID Service is also automatically selected.
For more information, see Audiences Services - Master Marketing Profile. For more information about integratingAudience Manager and MMP, see Master Marketing Profile Integration.
• Data Source: Specify that the company is a third-party data provider within Audience Manager.
• Targeting Partner: Specify that the company acts as a targeting platform for Audience Manager customers.
• Visitor ID Service: Specify that the company has been enabled to use the Marketing Cloud Visitor ID Service.
The Marketing Cloud Visitor ID service provides a universal visitor ID across Marketing Cloud solutions. Formore information, see the Marketing Cloud Visitor ID Service user guide.
• Agency: Specify that the company will have an Agency account.
3. Click Create.
Continue with the instructions in Edit a Company Profile.
8Companies
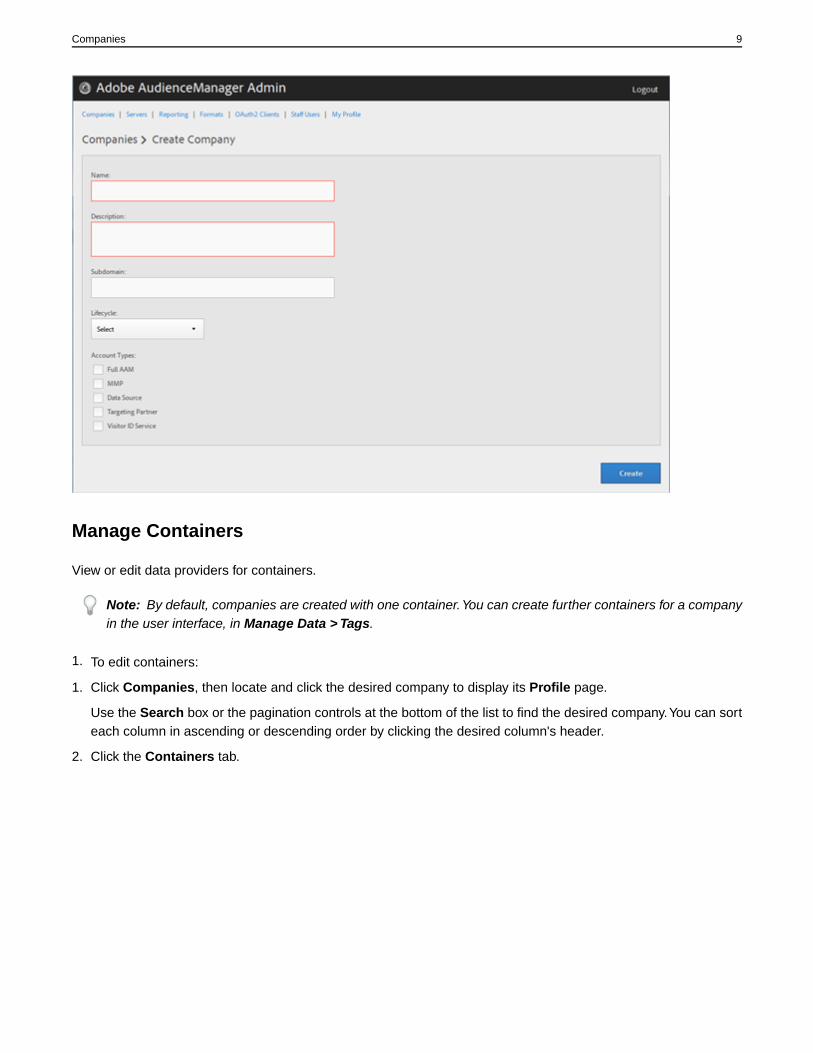
Manage Containers
View or edit data providers for containers.
Note: By default, companies are created with one container.You can create further containers for a companyin the user interface, in Manage Data > Tags.
1. To edit containers:
1. Click Companies, then locate and click the desired company to display its Profile page.
Use the Search box or the pagination controls at the bottom of the list to find the desired company.You can sorteach column in ascending or descending order by clicking the desired column's header.
2. Click the Containers tab.
9Companies

3. Click a container's row to view or edit data providers for that container.
4. Move data sources from the Available Data Sources and Selected Data Sources for This Container lists byselecting the desired data sources, then clicking the right or left arrows as necessary.
You can also perform this task from the Third Party Data Providerspage.
5. Click Save if you made changes.
10Companies

Device Graph Options for Companies
The Device Graph Options are available to companies that participate in the Adobe Marketing Cloud Device Co-op.If a customer also has a contractual relationship with a third-party device graph provider that is integrated withAudience Manager, this section will show options for that device graph. These options are located in Companies> company name > Profile > Device Graph Options.
This illustration uses generic names for the third-party device graph options. In production, these names come fromthe device graph provider and can vary from what's shown here. For example, the LiveRamp options usually (butnot always):
11Companies

• Start with "LiveRamp"
• Contain a middle name that varies
• End with "- Household" or "-Person"
Device Graph Options Defined
The device graph options you select here expose or hide the Device Options choices available to an AudienceManager customer when they create a Profile Merge Rule.
Co-op Device Graph
Customers who participate in the Adobe Marketing Cloud Device Co-op use these options to create a Profile MergeRule with deterministic and probabilistic data.The Corporate Provisioning Team activates and deactivates this optionvia a back-end API call.You cannot check or clear these boxes in the Admin UI. Also, the Co-op Device Graphand Company Device Graph options are mutually exclusive. Customers can ask us to activate one or the other,but not both. When checked, this exposes the Co-op Device Graph control in the Device Options settings for aProfile Merge Rule.
Company Device Graph
This option is for Analytics customers who use the People metric in their Analytics report suite. The CorporateProvisioning Team activates and deactivates this option via a back-end API call.You cannot check or clear theseboxes in the Admin UI. Also, the Company Device Graph and Co-op Device Graph options are mutually exclusive.Customers can ask us to activate one or the other, but not both. When checked:
• This device graph uses deterministic data that belongs to the company you're configuring (no probabilistic data).
• Audience Manager automatically creates a Data Source called partner name-Company Device Graph-Person.In the Data Source details page, Audience Manager customers can change the partner name, description, andapply Data Export Controls to this data source.
12Companies

• Audience Manager customers do not see a new setting in the Device Options section for a Profile Merge Rule.
LiveRamp Device Graph (Person or Household)
These check boxes are enabled in the Admin UI when a partner creates a Data Source and selects Use as anAuthenticated Profile and/or Use as a Device Graph.The names for these settings are determined by the third-partydevice graph provider (e.g., LiveRamp, TapAd, etc.). When checked, this means the company you're configuring isgoing to use data provided by these device graphs.
ID Syncing with Media Optimizer
By default, all companies sync data with Adobe Media Optimizer (AMO). In the Admin UI, each company containerhas a data source that manages this process.This data source is Adobe AMO (ID 411). Click a container row (underthe Containers tab) for a selected company to disable this default sync or to add and remove other data sourcesto the AMO sync process.
13Companies
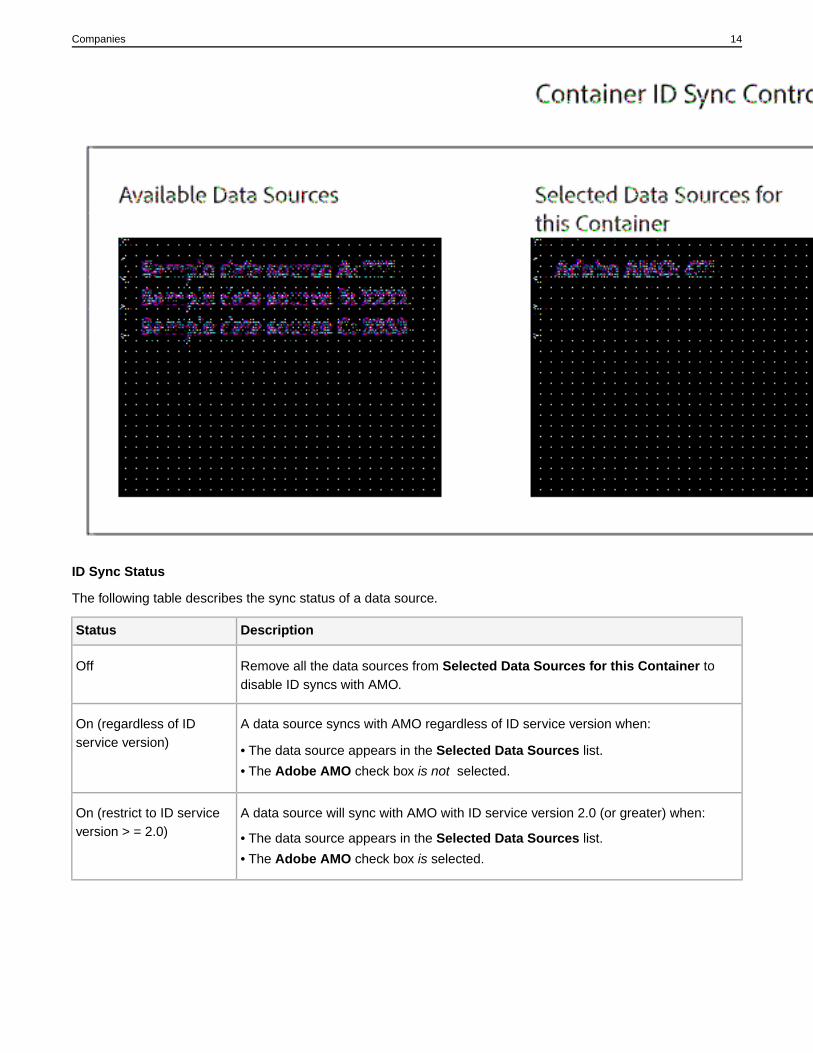
ID Sync Status
The following table describes the sync status of a data source.
DescriptionStatus
Remove all the data sources from Selected Data Sources for this Container todisable ID syncs with AMO.
Off
A data source syncs with AMO regardless of ID service version when:On (regardless of IDservice version)
• The data source appears in the Selected Data Sources list.
• The Adobe AMO check box is not selected.
A data source will sync with AMO with ID service version 2.0 (or greater) when:On (restrict to ID serviceversion > = 2.0) • The data source appears in the Selected Data Sources list.
• The Adobe AMO check box is selected.
14Companies

Manage First Party Data Providers
View or edit containers and mappings for first-party data providers.
1. Click Companies, then locate and click the desired company to display its Profile page.
Use the Search box or the pagination controls at the bottom of the list to find the desired company.You can sorteach column in ascending or descending order by clicking the desired column's header.
2. Click the First Party Data Providers tab.
3. Click a data provider's row to view or edit containers and mappings for that data provider.
4. Move containers from the Available Containers and Selected Containers for This Data Provider lists byselecting the desired containers, then clicking the right or left arrows as necessary.
5. Click Save if you made changes.
Manage Third-Party Data Providers
View or edit containers and mappings for third-party data providers.You can also enable sharing with different dataproviders.
1. Click Companies, then locate and click the desired company to display its Profile page.
Use the Search box or the pagination controls at the bottom of the list to find the desired company.You can sorteach column in ascending or descending order by clicking the desired column's header.
2. Click the Third Party Data Providers tab.
15Companies
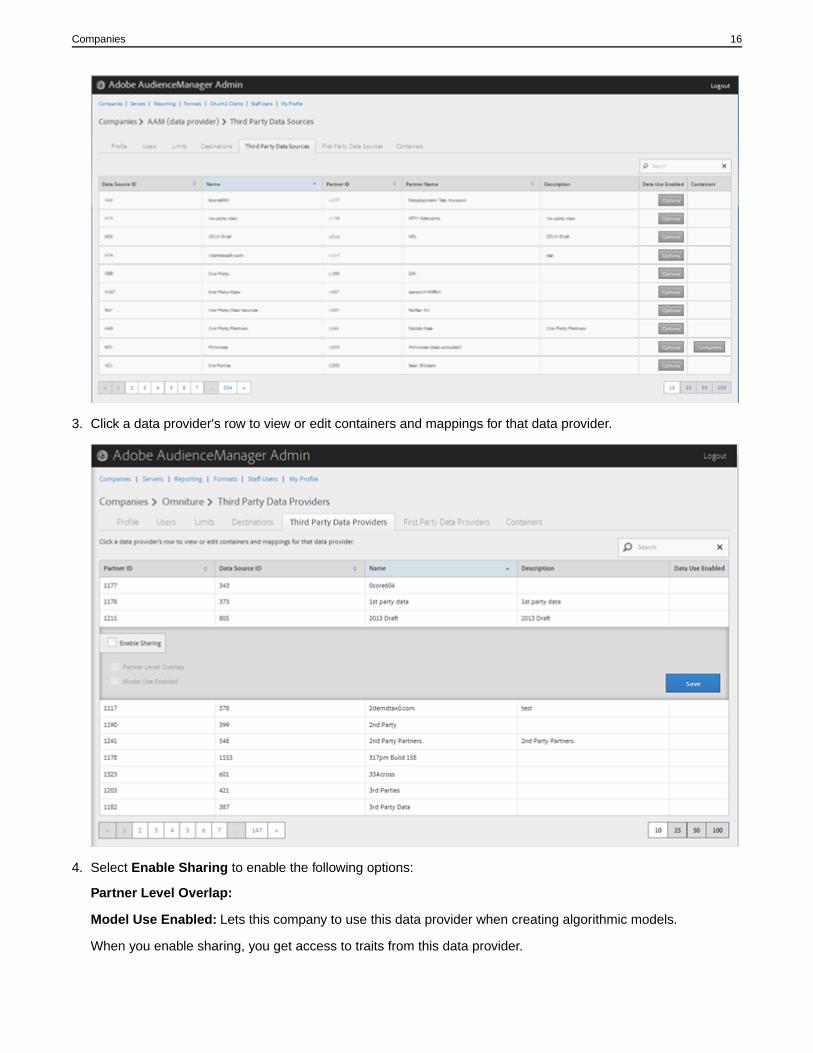
3. Click a data provider's row to view or edit containers and mappings for that data provider.
4. Select Enable Sharing to enable the following options:
Partner Level Overlap:
Model Use Enabled: Lets this company to use this data provider when creating algorithmic models.
When you enable sharing, you get access to traits from this data provider.
16Companies

5. (Conditional) If the container is enabled for this provider, you can select containers for this data provider bymoving the desired containers from the available list to the selected list.
You can also perform this task from the Containers page.
6. Click Save if you made changes.
Manage Company Destinations
Create new Audience Manager destinations or edit and delete existing destinations.
For detailed information, see Destinations in the Audience Manager Users Guide.
Create or Edit Company Destinations
Scroll through the sections for step-by-step instructions on how to create new Audience Manager destinations oredit existing destinations.
Please visit the Marketing Cloud partner integration page before setting up destinations. The page contains thespecific information that you need to fill in for each Audience Manager partner integration.
If your client wants to use Adobe Media Optimizer as a destination in Audience Manager , you need to set this upin Adobe Media Optimizer.
• Navigate to the Destinations Tab
• Basic Settings
• Realtime Data (for S2S destinations)
• Batch Data
• Configure Data Sources
• Save and Finalize
Navigate to the Destinations Tab
1. Click Companies, then locate and click the desired company to display its Profile page.You can use the Searchbox or the pagination controls at the bottom of the list to find the desired company.You can sort each column inascending or descending order by clicking the desired column's header.
2. Click the Destinations tab.
3. To create a new destination, click Add Destination.
Or
To edit an existing destination, click the destination's name in the Name column.
Basic Settings
Fill in the fields in the Basic Settings window.
Name: (Required) Specify the name of this destination.
Description: Specify descriptive information about this destination.
Type: (Required) Select the desired destination type:
• Bulk ID: Sync IDs between different platforms.
17Companies

• Bulk Trait: Send trait information in bulk to different platforms.
• Bulk Segment: Send segment information in bulk to different platforms.
• S2S: Use server-to-server destinations to send real-time and batch data to different platforms.
Auto-Fill Destination Mapping: (S2S only) Select an option:
• Segment ID: If you select this setting, the destination value mapping is filled with the Audience Manager SegmentID.
• Integration Code Value: If you select this setting, the destination value mapping is filled with the Audience ManagerSegment integration code.
User ID Key: (Required) Select the desired user ID key for this destination from the drop-down list.
This ID is used as the master data source ID. This determines the user IDs to be outbounded in the file.
Note: For the Bulk ID destination type, you cannot use the Audience Manager User ID or the Adobe MarketingCloud ID.
If your data source ID (DPID) does not display in the drop-down list, you must select the Outbound checkbox atthe data-source level on the Data Source Settings page.
Target Data Source: (Required) Select the desired data source for this destination from the drop-down list. Thissetting enables labeling of outbounded data, which allows for ingestion into separate systems on the clients' side.
Foreign Account ID: Specify the foreign account ID for this destination. This is the identification value in therecipient's system for this outbounded data.
Outbound Sample Rate Denominator: When the total amount of returned data is unknown, use this setting toreturn only a sample amount of data, rather than the full amount. Adjust the number here to represent a fraction ofthe data (e.g., a value of '100' returns 1/100th the regular amount of data, a value of '10' returns 1/10th the regularamount of data). The default is '1', which returns all data.
Realtime Data (for S2S destinations)
If you are creating an S2S destination, fill in the fields below:
Servers: Select the desired HTTP server for this destination.
Format: Select the desired format for this destination from the drop-down list.: HTTP only.
Note: For S2S only, you can enable or disable either Realtime or Batch destinations using the onscreenOff/On sliders.You cannot disable both options.
Batch Data
For Bulk ID, Bulk Trait or Bulk Segment destinations, fill in the fields below:
Protocol: (Required) Select the desired protocol for this destination from the drop-down list:
• FTP
• HTTP
• S3
Servers: (Required) Select the desired server for this destination from the drop-down list.
18Companies
Format: (Required) Select the desired format for this destination from the drop-down list: HTTP or file type, dependingon the protocol you chose above.
Sync Type: (Required) Select the desired sync type for this destination. This indicates the level of user activitiesclients would want to include in the outbound orders. Select Customer if clients are only interested in analyzingsegment qualifications from their properties. Select Platform if they want to include segment qualifications fromoff-site activities across all Audience Manager customers.
• Customer: File contains active users that have at least 1 trait realization only on client's properties (associatedwith the client's PID) for the selected time period.Your clients should use this option to outbound their real-timesegment qualifications to destinations.
• Platform: File contains active users that have at least 1 real-time interaction, be it ID sync or trait realization,anywhere across all Audience Manager clients' properties (associated with all client PIDs) for the selected timeperiod.Your clients should use this option to outbound their total segment qualifications to destinations.
• Lifetime: File contains active users seen anywhere across all Audience Manager clients' properties since thecreation of the destination.
Sync Type Lookback Period: If you select Customer or Platform, select a time period. Files contain active usersfor the selected time period.
Next, select the order type. This indicates the frequency and scope of each outbound integration with partners.Select between incremental and full orders.
Incremental Scheduled Run: With each run, Audience Manager will only outbound the net new users qualifiedsince the previous outbound order. Select the desired time period that you want Audience Manager to performincremental synchronization processes. For example, you can select every four hours, every seven days, or never.
Note: The first ever incremental order is equivalent to a full order because no previous users were ever sentto the destination.
Full Sync Scheduled Run: With each run, Audience Manager will outbound all active users since the destinationwas first set up. Select the desired schedule that you want Audience Manager to use to perform full synchronizationprocesses. For example, you can select every 24 hours, every seven days, every 30 days, or never.
Note: We recommend using incremental syncs more frequently than full syncs. Incremental syncs only sendfiles that contain new trait realizations or ID syncs. Full syncs send the all the files, whether or not they includenew realizations or ID syncs. Only use the Full Sync Scheduled Run configuration when clients need a fullcopy of all their users, to reduce the outbound data volume.
Configure Data Sources
For Bulk ID, Bulk Trait or Bulk Segment destinations, fill in the fields below. These settings let you send all data(traits, segments, or IDs, based on type selected) associated with the data sources.
All Unrestricted First Party Data: Select to use all first-party data sources. If you select this option, the AvailableData Sources options are disabled.
Available Data Sources: Use the arrows to move data sources between the Available Data Sources and In FileData Sources boxes.
19Companies
Save and Finalize
The Save button is activated after filling in all the required fields. Click Save to finalize the create destination process.
Delete Company Destinations
A step-by-step guide to deleting company destinations.
To delete a destination:
1. Click Companies, locate and click the desired company, then click the Destinations tab.
2.Click in the Actions column of the desired destination.
3. Click OK to confirm the deletion.
Note: You cannot delete a destination if it has segments mapped to it.
Manage Company Limits
Manage the following limits for the company: algorithmic models, segments, destinations, and traits.
1. Click Companies, then locate and click the desired company to display its Profile page.
Use the Search box or the pagination controls at the bottom of the list to find the desired company.You can sorteach column in ascending or descending order by clicking the desired column's header.
2. Click the Limits tab.
20Companies

3. Fill in the fields:
Note: If any of the fields are empty, the default is currently unlimited. All fields are independent. Forexample, in the Trait Limits section, you can specify 100 for Total Traits and 100 for the other trait types.The sum of Max Number of Algorithmic Traits, Max Number or Rule Based Traits, and Max Number ofOnboarded Traits does not equal the Total Number.
AlgoModel Limits: Specify the algorithmic limits for this company:
• Total Number: Specify the total number of algorithmic traits this company can have.
Segment Limits: Specify the segment limits for this company:
• Total Number: Specify the total number of segments this company can have.
Destinations Limits: Specify the destination limits for this company:
• Total Number: Specify the total number of destinations this company can have.
• Max Number of URL Destinations: Specify the maximum number of URL destinations this company can have.
21Companies

• Max Number of AdServer Destinations: Specify the maximum number of AdServer destinations this companycan have.
• Max Number of S2S Destinations: Specify the maximum number of S2S destinations this company can have.
Trait Limits: Specify the trait limits for this company:
• Total Number: Specify the total number of trait this company can have.
• Max Number of Algorithmic Traits: Specify the maximum number of algorithmic traits this company can have.
• Max Number of Rule Based Traits: Specify the maximum number of rule-based traits this company can have.
• Max Number of Onboarded Traits: Specify the maximum number of onboarded traits this company can have.
4. Click Save.
Manage Company Users
Create new Audience Management users or edit and delete existing users.
1. Click Companies, then locate and click the desired company to display its Profile page.
Use the Search box or the pagination controls at the bottom of the list to find the desired company.You can sorteach column in ascending or descending order by clicking the desired column's header.
2. Click the Users tab.
3. To create a new user, click Create a New User.
Or
To edit an existing user, locate and click the desired user the Username column.
22Companies

4. Fill in the fields:
First Name: (Required) Specify the user's first name.
Last Name: (Required) Specify the user's last name.
Username: (Required) Specify the user's Audience Management username. Usernames must be unique.
Email Address: (Required) Specify the user's email address.
Phone Number: Specify the user's phone number.
IMS ID: The user's Identity Management System ID. This ID lets the user link to Adobe solutions to the AdobeMarketing Cloud.
Is Admin: Make this user an Audience Management administrative user.
An administrator has all Audience Management user roles for this partner.
Status: While creating a new user, this field initially displays as Pending until the user logs in and resets thetemporary password.
If you are editing an existing user, you can select from the following statuses:
• Active: Specifies that this user is an active Audience Management user.
• Deactivated: Specifies that this user is a deactivated Audience Management user.
• Expired: Specifies that this user is an expired user.
• Locked Out: Specifies that this user is a locked-out user.
5. Click Submit.
23Companies
To delete a user:
1. Click Companies, locate and click the desired company, then click the Users tab.
2.Click in the Actions column of the desired user.
3. Click OK to confirm the deletion.
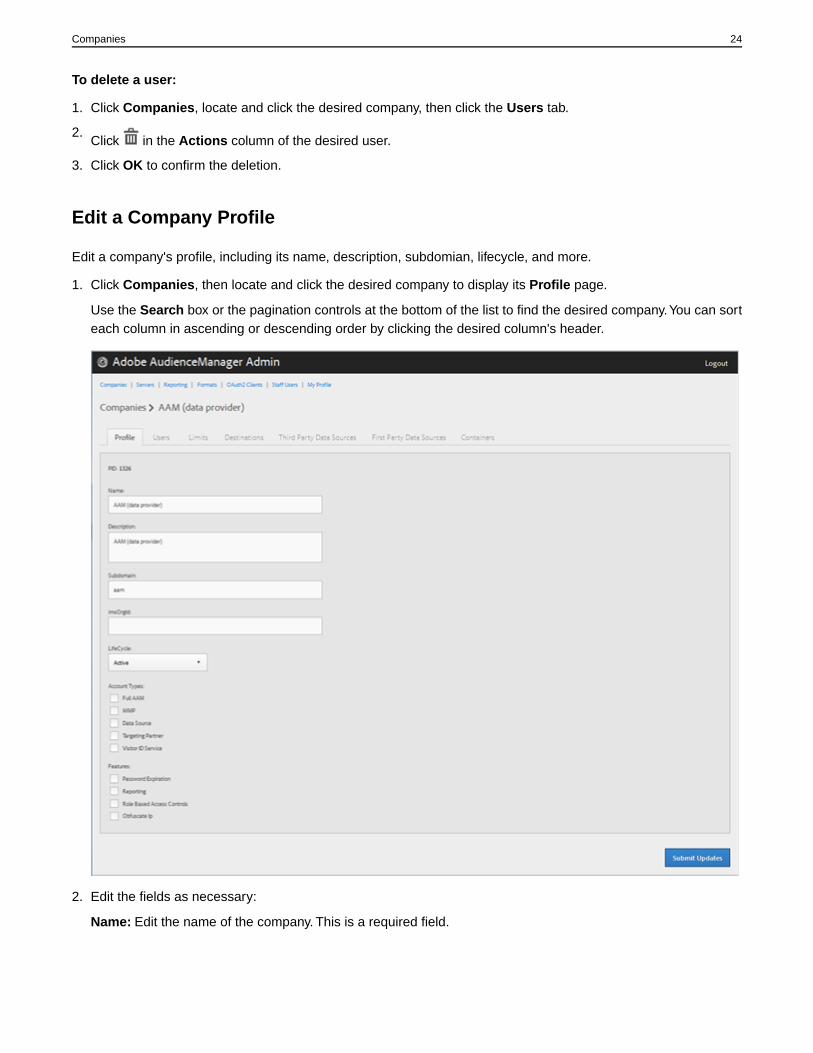
Edit a Company Profile
Edit a company's profile, including its name, description, subdomian, lifecycle, and more.
1. Click Companies, then locate and click the desired company to display its Profile page.
Use the Search box or the pagination controls at the bottom of the list to find the desired company.You can sorteach column in ascending or descending order by clicking the desired column's header.
2. Edit the fields as necessary:
Name: Edit the name of the company. This is a required field.
24Companies

Description: Edit the description of the company. This is a required field.
Subdomain: (Required) Specify the company's subdomain. The text you enter is what shows as the subdomainof the event call. This can't be changed. It must be a string of URL-valid characters.
For example, if your company was named AcmeCorp, the subdomain would be acmecorp.
Audience Management uses the subdomain for the Data Collection Server (DCS). In the previous example, ifyour company's full URL in DCS would be acmecorp.demdex.net.
imsOrgld: (Identity Management System Organization ID) This ID lets you connect your company with theAdobe Marketing Cloud.
Lifecyle: Specify the desired stage for the company:
• Active: Specify that the company will be an active Audience Management client. An Active account means apaying customer, not just for consulting, but for the Audience Management SKU.
• Demo: Specify that the company will be for demo purposes only. Reporting data will be automatically faked.
• Prospect: Specify that the company is a prospective Audience Management client, such as a company beinggiven a free POC or an account setup for a sales demo.
• Test: Specify that the company will be for internal testing purposes only.
Account Types: Specify the full set of account types for this company. No account type is mutually exclusivewith any other type.
• Full AAM: Specify that the company will have a full Adobe Audience Management account and users will havelogin access.
• MMP: Specify that the company has been enabled to use the Master Marketing Profile (MMP) capabilities.
If you select this account type, Visitor ID Service is also automatically selected.
For more information, see Audiences Services - Master Marketing Profile. For more information about integratingAudience Management and MMP, see Master Marketing Profile Integration.
• Data Source: Specify that the company is a third-party data provider within Audience Management.
• Targeting Partner: Specify that the company acts as a targeting platform for Audience Management customers.
• Visitor ID Service: Specify that the company has been enabled to use the Marketing Cloud Visitor ID Service.
The Marketing Cloud Visitor ID service provides a universal visitor ID across Marketing Cloud solutions. Formore information, see the Marketing Cloud Visitor ID Service user guide.
• Agency: Specify that the company will have an Agency account.
Features: Select the desired options:
• Password Expiration: Sets all user passwords within this company to expire after 90 days to increase AudienceManagement security.
• Reporting: Enables Audience Management reporting for this company.
• Role Based Access Controls: Enable role-based access controls for this company. Role-based access controlslet you create user groups with different access permissions. Individual users within these groups can thenaccess only specific features in Audience Management.
3. Click Submit Updates.
25Companies

Delete a Company
Use the Companies page in the Audience Management Admin tool to delete an existing company.
Note: You must have the DEXADMIN role in order to delete existing companies.
1. To delete an existing company, click Companies.
2.Click in the Actions column of the desired company.
3. Click OK to confirm the deletion.
Filter Outbound Data by Active Users Only
Follow these instructions to generate a full synchronization file that includes recently active users only.You maywant to filter for active users to push relevant data to an on-site targeting system or to limit the size of the files sentto a DSP.You cannot use this filter with incremental synchronization.
Note: A visitor does not need to be seen on a selected customer site or in their ad traffic to qualify as "active."They can be seen by any Audience Manager customer or partner to qualify as "active."
To filter by active users only:
1. Click Companies.
2. Select the company you want to work with and click Destinations.
3. In the Batch Data section, set the following options:
• Sync Type: Select Customer or Platform.• Sync Type Lookback Period: This time interval defines the range of your data file. Choices include 24-hours,
7-days, 30-days.
26Companies
• Incremental Sync Scheduled Run: Select Never. Remember, this filter applies to full synchronization filesonly.
• Full Sync Scheduled Run:This determines how often you want to receive this file. Choices include 24-hours,7-days, 30-days, or Never (to disable).
4. Click Save.
27Companies
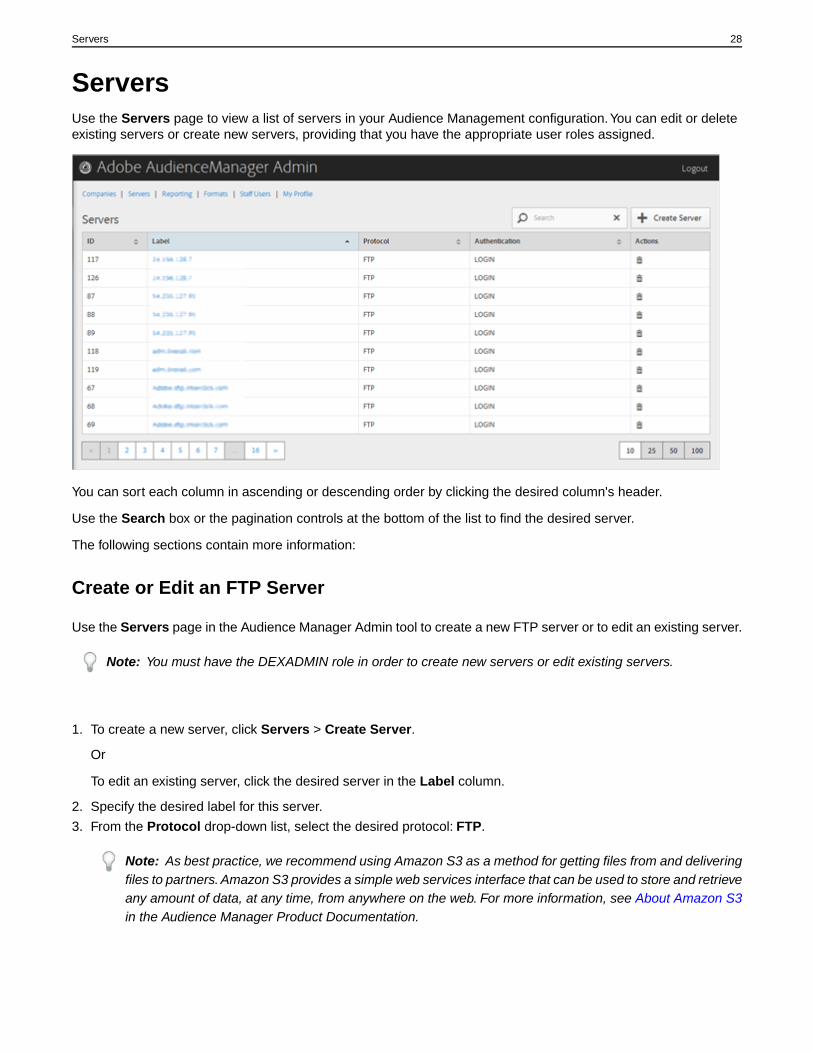
ServersUse the Servers page to view a list of servers in your Audience Management configuration.You can edit or deleteexisting servers or create new servers, providing that you have the appropriate user roles assigned.
You can sort each column in ascending or descending order by clicking the desired column's header.
Use the Search box or the pagination controls at the bottom of the list to find the desired server.
The following sections contain more information:
Create or Edit an FTP Server
Use the Servers page in the Audience Manager Admin tool to create a new FTP server or to edit an existing server.
Note: You must have the DEXADMIN role in order to create new servers or edit existing servers.
1. To create a new server, click Servers > Create Server.
Or
To edit an existing server, click the desired server in the Label column.
2. Specify the desired label for this server.
3. From the Protocol drop-down list, select the desired protocol: FTP.
Note: As best practice, we recommend using Amazon S3 as a method for getting files from and deliveringfiles to partners. Amazon S3 provides a simple web services interface that can be used to store and retrieveany amount of data, at any time, from anywhere on the web. For more information, see About Amazon S3in the Audience Manager Product Documentation.
28Servers

4. Fill in the fields:
Type: Select the desired encryption type: SFTP or FTPs/TLS.
Domain: Specify the desired domain (host) for this server.
Port: Specify the desired port for this server. The default port displays for each encryption type.You can changethe default port, if necessary.
Remote Path: Specify the desired remote path for this server. If you leave this field empty, Audience Managementplaces the files in the default directory.
.tmp File Rename on Completion: Enable this option to rename the .tmp file on completion.
Filename Suffix: Specify the text that you want appended to transfer files.
Moved to When Finished: Specify the path to the location where you want the transfer file moved on completion.
Authentication: Specify the desired server authentication method: Username/Password or SSH Key.
Note: Remember to whitelist our egress FTP IP: 52.44.29.204.
5. Click Create if you are creating a new server.
Or
Click Update if you are editing an existing server.
Create or Edit an HTTP Server
Use the Servers page in the Audience Manager Admin tool to create a new HTTP server or to edit an existing server.
Note: You must have the DEXADMIN role in order to create new servers or edit existing servers.
1. To create a new server, click Servers > Create Server.
Or
To edit an existing server, click the desired server in the Label column.
2. Specify the desired label for this server.
3. From the Protocol drop-down list, select the desired protocol: HTTP.
4. Fill in the fields:
Domain: Specify the desired domain (host) for this server.
Port: Specify the desired port for this server. The default port displays for each encryption type.You can changethe default port, if necessary
Maximum Users Per Request: Specify the maximum number of users per request allowed for this server.
URL Prefix: Specify the URL prefix to use for this server.
Authentication URL: Specify the Authentication URL for this HTTP server.
Authentication: Specify the desired authentication method: None, Username/Password, or SSH Key.
29Servers

HTTP Signature Header: The name of the HTTP header, provided by the customer, that contains the HTTPsignature key. The default value is X-Signature, as shown in the example below:
* Connected to partner.website.com (127.0.0.1) port 80 (#0)> POST /webpage HTTP/1.1> Host: partner.host.com> Accept: */*> Content-Type: application/json> Content-Length: 20> X-Signature: wxa2ByMWhhP328EvHQsVlOD5jTc=POST message content
HTTP Signature Key: The key used to sign the HTTP request, provided by the customer.
Show Signature Key: Toggle whether or not to display the signature in the browser.
HTTP Signature Encryption Method: Specify the method we use for encrypting the signature. Use SHA1 unlessthe customer prefers otherwise.
Note: If you want to enable OAuth 2.0 authentication for real-time data transfers for a partner, fill in thefields as in the table below. The fields in italics need to be filled in exactly as in the table.
ValueName
Server with OAuth 2.0 enabledLabel
HTTPProtocol
api.partner.comDomain
443Port
10Maximum Users per Request
/segments/aamURL Prefix
api.partner.com/oauth2/tokenAuthentication URL
Username/PasswordAuthentication
AuthorizationUsername
Basic your_password_herePassword
Leave this field blankHTTP Signature Header
Leave this field blankHTTP Signature Key
NoneHTTP Signature Encryption Method
5. Click Create if you are creating a new server.
Or
Click Update if you are editing an existing server.
Create or Edit an S3 Server
Use the Servers page in the Audience Manager Admin tool to create a new S3 server or to edit an existing server.
30Servers
Note: You must have the DEXADMIN role in order to create new servers or edit existing servers.
1. To create a new server, click Servers > Create Server.
Or
To edit an existing server, click the desired server in the Label column.
2. Specify the desired label for this server.
3. From the Protocol drop-down list, select the desired protocol: S3.
Note: As best practice, we recommend using Amazon S3 as a method for getting files from and deliveringfiles to partners. Amazon S3 provides a simple web services interface that can be used to store and retrieveany amount of data, at any time, from anywhere on the web. For more information, see About Amazon S3in the Audience Manager Product Documentation.
4. Fill in the fields:
Account: Specify the desired S3 account.
Bucket: Specify the desired S3 bucket.
Directory: Specify the desired S3 directory.
Access Key: Specify the desired S3 access key.
Secret Key: Specify the desired S3 secret key.
5. Click Create if you are creating a new server.
Or
Click Update if you are editing an existing server.
Delete a Server
Use the Servers page in the Audience Manager Admin tool to delete an existing server.
Note: You must have the DEXADMIN role in order to delete existing servers.
1. To delete an existing server, click Servers.
31Servers

2.Click in the Actions column of the desired server.
3. Click OK to confirm the deletion.
32Servers
ReportingManage Audience Management reports by creating new reports or by editing or deleting existing reports.You canalso assign a portal user as a Tableau user.
You can sort each column in ascending or descending order by clicking the desired column's header.
Use the Search box or the pagination controls at the bottom of the list to find the desired report.
The following sections contain more information:
Create or Edit a Report
Use the Reporting page in the Audience Management Admin tool to create a new report or to edit an existing report.
1. To create a new report, click Reporting > Create a New Report.
Or
To edit an existing report, click the desired report in the Name column.
33Reporting
2. Fill in the fields:
Name: (Required) Provide a descriptive name for the report.
Description: (Required) Specify descriptive information about this report.
HTML Code: (Required) Specify or paste your report's HTML code into the box.
Folder: Select the desired folder for this report:
• Audience Reports
• Delivery Reports
• Overlap Reports
• Other Reports
Depending on your selection, this report displays in Audience Management under the corresponding menu item.
Partners: Move partners from the top list (available partners) to the bottom list (selected partners) by selectingthe desired partners, then clicking the Select or Deselect buttons as necessary.
Active: Make this an active Audience Management report. If this option is not selected, the report is created butdoes not display in the Audience Management UI.
3. Click Create if you are creating a new report.
34Reporting

Or
Click Update if you are editing an existing report.
To delete a report:
1. Click Reporting.
2.Click in the Actions column of the desired report.
3. Click OK to confirm the deletion.
Assign a Portal User to Tableau User
Use the Reporting page to make a portal user a Tableau user. This lets users view Tableau reports in AudienceManagement.
1. Click Reporting > Assign Portal User to Tableau User.
2. To assign a user, in the desired partner row, type a Tableau username in the text field, then click outside the textfield.
Or
To delete an assignment, in the desired partner row, remove the username from the text field, then click outsidethe text field.
35Reporting

FormatsA format is a saved template (or file) that uses macros to organize the contents of data sent to a destination. Formattypes include HTTP formats and file formats. HTTP formats send data in a JSON object with a POST or GET method.File formats send data in a file by FTP. The macros used by each format let you set file names, define file headers,and organize the contents of a data file. In the Admin UI, you can create, save, and re-use formats when settingup destinations for customers..
Related Content
Enable Hadoop Sequence File Transfers for Outbound
You can enable binary Hadoop Sequence Files (SEQ) outbound batch transfers for Audience Manager customers.
The advantages of using Hadoop SEQ files are listed in the public documentation.
To enable SEQ outbound file transfers:
1. Select the company and the destination for which you want to enable SEQ outbound file transfers.
2. In the Edit Destinations interface, scroll down to Batch Data.
3. Select Protocol: FTP or S3;
4. Select Format: AAM-Outbound-SEQ (415);
5. Confirm by clicking Save at the bottom of the page. The customer can now send Hadoop Sequence Files to thedestination.
File Format Macros
Lists the macros you can use to create FTP-based data files. Some macros can be used for all data file fields androws. Other macros are specific to header and data rows only.
Contents:
Common Macros
Header Field Macros
Data Row Macros
36Formats

Common Macros
These macros can be used in any format field. For examples, see File Format Macro Examples.
DescriptionMacro
A non-printing ASCII character. It indicates the start of a row or a section of content. It can alsobe used to separate data columns in a file.
ASCII_SOH
Target Data Provider ID.DPID
User ID Key Data Provider ID.MASTER_DPID
Order / destination ID.ORDER_ID
An alias for an order / destination ID.PIDALIAS
The value for this alias is set in the Foreign Account ID field for a destination (in the BasicSettings section).
Indicates synchronization type. Accepts the following optional variables:SYNC_MODE
• full: Full synchronization.
• iter: Incremental synchronization.
Indicates data transfer method. Accepts the following optional variables:SYNC_TYPE
• ftp
• http
• s3
A 10-digit, UTC, Unix timestamp.TIMESTAMP
It can also be formatted as YYYYMMDDhhmmss following Java date/timestamp formatting rules.
Header Field Macros
Macros used in header fields only. For examples, see File Format Macro Examples.
DescriptionMacro
Used as a separator, this macro inserts a tab between fields.TAB
Data Row Macros
Macros used in data rows only. For examples, see File Format Macro Examples .
DescriptionMacro
Inserts a closed curly bracket } character.CLOSE_CURLY_BRACKET
37Formats
DescriptionMacro
Inserts a comma.COMMA
Data Partner Unique User Identifier. Returns the ID you've assigned to a user/sitevisitor if that ID has already been synchronized with an Audience Manager device ID.
DP_UUID
If the DPID is 0, this macro will return the Audience Manager ID instead of your ID forthe user.
Returns a list that contains multiple IDs for a data partner. This is useful if you havea large organization with multiple subdivisions or other organizational groups you're
DP_UUID_LIST
allowed to share data with. This macro returns a list of the IDs for those subordinategroups.
The output of this macro maps the data provider ID (DPID) to related unique user IDs(DPUUID). This macro must have a formatting string to control its output. Sampleoutput would look similar to the following:
DPUUIDS
"dpids=dpid1,dpid2,...dpidn|maxMappings=n|format=json"
The maxMappings setting determines how many mappings you want the macro toreturn. When maxMappings=0, this macro returns all the mappings for each specifiedDPID. Data is sorted by timestamp (most recent first) and returns results with thelargest timestamp first.
Required when using the conditional if and the SEGMENT_LIST andREMOVED_SEGMENT_LIST macros.
endif
This combination of macros creates a conditional statement that lists the segmentsusers belong to and have been removed from. It returns an empty string if bothconditions are not met or there's no data.
if(SEGMENT_LIST &&
REMOVED_SEGMENT_LIST)endif
Adobe Marketing Cloud ID.MCID
Inserts an open curly bracket { character.OPEN_CURLY_BRACKET
Deprecated. Do not use.OPT_OUT
Deprecated. Do not use.OUTPUT_ATTRIBUTE_TYPE
Returns 1 as a static, hardcoded value.OUTPUT_ATTRIBUTE_VALUE
Partner ID (PID). The PID appears under the Profile tab in the admin UI.PID
Returns a list of segments, if any, that have been removed.REMOVED_SEGMENT_LIST
38Formats

DescriptionMacro
Returns a list of segments in a list. Accepts the following optional variables:SEGMENT_LIST
• segmentId: Segment ID. Deprecated. Use sid (lower case only).
• csegid: Customer segment ID. Deprecated. Use sid (lower case only).
• sid: Segment ID.
• type: Returns 5, a static, hardcoded value that identifies data as segment data.
• alias: Deprecated. Do not use.
• lastUpdateTime: A Unix time stamp that indicates the last time a segment wasrealized.
Put these variables in curly brackets after the macro. For example, this code separatesresults with a pipe "|" character: <SEGMENT_LIST:{seg|<seg.type>,<seg.sid>};separator="|">
Returns 1 as a static, hardcoded value.SET_ATTRIBUTES
Inserts a tab separator.TAB
Returns a list of traits. Accepts the following optional arguments:TRAIT_LIST
• type: Trait types identified by a numeric ID. This variable returns:
• 10 which identifies a DPM trait (offline, onboarded by an inbound job).
• 3 which identifies a rules-based trait (realtime,; onboarded through the DCS).
• traitId: Trait ID.
• lastRealized: Last time the trait was realized. Unix timestamp.
Put these variables in curly brackets after the macro. For example, this code separatesthe results with a pipe "|" character: TRAIT_LIST{type|traitId};separator="|"
Audience Manager user ID.UUID
File Format Macro Examples
Examples of how macros are used to create outbound, FTP file templates.
Contents:
Common Macros
Header Field Macros
Data Row Macros
Note: In the tables, boldface type identifies each macro with its related output. For the format examples, the< > symbols have been added to help visually separate each macro.
39Formats

Common Macros
These macros can be used in any format field. See the File Format Macros for a complete list and definitions.
Format and Output ExamplesMacro
Format: <SYNC_TYPE>_<ORDER_ID>_<DPID>_<SYNC_MODE>_<TIMESTAMP>.syncDPID
Output: ftp_215_888_iter_1449756724.sync
Format:<SYNC_TYPE>_<ORDER_ID>_<DPID>_<MASTER_DPID>_<SYNC_MODE>_<TIMESTAMP>.sync
MASTER_DPID
Output: ftp_215_888_20915_iter_1449756724.sync
Format: <SYNC_TYPE>_<ORDER_ID>_<DPID>_<SYNC_MODE>_<TIMESTAMP>.syncORDER_ID
Output: ftp_215_888_iter_1449756724.sync
Format: <SYNC_TYPE>_<ORDER_ID>_<DPID>_<SYNC_MODE>_<TIMESTAMP>.syncSYNC_MODE
Output:
• Full: ftp_215_888_full_1449756724.sync
• Incremental: ftp_215_888_iter_1449756724.sync
Format: <SYNC_TYPE>_<ORDER_ID>_<DPID>_<SYNC_MODE>_<TIMESTAMP>.syncSYNC_TYPE
Output:
• FTP: ftp_215_888_iter_1449756724.sync
• HTTP: http_215_888_iter_1449756724.sync
• S3: s3_215_888_iter_1449756724.sync
Format: <SYNC_TYPE>_<ORDER_ID>_<DPID>_<SYNC_MODE>_<TIMESTAMP>.syncTIMESTAMP
Output: ftp_215_888_iter_1449756724.sync
Header Field Macros
Macros used in header fields only. See the File Format Macros for a complete list and definitions.
Format and Output ExamplesMacro
Format: <ORDER_ID><TAB><SYNC_TYPE>TAB
Output: 888 full.sync
In the output, the non-printing tab character separates each element.
Data Row Macros
Macros used in header fields only. See the File Format Macros for a complete list and definitions.
40Formats

Format and Output ExamplesMacro
Format: <DP_UUID><TAB><DP_UUID_LIST;separator=TAB>DP_UUID
Output: 123456 UUID1 UUID2 UUID3
Format: <DP_UUID><TAB><DP_UUID_LIST;separator=TAB>DP_UUID_LIST
Output: 123456 UUID1 UUID2 UUID3
This example creates a format that returns removed segments in a server-to-server feed.
{"AdvertiserId":"<PIDALIAS>", "DataCenterId": 2,"TDID":"<DP_UUID>","Data":[<SEGMENT_LIST:{seg|<OPEN_CURLY_BRACKET>"Name":"<seg.alias>"<CLOSE_CURLY_BRACKET>};
SEGMENT_LIST &&
REMOVED_SEGMENT_LIST
separator=","><if(SEGMENT_LIST && REMOVED_SEGMENT_LIST)><COMMA><endif><REMOVED_SEGMENT_LIST:{seg|<OPEN_CURLY_BRACKET>"Name":"<seg.alias>","TtlInMinutes":0<CLOSE_CURLY_BRACKET>}; separator=",">]}
Format: <DP_UUID><SEGMENT_LIST>;separator=" ">SEGMENT_LIST
Output: 123456 105955 101183 101180 101179
Format:<PID><TAB><UUID><TAB><DP_UUID><TAB><SET_ATTRIBUTES><TAB><OPT_OUT><TAB><SEGMENT_LIST:{seg|<seg.type>,<seg.alias>,<OUTPUT_ATTRIBUTE_VALUE>,<seg.lastUpdateTime>&}>
SET_ATTRIBUTES
Output: 1159 00088008579683653741516297509717335000 17t0aj01b120hp 1 05,103714,1,1344114661000&5,103713,1,1343250661000
Format: <DP_UUID><TAB><DP_UUID_LIST;separator=TAB>TAB
Output: 123456 UUID1 UUID2 UUID3
In the output, the non-printing tab character separates each element.
Format:<PID><TAB><DP_UUID><TAB><SET_ATTRIBUTES><TAB><TRAIT_LIST;separator=“|”>
TRAIT_LIST
Output: 1131 12345 1 123|456|789
HTTP Format Macros
Lists the macros you can use to create HTTP data files. HTTP sends data in a JSON format.
See the HTTP Format Macro Examples for a list and examples of some commonly used macro combinations.
DescriptionMethod TypeMacro
Audience Manager ID.GETAAM_UUID
41Formats

DescriptionMethod TypeMacro
Data Partner Unique User ID. This macro returns the ID you’veassigned to a user if their ID has already been synchronized withan Audience Manager device ID.
GETDP_UUID
Data Provider ID.GETDPID
Unix UTC timestamp. An internal timestamp, represents the timeAAM was notified to publish the S2S destination to our partners.
GET, POSTGENERATION_TIME
The user's IP address.GETIP
The number (integer) of segments a user no longer belongs to.GETNUM_REMOVED_SEGMENTS
The number of segments a user belongs to.GETNUM_SEGMENTS
Order or destination ID.GET, POSTORDER_ID
An alias for the partner ID. Also known as Foreign Account ID.GET, POSTPID_ALIAS
Generates a random number.GETRANDOM
Returns a list of segment IDs, if any, that a user no longer qualifiesfor.
GETREMOVED_SEGMENT_LIST
A list of segments that a user no longer qualifies for.You can alsoreturn specific segment fields that include:
GETREMOVED_SEGMENTS
• traitAlias
• segmentId
• status
• dateTime
Specify these fields in an array as shown in this example:
[<REMOVED_SEGMENTS:{seg|<OPEN_BRACKET>"Mapping":<seg.traitAlias>,"Status:"<seg.status>,
"Time":<seg.dateTime>,"SegmentId":<seg.segmentId><CLOSE_BRACKET>};
"separator=",">]
See also HTTP Format Macro Examples.
A list of last realizations for segments that the user no longerqualifies for.GETREMOVED_TIME_LIST
A list of aliased names of segments that a user no longer qualifiesfor.
GETREMOVED_TRAITALIAS_LIST
42Formats

DescriptionMethod TypeMacro
Returns a list of segment IDs.GETSEGMENT_LIST
A list of segments a user qualifies for.You can also return specificsegment fields that include:
GETSEGMENTS
• traitAlias
• segmentId
• status
• dateTime
Specify these fields in an array as shown in this example:
[<SEGMENTS:{seg|<OPEN_BRACKET>"Mapping":<seg.traitAlias>,"Status:"<seg.status>,
"Time":<seg.dateTime>,"SegmentId":<seg.segmentId><CLOSE_BRACKET>};
"separator=",">]
See also HTTP Format Macro Examples.
A list of last realizations.GETTIME_LIST
Unix, UTC timestamp. Represents the last realization of thesegment.
GETTIMESTAMP
A list of aliased names for a particular segment.GETTRAITALIAS_LIST
User agent of the initial request.GETUSER_AGENT
A list of Audience Manager user IDs.You can also return specificfields that include the following:
POSTUSER_LIST
• user.aamUuid• user.dpUuid• user.segments• user.removedSegments• user.userAgent• user.ip• user.dpuuids• user.timestamp• user.random
Specify these fields as shown in this example:
"AAM_UUID": "<user.aamUuid>""DataPartner_UUID": "<user.dpUuid>"
See also HTTP Format Macro Examples for a full example.
43Formats

HTTP Format Macro Examples
Examples of some commonly used HTTP macro combinations.
See the HTTP Format Macros for a list of macros and their definitions.
Output FormatMacro Examples
pid_alias|dp_uuid|trait_1,trait_2<PID_ALIAS>|<DP_UUID>|<TRAITALIAS_LIST;
separator=",">
"pid_alias|count:2|users:[uuid1:dpuuid1,
uuid2:dpuuid2]"
<PID_ALIAS>|count:<NUM_USERS>|users:[<USER_LIST:{user|<user.aamUuid>:<user.dpUuid>};
separator=", ">]
"Firefox|255.255.255.255|1395758143|42341"<USER_AGENT>|<IP>|<TIMESTAMP>|<RANDOM>
"Firefox|255.255.255.255|1395758143|42341"<USER_LIST:{u|<u.userAgent>|<u.ip>|<u.timestamp>|<u.random>};
separator=", ">
dpuuid1 AND dpuuid2<DP_UUIDS.1> AND <DP_UUIDS.2>
users:[dpuuid1 AND dpuuid2]users:[<USER_LIST:{user|<user.dpUuids.1> AND
<user.dpUuids.2>}; separator=", ">]
test_known_string=loremlipsum&segid=trait_1,trait_2&test_dpuuid_1000=dpuuid_1000test_known_string=loremlipsum&segid=<TRAITALIAS_LIST;
separator=",">&test_dpuuid_1000=<DP_UUIDS.1000>
test_dpuuids=dpuuid2test_dpuuids=<DP_UUIDS.(DPID)>
pid_alias|dp_uuid|trait_1,trait_2|trait_3,trait_4"<PID_ALIAS>|<DP_UUID>|<TRAITALIAS_LIST;
separator=",">|<REMOVED_TRAITALIAS_LIST;
separator=",">
{ "Users":[
{"Users": [<USER_LIST:{user|<OPEN_BRACKET> "AAM_UUID": "<user.aamUuid>",
{ "DataPartner_UUID": "<user.dpUuid>", "AAM_UUID":"uuid1", "Segments": "DataPartner_UUID":"dpuuid1",[<user.segments:{seg|<OPEN_BRACKET>"Segment": "Segments":[ "<seg.traitAlias>"<CLOSE_BRACKET>}; { separator=",">] "Segment":"alias1" "Removed_Segments": },[<user.removedSegments:{rseg|<OPEN_BRACKET>"Segment": { "<rseg.traitAlias>"<CLOSE_BRACKET>}; "Segment":"alias2"
44Formats
Output FormatMacro Examples
} ],
separator=",">] <CLOSE_BRACKET>}; separator=",">]}
"Removed_Segments":[ { "Segment":"alias3" }, { "Segment":"alias4" } ] } ]}
{ "Users":[
{"Users": [<USER_LIST:{user|<OPEN_BRACKET> "AAM_UUID": "<user.aamUuid>",
{ "DataPartner_UUID": "<user.dpUuid>", "AAM_UUID":"uuid1", "Segments": "DataPartner_UUID":"dpuuid1",[<user.segments:{seg|<OPEN_BRACKET>"Segment": "Segments":[ "<seg.traitAlias>","Status": { "<seg.status>"<CLOSE_BRACKET>}; separator=",">] "Segment":"alias1"
<CLOSE_BRACKET>}; separator=",">]} "Status":"1" }, { "Segment":"alias2" "Status":"0" } ] } ]}
pid_alias|dp_uuid|trait_1,trait_2|trait_3,trait_4<PID_ALIAS>|<DP_UUID>|<SEGMENTS:{seg|<seg.traitAlias>};
separator=\",\">|<REMOVED_SEGMENTS:{seg|<seg.traitAlias>};
separator=\",\">
Prints a comma if the fields segments andremovedSegments are not empty. This conditional can
<if(user.segments &&
user.removedSegments)><COMMA><endif>
be used for POST requests when concatenating lists forsegments and removed segments.
Create or Edit a Format
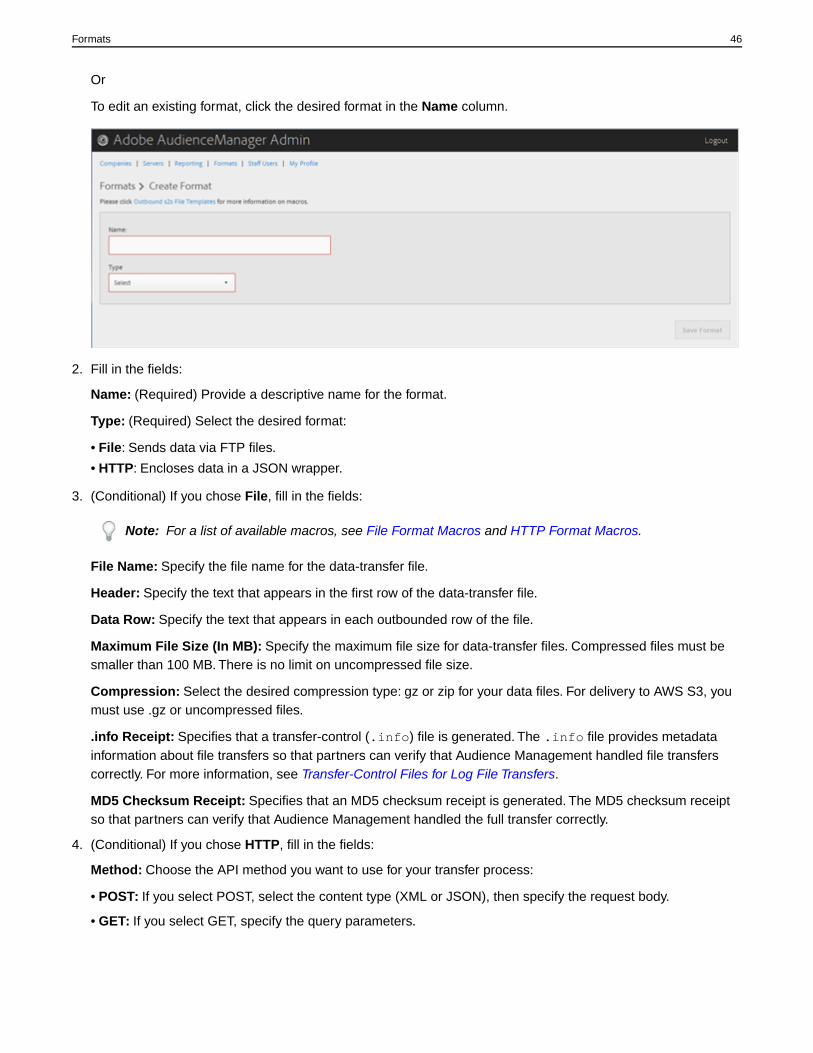
Use the Formats page in the Audience Management Admin tool to create a new format or to edit an existing format.
Tip: When selecting a format for your outbounded data, it's best, if possible, to re-use an existing format.Using an already-proven format ensures that your outbound data will be generated successfully.To see exactlyhow an existing format is formatted, click the Formats option in the menu bar and search for your format eitherby name or by ID number. Malformed formats or macros used in formats will provide incorrectly formattedoutput or will prevent information from being output entirely.
1. To create a new format, click Formats > Add Format.
45Formats
Or
To edit an existing format, click the desired format in the Name column.
2. Fill in the fields:
Name: (Required) Provide a descriptive name for the format.
Type: (Required) Select the desired format:
• File: Sends data via FTP files.
• HTTP: Encloses data in a JSON wrapper.
3. (Conditional) If you chose File, fill in the fields:
Note: For a list of available macros, see File Format Macros and HTTP Format Macros.
File Name: Specify the file name for the data-transfer file.
Header: Specify the text that appears in the first row of the data-transfer file.
Data Row: Specify the text that appears in each outbounded row of the file.
Maximum File Size (In MB): Specify the maximum file size for data-transfer files. Compressed files must besmaller than 100 MB. There is no limit on uncompressed file size.
Compression: Select the desired compression type: gz or zip for your data files. For delivery to AWS S3, youmust use .gz or uncompressed files.
.info Receipt: Specifies that a transfer-control (.info) file is generated. The .info file provides metadatainformation about file transfers so that partners can verify that Audience Management handled file transferscorrectly. For more information, see Transfer-Control Files for Log File Transfers.
MD5 Checksum Receipt: Specifies that an MD5 checksum receipt is generated. The MD5 checksum receiptso that partners can verify that Audience Management handled the full transfer correctly.
4. (Conditional) If you chose HTTP, fill in the fields:
Method: Choose the API method you want to use for your transfer process:
• POST: If you select POST, select the content type (XML or JSON), then specify the request body.
• GET: If you select GET, specify the query parameters.
46Formats
5. Click Create if you are creating a new format.
Or
Click Save Updates if you are editing an existing format.
To delete a format:
1. Click Formats.
2.Click in the Actions column of the desired format.
3. Click OK to confirm the deletion.
47Formats
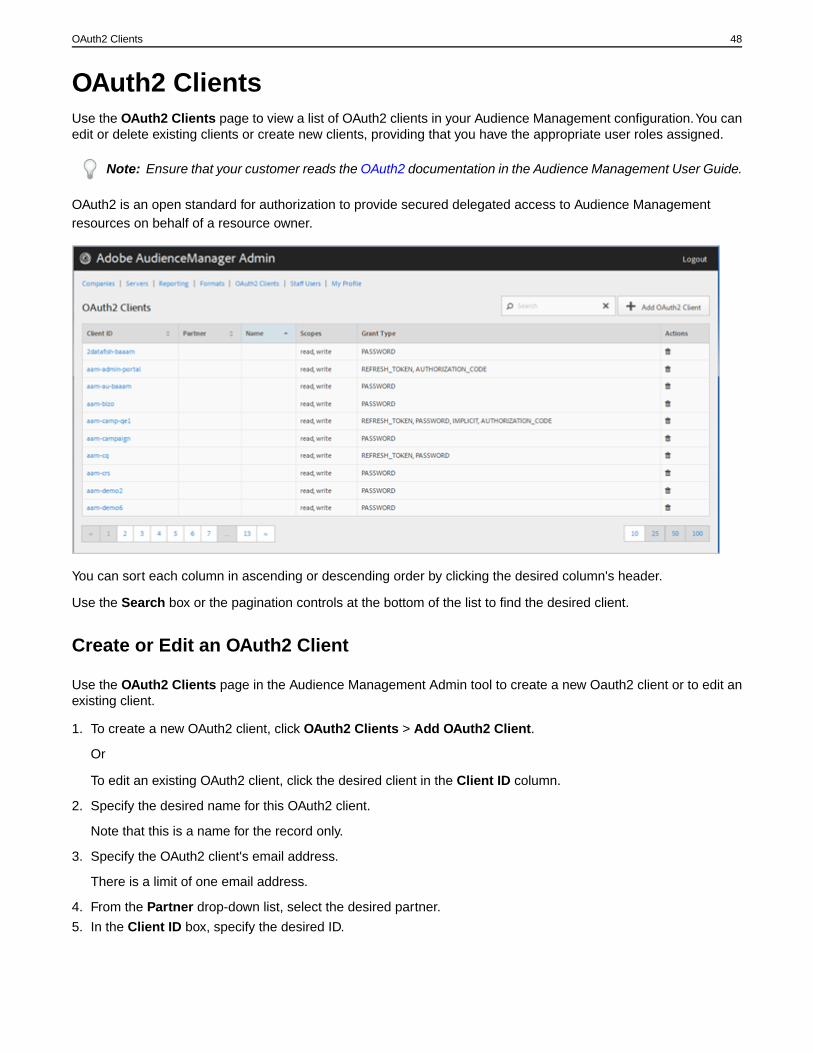
OAuth2 ClientsUse the OAuth2 Clients page to view a list of OAuth2 clients in your Audience Management configuration.You canedit or delete existing clients or create new clients, providing that you have the appropriate user roles assigned.
Note: Ensure that your customer reads the OAuth2 documentation in the Audience Management User Guide.
OAuth2 is an open standard for authorization to provide secured delegated access to Audience Managementresources on behalf of a resource owner.
You can sort each column in ascending or descending order by clicking the desired column's header.
Use the Search box or the pagination controls at the bottom of the list to find the desired client.
Create or Edit an OAuth2 Client
Use the OAuth2 Clients page in the Audience Management Admin tool to create a new Oauth2 client or to edit anexisting client.
1. To create a new OAuth2 client, click OAuth2 Clients > Add OAuth2 Client.
Or
To edit an existing OAuth2 client, click the desired client in the Client ID column.
2. Specify the desired name for this OAuth2 client.
Note that this is a name for the record only.
3. Specify the OAuth2 client's email address.
There is a limit of one email address.
4. From the Partner drop-down list, select the desired partner.
5. In the Client ID box, specify the desired ID.
48OAuth2 Clients

This is value used when submitting API requests.The prefix auto-populates when you start typing after you havechosen a Partner from the drop-down list in the preceding step. The correct format is the <partner subdomain>- <Audience Management username>.
6. Select or deselect the Restrict to Partner Users check box, as desired.
If this check box is selected, the user must be an Audience Management user listed for the selected partner. Asbest practice, we recommend that you select this option.
7. In the Scope section, select or deselect the Read and Write check boxes, as desired.
8. In the Grant Type section, select the desired means for authorization:
As best practice, we recommend that you use the default settings of Password and Refresh-token options.
• Implicit: If you select this option, the Redirect URI box is enabled.The user is given an automatic access tokenafter being authenticated and is immediately sent to the redirect URI.
• Authorization Code: If you select this option, the Redirect URI box is enabled. The user is returned to theclient after being authenticated and is then sent to the redirect URI.
• Password: The user is authenticated with a user-entered password rather than an automatic validation attemptvia an authorization server.
• Refresh_token: Used to refresh an expired access token for an extended period of time.
9. In the Redirect URI box, specify the desired URI.
This option is enabled only if you select the Implicit and Authorization_code grant types. The Redirect URIbox lets you specify a comma-separated value of acceptable URI values. This is the URI a user of a client isredirected to after approving the client for API access.
10. Specify the desired expiration time (in seconds) for access and refresh token expiration.
Access Token Expiration Time: The number of seconds that an access token is valid after being issued. Maybe null to use the platform default (12 hours). Also may be -1 to indicate that the access token does not expire.
Refresh Token Expiration Time: The number of seconds that a refresh token is valid after being issued. Maybe null to use the platform default (30 days).
11. Click Save.
To delete an OAuth2 client, click OAuth2 Clients, then click in the Actions column for the desired client.
API Requirements and Recommendations
Things you should encourage your clients to be aware of when they're working with the Audience Manager APIs.
Requirements
Note the following when working with Audience Manager API code:
• Request parameters: All request parameters are required unless specified otherwise.• JSON content type: Specify content-type: application/json and accept: application/json in your code.• Requests and responses: Send requests as a properly formatted JSON object. Audience Manager responds
with JSON formatted data. Server responses can contain requested data, a status code, or both.• Access: Your Audience Manager consultant will provide you with a client ID and key that lets you make API
requests.
49OAuth2 Clients

• Documentation and code samples: Text in italics represents a variable that you provide or pass in when makingor receiving API data. Replace italicised text with your own code, parameters, or other required information.
Recommendations: Create a Generic API User
We recommend creating a separate, technical user account for working with the Audience Manager APIs. This is ageneric account that is not tied to or associated with a specific user in your client's organization. This type of APIuser account helps accomplish 2 things:
• Identify what service is calling the API (e.g., calls from a client app that use our APIs or from making bulk changes)• Provide uninterrupted access to the APIs. An account tied to a specific employee may be deleted when they leave
company. This will prevent your customers from working with the available API code. A generic account that's nottied to a particular employee helps avoid this problem.
As an example or use case for this type of account, let's say your customers want to change a lot of segments atonce with the Bulk Management Tools. Well, to do this, they need API access. Rather than add permissions to aspecific user, create a non-specific, API user account that has the appropriate credentials, key, and secret to makeAPI calls. This is also useful if client's develop their own applications that use the Audience Manager APIs.
50OAuth2 Clients

Integration UsersUse the Integration Users page to view a list of users in your Audience Manager configuration.You can edit ordelete existing users or create new users, providing that you have the appropriate user roles assigned.
You can sort each column in ascending or descending order by clicking the desired column's header.
Use the Search box or the pagination controls at the bottom of the list to find the desired user.
The following sections contain more information:
Create or Edit a User
Use the Integration Users page in the Audience Manager Admin tool to create a new user or to edit an existinguser's account.
Note: You must have the CREATE_USER role in order to create new users.You must have the EDIT_USERrole in order to edit existing users.
1. To create a new user, click Integration Users > Create a New User.
Or
To edit an existing user, click the desired user in the Username column.
2. Fill in the fields:
First Name: (Required) Specify the user's first name.
Last Name: (Required) Specify the user's last name.
Username: (Required) Specify the user's username.
Email Address: (Required) Specify the user's email address.
Phone Number: Specify the user's phone number.
IMS ID: Specify the user's Internet Messaging Service ID.
User Roles: Select the desired user roles:
• DEXADMIN: Provides administrator access to perform tasks in the Audience Manager Admin tool. If you donot select this option, you can choose individual roles. These roles let users perform tasks using API calls, butnot in the Admin tool.
• CREATE_USERS: Lets users create new users using an API call.
• DELETE_USERS: Lets users delete existing users using an API call.
• EDIT_USERS: Lets users edit existing users using an API call.
• VIEW_USERS: Lets users view other users in your Audience Manager configuration using an API call.
• CREATE_PARTNERS: Lets users create Audience Manager partners using an API call.
• DELETE_PARTNERS: Lets users delete Audience Manager partners using an API call.
• EDIT_PARTNERS: Lets users edit Audience Manager partners using an API call.
• VIEW_PARNTERS: Lets users view Audience Manager partners using an API call.
51Integration Users
Status: Select Active to make this user an activated Audience Manager user.
3. Click Submit.
Delete a User
Use the Integration Users page in the Audience Manager Admin tool to delete an existing user.
Note: You must have the DELETE_USER role in order to create new users.
1. To delete an existing user, click Integration Users.
2.Click in the Actions column of the desired user.
3. Click OK to confirm the deletion.
52Integration Users
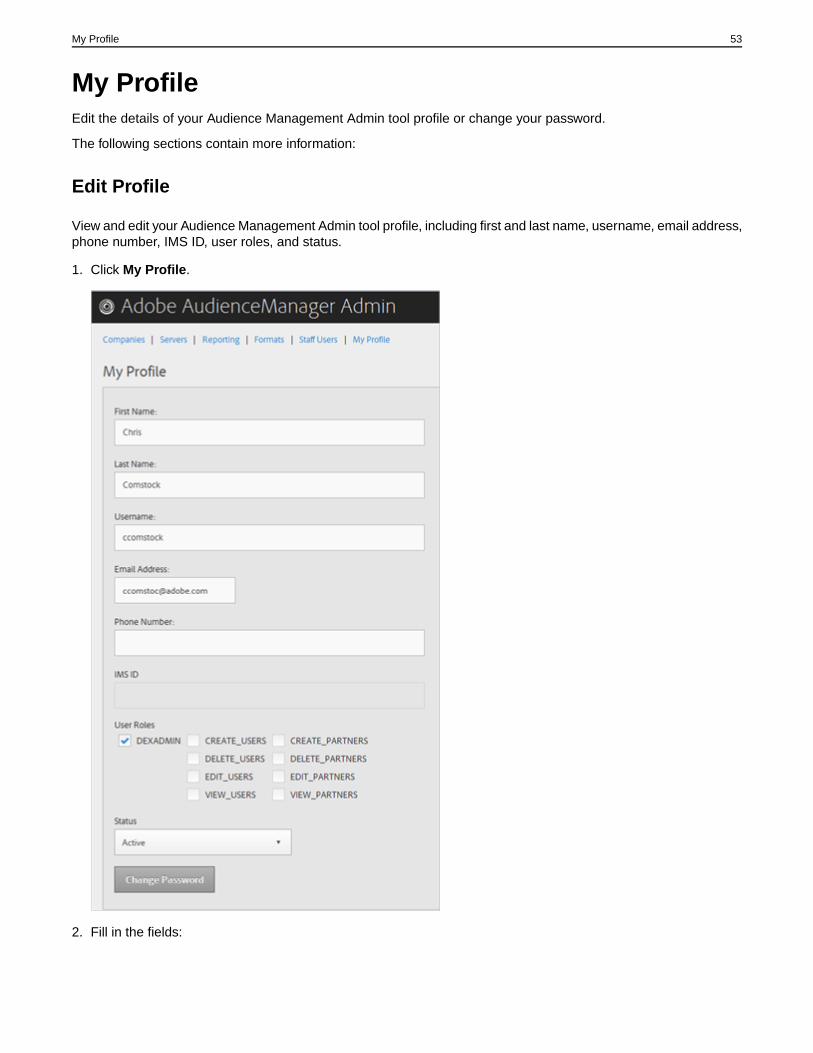
My ProfileEdit the details of your Audience Management Admin tool profile or change your password.
The following sections contain more information:
Edit Profile
View and edit your Audience Management Admin tool profile, including first and last name, username, email address,phone number, IMS ID, user roles, and status.
1. Click My Profile.
2. Fill in the fields:
53My Profile

First Name: (Required) Specify your first name.
Last Name: (Required) Specify your last name.
Username: (Required) Specify your first username.
Email Address: (Required) Specify your email address.
Phone Number: Specify your phone number.
IMS ID: Specify your Internet Messaging Service ID.
User Roles: Select the desired user roles:
• DEXADMIN: Provides administrator access to perform tasks in the Audience Management Admin tool. If youdo not select this option, you can choose individual roles. These roles let users perform tasks using API calls,but not in the Admin tool.
• CREATE_USERS: Lets users create new users using an API call.
• DELETE_USERS: Lets users delete existing users using an API call.
• EDIT_USERS: Lets users edit existing users using an API call.
• VIEW_USERS: Lets users view other users in your Audience Management configuration using an API call.
• CREATE_PARTNERS: Lets users create Audience Management partners using an API call.
• DELETE_PARTNERS: Lets users delete Audience Management partners using an API call.
• EDIT_PARTNERS: Lets users edit Audience Management partners using an API call.
• VIEW_PARNTERS: Lets users view Audience Management partners using an API call.
Status: Select the desired status:
• Active: Specifies that this user in an active Audience Management user.
• Deactivated: Specifies that this user is a deactivated user in Audience Management.
• Expired: Specifies that this user's account in Audience Management has expired.
• Locked Out: Specifies that this user's account in Audience Management is locked.
3. Click Submit.
Change Password
Change your Audience Management Admin tool password.
1. Click My Profile.
2. Click Change Password.
54My Profile

Your Audience Management password must be:
• At least eight characters in length
• Contain at lease one uppercase character
• Contain at least one lowercase character
• Contain at least one number
• Contain at least one special character
• Begin and end with an alpha-numeric character
• Begin and end with an alpha-numeric character
3. Specify your old password.
4. Specify your new password, then confirm the new password.
5. Click OK.
55My Profile

Destination Setup TroubleshootingInformation to help you set up destinations in Audience Management and avoid common problems.
I set up a destination, but I don't see any files. Where are they?
Common destination configuration problems include the following issues:
Misconfigured Destination
• Incorrect UserID Key: The UserID key is the MasterDPID of this destination and is the basis for the ID values thatwill be outbounded. Even if a UserID key is selectable via the drop-down list, it doesn't necessarily mean that thereare IDs/traits/segments mapped to this value. If the Outbounder process (which runs after destinations are created)does not find any users mapped to this UserID key, no data will be outbounded.
• No In File Data Sources Selected: When choosing any destination type other than S2S, a section appears at thebottom of the screen labeled Configure Data Sources. When this section first appears, no values are selected.If you forget to click the All First Party checkbox or individually select data sources from the Available DataSources window, no data will be outbounded.
Misconfigured Format
When selecting a format for your outbounded data, it's best, if possible, to re-use an existing format. Using analready-proven format ensures that your outbound data will be generated successfully. To see exactly how anexisting format is formatted, click the Formats option in the menu bar and search for your format either by name orby ID number. Malformed formats or macros used in formats will provide incorrectly formatted output or will preventinformation from being output entirely.
For more information on setting up formats and using macros, seeFile Format Macros and .
Misconfigured Server
• FTP
• Domain
• Do not enter any prefixes for hostnames. If you're given an account ftp://hello.com, simply enter hello.comin this field.
• Port/Type Combination
• For an FTP transfer, the preferred transfer type is SFTP.
• When selecting the SFTP type, the port is almost always 22.
• When selecting the FTPs/TLS type, the port is almost always 21.
• The FTPs/TLS type is not the same as a regular FTP transfer. We do not support regular (unsecured) FTPtransfers.
• Remote Path
• When choosing a remote subpath, it should be entered with no leading slash.
• If your transferred file is supposed to be placed in the (root)/inbound subfolder, simply add inbound forthe remote path, not /inbound.
• If you send your files multiple directories down the path, enter slashes in between each directory. If you're giventhe location of /inbound/subdirectory1/subdirectory2, you should enterinbound/subdirectory1/subdirectory2 in this field.
56Destination Setup Troubleshooting

• If your file should be placed in the directory automatically routed to by the external server, you can leave thisspace blank. Do not enter a period ( . ), slash ( / ), or anything else.
• S3
• S3 is the preferred transfer protocol (over FTP or HTTP).
• Bucket
• The bucket name should be listed with no slashes, prefixes, suffixes, etc. If you're given the addresss3://your-bucket you should simply add your-bucket to this field.
• Directory
• Leave this field blank unless you're specifically given a subdirectory into which the data should be placed. Ifyou're given the address s3://your-bucket/your-subdirectory, enter your-bucket in the Bucketfield and your-subdirectory should be added into the Directory field. Do not add preceding slashes.
• If you have to travel multiple directories down the path, only then should you use slashes as separators. So alocation of s3://your-bucket/your-subdirectory1/your-subdirectory2 would have your-bucketin the Bucket field and your-subdirectory1/your-subdirectory2 entered into the Directory field.
• Access / Secret Keys
• When TechOps creates a bucket and provides access/secret keys to a consultant, those credentials are usuallyREAD-ONLY credentials that are meant to be handed off to the client. These credentials should not be enteredinto the Access / Secret Key fields, because this will cause the transfer to fail (because those credentials areread-only, not writable). In the case where TechOps creates a bucket and provides credentials, the consultantshould also request an Adobe key pair - NOT TO BE GIVEN TO THE CLIENT - that will allow for writing files tothis bucket. That key should be added into these fields.
• HTTP
• Domain
• Do enter prefix information for HTTP entries. If you're given an account http://superduper.com, enterhttp://superduper.com in this field.
• URL Prefix
• When adding a URL prefix, leave the preceding slash off. An address of http://hello.com/r/x/y/z shouldhave http://hello.com entered in the Domain field and r/x/y/z entered here in the URL Prefix field.
• If a URL Prefix is not needed, leave this value blank.
• Authentication - SSH Key
• Enter the full SSH PRIVATE key value in this box, including headers, footers, and line breaks to ensure accurateencryption/key storage.
Not Enough Time for Outbound Generation
• The outbounding process runs twice daily, and multiple processes (outbounding, publishing, pushing to externallocations, etc.) must run before a file is pushed to its final destination. A good rule of thumb is that a destinationshould be fully configured at least 24 hours before you can expect data to be pushed to an external location.
57Destination Setup Troubleshooting
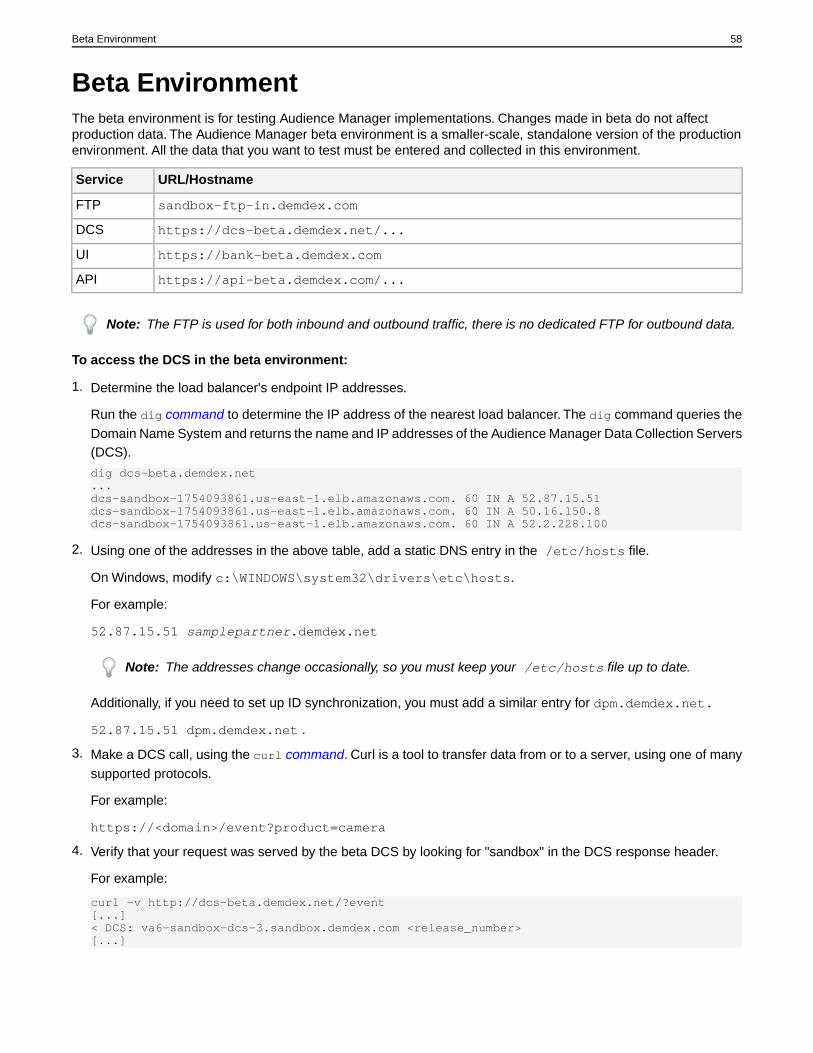
Beta EnvironmentThe beta environment is for testing Audience Manager implementations. Changes made in beta do not affectproduction data. The Audience Manager beta environment is a smaller-scale, standalone version of the productionenvironment. All the data that you want to test must be entered and collected in this environment.
URL/HostnameService
sandbox-ftp-in.demdex.comFTP
https://dcs-beta.demdex.net/...DCS
https://bank-beta.demdex.comUI
https://api-beta.demdex.com/...API
Note: The FTP is used for both inbound and outbound traffic, there is no dedicated FTP for outbound data.
To access the DCS in the beta environment:
1. Determine the load balancer's endpoint IP addresses.
Run the dig command to determine the IP address of the nearest load balancer. The dig command queries theDomain Name System and returns the name and IP addresses of the Audience Manager Data Collection Servers(DCS).
dig dcs-beta.demdex.net...dcs-sandbox-1754093861.us-east-1.elb.amazonaws.com. 60 IN A 52.87.15.51dcs-sandbox-1754093861.us-east-1.elb.amazonaws.com. 60 IN A 50.16.150.8dcs-sandbox-1754093861.us-east-1.elb.amazonaws.com. 60 IN A 52.2.228.100
2. Using one of the addresses in the above table, add a static DNS entry in the /etc/hosts file.
On Windows, modify c:\WINDOWS\system32\drivers\etc\hosts.
For example:
52.87.15.51 samplepartner.demdex.net
Note: The addresses change occasionally, so you must keep your /etc/hosts file up to date.
Additionally, if you need to set up ID synchronization, you must add a similar entry for dpm.demdex.net.
52.87.15.51 dpm.demdex.net .
3. Make a DCS call, using the curl command. Curl is a tool to transfer data from or to a server, using one of manysupported protocols.
For example:
https://<domain>/event?product=camera
4. Verify that your request was served by the beta DCS by looking for "sandbox" in the DCS response header.
For example:
curl -v http://dcs-beta.demdex.net/?event[...]< DCS: va6-sandbox-dcs-3.sandbox.demdex.com <release_number>[...]
58Beta Environment
Note:
Provision FTP / SFTP accounts and S3 bucket for inbound/outbound data:Submit tickets through the SKMS Request TechOps Help feature and specify: Sandbox environment.
59Beta Environment

Documentation UpdatesAll updates (additions, deletions, and corrections) to the Audience Manager Admin Guide, by date.
For information about feature releases, enhancements, and bug fixes see the Marketing Cloud Release Notes. Seethe previous release notes for older Marketing Cloud announcements. For Audience Manager documentationchanges, see Documentation Updates.
2017 Documentation Updates
DescriptionTopic
Read how you can enable customers to send Outbound SEQ files to their ownHadoop instance.
Enable Hadoop Sequence FileTransfers for Outbound
Added a brief instruction on how you can create containers.Manage Containers
Create or Edit CompanyDestinations
• Added instructions on balancing the use of full and incrementalsynchronisations.
• The provisioning of Adobe Media Optimizer as an Audience Managerdestination is done within Adobe Media Optimizer.
Minor revisions.Manage Company Destinations
New documentation that describes the AMO sync check box in each companycontainer.
ID Syncing with Media Optimizer
New documentation that describes how to configure device graph options.Device Graph Options forCompanies
New documentation that describes some requirements and recommendationsto be aware of and pass on to customers. This is duplicated in the public docs
API Requirements andRecommendations
with the same title and changes for a different reading audience. See APIRequirements and Recommendations in the public docs.
2016 Documentation Updates
DescriptionTopic
Added the egress FTP IP 52.44.29.204.Create or Edit an FTP Server
Minor revisions.Manage Company Destinations
Added HTTP signature to the Create Server Configuration wizard.Create or Edit an HTTP Server
Updated URLs and hostnames in the beta environment.Beta Environment
60Documentation Updates

DescriptionTopic
Instructions to generate a full synchronization file that includes active usersonly.
Filter Outbound Data by ActiveUsers Only
New documentation that lists HTTP macros and common examples.HTTP Format Macros
HTTP Format Macro Examples
2015 Documentation Updates
DescriptionDate and Topic
Revised macro section and added examples.December, 2015
Formats
2014 Documentation Updates
DescriptionDate and Topic
Added information about the <MCID> macro.November 12, 2014
Formats
Added information about the .info Receipt option.October 23, 2014
Create or Edit a Format
New page. Note that this page is a work-in-progress and will be updated in thecoming days.
October 23, 2014
Formats
New topic.October 22, 2014
Destination Setup Troubleshooting
Reworked entire topic. Added additional information and additional settings.October 21, 2014
Manage Company Destinations
Added additional information to the Lifecycle and Account Types sections.September 25, 2014
Create a Company
Added additional information to the Lifecycle and Account Types sections.September 25, 2014
Edit a Company Profile
61Documentation Updates