administrator's guide: windows ce 6.0 - hp thin client ...h10032. · administrator's...
TRANSCRIPT

Administrator's Guide: Windows CE 6.0 - HPThin Client t5530 and t5540Build 6.00.6xx or higher

© Copyright 2008–2009 Hewlett-PackardDevelopment Company, L.P. Theinformation contained herein is subject tochange without notice.
Microsoft and Windows are trademarks ofMicrosoft Corporation in the U.S. and othercountries.
Portions of this thin client use theWCECompat software library, which islicensed under the GNU Lesser GeneralPublic License, version 2.1. For a copy of thislicense, please see: http://www.gnu.org/licenses/old-licenses/lgpl-2.1.html.1.html.The WCECompat library was originallyobtained from: http://www.essemer.com.au/windowsce. The source code and buildsystem for the WCECompat library suppliedcan be obtained by contacting support at:1-800-474-6836 or: http://welcome.hp.com/country/us/en/wwcontact_us.html.
The only warranties for HP products andservices are set forth in the express warrantystatements accompanying such productsand services. Nothing herein should beconstrued as constituting an additionalwarranty. HP shall not be liable for technicalor editorial errors or omissions containedherein.
This document contains proprietaryinformation that is protected by copyright. Nopart of this document may be photocopied,reproduced, or translated to anotherlanguage without the prior written consent ofHewlett-Packard Company.
Administrator's Guide: Windows CE 6.0 -HP Thin Client t5530 and t5540
Build 6.00.6xx or higher
Second Edition (June 2009)
First Edition (August 2008)
Document Part Number: 488064–002

About This BookWARNING! Text set off in this manner indicates that failure to follow directions could result in bodilyharm or loss of life.
CAUTION: Text set off in this manner indicates that failure to follow directions could result in damageto equipment or loss of information.
NOTE: Text set off in this manner provides important supplemental information.
iii

iv About This Book

Table of contents
1 IntroductionImage Updates ..................................................................................................................................... 2Setup Wizard ........................................................................................................................................ 2
2 The DesktopDisplay .................................................................................................................................................. 4Taskbar ................................................................................................................................................ 4Start Menu ............................................................................................................................................ 5Icons ..................................................................................................................................................... 5
3 HP ThinConnectAdvanced Window ................................................................................................................................ 7Creating User Accounts ....................................................................................................................... 8Connections ....................................................................................................................................... 12
Adding Connections ........................................................................................................... 12Editing Connections ........................................................................................................... 12Deleting Connections ......................................................................................................... 13Assigning Connections to Users ........................................................................................ 13
Assign Connections Tab ................................................................................... 13Assigning Connections ...................................................................................... 15Designating Connections as Primary or Secondary .......................................... 15Enabling Automatic Connection and Reconnection .......................................... 16
Configuring the User Interface ........................................................................................................... 17Auto Starting HP ThinConnect ........................................................................................... 17Setting the Terminal to Kiosk Mode ................................................................................... 18
Enabling Automatic Log On and Keyboard Functions ........................................................................ 19Switching to a Different User .............................................................................................................. 20
4 Control Panel
Accessibility .............................................................................................................................. 22
Boot Settings .............................................................................................................................. 23
v

Certificates .............................................................................................................................. 24
Date/Time ................................................................................................................................ 25
DHCP Options .......................................................................................................................... 25
Dialing ....................................................................................................................................... 26
Display ..................................................................................................................................... 27
Global ICA Client Settings ....................................................................................................... 30
Keyboard Shortcuts ........................................................................................................... 30Preferences ....................................................................................................................... 31Server Location .................................................................................................................. 32Firewall Settings ................................................................................................................ 32
HP Easy Config ................................................................................................................. 33
VMWare View Appliance ................................................................................................... 34Citrix Desktop Appliance .................................................................................................... 36Web Appliance ................................................................................................................... 38
HP Easy Update .................................................................................................................. 40
HP Device Manager ....................................................................................................................... 42
HP ThinState Capture .............................................................................................................. 43
HP ThinState Capture ........................................................................................................ 43HP ThinState Deploy ......................................................................................................... 44
Internet Options ....................................................................................................................... 45
Keyboard ................................................................................................................................. 46
LPD Control ............................................................................................................................. 46
Modems ................................................................................................................................... 47
Mouse ...................................................................................................................................... 47
vi

Network and Dial-up Connections ........................................................................................... 48
Dial-up Connection ............................................................................................................ 48Direct Connection .............................................................................................................. 49Virtual Private Network (PPTP) Connection ...................................................................... 49Virtual Private Network (L2TP) Connection ....................................................................... 49PPP Over Ethernet (PPPoE) Connection .......................................................................... 49
Port Lock .................................................................................................................................. 49
Power Settings .......................................................................................................................... 50
Printers ........................................................................................................................................... 51
Printers .................................................................................................................... 51
Adding a Printer ................................................................................................ 52Setting up a Network Printer ............................................................................. 54Modifying an Existing Printer Configuration ...................................................... 55
Regional Settings ..................................................................................................................... 55
Security .................................................................................................................................... 57
Enabling Security ............................................................................................................... 57Creating a User Account .................................................................................................... 58
SNMP ........................................................................................................................................ 58
SNTP Client ............................................................................................................................. 63
System ..................................................................................................................................... 64
Resetting Settings to Factory Defaults .............................................................................. 65Copying Registry Settings ................................................................................................. 65
System Update ....................................................................................................................... 66
Terminal Server Client Licenses ............................................................................................ 67
ThinPrint ............................................................................................................................................. 68
View or Remove Programs ....................................................................................................... 68
VNC Server .............................................................................................................................. 68
Settings for VNC Server .................................................................................................... 70
vii

Volume and Sounds ................................................................................................................. 70
5 Programs and Add-onsPrograms ............................................................................................................................................ 72
ThinPrint ............................................................................................................................ 72ThinPrint over TCP/IP ....................................................................................... 72ThinPrint Network Printer .................................................................................. 76
HP Connections for Citrix Software ................................................................................... 78Creating a New ICA connection ........................................................................ 78Deleting a Connection ....................................................................................... 79Editing a Connection ......................................................................................... 79Creating a Desktop Shortcut to a Connection ................................................... 79
RDP 6.0 ............................................................................................................................. 79Terminal Emulation Connection ......................................................................................... 80TxtPad ............................................................................................................................... 82
Add-ons .............................................................................................................................................. 82ELO Touch Screen ............................................................................................................ 82
6 Registry Import/ExportClearing the Destination Registry ....................................................................................................... 83Exporting and Importing a Registry .................................................................................................... 84
Importing a Registry to Multiple Units ................................................................................ 84Exporting Registries from Multiple Units ............................................................................ 84
Index ................................................................................................................................................................... 85
viii

1 Introduction
HP thin clients with Microsoft Windows CE are easy to deploy, manage, and secure, and includepowerful features for mainstream business use.
● Easy to deploy
◦ Setup Wizard for easy configuration
◦ Familiar explorer shell that resembles Windows desktop
◦ Altiris Deployment Server
◦ HP Device Manager
◦ HP ThinState Capture
● Easy to manage
◦ Registry import tool
◦ Can update to the latest image directly from HP
◦ Can return to factory settings by pressing F9
● Easy to secure
◦ Can disable USB mass storage
◦ Can lock down user interface with HP ThinConnect
◦ Secure default Guest account
◦ More secure operating system
HP provides this client “ready to go” out of the box to meet most common customer requirements. Youmay want to add/remove features, lock down the user interface, etc. This guide will introduce you to themany features of this client and show you how to customize the client to your needs.
This guide provides the network administrator with instructions for local and remote configuration of theCE-based terminal. Typically, a terminal is configured locally then used as a template for other terminals,which are then configured using remote administration tools.
1

Image UpdatesHP provides periodic updates to the image for thin clients. Check the HP support site for importantdocumentation that provides specific information for your image version. You can find supportdocumentation at:
http://welcome.hp.com/country/us/en/support.html
For the latest version of the HP thin client Microsoft Windows CE image, visit:
http://h18004.www1.hp.com/support/files/thinclients/us/index.html
Setup WizardThe HP Microsoft Windows CE images include a Setup Wizard, which provides a simplified, easy-to-follow method to configure a thin client. The Setup Wizard launches after you unbundle the image. TheSetup Wizard launches the first time after either the thin client has either been reset to factory defaultsor a new software image has been loaded on the unit.
NOTE: There is a 20-second delay after the Setup Wizard launches. If you do not click Next beforethe timer expires, the thin clients loads the default settings.
2 Chapter 1 Introduction

2 The Desktop
The t5530 and t5540 thin clients with Microsoft Windows CE use an Explorer shell (desktop) thatresembles the typical Windows desktop to make it look familiar and easy to use. The desktop includesa taskbar, Start menu, shortcut icons, and a background image.
NOTE: The taskbar and the Start menu are hidden by default.
3

DisplayTo change the display settings, right-click on the desktop and select Properties. You can change thefollowing:
● background image
● appearance
● resolution and color quality settings
● screen saver
NOTE: You must reboot for changes to the display settings to take effect. If you do not know if yourmonitor supports a setting, click the Test button on the Display Properties Settings tab.
For more information about display settings, see Display on page 27 in the Control Panel
chapter.
TaskbarMove the pointer to the bottom of the screen to display the taskbar. The taskbar is hidden by default toprovide a clean ICA/RDP connection experience.
The taskbar provides access to system software. The taskbar includes:
● Start button
● active task buttons - currently running programs
● notification area - the system tray
To configure the thin client to show the taskbar:
1. Right-click on the taskbar.
2. Select Properties.
3. Clear the Auto hide check box.
4 Chapter 2 The Desktop

Start MenuTo open the Start menu, click the Start button on the taskbar. The Start menu provides access tosoftware and settings, allows you to run commands, and allows you to shut down the system.
IconsThe icons on the desktop provide shortcuts to software and connections. To launch a program from thedesktop, double-click the respective icon.
You can add icons for connections by right-clicking on the connection icon in the HP Connection forCitrix software window and selecting Send to Desktop. For more information, see HP Connections forCitrix Software on page 78 in Chapter 5.
NOTE: Windows CE architecture does not allow you to change the properties of programs fromdesktop shortcuts. You can only change property values for the shortcut itself from the desktop.
Start Menu 5

3 HP ThinConnect
HP ThinConnect allows you to:
● Manage user accounts.
● Add, edit, and delete connections.
◦ Terminal emulation
◦ Microsoft Remote Desktop Client (RDP) connections
◦ Internet Explorer
◦ Citrix ICA connections
◦ VMware View client
● Assign connections to users.
The main HP ThinConnect window allows you to perform actions for only the current user. To assignconnections to other users, use the HP ThinConnect Advanced window. For more information about theAdvanced window, see Advanced Window on page 7.
You can access HP ThinConnect by clicking Start > Programs > HP ThinConnect.
NOTE: You must close all active connections to use the following buttons: Add, Delete, Edit,Advanced, Exit.
6 Chapter 3 HP ThinConnect

The HP ThinConnect window includes the following features:
● Connection display area: Lists all connections assigned to the user currently logged on to theterminal. For each connection, the display shows the name, type, and status of the connection.
● Connect: Click to activate a selected connection.
● Exit: Click to exit HP ThinConnect. The OK button performs the same function.
● Control Panel: Click to access the Control Panel. This feature requires appropriate permissions.
● Add: Click to create a new connection and add it to the list of connections assigned to the usercurrently logged on to the terminal. You can assign the new connection to other users in theAdvanced window. For more information, see Adding Connections on page 12.
● Delete: Click to delete a selected connection. The connection is deleted from the list of connectionsavailable to all users, not just the user currently logged on to the terminal. For more information,see Deleting Connections on page 13.
● Edit: Click to edit the selected connection. For more information, see Editing Connectionson page 12.
● Advanced: Click to access the Advanced window, where you can configure and assignconnections and configure the terminal user interface. For more information, see AdvancedWindow on page 7.
● Help: Click to access help.
Advanced WindowYou can access the Advanced window by clicking the Advanced button in HP ThinConnect. You mustlog in with Administrator permissions or with the “User may add, edit, or delete connections” permissionto access the Advanced window. The Advanced window allows you to configure and assign connections,set up user security accounts, and configure the user interface for the terminal.
CAUTION: Click either OK button to save changes and close the Advanced window. Click the X buttonor Cancel to exit without saving changes.
Advanced Window 7

Creating User AccountsYou can set up terminal operator user accounts in the Security window, which you can access eitherfrom the ThinConnect Advanced window or from Control Panel.
The system comes with three default accounts:
● Administrator
● Guest
● User
You can use the default accounts as templates for new accounts. You can modify the default Guest andUser accounts.
The Users tab lists all operator accounts and shows which accounts are set up with Administratorsecurity permissions and which accounts are enabled.
To create a new user account:
1. In HP ThinConnect, click Advanced.
2. On the Assign Connections tab, click Security. This takes you to the Control Panel Securitywindow.
8 Chapter 3 HP ThinConnect

3. Select the Users tab, and then click Add to create a new user account.
Creating User Accounts 9

4. On the General tab, type a name for the new user account in the Name box. Valid characters forthe Name box include: A - Z, a - z, 0 - 9. (.)&^%$#!~‘’{}_-. Maximum length is 20 characters.
5. Type a password for the new user in the Password box.
6. Retype the password in the Confirm Password box.
7. To enable the user account, clear the Account is disabled check box.
8. To assign the same permissions to the new account that are assigned to an existing account,click Set from Template.
10 Chapter 3 HP ThinConnect

a. In the Based on list, select the account to use as a template.
b. Click OK to save your settings and return to the Add New User window.
c. To add another user, click Add another user. This option allows you to quickly add new users.
9. To select permissions for the new account, select the Permissions tab on the Add New Userwindow.
a. Select the items in the permissions list that you want to allow the user to access. If the useris an Administrator, select User is Administrator to provide full access. If you select User isAdministrator, you cannot select or clear items in the list.
b. To save your settings and add another user, click Add another user.
Creating User Accounts 11

or
Click OK to save your settings.
10. Click OK when you are finished adding users.
11. If you want to modify or delete user accounts, select the account, and then click Modify orDelete.
12. Click OK at the top of the window when you are done adding or modify user accounts.
ConnectionsYou can add, edit, or delete connections in HP ThinConnect and in the Advanced window. Addconnections as follows:
● Use HP ThinConnect to create and assign connections to the user currently logged on to theterminal.
● Use the Advanced window to assign the connection to other users.
Adding ConnectionsTo add a connection in HP ThinConnect:
1. In HP ThinConnect, click Add.
2. In the Choose type dialog box, select the type of connection you want to create, and then clickOK. A Wizard or setup dialog for the connection type is displayed.
3. Follow the on-screen instructions in the Wizard or setup dialog to add the connection to the user’sconnections list and to the list of available connections that you can assign to other users in theAdvanced window.
NOTE: If you create a connection in HP Connections for Citrix Software, the connection is alsodisplayed in HP ThinConnect. Similarly, connections created in HP ThinConnect are also displayed inHP Connections for Citrix Software.
Editing ConnectionsTo edit a connection in HP ThinConnect:
▲ Select the connection, and then click Edit. Make the appropriate changes in the Wizard or setupdialog.
NOTE: The following image illustrates the Edit Connection window for an RDP connection. The screenvaries based upon the type of connection you edit.
12 Chapter 3 HP ThinConnect

NOTE: Renaming a connection effectively deletes it from all user accounts.
Deleting ConnectionsTo delete a connection in HP ThinConnect:
▲ Select the connection, and then click Delete. The connection is deleted from all user connectionlists.
Assigning Connections to UsersAssign and configure connections for users in the Advanced window of HP ThinConnect.
Assign Connections TabThe Assign Connections tab allows you to assign connections to users. This tab contains the followingfeatures:
Connections 13

● User: This list includes all users accounts associated with the system. To configure connectionsfor a user, select the user from the list.
● Security: Allows you to access the Security window, where you can create and configure useraccounts. This button opens the same window as selecting Security from Control Panel.
● Available connections: On the left side of the window, this panel shows all available connectionsthat you can assign to users. The columns in this panel include:
◦ Name: Shows the name of the connection assigned when the connection was created.
◦ Type: Shows the type of connection.
● Add: Click to create a new connection and add it to the Available connections list. When youclick this button, a connection type list is displayed. When you select a connection type to add andclick OK, a wizard opens that allows you to configure connections.
● Delete: Select a connection in the Available connections list, and then click this button to deletethe connection. Deleting a connection here also deletes the connection from the list of connectionsassigned to all users.
● Edit: Select a connection in the Available connections list, and then click this button to edit theconnection.
● Connections for [user]: On the right side of the window, this panel shows the connectionsassigned to the user displayed in the User box.
◦ Name: Shows the name of the connection assigned to the user.
◦ Type: Shows the type of connection.
◦ Primary: Designates a connection as either primary or secondary. Yes indicates a primaryconnection. Click on the column value to change the setting. You cannot change the firstconnection in the list to secondary.
◦ Auto: Determines whether the system automatically connects when HP ThinConnect startsup. Yes indicates the system will automatically connect. Click on the column value to changethe setting. NOTE: You must configure HP ThinConnect to auto start for this setting to function
14 Chapter 3 HP ThinConnect

properly. To configure HP ThinConnect to automatically start up, see Auto Starting HPThinConnect on page 17.
◦ Persistent: Determines whether the system will attempt to reconnect when a connectionfails. Yes indicates the system will automatically attempt to reconnect. Click on the columnvalue to change the setting.
● OK: Click to save changes and exit the Advanced window.
● Cancel: Click to cancel unsaved changes and exit the Advanced window.
● Apply: Click to save changes.
Assigning ConnectionsOnce you have created a connection, you can assign it to users in the Advanced window.
1. In HP ThinConnect, click Advanced.
2. On the Assign Connections tab, select the appropriate user from the User list.
3. Double-click the connection in the Available connections list, or select the connection and clickthe right arrow. The connection is copied to the Connections for [user] list.
4. Click Apply to save the updated list of connections for the user.
Designating Connections as Primary or SecondaryYou can designate connections as primary or secondary in the Advanced window. A primary connectionis the first attempted in a group of connections. If a primary connection fails, the system attempts failoversecondary connections in the order they are listed. You can configure more than one primary connection,each of which can have several secondary connections associated with it. Secondary connections areoptional.
Connections 15

To designate a connection as primary or secondary:
1. In the HP ThinConnect window, click Advanced.
2. On the Assign Connections tab, select the appropriate user from the User list.
3. Select the connection from the user’s connection list that you want to make primary.
4. In the Primary column, click on the column value to change it. Yes means the connection is aprimary connection. The first entry in the list must be primary.
5. If you want to assign a secondary connection, select the connection and change the value in thePrimary column to No. The connection becomes secondary to the first primary connection directlyabove it in the list.
6. To arrange the order of connections, select a connection and click the up and down arrows.Secondary connections are associated with the first primary connection above them in the list.
7. Click Apply.
NOTE: Every secondary connection must have a primary connection listed above it.
Enabling Automatic Connection and ReconnectionIn the Advanced window, you can set up primary connections assigned to users to automatically connectat boot up and to reconnect if disconnected. Automatic connection requires that you configure HPThinConnect to start automatically. For more information, see Auto Starting HP ThinConnecton page 17.
To enable automatic connection and reconnection:
1. In the HP ThinConnect window, click Advanced.
2. On the Assign Connections tab, select the appropriate user from the User list.
3. Select the primary connection in the user’s connection list that you want to automatically connect.
4. In the Auto column, if the entry for the selected connection is No, click on No to change it toYes.
5. Select the connection in the user’s connection list that you want to make automatically reconnect.
16 Chapter 3 HP ThinConnect

NOTE: You can set only primary connections to automatically reconnect.
6. In the Persistent column, if the entry for the selected connection is No, click on No to change itto Yes.
7. To arrange the order of connections, select a connection and click the up and down arrows.Secondary connections are associated with the first primary connection above them in the list.
8. Click Apply to save your changes.
NOTE: You can set only primary connections to automatically connect when HP ThinConnect islaunched.
Configuring the User InterfaceThe Global UI tab on the Advanced window allows you to configure HP ThinConnect to startautomatically and allows you to set up Kiosk mode.
Auto Starting HP ThinConnectYou can enable automatic log on, which causes HP ThinConnect to start automatically when the userlogs in to Windows.
To auto start HP ThinConnect:
1. In the HP ThinConnect window, click Advanced.
2. Click the Global UI tab.
3. Select Auto start HP ThinConnect when logging into Windows.
4. Click Apply to save changes.
Configuring the User Interface 17

Setting the Terminal to Kiosk ModeKiosk mode limits the terminal’s functionality by hiding the desktop icons and limiting the Start menuto Shut Down only. There are also Kiosk mode options for hiding the task bar and hiding HPThinConnect.
NOTE: Before setting a terminal to run in Kiosk mode, you must define a user and create a connection.For more information, refer to “Creating user accounts” and “Connections”.
The preview display on the right side of the screen shows you how the user interface will appear whenyou select the various check boxes on the left side of the tab.
To set the terminal to run in Kiosk mode:
1. Create the necessary connection.
2. On the HP ThinConnect window, click Advanced.
3. Click the Global UI tab.
4. Select the Auto start HP ThinConnect when logging into Windows check box. This makes theKiosk mode option available.
5. Select Kiosk mode. Two more check boxes become available as options.
6. To further lock down the terminal in Kiosk mode by hiding the task bar at the bottom of the desktop,select the Hide connection task bar check box. You must select the automatic logon feature togain access to this feature.
18 Chapter 3 HP ThinConnect

7. To further lock down the terminal in Kiosk mode by hiding the user interface to connection settings,select Hide the User interface not allowing changes to connection settings. You must selectthe automatic logon feature to gain access to this feature.
8. Click Apply to save your changes, or click OK to save your changes and exit the Advanced window.
9. Log off the user for all changes to take effect.
Enabling Automatic Log On and Keyboard FunctionsThe Security window in Control Panel allows you to enable automatic log on which bypasses a user’spassword requirement when logging on to the system.
To enable automatic log on:
1. On the HP ThinConnect window, click Advanced.
2. Click Security. The System Statistics area shows information about system users andconnections.
Enabling Automatic Log On and Keyboard Functions 19

3. On the System tab, select Automatic Log On so the user does not have to enter a password tolog in to the local machine. You can set up automatic log on for one user per terminal. The defaultis no password. You must select Automatic Log On to gain access to the Single Button LogOn check box and the Account list.
4. If you want to lock the terminal when pressing Ctrl+Alt+Delete, select Lock screen when pressingCtrl+Alt+Delete. This feature allows users to quickly lock their terminal and prevent unauthorizedaccess. When the terminal is locked, press Ctrl+Alt+Delete again to type your password to regainaccess to the terminal.
5. If you want to activate the single button connect feature, select Single Button Log On. This featureinvokes a dialog box that requires the terminal operator to press Enter or click the Logon buttonon the dialog box to log in. If someone other than the auto logon user wants to log onto the terminal,press Esc or Alt+F4.
6. From the Account list, select the account that the system will use to log on the terminal operator.
7. Select Enable Reset Hotkey to allow the terminal to be reset to factory defaults (registry andshortcuts) by pressing and holding F9 key during boot.
CAUTION: If you disable the F9 reset function and then change monitors or change displaysettings resulting in your monitor becoming unable to display, the only way to recover the client willbe to reflash it.
8. Click OK at the top of the window to save your changes.
Switching to a Different UserTo switch to a different user when booting:
1. Press the power button to start the system.
2. Press Esc or Alt+F4 before the automatic logon countdown completes.
3. Log on as the user of your choice.
20 Chapter 3 HP ThinConnect

4 Control Panel
This chapter provides an overview of the programs in the Control Panel and provides step-by-stepinstructions to perform certain tasks. You can use many of the programs for local administration, whileyou use others, such as DHCP Options and SNMP, for remote administration.
To open the Control Panel:
● From the desktop, select Start > Settings > Control Panel.
or
● From the HP ThinConnect window, click the Control Panel button.
NOTE: The LPD Control program is available only on terminals equipped with a serial port.
21

AccessibilityThe Accessibility dialog box allows you to configure the terminal with 508 Accessibility features.Accessibility options are available for the keyboard, sound, display, and mouse.
● Keyboard: Allows you to enable StickyKeys, which lets you use the Shift, Ctrl, and Alt keys pressingone key at a time rather than holding them all down simultaneously. You can also enableToggleKeys to hear tones when pressing the Caps Lock, Num Lock, and Scroll Lock keys.
● Sound: Allows you to enable SoundSentry, which causes Windows to generate visual warningswhen the system makes a sound.
● Display: Allows you to enable High Contrast, which causes Windows to use colors and fontsdesigned for easy reading.
● Mouse: Allows you to enable MouseKeys, which lets you control the pointer with the numerickeypad on the keyboard.
● General: Allows you to automatically turn off accessibility features after a set amount of idle time.You can also enable the notification feature, which causes Windows to make a sound when youturn a feature on or off.
22 Chapter 4 Control Panel

Boot SettingsThe Boot Settings dialog box allows you to configure the thin client boot order.
Boot Device Order: Select to enable the device to which the thin client boots. Use the up and downarrows to the left of the list to change the position of a selected device.
NOTE: You cannot clear (disable) ATA Flash.
Enable F12 Network Boot: Select to enable the ability to boot the client using a network drive.
Boot Settings 23

CertificatesThe Certificates dialog box allows you to import, store, and view security certificates. Certificates andcertificate authorities ensure that an SSL connection is made to the intended secure server. Certificateinformation is exchanged between the terminal browser and the secure server when establishing aconnection. If a trusted certificate authority can authenticate the certificate, the secure page isautomatically displayed. A private key is also used to encrypt data over an SSL connection.
To import a certificate or private key:
1. Select the type of certificate you would like to import from the drop-down list.
● Trusted Authorities are digital certificates issued by certification authorities. The Windows CEbrowser comes with a pre-defined list of trusted certification authorities that include Equifax,Thwarte, Entrust, GlobalSign, GTE, and others.
● My Certificates are your personal digital certificates.
● Other Authorities are intermediate certificate authorities. No intermediate authorities areloaded by default.
2. Click Import, select the location source of the certificate or key, and then click OK.
● From a File allows you to import a certificate or key from any mapped drive. Browse to thecertificate or key and select it, or select the Type and type the name of the certificate or keyin the Name box.
● From a Smart Card allows you to import a certificate from a Smart Card. Make sure the SmartCard is inserted and select a Reader from the list. The radio button is active only if a smartcard is inserted.
● Friendly name allows you to rename a certificate that you import.
3. Click OK.
24 Chapter 4 Control Panel

Date/TimeThe Date/Time Properties dialog box allows you to set the date and current time, select the appropriatetime zone, and enable automatic clock adjustment for daylight savings time for the terminal.
▲ Select the appropriate date and time information, and then click Apply.
DHCP OptionsThe DHCP Options page allows you to configure the thin client with tags (see the Codes column in theillustration below) that identify the FTP location of the update image that the client retrieves from theFTP server. If you set these tags, the Value column will be populated automatically with the FTP serverlocation. Each time the system boots, it will check these fields for a file server (or FTP server) and willlook for system updates. Use the Power Settings utility to schedule wakeup and shutdown times to makesure the system is updated regularly.
NOTE: For information about resetting thin client settings to factory defaults, see the System
on page 64 section later in this chapter.
Date/Time25

To change tag codes:
1. Double-click on the name of the option to change. A dialog box will be displayed with a list of allvalid options.
2. Select the appropriate value from the list, and then click OK.
DialingThe Dialing Properties dialog box allows you to:
● Add or select a dialing location.
● Configure dial-up settings for the selected location. Local settings include the area code, county/region code, and tone or pulse dialing.
● Disable call waiting.
● Set up dialing patterns for local, long distance, and international calls.
26 Chapter 4 Control Panel

To add a dialing location:
1. Select or add a When dialing from location and type the local settings for the location.
2. Click OK after entering the information.
To configure the system to use an area code for local calls:
1. Click Dialing Patterns.
2. In the For Local calls dial box, add an F before the G. For example, F,G will dial the area code,then 7-digit phone number.
DisplayThe Display Properties dialog box allows you to configure the background image, appearance scheme,screen resolution, color quality, refresh frequency, and screen saver.
NOTE: You can also access the Display Properties dialog box by right-clicking on the desktop andselecting Properties.
Reboot the terminal for display property changes to take effect.
The Background tab allows you to set the background image that appears on your monitor. You canuse a background image that is any of the following formats:
● bmp
● gif
● jpeg
Display27

Save background image files in the Hard Drive folder to assure the client can find them after a reboot.
The Appearance tab allows you to set the Windows CE color scheme.
The Settings tab includes a Test button that you can use to test the resolution and refresh settings. Ifyou select settings your monitor does not support and you do not test updated settings, the next timeyou reboot, your display will not work and you must press F9 to reset to defaults.
In the Screen Saver tab you can set up password protection as well as configure the following screensaver options:
● no screen saver
● turn off monitor
● floating image
● tiled image
The following table lists the available screen resolutions, color quality settings, and refresh frequencies.The default is 800x600x16 @ 60Hz.
Resolution/Color Wide Screen 60Hz 75Hz 85Hz
800x480x16 X X
800x480x32 X X
800x600x16 X X X
800x600x32 X X X
1024x768x16 X X X
1024x768x32 X X X
1280x720x16 X X
1280x720x32 X X
1280x768x16 X X
1280x768x32 X X
1280x1024x16 X X X
1280x1024x32 X X X
1360x768x16 X X
1360x768x32 X X
1366x768x16 X
1366x768x32 X
1400x1050x16 X
1400x1050x32 X
1440x900x16 X X
1440x900x32 X X
1600x1200x16 X X X
28 Chapter 4 Control Panel

Resolution/Color Wide Screen 60Hz 75Hz 85Hz
1600x1200x32 X
1680x1050x16 X X X X
1680x1050x32 X X X X
1920x1200x16 X X
1920x1200x32 X X
1920x1440x16 X
1920x1440x32 X
2048x1536x16
2048x1536x32
NOTE: If you set the display settings out of range, you must reset the terminal to factory defaults byrebooting the terminal and holding down the F9 key until you see a window that says “Loading...” at thebottom. Resetting the terminal to factory defaults erases all configuration settings and connections.
Display29

Global ICA Client SettingsThe Global ICA Client Settings dialog box allows you to configure ICA default client settings.
Keyboard ShortcutsThe Keyboard Shortcuts tab allows you to configure hot key combinations that you can use duringactive ICA sessions. You can assign the hot keys used to perform a function by selecting the hot keycombinations from the list next to each function.
● Connection Status invokes a message about the status of the connection.
● Close Session disconnects the terminal from the server but does not actually close the sessionon the server. The session will continue to run on the server until the terminal operator logs off.
● ESC performs the same function as the Esc key.
● CTRL+ALT+DEL invokes the terminal Security dialog box.
● CTRL+ESC calls up the Remote Task list on WinFrame servers, or opens the Start menu onMetaFrame servers.
● ALT+ESC cycles the focus through the minimized icons.
● ALT+TAB cycles through open applications in sequential order.
● ALT+BACKTAB also cycles through open applications sequentially, but in the opposite direction.
30 Chapter 4 Control Panel

PreferencesThe Preferences tab allows you to set color preferences during an ICA session.
The Preferences tab contains the following:
● Serial Number: Type the serial number of the ICA Client software exactly as it appears on theserial number card. This is necessary when using the ICA Windows CE Client with certain products,such as WinFrame Host/Terminal. It is not necessary for MetaFrame servers.
● Default Window Colors: Select the color option for the ICA client. If the ICA server does notsupport the selected color option, then it defaults to 16-bit color.
● PNAgent: Select to enable PNAgent.
◦ Settings: Click to display a dialog box that allows you to type the URL of the PNAgent server.You can use this server to remotely configure PNAgent settings. You can configure ICAseamless settings is these screens.
◦ Force PNAgent on Reboot: Select to cause PNAgent to prompt you to log in every time youreboot.
● Apply Windows key combinations: Select the option in which you want key combinations tofunction.
◦ In full screen desktops only and On the remote desktop apply to the ICA session.
◦ On the local desktop applies to the local client.
Global ICA Client Settings 31

Server LocationThe Server Location tab allows you to view/add Citrix servers on the network that have ICA connectionsconfigured.
The Server Location tab contains the following:
● Server Group: Select whether the servers in the server address list belong to your Primary, Backup1, or Backup 2 group.
● Server address list: Lists the entered server locations.
● Add: Click to add a server address.
● Delete: Click to delete a server address.
● Rename Group: Click to rename the selected server group.
● Default List: Click to recall the previous server address list.
Firewall SettingsThe Firewall Settings tab allows you to set up a firewall by placing a proxy server between a serverand a client.
In the Proxy section, select a protocol from the list, and then type the proxy address and port.
32 Chapter 4 Control Panel

In the SSL/TLS Relay section, type the relay address and port for the Socket Security Layer (SSL) orTransport Layer Security (TLS) protocol.
If the firewall uses address remapping, you must configure the client to use the alternate addressreturned by the data collector by selecting Use alternate address through firewalls. This is necessarywhether or not you are using a SOCKS or secure proxy server.
HP Easy Config
HP Easy Config allows the administrator to easily configure the thin client for one of 4 different pre-configured modes. In general HP Easy Config will configure three groups of settings: a connection, anadditional user and kiosk mode for the user interface selected.
Configuration modes:
● Default Desktop
● VMware View Appliance
● Citrix Desktop Appliance
● Web Appliance
Default Desktop is the default mode of the thin client. In this mode, the client boots in standard desktopmode without making any default connections.
NOTE: To log out of the selected appliance mode, press Ctrl + Alt + the up arrow and a log off buttonwill appear in the bottom right corner. Press Ctrl + Alt, + the down arrow to make the log off buttondisappear.
To return to the Default Desktop mode, log out of the selected Appliance mode. During the AutomaticLog On screen, press Esc and the Administrator login screen will appear. Log in as Administrator anduse Easy Config to switch back to Default Desktop mode.
HP Easy Config
33

VMWare View Appliance1. To see the VMware settings, click VMware View Appliance and click Next.
34 Chapter 4 Control Panel

2. Type the server address in the field and then click Next.
3. Type the credentials in the Username, Password, and Domain fields and then click Next.
4. Select Use a proxy server and type the server address and port in the fields. Click Finish.
The next time the thin client is started up, it will boot into VMware Appliance mode.
HP Easy Config
35

Citrix Desktop Appliance1. To see the Citrix XenDesktop settings, click Citrix Desktop Appliance and then click Next.
36 Chapter 4 Control Panel

2. Type the server address in the field and then click Next.
3. Select Use a proxy server and type the server address and port in the fields. Click Finish.
The next time the thin client is started up, it will boot into Citrix Desktop Appliance mode.
HP Easy Config
37
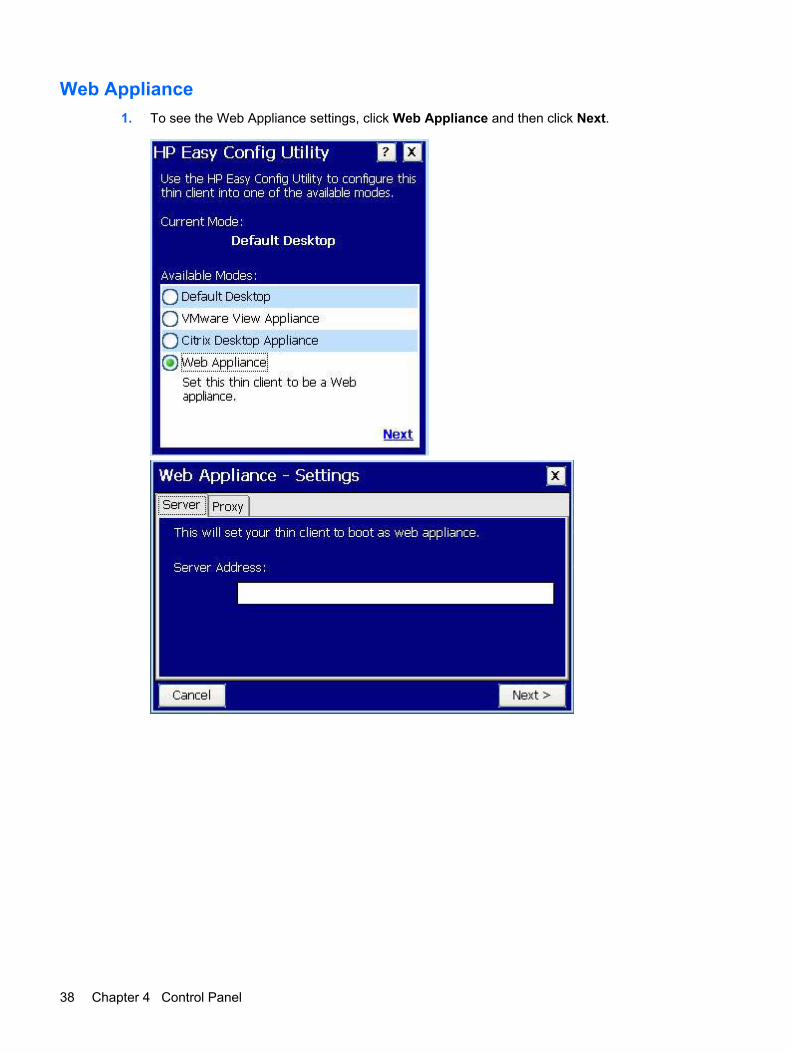
Web Appliance1. To see the Web Appliance settings, click Web Appliance and then click Next.
38 Chapter 4 Control Panel

2. Type the server address in the field and then click Next.
3. Select Use a proxy server and type the server address and port in the fields. Click Finish.
The next time the thin client is started up, it will boot into Web Appliance mode.
HP Easy Config
39

HP Easy Update
HP Easy Update allows the administrator to greatly reduce the number of steps required to update thethin client software image and/or Add-ons.
To update the thin client software image:
1. Launch Easy Update from the control panel. Easy Update will go to the Web to get the latestavailable updates.
The administrator will be presented with the current version of images installed and all the imagesavailable for that particular thin client model number. This makes it easy for the administrator tocompare versions and release notes.
2. Select an image version. The Add-on button will change to Install Image button. Press InstallImage and the HP Easy Update application will automatically download and install the selectedimage version.
Release notes can be viewed by selecting an image version and then clicking Release Notes.
NOTE: The Release notes window must be closed to continue with the install process.
3. Click Finish when complete.
HP Easy Update will close and the selected changes are complete.
40 Chapter 4 Control Panel

To install Add-ons to the thin client software image:
1. Open the HP Easy Update Application and click Add-on. If an image update is not required,click Add-on to continue.
The Administrator can select multiple Add-ons to install, update, or uninstall. The Add-ons listedare all the Add-ons available for update or install. If a newer version is available than the onepreinstalled in the image, a version number will be listed in the New Version Available column. Ifno version is listed, no updates are available.
2. Clear a box to remove an Add-on. Select a box to install or update an Add-on.
3. Click Next, then accept the HP License Agreement to continue.
Easy Update will install selected new Add-ons, update selected Add-ons, and uninstall selectedAdd-ons all in a single process. A reboot is not required.
4. Click Finish when done.
HP Easy Update will close and the selected changes are complete.
HP Easy Update
41

HP Device ManagerHP Device Manager is enterprise-class thin client management software that allows customers to viewtheir thin client assets remotely and to manipulate those thin clients to meet the required business need.
Thin Client Management features include:
● Asset and inventory management
● Thin client settings and connection cloning
● Software updates
● Patch and client updates
● Remote control
● Remote power management
For more detailed information, please see the HP Device Manager User Manual or the HP DeviceManager Worldwide QuickSpec at http://www.hp.com.
42 Chapter 4 Control Panel

HP ThinState CaptureHP ThinState capture and deploy allows you to capture a full thin client image or system settings anddeploy them to other thin clients of the same model.
HP ThinState CaptureNOTE: The HP ThinState Capture tool is not a standalone tool and can only be accessed by theadministrator from within the thin client image.
Save all data on the USB flash drive on some other device prior to performing this procedure. The USBflash drive will be formatted and all data will be lost.
ATTENTION: When deploying an image or settings from a “source” or “master” thin client to a “target”thin client, please make sure that source/master and target thin clients have identical hardware. This isapplicable regardless of deployment method being used: HP ThinState Tools, Altiris DeploymentSolution, HP OpenView Client Configuration Manager, or any other deployment solution being used.
The HP ThinState Capture tool is a simple wizard-based tool that you can use to capture an HP thinclient image or system settings that you can then deploy to another HP thin client of identical model andhardware.
What do you need to have?
● An HP-approved USB drive key.
● An HP thin client CE unit that contains the latest HP provided image is optional.
Once you launch the ThinState Capture tool from within the Control Panel, you are presented with thefollowing screen.
HP ThinState Capture43

1. Click Next.
2. Connect a USB flash drive to the unit. The USB flash drive letter and size are displayed. The USBflash drive must be greater in size than the on-board flash disk.
3. Choose whether you want to capture a full image or system settings. Click Capture.
4. Click Yes on the warning screen. The ThinState Capture tool formats and makes the USB flashdrive bootable. ThinState Capture reboots the system.
5. Follow the on-screen instructions.
You can now use the USB flash drive to deploy the captured image or system settings to another HPthin client of the exact same model and hardware.
HP ThinState DeployTo perform a ThinState deployment:
1. Set the boot order in the F10 System BIOS to USB boot (if necessary).
2. Attach the USB flash drive to the thin client unit you wish to deploy the captured image or systemsettings to, and then power on the unit.
3. Follow the on-screen instructions. You can deploy the captured image or settings in one of thefollowing ways:
● Upload to an FTP server or Windows file share
● Save to a USB flash drive
● Have the thin client host the settings or full image for other units to pick up using SystemUpdate (If you are using this option, you do not need the USB flash drive.)
44 Chapter 4 Control Panel

After you remove the USB flash drive and cycle power to the system, the image unbundles. Do notinterrupt or cycle power to the unit during this process.
You may use the captured image (flash.dd) found in the USB flash drive in combination with AltirisDeployment Solution to remotely image multiple thin client units.
NOTE: You must use flash.ibr in conjunction with the HP ThinState Deploy utility (e.g., ibr.exe).Flash.dd is not compatible with the Altiris rdeploy.exe or rdeployt.exe utilities. Please consult the HPCompaq Thin Client Imaging Tool at: http://h20000.www2.hp.com/bc/docs/support/SupportManual/c00485307/c00485307.pdf
For more information about Altiris, see http://www.altiris.com/.
Internet OptionsThe Internet Settings dialog box allows you to configure Internet browser settings on the terminal.
The Internet Settings dialog box includes the following tabs:
● General: Allows you to enter start and search pages, identify the Web browser type to determinehow Web pages are displayed, set the cache size, and clear cache and history.
● Connection: Allows you to select LAN or autodial connections and to configure proxy serversettings.
● Security: Allows you to specify Web sites that are trusted, restricted, and so on. Also allows youconfigure ActiveX, scripting, and other advanced-type internet options.
● Privacy: Allows you to configure how the browser handles cookies.
● Advanced: Allows you to configure multiple internet options, including options for accessibility,browsing, multimedia, and security.
● Popups: Allows you to configure how the browser handles pop-ups, including blocking, notificationwhen pop-ups are blocked, and exceptions that allow popups from specific sites.
● Other Options: Allows you to enable browser window resizing, enable favorites, and set the fontsize.
NOTE: Due to CE architecture, proxy exceptions are not available.
Internet Options45

KeyboardThe Keyboard Properties dialog box allows you to configure your keyboard.
Repeat delay determines how long you must hold down a key before its character starts repeating.
Repeat rate determines how quickly a character repeatedly is displayed on screen when the key is helddown.
If you are a legacy user, see Regional Settings on page 55 to change keyboard settings.
Select Disable local Windows key combinations (e.g. ALT+TAB) to disable the passing of hot keysto the terminal service server.
Select Boot time Num Lock state (On/Off) to enable Num Lock on the client.
LPD ControlThe LPD Control dialog box allows you to set the terminal up as a line printer (print server).
46 Chapter 4 Control Panel

To set the terminal up as a print server:
1. Select Enable Printer.
2. Type the Printer Name and Network Port.
3. Select the appropriate printer port from the list. If you select a COM port, you have the option ofconfiguring the serial port by clicking Configure and typing the appropriate parameters.
4. Select Send Form Feed if form feeds are necessary. Form feeds are primarily used with olderprinter technology.
NOTE: Verify the terminal serial port is enabled in BIOS and in the Control Panel Port Lock window.You must also set up the application server for LPD printing.
ModemsThe Modem Settings dialog box allows you to access and modify settings for external modems.
Refer to the device instructions that shipped with the modem, or located on the manufacturer Web site,for listings of modem “AT” commands available for the modem.
MouseThe Mouse Properties dialog box allows you to set the mouse double-click sensitivity for speed andphysical distance between clicks.
Modems47

● Use the Double-Click tab to set the double-click sensitivity by double-clicking the grid icon, thentest the setting by double-clicking the test icon.
● Use the Button Configuration tab to configure for left-handed use.
● Use the Pointer Speed tab to configure how fast the mouse pointer moves on the screen basedon how the users moves the mouse.
Network and Dial-up ConnectionsThe Network and Dial-up Connections window allows you to configure connectivity between the terminaland the Internet, a network, or a computer.
To make a new connection, double-click the Make New Connection icon, select the type of connectionyou want to make, and then configure the connection.
Choose from the following connection types:
● Dial-up Connection
● Direct Connection
● VPN (PPTP)
● VPN (L2TP)
● Ethernet (PPPoE)
Dial-up ConnectionYou can use a dial-up modem with the thin client to access a dial-up server. This method provides twoways to access the enterprise intranet:
● An enterprise dial-up server connects directly to the enterprise intranet.
● An Internet Service Provider (ISP) dial-up server provides access to the Internet, from which thethin client must access an enterprise Point-to-Point Tunneling Protocol (PPTP) Virtual PrivateNetwork (VPN) server that connects to the enterprise intranet.
48 Chapter 4 Control Panel

NOTE: The dial-up server must be a Microsoft Remote Access Server or another server that supportsindustry-standard protocols.
Direct ConnectionThis type of connection allows you to connect directly to another computer through the serial port onthe terminal.
NOTE: This option is available only to thin clients with serial ports.
Virtual Private Network (PPTP) ConnectionPoint-to-Point Tunneling Protocol (PPTP) is a network protocol that enables the secure transfer of databetween a remote client (in this case the thin client) and an enterprise server environment by creatinga VPN across TCP/IP-based data networks such as the Internet. It provides a password-protected paththrough the enterprise firewall to the enterprise server environment in which the network and sessionservices required by the thin client reside.
Access to the internet requires an Internet Service Provider (ISP). You may use any of the standardmeans of connecting to the ISP, such as a dial-up modem, cable modem, or DSL modem.
You must first establish the connection to the ISP, before contacting the enterprise PPTP VPN server.This includes dial-up access as well as direct access through the cable modem and DSL modem paths.
Virtual Private Network (L2TP) ConnectionLayer Two Tunneling Protocol (L2TP) merges the Microsoft PPTP protocol with the Cisco Layer TwoForwarding (L2F) protocol. L2TP is basically the same as PPTP; the primary difference is that L2TPsupports encryption.
PPP Over Ethernet (PPPoE) ConnectionThis is a connection from the thin client Ethernet port directly to the enterprise intranet. No additionalhardware is required.
In this configuration all network services may be used, including the enterprise DHCP server. A DHCPserver on the network may provide not only the terminal’s IP address, but also the location of the fileserver containing the software updates.
Port LockThe Port Lock dialog box allows you to enable or disable COM 1 ports, LPT ports, and USB mass storagedevices.
Port Lock 49

To enable a port, select the appropriate check box, and then click OK.
Power SettingsThe Power Settings dialog box allows you to configure settings such as BIOS wake-up, shutdown, powerstate after power failure, and alarm settings.
BIOS Wakeup Alarm: Set the time of day the thin client wakes up. You must first reboot and then shutdown the unit for this feature to work.
Enable Wake On LAN: Select to enable the power in the client to be turned on by the network.
PWRON State After Power Fail: Select whether power is to be on/off or defaults to its former stateafter a power failure.
Set Alarm: Select the day(s) that the thin client wakes up. You must first reboot and then shut down theunit for this feature to take affect.
50 Chapter 4 Control Panel

Shutdown settings: Set the time of day the thin client is to shut down.
Printers
Printers
The Printers dialog box allows you to add local and network printer configurations and modify existingprinter configurations. This configuration enables the terminal to print from a server session to a localprinter.
NOTE: Windows CE is best suited for printing smaller documents.
The Printers dialog box contains an Add Network Printer icon, an Add Local Printer icon, and an iconfor each configured printer.
You can use Internet Printing Protocol (IPP) to print to network printers. IPP defines a standard protocolfor printing as well as managing print jobs.
NOTE: To avoid port conflicts, HP recommends using COM2 for IPP printing.
Printers 51

Adding a PrinterTo add a printer configuration from the Printers dialog box:
1. Double-click the Add Network Printer or Add Local Printer icon to invoke the Printer Wizard,which allows you to configure a new printer.
2. In the first panel of the wizard, select the port that you want the printer to use, and then clickNext.
52 Chapter 4 Control Panel

3. In the next wizard panel, select the printer manufacturer and model, and then click Next.
CAUTION: It is critical that the model name entered in step 3 match EXACTLY the name of thedriver installed on the terminal server. If it does not, printing will fail.
4. Click Yes to print test page and share this printer, if desired, and then click Finish.
The configured printer now appears in the printer window.
Printers 53
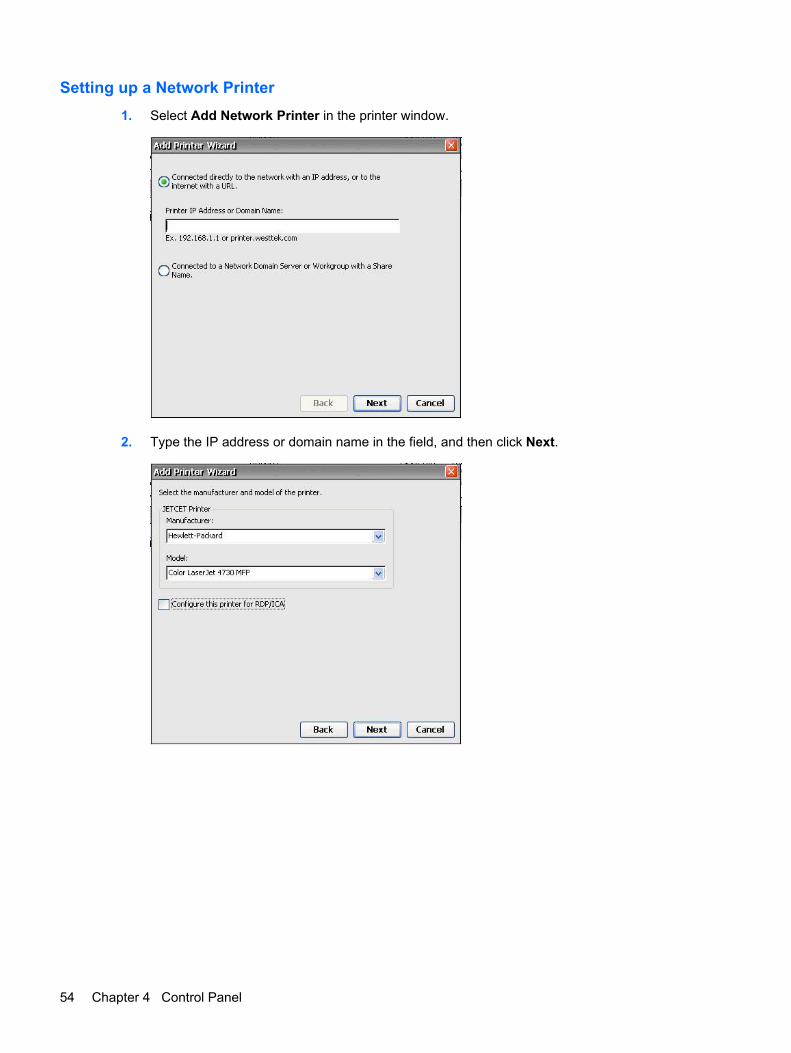
Setting up a Network Printer1. Select Add Network Printer in the printer window.
2. Type the IP address or domain name in the field, and then click Next.
54 Chapter 4 Control Panel

3. Select the printer manufacturer and model, and then click Next.
4. Click Yes to print test page, if desired.
Modifying an Existing Printer ConfigurationTo modify an existing printer configuration in the Printers dialog box:
1. Double-click the desired printer icon or select the icon and click Properties. The Printer Propertiesdialog box is displayed.
2. Make any necessary modifications, and then click OK to save.
Regional SettingsThe Regional and Language Settings dialog box allows you to customize regional settings for theterminal. You can change the way Windows CE displays numbers, currency amounts, times, and dates.
The Regional Settings Properties dialog box includes the following tabs:
● Regional Settings: Allows you to select an input locale, which determines how some programsformat numbers, currency, time, and dates. The options available on the other tabs are determinedby the selected region.
Regional Settings55

Click Customize to configure the way Windows displays the following:
◦ Numbers
◦ Currency
◦ Time
◦ Date
● User Interface Language: Allows you to determine the language used for the menus, dialogs andalerts. Only English is supported.
● Input Language: Allows you to select the keyboard language. You can select multiple languages.You can toggle between languages by clicking on the language system tray icon.
56 Chapter 4 Control Panel

SecurityThe Security dialog box allows you to control various terminal functions related to security and terminaloperator accounts.
Enabling SecuritySystem security is enabled by default, which forces users to log in if the automatic login feature is notenabled.
● Select Lock screen when pressing Ctrl+Alt+Delete to allow users to lock the terminal throughthe Ctrl+Alt+Delete keyboard command.
● Select Automatic Log On to bypass the need for the user to enter a password to log in. This alsoactivates the Single Button Log On check box and Account list.
◦ Select Single Button Log On to enable the single button connect feature, which invokes adialog box that requires the terminal operator to press a keyboard key or click the Logonbutton on the dialog box to log in.
◦ In the Account list, select the account that the terminal will use to log in user. For informationabout creating a new account, see Creating a User Account on page 58.
Select Enable Reset Hotkey if you want to allow users to reset the terminal to factory defaults (registryand shortcuts) by pressing and holding the F9 key during boot.
Security57

Creating a User AccountTo create a new security account for a terminal operator, select the Users tab on the Security dialogbox. This tab lists all the operator accounts and shows which accounts are set up with Administratorsecurity privileges and which accounts are enabled.
For more information about creating user accounts, see Creating User Accounts on page 8 in Chapter3.
SNMPYou can manage the terminal through standard third-party simple network management protocol(SNMP) tools. The SNMP Network Administration dialog box allows you to enter parameters requiredfor SNMP management.
SNMP agents run in network elements and respond to Network Management Station (NMS) queries(GETs). SNMP provides a means to query all terminals assigned to a specific community. Eachcommunity should have a unique name, and all members of a community have the same accessprivileges. You can assign a single terminal to multiple communities.
Agents send unsolicited reports (traps) back to a specified IP address when a particular network activityoccurs. The following traps are supported: cold start, warm start, authentication failure, link down, andlink up.
To add a new community:
1. Click the Agent tab.
2. In the Traps section, click Add Community.
3. Type the new community name, and then click OK.
58 Chapter 4 Control Panel

To add and assign rights to an accepted community:
1. Click the Security tab.
2. Click Add in the Accepted Community Names section. The Community Configuration dialog isdisplayed.
3. Type the name of the community in the Community Name box.
4. Select the rights to the community in the Rights list, and then click OK.
SNMP 59

To add SNMP packets:
1. Click the Security tab.
2. Select Accept SNMP Packets from these hosts.
3. Click Add in the SNMP packets section. The SNMP Configuration dialog is displayed.
4. Type the host name or IP address, and then click OK.
5. Repeat steps 1 and 2 to add more hosts.
60 Chapter 4 Control Panel

To configure SNMP:
1. On the Agent tab, type the physical location of the terminal in the Location box.
2. Type the name of the contact person responsible for the terminal in the Contact box.
3. Assign the terminal to a community by selecting a community from the Community Name list.
4. To add a trap destination:
a. In the Trap Destinations section, click Add. The SNMP Configuration dialog is displayed.
b. Type the host name or IP address of the NMS trap server, and then click OK.
SNMP 61

5. If you want to add or change SNMP security settings, click the Security tab.
6. To enable an authentication failure trap, select Enable Authentication Failure Trap.
7. Select the hosts from which SNMP packets may be accepted. Choose either Accept SNMPpackets from any host or Accept SNMP packets from these hosts.
8. Click OK after entering all the necessary SNMP information.
62 Chapter 4 Control Panel

SNTP ClientThe SNTP dialog box allows administrators to synchronize the clocks on all thin clients. Administratorscan set thin clients to automatically synchronize with an Internet time server or with a boot server.
Synchronization can occur only when your computer is connected to the Internet.
NOTE: This feature can generate significant network traffic.
SNTP Client63

SystemThe System Properties dialog box allows you to view manufacturer and product information, networksettings, and copyright information. You can also reset the terminal to default factory settings, adjustthe memory allocated for storage and running programs, assign a device name for network identificationpurposes, and configure the network card.
The System Properties dialog box includes the following tabs:
● General: Shows manufacturer and product information for the terminal. Includes a Reset buttonthat you can use to reset the terminal to factory default property settings. It also includes Exportand Import buttons for easy registry import/export . For more information, see Copying RegistrySettings on page 65.
● Memory: Allows you to adjust memory allocation between memory for storage room and memoryneeded to run programs.
● Network: Allows you to designate a device name and description that identifies the terminal acrossthe network. You can type a name or accept the name provided by the DHCP server. The default
64 Chapter 4 Control Panel

device name is “HP” followed by the MAC address. If the device is reset to factory defaults, thedevice name reverts to the factory default name.
This tab also shows network settings and provides a Configure Network Card button that allowsyou to adjust the speed/duplex for the card.
The Renew button renews the terminal IP address.
● Copyrights: Shows copyright information for the terminal.
Resetting Settings to Factory DefaultsTo reset all thin client settings to factory defaults:
1. Click the General tab.
2. In the Terminal Settings section, click Reset.
3. Click Yes to reset the terminal to factory settings. The terminal restarts.
● The default for File Server is 161.
● The default for Path and Filename is 162.
Copying Registry SettingsYou can copy and transfer the registry settings from one thin client to another. Also known as “ARP”,this feature allows you to configure a thin client and then transfer that configuration to multiple other thinclients. To clone an entire thin client image, you must first update the image, and then transfer the registryfiles.
You can transfer registry settings on only “like-to-like” clients, meaning that the thin client you transferto must have the same of the following list as the thin client you transfer from.
● model number
● build number
● add-ons
To transfer registry settings to one thin client:
NOTE: You can use Altiris or FTP to transfer registry settings to multiple thin clients.
1. Configure a thin client to your specifications.
2. In Control Panel > System > General tab, in the Terminal Settings section, click Export.
3. Navigate to where you want to save the settings file. You can save the file to the hard drive, anetwork drive, a USB drive key, etc. After you give the file and name and click OK to save the file,it can take up to five minutes for the file to save.
4. After exporting the registry settings file, from the thin client to update, go to Control Panel >System > General tab, and in the Terminal Settings section, click Import.
5. Navigate to where you exported the settings file, select the file, and then click OK. You must restartthe client for the new settings to take effect.
NOTE: The registry settings file does not include desktop shortcuts.
System65

For more information about exporting registry settings, see Chapter 6, Registry Import/Exporton page 83.
System UpdateThe System Update dialog box allows you to define the means by which you update the terminal image.The feature updates only the operating system, the BIOS is not updated. You can update the image:
This tab allows you to automatically update the image by having the DHCP server provide the locationof the file server on which the upgrade files are located. This feature provides an alternative to Altiris forimage deployment.
● Directly from HP by manually entering HP FTP file server information for the server that containsthe update.
● By allowing the DHCP server to locate the FTP file server that contains the update.
NOTE: For more information on setting DHCP values, refer to the “DHCP Options” section in thischapter.
You may want to update your image because of the following:
● You receive a new client, perform updates to the client image, and decide you want to revert to the“good, known” image.
● An image gets corrupted and the client requires re-imaging.
● Your client image is old and you want the newest available stable image.
CAUTION: Turning off the power before the update is complete may corrupt the flash memory on theterminal.
66 Chapter 4 Control Panel

For information about automatically updating your client, see the related white paper at:http://h20000.www2.hp.com/bc/docs/support/SupportManual/c00448549/c00448549.pdf.
To update the image using the DHCP server:
1. From the Server type list, select either FTP or Network Share.
2. In the Host box, type the name of the host box.
3. In the Path box, type the path. If you selected FTP from the Server type list, you must also typethe port number in the box to the right of the Path box.
4. In the User ID and Password boxes, type the user ID and password required by the FTP file server.
5. If you selected Network Share from the Server type list, in the Domain box, type the networklocation.
6. Select Check for updates at startup to cause the unit to check the entered FTP site for softwareupdates.
7. Click Connect to connect to the server you configured in the previous steps. The Connect buttonis not available until you enter valid information for the server.
8. Select Use Values from DHCP Server.
9. In the Server Name/IP box, type the FTP Server Name/IP.
10. In the Path and Filename box, type the path and file name of the image.
11. In the Server Port box, type the FTP server port.
12. In the User ID and Password boxes, type the user ID and password required by the FTP file server.
13. To automatically update the image each time the terminal is restarted, select Automatically checkfor updates on startup. This feature allows you to place a single, updated image on an FTP siteand have clients automatically check that site at boot-up and update with the new image.
14. Click Update to begin the update process.
The DHCP Options dialog allows you to set the DHCP tags that identify the FTP location of the updateimage.
To change the FTP option IDs, type over the entry in the Server Port box, and then click OK. The valuemust match what is set up on the DHCP server.
Terminal Server Client LicensesThe Terminal Server Client Licenses dialog box allows you to view stored licenses. You can use thiswindow to delete or save licenses.
Terminal Server Client Licenses67

ThinPrintThinPrint can be used for ICA/RDP sessions, provided a TCP/IP connection exists between server andclient. For more information, see ThinPrint on page 72.
View or Remove ProgramsThe View or Remove Programs dialog box allows you to view or remove software programs currentlyinstalled on the terminal.
To remove a program, select the program from the list and click Remove.
VNC ServerVirtual Network Computing (VNC) is a remote control program that allows you to view and interact withone computer (the “server”) using a simple program (the “viewer”) on another computer anywhere onthe Internet. The VNC Server runs as a service and therefore is available even when the user is loggedoff the thin client.
68 Chapter 4 Control Panel

VNC Server69

Settings for VNC ServerConfigure VNC Server on your thin client by selecting the following:
Check Box Explanation
Prompt local user to acceptincoming connections
The default should be ENABLED and Auto Accept should beENABLED
Enable Viewer Cursor This setting allows the viewer to show its cursor on the screen whilemoving the mouse. The viewer shows a small dot that points to theactual location of the “hot spot” of the remote cursor location.Enabling this setting will show the local cursor of the viewer;however, the remote dot will lag behind the local viewer cursor asit tries to synchronize the local viewer cursor.
Accept input events from clients Enabling this setting will allow the viewer to control the keyboardand mouse of the unit remotely.
Autoport Select This setting will be devalued, leaving only the “Accept connectionson port” and “Allow HTTP connections on port”.
Accept connections on port Defaults to the standard VNC port of 5900.
Allow HTTP connections on port Defaults to the standard VNC port of 5800 for JVM (Java)-enabledWeb Browser Viewers.
NOTE: Windows CE does not support Java.
You can find additional information about VNC Server features at: http://www.realvnc.com/documentation.html.
Volume and SoundsThe Volume & Sounds Properties dialog box allows you to adjust the volume setting and enable soundsfor various events and conditions. You can also create custom sound schemes for various events.
70 Chapter 4 Control Panel

5 Programs and Add-ons
This chapter provides detailed information about programs and add-on programs for the CE 5.0 image.You can download add-ons from the HP Support Web site.
Add-ons are programs that you can add and remove from a thin client. Add-ons consist of both programsthat come with the default thin client image, and programs that you can add.
The following table provides a list of Add-ons and whether they are included in the image:
Add-On In FactoryImage
CE 6.0 Add-On In FactoryImage
CE 6.0
Aclient forCE 6.0
Y Y TEC 5.0 Y Y
HP EasyConfig
Y Y HP ThinConnect Y Y
HP EasyUpdate
Y Y ThinPrint Y Y
ICA 10.x Y Y HP ThinState Y Y
InternetExplorer6.0 for 6.00
Y Y TxtPad Y Y
JetCet 5.0for 6.00
Y Y Universal SCReader
Y Y
KeyboardIntl
Y Y USB MassStorage 6.0
Y Y
MediaPlayer 9.0for 6.00
Y Y USB Parallel Portfor 6.0
Y Y
RDP 6.0 Y Y USB Wireless for6.0 (VIA)
Y
SetupWizard
Y Y VNC Server Y Y
SNTPClient 6.0
Y Y Win Explorer Y Y
71

ProgramsThinPrint
The following steps illustrate how to set up ThinPrint over TCP/IP. ThinPrint can also be used for ICA/RDP sessions, provided a TCP/IP connection exists between server and client. You must set upThinPrint on the server before attempting any ThinPrint jobs. For more information about how to set upthe server, see http://www.thinprint.com.
ThinPrint over TCP/IP1. Connect a local printer to the thin client.
NOTE: Windows CE assigns LPT1 to the parallel port and LPT2 to the USB port.
2. Open ThinPrint by selecting the icon on the Windows task bar or by clicking Start > Programs >ThinPrint.
72 Chapter 5 Programs and Add-ons

3. Click the Assignment tab to set up the printer. The default printer name and port appear asLPT1:LPT1.
4. Click Add local port to enter a new printer name and port; for example, HP_LaserJet_1150.You can change the printer name by selecting the printer and clicking the Edit entry button.
Programs 73

5. Select the printer you just created.
6. Click OK to close the ThinPrint screen.
7. Reopen ThinPrint.
8. Select the printer you created from the Current printer list.
9. Click OK to save settings.
10. Create an ICA or RDP connection in HP ThinConnect.
11. Double-click on the connection you just created.
74 Chapter 5 Programs and Add-ons

12. Log in to the server.
Programs 75

13. Open a any Word document and click File > Print.
14. Select the printer from the list. The display format is printer name#computer name. (Forexample, hp_LaserJet_1150#HP000AE495D355:1)
15. Click OK to print the document.
ThinPrint Network Printer1. Open ThinPrint.
2. Click the Assignment tab, and then click the Add Network Printer button.
3. If configuring a shared printer:
a. Select Shared printer.
b. Type the Printer name.
c. Type the Network path, User name, and Password.
76 Chapter 5 Programs and Add-ons

NOTE: The printer name must match the printer name set up on the server.
4. If configuring an LPD Printer:
a. Select LPD Printer.
b. Type the Printer name.
c. Type the printer’s IP address in the Printer address field.
NOTE: The printer name must match the printer name set up on the server.
5. Click OK to save settings and close the Network Printer window.
6. On the Assignment tab, select the check box next to the printer you just set up.
7. Click OK to save settings and close ThinPrint.
Programs 77

8. Open ThinPrint and select the printer you just added from the drop-down list.
9. Log in to ICA or RDP.
10. Open any Word document. and then select Print.
11. Select the printer from the list.
12. Select OK to print the document.
HP Connections for Citrix SoftwareThe HP Connections for Citrix Software window provides a quick and easy means of creating new ICAconnections. You can also delete and edit connections, as well as create desktop shortcuts forconnections.
NOTE: Any ICA connection created will appear in both the HP ThinConnect window and the HPConnections for Citrix Software window. For more information about HP ThinConnect , see Chapter3, HP ThinConnecton page 6.
You can access the HP Connections for Citrix Software window from:
● Start > Programs > HP Connections for Citrix Software.
● The shortcut icon on the desktop.
Creating a New ICA connectionThe upper section of the window contains the ICA connection.
To create a new connection:
1. Double-click the icon in the top section.
or
2. From the File menu, highlight New Connection and select the type of connection you want tomake. Follow the instructions in the Wizard or dialog.
78 Chapter 5 Programs and Add-ons

Deleting a ConnectionTo delete an established connection:
1. Right-click on the connection and select Delete Connection.
or
Select the connection and press the Delete key.
2. Click Yes to delete the connection.
NOTE: Deleting a connection through HP Connections for Citrix Software also deletes the connectionfrom HP ThinConnect.
Editing a ConnectionTo edit an established connection:
1. Right-click on the connection and select Edit Connection.
2. Modify the connection.
Creating a Desktop Shortcut to a ConnectionYou can create a shortcut to a connection on the desktop through HP Connections for Citrix Software.You cannot create shortcuts through HP ThinConnect.
To create a shortcut, right-click on the connection and select Send to Desktop.
RDP 6.0Remote Desktop Protocol (RDP) 6.0 replaces RDP 5.5 and provides the following functionality:
● Unicode compatibility, which enables you to send Unicode values of characters as virtual key codesto the keyboard input.
● RDP supports operation in any environment that allows network localization, automatic disconnect,and remote configuration.
● Variable bandwidth allocation through client-side bitmap caching and optional compression for low-bandwidth connections, significantly improving performance over low-bandwidth connections.
● Multichannel-capable protocol that permits separate virtual channels for carrying presentation data,serial-device communication, licensing information, and heavily encrypted data.
● Remote control which lets the support staff view and control a Terminal Services session. Sharinginput and display graphics between two Terminal Services sessions lets support staff diagnoseand resolve problems remotely.
● Network Load Balancing (NLB), available in Windows 2000 Advanced Server and DatacenterServer.
● High color 16-bit, 24-bit, and 32-bit graphics are supported if they are also supported in the graphicsdriver.
● Custom high resolution supports wide screen monitors.
Programs 79

● Clipboard sharing, also known as clipboard redirection. The local clipboard becomes a part of theclipboard viewer chain in the remote session, allowing the user to copy and paste betweenapplications running in both the remote session and on the local client.
● Local-printer redirection so server applications can print locally to the client device.
● Local audio playback so server applications can direct audio to the client device or play at theTerminal Server.
● Local-port redirection so server applications can use parallel and COM ports of the client device.
● Local drive redirection so server applications can use the file system (including ATA) of the clientdevice.
● File redirection filter that permits exposing only specific directories. If you specify that only externalstorage, such as Compact Flash or USB storage, be exposed through the redirected drive,information is saved only to the redirected drive.
● TS CAL maintenance tool. This control panel window is available in any OS design that supportsControl Panel programs, such as the Enterprise Web Pad. It requires that RDP client be in the run-time image.
● Server authentication verifies that you are connecting to the correct remote computer or server tohelp prevent unintentionally exposing confidential information.
● Transport Layer Security (TLS)/Secure Sockets Layer (SSL) protects users from rogue servers.
● Network level authentication requires user level authentication prior to establishing full RDPconnection. This may remove the need for the HP Single Login Button, as this feature allows youto leave the thin client on the RDP logon screen indefinitely without taking server resources.
RDP runs in Graphics, Windowing, and Events Subsystem (GWES) rather than in its own process space.This provides faster display updates by reducing the protected server library (PSL) and kernel overhead.RDP running in GWES can improve performance up to 30%.
NOTE: If you configured RDP to run in GWES, you cannot run RDP inside a Web browser. Optionally,you can configure RDP to run in Microsoft ActiveX Control.
Terminal Emulation ConnectionTerminal Emulation Connection (TEC) allows you to create a terminal emulation session for a terminal.You can create two different types of TECs, a one-time connection, or a connection associated with auser account.
80 Chapter 5 Programs and Add-ons

To create a one-time connection:
1. Click Start > Programs > Terminal Emulation.
2. In the Type box select the connection type.
3. Click Configure to configure settings for the connection type you selected.
4. If you selected TCP/IP in the Connect box, click Telnet Options to further configure theconnection.
5. In the Connect To box select the port to which to connect.
6. Click Connect to establish the connection. The Connect button is not available until the connectionis properly configured.
To associate a TEC with a user account:
1. Start > Programs > HP ThinConnect.
2. Click Add.
Programs 81

3. Select Terminal Emulation, and then click OK.
4. Follow the wizard to configure the connection.
TxtPadTxtPad is a simple text editor in the Windows CE the image. TxtPad associates with the following fileextensions: .txt, .ini, .log, and .arp.
NOTE: The maximum character limit is 5-MB of ASCII data.
TxtPad is available from a shortcut in the Start > Programs menu.
Add-onsThe following section provides information about add-ons that can be added to your CE-based thin clientimage.
ELO Touch ScreenThe ELO Touch Screen applet allows you to enable or disable the touch screen. You can also calibratethe touch screen by clicking the Align button.
82 Chapter 5 Programs and Add-ons

6 Registry Import/Export
ATTENTION: When deploying an image and settings from a “source” or “master” thin client to a “target”thin client, please make sure that source/master and target thin clients have identical hardware. This isapplicable regardless of deployment method being used: HP ThinState Tools, Altiris DeploymentSolution, HP OpenView Client Configuration Manager, or any other deployment solution being used.
This chapter explains how to import/export a thin client registry using Altiris Deployment Server. Formore information about Altiris, see http://www.altiris.com/.
For information about installing an Altiris BootWorks partition, see http://h20000.www2.hp.com/bc/docs/support/SupportManual/c00215445/c00215445.pdf15445/c00215445.pdf.
The Registry Import/Export tool is an HP-engineered software technology that makes it significantlyeasier and more cost efficient to manage HP thin clients. Registry Import/Export allows thin client devicesto inherit properties of other thin client devices. Extracting the settings of one device and redeployingthe same settings to other devices reduces network congestion. Registry settings can be 100 to 10,000times smaller than the entire image.
Please note the following about the Registry Import/Export tool:
● The tools requires extensive knowledge of Altiris Deployment Server.
● The source and target machine must have the same image with the same quantity of software add-ons, and the software add-ons must be of the same revision. The Registry Import/Export Toolcannot upgrade or downgrade application versions.
● The import/export process may take approximately two minutes to complete.
CAUTION: Currently, Registry Import/Export between the HP t5510 thin client and the HP t53x0 andt5500 thin clients is not supported.
Clearing the Destination RegistryBefore importing a new registry to a thin client, you must clear the destination machine registry. To clearthe registry, drag and drop CE_RegReset from the Job window to the Destination Computer. Completionof this process takes two to three minutes.
Clearing the Destination Registry 83

Exporting and Importing a RegistryTo export a registry:
1. Open the Deployment Server Console.
2. Select CE_RegExport from the Job window and drag and drop the Job to the source unit underthe Computers window. This copies the source computer’s registry and prepares it for import.
3. Select CE_RegImport from the Job window and drag and drop the job to the destination computerunder the Computers window. This imports the settings from the source computer to the destinationcomputer.
Importing a Registry to Multiple UnitsYou can import a single registry to multiple units. To import a registry to multiple units:
1. Select CE_RegExport from the Job window and drag and drop the Job to the source unit underthe Computers window. This copies the source computer’s registry and prepares it for import.
2. Select CE_RegImport from the Job window and drag and drop the job to “All Computers” underthe Computers window. This imports the settings from the source computer to the network.
Exporting Registries from Multiple UnitsWhile it is possible to export registries from multiple thin clients, it is important to ensure the registry fileshave different names. The export process saves a time stamp as part of the name for the saved file (forexample, 051306840.reg, which is May 13, 2006 at 8:40). If you export multiple units at the same time,the registry file names will be identical. To create distinct file names for each registry, HP recommendsthat you capture each registry a minute apart.
84 Chapter 6 Registry Import/Export

Index
Symbols/Numerics508 Accessibility features 22
AAccessibility 22accounts
default 8user 8
add-ons 71, 82adding
connections 7permissions 11printers 51rights to community 59shortcut 79SNMP packets 60user accounts 8
Advanced window 6Altiris BootWorks Web site 83Altiris Deployment Server 83Altiris Web site 45, 83appearance scheme 27area code 26ARP 64Assign Connections tab 13assigning connections to
users 13associating
TEC with user account 81Auto column 14auto starting
HP ThinConnect 15auto updating clients white
paper 67automatic log on
enabling 19
Bbackground image 27Based on box 11
Boot Settings 23bypass auto logon 20
Ccall waiting 26capturing images 43Certificates 24changing display settings 4Citrix 5Citrix Desktop appliance 36clearing the registry 83color quality 27configuring
dialing patterns 27display properties 4mouse 47SNMP 61user interface 17
connectionsadding 7adding ICA 78assigning 13, 15automatic 16deleting 7deleting ICA 79dial-up 48direct 49editing 7editing ICA 79primary 14primary or secondary 15
Control Panel 21copying registry settings 64country code 26creating
desktop shortcut 79new ICA connection 78one-time TEC 81user account 8user accounts 57
DDate/Time 25default accounts 8deleting
connections 7ICA connection 79user accounts 12
deploying images 44designating connections 15desktop 3desktop icons 5Device Manager 42device name 65DHCP Options 25dial-up connection 48Dialing 26dialing patterns 27direct connection 49Display 4display settings 4documentation 2
EEasy Config
Citrix Desktop appliance 36VMWare View appliance 34Web appliance 38
Easy Update 40editing
connections 7ICA connection 79
ELO touch screen 82Enable Reset Hotkey check
box 20enabling
automatic connection 16security 57
export 66exporting a registry 84
Index 85

Ffactory defaults 65features 1firewall settings, ICA 32form feeds 47frequency 28FTP server 25
GGETs 58Global ICA Client Settings 30GWES 80
Hhidden
Start menu 3taskbar 3
High Contrast display 22HP Compaq Thin Client Imaging
Tool Web site 45HP Connections for Citrix
Software 5HP Device Manager 42HP Easy Config 33HP Easy Update 40HP ThinConnect
auto starting 15HP ThinState 43HP ThinState Capture 43HP ThinState deploy 44
IICA
connection 78firewall settings 32keyboard shortcuts 30preferences 31seamless 31serial number 31server location 32
icons 5image 2, 66Imaging Tool Web site 45import 66importing a registry 84Internet Options 45Internet Printing Protocol 51IPP 51
JJava 70
KKeyboard 46keyboard shortcuts, ICA 30Kiosk mode 18
LL2TP 49LPD Control 21, 46
Mmemory allocation 64Modems 47modifying
printers 51, 55user accounts 12
Mouse 47MouseKeys 22My Certificates 24
Nname 65Network and Dial-up
Connections 48network device name 65Network Management Station
query 58network printer, setting up 54NMS 58
OOther Authorities 24
Ppermissions 11Persistent column 15PNAgent 31Port Lock 49power settings 50PPPoE 49PPTP 49preferences, ICA 31primary connections 15printer
adding 52modifying 55
printer, network, setting up 54Printers 51printers 51printing 46, 51programs 72pulse dialing 26
RRDP (6.0) 79reconnection 16refresh frequency 27region code 26Regional Settings 46registry
clearing 83importing and exporting 84settings 64
registry import/export tool 66Remote Desktop Protocol 79repeat delay 46repeat rate 46resetting settings 65resolution 28
Sscreen resolution 27screen saver 27, 28screen settings 28seamless 31secondary connections 15Security 57serial number 31Set from Template button 10setting
Kiosk mode 18permissions 11
settingspower 50VNC server 70
Setup Wizard 2shortcuts 5, 79Single Button Log On check
box 20SNMP 58SNTP Client 63sounds 70SoundSentry 22SSL 24SSL/TLS Relay 33Start menu 3, 5StickyKeys 22support documentation 2switching users 20System 25System Update 66
86 Index

Ttaskbar 3, 4TCP/IP, ThinPrint 72TEC 80Terminal Emulation
Connection 80Terminal Server Client
Licenses 67ThinConnect
Advanced window 6auto starting 15
ThinPrintNetwork Printer 76TCP/IP 72
ThinState 43ThinState Capture 43ThinState capture 43ThinState deploy 44time 25tone dialing 26touch screen 82traps 58Trusted Authorities 24TxtPad 82
Uupdating your system 66user accounts 8, 57user interface 17users
assigning connections to 13switching 20
VView or Remove Programs 68Virtual Network Computing 68Virtual Private Network 49VMWare View appliance 34VNC Server 68VNC Web site 70Volume and Sounds 70VPN 49
WWeb appliance 38Web sites
Altiris 45, 83HP Compaq Thin Client Imaging
Tool 45latest image 2support documentation 2
VNC 70white paper for Altiris BootWorks
partition 83white paper for auto updating
clients 67
Index 87