administrator guide sequel web interface 10... · welcome to sequel web interface 5 welcome to...
TRANSCRIPT

Administrator GuideSequel Web Interface
Copyright
Copyright © HelpSystems, LLC.
Viewpoint, Viewpoint Administrator, Sequel, Sequel Web Interface, and Esend are trademarks or registered trademarks of HelpSystems, LLC in the United States and other countries.
IBM, AS/400, OS/400, System i, System i5, i5/OS, Power Systems, and iSeries are trademarks or registered trademarks of International Business Machines Corporation in the United States and/or other countries.
Windows is a registered trademark of Microsoft Corporation in the United States and/or other countries.
UNIX is a registered trademark of The Open Group.
Linux is a registered trademark of Linus Torvalds.
Adobe, Acrobat, and Reader are either registered trademarks or trademarks of Adobe Systems Incorporated in the United States and/or other countries.
All other product and company names are trademarks of their respective holders. For third-party conditions and disclaim-ers, see the Release Notes in the product directory.
Doc Revision: 201609205428 sjs
© HelpSystems, LLC. All rights reserved. All trademarks and registered trademarks are the property of their respective owners.
www.helpsystems.com
About HelpSystemsHelpSystems is a leading provider of systems & network
management, business intelligence, and security & compliance software. We help businesses reduce data center costs by improving operational control and delivery of IT services.
Table of ContentsWelcome to Sequel Web Interface . . . . . . . . . . . . . . . . . . . . . . . . . . . . . . . . . . . . . . . . . . . . . . 5
Why Is There an Administrator Guide? . . . . . . . . . . . . . . . . . . . . . . . . . . . . . . . . . 5Contacting Sequel Software . . . . . . . . . . . . . . . . . . . . . . . . . . . . . . . . . . . . . . . . . . 7SWI Requirements . . . . . . . . . . . . . . . . . . . . . . . . . . . . . . . . . . . . . . . . . . . . . . . . . 7
Setup and Configuration . . . . . . . . . . . . . . . . . . . . . . . . . . . . . . . . . . . . . . . . . . . . . . . . . . . . . . 9
Modify the Apache HTTP Server Configuration File . . . . . . . . . . . . . . . . . . . . . . 9Adjust the HTTP Server Job Environment . . . . . . . . . . . . . . . . . . . . . . . . . . . . . . 11Test the Server . . . . . . . . . . . . . . . . . . . . . . . . . . . . . . . . . . . . . . . . . . . . . . . . . . . 12Set Product Defaults . . . . . . . . . . . . . . . . . . . . . . . . . . . . . . . . . . . . . . . . . . . . . . . 13Restart the Server . . . . . . . . . . . . . . . . . . . . . . . . . . . . . . . . . . . . . . . . . . . . . . . . . 16Final Test . . . . . . . . . . . . . . . . . . . . . . . . . . . . . . . . . . . . . . . . . . . . . . . . . . . . . . . . 17Install a Sequel Web Server . . . . . . . . . . . . . . . . . . . . . . . . . . . . . . . . . . . . . . . . . 17
Default HTML Documents . . . . . . . . . . . . . . . . . . . . . . . . . . . . . . . . . . . . . . . . . . . . . . . . . . . 21
WELCOME . . . . . . . . . . . . . . . . . . . . . . . . . . . . . . . . . . . . . . . . . . . . . . . . . . . . . 21HEADER . . . . . . . . . . . . . . . . . . . . . . . . . . . . . . . . . . . . . . . . . . . . . . . . . . . . . . . 22FOOTER . . . . . . . . . . . . . . . . . . . . . . . . . . . . . . . . . . . . . . . . . . . . . . . . . . . . . . . . 22Customizing the SWI HTML Members . . . . . . . . . . . . . . . . . . . . . . . . . . . . . . . . 23
SWI Command Parameters . . . . . . . . . . . . . . . . . . . . . . . . . . . . . . . . . . . . . . . . . . . . . . . . . . 25
Run a View, Report, Table or Query . . . . . . . . . . . . . . . . . . . . . . . . . . . . . . . . . . 25Run a SequelShowcase 'Select' Statement . . . . . . . . . . . . . . . . . . . . . . . . . . . . . . 27Display an Object Description . . . . . . . . . . . . . . . . . . . . . . . . . . . . . . . . . . . . . . . 28Runtime Prompting . . . . . . . . . . . . . . . . . . . . . . . . . . . . . . . . . . . . . . . . . . . . . . . . 29Display spooled files . . . . . . . . . . . . . . . . . . . . . . . . . . . . . . . . . . . . . . . . . . . . . . . 30Submit a request to a job queue . . . . . . . . . . . . . . . . . . . . . . . . . . . . . . . . . . . . . . 31Alternate HTML Headers and Footers . . . . . . . . . . . . . . . . . . . . . . . . . . . . . . . . . 31Suppress HTML Headers and Footers . . . . . . . . . . . . . . . . . . . . . . . . . . . . . . . . . 31Override view results title . . . . . . . . . . . . . . . . . . . . . . . . . . . . . . . . . . . . . . . . . . . 32Add column sorting to view results . . . . . . . . . . . . . . . . . . . . . . . . . . . . . . . . . . . 32Display a Viewpoint Graph Shortcut . . . . . . . . . . . . . . . . . . . . . . . . . . . . . . . . . . 33Display Using Frames . . . . . . . . . . . . . . . . . . . . . . . . . . . . . . . . . . . . . . . . . . . . . . 34
SWI Functions . . . . . . . . . . . . . . . . . . . . . . . . . . . . . . . . . . . . . . . . . . . . . . . . . . . . . . . . . . . . . 35
Spooled File Management Functions . . . . . . . . . . . . . . . . . . . . . . . . . . . . . . . . . . 35SWIVPDFT - Set SWI Viewpoint defaults. . . . . . . . . . . . . . . . . . . . . . . . . . . . . . 37SWIXMLMRG - Merge XML data . . . . . . . . . . . . . . . . . . . . . . . . . . . . . . . . . . . 37SWIXSLBLD - Build an XSL File . . . . . . . . . . . . . . . . . . . . . . . . . . . . . . . . . . . . 38SWIXMLSRV - Serve an XML Document . . . . . . . . . . . . . . . . . . . . . . . . . . . . . 40EXECUTE - Execute to a File . . . . . . . . . . . . . . . . . . . . . . . . . . . . . . . . . . . . . . . 40SWIRETURN - Move Browser Back in History . . . . . . . . . . . . . . . . . . . . . . . . . 41SWIOPEN - Display Frames in SWI . . . . . . . . . . . . . . . . . . . . . . . . . . . . . . . . . . 41SWISTMF - Write a STFM to Standard Out . . . . . . . . . . . . . . . . . . . . . . . . . . . . 42
SWI Solutions and Applications . . . . . . . . . . . . . . . . . . . . . . . . . . . . . . . . . . . . . . . . . . . . . . . 43
iii
iv Seq
Viewpoint Graph Support . . . . . . . . . . . . . . . . . . . . . . . . . . . . . . . . . . . . . . . . . . . 43Import Data to a Spreadsheet . . . . . . . . . . . . . . . . . . . . . . . . . . . . . . . . . . . . . . . . 45Using XML/XSL . . . . . . . . . . . . . . . . . . . . . . . . . . . . . . . . . . . . . . . . . . . . . . . . . . 49SWI Prompted Action . . . . . . . . . . . . . . . . . . . . . . . . . . . . . . . . . . . . . . . . . . . . . . 63
Appendix . . . . . . . . . . . . . . . . . . . . . . . . . . . . . . . . . . . . . . . . . . . . . . . . . . . . . . . . . . . . . . . . . . 67
Security . . . . . . . . . . . . . . . . . . . . . . . . . . . . . . . . . . . . . . . . . . . . . . . . . . . . . . . . . 67Directory Listing Access . . . . . . . . . . . . . . . . . . . . . . . . . . . . . . . . . . . . . . . . . . . . 67Multi-Language Features - Classic Interface . . . . . . . . . . . . . . . . . . . . . . . . . . . . 69Skybot . . . . . . . . . . . . . . . . . . . . . . . . . . . . . . . . . . . . . . . . . . . . . . . . . . . . . . . . . . 70SequelShowcase HTML Functions . . . . . . . . . . . . . . . . . . . . . . . . . . . . . . . . . . . . 71Sequel Web Server Global Date Format . . . . . . . . . . . . . . . . . . . . . . . . . . . . . . . . 74
Index . . . . . . . . . . . . . . . . . . . . . . . . . . . . . . . . . . . . . . . . . . . . . . . . . . . . . . . . . . . . . . . . . . . . . 75
uel Web Interface Administrator Guide
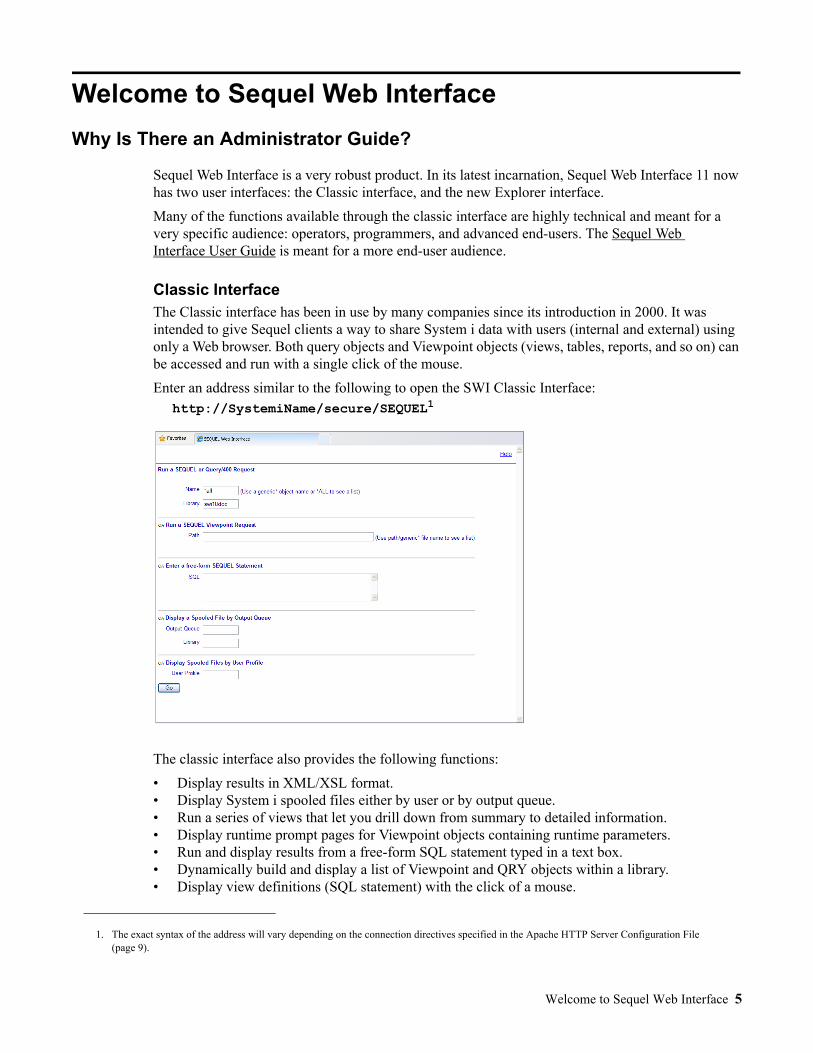
Welcome to Sequel Web Interface
Why Is There an Administrator Guide?
Sequel Web Interface is a very robust product. In its latest incarnation, Sequel Web Interface 11 now has two user interfaces: the Classic interface, and the new Explorer interface.
Many of the functions available through the classic interface are highly technical and meant for a very specific audience: operators, programmers, and advanced end-users. The Sequel Web Interface User Guide is meant for a more end-user audience.
Classic InterfaceThe Classic interface has been in use by many companies since its introduction in 2000. It was intended to give Sequel clients a way to share System i data with users (internal and external) using only a Web browser. Both query objects and Viewpoint objects (views, tables, reports, and so on) can be accessed and run with a single click of the mouse.
Enter an address similar to the following to open the SWI Classic Interface:http://SystemiName/secure/SEQUEL1
The classic interface also provides the following functions:
• Display results in XML/XSL format.• Display System i spooled files either by user or by output queue. • Run a series of views that let you drill down from summary to detailed information.• Display runtime prompt pages for Viewpoint objects containing runtime parameters.• Run and display results from a free-form SQL statement typed in a text box.• Dynamically build and display a list of Viewpoint and QRY objects within a library.• Display view definitions (SQL statement) with the click of a mouse.
1. The exact syntax of the address will vary depending on the connection directives specified in the Apache HTTP Server Configuration File (page 9).
Welcome to Sequel Web Interface 5
• Allow Report and Query objects to be submitted to a job queue.• Combine SWI with Sequel Data Access, to design comprehensive, browser-based business intel-
ligence systems.• The classic interface is fully customizable to your needs. The HTML pages shipped with SWI
may be replaced with pages of your own design.
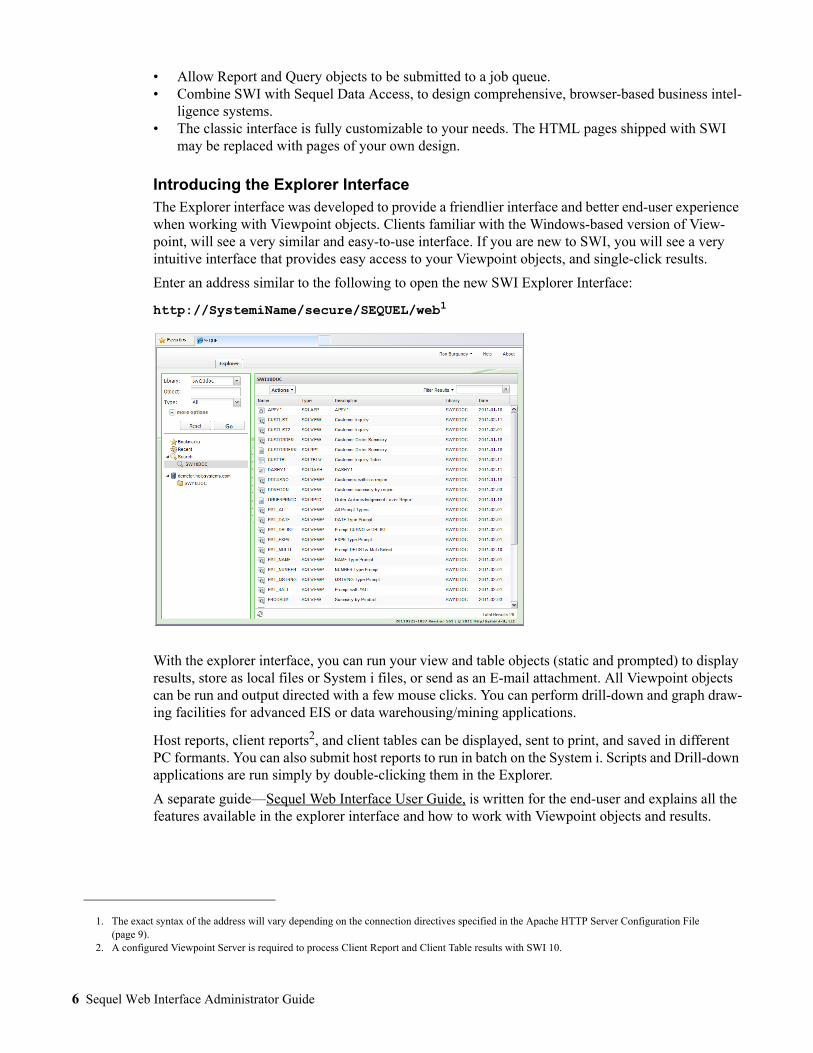
Introducing the Explorer InterfaceThe Explorer interface was developed to provide a friendlier interface and better end-user experience when working with Viewpoint objects. Clients familiar with the Windows-based version of View-point, will see a very similar and easy-to-use interface. If you are new to SWI, you will see a very intuitive interface that provides easy access to your Viewpoint objects, and single-click results.
Enter an address similar to the following to open the new SWI Explorer Interface:
http://SystemiName/secure/SEQUEL/web1
With the explorer interface, you can run your view and table objects (static and prompted) to display results, store as local files or System i files, or send as an E-mail attachment. All Viewpoint objects can be run and output directed with a few mouse clicks. You can perform drill-down and graph draw-ing facilities for advanced EIS or data warehousing/mining applications.
Host reports, client reports2, and client tables can be displayed, sent to print, and saved in different PC formants. You can also submit host reports to run in batch on the System i. Scripts and Drill-down applications are run simply by double-clicking them in the Explorer.
A separate guide—Sequel Web Interface User Guide, is written for the end-user and explains all the features available in the explorer interface and how to work with Viewpoint objects and results.
1. The exact syntax of the address will vary depending on the connection directives specified in the Apache HTTP Server Configuration File (page 9).
2. A configured Viewpoint Server is required to process Client Report and Client Table results with SWI 10.
6 Sequel Web Interface Administrator Guide
Contacting Sequel Software
Please contact Sequel Software (a HelpSystems company) for questions or to receive information about Viewpoint. You can contact us to receive technical bulletins, updates, program fixes, and other information via electronic mail, Internet, or fax.
For general Sequel Software Technology InformationHelpSystems can be reached by calling 952-933-0609.
For technical support or informationCall our general number 952-933-0609, and ask for technical support.
-or-
Send an E-mail to [email protected].
For information on Sequel Software products, services, and partner pro-gramsGo to the Sequel Software home page: www.helpsystems.com/sequel.
To download documentation, software, or the latest program fixesGo to ‘Your Account’ page: http://www.helpsystems.com/user.
SWI Requirements
Power System (System i, iSeries, AS400)The IBM i (OS/400, i5/OS) operating system must be:
• V6R1 or higher
The System i must be set up as an HTTP server. A step-by-step process is described in the following IBM publications:
• HTTP Server for AS/400 Quick Beginnings (GC41-5433)
• OS/400 TCP/IP Fastpath Setup (SC41-5430)
SequelFor SWI to run Sequel requests, the server must also have Sequel version 10 or higher installed. Sequel is a separately licensed product, and not part of SWI.
In order to run Sequel requests, the HTTP server job must have the Sequel product library in the job's library list (page 11).
A Viewpoint Server is required to run Client Report and Client Table requests. See the document titled ‘Viewpoint Server Setup Checklist’ for instructions.
Welcome to Sequel Web Interface 7
Personal Computer (browsing)
A version 4.0 or later browser is required, such as Firefox 3.5 (or higher), Internet Explorer 101 (or higher), or Safari 5.x (desktop and iPad). If you want to view XML/XSL content, Internet Explorer 7.0 or later is required. Data Binding (page 16) requires browsers that support ActiveX (Internet Explorer). Graphics resolution needs to be 1024 x 768 or higher. For best performance, the latest HTML5 standards compatible browser (Firefox 3.5, IE 10 or 11, or Chrome) is recommended. A cur-rent version of the Adobe Reader browser plug-in is recommend to properly view Client Reports.
Personal Computer (Sequel Web Server)This server is optional and should be configured if you intend to use the Sequel Web Interface to take advantage of multiple system access, interactive (pivot) Client Tables via a browser, the Viewpoint Repository, or job scheduling. The following is required:
• A server-class PC with at least 4GB of RAM, and a 2GHZ+ processor with at least two cores (8GB with 4 or more cores is recommended).
• Windows 7 Professional / 8 Professional / 8.1 Professional / Windows Server 2003 / Windows Server 2008 / Windows Server 2008 R2 / Windows Server 2012 / Windows Server 2012 R2.
Note: Although it is supported, we do not advise using a domain server for the server since it can create conflicts.
See page 17 for information on installing the Sequel Web Server.
1. If using Internet Explorer, be sure to access the Compatibility View Settings (Tools \ Compatibility View Settings) and uncheck the option to ‘Display intranet sites in Compatibility View’.
8 Sequel Web Interface Administrator Guide
Setup and ConfigurationAs of version R10M00 this section is optional. The install process now checks for an existing Apache instance for SWI. If an Apache instance for SWI does not exist (it will have the same name as the product library—usually SEQUELWI), the install process creates a new Apache instance, and adds the required directives to the configuration file. The instance is configured to use port 400, or the next available port in succession if 400 is in use. Review the pages that follow if you need to make modifications to the configuration file, or if you want to create a new instance from scratch.
Modify the Apache HTTP Server Configuration File
The Admin Server
The Apache HTTP server is maintained using a web-based server manager utility provided by IBM. This utility runs on its own server (ADMIN) that must be active before you can use it. With this util-ity you can work with existing server instances or create new instances.
To check that the ADMIN server is running, issue the following at a command line:
WRKACTJOB SBS(QHTTPSVR)
Look for a job named ADMIN. If it is not listed, issue the following command to start the server:
STRTCPSVR *HTTP HTTPSVR(*ADMIN)
If you have sufficient authority to the command, you will see a message that the server is starting.
After the ADMIN server is running, start a web browser and enter the following URL to access the ADMIN server manager:
http://<System i path>:2001/HTTPAdmin (the path is case sensitive)
From here, you can add the required (and any optional) SWI directives (below) to the Apache instance you wish to use for SWI. You can create a new instance and configuration file for SWI, or add SWI directives to an existing instance.
DO NOT alter any settings of the ADMIN server itself.
Required Directives
The directives required for SWI are grouped into two areas based on the level of access to SWI you desire—secure or non-secure. If you want to require that your users log in to access SWI, then add the ‘Secure Access Directives’ below. If you don’t want to require users to log in, then add the ‘Non-Secure Access Directives’. Included in each group are additional directives that are not related to access, but are required for the server to implement all SWI features.
Setup and Configuration 9
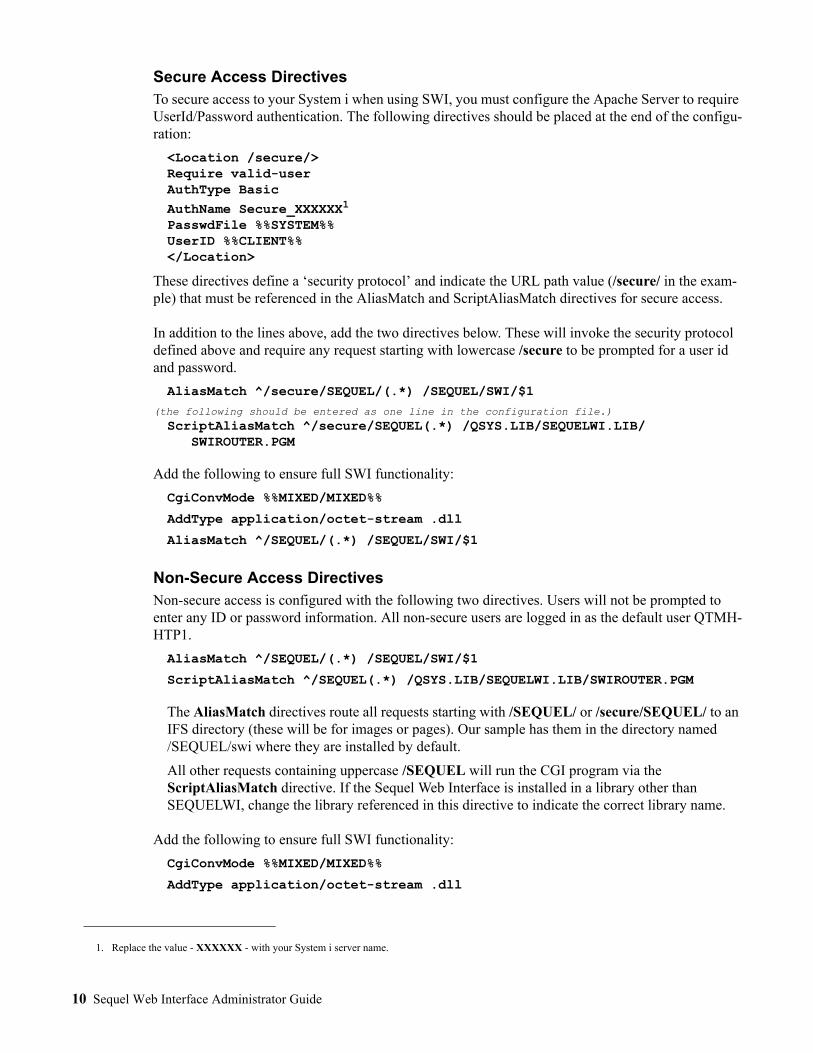
Secure Access DirectivesTo secure access to your System i when using SWI, you must configure the Apache Server to require UserId/Password authentication. The following directives should be placed at the end of the configu-ration:
<Location /secure/>Require valid-userAuthType Basic
AuthName Secure_XXXXXX1
PasswdFile %%SYSTEM%%UserID %%CLIENT%%</Location>
These directives define a ‘security protocol’ and indicate the URL path value (/secure/ in the exam-ple) that must be referenced in the AliasMatch and ScriptAliasMatch directives for secure access.
In addition to the lines above, add the two directives below. These will invoke the security protocol defined above and require any request starting with lowercase /secure to be prompted for a user id and password.
AliasMatch ^/secure/SEQUEL/(.*) /SEQUEL/SWI/$1
(the following should be entered as one line in the configuration file.)
ScriptAliasMatch ^/secure/SEQUEL(.*) /QSYS.LIB/SEQUELWI.LIB/SWIROUTER.PGM
Add the following to ensure full SWI functionality:
CgiConvMode %%MIXED/MIXED%%
AddType application/octet-stream .dll
AliasMatch ^/SEQUEL/(.*) /SEQUEL/SWI/$1
Non-Secure Access DirectivesNon-secure access is configured with the following two directives. Users will not be prompted to enter any ID or password information. All non-secure users are logged in as the default user QTMH-HTP1.
AliasMatch ^/SEQUEL/(.*) /SEQUEL/SWI/$1
ScriptAliasMatch ^/SEQUEL(.*) /QSYS.LIB/SEQUELWI.LIB/SWIROUTER.PGM
The AliasMatch directives route all requests starting with /SEQUEL/ or /secure/SEQUEL/ to an IFS directory (these will be for images or pages). Our sample has them in the directory named /SEQUEL/swi where they are installed by default.
All other requests containing uppercase /SEQUEL will run the CGI program via the ScriptAliasMatch directive. If the Sequel Web Interface is installed in a library other than SEQUELWI, change the library referenced in this directive to indicate the correct library name.
Add the following to ensure full SWI functionality:
CgiConvMode %%MIXED/MIXED%%
AddType application/octet-stream .dll
1. Replace the value - XXXXXX - with your System i server name.
10 Sequel Web Interface Administrator Guide
Optional Directives
The following optional features can be enabled by adding their corresponding directives to the con-figuration file. Be sure to use the correct format for secure or non-secure access.
SWIVPDFT TargetIf you specify a target path for temporary files (used with CRO reports and Client Tables - page 37), the following directive is needed. Choose either the secure or non-secure format.
For secure sessions:
AliasMatch ^/secure/path/(.*) /path/$1
For non-secure sessions:
AliasMatch ^/path/(.*) /path/$1
Open .VPT* Objects in ViewpointFirst time installations do not need to add these lines to the Apache configuration. Only if you are updating from SWI 10.x (and lower) should you manually add the following lines to allow Viewpoint design support for .vpt* repository files:
AddType application/octet-stream .vptview
AddType application/octet-stream .vptreport
AddType application/octet-stream .vptscript
<Files *.vpt*>
Header set Content-Disposition attachment
</Files>
Adjust the HTTP Server Job Environment
Library Lists
The library list of the HTTP server job is affected by the system value QUSRLIBL and/or by the Job Description used by the server job. The server job must have SEQUELWI on its library list, and it must also have the Sequel and Esend product libraries on the list if you wish to run Viewpoint views from your browser.
You can add these libraries globally through the system value, QUSRLIBL, or more selectively by adjusting the Job Description used by the HTTP server. On most machines, the Job Description used is QZHBHTTP in library QHTTPSVR. The user portion of the library list for typical HTTP server jobs could have just QGPL, QTEMP, SEQUELWI, Sequel and Esend. Some systems may need to have database libraries on the list also, depending on whether or not file references are qualified in the query.
After changing the job description or system value, you must end and then start the http server (see below). Using the restart option will not reset the server jobs library list.
Note: The install process will make the above modifications to the library list of the HTTP server job (starting with version 10).
Note:
Setup and Configuration 11
User Profiles
While the HTTP server runs under the user id QTMHHTTP, all CGI programs called as a result of configuration directives run under the user QTMHHTP1. It is necessary to have these user profiles enabled in order to use the Sequel web interface. Also, user QTMHHTP1 has to have special author-ity - *JOBCTL and *SPLCTL - in order to view spooled files through SWI.
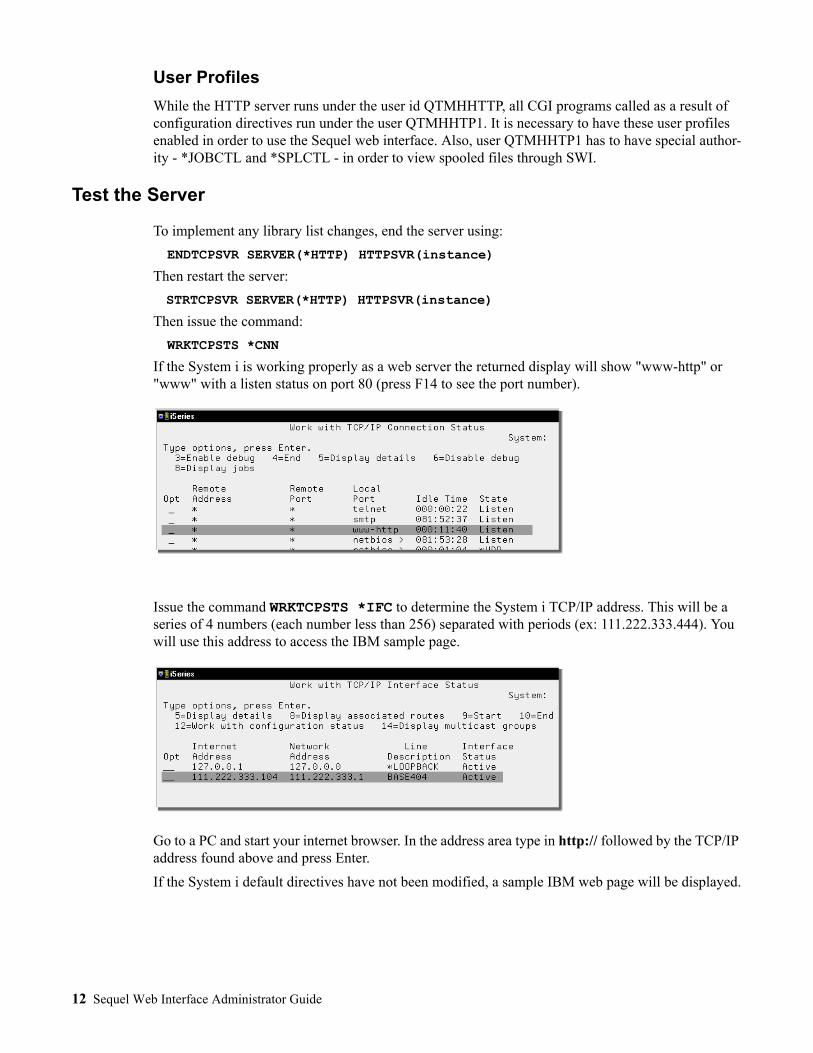
Test the Server
To implement any library list changes, end the server using:
ENDTCPSVR SERVER(*HTTP) HTTPSVR(instance)
Then restart the server:
STRTCPSVR SERVER(*HTTP) HTTPSVR(instance)
Then issue the command:
WRKTCPSTS *CNN
If the System i is working properly as a web server the returned display will show "www-http" or "www" with a listen status on port 80 (press F14 to see the port number).
Issue the command WRKTCPSTS *IFC to determine the System i TCP/IP address. This will be a series of 4 numbers (each number less than 256) separated with periods (ex: 111.222.333.444). You will use this address to access the IBM sample page.
Go to a PC and start your internet browser. In the address area type in http:// followed by the TCP/IP address found above and press Enter.
If the System i default directives have not been modified, a sample IBM web page will be displayed.
12 Sequel Web Interface Administrator Guide
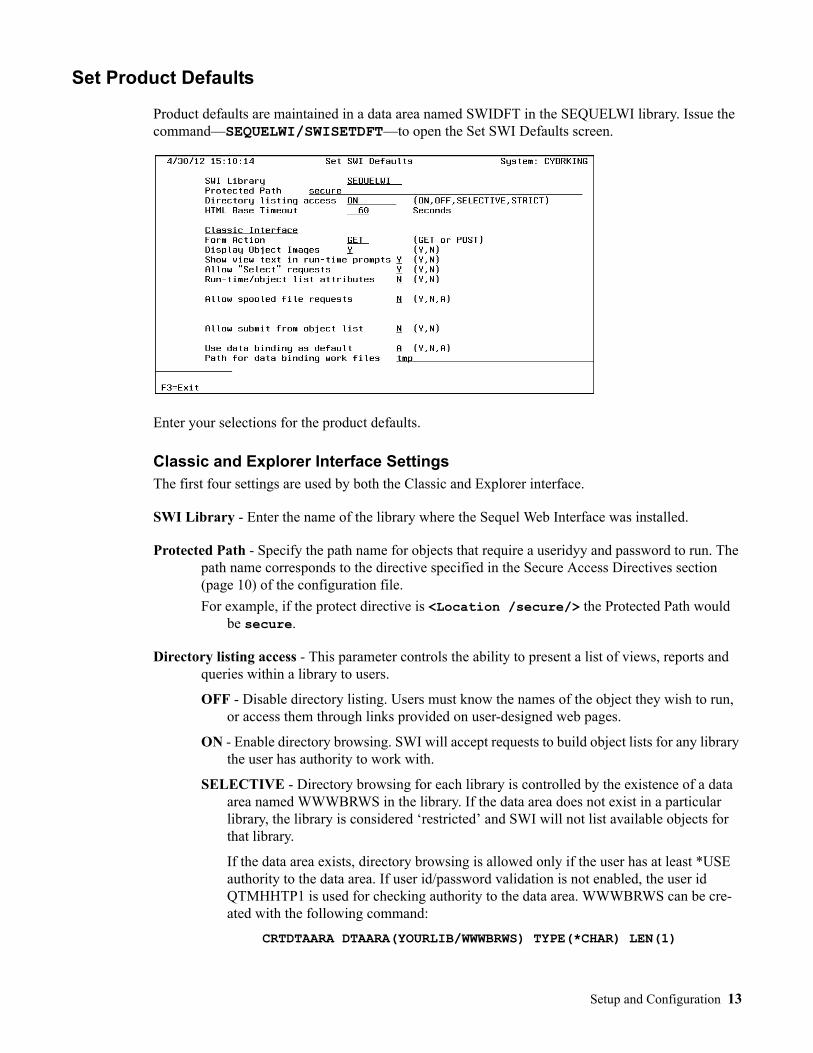
Set Product Defaults
Product defaults are maintained in a data area named SWIDFT in the SEQUELWI library. Issue the command—SEQUELWI/SWISETDFT—to open the Set SWI Defaults screen.
Enter your selections for the product defaults.
Classic and Explorer Interface SettingsThe first four settings are used by both the Classic and Explorer interface.
SWI Library - Enter the name of the library where the Sequel Web Interface was installed.
Protected Path - Specify the path name for objects that require a useridyy and password to run. The path name corresponds to the directive specified in the Secure Access Directives section (page 10) of the configuration file.
For example, if the protect directive is <Location /secure/> the Protected Path would be secure.
Directory listing access - This parameter controls the ability to present a list of views, reports and queries within a library to users.
OFF - Disable directory listing. Users must know the names of the object they wish to run, or access them through links provided on user-designed web pages.
ON - Enable directory browsing. SWI will accept requests to build object lists for any library the user has authority to work with.
SELECTIVE - Directory browsing for each library is controlled by the existence of a data area named WWWBRWS in the library. If the data area does not exist in a particular library, the library is considered ‘restricted’ and SWI will not list available objects for that library.
If the data area exists, directory browsing is allowed only if the user has at least *USE authority to the data area. If user id/password validation is not enabled, the user id QTMHHTP1 is used for checking authority to the data area. WWWBRWS can be cre-ated with the following command:
CRTDTAARA DTAARA(YOURLIB/WWWBRWS) TYPE(*CHAR) LEN(1)
Setup and Configuration 13
Objects in a restricted library (a library without the WWWBRWS data area) can still be accessed and executed using a URL in the browser, or through links provided on user-designed web pages.
STRICT - Directory browsing for each library is controlled by the existence of a data area named WWWBRWS in the library. If the data area does not exist in a particular library, the library is considered ‘restricted’ and SWI will not list available objects for that library. In addition, access and execution of objects in a restricted library using a URL in a browser, or through links provided on user-designed web pages is disabled.
If the data area exists, directory browsing is allowed only if the user has at least *USE authority to the data area. If user id/password validation is not enabled, the user id QTMHHTP1 is used for checking authority to the data area
HTML Base Timeout - Control the number of seconds (up to 9999) the browser will wait for requests to complete in the Explorer interface. The setting also applies in the Classic inter-face for query results returned using databind=A.
1 - 9999 - Specify in seconds the default timeout value for all Web Interface service requests such as 'Recent objects' and 'User details'. All other requests will allow 5 times the default value. Thus, the following requests will multiply the default value by 5, i.e. if the base timeout is 60, then the following requests will timeout at 300 seconds:
Running a client report/tableRunning views and host reports/tablesBuilding a list of objects when the library=*ALL
The following types of requests will be run in the background and show an error mes-sage if there is no response in the same base*5 time frame:
Emailing resultsSave to Stream file / IFS / Physical file / Remote database
14 Sequel Web Interface Administrator Guide
Classic Interface SettingsThe remaining settings are used only by the Classic interface.
Form Action - Default HTML documents included with SWI require an HTML form action of 'GET'. Use 'POST' to prevent parameter values from displaying in the URL.
Display Object Images- When SWI displays a list of objects within a library it may be set up to dis-play a hyperlinked icon that allows the user to display the view, report or table definition (including the SQL statement). Choose one of the following:
Y = Includes an object "icon" with a hyperlink to display the object definition.
N = Do not allow this option for users.
Show view text in runtime prompts - Specify whether or not to display the view description in the prompt window.
Y = Display view text.
N = Do not show view text.
Allow "Select" requests - Specify whether or not to allow free-form SQL requests at the address line or from HTML form entry.
Y = Allow free-form SQL requests.
N = Do not allow free-form SQL requests.
Run-time/object list attributes - This parameter is used to regulate the amount of information dis-played in an object list generated for a specified library. This parameter will also display or hide variable attributes (length, type, etc.) for runtime prompted requests. Specify one of the following:
Y- Displays Object Name (hyperlinked), Object Type, and Description.
N = Displays Description only.
Allow spooled file requests - When spooled file management functions are enabled (option A), users can choose from a number of management actions including: Copy, Move, Delete, Hold/Release, view attributes, Email the spooled file, Edistrib the spooled file, and copy to IFS as either text or PDF.
Setup and Configuration 15

Different settings can be applied to different users by using the secure access provided by the 'Protect' directive and by making customized copies of the SWIDFT data area in the 'Current Library' for each user id that needs special settings.
Specify whether or not to allow users to display spooled files at a browser:
Y - Allows spooled files to be displayed.
A - Enable spooled file management functions.
N - Does not allow spooled files to be displayed.
Allow submit from object list - This parameter allows the user to submit a Sequel Report (SQL-RPT) or Query object (QRY, QMQRY, QMFORM) to a job queue. When the object hyper-link is clicked, a separate browser window appears with prompts that let the user specify the job description, job queue, and output queue for the submitted job.
In addition, the user is allowed the option of submitting the request to the job queue or dis-playing the results in the browser. Specify either option:
Y - Allows the browser prompt window to be displayed.
N - Does not allow the browser prompt window to be displayed.
Use Data Binding as Default - Specify default related to Data Binding (result column sorting).
A - Display column sorting for view results by default. Use this option to ensure data and graphs retain their size and placement when viewed in SWI. (uses advanced sorting grid control)
N - Do not allow column sorting as a default.
Path for Data Binding Work Files - Specify the location on the IFS to hold data binding results. This file is automatically deleted.
Restart the Server
After the HTTP configuration file and the product defaults have been specified, restart the server with the following command:
STRTCPSVR *HTTP RESTART(*HTTP)
16 Sequel Web Interface Administrator Guide
Final Test
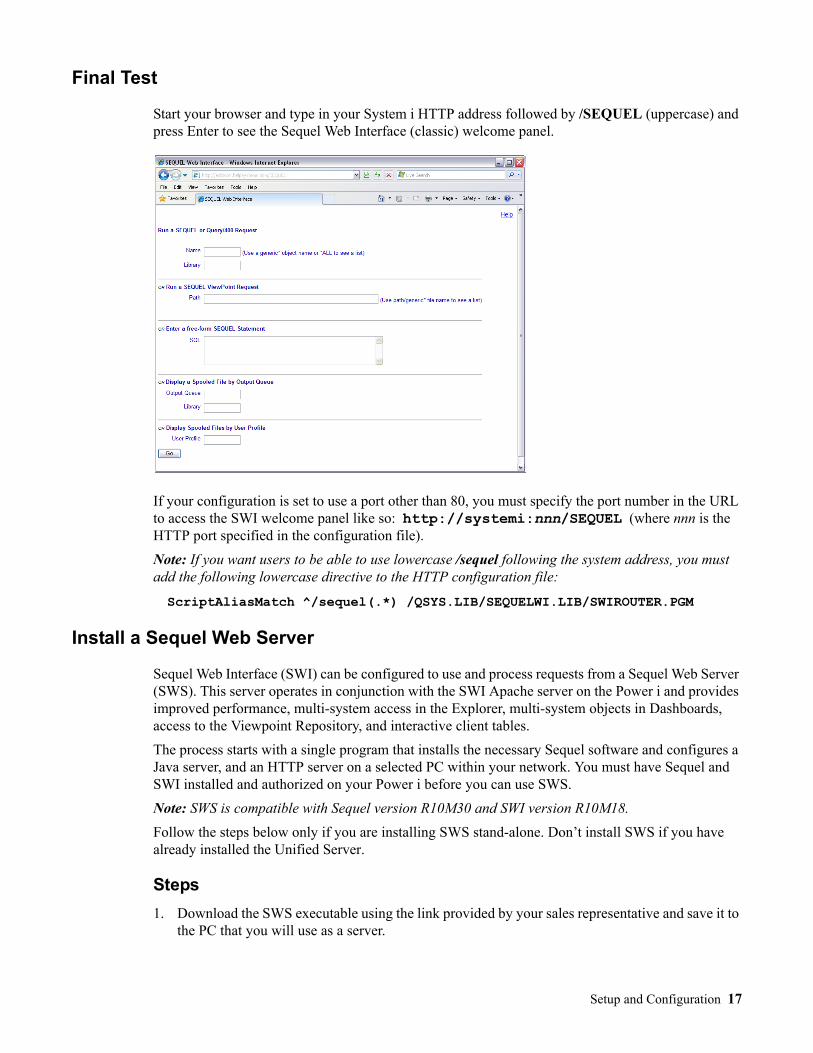
Start your browser and type in your System i HTTP address followed by /SEQUEL (uppercase) and press Enter to see the Sequel Web Interface (classic) welcome panel.
If your configuration is set to use a port other than 80, you must specify the port number in the URL to access the SWI welcome panel like so: http://systemi:nnn/SEQUEL (where nnn is the HTTP port specified in the configuration file).
Note: If you want users to be able to use lowercase /sequel following the system address, you must add the following lowercase directive to the HTTP configuration file:
ScriptAliasMatch ^/sequel(.*) /QSYS.LIB/SEQUELWI.LIB/SWIROUTER.PGM
Install a Sequel Web Server
Sequel Web Interface (SWI) can be configured to use and process requests from a Sequel Web Server (SWS). This server operates in conjunction with the SWI Apache server on the Power i and provides improved performance, multi-system access in the Explorer, multi-system objects in Dashboards, access to the Viewpoint Repository, and interactive client tables.
The process starts with a single program that installs the necessary Sequel software and configures a Java server, and an HTTP server on a selected PC within your network. You must have Sequel and SWI installed and authorized on your Power i before you can use SWS.
Note: SWS is compatible with Sequel version R10M30 and SWI version R10M18.
Follow the steps below only if you are installing SWS stand-alone. Don’t install SWS if you have already installed the Unified Server.
Steps
1. Download the SWS executable using the link provided by your sales representative and save it to the PC that you will use as a server.
Setup and Configuration 17
2. Double-click the executable (setupSequelWebServer.exe) to start the install. The first three steps will ask you to:
• Confirm the install (press Next).
• Specify the program destination folder (use the default, and press Next).
• Create a desktop and/or Quick Launch panel shortcut and press Install.
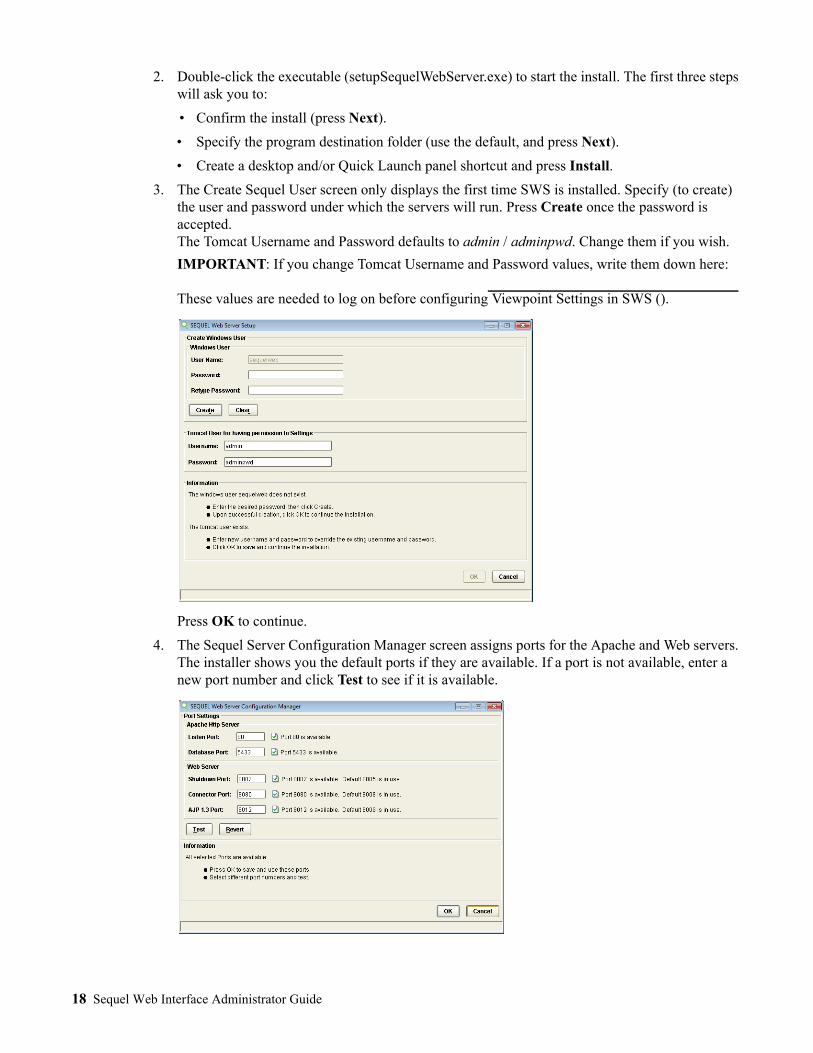
3. The Create Sequel User screen only displays the first time SWS is installed. Specify (to create) the user and password under which the servers will run. Press Create once the password is accepted.The Tomcat Username and Password defaults to admin / adminpwd. Change them if you wish.
IMPORTANT: If you change Tomcat Username and Password values, write them down here:
These values are needed to log on before configuring Viewpoint Settings in SWS ().
Press OK to continue.
4. The Sequel Server Configuration Manager screen assigns ports for the Apache and Web servers. The installer shows you the default ports if they are available. If a port is not available, enter a new port number and click Test to see if it is available.
18 Sequel Web Interface Administrator Guide
Once all ports are available, press OK to save the ports and continue installation.
To access this screen in the future, run the application, Sequel Web Server Configuration, located in the All Programs\Sequel Web Server folder. You can also use Windows Search to locate the application.
5. On the final screen press Finish to complete the install.
6. To test, select Start\All Programs\Sequel Web Server\Sequel Web Server Home
7. Add a Host Connection using the steps described below.
Add a Host Connection
Use the steps below to add connections to your Power i hosts. Each host defined requires a current version of Sequel and Sequel Web Interface with a valid product licenses.
1. Navigate to the address of the Sequel Web Server (typically http://SWSname/sequel/web/index.html), or use the shortcut described in step 6 above.
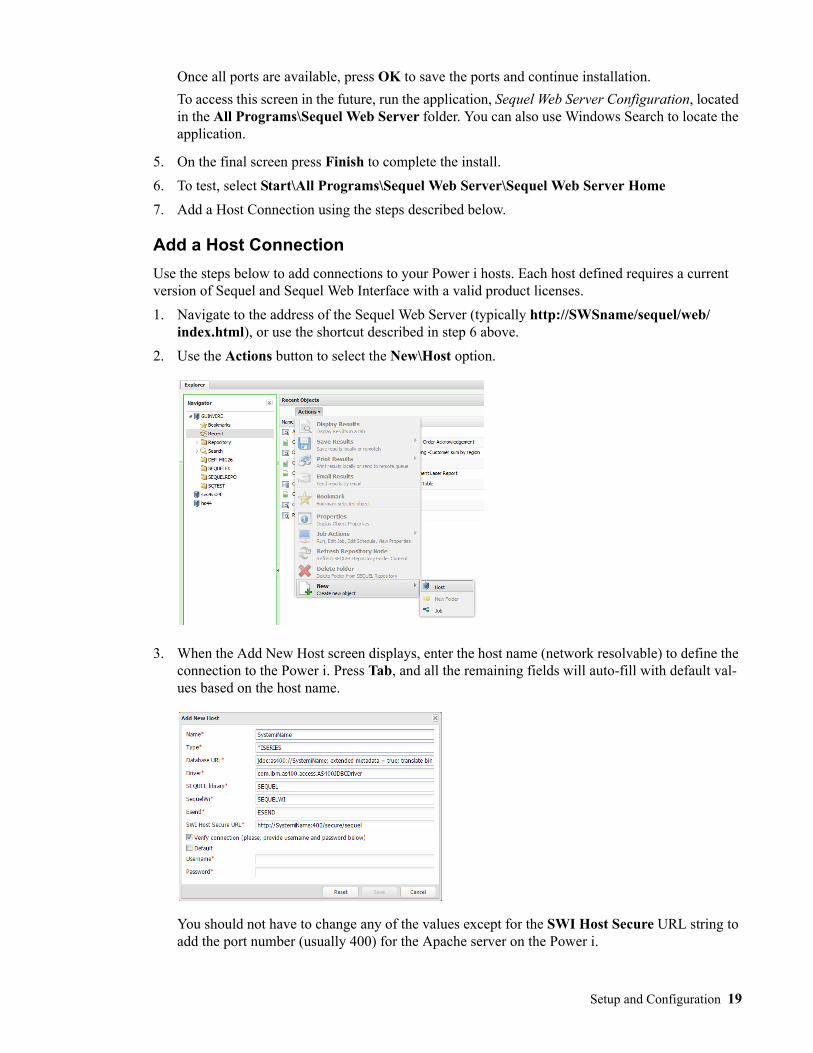
2. Use the Actions button to select the New\Host option.
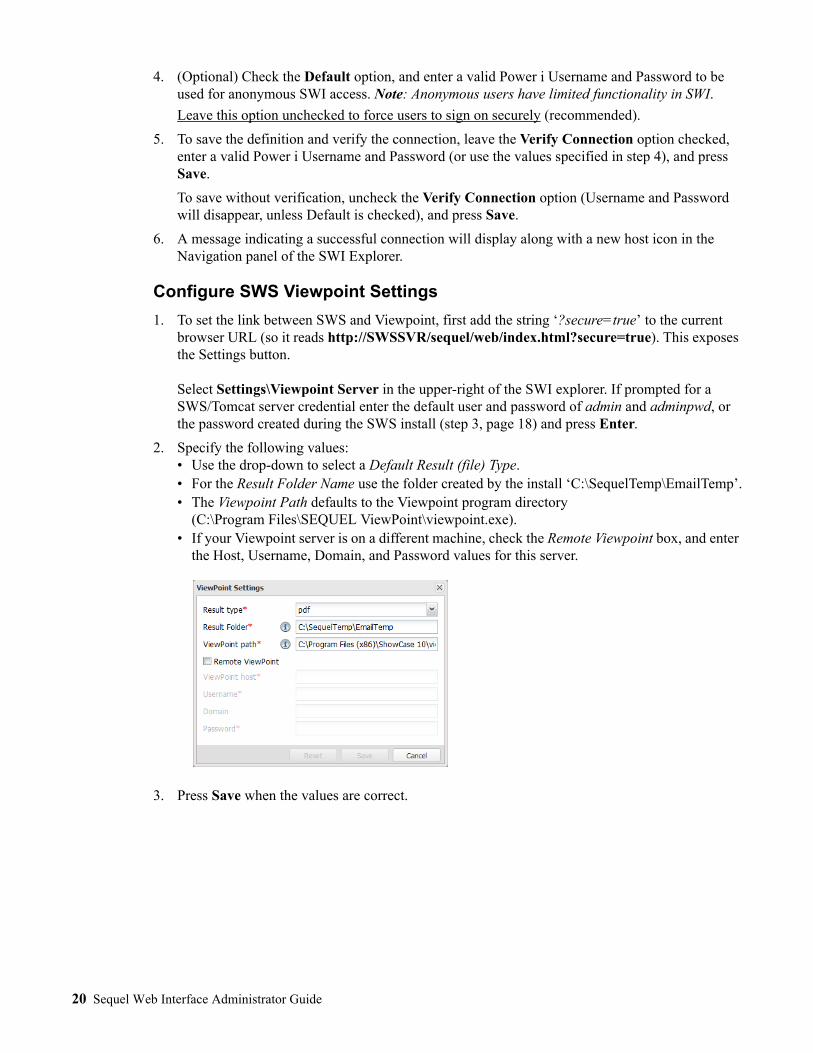
3. When the Add New Host screen displays, enter the host name (network resolvable) to define the connection to the Power i. Press Tab, and all the remaining fields will auto-fill with default val-ues based on the host name.
You should not have to change any of the values except for the SWI Host Secure URL string to add the port number (usually 400) for the Apache server on the Power i.
Setup and Configuration 19
4. (Optional) Check the Default option, and enter a valid Power i Username and Password to be used for anonymous SWI access. Note: Anonymous users have limited functionality in SWI.
Leave this option unchecked to force users to sign on securely (recommended).
5. To save the definition and verify the connection, leave the Verify Connection option checked, enter a valid Power i Username and Password (or use the values specified in step 4), and press Save.
To save without verification, uncheck the Verify Connection option (Username and Password will disappear, unless Default is checked), and press Save.
6. A message indicating a successful connection will display along with a new host icon in the Navigation panel of the SWI Explorer.
Configure SWS Viewpoint Settings
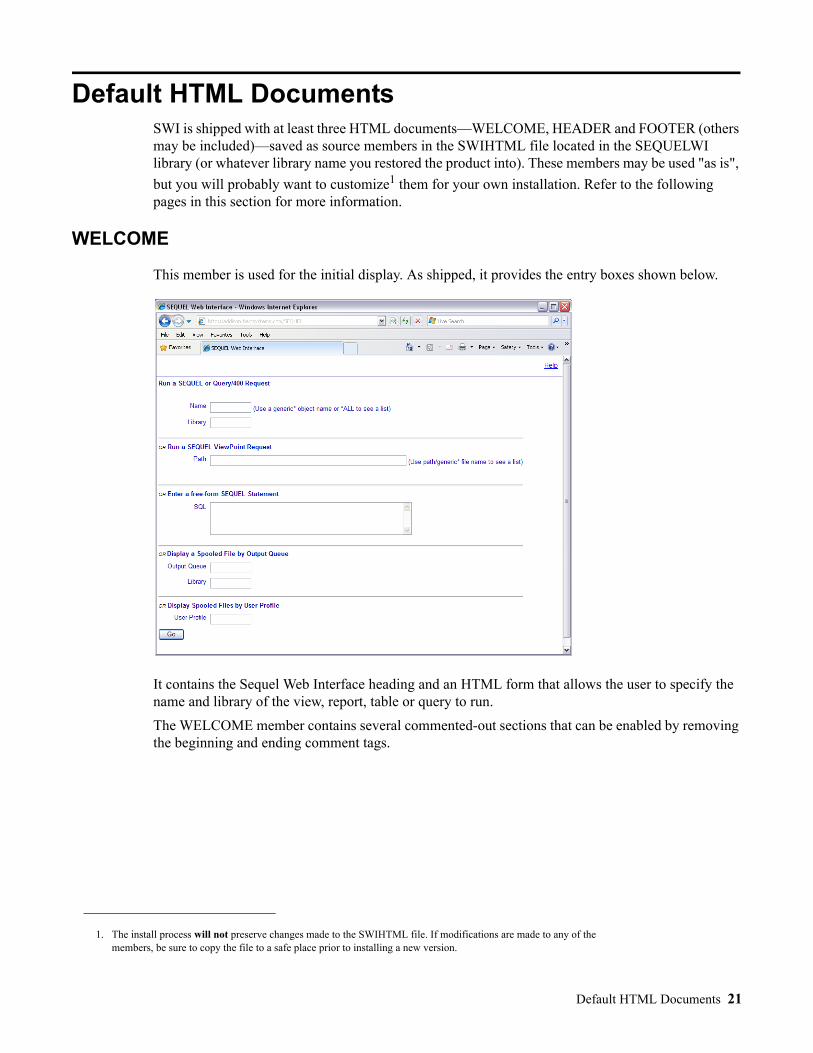
1. To set the link between SWS and Viewpoint, first add the string ‘?secure=true’ to the current browser URL (so it reads http://SWSSVR/sequel/web/index.html?secure=true). This exposes the Settings button. Select Settings\Viewpoint Server in the upper-right of the SWI explorer. If prompted for a SWS/Tomcat server credential enter the default user and password of admin and adminpwd, or the password created during the SWS install (step 3, page 18) and press Enter.
2. Specify the following values:• Use the drop-down to select a Default Result (file) Type.• For the Result Folder Name use the folder created by the install ‘C:\SequelTemp\EmailTemp’.• The Viewpoint Path defaults to the Viewpoint program directory
(C:\Program Files\SEQUEL ViewPoint\viewpoint.exe).• If your Viewpoint server is on a different machine, check the Remote Viewpoint box, and enter
the Host, Username, Domain, and Password values for this server.
3. Press Save when the values are correct.
20 Sequel Web Interface Administrator Guide
Default HTML DocumentsSWI is shipped with at least three HTML documents—WELCOME, HEADER and FOOTER (others may be included)—saved as source members in the SWIHTML file located in the SEQUELWI library (or whatever library name you restored the product into). These members may be used "as is",
but you will probably want to customize1 them for your own installation. Refer to the following pages in this section for more information.
WELCOME
This member is used for the initial display. As shipped, it provides the entry boxes shown below.
It contains the Sequel Web Interface heading and an HTML form that allows the user to specify the name and library of the view, report, table or query to run.
The WELCOME member contains several commented-out sections that can be enabled by removing the beginning and ending comment tags.
1. The install process will not preserve changes made to the SWIHTML file. If modifications are made to any of the members, be sure to copy the file to a safe place prior to installing a new version.
Default HTML Documents 21
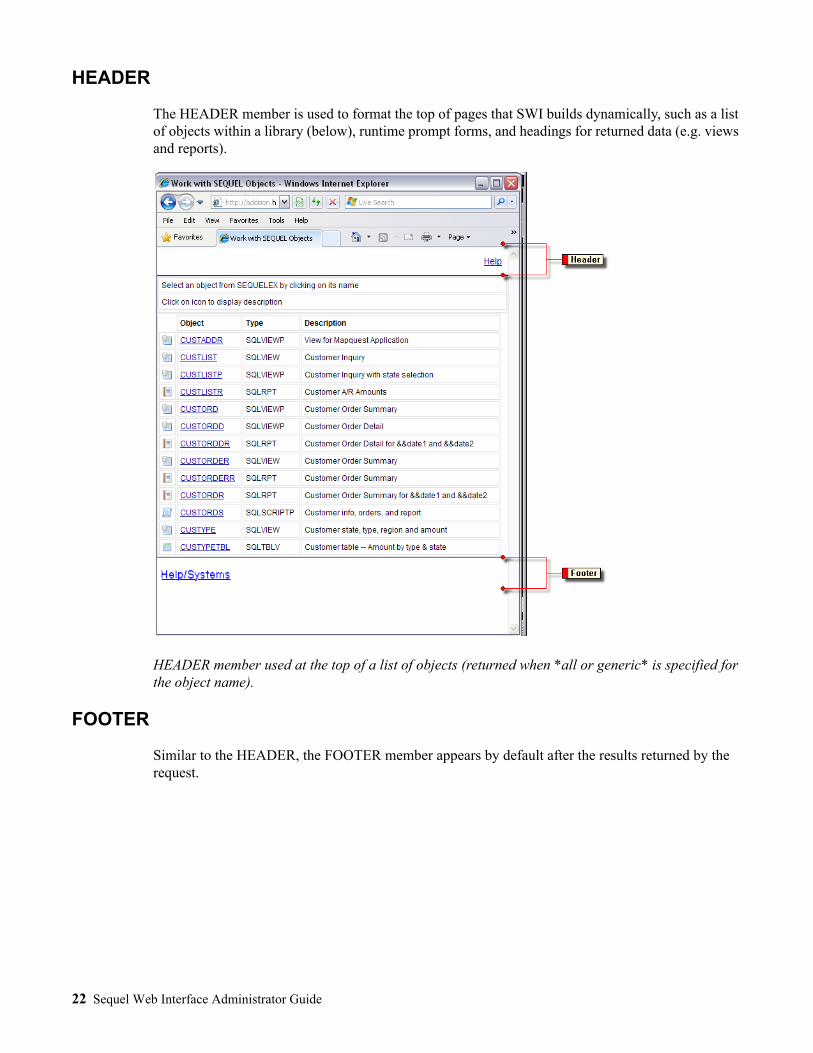
HEADER
The HEADER member is used to format the top of pages that SWI builds dynamically, such as a list of objects within a library (below), runtime prompt forms, and headings for returned data (e.g. views and reports).
HEADER member used at the top of a list of objects (returned when *all or generic* is specified for the object name).
FOOTER
Similar to the HEADER, the FOOTER member appears by default after the results returned by the request.
22 Sequel Web Interface Administrator Guide
Customizing the SWI HTML Members
You can customize the appearance of the SWI HTML members to use similar design elements and graphics as your corporate web site. Almost any non-frame format will work. You may also create additional header and footer members to use for different divisions in your company or for different types of requests.
Alternately, you can request that NO header and/or footer be displayed with the results (see Suppress HTML Headers or Footers on page 31).
Members may be edited or created using your favorite HTML editor or SEU.
HMTL Editor
1. Create a new header/footer file with your HTML editor.
2. Save the new HTML file on your network or on the System i Integrated File System.
3. (Optional) Issue the ADDPFM command to add a new member to the SEQUELWI/SWIHTML source file if you want to create a new member. Otherwise, you are free to overlay one of the existing members with the new HTML file.
4. Use the System i Access 'Data Transfer to System i' option to transfer your HTML file to the desired source member in SEQUELWI/SWIHTML. Click the 'Details' button in this dialog win-dow, uncheck the 'Use PC File Description' option and specify File Type = ASCII Text.
5. (Optional) When you make a SWI request, you may specify an alternate header and/or footer to use with the results (see Alternate HTML Headers and Footers on page 31).
Note: The SEQUELWI/SWIHTML file was defined as 132 characters wide to allow editing with SEU. If you use an HTML editor the lines in your source may be wider, and will be truncated when the file is imported in step 4. Use the editor's source edit function or MS-Notepad to adjust line feeds to limit the width of the HTML code to less than 132 characters in width.
Edit with SEU
You can also use SEU to edit either the WELCOME, HEADER or FOOTER members. The Welcome member controls the elements displayed on the classic SWI main screen. The HEADER member has an image reference (logo) for the object list and results displays.
1. To modify the HEADER member, issue the following command to open the member in SEU:
STRSEU SRCFILE(SEQUELWI/SWIHTML) SRCMBR(header)
2. Look for this line which references the Sequel logo:
<img src=”sequel/App/images/sequel_logo_32.png”
3. You have two options to use your own graphic:
Create your own graphic and save it with the same name as ours—SEQUEL_logo_32.png. You can place it on the IFS in the SEQUEL\SWI\Apps\Images folder or the TMP folder.
or:
Change the line above to reference your logo file (in one of the two folders mentioned above).
4. If you change the source member, press F3 to exit SEU and save your changes.
Note: The WELCOME member contains the same image reference.
Default HTML Documents 23

24 Sequel Web Interface Administrator Guide
SWI Command ParametersSWI can interpret query parameters used within HTML hyperlinks and forms. Internet Explorer users can even type query parameters directly into the browser's address line. Some browsers may require the user to substitute any blanks or spaces with '+' characters and '+' with '%2B'. The query parameters can request output from Viewpoint and QUERY/400 objects, display lists of objects, or descriptive information about Viewpoint objects. All requests should begin with:
http://<path>/SEQUEL?
(where <path> consists of the server address)
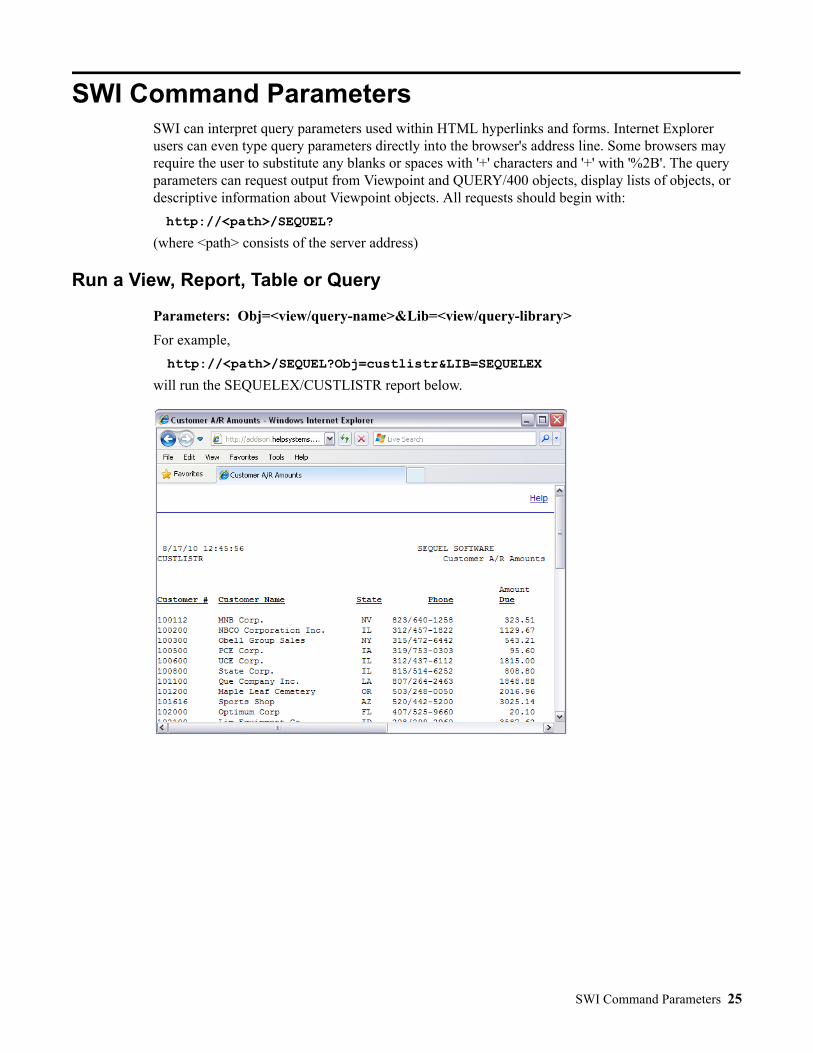
Run a View, Report, Table or Query
Parameters: Obj=<view/query-name>&Lib=<view/query-library>
For example,
http://<path>/SEQUEL?Obj=custlistr&LIB=SEQUELEX
will run the SEQUELEX/CUSTLISTR report below.
SWI Command Parameters 25

If the view is a runtime prompted view, the prompt will be displayed first, as in the ORDERSUMP example below.
Alternately, the use of *ALL or generic* in the OBJ parameter generates a document containing a list of all objects within a library.
http://<path>/SEQUEL?Obj=*all&LIB=SEQUELEX
On the display above, any object may be selected to run with a mouse click on the hyperlinked object name. Note also the small icons on the far left of the display before each object name. These are hyperlinked to display an object definition containing the SQL statement used in the object. These
26 Sequel Web Interface Administrator Guide
icons may be deleted from the display by specifying 'N' (no) for the Display Object Images parameter in the SWI Defaults (page 13).
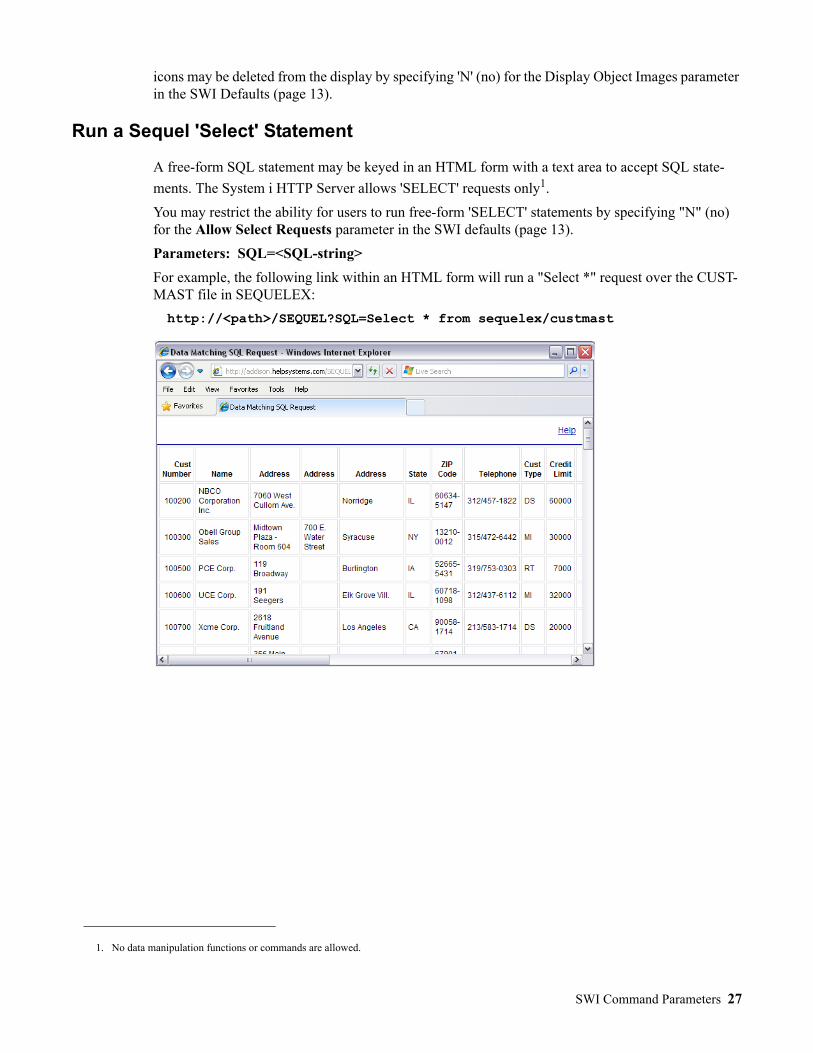
Run a Sequel 'Select' Statement
A free-form SQL statement may be keyed in an HTML form with a text area to accept SQL state-
ments. The System i HTTP Server allows 'SELECT' requests only1.
You may restrict the ability for users to run free-form 'SELECT' statements by specifying "N" (no) for the Allow Select Requests parameter in the SWI defaults (page 13).
Parameters: SQL=<SQL-string>
For example, the following link within an HTML form will run a "Select *" request over the CUST-MAST file in SEQUELEX:
http://<path>/SEQUEL?SQL=Select * from sequelex/custmast
1. No data manipulation functions or commands are allowed.
SWI Command Parameters 27
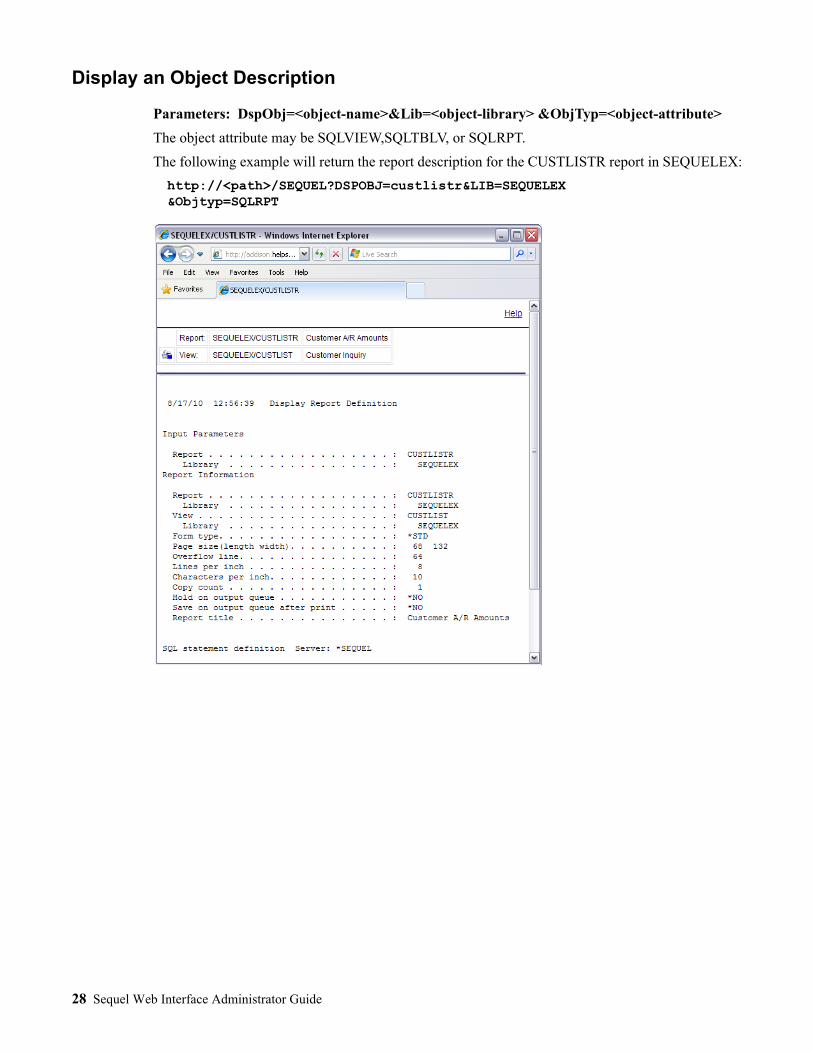
Display an Object Description
Parameters: DspObj=<object-name>&Lib=<object-library> &ObjTyp=<object-attribute>
The object attribute may be SQLVIEW,SQLTBLV, or SQLRPT.
The following example will return the report description for the CUSTLISTR report in SEQUELEX:
http://<path>/SEQUEL?DSPOBJ=custlistr&LIB=SEQUELEX&Objtyp=SQLRPT
28 Sequel Web Interface Administrator Guide
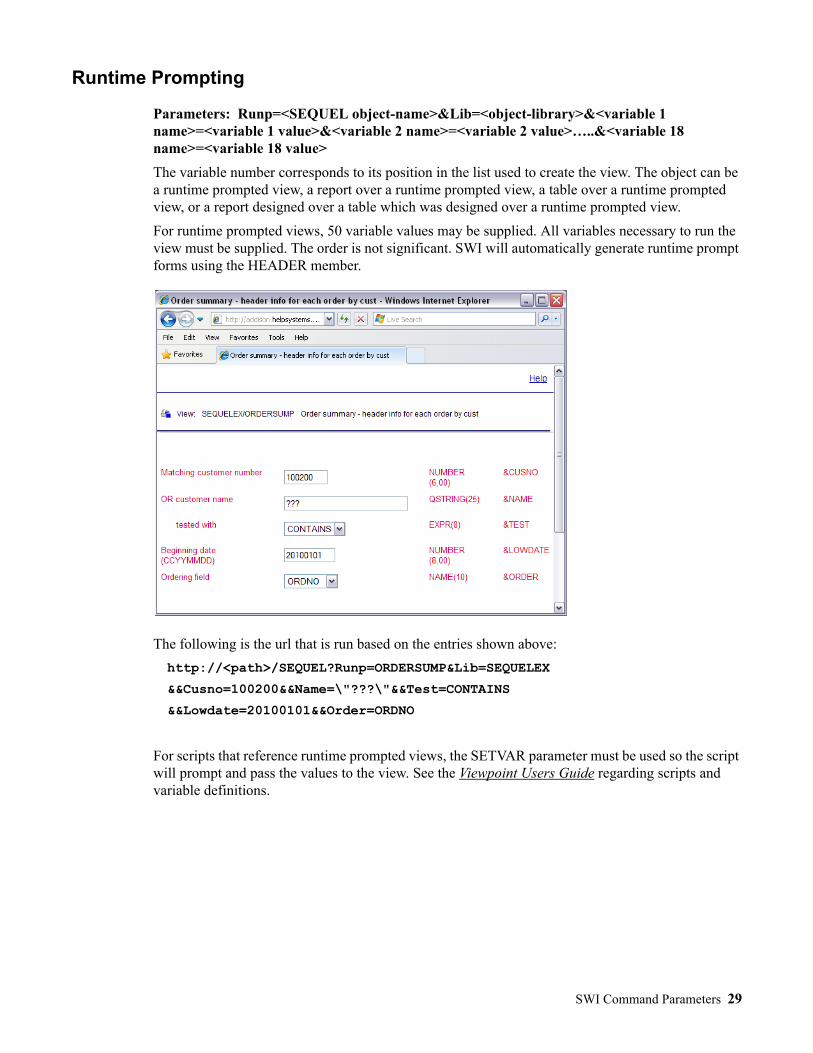
Runtime Prompting
Parameters: Runp=<SEQUEL object-name>&Lib=<object-library>&<variable 1 name>=<variable 1 value>&<variable 2 name>=<variable 2 value>…..&<variable 18 name>=<variable 18 value>
The variable number corresponds to its position in the list used to create the view. The object can be a runtime prompted view, a report over a runtime prompted view, a table over a runtime prompted view, or a report designed over a table which was designed over a runtime prompted view.
For runtime prompted views, 50 variable values may be supplied. All variables necessary to run the view must be supplied. The order is not significant. SWI will automatically generate runtime prompt forms using the HEADER member.
The following is the url that is run based on the entries shown above:
http://<path>/SEQUEL?Runp=ORDERSUMP&Lib=SEQUELEX
&&Cusno=100200&&Name=\"???\"&&Test=CONTAINS
&&Lowdate=20100101&&Order=ORDNO
For scripts that reference runtime prompted views, the SETVAR parameter must be used so the script will prompt and pass the values to the view. See the Viewpoint Users Guide regarding scripts and variable definitions.
SWI Command Parameters 29
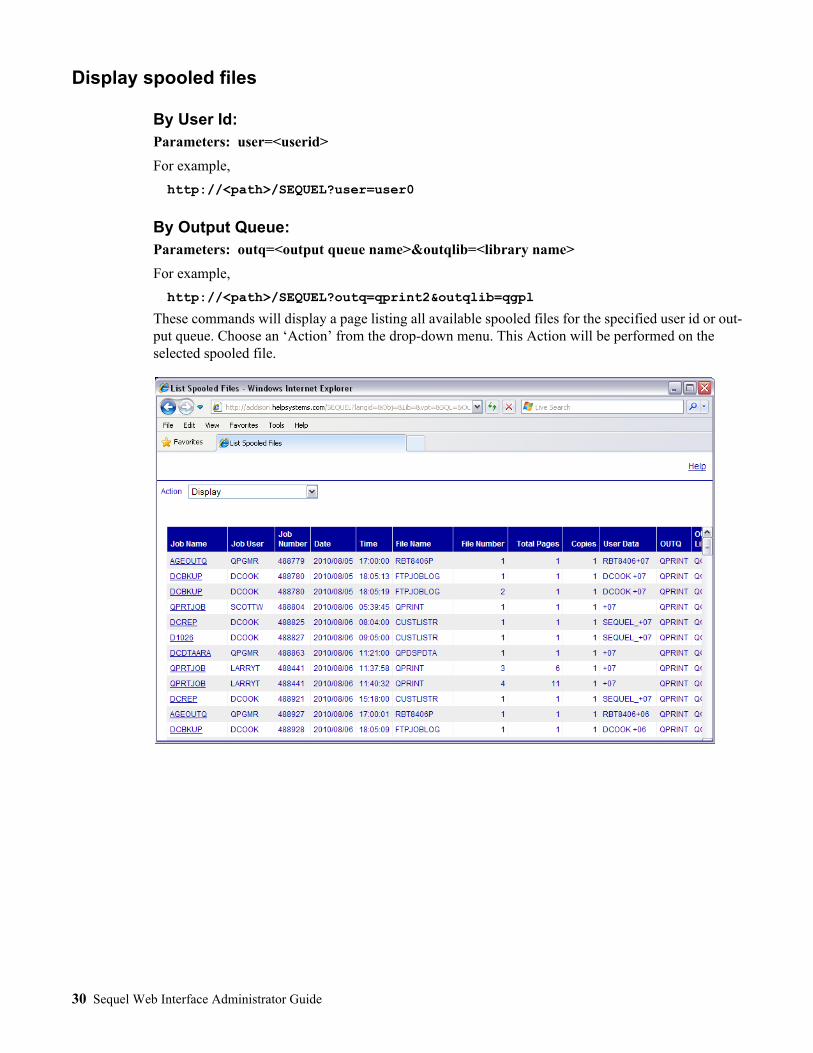
Display spooled files
By User Id:Parameters: user=<userid>
For example,
http://<path>/SEQUEL?user=user0
By Output Queue:Parameters: outq=<output queue name>&outqlib=<library name>
For example,
http://<path>/SEQUEL?outq=qprint2&outqlib=qgpl
These commands will display a page listing all available spooled files for the specified user id or out-put queue. Choose an ‘Action’ from the drop-down menu. This Action will be performed on the selected spooled file.
30 Sequel Web Interface Administrator Guide

Submit a request to a job queue
Parameters: &SBMJOB=Y
If &SBMJOB=Y is added on to the query string to run a report or query, the request will be submit-ted to a System i job queue. Instead of the report/query results being displayed in the browser, the job submission message will appear. The user may then come back at a later time and display the spooled file created by the job in the browser or from a green screen. This may be useful for those requests that a user knows is going to take a very long time.
Additional parameters that can be specified are:
&SBMJOBD - job description
&SBMJOBQ - job queue
&SBMOUTQ - output queue
Example:
http://<path>/SEQUEL?obj=custlistr&lib=sequelex&sbmjobd=Y&sbmjobq=qgpl/qpgmr&sbmoutq=qgpl/qprint
Alternate HTML Headers and Footers
Parameters: &headermbr=[member name]
&footermbr=[member name]
Including the &headermbr and/or &footermbr parameters in the command string will allow different headings or footers to be returned with SWI requests.
Example:
http://<path>/SEQUEL?Obj=region&Lib=swi&headermbr=newhdr&footermbr=newftr
The results are returned with a header named 'newhdr' and a footer named 'newftr'.
Suppress HTML Headers and Footers
Add either or both of the parameters to the command string to suppress the header or footer in the result display.
Parameters: &swinohdr=
&swinofooter=
Example:
http://<path>/SEQUEL?Obj=region&Lib=swi&swinohdr=&swinofooter=
SWI Command Parameters 31
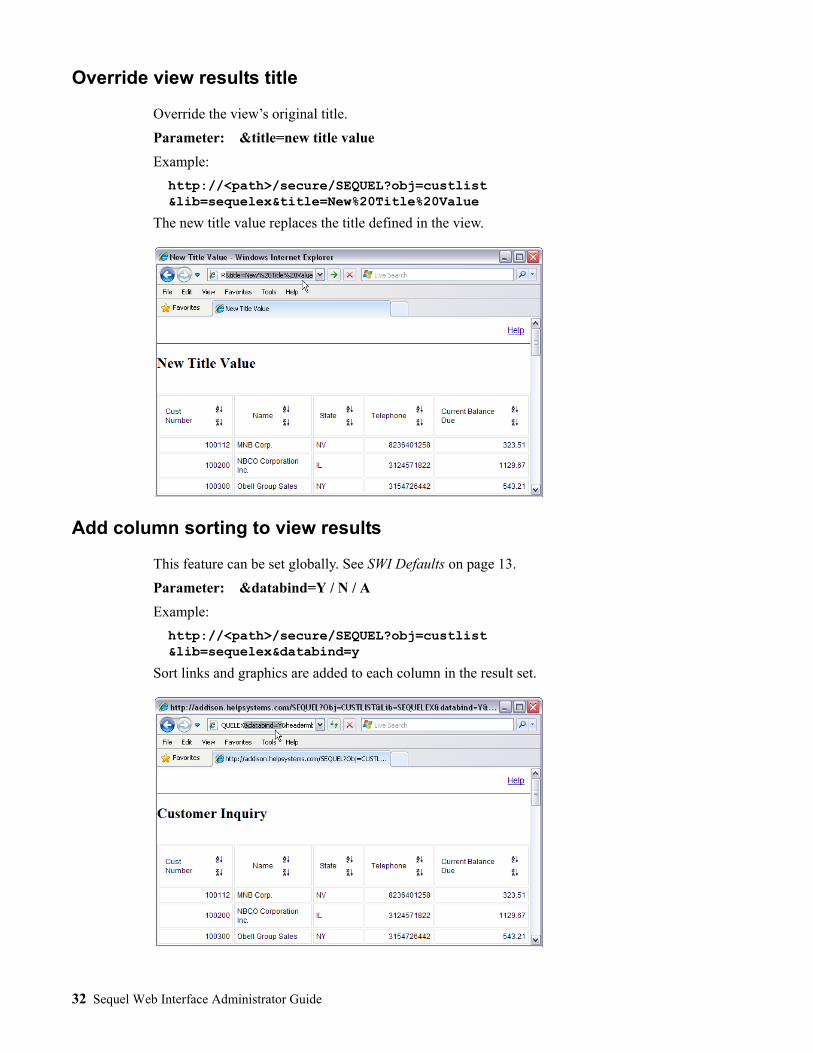
Override view results title
Override the view’s original title.
Parameter: &title=new title value
Example:
http://<path>/secure/SEQUEL?obj=custlist&lib=sequelex&title=New%20Title%20Value
The new title value replaces the title defined in the view.
Add column sorting to view results
This feature can be set globally. See SWI Defaults on page 13.
Parameter: &databind=Y / N / A
Example:
http://<path>/secure/SEQUEL?obj=custlist&lib=sequelex&databind=y
Sort links and graphics are added to each column in the result set.
32 Sequel Web Interface Administrator Guide
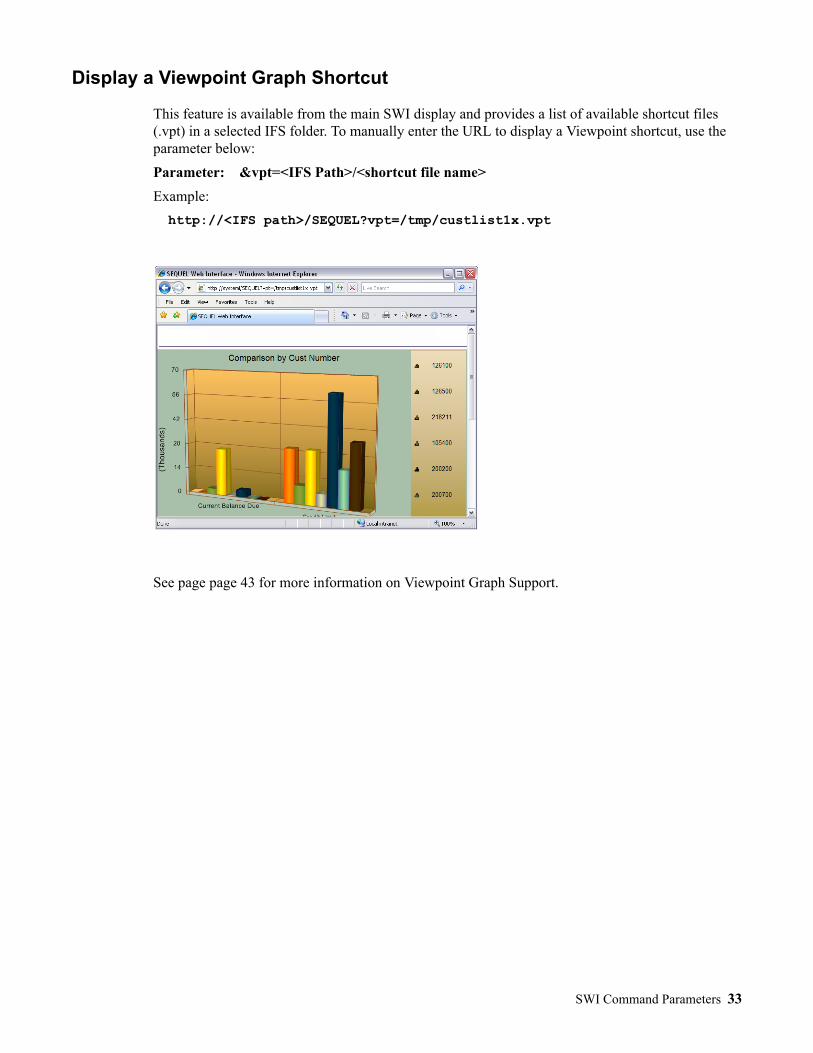
Display a Viewpoint Graph Shortcut
This feature is available from the main SWI display and provides a list of available shortcut files (.vpt) in a selected IFS folder. To manually enter the URL to display a Viewpoint shortcut, use the parameter below:
Parameter: &vpt=<IFS Path>/<shortcut file name>
Example:
http://<IFS path>/SEQUEL?vpt=/tmp/custlist1x.vpt
See page page 43 for more information on Viewpoint Graph Support.
SWI Command Parameters 33
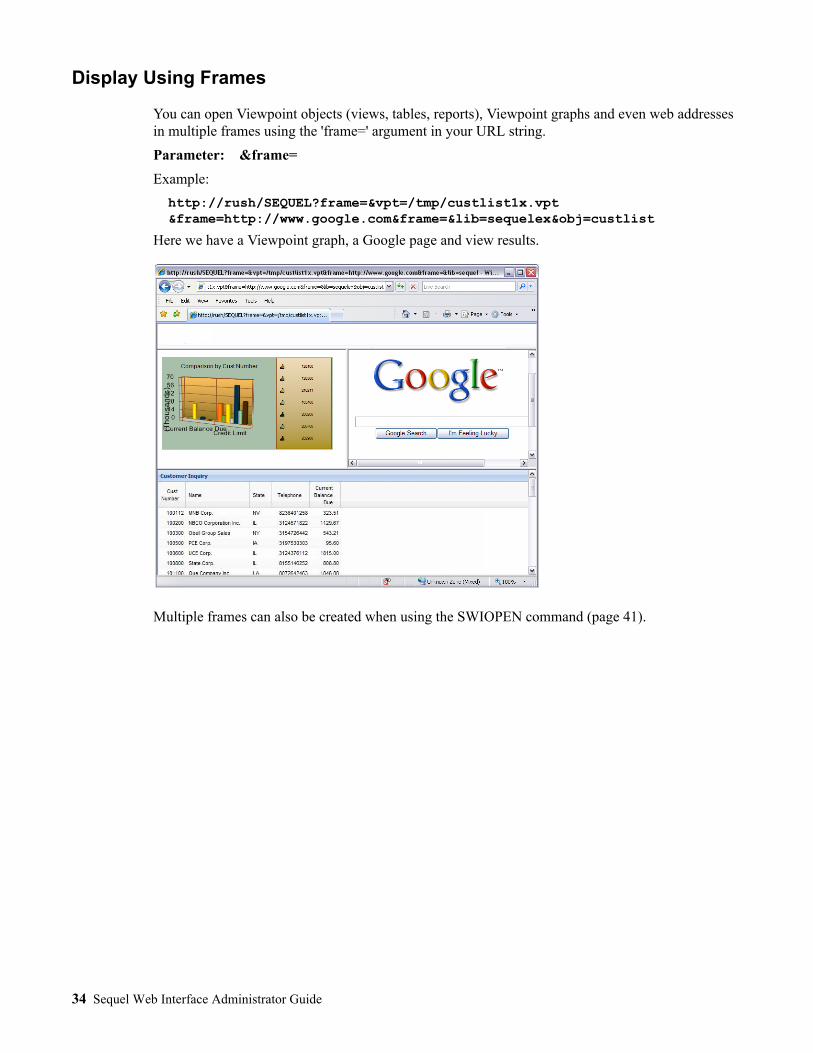
Display Using Frames
You can open Viewpoint objects (views, tables, reports), Viewpoint graphs and even web addresses in multiple frames using the 'frame=' argument in your URL string.
Parameter: &frame=
Example:
http://rush/SEQUEL?frame=&vpt=/tmp/custlist1x.vpt&frame=http://www.google.com&frame=&lib=sequelex&obj=custlist
Here we have a Viewpoint graph, a Google page and view results.
Multiple frames can also be created when using the SWIOPEN command (page 41).
34 Sequel Web Interface Administrator Guide
SWI Functions
Spooled File Management Functions
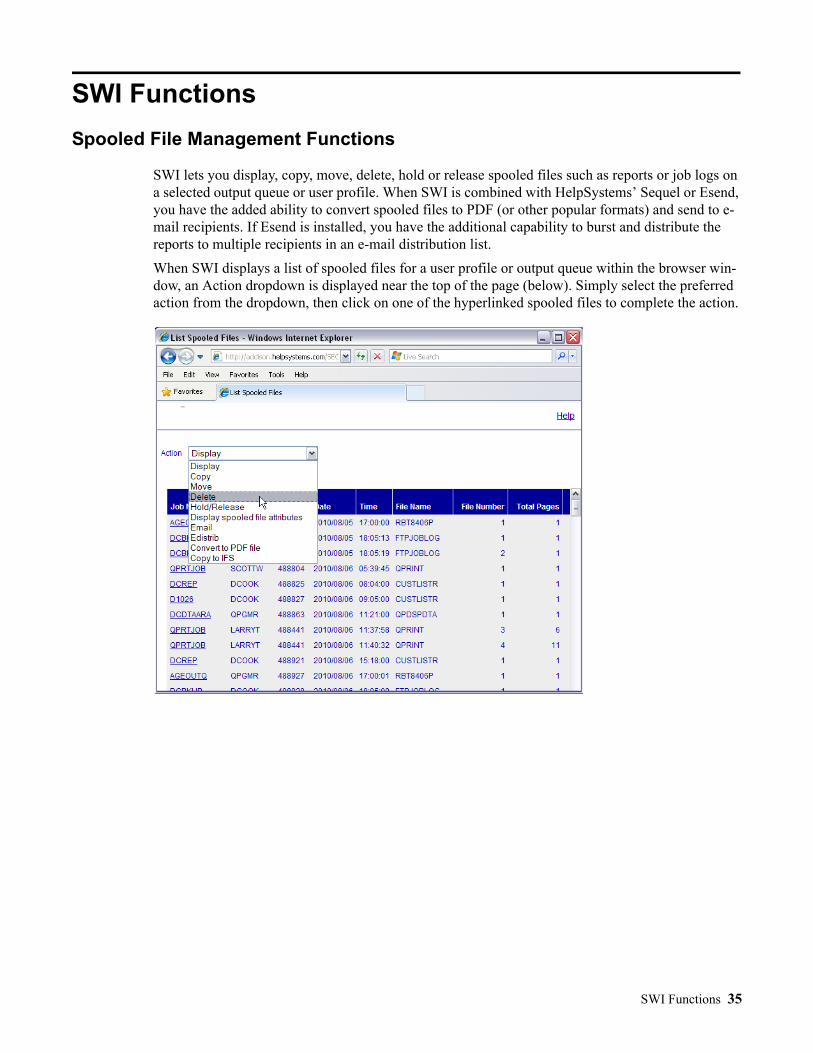
SWI lets you display, copy, move, delete, hold or release spooled files such as reports or job logs on a selected output queue or user profile. When SWI is combined with HelpSystems’ Sequel or Esend, you have the added ability to convert spooled files to PDF (or other popular formats) and send to e-mail recipients. If Esend is installed, you have the additional capability to burst and distribute the reports to multiple recipients in an e-mail distribution list.
When SWI displays a list of spooled files for a user profile or output queue within the browser win-dow, an Action dropdown is displayed near the top of the page (below). Simply select the preferred action from the dropdown, then click on one of the hyperlinked spooled files to complete the action.
SWI Functions 35
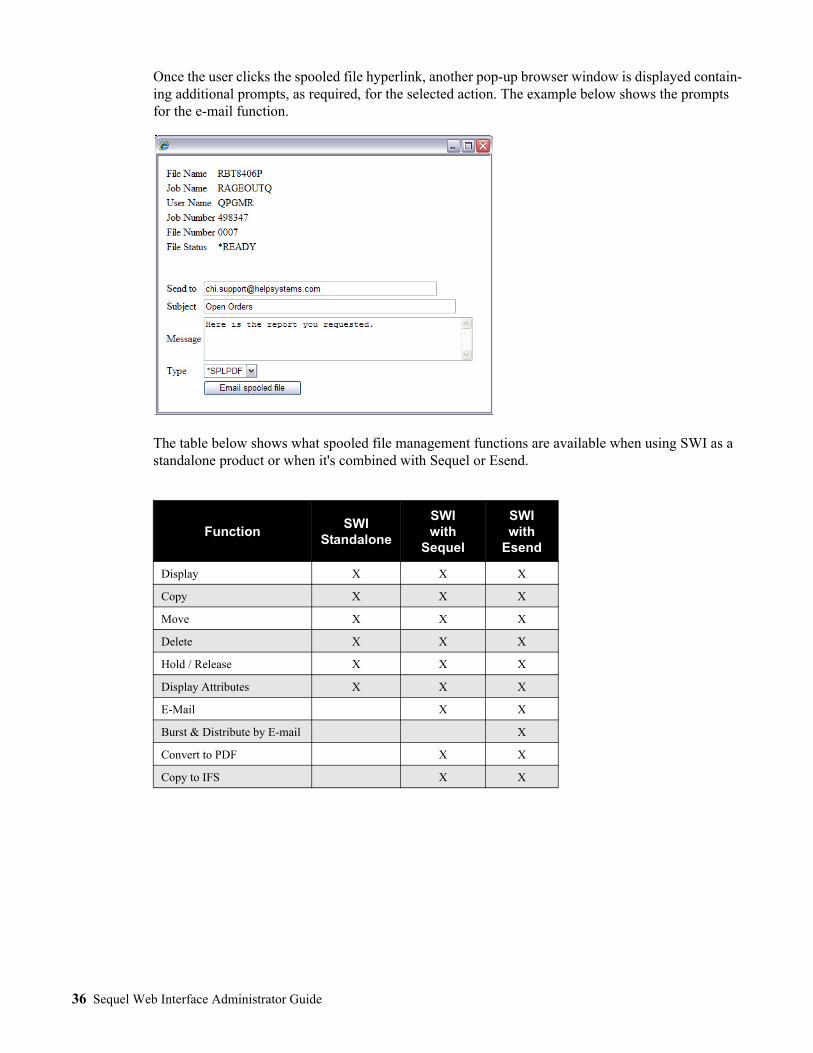
Once the user clicks the spooled file hyperlink, another pop-up browser window is displayed contain-ing additional prompts, as required, for the selected action. The example below shows the prompts for the e-mail function.
The table below shows what spooled file management functions are available when using SWI as a standalone product or when it's combined with Sequel or Esend.
FunctionSWI
Standalone
SWIwith
Sequel
SWIwith
Esend
Display X X X
Copy X X X
Move X X X
Delete X X X
Hold / Release X X X
Display Attributes X X X
E-Mail X X
Burst & Distribute by E-mail X
Convert to PDF X X
Copy to IFS X X
36 Sequel Web Interface Administrator Guide
SWIVPDFT - Set SWI Viewpoint defaults.
Use this command to name the configured Viewpoint Server1 that will process Client Report (CRO) and Client Table requests through SWI. This command uses the following parameters:
REMOTEPC - Name of the configured Viewpoint server.
OUTTYPE - Specify the output type for the CRO report.
*PDF - Create as pdf file.
*HTML - Create as html file.
USRPRF - Specifies the user identifier (ID) for the target System i. If a user ID is specified for this parameter and password security is active on the target system, RMTPWD(*NONE) is not valid.
Name - Specify a user ID to use that exists on the target system. If a user ID is specified and password security is active on the target system, a password must be specified.
*NONE - No user ID is sent. If security on the target system is configured to require a user ID, the command will fail.
PASSWORD - Password Specifies the password sent to the target System i.
Value - Specify a password sent to the target system to verify the sign-on of the user ID spec-ified in the RMTUSER parameter.
*NONE - The system does not send a password. If a user identifier (ID) is specified on the RMTUSER parameter and password security is active on the target system, the com-mand will fail.
TARGET - Target path on the IFS for the output file2. This value is used by the TOSTMF *REPOS-ITORY parameter of the EXECUTEVPT and REPORTVPT commands to construct the path to the repository ‘root’.
PGMFILEDIR - Specify the Viewpoint install directory on the Viewpoint sever (see the REMOTEPC parameter above). For Viewpoint it is usually ‘\program files\sequel viewpoint’.
SWIXMLMRG - Merge XML data
The purpose of this command is to merge multiple XML data files into a single XML data file mem-ber. This command uses the following parameters:
DATABASE - Specifies the name that will be used as the outermost tag identified in the merged database that will be created.
INTO - Specifies the IFS path name of the merged database to be created. Generally the suffix of the file should be '.XML'
XMLDATA - Specify up to six IFS file names containing XML data that will be merged.
1. See the Help/FACTS document titled - Viewpoint Server Configuration - for complete instruction on setting up a Viewpoint Server.2. The configuration file requires an extra directive to point to this target path. See page 11.
SWI Functions 37
REMOVE - Specify *YES to remove the data files specified in the XMLDATA parameter after the merged database is created.
SWIXSLBLD - Build an XSL File
This command generates a new XSL style sheet that incorporates one or more named XML data files. This allows persons familiar with HTML to start with a preformatted, syntactically correct XSL as a template and then modify it further to incorporate other design elements, graphics or styles. The modified XSL may then be saved and used to display data with the SWIXMLSRV command. This command uses the following parameters:
DATABASE - Specifies the name of outermost tag identifier that will exist in the XML database that will be transformed by the style sheet created by this command.
INTO - Specifies the IFS path name of the style sheet to be created. Generally the suffix of the file should be '.XSL'.
HEADER - Specifies whether the HTML in the HEADERXSL member of the SWIHTML file in the Sequel Web Interface is to included in the style sheet generated.
FOOTER - Specifies whether the HTML in the member specified in the footer member parameter of the SWIHTML file in the Sequel Web Interface is to be included in the style sheet generated.
FOOTERMBR - Specify the name of the member in the SWIHTML file in the Sequel Web Inter-face to be included in the style sheet generated as the footer.
NODE - Specify the tree structure that exists in the XML database using pairs of FROM/TO views and field names that link the views. Views are referenced to provide field name and attribute information. An XSL style sheet will be generated based upon this input:
From Library/View - The name of the parent Viewpoint view
From Field - The field name to be used to link to the child view.
To Library/View - The name of the child Viewpoint view
To Field - The field name to be used to link to the parent view.
Note: Due to an operating system limitation, runtime prompted views (views with variable values) may not be listed as NODE parameters in the SWIXSLBLD command. However, the following development strategy may be used as a work-around:
• Create the view(s) used in the script using hard-coded values in place of variable values.
• Modify and test the script until you are satisfied with the data results and the basic XSL template.
• Remove or comment-out the SWIXSLBLD command from the script.
• Replace the hard-coded selection parameters in your Viewpoint views with variable val-ues. Add the corresponding SETVAR parameters within the script.
• Modify the XSL file originally created by the SWIXSLBLD command to include addi-tional formatting or design styles.
Examples:If order headers and order lines are to be displayed, the node parameter might look like:
38 Sequel Web Interface Administrator Guide
NODE((SEQUELEX/ORDERSUM ordno SEQUELEX/ORDERLINE ordno))
If parts are to be listed by themselves:
NODE((SEQUELWI/PARTMAST *n *NONE))
To list customers, orders, and lines:
NODE ((SEQUELEX/CUSTINFO cusno SEQUELEX/ORDERSUM cusno)(SEQUELEX/ORDERSUM ordno SEQUELEX/ORDERLINE ordno)))
IMAGES - Specify the names of fields in the views specified that contain references to image URLs. In general, these are often derived fields constructed from data fields and constants concate-nated together:
'/tmp/C100200.jpg'
Where '/tmp/C' is a constant, '100200' is a customer number, and '.jpg' is a constant.
The appropriate XSL image tags will be inserted before and after the field values.
Library/View - The name of the Viewpoint view.
Field - The field name that contains the reference to the image.
Example:If the field PIC in the view CUSTINFO contains values like '/tmp/C100200.JPG' you can specify:
IMAGES((SEQUELEX/CUSTINFO PIC))
The image will be displayed when the XML/XSL are viewed in a browser.
HYPERLINKS - Specify the names of fields within views that have hyperlink URL references.
Library/View - The name of the Viewpoint view.
Field - The field that contains the URL or SWI command string that will be accessed when clicking on the hyperlink field. Similar to image links, this is typically a derived field constructed from data fields and constants concatenated together.
Hyperlink on Field - The field that will be hyperlinked.
Example:A Viewpoint view called STATEINFO shows a listing of all customers within a state. The user will be able to click on a hyperlinked customer number within the view results that will run another Viewpoint script (CUSTINFO) showing detailed data for that customer.
The REF field in the STATEINFO view is a derived field containing a SWI command string constructed from constants and a customer number concatenated together. The REF field for customer number '100200' contains the following character data:
SEQUEL?runp=custinfo&lib=testxml%26&cusno=100200
The Sequel tstxml/custinfo script identified in the string is the script that shows detailed data for a selected customer. The customer number portion at the end of the string will vary with each record.
The following HYPERLINKS parameter is used to create a hyperlink on the CUSNO field using the command string in the REF field:
HYPERLINKS((SEQUELEX/CUSTINFO REF CUSNO))
The appropriate XSL hyperlink tags will be inserted before and after the field values.
SWI Functions 39
TOTALS - Summary calculations (SUM, AVG, or COUNT) may be performed when the XML/XSL are served. Specify the names of fields in the views specified for which totaling is to be done. The results will be displayed in a table at the appropriate tree level.
Library/View - The name of the Viewpoint view.
Field - The field name to use for the calculations. Leave this blank if you wish to count the records.
Total Type - Specify SUM, AVG, or COUNT.
Example:If the total of the quantity shipped on all order lines, as well as the average quantity and total number of lines is to be displayed, specify:
TOTALS ((SEQUELEX/ORDERLINE QUANS SUM)(SEQUELEX/ORDERLINE QUANS AVG)(SEQUELEX/ORDERLINE *N COUNT))
Decimal Format (DECFMT) - Specify the decimal format to use for creating edit masks for number type fields in the resulting XSL file. The default is *JOB to use the decimal format of the current job. Other valid values are:
*SYSVAL - Use the value in the system value QDECFMT.
*BLANK - Decimal point is a '.', grouping separator is a ','.
I or J - Decimal point is a ',', grouping separator is a '.'.
SWIXMLSRV - Serve an XML Document
The purpose of this command is to display an existing XML data file with an existing XSL style sheet at the browser. This command uses the following parameters:
STYLESHEET - Specifies the subdirectory and name of the XSL style sheet file contained on the IFS.
XMLDATA - Specify up to six IFS file names containing XML data that will be displayed by the specified XSL style sheet.
EXECUTE - Execute to a File
EXECUTE is a Sequel Command1 that creates an output file from System i data. It may be used to create another DB2 file or a PC file in one of many commonly-used PC file formats, including XML.
A number of specialized parameters are used for generating and displaying XML content and are dis-cussed below. For a complete overview of the EXECUTE command refer to the Sequel 11 Program-mer's Guide.
ENTITY - The ENTITY parameter specifies the entity name being created in an XML formatted document. Specify one of the following options:
*VIEW - The entity name will be the view name run by the command.
1. A license to Sequel is required to use the EXECUTE command.
40 Sequel Web Interface Administrator Guide
*NONE - No entity will be created. The element(s) created by the view will be placed into the XML result without an entity wrapper.
Name - Enter a specific entity name.
ENTITYATTR - The entity attributes parameter specifies the attributes to include for the entity being created in an XML formatted document. Specify one of the following options:
*NONE - No attributes will be included with the entity tag.
Name - Enter a specific entity name.
Created Format Name (RCDFMT) - When used to create XML file output, this parameter should contain a value to format the XML tags.
SWIRETURN - Move Browser Back in History
Use in a multi-step process to return to a prompt screen for instance. This command uses the follow-ing parameters:
BACK - Entries backward in history
SWIOPEN - Display Frames in SWI
This command can be used within a CGI program or a Viewpoint script to open a new browser win-dow with the requested URL(s). A multi-frame environment can be described with each frame open-ing a different file. This command uses the following parameters:
TITLE - Specifies the title for the new window opened. This is only applied if multiple frames are requested.
HEIGHT - Specifies the height in pixels for the new window to be opened. Valid values are:
*MAX - Sets the height to the entire window content available.
100-999 - Valid range of pixel values for the window height.
WIDTH - Specifies the width in pixels for the new window to be opened. Valid values are:
*MAX - Sets the width to the entire window content available.
100-999 - Valid range of pixel values for the window width.
LEFT - Specifies the pixel offset from the left edge for the position of the new window. Valid values are:
0-999 - Valid range of pixel values for the left edge of the window.
TOP - Specifies the pixel offset from the top edge for the position of the new window. Valid values are:
0-999 - Valid range of pixel values for the top edge of the window.
DIRECTORY - Display directory buttons in the new window (Yes or No).
LOCATION - Display the location bar in the new window (Yes or No).
SWI Functions 41
MENUBAR - Display the menubar in the new window (Yes or No).
SCROLLBARS - Display scrollbars if the document doesn't fit in the new window (Yes or No).
STATUSBAR - Display the status bar in the new window. (Yes or No)
TOOLBAR - Display the toolbar (with Back, Forward, and other buttons).
ROWSET - Up to 4 vertical partitions can be requested for the new window. List the percentages of the browser window to be taken up by each row. If opening one file, put one entry equal to 100.
COLSET - Up to 8 horizontal partitions can be requested for the new window. List the following for each horizontal partition:
Row ID (1-4) - Defines the row to open the URL listed.
Column Proportion (1-100) - Defines the percentage of the row to be occupied by this par-tition.
Frame URL - Defines the action to take place in this partition.
Scrolling - Defines whether to allow scroll bars to exist in this partition.
*YES -
*NO -
SWISTMF - Write a STFM to Standard Out
Use this command to serve an HTML file from the IFS. This command can be used as a final step in a script to send a completion message to the browser window, or to display a report after it has been saved as a PDF file.
STMF - Specify the IFS path and file name to serve.
OUTPUT - Output to stream file.
PREFORMAT - Serve as pre-formatted text.
*YES
*NO
XLATE - Translate carriage returns.
*PCFILE
*YES
*NO
REPLACE - Replace existing file.
*YES
*NO
42 Sequel Web Interface Administrator Guide
SWI Solutions and Applications
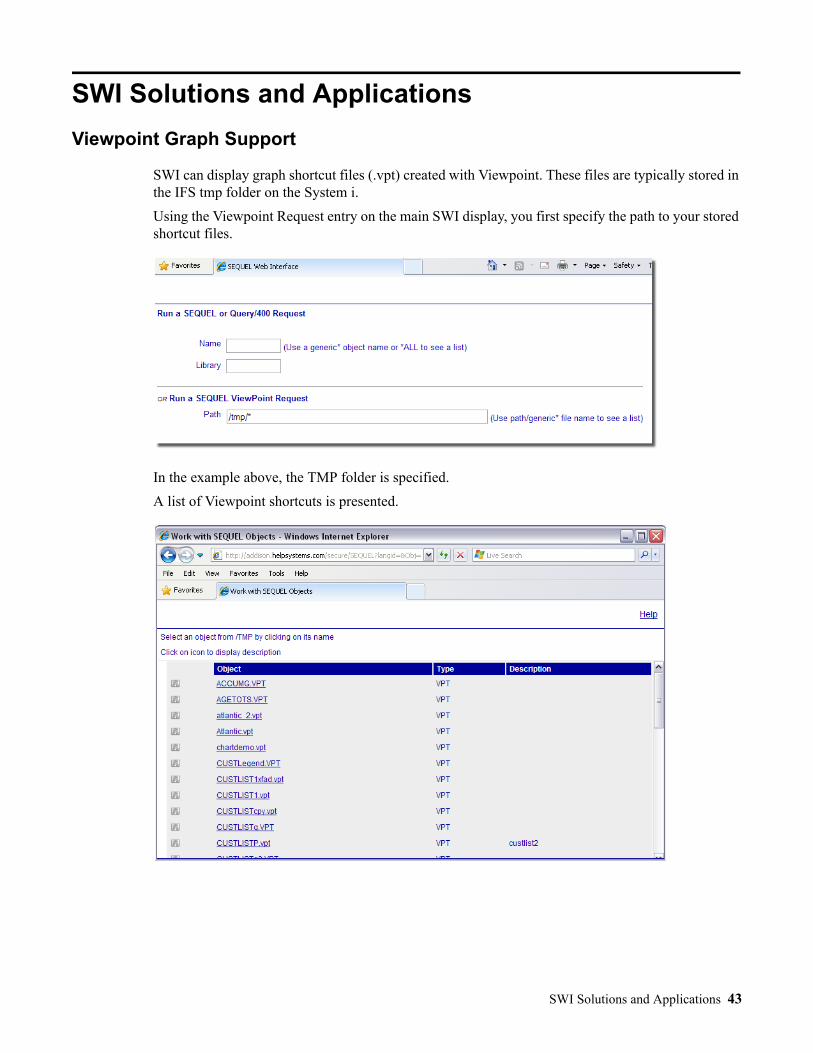
Viewpoint Graph Support
SWI can display graph shortcut files (.vpt) created with Viewpoint. These files are typically stored in the IFS tmp folder on the System i.
Using the Viewpoint Request entry on the main SWI display, you first specify the path to your stored shortcut files.
In the example above, the TMP folder is specified.
A list of Viewpoint shortcuts is presented.
SWI Solutions and Applications 43
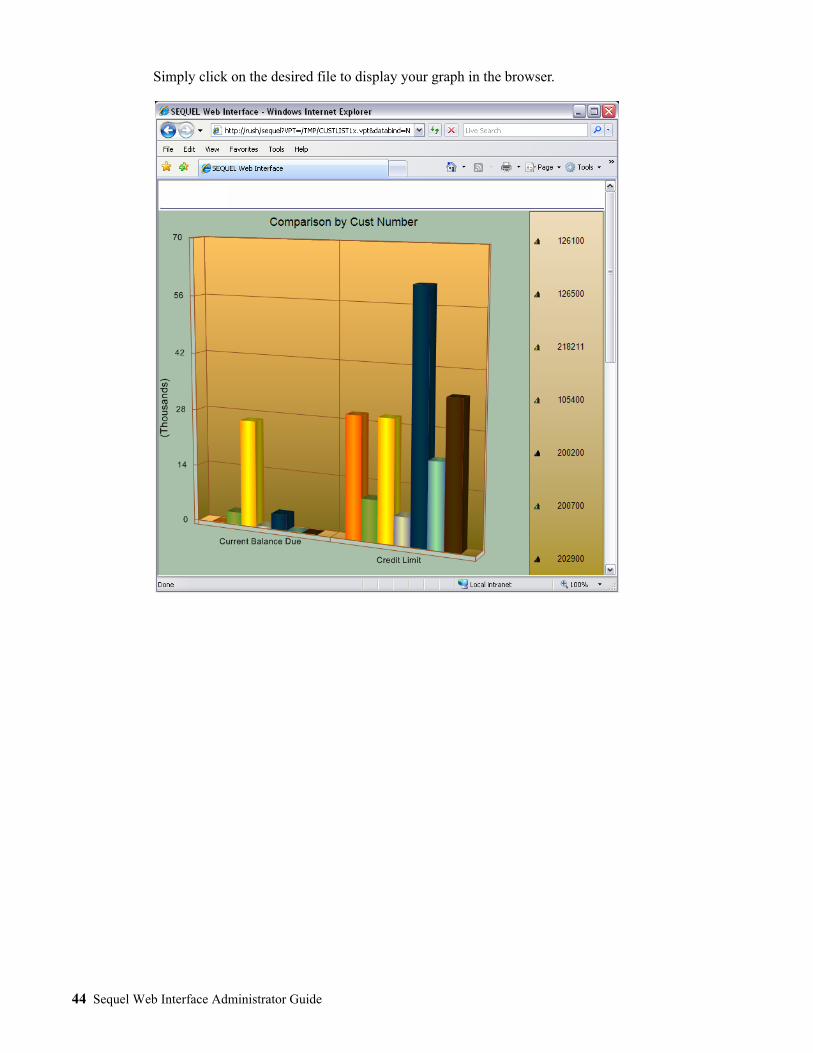
Simply click on the desired file to display your graph in the browser.
44 Sequel Web Interface Administrator Guide

Import Data to a Spreadsheet
When SWI processes a View request, the results appear in an HTML table comprised of rows and columns delineated with borders. Each data element is contained in its own "cell" when displayed in a browser. Newer versions of spreadsheet programs such as MS-Excel and Lotus 1-2-3 can automat-ically convert these HTML tables into their native format when they open a saved HTML file. The user may then work with the data in the spreadsheet program without having to re-key the data or make extensive modifications.
In contrast, when SWI processes a Viewpoint Report or Query/400 request, it needs to convert spooled file output into HTML "preformatted text". When a spreadsheet program opens this type of output, all the data elements in a report line are contained within a single spreadsheet cell, separated by blanks. A significant amount of user effort is required to copy and paste data elements into indi-vidual spreadsheet cells for further manipulation and analysis.
For the reasons described above, using a Viewpoint View is the optimal approach for copying System i data from a browser window to a spreadsheet program. Sequel is required for this operation. In addition to easier data transfer, Sequel offers some other very significant advantages over Query/400. Perhaps the most notable is the ability to create views with runtime prompts. SWI will automatically generate prompt pages to display in the browser or will process input from custom-developed prompt pages. Sequel also offers extensive data summarization and reformatting capabilities not found in Query/400 that will help present information in formats more useful to end users.
SWI offers a number of different approaches for remote transfer of data from the System i to a PC spreadsheet program such as MS-Excel. This section reviews three different approaches:
• Create an html file to open in Excel
• E-mail an Excel file from a Viewpoint Script
• Import as a Web Query
SWI Solutions and Applications 45
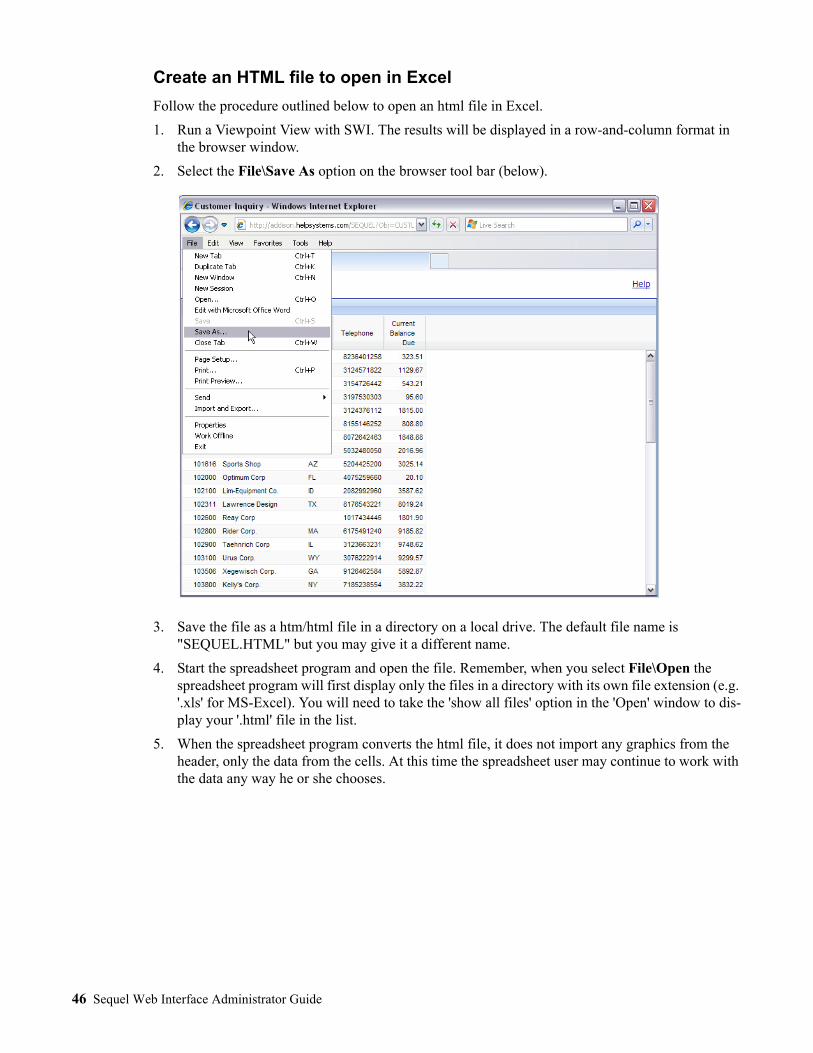
Create an HTML file to open in Excel
Follow the procedure outlined below to open an html file in Excel.
1. Run a Viewpoint View with SWI. The results will be displayed in a row-and-column format in the browser window.
2. Select the File\Save As option on the browser tool bar (below).
3. Save the file as a htm/html file in a directory on a local drive. The default file name is "SEQUEL.HTML" but you may give it a different name.
4. Start the spreadsheet program and open the file. Remember, when you select File\Open the spreadsheet program will first display only the files in a directory with its own file extension (e.g. '.xls' for MS-Excel). You will need to take the 'show all files' option in the 'Open' window to dis-play your '.html' file in the list.
5. When the spreadsheet program converts the html file, it does not import any graphics from the header, only the data from the cells. At this time the spreadsheet user may continue to work with the data any way he or she chooses.
46 Sequel Web Interface Administrator Guide
E-Mail from a Viewpoint Script
Another approach is simply to use the Sequel EXECUTE command within a script that runs a pre-defined view. The EXECUTE command can specify an output format of Excel (among many other PC formats) along with an e-mail recipient. In the script below a runtime prompt is used to supply an e-mail address for the recipient.
Script Commands10 MONMSG
20 SEQUEL/EXECUTE VIEW(SEQUELEX/CUSTLIST) PCFMT(*XLS) RECIPIENT('&&EMAIL')
Runtime VariableThe variable &&email is defined as:
Seq Variable Type Prompt text Length Dec
5 &EMAIL EXPR &EMAIL 80 0
Import as a Web Query
Newer versions of MS Excel provide a function to import real-time data from a web query into a spreadsheet file. The data is automatically updated whenever the spreadsheet is reopened or when the user clicks a 'refresh' option. If you need to import System i data into spreadsheets on a regular basis, you can use Sequel and the Sequel Web Interface as the underlying query, as described below.
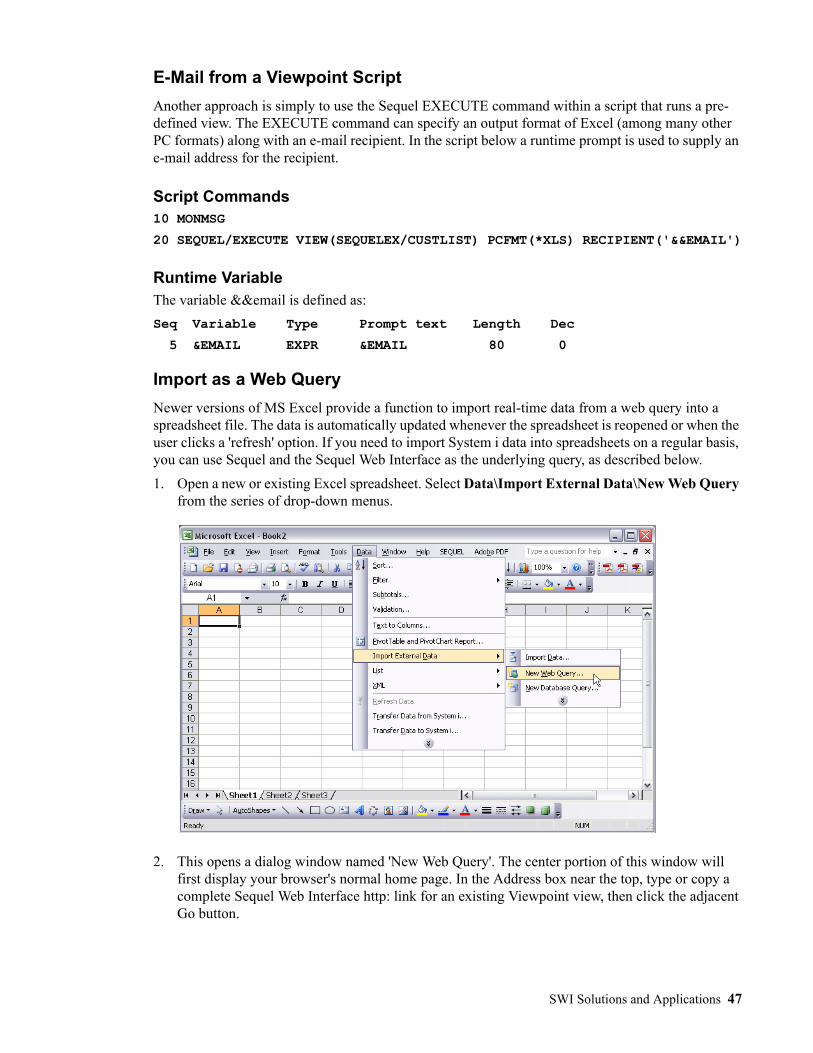
1. Open a new or existing Excel spreadsheet. Select Data\Import External Data\New Web Query from the series of drop-down menus.
2. This opens a dialog window named 'New Web Query'. The center portion of this window will first display your browser's normal home page. In the Address box near the top, type or copy a complete Sequel Web Interface http: link for an existing Viewpoint view, then click the adjacent Go button.
SWI Solutions and Applications 47
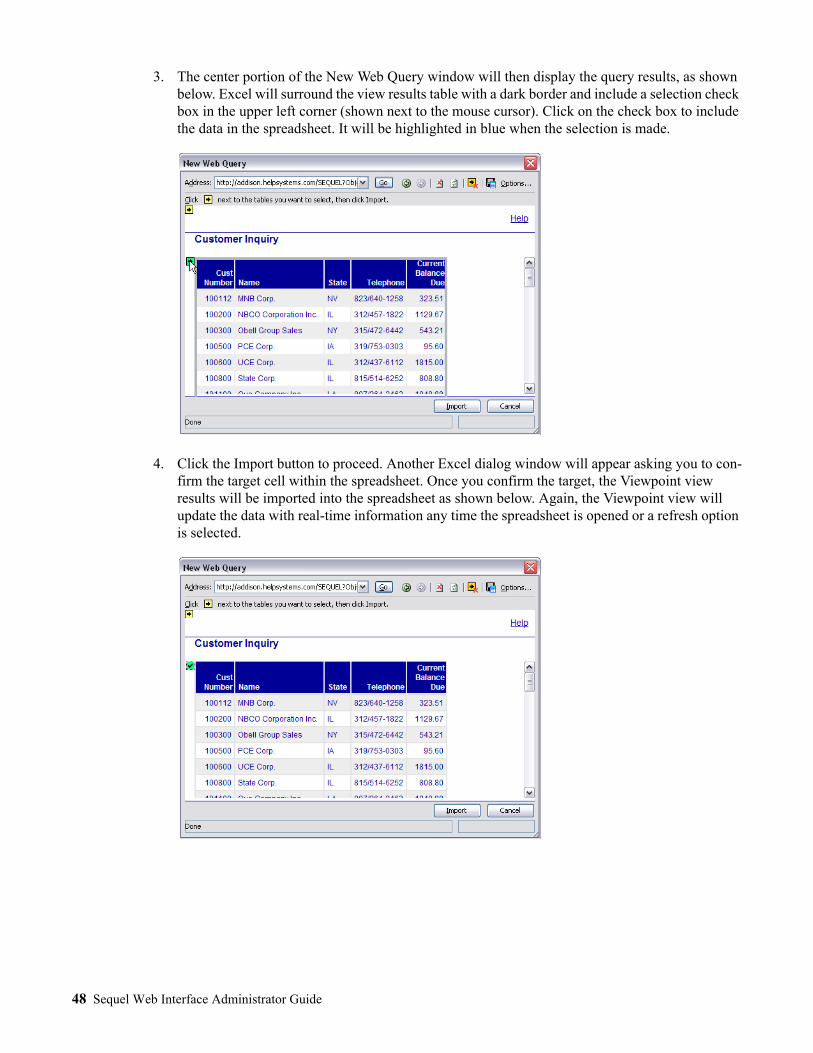
3. The center portion of the New Web Query window will then display the query results, as shown below. Excel will surround the view results table with a dark border and include a selection check box in the upper left corner (shown next to the mouse cursor). Click on the check box to include the data in the spreadsheet. It will be highlighted in blue when the selection is made.
4. Click the Import button to proceed. Another Excel dialog window will appear asking you to con-firm the target cell within the spreadsheet. Once you confirm the target, the Viewpoint view results will be imported into the spreadsheet as shown below. Again, the Viewpoint view will update the data with real-time information any time the spreadsheet is opened or a refresh option is selected.
48 Sequel Web Interface Administrator Guide
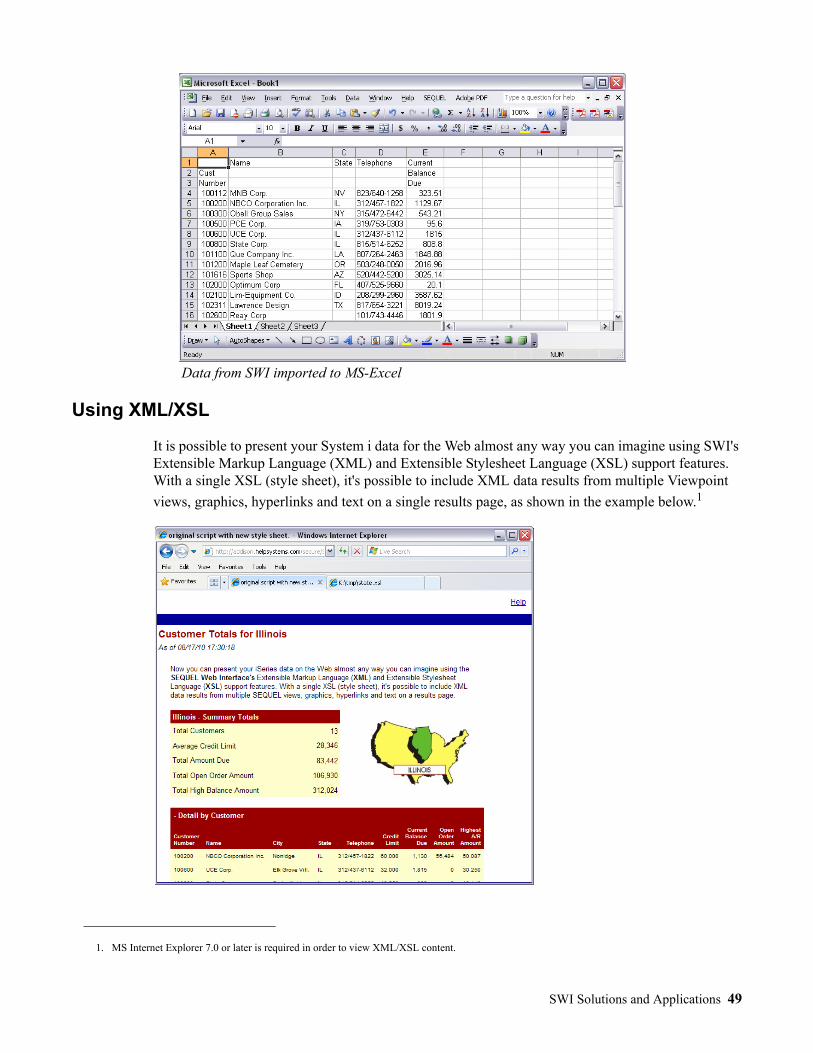
Data from SWI imported to MS-Excel
Using XML/XSL
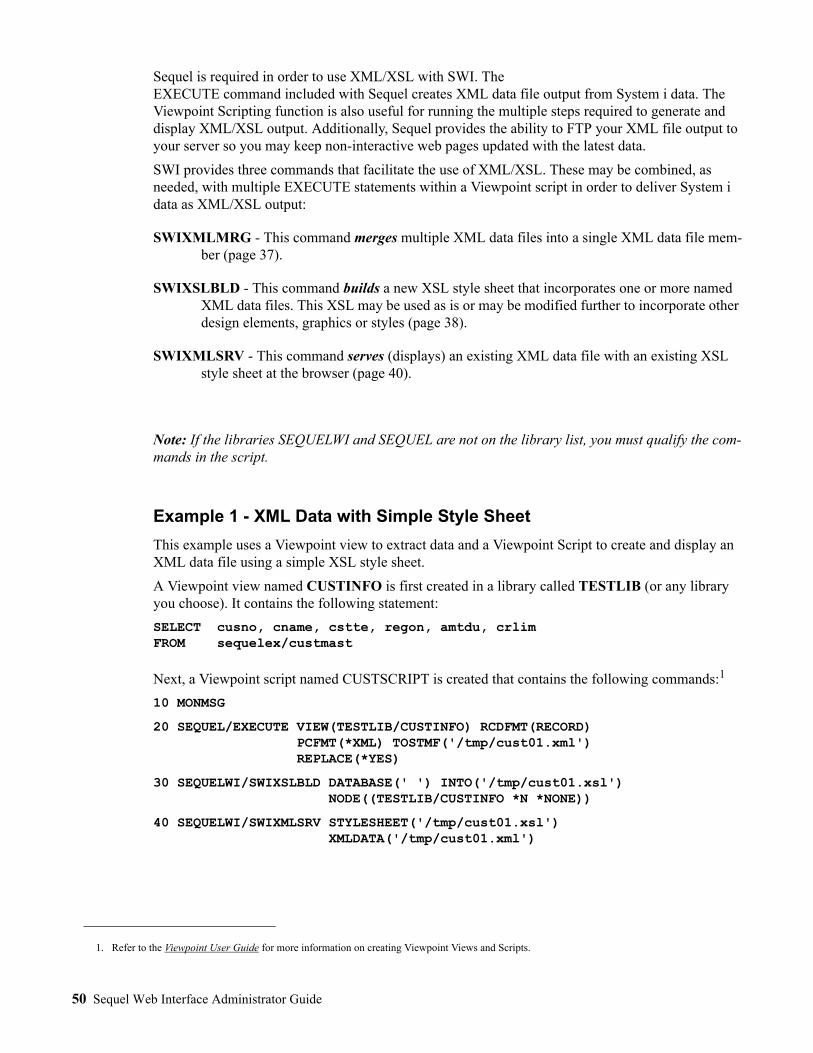
It is possible to present your System i data for the Web almost any way you can imagine using SWI's Extensible Markup Language (XML) and Extensible Stylesheet Language (XSL) support features. With a single XSL (style sheet), it's possible to include XML data results from multiple Viewpoint
views, graphics, hyperlinks and text on a single results page, as shown in the example below.1
1. MS Internet Explorer 7.0 or later is required in order to view XML/XSL content.
SWI Solutions and Applications 49
Sequel is required in order to use XML/XSL with SWI. The EXECUTE command included with Sequel creates XML data file output from System i data. The Viewpoint Scripting function is also useful for running the multiple steps required to generate and display XML/XSL output. Additionally, Sequel provides the ability to FTP your XML file output to your server so you may keep non-interactive web pages updated with the latest data.
SWI provides three commands that facilitate the use of XML/XSL. These may be combined, as needed, with multiple EXECUTE statements within a Viewpoint script in order to deliver System i data as XML/XSL output:
SWIXMLMRG - This command merges multiple XML data files into a single XML data file mem-ber (page 37).
SWIXSLBLD - This command builds a new XSL style sheet that incorporates one or more named XML data files. This XSL may be used as is or may be modified further to incorporate other design elements, graphics or styles (page 38).
SWIXMLSRV - This command serves (displays) an existing XML data file with an existing XSL style sheet at the browser (page 40).
Note: If the libraries SEQUELWI and SEQUEL are not on the library list, you must qualify the com-mands in the script.
Example 1 - XML Data with Simple Style Sheet
This example uses a Viewpoint view to extract data and a Viewpoint Script to create and display an XML data file using a simple XSL style sheet.
A Viewpoint view named CUSTINFO is first created in a library called TESTLIB (or any library you choose). It contains the following statement:
SELECT cusno, cname, cstte, regon, amtdu, crlim FROM sequelex/custmast
Next, a Viewpoint script named CUSTSCRIPT is created that contains the following commands:1
10 MONMSG
20 SEQUEL/EXECUTE VIEW(TESTLIB/CUSTINFO) RCDFMT(RECORD) PCFMT(*XML) TOSTMF('/tmp/cust01.xml') REPLACE(*YES)
30 SEQUELWI/SWIXSLBLD DATABASE(' ') INTO('/tmp/cust01.xsl') NODE((TESTLIB/CUSTINFO *N *NONE))
40 SEQUELWI/SWIXMLSRV STYLESHEET('/tmp/cust01.xsl') XMLDATA('/tmp/cust01.xml')
1. Refer to the Viewpoint User Guide for more information on creating Viewpoint Views and Scripts.
50 Sequel Web Interface Administrator Guide
Command Descriptions
10 MONMSG - The OS/400 MONMSG (Monitor Message) command is included as the first step to allow the script to continue even if warning messages are issued.
20 EXECUTE - This command creates an output file with the following parameters:
VIEW - The Viewpoint view named CUSTINFO (created above) extracts the data from the DB2 database file.
RCDFMT - A value of RECORD will be used for the XML tags.
PCFMT - The output file is created in XML format.
TOSTMF - The new XML file is called cust01.xml and is saved in the /tmp subdirectory in the System i' IFS.
REPLACE - Overwrites the same file created during a previous run, if it exists.
30 SWIXSLBLD - This command generates a XSL style sheet.
DATABASE - This parameter is set to blank (' ').
INTO - The new XSL file is named cust01.xsl and is saved in the /tmp subdirectory.
NODE - The NODE parameter includes the view used in the previous EXECUTE command. As only one view is used in the script, *N *NONE is used to specify related views.
40 SWIXMLSRV - This command takes the second XML file created in step 20 and the XSL file created in step 30 and serves them back to the browser.
Although you will not be able to see XML/XSL output at the 'green screen', follow this general approach when testing your script at a host terminal:
Run the script in 'step mode' to ensure each command completes successfully. Watch for error mes-sages and correct problems before you run the script from a browser.
When the script completes, start Windows Explorer and navigate to the subdirectory on the IFS where you created the XML and XSL files. When you double-click on each file name, your default browser will display the XML or XSL. If there are problems with the file, the browser will display an error instead of the code. Review your command syntax in the script to check for discrepancies.
SWI Solutions and Applications 51
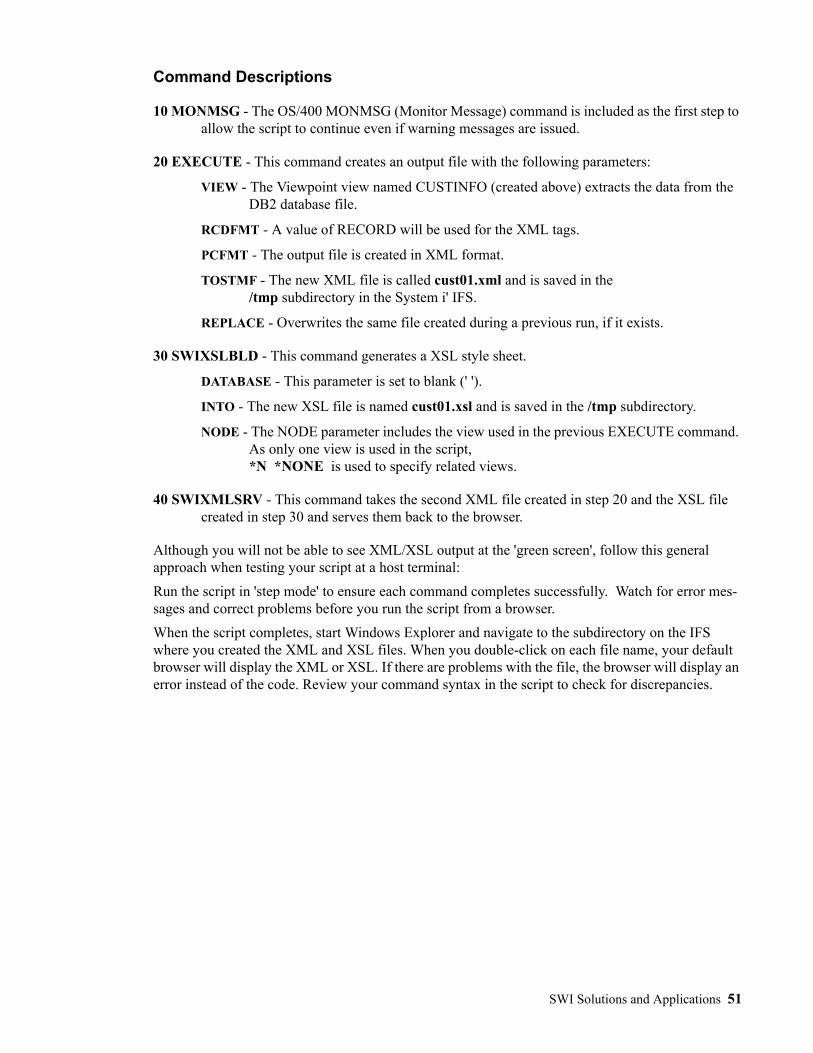
Using SWI, navigate to the location of the CUSTINFO script and double-click to view the results. A list of customers should display with a colored background.
Development Hints - Debugging XML/XSL from the browser is a bit cumbersome. If there are prob-lems with your script your browser will appear to be waiting for results indefinitely or you may get a blank screen or have only partial results displayed. If you right-click on the results and take the "View Source" option you will not see the XML or XSL 'code', only references to the file names.
Example 2 - Viewpoint View with Runtime Prompt
In this example we'll modify the CUSTINFO view created in Example 1 to include a runtime prompt that selects all customers within a specified state. Due to an operating system limitation the modified view needs to initially contain a hard-coded value in the WHERE clause for the state selection:
SELECT cusno, cname, cstte, regon, amtdu, crlimFROM sequelex/custmastWHERE cstte="IL"
After the view and script are tested and working, we'll replace the hard-coded value of "IL" with a runtime variable name (see below). For initial testing purposes the script created in Example 1 can be used without modification. It will later be changed to enable runtime prompting.
10 MONMSG
20 SEQUEL/EXECUTE VIEW(TESTLIB/CUSTINFO) RCDFMT(RECORD) PCFMT(*XML) TOSTMF('/tmp/cust01.xml') REPLACE(*YES)
30 SEQUELWI/SWIXSLBLD DATABASE(' ') INTO('/tmp/cust01.xsl') NODE((TESTLIB/CUSTINFO *N *NONE))
40 SEQUELWI/SWIXMLSRV STYLESHEET('/tmp/cust01.xsl') XMLDATA('/tmp/cust01.xml')
52 Sequel Web Interface Administrator Guide
Run the script from the browser. Once the script is working, modify the view by adding the runtime variable &cstte in the WHERE clause:
SELECT cusno, cname, cstte, regon, amtdu, crlimFROM sequelex/custmastWHERE cstte=&cstte
After the WHERE clause is modified, you will need to define the variable value &cstte (shown below) then save the view.
Seq Variable Type Prompt text Length Dec 5 &CSTTE QSTRING Customer state 4 0
Modify the script to comment-out or remove the SWIXSLBLD command on line 30. Do not delete the xsl file from the IFS. This will be used for formatting purposes after the runtime prompt is added.
Add a SETVAR clause to the EXECUTE command on line 20 that contains the &cstte variable. The modified script look like the following:
10 MONMSG
20 SEQUEL/EXECUTE VIEW(TESTLIB/CUSTINFO) RCDFMT(RECORD) PCFMT(*XML) TOSTMF('/tmp/cust01.xml') REPLACE(*YES) SETVAR((&CSTTE &CSTTE))
30 /* SEQUELWI/SWIXSLBLD DATABASE(CUST) INTO('/tmp/cust01.xsl') NODE((TESTLIB/CUSTINFO *N *NONE)) */
40 SEQUELWI/SWIXMLSRV STYLESHEET('/tmp/cust01.xsl') XMLDATA('/tmp/cust01.xml')
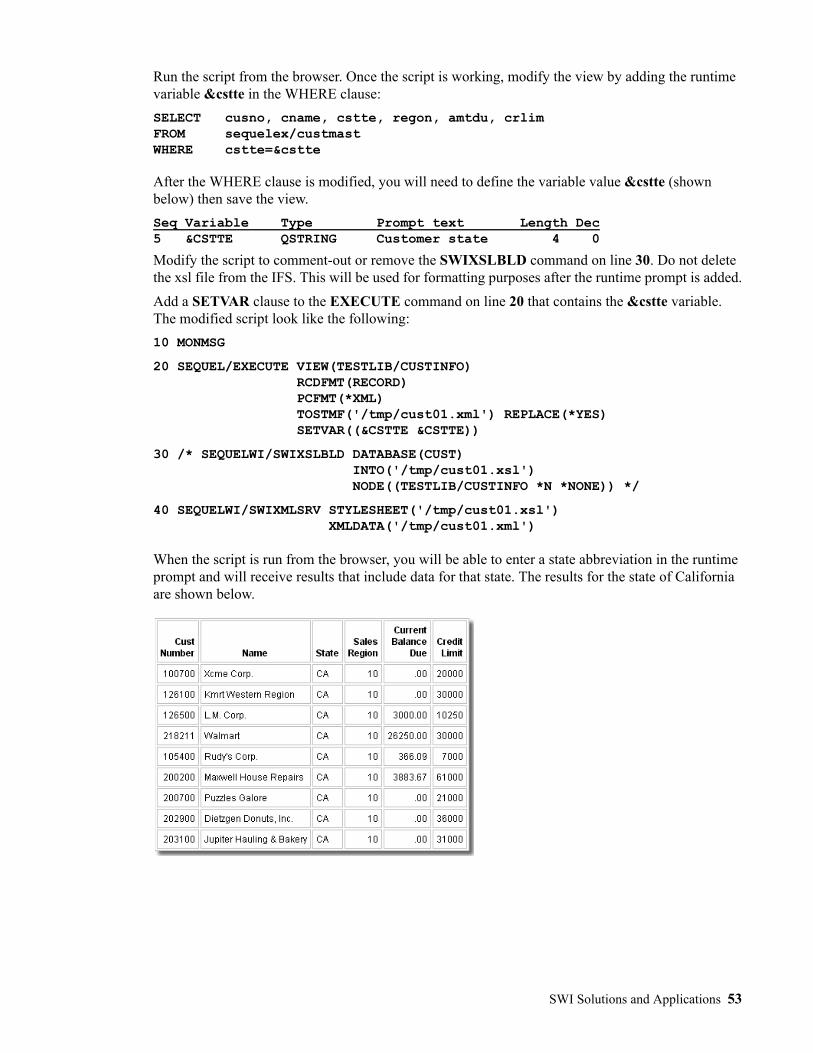
When the script is run from the browser, you will be able to enter a state abbreviation in the runtime prompt and will receive results that include data for that state. The results for the state of California are shown below.
SWI Solutions and Applications 53
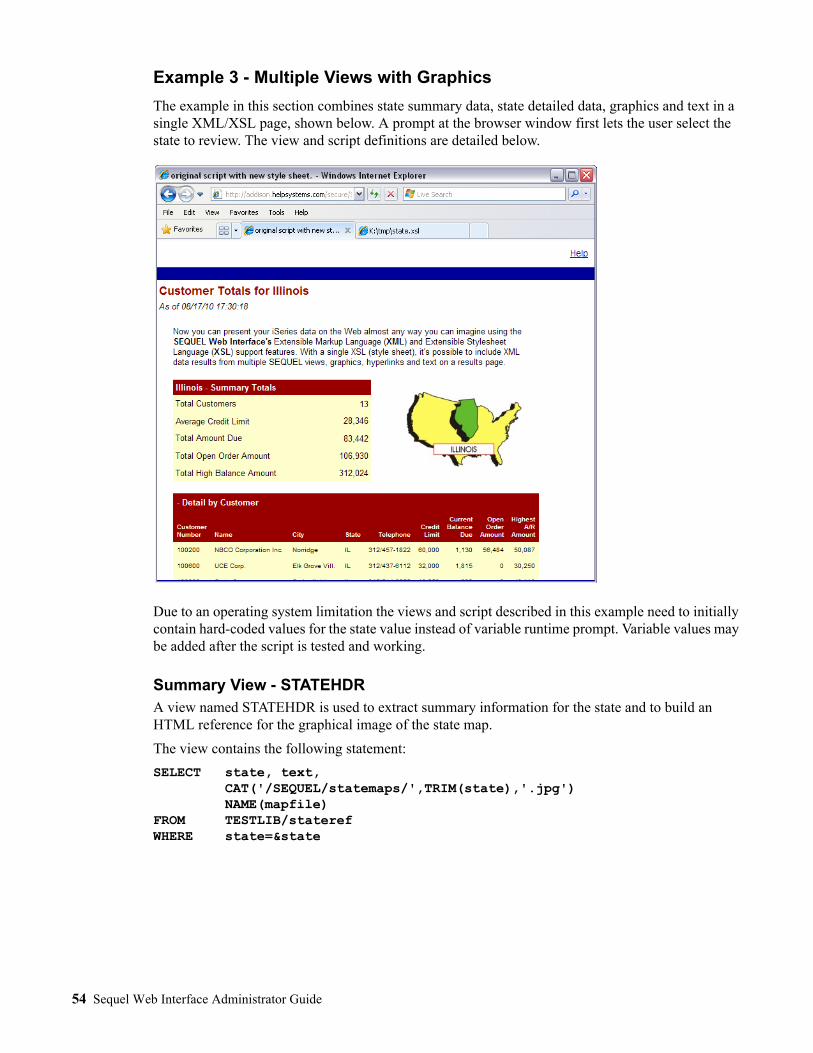
Example 3 - Multiple Views with Graphics
The example in this section combines state summary data, state detailed data, graphics and text in a single XML/XSL page, shown below. A prompt at the browser window first lets the user select the state to review. The view and script definitions are detailed below.
Due to an operating system limitation the views and script described in this example need to initially contain hard-coded values for the state value instead of variable runtime prompt. Variable values may be added after the script is tested and working.
Summary View - STATEHDRA view named STATEHDR is used to extract summary information for the state and to build an HTML reference for the graphical image of the state map.
The view contains the following statement:
SELECT state, text, CAT('/SEQUEL/statemaps/',TRIM(state),'.jpg') NAME(mapfile) FROM TESTLIB/stateref WHERE state=&state
54 Sequel Web Interface Administrator Guide
The view takes the state abbreviation (&state) entered for the script at the browser and searches a ref-erence file containing the full spelling of the state name. The CAT statement creates an image file URL that will display a graphical image in the results. This view returns the following data (exclud-ing the numeric data):
STATE TEXT MAPFILE IL Illinois /SEQUEL/statemaps/IL.jpg
Detail View - STATEDTLA view named STATEDTL extracts detailed data for each customer in the selected state. The view contains this statement:
SELECT cusno, cname, cadd3, cstte name(state), cphon, crlim EDTCDE(J), amtdu EDTCDE(J), oropn EDTCDE(J), highb EDTCDE(J)FROM sequelex/custmastWHERE state=&state
The field named cstte was renamed to state in this SELECT clause so that it shares a common field name with the STATEHDR view - this will be important when merging the output from the two dif-ferent views within the script.
Viewpoint ScriptA Viewpoint script creates XML output files from the STATDTL and STATEHDR views, merges the files together, generates an XSL file from the results, and serves the XML/XSL together at the browser. The script contains the following commands (a narrative for each command follows this example):
10 MONMSG
20 ALCOBJ OBJ((TESTLIB/STATEHDR *USRSPC *EXCLRD))
30 SEQUEL/EXECUTE VIEW(TESTLIB/STATEHDR) RCDFMT(RECORD) PCFMT(*XML) TOSTMF('/tmp/statehdr.xml') REPLACE(*YES) SETVAR((&STATE &STATE))
40 SEQUEL/EXECUTE VIEW(TESTLIB/STATEDTL) RCDFMT(RECORD) PCFMT(*XML) TOSTMF('/tmp/statedtl.xml') REPLACE(*YES) SETVAR((&STATE &STATE))
50 RMVLNK OBJLNK('/tmp/state.xml')
60 SEQUELWI/SWIXMLMRG DATABASE(STATE) INTO('/tmp/state.xml') XMLDATA('/tmp/statehdr.xml' '/tmp/statedtl.xml') REMOVE(*YES)
SWI Solutions and Applications 55
70 SEQUELWI/SWIXSLBLD DATABASE(STATE) INTO('/tmp/state.xsl') NODE((TESTLIB/STATEHDR STATE TESTLIB/STATEDTL CSTTE)) IMAGES((TESTLIB/STATEHDR MAPFILE)) TOTALS((TESTLIB/STATEDTL *N COUNT) (TESTLIB/STATEDTL AMTDU SUM) (TESTLIB/STATEDTL OROPN SUM) (TESTLIB/STATEDTL CRLIM AVG) (TESTLIB/STATEDTL HIGHB SUM))
80 CHGAUT OBJ('/tmp/state.xml') USER(*PUBLIC) DTAAUT(*RWX) OBJAUT(*ALL)
90 SEQUELWI/SWIXMLSRV STYLESHEET('/tmp/state.xsl') XMLDATA('/tmp/state.xml')
100 DLCOBJ OBJ((TESTLIB/STATEHDR *USRSPC *EXCLRD))
Command Descriptions
10 MONMSG - The OS/400 MONMSG (Monitor Message) command is included as the first step to allow the script to continue even if warning messages are issued.
10 MONMSG
20 ALCOBJ - As this script creates temporary XML work files in an IFS directory, the OS/400 ALCOBJ (Allocate Object) command is used to avoid problems that occur if concurrent users submit the same request.
20 ALCOBJ OBJ((TESTLIB/STATEHDR *USRSPC *EXCLRD))
30 EXECUTE - The Sequel EXECUTE command is used to generate a XML file containing sum-mary information for the selected state.
30 SEQUEL/EXECUTE VIEW(TESTLIB/STATEHDR) RCDFMT(RECORD) PCFMT(*XML) TOSTMF('/tmp/statehdr.xml') REPLACE(*YES) SETVAR((&STATE &STATE))
VIEW - Uses the STATEHDR view created above to extract the data from the database file.
RCDFMT - A value of RECORD will be used for the XML tags.
PCFMT - *XML is specified for the output format.
TOSTMF - The output stream file is created on the IFS at /tmp/statehdr.xml.
REPLACE - Used to overwrite the same file created during a previous run, if it exists.
SETVAR - Passes the state abbreviation entered at the script's runtime prompt to the view.
56 Sequel Web Interface Administrator Guide
40 EXECUTE - The Sequel EXECUTE command is used to generate a XML file containing detailed information for the selected state.
40 SEQUEL/EXECUTE VIEW(TESTLIB/STATEDTL) RCDFMT(RECORD) PCFMT(*XML) TOSTMF('/tmp/statedtl.xml') REPLACE(*YES) SETVAR((&STATE &STATE))
VIEW - Uses the STATEDTL view created above to extract the data from the database file.
RCDFMT - A value of RECORD will be used for the XML tags.
PCFMT - *XML is specified for the output format.
TOSTMF - The output stream file is created on the IFS at /tmp/statedtl.xml.
REPLACE - Used to overwrite the same file created during a previous run, if it exists.
SETVAR - Passes the state abbreviation entered at the script's runtime prompt to the view.
50 RMVLNK - The RMVLNK command removes the /tmp/state.xml file created in a previous run, if it still exists.
50 RMVLNK OBJLNK('/tmp/state.xml')
60 SWIXMLMRG - The SWIXMLMRG command is used to merge the XML files created in steps 30 and 40 into a single XML data file called '/tmp/state.xml'.
60 SEQUELWI/SWIXMLMRG DATABASE(STATE) INTO('/tmp/state.xml') XMLDATA('/tmp/statehdr.xml' '/tmp/statedtl.xml') REMOVE(*NO)
DATABASE - The outermost tag of the merged database will be named STATE.
INTO - The new XML file containing the merged XML files will be created at /tmp/state.xml.
XMLDATA - These are the XML files created in steps 30 and 40, above, that will be merged together.
REMOVE - A value of *NO indicates the INTO file will not be deleted at the conclusion of the script.
70 SWIXSLBLD - The SWIXSLBLD command generates an XSL style sheet.
70 SEQUELWI/SWIXSLBLD DATABASE(STATE) INTO('/tmp/state.xsl') NODE((TESTLIB/STATEHDR STATE TESTLIB/STATEDTL CSTTE)) IMAGES((TESTLIB/STATEHDR MAPFILE)) TOTALS((TESTLIB/STATEDTL *N COUNT) (TESTLIB/STATEDTL AMTDU SUM) (TESTLIB/STATEDTL OROPN SUM) (TESTLIB/STATEDTL CRLIM AVG) (TESTLIB/STATEDTL HIGHB SUM))
DATABASE - Must be the same name as used in 60 SWIXMLMRG, above.
SWI Solutions and Applications 57
INTO - Identifies the name and location of the new XSL file that will be generated.
NODE - Identifies the views and linking fields on which the XSL will be based.
IMAGES - Identifies which view/field contains an image link.
HYPERLINKS - Identifies view/fields which contain hyperlinks.
TOTALS - Identifies fields that should be summed or averaged, and a count will show the number of customers within each state.
80 CHGAUT - The OS/400 CHGAUT (Change Authority) is used to give access authority to the new XML file.
80 CHGAUT OBJ('/tmp/state.xml') USER(*PUBLIC) DTAAUT(*RWX) OBJAUT(*ALL)
90 SWIXMLSRV - The SWIXMLSRV command displays the XML data within the XSL style sheet created in the previous steps.
90 SEQUELWI/SWIXMLSRV STYLESHEET('/tmp/state.xsl') XMLDATA('/tmp/state.xml')
100 DLCOBJ - The OS/400 DLCOBJ (Deallocate Object) command unlocks the STATEHDR object so the object may be used by another user.
100 DLCOBJ OBJ((TESTLIB/STATEHDR *USRSPC *EXCLRD))
58 Sequel Web Interface Administrator Guide
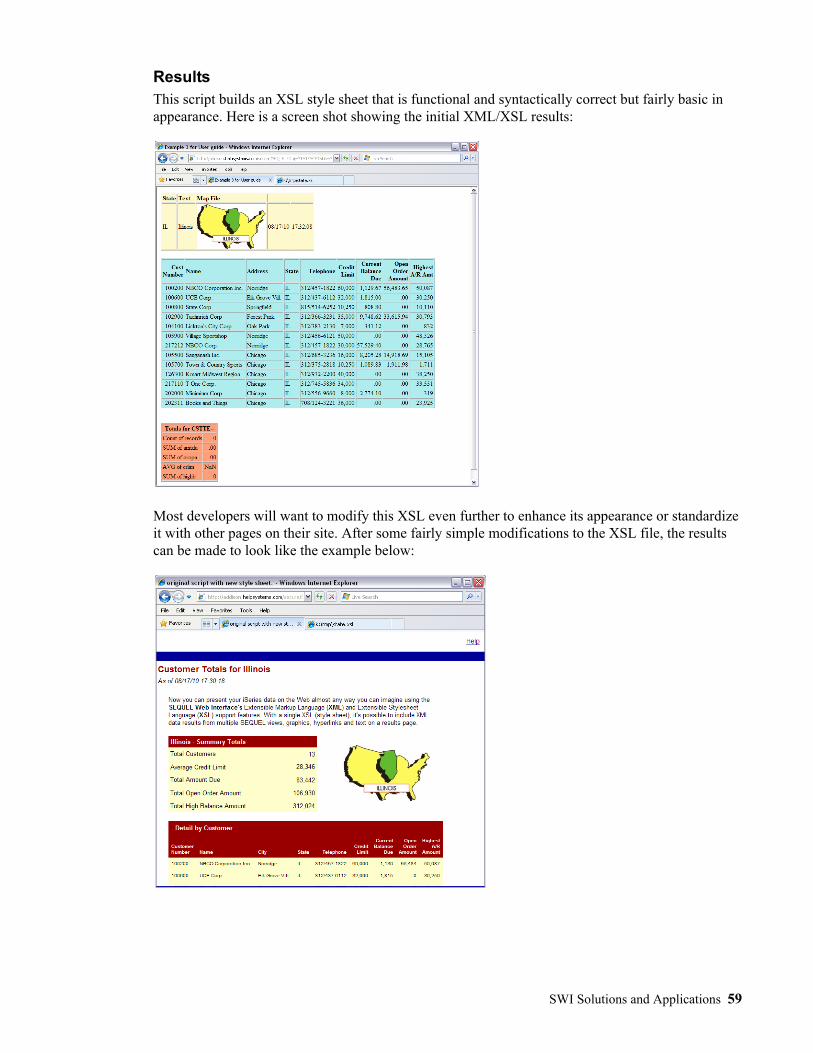
ResultsThis script builds an XSL style sheet that is functional and syntactically correct but fairly basic in appearance. Here is a screen shot showing the initial XML/XSL results:
Most developers will want to modify this XSL even further to enhance its appearance or standardize it with other pages on their site. After some fairly simple modifications to the XSL file, the results can be made to look like the example below:
SWI Solutions and Applications 59
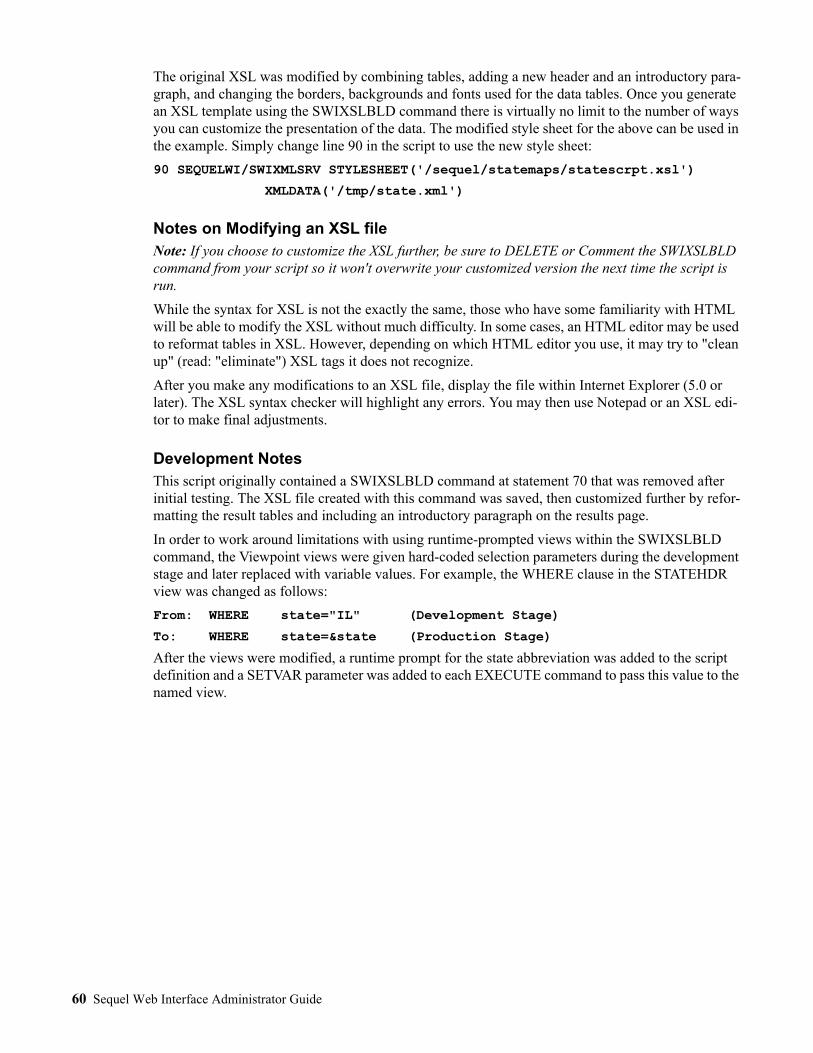
The original XSL was modified by combining tables, adding a new header and an introductory para-graph, and changing the borders, backgrounds and fonts used for the data tables. Once you generate an XSL template using the SWIXSLBLD command there is virtually no limit to the number of ways you can customize the presentation of the data. The modified style sheet for the above can be used in the example. Simply change line 90 in the script to use the new style sheet:
90 SEQUELWI/SWIXMLSRV STYLESHEET('/sequel/statemaps/statescrpt.xsl')
XMLDATA('/tmp/state.xml')
Notes on Modifying an XSL fileNote: If you choose to customize the XSL further, be sure to DELETE or Comment the SWIXSLBLD command from your script so it won't overwrite your customized version the next time the script is run.
While the syntax for XSL is not the exactly the same, those who have some familiarity with HTML will be able to modify the XSL without much difficulty. In some cases, an HTML editor may be used to reformat tables in XSL. However, depending on which HTML editor you use, it may try to "clean up" (read: "eliminate") XSL tags it does not recognize.
After you make any modifications to an XSL file, display the file within Internet Explorer (5.0 or later). The XSL syntax checker will highlight any errors. You may then use Notepad or an XSL edi-tor to make final adjustments.
Development NotesThis script originally contained a SWIXSLBLD command at statement 70 that was removed after initial testing. The XSL file created with this command was saved, then customized further by refor-matting the result tables and including an introductory paragraph on the results page.
In order to work around limitations with using runtime-prompted views within the SWIXSLBLD command, the Viewpoint views were given hard-coded selection parameters during the development stage and later replaced with variable values. For example, the WHERE clause in the STATEHDR view was changed as follows:
From: WHERE state="IL" (Development Stage)
To: WHERE state=&state (Production Stage)
After the views were modified, a runtime prompt for the state abbreviation was added to the script definition and a SETVAR parameter was added to each EXECUTE command to pass this value to the named view.
60 Sequel Web Interface Administrator Guide
Example 4 - XML Output for Other Applications
The EXECUTE and SWIXMLMRG commands may be used within a Viewpoint script to extract DB2 information and create complex XML files for use with WebSphere, EDI and other applica-tions. The RCDFMT, ENTITY, ENTITYATTR, and DATABASE parameters may be used to format the XML hierarchy as needed.
Review the script commands below and the resulting XML syntax on the pages that follow.
10 RUNCMD CMD('EXECUTE VIEW(XMLVIEW1)
RCDFMT(ORDHEAD) PCFMT(*XML1)
TOSTMF(''\tmp\xml1.xml'') REPLACE(*YES)
ENTITY(''order'')
ENTITYATTR(''type="_&&otype"'')
SETVAR((_&&ORDNO ''&&order''))')
SQL('select otype from sequelex/ordhead
where ordno=&&order')
20 SEQUEL/EXECUTE VIEW(XMLVIEW2) RCDFMT(ORDLINES) PCFMT(*XML1)
TOSTMF('\tmp\xml2.xml') REPLACE(*YES)
ENTITY('lines') SETVAR((&ORDNO '&&order'))
30 SEQUEL/EXECUTE VIEW(XMLVIEW3) RCDFMT(CUSTREC) PCFMT(*XML1)
TOSTMF('\tmp\xml3.xml') REPLACE(*YES)
ENTITY('CustInfo') SETVAR((&ORDNO '&&order'))
40 SEQUEL/EXECUTE VIEW(XMLVIEW4) RCDFMT(CONTACT) PCFMT(*XML1)
TOSTMF('\tmp\xml4.xml') REPLACE(*YES)
ENTITY('CustContacts')
SETVAR((&ORDNO '&&order'))
50 SEQUELWI/SWIXMLMRG DATABASE('Customer')
ENTITYATTR('type="Vendor"')
INTO('/tmp/xml5.xml')
XMLDATA('/tmp/xml3.xml' '/tmp/xml4.xml')
REMOVE(*YES)
60 SEQUEL/EXECUTE VIEW(TEST/XMLVIEW5) RCDFMT(ORDERTOTAL)
PCFMT(*XML1)
TOSTMF('\tmp\xml6.xml') REPLACE(*YES)
ENTITY(*NONE) SETVAR((&ORDNO '&&order'))
70 SEQUELWI/SWIXMLMRG DATABASE('Orders')
ENTITYATTR(*NONE)
INTO('/tmp/main.xml')
XMLDATA('/tmp/xml1.xml'
'/tmp/xml2.xml'
'/tmp/xml5.xml'
'/tmp/xml6.xml') REMOVE(*YES)
SWI Solutions and Applications 61
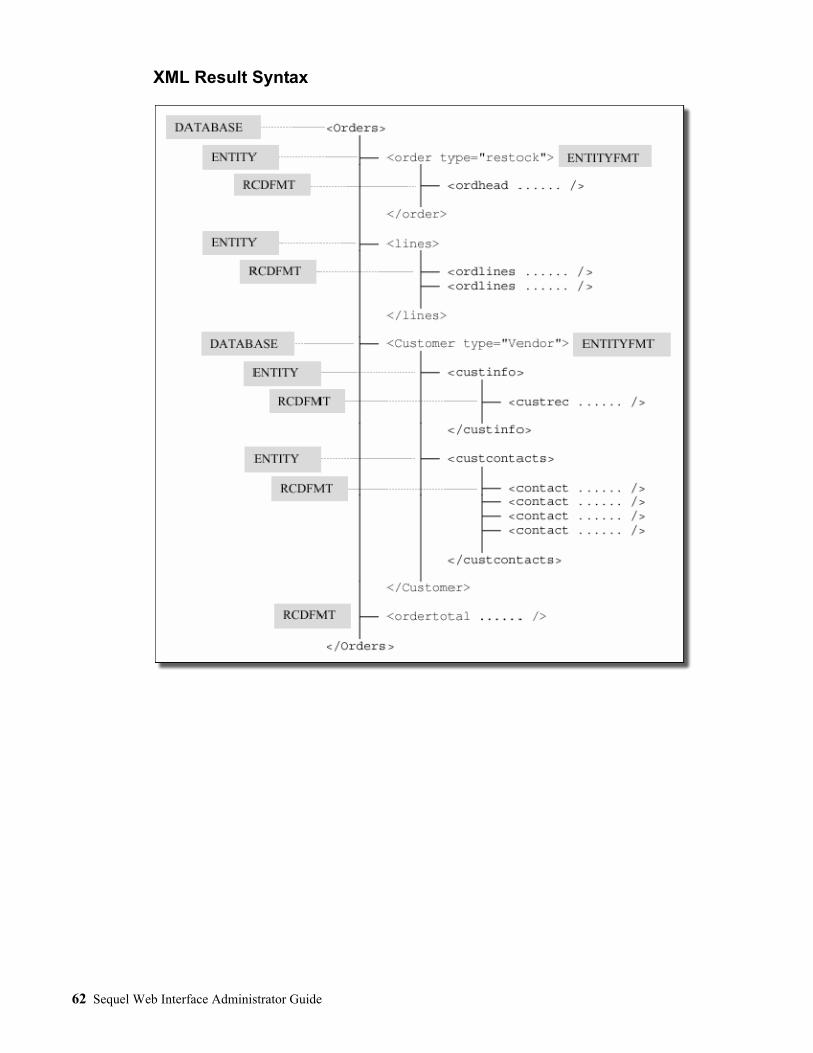
XML Result Syntax
62 Sequel Web Interface Administrator Guide
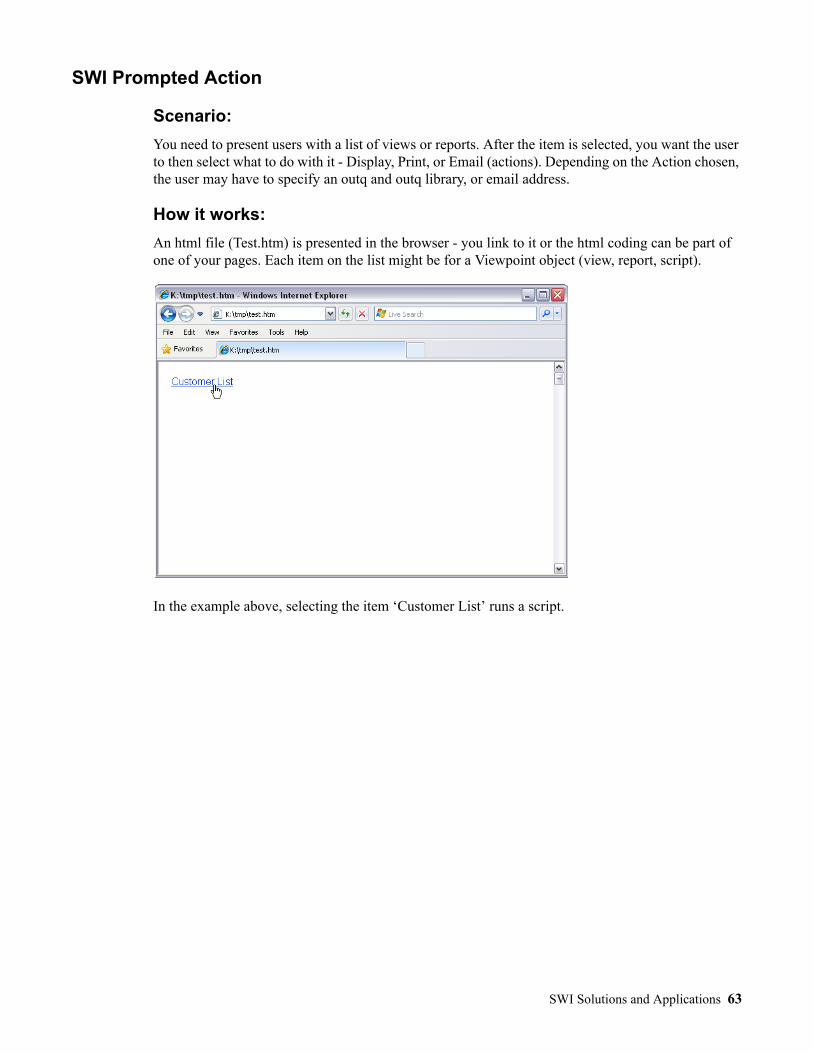
SWI Prompted Action
Scenario:
You need to present users with a list of views or reports. After the item is selected, you want the user to then select what to do with it - Display, Print, or Email (actions). Depending on the Action chosen, the user may have to specify an outq and outq library, or email address.
How it works:
An html file (Test.htm) is presented in the browser - you link to it or the html coding can be part of one of your pages. Each item on the list might be for a Viewpoint object (view, report, script).
In the example above, selecting the item ‘Customer List’ runs a script.
SWI Solutions and Applications 63
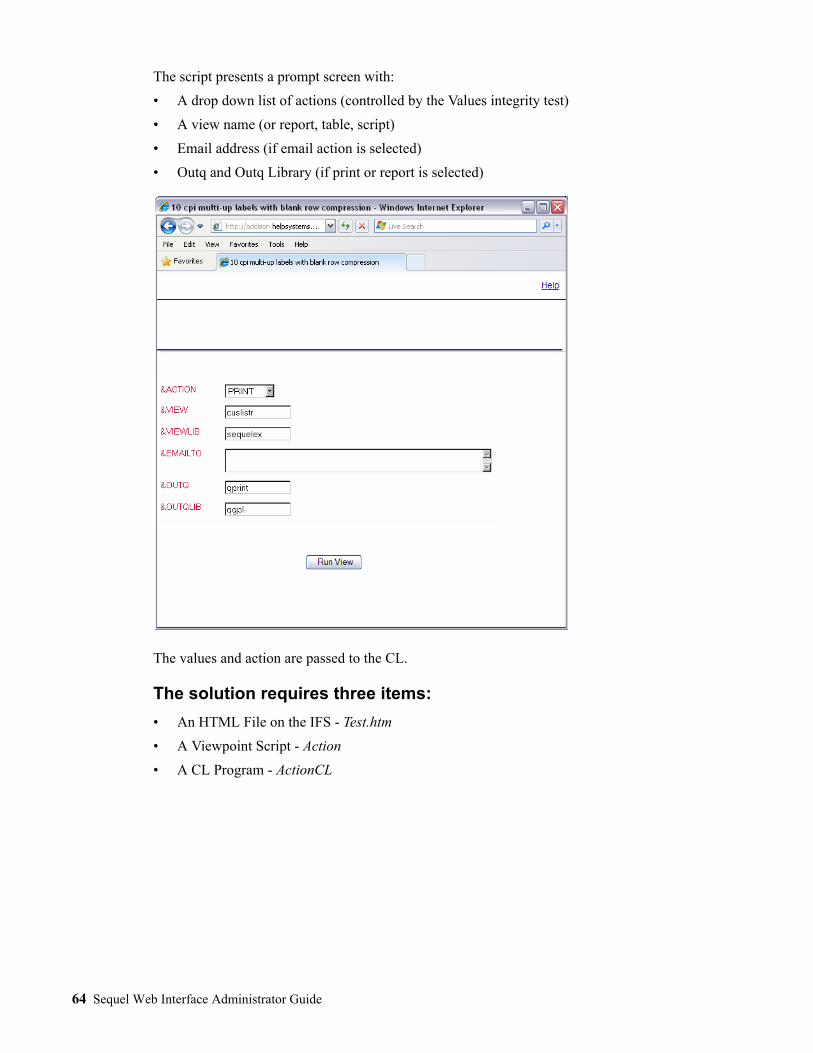
The script presents a prompt screen with:
• A drop down list of actions (controlled by the Values integrity test)
• A view name (or report, table, script)
• Email address (if email action is selected)
• Outq and Outq Library (if print or report is selected)
The values and action are passed to the CL.
The solution requires three items:
• An HTML File on the IFS - Test.htm
• A Viewpoint Script - Action
• A CL Program - ActionCL
64 Sequel Web Interface Administrator Guide
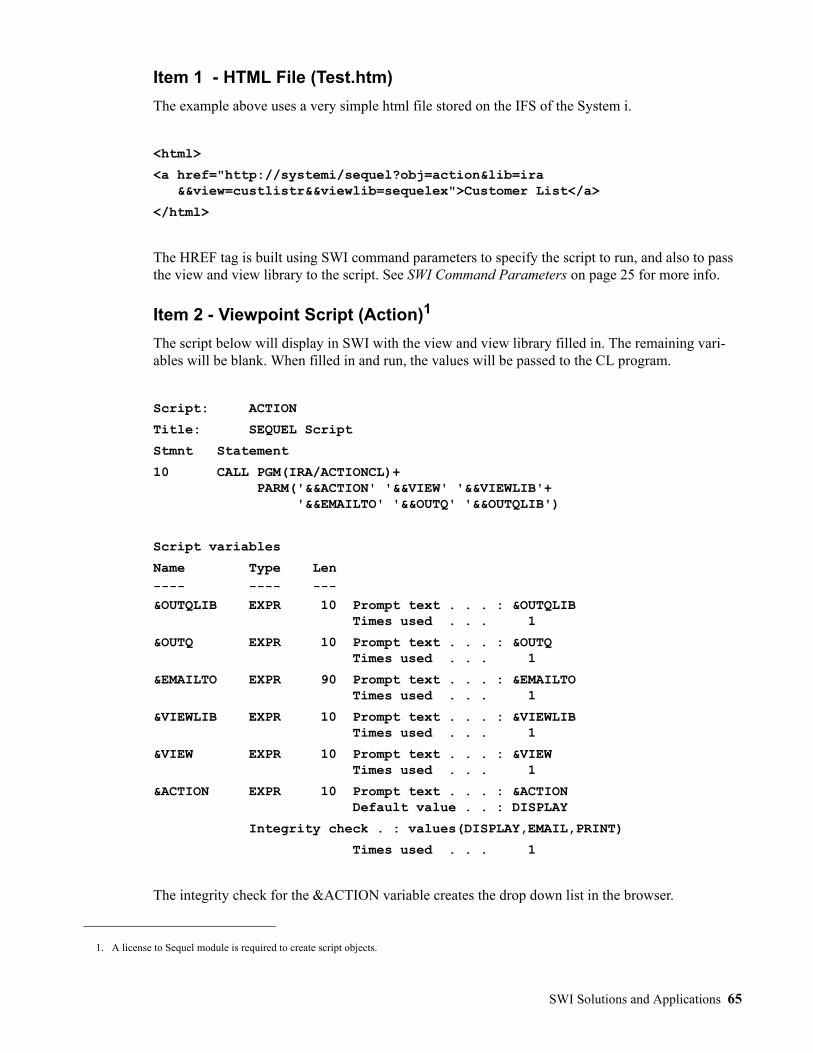
Item 1 - HTML File (Test.htm)
The example above uses a very simple html file stored on the IFS of the System i.
<html>
<a href="http://systemi/sequel?obj=action&lib=ira &&view=custlistr&&viewlib=sequelex">Customer List</a>
</html>
The HREF tag is built using SWI command parameters to specify the script to run, and also to pass the view and view library to the script. See SWI Command Parameters on page 25 for more info.
Item 2 - Viewpoint Script (Action)1
The script below will display in SWI with the view and view library filled in. The remaining vari-ables will be blank. When filled in and run, the values will be passed to the CL program.
Script: ACTION
Title: SEQUEL Script
Stmnt Statement
10 CALL PGM(IRA/ACTIONCL)+ PARM('&&ACTION' '&&VIEW' '&&VIEWLIB'+ '&&EMAILTO' '&&OUTQ' '&&OUTQLIB')
Script variables
Name Type Len---- ---- ---&OUTQLIB EXPR 10 Prompt text . . . : &OUTQLIB Times used . . . 1
&OUTQ EXPR 10 Prompt text . . . : &OUTQ Times used . . . 1
&EMAILTO EXPR 90 Prompt text . . . : &EMAILTO Times used . . . 1
&VIEWLIB EXPR 10 Prompt text . . . : &VIEWLIB Times used . . . 1
&VIEW EXPR 10 Prompt text . . . : &VIEW Times used . . . 1
&ACTION EXPR 10 Prompt text . . . : &ACTION Default value . . : DISPLAY
Integrity check . : values(DISPLAY,EMAIL,PRINT)
Times used . . . 1
The integrity check for the &ACTION variable creates the drop down list in the browser.
1. A license to Sequel module is required to create script objects.
SWI Solutions and Applications 65
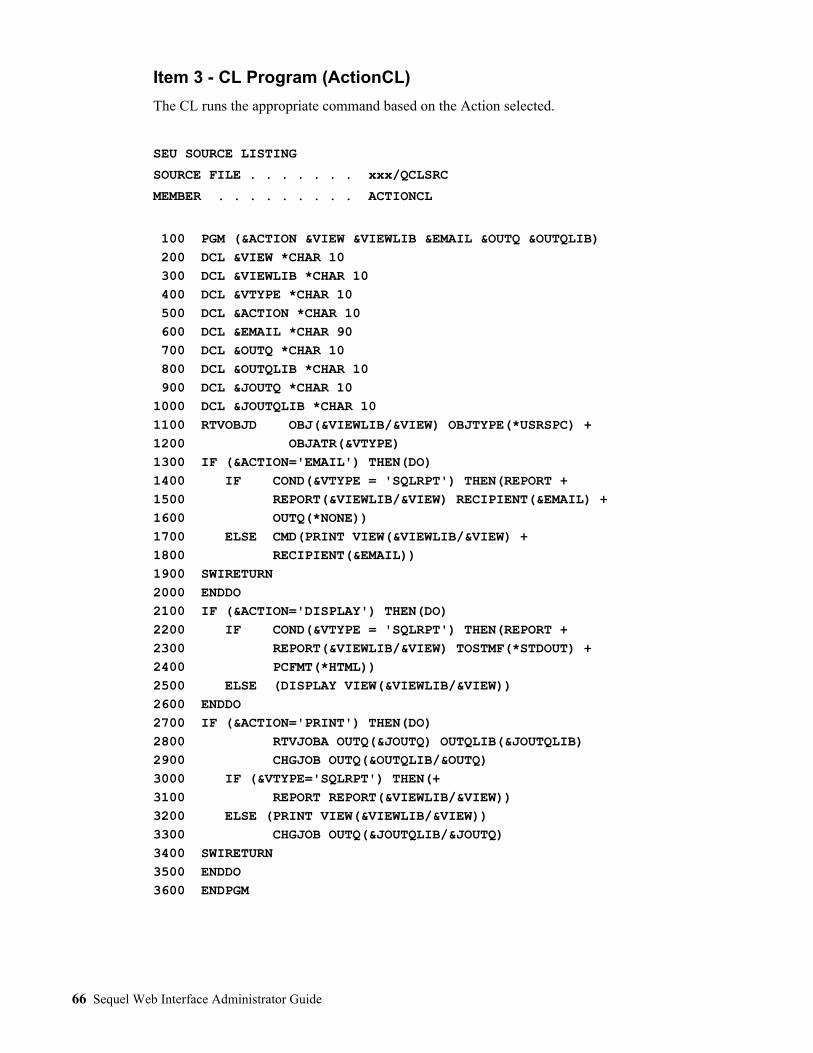
Item 3 - CL Program (ActionCL)
The CL runs the appropriate command based on the Action selected.
SEU SOURCE LISTING
SOURCE FILE . . . . . . . xxx/QCLSRC
MEMBER . . . . . . . . . ACTIONCL
100 PGM (&ACTION &VIEW &VIEWLIB &EMAIL &OUTQ &OUTQLIB) 200 DCL &VIEW *CHAR 10 300 DCL &VIEWLIB *CHAR 10 400 DCL &VTYPE *CHAR 10 500 DCL &ACTION *CHAR 10 600 DCL &EMAIL *CHAR 90 700 DCL &OUTQ *CHAR 10 800 DCL &OUTQLIB *CHAR 10 900 DCL &JOUTQ *CHAR 10 1000 DCL &JOUTQLIB *CHAR 10 1100 RTVOBJD OBJ(&VIEWLIB/&VIEW) OBJTYPE(*USRSPC) + 1200 OBJATR(&VTYPE) 1300 IF (&ACTION='EMAIL') THEN(DO) 1400 IF COND(&VTYPE = 'SQLRPT') THEN(REPORT + 1500 REPORT(&VIEWLIB/&VIEW) RECIPIENT(&EMAIL) + 1600 OUTQ(*NONE)) 1700 ELSE CMD(PRINT VIEW(&VIEWLIB/&VIEW) + 1800 RECIPIENT(&EMAIL)) 1900 SWIRETURN 2000 ENDDO 2100 IF (&ACTION='DISPLAY') THEN(DO) 2200 IF COND(&VTYPE = 'SQLRPT') THEN(REPORT + 2300 REPORT(&VIEWLIB/&VIEW) TOSTMF(*STDOUT) + 2400 PCFMT(*HTML)) 2500 ELSE (DISPLAY VIEW(&VIEWLIB/&VIEW)) 2600 ENDDO 2700 IF (&ACTION='PRINT') THEN(DO) 2800 RTVJOBA OUTQ(&JOUTQ) OUTQLIB(&JOUTQLIB) 2900 CHGJOB OUTQ(&OUTQLIB/&OUTQ) 3000 IF (&VTYPE='SQLRPT') THEN(+ 3100 REPORT REPORT(&VIEWLIB/&VIEW)) 3200 ELSE (PRINT VIEW(&VIEWLIB/&VIEW)) 3300 CHGJOB OUTQ(&JOUTQLIB/&JOUTQ) 3400 SWIRETURN 3500 ENDDO 3600 ENDPGM
66 Sequel Web Interface Administrator Guide
Appendix
Security
The System i HTTP server may be set up to enact user profile and password security to limit access from the Internet or an intranet. This option is available for OS/400 V4R2 and later. User profile and password validation are specified with the UserID and PasswdFile configuration directives.
SWI works as a Common Gateway Interface (CGI) program that is run by the System i HTTP server program. All SWI requests are run under a user profile named QTMHHTP1. If user/password valida-tion is not implemented, users can prohibit access to queries, views, files, and libraries by revoking authority to the QTMHHTP1 user profile. HTTP configuration directives can be set to require user/password validation. In that case, normal System i object authority constraints are enforced by the operating system, and the authority available is controlled by the user id entered on the sign on prompt.
There is no delete or update risk to System i data or objects. The System i HTTP server is a read-only server. It does not support the HTML PUT or DELETE methods. SWI does not expose UPDATE or DELETE commands.
Additional notes on security setup are described in the IBM Webmaster's Guide (GC41-5434).
Directory Listing Access
In addition to System i enforced authority constraints, SWI provides an additional level of control over the ability to list queries, views and reports in a given library. When Directory listing access is set to 'ON' in SWI defaults, the SWI list building function is fully enabled and user access to direc-tory lists will be controlled solely by System i object authority.
When Directory listing access is set to 'OFF' in SWI defaults, the SWI list building function is dis-abled, and users will not be able to browse lists of views, reports or queries for any library.
When the Directory listing access is set to 'SELECTIVE', the directory listing function for each library is controlled by the existence of a data area named WWWBRWS in the library. If the data area does not exist in a particular library, the library is considered ‘restricted’ and SWI will not list available objects for that library.
If the data area exists, directory browsing is allowed only if the user has at least *USE authority to the data area. If user id/password validation is not enabled, the user id QTMHHTP1 is used for checking authority to the data area.
Objects in a restricted library (a library without the WWWBRWS data area) can still be accessed and executed using a URL in the browser, or through links provided on user-designed web pages.
Similar to the SELECTIVE setting, the Directory listing access value of ‘STRICT’ controls the directory listing function for each library by the existence of a data area named WWWBRWS in the library. If the data area does not exist in a particular library, the library is considered ‘restricted’ and SWI will not list available objects for that library. In addition, the STRICT setting adds an extra layer of protection by disabling access and execution of objects in a restricted library when using a URL in a browser, or through links provided on user-designed web page.
If the data area exists, directory browsing is allowed only if the user has at least *USE authority to the data area. If user id/password validation is not enabled, the user id QTMHHTP1 is used for checking authority to the data area.
Appendix 67
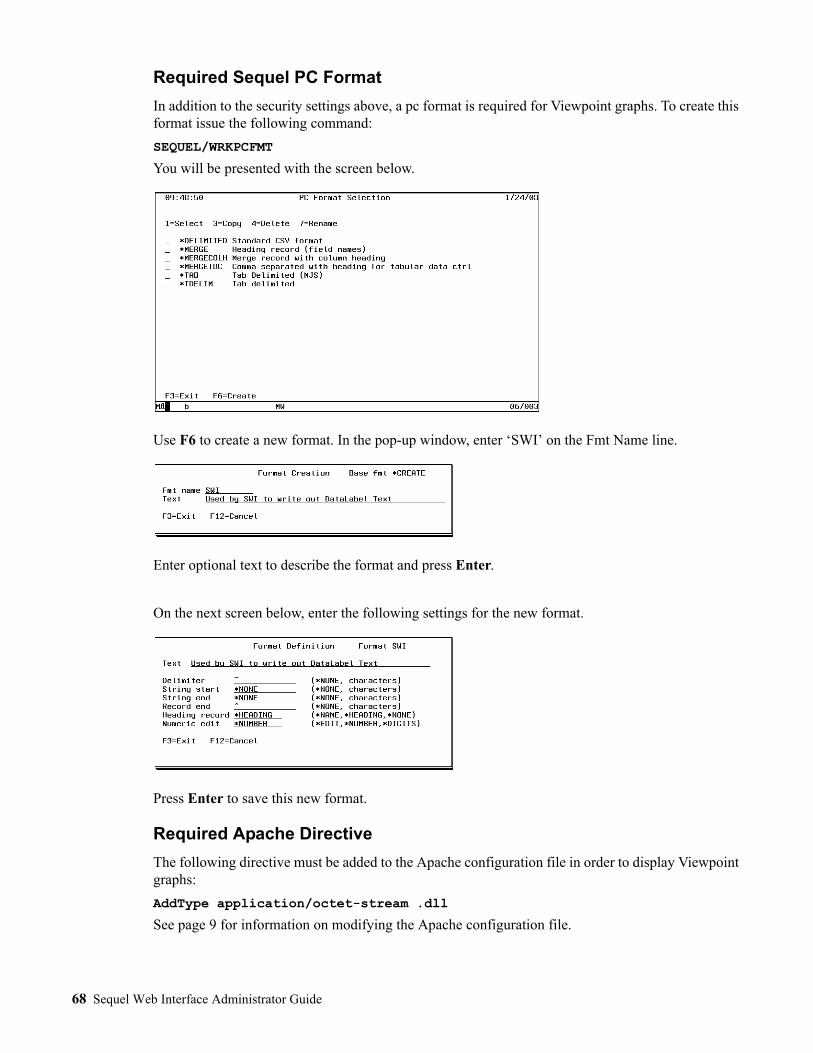
Required Sequel PC Format
In addition to the security settings above, a pc format is required for Viewpoint graphs. To create this format issue the following command:
SEQUEL/WRKPCFMT
You will be presented with the screen below.
Use F6 to create a new format. In the pop-up window, enter ‘SWI’ on the Fmt Name line.
Enter optional text to describe the format and press Enter.
On the next screen below, enter the following settings for the new format.
Press Enter to save this new format.
Required Apache Directive
The following directive must be added to the Apache configuration file in order to display Viewpoint graphs:
AddType application/octet-stream .dll
See page 9 for information on modifying the Apache configuration file.
68 Sequel Web Interface Administrator Guide
Multi-Language Features - Classic Interface
In addition to the WELCOME and HEADER members, which can be translated as needed, SWI also supports the translation of headings for the Object List and Spooled File List displays.
These list displays have a small number of text strings that describe the information on the pages. Translations for these strings can be provided by entering the translated text into the SWIXLATE file.
SWIXLATE has records for the Object List (Format=OBJLIST), Spooled File List (Format=SPLFLIST), and runtime prompt (Format=RUNP) displays. The English form of these strings is pro-vided in the set of records shown below coded with LANGUAGE="ENU". There are 6 records for the Object List display, 13 records for the Spooled File List display, and 5 records for the runtime prompt display.
These records can be copied, translated and assigned an appropriate language code and then be used to supply translated text when using SWI. Records can be maintained with a DFU program or any other standard method for manipulating file data. SWI does not provide a file maintenance program for this purpose.
When using the Web Interface, the desired language can be selected by including a new directive named LANGID in the URL request string. For example, the following link could be used to request
LANGUAGE TYPE Column Text
ENU OBJLIST 1 Select an object fromENU OBJLIST 2 by clicking on its nameENU OBJLIST 3 Click on icon to display descriptionENU OBJLIST 4 ObjectENU OBJLIST 5 TypeENU OBJLIST 6 DescriptionENU SPLFLIST 1 Job NameENU SPLFLIST 2 Job UserENU SPLFLIST 3 Job NumberENU SPLFLIST 4 DateENU SPLFLIST 5 TimeENU SPLFLIST 6 File NameENU SPLFLIST 7 File NumberENU SPLFLIST 8 Total PagesENU SPLFLIST 9 Total CopiesENU SPLFLIST 10 User DataENU SPLFLIST 11 OUTQENU SPLFLIST 12 OUTQ LibraryENU SPLFLIST 13 StatusENU RUNP 1 Run ViewENU RUNP 2 View:ENU RUNP 3 Report:ENU RUNP 4 Script:ENU RUNP 5 Table:
Appendix 69
a list of Viewpoint objects in the SWISAMPLE library and use German headings to describe the list contents.
http://207.208.238.144/SEQUEL?obj=*all&lib=swisample&langid=DEU
There are 3 ways to control which translation is used by SWI.
Method 1 - Simple default. A set of records with a blank language code will automatically be used if present. If the request does not specify a specific LANGID, the text present with a blank lan-guage code will be used. If there are no blank language code records, the standard US English headings will be used. These cannot be changed by editing the records coded with ENU.
Method 2 - User specific default. This method requires using a secure web signon. With this method, different users can have different default language translations by placing different versions of the SWIXLATE file in each users current library. Each SWIXLATE file will have a different translation in the records coded with a blank language code.
Method 3 - User written HTML with links to SWI list displays. In this method, the link to SWI list display is coded to include the LANGID directive in the URL request string.
Skybot
This section is reproduced from the Skybot document, Installing or Updating a Skybot Scheduler IBM i Agent, HelpSystems, LLC. 2014.
Running a Skybot IBM i Agent
The Skybot Scheduler agent process runs as jobs in the Skybot subsystem (SKYAGENT by default). You can start and stop the agent process with the SKYSTOP and SKYSTART commands in the product library (SKYAGENT by default).
Run the command, WRKACTJOB SBS(SKYAGENT), to view the Skybot subsystem.
Setting the Skybot Scheduler Agent to Start on IPL
The Skybot Scheduler agent starts each time the SKYAGENT subsystem starts. Add the following command to your initial program load (IPL) procedures to start the SKYAGENT subsystem each time you IPL:
STRSBS SBSD(SKYAGENT/SKYAGENT)
The Skybot Scheduler agent should be shut down whenever you power down your system. To make sure this occurs, insert the following command in your power-down or save program procedures:
CALL PGM(SKYAGENT/SKYSTOP)
Skybot Scheduler Authorization
When installed by default, the Skybot Scheduler agent creates two user profiles:
SKYBOTUSR
• Limited authority *PGMR user class profile.• Owns most of the Skybot objects.• Runs the agent processes.
70 Sequel Web Interface Administrator Guide
Most programs adopt the SKYBOTUSR authority to access Skybot data.
SKYBOTADM
• *SECOFR user class with high authority.• Owns the SKY163 program that submits the user jobs.• The SKY163 program adopts the authority of SKYBOTADM to allow it to submit jobs using
any configuration in the product.
Note: Installing into an ASP group creates an additional user profile that is configured specifically to reference the ASP group. The Skybot agent process runs as that user profile. That user profile refer-ences the SKYBOTUSR user profile as a group profile to have authority to access the Skybot objects.
If you're concerned about how much authority SKYBOTADM has on your system, you can reduce the authority of that profile and selectively grant authority to the system objects required to submit user jobs. To reduce the authority, use this command:
CHGUSRPRF USRPRF(SKYBOTADM) USRCLS(*USER) SPCAUT(*USRCLS)
If you reduce the authority of SKYBOTADM, you should make SKYBOTADM reference SKY-BOTUSR as a group profile so it has access to all Skybot objects. Use this command to do so:
CHGUSRPRF USRPRF(SKYBOTADM) GRPPRF(SKYBOTUSR)
After reducing the SKYBOTADM authority, you will need to provide SKYBOTADM with appropri-ate authority to any/all objects specified by the IBM i agent environments you define in Skybot Scheduler for running user jobs. Skybot Scheduler will not be able to submit jobs that reference any objects on the SBMJOB command that SKYBOTADM is not authorized to use.
Sequel HTML Functions
Sequel provides several functions to facilitate the development of views intended for use with SWI. HREF, HYPERLINK, IMG and IMGREF will build an HTML HREF tag and an HTML IMG SRC tag respectively. These functions simplify the process of building drill down views and views that display pictures using SWI and a browser interface.
HREF
This function builds the HREF tag needed to create a link to another view, report, script, or query object—a ‘drill-down’ link. Each operand can be a field name, a literal, or an expression. The first two operands are required. The first one is the item to appear on the page as an underlined "linkable" item. The second operand names the object to be run. If supplied, the third operand names the library for the object.
Subsequent operands are pairs of expressions. The first item in the pair names a variable used by the view, script, or report. The second item specifies its value.
HREF(item,"object"[,"library"[,"variable1",value1 [,"variable2",value2,...]]])
Item - An expression (numeric or character) that will appear as the underlined link.
Object - A character expression result to appear in the OBJ= parameter.
Library - An optional character expression result to appear in the LIB= parameter.
Variable1, value1 - Define the variable name (character expression) and value for each variable to appear. Numeric values are automatically converted to character.
Appendix 71
The following example causes the value (1129.67) to appear underlined on the HTML page and the query string to reference object ARQRY.
HREF(amtdu,"ARQRY")
A HTML tag like the following will be generated
<a href="SEQUEL?obj=ARQRY">1129.67</a>
This example causes the customer number to appear as the link, and the corresponding cname value to be passed in the query string to the NAME variable on the SEQUELEX/CUSTLIST object.
HREF(cusno,"custlist","SEQUELEX","name",cname)
A HTML tag like the following will be generated:
<a href="SEQUEL?obj=custlist&lib=SEQUELEX&%26name=NBCO+Corpora-tion+Inc.">100200</a>
HYPERLINK
HYPERLINK is a dual purpose function provided by Sequel.
Used in Viewpoint and SWI:HYPERLINK creates hyperlinks in your Viewpoint view results to launch Windows or Web-based objects (on the Internet or a network drive) like Excel spreadsheets, PDF documents, ViewPointy objects, Web sites, or any other type of application. You can run your views locally in Viewpoint or in the Sequel Web Interface using databind=N or databind=A.
Create the underlined link field by using the HYPERLINK function in conjunction with the required hyperlink keyword in the column heading. Key elements are bold:
HYPERLINK(URL, CHARDATA) NAME(FLDNAME) COLHDG("Column" "Heading" "HYPERLINK")
Here is important information about the key elements:
• URL is a field or expression that contains the Web or network drive address of the link to the document or object. It must be a character value that provides a valid URL or UNC path such as:"http://www.sequel-software.com"or"file://///POWERi/path/filename.xls"
• CHARDATA is a field or expression that supplies the data that appears underlined in the view results. It must be a character value.
• For Viewpoint only: The COLHDG parameter must contain the value "HYPERLINK" (or "hyperlink") as one of the column heading entries.
• For SWI, with databind=A, the link will automatically open in a new window or new tab depend-ing on browser settings.
Used in Classic SWI:The HYPERLINK function can be used with an HREF expression (for creating drill-down links) to cause the link to open in a new window like so:
HYPERLINK(HREF(link,"object","library","variable1",value1)) NAME(FLDNAME) COLHDG("Column" "Heading")
Note: Neither HREF nor HYPERLINK(HREF()) give a result that will work in SWI Explorer.
72 Sequel Web Interface Administrator Guide
Used in (new) SWI Explorer:The HREF function (for creating drill-down links) is not supported in the SWI Explorer environ-ment, so the link must be built manually like so:
CAT('"http://POWERi/secure/SEQUEL?obj=OBJECT &lib=LIBNAME&%26variable=',VALUE,'">',ITEM)
This is a general example for running a ‘drill to’ view from SWI that runs in the same window as the ‘drill from’ view.
In order to run the ‘drill to’ and open results in a new window, simply add the HYPERLINK function like so:
HYPERLINK(CAT('"http://POWERi/secure/SEQUEL ?obj=OBJECT&lib=LIBNAME&%26variable=',VALUE,'">',ITEM))
IMG
This function builds the IMG tag needed to reference an image file through SWI. The first must be a varying length character expression, a literal, or a field name that specifies the location of the image file. This value will be appended to the current URL and processed by the HTTP configuration file to locate the image. The second operand specifies an integer which is the pixel height of the image on the page.
IMG(source[,height])
Source - A character expression result that will be appended to <img src="SEQUEL/ to form the path to the image object.
Height - An optional numeric expression result that will appear in the height definition of the image.
Example:To use a jpg image of your logo:
IMG("logo.jpg",40)
A HTML tag like the following will be generated:
<img src="SEQUEL/logo.jpg" height="40">
To concatenate the customer number into the image file:
IMG(cat("images/C",trim(char(cusno)),".jpg"),100)
A HTML tag like the following will be generated causing the customer number to be converted to character, trimmed, and concatenated into the name of the image file:
<img src="SEQUEL/images/C100200.jpg" height="100">
IMGREF
This function is an enhanced version of the IMG function. It allows for the inclusion of additional attributes for image links such as alt, width, longdesc, and so on.
IMGREF(source[,height[,optional tags]])
Source - A character expression result that will be appended to <img src="SEQUEL/ to form the path to the image object.
Height - An optional numeric expression result that will appear in the height definition of the image.
Optional Tags - Typically this is an attribute (alt, width, etc.) set equal to a quoted value.
Appendix 73
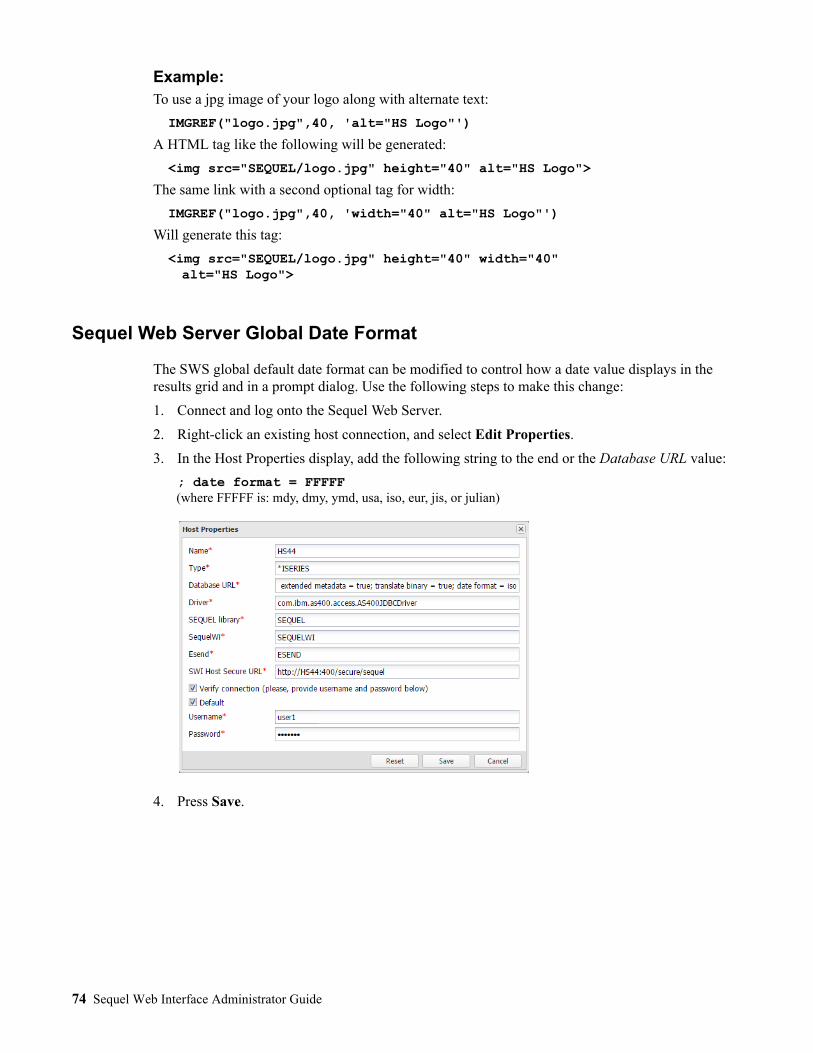
Example:To use a jpg image of your logo along with alternate text:
IMGREF("logo.jpg",40, 'alt="HS Logo"')
A HTML tag like the following will be generated:
<img src="SEQUEL/logo.jpg" height="40" alt="HS Logo">
The same link with a second optional tag for width:
IMGREF("logo.jpg",40, 'width="40" alt="HS Logo"')
Will generate this tag:
<img src="SEQUEL/logo.jpg" height="40" width="40" alt="HS Logo">
Sequel Web Server Global Date Format
The SWS global default date format can be modified to control how a date value displays in the results grid and in a prompt dialog. Use the following steps to make this change:
1. Connect and log onto the Sequel Web Server.
2. Right-click an existing host connection, and select Edit Properties.
3. In the Host Properties display, add the following string to the end or the Database URL value:
; date format = FFFFF (where FFFFF is: mdy, dmy, ymd, usa, iso, eur, jis, or julian)
4. Press Save.
74 Sequel Web Interface Administrator Guide
IndexAAllow "Select" requests .................................................... 15Allow spooled file requests .............................................. 15Allow submit from object list ........................................... 16Alternate HTML Headers and Footers ............................. 31Anonymous Access
SWS .......................................................................... 20Apache Server .................................................................... 9
BBuild XSL File ................................................................. 38
CClassic Interface
Allow "Select" requests ............................................. 15Allow spooled file requests ....................................... 15Data Binding as Default ............................................ 16Data Binding Path ..................................................... 16Directory listing access ............................................. 13Display Object Images .............................................. 15Form Action .............................................................. 15HTML Base Timeout ................................................ 14Protected Path ........................................................... 13Run-time/object list attributes ................................... 15Show View Text in Prompts ..................................... 15SWI Library .............................................................. 13
Column Sorting .......................................................... 16, 32Command Parameters ...................................................... 25Contacting Sequel Software ............................................... 7Create an HTML file to open in Excel ............................. 46Customize SWI HTML Members .................................... 23
DData Binding as Default ................................................... 16Data Binding Path ............................................................ 16&DATABIND= ................................................................ 32Default HTML Documents .............................................. 21Defaults ............................................................................ 13Directory Listing Access .................................................. 67Directory listing access .................................................... 13Display an Object Description ......................................... 28Display Frames in SWI .................................................... 41Display Object Images ..................................................... 15Display spooled files ........................................................ 30
EEdit with SEU ................................................................... 23E-Mail from a Sequel Script ............................................. 47ENDTCPSVR ................................................................... 12EXECUTE ........................................................................ 40Execute to a File ............................................................... 40Explorer Interface
Directory listing access ............................................. 13
HTML Base Timeout .................................................14Protected Path ............................................................13SWI Library ...............................................................13
FFOOTER Member ............................................................22&FOOTERMBR= .............................................................31Form Action ......................................................................15&FRAME= .......................................................................34Frames
In URL .......................................................................34With SWIOPEN ........................................................41
GGraph Shortcut ..................................................................33
HHEADER Member ............................................................22&HEADERMBR= ............................................................31Hide URL ..........................................................................15Host Connection
Add ............................................................................19HREF ................................................................................71HTML Base Timeout ........................................................14HTML documents .............................................................21HTTP Server Job Environment .........................................11HYPERLINK ....................................................................72
IIMG ...................................................................................73IMGREF ...........................................................................73Import as a Web Query .....................................................47Import Data to a Spreadsheet ............................................45
LLANGID ...........................................................................69&LIB= ...............................................................................25Library Lists ......................................................................11
MMerge XML data ..............................................................37Modify the Apache HTTP Config File ...............................9Modifying an XSL file ......................................................60Move Browser Back in History ........................................41Multi-Language Features ..................................................69
OOBJ= .................................................................................25&OBJTYP= ......................................................................28Open .VPT* Objects .........................................................11OUTQ= .............................................................................30&OUTQLIB= ....................................................................30Override view results title .................................................32
Index 75
PPassword Security
Apache HTTP Server ................................................ 10PC Requirements. See RequirementsProduct Defaults ............................................................... 13Prompted Action .............................................................. 63Prompted Scripts .............................................................. 29Protected Path ................................................................... 13
QQTMHHTP1 ............................................................... 12, 67QTMHHTTP .................................................................... 12QZHBHTTP ..................................................................... 11
RRequirements
PC ................................................................................ 8PC (Sequel Web Server) ............................................. 8Sequel Software .......................................................... 7Showcase ..................................................................... 7System i ....................................................................... 7
Run a Sequel ’Select’ Statement ...................................... 27Run a View/Report/Table or Query ................................. 25Runp= ............................................................................... 29Runtime Prompting .......................................................... 29Run-time/object list attributes .......................................... 15
S&SBMJOBD= .................................................................. 31&SBMJOBQ= .................................................................. 31&SBMOUTQ= ................................................................. 31Security ............................................................................. 67SELECTIVE ............................................................... 13, 67Sequel HTML Functions .................................................. 71Sequel Software Requirements. See RequirementsSequel Web Server Requirements. See RequirementsServe an XML Document ................................................ 40SETVAR .......................................................................... 29Show View Text in Prompts ............................................ 15Showcase HTML Functions ............................................. 71Showcase Requirements. See RequirementsSkybot IBM i Agent
Running ..................................................................... 70Start on IPL ............................................................... 70
Skybot Scheduler Authorization ...................................... 70Spool File Management Functions ................................... 36Spooled File Management ................................................ 35
Spoolfile Action ................................................................35SQL= .................................................................................27STRICT .......................................................................14, 67STRTCPSVR ....................................................................12Submit a request to a job queue ........................................31Suppress HTML Headers and Footers ..............................31SWI Library ......................................................................13SWIDFT ............................................................................13SWIHTML ..................................................................21, 23&SWINOFOOTER= ........................................................31&SWINOHDR= ................................................................31SWIOPEN .........................................................................41SWIRETURN ...................................................................41SWISETDFT ....................................................................13SWISTMF .........................................................................42SWIVPDFT ......................................................................37SWIXLATE ......................................................................69SWIXMLMRG .................................................................37SWIXMLSRV ..................................................................40SWIXSLBLD ....................................................................38System i Requirements. See Requirements
T&TITLE= ..........................................................................32
UUNC path ..........................................................................72User Profiles .....................................................................12User= .................................................................................30
VViewpoint Graph Support .................................................43
In URL .......................................................................33Required Apache Directive .......................................68Required Sequel PC Format ......................................68
Viewpoint Settings ............................................................20&VPT= ..............................................................................33
WWELCOME Member ........................................................21WRKPCFMT ....................................................................68WRKTCPSTS ...................................................................12WWWBRWS ........................................................13, 14, 67
XXML Result Syntax ..........................................................62XML/XSL .........................................................................49XML/XSL Development Hints .........................................52
76 Sequel Web Interface Administrator Guide