administrator guide - one health port · a digital credential binds the ... access to participating...
TRANSCRIPT

Administrator Guide
Version 9
November 2016

Administrator Guide:
T A B L E O F C O N T E N T S
1 C O N T E N T S
INTRODUCTION .............................................................................................................................................................4
1 SUBSCRIBER NOMINATIONS .......................................................................................................................................5
1.1 SUBSCRIBER NOMINATION INSTRUCTIONS ....................................................................................................5
1.2 CONFIRM SUBSCRIBER NOMINATION .............................................................................................................8
2 SUBSCRIBER REGISTRATION .......................................................................................................................................9
2.1 ACTIVATION CODE VALIDATION .....................................................................................................................9
2.2 SUBSCRIBER AGREEMENT ............................................................................................................................10
2.3 OHP SUBSCRIBER INFORMATION .................................................................................................................11
2.4 NEW PASSWORD ENTRY...............................................................................................................................12
2.5 PASSWORD SELF SERVICE RESET QUESTIONS ..............................................................................................12
2.6 ACTIVATION COMPLETE ...............................................................................................................................13
3 ADMINISTRATOR SUBSCRIBER MANAGEMENT .......................................................................................................13
3.1 RESET SUBSCRIBER’S PASSWORD ..................................................................................................................16
3.2 MODIFY SUBSCRIBER PROFILE .......................................................................................................................16
3.3 AFFILIATE SUBSCRIBER ...................................................................................................................................18
3.4 REMOVE SUBSCRIBER AFFILIATION................................................................................................................19
3.5 ADD SUBSCRIBER ROLES ................................................................................................................................20
3.6 REMOVE SUBSCRIBER ROLES ..........................................................................................................................21
3.7 SUSPEND SUBSCRIBER ACCOUNT ...................................................................................................................23
3.8 SEND ACTIVATION CODE .................................................................................................................................23
3.9 WHEN AN ADMINISTRATOR LEAVES AN ORGANIZATION ...............................................................................24
4 ORGANIZATION ADMINISTRATION ..........................................................................................................................25
4.1 ADD OR DELETE TAX ID FOR AN ORGANIZATION ............................................................................................26
4.2 MODIFY PROFILE .............................................................................................................................................29
4.3 ADDING AN ADMINISTRATOR FOR AN ORGANIZATION .................................................................................31
Revised: November 2016 Page #: 2

Administrator Guide:
4.4 REMOVE AN ADMINISTRATOR ........................................................................................................................32
4.5 ADD HELPDESK ................................................................................................................................................33
4.6 CREATE SUB-ORGANIZATION ..........................................................................................................................34
4.7 SUBSCRIBER LIST .............................................................................................................................................35
4.8 PENDING APPROVAL LIST ................................................................................................................................36
4.9 WHAT TO DO IF YOUR OHP ADMINISTRATOR LEAVES THE ORGANIZATION ..................................................36
5 SUBSCRIBER ADMINISTRATION ...............................................................................................................................36
5. 1 UPDATE PERSONAL INFORMATION ................................................................................................................37
5. 2 VIEW MY ADMINISTRATORS ...........................................................................................................................39
5.3 VIEW REGISTERED DEVICES/BROWSER 2ND FACTOR (B2F) .............................................................................39
5.4 CHANGE PASSWORD .......................................................................................................................................40
5.5 CHANGE SECRET QUESTIONS ..........................................................................................................................41
5.6 VIEW ROLES AND AFFILIATIONS......................................................................................................................42
5.7 VIEW LOGIN HISTORY......................................................................................................................................43
5.8 VIEW TRANSACTION HISTORY.........................................................................................................................43
5.9 REMOVE ROLES ...............................................................................................................................................44
6 CONTACTING ONEHEALTHPORT CUSTOMER SUPPORT ..........................................................................................45
Revised: November 2016 Page #: 3

Administrator Guide:
I N T R O D U C T I O N
OneHealthPort’s Security Service is designed to reduce the cost, complexity and risk of information exchange between providers and their information trading partners by employing digital credentials that share common policy. A digital credential binds the identity of a specific person to an electronic “token” that can be recognized and verified by computer systems. While there is a lot more that goes on behind the scenes, many people tend to think of their digital credential as their user ID and password. To deploy and properly maintain these digital credentials, the service has a few important features:
Self-administration by provider organizations. Your organization gets to manage its own OneHealthPort
account. Delegated responsibility. Your organization accepts responsibility for issuing and terminating digital
credentials for your workforce. Simplified access for authorized individuals. To protect patient privacy, manage risk for your organization
and simplify work flow, it is vital that every authorized Subscriber gets the right digital credential, uses it properly and is able to quickly access only their own organization’s data.
One key to making the service work in this manner for all parties is the OneHealthPort Administrator. The Administrator manages the OneHealthPort account for their organization. This document is the OneHealthPort Administrator’s Guide. Its primary purpose is to assist you in your role as your organization’s OneHealthPort Administrator. The sections that follow will provide you with step-by-step guidelines for managing your organization’s OneHealthPort account. In addition, this document serves as a training tool for support staff and other parties that need to understand how the service works. As such, you will see some sections that are not targeted directly at you as the Administrator.
Becoming a OneHealthPort Administrator
There are two ways to become an Administrator for OneHealthPort.
The person that initially registers their organization for an account with OneHealthPort automatically
becomes an Administrator. Any Administrator can nominate an additional Subscriber within their organization and then promote that
Subscriber to be an Administrator.
Responsibilities of an OneHealthPort Administrator
The Administrator plays a critical role in the OneHealthPort trusted community. The Administrator manages the OneHealthPort account for each participating organization. In this capacity the Administrator has a number of responsibilities that relate to protecting patient privacy, minimizing risk for provider organizations and simplifying access to participating sites for individual Subscribers to the OneHealthPort service. The responsibilities of a OneHealthPort Administrator include:
Creating Subscriber accounts Limiting access of Subscribers within the participating organization Modifying or deleting Subscriber affiliations and roles when a Subscriber’s relationship with the participating
organization changes. (e.g., an employee leaves the organization or a provider that is new to the organization) Assisting Subscribers with resetting passwords
Revised: November 2016 Page #: 4

Administrator Guide:
Nominating staff members to be OneHealthPort Subscribers Ensuring each user of the OneHealthPort system from their organization has a unique Subscriber account. Establishing the organization affiliation and role for each Subscriber Ensuring the participating organization has at least one other Administrator in place in case the original
Administrator is unavailable to perform their duties or has left the organization Verifying the identity of all Subscribers nominated by the organization for OneHealthPort digital credentials Maintaining the participating organization’s information including affiliations (Tax IDs and other data) in an
accurate and timely fashion
These administrative functions and others are available for you to access through the OneHealthPort website: www.onehealthport.com. Click on “Manage Your Account” at the top of the page, and then click on “Administrator Account”.
1 S U B S C R I B E R N O M I N A T I O NS
As the OneHealthPort Administrator you can nominate colleagues in your organization for a OneHealthPort digital credential. You begin this process by visiting the OneHealthPort web site www.onehealthport.com click “Manage Your Account”, and click on “Administrator Account”. To access the Account Administration section you will be asked to enter your Subscriber ID and password in order to log in.
1 . 1 S U B S C R I B E R N O M I N A T I O N I N S T R U C T I O N S
The next screen will show the Subscriber administration menu. To proceed with a nomination select “Nominate Subscriber.”
Revised: November 2016 Page #: 5

Administrator Guide:
The next screen you will see asks you as the Administrator to confirm that you have verified the identity of the person you are nominating as a Subscriber. If you agree with this statement, please click “Approve.” If you do not agree with this statement, please click “Reject.” If you click reject, that will terminate the nomination process.
To nominate the Subscriber enter the Subscriber’s First Name, Last Name, and email address. Please click “Submit” when you have entered the information.
Revised: November 2016 Page #: 6

Administrator Guide:
The next step in the nomination process is to assign a role(s) to the Subscriber.
Roles are used by some participating sites to control what information is allowed to be seen by the Subscriber. You should assign a role(s) from the list on the “Community Roles” screen that best describes the work the Subscriber you are nominating does for your organization. Subscribers can have multiple roles. The choice of roles includes:
Clinical roles:
Licensed Practitioner (MD, DO, DDS, DMD, PA, ARNP, Midwife, Podiatrist) Licensed Nurse (RN, LVN, LPN) Medical assistant (nurse's assistant, CNA or RNA) Other service provider (acupuncturist, pharmacist, therapist, chiropractor, medical technicians in
radiology or ultrasound) Medical Director
Administrative roles:
Billing specialist Credentialing manager – used by ProviderSource EFT Administrator Referral coordinator Office manager, Office worker (receptionist, customer service, admitting)
Quality measurement/management roles:
Quality Report And Data Entry – used by WSHA – QBS Quality Reports (view only) - used by WSHA – QBS Quality Manager – used by Washington Health Alliance
Select the appropriate role for the Subscriber by clicking the box or boxes if multiple roles are appropriate and then click “Submit” when you are finished. Note: A provider must have the role of Licensed Practitioner on their OneHealthPort account in order to complete and attest the ProviderSource credentialing record.
Revised: November 2016 Page #: 7

Administrator Guide:
1 . 2 C O N F I R M S U B S C R I B E R N O M I N A T I O N
The final step in the nomination process confirms successful nomination and provides the Administrator with the Subscriber ID and a one-time activation code for that Subscriber. It is very important for the Administrator to note this activation code, as you will no longer be able to view it after this screen closes. Please copy the Subscriber ID and activation code exactly as listed. Once the Administrator has copied the activation code and Subscriber ID, click OK and that will conclude this set of screens.
At this time, the system will also send an email notification to the nominated Subscriber providing them with the web site link (URL) and Subscriber ID to complete registration. The system will request that the Subscriber contact you as the nominating Administrator to obtain the activation code. OneHealthPort recommends that you as the Administrator contact the Subscriber and deliver the activation code and Subscriber ID to them directly. It is important the activation code be delivered only to the person you know is the same individual you nominated to be the OneHealthPort Subscriber.
Revised: November 2016 Page #: 8

Administrator Guide:
2 S U B S C R I B E R R E G I S T R A T I O N
Starting the process:
After nomination by an Administrator, the Subscriber will receive an email from OneHealthPort explaining how to complete the registration process. The email will provide:
The Subscriber ID A link to OneHealthPort’s registration web site. The “activation” link. The nominating Administrator’s name and contact information.
2 . 1 A C T I V A T I O N C O D E V A L I D A T I O N
The nominating Administrator must provide the activation code to the Subscriber. The Administrator generates this code during nomination (see Section 3). Subscribers need to retain the activation code provided by the Administrator until they have successfully completed the registration process by creating a password. Activation codes remain valid until the Subscriber registration process has been completed.
Revised: November 2016 Page #: 9

Administrator Guide:
Upon clicking the web site link in the invitation email the Activation Code Validation page will load. This is where the nominated Subscriber must input the activation code the nominating Administrator should have given them.
Please note: If the Subscriber does not have the activation code they will have to ask the Administrator to resend the activation code. This process is explained in Section 5.9.
2 . 2 S U B S C R I B E R A G R E E M E N T
After the Subscriber has entered their activation code, they will be asked to accept OneHealthPort’s Subscriber Agreement. All OneHealthPort Subscribers must accept the Subscriber Agreement. Each individual should review the agreement and then click accept or decline. Acceptance is required in order for OneHealthPort to activate a credential for the Subscriber. “Decline” terminates the Subscriber registration process. If the Subscriber clicks “Approve” the Subscriber will move on to the next page.
Revised: November 2016 Page #: 10

Administrator Guide:
2 . 3 O H P S U B S C R I B E R I N F O R M A T I O N
The Subscriber is required to provide business contact information along with their date of birth and gender. OneHealthPort maintains this information for Subscriber support and security purposes only. The privacy policy listed on the OneHealthPort web site describes how OneHealthPort protects Subscriber information. After the Subscriber has entered their information they should click “Submit” to go to the next page.
Revised: November 2016 Page #: 11

Administrator Guide:
2 . 4 N E W P A S S W O R D E N T R Y
During this step, the Subscriber is asked to create their password. The OneHealthPort password guidelines require:
Length of 8-24 characters That passwords must contain at least three of the following four categories:
o Upper case letters o Lower case letters o Numbers o Non-alphanumeric characters such as punctuation symbols (!@#$%^&?<>`~_+*).
The Subscriber should enter a password that complies with the OneHealthPort policy and then Click “Submit” when done.
2 . 5 P A S S W O R D S E L F S E R V I C E R E S E T Q U E S T I O N S
The Subscriber will choose four secret questions and provide answers to those questions. In the event of a forgotten password, the secret questions and answers can be used by the Subscriber at a later time to reset the password. The secret questions may also be used for security purposes by some of the participating sites. It is important for the Subscriber to choose questions and answers that they will remember. Answers are case sensitive and must be at least three (3) characters.
Revised: November 2016 Page #: 12

Administrator Guide:
To select secret questions, the Subscriber should click on the drop down menu for each question, click on the preferred question and then type the answer in the answer box next to the question. The Subscriber must select and answer all four secret questions. The answers being entered can be seen by the Subscriber by unselecting the Hide Answers check box in the lower left hand corner. The Subscriber should click “Submit” when the four questions have been selected and answered.
2 . 6 A C T I V A T I O N C O M P L E T E
The last screen in this process confirms successful creation of a password and entry of secret questions. This confirmation completes the registration process and the Subscriber’s activation code will no longer be valid. The Subscriber may immediately use the Subscriber ID and password as the digital credential to access OneHealthPort participating sites and applications. To proceed to the OneHealthPort home page and access participating sites, the Subscriber should click “Ok.”
3 A D M I N I S T R A T O R S U B S C R I B E R M A N A G E M E N T
Revised: November 2016 Page #: 13

Administrator Guide:
As an Administrator you have permission to perform the following administrative tasks for Subscribers you have nominated:
Update a Subscriber’s information Reset a Subscriber’s password Affliate an existing Subscriber to your organization Remove your organizational affiliation from Subscribers Change a Subscriber’s roles Change a Subscriber’s email address Send activation codes to new Subscribers
All of these functions are available in the Account Administration area at:
http://www.onehealthport.com/single-sign/manage-your-account
Begin by entering your Subscriber ID and password, to gain secure access to the OneHealthPort Administration area.
The next screen shows the OneHealthPort Administration main menu. The “Manage Subscriber” link in the “Subscriber Administration” sub-menu contains all administrative functions for managing Subscribers.
Revised: November 2016 Page #: 14

Administrator Guide:
Clicking any of the Manage Subscriber tools will prompt you to enter a Subscriber’s ID or Subscriber’s name to search.
To use the “search” feature, click on the magnifying glass icon and it will display a list of Subscribers you have access to as the Administrator. Once you have located the Subscriber you want to manage highlight that Subscriber row and click submit to view the Subscriber’s current profile (full name, Subscriber ID and Email). This is the first step in the workflow to make changes to the Subscriber’s account.
Revised: November 2016 Page #: 15

Administrator Guide:
3 . 1 R E S E T S U B S C R I B E R ’ S P A S S W O R D
As the Administrator you have the ability to assist a Subscriber in resetting a password. Password resets may be necessary when a Subscriber forgets the password, or learns that it has been compromised in some manner.
If a Subscriber knows the current password, it can be changed by the Subscriber by logging in to the Subscriber Administration area. If the Subscriber does not know the password, the “Secret Questions” process (see Section 6.1) may be used to allow the Subscriber to reset without assistance from the Administrator. If the Subscriber has not stored secret questions/answers in the OneHealthPort system, or has forgotten the answers, then the Administrator’s password reset function is available in order to assist the Subscriber.
To start the Administrator’s process of resetting a Subscriber’s password, from the Subscriber Profile Manager main menu, click “Reset Password”.
At the “Reset Password” screen, click name of the Subscriber’s account, then click “Submit.” This invalidates the Subscriber’s old password and allows a new one to be set, via a Temporary Password.
The next screen confirms that the email containing a temporary password has been sent to the Subscriber. This email has a link (URL) to a web page where the Subscriber can enter the Subscriber ID plus the Temporary Password, and then gain access to the Identity Manager Page.
3 . 2 M O D I F Y S U B S C R I B E R P R O F I L E
Revised: November 2016 Page #: 16

Administrator Guide:
As an Administrator you can change almost any of a Subscriber’s information except their date of birth. This is useful if the person has changed phone numbers, or moved to a different facility, or if their information was entered incorrectly during registration.
Name changes are for use only when a Subscriber has had a legal name change, such as in the event of marriage or divorce. Legal name changes are required to be made by the Administrator. Since the Subscriber’s name is a primary identifier for individuals in the OneHealthPort system, it is important to keep Subscriber names up-to- date.
Revised: November 2016 Page #: 17

Administrator Guide:
Note: when a Subscriber originally registers, a Subscriber ID is generated using the Subscriber’s name and three numbers (example: jsmith000). A name change will update OneHealthPort’s records for the Subscriber, but will NOT change the Subscriber ID.
To modify a Subscriber Profile, from the main menu, click “Modify Subscriber Profile”. Select the Subscriber profile to be modified, edit the profile, confirm the new information, and then click “Submit.”
You will then see a screen confirming the successful name change.
3 . 3 A F F I L I A T E S U B S C R I B E R
The Affiliate Subscriber function allows you as an Administrator to add affiliations for Subscribers that have OneHealthPort credentials. This is most often used to attach Subscribers to sub-organizations and give people from other organizations access to your information such as a billing entity or contracted service provider.
Please note, to affiliate someone to your organization they must first be a registered OneHealthPort Subscriber. If the individual you want to affiliate is not one of your Subscribers already and they are not registered through their own organization with OneHealthPort, you should direct them to register before trying to affiliate them to your organization.
Revised: November 2016 Page #: 18

Administrator Guide:
Type either the name or Subscriber ID of the person you wish to affiliate in the select Subscriber screen or use the magnifying glass icon to search Subscribers currently in your organization. Then select the name of the person you want to affiliate from the list of Subscribers found.
Pick the role to assign to them in your organization. You should then see a confirmation screen.
3 . 4 R E M O V E S U B S C R I B E R A F F I L I A T I O N
It is very important that accurate affiliations be maintained in OneHealthPort records by updating information as Subscriber affiliations change, particularly when an individual Subscriber is no longer affiliated with your organization. This is the method to disable access to your information for a Subscriber no longer with your organization or a Subscriber with a role change in your organization that no longer requires access to your organization information through a OneHealthPort Subscriber account.
Revised: November 2016 Page #: 19

Administrator Guide:
OneHealthPort participating sites rely on the affiliation information maintained in the OneHealthPort system to grant Subscribers secure access to information on their web sites. Inaccurate affiliation information could allow unauthorized access to protected information. Each Administrator is responsible, on behalf of their organization, for maintaining accurate affiliation and role information so that their Subscribers receive access only to online information their organization is entitled to view and manage.
To access this function, click “Remove Subscriber Affiliation” on the Subscriber Profile Manager main menu. Once you pick the Subscriber you want to remove, click “Submit,” you should see this confirmation screen.
3 . 5 A D D S U B S C R I B E R R O L E S
Like affiliations, role information for Subscribers should be kept up-to-date. If a Subscriber’s role has changed, it should be updated by the Administrator so that the Subscriber receives appropriate access rights associated with that role at OneHealthPort participating sites.
Revised: November 2016 Page #: 20

Administrator Guide:
Select the “Add Subscriber Role” tool to add additional community access roles to a Subscriber’s account. A list will appear with the Subscriber IDs of everyone in the organization.
After selecting a Subscriber, the next screen gives a list of all available roles. You should choose the desired role(s) by checking the box to the left of the role(s) and then pressing submit to add the role(s) to the Subscriber’s account.
After adding the role(s), a Success screen should appear.
3 . 6 R E M O V E S U B S C R I B E R R O L E S
Revised: November 2016 Page #: 21

Administrator Guide:
Different Community Roles give different kinds of role based access to Subscribers. If a Subscriber should no longer have that access, then those roles should be removed. Selecting the “Remove Subscriber Role” tool takes you to the Subscriber selection screen.
Clicking the magnifying glass without entering any information displays all the Subscribers in the organization, entering part of a Subscriber’s ID or name returns the Subscribers in the organization that most closely match the entered information.
Click the desired Subscriber and then the “Submit” button to access the community roles screen.
To remove a Subscriber’s role, highlight the community role in the top box and press “Select” to move it to the bottom box. Moving this role from top to bottom indicates that the role is no longer in the Subscriber’s account. Press “Submit” to confirm the removal.
Revised: November 2016 Page #: 22

Administrator Guide:
3 . 7 S U S P E N D S U B S C R I B E R A C C O U N T
The Suspension function is not currently available. To disable a Subscriber account, use the Remove Subscriber Affiliation workflow to disable the Subscriber account.
3 . 8 S E N D A C T I V A T I O N C O D E
If a recently nominated Subscriber misplaces their activation code, Administrators have the ability to issue them a new activation code via the Send Activation Code tool. Clicking the magnifying glass will return a list of all inactivated accounts, select the account that needs to be activated and press “Submit”.
Revised: November 2016 Page #: 23

Administrator Guide:
A screen will appear that allows you to enter the email address the new activation code will be sent to, the email address field will be automatically populated with the address the Subscriber account has listed, but may be changed in case that address is in error.
An email will be sent to that address with a link to the activation page and password instructions.
An Activation code will appear on the Administrator’s screen, it is the responsibility of the Administrator to manually deliver the new activation code to the Subscriber.
Click “Ok” returns the Administrator to the administration menu.
3 .9 W H E N A N A D M I N I S T R A T O R L E A V E S A N O R G A N I Z A T I O N
Revised: November 2016
Page #: 24

Administrator Guide:
Staff and management leave organizations for a variety of reasons. Each organization should always have two or more OneHealthPort Administrators to assist staff if your organization is big enough to support that. If the organization has a single OneHealthPort Administrator and they leave, two options are available:
If you have other active OneHealthPort Subscribers, you can promote one of those Subscribers to the
Administrator role. That person can nominate new Subscribers and promote a Subscriber to Administrator if needed.
If there are no other OneHealthPort Subscribers in our organization you will need to re-register your organization with a new Administrator. Register by accessing www.onehealthport.com and click the “Register” button.
4 O R G A N I Z A T I O N A D M I N I S T R A T I O N
OneHealthPort maintains certain information about each registered organization in order to allow it to effectively manage each organization’s account. This includes:
Contact information for the organization (address and phone number), The names of persons authorized to serve as OneHealthPort Administrators for the organization, Information about any sub-organizations created under the primary organization name A list of the organization’s Tax ID numbers. NPIs, not required data field, are collected for future reference.
In order for each organization to maintain current information in our system, OneHealthPort allows Administrators to manage their organization’s information. To manage your organization’s account, go to the OneHealthPort Administration site. On the right side of the main menu, you will find an Organization Administration Menu. The links found there allow Administrators to access each of the Organization Administration functions.
Revised: November 2016 Page #: 25

Administrator Guide:
4 . 1 A D D O R E D I T T A X I D F O R A N O R G A N I Z A T I O N
An organization may use multiple Tax IDs for accessing information on claims status at some of OneHealthPort’s participating web sites. Many of these sites use Tax IDs as the identifier for determining which claims the OneHealthPort Subscribers are allowed to access. As such, it is important to maintain accurate Tax ID information in the OneHealthPort system, as this information is attached to each Subscriber affiliated with your organization.
Revised: November 2016 Page #: 26
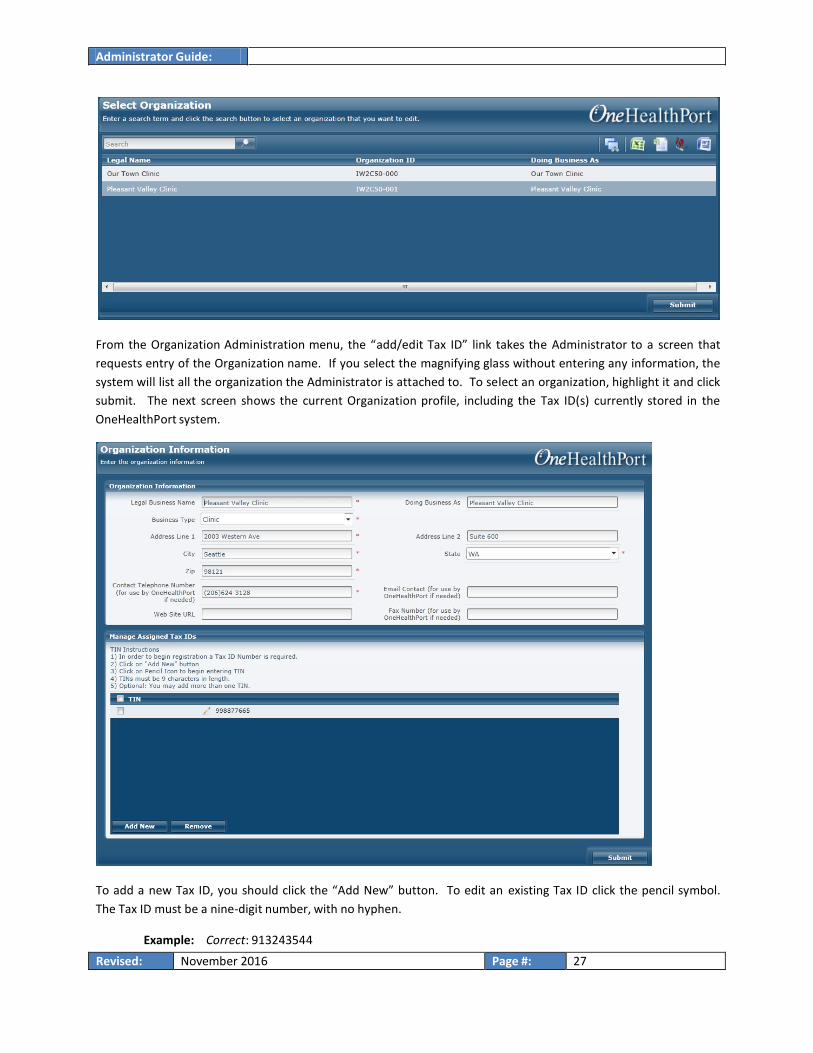
Administrator Guide:
From the Organization Administration menu, the “add/edit Tax ID” link takes the Administrator to a screen that requests entry of the Organization name. If you select the magnifying glass without entering any information, the system will list all the organization the Administrator is attached to. To select an organization, highlight it and click submit. The next screen shows the current Organization profile, including the Tax ID(s) currently stored in the OneHealthPort system.
To add a new Tax ID, you should click the “Add New” button. To edit an existing Tax ID click the pencil symbol. The Tax ID must be a nine-digit number, with no hyphen.
Example: Correct: 913243544
Revised: November 2016 Page #: 27

Administrator Guide:
Incorrect: 91-3243544
Multiple new Tax IDs may be entered, click the “Add New” button to add additional lines.
A Tax ID that is already in the system cannot be added to an unrelated organization. A Tax ID associated with a Parent organization can be added to a Sub-Organization tied to the parent. If you are trying to add a Tax ID and the system indicates it is already in use by another organization, OneHealthPort can assist you in identifying the organization using the Tax ID. Sometimes this is a billing company, vendor, or possibly a previous registration for your company. In order to minimize the number of duplicate organizations in the system, there will be a series of questions to help resolve the Tax ID conflict. More details of this process are available in Section 2 of this guide.
Revised: November 2016 Page #: 28
Administrator Guide:
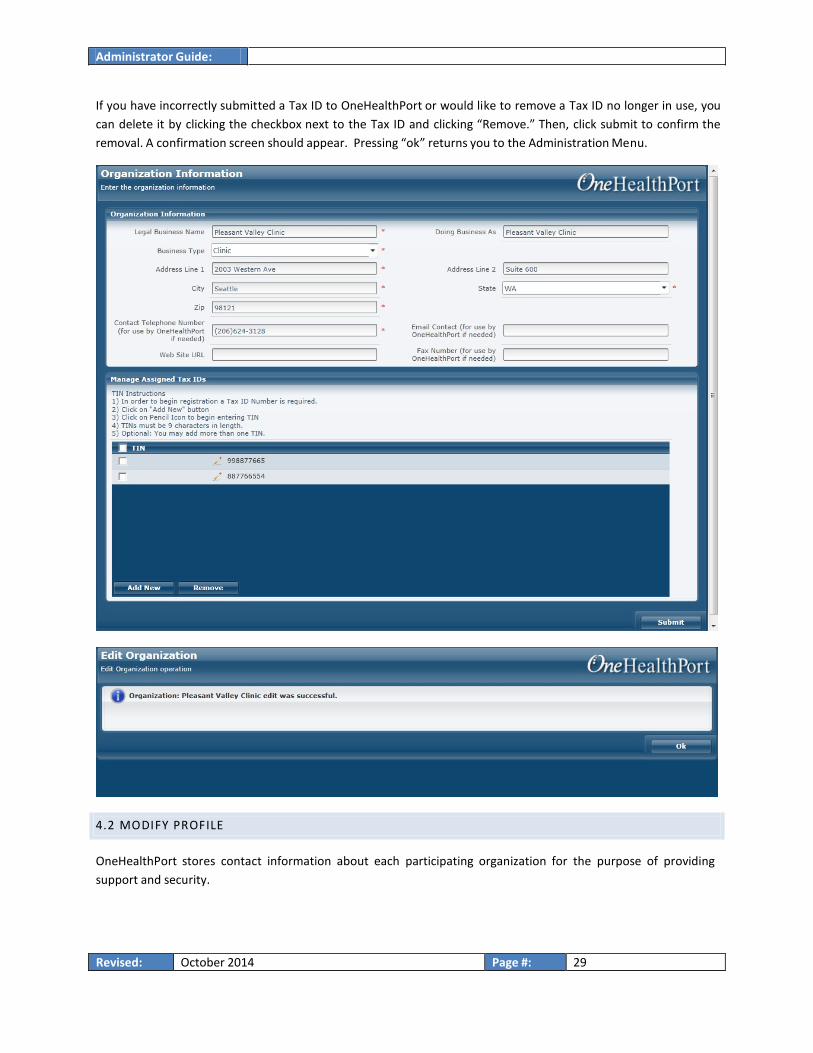
If you have incorrectly submitted a Tax ID to OneHealthPort or would like to remove a Tax ID no longer in use, you can delete it by clicking the checkbox next to the Tax ID and clicking “Remove.” Then, click submit to confirm the removal. A confirmation screen should appear. Pressing “ok” returns you to the Administration Menu.
4 .2 M O D I F Y P R O F I L E
OneHealthPort stores contact information about each participating organization for the purpose of providing support and security.
Revised: October 2014 Page #: 29

Administrator Guide:
OneHealthPort stores the name of the organization, its business address and its primary business phone number. It is important that OneHealthPort retains current information about each organization in the event we need to contact the organization regarding a support or security issue.
An Administrator can change the organization's contact information by clicking on the “Modify Profile” link in the Organization Administration menu.
The Administrator will then be asked to select the organization and/or sub-organization they wish to modify.
Select the organization and click “Submit”. The Administrator can review the profile for the organization and make edits by typing in the appropriate box.
Revised: November 2016 Page #: 30

Administrator Guide:
Once edits are made to the existing information displayed, click the “Submit” button to save the changes and receive a confirmation screen.
4 . 3 A D D I N G A N A D M I N I S T R A T O R F O R A N O R G A N I Z A T ION
Each organization can designate one or more persons to serve as OneHealthPort Administrators. It is highly recommended that each organization have at least two administrators. This allows the organization to perform critical OneHealthPort administration functions when one of its Administrators is unavailable or has left the organization.
To add an Administrator, the Administrator will login to the Manage Your Account section and select “Add Administrator”.
Revised: November 2016 Page #: 31

Administrator Guide:
You pick the name of the Subscriber that you wish to make an Administrator and hit submit. Pressing the magnifying glass returns the names of all active Subscribers under that Administrator. The Administrator then selects the Subscriber for promotion to administrator.
You will receive a confirmation screen to conclude the process.
4 . 4 R E M O V E A N A D M I N I S T R A T O R
If an organization determines that it no longer wants an individual to have OneHealthPort Administrator privileges, then an Administrator can use the “Remove Administrator” function to terminate those privileges. Because of the rights and responsibilities Administrators enjoy, it is vital that Administrator privileges be promptly revoked when the organization determines they are no longer valid. Clicking the Remove Administrator tool takes you to the “Find Subscriber” screen where you can enter the name of the Administrator to be removed, or select the magnifying glass to return a list of all Administrators.
Revised: November 2016 Page #: 32

Administrator Guide:
Select the Administrator whose access needs to be removed and click “Submit.”
A success notice will be returned.
If only a single Administrator is left in your organization that Administrator cannot be removed and attempting to do so will return the notice below. Another Subscriber should be promoted to Administrator before the single remaining Administrator is removed. If the Administrator has left the organization, a request can be made to promote an existing Subscriber to the Administrator role and that new Administrator can then disable the former Admin role. See section 6.9 for full details.
4 . 5 A D D H E L P D E S K
This function is unavailable at this time. It will allow the designation of Subscribers inside an organization to handle tech support and helpdesk issues.
Revised: November 2016 Page #: 33

Administrator Guide:
4 . 6 C R E A T E S U B - O R G A N I Z A T I O N
Many organizations have multiple Tax IDs. Sometimes certain Tax IDs are only used by certain departments or divisions within an organization. In these cases, it can be helpful to create “sub-organizations” or groupings of Tax IDs in the OneHealthPort system. This allows the organization to affiliate Subscribers with only the sub- organization Tax IDs they need to work with.
For example, if an organization has a certain Tax ID assigned to its Radiology unit, and wants to affiliate specific Subscribers with the Radiology unit (and its Tax ID); the OneHealthPort system allows creation of a sub - organization, such as "General Hospital - Radiology", and to assign certain Tax IDs to that sub-organization. Once an organization has created a sub-organization, when the organization nominates a Subscriber, the administrator will have the option to affiliate that person with the main organization ("General Hospital ") or the sub - organization ("General Hospital- Radiology"). Subscribers can also be affiliated with multiple organizations and sub-organizations, if desired.
OneHealthPort recommends that organizations exercise care in the assignment of names and Tax IDs to sub - organizations, to assure that the organization effectively manages its information and Subscribers over time. The Administrator may wish to contact the OneHealthPort help desk prior to creating a sub-organization, to discuss how to best manage the use of sub-organizations and particularly any Administrator rights it may delegate to these sub-organizations.
To create a sub-organization, you will select the parent organization. You will then enter the sub-organization’s data in the information fields, the sub-organizations name, the sub-organizations information, and the tax IDs it will be using.
Revised: November 2016 Page #: 34

Administrator Guide:
The Administrator that creates the sub-organization will automatically become the Administrator for the new sub- organization. That Administrator can nominate Subscribers and assign them to the new sub-organization and decide whether to promote an Administrator specific to the sub-organization or use one that has Administrator rights for both the sub-organization and parent organization.
4 . 7 S U B S C R I B E R L I S T O R L I S T U S E R S
The Subscriber List feature allows the Administrator to view a list of all Subscribers affiliated with your organization or sub-organization who have a Subscriber ID and their current status and last login information. This allows Administrators to manage their Subscribers.
The display shows a summary display listing the organization’s Subscribers and their information including SubscriberID, name, email address, roles and if the Subscriber is an Administrator.
On this screen an Administrator can perform most of the Subscriber management functions available elsewhere in the admin menu.
The Administrator can:
Check the recent use of OneHealthPort by each Subscriber with the “Subscriber Transaction” Tool Issue or revoke administrative access to Subscribers with the “Promote Subscriber/Demote Subscriber”
Tool Review a Subscriber account with the “Subscriber Detail” Tool Edit the a Subscriber account with the “Edit Subscriber” Tool Add and Remove Community Roles with the “Add Roles/Remove Roles” Remove Affiliations Reset Passwords Resend Activation code to un-activated Subscribers Remove Subscriber affiliations from the account.
Revised: November 2016 Page #: 35

Administrator Guide:
4 . 8 P E N D I N G A P P R O V A L L I S T
This future feature will allow an administrator to accept a request for a Subscriber ID from a new staff or contractor making a request to have an account affiliated with the organization. This feature is planned for 2015.
4 . 9 W H A T T O D O I F Y O U R O H P A D M I N I S T R A T O R L E A V E S T H E O R G A N I Z A T I O N
Staff and management leave organizations for a variety of reasons sometimes with little or no notice. Each organization should always have at least two OneHealthPort Administrators if your organization is big enough to support that. If you have only one Administrator and they leave, you have two options listed in the table below:
The Administrator left the organization and we need to nominate some new Subscribers
If you have other active OneHealthPort Subscribers, you can request that one of those Subscribers be promoted to the Administrator role.
Send an email to the OneHealthPort business offices at [email protected] with the following content:
Name and address of the organization Name and the OneHealthPort Subscriber ID of the person you wish to have
promoted A work phone number contact if OneHealthPort has additional questions A work email address if OneHealthPort has additional questions
The Administrator left the organization and there are no other OneHealthPort Subscribers in our organization
You will need to re-register your organization with a new Administrator. During the registration process you may hit a Duplicate TaxID error, the OneHealthPort system will walk you through choices that automate the process of asking for your TaxID to be released so you can register the organization with a new Administrator.
5 S U B S C R I B E R A D M I N I S T R A T I O N
The Subscriber Administration area can be accessed from the OneHealthPort web site, in the Account Administration section at http://www.onehealthport.com/single-sign/manage-your-account. Select “Subscriber Account” on the left navigation bar. Subscribers are able to perform the following tasks for themselves, after successful completion of Subscriber registration process:
Update personal information View Administrators View Registered Devices Change password or secret questions View roles and affiliations View log in history
Revised: November 2016 Page #: 36

Administrator Guide:
Remove roles
Subscribers begin by accessing the first screen in the Subscriber Administration area, which asks for entry of their Subscriber ID and password.
5 . 1 U P D A T E P E R S O N A L I N F O R M A T I O N
This function allows a Subscriber to update business address, email address, job title and phone information stored by OneHealthPort. Maintaining up-to-date contact information allows OneHealthPort and its participating sites to provide better Subscriber support. To access this function, the Subscriber clicks “Update personal information” on the main menu. Next, choose an item for editing and click “Edit.”
Revised: November 2016 Page #: 37

Administrator Guide:
The new or modified information may then be entered on the page. Once modifications have been completed, click “Submit.” The Subscriber will see a confirmation screen, indicating that the changes were successfully completed.
Revised: November 2016 Page #: 38

Administrator Guide:
5 . 2 V I E W M Y A D M I N I S T R A T O RS
To access this function, the Subscriber clicks “View My Administrators” on the main menu. You will view a list of Administrators for your organization along with their email addresses and phone numbers.
5 . 3 V I E W R E G I S T E R E D D E V I C E S
To access this function, the Subscriber clicks “My Registered Devices” on the main menu.
A Registered Device is a Browser 2nd Factor, an enhanced security feature to improve protection of personally identified information online. A Subscriber will be prompted to set up a device when the Subscriber visits a site that requires it. In that case the Subscriber will be redirected to the setup page. For Subscribers, the extra layer of security simply means answering a few secret questions yet it provides a higher level of protection and security than a password alone. This additional security is installed as a “cookie”, if your organization filters for “cookies”, you may have to answer the questions every time.
If there are no registered devices you will see an indication of this on a screen like the one below:
Revised: November 2016 Page #: 39

Administrator Guide:
5 . 4 C H A N G E P A S S W O R D
To access this function, the Subscriber clicks “Change Password” on the main menu. The OneHealthPort password policy requires that passwords meet the following standards:
Length between 8-24 characters Passwords must contain at least three of the following four categories:
o Upper case letters o Lower case letters o Numbers o Non-alphanumeric characters such as punctuation symbols (!@#$%^&?<>`~_+*).
Create your new password and then click submit. You will then see a confirmation screen.
Revised: November 2016 Page #: 40

Administrator Guide:
Account Inactivity Alert If a user account has not been logged in at least every 200 days, the following email will be sent to the user at 160 days:
5 . 5 C H A N G E S E C R E T Q U E S T I O N S
Click “Change Secret Questions” from the main menu. Select a secret question from the drop down menu and answer the question. You must type an answer for all four questions. Questions are case sensitive and must be at three characters.
Revised: November 2016 Page #: 41

Administrator Guide:
The Subscriber will click “Submit” and receive a confirmation.
5 . 6 V I E W R O L E S A N D A F F I L I A T I O N S
To access this function, the Subscriber clicks “View Roles and Affiliations” on the main menu. The Subscriber can view roles and affiliations connected to their OneHealthPort SubscriberID.
Revised: November 2016 Page #: 42

Administrator Guide:
5 . 7 V I E W L O G I N H I S T O R Y
If a Subscriber has any concerns that someone else is using their digital credential they can view their login history and confirm that they are the only ones using the digital credential.
To access this function, the Subscriber clicks “View login history” on the main menu. The Subscriber can view login history and registered devices connected with their OneHealthPort SubscriberID.
The table displayed shows the login date(s) for this Subscriber , the Internet address of the computer device used during the login, the name of the device being used (if available), and the first location the Subscriber went to when logged in. This history can be exported using one of the three options provided; export to Excel, export to CSV file, or export to PDF. The date range of the login history is selected in the drop down option at the top of display page.
If the Subscriber notes any unusual activity that raises concerns about whether their digital credential has been compromised, they should contact their Administrator and OneHealthPort support immediately.
5 . 8 V I E W T R A N S A C T I O N H I S T O R Y
To access this function, the Subscriber clicks “View Transaction History” on the main menu. The Subscriber can view the transaction or event date and description for an event associated with their OneHealthPort SubscriberID. This history includes changes to the individual Subscriber account or changes the Subscriber made to the organization account. This does not include a history of all the sites the Subscriber has visited.
Revised: November 2016 Page #: 43

Administrator Guide:
5 . 9 R E M O V E R O L E S
To access this function, the Subscriber clicks “Remove Roles” on the main menu. Subscriber will view a list of organizations their OneHealthPort Subscriber ID is affiliated with. The Subscriber must click on the name of the organization in which the role is to be removed and then click “Submit”.
The Subscriber will then be shown a list of community roles associated with their OneHealthPort Subscriber ID. Click the role to be removed then click “Remove” and then click “Submit.”
Revised: November 2016 Page #: 44

Administrator Guide:
The Subscriber will receive a confirmation screen noting that the role is successfully removed. The Subscriber cannot remove their last role if they only have one role left. Only an affiliated Administrator can add roles to a Subscriber account.
6 C O N T A C T I N G O N E H E A L T H P O R T C U S T O M E R S U P P O R T
If you have questions about any of the information contained in this guide, you may contact the OneHealthPort Help Desk by phone or email at:
Phone: 1-800-973-4797 (toll free) Email: [email protected]
Revised: November 2016 Page #: 45