administrative anner finance banner 9 · 1 missouri state university financial services...
TRANSCRIPT

1
Missouri State University Financial Services
Administrative Banner Finance Banner 9
For information on latest Banner Finance documentation, please visit:
http://www.missouristate.edu/financialservices/bannerfinance.htm
For questions and issue reporting:
Banner Finance:
Carrington Hall Room 113
901, South National Ave
Springfield, Missouri 65897
May 2017

2
Table of Contents
1. Introduction to Banner 9 administrative pages:
a. Welcome and Navigation………….……………………………………………………………………………..3
b. Forms Navigation………………………………..…………………………………………………………………..6
c. Administrative Banner Short Cut Keys……………………………………………………………………..7
d. Form Navigation………………………………………………………………………………………………………8
e. Set Preferences ……………………………………………………………………………………………………….8
f. My Banner – Personal Menu…………………………………………………………………………………….9
g. Download to Excel…………………………………………………………………………………………………..11
2. Frequently used forms………………………………………………………………………………………………………..12
a. Navigate FGIBDST- Organization Budget Status...…………………………………………………….13
b. Navigate FGITRND- Transaction Detail...………………………………………………………………….14
c. Navigate FRIGITD- Grant Inception To date……………………………………………………………..17
d. Navigate FTIIDEN – Vendor Information………………………………………………………………….18
e. Navigate FGIJVCD- Incomplete Documents……………………………………………………………..19
f. Navigate FOIDOCH – Document History………………………………………………………………….20
g. Navigate FAIVNDH – Vendor History……………………………………………………………………….21
h. Navigate FAAINVE – Invoice Entry…………………………………………………………………………..24
i. Navigate FPAPURR – Purchase Order Entry…………………………………………………………….27
3. Administrative Banner Error Messages………………………………………………………………………………31
4. Appendix
a. Appendix A……………………………………………………………………………………………………………..32
b. Appendix B ( Banner Rule Classes)…………………………………………………………………………..33

3
Navigate Banner 9
Menus: Select the three lines at the top left menu. This is the shortcut menu to Banner Forms. The
Menu is grouped by Functional modules.

4
Navigate Banner 9 The Welcome Screen:
1. User’s Name at the top right.
2. Button to log out. You can also close the browser to log out.
3. Search bar in the middle of the screen.
4. Pop out menu.
5. Search that stays on the top of the screen.
6. Folder to access recently used forms.
7. Application Navigator.
8. Shortcut Keys menu.
9. Help is activated when a form is displayed.
5
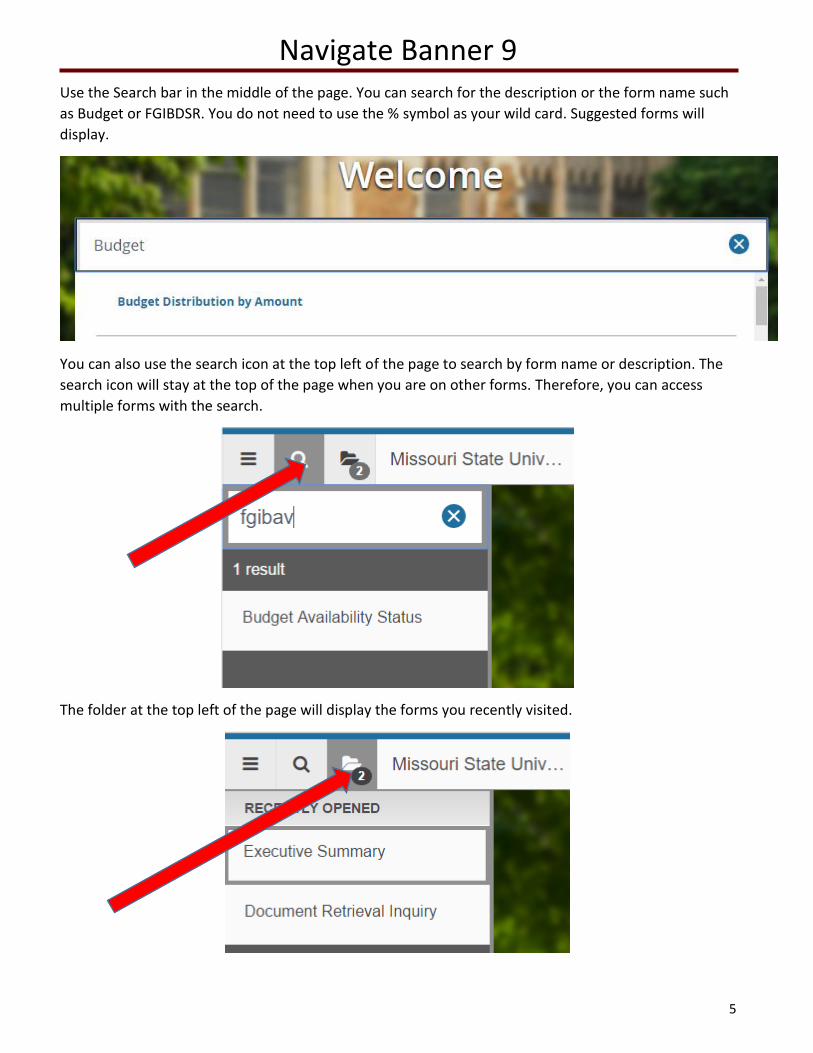
Navigate Banner 9 Use the Search bar in the middle of the page. You can search for the description or the form name such
as Budget or FGIBDSR. You do not need to use the % symbol as your wild card. Suggested forms will
display.
You can also use the search icon at the top left of the page to search by form name or description. The
search icon will stay at the top of the page when you are on other forms. Therefore, you can access
multiple forms with the search.
The folder at the top left of the page will display the forms you recently visited.
6
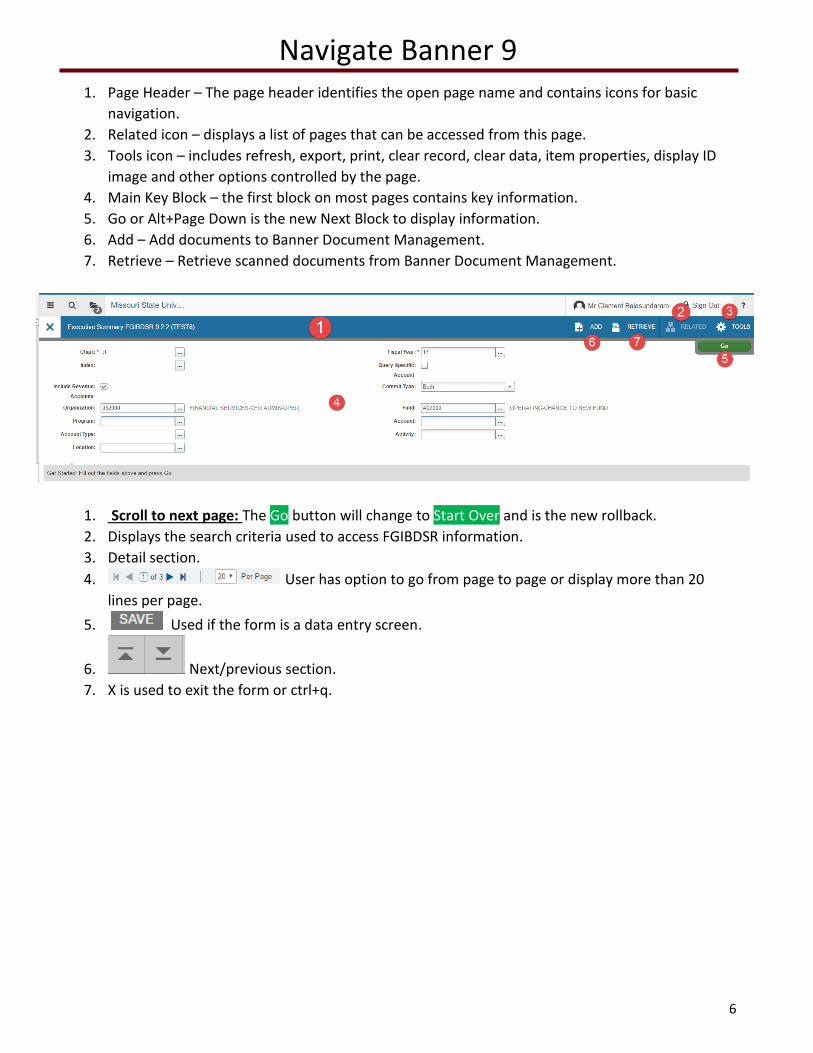
Navigate Banner 9 1. Page Header – The page header identifies the open page name and contains icons for basic
navigation.
2. Related icon – displays a list of pages that can be accessed from this page.
3. Tools icon – includes refresh, export, print, clear record, clear data, item properties, display ID
image and other options controlled by the page.
4. Main Key Block – the first block on most pages contains key information.
5. Go or Alt+Page Down is the new Next Block to display information.
6. Add – Add documents to Banner Document Management.
7. Retrieve – Retrieve scanned documents from Banner Document Management.
1. Scroll to next page: The Go button will change to Start Over and is the new rollback.
2. Displays the search criteria used to access FGIBDSR information.
3. Detail section.
4. User has option to go from page to page or display more than 20
lines per page.
5. Used if the form is a data entry screen.
6. Next/previous section.
7. X is used to exit the form or ctrl+q.

7
Navigate Banner 9
1. Section Icons:
a. Insert – Inserts Blank record.
b. Delete – Deletes current record.
c. Copy – Copies previous record.

8
Navigate Banner 9 Banner 9 Shortcut Keys
Function Key Stroke
Next Field/Item Tab
Previous Field/Item Shift + Tab
Up Up Arrow
Down Down Arrow
Previous Page Up Page Up
Next Page Down Page Down
First record Ctrl + Home
Last record Ctrl + End
Search list of values F9
Cancel page, Exit, Close Current Page, Cancel Search or Query
Ctrl + Q
Function Key Stroke
Save F10
Clear one Record Shift + F4
Delete Record Shift + F6
Duplicate Selected Record
F4
Insert/Create Record F6
Clear All in Section Shift + F5
Open Menu Directly Ctrl + M
Next Section Alt + Pg Down
Previous Section Alt + Pg Up
Duplicate Item F3
Clear Page/Start Over F7
Execute Filter Query F8
Function Key Stroke
Export Shift + F1
Print Ctrl + P
Refresh/Rollback F5
Change MEP Context Alt + Shift + C
Open Related Menu Alt + Shift + R
Open tools Menu Alt + Shift + T
More Information Ctrl + Shift + U
Application Navigator Display
Ctrl + Y
Application Navigator Search
Ctrl + Shift + Y
Application Navigator Help
Ctrl + Shift + L
Copy Ctrl + C
Cut Ctrl + X
Function Key Stroke
Paste Ctrl + V
Undo Ctrl + Z
Redo Ctrl + Shift + Z
Cancel Action Esc
Select on a Called Page
Alt +S
Retrieve BDM Document
Alt + R
Add BDM Document
Alt + A
Submit Workflow Alt + W
Release Workflow Alt + Q

9
Navigate Banner 9 Set Preferences
Set Your Preferences so you can:
a) See Column Header Records when you download to Excel
b) See the names of the screens on My Banner
1. In the search bar, type Preferences. Select
General User Preferences Maintenance.
2. In the Display Options tab, make sure all the
boxes are checked on the left side of the page. By
default, the second and last ones are not checked.
3. Save
4. Close
10
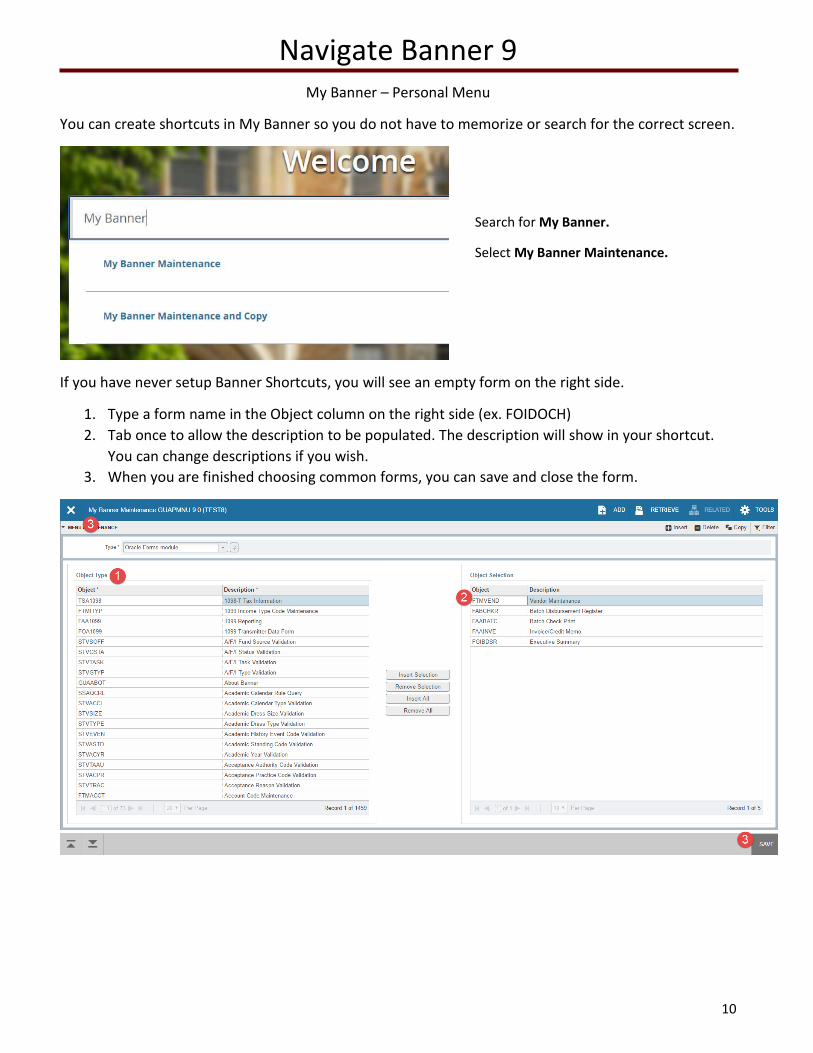
Navigate Banner 9 My Banner – Personal Menu
You can create shortcuts in My Banner so you do not have to memorize or search for the correct screen.
If you have never setup Banner Shortcuts, you will see an empty form on the right side.
1. Type a form name in the Object column on the right side (ex. FOIDOCH)
2. Tab once to allow the description to be populated. The description will show in your shortcut.
You can change descriptions if you wish.
3. When you are finished choosing common forms, you can save and close the form.
Search for My Banner.
Select My Banner Maintenance.
11
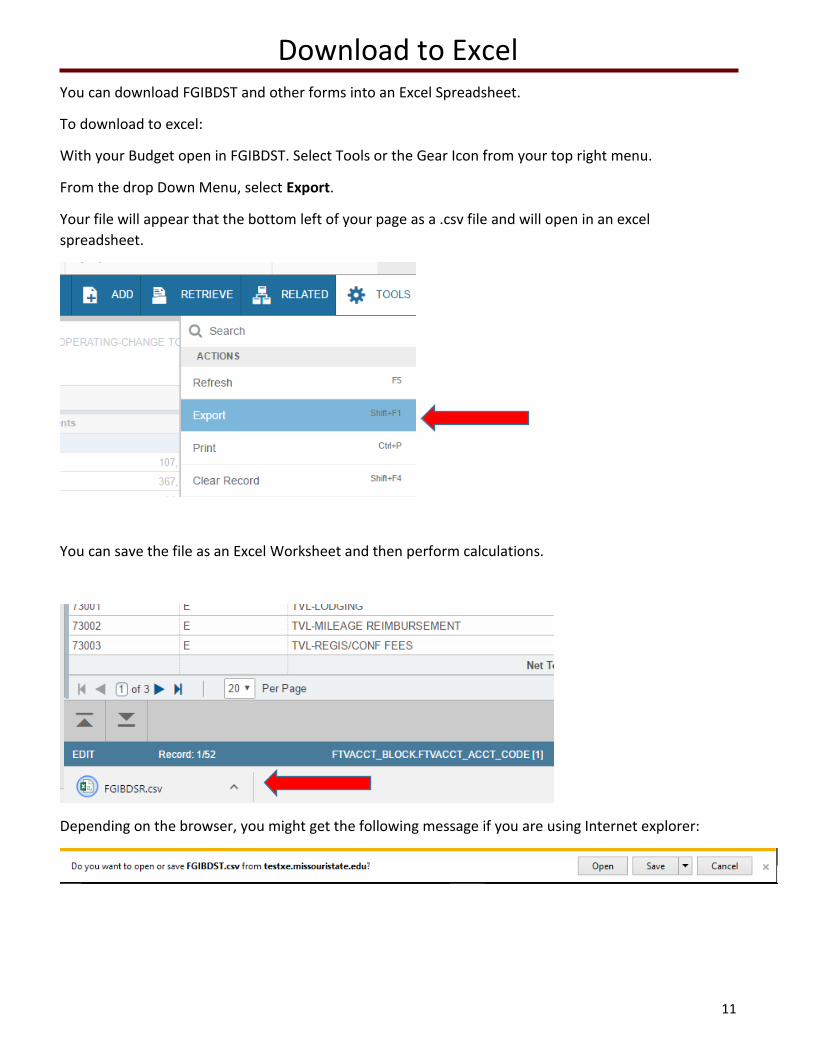
Download to Excel You can download FGIBDST and other forms into an Excel Spreadsheet.
To download to excel:
With your Budget open in FGIBDST. Select Tools or the Gear Icon from your top right menu.
From the drop Down Menu, select Export.
Your file will appear that the bottom left of your page as a .csv file and will open in an excel
spreadsheet.
You can save the file as an Excel Worksheet and then perform calculations.
Depending on the browser, you might get the following message if you are using Internet explorer:
12
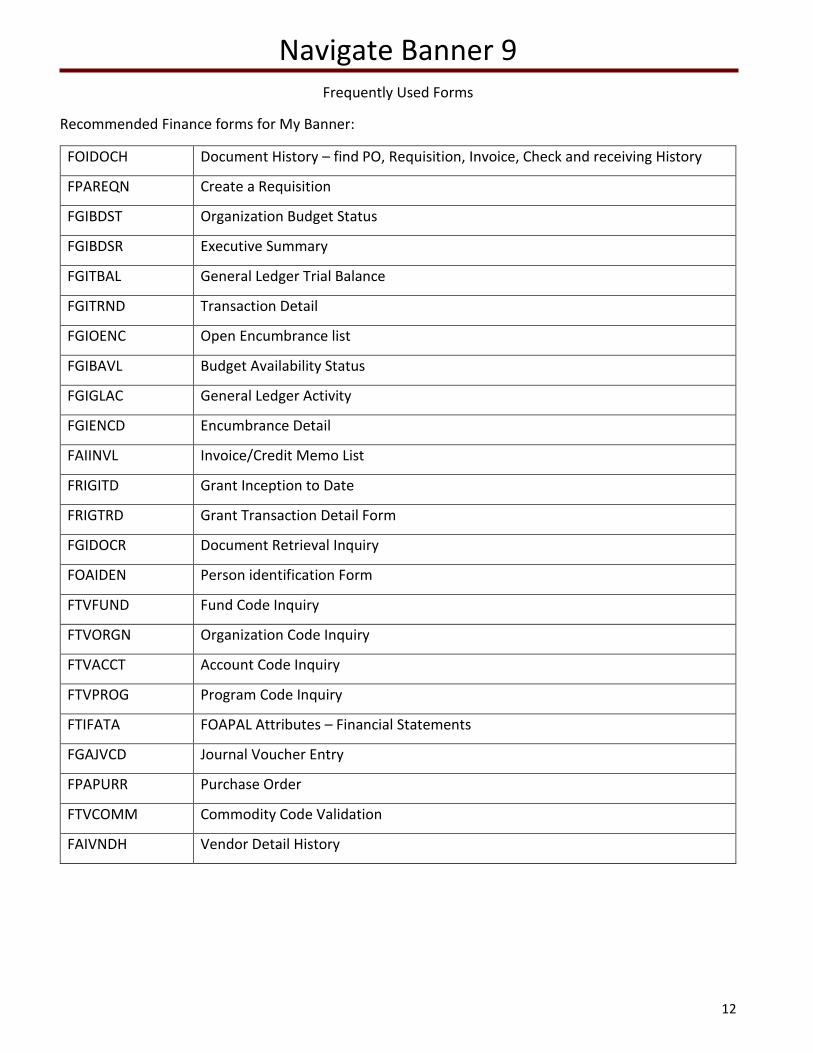
Navigate Banner 9 Frequently Used Forms
Recommended Finance forms for My Banner:
FOIDOCH Document History – find PO, Requisition, Invoice, Check and receiving History
FPAREQN Create a Requisition
FGIBDST Organization Budget Status
FGIBDSR Executive Summary
FGITBAL General Ledger Trial Balance
FGITRND Transaction Detail
FGIOENC Open Encumbrance list
FGIBAVL Budget Availability Status
FGIGLAC General Ledger Activity
FGIENCD Encumbrance Detail
FAIINVL Invoice/Credit Memo List
FRIGITD Grant Inception to Date
FRIGTRD Grant Transaction Detail Form
FGIDOCR Document Retrieval Inquiry
FOAIDEN Person identification Form
FTVFUND Fund Code Inquiry
FTVORGN Organization Code Inquiry
FTVACCT Account Code Inquiry
FTVPROG Program Code Inquiry
FTIFATA FOAPAL Attributes – Financial Statements
FGAJVCD Journal Voucher Entry
FPAPURR Purchase Order
FTVCOMM Commodity Code Validation
FAIVNDH Vendor Detail History
13
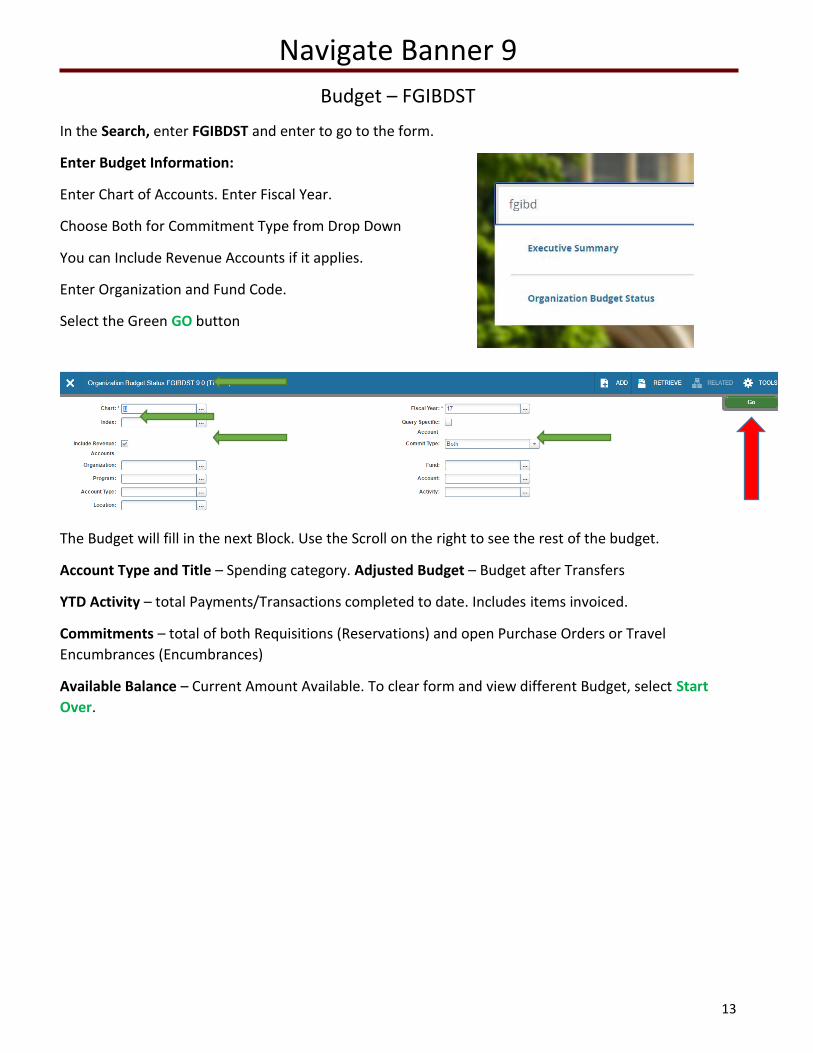
Navigate Banner 9
Budget – FGIBDST
In the Search, enter FGIBDST and enter to go to the form.
Enter Budget Information:
Enter Chart of Accounts. Enter Fiscal Year.
Choose Both for Commitment Type from Drop Down
You can Include Revenue Accounts if it applies.
Enter Organization and Fund Code.
Select the Green GO button
The Budget will fill in the next Block. Use the Scroll on the right to see the rest of the budget.
Account Type and Title – Spending category. Adjusted Budget – Budget after Transfers
YTD Activity – total Payments/Transactions completed to date. Includes items invoiced.
Commitments – total of both Requisitions (Reservations) and open Purchase Orders or Travel
Encumbrances (Encumbrances)
Available Balance – Current Amount Available. To clear form and view different Budget, select Start
Over.

14
Review Budget Transactions To review all the details of your transaction or to see related forms, select Related and choose FGITRND
for Transaction Detail
Filter or Search You can filter transactions to see all or specific line items.

15
To filter transactions choose the drop down menu, Add Another Field.
From the middle drop down menu, select appropriate options.
Enter Search Criteria and choose Go. Results from the filter will be displayed. You can double click on
the required field, or choose Select from the bottom right of the screen.

16
Choosing Select, will take you back to FGITRND or the initial Query page.
Clear All will remove all entered criteria and allow you to redo the criteria. You may also Export the
filtered content into Excel.
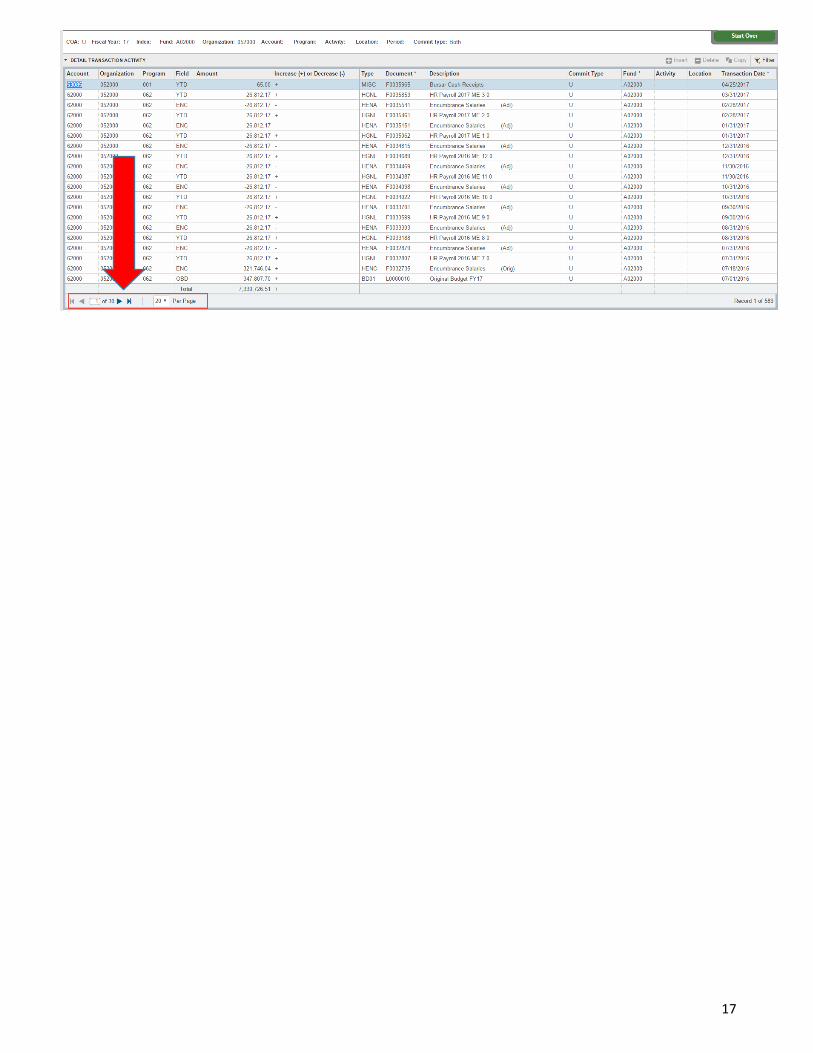
Once you choose Go. You will be directly taken to the Query Screen. You can exit the query screen to
see ALL options. The default number of records per page is 20. Scrolling through the rows will
automatically move you through the pages.
17

18
Grant Budget History - FRIGITD The FRIGITD form will show you the budget history of a grant from the inception of the grant even if it
crosses fiscal years. For instance, if you have a grant that starts Oct 1, it is not easy to see the whole
budget going through FGIBDST because it will display the budget based on Missouri State’s fiscal year.
FRIGITD allows you to see the whole budget no matter Fiscal years.
In the Search, enter FRIGITD
Enter Chart of Accounts – U
In the Grant field enter the Grant Fund Code (for Example – I02365) you do not need to enter a Fund
code or Organization Code.
If you enter a Fund code, an Organization code is required.
Select the green Go button or Alt + Page Down.
Your Budget will fill below.
19
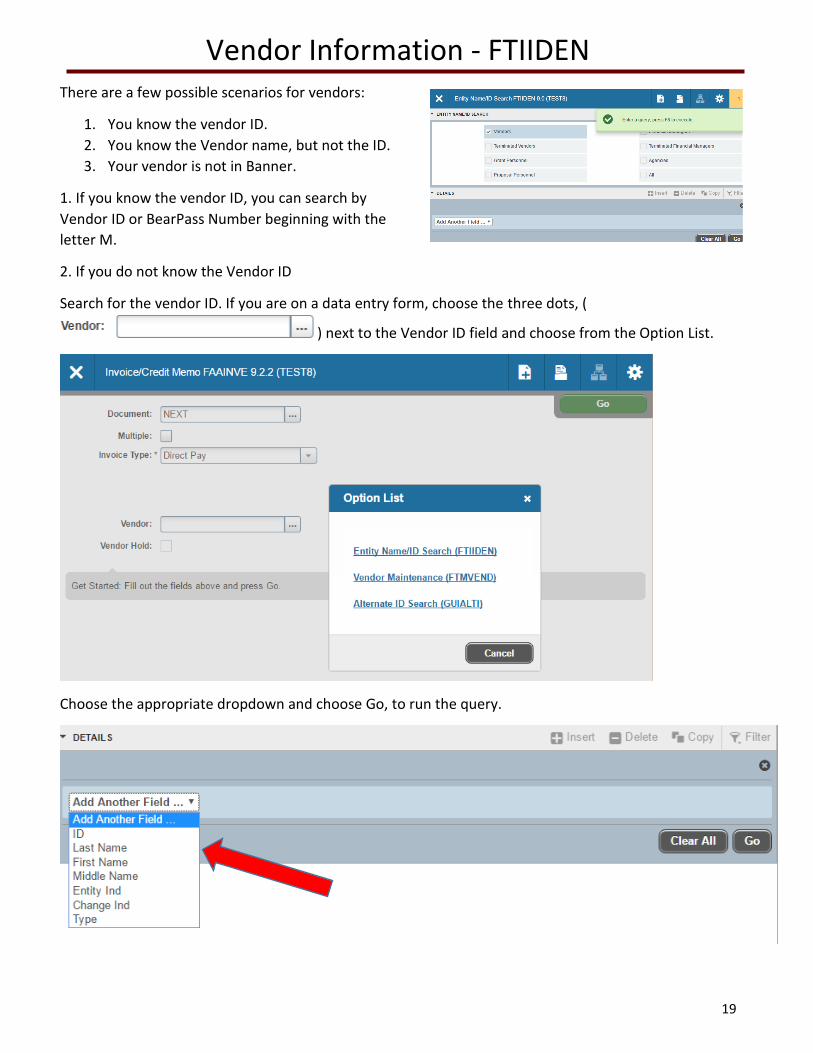
Vendor Information - FTIIDEN There are a few possible scenarios for vendors:
1. You know the vendor ID.
2. You know the Vendor name, but not the ID.
3. Your vendor is not in Banner.
1. If you know the vendor ID, you can search by
Vendor ID or BearPass Number beginning with the
letter M.
2. If you do not know the Vendor ID
Search for the vendor ID. If you are on a data entry form, choose the three dots, (
) next to the Vendor ID field and choose from the Option List.
Choose the appropriate dropdown and choose Go, to run the query.

20
Vendor Information - FTIIDEN When sorting through addresses or any form that has multiple records, be sure to look at the record
count at the bottom of the page before making a selection.
Incomplete Documents – FGIJVCD You can navigate to incomplete documents through FGIJVCD or FGAJVCD to see suspended Journal
vouchers. Double click on the Document you want to edit or choose Select at the bottom right of the
page.

21
Document History - FOIDOCH FOIDOCH or Document History allows users to see requisitions, Invoices, Checks Purchase Orders.
Document Type is required. Below are some common Document Types:
REQ – Requisition INV – Invoice
PO- Purchase Order CHK - Check
Enter Document type and Document code. Searches are allows on both fields to see possible options.
Choose Go to retrieve results.
Each Banner Document Type has a Status and Status Description indicator.
FOIDOCH – Invoice In the Invoices field, if an invoice has been issues, there will be one or more invoice numbers.
Next to the Invoice Number there will be a status code (Blank, P, R, X or S)
Blank – Not yet Paid
P – Paid
R – Receiving is incomplete
S – Invoice Suspended
X – Invoice was cancelled
FOIDOCH – Check In the Check field, if the check has been issued, there will be a check number.
Next to the Check number there will be a status code (X, F or Blank)
Blank – Newer Check, not yet generated
F – Check has been finalized.

22
X – Check has been voided.
If it is a Direct Deposit (indicated by an ! in the first digit, the status will always be blank)
Select the Check Disbursement field.
Select Related – Query Document by Type from the Menu Bar.
The Check Payment History screen will display.
1. Check Number
2. Check Amount
3. Vendor ID and Name
4. Invoices paid with this one check

23
FAIVNDH – Vendor History Go to FAIVNDH.
Find the vendor by Vendor ID
or select the three dots to search.
Select Entity Name Search (FTIIDEN)
Enter Search Criteria for Vendor. Choose appropriate
fields to query against. Select options such as Contains &
Equals can be used to search. The percentage(%)
symbol is no longer used as the wildcard search.
Type vendor name, which is Case Sensitive.
Select Go.
Double Click on the vendor you want to choose.
You will be re-directed back to FAIVNDH. With the vendor number filled in. Select Go to see detail.
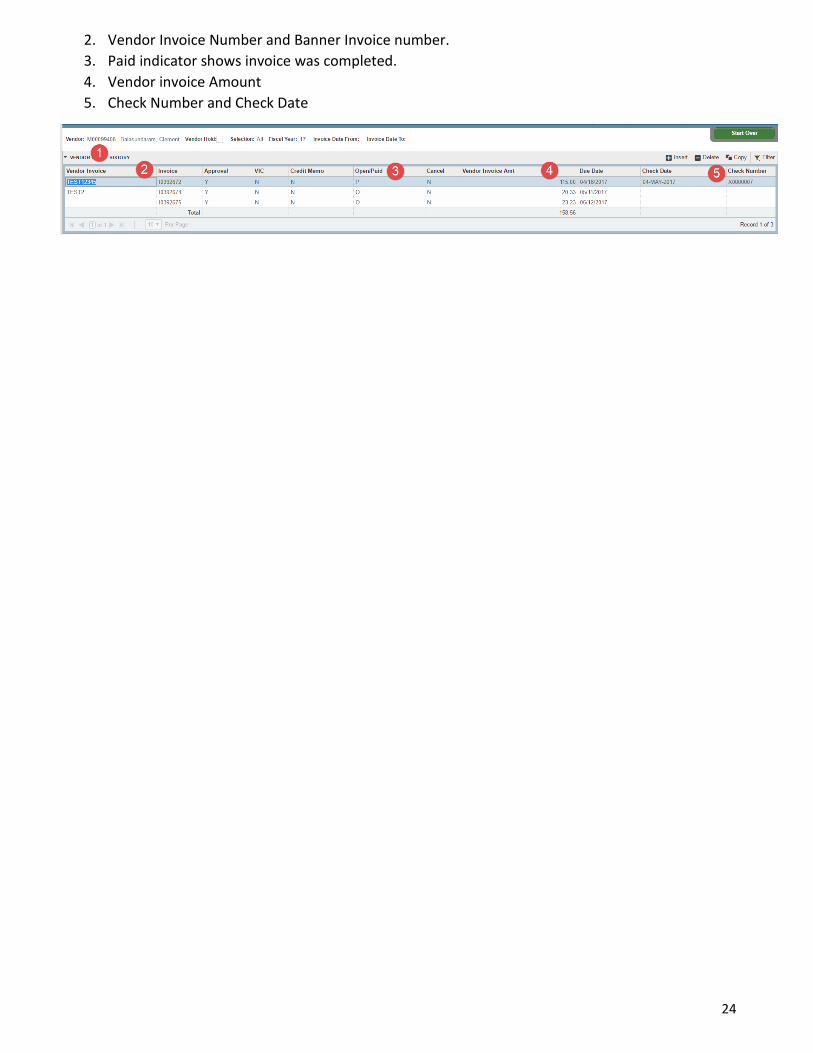
1. Vendor Number and Name.
24
2. Vendor Invoice Number and Banner Invoice number.
3. Paid indicator shows invoice was completed.
4. Vendor invoice Amount
5. Check Number and Check Date

25
Invoice/Credit Memo - FAAINVE To create a new Invoice:
In the search field, enter FAAINVE or Invoice
Type the word NEXT for a new Invoice.
1. Next will generate the next available Invoice
number.
2. Choose checkbox to select the multiple invoice option.
3. Invoice type includes direct pay, regular – for invoices paid against Purchase Orders and General
Encumbrances.
4. Enter vendor Bearpass number or perform a search for vendor ID.
Click Go or Alt + Pg Down.
1. Enter Invoice Date
2. Enter Transaction date
3. Enter or select appropriate address
4. Enter Payment due date which is almost all the time todays date.
5. Enter Bank code.
6. Enter vendor Invoice Number
7. Choose Credit Memo if it applies.

26
8. Choose Next Section to go to the next section.
Vendor Invoice Detail:
1. Enter Commodity code that applies.
2. Enter Approved payment amount.
3. Enter any Discounts that apply.
4. Check Net Amount.
5. To insert another record by using the “copy” button to copy the previous record.
i. Insert will insert a new blank record and will force you to enter the required
fields above.
ii. Delete button will delete the record. You might get an error message to click
Delete again.
Sequence number and account section:
1. Enter chart of Accounts.
2. Tab and year will default to current year.
3. Enter Fund Code. You can click the three dots to search a Fund or any FOAP.
4. Enter Organization code if applicable.
5. Enter Account Code
6. Enter Program code if applicable.
7. Enter Activity code if applicable.
8. Tab or click next section to continue.

27
Balancing Completion:
1. In Process allows you to save the Invoice and complete at a later time.
2. Complete will push the Invoice forward to generate a check or credit memo as applicable.
3. Amount of the invoice.
28
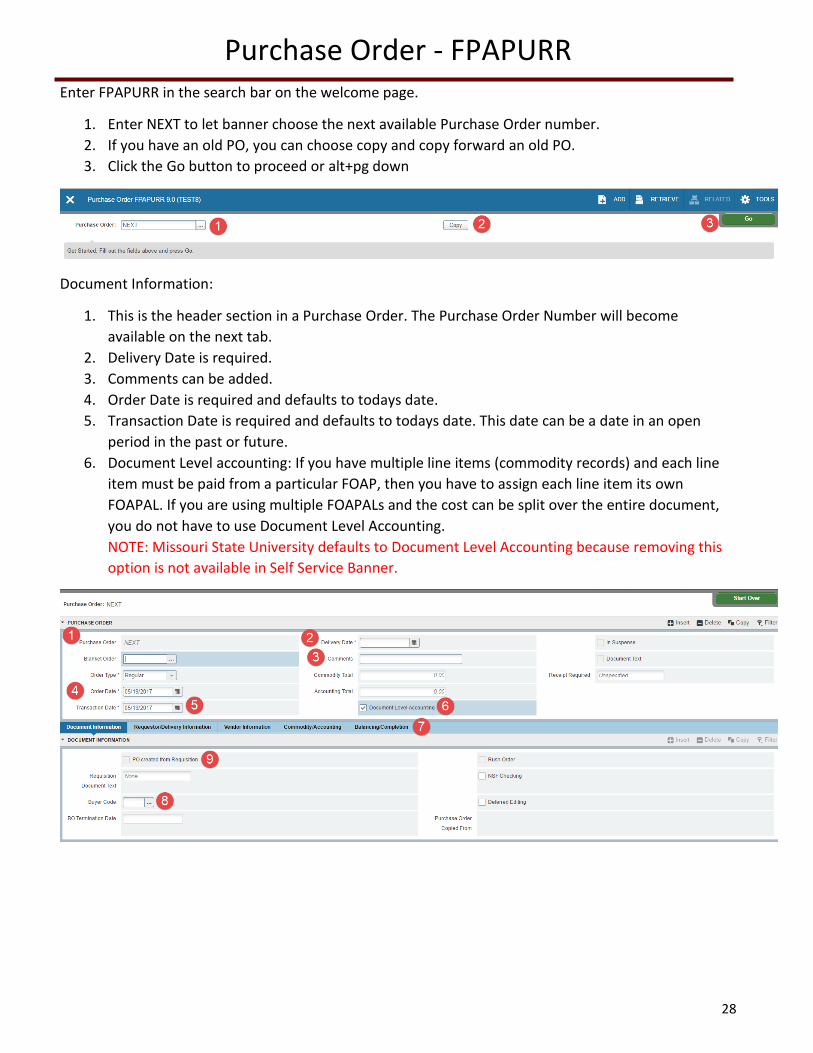
Purchase Order - FPAPURR Enter FPAPURR in the search bar on the welcome page.
1. Enter NEXT to let banner choose the next available Purchase Order number.
2. If you have an old PO, you can choose copy and copy forward an old PO.
3. Click the Go button to proceed or alt+pg down
Document Information:
1. This is the header section in a Purchase Order. The Purchase Order Number will become
available on the next tab.
2. Delivery Date is required.
3. Comments can be added.
4. Order Date is required and defaults to todays date.
5. Transaction Date is required and defaults to todays date. This date can be a date in an open
period in the past or future.
6. Document Level accounting: If you have multiple line items (commodity records) and each line
item must be paid from a particular FOAP, then you have to assign each line item its own
FOAPAL. If you are using multiple FOAPALs and the cost can be split over the entire document,
you do not have to use Document Level Accounting.
NOTE: Missouri State University defaults to Document Level Accounting because removing this
option is not available in Self Service Banner.

29
Purchase Order - FPAPURR Requestor/Delivery Information:
1. The Header record continues through all the tabs. This can be minimized by choosing the small
arrow next to Purchase Order.
2. Requestor information defaults from the Profile Maintenance view in Banner Finance.
3. Default Organization also defaults from the profile maintenance form.
4. Ship to defaults from the profile maintenance window and is required.
5. Attention To required. Should contain Department contact information with name and campus
phone extension.
Vendor Information:
1. Enter Vendor ID if it is available.
a. Click the three dots next to the field for option list below.
b. F9, is the shortcut key to enter into search and will take you to FTIIDEN.
c. See Search tools on page 18 of this user guide.
2. Tab and choose Address type and Address sequence number.
3. Choose Next section when complete with required fields.

30
Purchase Order - FPAPURR Commodity/Accounting:
1. Enter Commodity Code or use the three dots to search for valid commodity codes.
2. U/M Unit of measure is required and will default to EA.
3. Quantity needed is a required field.
4. Unit Price is a required field.
5. Check Commodity Text or Item text to add text to purchase order.
Add Commodity is used to add a commodity code that does not exist in the commodity
table but is being used in this purchase order.
6. Any Discounts that might apply.
7. Additional costs.
8. Insert accounting FOAP information:
a. If you have NSF override authority, you will be able to override completion due to
insufficient funds.
b. Use the COPY function to add a new record and copy the previous record.

31
Purchase Order - FPAPURR 1. Complete to finish the requisition.
2. In Process to save the Requisition. NOTE: the money is encumbering funds without being
completed and will show as a pending document on FGIBAVL.
3. No Receipt Required is also required.
Once Document has completed the following message will follow. Purchase order has to go through the
Approval Process and Posting process to post to the ledger.

32
Banner 9 Error Messages Error messages in Banner 9 display in three different colors on the top right of the screen.
Red Error requires changes to the form before proceeding.
Green messages are informational and do not need any changes to the form.
Yellow Messages require action.
33
Appendix A Resources for Help
Email:
Helpful Webpages:
Banner Finance: http://www.missouristate.edu/financialservices/bannerfinance.htm
Bear Finance (Reporting): http://www.missouristate.edu/financialservices/103557.htm
Accounting and Budgeting:
http://www.missouristate.edu/financialservices/accountingandbudgeting.htm
Procurement: http://www.missouristate.edu/procurement/
Bursar: http://www.missouristate.edu/bursar/
Grants and Contracts: http://www.missouristate.edu/financialservices/grantsandcontracts.htm

34
Appendix B Rule Codes:
Common rule codes you might see in Banner Finance forms or Argos Reports:
PORD - Establish purchase order
INNI - Accounts payable invoice without encumbrance
INEI - Invoice with encumbrance
INEC - Credit memo with encumbrance a Purchase Order
DNNI - Check - invoice without encumbrance
DNEI - Check - invoice with encumbrance
BD04 - Budget transfer done by end user
UB04 – Budget Adjustment by Financial Services
JE16 – Journal Entry by Financial Services (Inter Fund)
JE15 – Journal Entry by Financial Services (Intra Fund)
REQP - Requisition – reservation
RCQP - Cancel requisition
PORD - Establish purchase order
POLQ - Purchase order - request liquidation
PCLQ - Cancel PO - reinstate request
Invoice Transactions:
INNI - Accounts payable invoice without encumbrance
INNC - Credit memo without encumbrance
ICNI - Cancel invoice without encumbrance
ICNC - Cancel credit memo without encumbrance
ICEI - Cancel invoice with encumbrance
ICEC - Cancel credit memo with encumbrance
DNNC - Check - C/M without encumbrance
DNEC - Check - C/M with encumbrance
CNNI - Cancel check - invoice without encumbrance
CNNC - Cancel check - C/M without encumbrance
CNEI - Cancel check - invoice with encumbrance
CNEC - Cancel check - C/M with encumbrance
BD01 - Permanent adopted budget
BD02 - Permanent budget adjustments
BD04 - Temporary budget adjustment
GRAR – Accrued Accounts Receivable
GRRV - Accrued revenue
GRCC - Cost share charge
GRCG - Cost share grant
GRIC - Indirect cost charge
GRIR - Indirect cost recovery
JE16 - General Journal Entry (Inter Fund)
JE15 - General Journal Entry (Intra-fund)