administration guide release 5 - oracle · administration guide release 5.1 e22686-05 ... setting...
TRANSCRIPT

Oracle® Database FirewallAdministration Guide
Release 5.1
E22686-05
December 2012

Oracle Database Firewall Administration Guide Release 5.1
E22686-05
Copyright © 2003, 2012, Oracle and/or its affiliates. All rights reserved.
Contributors: Tammy Bednar, Paul Betteridge, Andrey Brozhko, Marek Dulko, Nithin Gomez, Paul Hackett, Gigi Hanna, K. Karun, Valarie Moore, Paul Laws, Steve Moyle, Gian Sartor, Stuart Sharp, James Spooner, Tom Taylor, James Wilson
This software and related documentation are provided under a license agreement containing restrictions on use and disclosure and are protected by intellectual property laws. Except as expressly permitted in your license agreement or allowed by law, you may not use, copy, reproduce, translate, broadcast, modify, license, transmit, distribute, exhibit, perform, publish, or display any part, in any form, or by any means. Reverse engineering, disassembly, or decompilation of this software, unless required by law for interoperability, is prohibited.
The information contained herein is subject to change without notice and is not warranted to be error-free. If you find any errors, please report them to us in writing.
If this is software or related documentation that is delivered to the U.S. Government or anyone licensing it on behalf of the U.S. Government, the following notice is applicable:
U.S. GOVERNMENT END USERS: Oracle programs, including any operating system, integrated software, any programs installed on the hardware, and/or documentation, delivered to U.S. Government end users are "commercial computer software" pursuant to the applicable Federal Acquisition Regulation and agency-specific supplemental regulations. As such, use, duplication, disclosure, modification, and adaptation of the programs, including any operating system, integrated software, any programs installed on the hardware, and/or documentation, shall be subject to license terms and license restrictions applicable to the programs. No other rights are granted to the U.S. Government.
This software or hardware is developed for general use in a variety of information management applications. It is not developed or intended for use in any inherently dangerous applications, including applications that may create a risk of personal injury. If you use this software or hardware in dangerous applications, then you shall be responsible to take all appropriate fail-safe, backup, redundancy, and other measures to ensure its safe use. Oracle Corporation and its affiliates disclaim any liability for any damages caused by use of this software or hardware in dangerous applications.
Oracle and Java are registered trademarks of Oracle and/or its affiliates. Other names may be trademarks of their respective owners.
Intel and Intel Xeon are trademarks or registered trademarks of Intel Corporation. All SPARC trademarks are used under license and are trademarks or registered trademarks of SPARC International, Inc. AMD, Opteron, the AMD logo, and the AMD Opteron logo are trademarks or registered trademarks of Advanced Micro Devices. UNIX is a registered trademark of The Open Group.
This software or hardware and documentation may provide access to or information on content, products, and services from third parties. Oracle Corporation and its affiliates are not responsible for and expressly disclaim all warranties of any kind with respect to third-party content, products, and services. Oracle Corporation and its affiliates will not be responsible for any loss, costs, or damages incurred due to your access to or use of third-party content, products, or services.

iii
Contents
Preface ............................................................................................................................................................... xiii
Audience..................................................................................................................................................... xiiiDocumentation Accessibility ................................................................................................................... xiiiRelated Documents ................................................................................................................................... xiiiConventions ............................................................................................................................................... xiv
1 Introducing Oracle Database Firewall
Downloading the Latest Version of This Manual ............................................................................. 1-1Oracle Database Firewall System Architecture .................................................................................. 1-1
About the Oracle Database Firewall System Architecture........................................................... 1-1High-Availability Resilient Pairs ..................................................................................................... 1-2Ways to Connect Oracle Database Firewall to a Database Network.......................................... 1-3Integrating Oracle Database Firewall with Third-Party Products.............................................. 1-4
Using the Oracle Database Firewall Administration Console ........................................................ 1-4About the Oracle Database Firewall Administration Console .................................................... 1-4Which Administration Console Should I Use? .............................................................................. 1-5
Tasks Performed in a Standalone Database Firewall Administration Console................. 1-5Tasks Performed in a Managed Database Firewall Administration Console .................... 1-6Tasks Performed in a Management Server ............................................................................. 1-6
Logging in to the Administration Console..................................................................................... 1-7Administration Console Tabs........................................................................................................... 1-9
Security Guidelines .............................................................................................................................. 1-10
2 Configuring an Oracle Database Firewall
About Configuring an Oracle Database Firewall .............................................................................. 2-1Step 1: Set the Database Firewall Date and Time .............................................................................. 2-1Step 2: Specify the Database Firewall System Settings .................................................................... 2-3Step 3: Enable Secure Log Access in the Standalone Database Firewall ...................................... 2-5Step 4: Configure the Standalone Database Firewall Syslog Destinations .................................. 2-5Step 5: Configure the Standalone Database Firewall Enforcement Points................................... 2-6Step 6: Configure the Database Firewall Bridge IP Address ........................................................... 2-8Step 7: Test the Standalone Database Firewall System Operation ................................................ 2-9What’s Next? .......................................................................................................................................... 2-10

iv
3 Configuring a Database Firewall Management Server
About Configuring an Oracle Database Firewall Management Server-Based System .............. 3-1Step 1: Perform Initial Tasks for Each Database Firewall Management Server .......................... 3-2
Step 1A: Specify the Management Server System Settings.......................................................... 3-2Step 1B: Enable Secure Log Access .................................................................................................. 3-4Step 1C: Set the Database Firewall Management Server Date and Time................................... 3-5Step 1D: Configure the Management Server Syslog Destinations.............................................. 3-6
Step 2: Perform Tasks for Each Oracle Database Firewall ............................................................... 3-7Step 2A: Configure the Database Firewall System and Time Settings....................................... 3-7Step 2B: Enter the Database Firewall Management Server Certificate and IP Address .......... 3-8
Step 3: Complete the Final Database Firewall Management Server Tasks .................................. 3-8Step 3A: Specify Management Server Partner Settings (Resilient Pair Only) ........................... 3-8Step 3B: Add Each Oracle Database Firewall to the Management Server................................. 3-9Step 3C: Define Resilient Pairs of Oracle Database Firewalls................................................... 3-11
Step 4: Configure the Management Server Enforcement Points.................................................. 3-12Step 5: Test the Management Server System Operation ............................................................... 3-14What’s Next?........................................................................................................................................... 3-14
4 Configuring Oracle Database Firewall for High Availability
About Using High Availability with Oracle Database Firewall..................................................... 4-1How Does High Availability Work with the Oracle Database Firewall Components? .......... 4-1Incorporating Resilient Pairs of Oracle Database Firewall Management Servers.................... 4-2Adding Paired Enforcement Points................................................................................................. 4-3Network Communication for the Resilient Pairs .......................................................................... 4-3
Configuring a Resilient Pair of Oracle Database Firewall Management Servers ....................... 4-3Procedure for Configuring a Pair of Resilient Database Firewall Management Servers ........ 4-4Swapping the Primary and Secondary Database Firewall Management Servers .................... 4-4
Configuring a Resilient Pair of Oracle Database Firewalls ............................................................. 4-5Procedure for Configuring a Pair of Oracle Database Firewalls................................................. 4-5Swapping the Primary and Secondary Oracle Database Firewalls ............................................ 4-5
Pairing Enforcement Points.................................................................................................................... 4-5Archiving Data.......................................................................................................................................... 4-6Updating the Oracle Database Firewall Software in Resilient Pairs ............................................. 4-6
5 Configuring Stored Procedure Auditing
About Stored Procedure Auditing (SPA)............................................................................................. 5-1Setting User Permissions for SPA......................................................................................................... 5-1
Setting SPA User Permissions on Oracle Databases ..................................................................... 5-1Setting SPA User Permissions for SQL Server Databases ............................................................ 5-2Setting SPA User Permissions for MySQL Databases .................................................................. 5-5Setting SPA User Permissions for Sybase ASE Databases ........................................................... 5-5Setting SPA User Permissions for Sybase SQL Anywhere Databases ....................................... 5-6
Installing the Sybase SQL Anywhere ODBC Driver for Linux ............................................ 5-7Setting Stored Procedure Auditing User Permissions........................................................... 5-7
Setting SPA User Permissions for IBM DB2 SQL Databases ....................................................... 5-8Enabling SPA on the Database Firewall.............................................................................................. 5-9
v
Disabling SPA........................................................................................................................................ 5-10
6 Configuring and Using Role Auditing
About User Role Auditing (URA) ......................................................................................................... 6-1Setting User Permissions for URA........................................................................................................ 6-1
Setting URA User Permissions for Oracle Databases ................................................................... 6-1Setting URA User Permissions for SQL Server Databases........................................................... 6-2Setting URA User Permissions for MySQL Databases ................................................................. 6-5Setting URA User Permissions for Sybase ASE Databases .......................................................... 6-5Setting URA User Permissions for Sybase SQL Anywhere Databases ...................................... 6-6
Installing the Sybase SQL Anywhere ODBC Driver for Linux ............................................ 6-7Setting URA User Permissions.................................................................................................. 6-7
Setting URA User Permissions for IBM DB2 SQL Databases ...................................................... 6-8Enabling URA on the Database Firewall............................................................................................. 6-9Disabling URA....................................................................................................................................... 6-10
7 Configuring and Using Local Monitoring
About Local Monitoring ......................................................................................................................... 7-1Installing Local Monitoring ................................................................................................................... 7-2
Accessing the Scripts Required to Install Local Monitoring........................................................ 7-2Database Accounts Created for Local Monitoring........................................................................ 7-2Installing Local Monitoring in an Oracle Database....................................................................... 7-3Installing Local Monitoring in a Microsoft SQL Server Database .............................................. 7-4Installing Local Monitoring in a Sybase ASE Database................................................................ 7-4
Enabling Local Monitoring .................................................................................................................... 7-5Disabling Local Monitoring................................................................................................................... 7-6
8 Configuring and Using Remote Monitoring
About Remote Monitoring ..................................................................................................................... 8-1Installing and Enabling Remote Monitoring ..................................................................................... 8-1
Step 1: Configure the Remote Monitor in the Administration Console..................................... 8-2Step 2: Access and Run the remote-agent Remote Monitor Script ............................................. 8-3Step 3: Ensure That the Remote Monitor Is Active ....................................................................... 8-4
Disabling Remote Monitoring............................................................................................................... 8-4
9 Configuring and Using Direct Database Interrogation
About Direct Database Interrogation (DDI) ....................................................................................... 9-1Using DDI to Interrogate SQL Server and SQL Anywhere Databases ...................................... 9-1Using DDI to Monitor Oracle Databases That Use Oracle Advanced Security ........................ 9-1
Configuring DDI for SQL Server and Sybase SQL Anywhere Databases ................................... 9-2Setting DDI User Permissions in a Microsoft SQL Server Database .......................................... 9-2Setting DDI User Permissions in a Sybase SQL Anywhere Database........................................ 9-3Enabling DDI in an Enforcement Point for SQL Server or SQL Anywhere Databases ........... 9-4
Configuring DDI for an Oracle Database With Oracle Advanced Security................................. 9-4Applying the Specified Patch to the Oracle Database .................................................................. 9-4

vi
Providing a Public Key to the Oracle Database............................................................................. 9-5Enabling DDI in an Enforcement Point for an Oracle Database ................................................. 9-6
Enabling DDI ............................................................................................................................................ 9-6Disabling DDI .......................................................................................................................................... 9-7
10 Configuring and Using Database Response Monitoring
About Database Response Monitoring............................................................................................. 10-1Configuring Database Response Monitoring.................................................................................. 10-2
Enabling Database Response Monitoring.................................................................................... 10-2Setting Up Login/Logout Policies in the Analyzer ................................................................... 10-2
11 Using Oracle Database Firewall with BIG-IP ASM
About the Integration of Oracle Database Firewall with BIG-IP ASM ..................................... 11-1Key Benefits of Integrating Oracle Database Firewall with BIG-IP ASM ................................ 11-2How the Integration Works................................................................................................................. 11-3Deploying the Oracle Database Firewall-BIG-IP ASM Integration ........................................... 11-3
About the Deployment................................................................................................................... 11-4System Requirements ..................................................................................................................... 11-4Configuring Oracle Database Firewall......................................................................................... 11-4Configuring BIG-IP ASM............................................................................................................... 11-5
Logging Profile ......................................................................................................................... 11-5Policy Settings........................................................................................................................... 11-6
Developing a BIG-IP ASM iRule................................................................................................... 11-6Required Syslog Message Format ......................................................................................... 11-8Configuring syslog-ng.conf .................................................................................................... 11-8
Presentation of Data in Oracle Database Firewall.......................................................................... 11-9Administration Console Dashboard............................................................................................. 11-9Viewing the Traffic Log Generated by BIG-IP ASM................................................................ 11-10
Understanding the Attributes .............................................................................................. 11-11Web Application Firewall (WAF) Reports ................................................................................ 11-11
12 Using Oracle Database Firewall with ArcSight SIEM
About the Integration of Oracle Database Firewall with ArcSight SIEM ................................. 12-1Enabling the Oracle Database Firewall-ArcSight SIEM Integration .......................................... 12-1Oracle Database Firewall-ArcSight SIEM Syslog Mapping Tables............................................ 12-2
About the ArcSight SIEM Integration .......................................................................................... 12-3DBFW:3 (Heartbeat)........................................................................................................................ 12-3DBFW:4 (Property Change) ........................................................................................................... 12-4DBFW:8 (Database Audit).............................................................................................................. 12-5DBFW:9 (Statement Alert) ............................................................................................................. 12-6DBFW:10 (Statement Alert (WAF)) .............................................................................................. 12-7DBFW:11 (Login Alert)................................................................................................................... 12-9DBFW:12 (Logout Alert) .............................................................................................................. 12-10DBFW:system (System Message (Operating System Alerts))................................................. 12-11

vii
13 System Administration
Security Guidelines .............................................................................................................................. 13-1Using the Dashboard ............................................................................................................................ 13-1Configuring Oracle Database Firewalls ........................................................................................... 13-2Configuring Protected Databases ...................................................................................................... 13-3
About Configuring Protected Databases ..................................................................................... 13-3Configuring User Settings for Protected Databases................................................................... 13-5
Listing, Creating, and Configuring Enforcement Points............................................................... 13-6About Working with Enforcement Points................................................................................... 13-6Managing Enforcement Points ...................................................................................................... 13-7Finding the Status of an Enforcement Point................................................................................ 13-7Changing the Settings of an Enforcement Point......................................................................... 13-7Configuring BIG-IP Application Security Manager Settings.................................................... 13-9
Configuring a Resilient Pair of Enforcement Points...................................................................... 13-9Configuring Traffic Sources................................................................................................................ 13-9Configuring Database Firewall as a Traffic Proxy.......................................................................... 13-9Changing the Network Configuration ............................................................................................ 13-11Configuring the System ..................................................................................................................... 13-12Archiving Data..................................................................................................................................... 13-13
About Archiving Data .................................................................................................................. 13-13Defining Archiving Destinations ................................................................................................ 13-14Creating an Archive Schedule..................................................................................................... 13-16Starting an Archive Job Manually .............................................................................................. 13-16Starting a Configuration Archive Job......................................................................................... 13-17Restoring an Archive .................................................................................................................... 13-18
Restoring a Configuration in which the Pass Phrase was not Archived ....................... 13-18Viewing the Logs................................................................................................................................. 13-19Configuring Connectors to Third-Party Systems.......................................................................... 13-20Configuring E-Mail Alerts................................................................................................................. 13-21
Configuring the SMTP Server ..................................................................................................... 13-21Configuring E-Mail Recipients.................................................................................................... 13-22Example E-Mail Alert Notification ............................................................................................. 13-22
Configuring Users ............................................................................................................................... 13-23About Configuring Users............................................................................................................. 13-23Creating a New User Account..................................................................................................... 13-24Creating Password Policies ......................................................................................................... 13-25
Viewing and Capturing Network Traffic in an Individual Database Firewall ...................... 13-25Viewing Network Traffic ............................................................................................................. 13-26Capturing Network Traffic .......................................................................................................... 13-26
Monitoring the Database Firewall’s Embedded Oracle Database ............................................ 13-27
A Oracle Database Firewall Database Schema
About the Oracle Database Firewall Schema .................................................................................... A-1Summary Tables ...................................................................................................................................... A-1
About the Summary Tables ............................................................................................................. A-2applied_baselines Table ................................................................................................................... A-2
viii
database_user_addresses Table ...................................................................................................... A-2database_users Table ........................................................................................................................ A-2dictionary Table................................................................................................................................. A-3protected_database_addresses Table ............................................................................................. A-3protected_databases Table............................................................................................................... A-4sources Table...................................................................................................................................... A-4summary_clusters Table .................................................................................................................. A-5cluster_components Table ............................................................................................................... A-6summary_records Table................................................................................................................... A-6summary_sessions Table.................................................................................................................. A-7summary_statement_attributes Table............................................................................................ A-8traffic_events Table ........................................................................................................................... A-9traffic_summaries View ................................................................................................................. A-11Relationship Diagram of the Summary Tables........................................................................... A-14
Log Forensic Tables .............................................................................................................................. A-15About the Forensic Tables.............................................................................................................. A-15traffic_log_queries Table ................................................................................................................ A-15traffic_log_query_results Table..................................................................................................... A-16
Stored Procedure and User Role Audit Tables................................................................................ A-21About the Stored Procedure and User Role Audit Tables ........................................................ A-21doa_approved_edits Table............................................................................................................. A-22doa_approved_objects Table ......................................................................................................... A-23doa_edit_comments Table ............................................................................................................. A-24doa_edits Table................................................................................................................................ A-24doa_pending_approvals Table...................................................................................................... A-25doa_tag_definitions Table.............................................................................................................. A-26
Report-Related Functions .................................................................................................................... A-27
B Syslog Message Format
About Syslog Messages.......................................................................................................................... B-1Message Format ....................................................................................................................................... B-1
Message ID = 1 (General Messages) ............................................................................................... B-2Message ID = 3 (Heartbeat) ............................................................................................................. B-2Message ID = 4 (Property Change)................................................................................................. B-3Message ID = 8 (Database Audit Summary)................................................................................. B-3Message ID = 9 (Statement Alerts) ................................................................................................. B-4Message ID = 10 (F5 BIG-IP ASM Alerts) ...................................................................................... B-5Message ID = 11 (Login Alert) ........................................................................................................ B-8Message ID = 12 (Logout Alert) ...................................................................................................... B-9
C Traffic Log Attributes
Transaction Status ................................................................................................................................... C-1Performance.............................................................................................................................................. C-2Context....................................................................................................................................................... C-2Attributes (F5) .......................................................................................................................................... C-2

ix
Glossary
Index

x

xi
List of Figures
1–1 Enterprise Architecture Using a Database Firewall Management Server .......................... 1-21–2 Oracle Database Firewall High Availability ........................................................................... 1-31–3 Dashboard Page of the Management Server Administration Console ............................... 1-54–1 High Availability Using a Resilient Pair of Oracle Database Firewalls .............................. 4-24–2 High Availability Using a Resilient Pair of Management Servers and Database Firewalls ....
4-310–1 Database Response Monitoring ............................................................................................. 10-111–1 Oracle Database Firewall with F5 BIG-IP ASM Data Flow Unit....................................... 11-213–1 Dashboard Page of the Management Server Administration Console ............................ 13-213–2 Appliances Tab for Configuring Oracle Database Firewalls ............................................. 13-313–3 Configuring a Protected Database......................................................................................... 13-413–4 Protected Database Settings ................................................................................................... 13-413–5 Finding Existing Enforcement Points ................................................................................... 13-713–6 Changing Settings of an Enforcement Point ........................................................................ 13-813–7 Archiving Data ....................................................................................................................... 13-1313–8 Managing Logs....................................................................................................................... 13-1913–9 Syslog Settings........................................................................................................................ 13-2013–10 Configuring Users.................................................................................................................. 13-2413–11 Viewing Network Traffic from a Database Firewall......................................................... 13-26A–1 Relationship Diagram of the Summary Tables.................................................................... A-14

xii
List of Tables
12–1 Message Types Sent to ArcSight SIEM ................................................................................ 12-312–2 DBFW:3 (Heartbeat) CEF Header Fields ............................................................................. 12-312–3 DBFW:3 (Heartbeat) Extension Fields ................................................................................. 12-412–4 DBFW:4 (Property Change) CEF Header Fields................................................................. 12-412–5 DBFW:4 (Property Change) Extension Fields..................................................................... 12-412–6 DBFW:8 (Database Audit) CEF Header Fields ................................................................... 12-512–7 DBFW:8 (Database Audit) Extension Fields ....................................................................... 12-512–8 DBFW:6 (Statement Alert) CEF Header Fields ................................................................... 12-612–9 DBFW:6 (Statement Alert (WAF)) Extension Fields .......................................................... 12-712–10 DBFW:7 (Statement Alert (WAF)) CEF Header Fields ...................................................... 12-812–11 DBFW:7 (Statement Alert (WAF)) Extension Fields .......................................................... 12-812–12 DBFW:11 (Login Alert) CEF Header Fields ........................................................................ 12-912–13 DBFW:11 (Login Alert) Extension Fields............................................................................. 12-912–14 DBFW:12 (Logout Alert) CEF Header Fields.................................................................... 12-1012–15 DBFW:12 (Logout Alert) Extension Fields ........................................................................ 12-1012–16 DBFW:system (System Message) CEF Header Fields ..................................................... 12-1112–17 DBFW:system (System Message) Extension Fields.......................................................... 12-11A–1 applied_baselines Table ........................................................................................................... A-2A–2 database_user_addresses Table .............................................................................................. A-2A–3 database_users Table................................................................................................................ A-2A–4 dictionary Table......................................................................................................................... A-3A–5 protected_database_addresses Table ..................................................................................... A-4A–6 protected_databases Table....................................................................................................... A-4A–7 sources Table ............................................................................................................................. A-5A–8 summary_clusters Table .......................................................................................................... A-5A–9 cluster_components Table ....................................................................................................... A-6A–10 summary_records Table........................................................................................................... A-6A–11 summary_sessions Table ......................................................................................................... A-8A–12 summary_statement_attributes Table.................................................................................... A-8A–13 traffic_events Table................................................................................................................... A-9A–14 traffic_summaries View ......................................................................................................... A-12A–15 traffic_log_queries Table........................................................................................................ A-15A–16 traffic_log_query_results Table............................................................................................. A-16A–17 doa_approved_edits Table .................................................................................................... A-22A–18 doa_approved_objects Table................................................................................................. A-23A–19 doa_edit_comments Table ..................................................................................................... A-24A–20 doa_edits Table........................................................................................................................ A-24A–21 doa_pending_approvals Table.............................................................................................. A-25A–22 doa_tag_definitions Table...................................................................................................... A-26C–1 Transaction Status..................................................................................................................... C-1C–2 Performance............................................................................................................................... C-2C–3 Context........................................................................................................................................ C-2C–4 Attributes (F5)............................................................................................................................ C-2
xiii
Preface
Welcome to Oracle Database Firewall Administration Guide. This section contains:
■ Audience
■ Documentation Accessibility
■ Related Documents
■ Conventions
AudienceThis guide has been written for system administrators who are responsible for the initial deployment and day-to-day administration of Oracle Database Firewall. It includes:
■ An introduction to the concepts and components of Oracle Database Firewall
■ Instructions on how to set up the system for the first time
■ Details of routine tasks such as monitoring the system, deploying policies, producing archives and running reports
This guide does not provide detailed information about the Oracle Database Firewall Analyzer software. Oracle Database Firewall Security Guide is provided for that purpose.
Documentation AccessibilityFor information about Oracle's commitment to accessibility, visit the Oracle Accessibility Program website at http://www.oracle.com/pls/topic/lookup?ctx=acc&id=docacc.
Access to Oracle SupportOracle customers have access to electronic support through My Oracle Support. For information, visit http://www.oracle.com/pls/topic/lookup?ctx=acc&id=info or visit http://www.oracle.com/pls/topic/lookup?ctx=acc&id=trs if you are hearing impaired.
Related DocumentsFor more information, see the following documents in the Oracle Database Firewall Release documentation set:
■ Oracle Database Firewall Release Notes
■ Oracle Database Firewall Installation Guide
xiv
■ Oracle Database Firewall Security Guide
■ Oracle Database Firewall Licensing Information
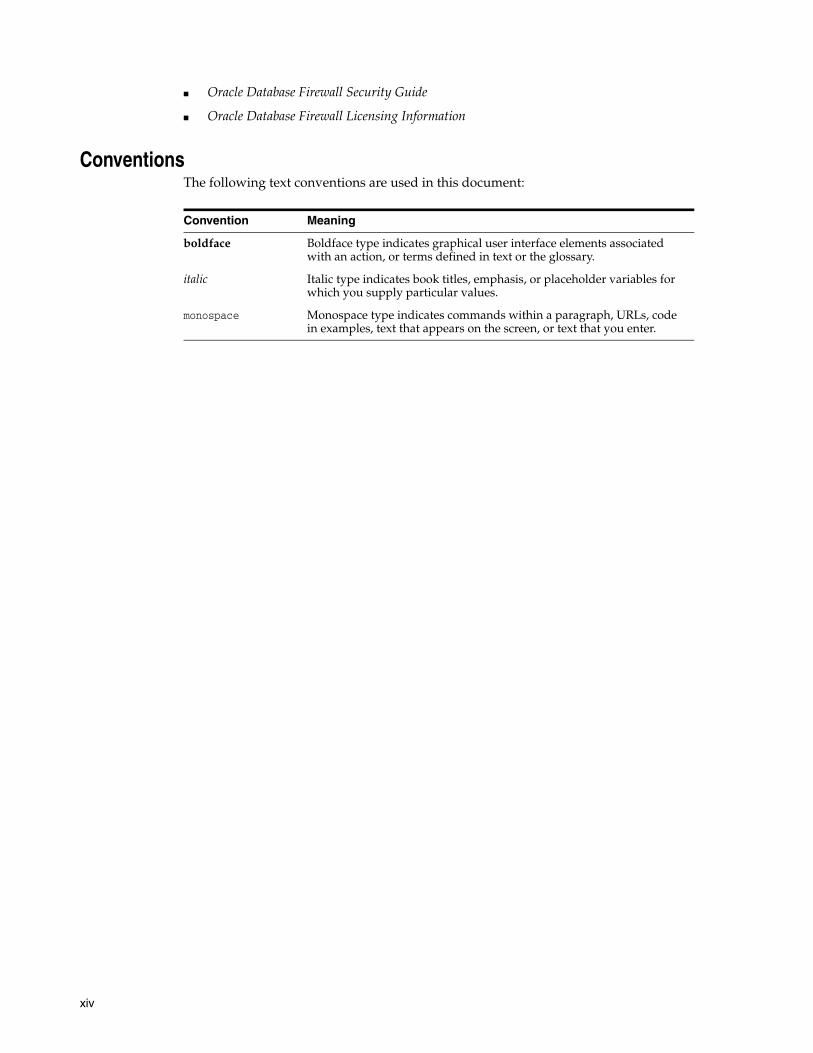
ConventionsThe following text conventions are used in this document:
Convention Meaning
boldface Boldface type indicates graphical user interface elements associated with an action, or terms defined in text or the glossary.
italic Italic type indicates book titles, emphasis, or placeholder variables for which you supply particular values.
monospace Monospace type indicates commands within a paragraph, URLs, code in examples, text that appears on the screen, or text that you enter.

1
Introducing Oracle Database Firewall 1-1
1Introducing Oracle Database Firewall
This chapter contains:
■ Downloading the Latest Version of This Manual
■ Oracle Database Firewall System Architecture
■ Using the Oracle Database Firewall Administration Console
■ Security Guidelines
Downloading the Latest Version of This ManualYou can download the latest version of this manual from the Oracle Database Firewall Web site, which is in the Database section of Oracle Technology Network. The URL is as follows:
http://www.oracle.com/technetwork/indexes/documentation/index.html
Oracle Database Firewall System ArchitectureThis section contains:
■ About the Oracle Database Firewall System Architecture
■ High-Availability Resilient Pairs
■ Ways to Connect Oracle Database Firewall to a Database Network
■ Integrating Oracle Database Firewall with Third-Party Products
About the Oracle Database Firewall System ArchitectureThe typical Oracle Database Firewall architecture has the following main components:
■ The database network, containing the database server and its clients: You are not required to install Oracle Database Firewall onto the database server or clients. However, if needed, you can install the Database Firewall Local Monitoring on the database server, which enables the Database Firewall to monitor SQL traffic originating from the users or processes that have direct access (for example, through the console) to the database computer.
■ The Database Firewall: This is a dedicated server that runs the Oracle Database Firewall software. Each Database Firewall collects SQL data from SQL databases, and then sends this SQL data to the Database Firewall Management Server to be analyzed in reports. After the Database Firewall sends the SQL data to the

Oracle Database Firewall System Architecture
1-2 Oracle Database Firewall Administration Guide
Management Server, it deletes it locally. The SQL data is then stored in the Management Server.
■ Database Firewall applications and other third-party applications: These applications perform system configuration, monitoring, and administration. If necessary, you can use a single computer to operate these applications. However, typically, there is a separate computer for each application, because applications are often used by different people or from different locations.
Examples of Database Firewall applications include the Oracle Database Firewall Administration Console and Oracle Database Analyzer. For details about the Analyzer, see the Oracle Database Firewall Security Guide.
You must use a Database Firewall Management Server to control one or more Database Firewall installations. Figure 1–1 shows an architecture for such a system. A Database Firewall Management Server is suitable for larger enterprise installations that protect multiple databases at different sites.
Figure 1–1 illustrates the position of the Management Server in the Database Firewall architecture.
Figure 1–1 Enterprise Architecture Using a Database Firewall Management Server
High-Availability Resilient PairsYou can configure pairs of Database Firewalls or pairs of Database Firewall Management Servers, or both, to provide a high-availability system architecture. These pairs are known as resilient pairs. The resilient pair configuration works in Database Activity Monitoring (DAM) mode only.
Note:
■ This figure shows only one protected database for simplicity. A typical architecture will have many protected databases.
■ Generally, Database Firewalls use different network ports (network devices and therefore, network paths) to connect to the Management Server. The Network Switch in this diagram shows two port connections for each of the Database Firewalls.
Oracle Database Firewall System Architecture
Introducing Oracle Database Firewall 1-3
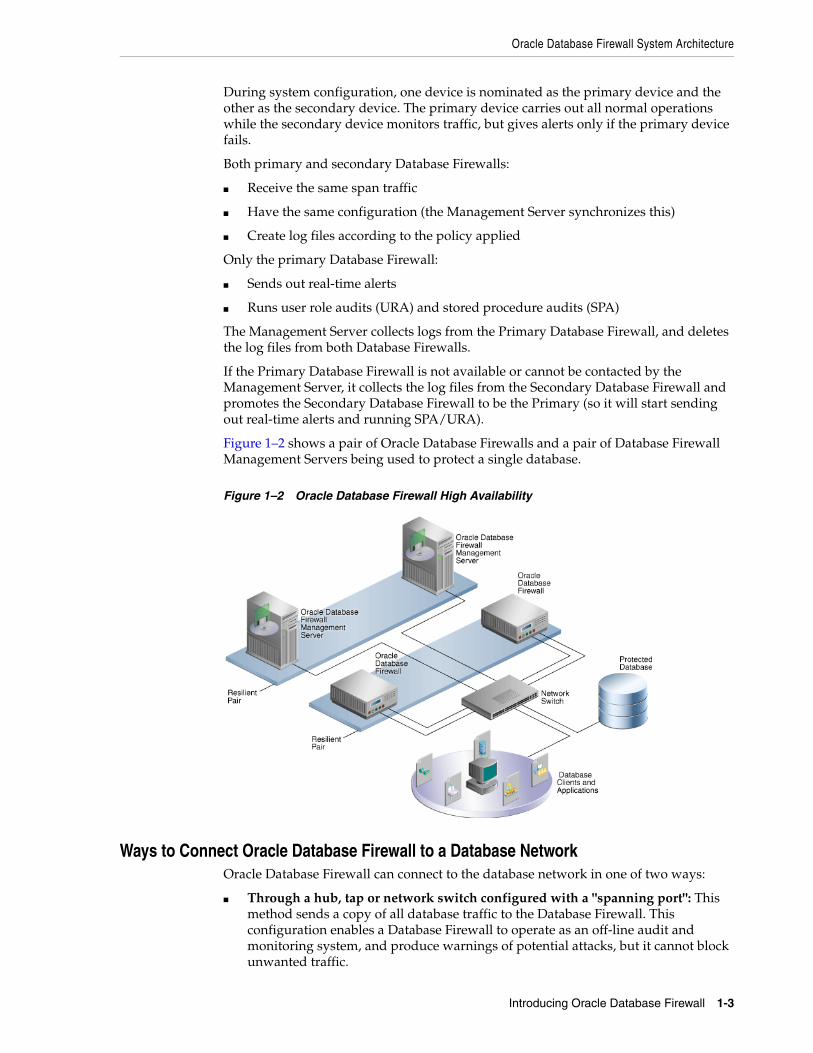
During system configuration, one device is nominated as the primary device and the other as the secondary device. The primary device carries out all normal operations while the secondary device monitors traffic, but gives alerts only if the primary device fails.
Both primary and secondary Database Firewalls:
■ Receive the same span traffic
■ Have the same configuration (the Management Server synchronizes this)
■ Create log files according to the policy applied
Only the primary Database Firewall:
■ Sends out real-time alerts
■ Runs user role audits (URA) and stored procedure audits (SPA)
The Management Server collects logs from the Primary Database Firewall, and deletes the log files from both Database Firewalls.
If the Primary Database Firewall is not available or cannot be contacted by the Management Server, it collects the log files from the Secondary Database Firewall and promotes the Secondary Database Firewall to be the Primary (so it will start sending out real-time alerts and running SPA/URA).
Figure 1–2 shows a pair of Oracle Database Firewalls and a pair of Database Firewall Management Servers being used to protect a single database.
Figure 1–2 Oracle Database Firewall High Availability
Ways to Connect Oracle Database Firewall to a Database NetworkOracle Database Firewall can connect to the database network in one of two ways:
■ Through a hub, tap or network switch configured with a "spanning port": This method sends a copy of all database traffic to the Database Firewall. This configuration enables a Database Firewall to operate as an off-line audit and monitoring system, and produce warnings of potential attacks, but it cannot block unwanted traffic.
Using the Oracle Database Firewall Administration Console
1-4 Oracle Database Firewall Administration Guide
For more information about connecting hubs, taps or switches, see the following Web site:
http://www.sans.org/security-resources/idfaq/switched.php
■ Inline between the database clients and database: This method enables Database Firewall to both block potential attacks and/or operating as an audit or monitoring system.
Integrating Oracle Database Firewall with Third-Party ProductsYou can integrate Oracle Database Firewall with the following third-party products:
■ BIG-IP Application Security Manager (ASM): This product from F5 Networks, Inc. is an advanced Web Application Firewall (WAF) that provides comprehensive edge-of-network protection against a wide range of Web-based attacks. It analyzes each HTTP and HTTPS request, and blocks potential attacks before they reach the Web application server. For more information, see Chapter 11, "Using Oracle Database Firewall with BIG-IP ASM."
■ ArcSight Security Information Event Management (SIEM): This product is a centralized system for logging, analyzing, and managing syslog messages from different sources. For more information, see Chapter 12, "Using Oracle Database Firewall with ArcSight SIEM."
Using the Oracle Database Firewall Administration ConsoleThis section contains:
■ About the Oracle Database Firewall Administration Console
■ Which Administration Console Should I Use?
■ Logging in to the Administration Console
■ Administration Console Tabs
About the Oracle Database Firewall Administration ConsoleThe Administration Console is a Web browser-based application that you use to configure, manage, and monitor Oracle Database Firewall. It is available on each Database Firewall (either standalone or managed) and Management Server.
The Administration Console is intended for use by network or system administrators who are responsible for IT systems deployment, maintenance, monitoring, and reporting.
Figure 1–3 shows the top portion of the status page of a managed Database Firewall Administration Console. (For a standalone Database Firewall, see "Step 1: Set the Database Firewall Date and Time" on page 2-1.)

Using the Oracle Database Firewall Administration Console
Introducing Oracle Database Firewall 1-5
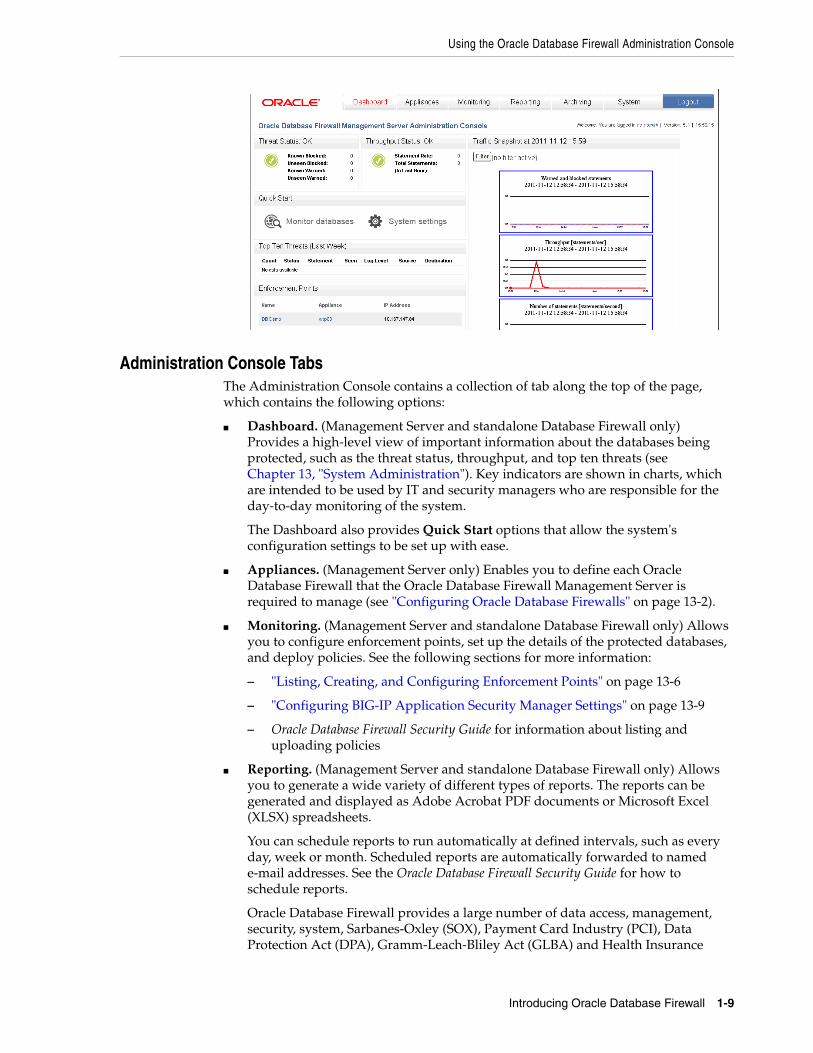
Figure 1–3 Dashboard Page of the Management Server Administration Console
You use the Administration Console to:
■ Deploy policies that were created in the Analyzer, by creating enforcement points for your site’s protected databases
■ Configure system settings for the Oracle Database Firewall.
■ Configure ArcSight SIEM connectors.
■ Create, find, and configure password security policies for users.
■ View and capture logged data.
All users of the Administration Console must enter a valid login ID and password before access is granted.
Because the Administration Console is a browser-based application, you can use it from any computer that has a supported Web browser, such as Internet Explorer. You can restrict this access by IP address.
Which Administration Console Should I Use?There are three possible Administration Consoles that you can use: one for a standalone Database Firewall, one for a Database Firewall that is managed by a Management Server, or one used by the Management Server itself.
The tasks that you perform in each are as follows:
■ Tasks Performed in a Standalone Database Firewall Administration Console
■ Tasks Performed in a Managed Database Firewall Administration Console
■ Tasks Performed in a Management Server
Tasks Performed in a Standalone Database Firewall Administration ConsoleTasks performed in a standalone Database Firewall Administration Console are as follows:
■ Using the Dashboard to view the overall system behavior
■ Management functions such as suspending, resuming, and changing Database Firewall controls or restarting a Database Firewall

Using the Oracle Database Firewall Administration Console
1-6 Oracle Database Firewall Administration Guide
■ System settings, such as changing the IP address, time, and keyboard settings
■ Checking the status of the standalone Database Firewall server
■ Configuring e-mail setup, such as the SMTP server address
■ Time synchronization and time offsets
■ Configuring public key synchronization
■ Configuring the Management Server certificate (this determines whether this is a standalone or managed Database Firewall)
■ Managing log files
■ Viewing system events
■ Summarizing traffic log files
■ Viewing and filtering the administration log
■ Repairing log files
■ Configuring, viewing, and approving changes found in stored procedure or user role auditing
■ Managing syslog and ArcSight SEIM connectors, and e-mail alerts
■ Creating and managing user accounts
■ Showing network traffic and capturing it to a file; finding traffic sources
■ Creating enforcement points and configuring protected databases
■ Uploading policies
■ Scheduling reports
■ Archiving jobs
Tasks Performed in a Managed Database Firewall Administration ConsoleTasks performed in a managed Database Firewall Administration Console are as follows:
■ Viewing and updating system settings
■ Checking the status of the managed Database Firewall
■ System and network settings, such as changing the IP address, time, and keyboard settings
■ Time synchronization and time offsets
■ Configuring public key synchronization
■ Configuring the Management Server certificate (this determines whether this is a standalone or managed Database Firewall)
■ Configuring the ArcSight connector
■ Creating and managing user accounts
■ Showing network traffic and capturing it to a file
Tasks Performed in a Management ServerTasks performed in a Management Server:
■ Using the Dashboard to view the overall system behavior

Using the Oracle Database Firewall Administration Console
Introducing Oracle Database Firewall 1-7
■ Management functions such as suspending, resuming, and changing Database Firewall controls or restarting a Database Firewall
■ Configuring resilient pairs of Management Servers
■ System settings, such as changing the IP address, time, and keyboard settings
■ Checking the status of the Management Server server
■ Configuring e-mail setup, such as the SMTP server address and so on
■ Time synchronization and time offsets
■ Configuring public key synchronization
■ Managing log files
■ Viewing system events
■ Summarizing traffic log files
■ Viewing and filtering the administration log
■ Repairing log files
■ Managing log files
■ Configuring, viewing, and approving changes found in stored procedure or user role auditing
■ Managing syslog and ArcSight SEIM connectors, and e-mail alerts
■ Creating and managing user accounts
■ Creating enforcement points and configuring protected databases
■ Uploading policies
■ Scheduling reports
■ Archiving jobs
Logging in to the Administration ConsoleTo log in to the Administration Console:
1. Open a Web browser from any computer that has network access to Oracle Database Firewall.
2. Enter the following URL:
https://ip_address/user/login
Provide the IP address for the server on which Oracle Database Firewall is installed. For example:
https://192.0.2.206/user/login
If you change the user interface port number (by using the System Settings page of the Administration Console), then you must also include this port number in the URL. Use the following syntax:
https://ip_address:port/user/login
For example:
https://192.0.2.206:444/user/login
Using the Oracle Database Firewall Administration Console
1-8 Oracle Database Firewall Administration Guide
Add this address to your Favorites to make it easy to access.
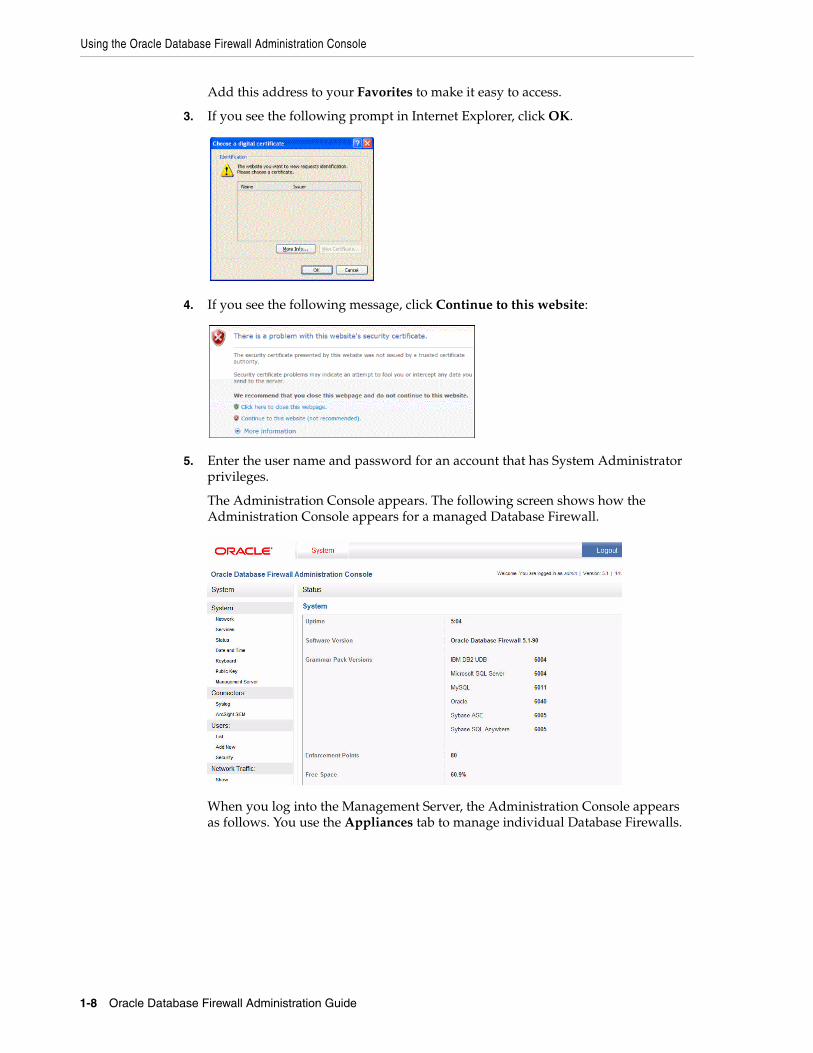
3. If you see the following prompt in Internet Explorer, click OK.
4. If you see the following message, click Continue to this website:
5. Enter the user name and password for an account that has System Administrator privileges.
The Administration Console appears. The following screen shows how the Administration Console appears for a managed Database Firewall.
When you log into the Management Server, the Administration Console appears as follows. You use the Appliances tab to manage individual Database Firewalls.
Using the Oracle Database Firewall Administration Console
Introducing Oracle Database Firewall 1-9
Administration Console TabsThe Administration Console contains a collection of tab along the top of the page, which contains the following options:
■ Dashboard. (Management Server and standalone Database Firewall only) Provides a high-level view of important information about the databases being protected, such as the threat status, throughput, and top ten threats (see Chapter 13, "System Administration"). Key indicators are shown in charts, which are intended to be used by IT and security managers who are responsible for the day-to-day monitoring of the system.
The Dashboard also provides Quick Start options that allow the system's configuration settings to be set up with ease.
■ Appliances. (Management Server only) Enables you to define each Oracle Database Firewall that the Oracle Database Firewall Management Server is required to manage (see "Configuring Oracle Database Firewalls" on page 13-2).
■ Monitoring. (Management Server and standalone Database Firewall only) Allows you to configure enforcement points, set up the details of the protected databases, and deploy policies. See the following sections for more information:
– "Listing, Creating, and Configuring Enforcement Points" on page 13-6
– "Configuring BIG-IP Application Security Manager Settings" on page 13-9
– Oracle Database Firewall Security Guide for information about listing and uploading policies
■ Reporting. (Management Server and standalone Database Firewall only) Allows you to generate a wide variety of different types of reports. The reports can be generated and displayed as Adobe Acrobat PDF documents or Microsoft Excel (XLSX) spreadsheets.
You can schedule reports to run automatically at defined intervals, such as every day, week or month. Scheduled reports are automatically forwarded to named e-mail addresses. See the Oracle Database Firewall Security Guide for how to schedule reports.
Oracle Database Firewall provides a large number of data access, management, security, system, Sarbanes-Oxley (SOX), Payment Card Industry (PCI), Data Protection Act (DPA), Gramm-Leach-Bliley Act (GLBA) and Health Insurance
Security Guidelines
1-10 Oracle Database Firewall Administration Guide
Portability and Accountability Act (HIPAA) report types by default, giving full traceability of all essential information over a selected date and time range.
■ Archiving. (Management Server and standalone Database Firewall only) Provides options that enable important data to be archived to prevent loss of data in the unlikely event of a disk or other system error (see "Archiving Data" on page 13-13).
■ System. (Management Server, standalone Database Firewall, and managed Database Firewall) Allows initial configuration of Oracle Database Firewall, such as IP addresses and time settings. These options are used during initial deployment of Oracle Database Firewall (see "Configuring the System" on page 13-12).
Most pages accessed from the top bar contain a menu of further sub-options along the left side of the page.
Security GuidelinesConsult the Oracle Database Firewall Security Guide for information on protecting your data and general recommendations about deploying Database Firewall in a network and in special configurations.

2
Configuring an Oracle Database Firewall 2-1
2Configuring an Oracle Database Firewall
This chapter contains:
■ About Configuring an Oracle Database Firewall
■ Step 1: Set the Database Firewall Date and Time
■ Step 2: Specify the Database Firewall System Settings
■ Step 3: Enable Secure Log Access in the Standalone Database Firewall
■ Step 4: Configure the Standalone Database Firewall Syslog Destinations
■ Step 5: Configure the Standalone Database Firewall Enforcement Points
■ Step 6: Configure the Database Firewall Bridge IP Address
■ Step 7: Test the Standalone Database Firewall System Operation
■ What’s Next?
About Configuring an Oracle Database FirewallThis chapter explains how to configure a standalone Oracle Database Firewall. Where indicated, a procedure also applies to a managed Oracle Database Firewall. For more information on which tasks can be done on which type of Database Firewall, see these topics:
"Tasks Performed in a Standalone Database Firewall Administration Console" on page 1-5"Tasks Performed in a Managed Database Firewall Administration Console" on page 1-6
If you want to configure a standalone Database Firewall to be managed by a Management Server, see Chapter 3, "Configuring a Database Firewall Management Server."
Before you start, ensure that the Database Firewall has been installed, as described in the Oracle Database Firewall Installation Guide.
Step 1: Set the Database Firewall Date and TimeIt is important to ensure that the Database Firewall uses the correct date and time so that log event times are accurate and scheduled tasks, such as archiving and reports,
Note: Some error messages that may occur during configuration require that your Web browser have JavaScript enabled.

Step 1: Set the Database Firewall Date and Time
2-2 Oracle Database Firewall Administration Guide
function correctly. Correct time settings are also needed so that Database Firewall Analyzer uses the correct time ranges when training on log data.
To set the Database Firewall date and time:
1. In the Database Firewall Administration Console, select the System tab.
2. Click Date and Time under the System menu on the left, and then scroll down and click the Change button.
3. Enter the correct date and time.
If a managed Database Firewall and Management Server are in different time zones, then the audit reports and summary reports will use the time zone of the Database Firewall that created the log file.
4. Use the Time Offset menu to select your local time with respect to Coordinated Universal Time (UTC).
For example, UTC-5 is five hours behind UTC. It is essential to select the correct setting to ensure that the time is set accurately during synchronization.
If you do not select the correct setting, the time will be set incorrectly when time synchronization occurs.
5. (Optional) Select Enable NTP Synchronization.
Selecting Enable NTP Synchronization keeps the time synchronized with the average of the time recovered from the time servers specified in the Server 1/2/3 fields, which can contain an IP address or name. If a name is specified, the DNS server specified in the System Settings page is used for name resolution.

Step 2: Specify the Database Firewall System Settings
Configuring an Oracle Database Firewall 2-3
6. Use the default server addresses, or enter the addresses of your preferred time servers.
Test Server displays the time from the server, but does not update the time at the Oracle Database Firewall Management Server or Oracle Database Firewall.
Selecting Synchronize Time After Save causes the time to be synchronized when you click Save.
7. Click Save.
To enable time synchronization, you also must specify the IP address of the default gateway and a DNS server, as described in "Step 2: Specify the Database Firewall System Settings" on page 2-3.
Step 2: Specify the Database Firewall System SettingsYou specify system settings from each Database Firewall’s administration console. System settings consist of network and services configuration as shown in the following procedures.
To configure the Database Firewall network settings:
1. In the System tab, select Network from the System menu on the left.
2. In the Network Configuration page, click the Change button.
3. Complete the fields as necessary, then click Save.
■ IP Address: The IP address of the currently accessed Database Firewall. This IP address connects to the Administration Console, or accesses the unit from Oracle Database Firewall applications such as the Analyzer. An IP address was set during installation. If you want to use a different address, then you can change it now. The IP address is static and must be obtained from the network administrator.
■ Network Mask: The subnet mask of Oracle Database Firewall.
■ Gateway: (optional) The IP address of the default gateway (for example, for internet access). The default gateway must be on the same subnet as the host.
■ Name: Enter a descriptive name for this Database Firewall, such as Database Firewall to monitor Oracle Database.
■ Link properties: Leave the setting at the default, unless your network has been configured not to use autonegotiation.
To configure the Database Firewall services:
1. In the System tab, under the System menu, click Services.
Note: If using names instead of IP addresses, you must have DNS already configured, otherwise name resolution will not work.
WARNING: In DPE (blocking) mode, Synchronize Time After Save causes all enforcement points to restart, thereby dropping existing connections to protected databases. This would cause a temporary traffic disruption.

Step 2: Specify the Database Firewall System Settings
2-4 Oracle Database Firewall Administration Guide
2. Click the Change button.
3. Complete the following fields as necessary, then click Save.
■ DNS Servers: (optional) The IP addresses of up to three DNS servers on the network. These are used to resolve any network names that may be used by Oracle Database Firewall. Keep the fields blank if there is no DNS server, otherwise system performance may be impaired.
■ Web Access: If you want to allow only selected computers to access the Administration Console, enter their IP addresses in the box. Using the default of all allows access from any computer in your site.
■ Terminal Access: You can specify a list of IP addresses that are allowed to access Oracle Database Firewall from a remote console. Entering all allows access from any computer in your site. The default of disabled prevents console access from any computer.
■ SNMP Access: Specifies a list of IP addresses that are allowed to access the network configuration of Oracle Database Firewall through SNMP (settings as per Terminal Access). The SNMP community string is gT8@fq+E.
Caution: When allowing access to the Database Firewall you must be careful to take proper precautions to maintain security. See the Security Guidelines chapter in Oracle Database Firewall Security Guide for a list of recommendations before completing this step.
Step 4: Configure the Standalone Database Firewall Syslog Destinations
Configuring an Oracle Database Firewall 2-5
■ Secure Log Access (Reporting): Specifies a list of IP addresses that are allowed to access the log data held on the Oracle Database Firewall Management Server, for example, to report using external reporting systems (settings as per Terminal Access). If you complete this setting, then ensure that you complete "Step 3: Enable Secure Log Access in the Standalone Database Firewall" on page 2-5.
■ Traffic Log Access (Analyzer): Specifies a list of IP addresses of computers running the Analyzer software that are allowed to access the traffic log on the Oracle Database Firewall Management Server (settings as per Terminal Access).
Step 3: Enable Secure Log Access in the Standalone Database FirewallIf you changed the default settings in the Secure Log Access (Reporting) field in "Step 2: Specify the Database Firewall System Settings" on page 2-3, then you must enable the access in the Database Firewall server.
1. Log in to the Database Firewall server as user root.
2. Change to the oracle user.
su - oracle
3. Execute the following command:
. oraenv
4. When prompted, enter dbfwdb for the Oracle SID.
5. The following message is displayed:
The Oracle base has been set to /var/lib/oracle
6. Log in to the database on this server using SQL*Plus.
sqlplus / as sysdba
7. Enable the dbfw_report account and grant this user a password.
ALTER USER dbfw_report ACCOUNT UNLOCK IDENTIFIED BY password;
8. Exit SQL*Plus.
Step 4: Configure the Standalone Database Firewall Syslog DestinationsUse the following procedure to configure the types of syslog messages to send from this Database Firewall (for example, to signal blocked statements).
1. In the standalone Database Firewall Administration Console, click the System tab.
2. Click Syslog in the Connectors menu.
The following page appears.

Step 5: Configure the Standalone Database Firewall Enforcement Points
2-6 Oracle Database Firewall Administration Guide
3. Complete the fields, as necessary:
■ Syslog Destinations (UDP): Use this box if you are using User Datagram Protocol (UDP) to communicate syslog messages. Enter the IP address of each computer that is permitted to receive the syslog messages.
■ Syslog Destinations (TCP): Use this box if you are using Transmission Control Protocol (TCP) to communicate syslog messages. TCP guarantees that the packets are sent and received correctly. Enter the IP address and port number of each machine that is permitted to receive the syslog messages.
■ Syslog Categories: You can select the types of syslog messages to generate. The syslog messages are in the following categories:
– System: System messages generated by Oracle Database Firewall or other software, which have a syslog priority level of at least "INFO".
– Alerts: Oracle Database Firewall and F5 alerts (Oracle Database Firewall syslog message IDs 9, 10, 11 and 12).
– Info: General Oracle Database Firewall messages and property changes (Oracle Database Firewall syslog message IDs 1, 4 and 8).
– Debug: Engineering debug messages (for Oracle support use only).
– Heartbeat: Oracle Database Firewall heartbeat message and current statistics (Oracle Database Firewall syslog message ID 3). Oracle Database Firewall sends a heartbeat every second for each Enforcement Point that you have configured for this system. (If you select this check box, be aware of the potential volume issues when you enable the Heartbeat feature.)
4. Click Apply.
Step 5: Configure the Standalone Database Firewall Enforcement PointsYou must configure each enforcement point that the standalone Database Firewall will use. (For a managed Database Firewall, you use the Management Server.)
To configure the enforcement points:
1. In the standalone Database Firewall Administration Console, select the Monitoring tab.
2. In the Enforcement Points menu, select Create.

Step 5: Configure the Standalone Database Firewall Enforcement Points
Configuring an Oracle Database Firewall 2-7
The Enforcement Point Wizard: Step 1 page appears.
3. Enter the following information:
■ Name: Enter a name for the enforcement point.
■ Use a builtin enforcement point (Monitor locally): The number of currently available enforcement points you can create, up to 80, is displayed.
4. Click Next.
The Enforcement Point Wizard: Step 2 page appears.
5. Select one or more traffic sources you want this enforcement point to monitor. If you select a proxy traffic source, you cannot select any other traffic sources. If Management appears in the list, then the Management Interface can be configured and used as a proxy.
6. Enter the following information:
■ Protected Database: Select Create New or choose from the list of available databases.

Step 6: Configure the Database Firewall Bridge IP Address
2-8 Oracle Database Firewall Administration Guide
■ Name: If creating a new protected database, enter a name for the database to be monitored.
■ Database Type: If creating a new protected database, select the database type.
■ Address and Port: If creating a new protected database, specify the IP address and port number of the database management system (i.e. the IP settings used by database clients to send traffic to the database), then click Add. If the protected database has more than one interface and/or port, enter the additional Address and Port details, then click Add again. If you are using a Domain Name Server (DNS), you can enter a hostname instead of an IP address.
7. Click Next.
The Enforcement Point Wizard: Step 3 page appears.
8. Enter the following settings:
■ Monitoring Mode: Select Database Activity Monitoring (DAM) if the enforcement point is to be used only to log statements and provide warnings of potential attacks. Select Database Policy Enforcement (DPE) if the enforcement point is also required to block potential attacks. Database Policy Enforcement is available only if you upload a policy (as described next).
If you have selected a traffic proxy as a traffic source for this Enforcement Point, then DPE mode is required and you cannot select DAM mode.
■ Policy: Select a baseline policy. To upload a custom policy developed using the Analyzer software, click Browse to select the file, then Upload. Use the text box to add a description. If this is the first time you are creating a baseline policy, then Oracle recommends that you select the unique.dna policy.
9. Click Next.
The Enforcement Point Wizard: Step 4 page appears.
10. Check your settings, and if you are satisfied, then click the Finish button.
Step 6: Configure the Database Firewall Bridge IP AddressIf you want Oracle Database Firewall to block potential attacks, and Database Firewall is not in proxy mode, then you must allocate an additional IP address that is unique to the database network. This is used as a bridge IP address to redirect traffic within the Database Firewall. When Database Firewall is used as a proxy (proxy mode) you do not need to allocate this additional IP address. See "Configuring Database Firewall as a Traffic Proxy" on page 13-9 for details.
Note 1: When you use a Database Firewall in DPE mode, you must configure any IP or MAC address spoofing detection rules so that they ignore database IP or MAC address changes made by that Database Firewall.
Note 2: When you set a Database Firewall to DPE mode (through Enforcement Point Settings or by restarting a Database Firewall with network passthrough), ensure that all connections to the database are forced to reconnect. In addition, in DPE mode, if you change Enforcement Point Settings, you must also force all database connections to reconnect.
Step 7: Test the Standalone Database Firewall System Operation
Configuring an Oracle Database Firewall 2-9
To configure the standalone Database Firewall bridge IP address:
1. In the Database Firewall Administration Console, click the System tab, then click Network under the System menu on the left.
2. Click the Change button.
3. In the Traffic Sources section, find the network that you want to configure.
4. Select Bridge Enabled for this network.
5. Specify an IP address and subnet mask if either of the following is true:
■ The pair of network interface ports connect the Oracle Database Firewall in-line between the database and clients (whether Database Policy Enforcement or Database Activity Monitoring mode is used).
■ The network interface ports are used to monitor traffic with the Oracle Database Firewall Local Monitoring software.
The IP address must be unique to the network, and is used as a bridge IP address to redirect traffic within the Database Firewall.
Enabled is automatically selected if the network interface ports are currently used to monitor traffic for enforcement points that have the Local Monitoring or DPE (Database Policy Enforcement) mode selected.
6. Click Save.
Step 7: Test the Standalone Database Firewall System OperationYou should verify that the standalone Database Firewall configuration is fully operational before you begin monitoring your protected database SQL traffic.
To test the system operation:
1. In the standalone Database Firewall Administration Console, click the Monitoring tab, and then from the Enforcement Points menu, select List to display the list of configured enforcement points. Check the status as follows:
a. Click the Status button for the appropriate enforcement point.
b. In the Appliances area, ensure that you see a green check-mark indicator in the Status column against the device that is performing the monitoring.
2. Click the Dashboard tab, and check that Number of statements increases every minute. This setting indicates that statements are being recognized.
3. Click the System tab, then in the Logs menu, click Traffic Log Files.
Note 1: The IP address of the bridge must be on the same subnet as all protected databases deployed in DPE mode on that bridge. This restriction does not apply to protected databases deployed in DAM mode.
Note 2: If the Database Firewall Management Server and the Bridge are connected to physically separate networks that are on the same subnet, Database Firewall may route responses out of the wrong interface. If physically separate networks are required, use different subnets.

What’s Next?
2-10 Oracle Database Firewall Administration Guide
Check that the log files exist. If you want to see the statements, create Log Search Results (in the Reporting tab, under the Traffic Log menu).
4. Verify that data can be obtained from the traffic log.
See Oracle Database Firewall Security Guide for information about accessing and viewing the traffic log.
What’s Next? The tasks in chapter complete the initial configuration of a Database Firewall. Your next step is to configure the Management Server, described in Chapter 3, "Configuring a Database Firewall Management Server." Depending on site requirements, you may need to configure other features, such as stored procedure auditing, user role auditing and local monitoring. These features are explained in later chapters of this guide.
After you have configured the standalone Database Firewall, users will be able to begin analyzing data. Once a policy has been developed, you must upload it. The Oracle Database Firewall Security Guide covers these tasks in detail.
Chapter 13, "System Administration," explains system administration tasks, including how to set up new users, monitor the system and produce reports.
3
Configuring a Database Firewall Management Server 3-1
3Configuring a Database Firewall Management Server
This chapter contains:
■ About Configuring an Oracle Database Firewall Management Server-Based System
■ Step 1: Perform Initial Tasks for Each Database Firewall Management Server
■ Step 2: Perform Tasks for Each Oracle Database Firewall
■ Step 3: Complete the Final Database Firewall Management Server Tasks
■ Step 4: Configure the Management Server Enforcement Points
■ Step 5: Test the Management Server System Operation
■ What’s Next?
About Configuring an Oracle Database Firewall Management Server-Based System
This chapter explains how to configure a Management Server for one or more Database Firewalls in your system.
Before you start, make sure that each device has been installed, as described in Oracle Database Firewall Installation Guide.
There are five main steps involved in the configuration process:
1. Perform the initial configuration tasks at the Oracle Database Firewall Management Server, for example, to confirm the Database Firewall Management Server IP address and set the date and time.
2. Configure each managed Database Firewall (for example, install the certificate from the Management Server).
3. Add each Oracle Database Firewall at the Oracle Database Firewall Management Server.
4. Run the Enforcement Point Wizard at the Oracle Database Firewall Management Server.
5. Check that the system is functioning correctly.
Each of these steps is described next. If resilient pairs of Oracle Database Firewall Management Servers or Oracle Database Firewalls are required, some of the above steps must be completed for each device.
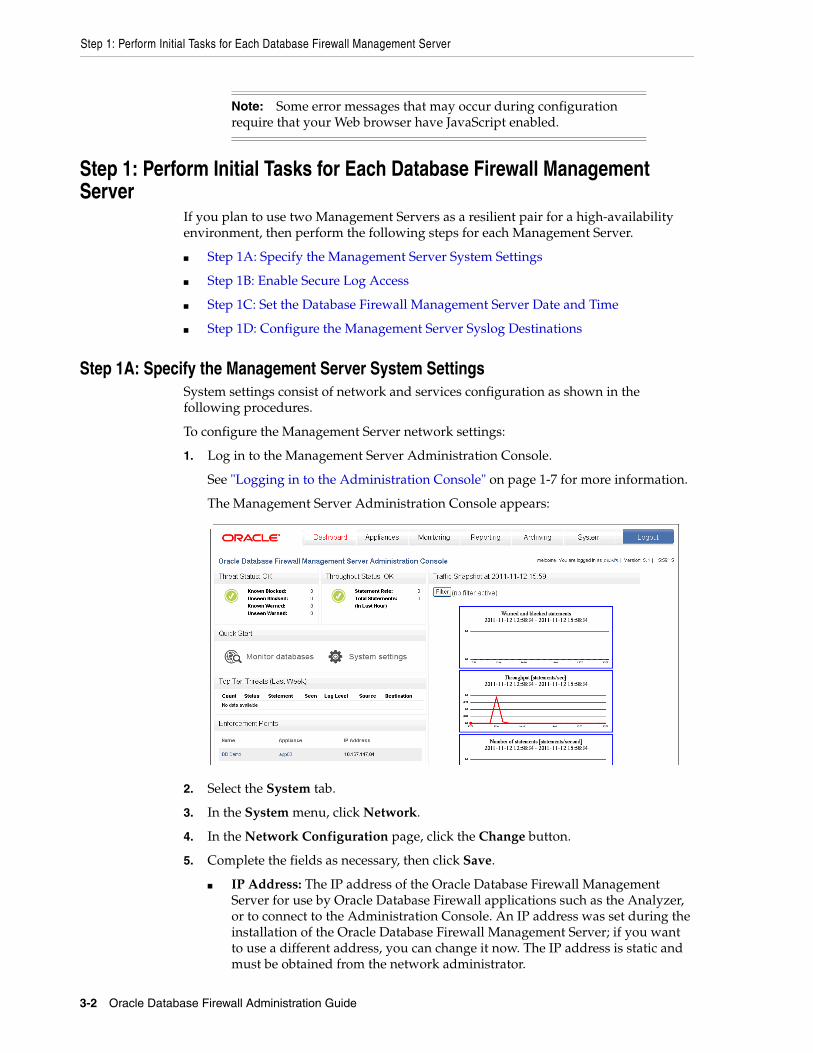
Step 1: Perform Initial Tasks for Each Database Firewall Management Server
3-2 Oracle Database Firewall Administration Guide
Step 1: Perform Initial Tasks for Each Database Firewall Management Server
If you plan to use two Management Servers as a resilient pair for a high-availability environment, then perform the following steps for each Management Server.
■ Step 1A: Specify the Management Server System Settings
■ Step 1B: Enable Secure Log Access
■ Step 1C: Set the Database Firewall Management Server Date and Time
■ Step 1D: Configure the Management Server Syslog Destinations
Step 1A: Specify the Management Server System SettingsSystem settings consist of network and services configuration as shown in the following procedures.
To configure the Management Server network settings:
1. Log in to the Management Server Administration Console.
See "Logging in to the Administration Console" on page 1-7 for more information.
The Management Server Administration Console appears:
2. Select the System tab.
3. In the System menu, click Network.
4. In the Network Configuration page, click the Change button.
5. Complete the fields as necessary, then click Save.
■ IP Address: The IP address of the Oracle Database Firewall Management Server for use by Oracle Database Firewall applications such as the Analyzer, or to connect to the Administration Console. An IP address was set during the installation of the Oracle Database Firewall Management Server; if you want to use a different address, you can change it now. The IP address is static and must be obtained from the network administrator.
Note: Some error messages that may occur during configuration require that your Web browser have JavaScript enabled.
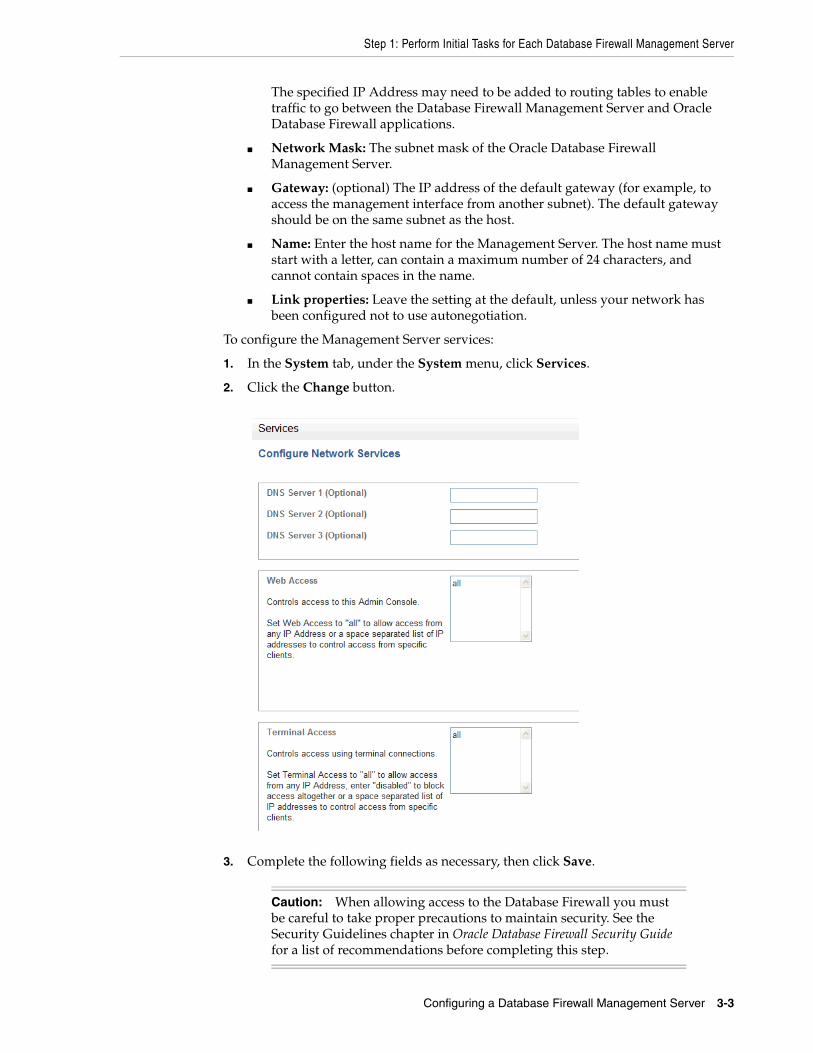
Step 1: Perform Initial Tasks for Each Database Firewall Management Server
Configuring a Database Firewall Management Server 3-3
The specified IP Address may need to be added to routing tables to enable traffic to go between the Database Firewall Management Server and Oracle Database Firewall applications.
■ Network Mask: The subnet mask of the Oracle Database Firewall Management Server.
■ Gateway: (optional) The IP address of the default gateway (for example, to access the management interface from another subnet). The default gateway should be on the same subnet as the host.
■ Name: Enter the host name for the Management Server. The host name must start with a letter, can contain a maximum number of 24 characters, and cannot contain spaces in the name.
■ Link properties: Leave the setting at the default, unless your network has been configured not to use autonegotiation.
To configure the Management Server services:
1. In the System tab, under the System menu, click Services.
2. Click the Change button.
3. Complete the following fields as necessary, then click Save.
Caution: When allowing access to the Database Firewall you must be careful to take proper precautions to maintain security. See the Security Guidelines chapter in Oracle Database Firewall Security Guide for a list of recommendations before completing this step.
Step 1: Perform Initial Tasks for Each Database Firewall Management Server
3-4 Oracle Database Firewall Administration Guide
■ DNS Servers: (optional) The IP addresses of up to three DNS servers on the network. These are used to resolve any network names that may be used by Oracle Database Firewall Management Server. Keep the fields blank if there is no DNS server, otherwise system performance may be impaired.
■ Web Access: If you want to allow only selected computers to access the Administration Console, enter their IP addresses in the box. Using the default of all allows access from any computer in your site.
■ Terminal Access: You can specify a list of IP addresses that are allowed to access Oracle Database Firewall Management Server from a remote console. Entering all allows access from any computer in your site. The default of disabled prevents console access from any computer.
■ SNMP Access: Specifies a list of IP addresses that are allowed to access the network configuration of Oracle Database Firewall Management Server through SNMP (settings as per Terminal Access). The SNMP community string is gT8@fq+E.
■ Secure Log Access (Reporting): Specifies a list of IP addresses that are allowed to access the log data held on the Oracle Database Firewall Management Server, for example, to report using external reporting systems (settings as per Terminal Access). If you complete this setting, then ensure that you complete "Step 1B: Enable Secure Log Access" on page 3-4.
■ Traffic Log Access (Analyzer): Specifies a list of IP addresses of computers running the Analyzer software that are allowed to access the traffic log on the Oracle Database Firewall Management Server (settings as per Terminal Access).
Step 1B: Enable Secure Log AccessIf you changed the default settings in the Secure Log Access (Reporting) field in "Step 1A: Specify the Management Server System Settings" on page 3-2, then you must enable the access in the Database Firewall server.
1. Log in to the Database Firewall server as user root.
2. Change to the oracle user.
su - oracle
3. Execute the following command:
. oraenv
4. When prompted, enter dbfwdb for the Oracle SID.
5. Log in to the database on this server using SQL*Plus.
sqlplus / as sysdbaEnter password: password
6. Enable the dbfw_report account and grant this user a password.
ALTER USER dbfw_report ACCOUNT UNLOCK IDENTIFIED BY password;
7. Exit SQL*Plus.

Step 1: Perform Initial Tasks for Each Database Firewall Management Server
Configuring a Database Firewall Management Server 3-5
Step 1C: Set the Database Firewall Management Server Date and TimeIt is important to ensure that the date and time set for the Management Server are correct, because events performed by the Management Server are logged with the date and time at which they occur. In addition, archiving occurs and specified intervals based on the time settings. Correct time settings are also needed so that Database Firewall Analyzer uses the correct time ranges when training on log data.
To set the Database Firewall Management Server date and time:
1. In the Management Server Administration Console, select the System tab.
2. Click Date and Time under the System menu on the left, and then scroll down and click the Change button.
3. Enter the correct date and time.
If a managed Database Firewall and Management Server are in different time zones, then the audit reports and summary reports will use the time zone of the Database Firewall that created the log file.
4. Use the Time Offset menu to select your local time with respect to Coordinated Universal Time (UTC).
For example, UTC-5 is five hours behind UTC. It is essential to select the correct setting to ensure that the time is set accurately during synchronization.
If you do not select the correct setting, the time will be set incorrectly when time synchronization occurs.
5. (Optional) Select Enable NTP Synchronization.
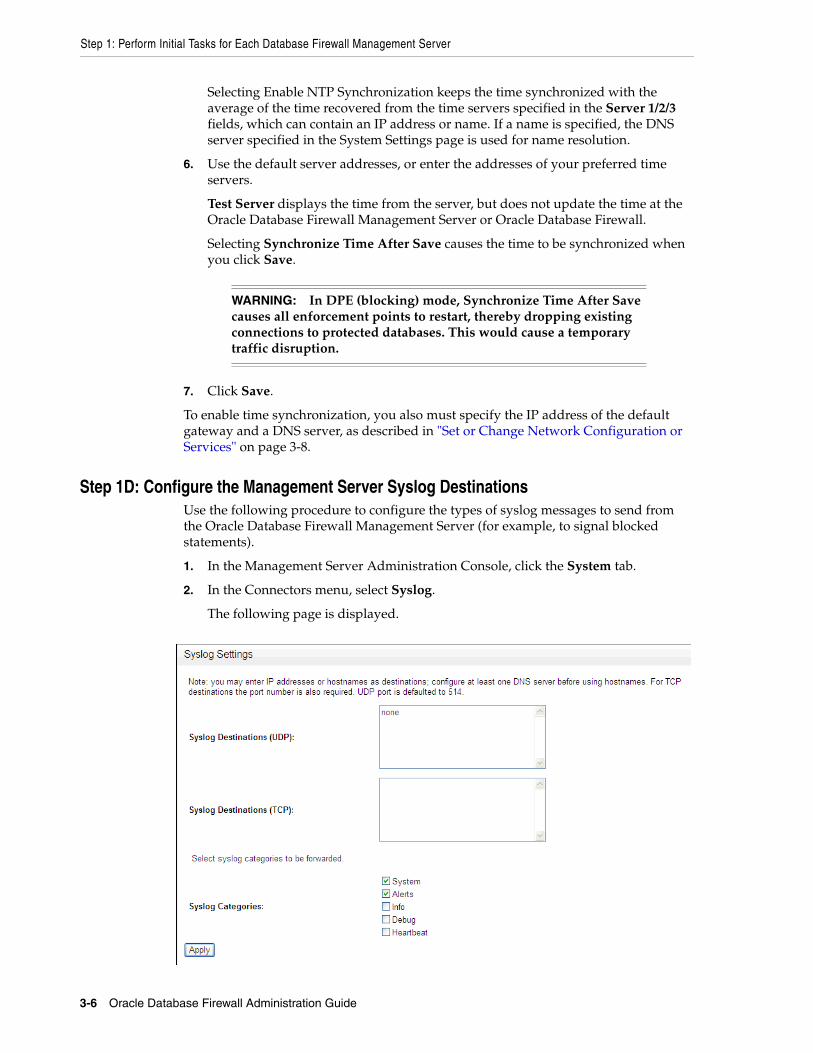
Step 1: Perform Initial Tasks for Each Database Firewall Management Server
3-6 Oracle Database Firewall Administration Guide
Selecting Enable NTP Synchronization keeps the time synchronized with the average of the time recovered from the time servers specified in the Server 1/2/3 fields, which can contain an IP address or name. If a name is specified, the DNS server specified in the System Settings page is used for name resolution.
6. Use the default server addresses, or enter the addresses of your preferred time servers.
Test Server displays the time from the server, but does not update the time at the Oracle Database Firewall Management Server or Oracle Database Firewall.
Selecting Synchronize Time After Save causes the time to be synchronized when you click Save.
7. Click Save.
To enable time synchronization, you also must specify the IP address of the default gateway and a DNS server, as described in "Set or Change Network Configuration or Services" on page 3-8.
Step 1D: Configure the Management Server Syslog DestinationsUse the following procedure to configure the types of syslog messages to send from the Oracle Database Firewall Management Server (for example, to signal blocked statements).
1. In the Management Server Administration Console, click the System tab.
2. In the Connectors menu, select Syslog.
The following page is displayed.
WARNING: In DPE (blocking) mode, Synchronize Time After Save causes all enforcement points to restart, thereby dropping existing connections to protected databases. This would cause a temporary traffic disruption.

Step 2: Perform Tasks for Each Oracle Database Firewall
Configuring a Database Firewall Management Server 3-7
3. Complete the fields, as necessary:
■ Syslog Destinations (UDP): Use this box if you are using User Datagram Protocol (UDP) to communicate syslog messages from the Oracle Database Firewall Management Server. Enter the IP address of each machine that is permitted to receive the syslog messages.
■ Syslog Destinations (TCP): Use this box if you are using Transmission Control Protocol (TCP) to communicate syslog messages from the Oracle Database Firewall Management Server. Enter the IP address and port number of each server that is permitted to receive the syslog messages.
■ Syslog Categories: You can select the types of syslog messages to generate. The categories have the following meanings:
– System: System messages generated by Oracle Database Firewall or other software, which have a syslog priority level of at least "INFO".
– Alerts: Oracle Database Firewall and F5 alerts (Oracle Database Firewall syslog message IDs 9, 10, 11 and 12).
This category is not present on the Management Server.
– Info: General Oracle Database Firewall messages and property changes (Oracle Database Firewall syslog message IDs 1, 4 and 8).
– Debug: Engineering debug messages (for Oracle Database Firewall use only).
– Heartbeat: Oracle Database Firewall heartbeat message and current statistics (Oracle Database Firewall syslog message ID 3).
This category is not present on the Management Server.
For more information about the meaning of each syslog message, see Appendix B, "Syslog Message Format."
4. Click Apply.
If you are using two Oracle Database Firewall Management Servers as a resilient pair, repeat "Step 1: Perform Initial Tasks for Each Database Firewall Management Server" on page 3-2 for the second Database Firewall Management Server.
Step 2: Perform Tasks for Each Oracle Database FirewallThis section contains:
■ Step 2A: Configure the Database Firewall System and Time Settings
■ Step 2B: Enter the Database Firewall Management Server Certificate and IP Address
Step 2A: Configure the Database Firewall System and Time SettingsPerform the tasks described here for each Oracle Database Firewall that will be managed by the Oracle Database Firewall Management Server.
Set Date and TimeTo configure the time settings, refer to "Step 1: Set the Database Firewall Date and Time" on page 2-1.
Step 3: Complete the Final Database Firewall Management Server Tasks
3-8 Oracle Database Firewall Administration Guide
Set or Change Network Configuration or ServicesTo set or change network or services settings for a Database Firewall, refer to "Step 2: Specify the Database Firewall System Settings" on page 2-3
For more information on network configuration refer to steps in "Changing the Network Configuration" on page 13-11.
Step 2B: Enter the Database Firewall Management Server Certificate and IP AddressChange each Oracle Database Firewall that will be managed by the Oracle Database Firewall Management Server from standalone to managed mode. To do so, copy the certificate details held on the Oracle Database Firewall Management Server and paste them into each Oracle Database Firewall. This enables Oracle Database Firewall to communicate with the Oracle Database Firewall Management Server.
1. At the Oracle Database Firewall Management Server Administration Console:
a. Click Certificate in the System menu.
b. Copy all the text displayed in the large box.
2. At Oracle Database Firewall Administration Console:
a. Click Management Server in the System menu.
b. Enter the IP address of the Management Server in the Oracle Database Firewall Management Server IP Address field.
c. Paste the Oracle Database Firewall Management Server certificate text into the Certificate box.
d. Click Apply.
When you click Apply, Oracle Database Firewall changes from standalone to managed mode and all tabs at the top of the console interface, except System, are removed. Removing the certificate or IP address reverts the Database Firewall to standalone mode.
3. If you want to use a resilient pair of Management Servers for a high availability environment, then select the Add Second Oracle Database Firewall Management Server check box and repeat steps 1 and 2 to enter the details of the second Oracle Database Firewall Management Server.
Step 3: Complete the Final Database Firewall Management Server TasksThis section contains:
■ Step 3A: Specify Management Server Partner Settings (Resilient Pair Only)
■ Step 3B: Add Each Oracle Database Firewall to the Management Server
■ Step 3C: Define Resilient Pairs of Oracle Database Firewalls
Step 3A: Specify Management Server Partner Settings (Resilient Pair Only)Follow this procedure if you are setting up the Management Server for high availability.
To specify the Management Server Partner Settings:
1. Copy the certificate details from the Management Server that will be used as the partner for the Management Server you are configuring, as described in the previous section.

Step 3: Complete the Final Database Firewall Management Server Tasks
Configuring a Database Firewall Management Server 3-9
2. At the Management Server you are configuring, select the System tab.
3. In the System menu, select High Availability.
The following is displayed:
4. Select primary or secondary under Status. (Only one of the pair will be primary.)
5. Enter the IP address and paste the certificate of the partner Management Server and save the changes.
6. Repeat the preceding steps for the second Management Server.
Synchronize Now is enabled when you enter the partner details. Selecting the Synchronize Now button forces an immediate synchronization of the two Oracle Database Firewall Management Servers. It is not normally necessary to use this button, since an auto-synchronization occurs 5 minutes after the last change.
Step 3B: Add Each Oracle Database Firewall to the Management ServerAdd each Oracle Database Firewall as follows:
1. Display the Oracle Database Firewall Management Server Administration Console.
This must be the primary Oracle Database Firewall Management Server if a resilient pair of Oracle Database Firewall Management Servers is used.
Note: You can determine which Oracle Database Firewall Management Server is the primary from the Status field in the High Availability section of the System Status page.
Also, the secondary Management Server has a red bar on its user interface, which identifies it as secondary.
Step 3: Complete the Final Database Firewall Management Server Tasks
3-10 Oracle Database Firewall Administration Guide
2. Click the Appliances tab.
3. Click Add in the Appliances menu.
4. Enter a name for Oracle Database Firewall in the first field, and its IP address in the second.
5. Click Save.
If there is a message that indicates that there is a problem with the certificate, check that the date and time are set consistently across both the Oracle Database Firewall and the Management Server.
6. Click the link on the name of the appliance to go to the Administration Console for that managed Database Firewall, and specify the following settings for that appliance.
■ Click Date and Time in the System menu, then click the Change button:
Set the time (to the time that you want the traffic to be logged. Typically, you set it to the local time. Set the Time Offset if you are using NTP time synchronization.
Enable NTP Time Synchronization: Select the check box to synchronize this Database Firewall’s time with the specified NTP servers.
Synchronize Time After Save: Select the check box to apply the NTP server time after you save and exit this page.
Click Save when finished with Date and Time.
■ Click Services in the System menu, and then click the Change button:
For the DNS Server 1, DNS Server 2, and DNS Server 3 fields, enter the IP addresses of up to three DNS servers on the network. Oracle Database Firewall uses these addresses to resolve any network names that may be used at the Oracle Database Firewall Management Server. Keep the fields blank if there is no DNS server, otherwise system performance may be impaired.
Web Access: If you want to allow only selected computers to access the Oracle Database Firewall Management Server Administration Console, enter their IP addresses in the box. Using the default of all enables access from any computer on your site.
Terminal Access: You can specify a list of IP addresses that are allowed to access the Oracle Database Firewall Management Server from a remote console. Entering all allows access from any computer on your site. The default of disabled prevents console access from any computer.
SNMP Access: Specifies a list of IP addresses that are allowed to access the Oracle Database Firewall Management Server's network configuration through SNMP (settings as per Terminal Access). The SNMP community string is gT8@fq+E.
Secure Log Access (Reporting): Specifies a list of IP addresses that are allowed to access the log data held on the Oracle Database Firewall
WARNING: In DPE (blocking) mode, Synchronize Time After Save causes all enforcement points to restart, thereby dropping existing connections to protected databases. This would cause a temporary traffic disruption.
Step 3: Complete the Final Database Firewall Management Server Tasks
Configuring a Database Firewall Management Server 3-11
Management Server, for example, to report using external reporting systems (settings as per Terminal Access). If you complete this setting, then ensure that you complete "Step 3: Enable Secure Log Access in the Standalone Database Firewall" on page 2-5.
Traffic Log Access (Analyzer): Specifies a list of IP addresses of computers running the Analyzer software that are allowed to access the traffic log on the Oracle Database Firewall Management Server (settings as per Terminal Access).
Click Save.
■ Click Syslog in the Connectors menu:
Syslog Destinations (UDP): Use this box if you are using a User Datagram Protocol (UDP) to communicate syslog messages (for example, disk full) from the Oracle Database Firewall Management Server. Enter the IP address of each machine that is permitted to receive the syslog messages.
Syslog Destinations (TCP): Use this box if you are using Transmission Control Protocol (TCP) to communicate syslog messages from the Oracle Database Firewall Management Server. Enter the IP address and port number of each server that is permitted to receive the syslog messages.
Syslog Categories: Select from the following types of syslog messages to generate:
– System: System messages generated by Oracle Database Firewall or other software, which have a syslog priority level of at least "INFO".
– Alerts: Oracle Database Firewall and F5 alerts (Oracle Database Firewall syslog message IDs 7, 9, 10, 11 and 12).
This category is not present on the Management Server.
– Info: General Oracle Database Firewall messages and property changes (Oracle Database Firewall syslog message IDs 1, 4 and 8).
– Debug: Engineering debug messages (for Oracle Database Firewall use only).
– Heartbeat: Oracle Database Firewall heartbeat message and current statistics (Oracle Database Firewall syslog message ID 3).
This category is not present on the Management Server.
Maximum Syslog Message Length (bytes): Enter the maximum number of character bytes for each syslog message. The accepted range of values is 1024 to 1048576. The default is 1024.
Click Apply when finished with the Syslog settings.
■ Click Network in the System menu, and configure the network settings as described in "Changing the Network Configuration" on page 13-11.
7. Repeat the procedure for each Oracle Database Firewall that the Oracle Database Firewall Management Server manages, including the second Oracle Database Firewall of a resilient pair.
Step 3C: Define Resilient Pairs of Oracle Database FirewallsComplete the following steps if you want to create a resilient pair of Oracle Database Firewalls:
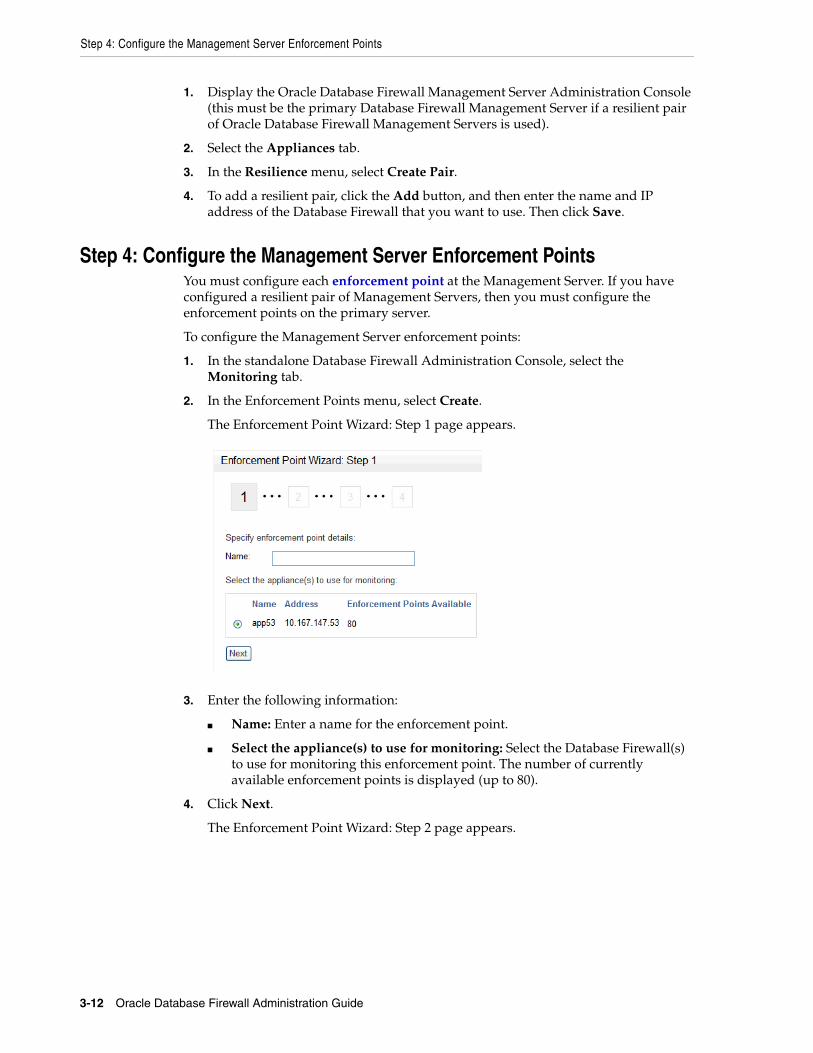
Step 4: Configure the Management Server Enforcement Points
3-12 Oracle Database Firewall Administration Guide
1. Display the Oracle Database Firewall Management Server Administration Console (this must be the primary Database Firewall Management Server if a resilient pair of Oracle Database Firewall Management Servers is used).
2. Select the Appliances tab.
3. In the Resilience menu, select Create Pair.
4. To add a resilient pair, click the Add button, and then enter the name and IP address of the Database Firewall that you want to use. Then click Save.
Step 4: Configure the Management Server Enforcement PointsYou must configure each enforcement point at the Management Server. If you have configured a resilient pair of Management Servers, then you must configure the enforcement points on the primary server.
To configure the Management Server enforcement points:
1. In the standalone Database Firewall Administration Console, select the Monitoring tab.
2. In the Enforcement Points menu, select Create.
The Enforcement Point Wizard: Step 1 page appears.
3. Enter the following information:
■ Name: Enter a name for the enforcement point.
■ Select the appliance(s) to use for monitoring: Select the Database Firewall(s) to use for monitoring this enforcement point. The number of currently available enforcement points is displayed (up to 80).
4. Click Next.
The Enforcement Point Wizard: Step 2 page appears.

Step 4: Configure the Management Server Enforcement Points
Configuring a Database Firewall Management Server 3-13
5. Select one or more traffic sources you want this enforcement point to monitor. If you select a proxy traffic source, you cannot select any other traffic sources. If Management appears in the list, then the Management Interface has been configured as a proxy and can be used as such.
6. Enter the following information:
■ Protected Database: Select Create New or choose from the list of available databases.
■ Name: If creating a new protected database, enter a name for the database to be monitored.
■ Database Type: If creating a new protected database, select the database type.
■ Address and Port: If creating a new protected database, specify the IP address and port number of the database management system (i.e. the IP settings used by database clients to send traffic to the database), then click Add. If the protected database has more than one interface and/or port, enter the additional Address and Port details, then click Add again. If you are using a Domain Name Server (DNS), you can enter a hostname instead of an IP address.
7. Click Next.
The Enforcement Point Wizard: Step 3 page appears.
8. Enter the following settings:
■ Monitoring Mode: Select Database Activity Monitoring (DAM) if the enforcement point is to be used only to log statements and provide warnings of potential attacks. Select Database Policy Enforcement (DPE) if the enforcement point is also required to block potential attacks.
If you have selected a traffic proxy as a traffic source for this Enforcement Point, then DPE mode is required and you cannot select DAM mode.

Step 5: Test the Management Server System Operation
3-14 Oracle Database Firewall Administration Guide
■ Policy: Select a baseline policy. To upload a custom policy developed using the Analyzer software, click Browse to select the file, then Upload. Use the text box to add a description. If this is the first time you are creating a baseline policy, then Oracle recommends that you select the unique.dna policy.
9. Click Next.
The Enforcement Point Wizard: Step 4 page appears.
10. Check your settings, and if you are satisfied, then click the Finish button.
Step 5: Test the Management Server System OperationYou should verify that the system is fully operational before commencing normal day-to-day operations.
To test the system operation:
1. In the Firewall Management Server Administration Console, click the Monitoring tab.
2. In the Enforcement Points menu, select List.
The Enforcement Points page appears.
3. Click the Status button.
In the Appliances area, ensure that there is a green check-mark indicator in the Status column against the device that is performing the monitoring.
4. Click the Dashboard tab, and check that Total Statements increases every minute. This indicates that statements are being recognized.
5. Click the Reporting tab, then View in Traffic Log menu. Click Start to see the statements that are being saved to the traffic log (the latest information may take up to five minutes to display).
6. Use the Analyzer software to verify that data can be obtained from the traffic log.
What’s Next?The tasks in chapter complete the initial configuration of Database Firewall Management Server. Your next step is to configure the connection between the protected databases and Database Firewalls. Depending on site requirements, you may need to configure other features, such as stored procedure auditing, user role auditing and local monitoring. These features are explained in later chapters of this guide.
Note 1: When you use a Database Firewall in DPE mode, you must configure any IP or MAC address spoofing detection rules so that they ignore database IP or MAC address changes made by that Database Firewall.
Note 2: When you set a Database Firewall to DPE mode (through Enforcement Point Settings or by restarting a Database Firewall with network passthrough), ensure that all connections to the database are forced to reconnect. In addition, in DPE mode, if you change Enforcement Point Settings, you must also force all database connections to reconnect.

What’s Next?
Configuring a Database Firewall Management Server 3-15
After you have configured the installed Database Firewalls and the Management Server, users will be able to begin analyzing data. Once a policy has been developed, you must upload it. See Oracle Database Firewall Security Guide for information about listing and uploading policies.
Chapter 13, "System Administration," explains system administration tasks, including how to set up new users, monitor the system and produce reports.

What’s Next?
3-16 Oracle Database Firewall Administration Guide

4
Configuring Oracle Database Firewall for High Availability 4-1
4Configuring Oracle Database Firewall for High Availability
This chapter contains:
■ About Using High Availability with Oracle Database Firewall
■ Configuring a Resilient Pair of Oracle Database Firewall Management Servers
■ Configuring a Resilient Pair of Oracle Database Firewalls
■ Pairing Enforcement Points
■ Archiving Data
■ Updating the Oracle Database Firewall Software in Resilient Pairs
About Using High Availability with Oracle Database FirewallThis section contains:
■ How Does High Availability Work with the Oracle Database Firewall Components?
■ Incorporating Resilient Pairs of Oracle Database Firewall Management Servers
■ Adding Paired Enforcement Points
■ Network Communication for the Resilient Pairs
How Does High Availability Work with the Oracle Database Firewall Components?Oracle Database Firewall provides high-availability solutions by allowing two Database Firewalls to be configured in a resilient pair. During normal operation, one unit (the primary) carries out all normal operations, while the other (the secondary) monitors traffic, but alerts only in the unlikely event that the primary should fail.
Both devices connect to the network normally. All settings necessary to configure the resilient pair are available from the Management Server Administration Console.
Figure 4–1 shows an example of two Database Firewalls being used as a resilient pair.
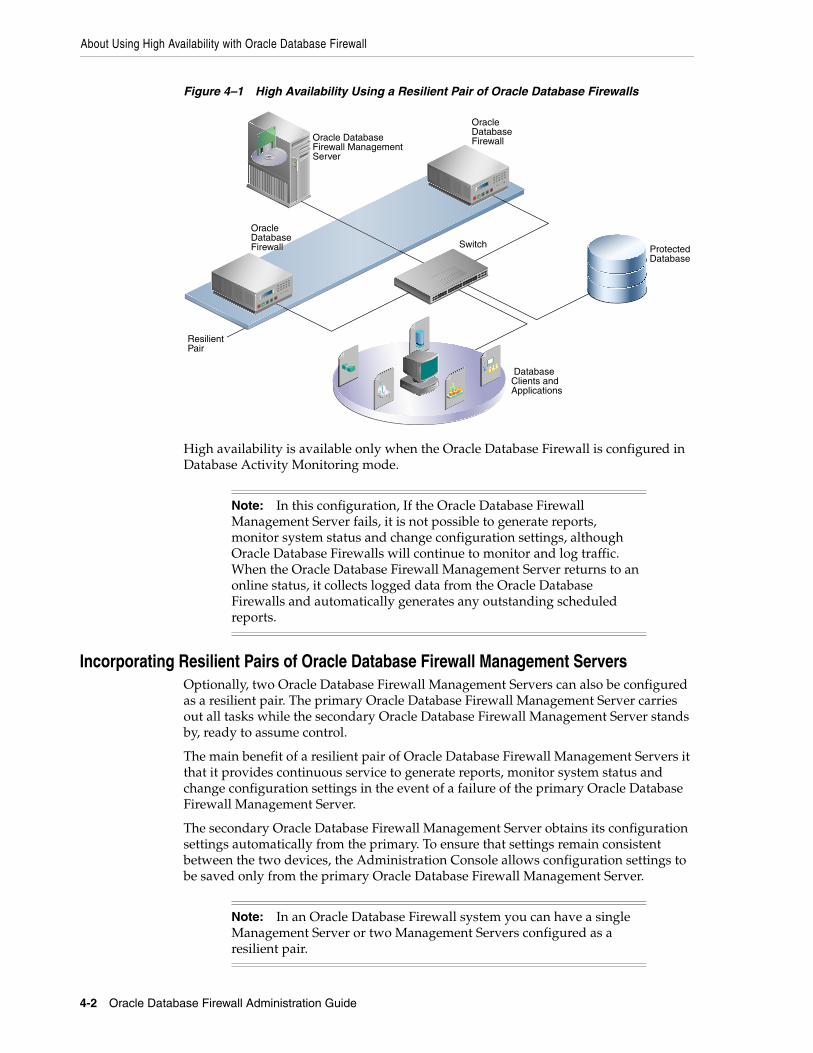
About Using High Availability with Oracle Database Firewall
4-2 Oracle Database Firewall Administration Guide
Figure 4–1 High Availability Using a Resilient Pair of Oracle Database Firewalls
High availability is available only when the Oracle Database Firewall is configured in Database Activity Monitoring mode.
Incorporating Resilient Pairs of Oracle Database Firewall Management ServersOptionally, two Oracle Database Firewall Management Servers can also be configured as a resilient pair. The primary Oracle Database Firewall Management Server carries out all tasks while the secondary Oracle Database Firewall Management Server stands by, ready to assume control.
The main benefit of a resilient pair of Oracle Database Firewall Management Servers it that it provides continuous service to generate reports, monitor system status and change configuration settings in the event of a failure of the primary Oracle Database Firewall Management Server.
The secondary Oracle Database Firewall Management Server obtains its configuration settings automatically from the primary. To ensure that settings remain consistent between the two devices, the Administration Console allows configuration settings to be saved only from the primary Oracle Database Firewall Management Server.
Note: In this configuration, If the Oracle Database Firewall Management Server fails, it is not possible to generate reports, monitor system status and change configuration settings, although Oracle Database Firewalls will continue to monitor and log traffic. When the Oracle Database Firewall Management Server returns to an online status, it collects logged data from the Oracle Database Firewalls and automatically generates any outstanding scheduled reports.
Note: In an Oracle Database Firewall system you can have a single Management Server or two Management Servers configured as a resilient pair.
Resilient Pair
Oracle Database Firewall
Oracle Database Firewall
Oracle Database Firewall Protected
Database
Oracle Database Firewall ManagementServer
DatabaseClients and Applications
Switch

Configuring a Resilient Pair of Oracle Database Firewall Management Servers
Configuring Oracle Database Firewall for High Availability 4-3
Figure 4–2 shows an example of high availability using a resilient pair of Database Firewalls and a resilient pair of Management Servers.
Figure 4–2 High Availability Using a Resilient Pair of Management Servers and Database Firewalls
Adding Paired Enforcement PointsOracle Database Firewall also allows two enforcement points to be paired. This may be useful in certain high-availability architectures that have two data centers. See "Pairing Enforcement Points" on page 4-5 for more information.
Network Communication for the Resilient PairsWhen you use resilient pairs, it is important to ensure that the network allows both devices in the pair to communicate with each other. Oracle Database Firewall must be able to communicate with both the primary and secondary Oracle Database Firewall Management Servers, and vice versa.
Configuring a Resilient Pair of Oracle Database Firewall Management Servers
Chapter 3, "Configuring a Database Firewall Management Server,"explains how to set up a new Oracle Database Firewall system, including the steps necessary to configure a resilient pair of Database Firewalls. This section provides steps that are specific to creating a resilient pair of Management Servers, which may be useful when adding high availability to an existing system.
This section contains:
■ Procedure for Configuring a Pair of Resilient Database Firewall Management Servers
ProtectedDatabase
Resilient Pair
Resilient Pair
Resilient Pair
Oracle Database Firewall
Oracle Database Firewall
Oracle Database Firewall
Oracle Database Firewall ManagementServer
Oracle Database Firewall ManagementServer
Oracle Database Firewall ManagementServer
DatabaseClients and Applications
Switch
Configuring a Resilient Pair of Oracle Database Firewall Management Servers
4-4 Oracle Database Firewall Administration Guide
■ Swapping the Primary and Secondary Database Firewall Management Servers
Procedure for Configuring a Pair of Resilient Database Firewall Management ServersTo set up a resilient pair of Oracle Database Firewall Management Servers:
1. Ensure that the Management Server software is installed and running on two servers.
2. For each Database Firewall that will be managed by the resilient pair of Management Servers:
1. Log in to the Administration Console of the Database Firewall.
See "Logging in to the Administration Console" on page 1-7 for more information.
2. Click the System tab, then click Management Server in the System menu.
3. Enter the IP address and certificate of one of the installed Management Servers.
4. Check Add Second Management Server, and then add the IP address and certificate of the other installed Management Server.
3. For each of the paired Management Servers:
1. Log in to the Administration Console of the Management Server.
2. Click the System tab, and in the High Availability Pairing section, click Change.
3. Select whether this is the primary or secondary Management Server in the Change Status field.
4. Enter the IP address and certificate of the partner Management Server, then click Apply.
5. Add each managed Database Firewall as an appliance in both Management Servers in the resilient pair. See "Step 3B: Add Each Oracle Database Firewall to the Management Server" on page 3-9.
To view the high availability settings for the Database Firewall Management Server:
1. In the Management Server’s administration console, click the System tab, and then click Status under the System menu.
2. View the Management Server’s high availability settings in the High Availability section of the Status page.
Swapping the Primary and Secondary Database Firewall Management ServersThere is normally no need to manually swap the status of an Oracle Database Firewall Management Server from primary to secondary and vice versa. However, there may be times when you want to swap the primary and secondary Management Servers, for example, in the event that the primary server fails, or during the upgrade process. During upgrades, you may want to swap the primary Management Server with the secondary Management Server in order to perform the upgrade on the secondary server.
To swap the primary and secondary Database Firewall Management Servers:
1. Log in to the Administration Console for the current primary Management Server.
See "Logging in to the Administration Console" on page 1-7 for more information.
Pairing Enforcement Points
Configuring Oracle Database Firewall for High Availability 4-5
2. Click Change in the High Availability Pairing section.
3. Click the Secondary button.
Configuring a Resilient Pair of Oracle Database FirewallsThis section explains the steps necessary to configure a resilient pair of Oracle Database Firewalls. Although these steps are covered in Chapter 3, which explains how to set up a new Oracle Database Firewall system, the summary of the steps given below may be useful if you are adding high availability to an existing system.
This section contains:
■ Procedure for Configuring a Pair of Oracle Database Firewalls
■ Swapping the Primary and Secondary Oracle Database Firewalls
Procedure for Configuring a Pair of Oracle Database FirewallsWhen you configure a High Availability environment, ensure that the specifications of the hardware used for paired Database Firewalls are identical.
To set up a resilient pair of Oracle Database Firewalls:
1. Log in to the Administration Console for the current primary Management Server (or the Management Server if you only have one).
See "Logging in to the Administration Console" on page 1-7 for more information.
2. Select the Appliances tab, and in the Resilience menu, click Create Resilient Pair.
3. Use the Primary and Secondary menus to choose the two Oracle Database Firewalls.
The Status column in the Appliances page shows which Oracle Database Firewall is the primary, and which is the secondary, as shown next. The status is refreshed each time the page is displayed.
Clicking Unpair removes the two devices from the resilient pair.
4. When setting up an enforcement point, the paired Oracle Database Firewalls are listed together, with a single radio button:
Swapping the Primary and Secondary Oracle Database FirewallsThere is normally no need to manually swap the status of an Oracle Database Firewall from primary to secondary and vice versa, since this is handled automatically in the event of a failure of the primary. However, if there are circumstances where you do want to make the change, such as during a software update:
1. Log in to the Administration Console for the current primary Management Server.
See "Logging in to the Administration Console" on page 1-7 for more information.
2. Select the Appliances tab, and then in the Appliances page, click Swap.
Pairing Enforcement PointsSome high-availability architectures employ two data centers in different locations, each of which has a local database, but which are viewed from the client applications as a single database. In this scenario, you should set up a separate enforcement point for each database and pair the two enforcement points in the Administration Console.

Archiving Data
4-6 Oracle Database Firewall Administration Guide
Pairing the enforcement points prevents duplicate records from appearing for user role auditing (see Chapter 6, "Configuring and Using Role Auditing") and stored procedure auditing (see Chapter 5, "Configuring Stored Procedure Auditing"), and allows any change to the policy to be automatically applied to both databases.
To pair two enforcement points:
1. Log in to the Administration Console for the current primary Management Server.
See "Logging in to the Administration Console" on page 1-7 for more information.
2. Select the Monitoring tab in the Administration Console of the primary Oracle Database Firewall Management Server.
3. In the Resilience menu, click Create Pair.
4. Use the Primary and Secondary menus to choose the two enforcement points.
Note: The two selected enforcements points must monitor the same protected database and use the same policy in DAM mode.
5. Save the changes.
You can unpair two enforcement points by clicking Unpair in the Enforcement Points page.
Archiving DataYou can archive data from Oracle Database Firewall Management Servers and Oracle Database Firewalls that are in resilient pairs by performing an archive in the normal way from only the primary Oracle Database Firewall Management Server. The secondary Oracle Database Firewall Management Server obtains configuration and SPA/URA audit data automatically from the primary. See "Archiving Data" on page 13-13 for more information.
Updating the Oracle Database Firewall Software in Resilient PairsUpdating the Oracle Database Firewall software with patch updates should not require you to interrupt database monitoring and protection. A patch installation can be carried out for resilient pairs with the primary server remaining online at all times.
When updating Oracle Database Firewall software in resilient pairs, you should first update the secondary server, swap the primary and secondary servers, and then update the new secondary server. This process is described in the Oracle Database Firewall Installation Guide.
Note: There is no concept of a primary and secondary enforcement points; both enforcement points monitor at the same time. High-availability redundancy is achieved only by setting up resilient pairs of Oracle Database Firewalls, and (optionally) resilient pairs of Oracle Database Firewall Management Servers.

5
Configuring Stored Procedure Auditing 5-1
5Configuring Stored Procedure Auditing
This chapter contains:
■ About Stored Procedure Auditing (SPA)
■ Setting User Permissions for SPA
■ Enabling SPA on the Database Firewall
■ Disabling SPA
About Stored Procedure Auditing (SPA)Stored procedure auditing (SPA) enables users to audit and approve changes to stored procedures on monitored databases. Oracle Database Firewall connects to the database server at scheduled intervals and discovers any changes or additions that have been made to stored procedures. Stored Procedure Auditing is supported for Oracle, Microsoft SQL Server, MySQL, Sybase ASE, Sybase SQL Anywhere, and IBM DB2 (Microsoft Windows, UNIX, and Linux) databases.
This chapter explains how to configure a Database Firewall-protected database so that users can audit changes to stored procedures. Instructions for performing the audit are in Oracle Database Firewall Security Guide.
Setting User Permissions for SPAThis section contains:
■ Setting SPA User Permissions on Oracle Databases
■ Setting SPA User Permissions for SQL Server Databases
■ Setting SPA User Permissions for MySQL Databases
■ Setting SPA User Permissions for Sybase ASE Databases
■ Setting SPA User Permissions for Sybase SQL Anywhere Databases
■ Setting SPA User Permissions for IBM DB2 SQL Databases
Setting SPA User Permissions on Oracle DatabasesTo set up the user account for Oracle databases (all releases later than Oracle Database 8i):
1. From the Oracle Database Firewall Product CD (Oracle Database Firewall Utilities 5.1), copy the database directory to the server where you plan to run the scripts.

Setting User Permissions for SPA
5-2 Oracle Database Firewall Administration Guide
2. On this server, go to the database/spa directory and uncompress the oracle compressed file, preferably into a directory called oracle.
3. Go to this oracle directory and review the uncompressed file (spa_setup.sql) so that you will understand its settings.
The spa_setup.sql script contains settings for the following information:
■ $(username) refers to the user account that will be responsible for stored procedure auditing. Ideally, this user account should be different from the user accounts specified for user role auditing and direct database interrogation (DDI) (for example, spa_auditor).
■ $(password) refers to the password for this user account.
4. Log in to Oracle Database as a user with privileges to create users and set user permissions.
For example:
sqlplus sys/ as sysdbaEnter password: passwordConnected.SQL>
If the database has been enabled with Oracle Database Vault, then log in as a user who has been granted the DV_ACCTMGR role.
5. Run the spa_setup script and answer the prompts.
For example:
SQL> @database/spa/oracle/spa_setup.sqlusername: as parameter 1:Enter value for 1: user_namepassword: as parameter 2:Enter value for 2: password
The spa_setup.sql script grants the stored procedure auditing user account the following privileges:
■ CREATE SESSION
■ SELECT on the sys.dba_objects and sys.dba_source system tables
6. (Optional) If you need to remove this user account, run the spa_drop script.
For example:
SQL> @database/spa/oracle/spa_drop.sqlusername: as parameter 1:Enter value for 1: user_name
Setting SPA User Permissions for SQL Server DatabasesTo set up the user account for Microsoft SQL Server (2000, 2005, or 2008) databases:
1. Decide where you are going to run the scripts: on the database server (locally) or from another computer (remotely).
2. Ensure that the computer where you will run the scripts has the sqlcmd.exe utility installed.

Setting User Permissions for SPA
Configuring Stored Procedure Auditing 5-3
3. Choose a user name and password for the database user account that will be responsible for the stored procedure auditing.
You will create this user account and password later in this procedure.
4. From the Oracle Database Firewall Product CD (Oracle Database Firewall Utilities 5.1), copy the database directory to the server where you plan to run the scripts.
5. On this server, go to the database/spa directory and uncompress the sqlserver compressed file, preferably into a directory called sqlserver.
6. Go to this sqlserver directory and review the uncompressed files so that you will understand their settings.
The scripts contain settings for the following information:
■ $(username) refers to the user account that will be responsible for stored procedure auditing. Ideally, this user account should be different from the user accounts specified for user role auditing and direct database interrogation (DDI) (for example, spa_auditor).
■ $(password) refers to the password for this user account.
■ $(database) refers to the database that you want to audit.
7. As a user who has privileges to create users and set user permissions, run the spa_add_user script on the SQL Server database.
The syntax is as follows:
sqlcmd -S server_name -U sa -P sa_password -i spa_add_user.sql -v username="username" password="password"
In this specification:
■ server_name: Enter the name or the IP address of the database server where the protected database resides. Only use this argument if you are running the script from a remote server.
■ sa: Enter the system administrator user name.
■ sa_password: Enter the system administrator password.
■ username: Enter the user account that you plan to create for stored procedure auditing, specified by $(username) in the scripts. Enclose this user name in double quotation marks.
■ password: Enter the password for the stored procedure auditing user account, specified by $(password) in the scripts. Enclose this password in double quotation marks.
Following are two command examples. (The lines wrap below, but you may see them on one line.)
sqlcmd -U sa -P sa_password -i spa_add_user.sql -v username="spa_auditor" password="abcd1234"
sqlcmd -S my_server -U sa -P sa_password -i spa_add_user.sql -v username="spa_auditor" password="abcd1234"
8. Grant the user permissions by running the spa_add_db_permissions or spa_add_all_db_permissions script.

Setting User Permissions for SPA
5-4 Oracle Database Firewall Administration Guide
The following examples show how to run the scripts remotely, but if you are running the scripts locally, then omit the -S server_name argument.
For permissions to a specific database, use the following syntax:
sqlcmd -S server_name -U sa -P sa_password -i spa_add_db_permissions.sql -v username="username" database="protected_database"
For the database="protected_database" setting:
■ Enter the name of the database within this server that you want to audit, specified by $(database) in the scripts.
■ Enclose this database name in double quotation marks.
For permissions to all databases, use this syntax:
sqlcmd -S server_name -U sa -P sa_password -i spa_add_all_db_permissions.sql-v username="username"
Below are two command examples. (The lines wrap below, but you may see each command on one line.)
sqlcmd -S my_server -U sa -P sa_password -i spa_add_db_permissions.sql-v username="jsmith" database="my_database"
sqlcmd -S my_server -U sa -P sa_password -i spa_add_all_db_permissions.sql-v username="jsmith"
The scripts grant the stored procedure auditing user account the following privileges:
■ VIEW DEFINITION and SELECT on the sys.all_objects and dbo.syscomments system tables for product version greater than 8.
■ SELECT on dbo.sysobjects and dbo.syscomments for product version less than Version 8.
9. (Optional) If you need to remove the above user permissions run the spa_drop_db_permissions or spa_drop_all_db_permissions script.
Use the following syntax for a specific database:
sqlcmd -S server_name -U sa -P sa_password -i spa_drop_db_permissions.sql -v username="username" database="protected_database"
Use the following syntax for all databases:
sqlcmd -S server_name -U sa -P sa_password -i spa_drop_all_db_permissions.sql-v username="username"
Below are two command examples. (The lines wrap below, but you may see each command on one line.)
sqlcmd -S my_server -U sa -P sa_password -i spa_drop_db_permissions.sql-v username="jsmith" database="my_database"
sqlcmd -S my_server -U sa -P sa_password -i spa_drop_all_db_permissions.sql-v username="jsmith"
10. (Optional) If you need to remove the stored procedure auditing user from the SQL Server database, run the spa_drop_user script.
The syntax is as follows:

Setting User Permissions for SPA
Configuring Stored Procedure Auditing 5-5
sqlcmd -S server_name -U sa -P sa_password -i spa_drop_user.sql -v username="username" password="password"
For example:
sqlcmd -U sa -P sa_password -i spa_drop_user.sql -v username="spa_auditor"
Setting SPA User Permissions for MySQL DatabasesTo set up the user account for MySQL databases:
1. Log in to the database as a user who has privileges to create users and set user permissions, and run the following command on the MySQL database:
create user 'username'@'hostname' identified by 'password'
For username, use the name of the Stored Procedure Auditing account, and for hostname use the hostname of the Database Firewall. For example:
create user 'spa_auditor'@'10.155.56.2' identified by 'jj_1234'
2. Grant required permissions to the user you just created by running the following command:
grant select on mysql.proc TO 'username'@'hostname'
For example:
grant select on mysql.proc TO 'spa_auditor'@'10.155.56.2'
The above command grants the stored procedure auditing user account the following privilege: SELECT on the mysql.proc system table.
3. (Optional) If you need to remove the stored procedure auditing user from the MySQL database, run the following command:
drop user 'username'@'hostname'
For example:
drop user 'spa_auditor'@'10.155.56.2'
Setting SPA User Permissions for Sybase ASE DatabasesFor Sybase ASE stored procedure auditing, the tempdb database must be large enough to accommodate the generated temp files.
To check the size of tempdb :
1. Run the sp_helpdb system stored procedure.
2. Compare the db_size columns for the sybsystemproc and tempdb databases.
The tempdb database should be larger than sybsystemproc, at least by a couple of MBs.
To set up the Sybase Adaptive Server Enterprise user accounts:
1. From the Oracle Database Firewall Product CD (Oracle Database Firewall Utilities 5.1), copy the database directory to the server where you plan to run the scripts.

Setting User Permissions for SPA
5-6 Oracle Database Firewall Administration Guide
2. On this server, go to the database/spa directory and uncompress the sybase compressed file, preferably into a directory called sybase.
3. As a user who has privileges to create users and set user permissions, run the spa_add_user script on the Sybase ASE database.
The syntax is as follows:
isql -S server_name -U sa -P sa_password -i spa_add_user.sql
In this specification:
■ server_name: Only use this argument if the database is remote. You can enter the name of the server or its IP address. If you are running the script locally, then you can omit the -S server_name argument.
■ sa: Enter the system administrator user name.
■ sa_password: Enter the system administrator password.
Examples:
isql -U sa -P sa_password -i spa_add_user.sql
isql -S my_server -U sa -P sa_password -i spa_add_user.sql
This script adds a default stored procedure auditing user, dbfw_spa_user, with a default password, defaultpassword. It is good practice to change this password later.
4. Grant this user permissions by running the spa_add_db_permissions script.
The syntax is as follows:
isql -S server_name -U sa -P sa_password -i spa_add_db_permissions.sql
In this specification:
■ server_name: Enter the name of the server or its IP address. Only use the argument -S server_name if the database is remote.
■ sa_password: Enter the system administrator password.
This script grants the stored procedure auditing user account the following privileges:
■ SELECT on dbo.sysdatabases, dbo.sysobjects, and dbo.syscomments.
5. (Optional) If you need to remove the above permissions, run the spa_drop_db_permissions script.
The syntax is as follows:
isql -S server_name -U sa -P sa_password -i spa_drop_db_permissions.sql
6. (Optional) If you need to remove the stored procedure auditing user, run the spa_drop_user script on the Sybase ASE database.
The syntax is as follows:
isql -S server_name -U sa -P sa_password -i spa_add_user.sql
Setting SPA User Permissions for Sybase SQL Anywhere DatabasesThis section contains:
■ Installing the Sybase SQL Anywhere ODBC Driver for Linux

Setting User Permissions for SPA
Configuring Stored Procedure Auditing 5-7
■ Setting Stored Procedure Auditing User Permissions
Installing the Sybase SQL Anywhere ODBC Driver for LinuxBefore you can use Sybase SQL Anywhere, you must install the SQL Anywhere ODBC driver for Linux.
To install the ODBC driver for Linux:
1. Log in to the Database Firewall server as user root.
2. From the Sybase SQL Anywhere installation media, copy the linux_x86_GA_sa1101_2044_l10n.tar.gz to a temporary location on the Database Firewall server.
3. Expand this archive file.
tar zxvf linux_x86_GA_sa1101_2044_l10n.tar.gz
4. Run the setup utility to begin the installation of the client.
./setup
5. When prompted, select to install only 3. Administration Tools.
6. When prompted, install the client to the /var/sqlanywhere11 directory.
7. From the Sybase SQL Anywhere installation media, copy sa11_full_linux_x86+x64.1101_2420_ebf.tar.gz to the Database Firewall server.
8. Expand this archive file.
tar zxvf sa11_full_linux_x86+x64.1101_2420_ebf.tar.gz
9. Run the setup utility to begin the installation of the client.
./setup
10. When prompted, select to install to the /var/sqlanywhere11 directory.
Setting Stored Procedure Auditing User PermissionsTo set up the Sybase SQL Anywhere user accounts:
1. From the Oracle Database Firewall Product CD (Oracle Database Firewall Utilities 5.1), copy the database directory to the server where you plan to run the scripts.
2. On this server, go to the database/spa directory and uncompress the sqlanywhere compressed file, preferably into a directory called sqlanywhere.
3. Go to this sqlanywhere directory and review the uncompressed file (spa_setup.sql) so that you will understand its settings.
The spa_setup.sql script contains settings for the following information:
■ $(username) refers to the user account that will be responsible for stored procedure auditing. Ideally, this user account should be different from the user accounts specified for user role auditing and direct database interrogation (DDI) (for example, spa_auditor).
■ $(password) refers to the password for this user account.
4. As a user who has privileges to create users and set user permissions, run the spa_setup.sql script on the SQL Anywhere database.

Setting User Permissions for SPA
5-8 Oracle Database Firewall Administration Guide
The syntax is as follows:
isql -S server_name -U sa -P sa_password -i spa_setup.sql-v username="username" password="password" database="protected_database"
In this specification:
■ server_name: Only use this argument if the database is remote. You can enter the name of the server or its IP address. If you are running the script locally, then you can omit the -S server_name argument.
■ username: Enter the user account that you plan to create for stored procedure auditing, specified by $(username) in the spa_setup.sql script. Enclose this user name in double quotation marks.
■ password: Enter the password for the stored procedure auditing user account, specified by $(password) in the spa_setup.sql script. Enclose this password in double quotation marks.
■ database="protected_database": Enter the name of the database within this server that you want to protect, specified by $(database) in the spa_setup.sql script. Enclose this database name in double quotation marks.
For example:
isql -S my_server -U sa -P password -i spa_setup.sql-v username="spa_auditor" password="$(password)_password" database="sales_db"
The spa_setup.sql script grants the stored procedure auditing user account the following privileges:
■ CONNECT
■ SELECT on the sys.sysuser, sys.sysprocedure, and sys.sysprocparm system tables.
5. (Optional) If you need to remove the above permissions, run the spa_drop script on the SQL Anywhere database.
The syntax is as follows:
isql -S server_name -U sa -P password -i spa_drop.sql-v username="username" password="password" database="protected_database"
Setting SPA User Permissions for IBM DB2 SQL DatabasesTo set up an IBM DB2 user account, you do not need to run any scripts. Instead, you create a new user account or designate an existing user account to be used for the stored procedure auditing.
To set up the IBM DB2 user account:
1. Log in to the IBM DB2 Windows, UNIX, or Linux database that you want to audit.
2. Create a new user account or designate an existing user account to be used for the stored procedure auditing.
3. Grant the following privilege to this user:
grant select on syscat.routines to user
4. (Optional) If you need to remove the above permission, either revoke the granted permission, or remove the user account from the IBM DB2 database.

Enabling SPA on the Database Firewall
Configuring Stored Procedure Auditing 5-9
Enabling SPA on the Database FirewallTo enable stored procedure auditing:
1. Log in to the standalone Database Firewall or Management Server Administration Console.
See "Logging in to the Administration Console" on page 1-7 for more information.
2. In the Monitoring tab, click List in the Enforcement Points menu.
3. Choose an enforcement point (or create one) to monitor the stored procedures, and click the Settings button.
All enforcement points also monitor SQL traffic to a nominated database server. If required, the enforcement point can monitor stored procedures in databases located on a different server.
4. Under Monitoring Settings, select the SPA check box.
5. Complete the SPA fields and options:
■ Database Address and Port: Specify the IP address of the server that holds the databases to be audited. For the port number, enter the port number used by the database. (For example, the default port number for Oracle databases is 1521. For Oracle databases, you can find this information in the tnsnames.ora file.) To use a hostname instead of an IP address, first configure DNS servers in System Services page.
The IP address of the protected database specified in the enforcement point is not automatically included in the audit.
■ Database Name: Name of the database. For Oracle databases, enter the service name, as defined in the tnsnames.ora file.
■ User Name: Enter the user name of the stored procedure auditing account, for example, spa_auditor.
■ Change Password: If you want to change the password of the user, click the Change Password button and then enter a new password. (This field appears only if you are editing an existing configuration. The first time that you configure stored procedure auditing, the Password and Confirm Password fields appear.)

Disabling SPA
5-10 Oracle Database Firewall Administration Guide
■ Database Connection (Test Now): Clicking Test Now checks that the specified user can log into the databases and has the required permissions.
■ First Run Time and Repeat Every: Specify the date and time to run the first audit and the frequency to repeat the audits. Select a time when the database is not busy, such as 2 a.m.
If you want to run an audit immediately, click List in the Enforcement Points menu, then the Manage button for the appropriate enforcement point, followed by Run Now.
Disabling SPAYou can disable stored procedure auditing. If you want to completely remove stored procedure auditing, see Oracle Database Firewall Installation Guide.
To disable stored procedure auditing:
1. Log in to the standalone Database Firewall or Management Server Administration Console.
See "Logging in to the Administration Console" on page 1-7 for more information.
2. Select the Monitoring tab.
By default, the Enforcement Points page appears. If it does not, then click the List button in the Enforcement Points menu on the left side of the page.
3. Find the enforcement point for the stored procedure auditing that you want to disable.
4. Click the Settings button.
The Monitoring Settings page appears.
5. In the SPA area, clear the Activate Stored Procedure Auditing check box.
6. Scroll to the bottom of the Monitoring Settings page and click the Save button.

6
Configuring and Using Role Auditing 6-1
6Configuring and Using Role Auditing
This chapter contains:
■ About User Role Auditing (URA)
■ Setting User Permissions for URA
■ Enabling URA on the Database Firewall
■ Disabling URA
About User Role Auditing (URA)User role auditing (URA) enables users to audit and approve changes to user roles in the databases on a specified database server. The Oracle Database Firewall connects to the database server at scheduled intervals and discovers any changes or additions that have been made to user roles. User role auditing is supported for Oracle, Microsoft SQL Server, My SQL, Sybase ASE, Sybase SQL Anywhere, and IBM DB2 (Microsoft Windows, UNIX, and Linux) databases.
This chapter explains how to configure a database protected by Database Firewall so that Database Firewall users can audit changes to user roles. Instructions for auditing the user roles are in Oracle Database Firewall Security Guide.
Setting User Permissions for URAThis section contains:
■ Setting URA User Permissions for Oracle Databases
■ Setting URA User Permissions for SQL Server Databases
■ Setting URA User Permissions for MySQL Databases
■ Setting URA User Permissions for Sybase ASE Databases
■ Setting URA User Permissions for Sybase SQL Anywhere Databases
■ Setting URA User Permissions for IBM DB2 SQL Databases
Setting URA User Permissions for Oracle DatabasesTo set up the user account for Oracle databases (all releases later than Oracle Database 8i):
1. From the Oracle Database Firewall Product CD (Oracle Database Firewall Utilities 5.1), copy the database directory to the server where you plan to run the scripts.

Setting User Permissions for URA
6-2 Oracle Database Firewall Administration Guide
2. On this server, go to the database/ura directory and uncompress the oracle compressed file, preferably into a directory called oracle.
3. Go to this oracle directory and review the uncompressed file (ura_setup.sql) so you will understand its settings.
The ura_setup.sql script contains settings for the following information:
■ $(username) refers to the user account that will be responsible for user role auditing. Ideally, this user account should be different from the user accounts specified for user role auditing and direct database interrogation (DDI) (for example, ura_auditor).
■ $(password) refers to the password for this user account.
4. Log in to Oracle Database as a user who has privileges to create users and set user permissions.
For example:
sqlplus sys/as sysdbaEnter password: passwordConnected. SQL>
If the database has been enabled with Oracle Database Vault, then log in as a user who has been granted the DV_ACCTMGR role.
5. Run the ura_setup script and answer the prompts as needed.
For example:
SQL> @database/ura/oracle/ura_setup.sqlusername: as parameter 1:Enter value for 1: user_namepassword: as parameter 2:Enter value for 2: password
The ura_setup.sql script grants the user role auditing user account the following privileges:
■ CREATE SESSION
■ SELECT on these system tables:
sys.dba_userssys.dba_role_privssys.dba_sys_privssys.proxy_usersv$pwfile_users
6. (Optional) If you need to remove this user account, run the ura_drop script.
For example:
SQL> @database/ura/oracle/ura_setup.sqlusername: as parameter 1:Enter value for 1: user_name
Setting URA User Permissions for SQL Server DatabasesTo set up the user account for Microsoft SQL Server (2000, 2005, or 2008) databases:

Setting User Permissions for URA
Configuring and Using Role Auditing 6-3
1. From the Oracle Database Firewall Product CD (Oracle Database Firewall Utilities 5.1), copy the database directory to the server where you plan to run the scripts.
2. Ensure that the computer where you will run the scripts has the sqlcmd.exe utility installed.
3. On this server, go to the database/ura directory and uncompress the sqlserver compressed file, preferably into a directory called sqlserver.
4. Go to this sqlserver directory and review the uncompressed files so you will understand their settings.
The scripts contain settings for the following information:
■ $(username) refers to the user account that will be responsible for user role auditing. Ideally, this user account should be different from the user accounts specified for user role auditing and direct database interrogation (DDI) (for example, ura_auditor).
■ $(password) refers to the password for this user account.
■ $(database) refers to the database that you want to audit.
5. As a user who has privileges to create users and set user permissions, run the ura_add_user script on the SQL Server database.
The syntax is as follows:
sqlcmd -S server_name -U sa -P sa_password -i ura_add_user.sql -v username="username" password="password"
In this specification:
■ server_name: Enter the name or the IP address of the database server where the protected database resides. Only use this argument if you are running the script from a remote server. You can omit it if you are running the script locally.
■ sa: Enter the system administrator user name.
■ sa_password: Enter the system administrator password.
■ username: Enter the user account that you plan to create for user role auditing, specified by $(username) in the scripts. Enclose this user name in double quotation marks.
■ password: Enter the password for the user role auditing user account, specified by $(password) in the scripts. Enclose this password in double quotation marks.
Following are two command examples. (The lines wrap below, but you may see them on one line.):
sqlcmd -U sa -P sa_password -i ura_add_user.sql -v username="ura_auditor" password="abcd1234"
sqlcmd -S my_server -U sa -P sa_password -i ura_add_user.sql -v username="ura_auditor" password="abcd1234"
6. Grant the user permissions by running the ura_add_db_permissions or ura_add_all_db_permissions script.
The following examples show how to run the scripts remotely, but if you are running the scripts locally, then omit the -S server_name argument.

Setting User Permissions for URA
6-4 Oracle Database Firewall Administration Guide
For permissions to a specific database, use the following syntax:
sqlcmd -S server_name -U sa -P sa_password -i ura_add_db_permissions.sql -v username="username" database="protected_database"
For the database="protected_database" setting:
■ Enter the name of the database within this server that you want to audit, specified by $(database) in the scripts.
■ Enclose this database name in double quotation marks.
For permissions to all databases, use this syntax:
sqlcmd -S server_name -U sa -P sa_password -i ura_add_all_db_permissions.sql-v username="username"
Below are two command examples. (The lines wrap below, but you may see each command on one line.)
sqlcmd -S my_server -U sa -P sa_password -i ura_add_db_permissions.sql-v username="jsmith" database="my_database"
sqlcmd -S server_name -U sa -P sa_password -i ura_add_all_db_permissions.sql-v username="jsmith"
The scripts grant the user role auditing user account the following privileges:
■ VIEW ANY DEFINITION for SQL Server 2005 and later
■ SELECT on these tables:
master.dbo.sysdatabasesmaster.dbo.sysloginsspecific_database.dbo.sysmembersspecific_database.dbo.sysusers
7. (Optional) If you need to remove the above user permissions run the ura_drop_db_permissions or ura_drop_all_db_permissions script.
Use the following syntax for a specific database:
sqlcmd -S server_name -U sa -P sa_password -i ura_drop_db_permissions.sql -v username="username" database="protected_database"
Use the following syntax for all databases:
sqlcmd -S server_name -U sa -P sa_password -i ura_drop_all_db_permissions.sql-v username="username"
Below are two command examples. (The lines wrap below, but you may see each command on one line.)
sqlcmd -S my_server -U sa -P sa_password -i ura_drop_db_permissions.sql-v username="jsmith" database="my_database"
sqlcmd -S server_name -U sa -P sa_password -i ura_drop_all_db_permissions.sql-v username="jsmith"
8. (Optional) If you need to remove the user role auditing user from the SQL Server database, run the ura_drop_user script.
The syntax is as follows:
sqlcmd -S server_name -U sa -P sa_password -i ura_drop_user.sql

Setting User Permissions for URA
Configuring and Using Role Auditing 6-5
-v username="username" password="password"
For example:
sqlcmd -U sa -P sa_password -i ura_drop_user.sql -v username="ura_auditor"
Setting URA User Permissions for MySQL DatabasesTo set up the user account for MySQL databases:
1. Log in to the database as a user who has privileges to create users and set user permissions, and run the following command on the MySQL database:
create user 'username'@'hostname' identified by 'password'
For username, use the name of the User Role Auditing account, and for hostname use the hostname of the Database Firewall. For example:
create user 'ura_auditor'@'10.155.56.2' identified by 'jj_1234'
2. Grant required permissions to the user you just created by running the following command:
grant select on mysql.user TO 'username'@'hostname'
For example:
grant select on mysql.user TO 'ura_auditor'@'10.155.56.2'
The above command grants the stored procedure auditing user account the following privilege: SELECT on the mysql.user system table.
3. (Optional) If you need to remove the stored procedure auditing user from the MySQL database, run the following command:
drop user 'username'@'hostname'
For example:
drop user 'spa_auditor'@'10.155.56.2'
Setting URA User Permissions for Sybase ASE DatabasesTo set up the Sybase Adaptive Server Enterprise user accounts:
1. From the Oracle Database Firewall Product CD (Oracle Database Firewall Utilities 5.1), copy the database directory to the server where you plan to run the scripts.
2. On this server, go to the database/ura directory and uncompress the sybase compressed file, preferably into a directory called sybase.
3. As a user who has privileges to create users and set user permissions, run the ura_add_user.sql script on the Sybase ASE database.
The syntax is as follows:
isql -S server_name -U sa -P sa_password -i ura_add_user.sql
In this specification:
Setting User Permissions for URA
6-6 Oracle Database Firewall Administration Guide
■ server_name: Only use this argument if the database is remote. You can enter the name of the server or its IP address. If you are running the script locally, then you can omit the -S server_name argument.
■ sa: Enter the system administrator user name.
■ sa_password: Enter the system administrator password.
Examples:
isql -U sa -P sa_password -i ura_add_user.sql
isql -S my_server -U sa -P sa_password -i ura_add_user.sql
4. Grant this user permissions by running the ura_add_db_permissions.sql script.
The syntax is as follows:
isql -S server_name -U sa -P password -i ura_add_db_permissions.sql
In this specification:
■ server_name: Only use this argument if the database is remote. You can enter the name of the server or its IP address. If you are running the script locally, then you can omit the -S server_name argument.
■ sa: Enter the system administrator user name.
■ sa_password: Enter the system administrator password.
The scripts grant the user role auditing user account the following privileges:
■ SELECT on these tables:
master.dbo.sysdatabasesmaster.dbo.sysloginsmaster.dbo.sysloginrolesmaster.dbo.syssrvrolesmaster.dbo.sysattributesspecific_database.sysusersspecific_database.sysalternatesspecific_database.sysroles
5. (Optional) If you need to remove the above permissions, run the ura_drop_db_permissions script.
The syntax is as follows:
isql -S server_name -U sa -P sa_password -i ura_drop_db_permissions.sql
6. (Optional) If you need to remove the user role auditing user, run the ura_drop_user script on the Sybase ASE database.
The syntax is as follows:
isql -S server_name -U sa -P sa_password -i ura_add_user.sql
Setting URA User Permissions for Sybase SQL Anywhere DatabasesThis section contains:
■ Installing the Sybase SQL Anywhere ODBC Driver for Linux
■ Setting URA User Permissions

Setting User Permissions for URA
Configuring and Using Role Auditing 6-7
Installing the Sybase SQL Anywhere ODBC Driver for LinuxBefore you can use Sybase SQL Anywhere, you must install the SQL Anywhere ODBC driver for Linux.
To install the ODBC driver for Linux:
1. Log in to the Database Firewall server as user root.
2. From the Sybase SQL Anywhere installation media, copy the linux_x86_GA_sa1101_2044_l10n.tar.gz to a secure location on the Database Firewall server.
3. Expand this archive file.
tar zxvf linux_x86_GA_sa1101_2044_l10n.tar.gz
4. Run the setup utility to begin the installation of the client.
./setup
5. When prompted, select to install only 3. Administration Tools.
6. When prompted, install the client to the /var/sqlanywhere11 directory.
7. From the Sybase SQL Anywhere installation media, copy sa11_full_linux_x86+x64.1101_2420_ebf.tar.gz to the Database Firewall server.
8. Expand this archive file.
tar zxvf sa11_full_linux_x86+x64.1101_2420_ebf.tar.gz
9. Run the setup utility to begin the installation of the client.
./setup
10. When prompted, select to install to the /var/sqlanywhere11 directory.
Setting URA User PermissionsTo set up the Sybase SQL Anywhere user accounts:
1. From the Oracle Database Firewall Product CD (Oracle Database Firewall Utilities 5.1), copy the database directory to the server where you plan to run the scripts.
2. On this server, go to the database/ura directory and uncompress the sqlanywhere compressed file, preferably into a directory called sqlanywhere.
3. Go to this sqlanywhere directory and review the uncompressed file (ura_setup.sql) so you will understand the privileges that the users in these scripts will have.
The ura_setup script contains settings for the following information:
■ $(username) refers to the user account that will be responsible for user role auditing. Ideally, this user account should be different from the user accounts specified for user role auditing and direct database interrogation (DDI) (for example, ura_auditor).
■ $(password) refers to the password for this user account.
4. As a user who has privileges to create users and set user permissions, run the ura_setup script on the SQL Anywhere database.
The syntax is as follows:
isql -S server_name -U sa -P password -i ura_setup.sql

Setting User Permissions for URA
6-8 Oracle Database Firewall Administration Guide
-v username="username" password="password" database="protected_database"
In this specification:
■ server_name: Only use this argument if the database is remote. You can enter the name of the server or its IP address. If you are running the script locally, then you can omit the -S server_name argument.
■ username: Enter the user account that you plan to create for user role auditing, specified by $(username) in the scripts. Enclose this user name in double quotation marks.
■ password: Enter the password for the user role auditing user account, specified by $(password) in the scripts. Enclose this password in double quotation marks.
■ database="protected_database": Enter the name of the database within this server that you want to protect, specified by $(database) in the scripts. Enclose this database name in double quotation marks.
For example:
isql -S my_server -U sa -P password -i ura_setup.sql-v username="ura_auditor" password="$(password)_password" database="sales_db"
The ura_setup script grants the user role auditing user account the following privileges:
■ CONNECT
■ SELECT on these system tables:
sys.sysusersys.sysuserauthoritysys.sysremoteusersys.sysloginmapsys.sysgroup
5. (Optional) If you need to remove the above permissions, run the ura_drop script on the SQL Anywhere database.
The syntax is as follows:
isql -S server_name -U sa -P password -i ura_drop.sql-v username="username" password="password" database="protected_database"
Setting URA User Permissions for IBM DB2 SQL DatabasesTo set up an IBM DB2 user account, you do not need to run any scripts. Instead, you create a new user account or designate an existing user account to be used for the user role auditing.
To set up the IBM DB2 user account:
1. Log in to the IBM DB2 Windows, UNIX, or Linux database that you want to audit.
2. Create a new user account or designate an existing user account to be used for the user role auditing.
3. Grant the following privileges to this user:
grant select on sysibmadm.authorizationids to usergrant select on syscat.dbauth to user

Enabling URA on the Database Firewall
Configuring and Using Role Auditing 6-9
4. (Optional) If you need to remove the above permissions, either revoke the granted permissions, or remove the user account from the IBM DB2 database.
Enabling URA on the Database FirewallTo enable user role auditing:
1. Log in to the standalone Database Firewall or Management Server Administration Console.
See "Logging in to the Administration Console" on page 1-7 for more information.
2. Click List in the Enforcement Points menu of the Monitoring page.
3. Choose an enforcement point to monitor user roles, and click the Settings button.
All enforcement points also monitor SQL traffic to a nominated database server. If required, the enforcement point can monitor user roles in databases located on a different server.
4. Select the URA check box:
5. Complete the URA fields and options:
■ Database Address and Port: Specify the IP address of the server that holds the databases to be audited. For the port number, enter the port number used by the database. (For example, the default port number for Oracle databases is 1521. For Oracle databases, you can find this information in the tnsnames.ora file.) All databases on the server will be included in the audit. If you are using a Domain Name Server (DNS), you can enter a hostname instead of an IP address.
The IP address of the protected database specified in the enforcement point is not automatically included in the audit.
■ Database Name: Name of the database. For Oracle databases, enter the service name, as defined in the tnsnames.ora file.
■ User Name: Enter the user name of the user who was created by the scripts described in "Setting User Permissions for URA" on page 6-1.
■ Change Password: If you want to change the password of the user, click the Change Password button and then enter a new password. (This field appears only if you are editing an existing configuration. The first time that you

Disabling URA
6-10 Oracle Database Firewall Administration Guide
configure user role auditing, the Password and Confirm Password fields appear.)
■ Database Connection (Test Now): Clicking Test Now checks that the specified user can log into the databases and has the required permissions.
■ First Run Time and Repeat Every: Specify the date and time to run the first audit and the frequency to repeat the audits. Select a time when the database is not busy, such as 2 a.m."
If you want to run an audit immediately, click List in the Enforcement Points menu, then the Manage button for the appropriate enforcement point, followed by Run Now.
Disabling URAYou can disable user role auditing. If you want to completely remove user role auditing, see Oracle Database Firewall Installation Guide.
To disable user role auditing:
1. Log in to the standalone Database Firewall or Management Server Administration Console.
See "Logging in to the Administration Console" on page 1-7 for more information.
2. Select the Monitoring tab.
By default, the Enforcement Points page appears. If it does not, then click the List button in the Enforcement Points menu on the left side of the page.
3. Find the enforcement point for the user role auditing that you want to disable.
4. Click the Settings button.
The Monitoring Settings page appears.
5. In the URA area, clear the Activate User Role Auditing check box.
6. Scroll to the bottom of the Monitoring Settings page and click the Save button.

7
Configuring and Using Local Monitoring 7-1
7Configuring and Using Local Monitoring
This chapter contains:
■ About Local Monitoring
■ Installing Local Monitoring
■ Enabling Local Monitoring
■ Disabling Local Monitoring
About Local MonitoringThe local monitoring software enables an enforcement point to monitor (but not block) SQL traffic that originates from sources that have direct access to the database, such as console users or batch jobs that run on the database server. Local monitoring does not send traffic across the network. You install the Oracle Database Firewall local monitoring software directly into the database that you are monitoring. Local monitoring uses an additional table in the database, which logs:
■ The last statement sent to the database by a console user or other process.
■ All statements originating from console users or processes that affect the data in the database, such as ALTER TABLE and DROP TABLE operations. Mechanisms including triggers (Oracle and Sybase) and event notifications (Microsoft SQL Server) log such statements.
The enforcement point collects the data by querying the database at regular intervals, then uses the data in the same manner as statements originating from database clients. Depending on the design of the policy, the statements may be logged or produce warnings, but since local monitoring is not inline between the traffic and database, the statements cannot be blocked. Logged traffic from the Local Monitor has its source IP address as 0.0.0.0.
Oracle Database Firewall supports local monitoring for Oracle, SQL Server, and Sybase ASE databases. For a full list of supported database products, see Oracle Database Firewall Installation Guide.
Note the following guidelines:
■ When using a Microsoft SQL Server 2005 or later database, ensure that the database uses mixed-mode authentication.
■ Local monitoring uses a source IP address of 0.0.0.0, and port 0, for statements originating from a console user or other process. The destination address (displayed in the traffic log) is the same as one of the protected databases being monitored.
Installing Local Monitoring
7-2 Oracle Database Firewall Administration Guide
■ Local monitoring does not record duplicate SQL statements. It only records the last SQL statement in a set of duplicate SQL statements.
■ Local Monitor does both a forward and reverse DNS lookup to determine if a session is from the local machine. If a DNS configuration is broken and prevents the server from doing the lookup successfully, then the Local Monitor cannot record console events. To ensure that Local Monitor records all local sessions, check that your DNS configuration is correct.
Installing Local MonitoringThis section contains:
■ Accessing the Scripts Required to Install Local Monitoring
■ Database Accounts Created for Local Monitoring
■ Installing Local Monitoring in an Oracle Database
■ Installing Local Monitoring in a Microsoft SQL Server Database
■ Installing Local Monitoring in a Sybase ASE Database
Accessing the Scripts Required to Install Local MonitoringThe scripts that you use to install the local monitoring components on the protected database are located in the Oracle Database Firewall Utilities 5.1 disc, in the database\localmonitor folder. Separate scripts are provided for Oracle, Sybase, and Microsoft SQL databases.
If the database is on a Windows platform, obtain the scripts from the .zip archive file. If you are using a Linux platform, you can unpack the .tar archive file as follows:
mkdir localmonitoring cd localmonitoringtar -xvf oracle.tar
Database Accounts Created for Local MonitoringThe installation process automatically creates the following two database accounts, with the necessary privileges:
■ DBFW_CONSOLE_ACCESS owns the schema objects.
■ DBFW_CONSOLE_ACCESS_QRY is used by Oracle Database Firewall to query the database.
The DBFW_CONSOLE_ACCESS account has the following privileges:
■ CREATE SESSION
■ ADMINISTER DATABASE TRIGGER
■ CREATE PROCEDURE
■ CREATE SEQUENCE
■ CREATE TABLE
■ CREATE TRIGGER
The DBFW_CONSOLE_ACCESS_QRY account has the following privilege:
■ CREATE SESSION

Installing Local Monitoring
Configuring and Using Local Monitoring 7-3
Installing Local Monitoring in an Oracle DatabaseTo install the local monitoring components on an Oracle database:
1. From the Oracle Database Firewall Product CD (Oracle Database Firewall Utilities 5.1), copy the database directory to the server where you plan to run the scripts.
2. On this server, go to the database/localmonitor directory and uncompress the oracle compressed file, preferably into a directory called oracle.
3. Go to this oracle directory and review the uncompressed files so you will understand the privileges that the users in these scripts will have.
4. Log in to Oracle Database as a user who has privileges to create users and set user permissions.
For example:
sqlplus sys/as sysdbaEnter password: passwordConnected. SQL>
If the database has been enabled with Oracle Database Vault, then log in as a user who has been granted the DV_ACCTMGR role.
5. Run the script named dcam_new_user to create the DBFW_CONSOLE_ACCESS account.
For example:
SQL> @dcam_new_user password1 password2
For password1 enter the password for the DBFW_CONSOLE_ACCESS account.
For password2 enter the password for the DBFW_CONSOLE_ACCESS_QRY table.
If you omit the passwords you will be prompted for them. For better security, allow the script to prompt you for the passwords.
6. Run the script named dcam_setup as the DBFW_CONSOLE_ACCESS account:
connect DBFW_CONSOLE_ACCESSEnter passowrd: password1SQL> @dcam_setup.sql
This script creates the tables and triggers that the monitoring system uses, and then grants access to the DBFW_CONSOLE_ACCESS_QRY table.
Provide the password of the DBFW_CONSOLE_ACCESS_QRY table to the person who is to enable local monitoring from the Administration Console.
7. (Optional) If you need to remove the above permissions, tables, and triggers, run the dcam_drop script:
connect DBFW_CONSOLE_ACCESSEnter passowrd: password1SQL> @dcam_drop.sql
8. (Optional) If you need to disable the DBFW_CONSOLE_ACCESS account and remove access to the DBFW_CONSOLE_ACCESS_QRY table, run the dcam_remove_user script:
SQL> @dcam_remove_user.sql

Installing Local Monitoring
7-4 Oracle Database Firewall Administration Guide
Installing Local Monitoring in a Microsoft SQL Server DatabaseTo install the local monitoring components on a Microsoft SQL Server database running mixed-mode authentication:
1. From the Oracle Database Firewall Product CD (Oracle Database Firewall Utilities 5.1), copy the database directory to the server where you plan to run the scripts.
2. On this server, go to the database/localmonitor directory and uncompress the sqlserver compressed file, preferably into a directory called sqlserver.
3. Go to this sqlserver directory and review the uncompressed files so you will understand the privileges that the users in these scripts will have.
4. Log in to the SQL Server as a user who has privileges to create users and set user permissions.
sqlcmd -S server_name -U sa -P password
5. Run the script named dcam_new_user to create the accounts.
1> :r dcam_new_user.sql
The script creates the DBFW_CONSOLE_ACCESS and DBFW_CONSOLE_ACCESS_QRY accounts with default passwords.
6. Change the passwords for the two accounts.
1> alter login DBFW_CONSOLE_ACCESS with password = 'new password';2> go1> alter login DBFW_CONSOLE_ACCESS_QRY with password = 'new password';2> go
7. Run the script named dcam_setup.sql.
1> :r dcam_setup.sql
This script creates the tables and event notification framework that the monitoring system uses, and then grants access to the table DBFW_CONSOLE_ACCESS_QRY.
Provide the password of the DBFW_CONSOLE_ACCESS_QRY account to the person who is to enable local monitoring from the Administration Console.
8. (Optional) To remove the user accounts created in Step 5, run the dcam_remove_user script:
1> :r dcam_remove_user.sql
9. (Optional) To remove the tables and notifications created in Step 7, run the dcam_drop script:
1> :r dcam_drop.sql
Installing Local Monitoring in a Sybase ASE DatabaseTo install the local monitoring components on a Sybase ASE database (not supported with a Sybase SQL Anywhere database):
1. From the Oracle Database Firewall Product CD (Oracle Database Firewall Utilities 5.1), copy the database directory to the server where you plan to run the scripts.
Enabling Local Monitoring
Configuring and Using Local Monitoring 7-5
2. On this server, go to the database/localmonitor directory and uncompress the sybase compressed file, preferably into a directory called sybase.
3. Go to this sybase directory and review the uncompressed files so you will understand the privileges that the users in these scripts will have.
4. As a user who has administrative privileges and privileges to create users, run the dcam_sa_setup script on the Sybase ASE database:
isql -S server_name -U sa -i dcam_sa_setup.sql
This script creates the dbfw_console_access_qry account with a default password.
5. Change the password for the dbfw_console_access_qry account.
isql -S server_name -U sa1> sp_password "sa password", new password, dbfw_console_access_qry2> go
Enter the dbfw_console_access_qry account name in lower case only. This account name is case sensitive.
6. Run the following scripts on the Sybase ASE database:
isql -S server_name -U dbfw_console_access_qry -i dcam_setup.sqlisql -S server_name -U sa -i dcam_sa_setup_global_trigger.sql
These scripts create the tables and global triggers that the monitoring system uses, and then grant access to the tables to the dbfw_console_access_qry account.
7. Provide the password that you created in Step 5 for the dbfw_console_access_qry account to the person who is to enable local monitoring from the Administration Console.
8. Restart Sybase ASE.
9. (Optional) To remove the permissions and tables added in this procedure, run the dcam_drop script, and restart Sybase ASE.
Enabling Local MonitoringTo enable local monitoring for a SQL database:
1. Log in to the Management Server Administration Console.
See "Logging in to the Administration Console" on page 1-7 for more information.
2. Click the Monitoring tab.
3. Click the Settings button for the appropriate enforcement point.
4. Select Activate Local Monitor in the Monitoring Settings page.
The Activate Local Monitor area expands as follows:

Disabling Local Monitoring
7-6 Oracle Database Firewall Administration Guide
5. Specify the following settings:
■ Database Address, Port, and Database Name: Specify the database name, IP address or name of the database machine, and the port number. If you are using a Domain Name Server (DNS), you can enter a hostname instead of an IP address.
■ Password and Password Confirmation: The password of the DBFW_CONSOLE_ACCESS_QRY account specified during the installation of the software at the protected database.
6. Click Save.
You can test local monitoring by performing an appropriate query in the database server and ensuring Oracle Database Firewall logs it.
Disabling Local MonitoringYou can disable local monitoring. If you want to completely remove local monitoring, see Oracle Database Firewall Installation Guide.
To disable local monitoring:
1. Log in to the Management Server Administration Console.
See "Logging in to the Administration Console" on page 1-7 for more information.
2. Select the Monitoring tab.
By default, the Enforcement Points page appears. If it does not, then click the List button in the Enforcement Points menu on the left side of the page.
3. Find the enforcement point whose local monitoring you want to disable.
4. Click the Settings button.
The Monitoring Settings page appears.
5. In the Local Monitoring area, clear the Activate Local Monitoring check box.
6. Scroll to the bottom of the Monitoring Settings page and click the Save button.
7. After completing this procedure in the UI, you must run the dcam_drop script. See the appropriate database section in this chapter for an example for each database type. If you do not perform this step, the database will eventually run out of space.
8
Configuring and Using Remote Monitoring 8-1
8Configuring and Using Remote Monitoring
This section contains:
■ About Remote Monitoring
■ Installing and Enabling Remote Monitoring
■ Disabling Remote Monitoring
About Remote MonitoringRemote monitoring enables an enforcement point to directly monitor SQL traffic in a database. To use remote monitoring, you run a script from the operating system of the Linux server that you want to use for the remote monitor. (Unlike local monitoring, you do not install the remote monitoring software into the database that you want to protect.) The script captures the SQL traffic from the network card and sends it over the network to an Oracle Database Firewall. This SQL data is then available for reports generated by this Database Firewall. You can configure one Database Firewall to manage multiple remote monitoring configurations on your network.
Remote monitoring is designed for situations when you have many small databases in a distributed environment, and you want Oracle Database Firewall to manage all of these small databases centrally. If you want to use remote monitoring for larger databases, then contact Oracle Support.
The remote monitoring files that you use are as follows:
■ remote-agent: The remote monitoring executable script. Typically, you download this script from the extras directory in the Oracle Database Firewall Utilities 5.1 disc into the /bin directory of the Linux server.
■ remote-agent.conf: A configuration file that the remote monitor uses to determine which traffic to forward to the Database Firewall for processing. Typically, you download this configuration file by using the Management Server Administration Console, and then you place it into the /etc directory. Do not edit this configuration file.
In the simplest configuration, you download and run the remote monitoring software onto the same Linux server as the database. If you want to install the remote monitoring software onto a server that is different from the database server, then you must use a spanning port to connect this database server to the Linux server that you want to use for the remote monitor.
Installing and Enabling Remote MonitoringThis section contains:

Installing and Enabling Remote Monitoring
8-2 Oracle Database Firewall Administration Guide
■ Step 1: Configure the Remote Monitor in the Administration Console
■ Step 2: Access and Run the remote-agent Remote Monitor Script
■ Step 3: Ensure That the Remote Monitor Is Active
Step 1: Configure the Remote Monitor in the Administration ConsoleIn this step, you tell the Administration Console which Linux server to use for the remote monitor, and then you download the remote monitor configuration file.
To configure the remote monitor in the Administration Console:
1. Log in to the Management Server Administration Console.
See "Logging in to the Administration Console" on page 1-7 for more information.
2. Select the Monitoring tab.
By default, the Enforcement Points page appears. If it does not, click List in the Enforcement Points menu on the left side of the page.
3. Find the enforcement point that you want to use for the remote monitor, and then click the Settings button for that enforcement point.
The Monitoring Settings page appears.
4. Scroll down to the Remote Monitor area and click the Activate Remote Monitor check box.
The Activate Remote Monitor section expands to enable you to add an IP address.
5. In the Monitor Address field, enter the IP address of the Linux server where you plan to install the remote monitor software, and then click the Add button.
The IP address is added, and now the Remote Monitor area appears similar to the following:
6. Scroll to the end of the Monitoring Settings page, and then click the Save button.
7. Return to the Remote Monitor area, and then click the Configure button.
The Download Monitor Configuration File page appears.
8. Under Configuration for Remote Monitor at ip_address, in the third bulleted item, click the enforcement point status page link, so that you can confirm that the connection that you created is valid.

Installing and Enabling Remote Monitoring
Configuring and Using Remote Monitoring 8-3
In the Status of Enforcement Point page, the Remote Monitors area should have a check box in the Enabled column for the IP address you entered. If it does not, then ensure that you have entered a valid IP address.
9. In the Web browser, click the Back button to return to the Download Monitor Configuration File page of the Administration Console.
10. Click the Download Configuration File button, and then save the remote-agent.conf file to the Linux server that you specified in the Administration Console.
Ideally, save this file in the /etc directory of this Linux server. You can rename this file if you want, for cases where you have multiple remote monitors configured. Oracle recommends that you rename this file only if you have a good reason. Do not edit this file.
Step 2: Access and Run the remote-agent Remote Monitor ScriptIn this step, you copy the remote monitor script to the Linux server and then run the script.
To access and run the remote monitor script:
1. On the Linux server on which you plan to run the remote monitoring software, log in as the root user.
2. Insert the Oracle Database Firewall Utilities 5.1 disc, and go to the extras directory.
3. From the extras directory, copy the remote monitor script, entitled remote-agent, to the Linux server, preferably to the /bin directory.
4. Enable the remote-agent script to be run as an executable.
chmod +x remote-agent
5. Run the remote-agent script.
./remote-agent
For a distributed environment where you have multiple remote monitors, you can run a command similar to the following. For example, suppose the configuration file is named db_sales_remote-agent.conf. You would run the remote-agent script using the following command:
./remote-agent --config=/etc/db_sales_remote-agent.conf
At this stage, the remote monitor should start collecting and sending SQL traffic to the Database Firewall that you are using to manage the remote monitor. The script runs until you disable the remote monitoring or until the process exits, for example if the Linux server is restarted. You may want to add this script execution to the startup script for the Linux server.
Options for Running the remote-agent ScriptTo display the options for the remote-agent executable, run the following command:
./remote-agent -help
The options are as follows:
■ verbose: Displays diagnostics. Disabled by default.

Disabling Remote Monitoring
8-4 Oracle Database Firewall Administration Guide
■ interface: Specifies a network interface to listen to. Use this setting for a computer that has multiple interfaces, to ensure that the correct interface is used. The default interface is eth0.
■ config: Specifies a directory path for the configuration file, if you have renamed it or if it is in a directory other than /etc. The default setting is /etc/remote-agent.conf.
These options require a leading double hyphen, for example, --verbose.
Step 3: Ensure That the Remote Monitor Is ActiveTo ensure that the remote monitor is active:
1. Log in to the Management Server Administration Console.
See "Logging in to the Administration Console" on page 1-7 for more information.
2. Select the Monitoring tab.
3. In the Enforcement Points page, select Status for the enforcement point configured to use the remote monitors.
If you have just added a remote monitor and you still have the Monitoring Settings page displayed, then you can refresh the Web page to see the current status.
4. Under Details, go to the Remote Monitor area.
The Remote Monitor area should have checkmarks under both the Enabled and Connected labels for the remote monitor address. If it does not, then ensure that the IP address is correct and that the remote-agent execution script is running on that Linux server.
Disabling Remote MonitoringYou can temporarily disable individual remote monitors or all remote monitors. Oracle Database Firewall saves the configuration information that you have created for the next time that you want to enable it. If you want to remove the remote monitor configuration and software, see Oracle Database Firewall Installation Guide.
To disable remote monitoring:
1. Log in to the Management Server Administration Console.
See "Logging in to the Administration Console" on page 1-7 for more information.
2. Select the Monitoring tab.
By default, the Enforcement Points page appears.
3. Click the Settings button for the enforcement point with the remote monitor.
The Monitoring Settings page appears.
4. Scroll down to the Remote Monitor area.
5. Disable the remote monitors as follows:
■ To disable individual remote monitors: Clear the check box under the Enabled label for each remote monitor that you want to disable.
■ To disable all remote monitors: Clear the Activate Remote Monitor check box.
Disabling Remote Monitoring
Configuring and Using Remote Monitoring 8-5
6. Scroll to the end of the Monitoring Settings page, and then click the Save button.

Disabling Remote Monitoring
8-6 Oracle Database Firewall Administration Guide

9
Configuring and Using Direct Database Interrogation 9-1
9Configuring and Using Direct Database Interrogation
This chapter contains:
■ About Direct Database Interrogation (DDI)
■ Configuring DDI for SQL Server and Sybase SQL Anywhere Databases
■ Configuring DDI for an Oracle Database With Oracle Advanced Security
■ Enabling DDI
■ Disabling DDI
About Direct Database Interrogation (DDI)Direct database interrogation (DDI) allows Database Firewall to interrogate certain supported databases for specific information. The information collected depends on the database type.
Using DDI to Interrogate SQL Server and SQL Anywhere DatabasesYou can use DDI to interrogate a monitored Microsoft SQL Server and Sybase SQL Anywhere database to obtain the name of the database user, operating system, and client program that originated a SQL statement, if this information is not available from the statement itself. This information then is made available in the Database Firewall reports.
To configure DDI for these two databases you must:
■ Run a provided script to grant privileges to an existing user account in the protected database. See "Configuring DDI for SQL Server and Sybase SQL Anywhere Databases" on page 9-2.
■ Enable DDI in the enforcement point that monitors the protected database. See "Enabling DDI" on page 9-6.
Using DDI to Monitor Oracle Databases That Use Oracle Advanced SecurityIf you are monitoring an Oracle Database that uses Oracle Advanced Security encryption, you must use DDI in order to decrypt statements sent to, and responses received from, that database so they can be analyzed.
Configuring DDI for an Oracle Database Using Oracle Advanced SecurityTo configure DDI for an Oracle Database with Oracle Advanced Security, you must:

Configuring DDI for SQL Server and Sybase SQL Anywhere Databases
9-2 Oracle Database Firewall Administration Guide
■ Apply a patch to the protected Oracle Database. See "Applying the Specified Patch to the Oracle Database" on page 9-4.
■ Provide a public key from the Database Firewall to the protected Oracle Database. "Providing a Public Key to the Oracle Database" on page 9-5.
■ Enable DDI in the enforcement point that monitors that database. See "Enabling DDI" on page 9-6.
Limitations on Decryption of Oracle Database StatementsConfiguring Database Firewall to decrypt traffic with Oracle Advanced Security has the following limitations:
■ The supported Oracle Database versions are: 10.x, 11.1, 11.2
■ There is no statement substitution in Database Firewall when Oracle Advanced Security checksum is used.
■ There is no support for Oracle Advanced Security RC4 cipher.
Configuring DDI for SQL Server and Sybase SQL Anywhere DatabasesThis section contains:
■ Setting DDI User Permissions in a Microsoft SQL Server Database
■ Setting DDI User Permissions in a Sybase SQL Anywhere Database
■ Enabling DDI in an Enforcement Point for SQL Server or SQL Anywhere Databases
Setting DDI User Permissions in a Microsoft SQL Server DatabaseTo set up the user account for a Microsoft SQL Server (versions 2005 or 2008) database:
1. From the Oracle Database Firewall Product CD (Oracle Database Firewall Utilities 5.1), copy the database directory to the server where you plan to run the script.
2. Ensure that the computer where you will run the scripts has the sqlcmd.exe utility installed.
3. On this server, go to the database/ddi directory and uncompress the sqlserver compressed file, preferably into a directory called sqlserver. This directory will contain the uncompressed file ddi_add_user.sql.
The ddi_add_user.sql script contains settings for the following information:
■ $(username) refers to the user account that will be responsible for direct database interrogation. Ideally, this user account should be different from the user accounts specified for stored procedure and user role auditing (for example, ddi_auditor).
■ $(password) refers to the password for this user account.
4. As a user who has privileges to create users and set user permissions, run the ddi_add_user.sql script on the SQL Server database.
The syntax is as follows:
sqlcmd -S server_name -U sa -P sa_password -i ddi_add_user.sql -v username="username" password="password"

Configuring DDI for SQL Server and Sybase SQL Anywhere Databases
Configuring and Using Direct Database Interrogation 9-3
In this specification:
■ server_name: Enter the name or the IP address of the database server where the protected database resides. Only use this argument if you are running the script from a remote server. You can omit it if you are running the script locally.
■ sa: Enter the system administrator user name.
■ sa_password: Enter the system administrator password.
■ username: Enter the user account that you plan to create for direct database interrogation, specified by $(username) in the ddi_add_user.sql script. Enclose this user name in double quotation marks.
■ password: Enter the password for the direct database interrogation user account, specified by $(password) in the ddi_add_user.sql script. Enclose this password in double quotation marks.
Examples:
sqlcmd -U sa -P sa_password -i ddi_add_user.sql -v username="ddi_auditor" password="abcd1234"
sqlcmd -S my_server -U sa -P sa_password -i ddi_add_user.sql -v username="ddi_auditor" password="abcd1234"
The ddi_add_user.sql script grants the direct database interrogation user account the following privileges:
■ VIEW ANY DEFINITION and VIEW SERVER STATE for SQL Server 2005 and later
■ SELECT on the master.dbo.sysdatabases table:
Setting DDI User Permissions in a Sybase SQL Anywhere DatabaseTo set user permissions for direct database interrogation in a Sybase SQL Anywhere database:
1. From the Oracle Database Firewall Product CD (Oracle Database Firewall Utilities 5.1), copy the database directory to the server where you plan to run the script.
2. On this server, go to the database/ddi directory and uncompress the sqlanywhere compressed file, preferably into a directory called sqlanywhere. This directory contains the uncompressed file ddi_add_user.sql.
This script contain settings for the following information:
■ $(username) refers to the user account that will be responsible for direct database interrogation. Ideally, this user account should be different from the user accounts specified for stored procedure and user role auditing (for example, ddi_auditor).
■ $(password) refers to the password for this user account.
3. As a user who has privileges to create users and set user permissions, run the ddi_add_user.sql script on the SQL Anywhere database.
The syntax is as follows:
isql -S server_name -U sa -P sa_password -i ddi_add_user.sql-v username="username" password="password" database="protected_database"
Configuring DDI for an Oracle Database With Oracle Advanced Security
9-4 Oracle Database Firewall Administration Guide
In this specification:
■ server_name: Only use this argument if the database is remote. You can enter the name of the server or its IP address. If you are running the script locally, then you can omit the -S server_name argument.
■ sa: Enter the system administrator user name.
■ sa_password: Enter the system administrator password.
■ username: Enter the user account that you plan to create for direct database interrogation, specified by $(username) in the ddi_add_user.sql script. Enclose this user name in double quotation marks.
■ password: Enter the password for the direct database interrogation user account, specified by $(password) in the ddi_add_user.sql script. Enclose this password in double quotation marks.
■ database="protected_database": Enter the name of the database within this server that you want to protect, specified by $(database) in the ddi_add_user.sql script. Enclose this database name in double quotation marks.
Examples:
isql -U sa -P sa_password -i sddi_add_user.sql-v username="ddi_auditor" password="abcd1234" database="sales_db"
isql -S my_server -U sa -P sa_password -i sddi_add_user.sql-v username="ddi_auditor" password="abcd1234" database="sales_db"
The ddi_add_user.sql script grants the direct database interrogation user account the following privileges:
■ CONNECT
■ SELECT on these system tables:
sys.sysusersys.sysuserauthoritysys.sysremoteusersys.sysloginmapsys.sysgroup
Enabling DDI in an Enforcement Point for SQL Server or SQL Anywhere DatabasesFollow the procedure in "Enabling DDI" on page 9-6 to complete the DDI setup for a Microsoft SQL Server or Sybase SQL Anywhere database.
Configuring DDI for an Oracle Database With Oracle Advanced SecurityThis section contains:
■ Applying the Specified Patch to the Oracle Database
■ Providing a Public Key to the Oracle Database
■ Enabling DDI in an Enforcement Point for an Oracle Database
Applying the Specified Patch to the Oracle DatabaseYou must apply the patch specified in this section to the Oracle Database that is using Oracle Advanced Security.
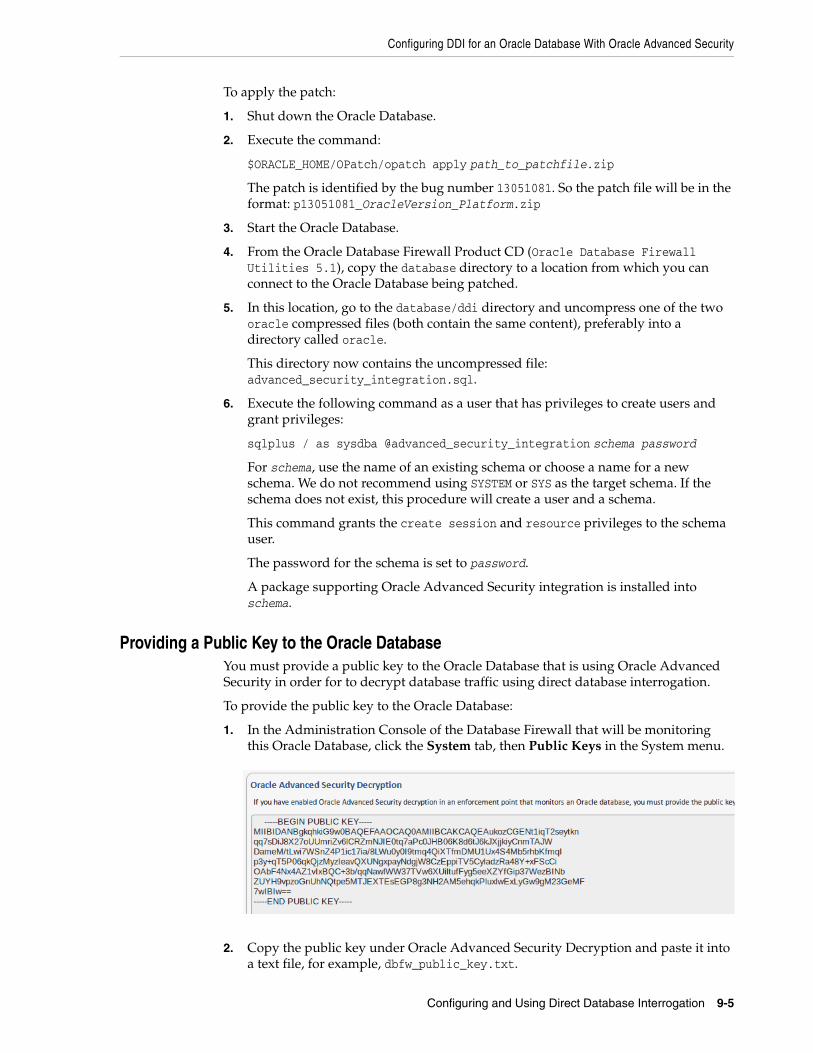
Configuring DDI for an Oracle Database With Oracle Advanced Security
Configuring and Using Direct Database Interrogation 9-5
To apply the patch:
1. Shut down the Oracle Database.
2. Execute the command:
$ORACLE_HOME/OPatch/opatch apply path_to_patchfile.zip
The patch is identified by the bug number 13051081. So the patch file will be in the format: p13051081_OracleVersion_Platform.zip
3. Start the Oracle Database.
4. From the Oracle Database Firewall Product CD (Oracle Database Firewall Utilities 5.1), copy the database directory to a location from which you can connect to the Oracle Database being patched.
5. In this location, go to the database/ddi directory and uncompress one of the two oracle compressed files (both contain the same content), preferably into a directory called oracle.
This directory now contains the uncompressed file: advanced_security_integration.sql.
6. Execute the following command as a user that has privileges to create users and grant privileges:
sqlplus / as sysdba @advanced_security_integration schema password
For schema, use the name of an existing schema or choose a name for a new schema. We do not recommend using SYSTEM or SYS as the target schema. If the schema does not exist, this procedure will create a user and a schema.
This command grants the create session and resource privileges to the schema user.
The password for the schema is set to password.
A package supporting Oracle Advanced Security integration is installed into schema.
Providing a Public Key to the Oracle DatabaseYou must provide a public key to the Oracle Database that is using Oracle Advanced Security in order for to decrypt database traffic using direct database interrogation.
To provide the public key to the Oracle Database:
1. In the Administration Console of the Database Firewall that will be monitoring this Oracle Database, click the System tab, then Public Keys in the System menu.
2. Copy the public key under Oracle Advanced Security Decryption and paste it into a text file, for example, dbfw_public_key.txt.

Enabling DDI
9-6 Oracle Database Firewall Administration Guide
Each Database Firewall has its own public key. In a case where you have Database Firewall high availability or Enforcement Point resiliency, when you have more than one Database Firewall monitoring this protected database, each Database Firewall public key must be copied and appended to the dbfw_public_key.txt file.
Note: For security purposes the dbfw_public_key.txt file must have the same access permissions as the sqlnet.ora file on the Oracle Database server.
3. Modify the sqlnet.ora file in the Oracle Database to include the public key and to require Oracle Advanced Security native traffic encryption:
a. Put the file you created in Step 2 on the Oracle Database server, preferably in the same directory as the sqlnet.ora file.
b. Open the sqlnet.ora file and append the following parameters (in this example the public key file is dbfw_public_key.txt):
SQLNET.ENCRYPTION_TYPES_SERVER=AES256SQLNET.DBFW_PUBLIC_KEY="/path_to_file/dbfw_public_key.txt"
c. Save and close the sqlnet.ora file.
Enabling DDI in an Enforcement Point for an Oracle DatabaseFollow the procedure in "Enabling DDI" on page 9-6 to complete the DDI setup for an Oracle Database that uses Oracle Advanced Security.
Enabling DDITo enable direct database interrogation in a Database Firewall:
1. Log in to the Management Server Administration Console.
See "Logging in to the Administration Console" on page 1-7 for more information.
2. Click the Monitoring tab.
By default, the Enforcement Points page appears. If it does not, click List in the Enforcement Points menu on the left side of the page.
3. Find the enforcement point that monitors the protected database that will be interrogated, and then click the Settings button for that enforcement point.
The Monitoring Settings page appears.
4. Scroll down to the Database Interrogation area and click the Activate Database Interrogation check box.
The Activate Database Interrogation area expands to enable you to complete the necessary authentication details.
Disabling DDI
Configuring and Using Direct Database Interrogation 9-7
5. Scroll to the end of the Monitoring Settings page, and then click the Save button.
Disabling DDIYou can temporarily disable direct database interrogation. Oracle Database Firewall saves the configuration information that you have created for the next time that you want to enable it. If you want to remove the direct database interrogation configuration and software, see Oracle Database Firewall Installation Guide.
To disable direct database interrogation:
1. Log in to the Management Server Administration Console.
See "Logging in to the Administration Console" on page 1-7 for more information.
2. Select the Monitoring tab.
By default, the Enforcement Points page appears.
3. Click the Settings button for the enforcement point that monitors the database for which you want to disable DDI.
The Monitoring Settings page appears.
4. Scroll down to the Direct Database Interrogation area.
5. Clear the Activate Database Interrogation check box.
6. Scroll to the end of the Monitoring Settings page, and then click the Save button.

Disabling DDI
9-8 Oracle Database Firewall Administration Guide
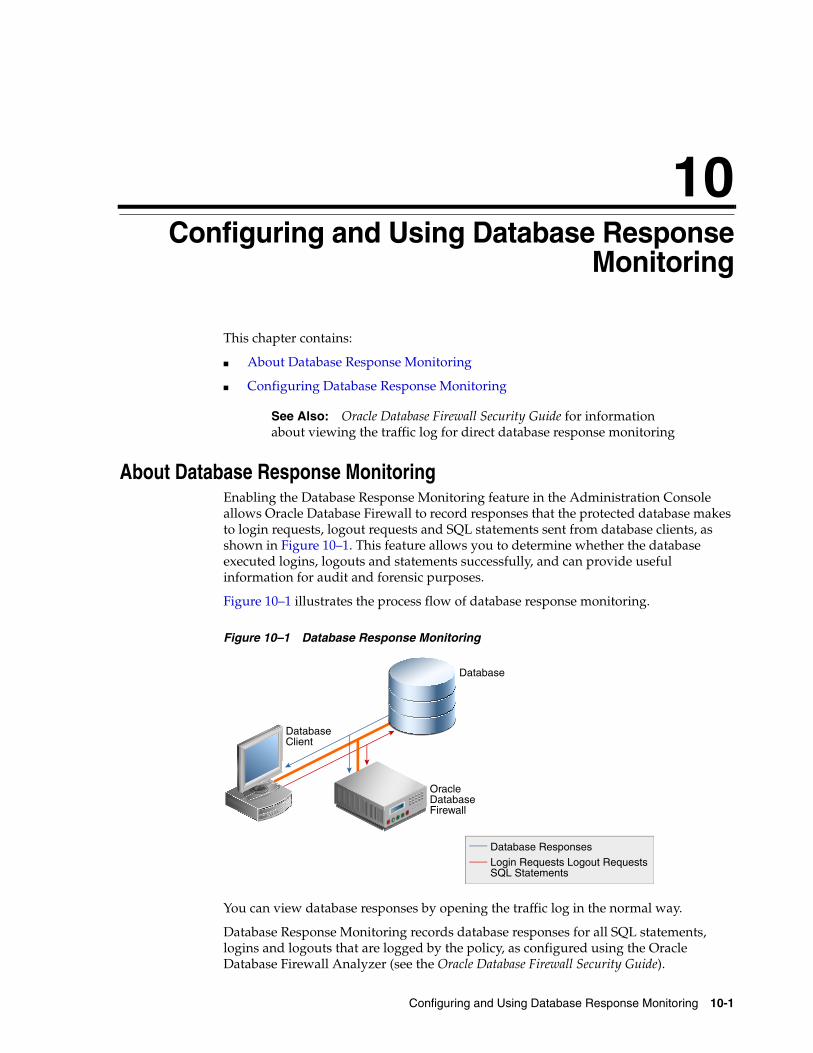
10
Configuring and Using Database Response Monitoring 10-1
10Configuring and Using Database Response Monitoring
This chapter contains:
■ About Database Response Monitoring
■ Configuring Database Response Monitoring
About Database Response MonitoringEnabling the Database Response Monitoring feature in the Administration Console allows Oracle Database Firewall to record responses that the protected database makes to login requests, logout requests and SQL statements sent from database clients, as shown in Figure 10–1. This feature allows you to determine whether the database executed logins, logouts and statements successfully, and can provide useful information for audit and forensic purposes.
Figure 10–1 illustrates the process flow of database response monitoring.
Figure 10–1 Database Response Monitoring
You can view database responses by opening the traffic log in the normal way.
Database Response Monitoring records database responses for all SQL statements, logins and logouts that are logged by the policy, as configured using the Oracle Database Firewall Analyzer (see the Oracle Database Firewall Security Guide).
See Also: Oracle Database Firewall Security Guide for information about viewing the traffic log for direct database response monitoring
Database
DatabaseClient
Database ResponsesLogin Requests Logout Requests SQL Statements
Oracle Database Firewall

Configuring Database Response Monitoring
10-2 Oracle Database Firewall Administration Guide
The information recorded in the traffic log includes the response interpreted by Oracle Database Firewall (such as "statement fail"), the detailed status information from the database, and the database response text (which may be displayed at the database client).
Configuring Database Response MonitoringThis section contains:
■ Enabling Database Response Monitoring
■ Setting Up Login/Logout Policies in the Analyzer
Enabling Database Response MonitoringTo enable database response monitoring:
1. Log in to the Management Server Administration Console.
2. Select the Monitoring tab.
3. Click List in the Enforcement Points menu.
4. Click the Settings button of the enforcement point that is being used to monitor the database.
The Monitoring Settings page appears.
5. Select Activate Database Response Monitoring.
If you also select Full error message annotation, any detailed response text messages generated by the database are also logged.
6. Click Save to save the changes.
Setting Up Login/Logout Policies in the AnalyzerThe login and logout policies are stored in the Oracle Database Firewall and must be configured using the Oracle Database Firewall Analyzer software. See the Oracle Database Firewall Security Guide for details.

11
Using Oracle Database Firewall with BIG-IP ASM 11-1
11Using Oracle Database Firewall with BIG-IP ASM
This appendix contains:
■ About the Integration of Oracle Database Firewall with BIG-IP ASM
■ Key Benefits of Integrating Oracle Database Firewall with BIG-IP ASM
■ How the Integration Works
■ Deploying the Oracle Database Firewall-BIG-IP ASM Integration
■ Presentation of Data in Oracle Database Firewall
About the Integration of Oracle Database Firewall with BIG-IP ASMThis chapter discusses integration of Oracle Database Firewall, BIG-IP Application Security Manager (ASM), Web clients, and the Web application server, how the integration works, and its key benefits.
BIG-IP Application Security Manager (ASM), from F5 Networks, Inc., is an advanced Web Application Firewall (WAF) that provides comprehensive edge-of-network protection against a wide range of Web-based attacks.
BIG-IP ASM is deployed between the Web clients and the Web application server, see Figure 11–1. It analyzes each HTTP and HTTPS request, and blocks potential attacks before they reach the Web application server. BIG-IP ASM can be installed on a wide range of BIG-IP platforms, see "Deploying the Oracle Database Firewall-BIG-IP ASM Integration" on page 11-3.
The integration of Oracle Database Firewall with BIG-IP ASM works well with an ArcSight SIEM integration. See Chapter 12, "Using Oracle Database Firewall with ArcSight SIEM," for more information.

Key Benefits of Integrating Oracle Database Firewall with BIG-IP ASM
11-2 Oracle Database Firewall Administration Guide
Figure 11–1 Oracle Database Firewall with F5 BIG-IP ASM Data Flow Unit
Oracle Database Firewall is deployed between the Web application server and database. It provides protection against attacks originating from inside or outside the network and works by analyzing the intent of the SQL statements sent to the database. It is not dependent on recognizing the syntax of known security threats, and can therefore block previously unseen attacks, including those targeted against an organization.
A deployment that includes both BIG-IP ASM and Oracle Database Firewall provides all the security benefits of both products and enables the two systems to work in partnership to reach unparalleled levels of data security.
A key benefit of the integration is that it allows BIG-IP ASM to pass Oracle Database Firewall additional information about the SQL statements sent to the database, including the Web user name and IP address of the Web user who originated them. This information is not usually available from the SQL statements generated by the Web application server.
The information obtained from BIG-IP ASM, and from the Oracle Database Firewall system itself, is logged by Oracle Database Firewall as attributes of the appropriate statements. Once the data has been logged, it can be retrieved in views of the traffic logs to give complete visibility into the source and nature of any attacks.
Key Benefits of Integrating Oracle Database Firewall with BIG-IP ASMThe key benefits of the integration are as follows:
■ Improves security through a partnership of the two systems.
■ Allows Oracle Database Firewall to provide detailed information about the origin and context of the SQL statements from the Web application layer.
■ Enables Oracle Database Firewall to act as a log store for data generated by BIG-IP ASM.
DatabaseServer
SyslogServer
WebClients
http/https
Syslog messages containing username,IP address, user cookies, and other data
F5 BIG-IP ASM WebApplication Firewall
Web ApplicatonServer
SQL
Oracle Database Firewall
Deploying the Oracle Database Firewall-BIG-IP ASM Integration
Using Oracle Database Firewall with BIG-IP ASM 11-3
■ Provides layered security at the edge of the network, and close to the database.
How the Integration WorksThe integration works by using a syslog messaging system to deliver alerts from the Web application firewall. Standard BIG-IP ASM syslog messages enabled through the ASM logging profile provide details of each alert, such as the user's source IP address and other attributes of the session.
In addition, an optional BIG-IP ASM iRule™ can be set up, which generates a syslog message during a user login to provide the Web username. Oracle Database Firewall provides a sample iRule, which must be customized to match the specific login procedures of the Web application. See "Developing a BIG-IP ASM iRule" on page 6.
During the deployment procedure, BIG-IP ASM is set up to route all its syslog messages to an Oracle Database Firewall. The Oracle Database Firewall attempts to match each relevant BIG-IP ASM syslog message with the appropriate SQL statements generated by the Web application server. If a match is found, it extracts the information contained in the BIG-IP ASM syslog message, and stores that information as attributes of the logged SQL statements. If a match is not found, a separate record is added to the traffic log, containing the attributes from the syslog message.
The software uses cookies to match SQL statements with Web users. When the user logs in, BIG-IP ASM assigns a unique cookie to that user (normally the cookie’s name starts with "TS"). The cookie and the name of the user is sent to the Oracle Database Firewall by a syslog message generated by the Oracle Database Firewall iRule. If the user's actions cause an alert or other event, BIG-IP ASM generates an additional syslog message containing the same identifying cookie, which enables the software to match the syslog message with the specific user. Since the Oracle Database Firewall system is also able to match syslog messages with SQL statements, this enables individual SQL statements relating to potential threats to be attributed to specific Web users.
The Oracle Database Firewall can automatically relay all syslog messages received from BIG-IP ASM to an external syslog server, up to a maximum size of 2KB each. If required, syslog messages generated by the Oracle Database Firewall itself can be routed to the same destination. The Oracle Database Firewall does not alter the BIG-IP ASM syslog traffic in any way.
The Oracle Database Firewall monitors the status of the connection to BIG-IP ASM, and generates syslog messages every two minutes if the connection is not present or has been lost.
Deploying the Oracle Database Firewall-BIG-IP ASM IntegrationThis section contains the following topics:
■ About the Deployment
■ System Requirements
■ Configuring Oracle Database Firewall
■ Configuring BIG-IP ASM
■ Developing a BIG-IP ASM iRule
See Also: Appendix B, "Syslog Message Format," for more information about the syslog format
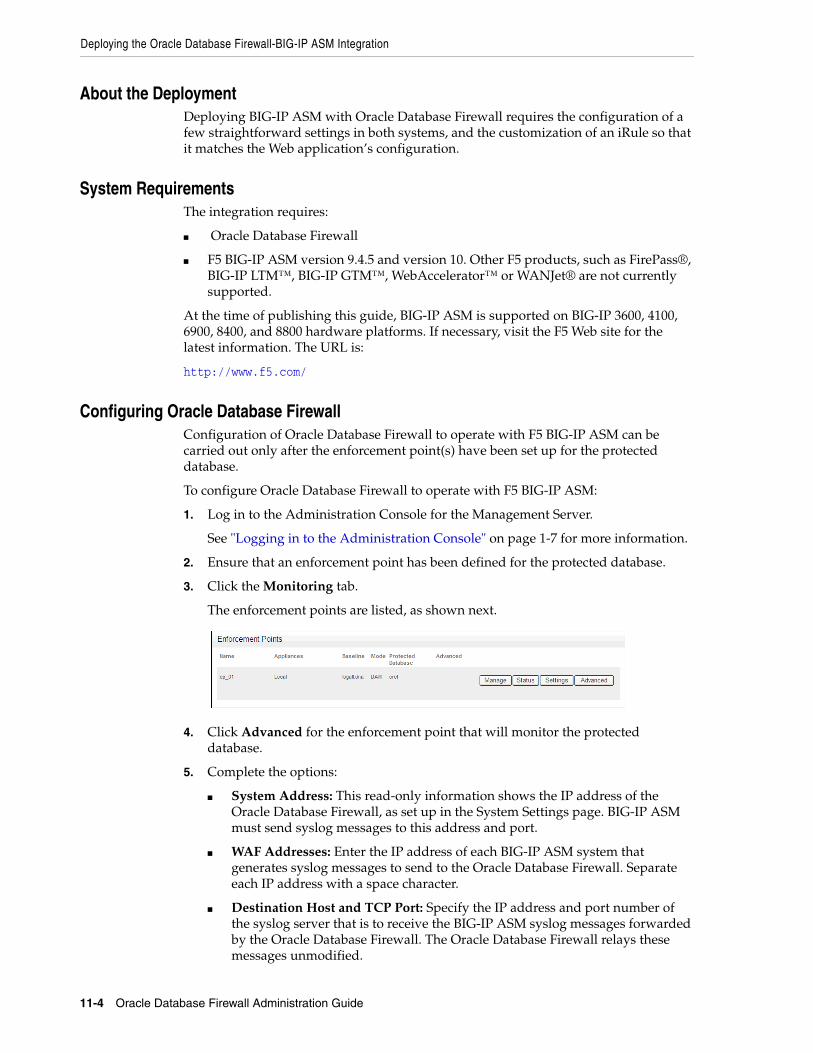
Deploying the Oracle Database Firewall-BIG-IP ASM Integration
11-4 Oracle Database Firewall Administration Guide
About the DeploymentDeploying BIG-IP ASM with Oracle Database Firewall requires the configuration of a few straightforward settings in both systems, and the customization of an iRule so that it matches the Web application’s configuration.
System RequirementsThe integration requires:
■ Oracle Database Firewall
■ F5 BIG-IP ASM version 9.4.5 and version 10. Other F5 products, such as FirePass®, BIG-IP LTM™, BIG-IP GTM™, WebAccelerator™ or WANJet® are not currently supported.
At the time of publishing this guide, BIG-IP ASM is supported on BIG-IP 3600, 4100, 6900, 8400, and 8800 hardware platforms. If necessary, visit the F5 Web site for the latest information. The URL is:
http://www.f5.com/
Configuring Oracle Database FirewallConfiguration of Oracle Database Firewall to operate with F5 BIG-IP ASM can be carried out only after the enforcement point(s) have been set up for the protected database.
To configure Oracle Database Firewall to operate with F5 BIG-IP ASM:
1. Log in to the Administration Console for the Management Server.
See "Logging in to the Administration Console" on page 1-7 for more information.
2. Ensure that an enforcement point has been defined for the protected database.
3. Click the Monitoring tab.
The enforcement points are listed, as shown next.
4. Click Advanced for the enforcement point that will monitor the protected database.
5. Complete the options:
■ System Address: This read-only information shows the IP address of the Oracle Database Firewall, as set up in the System Settings page. BIG-IP ASM must send syslog messages to this address and port.
■ WAF Addresses: Enter the IP address of each BIG-IP ASM system that generates syslog messages to send to the Oracle Database Firewall. Separate each IP address with a space character.
■ Destination Host and TCP Port: Specify the IP address and port number of the syslog server that is to receive the BIG-IP ASM syslog messages forwarded by the Oracle Database Firewall. The Oracle Database Firewall relays these messages unmodified.
Deploying the Oracle Database Firewall-BIG-IP ASM Integration
Using Oracle Database Firewall with BIG-IP ASM 11-5
The IP address does not need to be the same as the syslog destination used for syslog messages generated by the Oracle Database Firewall itself.
■ Disable WAF Alert Forwarding: Select this check box to stop the Oracle Database Firewall from forwarding syslog messages. The current status of alert forwarding is displayed below this option.
■ Enhance reports with WAF logging data: Select this check box to enable the Oracle Database Firewall traffic log to record BIG-IP ASM attributes obtained from the syslog messages, such as the IP address and name of the Web application user. If this box is not checked, Database Firewall will not attempt to match F5 and Database Firewall SQL messages.
■ Session Idle Timeout: The user's cookie is stored only for the length of time specified in this field. This enables the same cookie to be used by different users, providing the time period specified here has elapsed.
■ Exclude Addresses: You can specify a list of IP addresses of Web application servers or other SQL-generating sources to ignore for reporting purposes. For example, you may want to add the IP address of an internal Web application server.
Configuring BIG-IP ASMThis section describes how to create the logging profile and write policy settings.
Logging ProfileConfigure the Web application's logging profile to send BIG-IP ASM syslog messages to the Oracle Database Firewall. Use Server IP and Server Port, for example 5514, to specify the IP address of the Oracle Database Firewall (this is the same IP address used to connect to the Administration Console). Select TCP for the Protocol.
The Selected Items box must include the following attributes:
■ violations
■ unit_hostname
■ management_ip_address
■ policy_name
■ policy_apply_date
■ x_forwarded_for_header_value
■ support_id
■ request_blocked for F5 v9, or request_status for F5 v10 and v11
■ response_code
■ method
■ protocol
■ uri
■ query_string
■ ip for F5 v9, or ip_client for F5 v10 and v11
■ web_application_name
■ request
Deploying the Oracle Database Firewall-BIG-IP ASM Integration
11-6 Oracle Database Firewall Administration Guide
Policy SettingsIn the policy settings, enable the required events to send through the syslog (refer to the ASM help if you are not sure how to do this).
Oracle Database Firewall recognizes the following events:
■ Evasion technique detected
■ Request length exceeds defined buffer size
■ Illegal dynamic parameter value
■ Illegal meta character in header
■ Illegal meta character in parameter value
■ Illegal parameter data type
■ Illegal parameter numeric value
■ Illegal parameter value length
■ Illegal query string or POST data
■ Illegal static parameter value
■ Parameter value does not comply with regular expression
■ Attack signature detected
■ Illegal HTTP status in response
Developing a BIG-IP ASM iRuleOptionally, an iRule can be used to monitor the login page and generate a syslog message each time a user logs into the Web application. The syslog message contains the username of the Web application user, and the cookies associated with that user. The message is routed to the Oracle Database Firewall, which logs the username against SQL statements generated by the Web application server.
The sample iRule provided by Oracle Database Firewall contains the required format of the syslog message, but must be customized to handle the specific login requirements of your Web application.
# F5 BIG-IP example iRule# Description: Capture username and cookies from user login to web application## Global variable definitions and other initialisation logic goes herewhen RULE_INIT { ### Customise this to suit your application # The page that user logins from set ::login_page "/login.asp" # The name of the field holding the user name set ::login_parameter_name "Uname" # The method of authentiaction which will be sent to Oracle Database Firewall set ::auth_method "webforms" # HTTP protocol methods that is used by the login form set ::login_method "POST" ### Don't change these
Note: The attributes must appear in the Selected Items box in the order shown here.
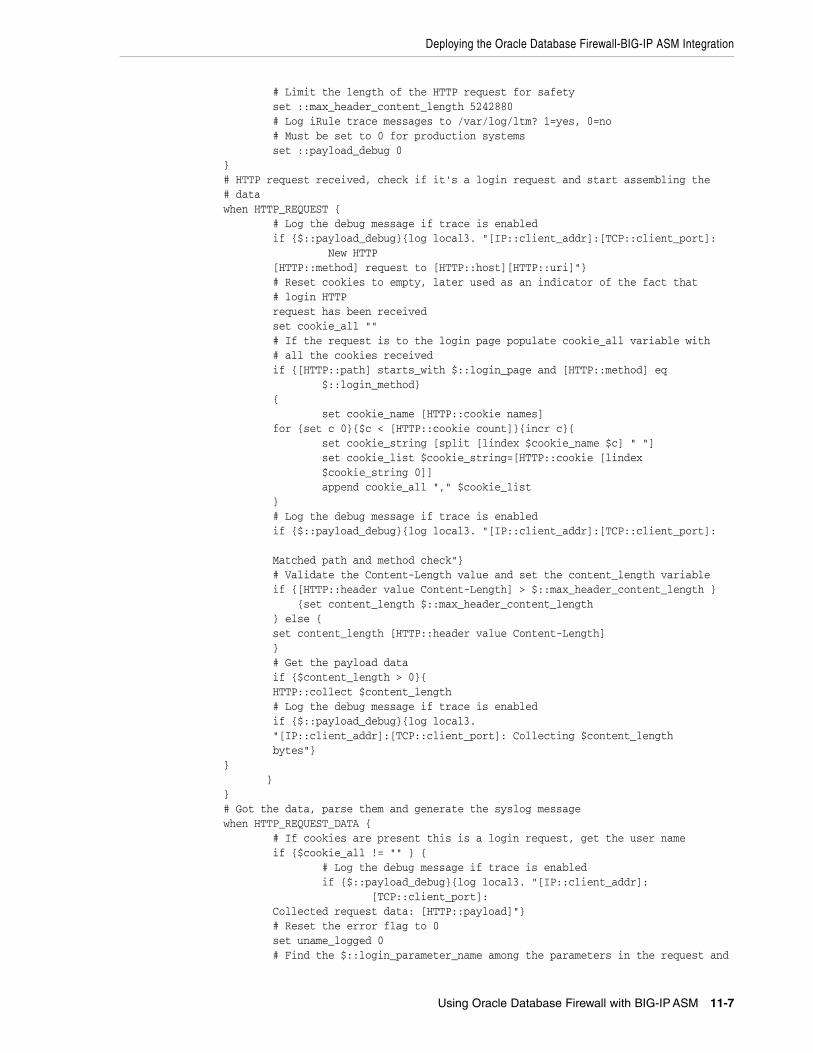
Deploying the Oracle Database Firewall-BIG-IP ASM Integration
Using Oracle Database Firewall with BIG-IP ASM 11-7
# Limit the length of the HTTP request for safety set ::max_header_content_length 5242880 # Log iRule trace messages to /var/log/ltm? 1=yes, 0=no # Must be set to 0 for production systems set ::payload_debug 0}# HTTP request received, check if it's a login request and start assembling the# datawhen HTTP_REQUEST { # Log the debug message if trace is enabled if {$::payload_debug}{log local3. "[IP::client_addr]:[TCP::client_port]: New HTTP [HTTP::method] request to [HTTP::host][HTTP::uri]"} # Reset cookies to empty, later used as an indicator of the fact that # login HTTP request has been received set cookie_all "" # If the request is to the login page populate cookie_all variable with # all the cookies received if {[HTTP::path] starts_with $::login_page and [HTTP::method] eq $::login_method} { set cookie_name [HTTP::cookie names] for {set c 0}{$c < [HTTP::cookie count]}{incr c}{ set cookie_string [split [lindex $cookie_name $c] " "] set cookie_list $cookie_string=[HTTP::cookie [lindex $cookie_string 0]] append cookie_all "," $cookie_list } # Log the debug message if trace is enabled if {$::payload_debug}{log local3. "[IP::client_addr]:[TCP::client_port]:
Matched path and method check"} # Validate the Content-Length value and set the content_length variable if {[HTTP::header value Content-Length] > $::max_header_content_length } {set content_length $::max_header_content_length } else { set content_length [HTTP::header value Content-Length] } # Get the payload data if {$content_length > 0}{ HTTP::collect $content_length # Log the debug message if trace is enabled if {$::payload_debug}{log local3. "[IP::client_addr]:[TCP::client_port]: Collecting $content_length bytes"}} }}# Got the data, parse them and generate the syslog messagewhen HTTP_REQUEST_DATA { # If cookies are present this is a login request, get the user name if {$cookie_all != "" } { # Log the debug message if trace is enabled if {$::payload_debug}{log local3. "[IP::client_addr]: [TCP::client_port]: Collected request data: [HTTP::payload]"} # Reset the error flag to 0 set uname_logged 0 # Find the $::login_parameter_name among the parameters in the request and

Deploying the Oracle Database Firewall-BIG-IP ASM Integration
11-8 Oracle Database Firewall Administration Guide
extrat its value set param_value_pairs [split [HTTP::payload] "&"] for {set i 0} {$i < [llength $param_value_pairs]} {incr i} { set params [split [lindex $param_value_pairs $i] "="] if { [lindex $params 0] equals $::login_parameter_name } { # User name was found, generate the syslog message # which includes IP, port, all the cookies, user name and # the auth_method string set username [lindex $params 1] log local3. "DBFIREWALL:CLIENT=[IP::client_ addr]:[TCP::client_port]$cookie_all, USERNAME=$username,AUTHMETHOD=$::auth_method" # Set the flag so not to trigger the error reporting log message below set uname_logged 1 break } } # If user name has not been found in parameters log an error if {$uname_logged == 0 } { log local0. "ERROR: iRule failed to extract user name from page $login_page with parameter $login_parameter_name" }}}
Required Syslog Message FormatThe required format of the syslog message to be generated by the custom iRule is as follows:
Rule [iRuleName] HTTP_REQUEST_DATA: DBFIREWALL:CLIENT=[ClientIPAddress]:[ClientPort],[Cookies],USERNAME=[Name],AUTHMETHOD=[AuthMethod]
In this specification:
■ [iRuleName] is the name of the iRule.
■ [ClientIPAddress] is the source IP address of the Web client.
■ [ClientPort] is the source port number of the Web client.
■ [Cookies] is a list of cookies available from the BIG-IP ASM HTTP object.
■ [Name] is the user name.
■ [AuthMethod] is the method of authentication used between the F5 Web server and its Web clients, as set up in BIG-IP ASM. Oracle Database Firewall does not use this information, other than to report the authentication method used.
For example:
Rule capture_login_rule HTTP_REQUEST_DATA:DBFIREWALL:CLIENT=10.190.0.1:443,ASPSESSIONIDSASSBSCD=1234,TS10da7b=23545, USERNAME=FredBloggs,AUTHMETHOD=webforms
Configuring syslog-ng.confTo enable the iRule syslog messages to be transmitted to the Oracle Database Firewall, it is necessary to log in to the BIG-IP hardware platform and execute the following BIG-IP ASM command, which modifies /etc/syslog-ng /syslog-ng.conf (do not modify the file directly, because changes will not persist after you restart the system):

Presentation of Data in Oracle Database Firewall
Using Oracle Database Firewall with BIG-IP ASM 11-9
bigpipe syslog include "destination d_dbfw { tcp(\"dbfw_ip_address\" port(dbfw_port));};log { source(local); filter(f_local3); destination(d_dbfw);};"
Where dbfw_ip_address and dbfw_port are the IP address and port number of the Oracle Database Firewall (as in Step 5 on page 11-4). For example:
bigpipe syslog include "destination d_dbfw { tcp(\"192.168.0.181\" port(5514));};log { source(local); filter(f_local3); destination(d_dbfw);};"
The two instances of the syslog destination name (d_dbfw) need to be changed only in the unlikely event that the destination name is already in use.
Presentation of Data in Oracle Database FirewallThis section contains the following topics:
■ Administration Console Dashboard
■ Viewing the Traffic Log Generated by BIG-IP ASM
■ Web Application Firewall (WAF) Reports
Administration Console DashboardThe Dashboard page of the Oracle Database Firewall Administration Console provides an overview of the top-ten threats by Web user, statistics about any blocked statements, and the current status of the link to BIG-IP ASM. You may want to display this information to obtain an overview of the threats and to confirm that the system is operational.
To display the information, log in to the Oracle Database Firewall Administration Console, and display the Dashboard page.
Two areas are provided on the Dashboard page for WAF information:
■ WAF Status: This provides the current status of the link to BIG-IP ASM (on the top line), and the following statistics:
– Policy Confirmed: The number of BIG-IP ASM syslog messages over the last hour that have been matched with SQL statements and generated an Oracle Database Firewall "block" or "warn".
– Policy Conflict: The number of BIG-IP ASM syslog messages over the last hour that have been matched with SQL statements, but did not generate an Oracle Database Firewall "block" or "warn".
– Matched: The number of BIG-IP ASM syslog messages that have been successfully matched with SQL statements over the last hour.
– Unmatched: The number of BIG-IP ASM syslog messages that have not been successfully matched with SQL statements over the last hour.
– Events in Last Hour: The total number of syslog messages from BIG-IP ASM over the last hour.
■ Top Ten Threats by Web User: This lists the most significant threats over the indicated period of time. The threats are listed by Web username. Each row is for a separate user.
Clicking a user lists all attacks made by the user.
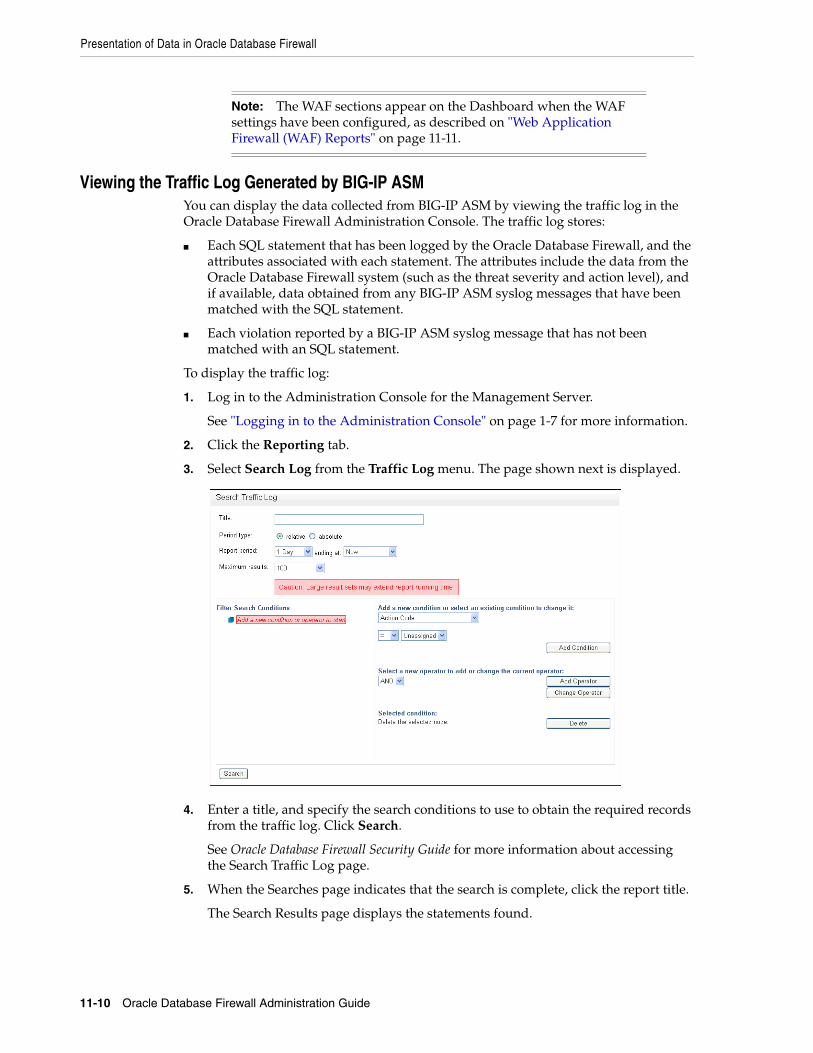
Presentation of Data in Oracle Database Firewall
11-10 Oracle Database Firewall Administration Guide
Viewing the Traffic Log Generated by BIG-IP ASMYou can display the data collected from BIG-IP ASM by viewing the traffic log in the Oracle Database Firewall Administration Console. The traffic log stores:
■ Each SQL statement that has been logged by the Oracle Database Firewall, and the attributes associated with each statement. The attributes include the data from the Oracle Database Firewall system (such as the threat severity and action level), and if available, data obtained from any BIG-IP ASM syslog messages that have been matched with the SQL statement.
■ Each violation reported by a BIG-IP ASM syslog message that has not been matched with an SQL statement.
To display the traffic log:
1. Log in to the Administration Console for the Management Server.
See "Logging in to the Administration Console" on page 1-7 for more information.
2. Click the Reporting tab.
3. Select Search Log from the Traffic Log menu. The page shown next is displayed.
4. Enter a title, and specify the search conditions to use to obtain the required records from the traffic log. Click Search.
See Oracle Database Firewall Security Guide for more information about accessing the Search Traffic Log page.
5. When the Searches page indicates that the search is complete, click the report title.
The Search Results page displays the statements found.
Note: The WAF sections appear on the Dashboard when the WAF settings have been configured, as described on "Web Application Firewall (WAF) Reports" on page 11-11.
Presentation of Data in Oracle Database Firewall
Using Oracle Database Firewall with BIG-IP ASM 11-11
Understanding the AttributesThe attributes shown with the Oracle Database Firewall logo are obtained from the Oracle Database Firewall system. Those with an F5 logo are obtained or derived from BIG-IP ASM. See Appendix C, "Traffic Log Attributes" for details of the attributes.
Web Application Firewall (WAF) ReportsYou can generate several reports from the Oracle Database Firewall Administration Console, including the following:
■ F5 Alerts Blocked by F5: All alerts blocked by BIG-IP ASM.
■ F5 Confirmed Alert: Alerts detected by BIG-IP ASM that generate a "block" or "warn" in Oracle Database Firewall.
■ F5 Incident Report: List of all incidents by time.
■ F5 Incident Summary by User: List of incidents grouped by user.
■ F5 Incident Summary by Cluster: List of incidents grouped by cluster of SQL statements.
■ F5 No WAF Match: Alerts detected by BIG-IP ASM that Oracle Database Firewall has not matched with SQL statements.
■ F5 Policy Conflict: Alerts detected by BIG-IP ASM that do not cause a "block" or "warn" in Oracle Database Firewall.
■ F5 Policy Conflict by User: Policy Conflict report grouped by user.

Presentation of Data in Oracle Database Firewall
11-12 Oracle Database Firewall Administration Guide
12
Using Oracle Database Firewall with ArcSight SIEM 12-1
12Using Oracle Database Firewall with ArcSight SIEM
This appendix contains:
■ About the Integration of Oracle Database Firewall with ArcSight SIEM
■ Enabling the Oracle Database Firewall-ArcSight SIEM Integration
■ Oracle Database Firewall-ArcSight SIEM Syslog Mapping Tables
About the Integration of Oracle Database Firewall with ArcSight SIEMThe ArcSight Security Information Event Management (SIEM) system is a centralized system for logging, analyzing, and managing syslog messages from different sources. ArcSight SIEM enables Oracle Database Firewall to provide full details of any security alerts or other selected event types, including the message text, priority and IP address of any attacker. If you are using a Management Server, then it sends the ArcSight SIEM messages, otherwise the events are sent from the standalone Database Firewall.
If you are also using the BIG-IP ASM interface, and an attack originates from the internet, Database Firewall provides the actual IP address of the attacking Web client. This feature enables you to pinpoint the source of the internet-based attack.
You do not need to install additional software if you want to integrate ArcSight SIEM with Database Firewall. You can configure the integration by using the Database Firewall Administration Console, which is described in the next section.
The syslog messages sent to the ArcSight SIEM Server are independent of any other syslog messages that may sent from Database Firewall. This means you can send standard syslog messages to a different destination.
Enabling the Oracle Database Firewall-ArcSight SIEM IntegrationWhen you enable the Oracle Database Firewall and ArcSight SIEM integration, the settings take effect immediately. You do not need to restart Database Firewall.
To enable ArcSight SIEM for Oracle Database Firewall:
1. Log in to the Administration Console for the standalone Database Firewall or the Management Server.
See "Logging in to the Administration Console" on page 1-7 for more information.
2. Select the System tab.
3. In the Connectors menu, select ArcSight SIEM.

Oracle Database Firewall-ArcSight SIEM Syslog Mapping Tables
12-2 Oracle Database Firewall Administration Guide
The ArcSight SIEM page appears.
4. Specify the following options:
■ Enable ArcSight event forwarding: Select this check box to enable the ArcSight interface.
■ ArcSight destinations: Depending on the communications protocol you are using, enter the IP address or host name of the ArcSight server in the UDP or TCP field. This setting enables the syslog log output to be sent to this ArcSight server in Common Event Format (CEF).
■ Event categories: Select any combination of syslog categories depending on which type of messages that are needed in the ArcSight server. For detailed information about the message types, see "Oracle Database Firewall-ArcSight SIEM Syslog Mapping Tables" on page 12-2.
■ Limit message length: To avoid sending large amounts of SQL text across the network, you can choose to limit the message to a specified number of bytes.
■ Maximum message length (bytes): Enter the maximum length that you want. The range allowed is 1024 to 1048576 characters. The default is 256 bytes.
5. Click the Apply button.
Oracle Database Firewall-ArcSight SIEM Syslog Mapping TablesThis section contains:
■ About the ArcSight SIEM Integration
■ DBFW:3 (Heartbeat)
■ DBFW:4 (Property Change)
■ DBFW:8 (Database Audit)
■ DBFW:9 (Statement Alert)
■ DBFW:10 (Statement Alert (WAF))

Oracle Database Firewall-ArcSight SIEM Syslog Mapping Tables
Using Oracle Database Firewall with ArcSight SIEM 12-3
■ DBFW:11 (Login Alert)
■ DBFW:12 (Logout Alert)
■ DBFW:system (System Message (Operating System Alerts))
About the ArcSight SIEM IntegrationYou can send the ArcSight SEIM syslog output, as described in Oracle Database Firewall Security Guide. The following tables describe which messages are passed to ArcSight SIEM and the fields of the Oracle Database Firewall messages map to the relevant ArcSight keys.
Table 12–1 describes the message types that Oracle Database Firewall sends to ArcSight SIEM.
DBFW:3 (Heartbeat)DBFW:3 heartbeat messages are generated every second while Database Firewall is running. The heartbeat message contains statement counts.
Table 12–2 describes the DBFW:3 CEF header fields.
Table 12–1 Message Types Sent to ArcSight SIEM
Message Type Event Name Description
DBFW:3 Heartbeat Heartbeat messages. One message is generated every second while Database Firewall is running.
DBFW:4 Property change Property change message. Describes configuration changes that are made by users.
DBFW:8 Database audit Database Object Auditing messages. These are generated by the Stored Procedure Auditing or User Role Auditing functionality of the Database Firewall.
DBFW:9 Statement alert Statement alerts. An alert of this type is given to display a full SQL statement and associated details. If database response monitoring is enabled, the response information is included in the alert.
DBFW:10 Statement alert (WAF)
Statement Web Application Firewall (WAF) alerts. An alert of this type is given when the Database Firewall appliance is working together with a Web Application Firewall. If database response monitoring is enabled, the response information is included in the alert.
DBFW:11 Login alert A user has attempted to log in to the database. If database response monitoring is enabled, the result of the login attempt (success or failure) is included in the alert.
DBFW:12 Logout alert A user has explicitly logged out from the database, or their TCP session has been closed.
DBFW:system System messages System messages in operating system format. These are alerts generated by the underlying operating system on which Database Firewall is installed.
Table 12–2 DBFW:3 (Heartbeat) CEF Header Fields
Header Name Content Example
Version Fixed integer: 0 Not applicable
Device Vendor Fixed string: Oracle Not applicable

Oracle Database Firewall-ArcSight SIEM Syslog Mapping Tables
12-4 Oracle Database Firewall Administration Guide
Table 12–3 describes the DBFW:3 extension fields.
DBFW:4 (Property Change)DBFW:4 property change messages describe configuration changes made by users to the Database Firewall or Management Server.
Table 12–4 describes the DBFW:4 CEF header fields.
Table 12–5 describes the DBFW:4 extension fields.
Device Product Fixed string: Database Firewall Not applicable
Device Version Database Firewall version 5.1
SignatureID Fixed string: DBFW:3 Not applicable
Name Fixed string: Heartbeat Not applicable
Severity Fixed integer: 0 Not applicable
Table 12–3 DBFW:3 (Heartbeat) Extension Fields
Database Firewall Field Description ArcSight Key Name Example
Monitoring point IP IP address of originating monitoring point
dvc 192.0.2.1
timestamp Time stamp of event. Must be converted to milliseconds.
rt 1147344001516
Rest of message All fields of a DBFW:3 heartbeat message
msg 0 0 0 6067 0 0
1147367001.097 0
Table 12–4 DBFW:4 (Property Change) CEF Header Fields
Header Name Content Example
Version Fixed integer: 0 Not applicable
Device Vendor Fixed string: Oracle Not applicable
Device Product Fixed string: Database Firewall Not applicable
Device Version Database Firewall version 5.1
SignatureID Fixed string: DBFW:4 Not applicable
Name Fixed string: Property change Not applicable
Severity Fixed integer: 0 Not applicable
Table 12–5 DBFW:4 (Property Change) Extension Fields
Database Firewall Field Description ArcSight Key Name Example
Monitoring point IP IP address of originating monitoring point
dvc 192.0.2.2
Table 12–2 (Cont.) DBFW:3 (Heartbeat) CEF Header Fields
Header Name Content Example

Oracle Database Firewall-ArcSight SIEM Syslog Mapping Tables
Using Oracle Database Firewall with ArcSight SIEM 12-5
DBFW:8 (Database Audit)DBFW:8 database audit messages capture audits from stored procedure auditing and user role auditing, after each run is completed. (See Chapter 5, "Configuring Stored Procedure Auditing," and Chapter 6, "Configuring and Using Role Auditing," for more information about this type of auditing.)
Table 12–6 describes the DBFW:8 CEF header fields.
Table 12–7 describes the DBFW:8 extension fields.
timestamp Time stamp of event. Must be converted to milliseconds.
rt 1231924678000
category Category of event cat appliance
name Name of system property changed
cs4 heartbeat_interval
Not applicable Fixed string: Property name
cs4Label Not applicable
value Value property is assigned
cs2 1
Not applicable Fixed string: Property value
cs2Label Not applicable
Table 12–6 DBFW:8 (Database Audit) CEF Header Fields
Header Name Content Example
Version Fixed integer: 0 Not applicable
Device Vendor Fixed string: Oracle Not applicable
Device Product Fixed string: Database Firewall Not applicable
Device Version Database Firewall version 5.1
SignatureID Fixed string: DBFW:8 Not applicable
Name Fixed string: Database audit Not applicable
Severity Fixed integer: 0. Not applicable
Table 12–7 DBFW:8 (Database Audit) Extension Fields
Database Firewall Field Description ArcSight Key Name Example
Monitoring point IP IP address of originating monitoring point
dvc 192.0.2.42
Target Database Connection string for audit database
request 192.0.2.43:5000/
Protected Database Name of database cs3 sales_db
Not applicable Fixed string: Protected database
cs3Label Not applicable
Table 12–5 (Cont.) DBFW:4 (Property Change) Extension Fields
Database Firewall Field Description ArcSight Key Name Example
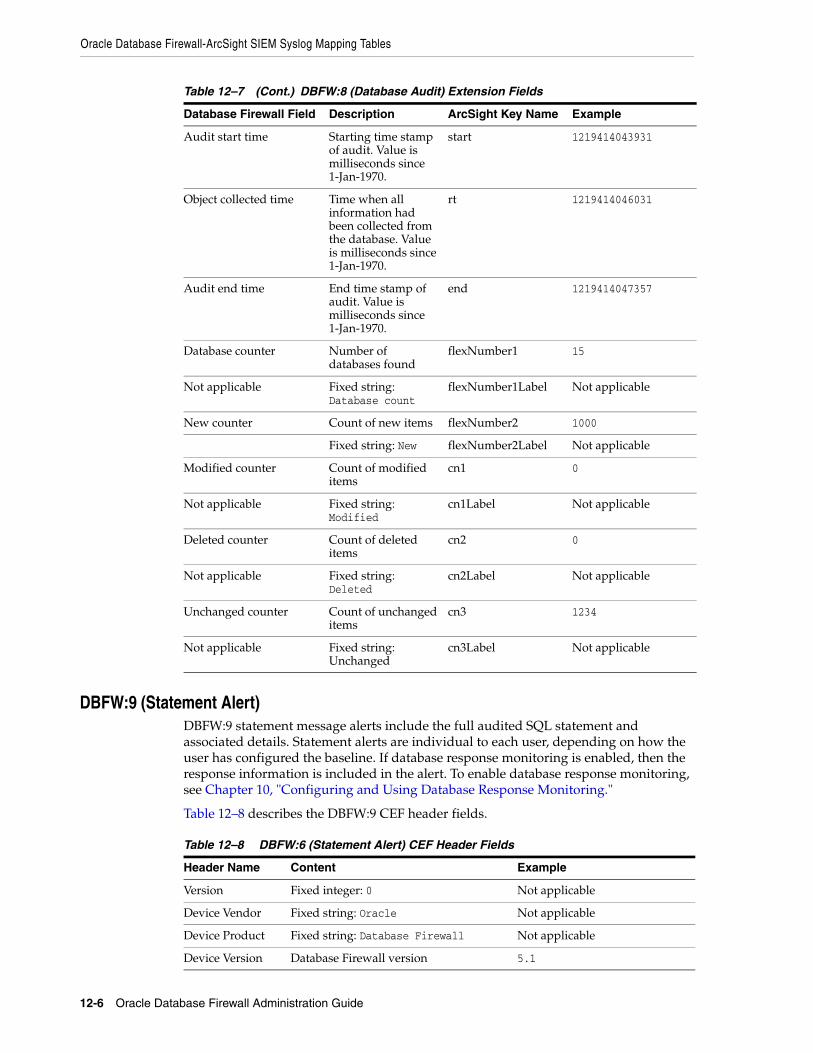
Oracle Database Firewall-ArcSight SIEM Syslog Mapping Tables
12-6 Oracle Database Firewall Administration Guide
DBFW:9 (Statement Alert)DBFW:9 statement message alerts include the full audited SQL statement and associated details. Statement alerts are individual to each user, depending on how the user has configured the baseline. If database response monitoring is enabled, then the response information is included in the alert. To enable database response monitoring, see Chapter 10, "Configuring and Using Database Response Monitoring."
Table 12–8 describes the DBFW:9 CEF header fields.
Audit start time Starting time stamp of audit. Value is milliseconds since 1-Jan-1970.
start 1219414043931
Object collected time Time when all information had been collected from the database. Value is milliseconds since 1-Jan-1970.
rt 1219414046031
Audit end time End time stamp of audit. Value is milliseconds since 1-Jan-1970.
end 1219414047357
Database counter Number of databases found
flexNumber1 15
Not applicable Fixed string: Database count
flexNumber1Label Not applicable
New counter Count of new items flexNumber2 1000
Fixed string: New flexNumber2Label Not applicable
Modified counter Count of modified items
cn1 0
Not applicable Fixed string: Modified
cn1Label Not applicable
Deleted counter Count of deleted items
cn2 0
Not applicable Fixed string: Deleted
cn2Label Not applicable
Unchanged counter Count of unchanged items
cn3 1234
Not applicable Fixed string: Unchanged
cn3Label Not applicable
Table 12–8 DBFW:6 (Statement Alert) CEF Header Fields
Header Name Content Example
Version Fixed integer: 0 Not applicable
Device Vendor Fixed string: Oracle Not applicable
Device Product Fixed string: Database Firewall Not applicable
Device Version Database Firewall version 5.1
Table 12–7 (Cont.) DBFW:8 (Database Audit) Extension Fields
Database Firewall Field Description ArcSight Key Name Example
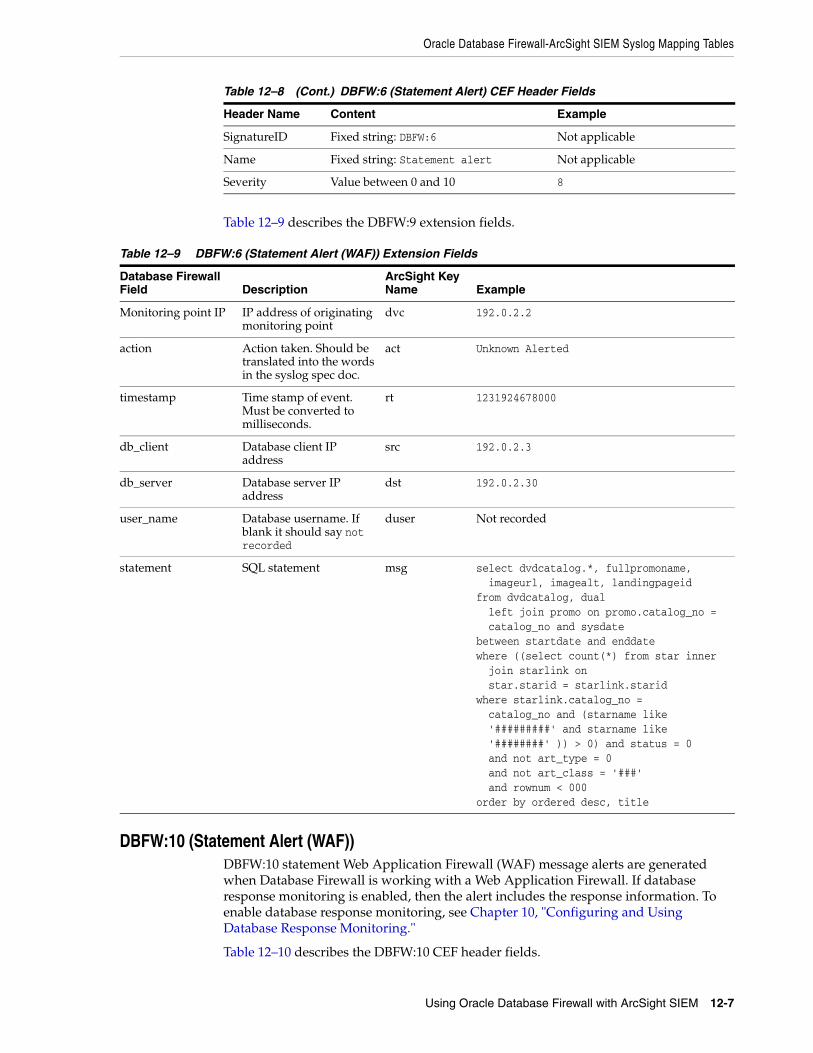
Oracle Database Firewall-ArcSight SIEM Syslog Mapping Tables
Using Oracle Database Firewall with ArcSight SIEM 12-7
Table 12–9 describes the DBFW:9 extension fields.
DBFW:10 (Statement Alert (WAF))DBFW:10 statement Web Application Firewall (WAF) message alerts are generated when Database Firewall is working with a Web Application Firewall. If database response monitoring is enabled, then the alert includes the response information. To enable database response monitoring, see Chapter 10, "Configuring and Using Database Response Monitoring."
Table 12–10 describes the DBFW:10 CEF header fields.
SignatureID Fixed string: DBFW:6 Not applicable
Name Fixed string: Statement alert Not applicable
Severity Value between 0 and 10 8
Table 12–9 DBFW:6 (Statement Alert (WAF)) Extension Fields
Database Firewall Field Description
ArcSight Key Name Example
Monitoring point IP IP address of originating monitoring point
dvc 192.0.2.2
action Action taken. Should be translated into the words in the syslog spec doc.
act Unknown Alerted
timestamp Time stamp of event. Must be converted to milliseconds.
rt 1231924678000
db_client Database client IP address
src 192.0.2.3
db_server Database server IP address
dst 192.0.2.30
user_name Database username. If blank it should say not recorded
duser Not recorded
statement SQL statement msg select dvdcatalog.*, fullpromoname, imageurl, imagealt, landingpageid from dvdcatalog, dual left join promo on promo.catalog_no = catalog_no and sysdate between startdate and enddate where ((select count(*) from star inner join starlink on star.starid = starlink.starid where starlink.catalog_no = catalog_no and (starname like '#########' and starname like '########' )) > 0) and status = 0 and not art_type = 0 and not art_class = '###' and rownum < 000 order by ordered desc, title
Table 12–8 (Cont.) DBFW:6 (Statement Alert) CEF Header Fields
Header Name Content Example

Oracle Database Firewall-ArcSight SIEM Syslog Mapping Tables
12-8 Oracle Database Firewall Administration Guide
Table 12–11 describes the DBFW:10 extension fields.
Table 12–10 DBFW:7 (Statement Alert (WAF)) CEF Header Fields
Header Name Content Example
Version Fixed integer: 0 Not applicable
Device Vendor Fixed string: Oracle Not applicable
Device Product Fixed string: Database Firewall Not applicable
Device Version Database Firewall version 5.1
SignatureID Fixed string: DBFW:10 Not applicable
Name Fixed string: Statement alert (WAF) Not applicable
Severity Value between 0 and 10 4
Table 12–11 DBFW:7 (Statement Alert (WAF)) Extension Fields
Database Firewall Field Description ArcSight Key Name Example
Monitoring point IP IP address of originating monitoring point
dvc 192.0.2.2
action Action taken. Should be translated into the words in the syslog spec doc.
act Known Alerted
db_client Database client IP address
src 192.0.2.31
db_server Database server IP address
dst 192.0.2.40
user_name Database username. If blank it should say not recorded
duser sa
web user name Username used by Web application
suser purchase@amazon
HTTP request Full HTTP request request POST /faq.asp?dummy=yes HTTP/1.1\x0d\x0aReferer: http://10.190.0.203/faq.asp\x0d\x0aContent-Type: application/x-www-formurlencoded\x0d\x0aUA-CPU:x86\x0d\x0a
Http Method HTTP method requestMethod POST
Http Protocol Protocol app http
Policy Name Policy Name cs1 toolshed_policy
Not applicable Fixed string: Policy Name
cs1Label Not applicable
Session Cookies Session cookies requestCookies ASPSESSIONIDQASTDTDC=OCOPOPDAOLMPKMOGNDDLHFJN;TS10da7b=868388b6d3c881a3342f0f7d2d2a3be38453eb9d2627f7b048edb424f5ff84534d7fb9f2
Http Referer Referring URL requestContext http://10.190.0.203/faq.asp

Oracle Database Firewall-ArcSight SIEM Syslog Mapping Tables
Using Oracle Database Firewall with ArcSight SIEM 12-9
DBFW:11 (Login Alert)DBFW:11 login message alerts reveal when a user has attempted to log in to the database. If database response monitoring is enabled, then the result of the login attempt (success or failure) is included in the event. To enable database response monitoring, see Chapter 10, "Configuring and Using Database Response Monitoring."
Table 12–12 describes the DBFW:11 CEF header fields.
Table 12–13 describes the DBFW:11 extension fields.
Http User Agent Browser type requestClientApplication
Mozilla/4.0 (compatible; MSIE 7.0; Windows NT 5.1)
Cardinal IP Address IP address of originating Web client
sourceTranslatedAddress
192.0.2.41
statement SQL statement msg SELECT * FROM \"A_updates\"WHERE id = '10'
Table 12–12 DBFW:11 (Login Alert) CEF Header Fields
Header Name Content Example
Version Fixed integer: 0 Not applicable
Device Vendor Fixed string: Oracle Not applicable
Device Product Fixed string: Database Firewall Not applicable
Device Version Database Firewall version 5.1
SignatureID Fixed string: DBFW:11 Not applicable
Name Fixed string: Login Alert Not applicable
Severity Value between 0 and 10 8
Table 12–13 DBFW:11 (Login Alert) Extension Fields
Database Firewall Field Description ArcSight Key Name Example
Enforcement point IP IP address of originating enforcement point
dvc 192.0.2.44
action Action act AlwaysAlert
timestamp Time stamp of event. Must be converted to millisecs.
rt 1231924678000
db_client Database client IP src 192.0.2.22
db_server Database server IP dst 192.0.2.123
user_name Database username. If blank it should say not recorded
duser not recorded
db_resp String representing Database Firewall’s interpretation of the database response
cs2 DB Success
Table 12–11 (Cont.) DBFW:7 (Statement Alert (WAF)) Extension Fields
Database Firewall Field Description ArcSight Key Name Example

Oracle Database Firewall-ArcSight SIEM Syslog Mapping Tables
12-10 Oracle Database Firewall Administration Guide
DBFW:12 (Logout Alert)DBFW:12 logout message alerts reveal when a user has explicitly logged out of the database, or if the user’s TCP session has closed.
Table 12–14 shows the DBFW:12 CEF header fields.
Table 12–15 shows the DBFW:12 extension fields.
Not applicable Fixed string: Execution result
cs2Label Not applicable
db_resp_code Signed Integer code returned from the database
cn1 4002
Not applicable Fixed string: Database response code
cn1Label Not applicable
db_resp_text Response text returned from the database
cs5 Login failed.
Not applicable Fixed string: Database response text
cs5Label Not applicable
db_resp_detail Detailed response text returned from the database
cs6 Severity: 14
Not applicable Fixed string: Database response detail text
cs6Label Not applicable
Table 12–14 DBFW:12 (Logout Alert) CEF Header Fields
Header Name Content Example
Version Fixed integer: 0 Not applicable
Device Vendor Fixed string: Oracle Not applicable
Device Product Fixed string: Database Firewall Not applicable
Device Version Database Firewall version 5.1
SignatureID Fixed string: DBFW:12 Not applicable
Name Fixed string: Logout Alert Not applicable
Severity Fixed integer: 0 Not applicable
Table 12–15 DBFW:12 (Logout Alert) Extension Fields
Database Firewall Field Description ArcSight Key Name Example
Enforcement point IP IP address of originating enforcement point
dvc 192.0.2.55
timestamp Time stamp of event. Must be converted to millisecs.
rt 1231924678000
Table 12–13 (Cont.) DBFW:11 (Login Alert) Extension Fields
Database Firewall Field Description ArcSight Key Name Example

Oracle Database Firewall-ArcSight SIEM Syslog Mapping Tables
Using Oracle Database Firewall with ArcSight SIEM 12-11
DBFW:system (System Message (Operating System Alerts))DBFW:system message alerts, which are in operating system file format, are generated by the underlying operating system on which Database Firewall is installed. An example of this type of alert is a hardware failure notification.
Table 12–16 describes the DBFW:system CEF header fields.
Table 12–17 describes the DBFW:system extension fields.
db_client Database client IP src 192.0.2.32
db_server Database server IP dst 192.0.2.56
user_name Database username. If username is not determined, then the string will be not recorded
duser not recorded
Table 12–16 DBFW:system (System Message) CEF Header Fields
Header Name Content Example
Version Fixed integer: 0 Not applicable
Device Vendor Fixed string: Oracle Not applicable
Device Product Fixed string: Database Firewall Not applicable
Device Version Database Firewall version 5.1
SignatureID Fixed string: DBFW:system Not applicable
Name Fixed string: System message Not applicable
Severity Fixed integer: 0 Not applicable
Table 12–17 DBFW:system (System Message) Extension Fields
Database Firewall Field Description ArcSight Key Name Example
Monitoring point IP IP address of originating monitoring point
dvc 192.0.2.44
timestamp Time stamp of event. Must be converted to milliseconds.
rt 1231924678000
Whole syslog message The entire syslog message
msg Mar 23 12:06:39 multi-1u kernel: br0: port 1(eth0) entering forwarding state
Table 12–15 (Cont.) DBFW:12 (Logout Alert) Extension Fields
Database Firewall Field Description ArcSight Key Name Example

Oracle Database Firewall-ArcSight SIEM Syslog Mapping Tables
12-12 Oracle Database Firewall Administration Guide

1 3
System Administration 13-1
13System Administration
This chapter describes routine tasks that may need to be carried out from time to time. It does not attempt to explain all options available from the Administration Console.
This chapter contains:
■ Security Guidelines
■ Using the Dashboard
■ Configuring Oracle Database Firewalls
■ Configuring Protected Databases
■ Listing, Creating, and Configuring Enforcement Points
■ Configuring a Resilient Pair of Enforcement Points
■ Configuring Traffic Sources
■ Configuring Database Firewall as a Traffic Proxy
■ Changing the Network Configuration
■ Configuring the System
■ Archiving Data
■ Viewing the Logs
■ Configuring Connectors to Third-Party Systems
■ Configuring E-Mail Alerts
■ Configuring Users
■ Viewing and Capturing Network Traffic in an Individual Database Firewall
■ Monitoring the Database Firewall’s Embedded Oracle Database
Security GuidelinesSystem administration tasks should take into account Oracle’s security recommendations. Consult the Oracle Database Firewall Security Guide for information on protecting your data and general recommendations about deploying Database Firewall in a network and in special configurations.
Using the DashboardThe Dashboard page of the Administration Console provides a high-level view of important information about the databases being protected, such as the threat status,

Configuring Oracle Database Firewalls
13-2 Oracle Database Firewall Administration Guide
throughput and top ten threats. Key indicators are shown in charts, which are intended to be used by IT and security managers who are responsible for the day-to-day monitoring of the system.
See the Oracle Database Firewall Security Guide for more information on using the Dashboard.
Figure 13–1 shows an example of the Dashboard page of the Administration Console for a Management Server.
Figure 13–1 Dashboard Page of the Management Server Administration Console
Configuring Oracle Database FirewallsYou can configure the Oracle Database Firewalls managed by a Database Firewall Management Server by using the Appliances tab. The Appliances tab is available only in the Oracle Database Firewall Management Server Administration Console.
Figure 13–2 shows the Appliances tab of the Management Server Administration Console.
Note 1: The Dashboard can include statistics from BIG-IP Application Security Manager, a Web application firewall product from F5 Networks, Inc. See Chapter 11 for more information.
Note 2: Certain long running operations, such as deleting large amounts of traffic log data, may interfere with the Management Server Administration Console. Wait until these operations are complete before performing administration tasks.

Configuring Protected Databases
System Administration 13-3
Figure 13–2 Appliances Tab for Configuring Oracle Database Firewalls
Use the Add button to add an Oracle Database Firewall. See "Step 3B: Add Each Oracle Database Firewall to the Management Server" on page 3-9.
Use the Create Resilient Pair button to create a resilient pair of Oracle Database Firewalls. See "Step 3C: Define Resilient Pairs of Oracle Database Firewalls" on page 3-11. After creating a resilient pair, Unpair and Swap buttons are displayed. You can use Swap to force the primary to become the secondary, and vice versa.
The following buttons are provided for each Oracle Database Firewall:
■ Manage: Allows you to perform operations such as to reboot or power off the Oracle Database Firewall, install software updates, remove the Database Firewall device from the appliances list, backup/restore configuration data to or from the Oracle Database Firewall Management Server, and perform file system checks. See Chapter 4, "Configuring Oracle Database Firewall for High Availability," if you must update a resilient pair of Oracle Database Firewalls.
■ Status: To view detailed status information for the standalone or managed Oracle Database Firewall.
■ Edit: To edit the name or IP address you have entered for the Oracle Database Firewall at the Oracle Database Firewall Management Server. This edits your entry for the appliance on this page, but does not change the actual IP address of the Oracle Database Firewall, which can only be set from the Database Firewall’s Administration Console.
Configuring Protected DatabasesThis section contains:
■ About Configuring Protected Databases
■ Configuring User Settings for Protected Databases
About Configuring Protected DatabasesYou can set up the details of the protected databases using the options in the Protected Databases menu of the Monitoring tab.
Figure 13–3 shows the Protected Databases page in the Administration Console.
Note: If you have a high availability environment and you have disabled JavaScript, you must manually refresh the appliances list to obtain their status.

Configuring Protected Databases
13-4 Oracle Database Firewall Administration Guide
Figure 13–3 Configuring a Protected Database
Clicking List in the Protected Databases menu lists all the protected databases that have already been configured. The picture shown above shows an example.
Clicking Create in the Protected Databases menu lets you create a new protected database.
Clicking a database name enables you to change the protected database settings. Figure 13–4 shows the settings that are available.
Figure 13–4 Protected Database Settings

Configuring Protected Databases
System Administration 13-5
Checkboxes let you select the types of compliance reports that can be produced. (Oracle Database Firewall Security Guide provides more information about these report types.) If you need to produce Sarbanes-Oxley (SOX), Payment Card Industry (PCI), Data Protection Act (DPA), Gramm-Leach-Bliley Act (GLBA) or Health Insurance Portability and Accountability Act (HIPAA) reports for the database, then select the appropriate checkboxes. The compliance reports will contain data relevant to the standard you select here.
The Maximum SQL Processors field lets you define the number of Database Firewall processes that may be used for an Enforcement Point associated with this protected database. This setting is used for load balancing purposes for high throughput protected databases. Each process uses an associated amount of available RAM on the Database Firewall, therefore, when defining this setting you must take into account the total number of processes allocated across all protected databases currently being monitored, as well as the total amount of available memory.
At the bottom of the page, enter the address and port number of the protected database and click Add.
Click Save when finished.
Configuring User Settings for Protected DatabasesTo configure user settings for a protected database:
1. Select the Monitoring tab.
2. Under Protected Databases, select List.
3. In the Protected Databases page, select the users link.
Clicking users in the protected database list allows you to view the names of the users who have accessed the database (this is determined from database traffic). You can click the name of a user to configure the user's "profile", such as the IP addresses that the user is expected to connect from; and whether the user should no longer be accessing the database (Access terminated since).
4. In the Users for protected database page, select the user name that you want to configure.
5. In the Edit Database User page, enter the appropriate user settings.
Note: Do not create two or more protected databases containing the same database details (IP address and port number). This can cause problems with report generation.

Listing, Creating, and Configuring Enforcement Points
13-6 Oracle Database Firewall Administration Guide
6. Click the Save Settings button.
These settings are used in reports to show deviations from expected database usage.
Listing, Creating, and Configuring Enforcement PointsThis section contains:
■ About Working with Enforcement Points
■ Managing Enforcement Points
■ Finding the Status of an Enforcement Point
■ Changing the Settings of an Enforcement Point
■ Configuring BIG-IP Application Security Manager Settings
About Working with Enforcement PointsAn Enforcement Point is lets you associate a policy with a specific protected database and network traffic sources.
The Enforcement Points menu in the Monitoring page enables you to list existing enforcement points, create new enforcement points (using the Enforcement Point Wizard), and view outstanding tasks for enforcement points. You can configure settings that are not available in the Enforcement Point Wizard. See "Step 5: Configure the Standalone Database Firewall Enforcement Points" on page 2-6 for more information.
Figure 13–5 shows the Enforcement Points page of the Administration Console.

Listing, Creating, and Configuring Enforcement Points
System Administration 13-7
Figure 13–5 Finding Existing Enforcement Points
Clicking List displays all existing enforcement points, as shown in the picture above. Four buttons are provided for each enforcement point listed: Manage, Status, Settings and Advanced, as described in the following sections.
Managing Enforcement PointsThe Manage button enables you to:
■ Suspend, resume, or delete the enforcement point.
■ Run, suspend, or resume a stored procedure audit or user role audit for the selected enforcement point.
Finding the Status of an Enforcement PointClick the Monitoring tab, then select List from the Enforcement Points menu. The Status button displays the details for an enforcement point, its status and the database it protects. If the enforcement point is in a managed Database Firewall, the Appliances tab in the Management Server shows the Oracle Database Firewall device that contains the enforcement point.
Changing the Settings of an Enforcement PointThe Settings button enables you to change the settings of the enforcement point, such as the database it protects, the policy that is used, and the protection mode.
Figure 13–6 shows an example of changing the settings of an enforcement point.

Listing, Creating, and Configuring Enforcement Points
13-8 Oracle Database Firewall Administration Guide
Figure 13–6 Changing Settings of an Enforcement Point
The following options are available:
■ Protected Database: This can be used to change the database that is protected.
■ Traffic Sources: Enables you to specify the network port(s) being used for the enforcement point.
■ Database Response: Select the check box to enable database response monitoring (see Chapter 10, "Configuring and Using Database Response Monitoring").
■ Database Interrogation: Select this option to give Oracle Database Firewall the ability to interrogate the monitored database to obtain the name of the database user, operating system, and client program that originated an SQL statement, if this information is not available from the statement itself. See "Enabling DDI" on page 9-6.
■ Remote Monitor: Selecting Activate Remote Monitor enables the enforcement point to accept and process SQL traffic detected by the remote monitoring software. See "Installing and Enabling Remote Monitoring" on page 8-1.
■ Local Monitor: Selecting Activate Local Monitor enables the enforcement point to monitor SQL traffic detected by the local monitoring software. See "Enabling Local Monitoring" on page 7-5.
■ SPA: Select this option to enable stored procedure auditing. See Appendix 5, "Configuring Stored Procedure Auditing".
■ URA: Select this option to enable user role auditing. See Appendix 6, "Configuring and Using Role Auditing".
■ Appliance Mode: Select one of these modes:

Configuring Database Firewall as a Traffic Proxy
System Administration 13-9
Select Database Policy Enforcement (DPE) if the enforcement point is required to block potential attacks. You must also use DPE mode, even if you are not currently blocking statements, if you have selected a proxy as the network interface in the Traffic Sources section of this page.
Select Database Activity Monitoring (DAM) if the enforcement point is to be used only to log statements and provide warnings of potential attacks. DPE is not available if the Oracle Database Firewall is in a resilient pair.
■ Policy: You can choose the baseline that the enforcement point uses.
Configuring BIG-IP Application Security Manager SettingsClick the Advanced button to configure settings for BIG-IP Application Security Manager. See Chapter 11 for more information.
Configuring a Resilient Pair of Enforcement PointsThe Resilience menu is available when you are using the Oracle Database Firewall Management Server Administration Console. You can use the Create Pair option to set up a pair of enforcement points. See "Pairing Enforcement Points" on page 4-5 for more information.
Configuring Traffic SourcesYou can set up Traffic Sources using the Administration Console for an Oracle Database Firewall. See the following two sections for more information:
■ "Configuring Database Firewall as a Traffic Proxy" on page 13-9
■ "Changing the Network Configuration" on page 13-11
Configuring Database Firewall as a Traffic ProxyDepending on your network configuration, when using Oracle Database Firewall in DPE mode, you may prefer to configure a traffic proxy in Oracle Database Firewall instead of a bridge inline with network traffic. You can then associate the proxy with an Enforcement Point. You can also specify multiple ports for a proxy in order to use them for different Enforcement Points.
The following procedure must be done directly on the Database Firewall that is acting as a proxy.
To configure a traffic proxy:
Note 1: When you use a Database Firewall in DPE mode, you must configure any IP or MAC address spoofing detection rules so that they ignore database IP or MAC address changes made by that Database Firewall.
Note 2: When you set a Database Firewall to DPE mode (through Enforcement Point Settings or by restarting a Database Firewall with network passthrough), ensure that all connections to the database are forced to reconnect. In addition, in DPE mode, if you change Enforcement Point Settings, you must also force all database connections to reconnect.
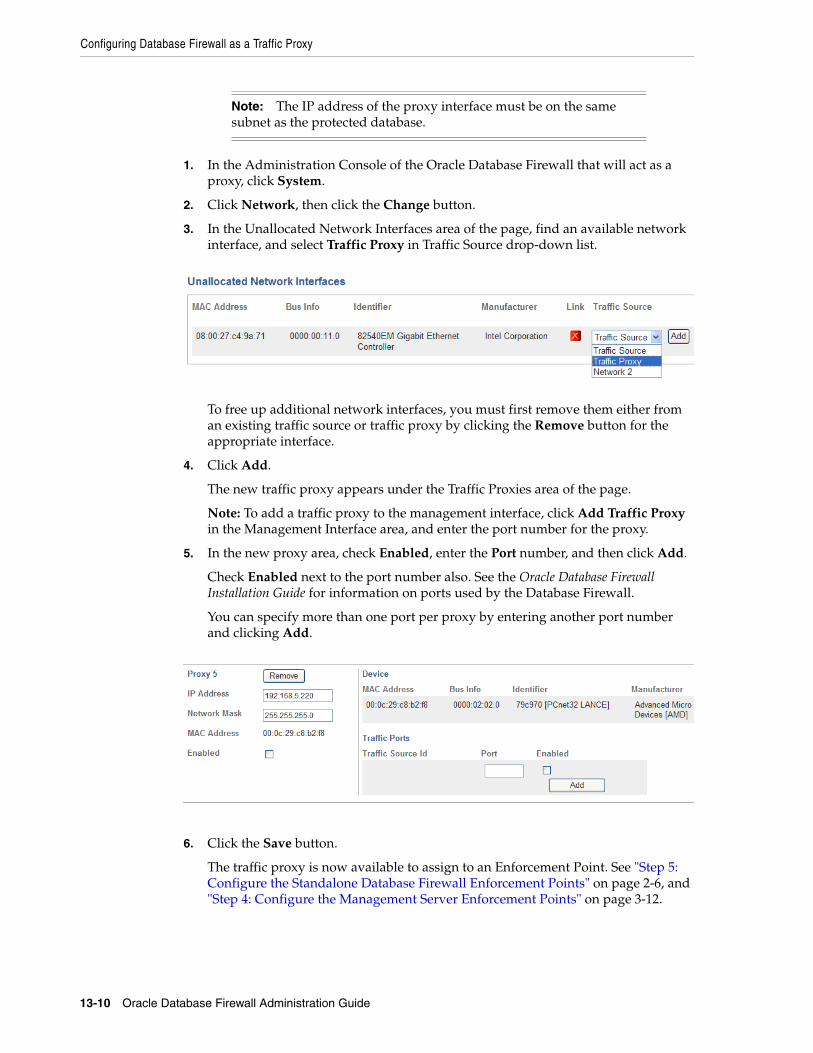
Configuring Database Firewall as a Traffic Proxy
13-10 Oracle Database Firewall Administration Guide
1. In the Administration Console of the Oracle Database Firewall that will act as a proxy, click System.
2. Click Network, then click the Change button.
3. In the Unallocated Network Interfaces area of the page, find an available network interface, and select Traffic Proxy in Traffic Source drop-down list.
To free up additional network interfaces, you must first remove them either from an existing traffic source or traffic proxy by clicking the Remove button for the appropriate interface.
4. Click Add.
The new traffic proxy appears under the Traffic Proxies area of the page.
Note: To add a traffic proxy to the management interface, click Add Traffic Proxy in the Management Interface area, and enter the port number for the proxy.
5. In the new proxy area, check Enabled, enter the Port number, and then click Add.
Check Enabled next to the port number also. See the Oracle Database Firewall Installation Guide for information on ports used by the Database Firewall.
You can specify more than one port per proxy by entering another port number and clicking Add.
6. Click the Save button.
The traffic proxy is now available to assign to an Enforcement Point. See "Step 5: Configure the Standalone Database Firewall Enforcement Points" on page 2-6, and "Step 4: Configure the Management Server Enforcement Points" on page 3-12.
Note: The IP address of the proxy interface must be on the same subnet as the protected database.

Changing the Network Configuration
System Administration 13-11
Changing the Network ConfigurationYou can change network settings from the Network page in the System menu. You must make these changes on each individual server, whether it is a Management Server, Standalone Database Firewall, or Managed Database Firewall.
To change network settings:
1. In the Administration Console of the Oracle Database Firewall or Management Server, click System, then click Network under the System menu on the left.
2. Click the Change button.
3. Edit the settings in the following sections of the page as needed:
■ Management Interface:
– To change the IP address, network mask, gateway, name, or add or change a proxy port for the Management Interface, edit the appropriate field(s).
■ Traffic Sources:
– To change the IP address or network mask of the traffic source, edit the appropriate field.
– To enable or disable a bridge in a traffic source, check or uncheck the Bridge Enabled box (this is possible only if the traffic source has two network interfaces associated with it).
– To remove the traffic source, click the Remove button on the left.
– To remove a network interface (i.e., network card) from the traffic source, click the Remove button on the right next to the specific device.
■ Traffic Proxies:
– To change the IP address, port, or network mask of the traffic proxy, edit the appropriate field.
– To add and enable a port, enter the port number in the field provided, click Enabled, and then click Add. Repeat for additional ports.
– To enable or disable the traffic proxy, check or uncheck the Enabled box on the left.
– To remove the traffic proxy, click the Remove button for that proxy.
See also "Configuring Database Firewall as a Traffic Proxy" on page 13-9.
■ Unallocated Network Interfaces:
This section appears only if you have unallocated network cards. A green icon appears in the Link column if the card is currently physically connected to a network (this indicator appears if the network card supports this feature).
– To assign a network interface to a traffic source or proxy, select the traffic source or proxy from the drop-down menu, then click Add.
– To assign a network interface to a new traffic source, select New in the dropdown menu and click Add. The network interface is assigned to the new traffic source, and the new traffic source is shown in the Traffic Sources section.
■ Link Properties:

Configuring the System
13-12 Oracle Database Firewall Administration Guide
– If for some reason your network is not using auto-negotiation, to set link properties for your network, choose one of the available radio buttons.
4. Click the Save button.
Configuring the SystemYou can configure the Oracle Database Firewall system settings using the options in the System menu of the System page. These options are used during initial deployment of Oracle Database Firewall.
Except where noted, the following options are available from the System menu of a Management Server or Standalone Database Firewall. The options Manage and Email Configuration are not available on a managed Database Firewall.
■ Manage: Provides options to:
– Suspend and resume system operation.
– Change the system to operate in test mode (not recommended in production systems).
– Perform a diagnostic file system check.
– Delete logged traffic.
– Reboot or power off the system.
■ Network: Allows you to change network settings such as IP address, network mask, and default gateway, configure traffic sources, and allocate network interfaces (network cards), and link properties.
■ Services: Allows you to optionally set DNS server addresses, and control web, terminal, SNMP, secure log and traffic log access.
■ High Availability: (Management Server only) Lets you specify a partner Management Server to use in a high availability pair, and to select the primary server in the pair. (See "Step 3A: Specify Management Server Partner Settings (Resilient Pair Only)" on page 3-8).
■ Status: Displays detailed status information, software license details, attribution notices and disclaimers.
■ Email Configuration: Used to configure the SMTP e-mail settings for scheduled reports (see Oracle Database Firewall Security Guide) and e-mail alerts (see "Configuring E-Mail Alerts" on page 13-21).
■ Date and Time: Use to configure date, time, time offset, and time synchronization with an NTP server. See "Step 1: Set the Database Firewall Date and Time" on page 2-1 for details.
■ Keyboard: This is used to specify the language to use for a keyboard connected to the Oracle Database Firewall Management Server or Oracle Database Firewall. The selection determines which characters appear on the screen when keys are pressed on the keyboard.
■ Public Key: Displays the public key, which may be necessary for archiving. for further information, see the notes on the page displayed.
■ Management Server: This is displayed only for an Oracle Database Firewall. The option allows you to make this a managed Database Firewall by entering the Management Server's IP address and certificate (see "Step 2B: Enter the Database Firewall Management Server Certificate and IP Address" on page 3-8). An Add

Archiving Data
System Administration 13-13
Second Management Server option is available if a resilient pair of Oracle Database Firewall Management Servers is used.
■ Certificate: This is displayed only for a Management Server. The option allows you to display the Management Server certificate, which can be copied to Oracle Database Firewalls to make them managed Database Firewalls (see "Step 2: Perform Tasks for Each Oracle Database Firewall" on page 3-7).
Archiving DataThis section contains:
■ About Archiving Data
■ Defining Archiving Destinations
■ Creating an Archive Schedule
■ Starting an Archive Job Manually
■ Starting a Configuration Archive Job
■ Restoring an Archive
About Archiving DataThe Archiving page of the Administration Console provides options that enable important data to be archived to prevent loss of data in the unlikely event of a disk or other system error. It is recommended that archiving is carried out regularly in accordance with your corporate policy. If required, you can create different archives for each protected database.
Figure 13–7 shows the Archiving Jobs page of the Administration Console.
Figure 13–7 Archiving Data
image_139.gif shows part of the Archiving Jobs page. The archiving jobs are categorized under the following sections:
■ Logfile Archive Jobs
■ Logfile Restore Jobs
***********************************************************************************************
Archive Data and Backup (accessed in the Appliances tab by clicking the Manage button for an appliance) archive the traffic logs or audit history for stored procedure

Archiving Data
13-14 Oracle Database Firewall Administration Guide
auditing and user role auditing. Archive Configuration archives system configuration data, including the baseline policies.
Defining Archiving DestinationsBefore an archive can be started, you must define one or more archive destinations as follows. An archiving destination specifies the archive storage locations and other configuration settings.
1. Log in to the standalone Database Firewall or Management Server Administration Console.
See "Logging in to the Administration Console" on page 1-7 for more information.
2. Click the Archiving tab.
3. Click Create in the Destinations menu. The following is displayed:
Notes:
■ The amount of data in the traffic log depends on the logging settings specified in the policy in the Analyzer. Excessive logging leads to rapid use of large amounts of disk space.
To prevent problems that might occur by the accumulation of processed traffic log files on the Oracle Database Firewall or Oracle Database Firewall Management Server, the system ensures that a target of 25% of the disk space remains free. You must take this into account when calculating the amount of disk space required for storage of traffic log files.
Once the free disk space target is exceeded, logfiles may be deleted by the system and will no longer be available for archiving and ad-hoc searching. When logfiles are deleted, you will see this indicated in the /var/www/log/backgroundrb.log file.
■ All files used by the Analyzer must be archived separately by your company's normal backup/archive systems. It is recommended that the following Analyzer files are archived:
Policy Files: File extension .dna
Model Files: File extensions .smdl and .smdl_data
Training Files: File extension .train

Archiving Data
System Administration 13-15
The figure shows the Create Archiving Destination page. The various fields are described in text.
***********************************************************************************************
4. Complete the following fields:
■ Transfer Method: The method used to transfer data from the Oracle Database Firewall Management Server to the machine that archives the data. Normally, you should select Secure Copy (scp) if the data is archived by a Linux machine, and Windows File Sharing (smb) if the data is archived by a Windows machine.
■ Name: The name of the archiving destination. This name is used to select the archiving destination when starting an archive.
■ Username: The account name on the machine to which the archive data will be transferred.
■ Address: The name or IP address of the machine that archives the data. If Windows File Sharing is selected, specify an IP address.
■ Port: This is the port number used by the secure copy or Windows fileshare service on the machine that archives the data. You can normally use the default port number.
If you selected Windows File Sharing as the Transfer Method, it is recommended you use port 445.
■ Path: The path to the archive storage location. If Secure Copy (scp) is used to archive the data and there is no leading slash character; the path is relative to the user's home directory. If there is a leading slash, the path is relative to the root directory. For a Windows machine, enter the sharename, followed by a forward slash and the name of the folder (for example, /sharename/myfolder).
■ Authentication Method: If Window File Sharing (smb) is used to archive the data, select Password and enter the login password. If a Linux machine is used, you can select Key Authentication. Follow the instructions that appear after selecting Key Authentication.

Archiving Data
13-16 Oracle Database Firewall Administration Guide
■ Password and Confirm Password: The password to log into the machine that archives the data.
5. Click Save.
Creating an Archive ScheduleYou can create a schedule to archive the traffic logs or audit files automatically at midnight on specified days. To do, this:
1. Log in to the standalone Database Firewall or Management Server Administration Console.
See "Logging in to the Administration Console" on page 1-7 for more information.
2. Click the Archiving tab.
3. Under Jobs, select Schedule.
4. In the Archiving page, click the Add button.
5. Select Log Files to create a schedule to archive traffic logs, or Db Audit to create a schedule to archive the history for stored procedure auditing and user role auditing.
6. Select Recurring if you want the archive to occur automatically at a specified interval.
If the check box is not selected, the archive will occur only once.
7. Use Date, Month and Weekday to specify the interval.
For example, if you select only Mon, the archive will take place at midnight on every Monday. If you select 1 and Jan, the archive will take place only on the 1st January every year (not recommended; the archive should occur more frequently).
8. Use Host to select the archive destination.
9. Select the protected database, or All.
10. Click Save.
Starting an Archive Job ManuallyIf you do not want to set up an archive schedule, use the following procedure to archive the traffic logs or audit files manually:
1. Log in to the standalone Database Firewall or Management Server Administration Console.
See "Logging in to the Administration Console" on page 1-7 for more information.
2. Click the Archiving tab.
Any existing archive or restore jobs are listed on the Archiving Jobs page.
3. Ensure that you have created an archiving destination first.
In the Destinations menu, select Create to create the archiving destination.
4. In the Jobs menu, select Archive Data.
The following screen is displayed:

Archiving Data
System Administration 13-17
The figure shows the Create Archive Job page. The various fields are described in text.
***********************************************************************************************
5. Complete the following fields:
■ Job Name: Give each archive a name.
■ Archive Destination: Choose the archive destination.
■ Archive class: Choose whether to archive the Log Files (traffic logs), or the Audit Files (the archive history for stored procedure auditing and user role auditing. If you choose Log Files, the following options are also displayed:
■ Include files that have already been archived: Select this check box to re-archive files that have already been archived.
■ Protected Database: Choose All, or a specified database.
■ Log Files: Choose the period to archive.
6. Click Archive.
You can view the progress of an archive job from the Archiving Jobs page (click the Archiving tab).
Clicking the job number in the Archiving Jobs page displays a page in which you can choose to pause or delete the job.
Starting a Configuration Archive JobBefore archiving configuration data from the Oracle Database Firewall Management Server, backup the configuration on each managed Database Firewall:
1. In the Management Server console, click the Appliances tab.
2. For each listed Database Firewall, click the Manage button.
3. Click the Backup button.
4. (Optional) You can check the Backup with pass phrase checkbox. For security reasons, this is not recommended. See "Restoring a Configuration in which the Pass Phrase was not Archived" on page 18.
Archiving Data
13-18 Oracle Database Firewall Administration Guide
Use the following procedure to archive configuration data, including Analyzer policies:
1. In the standalone Database Firewall or Management Server Administration Console.
See "Logging in to the Administration Console" on page 1-7 for more information.
2. Click the Archiving tab.
3. In the Jobs menu, select Archive Configuration.
4. In the Create Archive Job page, under the Settings section, complete the Job Name and Archive Destination fields.
5. (Optional) Under the Security section, you can check the Archive With Pass Phrase checkbox. For security reasons, you should not archive the pass phrase. See "Restoring a Configuration in which the Pass Phrase was not Archived" on page 18.
6. Click the Archive button.
After you click Archive, the archive job appears in the Configuration Archive Jobs list in the Archiving Jobs page.
Restoring an ArchiveIf you want to restore data from an archive, click Restore Data or Restore Configuration in the Jobs menu. The page that is displayed enables you to choose the archive destination to restore. All data stored at the archive destination will be restored.
The system overwrites the existing configuration when you restore a configuration. This can lead to traffic logs being removed. If you merge an old configuration with current traffic logs, first archive the data, then restore the configuration, and then restore the data.
When you restore previously archived traffic log data to a system using the Restore functionality, determine whether or not these log files must be associated with a monitoring point. You can do this from the Repair menu option in the System menu.
After restoring configuration data at an Oracle Database Firewall Management Server, display the Appliances page, click Manage for each Oracle Database Firewall device being controlled and select the Restore option.
Restoring a Configuration in which the Pass Phrase was not ArchivedA pass phrase is used to decrypt obfuscated passwords used in a Database Firewall system. The pass phrase is randomly generated at installation time, and is unique to each Database Firewall installation. For security reasons, we recommend that you do not archive the pass phrase when you archive a configuration.
There are three possible scenarios if you are restoring a configuration with no pass phrase archived:
■ Restoring a configuration archive to the same Database Firewall installation:
Note: Performing a Configuration Restore job will delete any Archive Jobs that have been made previously.
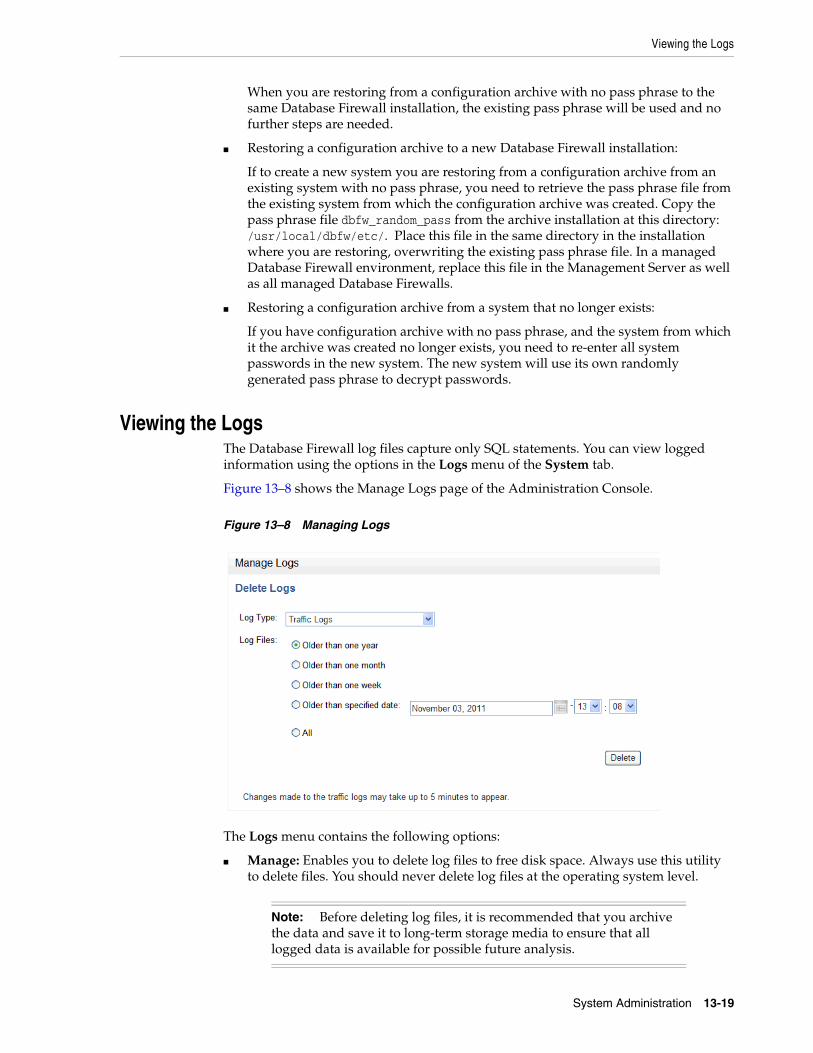
Viewing the Logs
System Administration 13-19
When you are restoring from a configuration archive with no pass phrase to the same Database Firewall installation, the existing pass phrase will be used and no further steps are needed.
■ Restoring a configuration archive to a new Database Firewall installation:
If to create a new system you are restoring from a configuration archive from an existing system with no pass phrase, you need to retrieve the pass phrase file from the existing system from which the configuration archive was created. Copy the pass phrase file dbfw_random_pass from the archive installation at this directory: /usr/local/dbfw/etc/. Place this file in the same directory in the installation where you are restoring, overwriting the existing pass phrase file. In a managed Database Firewall environment, replace this file in the Management Server as well as all managed Database Firewalls.
■ Restoring a configuration archive from a system that no longer exists:
If you have configuration archive with no pass phrase, and the system from which it the archive was created no longer exists, you need to re-enter all system passwords in the new system. The new system will use its own randomly generated pass phrase to decrypt passwords.
Viewing the LogsThe Database Firewall log files capture only SQL statements. You can view logged information using the options in the Logs menu of the System tab.
Figure 13–8 shows the Manage Logs page of the Administration Console.
Figure 13–8 Managing Logs
The Logs menu contains the following options:
■ Manage: Enables you to delete log files to free disk space. Always use this utility to delete files. You should never delete log files at the operating system level.
Note: Before deleting log files, it is recommended that you archive the data and save it to long-term storage media to ensure that all logged data is available for possible future analysis.

Configuring Connectors to Third-Party Systems
13-20 Oracle Database Firewall Administration Guide
■ System Events: Displays the contents of the event log, which stores system events that are not directly related to the Oracle Database Firewall software, such as operating system warnings.
■ Traffic Log Files: Displays the traffic log files and enables you to download them.
■ Administration Changes: Displays the contents of the administration log, which stores system actions such as logins, shutdowns, restarts, and baseline policy uploads.
■ Repair: Allows you to attach log files to a log source, such as an enforcement point. This may be necessary if log files have been restored from an archive and the original log source has been removed.
Configuring Connectors to Third-Party SystemsYou can configure connections to third-party systems by selecting Syslog from the Connectors menu in the System tab.
Figure 13–9 shows the Syslog Settings page of the Administration Console.
Figure 13–9 Syslog Settings
Note: If you want the most recent data to be made available for reporting purposes, click Summarize Now in Traffic Log Files page. Summarizing makes the data in the traffic log files available for reporting. Automatic summarizing takes place every hour.
Note: A more user friendly method of viewing the data in the traffic log is to use the Traffic Log options in the Reporting page (see Oracle Database Firewall Security Guide for more information about accessing the traffic log).

Configuring E-Mail Alerts
System Administration 13-21
The Connectors menu contains the following options:
■ Syslog: Allows you to configure the types of syslog messages to send and to specify the syslog destinations. See "Step 1D: Configure the Management Server Syslog Destinations" on page 3-6 (Oracle Database Firewall Management Server-based systems) or "Step 4: Configure the Standalone Database Firewall Syslog Destinations" on page 2-5 (standalone systems).
■ ArcSight SIEM: Enables you to configure communications to the ArcSight Security Information Event Management (SIEM) system. For more information about ArcSight SIEM, including details of the syslog message mapping between Oracle Database Firewall and ArcSight SIEM, see Chapter 12, "Using Oracle Database Firewall with ArcSight SIEM."
■ Email alerts: Enables you to send e-mail alerts to one or more users, including e-mail aliases. Allows you to send alerts to specified e-mail addresses. Enabling email alerts forwards all syslog alert message types (DBFW:9, DBFW:10, DBFW:11 and DBFW:12) to the specified email addresses. See "Configuring E-Mail Alerts" on page 13-21. See Appendix B, "Syslog Message Format," for the meanings of the syslog message types.
Configuring E-Mail AlertsYou can configure e-mail alert notification for users. This section contains:
■ Configuring the SMTP Server
■ Configuring E-Mail Recipients
■ Example E-Mail Alert Notification
Configuring the SMTP ServerThe SMTP protocol is widely used and recognized by internet mail servers.
To configure the SMTP server:
1. From the System tab, in the System menu, select Email Configuration.
2. Enter the following settings:
■ SMTP Server Address: Enter the SMTP server address, using either an IP address or the host name. Examples are as follows:
auth.smtp.example.commail.example.com192.0.2.20
■ Port: Enter the port number, which is typically 25.
■ Username: (Optional) Enter the user name.
■ Password and Password Confirmation: (Optional) Enter the password.
■ From Address: Enter the appropriate e-mail address, which will be displayed as the sender in e-mails.
■ Reply-to Address: Enter the appropriate e-mail address, which will be used as the reply address.
3. Click the Save button.

Configuring E-Mail Alerts
13-22 Oracle Database Firewall Administration Guide
4. To test the email configuration, enter a valid e-mail address in the Email Address field and then click Test. In a moment, an e-mail should appear in the e-mail tool used by the e-mail address.
Configuring E-Mail RecipientsAfter you have configured an SMTP server, you can configure one or more e-mail addresses of users who want to receive e-mail alerts.
To configure e-mail alert forwarding:
1. From the System tab, in the Connectors menu, select Email Alerts.
The Email Alerts page appears.
2. Select the Enable email alert forwarding check box.
3. Enter one or more e-mail recipient addresses, separated by a space, or new line.
4. Click the Apply button.
Example E-Mail Alert NotificationExample 13–1 shows an example of a an e-mail notification. The subject header is Oracle Database Firewall: Alert from device 192.0.2.82 for database 192.0.2.81 - Statement Alert.
Example 13–1 Contents of an E-Mail Alert Notification
Details of the alert: Alert name: Statement Alert Device: 192.0.2.82 Alert severity: Undefined Action: Warn Action Type: Unknown Alerted Message timestamp: 2010-11-12 13:45:05.746 Cluster ID: 2362095612 Logging level: Always Client address: 192.0.2.237:4743 Server address: 192.0.2.81:1433 Database username: unknown_username SQL statement ID: 4cdd44e129500000 Database response: Not collected Response code 0 Response text Response detail SQL: select * from creditcard where 0=0
Configuring Users
System Administration 13-23
Configuring UsersThis section contains:
■ About Configuring Users
■ Creating a New User Account
■ Creating Password Policies
About Configuring UsersYou can use the Users menu of the System page to create, list, and edit Administration Console user accounts. A valid user name and password must be provided when the Administration Console is started, or when a user of the Analyzer software connects using Train on Log Data or Test with Log Data.
You can create users in both standalone and managed Database Firewalls, and in the Management Server. These user accounts are local to each system, even after you have configured a Database Firewall to connect to a Management Server. For a standalone Database Firewall, in which both the Database Firewall and the Management Server are on the same Linux server, the system administrator user can perform all functions. However, if the Database Firewall is on a separate server from the Management Server, after you connect the Management Server to this Database Firewall, the system administrator functions change. For example:
■ Database Firewall administrator: Can now only change network settings, view network traffic, remove the Database Firewall from the Management Server, and similar tasks specific to the current Database Firewall.
■ Management Server administrator: Can create and manage enforcement points, configure policies, run reports, archive, and so on.
See "Which Administration Console Should I Use?" on page 1-5 for a full list of the privileges associated with these two accounts.
The default administrator user name is admin (lower case only). For better security and separation of duty, Oracle recommends that you reserve the admin user account as a back-up user account, and then create a separate administrative account for each existing user for day-to-day operations. These accounts should never be shared. This allows better auditing of administrator activity, and if the administrative user is unavailable or leaves the company, you have a back-up administrative user account to take this user’s place. For all of the user account options, you can create as many users as your site requires.
To ensure full traceability of system changes, the administration log stores the login ID of any person who makes a change from the Administration Console. Another reason for having separate Administration Console accounts is that this log enables you to easily track users who make changes to the Database Firewall system. See "Viewing the Logs" on page 13-19.
Figure 13–10 shows the Users page of the Administration Console.

Configuring Users
13-24 Oracle Database Firewall Administration Guide
Figure 13–10 Configuring Users
Creating a New User AccountTo create a new user account:
1. Log in to the Administration Console.
You can log in to a standalone or managed Database Firewall, or a Management Server. See "Logging in to the Administration Console" on page 1-7 for more information about logging in.
2. Select the System tab.
The System Settings page appears.
3. In the Users menu, select Add New.
The Add User page appears.
4. Complete the following information:
■ User name: Enter the login user name for the account (for example, psmith or lbernstein). Remember that this name is case sensitive. For example, if you create lbernstein, trying to log in as LBERNSTEIN will fail.
■ First Name: Enter the user’s first name.
■ Last Name: Enter the user’s last name.
■ Email: Enter the user’s e-mail address.
■ Role: Select from the following roles:
– System Administrator: Gives the user full access to all options in the Administration Console, and to connect from the Analyzer.
– View-only User: Enables the user to view log data, change his or her password, and connect from the Analyzer. This role enables the user to see statement details in the Analyzer. This user can create a policy file, but cannot upload it.
– Log Administrator: Enables a user of the Administration Console to view log data, change his or her password, configure logging, run archive or restore jobs, and connect from the Analyzer.
■ Suspended: Select this check box to suspend the user account.
■ Force Password Change on Next Login: Select this check box to enable the user to create a private password the first time that the user logs in. By default, this check box is selected.
■ Password: Enter a secure password. Follow these guidelines:
– Make the password between 8 and 30 characters and numbers.
– Include in the password at least one digit, one upper-case character, and one lower-case character.
Viewing and Capturing Network Traffic in an Individual Database Firewall
System Administration 13-25
– Do not use an actual word for the entire password.
– Combine two weaker passwords, such as welcome and binky1 into WelBinky1Come.
■ Confirm Password: Re-enter the password.
5. Click the Signup button.
Later on, if you must change the user account, select List from the Users menu, and then click the name of the user account that you want to change. The Edit User page appears.
Creating Password PoliciesFor better security, you can create password policies to force users to use strong passwords. The password policy applies to all users managed by the Database Firewall.
To create a password policy:
1. Log in to the Administration Console.
You can log in to a standalone or managed Database Firewall, or a Management Server. See "Logging in to the Administration Console" on page 1-7 for more information about logging in.
2. Select the System tab.
The System Settings page appears.
3. In the Users menu, select Security.
The User Security Settings page appears.
4. Specify the following settings:
■ Enforce Strong Passwords: Select this check box to enforce the following criteria:
– Must contain lowercase and uppercase characters
– Must contain at least one non alphabetical character
– Must not be systematic or simple (for example, abcde or 12345)
– Must not be made up of mostly the same characters (for example, aaaaaa11111)
If you disable this option, Oracle Database Firewall will give users advice about the strength of their passwords but will not enforce these guidelines.
■ Minimum Password Length: Enter a numeric value. The default is 6.
■ Enforce Novel Passwords: Select this check box to prevent users from specifying a password that they have used in the past.
■ Expire Passwords: Enter a numeric value to force users to change their passwords after a specified number of days. To disable password expiration, enter 0.
5. Click the Save button.
Viewing and Capturing Network Traffic in an Individual Database FirewallThis section contains:

Viewing and Capturing Network Traffic in an Individual Database Firewall
13-26 Oracle Database Firewall Administration Guide
■ Viewing Network Traffic
■ Capturing Network Traffic
Viewing Network TrafficYou may wish to view network traffic for debugging purposes. You can view network traffic for standalone or managed Database Firewalls. You can display network traffic in real time on the screen by clicking Show in the Network Traffic menu of the System tab. This option is not available for the Management Server.
Figure 13–11 shows the Network Traffic page of the Administration Console of a Database Firewall.
Figure 13–11 Viewing Network Traffic from a Database Firewall
Capturing Network TrafficYou can capture the network traffic to a file (.pcap file type) that you can later download and analyze.
To capture the network traffic to a file:
1. Log in to the standalone or managed Database Firewall Administration Console.
See "Logging in to the Administration Console" on page 1-7 for more information about logging in.
2. Select the System tab.
3. Under the Network Traffic menu, select Capture to File.
In a moment, the Network Traffic page lists the traffic file:

Monitoring the Database Firewall’s Embedded Oracle Database
System Administration 13-27
4. In the Network traffic files area, click the download button.
5. In the File Download dialog box, click Save.
6. In the Save As dialog box, navigate to the directory where you want to save the file, and then click the Save button.
Monitoring the Database Firewall’s Embedded Oracle DatabaseYou can use the Oracle Enterprise Manager Database Control to monitor the Oracle database embedded in the Database Firewall. Use the configuration steps in this section to set up monitoring of the Oracle embedded database in a Standalone Database Firewall or Management Server.
To configure monitoring of the embedded Oracle database:
1. On the computer running the Database Firewall or Management Server, log in as support and switch to user root.
2. Run the command:
/usr/local/dbfw/bin/dbfwdbctrl-cfg configure
3. When prompted for a password, enter the Oracle database sys password you specified when installing the Database Firewall or Management Server.
4. Run these two commands to start monitoring:
/etc/init.d/dbfwdbctrl autostart on
/etc/init.d/dbfwdbctrl start
After the next reboot, the Oracle Enterprise Manager Database Control will start automatically.
5. To access the Enterprise Manager Database Control in a browser, use the following URL:
https://Database_Firewall_or_Management_Server_IP_address:1158/em
The Oracle Enterprise Manager Database Control console appears.
6. Use the following access credentials:
■ User Name: enter sys
■ Password: enter the sys password
■ Connect As: select sysdba

Monitoring the Database Firewall’s Embedded Oracle Database
13-28 Oracle Database Firewall Administration Guide
For information on managing Oracle Enterprise Manager Database Control, see the Oracle Database Administrator’s Guide:
http://docs.oracle.com/cd/E11882_01/server.112/e25494/toc.htm#BEGIN
To stop and restart monitoring of the embedded Oracle database:
1. Run the following commands to stop monitoring and to disable autostart:
To stop monitoring, run: /etc/init.d/dbfwdbctrl stop
To disable autostart, run: /etc/init.d/dbfwdbctrl autostart off
2. Run the following commands to restart monitoring and enable autostart:
/etc/init.d/dbfwdbctrl autostart on
/etc/init.d/dbfwdbctrl start
After the next reboot, the Oracle Enterprise Manager Database Control will start automatically.
To check the status of the Enterprise Manager 11g Database Control (monitoring the embedded Oracle database):
1. On the computer running the Database Firewall or Management server, log in as root.
2. Run the command: /etc/init.d/dbfwdbctrl status
Here is a sample output:

A
Oracle Database Firewall Database Schema A-1
AOracle Database Firewall Database Schema
This appendix contains:
■ About the Oracle Database Firewall Schema
■ Summary Tables
■ Log Forensic Tables
■ Stored Procedure and User Role Audit Tables
■ Report-Related Functions
About the Oracle Database Firewall SchemaThe Oracle Database Firewall tables are stored in the SECURELOG schema. This schema contains a set of logically related tables, which are described in this appendix.
Summary TablesThis section contains:
■ About the Summary Tables
■ applied_baselines Table
■ database_user_addresses Table
■ database_users Table
■ dictionary Table
■ protected_database_addresses Table
■ protected_databases Table
■ sources Table
■ summary_clusters Table
■ cluster_components Table
■ summary_records Table
■ summary_sessions Table
■ summary_statement_attributes Table
■ traffic_events Table
■ traffic_summaries View

Summary Tables
A-2 Oracle Database Firewall Administration Guide
■ Relationship Diagram of the Summary Tables
About the Summary TablesThe summary tables store general information about the data that is being monitored, such as the names of the users logging in, the monitored databases, user sessions, database traffic, events, and so on.
applied_baselines TableTable A–1 provides the name of the policy that is currently used for while traffic is being captured.
database_user_addresses TableTable A–2 provides IP addresses that are expected to be used by a user who has accessed the protected database.
database_users TableTable A–3 records each user who has accessed a protected database.
Table A–1 applied_baselines Table
Column Datatype NULL Description
baseline_id INTEGER NOT NULL Unique ID of this record
name VARCHAR2(1024 CHAR) NOT NULL Name of the baseline (also available from traffic_summaries view (Table A–14))
database_id INTEGER NOT NULL ID of the protected database in the protected_databases table (Table A–6)
Table A–2 database_user_addresses Table
Column Datatype NULL Description
address_id INTEGER NOT NULL ID of the address record in this table
user_id INTEGER NULL ID of the database user in the database_users table (Table A–3)
address VARCHAR2(30) NULL Expected IP address of the user (possible one of many)
Table A–3 database_users Table
Column Datatype NULL Description
user_id INTEGER NOT NULL ID of the user record in this table
user_name VARCHAR2(255) NULL Name of the user who started the session (also available from traffic_summaries view Table A–14)
database_id INTEGER NULL ID of the protected database in the protected_databases table (Table A–6)

Summary Tables
Oracle Database Firewall Database Schema A-3
dictionary TableTable A–4 provides a set of mappings from coded values to meaningful text. This table is useful in generating understandable text in a report, without hard-coding the values into the report query. The tables throughout this appendix use values listed in this table. For example, several tables have a column entitled cluster_type. The values possible for the cluster_type column are listed in the dictionary table.
protected_database_addresses TableTable A–5 provides address and port details for each protected database.
terminated_at TIMESTAMP NULL Time that the session was ended
is_admin CHAR (ONLY:'0','1') NOT NULL Set to 1 if the user is an administrator of the database
is_predefined CHAR (ONLY:'0','1') NOT NULL Set to 1 if the user is a predefined user of the database (that is, automatically created when the protected_databases table (Table A–6) was created)
Table A–4 dictionary Table
Column Datatype NULL Description
category VARCHAR2(30) NOT NULL Name of item. Possible values:
■ dialect (database product)
■ event_action
■ log_action
■ logging_code
■ threat_severity
■ cluster_type
■ doa_object_type
■ doa_object_subtype
■ doa_object_class
■ doa_edit_type
■ database_event_type
■ record_type
■ response_status
■ log_cause
■ event_action_code
■ session_data_origin
value INTEGER NOT NULL Value of the item listed in the category column. For example, if the category is dialect and the database product listed is Oracle, then the value listed here is 2.
name VARCHAR2(100) NULL Description of value listed in the value column. For example, if the category is dialect and the value is 2, then the name listed here is Oracle.
Table A–3 (Cont.) database_users Table
Column Datatype NULL Description

Summary Tables
A-4 Oracle Database Firewall Administration Guide
protected_databases TableTable A–6 provides details about each protected database.
sources TableTable A–7 provides details about the source of an event: either the relevant hardware (or virtual) device for events that apply system-wide, or the monitoring enforcement point for events detected by monitoring.
Table A–5 protected_database_addresses Table
Column Datatype NULL Description
address_id INTEGER NOT NULL Unique ID of this record
address VARCHAR2(255) NOT NULL IP address of the protected database
port_number INTEGER NOT NULL Port number used to access the protected database
service_name VARCHAR2(255 CHAR NULL Database service name (optional)
database_id INTEGER NULL ID of the protected database in the protected_databases table (Table A–6)
Table A–6 protected_databases Table
Column Datatype NULL Description
database_id INTEGER NOT NULL Unique ID of the database
name VARCHAR2(250 CHAR) NOT NULL Name of the database
dialect SMALLINT NOT NULL SQL dialect:
■ 1 - Microsoft SQL Server
■ 2 - Oracle
■ 5 - Sybase
■ 7 - IBM DB2 (Linux, UNIX, Windows)
description VARCHAR2(1024 CHAR) NULL Description of the database
is_sox_database CHAR (ONLY:'0','1') NOT NULL Set to 1 if SOX reports can be produced from the database (also available from traffic_summaries view (Table A–14))
is_pci_database CHAR (ONLY:'0','1') NOT NULL Set to 1 if PCI reports can be produced from the database (also available from traffic_summaries view (Table A–14))
is_dpa_database CHAR (ONLY:'0','1') NOT NULL Set to 1 if DPA reports can be produced from the database (also available from traffic_summaries view (Table A–14))
is_glba_database CHAR (ONLY:'0','1') NOT NULL Set to 1 if GLBA reports can be produced from the database (also available from traffic_summaries view (Table A–14))
is_hipaa_database CHAR (ONLY:'0','1') NOT NULL Set to 1 if HIPAA reports can be produced from the database (also available from traffic_summaries view (Table A–14))

Summary Tables
Oracle Database Firewall Database Schema A-5
summary_clusters TableTable A–8 provides information about individual clusters for the purpose of reporting. As well as providing a unique identity to each cluster, this table provides an example statement that would appear in the cluster.
Table A–7 sources Table
Column Datatype NULL Description
id INTEGER NOT NULL Unique ID of the source of the event, which can be an appliance (physical server), in the case of syslog messages, or the enforcement point (in the case of database traffic related events, or enforcement point related syslog messages).
time TIMESTAMP NOT NULL Time that the source of the event was added to the database
name VARCHAR2(30) NOT NULL Short name of the source of the event
is_hardware CHAR (ONLY:'0','1') NULL Set to 1 if the source of the event is a syslog source other than an enforcement point
Table A–8 summary_clusters Table
Column Datatype NULL Description
cluster_id INTEGER NOT NULL Source ID of the binary data
grammar_version INTEGER NOT NULL Grammar-specific version number
dialect SMALLINT NOT NULL SQL dialect:
■ 1 - Microsoft SQL Server
■ 2 - Oracle
cluster_type SMALLINT NOT NULL Type of statements included in the cluster:
■ 0 - Composite
■ 1 - Data manipulation
■ 2 - Data definition
■ 3 - Data control
■ 4 - Procedural statement
■ 5 - Data manipulation
■ 6 - Transaction
■ 7 - Transaction composite
■ 8 - Invalid
See also traffic_summaries view (Table A–14)
representation CLOB NOT NULL String representation of cluster (path). Not used
cluster_example CLOB NULL An example of a statement in the cluster (also available from traffic_summaries view (Table A–14)

Summary Tables
A-6 Oracle Database Firewall Administration Guide
cluster_components TableTable A–9 breaks down information from the cluster path representation into cluster components. This information can be used in reporting to select clusters related to specified database tables or table columns.
summary_records TableTable A–10 provides primary information collected in the traffic log, as an hourly summary of the count of occurrences of each cluster.
Table A–9 cluster_components Table
Column Datatype NULL Description
cluster_id INTEGER NOT NULL Cluster global identifier
grammar_version INTEGER NOT NULL Grammar-specific version number
dialect SMALLINT NOT NULL Database type of the cluster. See dictionary table for meaning (Table A–9)
component_index INTEGER NOT NULL Index of the component (starts with 1)
component_type VARCHAR2(15) NOT NULL Component type may be one of: '
'keyword', 'column', 'table', 'stored_procedure', 'cluster_set
component_value VARCHAR2(4000) NULL The component string
Table A–10 summary_records Table
Column Datatype NULL Description
summary_id INTEGER NOT NULL Unique ID of the summary record
session_id INTEGER NOT NULL ID of the session in the summary_sessions table
attribute_set_id INTEGER NOT NULL Set with session attributes
cluster_id INTEGER NOT NULL ID of the cluster in the summary_clusters table (Table A–10); also available from traffic_summaries view (Table A–14)
attribute_id INTEGER NULL ID of the attribute in the summary_statement_attributes table (Table A–12).
grammar_version INTEGER NOT NULL Grammar-specific version number
response_status INTEGER NOT NULL Response code of the statement for database response monitoring:
■ 0 - Undefined
■ 1 - Unknown
■ 2 - Login success
■ 3 - Login fail
■ 4 - Statement success
■ 5 - Statement fail
See also traffic_summaries view (Table A–14)
time TIMESTAMP NOT NULL Time that the SQL statement was captured by the Database Firewall (also available from traffic_summaries view (Table A–14))

Summary Tables
Oracle Database Firewall Database Schema A-7
summary_sessions TableA new session is started when a client application successfully logs into a database. This session lasts for as long as the connection exists (often, until the application logs out from the database, although the session may terminate in a less controlled way). Sessions are associated with a client application, and with the authentication or identification information (primarily the user name) used to establish the connection. A simple client application creates a single session, or in some cases, one session after another. More complex applications may have many simultaneously active sessions.
Table A–11 provides details about each database session, typically identified by the source address of the session.
threat_severity INTEGER NOT NULL Threat severity of the statements:
■ 0 - Unassigned
■ 1 - Insignificant
■ 2 - Minor
■ 3 - Moderate
■ 4 - Major
■ 5 - Catastrophic
See also traffic_summaries view (Table A–14)
logging_code SMALLINT NOT NULL Logging level of the statements:
■ 0 - Unassigned
■ 1 - Never
■ 2 - Sample
■ 3 - Always
■ 4 - Once
■ 5 - Unique
See also traffic_summaries view (Table A–14)
action_code SMALLINT NOT NULL Action level of the statements:
■ 1 - Known blocked
■ 2 - Known warned
■ 3 - Unseen blocked
■ 4 - Unseen warned
See also traffic_summaries view (Table A–14)
statement_count INTEGER NULL Number of statements that have the same characteristics, as listed above (also available from traffic_summaries view (Table A–14))
Note: This table does not record each session. Instead, a new record is added when one or more of the fields (source_id, client, user_id, baseline_id, and dialect_version) is different from an existing record.
Table A–10 (Cont.) summary_records Table
Column Datatype NULL Description

Summary Tables
A-8 Oracle Database Firewall Administration Guide
summary_statement_attributes TableTable A–12 stores statement attribute values that can be summarized from the summary_records table.
Table A–11 summary_sessions Table
Column Datatype NULL Description
session_id INTEGER NOT NULL Unique ID of the database session
source_id INTEGER NULL ID of the sources in the sources table (also available from traffic_summaries view Table A–14)
client VARCHAR2(30) NULL IP address of the database client (also available from traffic_summaries view Table A–14)
user_id INTEGER NULL ID of the user who started the session (Table A–3)
baseline_id INTEGER NULL ID of the policy in the applied_baselines table (Table A–1)
dialect_version VARCHAR2(20) NULL Not used
application_name VARCHAR2(255) NULL Name of the client program used in this session
os_user_name VARCHAR2(255) NULL Operating system user name
Table A–12 summary_statement_attributes Table
Column Datatype NULL Description
id INTEGER NULL ID of each record in this table
hash INTEGER NULL Result of the CRC32 (Cyclic Redundancy Check) of the concatenation of all attribute values. This is for internal use only to enable fast searching.
f5_response_code VARCHAR2(4000) NULL HTTP response code
Note: This and the remaining fields in this table are relevant to the F5 BIG-IP ASM integration only. See Chapter 11, "Using Oracle Database Firewall with BIG-IP ASM," for more information.
f5_method VARCHAR2(4000) NULL HTTP request method
f5_protocol VARCHAR2(4000) NULL Request protocol
f5_uri VARCHAR2(4000) NULL Requested resource
f5_ip VARCHAR2(15) NULL Web client IP address
f5_web_application_name VARCHAR2(64) NULL Web application name
f5_unit_hostname VARCHAR2(64) NULL Name of the WAF box
f5_management_ip_address VARCHAR2(15) NULL IP address of the WAF management interface
f5_policy_name VARCHAR2(128) NULL WAF policy name
f5_x_forwarded_for_header_value
VARCHAR2(4000) NULL List of IP addresses provided by X-FORWARDED-FOR field in HTTP request
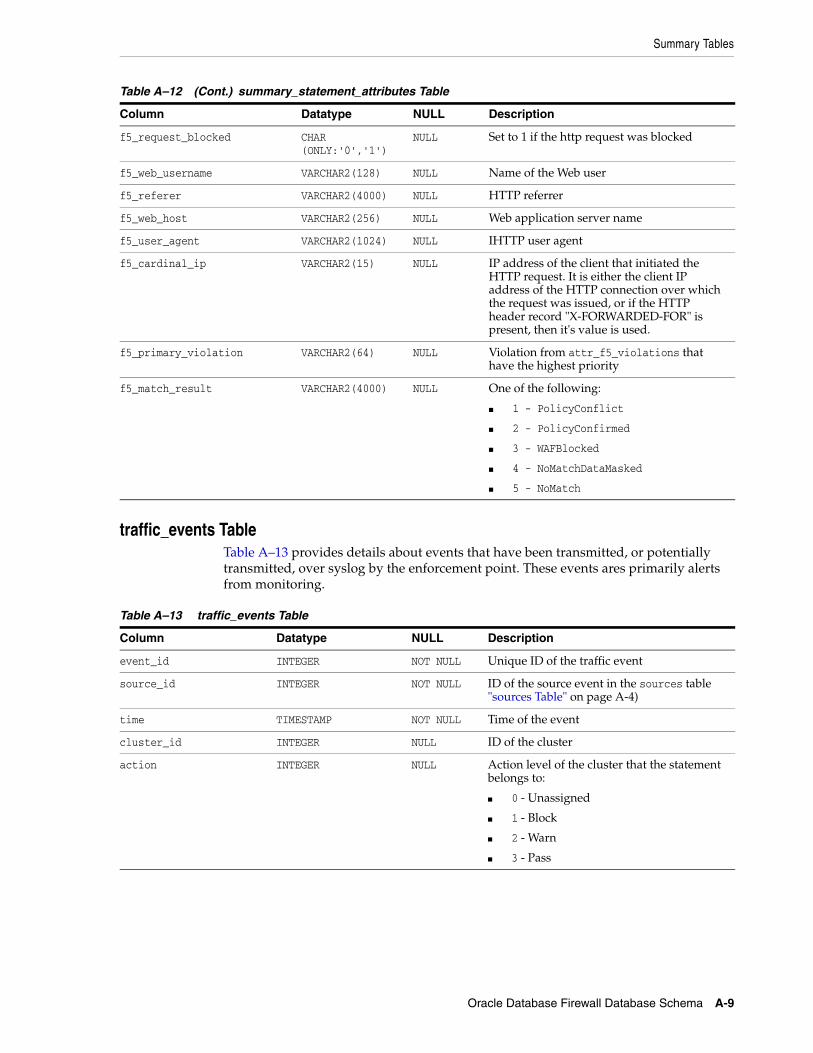
Summary Tables
Oracle Database Firewall Database Schema A-9
traffic_events TableTable A–13 provides details about events that have been transmitted, or potentially transmitted, over syslog by the enforcement point. These events ares primarily alerts from monitoring.
f5_request_blocked CHAR (ONLY:'0','1')
NULL Set to 1 if the http request was blocked
f5_web_username VARCHAR2(128) NULL Name of the Web user
f5_referer VARCHAR2(4000) NULL HTTP referrer
f5_web_host VARCHAR2(256) NULL Web application server name
f5_user_agent VARCHAR2(1024) NULL IHTTP user agent
f5_cardinal_ip VARCHAR2(15) NULL IP address of the client that initiated the HTTP request. It is either the client IP address of the HTTP connection over which the request was issued, or if the HTTP header record "X-FORWARDED-FOR" is present, then it's value is used.
f5_primary_violation VARCHAR2(64) NULL Violation from attr_f5_violations that have the highest priority
f5_match_result VARCHAR2(4000) NULL One of the following:
■ 1 - PolicyConflict
■ 2 - PolicyConfirmed
■ 3 - WAFBlocked
■ 4 - NoMatchDataMasked
■ 5 - NoMatch
Table A–13 traffic_events Table
Column Datatype NULL Description
event_id INTEGER NOT NULL Unique ID of the traffic event
source_id INTEGER NOT NULL ID of the source event in the sources table "sources Table" on page A-4)
time TIMESTAMP NOT NULL Time of the event
cluster_id INTEGER NULL ID of the cluster
action INTEGER NULL Action level of the cluster that the statement belongs to:
■ 0 - Unassigned
■ 1 - Block
■ 2 - Warn
■ 3 - Pass
Table A–12 (Cont.) summary_statement_attributes Table
Column Datatype NULL Description
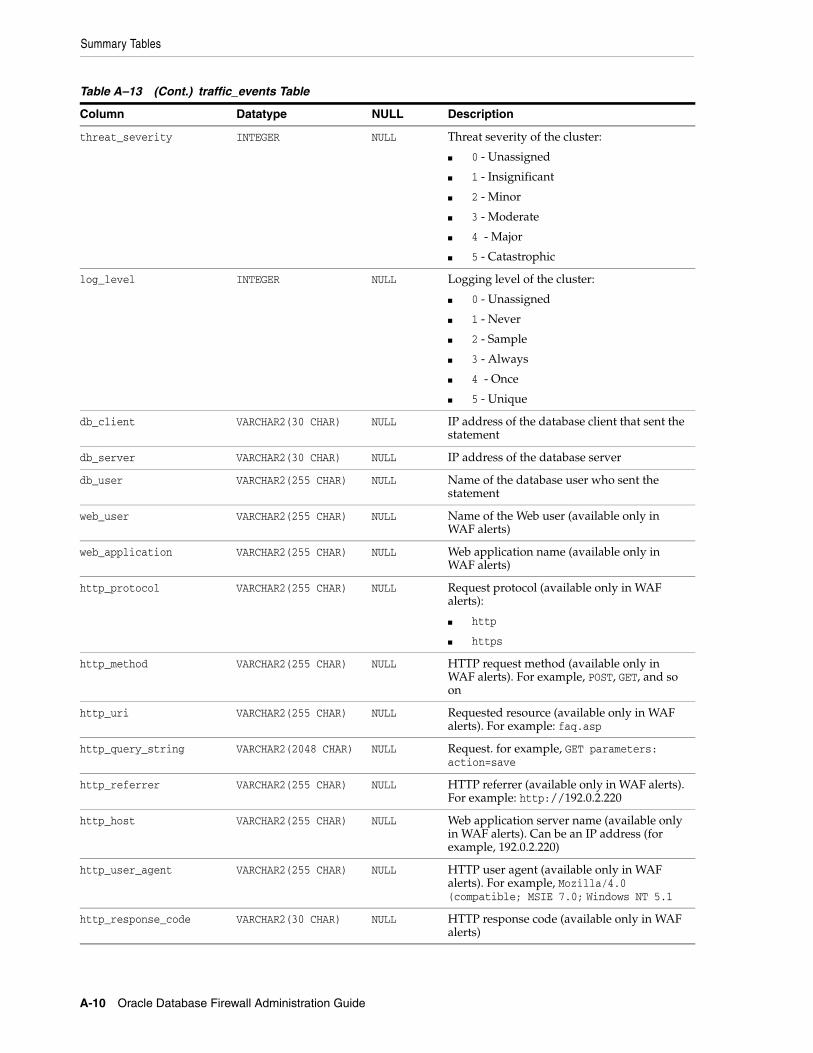
Summary Tables
A-10 Oracle Database Firewall Administration Guide
threat_severity INTEGER NULL Threat severity of the cluster:
■ 0 - Unassigned
■ 1 - Insignificant
■ 2 - Minor
■ 3 - Moderate
■ 4 - Major
■ 5 - Catastrophic
log_level INTEGER NULL Logging level of the cluster:
■ 0 - Unassigned
■ 1 - Never
■ 2 - Sample
■ 3 - Always
■ 4 - Once
■ 5 - Unique
db_client VARCHAR2(30 CHAR) NULL IP address of the database client that sent the statement
db_server VARCHAR2(30 CHAR) NULL IP address of the database server
db_user VARCHAR2(255 CHAR) NULL Name of the database user who sent the statement
web_user VARCHAR2(255 CHAR) NULL Name of the Web user (available only in WAF alerts)
web_application VARCHAR2(255 CHAR) NULL Web application name (available only in WAF alerts)
http_protocol VARCHAR2(255 CHAR) NULL Request protocol (available only in WAF alerts):
■ http
■ https
http_method VARCHAR2(255 CHAR) NULL HTTP request method (available only in WAF alerts). For example, POST, GET, and so on
http_uri VARCHAR2(255 CHAR) NULL Requested resource (available only in WAF alerts). For example: faq.asp
http_query_string VARCHAR2(2048 CHAR) NULL Request. for example, GET parameters: action=save
http_referrer VARCHAR2(255 CHAR) NULL HTTP referrer (available only in WAF alerts). For example: http://192.0.2.220
http_host VARCHAR2(255 CHAR) NULL Web application server name (available only in WAF alerts). Can be an IP address (for example, 192.0.2.220)
http_user_agent VARCHAR2(255 CHAR) NULL HTTP user agent (available only in WAF alerts). For example, Mozilla/4.0 (compatible; MSIE 7.0; Windows NT 5.1
http_response_code VARCHAR2(30 CHAR) NULL HTTP response code (available only in WAF alerts)
Table A–13 (Cont.) traffic_events Table
Column Datatype NULL Description

Summary Tables
Oracle Database Firewall Database Schema A-11
traffic_summaries ViewTable A–14 provides a view to data in other tables.
http_request VARCHAR2(2048 CHAR) NULL Full HTTP request. Includes POST data (available only in WAF alerts)
waf_host_name VARCHAR2(255 CHAR) NULL Name of the WAF appliance (available only in WAF alerts)
waf_management_ip VARCHAR2(30 CHAR) NULL IP address of the WAF management interface (available only in WAF alerts)
waf_policy_name VARCHAR2(255 CHAR) NULL WAF policy name (available only in WAF alerts)
waf_policy_date TIMESTAMP NULL The time when the WAF policy was applied (available only in WAF alerts)
waf_support_id VARCHAR2(255 CHAR) NULL Unique ID of the event in the WAF system (available only in WAF alerts)
waf_request_blocked VARCHAR2(30 CHAR) NULL TRUE if the http request was blocked (available only in WAF alerts)
waf_session_cookies VARCHAR2(512 CHAR) NULL Contains all the session cookies sent with the HTTP request (available only in WAF alerts)
primary_violation VARCHAR2(255 CHAR) NULL Violation with the highest priority (available only in WAF alerts)
cardinal_ip VARCHAR2(30 CHAR) NULL IP address of attacker
match_result INTEGER NULL One of the following (which are available only in WAF alerts):
■ 1 - Confirmed
■ 2 - Not confirmed
■ 3 - Not proven
statement_id INTEGER NULL Unique ID of the statement (sequential number)
statement VARCHAR2(2048 CHAR) NULL SQL statement string (may be truncated)
Table A–13 (Cont.) traffic_events Table
Column Datatype NULL Description

Summary Tables
A-12 Oracle Database Firewall Administration Guide
Table A–14 traffic_summaries View
Column Datatype NULL Description
database_id INTEGER NOT NULL Identifier of the database in the protected_databases table
db_name VARCHAR2(250) NOT NULL Name of the protected database:
■ Microsoft SQL Server
■ Oracle
■ Sybase ASE
■ Sybase SQL Anywhere
■ DB2/LUW (Linux, UNIX, Windows)
dialect SMALLINT NOT NULL SQL dialect used by the database:
■ 1 - Microsoft SQL Server
■ 2 - Oracle
■ 5 - Sybase ASE
■ 6 - Sybase SQL Anywhere
■ 8 - DB2/LUW (Linux, UNIX, Windows)
is_sox_database CHAR (ONLY:'0','1')
NOT NULL Set to 1 if SOX reports can be produced from the database (from protected_databases (Table A–6))
is_pci_database CHAR (ONLY:'0','1')
NOT NULL Set to 1 if PCI reports can be produced from the database (from protected_databases (Table A–6))
is_dpa_database CHAR (ONLY:'0','1')
NOT NULL Set to 1 if DPA reports can be produced from the database (from protected_databases (Table A–6))
is_glba_database CHAR (ONLY:'0','1')
NOT NULL Set to 1 if GLBA reports can be produced from the database (from protected_databases (Table A–6))
is_hipaa_database CHAR (ONLY:'0','1')
NOT NULL Set to 1 if HIPAA reports can be produced from the database (from protected_databases (Table A–6))
baseline_id INTEGER NOT NULL Identifier of the baseline in the applied_baselines table
baseline_name VARCHAR2(1024) NOT NULL Name of the baseline
grammar_version INTEGER NOT NULL Grammar version
session_id INTEGER NOT NULL Identifier of the session in the summary_sessions table
client VARCHAR2(30) NULL IP address of the database client
user_id INTEGER NULL Identifier of the user in the database_users table
user_name VARCHAR2(255) NULL Name of the database user
dialect_version VARCHAR2(20) NULL Not used
source_id INTEGER NULL ID of the source in the sources table (Table A–7)
application_name VARCHAR2(255) NULL The application name used as a client software in this session
os_user_name VARCHAR2(255) NULL Operating system user name
cluster_example CLOB NULL An example statement in the cluster

Summary Tables
Oracle Database Firewall Database Schema A-13
summary_id INTEGER NOT NULL Identifier of the record in the summary_records table
time TIMESTAMP NOT NULL Time of the statement count
cluster_id INTEGER NOT NULL ID of the cluster (from summary_records table (Table A–10))
attribute_id INTEGER NULL Identifier of the cluster in the summary_clusters table
threat_severity INTEGER NOT NULL Threat severity of the statements:
■ 0 - Unassigned
■ 1 - Insignificant
■ 2 - Minor
■ 3 - Moderate
■ 4 - Major
■ 5 - Catastrophic
logging_code SMALLINT NOT NULL Logging level of the statements:
■ 0 - Unassigned
■ 1 - Never
■ 2 - Sample
■ 3 - Always
■ 4 - Once
■ 5 - Unique
action_code SMALLINT NOT NULL Action level of the statements:
■ 1 - Known blocked
■ 2 - Known warned
■ 3 - Unseen blocked
■ 4 - Unseen warned
Table A–14 (Cont.) traffic_summaries View
Column Datatype NULL Description
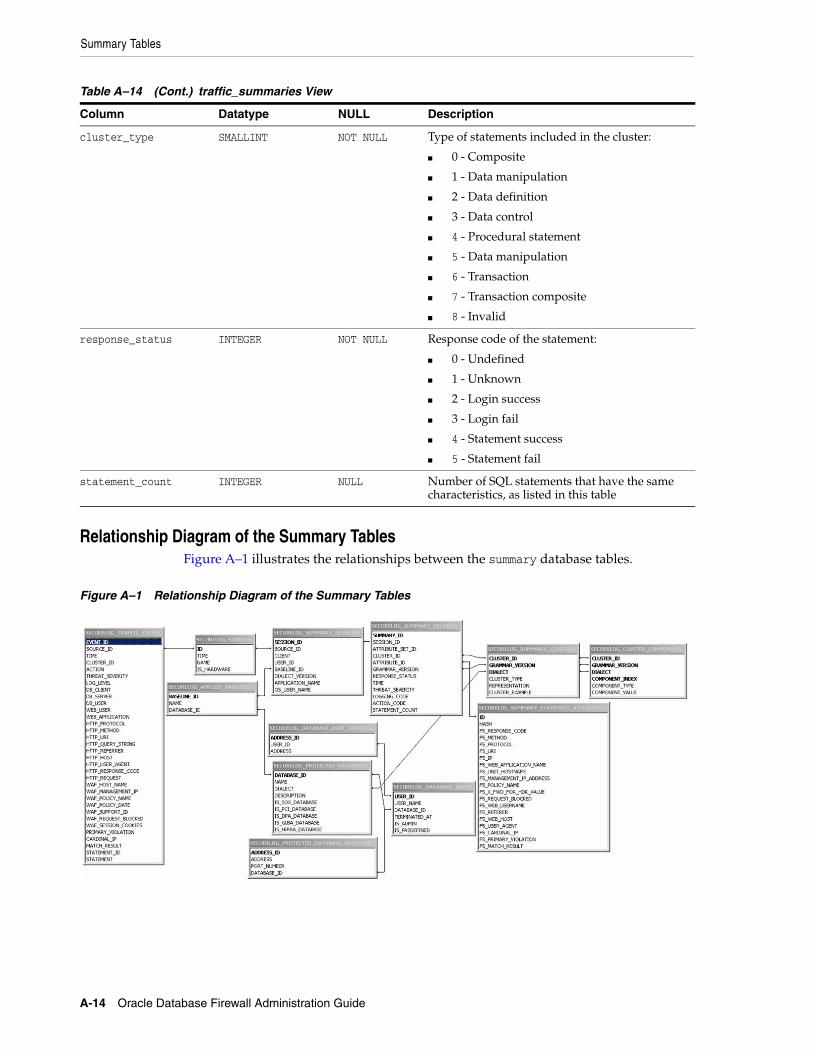
Summary Tables
A-14 Oracle Database Firewall Administration Guide
Relationship Diagram of the Summary TablesFigure A–1 illustrates the relationships between the summary database tables.
Figure A–1 Relationship Diagram of the Summary Tables
cluster_type SMALLINT NOT NULL Type of statements included in the cluster:
■ 0 - Composite
■ 1 - Data manipulation
■ 2 - Data definition
■ 3 - Data control
■ 4 - Procedural statement
■ 5 - Data manipulation
■ 6 - Transaction
■ 7 - Transaction composite
■ 8 - Invalid
response_status INTEGER NOT NULL Response code of the statement:
■ 0 - Undefined
■ 1 - Unknown
■ 2 - Login success
■ 3 - Login fail
■ 4 - Statement success
■ 5 - Statement fail
statement_count INTEGER NULL Number of SQL statements that have the same characteristics, as listed in this table
Table A–14 (Cont.) traffic_summaries View
Column Datatype NULL Description
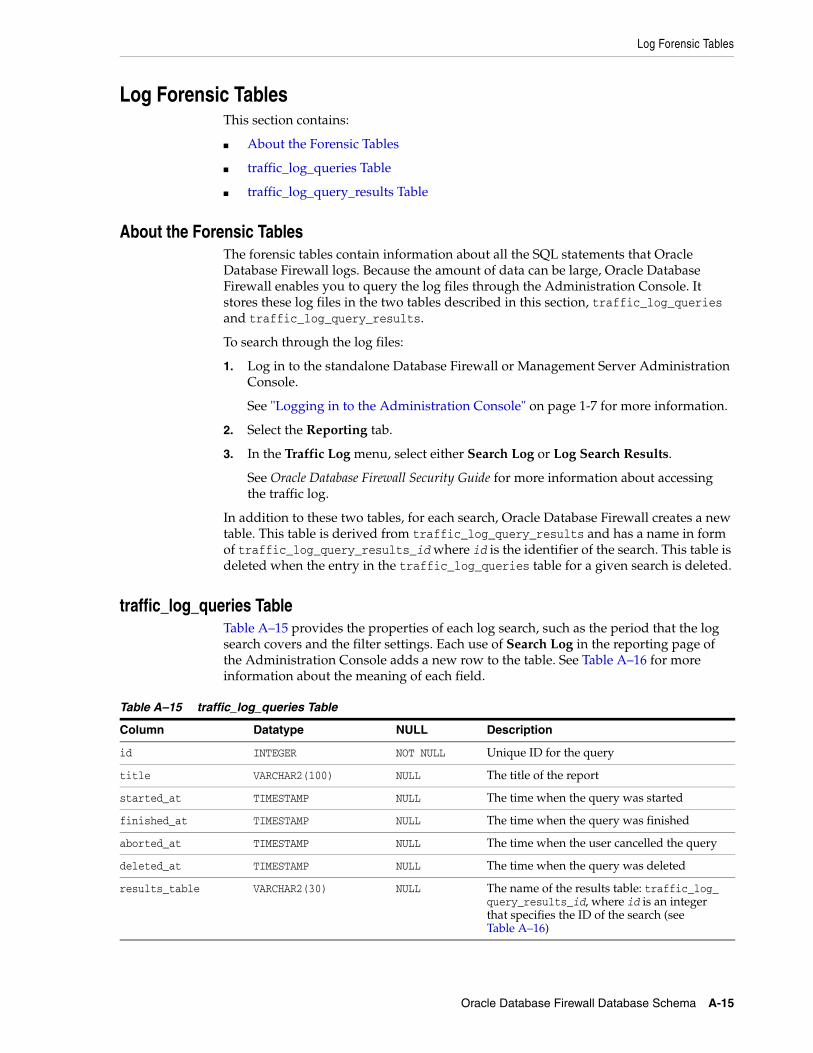
Log Forensic Tables
Oracle Database Firewall Database Schema A-15
Log Forensic TablesThis section contains:
■ About the Forensic Tables
■ traffic_log_queries Table
■ traffic_log_query_results Table
About the Forensic TablesThe forensic tables contain information about all the SQL statements that Oracle Database Firewall logs. Because the amount of data can be large, Oracle Database Firewall enables you to query the log files through the Administration Console. It stores these log files in the two tables described in this section, traffic_log_queries and traffic_log_query_results.
To search through the log files:
1. Log in to the standalone Database Firewall or Management Server Administration Console.
See "Logging in to the Administration Console" on page 1-7 for more information.
2. Select the Reporting tab.
3. In the Traffic Log menu, select either Search Log or Log Search Results.
See Oracle Database Firewall Security Guide for more information about accessing the traffic log.
In addition to these two tables, for each search, Oracle Database Firewall creates a new table. This table is derived from traffic_log_query_results and has a name in form of traffic_log_query_results_id where id is the identifier of the search. This table is deleted when the entry in the traffic_log_queries table for a given search is deleted.
traffic_log_queries TableTable A–15 provides the properties of each log search, such as the period that the log search covers and the filter settings. Each use of Search Log in the reporting page of the Administration Console adds a new row to the table. See Table A–16 for more information about the meaning of each field.
Table A–15 traffic_log_queries Table
Column Datatype NULL Description
id INTEGER NOT NULL Unique ID for the query
title VARCHAR2(100) NULL The title of the report
started_at TIMESTAMP NULL The time when the query was started
finished_at TIMESTAMP NULL The time when the query was finished
aborted_at TIMESTAMP NULL The time when the user cancelled the query
deleted_at TIMESTAMP NULL The time when the query was deleted
results_table VARCHAR2(30) NULL The name of the results table: traffic_log_query_results_id, where id is an integer that specifies the ID of the search (see Table A–16)
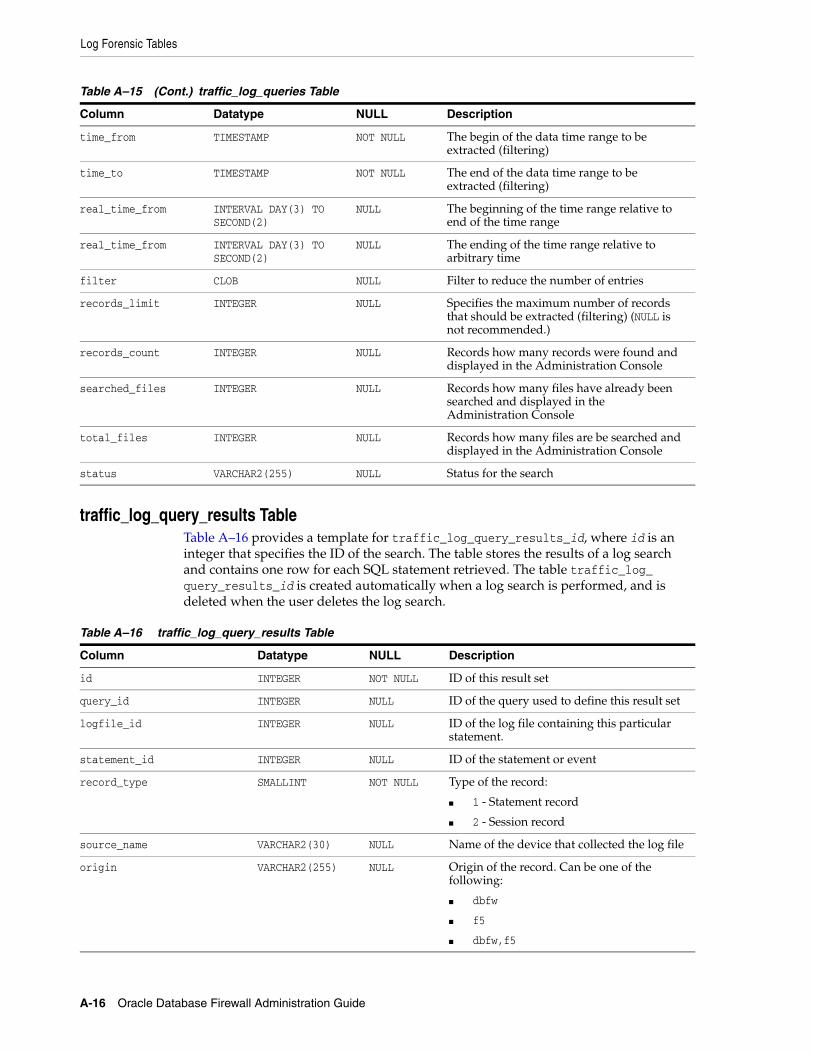
Log Forensic Tables
A-16 Oracle Database Firewall Administration Guide
traffic_log_query_results TableTable A–16 provides a template for traffic_log_query_results_id, where id is an integer that specifies the ID of the search. The table stores the results of a log search and contains one row for each SQL statement retrieved. The table traffic_log_query_results_id is created automatically when a log search is performed, and is deleted when the user deletes the log search.
time_from TIMESTAMP NOT NULL The begin of the data time range to be extracted (filtering)
time_to TIMESTAMP NOT NULL The end of the data time range to be extracted (filtering)
real_time_from INTERVAL DAY(3) TO SECOND(2)
NULL The beginning of the time range relative to end of the time range
real_time_from INTERVAL DAY(3) TO SECOND(2)
NULL The ending of the time range relative to arbitrary time
filter CLOB NULL Filter to reduce the number of entries
records_limit INTEGER NULL Specifies the maximum number of records that should be extracted (filtering) (NULL is not recommended.)
records_count INTEGER NULL Records how many records were found and displayed in the Administration Console
searched_files INTEGER NULL Records how many files have already been searched and displayed in the Administration Console
total_files INTEGER NULL Records how many files are be searched and displayed in the Administration Console
status VARCHAR2(255) NULL Status for the search
Table A–16 traffic_log_query_results Table
Column Datatype NULL Description
id INTEGER NOT NULL ID of this result set
query_id INTEGER NULL ID of the query used to define this result set
logfile_id INTEGER NULL ID of the log file containing this particular statement.
statement_id INTEGER NULL ID of the statement or event
record_type SMALLINT NOT NULL Type of the record:
■ 1 - Statement record
■ 2 - Session record
source_name VARCHAR2(30) NULL Name of the device that collected the log file
origin VARCHAR2(255) NULL Origin of the record. Can be one of the following:
■ dbfw
■ f5
■ dbfw,f5
Table A–15 (Cont.) traffic_log_queries Table
Column Datatype NULL Description
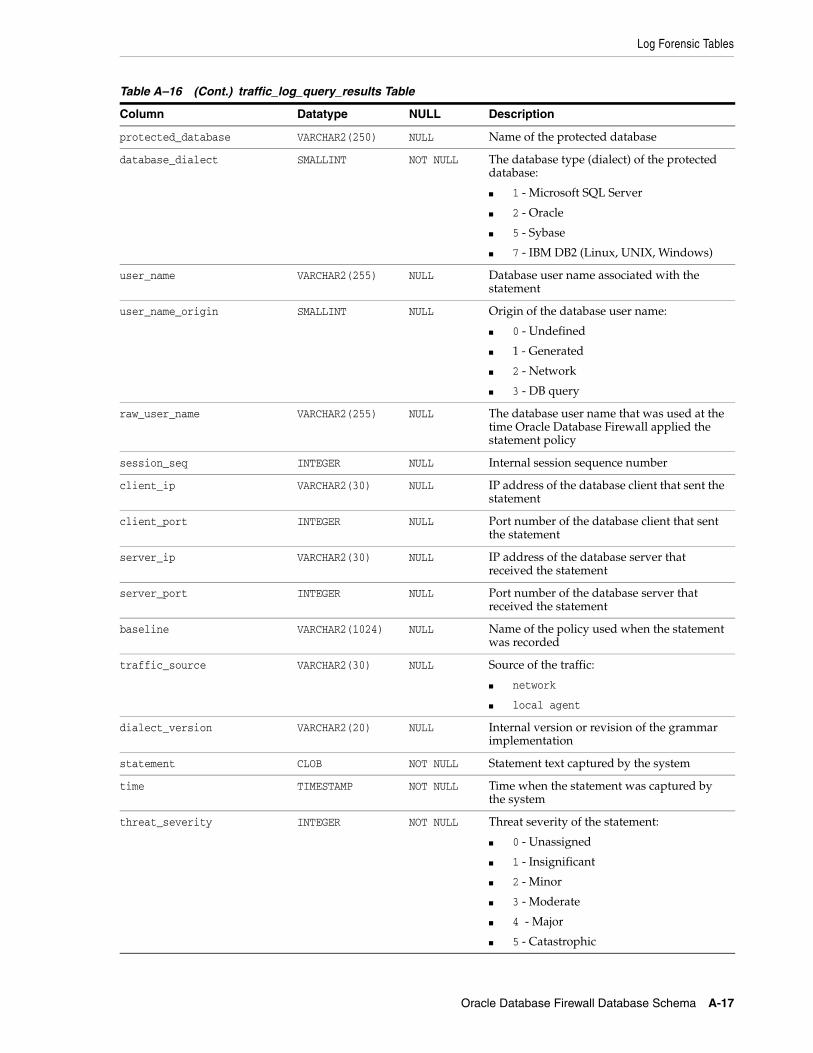
Log Forensic Tables
Oracle Database Firewall Database Schema A-17
protected_database VARCHAR2(250) NULL Name of the protected database
database_dialect SMALLINT NOT NULL The database type (dialect) of the protected database:
■ 1 - Microsoft SQL Server
■ 2 - Oracle
■ 5 - Sybase
■ 7 - IBM DB2 (Linux, UNIX, Windows)
user_name VARCHAR2(255) NULL Database user name associated with the statement
user_name_origin SMALLINT NULL Origin of the database user name:
■ 0 - Undefined
■ 1 - Generated
■ 2 - Network
■ 3 - DB query
raw_user_name VARCHAR2(255) NULL The database user name that was used at the time Oracle Database Firewall applied the statement policy
session_seq INTEGER NULL Internal session sequence number
client_ip VARCHAR2(30) NULL IP address of the database client that sent the statement
client_port INTEGER NULL Port number of the database client that sent the statement
server_ip VARCHAR2(30) NULL IP address of the database server that received the statement
server_port INTEGER NULL Port number of the database server that received the statement
baseline VARCHAR2(1024) NULL Name of the policy used when the statement was recorded
traffic_source VARCHAR2(30) NULL Source of the traffic:
■ network
■ local agent
dialect_version VARCHAR2(20) NULL Internal version or revision of the grammar implementation
statement CLOB NOT NULL Statement text captured by the system
time TIMESTAMP NOT NULL Time when the statement was captured by the system
threat_severity INTEGER NOT NULL Threat severity of the statement:
■ 0 - Unassigned
■ 1 - Insignificant
■ 2 - Minor
■ 3 - Moderate
■ 4 - Major
■ 5 - Catastrophic
Table A–16 (Cont.) traffic_log_query_results Table
Column Datatype NULL Description

Log Forensic Tables
A-18 Oracle Database Firewall Administration Guide
logging_code SMALLINT NOT NULL Logging level of the statement:
■ 0 - Unassigned
■ 1 - Never
■ 2 - Sample
■ 3 - Always
■ 4 - Once
■ 5 - Unique
log_cause SMALLINT NOT NULL Reason for logging the statement:
■ 0 - Undefined
■ 1 - Cluster
■ 2 - Novelty
■ 3 - Baseline anomaly
■ 4 - Invalid SQL
■ 5 - WAF
■ 6 - Login
■ 7 - Logout
action_code SMALLINT NOT NULL Action level of the statement:
■ 1 - Known blocked
■ 2 - Known warned
■ 3 - Unseen blocked
■ 4 - Unseen warned
event_action_code SMALLINT NULL Alert criterion that caused the statement to be logged:
■ 0 - Undefined
■ 1 - No alert
■ 2 - Always alert
■ 3 - Alert on success
■ 4 - Alert on failure
■ 5 - Block
freq_code INTEGER NOT NULL Number of the statements that this record represents.
■ In log all mode, the value is 1, because each statement is logged separately.
■ In log unique mode, the value is 1, because only the first occurrence with the unique combination of user name, IP address and cluster is logged.
■ In log sample mode, the value can be greater than 1.
cluster_id INTEGER NOT NULL Global ID of the cluster associated with the statement
Table A–16 (Cont.) traffic_log_query_results Table
Column Datatype NULL Description
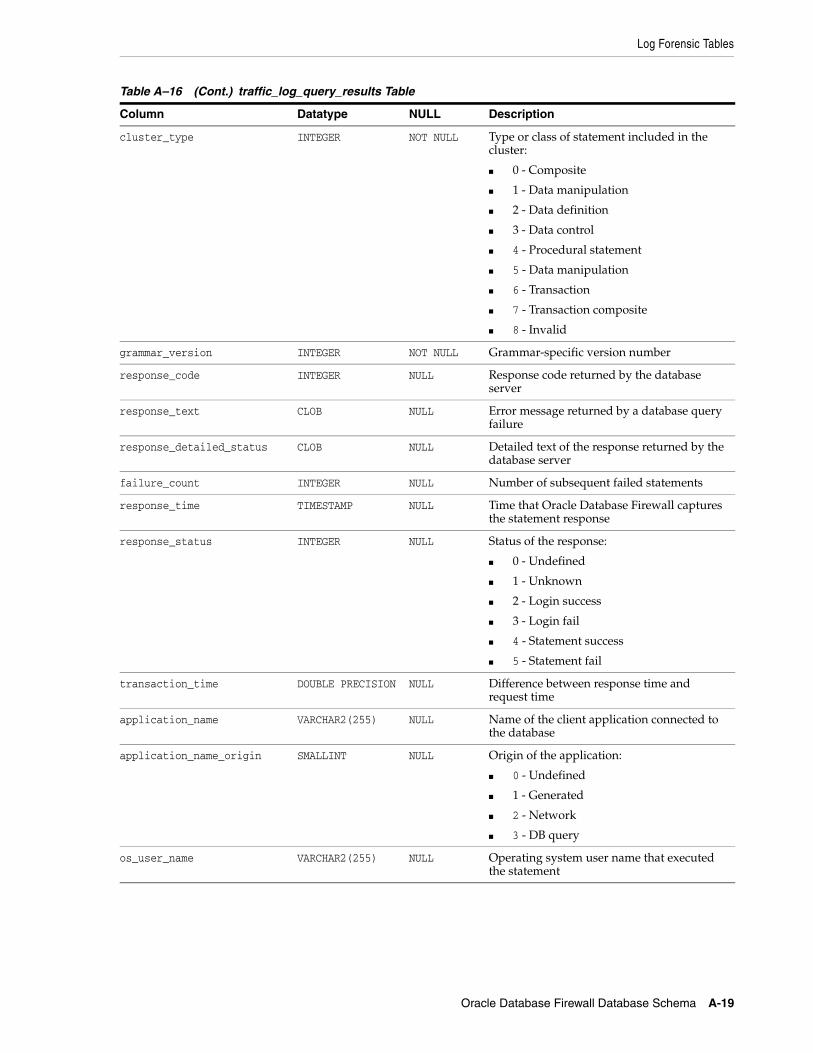
Log Forensic Tables
Oracle Database Firewall Database Schema A-19
cluster_type INTEGER NOT NULL Type or class of statement included in the cluster:
■ 0 - Composite
■ 1 - Data manipulation
■ 2 - Data definition
■ 3 - Data control
■ 4 - Procedural statement
■ 5 - Data manipulation
■ 6 - Transaction
■ 7 - Transaction composite
■ 8 - Invalid
grammar_version INTEGER NOT NULL Grammar-specific version number
response_code INTEGER NULL Response code returned by the database server
response_text CLOB NULL Error message returned by a database query failure
response_detailed_status CLOB NULL Detailed text of the response returned by the database server
failure_count INTEGER NULL Number of subsequent failed statements
response_time TIMESTAMP NULL Time that Oracle Database Firewall captures the statement response
response_status INTEGER NULL Status of the response:
■ 0 - Undefined
■ 1 - Unknown
■ 2 - Login success
■ 3 - Login fail
■ 4 - Statement success
■ 5 - Statement fail
transaction_time DOUBLE PRECISION NULL Difference between response time and request time
application_name VARCHAR2(255) NULL Name of the client application connected to the database
application_name_origin SMALLINT NULL Origin of the application:
■ 0 - Undefined
■ 1 - Generated
■ 2 - Network
■ 3 - DB query
os_user_name VARCHAR2(255) NULL Operating system user name that executed the statement
Table A–16 (Cont.) traffic_log_query_results Table
Column Datatype NULL Description

Log Forensic Tables
A-20 Oracle Database Firewall Administration Guide
os_user_name_origin SMALLINT NULL Origin of the operating system user:
■ 0 - Undefined
■ 1 - Generated
■ 2 - Network
■ 3 - DB query
attr_f5_request CLOB NULL Full HTTP request, including POST data
Note: This and the remaining fields in this table are relevant to the F5 BIG-IP ASM integration only. See Appendix 11, "Using Oracle Database Firewall with BIG-IP ASM," for more information.
attr_f5_headers CLOB NULL HTTP request
attr_f5_response_code CLOB NULL HTTP response code
attr_f5_method CLOB NULL HTTP request method
attr_f5_protocol CLOB NULL Request protocol
attr_f5_uri CLOB NULL Requested resource
attr_f5_query_string CLOB NULL Part of the URL containing request parameters sent using the GET method
attr_f5_ip VARCHAR2(15) NULL Web client IP address
attr_f5_web_application_name
VARCHAR2(64) NULL Web application name
attr_f5_violations CLOB NULL Identified WAF violations
attr_f5_unit_hostname VARCHAR2(64) NULL Name of the WAF box
attr_f5_management_ip_address
VARCHAR2(15) NULL IP address of the WAF management interface
attr_f5_policy_name VARCHAR2(128) NULL WAF policy name
attr_f5_policy_apply_date TIMESTAMP NULL The time when the policy was applied
attr_f5_x_forwarded_for_header_value
CLOB NULL List of IP addresses provided by X-FORWARDED-FOR field in HTTP request.
attr_f5_support_id VARCHAR2(20) NULL Unique ID of the event in the WAF system
attr_f5_request_blocked CHAR (ONLY:'0','1')
NULL Set to 1 if the HTTP request was blocked
attr_f5_web_username VARCHAR2(128) NULL Name of the Web user
attr_f5_authentication_method
CLOB NULL Session authentication method
attr_f5_referer CLOB NULL HTTP referrer
attr_f5_web_host VARCHAR2(256) NULL Web application server name
attr_f5_user_agent VARCHAR2(1024) NULL HTTP user agent
attr_f5_cardinal_ip VARCHAR2(15) NULL IP address derived from attr_f5_ip and attr_f5_x_forwarded_for_header_value
attr_f5_primary_violation VARCHAR2(64) NULL Violation from attr_f5_violations that have the highest priority
Table A–16 (Cont.) traffic_log_query_results Table
Column Datatype NULL Description

Stored Procedure and User Role Audit Tables
Oracle Database Firewall Database Schema A-21
Stored Procedure and User Role Audit TablesThis section contains:
■ About the Stored Procedure and User Role Audit Tables
■ doa_approved_edits Table
■ doa_approved_objects Table
■ doa_edit_comments Table
■ doa_edits Table
■ doa_pending_approvals Table
■ doa_tag_definitions Table
About the Stored Procedure and User Role Audit TablesThe database object auditing tables contain information about the stored procedures and user roles collected by the stored procedure auditing and user role auditing functions.
To find reports that describe the information captured in the Stored Procedure and User Role Audit tables:
1. Log in to the standalone Database Firewall or Management Server Administration Console.
See "Logging in to the Administration Console" on page 1-7 for more information.
2. Select the Reporting tab.
3. Do one of the following:
■ For stored procedure auditing, select from the Stored Procedure Auditing menu.
For more information, see Oracle Database Firewall Security Guide.
■ For user role auditing, select from the User Role Auditing menu.
For more information, see Oracle Database Firewall Security Guide.
attr_f5_session_cookies CLOB NULL Contains all the session cookies sent with the HTTP request
attr_f5_match_result CLOB Match result may be one of:
■ PolicyConflict
■ PolicyConfirmed
■ WAFBlocked
■ NoMatchDataMasked
■ NoMatch
attr_f5_match_tokens CLOB NULL List of matched tokens
Table A–16 (Cont.) traffic_log_query_results Table
Column Datatype NULL Description

Stored Procedure and User Role Audit Tables
A-22 Oracle Database Firewall Administration Guide
doa_approved_edits TableTable A–17 provides details about each set of changes to an object (stored procedure or user role) that have been approved. This information is used for user role auditing and stored procedure auditing.
Table A–17 doa_approved_edits Table
Column Datatype NULL Description
id INTEGER NOT NULL Unique ID of the monitoring point auditing this object
source_id INTEGER NOT NULL ID of the enforcement point monitoring the object
database_id INTEGER NULL ID of the protected database
object_type INTEGER NOT NULL Object type:
■ 0 - Undefined
■ 1 - Stored procedure
■ 2 - User
object_subtype INTEGER NOT NULL Object subtype:
■ 0 - Undefined
■ 1 - Procedure
■ 2 - Function
■ 3 - Trigger
■ 4 - Package
■ 5 - Package body
■ 6 - Java source
■ 7 - Extended procedure
■ 8 - Scalar function
■ 9 - Inline table function
■ 10 - Replication filter
■ 11 - Table function
object_class INTEGER NOT NULL Object class:
■ 0 - Undefined
■ 1 - System
■ 2 - User
name VARCHAR2(1024) NOT NULL Name of the object
tags VARCHAR2(2048) NULL Tags associated with the object
changes_summary VARCHAR2(255) NULL Contains a summary of the set of changes approved (for example: 3 modifications). This is a copy of the value from doa_pending_approvals (Table A–21).
changed_by VARCHAR2(2048) NULL Comma-separated list of the names of the database users who were responsible for the modifications (copy of the value from doa_pending_approvals (Table A–21
last_changed_at VARCHAR2(2048) NULL The date and time when the object was changed
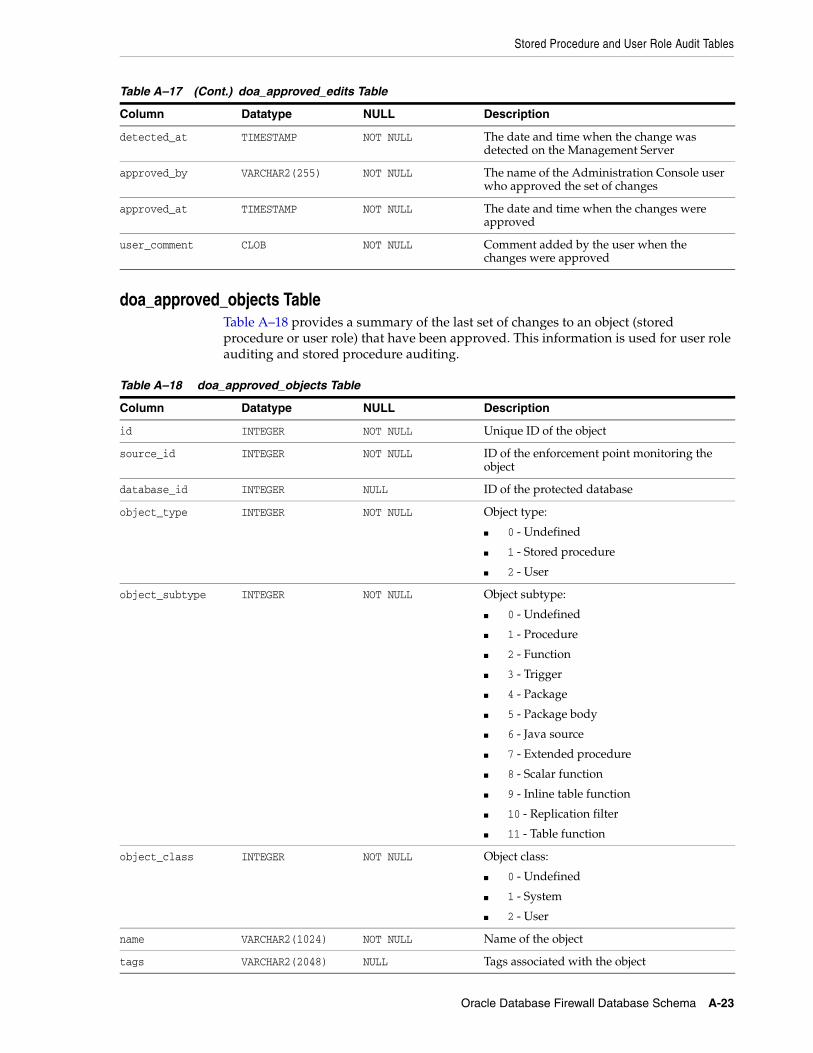
Stored Procedure and User Role Audit Tables
Oracle Database Firewall Database Schema A-23
doa_approved_objects TableTable A–18 provides a summary of the last set of changes to an object (stored procedure or user role) that have been approved. This information is used for user role auditing and stored procedure auditing.
detected_at TIMESTAMP NOT NULL The date and time when the change was detected on the Management Server
approved_by VARCHAR2(255) NOT NULL The name of the Administration Console user who approved the set of changes
approved_at TIMESTAMP NOT NULL The date and time when the changes were approved
user_comment CLOB NOT NULL Comment added by the user when the changes were approved
Table A–18 doa_approved_objects Table
Column Datatype NULL Description
id INTEGER NOT NULL Unique ID of the object
source_id INTEGER NOT NULL ID of the enforcement point monitoring the object
database_id INTEGER NULL ID of the protected database
object_type INTEGER NOT NULL Object type:
■ 0 - Undefined
■ 1 - Stored procedure
■ 2 - User
object_subtype INTEGER NOT NULL Object subtype:
■ 0 - Undefined
■ 1 - Procedure
■ 2 - Function
■ 3 - Trigger
■ 4 - Package
■ 5 - Package body
■ 6 - Java source
■ 7 - Extended procedure
■ 8 - Scalar function
■ 9 - Inline table function
■ 10 - Replication filter
■ 11 - Table function
object_class INTEGER NOT NULL Object class:
■ 0 - Undefined
■ 1 - System
■ 2 - User
name VARCHAR2(1024) NOT NULL Name of the object
tags VARCHAR2(2048) NULL Tags associated with the object
Table A–17 (Cont.) doa_approved_edits Table
Column Datatype NULL Description
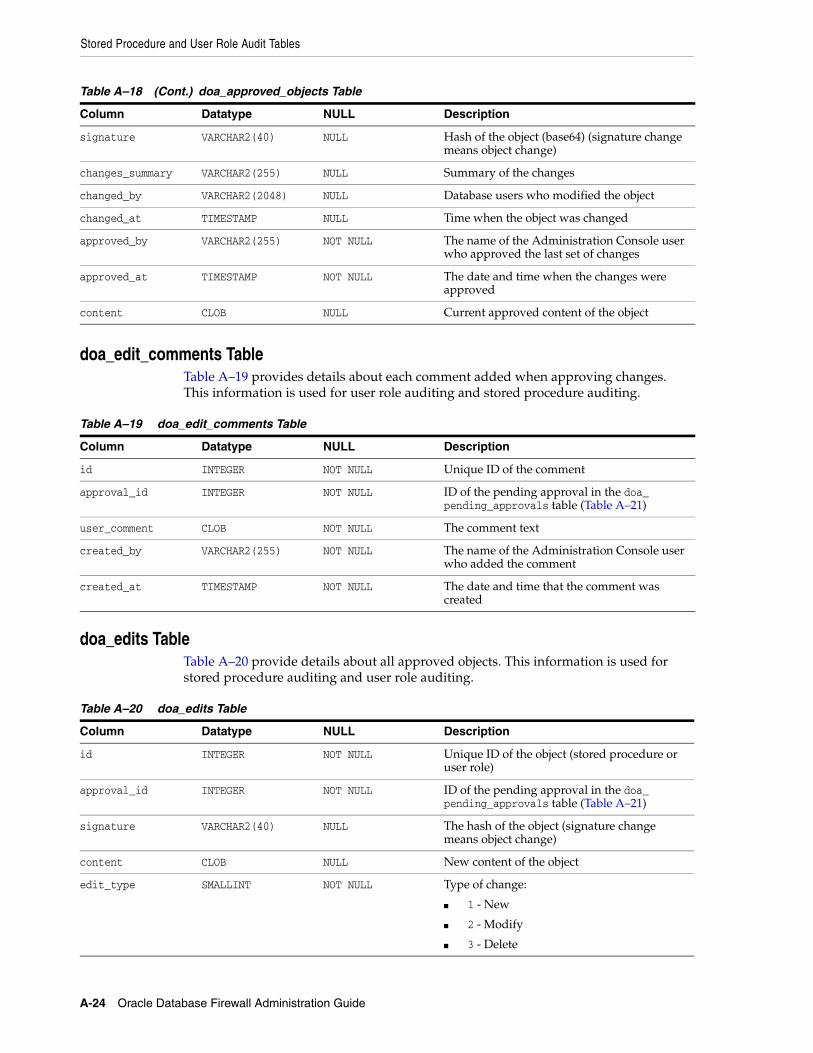
Stored Procedure and User Role Audit Tables
A-24 Oracle Database Firewall Administration Guide
doa_edit_comments TableTable A–19 provides details about each comment added when approving changes. This information is used for user role auditing and stored procedure auditing.
doa_edits TableTable A–20 provide details about all approved objects. This information is used for stored procedure auditing and user role auditing.
signature VARCHAR2(40) NULL Hash of the object (base64) (signature change means object change)
changes_summary VARCHAR2(255) NULL Summary of the changes
changed_by VARCHAR2(2048) NULL Database users who modified the object
changed_at TIMESTAMP NULL Time when the object was changed
approved_by VARCHAR2(255) NOT NULL The name of the Administration Console user who approved the last set of changes
approved_at TIMESTAMP NOT NULL The date and time when the changes were approved
content CLOB NULL Current approved content of the object
Table A–19 doa_edit_comments Table
Column Datatype NULL Description
id INTEGER NOT NULL Unique ID of the comment
approval_id INTEGER NOT NULL ID of the pending approval in the doa_pending_approvals table (Table A–21)
user_comment CLOB NOT NULL The comment text
created_by VARCHAR2(255) NOT NULL The name of the Administration Console user who added the comment
created_at TIMESTAMP NOT NULL The date and time that the comment was created
Table A–20 doa_edits Table
Column Datatype NULL Description
id INTEGER NOT NULL Unique ID of the object (stored procedure or user role)
approval_id INTEGER NOT NULL ID of the pending approval in the doa_pending_approvals table (Table A–21)
signature VARCHAR2(40) NULL The hash of the object (signature change means object change)
content CLOB NULL New content of the object
edit_type SMALLINT NOT NULL Type of change:
■ 1 - New
■ 2 - Modify
■ 3 - Delete
Table A–18 (Cont.) doa_approved_objects Table
Column Datatype NULL Description
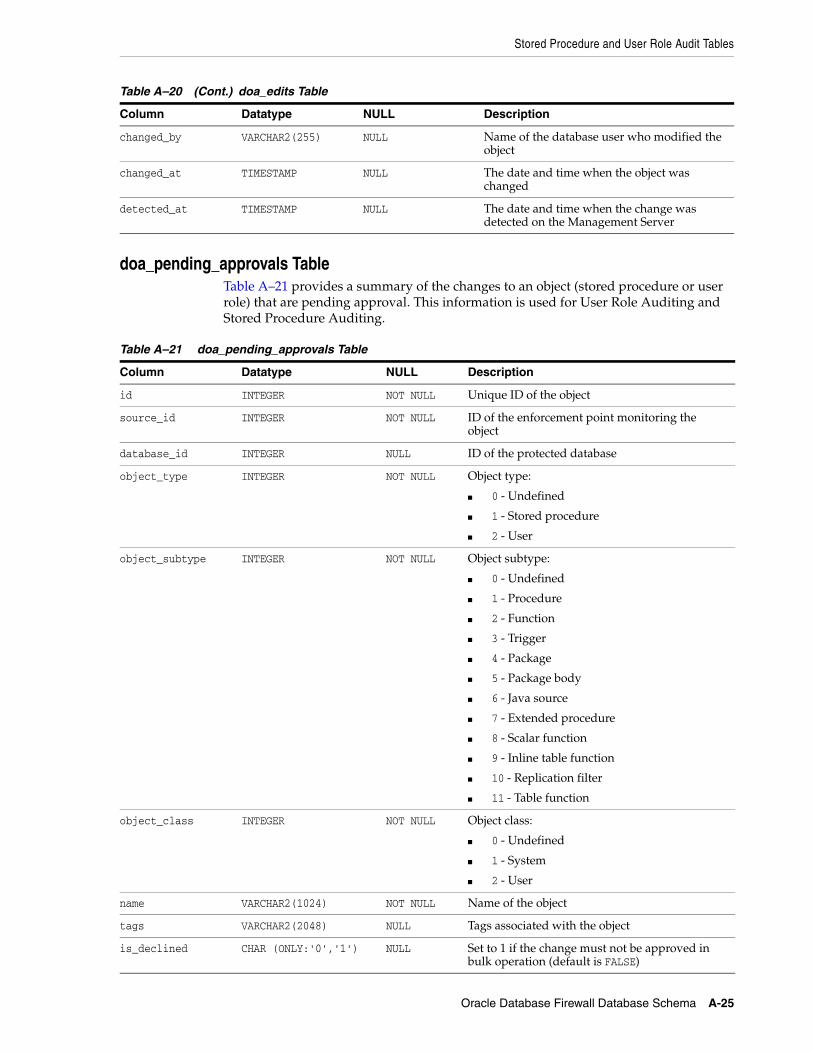
Stored Procedure and User Role Audit Tables
Oracle Database Firewall Database Schema A-25
doa_pending_approvals TableTable A–21 provides a summary of the changes to an object (stored procedure or user role) that are pending approval. This information is used for User Role Auditing and Stored Procedure Auditing.
changed_by VARCHAR2(255) NULL Name of the database user who modified the object
changed_at TIMESTAMP NULL The date and time when the object was changed
detected_at TIMESTAMP NULL The date and time when the change was detected on the Management Server
Table A–21 doa_pending_approvals Table
Column Datatype NULL Description
id INTEGER NOT NULL Unique ID of the object
source_id INTEGER NOT NULL ID of the enforcement point monitoring the object
database_id INTEGER NULL ID of the protected database
object_type INTEGER NOT NULL Object type:
■ 0 - Undefined
■ 1 - Stored procedure
■ 2 - User
object_subtype INTEGER NOT NULL Object subtype:
■ 0 - Undefined
■ 1 - Procedure
■ 2 - Function
■ 3 - Trigger
■ 4 - Package
■ 5 - Package body
■ 6 - Java source
■ 7 - Extended procedure
■ 8 - Scalar function
■ 9 - Inline table function
■ 10 - Replication filter
■ 11 - Table function
object_class INTEGER NOT NULL Object class:
■ 0 - Undefined
■ 1 - System
■ 2 - User
name VARCHAR2(1024) NOT NULL Name of the object
tags VARCHAR2(2048) NULL Tags associated with the object
is_declined CHAR (ONLY:'0','1') NULL Set to 1 if the change must not be approved in bulk operation (default is FALSE)
Table A–20 (Cont.) doa_edits Table
Column Datatype NULL Description
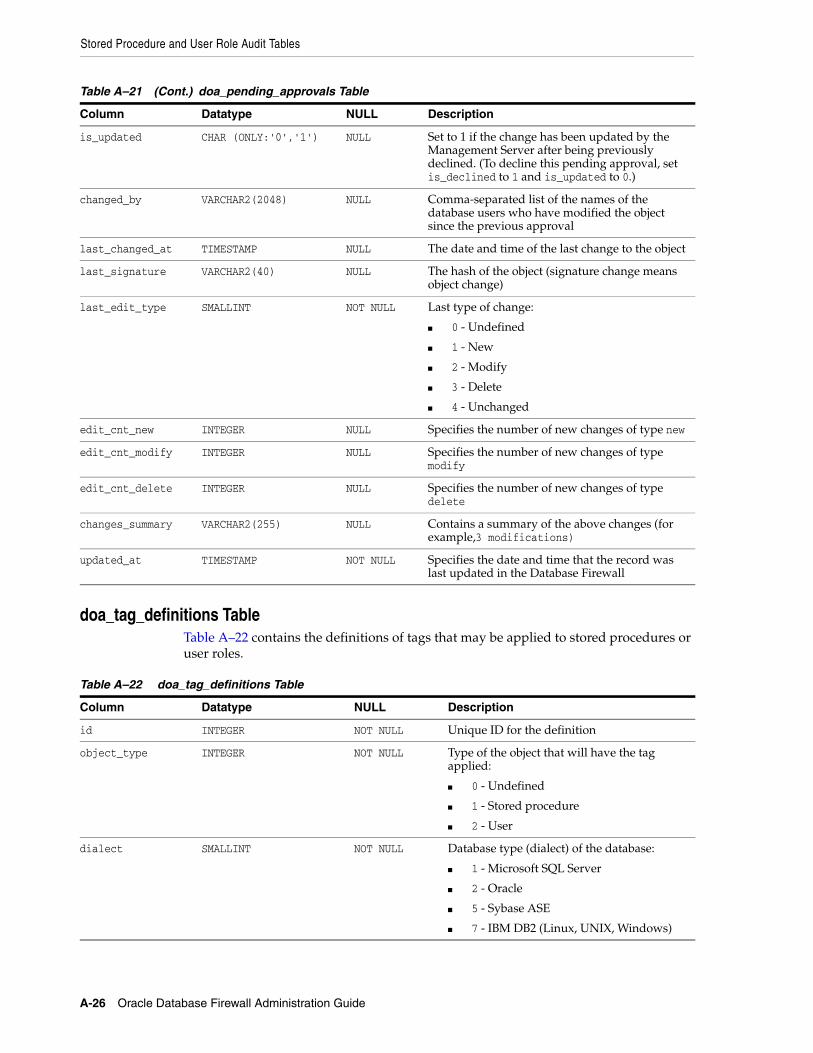
Stored Procedure and User Role Audit Tables
A-26 Oracle Database Firewall Administration Guide
doa_tag_definitions TableTable A–22 contains the definitions of tags that may be applied to stored procedures or user roles.
is_updated CHAR (ONLY:'0','1') NULL Set to 1 if the change has been updated by the Management Server after being previously declined. (To decline this pending approval, set is_declined to 1 and is_updated to 0.)
changed_by VARCHAR2(2048) NULL Comma-separated list of the names of the database users who have modified the object since the previous approval
last_changed_at TIMESTAMP NULL The date and time of the last change to the object
last_signature VARCHAR2(40) NULL The hash of the object (signature change means object change)
last_edit_type SMALLINT NOT NULL Last type of change:
■ 0 - Undefined
■ 1 - New
■ 2 - Modify
■ 3 - Delete
■ 4 - Unchanged
edit_cnt_new INTEGER NULL Specifies the number of new changes of type new
edit_cnt_modify INTEGER NULL Specifies the number of new changes of type modify
edit_cnt_delete INTEGER NULL Specifies the number of new changes of type delete
changes_summary VARCHAR2(255) NULL Contains a summary of the above changes (for example,3 modifications)
updated_at TIMESTAMP NOT NULL Specifies the date and time that the record was last updated in the Database Firewall
Table A–22 doa_tag_definitions Table
Column Datatype NULL Description
id INTEGER NOT NULL Unique ID for the definition
object_type INTEGER NOT NULL Type of the object that will have the tag applied:
■ 0 - Undefined
■ 1 - Stored procedure
■ 2 - User
dialect SMALLINT NOT NULL Database type (dialect) of the database:
■ 1 - Microsoft SQL Server
■ 2 - Oracle
■ 5 - Sybase ASE
■ 7 - IBM DB2 (Linux, UNIX, Windows)
Table A–21 (Cont.) doa_pending_approvals Table
Column Datatype NULL Description
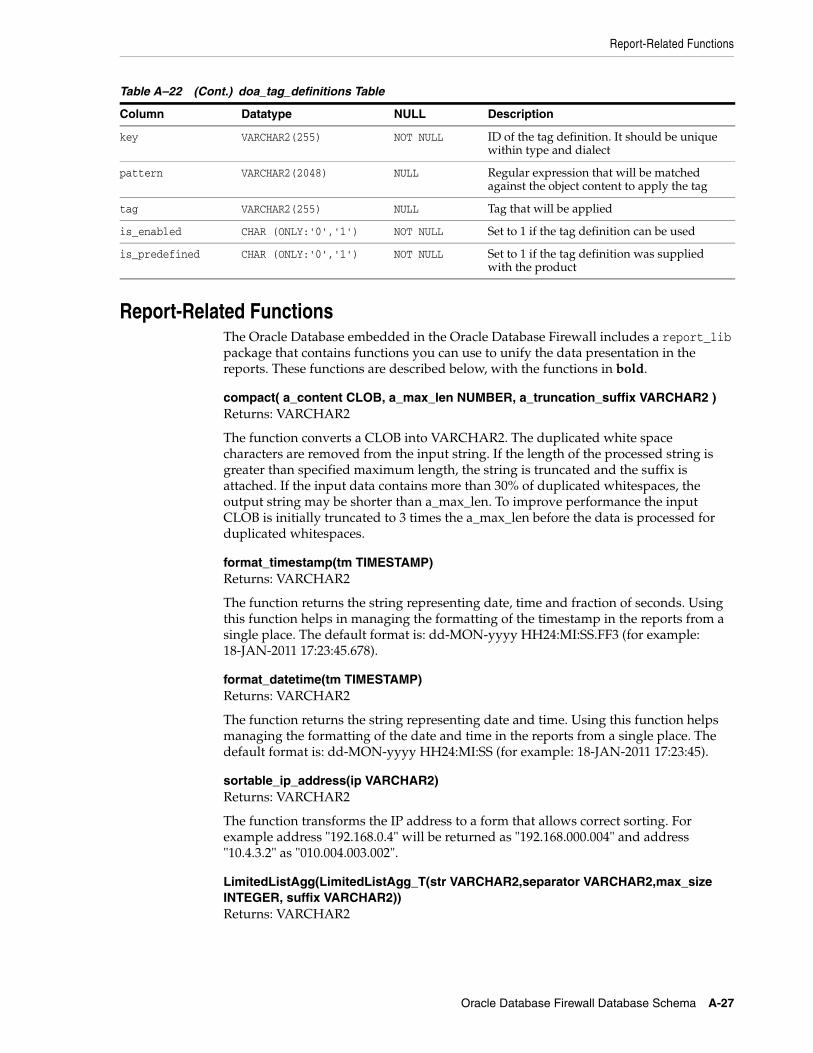
Report-Related Functions
Oracle Database Firewall Database Schema A-27
Report-Related FunctionsThe Oracle Database embedded in the Oracle Database Firewall includes a report_lib package that contains functions you can use to unify the data presentation in the reports. These functions are described below, with the functions in bold.
compact( a_content CLOB, a_max_len NUMBER, a_truncation_suffix VARCHAR2 ) Returns: VARCHAR2
The function converts a CLOB into VARCHAR2. The duplicated white space characters are removed from the input string. If the length of the processed string is greater than specified maximum length, the string is truncated and the suffix is attached. If the input data contains more than 30% of duplicated whitespaces, the output string may be shorter than a_max_len. To improve performance the input CLOB is initially truncated to 3 times the a_max_len before the data is processed for duplicated whitespaces.
format_timestamp(tm TIMESTAMP)Returns: VARCHAR2
The function returns the string representing date, time and fraction of seconds. Using this function helps in managing the formatting of the timestamp in the reports from a single place. The default format is: dd-MON-yyyy HH24:MI:SS.FF3 (for example: 18-JAN-2011 17:23:45.678).
format_datetime(tm TIMESTAMP)Returns: VARCHAR2
The function returns the string representing date and time. Using this function helps managing the formatting of the date and time in the reports from a single place. The default format is: dd-MON-yyyy HH24:MI:SS (for example: 18-JAN-2011 17:23:45).
sortable_ip_address(ip VARCHAR2)Returns: VARCHAR2
The function transforms the IP address to a form that allows correct sorting. For example address "192.168.0.4" will be returned as "192.168.000.004" and address "10.4.3.2" as "010.004.003.002".
LimitedListAgg(LimitedListAgg_T(str VARCHAR2,separator VARCHAR2,max_size INTEGER, suffix VARCHAR2))Returns: VARCHAR2
key VARCHAR2(255) NOT NULL ID of the tag definition. It should be unique within type and dialect
pattern VARCHAR2(2048) NULL Regular expression that will be matched against the object content to apply the tag
tag VARCHAR2(255) NULL Tag that will be applied
is_enabled CHAR (ONLY:'0','1') NOT NULL Set to 1 if the tag definition can be used
is_predefined CHAR (ONLY:'0','1') NOT NULL Set to 1 if the tag definition was supplied with the product
Table A–22 (Cont.) doa_tag_definitions Table
Column Datatype NULL Description

Report-Related Functions
A-28 Oracle Database Firewall Administration Guide
The aggregate function is located outside the report_lib package and is a standalone function. It concatenates the input strings using the separator. If the output string exceeds the requested limit, the result is truncated and the suffix is added.
Usage example:
SELECT LimitedListAgg(LimitedListAgg_T (data_column,',',200,'...[TRUNCATED]')) FROM table_name

B
Syslog Message Format B-1
BSyslog Message Format
This appendix contains:
■ About Syslog Messages
■ Message Format
About Syslog MessagesThe syslog message format is consistent with generally-accepted industry practices outlined in RFC 3164.
This appendix describes the syslog messages that can be generated by Oracle Database Firewalls and Oracle Database Firewall Management Servers. The syslog messages include alerts, periodically-updated statistics and heartbeat messages. Oracle Database Firewall updates the syslog messages in real time.
If a protected database being monitored receives more than 1000 alerts in one minute, subsequent alerts are not shown in the syslog messages. In this event, the following message is written to the syslog,:
WARN - More than 1000 alerts in the last minute. Subsequent alerts will not be processed.
Message FormatThe syslog message format is as follows.
message = date time hostname source num: DBFW:id message_text
In this specification:
■ message is the syslog message. The data up to the first colon is the message header; the data after the first colon is the message body. The text "DBFW" in the message body indicates that the syslog message is from Oracle Database Firewall. The maximum length of message is 1024 bytes.
■ date is the date the message was generated.
■ time is the date the message was generated.
■ hostname is the host name of the system that generated the message.
■ source is "DBFW", except for DBFW:8 where it is "dbaudit".
■ num is the instance number of the enforcement point that generated the message.

Message Format
B-2 Oracle Database Firewall Administration Guide
■ id is the message identifier, in the range 1 to 12.This specifies the type of message described by message_text. The meaning of each message identifier is described in the following sections.
■ message_text is the message text, which depends on the type of message.
For example:
Aug 15 11:02:57 DBFW DBFW1: DBFW:1 Configuration file reloaded
The maximum size of a DBFW syslog message is 2kB.
Message ID = 1 (General Messages)Message identifier 1 is used for general messages, such as Configuration file reloaded.
Message ID = 3 (Heartbeat)Message identifier 3 is for the heartbeat message, which is sent by the Oracle Database Firewall to indicate that it is operating and to provide current counters of the number of statements that have been passed, blocked, etc. The message text contains a number of fields, separated by spaces:
message_text = timestamp known_blocked known_warned known_passed unseen_blocked unseen_warned unseen_passed reset_time resilience_mode
For example:
Aug 15 11:02:57 DBFW DBFW1: DBFW:3 1147344001.516 0 0 0 6067 0 0 1147367001.097 0
In this specification:
■ timestamp is the time the alert occurred. This time is represented as the number of seconds since 1st January 1970 00:00:00 UTC, in the format sec.msec. The sec value is the number of whole seconds, and msec is the fractional part in milliseconds.
■ known_blocked is an integer that specifies the number of known statements that have been blocked since monitoring started.
■ known_warned is an integer that specifies the number of known statements that have generated a warning since monitoring started.
■ known_passed is an integer that specifies the number of known statements that have been passed since monitoring started.
■ unseen_blocked is an integer that specifies the number of previously unseen statements that have been blocked since monitoring started.
■ unseen_warned is an integer that specifies the number of previously unseen statements that have generated a warning since monitoring started.
■ unseen_passed is an integer that specifies the number of previously unseen statements that have been passed since monitoring started.
■ reset_time is the number of seconds between 1st January 1970 and the time the counters were last reset, in the format sec.msec. The sec value is the number of whole seconds, and msec is the fractional part in milliseconds.
■ resilience_mode is an integer that specifies whether the device is currently the active device in a resilient set (0), or currently a passive device (1). If the device is

Message Format
Syslog Message Format B-3
not in a resilient set, the value is 0. This setting should always be 0 in the current version ofOracle Database Firewall.
Message ID = 4 (Property Change)Message identifier 4 is used for messages that indicate a change in the value of a property at the device, such as a change in the baseline used or a change in the IP address. The message text contains a number of fields, separated by spaces:
message_text = timestamp category name value comment
For example:
Aug 15 11:02:57 DBFW DBFW1: DBFW:4 1147344001.516 "category" "name" "value" "My comment is %22Hello World%22"
In this specification:
■ timestamp is the time the alert occurred. This time is represented as the number of seconds since 1st January 1970 00:00:00 UTC, in the format sec.msec. The sec value is the number of whole seconds, and msec is the fractional part in milliseconds.
■ category indicates the general type of change that has been made, enclosed in quotation marks. The string can contain a maximum of 30 characters. Quotation mark ("), percent (%) and any characters with an ASCII value of less than 32 or greater than 126 are hexadecimal encoded (for example, %22 is used for quotation marks).
■ name is the name of the property, enclosed in quotation marks (30 characters max.). Hexadecimal encoding is the same as category.
■ value is the new value of the property, enclosed in quotation marks (30 characters max.). Hexadecimal encoding is the same as category.
■ comment is a comment added by the person who made the change, enclosed in quotation marks (30 characters max.). Hexadecimal encoding is the same as category.
Message ID = 8 (Database Audit Summary)This message is sent when a Stored Procedure Audit or User Role Audit has completed (see Chapter 5, "Configuring Stored Procedure Auditing," and Chapter 6, "Configuring and Using Role Auditing," respectively).
message_text = object_type type_of_scan audit_completion_flag target_database database_type protected_database audit_start_time object_collected_time audit_end_time database_counter database_object_counter new_counter modified_counter deleted counter unchanged_counter
For example:
Aug 15 11:02:57 multi000c2937e324 dbaudit1: DBFW:8 1 1 1 "192.168.0.57:5000/" 5 "test_pdb" 2009-03-24T11:59:59.123 2009-03-24T11:59:59.777 2009-03-24T11:59:59.801 15 2234 1000 0 0 1234
In this specification:
■ object_type is 1 for stored procedure and 2 for user roles.
■ type_of_scan is 0 for manual scan and 2 for scheduled scan.
■ audit_completion_flag is 0 for failure and 1 for success.

Message Format
B-4 Oracle Database Firewall Administration Guide
■ target_database is the connection string for audited database.
■ database_type is 1 for Microsoft SQL Server, 2 for Oracle, 5 for Sybase ASE and 6 for Sybase SQL Anywhere.
■ protected_database is the protected database name (as it appears in the Administration Console.
■ audit_start_time is the time when the audit started.
■ object_collected_time is the time when all information had been collected from the database.
■ audit_end_time is the time when the audit finished.
■ database_counter is the number of databases found and interrogated.
■ database_object_counter is the number of objects found (in the complete set of databases) in this scan.
■ new_counter is the number of objects created since the previous scan.
■ modified_counter is the number of objects modified since the previous scan.
■ deleted_counter is the number of objects deleted since the previous scan.
■ unchanged_counter is the number of objects unchanged since the previous scan.
Message ID = 9 (Statement Alerts)Message identifier 9 indicates a message resulting from a specific action that Oracle Database Firewall has taken after receiving an SQL statement. The message text contains a number of fields, separated by spaces:
message_text = action timestamp cluster_id threat_severity logging_level db_client_ip db_client_port db_server_ip db_server_port user_name database_name statement_id event_status database_status_code database_status_detail database_response_text statement
For example:
Nov 9 15:02:56 multi000c29198b62 DBFW1: DBFW:9 2 1257778976.429 4 4 3 "192.168.100.99" 1138 "192.168.100.100" 5000 "sa" "" 4af82f20df900003 2 14216 "Severity: 16" "Function 'db_property' not found." "SELECT db_property('name')"
In this specification:
■ action is one of the following: 1 = known blocked; 2 = known alerted; 3 = unknown blocked; 4 = unknown alerted.
■ timestamp is the time the alert occurred. This time is represented as the number of seconds since 1st January 1970 00:00:00 UTC, in the format sec.msec. The sec value is the number of whole seconds, and msec is the fractional part in milliseconds.
■ cluster_id is an integer that specifies the id of the cluster the statement belongs to.
■ threat_severity is an integer in the range 0 to 5 that specifies the threat severity of the message. The value 5 is the most severe.
■ logging_level is an integer in the range 1 to 5 that specifies the logging of the message: 1 = do not log; 2 = log sample; 3 = always log; 5 = log unique.
■ db_client_ip is the IP address of the client that sent the message, enclosed in quotation marks.

Message Format
Syslog Message Format B-5
■ db_client_port is an integer that specifies the port number of the database client that originated the statement.
■ db_server_ip is the IP address of the database server, enclosed in quotation marks.
■ db_server_port is an integer that specifies the port number of the database management system.
■ user_name is the database user associated with the session in which the alerting statement occurred. It is enclosed in quotation marks and uses the same hexadecimal encoding as statement.
■ database_name is the name of the database associated with the session in which the alerting statement occurred. It is enclosed in quotation marks and uses the same hexadecimal encoding as statement.
■ statement_id is a unique hexadecimal number for the monitored SQL statement.
■ event_status is an integer that gives the database response (see Chapter 10, "Configuring and Using Database Response Monitoring") to the statement: 1 = success; 2 = failure; 3 = database response monitoring switched off; 4 = response not seen.
■ database_status_code is an integer that gives the status code returned by the database. This applies only if database response monitoring is switched on.
■ database_status_detail is the detailed response string returned from the database (such as database status codes and severity of the error). It is enclosed in quotation marks and uses the same hexadecimal encoding as statement.
■ database_response_text is the response string returned from the database (the text intended for the database client). It is enclosed in quotation marks and uses the same hexadecimal encoding as statement.
■ statement is the statement that caused the alert, enclosed in quotation marks (UTF-8 encoded). The string may be truncated to contain a maximum of 1024 characters (including a final ...", if necessary). Backslash (\) characters are preceded by an additional backslash (\\). Quotation marks (") are preceded by a backslash (\"). Character codes with a hexadecimal value of 00 to 1f are replaced by the string "\x00" to "\x1f". The character with a hexadecimal value of 7f is replaced by "\x7f".
Message ID = 10 (F5 BIG-IP ASM Alerts)Message identifier 10 indicates a message resulting from alerts from the F5 BIG-IP ASM Web application firewall and database response information. The message text contains a number of fields, separated by spaces:
message_text = action timestamp cluster_id threat_severity logging_level db_client_ip db_client_port db_server_ip db_server_port user_name database_name statement_id event_status database_status_code database_status_detail database_response_text web_user_name request response_code method protocol URL query_string web_application_name unit_host_name management_IP_address policy_name policy_apply_date support_id request_blocked session_cookies referrer http_host http_user_agent primary_violation cardinal_ip_address match_result statement
For example:
Nov 9 16:02:32 multi000c29198b62 DBFW1: DBFW:10 2 1257782551.757 9 4 3 "192.168.100.99" 1138 "192.168.100.100" 5000 "sa" "" 4af83d17f9200006 1 0 "" "" "Unknown_2" "GET /SearcStr.asp?txtSrc=CLASS+%27+or+1%3D1--+

Message Format
B-6 Oracle Database Firewall Administration Guide
HTTP/1.1\x0d\x0aAccept: image/gif, image/x-xbitmap, image/jpeg, image/pjpeg, application/x-shockwave-flash, */*\x0d\x0aReferer: http://10.190.0.203/SearcStr.asp?txtSrc=GEEZER+%27+or+1%3D1--+\x0d\x0aAccept-Language: en-gb\x0d\x0aUA-CPU: x86\x0d\x0aAccept-Encoding: gzip, deflate\x0d\x0aUser-Agent: Mozilla/4.0 (compatible; MSIE 7.0; Windows NT 5.1)\x0d\x0aHost: 10.190.0.203\x0d\x0aConnection: Keep-Alive\x0d\x0aCookie: A-P$X123=123abc4561\x0d\x0a\x0d\x0a" "200" "GET" "HTTP" "/SearcStr.asp" "TaskIndex=3&TaskHTML=CACancelNoFields&TaskSectionReference=&TaskStreamType=Rule-Obj-FlowAction&TaskStatus=CAEndInteraction&TaskInstructions=&TaskHelpPresent=false&TaskHelpType=&TaskInstructionsCaption=Instructions&%24PpyWorkPage%24pCancelNotes=%27+or+1%3D1%0D%0A%3Ch1%3E+Hello+%3C%2Fh1%3E&fred=sp_jdbc_getcatalogs" "toolshed_class" "BIGIPASM01.SomeDomain.COM" "192.168.0.178" "toolshed_policy" "2008-10-10 16:02:59" "3776479346538055214" "" "" "http://10.190.0.203/SearcStr.asp?txtSrc=GEEZER+%27+or+1%3D1--+" "10.190.0.203" "Mozilla/4.0 (compatible; MSIE 7.0; Windows NT 5.1)" "Illegal meta character in parameter value" "10.190.0.3" "2" "rpc sp_jdbc_getcatalogs"
In this specification:
■ action is one of the following: 1 = known blocked; 2 = known alerted; 3 = unknown blocked; 4 = unknown alerted; 5 = known passed; 6 = unknown passed.
■ timestamp is the time the alert occurred. This time is represented as the number of seconds since 1st January 1970 00:00:00 UTC, in the format sec.msec. The sec value is the number of whole seconds, and msec is the fractional part in milliseconds.
■ cluster_id is an integer that specifies the id of the cluster the statement belongs to.
■ threat_severity is an integer in the range 0 to 5 that specifies the threat severity of the message. The value 5 is the most severe.
■ logging_level is an integer in the range 1 to 5 that specifies the logging of the message: 1 = do not log; 2 = log sample; 3 = always log; 5 = log unique.
■ db_client_ip is the IP address of the client that sent the message, enclosed in quotation marks.
■ db_client_port is an integer that specifies the port number of the database client that originated the statement.
■ db_server_ip is the IP address of the database server, enclosed in quotation marks.
■ db_server_port is an integer that specifies the port number of the database management system.
■ user_name is the database user associated with the session in which the alerting statement occurred. It is enclosed in quotation marks and uses the same hexadecimal encoding as statement.
■ database_name is the name of the database associated with the session in which the alerting statement occurred. It is enclosed in quotation marks and uses the same hexadecimal encoding as statement.
■ statement_id is a unique hexadecimal number for the statement.
■ event_status is an integer that gives the database response (see Chapter 10, "Configuring and Using Database Response Monitoring") to the statement: 1 = success; 2 = failure; 3 = database response monitoring switched off; 4 = response not seen.

Message Format
Syslog Message Format B-7
■ database_status_code is an integer that gives the status code returned by the database. This applies only if database response monitoring is switched on.
■ database_status_detail is the detailed response string returned from the database (such as database status codes and severity of the error). It is enclosed in quotation marks and uses the same hexadecimal encoding as statement.
■ database_response_text is the response string returned from the database (the text intended for the database client). It is enclosed in quotation marks and uses the same hexadecimal encoding as statement.
■ web_user_name is the name of the Web application user who originated the message, enclosed in quotation marks. Hexadecimal encoding is the same as statement. For more information refer to Understanding the Attributes in Chapter 11.
■ request is the BIG-IP ASM "request" attribute. It is enclosed in quotation marks and uses the same hexadecimal encoding as statement.
■ response_code is the BIG-IP ASM "response_code" attribute. It is enclosed in quotation marks and uses the same hexadecimal encoding as statement.
■ method is the BIG-IP ASM "method" attribute. It is enclosed in quotation marks and uses the same hexadecimal encoding as statement.
■ protocol is the BIG-IP ASM "protocol" attribute. It is enclosed in quotation marks and uses the same hexadecimal encoding as statement.
■ URL is the BIG-IP ASM "uri" attribute. It is enclosed in quotation marks and uses the same hexadecimal encoding as statement.
■ query_string is the BIG-IP ASM "query_string" attribute. It is enclosed in quotation marks and uses the same hexadecimal encoding as statement.
■ web_application_name is the name of the Web application, as obtained from the BIG-IP ASM "web_application_name" attribute. It is enclosed in quotation marks and uses the same hexadecimal encoding as statement.
■ unit_host_name is the BIG-IP ASM "unit_hostname" attribute. It is enclosed in quotation marks and uses the same hexadecimal encoding as statement.
■ management_IP_address is the BIG-IP ASM "management_ip_address" attribute, enclosed in quotation marks.
■ policy_name is the BIG-IP ASM "policy_name" attribute. It is enclosed in quotation marks and uses the same hexadecimal encoding as statement.
■ policy_apply_date is the BIG-IP ASM "policy_apply_date" attribute. It is enclosed in quotation marks and uses the same hexadecimal encoding as statement.
■ support_id is the BIG-IP ASM "support_id" attribute. It is enclosed in quotation marks and uses the same hexadecimal encoding as statement.
■ request_blocked is the BIG-IP ASM "request_blocked" attribute. It is enclosed in quotation marks and uses the same hexadecimal encoding as statement.
■ session_cookies provides the user-identification cookies, extracted from the header of the HTTP request. It is enclosed in quotation marks and uses the same hexadecimal encoding as statement.
■ referrer is the name of the referrer, extracted from the header of the HTTP request. It is enclosed in quotation marks and uses the same hexadecimal encoding as statement.

Message Format
B-8 Oracle Database Firewall Administration Guide
■ http_host is the host name, extracted from the header of the HTTP request. It is enclosed in quotation marks and uses the same hexadecimal encoding as statement.
■ http_user_agent is the name of the user agent, extracted from the header of the HTTP request. It is enclosed in quotation marks and uses the same hexadecimal encoding as statement.
■ primary_violation is the BIG-IP ASM violation associated with this statement, which the Database Firewall software believes is the most important. It is enclosed in quotation marks and uses the same hexadecimal encoding as statement.
■ cardinal_ip_address is the IP address that the Database Firewall software believes is the most important for client identification. The client HTTP request may have been forwarded several times through proxies.
■ match_result is an integer that indicates whether the BIG-IP ASM syslog message has been successfully matched with the SQL statement. 1 = Policy Conflict; 2 = Policy Confirmed; 3 = WAF Blocked request; 4 = No Match Data Masked by WAF; 5 = No match made. For further information, please refer to Understanding the Attributes in Chapter 11.
■ statement is the statement that caused the alert, enclosed in quotation marks and hex encoded in UTF-8. The string may be truncated to contain a maximum of 1024 characters (including a final ...", if necessary). Backslash (\) characters are preceded by an additional backslash (\\). Quotation marks (") are preceded by a backslash (\"). Character codes with a hexadecimal value of 00 to 1f are replaced by "\x00" to "\x1f".
Message ID = 11 (Login Alert)Message identifier 11 indicates that Oracle Database Firewall has identified a user login request. If database response monitoring is switched on (see Chapter 10, "Configuring and Using Database Response Monitoring"), the alert includes the database response information. The message text contains a number of fields, separated by spaces:
message_text = action timestamp threat_severity logging_level db_client_ip db_client_port db_server_ip db_server_port user_name database_name event_id connect_seen failure_threshold threshold_count event_status database_status_code database_status_detail database_response_text
For example:
Nov 9 16:21:18 multi000c29198b62 DBFW1: DBFW:11 2 1257783678.266 3 1 "192.168.100.99" 1137 "192.168.100.100" 5000 "sa" "" 4af8417e6e300001 1 0 0 2 4002 "Severity: 14" "Login failed.\x0a"
In this specification:
■ action is one of the following: 1 = no alert; 2 = always alert; 3 = alert on request success; 4 = alert on request failure; 5 = block request.
■ timestamp is the time the alert occurred. This time is represented as the number of seconds since 1st January 1970 00:00:00 UTC, in the format sec.msec. The sec value is the number of whole seconds, and msec is the fractional part in milliseconds.
■ threat_severity is an integer in the range 0 to 5 that specifies the threat severity of the message. The value 5 is the most severe.

Message Format
Syslog Message Format B-9
■ logging_level is an integer that specifies the logging of the message: 0 = do not log in traffic log; 1 = log in traffic log.
■ db_client_ip is the IP address of the client that sent the message, enclosed in quotation marks.
■ db_client_port is an integer that specifies the port number of the database client that originated the statement.
■ db_server_ip is the IP address of the database management system, enclosed in quotation marks.
■ db_server_port is an integer that specifies the port number of the database management system.
■ user_name is the database user associated with the session in which the alerting statement occurred. It is enclosed in quotation marks and uses the same hexadecimal encoding as statement.
■ database_name is the name of the database associated with the session in which the alerting statement occurred. It is enclosed in quotation marks and uses the same hexadecimal encoding as statement.
■ event_id is a unique hexadecimal number for the event.
■ connect_seen is an integer that specifies whether Oracle Database Firewall encountered a session connection for the session. 0 = connect not seen; 1 = connect seen.
■ failure_threshold is an integer that specifies the number of consecutive login failures that will trigger a change in policy (possibly to block logins).
■ threshold_count is an integer that specifies the current number of consecutive login failures.
■ event_status is an integer that gives the database response to the statement: 1 = success; 2 = failure; 3 = database response monitoring switched off; 4 = response not seen; 5 = request blocked.
■ database_status_code is an integer that gives the status code returned by the database.
■ database_status_detail is the detailed response string returned from the database (such as database status codes and severity of the error). It is enclosed in quotation marks and uses the same hexadecimal encoding as statement.
■ database_response_text is the response string returned from the database (the text intended for the database client). It is enclosed in quotation marks and uses the same hexadecimal encoding as statement.
Message ID = 12 (Logout Alert)Message identifier 12 indicates that Oracle Database Firewall has identified a user logout request. If database response monitoring is switched on (see Chapter 10, "Configuring and Using Database Response Monitoring"), the alert includes the database response information. The message text contains a number of fields, separated by spaces:
message_text = action timestamp threat_severity logging_level db_client_ip db_client_port db_server_ip db_server_port user_name database_name event_id logout_seen end_of_session_seen session_dropped_seen
For example:

Message Format
B-10 Oracle Database Firewall Administration Guide
Nov 10 09:34:46 multi000c29198b62 DBFW1: DBFW:12 2 1257845676.891 2 1 "192.168.100.99" 1138 "192.168.100.100" 5000 "sa" "" 4af933acb7700006 4af933abfce00003 1 1 0
In this specification:
■ action is one of the following: 1 = no alert; 2 = always alert.
■ timestamp is the time the alert occurred. This time is represented as the number of seconds since 1st January 1970 00:00:00 UTC, in the format sec.msec. The sec value is the number of whole seconds, and msec is the fractional part in milliseconds.
■ threat_severity is an integer in the range 0 to 5 that specifies the threat severity of the message. The value 5 is the most severe.
■ logging_level is an integer that specifies the logging of the message: 0 = do not log in traffic log; 1 = log in traffic log.
■ db_client_ip is the IP address of the client that sent the message, enclosed in quotation marks.
■ db_client_port is an integer that specifies the port number of the database client that originated the statement.
■ db_server_ip is the IP address of the database management system, enclosed in quotation marks.
■ db_server_port is an integer that specifies the port number of the database management system.
■ user_name is the database user associated with the session in which the alerting statement occurred. It is enclosed in quotation marks and uses the same hexadecimal encoding as statement.
■ database_name is the name of the database associated with the session in which the alerting statement occurred. It is enclosed in quotation marks and uses the same hexadecimal encoding as statement.
■ event_id is a unique hexadecimal number for the event.
■ first_event_id is the unique event identifier for the first event recorded for this session (hexadecimal number).
■ logout_seen is an integer that specifies whether Oracle Database Firewall encountered a logout for the session. 0 = logout not seen; 1 = logout seen.
■ end_of_session_seen is an integer that specifies whether Oracle Database Firewall encountered an end-of-session event for the session. 0 = event not seen; 1 = event seen.
■ session_dropped_seen is an integer that specifies whether Oracle Database Firewall encountered an session-dropped event for the session. 0 = event not seen; 1 = event seen.

C
Traffic Log Attributes C-1
CTraffic Log Attributes
This appendix describes the meaning of each attribute that is displayed when you expand a record in the traffic log Search Results dialog box.
This appendix contains:
■ Transaction Status
■ Performance
■ Context
■ Attributes (F5)
Transaction Status
Table C–1 Transaction Status
Attribute Meaning or Source
SQL Request SQL statement text, or text that indicates the response from logging in or out (e.g. "CONNECTED, FAILED LOGIN"). "CONNECTED" indicates that there is a connection between the database and database client.
Response Status This shows whether or not the statement or login was successfully executed by the database.
Response Code An integer response code as returned from the monitored database. The value and meaning are dependent on the database type. Please refer to your database system documentation for further information.
Response Detailed Status
Response status information as returned from the monitored database. Please refer to your database system documentation for further information.
Response Text Detailed verbose response message as returned from the monitored database. For errors, this is typically the same as the error message displayed at the client. This information is available only if the Full error message annotation check box is selected (see "Configuring Database Response Monitoring" on page 10-2).
Record Type The type of record that is being displayed ("session" for a login or logout, or "statement" for SQL requests).

Performance
C-2 Oracle Database Firewall Administration Guide
Performance
Context
Attributes (F5)
Table C–2 Performance
Attribute Meaning or Source
Request Time The time that the SQL request was sent to the database.
Response Time The time that the database response was generated.
Transaction Time The time taken to execute the SQL request.
Table C–3 Context
Attribute Meaning or Source
Traffic Source The source of the SQL request. For example, "network", "local monitor" or "remote monitor".
DB User Name Database login name.
DB User Name Origin
Method used to obtain the DB User Name. The possible value is: "generated" (the name "unknown_username" was assumed), "dbquery" (the name was obtained from a database query) or "network" (the name was obtained from the SQL traffic).
DB User Name (raw) The DB User Name that was used at the time Oracle Database Firewall applied the statement policy. This may be the same as DB User Name (if the name was available from the statement or derived from a previous statement) or "unknown_username".
DB Client Program Name
Name of the software being used to connect to the database.
DB Client Program Name Origin
Method used to obtain the DB Client Program Name. See DB User Name Origin for possible values.
DB Client IP Address
IP address of the database client that originated the SQL request.
DB Client Port Port of the database client that originated the SQL request.
DB Server IP Address
IP address of the database management system (i.e. the IP address used by database clients to send traffic to the database).
DB Server Port Port number of the database management system.
Database Type Name of the database type that the baseline applies to.
OS User Name Operating system login name.
OS User Name Origin
Method used to obtain the DB Client Program Name. See DB User Name Origin for possible values.
Table C–4 Attributes (F5)
Attribute Meaning or Source
Authentication Method
Obtained from the BIG-IP ASM "authentication method" defined in the iRule (e.g. "webform").

Attributes (F5)
Traffic Log Attributes C-3
Cardinal IP Address
The client HTTP request may have been forwarded several times through proxies. The IP address shown in this attribute is the one the Oracle Database Firewall software believes is the most important for client identification.
Management IP Address
Obtained from the BIG-IP ASM "management_ip_address" attribute.
Match Result This can display:
PolicyConfirmed BIG-IP ASM generated an alert, and the associated SQL statement generated a "block" or "warn" in Oracle Database Firewall.
NoMatch: The BIG-IP ASM syslog message containing the information displayed in the traffic log record has not been matched with an SQL statement.
NoMatchDataMasked The BIG-IP ASM syslog message containing the information displayed in the traffic log record has at least one field containing star ("*") characters, which indicates sensitive data that has been obliterated by BIG-IP ASM. The Oracle Database Firewall software is not able to match syslog messages containing obliterated fields, as configured in BIG-IP ASM.
PolicyConflict BIG-IP ASM generated an alert, but the associated SQL statement did not generate a "block" or "warn" in Oracle Database Firewall.
WAFBlocked BIG-IP ASM blocked a request. Although a syslog message was generated, the Web application server generated no SQL statements for this request.
Match Tokens This is for Oracle Database Firewall engineers only. It indicates the tokens that were used to match syslog messages with the SQL statement.
Method (http) Obtained from the BIG-IP ASM "method" attribute.
Policy Apply Date Obtained from the BIG-IP ASM "policy_apply_date" attribute.
Policy Name Obtained from the BIG-IP ASM "policy_name" attribute.
Primary Violation The BIG-IP ASM violation associated with this statement, which the Oracle Database Firewall software believes is the most important.
Protocol (http) Obtained from the BIG-IP ASM "protocol" attribute.
Query String (http)
Obtained from the BIG-IP ASM "query_string" attribute.
Referer (http) This is the name of the referrer, extracted from the header of the HTTP request.
Request (http) Obtained from the BIG-IP ASM "request" attribute.
Request Blocked Obtained from the BIG-IP ASM "request_blocked" attribute.
Response Code (http)
Obtained from the BIG-IP ASM "response_code" attribute.
Session Cookies This provides the user-identification cookies, extracted from the header of the HTTP request.
Support ID Obtained from the BIG-IP ASM "support_id" attribute. Clicking the link provides details of the violation in BIG-IP ASM. Note: The link does not function if ASM is restarted after monitoring the traffic.
URI (http) Obtained from the BIG-IP ASM "uri" attribute.
Table C–4 (Cont.) Attributes (F5)
Attribute Meaning or Source

Attributes (F5)
C-4 Oracle Database Firewall Administration Guide
Unit Hostname (http)
Obtained from the BIG-IP ASM "unit_hostname" attribute.
User Agent (http) Name of user agent, from the header of the HTTP request.
Violations Obtained from the BIG-IP ASM "violations" attribute.
Web Application Name
Provides the name of the Web application, as obtained from the BIG-IP ASM "web_application_name" attribute.
Web Client IP Address
Displays the IP address of the Web client, as obtained from the BIG-IP ASM "ip" attribute.
Web Host WAF host name, extracted from the header of the HTTP request.
Web Username If known, this provides the login username of the user. If the user is not known, but cookies with the specified prefix are provided, this displays "Anonymous_<cookie value>". If the HTTP request in the syslog message contains no cookies with the specified prefix, "Unknown_<auto incrementing number>" is displayed.
Table C–4 (Cont.) Attributes (F5)
Attribute Meaning or Source

Glossary-1
Glossary
action
A set of rules used by the baseline to evaluate statements for a cluster. These rules include four action levels: unassigned, block, warn, and pass.
action level
A standard policy rule that describes the actions to take when evaluating statements that match the cluster.
A standard baseline rule that describes of the type of data the baseline collects about statements, how often to collect the data, and how many statements to include in the log.
Administration Console
A browser-based application for configuring, managing, and monitoring the system. The Administration Console is displayed by logging into the Management Console or the standalone or managed Database Firewall from a Web browser, such as Internet Explorer. See "Which Administration Console Should I Use?" on page 1-5 for more information.
administration log
The log type that stores system actions such as logins, shutdowns, restarts, and baseline uploads. To ensure full traceability of system changes, the administration log stores the login ID of any person who makes a change from the Administration Console.
Analysis tab
A component of the user interface that is used to analyze the SQL statements that the Analyzer has read.
Analyzer
See Oracle Database Firewall Analyzer.
Background View
One of two View menu options. The first option in the View menu toggles between Background and Profile. The Background option is available only when Profile mode is displayed. The effect of the selection depends on whether you are using the Analysis, Clusters, or Details tab.
baseline
A configuration file that Oracle Database Firewall uses to determine the threat severity, action level, and logging level to use for each SQL statement it encounters.

bridge mode
Glossary-2
You create baselines in the Oracle Database Firewall Analyzer. A baseline can attach separate action and logging level settings to each cluster in a model. A baseline also specifies a default action and logging level for clusters that have not been previously logged, and therefore do not appear in the model. Baseline files have a.dna file extension.
bridge mode
Configuration that enables Oracle Database Firewall to block attacks made by SQL statements.
profile
Any combination of an IP address set, DB user set, client program set, OS user set, and a timeslice. Profiles are used to analyze statements and set up baseline rules for statements occurring at specified times from selected database users, IP addresses, client programs, and operating system users. You can create profiles using the Profiles option in the Tools menu.
client program set
A set of one or more database client program names. Client program sets are used in profiles to analyze data originating from selected programs, or to set up baseline rules for selected programs. A client program can belong to only one set. You can create client program sets using the Client Program Sets option in the Tools menu.
The Baseline Options dialog enables you to specify whether the baseline should use case matching when checking client program names.
cluster
A set of semantically similar SQL statements that is created when the Analyzer reads logged SQL statements, either to create the model or when testing against new logged SQL data. The Analyzer uses its built-in knowledge of the SQL syntax to categorize the SQL statements into semantic clusters. When designing the baseline, you can specify the action and logging level for each cluster.
cluster group
A set of clusters grouped by the Analyzer according to the meaning of each statement.
Clusters tab
A component of the user interface that enables you to develop the baseline by specifying an action, logging level, and threat severity for each cluster. The Clusters tab provides a tabular view of the clusters the Analyzer has generated, and is an alternative to using the Details tab.
Common Event Format (CEF)
An open log management standard that ArcSight uses when collecting data from different sources. This common event log format enables the Database Firewall and ArcSight integration to easily collect and aggregate data for analysis.
Create Policy option
A File menu option used to create a baseline file for the model. The option prompts you to specify the name of the baseline file to create. Baseline files have a .dna extension.

direct database Interrogation
Glossary-3
Database Activity Monitoring Mode
One of the monitoring modes for an Oracle Database Firewall. In Database Activity Monitoring (DAM) mode, the system logs statements and provides warnings of potential attacks. It does not block potential attacks.
See also Database Policy Enforcement Mode
Database Firewall
See Oracle Database Firewall.
Database Firewall Administration Console
See Oracle Database Firewall Administration Console.
Database Firewall Management Server
See Oracle Database Firewall Management Server.
Database Firewall Network
See Oracle Database Firewall network.
database network
The database network contains the database server and database clients.
Database Policy Enforcement Mode
One of the modes in which Oracle Database Firewall can operate. In this mode, the system performs all the actions of database activity monitoring, and blocks SQL statements that appear to be potential attacks.
See also Database Activity Monitoring Mode
Database Response Monitoring
Database Response Monitoring records database responses for all SQL statements, logins and logouts that are logged by the baseline. This Administration Console feature allows you to determine whether the database executed logins, logouts and statements successfully, and can provide useful information for audit and forensic purposes.
database user set
A set of one or more database user login names. Database user sets are used in profiles to analyze data originating from selected login names, or to set up baseline rules for selected database users. You can create database user sets using the DB User Sets option in the Tools menu.
The Baseline Options dialog enables you to specify whether the baseline should use case matching when checking database user names.
Details tab
A component of the user interface that enables you to develop the baseline by specifying an action, logging level, and threat severity for each cluster. The Details tab organizes the clusters into cluster groups, and is an alternative to using the Clusters tab.
direct database Interrogation
The ability to interrogate the monitored database to obtain the name of the database user, operating system, and client program that originated an SQL statement, if this information is not available from the statement itself.

enforcement point
Glossary-4
enforcement point
An Oracle Database Firewall logical configuration that associates a Database Firewall policy that you create with a specific protected database and network traffic source(s). In other words, the enforcement point defines the relationship between the protected database and the policy.
You can have multiple databases configured to use one enforcement point. The policy associated with an enforcement point is platform-specific, which means that the databases associated with it must be from the same database product line (for example, all Oracle databases).
exception
A feature that enables you to override standard baseline rules for specific cases. For example, you may want to set up an exception that overrides standard baseline rules (action level, logging level, and threat severity) for SQL statements originating from administrators.
Export as HTML option
A File menu option that enables you create an HTML file in which to export the properties and baseline information contained in the model displayed in the currently selected window. Use this option for reporting purposes, or to use the model data in other applications.
event log
Stores system events that are not directly related to the Oracle Database Firewall software, such as operating system warnings.
Filters
A Tools menu option used to manage which clusters to display in the Analysis and Details tabs.
hexadecimal format
The Base 16 representation used by the Inspect option on the Analysis tab to enable you to examine the characters in a selected statement. Displaying a statement in hexadecimal format may be useful if the statement includes unprintable characters.
Invalid SQL tab
A component of the user interface that displays any SQL statements that the Analyzer did not recognize (for example: statements that do not conform with the SQL syntax).
Invalid Statement policy
A Tools menu option used to define the action, logging level, and threat severity for invalid SQL statements. The Invalid Statement policy allows you to specify the policies the baseline must apply when Oracle Database Firewall encounters invalid SQL statements.
IP address set
A set of one or more IP addresses of database clients. IP address sets are used in profiles to analyze data originating from selected IP addresses, or to set up baseline rules for selected IP addresses. An IP address can belong to only one set. You can create IP address sets using the IP Address Sets option in the Tools menu.

Oracle Database Firewall
Glossary-5
Load Policy option
A File menu option used to create a model from a baseline that was created using the Create Policy option. The option prompts you to specify the name of the baseline file to load. This option is provided to enable recovery of a model from a baseline in the unlikely event that the original model data has been lost.
local monitor
An Oracle Database Firewall component that monitors SQL traffic that originates from sources that have direct access to the protected database, such as console users or batch jobs that run on a database server. The local monitor is a passive logging device. That is, you cannot use it to block SQL statements."
log level
A standard baseline rule that describes the type of data the baseline collects about statements, how often to collect the data, and how many statements to include in the log.
login and logout policy
A Tools menu option that enables you to specify the policies the baseline must apply when a database client logs into or logs out of the database. Use login policy to specify the login action level and threat severity of successful or unsuccessful database user logins, and whether to log logins. Use a logout policy to specify the logout action level and threat severity of database user logouts, and whether to log logouts.
Management Server
See Oracle Database Firewall Management Server.
model
A component that stores all the data used to develop a baseline, including the properties and analysis data, and all the baseline information. Each model is stored in a pair of files with .smdl and .smdl_data file extensions.
novelty policy
A set of rules that operate on the baseline. Novelty policies are used to loosen or tighten the default unseen statement policies for specific classes of statements, tables, or both. They specify the action level, logging level, and threat severity to use for unseen statements that operate on the specified classes of statements or tables.
For example, if the default action level is Warn, the user may want to set up novelty policies that apply a Pass action level to unseen statements that operate on tables containing public information, and a Block action to all unseen statements that operate on tables containing sensitive information.
Oracle Database Firewall
The Oracle Database Firewall component that performs these tasks:
■ Handles real-time recording and analysis of SQL transaction requests and responses from one or more Oracle, Microsoft SQL Server, Sybase, Sybase SQL Anywhere, and IBM DB2 SQL databases
■ Categorizes SQL transactions
■ Enforces data policies
■ Enables real-time alerting and event propagation
You can have multiple Database Firewalls connecting to one Management Server.

Oracle Database Firewall Administration Console
Glossary-6
See also Oracle Database Firewall Analyzer, Oracle Database Firewall Management Server.
Oracle Database Firewall Administration Console
The administrative console used to configure Oracle Database Firewall. This console is available on each Database Firewall and Management Server.
Oracle Database Firewall Analyzer
The Oracle Database Firewall component that enables users to develop baselines and log SQL statements to be analyzed for security vulnerabilities and usage patterns. Users who have little knowledge of SQL can use the Analyzer to develop baselines, and users who have detailed knowledge of SQL can use Analyzer to customize baselines.
See also baseline.
Oracle Database Firewall Management Server
The Oracle Database Firewall component that performs these tasks:
■ Aggregates SQL data from one or more Database Firewalls
■ Serves as a reporting platform for business reports
■ Centralizes the distribution of data control policies (but different policies can be applied to specific databases)
■ Stores and manages log files, including archiving and restoring the log files
■ Remotely manages all Database Firewalls to which it connects
■ Integrates with third-party applications, such as ArcSight SIEM
See also Oracle Database Firewall Analyzer and Oracle Database Firewall.
Oracle Database Firewall network
A system for securing and protecting data in SQL databases. Oracle Database Firewall blocks and produces warnings of attempted attacks, logs activity, and provides intelligent tools to assess vulnerabilities. Oracle Database Firewall enhances existing database security features, such as field encryption and user authentication.
OS user set
A set of one or more operating system user names. OS user sets are used in profiles to analyze data originating from selected OS users, or to set up baseline rules for selected OS users. You can create OS user sets using the OS User Sets option in the Tools menu.
The Baseline Options dialog enables you to specify whether the baseline should use case matching when checking operating system user names.
primary device
In a resilient pair, this is the main Database Firewall or Management Server that carries out normal operations.
Profile View
One of two options in the View menu. The first option in the View menu toggles between Background and Profile. The Profile option is available only when background mode is displayed. The effect of the selection depends on whether you are using the Analysis, Clusters, or Details tab.

Sensitive data masking option
Glossary-7
Properties tab
A component of the user interface that contains general information about the selected model, such as the original source of the data for the model, statistics, change control information, and notes.
protected database
The database being monitored by Oracle Database Firewall. See also local monitor and remote monitor.
remote monitor
Software that you install on a Linux server that has access to a database that you want to protect. Remote monitoring enables an enforcement point to directly monitor SQL traffic in a database. The remote monitor captures the SQL traffic and sends it over the network to an Oracle Database Firewall. This SQL data is then available for reports generated by this Database Firewall.
resilient pair
A feature of Oracle Database Firewall that enables the paired configuration of Oracle Database Firewall and Oracle Database Firewall Server to provide high-availability system architecture. During system configuration, one device is nominated as the primary device and the other as the secondary device. The primary device carries out all normal operations, while the secondary device monitors traffic. The secondary device alerts only when the primary device fails.
secondary device
In a resilient pair, this is the other Database Firewall or Management Server that monitors traffic and alerts when the primary fails.
security index
A measure of threat, expressed as a percentage. The higher the security index, the greater the threat. The security index is calculated as the sum of the product of the threat severity level of the cluster ID times the frequency of that cluster ID, where:
■ Threat severity is the threat severity of the cluster ID, as set in the Analyzer (range 0 to 5).
■ cid is the cluster ID. All clusters that occur over the specified time period are included in the calculation.
■ Frequency is the percentage of all statements recorded over the specified period that match the cluster.
Use this formula to calculate the security index:
Security Index = Σ (Threat severity (cid) x Frequency (cid) ) / 5
sensitive data masking
A process used in the baseline that automatically replaces all user data (such as string constants, integer constants, hexadecimal constants, and float constants) in a statement with alternative characters. The replacement characters that are used depend on the data type. The masking process prevents sensitive data from appearing in log files.
Sensitive data masking option
A Tools menu option that enables you to set up rules for automatic masking of sensitive data in log files, such as credit card numbers.

session
Glossary-8
session
A feature of Analyzer version 1.2 and earlier. A session (file extension .sshn) can contain multiple models. You can open session files from the Welcome dialog or using Open in the File menu. Each model in the session is displayed in a separate window. You cannot create sessions in Analyzer version 2.0 or later.
spanning port
A special port in a managed switch that can mirror the traffic of other ports in the same switch. Spanning ports are often used for network traffic monitoring. Spanning ports do not enable SQL statement blocking.
Summary tab
A policy that has had filtering added. A baseline displays the statement types, threat severities, and action levels currently in the baseline. From the Baseline tab, you can generate a baseline automatically, set up novelty and unseen statement policies, and filter the contents of the Details tab. The Baseline tab is the primary means of interacting with the baseline.
testing
The iterative process of developing the baseline. While the system is operational, a new set of SQL statements can be logged, and then imported into the Analyzer for analysis against the statements previously used to build the current baseline. This process (called "testing the model") enables possible security vulnerabilities to be identified and the baseline to be improved further. The process can be repeated as many times as required.
You can test the model using data in the traffic log, trace file, train file, or by entering single statements available from the Test menu.
The Analyzer reads each statement in the test data and assigns it to a cluster for analysis in the Analysis tab. Some statements in the test data may cause additional clusters to be generated.
threat severity
The measure of security risk for the policy item (be it cluster, novelty policy, and so on). Each cluster can have an optionally-assigned threat severity. There are six threat severity levels, ranging from Unassigned to Catastrophic (threat severity 5). When Oracle Database Firewall logs a statement, the threat severity of the statement is also logged. You can use third-party reports and syslog to display statements based on the logged threat severity.
timeslice
A set of one or more hours in a week (for example: 9 am to 5 pm, Monday to Friday). A timeslice can be used in a profile to define the hours of the week that the profile applies. You can create timeslices using the Timeslices option in the Tools menu. The same timeslice can be used in any number of profiles.
trace file
A binary log file obtained from a Microsoft SQL Server system, which contains a list of SQL statements. Trace files have a .trc file extension.
traffic log
A file that contains SQL statements that have been logged and stored on the Oracle Database Firewall Server or Oracle Database Firewall. If known, the traffic log stores
unseen statement
Glossary-9
the following information about the originator of each statement, which enables the creation of IP address sets:
■ IP address of the client
■ Database user login name
■ Database client program name
■ Operating system user name
train file
A text file containing a list of SQL statements. Train files can contain blank lines or a combination of SQL statements on each line. However, statements must not be split across lines. Train files have a .train file extension.
Training Mode
One of the four modes in which Oracle Database Firewall can operate. In this mode, the system logs traffic for the purposes of automated baseline generation.
unseen statement
A statement that does not match any of the clusters in the baseline. You can set up policies for unseen statements from the Summary tab.

unseen statement
Glossary-10
Index-1
Index
AAdministration Console
about, 1-4Appliances tab, 13-2Dashboard page, 13-2deciding which to use, 1-5Enforcement Points page, 13-6logging in to, 1-7Manage Logs page, 13-19Management Server performance, long-running
tasks, 13-2network traffic
capturing to file, 13-26viewing, 13-26
Protected Databases page, 13-3Syslog Settings page, 13-20Users page, 13-23
administration log, 13-23Analyzer
login and logout policies, 10-2Appliances page
configuring Oracle Database firewalls, 13-3Appliances tab, 1-9
manual refresh , high-availability and JavaScript, 13-3
applied_baselines table, A-2architecture
components, 1-1high availability resilient pairs, 1-2using Oracle Database Firewall Server, 1-2
archivingabout, 13-13and disk space limitation, 13-14Archiving With No Pass Phrase option, 13-18configuring archive job, 13-17defining destinations, 13-14manual, 13-16port for Windows File Sharing transfer
method, 13-15restoring, 13-18restoring configuration deletes archive jobs, 13-18scheduling, 13-16
Archiving tab, 1-10ArcSight Security Information Event Management
(SIEM)
about, 12-1configuring, 13-21database audit messages, 12-5deployment procedure, 12-1enabling interface, 12-2heartbeat messages, 12-3how the integration works, 12-3login alert messages, 12-9logout alert messages, 12-10message types, 12-3property change messages, 12-4specifying ArcSight server, 12-2statement alert messages, 12-6statement alert WAF messages, 12-7syslog conversion tables, 12-2 to 12-11system OS alert messages, 12-11
attributes (F5)traffic log attributes, C-2
auditingStored Procedure and User Role Audit
tables, A-21 to A-27stored procedures, 5-1 to 5-10user roles, 6-1 to 6-10
BBIG-IP ASM (Application Security Manager)
about integration, 11-1benefits of integration with Oracle Database
Firewall, 11-2configuration requirements, 11-4configuring with Database Firewall, 11-4creating logging profile, 11-5custom iRule, 11-8how integration works, 11-3integration with Oracle Database Firewall, 11-1iRules syslog messages, 11-8policy settings, 11-6presentation of data in Database Firewall, 11-9sample iRule, 11-6system requirements for integration, 11-4transmitting iRule syslog messages, 11-8used with ArcSight Security Information Event
Management (SIEM), 12-1viewing traffic log, 11-10
bridge IP addresses

Index-2
standalone Database Firewall, 2-8subnet restriction for DPE mode, 2-9
Ccluster_components table, A-6configuring BIG-IP ASM, 11-4configuring Oracle Database Firewalls, 13-2configuring Oracle Database firewalls, 13-2configuring protected databases, 13-3connectors
configuring to third-party systems, 13-20e-mail example, 13-22e-mail recipients, 13-22e-mail SMTP configuration, 13-21
contexttraffic log attributes, C-2
DDAM mode, 1-2Dashboard tab, 1-9data
archiving, 4-6presentation in reports, A-27
databaseschema, A-1
report-related functions, A-27database audit summary messages, B-3database connections
and DPE mode, 2-8, 3-14, 13-9Database Control
in Oracle Enterprise Manager, 13-27database_user_addresses table, A-2database_users table, A-2Date and Time
setting, 3-5date settings
standalone Database Firewall, 2-1dictionary table, A-3direct database interrogation
configuring for Oracle databases with Oracle Advanced Security, 9-1
direct database interrogation (DDI)about, 9-1configuring for Microsoft SQL Server
databases, 9-2configuring for Sybase SQL Anywhere
databases, 9-3disabling, 9-7enabling, 9-6
disk space25% free limitation, 13-14
DNSand Local Monitor function, 7-2
doa_approved_edits table, A-22doa_approved_objects table, A-23doa_edit_comments table, A-24doa_edits table, A-24doa_pending_approvals table, A-25
doa_tag_definitions table, A-26DPE mode
and spoofing detection rules, 2-8, 3-14, 13-9bridge IP addresses, 2-9forcing database connections to reconnect, 2-8,
3-14, 13-9traffic disruption on time synchronization, 2-3,
3-6, 3-10
Ee-mail notifications
configuring recipients, 13-22configuring SMTP server, 13-21example, 13-22
encryptionconfiguring DDI for encrypted Oracle
Database, 9-4native encryption in Oracle Advanced
Security, 9-6providing public key to encrypted Oracle
Database, 9-5enforcement points
configuring on Database Firewall, 2-6configuring on Management Server, 3-12definition, 13-6, Glossary-4pairing, 4-5
Enforcement Points pagemonitoring Oracle Database firewalls, 13-7
Enterprise ManagerDatabase Control, 13-27
error messagesand enabling JavaScript in browser, 2-1, 3-2
examplese-mail alert contents, 13-22
FF5 BIG-IP ASM alerts, B-5forensic database tables
about, A-15forensic tables
traffic_log_queries, A-15traffic_log_query_results, A-16
Ggeneral messages, B-2
Hhardware
identical for resilient pair of firewalls, 4-5heartbeat messages, B-2high availability
about resilient pairs, 1-2configuring resilient pair of firewalls, 4-5configuring resilient pair of Management
Servers, 4-3enforcement points, pairing, 4-5identical hardware for pair of firewalls, 4-5
Index-3
viewing settings for Management Server, 4-4
IIBM DB2 SQL databases, 6-8
stored procedure auditing, 5-8user role auditing, 6-8
installlocal monitoring, 7-2
IP addressesand port numbers, should be different for
protected databases, 13-5and spoofing detection in DPE mode, 2-8, 3-14,
13-9subnet restrictions for proxy interface, 13-10
iRule syslog messagesBIG-IP ASM command, 11-8
JJavaScript
enabling to display error messages, 2-1, 3-2refreshing appliances list manually, 13-3
Kkeyboard settings, 13-12
Llocal monitoring
about, 7-1and DNS configuration, 7-2database accounts created, 7-2disabling, 7-6enabling, 7-5installing
Microsoft SQL Server databases, 7-4Oracle databases, 7-3Sybase ASE databases, 7-4
removingMicrosoft SQL Server databases, 7-4Oracle databases, 7-3Sybase ASE databases, 7-5
scripts for installing, 7-2logging
archiving log data, 13-13forensic tables, A-15 to A-21viewing log files, 13-19
logout alerts, B-9logs
administration changes, 13-20, 13-23manage disk space, 13-19repair, 13-20system events, 13-20traffic, 13-20
MMAC addresses
spoofing detection and DPE mode, 2-8, 3-14, 13-9
management serverconfiguring resilient pair, 4-3performance during long-running tasks, 13-2swapping primary and secondary, 4-4viewing high availability settings, 4-4
Microsoft SQL Server databasesdirect database interrogation, 9-2local monitoring
installing, 7-4removing, 7-4
stored procedure auditing, add user permissions, 5-2
stored procedure auditing, remove user permissions, 5-4
user role auditing, 6-2user role auditing (URA), remove user
permissions, 6-4monitoring
embedded Oracle database in Database Firewall, 13-27
enforcement points, 13-6Monitoring tab, 1-9MySQL databases
stored procedure auditing, add user permissions, 5-5
stored procedure auditing, remove user permissions, 5-5
user role auditing (URA), add user permissions, 6-5
user role auditing (URA), remove user permissions, 6-5
OOracle Advanced Security
decrypting in Database Firewall, 9-1native encryption required, 9-6providing public key to encrypted Oracle
Database, 9-5Oracle Database
embedded in Database Firewall, monitoring, 13-27
Oracle Database Firewalladding, 13-3adding Database Firewall to Management
Server, 3-9creating a resilient pair, 13-3integration with BIG-IP ASM, 11-1updating, 4-6ways to connect to, 1-3
Oracle Database Firewall Administration ConsoleDashboard page, 11-9displaying BIG-IP ASM data, 11-9, 11-10generating BIG-IP ASM WAF reports, 11-11traffic log, 11-10
Oracle Database Firewall database schemaSee Stored Procedure and User Role Audit
database; forensic database; summary database
Oracle Database Firewall Server

Index-4
architecture using, 1-2Oracle Database Firewall tables, A-1Oracle Database Firewall views, A-1Oracle Database Firewall with BIG-IP ASM
configuration requirements, 11-4Oracle Database Firewall, standalone
about, 2-1bridge IP addresses, 2-8date and time setting, 2-1enforcement points, 2-6syslog destinations, 2-5system settings, 2-3testing configuration, 2-9
Oracle databasesdecrypting Oracle Advanced Security traffic, 9-1local monitoring
installing, 7-3removing, 7-3
stored procedure auditing, adding user account, 5-1
stored procedure auditing, removing user account, 5-2
user role auditing, adding user account, 6-1user role auditing, removing user account, 6-2
Ppartner settings
specifying, 3-8pass phrase
archiving with no pass phrase, 13-18not archived, restoring, 13-18
passwordsguidelines for creating, 13-24policies, 13-25
performancelong-running tasks affect management server
console, 13-2traffic log attributes, C-2
policiesapplied_baselines table, A-2archiving, 13-14enforcement point settings, changing, 13-7high availability configuration, 4-6login and logout policies, 10-2statements database response monitoring, 10-1statements local monitoring, 7-1uploading, 2-8, 3-14
port numberfor proxy, 13-10
property change messages, B-3protected databases
configuring protected databases, 13-3configuring user settings, 13-5should have different IP addresses, port
numbers, 13-5protected_database_addresses table, A-3protected_databases table, A-4proxy
add to management interface, 13-10
configuring in Database Firewall, 13-9IP address, subnet restrictions, 13-10port number, 13-10
public keyproviding to encrypted Oracle Database, 9-5
Rremote monitoring
about, 8-1checking status for, 8-4disabling, 8-4installing, 8-1options for running script, 8-3running, 8-3
report_libfunctions for data presentation, A-27
Reporting tab, 1-9reports
compliance settings, 13-5data presentation functions, A-27direct database interrogation, 9-1e-mail notification, 13-12Management Server failing, 4-2protected_databases table, A-4remote monitoring, 8-1scheduled reports, 13-12Stored Procedure and User Role Audit
tables, A-21traffic_summaries table, A-11See also Oracle Database Firewall tables
resilient pairabout, 1-2configuring, 4-5creating, 3-11identical hardware, 4-5of firewalls, 4-5of management servers, 4-3
restoring, 13-18configuration restore deletes previous archive
jobs, 13-18retaining current traffic logs when restoring
configuration, 13-18when pass phrase was not archived, 13-18
Sscheduling archives, 13-16schema, securelog, A-1secure log access
setting for Management Server, 3-4setting for standalone Database Firewall, 2-5
securelog schema, about, A-1security
and admin user accounts, 13-23guidelines for Database Firewall, 1-10, 13-1
server certificate, 3-8SMTP server, configuring for e-mail, 13-21sources table, A-4spoofing detection

Index-5
MAC and IP address, and DPE mode, 2-8, 3-14, 13-9
SQL AnywhereSee Sybase SQL Anywhere
SQL ServerSee Microsoft SQL Server
statement alerts, B-4Stored Procedure and User Role Audit tables
about, A-21doa_approved_objects, A-23doa_edits, A-24doa_pending_approvals, A-25doa_tag_definitions, A-26
Stored Procedure and User Role tablesdoa_approved_edits, A-22doa_edit_comments, A-24
stored procedure auditing (SPA)about, 5-1ArcSight syslog messages, 12-5disabling, 5-10enabling on Database Firewall, 5-9installing ODBC driver for Linux
Sybase SQL Anywhere databases, 5-7MySQL databases
add user permissions, 5-5removing user permissions
IBM DB2 SQL databases, 5-8Microsoft SQL Server databases, 5-4MySQL databases, 5-5Oracle databases, 5-2Sybase ASE databases, 5-6Sybase SQL Anywhere databases, 5-8
setting user permissionsIBM DB2 SQL databases, 5-8Microsoft SQL Server databases, 5-2Oracle databases, 5-1SQL Anywhere databases, 5-8Sybase ASE databases, 5-5Sybase SQL Anywhere databases, 5-7
Stored Procedure and User Role Audit tables, A-21 to A-27
subnetbridge IP address restriction, 2-9for proxy IP address, 13-10system settings, default gateway, 2-3, 3-3system settings, network mask, 2-3, 3-3
Summarize Now buttontraffic log files, 13-20
summary tablesabout, A-2applied_baselines, A-2cluster_components, A-6database_user_addresses, A-2database_users, A-2dictionary, A-3protected_database_addresses, A-3protected_databases, A-4relationship diagram, A-14sources, A-4summary_clusters, A-5
summary_records, A-6summary_sessions, A-7summary_statement_attributes, A-8traffic_events, A-9traffic_summaries view, A-11
summary_clusters table, A-5summary_records table, A-6summary_sessions table, A-7summary_statement_attributes table, A-8Sybase ASE databases
local monitoringinstalling, 7-4removing, 7-5
stored procedure auditingadd user permissions, 5-5remove user permissions, 5-6
user role auditing, 6-5Sybase SQL Anywhere databases
direct database interrogation, 9-3installing ODBC driver for Linux
stored procedure auditing, 5-7user role auditing, 6-7
stored procedure auditingremove user permissions, 5-8
stored procedure auditing, setting permissions, 5-7
user role auditingadd user permissions, 6-7remove user permissions, 6-8
synchronizing timetraffic disruption in DPE mode, 2-3, 3-6, 3-10
syslog destinationsconfiguring, 3-6
syslog messagesabout, B-1alerts, B-1database audit summary messages, B-3F5 BIG-IP ASM alerts, B-5format, B-1general messages, B-2heartbeat messages, B-1, B-2logout alerts, B-9property change messages, B-3size limits, B-2statement alerts, B-4statistics, B-1when refreshed, B-1
system settings, 3-2configuring, 13-12
System tab, 1-10
Tthird-party products used with Oracle Database
Firewall, 1-4third-party systems
configuring connectors, 13-20time settings
standalone Database Firewall, 2-1time synchronization
Index-6
traffic disruption in DPE mode, 2-3, 3-6, 3-10traffic disruptions
time synchronization in DPE mode, 2-3, 3-6, 3-10traffic log attributes, C-1
attributes (F5), C-2context, C-2performance, C-2transaction status, C-1
traffic logsBIG-IP ASM, 11-10free disk space limitation, 13-14retaining after restoring configuration, 13-18Summarize Now button, 13-20
traffic_events table, A-9traffic_log_queries table, A-15traffic_log_query_results table, A-16traffic_summaries view, A-11transaction status
traffic log attributes, C-1
Uupgrades, swapping Management Servers, 4-4user accounts
about, 13-23created from Management Server, 13-23creating, 13-24database_user_addresses table, A-2database_users table, A-2password policies, 13-25security guideline, 13-23tracing changes to, 13-23
user permissionsstored procedure auditing, 5-1user role auditing, 6-1
user role auditing (URA)about, 6-1ArcSight syslog messages, 12-5disabling, 6-10enabling on Database Firewall, 6-9installing ODBC driver for Linux
Sybase SQL Anywhere databases, 6-7MySQL databases
add user permissions, 6-5remove user permissions
IBM DB2 SQL databases, 6-9Microsoft SQL Server databases, 6-4MySQL databases, 6-5Oracle databases, 6-2Sybase databases, 6-6Sybase SQL Anywhere databases, 6-8
setting user permissionsMicrosoft SQL Server databases, 6-2Oracle databases, 6-1SQL Anywhere databases, 6-8Sybase ASE databases, 6-5Sybase SQL Anywhere databases, 6-7
Stored Procedure and User Role Audit database tables, A-21 to A-27
WWeb Application Firewall (WAF)
about, 11-1defined, 1-4reports in BIG-IP ASM, 11-11
Windows file sharingarchiving transfer method, recommended
port, 13-15