administration guide - juniper networks · this product includes the envoy snmp engine, ... and...
TRANSCRIPT

Juniper Networks, Inc.
1194 North Mathilda Avenue
Sunnyvale, CA 94089
USA
408-745-2000
www.juniper.net
Odyssey Access Client for Windows
Administration Guide
Enterprise EditionFIPS Edition
Release 5.6February 2013
Copyright Notice
This product includes the Envoy SNMP Engine, developed by Epilogue Technology, an Integrated Systems Company. Copyright © 1986-1997, Epilogue Technology Corporation. All rights reserved. This program and its documentation were developed at private expense, and no part of them is in the public domain.
This product includes memory allocation software developed by Mark Moraes, copyright © 1988, 1989, 1993, University of Toronto.
This product includes FreeBSD software developed by the University of California, Berkeley, and its contributors. All of the documentation and software included in the 4.4BSD and 4.4BSD-Lite Releases is copyrighted by the Regents of the University of California. Copyright © 1979, 1980, 1983, 1986, 1988, 1989, 1991, 1992, 1993, 1994. The Regents of the University of California. All rights reserved.
GateD software copyright © 1995, the Regents of the University. All rights reserved. Gate Daemon was originated and developed through release 3.0 by Cornell University and its collaborators. Gated is based on Kirton's EGP, UC Berkeley's routing daemon (routed), and DCN's HELLO routing protocol. Development of Gated has been supported in part by the National Science Foundation. Portions of the GateD software copyright © 1988, Regents of the University of California. All rights reserved. Portions of the GateD software copyright © 1991, D. L. S. Associates.
This product includes software developed by Maker Communications, Inc., copyright © 1996, 1997, Maker Communications, Inc.
Products made or sold by Juniper Networks or components thereof might be covered by one or more of the following patents that are owned by or licensed to Juniper Networks: U.S. Patent Nos. 5,473,599, 5,905,725, 5,909,440, 6,192,051, 6,333,650, 6,359,479, 6,406,312, 6,429,706, 6,459,579, 6,493,347, 6,538,518, 6,538,899, 6,552,918, 6,567,902, 6,578,186, and 6,590,785.
Juniper Networks, the Juniper Networks logo, NetScreen, and ScreenOS are registered trademarks of Juniper Networks, Inc. in the United States and other countries. JUNOS and JUNOSe are trademarks of Juniper Networks, Inc. All other trademarks, service marks, registered trademarks, or registered service marks are the property of their respective owners.
Copyright © 2013 Juniper Networks, Inc. All rights reserved.Printed in the USA.
FCC Statement
The following information is for FCC compliance of Class A devices: This equipment has been tested and found to comply with the limits for Class A digital device, pursuant to part 15 of the FCC rules. These limits are designed to provide reasonable protection against harmful interference when the equipment is operated in a commercial environment. The equipment generates, uses, and can radiate radio-frequency energy and, if not installed and used in accordance with the instruction manual, may cause harmful interference to radio communications. Operation of this equipment in a residential area is likely to cause harmful interference, in which case users will be required to correct the interference at their own expense.
The following information is for FCC compliance of Class B devices: The equipment described in this manual generates and may radiate radio-frequency energy. If it is not installed in accordance with the instruction manual, it may cause interference with radio and television reception. This equipment has been tested and found to comply with the limits for a Class B digital device in accordance with the specifications in part 15 of the FCC rules. These specifications are designed to provide reasonable protection against such interference in a residential installation. However, there is no guarantee that interference will not occur in a particular installation.
If this equipment does cause harmful interference to radio or television reception, which can be determined by turning the equipment off and on, the user is encouraged to try to correct the interference by one or more of the following measures:
Reorient or relocate the receiving antenna.
Increase the separation between the equipment and receiver.
Consult the dealer or an experienced radio/TV technician for help.
Connect the equipment to an outlet on a circuit different from that to which the receiver is connected.
Caution: Changes or modifications to this product could void the user's warranty and authority to operate this device and may result in the equipment no longer complying with FCC requirements for Class A or Class B digital devices. In that event, your right to use the equipment may be limited by FCC regulations, and you may be required to correct any interference to radio or television communications at your own expense.
U.S. Government Rights
Commercial software and commercial software documentation: This documentation is commercial computer software documentation and the products (whether hardware or software) covered by this documentation are or contain commercial computer software. Government users are subject to the Juniper Networks, Inc. standard end user license agreement and any applicable provisions of the FAR and its supplements. No further rights are granted.
Products (whether hardware or software) covered by, and information contained in, this documentation are controlled by U.S. Export Control laws and may be subject to the export or import laws in other countries. Nuclear, missile, chemical, biological weapons end uses or end users, whether direct or indirect, are strictly prohibited. Export or re-export to countries subject to U.S. embargo or to entities identified on US export exclusion lists, including, but not limited to, the denied persons and specially designated national lists, is strictly prohibited.
Disclaimer
THE SPECIFICATIONS AND INFORMATION REGARDING THE PRODUCTS IN THIS MANUAL ARE SUBJECT TO CHANGE WITHOUT NOTICE. ALL STATEMENTS, INFORMATION AND RECOMMENDATIONS IN THIS MANUAL ARE BELIEVED TO BE ACCURATE BUT ARE PRESENTED WITHOUT WARRANTY OF ANY KIND, EXPRESS OR IMPLIED.
THE SOFTWARE LICENSE AND LIMITED WARRANTY FOR THE ACCOMPANYING PRODUCT ARE SET FORTH IN THE INFORMATION PACKET THAT SHIPPED WITH THE PRODUCT AND ARE INCORPORATED HEREIN BY REFERENCE. IF YOU ARE UNABLE TO LOCATE THE SOFTWARE LICENSE OR LIMITED WARRANTY, CONTACT YOUR JUNIPER NETWORKS REPRESENTATIVE FOR A COPY.

M13219


Table of Contents
About This Guide ix
Objectives ....................................................................................................... ixAudience......................................................................................................... ixDocumentation Conventions............................................................................xList of Technical Publications .......................................................................... xiRequesting Technical Support ......................................................................... xi
Self-Help Online Tools and Resources...................................................... xiiOpen a Case with JTAC............................................................................ xii
Chapter 1 Understanding the Odyssey Access Client Administrator 1
OAC Overview .................................................................................................1OAC Network Authentication Overview ...........................................................2Planning an OAC Configuration .......................................................................3Odyssey Access Client Administrator Tools Overview......................................5
Connection Settings Tool ...........................................................................5Initial Settings Tool ....................................................................................6Machine Account Tool ...............................................................................6Permissions Editor Tool.............................................................................6Merge Rules Tool .......................................................................................6Custom Installer Tool.................................................................................6Script Composer Tool ................................................................................6PAC Manager Tool .....................................................................................7Context-Sensitive Help...............................................................................7
Chapter 2 Configuring a User Account 9
Initial Settings Tool Overview...........................................................................9Task Flow for Initial Settings ..........................................................................11Configuring Initial Settings .............................................................................12
Managing Windows Logon Settings .........................................................13Caution on Overriding Default Windows Logon Settings..........................13Configuring the Login Name Format........................................................14
Configuring Connection Timing for a User Account........................................15Testing Configuration Settings........................................................................16Testing Machine Connection Settings.............................................................16Controlling Network Adapters and Other Wi-Fi Supplicants ...........................17
Chapter 3 Configuring a Machine Account 19
Machine Account Overview............................................................................19Machine Account Tool Overview....................................................................19Task Flow for Machine Account Settings ........................................................20Enabling a Machine Account Connection .......................................................21Configuring Machine Account Settings ...........................................................22
v

vi
Odyssey Access Client Administration Guide
Machine Account Profile Options.............................................................23Setting Machine Account Password Credentials.......................................23Setting Automatic Certificate Selection for EAP-TLS.................................23Trust Configuration Requirements for Machine Authentication ...............23Restrictions for Machine Account Settings ...............................................23Configuring a Machine Password.............................................................24EAP Methods That Support Machine Credentials .....................................24Enabling Machine Authentication ............................................................24
Chapter 4 Configuring Network Connections 27
Connection Settings Tool Overview................................................................27Network Connection Timing ..........................................................................28
User-Level Connection Options................................................................28Machine-Level Connection Options .........................................................28
Task Flow for Connection Settings .................................................................29Configuring a User Account Connection.........................................................31
Connecting After the User’s Desktop Appears .........................................31Connecting After Windows Logon, Before the Desktop Appears..............31Connecting Prior to Windows Logon ......................................................32
Configuring a Machine Account Connection...................................................33Configuring Machine Account Connection Settings..................................34
Configuring a Prior to Windows Logon Connection with GINA.......................36Installing the Odyssey GINA Module ........................................................36Removing the Odyssey GINA Module ......................................................36Using Qualified Third-Party GINA Modules ..............................................37GINA Compatibility with Other Modules Running at Windows Logon......38Using GINA with Smart Cards ..................................................................38
Chapter 5 Setting Permissions for OAC Features 41
Permissions Settings Overview ......................................................................41Authentication Protocols..........................................................................41TTLS Inner Authentication Protocols........................................................42TTLS Inner EAP Protocols ........................................................................42PEAP Inner Authentication Protocols.......................................................42Profile Properties.....................................................................................42Options....................................................................................................42Network Properties..................................................................................42Odyssey Control ......................................................................................42User Interface Settings.............................................................................43User Interface—Hide Configuration Sections ...........................................43User Interface—Disable and Hide Configuration Sections........................43
Setting Permissions and Restrictions..............................................................43Guidelines for Using the Permissions Editor...................................................44
Chapter 6 Using Merge Rules 45
Merge Rules Overview ...................................................................................45Merge Rule Settings .................................................................................45Merge Rule Scenarios ..............................................................................46
Setting Merge Rules .......................................................................................47Setting Merge Rules for Profiles ...............................................................47Setting Merge Rules for Networks............................................................47Setting Merge Rules for Auto-Scan Lists ...................................................48Setting Merge Rules for Infranet Controllers ............................................49

Setting Merge Rules for Trust...................................................................49Setting Merge Rules for the Other Tab.....................................................50
Chapter 7 Deploying Odyssey Access Client 53
Custom Installer Tool Overview .....................................................................53Task Flow for Deployment .............................................................................54Creating an Installer File ................................................................................55
Additional Command Line Options Available to the OAC Installer ...........57Creating a Settings Update File ......................................................................57Task Flow for Updating User Account Settings ...............................................58Exporting an OAC Preconfiguration File.........................................................59Preconfiguring OAC for a Group of Users .......................................................60
Creating an OAC Configuration for Custom Installer................................60Creating a Settings Update File ................................................................60
Task Flow for Updating Machine Account Settings .........................................62Using Script Composer...................................................................................62Creating a Script ............................................................................................64
Adding or Replacing Profiles....................................................................64Removing a Profile ..................................................................................65Activating a Profile for a Wired Connection .............................................65Adding or Replacing Networks ................................................................66Setting the FIPS Mode Setting (FIPS Edition Only) ...................................66Removing a Configured Network.............................................................66Removing All Networks with a Common SSID.........................................67Activating a Wireless Network for a Connection ......................................67Adding or Replacing Auto-Scan Lists........................................................67Removing Auto-Scan Lists .......................................................................67Activating an Auto-Scan List ....................................................................67Adding or Replacing an Infranet Controller..............................................68Removing an Infranet Controller .............................................................68Adding or Replacing a Trusted Server......................................................68Removing a Trusted Server......................................................................69Replacing Options Settings ......................................................................69
Deploying Incremental Updates .....................................................................70Creating and Loading OAC Scripts Using Commands ..............................71
Chapter 8 Managing Protected Access Credentials 73
Refreshing the PAC Manager Display .............................................................73Deleting a PAC ...............................................................................................73Exiting from the PAC Manager.......................................................................73
Chapter 9 Sample Administrative Workflows 75
Using Single Sign-On for TTLS or PEAP ..........................................................75Configuring a Prior to Windows Logon with Odyssey GINA ...........................75Creating User Account Connection Settings and Installing Odyssey GINA ......76Testing Prior to Windows Logon Settings .......................................................76
Index 77
vii

viii
Odyssey Access Client Administration Guide

About This Guide
Objectives
This guide describes how to use the Juniper Networks Odyssey Access Client Administrator tools to configure, update, and deploy Odyssey Access Client (OAC) to users. In corporate networks, OAC negotiates with 802.1X wireless access points, 802.1X switches, and Infranet Controllers for authenticated, secure access to protected networks. An authentication server, such as Juniper Networks Steel-Belted Radius, must validate each user. In a Juniper Networks Unified Access Control (UAC) network, the user’s endpoint computer is checked for security compliance before being allowed to access protected resources on the network. In networks with 802.1X-enabled switches, the switches function as enforcement points in the network security architecture.
Audience
This guide is for network administrators whose responsibilities include managing secure wired and wireless network access for corporate users. It is particularly directed to those administrators who are responsible for configuring and deploying OAC to users, for configuring Extensible Authentication Protocol (EAP) settings, and for configuring which OAC features users can view or configure.
OAC offers a wide range of configuration options and controls, for administrators and for individual users. It is the administrator who determines how much flexibility and control users have, based on corporate security policies and on the configuration settings in the Odyssey Access Client Administrator. All administrators responsible for managing OAC should be familiar with using OAC and with the information presented in the Odyssey Access Client User Guide. See “List of Technical Publications” on page xi.
Some of the information in this document pertains to configuration tasks specific to the Juniper Networks Unified Access Control (UAC) security solution. If you use OAC on a UAC network, see the Unified Access Control Administration Guide on the Web at:
http://www.juniper.net/techpubs/
Objectives ix

Odyssey Access Client Administration Guide
x D
Documentation Conventions
The following tables show the conventions used throughout this book. Table 1 defines notice icons; Table 2 defines text conventions; Table 3 defines CLI conventions; and Table 4 defines GUI conventions.
Table 1: Notice Icons
Icon Meaning Description
Note Indicates important features or instructions.
Caution Indicates that you risk losing data or damaging your hardware.
Warning Alerts you to the risk of personal injury.
Table 2: Text Conventions
Convention Description
Plain sans serif type Filenames and directory names.
Italics Terms defined in text.
Variable elements for which you supply values.
Book titles.
+ (plus sign) Key names linked with a plus sign indicate that you must press two or more keys simultaneously.
Table 3: CLI Conventions
Convention Description
Bold type Commands that you enter; command names and options.
Plain sans serif type Filenames and directory names.
Code and system output.
Italics Variables for which you supply values.
[ ] Square brackets Elements in square brackets indicate optional keywords or variables.
| Pipe symbol Elements separated by the pipe symbol indicate a choice between mutually exclusive keywords or variables.
{ } Braces Elements in braces indicate required keywords or variables.
Table 4: GUI Conventions
Convention Description
> (chevron) Navigation paths through the UI.
Bold type User interface elements that you select in a procedure, such as tabs, buttons, and menu options.
Italics Variables for which you supply values.
ocumentation Conventions

About This Guide
List of Technical Publications
This section lists the manuals in the OAC and UAC documentation sets. All documents are available at http://www.juniper.net/techpubs/.
Odyssey Access Client User Guide—Provide an overview of OAC to basic and advanced users, provide detailed discussions and instructions for configuring network and authentication settings, and offer basic troubleshooting advice.
Odyssey Access Client Administration Guide—Describe how to plan, configure, and deploy OAC to multiple users, how to control access to OAC options based on the needs and skill levels of user groups, how to manage updates, and how to deploy updates using scripts.
Odyssey Access Client Quick Start Guide—Help basic users to install OAC and connect quickly to a wired or wireless network.
Odyssey Access Client Release Notes—Provides the latest information about features, changes, known problems, and resolved problems. If the information in the release notes differs from the information found in the documentation set, follow the release notes.
Unified Access Control Administration Guide—Describe the UAC Solution and provide instructions for configuration and maintenance.
Unified Access Control Quick Start Guide—Describe the basic tasks for configuring the Infranet Controller and the Infranet Enforcer.
Unified Access Control Client-Side Changes Guide—Describe the changes that OAC and the Infranet Controller make on client computers, including the installed files and registry changes.
Unified Access Control Custom Sign-in Pages Solutions Guide—Describe how to personalize the look and feel of the pre-authentication and sign-in pages that the Infranet Controller displays to users and administrators.
Unified Access Control J.E.D.I. Solutions Guide—Describe how to write and implement solutions through the Host Checker client and server APIs.
Unified Access Control Deployment Scenarios Guide—Provide recommendations for deploying the UAC solution.
Requesting Technical Support
Technical product support is available through the Juniper Networks Technical Assistance Center (JTAC). If you are a customer with an active J-Care or JNASC support contract, or are covered under warranty, and need post-sales technical support, you can access our tools and resources online or open a case with JTAC.
JTAC policies—For a complete understanding of our JTAC procedures and policies, review the JTAC User Guide located at http://www.juniper.net/customers/support/downloads/710059.pdf.
List of Technical Publications xi

Odyssey Access Client Administration Guide
xii
Product warranties—For product warranty information, visit http://www.juniper.net/support/warranty/.
JTAC hours of operation—The JTAC centers have resources available 24 hours a day, 7 days a week, 365 days a year.
Self-Help Online Tools and ResourcesFor quick and easy problem resolution, Juniper Networks has designed an online self-service portal called the Customer Support Center (CSC) that provides you with the following features:
Find CSC offerings—http://www.juniper.net/customers/support/
Search for known bugs—http://www2.juniper.net/kb
Find product documentation—http://www.juniper.net/techpubs/
Find solutions and answer questions using our Knowledge Base— http://kb.juniper.net/
Download the latest versions of software and review your release notes— http://www.juniper.net/customers/csc/software/
Search technical bulletins for relevant hardware and software notifications— http://www.juniper.net/alerts/
Join and participate in the Juniper Networks Community Forum—http://www.juniper.net/company/communities/
Open a case online in the CSC Case Manager—http://www.juniper.net/customers/cm/
To verify service entitlement by product serial number, use our Serial Number Entitlement (SNE) Tool located at https://tools.juniper.net/SerialNumberEntitlementSearch/.
Open a Case with JTACYou can open a case with JTAC on the Web or by telephone.
Use the Case Manager tool in the CSC at http://www.juniper.net/customers/cm/.
Call 1-888-314-JTAC (1-888-314-5822) toll free in USA, Canada, and Mexico.
For international or direct-dial options in countries without toll-free numbers, visit us at http://www.juniper.net/customers/support/requesting-support/.
Requesting Technical Support

Chapter 1
Understanding the Odyssey Access Client Administrator
This chapter presents an overview of the Odyssey Access Client Administrator—a suite of tools for configuring, updating, and deploying Odyssey Access Client (OAC) to users and for controlling which OAC features users can access. This chapter also presents a discussion of the components and processes required for secure network authentication and a summary of tasks to consider when planning to configure and deploy OAC to users.
OAC Overview
OAC is 802.1X network access client software. It provides full support for the Extensible Authentication Protocol (EAP), which is required for secure wireless LAN access. Together with an 802.1X-compatible RADIUS server such as Juniper Networks Steel-Belted Radius, OAC secures the authentication and connection of WLAN users, ensuring that only authorized users can connect, login credentials are not compromised, and data privacy is maintained over the wireless link. OAC also serves as a client for enterprises that are deploying identity-based (wired 802.1X) networking. OAC provides wireless access to enterprise networks, home Wi-Fi networks, and public hotspots.
The Juniper Networks Unified Access Control (UAC) solution combines user identity and device security state information with network location to create a unique access control policy for each user. The UAC solution can be enabled at Layer 2 using 802.1X, or at Layer 3 using an overlay deployment. UAC can also be provisioned in mixed mode using 802.1X for network admission control and Layer 3 for resource access control. At the center of this solution is the Infranet Controller, a server that verifies your identity and your computer’s compliance with security requirements before allowing you to access protected resources. An Infranet Enforcer is a firewall for the Infranet Controller to enforce security policies. An Infranet Enforcer is deployed in front of an Infranet Controller and protected network resources.
You can deploy OAC in a network that includes the UAC security solution where authenticated access to protected network resources is managed by an Infranet Controller. You can also deploy OAC in a traditional network without an Infranet Controller where OAC negotiates directly with an authentication, authorization, and accounting (AAA) server for authenticated access.
OAC Overview 1

Odyssey Access Client Administration Guide
2
OAC Network Authentication Overview
When OAC attempts a secure network connection, a series of negotiated transactions takes place before that connection is complete. Figure 1 summarizes the basic network components and transactions involved in such a connection.
For more information on network security and authentication, see the Odyssey Access Client User Guide.
Figure 1: Network Authentication Events
A user or computer must be authenticated before gaining access to protected network resources. Such a connection requires a series of events to occur during the logon process. In an IEEE 802.1X network, those events include user or machine authentication using Extensible Authentication Protocol (EAP) methods. In a UAC network, both the user and the computer must comply with network security policies.
1. OAC attempts to make an authenticated network connection. Depending on the network infrastructure, the network connection can include a Layer 2 connection to an 802.1X switch or wireless access point or a Layer 3 connection to an Infranet Controller or to a switch that does not support 802.1X authentication.
For a wired OAC client, authentication occurs through authentication ports on an 802.1X switch (at Layer 2) to the authentication server. If a network switch that does not support 802.1X, the network connection occurs at Layer 3.
A wireless OAC client communicates with the authentication server through an 802.1X access point. The client and the authentication server conduct a public/private key exchange.
2. The authentication server sets up an encrypted tunnel to negotiate secure wireless authentication.
3. Successful wired or wireless authentication gives the user access to a VLAN and the appropriate protected network resources.
(Layer 3)(Layer 2)
OAC Network Authentication Overview

Chapter 1 Understanding the Odyssey Access Client Administrator
Planning an OAC Configuration
Consider the following questions as you plan your OAC configuration:
Will you be authenticating users, computers, or both? If you are setting up computers that support multiple users, consider using machine authentication. The method you use determines the flow of steps for configuring the client settings.
Do you need the computers to connect to the network before the user desktop appears? If you need to run setup scripts or other processes that run earlier, you can configure OAC user account settings to support this ability.
How many variations of OAC configuration do you need? Based on the user roles configured on the Infranet Controller, you can configure OAC, export the settings to the Infranet Controller, and map those settings to specific roles.
Which outer EAP authentication protocols do you need? In a UAC network, you can use either Tunneled Transport Layer Security (TTLS) or Protected EAP (PEAP). In a traditional network, check your corporate security policy or ask your network security officer which protocols are supported.
If you use TTLS or PEAP, which inner authentication protocols do you need? An inner authentication protocol is one transmitting and/or receiving communications within a tunnel provided by a tunneling protocol, such as TTLS. In a UAC network, you must use Juniper Networks UAC (JUAC).
Which encryption method(s) apply? The encryption methods available to you depend on the access points deployed on your network and on the association mode you select—Wired Equivalent Privacy (WEP), Wi-Fi Protected Access (WPA), or WPA2. If you are using OAC FIPS Edition, there are specific constraints on encryption methods, based on whether FIPS mode is selected. Contact your network security officer if you are unsure which methods your network supports.
Should you allow users to access and update network auto-scan lists? Auto-scan lists might pose risks of man-in-the-middle attacks or other applications designed to attract wireless connections. Consider using preemptive networks as part of your wireless network configuration.
For wireless networks, what are the service set identifiers (SSIDs) for your wireless access points and should you broadcast them? The SSIDs that you use to configure wireless networks must match those of the wireless access points on your network. Without the SSID, OAC can detect a wireless network but cannot connect to it.
Is wireless suppression appropriate for your users? Wireless suppression disables wireless connections as long as the client has a wired network connection. A wired connection usually provides greater network bandwidth and preserves the wireless network bandwidth for users who need a wireless connection.
Planning an OAC Configuration 3

Odyssey Access Client Administration Guide
4
Should you allow users to modify configuration settings after you deploy them? The administrative tools allow you to hide, disable, and lock individual configuration settings. You can customize the OAC user interface to provide a simpler set of controls and options for users whom you do not want to change predefined configuration settings.
Should you allow users to add, remove, or modify trusted servers and certificates? You can turn off access to trust settings to prevent users from modifying them.
Which network profile configuration settings apply if your network includes Infranet Controllers? Should these settings be locked so that users cannot change them? Each Infranet Controller requires a separate profile.
Should you allow Fast User Switching for Windows Vista users? Fast User Switching is enabled for Windows Vista and is enabled by default for domain users on Windows XP.
This means that all concurrent user sessions on a given Windows Vista system can access the current desktop connections to networks and Infranet Controllers. Thus, if one user has a current network connection, other users logged in on the same computer can access the same network connections. This can be a security risk. A background process running in one user session can piggyback onto the network access granted to another session and access resources to which the user should not have access rights. We recommend that you disable Fast User Switching for Windows Vista users.
What configuration is best if you want to restrict and simplify the OAC configuration for most of your users? Which optional settings should you hide and which ones should you disable so that they cannot be accessed?
Should you allow access to other wireless supplicant programs or do you prefer to enforce the use of OAC? You can configure OAC to manage all network adapters and prevent users from exiting OAC, thus preventing them from using other Wi-Fi supplicant programs.
How will you deploy the configuration?
In a UAC network, you can create and save preconfigured OAC settings and save them in a .zip file to be uploaded to an Infranet Controller. The Infranet Controller administrator can then associate a specific OAC configuration to a specific role and download preconfigured clients from the Infranet Controller.
In a traditional network, you can use an .msi file and update scripts.
Read this guide and the Odyssey Access Client User Guide thoroughly before configuring OAC for users. Become familiar with the available options and the configuration procedures for each one.
Chapter 9, “Sample Administrative Workflows,” provides sample workflow scenarios for performing common administration tasks, such as setting up single sign-on for users.
Planning an OAC Configuration

Chapter 1 Understanding the Odyssey Access Client Administrator
Odyssey Access Client Administrator Tools Overview
You can preconfigure OAC and deploy a common configuration to multiple users with push technology software deployment products. These are third-party products used to distribute software to multiple users at the same time. You can update existing OAC installations with new or modified configuration settings that reflect your current network security policy. The Odyssey Access Client Administrator tools let you select individual OAC features and hide, disable, or lock individual settings before deploying the configured OAC client to users.
To access the Odyssey Access Client Administrator, select Tools > Odyssey Access Client Administrator from the Odyssey Access Client Manager menu bar. You can also double-click the odClientAdministrator.exe application in the directory where OAC is installed. The default location is C:\Program Files\Juniper Networks\Odyssey Access Client\Odyssey Access Client Manager.
The Odyssey Access Client Administrator tools are represented by icons in the Odyssey Access Client Administrator management interface (Figure 2 on page 5).
Figure 2: Odyssey Access Client Administrator Tool Icons
Connection Settings ToolUse the Connection Settings tool to configure when the network connection occurs. These settings offer flexibility for controlling when authentication completes and accommodates processes such as startup scripts. The options are:
Connect to the network after the Windows desktop appears. This connection type requires user login credentials.
Connect to the network after Windows logon but before the Windows desktop appears. This connection type requires user login credentials.
Connect to the network before Windows logon. This connection type requires that you install the OAC Graphical Identification and Authentication (GINA) module. See “Connecting Prior to Windows Logon” on page 32 and “Installing the Odyssey GINA Module” on page 36. This connection type requires user login credentials.
Connect to the network at the machine level (not the user level) at Windows startup. See “Configuring a Machine Account Connection” on page 33.
Install and use GINA. See “Configuring a Prior to Windows Logon Connection with GINA” on page 36.
Odyssey Access Client Administrator Tools Overview 5

Odyssey Access Client Administration Guide
6
Initial Settings ToolUse the Initial Settings tool to perform one or more of the following tasks for a user account configuration:
Preconfigure OAC networks and authentication profiles before deploying OAC for groups of users. See “Configuring Initial Settings” on page 12 and “Exporting an OAC Preconfiguration File” on page 59.
Create and test preconfigured settings before creating a new custom installer or an update file. See “Testing Machine Connection Settings” on page 16.
Manage SIM cards and SIM card PIN settings. See the Odyssey Access Client User Guide for information on managing SIM cards.
Machine Account ToolUse the Machine Account tool to configure an authenticated network connection for the physical computer rather than for a user. Machine accounts provide a persistent network connection when no user is logged in. See “Configuring a Machine Account Connection” on page 33.
Permissions Editor ToolUse the Permissions Editor tool to apply custom feature-by-feature restrictions on a user’s ability to use or modify OAC configuration settings. This tool lets you disable or hide OAC settings and menu options that you do not want users to change.
Merge Rules ToolUse the Merge Rules tool to specify the rules for creating a settings update file or a new custom installer file. Merge rules determine how configuration items are added to existing user configurations. You can assign rules that modify current configurations or that prevent users from editing the configurations. You can also use this tool to lock profiles, networks, auto-scan lists, Infranet Controllers, and other settings so that users cannot modify them.
Custom Installer ToolUse the Custom Installer tool to create a preconfigured installer (.msi) file or a settings update file from the initial user or machine settings that you have configured with Odyssey Access Client Administrator tools. Use custom installer files for upgrades and new user installations. After you have the .msi file, you can deploy the OAC configuration to users with a variety of mass-distribution deployment tools.
You can use the Custom Installer tool to merge updated configuration settings with existing machine account settings.
Script Composer ToolUse the Script Composer tool to create configuration scripts that add new settings, replace existing settings, or remove settings in OAC configurations.
Odyssey Access Client Administrator Tools Overview

Chapter 1 Understanding the Odyssey Access Client Administrator
PAC Manager ToolUse the PAC Manager tool to manage protected access credentials (PACs) for EAP-FAST.
Context-Sensitive Help The Odyssey Access Client Administrator includes online help that you can access by selecting Help > Help Topics in the Odyssey Access Client Administrator menu bar.
To get context-sensitive help for the Odyssey Access Client Administrator, press F1 on the keyboard.
Odyssey Access Client Administrator Tools Overview 7

Odyssey Access Client Administration Guide
8
Odyssey Access Client Administrator Tools Overview
Chapter 2
Configuring a User Account
This chapter describes how to use the Initial Settings tool.
Initial Settings Tool Overview
The Initial Settings tool lets you preconfigure OAC for deployment to your users. When you preconfigure OAC for your users, OAC uses those settings when it runs for the first time. Without preconfigured settings, a user sees the default configuration with no networks, profiles, or adapters configured.
If you want to create a preconfigured copy of OAC for deployment to multiple users, you must use the Initial Settings tool. The Initial Settings tool lets you configure settings for profiles, networks, auto-scan lists, trusted servers, adapters, and Infranet Controllers in the same way.
The options on the Tools menu in the Initial Settings tool differ from the options on the Odyssey Access Client Manager Tools menu. The File menu in the Initial Settings tool does not include the Forget Password and Forget Temporary Trust options available in the Odyssey Access Client Manager. These are local user options that do not apply for a configuration distributed to multiple users.
The Tools menu in the Initial Settings tool includes the following options:
Reload and Test Initial Settings—Tests the initial configuration before deploying it to users. See “Configuring Connection Timing for a User Account” on page 15.
SIM Card Manager—A Subscriber Identity Module (SIM) card is an electronic card present in some mobile wireless devices and used to identify a subscriber to the network. You can use a SIM card for OAC authentication if your client computer has a SIM card reader.
You can use OAC to manage the personal identification number (PIN) on your SIM card hardware. See the discussion on managing SIM card PIN settings in the Odyssey Access Client User Guide.
Logs—Displays the current contents of the debuglog.log file. See the discussion on viewing log files and diagnostics in the Odyssey Access Client User Guide.
NOTE: If you have a FIPS license, the File menu displays options for turning FIPS mode on and off.
Initial Settings Tool Overview 9

Odyssey Access Client Administration Guide
10
Preferences—Toggles the display of the system tray icon, the control panel icon, or the Odyssey Access Client Manager splash screen.
Windows Logon Settings—Allows you to override the default network connection timing for all users to whom you deploy the default configuration image. See the discussion on managing Windows logon settings in the Odyssey Access Client User Guide.
Options—Shows the following categories of settings organized as separate tabs:
Security
Enable session resumption: Restricts session resumption for any session older than the time that you set.
Enable automatic reauthentication: Enables periodic automatic reauthentication and sets the reauthentication frequency setting.
Enable server temporary trust: Lets you authenticate to a network whose authentication server is not yet configured as trusted in the Trusted Servers dialog box.
Prompt for smartcard PIN: Prompts for a smart card PIN.
Interfaces
Wireless suppression: Defaults to a wired network connection whenever one is available to preserve wireless bandwidth for users who do not have a wired connection.
Manage wired/wireless adapters: Configures OAC for any wired or wireless adapter automatically.
Preemptive Networks—Lets you specify an auto-scan list of preferred networks that, if found, take precedence over any network or auto-scan list currently enabled in the connection dialog box when searching for a network.
EAP-FAST—Controls when OAC prompts for EAP-FAST credentials.
Notifications—Manages the display of notification messages relating to authentication and network connection status.
Default Login Name—Lets you modify the default login name prompt format that appears in any authentication profile you create. This allows you to set up a login name format when the network to which you need to connect has a non-standard login name format.
NOTE: Preemptive networks affect which networks to search for and in what order to search. They do not affect when to search. If you select the Switch to a preferred network check box for an auto-scan list, OAC actively monitors the SSIDs being broadcast so that, if an SSID higher up on the list is detected, OAC switches to that network. This feature requires SSIDs to be broadcast to be effective.
Initial Settings Tool Overview
Chapter 2 Configuring a User Account
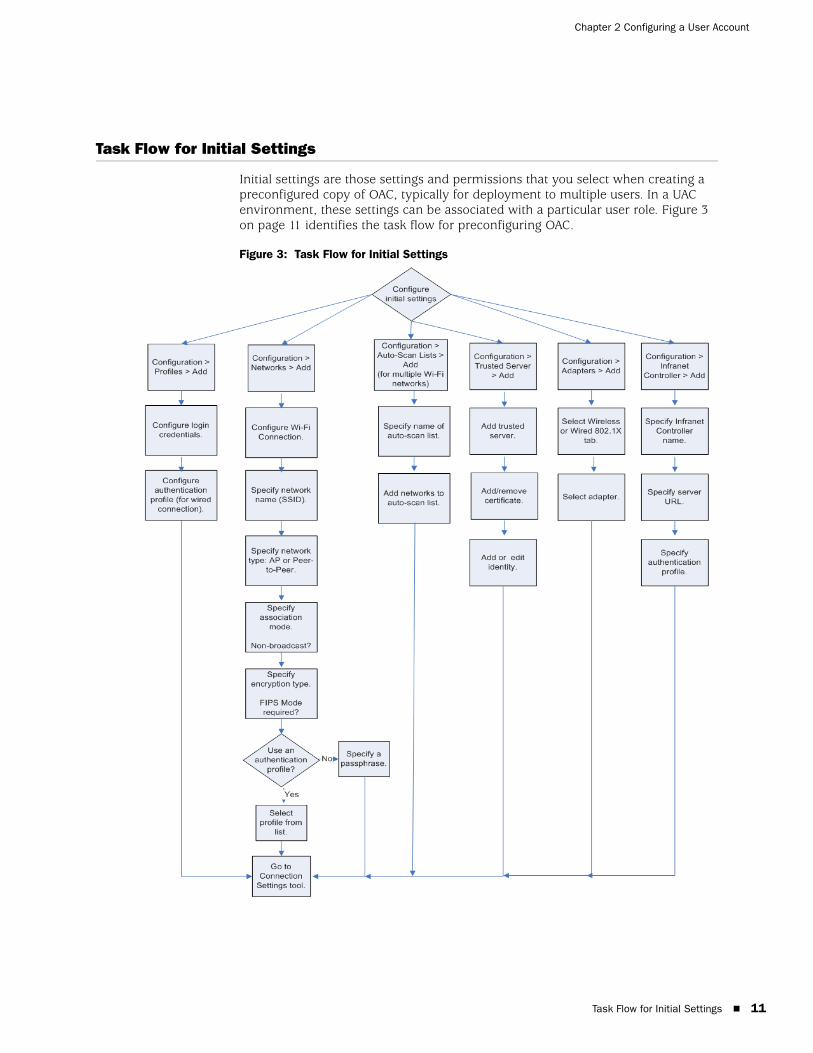
Task Flow for Initial Settings
Initial settings are those settings and permissions that you select when creating a preconfigured copy of OAC, typically for deployment to multiple users. In a UAC environment, these settings can be associated with a particular user role. Figure 3 on page 11 identifies the task flow for preconfiguring OAC.
Figure 3: Task Flow for Initial Settings
Task Flow for Initial Settings 11
Odyssey Access Client Administration Guide
12
Configuring Initial Settings
Configure the following sets of features in the Initial Settings tool in much the same way that you configure them in the Odyssey Access Client Manager. Do this for an individual user or for a group of users to which you deploy a common configuration image. You can create more than one configuration image if different groups of users require different settings or if you need to apply more restrictions to one group than for another.
The following categories of settings appear under Configuration in the Initial Settings tool sidebar.
Profiles—Preconfigure the authentication settings that correspond to a specific network that requires authenticated access. See the Odyssey Access Client User Guide for instructions on configuring authentication profiles. (A wired 802.1X connection required an authentication profile.)
Networks—Configure the default networks for this user or for a configuration image to deploy to multiple users. See the Odyssey Access Client User Guide for instructions on configuring networks.
Auto-Scan Lists—Configure and order the networks for an auto-scan list for this user or for a configuration image to deploy to multiple users. See the Odyssey Access Client User Guide for instructions on configuring auto-scan lists and features such as wireless suppression.
Trusted Servers—Configure the trusted root certificate authority (CA) or intermediate CA certificate in the local certificate store of the computer that you use for configuration updates. Then configure a trusted server for users in the Initial Settings tool. You can configure the trust settings individually. See the Odyssey Access Client User Guide for instructions on configuring trusted servers and adding or removing certificates.
To manage merge rule settings for trust configuration, see “Setting Merge Rules for Trust” on page 49. You can now manage merge rule settings, such as locking, for individual certificate and identity entries.
Adapters—Configure the wired or wireless adapters users can have. Users are not required to have exactly the same adapter you have (the names and models can differ), as long as you install a similar type (wired or wireless) of adapter on their computers. See the Odyssey Access Client User Guide for instructions on managing network adapters.
Infranet Controllers—Configure one or more Infranet Controllers for users. Select the User may not disconnect from this IC check box to lock a user connection to a specific Infranet Controller. This feature maintains host checker policies and endpoint integrity checks as long as the computer or the user is on the network. The feature is only available in the Initial Settings and the Machine Account tools. It allows administrators to prevent users from disabling the connection.
NOTE: Your authentication server might not support all of the EAP authentication methods available in OAC. Identify the methods your authentication server supports before setting up authentication for OAC.
Configuring Initial Settings

Chapter 2 Configuring a User Account
When users run OAC for the first time, they typically see the settings that have been preconfigured in the Initial Settings tool. You can use the same configuration settings for:
Custom installers
Settings update files
Preconfigured settings for export to an Infranet Controller
Managing Windows Logon Settings Select Tools > Windows Logon Settings to override the default setting for network connection timing. For Windows XP, this option supports users whose configuration is based on a preconfigured GINA connection timing (on Vista and Windows 7, this is a Credential Provider) and provides the ability to override the default setting. This option lets a user connect to a network other than the default connection configured for OAC, in which case logon credentials might be different. See “Connecting Prior to Windows Logon” on page 32 for a complete description of the logon timing options.
Any of the Windows logon options can be configured as your default network connection timing. Additionally, you can allow OAC users to override the timing of default network connection settings. For example, if users can log onto a domain with cached credentials and if the network connection is configured to occur prior to Windows logon, users can change the connection timing to connect to the network after the desktop appears.
Caution on Overriding Default Windows Logon SettingsThe Windows Logon Settings option in the Odyssey Access Client Manager lets users override the default network connection timing (which is configured using the Connection Settings tool). The Windows Logon Settings option accommodates users who have different connectivity requirements at login time. For example, an OAC configuration distributed to multiple users might contain predefined networks for most corporate users. However, users in a remote location might need to connect to other networks and the requirements for login timing might differ. This option lets those users override the default login setting without needing administrative privileges. This option is not used frequently.
NOTE: Before creating a custom installer or a settings update file, use the Merge Rules tool to specify how the Initial Settings tool configuration applies to updated or new user configurations.
NOTE: Changing the logon timing can affect other startup processes.
NOTE: Do not select Override default settings for Windows logon in the Initial Settings tool unless you intend to let users override the network connection settings you configure in the GINA tab of the Connection Settings tool.
Configuring Initial Settings 13

Odyssey Access Client Administration Guide
14
If default login settings are overridden and if you use the Odyssey GINA module on Windows, users can configure a network connection that takes place before Windows logon. Users can override default network connection settings that you configure unless you have restricted them with the Permissions Editor.
Users cannot override trusted server configuration if OAC is set up to connect before Windows logon. The only way to change the trust setting for a Windows logon connection is to modify those settings in the Trusted Servers dialog box of the Initial Settings tool.
Configuring the Login Name FormatSelect Tools > Options > Default Login Name from the Initial Settings tool to specify the default login for all new OAC users. The default login name option that you specify might require user input if you specify a custom format. In that case, the user sees a prompt for the custom login name. See “Specifying a Custom Login Format” on page 14.
The resulting default login name applies under the following circumstances:
The default login name appears automatically in the Login Name box of any new Odyssey Access Client Manager authentication profile the user creates.
If you preconfigure authentication profiles for deployment to multiple users, you can leave the Login Name box blank. When a user to whom you deploy the profile runs OAC, the Login Name box is populated with the user’s Windows logon name.
The default login name is populated automatically for profiles when a user imports an OAC script that includes a profile with a blank username.
Specifying a Custom Login FormatUse this setting to insert text that prompts the user with the correct login format the first time they use OAC for authentication. The login format that the user enters is populated automatically for the following profiles:
All new authentication profiles that the user creates.
Any authentication profiles that you configure with blank login names for distribution to your users through settings update files and custom installers.
For example, you could require users to use the following format for the login name:
username@domain
To specify the custom login name format prompt:
NOTE: You do not need the Merge Rules tool to lock the default login name that is used by a custom installer or settings update file. The default login name option that you specify in the Initial Settings tool is automatically used in any custom installer or settings update file.
Configuring Initial Settings

Chapter 2 Configuring a User Account
1. Select Tools > Options from the Initial Settings tool. The Options dialog box appears.
2. Select the Default Login Name tab.
3. Select Prompt for login name using the following prompt.
4. Specify the prompt for the login name format.
5. Select OK.
Configuring Domain-Decorated or Undecorated Login NamesTo specify the default login name for all user profiles as the domain-decorated or undecorated Windows logon name:
1. Select Tools > Options from the Initial Settings tool. When the Options dialog box appears, select the Default Login Name tab.
2. Select one of the following Windows logon name formats:
Decorated Windows logon name—Use the default domain-decorated Windows logon name format of Domain_name\Logon_Name.
Undecorated Windows logon name—Use the Windows logon name without any domain name decoration.
3. Select OK.
Configuring Connection Timing for a User Account
If you are not using machine-level authentication, users connect to the network by providing login credentials. Note, however, that timing options for network authentication determine when the authenticated connection is established. Configure these settings after you have completed the user account configuration settings using the Initial Settings tool.
To configure a user network connection:
1. Double-click the Connection Settings tool.
2. Select the User Account tab.
3. Select the connection timing option you prefer. See “Network Connection Timing” on page 28 for specific instructions and details.
4. Save your settings and close the Connection Settings tool.
5. Disable any configuration features you that need to restrict or lock using the Permissions Editor tool.
Configuring Connection Timing for a User Account 15

Odyssey Access Client Administration Guide
16
Testing Configuration Settings
This section describes how to test the configuration for users or machine connections before you create a custom installer to deploy it.
The Reload and Test Initial Settings option loads the configuration defined in the Initial Settings tool to the Odyssey Access Client Manager and attempts a network connection. If the connection fails, try to troubleshoot the failure like any other failed connection, based on error messages and the entries in the log file.
To test your user connection settings:
1. Double-click the Initial Settings tool.
2. Select Tools > Reload and Test Initial Settings from the Initial Settings tool.
3. Select OK. This permanently deletes your current Odyssey Access Client Manager settings and loads your settings from the Initial Settings tool into the Odyssey Access Client Manager.
4. Test all the connections through the Wi-Fi or Ethernet Connection dialog box of the Odyssey Access Client Manager. Any modifications that you make in the Odyssey Access Client Manager are not reflected in the Initial Settings tool.
5. Return to the Initial Settings tool to correct any connection problems and retest the connections as necessary.
Testing Machine Connection Settings
To test machine connection settings:
1. Double-click the Connection Settings tool.
2. Select the Machine Account tab.
3. Select Leave the machine connection active.
4. Select OK.
5. Double-click the system tray icon to open the Odyssey Access Client Manager.
6. Verify the status of your network connection(s).
7. Return to the Machine Account tab to correct any connection problems and retest these connections, if necessary.
8. If you modified your connection settings, select the Machine Account tab in the Connection Settings dialog box and restore the previous settings.
Testing Configuration Settings

Chapter 2 Configuring a User Account
Controlling Network Adapters and Other Wi-Fi Supplicants
If network administration policies prohibit users from managing network adapters or using Wi-Fi supplicant programs other than OAC, you can limit users’ ability to configure or disable OAC.
You can configure OAC to manage any wired or wireless adapter on the user’s computer automatically. You can then lock this setting in the Merge Rules tool before deploying OAC.
You can use the Permissions Editor to prevent users from exiting OAC and prevent external programs from disabling OAC.
You can use the Merge Rules tool to lock OAC settings.
Controlling Network Adapters and Other Wi-Fi Supplicants 17

Odyssey Access Client Administration Guide
18
Controlling Network Adapters and Other Wi-Fi Supplicants
Chapter 3
Configuring a Machine Account
This chapter describes how to configure machine accounts.
Machine Account Overview
A machine (computer) has a name and password that is transmitted to the network before a user logs in. With a machine connection enabled, a network IP connection persists as long as the computer is running, even if a user is not logged in. This can be done using a preconfigured user name and password or, in a Windows environment, with the computer’s Active Directory credentials or certificate.
A machine account connection is the earliest time that OAC can connect to the network and is useful for administrative tasks such as nightly backups or update processes that take place whether or not the user is logged in. It is also used for Active Directory domain policy scripts that run during startup.
You can configure OAC to use a machine connection when a user connection is not available, transition to a user-level connection after a user logs in to the network, and then resume a machine connection after the user logs out.
Machine Account Tool Overview
The user interface for the Machine Account tool is similar to the interface for the Initial Settings tool. You can use the items in sidebar to configure the settings for profile, networks, auto-scan lists, trusted servers, adapters, and Infranet Controllers in the same way.
Double-click Machine Account in the Odyssey Access Client Administrator to open the Machine Account tool.
The File menu in the Machine Account tool does not include the Forget Password or Forget Temporary Trust options available in the Odyssey Access Client Manager. These are local user options that do not apply for a broad-based configuration.
NOTE: After you configure machine account settings on a target computer manually or by means of a settings update file, you must restart the computer.
Machine Account Overview 19

Odyssey Access Client Administration Guide
20
The Tools menu option in the Machine Account tool has fewer options than the Odyssey Access Client Manager Tools menu.
Select Tools > Options in the Machine Account tool. You can configure settings for the following tabs:
Security
Interfaces
Preemptive Networks
Notifications
Task Flow for Machine Account Settings
Machine account settings are those settings and permissions that you select when you are setting up a preconfigured copy of OAC for a machine-level connection. Figure 4 on page 21 shows the task flow for configuring machine account settings.
Task Flow for Machine Account Settings

Chapter 3 Configuring a Machine Account
Figure 4: Task Flow for Machine Account Settings
Enabling a Machine Account Connection
To configure a machine account in the Connection Settings tool:
1. Open the Connection Settings tool and select the Machine Account tab.
2. Select Enable network connection using machine account.
3. Select Leave the machine connection active; users are connected via the machine connection. In this case, the machine account is active even when the user is not logged into Windows.
Enabling a Machine Account Connection 21

Odyssey Access Client Administration Guide
22
After you configure a machine-level network connection in the Connection Settings tool, use the Machine Account tool to configure the machine network connection settings for a profile. This type of configuration is similar to how you configure connection settings for the Odyssey Access Client Manager.
A machine account can be assigned to a different VLAN from the one set up for a user account. If you configure the machine account to transition to a user account when the user logs in, the IP address for the machine might change because of a different VLAN assignment. Similarly, when the user logs off, if the account is configured to transition back to a machine account, the IP address and VLAN assignments might change back again.
Configuring Machine Account Settings
Configure machine account settings in the Machine Account tool in much the same way that you configure them in the Odyssey Access Client Manager. You can create more than one configuration image if different groups of users require different settings or if you need to apply more restrictions to one group than to another.
The following configuration categories appear in the navigation pane in the Machine Account tool. See the Odyssey Access Client User Guide for instructions on configuring the settings.
Profiles—Preconfigure the authentication settings that correspond to a specific network that requires authenticated access.
Networks—Configure the default networks for this user or for a configuration image to deploy to multiple users.
Auto-Scan Lists—Configure and order the networks for an auto-scan list for this user or for a configuration image to deploy to multiple users. See the Odyssey Access Client User Guide for instructions on configuring auto-scan lists and features such as wireless suppression.
Trusted Servers—Configure the trusted root CA or intermediate CA certificate in the local certificate store of the computer that you use for configuration updates. Then configure a trusted server for users in the Initial Settings tool. You can configure the trust settings individually. See the Odyssey Access Client User Guide for instructions on configuring trusted servers and adding or removing certificates.
To manage merge rule settings for trust configuration, see “Setting Merge Rules for Trust” on page 49. You can now manage merge rule settings, such as locking, for individual certificate and identity entries.
NOTE: Your authentication server might not support all of the EAP authentication methods available in OAC. Try to determine which methods your authentication server allows before setting up authentication in OAC.
Configuring Machine Account Settings

Chapter 3 Configuring a Machine Account
Adapters—Configure the wired or wireless adapters users can have. Users are not required to have exactly the same adapter you have (the names and models can differ), as long as you install a similar type (wired or wireless) of adapter on their computers. See the Odyssey Access Client User Guide for instructions on managing network adapters.
Infranet Controllers—Configure one or more Infranet Controllers for users. Select the User may not disconnect from this IC check box to lock a user connection to a specific Infranet Controller. This feature maintains host checker policies and endpoint integrity checks as long as the computer or the user is on the network. The feature is only available in the Initial Settings and the Machine Account tools. It allows administrators to prevent users from disabling the connection. See the Odyssey Access Client User Guide for instructions on configuring an Infranet Controller connection.
Machine Account Profile OptionsYou can configure profiles, networks, auto-scan lists, trusted servers, adapters, and Infranet Controllers for a machine account. The only profiles, networks, adapters, or Infranet Controllers that are used for machine connections are those you configure in the Machine Account tool.
Setting Machine Account Password CredentialsIf you enter a password in a machine account profile and intend to create a custom installer, the credentials that you enter are used by all copies of OAC that use this installer. It is better to enter credentials on each client computer manually if user credentials are required.
Setting Automatic Certificate Selection for EAP-TLS If you require Extensible Authentication Protocol-Transport Layer Security (EAP-TLS) for authentication and plan to distribute this configuration to multiple users, select Use automatic certificate selection on the profile you use for the machine connection. See the discussion on configuring authentication profiles in the Odyssey Access Client User Guide.
Trust Configuration Requirements for Machine AuthenticationConfigure a trusted root certificate authority (CA) or intermediate CA certificate for a machine connection from the Trusted Servers dialog box of the Machine Account tool. Before you do so, make sure that you have the certificate installed in the certificate store on the computer that you use for configuration. See the discussion on managing trusted servers in the Odyssey Access Client User Guide for information about how to add certificates.
Restrictions for Machine Account SettingsDefault login name, EAP-FAST options, and authentication methods that require user interactions, such as those associated with tokens, do not apply for machine account settings. The Profile Properties dialog box in the Machine Account tool varies slightly from that of the Odyssey Access Client Manager.
Configuring Machine Account Settings 23

Odyssey Access Client Administration Guide
24
Configuring a Machine Password You can configure machine credentials (computer name and computer domain password) when authenticating the computer to RADIUS servers that check the machine credentials against an Active Directory listing. The machine credentials are created automatically when the computer joins the domain.
To use machine credentials for authentication:
1. Select Configuration > Profiles in the Machine Account tool.
2. When the profiles list appears, click Add.
3. When the Add Profile dialog box appears, click the User Info tab and select Use machine credentials.
If you select Use machine credentials, OAC uses the machine credentials created when the computer is joined to a domain for authentication. If you do not select this option, OAC uses the username provided as a login name.
4. Enter a realm name in the Realm (optional) box.
5. Select the Permit login using password check box unless you are authenticating with TLS.
When you have configured the machine credentials, open the Connection Settings tool. Select the Machine Account tab and select Enable network connection using machine account.
EAP Methods That Support Machine CredentialsMachine credentials are valid only with EAP-TTLS or EAP-PEAP. Select one or both of these authentication methods for the profile. Then configure the authentication options on the TTLS Settings tab or PEAP Settings tab of the Profiles Properties dialog box, as necessary. See the Odyssey Access Client User Guide for instructions on selecting authentication protocols for a machine account profile.
Enabling Machine AuthenticationWhen OAC connects to a UAC network, it supports Active Directory machine authentication and endpoint assessment. This means that you can configure a machine account for integrity checking.
To enable this feature:
1. Double-click the Machine Account tool and click the Profiles icon from the sidebar.
2. Click Add.
NOTE: After you configure a machine account on a user computer, you must restart the computer.
Configuring Machine Account Settings

Chapter 3 Configuring a Machine Account
3. In the User Info tab, specify a login name or select Use machine credentials. Optionally, specify a realm name other than the default.
4. Click the TTLS tab and select EAP as the inner authentication protocol; then select JUAC as the inner EAP protocol. (These settings are in place by default.)
NOTE: If an endpoint integrity check fails for a machine-level connection, remediation instructions or other notifications are not displayed. Depending on the policy defined for machine authentication, the computer might be redirected to a protected VLAN where remediation can occur.
Configuring Machine Account Settings 25

Odyssey Access Client Administration Guide
26
Configuring Machine Account Settings
Chapter 4
Configuring Network Connections
This chapter describes how to use the Connection Settings tool.
Connection Settings Tool Overview
The Connection Settings tool lets you configure options that control the type and timing of OAC network connections. By default, OAC connects to a network after the Windows desktop appears. This default behavior is appropriate when no special processing is required early in the Windows startup sequence. However, you might need an authenticated connection earlier to enable domain authentication before a user logs in or to execute scripts during a startup process.
Double-click the Connection Settings tool in the Odyssey Access Client Administrator. The Connection Settings dialog box has three tabs:
User Account—Use these settings to configure the default timing of user network connections. At the user level, the network connection requires a user’s login credentials and persists as long as the user is logged in.
Machine Account—Use these settings to configure a machine-level network connection at Windows startup time using machine credentials. At the machine level, the network connection uses the credentials of either a user or of a physical computer. A machine connection can persist as long as the computer is running, regardless of which user is logged in.
GINA—Use the Odyssey Graphical Identification and Authentication (GINA) module to control authentication before Windows startup. GINA is a replaceable dynamic link library (DLL) that runs before the Windows logon process to gather user credentials needed for authentication. GINA is instrumental in enabling a network connection to occur before Windows logon. Various vendors have their own versions of GINA. The Odyssey GINA module is designed to interact with OAC and is compatible with GINA modules from other vendors. See “Configuring a Prior to Windows Logon Connection with GINA” on page 36.
NOTE: On Windows Vista and Windows 7 systems, the capabilities described for GINA are provided by Credential Providers. There is a separate OAC login icon for using OAC to connect and log on to these systems. On Windows XP the GINA modules were "chained" and could sometimes interoperate, whereas Credential Providers are independent from each other.
Connection Settings Tool Overview 27

Odyssey Access Client Administration Guide
28
Network Connection Timing
You can control when network connections occur based on events such as Windows startup and authentication. Connection timings can apply at either the machine connection level or the user login level and are mutually exclusive. The settings described in this section show the available options.
User-Level Connection OptionsThe three types of user-level connection are as follows:
A user-level connection to the network occurs based on user credentials immediately before the user logs onto Windows.
A user-level connection to the network occurs based on user credentials after the user logs onto Windows but before the desktop appears.
A user-level connection to the network occurs based on user credentials after the Windows desktop appears.
Note that some of these configurations are enabled or disabled based on other features that you select.
For more information about configuring the various network connection options, as well as information about why you might select one scenario over another, see the following sections:
“Configuring Machine-Only Connections” on page 34
“Configure Machine Connections That Switch to User Connections” on page 35
Machine-Level Connection OptionsA machine connection to the network can use either the physical computer’s login credentials or the user’s credentials.
The following configuration options are available for a machine connection:
A machine-level connection to the network occurs when Windows starts up. With this connection type, the computer remains accessible over the network even if the user is not logged in, as long as the computer is still running. This option is useful for deploying update scripts and backups whether or not the user is logged in.
A machine-level connection to the network occurs at Windows startup time and switches to a user-level connection and authentication immediately before the user logs in to Windows.
NOTE: Before configuring user account connection settings, use the Initial Settings tool to configure the user account. Similarly, before configuring machine account connection settings, use the Machine Account tool to configure the machine account settings.
Network Connection Timing

Chapter 4 Configuring Network Connections
A machine-level connection to the network occurs at Windows startup time and switches to user-level connection and authentication after the user logs in to Windows but before the desktop appears.
A machine-level connection to the network occurs at Windows startup time and switches to user-level connection and authentication after the desktop appears.
Task Flow for Connection Settings
Connections settings determine how and when OAC connects to a network. Figure 5 on page 30 is a task-flow diagram for configuring connection settings for user account and for machine account connections.
Task Flow for Connection Settings 29

Odyssey Access Client Administration Guide
30
Figure 5: Task Flow for Connection Settings
Task Flow for Connection Settings

Chapter 4 Configuring Network Connections
Configuring a User Account Connection
The success of a network connection might depend on the timing you select. The default option establishes the network connection after the desktop appears. However, if you require users to connect to the network before the desktop appears—for example, if you run startup scripts from the network—you can select an earlier connection time.
Select the User Account tab in the Connection Settings tool to configure a connection to occur before or after the Windows logon prompt appears. Configure the timing of a user-level connection with the options listed under Use Odyssey to connect to the network. The following options control when the login prompt appears:
After the user’s desktop appears—Select this option if you do not want the user to establish a network connection before the desktop appears. This is the default setting.
After Windows logon, before the desktop appears—Select this option if you want the user to establish a network connection before the desktop appears but not before the Windows logon. See “Connecting After Windows Logon, Before the Desktop Appears” on page 31.
Prior to Windows logon, using the following settings—Select this option if you want the user to establish a network connection before logging in to Windows. See “Connecting Prior to Windows Logon” on page 32.
To configure Windows logon features for a custom installer or to update configuration settings, follow the guidelines in “Configuring the Login Name Format” on page 14.
Connecting After the User’s Desktop AppearsThis option is the default setting and there are no optional settings.
Connecting After Windows Logon, Before the Desktop AppearsThere are two choices for the conditions under which the connection takes place after the Windows desktop appears:
Defer the connection whenever users of this computer are connected to your network through a wired adapter. Do this by selecting Any wired adapter. This option applies even if the wired adapter is not connected to an 802.1X hub or switch.
Defer the connection whenever users are connected to your network through one or more specified adapters. Do this by selecting One of the following adapters. This option is valid for any adapter listed.
To edit the list of adapters:
a. Select Edit. The Select Adapters dialog box appears.
b. Select any adapter that you want used for network connections that occur after the desktop appears.
Configuring a User Account Connection 31

Odyssey Access Client Administration Guide
32
c. Select OK to close the Select Adapters dialog box.
The selected adapters appear in the list next to the Edit button on the User Account tab of the Connection Settings tool.
Connecting Prior to Windows Logon
If your network configuration has a profile that requires a password for authentication, select Configuration > Profiles > Properties > User Info in the Initial Settings tool and select the Use Windows password box on the Password subtab. See the discussion on configuring authentication profiles in the Odyssey Access Client User Guide.
If your network configuration requires a profile that specifies EAP-TLS or any other certificate-based authentication method, select Use the logon certificate from my smart card reader on the Certificate subtab of the User Info tab in the Profile Properties dialog box. The options for configuring this type of connection are as follows:
Use alternate settings on failure—Provide an alternate wired 802.1X adapter and profile (or wireless adapter network) for connections that take place before Windows logon. The alternate configuration applies if a connection attempt using the displayed adapter/network pair fails and a failure code is returned.
One use of this option is to provide an alternate 802.1X wired adapter (and profile) for connections that occur before Windows logon. Another use is to provide an alternate adapter and network in the event of failure. OAC uses the alternate settings automatically to try to establish a connection.
Configure the alternative adapter and profile in the Initial Settings tool before you configure alternate settings for this option.
After selecting this option, select the Edit Alternate Settings button and then select an alternate adapter and network.
Prompt to connect—There are three options available that control whether a prompt screen should appear before the network connection at login time. The options are:
Never—Select this option if you do not want your users to be prompted to connect, even if the connection attempt fails.
NOTE: Before you can configure Prior to Windows Logon connection settings, select the GINA tab in the Connection Settings tool and install the Odyssey GINA module. See “Installing the Odyssey GINA Module” on page 36 and “GINA Compatibility with Other Modules Running at Windows Logon” on page 38.
NOTE: The alternate settings option applies to a connection of the same type; that is, if a wireless connection fails, the alternate adapter and network must also be wireless. Failing over from a wireless to a wired connection, or from wired to wireless, is not valid.
Configuring a User Account Connection
Chapter 4 Configuring Network Connections
On connection failure—Select this option if you want your users only to be prompted when a connection attempt fails.
Prior to connecting to the network—Select this option if you want your users to be prompted each time they log on to Windows.
Wait until the user’s desktop appears before using Odyssey Access Client to connect to the network—Override the prior to Windows logon connection setting when users can connect with a network adapter.
Select Any wired adapter. When you do so, OAC connects after the desktop appears.
Configuring a Machine Account Connection
A machine account lets you connect and authenticate a computer, rather than a user, to the network. This process includes having an IP address assigned to the computer (a Layer 2 network connection). The network connection and IP address assignment occurs before the user logs in. A machine account is useful for setting up domain-level resources and drive mappings before a user connects.
User authentication is different from authenticating a computer: different credentials are required to connect to the network. While the physical computer might have network access, a separate process is needed for a user to log on and be authenticated.
When you configure machine account connections, you must also configure authentication profile options (such as the credentials and network to use) for machine account connections. See “Machine Account Profile Options” on page 23.
Select the Machine Account tab in the Connection Settings tool to connect to the network at startup time with machine (rather than user) credentials, and select the Enable network connection using machine account check box. Then select one of the following mutually exclusive options:
Leave the machine connection active; users are connected via the machine connection—Maintains the machine-level network connection after a user logs in. This option gives users less control over their network connections but they still have access to the network resources. They can view status information and reconnect to the network but cannot change the existing OAC configuration. This option supports an environment where coworkers use any computer in the workspace without logging on or off: users do not require authentication because the computer is authenticated.
Drop the machine connection; users must connect with their own credentials—Drops the machine connection and automatically establishes a network connection based on the user’s Windows credentials when the user logs in. With this connection type, users have less restricted network access than when the machine connection is still active. After being authenticated, users can modify or view connection settings using the Odyssey Access Client Manager.
Configuring a Machine Account Connection 33

Odyssey Access Client Administration Guide
34
Use this option when the endpoint machine must be connected even when no one is logged in. The machine connection is used to support remote administrative tasks or system service scripts that run during off hours. A user who needs network access from that machine must provide his or her own credentials.
When the user logs off, the connection reverts to a machine account.
If you select this option, set the timing for the user connection by clicking the User Account tab.
Select one of the following timing options:
After the user’s desktop appears
After Windows logon, before the desktop appears
Prior to Windows Logon, using the following settings
Configuring Machine Account Connection SettingsTo configure your connection settings based on your selections:
1. Double-click the Connection Settings tool.
2. Select a machine network connection option from the Machine Account tab.
3. Configure the network connection settings.
4. Double-click the Initial Settings tool to configure new user account settings to let users connect using their own credentials after the machine connection has been established.
Configuring Machine-Only ConnectionsTo identify a client machine on the network without relying on user credentials, you can connect all client machines to the network using machine authentication. This can be useful if you have any machine-related startup processes. You can use this feature to maintain network connections for the client machine even when users are logged off. In this way, the machine is always connected to the network, even if no user is logged in, as long as the machine is on and Windows is running. This is useful for running scripts at off hours and for remote administrative tasks.
To configure a machine-only connection:
1. Double-click the Connection Settings tool.
2. Select the Machine Account tab and select Enable network connection using machine account.
3. Select Leave the machine connection active.
4. Select OK.
Configuring a Machine Account Connection

Chapter 4 Configuring Network Connections
5. Double-click the Machine Account tool. Set up your machine network connection, including networks, adapters, and profiles, and close the Machine Account tool. See “Configuring a Machine Password” on page 24 for details about specifying machine account profiles.
Configure Machine Connections That Switch to User ConnectionsYou can connect all client machines to the network using machine credentials and then require user authentication when the user logs in. This option lets you perform network tasks at Windows startup, before users log in, and then switch to an authenticated user-level network connection when the user logs in. You can run maintenance scripts and backups at night or during hours when users are typically not in the office.
To configure a machine connection that can switch to a user connection:
1. Double-click the Connection Settings tool in the Odyssey Access Client Administrator.
2. Select the Machine Account tab and select Enable network connection using machine account.
3. Select Drop the machine connection.
4. Select the User Account tab, select one of the available user authentication timing options, and then click OK.
5. Double-click the Machine Account tool. When the Machine Account dialog box appears, configure your machine network connection by using the Networks, Trusted Servers, Adapters, and Profiles dialog boxes. See “Configuring a Machine Password” on page 24 for details about specifying machine account profiles.
6. Close the Machine Account tool.
7. Double-click the Initial Settings tool. The Initial Settings dialog box appears. Configure your user network connection by using the Profiles, Networks, Trusted Servers, and Adapters dialog boxes.
8. Close the Initial Settings tool.
9. Double-click the Merge Rules tool to lock any configuration features that require locking.
Configuring a Machine Account Connection 35

Odyssey Access Client Administration Guide
36
Configuring a Prior to Windows Logon Connection with GINA
The OAC Identification and Authentication (GINA) module is a replaceable dynamic link library (DLL) that runs before the Windows logon process completes. is instrumental in enabling a network connection to occur before Windows logon. It captures user login credentials from the Windows logon dialog box and delays the actual Windows logon to enable other setup processes and scripts to run first. As soon as a user enters Windows logon credentials, GINA captures and uses them to authenticate the user before the login process and the network connection are complete. In this way, users are authenticated on the network before they have a connection.
Connecting before Windows logon can be helpful when users have startup processes that require network connections to run. This is also a useful tool if your company uses Active Directory as a user database.
Odyssey GINA is an advanced configuration tool intended for administrators who are familiar with the Windows GINA module and who understand how to use it. The Odyssey GINA module preempts Windows GINA and is intended for use with OAC connection and authentication only.
Installing the Odyssey GINA ModuleTo install the GINA module:
1. Open the Odyssey Access Client Administrator and select Connection Settings.
2. Select the GINA tab.
3. Click the Install Odyssey GINA module button.
4. Select the User Account tab.
5. Select Prior to Windows logon button and configure your logon settings.
6. Click OK.
Removing the Odyssey GINA ModuleTo remove the Odyssey Access Client GINA module:
1. Open the Odyssey Access Client Administrator and select Connection Settings.
NOTE: On Windows Vista and Windows 7 systems, the capabilities described for GINA are provided by Credential Providers. There is a separate OAC login icon for using OAC to connect and log on to these systems. On Windows XP the GINA modules were "chained" and could sometimes interoperate, whereas Credential Providers are independent from each other.
NOTE: On Windows systems, you must install the Odyssey GINA module to be able to use this type of network connection.
Configuring a Prior to Windows Logon Connection with GINA

Chapter 4 Configuring Network Connections
2. Select the GINA tab.
3. Click the Remove Odyssey GINA module button from the GINA tab of the Connection Settings tool.
4. Restart your computer.
Using Qualified Third-Party GINA ModulesIn addition to the Odyssey GINA module, OAC also supports other qualified third-party GINA modules. A qualified GINA module is one that Juniper Networks has confirmed as being compatible with Odyssey GINA. The list of qualified modules appears on the GINA tab.
Adding a New GINA ModuleIn addition to the list of qualified GINA modules that come with OAC, you can add other GINA modules to the OAC configuration.
To add a new GINA module:
1. Open the Odyssey Access Client Administrator and select Connection Settings.
2. Select the GINA tab.
3. Click Add.
4. In the dialog box that prompts for the new GINA module name, enter the new GINA module name. The module name must conform to the Microsoft file naming conventions, defined in detail at http://msdn.microsoft.com/en-us/library/aa365247.aspx.
5. Click OK.
Using a Third-Party GINA Module and Odyssey GINATo use a third-party GINA module in addition to the Odyssey GINA module, install the Odyssey GINA module after you install the third-party GINA module.
If you install the Odyssey GINA module before installing a third-party GINA module:
1. Remove the Odyssey GINA module. See “Removing the Odyssey GINA Module” on page 36.
2. Install the third-party GINA module.
3. Install the Odyssey GINA module using the instructions in “Installing the Odyssey GINA Module” on page 36.
NOTE: When you upgrade to a new version of OAC, the list of GINA modules is reset to those modules that OAC supports by default. To retain any modules that you have added to the list of qualified GINA modules, specify that you want to maintain your current OAC settings when upgrading.
Configuring a Prior to Windows Logon Connection with GINA 37

Odyssey Access Client Administration Guide
38
4. Add the third-party GINA modules to the list of qualified modules.
5. Restart your computer.
Removing a GINA ModuleTo remove a GINA module:
1. Open the Odyssey Access Client Administrator and select Connection Settings.
2. Select the GINA tab.
3. Highlight one or more entries from the list of qualified GINA modules.
4. Click Remove.
GINA Compatibility with Other Modules Running at Windows Logon The Odyssey GINA module runs before the Windows GINA module that presents the Windows Logon dialog box.
Note the following about the interaction between OAC and other login modules:
You might be prompted for credentials by OAC for some applications that replace the Microsoft Windows logon screen.
OAC is compatible with a number of login modules, preserving single sign-on behavior.
In the case of Novell Client for Windows, OAC uses your Novell credentials at login time without prompting for credential information.
Using GINA with Smart CardsIf you plan to use smart cards with GINA authentication, set the following configuration features using the Initial Settings tool. See the Odyssey Access Client User Guide for directions for performing each of these tasks.
1. Select Configuration > Profiles.
2. Click Add to create an authentication profile that uses a certificate-based authentication protocol such as EAP-PEAP, EAP-TTLS, or EAP-TLS (with TLS as the inner authentication protocol).
CAUTION: Installing or using a third-party GINA module with Odyssey GINA might cause problems with system startup or operation. If you encounter problems after installing a third-party GINA module, contact JTAC for information on how to use a boot disk to recover without reinstalling your system.
CAUTION: The Odessey Client does not support the Novell Client on Windows 7 or on Vista.
Configuring a Prior to Windows Logon Connection with GINA

Chapter 4 Configuring Network Connections
3. Select the User Info tab and enter a text string in the Login Name box. If you leave the Login Name box blank, authentication will fail.
If you are using Juniper Networks Steel-Belted Radius for authentication, any text string is acceptable.
4. Select the Certificate subtab on the User Info tab.
5. Select both Permit login using my certificate and Use the login certificate from my smart card reader.
6. Select OK to save the profile.
7. Configure a network and trusted server. Make sure that you associate the profile created in Step 2 with this network.
8. Select Tools > Odyssey Access Client Administrator.
9. Double-click Initial Settings.
10. Configure any options you require by selecting Tools > Options in the Initial Settings dialog box.
11. Close the Initial Settings tool.
12. Double-click the Connection Settings tool and do the following:
a. Install GINA if it is not already installed. See “Installing the Odyssey GINA Module” on page 36.
b. Set up the appropriate prior to Windows logon connection option on the User Account tab and select the network that you configured in Step 7.
13. Double-click the Merge Rules tool and lock the profile that you created in Step 2. Lock any other features that require locking.
Note the following about setting up GINA connections:
You can configure all default user account network settings in the Initial Settings tool. However, the restricted options are not disabled by default in the Initial Settings tool, so be sure to configure the network connection properly.
Features that apply only when you configure default Windows logon settings in the Initial Settings tool are not available if your users override default Windows logon settings by selecting Tools > Windows Logon Settings from the Odyssey Access Client Manager menu bar.
NOTE: You can configure a profile that uses both smart card and password-based protocols for authentication before or after Windows logon if you install GINA. EAP-TLS works only with smart cards at GINA logon time.
NOTE: Turning FIPS mode on disables OAC smart card PIN management.
Configuring a Prior to Windows Logon Connection with GINA 39

Odyssey Access Client Administration Guide
40
You can configure all of the machine account network settings from the Machine Account tool. The restricted options are disabled for you in the Machine Account tool.
The password, token, and PIN prompt restrictions apply to the listed protocols whenever they are in use (either as inner or outer authentication protocols).
You can configure a prior to Windows logon machine authentication that includes both EAP-TLS with smart card certificates and a password-based protocol such as EAP-TTLS. In this case, the authentication method depends on whether the user wants to use a smart card or a Windows password to log on. The login prompts with both options, and the user must select one.
Configuring a Prior to Windows Logon Connection with GINA
Chapter 5
Setting Permissions for OAC Features
This chapter describes how to use the Permissions Editor tool.
Permissions Settings Overview
The Permissions Editor tool lets you enable, disable, or hide individual OAC configuration settings and control which features users can see or access. The Permissions Editor allows you to decide which authentication protocols are supported on your network, control which wireless network properties your network will support, and disable parts of the Odyssey Access Client Manager interface to provide a simple interface for users who only need to connect and disconnect from a network or an Infranet Controller.
You can give advanced users access to more features, such as the ability to create and configure networks or change trust settings. In this case, create and deploy a separate predefined configuration tailored for those users and use the Permissions Editor to enable the options appropriate to that group of users. The range of options is extensive, so you can control configurations with the flexibility you need.
Use the Permissions Editor tool to apply customized feature-by-feature restrictions on a user’s ability to use or modify OAC-specific features in the configuration. This lets you hide or disable settings that you do not want users to change.
The settings that you configure in the Permissions Editor tool are applied automatically to the machine you use to preconfigure OAC for deployment. You can also create a file to export the permissions configuration to one or more users. See “Merging Settings” on page 61.
Options that you disable in the Permissions Editor that are not specific to controlling the appearance of the Odyssey Access Client Manager still appear in a menu or dialog box. If users attempt to access disabled options, a dialog box instructs the user that the administrator has disabled that option.
Authentication ProtocolsUse the authentication protocol settings to enable or disable individual outer EAP protocols, such as EAP-SIM. When individual protocols are disabled, they still appear in the list of protocol choices. However, when a user attempts to save the profile settings by clicking OK, an error message identifies which protocols are invalid and prevents the save operation from succeeding until all the settings have been validated.
Permissions Settings Overview 41

Odyssey Access Client Administration Guide
42
TTLS Inner Authentication ProtocolsUse the TTLS inner authentication protocol settings to enable or disable individual protocols, such as MS-CHAP. When individual protocols are disabled, they still appear in the list of protocol choices. However, when a user attempts to save the profile settings by clicking OK, an error message identifies which protocols are invalid and prevents the save operation from succeeding until all the settings have been validated.
TTLS Inner EAP ProtocolsUse the TTLS inner EAP protocol settings to enable or disable individual inner EAP protocols, such as EAP-GenericTokenCard. When individual protocols are disabled, they still appear in the list of protocol choices. However, when a user attempts to save the profile settings by clicking OK, an error message identifies which protocols are invalid and prevent the save operation from succeeding until all the settings have been validated.
PEAP Inner Authentication ProtocolsUse the PEAP inner authentication protocol settings to enable or disable individual inner PEAP protocols, such as EAP-POTP. When individual protocols are disabled, they still appear in the list of protocol choices. However, when a user attempts to save the profile settings by clicking OK, an error message identifies which protocols are invalid and prevents the save operation from succeeding until all the settings have been validated.
Profile PropertiesUse the profile properties setting to enable or disable the requirement for a valid certificate as part of login authentication.
Options Use the Options setting to enable or disable temporary trust for users. This option appears in the Security tab of the Initial Settings > Tools > Options menu even after it has been disabled. Users cannot change it if it is disabled.
Network PropertiesUse the network properties settings to enable or disable specific network options, such as peer-to-peer networks or specific encryption protocols. The Disable non-broadcast networks option lets you disable access to networks that do not broadcast an SSID, even if that network has been configured in OAC with an SSID. The Permissions Editor settings override the current settings in OAC.
Odyssey ControlUse the Odyssey control setting to prevents users or external programs from editing the Windows Registry to disable OAC. In conjunction with the options in the Initial Settings tool for managing all adapters, this setting prevents users from using a different and unauthorized wireless client to access protected network resources. See “Controlling Network Adapters and Other Wi-Fi Supplicants” on page 17.
Permissions Settings Overview

Chapter 5 Setting Permissions for OAC Features
User Interface SettingsUse the user interface settings to remove the Odyssey Access Client Administrator or License Keys dialog box in the Help menu. You can also turn off the display of individual settings in the Odyssey Access Client Manager sidebar, and prevent users from editing the Windows Registry to disable OAC to use a different wireless access client to circumvent the network security policy.
User Interface—Hide Configuration SectionsUse the user interface—hide configuration settings to hide individual configuration folders in the sidebar (Profiles, Networks, Auto-Scan Lists, Trusted Servers, Adapters, and Infranet Controllers) or hide the entire Configuration section in the sidebar.
Any setting configured as hidden (but not disabled) appears in a View menu in the Odyssey Access Client Manager menu bar. A user can see which settings are hidden in the View menu and turn those settings on again one at a time. When you configure a setting as hidden in the Permissions Editor, that setting resets to being hidden each time the user starts the Odyssey Access Client Manager.
If you do not hide any of the configuration options, the View menu does not appear in the Odyssey Access Client Manager menu bar.
User Interface—Disable and Hide Configuration SectionsThe options in this category disable and hide individual configuration folders in the sidebar (Profiles, Networks, Auto-Scan Lists, Trusted Servers, Adapters, and Infranet Controllers) or hide the entire Configuration section in the sidebar. Features that are hidden and disabled are under the administrator’s control and do not appear in the View menu. Only the administrator can re-enable them.
Setting Permissions and Restrictions
To set up permission or restrictions for individual configuration settings:
1. Open the Permissions Editor tool.
2. Select the check box to set the indicated restriction, such as Disable EAP-SIM.
3. Click OK.
To remove a restriction, clear the check box.
NOTE: If you disable user access to the Odyssey Access Client Administrator, you can disable your own access to this tool. You can restart the Odyssey Access Client Administrator from drive:\Program Files\Juniper Networks\Odyssey Access Client\odClientAdministrator.exe.
Setting Permissions and Restrictions 43

Odyssey Access Client Administration Guide
44
Guidelines for Using the Permissions Editor
The following guidelines apply when you set or change permissions or restrictions.
Any features that you restrict (lock) in the Merge Rules tool are exempt from constraints that you configure in the Permissions Editor tool.
Features or options that you restrict might remain visible to your users, even though they cannot configure or use them.
If you select Disable [any] networks, users cannot connect to unspecified networks using the [any] network feature. See the discussion on managing network access in the Odyssey Access Client User Guide.
If you select Disable ad-hoc networks, users cannot make peer-to-peer connections.
If you select Remove Odyssey Access Client Administrator from Tools menu, users cannot access the Odyssey Access Client Administrator from the Odyssey Access Client Manager.
If you select Remove License Keys from Help menu, users cannot modify or view license keys.
If you select any of the Disable unauthenticated options, users cannot create a network configuration using the specified encryption protocol if they do not assign a profile to the network connection.
The Disable unauthenticated clear connections option applies to network descriptions configured for no encryption (none is selected as the encryption method on the Network Properties dialog box).
If you select any of the Disable authenticated options, users cannot create a network configuration using the specified encryption protocol when they assign a profile to the network connection.
If you hide (rather than disable) settings, the Odyssey Access Client Manager menu bar displays a View menu showing the hidden settings. Users can toggle options on or off by selecting them. When there are no hidden settings configured, the View menu does not appear.
You can prevent users from exiting OAC by selecting Do not allow users to exit Odyssey. Enabling this settings removes the Exit selection from the OAC icon in the system tray. You can use this setting along with the options to manage all wireless (Wi-Fi) adapters and manage all wired (Ethernet) adapters to prevent users from using a different wireless supplicant program and potentially bypassing the network access security policy.
NOTE: You can use the Merge Rules tool to lock individual categories of configuration settings to prevent users from changing them.
Guidelines for Using the Permissions Editor

Chapter 6
Using Merge Rules
This chapter discusses how to use the Merge Rules tool.
Merge Rules Overview
Merge rules let you add, replace, or lock configuration settings defined in the Initial Settings tool. Merge rules are intended to help manage OAC configuration updates. Merge rules can be applied to the following categories of configuration settings, each of which is represented by a tab in the Merge Rules dialog box:
Profiles
Networks
Auto-scan lists
Infranet Controllers
Trust
Other
Merge rules let you control how the current Initial Settings tool configuration options apply to the users of the current machine, to a new custom installer file, or to a configuration update file.
Merge Rule SettingsThis section describes the function of each merge rule setting. Note that some merge rule settings are not available for all configuration categories.
None—Do not merge these settings into the existing user configuration but set them for new user accounts.
Add if not present—Add the settings to the existing user configuration but do not overwrite settings with the same names, such as a network or profile name. This is the default option for all tabs of the Merge Rules tool except for the items on the Other tab for which this option is not available. This mode affects the configurations for new users and current users of your OAC installations. Users can modify these settings.
Merge Rules Overview 45

Odyssey Access Client Administration Guide
46
Set, replace if present—Add the settings to the existing user configuration and overwrite any settings with the same names if they already exist. This mode affects the configurations for new users and current users of your OAC installations. Users can modify these settings.
Lock except user info—Overwrite all existing user configuration settings, except for any user credential information (username, password, or user certificate) associated with a profile.
This option is available for profiles only. It prevents users from editing any portions of a locked profile except for credentials. Do not specify a username, password, or user certificate for any profile you create in the Initial Settings tool if you plan to apply this type of locking.
Lock—Set or replace all existing user configuration settings and prevent users from editing them. When you lock a feature, OAC deletes the current user settings with the same name and prevents new and current users from editing them. Users see one of the following indicators for locked features:
Title bars of dialog boxes are marked as read-only if every feature shown on the dialog box is locked.
Text that appears on a tab of a dialog box indicates that the features on the selected tab are locked.
The settings that you make in merge rules affect the settings for all users of the machine that you are configuring. The changes take effect as soon as you close the Merge Rules tool. You can then use these merge rules when you provide configuration updates to your users or when creating a new installer file.
Merge Rule ScenariosYou might want to configure rules to update current user configurations to:
Update OAC periodically to a group of users or machines.
Add networks, profiles, auto-scan lists, or Infranet Controllers to existing configurations.
Upgrade users with a newer version of OAC.
Set up a locked configuration to be installed on a new machine. (The default setting is to enable all configuration settings.)
Lock specific settings, such as FIPS mode or trust settings, that you do not want users to change. You can lock an Infranet Controller or the corresponding profile configuration and require users to connect to a specific Infranet Controller.
Merge Rules Overview

Chapter 6 Using Merge Rules
Setting Merge Rules
Use the Merge Rules tool to assign rules to apply initial settings and Windows logon configurations to the current machine or to a configuration file you create in the Custom Installer. The following sections describe how to set merge rules for each of the merge rule categories.
Setting Merge Rules for ProfilesTo set merge rules for profiles:
1. Select the Profiles tab in the Merge Rules tool. The profiles that you have configured appear in the list at the bottom of the window.
2. Select a profile and click the Set Merge Rules button to see the available merge rule settings.
3. Select the merge rule you want to apply.
4. Repeat these steps for other merge rule modes that you need for updates to authentication profiles.
5. (Optional) Select the Permit only the following profiles check box.
When you enable this option:
Users can access only the profiles that you configure through the Initial Settings tool.
All options (aside from user credentials) for all user profiles are locked.
Users cannot add new profiles to their configurations.
Users can edit their credentials for each of the locked profiles that you configure.
Profiles configured previously are hidden from users and are disabled. To make these visible to your users, clear the Permit only the following profiles check box.
6. If, in addition to locking all profiles, you want to lock user credentials for one or more of these locked profiles, select the profiles whose user credentials you want to lock and select Lock in the Set Merge Rules list.
7. Click OK.
Setting Merge Rules for Networks To set merge rules for a network:
1. Select the Networks tab in the Merge Rules tool. The networks that you have configured appear in the list at the bottom of the window.
2. Select a network and click the Set Merge Rules button to see the available merge rule settings.
Setting Merge Rules 47
Odyssey Access Client Administration Guide
48
3. Select the merge rule you want to apply.
4. Repeat these steps for other merge rule modes that you need for networks.
5. (Optional) Select the Permit only the following networks check box. When you enable this option:
Users can use only those networks configured with the Initial Settings tool.
All components of all user networks are locked.
Users cannot add new networks to their configurations.
Networks configured previously in OAC are hidden and disabled.
6. Click OK.
.
Setting Merge Rules for Auto-Scan ListsTo set merge rules for auto-scan lists:
1. Select the Auto-Scan Lists tab in the Merge Rules tool. The auto-scan lists that you have configured appear in the list at the bottom of the window.
2. Select an auto-scan list and click the Set Merge Rules button to see the available merge rule settings.
3. Select the merge rule you want to apply.
4. Repeat these steps for other merge rule modes that you need for auto-scan lists.
5. (Optional) Select the Permit only the following auto-scan lists check box. When you enable this option:
Users can access only the auto-scan lists you configure with the Initial Settings tool.
All components of all user auto-scan lists are locked.
Users cannot add new auto-scan lists to their configurations.
Any auto-scan lists configured previously in OAC are hidden from users and disabled. To make these visible to users, clear the Permit only the following auto-scan lists check box.
6. Click OK.
NOTE: (FIPS Edition only): If you use FIPS mode connections in your network, you can select FIPS Mode On in the Initial Settings tool and lock the FIPS mode setting as a merge rule. Lock any networks for which FIPS mode is required.
Setting Merge Rules

Chapter 6 Using Merge Rules
Setting Merge Rules for Infranet ControllersTo set merge rules for Infranet Controllers:
1. Select the Infranet Controllers tab in the Merge Rules tool. The Infranet Controllers that you have configured appear in the list at the bottom of the window.
2. Select an Infranet Controller from the list and click the Set Merge Rules button to see the available merge rule settings.
3. Select the merge rule you want to apply.
4. Repeat these steps for other merge rule modes that you need for individual Infranet Controllers.
5. (Optional) Select the Permit only the following Infranet Controllers check box. When you enable this option:
Users can use only the Infranet Controllers that you configure through the Initial Settings tool.
All components of all Infranet Controllers are locked.
Users cannot add new Infranet Controllers to their configurations.
Any Infranet Controllers configured previously in OAC are hidden from users and disabled. To make these visible to your users again, clear the setting for Permit only the following Infranet Controllers.
6. Click OK.
Setting Merge Rules for TrustIn previous releases of OAC, merge rule settings applied uniformly to the entire trust table. Trust configuration now offers a more granular configuration for merge rules and is located in a separate Trust tab in the Merge Rules tool.
For example, Acme Corporation has its own certificate authority (CA) issued by a trusted root CA (Verisign). The Acme CA can use this root certificate to generate and deploy their own intermediate certificates to their Infranet Controllers for internal authentication. Acme employees then trust these intermediate certificates when they request authentication.
Users do not typically configure their own trust settings. A corporate security officer sets up trust configuration using the Initial Settings tool and uses merge rules to distribute a locked-down trust configuration to users.
A security officer can update trust settings to add other subordinates to the root (Verisign) or remove them as necessary. In this example, Acme CA and all of its subordinates are trusted as long as the Verisign CA is trusted.
Verisign CA (set, replace)
Acme CA (lock)
<any> (lock)
Setting Merge Rules 49

Odyssey Access Client Administration Guide
50
Note the following when configuring merge rules for trust:
You can add trusted server entries to an existing list of trusted servers. You can also add subordinate certificate identities and set merge rules for them.
You can configure merge rule settings to lock individual nodes in the trust tree. If you lock an entry in the trust tree, users cannot modify the trust settings for that entry. Lock settings propagate from a node to its descendants.
Merge rules for either Add if not present or Set, replace if present that you set for an individual trust node also apply to its ancestors (parent nodes). The rule does not apply to the node’s descendants (children) unless you set them separately.
You can undo a merge rule by selecting None.
To set merge rules for trust:
1. Select the Trust tab in the Merge Rules tool. The currently configured trust tree settings appear in the list at the bottom of the window.
2. Select any item in the trust tree and click the Set Merge Rules button to select the merge rule you want to apply.
3. Repeat these steps for other merge rule modes that you need for individual trust settings.
4. (Optional) Select the Permit only the following trust check box. When you enable this option:
Users can use only the trust settings that you configure through the Initial Settings tool.
All components of the trust tree are locked.
Users cannot add new trust settings.
Any trust settings configured previously in OAC are hidden from users and disabled.
5. Click OK.
Setting Merge Rules for the Other TabUse the Other tab in the Merge Rules tool to assign configuration update rules for the following categories of settings:
Windows logon settings—Control whether users can override the default settings for Windows logon.
Security and EAP-FAST—Control whether users can change settings in the Tools > Options > Security dialog box on their computers or modify the current configuration settings for EAP-FAST.
Setting Merge Rules

Chapter 6 Using Merge Rules
FIPS Mode (FIPS Edition only)—Lock or unlock FIPS mode for users who have a FIPS license.
Options: Interfaces (wireless suppression and network adapters)—Lock or unlock settings for wireless suppression and adapter use.
Options: Preemptive networks—Control user access to the preemptive network setting.
Options: Notifications—Control the appearance and display timing for warning and failure messages.
To set merge rules for any setting in the Other tab:
1. Select the Other tab in the Merge Rules tool.
2. Select any item from the Item list and click the Set Merge Rules button to see the available merge rule settings.
3. Select the merge rule you want to apply.
4. Repeat these steps for other merge rule modes that you need for individual items.
5. Click OK.
NOTE: A warning or an error message might appear when you close the Merge Rules tool. For example, an error message appears if you attempt to assign an invalid merge rule. These error messages describe how to resolve merge rule errors or inconsistencies.
Setting Merge Rules 51

Odyssey Access Client Administration Guide
52
Setting Merge Rules
Chapter 7
Deploying Odyssey Access Client
This chapter discusses the methods available for deploying new and updated OAC configurations to one or more users. This includes the ability to export a configuration in XML format (contained in a .zip file) that can be subsequently imported by an Infranet Controller. The deployment methods are:
Use an .msi file to deploy preconfigured settings.
Use an .msi file to deploy updated configuration settings.
Export configuration settings for use on an Infranet Controller.
Use a script to deploy updated configuration settings.
Custom Installer Tool Overview
Use this tool to create a preconfigured installer (MSI) file or a settings update file from the initial user or machine settings that you have configured with Odyssey Access Client Administrator tools. You can also use this tool to deploy OAC license keys with the configuration. After you have the configurations settings saved in an .msi file, you can deploy them using mass-distribution push-technology software, such as Microsoft Systems Management Server (SMS). Alternatively, you can export the settings in a .zip file to be used for deployment from an Infranet Controller.
The configuration settings that you deploy to users are those configured in the Initial Settings, Machine Account, Permissions Editor, and Merge Rules tools as:
Preconfigured copy of OAC to one or more users and machines
Updated OAC configurations for existing users and machines
New or updated licenses
Custom installer files and updated user configuration files derive their configuration from the features you set using the Odyssey Access Client Administrator tools, not in the Odyssey Access Client Manager.
Custom Installer Tool Overview 53
Odyssey Access Client Administration Guide
54
After you configure and test your configuration settings, use the Custom Installer tool in the Odyssey Access Client Administrator to create a new OAC installer file with the defaults that are configured from your template. See “Configuring Connection Timing for a User Account” on page 15 for more information on testing configuration settings. See “Merging Settings” on page 61.
Task Flow for Deployment
Figure 6 on page 55 shows the high-level task flows for deploying OAC configuration settings. There are four methods of deploying configuration settings for OAC:
A new configuration file (MSI). See “Creating an Installer File” on page 55.
Updated configuration settings. See “Creating a Settings Update File” on page 57.
A preconfiguration file that can be exported as a .zip file. See “Exporting an OAC Preconfiguration File” on page 59.
An update script. See “Using Script Composer” on page 62.
NOTE: After you configure machine account settings and use the resulting .msi file to install the settings in a target computer, you must restart the computer.
Task Flow for Deployment
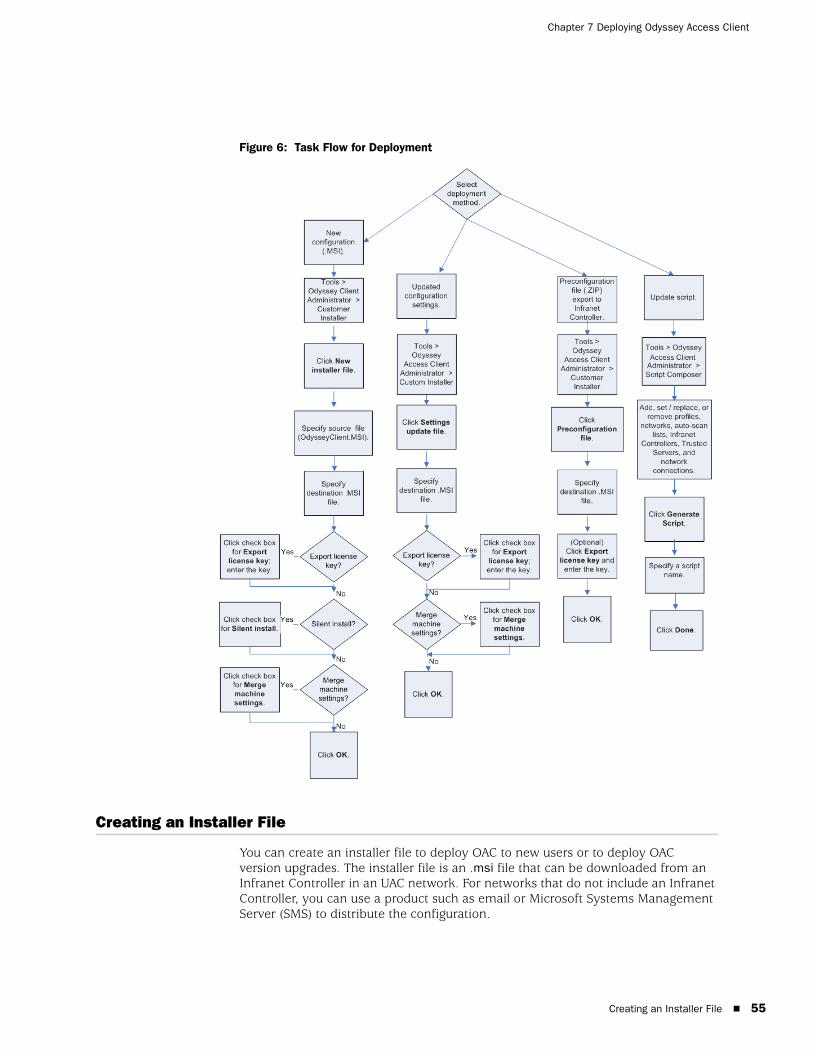
Chapter 7 Deploying Odyssey Access Client
Figure 6: Task Flow for Deployment
Creating an Installer File
You can create an installer file to deploy OAC to new users or to deploy OAC version upgrades. The installer file is an .msi file that can be downloaded from an Infranet Controller in an UAC network. For networks that do not include an Infranet Controller, you can use a product such as email or Microsoft Systems Management Server (SMS) to distribute the configuration.
Creating an Installer File 55

Odyssey Access Client Administration Guide
56
Note the following guidelines when you are preparing a new custom installer file for deployment:
If you create a new custom installer file and do not export a license key, the license for the installed product expires in 30 days.
The default OAC license in a UAC network is built into the product, so there is never a prompt for a license key. Thus, a custom installer based on the default license key is always a silent installation because there is no need to prompt for a license key.
All locking rules that you specify in the Merge Rules tool apply to new custom installer files. If you select Settings update file in the Custom Installer tool, you can create a configuration file that includes administrative updates from the merge rules and permission restrictions you configure in the Merge Rules and Permissions Editor tools. You cannot use settings updates for new installers. See “Merging Settings” on page 61.
To create an installer file:
1. Double-click the Custom Installer icon.
2. Select the New installer file option button.
3. Specify the source installer (.msi) file. This file must be a full product installer file for OAC. Enter the path and name of the file in the File name box or do the following:
a. Select the top Browse button. The Select Source File dialog box appears.
b. Use the Files of type list at the bottom of the Select Source File dialog box to search for the correct file type. You can use the original OAC installer file from any current or previous release (OdysseyClient.msi) as the source file.
c. Double-click the source file in the window or select Open.
4. Specify the destination installer (.msi) file. Enter the path and name of the file in the File name box or do the following:
a. Select Browse to browse for the desired destination file. The Select Destination File dialog box appears.
b. Select the name of the new (destination) .msi file.
c. Select Save.
5. Optionally, select Export license key and enter a valid license key for the number of copies you intend to distribute.
6. Select Silent install if you want the installation to run without displaying any dialog boxes during the installation process.
7. Select Merge Machine Settings to update OAC configuration settings for users so that settings are merged with the existing configuration. See “Merging Settings” on page 61.
Creating an Installer File

Chapter 7 Deploying Odyssey Access Client
8. Click OK.
Additional Command Line Options Available to the OAC InstallerThe OAC intaller supports all standard msiexec.exe command line options. In addition to the standard options, the OAC installer also supports the following commands:
NOADMIN=1
When you specify NOADMIN=1 on the msiexec.exe command line, the OAC Administrator is not installed. Specifically, odClientAdministrator.exe is not installed and the Odyssey Access Client Administrator menu item is not displayed from the Tools menu.
LICENSEKEY=<licensekey>
(Note that you replace<licensekey> with the real license key.) This command allows you to set a license key at the command line. This is particularly useful if a non-preconfigured installer is being run silently.
INSTALLGINA=1
This command line option tells the installer to install the OAC GINA module.
REBOOT=ReallySuppress
This is a standard MSI command line option. It tells the installer not to prompt for a reboot, even if one is required.
Creating a Settings Update File
A settings update file contains any updated configuration settings that you have made. The difference between a settings update file and a new installer file is that the new installer file also contains the software for installing OAC. The update file provides updates and new settings to existing OAC configurations.
Only users with administrative privileges on their machines can run the settings update file on their own machines.
To create a settings update file:
1. Double-click the Custom Installer icon.
2. Click Settings update file.
3. Specify a destination file for the update settings. You can enter a file name or click Browse to find the desired destination directory. If you click Browse, the Select Destination File dialog box appears. The default destination file name is OdysseyClientUpdate.msi.
4. Use the Save as type list at the bottom of the Select Destination File dialog box to use a file type other than the default (msi).
Creating a Settings Update File 57

Odyssey Access Client Administration Guide
58
5. Select Merge Machine Settings if you want to update OAC configuration settings for users so that settings are merged with the existing configuration. See “Merging Settings” on page 61.
6. Select Export license key and enter a license key that is valid for the number of copies that you intend to distribute. Use this option to deploy new license keys.
7. Click Save.
8. Click OK.
See Figure 7, “Task Flow for Updating User Account Settings,” on page 58.
Task Flow for Updating User Account Settings
Figure 7 on page 58 is a high-level task flow for deploying configuration update settings to existing OAC users. You can also use this option to merge update for machine settings.
Figure 7: Task Flow for Updating User Account Settings
Task Flow for Updating User Account Settings

Chapter 7 Deploying Odyssey Access Client
Exporting an OAC Preconfiguration File
You can export a detailed OAC configuration file that can be imported by an Infranet Controller and mapped to specific user roles when being deployed to users. In this way, you can tailor OAC configuration files to specific user roles.
The following tools can be used to create a preconfiguration file:
Connection Settings
Initial Settings
Machine Account
Permissions Editor
Merge Rules
In addition to the settings generated by these tools, you can include a license key and a flag to indicate whether GINA is installed in the preconfiguration file. The preconfiguration file can control whether GINA is installed as part of an installation or upgrade.
The preconfiguration file option lets you save OAC settings in a .zip file so that an Infranet Controller administrator can import them for deployment to users. The contents of the .zip file include:
XML files (preconfig.xml and properties.xml)
Certificates (.pfx files)
To export a preconfigured settings file:
1. Double-click the Custom Installer icon.
2. Select Preconfiguration file.
3. Select the Browse button and navigate to a location for saving the settings in a .zip file. The Save Destination File dialog box appears. Enter the name of the file or select an existing .zip file in the current directory, and then select Save.
4. Optionally, select Export license key and enter any valid license key (Enterprise or FIPS Edition) for the copies of OAC to distribute for a given role.
5. Click OK.
NOTE: Exporting a configuration file is used only to deploy OAC configurations in a UAC network in which configurations are associated with specific user roles. For details on using this feature, see the discussion on using a preconfigured installer in the Unified Access Control Administration Guide.
Exporting an OAC Preconfiguration File 59
Odyssey Access Client Administration Guide
60
For more information about importing a preconfigured .zip file and mapping that file to user roles on an Infranet Controller, see the discussion on initial configuration of the Infranet Controller in the Unified Access Control Administration Guide.
Preconfiguring OAC for a Group of Users
You can preconfigure profiles and networks for deployment to a group of users by creating a custom installer. For example, each copy of OAC that you install with this configuration could include a default network. If all users require the same network configuration, a custom installer reduces or eliminates the need for your end users to enter configuration information. For those users who do not require a new installation of OAC, you can use the same settings to update their configurations.
Creating an OAC Configuration for Custom InstallerYou can use the Odyssey Access Client Administrator tools to create a custom installer that deploys a standard configuration to users. The custom installer can include settings users cannot change (for example, connection timing, authentication protocols, or networks) as well as settings that users can modify as needed (for example, profiles for use in a home office). After you create a custom installer file, you can deploy it to groups of OAC users.
To configure the settings that will be used in a custom installer:
1. Configure network configuration and connection options. Refer to the following sections for more information:
“Configuring Connection Timing for a User Account” on page 15
“Enabling a Machine Account Connection” on page 21
“Configure Machine Connections That Switch to User Connections” on page 35
2. Use the Permissions Editor to configure feature access or control restrictions. See “Setting Permissions for OAC Features” on page 41.
3. Use the Merge Rules tool to configure locking options and specify how the updated configuration will be applied to target computers. See “Using Merge Rules” on page 45.
4. Test network connections. See “Configuring Connection Timing for a User Account” on page 15.
Creating a Settings Update FileYou configure connection settings from the Connection Settings tool, machine account settings in the Machine Account tool, user settings in the Initial Settings tool, lock options in the Merge Rules tool, and feature constraints in the Permissions Editor tool. After you have set up a standard configuration, you are ready to create a settings update file to distribute the standard configuration to users.
Preconfiguring OAC for a Group of Users

Chapter 7 Deploying Odyssey Access Client
Note the following limitations for settings update files:
You cannot use a settings update file to deploy OAC upgrades. Use a new installer file for OAC version upgrades.
You cannot include stored passwords or login names in a settings update file.
You cannot include client certificates in a settings update file. You can, however, configure certificates for any trusted root server in the Trusted Servers dialog box of the Initial Settings or Machine Account tool.
To create a settings update file:
1. Double-click the Custom Installer tool.
2. Select Settings update file.
3. Enter an .msi file name in the Destination file box. Alternatively, click Browse, select the name of an existing configuration file, and click Save.
4. If you want to distribute an OAC license with the settings update file, click the Export license key check box and enter the license key in the corresponding text box.
5. If you want to merge new settings with existing settings, click the Merge machine settings check box. Refer to “Merging Settings” on page 61 for more information about this option.
6. Click OK.
After the Custom Installer tool saves your settings to the specified installation file, you are ready to install the file on one or more target computers.
Merging SettingsYou can merge new settings into an existing configuration to preserve current settings.
Networks—If the SSID and network name of a network in the update match an existing network, the updated network configuration replaces the current version.
Profiles—If the name of an authentication profile in the update matches the name of an existing profile, the update replaces the existing version.
Infranet Controllers—If the name of an Infranet Controller in the update matches the name of an existing Infranet Controller, the update replaces the existing version.
Auto-scan lists—If the name of an auto-scan list in the update matches the name of a current auto-scan list, the contents of new auto-scan list are added to the end of the current auto-scan list, preserving any existing networks in the current file that are not contained in the update.
Preconfiguring OAC for a Group of Users 61

Odyssey Access Client Administration Guide
62
Task Flow for Updating Machine Account Settings
Figure 8: Task Flow for Updating Machine Account Settings
Using Script Composer
You can use the Script Composer tool to create XML-based configuration scripts to add, replace, or remove settings in OAC configurations on target computers. You can use these scripts to deploy preconfigured OAC settings to platforms other than Windows desktop versions—such as Macintosh, Linux, and Windows Mobile/CE—that do not include the Odyssey Access Client Administrator. You can use a single script to distribute updates for profiles, networks, and auto-scan lists. You can also use scripts to modify settings for trusted servers, security and EAP-FAST, wireless suppression, preemptive networks, and Windows logon timing settings.
Task Flow for Updating Machine Account Settings

Chapter 7 Deploying Odyssey Access Client
If you have personal data such as a password in a profile, the script can encrypt that data. When OAC imports that script, the information is decrypted. There is no difference from the user’s perspective between a script with encrypted data and one without encrypted data. Encryption and decryption occur transparently.
Scripts differ from configuration files in that they are specifically oriented toward data that affects the user running the script, as opposed to system-wide data or initial configuration data.
You can perform the following tasks with scripts:
Add—Add settings that are not currently defined in the user configuration. Those updates are applied when the script runs only if the user’s configuration does not have components with the same name. The configuration settings that you can select to add must be in the copy of OAC on your local machine.
Set—Set or replace current settings. The configuration settings that you can select to add or replace must be in the copy of OAC on your local machine.
Remove—Remove configuration settings. The settings do not have to be part of the configuration on your local machine.
Connect—Enable automatic connections. You select a profile for a wired connection or a network or auto-scan list for a wireless connection.The adapter used is the first appropriate adapter configured in OAC for the user.
Alternatively, you can use a command-line interface to export an entire configuration to a script. See “Creating and Loading OAC Scripts Using Commands” on page 71.
After you create and distribute a script file, users can access this script by clicking Tools > Check New Scripts in the Odyssey Access Client Manager. See “Deploying Incremental Updates” on page 70.
NOTE: You cannot include certificates in scripts created with the Script Composer.
NOTE: An update script will fail to update a setting in the target client if that setting is locked in the client configuration. The setting must be unlocked with the Merge Rules tool on the user’s machine before the update can take effect. This situation can occur if a user has access to the Odyssey Access Client Administrator and has locked a setting locally.
Using Script Composer 63

Odyssey Access Client Administration Guide
64
Creating a Script
To create a script with the Script Composer:
1. Set up the configuration to include the settings that you want to add or modify.
The Script Composer uses the Odyssey Client Manager settings on the machine where those settings have been configured. Scripts are composed from configuration settings on a template machine—not from system data (settings configured in the Initial Settings tool). See the Odyssey Access Client User Guide for information about configuring individual OAC settings.
2. Double-click the Script Composer icon. The Script Composer dialog box appears.
3. Specify the tasks you want the script to perform. See the following sections for information on how to add, remove, or activate different types of information.
4. Click Generate Script.
5. When the Select Destination File dialog box appears, use the Save as type list to specify the file format for your script.
To save your script as an autoscript that OAC executes without user intervention, select the .odyClientScriptAuto file type.
To save your script as a manual script that your users can choose to run, select the .odyClientScript file type.
6. Enter a name for the file in the File name box.
7. Click Save.
8. Click Done to exit the Script Composer.
After you create a script, you can distribute it to the target computers on which you want it to run.
Adding or Replacing ProfilesYou can add or set any number of profiles that you have configured in the Odyssey Access Client Manager in the same script. Use the Add action to add a new profile to the target computer. Use the Set, replace if present action to overwrite a profile on the target computer with an update profile of the same name.
To add or set profiles from the Script Composer:
1. Select Profiles under the Add or Set group in the Select category list.
Use the Add action to add a profile to the target computer. If a profile with the same name already exists on the target computer, the script does nothing.
Creating a Script

Chapter 7 Deploying Odyssey Access Client
Use the Set, replace if present action to add a profile on the target computer. If a profile with the same name already exists on the target computer, the script overwrites the old profile configuration.
The profiles configured in the Odyssey Access Client Manager appear listed on the right.
2. Select the profiles that you want to include in the script. You can select multiple profiles.
Note the following guidelines:
User identity information (such as names or passwords) in the profiles you select is distributed to users who run the resulting script. Passwords are encrypted.
If user identity information in the profiles you select is blank, OAC attempts to replace the name and/or password with the user’s Windows identity when the script runs. If this is not possible, OAC prompts the user for identity credentials the first time the user connects to the network.
Certificate information is not included in the script.
Removing a ProfileYou can remove one or more profiles on a target computer if you know the name of each profile that you want to remove.
To configure your script to remove profiles from target computers:
1. Select Profiles under the Remove group in the Select category list.
2. Enter the name of each profile you want to remove in the text area provided. Press Enter after each profile name.
You can remove as many profiles as you want. If you remove all of the existing profiles, the user on the target computer cannot be authenticated on the network.
Activating a Profile for a Wired ConnectionTo activate a profile for OAC wired connections:
1. Select Profile under the Connect group in the Select category list.
2. Select the check box next to each profile that you want to be activated.
Creating a Script 65
Odyssey Access Client Administration Guide
66
Adding or Replacing NetworksYou can specify networks that you want to add or replace on target computers when a script is run. To add or set networks:
1. Select Networks under the Add or Set group in the Select category list.
Use the Add action to add a network to the target computer. If a network with the same name already exists on the target computer, the script does nothing.
Use the Set, replace if present action to add a network on the target computer. If a network with the same name already exists on the target computer, the script overwrites the old network configuration.
The networks that you have configured in the Odyssey Access Client Manager appear listed on the right.
2. Select the networks that you want to include in this category. You can select multiple networks.
Setting the FIPS Mode Setting (FIPS Edition Only)If you have a FIPS Edition license, you can use a script to set FIPS mode on or off:
1. Double-click the Initial Settings tool.
2. Select Configuration > Networks in the navigation pane.
3. Select the network for which you want to set or replace the FIPS mode setting.
4. Select File > FIPS Mode to toggle the setting on or off.
5. Close the Initial Settings tool.
6. Follow the steps in “Adding or Replacing Networks” on page 66.
Removing a Configured NetworkYou can remove a specific network from an OAC configuration if you know the name (SSID) and description of the network. To remove a specific network:
1. Select Networks under the Remove group in the Select category list.
2. Enter the description and SSID of each network that you want to remove in the text area provided. Press Enter after typing the name and description of each network you want to remove.
The syntax for identifying a network is: description <SSID>. For example, enter Home Network <skynet> to remove a network called Home Network that uses an SSID of skynet.
Creating a Script

Chapter 7 Deploying Odyssey Access Client
Removing All Networks with a Common SSIDYou can remove all networks that use a specific SSID, regardless of their descriptions.
To remove all networks that share a common SSID:
1. Select SSIDs under the Remove group.
2. Enter the SSID of each network that you want to remove in the text area provided. Press Enter after typing the name and description of each network you want to remove.
The syntax for identifying a network SSID is SSID (without angle brackets). For example, enter skynet to remove all networks use an SSID of skynet.
Activating a Wireless Network for a ConnectionTo activate a network for OAC wireless connections:
1. Select Network under the Connect group in the Select category list.
2. Select the check box next to each networks to be activated.
Adding or Replacing Auto-Scan ListsYou can add or set (replace if present) one or more auto-scan lists that you have configured in the Odyssey Access Client Manager in the same script. Use the option to add one or more auto-scan lists if it they are not currently on the client machine. Use the option to set one or more auto-scan lists to replace and existing ones of the same name.
To add or set auto-scan lists that you configured in the Odyssey Access Client Manager:
1. Select Auto-Scan Lists under the Add or Set group in the Select category list.
The auto-scan lists you have configured in the Odyssey Access Client Manager appear on the right.
2. Select the auto-scan lists that you want to include in this category.
Removing Auto-Scan ListsTo remove one or more auto-scan lists:
1. Select Auto-Scan Lists under the Remove group in the Select category list.
2. Enter the name of any auto-scan list that you want to remove in the text area provided. Press Enter after typing the name of each auto-scan list that you want to remove.
Activating an Auto-Scan ListTo activate an auto-scan list for OAC wireless connections:
Creating a Script 67

Odyssey Access Client Administration Guide
68
1. Select Auto-Scan List under the Connect group in the Select category list.
2. Select the check box next to each auto-scan list to be activated.
Adding or Replacing an Infranet ControllerYou can specify Infranet Controllers that you want to add or replace on target computers when a script is run. To add or set Infranet Controllers:
1. Select Infranet Controllers under the Add or Set group in the Select category list.
Use the Add action to add an Infranet Controller to the target computer. If an Infranet Controller with the same name already exists on the target computer, the script does nothing.
Use the Set, replace if present action to add an Infranet Controller on the target computer. If an Infranet Controller with the same name already exists on the target computer, the script overwrites the old Infranet Controller configuration.
The Infranet Controllers that you have configured in the Odyssey Access Client Manager appear listed on the right.
2. Select the Infranet Controllers that you want to include in this category. You can select multiple Infranet Controllers.
Removing an Infranet ControllerYou can remove a specific Infranet Controller from an OAC configuration if you know the name of the Infranet Controller.
To remove one or more Infranet Controllers:
1. Select Infranet Controller under the Remove group in the Select category list.
2. Enter the name of each Infranet Controller that you want to remove in the text area provided. Press Enter after typing each name.
Adding or Replacing a Trusted ServerYou can specify trusted servers that you want to add or replace on target computers when a script is run. To add or set trusted servers:
1. Select Trusted Servers under the Add or Set group in the Select category list.
Use the Add action to add a trusted server to the target computer. If a trusted server with the same name already exists on the target computer, the script does nothing.
Use the Set, replace if present action to add a trusted server on the target computer. If a trusted server with the same name already exists on the target computer, the script overwrites the old trusted server configuration.
Creating a Script

Chapter 7 Deploying Odyssey Access Client
The trusted servers that you have configured in the Odyssey Access Client Manager appear listed on the right.
2. Select the trusted servers that you want to include in this category. You can select multiple trusted servers.
Removing a Trusted ServerYou can remove a specific trusted server from an OAC configuration if you know the name of the trusted server.
To remove one or more trusted servers:
1. Select Trusted Servers under the Remove group in the Select category list.
2. Enter the name of each trusted server that you want to remove in the text area provided. Press Enter after typing each name.
Replacing Options SettingsYou can use scripts to modify the following types of OAC settings (which can be accessed by selecting Tools > Options in the Odyssey Access Client Manager) on a target computer:
Security
Interfaces (wireless suppression and network adapters)
Preemptive networks
Notifications (settings that control the appearance and display timing for warning and failure messages)
Default login name
EAP-FAST
See the Odyssey Access Client User Guide for information on configuring these settings.
To set (replace) the options settings configured by selecting Tools > Options in the Odyssey Access Client Manager:
1. Select Other under the Set group in the Select category list.
2. Enable the check box next to the settings category in the options list displayed on the right.
Each of these settings categories corresponds to the current settings configured in the Tools > Options menu in the Odyssey Access Client Manager and in the Initial Settings tool.
Creating a Script 69

Odyssey Access Client Administration Guide
70
Deploying Incremental Updates
You can update OAC configurations for one or more users. For example, if you add new SSIDs to a network, you can configure the network once with the Odyssey Access Client Manager and then create a script that deploys the updated configuration to one or more users.
To provide scripts to update user configurations:
1. Generate one or more scripts using the Script Composer or the command-line interface.
See “Using Script Composer” on page 62 for information about creating scripts using the Script Composer. Make sure that you save your scripts with the correct extension for autoscripts or manual scripts.
See “Creating and Loading OAC Scripts Using Commands” on page 71. Encrypted scripts that you create using the command-line interface can only be executed automatically.
2. Deliver the script(s) to the default directory described by the following path on your user’s computer:
Application Data\Funk Software\Odyssey Client\newScripts
where Application Data is typically located in volume:\Documents and Settings\username\Application Data
This might differ for non-English versions of the Windows operating system.
OAC polls regularly for new scripts and executes them automatically as long as they are in the locations specified above.
OAC polls this directory for new scripts frequently. New scripts are treated as follows:
Autoscripts run automatically when detected by OAC.
Users can run or delete other scripts when they select Tools > Check New Scripts from the Odyssey Access Client Manager.
If you store a script in a location other than the default, use Tools > Run Script to browse to the script and click Open to run it manually.
NOTE: To view the Application Data directory, you must make hidden files and folders visible.
Depending on your operating system, the physical path to the Application Data folder is always the CSIDL_APPDATA path used by Windows shell programmers. After you locate the Application Data folder, you can access the scripts under Odyssey Access Client\newScripts.
Deploying Incremental Updates

Chapter 7 Deploying Odyssey Access Client
Creating and Loading OAC Scripts Using CommandsYou can use CLI commands to create scripts that export the entire Odyssey Access Client Manager configuration. The syntax is as follows:
odClientAdministrator arguments
The arguments that you can use to save (export) the Odyssey Access Client Manager configuration or restore (import) a saved configuration to the Odyssey Access Client Manager are:
/E[xport]=filename/I[mport]=filename/Key= encryptionKey /N[oSavePrivateData]/S[ilent]
You can use any of the following argument combinations:
/E=filename
/E=filename /N
/E=filename /S
/E=filename /K=encryptionKey /N
/E=filename /K=encryptionKey /N /S
/E=filename /K=encryptionKey
/E=filename /K=encryptionKey /S
/I=filename
/I=filename /S
/I=filename /K=encryptionKey
/I=filename /K=encryptionKey /S
Note the following guidelines about the behavior of CLI commands:
Only users with administrative privileges can import or export scripts from the command line.
Users can execute scripts with an .odyClientScript file extension by selecting Tools > Run Script in the Odyssey Access Client Manager
If you use multiple switches, leave a space between each switch command.
The Odyssey Access Client Administrator displays a message after your import or export unless you use the /S (silent mode) switch.
An error level is always returned when a script runs, so you can use the errorlevel command in a batch file to evaluate the error level. A 0 indicates success. Failures return nonzero values.
Deploying Incremental Updates 71

Odyssey Access Client Administration Guide
72
The script that you create using this command-line interface adds any new items to an Odyssey Access Client Manager configuration, and replaces existing items if they have the same names.
If you do not specify an encryption key, OAC encrypts passwords, WEP keys, and passphrases so that any user with OAC installed can run this script. If you specify the /K encryption key switch with an exported script, the encryption key you supply must also be used when you or someone executes configuration script to update OAC settings.
If you specify the /K switch when you export a script, you cannot use the following symbols for this key: |, &
If you specify the /N switch when you export a configuration, then none of your personal data (username, password, and any WEP keys you supply) is exported.
Certificates are never exported using CLI commands.
Adapter types (wired or wireless) are exported, but the adapter details are not. If you create a custom installation file configured for a wireless connection, the installer file adds a wireless adapter but the adapter information does not include the make and model of the adapter. Therefore, during installation, OAC takes control of the default Wi-Fi adapter. Similarly, if the configuration being installed is configured for a wired adapter, OAC takes control of the default Ethernet adapter
Exported features are not locked, even if they are locked in your Odyssey Access Client Manager configuration. To lock features, use the Merge Rules tool and create a settings update file. See “Merging Settings” on page 61.
Deploying Incremental Updates

Chapter 8
Managing Protected Access Credentials
The PAC Manager tool manages protected access credentials (PACs) for EAP-FAST.
PACs are used to perform mutual authentication with a secure access control server (ACS) during EAP-FAST authentication. PACs have a randomly generated encryption key to set up a TLS tunnel and are used instead of certificates.
Consult your ACS documentation for discussions of PACs and how they are created and provisioned on the server.
Double-click the PAC Manager tool to view or delete the PACs currently in use.
Refreshing the PAC Manager Display
To update the display for a selected PAC listing, select Refresh.
Deleting a PAC
To delete one or more selected PACs from the list, select Delete.
Exiting from the PAC Manager
To exit from the PAC Manager tool, select Close.
Refreshing the PAC Manager Display 73

Odyssey Access Client Administration Guide
74
Exiting from the PAC Manager
Chapter 9
Sample Administrative Workflows
This chapter presents common administrative tasks and provides the workflow steps for accomplishing them. These tasks require familiarity with the Odyssey Access Client Manager and the Odyssey Access Client Administrator.
Using Single Sign-On for TTLS or PEAP
Single sign-on requires that you have already installed the certificate authority (CA) certificate needed for server validation. The certificate must be installed in the trusted root certificate store on the local machine.
To configure OAC for prior to Windows logon connections:
1. Create the network configuration with the Initial Settings tool.
2. Set up a user account and GINA connection settings using the Connection Settings tool.
3. Test the connection settings and update any configuration settings in the Initial Settings tool or the Connection Settings tool, as necessary.
Configuring a Prior to Windows Logon with Odyssey GINA
Connecting prior to Windows logon is helpful if users have startup processes that need a network connection to run. For example, you can configure OAC for EAP-TTLS or EAP-PEAP authentication with prior to Windows logon by using OAC and with the Odyssey GINA module installed. This enables Windows users to connect to a network using Windows logon credentials before a login dialog box appears.
Before you can complete the connection settings for prior to Windows logon, you must define the network configuration in the Initial Settings tool.
To configure the network configuration:
1. Set up an adapter.
2. Create a profile. Leave the login name blank when you create a profile for use with GINA.
3. Add a network.
Using Single Sign-On for TTLS or PEAP 75

Odyssey Access Client Administration Guide
76
4. Set up a trusted server certificate.
5. Connect to the network.
See the Odyssey Access Client User Guide for instructions for each of these steps.
Creating User Account Connection Settings and Installing Odyssey GINA
To configure the Connection Settings and install Odyssey GINA:
1. Double-click the Connection Settings tool in the Odyssey Access Client Administrator.
2. Select the GINA tab and click Install Odyssey GINA Module. If the GINA module is installed, skip this step.
3. Select the User Account tab and select prior to Windows logon, using the following settings.
4. Select OK.
If you require authentication at machine startup time, you can configure machine account settings to have users connect to the network using the machine account at machine startup time and then drop that connection to connect to the network with user credentials prior to Windows logon. In this case, configure machine account settings on the Machine Account tab of the Connection Settings tool before you click OK.
If you intend to use OAC for single sign-on authentication to an external database other than Windows, select Prompt before connecting to the network before you click OK.
Testing Prior to Windows Logon Settings
To test prior to Windows logon settings:
1. Double-click the Initial Settings tool and select Tools > Reload and Test Initial Settings.
2. Open the Odyssey Access Client Manager.
3. Check the connection status on the Wi-Fi or Ethernet dialog box, based on the type of network connection you have (wireless or wired).
4. Modify any settings in the Initial Settings or Connection Settings tool and re-test as necessary from the Initial Settings tool.
Creating User Account Connection Settings and Installing Odyssey GINA

Index
Numerics802.1X........................................................... ix, 1, 2, 31, 32802.1X access point ...........................................................2Aaccess point........................................................................2Active Directory ....................................................19, 24, 36adapter .................................................................19, 23, 31Adapters dialog box ..........................................................35Add Profile dialog box.......................................................24ad-hoc network.................................................................44authentication
Layer 2 ........................................................................2Layer 3 ........................................................................2machine-level ............................................................15
authentication protocol .........................................25, 38, 42authentication protocols .....................................................3authentication server ......................................... ix, 2, 12, 22automatic reauthentication ...............................................10auto-scan list.............3, 6, 12, 19, 22, 23, 46, 48, 61, 62, 63
activating...................................................................67adding .......................................................................67removing...................................................................67replacing ...................................................................67
Autoscript .........................................................................70autoscript....................................................................64, 70
Bbypassing OAC..................................................................44
CCAcached credentials ............................................................13certificate......................................................................4, 22certificate authority, see CAcertificate store .................................................................22CLI....................................................................................71command line interface, see CLIConnection Settings dialog box...................................16, 27Connection Settings tool ...............................................5, 27connection timing...................................................5, 10, 28Credential Providers..........................................................36credentials ............................1, 5, 10, 13, 15, 65, 73, 75, 76Custom Installer tool...........................................................6
Ddesktop.............................................................................28disabling configuration settings...........................................4
domain .............................................................................13domain password .............................................................24domain policy ...................................................................19domain-decorated.............................................................15domain-decorated login name ..........................................14
EEAP............................................................................ix, 1, 2EAP-FAST..............................................7, 23, 50, 62, 69, 73EAP-FAST credentials ........................................................10encrypted tunnel.................................................................2endpoint integrity check ...................................................25Ethernet Connection dialog box........................................16exporting to an Infranet Controller....................................53Extensible Authentication Protocol, see EAP
FFast User Switching.............................................................4FIPS ..........................................................................3, 9, 59FIPS mode ........................................3, 9, 39, 46, 48, 51, 66format, login name ...........................................................14
GGINA.......................5, 13, 14, 27, 32, 36, 37, 38, 59, 75, 76
and smart cards.........................................................38Graphical Identification and Authentication, see GINA
Hhelp menu ........................................................................10hiding configuration settings...............................................4
IInfranet Controller1, 2, 3, 4, 6, 9, 12, 13, 19, 23, 41, 43, 45,
46Infranet Enforcer.................................................................1Initial Settings dialog box............................................35, 39Initial Settings tool ..........................................................6, 9inner authentication protocol ................................25, 38, 42inner authentication protocols ............................................3install, silent......................................................................56Installer command line options.........................................57integrity check ..................................................................25intermediate CA................................................................22
JJUAC..................................................................................25Juniper Networks UAC, see JUAC
Index 77

Odyssey Access Client Administration Guide
78
Llayer 2 authentication......................................................... 2layer 3 authentication......................................................... 2license key...................................................... 53, 56, 59, 61
default....................................................................... 56exporting............................................................. 56, 58
license keys ...................................................................... 44License Keys dialog box.................................................... 43locking configuration settings ............................................. 4login credentials ............................................................... 15login name ..................................................... 14, 61, 69, 75login name format............................................................ 14logon settings ................................................................... 13
Mmachine account .............................................................. 19Machine Account dialog box............................................. 35Machine Account tool ................................................... 6, 19machine authentication.............................. 3, 23, 24, 25, 40machine-level authentication............................................ 15machine-level connection ................... 20, 22, 25, 27, 28, 33man-in-the-middle attack.................................................... 3manual script ............................................................. 64, 70merge rule
trust configuration..................................................... 12Merge Rules dialog box..................................................... 45Merge Rules tool ................................................................. 6
Nname format .................................................................... 14network adapter ............................................. 12, 19, 23, 31network connection timing..................................... 5, 10, 28Network Properties dialog box.......................................... 44Networks dialog box......................................................... 35Novell Client for Windows ................................................ 38
OOAC upgrades................................................................... 61odClientAdministrator.exe................................................... 5odyClientScript ................................................................. 64odyClientScriptAuto .......................................................... 64OdysseyClientUpdate.msi ................................................. 57online help ......................................................................... 7Options dialog box ........................................................... 15outer authentication protocols ............................................ 3
PPAC Manager tool ............................................................... 7PACs ................................................................................... 7password .............................................................. 24, 40, 61PEAP .............................................................. 24, 38, 42, 75peer-to-peer connection.................................................... 44Permissions Editor tool ................................................. 6, 41planning a configuration..................................................... 3profile properties .............................................................. 42Profile Properties dialog box....................................... 23, 32Profiles dialog box ............................................................ 35Profiles Properties dialog box ........................................... 24
protected access credentials, see PACsProtected EAP, see PEAPpush technology .................................................................5
Rrealm..........................................................................24, 25reauthentication ...............................................................10Registry ............................................................................42Reload and Test Initial Settings option ..............................16root CA .............................................................................12
SSave Destination File dialog box .......................................59script ......................................................................3, 64, 70Script Composer dialog box..............................................64Script Composer tool ..........................................................6Select Adapters dialog box ..........................................31, 32Select Destination File dialog box .........................56, 57, 64Select Source File dialog box.............................................56service set identifier, see SSIDsession resumption...........................................................10settings update file..................................................6, 13, 61setup script.........................................................................3silent install ......................................................................56silent installation...............................................................56SIM cardSIM Card Manager ..............................................................9SIM cards............................................................................6single sign-on......................................................................4smart card ........................................................................38
with GINA..................................................................39smart card certificates ......................................................40SMS ............................................................................53, 55SSID..................................................................................42startup time ......................................................................29Steel-Belted Radius .................................................. ix, 1, 39Subscriber Identity Module, see SIM cardsupplicant .....................................................................4, 17system tray icon ...............................................................16Systems Management Server......................................53, 55
Ttiming, network connection..........................................5, 28TLS ...................................................................................38token ................................................................................40trusted root CA ...........................................................12, 22trusted server ...................................................4, 12, 13, 19Trusted Servers dialog box ........................10, 14, 23, 35, 61TTLS .........................................................24, 38, 40, 42, 75tunnel .................................................................................2Tunneled Transport Layer Security, see TTLS
Uundecorated login name ...................................................14user-level connection ............................................28, 29, 35
VVista ...................................................................................4
Index

Index
VLAN ............................................................................2, 22
WWEP .................................................................................72Wi-Fi dialog box................................................................16Wi-Fi Protected Access, see WPAWi-Fi supplicant............................................................4, 17Windows desktop .............................................................28Windows Logon dialog box...............................................38Windows logon settings ....................................................13Windows Registry.............................................................42Windows startup time.......................................................29Windows Vista ....................................................................4Windows XP .......................................................................4wired adapter .......................................................19, 23, 31Wired Equivalent Privacy, see WEPwireless adapter....................................................19, 23, 31wireless suppression.............................3, 10, 12, 51, 62, 69WPAWPA2 .................................................................................3
XXML..................................................................................53
Index 79

Odyssey Access Client Administration Guide
80
Index