adlib pdf installation guide - adlib software · webdav publishing (for iis) webdav 7.5 (iis web...
TRANSCRIPT

Adlib PDF Installation Guide
PRODUCT VERSION: 1.5
REVISION DATE: April 2012

Copyright
© 2012 Adlib
This manual, and the Adlib products to which it refers, is furnished under license and maybe used or copied only in accordance with the terms of such license. The content of thismanual is provided for informational use only, is subject to change without notice andshould not be construed as a commitment by Adlib Publishing Systems Inc. AdlibPublishing Systems Inc. assumes no responsibility or liability for any errors or inaccuraciesthat may appear in this manual.
Except as permitted by such license, no part of this publication may be reproduced, storedin a retrieval system, or transmitted, in any form or by any means, electronic, mechanical,recording, or otherwise without the prior written permission of Adlib Publishing Systems Inc.
Adlib, Adlib Software, Adlib PDF, Adlib Workflows for SharePoint, Adlib Director, the AdlibSoftware logo, and Adlib logo are either registered trademarks or trademarks of AdlibPublishing Systems Inc. All other trademarks are property of their respective owners.
Portions of this product contain code from OmniPage Capture SDK (registered trademarkof Nuance Communications Inc.), Outside In (registered trademark of Oracle), Glyph &Cog, LLC (Copyright 2003-2010), Pegasus Imaging Corporation (Tampa, FL), PDFNetSDK from PDFTron™ Systems (Copyright 2001-2010) and are distributed by Adlib underlicense.
Adlib Publishing Systems Inc.
215 - 3228 South Service Rd.
Burlington, Ontario
Canada L7N 3H8
Phone: 1-905-631-2875
www.adlibsoftware.com
Printed in Canada.
All rights reserved.

Adlib PDF Installation Guide © 2012 Adlib 1
Table of Contents
1 Installation Guide Overview....................................................................................... 3Typographical Conventions....................................................................................................................3Notes......................................................................................................................................................3Terminology ...........................................................................................................................................4
2 System Requirements ................................................................................................ 5General ..................................................................................................................................................5Database................................................................................................................................................5Folder Connector ...................................................................................................................................7Job Management Service ......................................................................................................................8Process Manager ...................................................................................................................................8Services .................................................................................................................................................9System Manager ..................................................................................................................................11Transformation Engine.........................................................................................................................11
3 SQL Server Installation Instructions....................................................................... 14Overview ..............................................................................................................................................14Installation Instructions.........................................................................................................................14
4 Oracle Installation Instructions ............................................................................... 27Overview ..............................................................................................................................................27Installation Instructions.........................................................................................................................27
5 Manual System Configurations ............................................................................... 47Overview ..............................................................................................................................................47Configure Default Environment ............................................................................................................47Configure Source(s) .............................................................................................................................55Restart Process Manager ....................................................................................................................59
6 License Manager Instructions ................................................................................. 61Explanation of License Types ..............................................................................................................61Evaluation License ...............................................................................................................................62Activate License - Online .....................................................................................................................65Activate License - Offline .....................................................................................................................70Rehost License - Online.......................................................................................................................77Rehost License - Offline.......................................................................................................................82Return License - Online .......................................................................................................................89Return License - Offline .......................................................................................................................94
7 Uninstallation and Modification............................................................................. 101Complete Uninstallation .....................................................................................................................101Modification ........................................................................................................................................102
A Troubleshooting .................................................................................................... 108

Adlib PDF Installation Guide © 2012 Adlib 2
B Software Product Activation FAQ ........................................................................ 110
C Adlib CAD Viewer Licensing FAQ ........................................................................ 113
D Contact Adlib ......................................................................................................... 114
E Index ....................................................................................................................... 115

Adlib PDF Installation Guide © 2012 Adlib 3
Installation Guide Overview
Adlib PDF is the next generation of Adlib transformation technology. Its design offers a high degree of flexibility for developing systems that provide scalability and high availability. An intuitive, interactive interface enables users to setup, configure, and troubleshoot systems which are easily configured to fulfill each user’s unique requirements.
The Installation Guide provides a comprehensive list of the steps required to perform a complete Adlib PDF installation, uninstallation, and licensing of the product. Users can also choose to install and modify Adlib Components individually, according to business requirements.
This guide also contains a detailed list of all system prerequisites that must be available before installation.
Typographical ConventionsThe following typographical conventions are used throughout this guide.
NotesNotes, cautions and tips are offered throughout the guide and are quickly identified with the following icons:
Provides informational notes relevant to the content.
Provides important cautionary notes relevant to the content.
Item Convention Examples
Adlib elements Teal, Title case
The Folder Connector integrates with file folders
Menu options & titles
Push buttons
Settings
Bold Select Transformation Rules from the Settings menu.
Click Save.
Drag Active from the Settings toolbox.
Page elements and titles
Window titles
Italics Navigate to the Edit tab on the Rule Set Editor page.
Drag Active from the Settings toolbox to the work area.
Define attribute settings in the Edit Attribute window.
Script Mono code ${Adlib.FolderConnector.InputFileExtension}
URLs Lowercase http://www.adlibsoftware.com/
User-defined element Enclosed in angle brackets
C:\Adlib\<install folder>

Adlib PDF Installation Guide © 2012 Adlib 4
Provides helpful tips and shortcuts.
TerminologyDetailed descriptions of terminology applicable to the Adlib product can be found in the Adlib PDF Glossary.

Adlib PDF Installation Guide © 2012 Adlib 5
System Requirements
The following prerequisites must be available prior to the installation of Adlib PDF. These systems requirements are broken down by Component as each Component can be installed individually and may have differing needs.
General
Hardware Requirements
Software Requirements
Database
Hardware Requirements
Component Requirement
Processor Speed Minimum: 1.6 GHz
Recommended: 2.8 GHz or higher
Memory (RAM) Minimum: 1 GB
Recommended: 2 GB or higher
Network Minimum: 100 MB
Recommended: 1 GB
Hard Disk Space Minimum: 400 MB available (application files only)
Component Requirement
Operating System Windows Server 2003 R2 32-bitWindows Server 2008 64-bitWindows Server 2008 R2
Microsoft .NET Framework Microsoft .NET Framework 3.5 SP1
Component Requirement
Processor Speed
Memory (RAM)
The hardware required to accommodate the desired operating size of the database.

Adlib PDF Installation Guide © 2012 Adlib 6
Storage Requirements
Software RequirementsFor Microsoft SQL Server
Component Requirement
Database Disk Space Requirements (Data and Index)
200 KB per successful job when logging in Info mode.
Unsuccessful jobs may retain additional information; the space requirements for this information is variable and may be up to 3-4x larger, depending on log level settings.
The following formula may be used to determine the minimum disk space required relative to the time elapsed between database clean-up procedures:
200 KB * Average Number of Active Jobs in the Adlib System = Estimated Database Growth Per Day
Adlib PDF contains a Database Growth Management feature that purges certain database tables according to parameters such as database size or age of the records, depending on the type of database being utilized. For more information see the Adlib PDF User Guide.
Database Requirement
Database Microsoft SQL Server 2005
Microsoft SQL Server 2008
Microsoft SQL Server 2008 R2
Microsoft SQL Server 2005 Named Pipes must be enabled.
Tablespace/schema and User Account A database tablespace/schema with a corresponding user account must be created prior to the Adlib PDF installation.
When creating the database, the following options must be used explicitly:
CREATE DATABASE [ADLIB_CTP|OTHER_NAME] COLLATE SQL_Latin1_General_CP1_CI_AIwhere:
Latin1_General = Default ordering for sorts
CP1 = code page 1252 for non-Unicode data
(Note: All Adlib string data types are Unicode)CI = case insensitive
AI = accent insensitive

Adlib PDF Installation Guide © 2012 Adlib 7
For Oracle
Folder Connector
Hardware Requirements
Software Requirements
For Windows Server 2003 32-bit / 2008 64-bit / 2008 R2
Database Requirement
Oracle Central Database Oracle 10G
Oracle 11G Release 2
SQL Plus
Tablespace/schema and User Account A database tablespace/schema with a corresponding user account must be created prior to the Adlib installation.
Oracle Client Server (32-bit) ODP.Net 11.2.0.1.2 (32-bit)
Adlib PDF for Oracle can be installed on either a 32-bit or 64-bit system, but currently only a 32-bit installer is available. The installation will be performed in 32-bit mode.
Component Requirement
Processor Speed
Memory (RAM)
Hard Disk Space
Minimum: The hardware required to run the Operating System on the machine.
Recommended: Increased performance can be gained by launching multiple Folder Connector threads through multiple CPUs.
For more information on multi-threading System Settings, see the Adlib PDF User Guide.
Component Requirement
Java Runtime Environment (JRE) Java Runtime Environment 1.6
JAVA_HOME environment variable JAVA_HOME environment variable

Adlib PDF Installation Guide © 2012 Adlib 8
Job Management Service
Hardware Requirements
Software Requirements
Process Manager
Hardware Requirements
Software Requirements
For Windows Server 2003 32-bit / 2008 64-bit / 2008 R2
Component Requirement
Processor Speed
Memory (RAM)
Hard Disk Space
Minimum: The hardware required to run the Operating System on the machine.
Recommended: Increased performance can be gained by launching multiple Job Management Service threads through multiple CPUs.
For more information on multi-threading System Settings, see the Adlib PDF User Guide.
Component Requirement
n/a None - see General Requirements.
Component Requirement
Processor Speed
Memory (RAM)
Hard Disk Space
See General Requirements Section.
Component Requirement
User Account Control Settings Turn off UAC for the user under which Adlib executables and services will be run.

Adlib PDF Installation Guide © 2012 Adlib 9
Services
Hardware Requirements
Software Requirements
For Windows Server 2003 32-bit / 2008 64-bit / 2008 R2
For Windows Server 2003 32-bit (specific)
For Windows Server 2008 64-bit (specific)
Component Requirement
Processor Speed See General Requirements Section.
Memory (RAM) Minimum: 512 MB
Recommended: See General Requirements Section.
Hard Disk Space See General Requirements Section.
Component Requirement
ASP.NET (for IIS) ASP.NET enabled (IIS Application Development module)
Web Services Enhancements (WSE) WSE 3.0
Component Requirement
Internet Information Services (IIS) Internet Information Services 6.0
Set the IIS Authorization Account to be used for Web Services installation as a member of the group IIS_WPGM.
Component Requirement
Internet Information Services (IIS) Internet Information Services 6.0 Management Compatibility
Internet Information Services 7.0 must be enabled.
IIS 7.0 is included (but not enabled) by default on Windows Server 2008 64-bit.
WebDAV Publishing (for IIS) WebDAV 7.5 (IIS Web Publishing extension module)
Windows Authentication (for IIS) Windows Authentication (IIS Web Server Security option)
HTTP Activation HTTP Activation
HTTP Activation is located within the .NET Framework 3.0 Features WCF Activation group.

Adlib PDF Installation Guide © 2012 Adlib 10
For Windows Server 2008 R2 (Specific)
Web Browser User Interface
Component Requirement
Internet Information Services (IIS) Internet Information Services 6.0 Management Compatibility
Internet Information Services 7.5 must be enabled.
IIS 7.5 is included (but not enabled) by default on Windows Server 2008 R2.
WebDAV Publishing (for IIS) WebDAV 7.5 (IIS Web Publishing extension module)
Windows Authentication (for IIS) Windows Authentication (IIS Web Server Security option)
.NET Framework 3.5.1 Features .NET Framework 3.5.1 Features
HTTP Activation HTTP Activation
HTTP Activation is located within the .NET Framework 3.5.1 Features WCF Activation group.
Component Requirement
Microsoft Internet Explorer Microsoft Internet Explorer 7.0 / 8.0 (32-bit mode)
Microsoft Silverlight Microsoft Silverlight 4.0 (or greater)

Adlib PDF Installation Guide © 2012 Adlib 11
System Manager
Hardware Requirements
Software Requirements
Component Requirement
Processor Speed Minimum: 1 GHz
Recommended: See General Requirements Section.
Memory (RAM) Minimum: 512 MB
Recommended: See General Requirements Section.
Additional RAM should be added if processing large files or if running intensive applications in parallel with a Transformation Engine, or if a Network Load Balancing IIS Cluster with multiple System Manager Components is not being used.
Network See General Requirements Section.
Hard Disk Space Minimum: 1 GB
Component Requirement
Microsoft Office 2007/2010 and/or MIcrosoft Office Compatibility Pack
System Manager requires MS Office and/or Office Compatibility Pack installed when utilizing processing rules that reference document properties for Office 2007/2010 file formats.

Adlib PDF Installation Guide © 2012 Adlib 12
Transformation Engine
Hardware Requirements
Storage Requirements
Component Requirement
Processor Speed see General Requirements Section
Memory (RAM) see General Requirements Section
Additional RAM should be added if processing large files or if running resource intensive applications in parallel with the Transformation Engine
Hard Disk Space see General Requirements Section
Component Requirement
Disk Space Requirements Minimum: 1 GB
Runtime File Share Disk Space Requirements
The shared file system used for processing documents should have enough disk space to store all active documents and their renditions (plus a buffer for queued documents) for all Adlib Servers installed.
This formula is recommended:Average Document File Size * 2.5 * Average Number of Jobs in the Adlib System = Estimated Minimum Disk Space for the file share
For example, if the average document file size is 10 MB, and the average queue length is 100 jobs:
10 MB * 2.5 * 100 documents in system = 2.5 GB minimum disk space
After a job has been processed by Adlib, the documents can be automatically deleted from the shared file system.
Runtime Adlib Server Disk Space Requirements
Each Adlib Server requires enough disk space to handle the largest document and its rendition

Adlib PDF Installation Guide © 2012 Adlib 13
Software Requirements
For Windows Server 2003 32-bit / 2008 64-bit / 2008 R2
Component Requirement
Microsoft Internet Explorer Microsoft Internet Explorer 7.0 / 8.0
Internet Explorer 7.0 is included by default on Windows Server 2008 64-bit / 2008 R2.
Native Application Rendering For Native Application rendering support, the proper licenses must be obtained.
These applications must be registered in compliance with the licensing guidelines specified for each product.
Your organization is responsible to ensure that these Native Applications use complies with the rights and licenses obtained.
Any Configuration/Initialization dialogs need to be acknowledged within each application before the Transformation Engine can utilize them. For example, many applications have dialogs where users must provide personal information (Title, Name, Company, etc.) before using the application.
Licensed Fonts Proper licenses must be obtained in order for the Transformation Engine to embed licensed fonts within PDF output.
CAD File Type Conversions .NET Framework 4.0 is required when using the ConvertToPdf.Cad Transformation Rule Setting.
Autodesk Inventor 2011/2012 must installed on the system prior to the installation of the Transformation Engine Component if these file types will be rendered using the ConvertToPdf.Cad Transformation Rule Setting.

Adlib PDF Installation Guide © 2012 Adlib 14
SQL Server Installation Instructions
OverviewAdlib PDF, including all the associated components, can be installed on a single server by performing a Complete Installation. Using a Custom installation, the user can install selected components on multiple servers. For more information on configuring a multi-server deployment of Adlib PDF, Contact Adlib.
Prepare for InstallationTo install Adlib PDF you must be logged into the system with an account that has Local Administrator rights and perform the installation from the local machine (do not install from Terminal Services).
Ensure that the necessary system requirements are available, including a database tablespace/schema with a corresponding user account. (See System Requirements for more details on installation prerequisites and the database creation options that are required).
Installation Instructions
To Install the Adlib PDF:1. Close all applications.
2. Run the Adlib PDF 32- or 64-bit installation file.
Currently, Adlib PDF for Oracle can only be installed using a 32-bit installer. For Oracle installation instructions, please see the Oracle Installation Instructions chapter.

Adlib PDF Installation Guide © 2012 Adlib 15
3. In the Adlib-Installation Wizard window, click Next.
Figure 1 - Adlib-Installation Wizard
4. In the License Agreement window, accept the End-User License Agreement terms.
Figure 2 - License Agreement Window

Adlib PDF Installation Guide © 2012 Adlib 16
5. In the Customer Information window, type the Username and Company Name and click Next.
Figure 3 - Customer Information Window

Adlib PDF Installation Guide © 2012 Adlib 17
6. In the Setup Type window, select Complete to begin a complete installation of all components of the Adlib system.
Or,
7. Select Custom to begin an installation of the components of your choice.
8. If desired, click Browse… and select an alternate Installation Folder for the installation.
9. Click Next.
Figure 4 - Setup Type Window
For further instructions on a Custom installation, please refer to the steps below that are applicable to the components you wish to install. During a Complete installation several system defaults are created that must be replicated manually after a Custom installation before Adlib PDF will be operational. For a description of these procedures, see Manual System Configurations.
If any system prerequisites are not available, a pop-up window will be displayed listing the missing requirements.
10. If a Custom installation was specified, select the components you wish to install in the Select Features window. The disk space required/available for the selected components will be displayed.The following options are available:
Database Scripts: The scripts and support files required to create the Adlib System Database.
Services: The Job Management Service and the services required to run the Adlib Management Console.

Adlib PDF Installation Guide © 2012 Adlib 18
System Manager: The component that manages jobs and monitors all Adlib System components. System Manager also prepares each job by executing the appropriate rule sets and issues alerts to the system administrator.
Transformation Engine: The component that performs file transformations.
Folder Connector: A Connector whose Source type is one or more file folders. A Connector is a type of component that monitors a Source for content and submits it as a job to the Adlib System. A Connector also receives completed job output. Only one Folder Connector can be installed on each machine.
Figure 5 - Select Features Window
The Adlib Database Scripts Component, which registers a schema to the database platform, must be installed only once even if other components (e.g. Folder Connectors) are installed on multiple servers.

Adlib PDF Installation Guide © 2012 Adlib 19
11. In the Management Console Login Settings window, type the Password you wish to use to login to the Adlib Management Console.
12. Enter the Email Address at which you wish to receive system notifications and click Next.
The Username for these administrator-level credentials is predefined as “sysadmin”.
Figure 6 - Management Console Login Settings

Adlib PDF Installation Guide © 2012 Adlib 20
13. Select either SQL Server or SQL Express in the Database Type Selection window. If SQL Express is selected, the database will be installed along with Adlib PDF. To continue with an Oracle database installation, please refer to Oracle Installation Instructions.
Currently, Adlib PDF for Oracle can only be installed with a 32-bit installer.
Figure 7 - Database Type Selection Window

Adlib PDF Installation Guide © 2012 Adlib 21
14. If SQL Server was selected, enter or modify the default values for the following fields in the SQL Server Database Settings window and click Next:
Database Name: Any alias for the name of the database to be used by Adlib PDF.
Server Name: The machine name where the database is located.
Username/Password: The credentials of a database user with read/write privileges. These credentials will be used to register components and to make calls to the database.
When performing an Adlib PDF for SQL Server installation, the database tablespace/schema with a corresponding user account must be available prior to the installation of the Adlib system.
The information provided in the Database Settings window will be used to verify a connection to the database before the remainder of the installation can proceed.
Figure 8 - SQL Server Database Settings Window

Adlib PDF Installation Guide © 2012 Adlib 22
15. If desired, modify the default path in the Root Adlib Work Folder window. This is the location where the working folders will be created as necessary for the components being installed.
Figure 9 - Root Adlib Work Folder

Adlib PDF Installation Guide © 2012 Adlib 23
16. In the Windows Credentials window, type the Account and Password under which the Adlib executables and services will run. These must be the credentials of a Windows user with local administrator privileges. The Account name must be in the domain\username format.
User Account Control security settings must be turned off for this Windows user before the installation of Adlib PDF.
Figure 10 - Windows Credentials Window

Adlib PDF Installation Guide © 2012 Adlib 24
17. In the Service Settings window, enter or modify the default values for the following fields:
Port Number: The port number for the user console connection to the Adlib website.
IIS Authentication Settings Account/Password: The credentials of a user with the right to create Internet Information Services Settings, using the domain\username format.
Create a local Job Folder: An IIS virtual directory and a shared path will be created for use by the System Manager.
Or,
Use Existing Job Folder: Select this option if you are configuring a clustered environment.
If the Use Existing Job Folder option is selected, the File Repository UNC Path and File Repository Web Server Path must be specified in the Job Management Service System Settings, using the Adlib Management Console. For more information on modifying System Settings, see the Adlib PDF User Guide.
Figure 11 - Service Settings Window

Adlib PDF Installation Guide © 2012 Adlib 25
18. In the Start Copying Files window, review the list of components that will be installed. If any changes are required, click Back to make changes.
19. Click Next to begin copying the program files. The software will install using the settings defined during the installation process.
Figure 12 - Start Copying Files Window

Adlib PDF Installation Guide © 2012 Adlib 26
20. In the InstallShield Wizard Complete window, select the appropriate checkbox if you wish to view the Installation Log and or launch the License Manager and click Finish. For more information on activating a license for Adlib PDF, see License Manager Instructions.
The License Manager link will appear only when a Complete installation has been performed, or when the Transformation Engine has been installed.
Figure 13 - InstallShield Wizard Complete Window
The Transformation Engine must be activated in either evaluation mode or with a license key before jobs can be processed. If you do not wish to activate at this time, the License Manager can also be accessed from the Start menu group of Adlib PDF.
Once Adlib PDF has been licensed, the Process Manager Service must be started before the Transformation Engine will be operational. For more information on using the Process Manager Service, see the Adlib PDF User Guide.

Adlib PDF Installation Guide © 2012 Adlib 27
Oracle Installation Instructions
OverviewAn installation of Adlib PDF for Oracle involves a 4-step process:
1. Installing the Oracle database scripts.
2. Manually executing the scripts.
3. Installing Adlib PDF Components.
4. Configuring system defaults in the Adlib Management Console.
Adlib PDF for Oracle can be installed on either a 32-bit or 64-bit system, but currently only a 32-bit installer is available. The installation will be performed in 32-bit mode.
Prepare for InstallationTo install Adlib PDF you must be logged into the system with an account that has Local Administrator rights and perform the installation from the local machine (do not install from Terminal Services).
Ensure that the necessary system requirements are available, including a database tablespace/schema with a corresponding user account. (See System Requirements for more details on installation prerequisites and the database creation options that are required).
Installation Instructions
Step 1: Install Adlib PDF Oracle Database Scripts:1. Close all applications.
2. Run the Adlib PDF 32-bit installation file.

Adlib PDF Installation Guide © 2012 Adlib 28
3. In the Adlib-Installation Wizard window, click Next.
Figure 14 - Adlib-Installation Wizard
4. In the License Agreement window, accept the End-User License Agreement terms.
Figure 15 - License Agreement Window

Adlib PDF Installation Guide © 2012 Adlib 29
5. In the Customer Information window, type the Username and Company Name and click Next.
Figure 16 - Customer Information Window

Adlib PDF Installation Guide © 2012 Adlib 30
6. In the Setup Type window, select Custom. The Custom option must be selected during the first step of the installation in order to instruct the Installer to create the Oracle database scripts only.
7. If desired, click Browse… and select an alternate Installation Folder for the installation.
All Adlib PDF Components will be installed to the location specified in the Setup Type window on this machine; this location cannot be modified during any installation modifications. To install additional components on another machine, the installation executable must be run again on that machine.
8. Click Next.
Figure 17 - Setup Type Window
If any system prerequisites are not available, a pop-up window will be displayed listing the missing requirements.

Adlib PDF Installation Guide © 2012 Adlib 31
9. In the Select Features window, select only the Database Scripts Component.
Figure 18 - Select Features Window

Adlib PDF Installation Guide © 2012 Adlib 32
10. In the Management Console Login Settings window, type the Password you wish to use to login to the Adlib Management Console.
11. Enter the Email Address at which you wish to receive system notifications and click Next.
The Username for these administrator-level credentials is predefined as “sysadmin”.
Figure 19 - Management Console Login Settings

Adlib PDF Installation Guide © 2012 Adlib 33
12. Select Oracle In the Database Type Selection window.
Figure 20 - Database Type Selection Window

Adlib PDF Installation Guide © 2012 Adlib 34
13. In the Oracle Database Settings window, complete the following fields and click Next. The scripts and support files required to create the Adlib PDF database will be created and dropped in the location specified.
Oracle Net Service Name: Any alias for the service name of the connection to the Oracle database. This alias is specified in the tnsnames.ora file.
Username/Password: The credentials of a database user with read/write privileges. These credentials will be used to register components and to make calls to the database.
A database tablespace/schema with a corresponding user account must be available prior to the installation of Adlib PDF.
The information provided in the Oracle Database Settings window will be used to verify a connection to the database before the remainder of the installation can proceed.
Figure 21 - Oracle Database Settings Window

Adlib PDF Installation Guide © 2012 Adlib 35
14. In the Start Copying Files window, click Next to begin installing the scripts to the location specified in the Oracle Database Settings window.
Figure 22 - Start Copying Files Window

Adlib PDF Installation Guide © 2012 Adlib 36
15. In the InstallShield Wizard Complete window, click the checkbox if you wish to view the Installation Log and/or click Finish to exit.
Figure 23 - InstallShield Wizard Complete Window

Adlib PDF Installation Guide © 2012 Adlib 37
Execute the Database Scripts
Step 2: Execute the scripts:1. To manually run the database scripts, open a command prompt and execute the following
statement at the location of the scripts:
RunOracleScripts.cmd <Username> <Password> <OracleNetServiceName>
The message “Creating database schema and inserting seed data will be displayed”.
A space is required between each parameter in the statement.
Figure 24 - Command Prompt Window

Adlib PDF Installation Guide © 2012 Adlib 38
Install Adlib PDF Components
Step 3: Install the Adlib PDF Components:1. Run the Adlib PDF 32-bit installation file.
2. Select Modify in the Setup Maintenance window.
Figure 25 - Setup Maintenance Window

Adlib PDF Installation Guide © 2012 Adlib 39
3. In the Select Features window select all the Adlib Components to be installed.
In the Select Features window, any Components that are unchecked will be uninstalled if they were previously installed on that machine. We recommend that the Database Scripts Component remains checked so that the scripts will be retained for future use.
Figure 26 - Select Features Window

Adlib PDF Installation Guide © 2012 Adlib 40
4. In the Management Console Login Settings window, enter the Password and Email Address specified during the Database Scripts installation and click Next.
Figure 27 - Management Console Login Settings
5. Select Oracle In the Database Type Selection window.
Figure 28 - Database Type Selection Window

Adlib PDF Installation Guide © 2012 Adlib 41
6. In the Oracle Database Settings window, enter the Oracle Net Service Name and Username/Password that were specified during the Database Scripts installation and click Next.
Figure 29 - Oracle Database Settings Window

Adlib PDF Installation Guide © 2012 Adlib 42
7. If desired, modify the default path in the Root Adlib Work Folder window. This is the location where the working folders will be created as necessary for the Components being installed.
Figure 30 - Root Adlib Work Folder

Adlib PDF Installation Guide © 2012 Adlib 43
8. In the Windows Credentials window, type the Account and Password under which the Adlib executables and services will run. These must be the credentials of a Windows user with local administrator privileges. The Account name must be in the domain\username format.
User Account Control security settings must be turned off for this Windows user before the installation of Adlib PDF.
Figure 31 - Windows Credentials Window

Adlib PDF Installation Guide © 2012 Adlib 44
9. In the Service Settings window, enter or modify the default values for the following fields:
Port Number: The port number for the user console connection to the Adlib website.
IIS Authentication Settings Account/Password: The credentials of a user with the right to create Internet Information Services Settings, using the domain\username format.
Create a local Job Folder: An IIS virtual directory and a shared path will be created for use by the System Manager.
Or,
Use Existing Job Folder: Select this option if you are configuring a clustered environment.
If the Use Existing Job Folder option is selected, the File Repository UNC Path and File Repository Web Server Path must be specified in the Job Management Service System Settings, using the Adlib Management Console. For more information on modifying System Settings, see the Adlib PDF User Guide.
Figure 32 - Service Settings Window

Adlib PDF Installation Guide © 2012 Adlib 45
10. In the Start Copying Files window, review the list of components that will be installed. If any changes are required, click Back to make changes.
11. Click Next to begin copying the program files. The software will install using the settings defined during the installation process.
Figure 33 - Start Copying Files Window

Adlib PDF Installation Guide © 2012 Adlib 46
12. In the InstallShield Wizard Complete window, select the appropriate checkbox if you wish to view the Installation Log and or launch the License Manager and click Finish. For more information on activating a license for Adlib PDF, see License Manager Instructions.
The License Manager link will appear only when the Transformation Engine has been installed.
Figure 34 - InstallShield Wizard Complete Window
The Transformation Engine must be activated in either evaluation mode or with a license key before jobs can be processed. If you do not wish to activate at this time, the License Manager can also be accessed from the Start menu group of Adlib PDF.
Several manual system configurations must be performed before the Adlib system will be operational. See Manual System Configurations for a detailed list of these procedures.

Adlib PDF Installation Guide © 2012 Adlib 47
Manual System Configurations
OverviewAfter a custom Component installation several manual system configurations must be performed in order to prepare Adlib PDF for content rendering. These include the assignment of Components to the default environment, configuration of a Source, and the assignment of a Source to an Instruction Set. Additional System Setting configurations may be needed if the Adlib system has been installed on multiple servers. For more information on Adlib Components and System Settings, please refer to the Adlib PDF User Guide.
Configure Default EnvironmentAll installed Components must be assigned to an environment in order to be operational.
To Assign Components to an Environment:1. Login to the Adlib Management Console using the credentials entered in the Management
Console Login Window during installation.
2. Click the System Settings tab.
Figure 35 - System Settings Page

Adlib PDF Installation Guide © 2012 Adlib 48
3. On the Environments page, drag all of the Unassigned Components into the Default Environment (not the read-only Environment).
4. If desired, rename the Default Environment by selecting Properties from the Environment Edit menu and modifying the fields.
Figure 36 - Drag Unassigned Components into Environment

Adlib PDF Installation Guide © 2012 Adlib 49
Add Users to Process ManagerUser accounts must be added to the Process Manager Users, Transformation Engine, and Folder Connector Rule Settings.
To Configure Process Manager:1. Select Process Manager from the Settings menu in the Default Environment. The Rule Set
Editor opens.
Figure 37 - Environments Page - Settings Menu

Adlib PDF Installation Guide © 2012 Adlib 50
2. Click the Edit tab to enable editing of the System Settings.
Figure 38 - Edit Tab
3. Select Edit from the Adlib.ProcessManager.Users Rule Setting Edit menu.
Figure 39 - Rule Setting Edit Menu

Adlib PDF Installation Guide © 2012 Adlib 51
4. In the Edit Adlib.ProcessManager.Users window, enter the Username and Password that correspond to the Windows User credentials that were specified during the Adlib PDF installation and click OK. The Username must be in the domain\username format.
Figure 40 - Process Manager Users Rule Settings
5. Select Edit from the Adlib.ProcessManager.TransformationEngine Rule Setting Edit menu.

Adlib PDF Installation Guide © 2012 Adlib 52
6. In the Edit Adlib.ProcessManager.TransformationEngine window, enter the Username that corresponds to the Windows User credentials that were specified during the Adlib PDF installation and click OK. The Username must be in the domain\username format.
Figure 41 - Process Manager Transformation Engine Rule Settings
7. Select Edit from the Adlib.ProcessManager.FolderConnector Rule Setting Edit menu.

Adlib PDF Installation Guide © 2012 Adlib 53
8. In the Edit Adlib.ProcessManager.FolderConnector window, enter the Username that corresponds to the Windows User credentials that were specified during the Adlib PDF installation and click OK. The Username must be in the domain\username format.
Figure 42 - Process Manager Folder Connector Rule Settings

Adlib PDF Installation Guide © 2012 Adlib 54
9. Click Save to save the changes to the Process Manager System Settings.
Figure 43 - Save Rule Set Changes
10. Click the System Settings tab to return to the Environments page.
11. Select Publish from the Edit menu in the Default Environment. The message “Environment Successfully Published” will be displayed.
Figure 44 - Publish Environment Configuration

Adlib PDF Installation Guide © 2012 Adlib 55
Configure Source(s)In order for content to be input to Adlib PDF, at least one type of Source must be configured and associated with a Connector. Several types of Sources and Connectors are available in the system, based on the type of input or application from which the content will be passed into the system. In this example, a Folder Source and Connector will be configured; this involves creating an Input/Output folder structure and assigning the new Source to an Instruction Rule Set.
For more information on the installation and configuration of the SharePoint Workflow Connector, see the Adlib PDF SharePoint Workflow Connector Guide, and for more information on the Documentum Connector, refer to the Adlib PDF Documentum Connector Guide.
To Configure a Folder Source:1. Click the Sources button on the System Settings Page.
2. Drag a Folder Source Type from the left pane to the area surrounded by a dotted line labelled “Drag a Source Type here...”
Figure 45 - Drag Folder Source Type

Adlib PDF Installation Guide © 2012 Adlib 56
3. In the Properties window, enter the Folder Source Name and optional Description. Click Save.
Figure 46 - Folder Source Properties Window
4. Select Edit from the Folder Source Edit menu.
Figure 47 - Folder Source Edit Menu

Adlib PDF Installation Guide © 2012 Adlib 57
5. To assign a Connector to monitor the new Source, click the plus sign adjacent to Connectors: and select <FolderConnectorServer>.Folder Connector from the drop-down list.
Figure 48 - Assign a Folder Connector to a Folder Source
6. Using Windows Explorer, create a folder with the name of the Source and subfolders labeled Input and Output. The Input and Output folder locations must be accessible by the machine on which the Folder Connector is installed.
7. Copy the path to the Input subfolder and paste the location in the Input field. Repeat this process for the Output subfolder.
Figure 49 - Folder Source Input and Output Folders
8. Click Save.

Adlib PDF Installation Guide © 2012 Adlib 58
Assign the Folder Source to an Instruction SetAt least one Folder Source must be assigned to an Instruction Set of rules before it can be used for content transformation.
To Assign a Folder Source to an Instruction Set:1. Navigate to the Job Settings tab. The unassigned Sources are listed in the left pane.
2. Drag one or more Folder Sources into the Default Instruction Set.
Figure 50 - Assign Folder Source to Instruction Set
3. If desired, rename the Instruction Set by selecting Properties from the Instruction Set Edit menu and modifying the fields.
Figure 51 - Instruction Set Properties
4. If desired, create Job Acceptance and/or Transformation Rules within this Instruction Set.
For more information on Job Acceptance and Transformation Rules see the Adlib PDF User Guide.
5. Select Publish from the Instruction Set Edit menu to save the changes and activate the rules.

Adlib PDF Installation Guide © 2012 Adlib 59
Restart Process ManagerBefore using Adlib PDF the system must be licensed and the Process Manager Service must be restarted in order for the changes to take affect. See the License Manager Instructions chapter for more information.
To Restart the Process Manager Service:1. Select Control Panel from the Windows Start menu, then open Administrative Tools/
Services. Select the Adlib Process Manager Service and click Restart the Service.
Figure 52 - Restart Services

Adlib PDF Installation Guide © 2012 Adlib 60
2. To view the status of the Adlib system Components, navigate to the Monitoring tab in the Management Console and click the System Status button. The status of each Component is displayed in the report. Ensure that all Components show a status of “Started” before submitting content for transformation.
Figure 53 - System Status Page
For more information on using the Adlib Management Console see the Adlib PDF User Guide.

Adlib PDF Installation Guide © 2012 Adlib 61
License Manager Instructions
The Adlib License Manager can be used to manage all of your Adlib PDF license needs. Licenses can be activated, returned and rehosted according to business requirements.
Explanation of License TypesThere are four types of license transactions that can be performed within the Adlib License Manager:
The Transformation Engine must be stopped using the Process Manager before performing any type of license transaction. For more details on stopping and restarting the service, see the Adlib PDF User Guide.
License Type Use
Evaluation License Enables Adlib PDF for a 30-day evaluation period. Evaluation may be enabled only once per computer. Output will be watermarked.
Activate License Activates an Adlib PDF license for exclusive use with all of the features that are included in the purchased license package.
Rehost License Temporarily returns a license to the Adlib license server so that it can be re-activated on a different machine.
Rehost can also be used to temporarily remove then return a license to the same machine when making any significant changes to a server (such as virtualizing a server or making any significant hardware changes.)
Return License Returns a license to the Adlib license server with no transfer.

Adlib PDF Installation Guide © 2012 Adlib 62
Evaluation LicenseThe Activate Evaluation license transaction enables Adlib PDF in evaluation mode for a 30-day trial period. Output will be watermarked.
To Activate an Evaluation License:1. In the License Transaction Type window, select Activate Evaluation and click Next.
Figure 54 - License Transaction Type window

Adlib PDF Installation Guide © 2012 Adlib 63
2. In the Activate Evaluation window, click Activate to begin the 30-day trial period.
Figure 55 - Activate Evaluation window

Adlib PDF Installation Guide © 2012 Adlib 64
3. In the License Transaction Complete window, click Close to close the License Manager. The Transformation engine must now be restarted using the Process Manager service before jobs can be processed. For more information on stopping and starting the service, see the Adlib PDF User Guide.
Figure 56 - License Transaction Complete window

Adlib PDF Installation Guide © 2012 Adlib 65
Activate License - OnlineThe Activate License transaction type registers Adlib PDF with all of the features that are included in the purchased license package. Any feature that is outside of the purchased license package will produce evaluation watermarks when selected.
To Activate a License Online:1. In the License Transaction Type window, select Activate License and click Next.
Figure 57 - License Transaction Type window
The Adlib License server is only contacted during user-initiated license transactions from the Adlib License Manager application, and not at any other time without explicit user notification and consent.

Adlib PDF Installation Guide © 2012 Adlib 66
2. In the License Transaction Method window, select Online and click Next.
Figure 58 - License Transaction Method window
3. If desired, in the User Information window type the Name, Company, Phone and Email and click Next.
Figure 59 - User Information window

Adlib PDF Installation Guide © 2012 Adlib 67
This information is only used when contacting Adlib for support.
4. In the Activation ID window, type the Activation ID provided by Adlib Fulfillment and click Next.
Figure 60 - Activation ID window

Adlib PDF Installation Guide © 2012 Adlib 68
5. In the Online License Transaction window, click Activate to begin the activation.
The Transformation Engine must be stopped using the Process Manager before performing any type of license transaction. For more details on stopping and restarting the service, see the Adlib PDF User Guide.
Figure 61 - Online License Transaction window
The Adlib Transformation Engine requires one license per virtual machine.

Adlib PDF Installation Guide © 2012 Adlib 69
6. When the license has been activated, click Finish to return to the main menu of the Adlib License Manager or Close to exit the application. The Transformation Engine must now be restarted using the Process Manager service before jobs can be processed. For more information on stopping and starting the service, see the Adlib PDF User Guide.
Figure 62 - License Transaction Complete window

Adlib PDF Installation Guide © 2012 Adlib 70
Activate License - OfflineLicenses can be activated offline by generating an activation request file and transmitting it online to the Adlib license server on an alternate computer, or by email to Adlib customer service.
To Activate a License Offline:1. In the License Transaction Type window, select Activate License and click Next.
Figure 63 - License Transaction Type window
2. In the License Transaction Method window, select Offline and click Next.

Adlib PDF Installation Guide © 2012 Adlib 71
Figure 64 - License Transaction Method window
3. In the Offline License Transaction Steps window, select Step 1: Generate an offline activation request file.
4. Type the Activation ID provided by Adlib Fulfillment and click Next.
Figure 65 - Offline License Transaction Steps window

Adlib PDF Installation Guide © 2012 Adlib 72
5. In the Offline License Transaction Request File window, click Save to File and choose a location to save the file to your computer.
6. Click Next.
Figure 66 - Offline License Transaction Request File window
7. The file must then be processed using one of the following methods
Copy the Activation Request file to a system connected to the internet and access http://www.adlibsoftware.com/AdlibLicenseServices. An Activation Response file can be generated from this website for the next step in the Activation process.
Or,
Submit the Activation Request file via email to [email protected]. An Activation Response file sent by Adlib (within one business day) can then be used in the next step to complete the license transaction. The Adlib License Manager can be reopened to continue with the next step at anytime.
8. Once the response file has been received, copy it to the machine where the Adlib Transformation Engine is installed.

Adlib PDF Installation Guide © 2012 Adlib 73
9. In the Offline License Transaction Steps window, select Step 2: Process the Offline Activation Response File and click Browse to locate the file.
Figure 67 - Offline License Transaction Steps Window

Adlib PDF Installation Guide © 2012 Adlib 74
10. If desired, in the User Information window, type the Name, Company, Phone and Email and click Next.
Figure 68 - User Information window
This information is only used when contacting Adlib for support.

Adlib PDF Installation Guide © 2012 Adlib 75
11. In the Offline License Transaction window, click Activate to begin the activation.
The Transformation Engine must be stopped using the Process Manager before performing any type of license transaction. For more details on stopping and restarting the service, see the Adlib PDF User Guide.
Figure 69 - Offline License Transaction window
The Adlib Transformation Engine requires one license per virtual machine.

Adlib PDF Installation Guide © 2012 Adlib 76
12. When the license has been activated, click Finish to return to the main menu of the Adlib License Manager or Close to exit the application. The Transformation Engine must now be restarted using the Process Manager service before jobs can be processed. For more information on stopping and starting the service, see the Adlib PDF User Guide.
Figure 70 - License Transaction Complete window

Adlib PDF Installation Guide © 2012 Adlib 77
Rehost License - OnlineThe Rehost License transaction allows a license to be moved from one machine to another by temporarily returning the license to the Adlib license server so it can then re-activating it on a different machine. Rehost can also be used to temporarily remove then return a license to the same machine when making any significant changes to a server (such as virtualizing a server or making any significant hardware changes).
To rehost a license, perform the Rehost License transaction on the original machine and then Activate the license on the new machine. Do not uninstall Adlib PDF until you have completed the rehosting process.
To Rehost a License Online:1. In the License Transaction Type window, select Rehost License and click Next.
Figure 71 - License Transaction Type window
Adlib PDF Installation Guide © 2012 Adlib 78
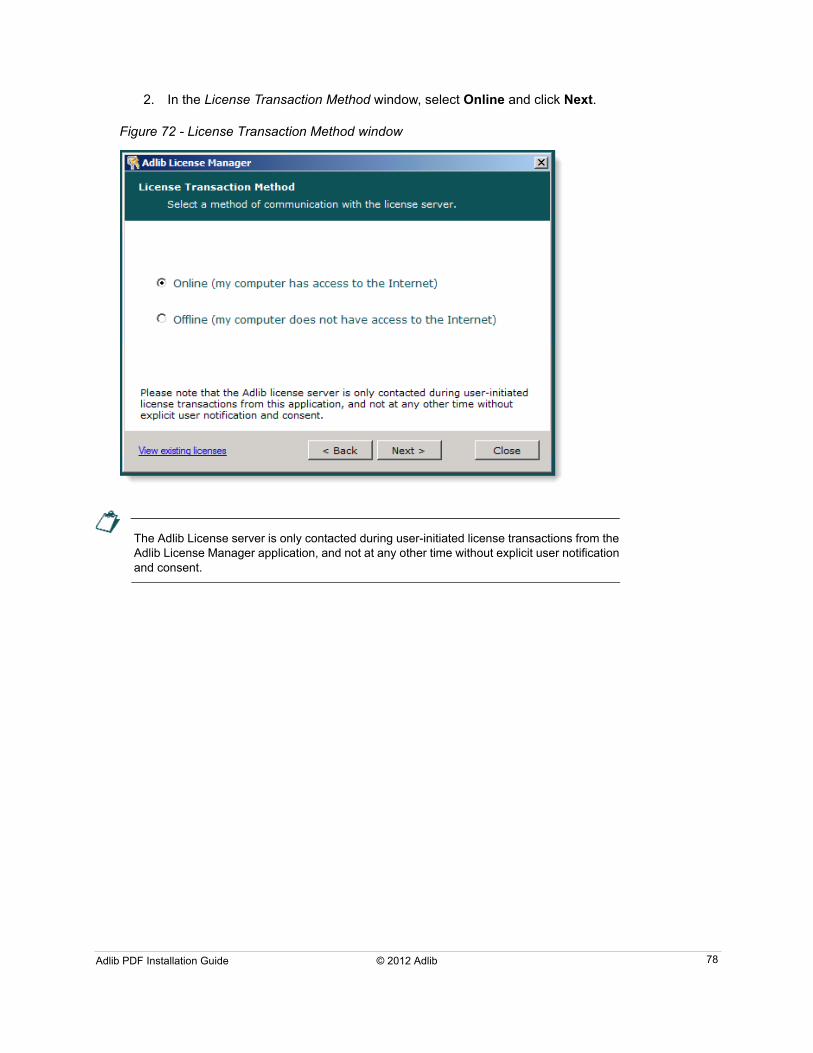
2. In the License Transaction Method window, select Online and click Next.
Figure 72 - License Transaction Method window
The Adlib License server is only contacted during user-initiated license transactions from the Adlib License Manager application, and not at any other time without explicit user notification and consent.

Adlib PDF Installation Guide © 2012 Adlib 79
3. In the Activation ID window, type the original Activation ID provided by Adlib Fulfillment and click Next.
The Activation IDs for all licenses currently in use can be viewed by clicking the View Existing Licenses link in the lower left of the Adlib License Manager windows.
Figure 73 - Existing Licenses window
Figure 74 - Activation ID window

Adlib PDF Installation Guide © 2012 Adlib 80
4. In the Online License Transaction window, click Rehost to return your license temporarily to the Adlib License server.
The Transformation Engine must be stopped using the Process Manager before performing any type of license transaction. For more details on stopping and restarting the service, see the Adlib PDF User Guide.
Figure 75 - Online License Transaction window

Adlib PDF Installation Guide © 2012 Adlib 81
5. When the license has been rehosted, click Finish to return to the main menu of the Adlib License Manager or Close to exit the application.
Figure 76 - License Transaction Complete window
Once the rehost has been completed, the Adlib Transformation Engine will return to Evaluation mode with time remaining from the original Evaluation start date.
Adlib PDF can now be uninstalled from the original machine and installed on a new machine, or rather, modifications can be made to the original server before the license is re-activated on the same machine. For detailed uninstallation and instructions, see Uninstallation and Modification. The original license can then be activated on the new machine or on the modified, original machine (see To Activate a License Online:).

Adlib PDF Installation Guide © 2012 Adlib 82
Rehost License - OfflineLicenses can be rehosted offline by generating an rehost request file and transmitting it online to the Adlib license server on an alternate computer or by email to Adlib customer service.
To Rehost a License Offline:1. In the License Transaction Type window, select Rehost License and click Next.
Figure 77 - License Transaction window

Adlib PDF Installation Guide © 2012 Adlib 83
2. In the License Transaction Method window, select Offline and click Next.
Figure 78 - License Transaction Method window

Adlib PDF Installation Guide © 2012 Adlib 84
3. In the Offline License Transaction Steps window, select Step 1: Generate an offline rehost request file.
4. Type the Activation ID provided by Adlib Fulfillment and click Next.
Figure 79 - Offline License Transaction Steps window

Adlib PDF Installation Guide © 2012 Adlib 85
5. In the Offline License Transaction Request File window, click Save to File and choose a location to save the file to your computer.
6. Click Next.
Figure 80 - Offline License Transaction Request File window
7. The file must then be processed using one of the following methods:
Copy the Rehost Request file to a system connected to the internet and access http://www.adlibsoftware.com/AdlibLicenseServices. A Rehost Response file can be generated from this website for the next step in the Rehost process.
Or,
Submit the Rehost Request file via email to [email protected]. A Rehost Response file sent by Adlib (within one business day) can then be used in the next step to complete the license transaction. The Adlib License Manager can be reopened to continue with the next step at anytime.
8. Once the response file is received, copy it to the system where the Adlib Transformation Engine is installed.

Adlib PDF Installation Guide © 2012 Adlib 86
9. In the Offline License Transaction Steps window, select Step 2: Process the offline rehost response file and click Browse to locate the file.
Figure 81 - Offline License Transaction Steps window

Adlib PDF Installation Guide © 2012 Adlib 87
10. In the Offline License Transaction window, click Rehost to temporarily return the license to the Adlib License server.
The Transformation Engine must be stopped using the Process Manager before performing any type of license transaction. For more details on stopping and restarting the service, see the Adlib PDF User Guide.
Figure 82 - Offline License Transaction window
Adlib PDF Installation Guide © 2012 Adlib 88
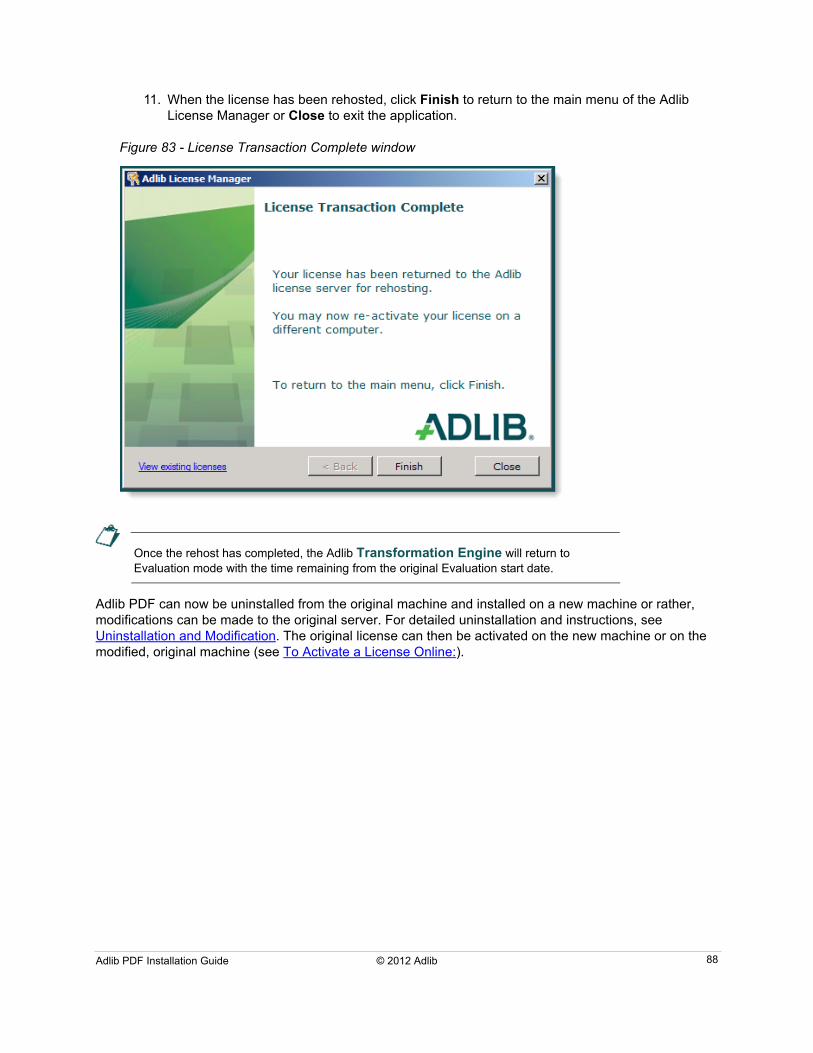
11. When the license has been rehosted, click Finish to return to the main menu of the Adlib License Manager or Close to exit the application.
Figure 83 - License Transaction Complete window
Once the rehost has completed, the Adlib Transformation Engine will return to Evaluation mode with the time remaining from the original Evaluation start date.
Adlib PDF can now be uninstalled from the original machine and installed on a new machine or rather, modifications can be made to the original server. For detailed uninstallation and instructions, see Uninstallation and Modification. The original license can then be activated on the new machine or on the modified, original machine (see To Activate a License Online:).

Adlib PDF Installation Guide © 2012 Adlib 89
Return License - OnlineThe Return License transaction permanently returns a license to the Adlib license server.
To Return a License Online:1. In the License Transaction Type window, select Return License and click Next.
Figure 84 - License Transaction Type window

Adlib PDF Installation Guide © 2012 Adlib 90
2. In the License Transaction Method window, select Online and click Next.
Figure 85 - License Transaction Method window

Adlib PDF Installation Guide © 2012 Adlib 91
3. In the Activation ID window, type the Activation ID for the license to be returned and click Next.
The Activation IDs for all licenses currently in use can be viewed by clicking the View Existing Licenses link in the lower left of the Adlib License Manager windows.
Figure 86 - Existing Licenses window
Figure 87 - Activation ID window

Adlib PDF Installation Guide © 2012 Adlib 92
4. In the Online License Transaction window, click Return to permanently return your license to the Adlib License server.
Figure 88 - Online License Transaction window
5. When the license has been returned, click Finish to return to the main menu of the Adlib License Manager or Close to exit the application.
Figure 89 - License Transaction Complete window

Adlib PDF Installation Guide © 2012 Adlib 93
Once the return has been completed, Adlib Transformation Engine returns to Evaluation mode with time remaining from the original Evaluation start date.
If desired, Adlib PDF can now be uninstalled. For detailed uninstallation instructions, see Uninstallation and Modification.

Adlib PDF Installation Guide © 2012 Adlib 94
Return License - OfflineLicenses can be returned offline by generating an return request file and transmitting it online to the Adlib license server on an alternate computer or by email to Adlib customer service.
To Return a License Offline:1. In the License Transaction Type window, select Return License and click Next.
Figure 90 - License Transaction Type window

Adlib PDF Installation Guide © 2012 Adlib 95
2. In the License Transaction Method window, select Offline and click Next.
Figure 91 - License Transaction Method window

Adlib PDF Installation Guide © 2012 Adlib 96
3. In the Offline License Transaction Steps window, select Step 1: Generate an offline return request file.
4. Type the Activation ID provided by Adlib Fulfillment and click Next.
Figure 92 - Offline License Transaction Steps window

Adlib PDF Installation Guide © 2012 Adlib 97
5. In the Offline License Transaction Request File window, click Save to File and choose a location to save the file to your computer.
6. Click Next.
Figure 93 - Offline License Transaction Request File window
7. The file must then be processed using one of the following methods:
Copy the Return Request file to a system connected to the internet and access http://www.adlibsoftware.com/AdlibLicenseServices. A Return Response file can be generated from this website for the next step in the Return process.
Or,
Submit the Return Request file via email to [email protected]. A Return Response file sent by Adlib (within one business day) can then be used in the next step to complete the license transaction. The Adlib License Manager can be reopened to continue with the next step at anytime.
8. Once the response file is received, copy it to the system where the Adlib Transformation Engine is installed.

Adlib PDF Installation Guide © 2012 Adlib 98
9. In the Offline License Transaction Steps window, select Step 2: Process the offline return response file and click Browse to locate the file.
Figure 94 - Offline License Transaction Steps window

Adlib PDF Installation Guide © 2012 Adlib 99
10. In the Offline License Transaction window, click Return to permanently return the license to the Adlib License server.
Figure 95 - Offline License Transaction window

Adlib PDF Installation Guide © 2012 Adlib 100
11. When the license has been returned, click Finish to return to the main menu of the Adlib License Manager or Close to exit the application.
Figure 96 - License Transaction Complete window
Once the return has completed, the Adlib Transformation Engine returns to Evaluation mode with remaining time from the original Evaluation start date.
If desired, Adlib PDF can now be uninstalled. For detailed uninstallation instructions, see Uninstallation and Modification.

Adlib PDF Installation Guide © 2012 Adlib 101
Uninstallation and Modification
Users can perform a complete uninstallation of the entire Adlib PDF system, including all of the installed Components, or if desired, users can modify an existing installation of Adlib PDF by uninstalling selected Components or by adding new Components to the current configuration. For more information on a multi-server deployment of Adlib PDF, Contact Adlib.
Complete Uninstallation
To Perform a Complete Uninstallation:1. On the Windows Start menu, select Control Panel, then Programs and Features. Select
Adlib and click Uninstall.
Before performing an uninstallation of Adlib PDF, ensure that Process Manager Services have been stopped. For more information, see the Adlib PDF User Guide.
2. In the Adlib-InstallShield Wizard window, type the “sysadmin” account Password that was used in the installation of Adlib PDF and ensure that the default Services URL is the URL that hosted the Adlib Services. Click Next.
Figure 97 - Adlib - InstallShield Wizard Window

Adlib PDF Installation Guide © 2012 Adlib 102
3. To begin the uninstallation, click Yes in the confirmation pop-up.
Figure 98 - Uninstall Confirmation pop-up
4. In the Uninstall Complete window, click the checkbox if you wish to view the Installation Log, and click Finish to complete the uninstallation.
Figure 99 - Uninstall Complete Window
ModificationDuring modification, a user can choose to uninstall one or more existing Components or add a new Component to the system.
Before uninstalling a Component, ensure that Process Manager Services have been stopped, and that the Component is no longer assigned to an Environment in the Adlib Management Console. For more information, see the Adlib PDF User Guide.

Adlib PDF Installation Guide © 2012 Adlib 103
To Uninstall one or more Components:1. On the Windows Start menu, select Control Panel, then Programs and Features. Select
Adlib and click Change.
2. In the Adlib Setup Maintenance window, click Modify.
Figure 100 - Adlib Setup Maintenance window

Adlib PDF Installation Guide © 2012 Adlib 104
3. In the Select Features window, deselect the features to be removed from the system and click Next.
The checkboxes for the features that are currently installed will show as selected.
Figure 101 - Select Features window
4. Provide additional Component information as required.
Additional information may be required for the deregistration process, such as the user credentials specified during installation, according to the Component chosen to remove.

Adlib PDF Installation Guide © 2012 Adlib 105
5. The Components selected to be removed will be listed in the Start Copying Files window. Click Next to proceed with the removal. The selected Components will be removed from Adlib PDF.
Figure 102 - Start Copying Files Window
To Install a New Component:1. On the Windows Start menu, select Control Panel, then Programs and Features. Select
Adlib and click Change.

Adlib PDF Installation Guide © 2012 Adlib 106
2. In the Adlib Setup Maintenance window, click Modify.
Figure 103 - Adlib Setup Maintenance window
3. In the Select Features window, select the features to be added to the system and click Next.
Figure 104 - Select Features window
4. Provide additional Component information as required.

Adlib PDF Installation Guide © 2012 Adlib 107
5. The Components selected to be installed will be listed in the Start Copying Files window. Click Next to proceed with the installation of the Component(s). The selected Component(s) will be added to Adlib PDF.
Figure 105 - Start Copying Files Window
6. Depending on the Component that was installed, several manual system configurations may be required before the Component becomes operational within Adlib PDF. Please see Manual System Configurations for more information.

Adlib PDF Installation Guide © 2012 Adlib 108
Appendix A: Troubleshooting
This section serves as a guide to help troubleshoot problems that might occur while using Adlib PDF. It provides direction for diagnosing common issues and describes the steps required for resolution.
Common Issues
ISSUE
When attempting to install the Silverlight plug-in in Internet Explorer 8 on Windows Server 2008 R2, Internet Explorer will report the following issue and Silverlight will not be installed:
Figure 106 - Silverlight Plug-In Error, Windows Server 2008 R2
CAUSE
Custom level security options are not enabled.
SOLUTION
In order to enable the Silverlight plug-in download, various Custom Level security options must be specified in Windows IE.
To Set Custom Level Security Settings to Enable the Silverlight Plug-In:1. Open the Internet Explorer browser.
2. Select Tools/Internet Options and click the Security tab.
3. Select the Internet Zone icon and click Custom Level...
If the Custom Level button is not available, the Internet Explorer Enhanced Security Configuration (IE ESC) is enabled for Administrators, and therefore the “Custom Level...” option will be disabled. In order to access the “Custom Level..” option, the IE ESC must be temporarily disabled.
To temporarily disable IE ESC, perform the following steps:

Adlib PDF Installation Guide © 2012 Adlib 109
1)On the Start menu, select Control Panel/Administrative Tools/Server Manager.
2)Under the Server Summary category, expand Security Information.
3)Click Configure IE ESC.
4)Disable IE ESC for Administrators and click OK.
5)Return to Step 1.
4. Under the Downloads category, enable the option File download.
5. Under the Miscellaneous category, enable the option Prompt (recommended) for the Launching applications and unsafe files option.
6. Under the Miscellaneous category, enable the option Prompt (recommended) for the Launching programs and files in an IFRAME option.
7. Click OK.
8. Close the Internet Options window.
9. Close the Internet Explorer browser.
10. Reopen the Internet Explorer browser and navigate to the original website and the Silverlight Plug-In will now install.
11. If the IE ESC for Administrators had to be temporarily disabled, perform the following steps to enable it again:
1)On the Start menu, select Control Panel/Administrative Tools/Server Manager.
2)Under the Server Summary category, expand Security Information.
3)Click Configure IE ESC.
4)Enable IE ESC for Administrators and click OK.

Adlib PDF Installation Guide © 2012 Adlib 110
Appendix B: Software Product Activation FAQ
What is Activation?Software activation is an interactive representation of Adlib's license agreement for our valued customers. Activation protects the intellectual property and innovation delivered within Adlib’s products.
Adlib is committed to preventing unauthorized use of its software using methods designed to have minimal impact on licensed users. When a customer installs an Adlib product that requires activation, the software will automatically attempt to activate via a connection to the Internet. The license information will be sent to Adlib and it will be verified without any action by the customer. For installations without an active internet connection there is a convenient 'offline' method for activating Adlib software products.
The activation process does not transmit any personally identifiable information, except to the extent that IP addresses may be considered personally identifiable in some locations, nor does it limit licensed users' ability to use the software the way they always have under the Adlib End-User License Agreement.
How Does Activation Work?A unique Activation ID is issued to the end-user, which corresponds to license rights stored on the Adlib License Server. The Adlib License Manager application (included with the software installation) is used in conjunction with the Activation ID to transfer those license rights to the end-user machine; this is referred to as "activating" the license, and is only required to be performed once. Adlib License Manager also supports other license lifecycle transactions, such as transferring ("rehosting") a license from one end-user machine to another, upgrading a license, and activating additional licenses.
Why is Activation Necessary?To ensure that the software is used in compliance with the product license, in terms of:
1. Concurrent Installations
2. Feature Set
3. Expiry Date
4. Support/Upgrade Policies
How can I Activate my Product License?In the Adlib License Manager (Start/Programs/Adlib), select Activate License. You can choose one of two activation methods:
1. Online (automatic via Internet)
This method requests an Activation ID and contacts the Adlib License Server directly via the Internet, activating the license automatically without further user interaction. Please note that your network must permit communication through port 80 for this activation method to succeed.

Adlib PDF Installation Guide © 2012 Adlib 111
2. Offline (manual via proxy)
This method requests an Activation ID and generates an XML file that contains the activation request. The request file must be submitted to Adlib for processing, either through the Adlib self-serve web page (http://www.adlibsoftware.com/AdlibLicenseServices), or by email attachment to [email protected]. An XML file will be returned that contains the activation response, which must be input into the Adlib License Manager to complete the activation.
What about Evaluation Licenses?The standard 30-day evaluation license is embedded within the Adlib License Manager, and therefore does not require an Activation ID or communication with the Adlib License Server. However, you must still activate this license through the "Activate Evaluation" option when you are ready to begin your evaluation period.
Can I Extend my Evaluation Period?Yes. If you require additional time to evaluate the product, please contact your Adlib representative. Evaluation extensions require an Activation ID and must be activated against the Adlib License Server in the same manner as full product licenses.
Is an Internet Connection Required for Activation?No. If the machine requiring the activation does not have Internet access, you can use any other Internet enabled machine as a manual proxy. If this is still not feasible, you can send an offline activation request by regular mail on any portable file storage medium.
How Often will the Software Contact the Adlib License Server?The Adlib License Server is only contacted by the Adlib License Manager during user-initiated license transactions (activations, rehosts and returns). There is no "background" communication with the Adlib License Server. The only exception to this rule is for silent installations, where the installer can be configured to automatically perform an activation.
Does Activation Transmit any Personal Information from my Machine?No. A unique machine ID is generated and transmitted to the Adlib License Server when activating, for the purpose of ensuring the uniqueness of each activation. This machine ID acts as a cumulative hardware "signature" and does not include details about the specific make or model of individual hardware components.
Why do Offline Activations Sometimes Require More than Two Steps?If an end-user machine has never performed an activation, its license storage must be initialized by the Adlib License Server before any activations can occur. Initialization is a distinct step that cannot be combined with the activation itself. Because the Adlib License Server cannot know whether an end-user machine requires initialization until it receives an activation request, such a request may result in an initialization rather than activation. For online activations, this process is transparent to the end-user since Adlib License Manager will automatically submit a new activation request in the event of an initialization response. For offline activations, however, an initialization response will require the user to manually submit a new activation request.

Adlib PDF Installation Guide © 2012 Adlib 112
Can I Activate using my old Customer Number/Serial Number?No. Please contact your Adlib representative to obtain an Activation ID.
Can I Transfer my License to a Different Machine after Activation?Yes. Select the "Rehost" option in Adlib License Manager to temporarily return your license to the Adlib License Server. The license is now available to be activated on a different machine.
Will I Lose my License if I Format my Hard Drive after Activation? No. Simply re-install the software and activate using your original Activation ID. Please note that if you are also making significant hardware changes to the machine, it is recommended that you rehost your license first to ensure that it can be re-activated on the new hardware configuration.
Will Activation Work in a Virtual Machine Environment?Yes. Please note that each virtual machine will require its own unique activation. If you plan on virtualizing an existing installation, please be sure to rehost any existing licenses first, so that they can be successfully activated when running the new virtual machine.
How will this Impact my Disaster Recovery Plan (DRP)?The following DRP activities will invalidate an activated license:
1. Restoring a system backup to a different machine.
2. Virtualizing a machine.
3. Moving the boot hard drive to a different machine.
Always be sure to rehost your license before moving to a new machine. If your original machine is unrecoverable and you are unable to perform the rehost, please contact your Adlib representative to obtain a new Activation ID.
Who do I Contact if I have Questions or Concerns?Your Adlib representative (+1.905.631.2875), or send an email to [email protected].
Adlib PDF Installation Guide © 2012 Adlib 113
Appendix C: Adlib CAD Viewer Licensing FAQ
The Adlib CAD Viewer can be licensed for Adlib PDF and provides the facility to convert many different CAD file types. For a full list of supported CAD file types, please refer to the Adlib PDF User Guide. In order to Activate an Adlib CAD Viewer license, the following instructions must be followed to ensure it will be properly registered:
1. Apply the Activation ID provided by Adlib which contains the Adlib CAD Viewer option. (This will remove the Adlib CAD Viewer evaluation watermark but will still enforce a 1,000 CAD page conversion limit.)
2. Send Adlib the computer name that the Transformation Engine and Adlib CAD Viewer will be installed on. (Right click on "My Computer", Select Properties, Computer Name. The first part of "Full computer name" is what Adlib requires.) If the Computer Name is larger than 25 characters, the Adlib CAD Viewer will need to be tied to a system based IP address instead of the Computer Name.
3. Save the file IGCKey.lic provided by Adlib to the folder where the Transformation Engine is installed to (e.g. C:\Program Files (x86)\Adlib\Engine\ECAD). Please overwrite the evaluation license file (IGCKey.lic) in this location.
4. The Adlib CAD Viewer can be evaluated but has a conversion limitation of 1,000 CAD pages. This evaluation limitation is not related to the regular Adlib PDF 30-day trial expiration. Once 1,000 CAD pages have been rendered through the Adlib CAD Viewer component, the trial for this module will expire. To Rehost Adlib PDF activation (including an Adlib CAD Viewer license) to another system, please Contact Adlib.
Adlib PDF Installation Guide © 2012 Adlib 114
Appendix D: Contact Adlib
Web Site www.adlibsoftware.com/
Sales [email protected]
Support [email protected]
Phone 1-905-631-2875 or
1-866-991-1704 (North America)
Fax 1-905-639-3540
Mail Adlib
215-3228 South Service Road
Burlington, Ontario
Canada L7N 3H8

Adlib PDF Installation Guide © 2012 Adlib 115
Appendix E: Index
AActivate License
Offline . . . . . . . . . . . . . . . . . . . . . . . . . . . . . 70Online . . . . . . . . . . . . . . . . . . . . . . . . . . . . . 65
Activation Response File, offline . . . . . . . . . . 73Adlib License Manager . . . . . . . . . . . . . . . . . . 61Adlib license server . . . . . . . . . . . . . . . . . . . . 61
CComplete Uninstallation . . . . . . . . . . . . . . . . 101Contact Adlib . . . . . . . . . . . . . . . . . . . . . . . . 114Create a local Job Folder . . . . . . . . . . . . . 24, 44Custom Installation . . . . . . . . . . . . . . . . . . . . . 17
Manual System Configurations . . . . . . . . . . 47Customer Information window . . . . . . . . . 16, 29Customer Number/Serial Number . . . . . . . . 112
DDatabase Name . . . . . . . . . . . . . . . . . . . . 21, 34Database Scripts . . . . . . . . . . . . . . . . . . . 17, 31Database Settings
Database Name . . . . . . . . . . . . . . . . . . . . . 21Oracle Net Service Name . . . . . . . . . . . . . . 34Server Name . . . . . . . . . . . . . . . . . . . . . . . . 21Username/Password . . . . . . . . . . . . . . 21, 34
Database tablespace/schema . . . . . . . . . 14, 27Disaster Recovery Plan . . . . . . . . . . . . . . . . 112Disk space required/available . . . . . . . . . . . . . 17
EEvaluation License . . . . . . . . . . . . . . . . . . . . . 62
FFile Repository UNC Path . . . . . . . . . . . . 24, 44File Repository Web Server Path . . . . . . . 24, 44Folder Connector . . . . . . . . . . . . . . . . . . . . . . 18
IIIS Authentication Settings
Account/Password . . . . . . . . . . . . . . . 24, 44Install a New Component . . . . . . . . . . . . . . . 105Installation Instructions
Adlib PDF . . . . . . . . . . . . . . . . . . . . . . . . . . 14Adlib PDF for Oracle . . . . . . . . . . . . . . . . . . 27
InstallShield Wizard Complete window 26, 36, 46
LLicense Agreement window . . . . . . . . . . . 15, 28License Manager . . . . . . . . . . . . . . . . . . . . . . 61License Types . . . . . . . . . . . . . . . . . . . . . . . . 61local administrator rights . . . . . . . 14, 23, 27, 43
MManagement Console Login Settings
window . . . . . . . . . . . . . . . . . . . . . 19, 32, 40Manual System Configurations . . . . . . . . . . . 47Modification of Installation . . . . . . . . . . . . . . 102
OOffline
Activation Request File . . . . . . . . . . . . . . . . 71Activation Response File . . . . . . . . . . . . . . 73Rehost Request File . . . . . . . . . . . . . . . . . . 84Rehost Response File . . . . . . . . . . . . . . . . 86Return Request File . . . . . . . . . . . . . . . . . . 96Return Response File . . . . . . . . . . . . . . . . . 98
Oracle Database Scripts . . . . . . . . . . . . . . . . 27Oracle Installation Instructions . . . . . . . . . . . . 27
PPort Number . . . . . . . . . . . . . . . . . . . . . . . 24, 44Process Manager . . . . . . . . . . . . . . . . . . . . . . 61
System Requirements . . . . . . . . . . . . . . . . . 8
RRehost License
Offline . . . . . . . . . . . . . . . . . . . . . . . . . . . . . 82Online . . . . . . . . . . . . . . . . . . . . . . . . . . . . . 77
Rehost Request File, offline . . . . . . . . . . . . . . 84Rehost Response File . . . . . . . . . . . . . . . . . . 85Return License
Offline . . . . . . . . . . . . . . . . . . . . . . . . . . . . . 94Online . . . . . . . . . . . . . . . . . . . . . . . . . . . . . 89
Return Request File, offline . . . . . . . . . . . . . . 96Return Response File, offline . . . . . . . . . . . . . 97Root Adlib Work Folder . . . . . . . . . . . . . . 22, 42
SServer Name . . . . . . . . . . . . . . . . . . . . . . . . . 21Services . . . . . . . . . . . . . . . . . . . . . . . . . . . . . 17
System Requirements . . . . . . . . . . . . . . . . . 9Services Settings

Adlib PDF Installation Guide © 2012 Adlib 116
Create a local Job Folder/Use Existing Job Folder . . . . . . . . . . . 24, 44
IIS Authentication Settings Account/Password . . . . . . . . . . . . 24, 44
Port Number . . . . . . . . . . . . . . . . . . . . . 24, 44Setup Type window . . . . . . . . . . . . . . . . . 17, 30Start Copying Files window . . . . . . . . . . . 25, 45System Manager . . . . . . . . . . . . . . . . . . . . . . 18
System Requirements . . . . . . . . . . . . . . . . 11System Requirements
Process Manager . . . . . . . . . . . . . . . . . . . . . 8Services . . . . . . . . . . . . . . . . . . . . . . . . . . . . 9System Manager . . . . . . . . . . . . . . . . . . . . . 11Transformation Engine . . . . . . . . . . . . . . . . 11
TTerminal Services . . . . . . . . . . . . . . . . . . . 14, 27Transformation Engine . . . . . . . . . . . . . . . . . . 18
Stopped for License Activation . . . . . . . . . . 61System Requirements . . . . . . . . . . . . . . . . 11
UUninstallation . . . . . . . . . . . . . . . . . . . . . . . . 101Use Existing Job Folder . . . . . . . . . . . . . . 24, 44User Account Control security settings . . . 23, 43
VView Existing Licenses . . . . . . . . . . . . . . . . . . 79
Wwatermark . . . . . . . . . . . . . . . . . . . . . . . . . . . . 62Windows Credentials
Account/Password . . . . . . . . . . . . . . . . 23, 43