adaptec storage manager v4 - user's...
TRANSCRIPT

r
User’s GuideAdaptec
Storage Manage

● 2
Copyright
©2005 Adaptec, Inc. All rights reserved. No part of this publication may be reproduced, stored in a retrieval system, or transmitted in any form or by any means, electronic, mechanical, photocopying, recording or otherwise, without the prior written consent of Adaptec, Inc., 691 South Milpitas Blvd., Milpitas, CA 95035.
Trademarks
Adaptec, Storage Manager, and the Adaptec logo are trademarks of Adaptec, Inc., which may be registered in some jurisdictions.
Microsoft and Windows are trademarks of Microsoft Corporation in the US and other countries, used under license.
Red Hat is a trademark of Red Hat, Inc. in the US and other countries, used under license.
Novell and NetWare are trademarks of Novell, Inc. in the US and other countries, used under license.
All other trademarks are the property of their respective owners.
Changes
The material in this document is for information only and is subject to change without notice. While reasonable efforts have been made in the preparation of this document to assure its accuracy, Adaptec, Inc. assumes no liability resulting from errors or omissions in this document, or from the use of the information contained herein.
Adaptec reserves the right to make changes in the product design without reservation and without notification to its users.
Disclaimer
IF THIS PRODUCT DIRECTS YOU TO COPY MATERIALS, YOU MUST HAVE PERMISSION FROM THE COPYRIGHT OWNER OF THE MATERIALS TO AVOID VIOLATING THE LAW WHICH COULD RESULT IN DAMAGES OR OTHER REMEDIES.

● 3
Adaptec Customer Support
If you have questions about installing or using your Adaptec product, check this document first—you will find answers to most of your questions. If you need further assistance, use the support options listed below. To expedite your service, have your computer in front of you.
Technical Support Identification (TSID) Number
● Before contacting Technical Support, you need your unique 12-digit TSID number. The TSID number identifies your product and support status.
● The TSID number is included on a white, bar-coded label, like this example:
● Affix a copy of the TSID label to the CD jacket so that you don’t lose it.
North America
● Visit our Web site at www.adaptec.com.
● Search the Adaptec Support Knowledgebase (ASK) at ask.adaptec.com for articles, troubleshooting tips, and frequently asked questions for your product.
● For information about Adaptec’s support options, call +1 408-957-2550, 24 hours per day, 7 days per week. To speak with a Technical Support Specialist,
● For Hardware products call +1 408-934-7274, Monday to Friday, 3:00 A.M. to 5:00 P.M., Pacific Time.
● For RAID and Fibre Channel products call +1 321-207-2000,Monday to Friday, 3:00 A.M. to 5:00 P.M., Pacific Time.
● For support via e-mail, submit your question at ask.adaptec.com.
● You can order Adaptec products, including accessories and cables, by calling +1 408-957-7274. Or, you can order cables online at www.adaptec.com/buy-cables.
Europe
● Visit our Web site at www.adaptec-europe.com.
● German: Call +49 89 43 66 55 22, Monday to Friday, 9:00 to 17:00, CET. For support via e-mail, submit your question at ask-de.adaptec.com.
● French: Call +49 89 43 66 55 33, Monday to Friday, 9:00 to 17:00, CET. For support via e-mail, submit your question at ask-fr.adaptec.com.
● English: Call +49 89 43 66 55 44, Monday to Friday, 9:00 to 17:00, GMT. For support via e-mail, submit your question at ask.adaptec.com.
● You can order Adaptec cables online at www.adaptec.com/buy-cables.
Japan
● Visit our Web site at www.adaptec.co.jp.
● Call +81 3 5308 6120, Monday–Friday, 9:00 A.M. to 12:00 P.M and 1:00 P.M. to 6:00 P.M.

● 4
Software License Agreement
PLEASE READ CAREFULLY: THE USE OF THIS SOFTWARE IS SUBJECT TO THE SOFTWARE LICENSE TERMS OF ADAPTEC, INC. AND OTHER LICENSORS WHOSE SOFTWARE MAY BE BUNDLED WITH THIS PRODUCT.
BY YOUR USE OF THE SOFTWARE INCLUDED WITH THIS PRODUCT YOU AGREE TO THE LICENSE TERMS REQUIRED BY THE LICENSOR OF THAT SOFTWARE, AS SET FORTH DURING THE INSTALLATION PROCESS. IF YOU DO NOT AGREE TO THE LICENSE TERMS APPLICABLE TO THE SOFTWARE, YOU MAY RETURN THE ENTIRE UNUSED PRODUCT FOR A FULL REFUND.
In return for acquiring a license to use the Adaptec software (“Software”) and the related documentation, you agree to the following terms and conditions:
1. License. This Agreement grants you, the Licensee, a license to:
● Use the Software on a single computer system or on multiple workstations, systems and servers which incorporate an Adaptec RAID controller and may be accessed by multiple users from multiple locations. You may make as many installations of the Software as needed, but must restrict such installation only to systems, workstations or servers using an Adaptec RAID controller.
● Make one copy of the Software in machine readable form solely for back-up purposes provided you reproduce Adaptec’s copyright notice and any proprietary legends.
2. Restrictions. You may not distribute copies of the Software to others. You may not post or otherwise make available the Software, or any portion thereof, in any form, on the Internet. You may not use the Software in a computer service business, including in time sharing applications. The Software contains trade secrets and, in order to protect them, you may not decompile, reverse engineer, disassemble, or otherwise reduce the Software to a human-perceivable form. YOU MAY NOT MODIFY, ADAPT, TRANSLATE, RENT, LEASE, LOAN, RESELL FOR PROFIT, DISTRIBUTE, NETWORK OR CREATE DERIVATIVE WORKS BASED UPON THE SOFTWARE OR ANY PART THEREOF.
3. Ownership of Software. As Licensee, you own the media upon which the software is recorded or fixed, but Adaptec and its licensors retain title and ownership of the Software recorded on the original media and all subsequent copies of the Software, regardless of the form or media in which or on which the original and other copies may exist. This license is not a sale of the Software or any copy.
4. Confidentiality. You agree to maintain the Software in confidence and that you will not disclose the Software to any third party without the express written consent of Adaptec. You further agree to take all reasonable precautions to preclude access of unauthorized persons to the Software.
5. Term. This license is effective until January 1, 2045, unless terminated earlier. You may terminate the license at any time by destroying the Software (including the related documentation) together with all copies or modifications in any form. Adaptec will have the right to terminate our license immediately if you fail to comply with any term or condition of this Agreement. Upon any termination, including termination by you, you must destroy the Software (including the related documentation), together with all copies or modifications in any form.

● 5
6. Special Terms Applicable to Databases. Where a database is included with the Software, you acknowledge that it is licensed only in connection with the use of the Software to perform disc creation, and that the database and all data derived therefrom must be maintained in confidence in accordance with the provisions of Section 4. This license does not grant you any rights to distribute or disclose such database or data.
7. Limited Warranty. Adaptec and its Licensor warrant only that the media upon which the Software is furnished will be free from defects in material or workmanship under normal use and service for a period of thirty (30) days from the date of delivery to you. ADAPTEC AND ITS LICENSORS DO NOT AND CANNOT WARRANT THE PERFORMANCE OR RESULTS YOU MAY OBTAIN BY USING THE SOFTWARE OR DOCUMENTATION. THE FOREGOING STATES THE SOLE AND EXCLUSIVE REMEDIES ADAPTEC AND ITS LICENSORS WILL PROVIDE FOR BREACH OF WARRANTY. EXCEPT FOR THE FOREGOING LIMITED WARRANTY, ADAPTEC AND ITS LICENSORS MAKE NO WARRANTIES, EXPRESSED OR IMPLIED, INCLUDING, BUT NOT LIMITED, AS TO NON-INFRINGEMENT OF THIRD PARTY RIGHTS, MERCHANTABILITY OR FITNESS FOR A PARTICULAR PURPOSE. Some states do not allow the exclusion of implied warranties or limitations on how long an implied warranty may last, so the above limitations may not apply to you. This warranty gives you specific legal rights and you may also have other rights which vary from state to state.
8. The entire liability of Adaptec and its licensors, and your exclusive remedy for a breach of this warranty, shall be:
● The replacement of any media not meeting the above limited warranty which is returned to Adaptec; or:
● If Adaptec or its distributor is unable to deliver replacement media which is free from defects in materials or workmanship, you may terminate this Agreement by returning the Software and your money will be refunded.
9. Limitation of Liability. IN NO EVENT WILL ADAPTEC OR ITS LICENSORS BE LIABLE TO YOU FOR ANY INCIDENTAL, CONSEQUENTIAL OR INDIRECT DAMAGES, INCLUDING ANY LOST PROFITS, LOST SAVINGS, OR LOSS OF DATA, EVEN IF ADAPTEC OR A LICENSOR HAS BEEN ADVISED OF THE POSSIBILITY OF SUCH DAMAGES, OR FOR ANY CLAIM BY ANY OTHER PARTY. Some states do not allow the exclusion or limitation of special, incidental, or consequential damages, so the above limitation or exclusion may not apply to you.
10. Export. You acknowledge that the laws and regulations of the United States and other countries may restrict the export and re-export of the Software. You agree that you will not export or re-export the Software or documentation in any form in violation of applicable United States and foreign law.
11. Government Restricted Rights. The Software is subject to restricted rights as follows. If the Software is acquired under the terms of a GSA contract: use, reproduction or disclosure is subject to the restrictions set forth in the applicable ADP Schedule contract. If the Software is acquired under the terms of a DoD or

● 6
civilian agency contract, use, duplication or disclosure by the Government is subject to the restrictions of this Agreement in accordance with i C.F.R. 12.212 of the Federal Acquisition Regulations and its successors and 49 C.F.R. 227.7202-1 of the DoD FAR Supplement and its successors.
12. General. You acknowledge that you have read this Agreement, understand it, and that by using the Software you agree to be bound by its terms and conditions. You further agree that it is the complete and exclusive statement of the agreement between Adaptec and you, and supersedes any proposal or prior agreement, oral or written, and any other communication between Adaptec and you relating to the subject matter of this Agreement. No additional or any different terms will be enforceable against Adaptec unless Adaptec gives its express consent, including an express waiver of the terms of this Agreement, in writing signed by an officer of Adaptec. You assume full responsibility for the use of the Software and agree to use the Software legally and responsibly. This Agreement shall be governed by California law, except as to copyright matters, which are covered by Federal law. This Agreement is deemed entered into at Milpitas, California by both parties. Should any provision of this Agreement be declared unenforceable in any jurisdiction, then such provision shall be deemed severable from this Agreement and shall not affect the remainder hereof. All rights in the Software not specifically granted in this Agreement are reserved by Adaptec.
Should you have any questions concerning this Agreement, you may contact Adaptec by writing to:
Adaptec, Inc.Legal Department691 South Milpitas BoulevardMilpitas, California 95035.

Contents
1 About This GuideTerminology Used in this Guide...................................................15
2 Introduction to Adaptec Storage ManagerAbout Adaptec Storage Manager ..................................................17About the Adaptec Storage Manager Agent .................................17System Requirements ....................................................................18Growing Your Storage Space with Adaptec Storage Manager ....19
A Simple Storage Space ..........................................................19An Advanced Storage Space ...................................................19Continuing to Grow Your Storage Space ..............................20
Adding Enhanced Features ...........................................................21Unlocking the Enhanced Features .........................................22
Getting Started Checklist...............................................................23
3 Step 1: Installing Adaptec Storage ManagerInstalling on Windows ..................................................................25
Before You Begin ....................................................................25Installing Adaptec Storage Manager ......................................25Completing a Silent Installation (Advanced)........................26
Installing on Linux.........................................................................28Before You Begin ....................................................................28Installing Adaptec Storage Manager ......................................28

Contents ● 8
Installing on NetWare ...................................................................29Before You Begin ....................................................................29Installing Adaptec Storage Manager ......................................29
4 Step 2: Starting Adaptec Storage ManagerStarting Adaptec Storage Manager on Windows .........................31Starting Adaptec Storage Manager on Linux ...............................32Starting Adaptec Storage Manager on NetWare..........................32Starting the Adaptec Storage Manager Agent Only .....................33
Starting the Agent on Windows.............................................33Starting the Agent on Linux ...................................................34Starting the Agent on NetWare..............................................34
Understanding Permission Levels ................................................35Administrator Level ................................................................35User Level ................................................................................36Guest Level ..............................................................................36Configuring NetWare User Authentication..........................37
Logging Out of Adaptec Storage Manager ...................................38Logging Back In ......................................................................38
5 Step 3: Exploring Adaptec Storage ManagerNavigating the Main Window.......................................................40Using Enterprise View...................................................................40Using Physical Devices View.........................................................41Using Logical Devices View ..........................................................42Revealing More Disk Drive Information .....................................43Checking System Status.................................................................45Working in Adaptec Storage Manager .........................................46
About the Actions Menu ........................................................46Getting Help...................................................................................46
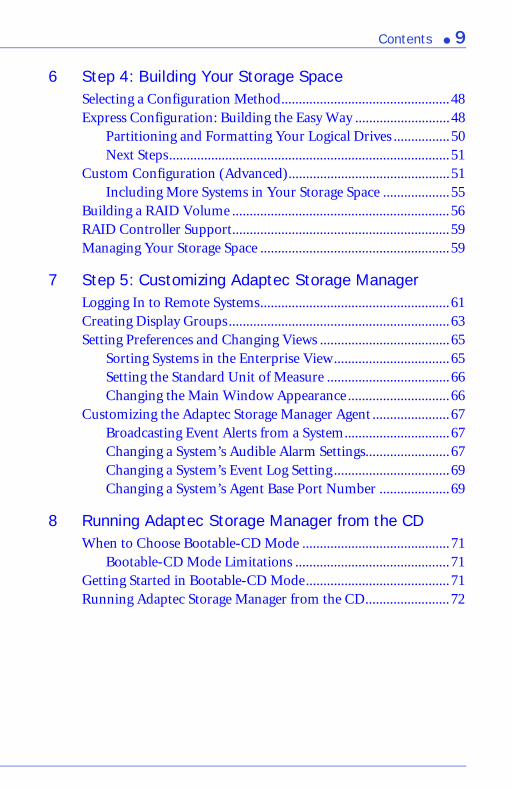
Contents ● 9
6 Step 4: Building Your Storage SpaceSelecting a Configuration Method................................................48Express Configuration: Building the Easy Way ...........................48
Partitioning and Formatting Your Logical Drives ................50Next Steps................................................................................51
Custom Configuration (Advanced)..............................................51Including More Systems in Your Storage Space ...................55
Building a RAID Volume ..............................................................56RAID Controller Support..............................................................59Managing Your Storage Space ......................................................59
7 Step 5: Customizing Adaptec Storage ManagerLogging In to Remote Systems......................................................61Creating Display Groups...............................................................63Setting Preferences and Changing Views .....................................65
Sorting Systems in the Enterprise View.................................65Setting the Standard Unit of Measure ...................................66Changing the Main Window Appearance .............................66
Customizing the Adaptec Storage Manager Agent ......................67Broadcasting Event Alerts from a System..............................67Changing a System’s Audible Alarm Settings........................67Changing a System’s Event Log Setting .................................69Changing a System’s Agent Base Port Number ....................69
8 Running Adaptec Storage Manager from the CDWhen to Choose Bootable-CD Mode ..........................................71
Bootable-CD Mode Limitations ............................................71Getting Started in Bootable-CD Mode.........................................71Running Adaptec Storage Manager from the CD........................72

Contents ● 10
9 Managing Logical Drives and Hot SparesUnderstanding Logical Drives ......................................................74Creating Logical Drives .................................................................75
Setting the Size of a Logical Drive..........................................75Including Different-sized Disk Drives in a Logical Drive.....76Creating a Logical Drive Using Available Space....................77
Fine-tuning Logical Drives............................................................78Changing the Write Cache Setting.........................................79Changing the Stripe Size.........................................................79Changing the Read Cache Setting..........................................80Changing the Initialize Method .............................................80Changing the Initialize Priority..............................................81
Verifying Logical Drives ................................................................81Verifying and Fixing a Logical Drive .....................................82Verifying a Logical Drive (Without Fix) ...............................83Enabling/Disabling Background Consistency Check ...........84
Increasing the Capacity of a Logical Drive ...................................84Extending a Partition on a Logical Drive ..............................87
Changing the RAID Level of a Logical Drive ...............................87Deleting a Logical Drive ................................................................89Working with Hot Spares..............................................................90
Hot Spare Limitations ............................................................90Dedicated Spare or Global Spare? ..........................................90Designating a Global Hot Spare.............................................91Assigning a Dedicated Hot Spare...........................................92What Do the Hot Spare Icons Mean? ....................................93Removing a Hot Spare............................................................93
10 Protecting Your DataCreating a Snapshot.......................................................................96
Snapshot Limitations..............................................................96Creating a Snapshot with Backup ..........................................97Creating a Snapshot Without Backup ...................................97Deleting a Snapshot ................................................................97
Enabling Copyback........................................................................98

Contents ● 11
11 Monitoring Your Storage SpaceMonitoring Options ....................................................................100Checking Activity in Your Storage Space ...................................101
Viewing the Full List of Events.............................................101Clearing the Event Log .........................................................102
What Do the Status Icons Mean?................................................102Using Event Notifications to Monitor Status.............................103
Setting up Event Notifications .............................................103Managing the Event Notification List..................................107Monitoring and Managing the Notification Log ................109Disabling Event Notifications ..............................................111Setting Up Email Notifications ............................................111Managing the Email List.......................................................115Monitoring and Managing the Email Log...........................116Changing the Email Notification Manager Settings ...........118Disabling Email Notifications ..............................................119
Broadcasting Event Alerts to Users.............................................120Silencing and Testing the Audible Alarm...................................121
Testing the Alarm .................................................................121Silencing the Alarm...............................................................122Disabling a Controller’s Alarm ............................................122
Viewing Component Properties .................................................122
12 Managing TasksScheduling a Task ........................................................................124Opening the Task Manager.........................................................126Monitoring Tasks ........................................................................127
Monitoring Upcoming Tasks in the Task List ....................127Checking Past Tasks and Events in the Event Log ..............127
Modifying a Task .........................................................................129What if a task misses its start time?......................................130
Deleting a Task.............................................................................130Disabling the Task Manager........................................................131
Re-enabling the Task Manager ............................................131

Contents ● 12
13 Managing Remote SystemsIntroduction.................................................................................133Removing a Remote System........................................................133
14 Working with Display GroupsAdding a System to a Display Group..........................................135Viewing Display Group Status ....................................................136Removing a System from a Display Group ................................136Moving a System from One Display Group to Another............137Renaming a Display Group.........................................................137Deleting a Display Group............................................................138
15 Managing Controllers and Disk DrivesRescanning a Controller..............................................................140Registering New Controllers .......................................................140Viewing Controller Properties ....................................................141Saving Your Controller Configuration.......................................141Updating Controller BIOS and Firmware..................................142
Before You Begin ..................................................................142Updating the Controller BIOS and Firmware.....................142
Setting a Disk Drive to ‘Failed’....................................................144Replacing Disk Drives in a Logical Drive ...................................145
16 Solving ProblemsIdentifying a Failed or Failing Component................................147Recovering from a Disk Drive Failure ........................................147
Failed Disk Drive Protected by a Hot Spare ........................148Failed Disk Drive Not Protected by a Hot Spare .................149Failure in Multiple Logical Drives Simultaneously.............149Disk Drive Failure in a RAID 0 Logical Drive .....................149Multiple Failures in the Same Logical Drive .......................150Removing a Failed Disk Drive’s Icon...................................150
Rebuilding Logical Drives ...........................................................151Solving Notification Problems....................................................151Creating an Archive File ..............................................................152Troubleshooting Adaptec Storage Manager...............................152

Contents ● 13
A Configuring SNMP SupportConfiguring SNMP Support on Windows.................................154Configuring SNMP Support on Linux .......................................155Configuring SNMP Support on NetWare..................................155
B Quick Answers to Common Questions...How do I...? ..................................................................................157
Set up my storage space?.......................................................157Open the Configuration wizard?..........................................157Turn off the alarm? ...............................................................157Add a new user to Adaptec Storage Manager? ....................157Add a remote system? ...........................................................157Prevent a user from changing my storage space? ................157Check disk drive or logical drive status? ..............................157Access a feature with a padlock icon beside it?....................157Log out of Adaptec Storage Manager? .................................157Schedule a task?.....................................................................158Find the Task Manager?........................................................158Find the Notification Manager? ...........................................158Find the Email Notification Manager? ................................158
What’s the difference between...?................................................159Adaptec Storage Manager and the agent?............................159Event notifications, email notifications, and event alerts? .159
C Buttons and Icons At-a-GlanceIcons in the Physical Devices View .............................................161Icons in the Logical Devices View...............................................161Buttons in the Physical/Logical Devices Views ..........................162Buttons on the Main Window Tool Bar.....................................162

Contents ● 14
D Understanding RAIDUnderstanding Drive Segments ..................................................164RAID 0 (Non-RAID Logical Drives) ..........................................164RAID 1 Logical Drives .................................................................165RAID 1 Enhanced Logical Drives ...............................................166RAID 10 Logical Drives ...............................................................167RAID 5 Logical Drives .................................................................168RAID 5EE Logical Drives ............................................................169RAID 50 Logical Drives ...............................................................170RAID 6 Logical Drives .................................................................171RAID 60 Logical Drives ...............................................................172Selecting the Best RAID Level .....................................................173
Glossary
Index

1About This Guide
This User’s Guide explains how to install and use Adaptec® Storage Manager to build a storage space and manage your stored data, whether you have a single RAID controller installed in a server or a complex Storage Area Network (SAN) with multiple RAID controllers and servers.
This Guide is written for advanced computer users who want to create a storage space for their data. Advanced knowledge of storage networks is not required, but you should be familiar with computer hardware, data storage, and Redundant Array of Independent Disks (RAID) technology.
If you are using Adaptec Storage Manager as part of a complex storage system, such as a SAN, you should be familiar with network administration terminology and tasks, have knowledge of Local Area Network (LAN) and SAN technology, and be familiar with the input/output (I/O) technology—such as Fibre Channel (FC) or Serial Attached SCSI (SAS)—that you are using on your network.
Note: Because this Guide covers multiple Adaptec RAID products, some of the features and functions described here may not be available for your controller.

Chapter 1: About This Guide ● 15
Terminology Used in this GuideBecause this Guide provides information that can be used to manage multiple Adaptec RAID products in a variety of configurations from DAS to SAN, the generic term “storage space” is used to refer to the controller(s) and disk drives being managed with Adaptec Storage Manager.
For efficiency, the term “components” or “component” is used when referring generically to the physical and virtual parts of your storage space, such as systems, disk drives, controllers, and logical drives.
Many of the terms and concepts referred to in this Guide are known to computer users by multiple names. In this Guide, this terminology is used:
● Controller (also known as adapter, HBA, board, or card)
● Disk drive (also known as hard disk, hard drive, or hard disk drive)
● Logical drive (also known as logical device)
Note: For more information, see Understanding RAID on page 163 and the Glossary on page 174.

2Introduction to Adaptec Storage Manager
In this chapter...
About Adaptec Storage Manager ......................................................17
About the Adaptec Storage Manager Agent .....................................17
System Requirements.........................................................................18
Growing Your Storage Space with Adaptec Storage Manager .........19
Adding Enhanced Features................................................................21
Getting Started Checklist...................................................................23
This chapter describes Adaptec Storage Manager and the Adaptec Storage Manager agent, explains the concept of a “storage space” and provides a checklist of getting-started tasks.

Chapter 2: Introduction to Adaptec Storage Manager ● 17
About Adaptec Storage ManagerAdaptec Storage Manager is a software application that helps you build a storage space for your online data, using Adaptec RAID controllers and disk drives.
With Adaptec Storage Manager, you can group disk drives into logical drives and build in redundancy to protect your data and improve system performance.
You can also use Adaptec Storage Manager to monitor and manage all the controllers and disk drives in your storage space from a single location.
About the Adaptec Storage Manager AgentWhen Adaptec Storage Manager is installed on a computer, the Adaptec Storage Manager agent is also installed automatically. The agent is like a service that keeps your storage space running. It’s designed to run in the background, without user intervention, and its job is to monitor and manage system health, event notifications, tasks schedules, and other on-going processes on that system. It sends notices when tasks are completed successfully, and sounds an alarm when errors or failures occur on that system.
The agent uses less memory than the full application. If your storage space includes systems that won’t be connected to monitors (and therefore won’t require the user interface described in this Guide), you can choose to run the agent only on those systems instead of the full application (see page 33). You may want to do this if system resources are limited, or if you want more system resources available for other tasks.
You can manage and monitor systems running the agent only by logging into them as remote systems (see page 61).
You can also customize the agent settings to suit your storage space requirements (see page 67).

Chapter 2: Introduction to Adaptec Storage Manager ● 18
System Requirements● PC-compatible computer with Intel Pentium, or equivalent,
processor
● At least 128 MB of RAM
● 20 MB of free drive space
● 16-bit SVGA color monitor with a resolution of at least 800 x 600
● CD drive
● One of these operating systems:
● Microsoft® Windows® 2000—Server, Advanced Server, Professional
● Windows 2003 Server—Standard, Advanced
● Windows XP—Home Edition, Professional
● Red Hat® Linux—Professional, Enterprise, Advanced Server
● SuSE Linux—Personal, Professional, Enterprise
Note: For the latest on Adaptec’s support of Linux, or to download driver sources, visit www.adaptec.com.
● Novell®—NetWare® 6.5
Note: Adaptec Storage Manager can also be used before an operating system is installed. See page 70 for more information.
Chapter 2: Introduction to Adaptec Storage Manager ● 19
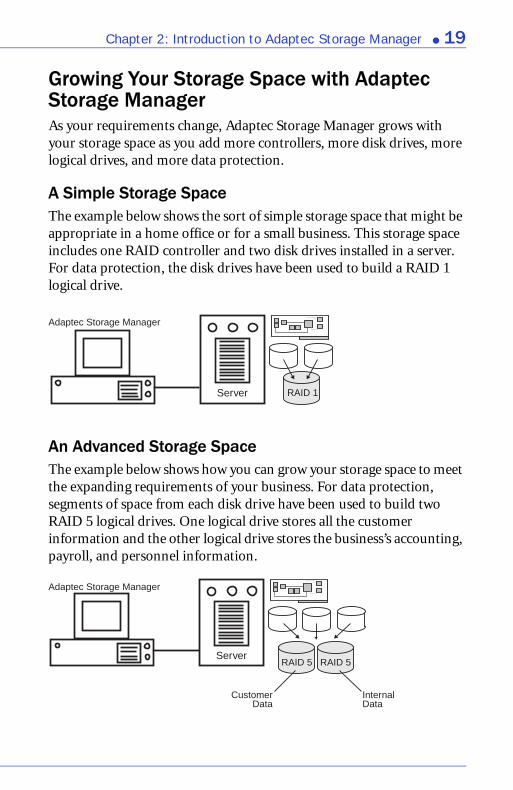
Growing Your Storage Space with Adaptec Storage ManagerAs your requirements change, Adaptec Storage Manager grows with your storage space as you add more controllers, more disk drives, more logical drives, and more data protection.
A Simple Storage SpaceThe example below shows the sort of simple storage space that might be appropriate in a home office or for a small business. This storage space includes one RAID controller and two disk drives installed in a server. For data protection, the disk drives have been used to build a RAID 1 logical drive.
An Advanced Storage SpaceThe example below shows how you can grow your storage space to meet the expanding requirements of your business. For data protection, segments of space from each disk drive have been used to build two RAID 5 logical drives. One logical drive stores all the customer information and the other logical drive stores the business’s accounting, payroll, and personnel information.
Server RAID 1
Adaptec Storage Manager
ServerRAID 5RAID 5
CustomerData
InternalData
Adaptec Storage Manager

Chapter 2: Introduction to Adaptec Storage Manager ● 20
Continuing to Grow Your Storage SpaceAs your needs change, Adaptec Storage Manager will help you grow your storage space to include multiple controllers and disk drives in multiple locations.
The Administrator of the storage space shown in the example below can create and modify logical drives and monitor all the controllers and disk drives in the storage space from a single workstation.
ServerRAID 5RAID 5
Department 2Data
Department 3Data
Server
RAID 50 CustomerData
Server RAID 1
Department 1 Data
Adaptec Storage Manager

Chapter 2: Introduction to Adaptec Storage Manager ● 21
Adding Enhanced FeaturesAs you grow your storage space, you can enhance data protection and improve performance by upgrading your Adaptec controller with extra features, then manage these enhanced features with Adaptec Storage Manager.
Adaptec offers a package of upgrade features that can be activated with a feature key (sold separately). Purchase a feature key to unlock these features:
● Copyback (see page 98)
● Snapshots (see page 96)
● RAID 1E (see page 166)
● RAID 5EE (see page 169)
● RAID 6 (see page 171)
● RAID 60 (see page 172)
Locked features—features which are unavailable without a key— have a padlock icon (shown at right) beside them, as shown in the examples below. If you select a locked feature, you are reminded that a key is required to unlock it.
To purchase a feature key, contact your Adaptec Reseller or refer to the Adaptec Web site at www.adaptec.com.
To unlock the enhanced features with a feature key, see page 22.

Chapter 2: Introduction to Adaptec Storage Manager ● 22
Unlocking the Enhanced FeaturesTo unlock enhanced features with a feature key:
1 In the Enterprise View, right-click the controller you want, then click Add feature key.
The Add Feature Key window opens.
2 Enter the feature key, then click OK.
3 Click OK to confirm.
The enhanced features are unlocked and are now ready for use.

Chapter 2: Introduction to Adaptec Storage Manager ● 23
Getting Started ChecklistThis Guide provides five special Getting Started chapters to help you install, start, and begin to use Adaptec Storage Manager.
❏ Step 1: Install Adaptec Storage Manager on every computer that will be part of your storage space (see page 24).
❏ Step 2: Start Adaptec Storage Manager—or the Adaptec Storage Manager agent only—on every computer in your storage space (see page 30).
❏ Step 3: Explore the features of Adaptec Storage Manager (see page 39).
❏ Step 4: Build your storage space (see page 47).
❏ Step 5: Optional—Customize Adaptec Storage Manager and the Adaptec Storage Manager agent (see page 60).

23
45
1
Getting Started
3Step 1: Installing Adaptec Storage Manager
In this chapter...
Installing on Windows.......................................................................25
Installing on Linux.............................................................................28
Installing on NetWare........................................................................29
Adaptec Storage Manager must be installed on every computer that will be part of your storage space.
To install Adaptec Storage Manager, follow the instructions for your operating system:
Note: You need administrator or root privileges to install Adaptec Storage Manager. For details on verifying privileges, refer to your operating system documentation.
To use Adaptec Storage Manager to configure a RAID controller before you install your operating system, see Running Adaptec Storage Manager from the CD on page 70.

Step 1: Installing Adaptec Storage Manager ● 25
Installing on WindowsThis section describes how to install Adaptec Storage Manager on computers running Windows. See System Requirements on page 18 for a list of supported operating systems.
Note: Advanced users—To perform a silent installation, follow the instructions on page 26.
Before You BeginIf a previous version of Adaptec Storage Manager is installed on your computer, you must remove it before beginning this installation. To uninstall Adaptec Storage Manager, use the Add/Remove Programs option in your Windows Control Panel.
Installing Adaptec Storage Manager1 Insert the Adaptec Storage Manager CD.
The Installation wizard opens automatically. (If it doesn’t open, browse to the CD in Windows Explorer, then click Autorun.)
2 Follow the on-screen instructions to complete the installation.
Do not install SNMP (Simple Network Management Protocol) unless you have a specific requirement for Adaptec Storage Manager to work with SNMP gets and traps. (See page 153 for more information.)
3 Repeat these steps to install Adaptec Storage Manager on every Windows computer that will be part of your storage space.
4 Continue with Starting Adaptec Storage Manager on Windows on page 31.

Step 1: Installing Adaptec Storage Manager ● 26
Completing a Silent Installation (Advanced)A silent installation uses command line parameters to complete an installation without messages or user interaction.
To complete a silent installation:
1 Insert the Adaptec Storage Manager CD into your CD drive.
2 Open a command prompt window and change to the CD directory.
3 Install Adaptec Storage Manager using this command line string: setup.exe /s /v“ /qn <OPTIONS>”
This table describes the command line options. Multiple features can be separated with commas.
Option Required Values
INSTALLDIR Yes \“path to installation directory\”The installation path must be enclosed in escaped quotation marks.For example:INSTALLDIR=\“C:\Program Files\Adaptec\Adaptec Storage Manager\”
ADDLOCAL No ■ All—(Default) Installs all features.
■ Manager—Installs Adaptec Storage Manager.
■ SNMPSupport—Installs SNMP support; requires Manager feature. (See page 153 for more information.)
■ ASMReadme—Installs the Readme file and Start menu shortcut.
■ CLITools—Installs Command Line Interface tools.
Note: Use commas to separate multiple features.
REBOOT No ■ Force—(Default) Forces a reboot at the end of the installation.
■ Suppress—Suppresses a reboot unless files were in use and could not be overwritten during installation.
■ ReallySuppress—Suppresses all reboots at the end of the installation.

Step 1: Installing Adaptec Storage Manager ● 27
Example command strings:
● Install all default features and default to reboot:
setup.exe /s /v“ /qn INSTALLDIR=\“C:\Program Files\Adaptec\Adaptec Storage Manager\””
● Install Adaptec Storage Manager, Readme, and SNMP support, and default to reboot:
setup.exe /s /v“ /qn INSTALLDIR=\”C:\Program Files\Adaptec\Adaptec Storage Manager\“ADDLOCAL=Manager,SNMPSupport,ASMReadme”
4 After a minute or two, the silent installation should be complete and the Adaptec Storage Manager icon should be accessible.

Step 1: Installing Adaptec Storage Manager ● 28
Installing on LinuxThis section describes how to install Adaptec Storage Manager on computers running Linux. See System Requirements on page 18 for a list of supported operating systems.
Adaptec Storage Manager includes the Java Runtime Environment (JRE).
Before You BeginIf a previous version of Adaptec Storage Manager is installed on your computer, you must remove it before beginning this installation. Any customization files you created with the previous version are saved and used in the upgrade.
To remove Adaptec Storage Manager, type the rpm --erase StorMan command.
Installing Adaptec Storage Manager1 Insert the Adaptec Storage Manager CD.
2 Mount the Adaptec Storage Manager CD:
3 Change to the cdrom directory:
4 Extract the RPM package and install it:
rpm --install ./StorMan*.rpm
5 Unmount the Adaptec Storage Manager CD:
6 Repeat these steps to install Adaptec Storage Manager on every Linux computer that will be part of your storage space.
7 Continue with Starting Adaptec Storage Manager on Linux on page 32.
Red Hat mount /dev/cdrom /mnt/cdrom
SuSE mount /dev/cdrom /media/cdrom
Red Hat cd /mnt/cdrom/linux/manager
SuSE cd /media/cdrom/linux/manager
Red Hat umount /mnt/cdrom
SuSE umount /media/cdrom

Step 1: Installing Adaptec Storage Manager ● 29
Installing on NetWareThis section describes how to install Adaptec Storage Manager on computers running NetWare. See System Requirements on page 18 for a list of supported operating systems.
Before You BeginYou need the latest Support Pack for your operating system so you can run the supported Java Virtual Machine (JVM). You need JVM version 1.3 or later. To check your JVM version, load JVM, type JAVA -VERSION.
Note: For the latest updates from Novell, visit www.novell.com.
Installing Adaptec Storage Manager1 Insert the Adaptec Storage Manager CD.
2 From the command prompt, type load cdrom and press Enter.
3 From the command prompt, type:
xx_yy_zz:\netware\manager\install
where xx is the product CD, yy is the version number, and zz is the release number. For example:
adptcd_v2_01
The installation program starts.
4 Follow the on-screen instructions to complete the installation.
5 Repeat these steps to install Adaptec Storage Manager on every NetWare computer that will be part of your storage space.
6 Continue with Starting Adaptec Storage Manager on NetWare on page 32.

23
45
1
Getting Started
4Step 2: Starting Adaptec Storage Manager
In this chapter...
Starting Adaptec Storage Manager on Windows .............................31
Starting Adaptec Storage Manager on Linux ...................................32
Starting Adaptec Storage Manager on NetWare...............................32
Starting the Adaptec Storage Manager Agent Only .........................33
Understanding Permission Levels .....................................................35
Logging Out of Adaptec Storage Manager .......................................38
To start Adaptec Storage Manager, follow the instructions for your operating system. To start the Adaptec Storage Manager agent only, see page 33.
Note: You need root privileges to run Adaptec Storage Manager.
To use Adaptec Storage Manager to configure a RAID controller before you install your operating system, see Running Adaptec Storage Manager from the CD on page 70.

Step 2: Starting Adaptec Storage Manager ● 31
Starting Adaptec Storage Manager on WindowsOn systems running Windows, you can run Adaptec Storage Manager as a stand-alone application (like a regular software application), or in a browser window (such as Microsoft Internet Explorer).
Note: Normally, you only need to run Adaptec Storage Manager in a browser window if you’re working on a computer that isn’t part of your storage space (does not have a controller installed). If the computer you’re working on is part of your storage space, run Adaptec Storage Manager as a standalone application.
1 Click Start > Programs > Adaptec Storage Manager.
The Log In dialog box appears.
2 Enter the user name and password that you use to log on to your system, then click Connect.
Note: Each user name has a permission level associated with it. See Understanding Permission Levels on page 35 for more information.

Step 2: Starting Adaptec Storage Manager ● 32
Starting Adaptec Storage Manager on Linux1 Type the following command to change to the Adaptec Storage
Manager installation directory:
cd /usr/StorMan
2 Type the following command and press Enter:
sh StorMan.sh
3 When the Log In dialog box appears (see page 31), enter the user name and password that you use to log on to your system, then click Connect.
Note: Each user name has a permission level associated with it. See Understanding Permission Levels on page 35 for more information.
Starting Adaptec Storage Manager on NetWareTo start Adaptec Storage Manager on the NetWare operating system, type the LOAD RAIDMAN command.

Step 2: Starting Adaptec Storage Manager ● 33
Starting the Adaptec Storage Manager Agent Only
Note: For more information, see About the Adaptec Storage Manager Agent on page 17.
To start the Adaptec Storage Manager agent only, follow the instructions for your operating system:
● For Windows, see below.
● For Linux, see page 34.
● For NetWare, see page 34.
Starting the Agent on WindowsOn systems running Windows, the Adaptec Storage Manager agent starts automatically when the system is powered on.
To verify that the agent is running:
1 Open the Windows Control Panel.
2 Double-click Administrative Tools, then double-click Services.
3 In the list of services, check that the Adaptec Storage Manager agent is installed and running. If it’s not, you can choose to restart it.
4 Manage and monitor the system by logging into it as a remote system (see page 61).
The Adaptec Storage Manager agent’s default settings are suitable for most storage spaces. To customize the settings for your specific requirements, see page 67.

Step 2: Starting Adaptec Storage Manager ● 34
Starting the Agent on LinuxOn systems running Linux, the Adaptec Storage Manager agent starts automatically when the system is powered on.
To verify that the agent is running:
1 Open a shell window.
2 Enter this command: ps -ef | grep StorAgnt.sh
3 If the agent is running, it’s listed as sh StorAgnt.sh.
4 Manage and monitor the system by logging into it as a remote system (see page 61).
The Adaptec Storage Manager agent’s default settings are suitable for most storage spaces. To customize the settings for your specific requirements, see page 67.
Starting the Agent on NetWareTo start the agent:
1 From the NetWare console, type: LOAD RaidAgnt
2 Press Enter.
3 Manage and monitor the system by logging into it as a remote system (see page 61).
The Adaptec Storage Manager agent’s default settings are suitable for most storage spaces. To customize the settings for your specific requirements, see page 67.

Step 2: Starting Adaptec Storage Manager ● 35
Understanding Permission LevelsWhen you log in to Adaptec Storage Manager, your permission level is identical to your operating system permission level. For example, if you have Administrator permissions on your operating system, you also have Administrator permissions in Adaptec Storage Manager.
Note: NetWare users only—See Configuring NetWare User Authentication on page 37.
This section describes the three different permission levels:
● Administrator (see below)
● User (see page 36)
● Guest (see page 36)
Administrator LevelLogging in as an Administrator allows you full access to manage and modify the controllers, disk drives, and logical drives that are part of your storage space.
To log in as an Administrator:
● Windows—Enter a valid user name and password for the Administrator or Administrative User on the system. (The Administrative User is any member of the local Administrators group, which can, in a Domain configuration, include Domain Administrators.)
● Linux—Enter root for the user name and enter the root password.
● Netware—See page 37.

Step 2: Starting Adaptec Storage Manager ● 36
User LevelLogging in as a User partially restricts your access to the storage space, as described in this Table.
To log in as a User, use your normal network user name and password.
Guest LevelLogging in as a Guest restricts your access to the storage space to “view-only”.
You can see all local and remote systems and view their properties windows, view event logs, save configuration files and support archives, and browse the online Help.
You cannot make any changes to the storage space.
To log in as Guest, click Cancel on the Login window.
Users can... User’s can’t...
Rescan controllers Create logical drives
Save activity logs Modify logical drives
Verify disk drives (with and without fix) Delete logical drives
Verify logical drives (with and without fix) Delete hot spares
Identify disk drives and enclosures Perform data migrations
Rebuild disk drives
Create hot spares
Access the same information as Guests (see below)

Step 2: Starting Adaptec Storage Manager ● 37
Configuring NetWare User AuthenticationThis section describes two ways to configure NetWare user authentication.
Out-of-box Authentication
● Administrative Access—Granted exclusively to the Admin user account, which must be defined within the NetWare Bindery context of the server running the Adaptec Storage Manager agent.
● User Access—Granted to all Bindery and NetWare Directory Services (NDS) user accounts. For NDS users, the user account must reside within the same tree as the server running the Adaptec Storage Manager agent.
When logging into Adaptec Storage Manager, NDS users must provide the fully distinguished account name.
NDS Authentication
NDS authentication is based on NDS group membership.
To set up NDS group membership:
1 Create and populate an NDS group for storage administration.
Note: The group must reside within the same NDS tree as the server running the Adaptec Storage Manager agent.
2 Install Adaptec Storage Manager.
3 Restrict authentication to the new group by adding this entry to the SYS:\RAIDMAN\RaidAgent.pps file:
agent.group.NetWareStorageAdmin=<fully distinguished group name>
For example:
agent.group.NetWareStorageAdmin=.CN=StorageAdmins.O=Acme
4 Restart the server.
Limited user access is granted to all NDS user accounts.

Step 2: Starting Adaptec Storage Manager ● 38
Logging Out of Adaptec Storage ManagerTo log out of Adaptec Storage Manager:
1 In the Enterprise View, click on the local system.
2 In the menu bar, select Actions, then click Log out.
You are logged out of Adaptec Storage Manager.
Logging Back InTo log in to Adaptec Storage Manager:
1 In the Enterprise View, click on the local system.
2 In the menu bar, select Actions, then click Log in.
3 Enter your user name and password, then click Connect. (See Understanding Permission Levels on page 35 for more information.)
23
45
1
Getting Started
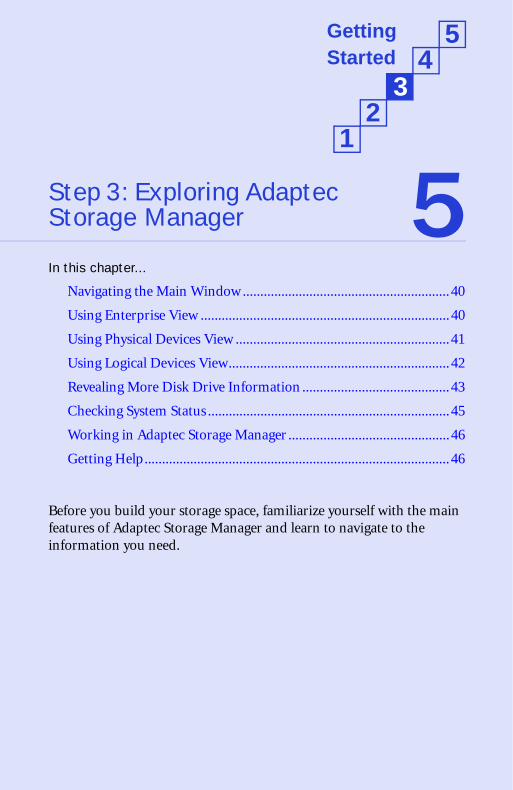
5Step 3: Exploring Adaptec Storage Manager
In this chapter...
Navigating the Main Window ...........................................................40
Using Enterprise View .......................................................................40
Using Physical Devices View .............................................................41
Using Logical Devices View...............................................................42
Revealing More Disk Drive Information ..........................................43
Checking System Status .....................................................................45
Working in Adaptec Storage Manager ..............................................46
Getting Help.......................................................................................46
Before you build your storage space, familiarize yourself with the main features of Adaptec Storage Manager and learn to navigate to the information you need.

Step 3: Exploring Adaptec Storage Manager ● 40
Navigating the Main WindowThe main window of Adaptec Storage Manager has three main panels, or views, in addition to the other features shown below.
Resize the panels and scroll horizontally or vertically as required, to view more or less information.
Using Enterprise ViewThe Enterprise View is an expandable tree that lists the local system (the computer you’re working on) and any remote systems that you’re logged in to. All the controllers on those systems are also listed in the Enterprise View. (See Logging In to Remote Systems on page 61 for more information about local and remote systems.)
Note: See Creating Display Groups on page 63 to learn how to group related local and remote systems together in the Enterprise View.
ToolBar
MenuBar
Physical DevicesView
Logical DevicesView
EnterpriseView
Event ViewerStatus Bar

Step 3: Exploring Adaptec Storage Manager ● 41
When you select a component in the Enterprise View, the disk drives and logical drives (“devices”) associated with it appear in the Physical and Logical Devices Views, as shown below.
You can perform most tasks by selecting a controller in the Enterprise view and working with its associated devices in the Physical and Logical Devices Views.
Using Physical Devices ViewWhen you select a controller in the Enterprise View, information about the physical disk drives connected to that controller appear in the Physical Devices View.
Disk drives designated as hot spares have plus signs (+) beside them:
● A blue plus sign (shown at right) means that the spare is protecting at least one logical drive.
● A hot spare with a yellow plus sign (shown at right) may not be large enough to protect the logical drive it’s assigned to, or may not be assigned to a logical drive.
See Working with Hot Spares on page 90 for more information.
By selecting Controller 1 in the Enterprise View...
...the disk drives connected to Controller 1 and the logical drives created with those disk drives appear in the Physical and Logical Devices Views.
...eight disk drives.Controller 2 is connected to...

Step 3: Exploring Adaptec Storage Manager ● 42
Hold your cursor over any disk drive to see its status, port number, and maximum speed. You can also click the arrow, shown at right, to see this same information for all the disk drives at the same time. To reveal further information, use the View buttons to change how the disk drives are displayed, as described in Revealing More Disk Drive Information on page 43.
A disk drive shaded in light blue is not part of any logical drive. A disk drive shaded half light/half dark blue (as shown at right) has some space allocated to a logical drive, and some space available.
To view the logical drives associated with a particular disk drive, see Using Logical Devices View on page 42.
Using Logical Devices ViewWhen you select a controller in the Enterprise View, information about the logical drives and arrays associated with that controller appear in the Logical Devices View. (A logical drive is a group of physical disk drives that your operating system recognizes as a single drive. For more information, see Understanding Logical Drives on page 74.)
The RAID level of a logical drive is indicated by the number inside the logical drive’s icon. For instance, the logical drive shown at right has RAID 1. Logical drives protected by hot spares have plus signs (+) beside them, as shown at right.
Hold your cursor over any logical drive to see its name, status, and size. You can also click the arrow, shown at right, to view this same information for all the logical drives at once.
...eight disk drives...Controller 2 is connected to...
...from which two logical drives have been created.

Step 3: Exploring Adaptec Storage Manager ● 43
Click on a logical drive to highlight the disk drives that comprise it in the Physical Devices View.
You can also click on any disk drive to see which (if any) logical drive it belongs to. A disk drive shaded in light blue is not part of any logical drive.
Revealing More Disk Drive InformationYou can reveal more information about your disk drives by using the View buttons to change how they are displayed.
By default, disk drives are displayed in unexpanded Text Description View, as shown below.
Click the expand arrow to see basic disk drive information.
Three disk drives (plus one hot spare) comprise the selected RAID 5 logical drive.
View buttons
Text Description View button

Step 3: Exploring Adaptec Storage Manager ● 44
Click the Full Size Capacity View button to see the size capacities of your disk drives, as shown below.
Disk drives or segments of disk drives that are included in logical drives are shaded brown.
Click the Relative Size Capacity View button to see the size capacities of your disk drives relative to each other, as shown below.
A full length bar is displayed for the largest disk drive. Proportionally shorter bars are displayed for other disk drives.
Full Size Capacity View button
Relative Size Capacity View button

Step 3: Exploring Adaptec Storage Manager ● 45
Checking System StatusAdaptec Storage Manager includes an Event Viewer and a status bar for at-a-glance system and event status information.
The status bar (shown below) provides at-a-glance information about a selected controller.
The Event Viewer (shown below) provides status information and messages about activity (or events) occurring in your storage space. Double-click any event to see more information in an easier-to-read format. See Monitoring Your Storage Space on page 99 for more information.
Note: By default, all Warning- and Error-level events activate an audible alarm. See Silencing and Testing the Audible Alarm on page 121 for more information.
The status icon indicates if a controller is in a normal state or if a problem has been detected
The tree path displays the location of the selected objectwithin Adaptec Storage Manager

Step 3: Exploring Adaptec Storage Manager ● 46
Working in Adaptec Storage ManagerAdaptec Storage Manager provides multiple ways to work with its menus and windows.
Most menu options are available by:
● Selecting items from the menu bar.
● Clicking buttons on the tool bar.
● Right-clicking on components in the main window. (Only tasks and windows associated with a specific component are available on right-click menus.)
For simplicity, the tasks in this Guide are explained mainly using menu bar options.
About the Actions MenuMost of the main tasks in Adaptec Storage Manager are part of the Actions menu on the menu bar. Options on the Actions menu vary, depending on which type of component is selected in the main window. For instance, managed systems, disk drives, and hot spares each have specialized Actions menus.
Getting HelpAdaptec Storage Manager online Help includes conceptual information, glossary definitions, and descriptions of on-screen menus and items, in addition to step-by-step instructions for completing tasks.
To open the online Help, click the Help button (shown at right). Alternatively, press the F1 key, or in the menu bar select Help, then click Search or Contents.
Press the Help button in a dialog box or wizard for help with that specific dialog box, window, or procedure.

23
45
1
Getting Started
6Step 4: Building Your Storage Space
In this chapter...
Selecting a Configuration Method....................................................48
Express Configuration: Building the Easy Way ................................48
Custom Configuration (Advanced) ..................................................51
Building a RAID Volume...................................................................56
RAID Controller Support..................................................................59
Managing Your Storage Space ...........................................................59
Once you have logged in to Adaptec Storage Manager, you can begin to build your storage space by creating logical drives. (For more information, see Understanding Logical Drives on page 74.)
Note: You must be logged in as an Administrator to complete the tasks described in this chapter.

Step 4: Building Your Storage Space ● 48
Selecting a Configuration MethodAdaptec Storage Manager has a wizard to help you build (or configure) logical drives, and offers two configuration methods to choose from, depending on your needs:
● Express configuration (basic)—Automatically creates logical drives by grouping together same-sized physical drives, and assigns RAID levels based on the number of physical disk drives in the logical drive.
Use the express method when you want to use all available disk drives in the most efficient manner. For instructions, see page 48.
● Custom configuration (advanced)—Helps you group disk drives, set RAID levels, determine logical drive size, and configure advanced settings manually.
Use the custom method when you want to create specific logical drives with any or all available disk drives. For instructions, see page 51.
Express Configuration: Building the Easy WayWhen you use express configuration, Adaptec Storage Manager automatically creates logical drives by grouping together same-sized physical disk drives, and assigns RAID levels based on the number of physical disk drives in a logical drive:
● A logical drive with three or more physical disk drives is assigned RAID 5.
● A logical drive with two physical disk drives is assigned RAID 1.
● A logical drive with only a single physical disk drive becomes a simple volume, which does not offer redundancy.
Note: To create a logical drive with any other RAID level, you must use the custom method, as described on page 51. See Understanding RAID on page 163 for more information about RAID levels.
By default, logical drive size is set by Adaptec Storage Manager and automatically maximizes the capacity of the disk drives. However, you can choose to specify a size for a logical drive, if required.

Step 4: Building Your Storage Space ● 49
To build your storage space with the express method:
1 In the Enterprise View, select the controller you want.
2 On the toolbar, click Create.
3 When the wizard opens, select Express configuration..., then click Next.
4 Review the information that is displayed.
In the example below, Adaptec Storage Manager has used three equal-sized disk drives to automatically create one logical drive with RAID 5 and a hot spare.

Step 4: Building Your Storage Space ● 50
To specify a size for the logical drives, or to make other changes to the configuration, click Modify logical devices. See Step 6 on page 53 for more information.
Note: Some operating systems have size limitations for logical drives. Before you save the configuration, verify that the size of the logical drive is appropriate for your operating system.
5 Click Apply, then click Yes.
Adaptec Storage Manager builds the logical drive(s). The configuration is saved on the Adaptec controller and on the physical drives.
6 Repeat Steps 1 to 5 for each controller on your system.
7 Continue with Partitioning and Formatting Your Logical Drives below.
Partitioning and Formatting Your Logical DrivesThe logical drives you create appear as physical disk drives on your operating system. You must partition and format these logical drives before you can use them to store data.
Note: Logical drives that have not been partitioned and formatted cannot be used to store data.
Refer to your operating system documentation for more information.

Step 4: Building Your Storage Space ● 51
Next StepsIf you have installed Adaptec RAID controllers on more than one computer, to continue building your storage space:
● From each computer, log in to Adaptec Storage Manager and repeat Steps 1 to 7 to create logical drives.
● From your local system (the computer you’re working on), log in to all other computers in your storage space as remote systems (see page 61), then repeat Steps 1 to 7 to create logical drives.
The maximum number of supported RAID controllers varies depending on your operating system. See RAID Controller Support on page 59 for more information.
To continue, see Managing Your Storage Space on page 59.
Custom Configuration (Advanced)Custom configuration helps you build your storage space manually by stepping you through the process of creating logical drives, setting RAID levels, and configuring other settings.
To build your storage space with custom configuration:
1 In the Enterprise View, click the controller you want.
Note how many available disk drives are connected to the controller; this information will be helpful as you create logical drives.
2 On the toolbar, click Create.

Step 4: Building Your Storage Space ● 52
3 When the wizard opens, select Custom configuration..., then click Next.
4 Select a RAID level.
The most common RAID levels are listed first; advanced RAID levels are available by clicking Advanced settings.
Note: To build a RAID Volume, see page 56. See Understanding RAID on page 163 for more information about RAID levels.
5 Click Next.
Step 4: Building Your Storage Space ● 53
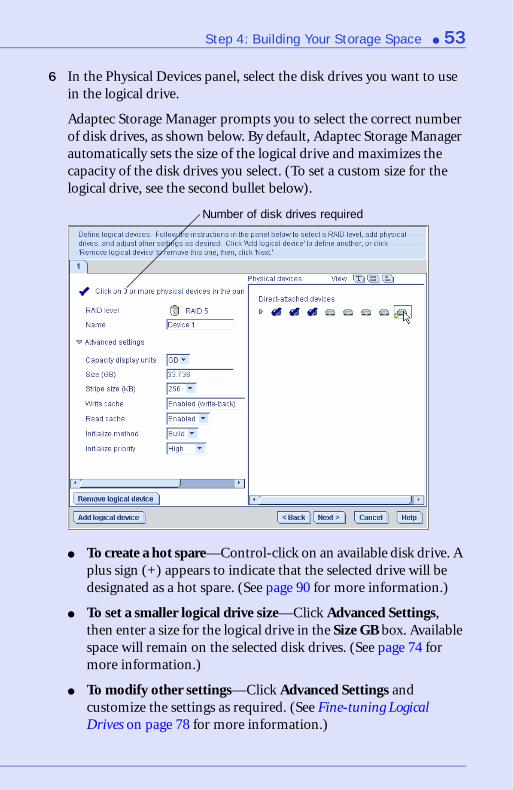
6 In the Physical Devices panel, select the disk drives you want to use in the logical drive.
Adaptec Storage Manager prompts you to select the correct number of disk drives, as shown below. By default, Adaptec Storage Manager automatically sets the size of the logical drive and maximizes the capacity of the disk drives you select. (To set a custom size for the logical drive, see the second bullet below).
● To create a hot spare—Control-click on an available disk drive. A plus sign (+) appears to indicate that the selected drive will be designated as a hot spare. (See page 90 for more information.)
● To set a smaller logical drive size—Click Advanced Settings, then enter a size for the logical drive in the Size GB box. Available space will remain on the selected disk drives. (See page 74 for more information.)
● To modify other settings—Click Advanced Settings and customize the settings as required. (See Fine-tuning Logical Drives on page 78 for more information.)
Number of disk drives required

Step 4: Building Your Storage Space ● 54
7 If you have no other available disk drives, skip to Step 9.
If you have available disk drives and want to create additional logical drives, click Add logical device to open a new tab in the wizard.
8 Repeat Steps 4 to 7 for each logical drive that you want to create on the controller.
9 Click Next, then review the logical drive settings.
The example below shows two logical drives with RAID 5 are ready to be created.
To make changes, click Back.
Note: Some operating systems have size limitations for logical drives. Before continuing, verify that the size of the logical drive is appropriate for your operating system. For more information, refer to your operating system documentation.
Tab for second logical drive

Step 4: Building Your Storage Space ● 55
10 Click Apply, then click Yes.
Adaptec Storage Manager builds the logical drive(s). The configuration is saved on the Adaptec controller and on the physical drives.
11 Repeat Steps 1 to 10 for each controller on your system.
12 Partition and format your logical drives. See page 50 for more information.
If your storage space comprises one or more Adaptec RAID controllers on a single computer, building is complete. Continue with Managing Your Storage Space on page 59.
If you have installed Adaptec RAID controllers on more than one computer and wish to add them to your storage space, continue with Including More Systems in Your Storage Space below.
Including More Systems in Your Storage Space If you have installed Adaptec RAID controllers on more than one computer, to continue building your storage space:
● From each individual computer, log in to Adaptec Storage Manager and repeat Steps 1 to 12 to continue building your storage space, or
● From your local system, log in to all the other computers as remote systems (see page 61), then repeat Steps 1 to 12 to continue building your storage space.
Note: The maximum number of supported RAID controllers varies depending on your operating system. See RAID Controller Support on page 59 for more information.
When your storage space is complete, continue with Managing Your Storage Space on page 59.

Step 4: Building Your Storage Space ● 56
Building a RAID VolumeA RAID Volume comprises two or more logical drives connected end-to-end. The logical drives in a RAID Volume:
● Must be built using disk drives connected to the same controller.
● Must have the same RAID level assigned.
● Must not be striped together.
● May have equal or different capacities.
To build a RAID Volume:
1 Create two or more logical drives that meet the requirements listed above, and wait for them to build and initialize. For instructions, see Express Configuration: Building the Easy Way on page 48 or Custom Configuration (Advanced) on page 51.
The example below shows two RAID 5 logical drives.
2 On the toolbar, click Create.
3 When the configuration wizard opens, select Custom configuration..., then click Next.

Step 4: Building Your Storage Space ● 57
4 Click Advanced settings, select RAID Volume, then click Next.
5 In the Logical Devices panel, select the logical drives you want to use in the RAID Volume.
Adaptec Storage Manager prompts you to select the correct number of logical drives, as shown below.
6 Modify the Advanced Settings, if required. (See Fine-tuning Logical Drives on page 78 for more information.)
7 Click Next.
Number of disk drives required

Step 4: Building Your Storage Space ● 58
8 Review the RAID Volume settings.
The example below shows one RAID Volume ready to be created.
To make changes, click Back.
9 Click Apply, then click Yes.
Adaptec Storage Manager builds the RAID Volume. The configuration is saved on the Adaptec controller and on the physical drives.
Adaptec Storage Manager replaces the individual logical drives with a single RAID Volume in the Logical Devices View. The Event Viewer shows that the logical drives have been deleted.
10 Partition and format your RAID Volume. See page 50 for more information.

Step 4: Building Your Storage Space ● 59
RAID Controller SupportThe maximum number of RAID controllers supported by Adaptec Storage Manager varies, depending on your computer’s operating system:
● Windows—up to 16 Adaptec RAID controllers
● Linux—up to 12 Adaptec RAID controllers
● NetWare—up to 16 Adaptec RAID controllers
Note: For the most recent operating system support information, visit www.adaptec.com.
Managing Your Storage SpaceOnce your storage space is built, you can add systems, controllers, and disk drives to meet your changing needs, then create logical drives by repeating the steps in this chapter.
To customize Adaptec Storage Manager and make managing your storage space easier and more effective, continue with Step 5: Customizing Adaptec Storage Manager on page 60.
To learn how to monitor, manage, and modify your storage space, see these chapters in the rest of this Guide:
● Managing Logical Drives and Hot Spares on page 73
● Protecting Your Data on page 95.
● Monitoring Your Storage Space on page 99
● Managing Tasks on page 123
● Managing Remote Systems on page 132
● Working with Display Groups on page 134
● Managing Controllers and Disk Drives on page 139
● Solving Problems on page 146
To find the most commonly asked-about information, see Quick Answers to Common Questions... on page 156.

23
45
1
Getting Started
7Step 5: Customizing Adaptec Storage Manager
In this chapter...
Logging In to Remote Systems ..........................................................61
Creating Display Groups ...................................................................63
Setting Preferences and Changing Views..........................................65
Customizing the Adaptec Storage Manager Agent...........................67
You can customize Adaptec Storage Manager to make managing your storage space easier and more effective:
● Log in to other systems on your network to view and manage all your controllers, disk drives, and logical drives from your local system (see page 61).
● Create display groups to organize related local and remote systems (see page 63).
● Change display settings, and add or remove features from the main window (see page 65).
● Change alarm settings, or set the agent to broadcast event notices from selected systems (see page 67).
Note: The tasks described in this chapter are optional.

Step 5: Customizing Adaptec Storage Manager ● 61
Logging In to Remote SystemsIf multiple computers (or systems) on your network are in your storage space, you can use Adaptec Storage Manager to monitor and manage all of them from one computer.
The computer that you’re working on is called the local system. All other computers in your storage space are remote systems. ‘Local’ and ‘remote’ are relative terms, as shown in the Figure below: when you are working on workstation A (local system), server B is a remote system; when you are working on server B (local system), workstation A is a remote system.
To manage remote systems, you log in to them from the local system. Adaptec Storage Manager or the Adaptec Storage Manager agent (see page 33) must be running on the remote system and before you can log in to it.
Workstation runningAdaptec Storage Manager
or Agent
A
Local logged into remote
Local logged into remote
Server
B
Server runningAdaptec Storage Manager
Workstation runningAdaptec Storage Manager
A
Server
B
Server runningAdaptec Storage Manager
or Agent

Step 5: Customizing Adaptec Storage Manager ● 62
When you log in to a remote system, you add that system to the Enterprise View of Adaptec Storage Manager, as shown in the example below.
Once you have logged in to a remote system, it is automatically included in the Enterprise View each time you start Adaptec Storage Manager from the local system.
To log in to a remote system:
1 From the menu bar, click Remote, then select Add Remote System.
The Add Remote System window opens.
2 Enter the host name or TCP/IP address of the remote system.
3 Enter the startup port number of the remote system. The default port number is 34571.
4 If prompted, enter your user name and password. (User names and passwords are case sensitive.)
To save this user name and password, click inside the Save user name/password box.

Step 5: Customizing Adaptec Storage Manager ● 63
5 Click Connect.
Adaptec Storage Manager connects to the remote system and adds it to the list of managed systems in the Enterprise View.
6 To manage the remote system, select it in the Enterprise View and enter your user name and password if prompted.
To create logical drives on your remote systems, see Step 4: Building Your Storage Space on page 47.
For more information about remote systems, see Managing Remote Systems on page 132.
Creating Display GroupsYou can organize related local and remote systems into display groups to make managing your storage space easier and more effective.
Systems in a display group appear together in the Enterprise View under the group name.
To create a display group:
1 In the Enterprise View, right-click on a system that you want to add to a display group.
2 Select Change display group, then click New group.

Step 5: Customizing Adaptec Storage Manager ● 64
3 Enter a name for the new display group, then click OK.
The display group is created and the system you selected in Step 1 is added to it.
4 To add another system to the display group, right-click on that system in the Enterprise View, select Change display group, then click the display group name.
The system is added to the display group.

Step 5: Customizing Adaptec Storage Manager ● 65
Display groups are sorted alphabetically and appear in the Enterprise View below any systems that are not part of a display group.
A system can belong to only one display group at a time; you can’t include the same system in multiple display groups.
For more information, see Working with Display Groups on page 134.
Setting Preferences and Changing ViewsYou can customize Adaptec Storage Manager by:
● Sorting the systems in the Enterprise View (see below).
● Selecting the standard unit of measure shown for disk drives (see page 66).
● Excluding the tool bar or status bar from the main window, or turning off the Tool Tips (see page 66).
Sorting Systems in the Enterprise ViewYou can set Adaptec Storage Manager to sort systems in the Enterprise View alphabetically or chronologically. By default, systems are listed in alphabetical order. The local system always appears first when you sort objects alphabetically.
To re-sort the Enterprise View:
1 In the menu bar of the main window, select File, then click Preferences.
2 Click the Display options tab.
3 In the System tree sorting drop-down menu, select the option you want.
4 Click OK.

Step 5: Customizing Adaptec Storage Manager ● 66
Setting the Standard Unit of MeasureYou can set Adaptec Storage Manager to show disk drive capacity in measures of megabytes (MB), gigabytes (GB), or terabytes (TB).
You can choose the Auto-select setting to allow Adaptec Storage Manager to show the most appropriate unit of measure based on disk drive size. This option allows different disk drives to be shown in different units of measure.
By default, disk drives are shown in GB.
To change the standard unit of measure:
1 In the menu bar of the main window, select File, then click Preferences.
2 Click the Display options tab.
3 In the Capacity display units drop-down menu, select the option you want.
4 Click OK.
Changing the Main Window AppearanceYou can choose to remove the tool bar and status bar from the main Adaptec Storage Manager window to save space on-screen. You can also choose to turn off the Tool Tips that automatically appear when you place your cursor over on-screen items.
To change the appearance of the main window, in the menu bar select View. The options in the View menu are toggle switches, which means that they can be selected and deselected by clicking on them.

Step 5: Customizing Adaptec Storage Manager ● 67
Customizing the Adaptec Storage Manager AgentThe Adaptec Storage Manager agent’s default settings are suitable for most storage spaces. (See page 17 for more information about the agent.) However, you can customize the agent on any system by:
● Setting the agent to broadcast events on that system to all logged-in users. See below.
● Changing the frequency and duration of the alarm, or choose to disable the alarm for that system. See page 67.
● Changing the operating system event log setting for that system. See page 69.
● Changing to agent base port number on that system. See page 69.
Any changes you make to the agent settings affect the selected system only and are not applied to all systems in your storage space.
Broadcasting Event Alerts from a SystemYou can set the Adaptec Storage Manager agent to send event alerts about a specific system to all users who are logged into your storage space network. You might want to do this if your storage space isn’t managed by a dedicated person, or if that particular system is off-site or isn’t connected to a monitor.
Event alerts signal to everyone working on the storage space that technical assistance is required for that system.
For more information, see Broadcasting Event Alerts to Users on page 120.
Changing a System’s Audible Alarm SettingsWarning- and Error-level events on a system (see page 101) trigger an audible alarm, a series of beeps which sound every five minutes until the event is resolved.
You can change the frequency and duration of the alarm, or choose to disable the alarm on any system. For information about using the audible alarm, see page 121.

Step 5: Customizing Adaptec Storage Manager ● 68
To change alarm settings on a system:
1 Click the Configure button, select the system you want, then click General Settings.
The Adaptec Storage Manager Agent General Settings window opens for that system.
2 Edit the alarm settings as required. (Select or deselect Sound alarm; change the alarm interval time.)
Caution: If you disable the alarm, no audible signal will sound on that system when a Warning- or Error-level event occurs.
3 Click Save changes.
4 Restart Adaptec Storage Manager to apply the new settings.
!

Step 5: Customizing Adaptec Storage Manager ● 69
Changing a System’s Event Log Setting By default, all Warning- and Error-level events on a system are recorded in the operating system event log.
To disable operating system event logging on a system:
1 Click the Configure button, select the system you want, then click General Settings.
The Adaptec Storage Manager Agent General Settings window opens for that system. (See Step 1 on page 68.)
2 Deselect Save events in OS event log.
3 Click Save changes.
4 Restart Adaptec Storage Manager to apply the new setting.
Changing a System’s Agent Base Port NumberAdaptec Storage Manager uses four consecutive ports to access remote systems: 34571, 34572, 34573, and 34574. The default port number for the agent is 34571. If your system has a conflict with these ports, change the base port to a different port number.
To change the agent base port number:
1 Click the Configure button, select the system you want, then click General Settings.
The Adaptec Storage Manager Agent General Settings window opens for that system. (See Step 1 on page 68.)
2 Enter a new agent system base port number.
3 Click Save changes.
4 Restart Adaptec Storage Manager and the Adaptec Storage Manager agent to apply the new setting.

8Running Adaptec Storage Manager from the CD
In this chapter...
When to Choose Bootable-CD Mode...............................................71
Getting Started in Bootable-CD Mode.............................................71
Running Adaptec Storage Manager from the CD ............................72
This chapter describes how to run Adaptec Storage Manager from the Adaptec RAID installation CD included in the kit, instead of as an installed application. When you run Adaptec Storage Manager from the CD, you are using bootable-CD mode.

Chapter 8: Running Adaptec Storage Manager from the CD ● 71
When to Choose Bootable-CD ModeUse Adaptec Storage Manager in bootable-CD mode if you want to install your operating system on a disk drive or logical drive associated with your controller. Bootable-CD mode lets you configure the controller before you install your operating system.
After you have configured the controller and installed the operating system, install and run Adaptec Storage Manager as an installed software application (see page 24).
Bootable-CD Mode LimitationsRunning Adaptec Storage Manager from the CD is not an alternative to running it as an installed software application. Most of the features and functions described in this User’s Guide are not available when you are running Adaptec Storage Manager from the CD. Bootable-CD mode is only for configuring your controller before you install an operating system.
Getting Started in Bootable-CD ModeThis is a checklist of tasks to complete when you’re building your storage space with Adaptec Storage Manager in bootable-CD mode.
❏ Install your Adaptec RAID controller.
❏ Run Adaptec Storage Manager (see page 72).
❏ Build your storage space (see page 47).
For an introduction to the Adaptec Storage Manager window and its features, see Step 3: Exploring Adaptec Storage Manager on page 39.
❏ Install your operating system (and controller device drivers, if appropriate).
❏ Install Adaptec Storage Manager as a software application (see page 24).
❏ Continue to build, customize, and manage your storage space as described in the rest of this User’s Guide.

Chapter 8: Running Adaptec Storage Manager from the CD ● 72
Running Adaptec Storage Manager from the CD
Note: Before you begin, ensure that your system is set up to boot from a CD. Check the system BIOS to see if the CD drive is listed first in the boot order. For more information, refer to your computer’s documentation.
To run Adaptec Storage Manager in bootable-CD mode:
1 Insert the RAID installation CD into your CD drive, then restart your computer.
2 When prompted, select the language you want, then press Enter.
3 Review the license information, then press Enter.
The main Adaptec Storage Manager CD menu opens.
4 Click Launch Configuration Utility.
Adaptec Storage Manager opens.
5 Click Create..
The Configuration wizard opens.
6 Continue with Step 4: Building Your Storage Space on page 47.

9Managing Logical Drives and Hot Spares
In this chapter...
Understanding Logical Drives...........................................................74
Creating Logical Drives .....................................................................75
Fine-tuning Logical Drives................................................................78
Verifying Logical Drives.....................................................................81
Increasing the Capacity of a Logical Drive .......................................84
Changing the RAID Level of a Logical Drive ...................................87
Deleting a Logical Drive ....................................................................89
Working with Hot Spares ..................................................................90
This chapter explains how to manage logical drives and hot spares associated with Adaptec RAID controllers.
To create a logical drive, see Step 4: Building Your Storage Space on page 47.

Chapter 9: Managing Logical Drives and Hot Spares ● 74
Understanding Logical DrivesA logical drive is a group of physical disk drives that appears to your operating system as a single drive that can be used for storing data.
A logical drive can comprise one or more disk drives and can use part or all of each disk drive’s capacity.
It is possible to include the same disk drive in two different logical drives by using just a portion of the space on the disk drive in each, as illustrated below.
Disk drive space that has been assigned to a logical drive is called a segment. A segment can include all or just a portion of a disk drive’s space. A disk drive with one segment is part of one logical drive, a disk drive with two segments is part of two logical drives, and so on. A segment can be part of only one logical drive. When a logical drive is deleted, the segments that comprised it revert to available space (or free segments).
A logical drive can include redundancy, depending on the RAID level assigned to it. (See Understanding RAID on page 163 for more information.)
Once a logical drive has been created, you can change its RAID level or increase its capacity to meet changing requirements. You can also protect your logical drives by assigning one or more hot spares to them. (See page 90 for more information.)
AvailableSpace
Disk Drives (500 MB Each)
RAID 5 Logical DriveRAID 1 Logical Drive
250 MB
250 MB
250 MB 250 MB
250 MB
250 MB250 MB
250 MB
250 MB
250 MB
Segment (250 MB)Segment (250 MB)

Chapter 9: Managing Logical Drives and Hot Spares ● 75
Creating Logical DrivesFor basic instructions for creating logical drives, see Step 4: Building Your Storage Space on page 47.
This section describes three additional scenarios for creating logical drives:
● Setting the size of a new logical drive (see below)
● Including different-sized disk drives in a logical drive (see page 76)
● Creating a logical drive using available segments of disk drives (see page 77)
Setting the Size of a Logical DriveAs described in Step 6 on page 53, Adaptec Storage Manager automatically sets the size of a new logical drive to maximize the capacity of the disk drives that it comprises. However, you can choose to set the size for a new logical drive. You may want to do this to maximize your available disk drive space, or allocate available space to more than one logical drive.
To set the size of a logical drive,
1 Complete Steps 1 through 6 in Custom Configuration (Advanced) on page 51.
2 Click Advanced Settings.
The maximum size of the logical drive appears in the Size (GB) box.
3 Enter the new size for the logical drive. The size you enter must be less than or equal to the maximum size.
4 Click Next.
5 Review the logical drive settings, click Apply, then click Yes.
Adaptec Storage Manager builds the logical drive. The configuration is saved in the Adaptec controller and in the physical drives.
If the disk drives you used to create this logical drive have available space left over, you can use them to create a new logical drive (see page 77), or to expand an existing logical drive (see page 84).
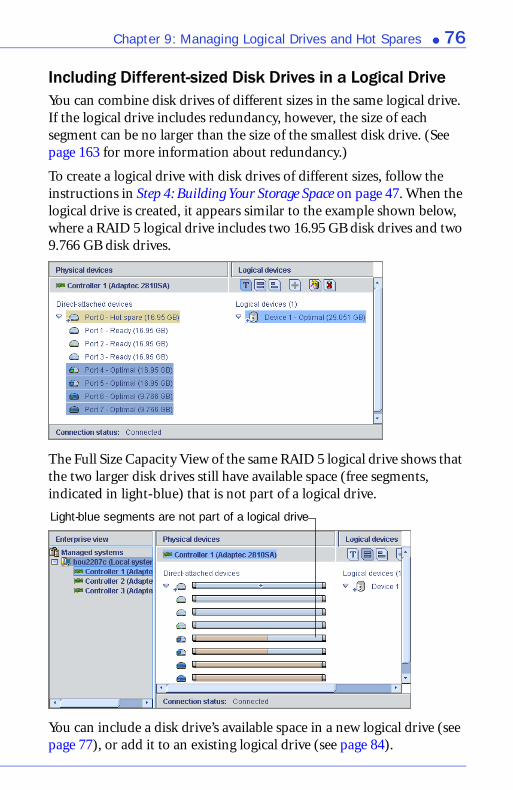
Chapter 9: Managing Logical Drives and Hot Spares ● 76
Including Different-sized Disk Drives in a Logical DriveYou can combine disk drives of different sizes in the same logical drive. If the logical drive includes redundancy, however, the size of each segment can be no larger than the size of the smallest disk drive. (See page 163 for more information about redundancy.)
To create a logical drive with disk drives of different sizes, follow the instructions in Step 4: Building Your Storage Space on page 47. When the logical drive is created, it appears similar to the example shown below, where a RAID 5 logical drive includes two 16.95 GB disk drives and two 9.766 GB disk drives.
The Full Size Capacity View of the same RAID 5 logical drive shows that the two larger disk drives still have available space (free segments, indicated in light-blue) that is not part of a logical drive.
You can include a disk drive’s available space in a new logical drive (see page 77), or add it to an existing logical drive (see page 84).
Light-blue segments are not part of a logical drive

Chapter 9: Managing Logical Drives and Hot Spares ● 77
Creating a Logical Drive Using Available Space Free segments on a disk drive can be used to create a new logical drive. (A segment can only be used in one logical drive at a time.)
To create a logical drive using free segments on disk drives:
1 Complete Steps 1 through 5 in Custom Configuration (Advanced) on page 51.
2 In the Physical Devices panel, select the disk drives and/or free disk drive segments you want to use in the logical drive.
In the example below, two free disk drive segments (indicated in blue) are used to create a RAID 1 logical drive.
3 Click Next.
4 Review the logical drive settings.
5 Click Apply, then click Yes.
Adaptec Storage Manager builds the logical drive. The configuration is saved in the Adaptec controller and in the physical drives.
Free segments and available disk drives are blue

Chapter 9: Managing Logical Drives and Hot Spares ● 78
Fine-tuning Logical DrivesYou can fine-tune a new or existing logical drive to meet your needs by adjusting the Advanced settings described in this section. (Not all options are available for all controllers or all RAID levels.)
Note: The default settings in Adaptec Storage Manager are optimal for most users and storage spaces. Only advanced users should change the settings described in this section.
To fine-tune a logical drive:
1 Open the list of Advanced settings.
If you are creating a new logical drive, follow the instructions in Step 6 on page 53.
If you are modifying an existing logical drive:
a In the Enterprise View, click the controller associated with the logical drive.
b In the Logical Devices View, click the logical drive.
c In the menu bar, select Actions, then click Expand or change logical device.
d Click Next, then click Advanced settings.
Modify the available settings as required for your logical drive (not all options are available for all controllers or all RAID levels):
● Logical drive size (see page 75)
● Write cache (see page 79)
● Stripe size (see page 79)
● Read cache (see page 80)
● Initialize method (see page 80)
● Initialize priority (see page 81)
2 Click Next.
3 To apply the changes immediately, click Apply.
To schedule the changes for later, click Schedule, then set the date and time. (For more information, see page 124.)

Chapter 9: Managing Logical Drives and Hot Spares ● 79
Changing the Write Cache SettingThe write cache setting determines when data is stored on a disk drive and when the controller communicates with the operating system.
● Disabled (write-through)—The controller sends (or writes) the data to a disk drive, then sends confirmation to the operating system that the data was received. Use this setting when performance is less important than data protection.
● Enabled (write-back)—The controller sends confirmation to the operating system that the data was received, then writes the data to a disk drive. Use this setting when performance is more important than data protection and you aren’t using a battery-backup cache. Enabled is the default setting.
● Enabled (write-back) when protected by battery—The controller sends confirmation to the operating system that the data was received, then writes the data to a disk drive. Use this setting if you are using a battery-backup cache and performance is more important than data protection.
Note: (RAID 10, 50, and 60 only) All logical drives within a RAID 10/50/60 logical drive must have the same write cache setting—either all write-through or all write-back.
To quickly change the write cache setting, click the logical drive you want; then, in the menu bar, select Actions, click Configure write cache, then select Enabled or Disabled as required.
Changing the Stripe SizeThe stripe size is the amount of data (in KB) written to one partition before the controller moves to the next partition in a logical drive.
Stripe size options vary, depending on your controller. Normally, the default stripe size provides the best performance.
For RAID 6 and RAID 60 logical drives, the more disk drives there are in the logical drive, the fewer the stripe size options.

Chapter 9: Managing Logical Drives and Hot Spares ● 80
Changing the Read Cache SettingWhen read caching is enabled, the controller monitors the read access to a logical drive and, if it sees a pattern, pre-loads the cache with data that seems most likely to be read next, increasing performance.
● Enabled—The controller transfers data from the logical drive to its local cache in portions equal to the stripe size. Use this setting for the best performance when workloads are steady and sequential. Enabled is the default setting.
● Disabled—The controller transfers data from the logical drive to its local cache in portions equal to the system I/O request size. Use this setting for the best performance when workloads are random or the system I/O requests are smaller than the stripe size. (For more information about system I/O requests, refer to your operating system documentation.)
To quickly change the read cache setting, click the logical drive you want; then, in the menu bar, select Actions, click Configure read cache, then select Enabled or Disabled as required.
Changing the Initialize MethodThe Initialize Method setting determines how a logical drive is initialized (prepared for reading and writing), and how long initialization will take. The settings are presented in order of slowest to fastest method.
● Build—(slowest) For RAID 1 logical drives, data is copied from the primary drive to the mirror drive; for RAID 5 logical drives, parity is computed and written. Build is the default setting.
Adaptec Storage Manager performs build initializations in the background; you can use the logical drive immediately.
● Clear—Every block in the logical drive is overwritten, removing all existing data. You can’t use the logical drive until the initialization is complete.
● Quick—(fastest) The logical drive is made available immediately. Quick initialization should be used for new physical disks only.

Chapter 9: Managing Logical Drives and Hot Spares ● 81
Changing the Initialize PriorityThe Initialize Priority setting determines the priority for the initialization of the logical drive. The default setting is High, which means that the logical drive is initialized as quickly as possible.
Verifying Logical DrivesTo ensure that there are no data problems on your logical drives, it is important to verify them. When you verify a logical drive, Adaptec Storage Manager checks it for inconsistent or bad data and then fixes any problems. (You can also choose to verify a logical drive without fixing it.)
Logical drives with no redundancy (for instance, RAID 0 logical drives) do not need to be verified.
In Adaptec Storage Manager, logical drive verification can occur in different ways, depending on your controller:
● Automatic verification—If your controller supports build initialization, Adaptec Storage Manager automatically verifies all new redundant logical drives. No manual verification is required.
To see if your controller supports build initialization, right-click the controller in the Enterprise View and click Properties.
● Manual verification—If your controller doesn’t support build initialization, a Warning-level event notice appears in the Event Viewer prompting you to verify a logical drive before you begin to use it. To verify a logical drive manually, see Verifying Logical Drives on page 81.
● Background verification—If your controller supports background consistency check, Adaptec Storage Manager continually and automatically checks your logical drives once they’re in use.
To see if your controller supports background consistency check, right-click the controller in the Enterprise View and click Properties. To enable or disable background consistency check, see page 84.
Note: If your controller doesn’t support background consistency check, Adaptec highly recommends that you verify your logical drives weekly, following the instructions in Verifying Logical Drives on page 81.

Chapter 9: Managing Logical Drives and Hot Spares ● 82
Verifying and Fixing a Logical Drive
Note: To verify a logical drive without fixing it, see page 83.
While Adaptec Storage Manager verifies and fixes a logical drive, you can’t complete any other tasks on the controller. Because the verification can take a long time to complete, you may want to schedule it as a task to be completed overnight or on a weekend.
To verify and fix a logical drive:
1 In the Enterprise View, click the controller associated with the logical drive.
2 In the Logical Devices View, click the logical drive.
3 In the menu bar, select Actions, then click Verify with fix.
4 To begin the verification immediately, click Yes.
To schedule the verification, click Schedule, then set the date and time. You can also choose to set the verification as a recurring task. (For more information, see page 124.)
Note: Don’t power off the system while the verification is in progress. If you do, the verification will stop.
While the verification is in progress, the logical device is shown as an animated icon (as shown at right) to indicate that the task is in progress.

Chapter 9: Managing Logical Drives and Hot Spares ● 83
When the verification is complete, an event notice is generated in the local system’s event log (and broadcast to other systems, if you have event notification set up—see page 103).
You can now continue working on the controller.
Verifying a Logical Drive (Without Fix)
Note: To verify and fix a logical drive, see page 84.
While Adaptec Storage Manager verifies a logical drive, you can’t complete any other tasks on the controller associated with that logical drive. Because verification takes a long time to complete, you may want to schedule it as a task to be completed overnight or on a weekend.
To verify a logical drive:
1 In the Enterprise View, click the controller associated with the logical drive.
2 In the Logical Devices View, click the logical drive.
3 In the menu bar, select Actions, then click Verify.
4 To begin the verification immediately, click Yes.
To schedule the verification for later, click Schedule, set the date and time, then click Apply. You can also set the verification to recur. (For more information, see page 124.)
Note: Don’t power off the system while the verification is in progress. If you do, the verification will stop.

Chapter 9: Managing Logical Drives and Hot Spares ● 84
While the verification is in progress, the logical device is shown as an animated icon (as shown at right) to indicate that the task is in progress.
When the verification is complete, an event notice is generated in the local system’s event log (and broadcast to other systems, if you have event notification set up—see page 103).
You can now continue working on the controller.
Enabling/Disabling Background Consistency CheckIf your controller supports background consistency check, Adaptec Storage Manager continually and automatically checks your logical drives once they’re in use. (To see if your controller supports background consistency check, right-click the controller in the Enterprise View and click Properties.)
To enable or disable background consistency check:
1 In the Enterprise View, click the controller.
2 In the menu bar, select Actions, then click Enable (Disable) background consistency check.
The controller is updated with the new setting.
Increasing the Capacity of a Logical DriveYou can add more disk drive space to a logical drive to increase its capacity (or expand it).
Note: The maximum size of a logical drive varies by controller. Refer to your controller’s documentation for more information.
The expanded logical drive must have a capacity that’s greater than or equal to the original logical drive.
To increase the capacity of a logical drive:
1 In the Enterprise View, click the controller associated with the logical drive.
2 In the Logical Devices View, click the logical drive.

Chapter 9: Managing Logical Drives and Hot Spares ● 85
3 In the menu bar, select Actions, then click Expand or change logical device.
A wizard opens to help you modify the logical drive.
4 Click Next.
5 Click on the disk drive(s) or disk drive segments you want to add to the logical drive.
If you want to remove a specific disk drive or segment and replace it with another one (for instance, replace a smaller disk drive with a larger one), click on the disk drive you want to remove.
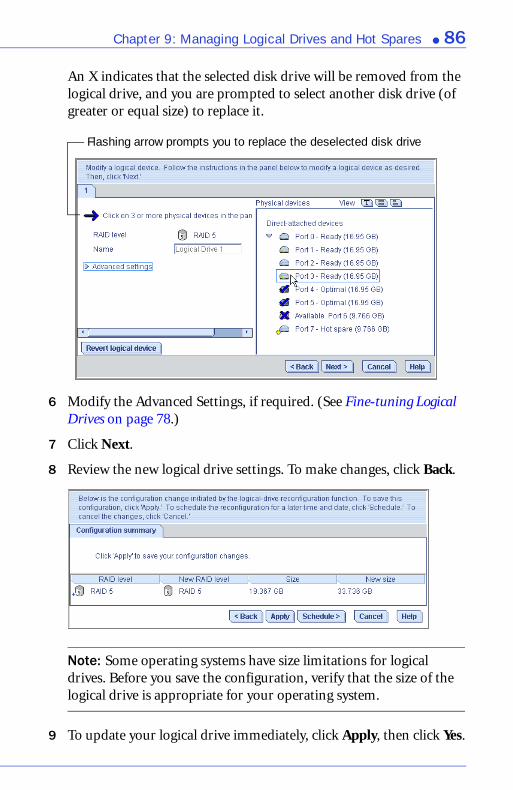
Chapter 9: Managing Logical Drives and Hot Spares ● 86
An X indicates that the selected disk drive will be removed from the logical drive, and you are prompted to select another disk drive (of greater or equal size) to replace it.
6 Modify the Advanced Settings, if required. (See Fine-tuning Logical Drives on page 78.)
7 Click Next.
8 Review the new logical drive settings. To make changes, click Back.
Note: Some operating systems have size limitations for logical drives. Before you save the configuration, verify that the size of the logical drive is appropriate for your operating system.
9 To update your logical drive immediately, click Apply, then click Yes.
Flashing arrow prompts you to replace the deselected disk drive
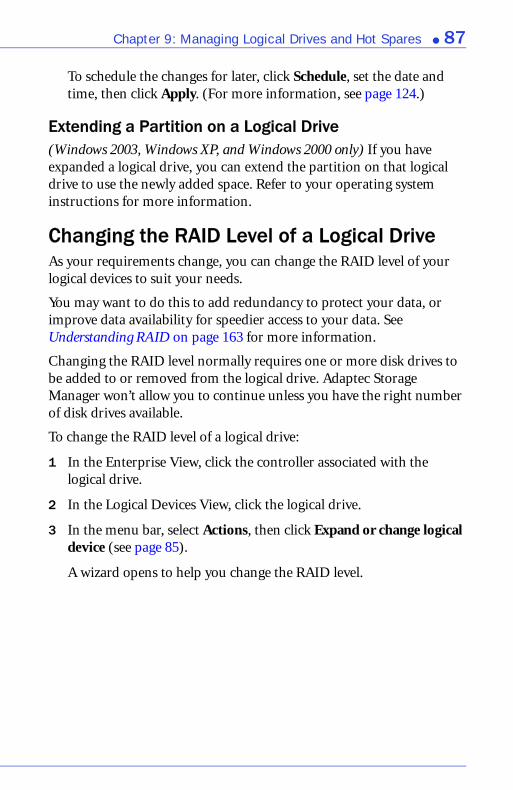
Chapter 9: Managing Logical Drives and Hot Spares ● 87
To schedule the changes for later, click Schedule, set the date and time, then click Apply. (For more information, see page 124.)
Extending a Partition on a Logical Drive(Windows 2003, Windows XP, and Windows 2000 only) If you have expanded a logical drive, you can extend the partition on that logical drive to use the newly added space. Refer to your operating system instructions for more information.
Changing the RAID Level of a Logical DriveAs your requirements change, you can change the RAID level of your logical devices to suit your needs.
You may want to do this to add redundancy to protect your data, or improve data availability for speedier access to your data. See Understanding RAID on page 163 for more information.
Changing the RAID level normally requires one or more disk drives to be added to or removed from the logical drive. Adaptec Storage Manager won’t allow you to continue unless you have the right number of disk drives available.
To change the RAID level of a logical drive:
1 In the Enterprise View, click the controller associated with the logical drive.
2 In the Logical Devices View, click the logical drive.
3 In the menu bar, select Actions, then click Expand or change logical device (see page 85).
A wizard opens to help you change the RAID level.

Chapter 9: Managing Logical Drives and Hot Spares ● 88
4 Select a new RAID level, then click Next. Only valid options are offered.
In the example shown in this section, a RAID 1 logical device is being changed to a RAID 5 logical device.
5 In the Logical Devices panel, select the disk drives you want to use in the modified logical drive.
Adaptec Storage Manager prompts you to select the correct number of disk drives, as shown below.
If you want to remove a specific disk drive and replace it with another one (for instance, replace a smaller disk drive with a larger one), click on the disk drive you want to remove. An X indicates that the selected disk drive will be removed from the logical drive.
6 Modify the Advanced Settings, if required. (See Fine-tuning Logical Drives on page 78.)
Number of disk drives required

Chapter 9: Managing Logical Drives and Hot Spares ● 89
7 Click Next.
8 Review the new logical drive settings. To make changes, click Back.
Note: Some operating systems have size limitations for logical drives. Before you save the configuration, verify that the size of the logical drive is appropriate for your operating system.
9 To update your logical drive immediately, click Apply, then click Yes.
To schedule the changes for later, click Schedule, set the date and time, then click Apply. (For more information, see page 124.)
Deleting a Logical Drive
Caution: When you delete a logical drive, you lose all data stored on that logical drive.
To delete a logical drive:
Ensure that you no longer need the data stored on the logical drive.
1 In the Enterprise View, click on the controller associated with the logical drive.
2 In the Logical Devices View, click the logical drive.
3 In the menu bar, select Actions, then click Delete logical device.
!

Chapter 9: Managing Logical Drives and Hot Spares ● 90
4 When prompted, click Yes to delete the device, or No to cancel the deletion.
If you click Yes, the logical device is deleted. The disk drives or drive segments included in the logical device become available, and can be used to create a new logical drive (see page 77), or to expand an existing logical drive (see page 84).
Working with Hot SparesA hot spare is a disk drive that automatically replaces any failed drive in a logical drive, and can subsequently be used to rebuild that logical drive. (For more information on recovering from a disk drive failure, see page 147.)
Hot Spare Limitations● You can’t create a hot spare for RAID 0 logical drives, simple
volumes, or spanned volumes.
● You can’t create a hot spare from a disk drive that is already part of a logical drive.
● You should select a disk drive that is at least as big as the largest disk drive it might replace.
Dedicated Spare or Global Spare?A global hot spare is not assigned to a specific logical drive and will protect any logical drive on the controller (except RAID 0 logical drives). You can designate a global hot spare before or after you build logical drives on a controller; you can also designate a global hot spare while you’re creating a logical drive. To designate a global hot spare, see page 91.
A dedicated hot spare is assigned to one or more specific logical drives and will only protect those logical drives. You must create the logical drive before you can assign a dedicated hot spare. To assign a dedicated hot spare, see page 92.

Chapter 9: Managing Logical Drives and Hot Spares ● 91
Designating a Global Hot SpareThis section describes how to designate a global hot spare before or after you build a logical drive.
Note: To designate a global hot spare while you’re creating a logical drive, see Step 6 on page 53.
To designate a global hot spare:
1 In the Enterprise View, click the controller on which you want a global hot spare.
2 In the Physical Devices View, click the disk drive you want to designate as a hot spare. (See Hot Spare Limitations on page 90 for help selecting a disk drive.)
3 Click the Create global hot-spare drive button (shown at right).
A plus sign appears beside the selected disk drive, indicating that it’s designated as a hot spare. (A yellow plus sign indicates an error. See What Do the Hot Spare Icons Mean? on page 93 for help solving the problem.)
Any other logical drives created on the controller will automatically be protected by that global hot spare.
Hot spare

Chapter 9: Managing Logical Drives and Hot Spares ● 92
Assigning a Dedicated Hot SpareA dedicated hot spare is assigned to one or more specific logical drives.
To assign a dedicated hot spare:
1 In the Enterprise View, click the controller on which you want a dedicated hot spare.
2 In the Physical Devices View, click the disk drive you want to designate as a hot spare. (See Hot Spare Limitations on page 90 for help selecting a disk drive.)
3 In the menu bar, select Actions, then click Create dedicated hot-spare drive for, then click the name of the logical drive. (In the example below, the logical drive name is “Clients”.)
A plus sign appears beside the selected disk drive, indicating that it’s designated as a dedicated hot spare. (A yellow plus sign indicates an error. See What Do the Hot Spare Icons Mean? on page 93 for help solving the problem.)
4 To use the same dedicated hot spare to protect another logical drive, repeat Step 2 and Step 3.
Hot spare

Chapter 9: Managing Logical Drives and Hot Spares ● 93
What Do the Hot Spare Icons Mean?
Removing a Hot SpareYou can remove a global hot spare or dedicated hot spare. You may want to do this to:
● Make disk drive space available for a logical drive.
● Make a dedicated hot spare into a global hot spare or a global hot spare into a dedicated hot spare.
● Remove the ‘hot spare’ designation from a disk drive that is no longer being used as a hot spare. (When a hot spare is built into a logical drive after a disk drive failure, it retains its ‘hot spare’ designation even though it can no longer protect the logical drives it’s assigned to. See Recovering from a Disk Drive Failure on page 147 for more information.)
Icon Explanation Action
■ Healthy global or dedicated hot spare
No action required.
■ Hot spare is not assigned to any logical drives
■ Create at least one logical drive on the same controller
■ Hot spare is too small to protect the logical drive(s) it’s assigned to
■ Designate larger disk drive as hot spare
■ Global hot spare was designated before any logical drives were built
■ Create at least one logical drive on the same controller
■ Hot spare has been built into a logical drive after disk drive failure
■ Designate replacement or other available disk drive as new hot spare; remove ‘hot spare’ designation from disk drive (see below)

Chapter 9: Managing Logical Drives and Hot Spares ● 94
To remove a hot spare:
1 In the Enterprise View, click the controller associated with the hot spare.
2 In the Physical Devices View, click the hot spare.
3 In the menu bar, select Actions, then click Delete hot-spare drive or Delete dedicated hot-spare drive.
The hot spare is deleted, and the disk drive becomes available for other uses in your storage space.

10Protecting Your Data
In this chapter...
Creating a Snapshot ...........................................................................96
Enabling Copyback............................................................................98
This chapter describes two additional methods of protecting the data on your storage space, Snapshot and Copyback.

Chapter 10: Protecting Your Data ● 96
Creating a Snapshot
Note: Snapshot is an upgrade feature; if the Snapshot feature is locked, see Adding Enhanced Features on page 21 for information on purchasing a feature key.
A snapshot is a frozen image of a logical drive at a particular point in time. You can copy the data on one logical device to another logical device by creating a snapshot. You may want to do this if you want to back up your data to tape, clone a drive, or copy the data to multiple servers.
There are two snapshot options:
● Snapshot Backup—Copies all data on a logical drive so that it can be moved from one server to another. See page 97.
● Snapshot Nobackup—Creates a temporary copy of a logical drive for tape backup and reference (uses less system resources than Snapshot Backup).
Snapshot Limitations● You can create a snapshot of only one controller at a time; you can’t
create a snapshot that includes multiple controllers.
● The source logical drive (the logical drive that you’re copying) and the target logical drive (the logical drive that you’re copying to) must be on the same controller.
● The source and target logical drives may have the same or different RAID levels.
● You can create up to four snapshots on each controller.
● The size of the target logical drive must be greater than or equal to the size of the source logical drive.
● You can’t modify any information on a snapshot.

Chapter 10: Protecting Your Data ● 97
Creating a Snapshot with BackupTo create a snapshot with backup:
1 In the Logical Devices View, right-click the logical drive you want to copy.
2 Select Create snapshot, click with backup to, then click the name of the target logical drive.
The snapshot is created on the target logical drive. The snapshot appears in Adaptec Storage Manager with a camera icon beside it, as shown at right.
Creating a Snapshot Without BackupTo create a snapshot without backup:
1 In the Logical Devices View, right-click the logical drive you want to copy.
2 Select Create snapshot, click without backup to, then click the name of the target logical drive.
The snapshot is created on the target logical drive. The snapshot appears in Adaptec Storage Manager with a camera icon beside it, as shown at right.
3 Use an operating system-level or third-party data backup tool to move the snapshot onto a tape drive or other server.
Deleting a SnapshotWhen a snapshot is no longer needed, you can delete it from Adaptec Storage Manager.
To delete a snapshot:
1 In the Logical Devices View, right-click the snapshot you want to delete.
2 Click Remove snapshot.
The snapshot is deleted.

Chapter 10: Protecting Your Data ● 98
Enabling Copyback
Note: Copyback is an upgrade feature; if the Copyback feature is locked, see Adding Enhanced Features on page 21 for information on purchasing a feature key.
When a logical drive is rebuilt using a hot spare (see page 148), data from the failed drive is transferred to the hot spare. When copyback is enabled, data is moved back to its original location once the controller detects that the failed drive has been replaced. Once the data is copied back, the hot spare becomes available again.
Copyback is disabled by default.
To enable copyback, right-click the controller, then click Enable or Disable copy back mode. (The copyback setting is a toggle switch.)

11Monitoring Your Storage Space
In this chapter...
Monitoring Options ........................................................................100
Checking Activity in Your Storage Space........................................101
What Do the Status Icons Mean? ....................................................102
Using Event Notifications to Monitor Status .................................103
Broadcasting Event Alerts to Users .................................................120
Silencing and Testing the Audible Alarm........................................121
Viewing Component Properties .....................................................122
This chapter describes how Adaptec Storage Manager helps you monitor your storage space.

Chapter 11: Monitoring Your Storage Space ● 100
Monitoring OptionsAdaptec Storage Manager provides many ways to monitor the status of your storage space:
● Event Viewer—The main window of Adaptec Storage Manager includes an Event Viewer that provides at-a-glance status information about activity occurring in your storage space. (See page 101.)
● Status Icons—Three basic icons (information, warning, and error) appear in the Event Viewer and in the main Adaptec Storage Manager window to help you quickly identify problems. (See page 102.)
● Notification Manager and Email Notification Manager—Notification utilities help you monitor these activities on local and remote systems (see page 103 and page 111):
● Progress of scheduled tasks, such as logical drive verifications.
● Changes in the status of the physical components of your storage space, such as disk drives.
● Changes to the local system, such as the expansion of a logical drive expansion or the creation of a hot spare.
● Audible Alarm—A series of beeps sounds whenever a serious event occurs on your storage space. (See page 121.)
● Properties Button—You can check the status of any component in your storage space by using the Properties button. (See page 122.)

Chapter 11: Monitoring Your Storage Space ● 101
Checking Activity in Your Storage SpaceFrom your local system, you can see status information and messages about the activity (or events) occurring in your storage space by looking at the Event Viewer, which displays a log of events. Status is indicated by an icon in the left-hand column, as shown below. (The icons are described in What Do the Status Icons Mean? on page 102.)
Double-click any event to see more details in an easier-to-read format. Click Next to see the next event in the list.
You can monitor activity on, and the status of, remote systems from the local system by using Adaptec Storage Manager’s two notification utilities to broadcast messages—the Notification Manager (see page 103) and the Email Notification Manager (see page 111).
Viewing the Full List of EventsTo open a full-screen version of the event log, click the Events button (shown at right).
To make it easier to find a specific event, click on the column heads to sort the events. (Sort events by status icons—see above—to help you find specific Error- or Warning-level events.

Chapter 11: Monitoring Your Storage Space ● 102
Clearing the Event LogTo clear the event log of all recorded activity:
1 In the menu bar of the main Adaptec Storage Manager window, click Actions, select Agent actions, then click Clear the configuration event log.
2 Click Yes to clear the log.
The log is cleared, except for one event reporting that the log was cleared.
What Do the Status Icons Mean?Adaptec Storage Manager indicates event status with icons. The Table below lists the three categories, or types, of events based on severity.
Warning- and Error-level icons appear next to components (such as systems and logical drives) affected by a failure or error, creating a trail, or rapid fault isolation, that helps you identify the source of a problem when it occurs. See Identifying a Failed or Failing Component on page 147 for more information.
Note: All Warning- and Error-level events also cause the audible alarm to sound. See page 121 for more information.
Icon Status Examples
Information The local system successfully connected to a remote system; a logical drive was created; a hot spare was created; a logical drive was deleted.
Warning A logical drive is in a degraded state; a disk drive is being rebuilt.
Error A controller has failed; a logical drive has failed; a hot spare has failed; a disk drive within a logical drive has failed.

Chapter 11: Monitoring Your Storage Space ● 103
Using Event Notifications to Monitor StatusYou can set up Adaptec Storage Manager to broadcast messages (or notifications) to selected remote systems and users when an event, such as the creation of a logical drive or the failure of a disk drive, occurs on the local system. (For more information about event types, see page 101.)
You can set up one or both of these types of notifications for any system in your storage space:
● Event notifications—Messages about a system are sent to the Event Viewer of other systems in your storage space. See below.
● Email notifications—Messages about a system are sent by email to specified users. See page 111.
Setting up Event NotificationsEvent notifications are messages about events on one system that are sent to the Event Viewer of another system in your storage space. These messages, called logged notifications, can help you monitor activity on your entire storage space from a single local station, and are especially useful in storage spaces that include multiple systems running the Adaptec Storage Manager agent only.
Logged notifications include status information and identify which system (or source) an event occurred on. For instance, in the example shown below, the Event Viewer indicates that a logical drive was added to a system named ‘bra2380a’ and then verified.
Logged notifications are not sent to all systems in your storage space. In the Notification Manager, you can specify which systems will send and receive logged notifications; then, you can add or delete systems as your storage space grows and changes.

Chapter 11: Monitoring Your Storage Space ● 104
Opening the Notification Manager and Adding SystemsThis section describes how to set up event notifications for one system in your storage space. You must complete the tasks in this section for each individual system that you’ll be monitoring with logged notifications.
To set up event notifications for a system:
1 Note this information for each system that will receive event notifications about the selected system:
● Host name or TCP/IP address
● TCP/IP port number (or the default, 34571)
2 In the Adaptec Storage Manager tool bar, click Configure, select the system you want, then click Notifications.
The Notification Manager opens on the Notifications tab of a new window. The local system is automatically included on the Notification List—by default, all local events are listed in the local Event Viewer.
Notification LogNotification List
Notifications Tab

Chapter 11: Monitoring Your Storage Space ● 105
3 Add the names of the other system(s) in your storage space that will receive event notifications generated by this system to the Notification List:
a In the tool bar, click Add system.
b In the Add System window, enter the host name or TCP/IP address of the first system. If you are not using the default port number, 34571, enter the TCP/IP port. Then, click Add.
c If you want more than one system to receive the event notifications, repeat Step b as required.
d When done, click Cancel to close the Add System window.
The systems you added appear in the Notification List. Although you can’t sort the list, you can reorganize the columns by clicking and dragging the column heads, as shown below.
4 Close the Notifications window when you’re done.
Note: You can access other utilities in this window, such as the Task Manager (see page 123), by clicking their tabs.
5 Repeat Steps 1 to 4 for each system you want to monitor with event notifications.

Chapter 11: Monitoring Your Storage Space ● 106
Sending a Test EventTo ensure that a system is receiving logged notifications, you can send a test event.
To send a test event:
1 Open the Notification Manager. (See page 104.)
Note: You can also access the Notification Manager by selecting the system you want in the Enterprise View, then (on the menu bar) clicking Actions > Agent actions > Configure > Notifications tab.
2 In the Notification List, click on the system you want to send a test event to.
Note: You can only send a test event to one system at a time.
3 On the menu bar, select Actions, then click Send test event.
The test event is sent. A message appears indicating either that the test event was sent successfully or that the test failed. (Click OK to clear the message.)
If the test is successful, the receiving system beeps once, and its Event Viewer shows that a test event was received, as shown below.
Test event

Chapter 11: Monitoring Your Storage Space ● 107
If the test fails:
a Ensure that the receiving system is powered on and running Adaptec Storage Manager.
b Open the receiving system’s System Properties window (see Step 3 on page 107) and double-check the TCP/IP address and port number.
c Try sending the test event again.
Managing the Event Notification ListThis section describes how to manage systems in the Notification List:
● To add a system to the Notification List, see page 104.
● To modify a system’s connection information, see page 107.
● To remove a system from the Notification List, see page 108.
Modifying a System’s Address or Host NameIf the TCP/IP information or host name of a system changes, update its properties in the Notification Manager.
Note: Does this system receive event notifications from more than one other system? Ensure you enter the updated information in the Notification Manager of all affected systems.
To modify system information:
1 Open the Notification Manager. (See page 104.)
2 In the Notification List, click on the system you want to modify.
3 In the System Properties window, enter the new information, then click OK.
The Notification List shows the modified information.

Chapter 11: Monitoring Your Storage Space ● 108
Removing a System from the Notification ListYou can remove any system (including the local system) from the Notification List. Once a system has been removed, logged notifications from the local system are no longer sent to it.
To remove a system from the Notification List:
1 Open the Notification Manager. (See page 104.)
2 In the Notification List, click on the system you want to remove.
3 In the tool bar, click Delete system.
4 Click Yes to confirm the deletion.
The system is removed from the Notification List.

Chapter 11: Monitoring Your Storage Space ● 109
Monitoring and Managing the Notification LogThe Notification Log displays status information and messages about the Notification Manager itself, such as whether notifications were sent successfully or not.
This section describes how to manage the Notification Log and use it to monitor the logged notifications being sent:
● Using the Notification Log (see below).
● Find the Notification Log files (see page 110).
● Clear the Notification Log (see page 110).
Using the Notification Log
By default, notification events are listed in the order they occurred, with the most recent event first. To make it easier to find a specific event, click on the column heads to sort the events. You can also reorganize the columns by clicking and dragging the column heads (see the Figure on page 105).
The Notification Log uses icons to show the status of events. These icons also appear in the Event Viewer of the remote systems.
Double-click on an event to see basic information about it. Click Next to see the next event in the list.
Icon Status Explanation and Solution
Information The Notification Manager successfully connected and sent the event. No action required.
Error The Notification Manager did not successfully connect to a system or send an event. Ensure that the correct host name and TCP/IP address of the receiving system is correct (see page 107).

Chapter 11: Monitoring Your Storage Space ● 110
Finding the Notification Log FilesIn addition to appearing in the Notification Log, notifications are saved in a log file named raidnot.log, which can be found in the top-level Adaptec Storage Manager folder.
The raidnot.log file has a maximum capacity of 200 kilobytes (KBs). When the capacity is exceeded, old events are copied into a file named raidnot.old, and a new raidnot.log file is created. If a raidnot.old already exists, it is overwritten.
Clearing the Notification LogTo make it easier to monitor recent events, you can clear the Notification Log.
Note: Clearing the Notification Log doesn’t erase the existing raidnot.log file (see above).
To clear the Notification Log:
1 Open the Notification Manager. (See page 104.)
2 In the menu bar, click File, select Clear the event log, then click Notifications.
3 Click Yes to clear the log.
The log is cleared, except for one event reporting that the log was cleared.

Chapter 11: Monitoring Your Storage Space ● 111
Disabling Event NotificationsEvent notifications are enabled by default. You can choose disable them, if required.
Note: If you disable event notifications, events will be generated but not broadcast—not even to the local system.
To disable event notifications:
1 Open the Notification Manager. (See page 104.)
2 In the menu bar, click Actions, then click Disable notifications.
Event notifications are disabled. The Notifications tab (shown at right) shows the red ‘disabled’ icon.
Re-enabling Event NotificationsTo re-enable event notifications, repeat steps 1 and 2 in Disabling Event Notifications above, selecting Enable Notifications during Step 2.
Setting Up Email NotificationsEmail notifications are email messages about events on a system in your storage space that are sent to specified users. Email notifications can help you monitor activity on your entire storage space from any location, and are especially useful in storage spaces that include multiple systems running the Adaptec Storage Manager agent only.
Only the users you specify receive email notifications. (See page 115.) You can specify which types of events generate email messages to which recipients to ensure that errors receive immediate attention from the right people.
In the Email Notification Manager, you can add and delete email recipients, and modify the types of email notices they receive, as your requirements change.

Chapter 11: Monitoring Your Storage Space ● 112
Opening the Email Notification ManagerThis section describes how to set up email notifications for one system in your storage space. You must complete the tasks in this section for each individual system that you’ll be monitoring with email notifications.
To set up email notifications:
1 Note this information:
● The address of your Simple Mail Transfer Protocol (SMTP) server (host name and domain, or TCP/IP address)
● The name and email address of each person who will receive email notifications
2 In the tool bar, click Configure, select the system you want, then click Email Notifications.
The Email Notification Manager opens on the Email Notifications tab of a new window.
3 If this is the first time you are opening the Email Notification Manager, continue with Entering the SMTP Server Settings on page 113.
To set up email notifications, continue with Adding an Email Recipient on page 113.
Email LogEmail List
Email Notifications Tab

Chapter 11: Monitoring Your Storage Space ● 113
Entering the SMTP Server SettingsThe first time you are opening the Email Notification Manager, the SMTP Server Settings window opens automatically.
In the SMTP Server Settings window:
1 Enter the address of your SMTP server.
2 Enter the “From” address to appear in email notifications.
If email recipients will be replying to email notifications, be sure that the “From” address belongs to a computer that is actively monitored.
3 Click OK to save the settings.
4 To set up email notifications, continue with Adding an Email Recipient on page 113.
Adding an Email RecipientTo add an email recipient to the Email List:
1 Open the Email Notification Manager. (See page 111.)
2 In the tool bar, click Add email recipient.
3 In the Add Email Recipient window (shown in the next Step), enter the recipient’s name and email address.
4 In the Event Type drop-down menu, select an event level. (For more information on event levels, see page 102.)
5 Click Add.

Chapter 11: Monitoring Your Storage Space ● 114
6 Repeat Steps 3 to 5 to add more email recipients.
7 Click Cancel to close the Add Email Recipient window.
The email recipients you added appear in the Email List.
Although you can’t sort the list, you can reorganize the columns by clicking and dragging the column heads (see the Figure on page 105).
8 Close the Email Notifications window when you’re done.
Note: You can access other utilities in this window, such as the Task Manager (see page 123), by clicking their tabs.
9 Repeat Steps 1 to 8 for each system you want to monitor with email notifications.
Sending a Test MessageTo ensure that an email recipient is receiving event notifications, you can send them a test message.
To send a test message:
1 Open the Email Notification Manager. (See page 111.)
Note: You can also access the Notification Manager from the menu bar by clicking Actions > Agent actions > Configure > Email Notifications tab.
2 Click on the email address you want to send the test message to.
Note: You can only send a test message to one email address at a time.

Chapter 11: Monitoring Your Storage Space ● 115
3 On the menu bar, select Actions, then click Send test message.
The test message is sent.
If the test is successful, the email recipient receives the test message.
If the test fails:
a Ensure that the recipient’s email address is correct. (See Modifying a Recipient’s Information on page 115 to modify the address.)
b Ensure that your SMTP server address is correct. (See Changing the Email Notification Manager Settings on page 118 to modify the address.)
c Try sending the test message again.
Managing the Email ListThis section describes how to:
● Add an email recipient, see page 113.
● Modify an email recipient’s information, see below.
● Remove an email recipient, see page 116.
Modifying a Recipient’s InformationIf a recipient’s email address changes, or if you need to change the types of event notifications the recipient receives, you can update the recipient’s information in the Email List.
To modify a recipient’s information:
1 Open the Email Notification Manager. (See page 111.)
2 Click on the recipient’s name.

Chapter 11: Monitoring Your Storage Space ● 116
3 Modify the recipient’s information as required, then click OK.
Removing a Recipient from the Email ListYou can remove any recipient from the Email List. Once a recipient has been removed, event notifications from the local system are no longer sent to that email address.
To remove a recipient from the Email List:
1 Open the Email Notification Manager. (See page 111.)
2 Click on the recipient you want to remove.
3 In the tool bar, click Delete email recipient.
4 Click Yes to confirm the deletion.
The recipient is removed from the Email List.
Monitoring and Managing the Email LogThe Email Log displays status information and messages about the Email Notification Manager itself, such as whether email notifications were sent successfully or not.
This section explains how to:
● Use the Email Log (see page 117).
● Find the Email Log files (see page 117).
● Clear the Email Log (see page 117).

Chapter 11: Monitoring Your Storage Space ● 117
Using the Email LogBy default, email events are listed in the order they occurred, with the most recent event first. To make it easier to find a specific event, click on the column heads to sort events. You can also reorganize the column by clicking and dragging the column heads (see the Figure on page 105).
Double-click on an event to see basic information about the event, including the event type. (See page 116 for a list of event types.) Click Next to see the next event in the list.
Finding the Email Log FilesIn addition to appearing in the Email Log, event notifications are saved in a log file named raidsmtp.log, which can be found in the top-level Adaptec Storage Manager folder.
The raidsmtp.log file has a maximum capacity of 200 kilobytes (KBs). When the capacity is exceeded, old events are copied into a file named raidsmtp.old, and a new raidsmtp.log file is created. If a raidsmtp.old already exists, it is overwritten.
Clearing the Email LogTo make it easier to monitor recent events, you can clear the Email Log.
Note: Clearing the Email Log doesn’t erase the existing raidsmtp.log file (see above).
To clear the Email Log:
1 Open the Email Notification Manager. (See page 111.)

Chapter 11: Monitoring Your Storage Space ● 118
2 In the menu bar, select Clear the event log, then click Email Notifications.
3 Click Yes to clear the log.
The log is cleared, except for one event reporting that the log was cleared.
Changing the Email Notification Manager SettingsYou can modify these Email Notification Manager settings as your needs change:
● Address of your SMTP server
● ‘From’ address that will appear in email notifications
To modify the Email Notification Manager settings:
1 Open the Email Notification Manager. (See page 111.)
2 In the menu bar, select Actions, then click SMTP server settings.
The SMTP Server Settings window opens.
3 Enter the address of your SMTP server.

Chapter 11: Monitoring Your Storage Space ● 119
4 Enter the “From” address to appear in email notifications.
If email recipients will be replying to email notifications, be sure that the “From” address belongs to a computer that is actively monitored.
5 Click OK to save the settings.
Disabling Email NotificationsEmail notifications are enabled by default, but can be disabled, if required.
Note: If you disable email notifications, events will be generated but email notices won’t be broadcast.
To disable email notifications:
1 Open the Email Notification Manager. (See page 111.)
2 In the menu bar, click Actions, then click Disable Email Notifications.
Email notifications are disabled. The Email Notifications tab (shown at right) shows the red ‘disabled’ icon.
Re-enabling Email NotificationsTo re-enable email notifications, repeat steps 1 and 2 in Disabling Email Notifications above, selecting Enable Notifications during Step 2.

Chapter 11: Monitoring Your Storage Space ● 120
Broadcasting Event Alerts to UsersYou can set the Adaptec Storage Manager agent to send event alerts about a specific system to all users who are logged into your storage space. You might want to do this if your storage space isn’t managed by a dedicated person, or if that particular system is off-site or not connected to a monitor. Event alerts signal everyone working on the storage space that a system requires technical assistance.
When you set Adaptec Storage Manager to broadcast event alerts, all logged-in users receive messages about all types of events. In Windows, these alerts appear as pop-up messages; in all other operating systems, these alerts appear as console messages.
When enabled, event alerts occur independent of event notifications (see page 103) and email notifications (see page 111).
To enable event alerts:
1 On the tool bar, click the Configure button, select the system you want, then click General Settings.
The Adaptec Storage Manager Agent General Settings window opens for that system.
2 Select Broadcast events to logged-in users, then click Save changes.
3 Restart Adaptec Storage Manager to apply the change.

Chapter 11: Monitoring Your Storage Space ● 121
Silencing and Testing the Audible AlarmBy default, when a Warning- or Error-level event (see page 101) occurs on any system in the Enterprise View, an audible alarm is triggered on the local system. The alarm is a series of beeps, which sound every five minutes until the event is resolved.
You can change the frequency and duration of the alarm, or choose to disable the alarm on any system. See Changing a System’s Audible Alarm Settings on page 67 for more information.
This section describes how to:
● Ensure the alarm is working on your local system (see below).
● Silence a sounding alarm (see page 122).
● Disable the alarm for a selected controller (see page 122).
Testing the AlarmTo test the audible alarm to ensure that it’s working on your local system:
1 Ensure that the speakers on your local system aren’t muted.
2 In the Enterprise View, click on any controller.
3 In the menu bar, click Actions, select Alarm Actions, then click Test alarm.
The alarm sounds.
4 To stop the test, click OK.

Chapter 11: Monitoring Your Storage Space ● 122
Silencing the AlarmWhen a Warning- or Error-level event occurs, you can silence the alarm on your local system while you fix the problem.
To silence the alarm, click the Silence button (shown at right) in the main Adaptec Storage Manager window.
Disabling a Controller’s AlarmYou can disable the alarm for a selected controller, if required.
Caution: If you disable the alarm, no audible signal will sound when a Warning- or Error-level event occurs on the controller.
1 In the Enterprise View, click on the controller you want.
2 In the menu bar, click Actions, select Alarm Actions, then click Silence alarm.
The alarm is disabled for that controller.
Viewing Component PropertiesClick on any component in the main window of Adaptec Storage Manager, then click the Properties button (shown at right) to view version numbers, status, model numbers, and other information about that component.
The properties listed vary, depending on which type of component you selected.
!

12Managing Tasks
In this chapter...
Scheduling a Task.............................................................................124
Opening the Task Manager .............................................................126
Monitoring Tasks .............................................................................127
Modifying a Task..............................................................................129
Deleting a Task .................................................................................130
Disabling the Task Manager ............................................................131
Adaptec Storage Manager allows you to schedule some types of jobs (or tasks) to complete at convenient times. Additionally, you can schedule some tasks to recur at preset times.
A Task Manager utility helps you manage the tasks you schedule.
This chapter describes how to schedule, monitor, and manage tasks.

Chapter 12: Managing Tasks ● 124
Scheduling a TaskIf a task is lengthy and limits access to components on your storage space, you may want to set a date and time for the task to complete, instead of running the task while there is activity on your storage space.
If a task must be performed regularly, you can schedule it to recur at preset times.
You can schedule these Adaptec Storage Manager tasks:
● Expanding a logical drive
● Changing a logical drive’s RAID level
● Modifying the stripe size of a logical drive
● Verifying a logical drive
● Verifying and fixing a logical drive
To schedule one of these tasks:
1 Complete each step of the task until you are prompted to click Apply. (Don’t click Apply.)
Schedule button

Chapter 12: Managing Tasks ● 125
2 Click Schedule.
The schedule window opens. (The window you see may be different from the one shown in this example, depending on which type of task you are scheduling.)
3 Set the date and time for the task.
Note: Keep geography in mind—If you are scheduling tasks on remote systems located in other geographical areas, remember that the time you set for a scheduled task is that system’s time, which may be different from local time. You will be prompted to select a new time if the one you’ve set occurs in the past on the remote system.
4 Set the recurrence frequency, if the option is available for this task and you want it to occur regularly.
5 Click Apply.
The task is saved in the Task Manager, and the scheduled task is added to the Task List. For more information about the Task Manager, see page 126.

Chapter 12: Managing Tasks ● 126
Opening the Task ManagerYou can use the Task Manager to monitor and modify the tasks you have scheduled. (To schedule a task, see page 124.)
Tasks are associated with systems. When you open the Task Manager, you see the scheduled tasks associated with that local or remote system only.
To open the Task Manager, in the tool bar, click Configure, select the system you want, then click Tasks.
The Task Manager opens on the Tasks tab of a new window. The Tasks tab has two main panels, as shown below:
Note: From the Tasks tab, you can access other utilities in this window, such as the Email Notification Manager (see page 111), by clicking their tabs.
Task Event LogTask List
Tasks Tab

Chapter 12: Managing Tasks ● 127
Monitoring TasksUse the two main panels of the Task Manager to monitor your tasks:
● Monitor upcoming tasks in the Task List (see below)
● Check past tasks and task events in the Task Event Log (see page 127)
Monitoring Upcoming Tasks in the Task ListThe Task List displays all scheduled tasks in order of creation, and includes basic information about each task. Although you can’t sort the tasks in any other order, you can reorganize the columns in the Task List by clicking and dragging the column heads (see the Figure on page 105).
The Status column of the Task List shows the current condition of each task:
● Scheduled—The task is scheduled to be completed at a future date and time.
● Executed—The task has been completed successfully.
● Executed*—A recurring task has been completed once and will be repeated at the scheduled time.
● Error—The task has not been completed successfully. (For more information about an error, double-click the task in the Task List to open the Task Properties window.)
Checking Past Tasks and Events in the Event LogThe Event Log displays detailed information about the Task Manager itself, such as when scheduled events were modified, deleted, or completed successfully.
By default, task events are listed in the order they occurred, with the most recent event first. To make it easier to find a specific event, click on the column heads to sort task events. You can also reorganize the columns by clicking and dragging the column heads (see the Figure on page 105).

Chapter 12: Managing Tasks ● 128
The Event Log uses icons to show the status of past tasks:
Double-click on an event to see basic information about the event. Click Next to see the next event in the list.
Icon Status Explanation and Solution
Information The task or event completed successfully. No action required.
Warning The task missed its start time. Reschedule the task to clear the error, as described in Modifying a Task on page 129.
Error The task failed. Delete the task to clear the error. Schedule the task again, as described in Scheduling a Task on page 124.)

Chapter 12: Managing Tasks ● 129
Modifying a TaskIf your requirements change, you can reschedule a task to a different date or time. You can also modify the task description that appears in the Task List. Creating a custom task description makes it easier to find the task in the Task List.
To modify a scheduled task:
1 In the tool bar, click Configure, select the system you want, then click Tasks (as shown on page 126).
2 In the Task Manager, select the task you want to change, then click Modify task.
3 In the Modify Task window, make the required changes, then click OK.
The task and Task List are updated with the new information.

Chapter 12: Managing Tasks ● 130
What if a task misses its start time?Tasks scheduled in Adaptec Storage Manager include an automatic 30-minute grace period following their start time, to accommodate temporary interruptions. For instance, if there’s a brief power outage a task will run once normal conditions resume, if the interruption lasts no longer than 30 minutes past the scheduled start time.
If a task misses its start time, it must be rescheduled. For instructions, see Modifying a Task on page 129.
If a recurring task misses its start time, it is automatically rescheduled to run at the next scheduled interval.
Deleting a TaskIf a scheduled task is no longer required, you can delete it from the Task Manager.
To delete a task:
1 In the tool bar, click Configure, select the system associated with the task you want to delete, then click Tasks (as shown on page 126).
2 In the Task Manager, select the task you want to delete, then click Delete task.
3 Click Yes to confirm the deletion.
The task is deleted.

Chapter 12: Managing Tasks ● 131
Disabling the Task ManagerThe Task Manager is enabled by default. If you do not wish to schedule tasks on a selected system, you can disable it.
Note: If you disable the Task Manager, no scheduled tasks will run on that system.
To disable the Task Manager:
1 In the tool bar, click Configure, select the system whose Task Manager you want to disable, then click Tasks (as shown on page 126).
2 In the menu bar, click Actions, then click Disable Task Scheduler.
The Task Manager is disabled. The Tasks tab (shown at right) shows the red ‘disabled’ icon.
Note: When the Task Manager is disabled, a brief three-tone alert sounds each time you open and log in to Adaptec Storage Manager. Scheduled tasks in the Task List will not run while the Task Manager is disabled.
Re-enabling the Task ManagerTo re-enable the Task Manager, repeat the steps in Disabling the Task Manager on page 131, selecting Enable Task Scheduler during Step 2.
Scheduled tasks that have missed their start times must be rescheduled if you want them to run. See Modifying a Task on page 129 for instructions.
Scheduled tasks that did not miss their start time while the Task Manager was disabled will run as scheduled.
13Managing Remote Systems
In this chapter...
Introduction.....................................................................................133
Removing a Remote System ............................................................133
This chapter describes how to work with and manage remote systems using Adaptec Storage Manager.
Chapter 13: Managing Remote Systems ● 133
IntroductionTo manage remote systems, you must log in to them from the local system. (See Logging In to Remote Systems on page 61 for a definition of ‘local’ and ‘remote’ systems, and for log in instructions.) Adaptec Storage Manager must be installed and running on a remote system before you can log in to it.
Once you have logged in to a remote system, you can work with its controllers, disk drives, and logical drives as if they were part of your local system. You must log in with the proper permission level to complete the tasks you wish to perform. (See Understanding Permission Levels on page 35 for more information.)
Removing a Remote SystemIf you no longer want to monitor a remote system, you can remove it from the Enterprise View of Adaptec Storage Manager.
Removing a remote system does not cause it to fail.
To remove a remote system:
1 In the menu bar of the main window, select Remote, select Remove managed system, then click the system you want to remove.
The Remove Managed System window opens.
2 If you want to continue receiving events from the remote system after it’s been removed from the local system, select Continue to receive events from the remote system from the drop-down menu.
3 Click OK.
The remote system is removed from the Enterprise View of Adaptec Storage Manager.

14Working with Display Groups
In this chapter...
Adding a System to a Display Group ..............................................135
Viewing Display Group Status ........................................................136
Removing a System from a Display Group.....................................136
Moving a System from One Display Group to Another ................137
Renaming a Display Group .............................................................137
Deleting a Display Group ................................................................138
This chapter describes how to work with and manage display groups in Adaptec Storage Manager.
To create display groups, see Creating Display Groups on page 63.

Chapter 14: Working with Display Groups ● 135
Adding a System to a Display GroupAs your storage space grows and changes, you can add new systems to your display groups.
To add a system to a display group:
1 Right-click on the system in the Enterprise View.
2 Select Change display group, then click the display group name.
The system is added to the display group.
Note: A system can belong to only one display group at a time; you can’t include the same system in multiple display groups.

Chapter 14: Working with Display Groups ● 136
Viewing Display Group StatusTo quickly view the status of systems within a display group, you can open the display group Properties window.
To view display group status, right-click on the system in the Enterprise View, then click Properties. The Properties window opens for that display group, summarizing the status of the systems that belong to that group.
Removing a System from a Display GroupTo remove a system from a display group:
1 In the Enterprise View, right-click the system you want to remove.
2 Select Change display group, then click None.
The system is removed from the display group.
Note: Systems that are not part of display groups are listed at the top of the Enterprise View, above any display groups.

Chapter 14: Working with Display Groups ● 137
Moving a System from One Display Group to AnotherTo move a system from one display group to another:
1 In the Enterprise View, right-click the system you want to remove.
2 Select Change display group, then click the name of the display group you want.
The system moves to its new display group.
Renaming a Display GroupYou can make managing your storage space easier and more efficient by giving your display groups meaningful names.
To rename a display group:
1 In the Enterprise View, right-click on the display group, then click Rename display group.
2 Enter a new name for the display group, then click OK.
The Enterprise View shows the new name of the display group.

Chapter 14: Working with Display Groups ● 138
Deleting a Display GroupIf required, you can delete a display group. When you delete the display group, the systems that belonged to it are listed at the top of the Enterprise View, above any remaining display groups.
To delete a display group:
1 In the Enterprise View, right-click on the display group.
2 Click Delete display group.
The display group is deleted and the systems that belonged to it are no longer grouped together in the Enterprise View.

15Managing Controllers and Disk Drives
In this chapter...
Rescanning a Controller ..................................................................140
Registering New Controllers ...........................................................140
Viewing Controller Properties ........................................................141
Saving Your Controller Configuration ...........................................141
Updating Controller BIOS and Firmware ......................................142
Setting a Disk Drive to ‘Failed’........................................................144
Replacing Disk Drives in a Logical Drive .......................................145
This chapter describes how to manage the RAID controllers in your storage space.

Chapter 15: Managing Controllers and Disk Drives ● 140
Rescanning a ControllerAfter you connect a disk drive to or remove a ‘Ready’ (non-failed) disk drive from a controller, Adaptec Storage Manager may not recognize the change until it rescans the controller.
To rescan a controller:
1 In the Enterprise View, click the controller.
2 In the menu bar, select Actions, then click Rescan.
Adaptec Storage Manager scans all the channels or ports on the controller you selected.
When the scan is complete, a report appears.
3 Click Done after you have reviewed the scan report.
Registering New ControllersWhen you log in to Adaptec Storage Manager, it searches for new controllers in your storage space. If it detects a new controller, you are prompted to register it.
To stay informed about Adaptec products and special offers, register your controllers by clicking Register Now.
Follow the on-screen instructions to complete the registration.

Chapter 15: Managing Controllers and Disk Drives ● 141
Viewing Controller PropertiesYou can open a Properties window for any controller in your storage space to view model and status information, including the firmware version number.
To view controller properties:
1 In the Enterprise View, click the controller.
2 In the menu bar, select Actions, then click Properties.
The Properties window for the controller opens.
3 Click the tabs to view all available information.
4 Click the X in the upper-right corner to close the window.
Saving Your Controller ConfigurationIf you require a record of your controller configurations, you can use Adaptec Storage Manager to create a text file with this information about all controllers on a selected system:
● Controllers
● Disk drives
● Disk drives used in logical drives
● Logical drives
To save a system’s controller configurations:
1 In the Enterprise View, click the local or remote system.

Chapter 15: Managing Controllers and Disk Drives ● 142
2 In the menu bar, select Actions, then click Save printable configuration.
3 In the Save window, browse to the directory you want, then enter a file name for the report. (The default directory is the directory in which the Adaptec Storage Manager is installed. The default file name is RaidCfg.log.)
A text-file report is saved.
Updating Controller BIOS and Firmware
Note: This task is recommended for advanced users only.
Adaptec Storage Manager provides a wizard to help you update the BIOS and firmware for the controllers in your storage space. The ROM Update wizard updates the BIOS and firmware for all controllers of the same type on local and remote systems. You can update one type of controller at a time.
Before You BeginBefore you begin, download the latest firmware images from the Adaptec Web site at www.adaptec.com. Image files typically come in sets of two or more and have a .ufi file extension.
Updating the Controller BIOS and FirmwareTo update the controller firmware:
1 In the Enterprise View, click Managed systems (shown in the Figure below).

Chapter 15: Managing Controllers and Disk Drives ● 143
2 In the menu bar, select Actions, then click Update controller images.
The ROM Update wizard opens.
3 Click Next.
4 Click Add to browse to the firmware image files you downloaded, then click Open.
5 In the wizard, click the image files you want, then click Next.
6 Select the controllers you want to update, then click Next.
Managed systems

Chapter 15: Managing Controllers and Disk Drives ● 144
7 Review the update summary, then click Apply.
8 When prompted, click Yes to begin the update.
Caution: Do not power down the controller(s) during the update.
9 When the update is complete, click OK. Then, restart the server(s) to activate the new firmware images.
Setting a Disk Drive to ‘Failed’Before you can remove a disk drive from a server, you must set it to a failed state to protect your data.
Caution: You may lose data or damage your disk drive if you remove a disk drive without first setting it to a failed state.
You can set a disk drive to a failed state if:
● The disk drive is not part of a logical drive, or
● The disk drive is part of a redundant, healthy logical drive
You can’t set a disk drive to a failed state if doing so will take a logical drive offline.
To set a disk drive to a failed state:
1 In the Physical Devices View, click the disk drive.
2 In the menu bar, select Actions, then click Set drive state to failed.
3 Click Yes to set the drive status to failed.
4 Remove and replace the disk drive.
5 If the logical drive that the disk drive belongs to is failed, see Recovering from a Disk Drive Failure on page 147.
!
!

Chapter 15: Managing Controllers and Disk Drives ● 145
Replacing Disk Drives in a Logical DriveYou can replace one or more disk drives in a logical drive. You may want to do this to upgrade to larger disk drives, or to make disk drive size uniform across the logical drive.
Caution: If another disk drive in the logical drive fails during rebuild (see page 151), you may lose data.
To replace a disk drive in a logical drive:
1 In the Physical Devices View, click the disk drive you want to replace.
2 Set the drive state to failed. (See page 144.)
3 Remove and replace the disk drive with one of equal or larger size.
4 Wait for the logical drive to rebuild. (See page 151.)
5 Repeat Steps 1 to 4 for all the disk drives you want to replace.
For information about solving disk drive problems, see Recovering from a Disk Drive Failure on page 147.
!

16Solving Problems
In this chapter...
Identifying a Failed or Failing Component ....................................147
Recovering from a Disk Drive Failure.............................................147
Rebuilding Logical Drives ...............................................................151
Solving Notification Problems ........................................................151
Creating an Archive File ..................................................................152
Troubleshooting Adaptec Storage Manager ...................................152

Chapter 16: Solving Problems ● 147
Identifying a Failed or Failing ComponentWhen your are notified of a Warning- or Error-level event, use Adaptec Storage Manager’s rapid fault isolation feature to quickly identify the source of the problem.
For instance, in the example below a disk drive has failed. To find the failed disk drive, follow the yellow Error icons:
Recovering from a Disk Drive FailureWhen a disk drive fails for any reason, it is represented in Adaptec Storage Manager with a red X, as shown at right.
This section explains how to recover when a disk drive fails:
● If the logical drive was protected by a hot spare (see page 148).
● If the logical drive was not protected by a hot spare (see page 149).
● If there is a disk drive failure in more than one logical drive simultaneously (see page 149).
● If it is a RAID 0 logical drive (see page 149).
● If multiple disk drives fail within the same logical drive (see page 150).
Error is on the local system...
...on Controller 1...
...and both the failed disk drive (marked with red X)and hot spare (with yellow +) are affected.

Chapter 16: Solving Problems ● 148
Failed Disk Drive Protected by a Hot SpareWhen a logical drive is protected by a hot spare, if a disk drive in that logical drive fails the hot spare is automatically incorporated into the logical drive and takes over for the failed drive.
For instance, when a disk drive fails in the RAID 5 logical drive shown in the example below, the logical drive is automatically rebuilt (its data is reconstructed) using the hot spare in place of the failed drive. You can’t access the logical drive until the rebuilding is complete.
Note: In the example above, the color of the hot spare changed from light-blue to dark-blue, showing that it is now part of a logical drive.
To recover from the failure:
1 Remove and replace the failed disk drive (following manufacturer’s instructions).
2 If copyback is not enabled—Remove the ‘hot spare’ designation from the original hot spare (the disk drive that was built into the logical drive). See page 93 for instructions. Then, designate a new hot spare to protect the logical drives on that controller.
If copyback is enabled—Data is automatically moved back to its original location once the controller detects that the failed drive has been replaced. No action is required. See Enabling Copyback on page 98 for more information.
...and logical drive is rebuilt with hot spare
Disk drive showsFailed status...
...hot spare takes over...

Chapter 16: Solving Problems ● 149
Failed Disk Drive Not Protected by a Hot SpareWhen a logical drive is not protected by a hot spare, if a disk drive in that logical drive fails, remove and replace the failed disk drive. The controller detects the new disk drive and begins to rebuild the logical drive.
If the controller fails to rebuild the logical drive, check that the cables, disk drives, and controllers are properly installed and connected. Then, if necessary, follow the instructions in Rebuilding Logical Drives on page 151.
Failure in Multiple Logical Drives SimultaneouslyIf there’s a disk drive failure in more than one logical drive at the same time (one failure per logical drive), and the logical drives have hot spares protecting them, the controller rebuilds the logical drives with these limitations:
● A hot spare must be of equal or greater size than the failed disk drive it’s replacing.
● Failed disk drives are replaced with hot spares in the order in which they failed. (The logical drive that includes the disk drive that failed first is rebuilt first, assuming an appropriate hot spare is available—see bullet above.)
If there are more disk drive failures than hot spares, see Failed Disk Drive Not Protected by a Hot Spare on page 149.
If copyback is enabled, data is moved back to its original location once the controller detects that the failed drive has been replaced. See Enabling Copyback on page 98 for more information.
Disk Drive Failure in a RAID 0 Logical DriveBecause RAID 0 volumes do not include redundancy, if a disk drive fails in a RAID 0 logical drive, the data can’t be recovered.
Correct the cause of the failure or replace the failed disk drives. Then, restore your data (if available).

Chapter 16: Solving Problems ● 150
Multiple Failures in the Same Logical DriveExcept in RAID 6 and RAID 60 logical drives (see pages 171 and 172), if more than one disk drive fails at the same time in the same logical drive, the data can’t be recovered.
Correct the cause of the failure or replace the failed disk drives. Then, restore your data (if available).
Note: In some instances, RAID 10 and RAID 50 logical drives may survive multiple disk drive failures, depending on which disk drives fail. See Understanding RAID on page 163 for more information.
Removing a Failed Disk Drive’s Icon
Note: You can only complete this task on disk drives that are not included in any logical drive.
When a disk drive fails, it may still appear in Adaptec Storage Manager although it is no longer available. To see an accurate representation of your storage space and make it easier to monitor your disk drives, you can remove a failed disk drive from the Physical Devices View.
In the Physical Devices View, right-click the failed disk drive, then click Remove failed drive.
Chapter 16: Solving Problems ● 151
Rebuilding Logical DrivesA hot-swap rebuild occurs when a controller detects that a failed disk drive in a logical drive has been removed and then reinserted.
To start a hot-swap rebuild:
1 Following manufacturer’s instructions, gently pull the failed disk drive from the server without fully removing it, then wait for it to spin down fully before continuing.
2 If there is nothing wrong with the disk drive, reinstall it, following manufacturer’s instructions.
If necessary, replace the failed disk drive with a new disk drive of equal or larger size.
3 The controller detects the reinserted (or new) disk drive and begins to rebuild the logical drive.
Solving Notification ProblemsTo test notifications on your storage space, you can send test events or emails to ensure that they’re being received properly.
If your test event fails:
1 Ensure that the remote system is powered on and running Adaptec Storage Manager.
2 Open the remote system’s System Properties window (see Step 3 on page 107) and double-check the TCP/IP address and port number.
3 Try sending the test event again.
If your test email fails:
1 Ensure that the recipient’s email address is correct. (See Modifying a Recipient’s Information on page 115 to modify the address.)
2 Ensure that your SMTP server address is correct. (See Changing the Email Notification Manager Settings on page 118 to modify the address.)
3 Try sending the test message again.

Chapter 16: Solving Problems ● 152
Creating an Archive FileYour Adaptec Storage Manager service representative might ask you to create a configuration and status information archive file to help diagnose a problem with your system.
To create the archive file:
1 In the Enterprise View, click the local or remote system on which the problem is occurring.
2 In the menu bar, select Actions, then click Save support archive.
3 Enter a name for the archive file or accept the default name, then click Save.
Troubleshooting Adaptec Storage ManagerIf you experience problems installing or using Adaptec Storage Manager, follow these suggestions:
● Ensure that you are logged in to Adaptec Storage Manager at the permission level you need to perform the tasks you want. (See page 35 for more information.)
● Ensure that all managed systems are powered on and that you are logged in to any remote systems you want to manage. (See page 61 for more information.)
● Check all cable connections.
● Try uninstalling and reinstalling Adaptec Storage Manager.

AConfiguring SNMP Support
In this appendix...
Configuring SNMP Support on Windows .....................................154
Configuring SNMP Support on Linux ...........................................155
Configuring SNMP Support on NetWare ......................................155
This appendix describes how to configure SNMP support for the Adaptec Storage Manager software. Adaptec Storage Manager supports SNMP “gets” and “traps” through the use of an SNMP agent.

Appendix A: Configuring SNMP Support ● 154
Configuring SNMP Support on Windows
Note: Be sure your Windows installation includes SNMP support. By default, Windows 2000 and Windows XP do not install SNMP.
To install and configure SNMP support:
1 Run the Adaptec Storage Manager installation program (see page 25).
2 When prompted, select Yes, install SNMP support.
3 Follow the on-screen instructions to complete the installation, then restart your computer.
4 Open the Windows Computer Management tool, then select Services from the tree.
5 Double-click SNMP Service.
The SNMP Service Properties window opens.
6 Click the Traps tab, then enter the IP address of each computer on which you want to enable traps.
7 Click OK.
8 Start the SNMP service.

Appendix A: Configuring SNMP Support ● 155
Configuring SNMP Support on LinuxFor the Linux operating system, the Adaptec Storage Manager SNMP agent is a sub-agent that interfaces with the UCD-SNMP agentx architecture. UCD-SNMP is a third-party package for Linux; for information, documentation, and downloads, see www.net-snmp.org.
To configure SNMP support:
1 Install Adaptec Storage Manager (see page 28).
2 Configure the UCD-SNMP master agent to be used with agentx.
3 Start the Adaptec Storage Manager SNMP sub-agent:
From the Adaptec Storage Manager installation directory, run the aus-snmpd executable.
Refer to your Linux documentation for information on configuring UCD-SNMP, agentx, and setting up traps.
Configuring SNMP Support on NetWareTo install Adaptec Storage Manager SNMP support, at the command prompt type this command, then press Enter:
load AUS-SNMP.NLM
Refer to your NetWare documentation for information on configuring traps.

BQuick Answers to Common Questions...
In this appendix...
How do I...? ......................................................................................157
What’s the difference between...? ....................................................159
This chapter provides quick references to frequently requested information about basic tasks and concepts in Adaptec Storage Manager.
Note: For troubleshooting tips, see Solving Problems on page 146.

Appendix B: Quick Answers to Common Questions... ● 157
How do I...?Set up my storage space?Follow the five steps in the Getting Started Checklist on page 23.
Open the Configuration wizard?In the Enterprise View, right-click the controller you want, then click Create logical device. Or, click either of the buttons shown at right. See page 47.
Turn off the alarm?Click the Silence button, shown at right.
Or, from the menu bar, click Actions, select Alarm actions, then click Silence alarm. See page 122.
Add a new user to Adaptec Storage Manager?Any user with a valid network user name and password can log into Adaptec Storage Manager. See page 30.
Add a remote system?Click the Add button, shown at right. See page 61.
Prevent a user from changing my storage space?See page 35 for information on restricting access.
Check disk drive or logical drive status?Hold your cursor over the disk drive or logical drive to reveal status information. See also page 43.
Access a feature with a padlock icon beside it?Features such as copyback, snapshot, and some RAID levels are enhanced features that must be unlocked with a special feature key (sold separately). See page 21.
Log out of Adaptec Storage Manager?In the Enterprise View, click on the local system. In the menu bar, select Actions, then click Log out. See page 38.
or

Appendix B: Quick Answers to Common Questions... ● 158
Schedule a task?Complete each step of the task until you are prompted to click Apply. (Don’t click Apply.) Click Schedule. See page 124.
Note: The Schedule button won’t appear on tasks that can’t be scheduled.
Find the Task Manager?In the tool bar, click Configure, select the system you want, then click Tasks. See page 126.
Find the Notification Manager?In the tool bar, click Configure, select the system you want, then click Notifications. See page 103.
Find the Email Notification Manager?In the tool bar, click Configure, select the system you want, then click Notifications. See page 111.

Appendix B: Quick Answers to Common Questions... ● 159
What’s the difference between...?Adaptec Storage Manager and the agent?Adaptec Storage Manager is the full software application, including the user interface (windows, menus) described in this Guide. It helps you build and maintain the logical drives, controllers, and disk drives that make up your storage space.
The agent is like a service that keeps your storage space running. Its job is to monitor system health and manage event notifications, tasks schedules, and other on-going processes on each system in your storage space. The agent can run independently of the full application.
See page 17 for more information.
Event notifications, email notifications, and event alerts?Event notifications (also called logged notifications) are messages about events on one system that are sent to the Event Viewer of another system in your storage space. (See page 103.)
Email notifications are email messages about events on a system in your storage space that are sent to specified users. (See page 111.)
Event alerts are pop-up messages or console messages about all types of events on a specific system, which are broadcast to all the users who are logged into your storage space. (See page 120.)

CButtons and Icons At-a-Glance
In this appendix...
Icons in the Physical Devices View .................................................161
Icons in the Logical Devices View...................................................161
Buttons in the Physical/Logical Devices Views ..............................162
Buttons on the Main Window Tool Bar..........................................162
This chapter provides quick references to the icons and buttons that appear in Adaptec Storage Manager.

Appendix C: Buttons and Icons At-a-Glance ● 161
Icons in the Physical Devices View
Icons in the Logical Devices View
Icon Descriptions
Ready disk drive
Disk drive with free space
Disk drive with no free space
Failed disk drive
Healthy global or dedicated hot spare
Hot spare with error (see page 93 for more information)
Hot spare being built into logical drive after disk drive failure
Hot spare built into logical drive after disk drive failure
Locked upgrade feature that can be activated with a feature key (see page 21 for more information)
Icon Description
Logical drive
Logical drive with healthy hot spare
Logical drive with a snapshot
Logical drive being initialized
Logical drive being modified
Logical drive being rebuilt after disk drive failure
Locked upgrade feature that can be activated with a feature key (see page 21 for more information)

Appendix C: Buttons and Icons At-a-Glance ● 162
Buttons in the Physical/Logical Devices Views
Buttons on the Main Window Tool Bar
Button Click to... More on...
...see a text description of your disk drives. ...page 43.
...see the size capacities of your disk drives. ...page 44.
...to see the size capacities of your disk drives relative to each other.
...page 44.
...to create a global hot spare. ...page 91.
...to create a logical drive. ...page 47.
...to delete a logical drive. ...page 89.
...to expand and collapse additional information about disk drives and logical drives.
...page 46.
Button Click to... More on...
...add a remote system. ...page 61.
...create a logical drive; open the Configuration wizard.
...page 47.
...silence the audible alarm. ...page 121.
...check status and other properties of a controller, disk drive, or other component.
...page 122.
...view the full Event log. ...page 101.
...configure the Adaptec Storage Manager agent settings.
...configure notification settings.
...configure email notification settings.
...check the status of scheduled tasks;monitor and modify scheduled tasks.
...page 67.
...page 103.
...page 111.
...page 123.
...open the online Help. ...page 46.

DUnderstanding RAID
In this appendix...
Understanding Drive Segments ......................................................164
RAID 0 (Non-RAID Logical Drives) ..............................................164
RAID 1 Logical Drives .....................................................................165
RAID 1 Enhanced Logical Drives....................................................166
RAID 10 Logical Drives ...................................................................167
RAID 5 Logical Drives .....................................................................168
RAID 5EE Logical Drives ................................................................169
RAID 50 Logical Drives ...................................................................170
RAID 6 Logical Drives .....................................................................171
RAID 60 Logical Drives ...................................................................172
Selecting the Best RAID Level .........................................................173
When you create logical drives in Adaptec Storage Manager, you can assign a RAID level to protect your data.
Each RAID level offers a unique combination of performance and redundancy. RAID levels also vary by the number of disk drives they support.
This appendix describes the RAID levels supported by Adaptec Storage Manager, and provides a basic overview of each to help you select the best level of protection for your storage system.

Appendix D: Understanding RAID ● 164
Understanding Drive SegmentsA drive segment is a disk drive or portion of a disk drive that is used to create a logical device. A disk drive can include both RAID segments (segments that are part of a logical drive) and available segments. Each segment can be part of only one logical device at a time. If a disk drive is not part of any logical device, the entire disk is an available segment.
RAID 0 (Non-RAID Logical Drives)A logical drive with RAID 0 includes two or more disk drives (maximum twelve) and provides data striping, where data is distributed evenly across the disk drives in equal-sized sections.
RAID 0 logical drives do not maintain redundant data, so they offer no data protection. However, compared to an equal-sized group of independent disks, a RAID 0 logical drive provides improved I/O performance.
Drive segment size is limited to the size of the smallest disk drive in the logical drive. For instance, a logical drive with two 250 GB disk drives and two 400 GB disk drives can create a RAID 0 drive segment of 250 GB, for a total of 1000 GB for the volume, as shown below.
Disk Drive 1
Disk Drive 2
Disk Drive 3
Disk Drive 4
250 GB
250 GB
400 GB
400 GB
Disk Drives in Logical Drive
Disk Drive 1
Disk Drive 2
Disk Drive 3
Disk Drive 4
RAID 0 Logical Drive = 1000 GB
1
2
3
4
Not Used
Not Used
5
6
7
81000
999
998
997...
...
...
...
Unused Space: 150 GB
Unused Space: 150 GB
Drive Segment Size (Smallest Disk Drive)

Appendix D: Understanding RAID ● 165
RAID 1 Logical DrivesA RAID 1 logical drive is built from two disk drives, where one disk drive is a mirror of the other (the same data is stored on each disk drive). Compared to independent disk drives, RAID 1 logical drives provide improved performance, with twice the read rate and an equal write rate of single disks. However, capacity is only 50 percent of independent disk drives.
If the RAID 1 logical drive is built from different- sized disk drives, the free space, drive segment size is the size of the smaller disk drive, as shown below.
Disk Drive 1
Disk Drive 2
250 GB
400 GB
Disk Drives in Logical Drive
Disk Drive 1
Disk Drive 2
RAID 1 Logical Drive = 250 GB
Not UsedUnused Space: 150 GB
1 – 250
1 – 250
Drive Segment Size (Smaller Disk Drive)

Appendix D: Understanding RAID ● 166
RAID 1 Enhanced Logical Drives
Note: RAID 1E is an upgrade feature; if the RAID 1E feature is locked, see Adding Enhanced Features on page 21 for information on purchasing a feature key.
A RAID 1 Enhanced (RAID 1E) logical drive is similar to a RAID 1 logical drive except that data is both mirrored and striped, and more disk drives can be included. A RAID 1E logical drive can be built from three or more disk drives—depending on the stripe size, the maximum number of disk drives ranges from eight to sixteen.
In the example below, the large bold numbers represent the striped data, and the smaller, non-bold numbers represent the mirrored data stripes.
Disk Drive 2
Disk Drive 3
400 GB
400 GB
Disk Drive 1 400 GB
Disk Drives in Logical Drive
Disk Drive 1
Disk Drive 2
Disk Drive 3
RAID 1E Logical Drive = 600 GB
3 2 6 5
2 1 5 4
1 3 4 6

Appendix D: Understanding RAID ● 167
RAID 10 Logical DrivesA RAID 10 logical drive is built from two or more equal-sized RAID 1 logical drives. Adaptec RAID controllers support a maximum number of 48 disk drives in a RAID 10 logical drive.
Data in a RAID 10 logical drive is both striped and mirrored. Mirroring provides data protection, and striping improves performance.
Drive segment size is limited to the size of the smallest disk drive in the logical drive. For instance, a logical drive with two 250 GB disk drives and two 400 GB disk drives can create two mirrored drive segments of 250 GB, for a total of 500 GB for the logical drive, as shown below.
Disk Drive 1
Disk Drive 2
Disk Drive 3
Disk Drive 4
250 GB
250 GB
400 GB
400 GB
Disk Drives in Logical Drive
Disk Drive 1
Disk Drive 2
Disk Drive 3
Disk Drive 4
RAID 10 Logical Drive = 500 GB
1
2
1
2
Not Used
Not Used
3
4
3
4500
499
500
499...
...
...
...
Unused Space: 150 GB
Unused Space: 150 GB
Drive Segment Size (Smallest Disk Drive)

Appendix D: Understanding RAID ● 168
RAID 5 Logical DrivesA RAID 5 logical drive is built from a minimum of three and a maximum of sixteen disk drives, and uses data striping and parity (see below) data to provide redundancy. Parity data provides data protection, and striping improves performance.
Parity data is an error-correcting redundancy that’s used to re-create data if a disk drive fails. In RAID 5 logical drives, parity data (represented by Ps in the example below) is striped evenly across the disk drives with the stored data.
Drive segment size is limited to the size of the smallest disk drive in the logical drive. For instance, a logical drive with two 250 GB disk drives and two 400 GB disk drives can contain 750 GB of stored data and 250 GB of parity data, as shown below.
In the example above, P represents the distributed parity data.
Disk Drive 1
Disk Drive 2
Disk Drive 3
Disk Drive 4
250 GB
250 GB
400 GB
400 GB
Disk Drives in Logical Drive
Disk Drive 1
Disk Drive 2
Disk Drive 3
Disk Drive 4
RAID 5 Logical Drive = 750 GB plus Parity
1
2
3
P
Not Used
Not Used
4
5
P
6 750
749
748
P...
...
...
...
Unused Space: 150 GB
Unused Space: 150 GB
Drive Segment Size (Smallest Disk Drive)

Appendix D: Understanding RAID ● 169
RAID 5EE Logical Drives
Note: RAID 5EE is an upgrade feature; if the RAID 5EE feature is locked, see Adding Enhanced Features on page 21 for information on purchasing a feature key.
A RAID 5EE logical drive is similar to a RAID 5 logical drive except that it includes a distributed spare drive (see below) and must be built from a minimum of four disk drives. The maximum number of disk drives is sixteen.
Unlike a hot spare (see page 90), a distributed spare is striped evenly across the disk drives with the stored data and parity data, and can’t be shared with other logical disk drives. A distributed spare improves the speed at which the logical drive is rebuilt following a disk drive failure.
A RAID 5EE logical drive protects your data and increases read and write speeds. However, capacity is reduced by two disk drives’ worth of space, which is for parity data and spare data.
In the example below, S represents the distributed spare, P represents the distributed parity data.
Disk Drive 1
Disk Drive 2
Disk Drive 3
Disk Drive 4
250 GB
250 GB
400 GB
400 GB
Disk Drives in Logical Drive
Disk Drive 1
Disk Drive 2
Disk Drive 3
Disk Drive 4
RAID 5EE Logical Drive = 500 GB plus Parity and Spare
1
2
S
P
Not Used
Not Used
S
P
3
4 500
S
449
P...
...
...
...
Unused Space: 150 GB
Unused Space: 150 GB
Drive Segment Size (Smallest Disk Drive)

Appendix D: Understanding RAID ● 170
RAID 50 Logical DrivesA RAID 50 logical drive is built from six to forty-eight disk drives configured as two ore more RAID 5 logical drives, and stripes stored data and parity data across all disk drives in both RAID 5 logical drives. (For more information, see RAID 5 Logical Drives on page 168.)
The parity data provides data protection, and striping improves performance. RAID 50 logical drives also provide high data transfer speeds.
Drive segment size is limited to the size of the smallest disk drive in the logical drive. For example, three 250 GB disk drives and three 400 GB disk drives comprise two equal-sized RAID 5 logical drives with 500 GB of stored data and 250 GB of parity data. The RAID 50 logical drive can therefore contain 1000 GB (2 x 500 GB) of stored data and 500 GB of parity data.
In the example above, P represents the distributed parity data.
RAID 50 Logical Drive = 1000 GB plus Parity
Drive 1 Drive 2 Drive 3 Drive 4 Drive 5 Drive 6
Total Unused Space = 450 GB
1, 5, P 3, P, 9 2, 6, P 4, P, 10P, 7, 11 P, 8, 12
250 GB 250 GB 250 GB 400 GB 400 GB 400 GB
500 GB Data Storage each250 GB Parity Data each
RAID 5 A
RAID 5 B

Appendix D: Understanding RAID ● 171
RAID 6 Logical Drives
Note: RAID 1E is an upgrade feature; if the RAID 1E feature is locked, see Adding Enhanced Features on page 21 for information on purchasing a feature key.
A RAID 6 logical drive is similar to a RAID 5 logical drive because it uses data striping and parity data to provide redundancy. However, RAID 6 logical drives include two independent sets of parity data instead of one. Both sets of parity data are striped separately across all disk drives in the logical drive.
RAID 6 logical drives provide extra protection for your data because they can recover from two simultaneous disk drive failures. However, the extra parity calculation slows performance (compared to RAID 5 logical drives).
RAID 6 logical drives must be built from four or more disk drives, to a maximum of sixteen. Maximum stripe size depends on the number of disk drives in the logical drive.
Disk Drive 1
Disk Drive 2
Disk Drive 3
Disk Drive 4
250 GB
250 GB
400 GB
400 GB
Disk Drives in Logical Drive
Disk Drive 1
Disk Drive 2
Disk Drive 3
Disk Drive 4
RAID 6 Logical Drive = 500 GB plus Parity (P1 & P2)
1
2
P1
P2
Not Used
Not Used
P1
P2
3
4 500
P1
449
P2...
...
...
...
Unused Space: 150 GB
Unused Space: 150 GB
Drive Segment Size (Smallest Disk Drive)

Appendix D: Understanding RAID ● 172
RAID 60 Logical Drives
Note: RAID 1E is an upgrade feature; if the RAID 1E feature is locked, see Adding Enhanced Features on page 21 for information on purchasing a feature key.
Similar to a RAID 50 logical drive (see page 170), a RAID 60 logical drive is built from eight disk drives configured as two or more RAID 6 logical drives, and stripes stored data and two sets of parity data across all disk drives in both RAID 6 logical drives.
Two sets of parity data provide enhanced data protection, and striping improves performance. RAID 60 logical drives also provide high data transfer speeds.

Appendix D: Understanding RAID ● 173
SU the logical drives on your storage space, ba rformance and reliability.
D number of drives in the logical drive. In ge
Built-in Hot Spare
MinimumDisk Drives
No 1
No 2
No 3
No 4
No 3
Yes 4
No 6
No 4
No 8
No 2
No 4
electing the Best RAID Levelse the Table below to select the RAID levels that are most appropriate forsed on the number of available disk drives and your requirements for pe
isk drive usage, read performance, and write performance depend on theneral, the more drives, the better the performance.
RAID level RedundancyDisk Drive
UsageRead
PerformanceWrite
Performance
RAID 0 No 100%
RAID 1 Yes 50%
RAID 1E Yes 50%
RAID 10 Yes 50%
RAID 5 Yes 67 – 94%
RAID 5EE Yes 50 – 88%
RAID 50 Yes 67 – 94%
RAID 6 Yes 50 – 88%
RAID 60 Yes 50 – 88%
Spanned Volume No 100%
RAID Volume No 50 – 100%

Glossary
AAdaptec Storage Manager agentRuns in the background on your computer, monitoring and managing event notifications, tasks schedules, and other on-going processes in your storage space. It requires no user intervention and includes no user interface.
available spaceSpace on a disk drive that is not being used by a logical drive. When a logical drive is deleted, its space becomes available. See also logical drive.
Bbackground consistency checkA controller function that continually and automatically verifies your logical drives once they’re in use.
bootable-CD modeA way of running Adaptec Storage Manager, where the application is not installed but is run directly from a CD.
CcacheA temporary, fast storage area that holds data from a slower storage device for quick access. Cache storage is normally transparent to the accessing device.
Glossary ● 175
channelAny path used for the transfer of data and the control of information between disk drives and a RAID controller.
controllerA hardware device that interprets signals between a host and a disk drive. Also known as an adapter or card. See also I/O.
copybackAdaptec RAID controller feature that allows data that has been moved to a hot spare to be returned to its original location once the controller detects that the failed drive has been replaced.
DDASDirect-attached Storage. Data storage that is physically connected to a server. See also LAN, SAN.
drive segmentSee segment.
EEmail Notification ManagerA utility within Adaptec Storage Manager that emails event messages to selected recipients. See also email notifications, Notification Manager.
email notificationsEvent messages about remote systems that are emailed to selected recipients.
eventActivity on your storage space, such as a disk drive failure or logical drive verification.
Ffault toleranceThe ability of a system to continue to perform its functions even when one or more disk drives have failed.

Glossary ● 176
firmwareA combination of hardware and software; software written onto read-only memory (ROM).
formatSee initialize.
GGBGigaByte. 1,024 MB. See also MB.
HhostA computer that’s connected to a TCP/IP network. See also TCP/IP.
host bus adapter (HBA)An adapter card that includes all of the I/O logic, software, and processing to manage the transfer of information between the host and the devices it’s connected to.
hot spareA spare disk drive which will automatically replace a failed disk drive in a logical drive.
hot-swapRemove and replace a failed disk drive in a logical drive without shutting down the server or disrupting activity on the logical drive.
IinitializePrepare a disk drive for reading and writing.
I/OInput/Output. Data entering into or being extracted from a computer.
LLANLocal Area Network. A network of interconnected workstations sharing the resources of a single server, typically within the area of a small office building.

Glossary ● 177
LEDLight-emitting Diode. An electronic device that lights up when powered.
local systemThe computer that you’re working on. In Adaptec Storage Manager, ‘local’ and ‘remote’ are relative terms. See also remote system.
logged notificationsEvent messages about remote systems that appear in the Event Viewer of Adaptec Storage Manager. See also Notification Manager.
logical driveOne or more disk drives grouped together to appear as a single device to a computer. Also known as a logical device or array.
Mmanaged systemA computer or server in a storage space that’s being managed by Adaptec Storage Manager.
MBMegaByte. Depending on context, 1,000,000 or 1,048,576 bytes. Also 1000 KB.
mirroringData protection that duplicates all data from one drive onto a second drive. See also RAID.
NNotification ManagerA utility within Adaptec Storage Manager that broadcasts event messages to selected managed systems.
PparityA form of data protection used by some RAID levels to recreate the data of a failed disk drive in a logical drive. See also RAID.
partitionDivides the space of a disk drive into isolated sections.

Glossary ● 178
portA connection point to a controller, disk drive, expander, enclosure, or other device.
RRAIDRedundant Array of Independent Disks. For more information on RAID and all supported RAID levels, see Understanding RAID on page 163.
rapid fault isolationThe trail of yellow or red warning icons that leads from the high-level system view to the failed or failing component.
rebuildRe-create a logical drive after a disk drive failure.
recurring taskA scheduled task, such as logical drive verification, that occurs on a regular basis. See also Task Manager, scheduled task.
redundancyThe capability of preventing data loss if a disk drive fails. See also mirroring, parity.
remote systemIn Adaptec Storage Manager, all other computers in your storage space besides your local system are remote systems. ‘Local’ and ‘remote’ are relative terms. See also local system.
ROM Update wizardA program that updates the BIOS and firmware codes on the controller. See also firmware.
SSANStorage Area Network. A storage architecture that connects servers and disk drives across a network for enhanced reliability, scalability, and performance.

Glossary ● 179
scheduled task
Activity, such as logical drive verification, that is set to be completed at a specified date and time. See also recurring task.
segmentDisk drive space that has been assigned to a logical drive. A segment can include all or just a portion of a disk drive’s space.
SMTPSimple Mail Transfer Protocol.
snapshotA frozen image of a logical drive at a particular point in time.
spareSee hot spare.
storage spaceThe controller(s) and disk drives being managed with Adaptec Storage Manager.
stripe sizeAmount of data written to one partition before the controller moves to the next partition in a stripe set.
stripingA method of enhancing performance by spreading data evenly over multiple disk drives. Provides no data protection.
TTask ManagerA utility in Adaptec Storage Manager that allows you to schedule specific activity, such as expanding a logical drive, for a time that’s convenient. See also scheduled task, recurring task.
TBTeraByte. Approximately one million-million bytes, or 1024 GB.
TCP/IPTransmission Control Protocol/Internet Protocol. A set of communication protocols used to connect hosts on the Internet.

Glossary ● 180
VverifyCheck a logical drive for inconsistent or bad data. May also fix any data problems or parity errors.

Index
AActions menu 46
Agent actionsemail notifications 114event log 102notifications 106
Alarm Actions 121, 122Configure read cache 80Configure write cache 79Create dedicated hot-spare drive
for 92Delete dedicated hot-spare
drive 94Delete hot-spare drive 94Delete logical device 89description 46Disable Email Notifications 119Disable notifications 111Disable Task Scheduler 131Enable (Disable) background
consistency check 84Expand or change logical device
78, 85, 87Log in 38Log out 38Properties (controller) 141Rescan 140Save printable configuration 142Save support archive 152Send test event 106
Send test message 115Set drive state to failed 144SMTP server settings 118Update controller images 143Verify 83Verify with fix 82
activity on storage space 101Adaptec customer support 3Adaptec Storage Manager
Actions menu 46agent 17agent port number 69beginning steps 23bootable-CD mode 71display options 65, 66enhanced features 21Event Viewer 101feature keys 21, 22installing on Linux 28installing on NetWare 29introduction 17locked features 21, 22logging into remote systems 62main window 40operating systems 18remote systems 61standard unit of measure 66system requirements 18Task Manager 126unlocking enhanced features 22

Index ● 182
adapters. See controllersADDLOCAL 26Administrator permissions 35advanced settings 53, 78agent 17
alarm settings 67broadcast event alerts 67customizing 67event log 69introduction 17Linux 34NetWare 34port number 69Windows 33
alarmchanging settings 67disabling 67disabling (controller-level) 122duration 67frequency 67silencing 122testing 121
archive file 152audible alarm. See alarmautomatic verification 81
Bbackground consistency check 81,
84background verification 81base port number 69boards. See controllersbootable-CD mode 70 to 72broadcasting event alerts 120Build (initialize method) 80building storage space
bootable-CD mode 71custom configuration 51express configuration 48express RAID levels 48
RAID Volumes 56buttons
Logical Devices View 162Physical Devices View 162tool bar 162
Ccards. See controllersCD mode. See bootable-CD modeClear (initialize method) 80components
defined 15viewing properties 122
Configuration event detail window 101
configuration. See building storage space
Configure button 104configuring (defined) 48controller support 59controllers
disabling alarm 122properties 141registering 140rescanning 140saving configurations 141updating firmware 142
Copyback 98custom configuration 51customer support 3
Ddaemon 17dedicated hot spares 90
creating 92deleting logical drives 89devices 41disk drive segments 164disk drives
available space 42

Index ● 183
conceptual graphic 74different sizes in same logical
drive 76failed state 144failure recovery
multiple disk drives 150multiple logical drives 149RAID 0 logical drives 149with hot spare 148without hot spare 149
in logical drives 53relative capacity 44replacing in logical drives 145segments in logical drive 77text descriptions 43viewing logical drives 43viewing status 42
display groups 63adding systems 135creating 63deleting 138moving systems 137removing systems 136renaming display groups 137system status 136
distributed spare drives 169
EEmail event detail window 117Email List 112, 115
adding users 113modifying users 115removing users 116sending test emails 114
Email Log 112, 116clearing 117
Email Log files 117Email Notification Manager 111
clearing the Email Log 117disabling 119Email List 115
Email Log 116email notifications 111failed test emails 115log files 117modifying settings 118opening 112re-enabling 119test emails 114
email notifications 111"from" address 113adding users 113changing "from" address 118changing SMTP server 118Email List 115Email Log 116failed test emails 115modifying users 115removing users 116sending test emails 114SMTP server settings 113
Email Notifications tab 112Enterprise View 40
display options 65sorting systems 65
Error 127event alerts 120event log 101
clearing 102event log (operating system) 69Event Notification Manager
Notification List 105Notification Log 109
event notifications 103adding systems 104Event Viewer 103, 159failed test events 107introduction 103logged notifications 103modifying systems 107Notification List 105Notification Log 109

Index ● 184
removing systems 108sending test events 106sources of events 103
Event Viewer 45, 101event notifications 103, 159logged notification status 109logged notifications 103main window 40sources of events 103status icons 102
events 45sources 103status icons 102, 109
Events button 101expanding logical drives 84express configuration
RAID levels 48
Ffailed disk drives
multiple disk drives 150multiple logical drives 149RAID 0 logical drives 149without hot spare 149
FAQs 156feature keys 21
unlocking 22firmware 142formatting logical drives 50Full Size Capacity View 44
Gglobal hot spares 90glossary 174Guest permissions 36
Hhard disk, hard disk drive, hard
drive. See disk driveHBAs. See controllershelp 46hot spares 41, 42, 90 to 94
creating 53, 91creating dedicated 92dedicated 90distributed spare drives 169global 90limitations 90removing 93
Iicons 161initialize method 80initialize priority 81installation
Linux 28NetWare 29Windows 25Windows silent installation 26
INSTALLDIR 26
Jjobs. See tasks
LLinux
controller support 59installing Adaptec Storage
Manager 28SNMP support 155starting Adaptec Storage
Manager 32starting agent 34
local systems 61locked features 21
unlocking 22

Index ● 185
log filesclearing 110, 117Email Notification Manager 117Notification Manager 110
logged notifications. See event notifications
logging in 38Administrator 35Guest 36User 36
logging out 38logging back in 38
Logical Devices View 40, 42buttons 162icons 161
logical devices. See logical driveslogical drives 42, 73 to 90
advanced settings 53, 78automatic verification 81available space on disk drives 76background consistency check
81background verification 81building (advanced) 51building (basic) 48changing RAID levels 87custom configuration 51definition 74, 148deleting 89different-sized disk drives 76disabling background
consistency check 84disk drive segments 77, 164distributed spare drives 169enabling background
consistency check 84expanding 84extending partitions 87fine-tuning 78 to 81formatting 50
increasing capacity 84initialize method 80initialize priority 81manual verification 81maximum size 84mirrored data 165non-RAID 164options for creating 48parity 168partitioning 50RAID 1 165RAID 10 167RAID 1E 166RAID 5 168RAID 50 170RAID 5EE 169RAID 6 171RAID 60 172RAID level 42RAID segments 164RAID Volumes 56read cache 80rebuilding 151remove disk drive or segment 85replace disk drive or segment 85replacing disk drives 145selecting disk drives 53selecting RAID levels 52setting the size 75size 53size limitations 54stripe size 79striping data 164verifying 81, 83verifying and fixing 82verifying icon 84viewing disk drives 43viewing status 42write cache setting 79

Index ● 186
Mmain window 40
display options 66Enterprise View 40Event Viewer 40Logical Devices View 40menu bar 40Physical Devices View 40status bar 40tool bar 40
manual verification 81mirroring 165monitoring
clearing event log 102component properties 122Email Notification Manager 111email notifications 111event notifications 103full event log 101introduction 100Notification Manager 103status icons 102, 109tasks 127
NNetWare
controller support 59installing Adaptec Storage
Manager 29SNMP support 155starting Adaptec Storage
Manager 32starting agent 34
non-RAID logical drives 164Notification event detail
window 109Notification List 104, 105
adding systems 104modifying systems 107
removing systems 108sending test events 106
Notification Log 104, 109clearing 110Notification Log files 110status icons 109
Notification Manager 103clearing the log 110disabling 111event notifications 103failed test events 107log files 110opening 104re-enabling 111test events 106
notificationsemail notifications 103, 111event alerts 120event notifications 103introduction 103
Notifications tab 104
Oonline help 46opening Adaptec Storage Manager
Linux 32NetWare 32Windows 31
operating system event log 69operating systems 18
Pparity 168partitioning logical drives 50partitions 87permission level
Administrator 35Guest 36User 36

Index ● 187
Physical Devices View 40, 41buttons 162icons 161
port number 69Properties button 122
QQuick (initialize method) 80
RRAID
distributed spare drives 169mirrored data 165parity 168RAID 0 164RAID 1 165RAID 10 167RAID 1E 166RAID 5 168RAID 50 170RAID 5EE 169RAID 6 171
stripe size 79RAID 60 172
stripe size 79striping data 164
RAID controller support 59RAID levels
changing 87express configuration 48selecting 52
RAID segments 164RAID Volumes 56RaidCfg.log file 142raidnot.log file 110raidnot.old file 110raidsmtp.log file 117raidsmtp.old file 117read cache 80REBOOT 26
rebuilding (defined) 148rebuilding logical drives 151recurring tasks 124registering new controllers 140Relative Size Capacity View 44remote systems 61
introduction 133logging in 61removing 133startup port number 62
rescanning controllers 140ROM Update wizard 142running Adaptec Storage Manager
Linux 32NetWare 32Windows 31
Sscheduling tasks
rescheduling 130supported tasks
changing RAID level 89expanding logical drives 87modifying logical drives 78verifying 83verifying with fix 82
scheduling tasks. See also taskssegment 74segments 164silencing alarm 122size limitations for logical drives 54size of logical drives 75SMTP server settings 113Snapshot
creating with backup 97creating without backup 97deleting 97limitations 96Snapshot backup 96Snapshot nobackup 96
SNMP 25

Index ● 188
SNMP supportLinux 155NetWare 155Windows 154
spares. See hot sparesstand-alone application 31standard unit of measure 66starting Adaptec Storage Manager
Linux 32NetWare 32Windows 31
startup port number 62status
controller properties 141disk drives 42display group systems 136Event Viewer 45Event Viewer icons 102Notification Log icons 109status bar 45task events 127tasks 127View buttons 43
status bar 40, 45status icons
Event Viewer 102Notification Log 109Task Manager 127
storage space 15examples 19
stripe size 79striping 164support, customer 3system groups. See display groupssystem requirements 18systems 61
local systems 61remote systems 61sorting in Enterprise View 65
TTask Event Viewer 127Task List 127Task Manager
deleting tasks 130disabling 131missed start times 130modifying tasks 129monitoring tasks 127opening 126re-enabling 131scheduling tasksTask Event Viewer 127Task List 127
Task Scheduler. See Task Managertasks
deleting 130event status 127missed start times 130modifying 129monitoring 127recurring 124schedulingstatus 127status Error 127status Executed 127status Executed* 127status Scheduled 127
Tasks tab 126TCP/IP port number (default) 104technical support 3Technical Support Identification
(TSID) number 3terminology 15test events
email notifications 114event notifications 106failed email messages 115failed event notifications 107logged notifications 106

Index ● 189
Text Description View 43tool bar buttons 162TSID Number
See Technical Support Identification Number
Uupgrade features 21
unlocking 22user permissions
Administrator level 35Guest level 36User level 36
Vverifying and fixing logical
drives 82verifying logical drives 81, 83
automatic verification 81background verification 81icon 84
manual verification 81View buttons 43Views
Full Size Capacity 44Relative Size Capacity 44Text Description 43
WWindows
controller support 59installation 25silent installation 26SNMP support 154starting Adaptec Storage
Manager 31starting agent 33
write cachebattery-backup cache 79setting 79
write-back 79write-through 79

Adaptec, Inc.691 South Milpitas BoulevardMilpitas, CA 95035 USA
©2005 Adaptec, Inc.All rights reserved. Adaptec and the Adaptec logo are trademarks of Adaptec, Inc. which may beregistered in some jurisdictions.
Part Number: CDP-00030-01-A, Rev. ALB 09/05