adana 8 x 5 operating instructions 0207 - ip 8 x 5 operating instructions 0207.pdf · 9. transfer...
TRANSCRIPT

Adana Eight-Five Operating Instructions
The EIGHT-FIVE can print on card or paper, and it can he used for multi-colour printing. Picture illustrations, whether line blocks or halftone, can also be used. You can use your EIGHT-FIVE to print: Admission Tickets Fixture Cards Private Stationery Advertising Material Greetings Cards Programmes Award Certificates Handbills Receipt Forms Billheads and Statements Hymn Books Rule Books Booklets Labels and Tags School Reports Business Stationery Magazines Stock Cards Calendars Membership Cards Time Sheets Church Announcements Menus Visiting Cards Circulars Newsletters Wedding Stationery Envelopes Postcards Visiting Cards Gift Vouchers Price Tickets Window Notices
……..the scope is unlimited.
This operating manual has been re-produced from an original set of instructions. The ADANA EIGHT-FIVE Printing Machine is the finest hand-platen printing machine in the world. It will produce print of exceptionally high standard, and is used by printers, in industry, educational establishments, hospitals, churches and the home printer. The EIGHT-FIVE is designed by printers’ engineers of long experience and is robustly constructed using the latest techniques of gravity and pressure die casting. It is quick and easy to use and is ideal for the beginner in print.
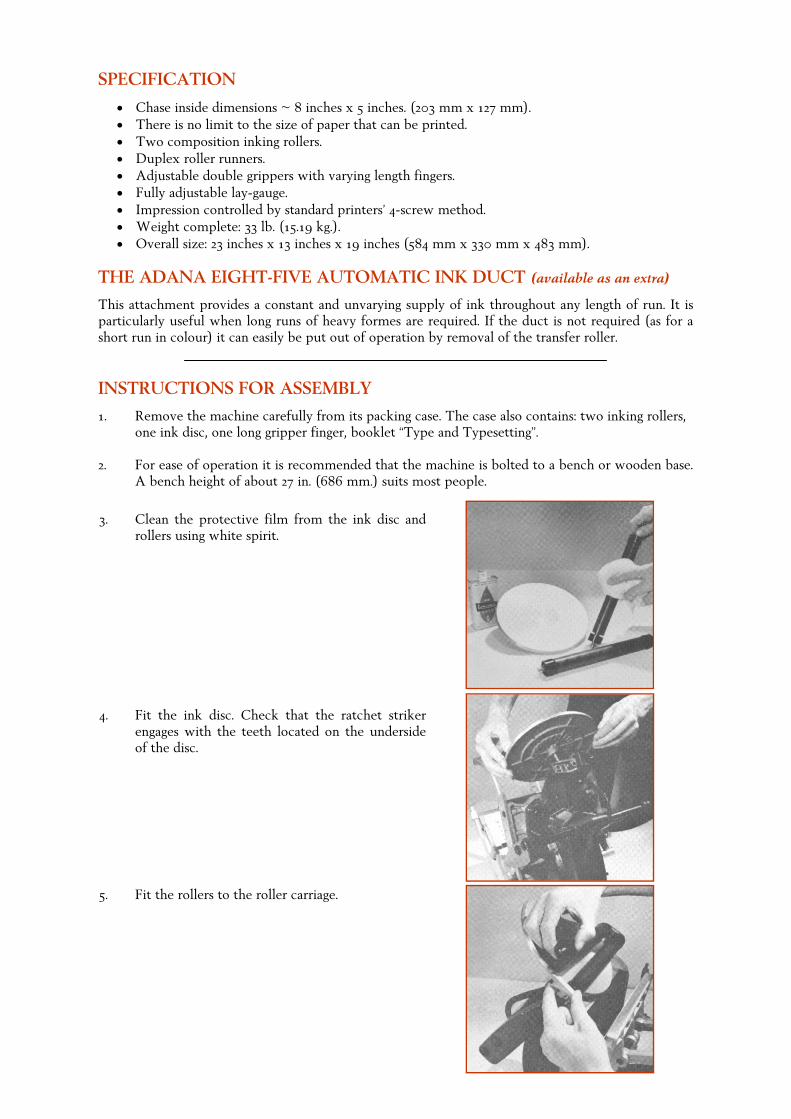
3. Clean the protective film from the ink disc and rollers using white spirit.
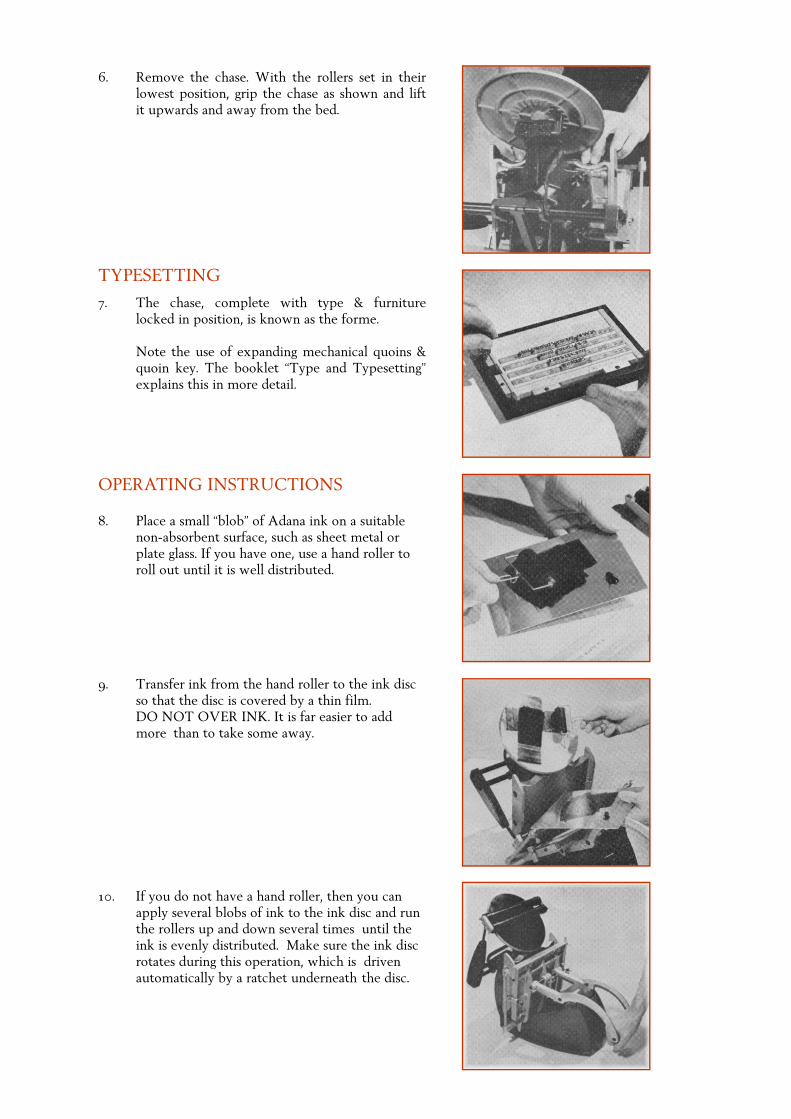
4. Fit the ink disc. Check that the ratchet striker engages with the teeth located on the underside of the disc.
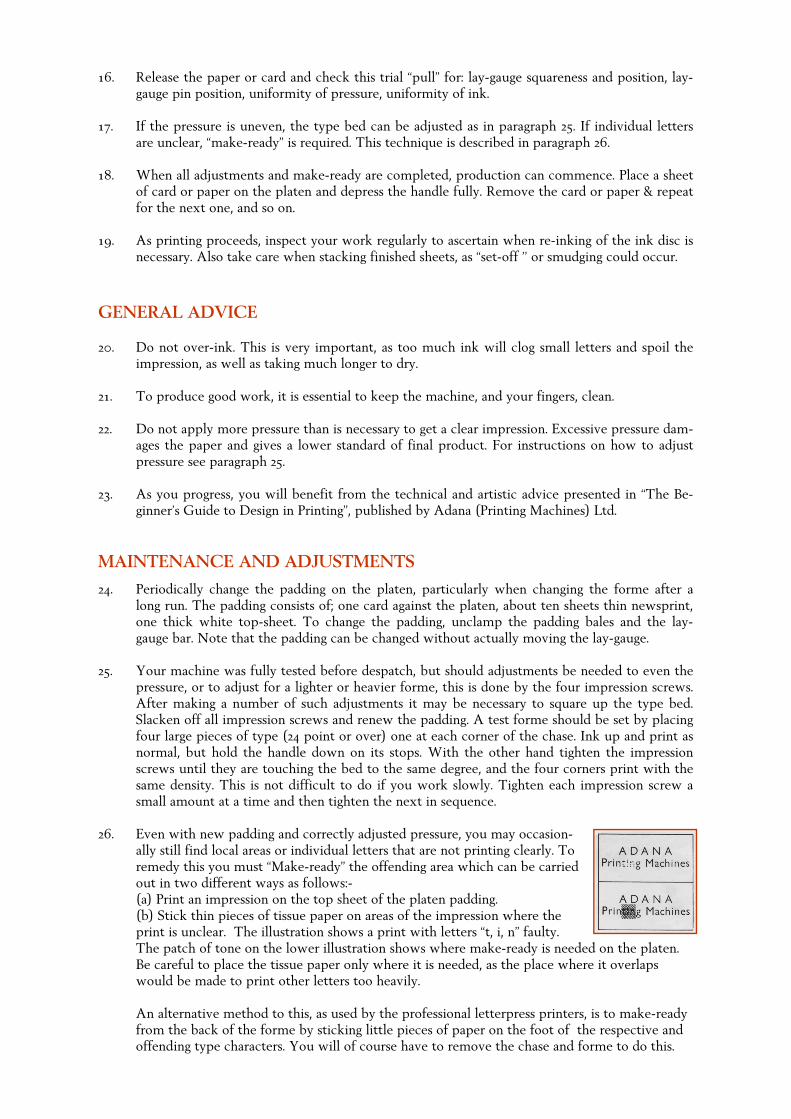
5. Fit the rollers to the roller carriage.
SPECIFICATION
• Chase inside dimensions ~ 8 inches x 5 inches. (203 mm x 127 mm). • There is no limit to the size of paper that can be printed. • Two composition inking rollers. • Duplex roller runners. • Adjustable double grippers with varying length fingers. • Fully adjustable lay-gauge. • Impression controlled by standard printers’ 4-screw method. • Weight complete: 33 lb. (15.19 kg.). • Overall size: 23 inches x 13 inches x 19 inches (584 mm x 330 mm x 483 mm).
THE ADANA EIGHT-FIVE AUTOMATIC INK DUCT (available as an extra)
This attachment provides a constant and unvarying supply of ink throughout any length of run. It is particularly useful when long runs of heavy formes are required. If the duct is not required (as for a short run in colour) it can easily be put out of operation by removal of the transfer roller. INSTRUCTIONS FOR ASSEMBLY
1. Remove the machine carefully from its packing case. The case also contains: two inking rollers, one ink disc, one long gripper finger, booklet “Type and Typesetting”.
2. For ease of operation it is recommended that the machine is bolted to a bench or wooden base. A bench height of about 27 in. (686 mm.) suits most people.
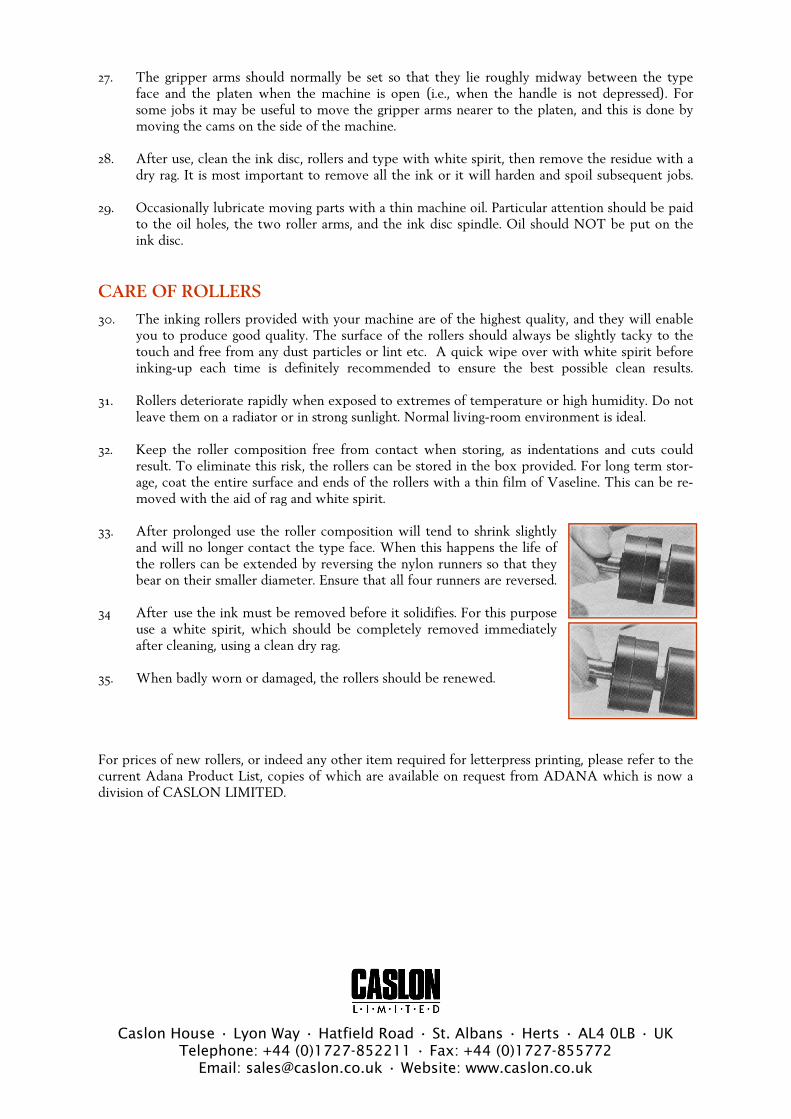
6. Remove the chase. With the rollers set in their lowest position, grip the chase as shown and lift it upwards and away from the bed.
TYPESETTING
7. The chase, complete with type & furniture locked in position, is known as the forme.
Note the use of expanding mechanical quoins & quoin key. The booklet “Type and Typesetting” explains this in more detail. OPERATING INSTRUCTIONS
8. Place a small “blob” of Adana ink on a suitable non-absorbent surface, such as sheet metal or plate glass. If you have one, use a hand roller to roll out until it is well distributed.
9. Transfer ink from the hand roller to the ink disc
so that the disc is covered by a thin film. DO NOT OVER INK. It is far easier to add more than to take some away. 10. If you do not have a hand roller, then you can apply several blobs of ink to the ink disc and run the rollers up and down several times until the ink is evenly distributed. Make sure the ink disc rotates during this operation, which is driven automatically by a ratchet underneath the disc.

11. Set the inking rollers to their lowest position and insert the forme into the bed of the machine.
The Chase has two lugs, one on each short side that locate into the slots on the insides of the inking roller bearer plates. 12. Adjust the position of the lay-gauge so that the stock you are printing on is correctly located. Before making a print, be sure that the lay gauge will not foul any type or blocks that you are printing, as this could seriously damage the forme. 13. The sideways position of the stock is located by a gauge pin that is stuck into the platen padding. The point is pushed into the padding and then in a direction away from the paper or card that is to be printed. 14. Adjust the position of the gripper fingers on the gripper arm. The fingers prevents the paper or card from sticking to the type face after making an impression. The grippers fingers MUST NOT be allowed to foul the type face. The long gripper finger can be used instead of the two short ones if this is more convenient.
15. Depress the handle several times to transfer ink from the disc to the type face. Then, with the paper or card in position, depress the handle firmly until it presses against the impression stops as shown.
16. Release the paper or card and check this trial “pull” for: lay-gauge squareness and position, lay-gauge pin position, uniformity of pressure, uniformity of ink.
17. If the pressure is uneven, the type bed can be adjusted as in paragraph 25. If individual letters are unclear, “make-ready” is required. This technique is described in paragraph 26.
18. When all adjustments and make-ready are completed, production can commence. Place a sheet of card or paper on the platen and depress the handle fully. Remove the card or paper & repeat for the next one, and so on.
19. As printing proceeds, inspect your work regularly to ascertain when re-inking of the ink disc is necessary. Also take care when stacking finished sheets, as “set-off ’’ or smudging could occur.
GENERAL ADVICE
20. Do not over-ink. This is very important, as too much ink will clog small letters and spoil the
impression, as well as taking much longer to dry.
21. To produce good work, it is essential to keep the machine, and your fingers, clean.
22. Do not apply more pressure than is necessary to get a clear impression. Excessive pressure dam-ages the paper and gives a lower standard of final product. For instructions on how to adjust pressure see paragraph 25.
23. As you progress, you will benefit from the technical and artistic advice presented in “The Be-ginner’s Guide to Design in Printing”, published by Adana (Printing Machines) Ltd.
MAINTENANCE AND ADJUSTMENTS
24. Periodically change the padding on the platen, particularly when changing the forme after a long run. The padding consists of; one card against the platen, about ten sheets thin newsprint, one thick white top-sheet. To change the padding, unclamp the padding bales and the lay-gauge bar. Note that the padding can be changed without actually moving the lay-gauge.
25. Your machine was fully tested before despatch, but should adjustments be needed to even the pressure, or to adjust for a lighter or heavier forme, this is done by the four impression screws. After making a number of such adjustments it may be necessary to square up the type bed. Slacken off all impression screws and renew the padding. A test forme should be set by placing four large pieces of type (24 point or over) one at each corner of the chase. Ink up and print as normal, but hold the handle down on its stops. With the other hand tighten the impression screws until they are touching the bed to the same degree, and the four corners print with the same density. This is not difficult to do if you work slowly. Tighten each impression screw a small amount at a time and then tighten the next in sequence.
26. Even with new padding and correctly adjusted pressure, you may occasion-ally still find local areas or individual letters that are not printing clearly. To remedy this you must “Make-ready” the offending area which can be carried out in two different ways as follows:- (a) Print an impression on the top sheet of the platen padding. (b) Stick thin pieces of tissue paper on areas of the impression where the print is unclear. The illustration shows a print with letters “t, i, n” faulty. The patch of tone on the lower illustration shows where make-ready is needed on the platen. Be careful to place the tissue paper only where it is needed, as the place where it overlaps would be made to print other letters too heavily.
An alternative method to this, as used by the professional letterpress printers, is to make-ready from the back of the forme by sticking little pieces of paper on the foot of the respective and offend ing type characters. You will of course have to remove the chase and forme to do this.
Caslon House • Lyon Way • Hatfield Road • St. Albans • Herts • AL4 0LB • UK Telephone: +44 (0)1727-852211 • Fax: +44 (0)1727-855772
Email: [email protected] • Website: www.caslon.co.uk
27. The gripper arms should normally be set so that they lie roughly midway between the type face and the platen when the machine is open (i.e., when the handle is not depressed). For some jobs it may be useful to move the gripper arms nearer to the platen, and this is done by moving the cams on the side of the machine.
28. After use, clean the ink disc, rollers and type with white spirit, then remove the residue with a dry rag. It is most important to remove all the ink or it will harden and spoil subsequent jobs.
29. Occasionally lubricate moving parts with a thin machine oil. Particular attention should be paid to the oil holes, the two roller arms, and the ink disc spindle. Oil should NOT be put on the ink disc.
CARE OF ROLLERS
30. The inking rollers provided with your machine are of the highest quality, and they will enable you to produce good quality. The surface of the rollers should always be slightly tacky to the touch and free from any dust particles or lint etc. A quick wipe over with white spirit before inking-up each time is definitely recommended to ensure the best possible clean results.
31. Rollers deteriorate rapidly when exposed to extremes of temperature or high humidity. Do not leave them on a radiator or in strong sunlight. Normal living-room environment is ideal.
32. Keep the roller composition free from contact when storing, as indentations and cuts could result. To eliminate this risk, the rollers can be stored in the box provided. For long term stor-age, coat the entire surface and ends of the rollers with a thin film of Vaseline. This can be re-moved with the aid of rag and white spirit.
33. After prolonged use the roller composition will tend to shrink slightly and will no longer contact the type face. When this happens the life of the rollers can be extended by reversing the nylon runners so that they bear on their smaller diameter. Ensure that all four runners are reversed.
34 After use the ink must be removed before it solidifies. For this purpose use a white spirit, which should be completely removed immediately after cleaning, using a clean dry rag. 35. When badly worn or damaged, the rollers should be renewed. For prices of new rollers, or indeed any other item required for letterpress printing, please refer to the current Adana Product List, copies of which are available on request from ADANA which is now a division of CASLON LIMITED.