adafruit cc3000 wifi
TRANSCRIPT
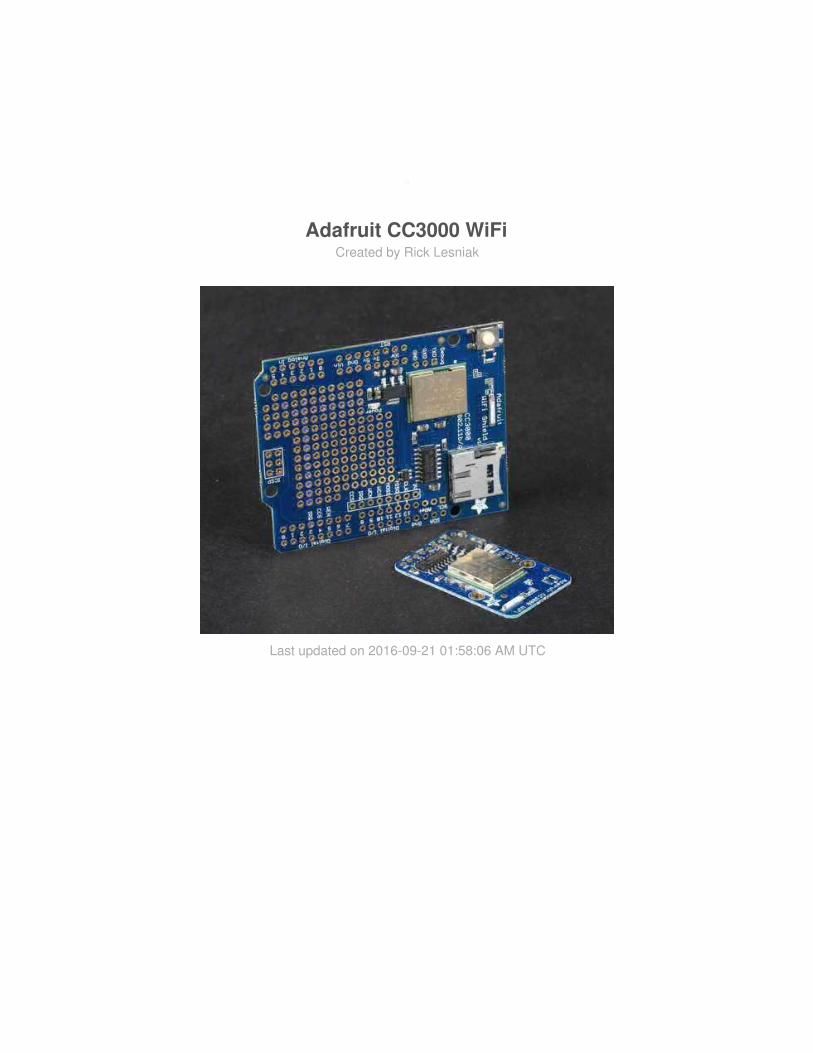
Adafruit CC3000 WiFiCreated by Rick Lesniak
Last updated on 2016-09-21 01:58:06 AM UTC
246778
1212
18181819191919
2121
2323
2525
2727
2929
31313131
313132
33
Guide Contents
Guide ContentsOverviewAssembly and WiringCC3000 BreakoutAssembly
Wiring
CC3000 ShieldAssembly
ConnectionsPinoutsOptional AntennaUsing the CC3000Download the LibrarySample Sketches
WEP with HEX Passphrases
buildtestbuildtest
WebClientWebClient
ntpTestntpTest
InternetTimeInternetTime
GeoLocationGeoLocation
SmartConfigSmartConfigCreate and SmartConfigReconnectSmartConfigCreateSmartConfigReconnect
Using the SmartConfigCreate SketchStep One: Install the SmartConfig AppStep Two: Configure the SmartConfig App on your Phone
Step Three: Open and Run 'SmartConfigCreate'
© Adafruit Industries https://learn.adafruit.com/adafruit-cc3000-wifi Page 2 of 47
3434
343636
3841414245
Step Four: Start the SmartConfig app on your PhoneStep Five: Stop the SmartConfig App on the Phone
Using the SmartConfigReconnect SketchSendTweet
SendTweet
Firmware UpgradesDownloadsFiles & DownloadsDimensional diagram for the CC3000 breakoutFAQ
© Adafruit Industries https://learn.adafruit.com/adafruit-cc3000-wifi Page 3 of 47
Overview
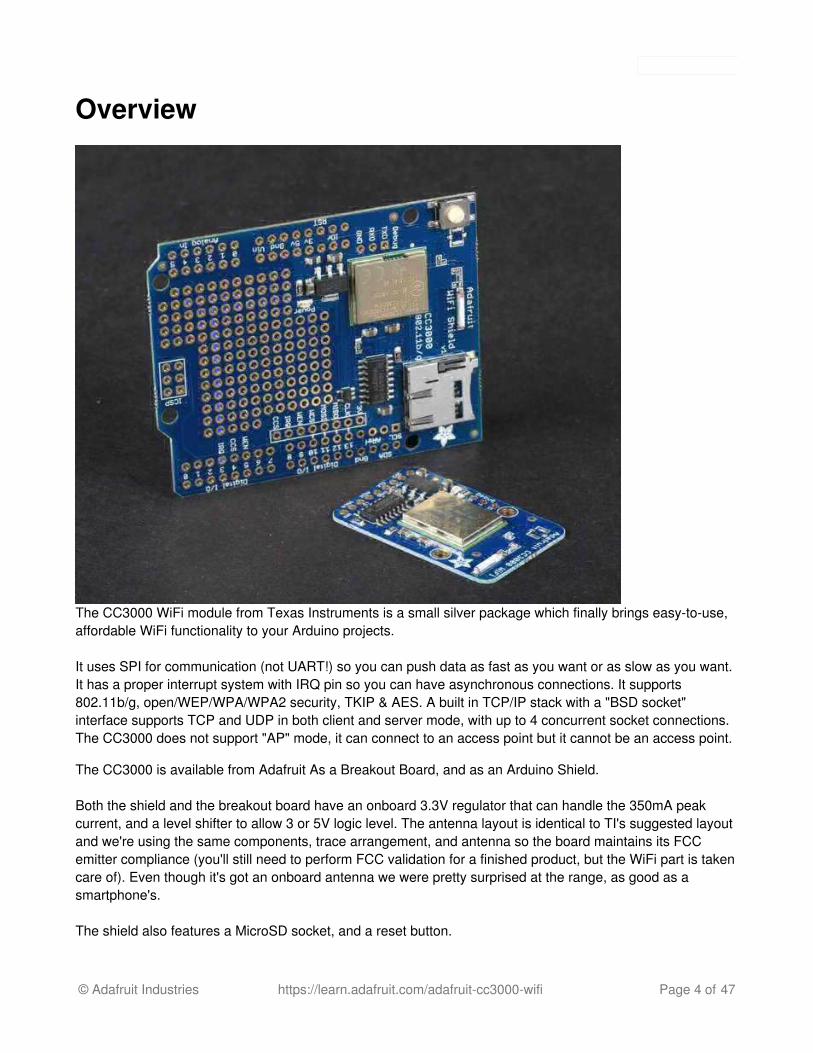
The CC3000 WiFi module from Texas Instruments is a small silver package which finally brings easy-to-use,affordable WiFi functionality to your Arduino projects.
It uses SPI for communication (not UART!) so you can push data as fast as you want or as slow as you want.It has a proper interrupt system with IRQ pin so you can have asynchronous connections. It supports802.11b/g, open/WEP/WPA/WPA2 security, TKIP & AES. A built in TCP/IP stack with a "BSD socket"interface supports TCP and UDP in both client and server mode, with up to 4 concurrent socket connections.The CC3000 does not support "AP" mode, it can connect to an access point but it cannot be an access point.
The CC3000 is available from Adafruit As a Breakout Board, and as an Arduino Shield.
Both the shield and the breakout board have an onboard 3.3V regulator that can handle the 350mA peakcurrent, and a level shifter to allow 3 or 5V logic level. The antenna layout is identical to TI's suggested layoutand we're using the same components, trace arrangement, and antenna so the board maintains its FCCemitter compliance (you'll still need to perform FCC validation for a finished product, but the WiFi part is takencare of). Even though it's got an onboard antenna we were pretty surprised at the range, as good as asmartphone's.
The shield also features a MicroSD socket, and a reset button.
© Adafruit Industries https://learn.adafruit.com/adafruit-cc3000-wifi Page 4 of 47

AND, the shield supports the Arduino SPI passthrough header pins, so it's compatible with the Mega,Leonardo, and Due, right out of the box - no rewiring necessary! Just solder closed the MISO, SCK, andMOSI jumpers on the back of the shield.
© Adafruit Industries https://learn.adafruit.com/adafruit-cc3000-wifi Page 5 of 47
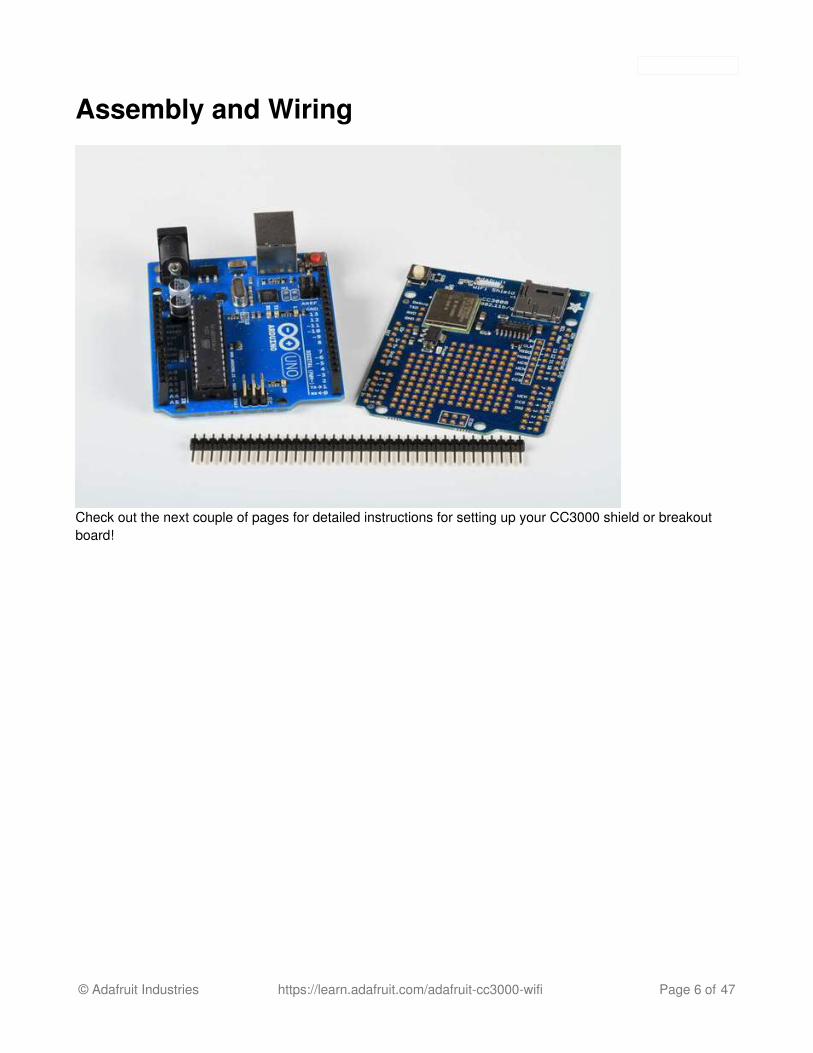
Assembly and Wiring
Check out the next couple of pages for detailed instructions for setting up your CC3000 shield or breakoutboard!
© Adafruit Industries https://learn.adafruit.com/adafruit-cc3000-wifi Page 6 of 47

CC3000 Breakout
AssemblyThe CC3000 breakout board ships with a strip of header pins. Snip off a 9-pin section and solder it to the 9holes on the side of the board.
The easiest way to do this is to first insert the header pins into a breadboard, to hold them securely while yousolder.
© Adafruit Industries https://learn.adafruit.com/adafruit-cc3000-wifi Page 7 of 47
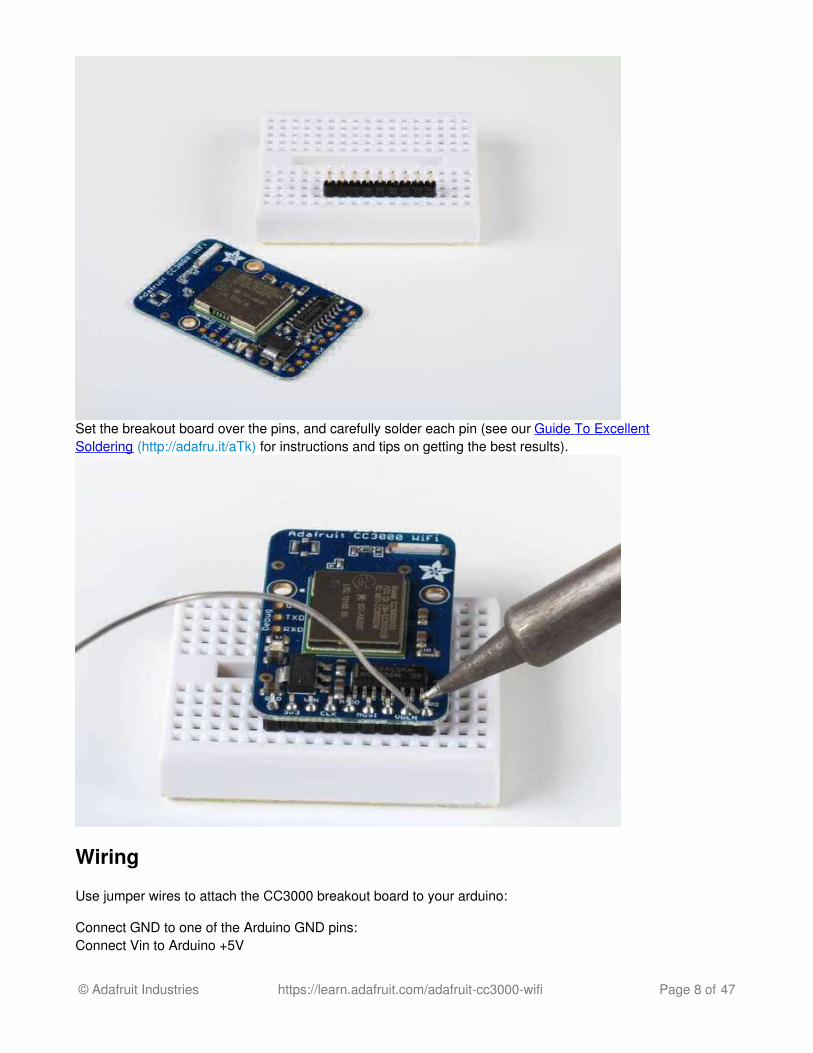
Set the breakout board over the pins, and carefully solder each pin (see our Guide To ExcellentSoldering (http://adafru.it/aTk) for instructions and tips on getting the best results).
Wiring
Use jumper wires to attach the CC3000 breakout board to your arduino:
Connect GND to one of the Arduino GND pins:Connect Vin to Arduino +5V
© Adafruit Industries https://learn.adafruit.com/adafruit-cc3000-wifi Page 8 of 47
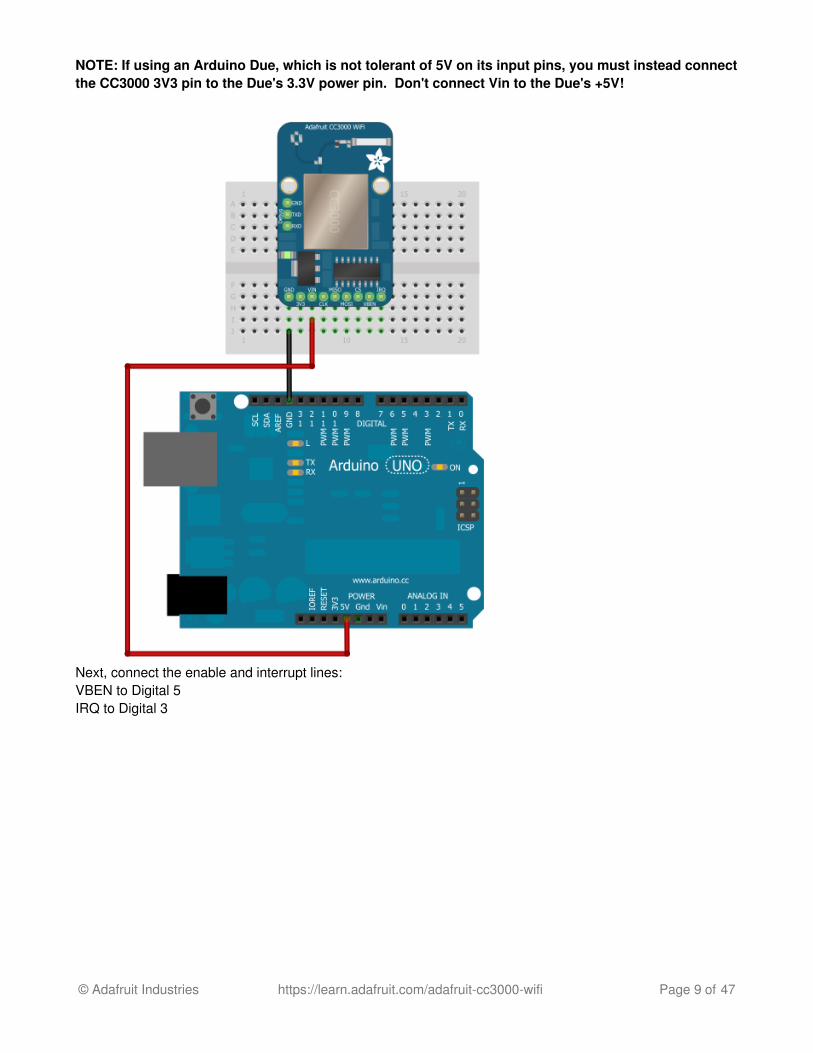
NOTE: If using an Arduino Due, which is not tolerant of 5V on its input pins, you must instead connectthe CC3000 3V3 pin to the Due's 3.3V power pin. Don't connect Vin to the Due's +5V!
Next, connect the enable and interrupt lines:VBEN to Digital 5IRQ to Digital 3
© Adafruit Industries https://learn.adafruit.com/adafruit-cc3000-wifi Page 9 of 47
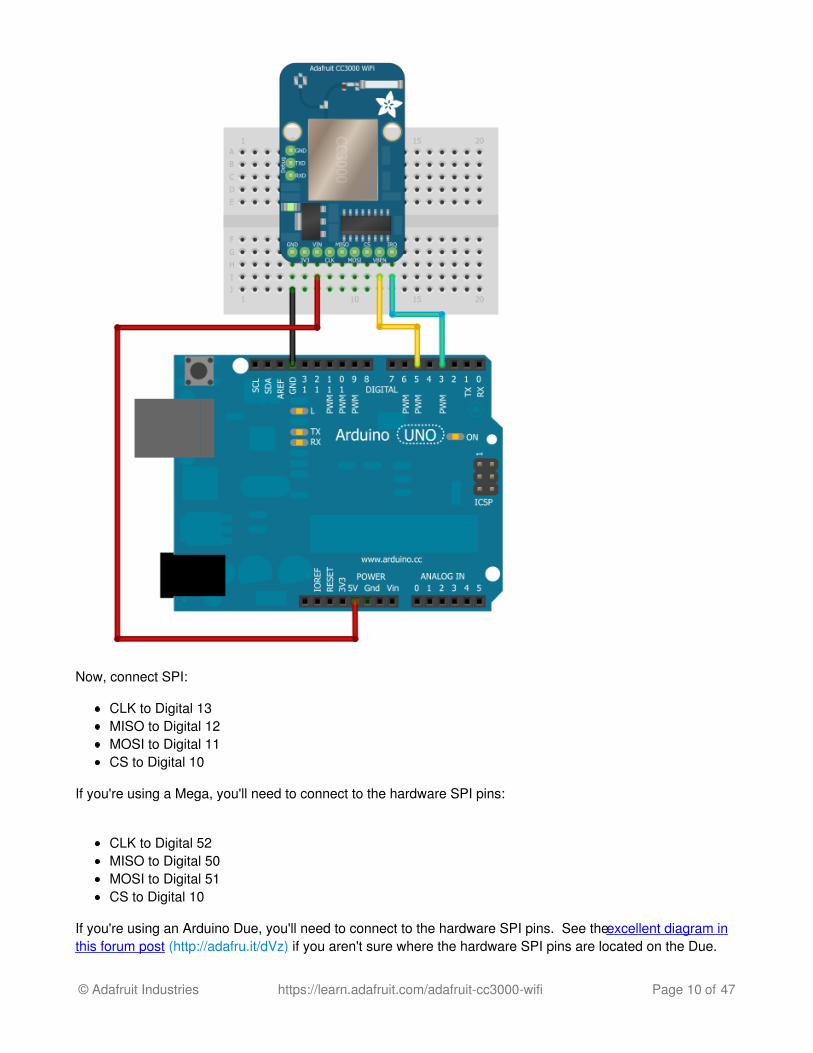
Now, connect SPI:
CLK to Digital 13MISO to Digital 12MOSI to Digital 11CS to Digital 10
If you're using a Mega, you'll need to connect to the hardware SPI pins:
CLK to Digital 52MISO to Digital 50MOSI to Digital 51CS to Digital 10
If you're using an Arduino Due, you'll need to connect to the hardware SPI pins. See the excellent diagram inthis forum post (http://adafru.it/dVz) if you aren't sure where the hardware SPI pins are located on the Due.
© Adafruit Industries https://learn.adafruit.com/adafruit-cc3000-wifi Page 10 of 47
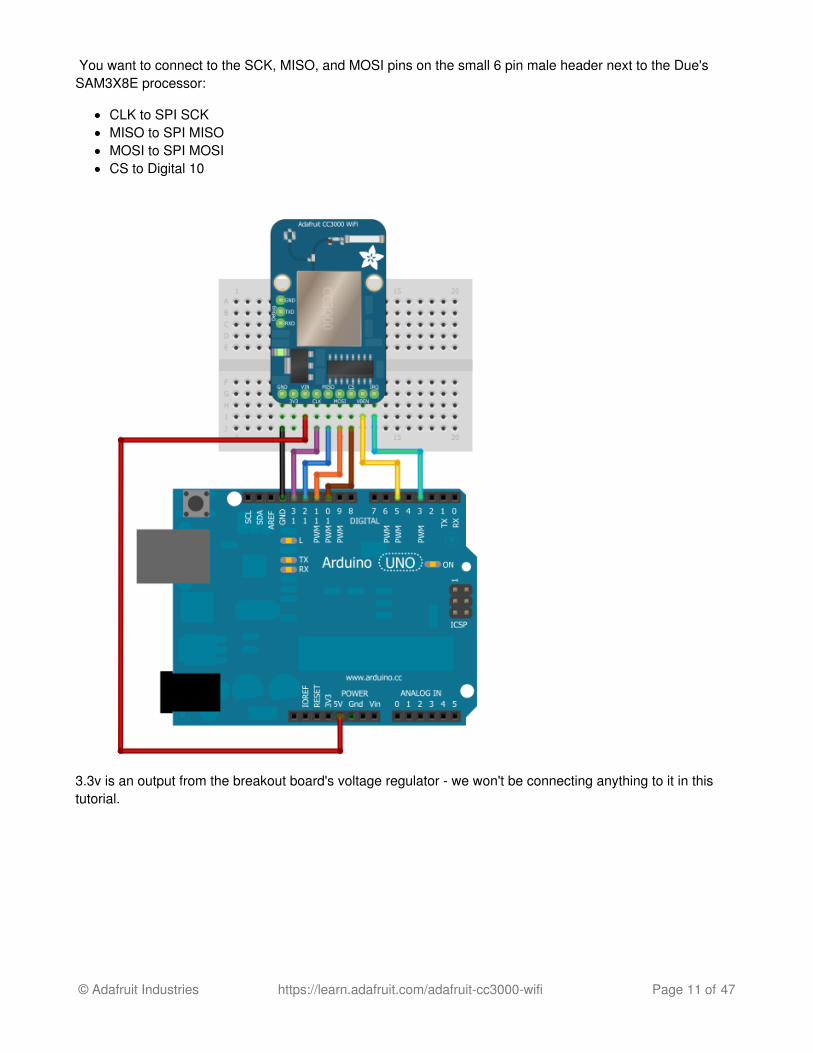
You want to connect to the SCK, MISO, and MOSI pins on the small 6 pin male header next to the Due'sSAM3X8E processor:
CLK to SPI SCKMISO to SPI MISOMOSI to SPI MOSICS to Digital 10
3.3v is an output from the breakout board's voltage regulator - we won't be connecting anything to it in thistutorial.
© Adafruit Industries https://learn.adafruit.com/adafruit-cc3000-wifi Page 11 of 47
CC3000 Shield
Assembly
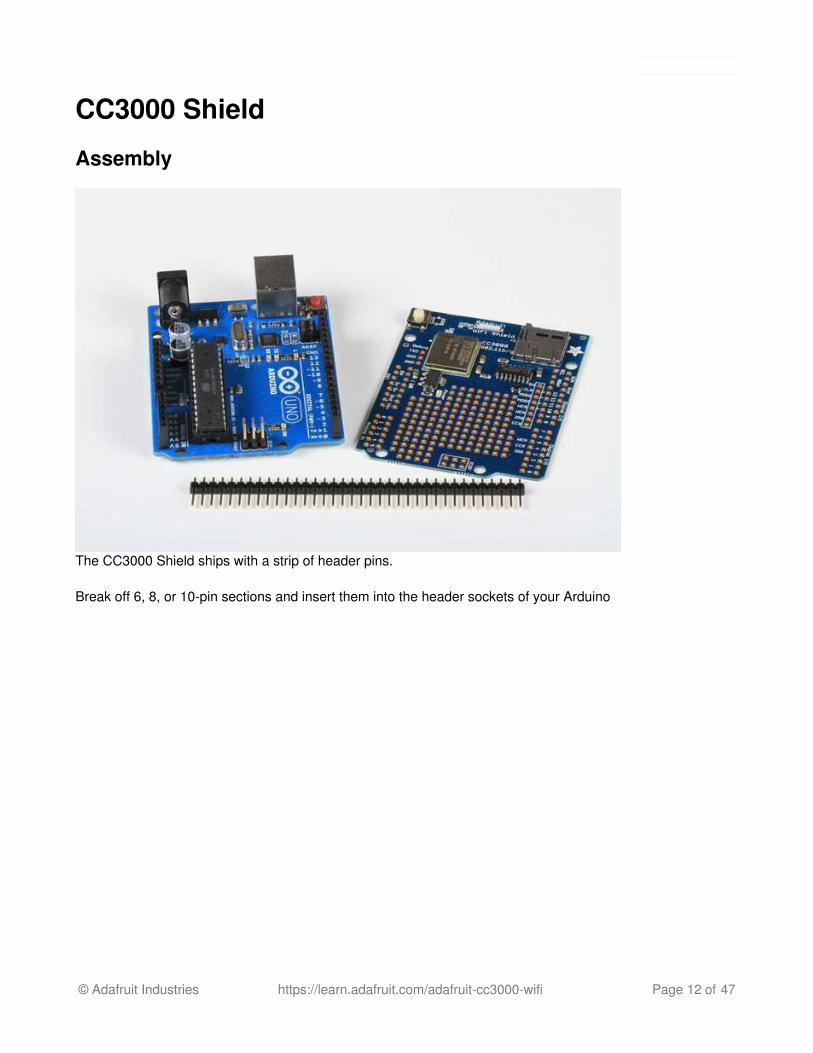
The CC3000 Shield ships with a strip of header pins.
Break off 6, 8, or 10-pin sections and insert them into the header sockets of your Arduino
© Adafruit Industries https://learn.adafruit.com/adafruit-cc3000-wifi Page 12 of 47
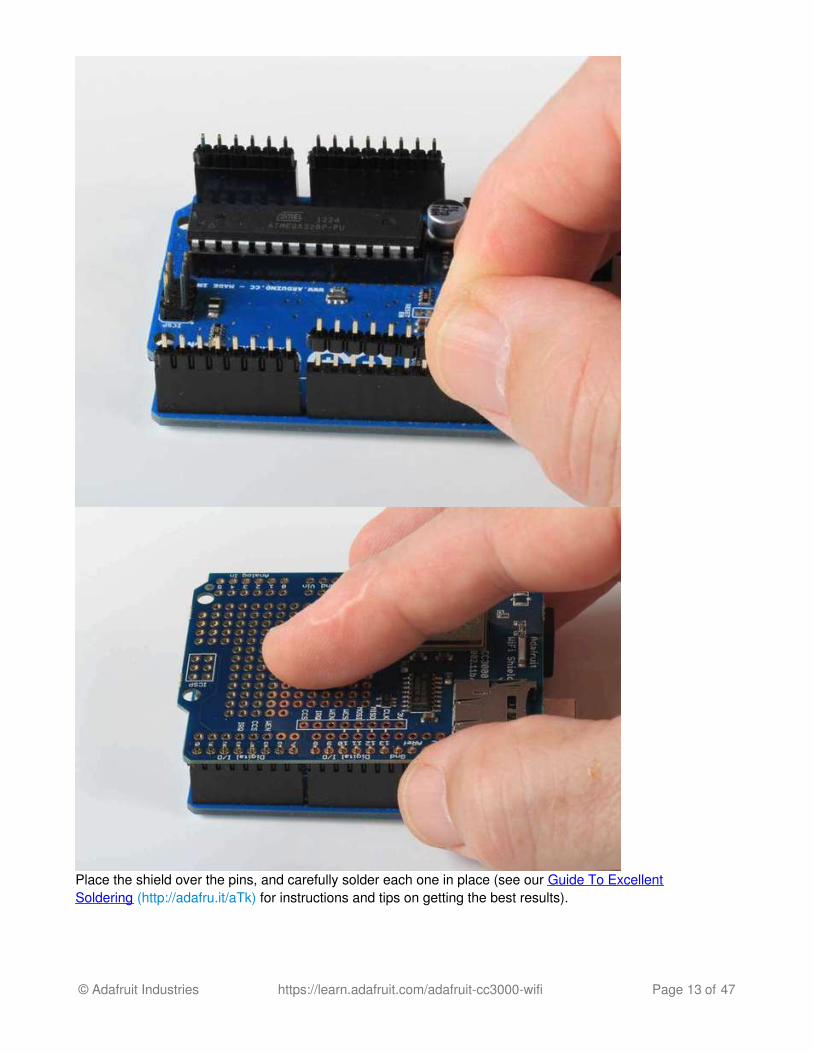
Place the shield over the pins, and carefully solder each one in place (see our Guide To ExcellentSoldering (http://adafru.it/aTk) for instructions and tips on getting the best results).
© Adafruit Industries https://learn.adafruit.com/adafruit-cc3000-wifi Page 13 of 47
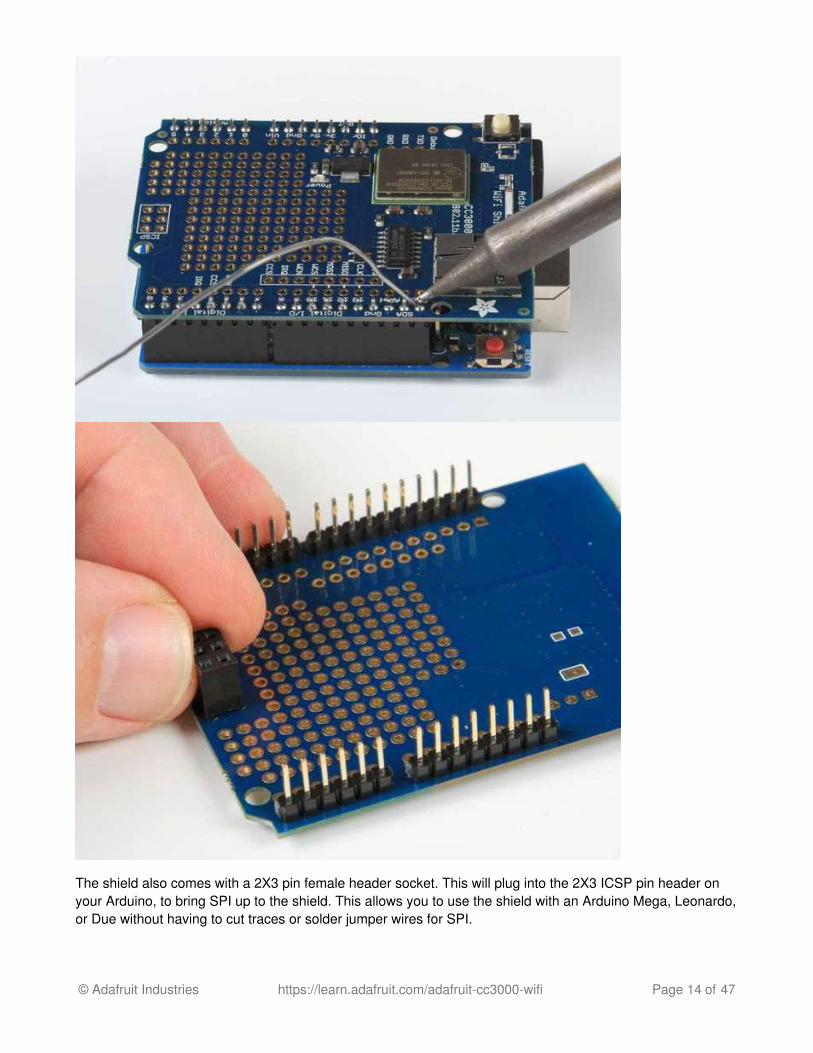
The shield also comes with a 2X3 pin female header socket. This will plug into the 2X3 ICSP pin header onyour Arduino, to bring SPI up to the shield. This allows you to use the shield with an Arduino Mega, Leonardo,or Due without having to cut traces or solder jumper wires for SPI.
© Adafruit Industries https://learn.adafruit.com/adafruit-cc3000-wifi Page 14 of 47
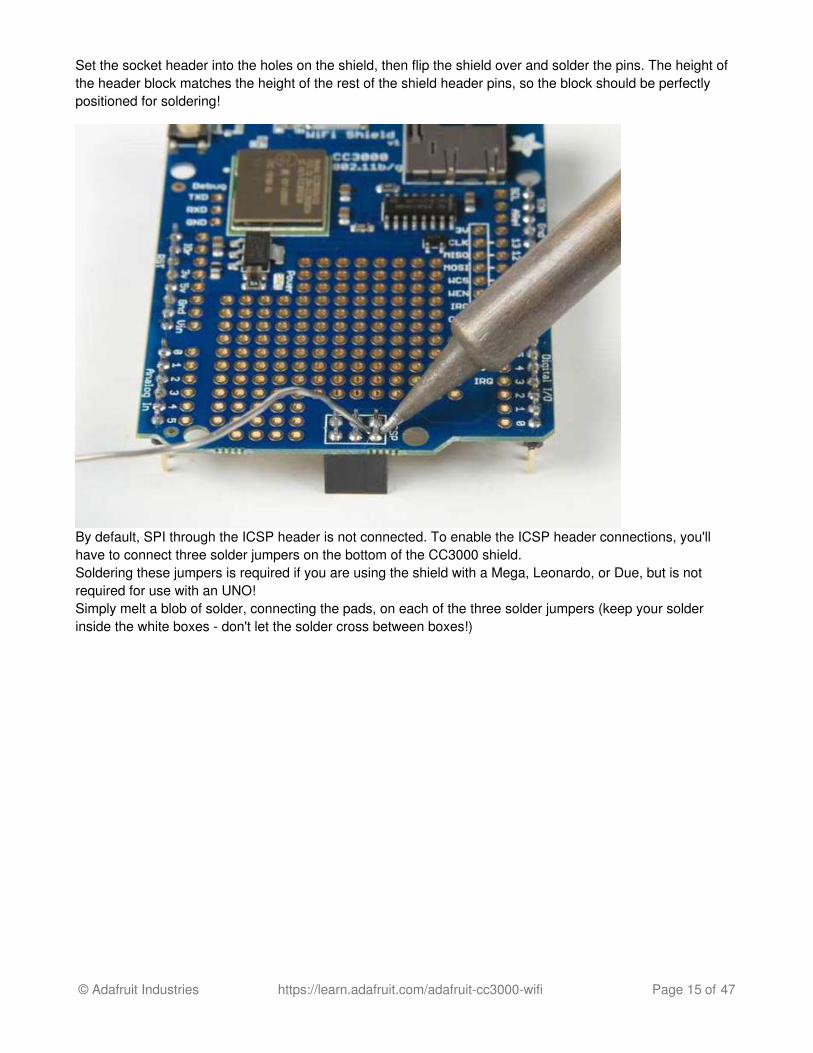
Set the socket header into the holes on the shield, then flip the shield over and solder the pins. The height ofthe header block matches the height of the rest of the shield header pins, so the block should be perfectlypositioned for soldering!
By default, SPI through the ICSP header is not connected. To enable the ICSP header connections, you'llhave to connect three solder jumpers on the bottom of the CC3000 shield.Soldering these jumpers is required if you are using the shield with a Mega, Leonardo, or Due, but is notrequired for use with an UNO!Simply melt a blob of solder, connecting the pads, on each of the three solder jumpers (keep your solderinside the white boxes - don't let the solder cross between boxes!)
© Adafruit Industries https://learn.adafruit.com/adafruit-cc3000-wifi Page 15 of 47
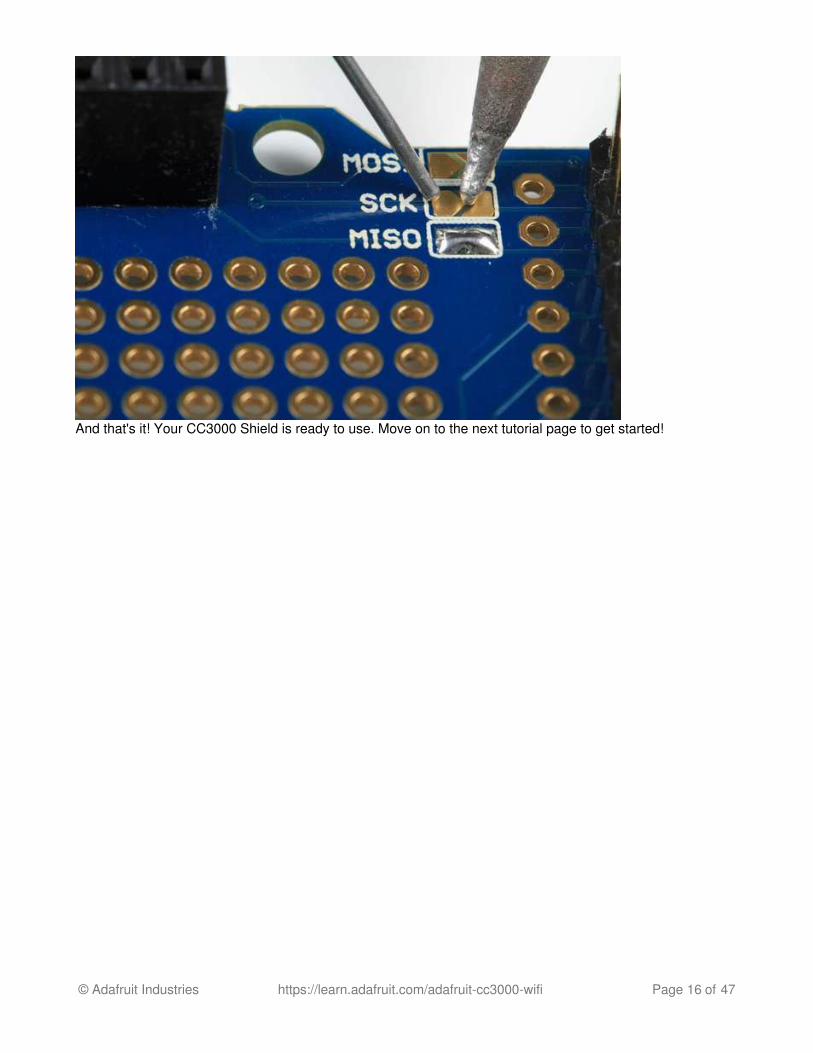
And that's it! Your CC3000 Shield is ready to use. Move on to the next tutorial page to get started!
© Adafruit Industries https://learn.adafruit.com/adafruit-cc3000-wifi Page 16 of 47

© Adafruit Industries https://learn.adafruit.com/adafruit-cc3000-wifi Page 17 of 47
Connections
Pinouts
The CC3000 is (electrically) fairly simple to use. The module requires an SPI connection, including a clock(CLK), data in from a microcontroller (MOSI) and data out to the microcontroller (MISO). It also uses a chip-select line (CS) for SPI to indicate when a data transfer as started
Along with the SPI interface, there is a power-enable type pin called VBAT_EN which we use to start themodule properly and also an IRQ pin, which is the interrupt from the CC3000. The IRQ pin is required tocommunicate and must be tied to an interrupt-in pin on the Arduino. On the Mega/UNO, we suggest #2 or #3
On the CC3000 shield, we use the following pin connections
SCK - #13MISO #12MOSI #11CS for CC3000 #10VBAT_EN #5CS for SD Card #4IRQ #3
On the breakout, be aware that the MISO (data out from module) pin does not go 'high impedance' when CSis driven high. Check the shield for how we use a 74AHC125 to manually tri-state this pin when it's sharedwith an SD card.
Optional AntennaIf you have a shield or breakout with a uFL connector (instead of an on-board ceramic antenna) you can use auFL to RP-SMA (http://adafru.it/852) or uFL to SMA (http://adafru.it/851) (less common) adapter and thenconnect to any 2.4 GHz antenna (http://adafru.it/945). This is handy when you want to place the module in abox but have the antenna on the outside, or when you need a signal boost
Please note that when using an external antenna, the module is no longer FCC-compliant, so if you want tosell the product with FCC certification, it must be retested.
© Adafruit Industries https://learn.adafruit.com/adafruit-cc3000-wifi Page 18 of 47
Using the CC3000Make sure your Arduino is powered by a 1 amp or higher rated external power supply when using with theCC3000! Powering an Arduino + CC3000 from a computer/laptop USB port will lead to unstable behavior andlockups because the USB port can't supply enough power!Use the Arduino 1.6.4 version or newer with the CC3000, EXCEPT for the firmware update sketches in thelibrary examples folder. Use 1.0.6 for those!
Download the LibraryWe will start by downloading the Adafruit CC3000 Library, available from our GitHubrepository (http://adafru.it/cFn).
You can download the latest ZIP file by clicking the button below.Download the latest Adafruit_CC3000 libraryhttp://adafru.it/cHeRename the uncompressed folder Adafruit_CC3000. Check that the Adafruit_CC3000 folder containsAdafruit_CC3000.cpp and Adafruit_CC3000.h; also ccspi.cpp, ccspi.h, an examples folder, and a utilityfolder
Place the Adafruit_CC3000 library folder your sketchbookfolder/libraries/ folder. You may need to createthe libraries subfolder if its your first library. Restart the IDE. You can figure out your sketchbookfolder byopening up the Preferences tab in the Arduino IDE.
If you're not familiar with installing Arduino libraries, please visit our tutorial: All About ArduinoLibraries (http://adafru.it/aYM)!
Sample SketchesThe Adafruit CC3000 Library contains several example sketches, demonstrating different capabilities of theCC3000 along with some useful programming techniques.
To run the sample sketches, you'll have to edit them to include the SSID and password of your access point.
#define WLAN_SSID "myNetwork" // cannot be longer than 32 characters!#define WLAN_PASS "myPassword"
Also, make sure that the right wireless security scheme is selected (unsecured, WEP, WPA, or WPA2)
// Security can be WLAN_SEC_UNSEC, WLAN_SEC_WEP, WLAN_SEC_WPA or WLAN_SEC_WPA2#define WLAN_SECURITY WLAN_SEC_WPA2
WEP with HEX Passphrases
If you are using WEP security, and your passphrase is a series of HEX digits, you can't simply enter it as aliteral string. Instead you have to define is as an actual binary sequence.For example, if your passphrase is 8899aabbccdd, you would define it as follows:
© Adafruit Industries https://learn.adafruit.com/adafruit-cc3000-wifi Page 19 of 47

// #define WLAN_PASS "8899aabbccdd" //don't do it this way!//do it this way:const char WLAN_PASS[] = {0x88, 0x99, 0xaa, 0xbb, 0xcc, 0xdd, 0x00};
Remember to append 0x00 to the declaration, after the passphrase, as shown in the example!Be aware the library does not currently support WEP passphrases with 0x00 null characters! See this bug formore details: https://github.com/adafruit/Adafruit_CC3000_Library/issues/97
© Adafruit Industries https://learn.adafruit.com/adafruit-cc3000-wifi Page 20 of 47
buildtest
buildtest
The buildtest sketch does a full test of core WiFi connectivity:
InitializationSSID ScanAccess Point connectionDHCP address assignmentDNS lookup of www.adafruit.com (http://adafru.it/aK0)Ping www.adafruit.com (http://adafru.it/aK0)Disconnect
It's a good idea to run this sketch when first setting up the module. It will let you know that everythingis working correctly.
Before you run the sketch, edit it to replace the dummy SSID and password with your own:
#define WLAN_SSID "yourNetwork" // cannot be longer than 32 characters!#define WLAN_PASS "yourPassword"
If you're using WEP, the password should look like this:
const char WLAN_PASS[] = {0x1A, 0x2B, 0x3C, 0x4D, 0x5E, 0x00};
Since it's a collection of bytes not 'passphrase' style keyAlso, make sure that the right wireless security scheme is selected (unsecured, WEP, WPA, or WPA2)
// Security can be WLAN_SEC_UNSEC, WLAN_SEC_WEP, WLAN_SEC_WPA or WLAN_SEC_WPA2#define WLAN_SECURITY WLAN_SEC_WPA2
Here's a sample of the Serial Monitor output of buildtest. You should see something similar:
Hello, CC3000!
RX Buffer : 131 bytesTX Buffer : 131 bytesFree RAM: 1237
Initialising the CC3000 ...Firmware V. : 1.19MAC Address : 0x08 0x00 0x28 0x01 0xA8 0x8AStarted AP/SSID scan
Networks found: 3================================================SSID Name : ExtremeRSSI : 58Security Mode: 3
SSID Name : Express
© Adafruit Industries https://learn.adafruit.com/adafruit-cc3000-wifi Page 21 of 47

RSSI : 59Security Mode: 3
SSID Name : fios63RSSI : 57Security Mode: 3
================================================
Deleting old connection profiles
Attempting to connect to fios63Started AP/SSID scan
Connecting to fios63...Waiting to connect...Connected!Request DHCP
IP Addr: 192.168.1.23Netmask: 255.255.255.0Gateway: 192.168.1.1DHCPsrv: 192.168.1.1DNSserv: 192.168.1.1www.adafruit.com -> 207.58.139.247
Pinging 207.58.139.247...5 repliesPing successful!
Closing the connection
Make sure you can see and recognize all of the access points around, connect to the access point, get agood connection with DHCP, can do a DNS lookup on www.adafruit.com (http://adafru.it/aK0) and ping itsuccessfully. If all this works, then your hardware is known good!
© Adafruit Industries https://learn.adafruit.com/adafruit-cc3000-wifi Page 22 of 47
WebClient
WebClient
The WebClient sketch does a test of the TCP client capability:
InitializationOptional SSID Scan (uncomment code section to enable)Access Point connectionDHCP address assignmentDNS lookup of www.adafruit.com (http://adafru.it/aK0)Optional Ping of www.adafruit.com (http://adafru.it/aK0) (uncomment code section to enable)Connect to website and print out webpage contentsDisconnect
The sketch connects to www.adafruit.com (http://adafru.it/aK0) and opens a specialwebpage (http://adafru.it/cFo) we have prepared for this example. It reads the contents of the page and printsthat out to the Serial Monitor.
Before you run the sketch, edit it to replace the dummy SSID and password with your own:
#define WLAN_SSID "yourNetwork" // cannot be longer than 32 characters!#define WLAN_PASS "yourPassword"
Also, make sure that the right wireless security scheme is selected (unsecured, WEP, WPA, or WPA2)
// Security can be WLAN_SEC_UNSEC, WLAN_SEC_WEP, WLAN_SEC_WPA or WLAN_SEC_WPA2#define WLAN_SECURITY WLAN_SEC_WPA2
Here's a sample of the Serial Monitor output of WebClient. You should see something similar:
Hello, CC3000!
Free RAM: 1157
Initializing...Started AP/SSID scan
Connecting to fios63...Waiting to connect...Connected!Request DHCP
IP Addr: 192.168.1.23Netmask: 255.255.255.0Gateway: 192.168.1.1DHCPsrv: 192.168.1.1DNSserv: 192.168.1.1www.adafruit.com -> 207.58.139.247
Connect to 207.58.139.247:80-------------------------------------HTTP/1.1 200 OK
© Adafruit Industries https://learn.adafruit.com/adafruit-cc3000-wifi Page 23 of 47
Date: Thu, 12 Sep 2013 11:04:02 GMTServer: ApacheAccess-Control-Allow-Origin: http://learn.adafruit.comAccess-Control-Allow-Headers: Origin, X-Requested-With, Content-Type, Accept, Accept-Encoding, Authorization, Referer, User-AgentAccess-Control-Allow-Methods: GET, POST, OPTIONSAccess-Control-Allow-Credentials: trueAccess-Control-Max-Age: 1728000Last-Modified: Thu, 27 Jun 2013 14:13:27 GMTAccept-Ranges: bytesContent-Length: 74Connection: closeContent-Type: text/html
This is a test of the CC3000 module!If you can read this, its working :)-------------------------------------
Disconnecting
Once you get this working, you can change the webpage you want to access to any kind of webpage on theInternet
© Adafruit Industries https://learn.adafruit.com/adafruit-cc3000-wifi Page 24 of 47
ntpTest
ntpTest
The ntpTest sketch does a test of the library's SNTP (Simple Network Time Protocol) client:
InitializationSSID ScanAccess Point connectionDHCP address assignmentSNTP time synchronizationExtract and print current time and date
The sntp client performs a time synchronization with servers from us.pool.ntp.org and pool.ntp.org. You canalso optionally provide it the addresses of one or two of your own time servers. The ntpTest sketch triestime.nist.gov first, before falling back to one of the pool servers.
The client also breaks out the synchronized network time into a structure containing current date and timefields. The sketch formats and prints this information to the Serial Monitor.To avoid unnecessary loading of NTP servers, please perform the time synchronization as infrequently aspossible. Once per day or longer should be plenty to maintain reasonably accurate time.Before you run the sketch, edit it to replace the dummy SSID and password with your own:
#define WLAN_SSID "yourNetwork" // cannot be longer than 32 characters!#define WLAN_PASS "yourPassword"
Also, make sure that the right wireless security scheme is selected (unsecured, WEP, WPA, or WPA2)
// Security can be WLAN_SEC_UNSEC, WLAN_SEC_WEP, WLAN_SEC_WPA or WLAN_SEC_WPA2#define WLAN_SECURITY WLAN_SEC_WPA2
Here's a sample of the Serial Monitor output of ntpTest. You should see something similar:
Hello, CC3000!
Free RAM: 843
Initialising the CC3000 ...Firmware V. : 1.19
Deleting old connection profiles
Attempting to connect to fios63Started AP/SSID scan
Connecting to fios63...Waiting to connect...Connected!Request DHCPUpdateNTPTimeCurrent local time is:7:18:52.65445Thursday, September 12, 2013
© Adafruit Industries https://learn.adafruit.com/adafruit-cc3000-wifi Page 25 of 47

Day of year: 255
Closing the connection
© Adafruit Industries https://learn.adafruit.com/adafruit-cc3000-wifi Page 26 of 47
InternetTime
InternetTime
The InternetTime sketch is a simplifies version of the ntpTest sketch. It does not use the library's SNTP client,but directly queries an NTP time server from pool.ntp.org to get the current "UNIX time" (seconds since1/1/1970, UTC (GMT)).
The sketch then uses the Arduino's internal timer to keep relative time. The clock is re-synchronized roughlyonce per day. This minimizes NTP server misuse/abuse.
The RTClib library (a separate download, and not used here) contains functions to convert UNIX time to otherformats if needed.
To avoid unnecessary loading of NTP servers, please perform the time synchronization as infrequently aspossible. Once per day or longer should be plenty to maintain reasonably accurate time.Before you run the sketch, edit it to replace the dummy SSID and password with your own:
#define WLAN_SSID "yourNetwork" // cannot be longer than 32 characters!#define WLAN_PASS "yourPassword"
Also, make sure that the right wireless security scheme is selected (unsecured, WEP, WPA, or WPA2)
// Security can be WLAN_SEC_UNSEC, WLAN_SEC_WEP, WLAN_SEC_WPA or WLAN_SEC_WPA2#define WLAN_SECURITY WLAN_SEC_WPA2
Here's a sample of the Serial Monitor output of InternetTime. You should see something similar:
Hello, CC3000!
RX Buffer : 131 bytesTX Buffer : 131 bytes
Initialising the CC3000 ...Firmware V. : 1.19MAC Address : 0x08 0x00 0x28 0x01 0xA8 0x8A
Deleting old connection profiles
Attempting to connect to fios63Started AP/SSID scan
Connecting to fios63...Waiting to connect...Connected!Request DHCP
IP Addr: 192.168.1.23Netmask: 255.255.255.0Gateway: 192.168.1.1DHCPsrv: 192.168.1.1DNSserv: 192.168.1.1Locating time server...
© Adafruit Industries https://learn.adafruit.com/adafruit-cc3000-wifi Page 27 of 47

Attempting connection...Connect to 62.116.162.126:123connected!Issuing request...Awaiting response...OKCurrent UNIX time: 1378987424 (seconds since 1/1/1970 UTC)Current UNIX time: 1378987439 (seconds since 1/1/1970 UTC)Current UNIX time: 1378987454 (seconds since 1/1/1970 UTC)Current UNIX time: 1378987469 (seconds since 1/1/1970 UTC)… etc …
© Adafruit Industries https://learn.adafruit.com/adafruit-cc3000-wifi Page 28 of 47

GeoLocation
GeoLocation
This example sketch queries the freegeoip.net service to get the local approximate geographic location basedon IP address.
Combined with code in the ntpTest or InternetTime sketches, this can give absolute position and time,extremely useful for seasonal calculations like sun position, insolation, day length, etc. One could always adda GPS module or just plug in values from your GPS or phone, but for applications where extreme accuracyisn't required, this has the luxury of coming 'free' with the CC3000 already in use.Positional accuracy depends on the freegeoip.net database, in turn based on data collected by maxmind.com.No guarantees this will work for every location. This software is provided as-is.Position should be polled only once, at startup, or very infrequently if making a mobile network-hopping thing,so as not to overwhelm the kindly-provided free geolocation service.
Before you run the sketch, edit it to replace the dummy SSID and password with your own:
#define WLAN_SSID "yourNetwork" // cannot be longer than 32 characters!#define WLAN_PASS "yourPassword"
Also, make sure that the right wireless security scheme is selected (unsecured, WEP, WPA, or WPA2)
// Security can be WLAN_SEC_UNSEC, WLAN_SEC_WEP, WLAN_SEC_WPA or WLAN_SEC_WPA2#define WLAN_SECURITY WLAN_SEC_WPA2
Here's a sample of the Serial Monitor output of GeoLocation. You should see something similar:
Hello, CC3000!Free RAM: 837Initializing...OK.Connecting to network...Started AP/SSID scan
Connecting to Turlingdrome...Waiting to connect...connected!Requesting address from DHCP server...OK
IP Addr: 192.168.0.4Netmask: 255.255.255.0Gateway: 192.168.0.1DHCPsrv: 192.168.0.1DNSserv: 192.168.0.1
Getting server IP address...192.151.154.154Connecting to geo server...Connect to 192.151.154.154:80connected.Requesting data...Reading response...OK
Disconnecting
RESULTS: Country: United States
© Adafruit Industries https://learn.adafruit.com/adafruit-cc3000-wifi Page 29 of 47

Region: California City: Richmond Longitude: -122.35 Latitude: 37.94
© Adafruit Industries https://learn.adafruit.com/adafruit-cc3000-wifi Page 30 of 47
SmartConfigSmartConfig is the special functionality in the CC3000 that allows setting the SSID and password settingswithout having to type or re-program the module. Any iOS/Android device can be used to set theconfiguration - solving the annoying deployment problem of how to set the connection details for a newdevice.
SmartConfigCreate and SmartConfigReconnect
These two SmartConfig sketches should be used together to demonstrate how the SmartConfig app can beused on your smartphone to pass connection details to your CC3000.
SmartConfigCreate
This sketch will initialise the CC3000, erasing any previous connection details stored on the device. It willthen enter SmartConfig mode with a 60 second timeout where it waits for configuration data to arrive from theSmartPhone.
If a connection was successfully established, the connection details will be stored in the non-volatile memoryof the CC3000, and the module will be configured to automatically reconnect to this network on startup(meaning you don't need to run the SmartConfig app unless your AP details change or you erase the storedconnection details on the module).
There's no need to edit the sketch to add your SSID and password - the SmartConfig app does that for you!
SmartConfigReconnect
This sketch shows how to use the CC3000 in 'reconnect' mode, and avoid erasing all stored connectionprofiles, which is unfortunately necessary with other sketches where manual config data is provided.
Initializates the CC3000 with a special SmartConfig flag so it doesn't erase the profile dataAccess Point connection (based on saved AP details)DHCP address assignmentDisconnect
SmartConfig is still in beta testing! It might not work on all networks!
Using the SmartConfigCreate Sketch
Step One: Install the SmartConfig App
Before you can use SmartConfig to provide your AP connection details, you need to install the SmartConfigapp:
For iOS devices simply search for the TI WiFi SmartConfig app (http://adafru.it/cQ3) from the app store.
© Adafruit Industries https://learn.adafruit.com/adafruit-cc3000-wifi Page 31 of 47

For Android devices, you can download the app directly from TI's CC3000 Wiki (http://adafru.it/cQ4)
Step Two: Configure the SmartConfig App on your Phone
Once you've installed the SmartConfig app, you need to connect to the AP that the CC3000 will be using(HOMENETWORK in the images below), and then load the app.
You should see a screen similar to the following, with the AP's SSID, Gateway IP Address and Device Namefields already populated:This tutorial will use an iPad to provide the SmartConfig details, but the process is basically the same onAndroid.
© Adafruit Industries https://learn.adafruit.com/adafruit-cc3000-wifi Page 32 of 47

Add the password for your Access Point, but don't click the START button yet!Don't change the Key or DeviceName fields!
Step Three: Open and Run 'SmartConfigCreate'In the File > Examples > Adafruit_CC3000 menu select the SmartConfigCreate sketch.Run the sketch and open the Serial Monitor via Tools > Serial Monitor.You should see something similar to the following text:
© Adafruit Industries https://learn.adafruit.com/adafruit-cc3000-wifi Page 33 of 47
Hello, CC3000!
RX Buffer : 131 bytesTX Buffer : 131 bytesFree RAM: 595
Initialising the CC3000 ...Firmware V. : 1.24MAC Address : 0x08 0x00 0x28 0x01 0xA8 0x1FWaiting for a SmartConfig connection (~60s) ...
Step Four: Start the SmartConfig app on yourPhoneBefore the Android sketch times out, click to 'Start' button in your TI app, and watch the serial monitorwindow of your sketch. After about 30 seconds you should see something similar to the following:
Got smart config dataSaved connection details and connected to AP!Request DHCP
IP Addr: 192.168.0.103Netmask: 255.255.255.0Gateway: 192.168.0.1DHCPsrv: 192.168.0.1DNSserv: 192.168.0.1
To use these connection details be sure to use'.begin(false, true)' with your Adafruit_CC3000code instead of the default '.begin()' values!
Closing the connection
Step Five: Stop the SmartConfig App on the Phone
If everything worked out and you successfully connected to your AP, the connection details were also storedin non-volatile memory on the CC3000 module. You can now use the SmartConfigReconnect sketch to testthe connection details, specifically paying attention to the extra flags in the Adafruit_CC3000.begin() functioncompared to other sketches..Did the sketch timeout before connecting?
Be sure to click 'Stat' in the SmartPhone app as soon as the 'Waiting for SmartConfig connection(~60s) ...' message pops up. The SmartConfig device will timeout after 60 seconds, so you may need torun the sketch again and be a bit quicker with your fingers.Make sure that the iPad or SmartPhone is connected to the same AP that you want the CC3000 toconnect to!Check your password in case there is a typo
Using the SmartConfigReconnect SketchThe SmartConfigReconnect sketch shows how to use (and retain) the connection details that were written tothe device in the example above.
© Adafruit Industries https://learn.adafruit.com/adafruit-cc3000-wifi Page 34 of 47

The key to using and maintaining the connection details is to pass an optional flag to the Adafruit_CC3000classes .begin() function to tell the driver NOT to delete existing connections, and to stay in auto connectmode:
/* !!!!!!!!!!!!!!!!!!!!!!!!!!!!!!!!!!!!!!!!!!!!!!!!!!!!!!!!!!!!!!! */ /* !!! Note the additional arguments in .begin that tell the !!! */ /* !!! app NOT to deleted previously stored connection details !!! */ /* !!! and reconnected using the connection details in memory! !!! */ /* !!!!!!!!!!!!!!!!!!!!!!!!!!!!!!!!!!!!!!!!!!!!!!!!!!!!!!!!!!!!!!! */ if (!cc3000.begin(false, true)) { Serial.println(F("Unable to re-connect!? Did you run the SmartConfigCreate")); Serial.println(F("sketch to store your connection details?")); while(1); }
The first flag should always be false, and is used to indicate that we are going to perform a firmware update.The second flag should always be true when using SmartConfig data, and puts the CC3000 in an auto-reconnect mode and maintains existing connection details in non-volatile memory.
If you were able to successfully connect using the SmartConfigCreate sketch, SmartConfigReconnectshould give you something similar to the following output:
Hello, CC3000!
Trying to reconnect using SmartConfig values ...Reconnected!
Requesting DHCP
IP Addr: 192.168.0.103Netmask: 255.255.255.0Gateway: 192.168.0.1DHCPsrv: 192.168.0.1DNSserv: 192.168.0.1
Closing the connection
Any time you don't provide the extra flags to the .begin method, all connection details will be erased and auto-reconnect mode will be disabled! Unfortunately, this is necessary when providing manual connection details,so be careful using non SmartConfig* sketches if you don't want to lose your connection details.
© Adafruit Industries https://learn.adafruit.com/adafruit-cc3000-wifi Page 35 of 47
SendTweetUnfortunately Twitter changed their API and require SSL connections which the CC3000 does not support.This page is only for reference as the SendTweet example does not work anymore and is not included in thelatest library.
SendTweet
This example sketch sends “tweets” (Twitter messages) from an Arduino with CC3000 WiFi. Usually thisrequires extra proxy software running on another computer, but this sketch operates directly from theArduino.
This is a barebones example that issues a single fixed message, but it’s easily adapted to send differentinformation such as a periodic sensor reading.
In addition to the WiFi setup explained below, it’s necessary to set up a Twitter developer account andcomplete an application form before this can be used. That procedure is explained on the Twitter Setuppage of the Internet of Things Printer tutorial (http://adafru.it/cHs).
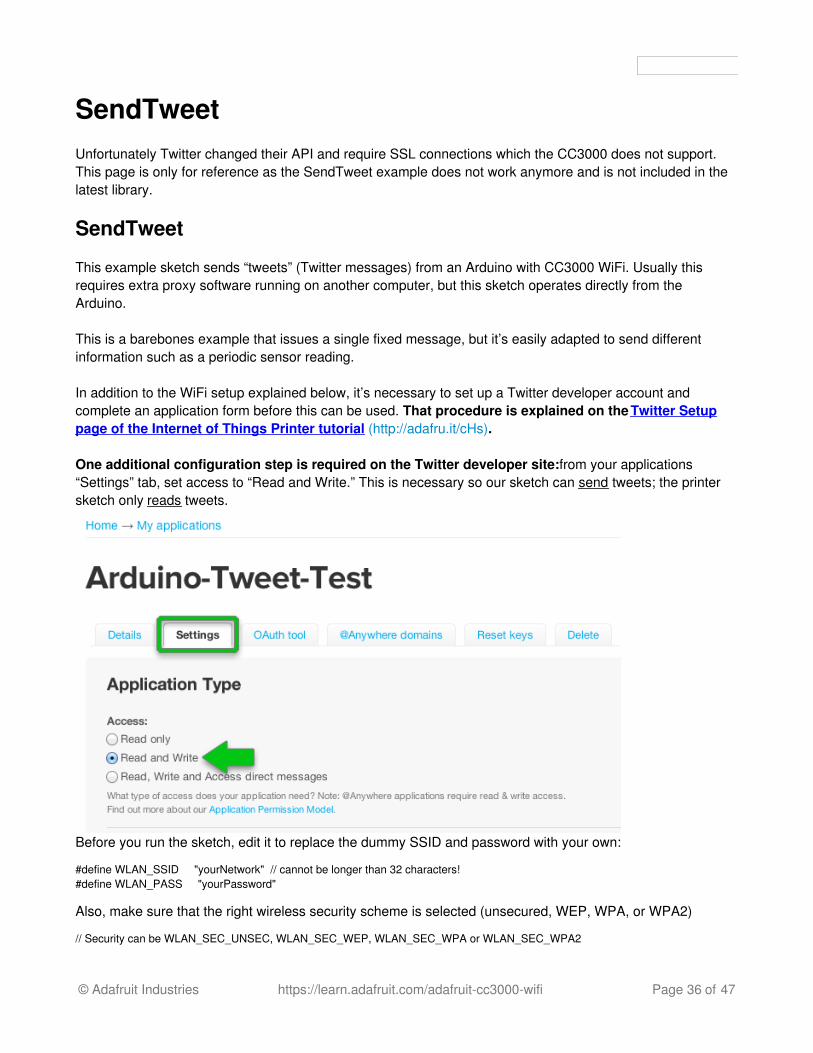
One additional configuration step is required on the Twitter developer site: from your applications“Settings” tab, set access to “Read and Write.” This is necessary so our sketch can send tweets; the printersketch only reads tweets.
Before you run the sketch, edit it to replace the dummy SSID and password with your own:
#define WLAN_SSID "yourNetwork" // cannot be longer than 32 characters!#define WLAN_PASS "yourPassword"
Also, make sure that the right wireless security scheme is selected (unsecured, WEP, WPA, or WPA2)
// Security can be WLAN_SEC_UNSEC, WLAN_SEC_WEP, WLAN_SEC_WPA or WLAN_SEC_WPA2
© Adafruit Industries https://learn.adafruit.com/adafruit-cc3000-wifi Page 36 of 47

#define WLAN_SECURITY WLAN_SEC_WPA2
Here's a sample of the Serial Monitor output of SendTweet. You should see something similar:
Hello! Initializing CC3000...Firmware V. : 1.19OKDeleting old connection profiles...OKConnecting to network...Started AP/SSID scan
Connecting to Turlingdrome...Waiting to connect...OKRequesting address from DHCP server...OKIP Addr: 192.168.0.4Netmask: 255.255.255.0Gateway: 192.168.0.1DHCPsrv: 192.168.0.1DNSserv: 192.168.0.1Locating time server...foundConnecting to time server...Connect to 155.101.3.115:123connected!Issuing request...OKAwaiting response...success!Locating Twitter server...OKConnecting to server...
Connect to 199.59.150.9:80OKIssuing HTTP request...OKAwaiting response...success!Waiting ~1 hour...
© Adafruit Industries https://learn.adafruit.com/adafruit-cc3000-wifi Page 37 of 47

Firmware UpgradesThe CC3000 is a complex chip that has its own firmware published by Texas Instruments. You might find itnecessary to upgrade the firmware, for example to use the latest version with recent bug fixes. Luckily it'seasy to upgrade (and downgrade) firmware on the chip using a few included examples in the AdafruitCC3000 Arduino library.
Currently there are two firmware versions provided in the library:
Version 1.12 - This is a minor bug fix release with release notes here (http://adafru.it/dVA).The 1.12 and earlier firmware versions are known to have problems with heavy load and certainnetwork conditions which can cause the CC3000 to lock up. Consider upgrading to the morerecent 1.13 release if you run into stability issues.
Version 1.13 - This is another bug fix release with release notes here (http://adafru.it/dVA). The 1.13 release has a fix for internal CC3000 issues which cause lock ups under heavy usageand certain network conditions. However note that the 1.13 release also appears to have bugswith UDP traffic (http://adafru.it/dVB). Most internet traffic uses TCP instead of UDP so you likelywon't run into problems and should consider upgrading to the latest 1.13 firmware.
Version 1.14 - This is a bug fix release with release notes here (http://adafru.it/dVA).
Do not power your Arduino & CC3000 from a computer/laptop USB port during a firmware upgrade! YouMUST use an external power supply with at least 1 amp of current capacity. This is to ensure the Arduino andCC3000 have enough power to operate during the firmware upgrade.Make sure to run firmware updates using Arduino IDE version 1.0.6 and NOT the later beta versions 1.5.7,1.5.8, or 1.6. The newer toolchain in the beta versions causes problems with the firmware update process.
To upgrade to a specific version first make sure you have the most recent Adafruit CC3000 Arduinolibrary (http://adafru.it/cFn) installed. If you installed the CC3000 library some time ago make sure todownload and install it again as fixes and new firmware versions are added periodically.
Next make sure your CC3000 is wired to your Arduino and can successfully run CC3000 sketches likebuildtest. If there's a problem communicating with the CC3000 you want to find out before your start thefirmware upgrade. Also be sure you're using a good quality 1 amp or more external power supply andnot a computer/laptop USB port to power the Arduino & CC3000!
Now in the Arduino IDE load one of the driverpatch_X_XX CC3000 examples, where X_XX is the versionlike driverpatch_1_13 for version 1.13. Adjust any of the pins to communicate with your Arduino just like youwould to run buildtest. Compile and load the sketch on your Arduino.
Open the serial monitor at 115200 baud and you should see a message such as a the following (try pressingthe Arduino's reset button if you see no message):
© Adafruit Industries https://learn.adafruit.com/adafruit-cc3000-wifi Page 38 of 47

Enter some text and press send to start the firmware upgrade process. The upgrade will happen fairly quicklyand should be done in a minute or two. Here's what you should see during an upgrade:
© Adafruit Industries https://learn.adafruit.com/adafruit-cc3000-wifi Page 39 of 47

After the upgrade finishes load the buildtest example and run it again. Confirm that everything works asexpected with the connection to your wireless network and ping of adafruit.com. Congratulations you'veupgraded the firmware on the CC3000!
Note: The version number displayed during the firmware upgrade and from sketches like buildtest includesthe major, minor, and patch numbers so it doesn't exactly match the version number from TI. Here's a handyconversion between reported version number and CC3000 firmware version:
Buildtest reports version 1.32 = CC3000 firmware v1.14Buildtest reports version 1.28 = CC3000 firmware v1.13Buildtest reports version 1.26 = CC3000 firmware v1.12Buildtest reports version 1.24 = CC3000 firmware v1.11
© Adafruit Industries https://learn.adafruit.com/adafruit-cc3000-wifi Page 40 of 47
Downloads
Files & DownloadsFor more information on the CC3000, check out TI's product page (http://adafru.it/cHf) and wikimicrosite (http://adafru.it/cHg), its got tons and tons of information about their WiFi moduleEagleCAD PCB files for the breakout on GitHub (http://adafru.it/reZ)EagleCAD PCB files for the shield on GitHub (http://adafru.it/rf0)Fritzing objects available in Adafruit Fritzing library (http://adafru.it/aP3)
List of wifi access points used to test the CC3000 (by TI, not verified by Adafruit) (http://adafru.it/rxe)Using an Apple Airport? Check this thread for details on how to set it up for use with theCC3000 (http://adafru.it/rxf)
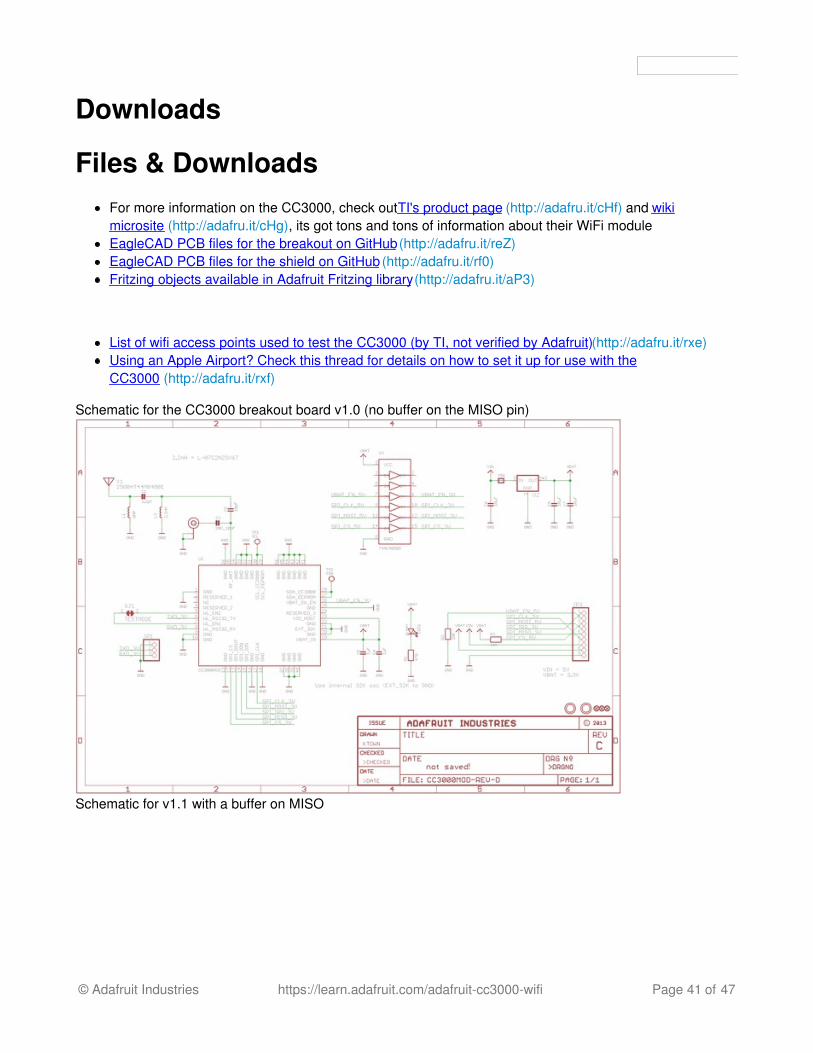
Schematic for the CC3000 breakout board v1.0 (no buffer on the MISO pin)
Schematic for v1.1 with a buffer on MISO
© Adafruit Industries https://learn.adafruit.com/adafruit-cc3000-wifi Page 41 of 47
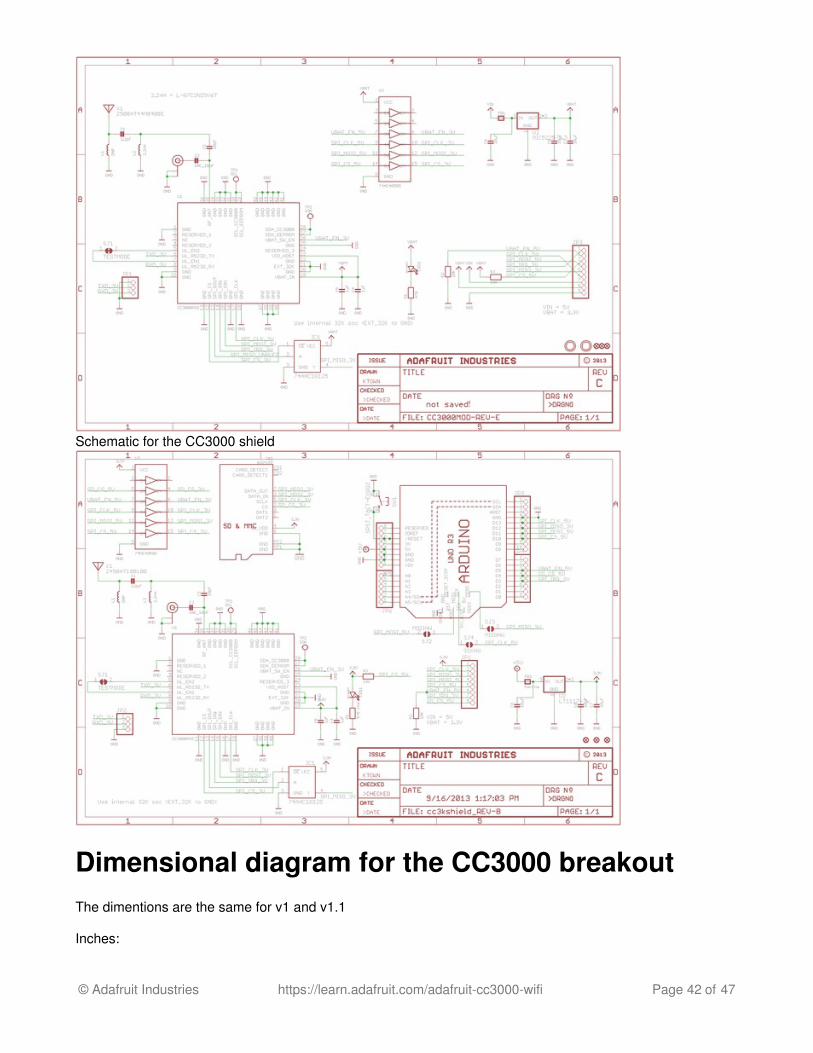
Schematic for the CC3000 shield
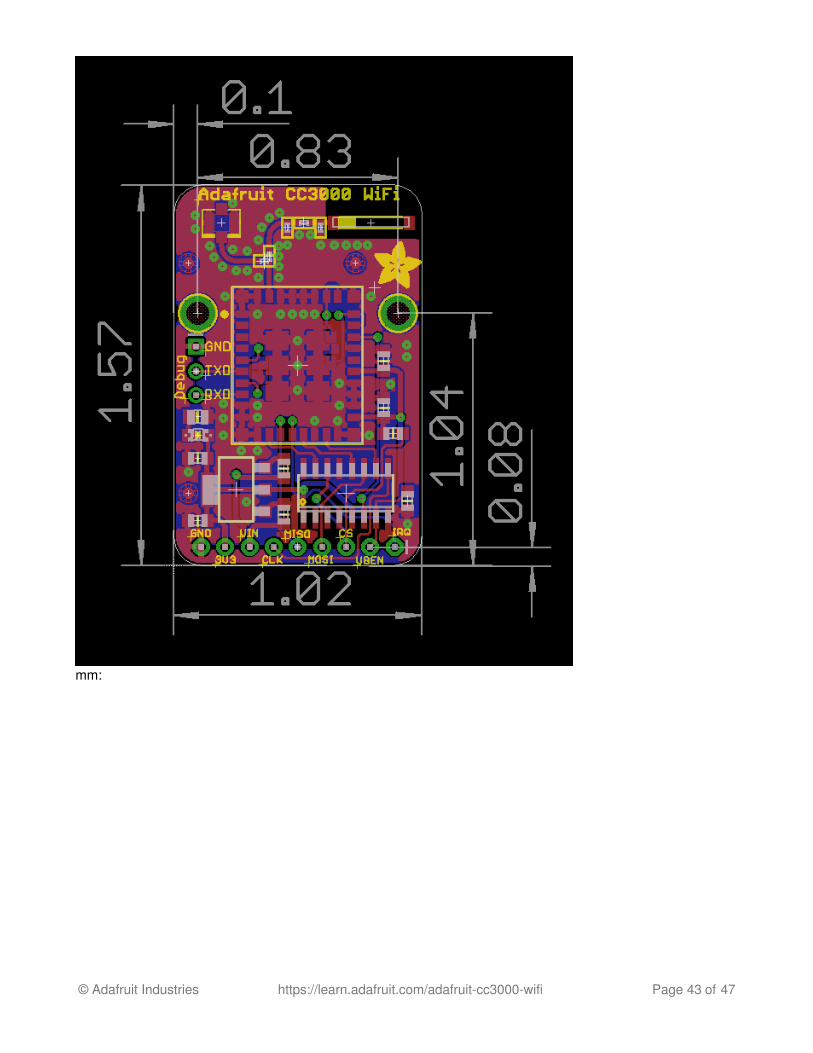
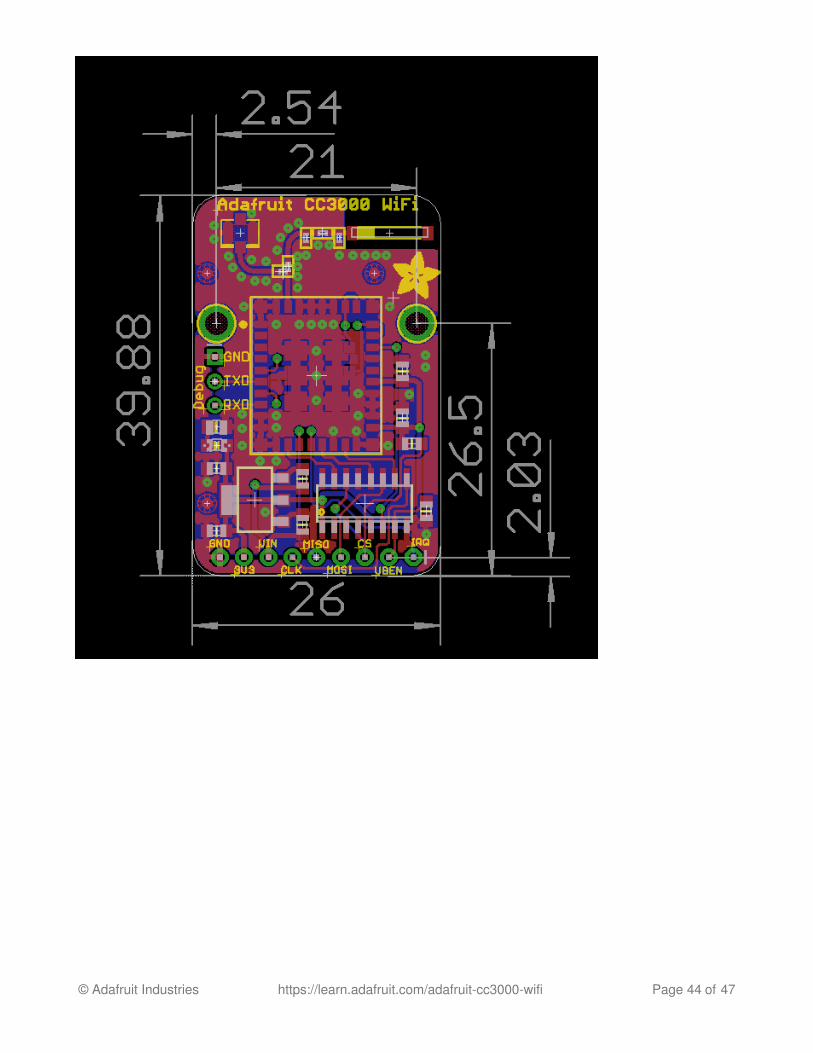
Dimensional diagram for the CC3000 breakoutThe dimentions are the same for v1 and v1.1
Inches:
© Adafruit Industries https://learn.adafruit.com/adafruit-cc3000-wifi Page 42 of 47
mm:
© Adafruit Industries https://learn.adafruit.com/adafruit-cc3000-wifi Page 43 of 47
© Adafruit Industries https://learn.adafruit.com/adafruit-cc3000-wifi Page 44 of 47
FAQI'm using WEP - how do I configure my HEX passphrase?
If your passphrase is a series of HEX digits, you can't simply enter it as a literal string. Instead you have todefine is as an actual binary sequence.For example, if your passphrase is 8899aabbccdd, you would define it as follows (note the 0x00 at the end! It's important!):
// #define WLAN_PASS "8899aabbccdd" //don't do it this way!//do it this way:const char WLAN_PASS = {0x88, 0x99, 0xaa, 0xbb, 0xcc, 0xdd, 0x00};
I'm using WEP and I tried that but it still doesn't workMake sure you have WLAN_SECURITY defined as WEP:
#define WLAN_SECURITY WLAN_SEC_WEP
What is the gain of the ceramic antenna? How does it compare to the external antennas?We use the Johannson 2500AT44M0400 (http://adafru.it/cVL) which has 0.5 dBi gain. Compare this to theexternal antennas with 2 dBi and 5dBi. Since antenna 'range' is not linear with the gain and antenna rangehas a lot to do with what else is transmitting or receiving, physical barriers, noise, etc. We can roughly say thatthe ceramic antenna has half the range of the 2dBi antenna, and the 5dBi antenna has double the range ofthe 2dBi antenna (roughly!)There is no way to know the actual range you will get unless you experiment with your setup since there is somany variables, but the ceramic antenna gets about the same range we expect with an every day cellphone
(http://adafru.it/cVL)How can I use the CC3000 with a static IP?
WiFi device IPs are dynamic 99% of the time, but it is possible to assign a static IP if your router permits it.Check out this forum post for how to go about it (http://adafru.it/doW)
I'm having difficulty seeing/connecting to my network...If you have an '802.11n only' router please configure it to add 'b or g' support. The CC3000 is 802.11b or gonly, it does not do 'n'!I'm not in the USA and my CC3000 can't see my router
The CC3000 only operates on channels 1 through 11. Outside of the United States, you may be able toconfigure your router to a channel number outside of that range. Make sure your router is configured for achannel in the range 1 through 11.
My CC3000 sketch locks up when initializing the CC3000...
A lockup during initialization is a very common issue when there isn't enough power to supply both theArduino and CC3000 board. Make sure you're powering the Arduino from a 1 amp or higher rated externalpower supply. Don't try to power the Arduino from a computer/laptop USB port because those portstypically can't provide enough power and will cause lockups!
© Adafruit Industries https://learn.adafruit.com/adafruit-cc3000-wifi Page 45 of 47
If you're using an Arduino UNO you can plug in a 7-12 volt power supply to the barrel jack on the board. Asupply like this 9V 1amp wall wart (http://adafru.it/63) is perfect for the Arduino UNO and CC3000.
Also if your Arduino supports changing the voltage of the digital I/O pins (like some 3rd party Arduino clones),make sure the voltage is set to 5 volts and not 3.3 volts.
My CC3000 sketch locks up after running for a while or under heavy load...
Unfortunately there is a well known internal issue with the CC3000 which can cause lock ups and instabilityover time or under heavy load. This thread on the Spark Core forums (http://adafru.it/dVC) dives deeply intothe issue and investigation with Texas Instruments. Ultimately the latest firmware version 1.13 was releasedwith a potential fix for the stability problems. If you'd like to upgrade to firmware version 1.13 see the page onfirmware upgrades in this guide (http://adafru.it/kA7).
How do I set a static IP address?
By default the CC3000 is configured to get an IP address automatically from your router using DHCP. Inmost cases this works well, however if you run into trouble getting an IP address or DNS server you shouldconsider setting a static IP address and DNS server.
To set a static IP address make sure you have the latest version of the CC3000 library and load the buildtestexample. Scroll down to the commented section of code in the setup function which discusses setting a staticIP address:
/*uint32_t ipAddress = cc3000.IP2U32(192, 168, 1, 19);uint32_t netMask = cc3000.IP2U32(255, 255, 255, 0);uint32_t defaultGateway = cc3000.IP2U32(192, 168, 1, 1);uint32_t dns = cc3000.IP2U32(8, 8, 4, 4);if (!cc3000.setStaticIPAddress(ipAddress, netMask, defaultGateway, dns)) {Serial.println(F("Failed to set static IP!"));while(1);}*/
Remove the /* and */ comment delineators and fill in the IP address, net mask, default gateway, and DNSserver values for your network. You might need to check your router's configuration page to find these details.
Run the buildtest sketch and the CC3000 should be configured to use the static IP address and configurationyou assigned. You can actually remove or comment out the IP assignment code because the CC3000 willremember the configuration in its internal non-volatile storage.
If you'd ever like to enable DHCP again, load buildtest and uncomment the section below the static IPaddress configuration:
/*if (!cc3000.setDHCP()) {Serial.println(F("Failed to set DHCP!"));while(1);}*/
© Adafruit Industries https://learn.adafruit.com/adafruit-cc3000-wifi Page 46 of 47

How do I connect to a college/hotel/airport WiFi network that requires using a web page to authenticate?
Unfortunately these networks are difficult or sometimes impossible for the CC3000 to connect to becausethey require using a web browser to authenticate with the network. However a couple options to pursue are:
Try contacting the network support team / administrator and see if they can allow the CC3000 onto thenetwork based on its MAC address. When you run the buildtest sketch it will print out the CC3000 MACaddress so you can copy it from there. This option is the easiest and most reliable way to get onto thenetwork, but might not be available depending on the network's policies.The second option is to clone the MAC address of a laptop or device you've gotten on the networkalready. For this you'll want to find the MAC address of the laptop/computer (usually in network settings,search online to get a direct answer depending on the OS you're using). Then uncomment andadjust the commented code in the setup function of the buildtest example which sets the MAC addressof the CC3000. Fill in your laptop/computer's MAC address and run the sketch to have the CC3000 startusing the provided MAC addres. Unfortunately at this point you have to turn off the clonedlaptop/computer or at least disconnect it from the network because two devices with the same MACcan't be on the network at the same time (they'll get confused and start seeing each other's traffic).
I'm using the IPAddress class or an example from the Ethernet library and it doesn't work, what's wrong?
The IPAddress class is not compatible with the IP addresses the CC3000 classes expect. However you canswitch to using the CC3000.IP2U32 function to generate an IP address. See this line in the buildtestexample (http://adafru.it/flI) for how to use this function, and what type to use to store the IP address (anunsigned 32-bit integer). Unfortunately the Arduino compiler will try to convert an IPAddress into this type soethernet library code might compile, but when the code actually runs it will fail because the data is not in theright order. Stick to using the IP2U32 function!
© Adafruit Industries Last Updated: 2016-09-21 01:58:05 AM UTC Page 47 of 47